1
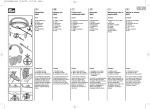
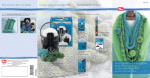
A A 1 2 3 4 5 7 6 8 2. In der 1. Runde das Garn schlaufenartig um alle Stifte legen. In der 2. Runde den Vorgang wiederholen bis alle Stifte zweifach umwickelt sind. Das Garn am äußeren Stift fixieren. 3. In der 3. Runde mit dem Strickhaken die untere Masche aufgreifen und über den Stift heben. Den Vorgang so oft wiederholen bis sich auf allen Stiften nur noch eine Masche befindet. 4. Ab jetzt immer abwechselnd eine Runde wickeln, eine Runde abstricken. Nach jeder gestrickten Runde die Maschen auf dem Strickring nach unten schieben. 5. Für den Strickbund nach dem Abstricken einer Runde (ca. Runde 10 - Runde 16) eine gewickelte Runde aussetzen. Dafür die Maschen der 1. Runde von innen über den jeweiligen Stift ziehen. Jetzt abstricken. 6. In den nächsten Runden immer abwechselnd eine Runde wickeln, eine Runde abstricken. Diesen Vorgang so lange wiederholen, bis die gewünschte Größe der Mütze erreicht ist. 7. Zum Abnähen der Maschen das Garnende bei einer Länge von ca. 50 cm abschneiden und durch die Nähnadel führen. Die Maschen nacheinander einzeln abnähen und über den Stift ziehen. 8. Ist die Runde komplett abgenäht, die Maschen zusammenziehen. Den Faden vernähen. Wer seine Mütze mit einem Pompon schmücken will, kann dazu das Pompon Set von Prym Art.-Nr.: 624 153 benutzen. 2. In the first row, loop the yarn around each pin. In the second row, repeat the process until all pins are looped twice. Secure the yarn to the outer pin. 3. In the third row, use the knitting hook to take up the bottom stitch and lift it over the pin. Repeat the process until each pin only has one stitch left. 4. Now alternate between looping and casting off one round. After each knitted round, push the stitches on the knitting ring down. 5. To knit a band, skip a looped round after casting off a round (approx. round 10 - round 16). Lift the stitches of the first round from inside over each pin, then cast off. 6. In the next rounds, alternate between looping and casting off one round. Repeat this process until the hat has the required size. 7. To sew up the stitches, cut off the yarn leaving a length of approx. 50 cm and thread it into the sewing needle. Sew up each stitch and lift it off the pin. 8. Once the round is fully sewn up, pull the stitches together and sew up the thread. To decorate your hat with a bobble, we recommend using the pompom set from Prym, art. no: 624 153. 2. Pour le premier tour, enroulez le fil en boucle autour de tous les clous. Pour le deuxième tour, répétez la procédure jusqu’à ce que tous les clous soient entourés d’une double boucle. Fixez le fil au clou extérieur. 3. Lors du 3e tour, hissez la maille du dessous au-dessus du clou à l’aide du crochet. Répétez ce geste jusqu’à ce qu’il ne reste plus qu’une seule maille sur chaque clou. 4. A partir de là, alternez les tours d’enroulement et les tours de crochet. Après chaque tour tricoté, abaissez les mailles le plus bas possible sur les clous. 5. Pour le bord-côtes, supprimez un tour d’enroulement après un tour de crochet (env. tour 10 - tour 16). Pour cela, tirez les mailles du premier tour depuis l’intérieur sur leurs clous respectifs. Ramenez alors au crochet. 6. Lors des tours suivants, alternez de nouveau un tour d’enroulement et un tour de crochet. Répétez cette procédure jusqu’à atteindre la taille de bonnet souhaitée. 7. Pour la terminaison, coupez la fin du fil sur environ 50 cm et enfilez-la dans l’aiguille. Passez l’aiguille dans chaque maille l’une après l’autre et tirez le fil dans la boucle de chaque clou. 8. Lorsque tout le rang est arrêté, tirez sur le fil puis arrêtez-le. Pour agrémenter votre bonnet d’un pompon, reportez-vous au set à pompon de Prym, n° art.: 624 153. 2. In de 1e ronde het garen om alle pennen wikkelen. In de 2e ronde deze werkwijze herhalen tot alle pennen twee maal omwikkeld zijn. Het garen aan de buitenste pen bevestigen. 3. In de 3e ronde de onderste steek met de breihaak oppakken en over de pen halen. Deze werkwijze net zo vaak herhalen tot er op iedere pen nog maar een enkele steek over is. 4. Vanaf dit punt altijd afwisselend een ronde wikkelen en een ronde afsteken. Na iedere gebreide ronde de steek op de breiring naar onder schuiven. 5. Voor de breirand na het afsteken van een ronde (ca. ronde 10 - ronde 16), een omwikkelde ronde toepassen. Hiervoor de steken van de 1e ronde van binnen over de respectievelijke pennen trekken. Nu afsteken. 6. In de volgende rondes altijd afwisselend een ronde omwikkelen en een ronde afsteken. Deze werkwijze net zolang herhalen tot de gewenste grootte voor de muts is bereikt. 7. Voor het afkanten van de steken een draadeinde afknippen op een lengte van 50 cm en door de naainaald steken: De steken na elkaar stuk voor stuk afnaaien en over de pen trekken. 8. Als de ronde volledig is afgenaaid, de steken bij elkaar trekken. De draden hechten. Wie de muts met een pompon wil opsieren, kan hiervoor de pomponset van Prym, bestelnr.: 624 153 gebruiken. 2. Nel primo giro passare il filo ad occhiello attorno a tutti i chiodini. Ripetere l’operazione nel secondo giro fino ad aver passato il filo due volte attorno a tutti i chiodini. Fissare il filo al chiodino esterno. 3. Nel terzo giro afferrare con il ferro ricurvo la maglia inferiore e portarla sopra il chiodino. Ripetere l’operazione fino a quando su tutti i chiodini resta solo una maglia. 4. Continuare alternando un giro di avvolgimento del filo ed un giro di lavorazione. Al termine di ogni giro spingere le maglie sull’anello verso il basso. 5. Per creare una fascia al termine di un giro lavorato (giro 10 - giro 16 circa) saltare un giro di avvolgimento del filo. Tirare le maglie del primo giro dall’interno sopra il rispettivo chiodino, quindi lavorarle. 6. Proseguire alternando sempre un giro di avvolgimento del filo ed un giro di lavorazione. Continuare fino ad ottenere le dimensioni desiderate della cuffia. 7. Per chiudere le maglie, tagliare l’estremità del filo ad una lunghezza di circa 50 cm ed infilare l’ago. Prendere le maglie una per una con l’ago e tirarle sopra il chiodino. 8. Dopo aver preso tutte le maglie, unire tirando le maglie. Fermare il filo. Se si desidera abbellire la cuffia con un pompon, si può utilizzare l’apposito set della Prym, art. no. 624 153. Instrucciones básicas para set tricotar circular Tricotado circular, con el ejemplo de un gorro 1. Fije el hilo en el palito exterior y páselo hacia el interior entre el primero y el último palito. El primer palito sirve siempre para fijar el hilo después de las vueltas completamente enrolladas. 2. En la primera vuelta, coloque el hilo en forma de lazo alrededor de todos los palitos. En la segunda vuelta, repita el proceso hasta que el hilo esté enrollado doblemente en todos los palitos. Fije el hilo en el palito exterior. 3. En la tercera fila, recoja con el gancho de tricotar la malla inferior y levántela por encima del palito. Repita este proceso hasta que sólo se encuentre una malla en todos los palitos. 4. A partir de ahora, vaya alternando siempre entre enrollar una vuelta y tricotar una vuelta. Después de cada vuelta tricotada, pase las mallas en el anillo de tricotar hacia abajo. 5. Para el borde, omita una vuelta enrollada después de tricotar una vuelta (aprox. vuelta 10 - vuelta 16). En cambio, pase las mallas de la primera vuelta desde el interior por el palito correspondiente. A continuación, proceda a tricotar. 6. En las siguientes vueltas, vaya alternando siempre entre enrollar una vuelta y tricotar una vuelta. Repita este proceso hasta alcanzar el tamaño deseado del gorro. 7. Para coser las mallas, corte el extremo del hilo a una longitud de aprox. 50 cm y enhébrelo en la aguja de coser. Cosa las mallas individualmente una tras otra y páselas por el palito. 8. Una vez que la vuelta esté cosida por completo, junte las mallas. Cosa el hilo. Si desea adornar el gorro con un pompón puede utilizar el pompón set de Prym, art. no. 624 153. RUS Основная инструкция по работе с набором колец для вязания Кругловязаное полотно, например, шапочка 1. Зафиксировать нить у внешнего штифта, затем ввести ее вовнутрь между первым и последним штифтом. Внешний штифт - это штифт для фиксирования нити после полностью выполненных круговых рядов. 2. В 1-м ряду заложить нить в форме петель за все штифты. Во 2-м ряду повторить эту операцию, пока все штифты дважды не будут обвиты нитью. Зафиксировать нить у внешнего штифта. 3. В 3-м ряду подхватить нижнюю петлю с помощью крючка и поднять ее поверх штифта. Эту операцию повторять до тех пор, пока на всех штифтах не будет еще по одной петле. 4. Начиная с этого момента, попеременно обвивать нитью штифты одного ряда, на штифтах следующего ряда петли провязывать. После каждого провязанного кругового ряда сдвигать петли на кольце вниз. 5. Для резинки после провязывания одного кругового ряда (ок. 10-16 р.р.) закончить рядом обвитых штифтов. Для этого петли первого кругового ряда вытянуть изнутри поверх соответствующих штифтов. Только после этого провязать. 6. Далее круговые ряды выполнять следующим образом: один ряд штифтов обвивать нитью, петли следующего ряда провязывать. Работать в этом ритме, пока шапочка не достигнет нужного размера. 7. Для сшивания петель отрезать конец нити длиной ок. 50 см, вдеть его в ушко иглы. Подхватывать на нить все петли по отдельности одну за другой и снимать их со штифтов. 8. Как только будут собраны все петли на нить, их можно собрать вместе. Затем нить закрепить. Тем, кто хочет украсить шапочку помпоном, может воспользоваться набором для изготовления помпонов от Prym арт. No: 624 153. Grundanleitung Strickring-Set Rundstricken am Beispiel einer Mütze 1. Das Garn am äußeren Stift fixieren, dann zwischen dem ersten und dem letzten Stift nach innen führen. Der äußere Stift dient prinzipiell der Fixierung des Garns nach vollständig gewickelten Runden. Basic instructions for knitting ring set Knitting a tube such as a hat 1. Secure the yarn to the outer pin and pass it between the first and the last pin into the centre. After each full round, the outer pin is used to secure the yarn. Mode d’emploi des tricotins circulaires Tricot circulaire: exemple d‘un bonnet 1. Fixez le fil au clou extérieur et passezle vers l’intérieur entre le premier et le dernier clou. Le clou extérieur sert à fixer le fil après les tours complets d’enroulement. Basisinstructies voor de breiringenset: Rondbreien bijvoorbeeld voor een muts. 1. Het garen aan het buitenste pennetjes bevestigen en dan tussen de eerste en de laatste pen naar binnen brengen. De buitenste pen is voor het bevestigen van het garen als de cirkel volledig omwikkeld is. Istruzioni base, set per maglia Lavorazione in tondo, ad esempio di una cuffia 1. Fissare il filo al chiodino esterno e portalo verso l’interno tra il primo e l’ultimo chiodino. In linea di principio il chiodino esterno serve a fissare il filo dopo aver completato il giro. Strickringanl_RZ.indd 1-2 Prym Consumer GmbH, Postfach 1740, D-52220 Stolberg http://www.prym-consumer.com Tel. +49(0) 24 02/1404, Fax +49(0) 2402/142905 [email protected] International: Tel. +49 2402/1404, Fax +49 2402/14 2902 [email protected] 31.07.2008 21:40:24 Uhr B B 1 2 3 4 5 6 7 8 2. In der 1. Reihe das Garn schlaufenartig um alle benötigten Stifte legen. Prinzipiell gilt, die Anzahl der Stifte plus 2 Stifte für die Randmaschen ergeben die Breite des Schals. 3. Die 2. Reihe deckungsgleich zurück wickeln. Dabei alle Stifte zweifach umwickeln, außer dem 1. und dem letzten Stift. Diese Stifte bilden immer den Wendepunkt für die Wicklung der nächsten Reihe. Sie bilden die Randmasche. 4. In der 3. Runde mit dem Strickhaken die untere Masche aufgreifen und über den Stift heben. Den Vorgang so oft wiederholen bis sich auf allen Stiften nur noch eine Masche befindet. 5. Ab der 4. Reihe immer alle Stifte umwickeln, außer dem Letzten. Die doppelt gewickelten Stifte mit dem Strickhaken abstricken. Der letzte Stift ist der Anfangspunkt für die Wicklung der nächsten Reihe. Das Ganze solange wiederholen bis die gewünschte Länge des Schals erreicht ist. 6. In der letzten Reihe die Maschen abketten. Dazu die ersten beiden Stifte mit dem Garn umwickeln. Dann mit dem Strickhaken abstricken. 7. Die zweite Masche mit dem Strickhaken auf den ersten Stift heben. Dann abstricken und wieder auf den zweiten Haken zurück heben. 8. Den nächsten Stift umwickeln und abstricken. Diese Masche auf den ersten Stift heben. Erneut abstricken und wieder zurück auf den zweiten, leeren Stift legen. Den Vorgang wiederholen bis alle Maschen abgekettet sind. 2. In the first row, loop the yarn around the required number of pins. In principle, the number of pins plus an extra two for the edge stitches equal the width of the scarf. 3. Loop the second row back in the same way. All pins are looped twice except the first and the last one. These pins are the “turning points” to reverse into the next row and make up the edge stitches. 4. In the third row, use the knitting hook to take up the bottom stitch and lift it over the pin. Repeat the process until each pin only has one stitch left. 5. From row 4, loop the yarn around all pins except the last one. Use the knitting hook to cast off the double loops on each pin. The last pin is used to start winding the next row. Repeat the process until the scarf has the required length. 6. In the last row, bind off the stitches. Loop the yarn around the first two pins. Now cast off using the knitting hook. 7. Use the knitting hook to lift the second stitch onto the first pin. Cast off and lift it back onto the second pin. 8. Loop the yarn around the next pin and cast off. Lift the stitch onto the first pin, cast it off and lift it back onto the second, empty pin. Repeat the process until all stitches have been bound off. 2. Pour la première rangée, enroulez le fil en boucle autour du nombre de clous souhaité. La largeur de l’écharpe correspond au nombre de clous utilisés, plus deux pour les mailles lisières. 3. Pour la deuxième rangée, revenez dans l’autre sens, en enroulant le fil une deuxième fois autour des clous, sauf sur le premier et le dernier. Ceux-ci marquent toujours le point de passage d’une rangée à l’autre. Ils forment les mailles lisières. 4. Lors du 3e tour, hissez la maille du dessous au-dessus du clou à l’aide du crochet. Répétez ce geste jusqu’à ce qu’il ne reste qu’une seule maille sur chaque clou. 5. A partir du 4e rang, enroulez toujours le fil autour de tous les clous sauf le dernier. Rabattez au crochet le fil des clous entourés de deux boucles. Le dernier clou marque le point de départ de la rangée suivante. Répétez cette procédure jusqu’à atteindre la longueur d’écharpe voulue. 6. Pour la dernière rangée, rabattez les mailles. Pour cela, enroulez le fil autour des deux premiers clous. Rabattez ensuite au crochet. 7. Hissez la deuxième maille au-dessus du premier clou à l’aide du crochet. Puis rabattez au crochet et hissez de nouveau autour du deuxième clou. 8. Enroulez le fil autour du clou suivant et prenez-le au crochet. Hissez cette maille au-dessus du premier clou. Crochetez de nouveau et replacez le fil autour du deuxième clou, vide. Répétez la procédure jusqu’à ce que toutes les mailles soient rabattues. 2. In de 1e rij het garen lusvormig om alle benodigde pennen wikkelen. Over het algemeen telt men voor de breedte van de sjaal het aantal pennen plus 2 pennen voor de randsteken. 3. De 2e rij op dezelfde wijze terug wikkelen. Hierbij alle pennen twee keer omwikkelen, behalve de 1e en de laatste pen. Deze pennen vormen altijd het keerpunt voor de omwikkeling van de volgende rij. Ze vormen de randsteken. 4. In de 3e ronde de onderste steek met de breihaak oppakken en over de pen halen. Deze werkwijze net zo vaak herhalen tot er op de iedere pen nog maar een enkele steek over is. 5. Vanaf de 4e rij altijd alle pennen omwikkelen, behalve de laatste. De dubbel omwikkelde pen met de breihaak afsteken. De laatste pen is het beginpunt voor de omlussing van de volgende rij. Over de gehele lengte herhalen tot de gewenste lengte voor de sjaal is bereikt. 6. In de laatste rij de steken afkanten. Hiertoe de eerste twee pennen met het garen omwikkelen. Dan met de breihaak afsteken. 7. De tweede steek met de breihaak op de eerste pen zetten. Dan afsteken en weer op de tweede haak terugzetten. 8. De volgende pen omwikkelen en afsteken. Deze steek op de eerste pen zetten. Opnieuw afsteken en weer terug op de tweede, lege pen zetten. Deze werkwijze herhalen tot alle steken afgekant zijn. 2. Nel primo giro passare il filo ad occhiello attorno a tutti i chiodini necessari. La larghezza dello scialle è data in linea di principio dal numero dei chiodini più altri due chiodini per le maglie del bordo. Eseguire allo stesso modo il secondo giro, tornando indietro, passando così il filo 2 volte attorno a tutti i chiodini ad eccezione del primo e dell’ultimo. Questi due chiodini costituiscono sempre il punto di inversione per la lavorazione del giro successivo e formano il bordo. 4. Nel terzo giro afferrare con il ferro ricurvo la maglia inferiore e portarla sopra il chiodino. Ripetere l’operazione fino a quando su tutti i chiodini resta solo una maglia. 5. Dal quarto giro passare il filo attorno a tutti i chiodini, ad eccezione dell’ultimo. Lavorare con il ferro ricurvo i chiodini avvolti con doppio filo. L’ultimo chiodino è il punto di partenza per la lavorazione del giro successivo. Continuare la lavorazione fino a raggiungere la lunghezza desiderata dello scialle. 6. Nell’ultimo giro chiudere le maglie: avvolgere il filo attorno ai primi due chiodini, quindi lavorare con il ferro ricurvo. 7. Portare la seconda maglia con il ferro ricurvo sul primo chiodino. Quindi lavorarla e portarla nuovamente sopra il secondo chiodino. 8. Passare il filo attorno al chiodino successivo e lavorare. Portare questa maglia sul primo chiodino. Lavorarla nuovamente e portare la maglia sul secondo chiodino vuoto. Ripetere l’operazione fino ad aver chiuso tutte le maglie. Instrucciones básicas para set tricotar circular Tricotado de superficies, con el ejemplo de una bufanda 1. Fije el hilo en el palito exterior y páselo hacia el interior entre el primero y el último palito. Al tricotar superficies, el palito exterior sirve para fijar el hilo en una de cada dos filas. 2. En la primera fila, coloque el hilo en forma de lazo alrededor de todos los palitos necesarios. Por principio, se dice que el número de palitos más 2 palitos para las mallas de orillo corresponde a la anchura de la bufanda. 3. Enrolle la segunda fila de la misma manera hacia atrás. Enrolle el hilo dos veces en cada palito, excepto en el primero y en el último. Estos palitos representan siempre el punto de inversión para ejecutar la siguiente fila. Forman la malla de orillo. 4. En la tercera fila, recoja con el gancho de tricotar la malla inferior y levántela por encima del palito. Repita este proceso hasta que sólo se encuentre una malla en todos los palitos. 5. A partir de la cuarta fila, enrolle siempre todos los palitos excepto el último. Con la ayuda del gancho de tricotar vaya tricotando los palitos con el hilo doblemente enrollado. El último palito es el punto de partida para enrollar la siguiente fila. Vaya repitiendo este proceso hasta alcanzar la longitud deseada de la bufanda. 6. En la última fila, fije las mallas. Para este fin, enrolle el hilo en los dos primeros palitos. A continuación, tricote con el gancho de tricotar. 7. Con la ayuda del gancho de tricotar, levante la segunda malla sobre el primer palito. Tricote la malla y vuelva a colocarla en el segundo gancho. 8. Enrolle el hilo en el siguiente palito y tricote. Levante esta malla al primer palito. Vuelva a tricotar la malla y colóquela de nuevo en el segundo palito vacío. Repita el proceso hasta que haya fijado todas las mallas. RUS Основная инструкция по работе с набором колец для вязания Вязание ровного полотна, например, шарфа 1. Нить зафиксировать у внешнего штифта и ввести вовнутрь между первым и последним штифтом. Внешний штифт служит для вязания ровного полотна, в каждом 2-м ряду для фиксирования нити. 2. В 1-м ряду заложить нить в форме петель за все необходимые штифты. Чтобы грамотно расчитать ширину шарфа необходимо к выбранному количеству штифтов добавить 2 штифта для кромочных петель. 3. Второй ряд штифтов аналогично обвить нитью. При этом все штифты обвить нитью два раза, кроме первого и последнего штифта. Эти штифты всегда являются поворотными для обвивки штифтов следующего ряда. Они образуют кромочную петлю. 4. В 3-м ряду захватить с помощью крючка нижнюю петлю и поднять ее поверх штифта. Продолжать работать в этом ритме до тех пор, пока на всех штифтах не появится еще по одной петле. 5. Начиная с 4-го ряда всегда обвивать нитью все штифты, кроме последнего. На штифтах, обвитых дважды, выполнять петли с помощью крючка. Последний штифт предыдущего ряда считается начальным штифтом для следующего ряда. Продолжать работать в этом ритме до тех пор, пока шарф не достигнет нужной длины. 6. В последнем ряду закрыть все петли. Для этого обвить нитью два первых штифта. Затем работать с помощью крючка. 7. Вторую петлю поднять с помощью крючка на первый штифт. Затем провязать и снова поднять на второй штифт. 8. Обвить следующий штифт и выполнить петлю. Эту петлю поднять на первый штифт. Снова выполнить петлю и перекинуть ее назад на второй, пустой штифт. Продолжать работать в этом ритме до тех пор, пока все петли не будут закрыты. Grundanleitung Strickring-Set Flachstricken am Beispiel eines Schals 1. Das Garn am äußeren Stift fixieren und zwischen dem ersten und dem letzten Stift nach innen führen. Der äußere Stift dient beim Fläche stricken, in jeder 2. Reihe, zur Fixierung des Garns. Basic instructions for knitting ring set Knitting a flat panel such as a scarf 1. Secure the yarn to the outer pin and pass it between the first and the last pin into the centre. When knitting a flat panel, the outer pin is used in every other row to secure the yarn. Mode d’emploi des tricotins circulaires Tricot droit: exemple d’une écharpe 1. Fixez le fil au clou extérieur et passezle vers l’intérieur du tricotin géant entre le premier et le dernier clou. Lors du tricotage rectiligne, le clou extérieur sert à fixer le fil tous les 2 rangs. Basisinstructies voor de breiringenset: Een plat oppervlak breien bijvoorbeeld voor een sjaal 1. Het garen aan het buitenste pennen bevestigen en tussen de eerste en de laatste pen naar binnen halen. De buitenste pen is voor het vastzetten van het garen bij iedere 2e rij. Istruzioni base, set per maglia Lavorazione piatta, ad esempio di uno scialle 1. Fissare il filo al chiodino esterno e portalo verso l’interno tra il primo e l’ultimo chiodino. Il chiodino esterno serve nella lavorazione piatta a fissare il filo ad ogni secondo giro. Strickringanl_RZ.indd 3-4 31.07.2008 21:40:35 Uhr