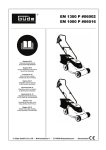
1
Anleitung_RPM_56_S_MS_SPK7:_
21.12.2009
15:04 Uhr
k
Originalbetriebsanleitung
Benzin-Rasenmäher
Assembly and Operating Instructions
Petrol Lawn Mower
Instructions de montage et mode d’emploi
Tondeuse à gazon à essence
j
Originální návod k obsluze
Benzinová sekačka na trávu
Seite 1
�
Art.-Nr.: 34.007.51
I.-Nr.: 01019
RPM
56 S-MS
Anleitung_RPM_56_S_MS_SPK7:_
21.12.2009
15:04 Uhr
Seite 2
Vor Inbetriebnahme Bedienungsanleitung und
Sicherheitshinweise lesen und beachten
Read and follow the operating instructions and safety information
before using for the first time.
Avant la mise en service, lisez le mode d’emploi et les consignes
de sécurité et respectez-les.
j
Aby se zabránilo poškození převodovky, je třeba provádět přepínání
vrtání/vrtání s příklepem pouze ve vypnutém stavu.
2
Anleitung_RPM_56_S_MS_SPK7:_
1
6
21.12.2009
15:04 Uhr
Seite 3
1
2
3
5
19
10
11
4
7
12
8
17
9
20
2
18
22
13
2
5
7
21
14
16
15
3
Anleitung_RPM_56_S_MS_SPK7:_
21.12.2009
3a
15:04 Uhr
Seite 4
3b
18
2
15
18
16
5
4
3c
3d
24
13
4
4
8
7
5a
19
1
5
Anleitung_RPM_56_S_MS_SPK7:_
21.12.2009
15:04 Uhr
5b
5c
6a
6b
21
22
7
Seite 5
8
9
5
Anleitung_RPM_56_S_MS_SPK7:_
21.12.2009
9
15:04 Uhr
Seite 6
10a
11
12
10b
11a
11
max
11b
6
min
11c
Anleitung_RPM_56_S_MS_SPK7:_
21.12.2009
15:04 Uhr
Seite 7
12
23
13
1
2
3
4
5
6
7
7
Anleitung_RPM_56_S_MS_SPK7:_
21.12.2009
15:04 Uhr
Seite 8
D
Inhaltsverzeichnis:
1.
2.
3.
4.
5.
6.
7.
8.
9.
8
Sicherheitshinweise
Gerätebeschreibung
Bestimmungsgemäße Verwendung
Technische Daten
Vor Inbetriebnahme
Bedienung
Reiningung, Wartung, Lagerung, Transport und Ersatzteilbestellung
Entsorgung und Wiederverwertung
Fehlersuchplan
Anleitung_RPM_56_S_MS_SPK7:_
21.12.2009
15:04 Uhr
Seite 9
D
Achtung!
Beim Benutzen von Geräten müssen einige
Sicherheitsvorkehrungen eingehalten werden, um
Verletzungen und Schäden zu verhindern. Lesen Sie
diese Bedienungsanleitung / Sicherheitshinweise
deshalb sorgfältig durch. Bewahren Sie diese gut
auf, damit Ihnen die Informationen jederzeit zur
Verfügung stehen. Falls Sie das Gerät an andere
Personen übergeben sollten, händigen Sie diese
Bedienungsanleitung / Sicherheitshinweise bitte mit
aus. Wir übernehmen keine Haftung für Unfälle oder
Schäden, die durch Nichtbeachten dieser Anleitung
und den Sicherheitshinweisen entstehen.
1. Sicherheitshinweise für
handgeführte Rasenmäher
Hinweise
1. Lesen Sie die Gebrauchsanweisung sorgfältig.
Machen Sie sich mit den Einstellungen und dem
richtigen Gebrauch der Maschine vertraut.
2. Erlauben Sie niemals Kindern oder anderen
Personen, die die Gebrauchsanweisung nicht
kennen, den Rasenmäher zu benutzen. Örtliche
Bestimmungen können das Mindestalter des Benutzers festlegen.
3. Mähen Sie niemals während andere Personen,
insbesondere Kinder oder Tiere, in der Nähe
sind. Denken Sie daran, dass der Maschinenführer oder der Benutzer für Unfälle mit anderen
Personen oder deren Eigentum verantwortlich
ist.
4. Falls Sie das Gerät an andere Personen
übergeben sollten, händigen Sie diese
Bedienungsanleitung bitte mit aus.
Vorbereitende Maßnahmen
1. Während des Mähens sind immer festes Schuhwerk und lange Hosen zu tragen. Mähen Sie
nicht barfuß oder in leichten Sandalen.
2. Überprüfen Sie das Gelände, auf dem die
Maschine eingesetzt wird, und entfernen Sie alle
Gegenstände, die erfasst und weggeschleudert
werden können.
3. Warnung: Benzin ist hochgradig entflammbar:
- bewahren Sie Benzin nur in den dafür vorgesehenen Behältern auf.
- tanken Sie nur im Freien und rauchen Sie nicht
während des Einfüllvorganges.
- Benzin ist vor dem Starten des Motors einzufüllen. Während der Motor läuft oder bei heißem
Mäher darf der Tankverschluss nicht geöffnet
oder Benzin nachgefüllt werden.
- falls Benzin übergelaufen ist, darf kein Versuch
unternommen werden, den Motor zu starten.
Statt dessen ist die Maschine von der benzinverschmutzten Fläche zu entfernen. Jeglicher
Zündversuch ist zu vermeiden bis sich die
Benzindämpfe verflüchtigt haben.
- aus Sicherheitsgründen sind Benzintank und
andere Tankverschlüsse bei Beschädigung
auszutauschen.
4. Ersetzen Sie defekte Schalldämpfer
5. Vor dem Gebrauch ist immer durch Sichtkontrolle zu prüfen, ob die Schneidwerkzeuge, Befestigungsbolzen und die gesamte Schneideinheit abgenutzt oder beschädigt sind. Zur Vermeidung einer Unwucht dürfen abgenutzte oder
beschädigte Schneidwerkzeuge und Befestigungsbolzen nur satzweise ausgetauscht werden.
6. Bei Geräten mit mehreren Messern beachten
Sie, dass durch das Drehen eines Messers
andere Messer zu drehen beginnen können.
Handhabung
1. Lassen Sie den Verbrennungsmotor nicht in
geschlossenen Räumen laufen, in denen sich
gefährliches Kohlenmonoxid sammeln kann.
2. Mähen Sie nur bei Tageslicht oder bei guter
künstlicher Beleuchtung. Wenn möglich, ist der
Einsatz des Gerätes bei nassem Gras zu vermeiden.
3. Achten Sie immer auf einen guten Stand an
Hängen.
4. Führen Sie die Maschine nur im Schritttempo
5. Bei Maschinen auf Rädern gilt: Mähen Sie quer
zum Hang, niemals auf- oder abwärts.
6. Seien Sie besonders vorsichtig, wenn Sie die
Fahrtrichtung am Hang ändern.
7. Mähen Sie nicht an übermäßig steilen Hängen
8. Seien Sie besonders vorsichtig, wenn Sie den
Rasenmäher umkehren oder ihn zu sich heranziehen.
9. Halten Sie das Schneidmesser an, wenn der
Rasenmäher angekippt werden muss, bei einem
Transport über andere Flächen als Gras und
wenn der Rasenmäher von und zu der zu
mähenden Fläche bewegt wird.
10. Benutzen Sie den Rasenmäher niemals mit beschädigten Schutzeinrichtungen oder Schutzgittern oder ohne angebaute Schutzeinrichtungen z.B. Prallbleche und/oder Grasfangeinrichtungen.
11. Ändern Sie nicht die Regeleinstellungen des
Motors oder überdrehen Sie ihn nicht.
12. Lösen Sie die Motorbremse, bevor Sie den Motor
starten.
13. Starten Sie den Motor mit Vorsicht, entsprechend den Herstelleranweisungen. Achten Sie auf
ausreichenden Abstand der Füße zu dem
9
Anleitung_RPM_56_S_MS_SPK7:_
21.12.2009
15:04 Uhr
Seite 10
D
Schneidmesser.
14. Beim Starten oder Anlassen des Motors darf der
Rasenmäher nicht gekippt werden, es sei denn,
der Rasenmäher muss bei dem Vorgang angehoben werden. In diesem Fall kippen Sie ihn nur
so weit, wie es unbedingt erforderlich ist, und
heben Sie nur die vom Benutzer abgewandte
Seite hoch.
15. Starten Sie den Motor nicht, wenn Sie vor dem
Auswurfkanal stehen.
16. Führen Sie niemals Hände oder Füße an oder
unter sich drehende Teile. Halten Sie sich immer
entfernt von der Auswurföffnung.
17. Heben Sie oder tragen Sie niemals einen
Rasenmäher mit laufendem Motor.
18. Stellen Sie den Motor ab und ziehen Sie den
Kerzenstecker ab:
- bevor Sie Blockierungen lösen oder Verstopfungen im Auswurfkanal beseitigen.
- bevor Sie den Rasenmäher überprüfen,
reinigen oder Arbeiten an ihm durchführen.
- wenn ein Fremdkörper getroffen wurde. Suchen
Sie nach Beschädigungen am Rasenmäher und
führen Sie die erforderlichen Reparaturen durch
bevor Sie erneut starten und mit dem
Rasenmäher arbeiten. Falls der Rasenmäher
anfängt ungewöhnlich stark zu vibrieren, ist eine
sofortige Überprüfung erforderlich.
19. Stellen Sie den Motor ab:
- wenn Sie sich vom Rasenmäher entfernen
- bevor Sie nachtanken.
20. Beim Abstellen des Motors ist der Gasregler auf
Position “Stop” zu stellen. Der Benzinhahn ist zu
schließen.
21. Ein Betreiben der Maschine mit übermäßiger
Geschwindigkeit kann die Unfallgefahr erhöhen.
22. Seien Sie vorsichtig bei Einstellarbeiten an der
Maschine und vermeiden Sie ein Einklemmen
von Fingern zwischen dem sich bewegenden
Schneidwerkzeug und starren Geräteteilen
Wartung und Lagerung
1. Sorgen Sie dafür, dass alle Muttern, Bolzen und
Schrauben fest angezogen sind und das Gerät in
einem sicheren Arbeitszustand ist.
2. Bewahren Sie den Rasenmäher niemals mit
Benzin im Tank innerhalb eines Gebäudes auf,
in dem möglicherweise Benzindämpfe mit
offenem Feuer oder Funken in Berührung
kommen können.
3. Lassen Sie den Motor abkühlen, bevor Sie den
Rasenmäher in geschlossenen Räumen abstellen.
4. Um Brandgefahr zu vermeiden, halten Sie Motor,
Auspuff und den Bereich um den Kraftstofftank
frei von Gras, Blättern oder austretendem Fett
10
(Öl).
5. Prüfen Sie regelmäßig die Grasfangeinrichtung
auf Verschleiß oder Verlust der Funktionsfähigkeit.
6. Ersetzen Sie aus Sicherheitsgründen abgenutzte
oder beschädigte Teile.
7. Falls der Kraftstofftank zu entleeren ist, sollte
dies im Freien, mit einer Benzin-Absaugpumpe
(in Baumärkten erhältlich) erfolgen.
Restrisiken
Auch wenn Sie dieses Gerät vorschriftsmäßig
bedienen, bleiben immer Restrisiken bestehen.
Folgende Gefahren können im Zusammenhang
mit der Bauweise und Ausführung dieses Geräts
auftreten:
1. Gehörschäden, falls kein geeigneter Gehörschutz getragen wird.
2. Gesundheitsschäden, die aus Hand-ArmSchwingungen resultieren, falls das Gerät über
einen längeren Zeitraum verwendet wird oder
nicht ordnungsgemäß geführt und gewartet wird.
WARNUNG
Lesen Sie alle Sicherheitshinweise und
Anweisungen. Versäumnisse bei der Einhaltung der
Sicherheitshinweise und Anweisungen können
elektrischen Schlag, Brand und/oder schwere
Verletzungen verursachen.
Bewahren Sie alle Sicherheitshinweise und
Anweisungen für die Zukunft auf.
Erklärung des Hinweisschildes auf dem Gerät
(siehe Bild 13)
1) Bedienungsanleitung lesen
2) Achtung! Gefahr durch herausgeschleuderte
Teile. Sicherheitsabstand einhalten
3) Achtung! Vor scharfen Messern - Vor allen
Wartungs-, Instandsetzungs-, Reinigungs- und
Einstellarbeiten den Motor abstellen und
Zündkerzenstecker abziehen
4) Vor Inbetriebnahme Öl und Treibstoff einfüllen
5) Vorsicht! Gehörschutz und Schutzbrille tragen
6) Motorstart-/Motorstophebel
(I=Motor an; 0=Motor aus)
7) Fahrhebel (Kupplungshebel)
Anleitung_RPM_56_S_MS_SPK7:_
21.12.2009
15:04 Uhr
Seite 11
D
2. Gerätebeschreibung (Bild 1/2)
1. Motor Start-/Stopphebel – Motorbremse
2. oberer Schubbügel
3. Chokehebel / Gashebel
4. Startseilzug
5. unterer Schubbügel
6. Handgriff
7. Fangsack
8. Auswurfklappe
9. Schnitthöhenverstellung
10. Tankeinfüllkappe
11. Öleinfüllstutzen
12. Ölablassschraube
13. 2 Kabelclips
14. Zündkerzenschlüssel
15. 2 Vierkantschrauben für unteren Schubbügel
16. 2 Schrauben für oberen Schubbügel
(Schnellspannfunktion)
17. Seitenauswurfdeckel
18. 4 Sternmuttern für Schubbügel
19. Fahrhebel (Kupplungshebel)
20. Antriebsrad (links und rechts)
21. Seitenauswurfadapter
22. Mulchadapter
23. Zündkerze
24. Haken für Startseilzug
Achtung! Wegen körperlicher Gefährdung des
Benutzers darf der Rasenmäher nicht zu folgenden
Arbeiten eingesetzt werden: zum Trimmen von
Büschen, Hecken und Sträuchern, zum Schneiden
und Zerkleinern von Rankgewächsen oder Rasen
auf Dachbepflanzungen oder in Balkonkästen und
zum Reinigen (Absaugen) von Gehwegen und als
Häcksler zum Zerkleinern von Baum- und
Heckenabschnitten. Ferner darf der Rasenmäher
nicht als Motorhacke verwendet werden zum Einebnen von Bodenerhebungen, wie z.B. Maulwurfshügel.
Aus Sicherheitsgründen darf der Rasenmäher nicht
als Antriebsaggregat für andere Arbeitswerkzeuge
und Werkzeugsätze jeglicher Art verwendet werden.
4. Technische Daten
Motortyp:
Einzylinder-Viertaktmotor 173 ccm
Arbeitsdrehzahl n0:
Kraftstoff:
Tankinhalt:
Motoröl:
Zündkerze:
3. Bestimmungsgemäße Verwendung
Elektrodenabstand:
Schnitthöhenverstellung:
Der Benzin Rasenmäher ist für die private
Benutzung im Haus- und Hobbygarten geeignet.
Schnittbreite:
Als Rasenmäher für den privaten Haus- und Hobbygarten werden solche angesehen, deren jährliche
Benutzung in der Regel 50 Stunden nicht übersteigen und die vorwiegend für die Pflege von Grasoder Rasenflächen verwendet werden, nicht jedoch
in öffentlichen Anlagen, Parks, Sportstätten sowie
nicht in der Land- und Forstwirtschaft.
Schallleistungspegel LWA:
Bitte beachten Sie, dass unsere Geräte
bestimmungsgemäß nicht für den gewerblichen,
handwerklichen oder industriellen Einsatz konstruiert
wurden. Wir übernehmen keine Gewährleistung,
wenn das Gerät in Gewerbe-, Handwerks- oder
Industriebetrieben sowie bei gleichzusetzenden
Tätigkeiten eingesetzt wird.
Schalldruckpegel LpA:
2800 min-1
Benzin
ca. 2 l
ca. 0,6 l / 10W30
F6RTC
0,5 - 0,6 mm
zentral (30-75 mm)
560 mm
90,1 dB(A)
98 dB(A)
Unsicherheit k:
3 dB(A)
Vibration ahw:
7,3 m/s2
Unsicherheit k:
1,5 m/s2
Gewicht:
46 kg
Geräusch- und Vibrationswerte wurden nach EN ISO
11201, EN ISO 3744 und EN 1033 ermittelt.
Die Einhaltung der vom Hersteller beigefügten Gebrauchsanweisung ist Voraussetzung für den
ordnungsgemäßen Gebrauch des Rasenmähers. Die
Gebrauchsanweisung enthält auch die Betriebs-,
Wartungs- und Instandhaltungsbedingungen.
11
Anleitung_RPM_56_S_MS_SPK7:_
21.12.2009
15:04 Uhr
Seite 12
D
5. Vor Inbetriebnahme
5.2 Einstellen der Schnitthöhe
5.1 Zusammenbau der Komponenten.
Bei der Lieferung sind einige Teile demontiert. Der
Zusammenbau ist einfach, wenn die folgenden Hinweise beachtet werden
Achtung! Beim Zusammenbau und für Wartungsarbeiten benötigen Sie folgendes zusätzliches Werkzeug, das nicht im Lieferumfang enthalten ist:
eine Ölauffangwanne flach (für Ölwechsel)
einen Messbecher 1 Liter (Öl / Benzinfest)
einen Benzinkanister ( 5 Liter sind ausreichend
für ca. 6 Betriebsstunden)
einen Trichter (passend zum Benzineinfüllstutzen des Tanks)
Haushaltswischtücher (zum Abwischen von Öl /
Benzinresten; Entsorgung an der Tankstelle)
eine Benzin Absaugpumpe (Plastikausführung, in
Baumärkten erhältlich)
eine Ölkanne mit Handpumpe (in Baumärkten
erhältlich)
1 l Motoröl 10W30
Achtung! Das Verstellen der Schnitthöhe darf nur
bei abgestelltem Motor und abgezogenem
Zündkerzenstecker vorgenommen werden.
Montage
1. Rasenmäher und Anbauteile aus Verpackung
nehmen und überprüfen ob alle Teile vorhanden
sind (Abb. 2)
2. Unteren Schubbügel mit je einer
Vierkantschraube (Abb. 3a/Pos. 15) und einer
Sternschraube (Abb. 3a/Pos. 18) an beiden
Seiten festschrauben. Entsprechend der
gewünschten Griffhöhe eines der drei Löcher für
die Befestigung auswählen. Achtung! Auf beiden
Seiten die gleiche Höhe einstellen! Achten Sie
dabei darauf, dass die Seilzüge, die später
befestigt werden, nicht im Weg sind.
3. Oberen Schubbügel am unteren Schubbügel mit
je einer Schraube (Abb. 3b/Pos. 16) und einer
Sternschraube (Abb. 3b/Pos. 18) an beiden
Seiten festschrauben. Darauf achten, dass die
Bügel der Schrauben (16) beim Anziehen nach
innen geklappt sind, damit die
Schnellspannfunktion erhalten bleibt.
4. Den Griff des Startseilzuges (Abb. 3c/Pos. 4) am
dafür vorgesehenen Haken (Abb. 3c/Pos. 24) wie
in Abb. 3c gezeigt einhängen.
5. Die Seilzüge mit den beiliegenden Kabelclips
(Abb. 3d/Pos. 13) am Schubbügel fixieren.
6. Auswurfklappe (Abb. 4/Pos. 8) mit einer Hand
anheben und den Grasfangsack (Abb. 4/Pos. 7)
wie in Abb. 4 gezeigt einhängen
12
Bevor Sie zu Mähen beginnen, prüfen Sie, ob die
Schneidwerkzeuge nicht stumpf und Ihre
Befestigungsmittel nicht beschädigt sind.
Ersetzen Sie stumpfe und/oder beschädigte
Schneidwerkzeuge gegebenenfalls im ganzen
Satz, um keine Unwucht zu erzeugen. Bei dieser
Prüfung den Motor abstellen und den
Zündkerzenstecker abziehen.
Die Einstellung der Schnitthöhe erfolgt zentral mit
dem Schnitthöhenverstellhebel (Abb. 8/Pos. 9).
Es können 5 verschiedene Schnitthöhen
eingestellt werden.
Ziehen Sie den Einstellhebel nach außen und
stellen Sie die gewünschte Schnitthöhe ein. Der
Hebel rastet in der gewünschten Position ein.
6. Bedienung
Achtung!
Der Motor wird ohne Öl ausgeliefert. Vor Inbetriebnahme daher unbedingt Öl einfüllen.
Verwenden Sie hierzu normales Mehrbereichsöl
(10W30). Der Ölstand im Motor muss vor jedem
Mähen überprüft werden. (siehe Kontrolle des
Ölstandes).
Um ein ungewolltes Starten des Rasenmähers zu
vermeiden, ist dieser mit einer Motorbremse ausgestattet (Abb. 5a/Pos. 1), welche betätigt werden
muss, bevor der Rasenmäher gestartet wird. Beim
Loslassen des Motorbremshebels muss dieser in die
Ausgangsposition zurückkehren und der Motor wird
automatisch abgestellt.
Stellen Sie den Gasregler (Abb. 7) in die Position
“I I”. Ziehen Sie den Motorbremshebel (Abb. 5b)
und ziehen Sie kräftig am Startseilzug. Mit dem
Gasregler können Sie die Geschwindigkeit und die
Umdrehungen des Messers regeln (Abb. 7).
Bevor Sie mit dem Rasenmähen beginnen, sollten
Sie diesen Vorgang einige Male durchführen, um
sicher zu gehen, dass alles korrekt funktioniert.
Jedesmal wenn Sie irgendwelche Einstell- und/oder
Reparaturarbeiten an Ihrem Rasenmäher vornehmen müssen, warten Sie, bis sich das Messer
nicht mehr dreht.
Stellen Sie vor jeder Einstell-, Wartungs- und
Reparaturarbeit den Motor ab.
Anleitung_RPM_56_S_MS_SPK7:_
21.12.2009
15:04 Uhr
Seite 13
D
Hinweise:
1. Motorbremse (Abb. 5a/Pos. 1): Verwenden Sie
den Hebel, um den Motor abzustellen. Wenn sie
den Hebel loslassen, stoppen Motor und
Schneidemesser automatisch. Zum Mähen
halten Sie den Hebel in Arbeitsstellung (Abb.
5b). Vor dem eigentlichen Mähen, sollten Sie
den Start-/Stophebel mehrmals überprüfen.
Vergewissern Sie sich, dass das Zugseil leicht
gängig ist.
2. Gasregler (Abb. 7): Verschieben Sie ihn, um die
Motorgeschwindigkeit zu erhöhen oder zu
verringern. (Schildkröte = langsam / Hase =
schnell)
3. Fahrhebel Kupplungshebel (Abb. 5a/Pos. 19):
Betätigen Sie ihn (Abb. 5c), wird die Kupplung
für den Fahrantrieb geschlossen und der
Rasenmäher beginnt bei laufendem Motor zu
fahren. Lassen Sie den Fahrhebel rechtzeitig los
um den fahrenden Rasenmäher zu stoppen.
Üben Sie das Anfahren und Anhalten vor dem
ersten Mähen bis Sie mit dem Fahrverhalten
vertraut sind.
4. Warnhinweis: Das Schneidemesser rotiert,
wenn der Motor gestartet wird.
Wichtig: Vor dem Starten des Motors bewegen
Sie die Motorbremse mehrmals, um zu Prüfen,
ob das Stopseil auch gut funktioniert.
Beachte: Der Motor ist auf die Schnittgeschwindigkeit für Gras, und Grasauswurf in den Fangsack und für eine lange Motor-Lebenszeit ausgelegt
5. Überprüfen Sie den Ölstand.
6. Füllen Sie den Tank mit ca. 1,9 Liter Benzin,
wenn er leer ist und verwenden Sie einen
Trichter und Maßbehälter. Vergewissern Sie
sich, dass das Benzin sauber ist.
Warnung: Verwenden Sie immer nur einen
Sicherheitsbenzinkanister. Rauchen Sie nicht beim
Einfüllen von Benzin. Schalten Sie den Motor vor
dem Einfüllen von Benzin ab und lassen Sie den
Motor einige Minuten abkühlen.
7. Vergewissern Sie sich, dass das Zündkabel an
der Zündkerze angeschlossen ist.
8. Rasten Sie den Gashebel auf Stellung “I I” ein.
9. Stehen Sie hinter dem Motormäher. Eine Hand
soll am Motor-Start-/Stophebel sein. Die andere
Hand soll am Startergriff sein.
10. Den Motor mit dem Reversierstarter (Abb.1/
Pos.4) starten. Hierfür den Griff ca. 10-15 cm
(bis ein Widerstand spürbar ist) herausziehen,
dann kräftig mit einem Ruck anziehen. Sollte der
Motor nicht gestartet haben, nochmals am Griff
anziehen.
Achtung! Den Seilzug nicht zurückschleudern
lassen.
Achtung: Bei kühlem Wetter kann es
erforderlich sein, den Anlassvorgang mehrmals
zu wiederholen.
11. Bei betriebswarmen Motor kann dieser in der
Stellung “Schildkröte” (Abb. 7) gestartet werden.
Wichtig: Startversuche in der Stellung “I I”
können bei betriebswarmen Motor zum Nässen
der Zündkerze des Motors führen. Machen sie
Startversuche dann erst nach einigen Minuten
wieder.
Mulchen
Beim Mulchen wird das Schnittgut im
geschlossenen Mähergehäuse zerkleinert und auf
dem Rasen wieder verteilt. Eine Grasaufnahme und
Entsorgung entfällt.
Achtung: Mulchen ist nur bei relativ kurzem Rasen
möglich. Optimale Ergebnisse erzielen Sie nur mit
einem Mulchmesser (als Zubehör erhältlich).
Um die Mulchfunktion zu nutzen, hängen Sie den
Fangsack aus und schieben Sie den Mulchadapter
(Abb. 6a /Pos. 22) in die Auswurföffnung und
schließen Sie die Auswurfklappe.
Seitenauswurf
Um den Seitenauswurf zu nutzen sollte der
Mulchadapter (Pos. 22) montiert sein. Hängen Sie
den Seitennauswurfadapter (Abb. 6b/Pos. 21) wie in
Abbildung 6b zu sehen ein.
6.1 Vor dem Mähen
Wichtige Hinweise:
1. Ziehen Sie sich richtig an. Tragen Sie festes
Schuhwerk und keine Sandalen oder
Tennisschuhe.
2. Überprüfen Sie das Schneidemesser. Ein
Messer, das verbogen oder sonst wie beschädigt
ist, muss gegen ein Originalmesser
ausgetauscht werden.
3. Füllen Sie den Benzintank im Freien auf. Benutzen sie einen Einfülltrichter und einen Meßbehälter. Wischen Sie übergelaufenes Benzin
weg.
4. Lesen und beachten Sie die Betriebsanleitung
und auch die Hinweise bezüglich des Motors und
der Zusatzgeräte. Heben Sie die Anleitung auch
für die anderen Benutzer des Gerätes zugänglich
auf.
5. Auspuffgase sind gefährlich. Lassen Sie den
Motor nur im Freien an.
6. Vergewissern Sie sich, dass alle
Sicherheitseinrichtungen vorhanden sind und
13
Anleitung_RPM_56_S_MS_SPK7:_
21.12.2009
15:04 Uhr
Seite 14
D
auch gut funktionieren.
7. Das Gerät sollte nur von einer Person bedient
werden, die auch dazu geeignet ist.
8. Das Mähen von nassem Gras kann gefährlich
sein. Mähen Sie Gras möglichst trocken.
9. Weisen Sie andere Personen oder Kinder an,
sich vom Mäher entfernt aufzuhalten.
10. Mähen Sie niemals bei schlechten Sichtverhältnissen.
11. Heben Sie herumliegende, lose Gegenstände vor
dem Mähen vom Boden auf.
6.2 Hinweise zum richtigen Mähen
Achtung! Öffnen Sie die Auswurfklappe nie,
wenn die Fangeinrichtung entleert wird und der
Motor noch läuft. Das umlaufende Messer kann
zu Verletzungen führen.
Befestigen Sie die Auswurfklappe und den Grasfangsack immer sorgfältig. Beim Entfernen vorher
den Motor ausschalten.
Der durch die Führungsholme gegebene Sicherheitsabstand zwischen Messergehäuse und Benutzer ist
stets einzuhalten. Beim Mähen und Fahrtrichtungsänderungen an Böschungen und Hängen ist besondere Vorsicht geboten. Achten Sie auf einen
sicheren Stand, tragen Sie Schuhe mit rutschfesten,
griffigen Sohlen und lange Hosen. Mähen Sie immer
quer zum Hang.
Hänge über 15 Grad Schräge dürfen mit dem
Rasenmäher aus Sicherheitsgründen nicht gemäht
werden.
Üben Sie besondere Vorsicht beim
Rückwärtsbewegen und beim Ziehen des
Rasenmähers. Stolpergefahr!
6.3 Das Mähen
Nur mit scharfen, einwandfreien Messern schneiden,
damit die Grashalme nicht ausfransen und der
Rasen nicht gelb wird.
Zur Erzielung eines sauberen Schnittbildes den
Rasenmäher in möglichst geraden Bahnen führen.
Dabei sollten sich diese Bahnen immer um einige
Zentimeter überlappen, damit keine Streifen stehen
bleiben.
Die Unterseite des Mähergehäuses sauber halten
und Grasablagerungen unbedingt entfernen. Ablagerungen erschweren den Startvorgang, beeinträchtigen die Schnittqualität und den Grasauswurf.
An Hängen ist die Schneidbahn quer zum Hang zu
14
legen. Ein Abgleiten des Rasenmähers lässt sich
durch Schrägstellung nach oben verhindern.
Wählen Sie die Schnitthöhe, je nach der tatsächlichen Rasenlänge. Führen Sie mehrere Durchgänge
aus, so dass maximal 4cm Rasen auf einmal abgetragen wird.
Bevor irgendeine Kontrolle des Messers durchgeführt wird, Motor abstellen. Denken Sie daran, dass
das Messer nach dem Ausschalten des Motors sich
noch einige Sekunden weiterdreht. Versuchen Sie
nie, das Messer zu stoppen.
Prüfen Sie regelmäßig, ob das Messer richtig befestigt, in gutem Zustand und gut geschliffen ist.
Schleifen oder ersetzen Sie es, falls dies nicht der
Fall sein sollte. Falls das in Bewegung befindliche
Messer auf einen Gegenstand schlägt, den
Rasenmäher anhalten und warten bis das Messer
vollkommen still steht. Kontrollieren Sie
anschließend den Zustand des Messers und des
Messerhalters. Falls dieses beschädigt ist muss es
ausgewechselt werden.
Hinweise zum Mähen:
1. Achten Sie auf feste Gegenstände. Der
Rasenmäher könnte beschädigt werden oder es
könnten Verletzungen entstehen.
2. Ein heißer Motor, Auspuff oder Antrieb kann Verbrennungen verursachen. Also nicht berühren.
3. Bei Hängen oder steil abfallendem Gelände
vorsichtig mähen.
4. Fehlendes Tageslicht oder nicht ausreichende
künstliche Beleuchtung sind ein Grund, um das
Mähen einzustellen.
5. Überprüfen Sie den Mäher, das Messer und die
anderen Teile, wenn Sie in einen Fremdkörper
gefahren sind oder wenn das Gerät stärker als
normal vibriert.
6. Machen Sie keine Einstellungsänderungen oder
Reparaturen ohne den Motor vorher abzustellen.
Ziehen Sie den Zündkabelstecker.
7. Auf oder in der Nähe einer Straße achten Sie auf
den Straßenverkehr. Halten Sie den
Grasauswurf von der Straße fern.
8. Vermeiden Sie Stellen, wo die Räder nicht mehr
greifen oder das Mähen unsicher ist. Vor einer
Rückwärtsbewegung vergewissern Sie sich, ob
nicht kleine Kinder hinter Ihnen sind.
9. In dichtem, hohen Gras stellen Sie die höchste
Schnittstufe ein und mähen Sie langsamer. Vor
dem Entfernen von Gras oder sonstigen
Verstopfungen, stellen Sie den Motor ab und
lösen Sie das Zündkabel.
10. Entfernen Sie niemals Teile, die der Sicherheit
dienen.
11. Füllen Sie niemals Benzin in den Motor, der noch
Anleitung_RPM_56_S_MS_SPK7:_
21.12.2009
15:05 Uhr
Seite 15
D
heiß ist oder läuft
6.4 Entleeren des Grasfangsackes
Sobald während des Mähens Grasreste liegen
bleiben, muss der Fangsack entleert werden.
Achtung! Vor dem Abnehmen des Fangsackes
den Motor abstellen und den Stillstand des
Schneidwerkzeugs abwarten.
Zum Abnehmen des Fangsackes mit einer Hand die
Auswurfklappe anheben, mit der anderen Hand den
Fangsack am Tragegriff herausnehmen (Abb. 4).
Der Sicherheitsvorschrift entsprechend fällt die Auswurfklappe beim Aushängen des Fangsackes zu und
verschließt die hintere Auswurföffnung. Bleiben
dabei Grasreste in der Öffnung hängen, so ist es für
ein leichteres Starten des Motors zweckmäßig, den
Rasenmäher um etwa 1m zurückzuziehen.
Schnittgutreste im Mähergehäuse und am Arbeitswerkzeug nicht von Hand oder mit den Füßen entfernen, sondern mit geeigneten Hilfsmitteln, z.B.
Bürste oder Handbesen.
Zur Gewährleistung eines guten Aufsammelns
müssen der Fangsack und besonders das Luftgitter
von innen nach der Benutzung gereinigt werden.
Fangsack nur bei abgeschaltetem Motor und
stillstehendem Schneidwerkzeug einhängen.
Auswurfklappe mit einer Hand anheben und mit der
anderen Hand den Fangsack am Handgriff halten
und von oben einhängen.
6.5 Nach dem Mähen
1. Den Motor immer zuerst abkühlen lassen, bevor
man den Rasenmäher in einem geschlossenen
Raum abstellt.
2. Entfernen Sie Gras, Laub, Schmiere und Öl vor
dem Einlagern. Keine anderen Gegenstände auf
dem Mäher ablagern.
3. Kontrollieren Sie vor erneutem Gebrauch alle
Schrauben und Muttern. Gelockerte Schrauben
sind fest zu ziehen.
4. Entleeren Sie den Grasfangsack vor dem
erneuten Gebrauch.
5. Lösen Sie den Zündkerzenstecker, um unerlaubten Gebrauch zu verhindern.
6. Achten Sie darauf, dass der Mäher nicht neben
einer Gefahrenquelle abgestellt wird.
Gasschwaden können zu Explosionen führen.
7. Es dürfen nur Originalteile oder solche vom
Hersteller genehmigte Teile bei Reparaturen
verwendet werden (siehe Adresse der
Garantieurkunde).
8. Bei längerem Nichtgebrauch des Mähers, den
Benzintank mit einer Benzinabsaugpumpe entleeren.
9. Kinder anweisen den Mäher nicht zu benützen.
Er ist kein Spielzeug.
10. Niemals Benzin in der Nähe einer Funkenquelle
aufbewahren. Verwenden Sie immer einen geprüften Kanister. Halten Sie Benzin von Kindern
fern.
11. Ölen und warten Sie das Gerät
12. Wie man den Motor abstellt:
Um den Motor abzustellen, lassen Sie den
Motor-Start-/Stophebel los (Abb. 5a/Pos. 1).
Schließen Sie den Benzinhahn und ziehen Sie
den Zündkerzenstecker von der Zündkerze ab,
um zu vermeiden, dass der Motor startet.
Überprüfen sie vor dem erneuten anlassen den
Seilzug der Motorbremse. Kontrollieren Sie, ob
der Seilzug richtig montiert ist. Ein geknicktes
oder beschädigtes Abstellseil muss ausgewechselt werden.
7. Reiningung, Wartung, Lagerung,
Transport und Ersatzteilbestellung
Achtung:
Arbeiten Sie nie bei laufendem Motor an
stromführenden Teilen der Zündanlage oder
berühren diese. Ziehen Sie vor allen Wartungs- und
Pflegearbeiten den Zündkerzenstecker von der
Zündkerze ab. Führen Sie niemals irgendwelche
Arbeiten am laufenden Gerät durch. Arbeiten die in
dieser Bedienungsanleitung nicht beschrieben
werden, sollten nur bei einer autorisierten Fachwerkstatt durchgeführt werden.
7.1 Reinigung
Nach jedem Gebrauch sollte der Mäher gründlich
gereinigt werden. Besonders die Unterseite und die
Messeraufnahme. Dazu kippen Sie den Rasenmäher
auf die linke Seite(gegenüber Öleinfüllstutzen)
Hinweis: Bevor Sie den Rasenmäher auf die Seite
kippen, entleeren Sie den Kraftstofftank mit einer
Benzinabsaugpumpe vollständig. Der Rasenmäher
darf nicht über 90 Grad gekippt werden. Am
leichtesten entfernen Sie Schmutz und Gras gleich
nach dem Mähen. Angetrocknete Grasreste und
Schmutz können zu einer Beeinträchtigung des
Mähbetriebes führen. Kontrollieren Sie, ob der
Grasauswurfkanal frei von Grasresten ist und
entfernen diese bei Bedarf. Reinigen Sie den Mäher
niemals mit einem Wasserstrahl oder Hochdruckreiniger. Der Motor soll trocken bleiben.
Aggressive Reinigungsmittel wie Kaltreiniger oder
15
Anleitung_RPM_56_S_MS_SPK7:_
21.12.2009
15:05 Uhr
Seite 16
D
Waschbenzin dürfen nicht verwendet werden.
zwischen max und min des Ölmessstabes (Abb. 10b)
befinden.
7.2 Wartung
7.2.1 Radachsen und Radnaben
Sollten einmal pro Saison leicht eingefettet werden.
Dazu nehmen Sie die Radkappen mit einem Schraubendreher ab und lösen die Befestigungsschrauben
der Räder.
7.2.2 Messer
Lassen Sie ihr Messer aus Sicherheitsgründen nur
von einer autorisierten Fachwerkstatt schärfen,
auswuchten und montieren. Um ein optimales
Arbeitsergebnis zu erzielen, wird empfohlen das
Messer einmal im Jahr überprüfen zu lassen.
Wechseln des Messers (Abb. 9)
Beim Wechseln des Schneidwerkzeuges dürfen nur
Original-Ersatzteile verwendet werden. Die Kennzeichnung des Messers muss mit der in der Ersatzteilliste angegebenen Nummer übereinstimmen.
Niemals ein anderes Messer einbauen.
Beschädigte Messer
Sollte das Messer trotz aller Vorsicht mit einem Hindernis in Berührung gekommen sein, sofort Motor
abstellen und Zündkerzenstecker abziehen.
Mäher seitlich kippen und Messer auf Beschädigung
überprüfen. Beschädigte oder verbogene Messer
müssen ausgewechselt werden. Niemals ein verbogenes Messer wieder geradebiegen. Niemals mit
einem verbogenen oder stark abgenutzten Messer
arbeiten, dies verursacht Vibrationen und kann
weitere Beschädigungen am Mäher zur Folge haben.
Achtung: Beim Arbeiten mit einem beschädigten
Messer besteht Verletzungsgefahr.
Messer nachschleifen
Die Messerschneiden können mit einer Metallfeile
nachgeschärft werden. Um eine Unwucht zu vermeiden sollte das Schleifen nur von einer
autorisierten Fachwerkstatt durchgeführt werden.
7.2.3 Ölstandskontrolle
Achtung: Motor niemals ohne oder mit zuwenig Öl
betreiben. Dies kann schwere Schäden am Motor
verursachen. Nur Motorenöl 10W30 verwenden.
Kontrolle des Ölstandes:
Rasenmäher auf eine ebene, gerade Fläche stellen.
Den Ölmeßstab (Abb. 10a/Pos. 11) durch
Linksdrehung abschrauben und Messstab
abwischen. Messstab wieder bis zum Anschlag in
den Einfüllstutzen stecken, nicht zuschrauben.
Messstab herausziehen und in waagrechter Stellung
den Ölstand ablesen. Der Ölstand muss sich
16
Ölwechsel
Der Motorölwechsel sollte jährlich vor Saisonbeginn
(zusätzlich zu den Informationen des Serviceheft
Benzin) bei betriebswarmem Motor durchgeführt
werden.
Nur Motoröl (10W30) verwenden.
Platzieren sie eine flache Ölauffangwanne unter
dem Rasenmäher.
Öleinfüllschraube(Abb10a/ Pos.11) öffnen.
Öffnen Sie die Ölablassschraube (Abb.10a/Pos.
12). Warmes Motoröl in einen Auffangbehälter
ablassen.
Nach Auslaufen des Altöls Ölablassschraube
wieder schließen.
Motoröl bis zur oberen Markierung des
Ölmessstabes einfüllen (ca. 0,6l).
Achtung! Ölmessstab zum Prüfen des Ölstandes
nicht einschrauben, sondern nur bis zum
Gewinde einstecken.
Das Altöl muss gemäß den geltenden
Bestimmungen entsorgt werden.
7.2.4 Pflege und Einstellung der Seilzüge
Die Seilzüge öfters einölen und auf Leichtgängigkeit
überprüfen.
7.2.5 Wartung des Luftfilters (Abb. 11a-11c)
Verschmutzte Luftfilter verringern die Motorleistung
durch zu geringe Luftzufuhr zum Vergaser. Regelmäßige Kontrolle ist daher unerlässlich. Der Luftfilter
sollte alle 25 Betriebsstunden kontrolliert werden und
bei Bedarf gereinigt werden. Bei sehr staubiger Luft
ist der Luftfilter öfters zu überprüfen.
Achtung: Luftfilter nie mit Benzin oder brennbaren
Lösungsmitteln reinigen. Luftfilter nur mit Druckluft
oder durch Ausklopfen reinigen.
7.2.6 Wartung der Zündkerze
Überprüfen Sie die Zündkerze erstmals nach 10
Betriebsstunden auf Verschmutzung und reinigen
Sie diese gegebenenfalls mit einer
Kupferdrahtbürste. Danach die Zündkerze alle 50
Betriebsstunden warten.
Ziehen Sie den Zündkerzenstecker (Abb.12/Pos.
23) mit einer Drehbewegung ab.
Entfernen Sie die Zündkerze mit dem
beiliegendem Zündkerzenschlüssel.
Der Zusammenbau erfolgt in umgekehrter
Reihenfolge.
Anleitung_RPM_56_S_MS_SPK7:_
21.12.2009
15:05 Uhr
Seite 17
D
7.2.7 Reparatur
Nach Reparatur oder Wartung vergewissern, ob alle
sicherheitstechnischen Teile angebracht und in
einwandfreiem Zustand sind.
Verletzungsgefährdende Teile von anderen
Personen und Kindern unzugänglich aufbewahren.
Achtung: Laut Produkthaftungsgesetz haften wir
nicht für Schäden die durch unsachgemäße Reparatur verursacht werden oder wenn bei Ersatzteilen
nicht Originalteile oder von uns freigegebene Teile
verwendet werden. Ebenso haften wir nicht für
Schäden von unsachgemäßen Reparaturen. Beauftragen sie einen Kundendienst oder einen autorisierten Fachmann. Entsprechendes gilt auch für Zubehörteile.
7.2.8 Betriebszeiten
Rasenmäher dürfen nur an Werktagen in der Zeit
von 7.00 – 19.00 Uhr betrieben werden. Beachten
Sie bitte die gesetzlichen Bestimmungen, die örtlich
unterschiedlich sein können.
7.3 Vorbereitung für das Einlagern des
Rasenmähers
Warnhinweis: Entfernen Sie das Benzin nicht in
geschlossenen Räumen, in der Nähe von Feuer oder
beim Rauchen. Gasdämpfe können Explosionen
oder Feuer verursachen.
1. Entleeren Sie den Benzintank mit einer BenzinAbsaugpumpe.
2. Starten Sie den Motor und lassen Sie den Motor
solange laufen bis das restliche Benzin verbraucht ist .
3. Machen Sie nach jeder Saison einen Ölwechsel.
Dazu entfernen Sie das alte Motoröl vom
warmen Motor und füllen neues nach.
4. Entfernen Sie die Zündkerze vom Zylinderkopf.
Füllen Sie mit einer Ölkanne ca. 20 ml Öl in den
Zylinder. Ziehen Sie den Startergriff langsam, so
dass das Öl den Zylinder innen schützt.
Schrauben Sie die Zündkerze wieder ein.
5. Reinigen Sie die Kühlrippen des Zylinders und
das Gehäuse.
6. Reinigen Sie das ganze Gerät, um die Lackfarbe
zu schützen.
7. Bewahren Sie das Gerät an einem gutgelüfteten
Platz oder Ort auf.
3. Entleeren Sie das Motoröl vom warmen Motor.
4. Entfernen Sie den Zündkerzenstecker von der
Zündkerze.
5. Reinigen Sie die Kühlrippen des Zylinders und
das Gehäuse.
6. Hängen Sie den Startseilzug am Haken
(Abb. 3c) aus. Lösen Sie die Flügelmuttern und
klappen den oberen Schubbügel nach unten.
Beachten Sie dabei, dass beim Umklappen die
Seilzüge nicht geknicket werden.
7. Wickeln Sie einige Lagen Wellpappe zwischen
oberen und unteren Schubbügel und Motor, um
ein Scheuern zu vermeiden.
7.5 Ersatzteilbestellung
Bei der Ersatzteilbestellung sollten folgende
Angaben gemacht werden:
앬 Typ des Gerätes
앬 Artikelnummer des Gerätes
앬 Ident- Nummer des Gerätes
앬 Ersatzteil- Nummer des erforderlichen Ersatzteils
Aktuelle Preise und Infos finden Sie unter
www.isc-gmbh.info
8. Entsorgung und Wiederverwertung
Das Gerät befindet sich in einer Verpackung um
Transportschäden zu verhindern. Diese Verpackung
ist Rohstoff und ist somit wieder verwendbar oder
kann dem Rohstoffkreislauf zurückgeführt werden.
Das Gerät und dessen Zubehör bestehen aus
verschiedenen Materialien, wie z.B. Metall und
Kunststoffe. Führen Sie defekte Bauteile der
Sondermüllentsorgung zu. Fragen Sie im
Fachgeschäft oder in der Gemeindeverwaltung nach!
7.4 Vorbereitung des Rasenmähers für den
Transport
1. Entleeren Sie den Benzintank (siehe Punkt
7.3/1)
2. Lassen Sie den Motor solange laufen bis das
restliche Benzin verbraucht ist.
17
Anleitung_RPM_56_S_MS_SPK7:_
21.12.2009
15:05 Uhr
Seite 18
D
9. Fehlersuchplan
Warnhinweis: Zuerst den Motor abschalten und das Zündkabel ziehen, bevor Inspektionen oder Justierungen
vorgenommen werden.
Warnhinweis: Wenn nach einer Justierung oder Reparatur der Motor einige Minuten gelaufen ist, denken Sie
daran, dass der Auspuff und andere Teile heiß sind. Also nicht berühren, um Verbrennungen zu vermeiden.
Störung
Unruhiger Lauf, starkes vibrieren
des Gerätes
Motor läuft nicht
Motor läuft unruhig
Rasen wird gelb, Schnitt
unregelmäßig
Grasauswurf ist unsauber
18
mögliche Ursache
Behebung
- Schrauben lose
- Schrauben prüfen
- Messerbefestigung lose
- Messerbefestigung prüfen
- Messer unwuchtig
- Messer ersetzen
- Bremshebel nicht gedrückt
- Bremshebel drücken
- Gashebel falsche Stellung
- Einstellung prüfen
- Zündkerze defekt
- Zündkerze erneuern
- Kraftstofftank leer
- Kraftstoff einfüllen
- Luftfilter verschmutzt
- Luftfilter reinigen
- Zündkerze verschmutzt
- Zündkerze reinigen
- Messer ist unscharf
- Messer schärfen
- Schnitthöhe zu gering
- richtige Höhe einstellen
- Motordrehzahl zu gering
- Hebel auf max. stellen
- Motordrehzahl zu gering
- Gashebel auf max. stellen
- Schnitthöhe zu niedrig
- richtig einstellen
- Messer abgenutzt
- Messer austauschen
- Fangsack verstopft
- Fangsack ausleeren
Anleitung_RPM_56_S_MS_SPK7:_
21.12.2009
15:05 Uhr
Seite 19
GB
Table of contents:
1.
2.
3.
4.
5.
6.
7.
Safety regulations
Layout
Intended use
Technical data
Before starting the equipment
Operation
Cleaning ,maintenance, storage, transport and
ordering of spare parts
8. Disposal and recycling
9. Troubleshooting guide
19
Anleitung_RPM_56_S_MS_SPK7:_
21.12.2009
15:05 Uhr
Seite 20
GB
Important!
When using the equipment, a few safety precautions
must be observed to avoid injuries and damage.
Please read the complete operating instructions and
safety regulations with due care. Keep this manual in
a safe place, so that the information is available at all
times. If you give the equipment to any other person,
hand over these operating instructions and safety
regulations as well. We cannot accept any liability for
damage or accidents which arise due to a failure to
follow these instructions and the safety instructions.
1. Safety instructions for handoperated lawn mowers
Note
1. Read the directions with due care. Familiarize
yourself with the settings and proper operation of
the machine.
2. Never allow children or other persons who are
not familiar with the operating instructions to use
the mower. Contact your local governmental
agency for information regarding minimum age
requirements for operating the mower.
3. Never mow in the direct vicinity of persons especially children - or animals. Always keep in
mind that the operator is responsible for
accidents involving other persons and/or their
property.
4. If you give the equipment to any other person,
give them these operating instructions as well.
Preliminary measures
1. Always wear sturdy, non-slip footwear and long
trousers when mowing. Never mow barefoot or in
sandals.
2. Check the grounds on which the machine will be
used and remove all objects that could be caught
up and violently flung out of the chute.
3. Warning: Petrol is highly flammable! Therefore:
- Only store petrol in containers designed to hold
petroleum-based liquids.
- Only refuel out in the open and do not smoke
during the refueling process.
- Always refuel the lawn mower before starting
the engine. Always ensure that the fuel tank cap
is closed when the engine is running and when
the mower is hot; also do not refuel.
- If petrol has overflowed, do not under any
circumstances attempt to start the engine.
Instead, remove the machine from the affected
area. Avoid starting the engine until the petrol
fumes have completely evaporated.
- For safety reasons, the petrol tank and other
20
tank closures must be replaced if they are
damaged.
4. Replace defective mufflers.
5. Before using the mower, visually inspect it to
ensure that the blade, mounting bolts and the
entire cutting apparatus are in good working
order (i.e. not worn out or damaged). To prevent
any imbalance, replace worn out or damaged
blades and mounting bolts as a set only (if
applicable).
6. Please note that where a mower has more than
one blade, the rotation of one of the blades can
cause the others to rotate as well.
Handling
1. Do not let the combustion engine run in enclosed
areas, as dangerous carbon monoxide gas can
build up.
2. Only mow in broad daylight or in well-lit
conditions. Avoid using the machine on wet
grass as far as possible.
3. Always maintain good footing on inclines.
4. Only operate the machine at a walking pace.
5. For machines with wheels: Always mow across
hills i.e. never straight up or straight down.
6. Be particularly careful when you change direction
on a slope.
7. Do not mow on overly steep inclines.
8. Always be extra careful when turning the mower
around and when pulling it towards you.
9. Switch off the lawn mower and ensure that the
blade has stopped rotating whenever the mower
has to be tilted for transporting over areas other
than lawns and whenever it has to be moved
from or to the area you want to mow.
10. Never use the lawn mower if the blade or safety
grilles are damaged, or without the attached
guards, e.g. deflectors and/or grass catching
devices.
11. Do not adjust or overclock the engine speed
settings.
12. Release the engine brake before you start the
engine.
13. Start the engine with care, in accordance with
the manufacturer’s instructions. Make sure that
your feet are far enough away from the mower
blade!
14. Do not tilt the lawn mower when you start the
engine unless the mower must raised off of the
ground a little in order to start it. In the latter
case, tilt the mower as little as absolutely
necessary and only raise the side opposite to
that of the user.
15. Never start the engine while standing in front of
the chute.
16. Never move your hands or feet toward or under
Anleitung_RPM_56_S_MS_SPK7:_
21.12.2009
15:05 Uhr
Seite 21
GB
any rotating parts. Keep clear of the chute
opening at all times.
17. Never lift or carry a lawn mower with the engine
running.
18. Switch off the engine and pull the spark plug
boot:
- before you dislodge any blockages or clogs in
the chute.
- before carrying out any checks, cleaning,
maintenance or other work on the lawn mower
- if the lawn mower strikes a foreign body,
examine it for signs of damage and carry out any
necessary repairs before restarting and
continuing to work with the mower. If the lawn
mower begins to experience exceptionally strong
vibrations, immediately switch it off and check it.
19. Switch off the engine:
- when you leave the lawn mower.
- before you refuel.
20. When you switch off the engine, move the speed
lever to the Off position. Close the petrol
stopcock.
21. Operation of the machine at higher than normal
speed can lead to an increased risk of accidents.
22. Take care when carrying out installation work on
the machine, and avoid trapping fingers between
the moving cutting tool and the fixed parts of the
machine.
Maintenance and storage
1. Make sure that all nuts, bolts and screws are
tightened securely and that the machine is in
safe working condition.
2. Never store the mower (with petrol in the tank)
inside a building in which petrol fumes could
come into contact with open flames or sparks.
3. Allow the motor to cool before you put the lawn
mower in an enclosed area.
4. In order to avoid fire hazards, keep the engine,
exhaust and the area around the fuel tank free
from grass, leaves and leaking grease (oil).
5. Routinely check the grass basket for signs of
wear and impaired functionality.
6. For your own safety, replace worn or damaged
parts without delay.
7. If the fuel tank should require emptying this
should only be done in the open air using a
petrol suction pump (available from DIY shops).
CAUTION!
Read all safety regulations and instructions.
Any errors made in following the safety regulations
and instructions may result in an electric shock, fire
and/or serious injury.
Keep all safety regulations and instructions in a
safe place for future use.
Explanation of the symbols on the machine:
(Fig. 13)
1) Read the operating instructions
2) Important! Danger from catapulted parts. Keep a
safe distance.
3) Important! Switch off the engine and pull the
spark plug boot before doing any maintenance,
repair, cleaning or adjustment work.
4) Fill with oil and fuel before starting the mower.
5) Caution! Wear ear protection and safety goggles.
6) Engine start/stop lever (I=Engine on; 0=Engine
off)
7) Drive lever (clutch lever)
2. Layout (Fig. 1+2)
1.
2.
3.
4.
5.
6.
7.
8.
9.
10.
11.
12.
13.
14.
15.
16.
Engine start/stop lever – engine brake
Top push bar
Choke lever / Throttle lever
Starter cable
Lower push bar
Handle
Debris bag
Ejector flap
Cutting height adjustment
Tank filler cap
Oil-filler neck
Oil drainage screw
2 x cable ties
Spark plug wrench
2 x square head screws for top push bar
2 screws for upper push bar (high speed
clamping function)
17. Side ejector cover
18. 4 x star nuts for push bar
19. Drive lever (clutch lever)
20. Drive wheel (left and right)
21. Side ejector adaptor
22. Mulching adaptor
3. Proper operation
The petrol lawn mower is intended for private use i.e.
for use in home and gardening environments.
Private use of the lawn mower refers an annual
operating time generally not exceeding that of 50
hours, during which time the machine is primarily
used to maintain small-scale, residential lawns and
home/hobby gardens. Public facilities, sporting halls,
21
Anleitung_RPM_56_S_MS_SPK7:_
21.12.2009
15:05 Uhr
Seite 22
GB
and agricultural/forestry applications are excluded.
Please note that our equipment has not been
designed for use in commercial, trade or industrial
applications. Our warranty will be voided if the
machine is used in commercial, trade or industrial
businesses or for equivalent purposes.
5. Before starting the engine
The operating instructions as supplied by the
manufacturer must be kept and referred to in order to
ensure that the lawn mower is properly used and
maintained. The instructions contain valuable
information on operating, maintenance and servicing
conditions.
Important! You will need the following additional
tools (not supplied) for assembly, and also for
maintenance work:
앬
A flat oil drip tray (for changing the oil)
앬
A 1 liter measuring jug (oil/petrol resistant)
앬
A petrol can (5 liters is sufficient for approx. 6
operating hours)
앬
A funnel (suitable for the tank’s petrol filler neck)
앬
Household wipes (to wipe up oil/petrol residue;
dispose of these at a filling station)
앬
A petrol suction pump (plastic, available from
DIY stores)
앬
An oil can with hand pump (available from DIY
stores)
앬
1 liter of engine oil (10W30)
Important! Due to the high risk of bodily injury to the
user, the lawn mower may not be used to trim
bushes, hedges or shrubs, to cut scaling vegetation,
planted roofs, or balcony-grown grass, to clean (suck
up) dirt and debris off walkways, or to chop up tree or
hedge clippings. Moreover, the lawn mower may not
be used as a power cultivator to level out high areas
such as molehills.
For safety reasons, the lawn mower may not be used
as a drive unit for other work tools or toolkits of any
kind.
4. Technical data
Engine type:
Single cylinder four-stroke engine, 173 ccm
Working speed:
Fuel:
Tank capacity:
Engine oil:
Spark plug:
Electrode spacing:
Cutting height adjustment:
Cutting width:
LpA sound pressure level:
LWA sound power level:
2800 min-1
standard petrol
approx. 2 l
approx. 0.6 l / 10W30
F6RTC
0.5 – 0.6 mm
central, (30-75 mm)
560 mm
90,1 dB(A)
98 dB(A)
K uncertainty
3 dB (A)
Vibration ahw
7.3 m/s2
K uncertainty
1.5 m/s2
Weight:
22
46 kg
5.1 Assembling the components
Some parts of the mower come disassembled. For
quick and easy assembly, read and follow the
instructions below.
Assembly
1. Take the mower and attachment parts out of the
packaging and check that all parts are present
(Fig. 2).
2. Fasten the push bar using a square head screw
(Fig. 3a/Item 15) and a star screw (Fig. 3a/Item
18) on each side. For fastening choose one of
the three holes to suit the required height of the
handle. Important. The identical height must be
set on both sides. Ensure that the cords which
are fastened later are not in the way.
3. Fasten the top push bar to the bottom push bar
using a screw (Fig. 3b/Item 16) and a star screw
(Fig. 3b/Item 18) on each side. Make sure that
the lobes of the screws (16) are folded towards
the inside so that the high speed clamping
function remains operational.
4. Insert the grip of the starter cord (Fig. 3c/Item 4)
into the hook provided for that purpose (Fig.
3c/Item 24) as shown in Figure 3c.
5. Fasten the cords to the push bar with the
supplied cable ties (Fig. 3d/Item. 13).
6. Lift the ejector flap (Fig. 4 / Item 8) with one hand
and hook in the grass bag (Fig. 4/Item 7) as
shown in Figure 4
Anleitung_RPM_56_S_MS_SPK7:_
21.12.2009
15:05 Uhr
Seite 23
GB
5.2 Setting the cutting height
Important! Adjust the cutting height only when
the engine is switched off and the plug boot has
been pulled.
앬
앬
앬
Before you begin to mow, check to ensure that
the blade is not blunt and that none of the
fasteners are damaged. To prevent any
imbalance, replace blunt and/or damaged blades
as a set only (if applicable). To carry out this
check, first switch off the engine and pull the
spark plug boot.
The cutting height is centrally adjusted with the
cutting height adjustor lever
(Fig. 8/Item 9). Up to 5 different cutting heights
can be selected.
Pull the adjustor lever out and select the desired
cutting height. The lever snaps into the desired
position.
6. Operation
Important!
The engine does not come with oil in it.
Therefore, ensure that you add 0.6 liters of oil
before starting it up. Use normal, multigrade oil
(10W30). The oil level in the engine must be
checked each time before mowing. (see
Checking the oil level).
In order to avoid any unintentional start-ups of the
lawn mower, it comes equipped with an engine
brake (Fig. 5a/Item 1) which must be pulled back
before the engine can be started. When the engine
control lever is released it must return to its initial
position, at which point the engine automatically
switches off.
Move the speed lever (Fig. 7) to position “I I”.
Press the engine brake lever (Fig. 5b) together
and give the starter cord a vigorous pull. You can
control the rotation speed of the blade using the
speed lever (Fig. 7).
Before you start mowing, you should run through
this operation several times in order to ensure that
the machine is working properly.
Whenever you need to perform any kind of adjustment and/or repair work on your lawn mower, wait
until the blade has come to a complete stop.
Always switch off the engine before carrying out any
adjustments, maintenance or repairs.
Note:
1. Engine brake (Fig. 5a/Item 1): Use the lever to
stop the engine. When you release the lever the
engine and the blade stop automatically (Fig.
5b). To mow, hold the lever in the working
position. Before you start to mow, check the
start/stop lever several times to be sure that it is
working properly. Ensure that the tension cable
can be smoothly operated (i.e. is not catching or
kinking in any way).
2. Speed lever (Fig. 7): Move this lever in order to
increase or decrease the engine speed. (Tortoise
= Slow / Hare = Fast)
3. Drive lever (clutch lever) (Fig. 5a/Item 19): If you
press this (Fig. 5c) the clutch for the drive will be
closed and the lawnmower will start to move with
the motor running.
Release the drive lever in good time to stop the
moving lawnmower. Practice starting and
stopping before you use the mower for the first
time until you are familiar with controlling the
mower.
4. Caution: The blade begins to rotate as soon as
the engine is started.
Important:
Before you start the engine, move the motor
brake several times to be sure that the stop
cable is properly working. Note: The engine is
factory set to a speed that is optimal for cutting
and blowing grass into the basket and is
designed to provide many years of use.
5. Check the oil level.
6. Fill the tank with approx. 1.9 liters of petrol
whenever empty, using a funnel and measuring
jug to do so. Ensure that the petrol is free of any
contaminants.
Warning: Never use more than one safety petrol
can. Do not smoke when refueling. Switch off the
engine before refueling and allow the engine to cool
down for a few minutes.
7. Ensure that the ignition cable is connected to the
spark plug.
8. Move the speed lever to position “I I”.
9. Stand behind the mower. Place one hand on the
engine start/stop lever. Place the other hand on
the starter handle.
10. Start the engine using the reversing starter (Fig.
1/Item 4). To do this pull the handle approx. 10 –
15 cm (until you feel a resistance) and then start
the engine with a sharp pull. If the engine does
not start, pull the handle again.
Important! Never allow the starter cord to snap
back.
Note: In cold weather, it may be necessary to
repeat the starting process several times.
23
Anleitung_RPM_56_S_MS_SPK7:_
21.12.2009
15:05 Uhr
Seite 24
GB
11. When the engine is at working temperature it can
be started in the “Tortoise” (Fig. 7) setting.
Important: Attempting to start the engine when
set at position “I I” may cause the spark plug to
become wet if the engine is at working
temperature. Wait a few minutes before
attempting to start the engine again.
Mulching
In the mulching mode the cuttings are shredded in
the enclosed mower housing and then spread back
onto the lawn. It is not necessary to gather and
dispose of the grass.
Important: Mulching is only possible if the lawn is
relatively short. Optimum results can be achieved
only with a mulching blade (available as an
accessory).
To use the mulching function, disconnect the debris
bag, slide the mulching adaptor into the ejector
opening (Fig. 6a/Item 22) and close the ejector
opening.
Side ejector
You should fit the mulching adaptor (Item 22) in
order to use the side ejector. Connect the side
ejector adaptor (Fig. 6b/Item 21) as shown in Figure
6b.
6.1 Before mowing
Important information
1. Make sure that you are properly dressed when
mowing. Wear sturdy, non-slip footwear; do not
wear sandals or tennis shoes.
2. Inspect the blade. A blade that is bent or
damaged in any other way must be immediately
exchanged for a genuine Einhell replacement
blade.
3. Do not fill the fuel tank indoors, but rather out in
the open. Use a filling funnel and a measuring
jug. Wipe off any spilled petrol.
4. Read and follow in the instructions in the
operating manual as well as the information
regarding the engine and accessory equipment.
Store the manual in a place where it can be
readily accessed by other users of the machine.
5. Exhaust gas is dangerous. Only start the engine
out in the open.
6. Make sure that all the guards are fitted and that
they are in good working order.
7. The machine should only be operated by
persons who are well informed with the way it
works, and who are in reasonably good physical
condition.
24
8. It can be dangerous to mow the grass when it is
wet. Try to ensure that you only mow the grass
when it is dry.
9. Advise children and others to keep well away
from the lawn mower.
10. Never mow the grass in poor visibility.
11. Remove all loose objects from the lawn before
you start mowing the grass.
6.2 Tips for proper mowing
Important! Never open the chute flap when the
catch bag has been detached (to be emptied) and
the engine is still running. The rotating blade can
cause serious injuries!
Always carefully fasten the chute flap and grass
basket. Switch off the engine before emptying the
grass basket.
Always ensure that a safe distance (provided by the
length of the long handles) is maintained between
the user and the mower housing. Be especially
careful when mowing and changing direction on
slopes and inclines. Maintain a solid footing and
wear sturdy, non-slip footwear and long trousers.
Always mow along the incline (not up and down).
For safety reasons, the lawn mower may not be used
to mow inclines whose gradient exceeds 15 degrees.
Use special caution when backing up and pulling the
lawn mower. Tripping hazard!
6.3 Mowing
Only use a sharp blade that is in good condition. This
will prevent the grass blades from fraying and the
lawn from turning yellow.
Try to mow in straight lines for a nice, clean look.
Insodoing, the mowing swaths should always overlap
each other by a few centimeters in order to avoid
bare strips.
Keep the underside of the mower housing clean and
remove grass build-up. Deposits not only make it
more difficult to start the mower; they decrease the
quality of the cut and make it harder for the machine
to bag the grass. Always mow along inclines (not up
and down). Slightly turning the front wheels up the
hill while mowing will prevent the mower from sliding
out of the straight line. Select the cutting height
according to the length of the grass. If the lawn has
grown quite a bit, mow over it several times so that
no more than 4 cm of grass are cut at one time.
Anleitung_RPM_56_S_MS_SPK7:_
21.12.2009
15:05 Uhr
Seite 25
GB
Switch off the engine before doing any checks on the
blade. Keep in mind that the blade continues to
rotate for a few seconds after the engine has been
switched off. Never attempt to manually stop the
blade.
Regularly check to see if the blade is securely
attached, is in good condition and is sharp. If the
contrary is the case, sharpen the blade or replace it.
In the event that the blade strikes an object,
immediately switch off the lawn mower and wait for
the blade to come to a complete stop. Then inspect
the condition of the blade and the blade mount.
Replace any parts that are damaged.
Tips for proper mowing:
1. Pay attention to ensure that you do not run into
or over anything that could damage the mower.
The lawn mower could be damaged and/or the
machine could inflict bodily injury.
2. A hot engine, exhaust or drive unit can burn the
skin if touched. Thus, do not touch these parts
unless the mower has been switched off for a
while and you know that they have cooled down!
3. Use extra caution when mowing on inclines and
steep grades.
4. Insufficient daylight or even a sufficient level of
artificial light is one reason not to mow.
5. Check the mower, the blade and other parts if
they have struck a foreign object or if the
machine vibrates more than usual.
6. Do not make any adjustments or repairs until the
engine has been switched off. Pull the plug boot.
7. Pay special attention if you are mowing directly
next to a street or are close by one (traffic).
Always keep the grass chute pointed away from
the street.
8. Avoid mowing in places where the wheels have
trouble gripping or mowing is unsafe in any other
way. Before you back up, ensure that nobody is
standing behind you (especially little children,
who are more difficult to see).
9. When mowing over thick, high grass, select the
highest cutting level and mow at a slower speed.
Before you remove any grass or blockages of
any kind, switch off the engine and pull the plug
boot.
10. Never remove any safety-related parts.
11. Never fill the engine with petrol when it is hot or
is running.
6.4 Emptying the grass basket
As soon as grass clippings start to trail the lawn
mower, it is time to empty the grass basket.
Important! Before taking off the grass basket,
switch off the engine and wait until the blade has
come to a stop.
To take off the grass basket, use one hand to lift up
the chute flap and the other to grab onto the basket
handle (Fig. 4). Remove the basket.
For safety reasons, the chute flap automatically falls
down after removing the grass basket and closes off
the rear chute opening. If any grass remains in the
opening, it will be easier to restart the engine if you
pull the mower back approx. 1 meter.
Do not use your hands or feet to remove clippings in
or on the mower housing, but instead use suitable
tools such as a brush or a hand broom.
In order to ensure that the majority of grass clippings
are picked up, the inside of both the catch bag and
especially the air grill must be cleaned after each
use.
Reattach the catch bag only when the engine is
switched off and the blade is stopped.
Using one hand, lift up the chute flap, while grabbing
onto the basket handle with the other. Hang in the
basket from the top.
6.5 After mowing
1. Allow the engine to cool before you put the lawn
mower in an enclosed area.
2. Remove grass, foliage, grease and oil before
storing the mower. Do not place any objects on
top of the mower.
3. Check all the screws and nuts once more before
you start to use the lawn mower again. Tighten
any loose screws.
4. Also be sure to empty the grass basket.
5. Pull the spark plug boot to prevent unauthorized
use.
6. Ensure that you do not park the mower next to
any source of danger. Petrol fumes can lead to
explosions.
7. Only original parts or parts approved by the
manufacturer may be used for repairs
(see address on the warranty certificate).
8. If the lawn mower is not going to be used for an
extended period, empty the petrol tank using a
petrol suction pump.
9. Tell your children not to use the mower. It is not
a toy.
10. Never place petrol near an ignition source.
25
Anleitung_RPM_56_S_MS_SPK7:_
21.12.2009
15:05 Uhr
Seite 26
GB
Always use a can that is approved to store
petrol. Keep petrol away from children.
11. Oil and maintain the machine.
12. How to switch off the engine:
All you have to do to switch off the engine is
release the engine start/stop lever (Fig.
5a/Item 1). Close the petrol cock and pull the
spark plug boot from the spark plug boot in order
to prevent the engine from restarting. Before you
start the engine again, check the cord for the
engine brake. Check that the cord is correctly
fitted. If the cord is kinked or damaged, it should
be replaced.
7. Cleaning, maintenance, storage,
transport and ordering of spare parts
Important:
Never work on or touch conducting parts on the
ignition unit with the engine running. Always pull the
spark plug boot from the spark plug before starting
any work of care or maintenance. Never perform any
work on the machine while it is running. Any work not
described in these Operating Instructions must be
performed by an authorized service workshop only.
7.1 Cleaning
The lawn mower should be thoroughly cleaned after
every use, especially the underneath and the blade
mount. To do so, tip the lawn mower onto its left side
(the opposite side to the oil filling socket).
Important: Before you tip the lawn mower onto its
side, completely empty the fuel tank using a petrol
suction pump. The lawn mower must never be tilted
by more than 90 degrees. Dirt and grass is easiest to
remove immediately after you have finished mowing
the grass. Dried on grass and dirt can result in
poorer mowing performance. Check that the grass
chute is free of any residual grass. Remove any such
residue. Never clean the lawn mower with a water jet
or high-pressure cleaner. The engine must remain
dry. Do not use aggressive cleaning agents such as
cold cleaner or petroleum ether.
7.2 Maintenance
7.2.1 Wheel axles and wheel hubs
These should be lightly greased once a season. To
do so, remove the wheel caps with a screwdriver and
slacken the fastening screws on the wheels.
7.2.2 Blade
For safety reasons you should only ever have your
blade sharpened, balanced and mounted by an
26
authorized service workshop. For optimum results it
is recommended that the blade should be inspected
once a year.
Changing the blade (Fig. 9)
Only ever use original spare parts when having the
blade replaced. The marking on the blade must be
matched with the number given in the list of spare
parts. Never have any other model of blade fitted.
Damaged blades
Should the blade, in spite of all precautions, come
into contact with an obstruction, shut down the
engine immediately and pull the spark plug boot. Tip
the lawn mower onto its side and check the blade for
damage. Damaged or bent blades must be replaced.
Never attempt to bend a bent blade back to straight
again. Never mow the lawn with a bent or heavily
worn blade as this will cause vibrations and can lead
to further damage to the lawn mower.
Important: There is a risk of injury if you work with a
damaged blade.
Resharpening the blade
The blades can be resharpened with a metal file. In
order to avoid imbalance, the blade should be
resharpened by an authorized service workshop.
7.2.3 Checking the oil level
Important: Never run the engine with no or too little
oil. This could cause severe damage to the engine.
Use only 10W30 engine oil.
Checking the oil level:
Stand the lawn mower on a flat level surface.
Unscrew the oil dip stick by turning anticlockwise,
pull out and wipe. Insert the dip stick back in the
filling mount as far as the stop, but do not screw back
in. Pull out the dip stick again and read off the oil
level while holding horizontally. The oil level must be
between the maximum (Fig. 10b/Item max) and the
minimum (Fig. 10b/Item min). The moveable orange
plastic part on the oil dip stick provides protection
against oil foam.
Changing the oil
Change the engine oil every year before the start of
the season (in addition to the information in the
petrol service manual) when the engine is warm.
앬
Use only engine oil (10W30).
앬
Place a flat oil drip tray beneath the mower.
앬
Open the oil filler screw (Fig. 10a/Item 11).
앬
Open the oil drainage screw (Fig. 10a/Item 12).
Drain the warm engine oil into a drip tray.
앬
Close the drain screw again when all the used oil
Anleitung_RPM_56_S_MS_SPK7:_
21.12.2009
15:05 Uhr
Seite 27
GB
앬
앬
앬
has been drained.
Fill up with engine oil as far as the top mark on
the dipstick (approx. 0.6 l).
Important! Do not screw in the oil dipstick to
check the oil level – only insert it as far as the
thread.
Dispose of the used oil in accordance with
applicable regulations.
7.2.4 Care and adjustment of the cables
Oil the cables at regular intervals and check that they
move easily.
7.2.5 Maintenance of the air filter (Fig. 11a-11c)
A soiled air filter will reduce the performance of the
engine because it will prevent enough air getting to
the carburetor. It is therefore imperative that regular
checks are made. The air filter should be checked
every 25 hours and cleaned if required. If the air is
very dusty the air filter should be checked more
regularly.
Important: Never clean the air filter with petrol or
inflammable cleaning agents. Clean the air filter with
compressed air or simply by knocking out any
soiling.
7.2.6 Maintenance of the spark plug
Check the spark plug for dirt and grime after 10
hours of operation and if necessary clean it with a
copper wire brush. Thereafter service the spark
plug after every 50 hours of operation.
앬
Pull off the spark plug boot (Fig. 12a/Item 23)
with a twist.
앬
Remove the spark plug with the supplied spark
plug wrench.
앬
Assemble in reverse order.
7.2.7 Repairs
After any repair or maintenance work, check that all
safety-related parts are in place and in proper
working order.
All parts which may cause injury must be kept where
they are inaccessible to children or others.
Important: In accordance with product liability
legislation we are not liable for any damages caused
by improper repairs or the use of spare parts that are
not original spare parts or parts approved by us. In
addition, we are also not liable for any damages
arising from improper repairs. Such work should be
performed by a customer services workshop or
authorized specialist. The same applies to accessory
parts.
7.2.8 Times of use
Lawn mowers are only permitted to be used on
workdays between the hours of 7.00 a.m. and 7.00
p.m. Please comply with statutory regulations, which
may vary from location to location.
7.3 Preparing the mower for long-term storage
Caution: Do not empty the petrol tank in enclosed
areas, near fire or when smoking. Petrol fumes can
cause explosions and fire.
1. Empty the petrol tank with a petrol suction pump.
2. Start the engine and let it run until any remaining
petrol has been used up.
3. Change the oil at the end of every season. To do
so, remove the used engine oil from a warm
engine and refill with fresh oil.
4. Remove the spark plug from the cylinder head.
Fill the cylinder with approx. 20 ml of oil from an
oil can. Slowly pull back the starter handle, which
will bathe the cylinder wall with oil. Screw the
spark plug back in.
5. Clean the cooling fins of the cylinder and the
housing.
6. Be sure to clean the entire machine to protect
the paint.
7. Store the machine in a well-ventilated place.
7.4 Preparing the mower for transportation
1. Empty the petrol tank (see item 7.3/1).
2. Always let the engine run until it has used up the
remainder of petrol in the tank.
3. Empty the engine oil from the warm engine.
4. Remove the spark plug boot from the spark plug.
5. Clean the cooling fins of the cylinder and the
housing.
6. Remove the start tension cable from the hook
(Fig. 3c). Slacken the wing nuts and fold down
the upper push bar.
7. Wedge a few layers of corrugated cardboard
between the upper and lower push bars and the
engine in order to prevent any chafing.
7.5 Ordering replacement parts
Please quote the following data when ordering
replacement parts:
앬 Type of machine
앬 Article number of the machine
앬 Identification number of the machine
앬 Replacement part number of the part required
For our latest prices and information please go to
www.isc-gmbh.info
27
Anleitung_RPM_56_S_MS_SPK7:_
21.12.2009
15:05 Uhr
Seite 28
GB
8. Disposal and recycling
The unit is supplied in packaging to prevent its being
damaged in transit. This packaging is raw material
and can therefore be reused or can be returned to
the raw material system.
The unit and its accessories are made of various
types of material, such as metal and plastic.
Defective components must be disposed of as
special waste. Ask your dealer or your local council.
9. Faults and remedies for faults
Caution: Always switch off the engine and pull the ignition cable before starting any inspection or adjustment
work.
Caution: If, after making an adjustment or repair to the engine, you let it run for a few minutes, remember that
the exhaust and other parts will get hot. Thus, do not touch parts that emanate heat, as these may burn you.
Fault
Possible cause
Remedy
Loud while running, machine
vibrates heavily
- Screws are loose
- Blade fasteners are loose
- Blade is unbalanced
- Check screws
- Check blade fasteners
- Replace blade
Engine does not start
- Brake lever not pressed
- Speed lever in wrong position
- Spark plug is defective
- Fuel tank is empty
- Press brake lever
- Check setting
- Replace spark plug
- Refill with fuel
Engine runs unsteadily
- Air filter is soiled
- Spark plug is soiled
- Clean the air filter
- Clean the spark plug
Uneven mowing results
- Blade is blunt
- Cutting height is too low
- Engine speed is too low
- Sharpen the blade
- Set correct height
- Set lever to max.
Unsatisfactory bagging of the
grass
- Engine speed is too low
- Cutting height is too low
- Blade is worn
- Basket is clogged
- Set speed lever to max.
- Set correct height
- Replace the blade
- Empty the basket
28
Anleitung_RPM_56_S_MS_SPK7:_
21.12.2009
15:05 Uhr
Seite 29
F
Sommaire :
1.
2.
3.
4.
5.
6.
7.
Consignes de sécurité
Description de l’appareil
Utilisation conforme à l’affectation
Données techniques
Avant la mise en service
Commande
Nettoyage, maintenance, stockage, transport et
commande des pièces de rechange
8. Mise au rebut et recyclage
9. Plan de recherche des erreurs
29
Anleitung_RPM_56_S_MS_SPK7:_
21.12.2009
15:05 Uhr
Seite 30
F
Attention !
Lors de l’utilisation d’appareils, il faut respecter
certaines mesures de sécurité afin d’éviter des
blessures et dommages. Veuillez donc lire
attentivement ce mode d’emploi/ces consignes de
sécurité. Veillez à le conserver en bon état pour
pouvoir accéder aux informations à tout moment. Si
l’appareil doit être remis à d’autres personnes, veillez
à leur remettre aussi ce mode d’emploi/ces
consignes de sécurité. Nous déclinons toute
responsabilité pour les accidents et dommages dus
au non-respect de ce mode d’emploi et des
consignes de sécurité.
1. Consignes de sécurité de la
tondeuse à gazon commandée à la
main
Remarques
1. Lisez minutieusement ce mode d’emploi.
Apprenez à vous servir correctement de la
machine en effectuant les réglages.
2. Ne permettez jamais à des enfants ou autres
personnes n’ayant pas connaissance du mode
d’emploi de se servir de la tondeuse à gazon.
Des prescriptions locales peuvent déterminer
l’âge minimum requis des utilisateurs.
3. Ne tondez jamais le gazon alors que d’autres
personnes, particulièrement des enfants ou
encore des animaux, se trouvent à proximité.
Pensez au fait que l’opérateur/opératrice ou
l’utilisateur/utilisatrice de la machine sera tenu/e
responsable de tout accident sur d’autres
personnes ou ce qui leur appartient.
4. Si l’appareil doit être remis à d’autres personnes,
remettez-leur aussi ce mode d’emploi.
Mesures préalables
1. Pendant la tonte, portez toujours des chaussures
solides et un pantalon long. Ne tondez jamais
pieds nus ou en sandales légères.
2. Contrôlez le terrain sur lequel vous allez
employer la machine et retirez tous les objets
pouvant être attrapés et éjectés par la tondeuse.
3. Avertissement : L’essence est extrêmement
inflammable :
- conservez l’essence uniquement dans des
réservoirs prévus à cet effet
- faites le plein uniquement à l’air libre et ne
fumez pas pendant le remplissage
- il faut remplir l’essence avant de démarrer le
moteur. Pendant que le moteur fonctionne ou
si la tondeuse est chaude, il est interdit d’ouvrir
la fermeture du réservoir et de remplir de
30
carburant.
- si de l’essence déborde, il ne faut surtout pas
essayer de mettre le moteur en marche. Au
lieu de cela, il faut éloigner la machine de
l’endroit sali d’essence. Tout essai de
démarrage doit être évité jusqu’à ce que les
vapeurs d’essence soient complètement
volatilisées
- pour des raisons de sécurité, remplacez
toujours le réservoir à essence et autres
fermetures de réservoir dès qu’un
endommagement est détecté.
4. Remplacez les amortisseurs de bruit défectueux
5. Avant l’utilisation, contrôlez toujours à vue si
l’outil de coupe, toute l’unité de coupe et les
boulons de fixation sont usés ou abîmés. Pour
éviter tout déséquilibre, les pièces
endommagées ou usées et les boulons de
fixation doivent être uniquement remplacés par
jeux complets.
6. Pour les appareils qui ont plusieurs lames,
veillez au fait que lorsque l’on tourne une lame,
les autres commencent aussi à tourner.
Manipulation
1. Ne faites jamais marcher le moteur à combustion
dans des endroits fermés dans lesquels du
monoxyde de carbone, dangereux, peut
s’emmagasiner.
2. Ne tondez qu’à la lumière du jour ou lorsque
vous êtes bien éclairé artificiellement. Si
possible, évitez de vous servir de l’appareil
lorsque l’herbe est mouillée.
3. Veillez à toujours garder une position équilibrée
sur les pentes.
4. Ne guidez la machine qu’au pas
5. Pour les machines sur roues, veuillez respecter :
tondez transversalement par rapport à la pente,
jamais en descente ou en montée.
6. Faites particulièrement attention lorsque vous
changez de direction sur une pente.
7. Ne tondez pas sur des pentes très raides
8. Soyez particulièrement précautionneux lorsque
vous faites demi-tour avec la tondeuse à gazon
ou lorsque vous la tirez vers vous.
9. Arrêtez la lame lorsqu’il vous faut renverser la
tondeuse à gazon en cas de transport pardessus d’autres surfaces que de l’herbe et
lorsque vous déplacez la tondeuse à gazon
d’une surface à tondre à une autre.
10. N’utilisez jamais la tondeuse à gazon lorsque la
grille de protection ou les dispositifs de
protection sont endommagés ou sans dispositif
de protection monté, p. ex. des chicanes et/ou
dispositifs collecteurs d’herbe.
11. Ne modifiez jamais les réglages de base du
Anleitung_RPM_56_S_MS_SPK7:_
21.12.2009
15:05 Uhr
Seite 31
F
moteur et ne le faites pas marcher en surrégime.
12. Desserrez le frein moteur avant de lancer le
moteur.
13. Faites démarrer le moteur avec précaution,
conformément aux instructions du producteur.
Veillez à garder une distance suffisante entre
vos pieds et les lames.
14. Ne faites pas basculer la tondeuse à gazon
pendant le démarrage du moteur ou si vous le
laissez allumé à moins que vous deviez soulever
la tondeuse à gazon pendant la tonte. Dans un
tel cas, basculez-la juste assez et ne soulevez
que le côté caché à l’utilisateur.
15. Ne faites jamais démarrer le moteur lorsque
vous vous trouvez devant le canal d’éjection.
16. Ne mettez jamais les mains ou les pieds sur ou
sous des pièces en rotation. Tenez-vous
toujours éloigné de l’orifice d’éjection.
17. Ne soulevez jamais ni ne portez jamais une
tondeuse à gazon alors que le moteur tourne.
18. Arrêtez le moteur et tirez la cosse de bougie :
- avant de défaire le verrouillage ou d’éliminer
des obturations du canal d’éjection
- avant de contrôler la tondeuse à gazon, de la
nettoyer ou d’effectuer dessus des travaux
- lorsque la tondeuse a avalé un corps étranger.
Recherchez les éventuels endommagements
de la tondeuse à gazon et effectuez les
réparations nécessaires avant de refaire
démarrer la tondeuse à gazon et de travailler
avec elle. Si la tondeuse à gazon commence à
vibrer fortement, un contrôle immédiat est
indispensable.
19. Eteignez le moteur :
- lorsque vous vous éloignez de la tondeuse à
gazon
- avant de remplir d’essence.
20. Lorsque vous éteignez le moteur, mettez le
régulateur de vitesse en position “Arrêt”. Le
robinet d’essence doit être fermé.
21. Le fait d’exploiter la machine à une vitesse
excédante peut augmenter les risques
d’accident.
22. Soyez prudents pendant les travaux de réglage
de la machine et évitez de vous faire coincer les
doigts entre les outils de coupe en mouvement et
des pièces rigides de l’appareil
des étincelles.
3. Laissez refroidir le moteur avant de stocker la
tondeuse à gazon dans un endroit fermé.
4. Pour éviter tout risque d’incendie, maintenez le
moteur, l’échappement et la zone entourant le
réservoir á carburant sans herbe, feuilles ni fuite
de matière grasse (huile).
5. Vérifiez régulièrement si le dispositif de récolte
de l’herbe n’est pas usé ou s’il n’a pas perdu son
aptitude au fonctionnement.
6. Remplacez les pièces usées ou endommagées
pour des raisons de sécurité.
7. Si vous devez vidanger le réservoir à carburant,
faites-le à l’air libre, en vous servant d’une
pompe d’aspiration de carburant (à acheter dans
les grandes surfaces de matériaux de
construction).
AVERTISSEMENT !
Veuillez lire toutes les consignes de sécurité et
instructions.
Tout non-respect des consignes de sécurité et
instructions peut provoquer une décharge électrique,
un incendie et/ou des blessures graves.
Conservez toutes les consignes de sécurité et
instructions pour une consultation ultérieure.
Explication des symboles sur l’appareil
(figure 13) :
1) Lire le mode d’emploi
2) Attention ! Risques en raison de pièces
catapultées. Respecter la distance de sécurité
3) Attention aux lames tranchantes - retirez la cosse
de bougie d’allumage avant l’entretien
4) Remplir d’huile et de carburant avant la mise en
service
5) Attention ! Portez une protection de l’ouïe et des
lunettes de protection
6) Levier de mise en marche / d’arrêt du moteur
(I=moteur MARCHE ; 0=moteur ARRET)
7) Levier de commande (levier d’accouplement)
Maintenance et stockage
1. Veillez à ce que tous les écrous, goujons et vis
soient bien serrées et á ce que l’appareil soit
dans un état de fonctionnement sûr.
2. Ne gardez jamais la tondeuse à gazon avec du
carburant dans le réservoir à l’intérieur d’un
bâtiment, dans lequel probablement des vapeurs
d’essence peuvent rencontrer du feu ouvert ou
31
Anleitung_RPM_56_S_MS_SPK7:_
21.12.2009
15:05 Uhr
Seite 32
F
2. Description de l’appareil (figure 1/2)
1. Levier de démarrage / d’arrêt du moteur - frein
moteur
2. Guidon supérieur
3. Levier excentrique / levier de l’accélérateur
4. Corde de lancement
5. Guidon inférieur
6. Poignée
7. Sac collecteur
8. Clapet d’éjection
9. Réglage de la hauteur de coupe
10. Clapet de remplissage de réservoir
11. Tubulure de remplissage d’huile
12. Bouchon de vidange d’huile
13. 2 colliers
14. Clé à bougie
15. 2 vis à tête carrée pour guidon inférieur
16. 2 vis pour guidon supérieur
(fonction de serrage rapide)
17. Couvercle d’éjection latérale
18. 4 écrous à étoile pour guidon
19. Levier de commande (levier d’accouplement)
20. Roue d’entraînement (gauche et droite)
21. Adaptateur d’éjection latérale
22. Adaptateur de paillage
aussi les conditions d’utilisation, de maintenance et
d’entretien.
Attention! En raison de l’exposition à des risques du
corps de l’utilisateur/l’utilisatrice, la tondeuse à gazon
ne doit pas servir aux travaux suivants :
débroussaillement de buissons, haies et arbustes,
coupe et broyage de plantes grimpantes ou de
gazons sur toits ou dans des bacs de balcons,
nettoyage (aspiration) de sentiers ni comme
hacheuse pour concasser des tronçons d’arbres et
de haie. De plus, la tondeuse à gazon ne doit pas
être employée comme moto-bêche pour araser des
élévations de terrain comme par ex. des taupinières.
Pour des raisons de sécurité, il est interdit d’utiliser la
tondeuse à gazon comme groupe d’entraînement
pour d’autres outils et jeux d’outils en tous genres.
4. Caractéristiques techniques
Type de moteur :
moteur à quatre temps monocylindre 173 ccm
Vitesse de travail :
Carburant :
3. Utilisation conforme
2800 t/min
essence normale sans plomb
Contenance du réservoir :
env. 2 L
Huile moteur :
La tondeuse à gazon à essence convient à l’emploi
privé dans les jardins de maisons et de loisirs.
env. 0,6 L / 10W30
Bougie d’allumage :
F6RTC
Distance entre les électrodes :
0,5 – 0,6 mm
Réglage de la hauteur de coupe :
Sont considérés comme tondeuses à gazon pour les
jardins domestiques et de loisirs celles dont
l’utilisation annuelle ne dépasse pas 50 heures et qui
sont utilisées surtout pour l’entretien de surfaces
d’herbe ou de gazon, ne le sont pas cependant
celles utilisées dans les installations publiques, les
parcs, les terrains de sports ainsi que dans
l’agriculture et les exploitations forestières.
Veillez au fait que nos appareils, conformément à
leur affectation, n’ont pas été construits, pour être
utilisés dans un environnement professionnel,
industriel ou artisanal. Nous déclinons toute
responsabilité si l’appareil est utilisé
professionnellement, artisanalement ou dans des
sociétés industrielles, tout comme pour toute activité
équivalente.
Le respect du mode d’emploi joint par le fabricant est
la condition préalable à une utilisation conforme de la
tondeuse à gazon. Le mode d’emploi comprend
32
centrale (30-75 mm)
Largeur de coupe :
Niveau de pression acoustique LpA :
Niveau de puissance acoustique LWA :
560 mm
90,1 dB(A)
98 dB(A)
Imprécision K
3 dB (A)
Vibration ahw:
7,3 m/s2
Imprécision K
1,5 m/s2
Poids :
46 kg
5. Avant la mise en service
5.1 Assemblage des composants.
Certaines pièces sont livrées démontées.
L’assemblage est simple à condition de respecter les
consignes suivantes
Attention ! Pour l’assemblage et pour les travaux de
maintenance, vous aurez besoin de l’outillage
Anleitung_RPM_56_S_MS_SPK7:_
21.12.2009
15:05 Uhr
Seite 33
F
suivant non compris dans la livraison :
une cuve collectrice d’huile en position
horizontale (pour la vidange d’huile)
un récipient doseur d’un litre (résistant à l’huile /
à l’essence)
un bidon d’essence (5 litres suffisent à 6 heures
de service)
un entonnoir (convenant aux tubulures de
remplissage d’essence du réservoir)
des chiffons ménagers (pour essuyer les restes
d’huile / d’essence ; les remettre à une station
d’essence pour leur élimination)
une pompe d’aspiration à carburant (en
plastique, à acheter dans les grandes surfaces
de matériaux de construction)
une burette d’huile avec pompe à main (à
acheter dans les grandes surfaces de matériaux
de construction)
1 l d’huile pour moteurs 10W30
Montage
1. Retirez la tondeuse à gazon et les pièces de
montage de l’emballage et contrôlez si tous les
constituants sont présents (fig. 2).
2. Vissez à fond le guidon inférieur en utilisant
respectivement une vis à tête carrée (fig. 3a/pos.
15) et une vis-étoile (fig. 3a/pos. 18) des deux
côtés. Choisissez un des trois trous de fixation
en fonction de la hauteur de poignée souhaitée.
Attention ! Réglez la même hauteur des deux
côtés ! Veillez à ce faisant à ce que les câbles de
transmission à fixer plus tard ne gênent pas.
3. Vissez à fond le guidon supérieur sur le guidon
inférieur en utilisant respectivement une vis (fig.
3b/pos. 16) et une vis-étoile (fig. 3b/pos. 18) des
deux côtés. Veillez à ce que les arceaux des vis
(16) soient rabattus vers l’intérieur lors du serrage
afin de garder la fonction de serrage rapide.
4. Accrochez la poignée de la corde de lancement
(fig. 3c/pos. 4) sur le crochet prévu à cet effet
(fig. 3c/pos. 24) comme représenté sur la fig. 3c.
5. Fixez les câbles de transmission avec les colliers
joints (fig. 3d/pos. 13) sur le guidon.
6. Soulevez le clapet d’éjection (fig. 4/pos. 8) d’une
main et accrochez le sac collecteur d’herbe (fig.
4/pos. 7) comme représenté sur la fig. 4.
5.2 Réglage de la hauteur de coupe
Attention ! Le déplacement de la hauteur de
coupe peut seulement être entrepris lorsque le
moteur est arrêté et la cosse de bougie
d’allumage débranchée.
avant de commencer à tondre, vérifiez si les outils
de coupe ne sont pas émoussés ni leurs fixations
endommagées. Remplacez les outils de coupe
émoussés et/ou endommagés, le cas échéant, en
jeu complet, pour ne générer aucun balourd. Lors
de ce contrôle, mettez le moteur hors circuit et
retirez la cosse de bougie d’allumage.
le réglage de la hauteur de coupe se fait
centralement via le levier de réglage de la hauteur
de coupe (fig. 8/Pos. 9). 5 hauteurs de coupe
diverses sont réglables.
tirez le levier de réglage vers l’extérieur et réglez
la hauteur de coupe désirée. Le levier s’encrante
dans la position désirée.
6. Commande
Attention !
Le moteur est livré sans huile. Avant la mise en
service, remplissez par conséquent absolument
de 0,6 l d’huile. Utilisez de l’huile multigrade
normale (10W30). Il faut contrôler le niveau
d’huile du moteur avant chaque tonte. (voir
Contrôle du niveau d’huile).
Pour éviter que la tondeuse à gazon ne se mette en
marche par mégarde, elle est dotée d’un frein moteur
(fig. 5a/Pos. 1) qu’il vous faut actionner avant de
faire démarrer la tondeuse à gazon. Lorsque l’on
relâche le levier du frein moteur, il doit retourner
dans sa position de départ et le moteur se met
automatiquement hors circuit.
Mettez le régulateur de vitesse (fig. 7) en position
“I I”. Serrez le levier du frein moteur (fig. 5b) et tirez
vigoureux le corde de lancement. Le régulateur de
vitesse permet de régler la vitesse et les tours de la
lame (fig. 7).
Avant de commencer à tondre le gazon, effectuez
cette opération plusieurs fois pour vous assurer que
tout fonctionne correctement.
A chaque fois que vous effectuez des travaux
quelconques de réglage ou de réparation sur votre
tondeuse à gazon, attendez que la lame ait cessé de
tourner.
Mettez toujours le moteur hors circuit avant chaque
travail de réglage, de maintenance et de réparation.
Remarques :
1. Frein moteur (fig. 5a/Pos. 1) : Utilisez le levier
pour mettre le moteur hors circuit. Lorsque vous
relâchez le levier, le moteur et les lames
s’arrêtent automatiquement. Pour tondre,
maintenez le levier en position de travail (fig. 5b).
Avant de commencer vraiment à tondre,
contrôlez plusieurs fois le levier de
33
Anleitung_RPM_56_S_MS_SPK7:_
21.12.2009
15:05 Uhr
Seite 34
F
2.
3.
4.
5.
6.
démarrage/d’arrêt. Assurez-vous que le câble
est bien accessible.
Régulateur de gaz (fig. 7) : déplacez-le pour
augmenter ou réduire la vitesse du moteur.
(tortue = lent / lièvre = rapide)
levier de commande levier d’accouplement) (fig.
5a/Pos. 19) : lorsque vous l’actionnez (fig. 5c),
l’accouplement de l’organe de transmission se
ferme et la tondeuse à gazon commence à se
déplacer le moteur en marche.
Relâchez le levier de commande en temps utile
pour faire arrêter la tondeuse. Entraînez-vous à
démarrer et à vous arrêter avant de tondre le
gazon pour la première fois jusqu’à ce que vous
y arriviez sans réfléchir.
Note d’avertissement : la lame de coupe est en
rotation lorsque le moteur démarre.
Important : Avant de lancer le moteur, actionnez
plusieurs fois le frein moteur afin de vérifier si le
câble d’arrêt fonctionne également correctement.
A respecter : le moteur est conçu pour la
vitesse de coupe de l’herbe, et le rejet de l’herbe
dans le sac collecteur et pour un long cycle de
vie du moteur.
Contrôlez le niveau d’huile
Remplissage le réservoir d’env. 1,9 litres
d’essence lorsqu’il est vide et utilisez un
entonnoir et un récipient gradué. Assurez-vous
que l’essence est bien propre.
Avertissement : Utilisez toujours exclusivement un
bidon d’essence de sécurité. Ne fumez jamais en
remplissant de carburant. Mettez le moteur hors
circuit avant de remplis d’essence et laissez le
moteur refroidir quelques minutes.
7. Assurez-vous que le câble d’allumage est bien
raccordé à la bougie d’allumage.
8. Encrantez l’accélérateur en position “I I”.
9. Tenez-vous derrière la tondeuse à moteur. Une
main doit être posée sur le levier de démarrage
moteur/ d’arrêt. L’autre sur la poignée de
démarrage.
10. Faites démarrer le moteur avec le starter
réversible (fig.1/pos. 4). Pour ce faire, sortez la
poignée d’env. 10-15 cm (jusqu’à sentir une
résistance), ensuite actionnez-la d’un coup sec.
Si le moteur n’a pas démarré, réactionnez la
poignée.
Attention ! Ne laissez pas le câble de
transmission revenir à toute vitesse.
Attention : lorsqu’il fait froid, il peut être
nécessaire de recommencer plusieurs fois le
processus de démarrage.
11. Lorsque le moteur est à la température de
service, il peut être démarré en position “tortue”
(fig. 7).
34
Important : les essais de démarrage en position
“I I” peuvent noyer la bougie d’allumage du
moteur lorsque celui-ci est à la température de
service. Attendez quelques minutes avant de
réessayer de démarrer.
Paillage
Lors du paillage, l’herbe coupée est déchiquetée
dans le carter fermé de la tondeuse et redistribuée
sur le gazon. Le ramassage et l’élimination de
l’herbe sont supprimés.
Attention : Le paillage n’est possible que sur des
gazons relativement courts. Vous obtiendrez un
résultat optimal avec une lame de paillage
(disponible en tant qu’accessoire).
Pour utiliser la fonction paillage, décrochez le sac
collecteur et poussez fig. l’adaptateur de paillage (fig.
6a/pos. 22) dans l’orifice d’éjection et fermez le
clapet d’éjection.
Ejection latérale
Pour utiliser l’éjection latérale, il faut monter
l’adaptateur de paillage (pos. 22). Accrochez
l’adaptateur d’éjection latérale (fig. 6b/pos. 21)
comme indiqué dans la figure 6b.
6.1 Avant la tonte
Remarques importantes :
1. Habillez-vous correctement. Portez de bonnes
chaussures, pas de sandales ni de tennis.
2. Contrôlez la lame de coupe. Il faut remplacer
une lame courbe ou endommagée par une lame
d’origine.
3. Remplissez le réservoir à essence à l’air libre.
Utilisez un entonnoir de remplissage et un
récipient de mesure Essuyez l’essence
échappée.
4. Lisez et respectez le mode d’emploi ainsi que
toutes les remarques en rapport avec le moteur
et les appareils rapportés. Conservez le mode
d’emploi dans un endroit accessible également
pour d’autres utilisateurs/utilisatrices de
l’appareil.
5. Les gaz d’échappement sont dangereux. Mettez
le moteur en circuit uniquement à l’air libre.
6. Assurez-vous que tous les dispositifs de sécurité
sont bien présents et qu’ils fonctionnent
également bien.
7. L’appareil doit uniquement être utilisée par une
personne qualifiée.
8. La tonte d’herbe mouillée peut être dangereuse.
Tondez l’herbe de préférence lorsqu’elle est
sèche.
Anleitung_RPM_56_S_MS_SPK7:_
21.12.2009
15:05 Uhr
Seite 35
F
9. Indiquez aux autres personnes ou enfants
qu’elles doivent s’éloigner de la tondeuse.
10. Ne tondez jamais le gazon lorsque la vue est
mauvaise.
11. Retirez du sol tous les objets détachés avant la
tonte.
6.2 Consignes pour tondre le gazon correctement
Attention ! N’ouvrez jamais le clapet d’éjection
lorsque le dispositif de ramassage va être vidé et
que le moteur tourne. La lame en rotation peut
entraîner des blessures.
Fixez le clapet d’éjection et le sac collecteur d’herbe
toujours minutieusement. En cas d’éloignement,
arrêtez avant le moteur.
La distance de sécurité donnée par les longerons du
guidon entre le carter et l’utilisateur doit toujours être
maintenue. En tondant et en modifiant la direction
auprès de buissons et de pentes, veuillez faire
particulièrement attention. Veillez à vous tenir de
façon sûre, portez des chaussures à semelles antidérapantes et agrippantes et des pantalons longs.
Tondez toujours transversalement par rapport à la
pente.
Les pentes de plus de 15 degrés ne doivent, pour
des raisons de sécurité, pas être tondues avec la
tondeuse à gazon.
Soyez particulièrement précautionneux lorsque vous
vous déplacez en reculant et lorsque vous tirez la
tondeuse à gazon. Risque de trébucher !
6.3 La tonte
Couper uniquement avec une lame aiguisée, de telle
façon que les brins d’herbe ne soient pas effilochés
et ne jaunissent pas.
Pour obtenir une tonte correcte, il faut faire suivre à
la tondeuse à gazon des pistes droites, dans la
mesure du possible. Les bords de ces pistes doivent
alors se chevaucher de quelques centimètres pour
qu’aucune bande ne reste sans tonte.
La partie inférieure du carter de la tondeuse à gazon
doit être gardée propre et les dépôts d’herbe
absolument éliminés. Les dépôts gênent le
processus de démarrage, altèrent la qualité de
coupe et l’éjection de l’herbe. Sur les pentes, il faut
suivre une ligne de tonte transversale par rapport à
la pente. Un glissement de la tondeuse à gazon est
évité par une inclinaison vers le haut.
Sélectionnez la hauteur de coupe, en fonction de la
hauteur de gazon réelle. Passez plusieurs fois au
même endroit afin de ne devoir couper à chaque fois
qu’au maximum 4 cm de gazon.
Avant tout contrôle de la lame, mettez le moteur hors
circuit. Pensez aussi que la lame continue à tourner
quelques secondes après l’arrêt du moteur.
N’essayez jamais, d’arrêter la lame.
Vérifiez régulièrement, si la lame est correctement
fixée, en bon état et bien aiguisée. Si tel n’est pas le
cas, aiguisez-la ou remplacez-la. Si la lame en
mouvement frappe un objet, arrêtez la tondeuse à
gazon et attendez, que la lame soit au repos.
Contrôlez ensuite l’état de la lame et du porte-lame.
En cas d’endommagement, remplacez-les.
Remarques relatives à la tonte :
1. Attention aux objets solides. La tondeuse à
gazon peut être endommagée et vous pouvez
vous blesser ou blesser d’autres personnes.
2. Un moteur, échappement ou entraînement
chaud peut causer des brûlures. Donc, ne les
touchez pas.
3. Tondez avec précaution sur les pentes ou
terrains en pente.
4. Une raison d’interruption de la tonte est le
manque de lumière du jour ou d’éclairage
artificiel suffisant.
5. Contrôlez la tondeuse, la lame et les autres
pièces lorsque vous êtes passés sur un corps
étranger ou lorsque l’appareil vibre plus que la
normale.
6. ne changez pas les réglages et n’effectuez
aucune réparation sans avoir mis auparavant le
moteur hors circuit. Tirez le câble d’allumage.
7. Sur une route ou à proximité d’une rue, attention
à la circulation. Maintenez l’éjection de l’herbe
éloignée de la rue.
8. Evitez les endroits sur lesquels les roues
patinent ou la tonte est incertaine. Avant de
reculer, assurez-vous qu’il n’y a pas de petits
enfants derrière vous.
9. Dans l’herbe dense et haute, réglez le plus grand
niveau de coupe et tondez plus lentement. Avant
d’éliminer de l’herbe ou d’autres obturations,
mettez le moteur hors circuit et déconnectez le
câble d’allumage.
10. Ne retirez jamais de pièces servant à la sécurité.
11. Ne remplissez jamais d’essence dans un moteur
encore chaud ou en fonctionnement.
35
Anleitung_RPM_56_S_MS_SPK7:_
21.12.2009
15:05 Uhr
Seite 36
F
6.4 Vidanger le sac collecteur d’herbe
Dès que des restes d’herbe restent sur le sol
pendant la tonte, le sac collecteur doit être vidé.
Attention ! Avant de décrocher le sac collecteur,
arrêtez le moteur et attendez l’arrêt de l’outil de
coupe.
Pour décrocher le sac collecteur, levez le clapet
d’éjection avec une main, avec l’autre main, prenez
le sac collecteur par la poignée (Fig. 4).
Conformément aux prescriptions de sécurité, le
clapet d’éjection se ferme au décrochage du sac
collecteur et bouche l’orifice d’éjection arrière. Si
des restes d’herbe sont accrochés dans l’ouverture,
mettez le moteur en marche lentement, et reculez la
tondeuse à gazon d’environ 1 m.
Les restes de coupe dans le carter et sur l’outil de
travail ne sont pas à enlever à la main ou au pied,
mais avec les moyens appropriés, par ex. brosse ou
balayette.
Pour garantir un bon ramassage, le sac collecteur et
surtout la grille d’air doivent être nettoyées de
l’intérieur après utilisation.
N’accrochez le sac collecteur qu’après l’arrêt du
moteur et de l’outil de coupe.
Levez le clapet d’éjection avec une main et avec
l’autre main maintenez le sac collecteur par la
poignée et accrochez-le d’en haut
6.5 Après la tonte
1. Laissez toujours refroidir le moteur avant de
ranger la tondeuse à gazon dans un endroit
fermé.
2. Retirez l’herbe, le graissage et l’huile avant de la
ranger. Ne posez aucun autre objet sur la
tondeuse.
3. Contrôlez toutes les vis et tous les écrous avant
de la réutiliser. Revissez les vis desserrées.
4. Videz le sac collecteur d’herbe avant une
nouvelle utilisation.
5. Desserrez la cosse de bougie d’allumage pour
éviter une utilisation non autorisée.
6. Veillez à ce que la tondeuse ne soit pas rangée
à proximité d’une source de risques. Les vapeurs
de gaz peuvent entraîner des explosions.
7. Il est uniquement autorisé d’utiliser des pièces
d’origine ou autorisées par le producteur pour les
réparations (voir adresse du bulletin de garantie).
8. Lorsque vous n’utilisez pas la tondeuse pendant
une période prolongée, videz le réservoir à
essence à l’aide d’une pompe d’aspiration à
essence.
9. Ordonnez aux enfants de ne pas utiliser la
36
tondeuse. Ce n’est pas un jouet.
10. Ne conservez jamais de carburant à proximité
d’une source d’étincelles. Utilisez toujours un
bidon contrôlé. Conservez l’essence hors de
portée des enfants.
11. Huilez l’appareil et effectuez-en la maintenance
12. Comment mettre le moteur hors circuit :
Pour arrêter le moteur, relâchez le levier de
démarrage / d’arrêt du moteur (fig. 5a/pos. 1).
Fermez le robinet d’essence et tirez la cosse de
la bougie d’allumage afin d’éviter que le moteur
ne démarre.
Contrôlez le câble de transmission du frein
moteur avant tout redémarrage. Contrôlez si le
câble de transmission est bien monté.
Remplacez toujours un câble de sécurité plié ou
endommagé.
7. Nettoyage, maintenance, stockage,
transport et commande des pièces de
rechange
Attention :
ne travaillez jamais lorsque le moteur est en marche
sur des pièces conductrices de courant ou
l’installation d’allumage. Ne les touchez pas non
plus. Retirez avant tous travaux de maintenance et
d’entretien la cosse de bougie d’allumage.
N’effectuez jamais de travaux quelconques sur un
appareil en marche. Les travaux n’étant pas décrits
dans ce mode d’emploi doivent uniquement être
réalisés dans un atelier spécialisé dûment autorisé.
7.1. Nettoyer la tondeuse
Nettoyez la tondeuse à fond après chaque utilisation.
En particulier la face inférieure et le logement de
lame. Renversez la tondeuse à gazon sur la gauche
(face à la tubulure de remplissage d’huile)
Nota : Avant de retourner la tondeuse à gazon de
côté, videz le réservoir de carburant complètement à
l’aide d’une pompe d’aspiration à essence. Il est
interdit de basculer la tondeuse à gazon de plus de
90 degrés. Il est plus facile de retirer l’encrassement
et l’herbe juste après la tonte. Les restes d’herbe et
salissures sèches peuvent entraver au bon
fonctionnement de la tondeuse. Contrôlez si le canal
d’éjection de l’herbe est bien exempt de restes
d’herbe et retirez-les en cas de besoin. Ne nettoyez
jamais la tondeuse au jet d’eau ni à l’aide d’un
nettoyeur haute pression. Le moteur doit rester sec.
Il est interdit d’utiliser des produits de nettoyage
agressifs tels un nettoyant à froid ou de l’éther de
pétrole.
Anleitung_RPM_56_S_MS_SPK7:_
21.12.2009
15:05 Uhr
Seite 37
F
7.2. Maintenance
7.2.1 Essieux et moyeux de roue
Doivent être légèrement graissé chaque saison.
Retirez les enjoliveurs avec un tournevis et
desserrez les vis de fixation des roues.
7.2.2 lame
Pour des raisons de sécurité, faites aiguiser,
équilibrer et monter votre lame exclusivement par un
atelier spécialisé dûment autorisé. Pour obtenir un
résultat optimal, il est conseillé de faire contrôler la
lame une fois par an.
Remplacement de la lame (fig. 9)
Lorsque vous remplacez l’outil de coupe, seules des
pièces de rechange d’origine doivent être
employées. Le repère de la lame doit correspondre
au numéro indiqué dans la liste des pièces de
rechange. Ne montez jamais d’autre lame.
Lames endommagées
Si, malgré toutes les précautions, la lame entre en
contact avec un obstacle, mettez immédiatement le
moteur hors circuit et retirez la cosse de bougie
d’allumage. Basculez la tondeuse de côté et
contrôlez si la lame n’est pas endommagée.
Remplacez les lames pliées ou endommagées. Ne
redressez jamais une lame pliée. Ne travaillez jamais
avec une lame pliée ou très usée, cela génère des
vibrations et peut entraîner d’autres
endommagements de la tondeuse.
Attention : Risque de blessure en cas de travail
avec une lame endommagée.
Affûter la lame
On peut aiguiser les tranchants de la lame avec une
lime en métal. Afin d’éviter un balourd, faites
effectuez le meulage exclusivement par un atelier
spécialisé dûment autorisé.
7.2.3 Contrôle du niveau d’huile
Attention : ne faites jamais fonctionner le moteur
sans ou avec trop peu d’huile. Cela peut causer de
graves dommages du moteur. Utilisez uniquement
de l’huile pour moteur 10W30.
Contrôle du niveau d’huile :
Mettez la tondeuse à gazon sur une surface plane et
droite. Dévissez la jauge de niveau d’huile (fig. 10A/
pos 11) en la tournant à gauche et essuyez la jauge.
Renfilez la jauge jusqu’à la butée dans la tubulure de
remplissage, ne vissez pas. Retirez la jauge et lisez
le niveau d’huile à l’horizontale. Le niveau d’huile doit
se trouver entre min et max de la jauge de niveau
d’huile (fig. 10b)
Vidange d’huile
Il faut réaliser la vidange d’huile une fois par an,
avant le début de la saison (en sus des informations
du manuel de service Essence) à moteur chaud.
Utilisez exclusivement de l’huile pour moteur
(10W30).
Placez une cuve collectrice d’huile basse sous la
tondeuse à gazon.
Ouvrez le bouchon de remplissage d’huile (fig.
10a/ pos. 11).
Ouvrez le bouchon de vidange d’huile (fig. 10a/
pos. 12). Faites couler l’huile pour moteur dans
un récipient collecteur.
Une fois l’huile usée écoulée, refermez le
bouchon de vidange d’huile.
Remplissez d’huile pour moteur jusqu’au repère
supérieur de la jauge de niveau d’huile (env.
0,6l).
Attention ! Ne vissez pas la jauge de niveau
d’huile pour contrôler le niveau d’huile, mais
enfoncez-la uniquement jusqu’au filetage.
L’huile usée doit être éliminée conformément aux
prescriptions en vigueur.
7.2.4 Entretien et réglage des câbles de
transmission
Huilez souvent les câbles de transmission et
contrôlez leur souplesse.
7.2.5 Maintenance du filtre à air (fig. 11a-11c)
Les filtres à air encrassés réduisent la puissance
motrice en raison d’une amenée d’air au carburateur
trop réduite. Des contrôles réguliers sont par
conséquent indispensables. Il faut contrôler le filtre à
air toutes les 25 h. et le nettoyer en cas de besoin. Si
l’ai est très chargé de poussière, contrôlez plus
souvent le filtre à air.
Attention : Ne nettoyez jamais le filtre à air à
l’essence ou avec du détergent combustible.
Nettoyez le filtre à air uniquement à l’air comprimé
ou en tapotant dessus.
7.2.6 Maintenance de la bougie d’allumage
Contrôlez la bougie d’allumage pour la première fois
au but de 10 heures de service. Repérez les
encrassements et nettoyez-les le cas échéant à
l’aide d’une brosse à fils de cuivre. Effectuez ensuite
une maintenance de la bougie d’allumage toutes les
50 heures de service.
Retirez la cosse de la bougie d’allumage (fig. 12/
pos. 23) d’un mouvement rotatif.
Retirez la bougie d’allumage avec la clé à bougie
jointe.
Le montage est effectué dans l’ordre inverse des
étapes.
37
Anleitung_RPM_56_S_MS_SPK7:_
21.12.2009
15:05 Uhr
Seite 38
F
7.2.7 Réparation
Assurez-vous après des réparations ou une
maintenance que toutes les pièces relatives à la
technique de sécurité sont bien montées et en état
irréprochable.
Conservez les pièces dangereuses hors de portée
des autres personnes et des enfants.
Attention : Conformément à la loi sur la
responsabilité civile, nous ne répondons pas des
dommages issus d’une réparation non conforme aux
règles de l’art ou lorsque les pièces de rechange
utilisées ne sont pas originales ni des pièces
autorisées par nos soins. Nous ne pouvons pas non
plus être tenus responsables de dommages issus de
réparations non conformes aux règles de l’art.
Faites-les effectuer par un service après-vente ou
unE spécialiste dûment autoriséE. De même
également pour les accessoires.
7.2.8 Temps de service
Il est uniquement permis de tondre le gazon les jours
ouvrables entre 7h00 et 19h00. Veuillez respecter
les règlements légaux pouvant différer en fonction de
la localité.
7.4 Préparatifs de la tondeuse à gazon pour le
transport
1. Videz le réservoir à essence (voir Repère 7.3/1)
2. Faites tourner le moteur jusqu’à ce que le reste
d’essence soit consommé.
3. Videz l’huile du moteur chaud.
4. Retirez la cosse de bougie d’allumage.
5. Nettoyez les ailettes de refroidissement du
cylindre et le carter.
6. Accrochez la corde de lancement sur le crochet
(fig. 3c). Desserrez les écrous à oreilles et
rabattez le guidon supérieur vers le bas. Faites
attention, ce faisant, à ne pas plier les tirants à
câble pendant le rabattage.
7. Enroulez quelques couches de carton ondulé
entre le guidon supérieur, le guidon inférieur et le
moteur, afin d’éviter des rayures.
7.5 Commande de pièces de rechange
Pour les commandes de pièces de rechange,
veuillez indiquer les références suivantes:
앬 Type de l’appareil
앬 No. d’article de l’appareil
앬 No. d’identification de l’appareil
앬 No. de pièce de rechange de la pièce requise
Vous trouverez les prix et informations actuelles à
l’adresse www.isc-gmbh.info
7.3 Préparatifs de stockage de la tondeuse à
gazon
8. Mise au rebut et recyclage
Avertissement : Ne retirez pas l’essence carburant
dans des endroits fermés, à proximité de feu ou en
fumant. Les vapeurs de gaz peuvent causer des
explosions ou un incendie.
1. Videz le réservoir à essence à l’aide d’une
pompe d’aspiration d’essence.
2. Lancez le moteur et faites-le tourner jusqu’à ce
que le restant d’essence soit consommé.
3. Changez l’huile après chaque saison. Eliminez
l’ancienne huile à moteur du moteur chaud et
remplissez de nouvelle huile.
4. Retirez la bougie d’allumage de la culasse.
Remplissez avec une burette d’huile env. 20 ml
huile dans le cylindre. Tirez lentement la poignée
de démarrage, pour que l’huile protège l’intérieur
du cylindre. Vissez à nouveau la bougie
d’allumage.
5. Nettoyez les ailettes de refroidissement du
cylindre et le carter.
6. Nettoyez tout l’appareil pour protéger la couleur
du vernis.
7. Conservez l’appareil dans un emplacement ou
un lieu bien aéré.
38
L’appareil se trouve dans un emballage permettant
d’éviter les dommages dus au transport. Cet
emballage est une matière première et peut donc
être réutilisé ultérieurement ou être réintroduit dans
le circuit des matières premières.
L’appareil et ses accessoires sont en matériaux
divers, comme par ex. des métaux et matières
plastiques. Eliminez les composants défectueux
dans les systèmes d’élimination des déchets
spéciaux. Renseignez-vous dans un commerce
spécialisé ou auprès de l’administration de votre
commune !
Anleitung_RPM_56_S_MS_SPK7:_
21.12.2009
15:05 Uhr
Seite 39
F
9. Dérangements et dépannage
Avertissement : Mettez tout d’abord le moteur hors circuit et retirez le câble d’allumage avant toute
inspection ou ajustement.
Avertissement : si après un ajustement ou une réparation, le moteur a tourné quelques minutes, pensez au
fait que le pot d’échappement les autres pièces sont chaudes. Donc, ne les touchez pas afin d’éviter des
brûlures.
Dérangement
Cause probable
Dépannage
Course irrégulière, fortes
vibrations de l’appareil
- vis desserrées
- fixation des lames desserrée
- lame non équilibrée
- contrôlez les vis
- contrôlez la fixation des lames
- remplacez la lame
Moteur ne démarre pas
- levier du frein non appuyé
- mauvaise position de
l’accélérateur
- bougie d’allumage défectueuse
- réservoir à essence vide
- ppuyez sur le levier du frein
- contrôlez le paramétrage
Le moteur fonctionne i
irrégulièrement
- iltre à air encrassé
- bougie d’allumage encrassée
- nettoyez le filtre à air
- nettoyez la bougie d’allumage
Le gazon vire au jaune, coupe
irrégulière
- lame émoussée
- hauteur de coupe trop basse
- vitesse de rotation du moteur
trop lente
- aiguisez la lame
- régler la hauteur correcte
- mettez le levier sur maxi.
- vitesse de rotation du moteur
trop lente
- hauteur de coupe trop basse
- lame usée
- sac collecteur bouché
- mettez l’accélérateur sur maxi.
- réglez correctement
- remplacez la lame
- videz le sac collecteur
L’éjection d’herbe n’est pas
propre
- remplacez la bougie d’allumage
- remplissez de carburant
39
Anleitung_RPM_56_S_MS_SPK7:_
21.12.2009
CZ
Obsah:
1.
2.
3.
4.
5.
6.
7.
Bezpečnostní pokyny
Popis přístroje
Použití podle účelu určení
Technická data
Před uvedením do provozu
Obsluha
Čištění, údržba, uložení, transport a objednání
náhradních dílů
8. Likvidace a recyklace
9. Plán vyhledávání chyb
40
15:05 Uhr
Seite 40
Anleitung_RPM_56_S_MS_SPK7:_
21.12.2009
15:05 Uhr
Seite 41
CZ
Pozor!
Při používání přístrojů musí být dodržována určitá
bezpečnostní opatření, aby se zabránilo zraněním a
škodám. Přečtěte si proto pečlivě tento návod k
obsluze. Dobře si ho uložte, abyste měli tyto
informace kdykoliv po ruce. Pokud předáte přístroj
jiným osobám, předejte s ním i tento návod k
obsluze.
Nepřebíráme žádné ručení za škody a úrazy vzniklé
v důsledku nedodržování tohoto návodu k obsluze a
bezpečnostních pokynů.
1. Bezpečnostní pokyny pro ručně
ovládané sekačky na trávu
Pokyny
1. Pečlivě si přečtěte návod k použití. Seznamte se
s nastaveními a se správným užíváním stroje.
2. Nikdy nedovolte dětem nebo jiným osobám,
které neznají návod knovit minimální věk
uživatele.
3. Nikdy nesečte, pokud jsou v blízkosti jiné osoby,
především děti, nebo zvířata. Pamatujte, že
osoba řídící sekačku nebo uživatel jsou
odpovědni za nehody s jinými osobami nebo za
nehody na jejich vlastnictví.
4. Pokud předáte přístroj jiným osobám, předejte s
ním prosím i tento návod k obsluze.
Přípravná opatření
1. Během sečení vždy noste pevnou obuv a dlouhé
kalhoty. Nikdy nesečte bosi nebo v lehkých
sandálech.
2. Zkontrolujte terén, na kterém budete stroj
používat, a odstraňte veškeré předměty, které
lze uchopit a odnést.
3. Pozor: Benzín je za vysokých teplot hořlavý:
- Skladujte benzín pouze v nádobách pro něj
určených.
- Tankujte pouze venku a během tankování
nekuřte.
- Před spuštěním motoru se musí nalít benzín.
Během běhu motoru nebo u horké sekačky
nesmí být benzínový uzávěr otevřen nebo benzín
doplňován.
- Přetekl-li benzín, nikdy nezkoušejte motor
nastartovat. Místo toho odstraňte ze stroje
veškeré plochy znečištěné benzínem. Jakýkoli
pokus nastartovat motor je zakázán, než se
odpaří benzinové výpary.
- Zž na benzín a jiné benzínové uzávěry vyměnit.
4. Nahraďte poškozené tlumiče hluku.
5. Před použitím se vždy zrakem přesvědčte, zda
nejsou opotřebené nebo poškozené řezné
nástroje, upínací svorníky a celkové řezné
ústrojí. Aby se zabránilo nevyváženosti, smějí
být opotřebené nebo poškozené řezné nástroje
a upínací svorníky vyměňovány pouze v sadách.
6. U přístrojů s větším počtem nožů prosím dbejte
na to, že se otáčením jednoho nože mohou začít
otáčet také ostatní nože.
Manipulace
1. Nikdy nenechte spalovací motor běžet
v uzavřených prostorách, ve kterých se
může hromadit nebezpečný oxid uhelnatý.
2. Sečte pouze za denního světla nebo při dobrém
umělém osvětlení. Je-li možné, nepoužívejte
přístroj na sečení mokré trávy.
3. Dbejte vždy na správné postavení na svazích.
4. Veďte stroj pouze v krokovém tempu.
5. U strojů na kolečkách platí: Sečte příčně ke
svahu, nikdy ne nahoru a dolů.
6. Buďte zvlášť opatrní, měníte-li na svahu směr
jízdy.
7. Nikdy nesečte na příliš strmých svazích.
8. Buďte zvlášť opatrní, obracíte-li sekačku nebo ji
k sobě přitahujete.
9. Zastavte nůž, jestliže musí být sekačka
překlopena, musí-li být přepravena přes
jiné plochy než trávu a dopravujete-li sekačku
k sekané ploše a od ní.
10. Nikdy sekačku nepoužívejte s poškozenými
ochrannými zařízeními nebo ochrannými mřížemi
nebo bez namontovaných ochranných zařízení,
např. zarážek a/nebo sběrných zařízení na trávu.
11. Nikdy neměňte regulační nastavení motoru nebo
motor nepřetáčejte.
12. Před startem motoru odbrzděte motorovou
brzdu.
13. Motor startujte opatrně, dle pokynů výrobce.
Dbejte na dostatečný odstup nohou od nože.
14. Při startu nebo spouštění motoru nesmí být
sekačka nakloněná, ledaže by musela být
sekačka při chodu nadzdvihnuta. V tomto
případě ji nakloňte pouze tak, jak je
bezpodmínečně nutné, a nadzvedněte pouze
stranu odvrácenou od uživatele.
15. Nikdy nespouštějte motor, stojíte-li před
vyhazovacím kanálem.
16. Nikdy nedávejte ruce nebo nohy na nebo pod
točící se části. Vždy se zdržujte ve vzdálenosti
od vyhazovacího otvoru.
17. Nikdy sekačku nezdvihejte nebo nepřenášejte se
zapnutým motorem.
18. Vypněte motor a vytáhněte koncovku
zapalovacího kabelu:
- před uvolněním zablokování nebo před
41
Anleitung_RPM_56_S_MS_SPK7:_
21.12.2009
15:05 Uhr
Seite 42
CZ
19.
20.
21.
22.
odstraňováním nánosů ve vyhazovacím kanále;
- před kontrolou, čištěním nebo prováděním
prací na sekačce;
- při nárazu na cizí těleso. Vyhledejte poškození
na sekačce a před opětovným spuštěním
sekačky a prací s ní proveďte požadované
opravy. Začne-li sekačka neobvykle silně
vibrovat, je nutná okamžitá kontrola.
Vypněte motor:
když se vzdálíte od sekačky,
před dotankováním.
Při vypnutí motoru se musí dát regulátor plynu
(obr. 10) na pozici Vypnuto. Benzínový kohout
(obr. 11) se musí zavřít.
Používání stroje při nadměrné rychlosti může
zvýšit nebezpečí úrazu.
Buďte opatrní při nastavovacích pracích na stroji
a vyvarujte se přiskřípnutí prstů mezi pohybující
se řezný nástroj a nepoddajné součásti přístroje
Údržba a skladování
1. Dbejte na to, aby veškeré matice, svorníky a
šrouby byly pevně utaženy a aby byl přístroj
v bezpečném pracovním stavu.
2. Nikdy neskladujte sekačku uvnitř budovy sí, ve
které by se mohly benzínové výpary dostat do
kontaktu s otevřeným ohněm nebo jiskrami.
3. Než uložíte sekačku do uzavřených prostor,
nechte vychladnout motor.
4. Aby se zabránilo nebezpečí požáru, udržujte
motor, výfuk a oblast kolem palivové nádrže
prosté trávy, listů nebo vystupujícího tuku (oleje).
5. Pravidelně kontrolujte sběrné zařízení na trávu
z hlediska otěru nebo ztráty funkčnosti.
6. Z bezpečnostních důvodů vyměňujte
opotřebené nebo poškozené díly.
7. Musíte-li vyprázdnit palivovou nádrž, musí tato
činnost probíhat venku, za pomoci odsávacího
čerpadla na benzín (k dostání v prodejnách se
stavebním materiálem).
VAROVÁNÍ!
Přečtěte si všechny bezpečnostní pokyny a
instrukce.
Zanedbání při dodržování bezpečnostních pokynů a
instrukcí mohou mít za následek úder elektrickým
proudem, požár a/nebo těžká zranění.
Všechny bezpečnostní pokyny a instrukce si
uložte pro budoucí použití.
Vysvětlení informačního štítku na přístroji (viz
obr. 13)
1) Přečíst návod k obsluze.
2) Pozor! Nebezpečí způsobené vymrštěnými díly.
Dodržovat bezpečnostní vzdálenost.
42
3) Pozor! Ostré nože – Před všemi údržbovými,
opravárenskými, čisticími a seřizovacími pracemi
vypnout motor a vytáhnout koncovku zapalovací
svíčky
4) Před uvedením do provozu doplnit olej a palivo
5) Pozor! Nosit ochranu sluchu a ochranné brýle.
6) Páčka spuštění/vypnutí motoru
(I=motor ZAP; 0=motor VYP)
7) Páčka pojezdu (páčka spojky)
2. Popis přístroje (obr. 1/2)
1. Páčka spuštění/vypnutí motoru - motorová
brzda
2. Horní vodicí rukojeť
3. Páčka sytiče / páčka plynu
4. Startovací lanko
5. Spodní vodicí rukojeť
6. Rukojeť
7. Sběrací vak
8. Vyhazovací klapka
9. Nastavení výšky sekání
10. Víčko plnicího otvoru nádrže
11. Plnicí hrdlo oleje
12. Šroub vypouštěcího otvoru oleje
13. 2 kabelové klipsy
14. Klíč na zapalovací svíčky
15. 2 šrouby se čtyřhrannou hlavou pro spodní
vodicí rukojeť
16. 2 šrouby pro horní vodicí rukojeť (rychloupínací
funkce)
17. Víko bočního vyhazování
18. 4 hvězdicové matice pro vodicí rukojeť
19. Páčka pojezdu (páčka spojky)
20. Hnací kolo (vlevo a vpravo)
21. Adaptér bočního vyhazování
22. Mulčovací adaptér
3. Použití podle účelu určení
Benzínová sekačka je vhodná pro soukromé
používání na zahradách u domů a chat.
Za sekačky na trávu pro soukromé zahrady a
zahrádky jsou považovány ty, jejichž roční použití
zpravidla nepřesáhne 50 hodin a které jsou převážně
používány pro péči o trávu nebo trávníky, nikoliv
však na veřejných plochách, v parcích, na
sportovištích a také ne v zemědělství a lesním
hospodářství.
Dodržování návodu koužití obsahuje i podmínky
provozu, údržby a opravy.
Anleitung_RPM_56_S_MS_SPK7:_
21.12.2009
15:05 Uhr
Seite 43
CZ
Pozor! Kvůli tělesnému ohrožení uživatele se nesmí
sekačka na trávu používat k vysázených na
střechách nebo v balkónových truhlících a k čištění
(odsávání) chodníků a jako sekačka ke zmenšování
segmentů stromů a živých plotů. Dále se sekačka na
trávu nesmí používat jako motorová plečka pro
zarovnávání vyvýšenin jako např. krtin.
Z bezpečnostních důvodů se nesmí sekačka
používat jako hnací agregát pro jiné pracovní
nástroje a sady nástrojů jakéhokoli druhu.
4. Technické údaje
Typ motoru: jednoválcový čtyřdobý motor 173 ccm
Pracovní otáčky:
cca 2800 min-1
Palivo:
běžný benzín bezolovnatý
Objem nádrže:
cca 2 l
Motorový olej:
cca 0,6 l / 10W30
Zapalovací svíčka:
F6RTC
Odstup elektrod:
0,5 - 0,6 mm
Nastavení výšky řezu:
centrální, 5stupňové (30-75 mm)
Šíře řezu:
560 mm
Hladina hluku LpA:
90,1 dB (A)
Hladina hluku LWA:
98 dB (A)
konev na olej s ručním čerpadlem (k dostání ve
stavebních marketech)
앬
1 l motorový olej 10W-30
Montáž
1. Sekačku a dodatečné díly vyjmout z balení a
zkontrolovat, zda žádné díly nechybí (obr. 2)
2. Spodní vodicí rukojeť přišroubovat na obou
stranách vždy pomocí jednoho šroubu se
čtyřhrannou hlavou (obr. 3a/pol. 15) a
hvězdicového šroubu (obr. 3a/pol. 18). Příslušně
podle požadované výšky rukojeti zvolit jeden ze
tří otvorů pro upevnění. Pozor! Na obou
stranách nastavit stejnou výšku! Dbejte přitom
na to, aby nepřekážela lanka, která se upevní
později.
3. Horní vodicí rukojeť přišroubovat na spodní
vodicí rukojeti na obou stranách vždy pomocí
jednoho šroubu (obr. 3b/pol. 16) a hvězdicového
šroubu (obr. 3b/pol. 18). Dbát na to, že jsou
páčky šroubů (16) při utahovaní zaklapnuty
směrem dovnitř, aby zůstala zachována
rychloupínací funkce.
4. Rukojeť startovacího lanka (obr. 3c/pol. 4)
zavěsit na příslušném háčku (obr. 3c/pol. 24)
tak, jak je znázorněno na obr. 3c.
5. Lanka upevnit na vodicí rukojeti pomocí
přiložených kabelových klipsů (obr. 3d/pol. 13).
6. Jednou rukou nadzvednout vyhazovací klapku
(obr. 4/pol. 8) a zavěsit sběrací vak (obr. 4/pol. 7)
tak, jak je znázorněno na obr. 4.
앬
Nejistota K
Vibrace ahw:
3 dB (A)
7,3 m/s2
5.2 Nastavení výšky řezu
Nejistota K
Hmotnost:
1,5 m/s2
46 kg
Pozor! Přestavení výšky řezu smí být prováděno
pouze, když je motor vypnutý a koncovka
zapalovacího kabelu vytažená.
5. Před uvedením do provozu
앬
5.1 Montáž komponent
Při dodávce jsou některé komponenty demontovány.
Montáž je jednoduchá, pokud jsou dodržovány
následující pokyny.
Pozor! Pro montáž a údržbu potřebujete následující
dodatečné nářadí, které není v rozsahu dodávky:
앬
záchytná vana na olej, mělká (pro výměnu oleje)
앬
odměrka 1 litr (odolná proti oleji/benzínu)
앬
kanystr na benzín (5 litrů vystačí na cca 6
provozních hodin)
앬
nálevka (vhodná pro plnicí hrdlo nádrže)
앬
papírové utěrky (na otření zbytků oleje/benzínu;
likvidace u čerpací stanice)
앬
sací čerpadlo na benzín (provedení z plastu, k
dostání ve stavebních marketech)
앬
앬
Než začnete sekat, zkontrolujte, zda řezné
nástroje nejsou tupé a jejich upevňovací
prostředky nejsou poškozeny. Nahraďte tupé
a/nebo poškozené řezné nástroje popřípadě
v celé sadě, aby nedošlo k nevyváženosti. Při
této kontrole vypněte motor a vytáhněte
koncovku zapalovacího kabelu.
Nastavení výšky řezu probíhá centrálně pomocí
nastavovací páky výšky řezu (obr. 8/pol. 9).
Může být nastaveno 5 různých výšek řezu.
Vytáhněte nastavovací páku směrem ven a
nastavte požadovanou výšku řezu. Páka
zapadne v požadované pozici.
43
Anleitung_RPM_56_S_MS_SPK7:_
21.12.2009
15:05 Uhr
Seite 44
CZ
6. Obsluha
Pozor!
Motor je dodáván bez oleje. Před uvedením do
provozu proto bezpodmínečně doplňte 0,6 l oleje.
Používejte běžný univerzální olej (10W30). Před
každým sečením musí být zkontrolován stav
oleje v motoru (viz Kontrola stavu oleje).
Aby se zabránilo nechtěnému spuštění sekačky, je
tato vybavena motorovou brzdou (obr. 5a/pol. A),
která musí být aktivována, než je sekačka spuštěna.
Při uvolnění páčky motorové brzdy se tato musí
vrátit zpět do výchozí polohy a motor je automaticky
vypnut.
Regulační páčku plynu (obr. 7) nastavte do polohy
“I I”. Zmáčkněte páčku motorové brzdy (obr. 5b) a
silně zatáhněte za startovací lanko. Pomocí
regulační páčky plynu můžete regulovat rychlost a
otáčky nože (obr. 7).
Před začátkem sečení byste měli tuto operaci
několikrát provést, abyste se ujistili, že vše správně
funguje. Pokaždé, když musíte provádět jakékoli
práce týkající se nastavení a/nebo oprav na Vaší
sekačce, vyčkejte, až se nůž nebude točit.
Před jakýmkoli nastavováním, údržbou nebo
opravou vypněte motor.
Pokyny:
1. Motorová brzda (obr. 5a/pol. 1): Pro vypnutí
motoru používejte páku. Když páku uvolníte,
automaticky se zastaví motor a nože (obr. 5b).
Pro sečení držte páku věli páku start/stop
několikrát zkontrolovat. Ujistěte se, že
protahovací lanko lehce chodí.
2. Regulační páčka plynu (obr. 7): Posouvejte ji,
pokud chcete zvýšit nebo snížit rychlost motoru.
(“želva” = pomalu / ”zajíc” = rychle)
3. Páka pojezdu (páka spojky) (obr. 5a/pol. 19):
Stisknete-li tuto páku (obr. 5c), spojka pro
pohon pojezdu se zavře a sekačka začne jezdit
při běžícím motoru.
Uvolněte páku pojezdu včas, abyste zastavili
jedoucí sekačku. Cvičte si rozjezd a zastavení
před prvním sečením, až budete seznámeni
s ovladatelností.
4. Výstražné upozornění: Nůž rotuje, když je
motor spuštěn.
Důležité: Před spuštěním motoru pohybujte
vícekrát motorovou brzdou, abyste zkontrolovali,
že zastavovací lanko také dobře funguje.
Upozornění: Motor je dimenzován na rychlost
řezu pro trávu a výhoz trávy do sběrného vaku a
44
pro dlouhou životnost motoru.
5. Zkontrolujte stav oleje.
6. Naplňte nádrž s cca 1,9 l benzínu, když je
prázdná, a použijte trychtýř a odměrku. Ujistěte
se, že je benzín čistý.
Výstraha: Vždy používejte pouze bezpečnostní
kanistr na benzín. Při plnění benzínu nekuřte. Před
plněním benzínu vypněte motor a nechte motor
několik minut vychladnout.
7. Ujistěte se, že kabel zapalování je připojen na
zapalovací svíčku.
8. Páčku plynu nastavte do polohy “I I”.
9. Stůjte za motorovou sekačkou. Jedna ruka musí
být na páce start/stop motoru. Druhá na
spouštěcí rukojeti.
10. Motor spustit pomocí reverzního startéru (obr.
1/pol. 4). K tomu rukojeť vytáhnout cca 10-15
cm (až je citelný odpor), poté silně jedním tahem
zatáhnout. Pokud motor nenaskočí, ještě jednou
zatáhnout za rukojeť. Pozor! Lanko nenechat
vymrštit zpět.
Nenaskočí-li motor po cca 5-6 opakováních.
Upozornění: Za studeného počasí může být
nutné spouštěcí postup několikrát opakovat.
11. Pokud je motor zahřátý na provozní teplotu,
může být spuštěn v poloze “želva” (obr. 7).
Důležité: Pokusy o spuštění motoru v poloze
“I I” mohou u motoru zahřátého na
provozní teplotu vést k tomu, že je svíčka mokrá
od benzínu. Opakujte proto spouštění teprve po
několika minutách.
Při mulčování se sekaná tráva rozseká v uzavřeném
krytu sekačky a opět rozmístí na trávníku. Odpadá
tím sběr a likvidace trávy.
Pozor: Mulčování je možné pouze u relativně
krátkého trávníku. Optimálních výsledků docílíte
pouze s mulčovacím nožem (k dostání jako
příslušenství).
Abyste mohli využívat tuto mulčovací funkci, vyvěste
sběrací vak a nastrčte mulčovací adaptér (obr.
6a/pol. 22) na vyhazovací otvor a zavřete vyhazovací
klapku.
Boční vyhazování
Abyste mohli využívat boční vyhazování, měl by být
namontován mulčovací adaptér (pol. 22). Zavěste
adaptér bočního vyhazování (obr. 6b/pol. 21) tak, jak
je znázorněno na obr. 6b.
Anleitung_RPM_56_S_MS_SPK7:_
21.12.2009
15:05 Uhr
Seite 45
CZ
6.1 Před sečením
Důležité pokyny:
1. Správně se oblečte. Noste vhodnou obuv a ne
sandály nebo tenisové boty.
2. Zkontrolujte nože. Nůž, který je ohnutý nebo
jinak poškozený, musí být vyměněn za originální
nůž.
3. Natankujte nádrž na benzín venku. Používejte
plnicí trychtýř a odměrku. Přeteklý benzín otřete.
4. Přečtěte si a dodržujte návod k provozu a také
pokyny týkající se motoru a přídavných zařízení.
Uschovejte návod přístupný i pro jiné uživatele.
5. Výfukové plyny jsou nebezpečné. Nechte běžet
motor pouze venku.
6. Ujistěte se, že jsou k dispozici veškerá
bezpečnostní zařízení a také dobře fungují.
7. Přístroj by měl být obsluhován pouze osobou,
která je k tomu způsobilá.
8. Sečení mokré trávy může být nebezpečné.
Sečte trávu co možná nejsušší.
9. Poučte jiné osoby nebo děti, aby se nezdržovaly
v blízkosti sekačky.
10. Nikdy nesečte za špatné viditelnosti.
11. Před sečením odstraňte ze země okolo ležící,
volné předměty.
6.2 Pokyny ke správnému sečení
Pozor! Nikdy neotvírejte uzávěr vyhazovacího
otvoru, když se bude vyprazdňovat sběrné
zařízení a motor ještě běží. Točící nůž může vést
ke zraněním.
Vždy pečlivě upevněte uzávěr vyhazovacího otvoru a
sběrný vak na trávu. Při odstraňování napřed
vypněte motor.
Musí se vždy dodržovat bezpečnostní odstup daný
vodícími madly mezi krytem nože a uživatelem.
Obzvláště se musí dávat pozor při sečení a změně
směru jízdy na stráních a svazích. Dbejte na
bezpečný stav, noste obuv s protiskluzovou drsnou
podrážkou a dlouhé kalhoty. Vždy sečte příčně ke
svahu.
Svahy se šikmostí nad 15 stupňů se nesmějí
z bezpečnostních důvodů sekačkou na trávu nikdy
sekat.
Buďte obzvláště opatrní při zpětných pohybech a při
tažení sekačky. Nebezpečí zakopnutí!
6.3 Sečení
Sečte pouze s ostrými, bezvadnými noži, aby se
stébla trávy netřepila a tráva nežloutla.
Pro dosažení čistého řezu veďte sekačku věly vždy
o několik centimetrů překrývat, aby nezůstávaly
pruhy.
Spodní stranu těla sekačky udržujte čistou a
bezpodmínečně odstraňujte veškeré nánosy trávy.
Nánosy trávy ztěžují startovací proces, poškozují
kvalitu řezu a vyhazování trávy. Na svazích musí být
řezná dráha příčně ke svahu. Skluzu sekačky se
nechá zabránit šikmým postavením směrem nahoru.
Zvolte výšku řezu, vždy podle skutečné délky trávy.
Proveďte více záběrů tak, aby byly najednou
odnášeny max. 4 cm trávy. Před jakoukoli kontrolou
nože vypněte motor. Pamatujte, že se nůž po
vypnutí motoru ještě několik vteřin točí. Nikdy
nezkoušejte nůž zastavit.
Pravidelně kontrolujte, zda je nůž správně upevněn,
je v pohybující se nůž na předmět, zastavte sekačku
a vyčkejte, až se nůž zcela zastaví. Následně
zkontrolujte stav nože a držáku nože. Je-li nůž
poškozen, musí být vyměněn.
Pokyny pro sečení:
1. Dávejte pozor na pevné předměty. Sekačka by
mohla být poškozena nebo by mohlo dojít ke
zraněním.
2. Horký motor, výfuk nebo pohon mohou způsobit
popáleniny. Nedotýkejte se jich.
3. Na svazích nebo strmě zkoseném terénu sečte
opatrně.
4. Chybějící denní světlo nebo nedostatečné umělé
osvětlení jsou důvodem pro zastavení sečení.
5. Zkontrolujte sekačku, nůž a jiné díly, jestliže jste
najeli na cizí těleso nebo stroj vibruje silněji než
normálně.
6. Neprovádějte žádné změny nastavení nebo
opravy, aniž byste vypnuli motor. Vytáhněte
koncovku zapalovacího kabelu.
7. Na silnici nebo v blízkosti silnice dávejte pozor
na silniční dopravu. Udržujte vyhazování trávy ve
vzdálenosti od silnice.
8. Vyhněte se místům, kde kolečka již nezabírají
nebo je sečení nebezpečné. Při zpětném pohybu
se ujistěte, zda za Vámi nejsou malé děti.
9. V husté, vysoké trávě nastavte nejvyšší stupeň
řezu a sečte pomalu. Před odstraňováním trávy
nebo jiných zanesení vypněte motor a uvolněte
zapalovací kabel.
10. Nikdy neodstraňujte díly, které slouží
k bezpečnosti.
11. Nikdy neplňte benzín do motoru, který je ještě
horký nebo běží.
6.4 Vyprázdnění sběrného vaku na trávu
Jakmile zůstávají během sekání ležet na zemi zbytky
trávy, musí se sběrný vak vyprázdnit.
Pozor! Před sejmutím sběrného vaku vypněte
motor a vyčkejte, až se zastaví řezný nástroj.
Pro sejmutí sběrného vaku jednou rukou
45
Anleitung_RPM_56_S_MS_SPK7:_
21.12.2009
15:05 Uhr
Seite 46
CZ
nadzdvihněte uzávěr vyhazovacího otvoru, druhou
rukou vyjměte na rukojeti sběrný vak. Dle
bezpečnostního předpisu zapadne při vyvěšení
sběrného vaku uzávěr vyhazovacího otvoru a uzavře
zadní vyhazovací otvor. Zůstanou-li přitom viset
v otvoru zbytky trávy, tak je pro snadnější spuštění
motoru účelné odjet se sekačkou o cca 1 m.
Zbytky po sečení ve skeletu sekačky nebo na
pracovním nástroji neodstraňujte rukou nebo nohou,
ale za pomoci vhodných pomocných prostředků,
např. kartáče nebo ručního smetáčku.
Pro zaručení dobrého sběru musí být sběrný vak a
zvlášť vzduchová mříž zevnitř po použití vyčištěny.
Sběrný vak zavěšte pouze při vypnutém motoru a
vho nástroje.
Uzávěr vyhazovacího otvoru nadzdvihněte jednou
rukou a druhou rukou držte sběrný vak na rukojeti a
seshora zavěšte.
6.5 Po sečení
1. Před odstavením sekačky do uzavřené místnosti
nechte motor vždy nejdříve vychladnout.
2. Před uskladněním odstraňte trávu, listí, mazivo a
olej. Na sekačce neskladujte žádné jiné
předměty.
3. Před opětovným použitím zkontrolujte všechny
šrouby a matice. Volné šrouby pevně utáhněte.
4. Před opětovným použitím vyprázdněte sběrný
vak.
5. Uvolněte koncovku zapalovacího kabelu, abyste
zabránili nedovolenému použití.
6. Dejte pozor, abyste sekačku neodstavili vedle
zdroje nebezpečí. Zplodiny plynu mohou vést
k výbuchu.
7. Při opravách smějí být používány pouze
originální díly nebo díly schválené výrobcem (viz
adresa záručního listu).
8. Při delším nepoužívání sekačky vyprázdněte
nádrž na benzín pomocí odsávacího čerpadla na
benzín.
9. Poučte děti, aby sekačku nepoužívaly. Není to
hračka.
10. Nikdy neskladujte benzín ve benzín v dosahu
dětí.
11. Olejujte a udržujte přístroj.
12. Zastavení motoru:
Na zastavení motoru pusťte páčku
spuštění/vypnutí motoru (obr. 5a/pol. 1).
Zavřete benzínový kohout a stáhněte nástrčku
zapalovací svíčky, aby se zabránilo spuštění
motoru. Před opakovaným spuštěním motoru
překontrolujte lanko motorové brzdy.
Zkontrolujte, zda je lanko správně namontováno.
Zlomené nebo poškozené vypínací lanko musí
být vyměněno.
46
7. Čištění, údržba, uložení, transport a
objednání náhradních dílů
Pozor:
Nikdy při zapnutém motoru nepracujte na vodivých
částech zapalovacího zařízení nebo se jich
nedotýkejte. Před jakoukoli údržbou a péčí
vytáhněte koncovku zapalovacího kabelu ze
zapalovací svíčky. Nikdy neprovádějte jakékoli práce
na běžícím stroji. Práce, které nejsou popsány
vváděny pouze u autorizované dílny.
7.1 Čištění sekačky
Po každém použití by měla být sekačka důkladně
vyčištěna. Především spodní strana a uchycení
nože. Za tímto účelem překlopte sekačku na levou
stranu (proti plnicímu hrdlu oleje).
Pokyn: Před překlopením sekačky na stranu zcela
vyprázdněte palivovou nádrž pomocí odsávacího
čerpadla na benzín. Sekačka nesmí být překlopena
přes 90 stupňů. Nejsnadněji odstraníte nečistoty a
trávu ihned po sekání. Zaschlé zbytky trávy a
nečistoty mohou vést kzání. Zkontrolujte, zda je
vyhazovací kanál na trávu prostý zbytků trávy a při
potřebě je odstraňte. Sekačku nikdy nečistěte
proudem vody nebo vysokotlakými čističi. Motor
musí zůstat suchý. Agresivní čistidla jako čistidla pro
čištění za studena a čisticí benzín nesmějí být
používána.
7.2 Údržba
7.2.1 Osy kol a hlavy kol
by měly být jednou za sezónu lehce promazány.
Sejměte kryty kola pomocí šroubováku a uvolněte
upevňovací šrouby kol.
7.2.2 Nůž
Nůž nechte zrizovanou dílnou. Pro dosažení
optimálního pracovního výsledku doporučujeme nůž
nechat zkontrolovat jednou za rok.
Výměna nože (obr. 9)
Při výměně řezného nástroje smějí být používány
pouze originální náhradní díly. Značení nože musí
souhlasit sa seznamu náhradních dílů. Nikdy
nemontujte jiný nůž.
Poškozené nože
Dostane-li se nůž i přes veškerou opatrnost do styku
s překážkou, ihned vypněte motor a vytáhněte
koncovku zapalovacího kabelu. Sekačku bočně
překlopte a zkontrolujte nůž, není-li poškozen.
Poškozené nebo zohýbané nože musejí být
vyměněny. Nikdy ohnutý nůž nenarovnávejte. Nikdy
nepracujte se zohýbaným nebo silně
Anleitung_RPM_56_S_MS_SPK7:_
21.12.2009
15:05 Uhr
Seite 47
CZ
opotřebovaným nožem, ten způsobuje vibrace a
může mít za následek další poškození sekačky.
Pozor: Při práci s vzniká nebezpečí zranění.
Dobroušení nože
Nože mohou být dobroušeny kovovým pilníkem.
Aby se zabránilo nevyváženosti, měla by broušení
provádět pouze autorizovaná dílna.
7.2.3 Kontrola stavu oleje
Pozor: Motor nikdy neprovozujte bez oleje nebo
sálo olejem. To může způsobit těžká poškození
motoru. Používejte pouze motorový olej 10W30.
Kontrola stavu oleje:
Sekačku postavte na rovnou přímou plochu.
Otáčením doleva odšroubujte měrku na olej a utřete
měrku. Měrku opět zasuňte do plnicího hrdla až do
dorazu, nezašroubovávejte. Měrku vytáhněte a ve
vodorovné poloze odečtěte stav oleje. Stav oleje
musí být mezi max (horní hrana plošně lisované
kovové tyčinky, obr. 10b) a min (spodní hrana plošně
lisované kovové tyčinky, obr. 10b). Oranžový,
pohyblivý plastový díl na měrce oleje je ochrana
proti olejové pěně.
Výměna oleje
Výměna oleje by se měla provádět každý rok před
začátkem sezóny (dodatečně k informacím servisní
brožurky Benzín) u zahřátého motoru.
앬
Používat pouze motorový olej (10W30).
앬
Postavte pod sekačku mělkou záchytnou vanu
na olej.
앬
Otevřete plnicí šroub oleje (obr. 10a/ pol. 11).
앬
Otevřete vypouštěcí šroub oleje (obr. 10a/ pol.
12). Teplý motorový olej vypusťte do záchytné
vany.
앬
Po vytečení použitého oleje vypouštěcí šroub
oleje opět zavřete.
앬
Motorový olej naplňte až po horní značku měrky
oleje (cca 0,6 l).
앬
Pozor! Měrku oleje ke kontrole stavu oleje
nezašroubovat, ale pouze zastrčit po závit.
앬
Použitý olej musí být zlikvidován příslušně podle
platných předpisů.
7.2.4 Údržba a nastavení tažných lanek
Tažná lanka častěji olejovat a kontrolovat lehkost
chodu.
7.2.5 Údržba vzduchového filtru (obr. 11a-11c)
Znečištěné vzduchové filtry snižují výkon motoru
kvůli příliš malému přívodu vzduchu do karburátoru.
Pravidelná kontrola je proto nezbytná. Vzduchový
filtr by měl být kontrolován každých 25 hodin a při
potřebě čištěn. Při velmi prašném vzduchu se musí
vzduchový filtr kontrolovat častěji.
Pozor: Vzduchový filtr nikdy nečistěte benzínem
nebo hořlavými rozpouštědly. Vzduchový filtr čistěte
pouze stlačeným vzduchem nebo ho vyklepněte.
7.2.6. Údržba zapalovací svíčky
Svíčku poprvé zkontrolujte po 10 provozních
hodinách, zda není znečištěna, a v případě potřeby ji
vyčistěte pomocí měděného drátěného kartáče.
Poté provádět údržbu každých 50 provozních hodin.
앬
Otáčením sundejte nástrčku zapalovací svíčky
(obr. 12/ pol. 23).
앬
Přiloženým klíčem na svíčky odstraňte
zapalovací svíčku.
앬
Montáž se provádí v opačném pořadí.
7.2.7 Oprava
Po opravě nebo údržbě se ujistěte, že veškeré
bezpečnostně-technické díly jsou umístěny a jsou
v bezvadném stavu. Díly ohrožující zdraví jiných
osob a dětí uchovávejte nepřístupné.
Pozor: Dle zákona o ručení za výrobek neručíme za
vady, které jsou způsobeny neodbornou manipulací
nebo když se u náhradních dílů nepoužívají originální
díly nebo námi schválené díly. Také neručíme za
škody způsobené neodbornou opravou. Pověřte jí
zákaznickou službu nebo autorizovaného odborníka.
To samé platí i pro díly příslušenství.
7.2.8 Provozní doba
Sekačky smějí být provozovány pouze v pracovní
dny v době od 7.00 – 19.00 hodin. Dodržujte prosím
zákonná ustanovení, která mohou být místně
odlišná.
7.3 Příprava pro uskladnění sekačky
Výstražné upozornění: Neodstraňujte benzín
v uzavřených místnostech, v blízkosti ohně nebo při
kouření. Výpary plynu mohou způsobit explozi nebo
požár.
1. Vyprázdněte nádrž na benzín pomocí
benzinového odsávacího čerpadla.
2. Spusťte motor a nechte motor běžet tak dlouho,
až se spotřebuje zbylý benzín.
3. Po každé sezóně proveďte výměnu oleje. Pro
tento účel odstraňte starý motorový olej
z teplého motoru a nalijte nový.
4. Zte cca 20 ml oleje do válce. Pomalu táhněte
startovací rukojeť tak, aby olej chránil válec
zevnitř. Poté opět našroubujte zapalovací
svíčku.
5. Vyčistěte chladicí žebra válce a skelet.
6. Vyčistěte celý přístroj, aby se chránila lakovaná
barva.
7. Skladujte přístroj na dobře větraném místě.
47
Anleitung_RPM_56_S_MS_SPK7:_
21.12.2009
CZ
7.4 Příprava sekačky pro přepravu
1. Vyprázdněte nádrž na benzín (viz bod 7.3/1).
2. Nechte motor běžet tak dlouho, až se
spotřebuje zbylý benzín.
3. Vyprázdněte motorový olej z teplého motoru.
4. Odstraňte koncovku zapalovacího kabelu od
zapalovací svíčky.
5. Vyčistěte chladicí žebra válce a skelet.
6. Vyvěste spouštěcí tažné lanko na hák (obr. 3c).
Uvolněte křídlatou matici a sklapněte horní
rukojeť dolů.
7. Naviňte několik vrstev vlnité lepenky mezi horní
a dolní rukojeť a motor, aby se zabránilo oděru.
7.5 Objednání náhradních dílů:
Při objednávce náhradních dílů je třeba uvést
následující údaje:
앬
Typ přístroje
앬
Číslo výrobku přístroje
앬
Identifikační číslo přístroje
앬
Číslo náhradního dílu požadovaného náhradního
dílu
Aktuální ceny a informace naleznete na
www.isc-gmbh.info
8. Likvidace a recyklace
Přístroj je uložen v balení, aby bylo zabráněno
poškození při přepravě. Toto balení je surovina a tím
znovu použitelné nebo může být dáno zpět do
cirkulace surovin.
Přístroj a jeho příslušenství jsou vyrobeny z
rozdílných materiálů, jako např. kov a plasty.
Defektní součástky odevzdejte k likvidaci zvláštních
odpadů. Zeptejte se v odborné prodejně nebo na
místním zastupitelství!
48
15:05 Uhr
Seite 48
Anleitung_RPM_56_S_MS_SPK7:_
21.12.2009
15:05 Uhr
Seite 49
CZ
9. Poruchy a odstraňování vad
Výstražné upozornění: Před kontrolou nebo seřizováním nejdříve vypněte motor a vytáhněte zapalovací
kabel.
Výstražné upozornění: Když po seřízení nebo opravě motor několik minut běžel, myslete na to, že výfuk a
jiné díly jsou horké. Takže se jich nedotýkejte, aby nedošlo ke spálení.
Porucha
Možná příčina
Odstranění
Neklidný běh, silné vibrování
přístroje
- volné šrouby
- volné upevnění nože
- nevyvážený nůž
- zkontrolovat šrouby
- zkontrolovat upevnění nože
- nahradit nůž
Motor neběží
- páka brzdy nestisknuta
- páka plynu chybná pozice
- poškozená zapalovací svíčka
- palivová nádrž prázdná
- stisknout páku brzdy
- zkontrolovat nastavení
- obnovit zapalovací svíčku
- doplnit palivo
Motor běží neklidně
- znečištěný vzduchový filtr
- znečištěná zapalovací svíčka
- vyčistit vzduchový filtr
- vyčistit zapalovací svíčku
Nepravidelně osekaná tráva
- nůž není ostrý
- výška řezu příliš malá
- otáčky motoru příliš malé
- nabrousit nůž
- nastavit správnou výšku
- páku nastavit na maximum
Nedostatečné vyhazování trávy
- otáčky motoru příliš malé
- výška řezu příliš malá
- nůž opotřebovaný
- ucpaný sběrný vak
- páku nastavit na maximum
- správné nastavení
- vyměnit nůž
- vyprázdnit sběrný vak
49
Anleitung_RPM_56_S_MS_SPK7:_
21.12.2009
15:05 Uhr
Seite 50
ISC GmbH · Eschenstraße 6 · D-94405 Landau/Isar
Konformitätserklärung
k erklärt folgende Konformität gemäß EU-Richtlinie und
Normen für Artikel
t explains the following conformity according to EU
directives and norms for the following product
p déclare la conformité suivante selon la directive CE et les
normes concernant l’article
C dichiara la seguente conformità secondo la direttiva UE e
le norme per l’articolo
N verklaart de volgende overeenstemming conform EU
richtlijn en normen voor het product
m declara la siguiente conformidad a tenor de la directiva y
normas de la UE para el artículo
O declara a seguinte conformidade, de acordo com a
directiva CE e normas para o artigo
l attesterer følgende overensstemmelse i medfør af
EU-direktiv samt standarder for artikel
U förklarar följande överensstämmelse enl. EU-direktiv och
standarder för artikeln
q vakuuttaa, että tuote täyttää EU-direktiivin ja standardien
vaatimukset
. tõendab toote vastavust EL direktiivile ja standarditele
j vydává následující prohlášení o shodě podle směrnice
EU a norem pro výrobek
X potrjuje sledečo skladnost s smernico EU in standardi za
izdelek
W vydáva nasledujúce prehlásenie o zhode podľa smernice
EÚ a noriem pre výrobok
A a cikkekhez az EU-irányvonal és Normák szerint a
következő konformitást jelenti ki
P deklaruje zgodność wymienionego poniżej artykułu z
następującymi normami na podstawie dyrektywy WE.
e декларира съответното съответствие съгласно
Директива на ЕС и норми за артикул
H paskaidro šādu atbilstību ES direktīvai un standartiem
G apibūdina šį atitikimą EU reikalavimams ir prekės
normoms
Q declară următoarea conformitate conform directivei UE
şi normelor pentru articolul
z δηλώνει την ακόλουθη συμμόρφωση σύμφωνα με την
Οδηγία ΕΚ και τα πρότυπα για το προϊόν
B potvrđuje sljedeću usklađenost prema smjernicama EU
i normama za artikl
f potvrđuje sljedeću usklađenost prema smjernicama EU
i normama za artikl
4 potvrđuje sledeću usklađenost prema smernicama EZ i
normama za artikal
T следующим удостоверяется, что следующие
продукты соответствуют директивам и нормам ЕС
1 проголошує про зазначену нижче відповідність
виробу директивам та стандартам ЄС на виріб
5 ја изјавува следната сообрзност согласно
ЕУ-директивата и нормите за артикли
Z Ürünü ile ilgili AB direktifleri ve normları gereğince
aşağıda açıklanan uygunluğu belirtir
L erklærer følgende samsvar i henhold til EU-direktivet
og standarder for artikkel
E Lýsir uppfyllingu EU-reglna og annarra staðla vöru
Benzin-Rasenmäher RPM 56 S-MS (Royal)
2009/105/EC
x
2006/95/EC
Notified Body:
Notified Body No.:
Reg. No.:
2006/28/EC
2005/32/EC
x
2006/42/EC
Annex IV
x
2004/108/EC
2004/22/EC
2000/14/EC_2005/88/EC
Annex V
x Annex VI
Noise: measured LWA = 96 dB (A); guaranteed LWA = 98 dB (A)
P = KW; L/Ø = 56 cm
Notified Body: TÜV Süd Industrie Service GmbH
Westendstrasse 199 80686 München (0036)
1999/5/EC
97/23/EC
x
90/396/EC
2004/26/EC
Emission No.: e11*97/68SA*2004/26*0989*00
89/686/EC_96/58/EC
Standard references: EN 836; EN ISO 14982
Landau/Isar, den 27.11.2009
First CE: 09
Art.-No.: 34.007.51 I.-No.: 01019
Subject to change without notice
50
Weichselgartner/General-Manager
Frank/Product-Management
Archive-File/Record: 3400750-02-4155050-08
Documents registrar: Mayn Robert
Wiesenweg 22, D-94405 Landau/Isar
Anleitung_RPM_56_S_MS_SPK7:_
21.12.2009
15:05 Uhr
Seite 51
Technische Änderungen vorbehalten
Technical changes subject to change
Sous réserve de modifications
j
Technické změny vyhrazeny
51
Anleitung_RPM_56_S_MS_SPK7:_
21.12.2009
15:05 Uhr
Seite 52
Der Nachdruck oder sonstige Vervielfältigung von Dokumentation und
Begleitpapieren der Produkte, auch auszugsweise ist nur mit ausdrücklicher Zustimmung der ISC GmbH zulässig.
The reprinting or reproduction by any other means, in whole or in part,
of documentation and papers accompanying products is permitted only
with the express consent of ISC GmbH.
La réimpression ou une autre reproduction de la documentation et des
documents d’accompagnement des produits, même incomplète, n’est
autorisée qu’avec l’agrément exprès de l’entreprise ISC GmbH.
j
Dotisk nebo jiné rozmnožování dokumentace a průvodních
dokumentů výrobků, také pouze výňatků, je přípustné výhradně se
souhlasem firmy ISC GmbH.
EH 12/2009 (01)