1
EN
DE
Gebrauchsanweisung
für die CAD/CAM-Titanbasen, CEREC®
1. Hersteller
Dentaurum Implants GmbH I Turnstr. 31 I 75228 Ispringen I Germany
2. Kurzbeschreibung
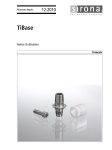
Jeweils eine CAD/CAM-Titanbasis, CEREC® wird zusammen mit einer Abutmentschraube unsteril geliefert. Alle Teile sind nur zum einmaligen Gebrauch bestimmt.
Der Scankörper muss separat über die Firma Sirona erworben werden.
Auf die CAD/CAM-Titanbasis, CEREC® können individuell gefertigte Mesostrukturen
oder Provisorien geklebt werden. Die verklebten Teile werden im Mund mit der
Abutmentschraube auf dem passenden Implantat verschraubt.
Der Scankörper dient ausschließlich zur Erfassung der Implantatlage für die
Konstruktion in der Software inLab 3D.
Die CAD/CAM-Titanbasis, CEREC® gibt es in unterschiedlichen Ausführungen, die
zu jeweils einem bestimmten Durchmesser des tioLogic ® Implantatsystems
kompatibel ist.
Implantattypen
Implantatdurchmesser
tiologic ®
tioLogic ST
®
3.3 mm
3.7 mm
4.2 mm
4.8 mm
5.5 mm
3.3 mm
3.7 mm
4.2 mm
4.8 mm
5.5 mm
CAD/CAM-Titanbasis
CEREC von
Dentaurum Implants
386-195-00
386-295-00
386-395-00
386-195-00
386-295-00
386-395-00
TiBase Scanbody
von Sirona
62 82 615
62 82 623
62 82 615
62 82 623
3. Materialien
CAD/CAM Titanbasis
3.7165
AnoTite Schraube
3.7165
4. Bestimmungsgemäßer Gebrauch
Das Sirona Dental CAD/CAM-System ist für die Herstellung von optischen Abdrücken zur Erfassung der topografischen Merkmale von Zähnen, dentalen Abdrücken oder Gipsmodellen mithilfe computerunterstützter Konstruktion und Fertigung bei Patienten indiziert, die Dentalrestaurationen und -prothesen benötigen.
Das System kann auch bei der Bearbeitung von Mesostrukturen eingesetzt werden
(restaurative Dentalprothesen, die in Verbindung mit enossalen Implantat-Abutments verwendet werden).
Das System, das auch bei der Bearbeitung von Mesostrukturen eingesetzt werden
kann, umfasst: CAD/CAM-Titanbasis, CEREC®.
CAD/CAM-Titanbasen, CEREC® werden in einem Implantat als prothetische Titanbasis zum Aufkleben auf Mesostrukturen fixiert, um die Funktion und Ästhetik im
Mundraum wiederherzustellen.
Kontraindikationen sind:
Mangelhafte Mundhygiene
Platzmangel
Bruxismus
Restaurationen von einzelnen Zähnen mit Freiendsattel
Restaurationen, deren Länge ein Verhältnis von 1:1,25 im Vergleich zur Länge
des Implantats übersteigt.
Restaurationen mit einer Winkelkorrektur von mehr als 15° in der Aufbaulinie S
und 20° in den Aufbaulinien M und L zur Implantatachse
Für Indikationen mit geringer vestibulo-oraler Knochenbreite stehen tioLogic ®
Implantate ø 3.3 mm zur Verfügung. Sie haben aufgrund ihres kleineren Durchmessers und Ihrer geringeren Belastbarkeit (im Vergleich z.B. mit tioLogic ®
Implantaten ø 4.2 mm) eine eingeschränkte Indikation.
Im zahnlosen Kiefer müssen mindestens vier tioLogic ® Implantate mit einer
verblockten Stegversorgung inseriert werden.
Im teilbezahnten Kiefer sind sie bei implantatgetragenen Versorgungen mit
tioLogic ® Implantaten ø 4.2 mm oder ø 4.8 mm / ø 5.5 mm zu kombinieren und
die prothetische Ausarbeitung festsitzend verblockt zu gestalten.
Bei der Versorgung mit Einzelkronen sind tioLogic ® Implantate ø 3.3 mm nur
für die unteren Incisivi oder die oberen lateralen Incisivi und nur mit einer Länge
von mindestens 11.0 mm einzusetzen.
Für Versorgungen mit Einzelkronen auf tioLogic® Implantaten ø 3.7 mm, ø 4.2 mm,
ø 4.8 mm und ø 5.5 mm ist eine Mindestlänge von 9.0 mm vorzusehen.
Nur für USA
VORSICHT: Laut Bundesgesetz der USA darf dieses Produkt nur an
Ärzte, Zahnärzte oder lizenzierte Fachleute bzw. in deren Auftrag
verkauft werden.
5. Verarbeitungshinweise
5.1 Scannen
1. Stecken Sie die CAD/CAM-Titanbasis, CEREC® auf das passende Laboranalog
im Meistermodell und schrauben es mit der mitgelieferten AnoTite Schraube
fest.
2. Stecken Sie den entsprechenden Scankörper (siehe Punkt 2) auf die CAD/CAMTitanbasis, CEREC®, bis dieser spaltfrei damit abschließt und achten Sie dabei auf
die vorgesehene Führungsnut. Der Scankörper ist ohne Puder/Scanspray scanbar.
3. Scannen Sie die Situation wahlweise mit inEos Blue, inEos, CEREC 3 oder
CEREC AC auf.
4. Konstruieren Sie mit der Software inLab 3D for Abutments V3.65 oder mit der
Software inLab 3D V3.80 (oder höher) die individuelle Form der Mesostruktur
unter Berücksichtigung folgender Hinweise: Da das tioLogic ® Implantatsystem
zum aktuellen Zeitpunkt in der Sirona CEREC® Software nicht integriert ist,
kann für die Berarbeitung in der Software alternativ das camlog® Implantatsystem ausgewählt werden. Hierbei sind folgende Hinweise zu beachten:
Bitte prüfen Sie die korrekte Position der Konstruktion vor dem Schleifvorgang.
Bei der Auswahl des camlog® Implantatsystems mit drei Positionierungsmöglichkeiten kann unter Umständen eine Korrektur notwendig sein. Wird dies
nicht beachtet, kann die Mesostruktur ggf. nicht korrekt ausgerichtet werden.
Die Korrektur erfolgt durch Einbringen einer entsprechenden Ausnehmung in
der korrigierten Position in der ungesinterten Mesostruktur. Schleifen Sie
anschließend die Form aus einem inCoris ZI meso-Block (siehe inLab 3D/inLab
3D for Abutments, Handbuch für den Anwender). Beachten Sie dazu unbedingt
die Hinweise zu Konstruktion, Nachbearbeitung und Sintern von Zirkonoxid in
der Gebrauchsanweisung für inCoris ZI meso-Blöcke.
5.2 Verarbeitung der CAD/CAM-Titanbasis, CEREC®
Der Durchmesser der CAD/CAM-Titanbasis, CEREC® darf nicht reduziert werden,
z. B. durch Beschleifen. Ein Kürzen der CAD/CAM-Titanbasis, CEREC® ist nicht
empfohlen.
Die Kontaktflächen der CAD/CAM-Titanbasis, CEREC® zum Implantat dürfen
weder abgestrahlt noch anderweitig bearbeitet werden!
Nur die für die Verklebung mit einer Mesostruktur vorgesehenen Flächen der CAD/CAMTitanbasis, CEREC® müssen gestrahlt (50 μm Aluminiumoxid, max. 2,0 bar) und
anschließend gereinigt (Alkohol oder Dampf) werden. Zum Schutz der Innenverbindung sollte die CAD/CAM-Titanbasis, CEREC® in einem Laboranalog fixiert werden.
Verwenden Sie als Kleber zum Verbinden von CAD/CAM-Titanbasis, CEREC® und
gesinterter inCoris ZI-Mesostruktur „PANAVIA™ F 2.0“, (Gebrauchsanweisung
Panavia beachten: www.kuraray-dental.de) extraoral.
1. Zur leichteren Handhabung während der Verklebung empfiehlt es sich, die
CAD/CAM-Titanbasis, CEREC® in ein Laborimplantat bzw. eine Polierhilfe einzuschrauben.
2. Decken Sie den Innensechskantkopf der Abutmentschraube mit Wachs ab.
3. Mischen Sie den Kleber nach Herstellerangaben an und tragen Sie ihn auf die
CAD/CAM-Titanbasis, CEREC® auf.
4. Schieben Sie die gesinterte inCoris ZI-Mesostruktur bis zum Anschlag auf.
Beachten Sie das Einrasten der Rotations- und Positionssicherung.
5. Entfernen Sie grobe Kleberüberschüsse sofort.
6. Zum endgültigen Aushärten des Klebers bringen Sie den Airblocker („Oxyguard“)
am Übergang Keramik/Titan und in den Schraubenkamin auf.
7. Entfernen Sie nach der Aushärtung die Überschüsse mit einem Gummipolierer.
5.3 Hinweise für den Zahnarzt
Die CAD/CAM-Titanbasen werden unsteril ausgeliefert. Es ist die Gebrauchsanweisung des Implantatherstellers zu beachten.
5.3.1 Sterilisation
Die individuellen Abutments sind vor dem Einsetzen zu sterilisieren. Außerdem
sind die vor Ort geltenden gesetzlichen Bestimmungen und die für eine Zahnarztpraxis geltenden Hygienevorschriften zu beachten.
Verwenden Sie zur Sterilisation der individuellen Abutments nur die für Zahnarztpraxen
geltenden Hygienevorschriften und validierten Sterilisationsverfahren. Beachten Sie
die Sterilisationsparameter.
Die Dampfsterilisation kann mit dem fraktionierten Vakuum- oder dem Gravitations
verfahren erfolgen. Die Sterilisationszeit beträgt bei 132 °C 5 Minuten oder bei
121 °C 15 Minuten. Die Dampfsterilisation darf nur mit Geräten ausgeführt werden,
die den Normen EN 13060 bzw. EN 285 entsprechen.
Die Validierung der Sterilisationsverfahren erfolgte gemäß EN ISO 17664.
Die Verantwortung für die Sterilität des individuellen Abutments liegt beim
Anwender. Es muss dafür Sorge getragen werden, dass bei der Sterilisation nur
geeignete Geräte, Materialien und produktspezifisch validierte Verfahren zum
Einsatz kommen. Es muss sichergestellt werden, dass die zur Anwendung kommenden Verfahren validiert sind. Die Ausrüstung und die Geräte müssen ordnungsgemäß instand gehalten und regelmäßig gewartet werden.
Der Verarbeiter (Zahntechniker) der CAD/CAM-Titanbasis, CEREC® und der Mesostruktur muss den Behandler auf die Sterilisation vor dem Einsetzen im Patientenmund hinweisen!
5.3.2 Anzugsmomente
AnoTite Schraube CAD/CAM-Titanbasis auf Modell:
im Mund:
von Hand
30 Ncm
6. Qualität / Gewährleistung und Haftung / Entwicklung
Entwicklung, klinische Prüfung, Fertigung und Qualitätsüberwachung des tioLogic ®
Produktprogramms erfolgt entsprechend der für Medizinprodukte maßgeblichen
Richtlinie 93/42/EWG.
Im Gewährleistungs- und Haftungsfall sind – vorbehaltlich abweichender Regelungen in dieser Kurzanweisung – die Ziffern 9 und 10 unserer Allgemeinen Lieferund Zahlungsbedingungen maßgeblich.
Ein Gewährleistungs- und Haftungsausschluss besteht insbesondere im Falle eines
unsachgemäßen Gebrauchs der Produkte durch den Anwender oder Dritte; dies
gilt ebenfalls bei einer Kombination des tioLogic ® Produktprogramms mit Fremdprodukten, deren Verwendung von Dentaurum Implants nicht ausdrücklich
empfohlen wird.
Verarbeitung und Anwendung des Produktes erfolgen außerhalb der Kontrolle von
Dentaurum Implants GmbH und stehen allein in der Verantwortung des Anwenders.
Die anwendungstechnische Beratung (mündlich und schriftlich) erfolgt nach dem
aktuellen Stand von Wissenschaft und Technik, der bei Inverkehrbringen des
Produktes bekannt ist. Sie entbindet den Anwender nicht von der Pflicht, die
Eignung der Produkte für die vorgesehenen Indikationen und Anwendungen selbst
zu prüfen. Es handelt sich hierbei lediglich um unverbindliche Empfehlungen, aus
denen keinerlei Zusicherungen oder Garantiezusagen abgeleitet werden können.
Alle Produkte unterliegen einer laufenden Weiterentwicklung unter Berücksichtigung des jeweils aktuellen Standes wissenschaftlicher Erkenntnisse – Änderungen
in Konstruktion, Design und Material sind vorbehalten.
7. Erklärung der verwendeten Symbole
B itte Etikett beachten. Zusätzliche Hinweise finden Sie im Internet unter
www.dentaurum.de (Erklärung der Symbole REF 989-313-00).
Stand der Information: 05/15
Änderungen vorbehalten
CEREC® ist ein eingetragenes Markenzeichen von Sirona.
camlog® ist ein eingetragenes Markenzeichen von CAMLOG.
FR
Instructions for use
CAD/CAM Titanium base, CEREC®
1. Manufacturer
Dentaurum Implants GmbH I Turnstr. 31 I 75228 Ispringen I Germany
2. Brief description
One CAD/CAM Titanium base, CEREC® is supplied with one abutment screw, both
in non-sterile condition. All components are intended for single use only. The scan
body has to be ordered separately at Sirona. Both individually manufactured
mesostructures and temporal restorations can be glued on the CAD/CAM Titanium
base, CEREC®. The glued components are screwed to the implant with the
abutment screw in the patient´s mouth.
The scan body´s sole purpose is to map the implant position for creating the design
in the inLab 3D software.
The CAD/CAM Titanium base, CEREC® is available in different versions, each
being compatible with a specific diameter of the tioLogic ® implant system.
Type of implant
tiologic
®
tioLogic ® ST
Implant
diameter
3.3 mm
3.7 mm
4.2 mm
4.8 mm
5.5 mm
3.3 mm
3.7 mm
4.2 mm
4.8 mm
5.5 mm
CAD/CAM Titanium
base by Dentaurum
Implants
386-195-00
386-295-00
386-395-00
386-195-00
386-295-00
386-395-00
TiBase scan body
by Sirona
62 82 615
62 82 623
62 82 615
62 82 623
3. Materials
CAD/CAM Titanium base
3.7165
AnoTite screw
3.7165
4. Intended use
The Sirona Dental CAD/CAM system is indicated for optical impressions to record
the topographical properties of teeth, dental impressions or plaster models by computer-aided design and manufacturing in patients that need dental restorations or
prosthetics. The system can also be used to process mesostructures (restorative
dental prosthetics used in combination with endosseous implant abutments). The
system that can be used for processing mesostructures comprises: CAD/CAM
Titanium base, CEREC®.
CAD/CAM titanium bases, CEREC® are fixated in an implant as prosthetic titanium
base for adhesion to mesostructures in order to restore function and aesthetics in
the oral cavity.
Contraindications:
Insufficient oral hygiene
Insufficient space
Bruxism
Single restorations with free-end sattle
Restorations whose length exceeds the ratio of 1:1.25 compared to the length
of the implant
Restorations that require an angulation correction of more than 15° for the S
series and more than 20° for the M and L series to the implant axis.
We offer tioLogic ® Ø 3.3 mm implants for patients with narrow alveolar ridges.
Due to the small diameter and low load capacity (compared to tioLogic® Ø 4.2 mm
implants), these implants have a limited range of indications.
In fully edentulous cases, four or more tioLogic ® implants must be inserted with
a splinted bar restoration.
In partially edentulous cases, implant supported restorations must be combined
with tioLogic® Ø 4.2 mm, Ø 4.8 mm or Ø 5.5 mm implants and a splinted fixed
prosthetic restoration.
In single restorations, tioLogic ® Ø 3.3 mm implants should only be used for the
lower incisors or the upper lateral incisors and only with a minimum 11.0 mm
implant length.
Single restorations on tioLogic ® Ø 3.7 mm, Ø 4.2 mm, Ø 4.8 mm or Ø 5.5 mm
implants require a minimum 9.0 mm implant length.
For the USA only
CAUTION: The federal law of the USA restricts the sale of this product
to or on the order of physicians, dentists or licensed practitioners.
5. Notes on processing
5.1 Scanning
1. Tighten the CAD/CAM Titanium base, CEREC® on the matching laboratory
analog in the master model with the supplied AnoTite screw.
2. Place the respective scan body (see section 2) on the CAD/CAM Titanium base,
CEREC® making sure it is seamlessly seated using the provided guide groove.
The scan body can be scanned without powder or scan spray.
3. Scan the model alternatively with inEos Blue, inEos, CEREC 3 or CEREC AC.
4. Design the individual shape of the mesostructure with inLab 3D for Abutments
V3.65 or with inLab 3D V3.80 (or higher) taking into account the following
indications: Since the tioLogic ® implant system is currently not integrated in
the Sirona CEREC® software, the camlog® implant system can be alternatively
selected within the software for the design process. Please note: Check the correct
position of the restoration before the grinding process. If you choose a camlog®
implant system with three positioning options, a correction could be necessary. If
this is not observed, the mesostructure could be positioned incorrectly. Correct the
position with a corresponding recess in the unsintered mesostructure moved into
the correct position. Then, grind the shape out of an inCoris ZI meso block (see
inLab 3D/inLab 3D for Abutments, Operator´s Manual). Please observe the indications on designing, processing and sintering zirconium oxide in the instructions for
use of inCoris ZI meso blocks.
5.2 Processing the CAD/CAM Titanium base, CEREC
5.2. Processing the CAD/CAM Titanium base, CEREC®
The diameter of the CAD/CAM Titanium base, CEREC® should not be reduced e.g.
by grinding. It is not recommended to shorten the CAD/CAM Titanium base,
CEREC®. The contact surfaces between the CAD/CAM Titanium base, CEREC® and
the implant must not be blasted or processed in any other way.
Only the parts of the CAD/CAM Titanium base, CEREC® surface that will be glued
to the mesostructure (50 μm aluminium oxide, max. 2.0 bar) should be blasted and
then cleaned with alcohol or steam. Secure the CAD/CAM Titanium base, CEREC®
in a laboratory analog to protect the internal connection. Use "PANAVIA™ F 2.0"
(adhere to the Instructions for use relating to Panavia: www.kuraray-dental.de)
extraoral.
1. For better handling during the gluing process, insert the CAD/CAM Titanium
base, CEREC® in a laboratory implant or a polishing aid.
2. Cover the hexagon socket head of the abutment screw with wax.
3. Mix the glue according to the manufacturer´s instructions and apply it to the
CAD/CAM Titanium base, CEREC®.
4. Slide the sintered inCoris ZI mesostructure onto the base as far as it will go.
Make sure it latches into the rotation and position stop.
5. Remove excess glue immediately.
6. A pply the Airblocker ("Oxyguard") to the transition point between ceramic and
titanium and to the screw funnel to finish hardening the glue.
7. After hardening, remove the residue glue with a rubber polisher.
5.3. Note for dental practitioners
The CAD/CAM Titanium bases are supplied in non-sterile condition. Please
observe the instructions of the implant manufacturer.
5.3.1 Sterilization
The individual abutments must be sterilized prior to usage. Please observe the
applicable legal regulations in the country and the applicable hygiene standards
for the dental practice.
Only use validated sterilization procedures and comply with the hygiene rules for
dental practices to sterilize the individual abutments. Observe the sterilization
parameters.
Steam sterilization can be performed with the fractional vacuum or the gravitation
procedure. The sterilization time is 5 minutes at 132°C/ 270°F or 15 minutes at
121°C/250°F. Perform steam sterilization using only equipment that complies with
EN 13060 and EN 285 standards.
The sterilization procedures must be validated in accordance with EN ISO 17664.
The responsibility for the sterilization of the individual abutments lies with the
user. Make sure to only use suitable equipment, materials and product-specifically
validated procedures for sterilization. Use validated procedures only. The
equipment must be maintained and serviced regularly and properly.
The dental technician that processes the CAD/CAM Titanium base, CEREC® and
the mesostructure must inform the dentist of the need to sterilize the components
before they are inserted in the patient´s mouth!
5.3.2 Tightening torque
AnoTite screw CAD/CAM titanium base on model:
in mouth:
manually
30 Ncm
6. Quality / Warranty and Liability / Development
Development, clinical testing, production and quality control of the tioLogic® product
range are completed in accordance with the Medical Device Directive 93/42/EEC.
Sections 9 and 10 of our General Terms of Delivery and Payment apply with regard to
warranty or liability – unless otherwise provided in this quick reference guide.
Warranty and liability are rendered void in particular if the products are not used by the
operator or a third party in accordance with the instructions for use; this also applies if the
tioLogic® product range is used in combination with products of other manufacturers,
which have not been specifically recommended for use by Dentaurum Implants.
Dentaurum Implants GmbH has no control over processing and application of the product,
which are the sole responsibility of the user.
Technical advice (oral and written) is based on the scientific and technical knowledge
available when the product is put on the market. It does not release the user from the
responsibility of personally checking the suitability of the products for the intended
indication and application. Advice is only given as a non-binding recommendation, which
cannot be assumed to provide any form of assurance or guarantee.
All products are subject to continuous development based on current scientific knowledge
and we reserve the right to make changes in the construction, design or material of the
products.
7. Explanation of symbol
P lease refer to the label. Additional information can be found at www.
dentaurum.de (Explanation of the symbols REF 989-313-00).
Date of Information: 05/15
Subject to modifications
CEREC® is a registered trademark of Sirona.
camlog® is a registered trademark of CAMLOG.
Mode d’emploi
pour base en titane CAD/CAM, CEREC®
1. Fabricant
Dentaurum Implants GmbH I Turnstr. 31 I 75228 Ispringen I Allemagne
2. Description sommaire
Chaque base en titane CAD/CAM, CEREC®, incluant une vis pour pilier, est fournie
dans un état non stérile. Toutes les pièces sont strictement à usage unique. L'achat
du scanbody devra se faire auprès de la société Sirona.
On peut coller des pièces provisoires ou des mésostructures fabriquées sur mesure
sur la base en titane CAD/CAM, CEREC®. En bouche, les pièces collées sont fixées
sur l'implant adéquat à l'aide de la vis pour pilier.
Le scanbody sert uniquement à enregistrer la position de l'implant en vue de sa
conception au moyen du logiciel inLab 3D.
La base en titane CAD/CAM, CEREC® est disponible en différentes versions, chacune
étant compatible avec un diamètre spécifique du système d'implants tioLogic ©.
Types
d'implants
tiologic
®
tioLogic ® ST
Diamètres
d'implants
3.3 mm
3.7 mm
4.2 mm
4.8 mm
5.5 mm
3.3 mm
3.7 mm
4.2 mm
4.8 mm
5.5 mm
Base en titane
CAD/CAM de
Dentaurum Implants
386-195-00
386-295-00
386-395-00
386-195-00
386-295-00
386-395-00
TiBase Scanbody
de Sirona
62 82 615
62 82 623
62 82 615
62 82 623
3. Matériel
base titane CAD/CAM
3.7165
vis AnoTite
3.7165
4. Utilisation conforme
Le système CAD/CAM Sirona Dental est particulièrement indiqué pour la
réalisation des empreintes optiques nécessaires à l'enregistrement de la
topographie dentaire, d'empreintes dentaires ou de modèles de plâtre selon la
technique de conception et de fabrication assistées par ordinateur chez les
patients nécessitant des prothèses ou des restaurations dentaires. Ce système
permet également d'élaborer des mésostructures (prothèses dentaires restauratives
utilisées en combinaison avec des piliers d'implants endo-osseux).
Ce système qui permet également d'élaborer des mésostructures comprend :
la base en titane CAD/CAM, CEREC®
Les bases en titane CAD/CAM, CEREC® sont des dispositifs prothétiques à fixer
sur des implants, lesquels seront collés à des mésostructures afin de rétablir de
bonnes conditions fonctionnelles et esthétiques en bouche.
Contre-indications :
Hygiène bucco-dentaire insuffisante
Manque d'espace
Bruxisme
Restaurations de dents isolées avec selle en extension
Restaurations, dont la longueur est supérieure à celle de l'implant à une échelle
de 1:1,25
Restaurations avec correction angulaire de plus de 15° pour la ligne de
piliers S et 20° pour les lignes de piliers M et L par rapport à l'axe de l'implant
En présence d'une faible largeur osseuse vestibulo-orale, des implants tioLogic©
de ø 3.3 mm sont à disposition. Ces implants ont un champ d'indications plus
restreint en raison d'un diamètre réduit et d'une faible capacité à supporter les
charges (en comparaison par exemple avec les implants tioLogic © ø 4.2 mm).
Dans un maxillaire édenté, il faut insérer au moins quatre implants tioLogic ©
avec une barre d’immobilisation.
Dans un maxillaire partiellement édenté, les restaurations sur implants doivent
être réalisées en combinaison avec des implants tioLogic ® ø 4.2 mm ou
ø 4.8 mm / ø 5.5 mm et la restauration doit être de nature monobloc fixée.
Pour les restaurations avec des couronnes unitaires, les implants tioLogic ® de
ø 3.3 mm ne peuvent être utilisés que pour les incisives inférieures ou les
latérales supérieures et avec une longueur minimum de 11.0 mm.
Pour les restaurations avec des couronnes unitaires sur les implants tioLogic ®
de ø 3.7 mm, ø 4.2 mm, ø 4.8 mm, ø 5.5 mm, une longueur minimum de
9.0 mm est requise.
Uniquement pour les Etats-Unis
ATTENTION : Conformément à la législation fédérale américaine, ce
produit ne peut être vendu qu'aux médecins, dentistes et professionnels
habilités en la matière ou sur leur ordre.
5. Indications relatives à la mise en œuvre
5.1 Numérisation
1. Insérez la base en titane CAD/CAM, CEREC® dans l'analogue de laboratoire du
maître-modèle et vissez-la en vous servant de la vis AnoTite fournie.
2. Insérez le scanbody approprié (voir point 2) dans la base en titane CAD/CAM,
CEREC jusqu'à ce qu'il s'y adhère sans le moindre interstice ; respectez la
rainure de guidade prévue à cet effet. Vous pouvez numériser le scanbody sans
appliquer de poudre ou de spray.
3. Enregistrez la situation au choix avec inEos Blue, inEos, CEREC® ou CEREC AC.
4. A l'aide du logiciel inLab 3D for Abutments V3.65 ou du logiciel inLab 3D V3.80
(ou version supérieure), procédez à une conception individuelle de la
mésostructure en respectant les indications suivantes : étant donné, qu'a
l'heure actuelle, le système implantaire tioLogic ® n'est pas intégré dans le
logiciel Sirona CEREC®, il est possible de recourir au système implantaire
camlog® lors de la conception au moyen du logiciel. Pour ce faire, respecter les
indications suivantes : vérifier la bonne position de la restauration avant le meulage.
Si vous choisissez un système implantaire camlog® disposant de trois options de
positionnement, une correction peut s'avérer nécessaire. Si ceci n'est pas respecté,
cela pourrait compromettre le bon positionnement de la mésostructure. Effectuez
la correction en mettant l'évidement correspondant dans la position correcte au
sein de la mésostructure non frittée. Meulez ensuite la forme à partir d'un bloc
inCoris Zl meso (voir inLab 3D/inLab 3D for Abutments, Manuel de l'utilisateur).
Veuillez respecter les indications relatives à la conception, aux retouches et au
frittage de la zircone figurant dans le mode d'emploi des blocs inCoris Zl meso.
5.2 Mise en œuvre de la base en titane CAD/CAM, CEREC®
Le diamètre de la base en titane, CEREC® ne devrait pas être réduit (p. ex. par
meulage). Il n'est pas recommandé de raccourcir la base en titane CAD/CAM, CEREC®.
Les surfaces de contact de la base en titane CAD/CAM, CEREC® et de l'implant ne
devraient ni être sablées ni faire l'objet d'un traitement quelconque !
Seules les surfaces de la base en titane CAD/CAM, CEREC® destinées à être collées à une
mésostructure doivent être sablées (oxyde d'aluminium de 50 μm, max. 2,0 bars) et
nettoyées par la suite (à l'alcool ou à la vapeur). Pour préserver la connexion interne, la
base en titane CAD/CAM, CEREC® doit être fixée à un analogue de laboratoire. Utilisez,
de manière extra-orale, la colle "PANAVIA™ F 2.0" (respecter le mode d'emploi
Panavia: www.kuraray-dental.de) extra-oral.
1. Pour un collage en toute facilité, il est recommandé de visser la base en titane
CAD/CAM, CEREC® dans un analogue d'implant ou un polissoir.
2. R ecouvrez la tête à six pans de la vis pour pilier de cire.
3. Mélangez la colle conformément aux instructions du fabricant et appliquez-la
sur la base en titane CAD/CAM, CEREC®.
4. Emmanchez la mésostructure inCoris Zl jusqu'à la butée. Veillez à ce que les dispositifs sécurisant la position et la rotation (anti-rotation) soient bien enclenchés.
5. R etirez immédiatement les excédents de colle.
6. Pour faire durcir définitivement la colle, appliquez l'Airblocker ("Oxygard") au
niveau de la zone de transition céramique/titane ainsi que dans le canal de la vis.
7. A
près le durcissement, retirez les excédents à l'aide d'un polissoir élastique.
5.3 Indications à l'attention du dentiste
Les bases en titane CAD/CAM sont livrées dans un état non stérile. Veuillez
respecter les instructions figurant dans le mode d'emploi de chaque fabricant.
5.3.1 Stérilisation
Les piliers personnalisés doivent être stérilisés avant l'insertion. Veuillez également respecter la législation locale en vigueur ainsi que les dispositions d'hygiène
applicables aux cabinets dentaires.
Pour la stérilisation des piliers personnalisés, n'appliquez que les règles d'hygiène en
vigueur pour les cabinets dentaires et des procédés de stérilisation validés. Respecter
les paramètres de stérilisation. La stérilisation à la vapeur peut être effectuée au
moyen du procédé à vide fractionné ou du procédé à gravitation. La durée de
stérilisation est de 5 minutes à 132 °C ou de 15 minutes à 121 °C. La stérilisation
à la vapeur ne pourra être effectuée qu'à l'aide d'appareils répondant à la norme
EN 13060 ou EN 285.
Le procédé de stérilisation a été validé selon EN ISO 17664.
L'utilisateur est responsable de la stérilité du pilier personnalisé. Lors de la stérilisation,
Il doit s'assurer que seuls des appareils et matériel adéquats ainsi que des
procédés validés et spécifiques au produit sont utilisés. Il faudrait veiller à ce que
tous les procédés utilisés soient validés. Equipement et appareils doivent être bien
entretenus et faire l'objet d'une maintenance régulière.
L'opérateur (prothésiste) qui fabrique la base en titane CAD/CAM, CEREC® et la
mésostructure doit informer le praticien de la nécessité de stériliser les composants avant toute mise en œuvre dans la bouche du patient.
5.3.2 Couples de serrage
Vis AnoTite base en titane CAD/CAM sur modèle : manuellement
en bouche : 30 Ncm
6. Qualité / garantie et responsabilité / développement
Le développement, l’évaluation clinique, la fabrication et le contrôle de la qualité de
la gamme de produits tioLogic® sont menés selon la directive européenne 93/42/CEE
relative aux dispositifs médicaux
Dans les cas où une demande en matière de garantie ou de responsabilité est
envisagée, les points 9 et 10 de nos conditions générales de vente concernant la
livraison et le règlement sont applicables sous réserve des points particuliers
énoncés dans la présente notice.
Une exclusion de la garantie et de la responsabilité prend effet en particulier en
cas d’utilisation non conforme des produits par l’utilisateur ou par des tiers ; ceci
est également le cas pour une utilisation de la gamme tiologic ® en combinaison
avec des produits d’une autre origine et dont l’utilisation n’est pas expressément
recommandée par Dentaurum Implants.
La mise en œuvre et l’utilisation du produit sont effectuées en dehors d’un contrôle direct
de Dentaurum dental GmbH et ont donc lieu sous l’entière responsabilité de l’utilisateur.
L’assistance technique (orale et écrite) est fournie conformément aux données
acquises de la science et de la technique au moment de la commercialisation du
produit. Elle ne dispense pas l’utilisateur de son obligation de s’assurer personnellement de l’aptitude du produit aux indications et utilisations envisagées. Il ne s’agit
que de recommandations générales non contractuelles ne pouvant en aucun cas être
interprétées comme étant des assurances ou des garanties accordées à l’utilisateur.
Tous les produits sont sujets à un développement permanent tenant compte des
données scientifiques les plus récentes – des modifications concernant la conception,
le design et le matériau peuvent ainsi intervenir.
7. Signification des symboles utilisés
éférez-vous à l‘étiquette. Pour des renseignements supplémentaires,
R
rendez-vous sur notre site Internet www.dentaurum.de (Explication des
symboles REF 989-313-00).
Mise à jour: 05/15
Sous réserve de modifications
CEREC est une marque déposée de Sirona.
camlog® est une marque déposée de CAMLOG.
Turnstr. 31 I 75228 Ispringen I Germany I Tel. + 49 72 31 / 803 - 0 I Fax + 49 72 31 / 803 - 295 I www.dentaurum-implants.de I [email protected]
IT
Dentaurum Implants GmbH I Turnstr. 31 I 75228 Ispringen I Alemania
2. Descripción breve
Una base de titanio CAD/CAM, CEREC® se suministra con un tornillo AnoTite, los
dos sin esterilizar. Todos los componentes están pensados para un solo uso. El
cuerpo de escaneado debe ser pedido por separado en Sirona. En la base de
titanio CAD/CAM, CEREC® pueden pegarse mesoestructuras adaptadas
individualmente o piezas provisionales. Los componentes adheridos se fijan en la
boca al implante con el tornillo AnoTite.
El cuerpo de escaneado sirve sólo para registrar la posición del implante para el
diseño en el software inLab 3D.
La base de titanio CAD/CAM, CEREC® está disponible en diferentes versiones,
cada una compatible con un diámetro determinado del sistema de implantes
tioLogic ®.
Tipo de
implante
Diámetro
de implante
tiologic ®
tioLogic ® ST
3.3 mm
3.7 mm
4.2 mm
4.8 mm
5.5 mm
3.3 mm
3.7 mm
4.2 mm
4.8 mm
5.5 mm
Base de titanio
CAD/CAM de
Dentaurum Implants
386-195-00
386-295-00
386-395-00
386-195-00
386-295-00
386-395-00
Cuerpo de
escaneado TiBase
de Sirona
62 82 615
62 82 623
62 82 615
62 82 623
3. Materiales
CAD/CAM Titanbasis
3.7165
Tornillo AnoTite
3.7165
4. Uso previsto
El sistema Sirona Dental CAD/CAM está diseñado para crear impresiones ópticas a
fin de determinar rasgos topográficos de dientes, impresiones dentales o modelos
de escayola con diseño y fabricación asistidos por ordenador (CAD/CAM) para
pacientes que necesitan restauraciones o prótesis dentales. El sistema también
está indicado para elaborar mesoestructuras (prótesis dentales restauradoras en
combinación con pilares de implantes endoóseos). El sistema para fabricar
mesoestructuras comprende: la base de titantio CAD/CAM, CEREC®.
Las bases de titanio CAD/CAM, CEREC® se fijan en un implante como base de
titanio protética para adherirlas a la mesoestructuras a fin de restablecer el
funcionamiento y la estética en la boca.
Contraindicaciones:
Falta de higiene oral
Falta de espacio
Bruxismo
Restauraciones unitarias con extremos libres
Restauraciones cuya longitud excede la proporción de 1 a 1.25 en comparación
con la longitud del implante
Restauraciones que requieren una corrección angular superior a los 15° en la
serie S y a los 20° en las series M y L en relación al eje del implante.
D entaurum Implants ofrece implantes tioLogic ® de Ø 3.3 mm para pacientes
con crestas alveolares demasiado estrechas. Debido al diámetro pequeño y la
capacidad de carga reducida (comparado con el implante tioLogic® de Ø 4.2 mm),
estos implantes tienen una gama de indicaciones reducida. En pacientes
totalmente desdentados, cuatro o más implantes tioLogic ® deben insertarse
con una restauración de barra ferulizada. En pacientes parcialmente desdentados,
restauraciones implantosoportadas deben ser combinados con implantes
tioLogic © de Ø 4.2 mm, Ø 4.8 mm or Ø 5.5 mm y una restauración protética
fija ferulizada. En restauraciones unitarias, los implantes tioLogic® de Ø 3.3 mm
deben ser utilizados para los incisivos inferiores o para los incisivos superiores
laterales y únicamente con una longitud de implante mínima de 11.0 mm.
Restauraciones unitarias en implantes tioLogic ® de Ø 3.7 mm, Ø 4.2 mm,
Ø 4.8 mm or Ø 5.5 mm requieren una longitud de implante mínima de 9.0 mm.
Sólo para EE.UU.
PRECAUCIÓN: Según la ley federal de los EE.UU., este producto sólo
debe venderse a médicos, odontólogos y profesionales certificados o
bajo prescripción facultativa.
5. Notas de procesamiento
5.1 Escaneado
1. Fije la base de titanio CAD/CAM, CEREC® en la réplica del implante apropiada
en el modelo maestro con el tornillo AnoTite suministrado.
2. Inserte el respectivo cuerpo de escaneado (ver apartado 2) en la base de titanio
CAD/CAM, CEREC® hasta que asiente perfectamente utilizando la ranura de
guía prevista. El cuerpo de escaneado puede escanearse sin polvo o spray de
escaneado.
3. Realice una impresión óptica del modelo opcionalmente con inEos Blue, inEos,
CEREC® 3 o CEREC® AC.
4. Construya la forma individual de la mesoestructura con el software inLab 3D for
Abutments V3.65 o con inLab 3D V3.80 (o superior) observando las siguientes
indicaciones: Ya que de momento el sistema de implantes tioLogic © no está
integrado en el programa Sirona CEREC®, se puede seleccionar el sistema de
implantes camlog® como alternativa para la elaboración dentro del programa.
Por favor observe las siguientes indicaciones: Asegúrese de que la construcción
esté en la posición correcta antes del tallado. Si selecciona el sistema de
implantes camlog® de 3 posiciones, probablemente será necesaria una corrección de posición. Si las indicaciones de corrección no son observadas, la posición de la mesoestructura puede ser incorrecta. Corrija la posición a través de un
corte en la mesoestructura no sinterizada en la posición corregida. A continua-
5.2 Procesamiento de bases de titanio CAD/CAM, CEREC®
El diámtro de las bases de titantio CAD/CAM, CEREC® no debe reducirse, p.ej.
mediante tallado. No se recomienda acortar la base de titanio CAD/CAM, CEREC®.
No se deben chorrear o modificar de ningun modo las superficies de contacto
entre la base de titanio CAD/CAM, CEREC® y el implante.
Únicamente la parte de la superficie de la base de titanio CAD/CAM, CEREC® que
será adherida a la mesoestructura (50 μm óxido de aluminio, max. 2.0 bar) se debe
chorrear y después limpiar con alcohol o vapor. Para proteger la conexión interna
debe fijarse la base de titanio CAD/CAM, CEREC® en la réplica del implante.
Utilice "PANAVIA™ F 2.0" (Observe las instrucciones de Panavia: www.kuraraydental.de) extraoralmente.
1. Para mejorar la manipulación durante la adhesión, inserte la base de titanio
CAD/CAM, CEREC® en un implante de laboratorio o en un soporte de pulido.
2. Cubra la cabeza hexagonal interior del tornillo AnoTite con cera.
3. Mezcle el adhesivo según las especificaciones del fabricante y aplíquelo a la
base de titanio CAD/CAM, CEREC®.
4. Deslice la mesoestructura sinterizada inCoris ZI sobre la base hasta el tope.
Asegúrese de que encaje el seguro de rotación y posición.
5. Elimine inmediatamente el exceso de adhesivo grueso.
6. A plique el sellador ("Oxyguard") en la zona de transición entre la cerámica y el
titanio y en la chimenea del tornillo para finalizar el endurecimiento del adhesivo.
7. Después del endurecimiento, elimine los restos de adhesivo con un pulidor de
goma.
Modalità d’uso per
basi in titanio CAD/CAM, CEREC®
1. Fabbricante
Dentaurum Implants GmbH I Turnstr. 31 I 75228 Ispringen I Germania
2. Descrizione breve
Ciascuna base in titanio CAD/CAM, CEREC® viene fornita non sterile, assieme ad
una vite per abutment. Tutte le parti sono esclusivamente monouso. Il corpo di
scansione deve essere acquistato separatamente dalla ditta Sirona.
Sulle basi in titanio CAD/CAM, CEREC® possono essere incollate mesostrutture
individuali finite o provvisori. Le parti incollate vengono poi avvitate in bocca sugli
impianti con le viti per abutment.
Il corpo di scansione viene utilizzato per determinare la posizione dell'impianto per
la costruzione con il software inLab 3D.
La base in titanio CAD/CAM, CEREC® è disponibile in diverse versioni, compatibli
con i vari diametri degli impianti tioLogic ©.
Tipo d’impianto
tiologic
5.3.2 Torque de apriete
Tornillo AnoTite para base de titanio CAD/CAM en el modelo:
en boca:
a mano
30 Ncm
®
tioLogic ® ST
5.3 Indicaciones para el odontólogo
La base de titantio CAD/CAM se suministra sin esterilizar. Por favor observe las
instrucciones del fabricante de implante.
5.3.1 Esterilización
El pilar individual debe esterilizarse antes de su utilización. Deben cumplirse las
disposiciones legales vigentes en el país y las normas de higiene de la clínica
dental.
Recurra únicamente a los procesos de esterilización válidos y adhiera a las reglas
de higiene para clínicas dentales para esterilizar los pilares individuales. Deben
observarse los parámetros de esterilización.
La esterilización puede realizarse mediante el proceso de vacío fraccionado o el de
gravitación. La esterilización debe durar 5 minutos a 132°C o 15 minutos a 121°C.
Utilice únicamente equipos conformes con las normas EN 13060 a EN 285 para la
esterilización con vapor.
La esterilización de los pilares individuales es responsabilidad del usuario. Debe
asegurarse de emplear únicamente euipos, materiales y procesos válidos
específicos del producto en la esterilización. Debe asegurarse de que los procesos
empleados hayan sido validados. La revisión y el mantenimiento de los equipos
deben realizarse de forma regular y según las indicaciones.
El técnico dental que trabaja la base de titanio CAD/CAM, CEREC® y la mesoestructura debe advertir al usuario que es precisa la esterilización antes de la utilización en la boca del paciente!
Diametro
dell’impianto
3.3 mm
3.7 mm
4.2 mm
4.8 mm
5.5 mm
3.3 mm
3.7 mm
4.2 mm
4.8 mm
5.5 mm
Base in titanio
CAD/CAM per
Dentaurum Implants
386-195-00
386-295-00
386-395-00
386-195-00
386-295-00
386-395-00
TiBase Scanbody
Sirona
62 82 615
62 82 623
62 82 615
62 82 623
3. Materiali
CAD/CAM base in titanio
3.7165
Vite AnoTite
3.7165
4. Uso conforme
Il sistema CAD/CAM Sirona Dental è indicato per la preparazione di impronte
ottiche per registrare le caratteristiche topografiche dei denti, delle impronte
dentali o dei modelli in gesso con l’ausilio della progettazione computer guidata e
della produzione, necessari per la realizzazione della riabilitazione protesica.
Il sistema può essere utilizzato anche nella lavorazione di mesostrutture (protesi
dentarie riabilitative in combinazione con abutment implantari endossei).
Il sistema, che può essere impiegato anche per l’elaborazione di mesostrutture,
comprende: basi in titanio per CAD/CAM, CEREC®.
Le basi in titanio CAD/CAM, CEREC® vengono fissate all’impianto come base
protesica in titanio da incollare su mesiostrutture al fine di ripristinare la funzione
e l’estetica orale del paziente.
Controindicazioni:
insufficiente igiene orale
mancanza di spazio
bruxismo
restauri di denti singoli con selle libere
restauri la cui lunghezza supera il rapporto di 1:1,25 rispetto alla lunghezza
dell’impianto
restauri con correzione angolare rispetto all'asse dell'impianto superiore a 15°
per la linea di abutment S e superiore a 20° per le linee di abutment M ed L
per indicazioni con scarso spessore osseo vestibolo-orale, sono disponibili gli
impianti tioLogic © da ø 3.3 mm che tuttavia hanno il loro limite nel minor
diametro e nell’inferiore resistenza alla deformazione rispetto ad es. agli
impianti tioLogic © da ø 4.2 mm.
In mascellari edentuli, il numero minimo di impianti tioLogic © da inserire è di
almeno 4 unità, tra loro solidarizzati con una barra.
In mascellari parzialmente edentuli, la riabilitazione implanto-supportata deve
essere combinata con impianti tioLogic © da ø 4.2 mm o ø 4.8 mm / ø 5.5 mm
e la protesi deve essere saldamente bloccata.
Nei restauri con corone singole, gli impianti tioLogic © da ø 3.3 mm devono
essere utilizzati solo per gli incisivi inferiori o per i laterali superiori e solo nella
lunghezza di almeno 11.0 mm.
Nei restauri con corone singole su impianti tioLogic © da ø 3.7 mm, ø 4.2 mm,
ø 4.8 mm e ø 5.5 mm, considerare una lunghezza minima di 9.0 mm.
5.2 Lavorazione della base in titanio CAD/CAM, CEREC®
Il diametro della base in titanio CAD/CAM, CEREC® non deve essere ridotto, ad es.
nella rifinitura. Si sconsiglia l’accorciamento della base in titanio CAD/CAM, CEREC®.
Le superfici di contatto della base in titanio CAD/CAM, CEREC® con l’impianto non
devono né essere sabbiate né altrimenti lavorate!
Devono essere sabbiate solo le superfici della base in titanio CAD/CAM, CEREC®
previste per l’incollaggio con la mesostruttura (ossido di alluminio da 50μ, max. 2,0
bar) e successivamente pulite (alcol o vapore). A protezione della connessione
interna, la base in titanio CAD/CAM, CEREC® deve essere fissata ad un analogo. Per
l’incollaggio della base in titanio CAD/CAM, CEREC® alla mesostruttura sinterizzata
inCoris ZI, utilizzare l’adesivo „PANAVIA™ F 2.0“ (osservare le istruzioni d’uso
Panavia: www.kuraray-dental.de) extraoral.
1. Per semplificarne l’utilizzo, si consiglia di avvitare la base in titanio CAD/CAM,
CEREC® su un analogo o su un supporto di lucidatura.
2. C
oprire con cera la testa dell’esagono interno della vite dell’abutment.
3. Miscelare il collante seguendo le indicazioni del produttore e applicarlo alla
base in titanio CAD/CAM, CEREC®.
4. Chiudere la mesostruttura sinterizzata inCoris ZI fino a battuta. Assicurarsi del
bloccaggio del dispositivo di sicurezza antirotazionale e di posizione.
5. A
sportare immediatamente le grossolane eccedenze di collante.
6. Per l’indurimento finale del collante, portare l’Airblocker („Oxyguard“) sul
passaggio ceramica/titanio e nel canale della vite.
7. D
opo l’indurimento, eliminare con un gommino le altre eccedenze di collante.
5.3 Indicazioni per l’odontoiatra
Le basi in titanio CAD/CAM vengono fornite non sterili. Devono essere seguite le
istruzioni d’uso del fabbricante del sistema implantare impiegato
5.3.1 Sterilizzazione
Gli abutment individuali devono essere sterilizzati prima dell’uso. Inoltre, devono
essere rispettate le disposizioni di legge vigenti localmente nonché le normali
indicazioni di igiene proprie dello studio dentistico.
Per la sterilizzazione degli abutment individuali, utilizzare solo sistemi di igiene
orale e di sterilizzazione validati. Osservare i parametri di sterilizzazione.
La sterilizzazione tramite vapore può essere adottata con metodo di vuoto frazionato
o di gravitazione. Il tempo di sterilizzazione è di 5 minuti a 132 °C o di 15 minuti
a 121 °C. La sterilizzazione tramite vapore deve essere effettuata con attrezzature
conformi alla normativa EN 13060 nonché EN 285.
La validazione del processo di sterilizzazione è conforme alla normativa EN ISO
17664. La responsabilità per la sterilizzazione degli abutment individuali rimane
dell’utilizzatore. È necessario considerare che, per la sterilizzazione, vengano
impiegati solo macchinari idonei nonché materiali e tecniche validate. A tal proposito,
occorre garantire che anche le procedure utilizzate siano validate.
Le attrezzature e i macchinari devono essere conservati in buono stato d’uso e con
una adeguata e periodica manutenzione.
L’utilizzatore (odontotecnico) della base in titanio CAD/CAM, CEREC® e quello
della mesostruttura devono ricordare al clinico la necessaria sterilizzazione prima
dell’inserimento della protesi in bocca al paziente!
5.3.2 Torque
Vite AnoTite della base in titanio CAD/CAM su modello:
in bocca:
Solo per USA
ATTENZIONE: in conformità alla legislazione USA, questo prodotto
può essere venduto esclusivamente a medici, odontoiatri o soggetti
abilitati all’esercizio della professione odontoiatrica.
6. Qualità / Garanzia e responsabilità / Sviluppo
Lo sviluppo, gli studi clinici, la produzione ed il controllo di qualità del programma
di prodotti tioLogic © sono realizzati secondo le direttive per i prodotti medicali
93/42/CEE.
Per la garanzia e la responsabilità sono validi i paragrafi 9 e 10 delle nostre
Condizioni di vendita, salvo diversamente descritto in queste brevi istruzioni per l‘uso.
La garanzia e la responsabilità decadono in caso di uso non corretto del prodotto
da parte dell‘utilizzatore o di una terza persona. Ciò vale anche nel caso di
combinazione di prodotti del programma tioLogic ® con materiali di altre aziende,
procedura espressamente sconsigliata da Dentaurum Implants.
La lavorazione e l‘uso dei prodotti avviene al di fuori della possibilità di controllo
da parte di Dentaurum Implants GmbH e restano quindi ad esclusiva responsabilità
dell‘utilizzatore.
La consulenza tecnica (orale o scritta), è basata secondo l‘ultimo livello scientifico
e tecnologico conosciuto al momento della messa in commercio del prodotto.
Questa non esonera l‘utilizzatore dal dovere di controllo del prodotto per
l‘indicazione e l‘uso previsti. Si tratta, in questo caso, esclusivamente di consigli
non vincolanti, dai quali non può essere dedotta alcuna assicurazione o garanzia.
Tutti i prodotti sono sottoposti a continuo sviluppo, in osservanza dell‘attuale
livello di conoscenza scientifica. Si riserva il diritto di apportare modifiche di
costruzione, design e nei materiali.
7. Aclaración de los símbolos utilizados
5. Indicazioni d’uso
7. Spiegazione dei simboli
Fecha de la información: 05/15
Nos reservamos el derecho de efectuar cambios
CEREC® es una marca registrada de Sirona.
camlog® es una marca registrada de CAMLOG.
5.1 Scansione
1. Inserire la base in titanio CAD/CAM, CEREC® sul corrispondente analogo nel
modello master e avvitarla saldamente con l’allegata vite AnoTite.
2. Inserire il relativo corpo di scansione (vedi punto 2) alla base in titanio
CAD/CAM, CEREC® senza lasciare fessure tra i due elementi e controllando il
posizionamento delle previste scanalature di guida. Il corpo di scansione può
essere scansionato senza l’uso di polveri o spray.
3. Registrare la situazione sia con inEos Blue che con inEos, con CEREC® 3 o
con CEREC® AC.
4. Con il software inLab 3D for Abutments V3.65 o con il software inLab 3D V3.80
(o superiore), costruire la forma individuale della mesostruttura osservando le
seguenti indicazioni: poiché al momento attuale il sistema tioLogic ® non è
stato integrato nel software Sirona CEREC®, per l’elaborazione possono essere
impiegato il sistema implantare camlog®. In tal caso è necessario tenere in
buon conto: verificare la corretta posizione della costruzione prima della
rettifica. Se viene scelto il sistema implantare camlog® con tre possibilità di
posizionamento può, in certe situazioni,rendersi necessaria una correzione. In
caso contrario la mesiostruttura potrebbe non essere perfettamente allineata.
La correzione consiste nell’introdurre la rientranza nella corrispondente
Gebrauchsanweisung für die CAD/CAM-Titanbasen, CEREC®
Instructions for use CAD/CAM Titanium base, CEREC®
Mode d’emploi pour base en titane CAD/CAM, CEREC®
Modo de empleo base de titanio CAD/CAM, CEREC®
Modalità d’uso per basi in titanio CAD/CAM, CEREC®
manuale
30 Ncm
6. Calidad / Garantía y responsabilidad / Desarrollo
El desarrollo, la comprobación clínica, la fabricación y el control de calidad de la
gama de productos tioLogic© se realizan siguiendo la Directiva 93/42/CEE para
productos sanitarios.
En caso de garantía y responsabilidad tendrán vigencia – exceptuando las reglamentaciones especiales indicadas en esta descripción breve – los párrafos 9 y 10 de
nuestras Condiciones generales de suministro y pago.
Existirá una exención de responsabilidad particularmente en el caso de un uso no
adecuado de los productos por parte del usuario o terceros; esto también es válido
para una combinación de la gama de productos tioLogic© con productos ajenos,
cuyo uso no haya sido expresamente recomendado por Dentaurum Implants.
La manipulación y el uso del producto tienen lugar fuera del control de Dentaurum
Implants GmbH y son responsabilidad única del usuario.
El asesoramiento en las técnicas de aplicación (oral y escrito) se realiza según el nivel
actual de la ciencia y la técnica, conocido en el momento de poner en circulación el
producto. No exime al usuario de la obligación de verificar por cuenta propia la
idoneidad de los productos para la indicación y los usos previstos. Se trata únicamente de recomendaciones sin compromiso, de las cuales no pueden derivarse
seguridades o garantías de tipo alguno.
Todos los productos están sometidos a un perfeccionamiento constante teniendo en
cuenta el estado actual de conocimientos científicos – reservado el derecho a
modificar la construcción, el diseño y el material.
P or favor observe la etiqueta. Más indicaciones se hallan en internet en
www.dentaurum.de (Explicación de los símbolos REF 989-313-00).
CEREC®
S i prega di osservare quanto riportato sull’etichetta. Ulteriori indicazioni
sono disponibili nel sito internet www.dentaurum.de (spiegazione dei
simboli REF 989-313-00).
Für Ihre Fragen zur Verarbeitung unserer Produkte steht Ihnen
unser Customer Support gerne zur Verfügung.
Hotline zahnärztliche Implantologie
+ 49 72 31 / 803 - 590
Hotline zahntechnische Implantologie
+ 49 72 31 / 803 -410
Telefonische Auftragsannahme
+ 49 72 31 / 803 - 560
Mehr Informationen zu Dentaurum-Produkten
finden Sie im Internet.
www.dentaurum.de
Con riserva di apportare modifiche
Stand der Information:
Date of information:
Mise à jour :
Fecha de la información:
Data dell’informazione:
CEREC® è un marchio registrato di Sirona.
05/15
Data dell’informazione: 05/15
camlog® è un marchio registrato di CAMLOG.
Germany 05/15/B/R1-2
1. Fabricante
IN
posizione corretta sulla mesostruttura non sinterizzata. Rifinire la forma da un
mesoblocchetto inCoris ZI (vedi Manuale per l’utilizzatore inLab 3D/inLab 3D
per abutment). Osservare assolutamente le indicazioni relative alla costruzione,
rifinitura e sinterizzazione dell’ossido di zirconio riportate nel manuale d’uso
del mesoblocchetto inCoris ZI.
989-181-00
Modo de empleo
base de titanio CAD/CAM, CEREC®
ción talle la forma a partir de un bloque inCoris ZI meso (ver inLab 3D for
Abutments, Manual del Operador). Por favor observe la notas para el diseño, el
rectificado y la sinterización del óxido de circonio en el manual de procesamiento de los bloques inCoris ZI meso.
Printed by Dentaurum
ES
Turnstr. 31 I 75228 Ispringen I Germany I Tel. + 49 72 31 / 803 - 0 I Fax + 49 72 31 / 803 - 295 I www.dentaurum-implants.de I [email protected]