1
Adding additional Nozzes to the system
The Exo Terra® Monsoon RS400 can be operated with up to 6
nozzles. Please note that every additional nozzle will result in less
performance from each nozzle installed. To connect additional
nozzles, an extra nozzle (PT2501) and a Y-connector (PT2498) is
needed (sold separately). Simply cut the tubing where convenient,
preferably as close as possible to the first Y-connector. Make sure
the nozzle can easily be mounted in its intended location without
stretching the tubing. Connect the tubing coming from the unit to
the single hole of the Y-connector and the other end of the tubing to
the double hole. Connect the tubing from the additional nozzle to the
other hole of the Y-connector.
Please note that additional nozzles also can be mounted in different
terrariums.
Remote Control (Optional)
A remote control (PT2496) is sold separately to operate the unit. It
also has the same three operation buttons (Off, On, Cycle), but the
cycle and duration still have to be set on the unit itself. The remote
control is ideal for launching additional spray sessions without
disturbing the animals by having to go to near to the terrarium.
Maintenance
It is advisable to place the unit in a dark location or otherwise
shielded from light to prevent the growth of algae in the reservoir.
Should algae form, just wipe the inside of the reservoir with a
damp cloth. Do NOT use detergent or solvents as it might harm
your terrarium animals! Make sure to discard any dirty water or
water containing debris or particles. Only use de-mineralised/
distilled water or debris-free and clean rainwater! Replace the filter
regularly, at least every six months depending on the usage and
water quality. If the nozzles are clogged or if they spray irregularly,
place the nozzles overnight in a 50/50 water/vinegar solution. Rinse
ENGLISH
FRANÇAIS
operate for 60 seconds.
• The Exo Terra® Monsoon RS400 should be set according to
the needs of the animals and to the size of the terrarium. Be
careful not to operate the unit too frequently or too long to
avoid overflowing the terrarium! The unit should be set so that
water added to the terrarium from the first operating cycle is
allowed to evaporate before the next operating cycle begins,
or at least make sure that the excess water can be drained out
of the terrarium.
• After the unit has been set and the cycle button has been
pressed on (blue cycle LED is illuminated), the unit immediately
starts it’s first cycle. The next cycle will begin depending on
hourly setting of the first dial. If the unit is switched off, the
cycle will start again after the cycle button has been pressed. In
the case of a power failure, the unit will automatically resume
in cycle mode. The first cycle starts as soon as the power
comes back on.
• When the reservoir is empty, it is advisable to refill the reservoir
immediately or to switch off the unit. The pump has a built in
safety cut-off that will switch off the pump (not the unit) when
overheated. When the pump cools down, it will automatically
switch on again. This is a safety feature, and one should not
rely on the thermal cut-off.
ESPAÑOL
8
Installation - Other Terrarium Models
Refer to your terrarium’s instruction manual for instructions on how to
install equipment, wiring and tubing inside the terrarium.
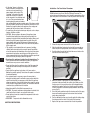
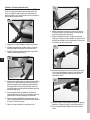
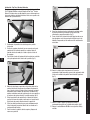
1. Mount the nozzles in position on the glass portion of the
terrarium’s side panels with the suction cups. Make sure that
the glass area is clean and free of any dirt or deposits before
mounting the nozzles. For the best results, mount the nozzles
as close as possible to the front opening windows and the top
screen.
2. Direct the nozzle positions inside the terrarium so that the spray
stream will avoid spraying on the terrarium’s front and side
panels when in operation.
3. Use the additional suction cups to neatly guide the tubing along
the side panels to the inlet location of your terrarium.
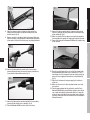
4. Connect the tubing from the nozzles to the Y-connector by
pressing the tubing firmly into one of the side-by-side holes as
far as possible. Connect both nozzles.
5. Connect the tubing to the remaining hole of the Y-connector by
pressing it firmly inside as far as possible.
6. Place the Monsoon RS400 unit on a hard, stable, level surface.
7. Connect the tubing coming from the Y-connector to the top of
the unit by pressing the tubing firmly into the opening as far
as possible.
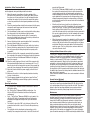
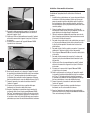
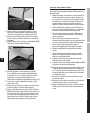
8. Make sure that the filter is properly connected to the spigot on
the underside of the control unit and placed inside the reservoir.
9. Ensure that the top of the Monsoon RS400 unit fits tightly on
top of the reservoir.
10. Open the small lid on top of the unit, and fill the reservoir with
de-mineralized/distilled water up to a maximum of 2.5 cm (1”)
from the top rim of the transparent reservoir. (Using regular tap
water will cause clogging of the nozzles by mineral deposits!)
11. Close the lid and connect the power supply jack to the back
of the unit.
12. Make sure the unit is in its final operating location, standing
level on a hard surface.
13. Plug the power adaptor into the wall socket, your Exo Terra®
Monsoon RS400 High-pressure Misting system is now ready
to use.
Operating instructions
• O- The Exo Terra® Monsoon RS400 is switched off - No blue
LED light is visible
• On- The Exo Terra® Monsoon RS400 is switched on - the
left blue LED light is illuminated and the unit will operate
continuously.
• Cycle - The Exo Terra® Monsoon RS400 is in cycle mode - the
right blue LED light is illuminated and the unit will operate
according to the program setting of the cycle and duration
controls.
• The left dial is to set the “ON” cycle (in hours) of the unit. For
example, when the dial is set on 4, the unit will operate every
4 hours.
• The right dial sets the duration of each operating cycle (in
seconds). For example, when the dial is set to 60, the unit will



![Mifare&I-CODE SLIカードカタログ [PDF: 676KB]](http://vs1.manualzilla.com/store/data/006534497_2-33502aa3dc766b11dae9c1f19188dfb2-150x150.png)