1
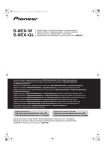
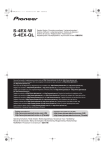
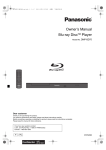
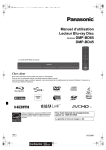
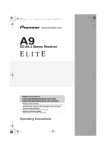
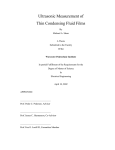
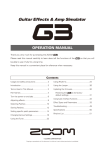
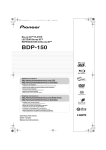
XRE3208A_S-W301W501W601_En.fm
1 ページ
2008年7月16日 水曜日 午後7時45分
S-W301/S-W501/S-W601
Operating Instructions
Mode d’emploi
English
POWERED SUBWOOFER
ENCEINTE ACTIVE D’EXTREMES GRAVES
Thank you for buying this PIONEER product. Please read through these operating instructions so you will know how to operate
your model properly. After you have finished reading the instructions, put them away in a safe place for future reference.
In some countries or regions, the shape of the power plug and power outlet may sometimes differ from that shown in the
explanatory drawings. However, the method of connecting and operating the unit is the same.
IN COMBINATION WITH SPEAKERS
The frequency characteristics of the S-W301/S-W501/S-W601 combined
with small-size speakers are shown below. As shown in these figures,
the low frequency range is improved.
• These special characteristics are obtained in an echoless chamber.
The effect of an additional S-W301/S-W501/S-W601 in an ordinary
listening room is better than the chart indicates when positioned
adequately.
• The rear (surround) speakers are most effective when installed in
parallel locations directly to the side, or slightly behind, the listener,
at a level about 1 meter (3.3 ft.) above the listener’s ears.
CAUTION:
When installing the center speaker on top of the TV, be sure to
secure it with tape or some other suitable means.
Otherwise, the speaker may fall from the TV due to external shocks
such as earthquakes, and it may lead to endangering those nearby
or damaging the speaker.
Small-size speakers + S-W301/S-W501/S-W601
IMPORTANT
CAUTION
RISK OF ELECTRIC SHOCK
DO NOT OPEN
The lightning flash with arrowhead symbol,
within an equilateral triangle, is intended to
alert the user to the presence of uninsulated
"dangerous voltage" within the product's
enclosure that may be of sufficient
magnitude to constitute a risk of electric
shock to persons.
CAUTION:
TO PREVENT THE RISK OF ELECTRIC
SHOCK, DO NOT REMOVE COVER (OR
BACK). NO USER-SERVICEABLE PARTS
INSIDE. REFER SERVICING TO QUALIFIED
SERVICE PERSONNEL.
1)
2)
3)
4)
5)
6)
7)
The exclamation point within an equilateral
triangle is intended to alert the user to the
presence of important operating and
maintenance (servicing) instructions in the
literature accompanying the appliance.
D3-4-2-1-1_En-A
11) Only use attachments/accessories specified by the
manufacturer.
12) Use only with the cart, stand, tripod, bracket, or table
specified by the manufacturer, or sold with the
apparatus. When a cart is used, use caution when
moving the cart/apparatus combination to avoid
injury from tip-over.
Read these instructions.
Keep these instructions.
Heed all warnings.
Follow all instructions.
Do not use this apparatus near water.
Clean only with dry cloth.
Do not block any ventilation openings. Install in
accordance with the manufacturer’s
instructions.
8) Do not install near any heat sources such as
radiators, heat registers, stoves, or other
apparatus (including amplifiers) that produce
heat.
9) Do not defeat the safety purpose of the polarized
or grounding-type plug. A polarized plug has two
blades with one wider than the other. A
grounding type plug has two blades and a third
grounding prong. The wide blade or the third
prong are provided for your safety. If the provided
plug does not fit into your outlet, consult an
electrician for replacement of the obsolete outlet.
10) Protect the power cord from being walked on or
pinched particularly at plugs, convenience
receptacles, and the point where they exit from
the apparatus.
13) Unplug this apparatus during lightning storms or
when unused for long periods of time.
14) Refer all servicing to qualified service personnel.
Servicing is required when the apparatus has been
damaged in any way, such as power-supply cord or
plug is damaged, liquid has been spilled or objects
have fallen into the apparatus, the apparatus has
been exposed to rain or moisture, does not operate
normally, or has been dropped.
P1-4-2-2_En
If the AC plug of this unit does not match the AC
outlet you want to use, the plug must be removed
and appropriate one fitted. Replacement and
mounting of an AC plug on the power supply cord of
this unit should be performed only by qualified
service personnel. If connected to an AC outlet, the
cut-off plug can cause severe electrical shock. Make
sure it is properly disposed of after removal.
The equipment should be disconnected by removing
the mains plug from the wall socket when left
unused for a long period of time (for example, when
D3-4-2-2-1a_A_En
on vacation).
CAUTION
The POWER switch on this unit will not completely
shut off all power from the AC outlet. Since the
power cord serves as the main disconnect device for
the unit, you will need to unplug it from the AC outlet
to shut down all power. Therefore, make sure the
unit has been installed so that the power cord can
be easily unplugged from the AC outlet in case of an
accident. To avoid fire hazard, the power cord should
also be unplugged from the AC outlet when left
unused for a long period of time (for example, when
D3-4-2-2-2a_A_En
on vacation).
This product is for general household purposes. Any
failure due to use for other than household purposes
(such as long-term use for business purposes in a
restaurant or use in a car or ship) and which
requires repair will be charged for even during the
K041_En
warranty period.
WARNING: Handling the cord on this product or
cords associated with accessories sold with the
product will expose you to chemicals listed on
proposition 65 known to the State of California and
other governmental entities to cause cancer and
birth defect or other reproductive harm.
D36-P4_A_En
VENTILATION CAUTION
POWER-CORD CAUTION
When installing this unit, make sure to leave space
around the unit for ventilation to improve heat
radiation (at least 25 cm at top, 15 cm at rear, and
10 cm at each side).
Handle the power cord by the plug. Do not pull out the
plug by tugging the cord and never touch the power
cord when your hands are wet as this could cause a
short circuit or electric shock. Do not place the unit, a
piece of furniture, etc., on the power cord, or pinch the
cord. Never make a knot in the cord or tie it with other
cords. The power cords should be routed such that they
are not likely to be stepped on. A damaged power cord
can cause a fire or give you an electrical shock. Check
the power cord once in a while. When you find it
damaged, ask your nearest PIONEER authorized
service center or your dealer for a replacement. S002*_En
WARNING
Slots and openings in the cabinet are provided for
ventilation to ensure reliable operation of the
product, and to protect it from overheating. To
prevent fire hazard, the openings should never be
blocked or covered with items (such as newspapers,
table-cloths, curtains) or by operating the
D3-4-2-1-7b_A_En
equipment on thick carpet or a bed.
To prevent a fire hazard, do not place any naked
flame sources (such as a lighted candle) on the
D3-4-2-1-7a_A_En
equipment.
This product contains mercury. Disposal of this
material may be regulated due to environmental
considerations. For disposal or recycling information,
please contact your local authorities or the Electronics
K057_En
Industries Alliance : www.eiae.org.
WARNING
WARNING
This equipment is not waterproof. To prevent a fire
or shock hazard, do not place any container filled
with liquid near this equipment (such as a vase or
flower pot) or expose it to dripping, splashing, rain
D3-4-2-1-3_B_En
or moisture.
Before plugging in for the first time, read the following
section carefully.
The voltage of the available power supply differs
according to country or region. Be sure that the
power supply voltage of the area where this unit
will be used meets the required voltage (e.g., 230 V
D3-4-2-1-4_A_En
or 120 V) written on the rear panel.
WARNING
Operating Environment
Operating environment temperature and humidity:
+5 ºC to +35 ºC (+41 ºF to +95 ºF); less than 85 %RH
(cooling vents not blocked)
Do not install this unit in a poorly ventilated area, or in
locations exposed to high humidity or direct sunlight (or
strong artificial light)
D3-4-2-1-7c_A_En
For U.S. Model
signal, and when set to 0º, it is in the same phase as the input signal.
• Normally, the switch is set to 0º.
But when the sound connection between the subwoofer and the
left and right speakers sounds unnatural, try switching to 180º
and set the switch in the position where the sound is natural.
• When using two or more subwoofers together, make sure that the
phase switch of all of them are set to the same position.
7 Auto Standby switch (AUTO STANDBY)
Switches the Auto Standby feature on/off.
When switched ON (the default setting is OFF), the Auto Standby
feature becomes active. In this mode, if there is no input signal for 12
minutes the system automatically switches to standby. The power is
automatically switched on again if an input signal is detected.
NOTE:
There may be cases where a connected component outputs noise or
some other non-audio signal which causes this system to
automatically power on when in Auto Standby mode. If this happens,
switch off the Auto Standby mode and switch the system on/off
manually.
8 Line Level Input terminal (LINE LEVEL INPUT)
Connect to the SUBWOOFER PREOUT terminal of an amplifier or
receiver, with the specially provided RCA plug cord.
9 Line Level Output terminal (LINE LEVEL OUTPUT)
Used for connecting other equipment through the amplifier. The
signal output from this jack is not affected in any way by the settings
of the various controls on the unit.
REAR PANEL
10 AC CORD
Connect the AC cord to a AC socket (in the room).
2
POWER
VOLUME
MAX
MIN
CROSSOVER
3
200 Hz
50 Hz
BYPASS
ON
OFF
PHASE
AUTO
STANDBY
ON
OFF
LINE LEVEL
OUTPUT INPUT
4
5
6
7
8
9
CONNECTIONS
Before making or changing any connections, switch off the power
and disconnect both this unit and the amplifier/receiver from the
AC outlet.
LINE LEVEL CONNECTION
Rear Panel
Supplied RCA plug cord
10
1 Power Indicator (STANDBY/ON)
Lights blue when the power has been switched ON. When AUTO
STANDBY switch is set to ON, lights blue whenever the speaker receive
an audio signal. If the power is switched OFF only briefly, the indicator
lights blue when power is restored. If no signal is present for more than
12 minutes, the subwoofer automatically reverts to standby mode and the
power indicator lights red. If, subsequently, a signal is received, power
automatically comes back on and the power indicator lights blue.
NOTE:
• If you are planning on switching the unit OFF for a long period of
time, make sure to check that the indicator light has gone out after
switching OFF.
2 Power switch (POWER)
Switches the subwoofer between ON and OFF.
3 Volume knob (VOLUME)
Sets the subwoofer volume.
• Turn the knob slowly from the MIN position.
• With this unit, the bass level can be independently set, so do not
turn up the bass on the AV amplifier.
4 Crossover knob (CROSSOVER)
When using the subwoofer, set the upper frequency limit for the
subwoofer (50 Hz to 200 Hz) so that it complements the output from
your other speakers.
When using the bass management features of an AV receiver, set to
BYPASS ON in order to use the low-pass filter of the AV receiver for
high quality sound.
INSTALLATION
Speaker Installation
• Subwoofer Installation Criteria
1
1 Left speaker
2 Right speaker
3 Recommended
installation range
for the subwoofer
4 Listening position
2
3
4
The subwoofer plays back the bass in monaural, making use of the fact
that the human ear is not very sensitive to the direction of low-pitched
sound. Because of this, the subwoofer can be installed almost
anywhere. If it is installed too far away, however, the sound from the
other speakers may become unnatural.
• An example of speaker positioning
1 Front left speaker
2
3
1
2 Center speaker
3 Front right speaker
4 Subwoofer
5 Listening area
6 Rear left speaker
4
7 Rear right speaker
The subwoofer is not magnetically shielded and so should not be
placed near a TV or monitor. Magnetic storage media (such as
floppy discs and tape or video cassettes) should also not be kept
close to the subwoofer.
• Do not place the speaker on an unstable surface, as doing so may
cause the speaker to fall and cause damage or bodily injury.
• Do not place cups, glasses, or other containers with fluids on top of
the units, since the units may be damaged if the liquid spills.
• The installation location selected should have a sturdy floor surface.
Mounting the speaker on a long-pile carpet should be avoided, since
the carpet may touch the driver’s diaphram, causing distorted
sound.
• Please install this unit away from the antenna cable of the tuner, as
noise can be caused with installation close to the antenna cable. In
such a case, use this unit at a position away from the antenna and
the antenna cable, or when playback of extra bass is not required,
switch off the power for this unit.
MAINTENANCE OF EXTERNAL SURFACES:
• Clean the surface by wiping with a soft, dry cloth.
• When the surfaces are very dirty, wipe with a soft cloth dipped in
some neutral cleanser diluted five or six times with water, and
wrung out well, and then wipe again with a dry cloth. Do not use
furniture wax or cleaners.
• Never use thinners, benzine, insecticide sprays and other
chemicals on or near this unit, since these will corrode the
surfaces.
7
• Position the left and right channel speakers at equal distances from
the TV set and approximately 1.8 meters (6 ft.) from each other.
• Install the center speaker above or below the TV so that the sound of
the center channel is localized at the TV screen.
n 150 W (S-W301)/170 W (S-W501)/180 W (S-W601) (RMS) power with
AB class amplifier that serves audio and video software playback
such as Dolby Digital with a wide dynamic range.
n Equipped with 20 cm (S-W301)/25 cm (S-W501)/30 cm (S-W601) driver
n Crossover frequency can be set to 50 Hz to 200 Hz.
1
• With playback of Dolby Digital, establishment of a special channel
for the subwoofer is recommended; and with playback of LFE (Low
Frequency Effect: sound effect like the rumbling of the earth, whose
purpose is to intensify the force of the video), the S-W301/S-W501/SW601 is especially effective.
NOTES:
FEATURES
STANDBY/ON
FREQUENCY (Hz)
6
• RCA plug cord x1
• Operating instructions
FRONT PANEL
Small-size speakers
• Do not attach the subwoofer to the wall or ceiling. They may fall off
and cause injury.
• Install the unit in a well-ventilated location where it will not be
exposed to high temperatures and high humidity.
• Do not place the unit near stoves or other heating equipment or at
locations exposed to direct sunlight, as these can have an adverse
effect on the cabinet and internal components. Also, do not install
the unit where there is too much dust or high humidity, as these can
cause malfunctioning or breakdowns. (Avoid cooking tables and
other locations where the unit would be exposed to heat, steam and
soot.)
• Do not place heavy or large objects on top of the speaker. Doing so
could provoke the speaker to fall, causing damages or bodily injury.
If speakers fall from their installation locations, they may suffer
irreparable cracks in their finish.
• Keep the unit away from devices such as cassette decks which are
sensitive to magnetic fields.
5
ACCESSORY ITEMS
PANEL FACILITIES
RESPONCE (dB)
Installation Precautions
This connection is for an amplifier or receiver equipped with a
SUBWOOFER PREOUT terminal. Connect to the LINE LEVEL INPUT
terminal on this unit, using the specially provided RCA plug cord.
NOTE:
• When connected to the PREOUT terminal for surround center
channel on the amplifier or receiver, the bass is heard only on the
center channel, so it will be insufficient.
OPERATION
For details regarding operating part functions, refer to PANEL
FACILITIES above.
1. Turn the POWER switch (2) ON.
• If the unit’s power cord is connected to a switched AC outlet on
the amplifier or receiver and the switch is left ON, the unit can be
turned ON/OFF together with the amplifier or receiver.
• If the unit cannot be connected to the amplifier or receiver, turn
the power to the amplifier or receiver ON before turning the power
to the unit ON. When turning the power OFF, turn the power to the
unit OFF before turning the power to the amplifier or receiver OFF.
2. Operate the amplifier or receiver and adjust the volume of the
other speakers.
5 Bypass switch (BYPASS)
When set to ON, the audio signal is routed to the woofer unit,
bypassing the amplifier’s crossover circuit.
3. Adjust the volume of the bass with the VOLUME knob (3).
• When necessary, operate the CROSSOVER knob (4) and PHASE
switch (6), and then adjust with the VOLUME knob (3).
6 Phase switch (PHASE 0º /180º)
When set to 180º, the output phase becomes the reverse of the input
4. Turn the POWER switch (2) OFF.
• The power indicator disappears.
TROUBLESHOOTING
Incorrect operations are often mistaken for trouble and malfunctions. If you think that there is something wrong with this component, check the
points below. Sometimes the trouble may lie in another component. Investigate the other components and electrical appliances being used. If the
trouble cannot be rectified even after exercising the checks listed below, ask your nearest PIONEER authorized service center or your dealer to carry
out repair work.
SYMPTOM
CAUSE
• Power supply plug is not correctly
inserted.
(Indicator does not light up when
power switch is turned on.)
1 No power is being supplied
REMEDY
• Insert plug securely.
2 No sound
(Indicator is lit.)
• Connection of accessory RCA plug
cord is wrong or disconnected.
• VOLUME knob is set to MIN.
• Check again and connect correctly.
3 Sound is distorted.
• Level is too high.
• Input level is too high.
• Turn the VOLUME knob counter-clockwise to lower the level.
• Turn the amplifier’s output level (volume, bass control, bass
boost) counter-clockwise to lower the level.
4 Howling noise occurs.
• No power supplied to the amplifier.
• Subwoofer level is set too high.
• Connect an amplifier and supply power.
• Place the subwoofer a good distance from speakers. Turn the
VOLUME knob counter-clockwise to lower the volume.
5 Much noise when listening to
AM or FM broadcasts.
• The AM loop antenna or the FM indoor • Increase the distance between the AM or FM antenna (for
antenna is close to this unit.
indoor use) and this unit.
• Turn clockwise slowly.
SPECIFICATIONS
Cabinet .....................Bass-reflex, floor-standing type
Speaker
S-W301.............................................20 cm cone type
S-W501.............................................25 cm cone type
S-W601.............................................30 cm cone type
Power Amplifier Continuous Power Output (RMS)
S-W301........................................150 W/6 Ω (100 Hz)
S-W501........................................170 W/6 Ω (100 Hz)
S-W601........................................180 W/6 Ω (100 Hz)
Input (sensitivity at 100 Hz)
LINE LEVEL (RCA jack) ..................................200 mV
Output (Level at 100 Hz)
LINE LEVEL (RCA jack) ..................................200 mV
Selectable CROSSOVER Frequencies
.............................................................. 50 Hz to 200 Hz
Outline Dimension
S-W301
.............. 360 mm (W) x 360 mm (H) x 398.5 mm (D)
14.2 in. (W) x 14.2 in. (H) x 15.7 in. (D)
S-W501
.............. 360 mm (W) x 380 mm (H) x 418.5 mm (D)
14.2 in. (W) x 15.0 in. (H) x 16.5 in. (D)
S-W601
.............. 360 mm (W) x 430 mm (H) x 438.5 mm (D)
14.2 in. (W) x 16.9 in. (H) x 17.3 in. (D)
Weight (without package)
S-W301......................................... 14.6 kg/32 lb. 4 oz.
S-W501......................................... 15.6 kg/34 lb. 7 oz.
S-W601....................................... 17.2 kg/37 lb. 15 oz.
Power Requirements................................120 V, 60 Hz
Power Consumption...........................................144 W
Power Consumption in standby .........................0.5 W
Accessories......................................RCA plug cord x1
Operating instructions
Specifications and design subject to possible
modification without notice, due to
improvements.
We Want You Listening For A Lifetime
Selecting fine audio equipment such as the unit
you’ve just purchased is only the start of your
musical enjoyment. Now it’s time to consider how
you can maximize the fun and excitement your
equipment offers. This manufacturer and the
Electronic Industries Association’s Consumer
Electronics Group want you to get the most out of
your equipment by playing it at a safe level. One that
lets the sound come through loud and clear without
annoying blaring or distortion-and, most importantly,
without affecting your sensitive hearing.
Sound can be deceiving. Over time your hearing
“comfort level” adapts to higher volumes of sound.
So what sounds “normal” can actually be loud and
harmful to your hearing. Guard against this by
setting your equipment at a safe level BEFORE your
hearing adapts.
Used wisely, your new sound equipment will
provide a lifetime of fun and enjoyment. Since
hearing damage from loud noise is often
undetectable until it is too late, this manufacturer
and the Electronic Industries Association’s
Consumer Electronics Group recommend you avoid
prolonged exposure to excessive noise. This list of
sound levels is included for your protection.
Decibel
Level Example
30
40
50
60
70
80
Quiet library, soft whispers
Living room, refrigerator, bedroom away from traffic
Light traffic, normal conversation, quiet office
Air conditioner at 20 feet, sewing machine
Vacuum cleaner, hair dryer, noisy restaurant
Average city traffic, garbage disposals, alarm clock
at two feet.
THE FOLLOWING NOISES CAN BE DANGEROUS
UNDER CONSTANT EXPOSURE
To establish a safe level:
• Start your volume control at a low setting.
• Slowly increase the sound until you can hear it
comfortably and clearly, and without distortion.
90 Subway, motorcycle, truck traffic, lawn mower
100 Garbage truck, chain saw, pneumatic drill
120 Rock band concert in front of speakers,
thunderclap
140 Gunshot blast, jet plane
180 Rocket launching pad
Once you have established a comfortable sound
level:
• Set the dial and leave it there.
Information courtesy of the Deafness Research Foundation.
Taking a minute to do this now will help to prevent
hearing damage or loss in the future. After all, we
want you listening for a lifetime.
S001_En
PIONEER CORPORATION
4-1, Meguro 1-Chome, Meguro-ku, Tokyo 153-8654, Japan
PIONEER ELECTRONICS (USA) INC.
is a trademark placed on a product with
Pioneer’s Phase Control technology. This technology
enables high-grade sound reproduction through
each component by improving overall phase matching.
P.O. BOX 1540, Long Beach, California 90801-1540, U.S.A. TEL: (800) 421-1404
PIONEER ELECTRONICS OF CANADA, INC.
300 Allstate Parkway, Markham, Ontario L3R 0P2, Canada TEL: 1-877-283-5901, 905-479-4411
PIONEER EUROPE NV
Haven 1087, Keetberglaan 1, B-9120 Melsele, Belgium TEL: 03/570.05.11
PIONEER ELECTRONICS ASIACENTRE PTE. LTD.
253 Alexandra Road, #04-01, Singapore 159936 TEL: 65-6472-7555
Published by Pioneer Corporation.
Copyright © 2008 Pioneer Corporation.
All rights reserved.
PIONEER ELECTRONICS AUSTRALIA PTY. LTD.
178-184 Boundary Road, Braeside, Victoria 3195, Australia, TEL: (03) 9586-6300
PIONEER ELECTRONICS DE MEXICO S.A. DE C.V.
Blvd.Manuel Avila Camacho 138 10 piso Col.Lomas de Chapultepec, Mexico,D.F. 11000 TEL: 55-9178-4270
K002_B_En
Français
1 ページ
2008年7月16日 水曜日 午後7時47分
Nous vous remercions pour cet achat d’un produit PIONEER.
Nous vous demandons de lire soigneusement ce mode d’emploi; vous serez ainsi à même de faire correctement fonctionner
l’appareil. Après avoir bien lu le mode d’emploi, le ranger dans un endroit sûr pour pouvoir s’y référer ultérieurement.
Dans certains pays ou certaines régions, la forme de la fiche d’alimentation et de la prise d’alimentation peut différer de celle
qui figure sur les schémas, mais les branchements et le fonctionnement de l’appareil restent les mêmes.
IMPORTANT
ATTENTION
DANGER D´ELECTROCUTION
NE PAS OUVRIR
Ce symbole de l’éclair, placé dans un
triangle équilatéral, a pour but d’attirer
l’attention de l’utilisateur sur la présence, à
l’intérieur du coffret de l’appareil, de
“tensions dangereuses” non isolées d’une
grandeur suffisante pour représenter un
risque d’électrocution pour les êtres
humains.
ATTENTION:
POUR ÉVITER TOUT RISQUE
D’ÉLECTROCUTION, NE PAS ENLEVER LE
COUVERCLE (NI LE PANNEAU ARRIÈRE).
AUCUNE PIÈCE RÉPARABLE PAR
L’UTILISATEUR NE SE TROUVE À
L’INTÉRIEUR. CONFIER TOUT ENTRETIEN À
UN PERSONNEL QUALIFIÉ UNIQUEMENT.
PRÉCAUTION DE VENTILATION
Lors de l’installation de l’appareil, veillez à laisser
un espace suffisant autour de ses parois de
manière à améliorer la dissipation de chaleur (au
moins 25 cm sur le dessus, 15 cm à l’arrière et 10 cm
de chaque côté).
AVERTISSEMENT
Les fentes et ouvertures du coffret sont prévues
pour la ventilation, pour assurer un fonctionnement
stable de l’appareil et pour éviter sa surchauffe.
Pour éviter les risques d’incendie, ne bouchez
jamais les ouvertures et ne les recouvrez pas
d’objets, tels que journaux, nappes ou rideaux, et
n’utilisez pas l’appareil posé sur un tapis épais ou
D3-4-2-1-7b_A_Fr
un lit.
Ce point d’exclamation, placé dans un
triangle équilatéral, a pour but d’attirer
l’attention de l’utilisateur sur la présence,
dans les documents qui accompagnent
l’appareil, d’explications importantes du
point de vue de l’exploitation ou de
l’entretien.
D3-4-2-1-1_Fr
NOTE IMPORTANTE SUR LE CABLE
D’ALIMENTATION
Cet appareil n’est pas étanche. Pour éviter les
risques d’incendie et de décharge électrique, ne
placez près de lui un récipient rempli d’eau, tel
qu’un vase ou un pot de fleurs, et ne l’exposez pas
à des gouttes d’eau, des éclaboussures, de la pluie
D3-4-2-1-3_A_Fr
ou de l’humidité.
Tenir le câble d’alimentation par la fiche. Ne pas
débrancher la prise en tirant sur le câble et ne pas
toucher le câble avec les mains mouillées. Cela risque
de provoquer un court-circuit ou un choc électrique. Ne
pas poser l’appareil ou un meuble sur le câble. Ne pas
pincer le câble. Ne pas faire de noeud avec le câble ou
l’attacher à d’autres câbles. Les câbles d’alimentation
doivent être posés de façon à ne pas être écrasés. Un
câble abîmé peut provoquer un risque d’incendie ou un
choc électrique. Vérifier le câble d’alimentation de
temps en temps. Contacter le service après-vente
PIONEER le plus proche ou le revendeur pour un
remplacement.
S002*_Fr
Avant de brancher l’appareil pour la première, lisez
attentivement la section suivante.
La tension de l’alimentation électrique disponible
varie selon le pays ou la région. Assurez-vous que
la tension du secteur de la région où l’appareil sera
utilisé correspond à la tension requise (par ex. 230
V ou 120 V), indiquée sur le panneau arrière.
D3-4-2-1-4_A_Fr
AVERTISSEMENT
Pour éviter les risques d’incendie, ne placez aucune
flamme nue (telle qu’une bougie allumée) sur
D3-4-2-1-7a_A_Fr
l’appareil.
Les caractéristiques de fréquence du S-W301/S-W501/S-W601 lorsqu’il
est utilisé en combinaison avec des enceintes acoustiques de petite
taille sont indiquées ci-dessous. Comme on peut le voir sur ce
graphique, la gamme des basses fréquences est sensiblement
améliorée.
• Ces caractéristiques spéciales sont obtenues dans une chambre
sans écho. L’effet produit par l’ajout d’un S-W301/S-W501/S-W601
dans une salle d’écoute ordinaire est supérieur à l’effet indiqué sur
le graphique, à condition que le subwoofer soit correctement placé.
Milieu de fonctionnement
ATTENTION
L’interrupteur POWER de cet appareil ne coupe pas
complètement celui-ci de sa prise secteur. Comme
le cordon d’alimentation fait office de dispositif de
déconnexion du secteur, il devra être débranché au
niveau de la prise secteur pour que l’appareil soit
complètement hors tension. Par conséquent, veillez
à installer l’appareil de telle manière que son cordon
d’alimentation puisse être facilement débranché de
la prise secteur en cas d’accident. Pour éviter tout
risque d’incendie, le cordon d’alimentation sera
débranché au niveau de la prise secteur si vous
prévoyez une période prolongée de non utilisation
(par exemple avant un départ en vacances).
Température et humidité du milieu de fonctionnement :
De +5 ºC à +35 ºC (de +41 ºF à +95 ºF); Humidité
relative inférieure à 85 % (orifices de ventilation non
obstrués) N’installez pas l’appareil dans un endroit mal
ventilé ou un lieu soumis à une forte humidité ou en plein
D3-4-2-1-7c_A_Fr
soleil (ou à une forte lumière artificielle).
Enceinte de petite taille
FREQUENCE (Hz)
• Il est recommandé de réserver un canal spécial pour le subwoofer en
cas de reproduction d’un programme Dolby Digital. Le S-W301/SW501/S-W601 est particulièrement efficace en cas de reproduction
d’un LFE (effet de basse fréquence : destiné à donner plus d’intensité
à la vidéo).
INSTALLATION
Installation des enceintes
• Critères d’installation du subwoofer
1
2
1 Enceinte gauche
2 Enceinte droite
3 Position préconisée
pour le subwoofer
4 Position d’écoute
3
4
ACCESSOIRES FOURNIS
CARACTERISTIQUES
• Câble à prise RCA x 1
• Mode d’emploi
n Puissance efficace de 150 W (S-W301)/170 W (S-W501)/180 W (SW601) (RMS) avec amplificateur de classe AB, servant un logiciel
audio et vidéo reproduit comme Dolby Digital avec une large plage
dynamique.
n Equipé d’un haut-parleur de 20 cm (S-W301)/25 cm (S-W501)/30 cm
(S-W601)
n La fréquence de recouvrement peut être réglée entre 50 Hz et 200 Hz.
ATTENTION:
Si vous installez l’enceinte centrale sur le téléviseur, assurez-vous
de le fixer avec du ruban adhésif ou par un autre moyen.
Sinon, l’enceinte risque de tomber à cause de chocs extérieurs à
l’appareil, comme des tremblements de terre, et vous pourriez
mettre en danger les personnes à proximité ou l’enceinte pourrait
être endommagée.
Précautions d’installation
D3-4-2-2-2a_A_Fr
Ce produit est destiné à une utilisation domestique
générale. Toute panne due à une utilisation autre
qu'à des fins privées (comme une utilisation à des
fins commerciales dans un restaurant, dans un
autocar ou sur un bateau) et qui nécessite une
réparation sera aux frais du client, même pendant la
K041_Fr
période de garantie.
• Les enceintes arrière (ambiophoniques) donnent les meilleurs
résultats lorsqu’elles sont placées de manière symétrique par
rapport à la position d’écoute, au même niveau ou légèrement
derrière, et à environ 1 mètre au-dessus du niveau des oreilles d’une
personne assise.
Enceinte de petite taille + S-W301/S-W501/S-W601
D3-4-2-2-1a_A_Fr
AVERTISSEMENT
AVERTISSEMENT
Si la fiche d’alimentation secteur de cet appareil ne
convient pas à la prise secteur à utiliser, la fiche doit
être remplacée par une appropriée.
Ce remplacement et la fixation d’une fiche secteur
sur le cordon d’alimentation de cet appareil doivent
être effectués par un personnel de service qualifié.
En cas de branchement sur une prise secteur, la
fiche de coupure peut provoquer une sérieuse
décharge électrique. Assurez-vous qu’elle est
éliminée correctement après sa dépose.
L’appareil doit être déconnecté en débranchant sa
fiche secteur au niveau de la prise murale si vous
prévoyez une période prolongée de non utilisation
(par exemple avant un départ en vacances).
UTILISATION COMBINEE AVEC DES
ENCEINTES ACOUSTIQUES
REPONSE (dB)
XRE3208A_S-W301W501W601_Fr.fm
Le subwoofer restitue les graves en monophonie, en profitant du fait
que l’oreille humaine n’est pas capable de localiser les sons graves.
Pour cette raison, ce subwoofer peut être installé pratiquement
n’importe où. Toutefois, s’il est installé trop loin, le son des autres hautparleurs risque de ne plus être naturel.
• Emplacements types des enceintes
1 Enceinte avant
2
3
1
gauche
2 Enceinte centrale
3 Enceinte avant
droite
4 Subwoofer
4
5 Zone d’écoute
6 Enceinte arrière
gauche
5
7 Enceinte arrière
droite
6
• Ne fixez pas le caisson de graves sur un mur ou au plafond, car il
pourrait tomber et provoquer des blessures.
• Installer le subwoofer dans un endroit bien ventilé où il ne sera pas
soumis à une humidité ou à des températures excessives.
• Ne pas placer le subwoofer à proximité d’un radiateur, ou autre
appareil de chauffage, et ne pas l’exposer aux rayons directs du soleil
car cela risquerait d’endommager le coffret ou les composants
internes. Ne pas le placer non plus dans un endroit excessivement
poussiéreux ou humide car ceci pourrait provoquer des anomalies
de fonctionnement ou une panne. (Eviter de le placer sur une table
de cuisine ou autres emplacements où il serait soumis à la chaleur,
à la vapeur ou à la suie.)
• Ne pas poser d’objets lourds ou volumineux sur le dessus de
l’enceinte, car ceci pourrait provoquer sa chute et entraîner des
dégâts ou des blessures. Si les enceintes devaient tomber, leur
finition pourrait subir des fissures irréparables.
• Ne pas placer le subwoofer à proximité d’un appareil, comme par
exemple un magnétophone, susceptible d’être affecté par les
champs magnétiques.
Comme le caisson de basse n’est pas blindé magnétiquement, ne
le placez pas à proximité d’un téléviseur ou d’un moniteur. En plus,
tout support magnétique de données (tels que disquettes, bandes
ou cassettes vidéo) doit être placé loin du caisson de basses.
• Ne pas placer l’enceinte sur une surface instable, car elle pourrait
tomber et provoquer des dégâts ou des blessures.
• Ne pas poser de tasses, verres ou autres récipients contenant un
liquide sur le dessus des appareils car ils pourraient être
endommagés si du liquide devait y pénétrer.
• L’emplacement d’installation choisi doit être la surface d’un
plancher solide. Eviter de poser l’enceinte sur un tapis à longs poils,
car ils pourraient toucher le diaphragme et provoquer une distorsion
des sons.
• Prière d’installer cette unité à distance du câble d’antenne du tuner,
car des parasites peuvent être provoqués par une installation proche
du câble d’antenne. Dans ce cas, utiliser cette unité à une position
écartée de l’antenne et du câble d’antenne, ou si la reproduction de
basses supplémentaires n’est pas nécessaire, couper l’alimentation
de cette unité.
ENTRETIEN DES SURFACES EXTERNES:
• Nettoyez la surface en frottant avec un linge doux et sec.
• Lorsque les surfaces sont extrêmement sales, utiliser un chiffon
doux et un produit détergent neutre dilué dans cinq ou six
volumes d’eau. Bien tordre le chiffon avant de nettoyer les
surfaces. Les essuyer ensuite avec un chiffon sec. Ne jamais
utiliser de produits de nettoyage ou de la cire pour meubles.
• Ne jamais utiliser de diluant, benzine, bombe insecticide et
autres produits chimiques à proximité de cette enceinte car ces
produits détérioreraient le fini de surface.
7
REMARQUES:
• Placer l’enceinte droite et l’enceinte gauche à égale distance du
récepteur de télévision et à environ 1,8 mètre l’une de l’autre.
• Installez l’enceinte centrale au-dessus ou en dessous du téléviseur,
de façon à ce que le son du canal central provienne de l’écran du
téléviseur.
DESCRIPTION DE LA FACE AVANT ET
DE LA FACE ARRIERE
FACE AVANT
6 Sélecteur de phase (PHASE 0º /180º)
Lors d’un réglage sur 180º , la phase de sortie devient l’inverse du
signal d’entrée; lors d’un réglage sur 0º, elle est la même que le
signal d’entrée.
• Ce sélecteur doit être normalement réglé sur 0º, mais lorsque
l’équilibre du son entre l’enceinte droite, l’enceinte gauche et le
subwoofer ne semble pas naturel, essayer 180º et laisser le
sélecteur à la positon donnant le résultat le plus naturel.
• A l’emploi de deux ou plusieurs subwoofers, veiller à ce que le
sélecteur de phase de chacun d’eux soit réglé à la même position.
2. Faire fonctionner l’amplificateur ou le récepteur et ajuster le
volume des autres haut-parleurs.
7 Interrupteur d’attente automatique (AUTO STANDBY)
Il active et désactive la fonction de mise en attente automatique.
Lorsque la fonction est en service (ON) (ce réglage est désactivé
(OFF) par défaut), la mise en attente automatique agit. Dans ce cas,
si aucun signal n’est entré pendant 12 minutes, le système passe
automatiquement en mode d’attente. L’alimentation est rétablie
automatiquement dès qu’un signal d’entrée est détecté.
Il arrive souvent que des anomalies de fonctionnement ou des problèmes apparents soient dus à de simples erreurs de manipulation. Si cette
enceinte semble ne pas fonctionner correctement, contrôler les points suivants. Parfois un autre élément de la chaîne est à l’origine du problème.
Contrôler tous les éléments et accessoires électriques utilisés. Si l’origine du problème n’a pas pu être trouvée après avoir effectué les contrôles
suivants, s’adresser au service après-vente PIONEER le plus proche ou à un distributeur.
REMARQUE:
• Des cas peuvent se présenter où un composant raccordé émet
des parasites ou d’autres signaux nonaudio qui provoquent une
remise sous tension du système alors qu’il est en mode d’attente
automatique. Dans ce cas, désactivez (OFF) le mode d’attente
automatique et mettez le système manuellement en service ou
hors service.
STANDBY/ON
1
3. Ajuster le volume des graves par le bouton VOLUME (3).
• Lorsque nécessaire, utiliser le bouton de réglage CROSSOVER (4)
et le sélecteur PHASE (6) et régler ensuite le volume avec le
bouton VOLUME (3).
DEPANNAGE
SYMPTÔME
2
POWER
VOLUME
MAX
MIN
CROSSOVER
3
200 Hz
50 Hz
BYPASS
ON
OFF
PHASE
AUTO
STANDBY
ON
OFF
LINE LEVEL
OUTPUT INPUT
4
5
6
7
8
9
10
9 Borne de sortie niveau ligne (LINE LEVEL OUTPUT)
Pour raccorder d’autres appareils via l’amplificateur. Le signal
fournit par cette prise n’est nullement affecté par les réglages des
diverses commandes de cet appareil.
10 CORDON SECTEUR
Branchez le cordon secteur sur une prise CA du secteur (dans la
pièce).
RACCORDEMENTS
Avant d’effectuer ou de changer les raccordements, mettre hors
tension et débrancher cet appareil et l’amplificateur ou le
récepteur au niveau de la prise secteur.
RACCORDEMENT DE NIVEAU LIGNE
1 Témoin d’alimentation (STANDBY/ON)
S’allume en bleu quand l’appareil est mis sous tension (ON). Quand
l’interrupteur AUTO STANDBY est activé (ON), il s’allume en bleu
chaque fois que l’enceinte reçoit des signaux audio. Si l’alimentation
n’est coupée (OFF) que brièvement, le témoin s’allume en bleu
lorsque l’alimentation est rétablie. Si aucun signal n’est présent
pendant plus de 12 minutes, le subwoofer repasse automatiquement
au mode d’attente et le témoin d’alimentation s’allume en rouge. Si,
par la suite, un signal est capté, l’alimentation est automatiquement
rétablie et le témoin d’alimentation s’allume en bleu.
REMARQUE:
• Si vous prévoyez de laisser l’appareil hors tension pendant une durée
prolongée, vérifiez que le témoin d’alimentation s’est bien éteint
après avoir mis l’appareil hors tension.
2 Interrupteur d’alimentation (POWER)
Pour activer (ON) ou désactiver (OFF) le caisson de graves.
3 Bouton de volume (VOLUME)
Permet de régler le volume du subwoofer.
• Tourner lentement le bouton à partir de la position MIN.
• Avec cet appareil, le niveau des basses peut être réglé
indépendamment et il n’est donc pas nécessaire d’élever le niveau
des basses sur l’amplificateur AV.
4 Bouton de réglage de recouvrement (CROSSOVER)
A l’emploi du caisson de graves, réglez la limite supérieure de
fréquence pour celui-ci (50 Hz à 200 Hz) de sorte qu’il complémente
la sortie de vos autres haut-parleurs.
Dans le cas d’une utilisation des fonctions de gestion des graves
d’un récepteur AV, régler sur BYPASS ON pour utiliser le filtre passebas du récepteur AV et améliorer la qualité du son.
5 Interrupteur de dérivation (BYPASS)
Lors d’un réglage sur ON (activé), le signal audio est acheminé vers
le haut-parleur de graves, évitant ainsi le circuit répartiteur de
l’amplificateur.
Face arrière
Câble à prise RCA fourni
Cette connexion est destinée à un amplificateur ou un récepteur muni
d’une borne SUBWOOFER PREOUT. Relier cette borne à la borne
d’entrée LINE LEVEL INPUT du subwoofer à l’aide du câble à prise RCA
fourni.
REMARQUE:
• En cas d’une connexion sur la borne PREOUT pour la voie centrale
surround sur l’amplificateur ou le récepteur, les graves ne seront
perçus que sur la voie centrale, ce qui laissera à désirer.
FONCTIONNEMENT
Pour les détails sur les fonctions des organes, reportez-vous à
DESCRIPTION DE LA FACE AVANT ET DE LA FACE ARRIERE ci-dessus.
1. Allumer (ON) l’interrupteur d’alimentation POWER (2).
• Si le cordon d’alimentation est branché sur une prise secteur
commutée de l’amplificateur ou du récepteur et que l’interrupteur
est laissé activé (ON), cet appareil pourra être mis sous/hors
tension en même temps que l’amplificateur ou le récepteur.
• Si cet appareil ne peut pas être connecté à l’amplificateur ou au
récepteur, mettre l’amplificateur ou le récepteur sous tension
(ON) avant de mettre cet appareil sous tension. Lors de la mise
hors tension, mettre cet appareil hors tension (OFF) avant de
couper l’alimentation de l’amplificateur ou du récepteur.
CAUSE
REMÈDE
1 L’enceinte ne se met pas sous tension (le • Le cordon d’alimentation n’est pas
branché correctement.
témoin d’alimentation ne s’allume pas
lorsque l’interrupteur POWER est enfoncé).
• Brancher correctement le cordon d’alimentation.
2 Pas de son
(Le témoin d’alimentation s’allume.)
• La connexion du cordon à fiche RCA • Vérifier les raccordements et connecter correctement.
fourni comme accessoire est erronée
ou le cordon est débranché.
• Tourner lentement ce bouton dans le sens des aiguilles d’une
• Le bouton de réglage du volume
montre.
VOLUME est réglé sur MIN.
3 Le son est déformé.
• Le niveau est trop élevé.
8 Borne d’entrée du niveau de ligne (LINE LEVEL INPUT)
Pour raccorder à la borne SUBWOOFWER PREOUT d’un
amplificateur ou d’un récepteur au moyen du cordon à fiche RCA
spécialement fourni.
FACE ARRIERE
4. Eteindre (OFF) l’interrupteur d’alimentation POWER (2).
• Le témoin d’alimentation disparaît.
• Le niveau d’entrée est trop élevé.
• Tourner le bouton de réglage du volume VOLUME dans le sens
contraire des aiguilles d’une montre pour baisser le niveau.
• Utiliser les commandes de réglage du niveau de sortie (volume,
réglage grave, renforcement des basses) de l’amplificateur
pour baisser le niveau.
4 Un bruit de cornemuse se produit.
• L’amplificateur n’est pas sous tension. • Connecter un amplificateur et le mettre sous tension.
• Le niveau du subwoofer est trop élevé. • Placer le subwoofer à une bonne distance des autres enceintes.
Tourner le bouton de réglage du volume VOLUME dans le sens
contraire des aiguilles d’une montre pour baisser le niveau.
5 Nombreux parasites lors d’écoute
d’émission AM ou FM.
• Augmenter la distance entre l’antenne AM ou FM (pour usage
• L’antenne-cadre AM ou l’antenne
intérieure FM est proche de cette unité.
intérieur) et cette unité.
FICHE TECHNIQUE
Coffret ........................... Type bass réflex, sur plancher
Haut-parleur
S-W301........................................Type conique 20 cm
S-W501........................................Type conique 25 cm
S-W601........................................Type conique 30 cm
Puissance de sortie continue (RMS)
S-W301......................................... 150 W/6 Ω (100 Hz)
S-W501......................................... 170 W/6 Ω (100 Hz)
S-W601......................................... 180 W/6 Ω (100 Hz)
Entrée (sensibilité à 100 Hz)
LINE LEVEL (prise RCA).................................. 200 mV
Sortie (Niveau à 100 Hz)
LINE LEVEL (prise RCA).................................. 200 mV
Sélection des fréquences de recouvrement
(CROSSOVER)........................................50 Hz à 200 Hz
Dimensions externes
S-W301.... 360 mm (L) x 360 mm (H) x 398,5 mm (P)
S-W501.... 360 mm (L) x 380 mm (H) x 418,5 mm (P)
S-W601.... 360 mm (L) x 430 mm (H) x 438,5 mm (P)
Poids (sans emballage)
S-W301..............................................................14,6 kg
S-W501..............................................................15,6 kg
S-W601..............................................................17,2 kg
Alimentation électrique....................... 120 V CA, 60 Hz
Consommation d’énergie ................................... 144 W
Consommation en mode Attente ....................... 0,5 W
Accessoires fournis................... Câble à prise RCA x 1
Mode d’emploi
Les caractéristiques techniques et le design
peuvent être modifiés sans aucun avis pour y
apporter des améliorations.
est une marque de commerce, appliquée
sur un appareil doté de la technologie “Phase
Control” de Pioneer. Cette technologie autorise
une reproduction sonore de haut niveau par
chaque composant grâce à une amélioration de la
synchronisation d’ensemble des phases.
Printed in
Should this product require service in the U.S.A. and you wish to locate the nearest Pioneer
Authorized Independent Service Company, or if you wish to purchase replacement parts,
operating instructions, service manuals, or accessories, please call the number shown
below.
1–800–421–1404
Please do not ship your product to Pioneer without first calling the Customer Support at the
above listed number for assistance.
Pioneer Electronics Service, Inc.
P.O. BOX 1760, Long Beach,
CA 90801-1760, U.S.A.
For warranty information please see the Limited Warranty sheet included with your product.
Should this product require service in Canada, please contact a Pioneer Canadian
Authorized Dealer to locate the nearest Pioneer Authorized Service Company in Canada.
Alternatively, please contact the Customer Satisfaction Department at the following address:
Pioneer Electronics of Canada, Inc.
Customer Satisfaction Department
300 Allstate Parkway, Markham, Ontario L3R 0P2
1-877-283-5901
905-479-4411
For warranty information please see the Limited Warranty sheet included with your product.
Si ce produit doit être réparé au Canada, veuillez vous adresser à un distributeur autorisé
Pioneer du Canada pour obtenir le nom du Centre de Service Autorisé Pioneer le plus près
de chez-vous. Vous pouvez aussi contacter le Service à la clientèle de Pioneer:
Pioneer Électroniques du Canada, Inc.
Service Clientèle
300, Allstate Parkway, Markham, Ontario L3R 0P2
1-877-283-5901
905-479-4411
Pour obtenir des renseignements sur la garantie, veuillez vous reporter au feuillet sur la
garantie restreinte qui accompagne le produit.
S018_C_EF
Publication de Pioneer Corporation.
© 2008 Pioneer Corporation.
Tous droits de reproduction et de traduction réservés.
Imprimé en
<XRE3208-A>