1
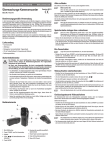
Mode d‘emploi
1. Mise en marche de l‘appareil Mycrocam 720 HD LIVE
Le MycrocamHD 720 HD LIVE est livré avec une batterie partiellement chargée ;
chargez la batterie complètement avant la première utilisation. Insérez votre carte
mémoire MicroSD dans la fente prévue à cet effet (voir photo). La carte est bien
insérée si vous entendez un « clic ». Appuyez ensuite sur le bouton
Marche /
Arrêt . La LED jaune s’allume et votre Mycrocam 720 HD LIVE est prêt à fonctionner.
2. Réalisation d’une vidéo
Pour filmer, appuyez sur le bouton
jusqu’à ce que la LED clignote à brefs
intervalles ; l’appareil commence alors à filmer. Pour indiquer qu’une vidéo est
en cours de réalisation, la LED clignote à intervalles réguliers. Pour terminer
l’enregistrement, appuyez sur le bouton
. La LED s’allume alors de nouveau en
continu. Si vous ne réalisez plus d’autres prises, l’appareil s’éteint automatiquement
après 30 secondes.
3. Prise de vue
Mettez l’appareil en marche comme décrit au point 1 et appuyez sur le bouton
.
La LED jaune clignote une fois. Votre Mycrocam 720 HD LIVE est maintenant en
mode photo. Appuyez une nouvelle fois sur le bouton
pour prendre une photo.
4. Utilisation comme webcam
Raccordez le Mycrocam 720 HD LIVE à votre ordinateur à l’aide du câble USB
joint et appuyez sur le bouton
. Votre ordinateur ajoute l’appareil à la liste des
lecteurs. Maintenez le bouton
supérieur enfoncé et appuyez sur le bouton
inférieur de telle sorte que les deux boutons soient
actionnés simultanément
pendant deux secondes environ. Votre ordinateur détecte automatiquement le
Mycrocam 720 HD LIVE dans sa fonction de webcam. En raison des différences
de configuration matérielle et logicielle, vous devrez peutêtre effectuer différents
réglages. (Le mode webcam n’est pas pris en charge par Windows7/32 bits et les
produits Apple.)
Pour cela, référez-vous aussi au chapitre Remarques.
Visionnage des photos / vidéos Pour regarder vos photos et vidéos, connectez
le Mycrocam 720 HD LIVE à votre ordinateur à l’aide du câble USB fourni. Appuyez
sur le bouton
. Votre ordinateur ajoute l’appareil à la liste des lecteurs et la
LED s’allume (jaune/rouge). Le répertoire DCIM s’affiche. Dans ce répertoire se
trouve le dossier 100Media, qui contient vos photos et vidéos. Il vous suffit de
double-cliquer sur le fichier (jpeg ou mov) pour ouvrir et regarder la photo ou la
vidéo correspondante.
Chargement de la batterie
Dès que le Mycrocam 720 HD LIVE est connecté à l’ordinateur à l’aide du câble
USB fourni, la batterie commence à se recharger. La batterie est complètement
rechargée après deux heures. Le chargement stoppe alors automatiquement. Il
n’est donc pas possible de surcharger la batterie.
Ne laissez jamais l’appareil sans surveillance durant le chargement de l‘accu!
Utilisation Respectez scrupuleusement les prescriptions légales. L’utilisateur
est seul responsable de l’utilisation conforme de l’appareil. Respectez la vie privée
d’autrui.
La société Dreidee Innovations GmbH décline toute responsabilité en cas de perte
de photos et de vidéos suite à un défaut de l’appareil Mycrocam 720 HD LIVE ou
de ses accessoires.
Remarques
• Compatible avec les systèmes d’exploitation : Windows XP, Windows VISTA,
Windows7*
et MacOS* (* Pas de fonction webcam avec Windows7 32 bits et MacOS)
• Vous pouvez utiliser des cartes MicroSD ou MicroSDHC de 1 à 32 Go de la
catégorie Class 4 ou supérieure.
• Si la fonction webcam ne s’active pas immédiatement, cochez « Preview » dans
les « Options » du logiciel AMcap.
• Si l’appareil ne réagit plus alors que la LED de contrôle est allumée en continu,
retirez la carte mémoire, enfoncez le bouton de remise à zéro (reset) situé sur
le côté gauche du boîtier à l’aide d’une aiguille ou d’un trombone, puis remettez
l’appareil en marche.
• Conservez soigneusement ce mode d’emploi. Il contient des informations
importantes sur l’utilisation et l’entretien de votre MycroCam 720 HD LIVE.
Questions techniques et support: [email protected]
Informations relatives aux produits www.mycrocam.info
Distribution / Sales:
www.cam-shop-online.com
[email protected]
Contact direct avec les constructeurs www.mycrocam.info
Dreidee Innovations GmbH, Probst-Niehues-Str. 15, 45768 Marl
Batterien gehören nicht in den Hausmüll.
EMV-Richtlinie 2004/108/EG, WEEE-Reg.-Nr. DE 52990241
Bedienungsanleitung
1. Einschalten der Mycrocam 720 HD LIVE.
Die Mycrocam HD LIVE wird mit einem teilgeladenen Akku ausgeliefert, bitte laden
Sie die Kamera vor dem ersten Einsatz ganz auf.
Bitte setzen Sie Ihre MicroSD Speicherkarte in den dafür vorgesehen Kartenslot
(Siehe Bild) ein. Die Karte ist richtig eingelegt wenn sie mit einem „Click“ eingerastet ist. Nun drücken Sie auf den Ein/Aus
Schalter einmal kurz , die gelbe LED
Anzeige leuchtet auf und Ihre Mycrocam 720 HD LIVE ist jetzt einsatzbereit.
2. Aufnahme eines Videos
Zur Aufnahme eines Videofilmes drücken Sie bitte den oberen Schalter
einmal
kurz und die LED Anzeige blinkt jetzt in kurzen Intervallen, die Aufnahme hat
begonnen. Zur Kontrolle während der Aufnahme blinkt die LED im Intervall. Zum
Beenden der Aufnahme drücken Sie den oberen
Schalter einmal, die LED ist
nun dauerhaft an (Standby). Falls Sie keine weiteren Aufnahmen mehr machen
schaltet sich die Mycrocam 720 HD LIVE automatisch nach 30 Sekunden ab.
3. Aufnahme eines Bildes
Bitte schalten Sie die Kamera durch Drücken des EIN/AUS Schalters ein. Die Kamera
ist nun im Standby Modus. Durch nochmaliges Drücken des EIN/AUS Schalters
wechseln Sie in den Fotomodus. Wenn Sie nun den Aufnahmeschalter
(oben)
drücken, nehmen Sie mit jedem Klick ein Bild auf.
4. Einsatz als Webcam
Schließen Sie die Mycrocam 720 HD LIVE mit dem beiliegenden USB Kabel an Ihren
Computer an. Drücken Sie den Aufnahmeschalter und halten diesen gedrückt, nun
drücken Sie den Ein/Aus
Schalter ebenfalls, sodass Sie für ca. 3 Sekunden beide
Schalter gleichzeitig gedrückt halten. Die Mycrocam 720 HD LIVE wird automatisch
als Webcam erkannt. Aufgrund unterschiedlicher System-Voraussetzungen bei
Hard-und Software kann es notwendig sein verschiedene Einstellungen vorzunehmen. (Die Webcam Funktion ist bei Windows 7/32bit und bei Apple Produkten
nicht möglich).
Bitte beachten Sie hierzu auch das Kapitel Hinweise.
5. Wiedergabe des Bildes/Videos
Zur Wiedergabe Ihrer Aufnahmen schließen Sie die Mycrocam 720 HD LIVE bitte
mit dem mitgelieferten USB-Kabel an Ihren Computer an, die LED leuchtet nun rot.
Drücken Sie dann den Ein/Aus-Schalter, die Kamera wird als Laufwerk (Wechsel-
datenträger DCIM) erkannt und die LED leuchtet gelb/rot. Sie können sich nun
durch Doppelklick auf die Datei (jpeg für Foto oder mov. für Video) die Filme oder
Bilder anschauen.
6. Laden des Akkus
Sobald die Mycrocam 720 HD LIVE mittels des mitgelieferten USB Kabels mit dem
Computer oder einem USB-Ladeadapter verbunden ist, wird der Akku geladen.
Der Akku ist nach ca. 2 Stunden vollständig geladen, der Ladevorgang wird automatisch beendet. Ein Überladen des Akkus ist somit nicht möglich.
Bitte lassen Sie die Kamera während des Ladevorganges nicht unbeaufsichtigt!
7. Bilder und Filme über Ihren TV anschauen
Mit dem mitgelieferten Cinch-Kabel haben Sie die Möglichkeit Ihre Aufnahmen
auf dem Fernseher zu betrachten. Verbinden Sie hierzu den gelben (Video) und
die weiß/roten Stecker (Audio) mit Ihrem Fernsehgerät und den USB Stecker mit
der Kamera. Durch dreimaliges Klicken des EIN/AUS Schalters
erscheint nun
in Ihrem Fernseher das Menü. Durch Drücken der Aufnahmetaste können Sie die
einzelnen Aufnahmen auswählen.
Achtung: Bei der Benutzung der Kamera mit dem Cinch-Kabel wird der Akku
nicht geladen.
Anwendung
Halten Sie Sich streng an gesetzliche Vorschriften. Der Nutzer ist allein für die
ordnungsgemäße Benutzung verantwortlich. Bitte achten Sie die Privatsphäre
Dritter. Die Dreidee Innovations GmbH haftet nicht für den Verlust von Aufnahmen durch Defekt der Mycrocam 720 HD LIVE oder des Zubehörs.
Hinweise
• Unterstütze Betriebssysteme: Windows XP, Windows VISTA, Windows7* sowie
MacOS* (* Windows7 32 Bit und MacOS keine Webcamfunktion)
• Es können MicroSD oder MicroSDHC Karten von 1GB-32 GB der Kategorie min.
Class4 oder schneller verwendet werden.
• Sollte die Webcam Funktion nicht sofort funktionieren, setzen Sie bitte im
Programm AMcap unter Optionen einen Haken bei Preview.
• Im Falle dass die Kamera bei dauerhaft leuchtender Kontrollleuchte nicht mehr
reagiert, entnehmen Sie die Speicherkarte und drücken mit einer Nadel oder
Büroklammer den Reset-Schalter auf der linken Gehäuse-Seite und starten die
Kamera neu.
• Bitte bewahren Sie die Bedienungsanleitung gut auf. Sie enthält wichtige Informationen zur Bedienung und Pflege Ihrer Mycrocam 720 HD LIVE.
Technischen Fragen und Support:
[email protected]
Produktinformationen
www.mycrocam.info
Vertrieb / Sales:
www.cam-shop-online.com
[email protected]
Kontakt des Herstellers:
Dreidee Innovations GmbH, Probst-Niehues-Str. 15, 45768 Marl
Batterien gehören nicht in den Hausmüll.
EMV-Richtlinie 2004/108/EG, WEEE-Reg.-Nr. DE 52990241
Manual
1. Switching On The Mycrocam 720 HD LIVE
The Mycrocam 720 HD LIVE is supplied with a partly charged battery. Please
fully charge the battery before using the camera. Please insert your MicroSD
memory card in the appropriate slot (see diagram). If you hear a click, the card
has been inserted correctly. Now press the on/off
button once. A yellow LED
will light up once the MycroCam 720 HD LIVE is ready to use.
2. Recording Videos
To record a video, press the upper button
once and the LED will start
blinking rapidly. Recording will then begin. The LED will blink repeatedly during
recording. To end the recording press the button
once. The LED will now
stay lit. When not in use, the Mycrocam 720 HD LIVE will switch off automatically after 30 seconds.
3. Taking Photos
Please switch on the camera as described in section #1 and press the button
The yellow LED will blink once, indicating that your Mycrocam 720 HD LIVE is
now in photo mode. Press the button
once to take a photograph, press
again to take another one.
4. Use As A Webcam
Connect the Mycrocam 720 HD LIVE to your computer with the USB cable provided and press the button . The camera will be detected as a drive. Now press
and hold the
button and then press the button below (keep both buttons
pressed for approx. 3 seconds). The Mycrocam 720 HD LIVE will automatically
be identified as a webcam. Due to different system requirements for hardware
and software, you may need to configure additional settings. (The webcam
function is not compatible with Windows7/32bit or Apple products).
Please also refer to the notes section.
Viewing Photos And Videos
To view your photos and video recordings, connect the Mycrocam 720 HD
LIVE to your computer using the USB cable provided, the red LED will show up.
Press the on/off
button and the camera will be detected as an external drive
(DCIM directore) and the LED will light up yellow/red. You will find your photos
and videos in the DCIM folder in this directory. Double-click a file (jpeg or mov)
to open the photo or video.
Charging The Battery
The battery will begin to charge as soon as the Mycrocam 720 HD LIVE is
connected to your computer via the USB cable provided. The battery will be
fully charged after 2 hours and will finish charging automatically, which means
the battery cannot be overcharged. Please do not leave the camera unattended
while it is charging!
Play Back Photos And Videos Via TV
Play back photos and videos via your TV with the provided cinch cable. Connect
the yellow (video) and white/red jack with your TV and the USB plug with the
camera. Now press the On/Off button three times and the menu shows up on
your TV screen. Press the recording button to choose between your recordings.
Attention: The battery will not charge with the cinch cable.
Usage Strictly observe legal regulations. Users are solely responsible for proper
usage. Please respect the privacy of third parties. Dreidee Innovations GmbH is
not liable for the loss of photos or videos caused by damage to the Mycrocam
720 HD LIVE or its accessories.
Notes
• Supported operating systems: Windows XP, Windows VISTA, Windows7* and
MacOS* (* No webcam function with Windows7 32 Bit and MacOS)
• You can use 1GB-32 GB MicroSD or MicroSDHC cards in the Class4 category
or faster.
• If the webcam function does not work straight away, please select the preview
check box under options in the AMcap programme.
• If the camera no longer responds and the LED remains constantly on, remove
the memory card and use a needle or paperclip to press the reset button on the
left side of the camera casing and restart the camera.
• Please store the operating instructions carefully. They contain important information on how to use and maintain your Mycrocam 720 HD LIVE.
Technical Queries And Support:
[email protected]
Product information:
www.mycrocam.info
Instrucciones de uso
1. Conectar la Mycrocam 720 HD LIVE
La MycroCam 720 HD LIVE se suministra con la batería a media carga. Por tanto,
antes de utilizar la cámara termine de cargar la batería. Introduzca su tarjeta de
memoria microSD en la ranura para tarjetas (véase imagen). La tarjeta estará bien
colocada cuando oiga el “clic” que indica que la tarjeta ha engatillado. Pulse el
botón de encendido/apagado
: el indicador LED amarillo se iluminará y
su cámara Mycrocam 720 HD LIVE estará operativa.
2. Grabar un vídeo
Para grabar un vídeo pulse el botón
hasta que el indicador LED parpadee en
intervalos cortos, indicando así que se ha iniciado la grabación. Para indicar que la
cámara está grabando el indicador LED parpadea en un intervalo determinado.
Para finalizar la grabación pulse el botón
. Ahora el LED permanecerá encendido.
Si no realiza más grabaciones, la MycrocamHD se apagará automáticamente
después de 30 segundos.
3. Hacer una fotografía
Encienda la cámara tal como se describe en el punto 1 y pulse el botón . El LED
amarillo parpadeará una vez para indicar que la Mycrocam 720 HD LIVE está en
modo fotografía. Para tomar una fotografía pulse el botón
una vez.
4. Usar como webcam
Conecte la MycrocamHD a su ordenador con el cable USB suministrado y pulse
el botón
, el ordenador reconocerá la cámara como una unidad. Para que el
ordenador reconozca automáticamente la MycroCam 720 HD LIVE como webcam
mantenga el botón superior
pulsado y pulse también el botón inferior
,
de modo que durante aprox. 2 segundos ambos botones estén pulsados simultáneamente. Debido a que los ordenadores tienen diferentes requisitos de sistema,
tanto para el hardware como para el software, podría ser necesario realizar varios
ajustes. (La función de webcam no es compatible con Windows7/32bits ni con los
productos Apple)
A este respecto, véase el capítulo Indicaciones Reproducir una fotografía/
vídeo Para ver sus tomas, conecte la Mycrocam 720 HD LIVE a su ordenador con
el cable USB suministrado. Pulse el botón para que el ordenador reconozca la cámara como una unidad y el LED se ilumine en amarillo/rojo. Después se mostrará
el directorio DCIM. Este direc torio contiene la carpeta 100Media, en la cual se
encuentran sus tomas. Haciendo doble clic sobre cualquiera de los archivos (jpeg
o mov) podrá ver la foto o el vídeo.
Cargar la batería La batería comienza a cargarse en cuanto la Mycrocam 720 HD
LIVE se conecta al ordenador con el cable USB. Transcurridas 2 horas la batería
estará completamente cargada y el proceso de carga se interrumpirá automáticamente. Por tanto, no es posible sobrecargar la batería.
¡No deje la cámara sin vigilancia durante el proceso de carga!
Uso Respete estrictamente las disposiciones legales. El usuario es el único responsable de dar un uso adecuado a la cámara. Respete la privacidad de terceros.
Dreidee Innovations GmbH no es responsable de la pérdida de tomas debida a
algún desperfecto de la MycroCamHD o de sus accesorios.
Indicaciones
• Sistemas operativos compatibles: Windows XP, Windows VISTA, Windows7* y
MacOS* (* Windows7 32 Bit y MacOS sin función de webcam)
• Pueden utilizarse tarjetas microSD o microSDHC de 1GB-32 GB de clase 4 o
superior.
• Si la función de webcam no se activa de inmediato, marque la opción Preview
contenida en Opciones en el programa AMcap.
• En caso de que la cámara deje de reaccionar con el piloto de control encendido
permanentemente, extraiga la tarjeta de memoria y pulse con una aguja o un clip
sujetapapeles el botón Reset ubicado en el lado izquierdo de la carcasa. De este
modo se reiniciará la cámara.
• Guarde bien las presentes instrucciones de uso. Éstas contienen información
importante sobre el manejo y el cuidado de su Mycrocam 720 HD LIVE.
Assistencia técnica [email protected]
Información de productos: www.mycrocam.info
Distribución: www.cam-shop-online.com [email protected]
Contacto con los fabricantes Dreidee Innovations GmbH, Probst-Niehues-Str. 15,
45768 Marl EMV-Richtlinie 2004/108/EG, WEEE-Reg.-Nr. DE 52990241