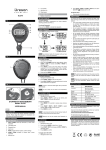
1
45016
Language......... Page
English (en)...........5
Chinese (zh).........70
French (fr)............ 27
German (de)..........11
Italian (it)............. 35
Japnese (ja).........42
Korean (ko)..........48
Polish (pl)............ 54
Russian (ru).........62
Spanish (es)........ 19
Digital - figure 1
45016
1) Button A (Light / Set)
4) Button D (Start)
2) Button B (Mode)
3) Button C (Reset)
3
Digital - figure 2
45016
Operational Manual
4) Button
B
1) Dual Time
2) if D is
held for 3) Real Time
2 sec.
Timer alarm -
4) Button
B
5) Chronograph
4) Button
B
6) Timer
7) Alarm
figure 3
1) select count down
2) Hour
3) Minute
4
4) Second
en
Digital
- Timer (Count-down stop, count-down
repeat or traditional timer with preset
value up to 23 hour, 59 minute,
59 seconds.)
- Key tone
- Backlight
45016
See figure 1, page 3. 1) Button A (Light /
Set), 2) Button B (Mode), 3) Button C
(Reset), 4) Button D (Start)
Features
- 14 Digits LCD Display, Display Hour,
Minute, Second, Year (2000~2069),
Month, Day, and Week
- 12/24H format selectable, Auto Calendar
- Dual Time
- 1/100 second Chronograph (The display
range of the stopwatch is 23 hours,
59 minutes, 59 seconds.)
- 4 independent daily alarms and
Chime hourly
Operation Manual
See figure 2, page 4. 1) Dual Time, 2) If D is
held for 2 sec., 3) Real Time, 4) Button B,
5) Chronograph, 6) Timer, 7) Alarm
5
Backlight Function
1. At any state, press button A to activate
the backlight. Real time Setup mode.
2. At real time mode, press button A
and hold for 2 seconds to enter the
time setting.
en
Double time setting
1. Hold button D for 2 seconds.
2. If time2 is displaying, dual time mode
(T2), press and hold A for 2 seconds to
enter the time2 Setup Mode.
3. Time difference between T2 and T1 will
be set.
4. Press button C/D to decrease / increase
the setting value.
5. Range of the time difference is ±23H.
6. Press button A to exit the Setup mode.
7. If there is no button operation for 30
seconds, Setup Mode will be exited and
returned to Real Time Display Mode.
3. Press button C / D to turn on/off the
“LIGHT” function. The backlight will be
on if any button is pressed and “LIGHT”
function is on. Again press button B and
“CHIME” will be set first. Press button B
to select mode in turn as following:
4. Press button C/D to decrease / increase
the setting value.
5. If button C/D has been pressed and held
for 2 sec., auto advance function will
be activated.
6. Press button A to exit the Setup Mode.
7. If there is no button operation for 30
seconds, Setup Mode will be exited and
returned to Real Time Display Mode.
6
Chronograph Mode
1. The display range of the stopwatch is
23 hours, 59 minutes, 59 seconds.
en
2. Lap “L” (Last) will be shown after lap
number 9. The last lap memory will be
overwritten by the latest lap whereas
the first 9 laps will be kept unchanged.
3. If there is no button operation for 30 sec.,
and chronograph is not running, Real
Time Mode will be retrieved.
2. Press button D to start/stop the
chronograph.
3. Press button C to split/reset the
chronograph.
4. Press button B to change into
Timer Mode.
5. Press button A to recall the memory
if chronograph is stopped.
6. Press button A to view the next lap.
7. Press button B to get into Timer Mode.
8. Press button C or D to exit Recall Mode
and go back to Chronograph Mode.
Remark
1. There are total of 10 lap memories.
7
Timer Mode
1. Hold button A for 2 seconds to enter timer
setup. There are three different timer
modes. Cycle using buttons C and D.
“CD STP” Count down – stop
“CD REP” Count down – repeat
“CD UP” Count down – up
2. Will be flashing if counter is counting
down. “TMR” will be flashing when
in use.
en
3. Press button D to start/stop the timer
counting.
4. Press button C to reset the counter to the
preset value if timer is stopped.
5. Press button B to change into alarm
mode.
Count Down Modes
1. Hold button A for 2 seconds to enter timer
setup for “STP” or “REP” mode.
2. Press button B to cycle through hour,
minute and second.
3. Use buttons C and D to adjust time.
Timer alarm
See figure 3, page 4. 1) Select count down,
2) Hour, 3) Minute, 4) Second
8
Alarm display mode
1. Press button D to select the alarm.
2. Press button C to enable/disable
the alarm.
3. Press button B to change to time
mode again.
4. If A is held for 2 seconds, alarm Setup
Mode will be entered.
5. If there is no button operation for 30
seconds, time mode will be retrieved
automatically.
6. Alarm (4 beeps per second) will sound for
30 seconds if enabled.
7. Press any button to stop to alarm.
Alarm Setup mode
1. Press button B to select between hour or
minute setting.
en
2. Press button C/D to decrease / increase
the setting value.
3. Press button A to exit the setting.
4. Alarm will be enabled automatically if
there is any change in hour or minute.
5. If there is no button operation for 30
seconds, Setup mode will be exited
automatically.
During the Warranty period, the case and
metal strap, watch movement, hands and
dial are the only components covered under
this Warranty. These will be repaired or the
watch will be replaced, at the sole discretion
of Zippo, free of repair charges. If the watch
or particular component must be replaced,
Zippo cannot guarantee that the identical
model will be available. In such cases a watch
or component similar in appearance and of
equal or greater value will be furnished.
The Warranty is only valid on presentation
of the original sales receipt or other
acceptable proof of purchase.
Watch Warranty
Your ZIPPO® brand watch is warranted
to be free of defects in materials and
workmanship for a period of two (2) years
from the date of original retail purchase
under the terms and conditions of
this Warranty.
9
en
This Warranty is void if the watch has
been damaged by accident, negligence,
unauthorized service or other factors not
due to defects in materials or workmanship.
This Warranty does not cover the battery,
crystal, non-metal strap or bracelet,
incidents of normal wear and tear (including
but not limited to scratches or other damage
to the finish), incidents of abuse, or water
damage unless the watch is marked as
waterproof and the watch was used as
instructed when the damage occurred.
This Warranty gives you specific legal
rights which are in addition to, but run
concurrently with, any other legal rights
which you may have under the statutes of
a state, province or country, and does not
10
limit those statutory rights. Other than as to
the foregoing, this Warranty is in lieu of all
other express and implied warranties.
If the product is NOT UNDER WARRANTY, all
costs including without limit costs of repair and
postage or freight must be paid by the customer.
To obtain service under this warranty,
please contact your Zippo distributor for
instructions (see separate sheet), visit our
web site www.Zippo.com or return to store
where purchased.
de
Digitaluhr
- 4 unabhängige tägliche
Alarmeinstellungen und
Glockenschlag zur vollen Stunde
- Zeituhr (Rückwärtszählung stoppt,
Rückwärtszählung wird wiederholt, oder
traditionelle Zeituhr mit voreingestellten
Werten bis 23 Stunden, 59 Minuten,
59 Sekunden).
- Tastenton
- Hintergrundbeleuchtung
45016
Siehe Abb. 1, Seite 3. 1) Taste A (Licht /
Einstellen), 2) Taste B (Modus), 3) Taste
C (Rückstellen), 4) Taste D (Start)
Merkmale
- 14-stellige LCD-Anzeige, Anzeige von
Stunde, Minute, Sekunde, Jahr
(2000~2069), Monat, Tag und Woche
- 12/24-Stunden-Format wählbar,
automatischer Kalender
- Doppelte Zeitangabe
- Hundertstelsekunden-Stoppuhr
(Anzeigebereich der Stoppuhr ist 23
Stunden, 59 Minuten, 59 Sekunden).
Funktionsbeschreibung
Siehe Abb. 2, Seite 4. 1) Doppelte
Zeitangabe, 2) Wenn D 2 Sek. lang
gedrückt wird, 3) Echtzeit, 4) Taste B,
5) Stoppuhr, 6) Zeituhr, 7) Alarm
11
de
Hintergrundbeleuchtung
1. Drücken Sie die Taste A in jedem
beliebigen Modus, um die
Hintergrundbeleuchtung zu aktivieren.
Einstellen im Echtzeitmodus.
2. Drücken Sie im Echtzeitmodus die Taste
A und halten sie 2 Sekunden lang
niedergedrückt, um die Zeit einzugeben.
3. Drücken Sie die Taste C/D zum Ein-/
Ausschalten der “LICHT”-Funktion.
Die Hintergrundbeleuchtung wird
eingeschaltet, wenn eine beliebige
Taste gedrückt wird und die “LICHT”Funktion aktiviert ist. Drücken Sie noch
einmal die Taste B, dann wird zuerst der
“GLOCKENSCHLAG” eingestellt. Drücken
Sie die Taste B, um nacheinander die
folgenden Modi zu wählen:
12
4. Drücken Sie die Taste C/D zum Senken /
Erhöhen des Einstellwertes.
5. Wenn die Taste C/D niedergedrückt
und 2 Sekunden lang gehalten wird,
aktiviert dies die automatische
Vorwärtsfunktion.
6. Drücken Sie die Taste A zum Verlassen
des Einstellmodus.
7. Werden 30 Sekunden lang keine Tasten
gedrückt, wird der Einstellmodus
verlassen und der EchtzeitAnzeigemodus aufgerufen.
Einstellen der doppelten Uhrzeit
1. Halten Sie die Taste D 2 Sekunden lang
niedergedrückt.
de
2. Wenn im doppelten Uhrzeitmodus (T2)
time2 angezeigt wird, drücken Sie die
Taste A und halten sie 2 Sekunden
lang niedergedrückt, um den time2Einstellmodus aufzurufen.
3. Der Zeitunterschied zwischen T2 und T1
wird eingestellt.
4. Drücken Sie die Taste C/D zum Senken /
Erhöhen des Einstellwertes.
5. Der Zeitunterschied kann ±23 Stunden
betragen.
6. Drücken Sie die Taste A zum Verlassen
des Einstellmodus.
7. Werden 30 Sekunden lang keine Tasten
gedrückt, wird der Einstellmodus
verlassen und der EchtzeitAnzeigemodus aufgerufen.
13
Stoppuhrmodus
1. Der Anzeigebereich der Stoppuhr ist 23
Stunden, 59 Minuten, 59 Sekunden.
2. Drücken Sie die Taste D zum Starten/
Stoppen der Stoppuhr.
3. Drücken Sie die Taste C zum Splitten/
Rückstellen der Stoppuhr.
4. Drücken Sie die Taste B zum Aufrufen des
Zeituhrmodus.
5. Drücken Sie die Taste A zum Aufrufen des
Speichers bei gestoppter Stoppuhr.
6. Drücken Sie die Taste A zum Ansehen der
nächsten Runde.
7. Drücken Sie die Taste B zum Aufrufen des
Zeituhrmodus.
8. Drücken Sie die Taste C oder D zum
Verlassen des Speichermodus und
Aufrufen des Stoppuhrmodus.
de
Hinweis
1. Es gibt insgesamt 10 Rundenspeicher.
2. Runde “L” (letzte Runde) erscheint nach
Runde 9. Der Speicher der letzten
Runde wird von der neuesten Runde
überschrieben, wogegen die ersten
9 Runden unverändert bleiben.
3. Werden 30 Sekunden lang keine Tasten
gedrückt, wenn die Stoppuhr nicht läuft,
wird der Echtzeitmodus aufgerufen.
Zeituhrmodus
1. Halten Sie die Taste A 2 Sekunden
lang niedergedrückt, um den
Zeituhr-Einstellmodus aufzurufen. Es
gibt drei verschiedene Zeituhrmodi.
Wechseln Sie mit den Tasten C und D
von einem zum anderen.
14
“CD STP”-Rückwärtszählung – stoppen
“CD REP”-Rückwärtszählung – wiederholen
“CD UP”-Rückwärtszählung – aufwärts
2. Blinkt, wenn die Zählung rückwärts läuft.
“TMR” blinkt, während die Funktion
läuft.
3. Drücken Sie die Taste D zum Starten/
Stoppen der Zeituhrzählung.
4. Nachdem die Zeitzählung stoppt,
drücken Sie die Taste C zum Rückstellen
der Zählung auf den voreingestellten
Wert.
5. Drücken Sie die Taste B zum Aufrufen des
Alarmmodus.
de
Rückwärtszählmodi
1. Halten Sie die Taste A 2 Sekunden
lang niedergedrückt, um die ZeituhrEinstellung für den Modus “STP” oder
“REP” aufzurufen.
2. Drücken Sie die Taste B zum Durchlaufen
von Stunde, Minute und Sekunde.
3. Stellen Sie mit den Tasten C und D die
Uhrzeit ein.
Zeituhralarm
Siehe Abb. 3, Seite 4. 1) Rückwärtszählung
wählen, 2) Stunde, 3) Minute,
4) Sekunde
15
Alarmanzeigemodus
1. Drücken Sie die Taste D zum Aufrufen
des Alarms.
2. Drücken Sie die Taste C zum Aktivieren/
Deaktivieren des Alarms.
3. Drücken Sie die Taste B zum erneuten
Aufrufen des Zeitmodus.
4. Durch Niederdrücken und Festhalten
(2 Sekunden) der Taste A wird der
Alarmeinstellmodus aufgerufen.
5. Werden 30 Sekunden lang keine Tasten
gedrückt, wird automatisch der
Echtzeitmodus aufgerufen.
6. Der Alarm (4 Signaltöne pro Sekunde)
ertönt 30 Sekunden lang, wenn er
aktiviert ist.
7. Drücken Sie eine beliebige Taste zum
Stoppen des Alarms.
de
Uhrengarantie
Alarmeinstellmodus
1. Drücken Sie die Taste B zur
Wahl zwischen Stunden- oder
Minuteneinstellung.
2. Drücken Sie die Taste C/D zum Senken /
Erhöhen des Einstellwertes.
3. Drücken Sie die Taste A zum Verlassen
des Einstellmodus.
4. Der Alarm wird automatisch aktiviert,
wenn sich die Stunde oder Minute
ändert.
5. Werden 30 Sekunden lang keine Tasten
gedrückt, wird der Einstellmodus
automatisch verlassen.
Ihre ZIPPO®-Uhr ist gemäß den
Geschäftsbedingungen dieser Garantie
frei von Material- und Verarbeitungsfehlern
für einen Zeitraum von zwei (2) Jahren
ab dem Datum des Originalverkaufs im
Einzelhandel.
Während des Garantiezeitraums
sind Gehäuse und Metallgurt,
Antriebsmechanismus der Uhr, Zeiger
und Ziffernblatt die einzigen Komponenten,
die im Rahmen dieser Garantie gedeckt
sind. Sie werden kostenlos repariert oder
die Uhr wird ersetzt, was im alleinigen
Ermessen von Zippo liegt. Falls die Uhr oder
eine bestimmte Komponente ersetzt werden
muss, kann Zippo nicht garantieren, dass
16
de
das identische Modell verfügbar ist.
In solchen Fällen wird eine Uhr oder
Komponente von ähnlichem Aussehen
und von gleichem oder größerem Wert zur
Verfügung gestellt.Die Garantie ist nur bei
Vorlage der Original-Verkaufsquittung oder
eines anderen akzeptablen Kaufnachweises
gültig.
Diese Garantie ist ungültig, wenn die Uhr
aus Versehen, aus Nachlässigkeit, aufgrund
von nicht genehmigtem Service oder aufgrund
anderer Faktoren beschädigt wurde, die nicht
auf Material- oder Verarbeitungsschäden
zurückzuführen sind.
Durch diese Garantie sind nicht gedeckt:
die Batterie, die Kristalle, der Gurt bzw.
das Armband, der/das nicht aus Metall
besteht, normale Verschleißerscheinungen
(einschließlich, aber nicht beschränkt
auf Kratzer oder sonstige Schäden am
Finish), Anzeichen von Missbrauch oder
Wasserschaden, es sei denn, die Uhr ist
als wasserdicht gekennzeichnet und wurde
beschreibungsgemäß benutzt, als der
Schaden auftrat.
Diese Garantie gibt Ihnen spezifische
Rechte, die zusätzlich zu und gleichzeitig
mit anderen Rechten gelten, die Ihnen ggf.
gemäß den Statuten eines Bundesstaates,
einer Provinz oder eines Landes zustehen,
ohne diese gesetzlich festgelegten Rechte
einzuschränken. Außer gemäß dem
Vorgenannten gilt diese Garantie anstelle
aller anderen ausdrücklichen und
stillschweigenden Garantien.
17
de
Falls das Produkt NICHT UNTER DEN
GARANTIEANSPRUCH FÄLLT, müssen
alle Kosten, einschließlich, aber nicht
beschränkt auf Reparaturkosten und Porto
oder Fracht, vom Kunden bezahlt werden.
Um einen Service im Rahmen dieser
Garantie zu beanspruchen, wenden Sie sich
zwecks Einzelheiten bitte an Ihren ZippoHändler (siehe separates Blatt), besuchen
Sie unsere Website www.Zippo.com, oder
bringen Sie die Uhr in das Geschäft zurück,
in dem Sie sie gekauft haben.
18
es
Digital
- 4 alarmas diarias independientes y
avisador horario
- Temporizador (parada de cuenta
atrás, repetición de cuenta atrás o
temporizador tradicional con valor
preajustado hasta 23 horas, 59
minutos, 59 segundos).
- Tono de tecla
- Retroiluminación
45016
Vea la figura 1, página 3. 1) Botón A (Luz /
Ajuste), 2) Botón B (Modo), 3) Botón C
(Reinicio), 4) Botón D (Inicio)
Características
- Pantalla LCD de 14 dígitos, Muestra hora,
minutos, segundos, año (2000~2069),
mes, día y semana
- Se puede seleccionar formato de
12/24 horas, calendario automático
- Doble horario
- Cronógrafo de 1/100 de segundo (el rango
de la pantalla del cronómetro es 23
horas, 59 minutos, 59 segundos).
Manual de funcionamiento
Vea figura 2, página 4. 1) Doble horario,
2) Si se mantiene pulsado D durante 2
segundos, 3) Hora real, 4) Botón B,
5) Cronógrafo, 6) Temporizador,
7) Alarma
19
es
Función de retroiluminación
1. En cualquier estado, pulse el botón A
para activar la retroiluminación. Modo
de ajuste de hora real.
2. En el modo de hora real, pulse el botón
A y manténgalo pulsado durante 2
segundos para ajustar la hora.
3. Pulse el botón C / D para encender
/ apagar la función de “LUZ”. La
retroiluminación estará activada si
se pulsa cualquier botón y la función
“LUZ” está activada. De nuevo, pulse
el botón B y “AVISADOR HORARIO” se
ajustará primero. Pulse el botón B para
seleccionar el modo tal y como si indica
a continuación:
4. Pulse el botón C/D para disminuir /
incrementar el valor del ajuste.
20
5. Si el botón C/D se ha pulsado y se
ha mantenido pulsado durante
2 segundos, se activará la función
de avance automático.
6. Pulse el botón A para salir del Modo
Ajuste.
7. Si no se acciona ningún botón durante
30 segundos, se saldrá del Modo Ajuste
y se volverá al Modo de Pantalla de
Hora Real.
Ajuste del doble horario
1. Mantenga pulsado el botón D durante
2 segundos.
2. Si aparece time2, modo de doble horario
(T2), pulse y mantenga pulsado A
durante 2 segundos para introducir el
Modo Ajuste time2.
es
3. Se ajustará la diferencia horaria entre
T2 y T1.
4. Pulse el botón C/D para disminuir /
incrementar el valor del ajuste.
5. El rango de la diferencia es ±23H.
6. Pulse el botón A para salir del Modo
Ajuste.
7. Si no se acciona ningún botón durante
30 segundos, se saldrá del Modo Ajuste
y se volverá al Modo de Pantalla de
Hora Real.
Modo cronógrafo
1. El rango de la pantalla del cronógrafo
23 horas, 59 minutos, 59 segundos.
2. Pulse el botón D para iniciar/detener
el cronógrafo.
21
3. Pulse el botón C para dividir/reiniciar el
cronógrafo.
4. Pulse el botón B para cambiar al Modo
Temporizador.
5. Pulse el botón A para recuperar la
memoria si el cronógrafo se ha
detenido.
6. Pulse el botón A para ver el siguiente
lapso.
7. Pulse el botón B para ir al Modo
Temporizador.
8. Pulse el botón C o D para salir del Modo
de Recuperación de Memoria y volver al
Modo Cronógrafo.
es
Observación
1. Hay un total de 10 memorias de lapso.
2. Lapso “L” (Último) se mostrará después
del lapso número 9. La memoria
del último lapso se sobreescribirá
mientras que los 9 primeros lapsos
permanecerán invariables.
3. Si no se acciona ningún botón durante
30 segundos, y no está funcionando el
cronógrafo, se recuperará el Modo de
Tiempo Real.
Modo temporizador
1. Mantenga pulsado el botón A durante
2 segundos para introducir el ajuste
horario. Hay ters modos diferentes de
temporizador. Recicle utilizando los
botones C y D.
Cuenta atrás “CD STP” – detener
Cuenta atrás “CD REP” – repetir
Cuenta atrás “CD UP” – ascendente
2. Estará destellante si el contador es
descendente. “TMR” destellará cuando
esté en uso.
3. Pulse el botón D para iniciar/detener el
conteo del temporizador.
4. Pulse el botón C para reiniciar el
contador al valor prefijado si se para el
temporizador.
5. Pulse el botón B para cambiar al Modo
Alarma.
22
es
Modos de cuenta atrás
1. Mantenga pulsado el botón A durante 2
segundos para introducir el ajuste del
temporizador en el modo “STP” o en el
modo “REP”.
2. Pulse el botón B para reciclar horas,
minutos y segundos.
3. Utilice los botones C y D para ajustar
la hora.
Alarma del temporizador
Vea figura 3, página 4. 1) Seleccione cuenta
atrás, 2) Hora, 3) Minuto, 4) Segundo
23
Modo de visualización de alarma
1. Pulse el botón D para seleccionar la
alarma.
2. Pulse el botón C para activar/desactivar
la alarma.
3. Pulse el botón B para cambiar al Modo
Temporizador de nuevo.
4. Si se mantiene pulsado A durante 2
segundos, se entrará en el Modo Ajuste.
5. Si no se actúa en ningún botón
durante 30 segundos, se recuperará
automáticamente el modo
temporizador.
6. La alarma (4 bips por segundo) sonará
durante 30 segundos si está activada.
7. Pulse cualquier botón para detener la
alarma.
es
Modo Ajuste de Alarma
1. Pulse el botón B para seleccionar entre el
ajuste de horas o minutos.
2. Pulse el botón C/D para disminuir /
incrementar el valor del ajuste.
3. Pulse el botón A para salir del ajuste.
4. La alarma se activará automáticamente
si se produce cualquier cambio en las
horas o en los minutos.
5. Si no se actúa en ningún botón
durante 30 segundos, se saldrá
automáticamente del modo Ajuste.
24
Garantía del reloj
Su reloj de marca ZIPPO® está
garantizado contra cualquier tipo de
defectos de materiales o mano de obra
durante un período de dos (2) años desde la
fecha de compra original en la tienda según
los términos y condiciones de esta Garantía.
Durante el período de garantía, la caja
y la correa de metal, el movimiento del
reloj, las manecillas y el dial son los
únicos componentes cubiertos por esta
garantía. Estos elementos se repararán o se
sustituirá el reloj, a la exclusiva discreción
de Zippo, sin gastos de reparación. Si hay
que sustituir el reloj o un componente en
particular, Zippo no puede garantizar que
esté disponible un modelo idéntico. En
es
estos casos, se suministrará un reloj o un
componente similar en cuanto a su aspecto
y de valor igual o mayor.
La Garantía sólo será válida mediante
presentación del recibo original de compra
u otra prueba aceptable de la compra.
Esta garantía quedará anulada si el reloj
ha sido dañado por accidente, negligencia,
mantenimiento no autorizado y otros
factores que no tengan que ver con los
materiales o la mano de obra.
Esta garantía no cubre la batería, el cristal,
la correa o brazalete que no sean de metal,
incidentes debidos al uso y desgaste
normales (incluyendo, sin limitarse a ello,
arañazos y otros daños en el acabado),
incidentes o abusos, o daños por agua
a no ser que el reloj esté marcado como
25
sumergible y ésta haya sido utilizado de
acuerdo con las instrucciones cuando se
produjo el daño.
Esta garantía le confiere derechos
legales específicos que son adicionales
y concurrentes con cualesquiera otros
derechos legales que usted pudiera tener
según las leyes de un estado, provincia o
país, y no limita esos derechos legales. Sin
perjuicio de lo indicado más arriba, esta
garantía sustituye a cualquier otra garantía
expresa o implícita.
Si es producto no está BAJO GARANTÍA,
todos los gastos, incluyendo, sin limitarse
a ellos, los gastos de reparación y envío o
transporte serán pagados por el cliente.
Para conseguir el servicio que se establece
en esta garantía, póngase en contacto con
es
su distribuidor Zippo para las instrucciones
pertinentes (vea la hoja aparte), visite
nuestro sitio web en www.Zippo.com o
devuelva el producto a la tienda en la que
lo ha comprado.
26
fr
Numérique
- Chronographe avec centièmes de seconde
(la durée maximale d’affichage du
chrono est de 23 heures, 59 minutes et
59 secondes).
- 4 alarmes quotidiennes indépendantes et
carillon à chaque heure
- Minuterie (compte à rebours et arrêt,
compte à rebours et reprise ou
minuterie classique avec valeur
préréglée jusqu’à 23 heures,
59 minutes et 59 secondes).
- Tonalité d’utilisation des boutons
- Rétro éclairage
45016
Voir la figure 1 en page 3. 1) Bouton A
(éclairer/régler), 2) Bouton B (mode),
3) Bouton C (réinitialiser), 4) Bouton D
(démarrer)
Caractéristiques
- Écran ACL 14 caractères, affichage des
heures, des minutes, des secondes, de
l’année (2000~2069), du mois, du jour
et de la semaine
- Format 12/24 heures sélectable par
l’utilisateur, calendrier automatique
- Heure double
27
fr
Mode d’emploi
Voir la figure 2 en page 4. 1) Heure
double, 2) Si le bouton D est enfoncé 2
secondes, 3) Heure actuelle, 4) Bouton
B, 5) Chronographe, 6) Minuterie,
7) Alarme
Utilisation du rétro éclairage
1. Quel que soit le mode utilisé, appuyez
sur le bouton A pour activer le rétro
éclairage. Mode de réglage en heure
réelle.
2. Lorsque le mode d’heure réelle est
activé, enfoncez le bouton A pendant
2 secondes et la montre se prépare au
réglage de l’heure.
28
3. Appuyez sur le bouton C/D pour activer/
désactiver la fonction « ÉCLAIRAGE ».
Lorsque la fonction « ÉCLAIRAGE » est
activée, la lampe s’allume dès qu’un
bouton est enfoncé. Appuyez sur le
bouton B et la fonction « CARILLON »
sera réglée en premier. Appuyez sur le
bouton B et vous pourrez sélectionner
le mode avec les choix successifs
suivants :
4. Appuyez sur le bouton C/D pour
diminuer/augmenter la valeur de
réglage.
5. Si le bouton C/D est maintenu enfoncé
pendant 2 secondes, la fonction
d’avance automatique est activée.
6. Pour quitter le mode de réglage, appuyez
sur le bouton A.
fr
7. Si aucun bouton n’est utilisé pendant
30 secondes, la montre quitte le mode
de réglage et retourne à l’affichage de
l’heure réelle.
Réglage de l’heure double
1. Enfoncez le bouton D pendant 2
secondes.
2. Lorsque la 2e heure est affichée avec le
mode d’heure double (T2), enfoncez
le bouton A pendant 2 secondes et la
montre se place en mode de réglage de
la 2e heure.
3. La différence de temps entre l’heure T2 et
l’heure T1 sera réglée.
4. Appuyez sur le bouton C/D pour
diminuer/augmenter la valeur
de réglage.
29
5. Le maximum de différence entre les deux
heures est de ±23 heures.
6. Pour quitter le mode de réglage, appuyez
sur le bouton A.
7. Si aucun bouton n’est utilisé pendant
30 secondes, la montre quitte le mode
de réglage et retourne à l’affichage de
l’heure réelle.
Mode Chronographe
1. La durée maximale de mesure du
chronomètre est de 23 heures,
59 minutes et 59 secondes.
2. Le bouton D permet de démarrer/arrêter
le chronographe.
3. Le bouton C permet de diviser/remettre à
zéro l’affichage du chronographe.
fr
après le 9e segment. La valeur dans
la mémoire du dernier segment sera
remplacée par celle du plus récent
segment, alors que les 9 premiers
segments seront conservés tels quels.
3. Si aucun bouton n’est utilisé pendant
30 secondes et que le chronographe
ne tourne pas, la montre retourne à
l’affichage de l’heure réelle.
4. Le bouton B permet de passer au mode
Minuterie.
5. Le bouton A permet de rappeler la valeur
en mémoire après que le chronographe
ait été arrêté.
6. Appuyez sur le bouton A pour voir le
segment suivant.
7. Le bouton B permet d’entrer dans le
mode Minuterie.
8. Appuyez sur le bouton C ou D pour
quitter le mode Rappel et retourner au
mode Chronographe.
Remarque
1. 10 mémoires de segment sont
disponibles.
2. Le segment « L » (pour « Last » ou
« dernier » en anglais) est affiché
30
Mode Minuterie
1. Enfoncez le bouton A pendant 2
secondes pour entrer dans le mode de
réglage de la minuterie. Trois modes de
minuterie sont disponibles. Faites-les
défiler avec les boutons C et D.
« CD STP » : Compte à rebours et arrêt
« CD REP » : Compte à rebours et reprise
fr
2. Appuyez sur le bouton B pour régler
successivement les heures, les minutes
et les secondes.
3. Utilisez les boutons C et D pour régler
les valeurs.
« CD UP » : Compte à rebours et chrono
2. Clignote lorsqu’un compte à rebours
est en cours. « TMR » clignote durant
l’utilisation.
3. Le bouton D permet de démarrer/arrêter
le fonctionnement de la minuterie.
4. Appuyez sur le bouton C pour remettre la
minuterie à la valeur prédéterminée si
la minuterie a été arrêtée.
5. Appuyez sur le bouton B pour passer au
mode Alarme.
Alarme de minuterie
Voir la figure 3 en page 4. 1) Choix du
compte à rebours, 2) Heures,
3) Minutes, 4) Secondes
Modes de compte à rebours
1. Enfoncez le bouton A pendant 2
secondes pour commencer le réglage
du mode « STP » (avec arrêt) ou « REP »
(avec reprise).
31
Mode d’affichage d’alarme
1. Appuyez sur le bouton D pour
sélectionner l’alarme.
2. Le bouton C permet d’activer/désactiver
l’alarme.
3. Le bouton B permet de retourner au
mode d’heure.
fr
4. Si vous enfoncez le bouton A pendant
2 secondes, vous entrez dans le mode
de réglage.
5. Si aucun bouton n’est utilisé pendant
30 secondes, le mode normal d’heure
revient automatiquement.
6. L’alarme (4 signaux sonores par seconde)
résonne pendant 30 secondes après
son activation.
7. Pour arrêter l’alarme, appuyez sur
n’importe quel bouton.
32
Mode de réglage d’alarme
1. Appuyez sur le bouton B pour basculer
entre le réglage des heures et des
minutes.
2. Appuyez sur le bouton C/D pour
diminuer/augmenter la valeur
de réglage.
3. Pour quitter le mode de réglage, appuyez
sur le bouton A.
4. L’alarme est activée automatiquement
si vous avez changé les heures ou les
minutes.
5. Si aucun bouton n’est utilisé pendant 30
secondes, le mode de réglage est quitté
automatiquement.
fr
Garantie de la montre
Votre montre ZIPPO® est garantie contre
les défauts de fabrication et de matériaux
pendant deux (2) ans à compter de la date
originale d’achat au détail, conformément
aux conditions de cette garantie.
Durant la période de garantie, le boîtier,
le bracelet métallique, le mouvement
d’horlogerie, les aiguilles et le cadran
sont les seuls composants couverts par la
garantie. Si nécessaire, ces composants
seront réparés ou la montre sera remplacée,
à l’entière discrétion de Zippo, sans aucun
frais de réparation. Si la montre ou l’un de
ses composants doit être remplacé, Zippo
ne peut garantir la disponibilité du même
modèle. Dans ces cas, une nouvelle montre
33
ou un composant ayant une apparence
semblable et une valeur égale ou supérieure
sera fourni en remplacement.
Cette garantie est valide uniquement sur
présentation du reçu de vente original ou
d’une autre preuve d’achat acceptable.
Cette garantie devient nulle si la montre
est endommagée par un accident, une
négligence, une réparation non autorisée
ou une cause autre qu’un défaut de
fabrication ou de matériaux.
Cette garantie ne couvre pas la pile, la
vitre, le bracelet non métallique (le cas
échéant) et les incidents liés à une usure
normale (comprenant notamment les
rayures et autres dommages à la finition), à
un usage abusif ou à une exposition à l’eau,
sauf si la montre est vendue comme étant
fr
Pour obtenir une réparation sous garantie,
veuillez contacter votre distributeur Zippo
(voir les coordonnées sur la feuille séparée),
visitez notre site web sur www.Zippo.com
ou demandez des instructions au détaillant.
résistante à l’eau et qu’elle a été utilisée
conformément aux instructions lorsque les
dommages sont survenus.
Cette garantie vous offre des droits
juridiques spécifiques pouvant compléter,
mais pas remplacer, les autres droits
juridiques en vigueur dans votre lieu de
résidence, lesquels prévalent toujours.
Outre ce qui figure ici, cette garantie
remplace toute autre garantie expresse
ou implicite.
Si le produit N’EST PLUS SOUS GARANTIE,
tous les frais seront à la charge du client,
ce qui s’applique notamment aux frais de
réparation et de port.
34
it
Digitale
- Cronografo a 1/100 (Il range di visualizzazione
del display del cronometro è 23 ore,
59 minuti, 59 secondi)
- 4 sveglie indipendenti quotidiane
e funzione Chime oraria
- Timer (Arresto conto alla rovescia,
ripetizione conto alla rovescia o timer
tradizionale con valore prestabilito fino
a 23 ore, 59 minuti, 59 secondi.)
- Tono chiave
- Retroilluminazione
45016
Vedere figura 1, pagina 3. 1) Pulsante A
(Luce / Impostazione), 2) Pulsante B
(Modalità), 3) Pulsante C (Azzera),
4) Pulsante D (Avvia)
Funzioni
- 14 cifre Visualizzazione LCD,
Visualizzazione Ora, Minuto, Secondo,
Anno (2000~2069), Mese, Giorno,
e Settimana
-Selezione tra formati 12/24H, Calendario
automatico
- Orario doppio
35
Manuale operativo
Vedere la figura 2, pagina 4. 1) Orario
doppio, 2) Se il pulsante D viene tenuto
premuto per 2 sec., 3) Tempo reale,
4) Pulsante B, 5) Cronografo, 6) Timer,
7) Sveglia
it
Funzione di retroilluminazione
1. In qualsiasi stato, premere il pulsante
A per attivare la retroilluminazione.
Modalità Configurazione Tempo reale.
2. In Modalità Tempo reale, premere il
pulsante A e tenerlo premuto per
2 secondi in modo per inserire le
impostazioni orario.
3. Premere i pulsanti C / D per portare
su on/off la funzione “LIGHT”. La
retroilluminazione sarà attivata se si
preme qualsiasi pulsante sarà premuto
e la funzione “LIGHT” si trova su “on”.
Premere il pulsante B ancora una volta
per impostare prima “CHIME”. Premere
il pulsante B per selezionare la modalità
a turno come segue:
36
4. Premere i pulsanti C/D per diminuire/
aumentare il valore di impostazione.
5. Se i pulsanti C/D sono stati premuti e
tenuti premuti per 2 secondi., sarà
attivata la funzione di avanzamento
automatico.
6. Premere il pulsante A per uscire dalla
Modalità Configurazione.
7. Se non si preme un pulsante di
funzionamento per 30 secondi, si uscirà
dalla Modalità Configurazione e si
tornerà alla Modalità Visualizzazione
Tempo reale.
it
Impostazioni Orario doppio
1. Tenere premuto il pulsante D per
2 secondi.
2. Se appare la scritta “time2”, ovvero
Modalità Orario doppio (T2), premere
e tenere premuto A per 2 secondi per
inserire la Modalità Configurazione
time2 (doppio orario).
3. Sarà impostata la differenza tra T2 e T1.
4. Premere i pulsanti C/D per diminuire/
aumentare il valore di impostazione.
5. Range della differenza oraria: ±23H.
6. Premere il pulsante A per uscire dalla
Modalità Configurazione.
7. Se non si preme un pulsante di
funzionamento per 30 secondi, si uscirà
dalla Modalità Configurazione e si tornerà
alla Modalità Visualizzazione Tempo reale.
37
Modalità cronografo
1. Il range di visualizzazione del cronografo
è di 23 ore, 59 minuti, 59 secondi.
2. Premere il pulsante D per avviare o
fermare (start/stop) il cronografo.
3. Premere il pulsante C per dividere o
azzerare (split/reset) il cronografo.
4. Premere il pulsante B per passare alla
Modalità Timer.
5. Premere il pulsante A per richiamare la
memoria se il cronografo si ferma.
6. Premere il pulsante A per vedere il lap
successivo.
7. Premere il pulsante B per entrare in
Modalità Timer.
8. Premere il pulsante C o D per uscire
dalla Modalità Richiamo e tornare alla
Modalità Cronografo.
it
Annotazione
1. Esiste un totale di 10 memorie lap.
2. Lap “L” (Last), ultimo, sarà mostrato
dopo il lap numero 9. L’ultima memoria
lap sarà sovrascritta dall’ultimo
lap, mentre i primi 9 lap rimarranno
invariati.
3. Se non si vede il pulsante operazione
per 30 secondi, e il cronografo non sta
funzionando, si tornerò la Modalità
Tempo reale.
Modalità Timer
1. Tenere premuto il pulsante A per 2
secondi per entrare nella configurazione
del timer. Esistono diverse modalità
per il timer. Attivare la Modalità Ciclo
usando i pulsanti C e D.
38
“CD STP” Conto alla rovescia – stop (ferma)
“CD REP” Conto alla rovescia – ripete
“CD UP” Conto alla rovescia – up (riprendi)
2. Lampeggerà se il contatore sta facendo
il conto alla rovescia Se è in uso,
lampeggerà la scritta “TMR”.
3. Premere il pulsante D per avviare/fermare
(start/stop) il conteggio del timer.
4. Premere il pulsante C per azzerare
il contatore portandolo al valore
predefinito dopo l’arresto del timer.
5. Premere il pulsante B per passare alla
Modalità Sveglia.
it
Modalità Conto alla rovescia
1. Tenere premuto il Pulsante A per 2
secondi per inserire la configurazione
del timer per le modalità “STP” o “REP”.
2. Premere il pulsante B per avviare il ciclo
mediante ora, minuto e secondo.
3. Usare i pulsanti C e D per regolare
l’orario.
Timer sveglia
Vedere la figura 3, pagina 4. 1) Selezionare
il conto alla rovescia, 2) Ore, 3) Minuti,
4) Secondi
39
Modalità Visualizzazione sveglia
1. Premere il pulsante D per selezionare
la sveglia.
2. Premere il pulsante C per attivare/
disattivare la sveglia.
3. Premere il pulsante B per modificare
nuovamente la Modalità Orario.
4. Se il pulsante A viene premuto per
2 secondi, si inserirà la Modalità
Configurazione sveglia.
5. Se non si preme alcun pulsante
per 30 secondi, la modalità sarà
automaticamente recuperata.
6. La sveglia (4 bip al secondo) suonerà per
30 secondi se attivata.
7. Premere qualsiasi pulsante per fermare
la sveglia.
it
Modalità Configurazione sveglia
1. Premere il pulsante B per selezionare tra
impostazione di ore o minuti.
2. Premere i pulsanti C/D per diminuire/
aumentare il valore di impostazione.
3. Premere il pulsante A per uscire
dall’impostazione.
4. La sveglia verrà attivata
automaticamente se si verificano
modifiche alle ore o ai minuti.
5. Se non si effettuano operazioni sui pulsanti
per 30 secondi, si uscirà automaticamente
dalla Modalità Configurazione.
Garanzia dell’orologio
L’orologio di marca ZIPPO® è garantito
senza difetti di materiali o di lavorazione
40
per un periodo di due (2) anni dalla data
dell’acquisto originale in base ai termini e
alle condizioni della presente Garanzia.
Durante il periodo di Garanzia, la cassa
e il cinturino metallico, il meccanismo di
movimento dell’orologio, le lancette e
il quadrante sono gli unici componenti
coperti da questa Garanzia. Questi,
oppure l’orologio, saranno riparati a sola
discrezione di Zippo, gratuitamente. Se
l’orologio o un componente particolare
dovrà essere sostituito, Zippo non potrà
garantire la disponibilità di un modello
identico. In questi casi, verrà fornito
all’acquirente un orologio o un componente
di simile aspetto e di pari o ugual valore.
La Garanzia è valida unicamente dietro
presentazione dello scontrino di vendita
it
originale o di un’altra accettabile prova
d’acquisto.
La presente Garanzia è nulla se l’orologio
è stato danneggiato accidentalmente, per
negligenza, riparazione presso un servizio
non autorizzato o altri fattori non dovuti ai
materiali o alla lavorazione.
La presente Garanzia non copre la batteria,
il cristallo, il cinturino non metallico o il
braccialetto, gli incidenti dovuti all’usura normale
(inclusi, senza limitazione, i graffi o altri danni
alle rifiniture) incidenti dovuti ad uso improprio
o danni causati dall’acqua, salvo il caso in cui
l’orologio sia marcato come impermeabile e sia
stato utilizzato secondo le istruzioni appropriate
quando si è verificato il danno.
La Garanzia conferisce specifici diritti legali
che entrano in vigore contemporaneamente
41
agli altri diritti legali aggiuntivi che
l’acquirente può avere in base agli statuti
vigenti in uno Stato, Provincia o paese, e
non limita questi diritti facenti parte di detti
statuti. A differenza di quanto descritto in
precedenza, questa Garanzia sostituisce tutte
le altre garanzie espresse o implicite.
Se il prodotto NON È COPERTO DA
GARANZIA, tutte le spese, inclusi, senza
limitazioni, i costi della riparazione e le
spese postali o di trasporto merci dovranno
essere pagate dall’acquirente.
Per ottenere riparazioni coperte da questa
garanzia, contattare il proprio distributore Zippo
per istruzioni (vedi foglio a parte), visitare il
nostro sito web www.Zippo.com o tornare al
negozio dove è stato acquistato l’orologio.
ja
42
ja
43
ja
44
ja
45
ja
46
ja
47
ko
48
ko
49
ko
50
ko
51
ko
52
ko
53
pl
Zegarek cyfrowy
45016
Zobacz: Rysunek 1 na stronie 3. 1) Przycisk
A (oświetlenie / ustawianie), 2) Przycisk
B (tryb pracy), 3) Przycisk C (zerowanie),
4) Przycisk D (start)
Dane techniczne
- wyświetlacz ciekłokrystaliczny 14 cyfr;
wyświetlanie godzin, minut, sekund,
roku (2000~2069), miesiąca, dnia
i tygodnia
- wybierany format 12/24 godzin,
automatyczny kalendarz
- podwójny tryb wskazywania czasu
54
- dokładność chronografu do 1/100 sekundy
(zakres wyświetlania czasu mierzonego
przez stoper wynosi 23 godziny,
59 minut, 59 sekund).
- 4 niezależne alarmy codzienne oraz sygnał
godzinowy
- wyłącznik czasowy (zatrzymanie
wyłącznika czasowego, ponowne jego
włączenie, lub tradycyjne stosowanie
z wstępnie ustawioną wielkością
czasu w zakresie 23 godzin, 59 minut,
59 sekund).
- dźwięk uruchamiania przycisków
- oświetlenie
pl
Instrukcja obsługi
Zobacz: Rysunek 2 na stronie 4.
1) Podwójny tryb wskazania czasu,
2) Jeśli przycisk D przetrzymany zostanie
przez 2 sek., 3) Czas bieżący, 4) Przycisk
B, 5) Chronograf, 6) Wyłącznik czasowy,
7) Alarm
Funkcja oświetlenia
1. Włączenie oświetlenia w dowolnym
trybie pracy możliwe jest po wciśnięciu
przycisku A. Tryb ustawiania czasu
bieżącego
2. W trybie czasu bieżącego, wcisnąć
przycisk A i przetrzymać go przez 2
sekundy w celu ustawienia czasu.
55
3. Naciskać przyciski C / D, by włączyć /
wyłączyć funcję oświetlenia (“LIGHT”).
Oświetlenie będzie włączane po
naciśnięciu dowolnego przycisku przy
załączonej funkcji oświetlenia(“LIGHT”).
Ponownie nacisnąć przycisk B, by
włączyć najpierw sygnał godzinowy
(“CHIME”). Uruchamiać przycisk
B w celu kolejnego wybierania
następujących trybów pracy:
4. Uruchomić przyciski C / D, by obniżyć /
podwyższyć ustawianą wartość.
5. Po wciśnięciu i przetrzymaniu przycisków
C / D przez 2 sekundy, włączona
zostanie funkcja automatycznego
liczenia do przodu.
6. Nacisnąć przycisk A, by wyjść z trybu
ustawiania.
pl
5. Zakres ustawionej różnicy wynosi
±23 godziny.
6. Nacisnąć przycisk A, by wyjść z trybu
ustawiania.
7. Jeśli przyciski nie są uruchamiane przez
okres 30 sekund, tryb ustawiania
jest zamykany i następuje powrót do
wyświetlania bieżącego czasu.
7. Jeśli przyciski nie są uruchamiane przez
okres 30 sekund, tryb ustawiania
jest zamykany i następuje powrót do
wyświetlania bieżącego czasu.
Ustawianie podwójnego trybu
wskazywania czasu
1. Przetrzymać przycisk D przez 2 sekundy.
2. Jeśli w trybie wskazywania podwójnego
czasu (T2) wyświetlany jest czas 2,
to wcisnąć i przetrzymać przez 2
sekundy przycisk A, by przejść do trybu
ustawiania czasu 2.
3. Ustawiona zostanie różnica między
czasem T2 a T1.
4. Uruchomić przyciski C / D, by obniżyć /
podwyższyć ustawianą wartość.
Tryb chronografu
1. Zakres wyświetlania czasu mierzonego
przez stoper wynosi 23 godziny,
59 minut, 59 sekund.
2. Nacisnąć przycisk D, by włączyć /
zatrzymać chronograf.
3. Nacisnąć przycisk C, by odczytać
międzyczas / zerować chronograf.
56
pl
numerem 9. Zapis ostatniego
międzyczasu będzie zastępowany przez
następny międzyczas, podczas gdy
wartości pierwszych 9 międzyczasów
pozostaną bez zmiany.
3. Jeśli żaden z przycisków nie będzie
naciskany przez 30 sekund, a
chronograf nie pracuje, to przywrócony
zostanie tryb czasu bieżącego.
4. Nacisnąć przycisk B, by przejść do trybu
wyłącznika czasowego.
5. Nacisnąć przycisk A, by przywołać
zapis pamięci, gdy chronograf został
zatrzymany.
6. Wcisnąć przycisk A, by zobaczyć
następny międzyczas.
7. Nacisnąć przycisk B, by przejść do trybu
wyłącznika czasowego.
8. Nacisnąć przyciski C lub D, by wyjść
z trybu przywołania, oraz przejść z
powrotem do trybu chronografu.
Uwaga
1. Do pamięci można zapisać łącznie
10 międzyczasów.
2. Międzyczas “L” (ostatni) pokazany
zostanie po międzyczasie oznaczonym
Tryb wyłącznika czasowego
1. Przetrzymać przycisk A przez 2 sekundy,
by przejść do ustawiania wyłącznika
czasowego. Występują trzy różne tryby
pracy wyłącznika czasowego. Można
włączać je cyklicznie przy użyciu
przycisków C i D.
57
pl
“CD STP” zliczanie w dół – zatrzymanie
“CD REP” zliczanie w dół – powtarzanie
“CD UP” zliczanie w górę
2. Element zaczyna migać, gdy licznik
rozpoczyna zliczanie. Napis “TMR” miga
podczas używania wyłącznika.
3. Nacisnąć przycisk D, by włączyć /
zatrzymać zliczanie przez wyłącznik
czasowy.
4. Nacisnąć przycisk C, by wyzerować licznik
to ustawionej wartości, jeśli wyłącznik
czasowy został zatrzymany.
5. Nacisnąć przycisk B, by przejść do trybu
alarmu.
58
Tryby zliczania w dół
1. Przetrzymać przycisk A przez 2 sekundy,
by przejść do ustawiania trybu (“STP”)
lub (“REP”) wyłącznika czasowego.
2. Naciskać przycisk B, by przechodzić
cyklicznie przez godzinę, minutę i
sekundę.
3. Wykorzystać przyciski C i D do ustawiania
czasu.
Alarm sygnalizowany przez wyłącznik
czasowy
Zobacz: Rysunek 3 na stronie 4. 1) Wybór
zliczania, 2) Godzina, 3) Minuta,
4) Sekunda
pl
Tryb wyświetlania alarmu
1. Nacisnąć przycisk D, by wybrać tryb
alarmu.
2. Nacisnąć przycisk C, by włączyć /
wyłączyć alarm.
3. Nacisnąć przycisk B, by przejść ponownie
do trybu wyłącznika czasowego.
4. Jeśli przycisk A przetrzymany zostanie
przez 2 sekundy, to włączony zostanie
tryb ustawiania alarmu.
5. Jeśli żaden z przycisków nie będzie
naciskany przez 30 sekund, to
przywrócony zostanie automatycznie
tryb wyłącznika czasowego.
6. Po włączeniu, alarm (4 bipy na sekundę)
trwać będzie przez okres 30 sekund.
7. Nacisnąć dowolny przycisk, by wyłączyć
dźwięk alarmu.
59
Tryb ustawiania alarmu
1. Nacisnąć przycisk B, by wybrać
ustawianie godzin lub minut.
2. Uruchomić przyciski C / D, by obniżyć /
podwyższyć ustawianą wartość.
3. Wcisnąć przycisk A, by wyjść z trybu
ustawiania.
4. Alarm uruchomiony będzie
automatycznie, jeśli nastąpi dowolna
zmiana godziny lub minuty.
5. Jeśli żaden z przycisków nie będzie
naciskany przez 30 sekund, to to tryb
ustawiania zostanie automatycznie
wyłączony.
pl
Gwarancja na zegarek
Gwarancja na zegarek ZIPPO® obejmuje
wszelkie wady materiałowe oraz błędy
robocizny przez okres dwóch (2) lat od
daty oryginalnego nabycia w sprzedaży
detalicznej na warunkach i zasadach
obowiązujących w niniejszej gwarancji.
W wymienionym okresie gwarancja
obejmuje jedynie kopertę zegarka i
metalową bransoletkę, mechanizm zegarka,
wskazówki i tarczę. Części te zostaną
naprawione, bądź też zegarek wymieniony
bezpłatnie, stosownie do decyzji podjętej
przez Zippo. W przypadku, gdy zegarek lub
określona jego część podlega wymianie,
Zippo nie zagwarantuje możliwości
otrzymania identycznego modelu. W takiej
60
sytuacji przekazany zostanie zegarek lub
część o podobnym wyglądzie i takiej samej
lub wyższej wartości.
Gwarancja ważna jest jedynie po
przedstawieniu oryginalnego dowodu
sprzedaży lub innego akceptowanego
dowodu zakupu.
Niniejsza gwarancja traci ważność,
jeśli zegarek został przypadkowo
uszkodzony, z powodu nieprawidłowej jego
ekspoatacji, dokonywania naprawy przez
nieupoważnione osoby, bądź też z powodu
innych czynników, nie wynikających z wad
materiałowych ani błędów robocizny.
Niniejsza gwarancja nie pokrywa baterii,
wyświetlacza ciekłokrystalicznego,
niemetalowego paska lub bransoletki,
uszkodzeń wynikających z normalnego
pl
zużycia lub eksploatacji (obejmujących,
ale nie ograniczonych do zarysowań
lub innego uszkodzenia zewnętrznej
powłoki), uszkodzeń powstałych z
winy użytkownika lub przekroczenia
wodoszczelności, chyba, że zegarek jest
określony jako wodoszczelny, a także
przypadków użytkowania niezgodnego z
przeznaczeniem.
Niniejsza gwarancja przyznaje
użytkownikowi dodatkowo określone prawa,
jakie przysługują mu równolegle z wszelkimi
innymi prawami, stosownie do przepisów
prawnych obowiązujących w państwie,
prowincji lub kraju, przy czym nie ogranicza
w żadnej mierze takich takich statutowych
przepisów. Poza wymienionym wyżej
warunkiem, niniejsza gwarancja zastępuje
61
wszelkie inne, wyrażone i domniemane
gwarancje.
Jeżeli produkt NIE JEST JUŻ OBJĘTY
GWARANCJĄ, to wszelkie koszty obejmujące
naprawę, wysyłką lub transport, muszą być
pokrywane przez klienta.
Aby uzyskać usługę w ramach niniejszej
gwarancji, należy skontaktować się z
najbliższym dystrybutorem Zippo w celu
otrzymania instrukcji, odwiedzić stronę
www.Zippo.com lub oddać produkt w
sklepie, gdzie był zakupiony.
ru
Цифровые часы
- 4 независимых дневных будильника и
ежечасный звонок
- Таймер (обратный отсчет с остановкой,
обратный отсчет с повтором или
обычный таймер с изначальным
значением 23 часа, 59 минут,
59 секунд).
- Тоновые звуки при нажатии клавиш
- Подсветка
45016
См. рисунок 1 на стр. 3. 1) Кнопка A
(Подсветка/ Установка), 2) Кнопка B
(Режим), 3) Кнопка C (Сброс),
4) Кнопка D (Пуск)
Характеристики
- ЖК-дисплей на 14 цифр, показывает
часы, минуты, секунды, год
(2000~2069), месяц, день и неделю
- Возможность выбора формата 12/24
часа, автоматический календарь
- Двойное время
- Хронограф с точностью 1/100 секунды
(Диапазон секундомера: 23 часа,
59 минут, 59 секунд).
Руководство по эксплуатации
См. рисунок 2 на стр. 4. 1) Двойное
время, 2) Если D удерживается 2 сек.,
3) Реальное время, 4) Кнопка B,
5) Хронограф, 6) Таймер, 7) Будильник
62
ru
Функция подсветки
1. Нажмите в любом состоянии кнопку
A, чтобы включить подсветку. Режим
настройки в реальном времени.
2. В режиме реального времени нажмите
кнопку А и удерживайте ее в течение
2 секунд, чтобы включить настройку
времени.
3. Нажмите кнопку C / D, чтобы включить/
выключить функцию подсветки
(LIGHT). Подсветка будет работать при
нажатии любой кнопки, если функция
LIGHT включена. Нажмите кнопку B
еще раз, чтобы установить режим
ежечасных звонков (CHIME). Нажмите
кнопку B, чтобы выбрать режим:
4. Нажмите кнопку C/D, чтобы уменьшить/
увеличить значение настраиваемого
параметра.
5. Если нажать кнопку C/D и удерживать
ее в течение 2 секунд, включится
функция автоматической прокрутки
значений.
6. Нажмите кнопку A, чтобы выйти из
режима настройки.
7. Если не нажимать ни одну кнопку в
течение 30 секунд, часы перейдут
из режима настройки в режим
отображения реального времени.
Установка двойного времени
1. Удерживайте кнопку D в течение
2 секунд.
63
ru
Режим хронографа
1. Рабочий диапазон секундомера
составляет 23 часа, 59 минут,
59 секунд.
2. Нажмите кнопку D, чтобы включить/
остановить хронограф.
3. Нажмите кнопку C, чтобы разделить /
сбросить хронограф.
4. Нажмите кнопку B, чтобы перейти в
режим таймера.
5. Нажмите кнопку A, чтобы вызвать
значение из памяти при остановке
хронографа.
6. Нажмите кнопку A, чтобы посмотреть
значение для следующего цикла.
7. Нажмите кнопку B, чтобы перейти в
режим таймера.
2. Если отображается время time2 в
режиме двойного времени (T2),
нажмите и удерживайте кнопку A
в течение 2 секунд, чтобы войти в
режим настройки времени time2.
3. Будет установлена разница времени
между T2 и T1.
4. Нажмите кнопку C/D, чтобы уменьшить
/ увеличить значение настройки.
5. Диапазон разницы во времени
±23 часа.
6. Нажмите кнопку A, чтобы выйти из
режима настройки.
7. Если не нажимать ни одну кнопку в
течение 30 секунд, часы перейдут
из режима настройки в режим
отображения реального времени.
64
ru
8. Нажмите кнопку C или D, чтобы выйти
из режима вызова значений из памяти
и вернуться в режим хронографа.
Замечание
1. Память хронографа может содержать
результаты для 10 циклов.
2. Цикл L (последний цикл) отображается
после цикла 9. Последний цикл в
памяти всегда заменяется новым
результатом, в то время как первые
9 циклов остаются без изменений.
3. Если не нажимать ни одну кнопку в
течение 30 секунд, когда хронограф
не работает, включается режим
реального времени.
65
Режим таймера
1. Удерживайте кнопку A в течение 2
секунд, чтобы войти в режим настройки
таймера. Всего существует три режима
работы таймера. Для переключения
режимов используются кнопки C и D.
CD STP: обратный отсчет – остановка
CD REP: обратный отсчет – повтор
CD UP: обратный отсчет – вверх
2. Мигает при обратном отсчете. Во время
использования мигает знак TMR.
3. Нажмите кнопку D, чтобы запустить/
остановить таймер.
4. Нажмите кнопку C, чтобы восстановить
заданное по умолчанию значение
счетчика при остановке таймера.
5. Нажмите кнопку B, чтобы перейти в
режим будильника.
ru
Режимы обратного отсчета
1. Удерживайте кнопку A в течение
2 секунд, чтобы войти в режим
настройки таймера для режима
STP или REP.
2. Используйте кнопку B, чтобы
переключаться между часами,
минутами и секундами.
3. Используйте кнопки C и D для
настройки времени.
Таймер с будильником
См. рисунок 3 на стр. 4. 1) Выбор
обратного отсчета, 2) Часы,
3) Минуты, 4) Секунды
66
Режим отображения будильника
1. Нажмите кнопку D, чтобы выбрать
режим будильника.
2. Нажмите кнопку C, чтобы включить/
выключить будильник.
3. Нажмите кнопку B, чтобы вернуться в
режим часов.
4. Если удерживать кнопку A в течение 2
секунд, войдите в режим настройки
будильника.
5. Если не нажимать ни одну кнопку в течение
30 секунд, режим отсчета времени будет
восстановлен автоматически.
6. Будильник (4 гудка в секунду) будет
работать в течение 30 секунд, если
он включен.
7. Нажмите любую кнопку, чтобы
остановить будильник.
Режим настройки будильника
1. Используйте кнопку B для
переключения между часами и
минутами.
2. Нажмите кнопку C/D, чтобы уменьшить/
увеличить значение параметра.
3. Нажмите кнопку A, чтобы выйти из
режима настройки.
4. Если значение часов или минут будет
изменено, будильник будет включен
автоматически.
5. Если ни одна кнопка не будет
активирована в течение 30 секунд,
режим настройки закроется
автоматически.
67
Гарантия на часы
ru
На ваши часы марки ZIPPO® действует
гарантия на отсутствие дефектов
материалов и изготовления на два (2)
года с даты первоначальной покупки в
розницу согласно положениям и условиям
настоящей Гарантии.
В течение гарантийного срока
гарантия действует только на корпус и
металлический браслет, работу часов,
стрелки и циферблат. Zippo отремонтирует
эти компоненты или заменит часы
бесплатно по собственному усмотрению.
В случае необходимости замены часов
или определенного компонента Zippo
не может гарантировать наличия
идентичной модели. В подобном случае
ru
будут предоставлены часы или компонент
аналогичной или большей ценности.
Настоящая Гарантия действительна
только по предъявлении чека или другого
приемлемого подтверждения покупки.
Настоящая Гарантия недействительна,
если часы повреждены из-за
несчастного случая, небрежности,
несанкционированного сервисного
обслуживания или других факторов, не
связанных с дефектами материалов или
изготовления.
Настоящая Гарантия не действует на
батарею, хрусталь, неметаллический
ремешок или браслет, случаи обычного
износа (в том числе, помимо прочего,
царапины и другие повреждения отделки),
случаи неправильного использования
68
и случаи повреждения под действием
воды, если часы не помечены как
водонепроницаемые или если часы не
использовались согласно инструкции на
момент возникновения ущерба.
Настоящая Гарантия дает вам
определенные юридические права,
которые дополняют любые другие
юридические права, которые могут у
вас иметься согласно федеральному
или местному законодательству, и при
этом не ограничивают эти другие права
и действуют одновременно с ними. За
исключением вышесказанного, настоящая
Гарантия заменяет все другие явные и
косвенные гарантии.
Если в отношении изделия НЕ ДЕЙСТВУЕТ
ГАРАНТИЯ, клиент оплачивает все
ru
расходы, в том числе расходы на ремонт и
пересылку по почте или перевозку.
Чтобы воспользоваться сервисным
обслуживанием по этой гарантии,
обратитесь за инструкциями к вашему
дистрибутору Zippo (см. отдельный лист),
посетите наш сайт www.Zippo.com или
обратитесь в магазин, где вы приобрели
изделие.
69
zh
70
zh
71
zh
72
zh
73
zh
74
Printed in China
WL0103-B