1
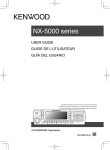
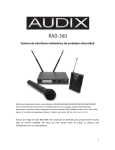
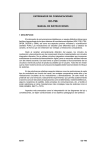
KCH-20R
USER MANUAL
MODE D’EMPLOI
MANUAL DEL USUARIO
B5A‑0605-00
REMOTE CONTROL HEAD
KCH-20R
USER MANUAL
• SDTM and microSDTM are trademarks of SD-3C, LLC in the United States. and/
or other countries.
• The Bluetooth® word mark and logos are registered trademarks owned
by Bluetooth SIG, Inc. and any use of such marks by JVC KENWOOD
Corporation is under license. Other trademarks and trade names are those of
their respective owners.
Firmware Copyrights
The title to and ownership of copyrights for firmware embedded in KENWOOD
product memories are reserved for JVC KENWOOD Corporation.
PRECAUTIONS
• Do not disassemble or modify the unit for any reason.
• Do not expose the unit to long periods of direct sunlight, nor place it close to heating
appliances.
• Do not place the unit in excessively dusty and/or humid areas, nor on unstable surfaces.
• If you detect an abnormal odor or smoke coming from the unit, disconnect the power
from the unit immediately. Contact your KENWOOD service center or dealer.
• Do not attempt to configure the transceiver while driving; it is too dangerous.
• Do not use options not specified by KENWOOD.
• For passenger safety, install the unit securely using the supplied mounting bracket and
screw set so the unit will not break loose in the event of a collision.
• Always turn off the power before installing optional accessories.
• When using the KCH-20R, refer to the “NOTICES TO THE USER” and
“PRECAUTIONS” in the USER GUIDE of Mobile Transceiver of NX-5000 series. If
the warnings (
) are not observed, there may be the possibility to have any
malfunction. In this case, press and hold the Power Switch for 5 seconds or more. If the
malfunction persists, ask your dealer.
SUPPLIED ACCESSORIES
a Mounting bracket........................................................................................................... 1
b Mounting screw.............................................................................................................. 2
c Screw set (5 x 16 mm self-tapping screw x 4, Spring washer x 4, Flat washer x 4)..... 1
d Microphone cable holder................................................................................................ 1
e Pan head sems screw (M3 x 8 mm).............................................................................. 1
f PF name plates (the A, B and C name plate has been attached)................................. 1
f
c
e
e
d
Microphone
cable
d
b
2
a
REPLACING THE PF NAME PLATE
You can reconfigure the PF name plates at
any time.
1 Remove the current PF name plate from
the function key using a fine-tipped tool.
2 Punch out the PF name plate card, and
insert the plate onto the relative function
key.
Name plate
Squeeze and insert
the plate
INSTALLING THE microSD MEMORY CARD
1 Open the Cap.
2 Insert the microSD memory card.
• Insert the microSD memory card with its
terminal side facing the same side as the
front of the panel.
• Insert the microSD memory card until it
clicks into place.
• To remove the microSD memory card,
push the card inwards once, then pull it out
straight.
microSD
memory card
Cap
Note:
◆◆ microSD memory cards (Class 2 or higher) and microSDHC memory cards (Class 2 or higher)
can be used.
◆◆ SDXC memory cards cannot be used.
◆◆ This transceiver is not guaranteed to operate with all microSD memory cards. (Operations are confirmed on memory cards for the following brands: SanDisk, TOSHIBA and
Panasonic.)
◆◆ Use the microSD memory card within the allowable operating temperature.
◆◆ Do not remove the microSD memory card or turn off this transceiver while the microSD memory
card is being accessed.
◆◆ The waterproof performance is not guaranteed if the microSD memory card slot cap is not fit into
place.
◆◆ Make sure your hands are clean before opening the microSD memory card slot cap.
Compensation Disclaimer
Data stored on the microSD memory card may be altered or lost due to problems with this
transceiver. We do not accept liability in respect of the data stored on your microSD memory card,
failure to save the data properly, loss of data, and any direct or indirect damages.
3
ORIENTATION
OPERATION PANEL
a b
c
d e
f
g
h
i
j
k l
m
a[ ] (Power) switch
Press to switch the transceiver ON or OFF.
b[ ] / [ ] keys
Press to activate its programmable function.
c 4-way D-pad
Press to activate its programmable function.
d PF keys <with Name Plate>
Press to activate its programmable function.
e Auxiliary (orange) key
Press to activate its programmable function.
f Illumination sensor
Sensor for Auto Dimmer Function.
g TX Indicator
Lights red while transmitting.
h Busy / Status indicator
Lights green while receiving. The indicator lights in different colors to indicate
the current status of the transceiver. i Microphone jack
Insert the microphone plug into this jack.
j [ ] / [ ] / [ ] / [ ] / [ ] / [ ] keys
Press to activate their programmable functions.
k [ ] / [ ] keys
Press to activate their programmable functions.
l VOL (Volume) control
Rotate clockwise to increase the volume level. Rotate counterclockwise to
decrease the volume level.
4
m CH (Channel) control
Rotate this control to activate its programmable function. (The default setting is Channel Select.)
For details on programming functions to the keys on your transceiver, please contact
your dealer or refer to the instruction manual available from the following URL.
http://manual2.jvckenwood.com/en_contents/search/
DISPLAY
Basic Frame
Function Indicator Area
Main Area
Key Guide Area
Message Frame
Messenger Area
Message Area
Display Area
Description
Function Indicator Area
Displays the various function indicators, signal strength
indicator and clock.
Main Area
Displays the information of the transceiver such as Channel
number and Zone number.
Key Guide Area
Displays the key functions for [ ], [
Messenger Area
Displays the Caller ID/Name.
Message Area
Displays the message texts.
5
], [ ], and [ ] keys.
FUNCTION INDICATOR
Indicator
Description
Displays the signal strength.
The channel is using high transmit power.
The channel is using medium transmit power.
The channel is using low transmit power.
In Digital mode (Digital Channel)
In Analog mode (Analog Channel)
In Digital mode (Mixed Channel)
In Analog mode (Mixed Channel)
The Bluetooth function is activated. Blinks in the process of turning on
Bluetooth.
Connected to Bluetooth device.
The GPS position is determined. Blinks when the GPS is unable to
determine the position.
Non-priority Scan or Voting/Site Roaming is in progress. Blinks when the
scan is paused. (green icon)
Priority Scan is in progress. Blinks when the scan is paused. (red icon)
Indicates Priority channel 1 or Priority Monitor ID 1.
Indicates Priority channel 2 or Priority Monitor ID 2.
Indicates Priority Monitor ID 3.
Indicates Priority Monitor ID 4.
The current channel is added to the scanning sequence.
The current Zone is added to the Multi-Zone scanning sequence.
The Scrambler function is activated.
The Encryption function is activated. Blinks when receiving an encrypted
carrier.
The Encryption (AES) function is activated. Blinks when receiving an
encrypted carrier.
The Encryption (DES) function is activated. Blinks when receiving an
encrypted carrier.
6
Indicator
Description
The Talk Around function is activated.
The Monitor or Squelch Off is activated.
The External Speaker is activated.
The External Speaker (Internal + External) is activated.
The Noise Reduction function is activated. Blinks when Noise Reduction is
functioning.
Blinks when an incoming call matches your Optional Signaling.
A message is stored in memory. Blinks when a new message has arrived.
The microSD memory card is recognized.
The microSD memory card is not recognized.
The VOX function is activated.
The Site Lock function is activated.
The Broadcast Call function is activated.
The Surveillance function is activated.
The selected group is programmed as telephone IDs.
The Horn Alert function is activated.
The Public Address function is activated.
AUX A is activated.
AUX B is activated.
AUX C is activated.
The Lone Worker function is activated.
The Compander function is activated.
The Operator Selectable Tone function is activated.
Blinks during Auto Recording.
The Key Lock function is activated.
7
TETE DE CONTRÔLE DEPORTEE
KCH-20R
MODE D’EMPLOI
• SD™ et microSD™ sont des marques commerciales de SD-3C, LLC aux
États-Unis et/ou dans d’autres pays.
• La marque et les logos Bluetooth® sont des marques deposes appartenant à
Bluetooth SIG, Inc. et toute utilisation de ces marques par JVC KENWOOD
Corporation est sous licence. Les autres marques et noms commerciaux sont
ceux de leurs propriétaires respectifs.
Droits d’auteur du micrologiciel
Le titre et la propriété des droits d’auteur pour le micrologiciel intégré dans
la mémoire du produit KENWOOD sont réservés pour JVC KENWOOD
Corporation.
PRÉCAUTIONS
• Ne démontez et ne modifiez sous aucun prétexte l’unité.
• N’exposez pas l'unité aux rayons directs du soleil pendant de longues périodes et ne le
placez pas près d’appareils chauffants.
• Ne laissez pas l’appareil dans un endroit trop poussiéreux ni trop humide; ne le placez
pas sur une surface instable.
• Si une odeur anormale ou de la fumée est générée par l'unité, mettez immédiatement
l’émetteur-récepteur hors tension et contactez votre revendeur KENWOOD.
• Ne tentez pas de configurer l'unité tout en conduisant, car cela est trop dangeureux.
• Ne pas utiliser les options non spécifiées par KENWOOD.
• Pour la sécurité du passager, et pour éviter que l’émetteur-récepteur ne se détache
en cas de collision, fixez solidement l'unité en utilisant le support de montage et
l’ensemble des vis.
• Veillez à toujours mettre hors tension avant d’installer des accessoires en option.
• Lorsque vous utilisez le KCH-20R, reportez-vous à “AVIS AUX UTILISATEURS” et à
“PRÉCAUTIONS” dans le “GUIDE DE L'UTILISATEUR” de l’émetteur-récepteur mobile
) ne sont pas respectés, il peut
de la série NX-5000. Si les avertissement (
y avoir un risque de dysfonctionnement. Dans ce cas, appuyez sur le commutateur
d’Alimentation et maintenez-le enfoncé pendant 5 secondes ou plus. Si le problème
persiste, adressez-vous à votre revendeur.
AVERTISSEMENT
ACCESSOIRES FOURNIS
a Support de montage...................................................................................................... 1
b Vis de montage.............................................................................................................. 2
c Ensemble de vis (Vis taraudeuse 5 x 16 mm x 4, Rondelle à ressort x 4, Rondelle ordinaire x 4).......... 1
d Dispositif de maintien du câble de microphone............................................................. 1
e Vis à tête bombée sems (M5 x 8 mm)........................................................................... 1
f Plaques signalétiques PF (les plaques signalétiques A, B et C sont déjà en place)..... 1
f
c
e
e
d
Câbles de
microphone
d
b
F-2
a
REMPLACEMENT DE LA PLAQUE SIGNALÉTIQUE PF
Vous pouvez reconfigurer les plaques
signalétiques n'importe quand.
1 Retirez la plaque signalétique PF
actuelle de la touche de fonction en
utilisant un outil à pointe fine.
2 Découpez la carte de la plaque
signalétique PF, et insérez la plaque sur
la touche de fonction correspondante.
Plaque
signalétique
Faites pression et
insérez la plaque
INSTALLATION DE LA CARTE MÉMOIRE microSD
1 Ouvrez le cache.
2 Insérez la carte mémoire microSD.
• Insérez la carte mémoire microSD avec
le côté terminal orienté du même côté
que l’avant du panneau.
• Insérez la carte mémoire microSD
jusqu’à ce qu’un clic se fasse entendre
montrant que la carte est en place.
• Pour retirer la carte mémoire microSD,
poussez-la vers l’intérieur une fois, puis
retirez-la sans la plier.
carte
mémoire
microSD
Cache
Remarque:
◆◆ Les cartes mémoire SDXC ne peuvent pas être utilisées.
◆◆ Le fonctionnement de cet émetteur-récepteur n’est pas garanti avec toutes les cartes mémoire
microSD.
◆◆ (Le fonctionnement est garanti sur les cartes mémoire pour les marques suivantes : SanDisk,
TOSHIBA et Panasonic.)
◆◆ Utilisez la carte mémoire microSD dans la température de fonctionnement recommandée.
◆◆ Ne retirez pas la carte mémoire microSD ou n’éteignez pas cet émetteur-récepteur pendant que
la carte mémoire microSD est en cours d’exécution.
◆◆ L’efficacité de l’étanchéité n’est pas garantie si le volet du logement de la carte mémoire
microSD n’est pas en place.
◆◆ Assurez-vous d’avoir les mains propres avant d’ouvrir le volet du logement de la carte mémoire
microSD.
Avis de non-responsabilité de compensation
Les données stockées sur la carte mémoire microSD peuvent être modifiées ou perdues à cause de
problèmes avec cet émetteurrécepteur. Nous n’acceptons aucune responsabilité en ce qui concerne
les données stockées sur votre carte mémoire microSD, l’échec de la sauvegarde correcte des
données, la perte des données et de tout dommage direct ou indirect.
F-3
ORIENTATION
PANNEAU DE COMMANDE
a b
c
d e
f
g
h
i
j
k l
m
a Commutateur [ ] (d’alimentation)
Appuyez pour mettre l’émetteur-récepteur sous tension ou hors tension.
b Touches [ ] / [ ]
Appuyez sur la touche pour activer leurs fonctions programmables.
c 4-voies D-pad
Appuyez sur la touche pour activer leurs fonctions programmables.
d Touches PF <Avec les plaques signalétiques>
Appuyez sur la touche pour activer leurs fonctions programmables.
e Touche auxiliaire (orange)
Appuyez sur la touche pour activer leurs fonctions programmables.
f Capteur d’éclairage
Capteur pour fonction Variateur automatique.
g Indicateur TX
S’allume en rouge lors de la transmission.
h Indicator d’occupé/ état
S’allume en vert lors de la réception. Le indicateur s’allume avec des couleurs
différentes pour indiquer l’état actuel de l’émetteur-récepteur. i Prise microphone
Insérez la fiche du microphone dans cette prise.
j Touches [ ] / [ ] / [ ] / [ ] / [ ] / [ ]
Appuyez sur la touche pour activer leurs fonctions programmables.
k Touches [ ] / [ ]
Appuyez sur la touche pour activer leurs fonctions programmables.
l Commande VOL (volume)
Tournez la commande dans le sens des aiguilles d'une montre pour
augmenter le niveau de volume. Tournez la commande dans le sens contraire
des aiguilles d'une montre pour diminuer le niveau de volume.
F-4
m Commande CH (canal)
Tournez cette commande pour activer sa fonction programmable. (Leréglage par défaut est Sélection du canal.)
Pour plus de détails sur les fonctions de programmation des touches de votre émetteurtransmetteur, veuillez contacter votre revendeur ou consultez le mode d’emploi disponible
à l’adresse URL suivante.
http://manual2.jvckenwood.com/en_contents/search/
AFFICHEUR
Cadre de base
Zone d’affichage des icons
de fonctions
Zone principale
Zone de guide des touches
Cadre de message
Zone de messenger
Zone de messages
Zone d’affichage
Zone d’indicateur de
fonction
Zone principale
Description
Affiche les diverses indicateurs de fonction, le témoin de
puissance du signal et l’heure.
Affiche les informations de l’émetteur-récepteur comme le
nombre Canal et le nombre Zone.
Zone de guide des
touches
Affiche les fonctions des touches pour [ ], [
Zone de messenger
Afficher l'identification de l'appelant / nom .
Zone de messages
Afficher les textes de message.
F-5
], [ ] et [ ].
INDICATEUR DE FONCTION
Indicateur
Description
Affiche la force du signal.
Le canal utilise une énergie de transmission élevée.
Le canal utilise une énergie de transmission moyenne.
Le canal utilise une énergie de transmission faible.
En mode numérique (Canal numérique)
En mode analogique (Canal analogique)
En mode numérique (Canal mixte)
En mode analogique (Canal mixte)
La fonction Bluetooth est activée. Clignote dans le processus d’activation
du Bluetooth.
Connecté à un dispositif Bluetooth.
La position GPS est déterminée. Clignote lorsque le GPS est incapable de
déterminer la position.
Balayage non prioritaire ou Vote / Site Roaming est en cours. Clignote
lorsque le balayage s’arrête momentanément. (indicateur vert)
Balayage prioritaire est en cours. Clignote lorsque le balayage s’arrête
momentanément. (indicateur rouge)
Indique le canal prioritaire 1 ou l’ID de l’écran prioritaire 1.
Indique le canal prioritaire 2 ou l’ID de l’écran prioritaire 2.
Indique l’ID de l’écran prioritaire 3.
Indique l’ID de l’écran prioritaire 4.
Le canal en cours est ajouté à la séquence de balayage.
La zone courante est ajoutée à la séquence de balayage multi-zone.
La fonction Brouilleur est activée.
La fonction Encodage est activée. Clignote lors de la réception d’un
transporteur crypté.
La fonction Encodage (AES) est activée. Clignote lors de la réception d’un
transporteur crypté.
La fonction Encodage (DES) est activée. Clignote lors de la réception d’un
transporteur crypté.
La fonction Talk Around est activée
F-6
Indicateur
Description
La fonction Surveillance ou Silencieux désactivé est activée.
Haut-parleur externe est activé.
Le haut-parleur externe (interne + externe) est activé.
La fonction Réduction du bruit est activée. Clignote lorsque Réduction du
bruit fonctionne.
Clignote lorsqu’un appel entrant correspond à vos Signal facultatif.
Un message est enregistré dans la mémoire. Clignote lorsqu’on reçoit un
nouveau message.
La carte mémoire microSD est reconnue.
La carte mémoire microSD n’est pas reconnue.
La fonction VOX est activée.
La fonction Verrouillage site est activée.
La fonction Appel de diffusion est activée.
La fonction Surveillance est activée.
Le groupe sélectionné est programmé en tant qu’ID de téléphone.
La fonction Avertissement par klaxon est activée.
La fonction Sonorisation est activée.
AUX A est activé.
AUX B est activé.
AUX C est activé.
La fonction Travailleur seul est activée.
La fonction Compander est activée.
La fonction Tonalité sélectionnable par l'opérateur est activée.
Clignote pendant Enregistrement automatique.
La fonction Verrouillage des touches est activée.
F-7
CABEZAL CONTROL REMOTO
KCH-20R
MANUAL DEL USUARIO
• SD™ y microSD™ son marcas comerciales de SD-3C, LLC en los Estados
Unidos y/o en otros países.
• La marca denominativa y los logos de Bluetooth® son marcas comerciales
registradas propiedad de Bluetooth SIG, Inc. y cualquier uso de dichas
marcas por JVC KENWOOD Corporation se encuentra bajo licencia. Otras
marcas y nombres comerciales pertenecen a sus respectivos dueños.
Derechos de propiedad intelectual del firmware
La titularidad y propiedad de los derechos de propiedad intelectual del firmware
integrado en las memorias de los productos KENWOOD están reservados para
JVC KENWOOD Corporation.
PRECAUCIONES
• No desmonte ni modifique la unidad bajo ningún concepto.
• No exponga el transceptor a la luz directa del sol durante periodos de tiempo
prolongados, ni lo coloque cerca de calefactores.
• No coloque la unidad en lugares excesivamente húmedos o polvorientos, o sobre
superficies inestables.
• Si detecta un olor anormal o humo procedente del transceptor, desconecte
inmediatamente la alimentación y póngase en contacto con su proveedor KENWOOD.
• No intente configurar la unidad mientras conduce, ya que resulta demasiado peligroso.
• No utilice opciones no especificadas por KENWOOD.
• Para la seguridad de los pasajeros, instale la unidad de forma segura utilizando el
soporte de montaje y el juego de tornillos de forma que el transceptor no se suelte en
caso de colisión.
• Siempre apague la corriente antes de instalar los accesorios opcionales.
• Al usar KCH-20R, consulte “AVISOS AL USUARIO” y “PRECAUCIONES” en la
GUÍA DEL USUARIO del transceptor móvil de la serie NX-5000. Si no respeta las
), podría producirse un funcionamiento incorrecto. En dicho
advertencias (
caso, mantenga pulsado el interruptor de alimentación durante 5 segundos o más. Si el
problema persiste, póngase en contacto con su distribuidor.
ADVERTENCIA
ACCESORIOS SUMINISTRADOS
a Soporte de montaje....................................................................................................... 1
b Tornillo de montaje......................................................................................................... 2
c Juego de tornillos (Tornillo autorroscante de 5 x 16 mm x 4, Arandela de resorte x 4, Arandela plana x 4)............................................................... 1
d Soporte del cable del micrófono.................................................................................... 1
e Tornillo Sems de cabeza plana (M3 x 8 mm)................................................................. 1
f Placas de identificación PF (las placas de identificación A, B y C han sido adjuntadas)..... 1
f
c
e
e
d
Cable de
micrófono
d
b
E-2
a
REEMPLAZO DE LA PLACA DE IDENTIFICACIÓN PF
Las placas de identificación PF se pueden
volver a configurar en cualquier momento.
1 Utilizando una herramienta de punta fina,
retire la actual placa de identificación PF
de la tecla de función.
2 Extraiga la tarjeta de la placa de
identificación PF, e inserte la placa en la
respectiva tecla de función.
Placa de
identificación
Apriete e inserte la
placa
INSTALACIÓN DE LA TARJETA DE MEMORIA microSD
1 Abra la tapa.
2 Inserte la tarjeta de memoria microSD.
• Inserte la tarjeta de memoria microSD
con el lado de su terminal orientado hacia
el mismo lado que la parte delantera del panel.
• Inserte la tarjeta de memoria microSD
hasta que haga clic en su lugar.
• Para extraer la tarjeta de memoria microSD,
presione la tarjeta hacia dentro una vez y
luego extráigala derecha hacia fuera.
Tarjeta de
memoria
microSD
Tapa
Nota:
◆◆ Se pueden utilizar tarjetas de memoria microSD (clase 2 o superior) y tarjetas de memoria
microSDHC (clase 2 o superior).
◆◆ No se pueden utilizar tarjetas de memoria SDXC.
◆◆ No se garantiza que este transceptor funcione con todas las tarjetas de memoria microSD.
◆◆ (Se confirman las operaciones en tarjetas de memoria para las siguientes marcas: SanDisk,
TOSHIBA y Panasonic).
◆◆ Utilice la tarjeta de memoria microSD dentro del rango de temperature de funcionamiento.
◆◆ No extraiga la tarjeta de memoria microSD ni apague este transceptor mientras se está
accediendo a la tarjeta memoria microSD.
◆◆ No se garantiza la impermeabilidad si la tapa de la ranura de la tarjeta de memoria microSD no
está ajustada en su lugar.
◆◆ Asegúrese de que sus manos estén limpias antes de abrir la tapa de la ranura de la tarjeta de
memoria microSD.
Descargo de responsabilidad de compensación
Los datos guardados en la tarjeta de memoria microSD se pueden modificar o perder debido a
problemas con este transceptor. No aceptamos ninguna responsabilidad en relación con los datos
almacenados en su tarjeta de memoria microSD, fallos al guardar los datos correctamente, pérdida
de datos, y cualquier daño directo o indirecto..
E-3
ORIENTACIÓN
PANEL DE OPERACIONES
a b
c
d e
f
g
h
i
j
k l
m
a Interruptor [ ] (alimentación)
Pulse para activar o desactivar el transceptor.
b Teclas [ ] / [ ]
Pulse para activar sus funciones programables.
c D-pad de 4 vías
Pulse para activar sus funciones programables.
d Teclas PF <con las placas de identificación>
Pulse para activar sus funciones programables.
e Tecla auxiliar (naranja)
Pulse para activar o desactivar el transceptor.
f Sensor de iluminación
Sensor para la función Atenuador automático.
g Indicador TX
Se ilumina en color rojo mientras transmite.
h Indicador de ocupado/ estado
Se ilumina en color verde mientras recibe. El indicador se ilumina en colores
diferentes para indicar el estado actual del transceptor.
i Conector de micrófono
Inserte la clavija del micrófono en este conector.
j [ ] / [ ] / [ ] / [ ] / [ ] / [ ] keys
Pulse para activar sus funciones programables.
k Teclas [ ] / [ ]
Pulse para activar sus funciones programables.
l Control VOL (Volumen)
Gire en sentido horario para aumentar el nivel de volumen. Gire en sentido
antihorario para disminuir el nivel de volumen.
E-4
m Control CH (Canal)
Gire este control para activar su función programable. (El ajuste predeterminado es Selección de canal.)
Para mas informacion acerca de la programacion de las funciones de teclas en
su transceptor, pongase en contacto con su distribuidor o consulte el manual de
instrucciones disponible en el siguiente URL.
http://manual2.jvckenwood.com/en_contents/search/
PANTALLA
Marco básico
Área del indicador de
la función
Área principal
Área de guía de tecla
Marco mensaje
Área de mensajero
Área de mensajes
Área de visualización
Descripción
Area del indicador de la
funcion
Muestra los distintos indicadores de funcion, el indicador
de intensidad de la senal y el reloj.
Área principal
Muestra la información del transceptor como, por ejemplo,
el número Canal y el número Zona.
Área de guía de tecla
Visualiza las funciones de las teclas [ ], [
Área mensajero
Muestra el identificador de llamadas / Nombre.
Área de mensajes
Muestra los textos de mensaje.
E-5
], [ ] y [ ].
INDICADOR DE LA FUNCIÓN
Indicador
Descripción
Muestra la intensidad de la señal.
El canal utiliza transmisión de alta potencia.
El canal utiliza transmisión de media potencia.
El canal utiliza transmisión de baja potencia.
En el modo digital (Canal digital)
En el modo analógico (Canal analógico)
En el modo digital (Canal mixto)
En el modo analógico (Canal mixto)
La función Bluetooth está activada. Parpadea durante el proceso de
activación de Bluetooth.
Conectado a un dispositivo Bluetooth.
Se define la posición GPS. Parpadea cuando el sistema GPS no puede
determinar la posición.
Exploración no prioritario o Votación/ Roaming Sitio está en curso.
Parpadea cuando la exploración está en pausa. (indicador verde)
Exploración prioritaria está en curso. Parpadea cuando la exploración está
en pausa. (indicador rojo)
Indica prioridad canal 1 o prioridad Monitor ID 1.
Indica prioridad canal 2 o prioridad Monitor ID 2.
Indica prioridad Monitor ID 3.
Indica prioridad Monitor ID 4.
El canal actual se añade a la secuencia de escaneado.
La zona actual se añade a la secuencia de escaneado Multi-Zone.
La función Mezclador está activada.
La función Cifrado está activada. Parpadea al recibir un portador cifrado.
La función Cifrado (AES) está activada. Parpadea al recibir un portador
cifrado
La función Cifrado (DES) está activada. Parpadea al recibir un portador
cifrado.
La función Talk Around está activada.
E-6
Indicador
Descripción
La función Monitor o Desactivar Silenciamiento está activada.
El altavoz externo está activado.
El altavoz externo (Interno + Externo) está activado.
La función Reducción de ruido está activada. Parpadea cuando Reducción
de ruido está funcionando.
Parpadea cuando una llamada entrante coincide con Señal opcional.
Hay un mensaje almacenado en la memoria. Parpadea cuando se recibe
un mensaje nuevo.
La tarjeta de memoria microSD es reconocida.
La tarjeta de memoria microSD no es reconocida.
La función VOX está activada.
La función Bloqueo de sitio está activada.
La función Llamada de Difusión está activada.
La función Vigilancia está activada.
El grupo seleccionado se programa como ID telefónica.
La función Bocina de alerta está activada.
La función Megafonía está activada.
AUX A está activado.
AUX B está activado.
AUX C está activado.
La función Trabajador solo está activada.
La función Compansor está activada.
La función Tono seleccionable por operador está activada.
Parpadea durante Grabación automática.
La función Bloqueo de las teclas está activada.
E-7
INFORMATION ON SOFTWARE LICENSE
This unit uses a software based on the license below.
*zlib LICENSE
Copyright (C) 1995-2013 Jean-loup Gailly and Mark Adler
This software is provided 'as-is', without any express or implied warranty. In no event will the authors be
held liable for any damages arising from the use of this software.
Permission is granted to anyone to use this software for any purpose, including commercial applications, and
to alter it and redistribute it freely, subject to the following restrictions:
1. The origin of this software must not be misrepresented; you must not claim that you wrote the original
software. If you use this software in a product, an acknowledgment in the product documentation would
be appreciated but is not required.
2. Altered source versions must be plainly marked as such, and must not be misrepresented as being the
original software.
3. This notice may not be removed or altered from any source distribution.
Jean-loup Gailly ( [email protected])
Mark Adler ([email protected])
*Libpng LICENSE
This copy of the libpng notices is provided for your convenience. In case of any discrepancy between this
copy and the notices in the file png.h that is included in the libpng distribution, the latter shall prevail.
COPYRIGHT NOTICE, DISCLAIMER, and LICENSE:
If you modify libpng you may insert additional notices immediately following this sentence.
This code is released under the libpng license.
libpng versions 1.2.6, August 15, 2004, through 1.6.8, December 19, 2013, are Copyright (c) 2004,
2006-2013 Glenn Randers-Pehrson, and are distributed according to the same disclaimer and license as
libpng-1.2.5
with the following individual added to the list of Contributing Authors
Cosmin Truta
libpng versions 1.0.7, July 1, 2000, through 1.2.5 - October 3, 2002, are Copyright (c) 2000-2002 Glenn
Randers-Pehrson, and are distributed according to the same disclaimer and license as libpng-1.0.6 with the
following individuals added to the list of Contributing Authors
Simon-Pierre Cadieux
Eric S. Raymond
Gilles Vollant
and with the following additions to the disclaimer:
There is no warranty against interference with your enjoyment of the library or against infringement.
There is no warranty that our efforts or the library will fulfill any of your particular purposes or needs. This
library is provided with all faults, and the entire risk of satisfactory quality, performance, accuracy, and
effort is with the user.
libpng versions 0.97, January 1998, through 1.0.6, March 20, 2000, are Copyright (c) 1998, 1999 Glenn
Randers-Pehrson, and are distributed according to the same disclaimer and license as libpng-0.96, with the
following individuals added to the list of Contributing Authors:
Tom Lane
Glenn Randers-Pehrson
Willem van Schaik
libpng versions 0.89, June 1996, through 0.96, May 1997, are Copyright (c) 1996, 1997 Andreas Dilger
Distributed according to the same disclaimer and license as libpng-0.88, with the following individuals added
to the list of Contributing Authors:
John Bowler
Kevin Bracey
Sam Bushell
Magnus Holmgren
Greg Roelofs
Tom Tanner
1
libpng versions 0.5, May 1995, through 0.88, January 1996, are Copyright (c) 1995, 1996 Guy Eric Schalnat,
Group 42, Inc.
For the purposes of this copyright and license, "Contributing Authors" is defined as the following set of
individuals:
Andreas Dilger
Dave Martindale
Guy Eric Schalnat
Paul Schmidt
Tim Wegner
The PNG Reference Library is supplied "AS IS". The Contributing Authors and Group 42, Inc. disclaim all
warranties, expressed or implied, including, without limitation, the warranties of merchantability and of
fitness for any purpose. The Contributing Authors and Group 42, Inc. assume no liability for direct, indirect,
incidental, special, exemplary, or consequential damages, which may result from the use of the PNG
Reference Library, even if advised of the possibility of such damage.
Permission is hereby granted to use, copy, modify, and distribute this source code, or portions hereof, for any
purpose, without fee, subject to the following restrictions:
1. The origin of this source code must not be misrepresented.
2. Altered versions must be plainly marked as such and must not be misrepresented as being the original
source.
3. This Copyright notice may not be removed or altered from any source or altered source distribution.
The Contributing Authors and Group 42, Inc. specifically permit, without fee, and encourage the use of this
source code as a component to supporting the PNG file format in commercial products. If you use this
source code in a product, acknowledgment is not required but would be appreciated.
A "png_get_copyright" function is available, for convenient use in "about" boxes and the like:
printf("%s",png_get_copyright(NULL));
Also, the PNG logo (in PNG format, of course) is supplied in the files "pngbar.png" and "pngbar.jpg (88x31)
and "pngnow.png" (98x31).
Libpng is OSI Certified Open Source Software. OSI Certified Open Source is a certification mark of the
Open Source Initiative.
Glenn Randers-Pehrson
glennrp at users.sourceforge.net
December 19, 2013
*Md5
Copyright (C) 1999, 2000, 2002 Aladdin Enterprises. All rights reserved.
This software is provided 'as-is', without any express or implied warranty. In no event will the authors be
held liable for any damages rising from the use of this software.
Permission is granted to anyone to use this software for any purpose, including commercial applications, and
to alter it and redistribute it freely, subject to the following restrictions:
1. The origin of this software must not be misrepresented; you must not claim that you wrote the original
software. If you use this software in a product, an acknowledgment in the product documentation would
be appreciated but is not required.
2. Altered source versions must be plainly marked as such, and must not be misrepresented as being the
original software.
3. This notice may not be removed or altered from any source distribution.
L. Peter Deutsch
[email protected]
2
© 2015