1
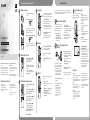
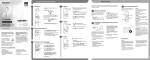
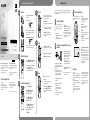
GB FR Let’s try out your new IC recorder 1. Power on. What to do next 4. Record. 1 Insert two batteries with the correct 1 Before you start using the IC recorder, make sure that polarity. Operation indicator 2 Turn the power on. 1 1 To turn the power off, slide the HOLDPOWER ON/ OFF switch in the direction of “POWER ON/OFF” for more than 2 seconds. IC Recorder 2 Press REC/PAUSE again to restart recording. 2 Press (stop) to stop recording. Recording stops and the operation indicator flashes in orange. To prevent unintentional operations (HOLD) Quick Start Guide 4-274-080-81(1) 2 5. Listen. To release the IC recorder from the HOLD status, slide the HOLDPOWER ON/OFF switch towards the center. Operation indicator © 2011 Sony Corporation Printed in China ICD-PX312 2. Set the date and time. 1, 2 Welcome to your new Sony IC recorder! This is the Quick Start Guide, which provides you with instructions on the basic operations of the IC recorder. Please read it carefully. We hope you enjoy using your new Sony IC recorder. Recording starts and the operation indicator lights in red. You can pause recording by pressing REC/PAUSE. Capacity (User available capacity) 2 GB (approx. 1.80 GB = 1,932,735,283 Byte) A part of the memory capacity is used as a management area. 1, 2 1 Press – or + to set the year, and 1 Press PLAY/STOPENTER. Playback starts and the operation indicator lights in green. 2 2 Adjust the volume by pressing VOL –/+. 1 3 Press (stop) to stop playback. 3 sequence in the same way. Press – or + to select the desired figures, and then press PLAY/STOPENTER. 6. Erase. Once a file is erased, you cannot restore it. IC Recorder (1) USB connecting cable (1) LR03 (size AAA) alkaline batteries (2) Application software, Sound Organizer (CD‑ROM) (1) Application software, Dragon NaturallySpeaking (DVD-ROM)* (1) Operating Instructions (Stored in the built‑in memory) * Supplied with some models in some regions only 1 3. Select the menu language. 2, 3, 4 1 5 2, 3, 4 1 Press and hold DISP/MENU. 2 Press – or + to select “Detail Menu,” and then press PLAY/STOPENTER. 3 Press – or + to select “Language,” and then press PLAY/STOPENTER. 4 Press – or + to select the language that you want to use in the display window, and then press PLAY/STOPENTER. 5 Press (stop). Press to display the folder selection window. Press – or + to select a folder. 2 2 1 Press ERASE. “Erase?” is displayed and the file to be erased is played back for confirmation. 2 Select “Yes” using – or +, and then press PLAY/STOPENTER. “Erasing…” is displayed while the selected file is being erased. Press PLAY/STOPENTER to move to the folder you have selected, and then press – or + to select a file. DISP/MENU NOISE CUT T-MARK instructions from the Sony support home page: http://www.sony.ca/ElectronicsSupport/ http://fr.sony.ca/ElectronicsSupport/ 1 Connect the IC recorder to your computer. 2 Open the “Instructions” folder on your computer. On Windows: Click [My Computer] or [Computer] - [IC RECORDER] - [Instructions]. On Macintosh: Click [IC RECORDER] on the desktop - [Instructions]. The file names of the operating instructions are as follows: Product name_language name_version. pdf (e.g. ICD-PX312_English_81.pdf ) To read the operating instructions, double-click the PDF file you want to read. Adds a track mark to set the starting point when recording or playing back a file. DISP/MENU Sets various menu items , such as REC Mode, Mic Sensitivity, etc. Various operations can be performed using Sound Organizer on your computer. You can import files recorded with the IC recorder into Sound Organizer to edit. You can import music files of a music CD or podcast files to transfer to the IC recorder. You can also burn CDs of the music you like. operating instructions from the “Instructions” folder to the local disk on your computer. your computer. T-MARK Sound Organizer (PC application software*) 3 Drag and drop the files of the 4 Disconnect the IC recorder from Sets the menu items for recording to the most appropriate settings according to various recording scenes. Reduces ambient noise to make the playback sound clearer. SCENE When a memory card has been inserted into the IC recorder, you can switch between the built-in memory and the external memory (memory card) using the menu. SCENE NOISE CUT 2 Select a file. Copying the operating instructions to your computer The operating instructions explaining all the features and functions of the IC recorder are stored as PDF files in the built-in memory of the IC recorder. You can also download the operating 2 Set the month, day, hour, and minute in Check the supplied items. 1 Select a folder. USB connecting cable then press PLAY/STOPENTER. This Class B digital apparatus complies with Canadian ICES-003. Selecting a folder/file You can select a folder in which you are going to record a file. You can also specify the file to be played back or erased in the selected folder. More advanced features For details on each operation, refer to the PDF operating instructions copied to your computer. you slide the HOLDPOWER ON/OFF switch towards the center to release the HOLD status. 1 Press REC/PAUSE. for more than 1 second Congratulations! You have set up your IC recorder and enjoyed your first recording. Let’s step up to the next stage. There are some more useful functions and information that you can use to fully utilize your IC recorder. * For Windows only Precautions On power Operate the unit only on 3.0 V or 2.4 V DC. Use two LR03 (size AAA) alkaline batteries or two NH-AAA-B2KN rechargeable batteries. On safety Do not operate the unit while driving, cycling or operating any motorized vehicle. On handling Do not leave the unit in a location near heat sources, or in a place subject to direct sunlight, excessive dust or mechanical shock. Should any solid object or liquid fall into the unit, remove the batteries and have the unit checked by qualified personnel before operating it any further. If you have any questions or problems concerning your unit, please consult your nearest Sony dealer. Étapes suivantes Essayez votre nouvel enregistreur IC FR GB 1. Mettez sous tension. 4. Enregistrez. Avant de commencer à utiliser l’enregistreur IC, assurez- 1 Insérez deux piles en respectant la 1 polarité. Indicateur de fonctionnement 2 Mettez l’appareil sous tension. 1 Appuyez sur REC/PAUSE. pendant au moins 1 seconde 1 1 Pour mettre l’appareil hors tension, faites glisser le commutateur HOLDPOWER ON/OFF vers « POWER ON/OFF » pendant au moins 2 secondes. 2 Pour désactiver la fonction HOLD de l’enregistreur IC, Bienvenue dans votre nouvel enregistreur IC Sony ! Ce document est le Guide de démarrage rapide qui vous fournit des instructions sur les opérations de base de l’enregistreur IC. Lisez-le attentivement. Nous espérons que vous apprécierez votre enregistreur IC Sony. Indicateur de fonctionnement 2. Réglez la date et l’heure. 1, 2 Capacité (capacité disponible pour l’utilisateur) 2 Go (environ 1,80 Go = 1 932 735 283 octets) Une partie de la mémoire est utilisée comme zone de gestion des données. 1, 2 2 Appuyez sur (stop) pour arrêter 5. Écoutez. faites glisser le commutateur HOLDPOWER ON/OFF vers le centre. ICD-PX312 appuyant sur REC/PAUSE. Appuyez de nouveau sur REC/PAUSE pour reprendre l’enregistrement. L’enregistrement s’arrête et l’indicateur de fonctionnement clignote en orange. Enregistreur IC 2 L’enregistrement commence et l’indicateur de fonctionnement s’allume en rouge. Vous pouvez interrompre l’enregistrement en l’enregistrement. Pour prévenir les opérations involontaires (HOLD) Guide de démarrage rapide vous de faire glisser le commutateur HOLDPOWER ON/OFF vers le centre pour désactiver la fonction HOLD. 1 Appuyez sur – ou sur + pour régler l’année, puis sur PLAY/STOPENTER. 1 Appuyez sur PLAY/STOPENTER. La lecture commence et l’indicateur de fonctionnement s’allume en vert. 2 2 Réglez le volume en appuyant sur 1 3 Appuyez sur (stop) pour arrêter la 3 lecture. Cet appareil numérique de la classe B est conforme à la norme NMB-003 du Canada. 6. Effacez. Une fois qu’un fichier a été effacé, il est impossible de le restaurer. Vérifiez les éléments fournis. Enregistreur IC (1) Câble de raccordement USB (1) Piles alcalines LR03 (AAA) (2) Logiciel d’application, Sound Organizer (CD-ROM) (1) Logiciel d’application, Dragon NaturallySpeaking (DVD-ROM)* (1) Mode d’emploi (stocké dans la mémoire intégrée) * Fourni avec certains modèles dans certaines régions uniquement 3. Sélectionnez la langue des menus. 2, 3, 4 1 5 2, 3, 4 1 enfoncé. 2 Appuyez sur – ou sur + pour sélectionner « Detail Menu », puis sur PLAY/STOPENTER. 3 Appuyez sur – ou sur + pour sélectionner « Language », puis sur PLAY/STOPENTER. 4 Appuyez sur – ou sur + pour sélectionner la langue que vous souhaitez utiliser dans la fenêtre d’affichage, puis appuyez sur PLAY/STOPENTER. 5 Appuyez sur (stop). 1 Appuyez sur ERASE. « Erase? » s’affiche et le fichier à effacer est lu pour confirmation. 1 Appuyez sur DISP/MENU et maintenez 2 2 Vous pouvez sélectionner un dossier dans lequel vous allez enregistrer un fichier. Vous pouvez également spécifier le fichier à lire ou à effacer dans le dossier sélectionné. 2 Sélectionnez un fichier. 1 Sélectionnez un dossier. Si une carte mémoire a été insérée dans Appuyez sur pour afficher la fenêtre de sélection de dossier. Appuyez sur – ou sur + pour sélectionner un dossier. 2 Sélectionnez « Yes » à l’aide de la touche – ou +, puis appuyez sur PLAY/STOPENTER. « Erasing… » s’affiche pendant l’effacement du fichier sélectionné. Pour voir des détails sur chaque opération, reportez-vous au mode d’emploi au format PDF que vous avez copié sur votre ordinateur. Appuyez sur PLAY/STOPENTER pour aller au dossier que vous avez sélectionné, puis appuyez sur – ou sur + pour sélectionner un fichier. l’enregistreur IC, vous pouvez basculer entre la mémoire intégrée et la mémoire externe (carte mémoire) à l’aide du menu. SCENE DISP/MENU T-MARK NOISE CUT Ajoute un repère de piste pour définir le point de départ lors de l’enregistrement ou de la lecture d’un fichier. T-MARK d’emploi sur la page d’accueil de Sony : http://www.sony.ca/ElectronicsSupport/ http://fr.sony.ca/ElectronicsSupport/ Sound Organizer (logiciel d’application pour PC*) Plusieurs opérations peuvent être effectuées à l’aide de Sound Organizer sur votre ordinateur. Vous pouvez importer des fichiers enregistrés avec l’enregistreur IC dans Sound Organizer pour les modifier. Vous pouvez importer des fichiers de musique d’un CD de musique ou des fichiers podcast pour les transférer sur l’enregistreur IC. Vous pouvez également graver la musique que vous aimez sur des CD. 1 Raccordez l’enregistreur IC à votre ordinateur. 2 Ouvrez le dossier « Instructions » sur votre ordinateur. Sous Windows : cliquez sur [Poste de travail] ou sur [Ordinateur] [IC RECORDER] - [Instructions]. Sous Macintosh : cliquez sur [IC RECORDER] sur le poste de travail [Instructions]. Les noms des fichiers du mode d’emploi sont les suivants : Nom produit_langue_version.pdf (par ex. ICD-PX312_English_81.pdf ) 4 Déconnectez l’enregistreur IC de * Pour Windows uniquement Précautions Pour consulter le mode d’emploi, double-cliquez sur le fichier PDF que vous souhaitez lire. DISP/MENU Règle diverses options de menu, telles que REC Mode, Mic Sensitivity, etc. mode d’emploi à partir du dossier « Instructions » sur le disque local de votre ordinateur. votre ordinateur. Règle les options de menu pour un enregistrement avec les paramètres les plus appropriés en fonction de diverses scènes d’enregistrement. Réduit le bruit ambiant pour rendre le son de lecture plus clair. 3 Glissez et déposez les fichiers du Câble de raccordement USB SCENE NOISE CUT Copie du mode d’emploi sur votre ordinateur Le mode d’emploi expliquant toutes les options et fonctions de l’enregistreur IC est stocké sous forme de fichiers PDF dans la mémoire intégrée de l’enregistreur IC. Vous pouvez également télécharger le mode minute dans l’ordre, de la même manière. Fonctions plus avancées Sélection d’un dossier/fichier VOL –/+. 2 Réglez le mois, le jour, l’heure et la Appuyez sur – ou sur + pour sélectionner les chiffres souhaités, puis sur PLAY/STOPENTER. Félicitations ! Vous avez configuré votre enregistreur IC et réalisé votre premier enregistrement. Passons à l’étape suivante. Il existe des fonctions et des informations plus utiles que vous pouvez utiliser pour profiter pleinement de votre enregistreur IC. Alimentation Faites uniquement fonctionner l’appareil sur une tension de 3,0 V ou 2,4 V CC. Utilisez deux piles alcalines LR03 (AAA) ou deux piles rechargeables NH-AAA-B2KN. Sécurité Ne faites pas fonctionner l’appareil en conduisant une voiture, une bicyclette ou tout autre véhicule motorisé. Manipulation Ne laissez pas l’appareil à proximité d’une source de chaleur ou dans un endroit exposé au rayonnement direct du soleil, à une poussière excessive ou à des chocs mécaniques. Si des éléments solides ou liquides venaient à pénétrer à l’intérieur de l’appareil, retirez les piles et faites-le vérifier par un technicien qualifié avant de le remettre en service. Si vous avez des questions ou des problèmes concernant cet appareil, consultez votre revendeur Sony.