1
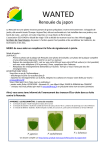
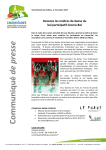
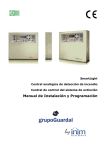
SL1 5600°K & SL1 3200°K
SL1 LED LIGHT USER’S GUIDE
MANUEL D’UTILISATION DU LUMINAIRE À LED SL1
EN
WARNING: The safety of this feature is
only guaranteed if the following
instructions have been observed.
FR
ATTENTION: La sureté de l'appareil n'est
garantie qu'en suivant scrupuleusement
les instructions ci-après. Il est donc
nécessaire de les conserver.
• Always disconnect power before working on
the fixture.
• Isoler l'appareil du secteur avant tout
manipulation.
• Fixture must not be installed in any other
position than that shown in instructions.
• L'appareil ne peut être installé dans une autre
position que celle indiquée dans les
instructions de montage.
• Assembly and maintenance of the fixture must
be performed carefully so as not to damage
components.
• All external parts of the fixture may be
cleaned with a soft damp cloth and mild
detergent.
• SMARTLIGHT MOTION will replace
merchandise with manufacturing defects only
if it is returned to the retailer from which it
was purchased.
• SMARTLIGHT MOTION will not provide
replacement until nature of defect has been
determined.
• If exposed to direct sunlight, the materials
used in this product may show natural
chromatic variations.
• Le montage et les manipulations de l'appareil
devront être éxecutés avec la plus grande
attention pour ne pas abimer ses composants.
• Le nettoyage intégral de l'appareil doit être
entretenu régulièrement à l'aide d'un chiffon
doux et de detergent neutre.
• SMARTLIGHT MOTION n'échangera ses
articles défectueux que par l'intermédiaire
d'un revendeur.
• SMARTLIGHT MOTION ne remplacera aucun
appareil sans avoir pu vérifier le défaut
• Les matériaux utilisés, si directement exposés
aux rayons solaires peuvent subir une
variation chromatique naturelle.
380 Parc Econormandie,
Le château de Grosmesnil,
76430 Saint Romain de Colbosc, France
Tel. 02 35 200 700 / Fax. 02 35 200 777
[email protected]
www.smartlightmotion.com
TECHNICAL SPECIFICATIONS
SPÉCIFICATIONS TECHNIQUES
EN
FR
SL1 HEAD / SL1 TÊTE
TYPE OF LED
720 SMD soft LED
ANGLE OF EMISSION
120°
COLOR TEMPERATURE
3200°k or 5600°k
POWER
140W
SIZE
"3'4"" x 7"" 7/8 inch x 7/8 inch"
1000mm x 200mm x 20mm
LED VOLTAGE
24V
WEIGHT
6.34lb / 2.9kg
POWER-BOX / BOÎTIER DE CONTRÔLE
INPUT VOLTAGE
110-230V
POWER DRAWN
0.78 A
POWER CONECTOR
Sale's country standard
Suivant le pays de vente
A
local
remote
DMX out
Dimmer
OFF
B
CONTENT : SL1 BASIC KIT
A
1 x Head light 5600°k or 3200°k
B
1 x Power-box 110-230V
C
1 x 24V cable - 8m linear
D
1 x Quick-lock mount 360°
E
1 x Acrylic diffusion sheet
DMX addrese
ON
DMX in
EN
C
D
FR
CONTENU : KIT DE BASE SL1
A
1 x Tête de lampe 5600° K ou 3200°k
B
1 x Boîtier de Contrôle 110-230V
C
1 x Montée de lampe 8m linéaire
D
1 x Accroche Quick-lock spigot double
boules
E
1 x Plaque de diffusion acrylique
E
USER GUIDE
GUIDE D'UTILISATION
EN
FR
1
2
3
local
remote
DMX addrese
ON
DMX in
DMX out
Dimmer
OFF
EN
Remove the SL1 from its
packaging.
EN
Connect the SL1 Head to the
Power-Box.
EN
Attach the Quick-lock double
ball mount on the back of SL1.
FR
Sortir le SL1 de son emballage.
FR
Relier la tête de lampe au boîtier
de contrôle.
FR
Fixer l’accroche Quick-lock
double boule au dos du SL1
4
5
local
remote
6
DMX addrese
ON
DMX in
DMX out
Dimmer
local
remote
DMX addrese
ON
OFF
DMX in
DMX out
Dimmer
OFF
EN
Connect the Power-Box on
electrical outlet 220V
EN
Switch on/off button on the
Power-Box to turn on the SL1
EN
Adjust the brightness by turning
the Potentiometer 0 to 100%.
FR
Brancher le boîtier de contrôle
sur une prise 220V
FR
Enclencher le bouton on/off sur
le boîtier pour allumer le SL1
FR
Ajuster la luminosité en
tournant le potentiomètre de 0 à
100%.
FR
Basculer en mode DMX
A
C1 C3
7
B1
B2
C2
EN
Switch to DMX
1. Button local / remote on remote
position. (A)
1. Bouton local/remote sur position
remote. (A)
2. Connect the input cables (DMX in)
and output (DMX out) 5-pin XLR
connectors (B1, B2).
2. Brancher les câbles sur entrée
(DMX in) et sur sortie (DMX out)
connectiques XLR 5-pins .(B1, B2)
3. Set the DMX address using the
buttons and framing DMX address.
(C1, C2, C3)
3. Régler l’adresse DMX à l’aide des
boutons et du cadrant DMX adresse.
(C1, C2, C3)
4. Controlling the SL1 from the DMX
table.
4. Piloter le SL1 à partir de la table
DMX.
EN
AFTER SALES SERVICE
MAX: 200W
1.0
m
EN
Minimum distance form the light object
FR
Distance minimale des objets éclairés
If a problem occurs, it is strictly forbidden to open
the product, immediately contact the
manufacturer (contact details below).
FR
EN
FR
SMARTLIGHT MOTION advised to avoid
removing the acrylic diffuser from the SL1
when in use.
SMARTLIGHT MOTION recommande de
ne pas utiliser l’éclairage SL1 sans sa plaque
de diffusion.
SERVICE APRES VENTE
En cas de problème sur le produit, il est
formellement interdit d'ouvrir ou d'intervenir sur
le produit, contacter immédiatement le fabricant
(coordonnées ci contre).
CONTACT US / NOUS CONTACTER
380 Parc Econormandie,
Le château de Grosmesnil,
76430 Saint Romain de Colbosc, France
Tel . 02 35 200 700 / Fax . 02 35 200 777
[email protected]
www.smartlightmotion.com
This device is made from 100% recyclable materials
Cet appareil est fabriqué à partir de materiaux 100% recyclable
RoHS means this products is restricted in hazardous substances such as lead, mercury etc...
RoHS signifie que ce produit ne contient aucune substances dangereuses (ni plomb, ni
mercure etc...)
It certifies the conformity of the products of the European community low voltage directive
Il atteste la conformité du produit aux dispositions des directives communautaires