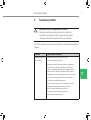
1
VC100
Gebrauchsanleitung
Instruction manual
Mode d’emploi
Manual de usuario
Istruzioni per l’uso
Návod k použití
使用说明
Gebrauchsanleitung
Vorwerk Akkusauger
VC100
Vorbemerkung
Herzlichen Glückwunsch zum Vorwerk Kobold Akkusauger!
Der Kleinste aus der Vorwerk-Familie wird Sie über viele
Jahre begleiten und Ihnen viel Spaß beim Reinigen Ihres
Haushaltes bereiten.
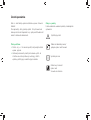
Zeichen und Symbole
Am Text finden Sie die aufgeführten Symbole mit folgender
Bedeutung:
Warnsymbol
Vor dem Start
• Lesen Sie die Gebrauchsanleitung aufmerksam durch,
bevor Sie den Akkusauger zum ersten Mal benutzen.
• Bewahren Sie die Gebrauchsanleitung für die zukünftige
Nutzung auf. Sie ist ein wichtiger Bestandteil des
Produkts und muss dem Produkt beiliegen, wenn Sie es
anderen Personen überlassen.
Verweis auf den Vorwerk
Kundenservice/Support
Symbol für einen Tipp
Verweis auf die Vorwerk
Internetpräsenz
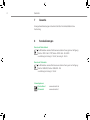
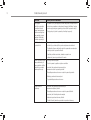
Inhalt
Vorbemerkung . . . . . . . . . . . . . . . . . . . . . . . . . . . . . . . 2
5
Störungsbehebung. . . . . . . . . . . . . . . . . . . . . . 17
Produktübersicht. . . . . . . . . . . . . . . . . . . . . . . . . . . . . 4
6
6.1
6.2
6.3
6.4
Entsorgung und Umweltschutz. . . . . . . . . . 20
Entsorgung des Gerätes . . . . . . . . . . . . . . . . . . . 20
Entsorgung der Akkus. . . . . . . . . . . . . . . . . . . . . 20
Entsorgung der Verpackung. . . . . . . . . . . . . . . . . 22
Informationen zum Umweltschutz. . . . . . . . . . . . 22
7
Garantie. . . . . . . . . . . . . . . . . . . . . . . . . . . . . . 24
8
Serviceleistungen. . . . . . . . . . . . . . . . . . . . . . 24
9
Technische Daten. . . . . . . . . . . . . . . . . . . . . . 25
1
1.1
1.2
1.3
. . . . . . . . . . . . . . . . . . . 5
Für Ihre Sicherheit
Bestimmungsgemäße Verwendung . . . . . . . . . . . 5
Gefahrenhinweise . . . . . . . . . . . . . . . . . . . . . . . . . 6
Gefahrenstufen . . . . . . . . . . . . . . . . . . . . . . . . . . . 9
2
2.1
2.1.1
2.1.2
2.2
Vorbereitung . . . . . . . . . . . . . . . . . . . . . . . . . . 10
Akkusauger aufladen . . . . . . . . . . . . . . . . . . . . . 10
An der Ladestation aufladen . . . . . . . . . . . . . . . 10
Aufladen ohne Ladestation . . . . . . . . . . . . . . . . . 11
Ladestation platzieren. . . . . . . . . . . . . . . . . . . . . 11
3
3.1
3.2
3.3
3.4
3.5
Bedienung . . . . . . . . . . . . . . . . . . . . . . . . . . . . . 12
Funktionsanzeige. . . . . . . . . . . . . . . . . . . . . . . . . 12
Akkusauger einschalten . . . . . . . . . . . . . . . . . . . 13
Boost-Funktion aktivieren. . . . . . . . . . . . . . . . . . . 13
Akkusauger ausschalten . . . . . . . . . . . . . . . . . . . 13
Akkusauger aufbewahren
. . . . . . . . . . . . . 13
4
Wartung. . . . . . . . . . . . . . . . . . . . . . . . . . . . . . . 15
4.1 Filtereinheit entnehmen. . . . . . . . . . . . . . . . . . . 15
4.2 Staubkammer entleeren . . . . . . . . . . . . . . . . . . . 16
4.3 Filtereinheit einsetzen. . . . . . . . . . . . . . . . . . . . . 16
DE
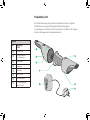
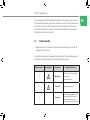
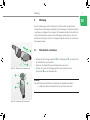
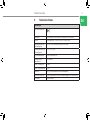
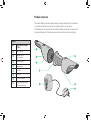
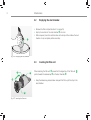
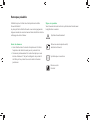
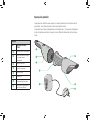
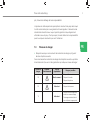
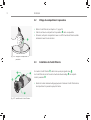
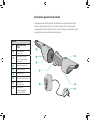
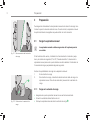
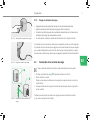
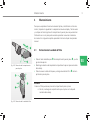
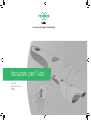
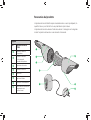
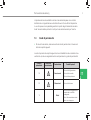
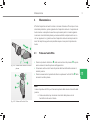
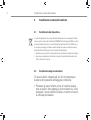
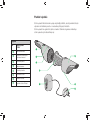
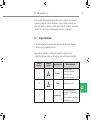
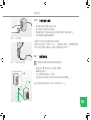
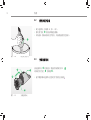
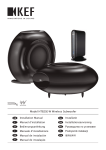
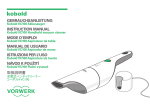
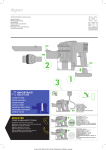
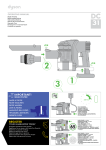
Produktübersicht
Der Kobold Akkusauger saugt mühelos verschiedenste Polster, auf glatten
Oberflächen und an engen Stellen gleichermaßen leistungsstark.
Der Akkusauger ist schnell und einfach zu entleeren. Das Bild mit der Legende
zeigt den Akkusauger und seine Bedienelemente.
Legende
Pos.
Akkusauger .
VC100
Staubkammer
Entriegelungstaste
für Staubkammer
7
Netzladegerät
6
8
1
Ladestation
Filtereinheit
5
Abluftöffnung
Funktionsanzeige
Ein-/Ausschalter mit
Boost-Funktion
4
2
3
1
Für Ihre Sicherheit
Größtmögliche Sicherheit gehört zu den Eigenschaften der Vorwerk Produkte.
Die Produktsicherheit des Akkusaugers kann jedoch nur dann gewährleistet
werden, wenn Sie dieses Kapitel beachten.
1.1
Bestimmungsgemäße Verwendung
Hinweis!
Dieses Gerät ist nicht dafür bestimmt, durch Personen
(einschließlich Kinder) mit eingeschränkten physischen,
sensorischen oder geistigen Fähigkeiten oder mangels
Erfahrungen und/oder mangels Wissen benutzt zu w
erden,
es sei denn, sie werden durch eine für ihre Sicherheit
zuständige Person beaufsichtigt oder erhielten von ihr
Anweisungen, wie der Akkusauger zu benutzen ist.
Kinder sollten beaufsichtigt werden, um sicherzustellen,
dass sie nicht mit dem Gerät spielen.
DE
6
Für Ihre Sicherheit
1.2
Gefahrenhinweise
Hinweis!
• Lesen Sie die Gebrauchsanleitung aufmerksam durch, bevor Sie den
Akkusauger zum ersten Mal benutzen.
• Beachten Sie insbesondere die folgenden Hinweise.
• Bewahren Sie die Gebrauchsanleitung für die zukünftige Nutzung auf. Sie ist
ein wichtiger Bestandteil des Akkusaugers und muss dem Produkt beiliegen,
wenn Sie es anderen Personen überlassen.
Beschädigung des Gerätes!
• Schalten Sie den Akkusauger vor allen Umrüst-, Reinigungs- und
Wartungsarbeiten immer aus und ziehen Sie das Netzladegerät aus der
Steckdose.
• Ziehen Sie das Netzladegerät nie an der Anschlussleitung, sondern am
Netzladegerät aus der Steckdose.
• Saugen Sie mit diesem Gerät niemals Wasser, andere Flüssigkeiten oder
leicht entzündbare Substanzen auf. Saugen Sie Asche erst auf, wenn sie völlig
ausgekühlt ist.
• Tauchen Sie den Akkusauger oder die Ladestation niemals in Wasser oder
andere Flüssigkeiten.
• Benutzen Sie den Akkusauger nicht in feuchten Umgebungen.
• Benutzen Sie keinesfalls den Akkusauger auf nassen Oberflächen oder in
Außenbereichen.
• Reinigen Sie niemals Ihr Gerät oder Ihr elektrisches Zubehör mit Wasser oder
feuchten Reinigern.
Für Ihre Sicherheit
Gefahr eines Stromschlags!
• Führen Sie Reparaturen an Ihrem Gerät nie eigenständig aus. Reparaturen an
Elektrogeräten dürfen nur vom zuständigen Vorwerk Kundendienst ausgeführt
werden.
• Führen Sie keine spitzen Gegenstände in die elektrischen Kontakte ein.
• Verändern Sie die Kontakte nicht.
• Betreiben Sie den Akkusauger nicht weiter, wenn es beschädigt ist.
• Setzen Sie sich bei Beschädigungen mit Ihrem nächstgelegenen Vorwerk
Kundendienst in Verbindung.
Brandgefahr!
• Saugen Sie keine glühende Asche oder glimmende Zigarettenstummel auf.
Explosionsgefahr!
• Saugen Sie keine explosiven oder leicht entflammbaren Stoffe auf.
• Werfen Sie den Akkusauger niemals in offenes Feuer.
Hinweis! Beschädigungsgefahr durch unsachgemäßen Gebrauch!
• Benutzen Sie ausschließlich Original Vorwerk Produkte.
• Prüfen Sie, bevor Sie den Akkusauger in Betrieb nehmen, ob die Spannungsangabe auf dem Gerät mit der örtlichen Netzspannung übereinstimmt.
• Betreiben Sie die Ladestation nur mit Wechselspannung und an einem durch
einen Fachmann ordnungsgemäß installierten Anschluss.
• Benutzen Sie den Akkusauger ausschließlich mit der auf dem Typenschild
angegebenen Wechselspannung.
• Verwenden Sie den Akkusauger und das Netzladegerät nicht, wenn
Beschädigungen daran erkennbar sind.
• Ziehen Sie das Netzladegerät aus der Steckdose, bevor Sie das Netzladegerät
reinigen.
7
DE
8
Für Ihre Sicherheit
• Laden Sie den Akkusauger nur mit dem mitgelieferten Netzladegerät (Typ: KSAA1200050W1EU) auf.
• Während des Aufladens fühlt sich das Netzladegerät warm an. Das ist normal.
• Lagern Sie den Akkusauger nicht im Freien und bewahren Sie es vor Feuchtigkeit geschützt auf.
• Stellen Sie den Akkusauger nicht in der Nähe einer Hitzequelle (Herd, Heizgerät, oder heiße Heizkörper) auf.
• Schalten Sie den Akkusauger nach jedem Gebrauch wieder aus.
• Die Ladebuchse führt Niederspannung (ca. 12 V) und ist deshalb ungefährlich.
• Blockieren Sie während des Staubsaugens keinesfalls die Abluftöffnungen.
• Schalten Sie den Akkusauger vor dem Aufladen aus.
• Verwenden Sie den Akkusauger ausschließlich mit eingesetzter Filtereinheit.
• Beim Bohren von Befestigungslöchern für die Ladestation an der Wand
(besonders in der Nähe einer Steckdose) ist besondere Vorsicht geboten, um
das Risiko eines elektrischen Schlags zu vermeiden.
• Laden und benutzen Sie den Akkusauger bei Temperaturen zwischen 5° C
und 35° C. Bewahren Sie es auch in diesem Temperaturbereich auf.
• Die Akkus keinesfalls kurzschließen! Setzen Sie die Akkus weder Feuer, Hitze
noch direkter Sonneneinstrahlung aus.
Benutzen Sie den Akkusauger nicht:
• Wenn das Gerät zu Boden gefallen ist und sichtbare Beschädigungen oder
Betriebsstörungen aufweist.
• Wenn die Ladestation oder das Kabel der Ladestation Beschädigungen
aufweist.
Der Akkusauger ist ausschließlich für den Haushalts- und Hausgebrauch
bestimmt. Bei unsachgemäßer oder der Gebrauchsanleitung nicht
entsprechender Verwendung übernimmt Vorwerk keine Haftung.
Für Ihre Sicherheit
9
Der Akkusauger erfüllt die Sicherheitsvorschriften des Landes, in dem es durch
eine autorisierte Vorwerk Organisation vertrieben wurde. Durch die Verwendung
des Gerätes in einem anderen Land kann die Einhaltung örtlicher Sicherheitsstandards nicht garantiert werden. Vorwerk lehnt deshalb daraus resultierende
Sicherheitsrisiken für den Nutzer ab.
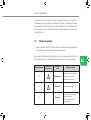
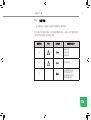
1.3
Gefahrenstufen
• Beachten Sie zu Ihrer Sicherheit auch die Gefahrenhinweise, die im Text der
folgenden Kapitel stehen.
Die Gefahrenhinweise der folgenden Kapitel erkennen Sie an dem Warnsymbol
und/oder an einem Signalwort, das eine Gefahrenstufe anzeigt:
Gefahrenstufe
Warnsymbol
Signalwort
Mögliche Gefahren
3
Warnung!
-- Gefahr eines Stromschlags
-- Brandgefahr
-- Explosionsgefahr
2
Vorsicht!
-- Verletzungsgefahr
1
Hinweis!
-- Beschädigungsgefahr durch
unsachgemäßen Gebrauch
-- Sachbeschädigung durch
unsachgemäße Anwendung
DE
10
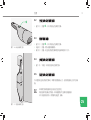
Vorbereitung
2
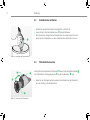
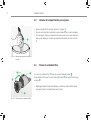
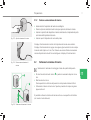
Vorbereitung
Sie können den Akkusauger bequem in der Ladestation aufbewahren, die an der
Wand montiert ist oder auf dem Tisch steht. So ist der Akkusauger mit seinen
leistungsstarken wiederaufladbaren Akkus jederzeit einsatzbereit.
2.1
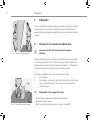
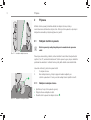
Akkusauger aufladen
Der Akkusauger muss vor der ersten Inbetriebnahme aufgeladen
werden
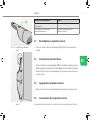
Bild 2.1 Positionierung der Ladestation
Wenn die Akkus leer sind, beginnt die Funktionsanzeige zu blinken und das
Sicherheitssystem („Cut off / Automatikstopp“) schaltet den Akkusauger aus,
um eine Beschädigung der Akkus zu verhindern. Die Funktionsanzeige blinkt
dann noch ein paar Sekunden weiter.
4
Es gibt zwei Möglichkeiten zum Aufladen Ihres Akkusaugers:
1.
An der Ladestation
2.
Ohne Ladestation, durch direktes Kontaktieren des Ladekabels mit dem
Akkusauger. Hierzu muss die Ladestation zuvor geöffnet werden.
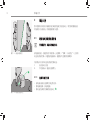
2.1.1
An der Ladestation aufladen
• Vergewissern Sie sich, dass der Akkusauger ausgeschaltet ist.
• Schließen Sie das Netzladegerät an das Stromnetz an.
• Setzen Sie den Akkusauger auf die Ladestation .
Bild 2.2 Aufsetzen auf die Ladestation
Vorbereitung
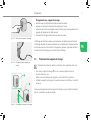
2.1.2
Aufladen ohne Ladestation
• Vergewissern Sie sich, dass der Akkusauger ausgeschaltet ist.
• Drücken Sie den Zapfen an der Ladestation, um die Ladestation zu öffnen.
• Stecken Sie den kleinen Stecker des Netzladegerätes in die entsprechende
Buchse am Griff des Akkusaugers.
• Stecken Sie anschließend das Netzladegerät in die Steckdose.
Bild 2.3 Öffnen der Ladestation
Die Funktionsanzeige zeigt an, dass der Akkusauger aufgeladen wird.
Die Funktionsanzeige geht aus, sobald die Akkus vollständig aufgeladen sind
(nach ca. 4 Stunden). Um eine optimale Aufladung zu ereichen, muss der
Akkusauger bis zum Erlöschen der Funktionsanzeige aufgeladen werden.
Bild 2.4 Aufladen ohne Ladestation
2.2
4
> 50 cm
4
Bild 2.5 Ladestation aufhängen
Ladestation platzieren
Wählen Sie das Befestigungsmaterial entsprechend der Beschaffenheit
Ihrer Wand.
• Zum Befestigen der Ladestation an der Wand benötigen Sie eine
Schraube.
• Befestigen Sie die Schraube in der Wand.
Achten Sie darauf, dass der der Abstand zum Boden mindestens 50 cm
beträgt
• Setzen Sie die Ladestation mit der dafür vorgesehenen Öffnung auf den
Haken bzw. die Schrauben auf.
Sie können die Ladestation auch auf eine waagerechte Fläche stellen (z. B. Tisch
oder Arbeitsplatte).
11
DE
12
Bedienung
3
Bedienung
In diesem Kapitel lernen Sie die Funktionen des Akkusaugers kennen.
Warnung! Gefahr eines Stromschlags
• Saugen Sie mit diesem Gerät niemals Wasser, andere Flüssigkeiten
oder leicht entzündbare Substanzen auf. Saugen Sie Asche erst auf,
wenn sie völlig ausgekühlt ist.
• Tauchen Sie den Akkusauger oder das Ladegerät niemals in Wasser
oder andere Flüssigkeiten.
3.1
Funktionsanzeige
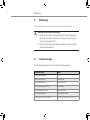
Die Funktionsanzeige zeigt Ihnen den Status Ihres Akkusaugers an.
Funktionsanzeige
Status
Funktionsanzeige aus
Aus
Funktionsanzeige an
Normalbetrieb
Funktionsanzeige an
Boost-Funktion ein
Funktionsanzeige blinken kurz
Bitte aufladen
Funktionsanzeige pulsieren
Ladevorgang läuft
Funktionsanzeige aus
Ladevorgang beendet
Funktionsanzeige blinken schnell
Fehlfunktion (siehe Kapitel 5 Seite 17)
Bedienung
8
3.2
Akkusauger einschalten
• Drücken Sie den Ein-/Ausschalter , um den Akkusauger e
inzuschalten.
3.3
Bild 3.6 Einschalten des Akkusaugers
Boost-Funktion aktivieren
• Drücken Sie den Ein-/Ausschalter , um den Akkusauger einzuschalten.
• Halten Sie den Ein-/Ausschalter gedrückt, die Boost-Funktion wird aktiviert.
• Lassen Sie den Ein-/Ausschalter los, der Akkusauger saugt wieder im
normalen Modus.
3.4
Akkusauger ausschalten
• Drücken Sie den Ein-/Ausschalter, um den Akkusauger auszuschalten.
3.5
Akkusauger aufbewahren
Setzen Sie den Akkusauger in die Ladestation, sobald Sie ihn nicht verwenden.
Die Akkus werden dadurch nicht schwächer.
Bild 3.7 Aufbewahrung des Akkusaugers
Wenn die Akkus des Akkusaugers nicht ganz leer sind, ist eine kurze
Ladezeit normal. Wenn die Funktionsanzeige nach dem Anschließen des Gerätes nur kurz angeht, bedeutet das, dass die Akkus bereits aufgeladen sind.
13
DE
14
Bedienung
Das effiziente Ladesystem des Akkusaugers schaltet sich automatisch aus,
wenn die Akkus vollständig geladen sind.
Der Akkusauger kann gefahrlos ständig mit der Ladestation verbunden bleiben.
Das Netzladegerät wird leicht warm; dabei handelt es sich um einen ganz
normalen Vorgang.
Wenn Sie beabsichtigen, den Akkusauger längere Zeit nicht zu
benutzen (z. B. Urlaub), ziehen Sie das Netzladegerät aus der Steckdose, um Strom zu sparen und einer Brandgefahr infolge von Kurzschlüssen durch Spannungsspitzen o. Ä. (z. B. bei Gewitter) vorzubeugen.
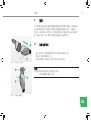
Wartung
4
Wartung
Damit Ihr Akkusauger optimal funktioniert und Ihnen stets Freude bereitet,
reinigen Sie den Akkusauger regelmäßig. Der Akkusauger ist schnell und einfach
zu entleeren und hygienisch zu reinigen. Die Staubkammer lässt sich einfach mit
einem Klick abnehmen, sodass Sie den Akkusauger leeren können, ohne sich
die Hände schmutzig zu machen. Im folgenden Kapitel erfahren Sie, wie Sie den
Akkusauger reinigen.
1
2
Bild 4.8 Abnehmen der Staubkammer
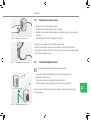
4.1
Filtereinheit entnehmen
• Drücken Sie die Entriegelungstaste der Staubkammer und nehmen Sie
die Staubkammer vom Gerät ab.
• Halten Sie die Düsenöffnung der Staubkammer nach unten.
• Drücken Sie erneut die Entriegelungstaste und entnehmen Sie die
Filtereinheit aus der Staubkammer.
5
1
2
Bild 4.9 Entnehmen der Filtereinheit
Hinweis!
Bei der Entnahme des Filters kann Staub aus der Staubkammer fallen.
• Halten Sie daher die Staubkammer mit der Düse nach unten.
15
DE
16
Wartung
4.2
Staubkammer entleeren
• EntnehmenSiedieFiltereinheit(sieheKapitel4.1aufSeite15).
• Leeren Sie den Inhalt der Staubkammer in einen Mülleimer.
• Falls erforderlich, reinigen Sie die Staubkammer mit einem feuchten Tuch und
lassen Sie die Staubkammer vor dem Zusammenbau vollkommen trocknen.
1
Bild4.10 EntleerenderStaubkammer
4.3
2
1
5a
Filtereinheit einsetzen
AchtenSiebeimEinsetzenderFiltereinheitdarauf,dassdiegrößereMulde
derFiltereinheitzurEntriegelungstasteanderStaubkammerzeigt.
• Halten Sie die Entriegelungstaste gedrückt und schieben Sie die Filtereinheit
bis zum Anschlag in die Staubkammer.
5
Bild4.11 Einsetzen der Filtereinheit
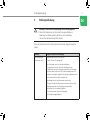
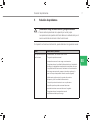
Störungsbehebung
5
17
Störungsbehebung
Warnung! Gefahr eines Stromschlags und Verletzungsgefahr
• Führen Sie Reparaturen an Ihrem Gerät nie eigenständig aus.
Reparaturen an Elektrogeräten dürfen nur vom zuständigen
Vorwerk Kundendienst ausgeführt werden.
Wenn Ihr Gerät einmal nicht richtig funktioniert kann das folgende Ursachen
haben:
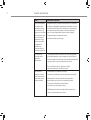
Störung
Mögliche Ursache und Behebung
Der Akkusauger
funktioniert nicht.
Möglicherweise sind die Akkus leer.
•Laden Sie den Akkusauger auf.
Der Akkusauger wird nicht korrekt aufgeladen:
•Vergewissern Sie sich, dass das Netzladegerät mit
Ladestation und der Akkusauger verbunden sind und dass
die Steckdose funktioniert (Die Funktionsanzeige am Griff
pulsiert und zeigt an, dass der Akkusauger aufgeladen wird).
Die Kontaktpunkte am Gerät und/oder am
Netzladegerät sind möglicherweise verschmutzt.
•Reinigen Sie die Kontaktpunkte mit einem trockenen Tuch.
Möglicherweise war der Akkusauger eingeschaltet,
während es sich im Ladegerät befand.
•Achten Sie darauf, dass der Akkusauger
zum Laden ausgeschaltet ist.
DE
18
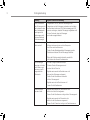
Störungsbehebung
Störung
Mögliche Ursache und Behebung
Nach Kontaktieren
des Akkusaugers mit
der Ladestation bzw.
dem Netzladegerät
solo beginnt der
Ladevorgang nicht
(keine pulsierende
Funktionsanzeige).
•Vergewissern Sie sich, dass das Netzladegerät mit
Ladestation und der Akkusauger verbunden sind und dass
die Steckdose funktioniert (Die Funktionsanzeige am Griff
pulsiert und zeigt an, dass der Akkusauger aufgeladen wird).
•Achten Sie darauf, dass der Akkusauger
zum Laden ausgeschaltet ist.
Die Funktionsanzeige •Der Akkusauger befindet sich im Sicherheitsblinkt schnell.
Modus; dies kann auf eine zu hohe Temperatur
der Akkus zurückzuführen sein.
•Ziehen Sie das Netzladegerät des Akkusaugers aus der
Steckdose und lassen Sie den Akkusauger abkühlen.
Wenn das Problem weiterhin besteht, wenden Sie
sich bitte an den Vorwerk Kundenservice.
Der Akkusauger
saugt gar nicht oder
nicht mehr so gut
wie zuvor, macht
ungewöhnliche
Geräusche.
Die Düse ist möglicherweise verstopft.
•Schalten Sie den Akkusauger aus und
machen Sie die Düse frei.
Möglicherweise wurde die Staubkammer nicht
richtig auf den Akkusauger aufgesetzt.
•Setzen Sie die Staubkammer ordentlich
auf den Akkusauger auf.
Möglicherweise ist die Staubkammer voll.
•Leeren Sie die Staubkammer.
Staub entweicht
aus dem Gerät.
Möglicherweise wurde die Staubkammer nicht
ordentlich auf den Gerät aufgesetzt.
•Setzen Sie die Staubkammer richtig auf den Akkusauger auf.
Möglicherweise wurde die Filtereinheit nicht
ordentlich in die Staubkammer eingesetzt.
•Setzen Sie die Filtereinheit richtig in die Staubkammer ein.
Störungsbehebung
19
Störung
Mögliche Ursache und Behebung
Staubkammer kann
nicht am Gerät
eingerastet werden.
•Die Filtereinheit ist verdreht eingesetzt.
•Drehen Sie die Filtereinheit, so dass die große
Mulde an der Filtereinheit auf der Seite der
Entriegelungstaste ist. (siehe auch Kapitel 4.3).
Falls sich die Störungen nicht beheben lassen, wenden Sie sich an den
Vorwerk Kundenservice (siehe Kapitel „8 Serviceleistungen“ auf Seite 24).
DE
20
Entsorgung und Umweltschutz
6
Entsorgung und Umweltschutz
6.1
Entsorgung des Gerätes
Als Besitzer eines Elektro- oder Elektronikaltgerätes ist es Ihnen (gemäß der EURichtlinie 2002/96/EG vom 27. Januar 2003 über Elektro- oder E
lektronikaltgeräte
sowie des Elektro- oder Elektronikgesetzes vom 16.3.2005) gesetzlich nicht
gestattet, dieses Gerät oder dessen elektrisches/elektronisches Zubehör über
den unsortierten Hausmüll zu entsorgen.
• Nutzen Sie stattdessen die dafür vorgesehenen kostenlosen
Rückgabemöglichkeiten.
• Informieren Sie sich hierzu bei Ihrer Stadt- oder Gemeindeverwaltung.
6.2
Entsorgung der Akkus
Die integrierten Lithium-Ion Akkus enthalten
Substanzen, die die Umwelt gefährden können.
•Entnehmen Sie die Akkus, bevor Sie das Gerät
entsorgen. Trennen Sie dazu das Gerät vom Netz.
Werfen Sie die Akkus nicht in den Hausmüll, sondern
geben Sie diese an einer offiziellen Sammelstelle für
Batterien ab. Entsorgung und Umweltschutz
Sie können das Gerät auch an den Vorwerk
Kundenservice geben. Dort werden die Akkus
herausgenommen und umweltgerecht entsorgt.
6.3
Vorsicht! Verletzungsgefahr durch auslaufende Akkus!
Ausgelaufene Akkus dürfen nicht mit den Augen und Schleimhäuten in
Berührung gebracht werden.
• Waschen Sie sich die Hände und spülen Sie die Augen mit klarem
Wasser aus. Wenn Sie weiterhin Beschwerden haben, suchen Sie
einen Arzt auf.
Entsorgung der Verpackung
Die Verpackung ist ein wichtiger Teil unseres Produkts: Sie schützt unsere Geräte
beim Transport vor Schäden und reduziert das Risiko eines Geräteausfalls. Daher
können wir nicht auf die Verpackung verzichten. Für den Fall, dass Sie Ihr Gerät
während der Garantiezeit oder auch danach zum Service oder Kundendienst einreichen oder einschicken müssen, ist die Originalverpackung der sicherste Schutz
vor Transportschäden.
Wenn Sie die Verpackung dennoch entsorgen möchten, so können Sie dies jederzeit und ohne Einschränkungen über Ihre regionalen Einrichtungen (AltpapierTonne, Gelbe Tonne, Wertstoffhof, Altpapiersammlung etc) tun.
Dafür beauftragt Vorwerk gesetzlich authorisierte Lizenzgeber. Bei Rückfragen
wenden Sie sich bitte an Ihr entsprechendes Service-Center
(siehe Kapitel „8 Serviceleistungen“ auf Seite 24).
21
DE
22
Entsorgung und Umweltschutz
6.4
Informationen zum Umweltschutz
Natur bewahren und die Umwelt schützen: Bei Vorwerk ist Umweltschutz ein
wichtiges Unternehmensziel.
Weniger Verpackung
Wir verwenden ausschließlich umweltfreundliches Material, das bei richtiger
Entsorgung wieder verwertet wird. Wir beteiligen uns schon bei der Entwicklung
an der Einsparung von Verpackungsabfall und setzen uns für seine Entsorgung
und Recycling ein.
Energie sparen
Vorwerk Produkte schonen die Umwelt: Sie verbrauchen nur wenig Energie bei
hoher Saugleistung.
Umweltgerechte Produktion
Bei der Herstellung unserer Produkte legen wir Wert auf den Schutz der
Umwelt. Wir verwenden recyclingfähige Kunststoffe und Farben. Auf umweltbelastende Flammhemmer haben wir ganz bewusst verzichtet.
Für unsere Filtertüten verwenden wir lösungsmittelfreie Kleber, ungebleichtes
Papier oder unbedenklichen Kunststoff. Unsere Gebrauchsanleitungen werden
aus nachhaltig bewirtschafteten Waldbeständen hergestellt und ohne Chlor
gebleicht.
Entsorgung und Umweltschutz
Wieder verwertbares Material
Das Material unserer Produkte kann nahezu vollständig wieder verwertet werden. Wir verzichten weitgehend auf den Einsatz von PVC.
Bei der Konstruktion unserer Produkte achten wir auf „sortenreines“ Material:
Die verwendeten Stoffe können später ohne großen Energieaufwand wieder mit modernen Anlagen stofflich getrennt werden. Damit sie noch leichter
recycelt werden können, haben wir unsere Kunststoffbauteile größtenteils
gekennzeichnet.
23
DE
24
Garantie
7
Garantie
Etwaige Garantieleistungen entnehmen Sie bitte Ihrem Bestellschein bzw. Kaufvertrag.
8
Serviceleistungen
Service in Deutschland
Die Mitarbeiter unseres Telefonservices stehen Ihnen gern zur Verfügung:
Telefon: 0202 - 564 - 3727, Telefax: 0202 - 564 - 83 - 5000
von Montag bis Freitag 8 - 18 Uhr, Samstag 8 - 14 Uhr.
Service in Österreich
Die Mitarbeiter unseres Telefonservices stehen Ihnen gern zur Verfügung:
Telefon: 0505 800, Telefax: 0505 800 - 145
von Montag bis Freitag 8 - 18 Uhr.
Internetpräsenz
Deutschland
Österreich
www.vorwerk.de
www.vorwerk.at
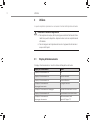
Technische Daten
9
25
Technische Daten
Akkusauger
Sicherheitszeichen
Gehäuse
Hochwertiger recyclebarer thermogeformter Kunststoff
Motor
Wartungsfreier DC-Motor mit ca. 20.000 U/min
Eingangsspannung
Netzladegerät
220-240 Volt Wechselspannung 50/60 Hertz
Ausgangsspannung
Netzladegerät
12 V DC +/- 10 %
Typ Netzladegerät
KSAA1200050W1EU
Nennleistung
des Motors
ca. 50 Watt
max. Luftleistung
9 Watt
max. Volumenstrom
12 l/s
Gewicht
750 g, ohne Ladestation und Netzladegerät
Geräuschemission
74 dBA (gemessen unter Freifeldbedingungen auf Arbeitstisch)
Akkupack
Lithium-Ionen
DE
Instruction manual
Vorwerk Tabletop
vacuum cleaner
VC100
Preliminary remark
Congratulations with your Vorwerk Kobold Tabletop vacuum
cleaner!
The smallest member of the Vorwerk family will see you
through many years and provide you with lots of fun when
cleaning your home.
Before getting started
• Read the instruction manual carefully before using the
Tabletop vacuum cleaner for the first time.
• Keep the instruction manual for future use. It is an important part of the product and must be kept with it if you
pass it on to someone else.
Characters and symbols
The symbols which appear in this instruction manual have
the following meanings:
Warning symbol
Reference to Vorwerk's
customer service department/
support
Symbol for a tip
Reference to Vorwerk's
Internet website
Inhalt
Preliminary remark . . . . . . . . . . . . . . . . . . . . . . . . . . . 2
5
Troubleshooting . . . . . . . . . . . . . . . . . . . . . . . 17
Product overview . . . . . . . . . . . . . . . . . . . . . . . . . . . . 4
6
6.1
6.2
6.3
6.4
Disposal and environmental protection . . . 20
Disposing of the device . . . . . . . . . . . . . . . . . . . 20
Disposing of batteries . . . . . . . . . . . . . . . . . . . . 20
Disposing of the packaging . . . . . . . . . . . . . . . . 21
Information on environmental protection . . . . . . 22
7
Warranty . . . . . . . . . . . . . . . . . . . . . . . . . . . . . 24
8
Services . . . . . . . . . . . . . . . . . . . . . . . . . . . . . . 24
9
Technical details . . . . . . . . . . . . . . . . . . . . . . . 25
1
1.1
1.2
1.3
For your safety
.....................5
Intended use . . . . . . . . . . . . . . . . . . . . . . . . . . . . 5
Hazards warnings. . . . . . . . . . . . . . . . . . . . . . . . . 6
Danger levels . . . . . . . . . . . . . . . . . . . . . . . . . . . . 9
2
2.1
2.1.1
2.1.2
2.2
Preparation . . . . . . . . . . . . . . . . . . . . 10
Charging the Tabletop vacuum cleaner . . . . . . .10
Charging at the charging unit . . . . . . . . . . . . .10
Charging without charging unit . . . . . . . . . . . . . 11
Placing the charging unit . . . . . . . . . . . . . . . . . . 11
3
3.1
3.2
3.3
3.4
3.5
Operation . . . . . . . . . . . . . . . . . . . . . . . . . . . . . 12
Function indicator . . . . . . . . . . . . . . . . . . . . . . . . 12
Switch on Tabletop vacuum cleaner . . . . . . . . . 13
Activating the boost function . . . . . . . . . . . . . . . 13
Switching off the vacuum cleaner . . . . . . . . . . . 13
Storing the Tabletop vacuum cleaner
. . . . 13
4
4.1
4.2
4.3
Maintenance . . . . . . . . . . . . . . . . . . . . . . . . . . 15
Removing the filter unit . . . . . . . . . . . . . . . . .15
Emptying the dust chamber . . . . . . . . . . . . . . . . 16
Inserting the filter unit . . . . . . . . . . . . . . . . . . . . 16
EN
Product overview
The Kobold Tabletop vacuum cleaner easily vacuums various kinds of upholstery
in the same powerful way, even on flat surfaces and in narrow areas.
The Tabletop vacuum cleaner can be emptied quickly and easily. The image with
the legend displays the Tabletop vacuum cleaner and its operation elements.
Legend
Item
Table vacuum cleaner
VC100
8
Dust chamber
Release key for
dust chamber
7
Mains charger
6
1
Charging unit
Filter unit
5
Air outlet
Function indicator
Activation/deactivation
with boost function
4
2
3
1
For your safety
Greatest possible safety is a characteristic of Vorwerk products. The Tabletop
vacuum cleaner's product safety can, however, only be ensured if you observe
this section.
1.1
Intended use
Note!
This device is not intended for use by persons (including
children) with limited physical, sensory or intellectual abilities
or a lack of experience and/or knowledge, unless they are
supervised by a person responsible for their safety or have
received instructions from this person as to how to use the
Tabletop vacuum cleaner.
Children should be supervised to ensure that they do not
play with the device.
EN
6
For your safety
1.2
Hazards warnings
Note!
• Read the instruction manual carefully before using the
table vacuum cleaner for the first time.
• Observe the following notes in particular.
• Keep the instruction manual for future use. It is an important part of the
Tabletop vacuum cleaner and must be kept with the product if you pass it on
to someone else.
Damage to the device!
• Always switch the Tabletop vacuum cleaner off before all retrofitting, cleaning
and maintenance work and disconnect the mains charger from the socket.
• Never disconnect the mains charger from the mains by pulling the connecting
cable, but rather by unplugging the mains charger from the socket.
• Never vacuum water, other liquids or easily inflammable substances with this
device. Only vacuum ash once it has cooled down entirely.
• Never submerge the Tabletop vacuum cleaner or the charging unit in water or
other liquids.
• Do not use the Tabletop vacuum cleaner in humid environments.
• You should never use the Tabletop vacuum cleaner on wet surfaces or
outdoors.
• Never clean your device or your electrical accessories with water or damp
cleaners.
For your safety
Risk of electric shock!
• Never perform repairs on your device yourself. Repairs to electric devices may
only be carried out by the responsible Vorwerk customer service department.
• Do not insert any pointed objects in the electric contacts.
• Do not change the contacts.
• Do not continue to operate the Tabletop vacuum cleaner if it is damaged.
• Contact your nearest Vorwerk customer service department in the event of
damage.
Fire hazard!
• Do not vacuum glowing ash or burning cigarettes.
Explosion hazard!
• Do not vacuum explosive or easily inflammable substances.
• Never throw the Tabletop vacuum cleaner in open fire.
Note! Risk of damage from improper use!
• Use original Vorwerk products only.
• Before using the Tabletop vacuum cleaner, check whether the voltage indication on the device complies with the local mains voltage.
• Only operate the charging unit with alternating current voltage and at a connection that is correctly installed by a specialist.
• Use the Tabletop vacuum cleaner with the alternating current voltage stated
on the type plate.
• Do not use the Tabletop vacuum cleaner or the mains charger if they have
been visibly damaged.
• Disconnect the mains charger from the socket before you clean the mains
charger.
7
EN
8
For your safety
• Only charge the Tabletop vacuum cleaner with the mains charger supplied
(Type: KSAA1200050W1EU).
• The mains charger feels warm during charging. This is normal.
• Do not store the Tabletop vacuum cleaner outdoors and protect it from humidity.
• Do not install the Tabletop vacuum cleaner near a heat source (oven, heating
unit or hot radiator).
• Switch the Tabletop vacuum cleaner off after every use.
• The charging socket operates at low voltage (approx. 12 V) and is therefore
not dangerous.
• Do not block the air outlets when vacuuming.
• Switch off the Tabletop vacuum cleaner before charging.
• Use the Tabletop vacuum cleaner with inserted filter unit only.
• When drilling fastening holes in the wall for the charging unit (in particular
near a socket), particular care must be taken to avoid the risk of an electric
shock.
• Charge and use the Tabletop vacuum cleaner between 5° C and 35° C. Also
store it within this temperature range.
• Do not short circuit the batteries in any event! Do not expose the batteries to
fire, heat or direct sunlight.
Do not use the Tabletop vacuum cleaner :
• If it has fallen to the ground and has visible damage or operating faults.
• If the charging unit or the cable of the charging unit has been damaged.
The Tabletop vacuum cleaner is intended for household and domestic use only.
In the event of improper use or use that does not comply with the instruction
manual, Vorwerk shall not assume any liability.
For your safety
9
The Tabletop vacuum cleaner fulfils the safety instructions of the country in
which it was sold by an authorised Vorwerk organisation. When using the device
in another country, compliance with local safety standards cannot be guaranteed. Vorwerk therefore rejects any resulting safety risks for the user.
EN
1.3
Danger levels
• For your safety, also observe the hazard warnings, which are specified in the
following sections.
You can identify the hazard warnings in the following sections by the warning
symbol and/or a signal word, which indicates the danger level:
Danger level
Warning
symbol
Signal word
Possible risks
3
Warning!
- Risk of electric shock
- Fire hazard
- Explosion hazard
2
Caution!
- Risk of injury
1
Note!
- Risk of damage from
improper use
- Material damage
from improper use
10
Preparation
2
Preparation
You can easily store the Tabletop vacuum cleaner in the charging unit, which
can be either mounted on the wall or stand on the table. This means that the
Tabletop vacuum cleaner is ready for use at any time with its powerful rechargeable batteries.
2.1
Charging the Tabletop vacuum cleaner
The Tabletop vacuum cleaner must be charged before using it for
the first time
Fig. 2.1 Positioning of the charging unit
If the batteries are empty, the function indicator starts to flash and the safety
system (cut-off / automatic stop) switches the Tabletop vacuum cleaner off to
prevent damage to the batteries. The function indicator then flashes for a few
more seconds.
4
There are two options to charge your Tabletop vacuum cleaner:
1.
At the charging unit
2.
Without the charging unit, by directly connecting the charging cable
to the Tabletop vacuum cleaner. To this end, the charging unit must be
opened first.
2.1.1
Fig. 2.2 Placing the charging unit
Charging at the charging unit
• Ensure that the Tabletop vacuum cleaner is switched off.
• Connect the mains charger to the mains supply.
• Place the Tabletop vacuum cleaner on the charging unit .
Preparation
2.1.2
Charging without charging unit
• Ensure that the Tabletop vacuum cleaner is switched off.
• Press the pin on the charging unit to open it.
• Insert the small plug of the mains charger in the corresponding socket on the
handle of the Tabletop vacuum cleaner.
• Then insert the mains charger into the socket.
Fig. 2.3 Opening the charging unit
The function indicator shows that the Tabletop vacuum cleaner is being charged.
The function indicator goes off as soon as the batteries are fully charged (after
approx. 4 hours). To achieve optimum charging, the Tabletop vacuum cleaner
must be charged until the function indicator goes off.
Fig. 2.4 Charging without charging unit
2.2
Placing the charging unit
Select the fastening material in accordance with the properties of your
wall.
4
> 50 cm
4
Fig. 2.5 Hanging up the charging unit
11
• You need a screw to mount the charging unit to the wall.
• Fasten the screw to the wall.
Ensure that the distance to the floor is at least 50 cm.
• Place the charging unit with the intended opening on the hook or screw.
You can also place the charging unit on an even surface (e.g., table or worktop).
EN
12
Operation
3
Operation
This section provides information on the functions of the Tabletop vacuum
cleaner.
Warning! Risk of electric shock
• Never vacuum water, other liquids or easily inflammable substances
with this device. Only vacuum ash once it has cooled down entirely.
• Never submerge the Tabletop vacuum cleaner or the charging unit in
water or other liquids.
3.1
Function indicator
The function indicator displays the status of your Tabletop vacuum cleaner.
Function indicator
Status
Function indicator off
Off
Function indicator on
Normal operation
Function indicator on
Boost function on
Function indicator flashes briefly
Please recharge
Function indicator pulsates
Charging in progress
Function indicator off
Charging progress ended
Function indicator flashes quickly
Malfunction (see Section 5, on page 17)
Operation
8
3.2
13
Switch ontable vacuum cleaner
• Press the activation/deactivation button to switch on the Tabletop vacuum
cleaner.
EN
3.3
Fig. 3.6 Switching on the Tabletop
vacuum cleaner
Activating the boost function
• Press the activation/deactivation button to switch on the Tabletop vacuum
cleaner.
• Hold the activation/deactivation button down; the boost function is activated.
• Release the activation/deactivation button; the Tabletop vacuum cleaner
operates in normal mode.
3.4
Switching off the vacuum cleaner
• Press the activation/deactivation buttonto switch off the Tabletop vacuum
cleaner.
3.5
Storing the Tabletop vacuum cleaner
Place the Tabletop vacuum cleaner in the charging unit as soon as you have
finished using it. This prevents the batteries from discharging.
Fig. 3.7 Storing the Tabletop vacuum
cleaner
If the Tabletop vacuum cleaner batteries are not entirely empty, a short
charging period is normal. If the function indicator comes on only briefly after connecting the device, this means that the batteries are already charged.
14
Operation
The efficient charging system of the Tabletop vacuum cleaner switches off automatically if the batteries are fully charged.
The Tabletop vacuum cleaner can remain in the charging unit without risk. The
mains charger becomes slightly warm; this is an entirely normal process.
If you do not intend to use the Tabletop vacuum cleaner for a longer
period of time (e.g., vacation), disconnect the mains charger from the
mains socket to save power and prevent a fire hazard as a result of
short circuits from voltage peaks etc. (e.g., during thunderstorms).
Maintenance
4
Maintenance
For your Tabletop vacuum cleaner to operate optimally and continually provide
you with pleasure, clean the Tabletop vacuum cleaner regularly. The Tabletop
vacuum cleaner can be emptied quickly and easily and cleaned hygienically. The
dust chamber can be removed with a simple click, which allows you to empty
the Tabletop vacuum cleaner without getting your hands dirty. The following section provides you with information on how to clean the Tabletop vacuum cleaner.
1
2
Fig. 4.8 Removing the dust chamber
4.1
Removing the filter unit
• Press the release key for the dust chamber and remove the dust
chamber from the device.
• Hold the nozzle outlet of the dust chamber down.
• Press the release key again and remove the filter unit from the dust
chamber.
5
1
2
Fig. 4.9 Removing the filter unit
15
Note!
When removing the filter, dust may fall out of the dust chamber.
• For this reason, hold the dust chamber's nozzle down.
EN
16
Maintenance
4.2
Emptying the dust chamber
• Remove the filter unit (see Section 4.1 on page 15).
• Empty the contents of the dust chamber into a bin.
• Where required, clean the dust chamber with a damp cloth and allow the dust
chamber to dry completely before assembly.
1
Fig. 4.10 Emptying the dust chamber
4.3
2
1
5a
Inserting the filter unit
When inserting the filter unit ensure that the larger tray of the filter unit
points towards the release key on the dust chamber .
• Keep the release key pressed down and push the filter up to the stop in the
dust chamber.
5
Fig. 4.11 Inserting the filter unit
Troubleshooting
5
17
Troubleshooting
Warning! Risk of electric shock and risk of injury
• Never perform repairs on your device yourself.
Repairs to electric devices may only be carried out by the responsible
Vorwerk customer service department.
If your device is not working properly, it may be due to one of the following
causes:
Fault
Possible causes and rectification
The Tabletop
vacuum cleaner
is not working.
The batteries may be empty.
• Recharge the Tabletop vacuum cleaner.
The Tabletop vacuum cleaner is not charged correctly:
• Ensure that the mains charger with charging unit
and the Tabletop vacuum cleaner are connected
and that the mains socket works (the function
indicator on the handle pulsates and indicates that
the Tabletop vacuum cleaner is being charged).
The contact points on the device and/
or mains charger may be soiled.
• Clean the contact points with a dry cloth.
The Tabletop vacuum cleaner may have been
switched on while it was in the charging unit.
• Ensure that the Tabletop vacuum cleaner
is switched off for recharging.
EN
18
Troubleshooting
Fault
Possible causes and rectification
After connecting
the table vacuum
to the charging unit
or mains charger
solo, the charging
process does not
begin (no pulsating
function indicator).
• Ensure that the mains charger with charging unit
and the Tabletop vacuum cleaner are connected
and that the mains socket works (the function
indicator on the handle pulsates and indicates that
the Tabletop vacuum cleaner is being charged).
• Ensure that the Tabletop vacuum cleaner
is switched off for recharging.
The function
indicator flashes
quickly.
• The Tabletop vacuum cleaner is in safety mode;
this may be due to the battery being too hot.
• Disconnect the mains charger of the Tabletop vacuum cleaner
from the mains socket and let the Tabletop vacuum cleaner
cool down.
If the problem persists, please contact
Vorwerk's customer service department.
The Tabletop vacuum
cleaner does not
vacuum at all or not
as good as it used
to, and/it makes
abnormal sounds.
The nozzle may be blocked.
• Switch the Tabletop vacuum cleaner
off and unblock the nozzle.
The dust chamber may not be correctly
inserted in the Tabletop vacuum cleaner.
• Insert the dust chamber into the Tabletop
vacuum cleaner properly.
The dust chamber may be full.
• Empty the dust chamber.
Dust leaks from
the device.
The dust chamber may not be correctly inserted in the device.
• Insert the dust chamber into the Tabletop
vacuum cleaner properly.
The filter unit may not have been correctly
inserted in the dust chamber.
• Insert the filter unit in the dust chamber correctly.
Troubleshooting
19
Fault
Possible causes and rectification
The dust chamber
cannot be slotted
into the device.
• The filter unit is inserted the wrong way round.
• Turn the filter unit so that the large tray is on the
side of the release key. (see also Section 4.3).
EN
If the fault cannot be rectified, please contact Vorwerk's customer service
department (see Section „8 Services“ on page 24).
20
Disposal and environmental protection
6
Disposal and environmental protection
6.1
Disposing of the device
As an owner of an electric and electronic device, it is not permitted by law (under
EU Directive 2002/96/EC of 27 January 2003 on electric and electronic devices
and the Electrics and Electronics Act of 16.3.2005) to dispose of this device or its
electric/electronic accessories via unsorted domestic waste.
• Instead, use the free collection centres intended for this purpose.
• Contact your city or municipal administration for information.
6.2
Disposing of batteries
The integrated lithium ion batteries contain substances
that can damage the environment.
• Remove the batteries before disposing of the device.
In addition, disconnect the device from the network.
Do not throw the batteries into domestic waste, but
return them to an official battery collection point.
Disposal and environmental protection
21
You can also return the device to Vorwerk's customer
service department. The batteries are removed there
and disposed of in an environmentally friendly way.
Caution! Risk of injury from leaking batteries!
Leaking batteries must not come into contact with the eyes and mucosa.
• Wash your hands and rinse your eyes with clear water. If you have
additional health complaints, consult a doctor.
6.3
Disposing of the packaging
The packaging is an important part of our product: it protects our devices from
damage during transportation and reduces the risk of a device fault. For this
reason, we cannot avoid using packaging. If you need to return or send in your
device during the warranty period, or after, to the service or customer service
department, the original packaging is the best protection against damages in
transit.
If you nevertheless wish to dispose of the packaging, you can do this at any time
and without limitation via your regional facilities (waste paper skip, yellow skip,
recycling depot, waste paper collection, etc.).
To this end, Vorwerk commissions legally authorised licensees. If you have any
questions, please contact the relevant service centre
(see Section „8 Services“ on page 24).
EN
22
Disposal and environmental protection
6.4
Information on environmental protection
Preserving nature and protecting the environment: at Vorwerk, environmental
protection is an important company objective.
Less packaging
We use only environmentally friendly material, which is recycled if disposed of
correctly. We are actively involved in cutting back on waste packaging during the
development stages and are committed to its disposal and recycling.
Saving energy
Vorwerk products protect the environment: They only use a small amount of
energy with high suction performance.
Environmentally friendly production
We attach a great deal of importance to environmental protection when manufacturing our products. We use recyclable plastics and colours. We deliberately
avoid using polluting flame retardants.
For our filter bags we use solvent-free adhesives, unbleached paper or nonhazardous plastic. Our instruction manuals are made from sustainably managed
forests and are bleached without chlorine.
Disposal and environmental protection
Reusable material
The material for our products can nearly be completely recycled. We largely
avoid using PVC.
When manufacturing our products, we ensure "sorted" materials: the substances
used can later be separated according to substances at modern facilities without
using great amounts of energy. To make them even easier for recycling, we have
labelled most of our plastic components.
23
EN
24
Warranty
7
Warranty
Any warranty services can be found in the order note or purchase
contract.
8
Services
Service in Germany
The employees of our telephone service will be happy to assist you:
telephone: 0202 - 564 - 3727, fax: 0202 - 564 - 83 - 5000
from Monday to Friday 8 am - 6 pm, Saturday 8 am - 2 pm.
Website
Germany
www.vorwerk.de
Technical details
9
25
Technical details
Table vacuum cleaner
Safety signs
EN
Housing
High-quality recyclable thermo-shaped plastic
Motor
Maintenance-free DC motor with approx. 20,000 r/min
Input voltage
mains charger
220-240 volts alternating current voltage 50/60 Hertz
Output voltage
mains charger
12 V DC +/- 10%
Mains charger type
KSAA1200050W1EU
Nominal
performance
of the motor
approx 50 watts
maximum air power
9 watts
maximum
volume flow
12 l/s
Weight
750 g, without charging unit and mains charger
Noise emission
74 dBA (measured under free-field conditions on worktop)
Battery pack
Lithium ion
Mode d'emploi
Aspirateur de table
Vorwerk
VC100
Remarque préalable
Félicitations pour l'achat de votre Aspirateur de table
Vorwerk Kobold !
Le plus petit de la famille Vorwerk vous accompagnera de
longues années et vous donnera entière satisfaction lors du
nettoyage de votre intérieur.
Avant de démarrer
• Lisez attentivement le mode d'emploi avant d'utiliser
l’aspirateur de table Vorwerk pour la première fois.
• Conservez précieusement le mode d'emploi pour une
lecture ultérieure. Il fait partie intégrante du produit et
doit être joint au produit si vous le cédez à d'autres
personnes.
Signes et symboles
Vous trouverez dans le texte les symboles mentionnés avec
la signification suivante :
Symbole d'avertissement
Renvoi au service après-vente/
assistance Vorwerk
Symbole pour une astuce
Renvoi au site
Internet
Contenu
Remarque préalable . . . . . . . . . . . . . . . . . . . . . . . . . . 2
5
Résolution des pannes . . . . . . . . . . . . . . . . . . 17
Aperçu du produit . . . . . . . . . . . . . . . . . . . . . . . . . . . 4
6
Mise au rebut et protection de
l'environnement . . . . . . . . . . . . . . . . . . . . . . . 20
Mise au rebut de l'appareil. . . . . . . . . . . . . . . . . 20
Mise au rebut des batteries . . . . . . . . . . . . . . . . 20
Mise au rebut de l'emballage. . . . . . . . . . . . . . . 21
Informations sur la protection de
l'environnement . . . . . . . . . . . . . . . . . . . . . . . . . 22
1
1.1
1.2
1.3
Pour votre sécurité
.................5
Utilisation conforme . . . . . . . . . . . . . . . . . . . . . . . 5
Indications de danger . . . . . . . . . . . . . . . . . . . . . . 6
Niveaux de danger . . . . . . . . . . . . . . . . . . . . . . . . 9
2
2.1
2.1.1
2.1.2
2.2
Préparation . . . . . . . . . . . . . . . . . . . . . . . . . . . 10
Chargement de l‘aspirateur de table Vorwerk . . 10
Chargement sur le support de charge . . . . . . . 10
Chargement sans support de charge . . . . . . . . 11
Placement du support de charge . . . . . . . . . . . . 11
3
3.1
3.2
3.3
3.4
3.5
Commande . . . . . . . . . . . . . . . . . . . . . . . . . . . . 12
Affichage des fonctions . . . . . . . . . . . . . . . . . . . 12
Allumer l‘aspirateur de table Vorwerk . . . . . . . . 13
Activation de la fonction Boost . . . . . . . . . . . . . 13
Eteindre l‘aspirateur de table Vorwerk . . . . . . . 13
Conservation de l‘aspirateur de table Vorwerk 13
4
4.1
4.2
4.3
Entretien. . . . . . . . . . . . . . . . . . . . . . . . . . . . . . 15
Démontage de l'unité filtrante . . . . . . . . . . . . . . 15
Vidage du compartiment à poussière . . . . . . . . 16
Installation de l'unité filtrante . . . . . . . . . . . . . . . 16
6.1
6.2
6.3
6.4
7
Garantie . . . . . . . . . . . . . . . . . . . . . . . . . . . . . . 24
8
Prestations de service . . . . . . . . . . . . . . . . . . 24
9
Caractéristiques techniques . . . . . . . . . . . . . 25
FR
Aperçu du produit
L'aspirateur de table Vorwerk aspire tout aussi facilement les revêtements les
plus divers, les surfaces lisses et dans les endroits étroits.
L'aspirateur peut être vidé rapidement et simplement. L'image avec la légende
montre l’aspirateur de table Vorwerk et ses différents éléments de fonctionnement.
Légende
Pos.
Aspirateur de table
VC100
Compartiment à poussière
Chargeur secteur
Touche de déverrouillage
du compartiment
à poussière
8
1
7
6
Support de charge
5
Unité filtrante
Sortie d'air
Affichage des fonctions
Interrupteur marche/arrêt
avec fonction Boost
4
2
3
1
Pour votre sécurité
Une sûreté optimale fait partie des qualités des produits Vorwerk. La sûreté de
l'aspirateur ne peut cependant être garantie que si vous respectez ce chapitre.
1.1
Utilisation conforme
Indication !
Cet appareil n'est pas destiné à être utilisé par des personnes (y compris les enfants) aux capacités physiques,
sensorielles ou intellectuelles limitées ou inexpérimentées
et/ou manquant de connaissances, à moins qu'elles ne
soient surveillées par des personnes compétentes en matière de sécurité ou qu'elles n'aient reçu des instructions
d'elles sur le fonctionnement de l'aspirateur.
Les enfants devront être surveillés pour s'assurer qu'ils ne
jouent pas avec l'appareil.
FR
6
Pour votre sécurité
1.2
Indications de danger
Indication !
• Lisez attentivement le mode d'emploi avant d'utiliser l'aspirateur de
table pour la première fois.
• Respectez notamment les indications suivantes.
• Conservez précieusement le mode d'emploi pour une lecture ultérieure. Il fait
partie intégrante de l'aspirateur et doit être joint au produit si vous le cédez à
d'autres personnes.
Endommagement de l'appareil !
• Eteignez toujours l’aspirateur de table Vorwerk avant tout travail de transformation, de nettoyage et d'entretien et retirez le chargeur secteur de la prise.
• Ne retirez jamais le chargeur secteur en tirant sur le câble de raccordement,
mais en retirant le chargeur secteur de la prise de courant.
• N'aspirez jamais d'eau, d'autres liquides ou des substances légèrement
inflammables avec cet appareil. N'aspirez de cendre que si elle est complètement refroidie.
• Ne plongez jamais l’aspirateur de table Vorwerk ou son support de charge
dans l'eau ou dans d'autres liquides.
• N'utilisez pas l’aspirateur de table Vorwerk dans un environnement humide.
• N'utilisez en aucun cas l’aspirateur de table Vorwerk sur des surfaces
mouillées ou à l'extérieur.
• Ne nettoyez jamais votre appareil ou vos accessoires électriques avec de l'eau
ou des chiffons humides.
Risque d'électrocution !
• N'effectuez jamais de réparation sur votre appareil vous-même . Les répa-
Pour votre sécurité
•
•
•
•
7
rations sur les appareils électriques ne doivent être effectuées que par le
service après-vente Vorwerk.
N'introduisez aucun objet pointu dans les contacts électriques.
Ne changez pas les contacts.
Ne continuez pas à utiliser l'aspirateur si celui ci est endommagé.
Contactez le service après-vente Vorwerk le plus proche en cas de dommages.
Risque d'incendie !
• N'aspirez pas de cendres incandescentes ou de mégot de cigarette mal éteint.
Risque d'explosion !
• N'aspirez aucune matière explosive ou légèrement inflammable.
• Ne jetez jamais l’aspirateur de table Vorwerk dans le feu.
Indication ! Risque d'endommagement suite à un mauvais usage !
• Utilisez exclusivement les produits Vorwerk d'origine.
• Vérifiez avant de mettre en service l’aspirateur de table Vorwerk si l'indication
de tension sur l'appareil correspond à la tension locale du secteur.
• Ne faites fonctionner le support de charge qu'avec du courant alternatif et une
installation électrique en bonne et due forme mise en place par un professionnel qualifié.
• Utilisez l’aspirateur de table Vorwerk exclusivement avec la tension alternative
spécifiée sur la plaque signalétique.
• N'utilisez pas l’aspirateur de table Vorwerk et le chargeur secteur si vous
détectez des dommages apparents.
• Débranchez le chargeur secteur avant de nettoyer le chargeur secteur.
• Rechargez l’aspirateur de table Vorwerk uniquement avec le chargeur secteur
fourni
FR
8
Pour votre sécurité
(type : KSAA1200050W1EU).
• Durant le rechargement, le chargeur secteur est chaud. C'est normal.
• Ne stockez pas l’aspirateur de table Vorwerk en plein air et protégez-le contre
toute humidité.
• Ne posez pas l’aspirateur de table Vorwerk à proximité d'une source de chaleur (cuisinière, appareil de chauffage ou radiateurs chauds).
• Eteignez l’aspirateur de table Vorwerk après chaque usage.
• Les connecteurs du chargeur délivrent une faible tension (environ 12 V) qui
est inoffensive.
• Ne bloquez en aucun cas les sorties d'air lorsque vous aspirez.
• Eteignez l’aspirateur de table Vorwerk avant de le recharger.
• Utilisez l’aspirateur de table Vorwerk exclusivement avec l'unité filtrante
insérée.
• Lors du percement des trous de fixation pour le support de charge au mur
(notamment à proximité d'une prise de courant), procédez avec une extrême
prudence afin d'éviter tout risque d'électrocution.
• Chargez et utilisez l’aspirateur de table Vorwerk à des températures comprises entre 5 ° C et 35 ° C. Conservez-le également dans un environnement
dans cette plage de température.
• Ne court-circuiter en aucun cas les batteries ! N'exposez pas les batteries au
feu, à la chaleur ou au rayonnement direct du soleil.
N'utilisez pas l’aspirateur de table Vorwerk :
• S'il est tombé au sol et présente des dommages ou des dysfonctionnements
visibles.
• Si le support de charge ou le câble du support présente des détériorations.
L'aspirateur de table est réservé exclusivement à un usage domestique et intérieur. En cas de mauvaise utilisation ou d'usage non conforme au mode d'em-
Pour votre sécurité
9
ploi, Vorwerk se décharge de toute responsabilité.
L'aspirateur de table respecte les prescriptions de sécurité du pays dans lequel
il a été commercialisé par une organisation Vorwerk agréée. L'observation des
standards de sécurité locaux ne peut pas être garantie lorsque l'appareil est
utilisé dans un autre pays. C'est pourquoi, Vorwerk décline toute responsabilité
quant aux risques de sécurité que court l'utilisateur.
1.3
FR
Niveaux de danger
• Respectez aussi pour votre sécurité les indications de danger qui figurent
dans les chapitres suivants.
Vous reconnaissez les indications de danger des chapitres suivants au symbole
d'avertissement et/ou au mot de signalisation qui indique un niveau de danger :
Niveau de
danger
Symbole
d'avertissement
Mot de
signalisation
Dangers possibles
- Risque d'électrocution
- Risque d'incendie
- Risque d'explosion
3
Avertissement !
2
Attention !
- Risque de blessures
Indication !
- Risque d'endommagement
suite à un mauvais usage
- Dommage matériel suite à
une utilisation inappropriée
1
10
Préparation
2
Préparation
Vous pouvez facilement conserver l’aspirateur de table Vorwerk dans le support
de charge monté au mur ou situé sur la table. l’aspirateur de table Vorwerk
avec ses batteries rechargeables ultraperformantes est ainsi opérationnel à tout
moment.
2.1
Chargement de l’aspirateur de table Vorwerk
L'aspirateur de table doit être chargé avant la première
utilisation
Fig. 2.1 Positionnement du chargeur
Quand les batteries sont vides, l'affichage des fonctions commence à clignoter
et le système de sécurité ("Cut off / Arrêt automatique") éteint l’aspirateur de
table Vorwerk pour éviter tout endommagement des batteries. L'affichage des
fonctions continue ensuite à clignoter encore quelques secondes.
4
Il existe deux possibilités pour charger votre aspirateur de table :
1.
Sur le chargeur
2.
Sans chargeur, en connectant directement l’aspirateur de table Vorwerk
avec le câble de charge. Pour cela, le support de charge doit être
auparavant ouvert.
2.1.1
Fig. 2.2 Pose sur le support de charge
Chargement sur le support de charge
• Assurez-vous que l’aspirateur de table Vorwerk est éteint.
• Branchez le chargeur secteur.
• Posez l’aspirateur de table Vorwerk sur le support de charge .
Préparation
11
Chargement sans support de charge
• Assurez-vous que l’aspirateur de table Vorwerk est éteint.
• Appuyez sur le bouton du support de charge pour l'ouvrir.
• Insérez la petite fiche du chargeur secteur dans la prise correspondante sur la
poignée de l’aspirateur de table Vorwerk.
• Introduisez le chargeur secteur dans la prise de courant.
Fig. 2.3 Ouverture du support de charge
L'affichage des fonctions indique que l’aspirateur de table Vorwerk est chargé.
L'affichage disparaît dès que les batteries sont complètement chargées (au bout
de 4 heures environ). Pour obtenir un chargement optimal, l’aspirateur de table
Vorwerk doit être chargé jusqu' l'extinction de l'affichage.
2.2
Fig. 2.4 Chargement sans support de
charge
4
> 50 cm
4
Fig. 2.5 Accrochage du support de charge
Placement du support de charge
Choisissez le matériel de fixation en fonction de la qualité de votre mur.
• Pour fixer le support de charge au mur, vous avez besoin d'une vis.
• Fixez la vis dans le mur.
Veillez à ce que la distance par rapport au sol soit de 50 cm minimum.
• Installez le support de charge par l'ouverture prévue à cet effet sur le crochet
ou les vis.
Vous pouvez également poser le support de charge sur une surface horizontale
(par ex. une table ou un plan de travail).
FR
12
Commande
3
Commande
Ce chapitre vous permet de faire connaissance avec les fonctions de l’aspirateur
de table Vorwerk.
Avertissement ! Risque d'électrocution
• N'aspirez jamais d'eau, d'autres liquides ou des substances légèrement
inflammables avec cet appareil. N'aspirez de cendres que si elles sont
complètement refroidies.
• Ne plongez jamais l’aspirateur de table Vorwerk ou le chargeur dans
l'eau ou dans d'autres liquides.
3.1
Affichage des fonctions
L'affichage des fonctions vous indique le statut de votre aspirateur de table.
Affichage des fonctions
Statut
Affichage des fonctions éteint
Eteint
Affichage des fonctions allumé
Mode normal
Affichage des fonctions allumé
Fonction Boost allumée
Clignotement court de l'affichage
Prière de recharger
Affichage des fonctions clignote
Le chargement est en cours
Affichage des fonctions éteint
Chargement terminé
Clignotement rapide de l'affichage
Dysfonctionnement (voir chapitre 5, page 17)
Commande
8
3.2
13
Allumer l’aspirateur de table Vorwerk
• Appuyez sur l'interrupteur marche/arrêt pour allumer l’aspirateur de table
Vorwerk.
Activation de la fonction Boost
Fig. 3.6 Allumage de l’aspirateur de table
Vorwerk
• Appuyez sur l'interrupteur marche/arrêt pour allumer l’aspirateur de table
Vorwerk.
• Maintenez l'interrupteur marche/arrêt enfoncé, la fonction Boost est activée.
• Relâchez l'interrupteur marche/arrêt, l’aspirateur de table Vorwerk aspire de
nouveau en mode normal.
3.3
Eteindre l’aspirateur de table Vorwerk
• Appuyez sur l'interrupteur marche/arrêt pour éteindre l’aspirateur de table
Vorwerk.
3.4
Conservation de l’aspirateur de table Vorwerk
Placez l’aspirateur de table Vorwerk dans le chargeur dès que vous ne l'utilisez
pas. Les batteries ne se déchargeront pas de cette manière.
Fig. 3.7 Conservation de l’aspirateur de
table Vorwerk
Si les batteries de l’aspirateur de table Vorwerk ne sont pas tout fait
vides, une courte durée de charge est normale. Si l'affichage des
fonctions ne s'allume que brièvement après le raccordement de
l'appareil, cela signifie que les batteries sont déjà chargées.
FR
14
Commande
Le système de charge de l’aspirateur de table Vorwerk s'éteint automatiquement
quand les batteries sont entièrement chargées.
L'aspirateur peut rester connecté en permanence avec le support de charge
sans aucun risque. Le chargeur secteur chauffe alors un peu ; ceci est tout à fait
normal.
Si vous envisagez de ne pas utiliser l’aspirateur de table Vorwerk durant
un certain temps (en vacances par ex.), débranchez le chargeur secteur
de la prise de courant pour économiser l'énergie et prévenir ainsi tout
risque d'incendie suite à des courts-circuits causés par des pics de
tension ou autres (par ex. en cas d'orage).
Entretien
4
15
Entretien
Pour que votre aspirateur de table fonctionne de manière optimale et vous
donne entière satisfaction, nettoyez-le régulièrement. L'aspirateur se vide
rapidement et simplement et peut être parfaitement nettoyé. Le compartiment
à poussière peut être facilement retiré avec un clic de façon à vider l'aspirateur
sans vous salir les mains. Le chapitre suivant vous indique comment nettoyer
l’aspirateur de table Vorwerk.
FR
1
4.1
2
Fig. 4.8 Retrait du compartiment à
poussière
Démontage de l'unité filtrante
• Appuyez sur la touche de déverrouillage du compartiment à poussière
et retirez le de l'appareil.
• Maintenez l'ouverture de la buse du compartiment à poussière vers le bas.
• Appuyez de nouveau sur la touche de déverrouillage et retirez l'unité filtrante
du compartiment à poussière.
5
1
2
Fig. 4.9 Démontage de l'unité filtrante
Indication !
Lors du démontage du filtre, de la poussière peut s'échapper du compartiment.
• C'est pourquoi, il faut maintenir le compartiment avec la buse vers le
bas.
16
Entretien
4.2
Vidage du compartiment à poussière
• Retirez l'unité filtrante (voir chapitre 4.1, page 15).
• Videz le contenu du compartiment à poussière dans une poubelle.
• Si besoin, nettoyez le compartiment avec un chiffon humide et faites-le sécher
entièrement avant de le remonter.
1
Fig. 4.10 Vidage du compartiment à
poussière
4.3
2
1
5a
Installation de l'unité filtrante
En insérant l'unité filtrante , veillez à ce que le plus grand creux
de l'unité filtrante soit en face de la touche de déverrouillage du compartiment à poussière .
• Gardez la touche de déverrouillage appuyée et introduisez l'unité filtrante dans
le compartiment à poussière jusqu'à la butée.
5
Fig. 4.11 Installation de l'unité filtrante
Résolution des pannes
5
17
Résolution des pannes
Avertissement ! Risque d'électrocution et de blessures
• N'effectuez jamais de réparation sur votre appareil vous-même .
Les réparations sur les appareils électriques ne doivent être
effectuées que par le service après-vente Vorwerk compétent.
Si votre appareil ne fonctionne pas correctement, les causes suivantes peuvent
en être à l'origine :
Panne
Cause possible et résolution
L'aspirateur de table
ne fonctionne pas.
Les batteries sont probablement vides.
• Rechargez l'aspirateur.
L'aspirateur de table n'est pas chargé correctement :
• Assurez-vous que le chargeur secteur avec le support de
charge sont raccordés à l'aspirateur et que la prise de courant
fonctionne (l'affichage des fonctions sur la poignée clignote et
indique que l’aspirateur de table Vorwerk est en chargement).
Les points de contact de l'appareil et/ou du chargeur
secteur sont probablement encrassés.
• Nettoyez les points de contact avec un chiffon sec.
L'aspirateur de table était probablement
allumé pendant le chargement.
• Veillez à ce que l'aspirateur soit éteint durant le chargement.
FR
18
Résolution des pannes
Panne
Cause possible et résolution
Après avoir connecté
l’aspirateur de table
Vorwerk avec le
support de charge
ou le chargeur
secteur seul, le
processus de charge
ne démarre pas (pas
de clignotement
de l'affichage
des fonctions).
• Assurez-vous que le chargeur secteur avec le support de
charge sont raccordés à l'aspirateur et que la prise de courant
fonctionne (l'affichage des fonctions sur la poignée clignote et
indique que l’aspirateur de table Vorwerk est en chargement).
• Veillez à ce que l'aspirateur soit éteint durant le chargement.
L'affichage des
fonctions clignote
rapidement.
• L'aspirateur de table se trouve en mode sécurité ; cela est
peut-être dû à une température trop élevée des batteries.
• Retirez le chargeur secteur de l'aspirateur de la prise de
courant et laissez refroidir l'aspirateur.
Si le problème persiste, veuillez vous adresser
au service après-vente Vorwerk.
L'aspirateur de table
n'aspire pas du tout
ou plus aussi bien
qu'auparavant et
émet des bruits
inhabituels.
La buse est probablement bouchée.
• Eteignez l'aspirateur et nettoyez la buse.
Le compartiment à poussière n'est probablement
pas connecté correctement à l'aspirateur.
• Connectez correctement le compartiment
à poussière à l'aspirateur.
Le compartiment à poussière est peut-être plein.
• Videz le compartiment à poussière.
Résolution des pannes
Panne
Cause possible et résolution
De la poussière
s'échappe de
l'appareil.
Le compartiment à poussière n'est probablement
pas connecté correctement à l'aspirateur.
• Connectez correctement le compartiment
à poussière à l'aspirateur.
19
L'unité filtrante est probablement mal insérée
dans le compartiment à poussière.
• Insérez correctement l'unité filtrante dans
le compartiment à poussière.
Le compartiment à
poussière ne peut
pas s'enclencher
sur l'appareil.
• L'unité filtrante est mal installée.
• Tournez l'unité filtrante de façon à ce que le grand
creux de l'unité filtrante soit en face de la touche
de déverrouillage. (voir aussi le chapitre 4.3).
Si vous ne pouvez pas résoudre le problème, adressez-vous au service
après-vente Vorwerk (voir chapitre „8 Prestations de service“ page 24).
FR
20
Mise au rebut et protection de l'environnement
6
Mise au rebut et protection de l'environnement
6.1
Mise au rebut de l'appareil
En tant que propriétaire d'un appareil électrique ou électronique, il vous est
interdit par la loi (conformément à la Directive UE 2002/96/CE du 27 janvier 2003
relative aux déchets d'équipements électriques et électroniques et à la loi du
16.3.2005) de jeter cet appareil ou ses accessoires électriques/électroniques
dans les ordures ménagères non triées.
• Utilisez plutôt les possibilités de collecte gratuites prévues à cet effet.
• Informez-vous auprès de votre municipalité.
6.2
Mise au rebut des batteries
Les batteries lithium-ion intégrées contiennent des
substances nocives pour l'environnement.
• Retirez les batteries avant de mettre l'appareil au
rebut. Pour cela, débranchez l'appareil. Ne jetez
pas les batteries dans les ordures ménagères, mais
déposez-les dans un lieu de collecte officiel.
Mise au rebut et protection de l'environnement
21
Vous pouvez également remettre l'appareil au
service après-vente Vorwerk. Les batteries y seront
prélevées et éliminées en veillant au respect de l'environnement.
Attention ! Risque de blessures avec les batteries qui fuient !
L'acide qui s'échappe ne doit pas entrer au contact avec les yeux ou les
muqueuses.
• Nettoyez-vous les mains et rincez les yeux avec de l'eau claire. Si vous
ressentez toujours des douleurs, consultez un médecin.
6.3
Mise au rebut de l'emballage
L'emballage est un composant important de notre produit : Il protège nos
appareils de tout endommagement durant le transport et réduit les risques de
défaillances des appareils. C'est pourquoi, nous ne pouvons pas renoncer à l'emballage. Si vous devez déposer ou envoyer votre appareil au service après-vente
durant la période de garantie ou ensuite, l'emballage d'origine est la protection la
plus sûre pour éviter tout dommage durant le transport.
Si vous désirez néanmoins éliminer l'emballage, vous pouvez le faire à tout moment et sans restrictions dans vos installations de recyclage locales (conteneur
de papiers usagés, conteneur jaune, centre de recyclage, collecte de papiers
usagés, etc.).
A cette fin, Vorwerk mandate légalement les bailleurs de licence autorisés. Si
vous avez des questions, veuillez-vous adresser à votre centre de service aprèsvente respectif (voir chapitre „8 Prestations de service“ page 24).
FR
22
Mise au rebut et protection de l'environnement
6.4
Informations sur la protection de l'environnement
Préservation de la nature et protection de l'environnement : Chez Vorwerk, la
protection de l'environnement est un objectif d'entreprise important.
Moins d'emballage
Nous utilisons exclusivement des matériaux écologiques qui peuvent être recyclés après une mise au rebut en bonne et due forme. Nous participons également au développement de la gestion des déchets d'emballage et oeuvrons
pour leur élimination et leur recyclage.
Economie d'énergie
Les produits Vorwerk préservent l'environnement : Ils consomment peu d'énergie pour de hautes performances d'aspiration.
Production respectueuse de l'environnement
Lors de la fabrication de nos produits, nous mettons l'accent sur la protection
de l'environnement. Nous utilisons des plastiques et des peintures recyclables.
Nous avons renoncé délibérément aux retardateurs de flamme qui polluent
l'environnement.
Pour nos sacs filtrants, nous utilisons des colles sans solvant, du papier non
blanchi ou des matières plastiques inoffensives. Nos modes d'emploi sont
imprimés sur du papier issu de réserves forestières autogérées et blanchi sans
chlore.
Mise au rebut et protection de l'environnement
23
Matériaux recyclables
Les matériaux qui composent nos produits peuvent être presque entièrement
recyclés. Nous refusons en grande partie l'utilisation de PVC.
Lors de l'élaboration de nos produits, nous attachons de l'importance aux matériaux «de même nature» :
Les matériaux utilisés peuvent être triés ultérieurement sans grande dépense
d'énergie dans des installations modernes. Afin qu'ils puissent être recyclés
encore plus facilement, nous avons marqué en grande partie nos composants.
FR
24
Garantie
7
Garantie
Consultez les éventuelles prestations de garantie sur votre bon de commande
ou contrat de vente.
8
Prestations de service
Les collaborateurs de notre service téléphonique se tiennent volontiers à
votre disposition :
Téléphone : 02 518 547 47
Du lundi au jeudi de 9h à 13h et de 14h à 18h, le vendredi de 9h à 13h et
de 13h15 à 17h.
Sites Internet
www.vorwerk.fr
Caractéristiques techniques
9
25
Caractéristiques techniques
Aspirateur de table
Signaux de sécurité
Boîtier
Plastique thermoformé recyclable de haute qualité
Moteur
Moteur CC sans entretien, environ 20.000 tr/min
Tension d'entrée du
chargeur secteur
Tension alternative 220-240 V - 50/60 Hz
Tension de sortie du
chargeur secteur
12 V DC +/-10%
Type de chargeur
secteur
KSAA1200050W1EU
Puissance nominale
du moteur
env. 50 W
Débit d'air max.
9W
Débit volumique
max.
12 l/s
Poids
750 g sans support de charge et chargeur secteur
Emission sonore
74 dBA (mesuré en champ libre sur un plan de travail)
Batteries
Lithium-ion
FR
Manual de usuario
Aspiradora manual
Vorwerk
VC100
Observación inicial:
¡Felicidades por haber adquirido la aspiradora manual
Kobold!
La más pequeña de la familia Vorwerk le acompañará durante muchos años y le aportará enormes satisfacciones en la
limpieza de su hogar.
Antes de comenzar
• Lea atentamente el manual de usuario antes de usar la
aspiradora manual por primera vez.
• Conserve el manual de usuario para referencia futura. Es
una parte importante del producto y debe acompañarlo si
lo deja a otras personas.
Signos y símbolos
En el texto verá los símbolos que figuran abajo con el
siguiente significado:
Símbolo de advertencia
Referencia al servicio de atención al cliente de Vorwerk
Símbolo para un consejo
Referencia a la presencia de
Vorwerk en Internet
Contenido
Observación inicial: . . . . . . . . . . . . . . . . . . . . . . . . . . 2
5
Solución de problemas . . . . . . . . . . . . . . . . . 17
Descripción general del producto . . . . . . . . . . . . . . 4
6
6.1
6.2
6.3
6.4
Eliminación y protección medioambiental . 20
Eliminación del aparato . . . . . . . . . . . . . . . . . . . 20
Eliminación de las baterías . . . . . . . . . . . . . . . . . 20
Eliminación del embalaje.. . . . . . . . . . . . . . . . . . 21
Información sobre la protección
medioambiental . . . . . . . . . . . . . . . . . . . . . . . . . 22
7
Garantía . . . . . . . . . . . . . . . . . . . . . . . . . . . . . . 24
8
Características de servicio. . . . . . . . . . . . . . . 24
9
Datos técnicos . . . . . . . . . . . . . . . . . . . . . . . . . 25
1
1.1
1.2
1.3
Para su seguridad
..................5
Uso previsto . . . . . . . . . . . . . . . . . . . . . . . . . . . . . 5
Indicaciones de peligro . . . . . . . . . . . . . . . . . . . . 6
Niveles de peligro . . . . . . . . . . . . . . . . . . . . . . . . 9
2
2.1
2.1.1
2.1.2
2.2
Preparación . . . . . . . . . . . . . . . . . . . . . . . . . . . 10
Cargar la aspiradora manual . . . . . . . . . . . . . . .10
Carga en la estación de carga . . . . . . . . . . . . .10
Carga sin estación de carga . . . . . . . . . . . . . . . 11
Colocación de la estación de carga . . . . . . . . . . 11
3
3.1
3.2
3.3
3.4
3.5
Manejo . . . . . . . . . . . . . . . . . . . . . . . . . . . . . . . 12
Indicador de funcionamiento . . . . . . . . . . . . . . . 12
Encendido de la aspiradora manual. . . . . . . . . . 13
Activación de la función Boost . . . . . . . . . . . . . . 13
Apagado de la aspiradora manual . . . . . . . . . . . 13
Conservación de la aspiradora manual . . . . . . . 13
4
4.1
4.2
4.3
Mantenimiento . . . . . . . . . . . . . . . . . . . . . . . . 15
Extracción de la unidad de filtro . . . . . . . . . . . . . 15
Vaciado del compartimento para el polvo . . . . . 16
Colocar la unidad de filtro. . . . . . . . . . . . . . . . . . 16
ES
Descripción general del producto
La aspiradora manual Kobold aspira sin problemas los tipos de tapicería más
diversos, las superficies lisas y los rincones más estrechos con igual poder.
La aspiradora manual es rápida y fácil de vaciar. La imagen con leyenda muestra
la aspiradora manual y sus elementos de mando.
Leyenda
Pos.
Aspiradora manual
VC100
Compartimento
para el polvo
Tecla de desbloqueo
para el compartimento
para el polvo
Unidad de alimentación
Interruptor de
encendido/apagado
con función Boost
Estación de carga
8
1
7
6
5
Unidad de filtro
Abertura de salida de aire
Indicador de
funcionamiento
4
2
3
1
Para su seguridad
El máximo de seguridad es una de las propiedades de los productos Vorwerk. La
seguridad de la aspiradora manual solo se puede garantizar si se tiene en cuenta
esta sección.
1.1
Uso previsto
Atención
Este aparato no está concebido para su uso por parte de
personas (inclusive niños) con discapacidades físicas, sensoriales o mentales, falta de experiencia y/o conocimiento,
salvo que estén bajo la supervisión de una persona responsable de su seguridad o reciban de ella instrucciones sobre
el modo de utilizar la aspiradora manual.
Los niños deben ser supervisados para asegurarse de que
no jueguen con el aparato.
ES
6
Para su seguridad
1.2
Indicaciones de peligro
Atención
• Lea atentamente el manual de usuario antes de usar la
aspiradora manual por primera vez.
• Preste especial atención a las siguientes instrucciones.
• Conserve el manual de usuario para referencia futura. Es una parte importante de la aspiradora manual y debe acompañar al producto si lo deja a otras
personas.
¡Daños en el aparato!
• Apague siempre la aspiradora manual antes de cualquier de trabajo de reequipamiento, limpieza y mantenimiento y saque la unidad de alimentación de la
caja de enchufe.
• No saque nunca la unidad de alimentación de la caja de enchufe tirando del
cable de conexión, sino de la propia unidad de alimentación.
• No aspire nunca agua, otros líquidos o sustancias fácilmente inflamables con
este aparato. No aspire cenizas hasta que se hayan enfriado por completo.
• No sumerja nunca la aspiradora manual o la estación de carga en agua o en
otros líquidos.
• No utilice la aspiradora manual en ambientes húmedos.
• No utilice en ningún caso la aspiradora manual en superficies húmedas o en
exteriores.
• No limpie nunca su aparato o sus accesorios eléctricos con agua o
limpiadores húmedos.
Para su seguridad
7
¡Riesgo de shock eléctrico!
• Nunca realice reparaciones de su aparato por cuenta propia. Las reparaciones
de aparatos eléctricos deben ser realizadas solo por el servicio autorizado de
atención al cliente de Vorwerk.
• No inserte objetos punzantes en los contactos eléctricos.
• No modifique los contactos.
• No siga utilizando la aspiradora manual si se encuentra dañada.
• En caso de daños, póngase en contacto con el servicio de atención al cliente
Vorwerk más cercano.
¡Peligro de incendio!
• No aspire cenizas calientes ni colillas encendidas.
¡Peligro de explosión!
• No aspire sustancias explosivas o inflamables.
• No arroje nunca el aspirador manual directamente al fuego.
Atención ¡Peligro de daños debido al uso incorrecto!
• Utilice exclusivamente productos originales Vorwerk.
• Antes de poner en servicio la aspiradora manual, compruebe que las indicaciones de tensión del aparato coinciden con la tensión de red del emplazamiento.
• Emplee la estación de carga solamente con corriente alterna y con una conexión debidamente instalada por un especialista.
• Utilice la aspiradora manual exclusivamente con la corriente alterna especificada en la placa de características.
• No emplee la aspiradora manual ni la unidad de alimentación si existen defectos reconocibles.
• Antes de limpiar la unidad de alimentación, sáquela de la caja de enchufe.
ES
8
Para su seguridad
• Cargue la aspiradora manual solamente con la unidad de alimentación incluida
en el suministro (modelo: KSAA1200050W1EU).
• Durante la carga, la unidad de alimentación se calienta. Esto es algo normal.
• No guarde la aspiradora manual al aire libre y protéjala de la humedad.
• No coloque la aspiradora manual cerca de una fuente de calor (cocina, calefactor o cuerpo de calefacción caliente).
• Vuelva a desconectar la aspiradora manual después de cada uso.
• La clavija de carga conduce baja tensión (aprox. 12 V), por lo que no es peligrosa.
• No bloquee en ningún caso las aberturas de salida del aire.
• Desconecte la aspiradora manual antes de cargarla.
• Emplee la aspiradora manual exclusivamente con la unidad de filtro colocada.
• A la hora de perforar agujeros para la fijación de la estación de carga a la pared
(en especial cerca de una caja de enchufe) se ruega tener especial precaución
para evitar el riesgo de descarga eléctrica.
• Cargue y utilice la aspiradora manual a temperaturas de entre 5 °C y 35 °C.
Guárdela también en ese rango de temperatura.
• ¡No cortocircuitar las baterías en ningún caso! No exponga las baterías al
fuego, al calor o a la radiación directa del sol.
No utilice la aspiradora manual:
• Si ha caído al suelo y presenta daños o fallos de funcionamiento evidentes.
• Si la estación de carga o su cable presentan daños.
La aspiradora manual está concebida exclusivamente para uso doméstico.
Vorwerk no asumirá responsabilidad alguna sobre el uso indebido o diferente del
indicado en el manual de usuario.
Para su seguridad
9
La aspiradora manual cumple las normas de seguridad del país en el que fue
distribuida por una organización autorizada por Vorwerk. No puede garantizarse
el cumplimiento de las normas locales de seguridad al utilizar el aparato en otro
país. Vorwerk, por tanto, rechaza los riesgos de seguridad para el usuario que
resulten de esto.
1.3
Niveles de peligro
• Para su seguridad tenga en cuenta también las indicaciones de peligros que
se encuentran en el texto de las secciones siguientes.
Reconocerá las indicaciones de peligros de las secciones siguientes por el símbolo de advertencia y/o una palabra de señal para indicar un nivel de peligro:
Nivel de peligro
Símbolo de
advertencia
Palabra de
señal
3
¡Advertencia!
2
¡Atención!
1
Atención
Peligros posibles
- ¡Riesgo de shock eléctrico!
- ¡Peligro de incendio!
- Peligro de explosión
- Riesgo de lesiones
- ¡Peligro de daños debido
al uso incorrecto!
- Daños materiales por
uso indebido
ES
10
Preparación
2
Preparación
Puede guardar cómodamente la aspiradora manual en la estación de carga montada en la pared o colocada sobre la mesa. De este modo, la aspiradora manual
de potentes baterías recargables se puede utilizar en todo momento.
2.1
Cargar la aspiradora manual
La aspiradora manual se debe cargar antes de la primera puesta
en servicio
Fig. 2.1 Posicionamiento de la estación
de carga
4
Si las baterías están vacías, el indicador de funcionamiento comienza a parpadear y el sistema de seguridad (“Cut off / Parada automática”) desconecta la
aspiradora manual para evitar que las baterías resulten dañadas. El indicador de
funcionamiento sigue parpadeando algunos segundos.
Existen dos posibilidades de carga de su aspiradora manual:
1.
En la estación de carga
2.
Sin estación de carga, enchufando directamente el cable de carga a la
aspiradora manual. Para ello se debe abrir previamente la estación de
carga.
2.1.1
Fig. 2.2 Colocación en la estación de
carga
Carga en la estación de carga
• Asegúrese de que la aspiradora manual se encuentra desconectada.
• Conecte la unidad de alimentación a la red.
• Coloque la aspiradora manual sobre la estación de carga .
Preparación
2.1.2
Fig. 2.3 Apertura de la estación de carga
11
Carga sin estación de carga
• Asegúrese de que la aspiradora manual se encuentra desconectada.
• Pulse la pestaña de la estación de carga para abrir la estación.
• Conecte el enchufe pequeño de la unidad de alimentación en la toma correspondiente del mango de la aspiradora manual.
• A continuación, enchufe la unidad de alimentación en la caja de enchufe.
El indicador de funcionamiento indica que la aspiradora manual se está cargando.
El indicador de funcionamiento se apaga en cuanto las baterías se hayan cargado
por completo (después de unas 4 horas). Para lograr una carga óptima, la aspiradora manual se debe cargar hasta que se apague el indicador de funcionamiento.
Fig. 2.4 Carga sin estación de carga
2.2
Colocación de la estación de carga
Elija el material de fijación conforme a las características de su pared.
4
> 50 cm
4
Fig. 2.5 Suspensión de la estación de
carga
• Para fijar la estación de carga a la pared necesita un tornillo.
• Fije el tornillo a la pared.
Tenga en cuenta que la distancia con respecto al suelo ha de ser como mínimo de 50 cm.
• Coloque la estación de carga con la abertura prevista para ello en el gancho o
en los tornillos.
También puede colocar la estación de carga sobre una superficie horizontal
(p. ej. mesa o superficie de trabajo).
ES
12
Manejo
3
Manejo
En este capítulo conocerá las funciones de la aspiradora manual.
¡Advertencia! ¡Riesgo de shock eléctrico!
• No aspire nunca agua, otros líquidos o sustancias fácilmente inflamables con este aparato. No aspire cenizas hasta que se hayan enfriado
por completo.
• No sumerja nunca la aspiradora manual o el cargador en agua o en
otros líquidos.
3.1
Indicador de funcionamiento
El indicador de funcionamiento le indica el estado de su aspiradora manual.
Indicador de funcionamiento
Estado
El indicador de funcionamiento
está apagado
Apagado
El indicador de funcionamiento
está encendido
Funcionamiento normal
El indicador de funcionamiento
está encendido
Función Boost conectada
El indicador de funcionamiento
parpadea brevemente
Por favor, cargar
El indicador de funcionamiento se
enciende y apaga a intervalos regulares
Proceso de carga en curso
Manejo
8
Indicador de funcionamiento
Estado
El indicador de funcionamiento
está apagado
Proceso de carga finalizado
El indicador de funcionamiento
parpadea rápidamente
Fallo de funcionamiento (véase
capítulo 5, página 17)
3.2
Fig. 3.6 Encendido de la aspiradora
manual
13
Encendido de la aspiradora manual
• Pulse el interruptor de encendido/apagado para encender la aspiradora
manual.
3.3
Activación de la función Boost
• Pulse el interruptor de encendido/apagado para encender la aspiradora manual.
• Mantenga pulsado el interruptor de encendido/apagado: la función Boost se activará.
• Suelte el interruptor de encendido/apagado: la aspiradora vuelve a aspirar en
el modo normal.
3.4
Apagado de la aspiradora manual
• Pulse el interruptor de encendido/apagado para apagar la aspiradora manual.
3.5
Fig. 3.7 Conservación de la aspiradora
manual
Conservación de la aspiradora manual
Coloque la aspiradora manual en la estación de carga siempre que no la utilice.
ES
14
Manejo
De este modo, las baterías no se descargan.
Si las baterías de la aspiradora manual no se encuentran completamente vacías, será algo normal que el tiempo de carga sea corto. Si el indicador de funcionamiento solo se enciende brevemente tras la conexión,
esto significará que las baterías ya están cargadas.
El eficiente sistema de carga de la aspiradora manual se desconecta automáticamente cuando las baterías se encuentren completamente cargadas.
La aspiradora manual se puede dejar permanentemente unida a la estación de
carga sin ningún peligro. La unidad de alimentación se calienta un poco; se trata
de un proceso completamente normal.
Si no tiene previsto utilizar la aspiradora manual durante mucho tiempo
(p. ej. en vacaciones), saque la unidad de alimentación de la caja de
enchufe, para ahorrar corriente y prevenir el peligro de incendios a
causa de cortocircuitos por picos de tensión o similares (p. ej. en caso
de tormenta).
Mantenimiento
4
15
Mantenimiento
Para que su aspiradora funcione de manera óptima y satisfactoria en todo momento, límpiela con regularidad. La aspiradora manual es rápida y fácil de vaciar
y se limpia de forma higiénica. El compartimento para el polvo se puede retirar
fácilmente con un clic para poder vaciar la aspiradora manual sin mancharse
las manos. En el siguiente capítulo aprenderá la forma de limpiar la aspiradora
manual.
1
4.1
2
Fig. 4.8 Extracción del compartimento
para el polvo
5
1
2
Fig. 4.9 Extracción de la unidad de filtro
Extracción de la unidad de filtro
• Pulse la tecla de desbloqueo del compartimento para el polvo y extraiga este del aparato.
• Mantenga la abertura de boquilla del compartimento para el polvo orientada
hacia abajo.
• Pulse de nuevo la tecla de bloqueo y extraiga la unidad de filtro del compartimento para el polvo.
Atención
Al sacar el filtro puede caer polvo del compartimento para el polvo.
• Por ello, mantenga el compartimento para el polvo con la boquilla
orientada hacia abajo.
ES
16
Mantenimiento
4.2
Vaciado del compartimento para el polvo
• Saque la unidad de filtro (véase capítulo 4.1, página 15).
• Vacíe el contenido del compartimento para el polvo en un cubo de basura.
• Si es necesario, limpie el compartimento para el polvo con un paño húmedo y
deje que se seque por completo el compartimento antes de volver a montarlo.
1
Fig. 4.10 Vaciado del compartimento para
el polvo
4.3
2
1
5a
Colocar la unidad de filtro
Al colocar la unidad de filtro, procure que la entalladura grande
de la unidad de filtro apunte a la tecla de desbloqueo del compartimento para
el polvo .
• Mantenga pulsada la tecla de desbloqueo y deslice la unidad de filtro hasta
que haga tope en el compartimento para el polvo.
5
Fig. 4.11 Colocación de la unidad de filtro
Solución de problemas
5
17
Solución de problemas
¡Advertencia! Riesgo de shock eléctrico y peligro de lesiones
• Nunca realice reparaciones de su aparato por cuenta propia.
Las reparaciones de aparatos eléctricos deben ser realizadas solo por el
servicio autorizado de atención al cliente de Vorwerk.
Si el aparato no funciona correctamente, puede deberse a las siguientes causas:
Fallo
Posible causa y solución
La aspiradora manual
no funciona.
Probablemente, las baterías están vacías.
• Cargue la aspiradora manual.
La aspiradora manual no se carga correctamente:
• Asegúrese de que la unidad de alimentación con la estación
de carga y la aspiradora manual están conectados y de que
la caja de enchufe funciona (el indicador de funcionamiento
del mango se enciende y apaga a intervalos regulares, lo
que indica que la aspiradora manual se está cargando).
Posiblemente estén sucios los puntos de contacto
del aparato y/o de la unidad de alimentación.
• Limpie los puntos de contacto con un paño seco.
Es posible que la aspiradora manual estuviese
conectada mientras se encontraba en el cargador.
• Asegúrese de que la aspiradora manual
está desconectada para la carga.
ES
18
Solución de problemas
Fallo
Posible causa y solución
Una vez establecido
el contacto de la
aspiradora manual
con la estación de
carga o con la unidad
de alimentación solo
ya no comienza el
proceso de carga
(ningún encendido
y apagado del
indicador de
funcionamiento a
intervalos regulares).
• Asegúrese de que la unidad de alimentación con la estación
de carga y la aspiradora manual están conectados y de que
la caja de enchufe funciona (el indicador de funcionamiento
del mango se enciende y apaga a intervalos regulares, lo
que indica que la aspiradora manual se está cargando).
• Asegúrese de que la aspiradora manual
está desconectada para la carga.
El indicador de
funcionamiento
parpadea
rápidamente.
• La aspiradora manual se encuentra en modo de seguridad;
esto puede deberse a una alta temperatura de las baterías.
• Saque la unidad de alimentación de la aspiradora manual de la
caja de enchufe y deje que la aspiradora se enfríe.
Si el problema persiste, le rogamos se dirija al
servicio de atención al cliente de Vorwerk.
La aspiradora
manual no aspira o
no lo hace tan bien
como antes, hace
ruidos inusuales.
Probablemente esté atascada la boquilla.
• Desconecte la aspiradora manual y desatasque la boquilla.
Probablemente no se haya colocado correctamente el
compartimento para el polvo en la aspiradora manual.
• Coloque correctamente el compartimento
para el polvo en la aspiradora manual.
Probablemente esté lleno el compartimento para el polvo.
• Vacíe el compartimento para el polvo.
Solución de problemas
Fallo
Posible causa y solución
Se escapa polvo
del aparato.
Probablemente no se haya colocado correctamente
el compartimento para el polvo en el aparato.
• Coloque correctamente el compartimento
para el polvo en la aspiradora manual.
19
Probablemente no se haya colocado correctamente la
unidad de filtro en el compartimento para el polvo.
• Coloque correctamente la unidad de filtro
en el compartimento para el polvo.
El compartimento
para el polvo no
se puede encajar
en el aparato.
• La unidad de filtro se ha colocado retorcida.
• Gire la unidad de filtro de modo que la entalladura grande
se encuentre en el lado de la tecla de desbloqueo de
la unidad de filtro (véase también el capítulo 4.3).
Si no se solucionan los problemas, póngase en contacto con el servicio
de atención al cliente de Vorwerk (véase capítulo „8 Características de
servicio“ en la página 24).
ES
20
Eliminación y protección medioambiental
6
Eliminación y protección medioambiental
6.1
Eliminación del aparato
Como propietario de un aparato eléctrico o electrónico no le está permitido por
ley (en conformidad con la directiva de la UE 2002/96/CE del 27 de enero de
2003 sobre aparatos eléctricos y electrónicos, así como con la ley sobre aparatos
eléctricos y electrónicos, con fecha 16-3-2005) eliminar este aparato o sus accesorios eléctricos y electrónicos en la basura doméstica no clasificada.
• En su lugar, utilice siempre el centro de devolución gratuita previsto.
• Infórmese al respecto en su ayuntamiento.
6.2
Eliminación de las baterías
Las baterías de iones de litio integradas contienen sustancias que pueden poner en peligro el medio ambiente.
• Saque las baterías antes de eliminar el aparato. Para
ello desconecte el aparato de la red. No tire las baterías junto con la basura doméstica: entréguelas en un
punto oficial de recogida de pilas y baterías.
Eliminación y protección medioambiental
21
También puede entregar el aparato al servicio de atención al cliente de Vorwerk. Allí se sacarán las baterías y
se eliminarán de forma respetuosa con el medio ambiente.
¡Atención! ¡Peligro de lesiones por la pérdida de líquidos de las baterías!
Las baterías que pierden líquido no pueden entrar en contacto con los ojos
o las mucosas.
• Lave las manos y aclare los ojos con agua limpia. Si sigue teniendo
molestias, consulte un médico.
6.3
Eliminación del embalaje.
El embalaje es una parte importante de nuestro producto: Protege a nuestros
aparatos de daños durante el transporte y reduce el riesgo de fallo del aparato.
Por lo tanto, no podemos prescindir del embalaje. En caso de que deba llevar
o enviar el aparato, durante el periodo de garantía o después, al servicio de
atención al cliente o reparación, el embalaje original es la protección más segura
contra daños durante el transporte.
Si no obstante desea deshacerse del embalaje, lo puede hacer en cualquier momento y sin restricciones en las instalaciones regionales (papelera de papel viejo,
papelera de reciclaje, centro de reciclaje, recogida de papel usado, etc.).
Para ello, Vorwerk encarga administradores de licencias autorizados legalmente.
Para cualquier consulta, póngase en contacto con su correspondiente Centro de
Servicios (véase capítulo „8 Características de servicio“ en la página 24).
ES
22
Eliminación y protección medioambiental
6.4
Información sobre la protección medioambiental
Preservar la naturaleza y proteger el medio ambiente: En Vorwerk, la protección
del medio ambiente es un objetivo empresarial importante.
Menos embalajes
Utilizamos exclusivamente materiales ecológicos que pueden ser reutilizados si
han sido eliminados correctamente. Participamos ya en el desarrollo de ahorro
de eliminación de embalajes y nos comprometemos con su eliminación y reciclaje.
Ahorro de energía
Los productos Vorwerk protegen el medio ambiente: Consumen poca energía
con una potencia de aspiración muy alta.
Producción orientada al medio ambiente
En la fabricación de nuestros productos, damos mucha importancia a la protección del medio ambiente. Utilizamos plásticos y pinturas que se puedan reciclar.
Hemos renunciado conscientemente a retardantes de llamas que perjudican el
medio ambiente.
Para nuestras bolsas de filtro utilizamos pegamento sin disolventes, papel sin
blanquear o plástico inofensivo. Nuestros manuales han sido elaborados con
productos forestales gestionados de manera sostenible y blanqueados sin cloro.
Eliminación y protección medioambiental
23
Material reutilizable
El material de nuestros productos se puede reutilizar casi por completo. Renunciamos en gran medida al uso de PVC.
En la elaboración de nuestros productos, prestamos atención a materiales "libres
de mezcla":
Los materiales utilizados se pueden separar más adelante de nuevo sin grandes
gastos de material de energía, con instalaciones modernas. Para que puedan ser
reciclados aún más fácilmente, hemos caracterizado a la mayoría de nuestros
componentes de plástico.
ES
24
Garantía
7
Garantía
Las eventuales garantías se desprenden de su orden de compra o
contrato de venta.
8
Características de servicio
Los empleados de nuestros servicios telefónicos están encantados de
ayudarle: +34 902 33 33 50, fax: +34 917 28 36 12
de lunes a viernes, de 9 a 20 horas.
Presencia en Internet
www.vorwerk.es
Datos técnicos
9
25
Datos técnicos
Aspiradora manual
Sello de seguridad
Caja
Plástico termoformado reciclable de alta calidad
Motor
Motor CC libre de mantenimiento con 20.000 rpm, aprox.
Tensión de
entrada unidad
de alimentación
220-240 voltios corriente alterna 50/60 hercios
Tensión de
salida unidad de
alimentación
12 V CC +/- 10 %
Tipo de unidad
de alimentación
KSAA1200050W1EU
Potencia nominal
del motor
50 vatios, aprox.
Potencia de
aire máx.
9 vatios
Caudal máx.
12 l/s
Peso
750 g, sin estación de carga y unidad de alimentación
Emisión de ruidos
74 dBA (medido en condiciones de campo
libre en la mesa de trabajo)
Paquete de baterías
Iones de litio
ES
Istruzioni per l'uso
Vorwerk
Aspiratori da tavolo
VC100
Informazioni preliminari
Un caloroso augurio all'aspiratore da tavolo Folletto di
Vorwerk!
Il più piccino della famiglia Vorwerk vi accompagnerà per
molti anni e vi offrirà il massimo del divertimento durante la
pulizia della vostra casa.
Prima di iniziare
• Leggere attentamente le istruzioni per l'uso prima di
utilizzare per la prima volta l'aspiratore da tavolo.
• Conservare le istruzioni per l'uso per utilizzi futuri. Costituiscono una componente importante del prodotto e
devono essere sempre accompagnate al prodotto quando
lo si cede ad altre persone.
Segni e simboli
Sul testo si trovano i simboli elencati con il seguente significato:
Simbolo di avvertimento
Rimando al servizio di assistenza clienti/supporto
Vorwerk
Simbolo per un consiglio
Rimando alla presenza su
internet di Vorwerk
Inhalt
Informazioni preliminari . . . . . . . . . . . . . . . . . . . . . . 2
5
Risoluzione problemi . . . . . . . . . . . . . . . . . . . 17
Panoramica del prodotto . . . . . . . . . . . . . . . . . . . . . . 4
6
6.1
6.2
6.3
6.4
Smaltimento e tutela dell'ambiente. . . . . . . 20
Smaltimento del dispositivo . . . . . . . . . . . . . . . . 20
Smaltimento degli accumulatori. . . . . . . . . . . . . 20
Smaltimento dell'imballaggio. . . . . . . . . . . . . . . 21
Informazioni sulla tutela ambientale . . . . . . . . . . 22
7
Garanzia . . . . . . . . . . . . . . . . . . . . . . . . . . . . . . 24
8
Prestazioni di assistenza . . . . . . . . . . . . . . . . 24
9
Dati Tecnici. . . . . . . . . . . . . . . . . . . . . . . . . . . . 25
1
1.1
1.2
1.3
Per la vostra sicurezza
..............5
Utilizzo secondo le disposizioni . . . . . . . . . . . . . . 5
Indicazioni di pericolo . . . . . . . . . . . . . . . . . . . . . . 6
Gradi di pericolosità . . . . . . . . . . . . . . . . . . . . . . . 9
2
2.1
2.1.1
2.1.2
2.2
Preparazione . . . . . . . . . . . . . . . . . . . . . . . . . . 10
Caricare l'aspiratore da tavolo . . . . . . . . . . . . .10
Caricare sulla stazione di ricarica . . . . . . . . . . .10
Caricare senza stazione di ricarica . . . . . . . . . . . 11
Collocare la stazione di ricarica . . . . . . . . . . . . . 11
3
3.1
3.2
3.3
3.4
3.5
Utilizzo . . . . . . . . . . . . . . . . . . . . . . . . . . . . . . . 12
Display di funzionamento . . . . . . . . . . . . . . . . . . 12
Attivare l'aspiratore da tavolo . . . . . . . . . . . . . . . 13
Attivare la funzione Boost . . . . . . . . . . . . . . . . . 13
Disattivare l'aspiratore da tavolo . . . . . . . . . . . . 13
Conservare l'aspiratore da tavolo . . . . . . . . . . . 13
4
4.1
4.2
4.3
Manutenzione . . . . . . . . . . . . . . . . . . . . . . . . . 15
Prelevare l'unità filtro . . . . . . . . . . . . . . . . . . . . . 15
Svuotare la camera di raccolta della polvere . . . 16
Utilizzare l'unità di filtro . . . . . . . . . . . . . . . . . . . 16
IT
Panoramica del prodotto
L'aspiratore da tavolo Folletto aspira incessantemente i cuscini più disparati, le
superfici lisce e i punti ristretti con una prestazione di pari misura.
L'aspiratore da tavolo è veloce e facile da svuotare. L'immagine con la legenda
mostra l'aspiratore da tavolo e i suoi elementi di comando.
Legenda
Pos.
Aspiratore da tavolo
VC100
Camera di raccolta
della polvere
Pulsante di sblocco
per la camera di
raccolta della polvere
Dispositivo di ricarica
Stazione di ricarica
8
1
7
6
5
Unità filtro
Apertura di sfiato
Display di funzionamento
Interruttore di accensione/
spegnimento con
funzione boost
4
2
3
1
Per la vostra sicurezza
La maggiore sicurezza possibile è parte integrante delle proprietà dei prodotti
Vorwerk. La sicurezza dell'aspiratore da tavolo può essere tuttavia garantita solo
se si osserva il presente capitolo.
1.1
Utilizzo secondo le disposizioni
Nota!
Questo apparecchio non è pensato per essere utilizzato da
persone (inclusi i bambini) con capacità fisiche, sensoriali o
psichiche ridotte oppure con mancanza di esperienza e/o di
conoscenza, a meno che non siano sorvegliate da una persona autorizzata a garantirne la sicurezza oppure che abbiano
ricevuto da questa indicazioni su come utilizzare l'aspiratore
da tavolo.
I bambini dovrebbero essere sorvegliati per garantire che
non giochino con il dispositivo.
IT
6
Per la vostra sicurezza
1.2
Indicazioni di pericolo
Nota!
• Leggere attentamente le istruzioni per l'uso prima di utilizzare per la prima
volta l'aspiratore da tavolo.
• Osservare in modo particolare le seguenti avvertenze.
• Conservare le istruzioni per l'uso per utilizzi futuri. Costituiscono una componente importante del prodotto e devono essere sempre accompagnate al
prodotto quando lo si cede ad altre persone.
Danneggiamento del dispositivo!
• Spegnere sempre l'aspiratore da tavolo prima di qualsiasi intervento di ristrutturazione, pulizia e manutenzione ed estrarre il dispositivo di carica dell'apparecchio di ricarica.
• Non estrarre mai l'apparecchio di carica dal cavo di collegamento, bensì dal
dispositivo di carica della presa.
• Non aspirare mai acqua, altri liquidi oppure sostanze facilmente infiammabili
con questo dispositivo. Aspirare le braci solo se completamente raffreddate.
• Non immergere mai l'aspiratore da tavolo o la stazione di ricarica in acqua o
altri liquidi.
• Non utilizzare l'aspiratore da tavolo in ambienti umidi.
• Non utilizzare in nessun caso l'aspiratore da tavolo su superfici umide oppure
in ambienti esterni.
• Mai pulire il proprio dispositivo oppure le proprie dotazioni elettriche con
acqua oppure detergenti umidi.
Per la vostra sicurezza
7
Pericolo di folgorazione!
• Mai eseguire autonomamente riparazioni ad un dispositivo. Le riparazioni degli
elettrodomestici possono essere eseguite solo dal personale di assistenza
competente di Vorwerk.
• Non introdurre oggetti appuntiti tra i contatti elettrici.
• Non modificare i contatti.
• Evitare di continuare ad utilizzare l'aspiratore da tavolo quando questo è danneggiato.
• In caso di danneggiamento, mettersi in contatto con il proprio servizio di assistenza Vorwerk più vicino.
Pericolo di incendio!
• Non aspirare cenere rovente oppure mozziconi di sigaretta accesi.
Pericolo di esplosione!
• Non aspirare materiali esplosivi oppure facilmente infiammabili.
• Non gettare mai l'aspiratore da tavolo tra le fiamme vive.
Nota! Pericolo di danneggiamento causato da un utilizzo improprio!
• Utilizzare esclusivamente prodotti originali Vorwerk.
• Verificare, prima di attivare l'aspiratore da tavolo, che le indicazioni sulla corrente poste sul dispositivo coincidano con quelle della tensione di rete locale.
• Attivare la stazione di carica solo con tensione alternata e con un collegamento regolarmente installato da uno specialista.
• Utilizzare l'aspiratore da tavolo unicamente con la tensione alternata indicata
sull'identificativo macchina.
• Non utilizzare l'aspiratore da tavolo e la stazione di carica quando si notano dei
danneggiamenti.
• Estrarre il dispositivo di carica dalla presa prima di pulire il dispositivo di ricarica.
IT
8
Per la vostra sicurezza
• Caricare l'aspiratore da tavolo solo con il dispositivo di ricarica fornito in dotazione (Tipo: KSAA1200050W1EU) .
• Durante la carica il dispositivo di ricarica si riscalda. Questo costituisce un
evento nella norma.
• Evitare di conservare l'aspiratore da tavolo all'aperto e conservarlo al riparo
dall'umidità.
• Non collocare l'aspiratore da tavolo nei pressi di una fonte di calore (forno,
dispositivo di riscaldamento oppure caloriferi roventi).
• Spegnere l'aspiratore da tavolo dopo averlo utilizzato.
• La presa di caricamento è percorsa da bassa tensione (ca. 12 V) e pertanto
non è pericolosa.
• Durante l'aspirazione, non bloccare mai le aperture di sfiato dell'aria.
• Spegnere l'aspiratore da tavolo prima di ricaricarlo.
• Utilizzare l'aspiratore da tavolo unicamente con un'unità di filtro attiva.
• Durante la trapanatura di fori di fissaggio per la stazione di ricarica a muro (in
particolare nei pressi di una presa) si deve prestare particolare attenzione ad
evitare il rischio di folgorazione elettrica.
• Caricare e utilizzare l'aspiratore da tavolo a temperature tra i 5° C e i 35° C.
Conservarlo anche in questo intervallo di temperatura.
• Non cortocircuitare in nessun caso gli accumulatori! Non esporre gli accumulatori al fuoco, al calore o all'irradiazione diretta dei raggi solari.
Non utilizzare l'aspiratore da tavolo :
• Quando cade a terra e presenta danneggiamenti e guasti operativi visibili.
• Se la stazione di ricarica oppure il cavo della stazione di ricarica presenta
danneggiamenti.
L'aspiratore da tavolo è concepito unicamente per l'uso domestico. Vorwerk non
si assume alcuna responsabilità in caso di utilizzo inadeguato oppure non conforme alle istruzioni per l'uso.
Per la vostra sicurezza
9
L'aspiratore da tavolo soddisfa le norme di sicurezza del paese in cui è stato
distribuito da un'organizzazione autorizzata Vorwerk. Se si utilizza il dispositivo
in un altro paese non è possibile garantire il rispetto degli standard di sicurezza
locali. Vorwerk declina pertanto i rischi per la sicurezza derivanti per l'utente.
1.3
Gradi di pericolosità
• Per la vostra sicurezza, osservare anche le note di pericolo che si trovano nel
testo dei capitoli seguenti.
Le note di pericolo dei capitoli seguenti sono contraddistinte da un simbolo di avvertimento e/o da una segnalazione che corrisponde ad un grado di pericolosità:
Grado di
pericolosità
Simbolo di
avvertimento
Parola chiave
Possibili pericoli
3
Avvertenza!
- Pericolo di folgorazione
- Pericolo di incendio
- Pericolo di esplosione
2
Attenzione!
- Pericolo di lesione
1
Nota!
- Pericolo di danneggiamento
causato da un utilizzo
inadeguato
- Danni alle cose determinati
da un uso improprio
IT
10
Preparazione
2
Preparazione
L'aspiratore da tavolo può essere conservato comodamente su una stazione di
ricarica montata a parete oppure collocata sul tavolo. In questo modo l'aspiratore
da tavolo è pronto per l'uso in qualsiasi momento con i suoi accumulatori ricaricabili ad alta prestazione.
2.1
Caricare l'aspiratore da tavolo
L'aspiratore da tavolo deve essere caricato prima della
prima messa in funzione
Fig. 2.1 Posizionamento della stazione di
ricarica
Quando gli accumulatori sono vuoti, il display di funzionamento comincia a lampeggiare e il sistema di sicurezza (“cut off / stop automatico”) disattiva l'aspiratore da tavolo per impedire un danneggiamento degli accumulatori. Il display di
funzionamento continua quindi a funzionare per alcuni secondi.
4
Vi sono due possibilità di caricare il vostro aspiratore da tavolo:
1.
sulla stazione di ricarica
2.
senza stazione di ricarica, tramite contatto diretto del cavo di carica con
l'aspiratore da tavolo. Allo scopo è necessario aprire preventivamente la
stazione di ricarica.
2.1.1
Fig. 2.2 Allacciamento alla stazione di
ricarica
Caricare sulla stazione di ricarica
• Assicurarsi che l'aspiratore da tavolo sia scollegato.
• Collegare il cavo della corrente alla rete elettrica.
• Agganciare l'aspiratore da tavolo alla stazione di ricarica .
Preparazione
2.1.2
11
Caricare senza stazione di ricarica
• Assicurarsi che l'aspiratore da tavolo sia scollegato.
• Premere il perno sulla stazione di ricarica per aprire la stazione di ricarica.
• Inserire lo spinotto del dispositivo di carica sulla boccola corrispondente posta
sul manico dell'aspiratore da tavolo.
• Inserire quindi il dispositivo di carica nella presa.
Fig. 2.3 Aprire la stazione di ricarica
Il display di funzionamento mostra che l'aspiratore da tavolo viene caricato.
Il display di funzionamento si spegne non appena gli accumulatori sono completamente carichi (dopo ca. 4 ore). Per ottenere una carica ottimale è necessario
caricare l'aspiratore da tavolo fino ad estinguere il display di funzionamento.
2.2
Fig. 2.4 Caricare senza stazione di
ricarica
Collocare la stazione di ricarica
Selezionare il materiale di montaggio in base alla qualità della parete.
4
> 50 cm
4
Fig. 2.5 Sistemare la stazione di ricarica
• Per montare la stazione di ricarica a parete è necessario disporre di una
vite.
• Montare la vite al muro.
Preoccuparsi che la distanza dal pavimento corrisponda ad almeno 50 cm
• Collocare la stazione di ricarica con l'apertura prevista allo scopo sul gancio
oppure sulle viti.
È possibile collocare la stazione di ricarica anche su una superficie orizzontale
(es. tavolo o tavolo di lavoro).
IT
12
Utilizzo
3
Utilizzo
In questo capitolo si impareranno a conoscere le funzioni dell'aspiratore da tavolo.
Avvertenza! Pericolo di folgorazione
• Non aspirare mai acqua, altri liquidi oppure sostanze facilmente infiammabili con questo dispositivo. Aspirare le braci solo se completamente
raffreddate.
• Non immergere mai l'aspiratore da tavolo o l'apparecchio di ricarica in
acqua o altri liquidi.
3.1
Display di funzionamento
Il display di funzionamento vi mostra lo status dell'aspiratore da tavolo.
Display di funzionamento
Status
Display di funzionamento off
Off
Display di funzionamento on
Esercizio normale
Display di funzionamento on
Funzione Boost on
Il display di funzionamento
lampeggia brevemente
Si prega di caricare
Il display di funzionamento lampeggia
Processo di caricamento in corso
Display di funzionamento off
Procedimento di carica terminato
Il display di funzionamento
lampeggia velocemente
Malfunzionamento (vedi
Capitolo 5 Pagina 17)
Utilizzo
8
3.2
13
Attivare l'aspiratore da tavolo
• Premere l'interruttore di accensione/spegnimento per accendere l'aspiratore da tavolo.
3.3
Fig. 3.6 Attivare l'aspiratore da tavolo
Attivare la funzione Boost
• Premere l'interruttore di accensione/spegnimento per accendere l'aspiratore da tavolo.
• Tenere premuto l'interruttore di accensione/spegnimento per attivare la funzione di boost.
• Rilasciare l'interruttore di accensione/spegnimento per riportare l'aspiratore da
tavolo in modalità normale.
3.4
Disattivare l'aspiratore da tavolo
• Premere l'interruttore di accensione/spegnimento per disattivare l'aspiratore
da tavolo.
3.5
Conservare l'aspiratore da tavolo
Collocare l'aspiratore da tavolo nella stazione di ricarica in caso di inutilizzo. In
questo modo gli accumulatori non si indeboliranno.
Fig. 3.7 Conservazione dell'aspiratore da
tavolo
Se gli accumulatori dell'aspiratore da tavolo non sono completamente
vuoti, è previsto un tempo di carica normale. Se il display di funziona-
IT
14
Utilizzo
mento in seguito al collegamento con il dispositivo si avvia solo brevemente,
significa che gli accumulatori sono già scarichi.
L'efficiente sistema di carica dell'aspiratore da tavolo si disattiva automaticamente quando gli accumulatori sono completamente carichi.
L'aspiratore da tavolo può restare continuamente attaccato senza pericoli sulla
stazione di ricarica. L'apparecchio di ricarica si riscalda facilmente; si tratta di un
procedimento assolutamente nella norma.
Se si ha in proposito di non utilizzare per lungo tempo l'aspiratore da
tavolo (ad esempio in caso di ferie), estrarre l'apparecchio di carica dalla
presa per risparmiare corrente ed evitare un pericolo di incendio in se
guito a cortocircuiti causati da picchi di tensione o simili (es. in caso di
temporale).
Manutenzione
4
15
Manutenzione
Affinché l'aspiratore da tavolo funzioni in maniera ottimale e offra sempre il massimo delle prestazioni, pulire regolarmente l'aspiratore da tavolo. L'aspiratore da
tavolo è veloce e semplice da svuotare e può essere pulito in maniera igienica.
La camera di raccolta della polvere può essere estratta semplicemente con un
clic non appena si è in grado di vuotare l'aspiratore da tavolo senza sporcarsi le
mani. Nel capitolo seguente sarà possibile sapere come pulire l'aspiratore da
tavolo.
1
4.1
2
Fig. 4.8 Prelievo della camera di raccolta
polvere
5
Prelevare l'unità filtro
• Premere il pulsante di sblocco della camera di raccolta polvere e prelevare la camera di raccolta polvere dell'apparecchio.
• Conservare rivolta verso il basso l'apertura delle bocchette della camera di
raccolta polvere.
• Premere nuovamente il pulsante di sblocco e prelevare l'unità di filtro dalla
camera di raccolta polvere.
1
2
Fig. 4.9 Prelievo dell'unità di filtro
Nota!
In caso di prelievo del filtro può fuoriuscire polvere dalla camera di raccolta della
polvere.
• Conservare allo scopo la camera di raccolta della polvere con la
bocchetta rivolta verso il basso.
IT
16
Manutenzione
4.2
Svuotare la camera di raccolta della polvere
• Prelevare l'unità di filtro (vedi Capitolo 4.1 a Pagina 15).
• Vuotare il contenuto della camera di raccolta polvere in un bidone della
spazzatura.
• Se necessario, pulire la camera di raccolta della polvere con un panno umido e
lasciare asciugare la camera di raccolta della polvere prima di rimontarla.
1
Fig. 4.10 Vuotamento della camera di
raccolta polvere
4.3
2
1
5a
Utilizzare l'unità di filtro
Quando si utilizza l'unità di filtro, preoccuparsi che la cavità principale
dell'unità di filtro indichi il pulsante di sblocco sulla camera di raccolta della
polvere.
• Premere il pulsante di sblocco e spingere l'unità di filtro fino a battuta nella
camera di raccolta della polvere.
5
Fig. 4.11 Impiego dell'unità di filtro
Risoluzione problemi
5
17
Risoluzione problemi
Avvertenza! Pericolo di folgorazione e di lesione
• Mai eseguire autonomamente riparazioni ad un dispositivo.
Le riparazioni dei dispositivi elettrici possono essere eseguite
unicamente dal servizio di assistenza Vorwerk competente.
Se il vostro dispositivo non funziona correttamente, le cause possono essere le
seguenti:
Problema
Possibile causa e risoluzione
L'aspiratore da tavolo
non funziona.
Probabilmente gli accumulatori sono vuoti.
• Caricare l'aspiratore da tavolo.
L'aspiratore da tavolo non viene caricato correttamente:
• Assicurarsi che il cavo di caricamento, la stazione di
ricarica e l'aspiratore da tavolo siano collegati e che la
presa funzioni (il display di funzionamento sul manico
lampeggia e mostra che l'aspiratore da tavolo è in carica).
I punti di contatto sull'apparecchio e/o sul dispositivo
di ricarica sono probabilmente sporchi.
• Pulire i punti di contatto con uno strofinaccio asciutto.
Probabilmente l'aspiratore da tavolo era inserito
mentre si trovava nell'apparecchio di carica.
• Preoccuparsi che l'aspiratore da tavolo sia
disattivato per essere caricato.
IT
18
Risoluzione problemi
Problema
Possibile causa e risoluzione
Una volta effettuato
il contatto
dell'aspiratore da
tavolo con la stazione
di ricarica oppure
con l'apparecchio
di ricarica da
rete in posizione
stand-alone, il
processo di carica
non ha inizio
(non si presenta
alcun display di
funzionamento
pulsante).
• Assicurarsi che il cavo di caricamento, la stazione di
ricarica e l'aspiratore da tavolo siano collegati e che la
presa funzioni (il display di funzionamento sul manico
lampeggia e mostra che l'aspiratore da tavolo è in carica).
• Preoccuparsi che l'aspiratore da tavolo sia
disattivato per essere caricato.
Il display di
funzionamento
lampeggia
velocemente.
• L'aspiratore da tavolo si trova in modalità sicurezza;
questo può essere riconducibile ad una temperatura
eccessivamente elevata degli accumulatori.
• Estrarre dalla presa il dispositivo di carica dell'aspiratore da
tavolo e lasciarlo raffreddare.
Se il problema persiste, rivolgersi al
Centro di Assistenza Vorwerk.
L'aspiratore da
tavolo non aspira
affatto oppure non
più così bene come
prima e produce
rumori inusuali.
Probabilmente la bocchetta è intasata.
• Disattivare l'aspiratore da tavolo e liberare la bocchetta.
Probabilmente la camera di raccolta della polvere non è
stata collocata correttamente sull'aspiratore da tavolo.
• Collocare la camera di raccolta della polvere
ordinatamente sull'aspiratore da tavolo.
Probabilmente la camera di raccolta della polvere è piena.
• Vuotare la camera di raccolta della polvere.
Risoluzione problemi
Problema
Possibile causa e risoluzione
La polvere fuoriesce
dal dispositivo.
Probabilmente la camera di raccolta della polvere non
è stata collocata ordinatamente sul dispositivo.
• Collocare la camera di raccolta della polvere
correttamente sull'aspiratore da tavolo.
19
Probabilmente l'unità di filtro non è stata inserita
correttamente nella camera di raccolta della polvere.
• Collocare correttamente l'unità di filtro nella
camera di raccolta della polvere.
La camera di raccolta
della polvere non può
essere innestata.
• L'unità di filtro viene montata in posizione attorcigliata.
• Girare l'unità di filtro in modo che la cavità grande
sull'unità di filtro sia collocata a fianco del pulsante
di sblocco. (vedi anche Capitolo 4.3).
Nel caso in cui non sia possibile risolvere i guasti, rivolgersi al servizio di
assistenza Vorwerk (vedi Capitolo „8 Prestazioni di assistenza“ a Pagina 24).
IT
20
Smaltimento e tutela dell'ambiente
6
Smaltimento e tutela dell'ambiente
6.1
Smaltimento del dispositivo
In qualità di proprietari di un vecchio elettrodomestico o di un apparecchio elettronico usato (in base alla direttiva UE 2002/96/CE del 27 gennaio 2003 in merito
ai vecchi elettrodomestici o ai vecchi dispositivi elettronici del 16.3.2005) non vi
è concesso per legge di smaltire questo dispositivo oppure i relativi accessori
elettrici/elettronici attraverso i rifiuti domestici indifferenziati.
• Utilizzare al suo posto le strutture gratuite di conferimento previste allo scopo.
• Allo scopo vi preghiamo di informarvi presso l'amministrazione della vostra
città o del vostro comune.
6.2
Smaltimento degli accumulatori
Gli accumulatori integrati agli ioni di litio contengono
sostanze che possono danneggiare l'ambiente.
• Prelevare gli accumulatori prima di smaltire l'aspiratore da tavolo. Non gettare gli accumulatori tra i rifiuti
domestici, bensì conferirli presso un centro di raccolta ufficiale per batterie.
Smaltimento e tutela dell'ambiente
21
Potete conferire l'aspiratore da tavolo anche al Servizio
di Assistenza Vorwerk. Presso il Centro di Assistenza
verranno estratti gli accumulatori e smaltiti secondo le
norme ambientali.
Attenzione! Pericolo di lesione causato da accumulatori in esaurimento!
Gli accumulatori esauriti non possono essere portati a contatto con gli
occhi e le mucose.
• Lavarsi le mani e risciacquarsi gli occhi con acqua pulita. Se continuano
a presentarsi problematiche, contattare un medico.
6.3
Smaltimento dell'imballaggio.
L'imballaggio è una componente importante del nostro prodotto: Protegge i
nostri dispositivi in fase di trasporto da danni e riduce il rischio di un avaria del
dispositivo. Per questo motivo non possiamo rinunciare all'imballaggio. Nel caso
in cui sia necessario spedire o consegnare l'apparecchio al servizio di assistenza
o in seguito di riparazione durante il periodo di garanzia, l'imballaggio originale è
la protezione più sicura dai danni da trasporto.
Se tuttavia si desidera smaltire l'imballaggio, è possibile farlo in qualsiasi momento e senza limitazioni tramite le strutture regionali (campana della carta, campana
gialla, centro di riciclaggio, raccolta carta usata, ecc.).
Vorwerk incarica allo scopo concedenti di licenze autorizzati. Se avete altre domande, siete pregati di rivolgervi al vostro centro di assistenza corrispondente
(vedi Capitolo „8 Prestazioni di assistenza“ a Pagina 24).
IT
22
Smaltimento e tutela dell'ambiente
6.4
Informazioni sulla tutela ambientale
Proteggere la natura e l'ambiente: Con Vorwerk la tutela ambientale è
degli obiettivi fondamentali dell'azienda.
Minore imballaggio
Utilizziamo esclusivamente materiale ecocompatibile che in caso di smaltimento
corretto verrà riutilizzato. Siamo già impegnati nello sviluppo del risparmio di rifiuti per l'imballaggio e ci impegnamo per il suo riciclaggio e il suo smaltimento.
Risparmiare energia
I prodotti Vorwerk risparmiano l'ambiente: Consumano poca energia ad elevata
aspirazione.
Produzione ecocompatibile
In fase di produzione dei nostri prodotti poniamo particolare attenzione alla tutela
dell'ambiente. Utilizziamo materiali sintetici e tinte che possono essere riciclati.
Abbiamo volutamente rinunciato a ritardanti di fiamma che rovinano l'ambiente.
Per le nostre borse filtrate utilizziamo adesivi privi di solventi, carta non sbiancata
oppure materiale sintetico non dannoso. Le nostre istruzioni per l'uso vengono
prodotte da componenti boschive elaborate a livello sostenibile e sbiancate senza
ricorrere al cloro.
Smaltimento e tutela dell'ambiente
23
Materiale riutilizzabile
Il materiale dei nostri prodotti può essere riutilizzato in maniera pressoché completa. Inoltre rinunciamo all'impiego di PVC.
Durante la costruzione dei nostri prodotti, prestiamo attenzione al materiale
“genuino“:
I materiali utilizzati possono essere differenziati in un secondo momento senza
particolare dispendio energetico ricorrendo ad impianti moderni. Affinché sia possibile riciclare in modo ancora più facile, abbiamo contrassegnato in buona parte i
nostri elementi sintetici.
IT
24
Garanzia
7
Garanzia
Qualsiasi tipo di garanzia può essere prelevata dal buono d'ordine oppure dal
contratto d'acquisto.
8
Prestazioni di assistenza
I collaboratori del nostro servizio di assistenza telefonica sono a vostra
disposizione:
Telefono: 800-014457, Telefax: 02 33 489 595
da lunedì a venerdì 8.30-17.30.
Presenza su internet
www.folletto.it
Dati Tecnici
9
25
Dati Tecnici
Aspiratore da tavolo
Marchio di sicurezza
Confezione
Materiale sintetico termoformato riciclabile di alto valore
Motore
Motore DC che non richiede manutenzione a ca. 20.000 giri/min
Tensione in entrata
dispositivo di
carica da presa
Corrente alternata da 220-240 Volt a 50/60 Hertz
Tensione in entrata
dispositivo di
carica da presa
12 V DC +/- 10 %
Tipo dispositivo di
carica da presa
KSAA1200050W1EU
Potenza nominale
del motore
ca. 50 Watt
Portata max. dell'aria
9 Watt
Corrente max.
assorbita
12 l/s
Peso
750 g, senza stazione di ricarica e dispositivo di ricarica
Emissione di rumori
74 dBA (misurato in condizioni di campo
libero sul tavolo di lavoro)
Pacco accumulatori
agli ioni di litio
IT
Návod k použití
Stolní vysavaè Vorwerk
VC100
Úvodní poznámka
Srde n vám blahop ejeme ke stolnímu vysava i Vorwerk
Kobold!
Ten nejmenší p ístroj z palety výrobk firmy Vorwerk vás
bude po mnoho let doprovázet a p i jeho použití budete mít
radost z úklidu vaší domácnosti.
P ed spušt ním
• Pozorn si p e t te návod k použití, než použijete stolní
vysava poprvé.
• Uschovejte si návod k použití pro budoucí využití. Je
d ležitou sou ástí výrobku a je nutné jej p iložit k
výrobku, jestliže jej p enecháte jiným osobám.
Znaky a symboly
U textu naleznete uvedené symboly s následujícím
významem:
Výstražný symbol
Odkaz na zákaznický servis/
podporu spole nosti Vorwerk
Symbol pro radu
Odkaz na p ítomnost
spole nosti
Vorwerk na internetu
Obsah
Úvodní poznámka . . . . . . . . . . . . . . . . . . . . . . . . . . . . 2
5
Odstraòování poruch . . . . . . . . . . . . . . . . . . . 17
Pøehled výrobkù . . . . . . . . . . . . . . . . . . . . . . . . . . . . . 4
6
6.1
6.2
6.3
6.4
Likvidace a ochrana životního prostøedí . . . 20
Likvidace pøístroje . . . . . . . . . . . . . . . . . . . . . . . 20
Likvidace akumulátorù . . . . . . . . . . . . . . . . . . . . 20
Likvidace obalu. . . . . . . . . . . . . . . . . . . . . . . . . . 21
Informace o ochranì životního prostøedí . . . . . . 22
7
Záruka . . . . . . . . . . . . . . . . . . . . . . . . . . . . . . . . 24
8
Servisní výkony . . . . . . . . . . . . . . . . . . . . . . . . 24
9
Technické údaje . . . . . . . . . . . . . . . . . . . . . . . . 25
1
1.1
1.2
1.3
Pro vaši bezpeènost
................5
Použití v souladu s urèením . . . . . . . . . . . . . . . . . 5
Upozornìní na nebezpeèí . . . . . . . . . . . . . . . . . . . 6
Stupnì ohrožení . . . . . . . . . . . . . . . . . . . . . . . . . . 9
2
2.1
2.1.1
2.1.2
2.2
Pøíprava . . . . . . . . . . . . . . . . . . . . . . . . . . . . . . 10
Nabíjení stolního vysavaèe . . . . . . . . . . . . . . . .10
Nabíjení z nabíjecí stanice . . . . . . . . . . . . . . . .10
Nabíjení bez nabíjecí stanice . . . . . . . . . . . . . . . 11
Umístìní nabíjecí stanice . . . . . . . . . . . . . . . . . . 11
3
3.1
3.2
3.3
3.4
3.5
Ovládání . . . . . . . . . . . . . . . . . . . . . . . . . . . . . . 12
Indikátor funkce . . . . . . . . . . . . . . . . . . . . . . . . . 12
Zapnutí stolního vysavaèe . . . . . . . . . . . . . . . . . 13
Aktivace funkce Boost . . . . . . . . . . . . . . . . . . . . 13
Vypnutí stolního vysavaèe . . . . . . . . . . . . . . . . . 13
Uložení stolního vysavaèe . . . . . . . . . . . . . . . . 13
4
4.1
4.2
4.3
Údržba . . . . . . . . . . . . . . . . . . . . . . . . . . . . . . . 15
Vyjmutí filtraèní jednotky . . . . . . . . . . . . . . . . . . 15
Vyprázdnìní prachové komory . . . . . . . . . . . . . . 16
Nasazení filtraèní jednotky . . . . . . . . . . . . . . . . . 16
CZ
Pøehled výrobkù
Stolní vysavaè Kobold snadno vysaje nejrùznìjší polštáøe, se stejnomìrnì silným
výkonem na hladkém povrchu i v nesnadno pøístupných místech.
Stolní vysavaè lze vyprázdnit rychle a snadno. Obrázek s legendou znázoròuje
stolní vysavaè a jeho obslužné prvky.
Legenda
Pol.
Stolní vysavaè
VC100
8
Prachová komora
Odjišťovací tlaèítko pro
prachovou komoru
7
Síťová nabíjeèka
6
1
Nabíjecí stanice
Filtraèní jednotka
5
Vyfukovací otvor
Indikátor funkce
Vypínaè s funkcí Boost
4
2
3
1
Pro vaši bezpeènost
Nejvyšší možná bezpeènost náleží k vlastnostem výrobkù spoleènosti Vorwerk.
Bezpeènost stolního vysavaèe jako výrobku lze však zaruèit jen tehdy, pokud se
budete øídit pokyny této kapitoly.
1.1
Použití v souladu s urèením
Upozornìní!
Tento pøístroj není urèen k tomu, aby byl používán osobami
(vèetnì dìtí) s omezenými fyzickými, senzorickými
nebo duševními schopnostmi nebo s nedostateènými
zkušenostmi a/nebo vìdomostmi, ledaže by byly pod
dohledem osoby dbající na jejich bezpeènost nebo od ní
dostávaly pokyny, jak se má stolní vysavaè používat.
Dìti by mìly být pod dohledem, aby se zajistilo, že si
nebudou s pøístrojem hrát.
CZ
6
Pro vaši bezpeènost
1.2
Upozornìní na nebezpeèí
Upozornìní!
• Pozornì si pøeètìte návod k použití, než použijete stolní vysavaè
poprvé.
• Respektujte pøedevším následující pokyny.
• Uschovejte si návod k použití pro budoucí využití. Je dùležitou souèástí
stolního vysavaèe a je nutné jej pøiložit k výrobku, jestliže jej pøenecháte jiným
osobám.
Poškození pøístroje!
• Než zahájíte pøestrojení, èištìní a údržbu, stolní vysavaè vždy vypnìte a
vytáhnìte síťovou nabíjeèku ze zásuvky.
• Netahejte síťovou nabíjeèku ze zásuvky za pøipojovací kabel, nýbrž za vlastní
tìlo síťové nabíjeèky.
• Nikdy tímto pøístrojem nevysávejte vodu, jiné tekutiny nebo snadno vznìtlivé
látky. Popel vysávejte, až pokud je zcela vychladlý.
• Stolní vysavaè nebo nabíjecí stanici nikdy nevkládejte do vody nebo jiných
tekutin.
• Nepoužívejte stolní vysavaè ve vlhkém prostøedí.
• V žádném pøípadì nepoužívejte stolní vysavaè na mokrém povrchu nebo ve
venkovních prostorách.
• Nikdy neèistìte pøístroj nebo jeho elektrické pøíslušenství vodou nebo èisticími
pøístroji na bázi kapalin.
Pro vaši bezpeènost
7
Nebezpeèí úderu elektrickým proudem!
• Nikdy neprovádìjte opravy pøístroje sami. Opravy elektrických pøístrojù smí
vykonávat jen pøíslušný zákaznický servis spoleènosti Vorwerk.
• Do elektrických kontaktù nevkládejte ostré pøedmìty.
• Kontakty nepozmìòujte.
• Stolní vysavaè dále nepoužívejte, jestliže je poškozen.
• V pøípadì poškození se obraťte na nejbližší zákaznický servis spoleènosti
Vorwerk.
Nebezpeèí požáru!
• Nevysávejte žhavý popel nebo žhnoucí nedopalky cigaret.
Nebezpeèí výbuchu!
• Nevysávejte výbušné nebo snadno vznìtlivé látky.
• Nikdy nesmíte hodit stolní vysavaè do otevøeného ohnì.
Upozornìní! Nebezpeèí poškození následkem neodborného použití!
• Používejte výluènì originální výrobky spoleènosti Vorwerk.
• Než uvedete stolní vysavaè do provozu, zkontrolujte, zda se napìtí uvedené na
pøístroji shoduje s místním síťovým napìtím.
• Provozujte nabíjecí stanici jen se støídavým napìtím a na pøípojce øádnì
instalované odborníkem.
• Používejte stolní vysavaè výluènì se støídavým napìtím uvedeným na
typovém štítku.
• Nepoužívejte stolní vysavaè a síťovou nabíjeèku, pokud je na nich znatelné
poškození.
• Vytáhnìte síťovou nabíjeèku ze zásuvky, než zaènete síťovou nabíjeèku èistit.
CZ
8
Pro vaši bezpeènost
• Nabíjejte stolní vysavaè jen dodanou síťovou nabíjeèkou
(typ: KSAA1200050W1EU).
• Bìhem nabíjení se síťová nabíjeèka zahøívá. To je normální.
• Neukládejte stolní vysavaè venku a uchovávejte jej chránìný pøes vlhkostí.
• Neukládejte stolní vysavaè do blízkosti zdroje tepla (sporák, topidlo nebo horké
radiátory).
• Po každém použití stolní vysavaè opìt vypnìte.
• Zdíøka nabíjeèky vede nízké napìtí (cca 12 V) a není proto nebezpeèná.
• Bìhem vysávání nikdy neblokujte vyfukovací otvory.
• Pøed nabíjením stolní vysavaè vypnìte.
• Používejte stolní vysavaè výluènì s nasazenou filtraèní jednotkou.
• Pøi vrtání otvorù pro upevnìní nabíjecí stanice na stìnu (zvláštì v blízkosti
zásuvky) postupujte velmi opatrnì, aby nenastalo nebezpeèí úderu elektrickým
proudem.
• Nabíjejte a používejte stolní vysavaè za teplot 5° C až 35° C. V rozsahu tìchto
teplot jej také skladujte.
• Akumulátory v žádném pøípadì nespojujte nakrátko! Nevystavujte
akumulátory ohni, žáru ani pøímému sluneènímu záøení.
Stolní vysavaè nepoužívejte:
• Pokud spadl na zem a vykazuje zøetelné poškození nebo provozní poruchy.
• Pokud nabíjecí stanice nebo kabel nabíjecí stanice vykazují poškození.
Stolní vysavaè je urèen výluènì pro použití v domácnosti a domì. Pøi
neodborném použití nebo použití v rozporu s návodem k použití nepøevezme
spoleènost Vorwerk žádné ruèení.
9
Pro vaši bezpeènost
Stolní vysavaè splòuje bezpeènostní pøedpisy zemì, v které byl autorizovanou
organizací spoleènosti Vorwerk distribuován. Pokud je pøístroj používán v jiné
zemi, nelze garantovat dodržení místních bezpeènostních standardù. Spoleènost
Vorwerk proto odmítá takto vzniklá bezpeènostní rizika pro uživatele.
1.3
Stupnì ohrožení
• Pro vaši bezpeènost respektujte také upozornìní na nebezpeèí, která jsou
uvedena v textu následujících kapitol.
Upozornìní na nebezpeèí v následujících kapitolách rozpoznáte podle
výstražného symbolu a/nebo signálního slova, které uvádí stupeò nebezpeèí:
Stupeò
ohrožení
Výstražný
symbol
Signální slovo
3
Varování!
2
Pozor!
1
Upozornìní!
Možná nebezpeèí
- Nebezpeèí úderu
elektrickým proudem
- Nebezpeèí požáru
- Nebezpeèí výbuchu
- Nebezpeèí poranìní
- Nebezpeèí poškození
následkem neodborného
použití
- Vìcné poškození následkem
neodborného použití
CZ
10
Pøíprava
2
Pøíprava
Mùžete stolní vysavaè pohodlnì ukládat do nabíjecí stanice, která je
namontovaná na stìnì nebo stojí na stole. Takto je stolní vysavaè s výkonnými
dobíjecími akumulátory kdykoliv pøipraven k použití.
2.1
Nabíjení stolního vysavaèe
Stolní vysavaè je nezbytné pøed prvním uvedením do provozu
nabít
Obr. 2.1 Umístìní nabíjecí stanice
Pokud jsou akumulátory prázdné, zaène indikátor funkce blikat a bezpeènostní
systém ("cut off / automatické zastavení") stolní vysavaè vypne, aby se zabránilo
poškození akumulátorù. Indikátor funkce poté ještì nìkolik sekund dále bliká.
4
Jsou dvì možnosti, jak stolní vysavaè nabít:
1.
Z nabíjecí stanice
2.
Bez nabíjecí stanice, pøímým spojením kabelu nabíjeèky se
stolním vysavaèem. K tomu je nutné nabíjecí stanici pøedtím otevøít.
2.1.1
Nabíjení z nabíjecí stanice
• Ujistìte se, že je stolní vysavaè vypnutý.
• Pøipojte síťovou nabíjeèku do sítì.
• Posaïte stolní vysavaè na nabíjecí stanici .
Obr. 2.2 Nasazení na nabíjecí stanici
11
Pøíprava
2.1.2
Nabíjení bez nabíjecí stanice
• Ujistìte se, že je stolní vysavaè vypnutý.
• Stisknìte èep na nabíjecí stanici, aby se otevøela.
• Zasuòte malý konektor síťové nabíjeèky do pøíslušné zdíøky v rukojeti stolního
vysavaèe.
• A následnì zasuòte síťovou nabíjeèku do zásuvky.
Obr. 2.3 Otevøení nabíjecí stanice
Indikátor funkce signalizuje, že se stolní vysavaè nabíjí.
Indikátor funkce zhasne, jakmile jsou akumulátory plnì nabity (za zhruba 4
hodiny). Aby se dosáhlo optimálního nabití, musí se stolní vysavaè nechat nabíjet
až do zhasnutí indikátoru funkce.
Obr. 2.4 Nabíjení bez nabíjecí stanice
2.2
Umístìní nabíjecí stanice
Vyberte upevòovací materiál podle charakteru stìny.
4
> 50 cm
4
Obr. 2.5 Zavìšení nabíjecí stanice
• K upevnìní nabíjecí stanice na stìnu potøebujete jeden šroub.
• Upevnìte šroub do stìny.
Dbejte, aby vzdálenost k podlaze èinila alespoò 50 cm
• Posaïte nabíjecí stanici pøíslušným otvorem na hák resp. šrouby.
Nabíjecí stanici mùžete také postavit na vodorovnou plochu (napø. stùl nebo
pracovní desku).
CZ
12
Ovládání
3
Ovládání
V této kapitole se seznámíte s funkcemi stolního vysavaèe.
Varování! Nebezpeèí úderu elektrickým proudem
• Nikdy tímto pøístrojem nevysávejte vodu, jiné tekutiny nebo snadno
vznìtlivé látky. Popel vysávejte, až pokud je zcela vychladlý.
• Stolní vysavaè nebo nabíjecí stanici nikdy nevkládejte do vody nebo
jiných tekutin.
3.1
Indikátor funkce
Indikátor funkce signalizuje stav stolního vysavaèe.
Indikátor funkce
Stav
Indikátor funkce nesvítí
Vypnuto
Indikátor funkce svítí
Bìžný provoz
Indikátor funkce svítí
Funkce Boost zapnuta
Indikátor funkce krátce bliká
Prosím nabít
Indikátor funkce pulzuje
Proces nabíjení probíhá
Indikátor funkce nesvítí
Proces nabíjení ukonèen
Indikátor funkce rychle bliká
Chybná funkce (viz kapitola 5 strana 17)
Ovládání
8
3.2
13
Zapnutí stolního vysavaèe
• Stisknutím vypínaèe stolní vysavaè zapnete.
3.3
Obr. 3.6 Zapnutí stolního vysavaèe
Aktivace funkce Boost
• Stisknutím vypínaèe stolní vysavaè zapnete.
• Podržením stisknutého vypínaèe aktivujete funkci Boost.
• Jakmile vypínaè pustíte, bude stolní vysavaè opìt vysávat v bìžném režimu.
3.4
Vypnutí stolního vysavaèe
• Stisknutím vypínaèe stolní vysavaè vypnete.
3.5
Uložení stolního vysavaèe
Vložte stolní vysavaè do nabíjecí stanice, jakmile jej nebudete používat.
Akumulátory se tím neoslabí.
Pokud nejsou akumulátory stolního vysavaèe úplnì prázdné, je doba
nabíjení obvykle krátká. Pokud se indikátor funkce po pøipojení pøístroje
jen krátce rozsvítí, znamená to, že jsou akumulátory již nabity.
Obr. 3.7 Uložení stolního vysavaèe
CZ
14
Ovládání
Úèinný nabíjecí systém stolního vysavaèe se automaticky vypne, jakmile jsou
akumulátory plnì nabity.
Stolní vysavaè mùže bez nebezpeèí zùstat trvale spojen s nabíjecí stanicí. Síťová
nabíjeèka se bude mírnì zahøívat; jedná se o zcela normální jev.
Jestliže máte v úmyslu stolní vysavaè delší dobu nepoužívat
(napø. dovolená), vytáhnìte síťovou nabíjeèku ze zásuvky, abyste
šetøili proud a pøedešli nebezpeèí požáru následkem zkratù
zpùsobenými napìťovými špièkami apod. (napø. pøi bouøce).
15
Údržba
4
Údržba
Aby váš stolní vysavaè optimálnì fungoval a mìli jste z nìj stále radost,
pravidelnì stolní vysavaè èistìte. Stolní vysavaè lze rychle a snadno vyprázdnit
a hygienicky vyèistit. Prachovou komoru lze snadno odebrat jedním pohybem,
takže mùžete stolní vysavaè vyprázdnit, aniž byste si zašpinili ruce. V následující
kapitole se dozvíte, jak se stolní vysavaè èistí.
1
2
Obr. 4.8 Vyjmutí prachové komory
4.1
Vyjmutí filtraèní jednotky
• Stisknìte odjišťovací tlaèítko prachové komory a vyjmìte prachovou
komoru z pøístroje.
• Tryskový otvor prachové komory držte smìrem dolù.
• Stisknìte znovu odjišťovací tlaèítko a vyjmìte filtraèní jednotku z prachové
komory.
5
1
2
Obr. 4.9 Vyjmutí filtraèní jednotky
Upozornìní!
Pøi vyjmutí filtru mùže z prachové komory vypadávat prach.
• Držte proto prachovou komoru tryskou smìrem dolù.
CZ
16
Údržba
4.2
Vyprázdnìní prachové komory
• Vyjmìte filtraèní jednotku (viz kapitola 4.1 na stranì 15).
• Vyprázdnìte obsah prachové komory do odpadkového koše.
• Pokud je tøeba, oèistìte prachovou komoru vlhkou utìrkou a nechejte
prachovou komoru pøed vložením zpìt úplnì vyschnout.
1
Obr. 4.10 Vyprázdnìní prachové komory
4.3
2
1
5a
Nasazení filtraèní jednotky
Pøi vkládání filtraèní jednotky dbejte, aby vìtší žlábek
filtraèní jednotky smìøoval k odjišťovacímu tlaèítku na prachové komoøe .
• Stisknìte odjišťovací tlaèítko a filtraèní jednotku zasuòte až na doraz do
prachové komory.
5
Obr. 4.11 Vložení filtraèní jednotky
Odstraòování poruch
5
17
Odstraòování poruch
Varování! Nebezpeèí úderu elektrickým proudem a nebezpeèí
poranìní
• Nikdy neprovádìjte opravy pøístroje sami.
Opravy elektrických pøístrojù smí vykonávat jen pøíslušný
zákaznický servis spoleènosti Vorwerk.
Pokud by váš pøístroj nìkdy nefungoval správnì, mùže to mít následující pøíèiny:
Porucha
Možná pøíèina a odstranìní
Stolní vysavaè
nefunguje.
Možná jsou vybité akumulátory.
• Stolní vysavaè nabijte.
Stolní vysavaè se nenabíjí správnì:
• Ujistìte se, že jsou spojeny síťová nabíjeèka s nabíjecí stanicí
a stolním vysavaèem a že zásuvka funguje (Indikátor funkce
na rukojeti pulzuje a signalizuje, že se stolní vysavaè nabíjí).
Kontakty na pøístroji a/nebo na síťové
nabíjeèce jsou možná zneèištìny.
• Vyèistìte kontakty suchou utìrkou.
Možná byl stolní vysavaè zapnutý, zatímco
se nacházel v nabíjecí stanici.
• Dbejte, aby byl stolní vysavaè pøi nabíjení vypnutý.
CZ
18
Odstraòování poruch
Porucha
Možná pøíèina a odstranìní
Po spojení
stolního vysavaèe
s nabíjecí stanicí
resp. samostatnou
síťovou nabíjeèkou
se nezahájí proces
nabíjení (indikátor
funkce nepulzuje).
• Ujistìte se, že jsou spojeny síťová nabíjeèka s nabíjecí stanicí
a stolním vysavaèem a že zásuvka funguje (Indikátor funkce
na rukojeti pulzuje a signalizuje, že se stolní vysavaè nabíjí).
• Dbejte, aby byl stolní vysavaè pøi nabíjení vypnutý.
Indikátor funkce
rychle bliká.
• Stolní vysavaè se nachází v bezpeènostním režimu; to
mùže být vyvoláno pøíliš vysokou teplotou akumulátorù.
• Vytáhnìte síťovou nabíjeèku stolního vysavaèe ze zásuvky a
nechejte stolní vysavaè zchladit.
Jestliže problém setrvává, obraťte se prosím na
zákaznický servis spoleènosti Vorwerk.
Stolní vysavaè vùbec
nevysává nebo již
nevysává tak dobøe
jako døíve, vydává
neobvyklé zvuky.
Tryska je možná ucpaná.
• Stolní vysavaè vypnìte a trysku uvolnìte.
Je možné, že prachová komora nebyla
nasazena na stolní vysavaè správnì.
• Nasaïte prachovou komoru na stolní vysavaè správnì.
Možná je prachová komora plná.
• Vyprázdnìte prachovou komoru.
Prach uniká z
pøístroje.
Je možné, že prachová komora nebyla
nasazena na pøístroj øádnì.
• Nasaïte prachovou komoru na stolní vysavaè øádnì.
Je možné, že filtraèní jednotka nebyla
vložena do prachové komory øádnì.
• Vložte filtraèní jednotku správnì do prachové komory.
Odstraòování poruch
Porucha
Možná pøíèina a odstranìní
Prachovou komoru
nelze do pøístroje
zaklapnout.
• Filtraèní jednotka je vložena obrácenì.
• Otoète filtraèní jednotku tak, aby velký žlábek na
filtraèní jednotce ležel na stranì odjišťovacího
tlaèítka. (viz také kapitola 4.3).
19
Pokud nelze poruchy odstranit, obraťte se na zákaznický servis spoleènosti
Vorwerk (viz kapitola „8 Servisní výkony“ na stranì 24).
CZ
20
Likvidace a ochrana životního prostøedí
6
Likvidace a ochrana životního prostøedí
6.1
Likvidace pøístroje
Jako majiteli elektrického nebo elektronického vysloužilého pøístroje vám ze
zákona (podle smìrnice EU 2002/96/ES z 27. ledna 2003 o použitých elektrických
nebo elektronických pøístrojích a podle zákona o elektrických nebo elektronických
pøístrojích z 16.3.2005) není dovoleno zlikvidovat tento pøístroj nebo jeho
elektrické/elektronické pøíslušenství jako netøídìný domovní odpad.
• Místo toho využijte k tomu urèených možností odevzdání zdarma.
• Informujte se o tom na magistrátu vašeho mìsta nebo obce.
6.2
Likvidace akumulátorù
Integrované lithium-ionové akumulátory obsahují látky,
které mohou ohrozit životní prostøedí.
• Akumulátory vyjmìte, než stolní vysavaè zlikvidujete.
Za tímto úèelem odpojte pøístroj ze sítì. Nevyhazujte
akumulátory do domovního odpadu, nýbrž je
odevzdejte na oficiálním sbìrném místì pro baterie.
Likvidace a ochrana životního prostøedí
21
Také mùžete stolní vysavaè odevzdat zákaznickému
servisu spoleènosti Vorwerk. Tam budou akumulátory
vyjmuty a ekologicky zlikvidovány.
Pozor! Nebezpeèí poranìní vyteklými akumulátory!
Vyteklé akumulátory se nesmí dostat do styku s oèima a sliznicemi.
• Umyjte si ruce a oèi vypláchnìte èistou vodou. Jestliže potíže
pøetrvávají, vyhledejte lékaøe.
6.3
Likvidace obalu
Obal je dùležitý díl našeho výrobku: Chrání naše pøístroje pøi transportu pøed
poškozením a snižuje riziko vypadnutí pøístroje. Proto se nemùžeme obalu
zøíci. Pro pøípad, že byste museli pøístroj bìhem záruèní doby nebo také po ní
odevzdat nebo zaslat do opravy nebo zákaznickému servisu, je originální obal
nejbezpeènìjší ochranou pøed poškozením pøi transportu.
Pokud byste chtìli obal pøesto zlikvidovat, mùžete tak kdykoliv a bez omezení
uèinit formou vašich regionálních zaøízení (popelnice pro starý papír, žlutá
popelnice, sbìrný dvùr, sbìr starého papíru atd.).
Spoleènost Vorwerk tímto povìøuje ze zákona autorizované poskytovatele
licence. Jestliže máte dotazy, obraťte se prosím na pøíslušné servisní støedisko
(viz kapitola „8 Servisní výkony“ na stranì 24).
CZ
22
Likvidace a ochrana životního prostøedí
6.4
Informace o ochranì životního prostøedí
Chraòte pøírodu a životní prostøedí: U spoleènosti Vorwerk je ochrana životního
prostøedí dùležitým podnikatelským cílem.
Ménì obalù
Používáme výluènì ekologický materiál, který je pøi správné likvidaci opìt
recyklován. Již pøi vývoji se úèastníme snižování odpadu z obalù a zasazujeme se
za jeho likvidaci a recyklaci.
Šetøení energií
Výrobky spoleènosti Vorwerk šetøí životní prostøedí: Spotøebovávají jen málo
energie za vysokého sacího výkonu.
Ekologická výroba
Pøi výrobì našich výrobkù klademe velký dùraz na ochranu životního prostøedí.
Používáme recyklovatelné plasty a barvy. Vìdomì nepoužíváme ekologicky
škodlivé látky zpomalující hoøení.
Pro naše filtraèní sáèky používáme lepidla neobsahující rozpouštìdla, nebìlený
papír nebo nezávadné plasty. Naše návody k použití jsou vyrábìny z lesních
porostù obhospodaøovaných tak, aby byl zajištìn jejich trvale udržitelný rozvoj, a
bìleny bez chlóru.
Likvidace a ochrana životního prostøedí
23
Recyklovatelný materiál
Materiál našich výrobkù lze témìø všechen recyklovat. V maximální možné míøe
jsme se vzdali použití PVC.
Pøi konstrukci našich výrobkù dbáme, aby materiál byl „jednotného druhu“:
Použité látky lze pozdìji bez velkého vynaložení energie v moderních zaøízeních
opìt látkovì separovat. Aby je bylo možné recyklovat ještì snadnìji, vìtšinu
našich plastových konstrukèních dílù jsme oznaèili.
CZ
24
Záruka
7
Záruka
Pøípadné záruèní výkony naleznìte prosím ve vaší objednávce resp.
kupní smlouvì.
8
Servisní výkony
Pracovníci naší telefonní služby vám rádi poskytnou pomoc:
telefon: Zelená linka: 800 168 987
Pondìlí až pátek: 08:00 - 18:00 hodin
Pøítomnost na internetu
www.vorwerk.cz
25
Technické údaje
9
Technické údaje
Stolní vysavaè
Bezpeènostní znak
Kryt
Kvalitní recyklovatelný tepelnì tvarovaný plast
Motor
Bezúdržbový stejnosmìrný motor s otáèkami cca 20 000 ot/min
Vstupní napìtí
síťové nabíjeèky
220-240 voltù støídavého napìtí 50/60 hertzù
Výstupní napìtí
síťové nabíjeèky
12 V DC +/- 10 %
Typ síťové nabíjeèky
KSAA1200050W1EU
Jmenovitý
výkon motoru
cca 50 wattù
Max. vzdušný výkon
9 wattù
Max. objemový
proud
12 l/s
Hmotnost
750 g, bez nabíjecí stanice a síťové nabíjeèky
Emise hluku
74 dBA (mìøeno za podmínek volného pole na pracovním stole)
Soustava
akumulátorù
lithium-ionové
CZ
使用说明
Vorwerk 充电式无线吸尘器
VC100
前言
欢迎使用 Vorwerk 充电式无线吸尘器,祝您使用愉快!
来自 Vorwerk 家族的最新产品将在您身边陪伴多年,为您的
家务清洁带来诸多乐趣。
图示和符号
说明书中用到的符号表示以下含义:
警告
使用前
• 第一次使用本品前,请仔细阅读使用说明。
• 请保存该说明书以备日后使用。说明书是本品的重要组成
部分,如果您将产品转交他人,必须附上说明书。
参阅 Vorwerk 售后服务与支持
提示标志
参阅 Vorwerk
网上咨询
Inhalt
前言
......................................2
产品概况. . . . . . . . . . . . . . . . . . . . . . . . . . . . . . . . . . . . . 4
1
1.1
1.2
1.3
注意安全
...........................5
按规定使用 . . . . . . . . . . . . . . . . .5
危险提示 . . . . . . . . . . . . . . . . . .6
危险等级 . . . . . . . . . . . . . . . . . .9
准备工作 . . . . . . . . . . . . . . . . . . . . . . . . . . . . . . 10
2
2.1 给充电式无线吸尘器充电 . . . . . . . . . 10
2.1.1 在充电站上充电 . . . . . . . . . . . . . 10
2.1.2 不在充电站上充电 . . . . . . . . . . . . 11
2.2 放置充电站 . . . . . . . . . . . . . . . . 11
3
3.1
3.2
3.3
3.4
3.5
使用 . . . . . . . . . . . . . . . . . . . . . . . . . . . . . . . . . . 12
功能指示灯 . . . . . . . . . . . . . . . . 12
开启充电式无线吸尘器 . . . . . . . . . . 13
激活增压功能 . . . . . . . . . . . . . . . 13
关闭充电式无线吸尘器 . . . . . . . . . . 13
保存充电式无线吸尘器 . . . . . . . . . . . 13
4
4.1
4.2
4.3
保养 . . . . . . . . . . . . . . . . . . . . . . . . . . . . . . . . . . 15
取出过滤单元 . . . . . . . . . . . . . . 15
清空灰尘贮存室 . . . . . . . . . . . . . . 16
安装过滤单元 . . . . . . . . . . . . . . . 16
5
故障排除 . . . . . . . . . . . . . . . . . . . . . . . . . . . . . . . 17
6
6.1
6.2
6.3
6.4
废料处理和环境保护 . . . . . . . . . . . . . . . . . . . . . . 19
器具废料的处理 . . . . . . . . . . . . . . 19
蓄电池处理 . . . . . . . . . . . . . . . . 19
包装处理 . . . . . . . . . . . . . . . . . 20
关于环境保护的信息 . . . . . . . . . . . . 21
7
保障 . . . . . . . . . . . . . . . . . . . . . . . . . . . . . . . . . . 23
8
客户服务 . . . . . . . . . . . . . . . . . . . . . . . . . . . . . . . 23
9
技术数据 . . . . . . . . . . . . . . . . . . . . . . . . . . . . . . . 24
CN
产品概况
利用充电式无线吸尘器可以毫不费力地给各种垫子吸尘,用于光滑平面和窄角时
效果同样显著。
此吸尘器可便捷快速进行清空。下面的图片及说明展示的是充电式无线吸尘器及
其工作部件。
图片说明
位置
充电式无线吸尘器
VC100
8
灰尘贮存室
灰尘贮存室锁键
1
7
电源充电器
6
充电站
过滤单元
5
排气口
功能指示灯
带增压功能开 / 关键
4
2
3
1
注意安全
Vorwerk 产品的特征之一就是实现最大程度上的安全。您只有重视此章节的内容
时,本品的产品安全性才能得到保证。
1.1
按规定使用
提示
提示!
身体、感官或精神上存在缺陷者、缺乏经验和 / 或缺乏认知
能力者(包括儿童)不得
不得使用该器具,除非在其人身安全负
责人员的监督或指导下。
应监督儿童以保证他们不会摆弄本产品。
CN
6
注意安全
1.2
危险提示
提示!
• 第一次使用
本品前,请仔细阅读使用说明。
• 请特别注意以下提示。
• 请保存该说明书以备日后使用。说明书是本品的重要组成部分,如果您将产品
转交他人,必须附上说明书。
器具损坏!
• 在对本品进行任何装配、清洁和保养工作前请先关闭本品并将电源充电器拔
出。
• 将电源充电器从插座上拔出时,请拔电源充电器而不是拔连接导线。
• 请不要用本品吸取水、其他液体或易燃物。灰烬完全冷却后才能吸取。
• 切勿将充电式无线吸尘器或其充电站浸入水或其他液体中。
• 切勿在潮湿环境中使用本品。
• 切勿在潮湿的表面或室外使用本品。
• 切勿用水或液体洗涤剂清洁本器具或其带电零件。
注意安全
7
有触电危险!
• 切勿自行维修器具。电气设备的维修仅允许由 Vorwerk 相关客户服务部门执
行。
• 切勿将尖锐物插入电触点。
• 切勿改变触点连接。
• 如果本品已损坏请勿再使用。
• 本品损坏时请与离您所处位置最近的 Vorwerk 客户服务部门联系。
有着火危险!
• 切勿用本品吸取任何灼热灰烬或未熄灭的烟蒂。
存在爆炸危险!
• 切勿用本品吸取任何易燃易爆物。
• 请勿将本品投入火中。
提示!违反操作规程使用本品将有损坏的危险!
• 请使用 Vorwerk 独家原装产品。
• 使用本品前,请先检查器具说明上的电压与本地电源电压是否一致。
• 只能在交流电压上使用充电站,并在由专业人员正确安装的电路上使用。
• 只能在型号牌上规定的交流电压下才能使用本品。
• 若充电式无线吸尘器和电源充电器上存在明显损坏,请勿使用。
• 清洁电源充电器前,请先将电源充电器从电源插头上拔下。
• 只能用标配的电源充电器给充电式无线吸尘器充电
(型号:KSAA1200050W1EU).
• 充电时电源充电器微微发热。此为正常现象。
• 切勿将本品置于室外,保存时请注意防潮。
CN
8
注意安全
•
•
•
•
•
•
•
切勿将本品置于热源(炉灶、取暖器或高温暖气片)附近。
每次使用后请关闭本品。
充电插口仅带低电压(约12 V),因此无危险。
吸尘时请勿堵塞排气口。
充电前请先关闭充电式无线吸尘器。
装好过滤单元后才能使用吸尘器。
要在墙上给充电站钻固定孔时(特别是在插座附近),请尤为小心,以避免触
电危险。
• 请在 5° C 至 35°C 的温度范围内使用本品和给本品充电。也在此温度范围
内对本品进行保存。
• 切勿使蓄电池短路!切勿将蓄电池投入火、高温中,或置于阳光直射处。
出现下列情况时请勿使用本品:
• 本品掉落到地上并显示出明显损坏或运行故障时。
• 充电站或充电站电线出现损坏时。
本品只能用于家务和家用。Vorwerk 对违反操作规程或不符合使用说明的使用不
负任何责任。
在通过授权的 Vorwerk 组织进行该充电式无线吸尘器经销的国家,本品符合其安
全规定。在其他国家使用本品时,则不能保证遵守其安全标准。因此,由此对使
用者造成的安全危险,Vorwerk 不对其承担责任。
9
注意安全
1.3
危险等级
• 为了您的安全,请也对下述章节中的危险提示加以重视。
对于下述章节中的危险提示,您可以通过警告符号和 / 或信号文字了解到这些符
号和文字所展示的是不同的危险等级。
危险等级
警告
信号文字
可能发生的危险
3
警告!
- 有触电危险
- 有着火危险
- 有爆炸危险
2
小心!
- 存在受伤危险
1
提示!
- 违反操作规程进行使
用存在损坏的危险
- 违反操作规程进行使
用引起的财产损害
CN
10
准备工作
2
准备工作
您可轻松将本品存放于装配在墙上或放置在桌上的充电站上。吸尘器的蓄电池功
率强劲且可反复充电,因此能随时投入使用。
2.1
给充电式无线吸尘器充电
首次使用前,本品必须完全充电。
蓄电池没电时,功能指示灯开始闪烁,安全系统(“切断 / 自动停止”)会关闭
充电式无线吸尘器,以避免蓄电池损坏。功能指示灯会继续闪烁数秒。
图片 2.1 充电站的放置
有两种方式可为本充电式无线吸尘器充电:
1.
在充电站上充电
2.
不用充电站,通过充电线缆与
4
2.1.1
在充电站上充电
• 请先确认充电式无线吸尘器已经关闭。
• 将电源充电器 与电源连接。
• 将充电式无线吸尘器放到充电站上 。
图片 2.2 放置在充电站上
准备工作
2.1.2
•
•
•
•
11
不在充电站上充电
请先确认充电式无线吸尘器已经关闭。
按下充电站上的塞子以打开充电站。
将电源充电器上的小插头插入充电式无线吸尘器把手上相应的插口中。
然后将电源充电器插到电源插座上。
图片 2.3 打开充电站
功能指示灯显示充电式无线吸尘器已开始充电。
蓄电池完全充电完毕(用时约 4 小时),功能指示灯即熄灭。为达到理想的充电
效果,充电式无线吸尘器必须一直充电直至到功能指示灯熄灭。
2.2
放置充电站
根据您家中墙壁的性质选择适合的固定材料。
图片 2.4 不在 充电站上充电
• 要把充电站 固定在墙上,您需要一颗螺钉。
• 将螺钉固定在墙上。
注意,螺钉距离地面至少 50 厘米。
• 通过为固定充电站而设计的孔洞可将充电站挂在钩子或螺钉上。
4
您也可以把充电站放置在水平平面(如桌子或工作台)上。
> 50 cm
4
图片 2.5 挂上充电站
CN
12
使用
3
使用
在这一章中您将了解本品的各种功能。
警告!有触电危险
• 请不要用本品吸取水、其他液体或易燃物。灰烬完全冷却后才能吸取。
• 切勿将桌面吸尘器或其充电设备浸入水或其他液体中。
3.1
功能指示灯
功能指示灯显示您的吸尘器的各种状态。
功能指示灯
状态
功能指示灯灭
关闭
功能指示灯亮
正常运行
功能指示灯亮
增压功能开启
功能指示灯短暂闪烁
请充电
功能指示灯跳动
正在充电
功能指示灯灭
充电结束
功能指示灯快速闪烁
功能故障(参见第 17 页第 5 章)
13
使用
8
3.2
开启充电式无线吸尘器
• 按下开 / 关键
3.3
图片 3.6 启动桌面吸尘器
,以开启充电式无线吸尘器。
激活增压功能
• 按下开 / 关键 ,以开启充电式无线吸尘器。
• 长按开 / 关键,增压功能即被激活。
• 放开开 / 关键,充电式无线吸尘器即重新在标准模式下工作。
3.4
关闭充电式无线吸尘器
• 按下 开 / 关键,以关闭充电式无线吸尘器。
3.5
保存充电式无线吸尘器
不再使用充电式无线吸尘器时,即将其放到充电站上。这样蓄电池电力才不会减
弱。
如果吸尘器蓄电池的电力还没有完全用完,
则充电时间短属正常情况。如果功能指示灯在器具接通电源
后只亮起较短时间,说明蓄电池已经 充满。
CN
图片 3.7 存放桌面吸尘器
14
使用
蓄电池完全充电完毕后,吸尘器的有效充电系统会自动关闭。
充电式无线吸尘器静止放置在充电站上无危险。电源充电器会微微发热,这属于
完全正常的过程。
如果您打算长时间不使用充电式无线吸尘器 (如度假期间),请将电源
充电器从插座上拔下,以节约电力并防止 由电压高峰或诸如此类(例如
暴风雨天气)情况导致短路而引起的火灾 危险。
15
保养
4
保养
为了您的充电式无线吸尘器能够实现最优操作并始终给您带来愉悦,请定期清洁
充电式无线吸尘器。此充电式无线吸尘器可便捷快速地进行清空,并能进行卫
生清洁。可轻松取下灰尘贮存室,以便您不用弄脏双手就能清空充电式无线吸尘
器。在接下来的一章中,您将了解如何清洁充电式无线吸尘器。
1
2
4.1
取出过滤单元
• 按下灰尘贮存室 的锁键 ,将灰尘贮存室从器具上取下。
• 将灰尘贮存室的喷嘴口向下。
• 再次按下锁键,将过滤单元 从灰尘贮存室中取出。
图片 4.8 取下灰尘贮存室
提示!
取出过滤单元时可能有灰尘从贮存室中掉出。
• 因此请喷嘴朝下握住贮存室。
5
1
2
图片 4.9 取出过滤单元
CN
16
保养
4.2
清空灰尘贮存室
• 取下过滤单元(参见第 15 页 4.1 章)。
• 将灰尘贮存室 里的东西倒进垃圾桶。
• 如有必要,用湿布清洁灰尘贮存室,并在装配前使其完全晾干。
1
图片 4.10
清空灰尘贮存室
4.3
2
1
5a
安装过滤单元 时请注意,将过滤单元的较大凹口
对准灰尘贮存室上 的锁键 。
• 按下锁键并推动过滤单元直至灰尘贮存室的止动部位。
。
5
图片 4.11
安装过滤单元
安装过滤单元
17
故障排除
5
故障排除
警告!有触电和受伤危险
• 切勿自行维修器具。电气设备的维修仅允许由 Vorwerk 相关客户服务部
门执行。
如果您的器具不能正常工作,可能是由以下原因引起:
故障
可能的原因和排除方法
充电式无线吸尘
器不能运行。
可能因为蓄电池无电量。
• 给充电式无线吸尘器充电。
充电式无线吸尘器不能正确充电:
• 请确认电源充电器与充电站和充电式无线吸尘器
已连接,且电源插座正常 (把手上的功能指示灯
跳动显示充电式无线吸尘器正在充电)。
器具和 / 或电源充电器上的连接处可能被污染。
• 用干布清洁这些连接处。
可能因为充电式无线吸尘器在充电中时被开启。
• 请注意充电前先关闭充电式无线吸尘器
将充电式无线吸尘
器与充电站或电源充
电器单独连接后没
有开始充电(功能指
示灯没有跳动)。
• 请确认,电源充电器已与充电站和充电式无线吸
尘器连接,且电源插座正常(把手上的功能指示灯
跳动显示充电式无线吸尘器正在充电)。
• 请注意充电前先关闭充电式无线吸尘器。
CN
18
故障排除
故障
可能的原因和排除方法
功能指示灯快
速闪烁。
• 充电式无线吸尘器正处于安全模式下; 可
能是由蓄电池温度过高引起。
• 将充电式无线吸尘器的电源充电器从插头上拔下,待其冷却。
充电式无线吸尘器
完全不能吸尘或吸
尘效果不如以前,且
发出不正常噪音。
可能因为喷嘴堵塞。
• 关闭充电式无线吸尘器,将喷嘴清空。
如果问题仍然存在,请联系 Vorwerk 客户服务部门。
可能因为灰尘贮存室没有正确安装在充电式无线吸尘器上。
• 将灰尘贮存室正确有序地安装在充电式无线吸尘器上。
可能因为灰尘贮存室已满。
• 清空灰尘贮存室。
灰尘从器具中泄漏。
可能因为灰尘贮存室没有正确安装在充电式无线吸尘器上。
• 将灰尘贮存室正确地安装在充电式无线吸尘器上。
可能因为过滤单元没有正确装入灰尘贮存室。
• 将过滤单元正确装入灰尘贮存室。
灰尘贮存室不能
与器具啮合。
• 过滤单元安装顺序颠倒。
• 转动过滤单元,以使过滤单元上的大凹口
朝向锁键一侧。
(参见 4.3 章节)
若未能排除故障,请联系 Vorwerk 客户服务部门 (参见第 23 页章节
“ 8 客户服务”)。
废料处理和环境保护
6
废料处理和环境保护
6.1
器具废料的处理
19
作为电器或电子旧设备的持有人(按照于 2003 年 1 月 27 日颁布的关于电器或
电子旧设备的欧盟 2002/96/EG 指令以及于 2005 年 3 月 16 日颁布的电器或电
子法),您不允许将本品或其电器 / 电子部件丢弃于未分类的家庭垃圾中。
• 您应该通过专门的免费回收对本品及其电器 / 电子部件进行处理。
• 请就此向您的市区或县区部门咨询。
6.2
蓄电池处理
集成锂离子蓄电池可能含有环境有害物质..
• 在您处理吸尘器前,请先将蓄电池取出。将器具与电
源断开。切勿将蓄电池丢弃于家庭垃圾中,应交到官
方的电池收集点。
CN
20
废料处理和环境保护
您也可以将吸尘器交到 Vorwerk 客户服务部门。在那里
蓄电池将被取出并按环保要求处理。
小心!废旧蓄电池存在造成受伤的危险!
废旧蓄电池不得与眼睛和黏膜接触。
• 请用清水冲洗双手和眼睛。如果您还是感觉不适,请及时就医。
6.3
包装处理
包装是我们产品的重要部分:包装保护我们的设备在运输过程中免受损坏并降低
器具脱落的风险。因此我们必须使用包装。在您需要将器具在保修期或之后递交
或寄送到售后或客户服务部门时,原包装是防止运输中出现损坏的最有效保护。
如果您还是想处理掉包装,您可随时将其处理掉,不受地区设施(废纸桶、黄色
垃圾桶、有价物品回收点、废纸收集点等均可)的限制。
经合法授权的许可证签发人已向 Vorwerk 进行相关授权。如需进一步查询请联系
您相应的服务中心 (参见第 23 页章节“ 8 客户服务”)。
废料处理和环境保护
6.4
21
关于环境保护的信息
保护自然和环境:环境保护是 Vorwerk
重要的企业目标。
较少的包装
我们只使用对环境无害的材料,这些材料在正确的处理之后又能再次利用。我们
已经参与到节约包装废料的行动中,致力于包装废料的处理和循环利用。
节约能源
Vorwerk 产品不损害环境:我们的产品进行高效吸尘时仅消耗少量能源。
符合环保要求的生产
我们的产品生产过程注重保护环境。我们使用可循环利用的塑料和颜料。我们自
觉拒绝使用会给环境造成负担的不可燃烧物。
我们的过滤袋使用可溶解的胶粘剂、未漂白纸张或放心塑料。我们的使用说明书
由可持续耕种的林木生产,未经氯漂。
CN
22
废料处理和环境保护
可重复利用的材料
我们产品的材料几乎可以完全重新利用。我们一直拒绝使用聚氯乙烯。
我们的产品在设计时注意使用“纯分类”的材料:
使用过的材料通过先进设备无需消耗大量能源即可进行分解。为便于回收利用,
我们最大限度地给产品的塑料部件做上标记。
23
保障
7
保障
对于可能发生的保障服务请您引用您的订购单或
购货合同。
8
客户服务
我们的电话客服人员竭诚为您服务:
电话:400-820-7711,传真:=86-21-5119-7708
周一至周日 7 点至 22 点.
网上咨询
www.vorwerk.com.cn
CN
24
技术数据
9
技术数据
桌面吸尘器
安全标志
外壳
采用一流的可回收热塑型塑料
电机
无需管理的 DC-电机,约 20.000 U/min
电源充电器输入电压
220-240 伏特 交流电压 50/60 赫兹
电源充电器输出电压
12 V DC +/- 10 %
电源充电器型号
KSAA1200050W1EU
电机额定功率
约 50 瓦特
最大气流效率
9 瓦特
最大容积电流
12 l/s
重量
不带充电站和电压充电器 750 克
噪音音量
74 dBA (在工作台上无物的条件下进行测试)
电池组
锂离子
23316–0711–70
Vorwerk Deutschland
Stiftung & Co. KG
Mühlenweg 17-37
D-42270 Wuppertal
www.vorwerk.de
Vorwerk Folletto s.a.s. di
Vorwerk Management s.r.l.
Via Ludovico di Breme, 33
20156 Milano
Italia
www.folletto.it
Vorwerk France s.c.s.
5, rue Jacques Daguerre/Case
Postale 406265
44306 Nantes Cedex 3
France
www.vorwerk.fr
Vorwerk Tornado
Christoph Merian Ring 23
4153 Reinach BL 1
Switzerland
www.vorwerk.ch
Vorwerk Austria
GmbH & Co. KG
Schäfferhofstr. 15
A 6971 Hard
www.vorwerk.at
Vorwerk España M.S.L., S.C.
Avda. Arroyo del Santo, 7
28042 Madrid
Espana
www.vorwerk.es
Vorwerk CS k.s.
Pod Pekarkou 1
147 000 Praha 4
Czech Republic
www.vorwerk.cz
Vorwerk China
Household Appliances Co., Ltd.
9, Vorwerk Plaza,
1768 Yishan Road
Shanghai 201103
China
www.vorwerk.com.cn
20110706-GAL23316_DEATENFRESITCZCN
Vorwerk Deutschland Stifung & Co. KG., Wuppertal