1
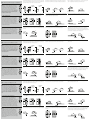
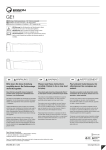
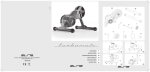
DE
EN
WARNUNG
TP1
Pedal Cleat Tool
Einstellwerkzeug für Pedalplatten
Adjustment Tool for Cleats
Outil de réglage de cales
AVERTISSEMENT
Bitte lesen Sie diese Anleitung sorgfältig durch. Bei
Fehlmontage droht Sturzgefahr.
Please read these instructions carefully. Failure to do
so may lead to injury.
Pour prévenir toute blessure, lire attentivement les
consignes qui suivent.
Stellen Sie sich nicht auf das TP1 – Bruchgefahr! Die Einstellung der Pedalplatten selbst erfolgt ausschließlich ohne angezogene Radschuhe.
Do not stand on the TP1 – it will break. Setting up shoes with the Cleat Tool
is to be carried out with the shoes not on your feet!
Ne vous tenez pas debout sur le TP1 - Risque de déchirure ! Le réglage de
la cale elle-même se fait exclusivement sans les chaussures.
Dieses TP1 ist ausschließlich für die Montage/Einstellung der entsprechenden
Pedalplatten vorgesehen. Das Einstellen anderen Pedal-Systeme ist nur mit dem
entsprechenden TP1 durchzuführen. Fragen Sie im Zweifelsfall einen Fachmann /
eine Fachwerkstatt.
This TP1 is only designed to aid in the setup of the stipulated pedal system only.
Other pedal systems can be set up using the appropriate TP1 tool. If in doubt please
consult a professional bicycle retailer.
Ce TP1 est conçu exclusivement pour le montage et le réglage des cales
correspondantes. Le réglage d‘autres systèmes de pédales ne doit être effectué
qu‘avec leTP1 correspondant. En cas de doute, adressez-vous à un spécialiste /
atelier spécialisé.
Jegliche Modifikationen dieses Produkts sind unzulässig und können unter
Umständen Ihre Sicherheit oder sogar Ihr Leben gefährden. Ein Anspruch auf
Sachmängelhaftung ist nach einem unsachgemäßen Gebrauch (Modifikation des
Produkts, Nichteinhalten der Warnhinweise dieser Anleitung) nicht gegeben.
Bewahren Sie diese Anleitung nach der Montage zum späteren Nachschlagen an
einem sicheren Ort auf. Sollten Sie dieses Produkt an eine dritte Person weitergeben,
so ist diese Anleitung oder eine Kopie beizulegen. Bei Verlust kann die Anleitung
unter www.ergon-bike.com heruntergeladen werden.
Reinigung:
Schmutz kann einfach mit handwarmem Seifenwasser entfernt werden. Anschließend sollte das TP1 abgespült und abgetrocknet werden. Das Ergon TP1 sollte nicht
mit petroleumhaltigen Stoffen wie mineralischen Ölen und Fetten sowie scharfen
Reinigern oder sonstigen Chemikalien in Kontakt gebracht werden. Das TP1 sollte
nicht in direkter Sonneneinstrahlung lagern.
DE – Handbuch zur Einstellung EN – Optimal Cleat Installation Guide
FR – Manuel de réglage optimal des cales
FR
Sachmängelhaftung:
Während der ersten zwei Jahre nach dem Kauf des TP1 haben Sie vollen Anspruch
auf die gesetzliche Sachmängelhaftung (vormals Gewährleistung). Sollten Mängel
auftreten, wenden Sie sich bitte unter Vorlage des Kaufbelegs an Ihren Ergon-Fachhändler. Detailliertere Informationen zur Sachmängelhaftung / Reklamation finden Sie
online unter www.ergonbike.com/warranty oder einfach QR-Code scannen.
This product must not be modified in any way. Doing so may endanger your safety or
life. The product warranty does not cover modified products, or products used in a
way not intended or set out in this document. Failure to follow all instructions will
invalidate the warranty.
Please keep these instructions in a safe place to refer to at a later date. Should you
pass the product on to a third person, please include these instructions or a copy
thereof. Should you misplace these instructions, a copy can be
downloaded at www.ergon-bike.com
Cleaning:
In order to ensure that your Ergon TP1 provides you with the best performance
please clean it using only warm soapy water. Rinse thoroughly using water. Do
not use petroleum based products or solvents, oil or grease on this product for
any reason. Do not store the TP1 in direct sunlight.
Ergon worldwide limited warranty:
Ergon warrants to the original retail purchaser that this product is free from defects in
material and workmanship for (2) two years from the date of original retail purchase.
Please see the current full warranty policy at www.ergonbike.com/warranty or scan
QR-code for details.
Toute modification de ce produit est interdite et peut le cas échéant mettre en péril
votre sécurité, voire votre vie. Un emploi non conforme (modification du produit,
nonrespect des avertissements présents dans le présent mode d‘emploi) supprime
tout droit à la garantie.
Conservez ce mode d‘emploi en lieu sûr après le montage afin de pouvoir le
consulter ultérieurement. Si vous devez transmettre ce produit à une tierce
personne, veuillez y joindre le présent mode d‘emploi ou une copie. En cas
de perte, le mode d‘emploi peut être téléchargé sur www.ergon-bike.com
Nettoyage:
Vous pouvez enlever la saleté simplement avec l´eau tiède savonneuse. Après cela
le TP1 devrait être propre et sec. Veuillez éviter tout contact du TP1 avec des
substances contenant du pétrole tout comme des huiles minérales et les
graisses, ainsi qu´avec des produits de nettoyage forts ou produits chimiques.
Le TP1 ne doit pas être stocké sous contact direct du soleil.
Garantie mondiale limitée de Ergon:
Ergon garantit à l‘acheteur de détail original que le présent produit est exempt de
défauts de matière et de fabrication pendant une période de (2) deux ans à compter
de la date d‘achat initiale. Veuillez consulter la politique de garantie complète en
vigueur sur www.ergonbike.com/warranty ou scanner votre code QR pour de plus
amples informations.
Ergon International:
RTI Sports GmbH
Universitaetsstr. 2, 56070 Koblenz / Germany
T +49 (0) 261 899998-28, F +49 (0) 261 899998-19
[email protected], www.ergon-bike.com
Ergon USA:
8285 Sunset Blvd.
Suite #12
West Hollywood, CA. 90046
T 323-848-4665, T 877-573-7466, F 323-848-9097
www.ergon-bike.com
www.ergonbike.com/warranty
www.ergonbike.com/warranty
www.ergonbike.com/warranty
INFORMATION
INFORMATION
INFORMATION
Testfahrt / Feinjustierung:
Vor jeder Fahrt die Schrauben auf festen Sitz prüfen. Die erste Testfahrt am besten
auf einem Hometrainer/Rollentrainer durchführen. Darauf achten, dass die Kraft
effektiv auf die Pedale gebracht wird. Hierbei unterschiedliche Krafteinsätze, Trittgeschwindigkeiten sowie Sitzhaltungen ausprobieren. Die Position der Schuhe mit Hilfe
des TP1 entsprechend optimieren, bis sich die Tretbewegung harmonisch anfühlt.
Maßgebend ist das eigene Körpergefühl. Hierzu die Einstell-Schritte auf der
Rückseite befolgen.
Test Riding / Fine Adjustment:
Before every ride, check to see if the screws holding the cleats are still tight. The first
test ride is best carried out on home trainer / rollers. Pay particular attention to how
effectively the power is transferred to the pedal. Try different exercises, cadences, as
well as sitting positions. Make small adjustments using the tool until you no longer
feel you are working against the springs in the pedals and the pedalling motion feels
harmonious. In order to make adjustments, follow the installation instructions
on the back side.
Die Einstellung anschließend auf einer verkehrsfreien Strecke testen. Das TP1 und
ein Werkzeug mitführen. Die Position der Pedalplatten wie zuvor beschrieben prüfen
und bei Bedarf nachjustieren. Die Position zuletzt im Gelände (MTB und Cyclo Cross)
testen. Bei der Nachjustierung darauf achten, dass die Schrauben gereinigt und
gemäß den Pedalplatten-Herstellerangaben angezogen werden.
Finally test your setup away from traffic. It is sensible to take the TP1 Cleat Tool with
you as well as other tools to make adjustments is needed. If applicable, make a final
test off road (MTB/CX). After every adjustment ensure that the cleat bolts are clean
are fastened tightly in accordance with the pedal manufacturers instructions.
TP1 Ergonomie Handbuch – Online
Detaillierte Informationen zum Thema Anatomie und Biomechanik können Sie dem
TP1 Online-Handbuch entnehmen: www.ergon-bike.com (Service/Downloads/TP1)
besuchen um die Anleitung als PDF herunterzuladen oder QR-Code scannen um
direkt zum Download zu gelangen.
TP1 Ergonomics Handbook – Online
Detailed information about biomechanics and anatomy can be found in the TP1
Online Handbook: Visit www.ergon-bike.com (Service/Downloads/TP1) to download
in PDF format. Alternatively use the QR code below.
Essai sur route/réglage fin:
Avant chaque utilisation, vérifiez que les vis sont bien serrées. Réaliser de
préférence le premier essai sur un Home-trainer ou sur des rouleaux. Veiller à ce
que la force soit transmise à la pédale de façon efficace. Pour cela, tester les
différentes forces, vitesses de pédalage et positions assises. Ajuster en
conséquence la position de la chaussure à l‘aide du TP1, jusqu‘à ce que le
mouvement de pédalage soit harmonieux. L‘élément déterminant est votre propre
sensation corporelle. Respecter pour cela les étapes de réglages présentées
au verso.
Tester le réglage uniquement sur une voie interdite à la circulation. Emporter le TP1
et un outil. Vérifier la position des cales décrite plus haut et réajuster si nécessaire.
Tester en premier lieu la position en tout-terrain (MTB et Cyclo Cross) Lors du
réajustement, veiller à ce que les vis soient nettoyées et serrées conformément aux
instructions du fabricant des cales.
Manuel d‘ergonomie TP1 - En ligne
Des informations détaillées sur le thème Anatomie et Biomécanique sont
disponibles sur le Manuel TP1 en ligne : rendez-vous sur www.ergon-bike.com
(Service/Downloads/TP1) pour télécharger les instructions au format PDF, ou
scannez le Code QR pour aller directement sur le téléchargement.
Ergon International, RTI Sports GmbH, Universitaetsstr. 2, 56070 Koblenz, Germany.
www.ergon-bike.com, info®ergon-bike.com
Ergon® is a worldwide trademark. Ergon reserve the right to change any products without
prior notice. Druckfehler, Irrtümer und Änderungen vorbehalten. Made in Taiwan.
www.ergon-bike.com (Service/Downloads/TP1)
ERG_MAN_TP1_02_2014
www.ergon-bike.com (Service/Downloads/TP1)
www.ergon-bike.com (Service/Downloads/TP1)
www-ergon-bike.com
DE – Anleitung zur Einstellung der Pedalplatten
1: Großzehengrundgelenk (breiteste Stelle des Fußes) an der Innenseite des rechten Schuhs
ertasten, sowie den Fersenmittelpunkt bestimmen. Die beiden Positionen mit Hilfe der beiliegenden Ergon-Zentriersticker auf der Außenseite des Radschuhs markieren.
1 Längsorientierung:
Die Pedalachse soll unter dem Fußballen liegen, da hier die beste
Kraftübertragung und Funktion der Muskulatur gesichert wird. Dazu
das Großzehengrundgelenk (GZGG) auf der Innenseite des angezogenen Radschuhs ertasten. In der Regel liegt das GZGG an der
breitesten Stelle des Fußes (Innenseiten). Versehen Sie den Schuh an
dieser Stelle von außen mit einem Ergon Zentriersticker. Die Pfeilmarkierung (Zentriersticker) sollte direkt auf die Orientierungslinie
der Pedalachse auf dem TP1 zeigen.
2 Q-Faktor / Stützweite der Füße:
Der Q-Faktor gibt an, wie groß die Stützweite der Füße ist. Je enger
die Füße am Tretlager liegen, desto besser ist die Kraftübertragung.
Daher sollten die Schuhe grundsätzlich so nah wie möglich an den
Kurbeln positioniert werden. Werden Überschuhe verwendet, sollte
dieser zusätzlich benötigte Raum zur Kurbel berücksichtigt werden.
Die auf dem TP1 abgebildete Achse entspricht einer Standard-Achse
von 55 mm. Die eigene Achse kann von diesem Wert abweichen.
Darauf achten, dass die Schuhe nicht zu nah an der Kurbel liegen und
diese beim Pedalieren beschädigen.
3 Fußwinkel:
Die Grundposition der Füße sollte möglichst parallel sein. Fühlt sich
die Tretbewegung unharmonisch an, dient die persönliche Fußstellung
beim Gehen und Stehen als Referenz. Den Schuh geringfügig nach
innen oder außen verstellen, bis sich die Tretbewegung harmonisch
anfühlt. Diese Justage beträgt in beide Richtungen jedoch nur wenige
Grad. Diesen Verstellbereich können Sie am Raster des TP1 ablesen,
indem der Fersenmittelpunkt markiert wird.
2: Pedalplatte laut Herstellerangaben montieren, die Schrauben dabei nur leicht anziehen.
Die Platte sollte nach dem Anziehen der Schrauben in alle Richtungen beweglich bleiben.
3: Das TP1 aufgeklappt auf eine Tischplatte legen. Den Schuh auf die Oberseite des TP1
setzen. Die Pedalplatte dabei in die dafür vorgesehene Aufnahme stecken.
Fersenmittelpunkt
Großzehengrundgelenk
right
4: Längsorientierung 1 , Stützweite der Füße (Q-Faktor) 2 , sowie Fußwinkel 3 einstellen.
Hierzu das Thema “Einstellmöglichkeiten” beachten. Die aufgedruckten Skalen und Zentriersticker helfen bei der späteren Übertragung dieser Werte auf den linken Schuh.
1
5: TP1 und Radschuh über die Tischkante schieben, so dass die Schrauben der Pedalplatte
erreichbar sind. Darauf achten dass sich die eingestellte Position des Schuhs dabei nicht
verändert. Anschließend die Schrauben leicht anziehen.
6: Den Schuh vom TP1 abziehen und anschließend die Schrauben mit dem vom Pedalplatten-Hersteller empfohlenen Anzugsmoment festziehen.
2
Nm / ft-lb
3
7: Die Pedalplatte wie zuvor beschrieben am linken Schuh montieren. Die Pedalplatte bleibt
beweglich. Danach beide Schuhe auf dem TP1 platzieren und in die entsprechenden Aufnahmen stecken.
8: Die Skalen-Werte des rechten Schuhs auf den linken übertragen bzw. die Schuhe symmetrisch zueinander ausrichten. Der rechte Schuh dient hierbei als Referenz.
9: Die Schrauben wie zuvor beschrieben anziehen. Darauf achten, dass sich die Einstellungen hierbei nicht ändern. Abschließend die Schrauben mit dem vom PedalplattenHersteller empfohlenen Anzugsmoment festziehen. Bei anschließenden Feineinstellungen,
z.B. nach einer Testfahrt, die Schritte 2-9 bis zur bevorzugten Einstellung wiederholen. Hierzu
das Thema “Testfahrt / Feinjustierung” auf der Frontseite beachten.
left
right
left
=
Nm / ft-lb
EN – Instructions for installation of cleats
1: Find the joint for the big toe (the widest part of the foot) by putting the shoe on and feeling
through the shoe. Also find the middle point of your ankle. Mark these two positions using
the provided Ergon pointer stickers on the outside of the shoe.
1 Fore / Aft positioning of the cleat
For efficient power transfer from your muscles the cleat should be
positioned so that the pedal axle is under the ball of the foot. To do this
while wearing shoes, simply find the joint at the base of your big toe. In
general the big toe joint is at the widest part of the foot. Mark this point
using an Ergon Reference Point sticker. The arrow (pointer stickers)
should point directly down at the reference line for the pedal
axle as marked on the TP1.
2 Q-Factor / Foot Stance
The Q-Factor is the value given to the stance of your cranks and
feet. This width in general should be small - the closer your feet are
to the bottom bracket the better. The shoe should pass as closely
as possible to the crank. The Ergon TP1 can help set this distance.
Please note that if you are to ride with overshoes, then adjustments
may be required accordingly. The axle on the pedal diagram pictured
on the TP1 tool is a standard axle measuring 55mm. It is possible that
your pedals have a longer or a shorter axle. Attention should therefore
be paid to the shoe and the crank arm not touching to avoid damage.
3 Adjustment of the foot angle (foot rotation)
The basic position of the feet should be parallel to each other. The
correct position on the TP1 for this foot position is between the centre
line and the Achilles tendon. Fine adjustment of this position should be
made to ensure that the pedaling motion feels comfortable. The shoe
can be turned slightly inwards or outwards to achieve this, however
the rotation should be no more than a few degrees. The markings on
the Ergon TP1 allow this angle to be recorded as the heel’s mid point
is marked.
2: Fit the cleats according to the instructions provided by the manufacturer. However do not
tighten them. It should be possible to move the cleat on the bottom of the shoe.
3: Open the TP1 and place is on a table top. Fit the cleat on the bottom of the shoe to the
cut-out on the tool.
Middle point
of your ankle
Joint for the
big toe
right
4: Adjust the fore/aft 1 , stance (Q-Factor) 2 , and angle of the foot 3 . Pay attention to the
section ‘installation information’. The printed scales and the pointer stickers will help you
translate the position to the other shoe.
1
5: Slide the TP1 and the shoe over the edge of the table, so that you can get at the screws
from below. Be sure not to change the position of the shoe. Now tighten the screws.
6: Remove the shoe from the TP1 and check that the screws are tightened to the correct
torque setting as stipulated by the shoe / pedal manufacturer.
2
Nm / ft-lb
3
7: Repeat the process for fitting the cleats to the other shoe, then fit both shoes to the TP1
tool.
8: Transfer the position from the first shoe to the other shoe using the grid on the TP1 for
reference. This will give you a symmetrical fit.
9: Tighten the screws as before to the correct torque setting as stipulated by the shoe /
pedal manufacturer, again paying attention to not move the cleats in the process. Finally
it is time to test ride, following which it may be necessary to repeat steps 2 – 9. For more
information please see the section ‘Test Ride / Fine Adjustment’ on the front side.
left
right
left
=
Nm / ft-lb
FR – Consignes de réglage des cales
1: Palpez l’articulation principale du gros orteil (point le plus large du pied) à l’intérieur de la
chaussure droite et déterminer le point central du talon. Repérer ces deux positions avec la
bande de marquage Ergon sur l’extérieur de la chaussure.
1 Orientation longitudinale de la cale
L’axe de pédale doit être en dessous de la plante antérieure du
pied car c’est ainsi que la force est la mieux transmise et que les
muscles fonctionnent au mieux. Palpez l’intérieur de la chaussure à la
recherche de l’articulation principale du gros orteil. Autre repère : ce
point se trouve généralement à l’endroit le plus large du pied. Placez
à cet endroit une bande de marquage Ergon. La flèche doit pointer
directement vers la ligne d’orientation de l’axe de pédale de
TP1.
2 Facteur Q / Distance entre les appuis des pieds
Le facteur Q indique la distance entre les appuis des pieds. Plus
les pieds reposent étroitement contre le pédalier, meilleure est
la transmission de la force. Les chaussures doivent donc être
positionnées aussi près que possible des manivelles. TP1 permet tout
simplement d’optimiser cet écartement. Si vous utilisez des couvrechaussures, tenez compte de l’espace supplémentaire nécessaire par
rapport à la manivelle. L’axe représenté sur le TP1 correspond à un axe
standard de 55 mm, l’axe personnalisé peut présenter un écart avec
cette valeur. Veiller à ce que les chaussures ne se trouvent pas trop
près de la manivelle et qu’elles ne l’abiment pas pendant le pédalage.
3 Réglage de l’angle de pied
La position de base des pieds doit être parallèle lorsque vous pédalez.
L’axe imaginaire entre le point central et le tendon d’Achille est
déterminant ici. L’angle de pied pourra être modifié ultérieurement
lors du réglage de précision, jusqu’à obtention d’un mouvement de
pédalage harmonieux. La chaussure pourra alors être légèrement
décalée vers l’intérieur ou vers l’extérieur. Cet ajustement ne se fait que
sur quelques degrés, dans les deux directions. Vous trouverez la plage
d’ajustement sur le quadrillage de TP1, avec comme point de repère le
point central du talon.
Articulation
principale du
gros orteil
2: Monter la cale en respectant les instructions du fabricant sans serrer complètement les
vis. Une fois les vis serrées, la cale doit rester mobile dans toutes les directions.
3: Poser le TP1 déplié sur une table. Placer la chaussure sur la face supérieure du TP1.
Clipser la cale sur le support prévu à cet effet.
Point central
du talon
right
4: Régler l’orientation longitudinale 1 , la distance entre les appuis des pieds (Facteur Q) 2 et
l’angle de pied 3 . Suivre la rubrique “Possibilités de réglage” Les échelles imprimées et la bande
de marquage sont utilisées pour le transfert ultérieur de ces valeurs sur la chaussure gauche.
1
5: Faire glisser le TP1 et la chaussure sur le bord de la table pour pouvoir accéder aux vis
de la cale. Veiller à ne pas modifier le réglage de la position de la chaussure. Serrer ensuite
légèrement les vis.
6: Retirer la chaussure du TP1 puis serrer les vis au couple recommandé par le fabricant des
cales.
2
Nm / ft-lb
3
7: Monter la cale sur la chaussure gauche comme décrit plus haut. La cale reste mobile.
Placer ensuite les deux chaussures sur le TP1 et les clipser sur les supports correspondants.
8: Transférer les valeurs de l’échelle de la chaussure droite sur la chaussure gauche, ou
orienter les chaussures symétriquement l’une par rapport à l’autre. La chaussure droite sert
de référence.
9: Serrer les vis comme décrit plus haut. Veiller à ne pas modifier les réglages. Serrer ensuite
les vis au couple recommandé par le fabricant des cales. Lors des réglages fins qui suivent
par exemple un essai sur route, reprendre les étapes 2-9 jusqu’à l’obtention du réglage
voulu. Suivre la rubrique “Essai sur route/ réglage fin” sur la première page.
left
left
right
=
Nm / ft-lb