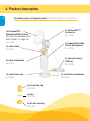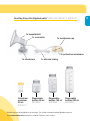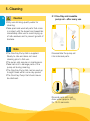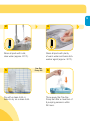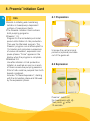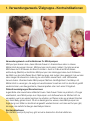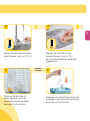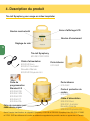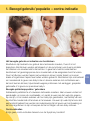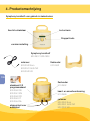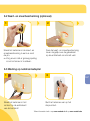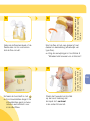
1
Symphony ® EN Instructions for use – hospital use | DE Gebrauchsanweisung – für die Verwendung im Krankenhaus | FR Mode d’emploi – Usage en milieu hospitalier | IT Istruzioni per l’uso – Uso ospedaliero | NL Gebruiksaanwijzing – voor gebruik in ziekenhuizen EFFICIENCY Thank you for choosing the Symphony Breastpump. Breastmilk is the natural choice for newborns, but there are reasons and situations where breastfeeding is not possible. For over 50 years, it has been Medela’s conviction that these mothers and infants can be supported. In close co-operation with breastfeeding experts, Medela, one of the market leaders, has researched and developed breastpumps that perfectly meet breastfeeding mothers’ needs. For mothers who insist on the best for their infants and themselves. Herzlichen Dank, dass Sie sich für die Milchpumpe Symphony entschieden haben. Muttermilch ist die natürlichste Form der Ernährung für Neugeborene, doch es gibt Situationen, in denen das Stillen aus verschiedenen Gründen nicht möglich ist. Als einer der Marktführer setzt sich Medela seit über 50 Jahren mit Überzeugung für das Wohl dieser Babys und Mütter ein. In enger Zusammenarbeit mit Stillexperten hat Medela Milchpumpen entwickelt, die optimal auf die Bedürfnisse stillender Frauen abgestimmt sind. Für Mütter, die nur das Beste für sich und ihr Baby wollen. Medela vous remercie d’avoir choisi un tire-lait Symphony. Le lait maternel est ce qu’il y a de plus naturel pour les nouveau-nés, mais dans certaines situations, l’allaitement au sein n’est pas possible. Voilà plus de 50 ans que Medela s’est donné pour mission d’assister ces mamans et ces nourrissons en difficulté. C’est grâce à une étroite collaboration avec des experts en lactation humaine que Medela, une des marques leaders sur le marché, a pu développer des tire-lait répondant parfaitement aux besoins des mamans qui allaitent. Ces appareils s’adressent aux mamans qui ne veulent que le meilleur pour leur nourrisson et elles-mêmes. Grazie per aver scelto il tiralatte Symphony. Il latte materno è la scelta naturale per i neonati, ma in alcuni casi non è possibile allattare al seno. Da oltre 50 anni Medela è impegnata ad aiutare madri e neonati che si trovano in queste situazioni. In stretta cooperazione con esperti in allattamento al seno, Medela, uno dei leader del mercato, ha condotto ricerche volte a sviluppare tiralatte che soddisfino pienamente le esigenze delle mamme che allattano. Per madri che esigono il meglio per i loro bambini e per loro stesse. Hartelijk dank dat u voor de Symphony borstkolf hebt gekozen. Moedermelk is de natuurlijke keuze voor pasgeboren baby’s, maar er zijn redenen en omstandigheden waarin het niet mogelijk is om borstvoeding te geven. Medela is er al meer dan 50 jaar van overtuigd dat deze moeders en baby’s met speciale oplossingen ondersteund kunnen worden. In nauwe samenwerking met borstvoedingsdeskundigen heeft Medela, die ook marktleider is, na uitvoerig onderzoek borstkolven ontwikkeld die perfect aansluiten aan de behoeften van moeders die borstvoeding geven. Voor moeders die het beste willen voor hun baby en voor zichzelf. EN 04–35 DE 36–67 FR 68–99 IT 100–131 NL 132–163 Table of Contents 4 1. Intended use / Population-Contraindication 2. Meaning of symbols 3. Important safety information 4. Product description 5. Cleaning 5.1 O ne-Day and reusable pump set – after every use 5.2 R eusable pump set – before first use, once a day and always before passing onto the next patient 5.3 R eusable pump set – d isinfecting and sterilising 5.4 Cleaning the breastpump 5.5 D isinfecting the breastpump 6. Preparing for pumping 6.1 Install program card 6.2 C ard and Cord Protector (optional) 6.3 Mains operation 6.4 A ssembling the One-Day Pump Set 6.5 A ssembling the reusable pump set 6.6 P reparing for pumping 7. Expression 5 6 8 10 14 14 16 17 17 17 18 18 19 19 20 20 22 24 7.1 P reparing for single pumping 7.2 E xpression 7.3 P reparing for double pumping 24 24 26 8. Preemie + Initiation Card 8.1 Preparation 8.2 Expression 8.3 Pumping log (optional) 9. Storing and thawing breastmilk 9.1 S torage 9.2 F reezing 9.3 T hawing 10. Troubleshooting 11. International warranty / disposal 12. Accessories list 13. EMC / Technical description 14. Technical specifications 28 28 28 29 30 30 30 30 31 32 33 164 170 1. Intended use / Population-Contraindication 5 The intended use and indications of breastpumps Breastpumps are intended to be used by lactating women in the hospital or home environment for expressing breastmilk. Breastpumps are indicated to alleviate the symptoms of engorgement by expressing milk. In case of mastitis breastpumps support the healing process by removing breastmilk from the affected breast. Breastpumps are indicated to relieve sore and cracked nipples and to bring out flat or inverted nipples. Also, breastpumps enable mothers to provide breastmilk for babies who cannot feed directly at the breast for a variety of reasons such as latch-on problems, cleft palate or premature babies. Intended patient population / user Adolescent paediatric or adult lactating women. Many women find it convenient, or even necessary, to use a breastpump to express and store their breastmilk once they have returned to work, are travelling or are otherwise separated from their baby. Women are often delighted to learn that a breastpump can be used as a supplement to breastfeeding and that some pumps are designed to mimic the suckling of a nursing baby. Contraindications There are no known contraindications for the Symphony breastpump. 2. Meaning of symbols The warning symbol identifies all instructions that are important for safety. Failure to observe these instructions can lead to injury or damage to the breastpump. When used in conjunction with the following words, the warning symbol stands for: Warning Can lead to serious injury or death. Caution Can lead to minor injury. i 6 i Note Can lead to material damage. Info Useful or important information that is not related to safety. Symbols on the packaging This symbol indicates that the material is part of a recovery/recycling process. This symbol indicates a carton package. This symbol indicates to keep the device away from sunlight. This symbol indicates to handle the fragile device with care. °C This symbol indicates the temperature limitation for operation, transport and storage. This symbol indicates the humidity limitation for operation, transport and storage. This symbol indicates the atmospheric pressure limitation for operation, transport and storage. This symbol indicates to keep the device dry. This symbol indicates that the packaging contains products intended to come in contact with food according to regulation 1935/2004. This symbol indicates unique GSI Global Trade Item Numbers (GTIN). Symbols on the device This symbol indicates to follow instructions for use. 0123 This symbol indicates the compliance with the essential requirements of the Council Directive 93/42/EEC of 14 June 1993 concerning medical devices. This symbol indicates the manufacturer. This symbol indicates do not dispose the device together with unsorted municipal waste (for EU only). This symbol indicates the compliance with additional USA and Canada safety requirements for medical electrical equipment. This symbol indicates a type BF applied part. SN This symbol indicates manufacturer's serial number of the device. REF This symbol indicates manufacturer's catalogue number of the device. IP21 This symbol indicates the protection against ingress of solid foreign objects and against harmful effects due to the ingress of water. This symbol indicates the date of manufacture (four digits for the year and two digits for the month). This symbol indicates that the Symphony is a class II device. This symbol indicates fuse (to identify fuse boxes or their location). This symbol indicates that the fuse box is safety tested. This symbol indicates open the cover of the mains socket. 7 3. Important safety information Failure to follow these instructions/safety information can lead to danger from the device. Subject to technical changes. 8 Device Danger of electrocution! Keep the device dry! Never immerse in water or other liquids! The Symphony breastpump is not heat-resistant: keep away from radiators and open flames. Do not expose the motor unit to direct sunlight. There are no user-serviceable parts inside the Symphony. Repairs must be performed only by an authorised service agency. Do not repair yourself! No modifications to the device are permitted. Never use a damaged device. Replace damaged or worn parts. Electrical use Separation from the mains is only assured through the disconnection of the power cord from the wall socket outlet. Keep the power cord away from heated surfaces. Do not reach for any electrical device if it has fallen into water. Unplug immediately. The Symphony breastpump should never be left unattended when plugged into a power source. Use 9 Use the Symphony breastpump only for its intended use as described in this manual. Never operate an electrical device if it has a damaged power cord, if it is not working properly, if it has been dropped or damaged, or dropped into water. Do not use the Symphony breastpump while bathing or showering. Do not use the Symphony breastpump while sleeping or overly drowsy. Do not drive whilst hands-free pumping. Supervision is necessary when the Symphony breastpump is used in the vicinity of children. Contact your lactation consultant or physician if you experience problems or pain. Portable and mobile radio frequency communications equipment can affect the Symphony breastpump. Important: lPlastic bottles and component parts become brittle when frozen and may break when dropped. lAlso, bottles and component parts may become damaged if mishandled, e.g. dropped, over-tightened, or knocked over. lTake appropriate care in handling bottles and components. lDo not use the breastmilk if bottles or components become damaged. 4. Product description 10 Symphony hospital breastpump LCD-display On / Off button Let-down button vacuum adjustment Symphony breastpump 600.0837 / 600.0838 power cord 928.0040 Euro 928.0041 AUS / NZ 928.0042 UK standard 2.0 program card 800.0540 DE 800.0541 EN 800.0542 FR 800.0543 IT 800.0544 NL socket for car connection cable bottle holder 810.0552 bottle holder 810.0552 card and cord protector 810.0589 power cord 928.0040 Euro 928.0041 AUS / NZ 928.0042 UK Health Canada device identifiers: Symphony: 0240108 and 0240208. Symphony Kits: 008.0292, 27098S and 27292. Please refer to the information addendum regarding products sold or licenced in Canada. Required accessories* Ready-to-Use products One-Day Pump Set (maximum 24 hours or 8 pumping sessions): PersonalFit Breastshield size M: 008.0176 PersonalFit Breastshield size L: 008.0177 PersonalFit Breastshield size XL: 008.0178 Colostrum container, 35 ml: 200.2110 Disposable bottles 80 ml: 200.2957 Disposable bottles 150 ml: 200.2956 Disposable bottles 250 ml: 200.4802 Reusable products* Symphony Hospital multibox with 20 pcs Symphony pump set in a PE-bag: Containing PersonalFit breasthield size M (24mm): 800.0557 Containing PersonalFit breastshield size L (27mm): 200.1141 Containing PersonalFit breastshield size XL (30mm): 200.1143 11 Optional accessories* Preemie+ Bundle: 200.2098 (DE), 200.2099 (EN), 200.2100 (FR), 200.2101 (NL), 200.2102 (JA), 200.2103 (ES) Mobile stand: 600.0832, Case: 600.7073, Card & Cord Protector: 600.0816 2-Phase Expression Symphony has 2-Phase Expression. 2-Phase Expression mimics the baby’s natural sucking pattern so more milk can be expressed in less time: natural, stimulating movements are followed by longer ones, ensuring an optimal milk flow. Stimulation: fast pumping rhythm to start the milk flow Expression: slower pumping rhythm to express milk gently and efficiently. * Accessories available for order can be found on page 34. Articles may not be available in all countries. For further information about Medela products, visit www.medela.com and look for location finders in your country. 4. Product description 12 Reusable pump set (Applied parts)* 800.0557 / 200.1141 / 200.1143 1x PersonalFit™ Breastshield M (24 mm) (for other breastshield sizes see Chapter 12, page 34) 810.7084 1x PersonalFit™ Connector 810.7088 1x valve head 810.0475 1x breastmilk bottle, 150 ml transparent 811.0020 2x valve membrane 820.7013 1x silicone tubing (105 cm) 800.0828 1x membrane cap 810.0667 1x protective membrane 820.0094 1x protective cap 810.0474 1x disc 810.0473 1x lid with opening 810.7062 One-Day-Pump Set (Applied parts)* 008.0176 / 008.0177 / 008.0178 1x breastshield 1x connector 1x membrane cap 1x protective membrane 1x membrane Colostrum container 35 ml 200.2110 1x silicone tubing Disposable bottles 80 ml 200.2957 Disposable bottles 150 ml 200.2956 Disposable bottles 250 ml 200.4802 *Articles may not be available in all countries. For further information about Medela products, visit www.medela.com and look for location finders in your country. 13 5. Cleaning Caution 14 lO nly use drinking-quality water for cleaning. l Take apart and wash all parts that come in contact with the breast and breastmilk immediately after use to avoid drying up of milk residues and to prevent growth of bacteria. 5.1 One-Day and reusable pump set – after every use 1 Note i lT he One-Day Pump Set is supplied Ready-to-Use and does not need cleaning prior to first use. l The pump sets require no maintenance. l Take care not to damage parts of the pump set during cleaning. l The One-Day Pump Set can be used up to eight times within a one-day period. l T he One-Day Pump Set should never be sterilised. Disassemble the pump set into individual parts. 4 Rinse all parts with cold, clear water (approx. 20 °C) for 10–15 seconds. 15 2 3 Clean all parts with plenty of warm water and basic dishwasher agent (approx. 30 °C). Rinse all parts with cold, clear water (approx. 20 °C). 5 Dry with a clean cloth or leave to dry on a clean cloth. One-Day Pump Set 6 Throw away the One-Day Pump Set after a maximum of 8 pumping sessions within 24 hours. 5. Cleaning Warning 16 lU se by more than one mother without adequate sterilisation may pose a health risk. l A ll parts must be cleaned after every use. They must additionally be disinfected and sterilised (e.g. autoclaved) once a day and always before being passed onto the next mother. 5.2 Reusable pump set – before first use, once a day and always before passing onto the next patient 1 Caution lO nly use drinking-quality water for cleaning. l for chapter 5.4 Cleaning the breastpump: Unplug the breastpump before cleaning. Note i l f or 5.3 Sterilisation: Only sterilise clean and intact parts. Do not stack parts on top of one another. To avoid damage, do not apply external pressure. i Disassemble the pump set into individual parts. 3 134˚ C Info lT hese cleaning instructions are general recommendations and may individually be adjusted based on the hospital’s specific directives and cleaning practices. Sterilise all the parts in the autoclave at 134 °C for three minutes. 5.3 Reusable pump set – disinfecting and sterilising 1 17 2 Check parts if they are clean and intact. Clean all parts in a washer disinfector for five minutes (at 93 °C). Check that the pump set is working. Replace defective parts of the pump set. 5.4 Cleaning the breastpump 5.5 Disinfecting the breastpump 1 Wipe off with a clean, damp (not wet) cloth. Water and basic dishwasher agent or non-abrasive detergent may be used. 1 disinfect Wipe off with a clean, damp (not wet) cloth. Alcohol-based disinfecting agent may be used. 6. Preparing for pumping 6.1 Install program card Warning 18 l f or chapter 6.2 Mains operation: Only use the power cord that comes with the Symphony. l Make sure the voltage of the power cord is compatible with the power source. i 1 Info lO nly use the pump with the appropriate program card (Standard or Preemie+*). Optional for pump with battery: l Built-in battery must be charged for 12 hours on receipt of the device. l The pump can be used during charging. l If the pump is to remain unused for a long time, charge the battery every two months (for 12 hours each time). l The optimum service life of the battery is achieved if it is not fully discharged on a regular basis or if the pump is charged while not in use. Pumping time (fully-charged battery) approx. 60 min. Charging time (for full charge) 12 hours Insert program card (Standard or Preemie+) in card compartment on the back of the breastpump. 3 To remove, unscrew the card and cord protector and slide out of the guide rail. 6.2 Card and Cord Protector (optional) 1 Insert the cord into the card and cord protector in a loop around the pin. Make sure there is enough play to plug the cord in. 19 2 Push the card and cord protector over the guide rail on the back until it stops and tighten the screw. 6.3 Mains operation 1 Insert the power cord into the power socket on the back of the pump. 2 Plug the power cord into the mains socket. *More information at www.medela.com 6. Preparing for pumping Caution 20 lW ash hands thoroughly (at least one minute) with soap and water before touching the breast, clean pump parts and clean pump set. 1 Note i lT he One-Day Pump Set is supplied Ready-to-Use and does not need cleaning prior to first use. l T he Reusable Pump Set needs cleaning prior to first use. Please see chapter 5.2. l Use Medela original accessories only. l Check pump set components for wear or damage before use. l Check that the membrane cap is mounted to the protective membrane correctly. l All components must be completely dry before use. i 6.4 Assembling the One-Day Pump Set Open the packaging of the Ready-to-Use pump set. Add a disposable bottle as required (35/80/150/250 ml). 6.5 Assembling the reusable pump set 1 Info lC arry out all the steps with care and assemble the pump set correctly. Otherwise a good vacuum may not be achieved. Carefully push the membrane onto the valve head until it engages. 21 3 More information on page 22, chapter 6.6 steps 1–3 2 Push the breastshield onto the connector. 2 Push the breastshield onto the connector. Screw the disposable bottle (35/80/150/250 ml as required) onto the connector. Insert the tubing onto the corresponding part of the connector. 3 Push the valve head and membrane onto the connector. Position valve head laterally. 6. Preparing for pumping 22 i Info 4 l f or step 3 (chapter 6.6): Always close the lid when pumping. The lid keeps the membrane cap pushed down to prevent a loss of vacuum that could occur if the membrane cap came off. Screw the bottle onto the connector. 6.6 Preparing for pumping 1 Open the breastpump lid. Press the oval button on the top of the Symphony and lift the handle. 5 Insert the tubing into the corresponding opening in the connector. 2 Position the membrane cap firmly on the breastpump membrane to form a seal. Centre the tubing connector in the recess in the pump housing. Make sure that the membrane cap engages and lies flush to the surface. 6 Place the protective membrane onto a flat surface and carefully push the membrane cap down until it engages. Insert the tubing adapter into the opening in the membrane cap. 3 Close the lid. 23 7. Expression Caution 24 lb efore step 2 (chapter 7.1): Wipe the breast with a warm cloth (do not use alcohol). l for step 2 (chapter 7.1): Answer the following questions to find out whether the available breastshield size will fit: l D oes the nipple move freely in the tunnel? l Is minimal or no areolar tissue being pulled into the tunnel of the breastshield? l Do you see a gentle, rhythmical motion in the breast with each cycle of the pump? l Do you feel the breast emptying all over? l Is your nipple pain-free? If the answer to any of these questions is “No” or if you experience problems or pain during expression, consult your breastfeeding and lactation consultant or midwife. l f or step 2 and 3 (chapter 7.1): Do not hold the pump set by the bottle. This can lead to blockage of the milk ducts and engorgement. i Info l If the pump has been running for 30 minutes without any manipulations (e.g. adjustment of the vacuum), the Symphony will automatically switch off. 7.1 Preparing for single pumping 1 Mount only one membrane cap to the breastpump membrane. 7.2 Expression 1 Switch on the breastpump with . Stimulation phase begins. The stimulation phase will automatically change to the expression phase after two minutes. 25 2 Place the breastshield on your breast so that your nipple is properly centred in the tunnel. 2 If your milk starts to flow before the end of the two minutes, press to change to the expression phase. Make sure that the milk flows into the bottle properly. 3 Hold the breastshield onto your breast with your thumb and index finger. Support your breast with the palm of your hand. 3 Set vacuum comfort: Rotate the vacuum to the right and increase until there is slight discomfort. Rotate to the left to reduce the vacuum slightly. 7. Expression Caution 26 4 lC ontact your midwife or breastfeeding and lactation consultant if you can express only minimal or no milk or if expression is painful. Note i lA lways disconnect the Symphony from the power source after expression. i Info lD o not kink the tubing during expression. l Press the “Let down” button to revert from the expression phase to the stimulation phase if necessary. If milk has not begun to flow after two successive stimulation phases, take a break and try again in 15–30 minutes. Try breast massage (ask your lactation consultant or doctor) and then pump using the Expression Phase. l The program stores the last vacuum setting in the stimulation phase. l Double pumping saves time and increases the energy content of the milk. Milk production may be increased and maintained long-term. Switch off the breastpump with . Do not fill the bottle above max. volume indicator line. 7.3 Preparing for double pumping 1 Place the breastshield on the breast so that the nipple is properly centred in the tunnel. Hold the breastshield onto your breast with your thumb and index finger. Support your breast with the palm of your hand. 6 27 Clean in accordance with chapter 5, page 14 et seq. 5 Use the stand or bottle holder to prevent the bottle from tipping over. Close the bottle with a lid or lid and disc (depending on bottle type). Follow the instructions in chapter 9 “Storing and thawing breastmilk”. 2 More information on page 25, chapter 7.2, steps 2 and 3. 3 Switch on the breastpump with Stimulation phase begins. The stimulation phase will automatically change to the expression phase after two minutes. . Place the second breastshield on the breast so that the nipple is properly centred in the tunnel. 8. Preemie+ Initiation Card 28 i Info lA ssists in initiating and maintaining lactation in breastpump-dependent mothers of premature infants. l The Preemie+ Initiation Card contains both pumping programs. l Preemie+ 1.0: Program for the immediate post-natal period until initiation of milk production. Then use the Standard program. The Preemie+ program runs uninterrupted for 15 minutes and comprises a sequence of various stimulation, expression and pause phases. “Done” appears in the display when the program is complete. l Standard 2.0: Use after initiation of milk production. Initiation is reached as soon as in each of three consecutive pumping sessions 20ml of milk could be pumped from both breasts combined. Includes “2-Phase Expression”, starting with the stimulation phase and followed by the expression phase. 8.1 Preparation 1 Unscrew the card and cord protector (optional) and slide out of the guide rail. 8.2 Expression 1 Preemie+: switch on the breastpump with Then press within 10 seconds. . 29 2 Swap program card 2.0 for Preemie+ initiation card. 3 Mark the pump with the Preemie+ sticker. Replace the card and cord protector (optional). 8.3 Pumping log (optional) 2 3 Breastmilk is best Pumping Log Personal Pumping Log for Set vacuum comfort: Rotate the vacuum to the right and increase until there is slight discomfort. Rotate to the left to reduce the vacuum slightly. Use the pumping log to check and track expression sessions. 9. Storing and thawing breastmilk 30 9.1 Storage Storage guidelines for freshly expressed breastmilk ( For healthy term babies ) Room temperature Refrigerator Freezer Thawed breastmilk 4 − 6 hours at 19 to 26 ° C ( 6 6 to 78 ° F ) 3 − 8 days at 4 ° C ( 3 9 ° F ) or lower 6 − 12 months –18 to – 20 °C ( 0 to 4 ° F ) In refrigerator for 10 h max. Do not refreeze ! l D o not store breastmilk in the door of the refrigerator. Instead choose the coldest part of the refrigerator (this is at the back of the glass shelf above the vegetable compartment). 9.2 Freezing IY ou can freeze expressed breastmilk in milk bottles or “Pump & Save”* bags. Do not fill the bottles or bags more than 3/4 full to allow space for possible expansion. I Label the bottles or “Pump & Save” bags with the date of expression. 9.3 Thawing Caution Do not thaw frozen breastmilk or do not warm breastmilk in a microwave or a pan of boiling water to avoid loss of vitamins, minerals and other important components and to prevent burns. I ln order to preserve the components of the breastmilk, thaw the milk in the refrigerator overnight. Alternatively, you can hold the bottle or “Pump & Save” bag under warm water (max. 37 °C). I G ently swirl the bottle or “Pump & Save” bag to mix any fat that has separated. Avoid shaking or stirring the milk. I With the Calesca* bottle warmer, it is possible to warm breastmilk in a gentle way. Note These storing and thawing breastmilk guidelines are a recommendation. National and hospital internal guidelines and standards may deviate. *More information at www.medela.com 10. Troubleshooting Problem Solution If the motor is not running Check whether mains power/battery is available. Check that the device is switched on. Check whether program card is inserted correctly in the card compartment on the back of the breastpump. If there is low or no suction Assemble the pump set in accordance with the instructions in chapter 6.4 or 6.5. Check whether all connections of the pump set and breastpump are secure. Express in accordance with chapter 7. Make sure that the breastshield forms a complete seal around the breast. T he white valve membrane must lie flat against the yellow valve head. Check that the valve head and membrane are clean and not damaged. See chapters 6.4 or 6.5 “Assembling the pump set”. l The ends of the tubing must be firmly connected to the connector and the opening in the membrane cap. l The protective membrane and membrane cap should be correctly assembled and the membrane cap is firmly fitted to the breastpump membrane to form a seal. l The protective membrane must be intact. l D o not kink or trap the tubing during expression. l A ll components must be completely dry. If there is an overflow 1. P lace the pump set into the bottle holder. 2. Turn off the pump and unplug the power cord from the socket. 3. Use a damp (not wet) cloth to wipe the pump and membrane area. 4. I f there is milk in the tubing: For One-Day Pump Set: throw away the pump set and use a new one. For reusable pump set: Remove tubing, protective membrane and membrane cap and clean in accordance with chapter 5.2 “Before first use and once a day”. Shake out any drops of water from the tubing and hang up the tubing to dry or let the pump run with tubing attached for 1–2 minutes or until dry. If there is condensation in the tubing: For One-Day Pump Set and reusable pump set: Let the pump run with tubing attached for 1–2 minutes or until dry. 5. W hen components are completely dry, reassemble breastpump and accessories set. 31 11. International warranty / disposal 32 Warranty and maintenance 3-year warranty for the unit from the date of purchase, excluding pump set and accessories. 6 months warranty for the batteries. The manufacturer is not liable for any damage or consequential damage caused by incorrect operation, inappropriate usage or use by unauthorised persons. Routine checks, servicing and battery exchange may only be carried out by Medela authorised personnel. The engineering of the Medela Symphony Breastpump has been verified by independent test institutes for compliance with the EN / IEC 60601-1 standard. Copies of such certificates may be obtained on request. Because of the method of construction used, Medela does not expect electrical safety to be affected at any time during the life of the product – provided that it is used properly in accordance with the intended use. There are no prescribed or recommended safety checks to be carried out. Disposal The unit is made of various metals and plastics. Before disposal, the device is to be rendered unusable and it must not be disposed of as unsorted municipal waste in accordance with local regulations. Use your local return and collection system for waste electrical and electronic equipment (incl. batteries). Improper disposal may have harmful effects on the environment and on public health.The accessories (pump set/bottles) are made of plastic and may only be disposed of in accordance with local regulations. 12. Accessories list Standard 2.0 Program Card Article number Product 800.0540 800.0541 800.0542 800.0543 800.0544 800.0545 800.0546 800.0547 800.0548 800.0549 800.0550 800.0551 800.0552 800.0553 800.0554 Program Program Program Program Program Program Program Program Program Program Program Program Program Program Program Card Card Card Card Card Card Card Card Card Card Card Card Card Card Card Preemie+ Preemie+ Preemie+ Preemie+ Preemie+ Preemie+ Bundle Bundle Bundle Bundle Bundle Bundle 33 Standard Standard Standard Standard Standard Standard Standard Standard Standard Standard Standard Standard Standard Standard Standard Preemie+ Bundle 200.2098 200.2099 200.2100 200.2101 200.2102 200.2103 DE EN FR NL JA ES 2.0 2.0 2.0 2.0 2.0 2.0 2.0 2.0 2.0 2.0 2.0 2.0 2.0 2.0 2.0 German English French Italian Dutch Swedish Danish Finnish Norwegian Polish Spanish Portuguese Greek Hungarian Czech 12. Accessories list 34 Accessories list* Art. no. Product 008.0176 008.0177 008.0178 008.0179 Symphony One-Day Pump Set, PersonalFit Breastshield Size M (24mm), Multibox 54 pcs. Symphony One-Day Pump Set, PersonalFit Breastshield Size L (27mm), Multibox 45 pcs. Symphony One-Day Pump Set, PersonalFit Breastshield Size XL (30mm), Multibox 45 pcs. Symphony and Lactina One-Day Pump Set, PersonalFit Breastshield Size M (24mm), Multibox 72 pcs. Symphony and Lactina One-Day Pump Set, PersonalFit Breastshield Size L (27mm), Multibox 60 pcs. Symphony and Lactina One-Day Pump Set, PersonalFit Breastshield Size XL (30mm), Multibox 60 pcs. 008.0180 008.0181 200.2110 200.2957 200.2956 200.4802 Colostrum Container: Set of 2 Disposable Bottles 35ml with Lids, Multibox 50 Sets Set of 40 Disposable Breastmilk Bottles 80ml with Lids, Multibox 12 Sets Set of 40 Disposable Breastmilk Bottles 150ml with Lids, Multibox 8 Sets Set of 40 Disposable Breastmilk Bottles 250ml with Lids, Multibox 4 Sets 800.0557 200.1141 200.1143 Symphony reusable pump set in PE-bag, breastshield size M (24mm), Multibox 20 pcs. Symphony reusable pump set in PE-bag, breastshield size L (27mm), Multibox 20 pcs. Symphony reusable pump set in PE-bag, breastshield size XL (30mm), Multibox 20 pcs. 800.0605 800.0606 800.0641 Basic Kit without Tubing, Multibox 25 pcs. Breastshield with Valve complete, Multibox 25 pcs. Comfort Breastshield with Valve complete, Multibox 25 pcs. *Articles may not be available in all countries. For further information about Medela products, visit www.medela.com and look for location finders in your country. Art. no. Product 200.0571 800.0668 800.0711 800.0712 800.0854 PersonalFit PersonalFit PersonalFit PersonalFit PersonalFit 800.0710 800.0660 800.0632 800.0608 800.0659 Breastshield Connector, Multipack 25 pcs. Symphony Membrane Cap, Multipack 25 pcs. Symphony Protective Membrane, Multipack 25 pcs. Symphony Membrane Cap and Protective Membrane, Multipack 25 pcs. Silicone Tubing with Polygon Adapters rolled, Multipack 25 pcs. 800.0622 800.0623 800.0624 800.0625 800.0627 800.0628 800.0629 800.0630 Valve head, Multipack 25 pcs. Valve membrane, Multipack 25 pcs. Valve complete incl. spare membrane, Multipack 25 pcs. Breastmilk bottle 150ml, Multipack 25 pcs. Lid, Multipack 25 pcs. Disc, Multipack 25 pcs. Cap, Mutlipack 25 pcs. Bottle Stand (1 bottle), Multipack 25 pcs. 600.0832 810.0552 600.0973 600.7073 600.0816 928.1017 600.0387 Mobile Stand to Symphony complete Bottle Stand to Symphony Hard Case to Symphony with Strap Hard Case to Symphony without Strap Symphony Card and Cord Protector Car Connection Cable for Symphony Test Vacuum Meter 35 Breastshield Breastshield Breastshield Breastshield Breastshield Size Size Size Size Size S (21mm), Multipack 25 pcs. M (24mm), Multipack 25 pcs. L (27mm), Multipack 25 pcs. XL (30mm), Multipack 25 pcs. XXL (36mm), Multipack 25 pcs. Inhaltsverzeichnis 1. Verwendungszweck/Zielgruppe – Kontraindikationen 2. Bedeutung der Symbole 3. Wichtige Sicherheitshinweise 4. Produktbeschreibung 5. Reinigung 36 5.1 E intages-Pumpset und wiederverwendbares Pumpset – nach jedem Gebrauch 5.2 M ehrweg-Pumpsets – vor Erstgebrauch, einmal täglich und immer vor der Übergabe an die nächste Patientin 5.3 W iederverwendbares Pumpset – Desinfektion und Sterilisierung 5.4 Reinigung der Milchpumpe 5.5 D esinfektion der Milchpumpe 6. Vorbereitung des Abpumpens 6.1 Installation der Programmkarte 6.2 K arten- und Kabelschutz (optional) 6.3 Netzbetrieb 6.4 Z usammensetzen des Eintages-Pumpsets 6.5 Z usammensetzen des Mehrweg-Pumpsets 6.6 V orbereitung des Abpumpens 7. Abpumpen 7.1 Vorbereitung für das einseitige Abpumpen 7.2 A bpumpen 7.3 Vorbereitung für das beidseitige Abpumpen 8. Preemie + Initiierungskarte 8.1 Vorbereitung 8.2 Abpumpen 8.3 Abpumpprotokoll (optional) 9. Aufbewahren und Auftauen der Muttermilch 9.1 A ufbewahrung 9.2 E infrieren 9.3 A uftauen 10. Fehlerbehebung 11. Internationale Gewährleistung / Entsorgung 12. Zubehörliste 13. EMC / Technical description 14. Technical specifications 37 38 40 42 46 46 48 49 49 49 50 50 51 51 52 52 54 56 56 56 58 60 60 60 61 62 62 62 62 63 64 65 164 170 1. Verwendungszweck / Zielgruppe – Kontraindikationen 37 Verwendungszweck und Indikationen für Milchpumpen Milchpumpen dienen dazu, dass stillende Frauen im Krankenhaus oder zu Hause Muttermilch abpumpen können. Milchpumpen sind zudem indiziert, Symptome eines Milchstaus durch Entleeren der Brust zu lindern. Auch im Falle einer Brustdrüsen entzündung (Mastitis) unterstützen Milchpumpen den Heilungsprozess durch Entleeren der Milch aus der betroffenen Brust. Milchpumpen sind zudem dazu geeignet, bei wunden oder rissigen Brustwarzen Linderung zu verschaffen sowie Flach- oder Hohlwarzen hervorzuholen. Überdies bieten Milchpumpen Müttern die Möglichkeit, ihre Babys mit Muttermilch zu versorgen, die aufgrund verschiedener Ursachen nicht an der Brust gestillt werden können, wie Saugprobleme, Gaumenspalten oder nach einer Frühgeburt. Patientinnenzielgruppe / Benutzerinnen Jugendliche oder erwachsene stillende Frauen. Viele Frauen finden es praktisch, oft sogar unerlässlich, eine Milchpumpe zum Abpumpen und Aufbewahren der Muttermilch zu verwenden, wenn sie wieder beginnen zu arbeiten, auf Reisen oder aus anderen Gründen von ihrem Baby getrennt sind. Da ist es beruhigend zu wissen, dass Milchpumpen als Ergänzung zum Stillen an der Brust eingesetzt werden können und dass es Pumpen gibt, die sogar das natürliche Saugen des Babys imitieren. Kontraindikationen Für die Milchpumpe Symphony gibt es keine bekannten Kontraindiktionen. 2. Bedeutung der Symbole Das Warnsymbol kennzeichnet alle für die Sicherheit wichtigen Anweisungen. Nichtbeachtung kann zu Verletzungen oder Schäden an der Milchpumpe führen. In Verbindung mit den folgenden Signalwörtern steht das Warnsymbol für: Achtung Kann zu schweren Verletzungen oder zum Tod führen. 38 Vorsicht Kann zu leichten Verletzungen führen. i Hinweis i Info Kann zu Sachschäden führen. Nützliche und wichtige Informationen, die nicht sicherheitsrelevant sind. Symbole auf der Verpackung Dieses Symbol zeigt an, dass das Material Teil eines Recycling-Prozesses ist. Dieses Symbol weist auf eine Kartonverpackung hin. Dieses Symbol zeigt an, dass das Produkt vor Sonnenlicht zu schützen ist. Dieses Symbol zeigt an, dass das zerbrechliche Produkt mit Vorsicht zu behandeln ist. °C Dieses Symbol zeigt die Temperaturbeschränkung für Betrieb, Transport und Lagerung an. Dieses Symbol weist auf die Luftfeuchtigkeitsbeschränkung für Betrieb, Transport und Lagerung hin. Dieses Symbol weist auf die Luftdruckbeschränkung für Betrieb, Transport und Lagerung hin. Dieses Symbol zeigt an, dass das Produkt trocken zu lagern ist. Dieses Symbol zeigt an, dass die Verpackung gemäss Verordnung 1935/2004 Produkte enthält, die dazu bestimmt sind, mit Lebensmitteln in Berührung zu kommen. Dieses Symbol gibt die weltweit eindeutige Identifikationsnummer GTIN (GS1 Global Trade Item Number) an. Symbole auf dem Gerät Dieses Symbol weist darauf hin, dass die Gebrauchsanweisung zu befolgen ist. 0123 Dieses Symbol besagt, dass das Gerät der Richtlinie 93/42/EWG des Rates vom 14. Juni 1993 über Medizinprodukte entspricht. Dieses Symbol weist auf den Hersteller hin. Dieses Symbol besagt, dass das Gerät nicht als ungetrennter Hausmüll entsorgt werden darf (gilt nur in der EU). Dieses Symbol besagt, dass das Gerät den zusätzlichen Sicherheitsanforderungen in den USA und Kanada für medizinische elektrische Geräte entspricht. Medizinapplikation vom Typ BF (Body Floating). SN Dieses Symbol verweist auf die Seriennummer des Gerätes. REF Dieses Symbol verweist auf die Hersteller-Katalognummer des Geräts. IP21 Dieses Symbol weist auf den Schutz gegen das Eindringen von Fremdkörpern und Wasser hin. Dieses Symbol verweist auf das Herstellungsdatum (vier Ziffern für das Jahr und zwei Ziffern für den Monat). Dieses Symbol verweist darauf, dass die Milchpumpe Symphony ein Gerät der Klasse II ist. Dieses Symbol stellt eine Sicherung dar (um auf Sicherungskästen bzw. deren Position hinzuweisen). Dieses Symbol besagt, dass das Netzteil sicherheitsgeprüft ist. Dieses Symbol weist auf die Möglichkeit zum Öffnen der Abdeckung der Netzbuchse hin. 39 3. Wichtige Sicherheitshinweise Bei Missachtung dieser Anleitung/Sicherheitshinweise können Gefährdungen durch das Gerät entstehen. Technische Änderungen bleiben vorbehalten. Gerät 40 Lebensgefahr durch Stromschlag! Bitte halten Sie das Gerät trocken! Tauchen Sie es niemals in Wasser oder andere Flüssigkeiten! Die Milchpumpe Symphony ist nicht hitzebeständig: Halten Sie das Gerät von Heizkörpern und offenem Feuer fern. Setzen Sie die Motoreinheit nicht direktem Sonnenlicht aus. Die Milchpumpe Symphony enthält keine Teile, die vom Kunden zu warten sind. Reparaturen dürfen nur durch eine autorisierte Servicestelle durch geführt werden. Bitte führen Sie Reparaturarbeiten nicht selbst durch! Änderungen am Gerät sind nicht erlaubt. Nehmen Sie niemals ein beschädigtes Gerät in Betrieb. Beschädigte oder abgenutzte Teile müssen ersetzt werden. Elektrische Verwendung Die Trennung vom Versorgungsnetz ist nur durch Trennen des Netzkabels von der Steckdose gewährleistet. Halten Sie das Netzkabel von heißen Oberflächen fern. Greifen Sie niemals nach einem ins Wasser gefallenen elektrischen Gerät! Ziehen Sie sofort den Netzstecker aus der Steckdose. Lassen Sie die Milchpumpe Symphony niemals unbeaufsichtigt, wenn sie an einer Stromquelle angeschlossen ist. Verwendung Verwenden Sie die Milchpumpe Symphony ausschließlich für den in dieser Gebrauchsanweisung beschriebenen Verwendungszweck. Nehmen Sie ein elektrisches Gerät niemals in Betrieb, wenn das Netzkabel beschädigt ist, wenn es nicht korrekt funktioniert oder wenn es heruntergefallen, beschädigt oder ins Wasser gefallen ist. Verwenden Sie die Milchpumpe Symphony nicht beim Baden oder Duschen. Verwenden Sie die Milchpumpe Symphony nicht, wenn Sie schlafen oder übermäßig müde sind. Fahren Sie während des freihändigen Abpumpens nicht Auto. Bei Verwendung der Milchpumpe Symphony in der Nähe von Kindern ist eine entsprechende Beaufsichtigung notwendig. Bitte wenden Sie sich bei Problemen oder Schmerzen an Ihre Hebamme, Laktationsberaterin oder Ihren Arzt. Tragbare und mobile Radiofrequenz-Kommunikationsgeräte können die Milchpumpe Symphony beeinflussen. Wichtig: lPlastikflaschen und andere Bestandteile können durch Einfrieren brüchig werden und zerbrechen, wenn sie herunterfallen. lAuch bei unsachgemäßem Gebrauch können Flaschen und andere Bestandteile beschädigt werden, z. B. wenn sie fallen gelassen, zu fest zusammengeschraubt oder umgestoßen werden. lGehen Sie mit den Flaschen und Bestandteilen entsprechend vorsichtig um. lVerwenden Sie die Muttermilch nicht, wenn die Flasche oder Bestandteile beschädigt wurden. 41 4. Produktbeschreibung Krankenhaus-Milchpumpe Symphony 42 LCD-Anzeige Ein-/Aus-Taste Let-down-Taste Vakuumeinstellung Milchpumpe Symphony 600.0837 / 600.0838 Netzkabel 928.0040 Euro 928.0041 AUS / NZ 928.0042 Großbritannien Standard 2.0 Programmkarte 800.0540 DE 800.0541 EN 800.0542 FR 800.0543 IT 800.0544 NL Autokabelanschluss Flaschenhalter 810.0552 Flaschenhalter 810.0552 Karten- und Kabelschutz 810.0589 Netzkabel 928.0040 Euro 928.0041 AUS / NZ 928.0042 Großbritannien Benötigtes Zubehör* Ready-to-Use-Produkte Eintages-Pumpset (maximal 24 Stunden oder 8 Abpumpvorgänge): PersonalFit Brusthaube Größe M: 008.0176 PersonalFit Brusthaube Größe L: 008.0177 PersonalFit Brusthaube Größe XL: 008.0178 Colostrum Container, 35 ml: 200.2110 Einweg-Flaschen, 80 ml: 200.2957 Einweg-Flaschen, 150 ml: 200.2956 Einweg-Flaschen, 250 ml: 200.4802 Mehrwegprodukte* Symphony Hospital Multibox mit 20 Stück Symphony-Pumpset in PE-Beutel: Enthält PersonalFit-Brusthaube Größe M (24 mm): 800.0557 Enthält PersonalFit-Brusthaube Größe L (27 mm): 200.1141 Enthält PersonalFit-Brusthaube Größe XL (30 mm): 200.1143 Optionales Zubehör* Preemie+-Paket: 200.2098 (DE), 200.2099 (EN), 200.2100 (FR), 200.2101 (NL), 200.2102 (JA), 200.2103 (ES) Rollstativ: 600.0832, Koffer: 600.7073, Karten- und Kabelschutz: 600.0816 2-Phase Expression Die Symphony verfügt über die Funktion „2-Phase Expression”. Die 2-Phase Expression beruht auf dem natürlichen Saugrhythmus des Babys, so kann mehr Milch in weniger Zeit abgepumpt werden: Auf natürliche, stimulierende Bewegungen folgen längere, die für optimalen Milchfluss sorgen. Stimulation: Schneller Pumprhythmus zur Anregung des Milchflusses Abpumpen: Langsamer Pumprhythmus für sanftes und effizientes Abpumpen der Milch. * Bestellbares Zubehör finden Sie auf Seite 66. Manche Artikel sind möglicherweise nicht in allen Ländern verfügbar. Weitere Informationen über Produkte von Medela finden Sie unter www.medela.com, über die länderspezifische Händlersuche. 43 4. Produktbeschreibung Wiederverwendbares Pumpset (Angewandte Teile)* 800.0557 / 200.1141 / 200.1143 1x PersonalFit™ 44 Brusthaube M (24 mm) (weitere Brusthaubengrößen siehe Kapitel 12, Seite 66) 810.7084 1x PersonalFit™ Verbindungsstück 810.7088 1x Ventilkopf 810.0475 1x Milchflasche 150 ml, transparent 811.0020 2x Ventilmembrane 820.7013 1x Silikonschlauch (105 cm) 800.0828 1x Membrankappe 810.0667 1x Schutzmembran 1x Schutzhaube 810.0474 1x Deckeleinlage 810.0473 1x Deckel mit Öffnung 810.7062 Eintages-Pumpset (Angewandte Teile)* 008.0176 / 008.0177 / 008.0178 1x Brusthaube 1x Verbindungsstück 45 1x Membrankappe 1x Schutzmembran 1x Membran Colostrum Container, 35 ml 200.2110 1x Silikonschlauch EinwegFlaschen, 80 ml 200.2957 EinwegFlaschen, 150 ml 200.2956 EinwegFlaschen, 250 ml 200.4802 *Manche Artikel sind möglicherweise nicht in allen Ländern verfügbar. Weitere Informationen über Produkte von Medela finden Sie unter www.medela.com, über die länderspezifische Händlersuche. 5. Reinigung Vorsicht lV erwenden Sie für die Reinigung nur Wasser in Trinkwasserqualität. l Alle Teile, die mit Brust und Milch in Berührung kommen, sofort nach 46 Gebrauch auseinandernehmen und reinigen, um ein Eintrocknen von Milch und Bakterienwachstum zu verhindern. 5.1 Eintages-Pumpset und wiederverwendbares Pumpset – nach jedem Gebrauch 1 Hinweis i l Das Eintages-Pumpset wird Ready-to-Use geliefert und muss daher vor dem ersten Gebrauch nicht gereinigt werden. l Das Pumpset muss nicht gewartet werden. l Bitte achten Sie darauf, keine Teile des Pumpsets bei der Reinigung zu beschädigen. l Das Eintages-Pumpset kann bis zu acht mal pro Tag verwendet werden. l Das Eintages-Pumpset darf nicht sterilisiert werden. Zerlegen Sie das Pumpset in seine Einzelteile. 4 Spülen Sie alle Teile mit kaltem, klares Wasser (ca. 20 °C) während 10 bis 15 Sekunden. 2 3 47 Reinigen Sie alle Teile mit viel warmem Wasser (circa 30 °C), dem ein handelsübliches Spülmittel zugesetzt ist. Spülen Sie alle Teile mit kaltem, klaren Wasser nach (ca. 20 °C). 5 Trocknen Sie die Teile mit einem sauberen Tuch ab oder lassen Sie sie auf einem sauberen Tuch trocknen. EintagesPumpset 6 Entsorgen Sie das Eintages-Pumpset spätestens nach acht Pumpsitzungen innerhalb von 24 Stunden. 5. Reinigung Achtung l Die Benutzung durch mehrere Mütter ohne vorherige ausreichende Sterilisierung kann ein Gesundheitsrisiko darstellen. l Alle Teile müssen nach jedem Gebrauch 48 gereinigt werden. Zusätzlich müssen sie einmal täglich und immer vor der Übergabe an die nächste Mutter desinfiziert und sterilisiert (z. B. auto klaviert) werden. 5.2 Mehrweg-Pumpsets – vor Erstgebrauch, einmal täglich und immer vor der Übergabe an die nächste Patientin 1 Vorsicht l Verwenden Sie für die Reinigung nur Wasser in Trinkwasserqualität. l zu Kapitel 5.4 (Reinigung der Milchpumpe): Ziehen Sie vor der Reinigung der Pumpe den Netzstecker. Hinweis i l zu 5.3 (Sterilisation): Sterilisieren Sie nur saubere und intakte Teile. Legen Sie die Teile nicht übereinander. Üben Sie keinen äußeren Druck darauf aus, um Schäden zu vermeiden. i Zerlegen Sie das Pumpset in seine Einzelkomponenten. 3 134˚ C Info lD ie folgenden Reinigungsangaben sind allgemeine Empfehlungen und können individuell den spezifischen Richtlinien und Reinigungsanweisungen eines Krankenhauses angepasst werden. Sterilisieren Sie alle Teile im Autoklav bei 134 °C während drei Minuten. 5.3 Wiederverwendbares Pumpset – Desinfektion und Sterilisierung 1 2 49 Überprüfen Sie, ob alle Teile sauber und intakt sind. Reinigen Sie alle Teile während fünf Minuten in einem Reinigungs- und Desinfektionsautomaten (bei 93 °C). Vergewissern Sie sich, dass das Pumpset ordnungsgemäß funktioniert. Nicht funktionstüchtige Teile des Pumpsets ersetzen. 5.4 Reinigung der Milchpumpe 5.5 Desinfektion der Milchpumpe 1 Wischen Sie die Pumpe mit einem sauberen, feuchten (nicht nassen) Tuch ab. Es können Wasser mit einem handelsüblichen Spülmittel oder nicht scheuernde Reinigungsmittel verwendet werden. 1 disinfect Wischen Sie die Pumpe mit einem sauberen, feuchten (nicht nassen) Tuch ab. Auch Desinfektionsmittel auf Alkoholbasis können verwendet werden. 6. Vorbereitung des Abpumpens 6.1 Installation der Programmkarte Achtung l z u Kapitel 6.2 (Netzbetrieb): Bitte verwenden Sie ausschließlich das mit der Milchpumpe Symphony gelieferte Netzkabel. 50 l Stellen Sie sicher, dass die Spannung des Netzkabels mit der Stromquelle kompatibel ist. i 1 Info lD ie Pumpe ist nur mit der passenden Programmkarte verwendbar (Standard oder Preemie+*). Optional bei Pumpe mit Akku: l Eingebauter Akku muss nach Erhalt des Geräts 12 Stunden aufgeladen werden. l Pumpe kann während des Aufladevorgangs benutzt werden. l Bei längerem Nichtgebrauch alle zwei Monate Akku nachladen (jeweils 12 h). l Die optimale Lebensdauer des Akkus wird erreicht, wenn er nicht regelmäßig vollständig entladen wird oder wenn die Pumpe bei Nichtbenutzung aufgeladen wird. Pumpdauer (Akku vollständig geladen) ca. 60 Min. Ladezeit (Akku vollständig geladen) 12 Stunden Installation der Programmkarte (Standard oder Preemie+) im Kartenfach auf der Rückseite der Milchpumpe. 3 Zum Entfernen Schraube des Karten- und Kabelschutzes lösen und aus der Führungsschiene schieben. 6.2 K arten- und Kabelschutz (optional) 1 2 51 Kabel in einer Schlaufe um Stift in Karten- und Kabelschutz einlegen. Stellen Sie sicher, dass genug Spielraum zum Einstecken des Kabels vorhanden ist. Karten- und Kabelschutz über Führungsschiene bis zum Anschlag in Rückseite schieben und Schraube arretieren. 6.3 Netzbetrieb 1 Stecken Sie das Netzkabel auf der Rückseite der Pumpe ein. 2 Stecken Sie das Netzkabel in eine Netzsteckdose ein. *Weitere Informationen unter www.medela.com 6. Vorbereitung des Abpumpens Vorsicht lW aschen Sie Ihre Hände gründlich (mind. eine Minute) mit Wasser und Seife, bevor Brust, gereinigte Pumpenteile sowie das gereinigte 52 Pumpset angefasst werden. 1 Hinweis i lD as Eintagespumpset wird Ready-toUse geliefert und muss daher vor dem ersten Gebrauch nicht gereinigt werden. l Bei dem wiederverwendbaren Pumpset ist vor dem ersten Einsatz eine Reinigung erforderlich. Siehe auch Kapitel 5.2. l Verwenden Sie nur Originalzubehör von Medela. l Überprüfen Sie die Teile des Pumpsets vor Gebrauch auf Abnutzung / Beschädigung. l Vergewissern Sie sich, dass die Membrankappe korrekt auf der Schutzmembrane montiert ist. l Alle Teile müssen vor Gebrauch komplett trocken sein. i 6.4 Zusammensetzen des Eintages-Pumpsets Öffnen Sie die Verpackung des Ready-to-Use Eintagespumpset. Verwenden Sie je nach Bedarf zudem eine Einwegflasche (35/80/150/250 ml). 6.5 Zusammensetzen des Mehrweg-Pumpsets 1 Info lB efolgen Sie alle Schritte sorgfältig und setzen Sie die Pumpe korrekt zusammen. Andernfalls wird möglicherweise kein ausreichendes Vakuum erzeugt. Stecken Sie die Membrane sorgfältig auf den Ventilkopf, bis sie einrastet. 3 Weiter auf Seite 54, Kapitel 6.6, Schritte 1 bis 3. 2 Stecken Sie die Brusthaube auf das Verbindungsstück. 2 Stecken Sie die Brusthaube auf das Verbindungsstück. Schrauben Sie die jeweilige Einwegflasche (je nach Bedarf 35/80/150/250 ml) auf das Verbindungsstück. Stecken Sie den Schlauch an den entsprechenden Anschluss am Verbindungsstück. 3 Stecken Sie den Ventilkopf mit Membrane auf das Verbindungsstück. Positionieren Sie den Ventilkopf seitlich. 53 6. Vorbereitung des Abpumpens i Info 4 l z u Schritt 3 (Kapitel 6.6): Schließen Sie beim Abpumpen immer den Deckel. Er hält die Membran kappe heruntergedrückt, um einen 54 Vakuumverlust durch Abspringen der Membrankappe zu verhindern. Schrauben Sie die Flasche auf das Verbindungsstück. 6.6 V orbereitung des Abpumpens 1 Öffnen Sie den Deckel der Milchpumpe. Drücken Sie den ovalen Knopf auf dem Oberteil der Milchpumpe Symphony und heben Sie den Griff an. 5 6 55 Schließen Sie den Schlauch an die entsprechende Öffnung im Verbindungsstück an. 2 Setzen Sie die Membrankappe fest und dicht auf die Milchpumpenmembrane. Zentrieren Sie den Schlauchanschluss in der Aussparung im Pumpengehäuse. Stellen Sie sicher, dass die Membrankappe einrastet und bündig auf der Oberfläche aufliegt. Legen Sie die Schutzmembrane auf eine flache Unterlage und drücken Sie die Membrankappe vorsichtig nach unten, bis sie einrastet. Stecken Sie den Schlauchadapter in die Öffnung der Membrankappe. 3 Schließen Sie den Deckel. 7. Abpumpen Vorsicht l vor Schritt 2 (Kapitel 7.1): Waschen Sie die Brust mit warmen Wasser ab (keinen Alkohol verwenden). l zu Schritt 2 (Kapitel 7.1): 56 Beantworten Sie die folgenden Fragen, um festzustellen, ob die vorhandene Brusthaubengröße passt: l Bewegt sich die Brustwarze frei im Tunnel? l Wird kein oder nur wenig Gewebe des Brustwarzenhofs in den Tunnel der Brusthaube gezogen? l Sind sanfte, rhythmische Bewegungen der Brust bei jedem Pumpzyklus zu sehen? l Spüren Sie, wie sich die Brust überall entleert? l Ist Ihre Brustwarze schmerzfrei? Wenn Sie eine dieser Fragen mit „Nein“ beantworten müssen oder wenn das Abpumpen Probleme oder Schmerzen bereitet, kontaktieren Sie bitte Ihre Stillund Laktationsberaterin oder Hebamme. l zu Schritt 2 und 3 (Kapitel 7.1): Pumpset nicht an der Flasche halten. Dies kann zum Abdrücken der Milchkanäle und zu Milchstau führen. i Info l Wenn die Pumpe 30 Minuten in Betrieb ist, ohne bedient zu werden (z. B. Einstellung des Vakuums), schaltet sich die Symphony automatisch aus. 7.1 Vorbereitung für das einseitige Abpumpen 1 Montieren Sie nur eine Membrankappe auf die Milchpumpenmembrane. 7.2 Abpumpen 1 Milchpumpe mit einschalten. Die Stimulationsphase beginnt. Nach zwei Minuten wechselt das Gerät automatisch in die Abpumpphase. 2 3 57 Setzen Sie die Brusthaube auf die Brust auf, so dass die Brustwarze gut zentriert im Tunnel liegt. 2 Falls die Milch vor Ablauf der zwei Minuten zu fließen beginnt, mit in den Abpumpmodus wechseln. Stellen Sie sicher, dass die Milch gut in die Flasche abfließt. Halten Sie die Brusthaube mit Daumen und Zeigefinger an die Brust. Stützen Sie die Brust mit der Handfläche. 3 Stellen Sie das Komfort-Vakuum ein: Drehen Sie das Vakuum nach rechts und erhöhen Sie es, bis Sie ein leicht unangenehmes Gefühl verspüren. Reduzieren Sie das Vakuum geringfügig, indem Sie leicht nach Links drehen. 7. Abpumpen Vorsicht 4 lK ontaktieren Sie Ihre Still- und Laktationsberaterin oder Hebamme, wenn Sie keine oder nur wenig Milch abpumpen können oder wenn das 58 Abpumpen schmerzhaft ist. Hinweis i lT rennen Sie die Milchpumpe Symphony nach dem Abpumpen immer von der Stromquelle. i Info l Bitte knicken Sie den Schlauch während des Abpumpens nicht. l Drücken Sie die „Let down”-Taste , um nötigenfalls von der Abpump- in die Stimulationsphase zurückzuwechseln. Wenn die Milch nach zwei aufeinander folgenden Stimulationsphasen noch nicht zu fließen begonnen hat, machen Sie eine Pause und versuchen Sie es nach 15 bis 30 Minuten erneut. Versuchen Sie es mit einer Brustmassage (bitte befragen Sie hierzu auch Ihre Laktationsberaterin oder Ihre Hebamme) und wechseln Sie später zum Pumpen in die Abpumpphase. l Das Programm speichert die letzte VakuumEinstellung in der Stimulationsphase. l Beidseitiges Abpumpen verringert den Zeitaufwand und erhöht den Energiegehalt der Milch. Die Milchproduktion kann erhöht und langfristig aufrecht erhalten werden. Schalten Sie die Milchpumpe mit aus. Füllen Sie die Flasche höchstens bis zur Markierung für das maximale Füllvolumen. 7.3 Vorbereitung für das beidseitige Abpumpen 1 Setzen Sie die Brusthaube auf die Brust auf, so dass die Brustwarze gut zentriert im Tunnel liegt. Halten Sie die Brusthaube mit Daumen und Zeigefinger an die Brust. Stützen Sie die Brust mit der Handfläche. 6 Reinigung gemäß Kapitel 5, Seite 46 und ff. 5 Verwenden Sie den Standfuß oder den Flaschenhalter, um ein Umkippen der Flasche zu vermeiden. 3 Weiter auf Seite 57, Kapitel 7.2, Schritte 2 und 3. 2 Verschließen Sie die Flasche mit dem Deckel oder mit Deckel und Deckeleinlage (je nach Flaschentyp). Befolgen Sie die Anleitung in Kapitel 9 „Aufbewahren und Auftauen der Muttermilch“. Schalten Sie die Milchpumpe mit ein. Die Stimulationsphase beginnt. Nach zwei Minuten wechselt das Gerät automatisch in die Abpumpphase. Setzen Sie die zweite Brusthaube so auf die Brust auf, dass die Brustwarze gut zentriert im Tunnel liegt. 59 8. Preemie+ Initiierungskarte i Info lH ilft Müttern von Frühgeborenen, die auf die Brustpumpe angewiesen sind, bei der Initiierung und der Aufrechterhaltung der Milchproduktion. 60 l Die Preemie+ Initiierungskarte beinhaltet beide Pumpprogramme. l Preemie+ 1.0: Programm für Zeitraum direkt nach Geburt bis zur Initiierung der Milchproduktion verwenden. Anschließend das Standardprogramm verwenden. Das Preemie+-Programm läuft 15 Minuten lang ohne Unterbrechung und umfasst eine Abfolge verschiedener Stimulations-, Extraktions- und Pausenphasen. Nach Abschluss des Programms wird „Done“ im Display angezeigt. l Standard 2.0: Nach der Initiierung der Milchproduktion verwenden.* Die Initiierung ist beendet, sobald in jeder von drei aufeinanderfolgenden Abpumpsitzungen 20 ml Milch aus beiden Brüsten zusammen abgepumpt werden konnten. Beinhaltet die „2-Phase-Expression”, angefangen mit der Stimulationsphase und gefolgt von der Abpumpphase. 8.1 Vorbereitung 1 Schraube des Karten- und Kabelschutzes (optional) lösen und aus Führungsschiene schieben. 8.2 Abpumpen 1 Preemie+: Schalten Sie die Milchpumpe mit ein. Drücken Sie anschließend innerhalb von 10 Sekunden . 2 3 61 Programmkarte 2.0 mit Preemie+-Initiierungskarte austauschen. Markieren Sie die Pumpe mit dem Preemie+-Aufkleber. Karten- und Kabelschutz (optional) wieder anbringen. 8.3 Abpumpprotokoll (optional) 2 3 Breastmilk is best Pumping Log Personal Pumping Log for Stellen Sie das Komfort-Vakuum ein: Drehen Sie das Vakuum nach rechts und erhöhen Sie es, bis Sie ein leicht unangenehmes Gefühl verspüren. Reduzieren Sie das Vakuum geringfügig, indem Sie leicht nach Links drehen. Abpumpprotokoll zur Kontrolle und Nachverfolgung der Abpumpsitzungen verwenden. 9. Aufbewahren und Auftauen der Muttermilch 9.1 Aufbewahrung Regeln für das Aufbewahren frisch abgepumpter Muttermilch (für gesunde, termingeborene Babys) 62 Raumtemperatur Kühlschrank Tiefkühltruhe Aufgetaute Muttermilch 4 bis 6 Stunden bei 19 bis 26 ° C (66 bis 78 ° F) 3 bis 8 Tage bei 4 ° C (39 ° F) oder weniger 6 bis 12 Monate bei −18 bis −20 ° C (0 bis 4 ° F) Im Kühlschrank max. 10 Stunden. Nicht wieder einfrieren! lB ewahren Sie Muttermilch nicht in der Kühlschranktür auf. Wählen Sie stattdessen den kältesten Ort im Kühlschrank (hinten auf dem Glasregal oberhalb des Gemüsefachs). 9.2 Einfrieren ID ie abgepumpte Muttermilch kann in Milchflaschen oder „Pump & Save“*-Beuteln eingefroren werden. Füllen Sie Flaschen oder Beutel höchstens zu drei Vierteln, um Raum für Ausdehnung zu lassen. I Beschriften Sie Milchflaschen oder „Pump & Save“-Beutel mit dem Datum, an dem Sie die Milch abgepumpt haben. 9.3 Auftauen Vorsicht Verwenden Sie keine Mikrowelle zum Auftauen oder Anwärmen von Muttermilch, und wärmen Sie die Muttermilch auch nicht in kochendem Wasser auf, damit Vitamine, Mineralien und andere wertvolle Inhaltsstoffe erhalten bleiben und Verbrühungen vermieden werden. IU m die Inhaltsstoffe der Muttermilch zu erhalten, tauen Sie die Milch am besten über Nacht im Kühlschrank auf. Ersatzweise können Sie die Flasche oder den „Pump & Save“Beutel auch unter warmes Wasser (max. 37 °C) halten. IS chwenken Sie die Milchflasche oder den „Pump & Save“-Beutel sanft, um abgesetztes Fett mit der Milch zu vermischen. Schütteln oder rühren Sie die Milch nicht. I Mit dem Flaschenwärmer Calesca* können Sie die Muttermilch schonend erwärmen. Hinweis Diese Regeln für das Aufbewahren und Auftauen von Muttermilch stellen eine Empfehlung dar. Staatliche und krankenhausinterne Richtlinien können davon abweichen. *Weitere Informationen unter www.medela.com 10. Fehlerbehebung Problem Lösung Motor läuft nicht Kontrollieren Sie, ob Netzstrom/Akku vorhanden ist. Kontrollieren Sie, ob das Gerät eingeschaltet ist. Vergewissern Sie sich, dass die Programmkarte auf Rückseite der Milchpumpe richtig eingesteckt ist. Die Pumpe saugt zu schwach oder gar nicht Pumpset nach Anleitung gemäß Kapitel 6.4 bzw. 6.5 zusammensetzen. Vergewissern Sie sich, dass alle Anschlüsse des Pumpsets und der Milchpumpe korrekt miteinander verbunden sind. Abpumpen gemäß Kapitel 7. Stellen Sie sicher, dass die Brusthaube die Brust rundum gut abdichtet. Die weiße Ventilmembrane muss flach auf dem gelben Ventilkopf aufliegen. Vergewissern Sie sich, dass der Ventilkopf und die Membrane sauber und unversehrt sind. Siehe Kapitel 6.4 bzw. 6.5 „Zusammensetzen des Pumpsets”. l Die Enden des Schlauches müssen fest mit dem Verbindungsstück und der Öffnung der Membrankappen verbunden sein. l Die Schutzmembrane und Membrankappe müssen korrekt zusammengesetzt sein, und die Membrankappe muss fest und dicht auf der Milchpumpenmembrane montiert sein. l Die Schutzmembrane muss intakt sein. l Knicken Sie den Schlauch während des Abpumpens nicht und klemmen Sie ihn nicht ein. l Alle Teile müssen komplett trocken sein. Wenn es zu einem Überlauf kommt: 1. S tellen Sie das Pumpset in den Flaschenhalter. 2. S chalten Sie die Pumpe aus und ziehen Sie das Netzkabel aus der Steckdose. 3. W ischen Sie Pumpe und Membranbereich mit einem feuchten (nicht nassen) Tuch ab. 4. B ei Milch im Schlauch: Beim Eintages-Pumpset: Entsorgen Sie das Pumpset und verwenden Sie ein neues. Beim Mehrweg-Pumpset: Pumpset mit Schlauch, Schutzmembran und Membrankappe abnehmen und gemäß Kapitel 5.2 „Vor Erstgebrauch und einmal täglich” reinigen. Schütteln Sie verbliebene Wassertröpfchen aus dem Schlauch heraus hängen Sie ihn zum Trocknen auf, oder lassen Sie die Pumpe mit angeschlossenen Schläuchen 1 bis 2 Minuten laufen, bzw. so lange, bis die Schläuche trocken sind. Bei Kondenswasser im Schlauch: Bei Eintages-Pumpset und Mehrweg-Pumpset: Lassen Sie die Pumpe mit angeschlossenen Schläuchen 1 bis 2 Minuten laufen, bzw. so lange, bis die Schläuche trocken sind. 5. W enn die Einzelteile vollkommen trocken sind, setzen Sie die Pumpe und das Zubehörset wieder zusammen. 63 11. Internationale Gewährleistung / Entsorgung Garantie und Wartung 3 Jahre Garantie auf das Gerät ab Kaufdatum, Pumpset und Zubehör ausgeschlossen. 6 Monate Garantie auf den Akku. Der Hersteller haftet nicht für direkte oder indirekte Schäden, die durch fehlerhaften Betrieb, unsachgemäße Verwendung oder Verwendung durch unbefugte Personen entstanden sind. Routinekontrollen, Servicearbeiten und der 64 Wechsel des Akkus sind nur durch von Medela autorisierte Stellen auszuführen. Die Technik der Milchpumpe Symphony von Medela wurde durch unabhängige Prüfstellen im Hinblick auf die Einhaltung der Norm EN / IEC 60601-1 überprüft. Kopien der betreffenden Zertifikate sind auf Anfrage erhältlich. Aufgrund der Bauart des Gerätes geht Medela davon aus, dass die elektrische Sicherheit über die gesamten Lebensdauer des Gerätes hinweg zu keinem Zeitpunkt beeinträchtigt sein wird – unter der Voraussetzung, dass das Gerät sachgemäß und in Übereinstimmung mit dem beabsichtigten Verwendungszweck eingesetzt wird. Es gibt keine vorgeschriebenen oder empfohlenen Sicherheitsüberprüfungen, die durchzuführen sind. Entsorgung Das Gerät besteht aus verschiedenen Kunststoff- und Metallmaterialien. Es ist vor der Entsorgung unbrauchbar zu machen und darf nicht als Hausmüll, sondern gemäß den lokalen Vorschriften entsorgt werden. Nutzen Sie daher die an Ihrem Wohnort eingerichteten Rückgabe- und Sammelsysteme für die Entsorgung von elektrischen und elektronischen Altgeräten (inkl. Akku). Eine unsachgemäße Entsorgung kann die Umwelt schädigen und eine Gefahr für die öffentliche Gesundheit darstellen. Das Zubehör (Pumpset / Flaschen) ist aus Kunststoff hergestellt und darf nur gemäß lokalen Vorschriften entsorgt werden. 12. Zubehörliste Standard 2.0 Programmkarte Artikelnummer Produkt 800.0540 800.0541 800.0542 800.0543 800.0544 800.0545 800.0546 800.0547 800.0548 800.0549 800.0550 800.0551 800.0552 800.0553 800.0554 Programmkarte Programmkarte Programmkarte Programmkarte Programmkarte Programmkarte Programmkarte Programmkarte Programmkarte Programmkarte Programmkarte Programmkarte Programmkarte Programmkarte Programmkarte Standard Standard Standard Standard Standard Standard Standard Standard Standard Standard Standard Standard Standard Standard Standard Preemie+-Paket Preemie+-Paket Preemie+-Paket Preemie+-Paket Preemie+-Paket Preemie+-Paket DE EN FR NL JA ES Preemie+-Paket 200.2098 200.2099 200.2100 200.2101 200.2102 200.2103 2.0 Deutsch 2.0 Englisch 2.0 Französisch 2.0 Italienisch 2.0 Niederländisch 2.0 Schwedisch 2.0 Dänisch 2.0 Finnisch 2.0 Norwegisch 2.0 Polnisch 2.0 Spanisch 2.0 Portugiesisch 2.0 Griechisch 2.0 Ungarisch 2.0 Tschechisch 65 12. Zubehörliste Zubehörliste* 66 Art.-Nr. Produkt 008.0176 008.0177 008.0178 008.0179 Symphony-Eintages-Pumpset mit PersonalFit-Brusthaube Größe M (24 mm), Multibox, 54 Stück Symphony-Eintages-Pumpset mit PersonalFit-Brusthaube Größe L (27 mm), Multibox, 45 Stück Symphony-Eintages-Pumpset mit PersonalFit-Brusthaube Größe XL (30 mm), Multibox, 45 Stück Symphony- und Lactina-Eintages-Pumpset mit PersonalFit-Brusthaube Größe M (24 mm), Multibox, 72 Stück Symphony- und Lactina-Eintages-Pumpset mit PersonalFit-Brusthaube Größe L (27 mm), Multibox, 60 Stück Symphony- und Lactina-Eintages-Pumpset mit PersonalFit-Brusthaube Größe XL (30 mm), Multibox, 60 Stück 008.0180 008.0181 200.2110 200.2957 200.2956 200.4802 Colostrum Container: Set aus 2 Einwegflaschen, 35 ml, mit Deckeln, Multibox mit 50 Sets Set aus 40 Einweg-Muttermilchflaschen, 80 ml, mit Deckeln, Multibox mit 12 Sets Set aus 40 Einweg-Muttermilchflaschen,150 ml, mit Deckeln, Multibox mit 8 Sets Set aus 40 Einweg-Muttermilchflaschen, 250 ml, mit Deckeln, Multibox mit 4 Sets 800.0557 200.1141 200.1143 Symphony-Mehrweg-Pumpset in PE-Beutel, Brusthaube Größe M (24 mm), Multibox mit 20 Stück Symphony-Mehrweg-Pumpset in PE-Beutel, Brusthaube Größe L (27 mm), Multibox mit 20 Stück Symphony-Mehrweg-Pumpset in PE-Beutel, Brusthaube Größe XL (30 mm), Multibox mit 20 Stück 800.0605 800.0606 800.0641 Basispaket ohne Schläuche, Multibox mit 25 Stück Brusthaube mit Ventil, komplett, Multibox mit 25 Stück Comfort-Brusthaube mit Ventil, komplett, Multibox mit 25 Stück *Manche Artikel sind möglicherweise nicht in allen Ländern verfügbar. Weitere Informationen über Produkte von Medela finden Sie unter www.medela.com, über die länderspezifische Händlersuche. Art.-Nr. Produkt 200.0571 800.0668 800.0711 800.0712 800.0854 Brusthaube Brusthaube Brusthaube Brusthaube Brusthaube 800.0710 800.0660 800.0632 800.0608 800.0659 Brusthaube, Verbindungsstück, Multipack mit 25 Stück Symphony-Membrankappe, Multipack mit 25 Stück Symphony-Schutzmembrane, Multipack mit 25 Stück Symphony-Membrankappe und Schutzmembrane, Multipack mit 25 Stück Silikonschlauch mit Polygon-Adaptern, gerollt, Multipack mit 25 Stück 800.0622 800.0623 800.0624 800.0625 800.0627 800.0628 800.0629 800.0630 Ventilkopf, Multipack mit 25 Stück Ventilmembrane, Multipack mit 25 Stück Ventil, komplett, inklusive Ersatzmembran, Multipack mit 25 Stück Milchflasche 150 ml, Multipack mit 25 Stück Deckel, Multipack mit 25 Stück Deckeleinlage, Multipack mit 25 Stück Kappe, Multipack mit 25 Stück Flaschenhalter (1 Flasche), Multipack, 25 Stück 600.0832 810.0552 600.0973 600.7073 600.0816 928.1017 600.0387 Symphony-Rollstativ, komplett Symphony-Flaschenhalter Symphony-Hartschalenkoffer mit Gurt Symphony-Hartschalenkoffer ohne Gurt Symphony-Karten- und Kabelschutz Symphony-Kabelanschluss fürs Auto Test-Vakuummeter „PersonalFit”, „PersonalFit”, „PersonalFit”, „PersonalFit”, „PersonalFit”, Größe S (21 mm), Multipack mit 25 Stück Größe M (24 mm), Multipack mit 25 Stück Größe L (27 mm), Multipack mit 25 Stück Größe XL (30 mm), Multipack mit 25 Stück Größe XXL (36 mm), Multipack mit 25 Stück 67 Table des matières 1. Utilisation prévue/Public concerné – Contre-indications 2. Signification des symboles 3. Informations de sécurité importantes 4. Description du produit 5. Nettoyage 5.1 S et réutilisable et One-Day pour tire-lait – Après chaque utilisation 5.2 S et réutilisable pour tire-lait – Avant la première utilisation, une fois par jour et systématiquement avant de le transmettre à une autre patiente 5.3 S et réutilisable pour tire-lait - Désinfection et stérilisation 5.4 Nettoyage du tire-lait 5.5 D ésinfection du tire-lait 68 6. Préparation à la séance d’expression 6.1 Installation de la carte de programmation 6.2 P rotection de la carte et du cordon (facultatif) 6.3 Fonctionnement sur secteur 6.4 A ssemblage du set One-Day pour tire-lait. 6.5 A ssemblage du set réutilisable pour tire-lait 6.6 P réparation à la séance d’expression 7. Expression 7.1 P réparation de l’expression simple 7.2 E xpression 7.3 P réparation de l’expression en double pompage 8. Carte d’initiation Preemie + 8.1 Préparation 8.2 Expression 8.3 Journal d’expression (facultatif) 9. Conservation et décongélation du lait maternel 9.1 C onservation 9.2 C ongélation 9.3 D écongélation 10. Résolution des problèmes 11. Garantie internationale/mise au rebut 12. Liste des accessoires 13. EMC / Technical description 14. Technical specifications 69 70 72 74 78 78 80 81 81 81 82 82 83 83 84 84 86 88 88 88 90 92 92 92 93 94 94 94 94 95 96 97 164 170 1. Utilisation prévue / Public concerné – Contre-indications 69 Utilisation prévue et indications pour les tire-lait Les tire-lait sont conçus pour être utilisés par des femmes allaitantes, à l’hôpital ou à domicile, en vue d’exprimer le lait maternel. Ils aident à atténuer les symptômes d’engorgement en permettant d’exprimer le lait des seins. En cas de mastite, ils facilitent le processus de guérison en permettant l’extraction du lait maternel et le drainage du sein enflammé. Les tire-lait permettent de soulager les mamelons douloureux et présentant des crevasses, et de faire ressortir les mamelons plats ou ombiliqués. Ils sont également utilisés par les mères pour administrer le lait maternel lorsque leur bébé ne peut pas être nourri directement au sein pour de multiples raisons (difficultés à téter, fente palatine ou bébé prématuré, par exemple). Public cible/utilisateur Les femmes allaitantes, qu’elles soient adolescentes ou adultes. De nombreuses femmes trouvent pratique, voire nécessaire, d’utiliser un tire-lait pour exprimer et conserver leur lait une fois qu’elles ont repris le travail ou bien lorsqu’elles sont en déplacement ou autrement éloignées de leur bébé. Elles sont souvent ravies d’apprendre qu’un tire-lait peut servir de complément à l’allaitement maternel et que certains sont même conçus pour imiter la succion d’un bébé au sein. Contre-indications Il n’existe aucune contre-indication connue au tire-lait Symphony. 2. Signification des symboles Les symboles d’avertissement renvoient à des instructions importantes en matière de sécurité. Le non-respect de ces instructions peut provoquer des blessures ou endommager le tire-lait. Le symbole d’avertissement peut avoir différentes significations s’il est associé à l’un des termes ci-après : Avertissement Peut engendrer des blessures graves ou la mort. Mise en garde Peut provoquer des blessures légères. i 70 i Remarque Peut endommager le matériel. Info Informations utiles ou importantes non relatives à la sécurité. Symboles présents sur l’emballage Ce symbole indique que le matériau peut être recyclé selon les réglementations en vigueur. Ce symbole indique un emballage en carton. °C Ce symbole indique que le produit doit être conservé à l’abri de la lumière directe du soleil. Ce symbole indique que le produit est fragile et doit être manipulé avec précaution. Ce symbole indique la limite de température à ne pas dépasser en cas de fonctionnement, de transport et de stockage. Ce symbole indique le taux d’humidité maximal à respecter pour l’utilisation, le transport et le stockage. Ce symbole indique la limite de pression atmosphérique à ne pas dépasser en cas de fonctionnement, de transport et de stockage. Ce symbole indique que le produit doit être maintenu au sec. Ce symbole indique que l‘emballage contient des produits destinés à entrer en contact avec des denrées alimentaires conformément au règlement N° 1935/2004 Ce symbole fait référence aux codes articles internationaux (GTIN) GSI uniques. Symboles présents sur l’appareil Ce symbole indique qu’il est impératif de suivre le mode d’emploi. 0123 Ce symbole indique la conformité aux principales exigences de la Directive du Conseil 93/42/CEE du 14 juin 1993 portant sur les dispositifs médicaux. Ce symbole fait référence au fabricant. Ce symbole indique que l’appareil ne peut être mis au rebut avec les déchets ménagers non triés (UE exclusivement). Ce symbole indique la conformité aux exigences de sécurité supplémentaires des États-Unis et du Canada en ce qui concerne les dispositifs médicaux électriques. Ce symbole fait référence à une partie appliquée de type BF. SN RÉF. IP21 Ce symbole indique le numéro de série affecté à l’appareil par le fabricant. Ce symbole indique le numéro de référence affecté à l’appareil par le fabricant. Ce symbole fait référence à la protection électrique contre la pénétration d’objets solides et contre les projections d’eau. Ce symbole indique la date de fabrication (quatre chiffres pour l’année et deux chiffres pour le mois). Ce symbole indique que le tire-lait Symphony est un appareil de classe II. Ce symbole fait référence au fusible (pour l’identification des boîtes à fusibles ou de leur emplacement). Ce symbole indique que la sécurité de la boîte à fusibles a été testée. Ce symbole indique que le cache de la prise électrique doit être relevé. 71 3. Informations de sécurité importantes Le non-respect de ces instructions/informations de sécurité peut rendre l’appareil dangereux. Sous réserve de modifications techniques. Produit Risque d’électrocution ! Conservez l’appareil au sec. Ne l’immergez jamais dans de l’eau ou dans d’autres liquides. Le tire-lait Symphony n’est pas thermorésistant : maintenez-le à distance des radiateurs et flammes nues. 72 N’exposez pas le bloc-moteur à la lumière directe du soleil. Le tire-lait Symphony ne contient aucune pièce pouvant être réparée par l’utilisateur. Toute réparation doit exclusivement être réalisée par un service technique agréé. Ne réparez pas l’appareil vous-même ! Aucune modification de l’appareil n’est autorisée. N’utilisez jamais un appareil endommagé. Remplacez les pièces abîmées ou usées. Fonctionnement électrique La mise hors tension de l’appareil n’est garantie qu’une fois que le câble d’alimentation a été débranché de la prise électrique murale. Maintenez le câble d’alimentation éloigné des surfaces chauffantes. Ne saisissez jamais un appareil électrique qui est tombé dans l’eau. Débranchez-le immédiatement. Ne laissez jamais le tire-lait Symphony sans surveillance lorsqu’il est branché sur une source d’alimentation. Utilisation N’utilisez le tire-lait Symphony que pour l’usage auquel il est destiné, conformément à la description de ce manuel. Ne vous servez en aucun cas d’un appareil électrique si le câble d’alimentation est en mauvais état ou si l’appareil ne fonctionne pas correctement, est endommagé ou est tombé au sol ou dans de l’eau. N’utilisez pas le tire-lait Symphony lors du bain ou de la douche. Ne faites pas fonctionner le tire-lait Symphony pendant votre sommeil ou en cas de grosse somnolence. Ne conduisez pas pendant l’expression en mains libres. Une surveillance est nécessaire lorsque le tire-lait Lactina est utilisé à proximité d’enfants. En cas de problèmes ou de douleur, contactez un professionnel de santé (consultante en lactation, médecin, etc.). Les appareils de communication portables et mobiles peuvent influer sur le fonctionnement du tire-lait Symphony. Important : lLes biberons en plastique et leurs pièces associées peuvent être fragilisés par la congélation et risquent de se casser en cas de chute. lDe même, les biberons et composants peuvent être endommagés à la suite d’une mauvaise manipulation, par exemple en cas de chute, de serrage excessif ou de renversement. lManipuler avec prudence les biberons et composants. lNe pas utiliser le lait maternel si les biberons ou composants sont endommagés. 73 4. Description du produit Tire-lait Symphony pour usage en milieu hospitalier Ecran d’affichage LCD Bouton marche/arrêt Bouton d’écoulement Réglage du vide 74 Tire-lait Symphony 600.0837/600.0838 Câble d’alimentation 928.0040 Euro 928.0041 Australie/ Nouvelle-Zélande 928.0042 Royaume-Uni Carte de programmation Standard 2.0 800.0540 DE 800.0541 EN 800.0542 FR 800.0543 IT 800.0544 NL Fiche de connexion pour câble allume-cigare Porte-biberon 810.0552 Porte-biberon 810.0552 Carte et protection du cordon 810.0589 Câble d’alimentation 928.0040 Euro 928.0041 Australie/ Nouvelle-Zélande 928.0042 Royaume-Uni Santé Canada, identifications du dispositif: Symphony: 0240108 et 0240208. Symphony Kits: 008.0292, 27098S et 27292. SVP faire référence à la notice en addendum regardante les produits vendus or approuvés en Canada. Accessoires requis* Produits Ready-to-Use. Set One-Day pour tire-lait (24 heures d’utilisation ou 8 séances d’expression maximum) Téterelle PersonalFit taille M : 008.0176 Téterelle PersonalFit taille L : 008.0177 Téterelle PersonalFit taille XL : 008.0178 Contenant pour colostrum, 35 ml : 200.2110 Biberons jetables 80 ml : 200.2957 Biberons jetables 150 ml : 200.2956 Biberons jetables 250 ml : 200.4802 Produits réutilisables* Multipack Symphony à usage hospitalier comprenant 20 pièces Set pour tire-lait Symphony sous sachet : Avec téterelle PersonalFit taille M (24 mm) : 800.0557 Avec téterelle PersonalFit taille L (27 mm) : 200.1141 Avec téterelle PersonalFit taille XL (30 mm) : 200.1143 75 Accessoires en option* Pack Preemie+ : 200.2098 (DE), 200.2099 (EN), 200.2100 (FR), 200.2101 (NL), 200.2102 (JA), 200.2103 (ES) Pied à roulettes : 600.0832, valise : 600.7073, carte et protection du cordon : 600.0816 Technologie 2-Phase Expression Le tire-lait Symphony est doté de la technologie 2-Phase Expression. La technologie 2-Phase Expression reproduit le schéma de succion du bébé et permet ainsi d’exprimer davantage de lait en moins de temps. Les mouvements naturels de stimulation sont suivis de mouvements plus longs, assurant un écoulement de lait optimal. Stimulation : rythme d’aspiration rapide pour déclencher l’écoulement de lait. Expression : rythme d’aspiration plus lent pour exprimer le lait de manière douce et efficace. * Les accessoires disponibles à la vente sont indiqués à la page 98. Certains articles peuvent ne pas être vendus dans tous les pays. Pour plus de détails concernant les produits Medela, consultez le site www.medela.com et effectuez une recherche sur le site de votre pays. 4. Description du produit Set réutilisable pour tire-lait (pièces associées)* 800.0557/200.1141/200.1143 1 téterelle PersonalFit™ taille M (24 mm) (pour d’autres tailles de téterelle, reportez-vous au chapitre 12, page 98) 810.7084 1 valve 76 810.0475 1 connecteur PersonalFit™ 810.7088 1 biberon transparent pour lait maternel, 150 ml 811.0020 1 tuyau en silicone (105 cm) 800.0828 2 membranes 820.7013 1 capsule membrane 810.0667 1 membrane de protection 820.0094 1 capuchon de protection 810.0474 1 disque de fermeture 810.0473 1 bague pour biberon 810.7062 Set One-Day pour tire-lait (pièces associées)* 008.0176/008.0177/008.0178 1 téterelle 1 connecteur 1 capsule membrane 77 1 membrane 1 tuyau en silicone Contenant pour Biberons jetables colostrum, 35 ml 80 ml 200.2957 200.2110 1 membrane de protection Biberons jetables Biberons jetables 250 ml 150 ml 200.4802 200.2956 *Certains articles peuvent ne pas être vendus dans tous les pays. Pour plus de détails concernant les produits Medela, consultez le site www.medela.com et effectuez une recherche sur le site de votre pays. 5. Nettoyage Mise en garde lN ’utilisez que de l’eau potable pour le nettoyage. l Démontez et nettoyez toutes les pièces qui sont entrées en contact avec la poitrine et le lait maternel immédiatement après utilisation afin d’éviter l’assèchement de résidus de lait et la prolifération de bactéries. i 78 5.1 Set réutilisable et One-Day pour tire-lait – Après chaque utilisation 1 Remarque lL e set One-Day pour tire-lait est fourni Ready-to-Use et n’a pas besoin d’être nettoyé avant la première utilisation. l Les sets pour tire-lait ne nécessitent aucune maintenance. l Veillez à ne pas endommager les pièces du set pour tire-lait lors du nettoyage. l Le set One-Day peut être utilisé jusqu’à huit fois par jour. l Le set One-Day pour tire-lait ne doit en aucun cas être stérilisé. Démontez toutes les pièces du set pour tire-lait. 4 Rincez les pièces à l’eau tiède à environ 20 °C pendant 10 à 15 secondes. 2 3 79 Nettoyez abondamment toutes les pièces à l’eau chaude avec du produit vaisselle (à environ 30 °C). Rincez les à l’eau claire à environ 20 °C. 5 Séchez les pièces avec un chiffon propre ou laissez-les sécher sur un chiffon propre. Set One-Day pour tire-lait 6 Jetez le set One-Day pour tire-lait au bout de 24 heures (8 séances d’expression maximum). 5. Nettoyage Attention 1 Mise en garde lN ’utilisez que de l’eau potable pour le nettoyage. l Pour la section 5.4, « Nettoyage du tire-lait » : Débranchez le tire-lait avant de le nettoyer. i 80 l L’utilisation du set d’accessoires par plusieurs mères peut entraîner un risque de contamination si celui-ci n’est pas correctement stérilisé. l Toutes les pièces doivent être nettoyées après chaque utilisation. Elles doivent également être désinfectées et stérilisées (autoclavées) une fois par jour et systématiquement avant de transmettre le set à une autre maman. 5.2 Set réutilisable pour tire-lait – Avant la première utilisation, une fois par jour et systématiquement avant de le transmettre à une autre patiente Remarque lP our la section 5.3 sur la stérilisation : Ne stérilisez que des pièces intactes et propres. Ne superposez pas les pièces. Pour éviter de les endommager, n’exercez pas de pression externe. i Démontez chaque pièce du set pour tire-lait. 3 134˚ C Info lC es instructions de nettoyage sont des recommandations générales et peuvent être adaptées individuellement selon les directives spécifiques et les pratiques de nettoyage de l’hôpital. Stérilisez toutes les pièces dans l’autoclave à 134 °C pendant trois minutes. 5.3 Set réutilisable pour tire-lait Désinfection et stérilisation 1 2 81 Assurez-vous que les pièces sont intactes et propres. Nettoyez toutes les pièces dans un appareil de lavage et de désinfection pendant cinq minutes (à 93 °C). Vérifiez que le set pour tire-lait fonctionne. Remplacez les pièces défectueuses. 5.4 Nettoyage du tire-lait 5.5 Désinfection du tire-lait 1 Essuyez le tire-lait à l’aide d’un chiffon propre et humide (non trempé). Vous pouvez utiliser de l’eau et du produit vaisselle ou bien un détergent non abrasif. 1 disinfect Essuyez le tire-lait à l’aide d’un chiffon propre et humide (non trempé). Vous pouvez utiliser un désinfectant à base d’alcool. 6. Préparation à la séance d’expression 6.1 Installation de la carte de programmation Attention l Section 6.2, « Fonctionnement sur secteur » : Utilisez exclusivement le câble d’alimentation fourni avec le tire-lait Symphony. lA ssurez-vous que la tension du câble d’alimentation est compatible avec celle de la source de courant. i 1 Info 82 l Le tire-lait doit être utilisé uniquement avec la carte de programmation appropriée (Standard ou Preemie+*). Pour les modèles de tire-lait avec batterie: lL orsque l’appareil vous est livré, chargez la batterie pendant 12 heures. lL e tire-lait peut être utilisé pendant la charge. lS i vous prévoyez de ne pas utiliser l’appareil pendant un certain temps, pensez à charger la batterie tous les deux mois (12 heures à chaque fois). lL a durée de vie utile optimale de la batterie s’applique dans la mesure où celle-ci ne subit pas de décharge complète régulière et où le tire-lait est chargé lorsqu’il n’est pas en fonctionnement. Durée de l’expression (avec batterie chargée à 100 %) environ 60 min Temps de charge (pour charge complète) 12 heures Introduisez la carte de programmation (Standard ou Preemie+) dans le logement dédié situé à l’arrière du tire-lait. 3 Dévissez la protection carte et le cordon puis faites les glisser vers le haut pour retirer la carte. 6.2 Protection de la carte et du cordon (facultatif) 1 Faites passer le câble dans la protection carte et cordon en formant une boucle autour de la vis. Veillez à conserver un jeu suffisant pour pouvoir brancher le câble. 2 Poussez la protection de carte et du cordon sur la glissière située à l’arrière jusqu’au blocage, puis serrez la vis. 6.3 Fonctionnement sur secteur 1 Introduisez le câble d’alimentation dans la fiche de connexion électrique à l’arrière du tire-lait. 2 Branchez le câble d’alimentation sur la prise électrique. *Pour plus d’informations, consultez le site www.medela.fr. 83 6. Préparation à la séance d’expression Mise en garde lL avez-vous soigneusement les mains (durant au moins une minute) avec de l’eau et du savon avant de toucher le sein, ainsi que les accessoires du set et ses pièces propres. 1 Remarque i lL e set One-Day pour tire-lait est fourni 84 Ready-to-Use et n’a pas besoin d’être nettoyé avant la première utilisation. l Le set réutilisable pour tire-lait doit être nettoyé avant la première utilisation. Reportez-vous à la section 5.2. l N’utilisez que des accessoires Medela originaux. l Avant utilisation, vérifiez que les pièces du set d’aceesoires ne présentent aucun signe d’usure ou d’endommagement. l Vérifiez que la capsule est correctement fixée sur la membrane de protection. l Toutes les pièces doivent être complètement sèches avant utilisation. i 6.4 Assemblage du set One-Day pour tire-lait. Ouvrez l’emballage du set pour tire-lait Ready-to-Use. Ajoutez un biberon jetable si besoin (de 35/80/150/250 ml). 6.5 Assemblage du set réutilisable pour tire-lait 1 Info lE xécutez soigneusement toutes les étapes de la procédure afin de monter correctement le set pour tirelait. Autrement, vous risquez de ne pas obtenir aspiration suffisante. Poussez doucement la membrane sur la valve jusqu’à ce qu’elle s’y emboîte. Insérez la téterelle sur le connecteur. 2 Insérez la téterelle sur le connecteur. 3 Pour plus d’informations, consultez la section 6.6 (étapes 1 à 3), page 86. 2 Vissez le biberon jetable (de 35/80/150/250 ml, selon vos besoins) sur le connecteur. Insérez le tuyau dans la partie correspondante du connecteur. 3 Poussez la valve et la membrane sur le connecteur. Positionnez latéralement la valve complète. 85 6. Préparation à la séance d’expression i Info 4 lP our l’étape 3 (section 6.6) : Fermez toujours le couvercle pour l’expression. Ce dernier maintient la capsule enfoncée de manière à empêcher la perte d’aspiration qui pourrait survenir si la capsule se détachait. 86 Vissez le biberon sur le connecteur. 6.6 Préparation à la séance d’expression 1 Ouvrez le couvercle du tire-lait. Appuyez sur le bouton ovale situé sur le dessus de l’appareil et soulevez la poignée. 5 Glissez le tuyau dans l’ouverture appropriée du connecteur. 2 Fixez la capsule solidement sur la membrane du tire-lait afin d’assurer l’étanchéité. Centrez le raccord du tuyau dans la rainure placée sur le dessus du tire-lait. Vérifiez que la capsule est emboîtée et affleure à la surface. 6 Posez la membrane de protection sur une surface plane et poussez délicatement la capsule vers le bas jusqu’à ce qu’elle s’emboîte. Connectez l’embout du tuyau à la capsule. 3 Refermez le couvercle. 87 7. Expression Mise en garde lA vant l’étape 2 (section 7.1) : Essuyez-vous légèrement le sein avec un linge tiède (n’utilisez pas d’alcool). l Pour l’étape 2 (section 7.1) : Répondez au questionnaire suivant pour vérifier que la taille de la téterelle est adaptée : l Le mamelon bouge-t-il librement dans l’embout de la téterelle ? l Constatez-vous qu’une petite partie de l’aréole seulement, voire aucune s’étire 88 dans l’embout ? l Observez-vous un mouvement doux et rythmé du sein à chaque cycle d’aspiration ? l Sentez-vous votre sein se vider complètement ? l Vos mamelons sont-ils indolores ? Si vous avez répondu « non » à au moins l’une des questions ci-dessus ou si vous rencontrez des difficultés ou éprouvez une douleur pendant l’expression, adressez-vous à une consultante en lactation ou à une sage-femme. l pour les étapes 2 et 3 (section 7.1) : Ne tenez pas le set pour tire-lait par le biberon. Vous risquez d’appuyer trop fort et pourriez provoquer un blocage des canaux galactophores et un engorgement de ceux-ci. i Info lS i le tire-lait Symphony reste en fonctionnement pendant 30 minutes sans qu’aucune manipulation ne soit effectuée (par exemple, le réglage du vide), il s’éteint automatiquement. 7.1 Préparation de l’expression simple 1 Installez une seule capsule sur la membrane du tire-lait. 7.2 Expression 1 Allumez le tire-lait en appuyant sur . La phase de stimulation démarre. Au bout de deux minutes, elle est automatiquement suivie de la phase d’expression. 2 3 89 Placez la téterelle sur le sein de manière à centrer correctement le mamelon dans l’embout. 2 Si le lait commence à s’écouler avant que le délai de deux minutes n’expire, appuyez sur le bouton d’écoulement pour passer en phase d’expression. Veillez à ce que le lait s’écoule correctement dans le biberon. Maintenez la téterelle sur le sein à l’aide de votre pouce et de votre index. Soutenez votre sein avec la paume de votre main. 3 Réglage de l’aspiration de confort : faites tourner le bouton de réglage de l’aspiration vers la droite jusqu’à ce que vous ressentiez une légère gêne. Tournez-le ensuite dans le sens inverse pour réduire un peu l’aspiration. 7. Expression Mise en garde 4 lC ontactez un professionnel de l’allaitement, par exemple une sagefemme ou une consultante en lactation, si vous n’exprimez que très peu de lait ou n’en exprimez pas du tout ou si l’expression s’avère douloureuse. Remarque i éconnectez toujours le tire-lait 90 l D Symphony de la source d’alimentation après l’expression. i Info lN e pliez pas le tuyau pendant l’expression. l Si, une fois en phase d’expression, vous devez revenir en phase de stimulation, appuyez sur le bouton d’écoulement . Si le lait ne s’écoule toujours pas au bout de deux phases de stimulation successives, patientez 15 à 30 minutes, puis réessayez. Massez vos seins (une consultante en lactation ou un professionnel peut vous indiquer comment faire) et tirez votre lait en utilisant la phase d’expression. l Le programme enregistre le dernier réglage d’aspiration appliqué lors de la phase de stimulation. l Une expression double permet de gagner du temps et accroît la teneur énergétique du lait. La production de lait peut en être augmentée et maintenue à long terme. Éteignez le tire-lait en appuyant . sur Ne remplissez pas le biberon au-delà du repère de volume maximal. 7.3 Préparation de l’expression en double pompage 1 Placez la téterelle sur le sein de manière à centrer correctement le mamelon dans l’embout. Maintenez la téterelle sur le sein à l’aide de votre pouce et de votre index. Soutenez votre sein avec la paume de votre main. Utilisez le support ou le portebiberon pour éviter que le biberon ne se renverse. 2 Allumez le tire-lait en appuyant sur . La phase de stimulation démarre. Au bout de deux minutes, elle est automatiquement suivie de la phase d’expression. Nettoyage conformément aux instructions du chapitre 5 (à partir de la page 78) 6 Fermez le biberon avec un couvercle, en ajoutant un disque de fermeture s’il y a lieu (suivant le type de biberon). Suivez les instructions du chapitre 9, « Conservation et décongélation du lait maternel ». 3 Pour plus d’informations, consultez la section 7.2 (étapes 2 et 3), page 89. 5 Placez l’autre téterelle sur le sein de telle sorte que le mamelon soit bien centré dans l’embout. 91 8. Carte d’initiation Preemie+ i Info lL a carte d’initiation Preemie+ facilite l’instauration et le maintien de la lactation chez les mères de nourrissons prématurés qui sont contraintes d’utiliser systématiquement un tire-lait. l Elle permet d’utiliser les deux programmes d’expression ci-après. l Preemie+ 1.0 : Programme valable immédiatement après la naissance jusqu’à l’initiation 92 de la production de lait. Ce programme est suivi du programme Standard 2.0 Le programme Preemie+ est exécuté de façon ininterrompue pendant 15 minutes et inclut une séquence de plusieurs phases de stimulation, d’expression et de pause. L’afficheur LCD indique « Done » (Terminé) lorsque le programme est achevé. l Standard 2.0 : Programme utilisé après l’initiation de la production de lait, que l’on considère comme réalisée dès lors que 20 ml de lait ont pu être exprimés des deux seins au cours de trois séances d’expression consécutives. Ce programme fait appel à la technologie 2-Phase Expression, commençant par une phase de stimulation pour se poursuivre par une phase d’expression. 8.1 Préparation 1 Dévissez la protection carte et cordon (facultatif) et désengagez-les de la glissière. 8.2 Expression 1 Preemie+ : allumez le tire-lait en appuyant sur . Vous disposez ensuite de 10 secondes pour appuyer sur . 2 Remplacez la carte de programmation 2.0 par la carte d’initiation Preemie+. 3 Apposez l’autocollant Preemie+ sur le tire-lait. Replacez la protection carte et cordon (le cas échéant). 8.3 Journal d’expression (facultatif) 2 3 Breastmilk is best Pumping Log Personal Pumping Log for Réglage de l’aspiration de confort : faites tourner le bouton de réglage de l’aspiration vers la droite jusqu’à ce que vous ressentiez une légère gêne. Tournez-le ensuite dans le sens inverse pour réduire un peu l’aspiration. Pour le contrôle et le suivi de vos séances d’expression, vous pouvez utiliser le journal d’expression. 93 9. Conservation et décongélation du lait maternel 9.1 Conservation Règles de conservation pour le lait maternel fraîchement exprimé (pour les bébés nés à terme et en bonne santé) Température ambiante Réfrigérateur Congélateur Lait maternel décongelé 4 à 6 heures entre 19 et 26 °C 3 à 8 jours à 4 °C ou moins 6 à 12 mois entre –18 et – 20 °C Au réfrigérateur pendant 10 h max. Ne pas recongeler ! l Ne conservez pas le lait maternel dans la porte du réfrigérateur. Choisissez plutôt la partie la plus froide du réfrigérateur (à l’arrière de la clayette en verre au-dessus 94 du bac à légumes). 9.2 Congélation IV ous pouvez congeler le lait maternel exprimé dans des biberons ou des sachets « Pump & Save »*. Remplissez les biberons ou sachets aux 3/4 maximum, de façon à laisser de l’espace pour la solidification du lait. I Marquez la date d’expression sur le contenant. 9.3 Décongélation Mise en garde Ne décongelez pas et ne réchauffez pas le lait maternel au four à micro-ondes ni dans une casserole d’eau bouillante afin d’éviter toute perte de vitamines, de minéraux et d’autres nutriments essentiels, ainsi que tout risque de brûlure. IP our préserver les composants du lait maternel, laissez-le décongeler dans le réfrigérateur toute une nuit avant de l’utiliser. Vous pouvez également passer le biberon ou le sachet « Pump & Save » sous l’eau chaude (37 °C max.). IS ecouez délicatement le biberon ou le sachet « Pump & Save » en vue d’homogénéiser les corps gras. Évitez de secouer vigoureusement le lait. I Le chauffe-biberon Calesca* permet de faire chauffer doucement le lait maternel. Remarque Ces règles de conservation et de décongélation du lait maternel sont des recommandations. Les règles et normes nationales et internes aux hôpitaux peuvent être différentes. *Pour plus d’informations, consultez le site www.medela.fr. 10. Résolution des problèmes Problème Solution Non-fonctionnement du moteur Assurez-vous que la source d’alimentation secteur/la batterie est opérationnelle. Vérifiez que l’appareil est allumé. Vérifiez si la carte de programmation est insérée correctement dans son logement à l’arrière du tire-lait. Pas ou peu d’aspiration Assemblez le set pour tire-lait selon les instructions détaillées dans la section 6.4 ou 6.5. Vérifiez si toutes les connections du set d’accessoires et du tire-lait ont été bien effectuées. Procédez à l’expression en vous reportant au chapitre 7. Assurez-vous que la téterelle est positionnée de façon hermétique sur le sein. La membrane blanche doit être positionnée à plat sur la valve jaune. Assurez-vous que la valve et la membrane sont propres et ne sont pas endommagées. Reportez-vous à la section 6.4 ou 6.5, « Assemblage du set pour tire-lait ». l Les extrémités du tuyau doivent être solidement raccordées au connecteur et à l’ouverture de la capsule. l La membrane de protection et la capsule doivent être assemblées correctement et la capsule doit être fermement positionnée sur la membrane du tire-lait de manière à assurer l’étanchéité. l La membrane de protection doit être intacte. l Ne pliez pas et n’obstruez pas le tuyau au cours de l’expression. l Toutes les pièces doivent être complètement sèches. Débordement 1. P lacez le set pour tire-lait dans le porte-biberon. 2. É teignez le tire-lait et débranchez le câble d’alimentation de la prise de courant. 3. N ettoyez le tire-lait et la membrane au moyen d’un chiffon humide (non trempé). 4. S i le tuyau contient du lait : Avec le set One-Day pour tire-lait : jetez le set et utilisez-en un autre. Avec le set réutilisable pour tire-lait : retirez le tuyau, la membrane de protection et la capsule et procédez au nettoyage en suivant les instructions de la section 5.2, « Avant la première utilisation et une fois par jour ». Secouez le tuyau pour éliminer les gouttes d’eau qui pourraient subsister et suspendez-le pour le laisser sécher ou bien faites fonctionner le tire-lait avec le tuyau relié pendant 1 à 2 minutes ou jusqu’au séchage. En présence de condensation dans le tuyau : Avec le set pour tire-lait One-Day et le set réutilisable : faites fonctionner le tire-lait avec le tuyau relié pendant 1 à 2 minutes ou jusqu’au séchage. 5. A ssemblez à nouveau le tire-lait et les accessoires lorsque toutes les pièces sont complètement sèches. 95 11. Garantie internationale / mise au rebut Garantie et entretien Cet appareil est garanti 3 ans à compter de la date d’achat, à l’exclusion du set pour tire-lait et des accessoires. Les batteries sont garanties 6 mois. Le fabricant n’est pas responsable des dégâts ou dommages dus à une manipulation incorrecte, un usage inapproprié ou une utilisation par une personne non autorisée. Les éventuels contrôles de routine, réparations et remplacements de batterie ne doivent être exécutés que par un technicien agréé Medela. La conception technique du tire-lait Symphony de Medela a été vérifiée par des organismes de contrôle indépendants et répond à la norme EN/CEI 60601-1. Des copies des certificats de conformité sont disponibles sur simple demande. 96 Du fait de sa méthode de fabrication, Medela garantit la sécurité électrique pendant toute la durée de vie du produit, dans la mesure où celui-ci est utilisé selon l’usage auquel il est destiné. Aucun contrôle de sécurité spécifique n’est prévu ou conseillé. Mise au rebut L’appareil est constitué de différentes pièces métalliques et en plastique. En fin de vie de l’appareil, il doit être rendu inutilisable. En fonction de la réglementation locale, il ne peut être jeté avec les déchets ménagers non triés. Renseignez-vous auprès de votre réseau local de collecte des déchets, notamment d’équipements électriques et électroniques (y compris les piles). Une élimination non conforme peut avoir des effets néfastes sur l’environnement et la santé publique. Les accessoires (set pour tire-lait/biberon) sont constitués principalement de plastique et doivent être mis au rebut conformément à la réglementation locale. 12. Liste des accessoires Carte de programmation Standard 2.0 Réf. article Produit 800.0540 800.0541 800.0542 800.0543 800.0544 800.0545 800.0546 800.0547 800.0548 800.0549 800.0550 800.0551 800.0552 800.0553 800.0554 Carte Carte Carte Carte Carte Carte Carte Carte Carte Carte Carte Carte Carte Carte Carte de de de de de de de de de de de de de de de Pack Pack Pack Pack Pack Pack Preemie+ Preemie+ Preemie+ Preemie+ Preemie+ Preemie+ programmation programmation programmation programmation programmation programmation programmation programmation programmation programmation programmation programmation programmation programmation programmation Pack Preemie+ 200.2098 200.2099 200.2100 200.2101 200.2102 200.2103 DE EN FR NL JA ES Standard 2.0, Standard 2.0, Standard 2.0, Standard 2.0, Standard 2.0, Standard 2.0, Standard 2.0, Standard 2.0, Standard 2.0, Standard 2.0, Standard 2.0, Standard 2.0, Standard 2.0, Standard 2.0, Standard 2.0, version version version version version version version version version version version version version version version allemande anglaise française italienne néerlandaise suédoise danoise finlandaise norvégienne polonaise espagnole portugaise grecque hongroise tchèque 97 12. Liste des accessoires Liste des accessoires* Réf. article 008.0176 008.0177 008.0178 008.0179 008.0180 98 008.0181 Produit Set One-Day pour tire-lait Symphony, téterelle PersonalFit taille M (24 mm), multibox 54 pièces. Set One-Day pour tire-lait Symphony, téterelle PersonalFit taille L (27 mm), multibox 45 pièces. Set One-Day pour tire-lait Symphony, téterelle PersonalFit taille XL (30 mm), multibox 45 pièces. Set One-Day pour tire-lait Symphony et Lactina, téterelle PersonalFit taille M (24 mm), multibox 72 pièces. Set One-Day pour tire-lait Symphony et Lactina, téterelle PersonalFit taille L (27 mm), multibox 60 pièces. Set One-Day pour tire-lait Symphony et Lactina, téterelle PersonalFit taille XL (30 mm), multibox 60 pièces. 200.2110 200.2957 200.2956 200.4802 Contenant pour colostrum : set de 2 flacons jetables de 35 ml avec couvercles, multibox 50 sets Set de 40 biberons pour lait maternel jetables avec couvercles, 80 ml, multibox 12 sets Set de 40 biberons pour lait maternel jetables avec couvercles, 150 ml, multibox 8 sets Set de 40 biberons pour lait maternel jetables avec couvercles, 250 ml, multibox 4 sets 800.0557 200.1141 200.1143 Set réutilisable pour tire-lait Symphony sous sachet plastique, téterelle taille M (24 mm), multibox 20 pièces. Set réutilisable pour tire-lait Symphony sous sachet plastique, téterelle taille L (27 mm), multibox 20 pièces. Set réutilisable pour tire-lait Symphony sous sachet plastique, téterelle taille XL (30 mm), multibox 20 pièces. 800.0605 800.0606 800.0641 Set de base sans tuyau, multibox 25 pièces. Téterelle avec valve intégrale, multibox 25 pièces. Téterelle Comfort avec valve complète, multibox 25 pièces. *Certains articles peuvent ne pas être vendus dans tous les pays. Pour plus de détails concernant les produits Medela, consultez le site www.medela.com et effectuez une recherche sur le site de votre pays. Réf. article Produit 200.0571 800.0668 800.0711 800.0712 800.0854 Téterelle Téterelle Téterelle Téterelle Téterelle 800.0710 800.0660 800.0632 800.0608 800.0659 Connecteur de téterelle, multipack 25 pièces. Capsule Symphony, multipack 25 pièces. Membrane de protection Symphony, multipack 25 pièces. Capsule et membrane de protection Symphony, multipack 25 pièces. Tuyau en silicone avec embouts polygonaux enroulé, multipack 25 pièces. 800.0622 800.0623 800.0624 800.0625 800.0627 800.0628 800.0629 800.0630 Valve, multipack 25 pièces. Membrane, multipack 25 pièces. Valve complète avec membrane de rechange, multipack 25 pièces. Biberon pour lait maternel 150 ml, multipack 25 pièces. Bague pour biberon, multipack 25 pièces. Disque de fermeture, multipack 25 pièces. Capuchon de protection, multipack 25 pièces. Porte-biberon (1 biberon), multipack 25 pièces. 600.0832 810.0552 600.0973 600.7073 600.0816 928.1017 600.0387 Pied à roulettes pour Symphony intégral Porte-biberon pour Symphony Valise rigide pour Symphony avec bandoulière Valise rigide pour Symphony sans bandoulière Protection carte et cordon Symphony Câble allume-cigare pour Symphony Vacuomètre d’essai PersonalFit PersonalFit PersonalFit PersonalFit PersonalFit taille S (21 mm), multipack 25 pièces. taille M (24 mm), multipack 25 pièces. taille L (27 mm), multipack 25 pièces. taille XL (30 mm), multipack 25 pièces. taille XXL (36 mm), multipack 25 pièces. 99 Indice 1. Uso previsto / A chi è destinato - Controindicazioni 2. Significato dei simboli 3. Importanti informazioni di sicurezza 4. Descrizione del prodotto 5. Pulizia 5.1 S et per tiralatte One Day e riutilizzabile – dopo ogni utilizzo 5.2 S et per tiralatte riutilizzabile: prima del primo utilizzo, una volta al giorno e sempre prima di passare alla paziente successiva 5.3 S et per tiralatte riutilizzabile - disinfezione e sterilizzazione 5.4 Pulizia del tiralatte 5.5 D isinfezione del tiralatte 6. Preparazione all’estrazione del latte 6.1 Installazione della scheda di programma 100 6.2 P rotezione della scheda e del cavo (opzionale) 6.3 Funzionamento a corrente 6.4 M ontaggio del set giornaliero per tiralatte One Day 6.5 M ontaggio del set per tiralatte riutilizzabile 6.6 P reparazione all’estrazione del latte 7. Estrazione 101 102 104 106 110 110 112 113 113 113 114 114 115 115 116 116 118 120 7.1 P reparazione all’estrazione singola 7.2 E strazione 7.3 P reparazione all’estrazione doppia 120 120 122 8. Scheda di iniziazione Preemie + 8.1 Preparazione 8.2 Estrazione 124 8.3 Registro delle poppate Pumping Log (opzionale) 9. Conservazione e scongelamento del latte materno 9.1 C onservazione 9.2 C ongelamento 9.3 S congelamento 10. Risoluzione dei problemi 11. Garanzia internazionale/smaltimento 12. Elenco accessori 13. EMC / Technical description 14. Technical specifications 124 124 125 126 126 126 126 127 128 129 164 170 1. Uso previsto/A chi è destinato – Controindicazioni Uso previsto e indicazioni dei tiralatte 101 I tiralatte sono destinati alle donne che allattano in ospedale o a casa estraendo il latte materno. I tiralatte sono indicati per alleviare i sintomi di ingorgo durante l’estrazione del latte materno. In caso di mastite, i tiralatte contribuiscono al processo di guarigione estraendo il latte materno dal seno infiammato. I tiralatte sono indicati per dare sollievo ai capezzoli screpolati e doloranti e per portare nella posizione corretta i capezzoli appiattiti o rientrati. Inoltre, consentono alle madri di nutrire con latte materno i neonati che non possono essere allattati direttamente al seno per vari motivi, ad esempio per problemi di attacco, di palatoschisi o perché nati prematuri. Utenti / destinatari Donne che allattano, giovani adolescenti o adulte. Molte donne trovano comodo, o addirittura necessario, l’uso del tiralatte per estrarre e conservare il latte materno, dopo essere tornate al lavoro, durante i viaggi o quando si trovano lontane dal bambino per altri motivi. Le madri sono spesso liete di sapere che il tiralatte può essere usato come integrazione all’allattamento al seno e che alcuni modelli sono studiati per imitare la suzione del bambino. Controindicazioni Non esistono controindicazioni note per il tiralatte Symphony. 2. Significato dei simboli Il simbolo di avvertenza identifica tutte le istruzioni importanti per la sicurezza. La mancata osservanza di tali istruzioni può comportare lesioni alle persone o danni al tiralatte. Abbinato ai seguenti termini, il simbolo di avvertenza assume i significati descritti di seguito. Avvertenza Può comportare lesioni gravi o la morte. Attenzione Può comportare lesioni non gravi. i Nota i Informazioni Può comportare danni alle cose. Informazioni utili o importanti non correlate alla sicurezza. Simboli sulla confezione Questo simbolo indica che il materiale è oggetto di un processo di recupero/riciclo. 102 Questo simbolo indica una confezione in cartone. Questo simbolo indica che il dispositivo non deve essere esposto alla luce solare. Questo simbolo indica che il dispositivo è fragile e deve essere maneggiato con attenzione. °C Questo simbolo indica i limiti di temperatura per funzionamento, trasporto e conservazione. Questo simbolo indica i limiti di umidità per funzionamento, trasporto e conservazione. Questo simbolo indica i limiti di pressione atmosferica per funzionamento, trasporto e conservazione. Questo simbolo indica di mantenere il dispositivo asciutto. Questo simbolo indica che la confezione contiene prodotti destinati a venire a contatto con alimenti secondo il regolamento 1935/2004 Questo simbolo indica il codice univoco GSI Global Trade Item Number (GTIN). Simboli sul dispositivo Questo simbolo indica di seguire le istruzioni per l’uso. 0123 Questo simbolo indica la conformità ai requisiti fondamentali della Direttiva del Consiglio 93/42/CEE del 14 giugno 1993 relativa ai dispositivi medici. Questo simbolo indica il produttore. Questo simbolo indica di non smaltire il dispositivo nei rifiuti urbani indifferenziati (solo per UE). Questo simbolo indica la conformità ai requisiti di sicurezza supplementari di USA e Canada per le apparecchiature elettromedicali. Questo simbolo indica una parte applicata di tipo BF. SN Questo simbolo indica il numero di serie del dispositivo assegnato dal produttore. REF Questo simbolo indica il codice di catalogo del dispositivo assegnato dal produttore. IP21 Questo simbolo indica la protezione contro l’ingresso di oggetti estranei solidi e contro gli effetti nocivi dovuti all’ingresso di acqua. Questo simbolo indica la data di produzione (quattro cifre per l’anno e due cifre per il mese). Questo simbolo indica che Symphony è un dispositivo di classe II. Questo simbolo indica il fusibile (per identificare le scatole dei fusibili o la loro ubicazione). Questo simbolo indica che la scatola dei fusibili è stata sottoposta a test di sicurezza. Questo simbolo indica di aprire il coperchio della presa di rete. 103 3. Importanti informazioni di sicurezza La mancata osservanza di queste istruzioni/informazioni di sicurezza può portare a situazioni di pericolo causate dal dispositivo. Con riserva di modifiche tecniche. Dispositivo Pericolo di folgorazione! Mantenere asciutto il dispositivo! Non immergere mai in acqua o altri liquidi! Il tiralatte Symphony non è resistente al calore: tenere lontano da radiatori e fiamme libere. Non esporre l’unità motore alla luce diretta del sole. 104 All’interno del tiralatte Symphony non sono presenti parti riparabili dal cliente. Le riparazioni devono essere effettuate esclusivamente da operatori di assistenza autorizzati. Non riparare da soli l’apparecchio. Non sono consentite modifiche al dispositivo. Non utilizzare mai un dispositivo danneggiato. Sostituire i componenti danneggiati o logorati. Uso del dispositivo collegato alla rete elettrica La separazione dalla rete elettrica è assicurata solo staccando il cavo di alimentazione dalla presa di corrente. Tenere il cavo di alimentazione lontano da fonti di calore. Non cercare di recuperare un apparecchio elettrico caduto in acqua. Scollegarlo immediatamente. Il tiralatte Symphony non deve mai essere lasciato incustodito mentre è collegato a una presa di corrente. Uso Usare il tiralatte Symphony solo per l’uso previsto, come descritto nel presente manuale. Non usare mai un apparecchio elettrico se ha un cavo di alimentazione danneggiato, se non funziona correttamente, se è caduto o danneggiato o se è caduto in acqua. Non utilizzare il tiralatte Symphony durante il bagno o la doccia. Non utilizzare il tiralatte Symphony quando si dorme o si è troppo assonnati. Non guidare durante l’estrazione del latte con l’opzione mani libere. È necessaria una supervisione se il tiralatte Symphony viene usato in prossimità di bambini. In caso di problemi o se si avverte dolore, consultare il proprio consulente per l’allattamento o il medico. Gli apparecchi di comunicazione a radiofrequenza, portatili o mobili, possono disturbare il tiralatte Symphony. Importante lLe bottiglie e i componenti in plastica diventano fragili se congelati e potrebbero rompersi cadendo. lInoltre, le bottiglie e i componenti potrebbero danneggiarsi se non maneggiati correttamente, ad esempio se lasciati cadere, se serrati eccessivamente o rovesciati. lPrestare attenzione quando si maneggiano le bottiglie e i componenti. lNon utilizzare il latte materno se le bottiglie o i componenti sono danneggiati. 105 4. Descrizione del prodotto Tiralatte ospedaliero Symphony Display LCD Tasto ON/OFF Tasto discesa latte Regolazione vuoto Tiralatte Symphony 600.0837 / 600.0838 106 Cavo di alimentazione 928.0040 Euro 928.0041 AUS / NZ 928.0042 UK Scheda di programma 2.0 Standard 800.0540 DE 800.0541 EN 800.0542 FR 800.0543 IT 800.0544 NL Presa per il cavo di collegamento all’automobile Porta bottiglia 810.0552 Porta bottiglia 810.0552 Protezione della scheda e del cavo 810.0589 Cavo di alimentazione 928.0040 Euro 928.0041 AUS / NZ 928.0042 UK Accessori necessari* Prodotti Ready-to-Use Set giornaliero per tiralatte One Day (massimo 24 ore oppure 8 sessioni di estrazione) Coppa per il seno PersonalFit taglia M: 008.0176 Coppa per il seno PersonalFit taglia L: 008.0177 Coppa per il seno PersonalFit taglia XL: 008.0178 Contenitore per colostro, 35 ml: 200.2110 Bottiglie monouso 80 ml: 200.2957 Bottiglie monouso 150 ml: 200.2956 Bottiglie monouso 250 ml: 200.4802 Prodotti riutilizzabili* Symphony Hospital confezione multipla da 20 pezzi Set per tiralatte Symphony in sacchetto di polietilene contenente coppa per il seno PersonalFit taglia M (24 mm): 800.0557 contenente coppa per il seno PersonalFit taglia L (27 mm): 200.1141 contenente coppa per il seno PersonalFit taglia XL (30 mm): 200.1143 Accessori opzionali* Pacchetto Preemie+: 200.2098 (DE), 200.2099 (EN), 200.2100 (FR), 200.2101 (NL), 200.2102 (JA), 200.2103 (ES) Supporto mobile: 600.0832, Custodia: 600.7073, Protezione della scheda e del cavo: 600.0816 2-Phase Expression Symphony dispone della tecnologia 2-Phase Expression. 2-Phase Expression imita il ritmo naturale di suzione del bambino in modo da estrarre più latte in meno tempo: movimenti di stimolazione naturale sono seguiti da altri più lunghi per garantire un flusso ottimale del latte. Stimolazione: ritmo veloce di aspirazione per avviare il flusso del latte. Estrazione: ritmo di aspirazione più lento per estrarre il latte in modo delicato ed efficiente. * Gli accessori disponibili su ordinazione sono reperibili a pagina 130. Gli articoli possono non essere disponibili in tutti i Paesi. Per ulteriori informazioni sui prodotti Medela, visitare il sito www.medela.it. 107 4. Descrizione del prodotto Set per tiralatte riutilizzabile (parti applicate)* 800.0557 / 200.1141 / 200.1143 1 coppa per il seno PersonalFit™ M (24 mm) (per altre misure di coppe per il seno, vedere il capitolo 12, pagina 130) 810.7084 1 connettore PersonalFit™ 810.7088 1 testa della valvola 810.0475 1 bottiglia per latte materno, 150 ml trasparente 811.0020 2 membrane della valvola 108 820.7013 1 tubicino in silicone (105 cm) 800.0828 1 coperchio della membrana 810.0667 1 membrana di protezione 820.0094 1 tappo protettivo 810.0474 1 ghiera 810.0473 1 coperchio con apertura 810.7062 Set giornaliero per tiralatte One Day (parti applicate)* 008.0176 / 008.0177 / 008.0178 1 coppa per il seno 1 connettore 1 coperchio della membrana 1 membrana di protezione 1 membrana Contenitore per colostro, 35 ml 200.2110 Bottiglie monouso 80 ml 200.2957 1 tubicino in silicone Bottiglie monouso 150 ml 200.2956 109 Bottiglie monouso 250 ml 200.4802 *Gli articoli possono non essere disponibili in tutti i Paesi. Per ulteriori informazioni sui prodotti Medela, visitare il sito www.medela.it. 5. Pulizia Attenzione lP er la pulizia, usare esclusivamente acqua potabile. l Separare e lavare tutti i componenti che entrano in contatto con il seno o con il latte materno subito dopo l’uso, per evitare l’essiccazione dei residui di latte e prevenire la formazione di batteri. 5.1 Set per tiralatte One Day e riutilizzabile – dopo ogni utilizzo 1 Nota i l Il set giornaliero per tiralatte One Day è fornito Ready-to-Use e non necessita di pulizia prima del primo impiego. 110 l Il set per tiralatte non necessita di manutenzione. l Prestare attenzione a non danneggiare i componenti del set per tiralatte durante la pulizia. l Il set giornaliero per tiralatte One Day può essere utilizzato fino a otto volte nell’arco di un giorno. l Il set giornaliero per tiralatte One Day non deve mai essere sterilizzato. Smontare il set per tiralatte nei singoli componenti. 4 Risciacquare tutti i componenti con acqua pulita fredda (circa 20 °C) per 10–15 secondi. 2 3 Risciacquare tutti i componenti con acqua pulita fredda (20 °C circa). 5 Asciugare con un panno pulito o lasciare asciugare su un panno pulito. Set giornaliero per tiralatte One Day Pulire tutti i componenti con abbondante acqua tiepida e un comune detergente per stoviglie (30 °C circa). 6 Gettare il set giornaliero per tiralatte One Day dopo un massimo di 8 sessioni di estrazione nell’arco di 24 ore. 111 5. Pulizia Avvertenza lL ’uso da parte di più madri senza una sterilizzazione adeguata può costituire un rischio per la salute. l Tutti i componenti devono essere puliti dopo ogni utilizzo. Devono inoltre essere disinfettati e sterilizzati (ad esempio in autoclave) una volta al giorno e sempre prima di passare alla madre successiva. 5.2 Set per tiralatte riutilizzabile: prima del primo utilizzo, una volta al giorno e sempre prima di passare alla paziente successiva 1 Attenzione lP er la pulizia, usare esclusivamente acqua potabile. l Per il paragrafo 5.4 “Pulizia del 112 tiralatte”: scollegare il tiralatte prima della pulizia. Nota i lP er 5.3 Sterilizzazione: sterilizzare solo componenti puliti e integri. Non impilare i componenti uno sopra l’altro. Per evitare danni, non applicare pressione esterna. i Smontare il set per tiralatte nei singoli componenti. 3 134˚ C Informazioni lL e presenti istruzioni di pulizia sono raccomandazioni di tipo generale e possono essere adattate singolarmente alle direttive specifiche e alle prassi di pulizia dell’ospedale. Sterilizzare tutti i componenti in autoclave a 134 °C per tre minuti. 5.3 Set per tiralatte riutilizzabile – disinfezione e sterilizzazione 1 2 Verificare che i componenti siano puliti e intatti. Pulire tutti i componenti in una disinfettatrice per cinque minuti (a 93 °C). Verificare il funzionamento del set per tiralatte. Sostituire 113 i componenti difettosi del set per tiralatte. 5.4 Pulizia del tiralatte 5.5 Disinfezione del tiralatte 1 Pulire con un panno umido (non bagnato) pulito. Possono essere utilizzati detersivi per stoviglie o detergenti non abrasivi con acqua. 1 disinfect Pulire con un panno umido (non bagnato) pulito. È possibile utilizzare disinfettanti a base di alcool. 6. Preparazione all’estrazione del latte 6.1 Installazione della scheda di programma Avvertenza l Per il paragrafo 6.2 “Funzionamento a corrente”: usare solo il cavo di alimentazione fornito con Symphony. l Assicurarsi che la tensione del cavo di alimentazione sia compatibile con quella di rete. i 1 Informazioni lU sare l’apparecchio esclusivamente con la scheda di programma appropriata (Standard o Preemie+*). Facoltativo per l’apparecchio a batteria Inserire la scheda di programma (Standard o Preemie+) nell’apposito scomparto sul retro del tiralatte. 114 l La batteria integrata deve essere caricata per 12 ore al ricevimento del dispositivo. lD urante la ricarica, è possibile utilizzare il tiralatte. l Se il tiralatte resta inutilizzato per lunghi periodi, caricare la batteria ogni due mesi (per 12 ore ogni volta). l La vita utile ottimale della batteria si ottiene quando la batteria non viene continuamente scaricata del tutto oppure se l’apparecchio viene messo in carica quando non è utilizzato. Tempo di estrazione (batteria completamente carica) circa 60 minuti Tempo di carica (per una carica completa) 12 ore 3 Per rimuovere la batteria, svitare la protezione della scheda e del cavo e farla scorrere sulla guida per estrarla. 6.2 Protezione della scheda e del cavo (opzionale) 1 Inserire il cavo nella protezione della scheda e del cavo a forma di anello intorno al perno. Accertarsi che ci sia gioco a sufficienza per collegare il cavo. 2 Spingere la protezione della scheda e del cavo sulla guida posta sul retro fino al fermo, poi stringere la vite. 115 6.3 Funzionamento a corrente 1 Collegare il cavo di alimentazione alla presa apposita sul retro dell’apparecchio. 2 Collegare il cavo di alimentazione alla presa di corrente. *Ulteriori informazioni sul sito www.medela.it 6. Preparazione all’estrazione del latte Attenzione l Lavare accuratamente le mani (per almeno un minuto) con acqua e sapone prima di toccare il seno e i componenti puliti dell’apparecchio e del set per tiralatte. 1 Nota i l Il set giornaliero per tiralatte One Day è fornito Ready-to-Use e non necessita di pulizia prima del primo impiego. l Occorre pulire il set per tiralatte riutilizzabile prima del primo impiego. Consultare il paragrafo 5.2. l Utilizzare esclusivamente accessori 116 originali Medela. l Controllare l’eventuale usura o danneggiamento dei componenti del set per tiralatte prima dell’uso. l Verificare che il coperchio della membrana sia montato correttamente sulla membrana di protezione. l Tutti i componenti devono essere completamente asciutti prima dell’uso. i 6.4 Montaggio del set giornaliero per tiralatte One Day Aprire la confezione del set per tiralatte Ready-to-Use Aggiungere una bottiglia monouso secondo necessità (35/80/150/250 ml). 6.5 Montaggio del set per tiralatte riutilizzabile 1 Informazioni l Eseguire tutte le operazioni con attenzione e montare correttamente il set per tiralatte. In caso contrario, potrebbe non essere ottenuto un vuoto adeguato. Spingere con cautela la membrana sulla testa della valvola fino all’inserimento. Spingere la coppa per il seno sul connettore. 2 Inserire la coppa per il seno nel connettore. 3 Ulteriori informazioni a pagina 118, paragrafo 6.6, operazioni 1–3 2 Avvitare la bottiglia monouso (35/80/150/250 ml secondo necessità) sul connettore. Inserite il tubicino nell’apposita parte del connettore. 3 Inserire la testa della valvola e la membrana nel connettore. Posizionare la testa della valvola lateralmente. 117 6. Preparazione all’estrazione del latte i Informazioni 4 lP er l’operazione 3 (paragrafo 6.6): chiudere sempre il coperchio apribile durante l’estrazione. Il coperchio apribile tiene il coperchio della membrana spinto verso il basso per evitare perdite di vuoto che potrebbero verificarsi in caso di distacco del coperchio della membrana. Avvitare la bottiglia al connettore. 118 6.6 Preparazione all’estrazione del latte 1 Aprire il coperchio del tiralatte. Premere il pulsante ovale sulla parte superiore di Symphony e sollevare l’impugnatura. 5 Inserire il tubicino lungo nell’apertura corrispondente del connettore. 6 Posizionare la membrana di protezione su una superficie piana e spingere con attenzione il coperchio della membrana finché non è saldo in sede. Inserire l’adattatore del tubicino nell’apertura nel coperchio della membrana. 119 2 Posizionare saldamente il coperchio della membrana sulla membrana del tiralatte fino ad ottenere una perfetta tenuta. Posizionare il connettore del tubicino al centro nell’incavo dell’apparecchio. Accertarsi che il coperchio della membrana sia saldo in sede e sia a livello della superficie circostante. 3 Chiudere il coperchio del tiralatte. 7. Estrazione Attenzione l Prima dell’operazione 2 (paragrafo 7.1): pulire il seno con una salvietta tiepida (non usare alcool). l Per l’operazione 2 (paragrafo 7.1): rispondere alle seguenti domande per sapere se la misura disponibile di coppa per il seno è corretta. l Il capezzolo si muove liberamente nel condotto? l Il tessuto dell’areola è in minima parte o per nulla attirato nel condotto della coppa? l Si vede un movimento delicato e ritmico del seno ad ogni ciclo di pompaggio? l Si avverte che il seno si svuota 120 completamente? l Non si avverte alcun dolore al capezzolo? Se la risposta ad una delle suddette domande è “No”, oppure in caso di problemi o di sensazioni di dolore durante l’estrazione, consultare l’ostetrica o il consulente per l’allattamento. lP er le operazioni 2 e 3 (paragrafo 7.1): non tenere il set per tiralatte tramite la bottiglia. Questo potrebbe comportare il blocco dei dotti lattiferi e l’ingorgo. i 7.1 Preparazione all’estrazione singola 1 Montare un solo coperchio della membrana sulla membrana del tiralatte. 7.2 Estrazione 1 Informazioni l Se il tiralatte sta funzionando da 30 minuti senza alcuna manipolazione (ad esempio regolazione del vuoto), Symphony si spegne automaticamente. Accendere il tiralatte con . Inizia la fase di stimolazione. Dopo due minuti si passa poi automaticamente dalla fase di stimolazione alla fase di estrazione. 2 Posizionare la coppa sul seno in modo tale che il capezzolo si trovi correttamente al centro del condotto. 2 Se il latte inizia a defluire prima che scadano i due minuti, premere per passare alla fase di estrazione. Accertarsi che il latte fluisca correttamente nella bottiglia. 3 Tenere la coppa sul seno con il pollice e l’indice. Sostenere il seno con il palmo della mano. 121 3 Impostare il proprio ”vuoto confortevole”: Ruotare a destra il regolatore di vuoto e aumentare fino ad avvertire un leggero disagio. Ruotare quindi il regolatore a sinistra per ridurre leggermente il vuoto. 7. Estrazione Attenzione 4 lC onsultare il proprio consulente per l’allattamento o l’ostetrica se la quantità di latte estratta è minima o nulla oppure se l’estrazione risulta dolorosa. Nota i l Scollegare sempre Symphony dall’alimentazione di rete al termine dell’estrazione. i Informazioni 122 l Non attorcigliare il tubicino durante l’estrazione. l Premere il tasto “Discesa latte” per tornare dalla fase di estrazione alla fase di stimolazione, ove necessario. Se il latte non inizia a defluire dopo due fasi di stimolazione successive, interrompere e riprovare dopo 15-30 minuti. Provare il massaggio al seno (consultare il consulente per l’allattamento o il medico) poi aspirare mediante la fase di estrazione. l Il programma memorizza l’ultima impostazione di vuoto nella fase di stimolazione. l L’estrazione doppia permette di risparmiare tempo e aumenta il contenuto energetico del latte. La produzione di latte può aumentare e mantenersi a lungo. Spegnere il tiralatte con . Non riempire la bottiglia oltre la linea che indica il volume massimo. 7.3 Preparazione all’estrazione doppia 1 Posizionare la coppa sul seno in modo tale che il capezzolo si trovi correttamente al centro del condotto. Tenere la coppa sul seno con il pollice e l’indice. Sostenere il seno con il palmo della mano. Usare il supporto o il porta bottiglia per evitare ribaltamenti. 6 Pulire secondo quanto indicato al capitolo 5, pagina 110 e seguenti. 5 Chiudere la bottiglia con un coperchio o con coperchio e ghiera (a seconda del tipo di bottiglia). Seguire le istruzioni del capitolo 9 “Conservazione e scongelamento del latte materno”. 2 Accendere il tiralatte con . Inizia la fase di stimolazione. Dopo due minuti si passa poi automaticamente dalla fase di stimolazione alla fase di estrazione. 3 Ulteriori informazioni a pagina 121, paragrafo 7.2, operazioni 2 e 3. 123 Posizionare la seconda coppa sul seno in modo che il capezzolo sia correttamente centrato nel condotto. 8. Scheda di iniziazione Preemie+ i Informazioni lL a scheda aiuta le mamme di bambini prematuri che utilizzano il tiralatte ad avviare e mantenere costante il flusso del latte. l La scheda di iniziazione Preemie+ contiene entrambi i programmi di aspirazione. l Preemie+ 1.0 Programma per il periodo immediatamente successivo alla nascita fino all’inizio della produzione di latte. Successivamente, utilizzare il programma Standard. Il programma Preemie+ funziona ininterrottamente per 15 minuti e comprende una sequenza 124 di varie fasi di stimolazione, estrazione e pausa. Quando il programma è completato, sul display è visualizzato “Fatto”. l Standard 2.0 Da utilizzare dopo l’inizio della produzione di latte. Si è raggiunta la fase di iniziazione del flusso se si sono estratti 20 ml totali di latte dalle due mammelle in ogni sessione di aspirazione, per tre volte consecutive. Include la tecnologia “2-Phase Expression”, che inizia con la fase di stimolazione e continua con quella di estrazione. 8.1 Preparazione 1 Svitare la protezione della scheda e del cavo (opzionali) e far scorrere fuori dalla guida. 8.2 Estrazione 1 Preemie+: accendere il tiralatte con . Quindi premere entro 10 secondi. 2 Scambiare la scheda di programma 2.0 con la scheda di iniziazione Preemie+. 3 Contrassegnare il tiralatte con l’adesivo Preemie+. Montare nuovamente la protezione della scheda e del cavo (opzionale). 8.3 Registro delle poppate Pumping Log (opzionale) 2 3 Breastmilk is best Pumping Log Personal Pumping Log for Impostare il proprio „vuoto confortevole”: Ruotare a destra il regolatore di vuoto e aumentare fino ad avvertire un leggero disagio. Ruotare quindi il regolatore a sinistra per ridurre leggermente il vuoto. Utilizzare il registro delle poppate Pumping Log per controllare e tracciare le sessioni di estrazione. 125 9. Conservazione e scongelamento del latte materno 9.1 Conservazione Linee guida per la conservazione del latte materno appena estratto (Per bambini sani nati a termine) Temperatura ambiente Frigorifero Congelatore Latte materno scongelato 4-6 ore a una temperatura compresa tra 19 e 26 °C (tra 66 e 78 °F) 3-8 giorni a una temperatura di 4 °C (39 °F) o inferiore 6-12 mesi a una temperatura compresa tra -18 e -20 °C ( tra 0 e 4 ° F ) In frigorifero per un massimo di 10 ore. Non ricongelare. l Non conservare il latte materno nella porta del frigorifero. Scegliere invece la parte più fredda del frigorifero (la parte posteriore del ripiano in vetro sopra lo scomparto delle verdure). 9.2 Congelamento IÈ possibile congelare il latte materno appena estratto nelle bottiglie per latte o nelle sacche “Pump & Save”*. Non riempire le bottiglie o le sacche per più di 3/4, in modo da lasciare spazio per una dilatazione del latte. 126 I Etichettare le bottiglie o le sacche “Pump & Save” con la data di estrazione. 9.3 Scongelamento Attenzione Non scongelare il latte materno e non scaldarlo in un forno a microonde o in una pentola di acqua bollente per evitare la perdita di vitamine, sali minerali e altre importanti sostanze e per evitare ustioni. I Al fine di preservare i componenti del latte materno, scongelare il latte nel frigorifero durante la notte. In alternativa, è possibile tenere la bottiglia o la sacca “Pump & Save” sotto l’acqua calda (max. 37 °C). I Far roteare delicatamente la bottiglia o la sacca “Pump & Save” per miscelare il grasso eventualmente separato. Evitare di scuotere o mescolare il latte. I Con il dispositivo per il riscaldamento Calesca*, è possibile scaldare delicatamente il latte materno. Nota Le presenti linee guida per la conservazione e lo scongelamento del latte materno sono semplicemente consigli. Possono differire dalle linee guida e dagli standard interni dell’ospedale. *Ulteriori informazioni sul sito www.medela.it 10. Risoluzione dei problemi Problema Soluzione Se il motore non funziona Verificare se sia presente l’alimentazione di rete/la batteria. Verificare che il dispositivo sia acceso. Verificare che la scheda di programma sia inserita correttamente nell’apposito scomparto sul retro del tiralatte. Se la suzione è scarsa o inesistente Assemblare il set per tiralatte secondo le istruzioni fornite ai paragrafi 6.4 e 6.5. Verificare che tutti i collegamenti del set per tiralatte e del tiralatte siano saldi. Estrarre secondo quanto indicato al capitolo 7. Assicurarsi che la coppa per il seno aderisca completamente al seno. La membrana bianca della valvola deve aderire perfettamente piana alla testa gialla della valvola. Verificare che la testa e la membrana della valvola siano pulite e non danneggiate. Consultare i paragrafi 6.4 o 6.5 “Montaggio del set per tiralatte”. l Le estremità del tubicino devono essere collegate saldamente al connettore e all’apertura nel coperchio della membrana. l La membrana di protezione e il coperchio della membrana devono essere montati correttamente e il coperchio della membrana deve aderire saldamente alla membrana del tiralatte per creare la tenuta. l La membrana di protezione deve essere intatta. l Non attorcigliare o bloccare il tubicino durante l’estrazione. l Tutti i componenti devono essere completamente asciutti. Se c’è una fuoriuscita 1. P osizionare il set per tiralatte nel porta bottiglia. 2. Spegnere l’apparecchio e staccare il cavo di alimentazione dalla presa. 3. Usare un panno umido (non bagnato) per pulire il tiralatte e l’area della membrana. 4. Se nel tubicino è presente latte procedere come segue. Set giornaliero per tiralatte One Day: smaltire il set per tiralatte e utilizzarne uno nuovo. Per il set per tiralatte riutilizzabile: rimuovere il tubicino, la membrana di protezione e il relativo tappo; pulire secondo quanto indicato al paragrafo 5.2 “Prima del primo impiego e una volta al giorno”. Scuotere le eventuali gocce d’acqua dal tubicino e appenderlo ad asciugare oppure mettere in funzione l’apparecchio con il tubicino collegato per 1-2 minuti o finché non si asciuga. Se nel tubicino è presente condensa, per il set giornaliero per tiralatte One Day e per il set per tiralatte riutilizzabile: far funzionare il tiralatte con il tubicino collegato per 1-2 minuti o finché non è asciutto. 5. Quando i componenti sono completamente asciutti, rimontare il tiralatte e il set accessori. 127 11. Garanzia internazionale / smaltimento Garanzia e manutenzione Garanzia di 3 anni per l’unità a decorrere dalla data di acquisto, con esclusione del set per tiralatte e degli accessori. Garanzia di 6 mesi per le batterie. Il produttore non risponde di eventuali danni, diretti o indiretti, causati dalla messa in funzione scorretta, dall’uso improprio o dall’utilizzo da parte di persone non autorizzate. I controlli di routine, la manutenzione e la sostituzione della batteria possono essere svolti esclusivamente da personale autorizzato Medela. L’ingegnerizzazione del tiralatte Medela Symphony è stata verificata da istituti di ricerca indipendenti per accertarne la conformità alla norma EN/IEC 60601-1. Copie dei suddetti certificati sono disponibili su richiesta. Grazie al metodo di fabbricazione impiegato, Medela non prevede possibili effetti sulla sicurezza elettrica durante la vita utile del prodotto, purché usato correttamente e conformemente all’uso previsto. Non è prescritto né raccomandato alcun controllo di sicurezza. 128 Smaltimento L’unità è costituita da vari elementi di metallo e plastica. Prima dello smaltimento, il dispositivo deve essere reso inservibile; non deve essere smaltito tra i rifiuti urbani indifferenziati, conformemente ai regolamenti locali. Utilizzare il sistema locale per il recupero e la raccolta delle apparecchiature elettriche ed elettroniche di scarto (batterie incluse). Lo smaltimento non corretto può avere effetti nocivi sull’ambiente e sulla salute pubblica. Gli accessori (set per tiralatte/bottiglie) sono realizzati in plastica e possono essere smaltiti esclusivamente in conformità alle norme locali. 12. Elenco accessori Scheda di programma 2.0 Standard Codice articolo Prodotto 800.0540 800.0541 800.0542 800.0543 800.0544 800.0545 800.0546 800.0547 800.0548 800.0549 800.0550 800.0551 800.0552 800.0553 800.0554 Scheda Scheda Scheda Scheda Scheda Scheda Scheda Scheda Scheda Scheda Scheda Scheda Scheda Scheda Scheda di di di di di di di di di di di di di di di programma programma programma programma programma programma programma programma programma programma programma programma programma programma programma Standard Standard Standard Standard Standard Standard Standard Standard Standard Standard Standard Standard Standard Standard Standard Pacchetto Preemie+ 200.2098 200.2099 200.2100 200.2101 200.2102 200.2103 Pacchetto Pacchetto Pacchetto Pacchetto Pacchetto Pacchetto Preemie+ Preemie+ Preemie+ Preemie+ Preemie+ Preemie+ DE EN FR NL JA ES 2.0 2.0 2.0 2.0 2.0 2.0 2.0 2.0 2.0 2.0 2.0 2.0 2.0 2.0 2.0 tedesco inglese francese italiano olandese svedese danese finlandese norvegese polacco spagnolo portoghese greco ungherese ceco 129 12. Elenco accessori Elenco accessori* Codice art. Prodotto 008.0176 Set giornaliero per tiralatte One Day Symphony con coppa per il seno PersonalFit taglia M (24 mm), confezione multipla da 54 pezzi Set giornaliero per tiralatte One Day Symphony con coppa per il seno PersonalFit taglia L (27 mm), confezione multipla da 45 pezzi Set giornaliero per tiralatte One Day Symphony con coppa per il seno PersonalFit taglia XL (30 mm), confezione multipla da 45 pezzi Set giornaliero per tiralatte One Day Symphony e Lactina con coppa per il seno PersonalFit taglia M (24 mm), confezione multipla da 72 pezzi Set giornaliero per tiralatte One Day Symphony e Lactina con coppa per il seno PersonalFit taglia L (27 mm), confezione multipla da 60 pezzi Set giornaliero per tiralatte One Day Symphony e Lactina con coppa per il seno PersonalFit taglia XL (30 mm), confezione multipla da 60 pezzi 008.0177 008.0178 008.0179 008.0180 008.0181 200.2110 130 200.2957 200.2956 200.4802 800.0557 200.1141 200.1143 800.0605 800.0606 800.0641 Contenitore per il colostro: set di 2 bottiglie monouso da 35 ml con coperchi, confezione multipla da 50 set Set di 40 bottiglie monouso per latte materno da 80 ml con coperchi, confezione multipla da 12 set Set di 40 bottiglie monouso per latte materno da 150 ml con coperchi, confezione multipla da 8 set Set di 40 bottiglie monouso per latte materno da 250 ml con coperchi, confezione multipla da 4 set Set per tiralatte riutilizzabile Symphony in sacchetto di polietilene, coppa per il seno taglia M (24 mm), confezione multipla da 20 pezzi Set per tiralatte riutilizzabile Symphony in sacchetto di polietilene, coppa per il seno taglia L (27 mm), confezione multipla da 20 pezzi Set per tiralatte riutilizzabile Symphony in sacchetto di polietilene, coppa per il seno taglia XL (30 mm), confezione multipla da 20 pezzi Kit base senza tubicino, confezione multipla da 25 pezzi Coppa per il seno con valvola completa, confezione multipla da 25 pezzi Coppa per il seno Comfort con valvola completa, confezione multipla da 25 pezzi *Gli articoli possono non essere disponibili in tutti i Paesi. Per ulteriori informazioni sui prodotti Medela, visitare il sito www.medela.it. Codice art. Prodotto 200.0571 800.0668 800.0711 800.0712 800.0854 Coppa per il seno PersonalFit taglia S (21 mm), confezione multipla da 25 pezzi Coppa per il seno PersonalFit taglia M (24 mm), confezione multipla da 25 pezzi Coppa per il seno PersonalFit taglia L (27 mm), confezione multipla da 25 pezzi Coppa per il seno PersonalFit taglia XL (30 mm), confezione multipla da 25 pezzi Coppa per il seno PersonalFit taglia XXL (36 mm), confezione multipla da 25 pezzi 800.0710 800.0660 800.0632 800.0608 800.0659 Connettore per coppa per il seno, confezione multipla da 25 pezzi Coperchio della membrana Symphony, confezione multipla da 25 pezzi Membrana di protezione Symphony, confezione multipla da 25 pezzi Coperchio della membrana e membrana di protezione Symphony, confezione multipla da 25 pezzi Tubicino in silicone con adattatori poligonali arrotolati, confezione multipla da 25 pezzi 800.0622 800.0623 800.0624 800.0625 800.0627 800.0628 800.0629 800.0630 Testa della valvola, confezione multipla da 25 pezzi Membrana della valvola, confezione multipla da 25 pezzi Valvola completa inclusa membrana di scorta, confezione multipla da 25 pezzi Bottiglia per latte materno da 150 ml, confezione multipla da 25 pezzi Coperchio, confezione multipla da 25 pezzi Ghiera, confezione multipla da 25 pezzi Tappo, confezione multipla da 25 pezzi Supporto per bottiglia (1 bottiglia), confezione multipla da 25 pezzi 600.0832 810.0552 600.0973 600.7073 600.0816 928.1017 600.0387 Supporto mobile per Symphony completo Supporto bottiglia per Symphony Custodia rigida per Symphony con cinghia Custodia rigida per Symphony senza cinghia Scheda e protezione del cavo Symphony Cavo per collegamento all’automobile per Symphony Vacuometro di prova 131 Inhoudsopgave 1. Beoogd gebruik / populatie – contra-indicatie 2. Betekenis van de symbolen 3. Belangrijke veiligheidsinformatie 4. Productomschrijving 5. Reiniging 5.1 A fkolfset voor één dag en herbruikbare afkolfset – na elk gebruik 5.2 H erbruikbare afkolfset – voor het eerste gebruik, eenmaal per dag en steeds alvorens hem aan een andere gebruiker te geven 5.3 H erbruikbare afkolfset – desinfecteren en steriliseren 5.4 De borstkolf reinigen 5.5 D e borstkolf desinfecteren 6. Voorbereidingen voor het afkolven 6.1 P rogrammakaart installeren 6.2 K aart- en snoerbescherming (optioneel) 6.3 Werking op netstroomadapter 6.4 In elkaar zetten van de afkolfset voor één dag 6.5 D e herbruikbare afkolfset in elkaar zetten 6.6 V oorbereidingen voor het afkolven 7. Afkolven 132 7.1 Voorbereiding enkel afkolven 7.2 A fkolven 7.3 Voorbereiding voor dubbel afkolven 8. Preemie + initiatiekaart 8.1 Voorbereiding 8.2 Afkolven 8.3 Kolflogboek (optioneel) 9. Moedermelk bewaren en ontdooien 9.1 B ewaren 9.2 Invriezen 9.3 O ntdooien 10. Problemen oplossen 11. Internationale garantie / afvalverwijdering 12. Lijst van accessoires 13. EMC / Technical description 14. Technical specifications 133 134 136 138 142 142 144 145 145 145 146 146 147 147 148 148 150 152 152 152 154 156 156 156 157 158 158 158 158 159 160 161 164 170 1. Beoogd gebruik / populatie – contra-indicatie Het beoogde gebruik en indicaties van borstkolven Borstkolven zijn bedoeld voor gebruik door lacterende moeders, thuis of in het ziekenhuis. Borstkolven worden geïndiceerd om de symptomen van stuwing middels het afkolven van moedermelk te verzachten. In geval van mastitis ondersteunen borstkolven het genezingsproces door moedermelk uit de aangedane borst te kolven. Door het afkolven worden tepels met wondjes en kloven minder belast, en kunnen vlakke of ingetrokken tepels naar buiten worden gebracht. Borstkolven zijn ook bedoeld 133 om moedermelk te geven aan baby’s die om diverse redenen niet rechtstreeks aan de borst kunnen drinken, bijvoorbeeld wegens problemen met aanleggen, gespleten gehemelte of in geval van premature baby’s. Beoogde patiëntenpopulatie / gebruikers Adolescente pediatrische of volwassen lacterende moeders. Veel vrouwen vinden het gemakkelijk, en soms ook noodzakelijk, om nadat ze weer aan het werk zijn gegaan, op reis zijn, of om andere redenen van hun baby zijn gescheiden, met behulp van een borstkolf de moedermelk af te kolven en te bewaren. Vrouwen zijn vaak blij te horen dat een borstkolf gebruikt kan worden als ondersteuning bij het geven van borstvoeding en dat sommige kolven zo zijn ontworpen dat ze het zuigen van een baby imiteren. Contra-indicaties Er zijn geen contra-indicaties bekend voor de Symphony borstkolf. 2. Betekenis van de symbolen Het waarschuwingssymbool geeft belangrijke veiligheidsinstructies aan. Als die instructies niet in acht worden genomen, kan dat letsel of schade aan de borstkolf veroorzaken. Indien het waarschuwingssymbool wordt gebruikt in combinatie met de volgende woorden, staat het voor: Waarschuwing Kan leiden tot ernstig letsel of de dood. Waarschuwing Kan leiden tot lichte verwondingen. i i Opmerking Kan leiden tot materiële schade. Info Nuttige of belangrijke informatie die niet aan veiligheid is gerelateerd. Symbolen op de verpakking Dit symbool geeft aan dat het materiaal deel uitmaakt van een terugwinnings-/recyclingproces. Dit symbool geeft een kartonnen verpakking aan. 134 °C Dit symbool geeft aan dat het apparaat niet in zonlicht geplaatst mag worden. Dit symbool geeft aan dat het apparaat breekbaar is en met zorg behandeld moet worden. Dit symbool geeft de temperatuurbeperking aan bij gebruik, transport en opslag. Dit symbool geeft de vochtigheidsbeperking aan bij gebruik, transport en opslag. Dit symbool geeft de luchtdrukbeperking aan bij gebruik, transport en opslag. Dit symbool geeft aan dat het apparaat droog gehouden moet worden. Dit symbool geeft aan dat de verpakking produkten bevat die goedgekeurd zijn om in contact te komen met levensmiddelen conform EG-verordening 1935/2004. Dit symbool verwijst naar de unieke GSI-identificatie van handelseenheden (GTIN) (barcodes). Symbolen op het apparaat Dit symbool wil zeggen dat de gebruiksaanwijzing gevolgd moet worden. 0123 Dit symbool geeft de conformiteit aan met de essentiële eisen van de Richtlijn 93/42/EEC van de Raad van 14 juni 1993 betreffende medische hulpmiddelen. Dit symbool geeft de fabrikant aan. Dit symbool betekent dat het apparaat niet samen met ongesorteerd gemeentelijk afval mag worden afgevoerd (geldt alleen in de EU). Dit symbool geeft de conformiteit aan met aanvullende Amerikaanse en Canadese veiligheidseisen voor elektrische medische hulpmiddelen. Dit symbool duidt op toepassing van een onderdeel van het type BF. SN Dit symbool geeft het serienummer van de fabrikant aan. REF Dit symbool geeft het fabrikantencatalogusnummer van het apparaat aan. IP21 Dit symbool wijst op de bescherming tegen indringing van vaste vreemde voorwerpen en schadelijke effecten door indringing van water. Dit symbool geeft de productiedatum aan (vier cijfers voor het jaar en twee cijfers voor de maand). Dit symbool geeft aan dat de Symphony een klasse II-apparaat is. Dit symbool geeft de zekering aan (om de zekeringdoos of de locatie ervan te identificeren). Dit symbool geeft aan dat de zekeringdoos op veiligheid is getest. Dit symbool geeft de aanwijzing om de klep van het stopcontact te openen. 135 3. Belangrijke veiligheidsinformatie Als deze aanwijzingen/veiligheidsinformatie niet worden opgevolgd, kan een veilig gebruik van het apparaat niet worden gegarandeerd. Technische wijzigingen voorbehouden. Apparaat Gevaar voor elektrocutie! Apparaat droog houden! Nooit in water of in andere vloeistoffen dompelen! De Symphony borstkolf is niet hittebestendig: weghouden van radiatoren en open vuur. Stel de motoreenheid niet bloot aan direct zonlicht. De Symphony bevat geen onderdelen die door de gebruiker gerepareerd kunnen worden. Reparatiewerkzaamheden mogen alleen door een bevoegde servicedienst worden uitgevoerd. Repareer het apparaat niet zelf. Aan het apparaat mogen geen wijzigingen worden aangebracht. Gebruik nooit een beschadigd apparaat. Vervang beschadigde of versleten onderdelen. 136 Omgaan met elektriciteit Scheiding van het net is alleen gewaarborgd als het netsnoer uit het stopcontact getrokken is. Houd het netsnoer uit de buurt van verwarmde oppervlakken. Pak een elektrisch apparaat dat in het water is gevallen niet vast. Trek onmiddellijk de stekker uit het stopcontact. Laat de Symphony borstkolf niet onbeheerd achter met de stekker in het stopcontact. Gebruik Gebruik de Symphony borstkolf alleen voor het doel waarvoor hij bestemd is, zoals beschreven in deze gebruiksaanwijzing. Gebruik een elektrisch apparaat niet als het netsnoer beschadigd is, als het niet goed werkt, als het gevallen of beschadigd is of als het in water is gevallen. Gebruik de Symphony borstkolf niet tijdens baden of douchen. Gebruik de Symphony borstkolf niet tijdens het slapen of als u zeer slaperig bent. Bestuur geen auto tijdens het handsfree afkolven. Er is toezicht vereist als de Symphony borstkolf in de buurt van kinderen wordt gebruikt. Consulteer uw lactatiekundige of arts in geval van problemen of pijn. De radiofrequenties van mobiele communicatieapparatuur kunnen een negatieve invloed hebben op de Symphony borstkolf. Belangrijk: lDoor invriezen worden plastic flessen en de onderdelen broos en daardoor is er een verhoogde kans op breken als ze vallen. lOok kunnen flessen en onderdelen beschadigd raken bij verkeerde hantering, bv. als ze vallen, te vast worden dichtgedraaid of worden omgestoten. lGa voorzichtig om met flessen en onderdelen. lGebruik de moedermelk niet als de flessen of onderdelen beschadigd zijn. 137 4. Productomschrijving Symphony borstkolf voor gebruik in ziekenhuizen Aan/uit-schakelaar Lcd-scherm Druppel-toets vacuüm-instelling Symphony borstkolf 600.0837 / 600.0838 netsnoer 928.0040 Euro 928.0041 AUS / NZ 928.0042 VK fleshouder 810.0552 138 standaard 2.0 programmakaart 800.0540 DE 800.0541 EN 800.0542 FR 800.0543 IT 800.0544 NL stopcontact voor autokabel fleshouder 810.0552 kaart- en snoerbescherming 810.0589 netsnoer 928.0040 Euro 928.0041 AUS / NZ 928.0042 VK Nodige accessoires* Ready-to-Use-producten Afkolfset voor één dag (maximaal 24 uur of 8 kolfsessies): PersonalFit borstschild maat M: 008.0176 PersonalFit borstschild maat L: 008.0177 PersonalFit borstschild maat XL: 008.0178 Colostrumcontainer, 35 ml: 200.2110 Disposable flesjes 80 ml: 200.2957 Disposable flesjes 150 ml: 200.2956 Disposable flesjes 250 ml: 200.4802 Herbruikbare producten* Symphony multibox voor ziekenhuizen met 20 stuks Symphony afkolfset in een PU-zak: Bevat een PersonalFit borstschild maat M (24 mm): 800.0557 Bevat een PersonalFit borstschild maat L (27 mm): 200.1141 Bevat een PersonalFit borstschild maat XL (30 mm): 200.1143 Optionele accessoires* Preemie+ pakket: 200.2098 (DE), 200.2099 (EN), 200.2100 (FR), 200.2101 (NL), 200.2102 (JA), 200.2103 (ES) Verrijdbare standaard: 600.0832, koffer: 600.7073, kaart- en snoerbescherming: 600.0816 2-Phase Expression Symphony is een systeem met 2-Phase Expression. 2-Phase Expression imiteert het natuurlijke zuigpatroon van baby’s, zodat er meer melk in minder tijd wordt afgekolfd: natuurlijke stimulerende bewegingen worden gevolgd door langere, waardoor een optimale melkstroom op gang komt. Stimulatie: snel kolfritme om de toeschietreflex op te wekken. Afkolven: langzamer kolfritme om de melk comfortabel en efficiënt af te kolven. * Leverbare accessoires zijn vermeld op pagina 162. Mogelijk zijn de artikelen niet in alle landen verkrijgbaar. Meer informatie over producten van Medela en verkooppunten in uw land, kunt u vinden op www.medela.com. 139 4. Productomschrijving Herbruikbare afkolfset (toegepaste onderdelen)* 800.0557 / 200.1141 / 200.1143 1x PersonalFit™ Borstschild M (24 mm) (voor borstschilden in andere maten, zie hoofdstuk 162, pagina 34) 810.7084 1x vacuümklep 810.0475 1x PersonalFit™ connector 810.7088 1x moedermelkflesje, 150 ml transparant 811.0020 1x silicone slang (105 cm) 800.0828 2x membraan van de vacuümklep 820.7013 1x afdekking membraan 140 810.0667 1x beschermdop 810.0474 1x dekselinleg 810.0473 1x deksel met opening 810.7062 1x beschermend membraan 820.0094 Afkolfset voor één dag (toegepaste onderdelen)* 008.0176 / 008.0177 / 008.0178 1x borstschild 1x connector 1x afdekking membraan 1x beschermend membraan 1x membraan 1x silicone slang 141 Colostrumcontainer 35 ml 200.2110 Disposable flesjes 80 ml 200.2957 Disposable flesjes 150 ml 200.2956 Disposable flesjes 250 ml 200.4802 *Mogelijk zijn de artikelen niet in alle landen verkrijgbaar. Meer informatie over producten van Medela en verkooppunten in uw land, kunt u vinden op www.medela.com. 5. Reiniging Waarschuwing lG ebruik voor het reinigen alleen water van drinkkwaliteit. l Haal de borstkolf uit elkaar en maak alle onderdelen die in aanraking komen met de borst en moedermelk onmiddellijk na het gebruik schoon, om te voorkomen dat melkresten opdrogen en om vorming van bacteriën tegen te gaan. 5.1 Afkolfset voor één dag en herbruikbare afkolfset – na elk gebruik 1 Opmerking i lD e afkolfset voor één dag hoeft voor het eerste gebruik niet te worden gereinigd omdat hij Ready-to-Use wordt geleverd. l De afkolfsets vergen geen onderhoud. l Pas op dat u tijdens het reinigen geen onderdelen van de afkolfset beschadigt. l De afkolfset voor één dag kan maximaal 24 uur worden gebruikt en daarbinnen voor maximaal acht afkolfsessies. 142 l De afkolfset voor één dag mag nooit worden gesteriliseerd. Haal de afkolfset uit elkaar tot losse onderdelen. 4 Spoel alle onderdelen in koud, schoon water (ongeveer 20 °C) gedurende 10-15 seconden. 2 3 Maak alle delen schoon met veel warm water en een standaard afwasmiddel (ongeveer 30 °C). Spoel alle onderdelen in koud, schoon water (ongeveer 20 °C). 5 Afkolfset voor één dag 6 143 Droog de onderdelen af met een schone doek of leg ze op een schone doek om te drogen. Gooi de afkolfset voor één dag weg na max. 8 afkolfsessies binnen 24 uur. 5. Reiniging Waarschuwing lG ebruik door meer dan één moeder zonder adequate sterilisatie kan een gezondheidsrisico met zich meebrengen. l Alle onderdelen moeten na elk gebruik worden gereinigd. Ze moeten eenmaal per dag en altijd voordat ze aan de volgende moeder worden gegeven, aanvullend worden gedesinfecteerd en gesteriliseerd (bv. in een autoclaaf worden gereinigd). Waarschuwing lG ebruik voor het reinigen alleen water van drinkkwaliteit. l Bij hoofdstuk 5.4 De borstkolf reinigen: vóór reiniging de borstkolf loskoppelen van de stroomvoorziening. i 144 1 Haal de afkolfset uit elkaar tot losse onderdelen. Opmerking lB ij 5.3 Sterilisatie: steriliseer alleen delen die schoon en onbeschadigd zijn. Onderdelen niet stapelen. Om beschadiging te voorkomen, dient u er geen externe druk op uit te oefenen. i 5.2 Herbruikbare afkolfset – voor het eerste gebruik, eenmaal per dag en steeds alvorens hem aan een andere gebruiker te geven 3 134˚ C Info l Deze reinigingsinstructies zijn algemene aanbevelingen en mogen worden aangepast volgens de specifieke richtlijnen en reinigingspraktijken van het ziekenhuis. Steriliseer alle delen in de autoclaaf gedurende drie minuten op 134 °C. 5.3 Herbruikbare afkolfset – desinfecteren en steriliseren 1 2 Controleer of de onderdelen schoon en onbeschadigd zijn. Maak alle delen schoon in een desinfecterende wasmachine gedurende vijf minuten (op 93 °C). Controleer of de afkolfset functioneert. Vervang defecte onderdelen van de afkolfset. 5.4 De borstkolf reinigen 5.5 De borstkolf desinfecteren 1 Afvegen met een schone, vochtige (niet natte) doek. U mag water met een standaard afwasmiddel of nietschurend wasmiddel gebruiken. 1 145 disinfect Afvegen met een schone, vochtige (niet natte) doek. Een desinfecterend middel op basis van alcohol mag ook worden gebruikt. 6. Voorbereidingen voor het afkolven 6.1 Programmakaart installeren Waarschuwing lB ij hoofdstuk 6.2 Gebruik met netstroomadapter: Gebruik uitsluitend het netsnoer dat bij de Symphony is geleverd. l Vergewis u ervan dat het voltage van het netsnoer overeenkomt met het voltage ter plaatse. i Info l Gebruik de kolf alleen met de bijbehorende programmakaart (Standard of Preemie+*). Optioneel voor borstkolf met batterij: lD e ingebouwde batterij moet na ontvangst van het apparaat 12 uur worden opgeladen. l De kolf kan tijdens het opladen worden gebruikt. 146 l Als de borstkolf gedurende langere tijd niet wordt gebruikt, laad de batterij dan elke twee maanden op (telkens 12 uur). l De optimale levensduur van de batterij wordt bereikt door hem regelmatig niet volledig leeg te laten worden of als de borstkolf wordt opgeladen als hij niet in gebruik is. Afkolftijd (bij volledig geladen batterij) circa 60 minuten Laadtijd (volledig laden) 12 uur 1 Programmakaart insteken (Standard or Preemie+) in het kaartcompartiment aan de achterkant van de borstkolf. 3 De batterij uit het apparaat halen door de kaart- en de snoerbescherming los te schroeven en hem uit de geleiderail te schuiven. 6.2 Kaart- en snoerbescherming (optioneel) 2 1 Steek het netsnoer in de kaart- en snoerbescherming in een lus rond de pin. Zorg ervoor dat er genoeg speling is om het snoer in te steken. Druk de kaart- en snoerbescherming zover mogelijk over de geleiderail op de achterkant en schroef vast. 6.3 Werking op netstroomadapter 1 Steek het netsnoer in het contact op de achterkant van de borstkolf. 2 Sluit het netsnoer aan op het stopcontact. *Meer informatie vindt u op www.medela.nl of op www.medela.be 147 6. Voorbereidingen voor het afkolven Waarschuwing lW as uw handen grondig (ten minste een minuut) met water en zeep voordat u uw borst, schone onderdelen en schone afkolfset aanraakt. 1 Opmerking i lD e afkolfset voor één dag hoeft voor het eerste gebruik niet te worden gereinigd omdat hij Ready-to-Use wordt geleverd. l De herbruikbare afkolfset dient voorafgaand aan het eerste gebruik te worden gereinigd. Zie hoofdstuk 5.2. l Gebruik alleen originele accessoires van Medela. l Controleer voor gebruik de onderdelen van de afkolfset op slijtage en beschadiging. l Controleer dat de membraankap correct 148 op het beschermend membraan is gemonteerd. l Voor het gebruik moeten alle onderdelen helemaal droog zijn. i 6.4 In elkaar zetten van de afkolfset voor één dag De verpakking van de Ready-to-Use afkolfset openen. Kies het gewenste disposable flesje (35/80/150/250 ml). 6.5 De herbruikbare afkolfset in elkaar zetten 1 Info lV oer alle stappen zorgvuldig uit en zet de afkolfset op de juiste wijze in elkaar. Anders wordt misschien geen goed vacuüm bereikt. Druk het membraan voorzichtig op de vacuümklep totdat het gekoppeld is. Druk het borstschild op de connector. 2 Druk het borstschild op de connector. 3 Meer informatie vindt u op pagina 150,hoofdstuk 6.6, stappen 1–3. 2 Schroef de disposable fles (van 35/80/150 of 250 ml) op de connector. Steek de slang in het corresponderende deel van de connector. 3 Duw de combinatie vacuümklep/ membraan op de connector. Positioneer de vacuümklep zijdelings. 149 6. Voorbereidingen voor het afkolven i Info 4 lB ij stap 3 (hoofdstuk 6.6): Sluit tijdens het afkolven altijd het deksel. Het deksel duwt de membraankap omlaag om te voorkomen dat verlies van vacuüm optreedt ingeval de membraankap los zou raken. Schroef de fles op de connector. 6.6 Voorbereidingen voor het afkolven 1 150 Open het deksel van de borstkolf. Druk op de ovale knop bovenop de Symphony en breng de hendel omhoog. 5 Steek de slang in de corresponderende opening in de connector. 2 6 Plaats het beschermend membraan op een vlakke ondergrond en druk de membraankap voorzichtig omlaag totdat hij vastklikt. Steek de adapter van de slang in de opening in de membraankap. 3 151 Plaats de membraankap stevig op het membraan van de borstkolf zodat er een luchtdichte afsluiting ontstaat. Plaats de connector van de slang in de uitsparing in de borstkolfbehuizing. Controleer of de membraankap vastgeklikt is en vlak op het oppervlak ligt. Sluit het deksel. 7. Afkolven Waarschuwing l Voorafgaand aan stap 2 (hoofdstuk 7.1): Neem de borst af met een warme doek (geen alcohol gebruiken). l Bij stap 2 (hoofdstuk 7.1): Beantwoord de volgende vragen om de juiste maat van het borstschild te bepalen: l Kan de tepel vrij binnen de schacht bewegen? l Wordt er geen of weinig weefsel van uw tepelhof in de schacht van het borstschild getrokken? l Ziet u bij elke cyclus van de kolf een rustige, ritmische beweging in uw borst? l Voelt u de borst helemaal leeg worden? l Is uw tepel pijnvrij? Als uw antwoord op een van deze vragen “nee” is, of als u tijdens het afkolven problemen of pijn ondervindt, raadpleeg dan uw borstvoedingsdeskundige/ lactatiekundige of uw verloskundige. 152 l Bij stappen 2 en 3 (hoofdstuk 7.1): Pak de afkolfset niet vast aan de fles. Dit kan leiden tot een blokkade van de melkkanalen en tot stuwing. i 7.1 Voorbereiding enkel afkolven 1 Plaats niet meer dan één membraankap op het membraan van de borstkolf. 7.2 Afkolven 1 Info lA ls de pomp 30 minuten heeft gelopen zonder dat enige aanpassing is gemaakt (bv. aanpassing van het vacuüm), dan schakelt de Symphony automatisch uit. Schakel de borstkolf in met . De stimulatiefase begint. De stimulatiefase gaat na twee minuten automatisch over in de afkolffase. 2 Plaats het borstschild op uw borst met de tepel in het midden van de schacht. 2 3 Houd het borstschild met uw duim en wijsvinger op de borst. Ondersteun de borst met de palm van uw hand. 3 153 Als de melk begint te stromen voordat de twee minuten om zijn, druk dan op om over te schakelen naar de afkolffase. Zorg ervoor dat de melk op de juiste manier de fles in stroomt. Vacuüm comfort instellen: Verhoog het vacuüm door de instelling naar rechts te draaien totdat het enigszins oncomfortabel voelt. Draai naar links om het vacuüm iets te verlagen. 7. Afkolven Waarschuwing 4 l Raadpleeg uw verloskundige of borstvoedingsdeskundige/lactatiekundige als u slechts een minimale hoeveelheid of geen melk kunt afkolven of als het afkolven pijnlijk is. Opmerking i l Haal na het afkolven altijd direct de stekker van de Symphony uit het stopcontact. i Info lZ org ervoor dat de slang tijdens het afkolven niet knikt. l Druk op de knop Toeschieten om zo nodig van de afkolffase terug te keren naar de stimulatiefase. Als de melk na 154 twee opeenvolgende stimulatiefasen niet begint te stromen, neem dan een pauze en probeer het na 15-30 minuten opnieuw. Probeer borstmassage (vraag uw lactatiekundige of medisch ondersteuner) en kolf dan af in de afkolffase. l Het programma slaat de laatste vacuüminstelling in de stimulatiefase op. l Dubbel afkolven bespaart tijd en verhoogt de voedingswaarde van de melk. De melkproductie kan toenemen en langere tijd op dat niveau blijven. Schakel de borstkolf uit met Vul de fles niet boven de streep die het maximale volume aangeeft. . 7.3 Voorbereiding voor dubbel afkolven 1 Plaats het borstschild op de borst met de tepel in het midden van de schacht. Houd het borstschild met uw duim en wijsvinger op de borst. Ondersteun de borst met de palm van uw hand. Gebruik de flesstandaard of de fleshouder om te voorkomen dat de fles omvalt. 2 Schakel de borstkolf in met . De stimulatiefase begint. De stimulatiefase gaat na twee minuten automatisch over in de afkolffase. Reinig zoals beschreven in hoofdstuk 5, pagina 142 e.v. 6 Sluit de fles af met een deksel of met deksel en dekselinleg (afhankelijk van type fles). Volg de aanwijzingen in hoofdstuk 9 “Moedermelk bewaren en ontdooien”. 3 Plaats het tweede borstschild op de borst zodanig dat de tepel zich centraal in de schacht bevindt. Meer informatie vindt u op pagina 153, hoofdstuk7.2, stappen 2 en 3. 5 155 8. Preemie+ initiatiekaart i Info lD e Preemie+ helpt de borstvoeding op gang te brengen en te houden bij moeders van premature baby’s die afhankelijk zijn van een borstkolf. l De Preemie+ initiatiekaart bevat beide afkolfprogramma’s. l Preemie+ 1.0: Programma voor de directe postnatale periode tot aan de initiatie van de melkproductie. Gebruik dan het standaardprogramma. Het Preemie+programma loopt ononderbroken gedurende 15 minuten en omvat een opeenvolging van verschillende stimulatie-, afkolf- en pauzefasen. In het venster verschijnt “Gereed” als het programma volledig is uitgevoerd. l Standaard 2.0: Gebruiken na initiatie van de melkproductie. Initiatie is bereikt zodra in elk van de drie 156 opeenvolgende afkolfsessies van beide borsten samen 20 ml melk is afgekolfd. Inclusief “2-Phase Expression”, waarbij begonnen wordt met de stimulatiefase, gevolgd door de afkolffase. 8.1 Voorbereiding 1 Schroef de kaart- en snoerbescherming (optioneel) los en schuif hem uit de geleiderail. 8.2 Afkolven 1 Preemie+: schakel de borstkolf in met . Druk dan binnen 10 seconden op . 2 De programmakaart 2.0 omwisselen voor de Preemie+ initiatiekaart. 3 Markeer de borstkolf met de Preemie+ sticker. Plaats de kaarten snoerbescherming (optioneel) opnieuw. 8.3 Kolflogboek (optioneel) 2 3 157 Breastmilk is best Pumping Log Personal Pumping Log for Vacuüm comfort instellen: Verhoog het vacuüm door de instelling naar rechts te draaien totdat het enigszins oncomfortabel voelt. Draai naar links om het vacuüm iets te verlagen. Gebruik het kolflogboek om afkolfsessies te controleren en op te zoeken. 9. Moedermelk bewaren en ontdooien 9.1 Bewaren Richtlijnen voor het bewaren van pas afgekolfde moedermelk (Voor gezonde, voldragen baby’s) Kamertemperatuur Koelkast Diepvriezer Ontdooide moedermelk 4 – 6 uur bij 19 tot 26 °C (66 tot 78 °F) 3 – 8 dagen bij 4 °C (39 °F) of lager 6 –12 maanden bij –18 tot –20 °C ( 0 tot 4 ° F ) In koelkast max. 10 u. Niet opnieuw invriezen! l Moedermelk niet in de deurvakken van de koelkast bewaren. Kies in plaats daarvan de koelste plaats in de koelkast (dat is achterin op de glazen plaat boven het groentecompartiment). 9.2 Invriezen IV ers afgekolfde moedermelk kan worden ingevroren in melkflesjes of in “Pump & Save”* moedermelkbewaarzakjes. De flesjes of zakken niet meer dan voor 3/4 vullen zodat er ruimte is voor mogelijk uitzetten. I Label de flesjes of “Pump & Save” zakken met de afkolfdatum. 9.3 Ontdooien Waarschuwing 158 Ingevroren moedermelk niet in een magnetron of in een pan met kokend water ontdooien, om te voorkomen dat er vitaminen, mineralen of andere belangrijke bestanddelen verloren gaan en om brandwonden te voorkomen. IO ntdooi de melk door haar gedurende een nacht in de koelkast te plaatsen. Zo worden de bestanddelen van de moedermelk behouden. Een andere mogelijkheid is om het moedermelkflesje of het “Pump & Save” moedermelkbewaarzakje in warm water (max. 37 °C) te plaatsen. I Het flesje of de “Pump & Save” zak behoedzaam heen en weer bewegen om eventueel gescheiden vet door de melk te mengen. Schudden en roeren van de melk vermijden. I Met behulp van de flessenwarmer Calesca* is het mogelijk moedermelk behoedzaam te verwarmen. Opmerking Deze richtlijnen voor bewaren en ontdooien zijn aanbevelingen. Nationale en interne ziekenhuisrichtlijnen en -normen kunnen hiervan afwijken. *Meer informatie vindt u op www.medela.nl of op www.medela.be 10. Problemen oplossen Probleem Oplossing De motor loopt niet Controleer of er netvoeding/batterijspanning beschikbaar is. Controleer of het apparaat aangezet is. Controleer of de programmakaart correct in het kaartcompartiment aan de achterkant van de borstkolf is ingebracht. Er is weinig of geen zuigkracht Zet de afkolfset in elkaar volgens de aanwijzingen in hoofdstuk 6.4 of 6.5. Controleer of alle verbindingen van de afkolfset en de borstkolf goed aangesloten zijn. Kolven zoals vermeld in hoofdstuk 7. Zorg ervoor dat het borstschild de borst rondom luchtdicht afsluit. Het witte membraan van de vacuümklep moet vlak tegen de gele vacuümklep liggen. Controleer of de vacuümklep en het membraan schoon en onbeschadigd zijn. Zie hoofdstukken 6.4 of 6.5 “De afkolfset in elkaar zetten”. l De uiteinden van de slang moeten correct zijn ingestoken in de connector en de opening in de membraankap. l Het beschermend membraan en de membraankap moeten correct in elkaar zijn gezet, en de membraankap moet correct op het borstkolfmembr aan zijn geplaatst om een luchtdichte afsluiting te vormen. l Het beschermend membraan mag niet beschadigd zijn. l Zorg ervoor dat de doorvoer door de slang tijdens het afkolven niet door een knik of door draaiing wordt afgesloten. l Alle onderdelen moeten volkomen droog zijn. Als de melk overloopt 1. P laats de afkolfset in de fleshouder. 2. Zet de kolf uit en trek de stekker van het netsnoer uit het stopcontact. 3. Gebruik een vochtige (niet natte) doek om de borstkolf en het membraan af te vegen. 4. Als zich melk in de slang bevindt: Bij de afkolfset voor één dag: gooi de afkolfset weg en gebruik een nieuwe. Bij de herbruikbare afkolfset: Verwijder de slang, beschermend membraan en membraankap en reinig zoals vermeld in hoofdstuk 5.2 “Voor het eerste gebruik en eenmaal per dag”. Schud eventuele waterdruppels uit en laat de slang hangend drogen of laat de pomp met aangesloten slang 1–2 minuten lopen of tot de slang droog is. Als zich condens in de slang bevindt: Bij de afkolfset voor één dag en de herbruikbare afkolfset: Laat de pomp lopen met aangesloten slang gedurende 1-2 minuten of totdat hij droog is. 5. Zet de borstkolf en onderdelen weer in elkaar als de onderdelen volledig droog zijn. 159 11. Internationale garantie / afvalverwijdering Garantie en onderhoud 3 jaar garantie voor de unit vanaf de aankoopdatum, uitgezonderd de afkolfset en accessoires. 6 maanden garantie op de batterijen. Voor schade die een direct of indirect gevolg is van onjuiste behandeling, niet-reglementair gebruik of gebruik door onbevoegde personen kan de fabrikant niet aansprakelijk worden gesteld. Routinecontroles, onderhoudsbeurten en vervanging van batterijen mogen alleen worden uitgevoerd door bevoegd personeel van Medela. Onafhankelijke testinstituten hebben vastgesteld dat de constructie van de Medela Symphony borstkolf in overeenstemming is met de norm EN/IEC 60601-1. Een kopie van de desbetreffende certificaten worden op verzoek uitgereikt. Vanwege de toegepaste constructie, verwacht Medela niet dat de elektrische veiligheid op enig moment tijdens de levenscyclus van het product wordt aangetast, mits het apparaat correct en overeenkomstig het beoogde gebruik wordt gebruikt. Er zijn geen voorgeschreven of aanbevolen veiligheidscontroles die moeten worden uitgevoerd. Afvalverwijdering 160 Het apparaat is vervaardigd van diverse metalen en kunststoffen. Alvorens het apparaat als afval af te voeren, moet het onbruikbaar worden gemaakt. Niet afvoeren als ongesorteerd gemeentelijk afval, maar behandelen in overeenstemming met de plaatselijke regelgeving. Gebruik de plaatselijke voorzieningen voor teruggave en inzamelen van oude elektrische en elektronische apparatuur (incl. accu’s). Als het apparaat niet correct wordt vernietigd, kan dit schadelijke gevolgen hebben voor het milieu en de volksgezondheid. De accessoires (afkolfset/flessen) zijn vervaardigd van kunststof en mogen alleen worden afgevoerd conform de lokale regelgeving. 12. Lijst van accessoires Standaard 2.0 programmakaart Artikelnummer Product 800.0540 800.0541 800.0542 800.0543 800.0544 800.0545 800.0546 800.0547 800.0548 800.0549 800.0550 800.0551 800.0552 800.0553 800.0554 Programmakaart Programmakaart Programmakaart Programmakaart Programmakaart Programmakaart Programmakaart Programmakaart Programmakaart Programmakaart Programmakaart Programmakaart Programmakaart Programmakaart Programmakaart Standard Standard Standard Standard Standard Standard Standard Standard Standard Standard Standard Standard Standard Standard Standard Preemie+ Preemie+ Preemie+ Preemie+ Preemie+ Preemie+ DE EN FR NL JA ES 2.0 2.0 2.0 2.0 2.0 2.0 2.0 2.0 2.0 2.0 2.0 2.0 2.0 2.0 2.0 Duits Engels Frans Italiaans Nederlands Zweeds Deens Fins Noors Pools Spaans Portugees Grieks Hongaars Tsjechisch Preemie+ pakket 200.2098 200.2099 200.2100 200.2101 200.2102 200.2103 pakket pakket pakket pakket pakket pakket 161 12. Lijst van accessoires Lijst van accessoires* Art. nr. Product 008.0176 008.0177 008.0178 008.0179 Symphony afkolfset voor één dag, PersonalFit borstschild maat M (24 mm), multibox 54 stuks Symphony afkolfset voor één dag, PersonalFit borstschild maat L (27 mm), multibox 45 stuks Symphony afkolfset voor één dag, PersonalFit borstschild maat XL (30 mm), multibox 45 stuks Symphony en Lactina afkolfset voor één dag, PersonalFit borstschild maat M (24 mm), multibox 72 stuks Symphony en Lactina afkolfset voor één dag, PersonalFit borstschild maat L (27 mm), multibox 60 stuks Symphony en Lactina afkolfset voor één dag, PersonalFit borstschild maat XL (30 mm), multibox 60 stuks 008.0180 008.0181 162 200.2110 200.2957 200.2956 200.4802 Colostrumcontainer: Set van 2 disposable flesjes 35 ml met deksel, multibox 50 sets Set van 40 disposable moedermelkflesjes 80 ml met deksel, multibox 12 sets Set van 40 disposable moedermelkflesjes 150 ml met deksel, multibox 8 sets Set van 40 disposable moedermelkflesjes 250 ml met deksel, multibox 4 sets 800.0557 200.1141 200.1143 Symphony herbruikbare afkolfset in PE-tas, borstschild maat M (24 mm), multibox 20 stuks Symphony herbruikbare afkolfset in PE-tas, borstschild maat L (27 mm), multibox 20 stuks Symphony herbruikbare afkolfset in PE-tas, borstschild maat XL (30 mm), multibox 20 stuks 800.0605 800.0606 800.0641 Basisset zonder slang, multibox 25 stuks Borstschild met vacuümklep compleet, multibox 25 stuks Comfort borstschild met vacuümklep compleet, multibox 25 stuks *Mogelijk zijn de artikelen niet in alle landen verkrijgbaar. Meer informatie over producten van Medela en verkooppunten in uw land, kunt u vinden op www.medela.com. Art. nr. Product 200.0571 800.0668 800.0711 800.0712 800.0854 PersonalFit PersonalFit PersonalFit PersonalFit PersonalFit 800.0710 800.0660 800.0632 800.0608 800.0659 Borstschild connector, multipak 25 stuks Symphony membraankap, multipak 25 stuks Symphony beschermend membraan, multipak 25 stuks Symphony membraankap en beschermend membraan, multipak 25 stuks Silicone slang met veelhoekige adapters opgerold, multipak 25 stuks 800.0622 800.0623 800.0624 800.0625 800.0627 800.0628 800.0629 800.0630 Vacuümklep, multipak 25 stuks Membraan, multipak 25 stuks Vacuümklep compleet incl. reserve membraan, multipak 25 stuks Moedermelkflesje 150 ml, multipak 25 stuks Deksel, multipak 25 stuks Dekselinleg, multipak 25 stuks Kap, multipak 25 stuks Flesstandaard (1 fles), multipak 25 stuks 600.0832 810.0552 600.0973 600.7073 600.0816 928.1017 600.0387 Verrijdbare standaard voor Symphony compleet Flesstandaard voor Symphony Koffer voor Symphony met riem Koffer voor Symphony zonder riem Symphony kaart- en snoerbescherming Autokabel voor Symphony Testvacuümmeter borstschild borstschild borstschild borstschild borstschild maat maat maat maat maat S (21 mm), multipak 25 stuks M (24 mm), multipak 25 stuks L (27 mm), multipak 25 stuks XL (30 mm), multipak 25 stuks XXL (36 mm), multipak 25 stuks 163 13. EMC / Technical description The Symphony breastpump needs special precautions regarding EMC (Electromagnetic compatibility) and needs to be installed and put into service according to the EMC information provided in these instructions for use. Wireless communications equipment such as wireless home network devices, mobile phones, cordless telephones and their base stations, walkie-talkies can affect the electric breastpump Symphony and should be kept at least a distance 1.0 m away from the equipment. Electromagnetic Compatibility (EMC, IEC 60601-1-2:2007, Table 1) Electromagnetic emissions The electric breastpump Symphony is intended for use in the electromagnetic environment specified below. The customer or the user of the electric breastpump Symphony should assure that it is used in such an environment. Compliance Electromagnetic environment – g uidance RF emissions CISPR 11 Group 1 The electric breastpump Symphony uses RF energy only for its internal function. Therefore, its RF emissions are very low and are not likely to cause any interference in nearby electronic equipment. RF emissions CISPR 11 Class B Harmonic emissions IEC 61000-3-2 Class A Voltage fluctuations / flicker emissions IEC 61000-3-3 Complies Emission tests 164 The electric breastpump Symphony is suitable for use in all establishments, including domestic establishments and those directly connected to the public low-voltage power supply network that supplies buildings used for domestic purposes. Warning – The electric breastpump Symphony should not be used adjacent to or stacked with other equipment. If adjacent or stacked use is necessary, the electric breastpump Symphony should be observed to verify normal operation in the configuration in which it will be used. Electromagnetic Compatibility (EMC, IEC 60601-1-2:2007, Table 2) Electromagnetic immunity The electric breastpump Symphony is intended for use in the electromagnetic environment specified below. The customer or the user of the electric breastpump Symphony should assure that it is used in such an environment. Immunity test Electrostatic discharge ( ESD ) IEC 61000-4-2 Electrical fast transient / burst IEC 61000-4-4 Surge IEC 61000-4-5 Compliance level Electromagnetic environment – guidance ± 6 kV contact ± 8 kV air ± 6 kV contact ± 8 kV air Floors should be wood, concrete or ceramic tile. If floors are covered with synthetic material, the relative humidity should be at least 30%. ± 2 kV for power supply lines ± 1 kV for input / output lines ± 2 kV for power supply lines ± 1 kV for input/ output lines Mains power quality should be that of a typical commercial or hospital environment. ± 1 kV line ( s ) to line ( s ) ± 2 kV line ( s ) to earth ± 1 kV differential mode ± 2 kV common mode Mains power quality should be that of a typical commercial or hospital environment. IEC 60601 test level 165 13. EMC / Technical description Voltage dips, short interruptions and voltage variations on power supply input lines IEC 61000-4-11 Power frequency (50/60 Hz) magnetic field IEC 61000-4-8 <5 % U T (>95 % dip in U T ) for 0,5 cycle 40 % U T (60 % dip in U T ) for 5 cycles 70 % U T (30 % dip in U T ) for 25 cycles <5 % U T (>95 % dip in U T for 5 s 3 A /m <5 % U T (>95 % dip in U T ) for 0,5 cycle 40 % U T (60 % dip in U T ) for 5 cycles 70 % U T (30 % dip in U T ) for 25 cycles <5 % U T (>95 % dip in U T ) for 5 s Mains power quality should be that of a typical commercial or hospital environment. If the user of the electric breastpump Symphony requires continued operation during power mains interruptions, it is recommended that the electric breastpump Symphony is powered from an uninterruptible power supply or a battery. 30 A /m Power frequency magnetic fields should be at levels characteristic of a typical location in a typical commercial or hospital environment. NOTE U T is the a.c. mains voltage prior to application of the test level. 166 Electromagnetic Compatibility (EMC, IEC 60601-1-2:2007, Table 4) Electromagnetic immunity The electric breastpump Symphony is intended for use in the electromagnetic environment specified below. The customer or the user of the electric breastpump Symphony should assure that it is used in such an environment. Immunity test IEC 60601 test level Compliance level Electromagnetic environment – guidance Portable and mobile RF communications equipment should be used no closer to any part of the electric breastpump Symphony, including cables, than the recommended separation distance calculated from the equation applicable to the frequency of the transmitter. Conducted RF IEC 61000-4-6 Radiated RF IEC 61000-4-3 3 Vrms 150 kHz to 80 MHz 3 V/m 80 MHz to 2,5 GHz 10 Vrms 3 V/m Recommended separation distance d = 0,35√P d = 1,2√P 80 MHz to 800 MHz d = 2,3√P 800 MHz to 2,5 GHz where P is the maximum output power rating of the transmitter in watts (W) according to the transmitter manufacturer and d is the recommended separation distance in metres (m). Field strengths from fixed RF transmitters, as determined by an electromagnetic site survey a, should be less than the compliance level in each frequency range.b Interference may occur in the vicinity of equipment marked with the following symbol: 167 13. EMC / Technical description NOTE 1 At 80 MHz and 800 MHz, the higher frequency range applies. NOTE 2 T hese guidelines may not apply in all situations. Electromagnetic propagation is affected by absorption and reflection from structures, objects and people. Field strengths from fixed transmitters, such as base stations for radio (cellular/cordless) telephones and land mobile radios, amateur radio, AM and FM radio broadcast and TV broadcast cannot be predicted theoretically with accuracy. To assess the electromagnetic environment due to fixed RF transmitters, an electromagnetic site survey should be considered. If the measured field strength in the location in which the electric breastpump Symphony is used exceeds the applicable RF compliance level above, the electric breastpump Symphony should be observed to verify normal operation. If abnormal performance is observed, additional measures may be necessary, such as re-orienting or relocating the electric breastpump Symphony. b Over the frequency range 150 kHz to 80 MHz, field strengths should be less than 10 V/m. a 168 Electromagnetic Compatibility (EMC, IEC 60601-1-2:2007, Table 6) Recommended separation distances between portable and mobile RF communications equipment and the electric breastpump Symphony The electric breastpump Symphony is intended for use in an electromagnetic environment in which radiated RF disturbances are controlled. The customer or the user of the electric breastpump Symphony can help prevent electromagnetic interference by maintaining a minimum distance between portable and mobile RF communications equipment (transmitters) and the electric breastpump Symphony as recommended below, according to the maximum output power of the communications equipment. Rated maximum output power of transmitter W Separation distance according to frequency of t ransmitter M 150 kHz to 80 MHz d = 0,35√P 80 MHz to 800 MHz d = 1,2√P 800 MHz to 2.5 GHz d = 2,3√P 0,01 0,04 0,12 0,23 0,1 0,11 0,37 0,74 1 0,35 1,2 2,3 10 1,11 3,7 7,4 100 3,50 12 23 For transmitters rated at a maximum output power not listed above, the recommended separation distance d in metres (m) can be estimated using the equation applicable to the frequency of the transmitter, where P is the maximum output power rating of the transmitter in watts (W) according to the transmitter manufacturer. NOTE 1 At 80 MHz and 800 MHz, the separation distance for the higher frequency range applies. NOTE 2 These guidelines may not apply in all situations. Electromagnetic propagation is affected by absorption and reflection from structures, objects and people. 169 14. Technical specifications vacuum (approx.) Vakuum (ungefährer Wert) force d’aspiration (env.) vuoto (circa) vacuüm (ca.) –50 ... –250 mmHg –7 ... –33 kPa 45 ... 120 cpm +40 Operation Betrieb Utilisation Funzionamento Bediening +50 Transport / Storage Transport / Lagerung Transport/stockage Trasporto/Conservazione Vervoer/opslag +5 °C -20 100 – 240 V ~ 50 / 60 Hz 0.5 A °C T 0.8 A, 250 V (slow blow) (träge Sicherung) (fusible à action retardée) (ritardato) (slow blow) 5 x 20 mm L = Low Breaking Capacity 5 x 20 mm L = niedrige Schaltleistung 5 x 20 mm L = pouvoir de coupure faible 5 x 20 mm L = bassa capacità di rottura 5 x 20 mm L = laag uitschakelvermogen 93 Operation Betrieb Utilisation Funzionamento Bediening 93 Transport / Storage Transport / Lagerung Transport/stockage Trasporto/Conservazione Vervoer/opslag 15 15 106 12 V T 2.5 A (slow blow) (träge Sicherung) (fusible à action retardée) (ritardato) (slow blow) Car adapter Adapter fürs Auto Adaptateur pour voiture Adattatore automobile Auto-adapter 70 kPa Operation / Transport / Storage Betrieb / Transport/ Lagerung Utilisation/Transport/Stockage Funzionamento/Trasporto/Conservazione Bediening/vervoer/opslag 170 900 410 410 mm 245 215 155 mm 3.5 kg kg 2.9 kg ref. master doc. 200.7159/B 2 x 6V, 1200 mAh Pb (lead acid) Pb (Bleisäure) Pb (plomb-acide) Pb (acido di piombo) Pb (zuur lood) Yuasa NP 1.2-6 Notes 171 International Sales Medela AG Lättichstrasse 4b 6341 Baar Switzerland Phone +41 41 562 51 51 Fax +41 41 562 51 00 [email protected] www.medela.com Australia Medela Australia Pty Ltd, Medical Technology 3 Arco Lane, Heatherton, Vic 3202 Australia Phone +61 3 9552 8600 Fax +61 3 9552 8699 [email protected] www.medela.com.au France Medela France Sarl 14, rue de la Butte Cordière 91154 Etampes Cedex France Phone +33 1 69 16 10 30 Fax +33 1 69 16 10 32 [email protected] www.medela.fr Germany & Austria Medela Medizintechnik GmbH & Co. Handels KG Postfach 1148 85378 Eching Germany Phone +49 89 31 97 59-0 Fax +49 89 31 97 59 99 [email protected] www.medela.de Italy Medela Italia Srl Via Turrini, 13-15 - Loc. Bargellino 40012 Calderara di Reno (BO) Italy Phone + 39 051 72 76 88 Fax + 39 051 72 76 89 [email protected] www.medela.it Netherlands & Belgium Medela Benelux BV Uilenwaard 31 5236 WB ‚s-Hertogenbosch Netherlands Phone +31 73 690 40 40 Fax +31 73 690 40 44 [email protected] [email protected] www.medela.nl www.medela.be Switzerland Medela AG Lättichstrasse 4b 6341 Baar Switzerland Phone +41 848 633 352 Fax +41 41 562 51 00 [email protected] www.medela.ch United Kingdom Medela UK Ltd. Huntsman Drive Northbank Industrial Park Irlam, Manchester M44 5EG United Kingdom Phone +44 161 776 0400 Fax +44 161 776 0444 [email protected] www.medela.co.uk USA Medela Inc. 1101 Corporate Drive McHenry, IL 60050 USA Phone +1 800 435 8316 Fax +1 815 363 1246 [email protected] www.medelabreastfeedingus.com Canada Medela Canada Inc. 4160 Sladeview Crescent Unit # 8 Mississauga, Ontario Canada L5L 0A1 Phone +1 905 608 7272 Fax +1 905 608 8720 [email protected] www.medela.ca © Medela AG/200.6264/2015-04/B Medela AG Lättichstrasse 4b 6341 Baar, Switzerland www.medela.com