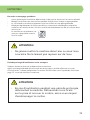
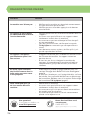
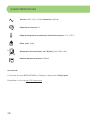
1
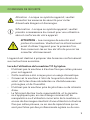
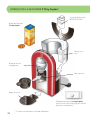
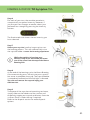
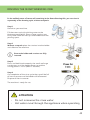
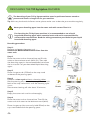
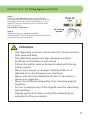
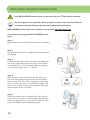
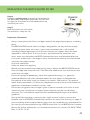
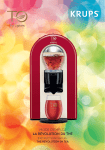
INTRODUCTION Pourquoi T.O by Lipton? Plus qu’une innovation, T.O by Lipton incarne une rupture dans le monde du thé. C’est une révolution dans la manière de l’infuser. Là où tout se joue. Au cœur de la bulle d’infusion transparente se cache une perle d’intelligence technologique baptisée Air Movement Infusion, conçue pour révéler les précieux arômes du thé dans toute leur richesse. Comment cela fonctionne-t-il? La capsule insérée est identifiée par la machine. Celle-ci module la température de l’eau et le temps d’infusion en fonction de la variété choisie. Puis la capsule est perforée. La technologie AIR MOVEMENT INFUSION peut entrer en action. Les feuilles de thé sont hydratées au premier contact de l’eau. Ensuite, le mélange est entraîné hors de la capsule. Sous l’effet d’un brassage régulier, chaque feuille s’ouvre parfaitement et libère ses arômes dans ses nuances les plus fines et les plus gourmandes. Jamais technologie n’avait permis un traitement des feuilles de thé aussi précis et respectueux de leur intégrité aromatique, dévoilant une explosion de parfums et de goûts savoureux. Découvrez notre Collection de thés et d’infusions sur www.TO-Lipton.com Version Française Vous pouvez également vous référer au mode d’emploi disponible sur www.TO-Lipton.com. 2 page 4 INTRODUCTION Why T.O by Lipton? T.O by Lipton is more than an innovation, it is a revolution in the world of tea. It is a revolutionary brewing process, which has at its heart the brewing orb. The brewing orb allows for the AIR MOVEMENT INFUSION technology to release the flavours and aromas of our delicious teas. How does this work? The machine recognizes each T.O by Lipton capsule inserted into it. The machine then adapts, according to the type of tea, to brew at the perfect temperature and for the correct length of time. When the capsule is inserted and elevates into the machine the AIR MOVEMENT INFUSION technology starts to act. As the capsule elevates its foil lid is pierced, then water is circulated through the capsule and into the brewing orb. The tea leaves gently infuse the water as a stream of air bubbles helps circulate the tea leaves for optimum flavour and aroma delivery. This technology is unique to T.O by Lipton and allows for the most fulfilling tea experience, with an explosion of delicious flavours and tantalizing aromas. Discover our Collection of teas and infusions on www.TO-Lipton.com English Version page 30 You can also refer to the online version on www.TO-Lipton.com. 3 SOMMAIRE VERSION FRANÇAISE Consignes de sécurité 5 Aperçu de la machine T.O by Lipton10 Installation de votre machine T.O by Lipton13 Initialisation avant la première utilisation 13 Préparation d’une tasse de T.O by Lipton15 Rinçage de la Bulle D’infusion Intelligente 18 Nettoyage de la Bulle D’infusion Intelligente 19 Détartrage de la machine T.O by Lipton21 Changement de la cartouche filtrante BRITA 23 Entretien25 Entretien et nettoyage quotidiens 25 Période prolongée d’inutilisation ou de transport 25 Diagnostic des pannes 26 Caractéristiques28 Traitement des déchets 4 29 CONSIGNES DE SÉCURITÉ Attention - Lorsque ce symbole apparait, veuillez consulter les mesures de sécurité pour éviter d’éventuels dangers et dommages. Information - Lorsque ce symbole apparait, veuillez prendre connaissance du conseil pour une utilisation sûre et conforme de votre appareil. ATTENTION – Les consignes de sécurité sont jointes à la machine. Veuillez les lire attentivement avant d’utiliser l’appareil pour la première fois. Puis conservez-les en lieu sûr afin de pouvoir les consulter ultérieurement. L’appareil est destiné à préparer des boissons conformément aux instructions suivantes. Lors de l’utilisation de la machine T.O by Lipton: • N’utilisez pas la machine à d’autres fins que celles prévues pour cet appareil. • Cette machine a été conçue pour un usage domestique. • Conservez la machine à l’abri de l’exposition directe du soleil, de fuites d’eau abondantes ou d’éclaboussures prolongées, et de l’humidité. • N’utilisez pas la machine près de jets d’eau ou de robinets d’eau. • Le fabricant décline toute responsabilité, et la garantie ne s’appliquera pas, en cas d’usage commercial, de manipulation ou d’utilisation incorrecte de la machine, ni en cas de dommages résultant d’une utilisation à d’autres fins que celles prévues, ou en cas de réparations qui ne sont pas faites par des professionnels agréés ou du non5 CONSIGNES DE SÉCURITÉ respect des instructions. • Votre machine a été conçue pour un usage domestique seulement. Elle n’a pas été conçue pour être utilisée dans les cas suivants qui ne sont pas couverts par la garantie: dans des coins de cuisines réservés au personnel dans des magasins, bureaux et autres environnements professionnels, dans des fermes, par les clients des hôtels, motels et autres environnements à caractère résidentiel, dans des environnements de type chambres d’hôtes. • Il convient de surveiller les enfants pour s’assurer qu’ils ne jouent pas avec l’appareil. Cet appareil peut être utilisé par des enfants âgés d’au moins 8 ans, à condition qu’ils bénéficient d’une surveillance ou qu’ils aient reçu des instructions quant à l’utilisation de l’appareil en toute sécurité et qu’ils comprennent bien les dangers encourus. Le nettoyage et l’entretien par l’utilisateur ne doivent pas être effectués par des enfants, à moins qu’ils ne soient âgés de plus de 8 ans et qu’ils soient sous la surveillance d’un adulte. Conserver l’appareil et son câble hors de portée des enfants âgés de moins de 8 ans. Les enfants ne doivent pas utiliser l’appareil comme un jouet. • Cet appareil peut être utilisé par des personnes dont les capacités physiques, sensorielles ou mentales sont réduites ou dont l’expérience ou les connaissances ne sont pas suffisantes, à condition qu’ils bénéficient d’une surveillance ou qu’ils aient reçu des instructions quant à l’utilisation de l’appareil en toute sécurité et en comprennent bien les dangers potentiels. • Cet appareil n’est pas prévu pour être utilisé par des personnes (y compris les enfants) dont les capacités physiques, sensorielles ou mentales sont réduites ou des 6 CONSIGNES DE SÉCURITÉ personnes dénuées d’expérience ou de connaissance, sauf si elles ont pu bénéficier, par l’intermédiaire d’une personne responsable de leur sécurité, d’une surveillance ou d’instructions préalables concernant l’utilisation de l’appareil. Pour éviter tout risque de choc électrique et d’incendie • Branchez uniquement la machine sur une prise secteur avec terre appropriée et facile d’accès. Vérifiez que la tension secteur correspond à celle indiquée sur la plaque signalétique de la machine. N’utilisez pas de rallonge électrique. Tout branchement incorrect entraîne l’annulation de la garantie. • Ne pas mettre l’appareil, le câble d’alimentation ou la fiche dans l’eau ou tout autre liquide. • N’ouvrez pas la machine – Danger d’électrocution! • En cas d’urgence : débranchez immédiatement la machine de la prise secteur. • Ne disposez pas le cordon d’alimentation au-dessus de bords tranchants ou coupants, ne pas le fixer ou le laisser pendre. • Suivez toujours les instructions de nettoyage pour nettoyer votre appareil : • Débrancher l’appareil. • Ne pas nettoyer l’appareil à chaud. • Nettoyer avec un chiffon ou une éponge humide. • Ne jamais mettre la machine dans l’eau ou sous l’eau courante. Ne la laissez pas reposer sur de l’eau. • N’utilisez pas votre machine si le cordon, la fiche ou le reste de la machine est endommagé. Faites obligatoirement remplacer le câble d’alimentation par le fabricant, le service après-vente ou des personnes de 7 CONSIGNES DE SÉCURITÉ qualification similaire afin d’éviter tout danger. Pour éviter tout risque de danger lorsque vous utilisez l’appareil • Ne jamais laisser l’appareil en cours de fonctionnement sans surveillance. • Si la machine est endommagée, ne l’utilisez pas. • Pour votre propre sécurité, utilisez uniquement des pièces et accessoires T.O by Lipton qui sont conçus pour votre machine. • Toutes les machines T.O by Lipton font l’objet de contrôles rigoureux. Des tests de fiabilité sont réalisés dans des conditions pratiques sur des machines sélectionnées. Certaines machines peuvent donc présenter des signes d’utilisation antérieure. • Videz le réservoir et débranchez l’appareil si vous n’avez pas l’intention d’utiliser la machine pendant une période prolongée (par exemple: vacances). • N’utilisez pas de produit de nettoyage puissant ni de nettoyant à base de solvant. Utilisez un linge humide et un produit de nettoyage doux pour nettoyer la surface de la machine. • Ne mettez jamais l’appareil ou une partie de celui-ci dans un lave vaiselle. • Lors du déballage de la machine, enlevez le film en plastique et jetez-le. • Cette machine fonctionne avec des capsules T.O by Lipton, disponibles uniquement sur www.TO-Lipton.com, ou auprès de votre représentant agréé T.O by Lipton. • La qualité T.O by Lipton est uniquement garantie en cas d’utilisation de capsules T.O by Lipton dans les machines T.O by Lipton. 8 CONSIGNES DE SÉCURITÉ • Remplissez le réservoir uniquement avec de l’eau potable à température ambiante entre 5°C et 35°C. • Ne mettez aucun liquide chaud ou autre que de l’eau potable dans le réservoir. • N’utilisez pas la machine sans le repose tasse pour éviter l’écoulement de liquide sur les surfaces environnantes. • Ne mettez pas les doigts dans le compartiment à capsule ou la bulle d’infusion. Risques de pincements et de blessures. • Avant la première utilisation de la machine, vérifiez que la cartouche filtrante est bien insérée. Pour en savoir plus, voir la section ‘Changement de la cartouche filtrante BRITA’. • Ne touchez pas à la bulle d’infusion pendant le cycle d’infusion, de rinçage et de nettoyage. • De l’eau chaude circule dans votre machine. Ne touchez pas à la bulle d’infusion pendant le cycle d’infusion et gardez vos distances de la vapeur chaude qui se dégage lorsque que la machine est en cours de fonctionnement. Risques de brûlures. • T.O by Lipton se réserve le droit de modifier les instructions sans préavis. CONSERVEZ CES INSTRUCTIONS – Le cas échéant, transmettez-les à tous les utilisateurs suivants. 9 APERÇU DE LA MACHINE T.O by Lipton* Cartouche filtrante BRITA INTENZA Boîte de capsules T.O by Lipton Réservoir à eau Bulle d’infusion intelligente Bec verseur Repose tasse Tablette nettoyante T.O by Lipton À utiliser lors du nettoyage de la bulle d’infusion intelligente. 10 *Couleur uniquement à titre de référence APERÇU DE LA MACHINE T.O by Lipton Capsule T.O by Lipton Emplacement de capsule Filtre Support filtre 1. 2. 3. 4. Cartouche filtrante BRITA INTENZA Boîte de capsules Tablette nettoyante Filtre et support filtre 5. 6. 7. 8. Machine T.O by Lipton Réservoir à eau Repose tasse Mode d’Emploi, Guide d’Utilisation Rapide et Guide d’Entretient Contenu de l’emballage 11 APERÇU DE LA MACHINE T.O by Lipton Boutons de commande Sélection de l’intensité Moins fort Plus fort 1 réservoir plein (1L) 12 Sélection de la taille de tasse et démarrage de l’infusion Marche / Arrêt Petite tasse Grande tasse 3 grandes tasses INSTALLATION DE VOTRE MACHINE T.O by Lipton Étape 1 Déballez soigneusement votre machine T.O by Lipton et retirez le film plastique placé sur l’avant de la machine. Déroulez la longueur désirée du cordon situé sous le socle de la machine et branchez-le sur une prise secteur. Étape 2 Déballez le repose tasse et insérez-le sous la machine. Étape 3 Enlevez la cartouche de son emballage de protection. Un anneau se situe en-dessous de la cartouche filtrante. Veuillez garder cet anneau sur la position d’usine (lettre ‘C’). Si ce n’est pas déjà le cas, veuillez tourner l’anneau sur la position ‘C’, comme indiqué. Une fois le réservoir retiré de la machine, insérez très fermement la cartouche filtrante de manière verticale au fond du réservoir, jusqu’au CLIC. Assurez-vous que la cartouche soit bien enclenchée, afin de garantir une performance optimale de la filtration. INITIALISATION AVANT LA PREMIÈRE UTILISATION Avant votre première tasse, veuillez procéder au cycle d’initialisation; étape indispensable. Après une période prolongée d’inutilisation ou si le réservoir d’eau est resté vide, effectuez de nouveau un cycle d’initialisation avant d’utiliser la machine. Étape 1 Placez le réservoir sur la machine et remplissez-le avec de l’eau froide potable jusqu’à la graduation Maximum (MAX). Prenez soin de ne pas renverser d’eau sur les bords du réservoir. Étape 2 Placez une grande tasse (>25cl) sur le repose tasse sous le bec verseur. 13 INITIALISATION AVANT LA PREMIÈRE UTILISATION Étape 3 Appuyez sur le bouton marche/ arrêt situé sur le haut de la machine jusqu’à ce que la bulle d’infusion intelligente s’allume. Étape 4 Placez le filtre dans le support, sans capsule, et insérez le support dans la machine. Assurez-vous que le support avec le filtre soit enfoncé jusqu’au bout. Étape 5 Voyants clignotants: la machine doit être initialisée. Appuyez simultanément sur les boutons qui clignotent Moins fort et Grande tasse (situés aux deux extrémités) pendant 5 secondes jusqu’au soulèvement du support et au lancement du cycle d’initialisation de la machine. Durant ce cycle, la machine pourra émettre différents bruits ou rester silencieuse. Étape 6 À la fin du cycle d’initialisation, la tasse est pleine d’eau de rinçage et le support est abaissé. Jetez l’eau de rinçage. La machine est prête à l’emploi. ATTENTION • Ne bloquez pas le filtre lorsqu’il est en mouvement. • N’essayez pas d’ouvrir la bulle d’infusion en forçant. 14 PRÉPARATION D’UNE TASSE DE T.O by Lipton Étape 1 Allumez votre machine en appuyant sur le bouton central de marche/arrêt jusqu’à ce que la bulle d’infusion intelligente s’allume. Étape 2 Remplissez le réservoir d’eau potable jusqu’à la graduation Maximum (MAX). Étape 3 Placez votre tasse (d’une capacité minimum de 20cl pour la Petite tasse et 25cl pour la Grande tasse) sous le bec verseur. Étape 4 Insérez une capsule T.O by Lipton sur l’avant du filtre, comme indiqué sur l’illustration. Ne retirez pas l’opercule d’aluminium de la capsule et ne le percez pas. Votre machine est conçue pour offrir une performance optimale lorsque vous utilisez une capsule T.O by Lipton neuve non ouverte. Étape 5 Insérez le filtre avec la capsule ainsi que le support dans la machine, comme indiqué sur l’illustration. Assurez-vous que le support avec le filtre soit enfoncé jusqu’au bout. 15 PRÉPARATION D’UNE TASSE DE T.O by Lipton Étape 6 Pour chacun de vos thés et infusions, la machine présélectionne automatiquement une intensité optimale. Cependant, si vous aimez votre boisson plus forte ou plus légère, sélectionnez l’intensité souhaitée en appuyant sur le bouton approprié. La graduation allumée indique l’intensité sélectionnée. Étape 7 Sélectionnez votre taille de tasse (petite tasse ou grande tasse) pour lancer le processus d’infusion. Le support de filtre se soulève alors automatiquement; l’expérience de l’infusion commence. Une délicieuse vapeur chaude se degage des orifices de la bulle durant le cycle d’infusion. Étape 8 A la fin du cycle d’infusion, la bulle d’infusion intelligente verse automatiquement la boisson dans votre tasse et de l’eau chaude finalise ce cycle. Le support de filtre est complètement abaissé et l’éclairage de la bulle s’estompe, vous pouvez alors retirer votre tasse et savourer votre délicieuse tasse de thé ou d’infusion. Étape 9 Pour jeter la capsule et les feuilles restantes, il vous suffit de retirer le filtre de son support, puis jeter la capsule et les feuilles en secouant le filtre. Rincezle ensuite sous le robinet si besoin. Pour plus de renseignements, consultez la section ‘Traitement des déchets’. 16 Orifices PRÉPARATION D’UNE TASSE DE T.O by Lipton Pour économiser l’énergie, la machine s’éteint automatiquement après 8 minutes de non utilisation. Lors du fonctionnement de la machine, commencez toujours par vérifier qu’il y ait de l’eau au dessus du niveau minimum (MIN) du réservoir. Si ce n’est pas le cas, lors de l’utilisation de la machine, celle-ci produira plus de vapeur que d’habitude au niveau des orifices situés au-dessus de la Bulle d’infusion. La machine s’arrêtera. Le réservoir devra être rempli de nouveau et un cycle d’initialisation devra être effectué avant la réutilisation. ATTENTION • Cette machine fonctionne uniquement avec les capsules T.O by Lipton. • N’utilisez jamais une capsule endommagée ou usagée au risque d’endommager la machine. 17 RINÇAGE DE LA BULLE D’INFUSION INTELLIGENTE Dans l’éventualité où des feuilles seraient restées dans la bulle, vous pouvez rincer celle-ci hors du cycle d’infusion, sans utiliser de capsule. Étape 1 Allumez votre machine. Remplissez le réservoir d’eau potable jusqu’à la graduation Maximum (MAX). Placez une grande tasse (> 25cl) sur le repose tasse, sous le bec verseur. Étape 2 Placez le filtre dans le support, sans capsule, et insérez le support dans la machine. Assurez-vous que le support avec le filtre soit enfoncé jusqu’au bout. Étape 3 Appuyez simultanément sur les boutons Petite tasse et Grande tasse pendant environ 3 secondes jusqu’au soulèvement du support et au lancement du processus de rinçage. Étape 4 À la fin du cycle de rinçage, la tasse est pleine d’eau de rinçage et le support est abaissé. Jetez l’eau chaude de rinçage. La machine est prête à l’emploi. ATTENTION • Ne buvez pas l’eau de rinçage. • De l’eau chaude circule dans l’appareil lors de son fonctionnement. 18 NETTOYAGE DE LA BULLE D’INFUSION INTELLIGENTE Pour garantir la transparence de la bulle d’infusion intelligente de votre machine, nous vous conseillons de la nettoyer 1 fois par mois. Les tablettes nettoyantes sont disponibles sur le site www.TO-Lipton.com. Étape 1 Allumez votre machine. Remplissez le réservoir d’eau potable jusqu’à la graduation Maximum (MAX). Étape 2 Placez un grand récipient (>50cl) sur le repose tasse, sous le bec verseur. Étape 3 Retirez la tablette nettoyante T.O by Lipton de son emballage. Enlevez le support filtre et le filtre de la machine puis placez une tablette nettoyante sur le filtre, comme indiqué sur l’illustration. Étape 4 Insérez le filtre avec la tablette nettoyante ainsi que le support dans la machine. Assurez-vous que le support avec le filtre soit enfoncé jusqu’au bout. Étape 5 Appuyez simultanément sur le bouton Moins fort et sur les deux boutons de Petite et Grande tasse jusqu’au soulèvement du support et au lancement du cycle de nettoyage. Veuillez noter que le nettoyage prend environ 10 minutes et que la graduation lumineuse des voyants indiquant l’intensité clignote, pour indiquer que le nettoyage est en cours. 10 min 19 NETTOYAGE DE LA BULLE D’INFUSION INTELLIGENTE Ne retirez pas directement le grand récipient car le nettoyage sera suivi d’un rinçage automatique. Étape 6 Jetez avec précaution la solution de nettoyage chaude qui est versée dans le récipient. La machine est prête a l’emploi. ATTENTION • Ne buvez pas l’eau de nettoyage. • La tablette nettoyante ainsi que l’eau de nettoyage peuvent être nocifs. Évitez tout contact direct avec les yeux et la peau. • De l’eau chaude circule dans l’appareil lors de son fonctionnement. 20 DÉTARTRAGE DE LA MACHINE T.O by Lipton Le détartrage de votre machine T.O by Lipton doit être effectué 1 fois par mois pour préserver votre machine et lui assurer une plus grande longévité. Conseil: Si l’eau est dure et calcaire, veuillez détartrer votre machine à intervalles réguliers. Retirez toujours la cartouche filtrante BRITA INTENZA du réservoir avant de commencer le détartrage. Pour détartrer la machine, il est conseillé d’utiliser un détartrant ménager liquide contenant de l’acide lactique et recommandé pour les machines à café et/ou thé, ainsi que de lire les consignes de sécurité fournies avec ce détartrant. Procédure de détartrage: Etape 1 Retirez et videz le réservoir à eau. Retirez la cartouche filtrante BRITA INTENZA du réservoir. Etape 2 Replacez le réservoir sur la machine, puis remplissez le réservoir d’eau jusqu’à la graduation Maximum (Max) (1L). Puis ajoutez le détartrant dans les proportions indiquées par les instructions accompagnant ce détartrant. Etape 3 Placez un grand récipient (>50cl) sur le repose tasse, sous le bec verseur. Etape 4 Réalisez un cycle de nettoyage sans tablette nettoyante. Appuyez simultanément sur le boutons Moins fort et sur les deux boutons de Petite et Grande tasse pendant 3 secondes jusqu’au soulèvement du support et au lancement du cycle. Veuillez noter que le processus prend environ 10 minutes. 10 min Etape 5 Videz le réservoir et rincez le abondamment. Etape 6 Replacez le réservoir sur la machine. Puis remplissez le réservoir d’eau potable jusqu’à la graduation Maximum (MAX). Placez une grande tasse (> 25cl) sur le repose tasse, sous le bec verseur. 21 DÉTARTRAGE DE LA MACHINE T.O by Lipton Etape 7 Pour réaliser le cycle de rinçage, appuyez simultanément sur les boutons Moins fort et Grande tasse (situés aux deux extrémités) pendant 3 secondes jusqu’au soulèvement du support et au lancement du cycle. Puis jetez l’eau de rinçage. Effectuez cette étape 4 fois. Etape 8 Après avoir suivis les instructions de détartrage, rincez soigneusement le réservoir; puis replacez la cartouche filtrante BRITA dans le réservoir. x4 Cycles de rinçage ATTENTION • Le détartrant peut être nocif. Eviter le contact avec les yeux et la peau. • Le détartrant est également nocif pour la surface de la machine et les plans de travail en marbre ou en pierre tendre. • Suivez les consignes de sécurité fournies avec le détartrant. • N’utilisez jamais de vinaigre ou de produits à base de vinaigre pour détartrer la machine au risque de l’endommager. • N’utilisez jamais de produits à base de chlore pour détartrer ou nettoyer la machine. • Ne mélangez jamais de détartrants et/ou produits de nettoyage différents. • Ne buvez jamais un liquide quelconque utilisé pour le détartrage. • Veuillez toujours performer 4 cycles de rinçage après le détartrage comme cela est indiqué dans la procédure. 22 CHANGEMENT DE LA CARTOUCHE FILTRANTE BRITA Seules les cartouches filtrantes BRITA INTENZA peuvent être utilisées avec votre machine T.O by Lipton. La cartouche filtrante doit être remplacée 4 fois par an ou plus fréquemment si la machine l’indique, afin d’optimiser la filtration et protéger la machine. Les cartouches filtrantes BRITA INTENZA sont disponibles sur le site www.TO-Lipton.com. Procédure pour changer la cartouche filtrante BRITA INTENZA: Etape 1 Retirez le réservoir de la machine, puis videz l’eau. Veillez à ce que la cartouche filtrante usagée soit retirée du réservoir. Etape 2 Retirez la cartouche filtrante neuve de son emballage de protection. Etape 3 Un anneau se situe au bas de la cartouche filtrante. Veuillez garder cet anneau sur la position d’usine (lettre ‘C’). Si ce n’est pas déjà le cas, veuillez tourner l’anneau sur la position ‘C’, comme indiqué. Etape 4 Une fois le réservoir retiré de la machine, insérez très fermement la cartouche filtrante de manière verticale au fond du réservoir, jusqu’au CLIC. Assurez-vous que la cartouche soit bien enclenchée, afin de garantir une performance optimale de la filtration. Etape 5 Replacez le réservoir sur la machine. Puis remplissez le réservoir d’eau jusqu’à la graduation Maximum (MAX). Placez une grande tasse (>25cl) sur le repose tasse, sous le bec verseur. Etape 6 Réalisez un cycle d’initialisation, en appuyant simultanément sur les boutons Moins fort et Grande tasse (situés aux deux extrémités) pendant 5 secondes jusqu’au soulèvement du support et au lancement du cycle. Etape 7 Remplissez de nouveau le réservoir avec de l’eau froide. La machine est prête à l’emploi. 23 CHANGEMENT DE LA CARTOUCHE FILTRANTE BRITA Informations importantes: •• •• •• •• •• •• •• •• •• •• •• 24 Toujours conserver les cartouches filtrantes de rechange scellées dans leur emballage d’origine dans un endroit frais et sec. La cartouche filtrante BRITA INTENZA est conçue pour être utilisée uniquement avec de l’eau du robinet traitée par les municipalités (Remarque: cette eau est contrôlée en permanence et est potable conformément à la réglementation) ou avec de l’eau d’un fournisseur privé qui a été approuvé pour la consommation humaine. Les autorités sanitaires peuvent émettre un avis d’ébullition de l’eau du robinet, dans ce cas l’eau filtrée Brita doit également être bouillie. Lorsque l’instruction de faire bouillir l’eau n’est plus en vigueur, l’ensemble de la machine à thé doit être nettoyé et une nouvelle cartouche insérée. La cartouche filtrante doit être uniquement utilisée avec de l’eau froide. Nettoyez régulièrement le réservoir d’eau. Si votre machine à thé exige un détartrage, retirez toujours la cartouche filtrante BRITA INTENZA du réservoir d’eau. Puis nettoyez l’ensemble du réservoir d’eau et replacez la cartouche filtrante. Pour certaines personnes, subissant par exemple un déficit immunitaire, il est généralement recommandé que l’eau du robinet soit portée à ébullition, ce qui s’applique aussi à l’eau filtrée. Indépendamment de la qualité de l’eau utilisée, il est recommandé d’utiliser des ustensiles en acier inoxydable, et tout particulièrement pour les personnes sensibles au nickel. Pour des raisons d’hygiène, la cartouche filtrante reçoit un traitement spécial à l’argent. Une faible quantité d’argent peut se retrouver dans l’eau. Cette quantité ne présente pas de risque connu pour la santé et se situe dans les limites prévues par l’Organisation Mondiale de la Santé (OMS). Au cours du processus de filtration, il peut y avoir une légère augmentation de la teneur en potassium. Cependant, un litre d’eau filtrée BRITA contient moins de potassium qu’une pomme, par exemple. Si vous avez une maladie rénale et / ou suivez un régime alimentaire de potassium restreint, nous vous recommandons de consulter votre médecin avant d’utiliser une cartouche filtrante BRITA. Ou appelez le service consommateurs BRITA® Prix d’un appel local, (surcoût possible depuis un mobile). Pour toutes questions concernant les produits BRITA®, la filtration de l’eau et des pièces de rechange: Rendez-vous sur le site internet www.brita.fr rubrique Service consommateurs/ demande de contact Tél. : 0810 73 15 45 - Lu. - Ve. de 09h30 - 12h30. Si votre machine à thé n’est pas utilisée pendant une période prolongée (par exemple en vacances), nous vous recommandons de jeter l’eau résiduelle du réservoir d’eau et de laisser la cartouche à l’intérieur du réservoir. Avant d’utiliser à nouveau la machine à thé retirez la cartouche, nettoyez le réservoir d’eau et réinsérez la cartouche avant d’effectuer un rinçage comme cela est indiqué dans la section ‘Rinçage de la bulle d’infusion intelligente’ page 18. L’eau du robinet et l’eau filtrée BRITA sont dédiées à la consommation humaine. Ce sont des aliments périssables et en tant que tels, ils doivent être consommés dans une journée. BRITA déclinera toute responsabilité si vous ne respectez pas ces recommandations pour l’utilisation et l’échange de la cartouche filtrante BRITA INTENZA. ENTRETIEN Entretien et nettoyage quotidiens •• •• •• •• •• Avant de nettoyer la machine, débranchez-la de la prise secteur et laissez-la refroidir. Remplissez le réservoir avec de l’eau potable fraîche avant chaque usage quotidien. La surface de la machine uniquement avec un chiffon ou une éponge humide. Nettoyez régulièrement le filtre avec de l’eau savonneuse chaude pour enlever les taches et les résidus de thé, afin d’assurer le bon écoulement du thé ou infusion dans votre tasse. La machine et ses éléments ne sont pas compatibles avec le lave-vaisselle. ATTENTION • Ne jamais mettre la machine dans l’eau ou sous l’eau courante. Ne la laissez pas reposer sur de l’eau. Période prolongée d’inutilisation ou de transport Videz et séchez le réservoir et débranchez la machine. Après une longue période d’inutilisation ou de transport, veuillez effectuer un cycle d’initialisation - comme indiqué dans la section ‘Initialisation avant la première utilisation’ page 13 - avant de réutiliser la machine. ATTENTION • En cas d’inutilisation pendant une période prolongée, débranchez la machine. Débranchez-la en tirant sur la prise et non sur le cordon, sinon vous risquez d’endommager le cordon. 25 DIAGNOSTIC DES PANNES Situation Solution La machine ne s’allume pas • • • Vérifiez que la machine est branchée correctement. Essayez une autre prise secteur. Vérifiez que vous avez bien appuyé sur le bouton marche/arrêt. Le support de filtre monte et redescend sans effectuer l’action demandée. • Vérifiez que le filtre est inséré correctement dans le support. Assurez- vous que le filtre et son support soient totalement insérés dans la machine. Assurez-vous que rien ne bloque le filtre lorsqu’il est en mouvement. Lors du cycle d’infusion, vérifiez que la capsule T.O by Lipton est neuve et que son opercule est intact. Lors de toutes autres actions, vérifiez qu’il n’y ait pas de capsule dans le filtre. • • • • Le support n’est pas en position basse après l’une des actions. • En fin de cycle d’infusion, des feuilles restent dans la bulle après que votre tasse ai été préparée. • Vous remarquez qu’il y a de l’eau autour de votre machine. • • • • • • Eteignez la machine, puis attendez 10 minutes avant de l’allumer de nouveau. Le support revient en position basse. Si ce n’est pas le cas, éteignez la machine de nouveau, et attendez que la machine refroidisse complètement (jusqu’à 60 minutes) avant de la rallumer. Effectuez un cycle de rinçage. Référez-vous à la section ‘Rinçage de la Bulle D’infusion Intelligente’ page 18. Si l’eau ne s’écoule pas sur l’intégralité de la surface de la bulle, il est conseillé d’effectuer un détartrage de la machine. Référez-vous à la section ‘Détartrage de la machine T.O by Lipton’ page 21. Débranchez la machine. Assurez- vous que le filtre et son support soient totalement insérés dans la machine. Assurez-vous qu’il n’ait pas eu d’eau renversée lors du remplissage du réservoir. Assurez-vous que votre tasse soit correctement placée sur le repose tasse. Une question? Consultez nos vidéos sur www.TO-Lipton.com Notre Service Client est à votre écoute: 0 800 033 033 (Appel gratuit depuis un poste fixe) 26 DIAGNOSTIC DES PANNES Situation Solution Pendant l’infusion de votre tasse, l’un des flux de bulles d’air dans la Bulle d’infusion ne fonctionne plus. • • Lorsque le support de filtre est en position basse, nettoyez doucement la base de la Bulle d’infusion avec un chiffon propre et humide ou une brosse douce. Si cela ne résout pas le problème, effectuez un cycle de détartrage. Référez-vous à la section ‘Détartrage de la machine T.O by Lipton’ page 21. Les voyants Moins fort et Grande tasse (situés aux deux extrémités) clignotent. • La machine nécessite un cycle d’initialisation. Référez-vous à la section ‘Installation de votre machine T.O by Lipton’ page 13. Tous les voyants clignotent • Veuillez éteindre et débranchez la machine pendant 10 minutes, puis allumez de nouveau. Assurez-vous que le niveau d’eau soit toujours situé au-dessus de la graduation Minimum (MIN). Assurez-vous d’avoir initialisé votre cartouche filtrante, référez-vous à la section ‘Initialisation avant la première utilisation’ la page 13. • • Les voyants Petite et Grande tasse clignotent • La machine nécessite un rinçage. Référez-vous à la section ‘Rinçage de la bulle d’infusion intelligente’ page 18. Le bouton marche/arrêt clignote • La cartouche filtrante a besoin d’être changée. Référez-vous à la section ‘Changement de la cartouche filtrante BRITA’ page 23. Une question? Consultez nos vidéos sur www.TO-Lipton.com Notre Service Client est à votre écoute: 0 800 033 033 (Appel gratuit depuis un poste fixe) 27 CARACTÉRISTIQUES Tension: 230 V ±10 %, 50 Hz, Puissance: 2400 W Capacité du réservoir: 1L Plage de températures ambiantes de fonctionnement: +5°C à 35°C Poids à sec: 3.2Kg H Dimensions de la machine L x H x P (mm): 200 x 360 x 283 L P Hauteur de tasse maximum: 100mm Accessoires: Cartouche filtrante BRITA INTENZA et Tablettes nettoyantes T.O by Lipton. Disponibles sur le site www.TO-Lipton.com 28 TRAITEMENT DES DÉCHETS Capsules T.O by Lipton Après utilisation, vous pouvez enlever les feuilles restantes de la capsule. L’opercule en aluminium peut être séparé de la capsule en plastique et être recyclé. Reportez vous à vos consignes de tri locales. Les feuilles restantes dans le filtre peuvent être ajoutées aux déchets compostables, si vous utilisez ce mode de recyclage, ou peuvent simplement être éliminées via les déchets ménagers, en conformité avec vos consignes de tri locales. Machine T.O by Lipton Participons à la protection de l’environnement ! Votre appareil contient de nombreux matériaux valorisables ou recyclables. Confiez celui-ci dans un point de collecte ou à défaut dans un centre de service agrée pour que son traitement soit effectué. La directive Européenne 2012/19/UE sur les Déchets des Equipements Electriques et Electroniques (DEEE), exige que les appareils ménagers usagés ne soient pas jetés dans le flux normal des déchets municipaux. Les appareils usagés doivent êtres collectés séparément afin d’optimiser le taux de récupération et le recyclage des matériaux qui les composent et réduire l’impact sur la santé humaine et l’environnement. Boîte de capsules T.O by Lipton Après son utilisation, aplatissez la boîte et recyclez-la avec les déchets carton/papier, en conformité avec vos consignes de tri locales . 29 CONTENTS ENGLISH VERSION Safety & operation precautions 31 T.O by Lipton machine overview 35 Setting up your T.O by Lipton machine 38 Priming before first use 38 Making a cup of T.O by Lipton tea 40 Rinsing the Smart Brewing Orb 43 Cleaning the Smart Brewing Orb 44 Descaling the T.O by Lipton machine 46 Replacing the BRITA water filter 48 Machine care 51 Daily care & cleaning 51 Long period of non-use or & transportation 51 Troubleshooting52 Specifications54 Disposal55 30 SAFETY & OPERATION PRECAUTIONS Caution - When you see this sign, please refer to the safety precautions to avoid possible harm and damage. Information - When you see this sign, please take note of the advice for the correct and safe usage of your appliance. CAUTION – The safety precautions are part of the appliance. Read them carefully before using your new appliance for the first time. Keep them in a place where you can find and refer to them later on. The appliance is intended to prepare beverages according to these instructions. When operating the T.O by Lipton machine: • Do not use the appliance for other than the intended use. • This T.O by Lipton machine has been designed for domestic use. • Protect the appliance from direct sunlight, prolonged or large splashes of water, and humidity. • Do not operate the T.O by Lipton machine near water jets or water taps. • The manufacturer accepts no responsibility and the guarantee will not apply for any commercial use, inappropriate handling or use of the appliance, any damage resulting from use for other purposes, nonprofessional repair or failure to comply with the instructions. • This appliance is intended for household use only. It is not intended to be used in the following applications, and the guarantee will not apply for: staff kitchen areas in shops, offices and other working environments; farm houses; 31 SAFETY & OPERATION PRECAUTIONS • • • • by clients in hotels, motels and other residential type environments; bed and breakfast type environments. Children should be supervised to ensure that they do not play with the appliance. This appliance can be used by children aged from 8 years and above if they have been given supervision or instruction concerning use of the appliance in a safe way and understand the hazards involved. Cleaning and user maintenance shall not be performed by children aged from 8 years and above without supervision. Keep the appliance and its cord out of the reach of children aged less than 8 years. Children should not play with the appliance. This appliance can be used by persons with reduced physical, sensory or mental capabilities or lack of experience and knowledge if they have been given supervision or instruction concerning use of the appliance in a safe way and understand the hazards involved. This appliance is not intended for use by persons (including children) with reduced physical, sensory or mental capabilities, or lack of experience and knowledge, unless they have been given supervision or instruction concerning use of the appliance by a person responsible for their safety. To avoid the risk of electric shock and fire • Only plug the appliance into suitable, easily accessible, earthed wall-mounted mains connections. Make sure the voltage of the power source is the same as that specified on the ratings plate attached to the machine. The use of an incorrect connection voids the warranty. • Do not place the device, power cord or plug in water or 32 SAFETY & OPERATION PRECAUTIONS any other liquid. • Do not open the appliance - hazardous voltage inside! • In case of an emergency: immediately remove the plug from the power socket. • Do not pull the cord over sharp edges, clamp it or allow it to hang down. • Always follow the maintenance instructions for cleaning your device: • Unplug the machine. • Clean only when the appliance has cooled down. • Only clean with a damp cloth or sponge. • Never put the appliance into water, or allow it to stand in water. • Do not use your T.O by Lipton machine if the power cord, plug or appliance has been damaged. The power cord must only be replaced by the manufacturer, after-sales service or similar qualified persons in order to avoid any danger. Avoid possible harm when operating the appliance • Never leave the appliance unattended during operation. • If the appliance is damaged do not use. • For your own safety, you should use only parts and appliance accessories from T.O by Lipton that are designed for your appliance. • All T.O by Lipton appliances pass stringent controls. Reliability tests under practical conditions are performed on selected units. Some appliances can therefore show traces of previous use. • Empty water tank and unplug if the appliance will not be used for an extended time (holidays etc.). • Do not use any strong cleaning agent or solvent cleaner. 33 SAFETY & OPERATION PRECAUTIONS • • • • • • • • • • • • Use a damp cloth and mild cleaning agent to clean the surface of the appliance. Never put the appliance or part of it in a dishwasher. When unpacking the machine, remove any plastic film and dispose. This appliance uses T.O by Lipton capsules available exclusively on www.TO-Lipton.com, or from your T.O by Lipton authorized representative. Quality is only guaranteed when T.O by Lipton capsules are used in the T.O by Lipton appliances. Only fill the water tank with drinking water at ambient temperature between 5°C and 35°C. Do not fill the water tank with hot water or any other liquid other than potable water. Do not use the appliance without the cup stand to avoid hot liquid contacting surrounding surfaces. Do not put fingers into capsule compartment or Smart Brewing Orb. Risk of pinching and injuries. On first use of the machine ensure that a water filter has been inserted. See section ‘Replacing the BRITA water filter’. Do not touch the Smart Brewing Orb whilst the appliance is brewing, rinsing or cleaning. Hot water runs through the machine. Do not touch the Smart Brewing Orb whilst the appliance is brewing and keep a safe distance from the hot steam while the machine is operating. Burning risks. T.O by Lipton reserves the right to change instructions without prior notice. SAVE THESE INSTRUCTIONS - Pass them on to any subsequent user. 34 T.O by Lipton MACHINE OVERVIEW* BRITA INTENZA Water filter T.O by Lipton capsule box Water tank Smart Brewing Orb Pouring spout Cup stand Cleaning tablet T.O by Lipton To be used when cleaning the Smart Brewing Orb. * Colour for reference only 35 T.O by Lipton MACHINE OVERVIEW T.O by Lipton Capsule Capsule placement Strainer Holder 1. 2. 3. 4. BRITA INTENZA Water filter Box of capsules Cleaning tablet Strainer & holder 5. 6. 7. 8. T.O by Lipton machine Water tank Cup stand User Guide, Quick User Guide & Machine care leaflet What’s Inside The Box 36 T.O by Lipton MACHINE OVERVIEW Control buttons Tea intensity selection Weaker Stronger 1 full tank (1L) Cup size selection & start of the brewing cycle On/Off Small Large 3 large cups 37 SETTING UP YOUR T.O by Lipton MACHINE Step 1 Carefully unpack your T.O by Lipton machine and remove the plastic film covering the front of the machine. Unwind the cable from the base of the machine to the desired length and plug into a mains wall socket. Step 2 Unpack and slide the cup stand under the machine. Step 3 Remove the filter cartridge from the protective packaging. On the bottom side of the water filter cartridge you will find a ring. Please leave the ring at the factory setting (letter “C”). If not already the case, please turn the ring to position ‘C’ as shown. With the water tank removed from the machine, push the filter firmly and vertically to the bottom of the water tank, so it clicks into place noticeably. Make sure that the filter is installed securely in the water tank. A tight fit guarantees an optimal filtration performance of the cartridge. PRIMING BEFORE FIRST USE First prime your machine before making your first cup of tea; this step is essential. Prime again when you start your machine after a long period without use, or if the water tank has run dry. Step 1 Place the water tank securely on the machine and fill with potable water to the Maximum mark (MAX). Taking care not to spill water. Step 2 Place a large cup that can easily hold 250ml on the the cup stand underneath the pouring spout. 38 PRIMING BEFORE FIRST USE Step 3 Press on/off button on the top of the machine until the Smart Brewing Orb illuminates. Step 4 Without a capsule place the strainer into the holder and slide into the machine. Ensure the holder and strainer are fully inserted. Step 5 Flashing lights : the machine needs priming. Press and hold simultaneously the Weak Brew and Large Cup buttons (far left and right) for 5 seconds until the holder moves up and the priming process starts. It is normal that your machine may make different sounds or go silent during the prime cycle. Step 6 On completion of the priming cycle the cup will be full of rinse water and the holder will be lowered. Dispose of the rinse water. The machine is ready for use. ATTENTION • Do not try to restrict movement of the strainer or holder. • Do not try to force open the Smart Brewing Orb. 39 MAKING A CUP OF T.O by Lipton TEA Step 1 Switch on the machine by pressing the centre ON/ OFF button until the Smart Brewing Orb illuminates. Step 2 Fill the water tank with drinking water to the Maximum mark (MAX). Step 3 Place your cup (with a minimum capacity of 200ml for small cup and 250ml for the large cup) underneath the pouring spout. Step 4 Insert a T.O by Lipton capsule at the front of the strainer as shown. Do not remove or pierce the foil lid of the capsule, your machine is designed for optimum performance with new, unopened T.O by Lipton capsules. Step 5 Slide the strainer and holder with the capsule into the machine as shown. Ensure the holder and strainer are fully inserted. 40 MAKING A CUP OF T.O by Lipton TEA Step 6 For each of your teas, the machine preselects automatically an optimal intensity. However, if you like your tea stronger or weaker select your preferred tea strength by pressing the intensity buttons. The illuminated scale shows the tea intensity you have selected. Step 7 Select your cup size (small or large cup) to start the brewing process. This will automatically raise the capsule holder to start the brewing experience. While the machine is brewing your delicious cup of tea, hot steam will come out of the vents from the top of the Smart Brewing Orb. Vents Step 8 At the end of the brewing cycle, the Smart Brewing Orb automatically pours the tea into your cup with hot water to complete the cycle. The capsule holder is completely lowered and the Orb light is dimmed. You can now remove the cup and enjoy your delicious tea. Step 9 To dispose of the capsule and remaining tea leaves, simply slide out the holder and the strainer and dispose by tapping out capsule and leaves from the strainer. Rinse it under the tap if required. Refer to the disposal section for more disposal options. 41 MAKING A CUP Of T.O by Lipton TEA To save energy the machine turns itself off automatically after 8 minutes of nonuse. Always start operating the appliance with water above the minimum mark (MIN) on the tank: otherwise more steam than usual will come out of the vents at the top of the Smart Brewing Orb during use. The machine will stop, the water tank will need to be refilled and the appliance primed before starting again. ATTENTION • This appliance operates with T.O by Lipton capsules only. • Never use a damaged or used capsule. This could damage the appliance. 42 RINSING THE SMART BREWING ORB In the unlikely event of leaves still remaining in the Smart Brewing Orb, you can rinse it separately to the brewing cycle, without a capsule. Step 1 Switch on your machine. Fill the water tank with drinking water to the Maximum mark (MAX). Place a large cup that can easily hold 250ml on the cup stand underneath the pouring spout. Step 2 Without a capsule place the strainer into the holder and slide into the machine. Ensure the holder and strainer are fully inserted. Step 3 Press and hold simultaneously the small and large cup buttons until the holder moves up and the rinsing process starts (about 3 seconds). Step 4 On completion of the rinse cycle the cup will be full of hot rinse water and the holder will be lowered. Dispose of the rinse water. The machine is ready for use. ATTENTION • Do not consume the rinse water. • Hot water runs through the appliance when operating. 43 CLEANING THE SMART BREWING ORB To maintain the Smart Brewing Orb clarity of your T.O by Lipton machine, we recommend cleaning the brewing chamber once a month. Cleaning tablets are available on the website www.TO-Lipton.com. Step 1 Switch on your machine. Fill the water tank with potable water to the Maximum mark (MAX). Step 2 Place a large vessel (>500ml) on the cup tray underneath the pouring spout. Step 3 Unwrap the T.O by Lipton cleaning tablet. Remove the holder with the strainer and place one cleaning tablet onto the filter mesh of the strainer as shown. Step 4 Slide the strainer and holder with the cleaning tablet into the machine. Ensure the holder and strainer are fully inserted. Step 5 Simultaneously press the weak strength button with both of the cup size buttons until the holder moves up and the cleaning cycle starts. Please note cleaning will take about 10 minutes and the tea strength lights will flash to indicate that cleaning is in progress. 10 min 44 CLEANING THE SMART BREWING ORB As part of the cleaning cycle an additional rinse will now be automatically performed by the machine. Do not remove the large vessel. Step 6 Carefully dispose of the cleaning solution once it has poured into the vessel. The machine is ready for use. ATTENTION • Do not consume the cleaning fluid. • The cleaning tablet and the cleaning fluid resulting from its use can be harmful. Avoid contact with eyes and skin. • Hot water runs through the appliance when operating. 45 DESCALING THE T.O by Lipton MACHINE The descaling of your T.O by Lipton machine must be performed once a month to protect and ensure a longer life for your machine. Tip: With very hard and calciferous water, please make sure to descale your machine regularly. Never pour descaling agent into the water tank with a water filter in it. For descaling the T.O by Lipton machine, it is recommended to use a liquid household descaling agent which contains lactic acid and is recommended for coffee and/or tea machines. Read the safety precautions provided with your liquid household descaling agent. Descaling procedure: Step 1: Remove and empty the water tank. Remove the BRITA INTENZA water filter from the water tank. Step 2 Place the water tank on the machine and fill with water to the maximum mark (MAX) (1L). Then add the descaling agent in the recommended ratio from the instructions of your household liquid descaling agent. Step 3 Place a large vessel (>500ml) on the cup stand underneath the pouring spout. Step 4 Perform a clean cycle without a cleaning tablet. Simultaneously press the weak strength button with both of the cup size buttons until the cleaning cycle starts. Please note cleaning will take about 10 minutes. Step 5 Empty the water tank and rinse thoroughly. Step 6 Place the water tank on the machine. Then fill the water tank with water to the Maximum mark (MAX). Place a large cup (that can easily hold 250ml) on the cup stand underneath the pouring spout. 46 10 min DESCALING THE T.O by Lipton MACHINE Step 7 Perform a rinsing cycle by pressing and holding simultaneously the small and large cup buttons until the holder moves up and the rinsing process starts (about 3 seconds). Dispose of the rinse water after the rinsing cycle. Perform this step 4 times. Step 8 When descaling has been performed as recommended, rinse your water tank underneath the tap and reinsert the water filter. x4 rinsing cycles ATTENTION • The descaling solution can be harmful. Avoid contact with eyes and skin. • The descaling agent can also damage machine surfaces and marble or soft stone. • Follow the safety instructions provided with the descaling agent. • Never use vinegar or vinegar-based products to descale as it can damage your machine. • Never use chlorine-based products to de-scale or clean your machine. • Never mix different descaling &/or cleaning agents together. • Do not consume any of the liquids used for descaling the machine. • Always perform 4 rinse cycles after descaling as indicated in the procedure. 47 REPLACING THE BRITA WATER FILTER Only BRITA INTENZA water filters can be used with your T.O by Lipton machine. The cartridge must be replaced 4 times per year or sooner if the machine indicates it to ensure optimum filtration performance and machine protection. BRITA INTENZA water filters are available on the website www.TO-Lipton.com. Procedure for changing the BRITA INTENZA water filter: Step 1 Remove the water tank from the machine and empty it. Step 2 Remove the new filter cartridge from the protective packaging. Step 3 On the bottom side of the water filter cartridge you will find a ring. Please leave the ring at the factory setting (letter “C”). If not already the case, please turn the ring to position ‘C’ as shown. Step 4 With the water tank removed from the machine, push the filter firmly and vertically to the bottom of the water tank, so it clicks into place noticeably. Make sure that the filter is installed securely in the water tank. A tight fit guarantees optimal filtration performance of the cartridge. Step 5 Place the water tank on the machine. Then fill the water tank with water to the Maximum mark (MAX). Place a large cup that can easily hold 250ml on the cup stand underneath the pouring spout. 48 REPLACING THE BRITA WATER FILTER Step 6 Perform a priming cycle by pressing simultaneously the Weak Brew and Large Cup buttons (far left and far right) for 5 seconds until the holder moves up and the cycle starts. Step 7 Refill the water tank with water. The machine is ready for use. Important information: •• •• •• •• •• •• •• •• Always store spare water filter cartridges sealed in the original packaging in a cool dry place. The BRITA INTENZA water filter cartridge is designed for use only with municipally treated tap water (note: this water is constantly controlled and is safe to drink according to legal regulations) or with water from private supplies which has been approved as safe to drink. If an instruction is received from the authorities that mains water must be boiled, the BRITA filtered water must also be boiled. When the instruction to boil water is no longer in force, the entire tea machine must be cleaned and a new cartridge inserted. Only filter cold water. Clean the water tank regularly. Should your tea machine require descaling, always remove the BRITA INTENZA water filter cartridge from the water tank. Then clean the whole water tank and reinsert the water filter cartridge. For certain groups of people (e.g. those with impaired immunity), it is generally recommended that tap water should be boiled; this also applies to filtered water. Irrespective of the water used, you should use stainless steel utensils. This product meets these requirements. In particular, people who are sensitive to nickel should use appliances with elements made of stainless steel. For reasons of hygiene, the cartridge is given a special treatment with silver. A small amount of silver, which poses no known threat to health, may be transferred to the water. This transference would be within the World Health Organisation (WHO) guidelines. During the filtering process, there may be a slight increase in potassium content. However, one litre of BRITA filtered water contains less potassium than e.g. an apple. If you have kidney disease and/or follow a potassium-restricted diet, we recommend that you consult your doctor before using a BRITA water filter. Or call BRITACare Customer Service for further information: visit the website www.brita.fr, contact Tel: 0810 731545, Mon - Fri 9:30 - 12:30. 49 REPLACING THE BRITA WATER FILTER •• •• •• 50 Should your tea machine not be in use for a prolonged period (e.g. holiday), we recommend that you discard any water left inside the water tank and leave the cartridge inside the tank. Before using the tea machine again take out the cartridge, clean the water tank and reinsert the cartridge before performing a rinse cycle as explained in the section ‘Rinsing the Smart Brewing Orb’ page 43. BRITA filtered water is dedicated for human consumption. It is a perishable food and as such please consume within one day. BRITA cannot accept any responsibility or liability if you do not respect our recommendations for the use and exchange of the BRITA INTENZA water filter cartridge. MACHINE CARE Daily Care & Cleaning •• •• •• •• •• Before cleaning, remove the plug from the mains socket and let the appliance cool down. Refill water tank with drinking water before each daily use. Clean the machine only with a damp soft cloth. Clean the strainer regularly with warm soapy water to remove tea stains and residues, and ensure adequate drainage of tea in your cup. Machine and parts of the machine are not dishwasher compatible. ATTENTION • Never immerse the appliance into water, or allow it to stand in water. Long Period Of Non-Use & Transportation Empty and dry the water tank and unplug the machine. Before re-using your machine, after a long period of non-use or transportation, please perform a prime cycle as explained in the section ‘Priming before first use’ page 38. ATTENTION • Disconnect the appliance from the mains when not in use for a long period. Disconnect by pulling out the plug and not by pulling the cord itself or the cord may become damaged. 51 TROUBLESHOOTING Situation Solution The T.O by Lipton machine does not switch on. • Holder goes up and down without performing the action. • • • • • • • Holder not in the ‘down’ position after one of the actions. • At the end of the brewing cycle, tea leaves remain in the Smart Brewing Orb after your drink has been dispensed. • You notice water around your machine. • • • • Any questions? Watch our videos on www.TO-Lipton.com 52 • • Check to be sure that the plug is plugged in securely. Try a different mains wall socket. Make sure the on/off button has been pressed (stable green light). Make sure the strainer is correctly inserted in the holder. Make sure nothing is obstructing the holder travel. Make sure the holder and strainer are fully inserted. When making tea make sure a new T.O by Lipton capsule with the foil intact is used. When performing any other actions make sure there is no capsule in place into the strainer. Disconnect the machine at the mains socket. Wait 10 minutes before turning on again; the holder returns to the ‘down’ position. If it does not, disconnect the machine again, and wait for the machine to cool (up to 60 minutes) before turning on again. You can then restart the cycle. Perform a rinsing cycle, refer to the section ‘Rinsing the smart Brewing Orb’ page 43. If the water flow doesn’t cover the surface of the smart brewing orb we recommend to perform a descaling cycle. Refer to the section ‘Descaling the T.O by Lipton machine’ page 46. Unplug the machine. Check the strainer and holder are fully inserted. Ensure water is not spilled when filling the tank. Ensure that your cup is correctly positioned on the cup stand. Our Customer Service is here to help: 0 800 033 033 (free call from landlines) Situation Solution When brewing your cup, one of the air bubble streams in the Smart Brewing Orb stops working. • • When the holder is in the down position, gently clean the base of the Brewing Orb with a clean damp cloth or soft brush. If this does not solve the issue, perform a descaling cycle, refer to the section ‘Descaling the T.O by Lipton machine’ page 46. Weak Brew and Large Cup (buttons far left and far right) lights are flashing • The machine requires a prime cycle. Please refer to the section ‘Setting up your T.O by Lipton Machine’ page 38. All lights flashing • Please switch off the machine for 10 minutes and switch on again. • Make sure the water level is always above the minimum mark (MIN). • Make sure you have primed your filter, refer to the section “Priming before first use” page 38. Small and Large Cup lights are flashing • The machine requires a rinse cycle. Please refer to section ‘Rinsing the Smart Brewing Orb’ page 43. The ON/OFF button flashes • Water filter needs changing. Refer to the section ‘Replacing the BRITA water filter’ page 48. Any questions? Watch our videos on www.TO-Lipton.com Our Customer Service is here to help: 0 800 033 033 (free call from landlines) 53 SPECIFICATIONS Voltage: 230 V ±10 %, 50 Hz, Power: 2400 W Water tank capacity: 1L Operating ambient temperature range: +5°C to 35°C Dry Weight: 3.2Kg H Machine dimensions WxHxD (mm): 200 x 360 x 283 W D Maximum cup height: 100mm Accessories BRITA INTENZA Water filter and T.O by Lipton cleaning tablets. Available online at www.TO-Lipton.com 54 DISPOSAL T.O by Lipton capsules After use, the capsule can be separated from the remaining leaves; the foil lid can be removed from the plastic capsule and recycled according to local authority regulations. The remaining tea from the strainer can be added to food waste if you use this method of recycling or simply be disposed of via household waste according to your local recycling guidelines. T.O by Lipton machine Participate in the protection of the environment! Your appliance contains valuable or recyclable materials. Leave the appliance at a collection point or an authorized service center for treatment. European Directive 2012/19/EU on Waste Electrical and Electronic Equipment (WEEE), requires that old household electrical appliances must not be disposed in normal municipal waste. Used appliances must be collected separately in order to optimize the recovery and recycling of the materials they contain and reduce the impact on human health and the environment. T.O by Lipton capsule carton After use collapse the carton and recycle with the cardboard/paper waste according to local authority regulations. 55 KRUPS GARANTIE INTERNATIONALE : www.krups.fr Ce produit est réparable par KRUPS, pendant et après la période de garantie. KRUPS s’efforce de conserver la plus grande partie du stock de pièces disponible pour la réparation de vos produits pendant une durée moyenne de 5 à 7 ans, après la dernière date de fabrication. Les accessoires, consommables, et autres pièces remplaçables directement par l’utilisateur peuvent être achetés sur www.accessories.home-and-cook. com, ou si ils sont disponibles localement tel que décrit sur le site internet www.krups.com La Garantie Ce produit est garanti par KRUPS contre tout défaut de fabrication ou de matière, pendant 2 ans à partir de la date d’achat en France et dans les pays précisés dans la liste jointe. Cette Garantie Internationale du fabricant KRUPS vient en complément des droits des consommateurs. La Garantie Internationale du fabricant couvre tous les coûts de remise en état d’un produit reconnu défectueux pour redevenir conforme à ses spécifications d’origine, par la réparation, la main-d’œuvre, et le remplacement éventuel de pièces défectueuses. Au choix de KRUPS, un produit de remplacement peut être proposé à la place de la réparation du produit défectueux. Les obligations de KRUPS dans le cadre de cette garantie se limitent exclusivement à cette réparation ou ce remplacement. Conditions & Exclusions La Garantie Internationale de KRUPS ne s’applique que pour les pays cités dans la Liste des Pays jointe, et n’est valable que sur présentation d’un justificatif d’achat. Le produit peut être déposé directement chez un réparateur agréé, ou peut y être envoyé en recommandé après avoir été emballé de manière adéquate. La liste complète des réparateurs agréés dans chaque pays, avec leurs coordonnées complètes, est disponible sur le site de KRUPS (www.krups.com), ou en appelant le numéro du Service Consommateurs en France au 09 74 50 10 61 , ou comme précisé dans la Liste des Pays, KRUPS n’a aucune obligation de réparer ou d’échanger un produit qui ne serait pas accompagné d’un justificatif d’achat. Cette garantie ne couvre pas les dommages qui seraient le résultat d’une mauvaise utilisation, d’une négligence, du non respect des instructions 56 d’utilisation et de maintenance, de l’utilisation avec une alimentation électrique non conforme à celle spécifiée sur la plaque signalétique, ou d’une modification ou d’une réparation non autorisée du produit. Elle n’inclut également pas l’usure normale du produit, ni la maintenance ou le remplacement de pièces consommables, ni les cas suivants : • utilisation d’une eau ou d’un consommable non adapté • entartrage (tout détartrage doit être réalisé conformément aux instructions dans le mode d’emploi) • entrée d’eau, de poussière, d’insectes dans le produit • dommages dus à un choc, ou une surcharge usage professionnel ou sur un lieu de travail • tous accidents liés à un feu, une innondation, la foudre, etc • verre ou céramique endommagé Cette garantie ne s’applique pas aux produits choqués, ou aux dommages résultant d’une utilisation impropre ou sans entretien, aux problèmes d’emballage ou de transport pendant l’ expédition du produit par son propriétaire. Afin d’offrir le meilleur service après-vente possible et d’améliorer constamment la satisfaction de ses clients, KRUPS pourra envoyer une enquête de satisfaction à tous ses clients dont le produit aura été réparé ou échangé par l’un des partenaires service agréés de KRUPS. La Garantie Internationale de KRUPS couvre exclusivement les produits achetés en France, et utilisés à des fins domestiques également dans un des pays listés dans Liste des Pays. En cas d’utilisation dans un pays différent de la France : a) La Garantie Internationale de KRUPS ne s’applique qu’en cas d’adéquation du produit avec les standards et normes locales, tels que le voltage, la fréquence électrique, le type de prise électrique, ou toute autre spécification locale. b) Le traitement de la Garantie Internationale peut prendre un temps supérieur aux conditions locales de réparation si la référence du produit n’est pas elle-même commercialisée par KRUPS dans le pays d’emploi. c) Au cas où le produit ne serait pas réparable dans le pays d’emploi, la Garantie Internationale de KRUPS est limitée au remplacement par un produit équivalent ou un produit alternatif de même valeur, si c’est possible. Droits des Consommateurs Cette Garantie Internationale de KRUPS n’affecte ni les droits légaux dont bénéficie tout consommateur localement, qui ne sauraient être exclus ou limités, ni les droits légaux envers un distributeur auprès de qui aurait été acheté un produit. Cette Garantie donne au consommateur des droits spécifiques, et le consommateur peut par ailleurs bénéficier des droits particuliers en fonction du Pays, de l’Etat ou de la Province. Le consommateur peut faire usage de ces droits de son seul fait. 57 KRUPS INTERNATIONAL LIMITED GUARANTEE : www.krups.com This product is repairable by KRUPS during and after the guarantee period. KRUPS endeavours to keep most of the stock of the spare parts available for the repair of your product for up to 5 to 7 years on average, from the last date of production. Accessories, consumables and end-user replaceable parts can be purchased, if locally available, as described on the KRUPS internet site www.krups.com The Guarantee This product is guaranteed by KRUPS (company address and details included in the country list of the KRUPS International Guarantee) against any manufacturing defect in materials or workmanship for a period of 2 years starting from the initial date of purchase. The international manufacturer’s guarantee by KRUPS is an extra benefit which does not affect consumer’s Statutory Rights. The international manufacturer’s guarantee covers all costs related to restoring the proven defective product so that it conforms to its original specifications, through the repair or replacement of any defective part and the necessary labour. At KRUPS’s choice, a replacement product may be provided instead of repairing a defective product. KRUPS’s sole obligation and your exclusive resolution under this guarantee are limited to such repair or replacement. Conditions & Exclusions The international KRUPS guarantee only applies within the guarantee period and for those countries listed in the country list attached and is valid only on presentation of a proof of purchase. The product can be taken directly in person to an authorised service centre or must be adequately packaged and returned, by recorded delivery (or equivalent method of postage), to a KRUPS authorised service centre. Full address details for each country’s authorised service centres are listed on KRUPS website (www.krups.com) or by calling the appropriate telephone number as set out in the country list to request the appropriate postal address. KRUPS shall not be obliged to repair or replace any product which is not accompanied by a valid proof of purchase. This guarantee will not cover any damage which occurs as a result of misuse, negligence, failure to follow KRUPS instructions, use on current or voltage other than as stamped on the product, or a modification or unauthorised repair of the product. It also does not cover normal wear and tear, maintenance or replacement of consumable parts, or the following: • using the wrong type of water or consumable • scaling (any de-scaling must be carried out according to the instructions 58 for use) • damages or poor results due to wrong voltage or frequency • professional or commercial use • ingress of water, dust or insects into the product • mechanical damages, overloading • accidents including fire, flood, thunderbolt, etc • damage to any glass or porcelain ware in the product This guarantee does not apply to any product that has been tampered with, or to damages incurred through improper use and care, faulty packaging by the owner or mishandling by any carrier. In order to offer the best possible after-sales service and constantly improve customer satisfaction, KRUPS may send a satisfaction survey to all customers who have had their product repaired or exchanged in a KRUPS authorised service centre. The international KRUPS guarantee applies only for products purchased in one of the countries listed, and used for domestic purposes only in one of the countries listed on the Country List. Where a product purchased in one listed country and then used in another listed country: a) The international KRUPS guarantee does not apply in case of non conformity of the purchased product with the local standards, such as voltage, frequency, power plugs, or other local technical specifications b) The repair process for products purchased outside the country of use may require a longer time if the product is not locally sold by KRUPS c) In cases where the product is not repairable in the new country, the international KRUPS guarantee is limited to a replacement by a similar product or an alternative product at similar cost, where possible. Consumer Statutory Rights This international KRUPS guarantee does not affect the statutory rights a consumer may have or those rights that cannot be excluded or limited, nor rights against the retailer from which the consumer purchased the product. This guarantee gives a consumer specific legal rights, and the consumer may also have other legal rights which vary from State to State or Country to Country. The consumer may assert any such rights at his sole discretion. *** Please keep this document for your reference should you wish to make a claim under the guarantee 59 60 61 / 62 / / / / / 63 64