1
1
ご使用方法/How to use
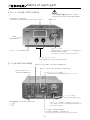
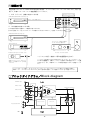
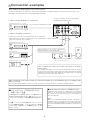
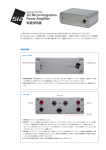
●リアパネルの各入力端子にお聴きになるソースの出力
●Connect the output cables from source equipment
to each input terminal on the rear panel.
●Insert the socket side of the supplied power cable
into the AC inlet ⑫ on the rear panel and then its
plug side into the wall socket. Push the “power”
switch ① to power on the unit.
●The pilot lamp ② blinks for about 50 seconds while
the vacuum tube is warming up. When the lamp
lights up continuously, the unit is ready to operate.
●Select the connected input signal using the “INPUT”
selector switch ③ on the front panel (“INPUT-1” is
selected when powered on).
●Plug in the earspeaker into one of the earspeaker
sockets ④ on the front panel, and turn the volume
knob ⑤ slowly clockwise to set optimal volume level.
●Turning independently the front part of the
double-structured knob adjusts the left channel level, and likewise the backside part of the knob adjusts the right channel level. The volume balance
between left and right channels can be adjusted in
this way.
●As other connection possibilities than described
above, a TV set or a portable apparatus equipped
with headphone jack can also be connected by
using a commercially available “stereo mini-plug →
RCA plug” conversion cable or connector.
コードを接続します。
●リアパネルのACインレット⑫に付属の電源コードを差し
込み、ACプラグをAC100Vのコンセントに差して「パ
ワースイッチ」①を押すと電源が入ります。
●真空管がウォームアップする間パイロットランプ②が約
20秒間前後点滅します。その後常時点灯しましたら動作
状態になります。
●フロントパネルの「INPUT」切換えスイッチ③で接続した
入力信号を切換えます。
(電源投入時は「INPUT-1」が選択されます)
●ご使用になるイヤースピーカーをフロントパネルの「イ
ヤースピーカーコンセント」④に差し込み、ボリュームツ
マミ⑤を徐々に右に回して最適な音量に調整してくださ
い。
●2重ツマミの手前を単独で回すと左チャンネルが、奥を
回すと右チャンネルが調整できます。
左右の音量のバランスはこれで調整します。
●上記以外の接続方法としては、市販の「ミニステレオプ
ラグ→RCAプラグ」の変換ケーブルや変換のコネクター
を使用すると、TVのヘッドフォン端子やミニステレオ
ジャックを装備しているポータブル機器と繋ぐことがで
きます。
2
使用上のご注意/Precautions for use
●There are high-voltage dangerous sections inside
the unit.
Do not remove the top cover or the bottom plate,
and avoid using the unit in humid or dusty places.
●Because of the vacuum tube used inside, this
driver unit generates heat. Do not cover the venting
holes on the top and bottom plates. When installing it in a rack etc., keep 5cm or more opening above the upper surface of the top cover. Also,
when a door is furnished in the front, keep it open
for better heat dissipation while using the unit.
●When the "POWER" switch on the front panel is
pushed on, red LED on the front panel blinks for
about 50 seconds (time needed for warming up
the vacuum tube heater), and then when the LED
lights up continuously, the unit is ready to operate.
Note that the LED starts to blink again and no
sound comes out for about 50 seconds if you
carelessly push off the "POWER" switch during
operation.
●本機の内部には高電圧の部分があり危険です。トップカ
バーや底板を外したり、水に濡れやすい場所やホコリの
多い場所での使用は避けてください。
●本機は真空管を使用しておりますので発熱します。通電
中は本体上下の通気孔を塞さがないでください。ラック
などに設置する場合、トップカバーの上面より5cm以上
あけて下さい。また、前面に扉がある場合、お使いに
なっている間は、扉は開けたままのほうが熱がこもり難
くなります。
●フロントパネルの「POWER」スイッチを投入すると約20
秒間前後(真空管のヒーターがウォームアップに要する
時間)フロントパネルの緑のLEDが点滅し、連続点灯に
変わると動作状態になります。ご使用中にうっかり
「POWER」スイッチをOFFにしてしまうと再度LEDが点滅
状態になり、再び20秒間位音が出ませんのでご注意くだ
さい。
-2-