1
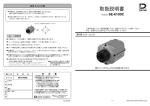
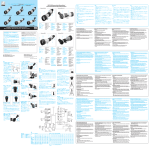
双眼鏡保証書
AR K
※機種名
Model Name
製造番号
Serial No.
購入日 年 月 日よ り 5年間
※保証期間
Purchase Date
Y M D
ご 住所
Address
※お客様
User Name
アーク シリーズ
The warranty is void outside Japan.
ご 芳名
Name
店名・ 住所
※販売店名
Dealer Name
55キ‐3‐(9000)‐1S‐45-(ミ)(水)
本保証書は本書記載の内容で 無料修理を
行う こ と を 約束する も ので す。
1.取扱説明書に お ける 正常な 使用状態で 、
お買い上げの日から 左記の期間中に故障
し た場合は購入店に修理を 依頼し て く だ
さ い。無料修理と な り ま す。
2.本書の※印横に記入のな い場合は無効と
な り ま す。
3.本書は日本国内において のみ有効で す。
4.有料修理の場合も あ り ま すので 、無料修
理規定・ ア フ タ ーサービ ス の項目も お読
みく ださ い。
5.本書に ご 記入の個人情報は、保証期間内
のサービ ス 活動のために利用さ せて 頂く
場合がご ざ いま すので 、ご 了承く ださ い。
Vixen limited warranty shall guarantee
free repair service in accordance with
terms and conditions described herein.
1.The free repair service shall be effective for a period of five year from
date of original purchase from the dealer stated on the left on the conditions that the product should be treated correctly according to the operating instructions.
2.The limited warranty shall be void and
of no force of effect in the event that
a model name, purchase date, user name or dealer name is blank.
3.The limited warranty shall be effective
in Japan only.
4.Depending on the conditions for repair
service, the repair cost may be charged. Go through the section of "REPAIR SERVICE".
5.The provided personal information may
be applied to service to the customers
during a warranty period.
ARK Series
ARK
BR12×80WP
BR16×80WP
BR20×80WP
BR30×80WP
取扱説明書
INSTRUCTION MANUAL
PART NAMES
各部のなまえ
使い方①
1. 対物・接眼レンズキャップをとります。
メガネをかけたままでのぞくときは、目当てを
次のようにしてください。メガネをかけたまま
のぞいても、十分な視野が得られます。
①…繰り出し式目当て
Twist-up Rubber Eyecup
⑥
②…視度調整リング
Diopter Ring
①
②
③
③…視度目盛り(裏側)
Diopter Adjustment Scale(back)
⑦
⑧
④…ボディ
Body
繰り出さない
For eyeglass wearers, do not
pull out the eyecups.
図1 Diagram 1
繰り出し式目当て
メガネをかけたままでのぞくときは、目当てを
繰り出さずにのぞいてください。(図1)
⑤…繰り出し式対物フード
Extendable Lens Shade
⑥…眼幅
Interpupillary Distance
⑦…ストラップ取付部
Strap Hook
⑨
⑩
⑧…ピント合わせリング
Focusing Wheel
⑨…クランプ
Clamp
⑪
④
⑩…ビノホルダー(裏側)
Tripod Adapter(back)
⑤
⑪…中心軸
Center Axis
HOW TO USE②
使い方②
Diagram 3
図3 Diagram 4
図4 1. 視度調整を行います。左側の接眼レンズを
左目でのぞきながら、「ピント合わせリング」を
回します。目標物に正しくピントが合ったら止
めます。できるだけ遠くのものを見て行ってく
ださい。(図3)
1. For diopter adjustment, try to find an
object in the distance. While looking
through the left eyepiece with the left
eye, focus on the object by turning
the focusing wheel. (Ref. Diagram 3)
2. 次に、右目で右側の接眼レンズをのぞきな
がら、「視度調整リング」を回します。同じ目
標物に正しくピントが合ったらとめます。(図
4)
※ このとき「視度調整リング」の視度目盛りを覚
えておきますと、次回に使用するときの視度
調整が簡単です。「視度調整リング」の目盛
りを合わせるだけで済みます。
2. Then, while looking through the right
eyepiece with the right eye, focus on the
same object by turning the diopter ring.
It is advisable to remember the scale of
the diopter ring so that you can set the
diopter ring immediately without going
through the above procedure every time
you use the binoculars. (Ref. Diagram 4)
3. 目標物を変えて見るときは、「ピント合わせリ
ング」のみを回して、ピントを合わせます。
(図5)
3. Once both eyes are focused on the
object, you can focus on different
objects only with the focusing wheel.
(Ref. Diagram 5)
4. ケースに収納の際は、繰り出し式目当てを元
に戻してください。
視度調整とは
左目と右目とでは、視力が違う場合がありま
す。その場合、「左目はピントが合うが右目で
はピントが合わない」または、その逆のことが
起こります。こうしたことを防ぎ、左目と右目の
視力のバランスをとるのが「視度調整」です。
図5 4. When containing the binoculars in the
carrying case, put the eyecups back to
the retracted position.
Diopter Adjustment
This is for those who have different
eyesight in right and left eyes. The
diopter ring compensates for the
difference in the right and left eyesight.
Diagram 5
SPECIFICATIONS
主な仕様
品 名
Model
BR12x80WP
BR16x80WP
BR20x80WP
BR30x80WP
品 名
Model
BR12x80WP
BR16x80WP
BR20x80WP
BR30x80WP
倍 率
対物レンズ
有効径
プリズム
材質
コーティング
Prism
Coatings
Magnification Objective
Aperture
実視界
見掛視界 1000m先
視界
Real Field Apparent Field
Field
of View
of View
at 1000m
12x
16x
20x
30x
80mm
80mm
80mm
80mm
BaK4
BaK4
BaK4
BaK4
MC
MC
MC
MC
4.2°
4.3°
3.5°
2.3°
ひとみ径
明るさ
アイレリーフ
至近距離
サイズ
高さ×幅×厚み
重さ
三脚取付
Size
H×W×D
Weight
Tripod Adapter
Socket
31.6×22×9.9cm
31.6×22×9.9cm
31.6×22×9.9cm
32.6×22×9.9cm
2390g
2390g
2390g
2445g
○
○
○
○
Exit Pupil Brightness Eye Relief Near Focus
6.7mm
5mm
4mm
2.7mm
44.9
25
16
7.3
18mm
17mm
16mm
18mm
仕様および外観は改善のため、予告なく変更する場合があります。
Speci f i cations are su bject to change w ithout prior notice.
〜14m
〜13m
〜14m
〜18m
50.4°
68.8°
70°
69°
MC :マルチコート。 Multi-Coated
73m
75m
61m
40m
前後する。 Move.
クランプ
Tripod Adapter
カメラ三脚
Tripod
図6 眼幅調整とは
眼幅調整とは、接眼部の間隔を自分の目の
間隔に合わせることです。眼幅が合っていな
いと、使っているうちに目が疲れる場合があ
ります。
Interpupillary Distance Adjustment
This is to adjust the distance between
the two eyepieces to fit your eyes.
Improper interpupillary distance may
result in eyestrain.
使い方③
三脚取付について
付属のビノホルダーは、カメラ三脚に直接取り付
けることができます。(図6)ビノホルダーにあるク
ランプをゆるめると双眼鏡本体が前後に動きま
す。バランスのよいところで固定してご使用くだ
さい。
Diagram 6
使い方④
引き出す。 Pull out.
図7 Strap Ring
図8 繰り出し式対物フードについて
繰り出し式対物フードを前に引き出すことで、逆
光防止に役立ちます。逆光時などにご使用くだ
さい。(図7)ケースに収納の際は、繰り出し式対
物フードを元に戻してください。
Diagram 7
開き止めリング
Diagram 8
Twist-up Rubber Eyecups
For eyeglass wearers, the twist-up
rubber eyecups should not be pulled
out. (Ref. Diagram 1)
2. While looking through the binoculars
with both eyes, adjust the interpupillary
distance by folding or unfolding the
body so that the field of view can be
seen as one circle. When doing this
adjustment, try to find an object in
the distance. (Ref. Diagram 2)
Clamp
ビノホルダー
1. Remove the objective caps and
eyepiece caps from the binoculars.
Even for those who wear eyeglasses,
it is possible to have a good field of
view. When using the binoculars
with eyeglasses worn, note the
following eyecup position.
2. 眼幅調整を行うため、両目でのぞきながら、
ボディを静かに開閉します。左右の視野が
重なって一つの円になったら止めます。眼幅
調整は、できるだけ遠くのものを見て行って
ください。(図2)
Diagram 2
図2 HOW TO USE①
HOW TO USE③
Using a photo tripod
The ARK binoculars can be mounted on
a photo tripod with the built-in tripod
adapter. If you loosen the clamp of the
tripod adapter, the tripod adapter will
move on the center axis. After
balancing the binoculars, fasten the
clamp. (Ref. Diagram 6)
HOW TO USE④
Extending the lens shade
The lens shade is extendable. The
extended lens shade helps prevent stray
light from falling on the objective and
improve contrast.When containing the
binoculars in the carrying case, put the
lens shade back to the retracted position.
ストラップ(つりヒモ)について
ATTACHING THE STRAPS
図のように付属のストラップを本体取付部に通し
て取り付けてください。(図8)
Attach the supplied strap to the hook as
illustrated. (Ref. Diagram 8)