1
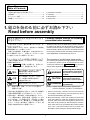
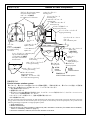
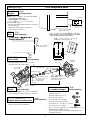
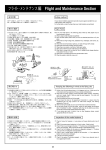
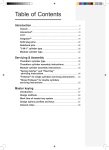
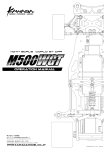
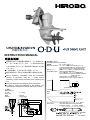
同軸反転方式
INSTRUCTION MANUAL
組立前に必ずこの説明書を最後まで、よくお読みにな
り、正しくお使い下さい。特に、「1.組立を始める前
に必ずお読み下さい」は、組立前及び走航前に必ず読
んで下さい。
この説明書は、大切にお手元に保管して下さい。
製品改良のため、予告なく仕様を変更する場合があります。
Before assembly, completely read this instruction
manual. In particular, read the "1. Read before
assembly" section before assembly and operating the
unit.
Keep this instruction manual in a handy, safe place.
In order to make improvements to this product, the
specifications is subject to change without prior notice.
主要諸元
Main features
ギヤ比
Gear ratio
重量
Weight
適合部品(別売)
Compatible parts (Sold separately)
/ ボート用プロポセット
無線機
Radio control device フェールセーフ機能の付いた2ch以上2サーボ
Programmable transmitter set for model boat with 2 or
more channels and 2 servos, with fail safe function
適合エンジン
/ 推奨エンジン:小松ゼノア G260PUM 水冷式
Compatible engine 2kw/10,000rpm程度のもの
クランク軸 ø12 テーパー1/5程度のもの
Recommended engine: Komatsu ZENOAH G260PUM
Water-cooled type
Approximately 2 kw/10,000 rpm
Crank shaft: ø12 Taper: approximately 1/5
M6X1.0
ø12
エンジンクランク軸
Engine crank shaft
テーパー1/5
Taper 1/5
船体
Hull
/ 1 : 0.786
/ 約750g
About 750g
23
77
45.5
182.5
* The prices in parentheses are the prices excluding consumption tax.
ø62
34
97
160
ドライブシャフト / 1901-002 ODUドライブシャフトASSY
Drive shaft
1901-002 ODU drive shaft assembly
¥12,600 (12,000)
¥税込価格(税抜価格)
35
ø56.5
35
153
42
48.5
トランサムボード
Transom board
C
MADE IN JAPAN
2005
No.30091
目 次
Table of Contents
1. 組立を始める前に必ずお読み下さい ........................ 1
2. 組立編 ............................................................................ 9
3. メンテナンス編 .......................................................... 14
4. 補修パーツについて .................................................. 16
1. Read before assembly ..................................................... 1
2. Assembly ........................................................................ 9
3. Maintenance ................................................................. 14
4. Repair parts ................................................................... 16
1. 組立を始める前に必ずお読み下さい
Read before assembly
組立を始める前に安全のために必ず For safety reasons, observe the following
precautions before assembly.
お守り下さい。
このたびは、ヒロボー製品をお買上げいただき、あ
りがとうございます。
安全にお使いいただくために、走航前にこの取扱説
明書を最後までよくお読みください。
走航上の注意事項、本機の能力、走航方法などを十
分にご理解のうえ正しく、安全にルールやマナーを守
って走航くださるようお願いいたします。
Thank you very much for purchasing a Hirobo product.
In order to be able to use this product safely, please
read this manual before running the boat. Please run
the boat safely observing all rules and manners after
having fully understood the operating precautions, the
unit's capabilities, and the best way to run it.
『シンボルとシグナル用語』の意味について
The meaning of symbols and signal words
注意文の頭部に表示の「シンボルとシグナル用語」
の意味を説明します。
なお、 注意 に記載した事項でも、状況によっ
ては重大な結果に結びつく可能性があります。
The meaning of symbols and signal words at the head
of cautionary notes are as explained below. Even
comments marked with
CAUTION may result in
serious harm depending on the circumstances.
警告
誤った取扱をしたときに、死亡や
重傷等の重大な結果に結び付く
可能性が大きいもの。
WARNING
Mishandling due to failure
to follow these instructions
may result in severe injury
or death.
注意
誤った取扱をしたときに、状況に
よっては重大な結果に結び付く
可能性があるもの。
CAUTION
Mishandling due to failure to
follow these instructions
may result in serious harm.
禁止
絶対に行わないでください。
FORBIDDEN
Do not attempt under any
circumstances.
(NOTE) : Implies important information regarding this
product’s assembly, operation, or maintenance.
(注):製品の組立、操作、メンテナンスに関する
重要なご注意。
1. Before assembly, read the instruction manual
thoroughly familiarizing yourself with the unit’s
structure and assembly procedures.
2. Before assembly, check the quantity of parts and
their descriptions. After the packaging has been
opened, parts cannot be exchanged or returned. In
the event of any missing or defective parts, have the
store from where you purchased the product stamp
your user’s card and send it with the name and
description of the part(s) to Hirobo’s Sales Group.
1. 組立る前に説明書を良く読んで、おおよその構造及
び組立手順を理解してから組立に入ってください。
2. 組立る前に、部品の数・内容をお確かめください。
パック開封の後は、部品の交換、返品等については
応じかねます。万一部品の不足・不良があった場合
には、お手数ですが、愛用者カードに販売店の印を
もらい、ヒロボー株式会社・営業グループまで、部
品名と内容を明記の上ご連絡ください。
1
無線操縦エンジン模型の安全について For the safe operation of radio controlled engines
警告
WARNING
エンジン始動の前に
Before starting the engine
1. 可能な限り、走航場を清掃してください。
◆ 小石、ガラス、くぎ、針金、ひも、浮遊物等の異
物を走航場から取り除いてください。
2. 周囲の状況を考慮してください。
◆ 強風、雨のとき、及び夜間は走航させないでくだ
さい。
◆ 人が多い場所では走航させないでください。
◆ 家、学校、病院などの近くでは走航させないでく
ださい。
◆ 同じ周波数の無線操縦模型が近くにいる時は走航
させないでください。
◆ 手漕ぎボート、泳いでいる人、釣りなどをしてい
る人がいる場所では走航させないでください。
3. 次のような人、または状況下では走航させないでく
ださい。
◆ 子供。
◆ 生理中、妊娠中の人。
◆ 疲れている時、病気の時、酔っている時。
◆ 薬物の影響、その他の理由で正常な操作ができな
い人。
◆ 初心者の方や、他人の機材を借りる場合、あらか
じめ模型を良く知っている人から安全指導を受け
てから始めてください。
4. 無理して使用しないでください。
◆ 機能に適さない改造や加工をしないでください。
◆ 使用限界が示されている物は、必ずその範囲で使
用してください。
5. きちんとした服装ではじめてください。
◆ 長そで、長ズボンを着用してください。
◆ 宝石や、物に引っ掛かりやすいものは、身につけ
ないでください。
◆ 長い髪は、肩までの長さに結わえてください。
◆ 足下保護のため、必ず靴を着用してください。
◆ 高温部に触る場合等は、必要に応じて手袋をして
ください。
6. ドライバーやレンチ等の工具は取り外してください。
◆ 始動する前に組立、取付、整備等に用いた工具類
が取り外してあることを確認してください。
7. 各部の点検をしてください。
◆ 始動前に、各部品に損傷がないか十分点検し、正
常に作動するか、また所定の機能を発揮するか確
認してください。
◆ 可動部分の位置調整、及び各部のボルト、ナット
の締付状態、部品の損傷、取付状態、その他走航
に影響を及ぼす全ての箇所に異常がないか確認し
てください。
◆ 無線機器の電源電圧(電池の量)は十分か確認して
ください。
◆ 損傷した部品、その他部品交換や修理は、説明書
の指示に従ってください。説明書に指示されてい
ない場合は、お買上げ販売店、またはヒロボー
(株)営業グループメンテナンス係で修理を行なっ
てください。
1. Clear as much debris from the water surface as possible.
◆ Clear away pebbles, glass, nails, wire, rope, floating
objects, or other trash from the water surface.
2. Consider the circumstances of the surrounding area.
◆ Do not run the boat in strong winds, rain, or at night.
◆ Do not run the boat in a crowded area.
◆ Do not run the boat near homes, schools, or hospitals.
◆ Do not run the boat near another radio controlled unit
that uses the same frequency.
◆ Do not run the boat near boaters, swimmers, or
fishermen.
3. This unit must not be operated by:
◆ Children.
◆ Menstruating or pregnant women.
◆ Tired, sick, or inebriated individuals.
◆ Individuals under the influence of drugs or for some
other reason incapable of operating the unit normally.
◆ Beginners or individuals operating a borrowed unit
should proceed only after having received safety
instructions from someone familiar with the model.
4. Do not use the unit improperly.
◆ Do not perform any remodeling or configuration
unsuitable for the unit’s functions.
◆ Make sure to use within the range of the limitations
indicated for the unit.
5. Wear appropriate clothing.
◆ Wear a long-sleeve top and trousers.
◆ Do not wear jewelry or objects that may get easily
entangled.
◆ Long hair should be bound to shoulder length.
◆ Wear shoes for solid footing.
◆ Wear gloves should it become necessary to touch hot
components.
6. Put away screwdrivers, wrenches, or other tools.
◆ Before starting the engine, check that any tools used in
the assembly, installation, or maintenance of the unit
have been put away.
7. Inspect each part.
◆ Before starting the engine, check for any damaged
parts and make sure that the unit operates normally
with all its functions in order.
◆ Adjust the positioning of moveable parts and check
that all nuts and bolts are fastened, that there are no
damaged or improperly installed parts, and that there
are no abnormalities that would adversely affect the
flight of the unit.
◆ Check that the power supply voltage (charge of the
batteries) in the remote control is sufficient.
◆ The exchange or repair of damaged parts should be
performed according to the instruction manual. In the
event that the desired operation is not indicated in the
manual, ask for repair service at the store from where
you purchased the product or at Hirobo’s Sales Group
Maintenance Section.
2
警告
WARNING
◆ 始動前に、必ず各部のネジがゆるんでいないか、
指定部への給油(オイル/グリス)、送・受信機用バ
ッテリーが充分に充電されているかを点検してく
ださい。
◆ プロペラの近くに人や物が絶対に近づかないよう
にしてください。
◆ スピンナーやプロペラ脱着時にウォーターインレ
ットで指を怪我しないようにカットした燃料チュ
ーブ等をかぶせて作業してください。
◆ Before starting the engine, make sure that there are no
loose screws, that all specified locations are properly
lubricated with grease or oil, and that the transmitter
and receiver batteries are properly charged.
◆ Make sure that you keep people and objects away from
the propeller.
◆ When installing/uninstalling the spinner or propeller,
affix a cut fuel tube so that your fingers are not injured
by the water inlet.
ウォーターインレット
Water inlet
第1プロペラは左ネジ注意
Caution: Left-hand screw is
used for first propeller.
先端が鋭利
Edge is sharp
カットした燃料チューブ等
Cut fuel tube, etc
スピンナー
Spinnner
2X28平行ピン スピンナー脱着時に使用します。
2x28 parallel pin Use this pin when mounting/dismounting
the spinner.
第2プロペラ
Second propeller
8. 純正部品を使用してください。
◆ 本説明書、及びヒロボーカタログに記載されてい
る、純正部品以外のものを使用しないでくださ
い。事故やけがの原因となる恐れがあります。
9. エンジンを回さないで、各部の操作方法を練習して
ください。
◆ エンジンを始動させる前に、各部の操作方法を練
習してください。
◆ 操作を充分に修得するまではエンジンを始動させ
ないでください。
◆ 機械の動きに異常がみられる場合もエンジンを始
動させないでください。
8. Use genuine parts.
◆ To reduce the risk of accidents and injuries, do not use
parts other than those shown in this instruction manual
or in Hirobo catalogs.
9. With the engine off, practice how to operate each part.
◆ Before starting the engine, practice how to operate
each part.
◆ Do not start the engine before having acquired
sufficient handling skill.
◆ D o n o t s t a r t t h e e n g i n e i n t h e e v e n t t h a t a n y
abnormalities are noticed in the movement of the
mechanisms.
走航中は
While running the boat
1. 無理な姿勢で操縦しないでください。
◆ 寝転んだり、座り込んだりした姿勢で操縦しない
でください。
◆ 傾斜地は、滑りやすいので足下に十分注意してく
ださい。
2. 次の場合は、エンジンを停止させてください。
◆ 船体の調整および、送信機の調整を行なうとき。
◆ 付属品および部品を交換するとき。
◆ 船体の調子が悪かったり、異常音や異常振動を発
生したとき。
◆ その他危険が予想されるとき。
3. エンジンを始動するときは、次のことに注意してく
ださい。
◆ 周囲に人、動物、障害物がないか十分に確認して
から始動してください。
◆ しっかりと船体を固定または保持してください。
◆ 送信機のスロットルのスティック位置及び、エン
ジンのキャブレター開度が、最スローの位置(アイ
ドリング状態)にあることを確認してください。
4. 怪我の恐れがありますので回転部分に手や物を絶対
に入れないでください。
5. 走航はゆとりとマナーを守ってお楽しみください。
◆ 一度に長時間の操縦や、連続して長時間の操縦
は、疲労により判断力を鈍らせ、思わぬ事故の原
因となりますので、適当に休憩を取るようにして
ください。
1. Do not operate in an awkward posture.
◆ Do not operate seated or lying down.
◆ Because slopes are slippery, exercise caution so as to
not loose your footing.
2. Stop the engine in the following situations:
◆ When adjusting the boat or the transmitter.
◆ When replacing accessories or parts.
◆ When the boat is out of alignment or when abnormal
noises or vibrations occur.
◆ Whenever some kind of danger is anticipated.
3. Exercise the following precautions when starting the
engine.
◆ C h e c k t h a t t h e r e a r e n o p e o p l e , a n i m a l s , o r
obstructions in the surrounding area.
◆ Hold the boat securely.
◆ Check that the position of the transmitter’s throttle
stick and the engine carburetor are at their lowest
positions (idling).
4. To reduce the risk of injury, never insert hands or objects
in rotating parts.
5. Enjoy running the boat while observing safety rules and
manners.
◆ Fatigue brought upon by continuous operation for long
periods at a time may result in impaired judgment or
accidents. Be sure to take sufficient rests.
3
警告
WARNING
◆ 操縦しているときは、あまり船体に近づかないで
ください。
◆ 本人の技量にあった走航をしてください。無理な
走航は思わぬ事故や怪我につながります。
6. エンジン始動後はもとより停止直後は、マフラーやエ
ンジン本体は高温になっております。火傷防止のため
マフラーやエンジンに触れないようにしてください。
◆ When operating, do not get too close to the boat.
◆ Operate the boat within the limits of your ability.
Operating the boat improperly increases the risk of
accidents or injury.
6. The engine and muffler become very hot after starting the
engine and remain hot immediately after shutdown. To
prevent burns, do not touch the engine or muffler.
走航後は
After running
1. 注意深く点検をしてください。
◆ すぐに各部の点検を行ない、ネジのゆるみや脱落
があれば必ず補修してください。
◆ 油、よごれ、水滴等はすぐに拭き取ってくださ
い。
◆ グリスアップや部品の交換は、説明書に従ってく
ださい。
◆ 長時間保管する場合には燃料タンク、キャブレタ
ー内の燃料をすべて抜き取ってください。
2. きちんと保管してください。
◆ 乾燥した場所で、幼児の手の届かないところに保
管してください。
3. 修理は、お買上げの販売店、またはヒロボー(株)営業
グループメンテナンス係にお申し付けください。
◆ 修理の知識のない方や専用工具を持っていない方
が修理をすると、十分な性能を発揮しないだけで
なく、事故や怪我の原因となります。
◆ 修理、調整をするときは、エンジンを停止して行
なってください。
◆ 損傷、故障箇所がある場合には、修理してから保
管してください。この場合、部品は、指定の純正
部品を必ず使用してください。
◆ 本体及び周辺機器の加工や改造は、本来の性能を
発揮できなくなる場合がありますので行なわない
でください。
◆ 保管時や輸送時は、燃料の損失、破損や怪我を防
ぐため、船体をしっかりと固定してください。
4. シーズン後は分解し、グリスアップをおすすめしま
す。
ヒロボー(株)でも有償でできます。営業グループメン
テナンス係にお申し付けください。
1. Conduct a thorough inspection.
◆ Immediately inspect each part and retighten or replace
any screws that may have become loose or fallen out.
◆ Wipe away any oil, dirt, or water.
◆ Grease or replace parts according to the instruction
manual.
◆ If storing for an extended period of time, completely
remove the fuel from the tank and carburetor.
2. Store the unit properly.
◆ Store in a dry place out of the reach of children.
3. Inquire about repairs at the store from where you
purchased the product or at Hirobo’s Sales Group
Maintenance Section.
◆ Individuals lacking proper knowledge or tools
necessary for repairs may not only impair the
performance of the unit but may also increase the risk
of accidents or injury.
◆ Turn off the engine before performing any repairs or
adjustments.
◆ Repair all damaged parts before storage. Make sure to
use only designated, genuine parts.
◆ Do not perform any remodeling or reconfiguration of
the boat or peripheral equipment. Doing so may impair
the boat performance.
◆ When storing or transporting the unit, secure it firmly
so as to prevent fuel loss, damage, or injury.
4. We recommend dismantling and greasing the boat after a
boating season. We, Hirobo Limited, offer this service for
a fee. Please contact our Sales Group Maintenance
Section.
Noise
When running the boat, be sure to have the muffler (silencer)
attached in order to avoid disturbing people in the
surrounding area.
騒音について
走航に際し、周囲に迷惑をかけないように十分に消音
効果のあるマフラー(サイレンサー)を必ず装着してくだ
さい。
4
For safe handling of the radio
controlled boat
無線操縦ボートを安全に
お取り扱いいただくために
警告
WARNING
走航前の始業点検
Inspection before running the boat
1. 初心者の方は、指導できる方から安全及び技術指導
を受けてください。独学は非常に危険です。
2. 各部のナットやボルトにゆるみ、脱落がないか確認
してください。
3. リンケージのロッドやアジャスターにガタやゆるみ
がないか確認してください。
4. エンジンマウントのボルトにゆるみがないか確認し
てください。
5. 送信機、受信機のバッテリー容量は十分か確認して
ください。
6. 燃料及び配管の状態を確認してください。燃料チュ
ーブの折れ曲がりやフィルターの目づまり、又、特
に古くなった燃料等は始動性が悪いばかりではな
く、走航中のエンジン停止から事故につながる場合
があります。
7. プラグの状態を確認してください。特に古くなった
プラグは始動性が悪いばかりではなく、走航中のエ
ンジン停止から事故につながる場合があります。
8. 電波の届く距離を確認してください。
9. 全てのサーボがスムーズに動作するか確認してくだ
さい。誤動作やムリな動作は操縦不能の原因とな
り、たいへん危険です。
10. 機体各部の潤滑油の給油を確認してください。
1. Beginners should have safety and technical guidance
from an experienced individual. Teaching yourself is
extremely dangerous.
2. Check that there are no missing or loose nuts or bolts.
3. Check that there is no rattle or loosening in the linkage
rods or adjusters.
4. Check that there are no loose bolts in the engine mount.
5. Check that the batteries for the transmitter, and receiver
are sufficiently charged.
6. Check the condition of the fuel and fuel line. Bent tubes,
clogged filters, and especially old fuel may not only
render the engine difficult to start but may also cause it
to stall while moving resulting in accidents.
7. Check the condition of the plugs. Old plugs may not
only render the engine difficult to start but may also
cause it to stall while moving resulting in accidents.
8. Check the reach of the radio waves.
9. Check that the servos operate smoothly. Their
malfunction may cause a loss of control and increase the
risk of danger.
10. Check that each part of the unit’s body is sufficiently
lubricated.
走航中の安全確認
Safety check while running the boat
1. エンジンを始動するときは周辺に当たるものや、巻
き込まれそうなものがないか確認してください。
2. プロペラの近くに人や物が絶対に近づかないように
してください。
3. 周囲に同じ周波数の使用者がいないことを確認し
て、送信機→受信機の順番にスイッチを入れ、送信
機のスロットルスティック及びトリムをエンシン始
動の位置にセットしてください。
4. エンジン始動には、必ず船体をしっかりと手で押さ
えてください。
5. エンジン始動後は、エンジン及びマフラー部が高温
になりますので、火傷に注意してください。
6. 走航をはじめるときは周囲の状況を十分把握し、走
航場内に他の人や危険物、障害物がないか確認して
ください。
7. 走航中に異常な振動や、異常な音が発生した場合、
すぐに回収し、エンジンを停止させ原因を確認して
ください。
8. 無理な走航や無謀な操縦は、事故や怪我の原因とな
りますので、ルールやマナーを守り、安全に責任を
もってお楽しみください。
9. 浮遊物や木片、草などがからんだ場合はすぐに回収
して取除いてください。
1. Check that there are no objects in the surrounding area
that may get entangled or struck by the unit.
2. Make sure that you keep people and objects away from
the propeller.
3. Check that there are no other operators in the surrounding
area using the same frequency and, after turning on first
the transmitter and then the receiver consecutively, set the
transmitter’s throttle stick and trim to their engine start-up
positions.
4. When starting the engine, make sure to hold the hull
firmly.
5. Because the engine and muffler become hot immediately
after the engine is started, exercise caution so as to
prevent burns.
6. When starting the boat, be aware of the conditions of the
surrounding area and check that there are no other people
or dangerous obstacles in the area.
7. In the event that abnormal noises or vibrations should
occur while running the boat, retrieve the boat
immediately, stop the engine, and check the cause of the
problem.
8. Because operating the boat improperly or recklessly may
cause accidents or injury, observe all safety rules and
manners and enjoy operating the unit safely and
responsibly.
9. If any floating objects, wood pieces, or weeds get caught
in the unit, retrieve the boat and remove any foreign
matter.
5
警告
WARNING
走航後の安全点検
Safety inspection after running the boat
1. 走航が終わったら、すぐに各部の点検を行ってくだ
さい。ネジのゆるみや脱落があれば、必ず補修して
ください。各部に傷や破損があれば、交換してくだ
さい。
2. 油汚れ等をきれいに拭き取ってください。
3. グリスアップや部品の交換は、説明書に従ってくだ
さい。
4. 長時間(期間)走航させない場合は、燃料タンク及び
キャブレター内の燃料を抜き取ってください。
5. シーズン後は分解し、グリスアップをおすすめしま
す。
ヒロボー(株)でも有償でできます。営業グループメ
ンテナンス係にお申し付けください。
1. Immediately inspect each part after every operation. Be
sure to replace or retighten missing or loose screws and
replace any damaged parts.
2. Wipe away any oil or dirt.
3. Grease or replace parts according to the instruction
manual.
4. If the boat will not be run for a long period of time, empty
the fuel from the tank and carburetor.
5. We recommend dismantling and greasing the boat after a
boating season. We, Hirobo Limited, offer this service for
a fee. Please contact our Sales Group Maintenance
Section.
保管場所
Storage area
1. 直射日光のあたる場所、高温になる場所(車内等)に
放置しないでください。
必ず風通しのよい日陰で保管してください。
2. タンクに燃料を補給したまま船体を保管しないでく
ださい。
1. Do not store in an area exposed to direct sunlight or where
temperatures may rise (i.e. in a car). Instead, store it in a
shaded, well ventilated area.
2. Do not store the boat with fuel in its tank.
本製品の改造、又、弊社以外の部品交換について、
十分なテストを行っていませんので、事故発生の可
能性もあります。その場合、一切の責任を負いかね
ますのでご了承ください。
Due to a lack of proper testing, please
acknowledge that Hirobo will not take
responsibility for accidents resulting from
remodeling the unit or from the replacement of
parts with those not manufactured by Hirobo.
注意
CAUTION
1. エンジン始動後は、必ず送信機のスロットルトリム
最スローの位置でエンジン停止が行なえることを確
認してください。
2. エンジンのスロー絞りの調整をアイドリング中に行
なう場合は、必ず船体をしっかりと押さえて、行な
ってください。また、排気ガスには十分注意してく
ださい。
1. After starting the engine, check if the engine stalls when
the transmitter’s throttle trim is at its lowest position.
2. When adjusting the engine’s low throttle speed while
idling, be sure to hold down the hull firmly. Be careful of
exhaust fumes.
6
各部の名称
Names of each component
ピボットボルトø5X12.5XM3
Pivot bolt ø5X12.5XM3
ラダーサーボ接続用
For rudder servo connection
ステアリングレバー
Steering lever
トランサムプレート
Transom plate
ステアリングフォーク
Steering fork
プロテクションカップ
Protection cup
ジョイント防水ブーツ
Waterproof joint boot
アッパーギヤーハウジング
Upper gear housing
アンチベンチレーション
プレート
Anti ventilation plate
ジョイント
Joint
ニップル
Nipple
エンジン水冷接続用
For engine cooling
connection
ハイドロシリンダー
Hydro cylinder
ウォーターインレット
Water inlet
(先端が鋭利)
(Edge is sharp)
ハイドロロッド
Hydro rod
キャップスクリューM2.6X6 (SUS)
Cap screw M2.6X6 (SUS)
ハイドロロッド伸縮用
For hydro rod extension
ジョイントハウジング
and retraction
Joint housing
スピンナー
Spinner
ロアーギヤーハウジング
Lower gear housing
第1プロペラ
First propeller
右回転
Rotates
clockwise
ロアーギヤーハウジング
Lower gear housing
ボタンボルトM3X4
Button bolt M3X4
水抜き用、グリスアップ用
For water drain and greasing
2X28平行ピン
2X28 parallel pin
第2プロペラ
Second propeller
左回転
Rotates
counterclockwise
同軸反転方式
Coaxial counter rotation system
同軸反転方式
Coaxial counter rotation system
第1プロペラ、第2プロペラの2個のプロペラを同軸に配置し、回転を逆転させ、第1プロペラで発生した回転流
のエネルギーを第2プロペラで回収することで、シングルプロペラに比べ
1. 高い推進力が得られること
2. 燃費が向上すること
3. 各プロペラにかかる推進力が半減するため、キャビテーションが減少すること(キャビテーションについ
ては)P.9 2. 組立編を参照してください。
4. キャビテーションの減少により、船体の振動が減少すること
などの特徴があります。
The first propeller and second propeller are both mounted on the same shaft, and rotated in opposite directions. Since the
energy of the rotational current created by the first propeller is absorbed by the second propeller, the system has the
following advantages compared to a single propeller system.
1. High driving force
2. Better fuel efficiency
3. Since the force on each propeller is reduced by half, cavitation is reduced. (Fro details about cavitation,
refer to “2. Assembly” section on page 9.)
4. Since the cavitation is reduced, there is less vibration of the boat.
7
ODU適合部品
エンジン
Engine
ODU compatible parts
(別売)
(Sold separately)
推奨エンジン:小松ゼノア G260PUM 水冷式
・2kw/10,000rpm程度のもの
※実用回転数:0∼10,000rpm
・クランク軸 ø12 テーパー1/5のもの
Recommended engine:
Komatsu ZENOAH G260PUM Water-cooled type
・2 kw/10,000 rpm
※Rotation speed range: 0-10,000 rpm
・Crank shaft: ø12 Taper: 1/5
M6X1.0
ø12
テーパー1/5
Taper 1/5
エンジンクランク軸
Engine crank shaft
船体 (別売)
Hull (Sold separately)
トランサムボードにODUが取付けられるもの。
When mounting to the transom board, use an ODU
transom plate of the size shown below.
参考:トランサムプレートサイズ
Reference: transom plate size
船体
Hull
ドライブシャフト
Drive shaft
56
68
77
(別売)
(Sold separately)
ø3.1
ODUジョイント
ODU joint
・1901-002 ODUドライブシャフトASSY
・1901-002 ODU drive shaft ASSY
42
48.5
42
トランサムボード
Transom board
35
(90.5
)
58
ODU側
ODU side
ユニバーサルシャフト
Universal shaft
エンジン側
Engine side
M6X10CS (SUS)
FW6X13X1T (SUS)
GBクラッチシャフト
GB clutch shaft
テーパーがあります
Tapered.
エンジン取付位置により
長さを調整して下さい。
Adjust the length according
to the engine location.
エンジンクランク軸
Engine crank shaft
ラダーのリンケージ用 (別売)
(Sold separately)
For rudder linkage
サーボ (別売)
(Sold separately)
Servo
・2505-001 M2ナット
・2505-001 M2 nut
・各社13kg/cm程度のハイトルクタイプのもの
・Any manufacturer’s high torque type: 13 kg/cm
エンジン水冷用チューブ
(別売)
Engine water-cooling tube (Sold separately)
・0404-764 ガソリンチューブ ø3X6X2000
・0404-764 Petrol tube ø3X6X2000
・2524-001 M2ロッドエンド
・2524-001 M2 rod end
・2525-007 EX ø5ボール台付
・2525-007 EX ø5 ball with stand
・2532-028 キャップスクリューM2X8
・2532-028 Cap screw M2X8
・アジャストロッドはラダーサーボ取付位置によって
適切なものをご使用ください。
・Use an adjuster rod that is suitable for the rudder servo
installation position.
8
2. 組立編
Assembly
1. ODUの取付位置について
1. ODU installing position
実際に取付ける前に目的に応じてODUの取付け高さを設定します。
取付け高さが高い 通常H = 0∼10 mm → ODUが水中に沈む量が少なくなる
・メリット
・デメリット
スピードがアップします。(注)船底等の形状により変化します。
キャビテーションやベンチレーション(空転現象)が発生しやすくなります。
特にラダーを切った場合に多く発生します。
取付け高さが低い 通常H = 10∼20 mm → ODUが水中に沈む量が多くなる
・メリット
・デメリット
低速時にラダーを切った場合でも、キャビテーションやベンチレーションが発生しにくく
なります。
スピードがダウンします。
キャビテーション… プロペラの圧力の低い部分が気化し、気泡が発生し、非常に短時間でつぶれること。
(空洞現象)
推進力がダウンします。
ベンチレーション… プロペラの回転により、水面から空気が入り込み、プロペラが空回りすること。
(空転現象)
推進力がダウンします。
特にラダーを切った場合に多く発生します。
Before actually installing the ODU, adjust the height at which the ODU is installed in
accordance with the purpose.
The ODU position is too high
Normally H = 0-10mm → The ODU is not sufficiently submerged in water.
The boat will speed up. Note) The speed will change depending on the shape of the bottom of the boat.
* Advantage
* Disadvantage Cavitations and ventilation easily generate especially when the rudder is moved.
The ODU position is too low
Normally H = 10-20mm → The ODU is too submerged in water.
* Advantage
Even when the rudder is moved at low speed, there will be few cavitations and ventilation.
* Disadvantage The speed will slow down.
Cavitations:
The part of the propeller with low pressure creates
air, and bubbles, which are destroyed very quickly,
are formed. The forward force is reduced.
トランサムボード
Transom board
トランサムプレート
Transom plate
アンチベンチレーション
プレート
Anti ventilation plate
Ventilation:
Due to the rotation of the propeller, air is drawn in
from the water surface, and the propeller rotates in
air. The forward force is reduced.
This occurs a lot when the rudder is moved.
H
船底
Boat bottom
ポイント
Point
センター
Center
ODUを船のセンターにまっすぐ取付けます。
・アンチベンチレーションプレートがセンター
からずれていたり、傾いていたりするとキャ
ビテーション(空洞現象)を起こしやすく、
スプレー(飛沫)もあがりやすくなります。
Mount the ODU straight in the center of the hull
・If the anti-ventilation plate is off center or tilted,
it may cause cavitations and raise a spray of
water.
トランサムプレート
Transom plate
トランサムボード
Transom board
アンチベンチレーションプレート
Anti-ventilation plate
9
船体
Hull
2. ODUの取付け加工
2. Preparing for the ODU mounting
トランサムボードの加工をします。
Prepare the transom board
トランサムボードにコピーを貼り付けます。
取付位置は「1. ODUの取付位置について」を参照してください。
トランサムボードにトランサムプレート取付用の穴をあけます。
Affix the copy to the transom board.
Refer to “1. ODU installing position” for details of the installing position.
Drill a hole in the transom board for mounting the transom plate.
トランサムボード
Transom board
コピー
Copy
実寸
Actual size
コピーしてお使い
ください。
Make a copy of this
drawing and use it
when mounting.
63 mm
カットします
Cut off
トランサムボード加工図
Transom board drawing
船底
Boat bottom
アンチベンチレーションプレート
Anti ventilation plate
10
ODUの取付けをします。
Install the ODU.
ø3.1穴(6ヶ所)
ø3.1 holes (6 places)
トランサムボードに取付ける時はトランサムプレートの
部にシリコンコーキング剤を塗布して防水をして
ください。
ø3.1の穴をあけます。(6ヶ所)
Before attaching to the transom board, apply silicon caulking
to the
part of the transom plate to make it water proof.
Drill ø3.1 holes. (6 places)
トランサムプレート
Transom plate
ネジ止めします。(6ヶ所)
Affix with screws. (6 places)
船体
Hull
トランサムボード
Transom board
シリコンコーキング剤塗布
Apply silicon caulking
トランサムプレート
Transom plate
M3ナット (SUS)
M3 nut (SUS)
M3X12CS (SUS)
トランサムボード
Transom board
3. エンジン ドライブシャフトの取付け
3. Installing the engine and drive shaft
ODUドライブシャフトASSYがほぼ水平になるようにエンジンマウントの高さを調整して下さい。
ODUドライブシャフトASSYが前後に3mm程度動くように取付けてください。
走航前にグリスをスプレーしてください。
Adjust the height of the engine mount so that the ODU drive shaft assembly is almost level.
Mount the ODU drive shaft assembly so that the ODU drive shaft assembly can move about 3 mm forward or backward.
Spray grease before running the boat.
ODUドライブシャフトASSY
2515-123
ODU drive shaft assembly
RCグリススプレー
エンジン取付位置により長さを
R/C Grease Spray
調整してください。
前後に3mm程度動くように
エンジン
RCグリススプレー
取付けてください。
Engine
R/C Grease Spray
¥840 (800)
Adjust the length according to the
engine mounting position.
¥税込価格(税抜価格)
Mount so that it can move about 3
* The prices in parentheses are the
mm forward or backward.
prices excluding consumption tax.
トランサムボード
Transom board
3mm
船体
Hull
エンジンマウント
Engine mount
エンジンクランク軸
Engine crank shaft
11
GBクラッチシャフト
GB clutch shaft
ODUジョイント
ODU joint
トランサムプレート
Transom plate
4. 配管図
4. Connection diagram
別売
Sold separately
エンジン水冷用チューブ
0404-764 ガソリンチューブ ø3X6X2000
Engine cooling tube
0404-764 Petrol tube ø3X6X2000
¥840 (800)
¥税込価格(税抜価格)
* The prices in parentheses
are the prices excluding
consumption tax.
船外へ排出
Drain out of the boat
ニップル
Nipple
5. ラダーのリンケージ
5. Rudder linkage
ラダースティック
送信機のラダースティックが中立で、トリムが中立
のとき、下の図のようになるようにアジャストロッ
ドを調整してください。
Adjust the adjuster rod so that it is as shown in the figure
below when the transmitter rudder stick is in neutral and
the trim is in neutral.
トリム
中立
Neutral
Rudder stick
モード1
アジャストロッドはラダーサーボ取付位置
によって適切なものをご使用ください。
Use an adjuster rod that is suitable for
the rudder servo installation position.
高さを合わせます。
Align the height.
Ttrim
Mode 2
送信機のスティック位置
Transmitter stick position
ピボットボルトø5X12.5XM3
Pivot bolt ø5X12.5XM3
EX ø5ボール台付
EX ø5 ball with stand
サーボホーン
Servo horn
ピボットボルトø5X12.5XM3
Pivot bolt ø5X12.5XM3
中立
Neutral
別売
Sold separately
2505-001 M2ナット
2505-001 M2 nut
¥210 (200)
サーボホーン
Servo horn
ラダーサーボ
Rudder servo
各社13kg/cm程度の
ハイトルクタイプのもの
Any manufacturer’s
high torque type: 13 kg/cm
別売
Sold separately
2532-028 キャップスクリューM2X8
2532-028 Cap screw M2X8
¥840 (800)
別売
Sold separately
2524-001 M2ロッドエンド
2524-001 M2 rod end
¥525 (500)
別売
Sold separately
2525-007 EX ø5ボール台付
2525-007 EX ø5 ball with stand
¥1,050 (1,000)
¥税込価格(税抜価格)
* The prices in parentheses are the prices excluding consumption tax.
12
6. ODUトリム角度調整
6. ODU trim angle adjustment
船首
Bow of the boat
ハイドロシリンダー
Hydro cylinder
ハイドロロッド
Hydro rod
B
ハイドロロッドを
縮める(船首が下がる)
Retract the hydro rod.
(Lower the bow of the boat)
M3ナット
M3 nut
船底の形状、風の強弱、波の高さに
応じてハイドロロッドの高さを調整
して下さい。
Adjust the height of the hydro rod
according to the shape of the boat bottom,
wind strength, and/or wave height.
M2.6X6CS (SUS)
A
Aの場合
In the case of A
A
ハイドロロッドを
伸ばす(船首が上がる)
Extend the hydro rod.
(Raise the bow of the boat)
B
Bの場合
In the case of B
船首が上がる
The bow of the boat tilts upward
船首が下がる
The bow of the boat tilts downward
13
3. メンテナンス編
Maintenance
エンジン水冷用チューブの点検
Engine cooling tube inspection
エンジン水冷のためのチューブや燃料チューブが折れたり、外れ
たり、目づまりしていないか点検してください。
ニップル
Nipple
Check to make sure that the engine cooling tube and fuel tube are not
bent, loosen, nor clogged.
エンジン水冷用チューブ
Engine cooling tube
プロペラの点検
Propeller inspection
注意 Caution
プロペラ等に浮遊物や草などがからんだ場合は走りが重たくなりますので、
すぐに回収してエンジンを停止させ、取除いてください。
プロペラは石や流木に当たると変形します。
変形したプロペラは最高速、加速、燃費が悪化するばかりでなく、振動を発
生し、ODUを傷めてしまうことがありますのでただちに交換してください。
In the case that any floating objects or weeds get caught in the propeller, the
boat will slow down. Retrieve the boat immediately and remove any matter
after stopping the engine.
When the propeller hits a stone or driftwood, it may get deformed.
Deformed propellers may not only render the boat difficult to attain the top
speed, accelerate, or cause it to consume too much fuel but may also cause
vibrations and damage the ODU.
Replace any deformed propellers immediately.
第2プロペラ
Second propeller
第1プロペラ
First propeller
プロペラの取外し方
How to take the propeller off
警告 Warning
スピンナーやプロペラ脱着時にウォーターイン
レットで指を怪我しないようにカットした燃料チ
ューブ等をかぶせて作業してください。
When installing/uninstalling
the spinner or propeller, affix
a cut fuel tube so that your
fingers are not injured by the 第1プロペラは左ネジ注意
Caution: Left-hand screw
water inlet.
is used for first propeller.
1. スピンナーを外します。
2X28平行ピンをスピンナーの穴に
入れ、左回転で外します。
Remove the spinner
Insert the 2X28 parallel pin into the
spinner hole, and turn it
counterclockwise to remove.
ウォーターインレット
Water inlet
カットした燃料チューブ等
スピンナー
Cut fuel tube, etc
Spinnner
2X28平行ピン スピンナー脱着時に使用します。
2X28 parallel pin Use this pin when mounting/
dismounting the spinner.
第2プロペラ
Second propeller
2. 第2プロペラを外します。
Remove the second propeller
3. 平行ピンø2X12を外します。
Remove the ø 2X12 parallel pin
プロペラシャフト
Propeller shaft
第2プロペラ
Second propeller
スピンナー
Spinner
2X28平行ピン
2X28 parallel pin
4. 第1プロペラを外します。
ODUジョイントをペンチ等でつかみ、第1プロ
ペラを右回転で外します。(左ネジ注意)
Remove the first propeller. Hold the ODU joint
using a nipper or the like and turn the first
propeller clockwise to remove it. (Note: lefthand screw is used.)
先端が鋭利
Edge is sharp
ODUジョイント
ODU joint
14
平行ピンø2X12
Parallel pin ø 2X12
第1プロペラは
左ネジ注意
Caution: Left-hand screw
is used for first propeller.
ニードルピンの摩耗確認
Needle pin wear check
注意 Caution
ニードルピンは20時間程度の走航で摩耗します。摩耗したらただち
に交換してください。
Needle pins will become worn out after about 20 hours of operation.
Replace any pins immediately when they are worn out.
ニードルピン4X27.8
needle pin 4X27.8
新品
New
摩耗
Worn
ニードルピン4X27.8
needle pin 4X27.8
ニードルピン4X27.8
needle pin 4X27.8
グリスアップ箇所
Greasing locations
ユニバーサルシャフト
ユニバーサルシャフト
Universal shaft
Universal shaft
ドライブシャフト
Drive shaft
ODUジョイント
ODU joint
ガソリンエンジン
Petrol engine
船体
Hull
RCグリス
スプレー
GBクラッチシャフト R/C grease spray
GB clutch shaft
RCグリス
スプレー
R/C grease
spray
ニードルピン4X27.8
needle pin 4X27.8
走航前にグリスをスプレーしてください。
Spray grease before running the boat.
ロアーギヤーハウジング
Lower gear housing
2515-003
ホビーオイルヘリ用
Hobby oil for helicopter
2515-123
RCグリススプレー
R/C Grease Spray
グリスアップ
Grease
ボタンボルトM3X4
Button bolt M3X4
走航後ゆるめ、水抜きをしてください。
水抜き後、グリスアップをしてください。
After running the boat, loosen the bolt and
drain the water, and then grease the bolt.
グリスアップはRCグリススプレーを70%、ホビーオ
イルヘリ用を30%混合したものをご使用ください。
Grease with 70% RC grease spray and 30 % hobby oil for
helicopter.
¥315 (300)
¥840 (800)
¥税込価格(税抜価格)
* The prices in parentheses are the prices excluding consumption tax.
15
4. 補修パーツについて Repair parts
●補修パーツのご購入につきましては、
キットを購入された模型店へコードNO.と名称を言ってお買い求め下さい。
●上記の方法で購入が困難な場合は、直接当社パーツ係まで下記要領にてお申し込み下さい。
商品のお届け
商品は受注生産となります。
商品は宅配便にて、
ご注文受付から30日前後でお届けいたします。
まことに勝手ながら、土日祝日、年末年始、GW、
お盆休み中のご注文は、休み明けから3日∼7日前後とさせていただきます。
また、
月初めは棚卸しのため1日∼3日ほど余分にお時間をいただくこともあります。あらかじめご了承ください。
商品の交換
商品の不良、配送上の破損、
ご注文と違う商品が届いた場合は、
お手数ですが商品到着8日以内に
お電話( 0847-40-0088 )パーツ係までご連絡の上、
ご返送ください。返送料は当社で負担いたします。
※コードNO、品名は商品に表示してあります。商品が届いてすぐに商品内容をご確認ください。
お客様のご都合による返品・交換は受付ておりませんので、
コードNO、品名、数量をご確認の上、
ご注文ください。
2004年1月改定
お申込方法
●お申込は FAX あるいは お電話 にて、
お申し込みください。
●お支払は 代金引換 となります。商品がお手元に届いた際に、代金を宅急便の方にお支払ください。
商品合計額【①パーツ代金の合計+②消費税(5%)】+ ③送料(代引手数料込み)が必要です。
※なお、現金書留による送金、銀行振込、切手等による代金受付は、現在行っておりません。ご了承ください。
■送料(代引手数料込)※商品合計額とお住まいの地区によって異なります。
商品合計額
地区
1万円以上
3万円未満
1万円未満
¥1,680
¥1,470
¥1,260
¥1,155
¥1,260
¥1,155
¥1,575
¥1,365
¥1,155
¥1,050
¥1,155
¥1,050
北海道、沖縄、離島
東北
関東、信越、北陸、中部
関西、中国
四国
九州
3万円以上
10万円未満
¥1,890
¥1,680
¥1,470
¥1,365
¥1,470
¥1,365
(例)北海道にお住まいの方で、パーツ9,800円分ご注文の場合
商品合計額¥10,290【①パーツ代金の合計¥9,800 + ②消費税(5%) ¥490 】+ ③送料(代引手数料込)¥1,680
=お支払金額¥11,970 となります。
受付No.
注文書(コピーしてお使い下さい)
お申し込み年月日
年
月
日
ふりがな
ご注文回数
日祝日配達
お名前
時間指定
〒
希望する・希望しない
無・有
( 時頃)
都・道
ご住所
郡
市・
区
府・県
TEL
はじめて・2回目以上
(
FAX
)
コードNo
品名
(
単価
)
数量
金額
−
−
−
−
−
①パーツ代金の合計
②消費税(5%)
商品合計額(①+②)
+
ヒロボー株式会社(パーツ係)
〒726-0004 広島県府中市府川町138
T EL:
(0847)40-0088(代)FAX:45-7670
http://model.hirobo.co.jp/
③送料(代引手数料込)
=
お支払金額=商品合計額(①+②)+③
16
パーツリスト
Parts list
内径: 大
Inner diameter: large
P.19へ
To P.19
2532-057
2506-047
内径: 小
Inner diameter: small
商品は受注生産となります。
商品は宅配便にてご注文受付から
30日前後でお届けします。
The products will be supplied on a madeto-order basis.
The product will be delivered by home
delivery service about 30 days from the
date of order.
1901-018
1901-024
1901-031
2508-007
2500-104
2538-012
1901-041
2529-010
1901-009
2531-009
2500-105
2500-103
1901-017
1901-044
2509-020
2532-062
2530-009
1901-042
2500-103
1901-030
1901-029
1901-010 1901-023
2532-063
1901-033
2532-057
1901-012
2505-021
1901-041
1901-033
1901-034
0404-764
2532-056
2529-010
1901-033
1901-035
2532-059
2532-061
1901-037
2532-058
2532-056
2506-048
2500-104
1901-011
2532-061
溝に合わせます
Align with grooves
1901-003
2505-021
1901-016
2531-009
1901-036
2529-013
2531-008
2509-007
2539-022
1901-045
2539-022
0404-764
2509-007
1901-049
1901-045
2531-008
2532-064
2506-049
1901-046
1901-002
Grease
Silicon
テーパー1/5
Taper 1/5
0404-764
Grease
船外へ排出
Drain out of the boat
17
Silicon
のマークがある箇所は、
グリスを使用してください。
のマークがある箇所は、
シリコンコーキング剤を使用
してください。
Use grease where this mark is
indicated.
Use silicon caulking where this
mark is indicated.
* The prices in parentheses are the prices excluding consumption tax.
コードNo.
Code No.
0404-764
1901-002
1901-003
1901-009
1901-010
1901-011
1901-012
1901-016
1901-017
1901-018
1901-023
1901-024
1901-029
1901-030
1901-031
1901-033
1901-034
1901-035
1901-036
1901-037
1901-041
1901-042
1901-044
1901-045
1901-046
1901-049
品名
Part
ガソリンチューブø3X6X2000
Petrol tube ø3X6X2000
O・D・U(アウト・ドライブ・ユニット) ドラ
イブシャフトASSY
O・D・U (out・drive・unit) drive shaft assy
O・D・Uトランサムプレート
O・D・U transom plate
O・D・Uステアリングホーク
O・D・U steering fork
O・D・Uプロテクションカップ
O・D・U protection cup
O・D・Uフックアップフォーク
O・D・U hook up fork
O・D・Uホースコネクション
O・D・U hose connection
O・D・Uキングピン
O・D・U kingpin
O・D・U Brgケース
O・D・U bearing case
O・D・U 14Tスパイラルマイタギヤー(左)
O・D・U 14T spiral miter gear(left)
O・D・U 第1軸
O・D・U first shaft
O・D・U 第2軸
O・D・U second shaft
O・D・Uステアリングシャフト
O・D・U steering Shaft
O・D・Uステアリングレバー
O・D・U steering Lever
O・D・Uジョイント防水ブーツ
O・D・U waterproof Joint Boot
O・D・Uニップル
O・D・U nipple
O・D・Uハイドロシリンダーセット
O・D・U hydro cylinder set
O・D・Uストッパー
O・D・U stopper
O・D・Uジョイント
O・D・U joint
O・D・Uヨークブッシュ
O・D・U yoke bush
O・D・Uステアリングブッシュ
O・D・U steering bush
O・D・Uトランサムブーツホルダー
O・D・U transom boot holder
ダブルボールジョイントø6Xø15X40
W ball joint ø6Xø15X40
GB ユニバーサルシャフト
GB universal shaft
GB クラッチシャフト
GB clutch shaft
カーボンパイプø18Xø20X400
Carbon pipe ø18Xø20X400
入数
Q'ty
1
1
1
1
1
1
1
1
1
1
1
1
1
1
1
1
1
1
1
2
2
1
1
1
1
1
2500-103
Brg. ø6Xø13X5 DD (SUS)
2
2500-104
Brg. ø6Xø15X5 DD (SUS)
2
2505-021
Brg. ø4Xø9X4スラスト(SUS)
Brg.ø4Xø9X4 thrust (SUS)
M3ナット(SUS)
M3 nut (SUS)
10
2506-047
FW 2X6X0.4T(SUS)
10
2506-048
FW 3X7X0.5T(SUS)
10
2506-049
FW 6X13X1T(SUS)
10
2500-105
2508-007
2509-007
2509-020
2529-010
2529-013
2530-009
2531-008
2531-009
2532-056
2532-057
2532-058
2532-059
2532-061
2532-062
2532-063
2532-064
2538-012
2539-022
スナップリングSR S-6
Snap ring SR S-6
ニードルピン4X27.8
Needle pin 4X27.8
ロールピンø2X8
Roll pin ø2X8
Oリング SS050
O-ring SS050
Oリング 1AS-5
O-ring 1AS-5
ピポットボルトø5X12.5XM3
Pivot bolt ø5X12.5XM3
セットスクリュー M3X3 (SUS)
Set screw M3X3 (SUS)
セットスクリュー M4X4 (SUS)
Set screw M4X4 (SUS)
キャップスクリュー M4X5 D=6 (SUS)
Cap screw M4X5 D=6 (SUS)
キャップスクリュー M2X5 (SUS)
Cap screw M2X5 (SUS)
キャップスクリュー M2X8 (SUS)
Cap screw M2X8 (SUS)
キャップスクリュー M2.6X8 (SUS)
Cap screw M2.6X8 (SUS)
キャップスクリュー M2.6X6 (SUS)
Cap screw M2.6X6 (SUS)
キャップスクリュー M2X3 D=3.3MM (SUS)
Cap screw M2X3 D=3.3MM (SUS)
キャップスクリュー M3X12 (SUS)
Cap screw M3X12 (SUS)
キャップスクリュー M6X10 (SUS)
Cap screw M6X10 (SUS)
サラビスM2X6 (SUS)
Disc screw M2X6 (SUS)
ボタンボルトM3X4 (SUS)
Button bolt M3X4 (SUS)
1
10
2
10
5
5
2
10
10
2
10
10
10
10
5
10
10
10
2
税込価格
(税抜価格)円
Price (Yen)
840
(800)
備考
Remarks
耐油ゴム
Oil resistant rubber
12,600
(12,000)
3,990
(3,800)
1,890
(1,800)
1,890
(1,800)
3,780
(3,600)
1,680
(1,600)
420
(400)
840
(800)
2,625
(2,500)
420
(400)
630
(600)
315
(300)
1,890
(1,800)
315
(300)
315
(300)
840
(800)
630
(600)
2,100
(2,000)
630
(600)
630
(600)
315
(300)
21,000
(20,000)
1,260
(1,200)
1,680
(1,600)
7,350
(7,000)
1,260
(1,200)
1,260
(1,200)
1,680
(1,600)
315
(300)
315
(300)
315
(300)
315
(300)
525
(500)
315
(300)
525
(500)
315
(300)
315
(300)
420
(400)
420
(400)
420
(400)
525
(500)
525
(500)
525
(500)
525
(500)
525
(500)
840
(800)
525
(500)
525
(500)
315
(300)
315
(300)
18
溝付きピンø2.5X10 1個付
With one ø2.5X10 grooved pin
結束バンド100mm 2個付
With two 100mm binding bands
ロールピンø2.5X12 2個付
With two ø2.5X12 roll pins
商品は受注生産となります。商品は宅配便にてご注文受付から30日前後でお届けします。
The products will be supplied on a made-to-order basis.
The product will be delivered by home delivery service about 30 days from the date of order.
2532-058
1901-038
2525-001
のマークがある箇所は、
グリスを使用してください。
のマークがある箇所は、
シリコンコーキング剤を使用
してください。
Use grease where this mark is
indicated.
Use silicon caulking where this
mark is indicated.
Grease
2506-047
Silicon
1901-004
Grease
P.17より
From P.17
Silicon
1901-039
1901-019
内径: 小
Inner diameter: small
1901-043
2500-109
2500-106
内径: 大
Inner diameter: large
1901-027
2500-109
1901-028
1901-025
2532-060
2532-057
2500-104
1901-005
1901-006
1901-032
2532-058
2533-028
2533-027
1901-040
内径: 大
左ネジ注意
Inner diameter: large Caution: Left-hand screw is used.
2500-106
1901-008
1901-047
2506-046
内径: 小
Inner diameter: small
2500-103
2531-008
2508-007
1901-020
2539-022
2509-018
2509-017
1901-022
内径: 小
Inner diameter:
small
内径: 大
Inner
diameter:
large
2500-108
1901-021
1901-015
2509-019
1901-026
2500-103
2500-105
2506-047
2532-057
1901-007
1901-013
1901-048
2500-107
第1プロペラは左ネジ注意
Caution: Left-hand screw is
used for first propeller.
19
1901-014
* The prices in parentheses are the prices excluding consumption tax.
コードNo.
Code No.
1901-004
1901-005
1901-006
1901-007
1901-008
1901-013
1901-014
1901-015
1901-019
1901-020
1901-021
1901-022
1901-025
1901-026
1901-027
1901-028
1901-032
1901-038
1901-039
1901-040
1901-043
1901-047
1901-048
品名
Part
O・D・Uアッパーギヤーハウジング
O・D・U upper gear housing
O・D・Uアンチベンチレーションプレート
O・D・U anti ventilation plate
O・D・Uジョイントハウジング
O・D・U joint housing
O・D・Uロア-ギヤーハウジング
O・D・U lower gear housing
O・D・Uオイルシールハウジング
O・D・U oil seal housing
O・D・U第2プロペラ(後)
O・D・U second propeller(rear)
O・D・U第1プロペラ(前)
O・D・U first propeller(front)
O・D・Uスピンナー
O・D・U spinner
O・D・U 14Tスパイラルマイタギヤー(右)
O・D・U 14T spiral miter gear(right)
O・D・U 11Tバーチカルギヤー
O・D・U 11T vertical gear
O・D・U 14T 軸付ベベルギヤー
O・D・U 14T bevel gear with shaft
O・D・U 14Tスパイラルベベルギヤー(右)
O・D・U 14T spiral bevel gear(right)
O・D・Uバーチカル シャフト
O・D・U vertical shaft
O・D・Uプロペラシャフト
O・D・U propeller shaft
O・D・U Brgカラー1
O・D・U bearing collar 1
O・D・U Brgカラー2
O・D・U bearing collar 2
O・D・Uウオーターインレット
O・D・U water Inlet
O・D・Uピポットブッシュ
O・D・U pivot bush
O・D・Uキングピンブッシュ
O・D・U kingpin bush
O・D・Uスラストブッシュ
O・D・U thrust bush
O・D・U 取扱説明書
O・D・U instruction manual
オイルシールG10X14X3
Oil seal G10X14X3
オイルシールG5X10X2
Oil seal G5X10X2
入数
Q'ty
1
1
1
1
1
1
1
1
1
1
1
1
1
1
1
1
1
2
2
2
1
1
1
2500-103
Brg. ø6Xø13X5 DD (SUS)
2
2500-104
Brg. ø6Xø15X5 DD (SUS)
2
2500-106
Brg. ø4Xø9X4スラスト(SUS)
Brg.ø4Xø9X4 thrust (SUS)
Brg. ø6Xø12X4.5スラスト(SUS)
Brg.ø6Xø12X4.5 thrust (SUS)
1
2500-107
Brg. ø5Xø10X4 DD (SUS)
2
2500-108
Brg. ø9Xø17X5 DD (SUS)
2
2500-109
Brg. ø6Xø17X6 DD (SUS)
2
2506-038
FW 6X8X0.1T
5
2506-047
FW 2X6X0.4T(SUS)
10
2500-105
2508-008
2509-017
2509-018
2509-019
2525-001
2531-008
2532-057
2532-058
2532-060
2533-027
2533-028
2539-022
スナップリング S-6 (SUS)
Snap ring S-6 (SUS)
ニードルピン2.5X9.8
Needle Pin 2.5X9.8
平行ピンø2X12 (SUS)
Parallel pin ø2X12 (SUS)
ø2X28平行ピン
Parallel pin ø2X28
ø5ボール(焼き入り)
ø5 ball (hardened)
セットスクリュー M3X3 (SUS)
Set screw M3X3 (SUS)
キャップスクリュー M2X5 (SUS)
Cap screw M2X5 (SUS)
キャップスクリュー M2X8 (SUS)
Cap screw M2X8 (SUS)
キャップスクリュー M3X30 (SUS)
Cap screw M3X30 (SUS)
ナベアタマビスM2X20 (SUS)
Pan head screw M2X20 (SUS)
ナベアタマビスM2X10 (SUS)
Pan head screw M2X10 (SUS)
ボタンボルトM3X4 (SUS)
Button bolt M3X4 (SUS)
1
10
2
2
2
10
10
10
10
10
20
20
2
税込価格
(税抜価格)円
Price (Yen)
4,620
(4,400)
3,990
(3,800)
3,360
(3,200)
3,780
(3,600)
1,680
(1,600)
6,930
(6,600)
8,190
(7,800)
1,050
(1,000)
2,625
(2,500)
3,150
(3,000)
3,675
(3,500)
3,150
(3,000)
1,050
(1,000)
840
(800)
315
(300)
315
(300)
420
(400)
630
(600)
630
(600)
1,050
(1,000)
2,520
(2,400)
420
(400)
420
(400)
1,260
(1,200)
1,260
(1,200)
1,680
(1,600)
1,680
(1,600)
1,260
(1,200)
1,260
(1,200)
1,260
(1,200)
525
(500)
315
(300)
525
(500)
315
(300)
315
(300)
315
(300)
525
(500)
420
(400)
525
(500)
525
(500)
525
(500)
420
(400)
420
(400)
315
(300)
20
備考
Remarks
ロゴシール付き
With logo sticker attached
溝付きピンø2.5X10 1個付
With one ø2.5X10 grooved pin
ロールピンø2.5X14 1個付
With one ø2.5X14 roll pin
MEMO
MEMO
広島県府中市府川町 138 〒726-0004
TEL:(0847)40-0088(代)FAX:45-7670
http://model.hirobo.co.jp/
138 FUKAWA-CHO, FUCHU-SHI,
HIROSHIMA-PREF., JAPAN. 〒726-0004
TEL:0847-40-0088 FAX:0847-45-7670
http//model.hirobo.co.jp/
注意 Note
①本書の内容の一部または全部を無断で転載することは禁止されています。
②本書の内容については、将来予告なしに変更することがあります。
③本書の内容について万全を期しておりますが、万一ご不審な点や誤り、記載もれなどお気付
きのことがありましたら、ご一報くださいますようお願いいたします。
④運用した結果については③項にかかわらず責任を負いかねますので、ご了承ください。
①Reproduction of this manual, or any part thereof, is strictly prohibited.
②The contents of this manual are subject to change without prior notice.
③Every effort has been made to ensure that this manual is complete and correct. Should there,
however, be any oversights, mistakes or omissions that come to your attention, please inform
us.
④Item ③ not withstanding, we cannot be responsible for events related to the operation of your
model.
平成17年7月
初版発行
平成17年8月
第2版発行
First printing
July 2005
Second printing August 2005