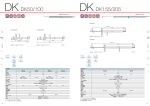
1
文書№取説−98070706
ご使用の前に
禁止
本製品は、防爆構造ではありません。 溶剤・可燃性ガス等が存在する「危険
場所」ではご使用になれません。
ご注意
・本製品は、高電圧を使用した「静電気除去装置」です。本製品を正しくお使い頂くために、
必ずこの「取扱説明書」をよくお読み下さい。
Simco-Ion Ionizing Air Blower
エアロスタット PC
・本製品は、電気製品です。また本製品は防塵構造ではありません。水・油・溶剤・微粉末
等が装置にかかりますと、本製品を著しく損傷させます。特に、高電圧を使用しています
ので、「結露」にご注意下さい。
・本製品を酸・アルカリ・塩素ガス等の腐食性ガスのある場所に持ち込まないで下さい。ま
た、そのような場所では使用しないで下さい。
・本製品は、この「取扱説明書」に記載された方法で設置・ご使用下さい。間違った取り付
け方法は思わぬ事故を招くことがあります。取り付け、メンテナンス等は電気配線等を含
む、電気製品の取り扱いに習熟された方がとり行って下さい。
取扱説明書
・本製品の除電電極は針状でその先端は、良好な除電性能を維持するために、鋭利に尖らせ
ております。そのため、容易に肌等に突き刺さりますので、取り扱いには十分お気をつけ
下さい。また、エアー吸い込み口および吹き出し口に物を差し込んだり、入れたりしない
で下さい。
・本製品の銘板に記載された「入力電圧」「周波数」をご確認のうえ、正しく接続して下さ
い。また「仕様」の項の使用条件の範囲を越えてご使用にならないようにして下さい。
・本製品には、アースが必要です。アースを接続せずに本製品を使用しないで下さい。
・本製品の正常使用時には、一切スパーク放電は見られません。もし万が一、目に見えるス
パークが通常使用状態で発生した場合は、電源を切り、「保守」の項の清掃を全て行って
下さい。清掃を行ってもスパークが止まらない場合は、本体の故障ですので必ず、弊社も
しくは弊社代理店へご連絡下さい。保証要項に従って、点検・修理・交換をさせていただ
きます。
・落下その他で、本製品に著しい衝撃・損傷を与えたときは、必ず点検を行って下さい。的
確に動作しないとき、あるいは点検時等に異常を発見した場合には必ず、必要な修理また
は交換を行って下さい。
ご注意
ご使用前に、この取扱説明書をよくお読みいただき、正し
くお使い下さい。
この取扱説明書の巻末が保証書になっております。内容を
よくご確認の上、大切に保存して下さい。
・本製品が異常に損傷あるいは老朽化しますと、電気ノイズの発生・高圧部(トランス等)
の焼損等を起こす可能性があります。この「取扱説明書」をよくお読み頂き、定期的に、
的確に、保守・点検を行って下さい。
・本製品は、改造・加工および不当な分解を行わないようにして下さい。
・本製品について、ご不明な点やご質問がございましたら、お買い上げ頂いた販売店もしく
は、弊社・「シムコジャパン株式会社」までご連絡下さい。
−1−
はじめに
目
このたびは、Simco-Ion Ionizing Air Blower エアロスタット PC
をお買い求め頂きまして、まことにありがとうございました。
梱包品の確認
本装置をお受け取りになられましたら、まず初めに製品および付属品を確認して下さい。
次
ご使用の前に
1頁
はじめに
2頁
目
3頁
次
第1章
概
要
4頁
第2章
主な仕様
5頁
第3章
静電気除去の原理
7頁
8頁
(1) 本体およびベンチスタンド(ノブボルト含む)
1台
第4章
設
(2) 電源コード
1本
第5章
運転要領
1本
第6章
保守・点検
10頁
(4) 交換用フィルター
1枚
第7章
異常時の処置
13頁
(5) 日常点検重要事項シール
1枚
第8章
主な消耗品および交換パーツリスト
14頁
(6) 取扱説明書/保証書
1冊
外観寸法図および概略回路図
(3) アース線
1.8m
1.8m
(本書)
保
証
置
9頁
15∼17頁
書
巻末
<本書の記号のご説明>
各記号は主として下記のような意味を表しています。
ご注意をお守りいただかないと重大な事故(死亡事故を含む)を引き起こす恐れ
があります。
梱包品に不足品がないことおよび製品に外観異常(変形、破損等)がないことを確
認して下さい。もし、不足品、外観不良品がございましたら、ただちに弊社もしく
は弊社代理店までご連絡下さい。
ご注意をお守りいただかないと装置の故障を生じる恐れがあります。また、周辺
の機械・設備等に悪影響を与えることがあります。
ご注意をお守りいただかないと感電の恐れがあります。
尚、
または
に記載した事項でも、状況によっては重大な事故に結び
つく可能性があります。いずれも重要な内容を記載していますので、必ずご注意事項を
お守り下さい。
−2−
−3−
第1章
概
要
第2章
Simco-Ion・エアロスタットPCは、電子部品、精密部品の効果的なESD(静電気放電)対策
の最も重要な方法としてイオンによる「静電気の除去 (中和)」を行う製品です。また、プラス
チック、医療、医薬、食品等々多くの業界での部品、製品への埃の付着等、多岐に渡る「静電気
による生産障害」を解決する目的で使用されます。
Simco-Ion・エアロスタットPCは、ポータブルタイプの除電用ブロワーです。小型ファンを内
蔵しており、風量はファンスピードコントローラーノブで自由に調節することができます。
Simco-Ion・エアロスタットPCは、高性能の除電用電極、パワーユニットを内蔵していますの
で、より早く、より完全に静電気帯電を除去し、電子デバイスの静電破壊、劣化を防止します。
主な仕様
型
番:エアロスタットPC
種
別:交流高電圧印加式除電器
構
造:抵抗接続直結型(通電中の高電圧電極に触れると、軽い電撃を受けます)
使 用 環 境 温 湿 度:0 ∼ 50 ℃,10∼85%RH(但し、氷結、結露のないこと)
サ
イ
ズ:180 (W)×247 (H)×112 (D) [mm] (詳細は15頁の図をご参照下さい)
ケ ー シ ン グ 材 質:アルミニウム
Simco-Ion・エアロスタットPCには、より完全に静電気帯電を除去するための両極性のイオン
を等量に生成する独自のイオンバランス回路(U.S.PAT.№ 5,153,811)で構成されている除電装
置です。
塗
装:白色塗装、ポリエステル/エポキシ
ゴ
静電気除去装置は一般に、電極が汚れたり、パーティクルが堆積すると除電効果が著しく低下し
ますが、エアロスタットPCは、標準装備された電極クリーニングブラシ(U.S.PAT.№ 4,734,5
80)のつまみを週に1回廻すだけで簡単に清掃ができ、イオン化効率の良い、イオンバランスの
とれた最高の状態で、常にご使用いただけます。
ム
足:絶縁性、無着色ポリウレタン
重
量:約 2.9 kg (スタンド、電源コード含)
入
力:AC 100 V, 0.3 A, 50/60 Hz (兼用)
(許容範囲:±10 V, 定格 110 V の電源には接続しないで下さい。)
前面パネルには、内部高電圧トランスが正常に動作していることを示す、イオナイゼーションラ
ンプがあり、エアロスタットPCの正常な動作を簡単に確認することができます。
設
エアロスタットPCには、次の特長・機能があります。
エ ア ー フ ィ ル タ ー:ラフフィルター,30 PPI オープンセルポリウレタンフォーム
洗浄可能、但し乾燥後装着(交換用フィルター別売)
置
距
離:50 mm 以上 600 mm 程度 (推奨距離 300 mm, 帯電物∼ブロワー前面)
・安全で高性能な除電効果
オ ゾ ン 発 生 量:0.01 ppm 以下
※測定器 DASIBI 1003AH 型オゾンモニター(紫外線吸収法)使用
ブロワー前面 150 mmの位置、風量最小で測定。
・本質自動イオンバランス回路(U.S.PAT.)
風 量 お よ び 騒 音:
・小型、軽量なポータブルタイプ
風
速
風量 (m3/min.)
騒音レベル(dB-A)
最
小
約 1.0
50
最
大
約 2.0
57
・電極クリーニングブラシ(U.S.PAT.)
・電源スイッチ兼用ファンスピード調整(無段階)
・エアーフィルターが標準装備
※ 騒音は、ブロワーの周囲600mmの位置にて測定
・脱着式入力コード
風
速:下表を参考にして下さい。単位: m/sec
・吹き出し角度が簡単に調整できるベンチスタンド
距
離
30cm
60cm
90cm
120cm
風速最小
1.2
1.0
0.7
0.6
風速最大
2.5
2.0
1.5
1.2
・イオナイゼーションランプ
※ エアーの流れの中央部分で測定。
−4−
−5−
第3章
イ オ ン ハ ゙ ラ ン ス 範 囲:± 10 V 以下(オートイオンバランス方式)
除
電
性
能:下表を参考にして下さい。単位:秒
風速
最大
最小
測定位置
(センターおよび左右150
mmの位置)
距離 (m)
0.3
0.6
0.9
1.2
150
5
7
11
16
センター
2
5
10
15
150
5
7
11
16
150
10
14
24
34
センター
4
9
16
24
150
10
14
24
34
※ 除電性能(減衰時間測定)およびイオンバランスは、ANSI/ESD STM3.1 ESD Associati
on Standard Test Methodに準じます。
測定電極: 6″×6″,20 pF の金属板(チャージプレートモニターを使用)
除電性能(減衰時間)は、初期帯電1000Vを100Vに減衰させるのに要した時間
装
置
寿
静電気除去の原理
静電気除去装置(除電装置)の基本的システムは、除電電極、高電圧ケーブル、パワーユニッ
トの3つの大きな構成要素を持っています。
エアロスタットPCはパワーユニット内蔵型ですので、外部に出てくる高電圧ケーブルはあり
ません。
除電電極は通常、放電電極(放電針、エミッタとも言います)と接地電極(アース電極とも言
います)から成りますが、エアロスタットPCは接地電極の代わりに、対向電極が設置されて
います。この対向電極は接地されておらず、オートイオンバランス機構が構成されています。
鋭利な先端を持つ放電電極の周囲に対向電極が配置されています。
パワーユニットは、除電電極に必要な交流高電圧を発生します。
エアロスタットPCは、以下のように作動します。
1)電源スイッチ兼用のファンスピードコントローラーノブを回すとファンが始動し、パワー
ユニットが交流高電圧を発生します。
2)高電圧が印加された放電電極の鋭利な先端部のまわりに不平等電界が発生し、コロナ放電
が発生します。
3)電極先端近傍の空気の分子(実際は、酸素、窒素、水蒸気等)がプラスイオンとマイナス
イオンに電離します。(簡略化して空気分子のイオン化と言っています。)
4)エアロスタットのファンからの空気の流れがこのイオンを運び、ワーク(帯電物)に吹き
付けられます。(実質的には電極近傍を通過するエアーがイオン化されます。)
5)反対極性の電荷は引き付け合う性質があります。帯電物の帯電電荷は反対極性のイオンを
その帯電が中和するまで引きつけます。
これがエアロスタットPCにおける「イオン化による静電気除去」のしくみです。
命:10000時間(8H/1日,250日/年の条件で、約5年)
※ 保証期間は、出荷後1年間です。
除電の概念図
−6−
−7−
第4章
設
置
第5章
ご注意
ご注意
すべての取付作業が終わるまで入力電源を入れないで下さい。
4.1
設置場所
○ 除電可能な距離は1m以上にもおよびますが、差し支えのない限り、帯電物から50cm以内
に近づけてご使用下さい。(推奨距離は 約 30 cm です。)設置距離が近いほど帯電物の帯
電を早く除電できます。
○ブロワーから出るエアーが帯電物に直接当たる場所を選定して下さい。本機と帯電物の間
には他のものを置かないで下さい。ブロワーエアーをさえぎる物があると的確な除電が行
えません。
○帯電物は空間に浮いた状態のときが最も良く除電できます。帯電物がアース体に接触して
いると、その部分の除電を的確に行うことができません。
○本機には専用のフィルターが付いています。ご使用環境がクリーンな場合はフィルターを
はずすこともできます。ブロワー背面側のフィルターリティナーをはずし、中のフィルタ
ーエレメント(薄いスポンジ状のフィルター)だけを取り除いて下さい。フィルター無し
の場合はさらに除電性能が向上します。
禁止
ブロワーは、溶剤および可燃性ガス等の雰囲気中に設置しないで下さい。
4.2
設置方法
エアロスタットPCは卓上において使用するほか、壁、棚、天井等に固定して使用するこ
とも可能です。設置には、標準装備のベンチスタンドを使用します。ベンチスタンドは卓
上型として使う場合のほか、壁、棚の下などの頑丈で平らな面にネジで固定するときに用
います。(16頁の図をご参照下さい。)
ブロワーの両側面のノブをゆるめて、エアー吹き出しの向きを調整し、向きが決まれば再
度ノブをしっかりしめて下さい。
4.3
運転要領
電源の接続
入力電圧は、100 V, 50/60 Hzです。周波数は兼用です。
付属の入力コードの3P用ACプラグを、アースが確実に接続されていることが確認され
た、100V電源コンセント(3P)に接続して下さい。次いで、入力コードのもう片端
を本機の入力INLETにしっかり差し込んで下さい。コンセントが2Pの場合には、3
P−2P交換用アダプターを取り付けて使用して下さい。この場合は、アダプターから出
ているアース線を必ずアースに接続して下さい。もしくは、付属のアース線の片端を本機
のアース端子に付け、もう片方の端をしっかりしたアースに接続して下さい。
・ご使用の前に、本機背面の銘板に記載された「入力電圧」「周波数」を確認して下さい。
・本機背面の接地端子(アース端子)とアースとの導通をテスターで確認して下さい。
(100
Ω以下)
5.1
[ 運転 ] 電源スイッチをONにします。
ファンスピードコントローラーノブ(スピコンノブ)を右に廻して、電源スイッチをON
にして下さい。前面のイオナイゼーションランプが点灯し、ファンが始動します。ファン
が回転を始めない場合は、一度スピコンノブを右一杯に回してから戻して下さい。
吹き出されるエアーが帯電物に到達しますと、除電が開始されます。
5.2
スピコンノブをさらに右に回し、風量調整します。
風速は作業にさしつかえない場合、できるだけ最大にしてご使用下さい。風速が速く(風
量が大きく)、設置距離が近いほど、より高い除電効果が得られます。
5.3
[ 停止 ] 電源スイッチをOFFにします。
停止する場合は、スピコンノブをカチッと音がするまで、左一杯に廻して下さい。
前面のイオナイゼーションランプが消灯し、ファンがゆっくり止まり、除電が停止します。
ご注意
・装置に外観異常/変形等がないことおよびイオナイゼーションランプの点灯を定期的に目視
確認して下さい。
・イオナイゼーションランプはネオンランプを採用しています。このランプはその特性により、
点灯時にチラツキを生じる場合があります。特に、50 Hzでご使用の場合、このチラツキが顕
著になる場合がありますが、故障ではありません。このランプは高電圧トランスから出力が
あるかどうかを表示しているだけですので、ランプにチラツキが見られても、性能・安全性
・機器寿命等に影響はありません。
・正常動作時には、スパーク放電(火花放電)は一切見られません。もし放電針の一部から断
続的にスパークが発生している場合は、次項の「保守・点検」の手順に従って、電極部等を
清掃して下さい。
清掃してもスパークがおさまらない場合には、弊社または弊社代理店までご連絡下さい。
スパークが発生しますと、除電効果が無いばかりでなく、電気ノイズの発生源になり、周辺
の電子機器等に誤動作等の悪影響を与えることがあります。また、そのまま放置して使用し
ますと電極部あるいは内蔵の高電圧トランス等が破損されることもあります。
・本装置を使用しないときは、必ず電源スイッチをOFFにして下さい。また、長期間ご使用
にならないときは、コンセントから入力コードを抜いておいて下さい。
ご注意
アース(3種アース)を必ず接続して下さい。アースがしっかり接続されていないと、危険
な上、除電効果が著しく落ちます。
取付姿勢に制限はありませんが、ブロワーのエアー吸い込み部(背面側)を紙等のゴミや壁
等で塞がないようにして下さい。
−8−
−9−
第6章
保守・点検
エアロスタットPCは、日常の簡単な保守で性能を維持できるように設計されています。
唯一の日常的なメンテナンスは放電針の清掃のみです。放電針の清掃は特許のクリーニング
ブラシでほんの数秒行うだけです。これでイオン出力を維持することができます。
エアロスタットPCは本質自動イオンバランスを構成し、放電針上のゴミ、汚れ、電源電圧
の変動および風量の変化を補い、イオン出力のバランスを維持させます。
定期的な保守管理として、各部の清掃およびイオンバランスとイオン出力のチェックを実施
して下さい。
ご注意
本機の清掃時には、必ず本体の電源スイッチをOFFにして下さい。
6.1
電極の清掃
エアロスタットPCの放電針を含む電極部は、他の除電装置同様、埃や汚れを蓄積しがち
です。汚れた電極は、イオン出力を減少させる原因になりますので、清掃することが必要
です。
放電針を清掃するために、吹き出し口の中央にあるポイントクリーナーノブをつまみ、時
計方向へ止まるまで廻し、それからノブを離してください。
清掃は1週間に1回以上行って下さい。
6.2
空気吸い込み口と吹き出し口の清掃
本体背面の空気吸い込み口および本体前面の吹き出し口は、良好なエアーの流れを確保す
るために、常に清掃された状態にして下さい。柔らかいブラシか掃除機で清掃を行って下
さい。
6.3
フィルターの清掃
ブロワー背面側のフィルターリティナーをはずし、中のフィルターエレメント(薄いスポ
ンジ状のフィルター)だけをを取り外して下さい。エアーフィルターを真水に浸し揉み洗
いして下さい。もし汚れが取れにくければ中性洗剤で洗浄して下さい。フィルターが充分
乾燥してから本体に装着して下さい。
重要
・フィルターの清掃が使用上の効果維持の要素となりますので定期的に清掃して下さい。
・フィルターが傷んでいる場合はオプションの交換用フィルターが用意されていますので、
弊社もしくは弊社代理店へご注文下さい。
6.4
内部の清掃
電源スイッチをOFFにしたあと、入力コードをコンセントから抜いて下さい。両側面の
ノブとネジをはずしてスタンドを取り外し、注意深く本機のカバーを外して下さい。
圧搾空気で内部のホコリを吹き飛ばすか、掃除機で吸引して下さい。このとき、内部部品
に清掃機器が当たらないようにご注意下さい。清掃後、元のようにカバーを付け、入力コ
ードをコンセントに差し込んで下さい。
ご注意
6.5 イオン出力のチェック(除電性能のチェック)
6.5.1 チャージプレートモニターでの測定
チャージプレートモニターを用いて、除電性能を定期的に確認して下さい。取扱等につき
ましては、別途チャージプレートモニターの取扱説明書を参照して下さい。(測定方法は、
ANSI/ESD STM3.1 ESD Association Standard Test Method に準じます。)
推奨する測定条件としまして下記に示します。
・チャージプレートモニターの測定部と本体間の距離を30cmに設定する。
・本体のファンスピードを最大にする。
・環境温湿度は、20℃±5℃、60%R.H.以下の環境で測定して下さい。
6.5.2 チャージプレートモニター以外での測定
もし、チャージプレートモニターをお持ちでなければ、
Simco-Ion製静電気測定器 FMX-003 のような静電気測定器を使用
してイオン出力をチェックすることもできます。
ここでは、静電気測定器を用いた「帯電物が的確に除電されるか
どうかの確認方法」をご説明致します。手順は以下の通りです。
① よく帯電するプラスチック板(150㎜角、1㎜厚程度)を2
種類用意します。
(塩ビ板とアクリル板等の表面が乾燥したプラスチック板が
良く帯電します。)
② その板をお互いに擦り合わせて、両方を1kV以上に帯電さ
せます。
③ 静電気測定器で測定して、両方の板の帯電電圧、極性を確
認、記録して下さい。
④ ブロワーをONにし、吹き出されるエアーを両方の板に別々
に当てます。(2枚の板は接触させないようにして、ブロワ
ーから約30cmの距離で、約1秒程度ブロワーのエアーを
当てます。)
⑤ 両方の板の帯電電圧、極性を再度測定し、記録します。
静電気測定器 FMX-003
両方の板の帯電が除去されていれば、そのブロワーは正常です。
帯電が除去されていなければ、電極部等の清掃を行い再度測定を行って下さい。
もし、除電が的確に行えないときは、必ず弊社または弊社代理店までご連絡下さい。
測定記録は、「除電装置の管理およびその記録」として、活用し、また保管される
ことをお奨め致します。
6.6 イオンバランスチェック
6.6.1 チャージプレートモニターでの測定
イオンバランスをチェックするために、チャージプレートモニターを使用されることをお
奬めいたします。(測定方法は、ANSI/ESD STM3.1 ESD Association Standard
Test Method に準じます。)チャージプレートモニターを用いて、イオンバランスを定
期的に確認して下さい。取扱等につきましては、別途チャージプレートモニターの取扱説
明書を参照して下さい。
推奨する測定条件としましては、6.5.1
の除電性能の測定と同じにして下さい。
6.6.2 チャージプレートモニター以外での測定
・Simco-Ion製静電気測定器 FMX-003 で測定
する場合には 付属のイオンバランス測定
用プレートを用いて測定することができま
す。(使用方法等につきましては測定器の取
扱説明書を参照して下さい。)
本機の清掃に、金属ブラシや市販のクリーナー、溶剤等を絶対に使用しないで下さい。
−10−
FMX-003でのイオンバランス測定
−11−
第7章
注)PCのイオンバランスは±10Vですが、静電気測定器 FMX-003のイオンバランス測
定用プレートは、検知部の面積・静電容量がANSI/ESD STM3.1 ESD Association
Standard Test Methodと違う関係で、±20V程度を目安にして下さい。
・静電気測定器を使用してイオンバランスをチェックする場合は、次の手順に従って下さ
い。
① 150㎜角以上の大きさの金属板を用意します。
② ①の金属板をできるだけ小さな高絶縁樹脂(フッ素樹脂等)またはガラス等で支持し、
ブロワー前面30㎝の位置に、ブロワーの風が金属板に直角に当たるように設置します。
③ その後方に静電気測定器を置きます。ブロワーの風が測定器の感知部に入らないこと
を確認して下さい。
④ ブロワーをOFFにし、金属板を接地して静電気測定器のゼロ調整を行い、その後金
属板の接地を外して、測定状態にします。
⑤ ブロワーをONにし、金属板の帯電電位を読み取って下さい。
◇
◇
金属板が−10V∼+10Vの帯電であれば、イオンバランスは正常です。
その範囲以上の帯電電位が読み取れれば、イオンバランスは正常ではありません。
ご注意
・6.5および6.6の測定には、正確に校正または調整された静電気測定器をご使用下さい。
・イオン化された風に静電気測定器の感知部を直接さらすような方法でのイオンバランスの測
定は行わないで下さい。このような方法では、静電気測定器のメーターの読みは正確な値を
示しません。
・従来の除電装置でよく行なわれた、「スパークテスト」は決して行わないで下さい。
本装置のバランス回路構成では「スパークテスト」は要領を得ないものとなっています。
また、放電針の短絡はバランス回路に悪影響を与えます。
6.7
7.1
異常時の処置
放電針からのスパーク
除電装置のシステムでは、目に見えるスパーク(火花放電)は正常使用時には一切起こり
ません。
もし、ブロワーの放電針からこのようなスパークが継続的に発生していれば、必ず、電極
部の清掃等のメンテナンスを行って下さい。清掃を行ってもスパークの発生が治まらない
場合は、電源スイッチをOFFにして、弊社もしくは弊社代理店に必ずご連絡下さい。
7.2
その他の異常
以下のような現象が発生した場合は、直ちに電源スイッチをOFFにして運転を停止し、
弊社または弊社代理店までご連絡下さい。
a)
ブロワー内部で火花が発生している。
b)
ブロワーが著しく変形している。
c)
異常な音やにおいがする。
d)
ファンが回らずエアーが吹き出てこない。
異常を発見した場合は、必ず点検・修理して下さい。または、修理・
点検依頼の詳細メモを添付の上、弊社宛その製品をご返送下さい。
調
整
エアロスタットPCのイオン出力は本質的にバランスが取れるように設計されていますの
で、使用途中あるいは定期的な調整を行う必要がありません。
もし、6.6のイオンバランスチェックの結果、イオンバランスが良好でないことが確認
された場合は、エアロスタットPCの除電電極を支持している絶縁材表面を圧搾空気等に
より絶縁部に付着した埃等のゴミを除去して下さい。この作業でもイオンバランスが崩れ
ている場合には、弊社または弊社代理店までご連絡下さい。保証要項に従い、弊社にて点
検修理させていただきます。
ご注意
エアロスタットPCの除電電極を支持している絶縁材表面が極端に汚れたり、吸湿材その他
の「導電性を付加する物質」が付着した場合、まれにイオンバランスが±10Vを外れる場
合があります。このような場合は、エアロスタットPCを分解洗浄すればイオンバランスは
正常に戻ります。分解洗浄(オーバーホール)は、保証期間内でも有償にて、弊社で行いま
すので、ご必要な場合は、弊社または弊社代理店までご連絡下さい。
6.8
故障箇所の点検
この点検は、本体カバーを開けて行います。このため高電圧を露出させることになり、大
変危険です。点検は専門の方にお任せ下さい。もしくは、弊社または弊社代理店までご連
絡下さい。保証要項に従い、弊社にて点検・修理させていただきます。
他にご不審な点、ご質問等がございましたら、弊社または弊社代理店までお問い合わせ下
さい。
−12−
−13−
第8章
主な消耗品および交換パーツリスト
部
品
名
数量
型
番
エアロスタットPCの外観寸法図
期待寿命
フィルター
1
PC用
ご使用環境によります
放電電極
1列
PC用
10000時間以上
高電圧トランス
1
PC用
10000時間以上
ファン、ヒューズ等、一般電気部品は省略しました。
ご注意
お客様ご自身で交換できるパーツは、フィルターのみです。高電圧トランスおよび放電電極
は弊社にて交換致します。(すべて有償です。)保証期間経過後の修理・点検等は、装置標準
寿命の期間内であっても、「有償修理」になります。
−14−
−15−
ベンチスタンドの詳細寸法図
−16−
エアロスタットPCの概略回路図
−17−
保
証
書
全ての弊社製品は「性能」およびその他の出荷検査をした後
出荷されておりますが、正常な使用状態において万一故障が
発生しました時には、下記の条件にて保証されております。
〔保証期間〕
弊社出荷日より1年間
〔保証内容〕
取扱説明書等の注意書に基づく正常なご使用状態のもとで、
製造上の責任による故障が、保証期間内に万一生じました場
合、無償にて修理または新品あるいは同等品と交換させてい
ただきます。
なお、修理、交換は本シムコ製品のみに限らせて頂きます。
本製品の故障、またはその使用によって生じた直接、間接の
損害については当社はその責を負わないものとします。
ご注意
1. ご使用前に必ず「取扱説明書」をお読み下さい。
2. 次のような場合は、保証期間中でも修理・調整等は、
有償になりますのでご注意下さい。
①
②
③
④
⑤
保証書のご提示がない場合。
落下その他の衝撃を加えられたり、お取り扱いが適
切でないために生じた故障、損傷の場合。
お客様による分解、不当な改造、修理による故障お
よび損傷。
火災、天災地変、あるいは異常入力電圧、水、蒸気、
油、酸等の外部要因に起因する故障、損傷の場合。
その他、その責が当社にないと判断された場合。
Simco-Ion Ionizing Air Blower
製 品 名
エアロスタット PC
出荷年月日
弊社では製品シリアルナンバ
ーにて出荷日の管理をおこな
っております。
保証期間
出荷日より1年間
シムコジャパン株式会社
本
社
〒650-0046
神戸市中央区港島中町1丁目2番4号
TEL.078-303-4651
静電気のスペシャリスト
シムコジャパン株式会社
本
社
〒650-0046
神戸市中央区港島中町1−2−4
TEL.078-303-4651 FAX.078-303-4655
神戸営業所
〒650-0046
東京営業所
〒130-0026
仙台営業所
〒980-0811
神戸市中央区港島中町1−2−4
TEL.078-303-4651 FAX.078-303-4655
東京都墨田区両国1−3−8西川ビル
TEL.03-3635-7261 FAX.03-3635-7189
宮城県仙台市若林区六丁の目町18−15
齋喜六丁の目ビル
TEL.022-227-8451 FAX.022-227-8454
ホームページ: http://www.simcoion.jp/
お問い合わせ: [email protected]
文書№取説−98070706
INST-98032806
Thank you for buying Simco-Ion products. This equipment will meet your
expectations and provide safe operation when it is properly installed and
maintained.
Checking the contents of package
Simco-Ion Electrostatic Neutralizer
Ionizing Air Blower AEROSTAT PC
INSTRUCTIONS
Installation/Operation/Maintenance
CAUTION
It is important that these instructions be read and understood before
installation or operation. Failure to follow these instruction so could
result in serious personal injury and/or damage to the equipment. At
the end of this manual, a written warranty is provided. This should
be stared in a safe place.
Please carefully remove the equipment from the carton and inspect. Note any
damage that might have occurred during shipment. Empty the carton to
ensure that small parts are not discarded. If any damage has occurred during
shipment, the local carrier should be notified at once. A report should be
forwarded to SIMCO JAPAN, INC. The address and other relevant
informations are written on the back cover page.
Package Contents
1) AEROSTAT PC with bench stand
1 pc.
2) Line cord 1.8 m long (3P)
1 pc.
3) Grounding cord 1.8 m long
1 pc.
4) Air filter element (spare)
1 pc.
5) Daily Inspection Label
1 pc.
6) Instructions Manual / Warranty (this book)
1 pc.
Please check if any part is missing or does not have
satisfactory finish. Contact us or our agents
immediately in the event of such occurrence.
- page 1 -
NOTES TO USERS
CONTENTS
Checking the contents of package....................................................page 1
WARNING
Packing Contents...............................................................................page 1
This equipment is not designed for classified (hazardous) environment.
It cannot be installed where it will be exposed to flameable or corrosive
solvents and gases.
Notes to Users...................................................................................page 2
Contents.............................................................................................page 3
Section 1. General description..........................................................page 4
CAUTION
- This equipment employs high voltage. Please follow the operating
instructions carefully in order to minimize electrical shock hazard.
-This equipment is intended for use in electrostatic processes that are free
from water, oil, solvents and other conductive contaminants. Exposure to
such contaminants will cause failure of the electrical insulation system of the
product.
-This equipment should not be operated in an ambient with corrosive fumes
of acid/alkali or corrosive gases such as chlorine.
-The primary side of this equipment must be connected to the correct line
voltage and frequency as indicated on the nameplate. Do not connect a
power unit with 100 V rated input voltage to 200 V supply. The applied
input voltage should be within permitted range mentioned in the section 2
(Specifications).
-The equipment must have proper grounding. Without proper grounding
there may be electrical shock/fire hazard.
-Do not insert any objects through intake or outlet grille.
-During normal use of this product, there should be no visible spark. If any
spark is observed, please turn off power and clean the unit following proper
maintenance procedure. In case sparking continues, contact us or our sales
representatives in your area.
-The neutralizing electrodes in this product consist of sharp needles. Please
take precautions against injury. Periodic maintenance, such as cleaning of
needle electrodes, is necessary for satisfactory performance of the equipment.
-If any abnormality is observed during inspection, the unit must be repaired
or replaced as required. Inspection, exchange and repair service will be
provided in accordance with the warranty conditions.
-This equipment is likely to be damaged if dropped. In such an event, it
should be carefully examined and any necessary repairs be made by an
authorized technician. The equipment will produce considerable electrical
noise and insulation might burn if the unit is damaged.
-This equipment was assembled and inspected at Simco's. Do not attempt to
disassemble or modify its construction. If you are not clear about its
operation and maintenance, call Simco Japan's authorized agent in your area.
-
page 2 -
Section 2. Specifications...................................................................page 5
Section 3. Principle of operation......................................................page 7
Section 4. Installation........................................................................page 8
Section 5. Operation..........................................................................page 9
Section 6. Maintenance...................................................................page 10
Section 7. Troubleshooting.............................................................page 14
Section 8. Replacement parts..........................................................page 15
Drawings................................................................................page 16 - 17
SIMCO EQUIPMENT REPAIR WARRANTY...........................enclosed
Explanation of Symbols:
WARNING
ATTENTION / CAUTION
ELECTRIC SHOCK HAZARD
- page 3 -
Section 1. GENERAL DESCRIPTION
Simco-Ion Aerostat PC ionized air blower produces an airflow that is rich in positive and
negative ions. Directing the airflow on an object that has an electrostatic charge will
neutralize the charge. Simco-Ion's Aerostat PC provides superior electrostatic discharge
times rates over a targeted work surface area.
Aerostat PC was designed for use with sensitive electronic components, where
ANSI/ESD is a problem. It can be applied in inspection, testing, assembly, and laboratory
environments. Aerostat PC can also be used where static electricity causes problems such
as: attraction of dirt to product, misalignment of small parts due to electrostatic "jumping",
and undesirable adhesion of plastic films due to electrostatic charge.
Aerostat PC is a portable ionized air blower. It has high performance ionizing electrodes
and power unit inside. It uses a small fan to produce airflow. The volume of airflow is
controlled by a variable speed control which provides a wide range of airflow settings.
Aerostat PC can neutralize static charge completely and quickly.
An inherent Ion Balance (Offset voltage) arrangement helps the production of equal
quantities of positive and negative ions. A built-in emitter cleaner provides easy cleaning
of the emitters. Cleaning emitters on a weekly basis keeps Aerostat PC working
efficiently for the life of the unit. To assure that the unit is working properly, the high
voltage AC is monitored by an ionization indicator lamp, provided on the front panel.
Features of Simco-Ion Aerostat PC Ionizing Air Blower are as follows;
Section 2. SPECIFICATIONS
Model:
Aerostat PC
Input:
100 V AC (±10V), 50/60 Hz (same units), 0.3 A
Ambient conditions:
0 to 50 ℃, 10 to 85 %RH (non-condensing)
Size:
180 (W) × 247 (H) × 112 (D) [mm] Refer to attached drawing.
Weight:
Approx. 2.9 kg (included a stand and a line cord)
Enclosure:
Formed Aluminum
Finish:
White paint, Polyester/Epoxy
Bench stand feet:
Non-conductive, Non-staining Polyurethane
Air filter:
30 PPI Open cell Polyurethane foam
Operating distance:
50 mm to 600 mm (Recommended distance: 300 mm)
Ozone production:
0.01 ppm (Measured at 150 mm in front of unit, fan low)
Air volume and
Audible noise:
Refer to the following table.
- Small, and portable
- Rapidly neutralizes static charges
- Covers an extended distance with ionized air
Air volume
(m3/min.)
Audible noise
(dB-A)
Minimum
1.0
50
maximum
2.0
57
(Audible noise: Measured at 600 mm from unit)
- Variable speed fan with wide range of air flow
- Patented (US patent # 5, 153, 8119) inherently balanced ion output
Fan speed
setting
Air velocity:
- Patented (US patent # 4, 734, 580) built-in ion emitter cleaner
- Ionization indicator lamp
- Air filter
Refer to the following table. (Unit: m/s)
Distance
30 cm
60 cm
90 cm
120 cm
Fan
Low
speed
setting High
1.2
1.0
0.7
0.6
2.5
2.0
1.5
1.2
(Measured at center line of air stream)
- Bench stand
- Durable, electrically grounded aluminum enclosure
- page 4 -
Ion Balance range:
0 V ± 10 V (offset voltage, automatic inherent Ion Balance)
- page 5 -
Section 3. PRINCIPLE OF OPERATION
Discharge time:
(Decay time)
Refer to the following table.
Fan speed
setting
Maximum
Minimum
In general static eliminators consist of ionizing electrodes, high voltage power unit
and a high voltage cable to connect power unit to ionizing electrodes. In Aerostat
PC, power unit is located inside; thus it does not need an external high voltage cable.
Distance
(m)
Measuring
position
0.3
0.6
0.9
1.2
150 mm
5
7
11
16
Center Line
2
5
10
15
150 mm
5
7
11
16
150 mm
10
14
24
34
Center Line
4
9
16
24
150 mm
10
14
24
34
NOTE:
Ion Balance (offset voltage) and Decay time are determined as per
ANSI/ESD STM3.1 ESD Association Standard Test Method using 6" × 6",
20 pF metal plate (Charged Plate Monitor).
Decay times are in seconds from 1000 volts to 100 volts at location shown.
Life expectancy:
Approx. 10,000 hours (based on 8 h/d, 250 d/y, 5 years)
Warranty:
One year after shipment
- page 6 -
Normally, ionizing electrodes consist of ionizing emitters and ground electrode.
Aerostat PC has no ground electrode. Instead, the reference electrode is isolated
from the ground and is placed around the ionizing needles. This arrangement makes
the working of Auto Ion Balance system possible.
The ionizing elements are energized with a low current, high voltage transformer.
The transformer contains a current limiting resistor which enhances ionization
stability and provides for safety. The high voltage AC is applied to a circular
arrangement of ion emitter points, which results in an intense alternating electric
field at the tip of the emitter points.
Simco-Ion Aerostat PC operates as follows:
1) When the power switch is turned on, the fan starts and the power unit produces
high voltage.
2) Because of intense electric field at the emitter tips, corona discharge is initiated.
Air around the emitters is ionized and positive and negative ions are produced.
3) The airflow can be controlled by the fan speed adjustment. The ionized air stream
carries ions of both polarities to the charged object that needs to be neutralized.
4) If the object has a negative charge, it will draw positive ions from the airflow.
Conversely, if the object has a positive charge, it will draw negative ions from
the airflow. The air ions are attracted to the oppositely charged object and
neutralize the charge on the object.
- page 7 -
Section 4. INSTALLATION
CAUTION
Do not turn on power switch until all installation work is completed.
4.1 Location
- Although neutralization distance can reach more than 1 m, the Aerostat PC should be
placed within 50 cm of the object to be neutralized. Recommended distance is approx.
30 cm. Shorter distance results in faster neutralization.
- The ionized air stream should be directed toward the charged object with no other
object in between. Any interference will make neutralization difficult and incomplete.
- An isolated charged object can be neutralized efficiently. An object in contact with
ground cannot be neutralized properly.
- Aerostat PC unit includes an air filter attached to it. In a clean environment the filter
may not be needed. It may be removed easily from the rear of the unit. This would
result in even better neutralization performance.
WARNING
Do not switch on Aerostat PC air blower in an ambient that contains organic
solvents or flammable gases.
4.2 Installation procedure
- Aerostat PC is designed for portable or permanent location operation. It is supplied
with a bench stand. The bench stand can be used for portable operation (desk model)
or bolted to a sturdy flat surface such as a wall or under a shelf.
- The direction of the air stream can be adjusted upward or downward by loosening the
lock knobs, tilting the unit to correct angle and retightening the knobs.
4.3 Utility power supply connection
The rated input to this unit is 100 V, 50 or 60 Hz. Same unit can be used for both
the frequencies. A line cord with a 3-pin plug is provided for Aerostat PC. If the
utility supply outlet is also a 3-terminal grounded receptacle, then grounding
connection is assured. On the other hand, if the utility outlet has two pins, a 3P - 2P
adapter is needed. In this case, either the ground wire from the adapter should be
connected to a proper ground or the unit itself should be grounded.
CAUTION
- Aerostat PC air blower must be grounded properly. It is dangerous to
operate it without proper grounding; also, its neutralization performance
suffers considerably.
- There is no restriction on the location of Aerostat PC except that its air inlet
should not be blocked by the wall on which it is mounted, paper or anything
else.
- page 8 -
Section 5. OPERATION
5.1 Activate Aerostat PC by turning the FAN SPEED knob clockwise, out of the OFF
position. The fan starts and the IONIZATION INDICATOR will illuminate to
indicate the presence of ionized air. Charge neutralization occurs when ionized
airflow reaches the charged object.
5.2 The direction of air stream can be adjusted upward or downward by loosening the
LOCK KNOBs placed both side of Aerostat PC, tilting the unit and retightening the
knobs. The airflow can be increased by turning the FAN SPEED knob further
clockwise. The time required to neutralize a static charge on an item in the air stream
depends on many factors. Two important factors are distance to ionizer and air
velocity. Air ions constantly “neutralize” each other. Positive and negative ions are
electrostatically attracted to each other. When they contact, the charge transfers and
the ions “recombine”. With high air velocity, the air ions travel further before they
“recombine”. Setting the fan speed as high as acceptable results in rapid
neutralization and coverage for very large area. Decreasing the distance results in
more rapid neutralization.
5.3 To stop Aerostat PC, turn the FAN SPEED knob counterclockwise to the OFF
position.
CAUTION
- Confirm the supply voltage and frequency from the nameplate.
- Check the resistance between the enclosure and the ground. It should be less
than 100 Ω.
- Confirm that there is no deformation of the enclosure.
- Check the lightning of the ionization indicator lamp periodically. The lamp is
a neon bulb. It may flicker a little, especially at 50 Hz. This is normal and
should not be considered as a failure. The lamp is connected to the
transformer secondary in order to indicate energization of the high voltage
transformer. The performance, safety and life of Aerostat PC air blowers
will not be affected by the flickering of neon lamps.
- During normal operation, there should be no visible spark. In case,
intermittent spark is observed, electrodes should be cleaned in accordance
with the procedure mentioned in next section under the heading
Maintenance. If even after cleaning sparking continues, please contact us or
our agents in your area. Sparking reduces ionization efficiency. Uncontrolled
sparking might damage electronic equipment in the vicinity, it might, also,
damage the high voltage transformer.
- Turn the switch off when Aerostat PC is not in use. If left unused for a long
period of time, the blower should be unplugged from the power receptacle.
-
page 9 -
Section 6. MAINTENANCE
Aerostat PC has been designed with low maintenance in mind. The only regular
maintenance suggested is emitter point cleaning, ion balance checking and ion output
checking. Emitter point cleaning takes only seconds with our patented point cleaner. This
assures continued performance on ion output.
Aerostat PC contains a patented balancing circuit that is inherently self-balancing. This
circuit compensates for dirt build-up on emitters, emitter point wear, line voltage
fluctuations and variations in air velocity. Scheduled checking of the ion output and
balance should be considered to assure quality audit requirements.
CAUTION
During cleaning power switch must be turned off.
6.1 Emitters cleaning
Like other electrical ionizers, the ion emitters of Aerostat PC tend to accumulate dust
and dirt. This decreases ion output. Therefore the emitter electrodes should be
cleaned regularly.
To clean the emitters points hold the POINT CLEANER knob between thumb and
forefinger and rotate it clockwise to the stop (approximately one turn) and release.
The spring-loaded point cleaning brush will return to its parking spot. This will move
a brush over the emitters to clean them. Recommended frequency of emitter point
cleaning is every 160 hours of operation. (Weekly for 24 hr/day operation, monthly
for 8 hr/day operation)
6.2 Air inlet and outlet cleaning
The air inlet grille on the rear of the unit and the ionized air outlet should remain
clean to prevent restriction of airflow. They can be cleaned with a soft brush or
vacuum.
6.3 Air filter cleaning
Remove the air filter from the rear of the unit by unsnapping the filter retainer. Rinse
the filter in plain water while gently squeezing. If the dirt is stubborn, wash the filter
in mild soap and water then rinse. Blot the filter dry with paper towels and allow to
dry. Install filter on air inlet and secure by snapping the filter retainer in place.
IMPORTANT:
Clean filter regularly for better efficiency. If the filter is damaged, it should
be replaced. In this case, either contact us directly or contact our agents in
your area.
- page 10 -
6.4 Inside cleaning
Disconnect the power cord, remove the knobs and the stand also, remove the screws
on both sides to take the cover out. Use compressed air or vacuum cleaner to remove
dust. Be careful so as not to damage the inside. After cleaning, place the cover back
on the unit and connect the power cord to the receptacle.
CAUTION
Never use metal brush or solvents (paint thinner etc.) to clean Aerostat PC.
6.5 Ion output check
6.5.1 Measure by charge plate monitor
To test the unit for ion output, the use of charged plate monitor is recommended.
Decay times can be measured and checked against the tables in Section 2,
Specifications. These tables comply with ANSI/ESD STM3.1 ESD Association
Standard Test Method.
The recommended measure condition is shown in the following.
- The measure part of the charge plate monitor and the distance between main bodies
are set to 30 cm.
- Fan speed is maximized.
- Do the measure of the environmental temperature humidity in an environment
20℃±5℃ and 60%R.H following.
6.5.2 Measure excluding charge plate monitor
If a charged plate monitor is not available, but a
static meter such as Simco- Ion Electrostatic
Fieldmeter FMX-003 is available, ion output may
be checked with the following procedure.
1) Prepare two plastic plates of different materials,
for example PVC and Acrylic; each 150 mm
sq., 1 mm thick.
2) Rub the plates together to get more than 1 kV
on the surface.
3) Measure the voltage and polarity of charge
using the fieldmeter.
4) Hold the plates 30 cm away from the ionized air
outlet of Aerostat PC; turn the blower on for 1
second (separately for each plate).
5) Measure voltage and polarity on the plates. If
both the plates are neutralized, the performance
of Aerostat PC blower is acceptable.
Model FMX-003
- page 11 -
NOTE:
If the plates are not neutralized, clean the emitters electrode and check its
performance again, following the procedure mentioned above. If
neutralization does not occur, please keep a record of the tests and contact
us or our agents in your area.
6.6 Ion Balance Check
6.6.1 Measure by charge plate monitor
To test the unit for ion balance, the use of a charge plate monitor is recommended.
Ion Balance (offset voltage) should be measured and checked against the specified
value given in section 2, Specifications. The specification in section 2 has been
prepared in accordance with ANSI/ESD STM3.1 ESD Association Standard Test
Method.
Do as a recommended measure condition as well as the measure of 6.5.1 ion output
check.
6.6.2 Measure excluding charge plate monitor
① Measure by Electrostatic Fieldmeter FMX-003 for the ion balance check of the
attachment.
Can the measure by using the plate for the ion balance check of the attachment in
case of the measure with Simco-Ion Electrostatic Fieldmeter FMX-003.
(Refer to the manual of the Fieldmeter about use etc.)
◇NOTE
The ion balance of Aerostat PC is ±10V. Make within ±20V a standard in the
plate for the ion balance measure of static electricity Electrostatic Fieldmeter
FMX-003 by relate, that an area and electrostatic capacity of the detection part are
different from ANSI/ESD STM3.1 ESD Association Standard Test Method.
2) A Electrostatic Fieldmeter is placed behind the plate. Make certain that ionized
air cannot reach the measuring device.
3) With the blower off, carry out zero adjustment of the measuring device.
4) Turn on the blower and read the static potential of the metal plate.
5) If a metallic board is electrification of -10V to +10V, the ion balance is normal.
If the electrification potential more than the range can be read, the ion balance is
not normal.
NOTE:
Do not try to determine ion balance by holding a static meter in the ionized
air stream. This will result in a meaningless reading.
CAUTION
- Measuring instruments used in sections 6.5 and 6.6 should be calibrated.
- Do not try to verify the operation of the unit by drawing a spark from an
ion emitter point. The design of the balancing circuit makes the “spark
test” inconclusive. Sustained grounding of the ion emitters may damage the
balancing circuit.
6.7 Ion Balance calibration
Aerostat PC's ion output is inherently balanced by design. As a result, there are no
calibration adjustments. Remove the surface of the insulating material where emitters
of Aerostat PC are supported when it is confirmed that the ion balance is not
excellent as a result of the ion balance check of 6.6 and remove the garbage such as
the dust which adhere to the insulation part with the compression air etc.
If, after checking the ion balance as outlined above (section 6.6), an unbalance or ion
balance (offset voltage) in excess of that specified in the Specification (section 2) is
found to exist, please contact Simco Japan's or refer to the following section on
"Troubleshooting".
CAUTION
②
Ion Balance measure with FMX-003
Measure by Electrostatic Fieldmeter
In case charged plate monitor is not available and a Electrostatic Fieldmeter in used
to check ion balance, following steps should be followed.
1) A metal plate, of size equal to or larger than 150 mm square, supported on
materials of high insulation resistance (glass, Teflon) is placed 30 cm away in
front of Aerostat PC air blower such that the direction of airflow is normal to
its surface.
- page 12 -
Failure of the electrical insulation of electrodes in Aerostat PC by dirt,
moisture or other conductive contaminants might result bad ion balance. In
this case, Aerostat PC should be taken apart and cleaned, please contact
Simco Japan's or our representatives in your area. Disassembly and cleaning
are not covered by warranty.
- page 13 -
Section 7. TROUBLESHOOTING
CAUTION
Troubleshooting, usually, requires opening the case of the unit. This exposes
hazardous voltages. It should be performed by a qualified service personnel.
Our company or our sales agents in your area can also be contacted.
Inspection and repair service is available in accordance with warranty
provided.
7.1 Spark from the emitter electrodes
During normal operation, there should be no visible spark from the emitters. In case
occasional sparks are observed, emitters might need to be cleaned. Follow the emitter
cleaning procedure mentioned above. If cleaning the emitters does not stop the
sparking, the unit might need replacement. In that case, please switch off the unit and
contact us or our representatives in your area.
Section 8. Replacement Parts
Part
No. of units in the blower
Expected life
Filter
1
Depends on working condition
Ionizer Assembly
1
Approx. 10,000 hours
HV transformer
1
Approx. 10,000 hours
Common electrical parts such as fan, lamp etc. are not included in this table.
ATTENTION
The air filter can be replaced by the customer on site. However, the replacement
of the emitter ring and the transformer must be done at the factory.
7.2 Ion output and Ion balance problems
For troubleshooting ion output and ion balance, one should check the high voltage
output of the transformer and the isolation of transformer secondary, reference
electrode and ion emitter bar from ground.
Voltage output:
For testing the open-circuit output voltage, with the unit unplugged the secondary
terminals of the transformer should be isolated and a high impedance (> 500 MΩ)
High voltage meter should be connected across it. Plug the unit in and turn it on. The
meter should read a minimum of 5 kVAC.
Isolation:
With the unit unplugged, check the following insulation resistance values separately
using a megohmmeter.
a) Two terminals of the transformer secondary connected together and chassis ground.
b) Reference electrode and chassis ground.
c) Ion emitter bar and chassis ground.
In all these cases, the measured resistance value should be greater than 10 GΩ at 7.5
kV DC.
7.3 Other abnormal conditions
In case any of the following problems is observed, turn the unit off and contact us or
our representatives in your area.
a) Any persistent visible spark inside
b) Change in shape of the blower
c) Any abnormal sound or smell
d) No airflow, fan does not work
- page 14 -
- page 15 -
Drawings AEROSTAT PC
STAND DETAILS
AEROSTAT PC SCHEMATIC
- page 16 -
- page 17 -
INST-98032806
SIMCO EQUIPMENT
REPAIR WARRANTY
Simco equipment has been carefully tested and inspected at the
factory and is warranted to be free from any defects in materials or
workmanship.
Simco Japan, Inc. will, under this warranty, repair or replace any
equipment, which proves upon their examination, to have become
defective within the Warranty period from the date of purchase. A one
year Warranty applies to all Simco equipment. The equipment is to be
returned by the purchaser to Simco Japan, Inc. or authorized agent of
Simco, transportation prepaid and insured for its full purchase price.
Prior to returning any goods for any reason, contact Simco Japan,
Inc. or authorized agent for an Authorized Return Number. This
number must accompany all returns.
The Warranty does not apply when the equipment has been tampered
with, misused, improperly installed, altered, has received damage
through abuse, carelessness, accident, connected to improper line
voltage, or has been serviced by anyone other than an authorized
factory representative. The warranty does not apply when Simco parts
and equipment have been energized by other than appropriate Simco
Power unit or generator, or when Simco Power unit or generator has
been used to energize other than Simco parts and equipment.
Simco Japan, Inc. makes no Warranty, expressed or implied, nor
accepts any obligation, liabilities or responsibility in connection with
the use of this product other than the repair or replacement of parts
as stated herein.
Product
Name
Simco-Ion Electrostatic Neutralizer
AEROSTAT PC Ionizing Air Blower
Delivery Product's serial number contains Warranty
Date
information on the shipping date.
Period
A one year
Warranty
SIMCO JAPAN, INC.
1-2-4, Minatojima-Nakamachi,
Chuo-ku, Kobe, 650-0046, Japan
Phone: +81-78-303-4651 Fax: +81-78-303-4655
WEB: http://www.simcoion.jp/
INQUIRY e-mail: [email protected]