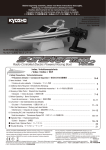
1
※ご使用前にこの説明書を良くお読みになり十分に理解してください。
Before beginning assembly, please read these instructions thoroughly!
WINGSPAN : 944mm (37.1")
R
THE FINEST RADIO CONTROL MODELS
ARF Kit
組立/取扱説明書
INSTRUCTION MANUAL
EP パイパー J-3 カブ M24〈ARFキット〉
EP Piper J-3 Cub M24
RADIO CONTROLLED ELECTRIC POWERED AIRCRAFT
目 次 INDEX
●キットに入っているもの/組立に必要な工具
KIT CONTENTS / TOOLS REQUIRED
●キットの他に用意するもの/プロポの準備/基本とニュートラル調整
RADIO PREPARATION
●本体の組立
ASSEMBLY
●飛行手順の注意
FLIGHT MANUAL
●分解図
EXPLODED VIEW
●パーツリスト
PARTS LIST
●取扱いの注意
OPERATING YOUR MODEL SAFETY
安全のための注意事項
この無線操縦模型は玩具ではありません!
●この商品は高い性能を発揮するように設計されていますので組立
てに不慣れな方は、模型を良く知っている人にアドバイスを受け
確実に組立ててください。
●組立て作業は、幼児の手のとどかない所で必ず行ってください。
●動かして楽しむ場所は万一の事故を考えて、安全を確認してから
責任をもってお楽しみください。
●組立てた後も説明書がいつでも見られるように大切に保管してく
ださい。
Ni-MH
2
3∼4
5∼8
9∼12
13
14
15
UNDER SAFETY PRECAUTIONS
This radio control model is not a toy!
●First-time builders should seek the advice of experienced modellers
before beginning assembly and if they do not fully understand
any part of the construction.
●Assemble this kit only in places out of childrenÕs reach!
●Take care before operating this model.
You are responsible for this modelÕs assembly and safe operation!
●Always keep this instruction manual ready at hand for quick
reference, even after completing the assembly.
・不要になったニカドバッテリーは、貴重な資源を守るために廃棄しないでリサイクル協力店へお持ちください。
・The product you have purchased is powered by a rechargeable battery. The battery is recyclable. At the end of its useful life, under
various national / state and local laws, it may be illegal to dispose of this battery into the municipal waste stream. Check with your local
solid waste officials for details in your area for recycling options or proper disposal. ※製品改良のため、予告なく仕様を変更する場合があります。 *SPECIFICATIONS ARE SUBJECT TO BE CHANGED WITHOUT NOTICE.
2004 KYOSHO CORPORATION/禁無断転載複製
(ARFキット)No.10221
組立て前の注意 BEFORE YOU BEGIN
◆組立てる前に説明書を良く読んで、おおよその構造を理解してから組立てに入ってください。
Read through the manual before you begin, so you will have an overall idea of what to do.
◆キットの内容をお確かめください。万一不良、不足がありましたら、お買い求めの販売店にご相談いただくか、当社「ユーザー相談室」までご連絡ください。
Check all parts. If you find any defective or missing parts, contact your local dealer or our Kyosho Distributor.
Warning!
● 無線操縦飛行機が初めてという方は、調整等を経験者のアドバイスを受けながら確実に行ってください。中途半端な組上がり
の機体を飛ばすのは大変危険です。
● 無線操縦飛行機が初めてという方には、単独飛行はできませんので、必ず経験者の指導を受けてください。
● この機体は、電動用に設計されていますので付属以外のモーターやエンジンを使用し、過激な飛行をおこなうと破損するだけ
でなく、大変危険ですので絶対におやめください。
● First-time fliers should seek advice on pre-flight adjustments and assembly from experienced fliers. Remember that
flying a badly assembled or badly adjusted aircraft is very dangerous!
● In the beginning, first-time fliers should always be assisted by an experienced flier and never fly alone!
● This model aircraft is designed to be powered by an electric-motor. Installing a powerful motor or engine, or flying this model
aggressively may lead to serious damage and accidents!
キットに入っているもの
KIT CONTENTS
輪ゴム(4本)
Rubber band
本体(胴体)
Fuselage
主翼
Main Wing
THE FINEST RADIO CONTROL MODELS
R
R
R
THE FINEST RADIO CONTROL MODELS
R
デカール
Decal
バッテリーハッチ
Battery Hatch
3 x14 mm TPビス(1本)
TP Screw
3 x10 mm TPビス(4本)
TP Screw
3 x 8 mm TPビス(4本)
TP Screw
THE FINEST RADIO CONTROL MODELS
ハッチストッパー
Hatch Stopper
R
R
THE FINEST RADIO CONTROL MODELS
THE FINEST RADIO CONTROL MODELS
メインギヤ(脚)
Main Landing Gear
No.1xxxx PIPER CUB J3
KYOSHO PRINTED IN CHINA
2.5 x 12 mm TPビス(2本)
TP Screw
組立に必要なもの REQUIRED FOR OPERATION
用意する工具・その他
REQUIRED
■ +ドライバー
(大、
中、
小)
Phillips Screwdriver (L.M.S)
用意する電池
■ハサミ
Scissors
■カッターナイフ
Sharp Hobby Knife
■キリ
Awl
2
■セロハンテープ
Cellophane Tape
■両面テープ
Double-sided
Tape
BATTERIES REQUIRED
■送信機用
単3乾電池(別売)
AA-size Batteries
(Transmitter)
AA
AA
キットの他にそろえる物
1
REQUIRED FOR OPERATION
専用バッテリー(充電式電池)8.4V-600mAh
プロポ
Radio control systems
4チャンネルの飛行機用 2サーボ無線操縦器(プロポ)セット、
マイクロサーボ×2、飛行機用アンプ×1
This model requires a minimum 4-channel radio control system (with 2 micro servos
and 1 speed control amp (electronic speed controller) for aircraft.
注意
上空用(飛行機用)のプロポセットを必ず使用してください。
(上空用以外使用禁止)
Only use radio control systems designed for aircraft.
●No.71193
8.4V-600mAh
ニッケル水素バッテリー
8.4V-600mAh Ni-MH Battery
充電器
3 Charger
■充電器(使用するバッテリーに適合したもの)
Charger (A charger suitable for your model's battery.)
プロポの取扱いは、プロポに付属の説明書を参考にしてください。
Read instruction manual supplied with radio control system
thoroughly before use.
■飛行機用のプロポ
A radio control system for aircraft.
2 Battery (Rechargable) 8.4V-600mAh
●No. 72511
マルチチャージャーⅣ
(ニッケル水素、ニカドバッテリー用)
Multi Charger IV
(For Ni-MH, Ni-Cd batteries)
■マイクロサーボ
又は超マイクロサーボ
Micro servo or super micro servo.
使用できるサーボサイズ
Suitable size servos
21∼25mm
11∼13 mm
24∼27mm
■飛行機用アンプ (10A以上)
Speed Control Amp. suitable for aircraft. (Minimum 10A)
●No. 72102
エクセルプロチャージャーVer.2
(ニッケル水素、ニカドバッテリー用)
Excel Pro Charger Ver.2
(For Ni-MH, Ni-Cd batteries)
●No. 90202
スカイ・ヴィクトリー
360Pアンプ
SKY VICTORY 360P amp
プロポの準備 RADIO PREPARATION
1
キットの組立てに入る前に、バッテリーを充電器の説明にしたがって充電しておきます。
The batteries should be charged before kit assembly. Charge the battery according to the charger's instruction manual.
2
プロポを下の順序にしたがってセットします。
Set up the radio as explained below.
●始める時
11
2
▲12Vバッテリー
Battery
8
1
6 ON
10 OFF
5
▼スカイビクトリーを
使用する場合の ●終わる時
変換コネクター
Adapter for Sky Victory 360P
3
●START
▲送信機
Transmitter
7
▲サーボ
Servo
9
▲アンプ(スカイビクトリー360P)
Speed Control Amp.
(Sky Victory 360P)
●FINISH
▲受信機
Receiver
4
1
単3乾電池をセットする。
(送信機)
2
アンテナをのばす。(送信機)
3
バッテリーをつなぐ。
4
アンテナ線をのばす。(受信機)
5
トリムレバーを中央にセットする。
6
スイッチを入れる。(送信機)
7
スイッチを入れる。(受信機)
8
スティックを動かしてサーボが動くか確認する。
9
スイッチを切る。(受信機)
10
スイッチを切る。(送信機)
11
アンテナを縮める。(送信機)
1
Install AA-size batteries. (Transmitter)
2
Extend the antenna. (Transmitter)
3
Connect the battery.
4
Extend the antenna. (Receiver)
5
Center the trims.
6
Switch on. (Transmitter)
7
Switch on. (Receiver)
8
Make sure the servos are in command.
9
Switch off. (Receiver)
10
Switch off.(Transmitter)
11
Retract the antenna.. (Transmitter)
3
電動プレーンの基本とサーボのニュートラル調整
BASIC CONNECTION FOR ELECTRIC POWERED AIRPLANE AND ADJUSTMENT OF SERVOS
電動プレーンの基本接続図。 ●プロポの取扱いは、プロポに付属の説明書を参考にしてください。
Basic connection for EP Airplane.
■バッテリー
Battery
● For more information, refer to radio system instruction manual.
■スイッチ Switch
■受信機
Receiver
エレベーター
Elevator
■エレベーターサーボ
Elevator Servo
■モーター Motor
■アンプ
Speed Control Amp.
■ラダーサーボ
Rudder Servo
ラダー
Rudder
サーボを取り付ける前には、
必ずサーボのニュートラルを出しておく必要があります。
Always set the servos at their neutral position before installing the servos.
サーボのニュートラルの出し方
Establishing servoÕs neutral position.
●図のように接続した状態で送受信機のスイッチをONにすると、自動的にサーボのニュートラルが出ます。
The servo's reach their neutral position automatically when connected according to the drawing below
and the transmitter/receiver switches are turned ON.
■受信機
Receiver
■スイッチ
Switch
■バッテリー
Battery
■アンプ
Speed Control
Amp.
■スイッチ
Switch
説明書に使われているマーク Explanation of symbols used in this instruction manual.
2mm
2mmの穴をあける(例)。
Make 2mm hole (example).
をカットする。
Cut off shaded portion.
1
●重要な注意事項があるマークです。
必ずお読みください。
Don't overlook this symbol!
注意して組立てる所。
Pay close attention here!
別購入品
Must be purchased
separately!
警告
Warning!
デカール
Decal
E
H
T
T
S
E
IN
F
IO
D
A
R
L
O
R
T
N
O
C
前
Front
S
L
E
D
O
M
反対側のデカールも同様に貼る。
Apply decals to opposite side in same way.
余ったデカールは好きなところに貼る。
Apply extra decals to your liking.
4
2
3 x 8 mm
サーボ
Servo
ラダーサーボ
Rudder Servo
エレベーターサーボ
Elevator Servo
3 x 8 mm TPビス
TP Screw
小さいサーボを使う場合は、
図の部分を指で押してサーボに
合わせる。
For smaller servos, use finger to align
position of screw holes.
-------------------------- 4
前
Front
3
アンプ
Speed Control Amp.
アンプ
Amp.
変換コネクター
Adapter
図はスカイアンプビクトリー使用の場合。
(接続はアンプの説明書を参考にする)
Diagram shows
Sky Victory 360P Amp.
(Refer to manual for
connection instructions).
両面テープで固定
Double-sided tape
アンプのスイッチに合わせて
胴体側面をカットする。
Align Amp. and cut fuselage.
接続はアンプの説明書を
参考にする。
Refer to manual for
connection.
2mm
アンプ付属
Supplied with
the Electric Speed Amp.
4
受信機
Receiver Installation
10㎜
受信機
Receiver
2mm
アンテナ線を出す。
Feed antenna out
両面テープで固定
Fix with tape
プロポの説明書を参考にコネクターを接続する。
Refer to radio system instruction manual
and connect the leads.
バッテリーコネクターを下へ出す。
Pull battery leads out from bottom.
別購入品
Must be purchased separately!
2mm
キリで穴をあける(例2㎜)
Make hole with Awl.
(example: 2mm).
注意して組立てる所。
Pay close attention here!
をカットする。
Cut off shaded portion.
Warning!
●重要な注意事項があるマークです。
必ずお読みください。
Don't overlook this symbol!
5
5
アンテナ線
Antenna Lead
アンテナ線はセロハンテープで胴体側面
に止める。
Fix the Antenna Lead to side of
fuselage with tape.
6
アンテナ線は垂直尾翼に
セロハンテープで止める。
Fix to the vertical fin
with tape.
リンケージ
Linkage
サーボ付属
Supplied with
servo.
一直線になるようにロッド
アジャスターを回して調整します。
Make straight by turning rod
adjuster.
90°
チューブをかぶせる。
Cover with tube.
2mm
10mm
一直線
Straight Line
90°
7
胴体
Fuselage
3 x10 mm
3 x10 mm TPビス(4本)
TP Screw
------------------------ 4
注意して組立てる所。
Pay close attention here!
別購入品
Must be purchased separately!
6
2mm
キリで穴をあける(例2㎜)
Make hole with Awl.
(example: 2mm).
Warning!
●重要な注意事項があるマークです。
必ずお読みください。
Don't overlook this symbol!
8
主翼
Main Wing
Warning!
2.5x12mm TPビス
TP Screw
確実に取付ける。飛行中にはずれると操縦
不能になり事故につながります。
Fix wing securely to fuselage. Loss of
wing will result in no control and crash.
--------------------- 2
E
H
T
T
S
E
IN
F
IO
D
A
R
L
O
R
T
N
O
C
S
L
E
D
O
M
図のように輪ゴムを2本使用する。 Use 2 rubber bands to secure wing as shown.
2.5 x 12 mm
中心に合わせる。
Align to the center.
THE FINEST RADIO CONTROL MODELS
A'
A"
A' = A"
平行
Parallel
注意して組立てる所。
Pay close attention here!
Warning!
●重要な注意事項があるマークです。
必ずお読みください。
Don't overlook this symbol!
7
9
3 x14 mm
バッテリー
Battery
3 x14 mm TPビス(1本)
TP Screw
--------------------- 1
8.4-600mAhニッケル水素バッテリー
8.4-600mAh Ni-MH Battery
コネクターは飛行させる時まで
接続しない。
Don't connect until just before flight.
10
重心位置
C of G Position
約45 mm
重心位置
C of G
右図の位置に重心が来るようにアンプや受信機を前後に
移動して重心位置を合わせる。
If necessary, move Receiver or Speed Control Amp
to get correct C of G (center of gravity).
Warning!
11
重心のチェックをする前に飛行は、おこなわない。
重心位置が正しくないと操縦不能になり事故につながります。
Do not fly before confirming the correct C of G position.
If the C of G is incorrect, you may lose control of your airplane and crash.
プロポの動作の確認
Check Radio System
スティックと各舵の動作があっていない
時は送信機のリバーススイッチで調整する。
If rudder doesn't move as per control stick,
use reverse switch on transmitter.
<エレベター> <Elevator>
<ラダー> <Rudder>
アップ
Up
6㎜
6㎜
ダウン
Down
注意して組立てる所。
Pay close attention here!
右
10 ㎜ Right
左
Left 10 ㎜
Warning!
●重要な注意事項があるマークです。
必ずお読みください。
Don't overlook this symbol!
8
パイパーカブJ-3 飛行手順の注意 / PIPER CUB J-3 FLIGHT MANUAL
●気軽に飛ばせ操縦もやさしい電動プレーン。でも空を飛び回るものだから安全確認は重要です。
この『飛行手順の注意』をよく読んで、安全な飛行方法について十分理解しておきましょう。
●R/Cプレーンが初めてという方の単独飛行はできません。必ずベテランの指導を受けてください。
●Electric plane with gentle flying characteristics. Safety checks on flying models are essential.
Please read this "Flight Manual" carefully to understand how to operate this model safely.
●First time fliers of R/C planes should seek the supervision of experienced model plane fliers.
1
飛行場所は慎重に選ぼう! / Choose Location Carefully!
●こんな場所での飛行は絶対に禁止です! ●Do NOT operate model near these areas!
人家やビル、子供の遊び場や
公園、交通量の多い道路、鉄
道、飛行場、高圧線、鉄塔な
どのそばは飛行禁止。また飛
行範囲に人、特に子供が入っ
てこないように注意する。
Do NOT use near: houses or
buildings; children's play
areas; road traffic;
railways; airports;
overhead powerlines and
pylons. Make sure no
people, especially
●理想的な飛行場所は…
飛行場所は左図のような四方が
広く人がいない場所が理想的で
す。(模型飛行機専用の飛行場
を使用する場合は、必ず管理者
の許可をとってください。)
The ideal location for
flying has wide-open space
in four directions with no
people. (If using a model
airfield, be sure to contact
the airfield's administrator
for permission).
2
フライト条件 / Flight Conditions
●初飛行は風速2∼3mの弱風が基本!
2~3mの
弱風
2~3m
Light Wind
●First flight should be in light wind speeds up to 2 - 3m!
強風
強風
弱風
Light
Wind
Strong
Wind
強風
Strong
Wind
Strong
Wind
強風での飛行や、横風・追い風で
の離着陸は禁止。
Do NOT try to land or take-off
with strong cross or tail
winds.
9
3
飛行前のチェック / Pre-Flight Check
充電
プロポ
バッテリーを充電する。
充電器やバッテリーの
取扱説明書をよく読んで、
正しく充電する。
プロポの取扱説明書をよく読んで
十分に理解しておく。
Battery Charge
Transmitter
Charge the battery.
Read the operating instructions
for the charger and battery
for correct charging method.
Read and understand the radio
system instructions to operate
the transmitter correctly.
●各部のチェックは確実にしましょう! ●Check Each Component Carefully!
1
主翼のねじれ・胴体と尾翼のねじれ・傷や
いたんでいる部品がないかをチェック。
Check for any bends or damaged parts
on main wing, fuselage or tail wing.
プロペラ・アダプター・各ビス等が
確実に取り付られているかチェック!
Check that propeller, adapter and all
screws are securely fastened!
2
周囲に同じバンドの人がいないか必ず確かめます。
Always check that no one is using the same
frequency (band) in the same area!
85
81
85
81
3
機体のスイッチがOFFとなっている事を確認してからバッテリーを
つなぐ。プロペラの周囲に人がいないか注意。
Make sure power switch on the plane is OFF before connecting battery.
Make sure no one is near the propeller.
スイッチに触らない!
Do NOT touch switch!
4
主翼をしっかりゴムバンドで固定。
Securely fasten the main wing
90°
with rubber bands.
90°
OFF
5
送信機のスイッチをON。
次に受信機のスイッチをON。
Switch transmitter ON.
Next, switch the receiver ON.
ON
受信機のスイッチ
モーター
スイッチに触らない!
Do NOT touch
Motor Switch!
ON
Receiver Switch
ON
万一モーターがまわってしまう事も考え
助手が機体の後方からしっかり押さえる。
In case motor starts rotating accidentally,
have an assistant hold the rear part of the
plane securely.
アンプの種類によっては
モータースイッチが無い
場合が有るので注意。
CAUTION: Depending on
type used, some amps
may not have a motor switch.
6
送信機と機体の動作を確認。
Check plane responds properly to control signals.
7
送信機のアンテナを伸ばしたまま、電波の到達距離テスト。
30 mぐらい離れて動作に異常がないことを必ず確認。
Extend transmitter antenna all the way, and test the range of the radio signal.
Step back about 30 m and check
for any unusual behaviour.
約 30 m位まで
About 30 meters
10
4
離陸 / Take-Off
風
Wind
風に向かって、機体を水
平に押出すように投げる。
Face into the wind, hold the
plane horizontally and launch
with a pushing motion.
送信機のアンテナが一番
伸びている事を確認し、
送信機と機体の動作を確認。
Extend transmitter antenna
all the way and check plane
responds properly to
transmitter signal.
手投げ後、左右に傾かないようにラダーを操作して調整。
アンプ仕様の場合フルスロットルのままで10∼20°ぐらいの
角度で上昇する。上昇しなかったりする場合はエレベーター
を操作して調整。40mぐらいの高度に達したら旋回開始。
(バッテリーの充電が不十分だと上昇しない)
After launching, use the rudder to stop plane from tilting
left or right. If using an amp, climb 10∼20°at full throttle.
If plane doesn't climb accordingly, adjust with elevator control. After
reaching an altitude of about 40m, beginning circling the plane.
(If battery is not charged properly,
plane will not ascend).
10∼20°
40m
5
飛行 / Flight
機首が下がったら、エレ
ベーターを操作して調整。
If plane nose dips, adjust
elevator control.
送信機のスティックの目盛で、
1目盛ぐらいラダーを左に操作。
Move the stick on the transmitter
about 1 notch to the left.
エレベーター
スティックを離す。
Release the elevator
stick.
ラダーを右に操作して送信機のスティックを
離す。機体が水平に戻り旋回終了。
Turn the rudder to the right and then
release control stick. Once plane
levels off, circle is complete.
風
Wind
●慣れるまでは、左旋回のみの楕円飛行。
Continue circling left in an oval pattern until accustomed to flying.
スティック操作はゆっくりと行う。
Move control sticks slowly.
11
6
着陸 / Landing
風上に向かったら、左右に傾かない
ようにラダーを操作して調整。
Once flying into the wind, use the rudder to
stop any left/right lean.
風
バッテリーが消耗してくるとオートカットが作動して
プロペラの回転が止まる。
プロペラの回転が止まった場所と風向きで着陸コースを決める。
風下から大きな旋回で風上に向けるのが基本。
When the battery runs down, the auto-cut will
stop propeller rotating. When propeller stops,
decide your landing approach based on wind
direction and landing area.
着陸コース
Turn wide with the wind,
Landing Course
and then land into the wind.
Wind
水平になったらエレベーターは操作せずに、
左右に傾かないようにラダーを操作して着陸。
Once horizontal, land the plane without using the
elevator, keeping the plane horizontal with the rudder.
水平に着陸するのが基本。
Horizontal landing is vital.
高度1mぐらいになったら、
エレベーターを操作して
機体を水平に調整。
From about 1m off the
ground use elevator to land
plane horizontally.
風
Wind
7
回収 / After Landing
受信機のスイッチをOFF。
Switch receiver OFF.
次に送信機のスイッチをOFF。
Then, switch transmitter OFF.
バッテリーのコネクターをはずす。
Disconnect the battery.
バッテリーを再充電する
場合は、よく冷ましてから・・・
Allow battery to cool down
before recharging.
OFF
OFF
8
再飛行するために、各部のネジの緩みがないか
チェックを行い破損やキズのあるパーツは交換
しておく。
For next flight, check that no screws have
loosened and replace any scratched or
damaged parts.
パーツ破損の場合 / Damaged Parts
破損したパーツ等は絶対に使用しないで、新しいパーツと交換してください。
(事故やケガの原因になります)
Do not use with damaged or broken parts (may result in accidents or injury).
Please replace with new parts.
12
飛行直後の
高温注意!
Caution: hot
after flight!
飛行後のメンテナンス / After Flight Maintenance
飛行しない時は、バッテリーのコネクター
をはずし、機体より外して保管する。
When not flying, disconnect battery
connector and remove battery from
plane.
9
飛行直後の
高温注意!
Caution: hot
after flight!
汚れをとり、メンテナンスをしておく。
回転部にグリスを塗っておく。
Remove any grime. Add grease to rotating
parts.
分解図 EXPLODED VIEW
4
7
5
S
L
E
D
O
M
20
L
O
R
T
N
O
C
8
E
H
T
T
S
E
IN
F
IO
D
A
R
1
3
2.5 x 12 mm TPビス
TP Screw
2
6
10
11
3 x 10mmTPビス
Screw
8
3 x 8 mm TPビス
TP Screw
9
10
3 x 10mmTPビス
Screw
3 x14 mm TPビス
TP Screw
3mmナット
Nut
2.5 x 20mmTPビス
Screw
3 x 23mmTPビス
Screw
17
14
3 x 4mmビス
Screw
19
R
THE FINEST RADIO CONTROL MODELS
16
2.5 x 16mmTPビス
Screw
R
THE FINEST RADIO CONTROL MODELS
R
18
13
THE FINEST RADIO CONTROL MODELS
12
R
R
THE FINEST RADIO CONTROL MODELS
R
15
No.1xxxx PIPER CUB J3
KYOSHO PRINTED IN CHINA
13
スペアパーツ
SPARE PARTS
★: FOR JAPANESE MARKET ONLY.
品番
No.
パーツ名
Part Names
カウリング
10221-01 Cowling
10221-02
メインギヤセット
Main Gear Set
デカール
Decale
10221-04 バッテリーカバーセット
Battery Cover Set
ギヤダウンユニット
10221-05
Gear Down Unit
10221-03
内容(キーNo.と入数)★定価 ★発送
Quantity
(税込)手数料
6 x 1
420
10 x 2 11 x 1
3x23mmビス/Screw x 2
3x10mmTPビス/TP Screw x 4
3mmナット/Nut x 4
19 x 1
8 9 x 1
3x14mmTPビス/TP Screw x 4
14 x 1 15 17 18 x 1
3mmナット/Nut x 2
2.5x16mmTPビス/TP Screw x 2
2.5x20mmTPビス/TP Screw x 2
210
一律
品番
No.
パーツ名
Part Names
プロペラセット
11221-06 Propeller Set
840 (税込) 11221-07 モーター
Motor
主翼セット
11221-11
Main Wing Set
11221-12 胴体
735
Fuselage
尾翼セット
11221-13
735
Tail Wing Set
内容
Quantity
★定価 ★発送
(税込)手数料
12 13 x 1
630
210
一律
16 x 1
1575 (税込)
1 x 1 3 x 4 8 x 2
2.5x12mmTPビス/TP Screw x 2
3150
2 x 1 7 x 2
3150
4 5 x 1 20 x 2
2415
1260
オプションパーツ
OPTIONAL PARTS
★: FOR JAPANESE MARKET ONLY.
品番
No.
71193
パーツ名
Part Names
8.4V-600mAhニッケル水素バッテリー
8.4V-600mAh Ni-MH Battery
エクセルプロチャージャー Ver 2.0
Excel PRO Charger Ver 2.0
マルチチャージャー IV
72551 Multi Charger IV
82591-40 5chマイクロRSセット (40MHz) AFRS-14
5ch Micro RS Set (40MHz) AFRS-14
5chマイクロRSセット (72MHz) AFRS-17
82591-72
5ch Micro RS Set (72MHz) AFRS-17
72102
★定価 ★発送
(税込)手数料
2625
210
一律
品番
No.
82592
パーツ名
Part Names
8.5gマイクロサーボ AFS-1
8.5g Micro Servo AFS-1
5chマイクロRXセット (40MHz) AFR-14
36750 (税込) 82593-40 5ch Micro RX Set (40MHz) AFR-14
5chマイクロRXセット (72MHz) AFR-17
82593-72 5ch Micro RX Set (72MHz) AFR-17
5040
90202 スカイヴィクトリー360P
12600
Sky Victory 360P
★定価 ★発送
(税込)手数料
3360
210
一律
6090 (税込)
6090
5040
12600
パーツの定価に消費税が含まれております。また、定価、発送手数料、消費
税は平成16年6月1日現在のもので、法規改正、運賃改定、諸事情などにとも
ない変更になりますのでご了承ください。
14
取扱いの注意 OPERATING YOUR MODEL SAFELY
飛 行 前
Before Flying
飛 行
Flying
京商の無線操縦模型は、高い性能
を発揮するように設計されており
ますので、飛行場所は万一を考え
て十分に安全であることを確認し
てから楽しんでください。
Before flying your airplane, ensure
the airfield is spacious enough.
Always fly it outdoors in safe areas
with no debris or obstacles!
強風や、横風での飛行はしない。
Do not fly your airplane on days
with strong winds or side winds.
プロポの取扱方は、プロポの説明
書をご覧ください。
For proper radio handling, refer to
it's instruction manual.
主翼が正しく取付けられているか
確認。
Ensure the main wing is securely
installed.
〇
飛 行 後
After Flying
×
×
Do not allow people watching to get too
close to a rotating propeller.
風
バッテリーのコネクターを抜く。
Unplug the Ni-Cd battery.
傷ついたプロペラ、変形したスピ
ンナーは使用しないでください。
Ba
Don't use defective propellers and
deformed spinners.
t te
スピンナー・プロペラ等のゆるみ
をチェック。
Ensure the spinner and propeller
are securely installed.
ry
Warning!
スティックを動かして各舵が調整
通り動くかチェック。
Move the sticks on your transmitter
to ensure that all controls move
according to your inputs and the
way you adjusted them.
プロペラの回転に注意する。
Beware of spinning propellers!
送信機のスイッチを OFF に。
Switch off the transmitter.
Y
ER
TT
OFF
プロポの電源は、常にチェック。
Check the radio batteries.
バッテリー、充電器とも充電中は
発熱しますので、燃えやすい物の
上での充電はおやめください。
Batteries and chargers become
hot. Keep away from flammable
materials.
BA
OFF
送信機のアンテナを
最後までのばす。
Fully extend
the antenna
(transmitter).
プロペラが回転中の機体には絶対
に見物の人を近付けないでください。
WIND
〇
同じバンド(電波帯)の同時飛行
は出来ません。近くで無線操縦模
型を楽しんでいる人がいたらバン
ドを確認してください。
If the airplane begins to operate by
itself, somebody else is on your frequency. Do not attempt to operate
it under such conditions as you may
lose of control of it.
機体を風上に向けて、着陸させる。
Always land airplane into the wind.
安 全 上 の 注 意
Cautions for Safety
ON
飛行させない時は、必ずニカドバ
ッテリーを機体より外しておく。
Unplug the Ni-Cd battery when not
in use.
ニカドバッテリーの分解・改造は
危険です、絶対にしないでください。
Never try to modify Ni-Cd battery.
This is very dangerous.
送信機のスイッチを入れる。
Switch on the transmitter.
OFF
ON
ON
バッテリーのコネクターをつなぐ。
Plug in the Ni-Cd battery.
機体を風上に向けて、手投げする。
Launch your airplane by hand into
the wind.
Warning!
プロペラの回転に注意する。
アンプの種類によっては、コネク
ターを接続しただけでモーター
(プロペラ)が回転する事もある。
Beware of spinning propellers! With
some electronic speed controllers,
the motor (propeller) starts spinning
as soon as battery is connected.
tery
風
Battery
WIND
Ba
tte
ry
Bat
不要になったニカドバッテリーは
捨てずに、販売店にお戻しください。
Do not dispose of used Ni-Cd
batteries, return them to the shop.
飛行機の動きがおかしい時は、飛
行を中止して原因を調べる。
If your airplane does not function correctly, land it at once and find out the
reason.
汚れを取り、回転部にはグリスを
付ける。
Remove grime, and add grease to
rotating parts.
ニカドバッテリーは有害重金属が
使用されています。火中に投げ入
れて破裂すると非常に危険ですの
で、絶対にしないでください。
Do not dispose of Ni-Cd batteries
in a fire. They will explode and
release harmful materials.
Battery
オプションパーツは京商純正パー
ツ以外使用しないでください。
Only use genuine KYOSHO parts.
15
R
THE FINEST RADIO CONTROL MODELS
京商ホームページ
http://www.kyosho.co.jp/
京商株式会社
〒243-0034 神奈川県厚木市船子153
メーカー指定の純正部品を使用して
安全にR/Cを楽しみましょう。
●ユ−ザ−相談室直通電話 046-229-4115
お問い合わせは:月曜∼金曜(祝祭日を除く) 10:00∼18:00
61920405-1
40
PRINTED IN JAPAN