1
TU-80_multi.fm 1 ページ 2003年9月9日 火曜日 午後4時1分
6. アキュピッチ機能オン/オフ表示:安定して± 3 セントの範囲に入っていたら、音でチュー
ニング完了を知らせます(アキュピッチ機能)
。チューニング完了の音は、チューニングしている音の
高さに合わせて、C5 ∼ B5 の範囲で「ピピッ」と鳴ります。
アキュピッチ 機能のオン(表示あり)/ オフ(表示なし)を切り 替えることができ ます。
[TUNER]
を押しながら電源を入れると、現在とは逆の状態に設定されます。
fig.01(パネル図)
fig. 1
7. 基準ピッチ表示:演奏時に基準の音程となる A4(ピアノでは鍵盤中央のラの音)の周波数を
11
・ メトロノーム画面 (fig. 3)
1. ガイド・インジケーター:メトロノームのテンポに合わせて点滅します。
10
12
設定したビートの強拍で「
3
6
7
0: (4 分音符)、1:
4:
3
1
1
7
6
4
5
5
4
fig. 2
fig. 3
取扱説明書
このたびは、BOSS チューナー&メトロノーム TU-80 をお買い上げいただきまして、まことにありが
とうございます。
この機器を正しくお使いいただくために、ご使用前に別紙「安全上のご注意」と「使用上のご注意」を
よくお読みください。また、この機器の優れた機能を十分ご理解いただくためにも、取扱説明書をよく
お読みください。取扱説明書は必要なときにすぐに見ることができるよう、 手元に置いてください。
お買い上げ時、電池はセットされておりません。必ず「電池交 換のしかた」にしたがって電池をセッ
トしてください。
© 2003 ボス株式会社 本書の一部、もしくは全部を無断で複写・転載することを禁じます。
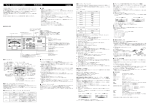
■ 各部の名称と働き (fig. 1)
1.[POWER]ボタン:電源のオン/オフを切り替えます。
電源をオンにした後、最後のボタン操作から何も操作せずに約 10 分以上経過すると、自動的に電源
がオフになります(オート・パワー・オフ機能)
。
オート・パワー・オフ機能のオン/オフを切り替えることができます。VALUE[
]と[
]を
同時に押したまま[POWER]を押して電源を入れると、オート・パワー・オフ機能はキャンセル(オ
フ)されます。再度電源を入れると、オート・パワー・オフ機能はオンになります。
2.[TUNER]ボタン:チューナーに切り替えます。
3.[METRONOME]ボタン:メトロノームに切り替えます。メトロノームをスタート/ストップ
します。
4. OUTPUT ジャック:INPUT ジャックに接続された楽器の信号が出力されます。また、電源をオ
フにすると、チューナー回路が完全に分離され、音質変化なし に楽器の信号が出力されます。ヘッド
ホンには対応していません。
※ メトロノーム音は、出力されません。
5.[SOUND]ボタン:TU-80の音のオン/オフを切り替えます。
チューナー時:クロマチック・モードのときは、半音ごと、12 個の基準音が鳴らせます。
ギター/ベース・モードのときは、開放弦の音程が鳴らせます。チ ューニングする音名/弦番号を変
えるときは、
[SOUND]を押して、VALUE[
]または[
]で、音名/弦番号を選びます。も
う一度[SOUND]を押すと、発音が止まります。
※ 発音中は、チューニングできません(メーターが振れません)
。
メトロノーム時:メトロノーム音をオン/オフします。
6.[SELECT]ボタン:押すごとに設定するパラメーターが切り替わります。
点滅しているパラメーターの値を VALUE[
]または[
]で設定します。
チューナー時:チューニング・モード、フラット・チューニング、基準ピッチの表示を切り替えます。
メトロノーム時:リズム・スタイル、ビート、テンポの表示を切り替えます。
7. VALUE[
]/[
]:押すごとにパラメーターの値が 1 ずつ減少/増加します。
メトロノームのテンポを設定するときは、VALUE[
]または[
]を押し続けると値が速く変
わります。
8. INPUT ジャック:チューニングするギターやベース・ギター等の楽器を接続します。
9. マイク:アコースティック楽器をチュ ーニングするとき使用します。マイクをできる限り楽器に
近づけてください。マイクを使用するときは INPUT ジャック、OUTPUT ジャックには何も接続しな
いでください。
10.スピーカー 11. ガイド・インジケーター 12. ディスプレイ
■ ディスプレイ表示
チューナー画面 (fig. 2)
1. ガイド・インジケーター:チューニングの目安をインジケーターの点灯で表示します。
「
「
「
」が点灯します。
●本書は再発行いたしません。所定事項の記
入および内容をよくお読みの上、大切に保
存してください。
(8 分音符)、3:
保
証
期
間
(3 連符)、
(16 分音符)
、 6:
(クラーベの基本パターン(3-2))、
お買い上げ日
ただし、ソフトウェア、
付属品、消耗部品は除く
3. ビート表示: を 1 拍としたときの拍子(ビート)の設定を表示します。設定した拍子の 1 拍
型 名
」点灯:ピッチが低い
」点灯:ピッチが高い
」と「
」が点灯:ピッチが合っている(± 3 セント)
2. チューニング・モード表示:3 つのチューニング・モードがあります。
CHROMATIC:半音毎 12 個全部の音程をチューニングできます。
GUITAR:ギターの弦番号でチューニングできます。
BASS:ベース・ギターの弦番号でチューニングできます。
3. フラット・チューニング表示:通常のチ ューニング(レギュラー・チューニン グ)より実際
の音程を全体に下げた(半音から 5 半音 =2 音半下げまで)チューニングを、通常の表示のまま簡単
に行なうことができます。
画面には、 (半音下げ),
,..
(5 半音)と表示されます。レギュラーのときは、 と
が
交互に点滅します。
4. 音名/弦番号表示:クロマチック・モードのときは「音名」+「オクターブ」を、ギター/ベー
ス・モードのときは「弦番号」+「音名」を表示します。
5. メーター:表示している音名、弦番号に対するピッチのズレを表示します。
※ ビートを「0」に設定したときは、一定の音で鳴ります。
※ リズム・ス タイルが「6」または「7」のとき(クラーベのとき)は、基 本パターンの繰返し回数
を設定します。
4. 針:テンポに合わせて移動します。
5. テンポ表示:設定範囲は
=30 ∼ 250 です。
■ チューナーを使う
1. チューニングする楽器を INPUT ジャックに接続します。
アコー スティック 楽器のチュー ニングには内 蔵マイクを使 用しますので、INPUT / OUTPUT
ジャックには何も接続せずに、楽器の近くに TU-80 を置いてください。
※ 他の機器と接続するときは、誤動作やスピーカーなどの破損を防ぐため、必ずすべての機器の音量
を絞った状態で電源を切ってください。
2. [POWER]を押して、電源をオンにします。
3. [TUNER]を押して、チューナーに切り替えます。
4. [SELECT]と VALUE[
]または[
]で、チューニング・モード(CHROMATIC、GUITAR、
BASS)を選びます。
必要に応じて、
[SELECT]と VALUE[
]または[
]で、フラット・チューニングと基
準ピッチの設定をします。
5. 楽器を単音で鳴らします。
鳴らした音に近い音名/弦番号がディスプレイに表示されます。
正確な音程とのズレが、メーターとチューニング・ガイドで表示されます。
6. 楽器をチューニングします。
目的の音名/弦番号がディスプレイに表示され、チューニング・ガイドの「 」と「
」が両
方点灯し、メーターの針が 0(中央)を指すように楽器をチューニングします。
安定してピッチが合う と、
「ピピッ」と鳴ってチューニング完了を知らせます。
(アキュピッチ機
能オンのとき)
■ メトロノームを使う
1. [POWER]を押して、電源をオンにします。
2. [METRONOME]を押して、メトロノームに切り替えます。
1 拍ごとに左右に針の表示が移動します。
[METRONOME]を押すごとに、メトロノームがスタート/ストップします。
必要に応じて、
[SELECT]と VALUE[
]または[
]でリズム・スタイル、ビート、テ
ンポを設定します。
テンポを設定するときは、VALUE[
]または[
]を押し続けると、値が速く変わります。
■ メモリー機能
電池を入れておくと、電源をオフにしても各種の設定を記憶させておくことができます。
電池をはずすと工場出荷時の設定に戻ります。
※ オート・パワー・オフ機能の設定、
[SOUND]ボタンのオン/オフは記憶されません。
工場出荷時の設定は以下の通りです。
[チューナー]チューニング・モード:CHROMATIC、基 準ピッチ:440 Hz、アキュピッチ機能:オン、
フラット・チューニング:レギュラー、サウンド:オフ
[メトロノーム]テンポ:120、リズム・スタイル:0(4 分音符)
、ビート:4、サウンド:オン
■ 電池交換のしかた
電池が消耗してくると、ディスプレイや LED の表示が暗くなってきます。
なるべく早く新しい電池と交換してください。
※ 電池は電源オフ時の記憶保持用電源としても使われています。電池を本体から抜いたり、電池が消
耗したときには、メモリー機能で記憶している各種設定は工場出荷時の状態に戻ります。
1. 本体底部の電池ブタを押しながらスライドさせて外します。
2. 古い電池を取り出します。
3. 新しい同じ種類の単 3 乾電池を 2 本入れます。
本社 〒530-0002 大阪市北区曽根崎新地1-4-20 桜橋IMビル11F
電話(06)6345-9800
※ 新し い電池と一度使用し た電池や種類の違 う電池を混ぜて使用
しないでください。液漏れの原因となります。
・ 本体底部のスリットにコインなどを差し込むと、
スタンドとして
使用することができます。
・ 図のストラップ・ホルダーにストラップを通すことができます。
4. 本製品は日本国内でご使用いただくことを前提に製
造・販売しております。従って本製品の保証は、
日本国外ではお受けできませんので、ご了承くだ
さい。
This warranty is valid only in Japan.
修理メモ
※ 本保証書は以上の保証規定により無料修理をお約
束するものです。従ってこの保証書によってお客
様の法律上の権利を制限するものではありません。
※ 本製品の補修用性能部品(製品の機能を維持する
ために必要な部品)の最低保有期間は製造打切
後6年です。この部品保有期間を修理可能の期間
とさせていただきます。保有期間経過後も、故
障内容によっては修理可能の場合がありますの
で、ローランドサービスステーションまでお問
い合わせください。
※ 修理の際、交換した部品を再生、再利用、製品
の品質向上等の目的で回収させていただくこと
がありますので、ご協力願います。
Owner’s Manual
Thank you, and congratulations on your choice of the BOSS TU-80 Tuner & Metronome.
Before using this unit, carefully read the sections entitled: “USING THE UNIT SAFELY” and
“IMPORTANT NOTES” (separate sheet).
These sections provide important information concerning the proper operation of the unit.
Additionally, in order to feel assured that you have gained a good grasp of every feature provided by
your new unit, this manual should be read in its entirety. The manual should be saved and kept on
hand as a convenient reference.
As shipped, the TU-80’s batteries are not yet installed. Be sure to read “Changing the
Batteries” and then follow the instructions to install the batteries.
Copyright © 2003 BOSS CORPORATION
All rights reserved. No part of this publication may be reproduced in any form without the
written permission of BOSS CORPORATION.
■ Panel Descriptions (fig. 1)
1. [POWER] Button: Switches the power on and off.
After the TU-80 is turned on, if approximately ten minutes passes without any button being pushed,
the power is then turned off automatically (Auto Power Off function).
You can turn the Auto Power Off function on and off. Simultaneously hold down VALUE [
] and
[
] and press [POWER] to turn on the power; the Auto Power Off function is then cancelled
(switch off). The next time the power is on, Auto Power Off function will once again activated.
2. [TUNER] Button: Switches the tuner mode.
3. [METRONOME] Button: Switches the metronome mode. Starts and stops the metronome.
4. OUTPUT Jack: The signal of the instrument connected to the INPUT jack is output from this
jack. The tuner’s circuitry is completely bypassed once you switch the power off, so your instrument’s
signal is output without any change in the tone quality. This jack is not for headphone use.
* The metronome sound will not be output.
5. [SOUND] Button: Switches the TU-80’s sound on and off.
When in tuner mode: In CHROMATIC mode, you can play any of the twelve notes in the chromatic scale.
In GUITAR/BASS mode, pitches corresponding to the open strings are played. When changing the
name of the note or the number for the string being tuned, press [SOUND] and then press VALUE
[
] or [
] to select the note name or string number. Press the [SOUND] once again to stop
playing the reference sound.
* The tuning function is disabled unless the TU-80’s sound is muted. (the meter does not fluctuate).
When in metronome mode: Switches the metronome sound on and off.
6. [SELECT] Button: The parameter to be set switches each time this is pressed.
Use VALUE [
]/[
] to make settings for the flashing parameter.
In tuner mode: Selects whether it is the tuning mode, flat tuning, or reference pitch that is indicated.
In Metronome mode: Selects whether it is the rhythm style, beat, or tempo that is indicated.
7. VALUE [
] [
]: The selected parameter value decreases or increases each time the
respective button is pressed.
Holding down VALUE [
] or [
] when setting the metronome tempo causes the values to
change more rapidly.
instrument. Do not connect anything to the INPUT or OUTPUT jacks when using the mic.
10. Speaker 11. Guide Indicators 12. Display
ストラップ・ホルダー
■ 主な仕様
●チューナー○基準ピッチ:A4=435 - 446Hz
○測定範囲:E0(20.6 Hz)∼ C8(4186.0 Hz) ○内部測定精度:± 1 セント
●メトロノーム○テンポ:30 - 250 ○リズム・スタイル:4 分音符、休符 8 分音符、8 分音符、3 連符、
中抜き 3 連符、16 分音符、クラーベ(3-2、2-3)○ビート:0 - 9
●入力インピーダンス:680kΩ ●表示:LCD ディスプレイ、 チューニング・ガイド LED
●接続端子:インプット・ジャック、アウトプット・ジャック●電源:単 3 乾電池× 2
●消費電流:3mA(メトロノーム使用時)、8mA(チューナー使用時、A4=440Hz 入力)
○連続使用時の電池の寿命(マンガン電池使用時)
:約 100 時間(A4=440Hz 連続入力時) ※使用条件によって異なりま
す。●外形寸法:122(幅)× 68(奥行)× 21(高さ)mm ●質量:117g(乾電池含む)
●付属品:単 3 型マンガン乾電池(R6 1.5V)2 本、取扱説明書、チラシ(安全上のご注意、使用上のご注意、サービスの窓口)
※ 製品の仕様および外観は、改良のため予告なく変更することがあります。
■ Display
• Tuner Screen (fig. 2)
1. Guide Indicators: These light to show how close you are to the target pitch.
When “
When “
7. Reference Pitch Indicator: The frequency of the A4 pitch (the middle A on a piano
keyboard) that is used in tuning for performances is called the "reference pitch." You can adjust the
reference pitch to any value from A=435 Hz to A=446 Hz.
• Metronome Screen (fig. 3)
1. Guide Indicators: Flashes in time with the metronome tempo.
” for the selected beat lights up on the down beats; the “
0:
(Quarter note), 1:
3:
(Triple), 4:
6:
保証規定
(ニ)本製品に異常がなく、他の部分、他の機器に
異常があり、点検及び改善した場合。
(ホ)お買い上げ後の輸送、移動、落下等による故
障や損傷および使用中に生じたキズ・汚れな
どの外観上の変化。
(ヘ)地震、落雷、風水害、その他の天災地変、火
災、公害、ガス、異常電圧による故障や損傷。
(ト)消耗部品(例:電池など)の取り替えを要す
る場合、および消耗部品の摩耗や劣化に起因
する故障や損傷。
8. INPUT Jack: Connect the guitar, bass guitar, or other instrument to be tuned here.
9. MIC: Use this when tuning acoustic instruments. Position the mic as closely as possible to the
※ 電池の極性(+ / −)を間違えないように注意してください。
4. 電池ブタをスライドさせて確実に閉めます。
pitch stabilizes within a range of three cents above or below the correct pitch. The beeping sound that
tells you that a string is precisely in tune will have the pitch of a note from C5 to B5, depending on the
string being tuned.
You can switch the AccuPitch function on (displayed) or off (not displayed). Holding down [TUNER]
while turning on the power sets the TU-80 to the opposite mode from the one currently active.
” lights up on the off beats.
sounds) from 0 to 7.
チューナー&メトロノーム TU-80
1. 保証期間内において、取扱説明書・本体貼付ラベ
ルなどの注意書に従った正常なご使用状態で発生
した故障については、第3項に示す場合を除き、無
料修理いたします。
2. 保証期間内に無料修理をお受けになる場合は、お
買い上げの販売店・又は最寄りのローランドサー
ビスステーションにご依頼のうえ、修理の際に本
書をご提示ください。お客様のご事情により出張
修理を依頼された場合、保証期間中であっても出
張料金を申し受けます。
3. 保証期間内でも、次の場合には有料修理となります。
(イ) 本書のご提示が無い場合。
(ロ)本書にお買上げ年月日・販売店名の記入が無
い場合、または字句を書き換えられた場合。
(ハ)ご使用上の誤り、又は当社の指定者以外の
手により修理・改造された場合。
5. Meter: This shows the difference in pitch from the indicated note name or string number.
6. Accu-Pitch On/Off Indicator: The Accu-Pitch function plays a beeping sound when the
2. Rhythm Style Indicator: Select one of the following rhythm styles (the way the metronome
太枠内に記入または捺印の無い場合は、必ず販売店発行の領収書またはそのお買い
上げ年月日・販売店等を証明するものを保証書に添えて大切に保存してください。
記入もしくは添付の無い場合は無効となりますので、ご注意ください。
(クラーベの基本パターン(2-3))
name” and “octave”; in GUITAR/BASS mode, it indicates the “string number” and “note name.”
The “
本体は一年間
年 月 日より
目で強音が鳴ります。設定範囲は、0 ∼ 9 です。
3
・
(中抜き 3 連符)、5:
7:
2
(休符 8 分音符)、 2:
●本保証書は、本書記載内容で無料修理をさ
せていただくことをお約束するものです。
●ご転居・ご贈答品などの場合で、お買上げ
販売店に修理を依頼することができない場
合は、ローランドサービスステーションに
お問い合せください。
取扱販売店名・住所・
選びます。
8
fig.02(LCD 図)
2
」が点灯、弱拍で「
[持込修理]
●保証期間中に故障が発生した場合は、製品
と本書をご持参ご提示の上、お買上げの販
売店にご依頼ください。
〒
ご住所
2. リズム・スタイル表示:次の 0 ∼ 7 からリズム・スタイル(メトロノームの鳴らしかた)を
9
5
4
様
ご芳名
「基準ピッチ」といいます。基準ピッチの変更可能な範囲は A=435 ∼ 446 Hz です。
1
2
お
客
様
4. Note Name/String Number Indicator: In CHROMATIC mode, this indicates the “note
ボス製品保証書
Products of Roland
” lights: pitch is flat (low). When “
” lights: pitch is sharp (high).
” and “
” light: in tune (±3 cents).
2. Tuning Mode Indicator: There are three tuning modes.
CHROMATIC: Allows tuning any of the twelve pitches in the chromatic scale.
GUITAR: Allows tuning by guitar string number.
BASS: Allows tuning by bass guitar string number.
3. Flat Tuning Indicator: This lowers the actual pitch of all notes below the regular tuning
(from one to five semitones, or two and a half steps), and can be accomplished simply without
changing the regular display.
The flat (“ ”) indicator will vary from “ ” (one semitone down) to “
” and so on to “
” (5
semitones down). With the regular setting, “
” and “
” alternately flash.
(Eighth rest and eighth note), 2:
(Triple with center rest), 5:
(Eighth note),
(Sixteenth note)
(Clave-based pattern (3-2)), 7:
(Clave-Based Pattern (2-3))
3. Beat Indicator: This indicates the beat setting when
is equivalent to one beat. The first
beat in the setting is played as the down beat. This can be set within a range from 0 to 9.
*
*
When the beat is set to “0,” a fixed, steady sound is played.
When the rhythm style is set to “6” or “7” (when set to claves), this sets the number of times the basic
pattern is repeated.
4. Needle: Moves in time with the tempo.
5. Tempo Indicator: This can be set within a range from
=30 to
=250.
■ Using the Tuner
1. Connect the instrument to be tuned to the INPUT jack.
The built-in mic is used for tuning acoustic instruments. When using the mic, make sure that
nothing is connected to the INPUT or OUTPUT jacks, and place the TU-80 near the instrument.
*
To prevent malfunction and/or damage to speakers or other devices, always turn down the volume, and turn
off the power on all devices before making any connections.
2. Press the [POWER] to switch the power on.
3. Press the [TUNER] to swtich the tuner mode.
4. Use the [SELECT] and the VALUE [
] or [
] to select the tuning mode (CHROMATIC,
GUITAR or BASS).
In necessary, use [SELECT] and VALUE [
] or [
] to set the flat tuning and reference pitch.
5. Play a single note on the instrument.
The note name/string number for the note that is playing appears in the display.
The meter and Tuning Guide show how far the note is from the correct pitch.
6. Tune the instrument.
With the intended note name/string number appearing in the display, tune the instrument so that
both “
” and “
” of the Tuning Guide are lit, and the meter needle points to 0 (center position).
When a stable pitch is achieved, the tuner makes a beeping sound, informing you that the tuning
is completed (when the Accu-Pitch function is set to on).
■ Using the Metronome
1. Press the [POWER] to switch the power on.
2. Press the [METRONOME] to swtich the metronome mode.
With each beat, the needle alternately moves to the left and right.
The metronome alternately starts and stops each time you press [METRONOME].
In necessary, use [SELECT] and VALUE [
] or [
] to set the rhythm style, beat and tempo.
Holding down VALUE [
] or [
] when setting the tempo causes the values to change more rapidly.
■ Memory Function
Once batteries are installed in the TU-80, a number of different settings can be stored in memory,
where they'll be preserved even while the power is turned off.
Removing the batteries returns the TU-80 to its original factory settings.
* The settings for the Auto Power Off function and the [SOUND] button On/Off are not saved.
The original factory settings are listed below.
[Tuner] Tuning Mode: CHROMATIC, Reference Pitch: 440 Hz, Accu-pitch Function: On,
Flat Tuning: Regular, Sound: Off
[Metronome] Tempo: 120, Rhythm Style: 0 (Quarter note), Beat: 4, Sound: On
■ Changing the Batteries
The display and LED indicators dim when the batteries begin to run down.
Replace the batteries as soon as possible.
* The settings stored by the memory function are reset to the default factory settings if the batteries are
removed from the tuner, or if the batteries get completely depleted.
1. Press down and slide off the lid of the batteries compartment
(located on the bottom of the unit).
2. Remove the old batteries from the compartment.
3. Insert two of the same type of fresh AA batteries.
* Make sure the “+” and “-” ends of the batteries are oriented correctly.
4. Slide the lid back into place.
* Do not mix fresh batteries with used ones, or mix batteries of different
types. Doing so can result in fluid leakage.
• You can insert a coin in the slit on the bottom of the unit and use
Hole
the coin as a stand.
• The strap can be passed through the hole shown in the figure.
■ Main Features
• Tuner - Reference Pitch: A4=435 Hz-446 Hz (1 Hz steps)
- Tuning Range: E0 (20.6 Hz)-C8 (4186.0 Hz) - Internal Tuning Accuracy: ±1 cent
• Metronome - Tempo: 30-250 - Rhythm Style: Quarter note, Eighth rest and eighth note, Eighth note, Triple, Triple with
center rest, Sixteenth note, Clave (3-2, 2-3) - Beat: 0-9 • Input Impedance: 680 kΩ • Indicator: LCD Display, Tuning
Guide LED • Connectors: Input Jack, Output Jack • Power Supply: Dry Battery (R6/LR6 (AA) Type) x 2
• Power Consumption: 3 mA (Metronome mode), 8 mA (Tuner mode and A4=440 Hz input) - Expected battery life
under continuous use (Carbon): Approximately 100 hours (A4 continuous input) * These figures will vary depending on the
actual conditions of use. • Dimensions: 122 (W) x 68 (D) x 21 (H) mm / 4-13/16 (W) x 2-11/16 (D) x 7/8 (H) inches • Weight:
117 g / 5 oz (including batteries) • Accessories: Dry Battery (R6 (AA) Type) x 2, Owner's Manual, Leaflet ("USING THE
UNIT SAFELY" and "IMPORTANT NOTES" ), Information (sepalate sheet)
* In the interest of product improvement, the specifications and/or appearance of this unit are subject to change without prior notice.
1SX
TU-80_multi.fm 1 ページ 2003年9月9日 火曜日 午後4時1分
6. アキュピッチ機能オン/オフ表示:安定して± 3 セントの範囲に入っていたら、音でチュー
ニング完了を知らせます(アキュピッチ機能)
。チューニング完了の音は、チューニングしている音の
高さに合わせて、C5 ∼ B5 の範囲で「ピピッ」と鳴ります。
アキュピッチ 機能のオン(表示あり)/ オフ(表示なし)を切り 替えることができ ます。
[TUNER]
を押しながら電源を入れると、現在とは逆の状態に設定されます。
fig.01(パネル図)
fig. 1
7. 基準ピッチ表示:演奏時に基準の音程となる A4(ピアノでは鍵盤中央のラの音)の周波数を
11
・ メトロノーム画面 (fig. 3)
1. ガイド・インジケーター:メトロノームのテンポに合わせて点滅します。
10
12
設定したビートの強拍で「
3
6
7
0: (4 分音符)、1:
4:
3
1
1
7
6
4
5
5
4
fig. 2
fig. 3
取扱説明書
このたびは、BOSS チューナー&メトロノーム TU-80 をお買い上げいただきまして、まことにありが
とうございます。
この機器を正しくお使いいただくために、ご使用前に別紙「安全上のご注意」と「使用上のご注意」を
よくお読みください。また、この機器の優れた機能を十分ご理解いただくためにも、取扱説明書をよく
お読みください。取扱説明書は必要なときにすぐに見ることができるよう、 手元に置いてください。
お買い上げ時、電池はセットされておりません。必ず「電池交 換のしかた」にしたがって電池をセッ
トしてください。
© 2003 ボス株式会社 本書の一部、もしくは全部を無断で複写・転載することを禁じます。
■ 各部の名称と働き (fig. 1)
1.[POWER]ボタン:電源のオン/オフを切り替えます。
電源をオンにした後、最後のボタン操作から何も操作せずに約 10 分以上経過すると、自動的に電源
がオフになります(オート・パワー・オフ機能)
。
オート・パワー・オフ機能のオン/オフを切り替えることができます。VALUE[
]と[
]を
同時に押したまま[POWER]を押して電源を入れると、オート・パワー・オフ機能はキャンセル(オ
フ)されます。再度電源を入れると、オート・パワー・オフ機能はオンになります。
2.[TUNER]ボタン:チューナーに切り替えます。
3.[METRONOME]ボタン:メトロノームに切り替えます。メトロノームをスタート/ストップ
します。
4. OUTPUT ジャック:INPUT ジャックに接続された楽器の信号が出力されます。また、電源をオ
フにすると、チューナー回路が完全に分離され、音質変化なし に楽器の信号が出力されます。ヘッド
ホンには対応していません。
※ メトロノーム音は、出力されません。
5.[SOUND]ボタン:TU-80の音のオン/オフを切り替えます。
チューナー時:クロマチック・モードのときは、半音ごと、12 個の基準音が鳴らせます。
ギター/ベース・モードのときは、開放弦の音程が鳴らせます。チ ューニングする音名/弦番号を変
えるときは、
[SOUND]を押して、VALUE[
]または[
]で、音名/弦番号を選びます。も
う一度[SOUND]を押すと、発音が止まります。
※ 発音中は、チューニングできません(メーターが振れません)
。
メトロノーム時:メトロノーム音をオン/オフします。
6.[SELECT]ボタン:押すごとに設定するパラメーターが切り替わります。
点滅しているパラメーターの値を VALUE[
]または[
]で設定します。
チューナー時:チューニング・モード、フラット・チューニング、基準ピッチの表示を切り替えます。
メトロノーム時:リズム・スタイル、ビート、テンポの表示を切り替えます。
7. VALUE[
]/[
]:押すごとにパラメーターの値が 1 ずつ減少/増加します。
メトロノームのテンポを設定するときは、VALUE[
]または[
]を押し続けると値が速く変
わります。
8. INPUT ジャック:チューニングするギターやベース・ギター等の楽器を接続します。
9. マイク:アコースティック楽器をチュ ーニングするとき使用します。マイクをできる限り楽器に
近づけてください。マイクを使用するときは INPUT ジャック、OUTPUT ジャックには何も接続しな
いでください。
10.スピーカー 11. ガイド・インジケーター 12. ディスプレイ
■ ディスプレイ表示
チューナー画面 (fig. 2)
1. ガイド・インジケーター:チューニングの目安をインジケーターの点灯で表示します。
「
「
「
」が点灯します。
●本書は再発行いたしません。所定事項の記
入および内容をよくお読みの上、大切に保
存してください。
(8 分音符)、3:
保
証
期
間
(3 連符)、
(16 分音符)
、 6:
(クラーベの基本パターン(3-2))、
お買い上げ日
ただし、ソフトウェア、
付属品、消耗部品は除く
3. ビート表示: を 1 拍としたときの拍子(ビート)の設定を表示します。設定した拍子の 1 拍
型 名
」点灯:ピッチが低い
」点灯:ピッチが高い
」と「
」が点灯:ピッチが合っている(± 3 セント)
2. チューニング・モード表示:3 つのチューニング・モードがあります。
CHROMATIC:半音毎 12 個全部の音程をチューニングできます。
GUITAR:ギターの弦番号でチューニングできます。
BASS:ベース・ギターの弦番号でチューニングできます。
3. フラット・チューニング表示:通常のチ ューニング(レギュラー・チューニン グ)より実際
の音程を全体に下げた(半音から 5 半音 =2 音半下げまで)チューニングを、通常の表示のまま簡単
に行なうことができます。
画面には、 (半音下げ),
,..
(5 半音)と表示されます。レギュラーのときは、 と
が
交互に点滅します。
4. 音名/弦番号表示:クロマチック・モードのときは「音名」+「オクターブ」を、ギター/ベー
ス・モードのときは「弦番号」+「音名」を表示します。
5. メーター:表示している音名、弦番号に対するピッチのズレを表示します。
※ ビートを「0」に設定したときは、一定の音で鳴ります。
※ リズム・ス タイルが「6」または「7」のとき(クラーベのとき)は、基 本パターンの繰返し回数
を設定します。
4. 針:テンポに合わせて移動します。
5. テンポ表示:設定範囲は
=30 ∼ 250 です。
■ チューナーを使う
1. チューニングする楽器を INPUT ジャックに接続します。
アコー スティック 楽器のチュー ニングには内 蔵マイクを使 用しますので、INPUT / OUTPUT
ジャックには何も接続せずに、楽器の近くに TU-80 を置いてください。
※ 他の機器と接続するときは、誤動作やスピーカーなどの破損を防ぐため、必ずすべての機器の音量
を絞った状態で電源を切ってください。
2. [POWER]を押して、電源をオンにします。
3. [TUNER]を押して、チューナーに切り替えます。
4. [SELECT]と VALUE[
]または[
]で、チューニング・モード(CHROMATIC、GUITAR、
BASS)を選びます。
必要に応じて、
[SELECT]と VALUE[
]または[
]で、フラット・チューニングと基
準ピッチの設定をします。
5. 楽器を単音で鳴らします。
鳴らした音に近い音名/弦番号がディスプレイに表示されます。
正確な音程とのズレが、メーターとチューニング・ガイドで表示されます。
6. 楽器をチューニングします。
目的の音名/弦番号がディスプレイに表示され、チューニング・ガイドの「 」と「
」が両
方点灯し、メーターの針が 0(中央)を指すように楽器をチューニングします。
安定してピッチが合う と、
「ピピッ」と鳴ってチューニング完了を知らせます。
(アキュピッチ機
能オンのとき)
■ メトロノームを使う
1. [POWER]を押して、電源をオンにします。
2. [METRONOME]を押して、メトロノームに切り替えます。
1 拍ごとに左右に針の表示が移動します。
[METRONOME]を押すごとに、メトロノームがスタート/ストップします。
必要に応じて、
[SELECT]と VALUE[
]または[
]でリズム・スタイル、ビート、テ
ンポを設定します。
テンポを設定するときは、VALUE[
]または[
]を押し続けると、値が速く変わります。
■ メモリー機能
電池を入れておくと、電源をオフにしても各種の設定を記憶させておくことができます。
電池をはずすと工場出荷時の設定に戻ります。
※ オート・パワー・オフ機能の設定、
[SOUND]ボタンのオン/オフは記憶されません。
工場出荷時の設定は以下の通りです。
[チューナー]チューニング・モード:CHROMATIC、基 準ピッチ:440 Hz、アキュピッチ機能:オン、
フラット・チューニング:レギュラー、サウンド:オフ
[メトロノーム]テンポ:120、リズム・スタイル:0(4 分音符)
、ビート:4、サウンド:オン
■ 電池交換のしかた
電池が消耗してくると、ディスプレイや LED の表示が暗くなってきます。
なるべく早く新しい電池と交換してください。
※ 電池は電源オフ時の記憶保持用電源としても使われています。電池を本体から抜いたり、電池が消
耗したときには、メモリー機能で記憶している各種設定は工場出荷時の状態に戻ります。
1. 本体底部の電池ブタを押しながらスライドさせて外します。
2. 古い電池を取り出します。
3. 新しい同じ種類の単 3 乾電池を 2 本入れます。
本社 〒530-0002 大阪市北区曽根崎新地1-4-20 桜橋IMビル11F
電話(06)6345-9800
※ 新し い電池と一度使用し た電池や種類の違 う電池を混ぜて使用
しないでください。液漏れの原因となります。
・ 本体底部のスリットにコインなどを差し込むと、
スタンドとして
使用することができます。
・ 図のストラップ・ホルダーにストラップを通すことができます。
4. 本製品は日本国内でご使用いただくことを前提に製
造・販売しております。従って本製品の保証は、
日本国外ではお受けできませんので、ご了承くだ
さい。
This warranty is valid only in Japan.
修理メモ
※ 本保証書は以上の保証規定により無料修理をお約
束するものです。従ってこの保証書によってお客
様の法律上の権利を制限するものではありません。
※ 本製品の補修用性能部品(製品の機能を維持する
ために必要な部品)の最低保有期間は製造打切
後6年です。この部品保有期間を修理可能の期間
とさせていただきます。保有期間経過後も、故
障内容によっては修理可能の場合がありますの
で、ローランドサービスステーションまでお問
い合わせください。
※ 修理の際、交換した部品を再生、再利用、製品
の品質向上等の目的で回収させていただくこと
がありますので、ご協力願います。
Owner’s Manual
Thank you, and congratulations on your choice of the BOSS TU-80 Tuner & Metronome.
Before using this unit, carefully read the sections entitled: “USING THE UNIT SAFELY” and
“IMPORTANT NOTES” (separate sheet).
These sections provide important information concerning the proper operation of the unit.
Additionally, in order to feel assured that you have gained a good grasp of every feature provided by
your new unit, this manual should be read in its entirety. The manual should be saved and kept on
hand as a convenient reference.
As shipped, the TU-80’s batteries are not yet installed. Be sure to read “Changing the
Batteries” and then follow the instructions to install the batteries.
Copyright © 2003 BOSS CORPORATION
All rights reserved. No part of this publication may be reproduced in any form without the
written permission of BOSS CORPORATION.
■ Panel Descriptions (fig. 1)
1. [POWER] Button: Switches the power on and off.
After the TU-80 is turned on, if approximately ten minutes passes without any button being pushed,
the power is then turned off automatically (Auto Power Off function).
You can turn the Auto Power Off function on and off. Simultaneously hold down VALUE [
] and
[
] and press [POWER] to turn on the power; the Auto Power Off function is then cancelled
(switch off). The next time the power is on, Auto Power Off function will once again activated.
2. [TUNER] Button: Switches the tuner mode.
3. [METRONOME] Button: Switches the metronome mode. Starts and stops the metronome.
4. OUTPUT Jack: The signal of the instrument connected to the INPUT jack is output from this
jack. The tuner’s circuitry is completely bypassed once you switch the power off, so your instrument’s
signal is output without any change in the tone quality. This jack is not for headphone use.
* The metronome sound will not be output.
5. [SOUND] Button: Switches the TU-80’s sound on and off.
When in tuner mode: In CHROMATIC mode, you can play any of the twelve notes in the chromatic scale.
In GUITAR/BASS mode, pitches corresponding to the open strings are played. When changing the
name of the note or the number for the string being tuned, press [SOUND] and then press VALUE
[
] or [
] to select the note name or string number. Press the [SOUND] once again to stop
playing the reference sound.
* The tuning function is disabled unless the TU-80’s sound is muted. (the meter does not fluctuate).
When in metronome mode: Switches the metronome sound on and off.
6. [SELECT] Button: The parameter to be set switches each time this is pressed.
Use VALUE [
]/[
] to make settings for the flashing parameter.
In tuner mode: Selects whether it is the tuning mode, flat tuning, or reference pitch that is indicated.
In Metronome mode: Selects whether it is the rhythm style, beat, or tempo that is indicated.
7. VALUE [
] [
]: The selected parameter value decreases or increases each time the
respective button is pressed.
Holding down VALUE [
] or [
] when setting the metronome tempo causes the values to
change more rapidly.
instrument. Do not connect anything to the INPUT or OUTPUT jacks when using the mic.
10. Speaker 11. Guide Indicators 12. Display
ストラップ・ホルダー
■ 主な仕様
●チューナー○基準ピッチ:A4=435 - 446Hz
○測定範囲:E0(20.6 Hz)∼ C8(4186.0 Hz) ○内部測定精度:± 1 セント
●メトロノーム○テンポ:30 - 250 ○リズム・スタイル:4 分音符、休符 8 分音符、8 分音符、3 連符、
中抜き 3 連符、16 分音符、クラーベ(3-2、2-3)○ビート:0 - 9
●入力インピーダンス:680kΩ ●表示:LCD ディスプレイ、 チューニング・ガイド LED
●接続端子:インプット・ジャック、アウトプット・ジャック●電源:単 3 乾電池× 2
●消費電流:3mA(メトロノーム使用時)、8mA(チューナー使用時、A4=440Hz 入力)
○連続使用時の電池の寿命(マンガン電池使用時)
:約 100 時間(A4=440Hz 連続入力時) ※使用条件によって異なりま
す。●外形寸法:122(幅)× 68(奥行)× 21(高さ)mm ●質量:117g(乾電池含む)
●付属品:単 3 型マンガン乾電池(R6 1.5V)2 本、取扱説明書、チラシ(安全上のご注意、使用上のご注意、サービスの窓口)
※ 製品の仕様および外観は、改良のため予告なく変更することがあります。
■ Display
• Tuner Screen (fig. 2)
1. Guide Indicators: These light to show how close you are to the target pitch.
When “
When “
7. Reference Pitch Indicator: The frequency of the A4 pitch (the middle A on a piano
keyboard) that is used in tuning for performances is called the "reference pitch." You can adjust the
reference pitch to any value from A=435 Hz to A=446 Hz.
• Metronome Screen (fig. 3)
1. Guide Indicators: Flashes in time with the metronome tempo.
” for the selected beat lights up on the down beats; the “
0:
(Quarter note), 1:
3:
(Triple), 4:
6:
保証規定
(ニ)本製品に異常がなく、他の部分、他の機器に
異常があり、点検及び改善した場合。
(ホ)お買い上げ後の輸送、移動、落下等による故
障や損傷および使用中に生じたキズ・汚れな
どの外観上の変化。
(ヘ)地震、落雷、風水害、その他の天災地変、火
災、公害、ガス、異常電圧による故障や損傷。
(ト)消耗部品(例:電池など)の取り替えを要す
る場合、および消耗部品の摩耗や劣化に起因
する故障や損傷。
8. INPUT Jack: Connect the guitar, bass guitar, or other instrument to be tuned here.
9. MIC: Use this when tuning acoustic instruments. Position the mic as closely as possible to the
※ 電池の極性(+ / −)を間違えないように注意してください。
4. 電池ブタをスライドさせて確実に閉めます。
pitch stabilizes within a range of three cents above or below the correct pitch. The beeping sound that
tells you that a string is precisely in tune will have the pitch of a note from C5 to B5, depending on the
string being tuned.
You can switch the AccuPitch function on (displayed) or off (not displayed). Holding down [TUNER]
while turning on the power sets the TU-80 to the opposite mode from the one currently active.
” lights up on the off beats.
sounds) from 0 to 7.
チューナー&メトロノーム TU-80
1. 保証期間内において、取扱説明書・本体貼付ラベ
ルなどの注意書に従った正常なご使用状態で発生
した故障については、第3項に示す場合を除き、無
料修理いたします。
2. 保証期間内に無料修理をお受けになる場合は、お
買い上げの販売店・又は最寄りのローランドサー
ビスステーションにご依頼のうえ、修理の際に本
書をご提示ください。お客様のご事情により出張
修理を依頼された場合、保証期間中であっても出
張料金を申し受けます。
3. 保証期間内でも、次の場合には有料修理となります。
(イ) 本書のご提示が無い場合。
(ロ)本書にお買上げ年月日・販売店名の記入が無
い場合、または字句を書き換えられた場合。
(ハ)ご使用上の誤り、又は当社の指定者以外の
手により修理・改造された場合。
5. Meter: This shows the difference in pitch from the indicated note name or string number.
6. Accu-Pitch On/Off Indicator: The Accu-Pitch function plays a beeping sound when the
2. Rhythm Style Indicator: Select one of the following rhythm styles (the way the metronome
太枠内に記入または捺印の無い場合は、必ず販売店発行の領収書またはそのお買い
上げ年月日・販売店等を証明するものを保証書に添えて大切に保存してください。
記入もしくは添付の無い場合は無効となりますので、ご注意ください。
(クラーベの基本パターン(2-3))
name” and “octave”; in GUITAR/BASS mode, it indicates the “string number” and “note name.”
The “
本体は一年間
年 月 日より
目で強音が鳴ります。設定範囲は、0 ∼ 9 です。
3
・
(中抜き 3 連符)、5:
7:
2
(休符 8 分音符)、 2:
●本保証書は、本書記載内容で無料修理をさ
せていただくことをお約束するものです。
●ご転居・ご贈答品などの場合で、お買上げ
販売店に修理を依頼することができない場
合は、ローランドサービスステーションに
お問い合せください。
取扱販売店名・住所・
選びます。
8
fig.02(LCD 図)
2
」が点灯、弱拍で「
[持込修理]
●保証期間中に故障が発生した場合は、製品
と本書をご持参ご提示の上、お買上げの販
売店にご依頼ください。
〒
ご住所
2. リズム・スタイル表示:次の 0 ∼ 7 からリズム・スタイル(メトロノームの鳴らしかた)を
9
5
4
様
ご芳名
「基準ピッチ」といいます。基準ピッチの変更可能な範囲は A=435 ∼ 446 Hz です。
1
2
お
客
様
4. Note Name/String Number Indicator: In CHROMATIC mode, this indicates the “note
ボス製品保証書
Products of Roland
” lights: pitch is flat (low). When “
” lights: pitch is sharp (high).
” and “
” light: in tune (±3 cents).
2. Tuning Mode Indicator: There are three tuning modes.
CHROMATIC: Allows tuning any of the twelve pitches in the chromatic scale.
GUITAR: Allows tuning by guitar string number.
BASS: Allows tuning by bass guitar string number.
3. Flat Tuning Indicator: This lowers the actual pitch of all notes below the regular tuning
(from one to five semitones, or two and a half steps), and can be accomplished simply without
changing the regular display.
The flat (“ ”) indicator will vary from “ ” (one semitone down) to “
” and so on to “
” (5
semitones down). With the regular setting, “
” and “
” alternately flash.
(Eighth rest and eighth note), 2:
(Triple with center rest), 5:
(Eighth note),
(Sixteenth note)
(Clave-based pattern (3-2)), 7:
(Clave-Based Pattern (2-3))
3. Beat Indicator: This indicates the beat setting when
is equivalent to one beat. The first
beat in the setting is played as the down beat. This can be set within a range from 0 to 9.
*
*
When the beat is set to “0,” a fixed, steady sound is played.
When the rhythm style is set to “6” or “7” (when set to claves), this sets the number of times the basic
pattern is repeated.
4. Needle: Moves in time with the tempo.
5. Tempo Indicator: This can be set within a range from
=30 to
=250.
■ Using the Tuner
1. Connect the instrument to be tuned to the INPUT jack.
The built-in mic is used for tuning acoustic instruments. When using the mic, make sure that
nothing is connected to the INPUT or OUTPUT jacks, and place the TU-80 near the instrument.
*
To prevent malfunction and/or damage to speakers or other devices, always turn down the volume, and turn
off the power on all devices before making any connections.
2. Press the [POWER] to switch the power on.
3. Press the [TUNER] to swtich the tuner mode.
4. Use the [SELECT] and the VALUE [
] or [
] to select the tuning mode (CHROMATIC,
GUITAR or BASS).
In necessary, use [SELECT] and VALUE [
] or [
] to set the flat tuning and reference pitch.
5. Play a single note on the instrument.
The note name/string number for the note that is playing appears in the display.
The meter and Tuning Guide show how far the note is from the correct pitch.
6. Tune the instrument.
With the intended note name/string number appearing in the display, tune the instrument so that
both “
” and “
” of the Tuning Guide are lit, and the meter needle points to 0 (center position).
When a stable pitch is achieved, the tuner makes a beeping sound, informing you that the tuning
is completed (when the Accu-Pitch function is set to on).
■ Using the Metronome
1. Press the [POWER] to switch the power on.
2. Press the [METRONOME] to swtich the metronome mode.
With each beat, the needle alternately moves to the left and right.
The metronome alternately starts and stops each time you press [METRONOME].
In necessary, use [SELECT] and VALUE [
] or [
] to set the rhythm style, beat and tempo.
Holding down VALUE [
] or [
] when setting the tempo causes the values to change more rapidly.
■ Memory Function
Once batteries are installed in the TU-80, a number of different settings can be stored in memory,
where they'll be preserved even while the power is turned off.
Removing the batteries returns the TU-80 to its original factory settings.
* The settings for the Auto Power Off function and the [SOUND] button On/Off are not saved.
The original factory settings are listed below.
[Tuner] Tuning Mode: CHROMATIC, Reference Pitch: 440 Hz, Accu-pitch Function: On,
Flat Tuning: Regular, Sound: Off
[Metronome] Tempo: 120, Rhythm Style: 0 (Quarter note), Beat: 4, Sound: On
■ Changing the Batteries
The display and LED indicators dim when the batteries begin to run down.
Replace the batteries as soon as possible.
* The settings stored by the memory function are reset to the default factory settings if the batteries are
removed from the tuner, or if the batteries get completely depleted.
1. Press down and slide off the lid of the batteries compartment
(located on the bottom of the unit).
2. Remove the old batteries from the compartment.
3. Insert two of the same type of fresh AA batteries.
* Make sure the “+” and “-” ends of the batteries are oriented correctly.
4. Slide the lid back into place.
* Do not mix fresh batteries with used ones, or mix batteries of different
types. Doing so can result in fluid leakage.
• You can insert a coin in the slit on the bottom of the unit and use
Hole
the coin as a stand.
• The strap can be passed through the hole shown in the figure.
■ Main Features
• Tuner - Reference Pitch: A4=435 Hz-446 Hz (1 Hz steps)
- Tuning Range: E0 (20.6 Hz)-C8 (4186.0 Hz) - Internal Tuning Accuracy: ±1 cent
• Metronome - Tempo: 30-250 - Rhythm Style: Quarter note, Eighth rest and eighth note, Eighth note, Triple, Triple with
center rest, Sixteenth note, Clave (3-2, 2-3) - Beat: 0-9 • Input Impedance: 680 kΩ • Indicator: LCD Display, Tuning
Guide LED • Connectors: Input Jack, Output Jack • Power Supply: Dry Battery (R6/LR6 (AA) Type) x 2
• Power Consumption: 3 mA (Metronome mode), 8 mA (Tuner mode and A4=440 Hz input) - Expected battery life
under continuous use (Carbon): Approximately 100 hours (A4 continuous input) * These figures will vary depending on the
actual conditions of use. • Dimensions: 122 (W) x 68 (D) x 21 (H) mm / 4-13/16 (W) x 2-11/16 (D) x 7/8 (H) inches • Weight:
117 g / 5 oz (including batteries) • Accessories: Dry Battery (R6 (AA) Type) x 2, Owner's Manual, Leaflet ("USING THE
UNIT SAFELY" and "IMPORTANT NOTES" ), Information (sepalate sheet)
* In the interest of product improvement, the specifications and/or appearance of this unit are subject to change without prior notice.
1SX