1
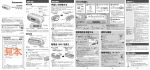
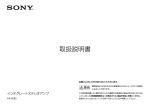
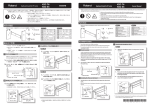
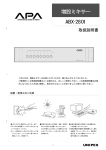
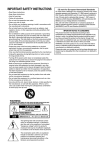
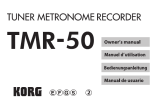
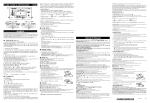
警告(続き)
●本製品に、異物(燃えやすいもの、硬貨、針
金など)や液体
(水やジュースなど)を絶対
にいれないでください。
●本製品を分解したり、改造したりしないでく
ださい。
Chromatic Tuner
CA-10
取扱説明書
注意
CA-10
AUTO
-20
0
MANUAL
+20
CENT
CENT
-50
+50
AUTO
MANL
NOTE
CALIB
POWER
IN
MIC
このたびはコルグクロマチックチュー
ナー CA-10をお買い上げいただき、あり
がとうございます。
J E G F 1
安全上のご注意
●本製品はマイクロコンピュータを使用した機
器です。このため他の電気機器を接近して同
時にご使用になりますと、それらに雑音が入
ることがあります。逆に他の電気機器から本
製品が雑音を受けて誤動作する場合がありま
す。
●長期間使用しない場合は、電池の液漏れを防
ぐために電池を抜いておいてください。
●スイッチやツマミに必要以上の力を加えます
と故障の原因となりますので注意してくださ
い。
●外装のお手入れは、必ず乾いた柔らかい布で
軽く拭いてください。ベンジンやシンナー系
の液体は絶対にご使用にならないでくださ
い。
(コンパウンド質、強燃性のポリッシャー
も不可)。
アフターサービス
警告
●本製品を使用する前に、以下の指示をよ
く読んでください。
●次のような場合には直ちに電源を切り、
コルグ営業所またはお買い上げになった
販売店に修理を依頼してください。
○異物が内部に入ったり、液体がこぼれ
たとき
○製品が(雨などで)濡れたとき
○製品に異常や故障が生じたとき
●次のような場所での使用や保存はしない
でください。
○温度が極端に高い場所(直射日光のあた
る場所、暖房機器の近く、発熱する機器の
上など)
○水気の近く(風呂場、洗面台、濡れた床
など)や湿度の高い場所
○ホコリの多い場所
●修理/部品の交換などで、取扱説明書に
書かれている以外のことは、絶対にしな
いでください。必ず最寄りのコルグ営業
所またはコルグ営業技術課に相談してく
ださい。
CA-10
AUTO
-20
0
8
MANUAL
+20
CENT
-50
3
+50
5
AUTO
MANL
NOTE
CALIB
1
2
POWER
IN
MIC
6
4
7
キャリブレーション
AUTO
-20
CENT
-50
音名
モード
0
右に記載の保証規定によりアフターサービスをいた
します。アフターサービスについてご不明の点は下
記へお問い合わせください。
▼▲▼株式会社コルグ▼▲▼
インフォメーション
〒 168 東京都杉並区下高井戸 1-15-12
☎ (03)5376-5022
東京営業所 〒 168 東京都杉並区下高井戸 1-11-17
☎ (03)3323-5241
名古屋営業所 〒 466 名古屋市昭和区八事本町
100-51 ☎ (052)832-1419
大阪営業所 〒 531 大阪市北区豊崎 3-2-1 淀川
5 番館 7F ☎ (06)374-0691
福岡営業所 〒 810 福岡市中央区白金 1-3-25
第 2 池田ビル 1F ☎ (092)531-0166
修理等のお問い合わせは最寄りの各営業所、または
下記までお問い合わせください。
営業技術課 〒 168 東京都杉並区下高井戸 1-15-12
☎ (03)3309-7004
本社:〒168 東京都杉並区下高井戸1-15-12 ☎ (03) 3325-5691
年
MANUAL
+20
CENT
+50
メーター
1 パワースイッチ
押すごとに、電源の ON/OFF が切り替わ
ります。電源 ONの状態でなにも操作しな
いで 20 分間、放置されると自動的に OFF
します。
430Hz から 449Hz まで 1Hz 刻みで設定でき
ます。
5 AUTO ボタン
このボタンを押すと AUTO モードになり、入
力された音に最も近い音名を自動的に判別し
てチューニングできます。
6MANL/ NOTE ボタン
このボタンを押すと MANUAL モードになり
ます。そのあと、1回押すごとに音名の設定が
切り替わります。
7 マイク
アコースティック楽器のチューニングをする
とき、音のでる部分に近づけてください。
INPUT ジャックが接続されているときは動作
しません。
8 チューニングガイド LED
音程があうと中央のLED が点灯します。音程
が低いときは左、高いときは右の LEDが点灯
します。
電池の入れ方
2 INPUT ジャック
チューニングしたいギター、ベースのア
ウトプットやピックアップ等を接続しま
す。
3 LCD 表示器
モード:現在のモードが AUTO か
MANUAL かを表示します。
音名:A,A#,BC,C#,D,D#,E,F,F#,G,G# を
表示します。
キャリブレーション:現在設定されてい
るキャリブレーションの値を表示
します。
メーター:基準ピッチからのずれを表示
します。➚
月
本社: 〒168 東京都杉並区下高井戸1-15-12
☎ (03) 3325-5691
日
TEL
販売店名
販売店住所
おところ
ー
おなまえ
TEL
(修理メモの欄)
・
・
・
・
ご注意(必ずお読みください)
この製品は、当社の厳密な製品検査に合格したものです。
万一保証期間内に製造上の不備に起因する故障の生じた場合は下記の保証規定により無償修理いたします。
保証条件
1.本保証書の有効期間はお買い上げ日より1ケ年です。
2.次の場合の修理は保証期間内であっても有料修理となります。
●消耗部品(電池など)を交換する場合。
●お取扱い方法が不適当のために生じた故障の場合。
●天災(火災、浸水等)によって生じた故障。
●故障の原因が本製品以外の、他の機器にある場合。
●KORG サービスステーション及び、KORG 指定者以外の手により修理、改造された部分の処理が
不適当であった場合。
●保証書に販売店名、お客様氏名、ご住所、お買い上げ日などが記入されていない場合あるいは、字
句を書き替えられた場合。
●本保証書の提示がない場合。
●日本国外で使用される場合。
尚、当社が修理した部分が再度故障した場合は保証期間外であっても、修理した日より3ケ月以内に
限り無償修理となります。
3.保証期間が切れますと修理は有料になりますが、引き続き、製品の修理は責任を持ってさせていただ
きます。修理用性能部品(電子回路など)は通常8年間を基準に保有しております。ただし外装部品
(パネルなど)の修理は類似の代替品を使用することもありますのでご了承ください。
4.お客様が保証期間中に移転された場合でも、保証は引き続きお使いいただけます。移転先のコルグ製
品お取り扱い楽器店、またはコルグ営業技術課までお問い合わせください。
お願い
本保証書に販売年月日の記入がない場合は無効となります。
※修理は、お買い上げの販売店に必ず本保証書を提示の上、ご依頼ください。
記入不可能な場合はお買い上げ年月日を証明できる領収書等と一緒にご保管ください。
※本書は再発行致しませんので、紛失しないよう大切に保管して下さい。
C1997 KORG INC.
➚4 CALIB ボタン
キャリブレーションの設定を変えます。
各部の名称と機能
CENT
お買上げ日
●今後の参照のために、この取扱説明書はお読
みになった後も大切に保管してくだい。
以下の指示を守ってください
保証書(日本国内有効)
コルグチューナー CA-10
本書は下記の保証規定により無料修理を行うことをお約
束するものです。
お買い上げの日から満1年の間に万一
故障が発生した場合は製品と共に本書をお買い上げの販
売店にご持参の上、修理をご依頼ください。
チューニングの方法
1. 電気楽器の場合は INPUT ジャックに楽器を
接続します。
2. キャリブレーションの表示を確認します。
設定を変えたい場合は CALIB ボタンを何回
か押して希望の値に設定します。
AUTO モードの場合
3. モードが AUTO になっているか表示を確認
します。MANUAL になっていたら AUTO ボ
タンを押します。
4. 楽器を単音で弾いて、合わせたい音名が表
示される様にチューニングしてください。さ
らにチューニングガイドの中央の LED がつ
くようにメーター表示を見ながらチューニン
グします。弦楽器の場合は、各弦を同様に
チューニングします。
MANUAL モードの場合
3.NOTE ボタンを押して合わせたい音名を表示
させます。
4. 楽器を単音で弾いて、チューニングガイド
の中央の LED がつくようにメーター表示を
見ながらチューニングします。弦楽器の場合
は、各弦を同様にチューニングします。
チューニングの基礎知識
セント表示について
1. ケースの裏側を図の様にスライドさせます。
2. 図のように電池 6F22(S-006P、別売)を入
れてください。電池の極性に注意してくだ
さい。
3. ケースをスライドさせてしめてください。
LCD の表示が薄くなってきたら電池を交
換してください。
セント(CENT)は音の高さの比率を示す最小の単位で
す。半音が 100 セント、1 オクターブが 1200 セン
トです。CA-10 では入力された音のピッチと正確な
ピッチとのずれをセント目盛で表示します。(1セン
トは非常に小さな単位ですので、+/-3 セント程度の
差はあまり問題になりません。)
基準ピッチとキャリブレーション
楽器のチューニングを合わせるために、ピアノの中
央のラ(A=440Hz)が基準ピッチとして用いられてい
ます。CA-10 では、A4 の基準ピッチを ➚
➚430-449Hz の範囲で設定することができま
す。基準ピッチを設定することをキャリブレー
ションといいます。
故障かな?と思ったら
チューニングできない。
またはチューニングしにくい。
電気楽器の場合は、楽器のボリュームをし
ぼっていませんか?またはボリュームを上
げすぎていませんか?メーターが安定する
ように楽器のボリュームを調整してくださ
い。
アコースティック楽器の場合は、内蔵マイ
ク(または外部マイク)と楽器の距離、向き
を変えてみてください。
誤動作が発生して、電源ON/OFFしても
直らない場合は、電池をはずしてセッ
トしなおしてください。
仕様
音律:12 平均律
測定範囲:A0(27.50Hz)-B7(3951.07Hz)
測定精度:± 3 セント
チューニングモード:AUTO,MANUAL
キャリブレーション機能:
430-449Hz(1Hz ステップ)
接続端子:INPUT ジャック
電源:6F22(S-006P) 9V 電池 1 個 (別売)
電池寿命:約 30 時間
(マンガン標準電池、A4 連続入力時)
外形寸法:62mm(W)x95.8mm(D)x28.5mm(H)
重量:106g(電池含む)
仕様及び外観は改良のため予告なく変更する場合があります。
Specifications
Chromatic Tuner
CA-10
OWNER'S MANUAL
CA-10
AUTO
-20
0
MANUAL
+20
CENT
CENT
-50
AUTO
+50
MANL
NOTE
CALIB
POWER
IN
MIC
Thank you for purchasing the KORG CA-10.
Scale: 12 note equal tempered
Detection range:
A0 (27.50 Hz) -- B7 (3951.07 Hz)
Detection precision: ± 3 cents
Tuning modes: AUTO, MANUAL
Calibration adjustment:
430-449 Hz (1 Hz steps)
Connection terminals: INPUT jack
Power supply: 9V battery 6F22
(S-006P; sold separately)
Battery life: approximately 30hours
(with manganese battery, A4 input)
Dimensions:
62 mm (W) x 95.8 mm (D) x 28.5 mm (H)
Weight: 106 g (with battery)
Specifications and appearance are subject to
change without notice for improvement.
THE FCC REGULATION WARNING
This equipment has been tested and found to comply with the limits for a Class B digital device, pursuant to Part 15 of the FCC Rules. These limits are designed to provide reasonable protection against
harmful interference in a residential installation. This equipment generates, uses, and can radiate radio
frequency energy and, if not installed and used in accordance with the instructions, may cause harmful
interference to radio communications. However, there is no guarantee that interference will not occur in
a particular installation. If this equipment does cause harmful interference to radio or television reception, which can be determined by turning the equipment off and on, the user is encouraged to try to
correct the interference by one or more of the following measures:
• Reorient or relocate the receiving antenna.
• Increase the separation between the equipment and receiver.
• Connect the equipment into an outlet on a circuit different from that to which the receiver is
connected.
• Consult the dealer or an experienced radio/TV technician for help.
Unauthorized changes or modification to this system can void the user’s authority to operate this equipment.
CE mark for European Harmonized Standards
CE mark which is attached to our company’s products of AC mains operated apparatus until
December 31, 1996 means it conforms to EMC Directive (89/336/EEC) and CE mark Directive (93/
68/EEC).
And, CE mark which is attached after January 1, 1997 means it conforms to EMC Directive (89/336/
EEC), CE mark Directive (93/68/EEC) and Low Voltage Directive (73/23/EEC).
Also, CE mark which is attached to our company’s products of Battery operated apparatus means it
conforms to EMC Directive (89/336/EEC) and CE mark Directive (93/68/EEC).
Precautions
Location
Using the unit in the following locations can
result in a malfunction.
• In direct sunlight
• Locations of extreme temperature or
humidity
• Excessively dusty or dirty locations
• Locations of excessive vibration
• Close to magnetic fields
Power supply
To power the tuner, use only a 6F22 (006P)
9V dry cell battery (sold separately).
Be sure to turn the power switch OFF when
the unit is not in use. Remove the battery in
order to prevent it from leaking when the units
is not in use for extended periods.
Handling
To avoid breakage, do not apply excessive force
to the switches or controls.
Cleaning
If the exterior becomes dirty, wipe it with a clean,
dry cloth. Do not use liquid cleaners such as
benzene or thinner, or cleaning compounds or
flammable polishes.
Keep this manual
After reading this manual, please keep it for later
reference.
Keeping foreign matter out of your equipment
Never set any container with liquid in it near this
equipment. If liquid gets into the equipment, it
could cause a breakdown, fire, or electrical
shock.Be careful not to let metal objects get into
the equipment.
Interference with other electrical devices
This product contains a microcomputer.
Radios and televisions placed nearby may
experience reception interference. Operate
this unit at a suitable distance from radios
and televisions.
Controls and their functions
CA-10
AUTO
-20
0
8
MANUAL
+20
CENT
CENT
-50
3
+50
5
AUTO
MANL
NOTE
CALIB
POWER
IN
1
2
MIC
6
4
7
CALIBRATION MODE
AUTO
-20
CENT
-50
0
NOTE NAME
MANUAL
+20
CENT
+50
METER
1 Power switch
The power will turn on/off each time you
press this switch. If you leave the unit
powered-on for 20 minutes without
performing any operation, the power will
automatically turn off.
2 INPUT jack
Connect the instrument that you wish to
tune.
3 LCD screen
Mode: This indicates whether the current
mode is AUTO or MANUAL.
Note name: This indicates a note name of
A, A#, B, C, C#, D, D#, E, F, F#, G, G#.
Calibration: This indicates the currently
specified calibration setting.
Meter: This indicates the deviation from the
correct pitch.
NOTICE
KORG products are manufactured under strict specifications and voltages required by
each country. These products are warranted by the KORG distributor only in each
country. Any KORG product not sold with a warranty card or carrying a serial number
disqualifies the product from the manufacturer’s/distributor’s warranty and liability. This
requirement is for your own protection and safety.
KORG INC.
15-12,Shimotakaido 1-chome, Suginami-ku, Tokyo, Japan
C 1997 KORG INC.
4 CALIB button
This changes the calibration setting.
Calibration can be set in 1 Hz steps from 430
Hz to 449 Hz.
5 AUTO button
Pressing this button will select AUTO mode,
so that the note name closest to the pitch you
played will automatically be displayed for
tuning.
6 MANL/NOTE button
Pressing this button will select MANUAL mode.
Subsequently, pressing this button additional
times will switch the note name setting.
7 Mic
When tuning acoustic instruments, place this
mic near the portion of the instrument from
which the sound is output.
4. Play a single note on your instrument, and
tune it so that the desired note name is
displayed.
Then watch the meter display, and make fine
adjustments to the tuning so that the center
LED of the tuning guide is lit. If you are
playing a stringed instrument, use the same
procedure to tune each string.
MANUAL mode
3. Press the NOTE button so that the desired
note name is displayed.
4. Play a single note on your instrument, and
watching the meter display, make fine
adjustments to the tuning so that the center
LED of the tuning guide is lit. If you are
playing a stringed instrument, use the same
procedure to tune each string.
The mic will not function when the INPUT jack
is connected.
8 Tuning guide LEDs
When the pitch is correct, the middle LED will
light. If the pitch is flat, the left LED will light. If
the pitch is sharp, the right LED will light.
Tuning procedure
1. If you are using an electrical instrument,
connect it to the INPUT jack.
2. Check the calibration display. If you wish to
change the setting, press the CALIB button
the appropriate number of times to make the
desired setting.
AUTO mode
3. Make sure that AUTO mode is selected. If
the unit is in MANUAL mode, press the AUTO
button.
Troubleshooting
Cannot tune. Or, tuning is difficult.
If you are using an electric instrument, has the
instrument volume been turned down?
Alternatively, has the volume been raised
excessively? Adjust the instrument volume so
that the meter becomes stable.
If you are using an acoustic instrument, try
changing the distance or angle between the
built-in mic (or external mic) and your
instrument.
If the unit malfunctions, and turning the
power OFF and then ON does not
resolve the problem, remove and then
reinstall the battery.
Installing the battery
1. Slide the rear of the case as shown in the
diagram.
2. Insert a 9V battery (6F22 type; S-006P,
sold separately) as shown. Be sure that the
polarity is correct.
3. Slide the case closed.
When the LCD screen becomes dim,
it's time to change the battery.
Basic concepts of tuning
About the Cent display
"Cents" are the smallest relative unit used
to indicate pitch. A semitone consists of
100 cents, and an octave consists of 1200
cents. The CA-10 shows the difference
between the input pitch and the correct
pitch in units of cents. (Since 1 cent is an
extremely small unit, differences of
approximately ± 3 cents will not normally
be a problem.)
Standard pitch and calibration
The tuning of an instrument is expressed
in terms of the frequency of the pitch of
the middle A note on a piano; most
commonly A4=440 Hz. On the CA-10 the
standard pitch (the frequency of A4) can
be adjusted in the range of 430-449 Hz.
Adjusting the standard pitch is referred to
as "calibration."
Technicsche Daten
CHROMATIC TUNER
CA-10
BEDIENUNGSANLEITUNG
CA-10
AUTO
-20
0
MANUAL
+20
CENT
CENT
-50
+50
AUTO
MANL
NOTE
CALIB
POWER
IN
MIC
Herzlichen Dank für den Kauf des Korg CA-10.
Skala: 12 Noten, wohltemperierte Stimmung
Erkennungsbereich:
A0 (27,50Hz - B7 (3591,07Hz)
Erkennungsgenauigkeit: ±3 Cents
Stimm-Modi: AUTO, MANUAL
Kalibrierungsbereich: 430 - 449Hz
(1-Hz-Schritte)
Anschlußbuchsen: INPUT-Buchse
Stromversorgung: 9V Batterie 6F22
(S-006P, separat erhältlich)
Batterie-Lebensdauer: etwa 30 Stunden
(mit Mangan Battrie, A4 Input-Buchse)
Abmessungen:
62mm (B) x 95,8mm (T) x 28,5mm (H)
Gewicht: 106g (mit Batterie)
Änderungen, die dem technischen Fortschritt
dienen, können jederzeit ohne Ankündigung
vorgenommen werden.
Grundlegende Konzepte des Stimmens
Über die Cent-Anzeige
“Cents” sind die kleinste relative Einheit zur
Angabe der Tonhöhe. Ein Halbton besteht aus
100 Cents, und eine Oktave besteht aus 1200
Cents. Der CA-10 zeigt den Unterschied
zwischen der eingespeisten Tonhöhe und der
korrekten Tonhöhe in Cent-Einheiten an. (Da 1
Cent eine extrem kleine Maßeinheit ist, stellen
Tonhöhenunterschiede von etwa ±3 Cents
normalerweise kein Problem dar.)
Vorsichtsmaßnahmen
CE-Marke der EG-Norm
Aufstellung
Betreiben Sie das Gerät nicht in folgenden
Umgebungen, da dies zu Fehlfunktionen führen
könnte:
• in direktem Sonnenlicht
• bei extremer Temperatur oder Luftfeuchtigkeit
• in extrem staubigen oder schmutzigen Umgebungen
• unter dem Einfluß starker Vibrationen
• in der Nähe eines Magnetfeldes
Stromversorgung
Verwenden Sie als Stromquelle ausschließlich
9V-Trockenbatteriezellen vom Typ 6F22 oder S006P(separat erhältlich).Stellen Sie den
Betriebsschalter bei Nichtgebrauch stets auf
“OFF” (aus), um die Batterie zu schonen.
Wenn Sie das Tuner voraussichtlich längere Zeit
nicht brauchen, sollten Sie die Batterie
herausnehmen, um eine Beschädigung durch
auslaufenden Elektrolyt zu vermeiden.
Interferenzen bei anderen Elektrogeräten
Dieses Produkt ist mit einem Mikrocomputer
ausgerüstet. Bei der Aufstellung in direkter Nähe von
Rundfunk- und Fernsehgeräten kann deren Empfang
durch Interferenzen gestört werden. Betreiben Sie
dieses Gerät deshalb in ausreichender Entfernung von
Rundfunk- und Fernsehempfängern.
Regler und ihre Funktionen
Handhabung
Bedienen Sie die Schalter und Regler nicht mit übermäßiger
Kraft, um Beschädigungen zu vermeiden.
Reinigung
Wenn das Gehäuse verschmutzt ist, reinigen Sie es mit
einem trockenen, weichen Tuch. Verwenden Sie keine
flüssigen Reinigungsmittel, zum Beispiel Leichtbenzin,
Verdünner, Lösungsmittel oder brennbare Polituren.
Bedienungsanleitung
Nachdem Sie die Bedienungsanleitung gelesen haben,
sollten Sie sie für den späteren Gebrauch gut aufbewahren.
Fremdgegenstände
• Stellen Sie keine Behälter mit Flüssigkeit in die Nähe dieses
Geräts. Wenn Flüssigkeiten in das Gerät gelangen, könnte
dies einen Systemausfall, Brand oder Stromschlag zur Folge
haben.
• Achten Sie darauf, daß keine Metallgegenstände in das
Gerät gelangen. Sollte dies dennoch geschehen, ziehen
Sie den Wechselstromadapter aus der Netzsteckdose.
Setzen Sie sich anschließend mit dem nächstgelegenen
Korg-Fachhändler oder dem Geschäft in Verbindung, in dem
Sie das Gerät gekauft haben.
KALIBRIERUNG MODUS NOTENNAME
0
MANUAL
+20
CENT
-50
+50
8
NADELANZEIGE
0
MANUAL
+20
CENT
CENT
-50
3
+50
5
AUTO
MANL
NOTE
CALIB
POWER
IN
1
2
MIC
6
7
4
1 Netzschalter
Mit einem Druck auf diese Taste schalten
Sie den CA-10 abwechselnd ein/aus.
Wenn Sie das Gerät 20 Minuten lang
eingeschaltet lassen, ohne es zu
bedienen, schaltet es sich automatisch
aus.
2 INPUT-Buchse
Schließen Sie hier das zu stimmende
Instrument an.
3 LCD-Bildschirm
Modus: Zeigt an, ob als aktueller Modus
AUTO oder MANUAL gewählt ist.
Notenname: Zeigt einen der Notennamen
A, A#, B, C, C#, D, D#, E, F, F#, G, G#
an.
Kalibrierung: Zeigt die momentan
gewählte Kalibrierungseinstellung an.
ACHTUNG
Alle KORG-Produkte werden entsprechend den Richtlinien der jeweiligen Länder mit allergrößter
Sorgfalt hergestellt. Sie unterliegen den Garantiebestimmungen der KORG-Vertriebsfirmen in den
einzelnen Ländern. Es ist besonders wichtig, den Service-Beleg umgehend vollständig ausgefüllt und
mit der Seriennummer des Gerätes an die Vertriebsfirma abzuschicken.
Im Interesse Ihrer eigenen Sicherheit, z. B. bei Verlust des Gerätes oder bei Funktionsstörungen, ist
bei uns die Seriennummer gespeichert.
Darüber hinaus erhalten Sie Informationen über Software-Update-Möglichkeiten sowie aktuelle
Softwareübersichten und Neuerscheinungen im KORG Professional Bereich.
C 1997 KORG INC.
CENT
AUTO
-20
Die CE-Marke auf unseren netzgespeisten Geräten deutet auf deren Übereinstimmung mit den EMCund CE-Richtilinien der EG (respektive 89/336/EWG und 93/68/EWG) hin. Diese Abzeichen ist bis
zum 3. Dezember 1996 gültig.
Die CE-Marke ab 1. Januar 1997 deutet auf Übereinstimmung mit den EMC-, CE- und
Niederspannungsstrom-Richtilinien der EG (respektive 89/336/EWG, 93/68/EWG und 93/68/EWG)
hin.
Die CE-Marke auf unseren batteriegespeisten Geräten deutet auf deren Übereinstimmung mit den
EMC- und CE-Richtilinien der EG (respektive 89/336/EWG und 93/68/EWG) hin.
KORG INC.
15-12,Shimotakaido 1-chome, Suginami-ku, Tokyo, Japan
AUTO
-20
CA-10
Kammerton und Kalibrierung
Die Stimmung eines Instruments wird
bezogen auf die Frequenz der Tonhöhe
des mittleren A eines Pianos. Diese ist
meistens A4 = 440Hz. Beim CA-10 können
Sie die Kammerton (die Frequenz von A4)
im Bereich von 430 - 449Hz einstellen.
Das Einstellen des Kammertons
bezeichnet man als “Kalibrieren”.
Nadelanzeige: Zeigt die Abweichung von der
korrekten Tonhöhe an.
4 CALIB-Taste
Damit ändern Sie die
Kalibrierungseinstellung.
Die Kalibrierung läßt sich in 1-Hz-Schritten
von 430Hz bis 449Hz einstellen.
5 AUTO-Taste
Mit einem Druck auf diese Taste wählen Sie
den AUTO-Modus, in dem der Notenname,
der der gespielten Tonhöhe am besten
entspricht, automatisch zum Stimmen
angezeigt wird.
6 MANL/NOTE-Taste
Mit einem Druck auf diese Taste wählen Sie
den MANUAL-Modus. Wenn Sie
anschließend nochmals diese Taste drücken,
wird der eingestellte Notenname gewechselt.
7 Mic
Halten Sie beim Stimmen von
Akustikinstrumenten dieses Mikrofon nahe
an den Teil des Instruments, der den Klang
abstrahlt.
Das Mikrofon ist außer Betrieb, wenn die
INPUT-Buchse belegt ist.
8 Stimmhilfe-LEDs
Wenn die Tonhöhe korrekt ist, leuchtet die
mittlere LED. Wenn die Tonhöhe zu tief ist,
leuchtet die linke LED. Wenn die Tonhöhe zu
hoch ist, leuchtet die rechte LED.
Stimmverfahren
Batterie einbauen
1.Wenn Sie ein elektrisches Intrument
verwenden, schließen Sie es an die INPUTBuchse an.
2.Prüfen Sie die Kalibrierungsanzeige. Wenn
Sie die Einstellung ändern möchten, drücken
Sie die CALIB-Taste entsprechend oft, um
die gewünschte Einstellung vorzunehmen.
AUTO-Modus
3.Stellen Sie sicher, daß der AUTO-Modus
gewählt ist. Wenn das Gerät in den
MANUAL-Modus geschaltet ist, drücken Sie
die AUTO-Taste.
4.Spielen Sie einen Einzelton auf Ihrem
Instrument, und stimmen Sie es so, daß der
gewünschte Notenname angezeigt wird.
Achten Sie dann auf die Nadelanzeige, und
nehmen Sie Feineinstellungen an der
Stimmung vor, bis die mittlere LED der
Stimmhilfe leuchtet. Wenn Sie ein
Saiteninstrument spielen, wiederholen Sie
das Verfahren, um die anderen Saiten zu
stimmen.
MANUAL-Modus
3.Drücken Sie so oft die NOTE-Taste, bis der
gewünschte Notenname angezeigt wird.
4.Spielen Sie einen Einzelton auf Ihrem
Instrument, achten Sie auf die Nadelanzeige
und nehmen Sie Feineinstellungen an der
Stimmung vor, bis die mittlere LED der
Stimmhilfe leuchtet. Wenn Sie ein
Saiteninstrument spielen, wiederholen Sie
das Verfahren, um die anderen Saiten zu
stimmen.
1.Verschieben Sie die Gehäuserückseite
entsprechend dem obigen Diagramm.
2.Legen Sie wie im Diagramm eine 9VBatterie (Typ 6F22; S-006P, separat
erhältlich) ein. Achten Sie auf die
korrekte Polarität.
3.Schieben Sie das Gehäuse zurück, bis
es geschlossen ist.
Wenn der LCD-Bildschirm allmählich
dunkler wird, sollten Sie die Batterie
wechseln.
Fehlersuche
Das Stimmen ist unmöglich oder
schwierig.
Beim Einsatz eines elektrischen
Instruments: Ist die Lautstärke des
Instruments zurückgedreht? Oder wurde
die Lautstärke übermäßig erhöht? Stellen
Sie die Instrumentenlautstärke so ein,
daß die Nadelanzeige sich stabilisiert.
Beim Einsatz eines akustischen
Instruments: Versuchen Sie, die
Entfernung oder den Winkel zwischen
dem eingebauten (oder externen)
Mikrofon und Ihrem Instrument zu
ändern.
Falls Funktionsstörungen auftreten
und das Problem sich durch AUS- und
EINSCHALTEN des Geräts nicht lösen
läßt, sollten Sie die Batterie entfernen
und anschließend wieder einbauen.
Spécifications techniques
Echelle: 12 notes à tempérament égal
Plage de détection:
A0 (La0 - 27,5 Hz) - B7 (Si7 - 3951,07 Hz)
Précision de détection: + 3 centièmes
Modes d’accordage: AUTO, MANUEL
Calibrage: 430 - 449 Hz (par pas de 1 Hz)
Bornes de raccordement: jack d’entrée INPUT
Alimentation: Pile de 9V 6F22
(S-006P, vendue séparément)
Durée de vie de la pile: environ 30 heures
(avec une pile au manganèse, entrée A4)
Dimensions:
62 mm (L) x 95,8 mm (P) x 28,5 mm (H)
Poids: 106 gr (pile comprise)
Les spécifications techniques et la finition
peuvent être sujettes à modifications sans avis
préalable dans un esprit d’amélioration
continue du produit.
CHROMATIC TUNER
CA-10
MANUEL D’UTILISATION
CA-10
AUTO
-20
0
MANUAL
+20
CENT
CENT
-50
+50
AUTO
MANL
NOTE
CALIB
POWER
IN
MIC
Merci d'avoir fait l'acquisition du Korg CA-10.
Précautions à prendre
Emplacement
L’utilisation de l’appareil dans les endroits
suivants risquerait d’être la cause d’un mauvais
fonctionnement:
• Sous les rayons directs du soleil
• Dans des endroits de températures extrêmes
ou d’une humidité excessive.
• Dans des endroits excessivement sales ou
poussiéreux.
• Dans des lieux sujets à des vibrations
excessives.
• A proximité de champs magnétiques
Alimentation
Pour alimenter le tuner, utilisez exclusivement
une pile sèche 6F22 ou 006P de 9 Volts (vendu
séparément).
Mettez toujours le métronome hors tension
lorsque vous ne l’utilisez pas afin de prolonger
au maximum la durée de vie de la pile.
Si vous ne prévoyez pas d’utiliser le métronome
pendant une période prolongée, enlever la pile
pour prévenir tout endommagement dû à une
fuite éventuelle du liquide de la pile.
Interférences avec d’autres appareils électriques
Cet instrument contient un micro-ordinateur. Les
postes de radio et de télévision situés à proximité
peuvent par conséquent souffrir d’interférences à la
réception. Veuillez dès lors faire fonctionner cet
appareil à une distance raisonnable de postes de radio
et de télévision.
Manipulations
Pour éviter tout dommage, ne jamais exercer une
force excessive sur les interrupteurs ou les
commandes.
Entretien
Essuyer l’extérieur avec un chiffon propre et sec. Ne
jamais utiliser de détergents liquides comme du
benzène ou du thinner ni des composants de
nettoyage ou des cires inflammables.
Conserver le manuel
Après avoir lu attentivement le présent manuel,
veuillez le conserver pour pouvoir le consulter
ultérieurement. .
Tenir tout corps étranger à l’écart de l’instrument:
• Ne jamais poser de récipient contenant du liquide à
proximité de l’instrument. La pénétration de liquide
dans l’instrument risquerait de provoquer une panne,
un incendie ou un court-circuit.
• Veiller à ce qu’aucun objet métallique ne tombe dans
l’instrument. Si un corps étranger a pénétré dans
l’équipement, débrancher l’adaptateur de la prise
secteur puis contacter le représentant Korg le plus
proche ou le magasin où l’équipement a été acheté.
CALIBRAGE MODE NOM DE LA NOTE
AUTO
-20
AUTO
-20
0
8
CENT
3
+50
5
CALIB
POWER
IN
-50
MANUAL
+20
CENT
+50
1
2
COMPTEUR
4 Touche CALIB
Permet de modifier le réglage de calibre.
Le calibrage peut être défini par pas de 1 Hz
entre 430 Hz et 449 Hz.
MIC
6
Marque CE de conformité aux normes de sécurité européennes
La marque CE attachée à nos produits alimentés par secteur indique que ces produits sont
conformes à la directive EMC (89/336/CEE) ainsi qu’à la directive relative à la marque CE (93/68/
CEE).Cette marque est valable jusqu’au 31 décembre 1996.
La marque CE attachée après le 1 janvier 1997 indique que ces produits sont conformes à la
directive EMC (89/336/CEE), à la directive relative à la marque CE (93/68/CEE) ainsi qu’à la directive
relative au courant de basse tension (73/23/CEE).
Enfin, la marque CE attachée à nos produits alimentés par batterie indique que ces produits sont
conformes à la directive EMC (89/336/CEE) ainsi qu’à la directive relative à la marque CE (93/68/
EEC).
ATTENTION
Les produits KORG sont fabriqués suivant les normes et les tentions d’alimentation requises dans
chaque pays. Ces produits sont garantis par le distributeur KORG dans le cadre de sa seule
distribution. Tout produit KORG non vendu avec sa carte de garantie ou ne portant pas son numéro
de série perd le bénéfice de la garantie du fabricant. Ces dispositions ont pout but la protection et la
sécurité de l’utilisateur.
KORG INC.
15-12,Shimotakaido 1-chome, Suginami-ku, Tokyo, Japan
C 1997 KORG INC.
Mise en place de la pile
1. Si vous utilisez un instrument électrique, le
raccorder à la borne INPUT.
2. Vérifier l’affichage de calibre. Pour modifier le
réglage, appuyer sur la touche CALIB autant
MANUAL
+20
-50
MANL
NOTE
CENT
0
Hauteur standard et calibrage
L’accordage d’un instrument s’exprime en
termes de fréquence de la hauteur tonale
de la note La sur un piano et plus
généralement sous forme de La4 = 440
Hz. Sur le CA-10, la hauteur standard (la
fréquence du La4) peut être ajustée sur
une plage allant de 430 à 449 Hz. Le
réglage de la hauteur standard s’appelle le
«calibrage».
de fois que nécessaire pour obtenir le réglage
souhaité.
CENT
AUTO
A propos de l’affichage des centièmes.
Les «centièmes» sont la plus petite unité utilisée
pour indiquer la hauteur tonale. Un demi-ton se
divise en 100 centièmes alors qu’une octave est
égale à 1200 centièmes. Le CA-10 indique la
différence entre la hauteur d’entrée et la hauteur
correcte en centièmes. (Etant donné qu’un
centième représente une très petite unité, des
différences d’environ + 3 centièmes ne posent
généralement pas de problème.)
Marche à suivre pour l’accordage
Les différentes commandes et leurs fonctions
CA-10
Principes de base pour l’accordage
7
4
1 Interrupteur d’alimentation POWER
L’appareil se met sous ou hors tension
chaque fois que l’on appuie sur cet
interrupteur. Si l’appareil reste sous tension
pendant 20 minutes sans être utilisé, son
alimentation se coupe automatiquement.
2 Borne d’entrée INPUT
Sert à brancher l’instrument à accorder.
3 Ecran LCD
Mode: Indique si l’appareil fonctionne en
mode automatique (AUTO) ou MANUEL.
Nom de la note: Indique le nom de la note
tel que A (La), A# (La#), B (Si), C (Do),
C# (Do#), D (Re), D# (Re#), E (Mi), F
(Fa), F# (Fa#), G (Sol), G# (Sol#)
Calibrage: Indique le calibrage sélectionné.
Compteur: Indique la déviation par rapport
à la hauteur tonale normale.
5 Touche AUTO
Appuyer sur cette touche pour sélectionner
le mode AUTO. Ainsi, le nom de la note la
plus proche de la hauteur jouée s’affiche
automatiquement pour son accordage.
6 Touche MANU/NOTE
Appuyer sur cette touche pour sélectionner
le mode MANUEL. Une seconde pression de
la touche permet de commuter avec le
réglage de nom de note.
7 Mic
Pour l’accordage des instruments
acoustiques, placer le micro à proximité de
la partie de l’instrument émettant le son.
Le micro ne fonctionne cependant pas lorsque
la borne d’entrée INPUT est raccordée.
8 Voyants d’accordage
Lorsque la hauteur tonale est correcte, le
voyant du milieu s’allume. Si la hauteur est
trop grave, le voyant gauche s’allume et si la
hauteur est trop aigu‘, le voyant droit s’allume.
Mode AUTO
3. S’assurer que le mode AUTO est sélectionné.
Si l’appareil se trouve en mode MANUEL,
appuyer sur la touche AUTO.
4. Jouer une seule note sur l’instrument et
l’accorder de sorte que le nom de note souhaité
s’affiche à l’écran.
Regarder ensuite le compteur et accorder avec
plus de précision pour que le voyant
d’accordage du milieu s’allume. Si vous jouez
d’un instrument à cordes, utiliser la même
méthode pour accorder chaque corde
successivement.
Mode MANUEL
3. Appuyer sur la touche NOTE jusqu’à ce que
le nom de la note souhaitée s’affiche à l’écran.
4. Jouer une seule note sur l’instrument.
Observer le compteur et accorder avec plus
de précision pour que le voyant d’accordage
du milieu s’allume. Si vous jouez d’un
instrument à cordes, utiliser la même méthode
pour accorder chaque corde successivement.
1. Faire glisser l’arrière du boîtier comme
illustré.
2. Insérer une pile de 9V (de type 6F22; S006P, non fournie) comme indiqué, en
respectant soigneusement les marques de
polarité.
3. Refaire glisser la partie du boîtier pour le
refermer.
Changer la pile dès que les voyants de
l’écran (LCD) s’affaiblissent.
Guide de dépannage
Impossible d’accorder l’instrument. Ou
l’accordage est trop difficile.
Si vous utilisez un instrument électrique,
le volume est-il réduit au minimum? Ou, le
volume est-il excessivement élevé? Régler
le volume de l’instrument de manière à
stabiliser le compteur.
Si vous utilisez un instrument acoustique,
essayer de modifier la distance ou l’angle
entre le micro incorporé (ou le micro externe)
et l’instrument.
En cas de mauvais fonctionnement,
qui ne se résout pas en mettant
l’appareil hors et sous tension, retirer
la pile puis la remettre en place.