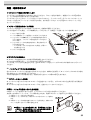
1
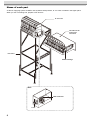
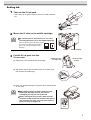
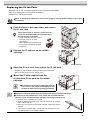
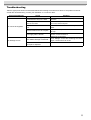
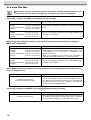
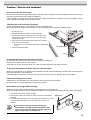
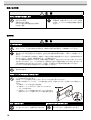
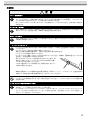
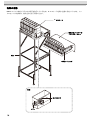
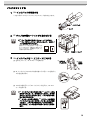
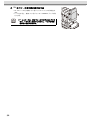
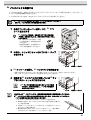
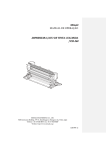
English Foreword ............................................................ 2 Safety Precautions ............................................ 3 Name of each part ............................................. 6 Setting Ink .......................................................... 7 Replacing the 2L Ink Pack ................................ 9 If ink error occurs ............................................ 10 Troubleshooting .............................................. 11 In a case like this ............................................. 12 Caution / Point to be checked ........................ 13 Japanese はじめに ................................................................... 14 安全にお使いいただくために ................................... 15 各部の名称 ................................................................ 18 インクをセットする ................................................. 19 2L インクパックを交換する ..................................... 21 インクエラーが発生したら ....................................... 22 故障?と思う前に ..................................................... 23 こんなときには ......................................................... 24 注意・確認事項など ................................................. 25 MIMAKI ENGINEERING CO., LTD. TKB Gotenyama Building, Kitashinagawa, Shinagawa-ku, Tokyo 141-0001, Japan Phone: +81-3-5420-8671 Fax: +81-3-5420-8687 URL: http: // www. mimaki. co. jp D201960-15 Foreword Thank you very much for your purchase of the Mimaki Bulk Ink System "MBIS1". About This Operation manual • This Operation manual describes the operation and maintenance of "TPC-1000" (hereafter referred to as "this machine"). • Please read and fully understand this Operation manual before putting the machine into service. It is also necessary to keep this Operation manual on hand. • Make arrangements so that this manual is certainly delivered to the person in charge of the operation of this machine. • This Operation manual has been carefully prepared for your easy understanding. However, please do not hesitate to contact a distributor in your district or our office if you have any inquiry. • Description contained in this Operation manual are subject to change without notice for improvement. • In the case where this Operation manual should be illegible due to destruction or lost by fire or breakage, purchase another copy of the Operation manual from our office. Caution DISCLAIMER OF WARRANTY: THIS LIMITED WARRANTY OF MIMAKI SHALL BE THE SOLE AND EXCLUSIVE WARRANTY AND IS IN LIEU OF ALL OTHER WARRANTIES, EXPRESS OR IMPLIED, INCLUDING, BUT NOT LIMITED TO, ANY IMPLIED WARRANTY OF MERCHANTABILITY OR FITNESS, AND MIMAKI NEITHER ASSUMES NOR AUTHORIZES DEALER TO ASSUME FOR IT ANY OTHER OBLIGATION OR LIABILITY OR MAKE ANY OTHER WARRANTY OR MAKE ANY OTHER WARRANTY IN CONNECTION WITH ANY PRODUCT WITHOUT MIMAKI'S PRIOR WRITTEN CONSENT. IN NO EVENT SHALL MIMAKI BE LIABLE FOR SPECIAL, INCIDENTAL OR CONSEQUENTIAL DAMAGES OR FOR LOSS OF PROFITS OF DEALER OR CUSTOMERS OF ANY PRODUCT. Requests • This Operation manual has been carefully prepared for your easy understanding. However, please do not hesitate to contact a distributor in your district or our office if you have any inquiry. • Description contained in this Operation manual are subject to change without notice for improvement. Unauthorized reproduction of this manual is strictly prohibited. MIMAKI ENGINEERING Co., Ltd. All Rights Reserved.Copyright 2 Safety Precautions About Symbols Symbols are used in this Operation manual for safe operation and for prevention of damage to the machine. One symbol is used for one caution. Please understand the meaning of each symbol and use this machine safely. Symbols and Their Meanings Meaning Failure to observe the instructions given with this symbol can result in death or serious injuries to personnel. Be sure to read and observe the instructions for proper operation. Failure to observe the instructions given with this symbol can result in injuries to personnel or damage to property. Important notes in use of this machine are given with this symbol. Understand the notes thoroughly to operate the machine properly. Useful information is given with this symbol. Refer to the information to operate the machine properly. Indicates the reference page for related contents. The symbol indicates that the instructions must be observed as strictly as the CAUTION instructions (including DANGER and WARNING instructions). A sign representing a precaution (the sign shown at left warns of an electric shock hazard) is shown in the triangle. The symbol indicates that the action shown is prohibited. A sign representing a prohibited action (the sign shown at left prohibits disassembly) is shown in or around the circle. The symbol indicates that the action shown must be taken without fail or the instructions must be observed without fail. 3 Cautions about installation Caution Do not install in the following places: • A place exposed to direct sunlight • On an inclined surface • A place that vibrates • A place exposed to direct air flow from an air conditioner, etc. • Around a place where fire is used • A place where the temperature or humidity changes significantly (The recommended usage environment differs depending on the connected printer.Confirm it referring to the instruction manual of the printer.) Warning for Use Warning How to Handle Ink • • • The ink used for this machine contains organic solvent. Since the ink is flammable, never use flame in or around the place where this machine is used. • If the machine is used in a room with bad ventilation or a hermetically closed room, be sure to install ventilation equipment. In addition, if you inhale a lot of vapor and feel bad, immediately move to a location of fresh air and then keep yourself warm and quiet. • If anyone drinks ink by mistake, keep him or her quiet and see a doctor immediately Do not allow him or her to swallow the vomit. After that, contact the Poison Control Center. • The ink contains organic solvent. If ink has stuck to your skin or clothes, immediately wash it off with detergent and water. If you get ink in your eyes, immediately wash your eyes with a lot of clean water for at least 15 minutes. In doing so, also wash eyes to rinse ink away completely. Then, consult a doctor as soon as possible. • Be sure to store ink packs out of reach of children. • When removing 2L eco case from the seat, be sure to wear goggles etc. Ink may spatter and get in your eyes. Do not pull out and insert the middle cartridge again as much as possible. Do not pull out /insert the middle cartridge as much as possible • The number of pulling out and inserting the middle cartridge shall be minimized. It may cause ink leakage. • When you do not use the middle cartridge, thoroughly pull out it from the slot. Store the middle cartridge you pulled out with its rubber cap pushed into the top edge of it to prevent ink leakage. 1. Thoroughly pull out the middle cartridge. 2. Remove the rubber cap located on the IC chip side of Rubber cap the middle cartridge. 3. Turn the middle cartridge around (to the opposite side of the IC chip) and push the rubber cap into the top edge of it to prevent ink leakage. Push into Prohibition of Use in a Damp Environment • Avoid locating the machine in a damp environment. Do not splash water onto the machine. Use in such an environment can give rise to fire, electric shocks or breakdown of the machine. 4 Prohibition of Disassembly or Modification • Never disassemble or modify this machine or the ink cartridges. Disassembly or modification results in electric shocks or breakdown of the machine. Caution for Use Caution Handling of MBIS1 • Even when not using MBIS1, keep the ink pack be set. If the ink pack is not set, the ink pack connector end located in the center of the seat will be solidified and supplying ink to the printer will not be available or ink leakage may occur. • Do not set the 2L eco case without 2L ink pack on the jack stand. Air may be mixed in. Adjusting level foot • Be sure to fix the level foot of MBIS1. If you draw a figure with the connected printer without the level foot fixed, MBIS1 may start to move. Using dedicated ink • Be sure to use dedicated ink for the printer to be connected. It will not operate with ink other than the dedicated one because of protecting the printer. How to Handle Ink Packs • If the ink pack is moved from a cold place to a warm place, leave it in the room temperature for three hours or more before using it. • Open the ink pack just before installing it in the machine. If it is opened and left for an extended period of time, normal printing performance of the machine may not be ensured. • Make sure to store ink packs in a cool and dark place. • Be sure to thoroughly consume the ink in the ink pack, once it is opened, within three months. If an extended period of time has passed away after opening the pack, printing quality would be poor. • When you removed the 2L ink pack from the seat before it ends, wipe ink adhering to inside of the connector part of the 2L ink pack with a cotton swab etc. If ink adhering to inside of the connector part may dry out, it may cause ink leakage when using it again. • To change the ink type or the color after installing MBIS1, replace the ink tube and the seat. Contact with sales office or our business office. • Never refill the ink pack with ink. Refilled ink pack can cause a trouble. Remember that MIMAKI assumes no responsibility for any damage caused by the use of the ink pack replenished with ink. • Neither pound the ink pack nor shake it violently, as doing so can cause leakage of ink. Do not leave the ink slot empty • Do not leave the ink slot empty for a long time. Leaving it empty may dry the slot and solidify the ink in the machine, then the machine will become unable to supply ink. • If ink cartridges are not set in the ink slot, an error message will display on the printer to set ink cartridges. Set the same colored ink cartridge as the ink used before. 5 Name of each part As the ink supplying system of MBIS1 uses hydraulic head pressure, 2L eco case is located in the higher place. When you set or exchange ink, prepare a foot stool etc. 2L eco case Ink station of the printer to be connected Jack stand Middle cartridge Seat Male connector Lever 6 Setting Ink 1 Take out the 2L ink pack. • Take out the 2L ink pack and the IC chip from a small cardboard box. 2L ink pack IC chip 2 Mount the IC chip on the middle cartridge. Be careful of the IC chip direction. If it is set in the wrong direction, ink is not supplied properly. Insert the chip facing the metal side to the left. Do not touch the metal part while inserting. (The IC chip may be damaged by static electricity.) IC chip 3 Put the 2L ink pack into the 2L eco case. (1) Open the 2L eco case as shown on the right. (1) While pressing the finger grip, Middle cartridge (2) open to right and left. (2) Tear off the seal on the connector of the 2L ink pack, and then remove the rubber plug. rubber plug (3) Put the 2L ink pack facing the connector down, and close the 2L eco case. When putting the 2L ink pack, shape the pack referring to the label in the 2L eco case. If unshaped, you may not use up the ink. Before closing the 2L eco case, make sure the connector of the ink pack is placed on the groove part of the 2L eco case. If it is not placed on the groove, it may not supply ink. groove part 7 4 Attach the 2L eco case to the base. • Ink is supplied to the printer connecting to the 2L eco case. • After 1 or 2 minutes, EMPTY lamp on the connected printer goes out. Push the 2L eco case all the way in. If not, it may not supply ink. 8 Replacing the 2L Ink Pack When ink has run out, a message appears on the connected printer display. (See the operation manual of the printer for details.) Replace the 2L ink pack as follows. When exchanging 2L ink pack, be sure to wear goggles. Ink may spatter and get in your eyes accidentally. 1 Push the lever of the base down, and remove the 2L eco case. When replacing the 2L ink pack, replace the male connector absorbent (attachment) periodically to prevent the stain in the base. • Replace the absorbent every five to ten times of the 2L ink pack replacement. • When replacing the absorbent, be sure to wear the attached goggles and gloves. 2 3 4 Remove the IC chip set on the middle cartridge. IC chip Middle cartridge IC chip Middle cartridge Open the 2L eco case, then replace the 2L ink pack. • Keep the IC chip removed in the step 2 with used 2L ink packs. (Not to mix with an IC chip of a new ink pack) Mount the IC chip supplied with the replacement 2L ink pack on the middle cartridge. Be careful not to touch the metal part of the IC chip. There is the danger of damaging IC chip because of static electricity being generated. Request an industrial waste disposal company for disposal of used ink packs. If removing an ink pack before it ends, follow the procedures below. Otherwise, you cannot accurately grasp the remaining amount of ink. 1. Remove an ink pack from an eco case. 2. Wipe ink adhering to inside of the connector part of the 2L ink pack with a cotton swab etc. 3. Remove the IC chip set on the middle cartridge, and keep it with the ink pack. 4. If you use the ink pack again, set the pack, and mount the IC chip kept with the pack on the middle cartridge. 9 If ink error occurs If ink error occurs, a warning message will be displayed in the display of the printer, and all operations related ink discharge such as printing and cleaning cannot be performed. When ink error occurs: “!CAR” or “!Cartridge” is displayed on the display of the printer. To display the details of ink error (1) Press the [ENTER] key in the local mode of the printer. (2) Press the [FUNCTION] (for JV33 etc.) or the [INFORMATION] (for JV5 etc.) to display the details of warning error. • Here, warning messages unique to MBIS is explained. For other warning errors, refer to the instruction manual of the printer. • For the method of detailed display of warning error, refer to the instruction manual of the printer. Message Cause Solution The middle cartridge is not set. • Set the middle cartridge without fail. NO CARTRIDGE The IC chip is not inserted into • Insert the IC chip. the middle cartridge. The IC chip cannot be read • Contact with a call center. correctly. JV33/TS3 JV33BS CJV30/CJV30BS/TPC JV5/TS5 WRONG INK IC [Cause] and [Solution] vary from the firmware version of the printer. : : : : FW ver.3.20 or before FW ver.2.00 or before FW ver.1.30 or before FW ver.4.10 or before • In the state of MBIS1 being in use, turn on the power In the state of ink cartridge in supply again. use, switched to MBIS1. • When you use MBIS1 for the first time, the initial filling is required. JV33/TS3 JV33BS CJV30/CJV30BS/TPC JV5/TS5 : : : : FW ver.4.00 or later FW ver.3.00 or later FW ver.2.00 or later FW ver.5.00 or later In the state of MBIS1 in use, the IC chip for ink cartridge has • Set the IC chip for MBIS1 into the middle cartridge. been set in the middle cartridge. WRONG CARTRIDGE INK END 10 • When 2L ink pack was replaced due to running out of ink etc., if you use the IC chip for old 2L ink pack without After replacing 2L ink pack, change, the printer cannot detect the ink information of you did not change the IC chip new 2L ink pack. When you replace 2L ink pack, set the to new one. IC chip attached to the replaced ink pack into the middle cartridge. Ink in the middle cartridge remains low. • When ink in the middle cartridge gets low, "INK END" appears and the EMPTY lamp blinks in red. We recommend replacing to the 2L ink pack early. Replacing to the 2L ink pack, ink is supplied to the middle cartridge, and the ink end error disappears. (If you use MBIS1, "INK END" appears without displaying "NEAR END". • If ink end occurs in one supply path while drawing or cleaning, the operation is terminated immediately. (for JV33 etc.) • Even if you replace 2L ink pack while ink end is displayed, the ink end display will not be released immediately. Wait until ink will be filled in the middle cartridge. After the ink end state is released, supplying ink will be available. Troubleshooting Take the appropriate actions as described below before taking the trouble as a failure. If the problem is still not solved after troubleshooting, contact your distributor or our service office. Failure phenomenon Ink cannot be supplied. Ink leakage occurs. Cause Solution The 2L eco case has not been • From the top, push the 2L eco case all the way in the base. pushed all the way in the base. The ink pack has not been set in • Check the ink pack is set in the 2L eco case. If it is not set, set the ink pack. the 2L eco case. The 2L eco case has not been • Set the eco case with the 2L ink pack on the base. set. Ink has ended in the 2L ink pack. • Replace the ink pack in the 2L eco case with the IC chip. Ink supply tube is broken. • Check the ink supply tube is not broken. If it is broken, contact for service. • Fasten the screw again. The screw at the upper part of • If ink leakage occurs after fastening the screw the middle cartridge is loosened. again, contact with a call center. • Contact with a call center. The connector of 2L eco case seat part is depleted. 11 In a case like this The number of pulling out and inserting the intermediate cartridge shall be minimized. If you pull out and insert the middle cartridge again and again, it may cause ink leakage etc. If you want to stop to use MBIS1 and want to use ink cartridge Firmware Version of the Printer Solution JV33/TS3 JV33BS CJV30/CJV30BS/TPC JV5/TS5 : : : : FW ver.3.20 or before FW ver.2.00 or before FW ver.1.30 or before FW ver.4.10 or before • After setting ink cartridges in all slots, turn on the power supply again. JV33/TS3 JV33BS CJV30/CJV30BS/TPC JV5/TS5 : : : : FW ver.4.00 or later FW ver.3.00 or later FW ver.2.00 or later FW ver.5.00 or later • Set the ink cartridge into the slot to be used. Rebooting the machine is not required. When using ink cartridges in all slots, if you want to stop to use ink cartridge and change to MBIS1 with initially filled Firmware Version of the Printer Solution JV33/TS3 JV33BS CJV30/CJV30BS/TPC JV5/TS5 : : : : FW ver.3.20 or before FW ver.2.00 or before FW ver.1.30 or before FW ver.4.10 or before • After setting middle cartridges in all slots, turn on the power supply again. (Until you turn on the power supply again, an ink error message “Ink IC abnormality” is displayed on the display of the printer. • When you use MBIS1 for the first time, the initial filling is required. Contact with sales office or our business office. JV33/TS3 JV33BS CJV30/CJV30BS/TPC JV5/TS5 : : : : FW ver.4.00 or later FW ver.3.00 or later FW ver.2.00 or later FW ver.5.00 or later • Set the ink cartridge into the slot to be used. Rebooting the machine is not required. When MBIS1 and ink cartridge are set at the same time, the remaining amount of ink of ink cartridge is displayed less. Firmware Version of the Printer Solution Common to all versions (only when JV5/TS5 is used) • When using MBIS1, the printer calculates the remaining amount of ink based on the ink pack set in MBIS1 (2 liter in full). Even if the ink cartridge is brand-new, the calculation will be performed based on 2 liter. Therefore, the remaining amount of ink will be displayed less. If you wish to switch from MBIS1 to ink cartridge temporarily by necessity. 12 Firmware Version of the Printer Solution Common to all versions • Pull out the middle cartridge of the slot to be switched to use of ink cartridge and set the ink cartridge alternatively. At this time, place the middle cartridge on the ink station of the printer. Caution / Point to be checked Do not leave the ink slot empty Do not leave the ink slot empty for a long time. Leaving it empty may dry the slot and solidify the ink in the machine, then the machine will become unable to supply ink. If ink cartridges are not set in the ink slot, an error message will display on the printer to set ink cartridges. Set the same colored ink cartridge as the ink used before. Checking ink in the ink case fixing base Check periodically that ink is not piled up in the ink case fixing base. When ink is piled up, dispose of the ink in the cup (accessory) coming from the ink disposal tube. 1. Prepare the cup. 2. Release clamp that holds the ink disposal tube. 3. Hold the top of the ink disposal tube with waste cloth, disconnect the plug, and put ink in the ink case fixing base into the cup. 4. Wipe out the end of the tube with waste cloth, hold the end, and connect the plug. • If ink remains in the ink case fixing base, repeat Step 3 to 4. 5. Hold the tube with clamp. Clamp Ink disposal tube Plug Cup To prevent the dryness of the male connector Do not leave the 2L eco case removed from the base for a long time. Dryness of the male connector may clog ink. Even when ink is end, set an empty 2L eco case to prevent dryness of the male connector. To prevent the dryness of the 2L ink pack connector part When you removed the 2L ink pack from the seat before it ends, wipe ink adhering to inside of the connector part of the 2L ink pack with a cotton swab etc. If ink adhering to inside of the connector part may dry out, it may cause ink leakage when using it again. Caution for setting 2L eco case Setting the 2L eco case without 2L ink pack may mix air from the male connector. Do not set the 2L eco case without 2L ink pack on the base. Notes when not using middle cartridge When you do not use the middle cartridge, thoroughly pull out it from the slot. Store the middle cartridge you pulled out with its rubber cap pushed into the top edge of it to prevent ink leakage. 1. Thoroughly pull out the middle cartridge. 2. Remove the rubber cap located on the IC chip side of the middle Rubber cap cartridge. 3. Turn the middle cartridge around (to the opposite side of the IC chip) and push the rubber cap into the top edge of it to prevent ink leakage. The number of pulling out and inserting the intermediate cartridge shall be minimized. If you pull out and insert the middle cartridge again and again, it may cause ink leakage etc. Push into 13 は じ めに この度は、バルクインク供給システム MBIS1 をお買いあげいただき、誠にありがとうございます。 取扱説明書について • • • • 本書は、 「MBIS1」の操作について説明いたします。 本書をお読みになり、十分理解してからお使いください。また、本書をいつも手元に置いてお使いください。 本書は、MBIS1 をお使いになる担当者のお手元に確実に届くようお取りはからいください。 本書は、内容について十分注意して作成していますが、万一不審な点がありましたら、販売店または弊社営業 所までご連絡ください。 • 本書は、改良のため予告なく変更する場合があります。ご了承ください。 • 本書が焼失/破損などの理由により読めなくなった場合は、新しい取扱説明書を弊社営業所にてお買い求めく ださい。 ご注意 株式会社ミマキエンジニアリングの保証規定に定めるものを除き、本製品の使用または使用不能から生ずるいか なる損害(逸失利益、間接損害、特別損害またはその他の金銭的損害を含み、これらに限定しない)に関して一 切の責任を負わないものとします。 また、株式会社ミマキエンジニアリングに損害の可能性について知らされていた場合も同様とします。 一例として、本製品を使用したメディア等の損失や、作成された物によって生じた間接的な損失等の責任負担も しないものとします。 MBIS1 を使用したことによる金銭上の損害および逸失利益、または第三者からのいかなる請求についても、当社 は一切その責任を負いかねますので、あらかじめご了承ください。 おねがい • この取扱説明書は、内容について十分注意しておりますが、万一ご不審な点などがありましたら、販売店また は弊社営業所までご連絡ください。 • この取扱説明書は、改良のため予告なく変更する場合があります。 本書の内容を無断で転載することは禁止されています。 © 株式会社ミマキエンジニアリング All Rights Reserved.Copyright 14 安全にお使いいた だ く ために マーク表示について 本書では、マーク表示により操作上の注意内容を説明しています。 各マーク表示の持つ意味をご理解し、本機を安全に正しくお使いください。 マーク表示の例 内 容 「警告」マークは、指示を無視して誤った取り扱いをすると、人が死亡または重傷を負う可能性 が想定される内容を示しています。必ずよくお読みになり、正しくお使いください。 「注意」マークは、指示を無視して誤った取り扱いをすると、人が傷害を負う可能性が想定され る内容および物的損害の発生が想定される内容を示しています。 「重要」マークは、MBIS1 をお使いいただく上で、知っておいていただきたい内容が書かれて います。操作の参考にしてください。 「ヒント」マークは、知っておくと便利なことが書かれています。操作の参考にしてください。 関連した内容の参照ページを示しています。 マークは、注意 ( 危険・警告を含む ) を促す内容があることを告げるものです。中に具体的 な注意事項 ( 左図の場合は感電注意 ) が描かれています。 記号は、禁止の行為であることを告げるものです。図の中や近傍に具体的な禁止内容 ( 左図 の場合は分解禁止 ) が描かれています。 記号は、行為を強制したり、指示する内容を告げるものです。図の中に具体的な指示内容 ( 左図の場合は差し込みプラグをコンセントから抜いてください ) が描かれています。 15 設置上のご注意 注 意 次のような場所には設置しない • 直射日光が当たる場所 • 水平でない場所 • 振動が発生する場所 • エアコンなどの風が直接当たる場所 • 火を使う場所 • 温度や湿度の変化が激しい場所(推奨する使 用環境は、接続するプリンターによって異な ります。プリンターの取扱説明書をご確認く ださい。 ) 警告事項 警 告 インクの取り扱い • MBIS1 で使用する専用インクは、危険物第 4 種第 2 石油類、または危険物第 4 類第 3 石油類に該当し ます。よって、引火する可能性があるため、MBIS1 を使用する場所は、火気厳禁としてください。 • 換気の悪い部屋や密閉された部屋で使用する場合は、必ず換気装置を設けてください。また、蒸気を大 量に吸い込んで気分が悪くなった場合は、直ちに空気の新鮮な場所に移動し、暖かくして安静にしてく ださい。 • 誤ってインクを飲み込んだ場合は、安静にして直ちに医師の診断を受けてください。嘔吐物は飲み込ま ないでください。その後、毒物管理センターへご連絡ください。 • インクは有機溶剤を使用しています。皮膚に付着した場合は、直ちに石けん水で洗った後、水で十分に 洗い流してください。万一、インクが目に入った場合は、直ちに大量の清浄水で 15 分以上洗い流し、ま ぶたの裏まで完全に洗い流してください。その後、できるだけ早く医師の診察を受けてください。 • インクパックは子供の手の届かないところに保管してください。 • 2L エコケースを台座から取り外すときは、ゴーグル等を着用してください。インクが飛んで目に入る可 能性があります。 中間カートリッジの抜き差しは極力しない • 中間カートリッジの抜き差しは必要最小限度にとどめてください。 インク漏れの原因となります。 • 中間カートリッジを使用しないときは、スロットから完全に抜いてください。 抜き取った中間カートリッジは、インク漏れ防止のため、先端にゴムキャップを押し込んで保管してく ださい。 1. 中間カートリッジを完全に抜き取る 2. 中間カートリッジの IC チップ側についているゴム ゴムキャップ キャップを取り外す 3. 中間カートリッジの向きを変え (IC チップと反対側 )、 先端にゴムキャップを押し込みインク漏れを防止する 押し込む 分解・改造はしない • MBIS1 やインクパックの分解・改造は、絶対 にしないでください。故障の原因になります。 16 湿気の多い場所では使用しない • 湿気の多い場所の使用や、MBIS1 に水をかけ ないでください。故障の原因になります。 注意事項 注 意 MBIS1 の取り扱い • MBIS1 を使用しないときも、インクパックをセットした状態にしておいてください。インクパックを セットしていないと、台座中央部にあるインクパックコネクタ先端のインクが固まり、プリンターへの インク供給ができなくなったり、インク漏れなどの原因となります。 • 2L インクパックが入っていない 2L エコケースを架台にセットしないでください。空気が混入する恐れ があります。 レベルフットの調整 • 必ず、MBIS1 のレベルフットを固定しておいてください。レベルフットが固定されていない状態で、接 続したプリンターで作図をすると、MBIS1 が動き出す場合があります。 専用インクを使う • 必ず、接続するプリンターの専用インクをお使いください。専用インク以外のインクでは、プリンター の保護のため動作しません。 2L インクパックについて • インクパックを寒い場所から暖かい場所に移動した場合は、3 時間以上室温環境下に放置してから使用 してください。 • インクパックは、取り付ける直前に開封してください。 開封した状態で長時間放置すると、正常に作図できない場合があります。 • インクパックは冷暗所で保存してください。 • インクパックは、開封してから 3ヶ月以内に使い切ってください。開封後、長期間経過したインクで作 図すると、作図品質低下の原因になります。 • 使いかけの 2L インクパックを台座から取り外したときは、綿 棒などを使用して 2L インクパックのコネクタ部内側に付着し ているインクを拭き取ってください。 コネクタ部内側のインクが乾燥すると、再使用するときにイン ク漏れの原因となります。 • MBIS1 設置後にインクの種類や色を変更する場合、中間カートリッジ、インクチューブ、台座の交換が 必要です。販売店または弊社営業所までサービスコールしてください。 • インクパック内のインクを詰め替えないでください。 • インクパックに衝撃を与えたり、激しく振り回さないでください。インクパックからインクが漏れる場 合があります。 インクスロットは空いたままにしない • インクスロットを長時間空いたままにしないでください。スロット部分が乾燥し、装置内でインクが固 まるなど、インク供給ができなくなることがあります。 • インクスロットにインクカートリッジがセットされていないと、プリンターのディスプレイにインク カートリッジのセットを促すエラーメッセージが表示されます。前に使用していたインクと同色のイン クカートリッジをセットしてください。 17 各部の名称 MBIS1 のインク供給システムは水頭圧を利用しているため、2L エコケースを高い位置に設定しています。イン クのセットや交換時は、踏み台などをご用意ください。 2L エコケース 接続するプリンターの インクステーション 架台 中間カートリッジ 台座 オスコネクタ レバー 18 インクをセッ ト する 1 2L インクパックを用意する • 小さい段ボールからインクパックと IC チップを取り出します。 2L インクパック IC チップ 2 IC チップを中間カートリッジに取り付ける IC チップの向きに注意してセットしてください。 IC チップが正しくセットされていないと、正常にイ ンクの供給が行われません。 金属がついている方を左側にして差し込む。 セットするときは、金属部分に触れないよ うにしてください。(静電気による IC チッ プ破壊の恐れがあります。) IC チップ 3 中間カートリッジ 2L インクパックを 2L エコケースに入れる (1) 図のようにして、2L エコケースを開ける (1) ツマミを 押しながら (2) 左右に 開ける (2) 2L インクパックのコネクタ部に着いているシールを剥がし、 ゴム栓を取り除く ゴム栓 (3) コネクタ部を下にして 2L インクパックを入れ、2L エコ ケースを閉じる 2L インクパックを入れるときは、2L エコケース内に あるラベルに従って、形を整えてください。形を整 えずにインクパックを入れると、インクを使い切れ ない場合があります。 2L エコケースを閉じる前に、2L エコケースの溝部に インクパックのコネクタが合っていることをご確認 ください。コネクタが溝部に合っていない状態に なってると、インク供給ができなくなることがあり ます。 溝部 19 4 2L エコケースを台座に取り付ける • 2L エコケースから接続しているプリンターにインクが供給され ます。 • 1 ~ 2 分すると、接続しているプリンターの EMPTY ランプが消 灯します。 2L エコケースは、奥までしっかりと押し込んでくだ さい。十分に押し込まれていないと、インクが供給 されない場合があります。 20 2L イ ン ク パ ッ ク を交換す る インクがなくなると、接続しているプリンターのディスプレイにメッセージが表示されます。(詳しくは、プ リンターの取扱説明書をご参照ください) インクがなくなったときは、次のようにして 2L インクパックを交換してください。 2L インクパックを交換するときは、ゴーグルを着用してください。 誤って、インクが目に入る可能性があります。 1 台座についているレバーを押し下げ、2L エコ ケースを取り外す 2L インクパック交換時、定期的にオスコネクタ吸収剤 ( 付属品 ) を交換することで、台座内の汚れを防止するこ とができます。 • 2L インクパックの交換 5 ~ 10 回 に 1 回の割合で、吸収剤を交換し てください。 • 吸収剤交換時は、必ず付属のゴー グルと手袋を着用してください。 2 中間カートリッジにセットされている IC チップ を取り外す IC チップ 3 4 中間カートリッジ 2L エコケースを開け、2L インクパックを交換する • 手順 2 で取り外した IC チップは、使い終わった 2L インクパックと一緒にしておいてください。 (新しい 2L インクパックの IC チップを混同しないようにするため) 交換する 2L インクパックに付属している IC チッ プを中間カートリッジに取り付ける IC チップの金属部分には触れないようにご注意 ください。静電気が発生し、IC チップが破壊す る恐れがあります。 IC チップ 中間カートリッジ 空になった 2L インクパックは、産業廃棄物処理業者に処理を依頼してください。 2L インクパックを使いかけの状態で取り外すときは、次のようにしてください。 インクの残量を正確に管理できなくなります。 1. 2L エコケースから使いかけの 2L インクパックを取り外す 2. 綿棒などを使い、2L インクパックのコネクタ部の内側に付着した インクを拭き取る 3. 中間カートリッジにセットしている IC チップを取り外し、2L イン クパックと一緒に保管する 4. 再度使用するときは、2L インクパックをセットし、一緒に保管し ておいた IC チップを中間カートリッジにセットする 21 イ ン ク エ ラ ー が発生 し た ら インクエラーが発生すると、プリンターのディスプレイにワーニングメッセージを表示し、プリントやクリーニ ングなど、インク吐出に関する動作は全てできなくなります。 インクエラーが発生すると : プリンターのディスプレイに“! CAR”または“! カートリッジ”を表示 します。 インクエラーの詳細を表示させるには (1) プリンターがローカルモードになっているとき【ENTER】キーを押す。 (2)【FUNCTION】(JV33 等)【INFORMATION】(JV5 等 ) のキーを押してワーニングエラーの詳細を表示させる。 • ここでは、MBIS1 固有のワーニングメッセージをお知らせします。その他のワーニングエラーについて は、プリンターの取扱説明書をご参照ください。 • ワーニングエラーの詳細表示方法について、詳しくはプリンターの取扱説明書をご参照ください。 表 示 原 因 対処方法 中間カートリッジがセットされ • 中間カートリッジを確実にセットしてください。 ていない カートリッジ ナシ 中間カートリッジに IC チップを • IC チップを挿入してください。 挿入していない IC チップを正しく読み取れない インク IC イジョウ プリンターのファーム ウェアバージョンに よって、[ 原因 ] と [ 対 処方法 ] が異なります。 JV33/TS3 JV33BS CJV30/CJV30BS/TPC JV5/TS5 • サービスコールしてください。 : ファームウェアバージョン 3.20 以前 : ファームウェアバージョン 2.00 以前 : ファームウェアバージョン 1.30 以前 : ファームウェアバージョン 4.10 以前 • MBIS1 に切り替えた状態で、電源を入れ直してください。 インクカートリッジ使用状態で • 初めて MBIS1 をお使いになる場合には、初期充填が必要に MBIS1 に切り替えた なります。サービスコールをしてください。 JV33/TS3 JV33BS CJV30/CJV30BS/TPC JV5/TS5 : ファームウェアバージョン 4.00 以降 : ファームウェアバージョン 3.00 以降 : ファームウェアバージョン 2.00 以降 : ファームウェアバージョン 5.00 以降 MBIS1 使用状態で、中間カート • MBIS1 用の IC チップを中間カートリッジに挿入してくだ リッジにインクカートリッジ用 さい。 の IC チップが取り付けられた カートリッジ イジョウ • インク切れなどで 2L インクパックを交換したとき、古い 2L インクパック用の IC チップをそのままお使いになると、 2L インクパックを交換したの 新しい2Lインクパックのインク情報をプリンターは検出で に、新しい IC チップに交換し きません。2L インクパックを交換したら、交換したインク なかった パックに付属しているICチップを中間カートリッジにセッ トしてください。 インクエンド • 中間カートリッジ内のインク残量が少なくなってくると、 “インクエンド”になります。EMPTY ランプが赤色点滅し てお知らせしますので、早めに 2L インクパックを交換する ことをお勧めします。 2Lインクパックを交換することで中間カートリッジ内にイ ンクが供給され、自動的にインクエンドは解消されます。 (MBIS1 をお使いの場合、 “ニアエンド”は表示されずにい きなり“インクエンド”となります。 中間カートリッジ内のインク • 作図中やクリーニング中に 1 供給経路でインクエンドにな 残量が少なくなった ると、動作は即時停止しますので、ご注意ください。(JV33 等) • インクエンドを表示しているときに2Lインクパックを交換 しても、すぐにはインクエンド表示は解除されません。中 間カートリッジにインクが供給されるまでしばらくお待ち ください。 インクエンド状態が解除されると、インク供給が可能とな ります。 22 故障? と 思 う 前に 故障?と思う前にもう一度確認してください。対処しても正常に戻らない場合は、販売店または弊社営業所にご 連絡ください。 現 象 インクを供給できない インク漏れが発生する 原 因 対処方法 2L エコケースが台座に十分押し • 2L エコケースを上から押し、台座に十分押し込 んでください。 込まれていない • 2L エコケース内にインクパックがセットされて 2L エコケース内にインクパック いるか確認してください。セットされていない場 がセットされていない 合には、インクパックをセットしてください。 2L エコケースがセットされてい • 2L インクパックをセットしたエコケースを台座 にセットしてください。 ない 2L インクパック内のインクが無 くなっている • 2L エコケース内のインクパックを交換してくだ さい。その際、IC チップも一緒に交換してくださ い。 インク供給チューブが折れてい る • インク供給チューブが折れていないか確認して ください。折れている場合は、サービスコールし てください。 • ネジを締め直してください。 中間カートリッジ上部のネジが • ネジを締め直してもインク漏れが発生する場合 ゆるんでいる は、サービスコールしてください。 2L エコケース台座部のコネクタ • サービスコールしてください。 が劣化している 23 こ ん な と き には 中間カートリッジの抜き差しは、最小限度にとどめてください。何度も中間カートリッジの抜き差 しを行うと、インク漏れなどの原因となります。 MBIS1 の使用を止め、インクカートリッジを使用したいとき プリンターのファームウェアバージョン 対処方法 JV33/TS3 JV33BS CJV30/CJV30BS/TPC JV5/TS5 : ファームウェアバージョン 3.20 以前 : ファームウェアバージョン 2.00 以前 : ファームウェアバージョン 1.30 以前 : ファームウェアバージョン 4.10 以前 • すべてのスロットにインクカートリッジをセットした 後、電源を再投入してください。 JV33/TS3 JV33BS CJV30/CJV30BS/TPC JV5/TS5 : ファームウェアバージョン 4.00 以降 : ファームウェアバージョン 3.00 以降 : ファームウェアバージョン 2.00 以降 : ファームウェアバージョン 5.00 以降 • 使用したい箇所のスロットにインクカートリッジをセッ トしてください。電源の再投入は不要です。 すべてのスロットでインクカートリッジを使用している場合、インクカートリッジの使用を止め 初期充填済みの MBIS1 に切り替えるには プリンターのファームウェアバージョン JV33/TS3 JV33BS CJV30/CJV30BS/TPC JV5/TS5 : ファームウェアバージョン 3.20 以前 : ファームウェアバージョン 2.00 以前 : ファームウェアバージョン 1.30 以前 : ファームウェアバージョン 4.10 以前 JV33/TS3 JV33BS CJV30/CJV30BS/TPC JV5/TS5 : ファームウェアバージョン 4.00 以降 : ファームウェアバージョン 3.00 以降 : ファームウェアバージョン 2.00 以降 : ファームウェアバージョン 5.00 以降 対処方法 • すべてのスロットに中間カートリッジをセットした後、 電源を再投入してください。 (電源を再投入するまで、プリンターのディスプレイには インクエラー“インク IC イジョウ”が表示されます。) • 初めて MBIS1 をご使用になる場合には、初期充填をする 必要があります。販売店または弊社営業所にサービス コールをしてください。 • 使用したい箇所のスロットにインクカートリッジをセッ トしてください。電源の再投入は不要です。 MBIS1 とインクカートリッジを同時にセットしているとき、インクカートリッジのインク残量が少な く表示される プリンターのファームウェアバージョン 対処方法 全バージョン共通 (JV5/TS5 使用時のみ ) • MBIS1 をご使用になると、プリンターは MBIS1 にセッ トされているインクパックを基準(2 リットルを満杯状 態)としてインク残量の算出などを行います。インクカー トリッジが新品の状態でも、2 リットルを基準にインク 残量の算出を行うため、インク残量が少なく表示されま す。 一時的に MBIS1 からインクカートリッジの使用に切り替えたいとき プリンターのファームウェアバージョン 全バージョン共通 24 対処方法 • インクカートリッジの使用に切り替えるスロットの中間 カートリッジを抜き、代わりにインクカートリッジを セットしてください。その際、中間カートリッジは、プ リンターのインクステーションの上に置いておいてくだ さい。 注意 ・ 確認事項な ど インクスロットは空いたままにしない インクスロットを長時間空いたままにしないでください。スロット部分が乾燥し、装置内でインクが固まるな ど、インク供給ができなくなることがあります。 インクスロットにインクカートリッジがセットされていないと、プリンターのディスプレイにインクカートリッ ジのセットを促すエラーメッセージが表示されます。前に使用していたインクと同色のインクカートリッジを セットしてください。 インクケース固定台内のインク確認 インクケース固定台にインクが溜まっていないか、定期的に確認してください。 インクが溜まっていた場合、インク廃棄用チューブからカップ(付属品)に溜まったインクを廃棄します。 1. カップを手元に置く 2. インク廃棄用チューブを固定しているクランプを外す 3. ウェスでインク廃棄用チューブの先端を押さえながら プラグを抜き、インクケース固定台内のインクをカッ プに入れる 4. ウェスでチューブの先端を拭き取り、押さえながらプ ラグを取り付ける • インクがカップに入りきらなかった場合、手順 3 ~ 4 を繰り返し行う 5. クランプで固定する クランプ インク廃棄用チューブ プラグ カップ オスコネクタの乾燥防止 2L エコケースを台座から外した状態で長時間放置しないでください。 オスコネクタが乾燥すると、インク詰まりなどの原因になります。 インクが終了してしまった場合などでも、空の 2L エコケースをセットしオスコネクタが乾燥しないようにして ください。 2L インクパックコネクタ部の乾燥防止 使いかけの 2L インクパックを台座から取り外したときは、綿棒などを使用して 2L インクパックのコネクタ部内 側に付着したインクを拭き取ってください。 コネクタ部内側のインクが乾燥すると、再使用するときにインク漏れの原因となります。 2L エコケースセットの注意 2L インクパックを入れていない 2L エコケースを台座にセットすると、オスコネクタから空気が混入する場合が あります。 2L インクパックを入れていない 2L エコケースは、台座にセットしないでください。 中間カートリッジを使用しないときの注意 中間カートリッジを使用しないときは、インクスロットから完全に抜き取ってください。 抜き取った中間カートリッジは、インク漏れ防止のため、先端にゴムキャップを押し込んで保管してください。 1. 中間カートリッジを完全に抜き取る 2. 中間カートリッジの IC チップ側についているゴムキャップを取り ゴムキャップ 外す 3. 中間カートリッジの向きを変え (IC チップと反対側 )、先端にゴム キャップを押し込みインク漏れを防止する 中間カートリッジの抜き差しは、最小限度にとどめて ください。何度も中間カートリッジの抜き差しを行う と、インク漏れなどの原因となります。 押し込む 25 26 27 © MIMAKI ENGINEERING CO., LTD.2010 D201960-15-06012010 NH