1
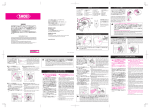
内装の着脱(Q.R.I.P.システム)
Removable Inner Parts (Q.R.I.P. System)
ベンチレーション・システム
Ventilation System
4
3
カタログ請求および販売についてのお問い合わせは、
下記〈本社・国内営業部〉まで、
製品の修理、品質についてのお問い合わせは、
〈茨城工場内 顧客サービス課〉
〒300-0525 茨城県稲敷市羽賀1793 TEL 029-892-3617
E-mail:[email protected]までご連絡ください。
取扱説明書
このたびは SHOEIヘルメットをお買い上げいただき、まことにありがと
うございます。この製品の機能および注意事項を十分にご理解いただ
き、より安 全に快 適なモーターサイクルライフを送っていただくため
に、ご使用まえに本取扱説明書を必ず最後までお読みください。
本取扱説明書は、読み終わったあとも大切に保管してください。なお、
本取扱説明書を紛失したときは、弊社までご請求ください。
Instructions for use
Thank you for purchasing this SHOEI helmet. Please read this
manual carefully before use and keep it for future reference. This
manual contains valuable information to help you understand the
functions of the product and the instructions for use in order for you
to enjoy a safety and comfortable motorcycle life. Your SHOEI
dealer can provide a replacement if it is lost.
VFX-W 179
バイザーの取り付け方
Installing the Visor (Peak)
バイザースクリュー
Visor Screw
バイザーを取り付けるときは、同梱のバ
イザースクリューを使用し、センター部
を固定してから、左右を締め付けます。
バイザーの角度は、センター部をゆる
めて調節できますが、視界を十分確保
できるように調整してから、しっかり締
めてください。また、専用のバイザース
クリュー以外は使用しないでください。
バイザーは、衝 撃や圧 力によって割れ
ることがあります。破 片で怪我をする
恐れがありますので、ゴーグルの着用
をお薦めします。
To install the visor, affix the enclosed
visor screws. Snug the left and right
screws, but leave the center screw loose. Adjust the angle of the visor to the
desired height then snug the center visor screw. Check all screws once more
to ensure they are securely snug. Never use any screw except for original
SHOEI visor screws to prevent damage to the threaded inserts.
The visor could shatter under pressure or due to an impact. Suitable goggles
are recommended for extra eye protection.
反射防止シート
Antireflection
Sticker
バイザーの裏面には、付属の反射防止シートを図のように、バイザーの溝とシー
トの切り欠き部分が合うように貼り付けてください。
※反射防止シートは、ブラックのプレーンモデルには付属していません。
For helmets so equipped, stick the enclosed anti-reflection sticker on the
inner surface of the visor. Line up the cut portions of the sticker with the
grooves in the visor as indicated in a drawing.
*Anti-reflection sticker is not enclosed with black plain colored model.
5
2
1
6
7
8
本社・国内営業部
〒110-0005 東京都台東区上野5-8-5 CP10ビル7F
11
TEL 03-5688-5180 FAX 03-3837-8245
10
HEAD OFFICE
7TH FLOOR, CP10 BLDG., 5-8-5 UENO, TAITO-KU, TOKYO JAPAN
〒110-0005 PHONE 03-5688-5170 FAX 03-3837-8245
9
フロントエアインテーク
Front Air Intake
www.shoei.com
1.
2.
3.
4.
5.
6.
7.
8.
9.
10.
11.
バイザー
フロントエアインテーク
トップエアアウトレット
シェル
衝撃吸収ライナー
リアエアアウトレット
窓ゴム
ロアエアインテーク
ノーズカバー
サイドエアアウトレット
ネックアウトレット
1.
2.
3.
4.
5.
6.
7.
8.
9.
10.
11.
Visor (Peak)
Front Air Intake
Top Air Outlet
Shell
Impact Absorbing Liner
Rear Air Outlet
Window Beading
Lower Air Intake
Nose Cover
Side Air Outlet
Neck Outlet
マッドガードの取り付け方
Installing the Mud Guard
(A)
To remove the nose cover, remove the screw and lift the nose cover slightly as
per drawing.
取り付けは、ノーズカバーの下
部を図のようにはめ込んでか
ら、スクリューで固定してくだ
さい。
※ノーズカバー内のノーズフィ
ルターは取り外しが可能で
す。ノーズカバーを取り付け
るときは、フィルターがきち
んと入っているか確認し、
ノーズカバーとシェルの間に
隙間がないように取り付けて
ください。
To fit the nose cover, align the flange on the lower part of the cover with the
shell and secure it with the screw.
*The nose filter inside the nose cover is removable. Before refitting the nose
cover check that the filter is aligned correctly, and there are no gaps.
チークパッド(右)
Cheek Pad (Right)
チークパッド(左)
Cheek Pad (Left)
チンストラップカバー(右)
Chinstrap Cover (Right)
(B)
ノーズカバーの取り外しは、スクリューを外してから、図のようにノーズカ
バーを上に少し持ち上げるようにして外します。
センターパッド
Center Pad
トップエアアウトレット
Top Air Outlet
リアエアアウトレット
Rear Air Outlet
Printed in Japan 20100701
ノーズカバーの取り外し方と取り付け方
Removing and Installing the Nose Cover
3Dフルサポートインナー
3D Full Support Inner
チンストラップカバー(左)
Chinstrap Cover (Left)
内装の交換について
Replacement of the Inner Parts
マッドガードを取り付けるには、
図のようにシェルと衝 撃 吸収ラ
イナーの隙間(A)に差し込みま
す。(B)部分は窓ゴムをめくり、
マッドガードを(A)同様に差し
込んでください。
Insert the mud guard into a gap
(A) between the shell and the
impact absorbing liner as per
drawing. For portions of (B), flip
a window beading and insert the
mud guard in the same manner.
※ヘルメットを持ち運ぶときなど
に、マッドガード部分を持たな
いでください。マッドガードが
外れたり、破損したりする場合
があります。
*Don’t hold the mud guard
when carrying the helmet as
it may become dislodged.
当製品はセンターパッド、チークパッド(左右)、チンストラップカバー(左右)
を取り外して洗うことができます。内装の名称と図を参照して、着脱を確実に
行ってください。
Center pad, cheek pads and chinstrap covers of both sides can be removed for
washing in this model. Remove or install firmly referring to the names and
drawings of the inner parts.
内装を交換する場合は、下記表を参照のうえ、正しいサイズのものをお求めください。
When you replace the inner parts, be sure to select the proper size for your helmet.
製品サイズ
センターパッド
Center Pad
チークパッド
Cheek Pad
Helmet Size
XS
S
M
L
XL
緩く
For Loose Fit
XS5
S5
M5
L5
XL5
-
標準
Standard
XS9
S9
M9
L9
XL9
XL5
XL9
きつく For Tight Fit
XXL
XS13
S13
M13
L13
XL13
緩く
For Loose Fit
31
31
31
31
31
-
標準
Standard
35
35
35
35
35
31
39
39
39
39
39
35
きつく For Tight Fit
●センターパッドは各製品サイズ共、標準装備のパッドからフィット感を変えたい場
合、上の表を参照しパッド(オプション)を交換してください。
●チークパッドは全サイズ共用パーツです。頬部のフィット感を変えたい場合は、上
の表を参照しパッド(オプション)を交換してください。たとえば、Mサイズで頬部
をきつくしたい場合はチークパッド39に交換し、逆に緩くしたい場合はチークパッ
ド31に交換します。
●センターパッド、チークパッドは各製品サイズで異なります。ご購入の際、お手持ち
のヘルメットのサイズをご確認ください。
●If you like to change fit of the standard center pad, change to the option center pad
referring to a table shown above.
●Cheek pad is common for all helmet sizes. If you like to change fit of the standard
cheek pad, change to the option cheek pad referring to a table above. For example,
if you like to change fit of size M cheek pad tight, change to the cheek pad 39.
Conversely, change to the cheek pad 31 if you like to make it loose.
●Cheek pad and center pad differ for each helmet size. When you replace, make
sure to check your helmet size.
※内装は必ずすべて装着してご使用ください。
* Make sure that all the inner parts are equipped before use.
内装の取り外し方と取り付け方
Removing and Installing the Inner Parts
■チークパッドの取り外し方
■Removing the Cheek Pads
1
7
8
引き剥がすようにホッ
クを3か所 外し、左 右
のチークパッドを取り
外します。
ホック
Snap
■センターパッドの取り付け方
■Installing the Center Pad
Unsnap 3 points and
pull out cheek pad of
both sides.
14 チークパッド
Cheek Pad
ブラケット
Bracket
チ ー クパッド を取り付 ける際、チンスト
ラップが図14のように正しい位置を通っ
ているか必ず確認してください。
チンストラップ
Chinstrap
When installing the cheek pad, be sure
that the chinstrap passes through the
cheek pad as per Drawing 14.
ブラケット
Bracket
2
3
チークパッドブラケット
Cheek Pad Bracket
チークパッドブラケット
Cheek Pad Bracket
プレート
Plate
(A)
プレート
Plate
(B)
Then, pull out plates
(A) and (B) in a bottom
of a cheek pad from
cheek pad brackets.
(Do both sides in the
same manner.)
9
15
チークパッドブラケット
Cheek Pad Bracket
チ ー クパッド 下 部 の プ
レート(A)
(B)をそれぞ
れチークパッドブラケッ
トに差し込みます(チー
クパッドは左右同じ要領
で取り付けます)
。
(A)
10
プレート
Plate
センターパッド前頭部のプ
レ ートが、図10 の 状 態 に
なっていることを確認して
ください。
16
チークパッドブラケット
Cheek Pad Bracket
(B)
センターパッドブラケット
Center Pad Bracket
ホック
Snap
センターパッドは後 頭部から取り外し
ま す。センターパッド ブラケットから
ホックを2か所外します。
Remove the center pad from a rear
head to a front portion. Unsnap 2
points at center pad brackets.
5
プレート
Plate
センターパッドの前頭部は、図5のよう
にプレートの近くを持って引き抜きま
す。
Pull out a front portion of the center
pad holding a plate as per Drawing 5.
11
ホック
Snap
次に後頭部の2か所のホッ
クを、カチッと音がするま
ではめ込みます。
6
チンストラップ
Chinstrap
ホック
Snap
チンストラップカバー
Chinstrap Cover
チンストラップカバー(左)
Chinstrap Cover (Left)
チンストラップカバー(右)
Chinstrap Cover (Right)
チンストラップカバーを取り外すには、チー
クパッドを取り外してからチンストラップカ
バーのホックを外し、チンストラップから引
き抜きます(左右同じ要領で取り外します)。
To remove a chinstrap cover, remove the
cheek pad first, release a snap and strip the
cover from the chinstrap. (Do both sides in
the same manner.)
チンストラップカバーは左右で形状が異なり
ますので、取り付けの際は、左図を参照し左
右を確かめてからチンストラップに通し、カ
チッと音がするまでホックをはめ込みます。
A cover differs right and left. To install,
identify right and left referring to a drawing
first. Then, pass the chinstrap through and
snap until you hear it clicks.
The neck outlet can be removed
for cleaning. To install it again,
insert the right and left tabs of
the plate into the gap between
the shell and the impact
absorbing liner as per drawing A.
Insert the center tab into a
bracket and check for secure fit.
E.Q.R.S.(エマージェンシークイックリリースシステム)
E.Q.R.S. (Emergency Quick Release System)
E.Q.R.S.(エマージェンシークイックリリースシステム)とは、万が一の事故の
際、救護者がライダーからヘルメットを脱がせやすくするために、チークパッド
を容易に取り外すことができる機構です。
緊急時にチークパッドを外すには、最初にチ
ンストラップをほどくか切断し、ヘルメット
を押さえながら、チンバー内側の赤いリング
を図のように引っ張ります。
■チークパッドの取り付け方
■Installing the Cheek Pads
チークパッドを取り付けるまえに、赤
いプレートが図12のように装着され
ているか 確 認してください。赤いプ
レートが 外 れているときは、チーク
パッド 本 体 のプレ ート の爪( A )に
12 (A)
引っかけて図のような 状 態にしてく
ださい。
次に、チークパッドのホックが2か所
共、図で 示した赤丸 の 位置にあり、
完全に露出しているか確認してくだ
さい。プレートが正しい位置に装着されていないと、チークパッドが取り付けら
れないことがあります。
ホック
Snap
To remove a cheek pad in an emergency,
cut or undo a chinstrap first, then, hold a
helmet firmly and pull a red ring inside a
chin bar as per drawing.
リングを引っ張ることでチークパッドのホッ
クが外れ、ライダーがヘルメットを被った状
態のまま、ヘルメット下部からパッドを引き
抜くことができます。
Pulling the ring will move the plate and
release snaps allowing a cheek pad to be
pulled out through the bottom of a helmet
while the helmet is still on the rider’s head.
Before installing the cheek pad, be sure the red plate is in the right position as
shown in Drawing 12. Be sure that 2 snaps are positioned in red circles as
indicated in the drawing and white portions of the snaps are fully exposed. If
the red plate is not in the right position, the cheek pad may not fit properly.
13
■チンストラップカバーの取り外し方と取り付け方
■Removing and Installing the Chinstrap Covers
ネックアウトレットは取り外しが
可能です。取り付けるときは、図
Aのように左右のプレートをシェ
ルと衝撃吸収ライナーの隙間に
差し込んでから、中央のブラケッ
トにネックアウトレットの溝がは
まるようにセンター 部 を差し込
みます。
Be sure that the plate of
the center pad is secured
as shown in Drawing 10.
E.Q.R.S. (Emergency Quick Release System) is a mechanism for emergency
personnel to remove the cheek pads.
4
A
B
Insert plates (A) and (B)
at the bottom of the
cheek pad into the
cheek pad brackets until
you hear it clicks. (Do
both sides in the same
manner.)
Slide and insert front plate into a gap of bracket from one side to another as
indicated in Drawings 7 and 9.
Snap 2 points into place in
the rear of the center pad
until you hear it clicks.
■センターパッドの取り外し方
■Removing the Center Pad
ブラケット
Bracket
プレート
Plate
前部プレートは、片側サイド(図 9 参照)から反対側にかけてブラケットの隙間
(図 7 矢印部分参照)に滑り込ませるように入れます。
次に、チークパッド 下
部 の プ レ ー ト( A )
(B)を チ ー クパッド
ブラケットから引き抜
きます(チークパッド
は 左 右 同じ 要 領 で 取
り外します)。
ネックアウトレットの取り外し方と取り付け方
Removing and Installing the Neck Outlet
ホック
Snap
❶
反対側のチークパッドも同じように外します。
Do in the same manner to remove a cheek
pad of the other side.
❸
プレート
Plate
リング
Ring
〈ご注意〉
❷
取り付けるときは、必ず最初にチークパッドの左右を確認してください。次に、
図13のようにチンストラップをパッドのくぼみに通し、❶→❷→❸の順にホッ
クをはめ込みます。ホックは、パッド側からホックの上部分を強く押し、カチッ
と音がするまで3か所をはめ込みます。
Identify right and left at first. Then, pass the chinstrap through the hollow
portion of the cheek pad and snap the pad at all 3 points in the order of ❶ to ❸
as per Drawing 13. Press the head of the snap from the pad side until you hear
it clicks.
チークパッドを外すときは、必ずヘルメット
をしっかりと押さえ、ライダーの頭部を動か
さないよう注意してください。
When removing cheek pads, make sure to
hold a helmet firmly and pay full attention
not to move rider's head.
1. ヘルメットからチークパッドを引き抜く
とき、片方の手で必ずヘルメットを固定
してください。
2. 走行中は絶対に使用しないでください。
3. 必ず専用のチークパッドを 使 用してく
ださい。専用の部品以外を取り付けたり
しないでください。
4. 普段、メンテナンスなどの目的でチーク
パッドを取り外すときには使用しないで
ください。
EMERGENCY USE ONLY
PULL RED RING INSIDE CHIN BAR
AND REMOVE CHEEK PAD
PULL RING TO
REMOVE CHEEKPAD
PULL RING TO
REMOVE CHEEKPAD
Warning
1. Make sure to hold the helmet firmly
by your hand when pulling out
cheek pads.
2. Never pull the red ring while riding.
3. Use genuine SHOEI cheek pads
only and never use non-SHOEI
parts.
4. Do not use Emergency Quick
Release System when removing
a cheek pad for maintenance.
これらのステッカーをヘルメットから剥がさな
いでください。
Never peel these stickers from a helmet.
内装の取り扱いに関するご注意
Keys for Handling the Inner Parts
1.ホックのはめ込み、取り外しはなるべくホック部の近くを持ち、ていねいに
行ってください。ホックはカチッと音がするまできちんと取り付けてくださ
い。
2.内装を洗う場合は手洗いか、洗濯機をご使用の場合はネットに入れるなどし
て、ていねいに洗ってください。洗濯の際は水を使用し、乾いた布で水を拭
き取ってから陰干ししてください。強くしぼると、プレート部分を破損する場
合がありますので、ご注意ください。衝撃吸収ライナー(内装を取り除いた
あとの中の発泡スチロール)は、水または水で薄めた中性洗剤で湿らせた布
で拭いてください。パーツを破損する恐れがありますので、ベンジン、シン
ナー、ガソリン、ガラスクリーナー、その他の溶剤は絶対に使用しないでくだ
さい。
1. When installing or removing the inner parts, hold near a snap and handle
with care. Press a head of the snap firmly until you hear it clicks.
2. When you wash the inner parts, wash by hand, or put them in mesh bag in case
of machine wash. Use water only for washing, wipe with dry cloth and dry in the
shade. An excessive wring may break a plate portion of the inner parts. Wipe
the impact absorbing liner (polystyrene foam under the pads) with a cloth
moistened by water or a solution of neutral detergent in water. Never use
benzine, thinner, petrol or any kind of harsh cleaner, as they may damage
the parts.
ご注意
WARNING
1.ご使用のまえに、バイザーのセンターと、左右のスクリューがしっかり締まっ
ているか、必ず確認してください。装着が不十分な場合、走行中にバイザー
が外れることがあり大変危険です。
2.パーツ類の汚れは、水で薄めた中性洗剤で洗い、水でよくすすいでから柔ら
かい布で拭いてください。パーツを破損する恐れがありますので、ベンジン、
シンナー、ガソリン、ガラスクリーナー、その他の溶剤は絶対に使用しないで
ください。
3.内装は必ずすべて装着して、ご使用ください。
1. Before wearing the helmet, make sure that visor’s center and side screws
are securely tightened. A visor coming loose while riding can be dangerous.
2. Clean the helmet parts with a solution of neutral detergent and water, rinse
well and dry with a soft cloth. Never use benzine, thinner, petrol or any
kind of harsh cleaner, as they may damage the parts.
3. Make sure that all the inner parts are equipped before you use the helmet!