1
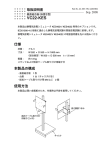
Part No. Z1-003-650, IA003712
取扱説明書
Sep. 2008
放電ガンスタンド
GS21-KES
本製品は静電気放電シミュレータ KES4021/ KES4022 専用のオプションです。
放電ガンを固定するためのスタンドです。同じポイント(特に垂直結合板)に放
電させるときに便利です。
静電気放電シミュレータ KES4021/ KES4022 の取扱説明書を先にお読みくださ
い。
仕様
寸法:402 (H)
質量:約 3 kg
200φ(単位:mm)
本体の構成
・ガンスタンド台座 1
・ガンスタンド支柱 1
・ガンストッパ 1
・ストッパ固定金具 1
組み立て方法
ストッパ固定金具
ガンストッパ
ツマミ
ガンスタンド
支柱
ピン ガンストッパ
水平にする
放電ガン固定ねじ
切り欠き部
ガンスタンド台座
ストッパ
固定金具
1. ストッパ固定金具のツマミを緩めます。
2. ガンストッパをストッパ固定金具のツマミから遠い方の穴に入れます。
3. ガンスタンド支柱をストッパ固定金具のツマミ側の穴に入れます。
4. ガンストッパと、ガンスタンド支柱が直角になるようにして、ストッパ固定
金具のツマミを軽く締めます。
5. ガンスタンド支柱のねじ部をガンスタンド台座の任意の穴にねじ込みます。
切り欠き部を使用して、スパナで締め付けます。
ガンスタンド台座には 3 つの穴が開いています。
ガンスタンド台座の向きや、放電ガンの安定性を考慮して選択してください。
放電ガンの取り付け
4
4
1
3
2
1. ストッパ固定金具のツマミを緩めて、ガンストッパのピンを水平にします。
2. ガンストッパの高さを調整して、ストッパ固定金具のツマミで締め付けます。
3. 放電ガンの溝をガンストッパのピンに合わせて入れます。
4. 放電ガンをガンスタンド台座と垂直にして、放電ガン固定ねじを締め付けま
す。
放電ガンの落下を防止するために、試験の前に各部のねじにゆるみがないことを
確認してください。
菊水電子工業株式会社
本社 • 技術センター 〒 224-0023 横浜市都筑区東山田 1-1-3
TEL : 045-593-0200(代)
http://www.kikusui.co.jp/
GS21-KES
INSTRUCTIONS
DISCHARGE GUN STAND
GS21-KES
The GS21-KES is an option to be used exclusively with the Electrostatic Discharge
Simulator KES4021/ KES4022. The GS21-KES is a stand for fixing a discharge gun.
This is useful when discharging to the same point (especially on a vertical coupling
plane).
Read the Operation Manual that comes with the Electrostatic Discharge Simulator
KES4021/ KES4022 before using the GS21-KES.
Specifications
Dimensions: 402 (H) x 200 φ (unit: mm)
Weight: approx. 3 kg
Configuration
Gun stand base
Gun stand support
Gun stopper
Stopper clamp
1
1
1
1
Assembling
Stopper clamp
Gun stopper
Tab
Gun stand
support
Pin
Stopper
clamp
Gun stopper
Place the pin
horizontally.
Screw for fixing
discharge gun
Flat portion
Gun stand
base
1.
Loosen the the stopper clamp tab.
2.
Insert the gun stopper into the hole on the far side of the stopper clamp tab.
3.
4.
5.
Insert the gun stand support into the hole on the tab side of the stopper
clamp.
Place the gun stopper at a right angle to the gun stand support and loosely
fasten the tab of the stopper clamp.
Fasten the screw portion of the gun stand support in the appropriate hole on
the gun stand base, using a wrench to the flat portion of the gun stand
support.
Three holes are provided on the gun stand base.
Select an appropriate hole, taking the orientation of the gun stand base and stability
of the discharge gun into consideration.
Attaching Discharge Gun
4
4
1
3
2
1.
2.
Loosen the the stopper clamp tab and adjust horizontally placing the pin of
the gun stopper.
Adjust the height of the gun stopper and tighten the gun stopper with the tab
of the stopper clamp.
3.
Insert the gun stopper into the mounting hole of the discharge gun, aligning
the slot of the mounting hole with the pin of the gun stopper.
4.
Place the discharge gun perpendicularly to the gun stand base and tighten
the screw for fixing the discharge gun.
Check for any loose screws before testing to avoid dropping the discharge gun.
KIKUSUI ELECTRONICS CORP.
1-1-3, Higashiyamata, Tsuzuki-ku, Yokohama, 224-0023, Japan
Tel: +81-45-593-7570 Fax: +81-45-593-7571
http://www.kikusui.co.jp/
GS21-KES


![静電気放電シミュレータ[KES4021A/4022A]](http://vs1.manualzilla.com/store/data/006582924_2-c8b53339fcebb946ab6b00af6a3f94bc-150x150.png)
![静電気放電シミュレータ[KES4021]](http://vs1.manualzilla.com/store/data/006533774_2-9d8ef29c886f67d2e1383891b3bd63e2-150x150.png)