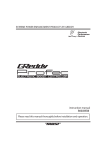
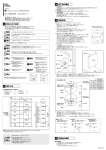
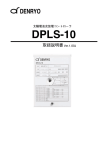
1
Thank you very much for your recent purchase: GReddy Multi D/A
Gauge. We hope this instruction manual will be helpful to you whether
you are a novice or technician . Please keep this instruction manual in
your car to read anytime.
◆ Relationship with our products ◆
Please read carefully
We made a tireless effort to develop the product for your safety and
comfortable car life. We think that our product could provide better
performance and convenience for your vehicle. However, there may
be a chance to lose the factory-offered safety by using our product.
Therefore, please read carefully in order for you to use safely and
comfortably at your own risk.
Multi
D/A
Gauge
instruction manual
1. Disclaimer
Please read carefully
To the best of our knowledge, the information contained herein is
accurate. However, neither TRUST CO., LTD or any of its subsidiaries
assumes any liability whatsoever for the accuracy or completeness of
the information contained herein. All materials may present unknown
hazards and should be used with caution. In particular, improper use of
our products and their inappropriate combination with other products
and substances may produce harmful results which cannot be
anticipated. Final determination of the suitability of any material is the
sole responsibility of the user. Although certain hazards are described
herein, we cannot guarantee that these are the only hazards that may
exist. All service performed on internal parts and equipment should be
provided by qualified technicians.
Please remember the following signs as you proceed to read manual.
Warning : If you don’t follow, drive at your own risk.
Attention Follow the directions to use properly.
Caution: If you don’t follow, may lead to breakdown of your automobile.
Important Be advised to use properly.
Warning
R e f e r t o y o u r a u t o m a k e r ’ s m a n u a l t o e n s u r e t h e s a f e t y. I f u s e d w r o n g l y, i t m a y c a u s e a n a c c i d e n t .
Before parking, confirm no flammable objects under the car. Use caution with muffler which has hot
temperature after driving and may create a fire hazard when parked near dried and flammable objects.
S t o p t h e e n g i n e i f i t s n o t n e c e s s a r y. T h e e x h a u s t v e n t i l a t i o n c o n t a i n s p o i s o n o u s g a s a n d i f y o u o p e r a t e i n
a closed space for a long time, it may cause you carbon monoxide poisoning.
Do not run the engine when you take a rest in the car. If taking a break while running the engine, there is a
danger of carbon monoxide poisoning.
Do not work shortly after the engine shutdown. There is a danger of burn injury because the entire exhaust
system is extremely hot.
Professional Installation is recommended.There is a risk of injury if done by an unprofessional person.
Make sure all mounting instructions & places are examined, and don’t let drop.
worngly installed objects would cause the fall and it is very dangerous.
Do not operate Multi D/A gauge while driving. It could cause a traffic accident.
Check the installed areas before you drive: around oil, water, fuel lines, and deterioration of them.
The mishandling of oil, water, and fuel lines would cause an engine breakage.
W h e n i n s t a l l i n g s e n s o r s , u s e s e a l t a p e t o m a k e a n i n s t a l l a t i o n s u r e l y.
Oil and water leaking would cause a catching fire and engine wreckage.
Operate outside or ventilated room when handling fuel lines which may induce fire.
Gasoline is flammable. It is dangerous to work around the fire items.
Before moving a car, make sure there’s nothing around the car. If don’t, may lead to the dangerous situation:
injury and property damage.
W h e n u s i n g s o l d e r i n g i r o n a n d n i p p e r, u s e p r o p e r l y. F a i l u r e t o u s e t o o l s m a y c a u s e s e r i o u s i n j u r y o r i l l n e s s .
Make sure there’s nothing under the driving pedals. It is very dangerous to leave something under the pedals
which lead to the non-functional brake.
Ca u ti o n
I nsta lla tio n in volves d i s a s s e m b l y o p e r a ti o n s : i n n e r - o u t er c ov eri ng part s of a v ehi c l e and m odif ic at i on of elec t ric al c om ponen t . P leas e
ope rate carefu lly sin c e w e d o n ’ t h a v e a n y r e s p o n s i b i l i t y of t hes e operat ions .
M ake sure n o t to d o m i s w i r i n g a n d s h o r t. C o u l d l e a d to t he w rec k age of all elec t ric al c om ponent s .
D o n o t mod ify the s e n s o r c o r d . C o u l d l e a d to a s h o r t or bad c onnec t i on as w ell as t he c ras h of all elec t ric al c om ponent s .
P rovide in sula tio n b y v i n y l ta p e fo r s o l d e r e d a r e a s .
P ressu re sen sor is a p r e c i s i o n c o m p o n e n t a n d fr a g i l e . D o not i ns t al l near v ibrat i ng plac e, w at er, and under high t em perat ure c o ndit ion.
W h e n d rilling h a lls fo r th e i n s ta l l a ti o n o f e x h a u s t te m perat ure s ens or, do not leav e debris of c ut t ing in t he pipe.
D o n o t in stall th e p o w e r u n i t n e a r th e p l a c e w i th h u m i d and dus t , ex pos ed t o direc t light , noz z le of heat er, et c .
D o n o t d isasse mble th e p r o d u c t. It w i l l b e e x e m p t fr o m w arrant y.
D o n o t in stall in e le c tr i c a l l y n o i s y e n v i r o n m e n ts s u c h as i gnit e s i gnal area. C ould lead t o t he s ens or gl it c h.
Atte n ti o n
W h e n removing th e m i n u s te r m i n a l o n th e b a tte r y, th e re are t hings t hat l os e m em ory : c loc k , audio, nav i gat ion s y s t em , el ec t ric s eat .
R ea d th e in stru ction c a r e fu l l y b e fo r e o p e r a ti o n . Afte r t he operat ion f inis hed, rec onf i gure s et t ings ac c ording t o ins t ruc t i on.
D ue to th e p recisio n m e c h a n i c a l e q u i p m e n t, d o n o t d r o p or hit it hard.
S o o n a fte r pu rch a se, c h e c k a l l p a r ts i n c l u d e d a s s p e c if ied on t he page 3 (C om plet e part s ).
P le a se con ta ct us if y o u s e e th e d i ffe r e n t n u m b e r s b e t w een t he m et er and pow er unit .
W ip e with a d ried c l o th w h e n y o u c l e a n . Wh e n s e e i n g t he s pot s , w i pe w i t h a dam p and t ight ly w rung out c lot h.
S h o u ld you h a ve q u e s ti o n s o r c o n c e r n s a b o u t o u r p r o d uc t , do not hes it at e t o c ont ac t us .
F o r th e te c h n i c i a n
P lea se retu rn th is ma n u a l w i th w a r r a n ty to th e c u s to m e r w hen m ount i ng is f i nis hed.
F o r th e u s e r
P lea se p a ss th is ma n u a l a n d w a r r a n ty to o th e r s w h e n rent ing out or t rans f erri ng y our v ehi c l e pos s es s ion.
2. Product features
F o r c a r m a nu fa ctu red i n Ja p a n equipped with12V batter y.
Si m u l t a n e ou s d i spl ay w i th a maxim um of 3 item s. Analogue and digital di s p l a y s i n t e g ra ti ng 7 d a ta .
7 d i s p l a y i n g d a ta are bo o st, w ater tem per atur e, oil tem per atur e, oil pr es s ur e,
f u e l p r e s s ure , e xh a u st te mpe ratur e, and power voltage.
T h e r e a r e tw o ga u g e face s for boost and oil. Optim um for tur bo engine as
w e l l a s N A en g i ne .
T h e p o w e r un i t ca n be i n sta l l e d inside of the engine r oom with sim ple w ater p r o o f . O n l y on e ha rne ss l i ne pulled in the car so no need to pull sever a l
e x t r a h a r n ess l i n e s.
An a l o g u e m ete r i s vi ew ab i l i ty consider ed: 270- degr ee view.
Ba c k l i g h t w i th sup e r l umi n o si ty LED lasts alm ost for ever. In addition, the
s e l e c t a b l e b a ckl i g h t col ors a re white, gr een, r ed, blue, or ange, pur ple, and
li g h t b l u e .
I l l u m i i n t e r l o cki ng sw i tch i s capable of dim m ing.
Al l s e t t i n g s an d cha n g e s can be per for m ed by the r em ote contr oller. Eas y
s e t t i n g s w i th u se r-fri e n d l y i co n s and buttons.
Pe a k v a l u e memory a n d w a rni ng function ar e configur able r espectively.
Pe r f o r m s I G ke y Op e n i ng /E n d i ng dem o on both analogue/digital display s .
3. Complete parts
①
To the connector
on the back
②
③
No.
Name
Remarks
①
②
③
④
⑤
⑥
⑦
⑧
⑨
⑩
⑪
⑫
⑬
⑭
⑮
⑯
⑰
⑱
⑲
Meter body
Remote control
Power harness
Power unit
Mounting holder
3way joint 4Φhose, Air filter
Manual
Water sensor harness
Water sensor
Oil sensor harness
Oil temperature sensor
62Φ x 45mm in depth
A battery (CR2025) included.
1m at power side. 1.5m at meter side.
Mounting hall 5Φ 84 x 55 x 16mm
Base measurement: 64 x 55mm
Hose 0.5m
4 pages
Oil pressure sensor harness
Oil pressure sensor
Boost sensor harness
Boost sensor
Fuel pressure sensor harness
Fuel pressure sensor
Oil & fuel pressure in common. 1.5m.
※2
Oil & fuel pressure in common 1/8 PT
※2
1.5m
※1
Nipple part: 4Φ 0.25m
※1
※1
Water/Oil/Exhaust temps in common 1.5m. Sold separately.
Water & oil temps in common. 1/8 PT 0.25m sold separately.
Water/Oil-exhaust temps in common 1.5m. Sold separately.
Water & oil temps in common. 1/8 PT 0.25m. Sold separately.
Oil / Fuel pressure in common 1.5m. Sold separately.
Oil / Fuel pressure in common 1/8PT. Sold separately.
Exhaust temperature sensor harness
Water/Oil exhaust temps in common 1.5m. Sold separately.
Exhaust temperature sensor
Fitting 1/8PT 0.25m. Sold separately.
※1 For boost face
※2 For oil pressure face
⑤
⑥
この度は、GReddy Multi D/A Gaugeをお買上げくださいまして誠に
ありがとうございます。
この取扱説明書は、Multi D/A Gaugeを初めてお使い頂く方はもちろ
ん、すでにお使いになられた経験をお持ちの方にも知識や経験を再認
識する上でお役に立つものと考えております。
この取扱説明書をよくお読みになり、内容を理解された上で実際にお
使い下さいますようお願い申し上げます。
また、
この取扱説明書は、いつでも取り出して読めるように車内に保
管されることをお勧め致します。
⑦
◆お客様と製品のかかわり合い◆
必ずお読み下さい
車とその取り扱い方法は、各自動車メーカーの、お客様に対しての
安全と快適な生活に関する、不断の研究開発の結果として生み出さ
れたものです。
弊社の製品は、
このような車に、更なる性能や利便性を付加するこ
とが出来ると考えております。
弊社もまた、お客様に製品を安全にかつ快適にお使い頂くために不
断の努力をしておりますが、製品の持つ特性上、その性能や利便性
と引き替えに、
自動車メーカーの提供する安全が、確保出来なくな
る場合があります。
その様な場合に必要な、安全に対する配慮と判断は、すべてお客様
ご自身の責任でお考え頂かなくてはなりません。
お客様の車と弊社の製品を、安全にかつ快適にお使い頂くためにも
製品を取り付ける車の取扱説明書を合わせて、
よくお読みになり、
十分に理解された上でお使い下さい。
Multi
D/A
Gauge
1.安全・取り扱いに関するご注意
必ずお読み下さい
製品を安全にお使い頂くには、正しい取り付けと正しい操作が不可欠
です。
この取扱説明書、ならびに、取り付ける車両の取扱説明書に示されて
いる安全に関する注意事項をよくお読みになり、十分に理解された上
でお使い下さい。
また、
この取扱説明書に書かれていない取り扱いをされる場合に必要
な、安全に対する配慮は、すべてお客様ご自身の責任でお考え頂くこ
とになります。
この取扱説明書には、あなたや他の人々への危害や財産への損害を、
未然に防ぎ、本製品を安全にお使い頂くために、守って頂きたい事項
を示しています。
その表示と図記号の意味は次のようになっています。内容をよくお読
みになり十分に理解された上でお使い下さい。
instruction manual
警告
もし、お守り頂かないと、生命の危機、
または重症を負う人身事故につながる恐れのある注意事項です。
お願い
製品を正しくお使い頂く為に、
必ず守って頂きたい注意事項です。
注意
もし、お守り頂かないと、製品だけでなく
自動車や設備の破損・故障につながる恐れのある注意事項です。
重 要
製品を正しくお使い頂く為に、
知っておいて頂きたい注意事項です。
警告
取り付け車両を扱う場合は、取り付け車両付属の取扱説明書をよくお読みの上、正しく安全に運転、管理して下さい。
自動車は、誤った扱
い方をすると、思わぬ人身事故等を引き起こす恐れがあります。
必ず自動車の下に燃えやすい物がないことを確認してから、停車、駐車して下さい。
自動車の排気部分は高温になり、エンジンを動かした
まま枯れ草などの燃えやすい物の上に停車や駐車すると、火災の危険があります。
必要な時以外は、必ずエンジンを停止して下さい。マフラーのテールパイプからは、有毒な成分が含まれた排気ガスが排出され、締め切っ
た車庫や倉庫の中などでエンジンを動かし続けると、一酸化炭素中毒の危険があります。エンジンを動かす時は、屋外、又は窓を開け、換
気扇などを回し、新鮮な外気を取り入れられる場所で作業して下さい。
車の中で休憩や仮眠をとる時は、必ずエンジンを停止して下さい。エンジンが動いたまま停車、又は駐車して、休憩や仮眠をとると、排気
ガスによる一酸化炭素中毒の危険があります。
エンジン停止直後は絶対に作業を行わないで下さい。エンジン停止直後は、エンジンや排気管が非常に高温になっており、火傷を負う可能
性があり危険です。
本製品の取り付け・配線作業は、本来、専門の教育を受けた整備士が行うべき作業です。専門外の方が作業されると、けがや火傷の可能性
があり危険です。
取り付け箇所・取り付け方法は慎重に検討し、絶対に脱落しないようにして下さい。誤った取り付け箇所・取り付け方法は、脱落を招き、
運転の妨げになる可能性があり、大変危険です。
運転中は絶対に本体の操作をしないで下さい。思わぬ人身事故等を引き起こす恐れがあります。
オイル、水及び燃料漏れ、オイル、水及び燃料ラインの劣化等、作業を行った箇所は走行前に必ず点検して下さい。オイル、水及び燃料関
係の取り扱いミス、作業ミスは重大な事故を引き起こす可能性があり、大変危険です。
センサー取り付け作業を行う際は、オイル、水及び燃料漏れを起こさないようにシールテープ等を使用し、確実に取り付けて下さい。オイ
ル、水及び燃料漏れは引火、エンジン破損の原因となり、大変危険です。
燃料系統の作業、点検等は周囲に火の気の無いことを確認し、屋外、又は、窓を開け、換気扇等を回し、新鮮な外気を取り入れられる場所
で行って下さい。
ガソリンは引火性があり、周囲に火の気があると火災の危険があり、大変危険です。
車両を発進させる時は、必ず周りに何もない事を確認して下さい。不用意に発進させると、思わぬ人身、物損の事故等を引き起こす恐れが
あります。
ハンダゴテ・ニッパー等の工具を使用する場合は、工具付属の取扱説明書をよくお読みの上、注意事項等を守り、正しくお使い下さい。
これらの工具は、誤った使い方をすると、けが、火傷等を引き起こす恐れがあります。
作業終了後は必ず、運転席の足元に何もないことを確認して下さい。運転席の足元に空き缶や使用した工具などがあると、
ブレーキペダル
の下にはさまり、
ブレーキ操作が出来なくなるなどの恐れがあり、大変危険です。
Driving side
Engine side
④
⑧
⑩
⑨
⑪
⑬
⑫
⑭
⑯
⑱
⑮
⑰
⑲
4. Installation
Caution
When installing or uninstalling sensors, disconnect sensors from sensor harness. Do not twist harness on the sensor side.
Warning
Installation process should be examined carefully. Make sure not to fall anything. Misinstallation would lead to a danger of your driving and life.
When installing sensors, fix them securely and use the seal tape not to leaking oil & water. Oil & water leaking would catch fire and lead to the wreckage
of engine.
【Power unit】
【Boost sensor】(3 way joint, orifice, 4Φ hose)
Fix it with a bolt.
The power unit designed with simple water-resistance
can be installed in the engine room but avoid water, dust,
humid, and high temp.
Surge tank
3-way joint
Use a bolt(s) to fix and make sure not to fall.
4Φ hose
Caution
【Power harness】
・Disconnect the minus terminal before wiring the power harness.
・Wire properly according to the colors of power harness.
・Tying the red and yellow lines to wire for the power unit, or wiring power source
and ignition power reversely would cause an indicator’s glitch.
・Make sure that there is no miswiring and replace the minus terminal.
Power harness
Red line
Fuel regulator
Sensor
(Fix the nipple downward)
Power source (to 12V line constantly)
Yellow line Ignition power (with ignition on, to 12V line)
White line Small-lamp (with small – lamp on, to 12V line)
Black line Grounding wire (to the minus terminal)
【Water temp sensor】(Radiator hose attachment)
【Oil pressure & Oil temperature sensors】
Water temp sensor 1/8PT bolt
(Seal tape wrapping)
Oil temp sensor
1/8PT bolt (Seal tape)
Engine side
(Clean before fitting)
Oil filter
Center bolt
Hose band
Radiator hose attachment
【Fuel pressure sensor】(3 way union, hose union example)
(Apply engine oil)
【Exhaust temp sensor】(Exhaust manifold)
Exhaust manifold
Fuel pressure regulator
3 way T- adapter
Fuel return pipe
(Low pressure)
Oil pressure/temp
sensor attachment
Oil pressure sensor
1/8PT bolt (Seal tape)
O ring
Tightening ring
Fitting
Hose union
(Seal tape wrapping)
Fuel feed pipe
(High pressure)
Fuel pressure sensor
1/8PT bolt
(Seal tape wrapping)
Drill a hall
1/8 PT
Exhaust temp sensor
5.Remote setting – Operation
Setting buttons
Backlight
Water temperature
Sound
Oil temperature
Peak
Exhaust temperature
Clear
Oil pressure
Warning
Boost
UP
Fuel pressure
Down
Voltage
Set
【Display setting】
○ To show 2 items – The first press, the item comes on the top, and the second, the previous item comes down & new item comes up.
The third press, the bottom item disappears.
○ To show 1 item – Press the button twice to show the desired item sole.
○ Press SET to save your setting.
(Example)
Fuel pressure up
Exhaust temp down
Exhaust temp up
【Warning setting】
Water temp up
Fuel pressure down
Water temp
only
【Sound setting】
Press the warning setting button.
Press the sound button to hear the current sound.
Each time pressing, the sound varies. “Set” to save your setting.
Select the item.
Setting 1 (PiPi--------)
Set values by pressing
up / down buttons.
Setting 2 (Pi-pipi, Pi-pipi)
SET: Save your setting.
Setting 4 (Silent)
Setting 3 (Pipi--Pipi)
SET to save your setting.
【Peak value display setting】
【Backlight setting】
Peak button: Display peak value.
Each time pressing backlight button, the color varies as follows.
White
Select each item to display each peak value.
Blue
Green
Light blue
Red
Yellow
Purple
【Special operations】
CLR: Clear everything.
SET: Back to the real time display.
Press & hold two buttons at the same time to reset.
Restart: Shut down and start again.
※Operating sound : PiPiPiPiPi Pi-PiPiPi
Reset: Back to the factory default
※Operating sound : Pi--PiPiPi Pi--PiPiPi Pi--PiPiPi
※Idle for 5 seconds, get back to the real time display.
6. Operation – Display
【 About display 】
○Each item shows the following ranges and values.
Item
Display
MIN MAX
Boost
BOOST
-100
250
kPa
0
150
℃
150
℃
Water temp WATER.T
Value
Oil temp
OIL.T
0
Oil press
OIL.P
0.0
12.0 ×100 kPa
Fuel press
FUEL.P
0.0
12.0 ×100 kPa
Exhaust temp
EXT.T
0
12.0
×10 ℃
Voltage
BATT
9.0
17.0
V
Current value
Bar indicator
Value
Value
Current value
Display item
1 item display
【 Peak value display 】
2-item display
↑ while pointing the peak value.
○ During the real time display, if the peak button is
pressed, the boost display points the peak value;
the oil pressure display points the peak value and
the digital display as well.
○ While the meter pointing the peak value,
if another button was clicked, its peak value will
be shown.
※ Multi
Press item button
while the peak value displays.
D/A Gauge stores updates after the power-off.
※ Please
refer to “5. Remote setting – operation” for the peak value operations.
While setting warning value,
! will display.
【 Warning settings 】
○During the real time display, press the warning setting button, select an objective
item, and switch to its warning value setting.
【 Warning behaviors 】
○ When each item reaches its preset value, “Warning action” performs.
“Warning action” when exceeding preset levels: Boost, Water temp,
Oil temp, Exhaust temp.
“Warning action” when being lower than preset levels:
Oil pressure, Fuel pressure, and Voltage.
Backlight flashing
Item flashing
・Analogue display
Backlight flashing with warning sound.
・Digital display
Item flashing with warning sound.
※ No
warning sound if the item is not on the display
even if its in the preset warning value.
Analogue display
※ Please
refer to “5.Remote setting – operation” for warning & sound settings.
Digital display
7.Troubleshooting
Please refer to the following troubleshooting advices.
Symptom
Cause
Solution
・Grounding wire is not on the minus terminal
on the battery.
・Extend the black line from the power source
and connect to the minus terminal.
・With ignition on, the pointer
is not at zero.
・Miswiring.
・Please refer to “4 Installation” and rewire
them.
・“Warning action” outside
the preset value.
・Picking up noise from ignition signal or other ・Avoid noise occurring areas and reinstall
signals.
sensor harness.
・Pointing strange value.
・Wiring is short circuit.
・With power on, the pointer
doesn’t function.
・Wiring is disconnected or break.
・Indicating lower value.
・Sensor harness’s coupler is connected
mistakenly.
・Check if any damage on wire and if it is
touching car body or not.
・Check if the coupler is disconnected or
the wire is damaged.
・Check if the coupler is installed properly.
・With ignition off, the pointer
doesn’t come back at zero.
・Power source and ignition power source
are not connected each other.
・Wire power source and ignition power
separately.
・No ending demo.
8. Service after the sales
Please don't hesitate to inform us if there is anything unclear.
If you find different manufacturing numbers between meter and power unit,
please bring it to the place you purchased or let us know directly.
Multi D/A Gauge is warranted for one year from the date of purchase against
manufacturer defects. Coverage is valid only with proof of purchase from an
Authorized Dealer. Alteration of this product will void warranty.
Additional services are available for a nominal charge.