1
700 DISC CHANGER
CHANGEUR 700 DISQUES
DRM-7000
300 DISC CHANGER
CHANGEUR 300 DISQUES
DRM-3000
Operating Instructions
Mode d’emploi
2
<DRC1285>
En
This product contains a laser diode of higher class than 1. To ensure
continued safety, do not remove any covers or attempt to gain
access to the inside of the product.
Refer all servicing to qualified personnel.
English
CAUTION
The following caution label appears on your changer.
Location: rear of the changer
CLASS 1 LASER PRODUCT
LASER KLASSE 1
APPAREIL À LASER DE
CLASSE 1
[For U.S. model]
[FOR NORTH AMERICA MODELS]
[For U.S. model]
CAUTION
CONSULT WITH THE COMPANY SALES REPRESENTATIVE.
“USE ONLY UL LISTED AND CANADIAN CERTIFIED POWER
SUPPLY CORD.”
A POWER SUPPLY CORD TYPE SJT, 18 AWG MINIMUM, 3WIRE GROUNDED TYPE SHALL BE USED WITH THIS
EQUIPMENT.
[For Taiwanese model]
[For Korean model]
WARNING:
Handling the cord on this product or cords associated with accessories sold with the product will expose you to lead, a chemical known to the State of
California and other governmental entities to cause
cancer and birth defects or other reproductive harm.
Wash hands after handling
3
<DRC1285>
En
IMPORTANT! SAFETY INSTRUCTIONS
1. READ INSTRUCTIONS – All the safety and operating instructions should be read before
the appliance is operated.
2. RETAIN INSTRUCTIONS – The safety and operating instructions should be retained for
future reference.
3. HEED WARNING – All warnings on the appliance and in the operating instructions
should be adhered to.
4. FOLLOW INSTRUCTIONS – All operating and use instructions should be followed.
5. CLEANING – Unplug this product from the wall outlet before cleaning.
Do not use liquid cleaners or aerosol cleaners. Use a damp cloth for cleaning.
6. WATER AND MOISTURE – Do not use this product near water.
7. ACCESSORIES – Do not place this product on an unstable cart, stand, or table.
The product may fall and be seriously damaged.
8. VENTILATION – Slots and openings in the cabinet and back or bottom are
provided for ventilation and to ensure reliable operation of the product and to
protect it from overheating. These openings must not be blocked or covered.
They should never be blocked by placing the product on a bed, sofa, rug, or other
similar surface. This product should never be placed in a built-in installation
unless proper ventilation is provided.
9. POWER SOURCES – This product should be operated only from the type of power
source indicated on the marking label. If you are not sure of the type of power
available, consult your dealer or local power company.
10. PLUG – This product is equipped with a wired grounding-type plug (a plug having a third
(grounding) pin). This plug will only fit into a grounding type power outlet. This is a
safety feature. If you are unable to insert the plug fully into the outlet, contact your
electrician to replace your obsolete outlet. Do not defeat the safety purpose of the
grounding type plug.
WARNING
This equipment is not waterproof. To prevent a fire
or shock hazard, do not place any container filed
with liquid near this equipment (such as a vase or
flower pot) or expose it to dripping, splashing, rain
D3-4-2-1-3_A_En
or moisture.
WARNING
This product equipped with a three-wire grounding
(earthed) plug - a plug that has a third (grounding)
pin. This plug only fits a grounding-type power
outlet. If you are unable to insert the plug into an
outlet, contact a licensed electrician to replace the
outlet with a properly grounded one. Do not
defeat the safety purpose of the grounding plug.
D3-4-2-1-6_A_En
Operating Environment
Operating environment temperature and humidity:
+5 ºC – +35 ºC (+41 ºF – +95 ºF); less than 85 %RH
(cooling vents not blocked)
Do not install this unit in a poorly ventilated area, or in
locations exposed to high humidity or direct sunlight (or
D3-4-2-1-7c_A_En
strong artificial light)
[For Australian and New Zealander models]
For pluggable Equipment, The Socket-Outlet Shall Be Installed
Near The Equipment and Shall Be Easily Accessible.
11. POWER-CORD PROTECTION – When unplugging the apparatus, pull on the plug – not
on the cord. Do not handle the cord on plug with wet hands. Doing so could cause an
electric short or shock. Do not allow anything to rest on the power cord. Do not locate
this product where persons will walk on the cord.
12. OVERLOADING – Do not overload wall outlets and extension cords as this can result
in fire or electric shock.
13. OBJECT AND LIQUID ENTRY – Never push objects of any kind into this product
through openings as they may touch dangerous voltage points or short out parts that
could result in a fire or electric shock. Never spill liquid of any kind on the product.
14. CONDENSATION – Moisture will form in the operating section of the product and the
product’s performance will be impaired if the product is brought from cool surroundings
into a warm room or if the room temperature rises suddenly. To prevent this, let the
product stand in its new surroundings for about an hour or two before switching it on,
or ensure that the room temperature rises gradually.
15. SERVICING – Do not attempt to service this product yourself as opening or
removing covers may expose you to dangerous voltage or other hazards.
Refer all servicing to qualified service personnel.
16. DAMAGE REQUIRING SERVICE
Unplug this product from the wall outlet and refer servicing to qualified service
personnel under the following conditions:
a. When the power cord or plug is damaged.
b. If liquid has been spilled, or objects have fallen into the video product.
c. If the product has been exposed to rain or water.
d. If the product does not operate normally when the operating instructions are
followed. Adjust only those controls that are covered by the operating instructions.
Improper adjustment of other controls may result in damage and will often
require extensive work by a qualified technician to restore the product to its
normal operation.
e. If the product has been dropped or the cabinet has been damaged.
f. When the product exhibits a distinct change in performance – this
indicates a need for service.
Thank you for buying this Pioneer product.
Please read through these operating instructions so you will
know how to operate your model properly. After you have
finished reading the instructions, put them away in a safe
place for future reference.
In some countries or regions, the shape of the power plug
and power outlet may sometimes differ from that shown in
the explanatory drawings. However, the method of
connecting and operating the unit is the same.
CONTENTS
FEATURES .................................................. 5
HANDLING PRECAUTIONS ...................... 6
READ BEFORE USE ................................... 7
Security features ................................................. 7
Offline media management ............................... 7
Deciding on system configuration ..................... 8
Add-on products ................................................. 8
Items included ................................................... 10
Discs ................................................................... 11
TO AVOID PROBLEMS ............................ 12
NAMES AND FUNCTIONS OF
INDIVIDUAL PARTS ................................. 15
INSTALLATION ........................................ 17
OPERATION ............................................. 26
User mode ......................................................... 26
System administrator mode ............................ 26
Adding drive units ............................................. 40
Exchanging drive units ..................................... 43
OTHERS .................................................... 46
Troubleshooting ................................................ 46
Specifications .................................................... 48
4
<DRC1285>
En
FLEXIBLE UNIT DESIGN
EASE OF INSTALLATION
The Pioneer DRM-7000/DRM-3000-disc changer is designed
so that a variety of different components may be purchased
and installed together to meet a variety of different needs.
The Pioneer DRM-7000/DRM-3000 comes with bays (i.e.,
spaces for the installation of drives or 50-disc magazines)
located at the front and rear of the unit, and the bays are
fitted with access doors that are designed to open widely
and enable you to install or remove individual components
with ease.
The front bay is for exclusive use with 50-disc magazines;
the rear bay has been designed as a multi-purpose installation
area:
In order to connect the changer to an existing data
management system or to build a new data management
system, it is necessary for the host computer to be able to
properly identify the changer and all the drives contained
therein and it is necessary to attach all the cables and specify
the settings needed for the host computer to control the
changer and drives.
The Pioneer DRM-7000/DRM-3000 is designed not only to
make it easy to install and add new drives, but also with a
wide range of features designed to make it easier to specify
host computer settings.
Loading Capacity
SECURITY FEATURES DESIGNED TO
PREVENT ERRONEOUS OR
UNAUTHORIZED OPERATIONS
Front bay
50-disc magazines only
Rear bay
Component
50-disc magazines
DRM-7000
DRM-3000
7
3
Max 16
Max 7
Max 8
Max 3
The maximum number of optional components that can be
installed differs depending on the component involved; for
details, consult the operating instructions for your option
components.
Combined Example
Data capacity emphasis
Performance emphasis
DRM-7000
Drives 2
Discs 720
Drives 16
Discs 370
DRM-3000
Drives 2
Discs 320
Drives 8
Discs 170
If desired, you can start with empty bay spaces and add
devices to them as your requirements increase.
THREE DIFFERENT TYPES OF DISC
MAGAZINES EQUIPPED WITH INTERNAL
MEMORY
In order to prevent interference, conflicts, or clashes occurring
between manual operations and computer-based operations,
entering procedure to the system administrator mode is
introduced. Anyone who wants to perform operations from
the control panel is required to enter system administrator
mode first, using the provided lock release key. And it is
possible to prevent the switchover to some sub-modes by
issuing a command from the host computer.
It is also possible to assign security privileges on the system
administrator who has the lock release key. Then operations
directly manipulating discs, like opening mailslot and ejecting
hyper magazine, are permitted to only the system
administrator.
CONTROL PANEL FITTED WITH AN LCD
MESSAGE WINDOW FOR EASE OF USE
The control panel is fitted with a 2-line, 16-column LCD
message window which is used to display instructions on
the proper operations to perform. And this makes it possible
to perform any of the wide variety of different operations
provided by the DRM-7000/DRM-3000 with only 5 keys.
Pioneer provides three different types of disc magazines
designed for convenience and ease of use in different
applications.
20-disc hyper magazine:
The main feature of the hyper magazine is its mobility. It
can be inserted and removed without opening the access
door. Another feature is a smart memory system that
records all user operations toward its lock/unlock
mechanism. One hyper magazine is provided as a standard
equipment with each Pioneer DRM-7000/DRM-3000.
50-disc magazine (locked-type):
This model is perfect for managing offline media where
the security and unchangeableness may be required. Builtin locking mechanism makes it impossible to remove discs
from magazine whenever it is outside the changer.
50-disc magazine (normal-type):
This model is convenient for importing or exporting large
volumes of discs into or from the changer. You can insert
discs into or remove them from a magazine releasing the
locking mechanism by a knob fitted with this magazine
when it is outside the changer.
5
<DRC1285>
En
English
FEATURES
HANDLING PRECAUTIONS
INSTALLATION
FOR SAFETY
Select an installation site with a flat, solid surface.
Do not install the system where it will suffer any of the
following:
1 Exposure to direct sunlight or a heater
2 High humidity or dust
3 Proximity to bathroom or kitchen
4 Exposure to spotlight
5 Proximity to any large electric apparatus such as a
refrigerator, air conditioner, dimmer, etc.
6 Uneven or unsteady installation surface.
(If the surface is not flat, first put down a hard plate or
similar support so that the system is installed level.)
7 Difficulty of service and maintenance.
÷ Do not install the unit on any unsteady platform or desk,
etc., as the unit is tall and heavy.
÷ Do not stack the units or do not place a heavy object on
the unit. It is extremely dangerous to do this, because the
objects may fall off or the unit may topple over. (Any
damage or injury suffered as a result of such installation is
the sole responsibility of the user. )
÷ Attach the placement fixtures first after unpacking the
changer. If it is moved before they are attached, there
is a danger of it toppling over or of the cables on the
rear being damaged.
÷ Always be sure not to insert your hand into the 20disc hyper magazine bay or not to touch any parts
inside of the bay when the power has been turned on,
otherwise it may result in bodily injury.
÷ For safety reasons, the DRM-7000/DRM-3000 is designed
so that the access doors cannot be opened while the
changer mechanism or internal drives are in operation.
÷ The high speed rotation of discs or the operation of the
high speed disc transport mechanism in the DRM-7000/
DRM-3000 causes slight vibrations and noise, but this does
not indicate a problem. And it does not effect the
performance of the changer.
If the changer is to be installed next to a wall, a minimum of
at least 50 cm of space must be provided between the back
of the changer and the wall.
Avoid placing objects directly on the changer.
HANDLING PRECAUTIONS
÷ Be careful not to stain, scratch or leave fingerprint, etc.,
on the signal surface, or recording surface of the discs.
The specified playback performance or recording
performance may not be obtained with such discs.
÷ Do not insert more than one disc in a mailslot, otherwise
malfunction will result.
÷ The Changer does not manage the disc contents. The data
should be managed by involving the host.
÷ Use only recording discs recommended by Pioneer. The
specified recording performance or playback performance
may not be obtained if a non-recommended disc is used.
Please note that the data recorded on discs is not covered
by our warranty.
÷ Pioneer may not be held liable for the loss of any data or
any other direct or indirect damage suffered as the result
of the use or breakdown of this product. It is strongly
recommended that regular backups be taken of all critical
data.
÷ Please be careful not to lose the lock release keys provided
with your DRM-7000/DRM-3000, otherwise you could not
manage your changer any more. The lock release key
certifies you as a system administrator and gives you a
privilege to open access doors, to eject a hyper magazine
and to use a mailslot.
POWER-CORD CAUTION
Handle the power cord by the plug. Do not pull out the plug
by tugging the cord and never touch the power cord when
your hands are wet as this could cause a short circuit or an
electric shock. Do not place the unit, a piece of furniture,
etc., on the power cord, or pinch the cord. Never make a
knot in the cord or tie it with other cords. The power cords
should be routed such that they are not likely to be stepped
on. A damaged power cord can cause a fire or give you an
electrical shock. Check the power cord once in a while. When
you find it damaged, ask your nearest PIONEER authorized
service center or your dealer for a replacement.
6
<DRC1285>
En
CONDENSATION
If the temperature difference between the changer and
environment is too large, water will condense in the changer
and the system may not provide proper performance. For
example, if you bring the changer into a warm room from
outside in cold weather, or if you increase room temperature
abruptly, condensation may result. If condensation occurs,
leave the changer for one hour in the room, or increase room
temperature gradually before using it.
CLEANING THE CHANGER
To clean the panel and the cover, use a soft, dry cloth to wipe
off dust and dirt. If the cabinet is heavily soiled, wipe off the
dirt using a soft cloth soaked with neutral detergent diluted 5
to 6 times. Then wipe the water off with a dry cloth. Do not
use benzine, thinner, insecticide or similar volatile chemicals,
as they may dissolve or discolor the cabinet surface. If you
use a chemical polishing cloth, carefully read the instructions
supplied with it.
SECURITY FEATURES
Information on the location of discs within the changer and
information to access data on discs are strictly monitored
and controlled from the changer control software and the
upper-level database management software.
Because of this, if any changes in the status of the discs
within the changer occur at a time when the changer is not
under the control of the host computer (or in a network
environment, under the control of a server), it becomes
impossible to control the changer and drives and to read
necessary files from discs.
Allowing discs stored within the changer to be removed
without any restrictions poses a security risk, not only in that
it would become impossible to access discs which have been
removed but also in that it might lead to the damage or loss
of discs.
Although the DRM-7000/DRM-3000 has been designed so
as to open the front and rear access doors from the control
panel (located at the top of the front of the unit) to remove
magazines or to insert or remove discs through the mailslots,
anyone who considers the security issues noted above will
be able to understood that it is necessary to place restrictions
on such operations.
This is why the control panel of the DRM-7000/DRM-3000
has been fitted with a key switch which may be locked to
disable operations of control keys. This switch cannot be
unlocked without the key provided with the DRM-7000/DRM3000, and if the system administrator will always keep this
key, it is impossible that ordinary users without key perform
unauthorized operations from the control panel.
It is also possible to restrict the range of operations which
are performed from the control panel. It means that a part of
system administrator’s privileges is controlled by the
command issued from the host computer and even if a
system administrator has the key, the host computer makes
it impossible to open the access doors, exchange discs, or
perform other unfavorable operations for itself.
OFFLINE MEDIA MANAGEMENT
The DRM-7000/DRM-3000 provides the following features
which makes it perfect for the management of offline media.
¶ Removable disc magazines
Disc magazines may be removed from the changer with
the discs left in the magazines. The use efficiency of the
space within the changer may much improve if the
infrequently used discs are collected in one magazine and
it is taken out from the changer into the offline storage.
All of the discs within an inserted magazine become
available immediately no matter which magazine bay it is
inserted into as long as the discs installed in the magazine
have been registered in the database as corresponding to
the magazine ID in question, and the same holds true when
a magazine is inserted into a different changer as long as
the changer in which it is inserted is under the control of
the same database.
¶ Disc magazines designed for easy tracking and control
Removing, inserting or replacing discs in magazines after
they have been removed from a changer may destroy the
correspondence between discs and magazine IDs.
To solve this problem, Pioneer provides 50-disc magazine
which has a locking mechanism to prevent all attempt to
change the status of the magazine outside the changer
and hyper magazine which has a smart memory system
that records all user operations toward its lock/unlock
mechanism so as to make it easier to track and control
the use of offline media.
¶ Registration of changer ID
When a disc magazine has been inserted into a changer
not under the control of the database management
software or into a changer belonging to another system,
the discs within that magazine may be rewritten or may
be replaced with other discs within that changer. Even if
the magazine in question is a locked-type, these
discrepancies between the discs actually contained within
the magazine and the information on those discs stored in
the database may be arise.
In order to prevent such problems from occurring, disc
magazines are designed to record the ID of the changer in
which they are used, and as long as the database has a
list of the IDs of changers controlled under the given
database, it is possible for the database management
software to determine whether or not a inserted disc
magazine has to be reinstalled by checking the changer
ID that may be read with the magazine ID.
However although the DRM-7000/DRM-3000 changer and
disc magazines do provide the features needed for the
management of offline media, it should be noted that the
actual procedures and methods available for the management
of offline media may differ depending on the database
management software and changer control software being
used.
It should further be noted that it is necessary to establish
how to employ controls for the handling of offline media. In
fact if management controls are strict enough, it is even
possible to use normal-type disc magazines which would
ordinarily be unsuited for use in the management of offline
media, in the same way as one would use locked-type disc
magazines.
¶ Unique disc magazine IDs
All disc magazines used in the DRM-7000/DRM-3000 are
assigned unique ID codes which makes it possible to
identify individual magazines simply by inserting them into
the magazine bays.
7
<DRC1285>
En
English
READ BEFORE USE
Read before use
DECIDING ON SYSTEM
CONFIGURATION
Before installing or using the changer, the first thing which
has to be done is to decide what components you should
install to where of the changer.
The connector panel and SCSI cables which come with the
DRM-7000/DRM-3000 are prepared on the assumption of the
following system configuration:
7 Two SE drives.
7 The two SE drives to be internally daisy-chained, and
connected to the changer using the accessory SE SCSI
cable.
(This type of configuration requires an additional SE SCSI cable
for connection to the SE SCSI host adapter.)
In the event that three or more SE drives are to be used, the
changer is to be connected to an LVD host adapter, an LVD
drive is to be installed, or in cases when multiple SCSI buses
are to be used to increase data transmission speed, optional
devices will be necessary in accordance with the specific
configuration planned.
To determine what additional equipment must be purchased
in order to create a desired configuration, it is recommended
that you first decide where drives are to be installed and
consult the configuration sheet on p. 188 (DRM-7000) or p.
189 (DRM-3000) before actually trying to configure your
system.
Before actually beginning to configure your changer system,
it is absolutely necessary that the following items be
determined:
¶ Type, number, and install position of drives
The DRM-7000/3000 uses an SE SCSI interface. When
the changer is connected to an LVD SCSI host adapter, or
when a DVD-R7783 using an LVD SCSI interface is installed
on the same bus as the changer, it is necessary to install
an LVD SCSI interface unit (DRM-ULV16).
Also, an additional power unit is required when nine or
more drives are to be installed on a single DRM-7000
changer.
¶ Type and install position of connector panel
Different connector panels are available for use with LVD
drives (internal daisy-chain connection) and SE drives
(internal daisy-chain connection and direct drive
connection).
¶ Cable connection method from connector panel to each
drive
¶ SCSI ID assignment
Multiple drives on the same SCSI bus must not have
identical ID.
¶ SCSI terminator setting
<SE SCSI bus>
The terminating switch for the drive or changer at the end
of the SCSI bus should be set to ON.
<LVD SCSI bus>
When DVD-R7783 and DRM-ULV16 are installed, it is
necessary to terminate the LVD SCSI bus.
Since the DVD-R7783 is not provided with a SCSI
terminator, an optional terminator must be purchased, or
the attached SCSI terminator (LVD) of DRM-ULV16 should
be used to provide LVD SCSI bus termination.
For SCSI connection refer to the “SCSI Connection Manual”
or consult your dealer.
8
<DRC1285>
En
The power unit provided as standard equipment is capable
of supplying power to rear bays #1 – 8. The total power
consumed by these eight drives should not exceed the
following:
DC +5 V 12 A or less
DC +12 V 8 A or less
The maximum current capacity of a single connector is as
follows:
DC +5 V Max 4 A
DC +12 V Max 4 A
By adding an optional expansion power unit to the DRM7000, power can be supplied to rear bays #9 – 16.
The maximum power consumption of these upper bays
and the maximum amount of power which may be supplied
over a single connector is the same as that of the lower
bays (i.e., Bay #1 – Bay #8).
NOTE:
¶ Be sure never to use any add-on products other than
Pioneer products.
¶ When turning off the power and turning it back on,
always be sure to allow an interval of 10 seconds or
more to elapse after turning off the power before turning
it back on. Note that this must be done because there
are times when the power is not switched off
immediately even after the power switched has been
flipped off when few drives have been installed in the
changer.
ADD-ON PRODUCTS
The following components may be purchased separately for
use with the Pioneer DRM-7000/DRM-3000 in order to adapt
it for use in configuring a system to your own specifications.
The maximum number of optional components that can be
installed differs depending on the component involved; for
details, consult the operating instructions for your option
components.
50-disc magazine
Used to store discs within the changer, these magazines
come in both normal and locked types which can be installed
in whatever combination best fits your needs.
¶ 50-disc magazine (locked-type)
[DRM-AL751]
Read before use
This is an LVD SCSI interface drive for reading DVD-ROM
discs and for reading/writing DVD-R/RW discs.
DVD-R/RW drive unit [DVD-R7322]
Power consumption: DC +5V, 1.5A
DC +12V, 1.0A
English
These disc magazines are designed so that the lock is not
released even when a magazine is removed from a
changer. Therefore the mailslot is necessary to insert discs
into these magazines or remove discs from them. These
magazines are extremely effective for use in situations
where they are used in combination with a host computer
which supports offline media management. (See p. 7 for
further details.)
¶ 50-disc magazine (normal-type)
[DRM-AF751]
This is an SE SCSI interface drive for reading DVD-ROM discs
and for reading/writing DVD-R/RW discs.
DVD-ROM drive unit [DVD-D7563]
Power consumption: DC +5V, 1.0A
DC +12V, 1.0A
Fitted with a knob which is used to release the locking
mechanism, these magazines are convenient for importing
or exporting large volumes of discs into or from the
changer.
20-disc hyper magazine [DRM-AH721]
This is an SE SCSI interface drive for reading DVD-ROM discs
and DVD-R/RW discs.
Disc flip unit [DRM-UF701]
This magazine is designed to make it possible to insert or
remove without opening the access doors. This magazine is
also equipped with a smart memory system that records all
user operations toward its lock/unlock mechanism. Therefore
the hyper magazine is convenient and also perfect for the
management of offline media. The DRM-7000/DRM-3000
comes with a hyper magazine as a standard equipment, and
additional hyper magazines may be used to easily build up an
offline library in 20-disc units.
DVD-R/RW drive unit [DVD-R7783]
Power consumption: DC +5V, 1.5A
DC +12V, 1.0A
The DRM-UF701 disc flip unit is designed for use in turning
over a disc. Note that this component is required when using
double-sided DVD discs.
Power supply unit [DRM-PW701] (for DRM-7000)
A DRM-PW701 add-on power supply unit must be installed
in order to use 9 or more drives within the same changer.
Always be sure to contact Pioneer service personnel for
installation.
Power supply: Maximum of DC +5V, 12A
Maximum of DC +12V, 8A
9
<DRC1285>
En
Read before use
LVD SCSI interface unit [DRM-ULV16]
This unit is necessary when connecting the DRM-7000/3000
with SE SCSI interface to an LVD host adapter. Always be
sure to contact Pioneer service personnel for installation.
ITEMS INCLUDED
20-disc hyper magazine ... 1
LVD drive connector panel (for 2 drives)
[DRM-LN721]
This connector panel is provided with a cable allowing two
LVD drives to be daisy-chained inside the changer.
LVD drive connector panel (for 4 drives)
[DRM-LN741]
This connector panel is provided with a cable allowing four
LVD drives to be daisy-chained inside the changer.
SCSI terminator (LVD) [DRM-TM160]
This is an externally mounted LVD terminator.
Since the DVD-R7783 is not provided with an LVD SCSI
terminator, termination must be provided for either with the
use of this unit, or else with the SCSI terminator (LVD)
provided with the DRM-ULV16.
* Installed in the changer body
SCSI cable (SE) for connecting changer
and drive ...1, 0.35 m
SCSI cable (LVD)
[CC-200]
2.5 m, VHDCI 68-pin to Half-pitch 68-pin
[CC-200-8]
8 m, VHDCI 68-pin to Half-pitch 68-pin
Power cord (for Canada and the U.S.) ... 1
[CC-201]
2.5 m, Half-pitch 68-pin to Half-pitch 68-pin
[CC-201-8]
8 m, Half-pitch 68-pin to Half-pitch 68-pin
These are LVD SCSI cables for use with external cabling, to
be used between host adapter and changer, or when daisychaining changers. Select the proper length and connector
configuration for your system.
Multi drive connector panel [DRM-SN721]
This type of power cord is for use
in America and Canada only.
Do not use this power cord in places
other than America or Canada.
Power cord (for Japan) ... 1
This connector panel is provided with a cable allowing two
SE drives to be daisy-chained inside the changer. One panel
is provided as standard equipment, and it can be combined
with “Cable for 2 drives” and “Cable for 4 drives.”
This type of power cord is for use
in Japan only.
Do not use this power cord in a
places other than Japan.
Single drive connector panel [DRM-SN711]
This connector panel can be used for direct connection of an
SE drive to SE SCSI host adapter, or for external daisy chain
connection.
Cable for 2 drives [DRM-SC721]
This is an SCSI cable supporting the expanded daisy-chain
installation of up to two SE drives. When combined with the
Multi drive connector panel, four SE drives can be daisychained inside the changer.
Cable for 4 drives [DRM-SC741]
This is an SCSI cable supporting the expanded daisy-chain
installation of up to four SE drives. When combined with the
Multi drive connector panel, six SE drives can be daisy-chained
inside the changer.
10
<DRC1285>
En
Base stabilizer
DRM-7000: 4
DRM-3000: 2
Lock release key ... 2
÷ Do not use the following types of discs for they may cause
malfunction of the unit or damage to the discs:
÷ Disc which has a molding flash (projected fin) left on
the periphery as shown in the figure.
÷ Disc with its edges are rounded or tapered as shown in
the figure.
Screw for use in attaching base stabilizers
DRM-7000 ... 12
DRM-3000 ... 6
Operating instructions ... 1
÷ Discs with adhesive surface on periphery or label face.
DISCS
Discs which may be used with the Pioneer DRM7000/DRM-3000
The types of discs which may be used with the Pioneer DRM7000/DRM-3000 vary depending on the types of drives being
used, and for further information on the types of discs which
may be used you should accordingly consult the operating
instructions provided with your drive units.
Handling the discs
÷ Avoid touching the signal surface when you use a disc.
÷ To hold it, place your fingers on the edge of the disc or the
edge of the center hole and the disc edge.
÷ When discs are handled within a dry environment, the discs
themselves may become charged with static electricity.
Handle discs only after touching a metal fixture or
otherwise discharging any static electricity from your body.
÷ Do not place discs in locations where they may be exposed
to dust or static electricity.
÷ The Changer can accommodate only the discs with a
diameter of 12 cm (5 in). As the Changer detects the
presence of disc with optical detection of the position at
about 5 mm (3/16 in) inside the external periphery of the
12 cm (5 in) disc, the use of a disc which is transparent at
the corresponding position (*) or a 8 cm (3 in) disc may
lead to disc detection error and to the disc damage in the
worst case. Also, the use of a 8 cm disc adapter is strictly
prohibited.
* Includes translucent “C-thru Disc” discs.
÷ This unit does not support “DualDisc (The Hybrid CD/DVD
Disc)”.
÷ Do not attach paper or stickers to the label side of the
disc. Handle discs carefully and avoid damaging the label.
÷ Discs rotate at high speed in the changer. Do not use
defective discs (e.g., cracked or considerably warped).
Such discs may damage the changer.
÷ DO NOT use non-standard discs, as these may adversely
influence this unit and other equipment.
÷ DO NOT play a disc having other shape than a circular
disc, such as heart shaped disc, or malfunction may occur.
11
<DRC1285>
En
English
Read before use
TO AVOID PROBLEMS
The following is a list of operation items that may potentially lead to problems in component functioning.
Issue
Potential Malfunction/Error
÷
Do not place foreign objects inside the changer, since malfunction
may result.
÷
[E83], [E99], [E88]
÷
Do not use the changer in locations subject to high concentrations
of dust, heat, or humidity.
* Do not install in locations directly exposed to outdoor dust or air.
* Do not install near air conditioner vents or air cleaners.
÷
Recording/playback malfunction
÷
Do not subject the recorder to impact or vibration during use.
* Do not install in hallways or other areas near frequent pedestrian
traffic.
When connecting exterior SCSI cable, be sure that power is first
turned off to host computer and changer.
* When connecting internal SCSI cable, power may be left while
connecting.
÷
Recording/playback malfunction
÷
Changer malfunction
÷
When installing a drive, be sure to connect the changer interface
cable to the connector corresponding to the bay in which the drive
is installed. If the cable is mistakenly connected to a neighboring
connector, the discs may be damaged and the E99 error may occur.
÷
[E83], [E99]
÷
The final device on a SCSI bus must have its terminator switched
ON, or an external terminator device used. The changer may operate erratically if proper termination is not provided. If no termination
is used and malfunctions occur, turn termination on before restoring
power to the changer.
* If the final device on a SCSI bus (with terminator turned ON) is
removed from the bus, or if its SCSI cable is disconnected, it means
that bus termination is not provided from that time, and the same
kind of malfunctions may occur as described above.
When installing a drive, if the wiring monitor indicator does not flash,
recheck and install the power cable connection, followed by the
changer interface connection.
÷
Display window (LCD)
doesn't appear correctly.
Operation keys malfunction.
Changer not recognized
on the SCSI.
÷
Changer does not detect
drive.
÷
Never disconnect power while the changer is transporting a disc, or
when the writer is recording data to a disc.
÷
÷
Changer malfunction.
Data recording malfunction
÷
When turning the power off and then on again, wait at least ten
seconds after turning the power off before turning it on again.
4. Control
÷
During data recording, do not send commands from the disc writer
to remove disc (Move Medium, Rezero Unit), since EC❋ error or
write malfunction may occur (back buffer underrun).
÷
÷
Recording malfunction
[EC❋], (where ❋ = 0 – F)
5. Transporting Unit
÷
When transporting the unit, pack the unit in its original packaging
materials, and ship in an upright position. Do not transport the unit
on its side.
÷
Do not transport the unit with drive units, 50-disc magazines or other
optional accessories loaded (except for 20-disc hyper-magazine).
When transporting the accessories, repack them in their original
packaging materials.
÷
Do not transport disc magazines with discs loaded.
÷
E8❋, E9❋, EF8, or EF3 errors cannot be corrected merely by resetting the changer’s power on/off. The system administrator mode
must be used to open and then close the door again. For these and
other errors, see the Operating Instructions, p. 46.
÷
[E8❋], [E9❋], [EF8], [EF3]
(where ❋ = 0 – F)
1. Installation
2. Connections
÷
÷
3. Power ON/OFF
6. Error Correction
12
<DRC1285>
En
÷
÷
TO AVOID PROBLEMS
Potential Malfunction/Error
÷
Blank discs, discs which have experienced failed recording operations, and discs whose recording sessions have not been closed,
cannot be used on the reader drive.
* Use the writer drive to determine whether a disc is blank.
÷
÷
÷
Do not affix paper labels or seals to discs. Also, do not allow the
printed surface of discs to become scratched.
* If a paper label is removed incorrectly, it may leave behind pieces
of adhesive that cause player malfunction; as a result, when re
moving an adhesive label, be sure to remove it carefully and fully,
taking care not to leave an scratches on the surface of the disc.
÷
÷
Scratches, fingerprints, or dirt adhering to the surface of a disc may
interfere with recording or playback. When handling discs, take care
not to touch the signal surface (the reflective recording surface).
Hold discs either by the outside edges, or by placing a finger in the
center hole.
÷
Recording/playback malfunction
÷
If a disc is soiled, wipe gently with a soft cloth in a radial direction,
straight from the center outwards. Do not wipe in a circular pattern.
* Use only the Pioneer Cleaning Cloth (Service Parts GED-009) for
wiping discs.
÷
Recording/playback malfunction
÷
To produce stable recording and playback, use only recommended
discs. For recommended discs, consult your dealer or Pioneer's
website.
÷
Recording/playback malfunction
÷
This component does not support DVD-R for Authoring media.
÷
Cannot record
÷
When inserting discs in magazines, be sure they are inserted flat
into the same slot; discs may be damaged if inserted diagonally (with
left and right edges in differing slots).
÷
[E83], [E99]
÷
Do not allow the open end of magazines to point downward, since
discs may fall out.
÷
[E83]
÷
Insert magazines slowly into the changer, since discs may fly fall out
if the magazine is inserted with excessive force.
* When inserting a magazine, if the electronic buzzer sounds or
error [E83 disc set NG] appears in the display, remove the magazine, press any dislodged discs back into the magazine, and slowly
insert the magazine once again.
÷
[E83]
9. Loading discs
÷
When loading discs in the disc magazine or hyper-magazine, we
recommend the use of the mail slot to prevent insertion mistakes.
* When setting a disc on the mail slot tray, place it gently so it does
not protrude from the tray.
10. Disc flip Unit
÷
When the Pioneer Disc flip unit DRM-UF701 is used in conjunction
with the changer DRM-7000, the changer must be equipped with
firmware Rev. 1.12 or later. Since malfunctions or disc damage may
occur when used with firmware revisions earlier than 1.12, be sure
to update your firmware to Rev. 1.12 or later before use.
For details regarding updating of firmware, consult your Pioneer
service center, or retail dealer.
* The DRM-3000 module is not limited by firmware revisions.
÷
÷
[EC❋], (where ❋ = 0 – F)
Other malfunctions
7. Discs
8. Disc Magazines
Reader drive malfunction
[Set Up NG] error
Recording/playback malfunction
÷ [E83], [E99]
13
<DRC1285>
En
English
Issue
TO AVOID PROBLEMS
Issue
11. DVD-R/RW drive
unit DVD-R7783
12. LVD SCSI
interface unit
DRM-ULV16
Potential Malfunction/Error
÷
In order to allow use of the DVD-R7783, changer firmware revision
must be 1.25 or later (for either DRM-7000 or DRM-3000).
If a firmware revision earlier than 1.25 is used, the changer’s device
driver may not operate correctly. Be sure to update your firmware to
Rev. 1.25 or later before use.
For details regarding updating of firmware, consult your Pioneer
service center, or retail dealer.
÷
Changer’s device driver
malfunctions
÷
When the DVD-R7783 is installed, the Power supply unit DRMPW701 cannot be used.
÷
Disc write/playback error
÷
When using the DRM-ULV16, the SE SCSI bus must be limited to
the following conditions. Usage is not supported beyond these limits:
÷
÷
Disc write/playback error
SCSI transmission error
÷
Disc write/playback error
Total bus length including internal to device: 3 m or less
Number of drives connected on bus: 3 or less *
* Under these conditions, a maximum of 3 SE drives can be
installed on a single changer. In addition, due to the limitations on
cable length, drives should be installed in the rear bays #1 to #3.
÷
14
<DRC1285>
En
When the DRM-ULV16 is installed, the Power supply unit DRMPW701 cannot be used.
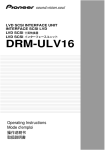
NAMES AND FUNCTIONS OF INDIVIDUAL PARTS
FRONT
FRONT ACCESS DOOR INSIDE
2
3
English
1
<Control panel>
5
ESC
ENT
6
FUNCTION
9
4
LOCK
UNLOCK
7
POWER
1
2
3
4
5
ROBOTICS
BUSY
DRIVE
BUSY
MAILSLOT
OCCUPIED
20-disc hyper magazine
Control panel
Mailslot
Front access door
LCD message window
The backlight to the LCD message window is designed to
automatically go into energy saving mode whenever more
than 1 minute passes without any operations being
performed from the control panel.
6 Operation keys
These keys are used to change the display items on the
LCD message window and to select setting fields or
values. Note that a lock release key is required in order to
become effective these keys.
Escape key (ESC):
The escape key is used to step back from the message
layer currently being displayed (i.e., to return to the
previous display) or to halt operations.
|«:
This key is used to decrement displayed values or to
move the display cursor down or to the left.
»\:
This key is used to increment displayed values or to
move the display cursor up or to the right.
Enter key (ENT):
The enter key is used to step forward from the message
layer currently being displayed or to initiate a specified
operation.
8
Function key (FUNCTION):
The function key must be pressed in order to enter the
system administrator mode.
7 Lock/Unlock key switch
Inserting a lock release key into this switch and rotating it
90 degrees releases the operation lock and makes it
possible to perform operations from the control panel.
8 Status indicators
POWER:
This indicator lights up whenever the power is on.
ROBOTICS BUSY:
This indicator lights up whenever a disc transport
mechanism is in operation.
DRIVE BUSY:
This indicator lights up whenever one or more discs
are being placed on each drives.
MAILSLOT OCCUPIED:
This indicator lights up whenever a disc is placed in the
closed mailslot.
9 Front bays
DRM-7000
For use with disc magazines: M1 – M7
DRM-3000
For use with disc magazines: M1 – M3
15
<DRC1285>
En
Names and functions of individual parts
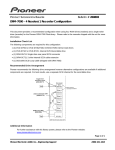
REAR
REAR ACCESS DOOR INSIDE
2
1
9
3
4
5
TERM
OFF
ON
CHANGER
POWER
ID
SCSI
OFF
ON
AC IN
6
7
GND
8
1 Rear plates
These plates cover the space for attaching the connector
panels.
2 Rear access door
3 SE drive SCSI ports (attached connector panel)
4 SCSI ID switch (ID)
This switch is used to assign the changer SCSI ID. If you
would like to decrement the displayed SCSI ID, push the
small switch just above the numeric display by a nib. And
if you would like to increment, push the small switch just
below the numeric display. Note that SCSI ID is set to ‘6’
at the time of shipment.
5 SCSI termination switch (TERM)
This switch is for SCSI termination. Note that this switch
is set ON at the time of shipment and it must be kept ON
during the changer installation. But when the SCSI bus
connection is completed and the changer is not the last
device on the SCSI bus, it must be set OFF certainly.
16
<DRC1285>
En
6 Changer SCSI ports (CHANGER SCSI)
7 Power switch (POWER)
This switch is used to turn the power to the changer on
and off.
8 Power inlet (AC IN)
The power cord is inserted into this power inlet. (Note
that you should always be sure to use only the power cord
provided with your changer.)
9 Rear bays
DRM-7000
For use with disc magazines: M8 – M15
For use with optional units/modules: Bays #1 – 16
DRM-3000
For use with disc magazines: M4 – M7
For use with optional units/modules: Bays #1 – 8
INSTALLATION
REGARDING MAXIMUM DRIVES WHEN USING DVD-R7783
English
In order to assure optimum drive performance, please adhere to the following configuration and environment parameter:
÷ When DRM-ULV16 is installed, and DVD-R7783 is connected on same bus as DVD-D7563 or changer
(see page 18, examples 1 – 3)
DVD-R7783
DRM-7000
DVD-D7563
1
2
3
4
0
1
2
3
DVD-R7783
DRM-3000
DVD-D7563
1
2
3
4
0
1
2
3
÷ When DRM-ULV16 is not installed, and DVD-R7783 is connected to separate bus from DVD-D7563 or
changer (see page 18, examples 4, 5)
DVD-R7783
DRM-7000
DVD-D7563
1
2
3
0
1
2
3
4
5
DVD-R7783
DRM-3000
4
DVD-D7563
:
:
:
1
2
3
4
0
1
2
3
4
5
Within room temperature limits of 5°C to 35°C.
Within room temperature limits of 5°C to 30°C.
This configuration not supported.
* The above figures indicate the number of drives permissible for each changer.
LIMITATIONS WITH SCSI CONNECTIONS
* For further details, consult “ STEP 2
4. Connecting SCSI cables ” (page 21).
A. When installing DRM-ULV16
(When LVD SCSI bus and SE SCSI bus are the same; see page 18, examples 1-3).
7 Connection Cable Length
LVD SCSI bus:
12 m or less
This is the total permissible length of cable, including that internal to devices (when multiple changers are connected,
includes length of cable between changers).
SE SCSI bus:
3 m or less
This is the total permissible cable for each changer, including internal cables.
7 Permissible SE drives: Maximum 3 (for each changer)
* Due to limitations on cable length, SE drives should be installed in rear bays #1 to #3.
B. When not installing DRM-ULV16
(When LVD SCSI bus is separate from SE SCSI bus, or SE SCSI bus alone is used; see page 18, examples 4-6)
7 Connection Cable Length (for each host adapter)
LVD SCSI bus:
12 m or less
This is the total permissible length of cable, including that internal to devices (when multiple changers are connected,
includes length of cable between changers).
SE SCSI bus:
6 m or less*
This is the total permissible length of cable, including that internal to devices (when multiple changers are connected,
includes length of cable between changers).
*SCSI-2 mode
17
<DRC1285>
En
Installation
SCSI CABLE CONNECTION EXAMPLES
A. When installing DRM-ULV16
LVD Line
SE Line
[Example 1]
LVD Drive 1
SE Drive 1
(ON)
1
2
3
4
5
6
DRM-ULV16
SCSI cable (LVD)
SCSI cable (SE)
SCSI terminator (LVD)
LVD drive connector panel (for 2 drives)
Multi drive connector panel
DRM-ULV16 Board
* SE device SCSI terminator switch setting
Host
Changer Board
(OFF)
(LVD)
[Example 2]
[Example 3]
LVD Drive 2
SE Drive 2
LVD Drive 1
SE Drive 1
(ON)
(OFF)
DRM-ULV16 Board
DRM-ULV16 Board
Host
Changer Board
(ON)
(LVD)
Host
(LVD)
Changer Board
(OFF)
B. When not installing DRM-ULV16
[Example 6]
[Example 4]
SE Drive 2
Host 2
(ON)
LVD Drive 1
(LVD)
SE Drive 1
(OFF)
SE Drive 2
(ON)
SE Drive 1
(OFF)
Host 1
Changer Board
(OFF)
(SE)
[Example 5]
LVD Drive 2
Host 2
LVD Drive 1
(LVD)
Host 1
(SE)
18
<DRC1285>
En
Changer Board
(ON)
Host
(SE)
Changer Board
(OFF)
Installation
1. Attach the base stabilizers.
To prevent the unit from falling over, be sure to attach the
accessory base stabilizers. The DRM-7000 is provided with
four stabilizers (one at each corner), and the DRM3000 is
provided with two (rear corners only).
Four casters at the bottom of DRM-7000/DRM-3000 allow it
to be moved lightly but they must be locked soon if you place
the changer on the chosen location. A caster is locked by
lowering its lever.
Lock
Base stabilizer
4. Connect power cord
Insert the power cord into the power inlet on the rear of the
changer and then insert the plug into a wall power outlet.
NOTES:
¶ Be sure to attach the base stabilizers before doing anything
else.
¶ Note that the base stabilizers also serve to protect the
ports and cables on the rear of the unit.
¶ Note that any damage incurred as a result of the unit falling
over or any damage caused to the rear ports or cables as
a result of a failure to install the base stabilizers will not be
covered under warranty.
¶ In the case of the DRM-3000, be sure to attach the
stabilizers only to the rear corners of the unit.
2. Deciding on the location where the changer is
to be installed
The changer is designed with a rear access door which can
be opened in inserting or removing drives or disc magazines,
and the location where the changer is to be installed should
be chosen so as to allow a minimum of 50cm of space
between the rear of the changer and the nearest wall so as
to leave enough room to open the rear access door and insert
or remove drives or disc magazines.
NOTE:
Always be sure to use only the power cord supplied with
your changer.
Also be sure to follow the instructions on the label on the
package and use only that cord designed for use in the
location in which the power cord is to be used.
um
nim cm
i
M 50
of
19
<DRC1285>
En
English
3. Lock the casters
STEP 1
Installation
STEP 2
Readying the changer for operation
In order to ready the changer for operation, perform the
following steps in the order indicated.
1. Turning on the power (see p. 20)
2. Loosening the shipping screws (see p. 20)
3. Installing drive units (see p. 20)
4. Connecting SCSI cables (see p. 21)
5. Inserting disc magazines (see p. 22)
6. Closing access doors (see p. 25)
3. Installing drive units
Install drives in rear bays (in event specific bays are
designated, install in the designated bays).
(1) Attaching add-on connector panels, if necessary
The connector panel provided as standard equipment is
installed under the assumption that SE drives will be
installed in rear bays #1 and #2. Remove the connector
panel if a different panel is to be installed here.
Screwdriver
When installing DRM-SN711,
DRM-SN721, use the screws
removed from the changer.
1. Turning on the power
When the power is first turned on, both the front and rear
access doors will automatically open. This is not a faulty
operation but the function of the shipping screws tightened
at the time of shipping or re-transporting.
NOTES:
¶ Be sure not to close neither the front nor rear access door
until all drives and disc magazines have been installed.
¶ If the door does not open when the power is turned on,
wait until the initialization routine has completed and the
LCD shows the user mode display (p. 25), then refer to p.
39 ("System Administrator Mode: Door Sub-mode") for
instructions on opening the door.
2. Loosening the shipping screws
When the front access door is opened, shipping screws may
be seen at near the bottom inside the changer. These screws
are attached to prevent damage to the built-in mechanism of
the changer during transporting.
Shipping screws are designed so that they can only be
loosened and cannot be removed so as to prevent their
becoming lost.
Shipping screws
NOTES:
¶ Be sure to tighten again the shipping screws before retransporting the changer.
¶ If you or someone close the front or the rear access door
with the shipping screws loosened, the closed door can
not open automatically like before. And when the both
doors are closed, the changer starts its mechanical
initialization. So if you have not finished the installation
yet, it is necessary to open the access doors again to
continue with installation. (See System administrator
mode: Door submodes on p. 39 for further information.)
20
<DRC1285>
En
When installing DRM-LN721,
DRM-LN741, use the screws
furnished as accessories (do
not use screws removed
from changer).
(2) Attaching drive units
Before installation, be sure to specify the following settings
at the rear of each drive to be installed. (See the operating
instructions provided with drive for details.)
¶ SCSI ID assignment
Specify the SCSI IDs to be used so as to ensure that the
same SCSI ID is not assigned by more than one drive on
the same SCSI bus.
¶ SCSI terminator settings
<SE SCSI Bus>
The terminator switch for the drive or changer at the end
of the SCSI bus should be set to ON.
<LVD SCSI Bus>
When DVD-R7783 and DRM-ULV16 are installed, it is
necessary to terminate the LVD SCSI bus.
Since the DVD-R7783 is not provided with a SCSI terminator,
an optional terminator must be purchased, or the attached
SCSI terminator (LVD) of DRM-ULV16 should be used to
provide LVD SCSI bus termination.
1 When inserting a drive, be sure to place the drive on the
changer guide rails and push the drive in until the lock
lever on the drive shifts to the locked position. Maybe you
can hear a clicking sound then.
Guide rails
(3) Reading and self-checking the installed drive’s SCSI
ID by the changer
¶ If all drives have been assigned different SCSI IDs, a
buzzer will sound once.
¶ If the same SCSI ID has been assigned to two or more
drives, a buzzer will sound three times.
NOTES:
¶ If installed drives are to be connected to different SCSI
buses, then the same SCSI ID assigned to each of the
drives may be all right.
¶ Even if none of the drives installed within a changer has
been assigned the same SCSI ID, it is necessary to check
that the same SCSI ID is not assigned to other devices
(e.g., hard disks) on the same SCSI bus.
Drive
4. Connecting SCSI cables
Lock lever
2 Connect the power cable.
¶ When the power cable has been connected, the wiring
monitor indicator on the rear of the drive (orange) will
light up.
¶ When terminator switch is set to ON, the termination
indicator (green) also lights (does not apply to DVDR7783).
Power cable
Wiring monitor indicator
Termination indicator
(Busy indicator on DVD-R7783)
3 Connect the changer interface cable.
¶ When the changer interface cable has been connected,
the wiring monitor indicators will flash at two-second
intervals.
Wiring monitor indicator
Changer interface cable
NOTE:
Connect the changer interface cable to the connector
corresponding to the bay in which the drives have been
installed. (Note that labels are affixed to connectors indicating
the corresponding bay number.) Note that it is extremely
important to do this, as connecting the changer interface cable
to a neighboring bay will result in damage to discs and the
disc transport mechanism.
After installing all drives and checking to make sure that they
have been properly connected, install the SCSI interface
cables.
For SCSI connections refer to the “SCSI Connection
Manual” or consult your dealer.
NOTES:
¶ Host adapter should be set to ID 7.
¶ The LVD SCSI bus should have a total length of 12 m or
less, and SE SCSI bus should have a total length of 6 m or
less (these lengths include wiring inside changers and
between changers when multiple changers are daisychained). However, if the DRM-ULV16 is installed, SE SCSI
bus length should be 3 m or less, and no more than 3
drives can be connected to the bus. As a result, a maximum
of 3 SE drives can be installed on a single changer, and
due to the limitations on cable length, drives should be
installed in the rear bays #1 to #3.
¶ When connecting SE drives, if one or more unused
connectors remain on the SCSI cable, the connector on
the end of the cable should be connected to the terminating
drive, and unused connectors allowed to remain the middle
of the cable (see page 18, examples 1, 3, 4, 6).
¶ The changer SCSI termination switch is set to ON at the
time of shipment. Always make sure that the changer SCSI
termination switch is set to OFF when the changer is not
the last device in the SCSI chain (see page 18, examples
1, 3, 4, 6).
¶ Note that the DRM-7000/DRM-3000 is unable to recognize
the existence of faulty SCSI cable connections or mistakes
in the assignment of SCSI IDs, and for this reason you
should always be sure to restart the host computer after
installation to make sure that all drive units and the changer
are properly recognized. This is the only way of confirming
that all SCSI devices are installed properly.
¶ When connecting a host computer, turn off power to both
changer and host computer before performing the
connection. After connections are completed, turn on
power to the changer first, followed by power to host
computer.
21
<DRC1285>
En
English
Installation
Installation
¶ The changer cannot recognize a drive unless the changer
interface cable is connected. Confirm connections by
looking at the wiring monitor indicator on the rear of the
drive.
= If the indicator is lighted, confirm that the changer
interface cable is connected properly.
= If the indicator is not lighted, confirm that the power
cable is connected properly. If connectors must be
reconnected, reconnect the power cable first, followed
by the changer interface cable.
¶ Despite the fact that the drive is recognized, if the drive’s
model name is not displayed on the lower LCD, disconnect
all three cables and reconnect them again.
Disconnect cables in the following order:
1. SCSI interface cable
2. Changer interface cable
3. Power cable
Connect cables in the following order:
1. Power cable
2. Changer interface cable
3. SCSI interface cable
(1) Insert discs into a normal-type 50-disc magazine and
insert the magazine into the changer.
1 Turn the release knob to the vertical direction to unlock.
2 Insert discs.
3 Turn the release knob to the horizontal direction to lock
the discs into place.
Release knob
Lock release
5. Inserting disc magazines
Any of the following methods may be used to insert discs
into the changer:
(1) Insert discs into a normal-type 50-disc magazine and then
insert the magazine into the changer.
(2) Insert discs into a 20-disc hyper magazine and then insert
the magazine into the changer.
(3) Use the control panel to specify the slot into which a disc
is to be inserted and transport a disc to the specified slot
from the mailslot.
(4) Issue some commands from the host computer to open
the mailslot and transport a disc to the specified slot from
the mailslot.
(5) Issue some commands from the host computer to move
discs in the loaded hyper magazine to some slots within
the loaded 50-disc magazines.
¶ Hyper magazine is not able to be inserted or removed when
the power to the changer is turned off.
¶ Methods (3) through (5) may be used after the changer is
ready for operation. When inserting discs in these
methods, always be sure to insert empty disc magazines
first.
Also note that methods (3) through (5) are used when
inserting locked-type 50-disc magazines. (See System
administrator mode: Mailslot submode on p. 36 for further
information.)
¶ Whether or not it is possible to use methods (4) and (5)
depends on the function of changer control software being
used, and you should check the manual which comes with
the software to check if it supports these methods to insert
discs.
NOTES:
¶ Insert with label facing upward.
¶ Insert discs horizontally. Otherwise it may result in
damage to the discs.
¶ Be careful not to scratch the reflective signal recording
surface.
¶ Do not turn a disc magazine upside down while the
lock is disengaged. Otherwise it may result in discs
falling out of the magazine.
4 Insert magazine into changer.
Holding the handle of the disc magazine, insert the disc
magazine into the changer following the changer guide
rails until it runs against the stopper.
And turn the handle to the left with pushing the magazine
in so that the lock pin on the left of the magazine slides
into the corresponding hole along the side of the changer.
Example: Loading magazine in front bay
Lock pin
Hole
Guide rails
≠
22
<DRC1285>
En
Lock
Label
NOTES:
¶ Insert with label facing upward.
¶ Insert discs horizontally. Otherwise it may result in
damage to the discs.
¶ Be careful not to scratch the reflective signal recording
surface.
¶ Do not turn a disc magazine upside down while the
lock is disengaged. Otherwise it may result in discs
falling out of the magazine.
Handle
Shown above is the insertion to the front magazine bay.
Though the insertion to the rear magazine bay is almost
same but note that the proper installation position is in the
place where it is very secluded.
To remove a disc magazine from the changer, pull the
handle towards you and pull the magazine from the
changer.
4 Insert magazine into changer.
Once the hyper magazine has been inserted partly into
the changer, it will be automatically loaded in.
Whenever a disc magazine is inserted into the changer,
its ID will be automatically read in and displayed on the
LCD message window within a few seconds.
ES
C
EN
FU
T
NC
TIO
N
LO
CK
UN
LO
CK
PO
WER
RO
BO
BU TICS
SY
DR
IV
BU E
SY
MA
OCIL SL
CU OT
PIED
A similar message will also be displayed whenever a disc
magazine has been removed.
If both of these messages appear together in rapid
succession, it indicates that a disc magazine has not been
correctly inserted, and you should check the magazine to
make sure that it has been inserted properly again.
(2) Insert discs into a 20-disc hyper magazine and insert
the magazine into the changer.
1 Turn the release knob to the vertical direction to unlock.
2 Insert discs.
3 Turn the release knob to the horizontal direction to lock
the discs into place.
When the hyper magazine has been loaded, a unique
magazine ID will be displayed together with the record of
the locking mechanism.
≠
Note that the magazine will be automatically ejected if the
changer is unable to read the magazine ID, and that if this
happens you should try inserting the magazine again.
NOTE:
If hyper magazine has been installed, see the instructions
given in System administrator mode: Hyper submode (p. 37)
removing the hyper magazine.
Release knob
Label
Lock release
Lock
23
<DRC1285>
En
English
Installation
Installation
Serial numbers are assigned to each of the slots within the changer into which discs may be inserted. Note that these numbers are
assigned even when no disc magazine has been inserted, and that for this reason slot numbers never change even when a new
disc magazine is inserted.
DRM-7000
Disc storage location
Slot number
(Disc No.)
Disc storage location
Slot number
(Disc No.)
Hyper magazine
Hyper
Slot 20
to
Slot 1
#770
to
#751
hyp-20
to
hyp-01
Magazine bay 15
M15
Slot 50
to
Slot 1
#750
to
#701
M15-50
to
M15-01
Magazine bay 7
M7
Slot 50
to
Slot 1
#350
to
#301
M7-50
to
M7-01
Magazine bay 14
M14
Slot 50
to
Slot 1
#700
to
#651
M14-50
to
M14-01
Magazine bay 6
M6
Slot 50
to
Slot 1
#300
to
#251
M6-50
to
M6-01
Magazine bay 13
M13
Slot 50
to
Slot 1
#650
to
#601
M13-50
to
M13-01
Magazine bay 5
M5
Slot 50
to
Slot 1
#250
to
#201
M5-50
to
M5-01
Magazine bay 12
M12
Slot 50
to
Slot 1
#600
to
#551
M12-50
to
M12-01
Magazine bay 4
M4
Slot 50
to
Slot 1
#200
to
#151
M4-50
to
M4-01
Magazine bay 11
M11
Slot 50
to
Slot 1
#550
to
#501
M11-50
to
M11-01
Magazine bay 3
M3
Slot 50
to
Slot 1
#150
to
#101
M3-50
to
M3-01
Magazine bay 10
M10
Slot 50
to
Slot 1
#500
to
#451
M10-50
to
M10-01
Magazine bay 2
M2
Slot 50
to
Slot 1
#100
to
#051
M2-50
to
M2-01
Magazine bay 9
M9
Slot 50
to
Slot 1
#450
to
#401
M9-50
to
M9-01
Magazine bay 1
M1
Slot 50
to
Slot 1
#050
to
#001
M1-50
to
M1-01
Magazine bay 8
M8
Slot 50
to
Slot 1
#400
to
#351
M8-50
to
M8-01
NOTE:
Although slot numbers reach as high as ‘770’, this does not mean that as many as 770 discs may be available within the DRM-7000.
DRM-3000
Disc storage location
Slot number
(Disc No.)
Slot 20
to
Slot 1
#370
to
#351
hyp-20
to
hyp-01
Magazine bay 3
M3
Slot 50
to
Slot 1
#150
to
#101
M3-50
to
M3-01
Magazine bay 2
M2
Slot 50
to
Slot 1
#100
to
#051
Magazine bay 1
M1
Slot 50
to
Slot 1
#050
to
#001
Hyper magazine
Hyper
Disc storage location
Slot number
(Disc No.)
Slot 50
to
Slot 1
#350
to
#301
M7-50
to
M7-01
Magazine bay 6
M6
Slot 50
to
Slot 1
#300
to
#251
M6-50
to
M6-01
M2-50
to
M2-01
Magazine bay 5
M5
Slot 50
to
Slot 1
#250
to
#201
M5-50
to
M5-01
M1-50
to
M1-01
Magazine bay 4
M4
Slot 50
to
Slot 1
#200
to
#151
M4-50
to
M4-01
Magazine bay 7
M7
NOTE:
Although slot numbers reach as high as ‘370’, this does not mean that as many as 370 discs may be available within the DRM-3000.
24
<DRC1285>
En
Installation
6. Closing access doors
English
First check to make sure that all components have been
installed into place and all cables have been connected.
If this has been done, close the front and the rear access
doors, then the initialization of the changer mechanism will
begin.
When initialization has been completed, a message like that
shown below will be displayed on the LCD message window.
The first line of this message is used to indicate the status of
the disc changer mechanism, and the second line is used to
indicate the installed drive number and to indicate whether
or not a disc has been loaded into the drive in question.
Drive numbers are assigned in sequence from the lowermost
to the uppermost drive.
NOTE:
If the maximum number of drives appears on the LCD
message window is shorter than the number of drives
installed, open the rear access door and check the power
cables and the changer interface cables to all drives installed.
(See System administrator mode: Door submodes on p. 39
for information on how to open the rear access door.)
25
<DRC1285>
En
OPERATION
The Pioneer DRM-7000/DRM-3000 has two operation modes.
One is user mode performing the computer-based operations
and the other is system administrator mode mainly performing
manual operations from the control panel. By dividing the
admitted operations into these two modes, it becomes
possible to prevent interference, conflicts, or clashes
occurring between operations performed from the control
panel and commands issued by the host computer.
SYSTEM ADMINISTRATOR MODE
The privilege to perform operations from the control panel is
given to the system administrator who keeps lock release
keys. Note that the following steps must be performed in
order to switch to system administrator mode.
1. Insert lock release key into the key switch located on the
control panel and rotate 90 degrees to shift the switch to
UNLOCK position.
USER MODE
Once a changer has been finished its power on initialization
or closing doors after installation, it will enter user mode and
it will become able to be controlled by the changer control
software and database management software running on the
host computer. When a changer is running normally in user
mode, the LCD message window will display a series of the
following status messages in one-second intervals.
ESC
ENT
FUNCTION
LOCK
UNLOCK
POWER
ROBOTICS
BUSY
DRIVE
BUSY
LOCK
MAIL SLOT
OCCUPIED
UNLOCK
2. Press the FUNCTION key.
When the changer enters system administrator mode, a
message like that shown below will be displayed on the LCD
message window:
≠
≠
System administrator mode is further divided into 8 different
submodes.
Information submodes
≠
≠
•
•
When operating in user mode, the changer will operate in
accordance with commands issued by the host computer.
These submodes enable the system administrator to read a
changer’s current settings or read data stored within a
changer. Note that these submodes do not affect the
operations performed by the host computer and the system
administrator can obtain a variety of information without
interfering with the control of the changer from the host
computer.
¶ Inquiry submode (see p. 28)
¶ Config submode (see p. 28)
¶ Option submode (see p. 30)
¶ Info submode (see p. 34)
Maintenance submodes
These submodes are used to maintain discs and their status
within the changer. Sometimes these submodes may use
the disc transport mechanism. Therefore whenever the
changer enter any one of these submodes, some commands
issued by the host computer may be ignored.
¶ Mailslot submode (see p. 36)
¶ Hyper submode (see p. 37)
¶ Probe submode (see p. 38)
¶ Door submode (see p. 39)
26
<DRC1285>
En
Operation
System administrator mode settings screen are displayed in
the sequence indicated below.
English
NOTE:
The DRM-7000/DRM-3000 is designed so as to prohibit the
use of maintenance submodes from the host computer. Note
that while it is possible to enter system administrator mode
even though the use of these submodes is prohibited, only
the information submodes will be able to be used.
Press » key
Auto probing
Press « key
Press » key
Hot start
Inquiry submode
Press « key
Press « key
Press » key
Press » key
Press the ENT key
Option submode
Press « key
Press » key
Info submode
Press « key
Press » key
Mailslot submode
Press « key
Press the ENT key to select
the operation to be
performed and then press
the ENT key again
Press « key
Press » key
Press » key
Press » key
Press » key
Hyper I/E
Press « key
Probe submode
Press « key
Press « key
Press the ENT key to select
a category and then press
the ENT key again
Hyper submode
Press « key
Press » key
Auto eject
Config submode
Press « key
Press » key
Press » key
Alert buzzer
Press » key
Free message
Press « key
Press » key
Inquiry change
Press « key
Press » key
Fan NG message
Press « key
Door submode
Press « key
Pressing the ESC key when in inquiry submode will cause
the system to return from system administrator mode to user
mode.
NOTES:
¶ Do not change the setting of the Inquiry change
function. Units are preset at the factory to DRM7000 (for DRM-7000 model) and DRM-3000 (for
the DRM-3000 model).
¶ Do not change the setting of the Fan NG
message function. Units are set to factory
default of ON.
Log
Contents
Run-statistics
Swap
Remove
Add
27
<DRC1285>
En
Operation
Inquiry submode
Inquiry submode is the entry to system administrator mode
and also the exit to user mode. Here the DRM-7000/DRM3000 displays information its own. The data displayed is the
same as that obtained when the host computer issues an
SCSI INQUIRY command to the changer. Your changer’s
current SCSI ID and the firmware revision is seen here.
Pressing the ENT key at this time then the changer’s model
name and device ID (i.e., serial number) to be displayed.
Pressing the ESC key causes the display to return one level
above from the message currently being displayed.
To change the changer’s SCSI ID, use the SCSI ID switch
located at the lower left at the rear of the changer.
When the setting value of the SCSI ID switch is altered, the
display will show a message like that shown below. (Note
that the message shown here is the message which would
be displayed when the SCSI ID is changed from ‘6’ to ‘5’.)
The SCSI ID will be updated only when the power to the
changer is turned OFF and ON or the host computer resets
the SCSI bus on which the changer is.
Config submode
Config submode is the mode to browse the current status of
the magazine bays and the rear bays. It may be used to make
sure that all components currently installed in the changer
have been properly recognized by the changer.
Pressing the ENT key causes the display to switch to the
‘select bay’ screen. Press the « or » key to select either the
magazine bay or the rear bay.
Operation when the rear bay has been selected
Pressing the ENT key first displays the component loaded in
rear bay #1.
¶ The bay number to be displayed is selected by pressing
the » or « key.
Press » or « key
≠
Press » or « key
≠
Press » or « key
≠
Example of display for DRM-7000
¶ If the component that has been inserted in the bay
displayed is a drive unit, it is possible to read out the SCSI
ID, termination switch settings, and device ID of the drive
in question.
Press the ENT key when the displayed is the bay in which
a drive has been inserted, then it displays the above
information.
28
<DRC1285>
En
Operation
To confirm the type of magazine installed, press the ESC
key to return to the bay select screen, then select the
desired magazine bay.
NOTE:
Some types of stored information are in layers. Then pressing
the ENT key may cause the display to proceed to the next
layer and pressing the ESC key causes the display to return
one level above from the message currently being displayed.
Note that pressing the ESC key too many times will cause
the system to return to user mode.
Further, if a DVD-R7783 unit is operated with SCSI ID 10-15,
the LCD will display A-F as follows:
SCSI ID
LCD display
1–9
1–9
10
A
11
B
12
C
13
D
14
E
15
F
Operation when the magazine bay has been selected
¶ Pressing the ENT key will cause the hyper magazine ID to
be displayed.
As the rear bays are multipurpose bays, sometimes some
bays cannot be used as magazine bays because drives
have been installed instead. Then the message displayed
will be like that indicated below.
Example of display for DRM-7000
¶ When you wish to check to see what type of disc magazine
has been installed, press the ENT key.
¶ Pressing the » key while magazine bay 15 (M15) is being
displayed will cause the display to return to a hyper
magazine display.
When you wish to view drives, press the ESC key to return
to the ‘select bay’ screen and then select the rear bay.
NOTE:
Some types of stored information are in layers. Then pressing
the ENT key may cause the display to proceed to the next
layer and pressing the ESC key causes the display to return
one level above from the message currently being displayed.
Note that pressing the ESC key too many times will cause
the system to return to user mode.
If a hyper magazine is not inserted, the following message
will be displayed instead.
¶ Pressing the » key while a hyper magazine is being
displayed will cause the magazine IDs to be displayed in
sequence beginning from magazine bay 1 (M1).
Press » key
≠
When no disc magazine has been inserted, the message
displayed will be as indicated below.
Example of display for DRM-7000
29
<DRC1285>
En
English
¶ If a disc has been transported to the drive, it is also possible
to press the ENT key to display the disc number.
Operation
Option submode
Some changer functions may be selected at user request. In
order to allow system administrators to make the most of
the features provided by changer control software and
database management software, optional functions may be
selected as needed. Note that requirements concerning
security levels or operations performed at the time of errors
may also change depending on the location in which the
changer has been installed, and that options should be
selected accordingly.
Option submode may be used to specify the following optional
functions.
1. Auto probing (Set OFF at the time of shipment)
2. Hot start (Set OFF at the time of shipment)
3. Auto eject (Set ON at the time of shipment)
4. Hyper I/E (Set ON at the time of shipment)
5. Alert buzzer (Set ON at the time of shipment)
6. Free message (Set OFF at the time of shipment)
1. Auto probing
It is possible that discs have been inserted into normal-type
50-disc magazines and hyper magazines before these
magazines are inserted into the changer. But it does not mean
that these imported discs are ready to use because the
changer and the host computer have not recognized yet which
slot holds a disc or not. Therefore the first thing to do is
examining which slot a disc is in, that is called probing.
While this probing function is usually performed by the
changer control software running on the host computer, in
cases where users wish to perform this before connecting
the changer to the host computer or in cases where the
changer control software being used does not support such
probing function, probe submode (see p. 38) may be used
instead. Using probe submode, however, may be
inconvenient since it requires that all of the disc magazines
to be checked be specified one by one.
Auto probing may be used to have the changer automatically
check all disc magazines which need to be checked to
determine whether or not discs have been inserted.
30
<DRC1285>
En
Press the ENT key
≠
Press the | key to set to ON
≠
Press the ENT key
≠
(Note that an “Auto probing is prohibited” message will
be displayed if auto probing is set to OFF.)
Note that even after switching auto probing function from
OFF to ON, auto probing will not actually be performed until
a reset is performed, a hyper magazine is inserted or the
mechanism initialization is finished after access doors are
closed.
When auto probing begins, the changer will begin to check
whether all slots of the disc magazines to be checked in
sequence to determine whether they are “empty” or “full”.
To turn auto probing temporarily off, turn the key switch to
UNLOCK position and press the ESC key.
NOTES:
¶ It takes approximately 2 minutes to check a 50-disc
magazine.
¶ Some commands from the host computer cannot be
executed while auto probing is being performed.
2. Hot start
3. Auto eject
When discs have been transported to drives and the power
to the changer is turned off and then the power to the changer
is turned back on, then the discs will be automatically returned
to their original slots. (Note that this automatic disc return
operation is not performed after a SCSI bus reset.)
For discs which are accessed frequently, however, it is
possible to use the hot start feature to make those discs
accessible immediately after power is turned on by leaving
the discs in the drives which had used them.
Hot start function is an optional function and it enables to
leave discs on the drives that had been using when the power
is turning on.
In network environments there are often times when
changers are installed near servers far from the locations in
which user terminals are located.
In environments such as these, when a user uses the changer
control software to issue a command requesting a disc within
a changer be removed through a mailslot, it is necessary for
the user to go to the location where the changer in question
has been installed in order to remove the disc, but before the
user reaches the changer the mailslot in which the disc has
been transported may already have been opened.
This may be convenient for some cases, however, unless a
system administrator resides near the changer it is as if there
were no security at all, and the same holds true of the ejection
of a hyper magazine.
This is the reason why it has been made possible to turn OFF
auto eject function. Placing restrictions on the automatic
ejection of mailslot tray and on the automatic ejection of a
hyper magazine, makes it possible to maintain a certain level
of security.
Press the ENT key
≠
Press the | key to set to ON
≠
Press the ENT key
≠
(Note that a “Hot start is prohibited” message will be
displayed if hot start function is set to OFF.)
NOTE:
Hot start function cannot be used when the changer control
software is designed so as to force discs to be returned to
their original slots.
Press the ENT key
≠
Press the \ key to set to OFF
≠
Press the ENT key
≠
(Note that a “Auto eject is activated” message will be
displayed if auto ejection function is set to ON.)
If auto eject function is set to OFF and a command is issued
from the host computer causing a disc to be carried to a
mailslot, the mailslot tray will not automatically open, and
instead a message like the following will be displayed on the
LCD message window.
31
<DRC1285>
En
English
Operation
Operation
Similarly, the hyper magazine will not be automatically ejected
even when an eject command is received from the host
computer, and instead like the following will be displayed on
the LCD message window.
Press the ENT key
≠
To press the ENT key to cause the tray of the mailslot or the
hyper magazine to be ejected, it is necessary for the key
switch to be in UNLOCK position. Since the tray of the mailslot
or the hyper magazine will not be ejected until a user with a
lock release key goes to the place where the changer in
question is installed and switches the key switch to UNLOCK
position, security is ensured during the interval between the
time a command is issued and the time the user actually
reaches the changer.
Press the \ key to set to OFF
≠
Press the ENT key
≠
4. Hyper I/E
While a hyper magazine is designed to be used as a disc
magazine capable of accommodating 20-discs at a time, since
it is also allowed to be removed without opening access doors
a hyper magazine can also be used as a high-capacity mailslot.
The subsystems which make up SCSI changers may be
divided into the following four types of elements:
1. Media transport element (i.e., robotics)
2. Storage elements (i.e., slots)
3. Import/export element (i.e., mailslot)
4. Data transfer elements (i.e., drives)
Although slots (which are provided by disc magazines) and
mailslot are usually defined as different elements, by turning
ON hyper I/E function it becomes possible to control a hyper
magazine in the same way as mailslot.
32
<DRC1285>
En
(Note that a “Hyper I/E is activated” message will be
displayed if hyper I/E function is set to ON.)
NOTE:
Since hyper magazines retain their attributes as storage
elements even when hyper I/E function is set to ON, the
changer control software may not treat a hyper magazine as
an import/export element.
However, hyper I/E function should always be set to OFF
when the changer control software being used does not
recognize the use of multiple import/export elements or when
there is a danger of erroneous operations being performed.
5. Alert buzzer
6. Free message
Control panel of the DRM-7000/DRM-3000 is equipped with
a buzzer which is designed to sound at designated times.
When discs are to be inserted or removed in accordance with
instructions from the host computer, messages will be
displayed on the LCD message window indicating the next
operation which must be performed.
¶ When a problem occurs with the changer:
When a problem occurs with the changer, the buzzer will
continue to sound until the operator presses one of the
keys on the control panel.
For example, when a disc is to be inserted or removed from
a mailslot (i.e., when auto eject function has been turned
OFF), the following message will be displayed.
If in this case messages on the LCD message window or
warning messages on the screen of the host computer
are sufficient, this alert buzzer may be turned OFF.
Press the ENT key
≠
Press the \ key to set to OFF
≠
Press the ENT key
≠
(Note that a “Alert buzzer is activated” message will be
displayed if the alert buzzer is set to ON.)
However, the following buzzers cannot be disabled, since
they are meant as response messages to operator inputs:
¶ When the rear access door is opened and a drive is being
inserted:
Since it is difficult to monitor progress from the LCD
message window while inserting a drive from the rear
access door, the buzzer sounds to provide an indication
that operation is proceeding without problem.
¶ When the keys on the control panel are disabled:
The buzzer will sound while the FUNCTION key is being
pressed.
While the messages displayed on the LCD message window
up until this point are the same whether a disc is being
inserted or removed, since all operations after the mailslot
has been opened are performed in accordance with
instructions from the host computer, the changer LCD
message window cannot display messages adequately.
By setting free message function ON, however, it becomes
possible to have the messages displayed on the LCD
message window overwritten by messages sent from the
host computer, and it becomes possible to display instructions
as the host computer wants to be done. It is also possible to
display other information such as the name of the application
controlling the changer, warning messages indicating that a
disc is being written, and other information which the host
computer possesses.
Press the ENT key
≠
Press the | key to set to ON
≠
Press the ENT key
≠
(Note that an “Free message is prohibited” message
will be displayed if free message function is set to OFF.)
Note that even if free message function is activated, if no
messages are received from the host computer, all messages
displayed on the LCD message window will consist of
messages from the changer itself.
33
<DRC1285>
En
English
Operation
Operation
Info submode
The DRM-7000/DRM-3000 stores data needed in order for
system administrators to perform daily maintenance in nonvolatile memories, and info submode may be used to browse
these data.
¶ Import-log
Import log is a sequential list of all disc slot numbers in
which discs have been newly inserted into the changer
when operating in mailslot submode (see p. 36).
The slot numbers displayed include the slot numbers not
only for discs which have been added but also discs which
have been replaced in mailslot submode. Note that discs
in normal-type 50-disc magazines which have been added
are displayed as a magazine unit.
If you press the ENT key at this point, the following menu
screen will appear which makes it possible to select the type
of information to be read.
Press « key
≠
Move the cursor to the type of information you need and
then press the ENT key.
Press « key
≠
Log
When you select log data browsing, it is possible to choose
either error-log or import-log data.
Example of display for DRM-7000
Move the cursor to either “Error-log” or “Import-log” and
press the ENT key to browse the corresponding log data.
¶ Error-log
The Error-log is a recorded history of operating errors
detected by the changer. Errors are numbered from the
most recent (1) up to a maximum of 32.
Moving the cursor to an error code and pressing the ENT
key causes a description of the type of error in question to
be displayed.
Press the ENT key gain to display detailed data regarding
the type of error.
Contents
Contents information of the changer may be retrieved in order
to browse the status of all slots within the changer.
Press « key
≠
Press » key
±
Example of display for DRM-7000
Press the ENT key
≠
Press the ENT key
≠
34
<DRC1285>
En
Note that the number displayed under the heading
“Uncertain” indicates the number of slots for which the
changer is still uncertain whether the slot is empty or full.
Run-statistics
The run statistics information may be retrieved to display the
amount of time or the number of times operations have been
performed.
Move the cursor to either “Work-time sum” or “Number of
moves” and press the ENT key to browse the corresponding
data.
¶ Work-time sum
“PowerOn-time” may be selected in order to display the
total amount of time the power has been turned on.
Press the ENT key
≠
¶ Number of moves
The « and » keys may be pressed to display the number
of any of the following four operations which have been
performed.
Elevation done:
This item may be selected to indicate the number of times
the elevation mechanism has been operated. Note that
this information is useful as a means of determining when
the elevation mechanism needs to be serviced or
maintained.
Load/Unload done:
This item may be selected to indicate the number of times
the loading mechanism has been operated in order to load
or unload a disc into a slot or a drive. When a disc is moved
from a slot to a drive, the number of load/unload operations
is normally counted as two. Note that this information is
useful as a means of determining when the loading
mechanism needs to be serviced or maintained.
Mailslot driven:
This item may be selected to indicate the number of times
a mailslot has been used. Note that an open-and-close
operation is counted as one time.
Hyper driven:
This item may be selected to indicate the number of times
a hyper magazine has been ejected or inserted. Note that
an eject-and-insert operation is counted as one time.
“Drive work-time” may be selected to display the total
amount of time each drive within the changer has been in
operation.
Press « key
≠
Press » key
±
Press « key
≠
Press » key
±
Press « key
≠
Press » key
±
Press « key
≠
Press » key
±
Press the ENT key
≠
Press » key
≠
Press » key
≠
Note that the data indicating the total amount of time
displayed under “Drive work-time” is maintained
individually for each unique device ID, and that for this
reason always the correct value is displayed even if a drive
is reinserted into a different bay within the changer.
* When disc flip unit DRM-UF701 is used.
35
<DRC1285>
En
English
Operation
Operation
Mailslot submode
Mailslot submode is designed to use mailslot with the control
panel in order to exchange, eject, or add discs.
NOTE:
Although the insertion or removal of discs may normally be
performed only by the host computer in order to prevent
discrepancies from arising in the database, it is permitted for
the system administrator to use this mode to insert or remove
discs. When doing so, however, the system administrator
must make a record of the slots to which discs have been
moved and, when necessary, also perform database
maintenance. (Note that the slot numbers of slots for which
discs have been added may be read by using the import-log
in Info submode.)
If you press the ENT key at this point, the following “Swap,
Remove, or Add some discs?” selection menu will appear.
Move the cursor to the menu item to be selected and press
the ENT key to make your selection.
Swap
¶ Use the » or « keys to specify the slot number of the slot
for which you wish to exchange discs and press the ENT
key.
(Note that each time either one of the » or « keys is
pressed, the slot numbers in which discs have been
inserted and the slot numbers for which the changer is
still uncertain whether the slot is empty or full will be shown
in sequence.)
If there is a disc in the specified slot, the disc will be carried
to the mailslot, the tray will open, and the following message
will be displayed.
If there is no disc in the specified slot, the tray will open and
the following message will be displayed.
36
<DRC1285>
En
¶ Place the new disc in the tray and press the ENT key.
The tray will close, the following message will be displayed,
and the disc will be carried to the specified slot.
When the disc swapping operation has been completed, the
message displayed on the LCD message window will return
to the initial swap disc message with the next slot number
corresponding to the condition described above being
displayed.
To exit swap mode, press the ESC key.
Remove
¶ Use the » or « keys to specify the slot number of the disc
you wish to remove and press the ENT key. (Note that
discs may be removed by this mode only from slots for
which it is confirmed that a disc has been inserted, and
that the selection menu displayed will not change when
the ENT key is pressed if there is no confirmed slot in
which a disc has been inserted.)
The specified disc will be carried to the mailslot, the tray
will open, and the following message will be displayed.
¶ Remove the disc and press the ENT key to close the tray.
When the disc has been removed, the message displayed
on the LCD message window will return to the initial remove
disc message with the next slot number corresponding to
the condition described above being displayed.
To exit remove mode, press the ESC key.
Operation
¶ Use the » or « keys to specify the slot number to which
you wish to add a disc and press the ENT key. (Note that
discs may be added by this mode only to slots for which it
is confirmed that no disc has been inserted, and that the
selection menu displayed will not change when the ENT
key is pressed if there is no slot confirmed empty.)
The mailslot tray will open and the following message will
be displayed.
¶ Place the new disc in the tray and press the ENT key.
The tray will close, the following message will be displayed,
and the disc will be carried to the specified slot.
When the disc has been added, the message displayed on
the LCD message window will return to the initial add disc
message with the next slot number corresponding to the
condition described above being displayed.
To exit add mode, press the ESC key.
Hyper submode
Hyper submode is designed to eject a hyper magazine. Since
the DRM-7000/DRM-3000 is not equipped with an exclusive
key to eject a hyper magazine, you must enter this mode to
make the ENT key into the eject key.
¶ When the ENT key is pressed, the changer will check to
see if any hyper magazine discs are currently used in drives.
If there are such discs currently in drives, the following
message will be displayed.
It is the host computer possessing the authority to return
discs in drives to disc magazines. Therefore, if you wish
to eject the hyper magazine right now, you must return to
user mode first and issue a command requesting the discs
be returned from the host computer.
When all the discs have been returned to the hyper
magazine, the following message will be displayed.
¶ Pressing the ENT key will cause the following messages
to be displayed and the hyper magazine to be ejected.
NOTE:
If you cannot add a new disc in add mode, add the disc in
swap mode instead.
≠
If you wish to exit this mode without replacing the hyper
magazine, press the ESC key three times to return to user
mode.
37
<DRC1285>
En
English
Add
Operation
If you wish to replace hyper magazines, insert the new hyper
magazine. Note that the hyper magazine will be automatically
loaded once it has been partway inserted, and that you should
be careful not to add excessive force when inserting a
magazine.
When the hyper magazine has been loaded, a unique
magazine ID will be displayed together with the record of the
locking mechanism.
When there are no records of the lock ever having been
unlocked, the message displayed will be as follows.
Probe submode
It is possible that discs have been inserted into normal-type
50-disc magazines and hyper magazines before these
magazines are inserted into the changer. But it does not mean
that these imported discs are ready to use because the
changer and the host computer have not recognized yet which
slot holds a disc or not.
Probe submode is used to examine which slot a disc is in.
While this probing function is usually performed by the
changer control software running on the host computer, in
cases where users wish to perform this before connecting
the changer to the host computer or in cases where the
changer control software being used does not support such
probing function, probe submode may be used instead.
When there are records of the lock having been unlocked,
the message displayed will be as follows.
¶ If you press the ENT key at this point, the magazine bay
numbers into which magazines have been loaded will be
displayed in sequence.
Note that the magazine will be automatically ejected if the
changer is unable to read the magazine ID, and that if this
happens you should try inserting the magazine again.
¶ Press the » or « key to select a disc magazine and press
the ENT key to confirm your selection. The changer will
examine each of the slots within the disc magazine in
sequence to check whether or not a disc has been inserted.
≠
≠
≠
:
≠
When all fifty slots have been probed, a message will be
displayed asking if you wish to continue.
Select “Yes” to continue and “No” to quit and then press
the ENT key.
38
<DRC1285>
En
Operation
Note that once probe submode has been used to perform a
check on a given disc magazine, there is no need to ever
check again for the presence or absence of discs in that
magazine as long as that magazine is not removed from the
changer.
Door submode
This mode is used to open the access doors to swap 50-disc
magazines, to swap or add drives.
Note that it is necessary to make sure that all discs within
the changer have been returned to their disc magazines or
mailslot. Otherwise neither of the access doors can be
opened.
This may be done by the system administrator, who should
first check the status of the drives from the host computer
before halting service and returning all discs.
¶ When the ENT key is pressed, the changer will check to
see if any discs are currently used in drives. If there are
any discs in drives, the following message will be displayed.
If this message is displayed, press the ESC key to return
to user mode and issue a command requesting the discs
be returned from the host computer.
When it has been confirmed that there are no discs in
drives, the following message will be displayed. Move the
cursor to specify the access door(s) to be opened.
¶ Pressing the ENT key will cause the specified access
door(s) to be opened.
NOTE:
When either of the access doors is opened, the system will
automatically return to user mode. To enter a different
submode, press the FUNCTION key to re-enter system
administrator mode (see p. 26).
39
<DRC1285>
En
English
Probe submode may also be used to examine which slot of
the hyper magazine a disc is in, in the same manner as for
50-disc magazines.
Operation
ADDING DRIVE UNITS
Any drive designed for use in the DRM-7000/DRM-3000
changer can easily be added as a new drive.
The power unit provided as standard equipment is designed
to provide sufficient electrical capacity to support up to 8
drives mounted in rear bays #1 to #8. When adding additional
drives to the rear bays #9 – #16 of the model DRM-7000,
however, an optional additional power unit is required.
How to add a drive
1. Enter system administrator mode and enter door
submode to open the rear access door.
The following message will be displayed on the LCD
message window.
2. Attach add-on connector panels, if necessary
Warning about static electricity
Always be sure never to touch the contacts or ports of
any connectors when installing additional drives or any
other type of add-on equipment. Also be sure to touch a
metallic surface on the changer before beginning the
adding operations.
Screwdriver
NOTES:
¶ When disconnecting drive cables that had been connected
before to make the work easier, always be sure to
disconnect those cables in the following order (i.e., the
opposite order from that in which they are connected):
1. SCSI interface cable
2. Changer interface cable
3. Power cable
¶ SCSI termination setting
<SE SCSI bus>
If you wish to add a drive to a SCSI bus where the
termination for an existing drive has been turned on, the
termination for the new drive to be added must be turned
on and the termination for the existing drive turned off.
<LVD SCSI bus>
Since the DVD-R7783 is not provided with a terminator,
no termination setting is provided for that unit.
Therefore an optional terminator must be purchased, or
the attached SCSI terminator (LVD) of DRM-ULV16 should
be used to provide LVD SCSI bus termination.
When installing DRM-SN711,
DRM-SN721, use the screws
removed from the changer.
When installing DRM-LN721,
DRM-LN741, use the screws
furnished as accessories (do
not use screws removed from
changer).
3. Place the drive on the changer guide rails, push the
drive in until the lock lever on the drive shifts to the
locked position. Maybe you can hear a clicking sound
then.
Guide rails
Drive
Lock lever
40
<DRC1285>
En
4. Connect the power cable.
If it is difficult to work, the SCSI interface cables of other
drives should be disconnected before continuing.
¶ When the power cable has been connected, the wiring
monitor indicator on the rear of the drive (orange) will
light up.
¶ When terminator switch is set to ON, the termination
indicator (green) also lights (does not apply to DVDR7783).
Power cable
Wiring monitor indicator
NOTES:
¶ If installed drives are to be connected to different SCSI
buses, then the same SCSI ID assigned to each of the
drives may be all right.
¶ Even if none of the drives installed within a changer has
been assigned the same SCSI ID, it is necessary to check
that the same SCSI ID is not assigned to other devices
(e.g., hard disks) on the same SCSI bus.
7. Connect the SCSI interface cable.
If you have disconnected the SCSI interface cables of any
other drives in Step 4, be sure to remember to reconnect
those cables.
8. Enter system administrator mode and enter config
submode (see p. 28) to check that the changer
recognizes all the internal drives.
For example, three DVD-ROM drives and one DVD-R drive
have been added in the rear bays beginning from Bay #1
in sequence, the following messages will be displayed.
Termination indicator
(Busy indicator on DVD-R7783)
5. Connect the changer interface cable.
¶ When the changer interface cable has been connected,
the wiring monitor indicator will flash at two-second
intervals.
Press » key
≠
Wiring monitor indicator
Press » key
≠
Press » key
≠
Changer interface cable
NOTE:
Connect the changer interface cable to the connector
corresponding to the bay in which the drives have been
installed. (Note that labels are affixed to connectors indicating
the corresponding bay number.) Note that it is extremely
important to do this, as connecting the changer interface cable
to a neighboring bay will result in damage to discs and the
disc transport mechanism.
Press » key
≠
6. The changer will then read the drive’s SCSI ID and
compare the drive’s settings to those of existing drives.
¶ If all drives have been assigned different SCSI IDs, a
buzzer will sound once.
¶ If the same SCSI ID has been assigned to two or more
drives, a buzzer will sound three times.
41
<DRC1285>
En
English
Operation
Operation
NOTES:
¶ If the changer interface cable has not been properly
connected, the changer will not be able to recognize the
drive at all. You should check the wiring monitor indicator
located on the back of the drive. When the cables have
been properly connected, the indicator ought to be flashing.
= If the indicator is lit, check to make sure that the changer
interface cable of the drive in question has been properly
connected.
= If the indicator is not lit, check to make sure that the
power cable of the drive in question has been properly
connected. If the cables need to be reconnected,
reconnect the power cable before reconnecting the
changer interface cable.
¶ If the drive is recognized but the model name of the drive
is not displayed in the lower half of the LCD message
window, disconnect all three cables and reconnect them
again.
Order in which cables are to be disconnected:
1. SCSI interface cable
2. Changer interface cable
3. Power cable
Order in which cables are to be reconnected:
1. Power cable
2. Changer interface cable
3. SCSI interface cable
9. To view the settings for all drives which have been
recognized, press the ENT key to proceed to the next
layer in the message display.
¶ The SCSI ID, termination switch setting, and unique
device ID of each drive will be read in and displayed at
the same time on the same message window.
¶ If four drives have been connected in a daisy chain
configuration and termination has been turned on for
the fourth drive in the chain, the messages displayed
will be as indicated below.
Press the ENT key
≠
Press the ESC key to return to the previous message
and then press the » key
≠
Press the ENT key
≠
42
<DRC1285>
En
Press the ESC key to return to the previous message
and then press the » key
≠
Press the ENT key
≠
Press the ESC key to return to the previous message
and then press the » key
≠
Press the ENT key
≠
NOTES:
¶ If the SCSI IDs or termination switch settings displayed
differ from those which set on the backs of drives, or if a
drive’s device ID fails to be displayed, it is likely that the
corresponding cables were improperly connected. If this
happens, follow the steps outlined below to properly
reconnect all the cables.
Order in which cables are to be disconnected:
1. SCSI interface cable
2. Changer interface cable
3. Power cable
Order in which cables are to be reconnected:
1. Power cable
2. Changer interface cable
3. SCSI interface cable
¶ If the device ID of a drive cannot be read, then it will be
impossible for the host computer to perform automatic
configuration.
10.Press the ESC key several times to return to user mode
and close the rear access door.
Press the ESC key
≠
Operation
Press the ESC key
≠
Drives may be exchanged following the same procedure as
that describing above for adding new drives.
Described below is the procedure to be following when
exchanging drives, and it also eliminates the worry of making
mistakes in the drive bay number which is to be exchanging.
Press the ESC key
≠
NOTE:
Barring some specific reason to the contrary, the SCSI ID
and termination settings of installed drives should be given
the same values as the drives they replace.
How to exchange a drive
Press the ESC key
≠
1. Enter system administrator mode and enter door
submode to open the rear access door.
The following message will be displayed on the LCD
message window.
Press the ESC key
≠
2. Enter system administrator mode again and enter
config submode to select the rear bay.
Close the rear access door
≠
Press the ENT key
≠
Initialization complete
≠
Select “Rear” and press the ENT key
≠
As the remaining steps which must be performed may differ
depending on the changer control software being used, please
consult the manual for the changer control software being
used for further instructions.
Also note that it may be necessary to restart the host
computer before it can recognize the drives which have been
added.
3. Use the » or « key to select the bay in which the drive
to be replaced is currently inserted.
Note that the messages actually displayed may lack some
of the following information if the drive being replaced has
been out of order.
43
<DRC1285>
En
English
EXCHANGING DRIVE UNITS
Operation
4. Make sure the wiring monitor indicator (orange). It is
located on the back of the drive and ought to be
flashing at half-second intervals if the drive has been
selected in Step 3. Then disconnect the cables to the
drive.
Order in which cables are to be disconnected:
1. SCSI interface cable
2. Changer interface cable
3. Power cable
9. Compare the SCSI ID and termination settings of the
newly installed drive against those of the removed
drive.
¶ If the SCSI ID of the new drive is the same as that of
the drive which has just been removed, the buzzer will
sound once.
¶ If the SCSI ID of the new drive is not the same as that
of the drive which has just been removed, the buzzer
will sound three times.
5. Remove the drive.
If it is difficult to work, the SCSI interface cables of other
drives should be disconnected before continuing.
10. Connect the SCSI interface cable.
If you have disconnected the SCSI interface cables of any
other drives in Step 5, be sure to remember to reconnect
those cables.
6. Check the SCSI ID and termination switch settings of
the drive which has just been removed, and set the
SCSI ID and termination switch settings of the drive
which is to be inserted in its place to the same settings.
¶ Since the DVD-R7783 is not provided with a terminator,
no termination setting is provided for that unit.
7. Insert the new drive and connect the power cable.
¶ When the power cable has been connected, the wiring
monitor indicator on the rear of the drive (orange) will
light up.
¶ When terminator switch is set to ON, the termination
indicator (green) also lights (does not apply to DVDR7783).
Power cable
Wiring monitor indicator
Termination indicator
(Busy indicator on DVD-R7783)
8. Connect the changer interface cable.
¶ When the changer interface cable has been connected,
the wiring monitor indicator will begin flashing at halfsecond intervals.
Wiring monitor indicator
Changer interface cable
44
<DRC1285>
En
11. Check the drive device ID displayed on the LCD
message window.
Press the ENT key
≠
NOTES:
¶ If the SCSI ID and termination switch settings displayed
differ from those which set on the back of the drive, or if a
drive’s device ID fails to be displayed, it is likely that the
corresponding cables were improperly connected. If this
happens, follow the steps outlined below to properly
reconnect all the cables.
Order in which cables are to be disconnected:
1. SCSI interface cable
2. Changer interface cable
3. Power cable
Order in which cables are to be reconnected:
1. Power cable
2. Changer interface cable
3. SCSI interface cable
¶ If the device ID of a drive cannot be read, then it will be
impossible for the host computer to perform automatic
configuration.
12. Press the ESC key several times to return to user mode
and close the rear access door.
Press the ESC key
≠
NOTE:
If you will replace drives without using the procedure
described above, you must be more careful not to remove
the wrong drive. In such a case, the installation procedure of
the drive is the same as that described in “How to add a
drive” (on p. 40), and note that the conditions under which
the buzzer is sounded differ slightly.
Press the ESC key
≠
Press the ESC key
≠
Press the ESC key
≠
Press the ESC key
≠
Close the rear access door
≠
Initialization complete
≠
As the remaining steps which must be performed may differ
depending on the changer control software being used, please
consult the manual for the changer control software being
used for further instructions.
45
<DRC1285>
En
English
Operation
OTHERS
TROUBLESHOOTING
Here are some tips for solving common problems that may be encountered. Some defects with discs or lack of experience in
performing operations may result in errors being displayed or in problems which seem breakdowns. Simple mistakes or
misconceptions can be corrected or cleared away by using the following table which has been provided for troubleshooting of the
system administrator.
If you still find it impossible to correct a problem or if an error message refuses to go away even after consulting the list below and
taking the recommended action, contact your service representative or the dealer from which you purchased the product for
assistance.
Also consult the section “TO AVOID PROBLEMS” on p.12.
Description of problem
Message display
Possible cause
Recommended action
Buzzer sounds when access door is
open and you insert a magazine.
M**
Disc set error
One or more discs has not been
properly placed in the slots of
that magazine.
Remove the magazine and check to see
if any discs are protruding.
Buzzer sounds when you insert a
hyper magazine.
Hyper magazine
Disc set error
One or more discs has not been
properly placed in the slots of
that hyper magazine.
Remove the hyper magazine and check
to see if any discs are protruding.
Buzzer sounds when power is first
turned on and initialization begins.
E83
Disc set NG
¶ Some foreign object has been
detected within the changer.
¶ Some discs are protruding
from their magazines.
Open the access door and check to see
if there is anything seems to be blocking
the optical sensor. If you find it then
remove it. Buzzer may stop.
Buzzer sounds and system refuses
to enter system administrator mode
when you press the FUNCTION key.
The key switch is set to the
locked position.
Use the lock release key to turn the key
switch to UNLOCK position.
Unable to enter Mailslot or Door
submode even though it is possible
to enter Inquiry or Config submode.
¶ The robotics were busy at the
time you pressed a key.
¶ Switchover to these
maintenance submodes has
been prohibited from the host
computer.
¶ Try again after making sure the
ROBOTICS BUSY indicator is off.
¶ Check to see if those operations has
been prohibited from the host
computer.
In Mailslot submode; Swap or Add,
tray opens again soon after it was
closed.
Place a new disc
& Press ENT-key
Mailslot was closed without
placing a disc on the tray.
Press the ESC key to halt the swap disc
or add disc operation.
In Mailslot submode; Remove, tray
opens again soon after it was
closed.
Remove the disc
& Press ENT-key
Mailslot was closed without
removing the disc from the tray.
Remove the disc from the tray.
As the discs in drives are not
returned even after the power is
turned off and back on, it is
impossible to open access doors in
Door submode.
The hot start function has been
turned on.
Turn hot start function off and turn the
power off and then back on. When the
discs have been returned, re-enter Door
submode and open the access door.
Access door refuses to open after
trying to open it in Door submode.
The access door is blocked and
is unable to open.
Remove whatever is blocking the
access door and try to open the access
door again.
There are some discs remaining
in drives.
Return to user mode, issue REZERO
command from the host computer
requesting that all discs be returned,
and try to perform the operation again
after all discs have been returned.
Access door selection screen fails to
appear when trying to open access
door in Door submode.
46
<DRC1285>
En
Host must return
every disc first
Description of problem
Hyper magazine cannot be ejected
in Hyper submode.
Message display
Host must return
all hyper’s disc
There exists a drive or drives which
fail to be recognized by the host
computer even though they have
been recognized in Config submode.
Possible cause
Return to user mode, issue REZERO
command from the host computer
requesting that all discs be returned,
and try to perform the operation again
after all discs have been returned.
¶ SCSI cable has not been
connected properly.
¶ SCSI ID or termination
settings have not been
correctly specified.
¶ Make sure that the SCSI cables have
been connected properly.
¶ Check to see if there is any device on
the same bus with the same SCSI ID
and to see that the SCSI chain has
been properly terminated.
¶ Re-configure the SCSI chain so that
the total length of all the cables does
not exceed the maximum allowable
length.
¶ Reboot the host computer.
¶ Operator has forgotten to
reboot the host computer.
scsiID=7 TermOFF
dev-ID=
Unable to properly read a disc which
has been inserted in a drive.
An error code is displayed on the
LCD message window and the
backlight flashes and the buzzer is
sounded.
E88, E89,E99, etc.
The LCD message window does not
come on when the power is turned
on.
Pressing the operation keys has no
effect.
Buzzer sounds when magazine is
loaded.
¶ Memory Failure
¶ Error
Recommended action
There are some discs that from
the hyper magazine remaining in
drives.
¶ The total length of the SCSI
cables is too long.
There exists a drive which fails to be
recognized by the host computer,
and the SCSI ID of the drive is set to
‘7’ when checked in Config
submode.
English
Others
¶ The power cable for the drive
in question has not been
connected.
¶ Drives have been inserted in
rear bays #9 through #16
without additional power
supply unit.
¶ Open the rear access door and check
to see if the power cable has been
properly connected.
¶ The power supplied by the power
supply included as standard
equipment is sufficient only for
operating drives in bays #1 through
#8. Reinstall the drive in one of these
bays or install the additional power
supply unit.
¶ The disc has been inserted
upside down.
¶ The disc is soiled or
scratched.
¶ Check to see if the disc has been
inserted upside down.
¶ Check to see if the disc is soiled or
scratched, and wipe away any soil or
replace the disc.
A mechanical error has occurred
which has made the changer
unable to continue in operation.
In system administrator mode, open the
access door and take whatever action is
required in order to eliminate the error
condition.
The changer SCSI termination
switch is set to OFF or the SCSI
cable is not properly connected.
¶ When installing is not finished, turn
the SCSI termination switch to ON
and turn the power OFF and ON.
¶ If the SCSI cable is not properly
connected, turn off the power. And
after connection the cable properly,
turn on the power again.
Magazine's memory data is not
being read correctly.
¶ Remove and reinsert magazine.
¶ If the magazine data still can't be read
properly, perform a "PROBE" of the
magazine, ten open and close the
door.
47
<DRC1285>
En
Others
SPECIFICATIONS
DRM-7000
DRM-3000
Description
700-disc changer
300-disc changer
Power supply
Power consumption
AC 100 V – 240 V, 50/60 Hz
Maximum of 5.5 A (500 W)
+
Maximum of 3.3 A (300 W)
General specifications
Weight of main unit (including placement fixtures) 91.7 kg (202 lb 3 oz)
External dimensions (including placement fixtures) 760 x 795 x 1520 mm (W x D x H)
Operating requirements*
60.6 kg (133 lb 10 oz)
760 x 729 x 872 mm (W x D x H)
29-15/16 x 31-5/16 x 59-7/8 in (W x D x H) 29-15/16 x 28-11/16 x 34-5/16 in (W x D x H)
+5 °C to +35 °C (+41°F to +95°F)
+
Humidity*
5% to 85% (with no condensation)
+
Storage requirements
–40 °C to +60 °C (–40°F to +140°F)
+
* The figures for permissible operating temperature and humidity may change depending on the components loaded. For details,
consult the operating instructions for each component used.
Functional specifications
Maximum number of discs
Maximum number of disc magazines
720 (12-cm discs)
320 (12-cm discs)
14
1
6
+
16
8
20-disc hyper magazine
Changer/drive SCSI cable
1
1
+
+
Power cord (for use in Canada and USA)
Power cord (for use in Japan)
1
1
+
+
50-disc magazines
20-disc hyper magazine
Maximum number of components
Items included
Base stabilizer
4
Screw for use in attaching Base stabilizer 12
2
6
Lock release key
Operations Instructions
+
+
2
1
¶ The external design of this product or any of the above specifications may be changed at any time without prior notification.
48
<DRC1285>
En
Others
+
1
±
¡
English
SCSI connector specifications
Pin layout of SCSI connectors
Signal name
GROUND
GROUND
GROUND
GROUND
GROUND
GROUND
GROUND
GROUND
GROUND
GROUND
GROUND
NC
NC
NC
GROUND
GROUND
GROUND
GROUND
GROUND
GROUND
GROUND
GROUND
GROUND
GROUND
GROUND
Pin No.
1
2
3
4
5
6
7
8
9
10
11
12
13
14
15
16
17
18
19
20
21
22
23
24
25
Signal name
26
27
28
29
30
31
32
33
34
35
36
37
38
39
40
41
42
43
44
45
46
47
48
49
50
-DB(0)
-DB(1)
-DB(2)
-DB(3)
-DB(4)
-DB(5)
-DB(6)
-DB(7)
-DB(P)
GROUND
GROUND
NC
TERMPWR
NC
GROUND
-ATN
GROUND
-BSY
-ACK
-RST
-MSG
-SEL
-C/D
-REQ
-I/O
NOTES:
¶ Pin No. 12 to 14, 37 and 39 are not grounded.
¶ The connectors are of the shielded type.
¶ For details on the control commands, refer to the separate
specifications manual.
Maintenance
In order to ensure safe and proper functioning of this unit,
we recommend regular maintenance. Extended service
life can be expected if maintained properly.
Published by Pioneer Corporation.
Copyright © 2006 Pioneer Corporation.
All rights reserved.
49
<DRC1285>
En
ATTENTION
Ce produit renferme une diode à laser d´une
catégorie supéroeire à 1. Pour garantir une
sécurité constante, ne pas retirer les couvercles
ni essayer d´accéder à l´intérieur de l´appareil.
Pour toute réparation, s´adresser à un personnel
qualifié.
AVERTISSEMENT
Cet appareil n’est pas étanche. Pour éviter les
risques d’incendie et de décharge électrique, ne
placez près de lui un récipient rempli d’eau, tel
qu’un vase ou un pot de fleurs, et ne l’exposez pas
à des gouttes d’eau, des éclaboussures, de la pluie
D3-4-2-1-3_A_Fr
ou de l’humidité.
AVERTISSEMENT
Cet appareil est muni d’une fiche de mise à la terre
(masse) à trois fils. Comme la fiche présente une
troisième broche (de terre), elle ne peut se brancher
que sur une prise de courant, prévue pour une mise
à la terre. Si vous n’arrivez pas à insérer la fiche
dans la prise de courant, contactez un électricien
qualifié pour faire remplacer la prise par une qui
soit mise à la terre. N’annulez pas la fonction de
sécurité que procure cette fiche de mise à la terre.
D3-4-2-1-6_A_Fr
Milieu de fonctionnement
Température et humidité du milieu de fonctionnement :
De +5 à +35ºC (de +41 à +95ºF); Humidité relative
inférieure à 85% (orifices de ventilation non obstrués)
N’installez pas l’appareil dans un endroit mal ventilé ou
un lieu soumis à une forte humidité ou en plein soleil
D3-4-2-1-7c_A_Fr
(ou à une forte lumière artificielle).
Pour les appareils enfichables, la prise doit être installée à
proximitément et aisément accessible.
La note suivante se trouver sur le panneau arrière de
votre lecteur.
CLASS 1 LASER PRODUCT
LASER KLASSE 1
APPAREIL À LASER DE
CLASSE 1
Nous vous remercions pour cet achat d’un produit Pioneer.
Nous vous demandons de lire soigneusement ce mode
d’emploi; vous serez ainsi à même de faire correctement
fonctionner l’appareil. Après avoir bien lu le mode d’emploi,
le ranger dans un endroit sûr pour pouvoir s’y référer
ultérieurement.
Dans certains pays ou certaines régions, la forme de la fiche
d’alimentation et de la prise d’alimentation peut différer de
celle qui figure sur les schémas, mais les branchements et le
fonctionnement de l’appareil restent les mêmes.
TABLE DES MATIERES
CARACTERISTIQUES .............................. 51
INSTRUCTIONS DE SECURITE ............... 52
A LIRE AVANT USAGE ............................ 53
Instructions de sécurité .................................... 53
Gestion de médias hors ligne .......................... 53
Choix de la configuration du système ............. 54
Périphériques .................................................... 54
Accessoires fournis ........................................... 56
Disques .............................................................. 57
POUR ÉVITER DES PROBLÈMES ........... 58
NOMS ET FONCTIONS
DES ELEMENTS ....................................... 61
INSTALLATION ........................................ 65
FONCTIONNEMENT ................................ 72
Mode utilisateur ................................................ 72
Mode administrateur de système .................... 72
Ajout de lecteurs ............................................... 86
Echange de lecteurs .......................................... 89
AUTRES SUJETS ..................................... 92
Dépannage ......................................................... 92
Caractéristiques techniques ............................. 94
50
<DRC1285>
Fr
CONCEPTION FLEXIBLE
FACILITE D’INSTALLATION
Le changeur de disque Pioneer DRM-7000/DRM-3000 a été
conçu de façon à ce qu’on puisse acheter et installer plusieurs
composants en même temps afin de répondre à des besoins
variés.
Le DRM-7000/DRM-3000 de Pioneer est équipé de baies (c.à-d. des espaces pouvant accueillir des lecteurs ou des
magasins à 50-disques) situées à l’avant et à l’arrière de
l’appareil. Ces baies sont équipées de portes d’accès qui
peuvent être largement ouvertes afin de faciliter l’installation
ou le retrait des composants.
La baie avant est limitée à un usage exclusif avec des
magasins de 50 disques, tandis que la baie arrière est conçue
comme une zone à usages multiples.
Pour permettre le raccordement du changeur à un système
de gestion de données existant ou l’élaboration d’un nouveau
système de gestion de données, l’ordinateur hôte doit être
capable d’identifier correctement le changeur et tous les
lecteurs qu’il contient, tous les câbles doivent être raccordés
et les paramètres doivent être spécifiés pour que l’ordinateur
hôte puisse contrôler le changeur et les lecteurs.
Le Pioneer DRM-7000/DRM-3000 est conçu non seulement
pour faciliter l’installation et l’ajout de nouveaux lecteurs, mais
il dispose aussi d’un grand nombre de fonctions permettant
de configurer plus facilement l’ordinateur hôte.
Capacité de chargement
Baie avant
Magasins à 50 disques seulement
Baie arrière
Composant
Magasins à 50 disques
DRM-7000
DRM-3000
7
3
Max. 16
Max. 7
Max. 8
Max. 3
Le nombre maximum de périphériques en option pouvant
être installés dépend de ceux qui sont utilisés. Pour plus de
détails, reportez-vous au mode d’emploi de vos périphériques
en option.
Exemple de combinaison
Accent sur capacité de données
Accent sur performances
DRM-7000
2 lecteurs
720 disques
16 lecteurs
370 disques
DRM-3000
2 lecteurs
320 disques
8 lecteurs
170 disques
Au besoin, vous pouvez commencer en laissant vides les
espaces de vos baies et en y ajoutant des éléments à mesure
de vos exigences.
TROIS TYPES DIFFERENTS DE
MAGASINS À DISQUE, EQUIPES D'UNE
MEMOIRE INTERNE
FONCTIONS DE SECURITE VISANT A
EVITER DES OPERATIONS ERRONEES
OU NON AUTORISEES
Afin d’éviter les interférences, conflits ou incompatibilités
entre les opérations manuelles et les opérations effectuées
à l’aide de l’ordinateur, une procédure a été créée pour entrer
en mode Administrateur de système. Chaque personne qui
souhaite effectuer des opérations à l’aide du tableau de
commande doit d’abord entrer en mode Administrateur de
système en utilisant la clé de déverrouillage fournie. Il est
également possible d’interdire l’accès à certains sous-modes
en envoyant une commande à l’aide de l’ordinateur hôte.
On peut aussi accorder des privilèges de sécurité aux
administrateurs de système en possession d’une clé de
déverrouillage. Dans ce cas, seul l’administrateur de système
a l’autorisation d’effectuer des opérations de manipulation
directe de disques, comme l’ouverture d’échangeurs et
l’éjection de magasin extractible.
TABLEAU DE BORD EQUIPE D’UNE
FENETRE DE MESSAGE LCD FACILE A
UTILISER
Le tableau de bord est équipé d’une fenêtre de message
LCD de 2-lignes de 16-caractères qui sert à afficher des
instructions sur les opérations à effectuer. Ceci permet
d’exécuter un grand nombre de fonctions offertes par le DRM7000/DRM-3000 à l’aide de 5 touches seulement.
Pioneer fournit trois types différents de magasins à disque,
faciles à utiliser dans différentes applications.
Magasin extractible de 20 disques:
La caractéristique principale du magasin extractible est sa
mobilité. Il peut être introduit et enlevé sans qu’il soit
nécessaire d’ouvrir la porte d’accès. Il est aussi équipé
d’un système de mémoire intelligente qui enregistre toutes
les opérations effectuées par l’utilisateur dans son
mécanisme de verrouillage/déverrouillage. Chaque DRM7000/DRM-3000 de Pioneer est livré en série avec un
magasin extractible.
Magasin de 50 disques (type verrouillable):
Ce modèle est idéal pour gérer des médias hors ligne, où
la sécurité et l’invariabilité sont importantes. Le mécanisme
de verrouillage empêche tout retrait de disque du magasin
à l’extérieur du changeur.
Magasin de 50 disques (type normal):
Ce modèle est pratique pour importer un grand nombre
de disques dans le changeur ou de les en exporter. Un
mécanisme de verrouillage intégré empêche tout retrait
de disques du magasin lorsque celui-ci se trouve à
l’extérieur du changeur.
51
<DRC1285>
Fr
Français
CARACTERISTIQUES
INSTRUCTIONS DE SECURITE
INSTALLATION
POUR DES RAISONS DE SÉCURITÉ
Choisissez un emplacement qui soit horizontal, plat et solide.
Veillez à ce que l’appareil ne soit pas installé dans les
conditions suivantes:
1 Exposition directe à la lumière du soleil ou à la chaleur
d’un radiateur
2 Exposition à une forte humidité ou aux poussières
3 Proximité d’une salle de bains ou d’une cuisine
4 Exposition à une lampe spot
5 Proximité d’un appareil électrique puissant tel que
réfrigérateur, climatiseur, régulateur d’éclairage de scène,
etc.
6 Sur une surface irrégulière et instable.
(Si la surface est irrégulière, intercalez un panneau rigide
entre cette surface et l’appareil.)
7 Dans un endroit ou l’entretien ou la réparation seront
difficiles.
÷ N’installez pas l’appareil sur une surface, un bureau etc.
instables, car l’appareil est encombrant et lourd.
÷ N’empilez pas plusieurs appareils, ne posez aucun objet
lourd sur un appareil. Ceci est très dangereux, car ces
objets peuvent tomber ou l’appareil peut être renversé.
(Tout dégât ou blessure encouru à la suite d’une telle
installation relève de la seule responsabilité de l’utilisateur.)
÷ Veillez à attacher d’abord les équerres de montage
après avoir déballé le changeur. Si celui-ci est déplacé
avant qu’ils sont attachés, il risque d’être renversé ou
les câbles à l’arrière peuvent être endommagés.
÷ Veillez à ne pas introduire votre main dans les baies
du magasin extractible de 20 disques ou à toucher
l’intérieur de la baie lorsque l’appareil est sous tension,
sous peine de blessures.
÷ Pour des raisons de sécurité, le DRM-7000/DRM-3000 a
été conçu de façon à ce que les portes d’accès ne puissent
être ouvertes lorsque le mécanisme du changeur ou les
lecteurs internes sont en service.
÷ La rotation à grande vitesse des disques ou le
fonctionnement du mécanisme de transport à grande
vitesse des disques dans le DRM-7000/DRM-3000
provoque de légères vibrations et des bruits, ce qui est
tout à fait normal et n’a aucun effet négatif sur les
performances du changeur.
Si le changeur doit être installé contre un mur, il faut laisser
au moins 50 cm d’espace entre l’arrière du changeur et le
mur.
Evitez de déposer des objets sur le changeur.
PRÉCAUTIONS D’EMPLOI
÷ Veillez à ne pas salir, rayer, laisser des empreintes digitales,
etc., sur la face des disques qui porte la gravure ou celle
qui doit recevoir l’enregistrement. Les caractéristiques
nominales de lecture ou d’enregistrement ne seront pas
respectées dans de telles situations.
÷ N’introduisez pas plus d’un disque à la fois dans la fente,
faute de quoi une anomalie de fonctionnement pourrait
se produire.
÷ Le changeur ne gère pas la table des matières. Les
données doivent être gérées par l’ordinateur central.
÷ Utilisez uniquement des disques enregistrables
recommandés par Pioneer. Les caractéristiques
d’enregistrement ou de lecture spécifiées ne seront pas
garanties si vous utilisez un disque non recommandé.
Veillez noter que les données enregistrées sur le disque
ne sont pas couvertes par notre garantie.
÷ Pioneer ne pourra en aucun cas être tenu pour responsable
despertes de données ou autres dommages directs ou
indirects subis parsuite de l’utilisation ou d’une panne de
ce produit. Il est fortementrecommandé d’effectuer des
sauvegardes régulières de toutes les données critiques.
÷ Veillez à ne pas perdre les clés de déverrouillage fournies
avec votre DRM-7000/DRM-3000 sous peine de ne plus
pouvoir gérer votre changeur. La clé de déverrouillage vous
confère la qualité d’administrateur de système et vous
donne l’autorisation d’ouvrir des portes d’accès, d’éjecter
un magasin extractible et d’utiliser un échangeur.
NOTE IMPORTANTE SUR LE CABLE
D’ALIMENTATION
Tenir le câble d’alimentation par la fiche. Ne pas débrancher
la prise en tirant sur le câble et ne pas toucher le câble avec
les mains mouillées. Cela risque de provoquer un court-circuit
ou un choc électrique. Ne pas poser l’appareil ou un meuble
sur le câble. Ne pas pincer le câble. Ne pas faire de noeud
avec le câble ou l’attacher à d’autres câble. Les câble
d’alimentation doivent être posés de façon à ne pas être
écrasés. Un câble abîmé peut provoquer un risque d’incendie
ou un choc électrique. Vérifier le câble d’alimentation de
temps en temps. Contacter le service après-vente PIONEER
le plus proche ou le revendeur pour un remplacement.
52
<DRC1285>
Fr
CONDENSATION
Si la différence de température entre le changeur et son
environnement est importante, l’humidité ambiante se
condense à l’intérieur du changeur, entraînant des anomalies
de fonctionnement. A titre d’exemple, si vous transportez le
changeur d’une pièce froide vers une pièce chaude, ou si
vous l’utilisez dans une pièce très humide ou une pièce où
vous venez tout juste d’allumer un feu, l’humidité ambiante
peut se condenser dans l’appareil. Si l’humidité s’est
condensée, conservez le changeur dans la pièce pendant une
heure, ou bien augmentez progressivement la température
de la pièce avant de l’utiliser.
NETTOYAGE DU CHANGEUR
Nettoyez le changeur au moyen d’un chiffon sec et doux.
Dans le cas des taches tenaces, vous pouvez utilisez un
chiffon humecté d’une solution étendue de détergent (1
mesure de détergent pour 5 à 6 mesures d’eau). Essorez
soigneusement le chiffon avant de frotter les taches. Essuyez
ensuite la surface avec un chiffon sec. N’utilisez aucun produit
volatil tel que les essences ou les diluants pour peinture, qui
peut endommager le lecteur. Dans le cas où vous employez
un chiffon imprégné d’un agent de nettoyage, lisez
attentivement les consignes qui l’accompagnent.
A LIRE AVANT USAGE
Le logiciel de contrôle du changeur et le logiciel de gestion
de base de données surveillent et contrôlent attentivement
les informations sur la position des disques dans le changeur
et sur l’accès aux données enregistrées sur les disques.
Par conséquent, si des changements dans l’état des disques
se trouvant à l’intérieur du changeur ont lieu à un moment où
celui-ci n’est pas contrôlé par l’ordinateur hôte (ou, s’il s’agit
d’un réseau, contrôlé par un serveur), il devient impossible
de commander le changeur et les lecteurs et de lire les fichiers
nécessaires sur les disques.
Permettre d’enlever librement, sans restrictions, des disques
stockés dans le changeur constitue également un risque pour
la sécurité, non seulement parce qu’on risque alors de ne plus
pouvoir accéder à des disques qui ont été enlevés, mais aussi
parce qu’on risque d’endommager ou de perdre des disques.
Bien que le DRM-7000/DRM-3000 ait été conçu pour que
l’ouverture de la porte d’accès avant et arrière se fasse à
l’aide du tableau de bord (situé à l’avant en haut de l’appareil)
afin d’enlever des magasins ou d’introduire ou d’enlever des
disques à travers les échangeurs, chaque personne prenant
en considération les problèmes de sécurité mentionnés cidessus comprendra aisément la nécessité d’imposer des
restrictions sur de telles opérations.
C’est pourquoi le tableau de bord du DRM-7000/DRM-3000
a été équipé d’un commutateur qui peut être verrouillé afin
d’empêcher les opérations effectuées par les touches de
commande. Ce commutateur ne peut être déverrouillé sans
la clé fournie avec le DRM-7000/DRM-3000.
Si l’administrateur de système garde cette clé en permanence
sur soi, les utilisateurs ordinaires qui ne sont pas en
possession de cette clé ne peuvent effectuer des opérations
non autorisées à l’aide du tableau de bord.
Il est également possible de restreindre certaines opérations
pouvant être effectuées à l’aide du tableau de bord. Ceci
signifie qu’une partie des privilèges accordés à
l’administrateur de système est contrôlée par une commande
envoyée par l’ordinateur hôte. Même si l’administrateur de
système dispose d’une clé, l’ordinateur hôte lui interdit
d’ouvrir des portes d’accès, d’échanger des disques ou
d’effectuer d’autres opérations dangereuses.
GESTION DE MEDIAS HORS LIGNE
Le DRM-7000/DRM-3000 présente les caractéristiques
suivantes qui en font un appareil idéal pour gérer des médias
hors ligne.
¶ Magasins à disque amovibles
Les magasins à disque peuvent être enlevés du changeur
avec les disques qu’ils contiennent. La gestion de l’espace
à l’intérieur du changeur peut devenir beaucoup plus efficace
si les disques peu utilisés sont réunis en un seul magasin et
enlevés du changeur pour être stockés hors ligne.
¶ Identification unique des magasins à disque
Tous les magasins à disque utilisés dans le DRM-7000/
DRM-3000 sont dotés d’un code d’identification unique
qui permet d’identifier individuellement des magasins en
les introduisant simplement dans les baies.
Tous les disques d’un magasin introduit deviennent
immédiatement accessibles, peu importe la baie dans
laquelle le magasin est introduit, à condition que les disques
du magasin aient été enregistrés dans la base de données
en tant que disques correspondant au code d’identification
du magasin en question. Ceci vaut aussi pour les magasins
introduits dans un autre changeur, à condition que le
changeur dans lequel il est introduit soit géré par la même
base de données.
¶ Magasins à disque conçus pour un repérage et contrôle
facile
Le retrait, l’introduction ou le remplacement de disques
dans des magasins après que ceux-ci ont été enlevés du
changeur peut briser le lien entre disques et code
d’identification de magasin.
Pour résoudre ce problème, Pioneer fournit des magasins
à 50-disques équipés d’un mécanisme de verrouillage afin
d’interdire toute tentative de changement d’état du
magasin une fois qu’il est enlevé du changeur et du
magasin extractible dotés d’un système de mémoire
intelligente qui enregistre dans son système de
verrouillage/déverrouillage toutes les opération effectuées
par l’utilisateur, ce qui facilite le suivi et le contrôle de
l’utilisation de médias hors ligne.
¶ Enregistrement du code d’identification du changeur
Lorsqu’un magasin à disque a été introduit dans un
changeur qui n’est pas géré par le logiciel de gestion de
base de données ou dans un changeur qui appartient à un
autre système, les disques de ce magasin peuvent être
réécrits ou remplacés par d’autres disques de ce changeur.
Même si le magasin en question est du type verrouillable,
des contradictions entre les disques qui se trouvent
réellement dans le magasin et les informations sur ces
disques stockées dans la base de données sont toujours
possibles.
Pour éviter de tels problèmes, Pioneer a conçu des
magasins à disque capables d’enregistrer le code
d’identification du changeur dans lequel ils sont utilisés. A
condition que la base de données contienne une liste de
codes d’identification des changeurs gérés par n’importe
quelle base de données, le logiciel de gestion de base de
données est en mesure de déterminer si un magasin
introduit doit être réinstallé, en vérifiant le code
d’identification du changeur et celui du magasin.
Bien que le changeur DRM-7000/DRM-3000 et les magasins
à disque présentent les caractéristiques nécessaires à la
gestion des médias hors ligne, il est possible que les
procédures réelles et les méthodes disponibles pour la gestion
des médias hors ligne diffèrent en fonction du logiciel de
gestion de base de données et du logiciel de contrôle du
changeur utilisés.
Remarquez qu’il est nécessaire d’établir une procédure de
contrôle pour le traitement des médias hors ligne. En fait, si
les contrôles de gestion sont assez strictes, on peut même
utiliser des magasins à disque de type normal qui autrement
ne pourraient pas être utilisés pour la gestion de médias hors
ligne de la même façon que les magasins à disque de type
verrouillable.
53
<DRC1285>
Fr
Français
INSTRUCTIONS DE SÉCURITÉ
A lire avant usage
CHOIX DE LA CONFIGURATION DU
SYSTÈME
La première chose à faire avant d’installer ou d’utiliser le
changeur est de décider quels composants doivent être
installés dans quelle partie du changeur.
Le panneau de connexion et les câbles SCSI fournis avec le
DRM-7000/DRM-3000 ont été préparés dans l’hypothèse de
la configuration suivante:
7 Deux lecteurs SE
7 Les deux lecteurs SE sont raccordés en guirlande à
l’intérieur et branchés au changeur au moyen du câble SE
SCSI fourni comme accessoire.
(Ce type de configuration nécessite un câble SE SCSI
supplémentaire pour la connexion à l’adaptateur hôte SE
SCSI.)
Si vous voulez utiliser trois lecteurs SE ou davantage, le
changeur doit être raccordé à l’adaptateur hôte LVD, un lecteur
LVD doit être monté, ou dans le cas où plusieurs bus SCSI
doivent être installés pour accroître la vitesse de transfert,
des dispositifs optiques seront nécessaires en conformité
avec la configuration particulière que vous envisagez.
Pour savoir quels équipements complémentaires il faut
acheter pour réaliser la configuration souhaitée, nous vous
conseillons de décider d’abord à quels endroits les lecteurs
doivent être installés et de consulter le tableau de
configuration à la page 188 (DRM-7000) ou page 189 (DRM3000) avant d’essayer de configurer votre système.
Avant de configurer votre changeur, il est absolument
nécessaire de bien déterminer les points suivants:
¶ Type, nombre et endroit d’installation des lecteurs
Le DRM-7000/3000 utilise une interface SE SCSI. Lorsque
le changeur est raccordé à un adaptateur hôte LVD SCSI,
ou si un DVD-R7783 utilisant une interface SCSI LVD est
installé sur le même bus que le changeur, il sera nécessaire
d’installer une interface SCSI LVD (DRM-ULV16).
De plus, une bloc d’alimentation supplémentaire sera
nécessaire si vous installez 9 lecteurs ou davantage sur
un seul changeur DRM-7000.
¶ Le type et l’endroit d’installation du panneau de connexion
Divers panneaux de connexion sont disponibles pour
fonctionner avec les lecteurs LVD (connexion interne en
guirlande) et les lecteurs SE (connexion interne en
guirlande et connexion directeur de lecteur).
¶ Schéma de connexion des câbles pour le panneau de
connexion à chaque lecteur
¶ Attribution de codes d’identification SCSI
Plusieurs lecteurs sur le même bus SCSI doivent avoir un
code d’identification différent.
¶ Réglage de terminaison SCSI
<Bus SE SCSI>
Le commutateur de terminaison pour le lecteur ou le
changeur à la fin du bus SCSI doit être activé (réglé sur
ON).
<Bus LVD SCSI>
Quand le DVD-R7783 et le DRM-ULV16 sont installés, il
est nécessaire de terminer le bus LVD SCSI.
Comme le DVD-R7783 n’est pas pourvu d’un terminateur
SCSI, vous devrez acheter un terminateur en option ou
bien le terminateur SCSI (LVD) prévu sur le DRM-ULV16
devra être utilisé pour assurer une terminaison au bus LVD
SCSI.
En ce qui concerne la connexion SCSI, reportez-vous au
“Manuel de branchement SCSI” ou consultez votre
revendeur.
54
<DRC1285>
Fr
Le bloc d’alimentation fourni comme équipement standard
est capable d’alimenter les baies arrière de #1 à #8. La
puissance totale consommée par ces 8 lecteurs ne doit
pas dépasser les valeurs suivantes :
CC +5 V, 12 A ou moins
CC +12 V, 8 A ou moins
La capacité électrique maximale de chaque connecteur
est la suivante :
CC +5 V max. 4 A
CC +12 V, max. 4 A
En ajoutant au DRM-7000 un bloc d’alimentation
supplémentaire disponible en option, le courant peut être
alimenté aux baies arrière #9 à #16.
La puissance maximale consommée par ces baies d’en
haut et le courant maximal fourni à chaque lecteur sont
les mêmes que pour les baies d’en bas (c.-à-d., baie #1 à
baie #8).
REMARQUES:
¶ N’utilisez jamais d’autres périphériques que les produits
de la marque Pioneer.
¶ Veillez à laisser un délai d’au moins 10 secondes entre
la mise hors tension de l’appareil et sa remise sous
tension. Ceci est absolument nécessaire, parce que
parfois le courant n’est pas coupé immédiatement, bien
que vous ayez appuyé sur l’interrupteur, si les lecteurs
installés dans le changeur sont peu nombreux.
PÉRIPHÉRIQUES
Les composant suivants peuvent être achetés séparément
pour être utilisés avec le Pioneer DRM-7000/DRM-3000, afin
d’adapter celui-ci à la configuration d’un système selon vos
spécifications.
Le nombre maximum de périphériques en option pouvant
être installés dépend de ceux qui sont utilisés. Pour plus de
détails, reportez-vous au mode d'emploi de vos périphériques
en option.
Magasin de 50 disques
Utilisés pour stocker des disques à l’intérieur du changeur,
ces magasins peuvent être de type normal ou de type
verrouillable et peuvent être installés dans n’importe quelle
combinaison.
¶ Magasin de 50 disques (type verrouillable)
[DRM-AL751]
Ces magasins à disque sont conçus de façon à ne pas
être déverrouillés, même s’ils sont enlevés d’un changeur.
Par conséquent, vous devez utiliser l’échangeur pour
introduire des disques dans ces magasins ou pour les
A lire avant usage
enlever. On est donc obligé d’utiliser les échangeurs pour
échanger les disques. Ces magasins sont très efficaces
dans des situations où ils sont utilisés avec un ordinateur
hôte capable de gérer des médias hors ligne. (Voir p. 53
pour plus de détails.)
¶ Magasin de 50 disques (type normal)
Il s’agit d’un lecteur à interface SCSI LVD, permettant la lecture
des disques DVD-ROM et pour la lecture/gravure de disques
DVD-R/RW.
Lecteur de DVD-R/RW [DVD-R7322]
Puissance consommée: CC +5V, 1,5A
CC +12V, 1,0A
Il s’agit d’un lecteur à interface SCSI SE, permettant la lecture
des disques DVD-ROM et pour la lecture/gravure de disques
DVD-R/RW.
Equipé d’un bouton permettant de déverrouiller le
mécanisme de verrouillage, ces magasins sont pratiques
pour importer de grandes quantités de disques dans le
changeur ou pour les en exporter.
Lecteur DVD-ROM [DVD-D7563]
Puissance consommée: CC +5V, 1,0A
CC +12V, 1,0A
Magasin extractible de 20 disques [DRM-AH721]
Il s’agit d’un lecteur à interface SCSI SE, permettant la lecture
des disques DVD-ROM et des disques DVD-R/RW.
Ce magasin a été conçu de façon à ce qu’il puisse être introduit
ou enlevé sans qu’il soit nécessaire d’ouvrir les portes d’accès.
Ce magasin est également équipé d’un système de mémoire
qui enregistre toutes les opérations de verrouillage/
déverrouillage effectuées par l’utilisateur. C’est pourquoi le
magasin extractible est pratique et parfait pour gérer des
médias hors ligne. Le DRM-7000/DRM-3000 est livré en série
avec un seul magasin extractible. D’autres magasins
extractible peuvent être ajoutés, ce qui permet de constituer
facilement une bibliothèque hors ligne en lots de 20 disques.
Systéme de retournement de disque [DRM-UF701]
Lecteur de DVD-R/RW [DVD-R7783]
Puissance consommée: CC +5V, 1,5A
CC +12V, 1,0A
Le dispositif de retournement de disque DRM-UF701 a été
conçu pour retourner un disque. Notez bien que ce composant
est requis lorsque vous utilisez des disques DVD double face.
Bloc d’alimentation électrique
[DRM-PW701] (pour DRM-7000)
Vous devez installer un bloc d’alimentation de périphérique
DRM-PW701 si vous voulez utiliser 9 ou plus de lecteurs dans
le même changeur.
Veuillez contacter le personnel technique de Pioneer pour
toute installation.
Alimentation: CC +5V, 12A au maximum
55
CC +12V, 8A au maximum
<DRC1285>
Fr
Français
[DRM-AF751]
A lire avant usage
Interface SCSI LVD [DRM-ULV16]
Câble de connexion pour 4 lecteurs [DRM-SC741]
Cette interface est nécessaire lors de la connexion du DRM7000/3000 avec une interface SE SCSI sur un adaptateur hôte
LVD. Veuillez contacter le personnel technique de Pioneer
pour toute installation.
Il s’agit d’un câble SCSI, prenant en compte l’installation
élargie en guirlande de quatre lecteurs SE au maximum.
Lorsqu’ils sont combinés avec un panneau de connexion
multi-lecteur, 6 lecteurs SE peuvent être raccordés en
guirlande à l’intérieur du changeur.
Panneau de connexion LVD (pour 2 lecteurs)
[DRM-LN721]
Ce panneau de connexion est doté d’un câble, permettant
une connexion en guirlande de deux lecteurs LVD à l’intérieur
du changeur.
ACCESSOIRES FOURNIS
Magasin extractible de 20 disques ... 1
Panneau de connexion LVD (pour 4 lecteurs)
[DRM-LN741]
Ce panneau de connexion est doté d’un câble, permettant
une connexion en guirlande de quatre lecteurs LVD à l’intérieur
du changeur.
Terminateur SCSI (LVD) [DRM-TM160]
Il s’agit d’une terminateur LVD à montage externe.
Comme le DVD-R7783 n’est pas doté d’un terminateur LVD
SCSI, une terminaison doit être assurée soit par l’emploi de
cette unité, soit via le terminateur SCSI (LVD) fourni avec le
DRM-ULV16.
Câble SCSI (LVD)
[CC-200]
*Installé dans le boîtier du changeur
Câble SCSI (SE) pour connexion changeur lecteur ...1, 0,35 m
2,5 m, VHDCI 68 broches à demi-pas 68 broches
[CC-200-8]
8 m, VHDCI 68 broches à demi-pas 68 broches
[CC-201]
2,5 m, demi-pas 68 broches à demi-pas 68 broches
[CC-201-8]
8 m, demi-pas 68 broches à demi-pas 68 broches
Il s’agit des câbles à utiliser pour le câblage externe, destinés
à un emploi entre l’adaptateur hôte et le changeur, ou lors
d’une connexion en guirlande de changeurs. Sélectionnez la
longueur et la configuration de connecteur, adaptées à votre
système.
Câble d’alimentation
(pour le Canada et les Etats-Unis) ... 1
Panneau de connexion multi-lecteur [DRM-SN721]
Ce panneau de connexion est fourni avec un câble qui permet
la connexion en guirlande de deux lecteurs SE à l’intérieur du
changeur. Un panneau est fourni comme équipement d’origine
et il peut être combiné avec des “Câble de connexion pour 2
lecteurs” et des “Câbles de connexion pour 4 lecteurs.”
Panneau de connexion individuel [DRM-SN711]
Ce panneau de connexion peut servir pour la connexion
directe d’un lecteur SE sur l’adaptateur hôte SE SCSI, ou bien
pour des connexions en guirlandes externes.
Ce type de cordon d’alimentation est prévu
pour le Canada et les États-Unis
uniquement. Ne pas utiliser ce cordon
d’alimentation dans un pays autre que le
Canada ou les États-Unis.
Câble d’alimentation (pour le Japon) ... 1
Câble de connexion pour 2 lecteurs [DRM-SC721]
Il s’agit d’un câble SCSI, prenant en compte l’installation
élargie en guirlande de deux lecteurs SE au maximum.
Lorsqu’ils sont combinés avec un panneau de connexion
multi-lecteur, 4 lecteurs SE peuvent être raccordés en
guirlande à l’intérieur du changeur.
56
<DRC1285>
Fr
Ce type de cordon d’alimentation est prévu
pour le Japon uniquement. Ne pas utiliser
ce cordon d’alimentation dans un pays
autre que le Japon.
A lire avant usage
DRM-3000: 2
Clé de déverrouillage ... 2
Vis pour fixer les stabilisateur de base
DRM-7000: 12
DRM-3000: 6
Mode d’emploi ... 1
÷ Les disques sont entraînés à grande vitesse par le moteur
du changeur. N’utilisez aucun disque endommagé (par
exemple, un disque fissuré ou voilé). Un disque
endommagé peut rendre le lecteur inutilisable.
÷ NE PAS utiliser de disques non standard, car ils peuvent
avoir une mauvaise influence sur cet appareil et d’autres
équipements.
÷ Sous peine de provoquer des défaillances, ne reproduisez
pas de CD ayant une forme autre que circulaire, telle que
des disques en forme de coeur.
÷ N’utilisez pas les disques suivants qui peuvent causer une
anomalie de fonctionnement de l’appareil ou être
endommagés:
÷ Disques portant encore des bavures de moulage (mal
ébarbés) sur leur pourtour, comme le montre
l’illustration.
÷ Disques dont le bord a été arrondi ou taillé en biseau,
comme le montre l’illustration.
DISQUES
Disques pouvant être utilisés avec le Pioneer
DRM-7000/DRM-3000
Les types de disque pouvant être utilisés avec le DRM-7000/
DRM-3000 varient en fonction des types de lecteur. Pour de
plus amples informations sur les types de disque utilisables,
veuillez consulter les modes d’emploi fournis avec vos
lecteurs.
÷
Précautions concernant les disques
÷ Veillez à ne pas toucher la surface des disques portant la
gravure.
÷ Saisissez les disques par leur bord, ou par leur centre et
leur bord.
÷
÷
÷ Ne collez aucune étiquette ou ruban adhésif sur la surface
d’un disque. Manipulez les disques avec soin de manière
à ne pas rayer ni endommager l’étiquette.
÷
÷ Disques ayant une surface adhésive sur la périphérie
ou la face étiquetée.
Lorsque des disques sont manipul és dans un
environnement sec, ils risquent de se charger d’électricité
statique. Maniez les disques uniquement après avoir
touché un objet métallique ou après avoir déchargé
l’électricité statique de votre corps par un autre moyen.
Ne placez pas les disques dans un endroit où ils seraient
exposés à de la poussière ou à de l’électricité statique.
Le changeur n’accepte que les disques de 12 cm. Etant
donné que le changeur détecte la présence d’un disque
grâce à un dispositif optique qui détermine si un obstacle
existe 5 mm environ à l’intérieur du cercle représentatif
d’un disque de 12 cm, vous concevez aisément que
l’utilisation d’un disque transparent (*) ou d’un disque de
8 cm puisse conduire le changeur à commettre une erreur
de détection de disque qui, dans l’hypothèse la plus
défavorable, se traduirait par l’endommagement de ce
disque. Par ailleurs, l’utilisation d’un adaptateur pour disque
de 8 cm est strictement interdite.
*Comprend les disques “C-thru Disc” translucides.
Cet appareil ne prend pas en compte les disques “DualDisc”
(Disque CD/DVD hybride).
57
<DRC1285>
Fr
Français
Stabilisateur de base
DRM-7000: 4
POUR ÉVITER DES PROBLÈMES
Vous trouverez ci-dessous une liste de rubriques, pouvant entraîner des problèmes dans le fonctionnement des composants.
Catégorie
1. Installation
÷
÷
÷
2. Branchements
÷
÷
÷
÷
3. Mise sous/hors
tension
÷
÷
4. Contrôle
5. Transport de
l’appareil
÷
÷
÷
÷
6. Correction des
erreurs
58
<DRC1285>
Fr
÷
Ne placez pas d’objets étrangers dans le changeur car ils pourraient
provoquer une défaillance.
N’utilisez pas le changeur dans des endroits très poussiéreux, chauds
ou humides.
* N’installez pas l’appareil dans un endroit exposé directement à
l’air ou à la poussière de l’extérieur.
* N’installez pas l’appareil près des orifices d’un climatiseur ou d’un
purificateur d’air.
Pendant son utilisation, ne soumettez pas l’appareil à des chocs ou
des vibrations.
* Ne l’installez pas dans un couloir ou dans un endroit où il y a
beaucoup d’allées et venues.
Avant le branchement du câble SCSI externe, veillez à couper d’abord
l’alimentation à l’ordinateur hôte et au changeur.
* Lors du branchement du câble SCSI interne, l’appareil peut être
laissé sous tension.
Lors de l’installation d’un lecteur, veillez à raccorder le câble
d’interface de changeur sur le connecteur correspondant dans la
baie où le lecteur est installé. Si le câble est raccordé par erreur sur
un autre connecteur, les disques pourraient en être endommagés et
l’erreur E99 peut se produire.
Le commutateur de terminaison du dispositif final sur un bus SCSI
doit être activé (sur ON), ou une terminaison externe doit être utilisée.
Le changeur risque de ne pas fonctionner correctement si une
terminaison adéquate n’est pas prévue. Si un commutateur de
terminaison n’est pas utilisé et que des défaillances se produisent,
mettez une terminaison en service avant de remettre le changeur
sous tension.
* Si le dispositif final sur un bus SCSI (dont la terminaison est activée
= ON) est retiré du bus, ou si son câble est déconnecté, cela veut
dire que la terminaison de bus n’existe plus à compter de ce mo
ment-la et qu’une défaillance du genre décrit plus avant peut se
produire.
Lors de l’installation d’un lecteur, si le voyant de contrôle de câblage
ne clignote pas, vérifiez le branchement du câble d’alimentation,
puis le branchement de l’interface du changeur.
Ne coupez jamais l’alimentation pendant que le changeur transporte
un disque ou que le dispositif d’écriture enregistre des données sur
un disque.
Lorsque l’appareil a été mis hors tension, attendez au moins 10
secondes avant de le remettre à nouveau sous tension.
Pendant l’enregistrement des données, n’envoyez pas des
commandes par le dispositif d’écriture pour retirer le disque (Move
Medium, Rezero Unit), car une erreur EC❋ ou une défaillance
d’écriture pourrait se produire (insuffisance de tampon arrière).
Pour transporter l’appareil, replacez-le dans les matériaux d’emballage
originaux et portez-le en position verticale. Ne placez pas l’appareil
sur son côté pendant son transport.
Ne transportez pas l’appareil alors que des lecteurs, magasins à 50
disques ou autres accessoires en option y sont chargés (sauf pour
le magasin extractible de 20 disques). Avant de transporter les
accessoires, replacez-les dans leurs matériaux d’emballage originaux.
Ne transportez pas des magasins à disques où des disques sont
installés.
Les erreurs E8❋, E9❋, EF8 et EF3 ne peuvent pas être corrigées
par simple mise sous/hors tension du changeur. Vous devez utiliser
le mode Administrateur de système pour ouvrir puis fermer la porte
d’accès. Pour corriger ces erreurs et d’autres, reportez-vous à “Mode
d’emploi” en page 92.
Problème/Erreur potentielle
÷
[E83], [E99], [E88]
÷
Défaillance
d’enregistrement / lecture
÷
Défaillance
d’enregistrement / lecture
÷
Défaillance du changeur
÷
[E83], [E99]
÷
La fenêtre d’affichage
(à cristaux liquides)
n’apparaît pas
correctement.
Les touches opératoires
ne fonctionnent pas bien.
Le changeur n’est pas
reconnu sur le SCSI.
÷
÷
÷
Le changeur ne détecte
pas le lecteur.
÷
÷
Défaillance du changeur
Défaillance à
l’enregistrement de
données
÷
Défaillance
d’enregistrement
[EC❋], (où ❋ = 0 – F)
÷
÷
[E8❋], [E9❋], [EF8], [EF3]
(où ❋ = 0 – F)
POUR ÉVITER DES PROBLÈMES
7. Disques
÷
÷
÷
÷
÷
÷
8. Magasins de
disques
÷
÷
÷
9. Mise en place
des disques
÷
10. Systéme de
retournement de
disque
÷
Des disques vierges, ceux dont les démarches d'enregistrement
ont échoué et ceux dont les sessions d’enregistrement n’ont pas
été refermées ne sont pas utilisables sur le lecteur.
* Utilisez un dispositif d’écriture pour déterminer si un disque est
vierge ou non.
Ne collez pas des étiquettes de papier ou des autocollants sur les
disques. Ne griffez pas la surface imprimées des disques.
* Si une étiquette de papier est imparfaitement enlevée, des
morceaux d’adhésifs peuvent y subsister et provoquer une
défaillance du lecteur. Si vous enlevez un autocollant, prenez soin
de la décoller soigneusement et complètement, en veillant à ne
pas laisser de rayures sur la surface du disque.
Des griffes, des traces de doigts ou de la poussière adhérant à la
surface d’un disque peuvent gêner l’enregistrement ou la lecture.
Lors du maniement des disques, ne touchez pas la surface des
signaux (surface réfléchissante). Tenez les disques par leur bord
extérieur ou placez un doigt dans l’orifice central.
Si un disque est souillé, frottez-le délicatement au moyen d’un linge
doux dans le sens radial, c’est–à-dire en ligne droite du centre vers
l’extérieur. Ne frottez pas les disques dans le sens circulaire.
* Utilisez uniquement le Chiffon de nettoyage Pioneer (Pièce de
service GED-009) pour nettoyer vos disques.
Pour garantir la stabilité de l’enregistrement et de la lecture, utilisez
uniquement les disques recommandés. A ce sujet, consultez votre
revendeur ou le site web de Pioneer.
Ce composant ne prend pas en charge les médias DVD-R for
Authoring.
Lors de la mise en place de disques dans le magasin, veillez à les
insérer à plat et dans la même rainure, car ils pourraient être
endommagés s'ils étaient insérés en oblique (les bords gauche et
droit dans une rainure différente).
N’inclinez pas le côté ouvert du magasin vers le bas, car les disques
pourraient ressortir et tomber.
Insérez lentement le magasin dans le changeur, car les disques
pourraient ressortir si le magasin y est inséré avec force.
* Si l’alerte électronique retentit ou si l’erreur [E83 disc set NG]
(disque mal installé) apparaît sur l’affichage à l’insertion d’un
magasin, retirez celui-ci, repoussez tout disque éventuellement
déplacé dans le magasin et insérez à nouveau lentement le
magasin.
Lors de la mise en place de disques dans le magasin ou le magasin
extractible, l’emploi d’un échangeur est recommandé pour éviter
des erreurs d’insertion.
* Lorsque vous disposez un disque sur le plateau à passe-lettre,
posez-le délicatement de sorte qu’il ne ressorte pas du plateau.
Si le Systéme de retournement de disque Pioneer DRM-UF701 est
utilisé avec le changeur DRM-7000, ce dernier doit être équipé du
logiciel microprogrammé Rev. 1.12 ou ultérieur. Comme des
défaillances ou des dégâts peuvent se produire sur les disques si
vous utilisez des révisions de logiciels antérieures à 1.12, veillez à
mettre le logiciel à jour à la Rev. 1.12 ou ultérieure avant l’utilisation.
Pour des détails au sujet de la mise à jour du logiciel, consultez un
centre de service Pioneer ou votre revendeur.
* Le module DRM-3000 n’est pas limité par les révisions du logiciel
microprogrammé.
Problème/Erreur potentielle
÷
÷
Défaillance du dispositif
de lecture
Erreur [Set Up NG] (Configuration NG)
÷
Défaillance
d’enregistrement/lecture
÷ [E83], [E99]
÷
Défaillance
d’enregistrement/lecture
÷
Défaillance
d’enregistrement/lecture
÷
Défaillance
d’enregistrement/lecture
÷
÷
Enregistrement impossible
[E83], [E99]
÷
[E83]
÷
[E83]
÷
÷
[EC❋], (où ❋ = 0 – F)
Autres défaillances
59
<DRC1285>
Fr
Français
Catégorie
POUR ÉVITER DES PROBLÈMES
Catégorie
11. Lecteur de
DVD-R/RW
DVD-R7783
12. Interface SCSI
LVD DRM-ULV16
÷
Pour que le DVD-R7783 puisse fonctionner, la révision de logiciel
microprogrammé du changeur doit être 1.25 ou ultérieure (pour le
DRM-7000 ou le DRM-3000). Si une revision de logiciel inférieure à
1.25 est utilisée, le lecteur du changeur risque de ne pas fonctionner
correctement. Veillez à mettre à jour votre logiciel par la révision
1.25 ou une ultérieure avant la mise en service.
Pour des détails sur la mise à jour du logiciel, consultez le centre
de service Pioneer ou le magasin de vente au détail.
÷ Lorsque le DVD-R7783 est installé, le bloc d’alimentation
électrique DRM-PW701 ne peut pas être utilisé.
÷ A l’emploi du DRM-ULV16, le bus SE SCSI doit être limité aux conditions suivantes. L’emploi n’est pas supporté au-delà de ces limites:
Longueur total de bus y compris longueur interne au dispositif:
3 m ou moins
Nombre de lecteurs raccordés sur le bus: 3 ou moins*
÷
60
<DRC1285>
Fr
* Dans ces conditions, un maximum de 3 lecteurs SE peuvent être
installés sur un seul changeur. De plus, en raison des limitations
imposées à la longueur des câbles, les lecteurs devraient être
installés dans les baies arrière #1 à #3.
Lorsque le DRM-ULV16 est installé, le bloc d’alimentation
électrique DRM-PW701 ne peut pas être utilisé.
Problème/Erreur potentielle
÷
Défaillance du dispositif
de lecture du changeur
÷
Erreur de gravure/lecture
de disque
Erreur de gravure/lecture
de disque
Erreur de transfert SCSI
÷
÷
÷
Erreur de gravure/lecture
de disque
NOMS ET FONCTIONS DES ELEMENTS
FACE AVANT
INTERIEUR DE LA PORTE AVANT
1
2
3
<Tableau de bord>
5
ESC
ENT
Français
6
FUNCTION
9
4
LOCK
UNLOCK
7
POWER
1
2
3
4
5
ROBOTICS
BUSY
DRIVE
BUSY
MAILSLOT
OCCUPIED
Magasin extractible de 20 disques
Tableau de bord
Echangeur
Porte d’accès frontale
Fenêtre de message LCD
L’éclairage de fond de la fenêtre de message LCD passe
automatiquement en mode économie d’énergie après 1
minute d’inactivité du tableau de bord.
6 Touches opératoires
Ces touches servent à changer les éléments affichés dans
la fenêtre de message LCD et de sélectionner des champs
ou des valeurs. Notez que vous avez besoin d’une clé de
déverrouillage pour activer ces touches.
Touche d’échappement (ESC):
La touche d’échappement sert à revenir en arrière par
rapport au message affiché (c.-à-d. à revenir à l’affichage
précédent) ou pour mettre fin aux opérations.
|«:
Cette touche sert à diminuer les valeurs affichées ou à
déplacer le curseur vers le bas ou vers la gauche.
»\:
Cette touche sert à augmenter les valeurs affichées ou
à déplacer le curseur vers le haut ou vers la droite.
Touche de validation (ENT):
La touche de validation sert à avancer d’un niveau par
rapport à celui du message affiché ou pour commencer
une opération spécifiée.
8
Touche de fonction (FUNCTION):
La touche fonction doit être enfoncée pour entrer en
mode Administrateur de système.
7 Commutateur à clé de verrouillage/déverrouillage
En introduisant une clé de déverrouillage dans ce
commutateur et en la tournant sur 90°, vous déverrouillez
le mécanisme de verrouillage, ce qui permet d’effectuer
des opérations à l’aide du tableau de bord.
8 Voyants d’état
POWER:
Ce voyant s’allume lorsque l’appareil est sous tension.
ROBOTICS BUSY:
Ce voyant s’allume chaque fois qu’un mécanisme de
transport de disque est en service.
DRIVE BUSY:
Ce voyant s’allume chaque fois qu’un ou plusieurs
disques sont introduits dans un lecteur.
MAILSLOT OCCUPIED:
Ce voyant s’allume chaque fois qu’un disque se trouve
dans un échangeur fermé.
9 Baie avant
DRM-7000
Pour utilisation avec magasins à disques : M1 – M7
DRM-3000
Pour utilisation avec magasins à disques : M1 – M3
61
<DRC1285>
Fr
Noms et fonctions des elements
FACE ARRIERE
INTERIEUR DE LA PORTE ARRIERE
2
1
9
3
4
5
TERM
OFF
ON
CHANGER
POWER
ID
SCSI
OFF
ON
AC IN
6
7
GND
8
1 Plaques arrière
Ces plaques servent à raccorder les panneaux de connexion.
2 Porte d’accès arrière
3 Ports SCSI de lecteur SE (attachés au panneau de
connexion)
4 Commutateur de code d’identification SCSI (ID)
Ce commutateur sert à attribuer le code d’identification SCSI
du changeur. Si vous voulez diminuer le code d’identification
SCSI affiché, appuyez sur le petit commutateur juste audessus de l’affichage numérique. Si vous voulez l’augmenter,
appuyez sur le petit commutateur juste en dessous de
l’affichage numérique. Notez qu’au départ de l’usine, le code
d’identification est réglé sur ‘6’.
5 Commutateur de terminaison SCSI (TERM)
Ce commutateur sert à effectuer la terminaison d’une chaîne
SCSI. Notez que ce commutateur est réglé sur ON au départ
de l’usine et qu’il doit rester dans cette position pendant
l’installation du changeur. Lorsque le raccordement au bus
SCSI est terminé et si le changeur n’est pas en bout de
chaîne SCSI, il convient de le régler sur OFF.
62
<DRC1285>
Fr
6 Ports SCSI du changeur (CHANGER SCSI)
7 Interrupteur (POWER)
Cet interrupteur sert à mettre le changeur sous et hors
tension.
8 Prise de courant (AC IN)
Le câble d’alimentation est raccordé à cette prise de
courant. (Utilisez toujours le câble d’alimentation fourni
avec votre changeur.)
9 Baies arrière
DRM-7000
Pour utilisation avec magasins à disques : M8 – M15
Pour utilisation avec unités / modules en option :
Baies #1 – 16
DRM-3000
Pour utilisation avec magasins à disques : M4 – M7
Pour utilisation avec unités / modules en option :
Baies #1 – 8
INSTALLATION
AU SUJET DU NOMBRE MAXIMAL DE LECTEURS A L’EMPLOI DU DVD-R7783
Pour garantir des performances optimales des lecteurs, veuillez respecter les paramètres suivants, relatifs à la configuration et à
l'environnement.
÷ Dans le DRM-ULV16 est utilisé et que le DVD-R7783 est raccordé au même bus que le DVD-D7563 ou que
le changeur (voir page 64, exemples 1, 2, 3)
DVD-D7563
1
DVD-R7783
2
3
DRM-3000
4
0
1
2
3
DVD-D7563
1
DVD-R7783
2
3
4
0
1
2
3
÷ Quand le DRM-ULV16 n'est pas utilisé, et que le DVD-R7783 est raccordé à un bus séparé du DVD-D7563
ou du changeur (voir page 64, exemples 4, 5)
DRM-7000
DVD-D7563
1
DVD-R7783
2
3
DRM-3000
4
0
1
2
3
4
5
DVD-D7563
:
:
:
1
DVD-R7783
2
3
4
0
1
2
3
4
5
Dans les limites de température ambiante de 5 à 35°C.
Dans les limites de température ambiante de 5 à 30°C.
Cette configuration n’est pas prise en compte.
* Les chiffres ci-dessus indiquent le nombre de lecteurs autorisés pour chaque changeur.
LIMITATIONS AUX CONNEXIONS SCSI
* Pour plus de détails, reportez-vous à “ ETAPE 2 4. Raccordement des câbles SCSI” (page 67).
A. À l’emploi du DRM-ULV16
(Quand le bus LVD SCSI et le bus SE SCSI sont les mêmes; reportez-vous à la page 64, exemples 1-3).
7 Longueur des câbles de connexion
Bus LVD SCSI:
12 m ou moins
Il s’agit de la longueur totale autorisée du câble, y compris celle des câbles internes aux dispositifs (quand plusieurs changeurs
sont raccordés, ceci comprend la longueur des câbles entre les changeurs).
Bus SE SCSI:
3 m ou moins
Il s’agit de la longueur totale autorisée pour chaque changeur, y compris la longueur des câbles internes.
7 Lecteurs SE autorisés: Maximum 3 (pour chaque changeur)
*Par suite des limitations imposées à la longueur des câbles, les lecteurs SE devront être installés dans les baies arrière #1
à #3.
B. Quand le DRM-ULV16 n’est pas utilisé
(Quand le bus LVD SCSI est séparé du bus SE SCSI, ou que seul le bus SE SCSI est utilisé, reportez-vous à la page 64, exemples 4-6)
7 Longueur des câbles de connexion (pour chaque adaptateur hôte)
Bus LVD SCSI:
12 m ou moins
Il s’agit de la longueur totale autorisée du câble, y compris celle des câbles internes aux dispositifs (quand plusieurs changeurs
sont raccordés, ceci comprend la longueur des câbles entre les changeurs).
Bus SE SCSI:
6 m ou moins*
Il s’agit de la longueur totale autorisée du câble, y compris celle des câbles internes aux dispositifs (quand plusieurs changeurs
sont raccordés, ceci comprend la longueur des câbles entre les changeurs).
*mode SCSI-2
63
<DRC1285>
Fr
Français
DRM-7000
Installation
EXEMPLES DE CONNEXION DE CÂBLES SCSI
A. À l’emploi du DRM-ULV16
Ligne LVD
Ligne SE
[Exemple 1]
Lecteur LVD 1
Lecteur SE 1
(activé)
1
2
3
4
5
6
DRM-ULV16
Câble SCSI (LVD)
Câble SCSI (SE)
Terminateur SCSI (LVD)
Panneau de connexion LVD (pour 2 lecteurs)
Panneau de connexion multi-lecteur
Carte DRM-ULV16
* Réglage du commutateur de terminaison SCSI du dispositif SE
Hôte
(LVD)
Carte de Changer
(désactivé)
[Exemple 2]
[Exemple 3]
Lecteur LVD 2
Lecteur SE 2
Lecteur LVD 1
Lecteur SE 1
(activé)
(désactivé)
Carte DRM-ULV16
Carte DRM-ULV16
Hôte
(LVD)
Carte de Changer
(activé)
Hôte
(LVD)
Carte de Changer
(désactivé)
B. Quand un DRM-ULV16 n’est pas utilisé
[Exemple 4]
[Exemple 6]
Lecteur SE 2
Hôte 2
(activé)
Lecteur LVD 1
(LVD)
Lecteur SE 1
(désactivé)
Lecteur SE 2
(activé)
Lecteur SE 1
(désactivé)
Hôte
(SE)
Hôte 1
Carte de Changer
(désactivé)
(SE)
[Exemple 5]
Lecteur LVD 2
Hôte 2
Lecteur LVD 1
(LVD)
Hôte 1
(SE)
64
<DRC1285>
Fr
Carte de Changer
(activé)
Carte de Changer
(désactivé)
Installation
3. Bloquez les roulettes
ETAPE 1
1. Fixez les stabilisateurs de base.
Afin d’éviter toute chute du changeur, prenez soin de fixer
les stabilisateurs de base fournis comme accessoires. Le
DRM-7000 s’accompagne de 4 stabilisateurs (un pour chaque
coin), tandis que 2 sont prévus (coins arrière seulement) dans
le cas du DRM-3000.
Les quatre roulettes en dessous du DRM-7000/DRM-3000
permettent de le déplacer facilement. Elles doivent toutefois
être bloquées dès que le changeur est définitivement installé.
Vous pouvez bloquer une roulette en appuyant sur la pédale.
Stabilisateur de base
4. Branchez le câble d’alimentation
Branchez le câble d’alimentation sur la prise à l’arrière du
changeur en branchez ensuite la fiche sur la prise de courant
murale.
REMARQUES:
¶ Assurez-vous de fixer les stabilisateurs de base avant de
faire quoi que ce soit.
¶ Les stabilisateurs de base servent aussi à protéger les ports
et les câbles à l’arrière de l’appareil.
¶ Notez qu’au cas où vous auriez omis de fixer les
stabilisateurs de base, tout dégât causé par une chute ou
tout dégât causé aux ports et aux câbles à l’arrière n’est
pas couvert par la garantie.
¶ Dans le cas du DRM-3000, les stabilisateurs seront fixés
seulement sur les coins arrière de l’appareil.
2. Choix de l’endroit d’installation du changeur
Le changeur est équipé d’une porte d’accès arrière qui peut
être ouverte pour introduire ou enlever des lecteurs ou des
magasins à disque. L’endroit d’installation du changeur doit
permettre de laisser au moins 50 cm entre l’arrière du
changeur et le mur, de façon à ce que la porte d’accès arrière
puisse être ouverte pour introduire et enlever des lecteurs
ou des magasins à disque.
Remarque:
N’utilisez que le câble d’alimentation fourni avec votre
changeur.
Assurez-vous de bien suivre les instructions de l’étiquette
de l’emballage et de n’utiliser le câble que dans des
endroits où il est censé être utilisé.
au
cm um
m
50 n0icm
m5i
65
<DRC1285>
Fr
Français
Bloquez
Installation
ETAPE 2
Préparer le changeur à la mise en service
Pour préparer le changeur à la mise en service, exécutez les
étapes suivantes dans l’ordre indiqué.
1. Mise sous tension (voir p. 66)
2. Desserrage des vis de transport (voir p. 66)
3. Installation des lecteurs (voir p. 66)
4. Raccordement des câbles SCSI (voir p. 67)
5. Introduction des magasins à disque (voir p. 68)
6. Fermeture des portes d’accès (voir p. 71)
1. Mise sous tension
Lorsque l’appareil est mis sous tension pour la première fois,
les portes d’accès avant et arrière s’ouvrent automatiquement.
Il ne s’agit pas d’un dysfonctionnement mais d’une fonction
des vis de transport, serrées avant l’expédition ou le
déplacement.
REMARQUES:
¶ Ne fermez pas les portes d’accès avant et arrière avant
que tous les lecteurs et magasins à disque soient installés.
¶ Si la porte d’accès ne s’ouvre pas lors de la mise sous
tension, attendez que le programme d’initialisation soit
achevé et que l’affichage à cristaux liquides (LCD) affiche
le mode utilisateur (page 71), puis reportez-vous à la page
85 (“Mode Administrateur de Système: Sous-mode
Porte”) où vous trouverez des explications sur l’ouverture
de la porte.
2. Desserrage des vis de transport
Lorsque la porte d’accès avant est ouverte, vous pouvez voir
les vis de transport au fond du changeur. Ces vis évitent que
le mécanisme intégré au changeur soit endommagé pendant
le transport.
Vous pouvez seulement desserrer les vis de transport. Il est
impossible de les enlever, pour éviter que vous ne les perdiez.
Vis de transport
REMARQUES:
¶ Assurez-vous de toujours resserrer les vis de transport
avant de déplacer le changeur.
¶ Si vous ou quelqu’un d’autre ferme la porte d’accès avant
ou arrière sans que les vis de transport soient serrées, la
porte fermée ne peut plus s’ouvrir automatiquement.
Lorsque les deux portes sont fermées, le changeur
démarre la procédure d’initialisation mécanique. Si vous
n’avez pas encore terminé l’installation, vous devez de
nouveau ouvrir les portes d’accès pour continuer
l’installation. (Voir mode Administrateur de système : sousmode Door (Porte) à la page 85 pour plus de détails.)
66
<DRC1285>
Fr
3. Installation des lecteurs
Installez les lecteurs dans les baies arrière (si des baies
particulières sont désignées, installez les lecteurs dans les
baies indiquées).
(1) Fixation de panneaux de connexion supplémentaires,
si besoin est.
Le panneau de connexion, fourni comme équipement
d’origine, est installé en supposant que les lecteurs SE seront
installés dans les baies arrière #1 et #2. Déposez le panneau
de connexion si un panneau différent doit être installé à cet
endroit.
Tournevis
Pour l’installation du DRM-SN711,
DRM-SN721, utilisez les vis
déposées sur le changeur.
Pour l’installation du DRM-LN721,
DRM-LN741, utilisez les vis
fournies comme accessoires
(n’employez pas les vis déposées
sur le changeur).
(2) Fixation de lecteurs
Avant toute installation, assurez-vous d’effectuer les réglages
suivants à l’arrière de chaque lecteur à installer. (Voir le mode
d’emploi fourni avec le lecteur pour les détails.)
¶ Attribution de codes d’identification SCSI
Spécifiez les codes d’identification SCSI à utiliser de façon
à ce que le même code d’identification SCSI ne soit pas
attribué à plus d’un lecteur raccordé au même bus SCSI.
¶ Réglages du terminateur SCSI
<Bus SE SCSI>
Le commutateur de terminaison pour le lecteur ou le
changeur à la fin du bus SCSI doit être activé (réglé sur
ON).
<Bus LVD SCSI>
Quand le DVD-R7783 et le DRM-ULV16 sont installés, il
est nécessaire de terminer le bus LVD SCSI. Comme le
DVD-R7783 n’est pas pourvu d’un terminateur SCSI, vous
devrez acheter un terminateur en option ou bien le
terminateur SCSI (LVD) prévu sur le DRM-ULV16 devra
être utilisé pour assurer une terminaison au bus LVD SCSI.
Installation
Rails de guidage
Lecteur
(3) Lecture et vérification automatique par le changeur
du code d’identification SCSI du lecteur installé
¶ Si des codes d’identification SCSI différents ont été
attribués à tous les lecteurs, la sonnette émettra un
signal.
¶ Si le même code d’identification SCSI à été attribué à
deux ou plus de lecteurs, la sonnette émettra trois
signaux.
REMARQUES:
¶ Si vous devez raccorder des lecteurs déjà installés à
d’autres bus SCSI, chaque lecteur peut conserver en
principe son code d’identification SCSI.
¶ Même si tous les lecteurs du changeur ont reçu un code
d’identification SCSI différent, il est toutefois nécessaire
de vérifier si le même code d’identification SCSI n’a pas
été attribué à d’autres dispositifs (par ex. des disques durs)
raccordés au même bus SCSI.
Levier de
verrouillage
2 Raccordez le câble d’alimentation.
¶ Lorsque le câble d’alimentation est raccordé, le voyant
de contrôle de câblage à l’arrière du lecteur (orange)
s’allume.
¶ Lorsque le commutateur de terminaison est activé (sur
ON), le voyant de terminaison (vert) s’allume (ceci ne
s’applique pas au DVD-R7783).
Câble d’alimentation
Voyant de contrôle de câblage
Voyant de terminaison
(Voyant Occupé sur le DVD-R7783)
3 Raccordez le câble d’interface changeur.
¶ Lorsque le câble d’interface changeur est raccordé, les
voyants de contrôle de câblage clignotent toutes les
deux secondes.
Voyant de contrôle de câblage
Câble d’interface changeur
REMARQUE:
Raccordez le câble d’interface changeur au connecteur qui
correspond à la baie dans laquelle les lecteurs ont été installés.
(Notez que des étiquettes ont été collées aux connecteurs,
indiquant le numéro de baie correspondant.) Ceci est très
important, car si vous raccordez le câble d’interface changeur
à une baie voisine, vous endommagerez les disques et le
mécanisme de transport de disque.
4. Raccordement des câbles SCSI
Raccordez les câbles d’interface SCSI après avoir installé tous
les lecteurs et vérifié s’ils sont raccordés comme il faut.
En ce qui concerne les connexions SCSI, reportez-vous
au “Manuel de branchement SCSI” ou consultez votre
revendeur.
REMARQUES:
¶ L’adapateur hôte doit être réglé sur ID 7.
¶ Le bus LVD SCSI doit avoir une longueur totale de connexion
de 12 m ou moins, et celle du bus SE SCSI doit être de 6 m
ou moins (ces longueurs incluent le câblage à l’intérieur des
changeurs et entre les changeurs, lorsque plusieurs d’entre
eux sont raccordés en guirlande).
Cependant si le DRM-ULV16 est installé, la longueur de
connexion du bus SE SCSI doit être de 3 m ou moins, et pas
plus de 3 lecteurs SE ne peuvent être installés sur le bus.
Par conséquent, un maximum de 3 lecteurs SE peuvent
être installés dans un seul changeur; en raison des limitations
imposées à la longueur des câbles, les lecteurs doivent être
installés dans les baies arrière #1 à #3.
¶ Lors du branchement des lecteurs SE, si un ou plusieurs
connecteurs restent inutilisés sur le câble SCSI, le
connecteur du bout du câble doit être raccordé au lecteur
de terminaison, et les connecteurs inutilisés peuvent rester
au milieu du câble (voir page 64, exemples 1, 3, 4, 6).
¶ Le commutateur de terminaison SCSI du changeur est
réglé sur ON (activée) au départ de l’usine. Veillez à ce
que le commutateur de terminaison SCSI du changeur soit
toujours réglé sur OFF (désactivée), si le changeur n’est
pas le dernier dispositif raccordé à la chaîne SCSI (voir
page 64, exemples 1, 3, 4, 6).
¶ Notez que le changeur DRM-7000/DRM-3000 est incapable
de détecter des raccordements de câble SCSI erronés ou
des erreurs d’attribution de code d’identification SCSI.
C’est pourquoi vous devez toujours redémarrer l’ordinateur
hôte après toute installation pour vérifier si tous les lecteurs
et le changeur ont bien été reconnus. C’est la seule façon
d’obtenir une confirmation que tous les dispositifs SCSI
ont été installés comme il faut.
67
<DRC1285>
Fr
Français
1 Lorsque vous introduisez un lecteur, posez-le sur les rails
de guidage du changeur et appuyez jusqu’à ce que le levier
de verrouillage du lecteur s’enclenche en position
verrouillé. Il se peut que vous entendiez un léger clic.
Installation
¶ Lors du branchement d’un ordinateur hôte, mettez hors
tension le changeur et l’ordinateur hôte avant d’effectuer
la connexion. Une fois qu’elle est terminée, mettez d’abord
le changeur sous tension, puis l’ordinateur hôte.
¶ Le changeur ne pourra pas reconnaître un lecteur si le câble
d'interface du changeur n’est pas connecté. Vérifiez les
connexions en observant le voyant de contrôle de câblage
à l’arrière du lecteur.
= Si le voyant est allumé, assurez-vous que le câble
d’interface de changeur est branché correctement.
= Si le voyant n’est pas allumé, assurez-vous que le câble
d’alimentation est branché correctement. Si les
connecteurs doivent être rebranchés, rebranchez
d’abord le câble d’alimentation, puis le câble
d’interface du changeur.
¶ Malgré que le lecteur soit reconnu, si le nom de modèle
du lecteur n’est pas affiché dans le bas de l’écran LCD,
déconnctez tous les trois câbles et rebranchez-les.
Débranchez les câbles dans l’ordre suivant:
1. Câble d’interface SCSI
2. Câble d’interface de changeur
3. Câble d’alimentation
Branchez les câbles dans l’ordre suivant:
1. Câble d’alimentation
2. Câble d’interface de changeur
3. Câble d’interface SCSI
5. Introduction des magasins à disque
Vous pouvez utilisez les méthodes suivantes pour introduire
des disques dans le changeu:
(1) Introduisez les disques dans un magasin à 50-disques de
type normal et introduisez ensuite le magasin dans le
changeur.
(2) Introduisez les disques dans un magasin extractible de 20
disques et introduisez ensuite le magasin dans le changeur.
(3) Utilisez le tableau de bord pour spécifier le slot dans lequel
le disque doit être introduit et envoyez ensuite un disque
vers le slot spécifié à l’aide de l’échangeur.
(4) Envoyez des commandes à l’aide de l’ordinateur hôte pour
ouvrir l’échangeur et envoyer un disque vers le slot spécifié
à l’aide de l’échangeur.
(5) Envoyez des commandes à l’aide de l’ordinateur hôte pour
déplacer des disques du magasin extractible chargé vers
certains slots appartenant aux magasins à 50-disques
chargés.
¶ Les hypermagasins ne peuvent être introduits ou enlevés
lorsque le changeur est hors tension.
¶ Les méthodes (3), (4) et (5) ne peuvent être utilisées
qu’après que le changeur soit prêt à l’emploi. Si vous
introduisez des disques par ces méthodes, assurez-vous
d’introduire d’abord un magasin à disque vide.
Notez bien que les méthodes (3), (4) et (5) sont utilisées
pour introduire un magasin à 50-disques de type
verrouillable. (Voir mode Administrateur de système: sousmode Echangeur à la page 82 pour plus de détails.)
¶ La possibilité d’utiliser les méthodes (4) et (5) dépend des
fonctions du logiciel de contrôle de changeur. Reportezvous au mode d’emploi du logiciel pour savoir s’il est
possible d’utiliser ces méthodes d’introduction de disques.
68
<DRC1285>
Fr
(1)Introduisez des disques dans un magasin à 50-disques
de type normal et introduisez le magasin dans le
changeur.
1 Mettez le bouton de déverrouillage à la position verticale
pour déverrouiller.
2 Introduisez les disques.
3 Mettez le bouton de déverrouillage à la position
horizontale pour maintenir les disques en place.
Bouton de déverrouillage
Déverrouillé
Verrouillé
Etiquette
REMARQUES:
¶ Introduisez les disques en orientant l'étiquette vers le
haut.
¶ Introduisez les disques horizontalement, sous peine de
les endommager.
¶ Prenez soin de ne pas griffer la surface luisante où les
signaux sont enregistrés.
¶ Ne retournez pas le magasin à disque pendant que la
serrure est ouverte, sous peine de faire tomber les
disques du magasin.
4 Introduisez le magasin dans le changeur.
Introduisez le magasin à disque dans le changeur en le
tenant par sa poignée et en prenant les rails de guidage
comme repère jusqu’à ce qu’il touche le butoir.
En introduisant le magasin, tournez la poignée vers la
gauche de façon à ce que la goupille de verrouillage situé
du côté gauche du magasin se loge dans le trou de la paroi
du changeur.
Exemple : Mise en place du magasin dans la baie avant
Goupille de
verrouillage
Trou
Rails de
guidage
≠
Installation
Poignée
La figure ci-dessus montre l’introduction d’un magasin dans
une baie avant. L’introduction d’un magasin dans une baie
arrière y ressemble beaucoup mais notez que le meilleur
endroit d’installation est celui qui se trouve le plus en retrait.
Pour enlever un magasin à disque du changeur, tirez sur la
poignée jusqu’à ce que le magasin sorte du changeur.
Chaque fois qu’un magasin de disque est introduit dans le
changeur, son code d’identification sera automatiquement
lu et affiché dans la fenêtre de message LCD en l’espace
de quelques secondes.
4 Introduisez le magasin dans le changeur.
Une fois que le magasin extractible est partiellement
introduit dans le changeur, il sera automatiquement chargé.
ES
C
EN
FU
LO
Un message similaire sera affiché chaque fois qu’un
magasin à disque est enlevé.
Si ces deux messages apparaissent consécutivement en
l’espace de quelques secondes, cela indique que le
magasin à disque n’a pas été introduit comme il faut. Vous
devez alors vérifier si le magasin a été correctement
introduit.
(2)Introduisez des disques dans un magasin extractible
de 20 disques et introduisez le magasin dans le
changeur.
1 Mettez le bouton de déverrouillage à la position verticale
pour déverrouiller.
2 Introduisez les disques.
3 Mettez le bouton de déverrouillage à la position
horizontale pour maintenir les disques en place.
T
NC
TIO
N
CK
UN
LO
CK
PO
WER
RO
BO
BU TICS
SY
DR
IV
BU E
SY
MA
OCIL SL
CU OT
PIED
Lorsque le magasin extractible est chargé, un code
d’identification unique est affiché à côté de l’enregistrement
montrant l’état du mécanisme de verrouillage.
≠
Notez que le magasin sera automatiquement éjecté si le
changeur est incapable de lire son code d’identification.
Dans ce cas, essayez d’introduire de nouveau le magasin.
REMARQUE:
Si vous avez installé un magasin extractible, reportez-vous
aux instructions sur le retrait d’un magasin extractible à la
page 83: Mode Administrateur de système: Sous-mode
“Hyper.”
Bouton de déverrouillage
Etiquette
Déverrouillé
Verrouillé
69
<DRC1285>
Fr
Français
REMARQUES:
¶ Introduisez les disques en orientant l’étiquette vers le
haut.
¶ Introduisez les disques horizontalement, sous peine de
les endommager.
¶ Prenez soin de ne pas griffer la surface luisante où les
signaux sont enregistrés.
¶ Ne retournez pas le magasin à disque pendant que la
serrure est ouverte, sous peine de faire tomber les
disques du magasin.
Installation
Des numéros de série sont attribués à chaque slot situé à l’intérieur du changeur et pouvant accueillir des disques. Ces numéros
sont toujours attribués, même si aucun magasin à disque n’a été introduit. C’est pourquoi les numéros des slots ne changent
jamais, même si vous introduisez un nouveau magasin à disque.
DRM-7000
Endroit de stockage du disque
Numéro de slot
(N° de disque)
Magasin extractible
Hyper
Slot 20
à
Slot 1
#770
Baie pour magasin 7
M7
Slot 50
à
Slot 1
#350
Baie pour magasin 6
M6
Slot 50
à
Slot 1
#300
Baie pour magasin 5
M5
Slot 50
à
Slot 1
#250
Slot 50
à
Slot 1
#200
Baie pour magasin 3
M3
Slot 50
à
Slot 1
#150
Baie pour magasin 2
M2
Slot 50
à
Slot 1
#100
Baie pour magasin 1
M1
Slot 50
à
Slot 1
#050
Baie pour magasin 4
M4
à
#751
à
#301
à
#251
à
#201
à
#151
à
#101
à
#051
à
#001
Endroit de stockage du disque
Numéro de slot
(N° de disque)
hyp-20
à
hyp-01
Baie pour magasin 15
M15
Slot 50
à
Slot 1
#750
M7-50
à
M7-01
Baie pour magasin14
M14
Slot 50
à
Slot 1
#700
M6-50
à
M6-01
Baie pour magasin 13
M13
Slot 50
à
Slot 1
#650
M5-50
à
M5-01
Baie pour magasin 12
M12
Slot 50
à
Slot 1
#600
Slot 50
à
Slot 1
#550
M4-50
à
M4-01
Baie pour magasin 11
M11
à
#701
à
#651
à
#601
à
#551
à
#501
M3-50
à
M3-01
Baie pour magasin 10
M10
Slot 50
à
Slot 1
#500
M2-50
à
M2-01
Baie pour magasin 9
M9
Slot 50
à
Slot 1
#450
M1-50
à
M1-01
Baie pour magasin 8
M8
Slot 50
à
Slot 1
#400
à
#451
à
#401
à
#351
M15-50
à
M15-01
M14-50
à
M14-01
M13-50
à
M13-01
M12-50
à
M12-01
M11-50
à
M11-01
M10-50
à
M10-01
M9-50
à
M9-01
M8-50
à
M8-01
REMARQUE:
Bien que les numéros de slot atteignent le chiffre de ‘770’, cela ne signifie pas que 770 disques sont disponibles dans le DRM-7000.
DRM-3000
Endroit de stockage du disque
Numéro de slot
(N° de disque)
Magasin extractible
Hyper
Slot 20
à
Slot 1
#370
Baie pour magasin 3
M3
Slot 50
à
Slot 1
#150
Baie pour magasin 2
M2
Slot 50
à
Slot 1
#100
Baie pour magasin 1
M1
Slot 50
à
Slot 1
#050
à
#351
à
#101
à
#051
à
#001
Endroit de stockage du disque
Numéro de slot
(N° de disque)
hyp-20
à
hyp-01
Baie pour magasin 7
M7
Slot 50
à
Slot 1
#350
M3-50
à
M3-01
Baie pour magasin 6
M6
Slot 50
à
Slot 1
#300
M2-50
à
M2-01
Baie pour magasin 5
M5
Slot 50
à
Slot 1
#250
M1-50
à
M1-01
Baie pour magasin 4
M4
Slot 50
à
Slot 1
#200
à
#301
à
#251
à
#201
à
#151
M7-50
à
M7-01
M6-50
à
M6-01
M5-50
à
M5-01
M4-50
à
M4-01
REMARQUE:
Bien que les numéros de slot atteignent le chiffre de ‘370’, cela ne signifie pas que 370 disques sont disponibles dans le DRM-3000.
70
<DRC1285>
Fr
Installation
6. Fermeture des portes d'accès
Vérifiez d’abord que tous les composants ont été installés et
que tous les câbles ont été raccordés.
Si c’est le cas, fermez les portes d’accès avant et arrière.
L’initialisation du mécanisme du changeur commence.
Lorsque l’initialisation est terminée, un message comme celui
qui figure ci-dessous sera affiché dans la fenêtre de message
LCD.
Français
La première ligne de ce message indique l’état du mécanisme
d’échange de disque. La deuxième ligne indique le numéro
du lecteur installé et indique si un disque a été chargé ou non
dans le lecteur en question.
Les numéros de lecteur sont attribués l’un après l’autre, du
lecteur le plus pas au lecteur le plus haut.
REMARQUE:
Si le nombre maximal de lecteurs affiché dans la fenêtre de
message LCD est inférieur au nombre de lecteurs installés,
ouvrez la porte d’accès arrière et vérifiez les câbles
d’alimentation et les câbles d’interface changeur raccordés à
tous les lecteurs installés.
(Voir mode Administrateur de système : Sous-modes “Door
(Porte)” à la page 85 pour savoir comment il faut ouvrir la
porte d’accès arrière.)
71
<DRC1285>
Fr
FONCTIONNEMENT
Le Pioneer DRM-7000/DRM-3000 peut fonctionner en deux
modes. Le premier est le mode Utilisateur qui permet
d’effectuer des opérations à l’aide de l’ordinateur hôte. Le
deuxième est le mode Administrateur de système qui sert
principalement à effectuer des opérations à l’aide du tableau
de bord. Le fait de séparer les opérations effectuées en deux
modes distincts permet d’éviter les interférences, les conflits
ou les incompatibilités entre les opérations effectuées à l’aide
du tableau de bord et les commandes envoyées par
l’ordinateur hôte.
MODE ADMINISTRATEUR DE SYSTÈME
Seuls les administrateurs de système qui sont en possession
des clés du tableau de bord ont le privilège d’effectuer des
opérations à l’aide de celui-ci. Notez bien qu’il faut exécuter
les étapes suivantes pour passer en mode Administrateur de
système.
1. Introduisez la clé de déverrouillage dans le commutateur
situé sur le tableau de bord et tournez-la sur 90° pour mettre
le commutateur sur la position UNLOCK (déverrouillé).
MODE UTILISATEUR
ESC
Une fois que le changeur a terminé la procédure d’initialisation
lors de sa mise sous tension ou que les portes ont été fermées
après l’installation, le changeur entre en mode Utilisateur. Il
sera alors piloté par le logiciel de contrôle de changeur et le
logiciel de gestion de base de données installés sur
l’ordinateur hôte. Lorsqu’un changeur fonctionne
normalement en mode Utilisateur, la fenêtre de message LCD
affichera toutes les secondes une série de messages d’état
du type suivant.
ENT
FUNCTION
LOCK
UNLOCK
POWER
ROBOTICS
BUSY
DRIVE
BUSY
LOCK
MAIL SLOT
OCCUPIED
UNLOCK
2. Appuyez sur la touche FUNCTION.
Lorsque le changeur entre en mode Administrateur de
système, un message du type suivant apparaît dans la fenêtre
de message LCD:
≠
Le mode administrateur de système est subdivisé en 8 sousmodes différents.
≠
≠
≠
•
•
Lorsque le changeur fonctionne en mode utilisateur, il exécute
les commandes envoyées par l’ordinateur hôte.
72
<DRC1285>
Fr
Sous-modes d’information
Ces sous-modes permettent à l’administrateur de système
de lire les réglages en cours d’un changeur ou de lire les
données stockées dans un changeur. Notez bien que ces
sous-modes n’influent pas sur les opérations effectuées à
l’aide de l’ordinateur hôte et permettent à l’administrateur
de système d’obtenir toutes sortes d’informations sans
perturber le contrôle du changeur par l’ordinateur hôte.
¶ Sous-mode Inquiry (Demande) (voir p. 74)
¶ Sous-mode Config (Configuration) (voir p. 74)
¶ Sous-mode Option (voir p. 76)
¶ Sous-mode Info (voir p. 80)
Sous-modes de maintenance
Ces sous-modes servent à faire la maintenance des disques
et de leur état à l’intérieur du changeur. Ces sous-modes font
parfois appel au mécanisme de transport de disque. Par
conséquent, chaque fois que le changeur entre dans un de
ces sous-modes, il se peut que certaines commandes
envoyées par l’ordinateur hôte soient ignorées.
¶ Sous-mode Mailslot (Echangeur) (voir p. 82)
¶ Sous-mode Hyper (voir p. 83)
¶ Sous-mode Probe (Vérification) (voir p. 84)
¶ Sous-mode Door (Porte) (voir p. 85)
Fonctionnement
REMARQUE:
Le DRM-7000/DRM-3000 a été conçu de façon à interdire
l’utilisation de sous-modes de maintenance par l’ordinateur
hôte. Notez que, bien qu’il soit possible d’entrer en mode
administrateur de système même si l’utilisation de ces sousmodes est interdite, seuls les sous-modes d’information
pourront être utilisés.
Les écrans de réglage du mode administrateur de système
apparaissent dans l’ordre suivant.
Appuyez sur
la touche »
Appuyez sur
la touche »
Sous-mode “Info”
Appuyez sur
la touche «
Appuyez sur
la touche »
Sous-mode
“Mailslot (Echangeur)”
Appuyez sur
la touche «
Appuyez sur la touche
ENT
Appuyez sur la touche ENT
pour sélectionner une
catégorie et appuyez de
nouveau sur la touche ENT.
Appuyez sur la touche ENT
pour sélectionner l’opération
à effectuer et appuyez de
nouveau sur la touche ENT.
Appuyez sur
la touche »
Appuyez sur
la touche «
Appuyez sur
la touche »
Alert buzzer
(Sonnette d’alarme)
Appuyez sur
la touche «
Appuyez sur
la touche »
Free message
(Message libre)
Appuyez sur
la touche «
Appuyez sur
la touche »
Inquiry change
(Change de demande)
Appuyez sur
la touche »
Appuyez sur
la touche «
Appuyez sur
la touche »
Appuyez sur
la touche »
Fan NG message
(Message Fan NG)
Sous-mode
“Probe (Vérification)”
Appuyez sur
la touche «
Appuyez sur
la touche »
Hyper I/E
Sous-mode “Hyper”
Appuyez sur
la touche «
Hot start
(Démarrage à chaud)
Appuyez sur
la touche «
Sous-mode “Option”
Appuyez sur
la touche «
Appuyez sur
la touche »
Français
Appuyez sur
la touche »
Appuyez sur
la touche »
Appuyez sur
la touche «
Auto eject
(Ejection automatique)
Sous-mode
“Config (Configuration)”
Appuyez sur
la touche «
Auto probing
(Vérification automatique)
Appuyez sur
la touche «
Sous-mode
“Inquiry (Demande)”
Appuyez sur
la touche «
Appuyez sur
la touche »
Appuyez sur
la touche «
Appuyez sur
la touche »
REMARQUES:
¶ Ne changez pas le réglage de la fonction
change de demande. Les appareils sont
préréglés en usine sur DRM-7000 (pour le
modèle DRM-7000) et sur DRM-3000 (pour
le modèle DRM-3000).
¶ Ne changez pas le réglage de la fonction
Message Fan NG. Les appareils sont préréglés
par défaut sur ON (activé).
Sous-mode
“Door (Porte)”
Appuyez sur
la touche «
Si vous appuyez sur la touche ESC lorsque
vous êtes en sous-mode Demande, le
système passe du mode administrateur de
système en mode utilisateur.
Log (Journal)
Swap (Echanger)
Contents (Contenu)
Remove (Enlever)
Add (Ajouter)
Run-stations
(Obtenir statistiques)
73
<DRC1285>
Fr
Fonctionnement
Sous-mode “Inquiry (Demande)”
Le sous-mode Demande permet d’entrer en mode
Administrateur de système et de quitter le mode Utilisateur.
Les informations sont affichées par le DRM-7000/DRM-3000
même. Les données affichées sont les mêmes que celles
que l’on obtient lorsque l’ordinateur hôte envoie une
commande SCSI INQUIRY à destination du changeur. Le code
d’identification SCSI de votre changeur et la révision du
microprogramme sont affichés ci-dessous.
Sous-mode “Config (Configuration)”
Le sous-mode Configuration permet de voir l’état actuel de
toutes les baies de magasin et des baies arrière. Il permet de
vérifier si tous les composants actuellement installés ont bien
été reconnus par le changeur.
Si vous appuyez sur la touche ENT, l’écran ‘sélectionner baie’
apparaît. Appuyez sur la touche « ou » pour sélectionner
soit une baie de magasin, soit une baie arrière.
Si vous appuyez à cet instant précis sur la touche ENT, le
nom de modèle du changeur et le code d’identification de
l’appareil (c.-à-d. le numéro de série) s’affichent.
Fonctionnement lorsqu’une baie arrière a été
sélectionnée
Si vous appuyez sur la touche ESC, l’écran revient au niveau
supérieur par rapport à celui du message affiché.
Pour changer le code d’identification SCSI du changeur,
utilisez le commutateur de code d’identification SCSI situé
en bas à gauche à l’arrière du changeur.
Lorsque la valeur de réglage du commutateur de code
d’identification SCSI est modifiée, l’écran affiche un message
du type suivant. (Notez bien que le message qui figure cidessous est le message qui serait affiché si vous aviez changé
le code d’identification SCSI de ‘6’ en ‘5’.)
Une pression sur la touche ENT affiche d’abord le composant
chargé dans la baie arrière #1.
¶ Le numéro de baie à afficher peut être sélectionné à l’aide
de la touche » ou «.
Appuyez sur la touche » ou «
≠
Appuyez sur la touche » ou «
≠
Le code d’identification SCSI n’est mis à jour que si le
changeur a été mis hors et sous tension ou que si l’ordinateur
hôte réinitialise le bus SCSI auquel le changeur est raccordé.
Appuyez sur la touche » ou «
≠
Exemple d’affichage sur le DRM-7000
¶ Si le composant introduit dans la baie affichée est un
lecteur, il est possible de lire son code d’identification SCSI,
les réglages du commutateur de terminaison et le code
d’identification du lecteur en question.
Appuyez sur la touche ENT lorsque la baie dans laquelle
un lecteur a été introduit est affichée. Les informations
décrites ci-dessus apparaissent.
74
<DRC1285>
Fr
Fonctionnement
Pour vérifier le type de magasin installé, appuyez sur la
touche ESC pour revenir à l’écran de sélection de baie,
puis sélectionnez la baie du magasin souhaité.
REMARQUE:
Certains types d’informations stockées s’étalent sur plusieurs
niveaux. Si vous appuyez sur la touche ESC, l’affichage revient
au niveau supérieur par rapport à celui du message en cours.
Notez que si vous appuyez trop souvent sur la touche ESC,
le système revient en mode Utilisateur.
De plus, si une unité DVD-R7783 est utilisée avec un code
SCSI ID de 10-15, l’écran LCD affichera A-F comme suit:
Code SCSI ID
Écran LCD
1–9
1–9
10
A
11
B
12
C
13
D
14
E
15
F
Fonctionnement lorsqu’une baie de magasin a
été sélectionnée
¶ Si vous appuyez sur la touche ENT, le code d’identification
de l’hypermagasin est affiché.
Comme les baies arrière sont polyvalentes, elles ne
pourront parfois pas être utilisées en tant que baies de
magasin parce que des lecteurs y sont déjà installés. Dans
ce cas, le message affiché sera du type suivant.
Exemple d’affichage sur le DRM-7000
¶ Si vous voulez voir quel type de magasin à disque a été
installé, appuyez sur la touche ENT.
¶ Si vous appuyez sur la touche » pendant que la baie de
magasin 15 (M15) est affichée, l’écran revient à l’affichage
d’un hypermagasin.
Si vous voulez afficher des lecteurs, appuyez sur la touche
ESC pour revenir à l’écran ‘sélectionner baie’ et sélectionnez
ensuite la baie arrière.
REMARQUE:
Certains types d’informations stockées s’étalent sur plusieurs
niveaux. Si vous appuyez sur la touche ESC, l’affichage revient
au niveau supérieur par rapport à celui du message en cours.
Notez que si vous appuyez trop souvent sur la touche ESC,
le système revient en mode Utilisateur.
Si aucun hypermagasin n’est introduit, le message suivant
s’affiche.
¶ Si vous appuyez sur la touche » pendant qu’un
hypermagasin est affiché, les codes d’identification des
magasins seront affichés dans l’ordre, à commencer par
la baie 1 (M1).
Appuyez sur la touche »
≠
Si aucun magasin à disque n’a été introduit, le message
suivant est affiché.
Exemple d’affichage sur le DRM-7000
75
<DRC1285>
Fr
Français
¶ Si un disque a été introduit dans le lecteur, vous pouvez
également appuyer sur la touche ENT pour afficher le
numéro de disque.
Fonctionnement
Sous-mode “Option”
Certaines fonctions du changeur peuvent être sélectionnées
à la demande de l’utilisateur. Afin de permettre aux
administrateurs de système d’utiliser au mieux les fonctions
offertes par le logiciel de contrôle du changeur et le logiciel
de gestion de la base de données, des fonctions facultatives
peuvent être sélectionnées selon leurs besoins. Notez bien
que les exigences en matière de niveaux de sécurité ou
d’opérations effectuées à la suite d’erreurs peuvent changer
en fonction de l’endroit où le changeur est installé et que les
options correspondantes doivent être sélectionnées.
Le sous-mode Option permet de spécifier les fonctions
facultatives suivantes.
1. Auto probing (Vérification automatique) (OFF
(désactivée) au départ de l’usine)
2. Hot start (Démarrage à chaud) (OFF (désactivée) au
départ de l’usine)
3. Auto eject (Ejection automatique) (ON (activée) au
départ de l’usine)
4. Hyper I/E (ON (activée) au départ de l’usine)
5. Alert buzzer (Sonnette d’alarme) (ON (activée) au départ
de l’usine)
6. Free message (Message libre) (OFF (désactivée) au
départ de l’usine)
1. Auto probing (Vérification automatique)
Il se peut que des disques aient été introduits dans des
magasins à 50-disques de type normal et dans des
hypermagasins avant que ces magasins ne soient introduits
dans le changeur. Or, cela ne signifie pas que les disques
introduits soient prêts à l’emploi, car le changeur et
l’ordinateur hôte n’ont pas encore reconnu les slots qui
contiennent des disques. La première chose à faire est donc
d’examiner tous les slots qui contiennent un disque,
autrement dit, d’effectuer une vérification.
Bien que cette fonction de vérification soit habituellement
exécutée par le logiciel de contrôle de changeur installé sur
l’ordinateur hôte, le sous-mode Vérification (voir p. 84) peut
être utilisé au cas où les utilisateurs souhaiteraient effectuer
cette vérification avant de raccorder le changeur à l’ordinateur
hôte ou lorsque le logiciel de contrôle de changeur est
incapable d’exécuter cette fonction de vérification. Le sousmode Vérification présente toutefois des inconvénients, car
il exige que tous les magasins à disque à vérifier soient
spécifiés l’un après l’autre.
La vérification automatique permet au changeur de vérifier
automatiquement tous les magasins à disque afin de savoir
si des disques ont été introduits.
76
<DRC1285>
Fr
Appuyez sur la touche ENT
≠
Appuyez sur la touche | pour ON (activer)
≠
Appuyez sur la touche ENT
≠
(Notez qu’un message ”Auto probing is prohibited” est
affiché si la vérification automatique est OFF (désactivée).)
Notez que, même si la fonction de vérification automatique
est réglée sur ON (activée) au lieu de sur OFF (désactivée),
cette vérification ne sera pas effectuée avant la réinitialisation
du changeur, l’introduction d’un magasin extractible ou la fin
de la procédure d’initialisation après la fermeture des portes
d’accès.
Lorsque la vérification automatique démarre, le changeur
commencera à vérifier l’un après l’autre tous les slots des
magasins à disque à vérifier pour voir s’ils sont ”empty”
(vides) ou ”full” (pleins).
Pour désactiver temporairement la vérification automatique,
réglez le commutateur sur la position UNLOCK et appuyez
sur la touche ESC.
REMARQUES:
¶ La vérification d’un magasin à 50-disques prend environ 2
minutes.
¶ Certaines commandes envoyées par l’ordinateur hôte ne
peuvent être exécutées pendant la vérification
automatique.
2. Hot start (Démarrage à chaud)
3. Auto eject (Ejection automatique)
Lorsque des disques ont été envoyés vers des lecteurs et le
changeur a été mis hors tension et ensuite remis sous tension,
les disques reviendront automatiquement dans leurs slots
d’origine. (Notez que cette opération de renvoi automatique
de disques n’est pas effectuée après une réinitialisation du
bus SCSI).
Pour des disques auxquels on accède fréquemment, il est
toutefois possible d’utiliser la fonction démarrage à chaud
afin de les rendre immédiatement accessibles après la mise
sous tension, en les laissant dans leurs lecteurs.
La fonction démarrage à chaud est une fonction facultative
qui permet de laisser les disques dans les lecteurs dans
lesquels ils se trouvaient lorsque le changeur était sous
tension.
Dans des environnements de réseau, il arrive souvent qu’un
grand nombre de changeurs soient installés à proximité de
serveurs éloignés des sites où se trouvent les terminaux des
utilisateurs.
Lorsqu’un utilisateur se sert du logiciel de contrôle de
changeur pour envoyer une commande de retrait d’un disque
d’un échangeur, il est obligé de se rendre sur le site où le
changeur en question est installé afin d’enlever le disque.
Or, avant que l’utilisateur n’atteigne le changeur, il se peut
que l’échangeur dans lequel le disque a été introduit soit déjà
ouvert.
Dans certains cas, cela peut être pratique. Toutefois, à moins
qu’un technicien de maintenance se trouve en permanence
à côté du changeur, c’est comme s’il n’y avait pas de système
de sécurité du tout. Cela vaut aussi pour l’éjection d’un
magasin extractible.
C’est pourquoi la possibilité a été prévue de OFF (désactiver)
la fonction d’éjection automatique. La possibilité d’imposer
des restrictions sur l’éjection automatique de tiroirs
d’échangeur et sur l’éjection automatique d’un magasin
extractible permet de maintenir un certain niveau de sécurité.
Appuyez sur la touche ENT
≠
Appuyez sur la touche | pour ON (activer)
≠
Appuyez sur la touche ENT
≠
(Notez qu’un message ”Hot start is prohibited” est
affiché si la fonction démarrage à chaud est OFF
(désactivée).)
REMARQUE:
La fonction démarrage à chaud ne peut être utilisé si le logiciel
de contrôle de changeur a été conçu de façon à forcer les
disques à revenir dans leurs slots d’origine.
Appuyez sur la touche ENT
≠
Appuyez sur la touche \ pour OFF (désactiver)
≠
Appuyez sur la touche ENT
≠
(Notez qu’un message ”Auto eject is activated” est
affiché si la fonction Ejection automatique est ON (activée).)
Si la fonction Ejection automatique est OFF (désactivée) et
une commande est envoyée depuis l’ordinateur hôte pour
diriger un disque vers un échangeur, le tiroir de l’échangeur
ne s’ouvrira pas automatiquement, mais un message du type
suivant sera affiché dans la fenêtre de message LCD.
77
<DRC1285>
Fr
Français
Fonctionnement
Fonctionnement
De même, le magasin extractible ne sera pas automatiquement
éjecté, même si le changeur reçoit une commande de
l’ordinateur hôte, mais un message du type suivant sera
affiché dans la fenêtre de message LCD.
Appuyez sur la touche ENT
≠
Afin de pouvoir appuyer sur la touche ENT pour éjecter le
tiroir de l’échangeur ou du magasin extractible, il faut que la
clé de déverrouillage soit mise à la position UNLOCK. Puisque
le tiroir de l’échangeur ou du magasin extractible ne sera pas
éjecté avant qu’un utilisateur en possession d’une clé de
déverrouillage ne se rende sur le site d’installation du
changeur en question et mette le commutateur à la position
UNLOCK, la sécurité est assurée entre le moment où la
commande est envoyée et le moment où l’utilisateur atteint
le changeur.
Appuyez sur la touche \ pour OFF (désactiver)
≠
Appuyez sur la touche ENT
≠
4. Hyper I/E
Bien qu’un magasin extractible ait été conçu pour être utilisé
comme un magasin capable d’accueillir 20-disques en même
temps, il peut aussi être utilisé comme échangeur de grande
capacité, puisqu’il permet le retrait de disques sans ouverture
des portes d’accès.
Les sous-systèmes qui sont à la base des changeurs SCSI
se composent de quatre éléments:
1. Système de transport de média (c.-à-d. le système
robotics)
2. Eléments de stockage (c.-à-d. les slots)
3. Elément d’importation/exportation (c.-à-d. l’échangeur)
4. Eléments de transfert de données (c.-à-d. les lecteurs)
Bien que les slots (dont sont équipés les magasins à disque)
et les échangeurs soient généralement considérés comme
des éléments différents, ON (l’activation) de la fonction Hyper
I/E permet de commander un magasin extractible de la même
façon qu’un échangeur.
78
<DRC1285>
Fr
(Notez qu’un message ”Hyper I/E is activated” est affiché
si la fonction Hyper I/E est réglée sur ON (activée).)
REMARQUE:
Comme les magasins extractible conservent leurs attributs
en tant qu’éléments de stockage, même lorsque la fonction
Hyper I/E est réglée sur ON (activée), il se peut que le logiciel
de contrôle de changeur ne traite pas le magasin extractible
comme un élément d’importation/exportation.
Notez toutefois que la fonction Hyper I/E devrait toujours être
réglée sur OFF (désactivée) si le logiciel de contrôle de
changeur utilisé est incapable de gérer plusieurs éléments
d’importation/exportation ou si les opérations effectuées
risquent de donner des résultats erronés.
Fonctionnement
5. Alert buzzer (Sonnette d’alarme)
6. Free message (Message libre)
Le tableau de bord du DRM-7000/DRM-3000 est équipé d’une
sonnette d’alarme qui émet des sons à certains moments.
Lorsque des disques doivent être introduits ou enlevés
conformément aux instructions de l’ordinateur hôte, des
messages apparaissent dans la fenêtre de message LCD pour
indiquer l’opération suivante à effectuer.
¶ Lorsqu’un problème survient dans le changeur:
Lorsqu’un problème survient dans le changeur, la sonnette
d’alarme continue à émettre un son jusqu’à ce que
l’opérateur appuie sur une touche du tableau de bord.
Par exemple, si un disque doit être introduit ou enlevé d’un
échangeur (c.-à-d. lorsque la fonction Ejection automatique a
été réglée sur OFF), le message suivant apparaît.
Appuyez sur la touche ENT
≠
Appuyez sur la touche \ pour OFF (désactiver)
≠
Comme les messages affichés dans la fenêtre de message
LCD sont jusqu’à présent les mêmes, que le disque soit
introduit ou enlevé, et comme toutes les opérations
effectuées après l’ouverture de l’échangeur respectent les
instructions de l’ordinateur hôte, la fenêtre de message LCD
du changeur est incapable d’afficher les messages appropriés.
En réglant la fonction message libre sur ON (activée), les
messages affichés dans la fenêtre de message LCD peuvent
toutefois être écrasés par les messages envoyés par
l’ordinateur hôte, ce qui permet d’afficher des instructions
conformes à celles de l’ordinateur hôte. D’autres informations
peuvent également être affichées, comme le nom de
l’application qui contrôle le changeur, des avertissements qui
indiquent qu’un disque est en cours d’écriture et d’autres
informations en rapport avec l’ordinateur hôte.
Appuyez sur la touche ENT
≠
Appuyez sur la touche ENT
≠
(Notez qu’un message ”Alert buzzer is activated” est
affiché si la sonnette d’alarme est ON (activée).)
Cependant, les sonnettes d’alarme suivantes ne peuvent pas
être désactivées, car elles servent de message en réponse à
des entrées par l’opérateur:
¶ Lorsque la porte d’accès arrière est ouverte et un lecteur
est introduit:
Comme il est difficile de surveiller la progression dans la
fenêtre de message LCD lorsqu’un lecteur est introduit
par la porte d’accès arrière, la sonnette d’alarme émet un
son pour indiquer que l’opération s’est déroulée sans
problèmes.
¶ Lorsque les touches du tableau de bord sont hors service:
La sonnette d’alarme émet un son lorsque la touche
FUNCTION est enfoncée.
Appuyez sur la touche | pour ON (activer)
≠
Appuyez sur la touche ENT
≠
(Notez qu’un message ”Free message is prohibited” est
affiché si la fonction Message libre est OFF (désactivée).)
Notez bien que si aucun message n’est reçu de l’ordinateur
hôte, tous les messages affichés dans la fenêtre de message
LCD proviendront du changeur, même si la fonction Message
libre est activée.
79
<DRC1285>
Fr
Français
Si les messages affichés dans la fenêtre de message LCD
ou les avertissements affichés sur l’écran de l’ordinateur
hôte suffisent, la sonnette d’alarme peut être réglée sur
OFF (désactivée).
Fonctionnement
Sous-mode “Info”
Le DRM-7000/DRM-3000 stocke les données nécessaires
pour que les administrateurs de système puissent effectuer
une maintenance quotidienne à l’aide de mémoires non
volatiles. Le sous-mode Info permet de faire défiler ces
données.
¶ Import-log (Journal d’importation)
Le journal d’importation est une liste séquentielle de tous
les numéros de slot par lesquelles des disques ont été
introduits récemment dans le changeur en sous-mode
Echangeur (voir p. 82).
Les numéros de slot affichés comprennent non seulement
les numéros pour des disques ajoutés mais aussi pour
des disques remplacés en sous-mode Echangeur. Notez
bien que les disques ajoutés dans des magasins à 50disques de type normal sont affichés comme faisant partie
d’un seul magasin.
Si vous appuyez à cet instant précis sur la touche ENT, le
menu suivant apparaîtra, permettant de sélectionner le type
d’information à afficher.
Appuyez sur la touche «
≠
Placez le curseur sur le type d’information dont vous avez
besoin et appuyez sur la touche ENT.
Log (Journal)
Lorsque vous sélectionnez l’affichage des données d’un
journal, vous pouvez choisir soit les données du journal
d’erreurs, soit celles du journal d’importation.
Appuyez sur la touche «
≠
Exemple d’affichage sur le DRM-7000
Placez le curseur, soit sur ”Error-log”, soit sur ”Import-log”
et appuyez sur la touche ENT pour faire défiler les données
du journal correspondant.
¶ Error-log (Journal d’erreurs)
Le journal d’erreur fournit un historique enregistré des
erreurs de fonctionnement détectées par le changeur. Ces
erreurs sont numérotées à partir de la plus récente (1)
jusqu’à un maximum de 32.
En plaçant le curseur sur un code d’erreur et en appuyant
sur la touche ENT, vous obtenez une description du type
de l’erreur en question.
Appuyez à nouveau sur la touche ENT pour afficher des
informations plus détaillées sur le type d’erreur.
Contents (Contenu)
Les informations sur le contenu du changeur peuvent être
récupérées dans l’ordre, ce qui permet de faire défiler l’état
de chaque slot du changeur.
Appuyez sur la touche «
≠
Appuyez sur la touche »
±
Exemple d’affichage sur le DRM-7000
Appuyez sur la touche ENT
≠
Appuyez sur la touche ENT
≠
80
<DRC1285>
Fr
Notez bien que le numéro affiché sous le titre ”Uncertain”
indique le numéro de slot pour lequel le changeur est encore
incapable de déterminer si le slot est vide ou plein.
Run-statistics (Obtenir statistiques)
Vous pouvez récupérer des informations statistiques pour
afficher la durée ou le nombre de fois qu’une opération a été
effectuée.
Placez le curseur, soit sur ”Work-time sum”, soit sur ”Number
of moves” et appuyez sur la touche ENT pour faire défiler les
données correspondantes.
¶ Work-time sum (Durée de travail totale)
Vous pouvez sélectionner ”PowerOn-time” pour afficher
la durée totale de la mise sous tension.
Appuyez sur la touche ENT
≠
Vous pouvez sélectionner ”Drive work-time” pour afficher
la durée totale de fonctionnement de chaque lecteur du
changeur.
Appuyez sur la touche ENT
≠
Appuyez sur la touche »
≠
Appuyez sur la touche »
≠
Notez bien que les données qui indiquent la durée totale
sous ”Drive work-time” sont mises à jour individuellement
pour chaque code d’identification unique de lecteur. C’est
pourquoi la valeur affichée est toujours correcte, même si
un lecteur est introduit dans une autre baie du changeur.
¶ Nombre d’opérations
Vous pouvez appuyer sur les touches « et » pour afficher
le nombre de fois que les opérations suivantes ont été
effectuées.
Elevation done (Elévation effectuée):
Vous pouvez sélectionner cet élément pour obtenir le
nombre de fois que le mécanisme d’élévation a été
sollicité. Cette information peut être utile pour déterminer
la date à laquelle le mécanisme d’élévation doit être révisé
ou entretenu.
Load/Unload done (Chargement/déchargement
effectué):
Vous pouvez sélectionner cet élément pour obtenir le
nombre de fois que le mécanisme de chargement a été
sollicité pour charger ou décharger un disque dans un slot
ou dans un lecteur. Lorsqu’un disque est déplacé d’un slot
vers un lecteur, ce chargement/déchargement compte en
principe pour deux opérations. Notez que cette information
peut être utile pour déterminer la date à laquelle le
mécanisme de chargement doit être révisé ou entretenu.
Mailslot driven (Echangeur sollicité):
Vous pouvez sélectionner cet élément pour obtenir le
nombre de fois qu’un échangeur a été sollicité. Notez
qu’une ouverture/fermeture compte pour une seule
opération.
Hyper driven (Hypermagasin sollicité):
Vous pouvez sélectionner cet élément pour obtenir le
nombre de fois que le magasin extractible a été éjecté ou
introduit. Notez qu’une éjection/introduction compte pour
une seule opération.
Appuyez sur la touche «
≠
Appuyez sur la touche »
±
Appuyez sur la touche «
≠
Appuyez sur la touche »
±
Appuyez sur la touche «
≠
Appuyez sur la touche »
±
Appuyez sur la touche «
≠
Appuyez sur la touche »
±
* Quand une systéme de retournement de
disque DRM-UF701 est utilisée.
81
<DRC1285>
Fr
Français
Fonctionnement
Fonctionnement
Sous-mode “Mailslot (Echangeur)”
Le sous-mode Echangeur a été créé pour piloter l’échangeur
à l’aide du tableau de bord, afin de pouvoir échanger, éjecter
ou ajouter des disques.
REMARQUE:
Bien que l’introduction et le retrait des disques soient des
opérations habituellement réservées à l’ordinateur hôte,
l’administrateur de système peut utiliser ce mode pour
introduire et enlever des disques, afin d’éviter des
contradictions dans la base de données. Dans ce cas,
l’administrateur de système doit toutefois garder une trace
des slots vers lesquels des disques ont été déplacés et, le
cas échéant, mettre à jour la base de données. (Notez que
les numéros des slots pour lesquels des disques ont été
ajoutés peuvent être lus à l’aide du journal d’importation en
sous-mode Info.)
Si vous appuyez à cet instant précis sur la touche ENT, le
menu “Swap, Remove or Add some discs?” suivant apparaît.
Placez le curseur sur l’élément de menu souhaité et appuyez
sur la touche ENT pour valider votre sélection.
¶ Posez le nouveau disque dans le tiroir est appuyez sur la
touche ENT. Le tiroir se ferme, le message suivant s’affiche
et le disque est dirigé vers le slot spécifié.
Lorsque l’opération d’échange de disque est terminée, le
message d’échange initial apparaît dans la fenêtre de
message LCD et le numéro de slot suivant qui répond au
critère décrit ci-dessus s’affiche.
Pour quitter le mode échange, appuyez sur la touche ESC.
Remove (Enlever)
¶ Servez-vous des touches » ou « pour spécifier le numéro
de slot du disque que vous souhaitez enlever et appuyez
sur la touche ENT. (Notez que ce mode permet de n’enlever
que des disques des slots pour lesquels il existe une
confirmation d’introduction de disque et que le menu de
sélection affiché ne changera pas en appuyant sur la touche
ENT s’il n’y a pas de slot pour lequel il existe une
confirmation d’introduction de disque.)
Le disque spécifié est dirigé vers l’échangeur, le tiroir
s’ouvre et le message suivant s’affiche.
Swap (Echanger)
¶ Servez-vous des touches » ou « pour spécifier le numéro
de slot a utiliser pour échanger des disques et appuyez
sur la touche ENT.
(Notez que chaque fois que vous appuyez sur la touche »
ou « les numéros des slots dans lesquels des disques
ont été introduits et les numéros des slots pour lesquels
le changeur est incapable de déterminer si le slot est vide
ou plein apparaissent l’un après l’autre)
S’il y a un disque dans le slot spécifié, le disque est dirigé
vers l’échangeur, le tiroir s’ouvre et le message suivant
s’affiche.
S’il n’y a pas de disque dans le slot spécifié, le tiroir s’ouvre
et le message suivant s’affiche.
82
<DRC1285>
Fr
¶ Enlevez le disque et appuyez sur la touche ENT pour fermer
le tiroir.
Lorsqu’un disque a été enlevé, le message de retrait initial
apparaît dans la fenêtre de message LCD et le numéro du
slot suivant qui répond au critère décrit ci-dessus s’affiche.
Pour quitter le mode enlever, appuyez sur la touche ESC.
Fonctionnement
¶ Servez-vous des touches » ou « pour spécifier le numéro
de slot du disque que vous souhaitez ajouter et appuyez
sur la touche ENT. (Notez que ce mode permet de n’ajouter
que des disques aux slots pour lesquels il existe une
confirmation d’absence de disque et que le menu de
sélection affiché ne changera pas en appuyant sur la touche
ENT s’il n’y a pas de slot pour lequel il existe une
confirmation d’absence de disque.)
Le tiroir de l’échangeur s’ouvre et le message suivant
s’affiche.
¶ Posez le nouveau disque dans le tiroir et appuyez sur la
touche ENT.
Le tiroir se ferme, le message suivant s’affiche et le disque
est dirigé vers le slot spécifié.
Sous-mode “Hyper”
Le sous- mode Hyper a été créé pour éjecter un magasin
extractible. Comme le DRM-7000/DRM-3000 n’est pas équipé
d’une touche spéciale pour éjecter un magasin extractible,
vous devez entrer dans ce mode pour que la touche ENT
puisse faire office de touche d’éjection.
¶ Lorsque vous appuyez sur la touche ENT, le changeur
vérifie si des magasins extractible sont actuellement
utilisés dans des lecteurs. Si c’est le cas, le message
suivant s’affiche.
Seul l’ordinateur hôte est autorisé à renvoyer des disques
d’un lecteur vers leurs magasins. Par conséquent, si vous
voulez éjecter le magasin extractible tout de suite, vous
devez d’abord revenir en mode Utilisateur et envoyer une
commande de renvoi de disque à l’aide de l’ordinateur hôte.
Lorsque tous les disques ont été renvoyés vers le magasin
extractible, le message suivant s’affiche.
Lorsqu’un disque a été ajouté, le message d’ajout initial
apparaît dans la fenêtre de message LCD et le numéro du
slot suivant qui répond au critère décrit ci-dessus s’affiche.
Pour quitter le mode ajouter, appuyez sur la touche ESC.
¶ Si vous appuyez sur la touche ENT, les messages suivants
s’affichent et le magasin extractible est éjecté.
REMARQUE:
Si vous ne pouvez plus ajouter un nouveau disque en mode
Ajouter, ajoutez-le en mode Echange.
≠
Si vous voulez quitter ce mode sans remplacer le magasin
extractible, il suffit d’appuyer trois fois sur la touche ESC pour
revenir en mode utilisateur.
83
<DRC1285>
Fr
Français
Add (Ajouter)
Fonctionnement
Si vous voulez remplacer des magasins extractible, introduisez
le nouveau magasin extractible. Notez que le magasin
extractible est automatiquement chargé dès qu’il est
partiellement introduit. N’exercez donc pas de force excessive
en introduisant un magasin.
Lorsque le magasin extractible est chargé, un code
d’identification unique est affiché ainsi que l’enregistrement
montrant l’état du mécanisme de verrouillage.
Si le journal ne contient aucun enregistrement de
déverrouillage, le message suivant s’affiche.
Sous-mode “Probe (Vérification)”
Il se peut que des disques aient été introduits dans des
magasins à 50-disques de type normal et dans des magasins
extractible avant que ces magasins ne soient introduits dans
le changeur. Or, cela ne signifie pas que les disques introduits
soient prêts à l’emploi, car le changeur et l’ordinateur hôte
n’ont pas encore reconnu les slots qui contiennent des
disques.
Le sous-mode Vérification sert à examiner tous les slots pour
voir s’ils contiennent un disque.
Bien que cette fonction de vérification soit habituellement
exécutée par le logiciel de contrôle de changeur installé sur
l’ordinateur hôte, le sous-mode Vérification peut être utilisé
au cas où les utilisateurs souhaiteraient effectuer cette
vérification avant de raccorder le changeur à l’ordinateur hôte
ou lorsque le logiciel de contrôle de changeur est incapable
d’exécuter cette fonction de vérification.
Dans le cas contraire, le message suivant s’affiche.
¶ Si vous appuyez à cet instant précis sur la touche ENT, les
numéros des baies dans lesquelles des magasins ont été
introduits s’affichent l’un après l’autre.
Notez que le magasin est automatiquement éjecté si le
changeur est incapable de lire son code d’identification. Dans
ce cas, vous devez essayer une nouvelle fois d’introduire le
magasin.
¶ Appuyez sur la touche » ou « pour sélectionner un
magasin à disque et appuyez sur la touche ENT pour
confirmer votre sélection. Le changeur examine l’un après
l’autre chaque slot du magasin à disque pour voir s’il
contient un disque.
≠
≠
≠
:
≠
Lorsque tous les cinquante slots ont été vérifiés, un message
s’affiche pour vous demander si vous voulez continuer.
Sélectionnez ”Yes” pour continuer et ”No” pour quitter et
appuyez ensuite sur la touche ENT.
84
<DRC1285>
Fr
Fonctionnement
Notez qu’une fois que le sous-mode Vérification a été utilisé
pour vérifier un magasin à disque donné, il est inutile de
procéder à une nouvelle vérification de présence ou d’absence
aussi longtemps que ce magasin n’est pas retiré du changeur.
Sous-mode “Door (Porte)”
Ce mode sert à ouvrir les portes d’accès afin d’échanger des
magasins à 50-disques et d’échanger ou d’ajouter des
lecteurs.
Notez qu’il faut díabord s’assurer que tous les disques du
changeur ont bien été renvoyés vers leurs magasins ou vers
l’échangeur, sinon aucune porte d’accès ne peut être ouverte.
L’administrateur de système peut effectuer cette tâche en
vérifiant d’abord l’état des lecteurs depuis l’ordinateur hôte
avant de les arrêter et de renvoyer tous les disques.
¶ Si vous appuyez sur la touche ENT, le changeur vérifie si
des disques sont actuellement utilisés dans les lecteurs.
S’il y a des disques dans les lecteurs, le message suivant
s’affiche.
Si ce message s’affiche, appuyez sur la touche ESC pour
revenir en mode Utilisateur et envoyer une commande de
renvoi de disque à l’aide de l’ordinateur hôte.
Dès que la confirmation arrive qu’il n’y a plus de disques
dans les lecteurs, le message suivant apparaît. Placez le
curseur sur la (les) porte(s) d’accès à ouvrir.
¶ Si vous appuyez sur la touche ENT, la (les) porte(s) d’accès
s’ouvre(nt).
REMARQUE:
Lorsqu’une des portes d’accès s’ouvre, le système revient
automatiquement en mode Utilisateur. Pour entrer dans un
sous-mode différent, appuyez sur la touche FUNCTION pour
entrer de nouveau en mode Administrateur de système (voir
p. 72).
85
<DRC1285>
Fr
Français
Vous pouvez aussi utiliser le sous-mode Vérification pour
vérifier la présence d’un disque dans les slots d’un magasin
extractible de la même façon que pour les magasins à 50disques.
Fonctionnement
AJOUT DE LECTEURS
Tout lecteur qui a été conçu pour être utilisé dans le changeur
DRM-7000/DRM-3000 peut facilement être ajouté en tant que
nouveau lecteur.
Le bloc d’alimentation fourni comme équipement en série
est conçu pour fournir un courant suffisant au fonctionnement
de 8 lecteurs, installés dans les baies arrière #1 à #8. Toutefois,
si vous installez des lecteurs supplémentaires dans les baies
arrière #9 à #16 du modèle DRM-7000, un bloc d’alimentation
supplémentaire, disponible en option, sera nécessaire.
Comment ajouter un lecteur
1. Entrez en mode Administrateur de système et ensuite
en sous-mode Porte pour ouvrir la porte d’accès
arrière.
Le message suivant s’affiche dans la fenêtre de message
LCD.
2. Attachez des panneaux de connexion supplémentaires,
si besoin est.
Avertissement
Veillez à ne jamais toucher les contacts ou ports des
connecteurs lorsque vous installez des lecteurs
supplémentaires ou tout autre périphérique. Assurez-vous
de toucher un objet métallique avant de commencer
l’opération d’ajout.
REMARQUES:
¶ Lorsque vous déconnectez des câbles de lecteur afin de
faciliter votre travail, faites-le dans l’ordre suivant (c.-à-d.
l’ordre inverse par rapport à celui dans lequel ils ont été
connectés):
1. Câble d’interface SCSI
2. Câble d’interface changeur
3. Câble d’alimentation
¶ Réglage de terminaison SCSI
<Bus SE SCSI>
Si vous voulez ajouter un lecteur à un bus SCSI sur lequel
la terminaison pour un lecteur existant a été activée, la
terminaison pour le nouveau lecteur à ajouter doit être
activée et la terminaison pour le lecteur existant doit être
désactivée.
<Bus LVD SCSI>
Comme le DVD-R7783 n’est pas muni d'un commutateur
de terminaison, aucun réglage de terminaison n’est prévu
pour cet appareil.
Par conséquent, vous devrez acheter un terminateur en
option ou bien le terminateur SCSI (LVD) prévu sur le DRMULV16 devra être utilisé pour assurer une terminaison au
bus LVD SCSI.
Tournevis
Pour l’installation du DRM-SN711,
DRM-SN721, utilisez les vis
déposées sur le changeur.
Pour l’installation du DRM-LN721,
DRM-LN741, utilisez les vis
fournies comme accessoires
(n’employez pas les vis déposées
sur le changeur).
3. Posez le lecteur sur les rails de guidage, appuyez jusqu’à
ce que le levier de verrouillage du lecteur s’enclenche
en position verrouillé. Il se peut que vous entendiez un
léger clic.
Rails de guidage
Lecteur
86
<DRC1285>
Fr
Levier de
verrouillage
4. Connectez le câble d’alimentation.
Si vous éprouvez des difficultés, les câbles d’interface SCSI
des autres lecteurs doivent être déconnectés avant de
continuer.
¶ Lorsque le câble d’alimentation est raccordé, le voyant
de contrôle de câblage à l’arrière du lecteur (orange)
s’allume.
¶ Lorsque le commutateur de terminaison est activé (sur
ON), le voyant de terminaison (vert) s’allume (ceci ne
s’applique pas au DVD-R7783).
REMARQUES:
¶ Si vous devez raccorder des lecteurs déjà installés à
d’autres bus SCSI, chaque lecteur peut conserver en
principe son code d’identification SCSI.
¶ Même si tous les lecteurs du changeur ont reçu un code
d’identification SCSI différent, il est toutefois nécessaire
de vérifier si le même code d’identification SCSI n’a pas
été attribué à d’autres dispositifs (par ex. des disques durs)
raccordés au même bus SCSI.
Câble
d’alimentation
7. Connectez le câble d’interface SCSI.
Si vous avez déconnecté les câbles d’interface SCSI
d’autres lecteurs à l’étape 4, n’oubliez pas de reconnecter
ces câbles.
Voyant de contrôle de câblage
8. Entrez en mode Administrateur de système et entrez
en sous-mode Configuration (voir p. 74) pour vérifier
si le changeur reconnaît tous les lecteurs.
Si, par exemple, trois lecteurs de DVD-ROM et un lecteur
de DVD-R ont été ajoutés dans les baies arrière, à
commencer par baie #1, le message suivant s’affiche.
Voyant de terminaison
(Voyant Occupé sur le DVD-R7783)
5. Connectez le câble d’interface changeur.
¶ Lorsque le câble d’interface changeur est raccordé, le
voyant de contrôle de câblage clignote toutes les deux
secondes.
Appuyez sur la touche »
≠
Voyant de contrôle de câblage
Appuyez sur la touche »
≠
Appuyez sur la touche »
≠
Câble d’interface changeur
REMARQUE:
Assurez-vous de raccorder le câble d’interface changeur au
connecteur qui correspond à la baie dans laquelle le lecteur
est installé. (Notez que des étiquettes ont été collées aux
connecteurs, indiquant le numéro de baie correspondant.)
Ceci est très important, car si vous raccordez le câble
d’interface changeur à une baie voisine, vous endommagerez
les disques et le mécanisme de transport de disque.
Appuyez sur la touche »
≠
6. Le changeur lit le code d’identification SCSI du lecteur
et compare les réglages du lecteur à ceux des lecteurs
existants.
¶ Si des codes d’identification SCSI différents ont été
attribués à tous les lecteurs, la sonnette émettra un
signal.
¶ Si le même code d’identification SCSI à été attribué à
deux ou plus de lecteurs, la sonnette émettra trois
signaux.
87
<DRC1285>
Fr
Français
Fonctionnement
Fonctionnement
REMARQUES:
¶ Si le câble d’interface changeur n’est pas raccordé comme
il faut, le changeur ne sera pas capable de reconnaître le
lecteur. Vous devriez vérifier le voyant de contrôle de
câblage situé à l’arrière du lecteur. Si les câbles ont été
raccordés comme il faut, ce voyant devrait clignoter.
= Si le voyant est allumé, vérifiez si le câble d’interface
changeur du lecteur en question est bien connecté.
= Si le voyant n’est pas allumé, vérifiez si le câble
d’alimentation du lecteur en question est bien connecté.
Si les câbles doivent être reconnectés, reconnectez le
câble d’alimentation avant de reconnecter le câble
d’interface changeur.
¶ Si le lecteur est reconnu mais si le nom de modèle du
lecteur ne s’affiche pas dans la partie inférieure de la
fenêtre de message LCD, déconnectez et reconnectez les
trois câbles.
Ordre dans lequel les câbles doivent être déconnectés:
1. Câble d’interface SCSI
2. Câble d’interface changeur
3. Câble d’alimentation
Ordre dans lequel les câbles doivent être reconnectés:
1. Câble d’alimentation
2. Câble d’interface changeur
3. Câble d’interface SCSI
9. Pour voir les réglages de tous les lecteurs reconnus,
appuyez sur la touche ENT afin d’accéder au niveau
suivant de l’affichage.
¶ Le code d’identification SCSI, le réglage du
commutateur de terminaison et le code d’identification
unique de chaque lecteur sont lus et affichés en même
temps dans la même fenêtre.
¶ Si quatre lecteurs ont été raccordés en chaîne bouclée
et si la terminaison a été activée pour le quatrième
lecteur de la chaîne, les messages suivants s’affichent.
Appuyez sur la touche ENT
≠
Appuyez sur la touche ESC pour revenir au message
précédent et appuyez ensuite sur la touche »
≠
Appuyez sur la touche ESC pour revenir au message
précédent et appuyez ensuite sur la touche »
≠
Appuyez sur la touche ENT
≠
Appuyez sur la touche ESC pour revenir au message
précédent et appuyez ensuite sur la touche »
≠
Appuyez sur la touche ENT
≠
REMARQUES:
¶ Si les codes d’identification SCSI ou les réglages du
commutateur de terminaison diffèrent de ceux qui figurent
sur l’arrière des lecteurs ou si un code d’identification d’un
lecteur ne s’affiche pas, il est probable que les câbles
correspondants ont été mal connectés. Dans ce cas,
exécutez les étapes suivantes afin de bien reconnecter
tous les câbles.
Ordre dans lequel les câbles doivent être déconnectés:
1. Câble d’interface SCSI
2. Câble d’interface changeur
3. Câble d’alimentation
Ordre dans lequel les câbles doivent être reconnectés:
1. Câble d’alimentation
2. Câble d’interface changeur
3. Câble d’interface SCSI
¶ Si l’ordinateur hôte n’arrive pas à lire le code d’identification
d’un lecteur, il ne pourra pas effectuer la configuration
automatique.
10.Appuyez plusieurs fois sur la touche ESC pour revenir
en mode Utilisateur et fermer la porte d’accès arrière.
Appuyez sur la touche ENT
≠
Appuyez sur la touche ESC
≠
88
<DRC1285>
Fr
Fonctionnement
ECHANGE DE LECTEURS
Appuyez sur la touche ESC
≠
Appuyez sur la touche ESC
≠
Appuyez sur la touche ESC
≠
Fermez la porte d’accès arrière
≠
Initialisation terminée
≠
Comme les étapes qui restent à exécuter peuvent varier en
fonction du logiciel de contrôle de changeur utilisé, veuillez
consulter le mode d’emploi du logiciel de contrôle de changeur
pour des instructions plus précises.
Remarquez qu’il peut être nécessaire de redémarrer
l’ordinateur hôte avant qu’il ne puisse reconnaître les lecteurs
ajoutés.
REMARQUE:
Sauf raisons particulières exigeant le contraire, les réglages
du code SCSI ID et de terminaison des lecteurs installés
doivent être les mêmes réglages que ceux des lecteurs qu’ils
remplacent.
Comment échanger un lecteur
1. Entrez en mode Administrateur de système et ensuite
en sous-mode Porte pour ouvrir la porte d’accès
arrière.
Le message suivant s’affiche dans la fenêtre de message
LCD.
2. Entrez de nouveau en Administrateur de système et
ensuite en sous-mode Configuration pour sélectionner
la baie arrière.
Appuyez sur la touche ENT
≠
Sélectionnez ”Rear” et appuyez sur la touche ENT
≠
3. Utilisez la touche » ou « pour sélectionner la baie dans
laquelle le lecteur à remplacer se trouve actuellement.
Si le lecteur remplacé est tombé en panne, il se peut que
les messages affichés ne contiennent pas toutes les
informations suivantes.
89
<DRC1285>
Fr
Français
Appuyez sur la touche ESC
≠
Vous pouvez échanger des lecteurs en suivant la même
procédure que celle décrite ci-dessus pour l’ajout de nouveaux
lecteurs.
La procédure à suivre pour échanger des lecteurs est décrite
ci-dessous. Elle vous aide à éviter les erreurs de numéros de
baies lorsque vous échangez des lecteurs.
Fonctionnement
4. Surveillez le voyant de contrôle de câblage (orange).
Il se trouve à l’arrière du lecteur et devrait clignoter
toutes les demies secondes si le lecteur a été
sélectionné à l’étape 3. Déconnectez ensuite les câbles
du lecteur.
Ordre dans lequel les câbles doivent être déconnectés:
1. Câble d’interface SCSI
2. Câble d’interface changeur
3. Câble d’alimentation
9. Comparez le code d’identification SCSI et les réglages
de terminaison du lecteur nouvellement installé à ceux
du lecteur enlevé.
¶ Si le code d’identification SCSI du nouveau lecteur est
le même que celui du lecteur enlevé, la sonnette émet
un signal.
¶ Si le code d’identification SCSI du nouveau lecteur n’est
pas le même que celui du lecteur enlevé, la sonnette
émet trois signaux.
5. Enlevez le lecteur.
Si vous éprouvez des difficultés, les câbles d’interface SCSI
des autres lecteurs doivent être déconnectés avant de
continuer.
10. Connectez le câble d’interface SCSI.
Si vous avez déconnecté les câbles d’interface SCSI
d’autres lecteurs à l’étape 5, n’oubliez pas de reconnecter
ces câbles.
6. Vérifiez le code d’identification SCSI et les réglages
du commutateur de terminaison du lecteur que vous
venez d’enlever et attribuez les mêmes valeurs pour
le code d’identification SCSI et les réglages du
commutateur de terminaison au lecteur à installer.
¶ Comme le DVD-R7783 n’est pas doté d’un commutateur
de terminaison, aucun réglage de terminaison n’est prévu
pour cet appareil.
11.Vérifiez le code d’identification du lecteur affiché dans
la fenêtre de message LCD.
7. Installez le nouveau lecteur et raccordez le câble
d’alimentation.
¶ Lorsque le câble d’alimentation est raccordé, le voyant
de contrôle de câblage à l’arrière du lecteur (orange)
s’allume.
¶ Lorsque le commutateur de terminaison est activé (sur
ON), le voyant de terminaison (vert) s’allume (ceci ne
s’applique pas au DVD-R7783).
Câble
d’alimentation
Voyant de contrôle de câblage
Voyant de terminaison
(Voyant Occupé sur le DVD-R7783)
8. Connectez le câble d’interface changeur.
¶ Lorsque le câble d’interface changeur est connecté, le
voyant de contrôle de câblage clignote toutes les
demies secondes.
Voyant de contrôle de câblage
Câble d’interface changeur
90
<DRC1285>
Fr
Appuyez sur la touche ENT
≠
REMARQUES:
¶ Si le code d’identification SCSI ou les réglages du
commutateur de terminaison diffèrent de ceux qui figurent
sur l’arrière des lecteurs, ou si un code d’identification d’un
lecteur ne s’affiche pas, il est probable que les câbles
correspondants ont été mal connectés. Dans ce cas,
exécutez les étapes suivantes afin de bien reconnecter
tous les câbles.
Ordre dans lequel les câbles doivent être déconnectés:
1. Câble d’interface SCSI
2. Câble d’interface changeur
3. Câble d’alimentation
Ordre dans lequel les câbles doivent être reconnectés:
1. Câble d’alimentation
2. Câble d’interface changeur
3. Câble d’interface SCSI
¶ Si l’ordinateur hôte n’arrive pas à lire le code d’identification
d’un lecteur, il ne pourra pas effectuer la configuration
automatique.
Fonctionnement
12. Appuyez plusieurs fois sur la touche ESC pour revenir
en mode Utilisateur et pour fermer la porte d’accès
arrière.
Appuyez sur la touche ESC
≠
REMARQUE:
Si vous avez l’intention de remplacer des lecteurs sans avoir
recours à la procédure décrite ci-dessus, vous devez faire
plus attention à ne pas enlever le mauvais lecteur. Dans ce
cas, la procédure d’installation du lecteur est la même que
celle décrite à “Comment ajouter un lecteur” (p. 86). Notez
que les conditions sous lesquelles la sonnette émet des
signaux diffèrent légèrement.
Français
Appuyez sur la touche ESC
≠
Appuyez sur la touche ESC
≠
Appuyez sur la touche ESC
≠
Appuyez sur la touche ESC
≠
Fermez la porte d’accès arrière
≠
Initialisation terminée
≠
Comme les étapes qui restent à exécuter peuvent varier en
fonction du logiciel de contrôle de changeur utilisé, veuillez
consulter le mode d’emploi du logiciel de contrôle de changeur
pour des instructions plus précises.
91
<DRC1285>
Fr
AUTRES SUJETS
DÉPANNAGE
Voici quelques conseils pour résoudre les problèmes fréquents que vous pourriez rencontrer. Certains défauts de disque ou le
manque d’expérience en matière d’exécution d’opérations peuvent provoquer l’affichage de messages d’erreur ou des
dysfonctionnements qui ressemblent à des pannes. De simples erreurs ou mauvaises compréhensions peuvent être corrigées ou
dissipées à l’aide du tableau suivant qui sert de guide de dépannage à l’administrateur de système.
Si vous n’arrivez toujours pas à résoudre le problème, ou si un message d’erreur persiste même après avoir consulté le tableau
suivant et pris les mesures recommandées, contactez votre représentant du service clientèle ou le revendeur chez qui vous avez
acheté le produit pour obtenir une assistance technique.
Reportez-vous aussi à la section "POUR ÉVITER DES PROBLÈMES" à la page 58.
Description du problème
Message affiché
Cause possible
Action recommandée
La sonnette retentit lorsque la porte
d’accès est ouverte et lorsque vous
introduisez un magasin.
M**
Disc set error
Un ou plusieurs disques n’ont
pas été introduits comme il faut
dans les slots de ce magasin.
Enlevez le magasin et vérifiez si les
disques sont introduits à fond.
La sonnette retentit lorsque vous
introduisez un magasin extractible.
Hyper magazine
Disc set error
Un ou plusieurs disques n’ont pas
été introduits comme il faut dans
les slots de ce magasin extractible.
Enlevez le magasin extractible et vérifiez
si les disques sont introduits à fond.
La sonnette retentit pendant la
première mise sous tension et
lorsque l’initialisation commence.
E83
Disc set NG
¶ Des corps étrangers ont été
détectés à l’intérieur du changeur.
¶ Certains disques ne sont pas
Ouvrez la porte d’accès et vérifiez si
quelque chose bloque le capteur optique.
Enlevez l’obstacle si vous le trouvez. Il se
peut que la sonnette s’arrête.
introduits à fond dans leurs magasins.
La sonnette retentit et le système refuse
d’entrer en mode Administrateur de
système lorsque vous appuyez sur la
touche FUNCTION.
Le commutateur à clé est en
position verrouillée.
Mettez le commutateur sur UNLOCK à
l’aide de la clé.
Impossible d’entrer en sous-mode
Echangeur ou Porte, alors que vous
pouvez entrer en sous-mode
Demande ou Configuration.
¶ Le système “robotics” était
occupé lorsque vous appuyiez
sur une touche.
¶ L’ordinateur hôte interdit
l’accès aux sous-modes de
maintenance.
¶ Essayez de nouveau après avoir
vérifié que le voyant ROBOTICS
BUSY est éteint.
¶ Vérifiez si l’ordinateur hôte interdit ce
genre d’opération.
Le tiroir s’ouvre de nouveau juste
après avoir été fermé en sous-mode
Echangeur; Swap ou Add.
Place a new disc
& Press ENT-key
L’échangeur a été fermé sans
qu’un disque ait été posé dans
le tiroir.
Appuyez sur la touche ESC pour arrêter
l’opération d’échange ou d’ajout de
disque.
Le tiroir s’ouvre de nouveau juste
après avoir été fermé en sous-mode
Echangeur; Remove.
Remove the disc
& Press ENT-key
L’échangeur a été fermé sans
qu’un disque ait été enlevé du
tiroir.
Enlevez le disque du tiroir.
Comme les disques n’ont pas été
renvoyés vers les lecteurs, il est
impossible d’ouvrir les portes d’accès
en sous-mode Porte, même après
avoir coupé et rétabli le courant.
La fonction démarrage à chaud a
été activée.
Désactivez la fonction démarrage à
chaud et coupez/rétablissez le courant.
Lorsque les disques ont été renvoyés,
entrez de nouveau en sous-mode Porte
et ouvrez la porte d’accès.
La porte d’accès refuse de s’ouvrir
en sous-mode Porte.
La porte d’accès est bloquée et
ne peut être ouverte.
Enlevez tout obstacle et essayez de
nouveau d’ouvrir la porte d’accès.
Les lecteurs contiennent encore
des disques.
Revenez en mode utilisateur, envoyez une
commande REZERO depuis l’ordinateur
hôte afin de renvoyer tous les disques et
réessayez d’effectuer l’opération après
que tous les disques aient été renvoyés.
L’écran de sélection de porte
d’accès n’appara”t pas lorsque vous
essayez d’ouvrir la porte d’accès en
sous-mode Porte.
92
<DRC1285>
Fr
Host must return
every disc first
Description du problème
Impossible d’éjecter le magasin
extractible en sous-mode Hyper.
Message affiché
Host must return
all hyper’s disc
L’ordinateur hôte refuse de
reconnaître un ou plusieurs lecteurs,
alors qu’ils ont été reconnus en
sous-mode Configuration.
Cause possible
Action recommandée
Les lecteurs contiennent encore
des disques, chargés depuis le
magasin extractible.
Revenez en mode Utilisateur, envoyez une
commande REZERO depuis l’ordinateur hôte
afin de renvoyer tous les disques et
réessayez d’effectuer l’opération après que
tous les disques aient été renvoyés.
¶ Le câble SCSI est mal
raccordé.
¶ Vérifiez si les câbles SCSI sont bien
raccordés.
¶ Le code d’identification SCSI
et les réglages de terminaison
sont mal spécifiés.
¶ Vérifiez si un périphérique doté du
même code d’identification SCSI est
raccordé au même bus et si la cha”ne
SCSI est correctement terminée.
¶ Reconfigurez la chaîne SCSI de façon
à ce que la longueur totale de tous les
câbles ne dépasse pas la limite
imposée.
¶ Redémarrez l’ordinateur hôte.
¶ La longueur totale des câbles
SCSI dépasse la limite
imposée.
¶ L’opérateur a oublié de
redémarrer l’ordinateur hôte.
L’ordinateur hôte refuse de
reconnaître un lecteur et le code
d’identification SCSI du lecteur a
pris la valeur ‘7’ en sous-mode
Configuration.
scsiID=7 TermOFF
dev-ID=
Impossible de lire correctement un
disque introduit dans un lecteur.
Un code d’erreur s’affiche dans la
fenêtre de message LCD, le voyant à
l’arrière clignote et la sonnette
retentit.
E88, E89, E99, etc.
La fenêtre de message LCD reste
vide après la mise sous tension.
Un appui sur les touches de
fonctionnement ne produit aucun
effet.
L'avertisseur retentit lorsque le
magasin est chargé.
¶ Memory Failure
(Défaillance de
mémoire)
¶ Error (Erreur)
¶ Le câble d’alimentation du
lecteur en question n’est pas
connecté.
¶ Des lecteurs ont été introduits
dans les baies arrières n° 9 à n°
16, sans qu’un bloc
d’alimentation complémentaire
ait été installé.
¶ Ouvrez la porte d’accès arrière et
vérifiez si le câble d’alimentation est
bien connecté.
¶ Le courant fourni par le bloc
d’alimentation livré en série ne peut
faire fonctionner que des lecteurs
installés dans les baies #1 à #8.
Réinstallez le lecteur dans une de ces
baies ou installez le bloc
d’alimentation complémentaire.
¶ Le disque a été introduit à
l’envers.
¶ Le disque et sale ou rayé.
¶ Vérifiez si le disque a été introduit à
l’envers.
¶ Vérifiez si le disque est sale ou rayé et
enlevez les saletés ou remplacez le
disque.
Une erreur mécanique s’est
produite qui empêche le
changeur de continuer à
effectuer des opérations.
Ouvrez la porte d’accès en mode
Administrateur de système et prenez les
mesures nécessaires pour éliminer les
causes de l’erreur.
Le commutateur de terminaison
SCSI du changeur est réglé sur
OFF ou le câble SCSI n’est pas
raccordé comme if faut.
¶ Lorsque l’installation est terminée,
réglez le commutateur de terminaison
SCSI sur “ON” et mettez l’appareil
hors et sous tension.
¶ Si le câble SCSI n’est pas bien
raccordé, mettez l’appareil hors
tension. Raccordez le câble comme il
faut et remettez l’appareil sous
tension.
Les données de la mémoire du
magasin ne sont pas lues
correctement.
¶ Retirez le magasin et réinsérez-le.
¶ S'il est encore impossible de lire
correctement les données du
magasin, effectuez le contrôle
"PROBE" du magasin en question,
puis ouvrez et refermez la porte.
93
<DRC1285>
Fr
Français
Autres sujets
Autres sujets
CARACTÉRISTIQUES TECHNIQUES
DRM-7000
DRM-3000
Caractéristiques générales
Description
Changeur 700-disques
Changeur 300-disques
Alimentation
Puissance consommée
AC 100 V – 240V, 50/60 Hz
5,5 A (500 W) au maximum
+
3,3 A (300 W) au maximum
Poids de l’appareil principal (équerres de montage compris) 91,7 kg
Dimension extérieures (équerres de montage compris)
760 x 795 x 1520 mm (L x P x H)
Température de fonctionnement*
+5 °C à +35 °C
60,6 kg
760 x 729 x 8720 mm (L x P x H)
+
Hygrométrie*
5 % à 85 % (sans condensation)
+
Température de stockage
–40 °C à +60 °C
+
* Les valeurs de la température de fonctionnement et de l'hygrométrie peuvent changer selon les composants chargés. Pour des
détails, consultez le mode d'emploi de chaque composant utilisé.
Caractéristiques fonctionnelles
Nombre maximal de disques
Nombre maximal de magasins à disque
720 (disques 12-cm)
320 (disques 12-cm)
14
1
6
+
16
8
1
1
+
+
Câble d’alimentation (pour le Canada et les Etats-Unis) 1
Câble d’alimentation (pour le Japon)
1
+
+
Stabilisateur de base
Vis pour fixer les stabilisateur de base
4
12
2
6
Clés de déverrouillage
Mode d’emploi
2
1
+
+
Magasins de 50 disques
Magasin extractible de 20 disques
Nombre maximal de composants
Accessoires fournis
Magasin extractible de 20 disques
Câble SCSI pour changeur/lecteur
¶ L’aspect extérieur de ce produit et les caractéristiques mentionnées ci-dessus sont susceptibles de changer à n’importe quel
moment sans préavis.
94
<DRC1285>
Fr
Autres sujets
Caractéristiques du connecteur SCSI
+
1
±
¡
Caractéristiques du connecteur SCSI
GROUND
GROUND
GROUND
GROUND
GROUND
GROUND
GROUND
GROUND
GROUND
GROUND
GROUND
NC
NC
NC
GROUND
GROUND
GROUND
GROUND
GROUND
GROUND
GROUND
GROUND
GROUND
GROUND
GROUND
N˚ de broche.
1
2
3
4
5
6
7
8
9
10
11
12
13
14
15
16
17
18
19
20
21
22
23
24
25
26
27
28
29
30
31
32
33
34
35
36
37
38
39
40
41
42
43
44
45
46
47
48
49
50
Désignation du signal
-DB(0)
-DB(1)
-DB(2)
-DB(3)
-DB(4)
-DB(5)
-DB(6)
-DB(7)
-DB(P)
GROUND
GROUND
NC
TERMPWR
NC
GROUND
-ATN
GROUND
-BSY
-ACK
-RST
-MSG
-SEL
-C/D
-REQ
-I/O
Français
Désignation du signal
REMARQUES:
¶ Les broches n° 12 à 14, 37 et 39 ne sont pas mises à la terre.
¶ Les connecteurs sont blindés.
¶ Pour de plus amples détails sur les instructions, reportezvous au manuel des spécifications.
Entretien
De manière à obtenir un fonctionnement irréprochable de
l’appareil, nous conseillons son entretien périodique.
L’appareil peut offrir de nombreuses années de service
s’il est entretenu comme il convient.
Publication de Pioneer Corporation.
© 2006 Pioneer Corporation.
Tous droits de reproduction et de traduction réservés.
95
<DRC1285>
Fr
小心﹕
本產品包含有1級以上的鐳射二極管。為了保証安全﹐切勿
打開任何機蓋或者試圖接觸本機內部﹐必要時應請求專業
技術人員提供服務。
下面的提醒標簽貼于本機上。
位置﹕本機后面板上。
CLASS 1 LASER PRODUCT
LASER KLASSE 1
APPAREIL À LASER DE
CLASSE 1
H018_ChK
承蒙惠顧本先鋒產品,甚表示感謝。
務請通讀本使用說明書,以便您掌握如何正確地使用此機器。
當您讀完本說明書后,請把它妥善保存好,以備今后查用。
在某些國家和地區,電源插頭或插座的形狀可能與文中插圖所
示的形狀有所差異。但是,本機的連接和操作方法是相同的。
目錄
特點 ................................ 97
安全注意事項 ........................ 98
使用前注意事項 ...................... 99
關于安全 .................................. 99
關于脫機媒體管理功能 ...................... 99
決定系統構成 ............................. 100
關于任選產品 ............................. 100
確認附件 ................................. 102
關于光盤 ................................. 103
為防止問題發生 .....................
各部名稱及其功能 ...................
設置 ...............................
操作 ...............................
104
107
109
118
用戶模式 ................................. 118
系統管理者模式 ........................... 118
追加驅動器 ............................... 132
更換驅動器 ............................... 135
其他 ............................... 138
故障和對策 ............................... 138
規格 ..................................... 140
96
<DRC1285>
ChK
特點
富于靈活性的系統構成
系統設定作業容易進行
本換盤機可按照顧客需求的規格另外購買、安裝各種組件並使
用。
當將換盤機組裝在原有的計算機系統或從頭建立計算機系統
時,必須進行電纜的連接或各種設定,以便主計算機能夠正確
用以安裝組件的間(為安裝驅動器或 50 張光盤箱而留出的空
間)位于本換盤機的前面和后面,打開門即可簡易拆裝各組
認識、控制換盤機與內裝在換盤機中的復數驅動器。
本換盤機不僅使安裝或追加驅動器的作業簡易進行,還具備使
件。
位于前面的間供 50 張光盤箱專用,而后面的間可供多目的使
主計算機側的設定作業容易進行的豐富的功能。
用。
完備對應誤操作或不正當操作的防護對策
可安裝台數
為預防操作板上的操作和來自主計算機的控制的相互干擾或矛
盾、衝突等的發生,設定成如果沒有配備的鎖定解除鑰匙,則
前面間
50 張光盤箱專用
后面間
組件
50 張光盤箱
DRM-7000 型
DRM-3000 型
7台
3台
最多 16 台
最多 7 台
最多 8 台
最多 3 台
最大可安裝台數依組件有所不同,詳情請參閱所使用組件附上
的操作說明書。
重視性能
對于郵件槽的開閉或 20 張超光盤箱的排出等可能會接觸光盤
本身的操作,亦可進行只允許系統管理人員操作的安全優先設
定。
通過顯示的充實,操作板操作進一步易于進行
由于表現力豐富的 1 6 位 2 行顯示窗顯示適當的操作指南信
組合例
重視數據容量
無法進入使用操作板進行的系統管理模式。
通過從主計算機的指示,亦可禁止操作板的操作。
DRM-7000 型
驅動器 2 台
光盤 720 張
驅動器 16 台
光盤 370 張
DRM-3000 型
驅動器 2 台
光盤 320 張
驅動器 8 台
光盤 170 張
息,因此只通過使用5個按鍵即可簡單地操作本換盤機豐富的
功能。
亦可在引進當初留出空間,而視需追加驅動器或光盤箱。
裝備存儲器的 3 種光盤箱
準備有 3 種光盤箱以便適應不同的用途。
20 張超光盤箱:
裝備有在換盤機外部所進行的鎖定機構的操作履歷記憶機
構。
標準裝備有 1 個,可不需打開門進行拆裝。
50 張光盤箱(鎖定式):
具有鎖定機構,無法在換片機外部取出光盤,因此最適合
于重視安全的脫機媒體管理。
50 張光盤箱(標準式):
由于帶有鎖定機構解除旋鈕,因此能夠在換盤機外部進行
光盤的更換。
97
<DRC1285>
ChK
中
國
語
安全注意事項
關于安放場所
安全注意事項
請選定樓板水平且堅固的場所安放。務請避免如下場所:
¶ 請勿將本機安放在桌子上面。
¶ 請勿堆放本機2台以上,或在其上面安放物品。否則可能會
1 直射陽光照射的場所或爐子等暖氣設備的附近。
2 濕氣或灰塵多的場所。
3 廁所(盥洗室)或廚房的附近。
4 聚光燈照射的場所。
5 電冰箱或調光機器、冷暖氣設備等大型產品的附近。
6 樓板不結實且不是水平的場所。
(不是水平時,墊上硬板等來使本機成為水平。)
7 維修保養不易進行的場所。
如果要靠牆壁安裝換盤機,請使換盤機背面和牆壁之間空開
50cm 以上。
請避免在換盤機主體上直接安放物件。
有物品掉下,或本機顛倒的情況,極其危險。(對于這種
情況的損壞等,本公司概不負其責任。)
¶ 打開包裝後,務請首先安裝顛倒防止配件。如果未安裝而
移動,可能會有顛倒或損壞位于后面的電纜類的情況。
¶ 在接通電源狀態,請勿將手插入20 張超光盤箱的間中,或
觸摸間內部的零部件,否則可能會有受傷的危險。
¶ 為安全起見,本機在動作中不能打開門。
¶ 由于光盤高速旋轉或光盤搬運機構,本機會有若干振動、
聲音產生,但這並不是異常。也沒有因此而給性能造成影
響。
關于結露現象
安裝注意事項
¶ 請充分注意所拿取光盤的信號面不要留下污垢、擦痕、指
印等。如果是這種唱片,則無法獲得規定的重現性能或記
錄性能。
¶ 請勿在郵件槽內一次裝入2張以上的光盤。否則成為故障的
如果本機以透冷的狀態搬進溫暖的房間內或急劇昇高溫度時,
可能會有動作部形成露水(結露),導致無法充分發揮本機性
能的情況。與此情況時,請將本機放置一小時左右,或逐漸昇
高室溫后再使用。
原因。
¶ 由于換盤機不進行光盤內信息的管理,因此,數據管理請
本機清潔方法
在主計算機側進行。
¶ 記錄用光盤請使用本公司推薦的光盤。如過使用推薦之外
操作板或機罩的清潔請使用軟干布擦拭。污垢頑固時,軟布蘸
濕稀釋 5 ∼ 6 倍中性洗滌劑的水並擰干后,擦拭污垢,然后再
的光盤,則可能無法獲得規定的記錄性能或重現性能。另
外,有關所記錄的數據,不包括在保證對象內。
用干布擦干。如果使用揮發油、稀釋劑、殺虫劑等非揮發性藥
品,可能會侵蝕表面,因此請勿使用它們。另外,要使用化學
¶ 對于使用本機,或本機故障而產生的數據損失,以及其他
直接、間接的損害,本公司概不負其責任,請預先予以諒
解。關于重要的數據,為預防萬一,請做好副片(拷貝)。
¶ 務請注意不要遺失配備的鎖定解除鑰匙。如果沒有鎖定解
除鑰匙,則無法進行光盤的取出、插入、更換(郵件槽和
光盤箱)或驅動器的更換。
注意不要損傷電源線
插入或拔除電源線必須拿好電源插頭進行。如果拉拽電源線或
用溼手插入或拔除,可能會有短路或觸電的危險。
電源線需要時常檢查有無損傷,如果發現有損傷,請與維修服
務聯係單位或本機經銷店委託進行更換。
98
<DRC1285>
ChK
抹布等時,請詳細閱讀化學抹布等附上的注意事項。
使用前注意事項
關于安全
有關“換盤機內的光盤容納位置信息”或“為存取光盤內數據
的信息”
,通過控制換盤機的換盤機控制軟件,或在其上位的
數據庫管理軟件來被嚴格管理。
為此,在不在主計算機(在網絡環境為服務器)管理之下發生
換盤機內的光盤狀態的變化,就會控制換盤機和驅動器,造成
無法從光盤取出必要的文件。
另外,如果無條件地承認將容納于換盤機內的光盤取出換盤機
外時,不僅無法存取該光盤,而且會導致光盤污損或丟失。
本換盤機設計成通過操作位于主體前面上部的操作板,可以打
開位于前面和后面的門來取出光盤箱,進行利用郵件槽的光盤
取出和裝入,但是如上所述,從安全性的觀點,須對這些操作
加以限制。
本換盤機在操作板上裝備有鑰匙開關,而當本開關置于
“LOCK”(鎖定)位置時操作板的按鍵操作變無效。
要使本開關設定成“UNLOCK”
(解除鎖定)時,需要配備的鎖
定解除鑰匙。如果本鎖定解除鑰匙由系統管理人員來管理,則
可以防止沒有持有鑰匙的一般用戶不正當地操作操作板。
另外,也可以從主計算機側加以限制。此時,即使持有鎖定解
除鑰匙的系統管理人員也無法進行換裝光盤或開閉門等的改變
換盤機內部狀態的操作,而成為由主計算機來掌握主導權。
關于脫機媒體管理功能
本換盤機具備如下所示適合“脫機媒體管理”的特點。
¶ 可拆卸的光盤箱
由于光盤箱能夠以裝入光盤的狀態從換盤機取出,因此通
過將使用頻率低的光盤匯集在一個光盤箱中並取出,並在
換盤機外面加以管理,即可有效利用換盤機內部的空間。
¶ 光盤箱固有的 ID
在本換盤機,由于光盤箱本身具有固有的ID(識別號碼),
因此只要安裝在換盤機中,即可識別光盤箱。
如果一次注冊在數據庫的光盤和光盤箱ID 的關係不變,將
該光盤箱安裝在哪一個光盤箱間,也能夠瞬時利用光盤箱
內的全部光盤。
安裝在處于同一數據庫管理之下的其他換盤機,也能夠進
行識別,因此可以同樣地予以利用。
¶ 適合管理的光盤箱
如果在換盤機外面進行光盤的裝入和取出,則會失去光盤
和光盤箱 ID 之間的關係。
通過使用在換盤機外面無法進行光盤裝入和取出的鎖定式
50 張光盤箱和記憶有在換盤機外面所進行的光盤裝入和取
出痕跡的 20 張超光盤箱,使脫機媒體管理容易進行。
¶ 記錄換盤機的 ID
不在數據庫管理軟件管理之下的獨立的換盤機或安裝在屬
于其他系統的換盤機內的光盤箱,有光盤在其換盤機內更
換或改寫的可能性,因此在將該光盤箱安裝在原來的換盤
機時,即使是鎖定式的光盤箱也會發生與注冊在數據庫的
信息有差異的情況。
為解決這種問題,光盤箱記錄有使用該光盤箱的換盤機的
ID 。如果數據管理軟件具備自己所管理的換盤機 ID 的一
覽,則可通過查出能夠與光盤箱的ID 一起讀取的換盤機的
ID ,即可判斷出有無必要重新安裝該光盤箱。
這樣,換盤機和光盤箱具備實現“脫機媒體管理功能”必要的
充分的特長,但實際的“脫機媒體管理”的水平依所使用數據
管理軟件或換盤機控制軟件有所不同。
另外,要進行“脫機媒體管理”必須適當規定運用方法。如果
運用方法妥當,即使本來不適合于脫機媒體管理的標準式光盤
箱,也能夠如同鎖定式進行操作。
99
<DRC1285>
ChK
中
國
語
使用前注意事項
決定系統構成
請在進行設置或操作之前決定系統的構成。
本換盤機裝備的接插板和配備的 SCSI 連接線是假設如下構成
供應的。
7 安裝的驅動器為 2 台 SE 驅動器。
7 2台SE驅動器在內部進行菊花鏈連接,用配備的SE SCSI連
接線與換盤機連接。
(為與 SE SCSI 主適配器連接,本構成必須另外準備 1 條 SE
SCSI 連接線。)
要使用3台以上的SE驅動器時,或換盤機連接到LVD主適配器
或安裝LVD驅動器時,或擬使用複數SCSI母線來增大數據傳送
速度時,將需要準備相應計劃的規定系統構成的任選裝置。
為此,建議使用配置單(DRM-7000型:見第188頁,DRM-3000
型:見第189 頁)等來確認必要的任選件類和預先決定驅動器
安裝位置後,進行實際的作業。
標準裝備的電源裝置可以向背面間 Bay#1∼#8供應電源。
請將這 8 台驅動器的消耗電流要設定成總計:
DC+5V 12A 以下
DC+12V 8A 以下
另外,從一個連接器可以供應的電流為:
DC+5V 最大 4A
DC+12V 最大 4A
又,通過追加任選的增設電源裝置, DRM-7000 型可以在背
面間的 Bay#9 ∼ #16 使用驅動器。
這時,上面側8台驅動器的消耗電流和從一個連接器可供應
的電流與下面側 8 台驅動器(Bay#1 ∼ #8)相同。
注意:
¶ 切忌使用本公司產品之外的任選產品。
¶ 要重新接通電源時,請先斷開電源並等待10秒鐘以上后
進行。
如果所安裝的驅動器不多,則會有雖然斷開電源開關但
暫時不會斷開電源的情況。
需要至少決定的項目如下:
¶ 驅動器的型式、台數和安裝位置
DRM-7000/3000 型使用 SE SCSI 接口。將換盤機連接到 LVD
SCSI 主適配器時,或安裝採用有 LVD SCSI 接口的 DVDR7783 型並使其與換盤機成為同一母線時,需要安裝 LVD
SCSI 介面轉換器[DRM-ULV16]型。
另外,要在一台 DRM-7000 型換盤機上安裝 9 台及以上的驅
動器時,需要安裝增設電源部件。
¶ 連接板的型式和安裝位置
有 LVD 驅動器用(內部菊花鏈連接用)和 SE 驅動器用(內部
菊花鏈連接用和驅動器直接連接用)。
¶ 從接插板到各驅動器的電纜連接方法
¶ SCSI-ID 的設定
在同一 SCSI 母線上, ID 不許重複。
關于任選產品
依顧客的規格,本換盤機有必要另外購買如下各種組件。
最大可安裝台數依組件有所不同,詳情請參閱所使用組件附上
的操作說明書。
50 張光盤箱
50 張光盤箱成為換盤機內部的光盤的保管場所。 50 張光盤箱
有鎖定式和標準式兩種,可以隨意組合使用。
¶ 50 張光盤箱(鎖定式)
[DRM-AL751 型]
¶ SCSI 終端化的設定
〈SE SCSI 母線〉
位於 SCSI母線終端的用於驅動器或換盤機的終端開關應設
定成 ON 。
〈LVD SCSI 母線〉
安裝有DVD-R7783型和DRM-ULV16型時,需要進行LVD SCSI
母線的端接。
由於 DVD-R7783 型沒有配備 SCSI 連接頭,因此應購買任選
的連接頭,或應使用DRM-ULV16型附屬的SCSI連接頭(LVD)
來提供 LVD SCSI 母線終端。
有關 SCSI 連接事宜,見“SCSI 連接說明書”或與本機經銷
店恰商。
由于不安裝在換盤機內時鎖定機構無法被解除,因此使用
郵件槽來進行光盤的更換。與支援“關于脫機媒體管理功
能(見第 99 頁)
”的主計算機共同使用時有效。
100
<DRC1285>
ChK
使用前注意事項
¶ 50 張光盤箱(標準式)
[DRM-AF751 型]
DVD-R/RW 驅動部件[DVD-R7322 型]
消耗電流: DC+5V , 1.5A
DC+12V , 1.0A
供 DVD-ROM 光盤的讀取,以及 DVD-R/RW 光盤的讀寫所使用的
SE SCSI 接口驅動器。
帶有解除鎖定機構的旋鈕,因此能夠總匯容納大量光盤後
安裝在換盤機內,或總匯排出換盤機。
20 張超光盤箱[DRM-AH721 型]
DVD-ROM 驅動部件[DVD-D7563 型]
消耗電流: DC+5V , 1.0A
DC+12V , 1.0A
中
國
語
不需打開門即可進行光盤的更換。
通過操作履歷記憶機構,會記憶鎖定解除旋鈕的操作,因此最
適合于“脫機媒體管理”。標準裝備有1 台 20 張超光盤箱,但
通過使用復數 20 張超光盤箱,能夠簡易進行 20 張為單位的脫
機庫的構築。
供DVD-ROM光盤以及DVD-R/RW光盤的讀取所使用的SE SCSI接
口驅動器。
光盤反轉部件[DRM-UF701 型]
DVD-R/RW 驅動部件[DVD-R7783 型]
消耗電流: DC+5V , 1.5A
DC+12V , 1.0A
用以反轉光盤的組件。使用雙面 DVD 光盤時必要。
增設電源裝置[DRM-PW701 型](DRM-7000 型用)
供 DVD-ROM 光盤的讀取,以及 DVD-R/RW 光盤的讀寫所使用的
LVD SCSI 接口驅動器。
在安裝 9 台以上驅動器時需要使用。
安裝必須委託本公司維修人員進行。
供應電流: DC+5V ,最大 12A
DC+12V ,最大 8A
101
<DRC1285>
ChK
使用前注意事項
LVD SCSI 介面轉換器[DRM-ULV16 型]
將對應 SE SCSI 接口的 DRM-7000/3000 型連接到 LVD 主適配器
時必要的部件。
安裝必須委託本公司維修人員進行。
確認附件
20 張超光盤箱
1個
LVD 連接板(2 驅動器用) [DRM-LN721 型]
能夠在換盤機內部進行 2 台 LVD 驅動器菊花鏈連接的帶有電纜
的接插板。
LVD 連接板(4 驅動器用) [DRM-LN741 型]
能夠在換盤機內部進行 4 台 LVD 驅動器菊花鏈連接的帶有電纜
的接插板。
※ 安裝在換盤機主體上。
SCSI 連接頭(LVD) [DRM-TM160 型]
外部連接用 LVD 連接頭。
由於 DVD-R7783 型沒有配備 LVD SCSI 連接頭,因此為使用本
換盤機、驅動器連接用 SCSI 連接線 1 條 :0.35m
產品,或 DRM-ULV16 型附屬的 SCSI 連接頭(LVD),應提供端
接。
SCSI 連接線(LVD)
[CC-200 型]
2.5m , VHDCI 68pin - 半間距 68pin
[CC-200-8 型]
8m , VHDCI 68pin - 半間距 68pin
電源線(日本用) 1 條
[CC-201 型]
2.5m ,半間距 68pin - 半間距 68pin
[CC-201-8 型]
本電源線為日本專用,請勿在其他
地區使用。應予以廢棄。
8m ,半間距 68pin - 半間距 68pin
外部布線用 LVD 對應 SCSI 連接線。
進行主適配器與換盤機之間,菊花鏈連接時換盤機之間等的連
電源線(美國、加拿大用) 1 條
接。請使用符合所使用系統的長度以及連接器形狀的。
多驅動器接插板[DRM-SN721 型]
能夠在換盤機內部進行 2 台 SE 驅動器菊花鏈連接的帶有電纜
的接插板。 1 個已在出廠時標準裝備,能夠與 2 驅動器增設電
本電源線為美國和加拿大專用,請
勿在其他地區使用。應予以廢棄。
纜或 4 驅動器增設電纜組合使用。
單一驅動器接插板[DRM-SN711 型]
本連接板可用於將 SE 驅動器直接連接到 SE SCSI 主適配器,
或用於外部菊花鏈連接。
2 驅動器增設電纜[DRM-SC721 型]
對應最多增設 2 台 SE 驅動器的菊花鏈連接用 SCSI 連接線。通
過與多驅動器接插板組合,能夠在換盤機內部進行 4 台 SE 驅
動器的菊花鏈連接。
4 驅動器增設電纜[DRM-SC741 型]
對應最多增設 4 台 SE 驅動器的菊花鏈連接用 SCSI 連接線。通
過與多驅動器接插板組合,能夠在換盤機內部進行 6 台 SE 驅
動器的菊花鏈連接。
102
<DRC1285>
ChK
顛倒防止配件
DRM-7000 型:4 個
DRM-3000 型:2 個
使用前注意事項
鎖定解除鑰匙
2把
¶ 下列光盤有可能因換盤機的動作造成光盤故障或光盤損
壞,使用前應予以注意。
¶ 圓周部有如圖所示毛刺(凸起部分)的光盤。
¶ 圓周部的錐度或圓度如圖所示極端大的光盤。
顛倒防止配件安裝用螺絲
DRM-7000 型:12 個
DRM-3000 型:6 個
操作說明書 1 本
¶ 外周部或標籤面帶有黏附性的光盤。
關于光盤
能夠使用的光盤
能夠使用的光盤依所使用的驅動器有不同。
請參照驅動器附上的操作說明書。
關于光盤拿取方法
¶ 拿取光盤時、注意不要觸摸信號面。
¶ 光盤要夾持兩端,或夾持中央孔與端部。
¶ 在乾燥的環境之下拿取光盤時,可能會有使光盤本身產生
靜電的情況。通過輕觸金屬部等來使身體的靜電放出後進
行光盤的拿取。
¶ 請勿將光盤放置於可能會有灰塵或靜電附著的場所。
¶ 換盤機只能使用外徑12cm光盤。換盤機具備光盤有無檢測
功能,而其方法通過光學方法檢測從12cm光盤的外周離約
5 mm 的部分來完成,因此如果使用該部分成為透明的光盤
(*),8cm 適配器,或使用外徑8cm 光盤,則可能會有光盤
有無檢測失誤,或損壞的情況。
* 包括半透明的“C-thru
¶ 沒有對應“DualDisc(The Hybrid CD/DVD
Disc”。
Disc)
”。
¶ 請勿在光盤表面上貼紙張或封條。亦勿擦傷標籤面。
¶ 光盤在換盤機內高速旋轉。請勿使用異常的光盤(有裂縫
的光盤或大大翹曲的光盤)。
¶ 請勿使用規格之外的光盤。
如果使用,可能會給本機及其他機器造成有害的影響。
¶ 形狀特殊的光盤(心臟形或六角形等)。
否則可能會成為故障的原因。
103
<DRC1285>
ChK
中
國
語
為防止問題發生
以下內容匯總了有關顧客的操作,特別易于造成故障的,可能性高的注意事項。
內
1. 關于設置
2. 關于連接
3. 關于電源接通/斷
開
容
可能發生的故障或錯誤
÷ 請勿在換盤機內插入異物。否則成為故障的原因。
÷ “E83”,“E99”,“E88”
÷ 請勿在灰塵多的場所或高溫、多溼的場所使用。
※ 請勿在從室外直接有室外空氣、粉塵吹進來的環境下設置。
※ 請勿在空調裝置空氣吹出口、空氣清淨機附近設置。
÷ 記錄重現不良
÷ 請勿在動作中給予衝擊或振動。
※ 請勿在通路、門附近等人的進出多的場所設置。
÷ 記錄重現不良
÷ 連接外接SCSI連接線時、以斷開主計算機和換盤機的電源狀態進行連
接。
※ 連接內部 SCSI 連接線時,可以接通電源狀態進行。
÷ 換盤機故障
÷ 安裝驅動器時,請將換盤機接口電纜連接到對應安裝驅動器的間的插
座。如果誤連接到相鄰的插座,可能成為光盤損壞、E99錯誤的原因。
÷ “E83”,“E99”
÷ 在 SCSI 母線上的端接的機器,必須將終端開關置於 ON 位置,或使用
外接連接頭進行終端化。如果沒有進行終端化,可能會有換盤機動作
不穩定的情況。如果在不進行終端化的狀態發生故障時,需進行終端
化後重新接通換盤機的電源。
※ 取下終端開關置於 ON 位置的機器,或拔除該機器的 SCSI 連接線
時,從該時點成為沒有進行終端化的狀態,因此成為與上述相同的
狀態。
÷ 顯示窗(LCD)不會正確顯
示
÷ 不接收操作按鍵
÷ 換盤機無法在SCSI上認識
÷ 如果在安裝驅動器時布線監視器指示燈不閃爍,請按連接電源線、連
接換盤機接口的順序重新進行連接。
÷ 換盤機不認識驅動器
÷ 請勿在換盤機搬運光盤期間,或記錄器在記錄期間斷開電源。
÷ 換盤機故障
÷ 記錄不良
÷ 重新接通電源時,斷開電源後要等待 10 秒鐘以上后再進行。
4. 關于控制
÷ 請勿在記錄期間從記錄器發送取出光盤的命令(M ove M edium 、
Rezero Unit)。否則可能會發生EC✽ 錯誤,或記錄不良(緩衝欠載
運行)。
5. 關于再搬運
÷ 搬運本機時,請使用購買時的包裝材料,並以直立的狀態搬運。請勿
以橫倒的狀態搬運。
÷ 請勿以安裝驅動器部件、 50 張光盤箱及其他任選件類(除 20 張超光
盤箱)的狀態進行搬運。要搬運任選產品時,請使用購買時的包裝材
料。
÷ 請勿以裝入光盤的狀態搬運光盤箱。
104
<DRC1285>
ChK
÷ 記錄不良
÷ “EC ✽”
(✽:O ∼ F)
為防止問題發生
內
容
可能發生的故障或錯誤
6. 關于對錯誤的應付
÷ E8 ✽ 、 E9 ✽ 、 EF8 、 EF3 的錯誤無法通過換盤機的電源重設定進行
錯誤解除。以系統管理模式打開、關閉門方可進行錯誤解除。包括其
他錯誤、請參照操作說明書第 138 頁。
÷(
“E8 ✽”,“E9 ✽”,
“EF8”,“EF3”
)
(✽:O ∼ F)
7. 關于光盤
÷ 空白光盤或失敗寫入的光盤、沒有進行關閉處理的光盤等無法在讀取
驅動器上使用。
※ 要進行光盤的空白判別時,請使用寫入驅動器。
÷ 讀取驅動器的動作不良
÷ “Set Up NG”錯誤
÷ 請勿在光盤表面上貼紙張或封條。亦勿擦傷標籤面。
※ 要剝離誤貼上的封條等時,如果剝離的痕跡上留下粘接物等,可能
會導致動作不良,請擦拭干淨。此時,應注意不要損傷光盤。
÷ 記錄、重現不良
÷ “E83”,“E99”
÷ 如果光盤上有裂痕、指印、灰塵,則無法進行數據的記錄或重現。拿
取光盤時,注意不要觸摸信號面(光澤面)。夾持兩端或夾持中央孔
和端部。
÷ 記錄、重現不良
÷ 光盤污垢時,用軟布從光盤內周向外周以直線做法擦拭。請勿沿着圓
周擦拭。
※ 擦拭時,請勿使用本公司維修零件 GED-009 型(清潔布)以外的東
西。
÷ 記錄、重現不良
÷ 為穩定的記錄、重現,請使用推薦的光盤。有關推薦的光盤,請到經
銷店或在本公司主頁上確認。
÷ 記錄、重現不良
÷ 本機沒有支援 DVD-R
÷ 不可記錄
8. 關于光盤箱
for Authoring 媒體的記錄。
中
國
語
÷ 要向光盤箱裝入光盤時,請水平裝入。傾斜裝入(左右格高度不同) ÷ “E83”,“E99”
時,有會損壞光盤的可能性。
÷ 請勿使光盤箱開口側朝下。有光盤跳出的可能性。
÷ “E83”
÷ 插入換盤機時,請慢慢插入。用力插入時,由于動作勢頭而有光盤跳 ÷ “E83”
出的可能性。
※ 如果插入時蜂鳴器繼續鳴響,或顯示部顯示出
“E83 disc set NG”
時,先拔出光盤箱,用手按回跳出的光盤,然后重新慢慢插入它。
9. 關於光盤的收藏
÷ 為防止誤插入,要在超光盤箱和光盤箱中收藏光盤時,建議使用郵件
槽。
※ 要在郵件槽的托盤上放置光盤時,需細心放置以免光盤從托盤超
出。
10.關于光盤反轉部件
÷ 要在 DRM-7000 型利用光盤反轉部件(DRM-UF701 型)時,換盤機的固
件修正需要 1.12 以后。以未滿修正 1.12 使用時,可能會成為故障或
光盤損壞的原因,務必更新為修正1.12以后再使用。有關更新事宜,
請向維修服務聯絡單位或經銷店詢問。
※ 在 DRM-3000 型,沒有因修正的限制。
÷ “EC ✽”(✽:O ∼ F)
÷ 其他
105
<DRC1285>
ChK
為防止問題發生
內
11. 關於 DVD-R/RW
驅動部件
DVD-R7783 型
12. 關於 LVD SCSI
介面轉換器
DRM-ULV16 型
容
可能發生的故障或錯誤
÷ 為了使用DVD-R7783型,換盤機固件修正對DRM-7000型和DRM-3000型
均應為 1.25 以後。如果使用 1.25 以前的固件修正,換盤機的器件驅
動器可能無法正常動作。使用前,必須將固件更新為 1.25 以後。
有關固件更新的詳情,請向貴地先鋒維修中心或經銷店詢問。
÷ 換盤機的器件驅動器無法
正常動作。
÷ 裝備了 DVD-R7783 型時,無法使用增設電源部件〔DRM-PW701〕型。
÷ 記錄重放不良
÷ 裝備了 DRM-ULV16 型時,需以如下條件使用 SE SCSI 母線。不能超越
限制使用。
÷ 記錄重放不良
÷ SCSI 通信不良
包括機器內部的全長
母線上能夠聯接的驅動器台數
3 m 及以下
3 台及以下※
※ 按上述條件,1台換盤機能夠安裝的SE驅動器最多為3台。另外,
由於電纜長度的限制,需安裝在背面間 #1 ∼ #3 中。
÷ 裝備了 DRM-ULV16 型時,無法使用增設電源部件〔DRM-PW701〕型。
106
<DRC1285>
ChK
÷ 記錄重放不良
各部名稱及其功能
前面部
前門內部
1
2
3
<操作板>
5
ESC
ENT
6
FUNCTION
4
9
LOCK
UNLOCK
7
POWER
ROBOTICS
BUSY
DRIVE
BUSY
MAILSLOT
OCCUPIED
8
中
國
語
1 20 張超光盤箱
2 操作板
3 郵件槽
4 前門
5 顯示窗(LCD)
如果操作板沒有操作1分鐘,LCD的背景照明自動轉換為省
電模式。
6 操作鍵和開關
用以進行 LCD 的顯示轉換或設定項目的選擇。
要操作時,需要使用鎖定解除鑰匙。
ESC : 使被顯示的畫面成為前面一個階層(前面畫面),
或使動作停止時按下。
|« : 減小數值,或使遊標向下或向左移動。
7 鎖定/解除鎖定鑰匙開關(LOCK/UNLOCK)
插入解除鎖定鑰匙並向右旋轉90 °時,鎖定被解除,能夠
進行操作板的操作。
8 動作指示燈
POWER:
接通電源時發亮。
ROBOTICS BUSY:
光盤搬運中發亮。
DRIVE BUSY:
光盤被搬到驅動器時發亮。
MAILSLOT OCCUPIED:
郵件槽中有光盤時發亮。
9 前面間
»\ : 增大數值,或使遊標向上或向右移動。
ENT : 使被顯示的畫面成為下面一個階層(下面畫面),
DRM-7000 型
光盤箱用:M1 ∼ M7
或使動作開始時按下。
FUNCTION:
DRM-3000 型
光盤箱用:M1 ∼ M3
使換盤機的動作模式成為“系統管理者模式”時按下。
107
<DRC1285>
ChK
各部名稱及其功能
后面部
后門內部
2
1
9
3
4
5
TERM
OFF
POWER
ID
ON
CHANGER
SCSI
OFF
ON
AC IN
6
7
GND
8
1 背面板
用以安裝接插板。
6 換盤機用 SCSI 端子(CHANGER SCSI)
7 電源開關(POWER)
2 后門
3 SE 驅動器用 SCSI 端子
用以接通/斷開換盤機的電源。
8 電源插座(AC IN)
4 SCSI ID 開關(ID)
用以設定換盤機的 SCSI-ID 。
用以連接電源線(務必使用配備的電源線)。
9 背面間
按上面時數字減小,按下面時數字增大。
出廠時設定成 6 。
5 SCSI 終端開關(TERM)
用以進行終端的設定。出廠時已設定成ON ,因此在設置作
業期間保持原樣。在完成 SCSI連接線的連接時,除換盤機
成為 SCSI 母線的終端之外,轉換為 OFF 。
108
<DRC1285>
ChK
DRM-7000 型
光盤箱用:M8 ∼ M15
任選部件用:Bay#1 ∼ Bay#16
DRM-3000 型
光盤箱用:M4 ∼ M7
任選部件用:Bay#1 ∼ Bay#8
設置
關於裝備有 DVD-R7783 型時的驅動器安裝台數
為了充分發揮驅動器的性能,需以如下構成以及室溫使用。
÷ 裝備有 DRM-ULV16 型,用同一母線將 DVD-R7783 型與 DVD-D7563 型或換盤機連接時(見第 110 頁,例 1 , 2 , 3)
DRM-7000
DVD-R7783
1台
2台
3台
4台
DRM-3000
0台
DVD-D7563
DVD-R7783
1台
2台
3台
4台
0台
1台
2台
DVD-D7563
3台
1台
2台
3台
÷ 沒有裝備 DRM-ULV16 型,用另外母線將 DVD-R7783 型與 DVD-D7563 型或換盤機連接時(見第 110 頁,例 4 , 5)
DRM-7000
DVD-D7563
DVD-R7783
1台
2台
3台
4台
DRM-3000
0台
0台
1台
2台
1台
2台
DVD-D7563
3台
4台
5台
DVD-R7783
1台
2台
3台
4台
3台
4台
中
國
語
5台
: 可以在 5℃∼ 35℃的室溫下使用。
: 可以在 5℃∼ 30℃的室溫下使用。
: 不能以本組合使用。
※ 上述為每 1 台換盤機的安裝台數。
關於連接 SCSI 時的限制
※ 有關詳情,請確認“
步驟 2
4. 連接 SCSI 連接線”(第 113 頁)。
A. 裝備有 DRM-ULV16 型時
(LVD SCSI 母線和 SE SCSI 母線為同一母線時,見第 110 頁
■ 電纜連接長度
例 1 ∼例 3)
LVD SCSI 母線
12m 及以下
包括到機器內部的電纜容許全長(連接複數台換盤機時,包括換盤機之間的電纜長度)。
SE SCSI 母線
3m 及以下
每 1 台換盤機的包括機器內部的電纜全長
■ SE 驅動器連接台數
最多 3 台(每 1 台換盤機)
※ 因電纜長度的限制, SE 驅動器需安裝在背面間 #1 ∼ #3 中。
B. 不裝備 DRM-ULV16 型時
(只在 LVD SCSI 母線和 SE SCSI 母線為另外母線或僅 SE SCSI 母線時,見第 110 頁
例 4 ∼例 6)
■ 電纜連接長度(每 1 台主適配器)
LVD SCSI 母線
12m 及以下
包括到機器內部的電纜容許全長(連接複數台換盤機時,包括換盤機之間的電纜長度)。
SE SCSI 母線
6m 及以下 *
包括到機器內部的電纜容許全長(連接複數台換盤機時,包括換盤機之間的電纜長度)。
*SCSI-2
mode
109
<DRC1285>
ChK
設置
SCSI 電纜的連接例
A. 裝備有 DRM-ULV16 型時
〔例 1〕
LVD 線路
SE 線路
1 DRM-ULV16 型
2 SCSI 連接線(LVD)
3 SCSI 連接線(SE)
4 SCSI 連接頭(LVD)
5 LVD 連接板(2 驅動器用)
6 多驅動器接插板
*
SE 器件的 SCSI 終端開關的設定
〔例 2〕
〔例 3〕
B. 不裝備 DRM-ULV16 型時
〔例 4〕
〔例 6〕
〔例 5〕
110
<DRC1285>
ChK
設置
3. 固定腳輪
步驟 1
為使換盤機不至于移動,務必鎖定全部 4 處腳輪。
1. 安裝顛倒防止配件
為防止顛倒, DRM-7000 型在前后左右 4 處, DRM-3000 型在后
側左右 2 處安裝配備的顛倒防止配件。
鎖定
4. 連接電源線
顛倒防止配件
將電源線插入位于換盤機背面的電源插座,然后連接到牆壁電
源插座。
注意:
¶ 顛倒防止配件應首先安裝好。
中
國
語
¶ 顛倒防止配件兼做換盤機后面的端子或電纜類的保護。
¶ 如果不安裝顛倒防止配件而發生顛倒,或后面的端子或電
纜類損壞,則成為保用對象之外。
¶ 在 DRM-3000 型,務必安裝在后側左右。
2. 決定設置場所
換盤機在后面也有門,成為能夠用以拆裝光盤箱或驅動器。為
使后門能夠打開並進行作業,換盤機后面與牆壁之間留下
50cm 以上的間隔。
注意:
務必使用配備的電源線。
請遵循貼在電源線包裝袋上的標籤,使用符合使用地區的
電源線。
上
m以
c
50
111
<DRC1285>
ChK
設置
3. 安裝驅動器
步驟 2
將驅動器安裝在背面間(有指定時在指定的背面間)中。
要設定成能夠動作的狀態時
要設定成本換盤機能夠動作的狀態時,請按下列步驟進行作
業:
1. 接通電源(見第 112 頁)
2. 旋松運輸螺絲(見第 112 頁)
3. 安裝驅動器(見第 112 頁)
4. 連接 SCSI 連接線(見第 113 頁)
5. 安裝光盤箱(見第 114 頁)
(1) 視需安裝任選的接插板。
出廠時標準裝備的接插板安裝在設想在背面間 #1 和 #2 安裝
SE 驅動器的位置安裝。在本位置安裝其他接插板時,需拆卸
它。
十字形螺絲刀
DRM-SN711 型、 DRM-SN721 型時
使用從換盤機取下的螺絲
6. 關閉門(見第 117 頁)
1. 接通電源
接通電源時,前門和后門自動開啟。這是因為運輸螺絲緊固,
並不是故障。
注意:
¶ 直至完成驅動器和光盤箱的安裝,不要關閉門。
¶ 接通電源后門仍不會開啟時,等待至初始化動作結束,而
LCD成為用戶模式(見第117頁),參照“系統管理者模式:
Door(門)子模式(見第 131 頁)”來打開門。
2. 旋松運輸螺絲
DRM-LN721 型、 DRM-LN741 型時
使用附屬的螺絲
(不使用從換盤機取下的螺絲)
打開換盤機的前門時,換盤機內部下側有運輸螺絲。本螺絲用
以在運輸時保護內部機構。
為防止運輸螺絲遺失,運輸螺絲設計成即使旋松也不會拆卸。
運輸螺絲
注意:
¶ 要移動本換盤機時,請緊固運輸螺絲。
¶ 以運輸螺絲旋松狀態關閉兩側的門時,進入機構的初始化
動作。
要繼續設置作業時,有必要重新打開門。請參照“系統管
理者模式:Door(門)子模式(見第 131 頁)
”來打開門。
(2) 安裝驅動器
安裝之前,請在驅動機的背面進行如下設定。(詳情請參照驅
動器的操作說明書。)
¶ SCSI-ID 的設定
在同一 SCSI 母線上,設定成 ID 不會重複。
¶ SCSI 終端化的設定
〈SE SCSI 母線〉
位於SCSI 母線終端的用於驅動器或換盤機的終端開關應設
定成 ON 。
〈LVD SCSI 母線〉
安裝有DVD-R7783型和DRM-ULV16型時,需要進行LVD SCSI
母線的端接。
由於 DVD-R7783 型沒有配備 SCSI 連接頭,因此應購買任選
的連接頭,或應使用DRM-ULV16型附屬的SCSI連接頭(LVD)
來提供 LVD SCSI 母線終端。
112
<DRC1285>
ChK
設置
1 在換盤機的導軌上安放驅動器,並壓下,直至聽到喀嚓聲
而驅動器的鎖定桿倒向“LOCK”一側。
導軌
(3) 換盤機讀取驅動器的 SCSI-ID 。
¶ 如果 SCSI-ID 沒有與其他驅動器重複,蜂鳴器會鳴響一
次。
¶ 與其他驅動器相同的 SCSI-ID 時,蜂鳴器鳴響 3 次,以
發出警告。
驅動器
注意:
¶ 如果連接到分別不同的SCSI母線,則有SCSI的重複也沒有
問題。
¶ 即使SCSI-ID沒有與換盤機內的其他驅動器重複,如果在要
連接的SCSI母線上有相同SCSI-ID的機器(硬磁盤機等),
則需要設定成不同的 SCSI-ID 。
4. 連接 SCSI 連接線
鎖定桿
確認到安裝了全部驅動器,完成了連接后,請進行 SCSI 接口
的布線。
2 連接電源用電纜。
¶ 位于驅動器背面的布線監視器指示燈(橙色)發亮。
¶ 終端開關置於ON位置時,終端指示燈(綠色)也亮起(除
有關 SCSI 連接事宜,見“SCSI 連接說明書”或與本機經銷店
恰商。
DVD-R7783 型)。
注意:
電源用電纜
¶ 主適配器應設定成 ID7 。
¶ LVD SCSI 母線需以 12m 及以下, SE SCSI 母線需以 6m 及以
下使用。(包括換盤機內部布線及換盤機菊花鏈連接時的
換盤機之間的長度。)
但是,裝備有 DRM-ULV16 型時的 SE SCSI 母線應為 3m 及以
下,而能夠連接在該母線上的驅動器台數也成為最多3台。
布線監視器指示燈
(因此, 1 台換盤機能夠裝備的 SE 驅動器成為最多 3 台。另
外,由於電纜長度的限制,需安裝在背面間 #1∼#3中。)
終端指示燈
(DVD-R7783 型為占線指示燈)
¶ 如果連接SE驅動器時SCSI連接線的連接器多餘,將電纜先
端部的連接器連接到端接的驅動器,使位於中間的連接器
3 連接換盤機接口電纜。
¶ 布線監視器指示燈以約 2 秒鐘周期閃爍。
多餘。(見第 110 頁,例 1 , 3 , 4 , 6)
¶ 換盤機的SCSI終端開關在出廠時設定成ON。當換盤機不是
SCSI 母線的終端 , 必須將 SCSI 終端開關設定成 OFF 。(見
第 110 頁,例 1 , 3 , 4 , 6)
布線監視器指示燈
¶ 換盤機不能認識 SCSI 連接線的連接或 SCSI-ID 的分配錯
誤。請在設置作業的最后,重新起動主計算機來確認有無
C
X
g
正確認識驅動器或換盤機。
¶ 要與主計算機連接時,換盤機、主計算機均需斷開電源後
再進行連接。連接結束後,先接通換盤機的電源,然後接
通主計算機的電源。
換盤機接口電纜
注意:
換盤機接口電纜請連接到對應安裝了驅動器的間的端子。
(端
子貼有對應端子的間號碼標籤。)
誤連接到相鄰的端子時,可
能會損傷光盤。
113
<DRC1285>
ChK
中
國
語
設置
¶ 如果沒有聯接換盤機接口電纜,換盤機將無法識別驅動
器。請確認驅動器後面的布線監視器指示燈。
→ 如亮起,請確認換盤機接口電纜有無正確連接。
→ 如熄滅,請確認電源用電纜的連接。要重新連接時,請
在連接電源用電纜後再連接換盤機接口電纜。
¶ 不管驅動器被認識,如果驅動器的型號名稱不被顯示於LCD
的下段,需拔除全部 3 條電纜,然後重新連接各電纜。
拔除電纜的順序:
1. SCSI 接口電纜
2. 換盤機接口電纜
注意:
¶ 使標籤面朝上裝入。
¶ 水平裝入光盤。傾斜着裝入時,可能會損傷光盤。
¶ 不要擦傷光盤信號面。
¶ 以解除鎖定的狀態使光盤箱朝下時,可能會有光盤落下
的情況。
4 將光盤箱安裝在換盤機中。
拿着光盤箱的手柄並沿着換盤機內的導軌插入。
推光盤箱直至碰到盡頭,然后邊推手柄邊向左側扳倒,以
使鎖定銷嵌入換盤機內壁上的孔中。
3. 電源用電纜
連接的順序:
例:安裝在前面間
1. 電源用電纜
2. 換盤機接口電纜
3. SCSI 接口電纜
鎖定銷
孔
5. 安裝光盤箱
在換盤機內容納光盤有如下方法:
(1)預先在標準式50張光盤箱內裝入光盤后安裝在換盤機中。
導軌
(2)預先在 20 張超光盤箱內裝入光盤后安裝在換盤機中。
(3)操作操作板,從郵件槽向所指定光盤號碼的槽搬運光盤。
(4)按照主計算機的指示,從郵件槽裝入光盤。
(5)按照主計算機的指示,將裝入光盤的20張超光盤箱安裝在
換盤機中。
¶ 如果換盤機沒有接通電源,則無法裝入或取出20 張超光盤
箱。
¶ 方法(3)∼(5)是在換盤機能夠動作后的操作。預先將空的光
盤箱安裝在換盤機中。
≠
要在鎖定式50 張光盤箱內裝入光盤時,利用本方法進行。
請參照“系統管理者模式:Mailslot 子模式(見第 128
頁)
”。
¶ 由于方法(4)和(5)利用換盤機控制軟件的功能,請參照所使
用軟件的操作說明書。
(1) 預先在標準式 50 張光盤箱內裝入光盤后安裝在換盤機。
1 向左旋轉解除旋鈕 90 °來解除鎖定。
手柄
2 裝入光盤。
3 向右旋轉解除旋鈕 90 °來鎖定光盤。
安裝在背面間也按相同要領進行。背面光盤箱正確的安裝
位置在相當深的部位。
要從換盤機取出光盤箱時,朝自己方向拉起手柄並拉出。
解除旋鈕
解除鎖定
114
<DRC1285>
ChK
標籤面
鎖定
設置
光盤箱安裝在換盤機中時,其光盤箱固有的 I D 被自動讀
4 將光盤箱安裝在換盤機中。
取,而被顯示于 LCD 上數秒鐘。
推入中途即被自動拉進機內。
取出光盤箱時也會有顯示出現。
ES
C
EN
FU
如果這些顯示交替出現,意味光盤箱沒有被正確安裝。請
再次確認光盤箱的安裝狀態。
T
NC
TIO
N
LO
CK
UN
LO
CK
PO
WER
RO
BO
BU TICS
SY
DR
IV
BU E
SY
MA
OCIL SL
CU OT
PIED
(2) 預先在 20 張超光盤箱內裝入光盤后安裝在換盤機中。
1 向左旋轉解除旋鈕 90 °來解除鎖定。
2 裝入光盤。
超光盤箱安裝在換盤機中時,顯示超光盤箱固有的ID 和鎖
3 向右旋轉解除旋鈕 90 °來鎖定光盤。
定機構的操作履歷。
中
國
語
≠
如果不能讀取 ID ,則被自動排出,請試圖再次插入。
解除旋鈕
標籤面
解除鎖定
鎖定
注意:
當安裝有超光盤箱時,請參照“系統管理者模式:Hyper
(超光盤箱)子模式(見第 129 頁)
”來取出超光盤箱。
注意:
¶ 使標籤面朝上裝入。
¶ 水平裝入光盤。傾斜着裝入時,可能會損傷光盤。
¶ 不要擦傷光盤信號面。
¶ 以解除鎖定的狀態使光盤箱朝下時,可能會右光盤落下
的情況。
115
<DRC1285>
ChK
設置
換盤機內部的光盤容納場所(槽)有序列號碼被分配。即使沒有裝入光盤箱也被分配,因此以后追加光盤箱,槽號碼不會變化。
DRM-7000 型
槽號碼
(光盤號碼)
光盤容納場所
槽號碼
(光盤號碼)
光盤容納場所
槽 20
|
槽1
#770
|
#751
hyp-20
|
hyp-01
光盤箱間 15
M15
槽 50
|
槽1
#750
|
#701
M15-50
|
M15-01
光盤箱間 7
M7
槽 50
|
槽1
#350
|
#301
M7-50
|
M7-01
光盤箱間 14
M14
槽 50
|
槽1
#700
|
#651
M14-50
|
M14-01
光盤箱間 6
M6
槽 50
|
槽1
#300
|
#251
M6-50
|
M6-01
光盤箱間 13
M13
槽 50
|
槽1
#650
|
#601
M13-50
|
M13-01
光盤箱間 5
M5
槽 50
|
槽1
#250
|
#201
M5-50
|
M5-01
光盤箱間 12
M12
槽 50
|
槽1
#600
|
#551
M12-50
|
M12-01
光盤箱間 4
M4
槽 50
|
槽1
#200
|
#151
M4-50
|
M4-01
光盤箱間 11
M11
槽 50
|
槽1
#550
|
#501
M11-50
|
M11-01
光盤箱間 3
M3
槽 50
|
槽1
#150
|
#101
M3-50
|
M3-01
光盤箱間 10
M10
槽 50
|
槽1
#500
|
#451
M10-50
|
M10-01
光盤箱間 2
M2
槽 50
|
槽1
#100
|
#051
M2-50
|
M2-01
光盤箱間 9
M9
槽 50
|
槽1
#450
|
#401
M9-50
|
M9-01
光盤箱間 1
M1
槽 50
|
槽1
#050
|
#001
M1-50
|
M1-01
光盤箱間 8
M8
槽 50
|
槽1
#400
|
#351
M8-50
|
M8-01
超光盤箱
Hyper
注意:
槽號碼最大有 #770 ,但並不意味能夠容納 770 張光盤。
DRM-3000 型
槽號碼
(光盤號碼)
光盤容納場所
槽號碼
(光盤號碼)
光盤容納場所
槽 20
|
槽1
#370
|
#351
hyp-20
|
hyp-01
光盤箱間 7
M7
槽 50
|
槽1
#350
|
#301
M7-50
|
M7-01
光盤箱間 3
M3
槽 50
|
槽1
#150
|
#101
M3-50
|
M3-01
光盤箱間 6
M6
槽 50
|
槽1
#300
|
#251
M6-50
|
M6-01
光盤箱間 2
M2
槽 50
|
槽1
#100
|
#051
M2-50
|
M2-01
光盤箱間 5
M5
槽 50
|
槽1
#250
|
#201
M5-50
|
M5-01
光盤箱間 1
M1
槽 50
|
槽1
#050
|
#001
M1-50
|
M1-01
光盤箱間 4
M4
槽 50
|
槽1
#200
|
#151
M4-50
|
M4-01
超光盤箱
Hyper
注意:
槽號碼最大有 #370 ,但並不意味能夠容納 370 張光盤。
116
<DRC1285>
ChK
設置
6. 關閉門
請確認各組件的安裝和電纜類的連接已完成。
關閉前門和后門,即開始機構的初始化動作。
初始化動作結束時, LCD 上會有如下顯示出現:
上層表示光盤搬運機構的動作情況,下層表示各驅動器內有無
光盤以及光盤號碼。
對于驅動器,從下面按序分配驅動器號碼。
注意:
如果所安裝的驅動器數和驅動器號碼的最大值不同,請打開后
門並確認驅動器的電源用電纜以及換盤機接口電纜的連接。
要打開門時,請參照“系統管理者模式:Door(門)子模式
(見第 131 頁)
”。
中
國
語
117
<DRC1285>
ChK
操作
本換盤機的動作模式有用戶模式和系統管理者模式。通過區別
各模式的操作,可以防止操作板的操作與來自主計算機的控制
的相互干擾或矛盾、衝突等的發生。
系統管理者模式
使用本換盤機操作板的操作基本上只允許帶有鑰匙的系統管理
者進行。要進入系統管理者模式時,需要進行如下操作:
1. 在操作板上的鑰匙開關中插入鎖定解除鑰匙,並轉動90 °
用戶模式
來設定成 UNLOCK 的位置。
結束了設置作業的換盤機將成為用戶模式,而可以通過主計算
機的換盤機控制軟件或數據庫管理軟件進行控制。在用戶模式
正常動作時, LCD 將以 1 秒鐘周期顯示現在的情況。
ESC
ENT
FUNCTION
LOCK
UNLOCK
POWER
ROBOTICS
BUSY
DRIVE
BUSY
LOCK
MAIL SLOT
OCCUPIED
UNLOCK
≠
2. 按下 FUNCTION 鍵。
成為系統管理者模式時, LCD 上會有如下顯示:
≠
≠
系統管理者模式分為 8 個子模式。
信息系的子模式
≠
:
:
在用戶模式,換盤機由主計算機的指示動作。
本子模式具有讀取換盤機現在的設定或記憶在內部的信息的功
能。系統管理者模式可不妨礙通過主計算機進行的換盤機的控
制而獲得各種信息。
¶ Inquiry 子模式(見第 120 頁)
Config 子模式(見第 120 頁)
Option 子模式(見第 122 頁)
¶ Info 子模式(見第 126 頁)
動作系的子模式
驅動光盤搬運機構或光盤箱排出機構,確認光盤的換裝或確認
槽內有無光盤的子模式。進入該子模式時,來自主計算機的對
換盤機的動作要求被無視。
¶ Mailslot 子模式(見第 128 頁)
Hyper 子模式(見第 129 頁)
Probe 子模式(見第 130 頁)
¶ Door 子模式(見第 131 頁)
118
<DRC1285>
ChK
操作
注意:
對于動作系子模式的利用,設定成可以從主計算機側禁止。儘
管被禁止也可以進入系統管理者模式,但只能利用信息系子模
式。
系統管理者模式的設定畫面安如下要領轉換:
按下 » 鍵
按下 » 鍵
Inquiry 子模式
按下 « 鍵
Auto probing 功能
按下 » 鍵
按下 « 鍵
Config 子模式
按下 « 鍵
按下 « 鍵
Hot start 功能
按下 » 鍵
Option 子模式
按下 » 鍵
按下 ENT 鍵
按下 ENT 鍵來選擇範疇,然后
再次按下 ENT 鍵。
Info 子模式
按下 « 鍵
按下 » 鍵
按下 ENT 鍵來選擇動作,
然后再次按下 ENT 鍵。
Mailslot 子模式
按下 « 鍵
按下 » 鍵
Hyper 子模式
按下 « 鍵
按下 » 鍵
Probe 子模式
按下 « 鍵
按下 » 鍵
按下 » 鍵
Door 子模式
按下 « 鍵
按下 « 鍵
按下 » 鍵
Auto eject 功能
按下 « 鍵
按下 » 鍵
Hyper I/E 功能
按下 « 鍵
按下 » 鍵
Alert buzzer 功能
按下 « 鍵
中
國
語
按下 » 鍵
Free message 功能
按下 « 鍵
按下 » 鍵
Inquiry change 功能
按下 « 鍵
按下 » 鍵
Fan NG message 功能
按下 « 鍵
注意:
¶ 請勿改變
Inquiry change 功能的設
定。出廠時,成為DRM-7000(DRM-7000型
時)或 DRM-3000(DRM-3000 型時)。
在 Inquiry 子模式中按下 ESC 鍵時,由系統管理者模式返回
用戶模式。
¶ 請勿改變 Fan NG message 功能的設
定。出廠時成為 ON 。
Log
Contents
Run-statistics
Swap
Remove
Add
119
<DRC1285>
ChK
操作
Inquiry(查詢)子模式
顯示本換盤機固有的信息的模式。顯示與主計算機通過發行
SCSI 的 INQUIRY(查詢)命令來獲得的數據相同的數據。以
“ID=”顯示的,就是本換盤機的 SCSI-ID 。
Config(狀態)子模式
本模式顯示光盤箱間和背面間的狀態,可以確認安裝在本換盤
機的組件是否被正確認識。
按下 ENT 鍵時,將成為間的選擇畫面。
按下 ENT 鍵時,顯示本換盤機的型號名稱和設備 ID(序列號
碼)。
按下 « 鍵或 » 鍵來移動遊標並選擇光盤箱間或背面間。
選擇了背面間時
按下 ESC 鍵時,回到前面一個階層。
按下 ENT 鍵時,顯示最初安裝在背面間 #1 中的組件。
¶ 間號碼通過按下 » 鍵或 « 鍵來選擇。
要變更換盤機的 S C S I - I D 時,請使用位于背面部左下方的
SCSI-ID 開關進行設定。
操作 SCSI-ID 開關時,成為如下顯示(從 6 變更為 5 時):
按下 » 鍵或 « 鍵
≠
再次接通換盤機的電源,或從主計算機側進行 SCSI 母線復位
時, SCSI-ID 被變更為 SCSI-ID 開關的設定值。
按下 » 鍵或 « 鍵
≠
按下 » 鍵或 « 鍵
≠
※ DRM-7000 型的顯示例。
¶ 如果被安裝的組件為驅動器,可以顯示SCSI-ID、終端開關
的設定,及該驅動器固有的設備 ID 。
在裝有驅動器的間被顯示時,按下 ENT 鍵。
120
<DRC1285>
ChK
操作
¶ 如果驅動器內裝有光盤,亦可顯示光盤號碼。
請按下 ENT 鍵。
在背面側,由于有驅動器等被安裝,因此有不能當作光盤
箱間使用的情況。
這時顯示成為如下所示:
要確認光盤箱時,按下ESC鍵來回到間的選擇畫面,並選擇
光盤箱間。
※ DRM-7000 型的顯示例。
¶ 要確認光盤箱的類型時,請按下 ENT 鍵。
注意:
每次按下ESC鍵,會回到前面一個階層,但如果按下過多,會
回到用戶模式。
另外,以 SCSI-ID 10 ∼ 15 使用 DVD-R7783 型時,以 A ∼ F 被
顯示於 LCD 上。
SCSI ID
LCD 顯示
1∼9
1∼9
10
A
11
B
12
C
13
D
14
E
15
F
¶ 如果在光盤箱間 15(M15)的畫面按下 » 鍵,則回到超光盤
箱的顯示。
要確認驅動器時,按下ESC鍵來回到間的選擇畫面,並選擇背
面間。
選擇了光盤箱間時:
注意:
¶ 按下 ENT 鍵時,最初會顯示 20 張超光盤箱的 ID 。
每次按下ESC鍵,會回到前面一個階層,但如果按下過多,會
回到用戶模式。
如果超光盤箱沒有被安裝,顯示如下:
¶ 如果在超光盤箱顯示時按下 » 鍵,從光盤箱間的 1 按序地
顯示光盤箱 ID 。
按下 » 鍵
≠
如果光盤箱沒有被安裝,則顯示如下:
※ DRM-7000 型的顯示例。
121
<DRC1285>
ChK
中
國
語
操作
Option(任選)子模式
本換盤機的部分功能可按照用戶系統的要求進行選擇。
請系統管理者適當設定任選功能,以便能夠有效利用換盤機控
制軟件或數據管理軟件的功能。另外,依換盤機的設置場所,
按下 ENT 鍵
≠
對安全水平或發生錯誤時的動作規格的要求也有不同,因此,
請考慮使用環境進行設定。
按下 | 鍵來選擇 ON
≠
在 Option 子模式,可以進行如下任選功能的設定:
1.Auto probing 功能(出廠時為 OFF)
2.Host start 功能 (出廠時為 OFF)
3.Auto eject 功能 (出廠時為 ON)
4.Hyper I/E 功能
(出廠時為 ON)
5.Alert buzzer 功能(出廠時為 ON)
6.Free message 功能(出廠時為 OFF)
按下 ENT 鍵
≠
設定了 OFF 時,顯示“Auto probing is prohibited”。
1. Auto probing(自動檢測)功能
即使將 Auto
對于打開門並安裝的標準式 50 張光盤箱或在換盤機外部容納
裝入超光盤箱或進行復位動作, Auto
動作。
光盤的 20 張超光盤箱,在換盤機內部確認到各槽有無裝入光
盤后再使用。
通常由主計算機的換盤機控制軟件進行本作業,但是如果希望
在與主計算機連接之前完成本作業,或換盤機控制軟件沒有支
持本作業,則使用 Probe 子模式(見第 130 頁)。但是,在
Probe 子模式,需要一個一個指定要確認的光盤箱。
Auto probing 功能是換盤機自動檢測需要確認的光盤箱,
實行光盤有無確認動作的功能。
probing 功能由 OFF轉換為ON ,直至開閉門、
probing 功能也不會
當 Auto probing 功能動作時,按序檢查需要確認的光盤箱
的各槽是“full”
(滿)還是“empty”
(空)。
要中止 Auto
probing 動作是,將鑰匙開關置于 UNLOCK 位
置並按下 ESC 鍵。
注意:
¶ 檢查 1 個 50 張光盤箱需要約 2 分鐘時間。
¶ 在 Auto probing 動作中,不會接受來自主計算機的控
制。
122
<DRC1285>
ChK
操作
2. Hot start(熱啟動)功能
3. Auto eject(自動排出)功能
成為在光盤裝入驅動器內的狀態斷開換盤機的電源時,下一次
在網絡環境,有大容量換盤機相鄰服務器設置,而與用戶終端
接通換盤機的電源時,該光盤被自動向原來的槽退還(在SCSI
母線復位,不會進行光盤的自動退還)。
隔絕的情況。
在這種環境,如果用戶使用換盤機控制軟件來作出將換盤機內
但是,只要保持被頻煩存取的光盤裝入驅動器的狀態,即可在
剛剛接通電源之后進行該光盤的讀取(Hot start)。
的光盤搬運到郵件槽的指示,那麼,為了取出光盤,用戶需要
到換盤機設置場所。而在用戶站在換盤機前面之前,裝入光盤
為此,設定成能夠選擇
“接通電源時不強制自動退還驅動器內
的光盤”的規格。
的郵件槽先開啟。
這樣,除了換盤機附近有系統管理者常駐的場合外,如同缺乏
安全性。這種情況在超光盤箱的排出時也相同。
通過將 Auto eject 功能設定成 OFF ,可以對郵件槽的托盤
按下 ENT 鍵
自動開啟或超光盤箱的自動排出加以限制,保持一定水平的安
全。
≠
按下 ENT 鍵
按下 | 鍵來選擇 ON
≠
按下 ENT 鍵
≠
按下 \ 鍵來選擇 OFF
≠
中
國
語
≠
按下 ENT 鍵
≠
設定了 OFF 時,顯示“Hot start is prohibited”。
注意:
如果換盤機控制軟件成為“將光盤強制退還”的規格,則 Hot
start 功能不起作用。
設定了 ON 時,顯示“Auto eject is activated”。
即使在 Auto eject 功能設定成 OFF 的狀態按來自主計算機
的指示向郵件槽搬運光盤,郵件槽的托盤也不會自動開啟。
LCD 上會有如下顯示:
123
<DRC1285>
ChK
操作
即使從主計算機接受了排出超光盤箱的指示,超光盤箱也不被
自動排出。
LCD 上會有如下顯示:
按下 ENT 鍵
≠
要按下ENT鍵來使郵件槽或超光盤箱動作時,鑰匙開關必須設
按下 \ 鍵來選擇 OFF
≠
定于 UNLOCK 位置。因為直至用戶帶著鎖定解除鑰匙到換盤機
設置場所,郵件槽或超光盤箱不會動作,因此這期間的安全得
到確保。
按下 ENT 鍵
4. Hyper I/E(超輸入/輸出)功能
≠
超光盤箱基本上當作能夠裝入 2 0 張光盤的光盤箱使用,但
是,為了有效利用不需打開門也可以取出光盤的特長,也可以
當作巨大的郵件槽使用。
按 SCSI 規定的換盤機將構成內部的元素分為 4 種類型:
1. 媒體搬運元素(Robotics)
2. 存儲元素(Slots)
3. 輸入/輸出元素(Mailslot)
4. 數據傳送元素(Drive)
通常的(光盤箱裝備的)槽和郵件槽被定義為不同類型的元
素,但是通過使 Hyper I/E功能設定成ON,也可以使超光盤
箱如同郵件槽加以控制。
124
<DRC1285>
ChK
設定了 ON 時,顯示“Hyper I/E is activated”。
注意:
即使是 Hyper I/E功能設定成ON,超光盤箱維持作為存儲元
素的屬性,因此換盤機控制軟件可以不需當作輸入/輸出元素
來使用。
但是,如果使用不承認存在復數輸入/輸出元素的,或有誤動
作可能性的換盤機控制軟件,將Hyper I/E功能設定成OFF。
操作
5. Alert buzzer(報警蜂鳴器)功能
6. Free message(自由信息)功能
本換盤機的操作板內裝有蜂鳴器,可視需使蜂鳴器鳴響。
按來自主計算機的指示進行光盤的裝入和取出時,LCD將顯示
下面應進行的操作。
¶ 換盤機發生故障時:
直至用戶按下操作板的按鍵為止,繼續鳴響。
例:使用郵件槽來進行光盤的裝入或取出
(Option 子模式:Auto eject 功能 OFF 時)
如果只是LCD或主計算機上的報警顯示就足夠,則設定成不
使報警蜂鳴器(Alert
buzzer)鳴響。
按下 ENT 鍵
≠
到此為止的LCD的顯示在裝入或取出光盤時也是共同,但是因
為在郵件槽開啟后進行的作業是按主計算機的指示進行的,因
此無法顯示換盤機的 LCD 。
Free message 功能設定成ON時,可以從主計算機改寫顯示
于 LCD 的內容,因此可以顯示操作步驟的指示。
按下 \ 鍵來選擇 OFF
≠
另外,可以任意顯示控制換盤機的應用程序名稱或正在寫入光
盤中的注意等由主計算機側所管理的信息。
按下 ENT 鍵
≠
按下 ENT 鍵
設定了 ON 時,顯示“Alert buzzer is activated”。
按下 | 鍵來選擇 ON
中
國
語
≠
≠
但是,下面的蜂鳴器為對作業者輸入的應答信息,因此無法使
蜂鳴器不鳴響。
¶ 打開后門進行驅動器安裝作業時:
由于在前面側的LCD監視作業情況有困難,因此通過蜂鳴器
來告知作業在適當地進行。
按下 ENT 鍵
≠
¶ 操作板的操作鍵無效時:
蜂鳴器在按下按鍵期間鳴響。
設定了 OFF 時,顯示“Free message is prohibited”。
即使 Free
message 功能設定成 ON ,如果主計算機不發送
任何信息,則換盤機自己決定在 LCD 上顯示的內容。
125
<DRC1285>
ChK
操作
¶ Import-log(輸入記錄)
Info(信息)子模式
本換盤機在內部非易失性存儲器中存儲對系統管理者日常維護
作業重要的數據。 Info 子模式是讀取該數據的模式。
按序顯示在 Mailslot 子模式(見第 128 頁)新容納在光
盤的槽號碼的功能。
不僅顯示以“Mailslot 子模式:Add”所追加的光盤,而
且顯示以“Mailslot 子模式:Swap”換裝的光盤。新安
裝的標準式50 張光盤箱等作為以箱為單位容納而被總括顯
示。
按下 ENT 鍵時,成為選擇要讀取數據的範疇的顯示。
按下 « 鍵
≠
移動遊標來選擇範疇並按下 ENT 鍵。
Log(記錄)
按下 « 鍵
≠
讀取錯誤記錄和輸入記錄的數據。
移動遊標來選擇“Error-log”或“Import-log”並按下
ENT 鍵。
※ DRM-7000 型的顯示例。
Contents(目錄)
¶ Error-log(錯誤記錄)
將換盤機所檢測的各種故障的履歷從最新的錯誤按序編號
到 32 號並記憶下來。
移動遊標來選擇錯誤號碼並按下ENT鍵時,顯示該錯誤代碼
的說明文章。
再按下 ENT 鍵時,將顯示發生該錯誤時的詳細信息。
讀取光盤箱有關槽的信息。
按下 « 鍵
≠
按下 » 鍵
±
※ DRM-7000 型的顯示例。
按下 ENT 鍵
≠
按下 ENT 鍵
≠
126
<DRC1285>
ChK
“Uncertain”表示換盤機沒有確認到有無光盤的槽數
操作
Run-statistics(動作統計)
讀取動作時間和動作次數的數據。
¶ Number of moves(動作次數)
按下 « 鍵和 » 鍵來顯示下面所示 4 個項目的動作次數。
Elevation done(昇降動作):
昇降動作的次數。該數據對掌握昇降系機構的維護時期有
效。
Load/Unload done(裝入取出動作):
移動遊標來選擇
“Work-time
sum”或“Number of moves”
並按下 ENT 鍵。
¶ Work-time sum(動作時間)
“PowerOn-time”顯示換盤機的總通電時間。
將光盤從槽或驅動器取出或裝入的裝載機構的動作次數。
將指定的槽的光盤搬運到指定的驅動器時,通常加2個計數
一起計算。本數據對掌握裝載機構的維護時期有效。
Mailslot driven(郵件槽驅動次數):
郵件槽的利用次數,以打開/關閉動作加 1 個計數一起計
算。
Hyper driven(超光盤箱換裝次數):
20 張超光盤箱的換裝次數。以排出/裝入動作加 1 個計數
按下 ENT 鍵
一起計算。
≠
按下 « 鍵
≠
“Drive
按下 » 鍵
±
work-time”將顯示內裝各驅動器的累計動作時間。
按下 ENT 鍵
按下 « 鍵
按下 » 鍵
≠
±
按下 « 鍵
≠
按下 » 鍵
±
按下 « 鍵
按下 » 鍵
≠
±
中
國
語
≠
按下 » 鍵
≠
按下 » 鍵
≠
以“Drive work-time”顯示的驅動器的動作時間由驅動
器固有的device-ID加以管理,因此即使改變驅動器的安
※ 使用光盤反轉部件[DRM-UF701]型時
裝位置也會經常顯示正確的數值。
127
<DRC1285>
ChK
操作
Mailslot(郵件槽)子模式
如果指定的槽中沒有光盤,則托盤開啟而會有如下顯示:
使用郵件槽和操作板來更換、取出和追加光盤的模式。
注意:
為了避免產生與數據庫的內容不配合,光盤的裝入和取出通常
在主計算機的控制之下進行,但是對于系統管理者允許在本模
式自由的光盤裝入和取出。但是,系統管理者需要記錄移動了
光盤的槽並視需維護數據庫。(追加了光盤的槽號碼可利用
¶ 將要更換的光盤安放在托盤上並按下 ENT 鍵。
托盤被拉進機內,而顯示轉換為如下,光盤被搬運到所指
定的槽。
Info 子模式的 Import-log 予以確認。)
當光盤的更換結束時,成為“Swap”的最初畫面,並顯示符
合條件的下一個槽號碼。
按下 ENT 鍵時 , 顯示“更換、取出、追加光盤”的動作選擇菜
要結束“Swap”時,請按下 ESC 鍵。
單。請移動遊標來選擇菜單並按下 ENT 鍵。
Remove(取出光盤)
Swap(更換光盤)
¶ 按下»鍵或«鍵來指定希望取出的光盤的槽號碼並按下ENT
¶ 按下»鍵或«鍵來指定希望更換的光盤的槽號碼並按下ENT
鍵。
(裝有光盤的槽的號碼和未確認有無光盤的槽的號碼按序被
顯示。)
如果指定的槽中有光盤,則將該光盤搬運到郵件槽而托盤
鍵。
(
“Remove”
只以已確認有光盤裝入的槽為對象,因此如果沒
有符合該條件的槽,即使按下ENT鍵也不會有顯示變化。)
將指定的光盤搬運到郵件槽而托盤開啟,並成為如下顯
示:
¶ 取出光盤並按下 ENT 鍵來關閉托盤。
開啟,並成為如下顯示:
當光盤的取出結束時,成為“Remove”的最初畫面,並顯示符
合條件的下一個槽號碼。
要結束“Remove”時,請按下 ESC 鍵。
128
<DRC1285>
ChK
操作
Add(追加光盤)
Hyper(超光盤箱)子模式
用以排出 20 張超光盤箱的模式。本換盤機不具備排出專用的
按鍵,因此通過進入本模式可以將ENT鍵當作超光盤箱的排出
用按鍵使用。
¶ 按下 » 鍵或 « 鍵來指定希望追加光盤的槽號碼並按下 ENT
鍵。
(
“Add”只以已確認沒有光盤裝入的槽為對象,因此如果沒
有符合該條件的槽,即使按下ENT 鍵也不會有顯示變化。)
郵件槽的托盤開啟,出現如下顯示:
¶ 將要追加的光盤安放在托盤上並按下 ENT 鍵。
托盤被拉進機內,顯示轉換為如下,光盤被搬運到所指定
的槽。
當光盤的追加結束時,成為“Add”的最初畫面,並顯示符合
條件的下一個槽號碼。
要結束“Add”時,請按下 ESC 鍵。
注意:
如果在“Add”無法追加光盤,請以“Swap”來追加光盤。
¶ 按下ENT鍵時,確認超光盤箱的光盤有無被搬運到驅動器,
如果光盤在驅動器內,成為如下顯示:
將驅動器內的光盤退還超光盤箱的權限在于主計算機。請
回到用戶模式,並從主計算機發出退還光盤的指示。
當超光盤箱的全部光盤齊全時,顯示成為如下:
中
國
語
¶ 按下 ENT 鍵時成為如下顯示,而超光盤箱被排出。
≠
要以不更換超光盤箱而以取出的狀態結束該模式時,請按下
ESC 鍵 3 次,回到用戶模式。
129
<DRC1285>
ChK
操作
要更換超光盤箱時,請裝入新的超光盤箱。超光盤箱從中途由
電動機拉進機內,因此請勿施加過度的力量。
Probe(檢測)子模式
打開門后裝入的標準式 50 張光盤箱,或在換盤機外部容納光
盤的 20 張超光盤箱經過在換盤機內部確認各槽中有無裝入光
盤后再使用。
通常由主計算機的換盤機控制軟件進行本作業,但是如果希望
當安裝了超光盤箱時,顯示超光盤箱固有的 ID 和鎖定機構的
操作履歷。
在與主計算機連接之前完成本作業,或換盤機控制軟件沒有支
持本作業,則使用 Probe 子模式。
沒有解除鎖定機構的跡象時的顯示:
有解除鎖定機構的跡象時的顯示:
如果不能讀取 ID ,將被自動排出,請再次試圖裝入。
¶ 按下 ENT 鍵時,按光盤箱間號碼的順序顯示被安裝的光盤
箱。
¶ 按下 » 鍵或 « 鍵來選擇光盤箱並按下 ENT 鍵。
從該光盤箱的第一個槽按序確認有無光盤。
≠
≠
≠
:
≠
結束全部 50 個槽的確認時,成為確認是否繼續進行的顯示。
要繼續時選擇“Yes”,要結束時選擇“No”並按下 ENT 鍵。
130
<DRC1285>
ChK
操作
在 Probe 子模式,與 50 張光盤箱相同, 20 張超光盤箱也可以
確認槽內有無光盤。
只要一次實行Probe子模式,除非取出該光盤箱,沒有必要重
新確認有無光盤。
Door(門)子模式
為換裝 50 張光盤箱、更換驅動器、進行追加等而打開門的模
式。
要打開門時,換盤機內的全部光盤必須回到光盤箱的槽或郵件
槽中。
系統管理者在主計算機上確認驅動器的利用情況,然后進行作
業的停止和光盤退還操作。
¶ 按下 ENT 鍵時,會確認光盤有無搬運到驅動器。
如果光盤搬運到驅動器,會出現如下顯示:
如果有此顯示出現,按下ESC鍵來回到用戶模式,從主計算
機發出指示並退還全部光盤。
確認到光盤不在驅動器中時,則成為如下顯示,移動遊標
來選擇要打開的門。
¶ 按下 ENT 鍵時,所指定的門開啟。
注意:
門開啟時,自動回到用戶模式。要實行其他子模式時,請按下
FUNCTION 鍵來重新進入系統管理者模式(見第 118 頁)。
131
<DRC1285>
ChK
中
國
語
操作
追加驅動器
為換盤機內裝用所設計的全部驅動器能夠簡易進行追加。
標準裝備的電源裝置具備可供安裝在背面間 #1 ∼ #8 的 8 台驅
動器使用的容量,但是要在 DRM-7000 型對背面間 #9 ∼ #16 追
驅動器追加步驟
1. 進入系統管理者模式並以 Door 子模式打開后門。
LCD 成為如下顯示:
加驅動器時,需要任選的增設電源裝置。
有關靜電的注意
2. 有安裝接插板的必要時,首先安裝它。
要在本換盤機追加驅動器或其他任選裝置時,切忌觸摸各
連接端子部分。
另外,先讓身體的一部分接觸到金屬部后進行追加作業。
十字形螺絲刀
DRM-SN711 型、 DRM-SN721 型時
使用從換盤機取下的螺絲
注意:
¶ 如果要在追加、更換驅動器時拔除現有驅動器的電纜,請
按與連接相反的步驟進行。
1. 拔除 SCSI 接口電纜。
2. 拔除換盤機接口電纜。
3. 拔除電源用電纜。
¶ SCSI 終端化的設定
〈SE SCSI 母線〉
現有驅動器被終端化而要在相同的SCSI 母線的延長上追加
驅動器時,應使追加的驅動器終端化。此時,現有驅動器
的終端開關要設定成 OFF 。
DRM-LN721 型、 DRM-LN741 型時
使用附屬的螺絲
(不使用從換盤機取下的螺絲)
〈LVD SCSI 母線〉
由於 DVD-R7783 型沒有裝備 SCSI 連接頭,因此沒有 DVDR7783型之下的設定。因此,必須購買任選的連接頭,或使
用 DRM-ULV16 型附屬的 SCSI 連接頭(LVD)來提供 LVD SCSI
母線端接。
3. 在換盤機的導軌上安放驅動器,並壓下,直至聽到喀嚓聲
而驅動器的鎖定桿倒向“LOCK”一側。
導軌
驅動器
鎖定桿
132
<DRC1285>
ChK
操作
4. 連接電源用電纜。
如果不易進行作業,請拆卸其他驅動器的SCSI接口電纜。
注意:
¶ 如果連接到分別不同的 SCSI 母線,則有 SCSI-ID 的重複也
¶ 位于驅動器背面的布線監視器指示燈(橙色)發亮。
¶ 終端開關置於ON位置時,終端指示燈(綠色)也亮起(除
沒有問題。
¶ 即使SCSI-ID沒有與換盤機內的現有驅動器重複,如果在要
DVD-R7783 型)。
連接的SCSI母線上有相同SCSI-ID的機器(硬磁盤機等),
則需要設定成不同的 SCSI-ID 。
電源用電纜
7. 連接 SCSI 接口電纜
如果在步驟 4 拆卸了其他驅動器的 SCSI 接口電纜,請不要
忘記將它連接上。
8. 以“系統管理者模式:Config 子模式(見第 120 頁)
”確認
布線監視器指示燈
換盤機有無認識全部驅動器。
例:(從背面間#1 按序安裝 3台 DVD-ROM 驅動器和 1台 DVDR 驅動器時)
終端指示燈
(DVD-R7783 型為占線指示燈)
5. 連接換盤機接口電纜。
¶ 布線監視器指示燈以約 2 秒鐘周期閃爍。
按下 » 鍵
≠
布線監視器指示燈
中
國
語
按下 » 鍵
≠
換盤機接口電纜
按下 » 鍵
≠
注意:
換盤機接口電纜請連接到對應安裝了驅動器的間的端子。
(端
子貼有對應端子的間號碼標籤。)誤連接到相鄰的端子時,可
能會損傷光盤。
按下 » 鍵
≠
6. 換盤機讀取驅動器的SCSI-ID並與現有驅動器的設定進行比
較。
¶ 如果 SCSI-ID 沒有與現有的驅動器重複,蜂鳴器鳴響 1
次。
¶ 與現有的驅動器相同的 SCSI-ID 時,蜂鳴器鳴響 3 次,
以發出警告。
133
<DRC1285>
ChK
操作
注意:
¶ 如果沒有連接換盤機接口電纜,換盤機無法認識驅動器。
請確認驅動器后面的布線監視器指示燈。
= 如發亮,請確認換盤機接口電纜有無正確連接。
按下 ENT 鍵
= 如熄滅,請確認電源用電纜的連接。要重新連接時,請
在連接了電源用電纜后連接換盤機接口電纜。
≠
÷ 雖然被認識為驅動器但在LCD的下層沒有驅動器型號名稱被
顯示時,請重新連接各電纜。
按下 ESC 鍵來回到前面的畫面並按下 » 鍵。
≠
拔除電纜的順序:
1. SCSI 接口電纜
2. 換盤機接口電纜
3. 電源用電纜
連接的順序:
1. 電源用電纜
按下 ENT 鍵
≠
2. 換盤機接口電纜
3. SCSI 接口電纜
9. 為將所認識驅動器的各設定以顯示進行確認,按下ENT鍵來
設定成下一個階層的畫面。
¶ 讀取並顯示 SCSI-ID 、終端開關、該驅動器固有的設備
注意:
ID 。
¶ 在 4 台被菊花鏈連接,而在驅動器 4 終端化的例子,成
÷ 如果SCSI-ID或終端開關的設定顯示與驅動器背面的設定不
同,或驅動器的設備 I D 沒被顯示,可能估計為連接有錯
為如下所示:
誤。請按下列順序重新正確連接各電纜。
拔除電纜的順序:
1. SCSI 接口電纜
2. 換盤機接口電纜
按下 ENT 鍵
≠
3. 電源用電纜
連接的順序:
1. 電源用電纜
2. 換盤機接口電纜
按下 ESC 鍵來回到前面的畫面並按下 » 鍵。
≠
3. SCSI 接口電纜
÷ 如果未能讀取設備 ID ,則無法進行主計算機的 Auto
figuration(自動認識)。
10. 按下 ESC 鍵來回到“用戶模式”,關閉后門。
按下 ENT 鍵
≠
按下 ESC 鍵
≠
按下 ESC 鍵來回到前面的畫面並按下 » 鍵。
≠
按下 ESC 鍵
≠
134
<DRC1285>
ChK
con-
操作
更換驅動器
驅動器的更換可按與“追加驅動器”相同的步驟進行。
按下 ESC 鍵
≠
利用“驅動器更換指南功能”時,即可不會弄錯驅動器間的號
碼。
以下為利用“驅動器更換指南功能”進行的驅動器更換的步
驟。
按下 ESC 鍵
≠
按下 ESC 鍵
≠
注意:
除非有特別的理由,要安裝的驅動器的SCSI-ID或終端化的設
定應與所取出的驅動器相同。
驅動器更換步驟
1. 進入系統管理者模式,以 Door 子模式打開后門。
LCD 成為如下所示的顯示。
關閉后門
≠
2. 再一次進入系統管理者模式,以 Config 子模式選擇背面
間。
初始化動作完成
≠
按下 ENT 鍵
≠
以后的動作依換盤機控制軟件有所不同,請參照所使用軟件的
操作說明書。
為了主計算機認識所追加的驅動器,需要進行主計算機的重新
起動。
選擇 Rear 並按下 ENT 鍵。
≠
3. 用 » 鍵或 « 鍵來選擇安裝有要更換的驅動器的間。
如果驅動器故障,可能會有LCD顯示的一部分缺落的情況。
135
<DRC1285>
ChK
中
國
語
操作
4. 確認位于所選擇驅動器背面的布線監視器指示燈(橙色)以
約 0.5 秒鐘周期閃爍,然后取下電纜。
請按如下順序拔除電纜:
9. 換盤機讀取新的驅動器的SCSI-ID並與所取下驅動器的設定
進行比較。
¶ 如果 SCSI-ID 與所取下的驅動器相同,蜂鳴器鳴響 1 次。
¶ 如果與所取下的驅動器不同的 SCSI-ID 時,蜂鳴器鳴響 3
次,以發出警告。
1. SCSI 接口電纜
2. 換盤機接口電纜
3. 電源用電纜
10. 連接 SCSI 接口電纜。
5. 拔出驅動器。
如果不易進行作業,請拆卸其他驅動器的SCSI 接口電纜。
6. 確認所取出的驅動器的SCSI-ID和終端開關的設定,使新安
如果在步驟 5 拆卸了其他驅動器的 SCSI 接口電纜,請不要
忘記將它連接上。
11. 以 LCD 的顯示確認驅動器的設備 ID 。
裝驅動器的 SCSI-ID 和終端開關成為相同的設定。
¶ 由於 DVD-R7783 型沒有裝備 SCSI 連接頭,因此沒有 DVDR7783 型之下的設定。
按下 ENT 鍵
≠
7. 安裝新的驅動器,連接電源用電纜。
¶ 位于驅動器背面的布線監視器指示燈(橙色)發亮。
¶ 終端開關置於 ON 位置時,終端指示燈(綠色)也亮起(除
DVD-R7783 型)。
注意:
電源用電纜
¶ 如果SCSI-ID或終端開關的設定顯示與驅動器背面的設定不
同,或驅動器的設備 I D 不被顯示,可能估計為連接有錯
誤。請按下列順序正確連接各電纜。
拔除電纜的順序:
1. SCSI 接口電纜
布線監視器指示燈
終端指示燈
(DVD-R7783 型為占線指示燈)
8. 連接換盤機接口電纜。
¶ 布線監視器指示燈以約 0.5 秒鐘周期閃爍。
布線監視器指示燈
換盤機接口電纜
136
<DRC1285>
ChK
2. 換盤機接口電纜
3. 電源用電纜
連接的順序:
1. 電源用電纜
2. 換盤機接口電纜
3. SCSI 接口電纜
¶ 如果未能讀取設備 ID ,則無法進行主計算機的 Auto
figuration(自動認識)。
con-
操作
12.按下 ESC 鍵來回到“用戶模式”,關閉后門。
注意:
如果不利用“驅動器更換指南功能”進行驅動器的更換,請注
意不要弄錯取出的驅動器。
另外,這時的驅動器的安裝成為與“驅動器追加步驟(見第
按下 ESC 鍵
≠
132 頁)
”相同的作業,因此蜂鳴器鳴響的條件會不同。
按下 ESC 鍵
≠
按下 ESC 鍵
≠
按下 ESC 鍵
≠
中
國
語
按下 ESC 鍵
≠
關閉后門
≠
初始化動作完成
≠
以后的動作依換盤機控制軟件有所不同,請參照所使用軟件的
操作說明書。
137
<DRC1285>
ChK
其他
故障和對策
如果認為發生故障,請稍微檢查以下下列情況。可能因為光盤不良、操作不熟悉等而會有認為故障,或有錯誤顯示出現的情況。原
因可能是單純的誤操作,或者誤會,有通過簡單的維修操作得到解決的場合。如果進行下列項目的檢查後,仍然不能解決,或錯誤
顯示不消失,請與維修服務單位或本機經銷店恰商。
(請一併參閱第 104 頁“為防止問題發生”一節。)
故障情況
打開門並安裝光盤箱時,蜂鳴器開始
鳴響。
顯示
解決措施
光盤沒有正確裝入光盤箱中。
取出光盤箱,確認光盤有無跳出。
光盤沒有正確裝入超光盤箱中。
取出超光盤箱,確認光盤有無跳出。
換盤機內有異物進入。光盤從光
盤箱跳出。
打開門,找出妨礙光盤搬運部移動的物件
並取出。
試圖按下 FUNCTION 鍵來進入系統管理
者模式時,蜂鳴器鳴響而被拒絕。
鑰匙開關設定成 LOCK 位置。
用解除鎖定鑰匙轉動鑰匙開關,設定成
UNLOCK 位置。
雖然能夠進入 Inquiry 子模式或
Config子模式,但不能進入Mailslot
子模式或 Door 子模式。
÷ 光盤搬運動作在實行中。
÷ 在沒有進行光盤搬運動作時再一次試圖
進行。
÷ 確認有無在主計算機禁止操作。
安裝超光盤箱時,蜂鳴器開始鳴響。
接通電源並開始初始化動作時,蜂鳴
器開始鳴響。
即使以 Mailslot 子模式的“Swap”或
“Add”來關閉郵件槽也會再次開啟。
M**
可能原因
Disc set error
Hyper magazine
Disc set error
E83
Disc set NG
÷ 主計算機禁止以系統管理者模
式進行操作。
Place a new disc
& Press ENT-key
Remove the disc
& Press ENT-key
光盤沒有安放在托盤上而關閉了
郵件槽。
如果希望停止光盤更換或光盤追加,要按
下 ESC 鍵。
沒有從托盤取出光盤而關閉了郵
件槽。
從托盤取出光盤。
即使接通電源也不會使留在驅動器內
的光盤退還,因此不能以 Door 子模式
打開門。
任選的 Hot
定。
在 Option 子模式使 Hot Start 功能設定
成 O F F 后,重新接通電源。光盤被退還
后,重新進入 Door 子模式並打開門。
試圖以 Door 子模式打開門,但門不開
啟而蜂鳴器開始鳴響。
門被什麼東西推着而打不開。
除去門前面的障礙物並重新進行操作。
光盤留在驅動器中。
回到用戶模式,從主計算機發出光盤退還
指示,並在退還結束后重新進行操作。
即使以 Mailslot 子模式的“Remove”
來關閉郵件槽也會再次開啟。
試圖以 Door 子模式打開門,但不會成
為門的選擇畫面。
138
<DRC1285>
ChK
Host must return
every disc first
Start 功能成為 ON 設
其他
故障情況
在 Hyper 子模式不能排出超光盤箱。
顯示
Host must,return
all hyper s disc
有在 Config 子模式被正確認識,而沒
有被主計算機認識的驅動器。
可能原因
解決措施
從超光盤箱搬運的光盤留在驅動
器中。
回到用戶模式,從主計算機發出光盤退還
指示,並在退還結束后重新進行操作。
÷ 沒有連接 SCSI 連接線。
÷ SCSI-ID或終端的設定不適當。
÷ 包括內部的連接重新進行確認。
÷ 確認同一母線上有無相同的ID,有無正
確終端化。
÷ 重新研究系統構成,以使電纜全長變
短。
÷ 正確重新起動。
÷ 到主計算機為止的電纜全長過
長。
÷ 忘了主計算機的重新起動。
有主計算機沒有認識的驅動器,而以
Config子模式確認時SCSI-ID成為7。
scsiID=7 TermOFF
dev-ID=
搬運到驅動器的光盤不能正確播放。
錯誤代碼顯示于 LCD 上,背景照明閃
爍,蜂鳴器開始鳴響。
E88.E89.E99 等
接通電源時, LCD 不被正確顯示。
操作鍵不起作用。
插入光盤箱時,蜂鳴器鳴響(嗶嗶嗶
聲)。
÷
÷
Memory Failure
Error
÷ 該驅動器的電源用電纜松脫。
÷ 驅動器安裝在背面間#9∼#16。
÷ 打開后門,確認連接。
÷ 利用標準電源裝置時電源只能供應到背
面間 # 8 為止。應改變驅動器的安裝位
置。
÷ 光盤的方向上下相反。
÷ 光盤有擦傷或污垢。
÷ 確認光盤的方向。
÷ 確認光盤的擦傷、污垢,進行光盤的更
換、清潔。
發生了換盤機的動作無法繼續的
機構系錯誤。
以系統管理者模式打開門,除去錯誤的原
因。
換盤機的 SCSI 終端開關設定成
OFF ,而 SCSI 連接線松脫。
÷ 如果在設置作業中,將 SCSI 終端開關
設定成 ON 並重新接通電源。
÷ 如果 SCSI 連接線沒有正確連接,斷開
電源,正確連接電纜后接通電源。
無法正確讀取光盤箱內存儲器的
數據。
÷ 試圖裝入或取出光盤箱。
÷ 如果仍然無法正確認識,進行光盤箱的
探測后,進行門的開閉。
139
<DRC1285>
ChK
中
國
語
其他
規格
DRM-7000 型
DRM-3000 型
700 張換盤機
AC100V ∼ 240V , 50/60Hz
最大 5.5A(500W)
91.7kg
760(寬)× 795(深)× 1520(高)mm
+ 5℃∼+ 35℃
5%∼ 85%(應無結露)
- 40℃∼+ 60℃
300 張換盤機
←
最大 3.3A(300W)
60.6kg
760(寬)× 729(深)× 872(高)mm
←
←
←
一般
形式
電源
電力消耗
主體質量(包括顛倒防止配件)
外形尺寸(包括顛倒防止配件)
容許工作溫度※
容許工作濕度※
貯藏溫度
※ 依所安裝的組件,容許工作溫度和容許工作濕度有所變化。
詳情請見各組件的操作說明書。
功能
可容納光盤
可容納光盤箱
50 張光盤箱
20 張超光盤箱
可安裝的組件
最大 720 張(12cm 光盤)
最大 320 張(12cm 光盤)
14 台
1台
16 台
6台
←
8台
1
1
1
1
4
12
2
1
←
←
←
←
2
6
←
←
附件
20 張超光盤箱
換盤機、驅動器連接用 SCSI 連接線
電源線(日本用)
電源線(美國、加拿大用)
顛倒防止配件
顛倒防止配件安裝用螺絲
解除鎖定鑰匙
操作說明書
¶ 因改良起見,上述規格及外觀可能會有變更,恕不另行通知。
140
<DRC1285>
ChK
其他
SCSI 端子規格
+
1
±
¡
SCSI 的插腳布置
信號名稱
GROUND
GROUND
GROUND
GROUND
GROUND
GROUND
GROUND
GROUND
GROUND
GROUND
GROUND
NC
NC
NC
GROUND
GROUND
GROUND
GROUND
GROUND
GROUND
GROUND
GROUND
GROUND
GROUND
GROUND
插腳號碼
1
2
3
4
5
6
7
8
9
10
11
12
13
14
15
16
17
18
19
20
21
22
23
24
25
26
27
28
29
30
31
32
33
34
35
36
37
38
39
40
41
42
43
44
45
46
47
48
49
50
信號名稱
-DB(0)
-DB(1)
-DB(2)
-DB(3)
-DB(4)
-DB(5)
-DB(6)
-DB(7)
-DB(P)
GROUND
GROUND
NC
TERMPWR
NC
GROUND
-ATN
GROUND
-BSY
-ACK
-RST
-MSG
-SEL
-C/D
-REQ
-I/O
中
國
語
注意:
÷ 插腳 12 ∼ 14 , 37 , 39 沒有接地。
÷ 連接器為屏蔽型。
÷ 控制命令等的詳情請另外參照規格書。
“關于定期維護(保養)合同
為了維持機器的功能及性能,以及延長壽命,建議簽訂定
期維護(保養)合同。
有關詳情,請與本機經銷店聯系。”
日本先鋒公司出版
版權 © 2006 日本先鋒公司
版權所有
141
<DRC1285>
ChK
目 次
このたびは、パイオニアの製品をお買い求めいただきまし
て、まことにありがとうございます。
本機の機能を十分に発揮させて効果的にご利用いただくため
に、お使用前にこの取扱説明書を最後までお読みください。
お読みになった後は保証書と一緒に保管してください。
使用中にわからないことや不具合が生じたとき、きっとお役
に立ちます。
特長 .......................................................... 143
安全上のご注意 ....................................... 144
お使いになる前に ................................... 145
セキュリティについて ...................................... 145
オフラインメディア管理機能について ........... 145
システム構成を決める ...................................... 146
オプション製品について .................................. 146
付属品の確認 ...................................................... 148
ディスクについて .............................................. 149
トラブルを防止するために .................... 150
各部の名称とはたらき............................ 153
設置 .......................................................... 155
操作 .......................................................... 164
ユーザーモード ..................................................
システム管理者モード ......................................
ドライブの追加 ..................................................
ドライブの交換 ..................................................
164
164
178
181
その他 ....................................................... 184
トラブルと対策 .................................................. 184
仕様 ..................................................................... 186
保証とアフターサービスについて ................... 187
D50-5-10-1_A_Ja
JIS C 61000-3-2適合品とは、日本工業規格「電磁両立性
−第3-2部:限度値−高調波電流発生限度値(1相当たりの入
力電流が20A以下の機器)」に基づき、商用電力系統の高調
波環境目標レベルに適合して設計・製造した製品です。
この装置は、情報処理装置等電波障害自主規制協議
会(VCCI)の基準に基づくクラスA情報技術装置
です。この装置を家庭環境で使用すると電波妨害を
引き起こすことがあります。この場合には使用者が
適切な対策を講ずるよう要求されることがあります。
D50-3-9-2-1_Ja
142
<DRC1285>
Ja
特 長
柔軟性のあるユニット構成
システム立ち上げ作業の容易さ
本チェンジャーは、
ユーザーの要求仕様に合わせて各種コン
ポーネントを別途購入、
装着して使用できるようになってい
チェンジャーを既存のコンピュータシステムに組み込んだ
ます。
コンポーネントを装着するベイ(ドライブや50 枚ディスク
マガジンを取り付けるスペース)
は本チェンジャーの前後に
あり、
各コンポーネントはドアを開けると簡単に着脱するこ
とができます。
フロント側のベイは50枚ディスクマガジン専用ですが、リ
り、新規にコンピュータシステムを構築する場合、ホストコ
ンピュータがチェンジャーとチェンジャーに内蔵された複数
のドライブを正しく認識し、制御できるようにケーブルの接
続や各種の設定を行う必要があります。
本チェンジャーは、
ドライブの装着や追加の作業を簡単にし
ただけではなく、ホストコンピュータ側の設定作業を容易に
するための豊富な機能を備えています。
ア側のベイは多目的になっております。
誤操作や不正操作に対する防護策を完備
装着可能台数
フロントベイ
50 枚ディスクマガジン専用
リアベイ
コンポーネント
50 枚ディスクマガジン
DRM-7000
DRM-3000
オペレーションパネルの操作とホストコンピュータからの制
御の相互干渉や矛盾、衝突などの発生を防止するため、オペ
7台
3台
最大 16 台
最大 7 台
最大 8 台
最大 3 台
レーションパネルを使用するシステム管理者モードには、
付
属の LOCK 解除キーが無いと入れないようにしました。
ホストコンピュータからの指示で、
オペレーションパネルの
操作を禁止することもできます。
最大可能搭載台数はコンポーネントごとに異なりますので、
詳しくは使用するコンポーネントの取扱説明書をご覧くださ
メールスロットの開閉や 20 枚ハイパーマガジンの排出な
ど、ディスクそのものに触れる操作は、システム管理者だけ
い。
に認めるセキュリティ優先の設定も可能です。
組み合わせ例
データ容量重視
パフォーマンス重視
DRM-7000
DRM-3000
ドライブ 2 台
ドライブ 2 台
ディスク 720 枚 ディスク 320 枚
ドライブ 16 台 ドライブ 8 台
ディスク 370 枚 ディスク 170 枚
導入当初はスペースを空けておき、必要に応じてドライブま
たはディスクマガジンを追加していくことも可能です。
表示の充実で扱いやすくなったオペレーショ
ンパネル
表現力豊かな 16 桁 2 行の LCD が適切な操作ガイドメッ
セージを表示するので、本チェンジャーの豊富な機能が5個
のキーだけで簡単に操作できます。
日
本
語
メモリを装備した3種類のディスクマガジン
ディスクマガジンには、
使い勝手の異なる三種類のものを用
意しました。
20 枚ハイパーマガジン:
チェンジャー外部でのロック機構の操作履歴記憶機構を
装備しています。
1 個は標準搭載しており、ドアを開けずに脱着できます。
50 枚ディスクマガジン(ロックタイプ)
:
ロック機構を備えており、チェンジャー外部ではディス
クが取り出せないため、セキュリティを重視したオフラ
インメディア管理に最適です。
50 枚ディスクマガジン(ノーマルタイプ)
:
ロック機構解除ノブが付いているので、チェンジャー外
部でのディスク交換が可能です。
143
<DRC1285>
Ja
安全上のご注意
設置場所について
安全のために
水平でかつ堅牢な床である場所を選んでください。
下記のよ
¶ 本機を机の上に置かないでください。
¶ 本機を 2 台以上積み重ねることや物を上に載せることは
うな場所は避けてください。
1 直射日光の当たる場所やストーブなどの暖房機具のそば。
2 湿気やホコリの多い場所。
3 トイレ(洗面所)や調理場の近く。
4 スポットライトの当たる場所。
5 冷蔵庫や調光機器、冷暖房機などの大型製品の近く。
6 床が弱くて水平でない場所。
(水平でない場合には、硬い板などを敷いて、本機が水平
になるようにしてください。
)
7 サービス、メンテナンスがしにくい場所。
チェンジャーを壁ぎわへ設置する際は、
チェンジャー後面と
壁の間を 50cm 以上あけてください。
チェンジャー本体の上に直接、物などを載せるのは避けてく
ださい。
おやめください。物が落下したり、本機が転倒する恐れが
あり大変危険です。
(この場合の破損等については、弊社
は一切の責任を負いかねます。
)
¶ 開梱したら最初に転倒防止金具を取り付けてください。
取り付けずに移動すると転倒したり、後面のケーブル類
を破損する恐れがあります。
¶ 電源の入った状態では、20枚ハイパーマガジンのベイに
手を入れたり、ベイ内部の部品に触れないでください。け
がをする危険があります。
¶ 本機は安全のため動作中にドアを開けることはできませ
ん。
¶ 本機はディスクの高速回転や高速ディスク搬送メカニズ
ムにより若干の振動、音が発生することがありますが異
常ではありません。また、これによる性能への影響はあり
ません。
取り扱い上の注意
¶ 取り扱うディスクの信号面に汚れ、キズ、指紋等付かない
よう十分注意してください。そのようなディスクの場合、
所定の再生性能や記録性能が得られなくなります。
¶ メールスロットに一度に 2 枚以上のディスクを載せない
でください。故障の原因となります。
¶ チェンジャーはディスク内の情報の管理は行っていませ
んので、データ管理はホストコンピュータ側で行ってく
ださい。
¶ 記録用ディスクは弊社が推奨しているディスクをご使用
ください。推奨以外のディスクですと所定の記録性能や
再生性能が得られない場合があります。なお、記録された
[設置]
付属の電源コードはこの機器のみで使用す
ることを目的とした専用部品です。
他の電気製品ではご使用になれません。
他の電気製品で使用した場合、発熱により
火災・感電の原因となることがあります。
また電源コードは本製品に付属のもの以外
は使用しないでください。
他の電源コードを使用した場合、この機器
の本来の性能が出ないことや、電流容量不
足による発熱から火災・感電の原因となる
ことがあります。
データについては保証の対象外となっております。
¶ 本機の使用により、または故障により生じたデータの損
失ならびに、その他直接・間接の損害につきましては、当
社は一切の責任を負いかねますので、あらかじめご了承
結露現象について
ください。重要なデータに関しては、万一に備えてバック
アップ(複製)を行ってください。
室温を上げたりしますと、動作部に露が生じ(結露)
、本機
の性能を十分に発揮できなくなることがあります。このよう
¶ 付属のロック解除キーはなくさないように十分気を付け
てください。ロック解除キーがないとディスクの取り出
な場合には1時間程度放置するか、徐々に室温を上げてから
ご使用ください。
本機を冷えきった状態のまま温かい室内に持ち込んだり急に
し、挿入、交換(メールスロット、マガジン共)やドライ
ブの交換ができなくなります。
本機のお手入れ
電源コードを傷つけないように
パネルやボンネットの清掃は、柔らかい布でからぶきしてく
ださい。汚れがひどい場合は中性洗剤を5∼6倍に薄めた水
電源コードの抜き差しは、
電源プラグをもって行ってくださ
い。コードを引っ張ったり、ぬれた手で取り扱うと、ショー
に柔らかい布を浸してよく絞った後、汚れを拭き取り、その
後乾いた布で拭いてください。ベンジン、シンナー、殺虫剤
トや感電の恐れがあります。
電源コードはときどき点検して、
傷んでいたらアフターサー
などの不揮発性の薬品をかけると表面が侵されることがあり
ますので使用しないでください。また、化学ぞうきん等をお
ビス連絡先または本機の取扱店に交換を依頼してください。
使いの場合は、化学ぞうきん等に添付の注意事項をよくお読
みください。
144
<DRC1285>
Ja
お使いになる前に
セキュリティについて
「チェンジャー内でのディスク収納位置情報」や「ディスク
内のデータにアクセスするための情報」は、チェンジャーを
制御しているチェンジャー制御ソフトウェア、あるいはその
上位にあるデータベース管理ソフトウェアによって厳密に管
理されています。
そのため、ホストコンピュータ(ネットワーク環境ではサー
バ)
の管理下にないときにチェンジャー内のディスクの状態
が変わってしまうと、
チェンジャーとドライブを制御して必
要なファイルをディスクから取り出すことができなくなりま
す。
また、チェンジャー内に収納されているディスクをチェン
ジャー外に取り出すことを無条件に認めると、そのディスク
にアクセスできなくなるだけでなく、
ディスクの汚損や紛失
などにもつながります。
本チェンジャーは、
本体前面上部にあるオペレーションパネ
ルの操作で、
前面と後面にあるドアを開いてマガジンを取り
出したり、
メールスロットを利用したディスクの出し入れが
できるよう設計されていますが、
先に述べたようにセキュリ
ティの観点からは、
これらの操作に制限をかけなければなり
ません。
本チェンジャーはオペレーションパネルにキースイッチを装
備しており、スイッチが「LOCK」のときにはオペレーショ
ンパネルのキー操作は無効です。
このスイッチを「UNLOCK」にするには付属の LOCK 解除
キーが必要です。この LOCK 解除キーをシステム管理者が
管理すれば、
キーを持たない一般のユーザーがオペレーショ
ンパネルを不正に操作することを防止できます。
また、
ホストコンピュータ側からも制限をかけることが可能
です。その場合、LOCK 解除キーを持つシステム管理者で
も、ディスクの入れ換えやドアの開閉など、チェンジャー内
部の状態を変更するような操作はできなくなり、
ホストコン
ピュータが主導権を握ることになります。
¶ ディスクマガジン固有の ID
本チェンジャーではディスクマガジン自体が固有のIDを
持っているため、チェンジャーに装着しただけでディス
クマガジンを識別することができます。
一度データベースに登録されたディスクとマガジンIDの
関係が変わらなければ、そのディスクマガジンをどのマ
ガジンベイに装着しても、ディスクマガジン内のすべて
のディスクが瞬時に利用可能になります。
同じデータベースの管理下にある他のチェンジャーに装
着しても識別できますので、同様に利用できます。
¶ 管理に適したディスクマガジン
ディスクとマガジン ID の関係は、チェンジャーの外で
ディスクの出し入れがおこなわれると失われます。
チェンジャー外ではディスクの出し入れができないロッ
クタイプの50枚ディスクマガジンとチェンジャー外での
ディスクの出し入れの痕跡を記憶している20枚ハイパー
マガジンを使用することで、オフラインメディア管理を
容易にしました。
¶ チェンジャーの ID を記録
データベース管理ソフトウェアの管理下にない独立した
チェンジャーや、別のシステムに属するチェンジャーに
装着されたディスクマガジンは、そのチェンジャーの内
部でディスクが入れ換えられたり、書き換えられる可能
性がありますので、そのディスクマガジンを元のチェン
ジャーに装着したとき、ロックタイプのマガジンであっ
てもデータベースに登録されている情報と食い違いが発
生することがあります。
この問題を解決するため、ディスクマガジンにはそのマ
ガジンを使っていたチェンジャーのIDが記録されていま
す。データ管理ソフトウェアが自分の管理しているチェ
ンジャーIDの一覧を持っていれば、マガジンIDと共に読
み出すことのできるチェンジャーの ID を調べることで、
そのディスクマガジンを再インストールする必要がある
かないかを判断することができます。
このように、チェンジャーとディスクマガジンには「オフラ
オフラインメディア管理機能について
本チェンジャーは、以下のような「オフラインメディア管
理」に適した特長を持っています。
¶ 取り外し可能なディスクマガジン
ディスクマガジンは、ディスクを入れたままチェン
ジャーから取り出すことが可能ですので、使用頻度の低
いディスクを一つのマガジンに集めて取り出し、チェン
インメディア管理機能」を実現するのに十分な特長を持って
いますが、実際の「オフラインメディア管理」のレベルは、
お使いのデータベース管理ソフトウェアやチェンジャー制御
ソフトウェアによって異なります。
また「オフラインメディア管理」を行うには運用方法を適切
に定めなければなりません。運用方法が適切であれば、本来
オフラインメディア管理に適さないノーマルタイプのディス
クマガジンであっても、ロックタイプと同様に扱うことも可
能です。
ジャーの外で管理すれば、チェンジャー内部のスペース
が有効活用できます。
145
<DRC1285>
Ja
日
本
語
お使いになる前に
システム構成を決める
設置や操作を行う前にシステムの構成を決めてください。
本チェンジャーに装着されているコネクターパネルと付属の
SCSI ケーブルは以下の構成を想定したものです。
7 搭載するドライブは SE ドライブを 2 台
7 2台のSEドライブを内部でディジーチェーン接続し、付
属の SE SCSI ケーブルでチェンジャーと接続する。
(この構成の場合にはSE SCSIホストアダプターと接続するた
めの SE SCSI ケーブル 1 本を別途用意する必要があります)
SEドライブを3台以上にする場合、チェンジャーをLVDホ
ストアダプターに接続したりLVDドライブを搭載する場合、
複数のSCSIバスを用いてデータ転送速度を高めたい場合な
どでは、
システム構成に応じたオプション製品が必要になり
ます。
そこで、コンフィギュレーションシート(DRM-7000:
標準搭載している電源ユニットはリアベイの Bay#1 ∼
#8 に供給可能なものです。
この 8 台分のドライブの消費電流は合計で
DC +5V 12A 以下
DC +12V 8A 以下
になるようにしてください。
なお、一つのコネクタから供給可能な電流は
DC +5V 最大 4A
DC +12V 最大 4A
です。
また、DRM-7000 はオプションの増設電源ユニットを
追加することによりリアベイの Bay#9 ∼ #16 でドライ
ブを使用することができます。
この場合の上側 8 台分のドライブの消費電流および一つ
のコネクタから供給可能な電流は、下側 8 台分(Bay#1
∼ #8)と同様です。
188 ページ、DRM-3000: 189 ページ)などを用いて必
要なオプション類の確認とドライブ装着位置をあらかじめ決
ご注意:
¶ 当社のオプション製品以外は絶対に使用しないでくだ
定してから実際の作業に取り掛かることをお勧めします。
さい。
¶ 電源を入れ直す場合は、電源を切ってから 10 秒以上
最低限決めておくべきことは以下の項目です。
¶ ドライブの台数、種類と装着位置
DRM-7000/3000 は SE SCSI インターフェースを採
用しております。チェンジャーを LVD SCSI ホストアダ
プターに接続する場合や、LVD SCSI インターフェース
を採用しているDVD-R7783を搭載しチェンジャーと同
一バスにする場合には、LVD SCSI インターフェースユ
ニット[DRM-ULV16]を装着する必要があります。
また、DRM-7000 において 9 台以上のドライブを装着
する場合は増設電源ユニットが必要です。
¶ コネクターパネルの種類と装着位置
LVD ドライブ用(内部ディジーチェーン接続用)と SE
ドライブ用(内部ディジーチェーン接続用とドライブ直
結用)があります。
¶ コネクターパネルから各ドライブへのケーブル接続方法
¶ SCSI-ID の設定
同一の SCSI バス上で ID が重複してはいけません。
¶ SCSI ターミネートの設定
< SE SCSI バス>
SCSI バスの終端となるドライブまたはチェンジャーの
ターミネートスイッチは ON にしてください。
< LVD SCSI バス>
DVD-R7783 や DRM-ULV16 を搭載している場合は、
同様に LVD SCSI バスの終端も行う必要があります。
DVD-R7783はSCSIターミネータを搭載しておりませ
んので、オプションまたは DRM-ULV16 に付属の SCSI
ターミネータ(LVD)を使用して、LVD SCSI バスの終
端を行ってください。
接続に関しましては、
『SCSI 接続マニュアル』をご覧に
なるか、本機の取扱店にご相談ください。
146
<DRC1285>
Ja
間隔をあけてから行ってください。
搭載するドライブが少ないときは、電源スイッチを
OFFにしてもしばらくの間電源が切れないことがあり
ます。
オプション製品について
本チェンジャーは、お客様の仕様に合わせて以下のような各
種コンポーネントを別途購入する必要があります。
最大可能搭載台数はコンポーネントごとに異なりますので、
詳しくは使用するコンポーネントの取扱説明書をご覧くださ
い。
50 枚ディスクマガジン
50 枚ディスクマガジンは、チェンジャー内部でのディスク
の保管場所となります。50 枚ディスクマガジンにはロック
タイプとノーマルタイプの2種類があり、自由に組み合わせ
て使用することができます。
¶ 50 枚ディスクマガジン(ロックタイプ)
[DRM-AL751]
お使いになる前に
チェンジャーに装着しないとロック機構が解除されない
ため、メールスロットを使ってディスクの交換をします。
「オフラインメディア管理機能(145 ページ参照)
」をサ
ポートしたホストコンピュータと共に用いる場合に有効
です。
出荷時に50枚のディスクを挿入済みのマガジンもありま
す。
DVD-R 50 枚入りディスクマガジン [DVM-AL751]
DVD-ROM ディスクの読み込み、および DVD-R/RW ディ
スクの読み書きをするための LVD SCSI インターフェース
ドライブです。
DVD-R/RW ドライブユニット[DVD-R7322]
消費電流: DC +5V, 1.5A
DC +12V, 1.0A
¶ 50 枚ディスクマガジン(ノーマルタイプ)
[DRM-AF751]
DVD-ROM ディスクの読み込み、および DVD-R/RW ディ
スクの読み書きをするためのSE SCSIインターフェースド
ライブです。
DVD-ROM ドライブユニット[DVD-D7563]
ロック機構を解除するノブがついていますので、大量の
ディスクを一括収納してからチェンジャーに装着したり、
消費電流: DC +5V, 1.0A
DC +12V, 1.0A
一括排出することができます。
20 枚ハイパーマガジン[DRM-AH721]
DVD-ROM ディスクおよび DVD-R/RW ディスクの読み込
みをするための SE SCSI インターフェースドライブです。
ドアを開けずにディスクの交換が可能です。
操作履歴記憶機構により、
ロック解除ノブを操作したことを
ディスク反転ユニット[DRM-UF701]
記憶していますので、
「オフラインメディア管理」に最適で
す。20枚ハイパーマガジン1個は標準搭載されていますが、
複数の 20 枚ハイパーマガジンを使用することで、20 枚単
位のオフラインライブラリの構築が簡単に行えます。
DVD-R/RW ドライブユニット[DVD-R7783]
消費電流: DC +5V, 1.5A
DC +12V, 1.0A
ディスクを反転させるためのコンポーネントです。両面
DVD ディスクを使用する場合に必要となります。
増設電源ユニット[DRM-PW701]
(DRM-7000用)
ドライブを 9 台以上搭載する場合に必要です。
取り付けは必ず弊社サービスマンに依頼してください。
供給電流: DC +5V, 12A max.
DC +12V, 8A max.
147
<DRC1285>
Ja
日
本
語
お使いになる前に
LVD SCSIインターフェースユニット[DRM-ULV16]
SE SCSIインターフェース対応のDRM-7000/3000を、
LVD ホストアダプターに接続する場合に必要です。
取り付けは必ず弊社サービスマンに依頼してください。
SCSI ケーブルです。マルチドライブコネクターパネルと組
み合わせることで、4 台の SE ドライブをチェンジャー内部
でディジーチェーン接続することができます。
4 ドライブ増設ケーブル[DRM-SC741]
LVD ドライブコネクターパネル(2 ドライブ用)
[DRM-LN721]
2 台の LVD ドライブをチェンジャー内部でディジーチェー
ン接続することのできるケーブルが付いたコネクターパネル
です。
LVD ドライブコネクターパネル(4 ドライブ用)
[DRM-LN741]
SEドライブ4台までの増設に対応するディジーチェーン用
SCSI ケーブルです。マルチドライブコネクターパネルと組
み合わせることで、6 台の SE ドライブをチェンジャー内部
でディジーチェーン接続することができます。
付属品の確認
20 枚ハイパーマガジン x1
4 台の LVD ドライブをチェンジャー内部でディジーチェー
ン接続することのできるケーブルが付いたコネクターパネル
です。
SCSI ターミネータ(LVD)[DRM-TM160]
外付け用の LVD ターミネータです。
DVD-R7783はLVD SCSIターミネータを搭載しておりま
せんので、終端には本品または DRM-ULV16 に付属の
SCSI ターミネータ(LVD)をご使用ください。
SCSI ケーブル(LVD)
[CC-200]
※ チェンジャー本体に装着されています。
チェンジャー、ドライブ間接続用SCSIケーブル(SE) x1
:0.35m
2.5m、VHDCI 68pin − ハーフピッチ 68pin
[CC-200-8]
8m、VHDCI 68pin − ハーフピッチ 68pin
[CC-201]
2.5m、ハーフピッチ 68pin − ハーフピッチ 68pin
[CC-201-8]
8m、ハーフピッチ 68pin − ハーフピッチ 68pin
電源コード(日本用) x1
外部配線用の LVD 対応 SCSI ケーブルです。
ホストアダプターとチェンジャー間、
ディジーチェーン時の
チェンジャー間等を接続します。
お使いのシステムに合った
長さおよびコネクター形状のものをお選びください。
マルチドライブコネクターパネル[DRM-SN721]
2台のSEドライブをチェンジャー内部でディジーチェーン接
続することのできるケーブルが付いたコネクターパネルです。
1個は出荷時に標準装備されており、2ドライブ増設ケーブル
や 4 ドライブ増設ケーブルと組み合わせることができます。
この電源コードは日本専用です。
他の地域では使用しないで廃棄し
てください。
電源コード(アメリカ、カナダ用) x1
シングルドライブコネクターパネル[DRM-SN711]
SE ドライブと SE SCSI ホストアダプターを直結する場合
や、チェンジャー外部でディジーチェーン接続する場合に使
用します。
2 ドライブ増設ケーブル[DRM-SC721]
SEドライブ2台までの増設に対応するディジーチェーン用
148
<DRC1285>
Ja
この電源コードはアメリカおよび
カナダ専用です。他の地域では使
用しないで廃棄してください。
お使いになる前に
転倒防止金具
DRM-7000: x4
DRM-3000: x2
¶ ディスクはチェンジャー内で高速回転しています。異常
なディスク(ひびが入ってしまったディスクや大きく
反ってしまったディスク)は使用しないでください。
¶ 規格外のディスクを使用しないでください。
LOCK 解除キー x2
使用した場合、本機および他の機器に悪影響をおよぼす
場合があります。
¶ 特殊な形のディスク(ハート形や六角形等)を使用しない
でください。
故障の原因となることがあります。
転倒防止金具取付用ネジ
DRM-7000: x12
DRM-3000: x6
取扱説明書 x1
保証書 x1
サービスネットワーク x1
¶ 以下のディスクはチェンジャーの動作でディスクに支障
をきたしたり、ディスクの破損をおこす恐れがあります
ので使用前にご確認ください。
・ 外周部に図のような著しいバリ(はみ出した部分)が
あるディスク
・ 外周部のテーパまたはラウンド(丸み)が図のように
極端に大きいディスク
ディスクについて
日
本
語
使用することのできるディスク
使用することのできるディスクは、使用するドライブによっ
て異なります。
ドライブの取扱説明書をご覧ください。
ディスクの取り扱いについて
※ 詳細は弊社サービスにお問い合わせください。
¶ ディスクを持つ場合には、信号面をさわらないようにし
てください。
¶ ディスクは両端を挟むようにして持つか、中央の穴と端
を挟んで持ってください。
・ 外周部やラベル面に粘着性のあるディスク
¶ 乾燥した環境でのディスクの取り扱いは、ディスク自身
に静電気を帯電させる場合があります。金属部を触るな
どして身体の静電気を放電した後に、ディスクの取り扱
いを行ってください。
¶ 埃や静電気が付着すると思われる場所には、ディスクを
置かないでください。
¶ チェンジャーは外径 12cm のディスクのみ使用可能で
す。チェンジャーはディスク有無検出機能を備えていま
すが、その方法は 12cm のディスクの外周から約 5mm
の部分を光学的に検出していますので、その部分が透明
¶ ディスクに紙やシールなどを貼り付けないでください。
また、ラベル面にもキズなどを付けないようにしてくだ
さい。
になっているようなディスク(*)
、8cmアダプターを使
用した場合や外径8cmのディスクを使用すると、ディス
ク有無を誤り、ディスクを破損する場合があります。
* 半透明である C-thru ディスクも含みます。
¶ DualDisc(CD/DVD ハイブリッドディスク)には対応
しておりません。
149
<DRC1285>
Ja
トラブルを防止するために
以下の内容は、お客様の取り扱いについて、特にトラブルにつながる可能性の高い注意事項をまとめたものです。
内 容
起こりうるトラブルやエラー
÷
チェンジャー内に異物を入れないでください。故障の原因になりま
す。
÷
ホコリの多い場所や、高温・多湿の場所では使用しないでください。 ÷
※屋外から外気、粉塵が直接入り込むような環境には設置しないで
ください。
※エアコン拭き出し口、
空気清浄機の近くに設置しないでください。
記録再生不良
÷
動作中に衝撃や振動を加えないでください。
※通路、ドアの近く等、人の出入りの多い場所へは設置しないでく
ださい。
÷
記録再生不良
÷
外付けの SCSI ケーブルを接続する際は、ホストコンピュータと
チェンジャーは電源を切った状態で接続してください。
※内部 SCSI ケーブルを接続する際は、電源を入れた状態で構いま
せん。
÷
チェンジャーの故障
÷
ドライブを装着する際、
チェンジャーインターフェースケーブルは、 ÷ 「E83」
、「E99」
ドライブを取り付けたベイに対応するコネクタに接続してください。
誤って隣接するコネクタに接続した場合、ディスク破損、E99 エ
ラーの原因になります。
÷
SCSI バス上の終端の機器では、必ずターミネートスイッチを ON
にするか外付けターミネータを使用して終端を行ってください。終
端を行っていない場合、チェンジャーの動作が不安定になる場合が
あります。終端を行わない状態で不具合が発生した場合には、終端
をしてからチェンジャーの電源を入れ直してください。
※ターミネートスイッチをONにしている機器を取り外す、または
その機器の SCSI ケーブルを抜くと、その時点から終端が行われ
ていない状態になりますので上記と同様の状態になります。
÷
÷
ドライブ装着時、ワイヤリングモニターインジケータが点滅しない
場合は、電源ケーブルの接続、チェンジャーインターフェースの接
続の順に再度接続し直してください。
÷
チェンジャーがドライブ
を認識しない
÷
チェンジャーがディスクを搬送中や、ライターが記録中は電源を切
らないでください。
÷
÷
チェンジャーの故障
記録不良
÷
電源を入れなおす場合は、電源を切ってから 10 秒以上間隔をあけ
てから行ってください。
4. 制御について
÷
記録中に、ライターからディスクを取り出すコマンド(Move Medium, Rezero Unit)を送らないでください。EC❋ エラー、ある
いは記録不良(バッファーアンダーラン)が発生します。
5. 再輸送について
÷
本機を輸送する際は、購入時の梱包材を使用し、直立の状態で輸送
してください。横倒しの状態では輸送しないでください。
÷
ドライブユニット、50枚マガジンおよびその他オプション類(20
枚ハイパーマガジンを除く)を装着した状態では輸送しないでくだ
さい。オプション製品を輸送する際は購入時の梱包材をご使用くだ
さい。
÷
ディスクマガジンはディスクを入れた状態では輸送しないでくださ
い。
DVD-R 50 枚入りディスクマガジン(DVM-AL751)の場合は、
未開封の場合に限り輸送可能です。
1. 設置について
2. 接続について
3. 電源 ON/OFF に
ついて
÷
6. エラーの対処につ
いて
150
<DRC1285>
Ja
÷
÷ 「E83」
、
「E99」
、
「E88」
÷
÷
表示窓(LCD)が正しく
表示されない
操作キーを受けつけない
チェンジャーが SCSI 上
で認識されない
÷ 記録不良
÷ 「EC❋」
( ❋:0 ∼ F )
E8❋、E9❋、EF8、EF3 のエラーはチェンジャーの電源リセット ÷ (
「E8❋」
、「E9❋」
、
ではエラー解除されません。システム管理者モードで一旦ドアを開
「EF8」
、「EF3」
)
け、閉めることによりエラー解除されます。その他のエラー含め、
( ❋:0 ∼ F )
取扱説明書の 184 ページを参照してください。
トラブルを防止するために
内 容
7. ディスクについて
起こりうるトラブルやエラー
÷ ブランクディスクや書き込みに失敗したディスク、
クローズ処理が行 ÷ リーダードライブの動作
われていないディスク等はリーダードライブでは使用できません。
不良
※ディスクのブランク判別を行う場合は、ライタードライブを使用 ÷ 「Set Up NG」エラー
してください。
÷
ディスクに紙やシールなどを貼り付けないでください。また、ラベ
ル面にもキズなどを付けないでください。
※誤って貼ってしまったシールなどを剥がす際には、剥がした跡に
粘着物等が残っていると動作不良を起す場合がありますので、
き
れいに拭きとってください。この時にディスクに傷を付けないよ
うに気をつけてください。
÷ 記録再生不良
÷ 「E83」
、「E99」
÷
ディスクに傷や指紋、ほこりが付くとデータの記録や再生ができな
くなります。ディスクを持つときは信号面を触らないようにしてく
ださい。両端をはさむか、中央の孔と端をはさむように持ってくだ
さい。
÷
記録再生不良
÷
ディスクが汚れていた場合には、柔らかい布でディスクの内周から
外周に向かってまっすぐ拭いてください。円周に沿って拭かないで
ください。
※拭く際には、弊社サービスパーツ GED-009(クリーニングクロ
ス)以外は使用しないでください。
÷
記録再生不良
÷
安定した記録・再生のために推奨ディスクをご使用ください。推奨
ディスクについては販売店または弊社ホームページにてご確認くだ
さい。
÷
記録再生不良
÷
DVD-R for Authoring メディアの記録はサポートしておりません。 ÷
記録不可
÷
マガジンにディスクを入れるときは、水平に入れてください。斜め
(左右の棚が段違い)に入れるとディスクを破損する恐れがありま
す。
÷
マガジンの開口側を下に向けないでください。ディスクが飛び出す
恐れがあります。
÷
チェンジャーに挿入する時は、ゆっくりと挿入してください。強く ÷ 「E83」
挿入すると、勢いでディスクが飛び出す恐れがあります。
※挿入時にブザーが鳴り続けたり、表示部に「E83 disc set NG」
と表示された場合は一度マガジンを抜き、飛び出しているディス
クを手で押し戻してから、もう一度ゆっくり挿入してください。
9. ディスク収納につ
いて
÷
ディスクマガジンおよびハイパーマガジンにディスクを収納する場
合は、挿入ミスを防止するためにもメールスロットをご使用になる
ことを推奨いたします。
※メールスロットのトレイにディスクを置く際には、トレイからは
み出さない様にていねいに置いてください。
10. ディスク反転
ユニットについて
÷
DRM-7000でディスク反転ユニット[DRM-UF701]を利用するた ÷ 「EC❋」
( ❋:0 ∼ F )
めには、チェンジャーのファームウェアリビジョンは 1.12 以降が ÷ その他
必要となります。リビジョン 1.12 未満において使用した場合は、
故障やディスクの破損等の原因となりますので、必ずリビジョン
1.12 以降にアップデートしてから使用してください。
アップデートについてはアフターサービス連絡先、または取扱店ま
でお問い合わせください。
※DRM-3000 ではリビジョンによる制限はありません。
8. マガジンについて
÷ 「E83」
、「E99」
÷ 「E83」
日
本
語
151
<DRC1285>
Ja
トラブルを防止するために
内 容
11. DVD-R/RW
ドライブユニット
DVD-R7783
について
12. LVD SCSI
インターフェース
ユニット
DRM-ULV16
について
起こりうるトラブルやエラー
÷
DVD-R7783 を利用するためには、チェンジャーのファームウェ ÷
アリビジョンは DRM-7000・DRM-3000 共、1.25 以降が必要
となります。リビジョン 1.25 未満で使用した場合、チェンジャー
のデバイスドライバによっては正常に動作しない場合があります。
必ずリビジョン1.25以降にアップデートしてから使用してくださ
い。
アップデートについてはアフターサービス連絡先、または取扱店ま
でお問い合わせください。
÷
DVD-R7783を搭載した場合、増設電源ユニット [DRM-PW701]
は使用できません。
÷
記録再生不良
÷
DRM-ULV16を搭載した場合、SE SCSIバスは以下の条件にてお
使いください。制限を越えての使用はできません。
÷
÷
記録再生不良
SCSI 通信不良
÷
記録再生不良
チェンジャーのデバイス
ドライバが正常に動作し
ない
機器内部を含む全長
3m 以下
バス上に接続できるドライブ台数 3 台以下※
※上記の条件より、チェンジャー 1 台に搭載できる SE ドライブは
最大 3 台となります。また、ケーブル長の制限から、リアベイの
# 1 ∼ # 3 に取り付けてください。
÷
152
<DRC1285>
Ja
DRM-ULV16 を搭載した場合、増設電源ユニット [DRM-PW701]
は使用できません。
各部の名称とはたらき
前面部
前面ドア内部
1
2
3
<オペレーションパネル>
5
ESC
ENT
6
FUNCTION
4
9
LOCK
UNLOCK
7
POWER
ROBOTICS
BUSY
DRIVE
BUSY
MAILSLOT
OCCUPIED
1 20 枚ハイパーマガジン
2 オペレーションパネル
3 メールスロット
4 フロントドア
5 表示窓(LCD)
LCD のバックライトは、オペレーションパネルが 1 分間
操作されないと自動的に省電力モードになります。
6 操作キースイッチ
LCD の表示の切り換えや設定項目の選択を行います。
8
7 LOCK / UNLOCK キースイッチ
LOCK解除キーを差し込んで右に90°回すと、ロックが
解除され、オペレーションパネルの操作が可能になりま
す。
8 動作インジケータ
日
本
語
POWER:
電源を入れると点灯します。
ROBOTICS BUSY:
ディスクの搬送中に点灯します。
操作するには LOCK 解除キーが必要です。
ESC: 表示している画面を一つ手前の階層(前の画面)
DRIVE BUSY:
ドライブにディスクが運ばれると点灯します。
にしたり、動作を停止させるときに押します。
|«: 数値を減少させたり、カーソルを下または左に移
MAILSLOT OCCUPIED:
メールスロットにディスクが入っているときに点灯しま
動させます。
»\: 数値を増加させたり、カーソルを上または右に移
す。
9 フロントベイ
動させます。
ENT: 表示している画面を一つ先の階層(次の画面)に
DRM-7000
ディスクマガジン用:M1 ∼ M7
したり、動作を開始するときに押します。
FUNCTION:
DRM-3000
ディスクマガジン用:M1 ∼ M3
チェンジャーの動作モードを「システム管理者モード」に
するときに押します。
153
<DRC1285>
Ja
各部の名称とはたらき
後面部
後面ドア内部
2
1
9
3
4
5
TERM
OFF
ON
CHANGER
POWER
ID
SCSI
OFF
ON
AC IN
6
7
GND
8
1 リアプレート
コネクターパネルを取り付けます。
6 チェンジャー用 SCSI 端子(CHANGER SCSI)
7 電源スイッチ(POWER)
2 リアドア
3 SE ドライブ用 SCSI 端子
チェンジャーの電源を ON / OFF します。
8 電源インレット(AC IN)
4 SCSI ID スイッチ(ID)
チェンジャーの SCSI-ID を設定します。
上を押すと数字がダウンし、下を押すと数字がアップし
ます。
出荷時は 6 に設定してあります。
5 SCSI ターミネートスイッチ(TERM)
ターミネートの設定を行います。出荷時はONに設定して
ありますので、設置作業中はそのままにしておいてくだ
さい。SCSI ケーブルの接続完了時に、チェンジャーが
SCSI バスの終端になる場合以外は OFF に切り換えてく
ださい。
154
<DRC1285>
Ja
電源コードを接続します(必ず付属の電源コードを使用
してください)
。
9 リアベイ
DRM-7000
ディスクマガジン用:M8 ∼ M15
オプションユニット用:Bay#1 ∼ Bay#16
DRM-3000
ディスクマガジン用:M4 ∼ M7
オプションユニット用:Bay#1 ∼ Bay#8
設 置
DVD-R7783 搭載時のドライブ搭載台数に関して
ドライブの性能を十分に発揮させるために、以下の構成および室温でお使いください。
÷ DRM-ULV16 を搭載し、DVD-R7783 を DVD-D7563 やチェンジャーと同一バスで接続した場合(156 ページ 例 1 ∼例 3 参照)
DRM-7000
DVD-D7563
1台
DVD-R7783
2台 3台 4台
0台
1台
◎
◎
◎
◎
◎
◎
◎
○
2台
3台
◎
◎
◎
○
○
○
○
×
DRM-3000
DVD-D7563
1台
DVD-R7783
2台 3台 4台
0台
1台
◎
◎
◎
◎
◎
○
○
×
2台
3台
◎
○
○
×
×
×
×
×
÷ DRM-ULV16 を搭載せず、DVD-R7783 を DVD-D7563 もしくはチェンジャーと別バスで接続した場合(156 ページ 例 4、例 5 参照)
DRM-7000
DVD-D7563
DVD-R7783
0台
1台
◎
2台
◎
3台
◎
4台
◎
1台
2台
◎
◎
◎
◎
◎
○
○
○
3台
4台
◎
○
○
○
○
×
×
×
5台
○
×
×
×
DRM-3000
DVD-D7563
DVD-R7783
0台
1台
◎
2台
◎
3台
◎
4台
○
1台
2台
◎
◎
◎
○
○
×
×
×
3台
4台
○
×
×
×
×
×
×
×
5台
×
×
×
×
◎:
5℃∼ 35℃の室温にてお使い頂けます。
○:
×:
5℃∼ 30℃の室温にてお使い頂けます。
この組み合わせではご使用頂けません。
※上記はチェンジャー 1 台あたりの搭載台数となります。
日
本
語
SCSI 接続時の制限に関して
※詳細につきましては、「 ステップ 2 4. SCSI ケーブルを接続する」
(159 ページ)をご確認ください。
A. DRM-ULV16 を搭載した場合
(LVD SCSI バスと SE SCSI バスが同一バスの場合、156 ページ 例 1 ∼例 3 参照)
7 ケーブル接続長
LVD SCSI バス
12m 以下
機器内部を含むケーブル全長(チェンジャー複数台接続時はチェンジャー間のケーブル長も含む)
SE SCSI バス
3m 以下
チェンジャー 1 台あたりの機器内部を含むケーブル全長
7 SE ドライブ接続台数
最大 3 台(チェンジャー 1 台あたり)
※ SE ドライブはケーブル長の制限により、リアベイ# 1 ∼# 3 に取り付けてください。
B. DRM-ULV16 を搭載しない場合
(LVD SCSI バスと SE SCSI バスが別バスまたは SE SCSI バスのみの場合、156 ページ 例 4 ∼例 6 参照)
7 ケーブル接続長(ホストアダプター 1 台あたり)
LVD SCSI バス
12m 以下
機器内部を含むケーブル全長(チェンジャー複数台接続時はチェンジャー間のケーブル長も含む)
SE SCSI バス
6m 以下 *
機器内部を含むケーブル全長(チェンジャー複数台接続時はチェンジャー間のケーブル長も含む)
*SCSI-2 モード
155
<DRC1285>
Ja
設 置
SCSI ケーブルの接続例
A. DRM-ULV16 を搭載した場合
LVD Line
[例 1]
SE Line
LVD Drive 1
SE Drive 1
(ON)
1 DRM-ULV16
2 SCSI ケーブル(LVD)
3 SCSI ケーブル(SE)
4 SCSI ターミネータ(LVD)
5 LVD ドライブコネクターパネル(2 ドライブ用)
6 マルチドライブコネクターパネル
DRM-ULV16 Board
Host
Changer Board
* SE デバイスの SCSI ターミネートスイッチの設定
(OFF)
(LVD)
[例 2]
[例 3]
SE Drive 2
LVD Drive 2
(ON)
SE Drive 1
LVD Drive 1
(OFF)
DRM-ULV16 Board
DRM-ULV16 Board
Host
Changer Board
(ON)
(LVD)
Host
(LVD)
Changer Board
(OFF)
B. DRM-ULV16 を搭載しない場合
[例 6]
[例 4]
SE Drive 2
(ON)
Host 2
LVD Drive 1
SE Drive 1
(LVD)
(OFF)
SE Drive 2
(ON)
SE Drive 1
(OFF)
Host 1
Changer Board
(OFF)
(SE)
[例 5]
LVD Drive 2
Host 2
LVD Drive 1
(LVD)
Host 1
(SE)
156
<DRC1285>
Ja
Changer Board
(ON)
Host
(SE)
Changer Board
(OFF)
設 置
3. キャスターを固定する
ステップ 1
チェンジャーが移動しないように、必ずキャスターを4ヶ所
すべてロックしてください。
1. 転倒防止金具を取り付ける
転倒防止のために、DRM-7000 は前後左右 4ヶ所に、 DRM-3000は後ろ側の左右2ヶ所に、付属の転倒防止金具
を取り付けてください。
ロック
転倒防止金具
4. 電源コードを接続する
チェンジャー後面にある電源インレットに電源コードを差し
込み、壁のコンセントに接続してください。
ご注意:
¶ 転倒防止金具は必ず最初に取り付けてください。
¶ 転倒防止金具はチェンジャー後面の端子やケーブル類の
保護も兼ねています。
¶ 転倒防止金具を取り付けずに転倒したり、後面の端子や
ケーブル類が破損した場合は、保証の対象外となります。
¶ DRM-3000 では、必ず後ろ側の左右に取り付けてくだ
さい。
2. 設置場所を決める
チェンジャーは後面にもドアがあり、ディスクマガジンやド
ライブなどが着脱できるようになっています。後面のドアを
開けて作業が行えるように、チェンジャー後面と壁の間を
50cm 以上あけてください。
日
本
語
ご注意:
電源コードは必ず付属のものを使用してください。
電源コードの袋に貼ってあるラベルに従い、その地域に
合ったものを使用してください。
5
m
0c
以
上
157
<DRC1285>
Ja
設 置
ステップ 2
動作可能な状態にするには
3. ドライブを取り付ける
ドライブをリアベイ(指定がある場合は指定されたベイ)に
取り付けます。
本チェンジャーを動作可能な状態にするには、以下の手順で
作業を行ってください。
1. 電源を入れる(158 ページ参照)
2. シッピングスクリューをゆるめる(158 ページ参照)
3. ドライブを取り付ける(158 ページ参照)
4. SCSI ケーブルを接続する(159 ページ参照)
5. ディスクマガジンを取り付ける(160 ページ参照)
(1)必要に応じてオプションのコネクターパネルを取り付け
ます。
出荷時に標準装備しているコネクターパネルは、リアベ
イの #1 と #2 に SE ドライブを取り付けることを想定し
た位置に取り付けてあります。この位置に他のコネク
ターパネルを取り付ける場合は、外してください。
6. ドアを閉める(163 ページ参照)
+ドライバー
1. 電源を入れる
DRM-SN711、DRM-SN721 の場合
チェンジャーから外したネジを使用
します
電源を入れると、自動的にフロントドアとリアドアが開きま
す。これはシッピングスクリューが締まっているためで、故
障ではありません。
ご注意:
¶ ドアはドライブとディスクマガジンの取り付けが終わる
まで閉めないでください。
¶ 電源を入れてもドアが開かないときは、初期化動作が終
り、LCD がユーザーモード表示(163 ページ)になるま
で待ち、
「システム管理者モード:Doorサブモード(177
ページ)
」を参照してドアを開けてください。
DRM-LN721、DRM-LN741 の場合
付属のネジを使用します
(チェンジャーから外したネジは使用
しません)
2. シッピングスクリューをゆるめる
チェンジャーの前面ドアを開けると、
チェンジャー内部の下
側にシッピングスクリューがあります。
このネジは輸送時に
内部機構を保護するためのものです。
シッピングスクリューは紛失防止のため、
ゆるめても取り外
しができないようになっています。
(2)ドライブを取り付けます。
シッピングスクリュー
ご注意:
¶ 本チェンジャーを移動する場合は、シッピングスク
リューを締めてください。
¶ シッピングスクリューをゆるめた状態で両方のドアを閉
めると、メカニズムの初期化動作に入ります。
設置作業を続けるには、再びドアを開ける必要がありま
す。
「システム管理者モード:Doorサブモード(177ペー
ジ)
」を参照してドアを開けてください。
取り付ける前に、ドライブの後面で以下の設定をしてく
ださい。
(詳しくはドライブの取扱説明書を参照してくだ
さい。
)
¶ SCSI-ID の設定
同一の SCSI バス上で、ID が重複しないようにしてく
ださい。
¶ SCSI ターミネートの設定
<SE SCSI バス >
SCSI バスの終端となるドライブまたはチェンジャー
のターミネートスイッチは ON にしてください。
<LVD SCSI バス >
DVD-R7783やDRM-ULV16を搭載している場合は、
同様に LVD SCSI バスの終端も行う必要があります。
DVD-R7783 は SCSI ターミネータを搭載しており
ませんので、オプションまたは DRM-ULV16 に付属
のSCSIターミネータ(LVD)を使用して、LVD SCSI
バスの終端を行ってください。
158
<DRC1285>
Ja
設 置
1 チェンジャーのガイドレールにドライブを載せ、カチッ
と音がし、ドライブのロックレバーが「LOCK」側へ倒れ
るまで押し込みます。
ガイドレール
(3)ドライブの SCSI-ID をチェンジャーが読み取ります。
¶ SCSI-ID が他のドライブと重複していない場合には、
ブザーが 1 回鳴ります。
¶ 他のドライブと同じ SCSI-ID の場合には、ブザーを 3
回鳴らして警告します。
ご注意:
ドライブ
¶ 別々の SCSI バスに接続する場合は SCSI-ID が重なって
いても問題はありません。
¶ チェンジャー内の他のドライブと SCSI-ID が重なってい
ない場合でも、接続する SCSI バス上に同じ SCSI-ID の
機器(ハードディスクなど)がある場合は、異なるSCSIID に設定する必要があります。
4. SCSI ケーブルを接続する
ロックレバー
2 電源用ケーブルを接続します。
¶ ドライブの後面にあるワイヤリングモニタインジケー
タ(オレンジ色)が点灯します。
¶ ターミネートスイッチが ON のときには、ターミネー
トインジケータ(緑色)も点灯します(DVD-R7783
を除く)
。
電源用ケーブル
すべてのドライブを装着し、接続が完了してしていることを
確認したら、
SCSIインタフェースの配線を行ってください。
接続に関しましては、
『SCSI接続マニュアル』をご覧になる
か、本機の取扱店にご相談ください。
ご注意:
¶ ホストアダプターは ID7 にてご使用ください。
¶ LVD SCSI バスは 12m 以下、SE SCSI バスは 6m 以下
にてご使用ください。
(チェンジャー内部配線およびチェ
ンジャーディジーチェーン時のチェンジャー間を含む。)
ただし、DRM-ULV16 を搭載した場合の SE SCSI バス
は 3m 以下とし、そのバス上に接続できるドライブ台数
も 3 台までとなります。
(したがって、チェンジャー 1 台
に搭載できる SE ドライブは最大 3 台となります。また、
ワイヤリングモニタインジケータ
ターミネートインジケータ
(DVD-R7783 はビジーインジケータ)
3 チェンジャーインタフェースケーブルを接続します。
¶ ワイヤリングモニタインジケータが約2秒周期で点滅
します。
ワイヤリングモニタインジケータ
ケーブル長の制限から、リアベイ# 1 ∼# 3 に取り付け
てください。
)
¶ SEドライブの接続時にSCSIケーブルのコネクタが余る
場合は、ケーブル先端部のコネクタをターミネートした
ドライブに接続し、中間のコネクタを余らせてください。
(156 ページ、例 1、3、4、6 参照)
¶ チェンジャーのSCSIターミネートスイッチは、出荷時に
はONに設定してあります。チェンジャーがSCSIバスの
終端でない場合には必ず SCSI ターミネートスイッチを
OFF にしてください。
(156 ページ、例 1、3、4、6 参照)
¶ チェンジャーは、SCSI ケーブルの接続やSCSI-IDの割り
当ての間違いを認識することができません。設置作業の最
<イラスト>
後にホストコンピュータを再起動し、ドライブやチェン
ジャーを正しく認識できていることをご確認ください。
¶ ホストコンピュータと接続する際には、チェンジャー、ホ
ストコンピュータ共に電源をOFFにしてから接続してく
チェンジャーインタフェースケーブル
ださい。接続終了後は、先にチェンジャーの電源を入れて
からホストコンピュータの電源を入れてください。
ご注意:
チェンジャーインタフェースケーブルは、
ドライブを取り付
けたベイに対応するコネクタに接続してください。
(コネク
タには対応するベイ番号のラベルが貼ってあります。
)誤っ
て隣接するコネクタに接続した場合、
ディスクを破損するこ
とがあります。
159
<DRC1285>
Ja
日
本
語
設 置
¶ チェンジャーインタフェースケーブルが接続されていな
いと、チェンジャーはドライブを認識することができま
(1)ノーマルタイプの 50 枚ディスクマガジンにあらかじめ
ディスクを入れてからチェンジャーに装着する
せん。ドライブ後面のワイヤリングモニタインジケータ
を確認してください。
1 リリースノブを左に 90°回してロックを解除する。
2 ディスクを収納する。
= 点灯ならチェンジャーインタフェースケーブルが正し
く接続されているか確認してください。
3 リリースノブを右に 90°回してディスクをロックす
る。
= 消灯なら電源用ケーブルの接続を確認してください。
接続し直す場合は、電源用ケーブルの接続後にチェン
ジャーインタフェースケーブルを接続してください。
¶ ドライブとして認識されているのに、LCD の下段にドラ
イブのモデル名が表示されない場合は各ケーブルを接続
し直してください。
ケーブルを抜く順番:
1. SCSI インタフェースケーブル
2. チェンジャーインタフェースケーブル
3. 電源用ケーブル
接続する順番:
1. 電源用ケーブル
リリースノブ
2. チェンジャーインタフェースケーブル
3. SCSI インタフェースケーブル
ロック解除
ロック
ラベル面
5. ディスクマガジンを取り付ける
チェンジャーにディスクを収納するには、
次のような方法が
あります。
(1)ノーマルタイプの 50 枚ディスクマガジンにあらかじめ
ディスクを入れてからチェンジャーに装着する
(2)20枚ハイパーマガジンにあらかじめディスクを入れてか
らチェンジャーに装着する
(3)オペレーションパネルを操作して、指定したディスク番
号のスロットにメールスロットからディスクを運ぶ
(4)ホストコンピュータの指示に従い、メールスロットから
ディスクを入れる
(5)ホストコンピュータの指示に従い、
ディスクを入れた20
枚ハイパーマガジンをチェンジャーに装着する
ご注意:
¶ ラベル面を上にして入れてください。
¶ ディスクは水平に入れてください。斜めにしていれる
とディスクを破損することがあります。
¶ ディスクの信号面に傷を付けないでください。
¶ ロックを解除したままディスクマガジンを下に向ける
と、ディスクが落下することがあります。
4 マガジンをチェンジャーに装着する。
ディスクマガジンのハンドルを持ち、チェンジャー内の
ガイドレールに沿って挿入します。
突きあたるまでマガジンを押し込み、ロックピンがチェ
ンジャーの内壁の穴にはまるようにハンドルを押しなが
ら左に倒してください。
¶ 20枚ハイパーマガジンは、チェンジャーの電源が入って
いないと出し入れすることができません。
¶ (3)∼(5)の方法は、チェンジャーが動作可能になった後
の操作です。あらかじめ空のディスクマガジンをチェン
ジャーに装着ください。
ロックタイプの50枚ディスクマガジンにディスクを入れ
例:フロントベイに装着する
ロックピン
穴
る場合は、これらの方法で行います。「システム管理者
モード:Mailslot サブモード(174 ページ)
」をご覧く
ガイドレール
ださい。
¶ (4)および(5)の方法は、チェンジャー制御ソフトウェア
の機能を利用しますので、お使いになるソフトウェアの
マニュアルをご覧ください。
≠
160
<DRC1285>
Ja
設 置
ご注意:
¶ ラベル面を上にして入れてください。
¶ ディスクは水平に入れてください。斜めにしていれる
とディスクを破損することがあります。
¶ ディスクの信号面に傷を付けないでください。
¶ ロックを解除したままディスクマガジンを下に向ける
ハンドル
と、ディスクが落下することがあります。
4 マガジンをチェンジャーに装着する。
途中まで押し込むと自動で引き込まれます。
リアベイに装着する場合も同様に行ってください。リア
マガジンの正しい装着位置は、かなり奥まったところで
す。
チェンジャーからディスクマガジンを取り出す場合は、
ハンドルを手前に起こして引き出します。
ディスクマガジンをチェンジャーに装着すると、その
ディスクマガジン固有のIDが自動的に読み取られ、LCD
に数秒間表示されます。
ES
C
EN
FU
T
NC
TIO
N
LO
CK
UN
LO
CK
PO
WER
RO
BO
BU TICS
SY
DR
IV
BU E
SY
MA
OCIL SL
CU OT
PIED
ディスクマガジンを抜いたときにも表示が出ます。
ハイパーマガジンをチェンジャーに装着するとハイパー
マガジン固有のIDとロック機構の操作履歴を表示します。
これらの表示が交互に出る場合、ディスクマガジンが正
しく装着されていません。ディスクマガジンの装着状態
を再度確認してください。
日
本
語
≠
(2)20 枚ハイパーマガジンにあらかじめディスクを入れて
からチェンジャーに装着する
1 リリースノブを左に 90°回してロックを解除する。
2 ディスクを収納する。
3 リリースノブを右に 90°回してディスクをロックす
る。
IDが読み取れないときは自動的にイジェクトしますので、
再度挿入してみてください。
ご注意:
ハイパーマガジンが装着されている場合は「システム管
理者モード:Hyper サブモード(175 ページ)」を参照
してハイパーマガジンを取り出してください。
リリースノブ
ラベル面
ロック解除
ロック
161
<DRC1285>
Ja
設 置
チェンジャー内部のディスク収納場所(スロット)には通し番号が割り当てられます。ディスクマガジンが入っていなくても割
り当てますので、あとからディスクマガジンを追加してもスロット番号は変わりません。
DRM-7000
ディスクの収納場所
スロット番号
(ディスク番号)
ディスクの収納場所
スロット番号
(ディスク番号)
ハイパーマガジン
Hyper
スロット 20
|
スロット 1
#770
|
#751
hyp-20
|
hyp-01
マガジンベイ 15
M15
スロット 50
|
スロット 1
#750
|
#701
M15-50
|
M15-01
マガジンベイ 7
M7
スロット 50
|
スロット 1
#350
|
#301
M7-50
|
M7-01
マガジンベイ 14
M14
スロット 50
|
スロット 1
#700
|
#651
M14-50
|
M14-01
マガジンベイ 6
M6
スロット 50
|
スロット 1
#300
|
#251
M6-50
|
M6-01
マガジンベイ 13
M13
スロット 50
|
スロット 1
#650
|
#601
M13-50
|
M13-01
マガジンベイ 5
M5
スロット 50
|
スロット 1
#250
|
#201
M5-50
|
M5-01
マガジンベイ 12
M12
スロット 50
|
スロット 1
#600
|
#551
M12-50
|
M12-01
マガジンベイ 4
M4
スロット 50
|
スロット 1
#200
|
#151
M4-50
|
M4-01
マガジンベイ 11
M11
スロット 50
|
スロット 1
#550
|
#501
M11-50
|
M11-01
スロット 50
|
スロット 1
#150
|
#101
M3-50
|
M3-01
スロット 50
|
スロット 1
#500
|
#451
M10-50
|
M10-01
マガジンベイ 2
M2
スロット 50
|
スロット 1
#100
|
#051
M2-50
|
M2-01
マガジンベイ 9
M9
スロット 50
|
スロット 1
#450
|
#401
M9-50
|
M9-01
マガジンベイ 1
M1
スロット 50
|
スロット 1
#050
|
#001
M1-50
|
M1-01
マガジンベイ 8
M8
スロット 50
|
スロット 1
#400
|
#351
M8-50
|
M8-01
マガジンベイ 3
M3
マガジンベイ 10
M10
ご注意:
スロット番号は #770 までありますが、770 枚のディスクが収納可能ということではありません。
DRM-3000
ディスクの収納場所
スロット番号
(ディスク番号)
スロット 20
|
スロット 1
#370
|
#351
hyp-20
|
hyp-01
マガジンベイ 3
M3
スロット 50
|
スロット 1
#150
|
#101
M3-50
|
M3-01
マガジンベイ 2
M2
スロット 50
|
スロット 1
#100
|
#051
マガジンベイ 1
M1
スロット 50
|
スロット 1
#050
|
#001
ハイパーマガジン
Hyper
ディスクの収納場所
スロット 50
|
スロット 1
#350
|
#301
M7-50
|
M7-01
マガジンベイ 6
M6
スロット 50
|
スロット 1
#300
|
#251
M6-50
|
M6-01
M2-50
|
M2-01
マガジンベイ 5
M5
スロット 50
|
スロット 1
#250
|
#201
M5-50
|
M5-01
M1-50
|
M1-01
マガジンベイ 4
M4
スロット 50
|
スロット 1
#200
|
#151
M4-50
|
M4-01
マガジンベイ 7
M7
ご注意:
スロット番号は #370 までありますが、370 枚のディスクが収納可能ということではありません。
162
<DRC1285>
Ja
スロット番号
(ディスク番号)
設 置
6. ドアを閉める
各コンポーネントの装着とケーブル類の結線が終了している
ことを確認してください。
フロントドアとリアドアを閉めるとメカニズムの初期化動作
を開始します。
初期化動作が完了すると、LCD には次のような表示がでま
す。
上段はディスク搬送メカニズムの動作状況、
下段は各ドライ
ブ内のディスクの有無およびディスク番号を表わしていま
す。
ドライブには下から順にドライブ番号が割り当てられます。
ご注意:
装着したドライブ数とドライブ番号の最大値が異なる場合
は、
リアドアを開けてドライブの電源用ケーブルおよびチェ
ンジャーインタフェースケーブルの接続を確認してくださ
い。
ドアを開けるには「システム管理者モード:Door サブモー
ド(177 ページ)
」をご覧ください。
日
本
語
163
<DRC1285>
Ja
操 作
本チェンジャーの動作モードには、
ユーザーモードとシステ
ム管理者モードがあります。それぞれのモードでの操作を区
別することにより、
オペレーションパネルの操作とホストコ
ンピュータからの制御の相互干渉や矛盾、
衝突などの発生を
防止します。
システム管理者モード
本チェンジャーのオペレーションパネルを使った操作は、
基
本的にはキーを持つシステム管理者にだけ許されています。
システム管理者モードへ入るには、次の操作が必要です。
1. オペレーションパネル上のキースイッチに LOCK 解除
キーを差し込み、90 ゜回して UNLOCK の位置にする。
ユーザーモード
設置作業が終了したチェンジャーは、ユーザーモードにな
ESC
ENT
FUNCTION
り、
ホストコンピュータのチェンジャー制御ソフトウェアや
データベース管理ソフトウェアによって制御可能になりま
LOCK
UNLOCK
POWER
ROBOTICS
BUSY
DRIVE
BUSY
LOCK
MAIL SLOT
OCCUPIED
UNLOCK
す。ユーザーモードで正常に動作している場合、LCD は現
在の状況を 1 秒周期で表示します。
2. FUNCTION キーを押す。
≠
システム管理者モードになると、LCD には次のような表示
が出ます。
≠
システム管理者モードは 8 つのサブモードに分かれていま
す。
≠
情報系のサブモード
チェンジャーの現在の設定や内部に記憶された情報を読み出
≠
:
:
ユーザーモードでは、
チェンジャーはホストコンピュータか
らの指示で動作します。
す機能を持つサブモードです。システム管理者は、ホストコ
ンピュータによるチェンジャーの制御を妨げずにさまざまな
情報を得ることができます。
¶ Inquiry サブモード(166 ページ参照)
¶ Config サブモード(166 ページ参照)
¶ Option サブモード(168 ページ参照)
¶ Info サブモード(172 ページ参照)
動作系のサブモード
ディスク搬送メカニズムやマガジン排出メカニズムを駆動
し、
ディスクの入れ換えやスロット内のディスクの有無を確
認するサブモードです。これらのサブモードに入ると、ホス
トコンピュータからのチェンジャーに対する動作要求は無視
されます。
¶ Mailslot サブモード(174 ページ参照)
¶ Hyper サブモード(175 ページ参照)
¶ Probe サブモード(176 ページ参照)
¶ Door サブモード(177 ページ参照)
164
<DRC1285>
Ja
操 作
ご注意:
動作系サブモードの利用については、
ホストコンピュータ側
から禁止できるようにしてあります。
禁止されていてもシス
テム管理者モードには入れますが、
情報系サブモードしか利
用できません。
» キーを押す
Auto probing 機能
システム管理者モードの設定画面は、次のように切り換わります。
« キーを押す
» キーを押す
Hot start 機能
« キーを押す
» キーを押す
Auto eject 機能
Inquiry サブモード
« キーを押す
« キーを押す
» キーを押す
« キーを押す
ENT キーを押してカテゴリー
押す
ENT キーを押して動作を
» キーを押す 選択し、再度 ENT キーを
Mailslot サブモード
« キーを押す
ENT キーを押す
» キーを押す を選択し、再度 ENT キーを
Info サブモード
« キーを押す
« キーを押す
» キーを押す
Option サブモード
押す
» キーを押す
Hyper サブモード
« キーを押す
» キーを押す
Hyper I/E 機能
Config サブモード
« キーを押す
» キーを押す
» キーを押す
» キーを押す
Alert buzzer 機能
« キーを押す
» キーを押す
Free message 機能
« キーを押す
» キーを押す
Inquiry change 機能
« キーを押す
» キーを押す
Fan NG message 機能
« キーを押す
Probe サブモード
« キーを押す
» キーを押す
Door サブモード
« キーを押す
ご注意:
÷ Inquiry change 機能の設定を変えないでく
ださい。工場出荷時は DRM-7000(DRM7000の場合)
、DRM-3000(DRM-3000
の場合)になっています。
÷ Fan NG message 機能の設定を変えない
でください。工場出荷時はON になっていま
す。
Log
InquiryサブモードのときにESCキーを押すと、システム管
Contents
理者モードからユーザーモードに戻ります。
Run-statistics
Swap
Remove
Add
165
<DRC1285>
Ja
日
本
語
操 作
Inquiry サブモード
Config サブモード
本チェンジャーが固有に持っている情報を表示するモードで
マガジンベイとリアベイの状態を表示するモードで、
本チェ
す。ホストコンピュータが SCSI の INQUIRY コマンドを発
行することによって入手するデータと同じものが表示されま
ンジャーに装着したコンポーネントが正しく認識されている
か確認することができます。
す。
“ID=”で表示するのは、本チェンジャーの SCSI-ID で
す。
ENT キーを押すと、ベイの選択画面になります。
«キーまたは»キーを押してカーソルを移動し、マガジンベ
ENT キーを押すと、本チェンジャーのモデル名とデバイス
ID(シリアル番号)を表示します。
イかリアベイを選択してください。
リアベイを選択した場合
ESC キーを押すと一つ手前の階層に戻ります。
チェンジャーの SCSI-ID を変更する場合は、後面部の左下
にある SCSI-ID スイッチで設定してください。
ENTキーを押すと、最初にリアベイ#1に装着されているコ
ンポーネントを表示します。
¶ ベイ番号は » キーまたは « キーを押して選択します。
SCSI-ID スイッチを操作すると、次の表示になります(6 か
ら 5 に変更した場合)
。
» キーまたは « キーを押す
≠
チェンジャーの電源を再度ONにするか、ホストコンピュー
タ側からSCSIバスリセットすると、SCSI-IDはSCSI-IDス
イッチの設定値に変更されます。
» キーまたは « キーを押す
≠
» キーまたは « キーを押す
≠
※ DRM-7000 の表示例です。
¶ 装着されているコンポーネントがドライブの場合には、
SCSI-ID、ターミネートスイッチの設定、およびそのドラ
イブ固有のデバイス ID を表示することができます。
ドライブの入っているベイの表示のときに、ENT キーを
押してください。
166
<DRC1285>
Ja
操 作
¶ ドライブにディスクが入っている場合には、ディスク番
号を表示することもできます。
リア側では、ドライブなどが装着されているためにマガ
ジンベイとして使えないことがあります。
その場合は次のように表示します。
ENT キーを押してください。
※ DRM-7000 の表示例です。
マガジンの確認をする場合は、ESC キーを押してベイの
選択画面に戻り、マガジンベイを選択してください。
¶ ディスクマガジンのタイプを確認したいときには、ENT
キーを押してください。
ご注意:
ESC キーを押すたびに一つ手前の階層に戻りますが、押し
すぎるとユーザーモードに戻ってしまいます。
なお、DVD-R7783をSCSI-ID 10∼15で使用した場合、
LCD には A ∼ F で表示されます。
SCSI-ID
LCD 表示
0 ∼ 9 10
0∼9 A
11
B
12
C
13
D
14
E
15
F
マガジンベイを選択した場合
¶ ENT キーを押すと、最初に 20 枚ハイパーマガジンの ID
を表示します。
¶ マガジンベイ 15(M 15)の画面で » キーを押すと、ハ
イパーマガジンの表示に戻ります。
ドライブの確認をする場合は、ESC キーを押してベイの選
択画面に戻り、リアベイを選択してください。
ご注意:
ESC キーを押すたびに一つ手前の階層に戻りますが、押し
すぎるとユーザーモードに戻ってしまいます。
ハイパーマガジンが装着されていない場合は次のように
表示します。
日
本
語
¶ ハイパーマガジンの表示のときに » キーを押すと、マガ
ジンベイの1から順にマガジン ID を表示します。
» キーを押す
≠
ディスクマガジンが装着されていない場合は次のように
表示します。
※ DRM-7000 の表示例です。
167
<DRC1285>
Ja
操 作
Option サブモード
チェンジャーの機能の一部はユーザーシステムの要求に合わ
せて選択することができます。
システム管理者は、
チェンジャー制御ソフトウェアやデータ
ENT キーを押す
≠
ベース管理ソフトウェアの機能を生かせるように、
オプショ
ン機能を適切に設定してください。また、チェンジャーの設
置場所によって、セキュリティレベルやエラー発生時の動作
仕様への要求も変わりますので、
使用環境を考慮して設定し
| キーを押して ON を選択する
てください。
≠
ENT キーを押す
≠
Option サブモードでは、以下のオプション機能を設定する
ことができます。
1. Auto probing 機能 (出荷時は OFF)
2. Hot start 機能
3. Auto eject 機能
(出荷時は OFF)
(出荷時は ON)
4. Hyper I/E 機能
5. Alert buzzer 機能
(出荷時は ON)
(出荷時は ON)
6. Free message 機能(出荷時は OFF)
OFF を設定したときは“Auto probing is prohibited”
と表示されます。
Auto probing 機能を OFF から ON に切り換えても、ドア
の開閉、
ハイパーマガジンの挿入またはリセットをするまで
1. Auto probing 機能
Auto probing 機能は動作しません。
Auto probing機能が動作すると、確認の必要なディスクマ
ドアを開けて装着したノーマルタイプの50枚ディスクマガ
ジンや、チェンジャー外部でディスクを収納した20枚ハイ
ガジンの各スロットが“full”なのか“empty”なのかを順
に調べていきます。
パーマガジンは、チェンジャー内部で各スロットにディスク
が入っているか確認してから使用します。
Auto probing 動作を中止するには、キースイッチを UN-
通常はホストコンピュータのチェンジャー制御ソフトウェア
がこの作業を行いますが、
ホストコンピュータと接続する前
LOCK 位置にして ESC キーを押します。
にこの作業を終えておきたい場合や、
チェンジャー制御ソフ
トウェアがこの作業をサポートしていない場合には Probe
ご注意:
サブモードを使用します(176ページ参照)
。しかし、Probe
サブモードでは確認するディスクマガジンをひとつずつ指定
しなければなりません。
Auto probing機能は、チェンジャーが確認の必要なディス
クマガジンを自動的に検出し、ディスクの有無確認動作を実
行する機能です。
168
<DRC1285>
Ja
¶ 50枚ディスクマガジン1台を調べるには約2分かかりま
す。
¶ Auto probing動作中は、ホストコンピュータからの制御
を受け付けません。
操 作
2. Hot start 機能
3. Auto eject 機能
ディスクがドライブ内にある状態でチェンジャーの電源を
切った場合、次にチェンジャーの電源を入れたときに、その
ネットワーク環境では、大容量のチェンジャーはサーバに隣
接して設置され、ユーザー端末とは隔絶していることがあり
ディスクは元のスロットに自動返却するようになっています
(SCSI バスリセットでは、ディスクの自動返却は行いませ
ます。
このような環境では、ユーザーがチェンジャー制御ソフト
ん)
。
しかし、
頻繁にアクセスされるディスクをドライブに置いた
ウェアを使い、チェンジャー内のディスクをメールスロット
に運ぶ指示を与えた場合、
ユーザーはディスクを取り出しに
ままにしておけば、
電源を入れた直後からそのディスクは読
み出しが可能となります(Hot start)
。
チェンジャーの設置場所へ行くことになります。そして、
ユーザーがチェンジャーの前に立つより先に、ディスクを載
そこで、
「電源を入れた時にドライブ内のディスクを強制自
動返却しない」という仕様を選択できるようにしています。
せたメールスロットは開いてしまいます。
これでは、チェンジャーの近くにシステム管理者が常駐して
いるような場合を除くと、セキュリティなど無いも同然で
す。このことはハイパーマガジンのイジェクトでも同様で
ENT キーを押す
≠
す。
Auto eject機能をOFFにすることにより、メールスロット
のトレイ自動オープンやハイパーマガジンのオートイジェク
トに制限をかけ、一定レベルのセキュリティを保持すること
ができます。
| キーを押して ON を選択する
≠
ENT キーを押す
≠
ENT キーを押す
≠
\ キーを押して OFF を選択する
≠
OFF を設定したときは“Hot start is prohibited”と
表示されます。
日
本
語
ENT キーを押す
≠
ご注意:
チェンジャー制御ソフトウェアが
「強制的にディスクを返却
する」という仕様になっている場合、Hot start は機能しま
せん。
ON を設定したときは“Auto eject is activated”と
表示されます。
Auto eject機能がOFFの状態で、ホストコンピュータから
の指示でメールスロットにディスクが運ばれても、メールス
ロットのトレイは自動オープンしません。
LCD には次のような表示が出ます。
169
<DRC1285>
Ja
操 作
ハイパーマガジンをイジェクトする指示をホストコンピュー
タから受けたときも、
ハイパーマガジンは自動イジェクトし
ません。
LCD には次のような表示が出ます。
ENT キーを押す
≠
\ キーを押して OFF を選択する
≠
ENT キーを押してメールスロットやハイパーマガジンを動
作させるには、キースイッチがUNLOCKの位置になってい
なければなりません。ユーザーが LOCK 解除キーを持って
チェンジャーの設置場所に行くまで、
メールスロットやハイ
パーマガジンは動作しないため、
その間のセキュリティは確
保されることになります。
ENT キーを押す
≠
4. Hyper I/E 機能
ハイパーマガジンは基本的には20枚のディスクを装着する
ことのできるディスクマガジンとして扱われますが、
ドアを
開けずにディスクを取り出せるという特長を生かすため、
巨
大なメールスロットとして扱うこともできます。
ON を設定したときは“Hyper I/E is activated”と表
示されます。
ご注意:
SCSI で規定されたチェンジャー装置は、内部を構成する要
素(エレメント)を 4 つのタイプに分けています。
1. メディア搬送エレメント(Robotics)
2. ストレージエレメント(Slots)
3. インポート/エクスポートエレメント(Mailslot)
4. データ転送エレメント(Drive)
通常の(ディスクマガジンが備えている)スロットとメール
スロットは違うタイプのエレメントとして定義されています
が、Hyper I/E 機能を ON にすることにより、ハイパーマガ
ジンをメールスロットと同様に制御することができます。
170
<DRC1285>
Ja
Hyper I/E 機能がON であっても、ハイパーマガジンはスト
レージエレメントとしての属性を維持していますので、
チェ
ンジャー制御ソフトウェアは、ハイパーマガジンをインポー
ト/エクスポートエレメントとして扱わなくても構いませ
ん。
しかし、
複数のインポート/エクスポートエレメントが存在
することを認めない、あるいは誤動作の危険があるような
チェンジャー制御ソフトウェアをご使用になるときは、
Hyper I/E 機能を OFF にしてください。
操 作
5. Alert buzzer 機能
6. Free message 機能
本チェンジャーのオペレーションパネルにはブザーが内蔵さ
ホストコンピュータからの指示で、ディスクの出し入れなど
れており、必要に応じてブザーが鳴るようになっています。
を行う場合、LCD は次に行うべき操作を表示します。
¶ チェンジャーに不具合が発生したとき:
ユーザーが、オペレーションパネルのキーを押すまで鳴
例:メールスロットを使ってディスクの出し入れを行う
(Option サブモード:Auto eject 機能が OFF の場合)
り続けます。
LCD やホストコンピュータ上の警告表示で十分なら、こ
の警告ブザー(Alert buzzer)を鳴らさないように設定
します。
ここまでの LCD の表示は、ディスクを入れる場合でも取り
出す場合でも共通ですが、
メールスロットが開いた後に行う
作業は、ホストコンピュータの指示によるものなので、チェ
ンジャーの LCD は表示することができません。
ENT キーを押す
≠
Free message 機能を ON にすると、LCD に表示する内容
をホストコンピュータから書き換えることが可能になり、操
作手順の指示を表示することができます。
\ キーを押して OFF を選択する。
≠
また、チェンジャーを制御しているアプリケーション名や、
ディスクに書き込み中であることのコーションなど、ホスト
コンピュータ側が管理している情報を自由に表示することが
できます。
ENT キーを押す
≠
ON を設定したときは“Alert buzzer is activated”と
表示されます。
ENT キーを押す
≠
日
本
語
| キーを押して ON を選択する。
≠
ただし、
以下のブザーは作業者の入力に対する応答メッセー
ジなので、ブザーを鳴らさないようにすることはできませ
ん。
¶ リアドアを開けてドライブの装着作業を行っているとき:
フロント側のLCDで作業状況をモニタするのは困難です
ENT キーを押す
≠
ので、ブザーによって作業が適切に進んでいることを知
らせます。
¶ オペレーションパネルの操作キーが無効なとき:
キーを押している間はブザーが鳴ります。
OFFを設定したときは“Free message is prohibited”
と表示されます。
Free message 機能を ON にしていても、ホストコン
ピュータが何もメッセージを送ってこない場合は、チェン
ジャー自身が LCD に表示する内容を決定します。
171
<DRC1285>
Ja
操 作
¶ Import-log
Info サブモード
本チェンジャーは、
システム管理者の日常のメンテナンス業
務に重要なデータを、内部の不揮発メモリに蓄積していま
す。Info サブモードはそのデータを読み出すモードです。
Mailslot サブモード(174 ページ)で新たにチェン
ジャーに収納したディスクのスロット番号を、順番に表
示する機能です。
「Mailslot サブモード:Add」で追加したディスクだけで
なく、
「Mailslot サブモード:Swap」で入れ換えたディ
スクも表示します。新たに装着されたノーマルタイプの
ENT キーを押すと、読み出すデータのカテゴリーを選択す
る表示になります。
50枚ディスクマガジンなどは、マガジン単位で収納され
たとして一括表示します。
« キーを押す
≠
カーソルを移動させてカテゴリーを選択し、ENT キーを押
してください。
« キーを押す
≠
Log
エラーログとインポートログのデータを読み出します。
※ DRM-7000 の表示例です。
カーソルを移動させて“Error-log”か“Import-log”を選
択し、ENT キーを押してください。
Contents
ディスクマガジンのスロットの情報を読み出します。
¶ Error-log
チェンジャーが検出したさまざまな不具合の履歴を、最
新のエラーから順に32番まで番号をつけて記憶していま
す。
カーソルを移動させてエラー番号を選択し、ENT キーを
押すと、そのエラーコードの説明文を表示します。
さらに ENT キーを押すと、そのエラーが発生した時の詳
細な情報を表示します。
« キーを押す
≠
» キーを押す
±
※ DRM-7000 の表示例です。
“Uncertain”は、チェンジャーがディスクの有無を確認
していないスロットの数を表わしています。
ENT キーを押す
≠
ENT キーを押す
≠
172
<DRC1285>
Ja
操 作
Run-statistics
動作時間と動作回数のデータを読み出します。
¶ Number of moves(動作回数)
« キーと » キーを押して、以下の 4 つの項目の動作回数
を表示させます。
Elevation done:
昇降動作の回数です。このデータは昇降系メカニズムの
メンテナンス時期を知るために有効です。
カーソルを移動して“Work-time sum”か“Number of
moves”を選択し、ENT キーを押してください。
¶ Work-time sum(動作時間)
“PowerOn-time”
はチェンジャーの総通電時間を表示し
ます。
Load/Unload done:
ディスクをスロットやドライブに出し入れするローディ
ングメカニズムの動作回数です。指定したスロットの
ディスクを指定したドライブに運ぶとき、通常は 2 カウ
ント加算されます。このデータはローディングメカニズ
ムのメンテナンス時期を知るために有効です。
Mailslot driven:
メールスロットの利用回数で、オープン/クローズで 1
ENT キーを押す
≠
“Drive work-time”は内蔵しているそれぞれのドライブ
の動作時間の累計を表わします。
ENT キーを押す
≠
カウント加算されます。
Hyper driven:
20枚ハイパーマガジンの入れ換えの回数です。排出/挿
入で 1 カウント加算されます。
« キーを押す
» キーを押す
≠
±
« キーを押す
≠
» キーを押す
±
» キーを押す
≠
« キーを押す
» キーを押す
≠
±
» キーを押す
« キーを押す
≠
» キーを押す
±
≠
“Drive work-time”
で表示されるドライブの動作時間は、
ドライブ固有の device-ID で管理していますので、ドラ
日
本
語
※ ディスク反転ユニット[DRM-UF701]
を使用の場合
イブの装着位置を入れ換えても常に正しい数値を示しま
す。
173
<DRC1285>
Ja
操 作
Mailslot サブモード
メールスロットとオペレーションパネルを使用して、
ディス
クの交換、取り出し、追加を行うモードです。
ご注意:
通常、
ディスクの出し入れはデータベースの内容との不整合
が発生しないようにホストコンピュータの制御下で行います
が、
システム管理者にはこのモードでの自由なディスクの出
し入れを認めています。ただし、システム管理者はディスク
を移動させたスロットを記録し、
必要に応じてデータベース
指定したスロットにディスクがなければ、トレイが開い
て次の表示が出ます。
¶ 交換するディスクをトレイにのせ、ENT キーを押してく
ださい。
トレイが引き込まれ、表示が次のように変わり、ディスク
が指定したスロットまで運ばれます。
をメンテナンスしなければなりません。
(ディスクを追加し
たスロット番号は、Info サブモードの Import-log で確認す
ることができます。
)
ディスクの交換が終了すると“Swap”の最初の画面になり、
条件に合う次のスロット番号が表示されます。
“Swap”を終了する場合は、ESC キーを押してください。
ENT キーを押すと「ディスクの交換、取り出し、追加」の
動作選択メニューを表示します。カーソルを移動してメ
ニューを選択し、ENT キーを押してください。
Remove(ディスクの取り出し)
¶ 取り出したいディスクのスロット番号を、»キーまたは«
Swap(ディスクの交換)
キーを押して指定し、ENT キーを押してください。
(
“Remove”はディスクの入っていることが確認済みの
スロットだけを対象としますので、その条件に合うス
ロットがなければENTキーを押しても表示は変わりませ
ん。
)
¶ ディスクを交換したいスロット番号を、» キーまたは «
キーを押して指定し、ENT キーを押してください。
(ディスクの入っているスロットの番号と、ディスクの有
無が未確認のスロットの番号が順に表示されます。
)
指定したスロットにディスクがあれば、そのディスクを
メールスロットに運んでトレイが開き、次の表示になり
ます。
指定したディスクをメールスロットに運んでトレイが開
き、次の表示になります。
¶ ディスクを取り出し、ENT キーを押してトレイを閉めて
ください。
ディスクの取り出しが終了すると“Remove”の最初の画面
になり、条件に合う次のスロット番号が表示されます。
“Remove”を終了する場合は、ESCキーを押してください。
174
<DRC1285>
Ja
操 作
Add(ディスクの追加)
Hyper サブモード
20枚ハイパーマガジンをイジェクトするためのモードです。
このチェンジャーにはイジェクト専用のキーがありませんの
¶ ディスクを追加したいスロット番号を、» キーまたは «
キーを押して指定し、ENT キーを押してください。
で、このモードに入ることで ENT キーをハイパーマガジン
のイジェクト用キーにします。
(“Add”はディスクの入っていないことが確認済みのス
ロットだけを対象としますので、その条件に合うスロッ
トがなければENTキーを押しても表示は変わりません。
)
メールスロットのトレイが開き、次の表示が出ます。
¶ ENT キーを押すと、ハイパーマガジンのディスクがドラ
イブに運ばれていないか確認し、ディスクがドライブに
ある場合には、次の表示になります。
¶ 追加するディスクをトレイにのせ、ENT キーを押してく
ださい。
トレイが引き込まれ、表示が次のように変わり、ディスク
が指定したスロットまで運ばれます。
ドライブ内のディスクをディスクマガジンに返却する権
限は、ホストコンピュータにあります。ユーザーモードに
戻り、ホストコンピュータからディスクを返却する指示
を出してください。
ハイパーマガジンのディスクがすべて揃っていると、次
のように表示されます。
ディスクの追加が終了すると“Add”の最初の画面になり、
条件に合う次のスロット番号が表示されます。
“Add”を終了する場合は、ESC キーを押してください。
ご注意:
“Add”でディスクの追加ができない場合は、
“Swap”でディ
¶ ENT キーを押すと次の表示になり、ハイパーマガジンが
イジェクトされます。
スクを追加してください。
≠
ハイパーマガジンを交換せず、取り出したままでこのモード
を終了する場合は、ESC キーを 3 回押し、ユーザーモード
に戻ってください。
175
<DRC1285>
Ja
日
本
語
操 作
ハイパーマガジンを交換する場合は、
新たなハイパーマガジ
ンを挿入してください。ハイパーマガジンは途中からモー
ターで引き込まれますので、無理な力を加えないでくださ
い。
Probe サブモード
ドアを開けて装着したノーマルタイプの50枚ディスクマガ
ジンや、チェンジャー外部でディスクを収納した20枚ハイ
パーマガジンは、チェンジャー内部で各スロットにディスク
が入っているか確認してから使用します。
通常はホストコンピュータのチェンジャー制御ソフトウェア
がこの作業を行いますが、
ホストコンピュータと接続する前
ハイパーマガジンが装着されると、
ハイパーマガジン固有の
ID とロック機構の操作履歴を表示します。
にこの作業を終えておきたい場合や、チェンジャー制御ソフ
トウェアがこの作業をサポートしていない場合には Probe
サブモードを使用します。
ロック機構を解除した痕跡がないときの表示
ロック機構を解除した痕跡があるときの表示
¶ ENT キーを押すと、装着されているディスクマガジンを
マガジンベイ番号の順に表示します。
ID が読み取れないときは自動的にイジェクトしますので、
再度挿入してみてください。
¶ »キーまたは«キーを押してディスクマガジンを選択し、
ENT キーを押してください。
そのディスクマガジンの 1 番目のスロットから順にディ
スクの有無を確認していきます。
≠
≠
≠
:
≠
50 スロットすべての確認が終わると、続けるかどうかの確
認の表示になります。
続けるのなら“Yes”
、終了するのなら“No”を選択してENT
キーを押します。
176
<DRC1285>
Ja
操 作
Probe サブモードでは、20 枚ハイパーマガジンも 50 枚
ディスクマガジンと同様に、
スロット内のディスクの有無を
確認することができます。
Probeサブモードを一度実行すれば、
そのディスクマガジン
が取り出されない限り、
ディスクの有無を再確認する必要は
ありません。
Door サブモード
50 枚ディスクマガジンを入れ換えたり、ドライブの交換、
追加などを行うためにドアを開けるモードです。
ドアを開くには、チェンジャー内のすべてのディスクがディ
スクマガジンのスロット、
またはメールスロットに戻ってい
ることが必要です。
システム管理者は、ドライブの利用状況をホストコンピュー
タで確認し、サービスの停止とディスク返却操作を行ってく
ださい。
¶ ENT キーを押すと、ディスクがドライブに運ばれていな
いか確認します。
ディスクがドライブに運ばれているときには、次の表示
が出ます。
この表示が出た場合はESCキーを押してユーザーモード
に戻り、ホストコンピュータから指示を出してすべての
ディスクを返却してください。
ディスクがドライブに無いことを確認すると次の表示に
なりますので、カーソルを移動して開けるドアを選択し
ます。
日
本
語
¶ ENT キーを押すと指定したドアが開きます。
ご注意:
ドアが開くと自動的にユーザーモードに戻ります。他のサブ
モードを実行する場合には、FUNCTION キーを押してシス
テム管理者モード(164 ページ)に入り直してください。
177
<DRC1285>
Ja
操 作
ドライブの追加
チェンジャー内蔵用に設計されたすべてのドライブは簡単に
追加することができます。
標準搭載している電源ユニットは、リアベイ #1 ∼ #8 に装
着するドライブ 8 台分の容量を備えていますが、D R M -
ドライブの追加の手順
1. システム管理者モードに入り、Doorサブモードでリアド
アを開けます。
LCD は次の表示になります。
7000 においてリアベイ #9 ∼ #16 にドライブを追加する
場合にはオプションの増設電源ユニットが必要となります。
静電気に関する注意
本チェンジャーにドライブやその他のオプションを追加
する場合、各コネクター端子部分には絶対に触れないで
2. コネクターパネルを取り付ける必要がある場合は、先に
取り付けます。
+ドライバー
DRM-SN711、DRM-SN721 の場合
チェンジャーから外したネジを使用
します
ください。
また、身体の一部をチェンジャー本体の金属部に接触さ
せてから追加作業を行ってください。
ご注意:
¶ ドライブの追加、交換の際に既存のドライブのケーブル
を抜く場合は、接続手順と逆の順序で行ってください。
1. SCSI インタフェースケーブルを抜く。
2. チェンジャーインタフェースケーブルを抜く。
3. 電源用ケーブルを抜く。
DRM-LN721、DRM-LN741 の場合
付属のネジを使用します
(チェンジャーから外したネジは使用
しません)
¶ SCSI ターミネートの設定
< SE SCSI バス>
既存のドライブがターミネートされていて、同じSCSIバ
スの延長上にドライブを追加する場合、追加したドライ
ブをターミネートすることになります。その際、既存のド
ライブのターミネートスイッチは OFF にしてください。
< LVD SCSI バス>
DVD-R7783はSCSIターミネータを搭載しておりませ
んので、DVD-R7783 での設定はありません。オプショ
ンまたは DRM-ULV16 に付属の SCSI ターミネータ
(LVD)を使用して、LVD SCSIバスの終端を行ってくだ
さい。
3. チェンジャーのガイドレールにドライブを載せ、カチッ
と音がし、ドライブのロックレバーが「LOCK」側へ倒れ
るまで押し込みます。
ガイドレール
ドライブ
ロックレバー
178
<DRC1285>
Ja
操 作
4. 電源用ケーブルを接続します。
作業しにくい場合は、他のドライブのSCSIインタフェー
ご注意:
¶ 別々の SCSI バスに接続する場合は SCSI-ID が重なって
スケーブルを外してください。
¶ ドライブの後面にあるワイヤリングモニタインジケー
いても問題はありません。
¶ チェンジャー内の既存のドライブと SCSI-ID が重なって
タ(オレンジ色)が点灯します。
¶ ターミネートスイッチが ON のときには、ターミネー
いない場合でも、接続する SCSI バス上に同じ SCSI-ID
の機器(ハードディスクなど)がある場合は、異なる
トインジケータ(緑色)も点灯します(DVD-R7783
を除く)
。
電源用ケーブル
SCSI-ID に設定する必要があります。
7. SCSI インタフェースケーブルを接続します。
手順 4. で、他のドライブの SCSI インタフェースケーブ
ルを外した場合は、忘れずに接続してください。
8.「システム管理者モード:Config サブモード(166 ペー
ジ)
」で、チェンジャーがすべてのドライブを認識してい
るか確認します。
例:(リアベイ #1 から順に 3 台の DVD-ROM ドライブ
ワイヤリングモニタインジケータ
と 1 台の DVD-R ドライブを装着した場合)
ターミネートインジケータ
(DVD-R7783 はビジーインジケータ)
5. チェンジャーインタフェースケーブルを接続します。
¶ ワイヤリングモニタインジケータが約2秒周期で点滅
します。
» キーを押す
≠
ワイヤリングモニタインジケータ
» キーを押す
≠
チェンジャーインタフェースケーブル
日
本
語
» キーを押す
≠
ご注意:
チェンジャーインタフェースケーブルは、
ドライブを取り付
けたベイに対応するコネクタに接続してください。
(コネク
タには対応するベイ番号のラベルが貼ってあります。
)誤っ
て隣接するコネクタに接続した場合、
ディスクを破損するこ
» キーを押す
≠
とがあります。
6. ドライブの SCSI-ID をチェンジャーが読み取り、既存の
ドライブの設定と比較します。
¶ SCSI-IDが既存のドライブと重複していない場合には、
ブザーが 1 回鳴ります。
¶ 既存のドライブと同じ SCSI-ID の場合には、ブザーを
3 回鳴らして警告します。
179
<DRC1285>
Ja
操 作
ご注意:
¶ チェンジャーインタフェースケーブルが接続されていな
いと、チェンジャーはドライブを認識することができま
せん。ドライブ後面のワイヤリングモニタインジケータ
ENT キーを押す
≠
を確認してください。
= 点灯ならチェンジャーインタフェースケーブルが正し
く接続されているか確認してください。
= 消灯なら電源用ケーブルの接続を確認してください。
接続し直す場合は、電源用ケーブルの接続後にチェン
ジャーインタフェースケーブルを接続してください。
ESC キーを押して手前の画面に戻り、» キーを押す
≠
¶ ドライブとして認識されているのに、LCD の下段にドラ
イブのモデル名が表示されない場合は各ケーブルを接続
し直してください。
ケーブルを抜く順番:
ENT キーを押す
≠
1. SCSI インタフェースケーブル
2. チェンジャーインタフェースケーブル
3. 電源用ケーブル
接続する順番:
1. 電源用ケーブル
2. チェンジャーインタフェースケーブル
3. SCSI インタフェースケーブル
9. 認識したドライブそれぞれの設定を表示で確認するため、
ENT キーを押して一つ先の階層の画面にしてください。
¶ SCSI-ID、ターミネートスイッチ、そのドライブ固有
のデバイス ID を読み出して表示します。
¶ 4 台がディジーチェーン接続され、ドライブ 4 でター
ミネートしている例では次のようになります。
ご注意:
÷ SCSI-ID やターミネートスイッチの設定表示がドライブ
後面の設定と異なる場合や、ドライブのデバイス ID が表
示されない場合は、接続に誤りがあったことが考えられ
ます。下記の順序で各ケーブルを正しく接続し直してく
ださい。
ケーブルを抜く順番:
1. SCSI インタフェースケーブル
2. チェンジャーインタフェースケーブル
3. 電源用ケーブル
接続する順番:
ENT キーを押す
≠
1. 電源用ケーブル
2. チェンジャーインタフェースケーブル
3. SCSI インタフェースケーブル
÷ デバイス ID が読み込めないと、ホストコンピュータによ
るオートコンフィギュレーション(自動認識)はできませ
ん。
ESC キーを押して手前の画面に戻り、» キーを押す
≠
10.ESC キーを押して「ユーザーモード」に戻り、リアドア
を閉めてください。
ENT キーを押す
≠
ESC キーを押して手前の画面に戻り、» キーを押す
≠
ESC キーを押す
≠
ESC キーを押す
≠
180
<DRC1285>
Ja
操 作
ドライブの交換
ドライブの交換は、
「ドライブの追加」と同様の手順で行う
ESC キーを押す
≠
ことができます。
「ドライブ交換ガイド機能」を利用すると、ドライブ交換の
際、ドライブベイ番号を間違えたりすることがありません。
以下は「ドライブ交換ガイド機能」を利用したドライブの交
換の手順です。
ESC キーを押す
≠
ご注意:
装着するドライブの SCSI-ID やターミネートの設定は、特
に理由のないかぎり、取り出すドライブと同じにしてくださ
い。
ESC キーを押す
≠
ドライブの交換の手順
リアドアを閉める
≠
初期化動作完了
≠
これ以後の動作は、
チェンジャー制御ソフトウェアによって
異なりますので、
お使いになるソフトウェアのマニュアルを
ご覧ください。
ホストコンピュータが追加したドライブを認識するために
は、ホストコンピュータの再起動が必要です。
1. システム管理者モードに入り、Doorサブモードでリアド
アを開けます。
LCD は次の表示になります。
2. もう一度システム管理者モードに入り、Configサブモー
ドでリアベイを選択します。
ENT キーを押す
≠
日
本
語
Rear を選択して、ENT キーを押す
≠
3. » キーまたは « キーで、交換するドライブの装着されて
いるベイを選択します。
ドライブが故障している場合には、LCD の表示の一部が
欠落していることがあります。
181
<DRC1285>
Ja
操 作
4. 選択したドライブの後面にあるワイヤリングモニタイン
9. 新しいドライブの SCSI-ID をチェンジャーが読み取り、
ジケータ(オレンジ色)が、約 0.5 秒周期で点滅してい
ることを確認し、ケーブルを外します。
取り外したドライブの設定と比較します。
¶ SCSI-ID が取り外したドライブと同じ場合には、ブザー
ケーブルは次の順序で抜いてください。
1. SCSI インタフェースケーブル
が 1 回鳴ります。
¶ 取り外したドライブと異なる SCSI-ID の場合には、ブ
2. チェンジャーインタフェースケーブル
3. 電源用ケーブル
5. ドライブを抜き出します。
作業しにくい場合は、他のドライブのSCSIインタフェー
スケーブルを外してください。
ザーを 3 回鳴らして警告します。
10. SCSI インタフェースケーブルを接続します。
手順 5. で、他のドライブの SCSI インタフェースケーブ
ルを外した場合は、忘れずに接続してください。
11. LCD の表示でドライブのデバイス ID を確認します。
6. 取り出したドライブのSCSI-IDとターミネートスイッチ
の設定を確認し、新しく装着するドライブの SCSI-ID と
ターミネートスイッチを同じ設定にします。
¶ DVD-R7783はSCSIターミネータを搭載しておりませ
んので、DVD-R7783でのターミネートの設定はありま
ENT キーを押す
≠
せん。
7. 新しいドライブを装着し、電源用ケーブルを接続します。
¶ ドライブの後面にあるワイヤリングモニタインジケータ
(オレンジ色)が点灯します。
¶ ターミネートスイッチがONのときには、ターミネートイ
ンジケータ(緑色)も点灯します(DVD-R7783を除く)
。
電源用ケーブル
ご注意:
¶ SCSI-ID やターミネートスイッチの設定表示がドライブ
後面の設定と異なる場合や、ドライブのデバイス ID が表
示されない場合は、接続に誤りがあったことが考えられ
ます。下記の順序で各ケーブルを正しく接続し直してく
ださい。
ケーブルを抜く順番:
1. SCSI インタフェースケーブル
2. チェンジャーインタフェースケーブル
3. 電源用ケーブル
接続する順番:
ワイヤリングモニタインジケータ
ターミネートインジケータ
(DVD-R7783 はビジーインジケータ)
8. チェンジャーインタフェースケーブルを接続します。
¶ ワイヤリングモニタインジケータが約 0.5 秒周期の点滅
になります。
ワイヤリングモニタインジケータ
チェンジャーインタフェースケーブル
182
<DRC1285>
Ja
1. 電源用ケーブル
2. チェンジャーインタフェースケーブル
3. SCSI インタフェースケーブル
¶ デバイス ID が読み込めないと、ホストコンピュータによ
るオートコンフィギュレーション(自動認識)はできませ
ん。
操 作
12. ESC キーを押して「ユーザーモード」に戻り、リアド
アを閉めます。
ご注意:
「ドライブ交換ガイド機能」を利用しないでドライブの交換
を行う場合は、取り出すドライブを間違えないように注意し
てください。
ESC キーを押す
≠
また、この場合のドライブの装着は、
「ドライブの追加の手
順(178 ページ)
」と同様の作業となりますので、ブザーの
鳴る条件が異なります。
ESC キーを押す
≠
ESC キーを押す
≠
ESC キーを押す
≠
ESC キーを押す
≠
日
本
語
リアドアを閉める
≠
初期化動作完了
≠
これ以後の動作は、
チェンジャー制御ソフトウェアによって
異なりますので、
お使いになるソフトウェアのマニュアルを
ご覧ください。
183
<DRC1285>
Ja
その他
トラブルと対策
故障かな?.
..と思ったら、ちょっと調べてください。ディスクの不良、操作の不慣れなどにより、故障したように思われたり、
エラー表示が出ることがあります。簡単なミスや勘違いをしていたり、ちょっとしたお手入れで直ることがあります。下の項目
をチェックしても直らない、エラー表示が消えない場合は、アフターサービス連絡先または本機の取扱店にご連絡ください。
(150 ページの「トラブルを防止するために」も合わせてご覧ください。
)
症 状
原 因
処 置
ディスクがマガジンに正しく装
着されていない。
マガジンを取り出し、ディスクが飛び出
していないか確認する。
ハイパーマガジンを挿入したとき、 Hyper magazine
ブザーが鳴りだした。
Disc set error
ディスクがハイパーマガジンに
正しく装着されていない。
ハイパーマガジンを取り出し、ディスク
が飛び出していないか確認する。
電源投入し初期化動作を始めたとき、 E83
ブザーが鳴りだした。
Disc set NG
チェンジャ内に何か異物が入っ
ている。ディスクがマガジンから
飛び出している。
ドアを開け、ディスク搬送部の移動の障
害となっているものを探し、取り出す。
FUNCTION キーを押してシステム
管理者モードに入ろうとすると、ブ
ザーが鳴って拒絶される。
キースイッチが L O C K 位置に
なっている。
LOCK 解除キーでキースイッチを回し、
UNLOCK 位置にする。
Inquiry や Config サブモードには入
れるのに、Mailslot サブモードや
Door サブモードには入れない。
÷ ディスク搬送動作実行中だっ
た。
÷ ホストコンピュータがシステ
ム管理者モードでの操作を禁
止している。
÷ ディスク搬送動作していないときに、
もう一度試してみる。
÷ ホストコンピュータで禁止していない
か確認する。
ディスクをトレイに置かないで
メールスロットを閉めた。
ディスク交換やディスク追加をやめたい
ときは、ESC キーを押す。
ドアを開けてマガジンを装着したと
き、ブザーが鳴りだした。
Mailslot サブモード“Swap”や
“Add”で、メールスロットを閉めて
もまた開いてしまう。
表 示
M∗∗
Disc set error
Place a new disc
& Press ENT-key
Mailslot サブモード“Remove”で、 Remove the disc
メールスロットを閉めてもまた開く。 & Press ENT-key
ディスクをトレイから取り出さ ディスクをトレイから取り出す。
ないでメールスロットを閉めた。
電源を入れ直してもドライブに残っ
ていたディスクが返却されないので、
Doorサブモ−ドでドアを開けること
ができない。
オプションの Hot Start 機能が
ON になっている。
Option サブモードで Hot Start 機能を
OFF にしてから、電源を入れ直す。ディ
スクが返却されてから、Doorサブモード
に入り直してドアを開ける。
Doorサブモードでドアを開けようと
したが、ドアが開かないでブザーが
鳴りだした。
ドアが何かに押されていて開か
ない。
ドアの前の障害物をどけて、操作をやり
直す。
Doorサブモードでドアを開けようと Host must return
したが、ドアの選択画面にならない。 every disc first
ディスクがドライブに残ってい
る。
ユーザーモードに戻り、ホストコン
ピュータからディスク返却の指示を出し、
返却が終わってから操作をやり直す。
184
<DRC1285>
Ja
その他
症 状
表 示
原 因
処 置
Hyper サブモードでハイパーマガジ
ンが排出できない。
Host must return
all hyper' s disc
ハイパーマガジンから運んだ
ディスクがドライブに残ってい
る。
ユーザーモードに戻り、ホストコン
ピュータからディスク返却の指示を出し、
返却が終わってから操作をやり直す。
÷ SCSIケーブルが接続されてい
ない。
÷ SCSI-ID やタ−ミネ−ション
の設定が適切でない。
÷ ホストコンピュータまでの総
ケーブル長が長すぎる。
÷ ホストコンピュータの再起動
を忘れている。
÷ 内部の接続も含めて再確認する。
÷ そのドライブの電源用ケーブ
ルが抜けている。
÷ リアベイ #9 から #16 にドラ
イブを装着している。
÷ リアドアを開けて、接続を確認する。
ドライブに運んだディスクが正しく
再生されない。
÷ ディスクの向きが上下逆。
÷ ディスクが傷ついている、ま
たは汚れている。
÷ ディスクの向きを確認する。
÷ ディスクのキズ、汚れを確認し、ディ
スク交換、クリーニングをおこなう。
L C D にエラーコードが表示され、 E88, E89, E99 な
バックライトが点滅し、ブザーが鳴 ど
りだした。
チェンジャーの動作が継続でき
ないメカニズム系のエラーが発
生した。
システム管理者モードでドアを開け、エ
ラーの原因を取り除く。
電源を入れたとき、LCD が正しく表
示されない。
操作キーが効かない。
チェンジャーのSCSIターミネー
トスイッチが O F F になってい
て、S C S I ケーブルが抜けてい
る。
÷ 設置作業中の場合は、SCSI ターミ
ネートスイッチを ON にして電源を
入れ直す。
÷ SCSI ケーブルが正しく接続されてい
なかったときは、電源を OFF にし、
ケーブルを正しく接続してから電源を
入れる。
Configサブモードでは正しく認識さ
れているのに、ホストコンピュータ
には認識されないドライブがある。
ホストコンピュータに認識されない
ドライブがあり、Config サブモード
で確認したら SCS-ID が 7 になって
いる。
マガジンを挿入したら
ブザー(ピッピッピッ)が鳴った。
scsiID=7 TermOFF
dev-ID=
÷ Memory Failure
÷ Error
マガジン内メモリーのデータが
正しく読み取れない。
÷ 同一バス上に同じ IDがないか、正しく
ターミネートされているか確認する。
÷ 総ケーブル長が短くなるように、ユ
ニット構成を再検討する。
÷ 正しく再起動してみる。
÷ 標準電源ユニットで電源供給されるの
はリアベイ#8まで。ドライブの装着位
置を変える。
÷ マガジンを出し入れしてみる。
÷ それでも正常に認識されない場合は、
マガジンのプローブを行った後、ドア
の開閉を行う。
185
<DRC1285>
Ja
日
本
語
その他
仕様
DRM-7000
DRM-3000
一般
形式
700 枚ディスクチェンジャー
300 枚ディスクチェンジャー
電源
AC 100V ∼ 240V、50/60Hz
←
消費電力
max. 5.5A(500W)
max. 3.3A(300W)
本体質量(転倒防止金具を含む)
91.7kg
60.6kg
外形寸法(転倒防止金具を含む)
760(幅)× 795(奥行)× 1520(高さ)mm 760(幅)× 729(奥行)× 872(高さ)mm
許容動作温度※
+ 5℃∼+ 35℃
←
※
許容動作湿度
5%∼ 85%(結露のないこと)
←
保存温度
− 40℃∼+ 60℃
←
※ 搭載するコンポーネントにより許容動作温度と許容動作湿度は変わることがあります。
詳しくは各コンポーネントの取扱説明書をご覧ください。
機能
収納ディスク
収納可能ディスクマガジン
50 枚ディスクマガジン
20 枚ハイパーマガジン
搭載可能なコンポーネント
最大 720 枚(12cm ディスク)
最大 320 枚(12cm ディスク)
14 台
1台
16 台
6台
←
8台
1
1
1
1
4
12
2
1
1
1
←
←
←
←
2
6
←
←
←
←
付属品
20 枚ハイパーマガジン
チェンジャー、ドライブ間接続用 SCSI ケーブル
電源コード(日本用)
電源コード(アメリカ、カナダ用)
転倒防止金具
転倒防止金具取付用ネジ
LOCK 解除キー
取扱説明書
保証書
サービスネットワーク
¶ 上記の仕様および外観は改良のため予告なく変更することがあります。
SCSI 端子仕様
信号名
+
1
±
¡
SCSI コネクタピン配列
信号名
GROUND
GROUND
GROUND
GROUND
GROUND
GROUND
GROUND
GROUND
GROUND
GROUND
186
<DRC1285>
Ja
ピン番号
1
2
3
4
5
6
7
8
9
10
26
27
28
29
30
31
32
33
34
35
信号名
-DB(0)
-DB(1)
-DB(2)
-DB(3)
-DB(4)
-DB(5)
-DB(6)
-DB(7)
-DB(P)
GROUND
GROUND
NC
NC
NC
GROUND
GROUND
GROUND
GROUND
GROUND
GROUND
GROUND
GROUND
GROUND
GROUND
GROUND
ピン番号
11
12
13
14
15
16
17
18
19
20
21
22
23
24
25
36
37
38
39
40
41
42
43
44
45
46
47
48
49
50
信号名
GROUND
NC
TERMPWR
NC
GROUND
-ATN
GROUND
-BSY
-ACK
-RST
-MSG
-SEL
-C/D
-REQ
-I/O
ご注意:
÷ ピン 12 ∼ 14、37、39 は接地していません。
÷ コネクタは、シールドタイプです。
÷ コントロールコマンド等の詳細は別途仕様書をご覧くだ
さい。
その他
保証とアフターサービスについて
保証書(別に添付してあります)について
保証書は、必ず「取扱店名・購入日」等の記入を確かめて取
扱店から受け取っていただき、内容をよくお読みの上、大切
に保管してください。
保証期間と保証内容について
修理を依頼されるときは
取扱説明書をよくお読みいただき、もう一度ご確認くださ
い。異常のあるときは、必ず電源プラグを抜いてください。
お願い
● 故障内容によっては、製品全体を取りはずすことが必
要となります。その場合には、設置業者に依頼しなけ
ればサービスを行えない場合がありますので予めご了
承ください。
● 保証期間について
保証期間は、
取扱説明書および本体貼付ラベル等の注意にし
たがった使用で、ご購入日より 1 年間といたします。
● 保証期間中は
万一、故障が生じたときは、保証書に記載されている当社保
● 次のように場合には保証期間中および保証期間経過後に
証規定に基づき修理いたします。アフターサービス連絡先ま
たは本機の取扱店にご連絡ください。
かかわらず、性能、動作の保証をいたしません。また、故
障した場合の修理についてもお受けいたしかねます。
連絡していただきたい内容
本機を改造して使用した場合、不正使用、使用上の誤りの場
合または他社製品と組み合わせて使用したときに、
動作異常
● ご住所:
● ご氏名:
などの原因が本機以外にあった場合。
● 電話番号:
● 製品名:
● 故障、故障の修理その他にともなう営業上の機会損失(逸
失利益)は保証期間中および保証期間経過後にかかわら
● 型番:
● ご購入日:
ず補償いたしかねますのでご了承ください。
補修用性能部品の保有期間/修理対応期間
当社はこの製品の補修用性能部品を製造打切後8年間保有し
ています。
なお、修理対応期間は、ご購入日より原則 8年とさせていた
だきます。
● 故障または異常の内容(できるだけ詳しく)
● 訪問ご希望日
● 訪問先までの道順と目標(建物・公園など)
● 保証期間が過ぎているときは
アフターサービス連絡先または本機の取扱店にご連絡くださ
い。修理すれば使用できる製品については、ご希望により有
料で修理いたします。
定期メンテナンス(保守)契約について
機器の機能及び性能を維持させるため、
また寿命を延ばすた
めにも定期メンテナンス(保守)契約を結ぶことをお勧めし
ます。
詳しくは弊社サービスマンまたは本機の取扱店にご連絡くだ
さい。
アフターサービス連絡先
TEL
管理会社名
担当者名
所在地
休日/夜間PM ∼AM
TEL
÷ 本ページの記載内容は日本国内において販売、使用され
ている製品のみに適用されます。
187
<DRC1285>
Ja
日
本
語
188
<DRC1285>
ID=
M1
ID=
M2
ID=
M3
ID=
M4
ID=
M5
ID=
M6
Type=
Type=
Type=
Type=
Type=
Type=
ID=
M8
ID=
M9
ID=
M10
ID=
M11
ID=
M12
ID=
M13
ID=
M14
M7
ID=
ID=
ID=
Type=
M15
Hyper
Front
Type=
Type=
Type=
Type=
Type=
Type=
Type=
Type=
Rear
changer
Bay#1
Bay#2
Bay#3
Bay#4
Bay#5
Bay#6
Bay#7
Bay#8
Bay#9
Bay#10
Bay#11
Bay#12
Bay#13
Bay#14
Bay#15
Bay#16
CONFIGURATION SHEET (DRM-7000)
DRM-7000
drive model name
changer name
Device-ID
term Revision SCSI-ID connection
Bay#1
Bay#2
Bay#3
Bay#4
Bay#5
Bay#6
Bay#7
Bay#8
Bay#9
Bay#10
Bay#11
Bay#12
Bay#13
Bay#14
Bay#15
Bay#16
panel
date
bus-No.
<DRC1285>
189
ID=
M1
ID=
M2
Type=
Type=
ID=
M4
ID=
M5
ID=
M6
M3
ID=
ID=
ID=
Type=
M7
Hyper
Front
Type=
Type=
Type=
Type=
Rear
changer
Bay#1
Bay#2
Bay#3
Bay#4
Bay#5
Bay#6
Bay#7
Bay#8
CONFIGURATION SHEET (DRM-3000)
DRM-3000
drive model name
changer name
Device-ID
term Revision SCSI-ID connection
Bay#1
Bay#2
Bay#3
Bay#4
Bay#5
Bay#6
Bay#7
Bay#8
panel
date
bus-No.
この取扱説明書の印刷には
植物性大豆油インキを使用
しています。
この取扱説明書は再生紙を使用しています。
C 2006 パイオニア株式会社 禁無断転載
Published by Pioneer Corporation.
Copyright © 2006 Pioneer Corporation.
All rights reserved.
153-8654 東京都目黒区目黒1丁目4番1号
PIONEER CORPORATION
4-1, Meguro 1-Chome, Meguro-ku, Tokyo 153-8654, Japan
PIONEER ELECTRONICS (USA) INC.
Business Solutions Division: 2265 East 220th Street, Long Beach, CA 90810, U.S.A. TEL: +1-213-746-6337
Customer Support Division: 1925 East Dominguez St. Long Beach, CA 90810, U.S.A. TEL: +1-310-952-2820
PIONEER ELECTRONICS OF CANADA, INC.
Industrial Products Department: 300 Allstate Parkway, Markham, Ontario L3R OP2, Canada TEL: +1-905-479-4411
PIONEER ELECTRONICS AUSTRALIA PTY. LTD. 178-184 Boundary Road, Braeside, Victoria 3195, Australia TEL:+61-39-586-6300
PIONEER ELECTRONICS ASIACENTRE PTE. LTD. 253 Alexandra Road, #04-01, Singapore 159936 TEL: +65-6472-1111
PIONEER (HK) LIMITED Suite 901- 906, 9th Floor, World Commerce Centre, Harbour City 11 Canton Road, Tsim Sha Tsui,
Kowloon, Hong Kong
TEL: +852-2848-6488
PIONEER HIGH FIDELITY TAIWAN CO., LTD. 13th Fl., No.44 Chung Shan, North Road Section 2. Taipei 100, Taiwan TEL: +886-2-2521-3588
2006
<06A00000>
1
30
Printed in Japan/Imprimé au Japon <DRC1285-A>