1
ベルタイマー/ BELL TIMER
QBT-30
OPERATING INSTRUCTIONS
このたびは、セイコ-製品をお買い上げいただき、誠にありがとうございました。
ご使用前にこの取扱説明書をよくお読みのうえ、正しくお使いください。
なお、お読みになった後はいつでもご覧いただけますよう、大切に保管してください。
Many thanks for purchasing SEIKO Bell Timer.
Before putting your SEIKO Bell Timer system to use, please be sure to carefully read
through this manual as it has been designed to provide you with information for
correct handling, use and maintenance necessary for safe, long-lasting and trouble-free
operation. Keep this manual at hand for ready reference.
-ご注意/ CAUTIONS-
(1) 本書の一部または全部を無断転載することは、禁止されております。
(2) 本書の内容については、将来予告なしに変更することがあります。
(3) 本書の内容については、万全を期して作成いたしましたが、万一ご不審な点や誤りなど、お気づき
の点がありましたらご連絡ください。
(4) 本製品がお客様により不適当に使用されたり、本書の内容に従わずに取り扱われたり、または当社
および当社指定のサ-ビス部門以外の第三者により修理・変更されたことに起因して生じた損害に
つきましては、責任を負いかねますのでご了承ください。
(1)
(2)
(3)
(4)
This manual is the property of SEIKO and may not without the express written consent of SEIKO
be copied or reproduced in any form, in whole or in part, or used for any purpose other than that
for which it is supplied.
This manual may be subject to change without notice.
This manual has been prepared to give complete information necessary for the operation, use,
handling and maintenance of MODEL QBT-30. For the purpose of our constant technical manual
improvement program, your questions, advice, suggestions and comments on the descriptions,
illustrations, procedures or any matter concerning this manual are highly appreciated.
SEIKO shall have no liability to the user in respect of any loss or damages, whether consequential
or incidental, sustained by the user if such loss or damages are:
1) due to abuse, misuse, failure to observe instructions given in the manual furnished by SEIKO
and neglect of other reasonable care and servicing due to be done by the user irrespective of
such instructions, and failure due to deliberate actions or gross negligence or accident;
2) caused by changes, modifications, or alterations made without prior written consent of SEIKO
or by any person other than authorized by SEIKO; or,
3) due to negligence on the part of the user of what should be done or should not be done as a
good caretaker of Bell Timer Model QBT-30.
-本書で使用の記号について/SYMBOLS AND THEIR MEANINGS-
本書に使用される記号の意味は次の通りです。
The symbols and terms used in this manual are explained below.
危険
DANGER
警告
WARNING
誤った取り扱いをしたとき、死亡または重傷を負う危険が切迫して
生じることが想定される内容を示します。
DANGER is used to indicate the presence of an imminent hazard
which is LIKELY to cause SEVERE personal injury, death, or
substantial property damage if the instructions under this heading
are ignored.
誤った取り扱いをしたとき、死亡または重傷を負う可能性が想定
される内容を示します。
WARNING is used to indicate such operational procedures,
practices, or situations that may result in personal injury or loss of
life if relevant instructions are not followed correctly.
I-5974-4
次の絵表示は、禁止事項を示します。
The following pictorial symbols indicate what must not be done.
一般的な禁止
General
Prohibition
分解禁止
Prohibition
against
disassembly/t
ampering
水場での使用禁止
Prohibition
against
exposure to
water
接触禁止
Prohibition
against touch
次の絵表示は、必ず実行していただく事項を示します。
The following pictorial symbols indicate what must be done.
一般的な指示
アース線の接続
電源プラグを抜く
General
instructions
Connection of
grounding
conductor
Extraction of
the power
plug
I-5974-4
目
次/Table of Contents
1
1.安全のため必ずお守りください/ Safety Precautions
4
2.概要/ Overview
5
3.製品の特長/ Features of QBT-30
5
4.付属品・予備品/ Accessories and Spares
6
5.システム構成/ System Configuration
7
6.各部の名称と機能/ Nomenclature and Functions
8
7.取り付け方法/ Installation
7.1 取り付け上の注意点/ Precautions
8
10
8.取り付けと結線/ Installation and Wiring
8.1 取り付けの位置/ Mounting position
10
8.2 取り付け穴の寸法/ Mounting hole sizes
10
8.3 壁面への取り付け/ Mounting on the wall
11
8.4 結線/ Wiring
13
16
9.操作方法/ Operation
9.1 操作部概要/ An outline of the control panel
16
9.2 電源の投入/ Powering-up
17
9.2.1 電源の投入/ Powering-up
17
9.2.2 システムリセット/ SYSTEM RESET
17
9.2.3 アナログ時計の運針/ Motion of analog clock hands
17
9.3 現在時刻の設定方法/ How to set the present time
18
9.4 プログラムの設定方法/ How to set the program
19
9.4.1 週間プログラム/ Weekly program
19
9.4.2 メロディ鳴動/ Playing of melodies
20
9.4.3 接点出力制御/ Dry contact output signal control
22
9.4.4 メ ロ デ ィ 鳴 動 と 接 点 出 力 制 御 / Control of melody playing and dry 24
contact output signal
9.4.5 プログラムのコピー/ How to copy a program
26
9.4.6 プログラムの消去/ How to clear a program
27
9.4.7 プログラムの全消去/ How to clear all the selected programs
27
9.5 接点出力方法の切替/ Changeover of dry contact signal output mode
28
9.6 メロディの試し鳴らし/ Melody test
29
9.7 サマータイムの設定方法/ How to set the summer time
30
9.8 タイムリンク(Japan Only)
31
9.8.1 タイムリンクとは
31
9.8.2 操作方法
33
9.8.3 定期受信
34
9.8.4 手動受信
34
35
10.標準電波(Japan Only)
10.1 標準電波とは
35
10.2 電波受信可能範囲は?
35
10.3 設置場所に関する注意は?
35
10.4 仕様
35
36
11.停電補償/ Backup against Commercial Power Failure
36
12.故障と思われる前に/ Troubles You Can Solve Yourself
38
13.お客様へのお願い/ Daily Servicing by the User
38
14.保証について/ Warranty
39
15.仕様/ Specifications
41
16.プログラム設定表/ Programming Table
I-5974-4
1.安全のために必ずお守りください/ Safety Precautions
製品を安全に正しくお使いいただき、あなたや他の人々への危害や財産への損害を未然に防ぐために、
守っていただきたい注意事項を示しています。
The following precautions must be strictly observed for the safety of yourself and your fellow workers and for
the protection of property from loss and damages.
●お客様用/ Safety instructions to the customer
危険/ DANGER
取り付け・電気 お客様は取り付け・電気工事および文中の「工事業者様へ」と書かれた枠内
工事の禁止
の作業を絶対に行わないでください。必ず、工事業者様へご依頼ください。
Prohibition
感電・火災・落下の危険があります。
against
Never attempt any of installation work, electrical engineering, and any of
unauthorized
the jobs instructed to the engineering outfit ("Installation Instructions"). All
installation and
of these jobs must always be commissioned to your engineering outfit
electrical
because they involve electric shock hazards, fire hazards and falling
engineering
hazards.
work
警告/ WARNING
設置場所の
選択
Selection of
location
異常時の処置
Actions to take
in case of
troubles
分解・修理・
改造の禁止
Prohibition
against
unauthorized
disassembly,
repair or
modification
この製品は、屋外に設置しないでください。屋内用のため、水が侵入すると、
感電や火災の原因になります。
The Bell Timer QBT-30 is designed for indoor use, and must not be
installed outdoors. Otherwise, rainwater may infiltrate into the product to
cause electric shock or fire accident.
浴室や水場など湿気の多い所に設置しないでください。感電や火災の原因に
なります。
It must not be installed in the bathroom or washing area or other damp
places, either. This may cause fire or electric shock hazard.
煙が出たり、異臭がするなど異常が発生したときは、すぐに電源プラグをコ
ンセントから抜いてください。修理は、お買い上げいただいた販売店もしく
は販売会社へご依頼ください。そのまま使用すると、感電や火災の原因にな
ります。
In case of abnormalities (QBT-30 is giving forth smoke, burnt smell, or is
hot to the touch, or showing other abnormal symptoms), shut down QBT-30
immediately, unplug the power cord, and call your nearby SEIKO dealer or
agent for repair service. If QBT-30 is left to take care of itself, it may result in
a risk of electric shock or fire.
修理は、お買い上げいただいた販売店もしくは販売会社へご依頼ください。
修理技術者以外の人が分解したり修理・改造を行うと感電や火災の原因にな
ります。
Call your nearby SEIKO dealer or agent for repair service. Unauthorized
disassembly, repair or modification may cause electric shock accidents or
fire accidents.
操作を行うときは、前扉を開いて行いますので、指定の操作部以外、触れな
操作時の注意
いでください。感電することがあります。
点
To operate QBT-30, its door needs to be opened to expose internal
Operating
components. Do not meddle with any parts other than designated controls.
precautions
Otherwise, fatal electric shock or fire accident may result.
1
I-5974-4
水や薬品などの液体をつけたり、かけないでください。万一、これらが内部
に入ったときは、電源プラグをコンセントから抜いてください。
液体禁止
点検は、お買い上げいただいた販売店もしくは販売会社へご依頼ください。
Prohibition
against wetting そのまま使用すると、感電や火災の原因になります。
Never immerse QBT-30 into water or any other liquid, or never splash water
with liquids
or any other liquid against QBT-30. Should any liquid enter QBT-30, unplug
(water,
the power cord, and call your SEIKO dealer or agent for inspection and
chemicals)
servicing. If QBT-30 is left to take care of itself, it may result in a risk of
electric shock or fire.
ぬれた手禁止
ぬれた手で製品の操作や電源の入り切りをしないでください。感電すること
Prohibition
があります。
against
Never operate QBT-30 or POWER switch with wet hands. Otherwise, you
handling with
may be killed by electric shock.
wet hands
電源プラグを抜き差しするときは、電源コードを持たずに電源プラグを持っ
て、抜き差ししてください。破損し、感電や火災の原因になります。
Always hold the plug firm when plugging and unplugging the power cord. If
you strain the power cord, it may be damaged to cause fire or electric shock
hazard.
電源コード類
電源コードを傷つけたり、加工したり、重い物をのせたり、無理に曲げない
の取り扱い
でください。感電や火災の原因になります。
Handling of
Handle the power cord with care not to damage it. Never load the power
power cord
cord with a heavy object. Never bend over the power cord unduly. All these
could lead to fatal electric shock or fire accident.
痛んだ電源コードやプラグ、差し込みのゆるいコンセントは使用しないで
ください。感電や火災の原因になります。
Never use the damaged power cord or shoddily-repaired power cord as by
taping. This may cause fire or electric shock hazard.
警告/WARNING
指定された電圧以外は使用しないでください。感電や火災の原因になりま
す。
Use a power supply of a specified rating only. Otherwise, electric shock or
fire accident may result.
電源
電源プラグをコンセントに差し込む前に、電源端子に結線されている電圧が
Power supply 正しいことを確認してください。感電や火災の原因になります。
Before plugging the power cord into the wall outlet, make sure that the
power supplied to the primary terminals of the circuit breaker has a
specified voltage rating. If the rating is other than specified for QBT-30,
electric shock or fire accident may result.
製品のアース端子に、アース線が取り付けてあることを確認してください。
アース線が取り付いていないと、故障や漏電のとき感電することがありま
アース線の
す。アース線は、D種接地以上の工事を必要としますので、工事業者へご依
確認
頼ください。
Confirmation of
Check to see if a grounding conductor is terminated to QBT-30. If QBT is
grounding
not grounded, electric shock accident may result when the product gets
faulty or leaky. The grounding work is required to be of Class D or higher
rating, and shall be undertaken by a licensed electrician.
ヒューズ交換
の禁止
Prohibition
against
unauthorized
fuse
replacement
ヒューズの交換作業は、お買い上げいただいた販売店もしくは販売会社へ
ご依頼ください。お客様が交換作業を行うと感電することがあります。
Call your SEIKO dealer or agent for fuse replacement service. Do not
attempt the fuse replacement yourself unless you are qualified for the job.
This is important to prevent fatal electric shock accident.
2
I-5974-4
外装のお手入
れ前の注意点
Precautions on
the servicing of
QBT-30 casing
内部のお手入
れ禁止
Prohibition
against
unauthorized
servicing of the
internal
components
外装をお手入れするときは、電源プラグをコンセントから抜いてください。
感電することがあります。
Before cleaning the surface of the casing, be sure to unplug the power
cord. Fatal electric shock accident may happen if you attempt to wipe the
casing with a damp cloth.
内部のお手入れは行わないでください。お買い上げいただいた販売店もしく
は販売会社へご依頼ください。お客様が作業をすると感電することがありま
す。
Call your SEIKO dealer or agent for the servicing of internal components.
Do not attempt yourself unless you are qualified for the job. This is
important to prevent fatal electric shock accident.
●工事業者様用/ Instructions to the engineering outfit
工事業者様へ/ For the engineering outfit
警告/WARNING
取り付け工事の注意事項/ Precautions on installation work
取り付け場所
の選択
Selection of
location for
installation
取り付け場所
の強度
Load-bearing
capacity
コンクリート
壁面の取り
付け方法
Mounting onto
the concrete
wall
取り付けネジ
の締め付け
Fastening
この製品は、屋外に設置しないでください。屋内用のため、水が浸入すると、
感電や火災の原因になります。
The Bell Timer QBT-30 is designed for indoor use, and must not be
installed outdoors. Otherwise, rainwater may infiltrate into the product to
cause electric shock or fire accident.
浴室や水場など湿気の多い所に設置しないでください。感電や火災の原因に
なります。
It must not be installed in the bathroom or washing area or other electric
shock- or fire accident-prone damp places, either.
取り付ける建造物の構造が、この製品の重さに十分耐えられることを確かめ
てください。この製品の重さは、約2kgです。強度の弱い所に取り付けた
場合、振動などで製品が落下し、人身事故にいたることがあります。
Make sure that the wall or other structure onto which the product is to be
mounted has a sufficient strength to bear up against the load of the
product. The maximum weight of the product is about 2 kg. If the wall
strength is not sufficient, it may yield to the product weight or external
shocks, letting fall the product to cause fatal accidents.
壁面がコンクリートの場合は、PYプラグと木ネジをご使用ください。木ネ
ジだけによる取り付けは、絶対に行わないでください。風圧や振動などで製
品が落下し、人身事故にいたることがあります。
Fasten the product onto the wall using anchor plugs (PY plug or the like)
and wood screws. Never use the wood screws alone to fasten the
product. Wood screws may yield under wind pressure and vibrations, and
let fall the product to cause fatal accidents.
製品の取り付けネジは十分に締め付けてください。締め付けが不十分だと風
圧や振動などで製品が落下し、人身事故にいたることがあります。
Be sure to tighten each wood screw into the anchor plug fully. If the
screws are not fastened securely, the product may come off from the wall
as the screws may loosen off under the influence of wind pressure or
vibrations, causing fatal accidents.
3
I-5974-4
●工事業者様用/ Instructions to the engineering outfit
工事業者様へ/ For the engineering outfit
電源・接点出力端子台に結線するときは、電源プラグが抜かれていることを
確認してください。感電することがあります。
電気工事
Prior to the wiring of the terminal blocks for power input and contact signal
Electrical
output circuits, make sure that the power cord is unplugged. You are
engineering
warned against working on live circuits as they involve fatal electric shock
hazards.
製品のアース端子にアース線を取り付けてください。アース線が取り付いて
いないと、故障や漏電のとき感電することがあります。なお、接地はD種接
地以上の工事を施工してください。
接地工事
Ground the Bell Timer Model QBT-30 by connecting a grounding
Grounding work
conductor to its grounding terminal. This is important for the prevention of
electric shock hazards in case of troubles such as earth leakage fault.
The grounding work must be Class D or higher in rating.
端子台
保護カバーの
取り付け
Installation of
terminal board
cover
電源・接点出力端子台の結線作業後、端子台の保護カバーをもとの位置に取
り付けてください。取り付いていないと、感電することがあります。
After wiring the terminal blocks for power supply and contact signal output
circuits, be sure to replace the terminal board cover for the protection of
operators against electric shock.
指定された電圧以外は使用しないでください。感電や火災の原因になりま
す。
Use a power supply of a specified rating only. Otherwise, electric
shock or fire accident may result.
電源
Power supply
電源プラグをコンセントに差し込む前に、電源端子に結線されている電圧が
正しいことを確認してください。感電や火災の原因になります。
Before plugging the power cord into the wall outlet, make sure that the
power supplied to the primary terminals of the circuit breaker has a
specified voltage rating.
2.概要/ Overview
ベルタイマー QBT-30 は、アナログ時計の機能に加え、プログラムにより任意の時刻にメロデ
ィの自動演奏や外部への接点出力を行うことが出来ます。これらのプログラムは、各曜日単位に設定
可能な週間プログラム方式となっており、操作が容易になっています。
また、オプションのタイムリンク送信機、あるいは長波受信器を使用することにより、長波標準電波
を定期的に自動受信して、時刻を正確に保つことが出来ます。
SEIKO bell timer Model QBT-30 serves as an analog clock. In addition, QBT-30 is capable of being
programmed to play melodies automatically at preset times and/or deliver contact signal output to
external circuits. A weekly programming system is used to specify the sequence of these operations on
a day-of-the-week basis.
If SEIKO TimeLink(R) transmitter-receiver or LF radio receiver available as optional feature is used, it is
possible to receive the standard radio wave automatically at regular intervals to keep accurate time for
QBT-30 at all times. (Japan Only)
4
I-5974-4
3.製品の特長/ Features of QBT-30
■
■
■
■
■
■
■
内部時計に高精度の水晶を使用し、平均月差±3秒を実現しています。
自動調針ムーブを採用していますので、時刻合わせをする際にアナログ時計の針位置合わせが
不要です。
最大60プログラムが設定できますので、幅広い用途にご使用いただけます。
独立した2チャネルの無電圧接点出力を有し、各種機器の制御にご使用いただけます。
全10曲のメロディを有しプログラムごとの曲選択が可能です。
オプションのタイムリンク機能を使用することにより、時刻合わせが不要です。
また、将来サマータイムが実施された場合も自動的に対応します。
(別売 ZA303N または SLR-201とSW-302が必要となります。)
下記項目の実施により、環境に配慮した製品となっています。
・「RoHS指令」適合品
・ニカド電池の不採用
・消費電力の低減
■ Equipped with a high-precision quartz oscillator, the internal clock operates at a monthly
average rate of ± 3 seconds.
■ An automatic hand-correction movement is employed, eliminating the need for analog clock
hand setting at the time of time setting.
■ Up to 60 programs can be set to cover a wide range of applications.
■ Two independent channels are available for dry contact signal outputs for control of various
devices.
■ 10 melodies are available for programming.
■ (Japan Only) Optional TimeLink(R) function eliminates the need for time setting. QBT-30
automatically responds to the implementation of summer time system. (For the
implementation of the daylight-saving system, these options are required: ZA303N or
SLR-201, and SW-302)
■ Featured by the following, QBT-30 is an environmentally friendly product.
・Conforming to RoHS Directive
・Elimination of need for Ni-Cd batteries
・Reduction of power consumption
4.付属品・予備品/ Accessories and Spares
付属品・予備品
Accessories and Spares
数 量
Quantity
備 考
Remarks
圧着端子(M3)
Crimp terminal (M3)
6個/6 pcs.
電源・接点出力端子用
For power input and contact signal output
圧着端子(M4)
Crimp terminal (M4)
1個/1 pc.
アース端子用
For grounding
丸木ネジ(M4.1)
Round-headed wood screw(M4.1)
3個/3 pcs.
本体固定用
For securing QBT-30
取付原寸図
Mounting hole drilling template
1枚/1 sheet
本体固定用
For drilling QBT-30 mounting holes
ACコード
AC power cord
1本/1 pc.
AC100V用(国内専用)
For AC100V (Japan only)
取扱説明書
Operating instruction manual
1部/1 copy
本書
This manual
保証書
Warranty registration card
1枚/1 card
国内専用
(Japan only)
5
I-5974-4
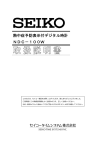
5.システム構成/ System Configuration
~こんな使い方ができます/ Illustrated Examples of Uses~
電源入力
Power input
AC90V~120V
AC200V~240V
照明器具など
Lights, etc.
QBT-30
CH1
接点出力/ Contact signal output
CH2
※照明器具や外部アンプの
電源制御などにご利用いただけます
外部アンプ
外部スピーカ
LINE OUT
External
amplifier
内部スピーカ
Built-in speaker
* Available for control of
power supply to the
luminaires, external
amplifiers, etc.
External speaker
タイムリンク
※特定小電力無線
SW-302(別売)
※屋内用
Japan Only
ZA303N(別売)
※屋内用
SLR-201(別売)
※屋外用
標準電波
標準電波
6
I-5974-4
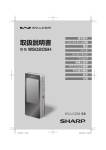
6. 各部の名称と機能/ Nomenclature and Functions
電源・接点出力端子台/
Terminal blocks for power input and
contact signal output
LINE
OUT
アース端子/ GND terminal
操作部/
スピーカ/ Speaker
アナログ時計/ Analog clock
液晶画面/ LCD screen
Control panel
● アナログ時計
スピーカ/ Speaker
2針式
内蔵デジタル時計と連動して動きます。
● 操作部
時刻設定や、タイマープログラムの設定を行います。
液晶画面にて、設定内容を確認しながら操作ができます。
● 液晶画面
通常は現在時刻をデジタル表示します。
設定中は、設定内容の確認ができます。
● スピーカ
メロディを鳴らします。
● LINE OUT
メロディ出力です。外部アンプに接続します。
● 電源・接点出力端子台
AC入力用、接点出力用(2回路)
● アース端子
アースに接続します。
● Analog clock
● Control panel
● LCD screen
● Speaker
● LINE OUT
● Terminal blocks for power input
and contact signal output
● GND terminal
Two-hand type
Interlocked with the built-in digital clock
Used for time setting and timer programming.
The control panel can be manipulated while visually checking the
settings on the LCD screen.
Usually, indicates the present time digitally.
During setting up, displays the data being set up for you
confirmation.
Plays a melody.
Melody output terminal, to be connected to an external amplifier.
For AC power supply, and contact signal output (2
channels)
To be connected to the grounding conductor.
7
I-5974-4
7.取り付け方法/Installation
警告/ WARNING
取り付け・電気
お客様は、取り付け・電気工事および文中の「工事業者様へ」と書かれた
工事の禁止
枠内の作業を絶対に行わないでください。必ず、工事業者様へご依頼くだ
Prohibition
さい。感電・火災・落下の危険があります。
against
Never attempt any of installation work, electrical engineering, and any of
unauthorized
the jobs instructed to the engineering outfit ("Installation Instructions")
installation and
electrical
because electric shock, fire and toppling hazards are involved.
engineering work
●工事業者様用/ Instructions to the engineering outfit
工事業者様へ/ For the engineering outfit
7.1
取り付け上の注意点/ Precautions
取り付け場所の選択/ Selection of location for installation
警告
WARNING
警告
WARNING
この製品は、屋外に設置しないでください。屋内用のため、水が浸入す
ると感電や火災の原因になります。
The Bell Timer QBT-30 is designed for indoor use, and must not be
installed outdoors. Otherwise, rainwater may infiltrate into the product to
cause electric shock or fire accident.
浴室や水場など湿気の多い所に設置しないでください。感電や火災の原
因になります。
It must not be installed in the bathroom or washing area or other electric
shock- or fire accident-prone damp places.
温度、湿度、振動などを考慮し、環境の良い場所をお選びください。
特に、環境温度は-10℃~+50℃の間の場所に設置してください。
Select an installation place least susceptible to the influence of temperature, humidity and vibration.
The ambient temperature of the selected place should be held within the range of -10℃ to +50℃.
取り付け場所の強度/ Load-bearing capacity
警告
WARNING
取り付ける建造物の構造が、この製品の重さに十分耐えられることを確
かめてください。この製品の重さは、約2kgです。強度の弱い所に取
り付けた場合、振動などで製品が落下し、人身事故にいたることがあり
ます。
Make sure that the wall or other structure onto which QBT-30 is to be
mounted has a sufficient strength to bear up against the weight of
QBT-30. The maximum weight of QBT-30 is about 2 kg. If the structural
strength is not sufficient, it may yield to the weight of QBT-30 or external
shocks, letting fall QBT-30 to cause fatal accidents.
8
I-5974-4
●工事業者様用/ Instructions to the engineering outfit
工事業者様へ/ For the engineering outfit
電源/ Power supply
警告
WARNING
指定された電圧以外は使用しないでください。
それ以外の電源を使用すると感電や火災の原因になります。
Use a power supply of a specified rating only. Otherwise, electric shock
or fire accident may result.
交流電源は昼夜連続使用しますので、専用電源をご使用ください。
電源はAC90V~AC120Vまたは、AC200V~AC240V、周波数は 50Hz または 60Hz でお使いくださ
い。
Use an exclusive power supply as the clock system runs 24 hours a day, 365 days a year. The power
supply should provide AC90V - AC120V or AC200V - AC240V, and its frequency should be 50Hz or 60Hz.
電気工事/ Electrical engineering work
警告
WARNING
電源プラグをコンセントに差し込む前に、電源端子に結線されている電
圧が正しいことを確認してください。感電や火災の原因になります。
Before plugging the power cord into the wall outlet, make sure that the
power supplied to the primary terminals of the circuit breaker has a
specified voltage rating. If the rating is other than specified for QBT-30,
electric shock or fire accident may result.
9
I-5974-4
●工事業者様用/ Instructions to the engineering outfit
工事業者様へ/ For the engineering outfit
8.取り付けと結線/ Installation and Wiring
8.1
取り付けの位置/ Mounting position
天井/ Ceiling
(上部/Headroom)
前ケースの開閉のため、
10 cm
壁
左側と上部を10cm以上
Wall
壁、天井から離してください。
Provide a clearance of at least
10cm at the top and left of
QBT-30 to facilitate the
open-close operation of the front
door.
10 cm
(左側/
Clearance
at left)
8.2
取り付け穴の寸法/ Mounting hole sizes
210mm
302mm
※取り付け位置は付属の取付原寸図を利用し、ネジを仮固定することもできます。
* Mark off and make the mounting holes by making use of the mounting hole drilling template
furnished. Or you may fix the mounting wood screws temporarily by making use of the
mounting hole drilling template.
10
I-5974-4
●工事業者様用/ Instructions to the engineering outfit
工事業者様へ/ For the engineering outfit
8.3
壁面への取り付け/ Mounting on the wall
● 壁面がコンクリートの場合/ Mounting on a concrete wall
※市販されているPYプラグ(木ネジM4.1用)を別途ご購入ください。
* Prepare PY plugs for M4.1 wood screws. These anchor plugs are
available on the market.
警告
WARNING
壁面がコンクリートの場合は、PYプラグと木ネジをご使用ください。
木ネジだけの取り付けは、絶対に行わないでください。
風圧や振動などで製品が落下し、人身事故にいたることがあります。
If the wall is made of concrete, use PY plugs and wood screws for
mounting QBT-30. Never use the wood screws alone for mounting as
they may come off under the influence of wind pressure or vibrations to
cause fatal accidents.
PYプラグ/
PY plug
②PYプラグを
打ち込む
①穴をあける
Drill mounting
holes.
ドリル径: PY プラグ指定
Drill hole: Specified PY plug
③余分を切断
する
Drive PY plugs
into the drilled
mounting holes.
④付属の木ネジ
で取り付ける
Cut off the
excess
projections.
Mount QBT-30,
and secure with
the wood screws
furnished.
木ネジ/ Wood
screw
入線孔
取り付け孔
Cable entry
Mounting hole
取り付けネジ(木ネジ)
Mounting screw (wood screw)
PYプラグ(壁面がコンクリートの場合)
PY plug (in case QBT-30 is to be
installed on a concrete wall)
11
I-5974-4
●工事業者様用/ Instructions to the engineering outfit
工事業者様へ/ For the engineering outfit
● 壁面が木の場合/ Wooden wall
「8.2 取り付け穴の寸法」を参照して、上部2ヶ所に木ネジをねじ込み、本体を掛けます。次に水平を
確認して下部に木ネジをねじ込んで締め付けます。最後に上部2ヶ所の木ネジを締め付けます。
While referring to the mounting hole layout drawing in "8.2 Mounting hole sizes", tighten wood screws
into two upper mounting holes, and hook the Bell Timer on them. After making sure that the Bell Timer is
set level, provisionally tighten a wood screw into the bottom hole. Then, give a final tightening torque to
the upper two wood screws.
● 取り付けネジ(木ネジ)の締め付け/ Tightening-up of mounting screws (wood screws)
警告
WARNING
製品の取り付けネジは十分に締め付けてください。締め付けが不十分だ
と風圧や振動などで製品が落下し、人身事故にいたることがあります。
Be sure to tighten each wood screw into the anchor plug fully. If the
screws are not fastened securely, QBT-30 may come off from the wall as
the screws may loosen off under the influence of wind pressure or
vibrations, causing fatal accidents.
12
I-5974-4
●工事業者様用/ Instructions to the engineering outfit
工事業者様へ/For the engineering outfit
8.4 結線/ Wiring
● 結線作業の注意事項/ Wiring precautions
警告
WARNING
警告
WARNING
電源・接点出力端子台に結線するときは、電源プラグが抜かれている
ことを確認してください。感電することがあります。
Prior to the wiring of the terminal blocks for power input and contact
signal output circuits, make sure that the power cord is unplugged.
You are warned against working on live circuits as they involve fatal
electric shock hazards.
電源・接点出力端子台への結線作業後、端子台の保護カバーをもとの
位置に取り付けてください。取り付いていないと、感電することがあ
ります。
After wiring the terminal blocks for power supply and contact signal
output circuits, be sure to replace the terminal board cover for the
protection of operators against electric shock.
● 電源線の結線/ Connection of power line
AC100V~AC120V でご使用の場合
Supply voltage rating: AC100V~AC120V
AC200V~AC240V でご使用の場合
Supply voltage rating: AC200V~AC240V
付属のACコード
AC power cord
furnished
アース
アース
GND wire
GND wire
M4圧着端子
(付属品)
CH1
CH2
AC200V AC100V C
FG
M4 crimp
terminal
(furnished)
M3圧着端子
(付属品)
M4圧着端子
(付属品)
M3 crimp
terminal
(furnished)
CH1
CH2
AC200V AC100V C
FG
M4 crimp
terminal
(furnished)
※付属のACコードは使用しないでください。
* For AC200V-AC240V, do not use the AC
power cord furnished.
警告
WARNING
製品のアース端子に、アース線が取り付けてあることを確認してくだ
さい。アース線が取り付いていないと、故障や漏電のとき感電するこ
とがあります。アース線は、D種接地以上の工事を必要としますので、
工事業者へご依頼ください。
Check to see if a grounding conductor is terminated to QBT-30. If QBT
is not grounded, electric shock accident may result when the product
gets faulty or leaky. The grounding work is required to be of Class D or
higher rating, and shall be undertaken by a licensed electrician.
13
I-5974-4
●工事業者様用/ Instructions to the engineering outfit
工事業者様へ/ For the engineering outfit
● 接点出力の結線/ Wiring of contact signal output terminals
外部機器(ブザー・蛍光灯など)を接続する場合
For termination of external deices (buzzer, fluorescent luminaire, etc.)
AC100V
AC100V
接続する機器の容量をよく確かめ
てから結線してください。
ブザー
Buzzer
Make sure of the load capacity
of equipment to be handled by
the Bell Timer before wiring.
照明
接点容量/Current-carrying capacity
of contacts
(CH1,CH2)
AC125V/5A,AC250V/3A
DC30V/5A
Luminaire
CH1
CH2
AC200V AC100V C
FG
M3圧着端子
(付属品)
M3 crimp
terminals
(furnished)
● メロディを外部スピーカで鳴らす場合/ Using an external speaker to play melodies
アンプ(別売)
Amplifier (option)
オーディオケーブル
(市販品)
スピーカ(別売)
Audio cable
(available on the market)
Speaker (option)
差し込む
Insert
CH1
CH2
AC200V AC100V C
FG
LINE OUT
14
I-5974-4
●工事業者様用/ Instructions to the engineering outfit
工事業者様へ/ For the engineering outfit
● アンプの入/切をタイマー制御する場合/ ON-OFF control of amplifier by timer
アンプ(別売)
Amplifier (option)
オーディオケーブル
(市販品)
スピーカ(別売)
Audio cable
(available on the market)
Speaker (option)
アンプ/ Amplifier
“A”SW
M3圧着端子
(付属品)
Insert
M3 crimp
terminal
(furnished)
またはCH2/or CH2
差し込む
CH1
CH2
AC200V AC100V C
FG
10 秒
10 seconds
LINE OUT
10 秒前出力を“ON”にすると、メロディが鳴る
10 秒前にアンプの電源を入れることができます。
(詳しくは「9. 操作方法」を参照)
LINE OUT
(メロディ
/melody)
アンプ電源
Amplifier power supply
By turning on the "10 SEC. ADVANCE
WARMUP" switch, you can warm up the
amplifier 10 seconds ahead of melody
playing. (For details, refer to "9. Operation"
below.)
外部スピーカの音量は、通常はライン出力レベルを
最大にしたうえで、外部アンプのボリュームで調整して
ください。
外部アンプのボリューム
Volume of external
amplifier
Normally, the volume of the external speaker is adjusted
with the volume knob of the external amplifier with the
LINE OUT LEVEL knob set at MAX.
15
(最大に)
(音量調整)
(Turn to MAX.)
(Volume adj.)
I-5974-4
9.操作方法/ Operation
9.1
操作部概要/ An outline of the control panel
①
③
②
④
⑥
⑤
⑨
⑩
⑫
⑦
⑬
⑧
⑪
①
②
③
④
⑤
⑥
⑦
⑧
⑨
⑩
⑪
⑫
⑬
液晶画面
モードスイッチ
設定用ボタン
コピー・消去
曜日
タイムリンク受信
タイムリンク制御
サマータイム
試し鳴らし
音量
接点出力制御
ライン出力レベル
システムリセット
:
:
:
:
:
:
:
:
:
:
:
:
:
現在時刻や設定画面を表示します。
現在時刻や設定画面にモードを切り替えます。
設定値を変更したり、決定するときに使用します。
プログラムをコピーしたり、消去するときに使用します。
プラグラムを実行する曜日を入力するときに使用します。
タイムリンクの受信状態を表示します。
タイムリンクにより時刻を受信するときに使用します。
サマータイムの実施、解除に使用します。
メロディの試し鳴らしのときに使用します。
内蔵スピーカの音量調整用のツマミです。
接点出力の制御に使用します。
メロディの出力レベルの調整用のツマミです。
システム全体のリセットです。
16
I-5974-4
① LCD screen
② MODE switch
: Displays the present time and the program setting screen.
: Used for changeover of present-time display mode to and
from program setting screen display mode.
: Used to change or set the parameters.
③ SET/SELECT/CANCEL buttons
④ COPY/PASTE/CLEAR/
ALL CLEAR buttons
⑤ Day-of-the-week buttons
(DAY buttons)
:
⑥
⑦
⑧
⑨
⑩
⑪
⑫
⑬
:
:
:
:
:
:
:
:
9.2
LINK -Japan OnlyTIMELINK control -Japan OnlySUMMER TIME
MELODY TEST
VOL
Dry contact output signal control
LINE OUT LEVEL
SYSTEM RESET
: Used to copy and clear programs.
Used to enter the day of the week when a program is to be
run.
Displays the TimeLink signal reception status.
Used when receiving the time-of-day signal via TimeLink.
Used to turn on/off the summer time system.
Used for trial run of melodies.
Sound volume adjusting knob for the built-in speaker.
Used for the control of contact signal output.
Melody output level adjusting knob.
Used to reset the entire system.
電源の投入/ Powering-up
9.2.1 電源の投入/ Powering-up
正しく結線ができましたら、電源プラグをコンセントに差し込み、電源を投入してください。
本体に電源スイッチはありませんので、大本の電源を入れることにより動作を始めます。
When the wiring has been completed correctly as specified, plug the power cord into the wall outlet
to power up the Bell Timer.
The Bell Timer has no POWER switch, and it is required to close the main circuit breaker to power up
the Bell Timer system.
9.2.2 システムリセット/ SYSTEM RESET
電源を投入したら、必ずシステムリセットを押してください。
3~4秒後、液晶画面に時刻が出ます。
(この時の時刻は、まだ現在時刻ではありません)
After closing the main circuit breaker, be sure to press the SYSTEM RESET button.
In 3 to 4 seconds, the time will be displayed on the LCD screen.
(Note that the time displayed is not the present time yet.)
9.2.3 アナログ時計の運針/ Motion of analog clock hands
電源を投入した後、1 分以内にアナログ時計が早送りで動作を始めます。
なお、この早送りは、液晶画面に表示された時刻と一致するまで続き、その後通常動作となります。
※早送りを始めたときのアナログ時計の位置と、液晶画面に表示される時刻との関係によっては
一致した時に停止せず早送りを続けることがありますが、その後再び一致したときに停止します。
※早送りをしている最中でも、次ページ以降の操作をすることができます。
In one minute after closing the main circuit breaker, the hands of the analog clock will start running in
a fast feed mode.
This fast feed motion will continue until the hands are brought in synchronism with the time on the
LCD screen.
* Depending on the relationship between the fast feed start position of the analog clock hands and
the time on the LCD screen, the fast feed may continue even after coincidence of hands with the
time displayed, but will cease to continue when the coincidence occurs again.
* You can carry out the operations described in the pages to follow even while the analog clock is
running in the fast feed mode.
17
I-5974-4
9.3
現在時刻の設定方法/ How to set the present time
例)2006年4月20日(木) 15時30分に設定する。
Ex.) To set the Bell Timer at 15:30, Thursday, April 20, 2006, follow the steps below:
1
モード切替/ Mode select
モードスイッチを時刻設定に合わせます。
液晶画面が点滅します。
Set the MODE select switch to TIME.
The LCD screen will flicker.
2
設定開始/ Setting start
決定ボタンを押します。
年桁が点滅し、設定が可能となります。
Press the SET button.
The year digits will flicker to show readiness for
setting.
3
現在日時の設定/Calendar setting
設定桁の値を「1」増加
Increment the setting digit.
年月日時分秒を設定します。
Set the year, month, date, hour, minute and
seconds.
【 入力時の注意 】
年桁
時桁
曜日
: 2000~2099 年の範囲で下2桁
を設定してください。
: 24時制で設定してください。
: 自動的に設定されます。
設定桁(点滅)の移動
Used to shift the flickering digit
(setting digit).
[Precautions on data entry]
Year digits
: Enter two least significant digits
within the range of 2000 to
2099.
Time digits
: Enter the data in the 24-hour
format.
Day of the week : Automatically set.
4
設定桁の値を「1」減少
Decrement the setting digit.
カウントスタート/ Count start
時報等に合わせて決定を押します。
決定を押したタイミングから、内部時計がカウ
ントを開始します。
Press the SET button in tune with the time signal.
As soon as the SET button is pressed, the built-in
clock will start counting.
5
設定終了/ End of setting
モードスイッチを通常に戻します。
通常でない場合、プログラム動作を実行しませ
ん。
アナログ時計は、デジタル時計に連動して、自
動的に調針します。
Set the MODE switch back to NORMAL.
Unless the MODE switch is at NORMAL, the system
will not perform any programmed operation.
The hands of the analog clock will be corrected
automatically as interlocked with the digital clock.
※
日時設定(3.現在日時の設定)を中止する時は、
キャンセルを押してください。
To abort the setting of time and date ("3. Calendar
setting"), give a push to the CANCEL button.
18
I-5974-4
9.4
プログラムの設定方法/ How to set the program
9.4.1 週間プログラム/ Weekly program
1週間の任意の時刻に、メロディ鳴動・接点出力のプログラムを作成し、実行することができます。
以下の3種類の週間プログラムを「最大60プログラム」まで設定可能です。
It is possible to prepare and run a program that plays melodies and delivers dry contact output
signals at any scheduled times of a week.
Up to 60 programs of the following three types can be set for QBT-30.
① 1週間の任意の時刻に、メロディを鳴らす。
→ P.20
② 1週間の任意の時刻に、接点出力を行う。
→ P.22
③ 1週間の任意の時刻に、メロディを鳴らし、接点出力を行う。 → P.24
① Playing a melody at any scheduled time of a week
② Generating dry contact output signal at any scheduled time of a week
③ Carrying out the playing of a melody and the generation of a dry
contact output signal at any scheduled time of a week
→ P.20
→ P.22
→ P.24
- メロディ/ Melodies -
・ プログラム設定ができるメロディは、下表の10曲です。
The programmable melodies are of the following 10 tunes:
MELODY No.
1
2
3
4
5
6
7
8
9
10
曲名/Title of music
ウェストミンスターの鐘/ Westminster Chime
エーデルワイス/ Edelweiss
小さな恋のメロディ/ Melody Fair
チムチム・チェリー/ Chim Chim Cheree
ビビディ・バビディ・ブー/ Bibbidi-Babbidi-Boo
夕焼け小焼け/ Yuyake Koyake
家路/ Going Home
別れの曲/ Etude Op.10,No.3
美女と野獣/ Beauty and the Beast
ア・ホール・ニュー・ワールド/ A Whole New World
曲の長さ/Length
40 秒/sec.
42 秒/sec.
43 秒/sec.
40 秒/sec.
30 秒/sec.
40 秒/sec.
45 秒/sec.
45 秒/sec.
44 秒/sec.
41 秒/sec.
・ 内蔵スピーカの音量調節は、音量ツマミで設定します。
・ 外部スピーカの音量調整は、ライン出力レベルツマミを最大にしたうえで、外部アンプのボリューム
で設定します。
・
・
The volume of the built-in speaker can be adjusted with the VOL. knob.
Normally, the volume of the external speaker is adjusted with the volume knob of the external
amplifier with the LINE OUT LEVEL knob set at MAX.
- 接点出力/ Dry contact output signal -
・ 外部の機器をタイマー動作させることができます。
・ 接点出力は2チャンネル(CH1/CH2)で、プログラムごとに出力CHを設定します。
・ 出力CHは、「CH1のみ出力」「CH2のみ出力」「CH1・2両方出力」から選択することが
できます。
・ External devices can be controlled by QBT-30 via dry contact output signals.
・ The dry contact output signals are available in 2 output channels (CH1/CH2), and any of these
channels can be assigned to each specific program.
・ The dry contact output signal can be delivered through CH1 alone or CH2 alone, or through
both CH1 and CH2.
19
I-5974-4
9.4.2 メロディ鳴動/ Playing the melodies
例)プログラムNo.3に以下のプログラムを設定する場合
曜日・開始時刻
: 月曜日 ~ 金曜日 の 8:45 に
メロディ
: No.2(エーデルワイス)を鳴らす
接点出力
: なし
Ex.) To schedule Program No. 3 as follows:
Day of the week and start time
: 8:45 every weekday
Melody
: No. 2 (Edelweiss)
Dry contact output signal
: None
1
モード切替/ Mode select
モードスイッチをプログラム設定に合わせま
す。(プログラムNo.1が表示されます)
Set the MODE switch to PROGRAM.
No.1 will be displayed.)
2
(Program
プログラムNo.設定/
Program No. select
プログラムNo.3を選び、決定を押して入
力を開始します。
Select Program No. 3, and press the SET button
to start entry of data.
3
曜日設定/ Day-of-the-week select
曜日ボタンで月~金曜日を設定します。
[-]:設定
[-]: denotes
"selected"
status.
Select the days of the week (Mon.-Fri.) using the
corresponding DAY buttons.
【 入力時の注意 】
各曜日ボタンは押す度に、
「設定」と「未設定」
を繰り返します。
[Precautions on the data entry]
The status of each specific day of the week will
be toggled between "selected [ - ]" and
"deselected [ ]" every time when the DAY
button is pressed.
4
開始時刻設定/ Start time select
設定桁の値を「1」増加
Increment the selected digit.
開始時刻8時45分を設定します。
Select the start time at 8:45.
【 入力時の注意 】
時桁は、24時制で設定してください。
[Precautions on data entry]
Select the hours digits in the 24-hour format.
設定桁(点滅)の移動
Used to shift the flickering
digit (selected digit).
設定桁の値を「1」減少
Decrement the selected digit.
5
メロディ設定/ Melody select
メロディNo.2を設定します。
Select Melody No. 2.
20
I-5974-4
6
決定/ Setting
設定内容を確認した後、決定を押します。
After making sure that the data items selected are
correct, press the SET button.
未設定項目がある場合、液晶画面全体が点滅し
ます。もう一度、設定内容をご確認ください。
① 曜日が設定されていますか?
② メロディNo.が設定されていますか?
If there are any data items yet to be selected, the
entire LCD screen will flash. Again check the data
items selected.
① Are the days of the week selected?
② Is Melody No. selected?
7
設定終了/ End of setting
モードスイッチを通常に戻します。
通常でない場合、プログラム動作を実行しませ
ん。
Turn the MODE switch back to NORMAL.
Unless the MODE switch is selected at NORMAL,
the program will not work.
※
プログラム設定(3.曜日設定~5.メロディ設
定)を途中で中止する時は、キャンセルを押し
てください。
To abort programming ("3. Day-of-the-week
select" through "5. Melody select") halfway, press
the CANCEL button.
※
プログラム設定中、試し鳴らしを押すと設定中
のメロディを鳴らすことができます。
By pressing the MELODY TEST button during
programming, you can play a melody being
selected.
21
I-5974-4
9.4.3 接点出力制御/ Dry contact output signal control
例)プログラムNo.4に以下のプログラムを設定する場合
曜日・開始時刻
: 土・日曜日 の 14:00 に
メロディ
: なし
接点出力
: CH1 から 4時間(14:00~18:00) 出力する
Ex.) To schedule Program No. 4 as follows:
Day of the week and start time
: 14:00 on Sat. and Sun.
Melody
: None
Dry contact output signal
: Output from CH1 for 4 hours (14:00 - 18:00)
1
モード切替/ Mode select
モードスイッチをプログラム設定に合わせま
す。(プログラムNo.1が表示されます)
Select the MODE switch at
(Program No. 1 will be displayed.)
2
PROGRAM.
プログラムNo.設定/
Program No. select
プログラムNo.4を選び、決定を押して入
力を開始します。
Select Program No. 4, and press the SET button
to start entry of data.
3
曜日設定/ Day-of-the-week select
[-]:設定
[-]: denotes
"selected"
status.
曜日ボタンで土・日曜日を設定します。
Select Sat. and Sun. by pressing respective DAY
buttons.
【 入力時の注意 】
各曜日ボタンは押す度に、
「設定」と「未設定」
を繰り返します。
[Precautions on data entry]
The status of each specific day of the week will be
toggled between "selected" [ - ] and "deselected"
[ ] every time when its DAY button is pressed.
4
開始時刻設定/ Start time select
設定桁の値を「1」増加
Increment the setting digit.
開始時刻14時00分を設定します。
Select the start time at 14:00.
【 入力時の注意 】
時桁は、24時制で設定してください。
[Precautions on data entry]
Select the hours digits in the 24-hour format.
設定桁の値を「1」減少
Decrement the setting digit.
5
設定桁(点滅)の移動
Used to shift the
flickering digit (setting
digit).
メロディNo.取り消し/
Melody No. deselect
メロディNo.を[-]にします。
[-]の場合、開始時刻になってもメロディは
鳴りません。
Deselect the melody No. The status of that
melody No. will be turned "deselected [ - ]".
If the melody No. is deselected, it will not be
played even when the start time is reached.
22
I-5974-4
6
出力CH設定/ Output channel select
出力CHをCHX に設定します。
Select CHX as output channel.
【 入力時の注意 】
出力CHは、4種類から設定可能です。
CH1のみ出力
: [CHX]
CH2のみ出力
: [CHY]
CH1・2両方出力 : [CHXY]
出力なし
: [CH ](表示なし)
[Precautions on data entry]
The following four combinations of outputs are available:
CH1 output only
: [CHX]
CH2 output only
: [CHY]
Output from both CH1 and CH2 : [CHXY]
No output
: [CH ](no indication)
7
出力時間設定/ Output duration select
出力時間を4h00m00s に設定します。
Select the output duration at 4h00m00s.
【 入力時の注意 】
出力時間は、1秒間~24時間まで設定できます。
[Precautions on data entry]
The output duration can be selected within the range of 1
second to 24 hours.
8
決定/ Setting
設定内容を確認した後、決定を押します。
After making sure that the data items selected are correct,
press the SET button.
未設定項目がある場合、液晶画面全体が点滅します。
もう一度設定内容をご確認ください。
① 曜日が設定されていますか?
② 出力CHが設定されていますか?
③ 出力時間が0h00m00s になっていませんか?
If there are any data items yet to be selected, the entire
LCD screen will flash. Again check the data items selected.
① Are the days of the week selected?
② Are output channels selected?
③ Isn't the output duration selected at 0h00m00s?
9
設定終了/ End of setting
モードスイッチを通常に戻します。
通常でない場合、プログラム動作を実行しません。
Turn the MODE switch back to NORMAL.
Unless the MODE switch is selected at NORMAL, the
program will not work.
※
プログラム設定(3.曜日設定~7.出力時間設定)を
途中で中止する時は、キャンセルを押してください。
To abort programming ("3. Day-of-the-week select"
through "7. Output duration select") halfway, press the
CANCEL button.
23
I-5974-4
9.4.4 メロディ鳴動と接点出力制御/ Control of melody playing and dry contact output signal
例)プログラムNo.5に以下のプログラムを設定する場合
曜日・開始時刻 : 月・水・金曜日 の 17:30 に
メロディ
: No.7(家路) を鳴らす
接点出力
: CH2 から 50秒間 出力する(アンプ起動)
Ex.) To schedule Program No. 5 as follows:
Day of the week and start time
: 17:30 on Mon., Wed. and Fri.
Melody
: No. 7 (Going Home)
Dry contact signal output
: Output from CH2 for 50 sec. (amplifier activated)
1
モード切替/Mode select
モードスイッチをプログラム設定に合わせま
す。
Select the MODE switch at PROGRAM.
2
プログラムNo.設定/
Program No. select
プログラムNo.5を選び、決定を押して入
力を開始します。
Select Program No. 5, and press the SET button
to start entry of data.
3
曜日設定/ Day-of-the-week select
[-]:設定
[-]: denotes
"selected"
status.
曜日ボタンで月・水・金曜日を設定します。
Select Mon., Wed., and Fri. by pressing respective
DAY buttons.
【 入力時の注意 】
各曜日ボタンは押す度に、
「設定」と「未設定」
を繰り返します。
[Precautions on data entry]
The status of each specific day of the week will be
toggled between "selected" [ - ] and "deselected"
[ ] every time when its DAY button is pressed.
4
開始時刻設定/ Start time select
設定桁の値を「1」増加
Increment the setting digit.
開始時刻17時30分を設定します。
Select the start time at 17:30.
【 入力時の注意 】
時桁は、24時制で設定してください。
[Precautions on data entry]
Select the hours digits in the 24-hour format.
設定桁の値を「1」減少
Decrement the setting digit.
5
設定桁(点滅)の移動
Used to shift the
flickering digit
(setting digit).
メロディ設定/ Melody select
メロディNo.7を設定します。
Select Melody No. 7.
24
I-5974-4
6
出力CH設定/ Output channel select
出力CHをCHYに設定します。
Select CHY as output channel.
【 入力時の注意 】
出力CHは、4種類から設定可能です。
CH1のみ出力
: [CHX]
CH2のみ出力
: [CHY]
CH1・2両方出力 : [CHXY]
出力なし
: [CH ](表示なし)
[Precautions on data entry]
The following four combinations of outputs are available:
CH1 output only
: [CHX]
CH2 output only
: [CHY]
Output from both CH1 and CH2 : [CHXY]
No output
: [CH ](no indication)
7
出力時間設定/ Output duration select
出力時間を0h00m50s に設定します。
Select the output duration at 0h00m50s.
【 入力時の注意 】
出力時間は、1秒間~24時間まで設定できます。
曲の長さよりも少し長めに設定します。
[Precautions on data entry]
The output duration can be selected within the range of 1
second to 24 hours.
The output duration should be made a little longer than the
playing time of the music piece.
8
決定/ Setting
設定内容を確認した後、決定を押します。
After making sure that the data items selected are correct,
press the SET button.
未設定項目がある場合、液晶画面全体が点滅します。
もう一度設定内容をご確認ください。
① 曜日が設定されていますか?
② メロディNo.が設定されていますか?
③ 出力CHが設定されていますか?
④ 出力時間が0h00m00s になっていませんか?
If there are any data items yet to be selected, the entire
LCD screen will flash. Again check the data items selected.
① Are the days of the week selected?
② Is Melody No. selected?
③ Are output channels selected?
④ Isn't the output duration selected at 0h00m00s?
9
設定終了/ End of setting
モードスイッチを通常に戻します。
通常でない場合、プログラム動作を実行しません。
Turn the MODE switch back to NORMAL.
Unless the MODE switch is selected at NORMAL, the
program will not work.
※
プログラム設定(3.曜日設定~7.出力時間設定)を
途中で中止する時は、キャンセルを押してください。
To abort programming ("3. Day-of-the-week select"
through "7. Output duration select") halfway, press the
CANCEL button.
※
プログラム設定中、試し鳴らしを押すと設定中のメロ
ディを鳴らすことができます。
By pressing the MELODY TEST button during
programming, you can play a melody being selected.
25
I-5974-4
9.4.5 プログラムのコピー/ How to copy a program
例)プログラムNo.3(設定済)をNo.6(空)にコピーする。
Ex.) To copy the data "from Program No. 3 (done)" "to Program No. 6 (empty)", follow the steps
below:
1
モード切替/ Mode select
モードスイッチをプログラム設定に合わせま
す。
Select the MODE switch at PROGRAM.
2
コピー元プログラム設定/
"From-program" select
プログラムNO.3を選びます。
Select Program No. 3 as a "from-program."
3
コピー/ Copying
コピーを押します。
画面が点滅し、コピーしたことをお知らせしま
す。
Press the COPY button. When the copying is
done, the LCD screen will flash.
4
コピー先プログラム設定/
"To-program" select
プログラムNO.6を選びます。
Select Program No. 6 as a "to-program."
5
貼り付け/ Pasting
貼り付けを押します。
プログラムNO.3の内容が、プログラム No.6
にコピーされます。
貼り付け後、必要な部分を変更してください。
Press the PASTE.
Program No. 3 will be pasted to Program No. 6.
After pasting the data, correct it if necessary.
26
I-5974-4
9.4.6 プログラムの消去/ How to clear a program
例)プログラムNo.5を消去する。
Ex.) To clear Program No. 5, follow the steps below:
1
モード切替/ Mode select
モードスイッチをプログラム設定に合わせま
す。
Select the MODE switch at PROGRAM.
2
消去プログラム設定/
Selecting a program to be cleared
プログラムNo.5を選びます。
Select Program No. 5.
3
プログラム内容消去/
Clearing the program data
消去を長押しします。
プログラム内容が消去されます
Hold down the CLEAR button for a while.
The program data will be cleared.
9.4.7 プログラムの全消去/ How to clear all the selected programs
1
モード切替/ Mode select
モードスイッチをプログラム設定に合わせま
す。
Select the MODE switch at PROGRAM.
2
プログラム全消去/ All clear
全消去を長押しします
設定されている全てのプログラムが消去され
ます。
Hold down the ALL CLEAR button for a while.
All the programs selected will be cleared.
27
I-5974-4
9.5
接点出力方法の切替/ Changeover of dry contact signal output mode
■ 出力方法の切替/ Changeover of output mode
接点出力CH1/2各々について、出力方法を 自動 / 切 / 手動 から選択することができます。
自動 :プログラムに従った接点出力を行います。
切
:プログラムに関係なく、接点出力を強制的に停止させます。
手動 :プログラムに関係なく、接点出力を強制的に行います。
For each of the dry contact output channels CH1 and CH2, any one of
the following modes can be selected:
AUTO
OFF
MANUAL
: Contact output is generated according to a program in action.
: Forces contact output off without regards to programs.
: Forces contact output on without regard to programs.
■ 10秒前出力/10 sec. advance warm-up
出力方法が 自動 の場合にのみ有効です。
10秒前出力 スイッチが 入 の時、プログラムで設定された開始時刻
の10秒前から出力します。
The switch is enabled only when the output mode is AUTO.
When the -10sec. switch is ON, an output will be generated 10 seconds
ahead of the start time preset in the program.
例)/ Ex.)
左図の設定の場合、CH1からは
9時59分50秒~10時30分00秒の
「30分10秒間」出力されます。
With the settings at left, an output will be
generated for 30min.10sec. from 9:59:50 to
10:30:00.
28
I-5974-4
9.6
メロディの試し鳴らし/ Melody test
例)モードスイッチが通常中に、MELODY No.6(夕焼け小焼け)の試し鳴らしを行う。
Ex.) To play Melody No. 6 (Yuyake-Koyake) with the MODE switch selected at NORMAL,
follow the steps below:
1
モード切替/ Mode select
メロディの試し鳴らしは、モードスイッチが
通常で行うことができます。
Melody test can be made with the MODE switch
at NORMAL.
2
試し鳴らしモードへの移行/
Activation of melody test mode
試し鳴らしを押します。
液晶画面に「MELODY No.1」が点滅
表示されます。
Press the MELODY TEST button.
"MELODY NO. 1" will flash on the LCD screen.
3
メロディ選択/ Melody select
メロディNo.6を選択します。
Select Melody No. 6.
4
試し鳴らし開始/ Melody test
試し鳴らしを押すと、メロディNo.6(夕焼
け小焼け)が鳴ります。
試し鳴らし中、再度試し鳴らしを押すと停止し
ます。
Press the MELODY TEST button, and Melody No.
6 (Yuyake-Koyake) will be played.
When the MELODY TEST button is pressed again
during melody test, the melody test will be toggled
off.
5
試し鳴らしモードの終了/
End of melody test mode
「1分間」どのスイッチも押さないと、液晶画
面の「MELODY No.
」が自動的に消えま
す。
If none of the switches have been pressed for one
minute, "MELODY NO." will disappear from the
LCD screen.
29
I-5974-4
9.7
サマータイムの設定方法/ How to set the summer time
サマータイムの設定方法は、タイムリンクスイッチの状態によって異なります。
The procedure for setting up the summer time varies depending on the status of the TIME LINK
switch.
■ 自動設定/ Auto mode
–Japan Only-
タイムリンクスイッチが 入 の時、サマータイムは自動的に設定されます。
タイムリンクについての詳細は、『9-8 タイムリンク』を参照してください。
■ 手動設定/ Manual mode
タイムリンクスイッチが 切 の時、サマータイムボタン操作で手動で設定します。
When the TIME LINK switch is OFF, the summer time needs to be set manually.
① サマータイムの開始/ Start of summer time
サマータイムボタンを長押しします。
Hold down the SUMMER TIME button for a 「SUMMER TIME」表示
"SUMMER TIME"
while.
displayed
デジタル時計 : +1時間
アナログ時計 : 1時間早送り
液晶画面
:「SUMMER TIME」表示
Digital clock
Analog clock
LCD screen
: +1 hour
: Fast feed by 1 hour.
: "SUMMER TIME" displayed
② サマータイムの終了/ End of summer time
サマータイムボタンを1秒間押します。
「SUMMER TIME」消去
"SUMMER TIME"
disappears.
Hold down the SUMMER TIME button for 1
second.
デジタル時計 : -1時間
アナログ時計 : 11時間早送り
液晶画面
:「SUMMER TIME」消去
Digital clock
Analog clock
LCD screen
: -1 hour
: Fast feed by 11 hours
: "SUMMER TIME" disappears
30
I-5974-4
9.8
タイムリンク
–Japan Only-
9.8.1 タイムリンクとは
タイムリンクとは、標準電波から取得した正確な時刻を無線を使って伝達するシステムです。
タイムリンクを使用することで、常に正確な時刻で動作します。
タイムリンクを使用するには以下の2つの方法があります。
■ タイムリンク送信機ZA303N を使用
建物内の窓際にZA303Nを置き、標準電波を受信します。
屋内は、タイムリンクで、約40mの伝達が可能です。(障害物のない場合)
標準電波
屋内
タイムリンク
ZA303N
窓
障害物のない場合、約40m
障害物があったり、距離が遠いなどの理由で、タイムリンクの電波が届かない場合は、
途中にZA303Nを置いて、中継させることもできます。
屋内
標準電波
タイムリンク
タイムリンク
窓
31
I-5974-4
■ 長波受信器SLR-201 と タイムリンクプロ中継器SW-302 を使用
建物内の窓際で標準電波が受信できない場合は、屋外にSLR-201を取り付けます。
屋内はSW-302を使用し、タイムリンクで、約40mの伝達が可能です。(障害物のない場合)
標準電波
SLR-201
屋内
タイムリンクプロ
タイムリンク
SW-302
障害物のない場合、約40m
窓
障害物があったり、距離が遠いなどの理由で、タイムリンクの電波が届かない場合は、
途中にSW-302または、ZA303Nを置いて、中継させることもできます。
標準電波
屋内
タイムリンクプロ
タイムリンク
窓
32
I-5974-4
9.8.2 操作方法
ベルタイマー本体の操作の前に
1
事前準備
■ZA303Nをご使用の場合
a)ZA303Nの取扱説明書に従い、窓際で標準電波を受信させて、現在時刻を取得
させます。
b)送信ボタンを押し、タイムリンクを手動送信します。
※ZA303Nは、手動送信の操作により30分間タイムリンク送信した後に自動停止
します。自動停止後は1時間ごとに1回タイムリンクを送信します。
■SLR-201とSW-302をご使用の場合
a)SLR-201を屋外に、SW-302を屋内に取り付けます。SW-302は
電源を投入します。
b)SLR-201が起動するのを待ちます。
※SLR-201は、日光が当たると充電を開始し、十分に充電されると自動的に
起動します。起動には良く晴れている場合でも約30分程度かかりますので、
ベルタイマーをご使用になる前日までに取り付けされることをお勧めします。
c)SLR-201が起動後に送信するタイムリンクプロによって、SW-302に
時刻がセットされたことを確認します。
※SW-302の液晶画面に現在時刻が表示されていることで確認できます。
※SW-302は、10分ごとに1回タイムリンクを送信します。
詳細は各製品の取扱説明書をご覧ください。
以上で準備は完了です。
ここからベルタイマー本体の操作に入ります。
2
タイムリンクスイッチを入に合わせます。
タイムリンク受信が点滅し、タイムリンク
の受信を開始します。
受信に成功したら
タイムリンクの受信に成功すると、
タイムリンク受信が点灯になります。
タイムリンク受信が点灯にならない場合
30分経ってもタイムリンク受信が点滅の
ままの場合、タイムリンクが受信できませ
ん。
ベルタイマー本体を受信できる位置に移動
してください。
※ZA303NやSW-302を移動する
ことも可能ですが、その場合は事前準備
からやり直しとなります。
33
30 分以上点滅のまま
設置場所の変更が必要
I-5974-4
9.8.3 定期受信
タイムリンクの受信に成功した後は、1時間ごとに定期受信を行います。
この定期受信により、常に正しい時刻を保ちます。
※定期受信は自動的に行われますので、操作は不要です。
なお、定期受信が24回(24時間)以上連続して失敗した場合に、
タイムリンク受信が消灯します。
この場合、前頁の“ タイムリンク受信が点灯にならない場合”と同様に
設置場所の見直しを行ってください。
9.8.4 手動受信
モードスイッチが通常で、タイムリンクスイッチが 入 の時
手動受信ボタンを押すことにより、直ちにタイムリンクを受信
させることができます。
モードスイッチが通常中に手動受信ボタンを押すことにより、
直ちにタイムリンクを受信させることができます。
手動受信は、タイムリンクスイッチを入にした場合と同様に
受信が成功するまで、タイムリンク受信が点滅を続けます。
手動受信は通常、使用する必要はありません。
ベルタイマー本体を移動した場合などにタイムリンクの受信確認として
使用してください。
34
I-5974-4
10.標準電波 –Japan Only10.1 標準電波とは
独立行政法人 情報通信研究機構(NICT)が運用しており、高精度の時刻情報およびカレンダー
情報が入った電波です。
標準電波は、国内の次の2カ所から送信されております。
①福島県南部の おおたかどや山 にある送信所
周波数40kHz
②福岡県と佐賀県の県境にある はがね山 にある送信所
周波数60kHz
標準電波の詳細については、独立行政法人 情報通信研究機構(NICT)のホームページをご参照ください。
ホームページアドレス h t t p : / / j j y . n i c t . g o . j p /
10.2 電波受信可能範囲は?
送信所から約1000kmの範囲です。
おおたかどや山
送信所(40kHz)
はがね山
送信所(60kHz)
1000km範囲
10.3 設置場所に関する注意は?
標準電波の受信は自動で行っていますが、受信可能な範囲であっても、天候、時間帯、地形や建物
の影響などにより正常に受信できない場合があります。
また、設置場所の周囲から発生する電波ノイズの影響により、受信が妨害されることがあります。
(電気機器・変電所・高架・工事現場・交通量の多い場所 ・・・・などの近傍はなるべく避ける)
このような電波の受信不良が頻繁に発生する場合は、長波受信器の設置場所や配線経路を変更する
などの対策を行ってください。
10.4 仕様
○ 修正精度
○ 受信周波数
○ 感度
±100ms以下
40kHz/60kHz (自動選択)
50dBuV/m以下
35
I-5974-4
11.停電補償/ Backup against Commercial Power Failure
本製品は、充電式のリチウム電池を内蔵し、停電時の動作補償を行っています。
なお停電中の動作は以下のようになります。
アナログ時計
液晶画面
各種操作
プログラム実行
停電補償時間
:
:
:
:
:
運針を続けます
表示が消えます
操作できません
実行されません
24時間
※プログラムの内容は、停電時間に関わらず、10年間保持されます。
停電補償時間を越えた停電が発生した場合、または充電時間(24時間)が不十分だった場合は、
時計が止まることがあります。
その場合は、停電が復帰してから、システムリセットボタンを押してください。
The Bell Timer Model QBT-30 has a built-in rechargeable lithium battery as a backup against
commercial power failure.
Even during commercial power failure, the basic performance will be maintained except for
functional degeneration as follows.
Analog clock
LCD screen
Control functions
Programs
Backup time
:
:
:
:
:
Continues running.
Turned off
Disabled
Will not run
24 hours
* The program data will be preserved unaffected by commercial power failure for 10 years.
Should the commercial power failure continue in excess of the backup time, or the battery is not
recharged for 24 hours, the clock may run down.
In such a case, press the SYSTEM RESET button after restoration of power supply.
12.故障と思われる前に/ Troubles You Can Solve Yourself
● まず、次のことを確認して下さい。
Before calling your agent or dealer for service, check the following list for possible troubles
that you yourself can remedy without difficulty by following the instructions written in this
manual.
(1)
液晶画面に何も表示しない/ Nothing is displayed on the LCD screen.
・ACコードが正しく接続されていますか?
・規定の電源が供給されていますか?
・ Is the AC power cord connected in position?
・ Is the power supply rating right for the Bell Timer?
(2)
ボタン・スイッチを押しても動作しない/
The Bell Timer does not respond to the operation of any button or switch.
・はじめにシステムリセットボタンを押してください。
・ Press the SYSTEM RESET button at first.
36
I-5974-4
(3)
音が出ない/ No sound is generated.
(内蔵スピーカの場合)
・音量ツマミを最小にしていませんか?
(外部スピーカの場合)
・ライン出力レベルのツマミを最小にしていませんか?
・外部アンプの電源は入っていますか?
・外部アンプのボリュームを最小にしていませんか?
In case of built-in speaker:
・ Isn't the VOL knob turned to a minimum?
In case of external speaker:
・ Isn't the LINE OUT LEVEL knob turned to a minimum?
・ Is the external amplifier turned on?
・ Isn't the volume of the external amplifier turned to a minimum?
(4)
プログラムが実行されない/ The program will not run.
・プログラムは入力されていますか?
・モードスイッチが通常の位置にあることを確認してください。
・時刻(日付・時間)は合っていますか?
・外部配線は正しくされていますか?
・停電中ではありませんか?
・
・
・
・
・
(5)
Has a schedule of operations incorporated into the program?
Make sure that the MODE switch is at NORMAL.
Is the time (date, time) correct?
Is the field wiring correct?
Isn't the commercial power supply off?
アナログ時計が狂う/ The analog clock gets out of order.
・液晶画面の時刻は合っていますか?
・システムリセットボタンを押してください。
・Is the time displayed on the LCD screen correct?
・Press the SYSTEM RESET button.
(6)
停電復帰後、時計が狂う/
The clock gets out of order after recovery from commercial power failure.
・24時間以上の停電ではありませんでしたか?
・復帰後にシステムリセットボタンを押してください。
・Hasn't the commercial power failure continued for more than 24 hours?
・Be sure to press the SYSTEM RESET button after recovery from power failure.
以上の確認で直らないとき、またはその他の異常が発生したときは、お買い上げいただいた
販売店もしくは販売会社へご連絡ください。
If the above troubleshooting still fails, or if other troubles occur, call your nearby
SEIKO dealer or agent for service.
37
I-5974-4
警告
WARNING
修理は、お買い上げいただいた販売店もしくは販売会社へご依頼くださ
い。修理技術者以外の人が分解したり修理・改造を行うと感電や火災の
原因になります。
Call your nearby SEIKO dealer or agent for repair service. Unauthorized
disassembly, repair or modification may cause electric shock accidents
or fire accidents.
13.お客様へのお願い/ Daily Servicing by the User
外装の手入れの仕方/ Care of enclosure
外装の汚れがひどいときは、水でうすめた中性洗剤を少量やわらかい布につけて拭き、
拭いた後で乾拭きをしてください。
ベンジン、シンナー、ミガキ粉、各種ブラシなどは使わないでください。
If the enclosure is found soiled, clean with a soft cloth soaked with a small quantity of neutral
syndet diluted with water, and then polish with a dry cloth.
Never use solvents (benzene, thinner, or the like), abrasives (polishing powder or the like),
and bristle brushes.
14.保証について/ Warranty
● この製品の修理用部品の保存期間は、通常7年を基準としています。正常なご使用であれば
この期間は原則として修理は可能です。修理用部品とは、製品の機能を維持するのに不可欠
な製品本体の部品です。
● 修理の可能な期間はご使用条件によりいちじるしく異なり、また、精度も元通りにならない
場合がありますので、修理ご依頼の際はお買い上げいただいた販売店もしくは販売会社へ
ご相談ください。
● 修理のとき、部品・その他の付属品などは一部代替部品を使用させていただくこともあり
ますので、ご了承ください。
● その他ご不明の点がありましたら、お買い上げいただいた販売店もしくは販売会社へお問い
合わせください。
● In principle, the spare parts for the Bell Timer Model QBT-30 will be available for 7 years
after sale, and your Bell Timer will be repaired within this period if it becomes faulty
under normal conditions of use. The spare parts here refer to the parts and components
essential for the functions of the Bell Timer.
● The period for which repair services are available varies over a wide range depending on
how your Bell Timer has been used. It should be noted that even if repair services are
made available, the timing accuracy may not be reinstated. For details, consult your
SEIKO dealer or agent.
● It is to be understood that SEIKO reserves the right to use substitutions for parts or
accessories for the purpose of repair service.
● If you should have any question or inquiry, please do not hesitate to consult your SEIKO
dealer or agent.
38
I-5974-4
15.仕様/Specifications
時
計
内蔵水晶精度
平均月差 ±3秒(+5~+35℃)
表
示
アナログ 2針式
デジタル 年月日、曜日、時分秒(24時制) 液晶表示
部
タ イ マ ー
時
刻
設
定
操作パネルからのキー入力
※タイムリンク使用時は不要
時
刻
修
正
標準電波による修正(オプション)
プログラム数
最大60プログラム
設
定
単
位
1分単位
設
定
方
式
操作パネルからのキー入力(液晶表示ガイダンス)
接
点
出
力
独立2チャネル(無電圧接点)
量
AC125V 5A
AC250V 3A
DC30V
5A
接
点
容
接点出力時間
1秒単位で設定可(最大24時間00分00秒)
曲
10曲
メロディNo.01
No.02
No.03
No.04
No.05
No.06
No.07
No.08
No.09
No.10
目
メ ロ デ ィ
入
力
内蔵スピーカ
8Ω 500mW
ラ イ ン 出 力
150mV(47kΩ)
電
AC90V~AC120V、AC200V~AC240V
源
消 費 電 力
約 4.0W
動 作 温 度
範
囲
-10℃ ~ +50℃
停 電 補 償
時計部:24時間
プログラム:10年
構
造
外
形
寸
法
W270×H372×D58.5
取
付
方
法
壁掛型
外
装
仕
上
樹脂製 アイボリー
量
約2.0Kg(本体のみ)
質
安 全 規 格
ウェストミンスターの鐘(40 秒)
エーデルワイス(42 秒)
小さな恋のメロディ(43 秒)
チムチム・チェリー(40 秒)
ビビディ・バビディ・ブー(30 秒)
夕焼け小焼け(40 秒)
家路(45 秒)
別れの曲(45 秒)
美女と野獣(44 秒)
ア・ホール・ニュー・ワールド(41 秒)
単位:mm
電気用品安全法
39
I-5974-4
Clock unit
Timer
Timing accuracy of
built-in quartz oscillator
Mean monthly rate: ±3 sec.(+5~+35℃)
Indication
Analog
Digital
Time setting
: 2-hand type
: Year, month, date, day of the week, hour, minute
and seconds (24-hour format); LCD display
By keying data from the control panel.
Time correction
Correction by standard radio wave (Japan Only)
Number of programs
60 max.
Setting unit
In 1-minute increment
Setting system
By LCD screen-guided keying of data from the control panel
Contact signal output
2 independent channels (dry contact signal)
Current-carrying
capacity of contacts
AC125V / 5 A
AC250V / 3A
DC30V / 5A
Contact output duration
Adjustable in seconds (Max. duration: 24h00m00s)
Title of the music
10 Tunes
Melody No.01
No.02
No.03
No.04
No.05
No.06
No.07
No.08
No.09
No.10
Built-in speaker
8Ω / 500mW
Line output
150mV (47kΩ)
Power supply
AC90V~AC120V, AC200V~AC240V
Melody
Input
Power
consumption
Operating
temperature
range
Commercial
power failure
backup
Construction
Applied
safety law or
regulation
Westminster Chime(40 Sec.)
Edelweiss(42 Sec.)
Melody Fair(43 Sec.)
Chim Chim Cheree(40 Sec.)
Bibbidi-Babbidi-Boo(30 Sec.)
Yuyake Koyake(40 Sec.)
Going Home(45 Sec.)
Etude Op.10,No.3(45 Sec.)
Beauty and the Beast(44 Sec.)
A Whole New World(41 Sec.)
approx. 4.0W
-10℃ ~ +50℃
Clock
Programs
: 24 hours
: 10 years
Overall dimensions
W270×H372×D58.5 (mm)
Installation
Wall mounted type
External finish
Synthetic resin, ivory-colored
Mass
approx. 2.0 kg (main body)
Electrical Appliance and Material Safety Law (Japan Only)
40
I-5974-4
16.プログラム設定表/ Programming Table
プログラム No.
Program
No.
曜日
Day of the week
日 月 火 水 木 金 土
Sun Mon Tue Wed Thu Fri
1
2
3
4
5
6
7
8
9
10
11
12
13
14
15
16
17
18
19
20
21
22
23
24
25
26
27
28
29
30
31
32
33
34
35
36
37
38
39
40
41
42
43
44
45
46
47
48
49
50
51
52
53
54
55
56
57
58
59
60
開始時刻
Start time
時:分
(H) : (M)
Sat
メロディ
No.
Melody
No.
接点出力/Contact output
出力時間
Output duration
CH
1
:
:
:
:
:
:
:
:
:
:
:
:
:
:
:
:
:
:
:
:
:
:
:
:
:
:
:
:
:
:
:
:
:
:
:
:
:
:
:
:
:
:
:
:
:
:
:
:
:
:
:
:
:
:
:
:
:
:
:
:
2
時間 : 分 : 秒
(H) : (M) : (S)
:
:
:
:
:
:
:
:
:
:
:
:
:
:
:
:
:
:
:
:
:
:
:
:
:
:
:
:
:
:
:
:
:
:
:
:
:
:
:
:
:
:
:
:
:
:
:
:
:
:
:
:
:
:
:
:
:
:
:
:
41
備考
Remarks
:
:
:
:
:
:
:
:
:
:
:
:
:
:
:
:
:
:
:
:
:
:
:
:
:
:
:
:
:
:
:
:
:
:
:
:
:
:
:
:
:
:
:
:
:
:
:
:
:
:
:
:
:
:
:
:
:
:
:
:
I-5974-4
42
I-5974-4
43
I-5974-4
当製品に関するお問い合わせおよび修理依頼は、お買い上げいただいた販売店もし
くは下記へご連絡ください。
Any question, inquiry or request for repair you may have about the
Bell Timer should be placed with your SEIKO dealer or agent or
with the following:
東
京
03(5646)1601
札
幌 011(640)6280
東
北
022(261)1323
信
越
0263(27)8601
名古屋
052(723)8531
大
阪
06(6445)8804
広
082(245)2571
九
州
092(475)1291
島
URL http://www.seiko-sts.co.jp
44
I-5974-4