1
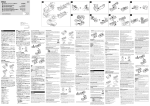
R
自動押え上げ装置(頭部内蔵タイプ)
Auto-lifter(Side-plate-mounting type)
AK141
取扱説明書 / パーツリスト
INSTRUCTION MANUAL / PARTS LIST
安全に使用していただくために使用前に、必ずこの取扱説明書をお読みください。
また、いつでもすぐに読めるように、この取扱説明書を保管してください。
注意
本取扱説明書は、AK141 についての説明書です。本製品を DDL-9000B に取り付けて使
用される際は、事前に DDL-9000B の取扱説明書の「安全についての注意事項」を読み、
十分理解の上でご使用ください。なお、AK141 を強調するため、DDL-9000B のイラス
トは簡略化されています。従って、安全装置のイラストも一部省略しております。
Read safety instructions carefully and understand them before using.
Retain this Instruction Manual for future reference.
CAUTION
This Instruction Manual is intended for the AK141. Read and fully understand the
instructions given under “IMPORTANT SAFETY INSTRUCTIONS” in the Instruction
Manual for the DDL-9000B before putting the machine into service when this device is
installed to the DDL-9000B .
In addition, to emphasize the AK141, some illustrations of the DDL-9000B are simplified.
Also, illustrations of the safety devices are partially omitted.
No.1529-00
iv
40089325
目
1.
2.
3.
4.
次
取り付け手順 ............................................................................................................................. 1
自動押え上げ機能選択方法 ...................................................................................................... 6
糸切り後の押え上げ上昇選択方法 ........................................................................................... 8
パーツリスト ............................................................................................................................. 9
CONTENTS
1. INSTALLATION ................................................................................................................. 1
2. HOW TO SELECT THE FUNCTION OF AUTO-LIFTER ................................................... 6
3. HOW TO SELECT THE FUNCTION OF LIFTING THE PRESSER FOOT
AFTER THREAD TRIMMING ............................................................................................ 8
4. PARTS LIST....................................................................................................................... 9
–1–
1. 取り付け手順 / INSTALLATION
注意
不意の起動による事故を防ぐため、電源を切ってから行ってください。
WARNING :
Turn OFF the power before starting the work so as to prevent accidents caused by abrupt start of the
sewing machine.
1) ミシンの窓板を取り外し、ひざ上げ横棒 1 の段
ねじ 2 を外します。
1)
2
Remove the side plate of the machine, and remove
hinge screw 2 in knee lifter side rod 1.
1
2) ひざ上げリンク 3 の段ねじ 4 を外し、付属の
ばね 6 をセットしたひざ上げリンク 5 と交換
し、段ねじ 7 で取り付けます。
3
この時、ミシンを倒してひざ上げ連結棒 8 が頭
部の穴 9 に入っていることを確認してください。
3) 交換したひざ上げリンク 5 に、ひざ上げ横棒ピ
4
ン !0 をねじ締めし、ひざ上げ横棒 1 をひざ上
げ横棒段ねじ 2 で取り付けます。
5
8
7
6
(注意)1. ひざ上げ横棒ピン !0 はゆるみ易いので、
しっかりと締め付けてください。
2. 各段ねじ部には、グリスを塗布してくだ
さい。
2)
2
1
Remove hinge screw 4 in knee lifter link 3, and
replace it with knee lifter link 5 set with attached
spring 6. Then install the knee lifter link with hinge
screw 7.
At this time, tilt the machine and make sure that
knee lifter connecting rod 8 enters the hole of
machine head 9.
!0
3)
lifter link 5. Then, install knee lifter side rod 1 on
knee lifter link with hinge screw 2.
9
8
Screw knee lifter side rod pin !0 in replaced knee
(Caution)
1. Securely tighten knee lifter side rod pin !0 since
it is easily loosened.
2. Apply grease to the hinge sections of respective
hinge screws.
–1–
4) ワイヤー押え !1 の止めねじ !2 を外します。
!3
ワイヤー押え台 !3 の止めねじ !4 を外します。
!1
!4
Remove setscrew !2 from wire clamp !1. Remove
setscrew !4 from wire clamp base !3.
4)
!2
!5
6
5) 付属のワイヤー押え台 (AK 用 )!5 と交換し、止
めねじ !6 2 本でアームねじ部 !7 に仮止めして
おきます。
!6
!9
※
この時ワイパーとタッチバックのコード !8 は図
のように配置してください。
ひざ上げリンクばね 6 をワイヤー押え台 (AK
用 )!5 の切り欠き部 !9 に掛けます。
5)
Replace the wire clamp base with wire clamp base
(for AK) !5 supplied with the unit. Temporarily
secure wire clamp base !5 on machine arm section
!7 with two setscrews !6.
!8
* At this time, locate cords !8 for the wiper and
one-touch type reverse feed device as shown
in the sketch.
Put knee lifter link spring 6 in notch !9 of wire
clamp base (for AK) !5.
!7
@4
6) ひざ上げ連結リンク @0 にひざ上げリンク板 @1
を段ねじ @2 で取り付けておきます。
@0
ひざ上げ横棒ピン !0 にひざ上げリンク板 @1 の
長穴をセットし、ひざ上げリンク支点軸 @3 で
アームねじ部 @4 に取り付けます。
@1
※
各段ねじ部及び、ひざ上げリンク板 @1 の長穴に
グリスを塗布してください。
6)
Install knee lifter link plate @1 on knee lifter
connecting link @0 with hinge screw @2.
@2
Fitting the slot in knee lifter link plate @1 over
knee lifter side rod pin !0 , install the knee lifter
connecting link on the arm by tightening knee lifter
link fulcrum shaft @3 in arm's threaded part @4.
@0
* Apply grease on each hinge screw and slot in
knee lifter link plate @1.
@3
!0
@1
–2–
@8
@7
@5
@9
#5
7) AK ソレノイド #7 からプランジャー @5 を外し、
パッキン @6、ゴム @7 と平座金 @8 と E リング
@9 を取り付けます。
#4
#3
ピン #0 を平座金 #1、ソレノイド連結リンク板
#2 に通し、平座金 #3、ばね座金 #4、ナット #5
2 個で取り付けます。
#2
#1
プランジャー @5 軸部にグリスを満遍なく塗布
し、AK ソレノイド #7 にセットします。
#0
@6
※
ピン #0 にグリスを塗布してください。パッキン
@6 の取り付け向きに注意してください。
7)
Remove plunger @5 from AK solenoid #7. Attach
packing @6, rubber @7, plain washer @8 and E ring
@9 to the AK solenoid. Put pin #0 through plain
washer #1 and solenoid connecting link plate #2,
and secure with plain washer #3, spring washer #4
and two nuts #5.
Apply grease evenly on the shaft of plunger @5.
Then mount the plunger on AK solenoid #7.
*
#6
8) AK ソレノイド取付板 #6 の長穴中心に AK ソレ
ノイド #7 を止めねじ #84 本で取り付けます。
#8
上記にセットした後、止めねじ #93 本と平座金
$03 個でアームに取り付けます。( 長穴中心 )
#7
#9
ナット #5 をアーム内部に向け、ソレノイド連結
リンク板 #2 をひざ上げ連結リンク @0 に段ねじ
@2 で取り付けます。
@0
#5
$0
Apply grease on pin #0. Carefully check the
orientation of packing @6 when installing it.
#2
※
段ねじ部にグリスを塗布してください。
8)
Install AK solenoid #7 on AK solenoid mounting
plate #6 with four setscrews #8.
@2
After the aforementioned setup, install them on
the arm with three setscrews #9 and three plain
washers $0. (At the center of the slot)
Install solenoid connecting link plate #2 on knee
lifter connecting link @0 with hinge screw @2 with
nut #5 faced inside the arm.
*
–3–
Apply grease on the hinge screw section.
@0
9) 押えを下げた状態で、ひざ上げ連結リンク @0 を
ワイヤー押え台 (AK 用 )!5 に当てた時に、
!5
ひざ上げ横棒ピン !0 とひざ上げリンク板 @1 に
1mm の隙間ができるよう、ワイヤー押え台 (AK
用 )!5 を位置調整する。
!1
糸緩めワイヤー $1 をワイヤー押え !1 で挟み、
止めねじ !2 にて取り付けます。
!2
!0
m
@1
$1
約4山
ately
Approxim
s
4 thread
1m
※
糸緩めワイヤー $1 が端面から約 4 山出た状態
で止めてください。
9)
Adjust the position of wire clamp base (for AK) !5
so that a clearance of 1 mm is provided between
knee lifter side rod !0 and knee lifter link plate
@1 when knee lifter connecting link @0 is pressed
against wire clamp base (for AK) !5 with the
presser foot lowered.
Place tension releasing wire $1 in wire clamp !1
and secure with setscrew !2.
*
Tighten the setscrew in the state where tension
releasing wire $1 projects from the end face by
approximately four threads.
10) AK 用窓板 $2 をミシンに取り付けます。
CP パネル取り付けには、付属の止めねじ $ 32
本を使用ください。
10) Install side plate for AK $2 on the sewing machine.
To install the CP panel, use two setscrews $3
$2
supplied with the unit.
$3
11) 付属の頭部支え棒 $4 に交換してください。
※
11)
$4
–4–
テーブルに最後までしっかり取り付けてください。
12) ミシンを倒して、糸切りソレノイド $5 を最大
に押し込んだ状態で、糸調子 ( 組 )$6 の皿浮き
量が 1 〜 1.5mm になるよう、糸緩めワイヤー
$1 を調整してください。
※ この調整が悪いと糸切り後の針糸残り長さが短
くなります。
$5
12) Tilt the sewing machine and adjust tension
releasing wire $1 so that floating amount of
the tension disk of tension controller (asm.)
$6 becomes 1 to 1.5 mm with thread trimming
solenoid $5 fully pressed until it will go no further.
$1
*
$6
If the floating amount of the tension disk is not
properly adjusted, the length of needle thread
remaining after thread trimming will be shorter.
1 〜 1.5mm
1 to 1.5 mm
13) AK ソレノイド #7 のコードをテーブルの穴に通
し、2P コネクタをコントロール基板上の
2P コネクタ $7 (CN37) に差し込みます。
SC-920 のセットアップ
Setup of SC-920
コネクタを挿入し終えたら、すべてのコードを
ボックス側面の束線バンドでまとめます。
13) Pass the cord for AK solenoid #7 through the hole
in the table to insert the 2P connector into 2P
connector $7 (CN37) on the control PCB.
After the insertion of the connector, bundle all
cords with a cable clip placed on the side face of
the control box.
$7
–5–
2. 自動押え上げ機能選択方法
HOW TO SELECT THE FUNCTION OF AUTO-LIFTER
自動押え上げ装置 (AK) を取り付けたとき、自動押
え上げ機能を働かせます。
1) コントロールボックス内のスイッチ 1 を押しな
がら電源スイッチを ON します。
CP-180 の場合
In case of CP-180
3
2
2) " ピ " と音とともに LED が表示 2、3(FL ON S)
になり自動押え上げ機能が有効となります。こ
の状態にて、スイッチ 1 を押すたびに FL ON
S ⇔ FL ON A に切り替わります。
表示が FL ON A の場合は、必ず FL ON S に
切り替えてください。
3) 電源スイッチを OFF し、再度電源スイッチを
ON にしてください。
通常動作にもどります。
1
4) 1)〜 3)の操作を再度くり返すと LED 表示が
(FL OFF) となり、自動押え上げ機能が働かな
くなります。
FL ON S : 自動押え上げ装置が有効となります。
FL ON A : エアー式自動押え上げ使用時に、自動押え上げ装置が有効になります。
FL OFF : 自動押え上げ機能は、働きません。( 標準出荷状態 )
(プログラム縫い完了時も同様に押え上げは自動上昇しません。)
(注意)1. 電源の入れ直しは、必ず 1 秒以上経過してから行なってください。
(電源の ON / OFF 動作が早いと設定がうまく切り換わらない場合があります。)
2. 本機能を正しく選択しないと自動押え上げは動作しません。
3. 自動押え上げ装置を取り付けずに "FL ON S" を選択すると縫い始めに一瞬起動が遅れます。
又、タッチバックスイッチが動作しなくなることがありますので、自動押え上げ装置を取り付
けてない時は、必ず "FL OFF" を選択してください。
When installing the auto-lifter device (AK), the function of auto-lifter is actuated.
1) Pressing switch 1 in the control box, turn ON the power switch.
2) LED displays 2 and 3 are turned to (FL ON S) with "beep", and the function of auto-lifter becomes effective.
In this state, every time switch 1 is pressed, the display is changed over between FL ON S and FL ON A.
When the display is FL ON A, be sure to change it over to FL ON S.
3) Turn OFF the power switch, and re-turn ON the power switch.
The machine returns to the normal operation.
4) When repeating the operations of 1) through 3), the LED displays become "FL OFF", and the function of autolifter is not actuated.
FL ON S : Auto-lifter device becomes effective.
FL ON A : At the time of using the pneumatic type auto-lifter, the auto-lifter device becomes effective.
FL OFF : The function of auto-lifter is not actuated. (Standard delivery state)
(Similarly, the presser foot is not automatically lifted when programmed stitching is completed.)
(Caution) 1. To perform re-turning ON of the power, be sure to perform after the time of one second or
more has passed.
(If ON/OFF operation of the power is performed quickly, setting may be not changed over well.)
2. Auto-lifter is not actuated unless this function is properly selected.
3. When "FL ON S" is selected without installing the auto-lifter device, starting is momentarily
delayed at the start of sewing. (In addition, be sure to select "FL OFF" when the auto-lifter is
not installed since the touch-back switch may not work.)
–6–
自動押え上げ装置 (AK) を取り付けたとき、自動押
え上げ機能を働かせます。
1) コントロールボックス内のスイッチ 4 を押しな
がら電源スイッチを ON します。
CP-18 の場合
In case of CP-18
5
6
2) " ピ " と音とともに LED が表示 5,6(FL ON S)
になり自動押え上げ機能が有効となります。こ
の状態にて、スイッチ 4 を押すたびに FL ON
S ⇔ FL ON A に切り替わります。
表示が FL ON A の場合は、必ず FL ON S に
切り替えてください。
3) 電源スイッチを OFF し、再度電源スイッチを
ON にしてください。
4
通常動作にもどります。
4) 1)〜 3)の操作を再度くり返すと LED 表示が
"FL OFF" となり、自動押え上げ機能が働かな
くなります。
FL ON S : 自動押え上げ装置が有効となります。
FL ON A : エアー式自動押え上げ使用時に、自動押え上げ装置が有効になります。
FL OFF : 自動押え上げ機能は、働きません。( 標準出荷状態 )
(プログラム縫い完了時も同様に押え上げは自動上昇しません。)
(注意)1. 電源の入れ直しは、必ず 1 秒以上経過してから行なってください。
(電源の ON / OFF 動作が早いと設定がうまく切り換わらない場合があります。)
2. 本機能を正しく選択しないと自動押え上げは動作しません。
3. 自動押え上げ装置を取り付けずに "FL ON S" を選択すると縫い始めに一瞬起動が遅れます。
又、タッチバックスイッチが動作しなくなることがありますので、自動押え上げ装置を取り付
けてない時は、必ず "FL OFF" を選択してください。
When installing the auto-lifter device (AK), the function of auto-lifter is actuated.
1) Pressing switch 4 in the control box, turn ON the power switch.
2) LED displays 5 and 6 are turned to (FL ON S) with "beep", and the function of auto-lifter becomes effective.
In this state, every time switch 4 is pressed, the display is changed over between FL ON S and FL ON A.
When the display is FL ON A, be sure to change it over to FL ON S.
3) Turn OFF the power switch, and re-turn ON the power switch.
The machine returns to the normal operation.
4) When repeating the operations of 1) through 3), the LED displays become "FL OFF", and the function of autolifter is not actuated.
FL ON S : Auto-lifter device becomes effective.
FL ON A : At the time of using the pneumatic type auto-lifter, the auto-lifter device becomes effective.
FL OFF : The function of auto-lifter is not actuated. (Standard delivery state)
(Similarly, the presser foot is not automatically lifted when programmed stitching is completed.)
(Caution) 1. To perform re-turning ON of the power, be sure to perform after the time of one second or
more has passed.
(If ON/OFF operation of the power is performed quickly, setting may be not changed over well.)
2. Auto-lifter is not actuated unless this function is properly selected.
3. When "FL ON S" is selected without installing the auto-lifter device, starting is momentarily
delayed at the start of sewing. In addition, be sure to select "FL OFF" when the auto-lifter is
not installed since the touch-back switch may not work.
–7–
3. 糸切り後の押え上げ上昇選択方法
HOW TO SELECT THE FUNCTION OF LIFTING THE PRESSER FOOT AFTER
THREAD TRIMMING
1) 機能設定 No.55 にて選択することができます。
CP-180 の場合
In case of CP-180
1 : 糸切り後に押え上げが上昇します。
(標準出荷設定)
(IP パネルにて、プログラム縫いを選択時
は、操作パネルの設定に従います。)
0 : 糸切り後の押え上げ自動上昇は行ないません。
(プログラム縫い完了時も同じように押え
上げは自動上昇しません。)
(注意)機能設定方法についての詳細については、電
装ボックスの取扱説明書を参照してください。
2
3
1
1)
CP-18 の場合
In case of CP-18
The function can be selected using function setting
No. 55.
1 : The presser foot is lifted after thread trimming.
(Standard setting at the time of delivery)
(When the programmed stitching is selected
with the IP panel, follow the setting of the
operation panel.)
0 : Lifting the presser foot automatically after
thread trimming is not performed.
(Similarly, the presser foot is not automatically
lifted when programmed stitching is completed.)
(Caution) Refer to the Instruction Manual for the
control box for details of function setting
method.
5
6
4
–8–
5. パーツリスト /PARTS LIST
1
25
23
31
26
22
20
18
17
19
21
24
16
5
12
11
4
10
29
20
3
6
2
9
#
13
27
28
8
7
28
#
30
14
15
–9–
REF.NO
1
2
3
4
5
6
7
8
9
10
11
12
13
14
15
16
17
18
19
20
21
22
23
24
25
26
27
28
29
30
31
NOTE PART NO
400-89370
400-86663
D2468-555-B00
WP-1703001-SC
RE-1200000-K0
WP-0612516-SD
400-86662
SM-4050855-SP
400-86759
WP-0550800-SP
WS-0610002-KN
NM-6050001-SP
B1652-210-D00
WP-0651056-SD
SM-4061255-SP
400-86665
400-86666
400-86668
400-86664
SD-0800327-TP
400-86667
400-82079
GAK-A1842000
GAK-330400A0
400-86644
SM-6051002-TP
400-89270
SM-4051455-SP
HX-0004300-00
400-24081
WP-0550800-SP
DESCRIPTION
品
AK141 COMPONENTS
AK_SOLENOID
RUBBER PLUNGER
WASHER 17X30X3
E-RING 12
WASHER 6.1X15.2X2.5
AK_SOLENOID_BASE
SCREW
BACK_SOLENOID_PLUNGER_PIN
WASHER 5.5X10X0.8
SPRING WASHER 6.1X12.2X1.5
NUT M5
GASKET
WASHER 6.5X11X1
SCREW M6 L=12
SOLENOID_CONNECTING_LINK_PLATE
KNEE_LIFTER_LINK_PLATE
KNEE_LIFTER_CONNECTING_LINK
SHOULDER_SCREW
SHOULDER SCREW
KNEE LIFTER LINK_AK
SHOULDER SCREW D=8 H=21.2
KNEE LIFTER LINK SPRING
SHAFT PIN ASM.
WIRE_HOLDER_AK
SCREW M5X0.8 L=10
SIDE_PLATE_AK
SCREW M5 L=14
CLIP
HEAD SUPPORT ROD
WASHER 5.5X10X0.8
AK 装置関係
AK ソレノイド
プランジャー ゴム
平座金 17 X 30 X 3
E 形止め輪 12
平座金 6.1 X 15.2 X 2.5
AK ソレノイド取付台
なべねじ M 5 L =8
逆送りソレノイドプランジャジャー ピン
平座金 5.5 X 10 X 0.8
ばね座金 M 6
六角ナット M 5 X 0.8 1種
パッキン
平座金 6.5 X 11 X 1
なべねじ M 6 L =12
ソレノイド連結リンク板
膝上げリンク板
膝上げ連結リンク
連結リンク支点軸段ねじ
段ねじ D =8 H =3.2
膝上げリンク AK 用
段ねじ D =8 H =21.2
膝上げリンクばね
膝上げ用棒ピン組
ワイヤー押え(AK 用)
六角穴ボルト M 5 X 0.8 L =10
AK 用窓板
なべ小ねじ M 5 L =14
結束バンド
頭部支え棒
平座金 5.5 X 10 X 0.8
– 10 –
名
Qty
1
(1)
(1)
(1)
(1)
(1)
(1)
(4)
(1)
(1)
(1)
(2)
(1)
(3)
(3)
(1)
(1)
(1)
(1)
(2)
(1)
(1)
(1)
(1)
(1)
(2)
(1)
(2)
(1)
(1)
(2)
– 11 –
工業用ミシン事業部
〒 182-8655 東京都調布市国領町 8-2-1
TEL. 03-3480-2357 • 2358(ダイヤルイン)
FAX. 03-3430-4909
http://www.juki.co.jp
INDUSTRIAL SEWING MACHINE DIVISION
8-2-1, KOKURYO-CHO, CHOFU-SHI,
TOKYO, 182-8655, JAPAN
PHONE : (81)3-3480-2357 • 2358
FAX : (81)3-3430-4909
http://www.juki.com
Copyright C 2009 JUKI CORPORATION
• 本書の内容を無断で転載、複写することを
禁止します。
• All rights reserved throughout the world.
この製品の使い方について不明な点がありましたらお求めの販売店又は当社営業所にお問い合わせください。
※この取扱説明書 / パーツリストは仕様改良のため予告なく変更する事があります。
Please do not hesitate to contact our distributors or agents in your area for further information when necessary.
* The description covered in this Instruction Manual, PartsList is subject to change for improvement
of the commodity without notice.
v
09 · 09 Printed in China