1
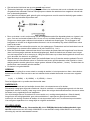
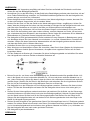
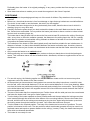
11 Preferably place the heater in its original packaging. In any case, provide dust-free storage in a cool and dark room. Save these instructions to enable you to consult them against in the future if required. POSITIONING Carefully remove the packaging and keep out of the reach of children. Pay attention to the mounting material! Before use, check that the device is free from damage or signs that may indicate an error/defect/failure. If in doubt, do not install or use the heater, but return it to the supplier! This heater has been designed to be hung horizontally from a wall; therefore do not use it whilst it is standing, lying or in any other way! Carefully choose the place where you wish to attach the heater to the wall. Make sure that the base is firm, flat and non-combustible. Do not position the heater just below or above a socket or close to heat sources such as cooking rings, etc. The heater has to hang at least 180 cm above the floor and at least 50 cm below the ceiling. Should you wish, at any time, to direct the radiation upwards, the distance to the ceiling has to be 100 cm, certainly when there is a plastic or combustible ceiling. Maintain a distance of at least 50 cm from side walls. Do not position the heater behind a door! The insulation of the heater is IP24 rated (splash proof) and therefore suitable for use in bathrooms. A distance of at least 1 m has to be maintained between the heater and baths, taps, fountains, showers etc. Make sure that no jets of water can be directed at the heater and that the heater cannot fall into the water. Only connect the heater to an earthed socket! When positioning and connecting the heater, make sure that your hands do not touch the heating elements. This is because traces can be left behind which, afterwards, will have a negative effect on the radiated heat. For use with a plug, the following applies: do not use extension leads and do not connect any other equipment next to the heater in the same socket! At the spot that you have selected, having taken into account the safety instructions, now drill 4 holes into the wall, with a horizontal distance of 119 mm and a vertical distance of 41 mm (see drawing). Make sure that the holes are positioned perfectly horizontally and vertically from one another. Tap the plugs into the drilled holes and screw in the supplied screws until a few millimetres remain between the head of the screw and the wall. The rear of the heater has four suspension eyes. Position these with the wide part over the screw heads and lower the heater until it can go no further (approx.1 cm). Turn the body of the heater upwards as far as possible and mark the spot where the locking screw has to be inserted (through the small hole at the bottom of the mounting bracket). Remove the heater from the wall, drill the hole for the locking screw and tap a plug into this. Again hang the heater up and turn the locking screw through the bracket in the wall. Your heater has now been secured. Turn the heater to the required position. The body of the heater can be turned to 5 positions. The mid position is horizontal to the room. The two positions which are directed upwards will only be used in exceptional cases and require a greater distance to the ceiling (1 metre). Finally, the heater has two positions which are directed downwards. The heater is now ready for use.