1
CS-470 DVD
Instruction Manual
5 IN 1 CAR AUDIO SYSTEM
WITH DISC/USB/CARD/BT/RADIO
AND TOUCH SCREEN
Remark: Any information subject to change without further notice
www.lenco.eu
PRECAUTION
CAUTION
RISK OF ELECTRIC SHOCK
DO NOT OPEN
WARNING: TO REDUCE THE
RISK OF FIRE OR ELECTRIC
SHOCK, DO NOT EXPOSE
THIS APPLIANCE TO RAIN OR
MOISTURE.
!
CAUTION: TO REDUCE THE RISK OF ELECTRIC SHOCK, DO NOT REMOVE
COVER (OR BACK). NO USER SERVICEABLE PARTS INSIDE. REFER
SERVICING TO QUALIFIED SERVICE PERSONNEL.
The lightening flash with arrowhead symbol, within an equilateral triangle, is
intended the alert the user to the presence of uninsulated dangerous voltage
within the products enclosure that may be of sufficient magnitude to constitute
a risk of electric shock to persons.
The exclamation point within an equilateral triangle is intended to alert user to
the presence of important operating and maintenance (servicing) instructions
in the literature accompanying the appliance.
!
CLASS 1 LASER PRODUCT
Laser product symbol: located on the rear panel of the unit, indicates this player is a class 1 laser product. It
uses a weak laser that does not emit hazardous radiation outside of the unit.
1.Read through this instruction manual before installation and use.
2.Do not touch the power plug with wet hand.
3.Switch off the main power when the unit is not in use. (Disconnect the power plug from the power outlet when
you do not intend to use the unit for a prolonged period of time.)
Before moving the unit, remove the disc from the unit/ tray first.
4.Do not open the cover or touch any of the components exposed out of the unit, only for qualified technicians.
5.Do not expose the unit under direct sunlight or nearby objects that radiate heat to avoid damage to the unit.
6.Do not place the unit in moist and humid conditions, which effect the pick-up of the unit.
7.Place the unit on a flat surface and ventilative condition. Please ensure the ventilation holes are not covered
to avoid overheating and malfunction.
8.Clear the panel and case with soft dry cloth only, do not apply any kind of thinner, alcohol or sprays.
9.The apparatus shall not be exposed to dripping or splashing and no objects filled with liquids, such as vases,
shall be placed on the apparatus
10.unplug the apparatus when not using for a long time oriented to disconnect from the Mains power
1
Contents
1. Before Operation.........................................................................................................3
1.1 Glossary........................................................................................................ 3
1.2 Precautions....................................................................................................3
1.3 Maintenance and Cleaning of Discs..............................................................4
1.4 Battery Information of the Remote Control....................................................4
1.5 The Remote Control Description...................................................................5
1.6 The Locations and Names of Controls on or in the Unit................................6
1.7 Wires Connection Description.......................................................................7
1.8 Unit Installation..............................................................................................8
2. Common Operation.....................................................................................................9
.
3. Radio Operation..........................................................................................................10
4. Disc, USB and MMC/SD Card Operation...................................................................11
4.1 Load/unload Disc, USB or Card......................................................................11
4.2 Pause Playback..............................................................................................12
4.3 Stop Playback ................................................................................................13
4.4 Select Chapter/Track with the UP/DN or the >>|/|<< Buttons.........................13
4.5 Select Chapter/Track with the Number Buttons..............................................13
4.6 Select Chapter/Track with the Root/PBC Menu..............................................13
4.7 Playback with Speed.......................................................................................14
4.8 Playback with Slow Speed..............................................................................14
4.9 Display Still Frame Step by Step....................................................................14
4.10 Playback Repeatedly....................................................................................14
4.10.1 One/All Repeat..........................................................................................14
4.10.2 A-B Repeat................................................................................................14
4.11 Playback in Scan Mode................................................................................15
4.12 Playback from a specified Chapter/Track or a Specified Time.....................15
4.13 Playback in Random.....................................................................................15
4.14 Playback in Different View-Angle.................................................................15
4.15 Playback in Zoom Mode...............................................................................15
4.16 Change the Caption Language.....................................................................16
4.17 Change the Audio Language........................................................................16
4.18 Look over the Playback Status.....................................................................16
4.19 Program Playback........................................................................................16
4.20 Playback IMAGE files..................................................................................17
4.21 Playback MP4 files......................................................................................17
4.22 ESP and Id3 Function..................................................................................17
4.23 The DVD System Menu Setup Operation....................................................18
*
The Parental Control..............................................................................21
*
The Region Code...................................................................................22
5. Blue Tooth Hand free System...................................................................................23
.
6. The Trouble Shooting...............................................................................................25
7. Specification.............................................................................................................26
2
1. Before Operation
1.1 Glossary
PBC (playback control)
It is a kind of signal(menu) recorded in the disc with SVCD or VCD2.0 format used for the playback control. For
the discs containing PBC, it can playback interactive software with the menu displayed on TV. And if the
disc contain still images, it can playback high definition of still image.
Title
Generally, the title is the important part of DVD disc. for example, the theme part of movie is title 1, the part
described how to make movie is title 2, the cast is title 3, etc. Every title contain a serial number that is easy to
lookup.
Chapter
A title can be divided into several blocks, so that every block can be operated as a unit, the unit is called
chapter. The chapter contain a unit at least.
Track
It is the biggest component of VCD. Generally, every song of karaoke disc is a track.
1.2 Precautions
Safety
1. Power Source: The unit should be connected to power supply only of the type described in the operating
instructions or as marked on the unit.
2. The unit is designed for negative terminal of the battery which is connected to the vehicle metal.
Please confirm it before installation.
3. Do not allow the speaker wires to be shorted together when the unit is switched on. Otherwise it may
overload or burn out the power amplifier.
4. Do not install the detachable panel before connecting the wire.
5. The protective case is to safely keep the front panel(see the photo).
Environment
1. Do not use this unit when water and moisture is near it.
2. If moisture forms inside the Lens, it may not operate properly. To correct this problem, wait about one
hour for the moisture to evaporate.
3. If the car interior is extremely hot, do not use the player until the car has been driven for a while to cool
off the interior.
3
1.3 Maintenance and Cleaning of Discs
Disc Maintenance
1. To keep the disc clean, handle the disc by its edge, do not touch the disc surface of the play side.
2. Do not stick paper or tape on the disc. If there is glue (or analog) on the disc surface, must wipe it up before
using.
3. Do not expose the disc to direct sunlight, or nearby heat sources such as caliduct, or leave it in a car parked
in direct sunlight where there can be a considerable rise in temperature.
4. Put the disc inside disc case to keep temperature after finishing playback.
Disc Cleaning
1. Before playing, wipe the disc with a clean lint. wipe the disc outwards from the disc center.
2. Do not use petrel, thinner. commercially cleaner or anti-static spray can damage the unit.
+ side up
B
A
Fig.1
Fig.2
Fig.3
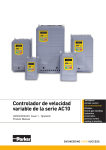
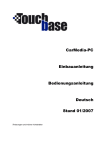
1.4 Battery Information of the Remote Control
Replace Battery in the Remote Control:
1.Before using the remote control for the first time, pull the insulating sheet out of the remote control as the
direction indicated by the arrow.(see fig.1)
2.Press the movable block hold as the direction indicated by the A arrow (See fig.2), then pull the battery
holder out of the remote control as the direction indicated by the B arrow(see fig.2).
3.Replace the old battery by a new battery with (+) polarity side upward. (See fig.3).
4.Insert the battery holder to the original position in remote control. (See fig.3).
Note about the Battery of the Remote Control:
1.Improper use of battery may cause overheating or explosion. so that Result in injury or fire .
2.Battery leakage may cause damage to the remote control(Battery Life: 6 months with normal use in normal
room temperature).
3.Do not short the battery.
4.Do not throw the battery into the fire.
5.To avoid the risk of accident, keep the battery out of reach of children.
4
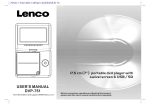
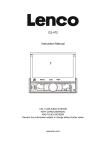
1.5The Remote Control Description
3
27
PWR
OPEN
14
29
32
9
34
35
EQ
1
4
BAND
M ENU
M OD E
0K
SE L
+
SE T UP
CL EAR
31
40
33
2. MENU BUTTON
6
3. POWER BUTTON
8
13
30
1. ANG BUTTON
2
MU
5
4. ^ BUTTON
7
5. >>| BUTTON
10
3
4
6
7
8
CLK
9/AF
0/10
TA
10+
/PTY
SLOW_FWD
ST
1
2
-10
+10
5
6. > BUTTON
11
7. |<< BUTTON
12
41
24
28
21
22
LOC
ZOOM
26
25
INT
RPT
AP S
RDM
17
SUBT ITLE
PAIR
REDI AL
19
TEL
39
A-B
10. PLAY/PAUSE BUTTON
18
TITLE/PBC
23
36
9. SEL BUTTON
15
S EA RC H
#
AUDIO
8. v BUTTON
16
11. NUMBER(0~10,+10
-10) BUTTONS
20
PROG
OSD
LOUD
37
12. 10+/PTY BUTTON
13. SETUP BUTTON
38
14. MODE BUTTON
15. APS/Hang Up BUTTON
16. SEARCH BUTTON
29. MUTE BUTTON
17. RDM BUTTON
30. STOP BUTTON
18. RPT BUTTON
31. VOLUME- BUTTON
19. SUBTITLE/REDIAL BUTTON
32. < BUTTON
20. TITLE/PBC/PAIR BUTTON
33. OK BUTTON
21. VIEW-ANGLE/ST/# BUTTON
34. VOLUME+ BUTTON
22. ZOOM BUTTON
35. BAND BUTTON
23. AUDIO BUTTON
36. PROG BUTTON
24. CLK BUTTON
37. OSD BUTTON
25. A-B BUTTON
38. LOUD BUTTON
26. INT BUTTON
39. TEL BUTTON
27. EQ/OPEN BUTTON
40. TA BUTTON
28. LOC/SLOW-FWD/* BUTTON
41. AF BUTTON
5
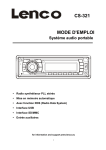
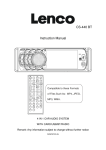
1.6
The Locations and Names of Controls on or in the unit
1
12
9
5
16
3
18
17 14
8
2
AP S
AV IN
REL
11 13 10
4 19
6
The Front Panel
SD/MMC
7
15
The Front Facet after removing the front panel
11. |<< button
12. BAND/TEL button
13. APS/HANG UP button
14. EJECT button
15. RESET button
16. Small LCD Screen
17. IR Remote Sensor
18. Microphone
19. REL button
1. OPEN button
2. POWER/MUTE button
3. Monitor
4. AV IN socket
5. Disc Slot
6. USB Jack
7. SD/MMC Card Slot
8. MODE button
9. VOL knob
10. >>| button
6
1.7 Wires Connection Description
The Description of the Wires Connection
Note: Use the clip end of a Ground Line provided by manufacturer to connect the Fixing Screw Bolt, use another end of the
Ground Line to connect the negative pole of the power source. Otherwise, the video on screen maybe flashes.
The Description of the Wires Connection of the Wiring Connecting Socket 1
NOTES:
1. Only speakers with 4 ohms impedance may be used.
2. Ensure that the blue auto antenna cable does not make contact with any ground connection.
Description of the Wires Connection of Wiring Connecting Socket 2
Description of Connecting the Parking Brake Line to the Parking Brake System Built in the Car
NOTE: after connecting the Parking Line, the video on the small monitor of the front panel will be display only after applying
the e-brake.
7
1.8 UNIT INSTALLATION
INSTALLATION INSTRUCTIO NS
THE UNIT IS INSTALLED TO BE AN ANTI-THEFT ONE. THE CHASSIS
OF THE UNIT WEARS A SLIDING METAL HOUSING. PLEASE DO THE
CONNECTION OF THE POWER, SPEAKERS AND ANTENNA ACCORDING
TO THE REQUIREMENT OF THE INSTRUCTION BOOK , THEN INSTALL
THE SLIDING METAL HOUSING IN THE CAR AS FOLLOWS.
METAL STRAP
TO BOOST UP THE CAPABILITY OF
ANTI-JAMMING, PLEASE FIX THE
METAL STRAP ON THE METAL
CONNECTED TO THE BOTTOM
BRACKET OF THE CAR.
SELECT THE PROPER TAB
FOR FIXING THE SLIDING
METAL HOUSING.
UNIT CHASSIS
PLASTIC TRIM OUT
DASH BOARD
FRONT PANEL
SLIDING METAL HOUSING
TO DRAW THE CHASSIS OUT OF
THE SLIDING METAL HOUSING,
INSERT THE LEFT AND RIGHT KEY
PLATES INTO THE RIGHT POSITION
OF THE 2 SIDES OF CHASSIS.
8
2. Common Operation
1. To turn on/off the unit
In power off mode, short press the POWER button to turn on the unit.
In power on mode, long press the POWER button on the front panel or short press the POWER button on
the remote control to turn off the unit.
2. To slide the monitor of the Car Audio System out of/into the chassis
Pressing the OPEN button can slide the monitor of the Car Audio System out of the chassis or slide it into
the chassis.
3. To select an optimal angle of the monitor of the Car Audio System
To select an up-down optimal angle of the monitor of the Car Audio System, press the DOWN/UP button
on the monitor or ANG button on the remote control repeatedly.
4. To select function mode
Press the MODE button to select RADIO, DISC (After inserting
a disc), USB(After inserting a USB storage), CARD(After inserting
a card), AUX or BLUETOOTH mode.
icon after popping up
During playback, tapping the
Keyboard interface can pop up Mode Menu as right.
Then tap one icon in it to select your desired mode.
5. To adjust sound level
Rotate the VOL knob on the front panel or press or hold
the + or - button on the remote control to directly adjust the volume level.
Mode Menu
6. To mute sound
Press the MUTE button on the remote control to turn on/off MUTE mode.
Pressing the POWER button on the front panel shortly also can turn on/off MUTE mode.
7. To display clock time
Press the CLK button to display clock time on the small monitor of the front panel.
After sliding the monitor into the chassis, pressing the CLK button can display time on the small LCD.
8. To select a desired EQ mode
Press the EQ button on the remote control to select one of the preset music equalizer curves: POP, ROCK,
CLAS, OFF. The sound effect will be changed.
9. To turn on/off LOUD mode
Press the LOUD button to turn on/off LOUD mode.
When turning on LOUD mode, it will enhance bass level immediately when bass is not enough.
10. To remove the front panel and reset the player
When the monitor or the small LCD display wrongly or some buttons are not available or sound is distorted,
press the REL button on the front panel to detach the front panel and then pull it rightward and then
leftward to remove it, then press the RESET button to rehabilitate the distorted program to zero.
11.To do setup
To do setup, tap the
icon in the Main Menu to turn to SETUP
interface as right.
In the interface, select one of GENERAL, TIME, AUDIO,
VIDEO ,RADIO , CALIBRATE by tapping them, then set
them by tapping some icons on the right side accordingly.
9
3.
Radio Operation
1. Enter RADIO mode
When you use MODE button or Mode Menu to enter RADIO
mode, it will display RADIO interface as right.
In RADIO interface, tapping the
icon can enter Mode
Menu; tapping the
icon can turn to frequency interface
as right; the other icons are same as ones in the unit panel
or in the Remote Control.
In menu set interface, you can adjust MUTE, APS, EQ,
TA, AF, PTY as right.
2. BAND BUTTON
In RADIO mode, press the BAND button on the remote control
to select your desired radio band of FM1, FM2, FM3, AM1
and AM2, and the word means which band is selected
will be displayed on the small monitor of the front panel.
3. TUNE/SEEK UP/DOWN BUTTONS
In RADIO mode:
1) Press and hold the >>|/|<< button to automatically search up/down for an available station from
current frequency.
2) Briefly press the >>| / |<< button to manually search up or down with step by step for your desired
station from the current frequency.
4. APS BUTTON
In RADIO mode:
1)When pressing and holding the APS button,the radio searches from the lowest frequency and checks the
signal strength level until 1 cycle search is finished. And then the 6 strongest stations are preset to the
corresponding preset number memory bank. The AS operation is implemented in the each bank of the
selected band. When the AS operation is finished, it will scan each preset station for 5 seconds in FM or AM
band from M1 as briefly pressing APS button. After finishing a circle of scanning , it will resume
broadcasting on the M1.
(It can store 3x6 stations for FM and 2x6 stations for AM in all)
2) When briefly pressing the APS button, the radio will scan each preset station for 5 seconds in FM or AM
band from M1. After finishing a circle of scanning, it will resume broadcasting on the M1.
NOTE: In FM band, FM1,FM2,FM3 is checked one at a time; In AM band, AM1, AM2 is checked one
at a time.
5. PRESET STATION [ 1-6 ] BUTTONS
In RADIO mode:
1) To memorize the current frequency on the current band, press and hold any one of the six preset buttons
(1-6) on remote control or rotate number knob and long press it .
2) To recall the preset memory on the current band, press one of the preset buttons [1-6] on remote control or
rotate number knob and press it .
6. STEREO/MONO BUTTON
Press the ST button on the remote control to select the STEREO or MONO sound mode for FM band.
7. LOC BUTTON
1) In RADIO mode, when the signals of the distant radio stations are very weak and the receiving effect is bad
during tuning, check whether there is the word LOC on LCD. If there is the word LOC on LCD, press this
button to turn off the LOC function, then tune again for the distance radio station;
2) In RADIO mode, when the signals of the local radio stations are too strong this causes interference to the
receiving effect during tuning, press this button to turn on the LOC function to display the word LOC on
LCD, then tune again for the local radio station.
8. PTY (PROGRAM TYPE) BUTTON
Press the PTY button briefly to select one of the following modes:
PTY MUSIC group- - PTY SPEECH group -- OFF
10
When PTY group is on, press the VOL+ or VOL- button on the remote control or rotate the VOL knob on
the front panel to select one of PTY programs as follows:
<-->NEWS<-->AFFAIRS<-->INFO<-->SPORT<-->EDUCATE<-->DRAMA
<-->CULTURE<-->SCIENCE<--> VARIED<-->WEATHER<--> FINANCE
<-->CHILDREN<-->SOCIAL<-->RELIGION<-->PHONE IN<-->TRAVEL
<-->LEISURE<-->DOCUMENT< -->PTY NONE<-->POP M< -->ROCK M
<-->EASY M<-->LIGHT M<--> CLASSICS<-->OTHER M<-->JAZZ
<-->COUNTRY<-->NATION M<-->OLDIES<-->FOLK M<-->
When PTY group is on, pressing the 6 number buttons also can select one of PTY programs as above.
After selecting one of the PTY programs, it will display SEEK PTY and automatically search for the station
of the PTY program. If the station of the PTY program does not exist, it will display PTY NONE and then
return back to the normal station.
9. AF [ALTERNATIVE FREQUENCIES] BUTTON
When pressing the AF button briefly,the AF switching mode is selected and the AF switching mode is
displayed by AF segment in display.
Segment off: AF switching mode off.
Segment on: AF switching mode on, and has RDS information.
Segment flashing: AF switching mode on, but RDS information is not received yet.
When the AF switching mode is selected, the radio checks the signal strength of the AF all the time.
The interval of checking time of each AFs depends on the signal strength of the current station, from a few
minute for the strong station to a few seconds for the weak station.
Every time that a new AF is stronger than the current station, it switches over to that frequency for very
short time, and the NEW FREQUENCY is displayed for 1-2 seconds.
Because the mute time of the AF switching or the checking time is very short, it is almost inaudible in case
of normal program. (When AF flash on LCD, it will search for the stronger RDS station. If AF and TP flash
on LCD, it can only search for the traffic announcement station).
In FM mode, when AF is on, SEEK, (SCAN), AUTO-MEMORY function can only receive and save the
RDS program.
10. TA [TRAFFIC ANNOUNCEMENT] BUTTON
Press the TA button shortly to turn on TA search mode.
When traffic announcement is transmitted:
1).If the unit is in Disc Play mode, it will switch to radio mode temporarily.
2).Temporarily switch over to an EON linked station when EON detects a traffic announcement on that
other program, and TA, TP will be displayed on LCD
* TA interruption function:
The current traffic announcement is cancelled by pressing TA button shortly.
* When TA is on, SEEK, (SCAN), AUTO MEMORY function can be received or saved only when
traffic program identification code has been received.
4. Disc and USB Operation
4.1 Load/unload disc or USB
To play files in a disc or card, press the EJECT button to slide down the monitor .
Then insert the disc or card into the disc slot or SD/MMC Card slot.
To unload the disc or card, press the STOP button twice to stop playback, then press the EJECT button
to slide down the monitor and eject disc in the disc slot and then remove the disc; or push the card firstly
and pull it out of the card slot.
To play files in an USB, insert the USB into the USB jack connecting to the Rear cabinet.
To unload the USB, press the STOP button twice and then remove the USB .
11
In USB or CARD mode, select your desired as right.
Remark: the
icon is for audio files; the
icon is
for video files; the
icon is for image files.
Tap the
icon to turn to main menu, tap the
icon
to turn to previous setting.
: Tap it can pause playback
US B/CARD INTERFACE
: Tap it can stop playback .
:Tapping one of them can switch on between
the speed levels of fast backward or forward.
(Except image mode.)
: Tapping one of them can select next or
previous chapter/track.
Root interface for MUSIC
: Tap it to turn volume up and down.
: Tap it to turn the selecting page up and down.
: Tap it to select INT play mode(Except image mode.)
: During VCD playback, tap it can select the audio
ST/MONO .
: Same as the MENU button on the remote control.
Keyboard interface-1
: Same as the TITLE button on the remote control.
: Same as the REPEAT button on the remote control.
: Same as the SUBTITLE button on the remote control.
: Tap it to select the track from 1-9 and then select
OK to play your selecting.
Keyboard interface-2
: During playback, press the ZOOM button and then
tap one of them are same as the direction
buttons on the Remote Control.
(Except music & image mode.);
During playback, press one of them to change the
playback angle. (Only for image mode.)
: Same as the ZOOM button on the Remote Control.
: Same as the RDM button on the Remote Control.
Keyboard interface-3
: During DVD playback, tap the icon to change the playback angle.
4.2 Pause Playback
In DVD/VCD/CD/MP3/WMA playing, press the PAUSE button on IR remote control to pause the
playback, press the PLAY button to resume normal playback.
12
4.3 Stop Playback
In DVD/VCD/MP3/WMA/CD playing, press the STOP button once to pause the playback, then press the
PLAY button to resume the normal playback; press the STOP button twice to full stop the playback, then
press the PLAY button to start playback from the beginning of the first chapter/track.
4.4 Select Chapter/Track with the >>| / |<< Button
Press the >>| / |<< button during playback to select the next or last chapter/track to playback.
Note: Press the >>|/|<< button multiple times to advance multiple chapters/tracks forward or backward.
4.5 Select Chapter/Track with the Number Buttons
In the state of DVD/VCD(PBC OFF)/MP3/WMA/CD playing, press one of the 1~9 and the 0/10 number
buttons to directly select and play the 1st to 10th track/chapter (the 0/10 button is used as the 10 button).
If you want to play the track/chapter number bigger than 10, use the 10+, 1~9 and 0/10 button. For
example 1, to play the 13th track/chapter, firstly press the 10+ button once, then press the 3 button. For
example 2, to play the 34th track/chapter, firstly press the 10+ button for 3 times, then press the 4
button.(the 0/10 button is used as the 0 button)
Note: long pressing the +10 or -10 button can play the next 10 or last 10
chapter/track(only for MP3/WMA).
4.6 Select Chapter/Track with the Root/PBC Menu (If the disc includes the root/PBC menu)
In the state of DVD playing
1.
Press the TITLE button on the remote control to display the title list.
2.
Press the direction buttons to select your desired title, and then press the OK or PLAY button to open the
root menu of the selected title.
3.
Press the direction buttons to select your desired chapter, finally press the OK or PLAY button to play
the selected chapter.
During playback, pressing the MENU button can directly display the root menu of the title that is playing.
In VCD mode
1.
When starting to turn on the PBC function, it will play from the beginning of the disc till it display the PBC
menu on TV screen if the disc include the PBC menu.
2.
Press the number buttons to select your desired track to play.
In MP3/WMA /CDmode, the TITLE, PBC, MENU buttons are disabled.
13
4.7 Playback with Speed
During normal playback, long press the >>|/|<< button continuously to fast forwards or backwards at the
following speeds: x2, x4, x8, x20, normal.
During speed playback, press the PLAY button to resume normal playback.
4.8 Playback with Slow Speed
During playback , press the SLOW_FWD button to execute the Slow Forward function.
With each consecutive pressing of the SLOW_FWD button, the playback speed decreases. The speed
levels in Slow Forward as follows: x1/2,x1/3,x1/4,x1/5,x1/6,x1/7,normal.
During slow forward, press the PLAY button to resume normal playback.
The function is only for video.
4.9 Display still frame step by step
If the unit is currently playing video, press the TEL button consecutively to display still frame step by step.
Press the PLAY button to resume normal playback.
4.10 Playback Repeatedly
4.10.1 ONE/ALL Repeat
1.
In DVD playback:
Press the RPT button to select REP CHAPTER, REP TITLE, REP ALL or REP OFF.
2.
In VCD(PBC OFF)/CD playback:
press the RPT button to select REP ONE, REP ALL or OFF.
When it is in the state of PBC ON, during VCD disc playing, the RPT button are not available.
3.
4.10.2
In MP3/WMA playback:
Press the RPT button to select REP ONE, REP DIR, REP ALL or OFF.
A-B Repeat
Press the A-B button if you want to repeat a specific segment on a disc that you define:
1.
Press the A-B button at a point (A) where you want it to be the start point of the repeat segment. Press
the A-B button again at a point (B) where you want it to be the terminal point of the repeat segment.
Then it will play the segment repeatedly.
2.
To cancel the A-B repeat mode and resume normal playback, press the A-B button for the third time.
Note:
During VCD/MP3/WMA/CD playback, points A and B must be within the same track.
During DVD playback, points A and B can be selected from different chapters.
14
4.11 Playback in Scan Mode
1. In the state of VCD(PBC OFF)/CD playing, press the INT button to play the previous 15 seconds part of
each track on the disc. Press the INT button again to resume normal playback.
2. In the state of DVD/MP3/WMA playing, the INT button is not available.
4.12 Playback from a specified chapter/track or a specified time
1. In the state of DVD playing, press the SEARCH button to display a interface and highlight the title item,
then use the number buttons to input the serial number of the title; use the direction buttons to highlight
the chapter item, then use the number buttons to input the serial number of the chapter; you can still use
the direction buttons to highlight the time item, then use the number buttons to input the desired time to
start playback; finally press the OK or PLAY button to play the selected chapter or play from the selected
time.
2. In the state of VCD/MP3/WMA/CD playing, press the SEARCH button to display a interface and highlight
the track item, then use the number buttons to input the serial number of the track; you can still use the
direction buttons to highlight the time item, then use the number buttons to input the desired time to start
playback; finally press the OK or PLAY button to play the selected track or play from the selected time.
4.13 Playback in Random
In the state of DVD/VCD(PBC OFF)/MP3/WMA/CD playing, press the RDM button to switch between
RANDOM (ON)/RANDOM OFF. When in RANDOM (ON) mode, it will play in random.
4.14 Playback in Different View-Angle
1. In the state of VCD/MP3/WMA/CD playing, the VIEW-ANGLE button on the IR remote control is not
available.
2. In the state of DVD playing, press the VIEW-ANGLE button repeatedly on the IR remote control to view in
different angle.(This function is only for the DVD media with ANGLE function)
4.15 Playback in Zoom Mode
In video/image mode, during playback, press the ZOOM button continuously to enlarge a certain area of
the images on the screen with these multiples:
ZOOMx2,ZOOMx3,ZOOMx4,ZOOMx1/2,ZOOMx1/3,ZOOMx1/4,ZOOM OFF.
Press one of the ^/v/>/< buttons to select the area you want to enlarge.
4.16 Change the Caption Language
In the state of DVD playing, press the SUBTITLE button repeatedly to select the language of the caption
or turn off the caption.(depend on the media used.)
In the state of VCD/MP3/WMA/CD playing, the button is not available.
15
4.17 Change the Audio Language
1. In the state of DVD playing, press the AUDIO button repeatedly on the IR remote control to select the
desired language type. (depend on the media used)
2. In the state of VCD playing, press the AUDIO button repeatedly to select the sound mode of the MONO L,
MONO R, MIX MONO and Stereo, no language function.
3. In the state of CD/WMA/MP3 playing, the AUDIO button is invalid.
4.18 Look over the Playback Status
1. In the state of DVD playing, press the OSD button repeatedly on the remote control to turn on/off the
playback status. When it is on, it will display the information such as: the serial number of the playing title,
the serial number of the playing chapter, the elapsed time of the playing chapter, the remained time of the
playing chapter, the elapsed time of the playing title, the remained time of the playing title, etc.
2. In the state of VCD/CD playing, press the OSD button repeatedly on the remote control to turn on/off the
playback status. When it is on, it will display the information such as: the serial number of the playing track,
the elapsed time of the playing track, the remained time of the playing track, the elapsted time of the disc,
the remained time of the disc.
3. In the state of MP3/WMA playing, press the OSD button repeatedly on the remote control to turn on/off the
playback status. When it is on, it will display the information such as: the serial number of the playing track,
the elapsed time of the playing track, the remained time of the playing track.
4.19 Program Playback
1
2
3
4
*
*
*
It allows you to enter the order in which you want some chapters/tracks in DVD/VCD/MP3/WMA/CD to
play.
During playback, press the PROG button to enter a program interface as follows:
Use the direction buttons to move cursor onto the desired place for inputting the sequence number.
Use the number button to input desired sequence number of title/chapter/ track with desired sequence.
Use the direction button to move cursor onto Play item, then press the OK button to play the programmed
titles/chapters/tracks in programmed order; only pressing the PLAY button also can play the programmed
titles/chapters/tracks in programmed order.
To exit program playback, firstly press the STOP button, then press the PLAY button to enter sequence
playback; or press the PROG button twice again.
To remove the all programmed sequence numbers, move the cursor onto Clear item, then press the OK
button.
To change the programmed sequence, move the cursor onto the item you want to change, input the
desired sequence number.
16
*
During VCD playback, if it is in PBC ON mode, at the same time of entering the state of program playback,
it turns off PBC mode.
4.20 Playback IMAGE files
1. The root menu is displayed on the monitor when beginning to switch on IMAGE mode. .
In the root menu, the left file sort icon is for MP3/WMA file; the middle file sort icon is for IMAGE file; the
right file sort icon is for VIDEO file. If one of these 3 file sort does not exist, you can not move cursor onto
the file sort icon.
2. When displaying the root menu, press the direction buttons to select your desired FOLDER, file or file sort
icon, then press the OK or PLAY button to open the FOLDER, or play the selected file, or play only this
sort of file.
When displaying the root menu, you can also use the number buttons to select the serial number of the
file and play the file.
When you select the IMAGE file sort icon, press the ^ or > button to select the first IMAGE file, then press
the v button to select the desired IMAGE file, finally press the OK or PLAY/PAUSE button to display the
image in full screen from the selected IMAGE file.
3. During IMAGE playback, press one of the >/</^/v buttons to change the angle of viewing picture that is
displaying as follows:
>: 90 deg cw; <: 90deg ccw; ^:UP<-->DOWN; v: LEFT<-->RIGHT
During IMAGE playback, press the PROG button to change the mode of refresh picture.
During IMAGE playback, press the STOP button to stop playing and return to the root menu.
*
*
During IMAGE playback, the following buttons are not available: SLOW-FWD, SUBTITLE, TITLE, ANGLE,
AUDIO, RDM, INT and A-B.
In IMAGE mode, the other operations are same as ones in MP3/WMA mode.
4.21 Playback MP4 files
1. The root menu is displayed on TV when beginning to switch on MP4 mode, then it will automatically play
the first file.
During playback, press the STOP button to stop playing and return to the root menu.
2. When displaying the root menu, press the direction buttons to select your desired FOLDER ,file or file sort
icon, then press the OK or PLAY button to open the FOLDER, open the files of the file sort icon or play the
selected file.
When displaying the root menu, you can also use the number buttons to select the serial number of the file
and play the file.
*
The ANGLE, PROG, RDM, INT and TITLE/PBC button are not valid.
*
The other functions are same as ones in DVD mode; but the RPT function is same as one in MP3/WMA
mode.
4.22 ESP and Id3 Function
There is ESP function for all formats of discs.
In MP3/WMA mode, during playback, the information of the file name, folder name, song s title, artist and
album will be scrolling on the LCD display.
As long as the current playing Mp3 music contains relevant Id3 tag information in version 1.0/2.0 format,
the 3 items underlined above will be scrolling on the LCD display; otherwise, they will not.
17
4.23 The DVD System Menu Setup Operation
1. Press the SETUP button on the remote control to access the DVD System Menu on the monitor.
2. There are 6 setup pages in all for the System Menu. Press the > or < button to select an desired
setup page.
3. Press the ^ or v button to select an setup item in the selected setup page.
4. Press the > button to enter the setup item. Then press the v or ^ button to select a desired mode of the
setup item, finally press the OK button to confirm it.
*
*
Press the < button to return to the upper level.
Press the SETUP button again or use the direction buttons to highlight the item of the EXIT SETUP
and then press the OK button to exit the System Menu.
For the DVD System Menu, there are 6 setup pages in all. They display as follows:
4.23.1 SYSTEM SETUP
TV TYPE
The setup item is for matching TV screen size.
4:3 PS: Choose the item when connecting a TV set with 4:3 screen.
When playing the pictures with 16:9 size, the left and right parts of
the video will be cut out, and display in full screen.
4:3 LB: Choose the item when connecting a TV set with 4:3 screen.
When playing the pictures with 16:9 size, the top and bottom parts of the TV screen will be turned into a
black square respectively.
16:9: Choose the item when connecting a TV set with 16:9 wide screen.
PASSWORD
This setup item is for locking or unlocking the rating level of the Parental Control. The defaulted state is locked.
The defaulted password is 0000. You can set a new password that you like: Select the PASSWORD item and
then press the > button to enter it, then input the original password 0000, and then press the OK button to
unlock it. Press the > button to enter it again, then input a new password that you like and then press the OK
button to make it effective.
Before the other persons see the Manual, you should get the password in mind and cut out the part of
PASSWORD in the Manual.
RATING
The item is for setting a new rating level of the Parental Control.
1. Select the PASSWORD item and then press the > button to enter it, then input the password mentioned
above, and then press the OK button to unlock the setting of the rating level of the Parental Control.
2. Select the RATING item and then press the > button to enter it, then use the direction buttons to select your
desired rating level, then press the OK button to confirm.
3. Select the PASSWORD item again and then press the > button to enter it, then input the password, and then
press the OK button to lock the new setting of the rating level of the Parental Control.
DEFAULT
This item is for making all setup items change back to original status.
18
4.23.2 LANGUAGE SETUP
OSD LANGUAGE
This item is for selecting the language of the SYSTEM MENU
and all operating prompt interface displayed during playback.
AUDIO LANG
This item is for selecting a audio language.
SUBTITLE LANG
This item is for selecting a subtitle language.
MENU LANG
This item is for selecting a disc menu language.
4.23.3 AUDIO SETUP
AUDIO OUT
there is only ANALOG mode, i.e. SPDIF/OFF, not optional.
KEY
It is for selecting your desired basic music tone
(from low to high).
4.23.4 VIDEO SETUP
BRIGHTNESS
It is for adjusting the brightness of the video output.
CONTRAST
It is for adjusting the contrast of the video output.
HUE
It is for adjusting the hue of the video output.
SATURATION
It is for adjusting the saturation of the video output.
SHARPNESS
It is for adjusting the sharpness of the video output.
19
4.23.5 SPEAKER SETUP
DOWNMIX
It is for selecting your desired sound effect when there is not central
speaker and subwoofer.
There are 3 mode: LT/RT, STEREO, VSS.
LT/RT: When playing a disc with PRO LOGIC Dolby stereo effect,
choose the item, so it will output audio signal with vivid theatre effect.
STEREO: If you choose the item, when outputting audio signal with
5.1 channels, it will output the left and right channels of signal ;
when outputting audio signal with 2 channels, it will output the common
2 channels of stereo signal.
VSS: If you choose the item, when playing a disc recorded with 5.1 channels,
the main channel speakers can output audio signal with VSS effect.
4.23.6 DIGITAL SETUP
OP MODE
It is for selecting audio output mode
LINE OUT: It can linearly compress the audio signal. So the volume level
is lower. You should select the item at night.
RF REMOD: It can make the volume level higher.
You should select it at daylight.
DYNAMIC RANGE
After selecting the compression mode of LINE OUT, set the item, so you
Can adjust the linear compression ratio. If you set it to be FULL,
the Peak-to-Peak value of the audio signal is the minimum; if you set it to
be OFF, the Peak-to-Peak value is the maximum.
DUAL MONO
It is for selecting a desired audio output mode for the left and right ways of signal.
It is mainly for Karaoke of Ac3. There are 4 modes in all as follows:
STEREO, MONO L, MONO R, MIX MONO.
20
* The Parental Control
Q:After inserting DVD disc into disc compartment, it will appear a dialogue window
that asks me to input a password of 4 digit. Why ?
A:This is because the disc movie you are playing was rated with the Parental
Control, and the current rating level of DVD player is lower than one of the current
discs. You must input the password and enter it to access the Parental Control setup
menu. Then you my set an equal or higher rating level than one of current discs ,
allowing you to play the disc.
!
NOTE
*
If you have not changed the password, the factory preset password for the DVD
player will be empty. So that you should input a desired password and input it
again to verify it to enter the Parental Control setup menu.
*
For the rating level setup of Parental Control of the DVD player, please refer to
the relative content of LOCK setup menu for details.
Accessories: Parental Control
The Parental Control function of a DVD player can control the playback of the movie
rated level in a disc. You can set the DVD player(include software player in PC) to
be a certain rating level with SETUP MENU on the screen. If the rating level set in
the disc is higher than one set in the DVD player, the DVD player can not playback
the disc. Sometimes the Parental Control sequences in some discs are different
from each other. The rating level setup can be protected by the password. Therefore,
if you select Unlock item, the Parental Control function will be invalid, the content
of disc will be played totally.
The disc movie can be designed as that the DVD player will playback the different
version of content of a same movie according to the different rating level set by
Parental Control. Depending on the DVD feature of seamless switching described
above, the scenes that are not fitting for children will be cleared or replaced by the
other fitting scene automatically.
All rating levels of Parental Control are as follows:
1
2
3
4
5
6
7
8
Unlock
Kid Safe
G
PG
PG 13
PG R
R
NC 17
Adult
21
*
The Region Code
Q: REGION ERROR displayed after inserting disc into disc compartment. Why ?
A: Because the DVD player and disc has respective region codes. If the region codes
do not match, the DVD player can not play the disc.
Appendix: The region code of DVD:
The Motion Picture Association of America (MPAA) divided the world into 6
regions, and named every region a code . The region codes and the countries
or areas represented by the region codes as follows:
Region 1: America, Canada, East-Pacific Inlands;
Region 2: Japan, West Europe, North Europe, Egypt, South Africa, Middle East;
Region 3: South-east Asian countries include Taiwan, Hong Kong, South Korea,
Thailand, indonesia, etc.;
Region 4: Australia, New Zealand, Central South America, South Pacific Inlands;
Region 5: Russia, Mongolia, Indian Peninsula, Middle Asia, East Europe, North
Korea, North Africa, North-west Asia etc.;
Region 6: China mainland.
Only the discs produced by the 8 biggest filmmaking companies of America assign
region codes. The DVD movie discs not produced by the 8 biggest filmmaking
companies of America were not restricted by the rule of region code. Generally,
they are called FreeRegionCode discs or Full Region discs. The 8 biggest filmmaking companies of America are as follows:
1. WarnerBros;
2. Columbia;
3. 20thCenturyFOX;
4. Paramount;
5. Universal;
6. UA(UnitedArtist);
7. MGM(MetroDogwynMayer);
8. WaltDisney
22
5. BLUE TOOTH HANDFREE SYSTEM
1.
Enter Bluetooth mode
When you use MODE button or Mode Menu to enter
Bluetooth mode, it will display Bluetooth interface as right.
In Bluetooth interface, the icons descriptions are as follows:
: Tap this icon can transfer audio between the Car
Audio System and phone.
: Tap this icon to turn to call messages interface
as right.
: Tap this icon to turn to audio call mode, call the
name you have record in your phone, then it
will can out automatically.
The other icons are same as ones in the front panel
and Remote Control.
2. Pairing and connection
1) Turn on the Bluetooth mode of the mobile phone;
2) Select the item of Finding the Bluetooth Device and enter it. After finishing the finding, it will show the
name of the Bluetooth Device if finding a Bluetooth Device.
Select it and enter it, then it will show a interface that ask you to input a password, input the password
0000 and then enter it. Then it will tell you pair OK.
3) For some mobile phones, they can automatically connect with the BT device of the car audio system after
pairing is ok; for some mobile phones, they need to select the paired BT device and press the
CONNECTION button . When connection is ok, the LCD of the car audio system will show LINK OK.
* when pairing is failed, press and hold the PAIR button on the remote control to enter pairing mode,
then the LCD will display PAIR START, then pair and connect with mobile phone again.
3. Use the mobile phone to do connection or disconnection
In the connection status, find the paired and connected Bluetooth Device, then press the disconnection
button to do disconnection;
In the disconnection status, find the paired and disconnected Bluetooth Device, then press the connection
button to do connection.
4. In the connection status: the audio of mobile phone transfers to the car audio system whenever a dialling
takes place or receiving a call.
5.
Dialling when in connection status
5.1
Dial with the mobile phone directly.
5.2 Dial with remote control with the following procedures:
(1) Input telephone number with number buttons 0-9
*
Press CLEAR button briefly to cancel the wrongly input number if necessary
(2) Press TEL briefly to execute the dialling.
23
5.3 To redial the last phone number dialled
Press REDIAL button briefly or tap the icon
6.
to validate the last phone number.
Accept/Reject/End Call
6.1 When ringing, press TEL button briefly to accept the call;
6.2 When ringing, press HANGUP button briefly to reject the call;
6.3 When talking, press HANGUP button briefly to end the call.
Note: During ringing, the phone number appears.
24
6. The Trouble Shooting
Please read the user’s manual carefully before using the DVD player. If you have any troubles in using this player, try to solve the
problems by the suggestions mentioned below. If you can not remove the trouble after using all the suggestions, please contact
the company or the technical service center authorized by us. For the sake of your safety, please do not open the cover and
repair the player by yourself, if that, it may cause electric shock.
NO PICTURE, SOUND AND INDICATION
*
Ensure that the power switch is on.
*
Ensure that the wall inlet is ok.
*
Ensure that the power cord is not damaged or the fuse is not blown.
*
Ensure that the power plug is connected to the inlet tightly.
NO SOUND BUT HAVE PICTURE
*
Ensure that the player’s audio output has a good connection with monitor’s audio input.
*
Check whether the audio connector is damaged.
*
Check whether you have turned down the volume.
*
Ensure that you have set the right AUDIO setup of the player.
*
Ensure that the audio is not under mute.
NO PICTURE BUT HAVE SOUND
*
Ensure that the player’s video output has a good connection with monitor’s video input.
*
Ensure that you have turned your monitor to the AV input channel connecting to your player.
*
Check whether the video connector is damaged.
*
Ensure that you have set the right VIDEO settings of the player.
BLACK AND WHITE PICTURE OR SCREEN ROLLING
*
Ensure that you have set the right TV SYSTEM (e.g. PAL, NTSC) setting.
FLAWS OF PICTURE OR SOUND
*
Check whether the setting of AUDIO is right.
*
Check whether the disc is scratched or stained.
*
Check whether the AV connector and the output terminal is stained.
*
Check whether there is condensation inside the Lens. If so, leave the player off for an hour
or so, then try again.
*
Check whether the installation angle is less than 30°.
DISPLAY NO DISC OR BAD DISC
*
Ensure that you have put the disc on the tray.
*
Check whether the disc is put in the reverse side.
*
Check whether the disc is distorted.
*
Check whether the disc is stained or scratched badly.
*
Ensure that the disc format is compatible to the player.
*
Ensure that the temperature inside the car is not too high. If so, cool off till the ambient
temperature returns to normal.
*
Replace another disc to insert it into the disc compartment.
REMOTE CONTROL IS INSENSITIVE OR DOES NOT WORK
*
Check the batteries of remote control and make sure that they are to be powerful and
good conductivity.
*
Direct the remote control to the IR sensor of the player.
*
Check whether there are some obstacles between the remote control and IR sensor.
SOME FUNCTION BUTTONS DO NOT WORK
*
Turn off the power, then turn on again.
*
Reset the unit to zero, then turn on again.
*
Remove the front panel from the unit, then install it again and then turn on again.
THE RADIO DOES NOT WORK
Check whether the antenna cable is connected firmly. Or manually tune for a station.
THE TFT DISPLAY LOST TOUCH EFFECT
*
Insert a disc and press stop button , then press zoom button, finally press the ^ and v buttons to
turn to calibrate mode and then tap the cross cursor as it show until display ok and turn power off
and then turn the unit on again.
25
7. Specification
General Specification
Power Supply Requirement..................................................DC 12V
Maximum Power Output..............4 x 25W(measured at DC 14.4 V)
Dimensions(w x h x d)..........................................178 x 50 x 160mm
DVD Deck Specification
Format...................................DVD/VCD/JPEG/MP4/MP3/WMA/CD
Video System..........................................................................NTSC
Audio System...............................................................24 bit/96KHz
Loading System.......................................................... Auto Loading
Mounting Angle.................................................................0 to +/-30
Video Specification
Video Type...................................................................16:9 and 4:3
Video Output level......................................Composite:1.0± 0.2Vp-p
Load impedance: 75 ohms
Horizontal Resolution................................................................500
Audio Specification
Audio Output(Analog audio).......................................2.0+0-1.0Vrms
Frequency Response..........................20Hz ~ 20KHz(at 1KHz 0 dB)
S/N Ratio(Audio)...............................................≥90dB(at 1KHz 0 dB)
Separation.................................................................................50dB
Radio Specification
FM Section
Frequency range.................................................87.5MHz - 108MHz
Usable sensitivity.........................................................................3uV
I.F Frequency......................................................................10.7MHz
AM Section
Frequency...........................................................522KHz - 1620KHz
Formats for media player:
Video:
MPEG-1
MPEG-2
Xvid
MP4
VCD
SVCD
DVD-Video
Picture:
JPEG
Audio:
MP2
MP3
WMA
ACC
AC3
CDDA
HDCD/CD-G
26
CS-470 DVD
Bedienungsanleitung
5-IN-1 AUTORADIOSYSTEM MIT DISC/USB/SPEICHERKARTEN/BLUETOOTH/RADIO UND
TOUCHSCREEN
Anmerkung: Alle Informationen können jederzeit ohne vorherige Ankündigung geändert werden
27
VORSICHTSMASSNAHMEN
WARNUNG – ZUR VERMEIDUNG VON FEUER- ODER STROMSCHLAGGEFAHR, SETZEN SIE DIESES
GERÄT BITTE NIEMALS REGEN ODER STARKER FEUCHTIGKEIT AUS.
ACHTUNG: ZUR VERMEIDUNG VON STROMSCHLAGGEFAHR, GERÄT NICHT ÖFFNEN! ES BEFINDEN
SICH KEINE TEILE IM INNEREN DES GERÄTS, DIE VOM BENUTZER GEWARTET WERDEN
KÖNNEN. WENDEN SIE SICH IMMER AN AUSGEBILDETES WARTUNGSPERSONAL.
Das Dreieckszeichen mit Blitzsymbol verweist auf gefährliche Spannungen im Gerätegehäuse, die
so hoch sein können, dass sie eine Gefahr von Stromschlägen bilden.
Das Dreieckszeichen mit Ausrufungszeichen verweist auf wichtige Funktions- und
Wartungshinweise (Reparatur) in der dem Gerät beigelegten Bedienungsanleitung.
!
CLASS 1 LASER PRODUCT
Laserproduktsymbol: Befindet sich auf der Rückseite des Geräts. Zeigt an, dass dieses Gerät ist ein
Produkt der Laserklasse 1 ist. Es verwendet einen schwachen Laser, der keine gefährliche Strahlungen
außerhalb des Geräts ausstrahlt.
1. Lesen Sie dieses Handbuch vor Einbau und Inbetriebnahme.
2. Berühren Sie den Stromanschluss niemals mit nassen oder feuchten Händen.
3. Schalten Sie das Gerät aus, wenn es nicht benutzt wird. (Ziehen Sie den Anschlussstecker aus dem
Stromanschluss heraus, wenn Sie das Gerät über einen längeren Zeitraum nicht verwenden.)
Bevor Sie das Gerät an einen anderen Ort bewegen, entfernen Sie die zunächst die Disc aus dem Ladefach
des Geräts.
4. Öffnen Sie nicht die Abdeckung und berühren Sie keine der Bauteile des Geräts. Dies sollte nur von
entsprechend ausgebildeten Fachleuten vorgenommen werden.
5. Setzen Sie das Gerät keiner direkten Sonnenstrahlung aus und stellen Sie es niemals in die Nähe von
Objekten, die Wärme abstrahlen, um Schäden am Gerät zu vermeiden.
6. Stellen Sie das Gerät an Orten mit hoher Feuchtigkeit auf, die dazu führen kann, dass Ihre Medien nicht
richtig eingelesen werden können.
7. Stellen Sie das Gerät an einem gut belüftetem Ort auf eine flache Unterlage. Achten Sie darauf, dass die
Lüftungsöffnungen nicht verdeckt sind, um Überhitzung und Fehlfunktionen zu vermeiden.
8. Reinigen Sie die Bedientafel und das Gehäuse der Geräts nur mit einem weichen, trockenen Tuch.
Verwenden Sie niemals Verdünner, Alkohol oder Sprays.
9. Dieses Gerät darf keinen Wassertropfen und -spritzern ausgesetzt werden. Gegenstände, die mit
Flüssigkeiten gefüllt sind, dürfen nicht auf das Gerät gestellt werden.
10. Trennen Sie das Gerät bei längerer Nichtbenutzung von der Stromversorgung ab.
28
Inhalt
1. Vor der Inbetriebnahme................................................................................................. .30
1.1 Glossar...................................................................................................................... 30
1.2 Vorsichtsmaßnahmen................................................................................................30
1.3 Wartung und Reinigung von Discs ............................................................................31
1.4 Batterieinformationen zur Fernbedienung..................................................................31
1.5 Beschreibung der Fernbedienung .............................................................................32
1.6 Anordnung und Bezeichnung der Bedienelemente des Geräts.................................33
1.7 Anschluss des Geräts..................................................................…...........................34
1.8 Einbau des Geräts.....................................................................................................35
2. Allgemeine Bedienung......................................................................................................36
3. Radiobetrieb.....................................................................................................................37
4. Disc-, USB- und MMC/SD-Betrieb...................................................................................39
4.1 Einlegen / Auswerfen von Discs, USB-Medien oder Speicherkarten........................39
4.2 Wiedergabepause.....................................................................................................40
4.3 Stoppen der Wiedergabe..........................................................................................40
4.4 Kapitel- / Titelsuche mit UP / DN oder >>| / |<< .......................................................40
4.5 Auswahl von Kapiteln / Titeln mit den Zifferntasten..................................................40
4.6 Kapitel- / Titelauswahl über das Haupt-/PBC-Menü.................................................40
4.7 Wiedergabegeschwindigkeit.....................................................................................41
4.8 Zeitlupe.....................................................................................................................41
4.9 Einzelbildwiedergabe................................................................................................42
4.10 Wiederholung..........................................................................................................42
4.10.1 Einzelwiederholung / Alle wiederholen.................................................................42
4.10.2 AB-Wiederholung ................................................................................................42
4.11 Wiedergabe im Suchmodus....................................................................................42
4.12 Wiedergabe bestimmter Kapitel / Titel oder eines bestimmten Abspielpunkts.......42
4.13 Zufallswiedergabe..................................................................................................43
4.14 Wiedergabe verschiedener Kameraperspektiven..................................................43
4.15 Bildvergrößerung...................................................................................................43
4.16 Ändern der Untertitelsprache.................................................................... ............43
4.17 Ändern der Audiosprache......................................................................................43
4.18 Überprüfen des Wiedergabestatus........................................................................44
4.19 Programmwiedergabe...........................................................................................44
4.20 Wiedergabe von Bilddateien.................................................................................45
4.21 Wiedergabe von MP4-Dateien.............................................................................45
4.22 ESP- und ID3-Funktion........................................................................................45
4.23 DVD-Systemeinstellungsmenü............................................................................46
* Benutzereinschränkung.............................................................................................49
* Regionalcode............................................................................................................50
5. Bluetooth-Freisprechsystem.........................................................................................51
6. Fehlerbehebung...........................................................................................................53
7. Technische Daten.........................................................................................................54
29
1. Vor der Inbetriebnahme
1.1 Glossar
PBC (Wiedergabesteuerung)
Es ist eine Art des Signals (Menü), das zusammen mit Aufzeichnungen im SVCD- oder VCD2.0-Format zur
Wiedergabesteuerung verwendet wird. Discs, die PBC unterstützen, können interaktive Software mit Menüs
auf dem Fernsehbildschirm anzeigen. Wenn sich auf der CD Bilder befinden, können diese hochauflösend
dargestellt werden.
Titel
Im Allgemeinen ist der Titel der wichtigste Teil einer DVD. So ist zum Beispiel der Film einer DVD Titel 1, der
Teil, in dem beschrieben wird wie der Film gedreht wurde Titel 2, die Besetzung Titel 3 etc. Jeder Titel enthält
eine Seriennummer, mit der der Titel auf einfache Weise zu finden ist.
Kapitel
Ein Titel kann in mehrere Blöcke unterteilt werden, sodass jeder Block eine Einheit darstellt. Diese Einheiten
werden als Kapitel bezeichnet. Das Kapitel enthält mindestens eine Einheit.
Titel (Spur)
VCDs werden in Spuren unterteilt. Im Allgemeinen ist jeder Musiktitel einer Karaoke-Disc eine Spur.
1.2 Vorsichtsmaßnahmen
Sicherheitshinweise
1. Stromversorgung: Das Gerät darf nur mit der auf dem Gerät oder der Bedienungsanleitung angegebenen
Betriebsspannung betrieben werden.
2. Das Gerät wurde so konzipiert, dass der negative Anschluss der Batterie an die Karosserie
angeschlossen wird. Überprüfen Sie dies bitte vor dem Einbau.
3. Schließen Sie niemals die Lautsprecherdrähte im angeschalteten Zustand des Geräts kurz. Dies könnte
zu Überlastung und Verbrennungen führen.
4. Installieren Sie die abnehmbaren Bedientafel vor dem Anschluss der Kabel.
5. Die Schutztasche dient dem Schutz der Bedientafel (siehe Abbildung).
Betriebsbedingungen
1. Verwenden Sie dieses Gerät nicht in der Nähe von Wasser und Feuchtigkeit.
2. Wenn sich Feuchtigkeit im Inneren des Geräts befindet, kann es u. U. nicht richtig funktionieren. Um
dieses Problem zu beheben, warten Sie ca. eine Stunde, bis die Feuchtigkeit verdunstet ist.
3. Wenn es im Fahrzeug besonders heiß ist, benutzen Sie den Player bitte erst nach kurzer Fahrzeit, damit
der Innenraum abkühlen kann.
30
1.3 Wartung und Reinigung von Discs
Wartung von Discs
1. Sie halten die Disk sauber, indem Sie die Disc am Rand festhalten und dabei die Disc-Oberfläche nicht
berühren.
2. Befestigen Sie kein Papier oder Aufkleber auf den Discs. Wenn sich Klebstoff oder Staub auf der
Disc-Oberfläche befindet, muss die Disc vor dem Abspielen gereinigt werden.
3. Schützen Sie die Discs vor direktem Sonnenlicht oder Wärmequellen wie z. B. Heizkörpern. Lassen Sie sie
nicht in Fahrzeugen, die direkt in der Sonne geparkt wurden, liegen, da es zu einen erheblichen Anstieg der
Innenraumtemperatur kommen kann.
4. Legen Sie die Disc nach der Wiedergabe wieder zurück in ihre Hülle, um sie sauber zu halten.
Disc-Reinigung
1. Bevor Sie die Disc abspielen, reinigen Sie sie mit einem sauberen Reinigungstuch. Wischen Sie immer von
der Innenseite nach Außen.
2. Benutzen Sie keine Lösungsmittel oder Benzin. Im Handel erhältliche Reinigungsmittel oder
Antistatiksprays können das Gerät beschädigen.
1.4 Batterieinformationen zur Fernbedienung
Auswechseln der Fernbedienungsbatterie:
1. Bevor Sie die Fernbedienung zum ersten Mal benutzen, ziehen Sie den Isolierstreifen in Pfeilrichtung aus
der Fernbedienung heraus. (Siehe Abb.1)
2. Drücken Sie die Klammer in Pfeilrichtung A (siehe Abb. 2) und ziehen Sie den Batteriehalter aus der
Fernbedienung in Pfeilrichtung B heraus (siehe Abb. 2).
3. Legen Sie eine neue Batterie in den Batteriehalter. Achten Sie beim einlegen der Batterie auf die richtige
Polarität (+ nach oben).
(Siehe Abb. 3)
4. Setzen Sie den Batteriehalter in seine ursprüngliche Position in der Fernbedienung zurück.
(Siehe Abb. 3)
Hinweise zur Fernbedienungsbatterie:
1. Unsachgemäßer Gebrauch der Batterie kann zur Überhitzung oder Explosion führen.
Und dabei Verletzungen oder Feuer hervorrufen.
2. Auslaufende Batterien können die Fernbedienung beschädigen. (Batterielebensdauer: 6 Monate bei normalem Gebrauch und normaler Raumtemperatur).
3. Achten Sie darauf, dass die Kontakte der Batterie nicht kurzgeschlossen werden.
4. Werfen Sie die Batterie nicht ins Feuer.
31
5. Zur Vermeidung von Unfällen halten Sie die Batterie außer Reichweiter von Kindern.
1.5 Beschreibung der Fernbedienung
3
27
PWR
OPEN
14
29
32
35
4
BAND
EQ
2
MU
MENU
M OD E
+
8
SE TUP
13
CLEAR
40
5
7
31
30
33
6
0K
SE L
9
34
1
10
3
4
6
7
8
CLK
9/AF
0/10
TA
10+
/PTY
SLOW_FWD
ST
1
2
-10
+10
5
11
12
41
24
28
21
22
LOC
ZOOM
26
25
#
S EA RC H
RPT
INT
AUDIO
AP S
RDM
18
17
TITLE/PBC
SUBT ITLE
PAIR
REDI AL
19
TEL
39
A-B
23
36
16
15
20
PROG
OSD
37
24. CLK
25. A-B
26. INT
27. EQ / OPEN
28. LOC / SLOW-FWD / *
29. TON AUS
30. STOPP
31. LAUTSTÄRKE 32. <
LOUD
38
1. ANG
2. MENU
3. EIN/AUS (POWER)
4. ^
5. >>|
6. >
7. |<<
8. v
9. SEL
10. WIEDERGABE / PAUSE
11. ZIFFERN (0 ~ 10, +10 / -10)
12. 10+/PTY
13. SETUP
14. MODE
15. APS / Auflegen
16. SEARCH
17. RDM
18. RPT
19. SUBTITLE / REDIAL
20. TITLE / PBC / PAIR
21. VIEW-ANGLE / ST / #
22. ZOOM
23. AUDIO
33. OK
34. LAUTSTÄRKE +
35. BAND
36. PROGRAMM
37. OSD
38. LOUD
39. TEL
40. TA
41. AF
32
1.6 Anordnung und Bezeichnung der Bedienelemente des Geräts
1
12
9
5
16
3
18
17 14
8
2
APS
AV IN
REL
11 13 10
4 19
Die Bedientafel
SD/MMC
7
15
Die Gerätevorderseite nach dem Entfernen der Bedientafel
1. OPEN
2. POWER/MUTE
3. Monitor
4. AV-Eingang
5. Discladefach
6. USB-Anschluss
7. SD/MMC-Kartensteckplatz
8. MODE
9. VOL-Drehknopf
10. >>|
11. |<<
12. BAND / TEL
13. APS / Auflegen
14. EJECT
15. RESET
16. Kleiner LCD-Bildschirm
17. Fernbedienungssensor (IR)
18. Mikrofon
19. REL
33
6
1.7 Anschluss des Geräts
Beschreibung der Kabelanschlüsse
GREEN
PARKING LINE
WHITE
REVERSAL LINE
BLACK
RADIO ANTENNA JACK BLACK
Hinweis: Verwenden Sie die Klammer am Ende von der vom Hersteller bereitgestellten Masseleitung zum Anschluss an die
Befestigungsschraube. Verbinden das andere Ende der Masseleitung am negativen Pol der Stromquelle. Andernfalls kann das
Video auf dem Bildschirm flackern.
Beschreibung der Verdrahtung des Anschlusses 1
HINWEISE
1.
2.
Nur Lautsprecher mit einer Impedanz von 4 Ohm dürfen verwendet werden.
Stellen Sie sicher, dass das blaue Automatik-Antennenkabel nicht in Kontakt mit dem Masseanschluss kommt.
Beschreibung des Schaltplans für Anschluss 2
Beschreibung zum Anschluss des Feststellbremsendrahts an das Feststellbremsensystem des Fahrzeugs
Feststellbremse
Hinweis: Nach dem Anschluss des Parkanschlussdrahts, erscheint das Videobild auf dem kleinen Monitor der Bedientafel nur
wenn die elektronische Bremse betätigt wurde.
34
1.8 EINBAU DES GERÄTS
EINBAUANWEISUNGEN
DAS GERÄT IST MIT EINER ANTI-DIEBSTAHLFUNKTION VERSEHEN.DAS GEHÄUSE DES GERÄTS
VERFÜGT ÜBER GLEITSCHIENEN.SCHLIESSEN SIE BITTE DIE STROMVERSORGUNG, LAUTSPRECHER
UND ANTENNE GEMÄSS DEN ANFORDERUNGEN DER BEDIENUNGSANLEITUNG AN. INSTALLIEREN
SIE DAS GLEITSCHIENENMETALLGEHÄUSE WIE FOLGT.
METALLSTÜTZSTREIFEN
Um einen störungsfreien Betrieb
zu gewährleisten, vergewissern
Sie sich bitte, dass
der Metallstützstreifen fest mit dem
Fahrzeuggehäuse verbunden wird.
Biegen Sie die Laschen des
Metalleinbaurahmens mit einem
Schraubendreher gegen das
Armaturenbrett.
GEHÄUSE
ARMATURENBRETT
METALLEINBAURAHMEN
PLASTIKRAHMEN
BEDIENTAFEL
Um das Gerät aus dem Metalleinbaurahmen zu
entfernen, stecken Sie die beiden mitgelieferten
Schlüssel zur gleichen Zeit in die Schlitzen auf der
linken und rechten Seite des Gehäuses. Ziehen Sie
dann das Gehäuse aus dem Metalleinbaurahmen wie
in der rechten Abbildung gezeigt, heraus.
35
2. Allgemeine Bedienung
1. Ein-/Ausschalten des Geräts
Betätigen Sie die POWER-Taste, um das Gerät einzuschalten.
Sie können das Gerät dann wieder ausschalten, indem Sie auf, halten Sie
die POWER-Taste auf der Frontplatte oder drücken Sie kurz die
POWER-Taste auf der Fernbedienung, um das Gerät auszuschalten.
2. Herausfahren des Monitors aus dem Gehäuse des KFZ-Audiosystems.
Betätigen Sie die OPEN-Taste, um den Monitor des KFZ-Audiosystems
aus dem Gehäuse herauszufahren oder wieder zurückzuschieben.
Mode Menu
3. Einstellen eines optimalen Monitorwinkels
Um den vertikalen Monitorwinkel des KFZ-Audiosystems optimal einzustellen, benutzen Sie die ^/v-Tasten
am Monitor oder die ANG-Taste auf der Fernbedienung.
4. Auswahl eines Funktionsmodus
Betätigen Sie die MODE-Taste zur Auswahl des RADIO-, DISC- (nach dem Einlegen einer Disc), USB(nach dem Anschluss eines USB-Mediums), CARD- (nach dem Einlegen einer Speicherkarte), AUX- oder
BLUETOOTH-Modus.
Während der Wiedergabe können Sie, sobald die Tastaturoberfläche angezeigt wird, durch Tippen auf das
entsprechende Symbol auf der rechten Seite das Modusmenü sehen. Tippen Sie dann auf ein Symbol, um den
gewünschten Modus zu wählen.
5. Einstellen der Lautstärke
Drehen Sie am VOL-Drehknopf auf der Bedientafel oder benutzen Sie die Tasten + oder - auf der
Fernbedienung, um die Lautstärke direkt einzustellen.
6. Stummschaltung
Betätigen Sie die MUTE-Taste, um die Tonausgabe aus- bzw. wieder einzuschalten.
Mithilfe der POWER-Taste auf der Bedientafel können Sie die Tonausgabe ebenfalls ein- und ausschalten.
7. Anzeige der Uhrzeit
Betätigen Sie die CLK-Taste, um die Uhrzeit auf dem kleinen Monitor auf der Bedientafel anzuzeigen.
Nach dem Zurückschieben des Monitors in das Gehäuse können Sie die CLK-Taste betätigen, um die
Uhrzeit auf dem kleinen LCD-Bildschirm anzuzeigen.
8. Auswahl des gewünschten EQ-Modus
Betätigen Sie die EQ-Taste auf der Fernbedienung, um einen der voreingestellten Equalizer auszuwählen:
POP, ROCK, CLAS, AUS. Der Soundeffekt wird dann geändert.
9. Ein-/Ausschalten des LOUD-Modus
Betätigen Sie die LOUD-Taste, um die LOUD-Funktion zu aktivieren bzw. deaktivieren.
Beim Einschalten des LOUD-Modus, wird es Basspegel umgehend erhöht, wenn nicht genügend Tieftöne
vorhanden sind.
10. Entfernen der Bedientafel und Zurücksetzen des Geräts
Wenn der Monitor oder die kleine LCD-Anzeige Fehlanzeigen aufweisen oder einige Tasten nicht zur
Verfügung stehen bzw Ton verzerrt ist, betätigen Sie die REL-Taste auf der Vorderseite, um die Bedientafel
abzunehmen und dann nach rechts und links herunterzuziehen. Betätigen Sie die RESET-Taste, um das Gerät
zurückzusetzen.
11. Einstellungen vornehmen
Um Einstellungen vorzunehmen, tippen Sie auf das Symbol
im
Hauptmenü, um das Einstellungsmenü.
Wählen Sie dann eines der folgenden Untermenüs aus, indem Sie auf die
entsprechenden Symbole tippen: Allgemein, Uhrzeit, Audio, Video, Radio,
Kalibrierung.
36
3.
Radiobetrieb
1. Aufrufen des RADIO-Modus
Benutzen Sie MODE-Taste oder das Modusmenü, um in den RADIOModus zu gehen. Die entsprechende Oberfläche wird dann auf der
rechten Seite angezeigt.
Tippen Sie im RADIO-Modus auf das Symbol
, um auf das
Modusmenü zuzugreifen. Halten Sie während der Wiedergabe
die Mode-Taste gedrückt, um den TFT-Bildschirm ein- bzw.
auszuschalten. Tippen Sie auf das Symbol
, um zur
Frequenzanzeige zu wechseln. Die anderen Symbole sind auf dem
Gerät und der Fernbedienung identisch.
Im Einstellungsmenü können Sie MUTE, APS, EQ, TA, AF, PTY einstellen.
2. BAND
Betätigen Sie die BAND-Taste auf der Fernbedienung im
RADIO-Modus, um das gewünschte Frequenzband (FM1, FM2, FM3,
AM1 und AM2) auszuwählen. Das entsprechende Frequenzband wird dann auf dem kleinen Monitor der
Bedientafel angezeigt.
3. TUNE/SEEK ^/v
Im RADIO-Modus:
1) Halten Sie die Tasten >>| / |<< gedrückt, um automatisch nach oben / unten von der aktuellen Frequenz
ausgehend nach einem Sender zu suchen.
2) Betätigen Sie die Tasten >>| / |<<, um manuell nach oben oder unten schrittweise von der aktuellen
Frequenz aus nach dem gewünschten Sender zu suchen.
4. APS
Im RADIO-Modus:
1) Wenn Sie die APS-Taste gedrückt halten, sucht das Radio von der niedrigsten Frequenz aus und überprüft
die Signalstärke, bis der vollständige Suchvorgang beendet ist. Die jeweils 6 stärksten Sender werden dann
unter den entsprechenden Speichernummern gespeichert. Die automatische Suche betrifft nur für den
jeweiligen Speicher des gewählten Frequenzbands. Wenn der Suchvorgang beendet ist, werden die
gespeicherten Sender für 5 Sekunden wiedergegeben, wenn Sie die APS-Taste betätigen. Danach wird der
unter M1 gespeicherte Sender wiedergegeben.
(Sie können insgesamt 3 x 6 Sender für UKW und 2 x 6 Sender für MW speichern.)
2) Wenn Sie die APS-Taste betätigen, werden die gespeicherten Sender für 5 Sekunden wiedergegeben.
Danach wird der unter M1 gespeicherte Sender wiedergegeben.
HINWEIS: Es kann jeweils nur ein Band zur gleichen Zeit benutzt werden, im UKW-Band, FM1, FM2, FM3
und im MW-Band, AM1, AM2.
5. SPEICHERTASTEN [1-6]
Im RADIO-Modus:
1) Um die aktuelle Frequenz auf dem aktuellen Band zu speichern, halten Sie eine der sechs Speichertasten
(1-6) auf der Fernbedienung gedrückt oder drehen Sie am Drehknopf und halten Sie ihn gedrückt.
2) Um einen gepeicherten Sender auf dem aktuellen Band aufzurufen, betätigen Sie die entsprechende
Speichertaste [1-6] auf der Fernbedienung oder drehen Sie Drehknopf und drücken Sie darauf.
6. STEREO / MONO
Betätigen Sie die ST-Taste auf der Fernbedienung, um den STEREO- oder MONO-Sound-Modus für das
UKW-Band zu wählen.
7. LOC
1) Wenn im RADIO-Modus die Signale ferner Radiosender sehr schwach sind und die Empfang zu wünschen
37
übrig lässt, überprüfen Sie bitte, ob die Anzeige LOC auf dem LCD-Bildschirm erscheint. Wenn LOC auf dem
LCD-Bildschirm erscheint, betätigen Sie diese Taste zum Ausschalten der LOC-Funktion. Stellen Sie dann den
entfernter gelegenen Radiosender erneut ein.
2) Wenn im RADIO-Modus, wenn die Signale lokaler Radiosendern zu stark sind und Störungen verursachen,
betätigen Sie diese Taste, um die LOC-Funktion einzuschalten. LOC erscheint dann auf dem LCD-Bildschirm.
Stellen Sie dann den lokalen Radiosender erneut ein.
8. PTY (PROGRAMMART)
Betätigen Sie die PTY-Taste zur Auswahl eines der folgenden Modi:
PTY-MUSIK - - PTY-SPRACHE -- AUS
Benutzen Sie dann die Taste VOL+ oder VOL- auf der Fernbedienung oder drehen Sie am VOL-Knopf auf
der Gerätevorderseite, um ein PTY-Programm zu wählen.
↔ NACHRICHTEN ↔ BERICHTE ↔ INFO ↔ SPORT ↔ BILDUNG ↔ GESCHICHTEN
↔ KULTUR ↔ WISSENSCHAFT ↔ VERSCHIEDENES ↔ WETTER ↔ FINANZEN
↔ KINDER ↔ GESELLSCHAFT ↔ RELIGION ↔ TELEFONPROGRAMME ↔ REISE
↔ FREIZEIT ↔ DOKUMENTATIONEN ↔ KEIN PTY ↔ POP-M ↔ ROCK-M
↔ EASY-M ↔ LEICHTE M ↔ KLASSIK ↔ ANDERE M ↔ JAZZ
↔ COUNTRY ↔ VOLKS-M ↔ OLDIES ↔ FOLK ↔
Wenn die jeweilige PTY-Gruppe ausgewählt ist, können Sie mithilfe der 6 Zifferntasten eines der
PTY-Programmarten wie oben gezeigt wählen.
Nach der Auswahl eines der PTY-Programme, wird SEEK PTY angezeigt und automatisch nach Sendern
des PTY-Programms gesucht. Wenn kein Sender gefunden wird, erscheint PTY NONE die Wiedergabe geht
wieder zurück zum aktuellen Sender.
9. AF (Alternative Frequenzen)
Betätigen Sie die AF-Taste, um den AF-Umschaltmodus zu aktivieren. Der Zustand des Modus wird durch
ein blinkendes AF-Symbol angezeigt.
Segment aus: AF-Umschaltmodus aus
Segment an: AF-Umschaltmodus an + verfügbare RDS-Informationen
Segment blinkt: AF-Umschaltmodus an, RDS-Informationen aber noch nicht empfangen.
Nachdem der AF-Modus aktivieren wurde, überprüft das Radio die AF-Signalstärke ständig. Das Intervall
zur Überprüfung der einzelnen AFs hängt von der Signalstärke des aktuellen Senders ab und kann von ein
paar Minuten für ein starkes Signal auf bis ein paar Sekunden für schwache Signale gehen.
Jedes Mal wenn der neue AF-Sender starker ist als der momentanen Sender, kann das Gerät innerhalb
kürzester Zeit zur neuen Frequenz springen und in der Anzeige erscheint für 1 - 2 Sekunden die Meldung
NEW FREQUENCY.
Weil die Stummschaltung der Tonausgabe während der AF-Umschaltung äußerst kurz ist, kann die
Umschaltung bei normalen Radioprogrammen in der Regel nicht wahrgenommen werden. (Wenn AF in der
Anzeige blinkt, sucht das Radio nach dem stärkeren RDS-Sender. Wenn AF und TP in der Anzeige blinken,
wird nur nach Sendern mit Verkehrsmeldungen gesucht.)
Wenn die AF-Funktion im UKW-Modus eingeschaltet ist, können die Funktionen SEEK (SCAN),
AUTO-MEMORY nur RDS-Sender empfangen und speichern.
10. TA-Tast (VERKEHRSANSAGEN)
Betätigen Sie die TA-Taste zum Einschalten des TA-Modus.
Wenn Verkehrsnachrichten gesendet werden:
1) Befindet sich das Gerät im Disc-Wiedergabemodus, wird es temporär in den Radiomodus geschaltet.
2) Das Gerät schaltet vorübergehend zu einem anderen Sender im EON-Netz, wenn EON auf anderen
Verkehrsnachrichten erkennt. TP wird entsprechend auf dem LCD-Bildschirm angezeigt.
* TA-Unterbrechungsfunktion:
Die aktuelle Verkehrsmeldung wird durch Betätigung der TA-Taste abgebrochen.
* Bei eingeschaltetem TA-Modus, können die SEEK, (SCAN), AUTO MEMORY-Funktionen nur wenn der
Verkehrsprogrammerkennungscode empfangen, benutzt und gespeichert wurde.
38
4. Disc- und USB-Betrieb
4.1 Einlegen / Auswerfen von Discs oder USB-Medien
Um Dateien auf einer Disc oder Speicherkarte abzuspielen, betätigen Sie die EJECT-Taste, um den
Monitor nach unten zu schieben.
Legen Sie dann die Disc oder Speicherkarte in das Disc-Ladefach bzw. den SD/MMC-Kartensteckplatz.
Um die Disc oder Speicherkarte wieder zu entfernen, betätigen Sie die STOP-Taste zweimal, um die
Wiedergabe anzuhalten. Betätigen Sie dann die EJECT-Taste, um den Monitor nach unten zu schieben und
Disc aus dem Disc-Ladefach auszuwerfen und zu entfernen. Wenn Sie eine Speicherkarte entfernen wollen,
drücken Sie zunächst auf die Karte und ziehen Sie sie aus dem Kartensteckplatz heraus.
Um Dateien auf einem USB-Medium wiederzugeben, setzen Sie es in den USB-Anschluss auf der
Rückseite des Gehäuse.
Um das USB-Medium vom USB-Anschluss zu entfernen, betätigen Sie die Taste zweimal und entfernen
Sie dann das USB-Medium.
Sie können den USB- oder CARD-Modus, wie rechts gezeigt, wählen.
Anmerkung:
Symbol für Audiodateien,
Symbol für Videodateien,
Symbol für Bilddateien.
, um das Hauptmenü aufzurufen. Tippen Sie auf das Symbol
, um zur
Tippen Sie auf das Symbol
vorherigen Einstellung zurückzukehren.
: Wiedergabe vorübergehend unterbrechen
: Wiedergabe stoppen.
:Schnellsuchlauf rückwärts oder vorwärts in verschiedenen
Geschwindigkeiten.(nicht im Bildmodus verfügbar)
: Auswahl des nächsten oder vorigen Kapitels / Musiktitels.
Root interface for MUSIC
: Lautstärke erhöhen und verringern.
: Auswahl von Seiten nach oben und unten.
: Starten der INT-Wiedergabe (nicht im Bildmodus verfügbar.)
: Auswahl des ST/MONO-Kanals während der VCD-Wiedergabe
Keyboard interface-1
: Entspricht der MENU-Taste auf der Fernbedienung.
: Entspricht der TITLE-Taste auf der Fernbedienung.
: Entspricht der REPEAT-Taste auf der Fernbedienung.
: Entspricht der SUBTITLE-Taste auf der Fernbedienung.
: Auswahl des Titels 1 bis 9. Betätigen Sie danach OK zur
Wiedergabe Ihrer Auswahl.
: Betätigen Sie während der Wiedergabe die ZOOM-Taste
und tippen Sie dann die Symbole. Die Funktion ist
identisch mit den Richtungstasten auf der Fernbedienung.
(nicht im Musik- und Bildmodus verfügbar.)
Betätigen Sie diese Taste während der Anzeige, um die
Ausrichtung zu ändern. (Nur im Bildmodus verfügbar.)
39
Keyboard interface-2
Keyboard interface-3
: Entspricht der ZOOM-Taste auf der Fernbedienung.
: Entspricht der RDM-Taste auf der Fernbedienung.
: Tippen Sie während der DVD-Wiedergabe auf dieses Symbol, um die Kameraperspektive zu
wechseln.
4.2 Wiedergabepause
Betätigen Sie während der DVD/VCD/CD/MP3/WMA-Wiedergabe die PAUSE-Taste auf Fernbedienung,
um die Wiedergabe vorübergehend anzuhalten. Betätigen Sie die WIEDERGABE-Taste, um mit der normalen
Wiedergabe fortzufahren.
4.3 Stoppen der Wiedergabe
Betätigen Sie während der DVD/VCD/CD/MP3/WMA-Wiedergabe die STOPP-Taste, um die Wiedergabe
vorübergehend anzuhalten. Betätigen Sie die WIEDERGABE-Taste, um mit der normalen Wiedergabe
fortzufahren.
Betätigen Sie die STOPP-Taste zweimal, um die Wiedergabe vollständig zu stoppen. Betätigen Sie dann
die WIEDERGABE-Taste, um die Wiedergabe erneut vom Anfang des ersten Kapitels / Musiktitel zu starten.
4.4 Kapitel- / Titelsuche mit >>| / |<<
Betätigen Sie die Tasten >>| / |<< während der Wiedergabe, um das nächste oder vorige Kapitel /
Musiktitel zur Wiedergabe auszuwählen.
Hinweis: Betätigen Sie die Tasten >>| / |<< mehrmals, um mehrere Kapitel / Spuren gleichzeitig vorwärts
oder rückwärts zu springen.
4.5 Auswahl von Kapiteln / Titeln mit den Zifferntasten
Betätigen Sie während der DVD/VCD(PBC AUS)/MP3/WMA/CD-Wiedergabe eine der Zifferntasten 1 ~ 9
und 0/10, um das erste bis zehnte Kapitel / Spur direkt auszuwählen (die 0/10-Taste wird wie die 10-Taste
verwendet).
Wenn Sie ein Kapitel/Musiktitel mit einer Nummer größer als 10 abspielen wollen, verwenden Sie die
Taste 10+ und dann die Tasten 1 ~ 9 und 0/10. Beispiel 1: Zur Wiedergabe des 13. Kapitel/Musiktitels
betätigen Sie zuerst die Taste 10+ und dann die Taste 3. Beispiel 2: Zur Wiedergabe des 34.
Kapitel/Musiktitels betätigen Sie zuerst die Taste 10+ dreimal und dann die Taste 4. (Die 0/10-Taste wird als
die 0-Taste verwendet.)
Hinweis: Durch gedrückt halten der Taste +10 oder -10 können die nächsten 10 oder letzten 10 Kapitel /
Musiktitel (nur bei MP3/WMA) übersprungen werden.
4.6 Kapitel- / Titelauswahl über das Haupt-/PBC-Menü (wenn die Disc über ein Haupt- / PBC-Menü verfügt)
Während der DVD-Wiedergabe
40
1.
Betätigen Sie die TITLE-Taste auf der Fernbedienung, um die Titelliste anzuzeigen.
2. Benutzen Sie die Navigationstasten, um den gewünschten Titel auszuwählen und betätigen Sie dann die
OK-Taste oder die WIEDERGABE-Taste, um das Hauptmenü des ausgewählten Titels zu öffnen.
3.
Benutzen Sie die Navigationstasten, um das gewünschte Kapitel auszuwählen. Betätigen Sie
anschließend die OK-Taste oder die WIEDERGABE-Taste, um das ausgewählte Kapitel abzuspielen.
Während der Wiedergabe können Sie mit der MENU-Taste direkt das Menü des Titels, der abgespielt
wird, anzeigen.
Im VCD-Modus
1. Schalten Sie die PBC-Funktion ein und die Disc wird vom Anfang an abgespielt, bis das PBC-Menü auf
dem Fernsehbildschirm angezeigt wird, wenn sich auf der Disc ein PBC-Menü befindet.
2.
Benutzen Sie die Zifferntasten, um den gewünschten Titel zur Wiedergabe auszuwählen.
Im MP3/WMA/CD-Modus sind TITLE-, PBC-, MENU-Tasten nicht verfügbar.
4.7 Wiedergabegeschwindigkeit
Halten Sie während der normalen Wiedergabe Sie die Tasten >>| / |<< gedrückt, um den Schnellsuchlauf
vorwärts oder rückwärts bei den folgenden Geschwindigkeiten zu starten: 2fach, 4fach, 8fach, 20fach, normal.
Betätigen Sie während des Schnellsuchlaufs die WIEDERGABE-Taste, um mit der normalen Wiedergabe
fortzufahren.
4.8 Zeitlupe
Betätigen Sie während der Wiedergabe die SLOW_FWD-Taste, um die Zeitlupenfunktion auszuführen.
Mit jeder Betätigung der SLOW_FWD-Taste, verringert sich die Wiedergabegeschwindigkeit. Die
Zeitlupengeschwindigkeit wird in der folgenden Reihenfolge verändert: 1/2, 1/3, 1/4, 1/5, 1/6, 1/7, normal.
Betätigen Sie während der Zeitlupe die PLAY-Taste, um mit der normalen Wiedergabe fortzufahren.
Diese Funktion ist nur für Video verfügbar.
4.9 Einzelbildwiedergabe
Während der Videowiedergabe können Sie die TEL-Taste zur Wiedergabe einzelner Bilder benutzen.
Betätigen Sie die WIEDERGABE-Taste , um mit der normalen Wiedergabe fortzufahren.
41
4.10 Wiederholung
4.10.1 Einzelwiederholung / Alle wiederholen
1.
Während der DVD-Wiedergabe:
Betätigen Sie die RPT-Taste, um REP CHAPTER, REP TITLE, REP ALL oder REP OFF zu wählen.
2.
Während der VCD(PBC OFF)/CD-Wiedergabe:
Betätigen Sie die RPT-Taste, um REP ONE, REP ALL oder OFF zu wählen.
Wenn der PBC-Modus während der VCD-Wiedergabe eingeschaltet ist, steht die RPT-Taste nicht zur
Verfügung.
3.
Während der MP3/WMA-Wiedergabe
Betätigen Sie die RPT-Taste, um REP ONE, REP DIR, REP ALL oder OFF zu wählen.
4.10.2 AB-Wiederholung
Betätigen Sie die A-B-Taste, wenn Sie einen bestimmten Abschnitt auf der Disc, den Sie definieren,
wiederholen möchten:
1. Betätigen Sie die A-B-Taste an dem Punkt (A), an dem Sie den Startpunkt des Wiederholungsabschnitts
setzen wollen. Betätigen Sie die A-B-Taste erneut an dem Punkt (B), an dem Sie den Endpunkt des
Wiederholungsabschnitts setzen wollen. Danach wird dieser Abschnitt endlos wiederholt.
2. Um den AB-Wiederholungsmodus zu verlassen und die normale Wiedergabe fortzusetzen, betätigen Sie
die AB-Taste bitte ein drittes Mal.
Hinweis:
Bei der VCD/MP3/CD-Wiedergabe müssen die Punkte A und B auf der gleichen Spur liegen.
Bei einer Abschnittswiederholung auf DVDs dürfen die Punkte A und B in verschiedenen Kapiteln liegen.
4.11 Wiedergabe im Suchmodus
1. Während der Wiedergabe von VCD(PBC AUS)/CD-Discs betätigen Sie die INT-Taste, um die jeweils
ersten 15 Sekunden jedes Titels auf der Disc abzuspielen. Betätigen Sie die INT-Taste, um mit der normalen
Wiedergabe fortzufahren.
2. Während der DVD/MP3/WMA-Wiedergabe steht die INT-Taste nicht zur Verfügung.
4.12 Wiedergabe bestimmter Kapitel / Titel oder eines bestimmten Abspielpunkts
1. Betätigen Sie während der DVD-Wiedergabe die SEARCH-Taste, um auf das Suchmenü zuzugreifen. Sie
können dann mithilfe der Zifferntasten einen Titel auswählen. Benutzen Sie dann die Navigationstasten, um
auf das Kapitelfeld zu gehen. Benutzen Sie dann erneut die Zifferntasten zur Auswahl des gewünschten
Kapitels.
Sie können dann mit den Navigationstasten auf das Zeitfeld gehen und dann mithilfe der Zifferntasten die
gewünschte Abspielzeit eingeben. Betätigen Sie schließlich die OK-Taste oder die WIEDERGABE-Taste, um
das ausgewählte Kapitel bzw. den gewählten Zeitabschnitt abzuspielen.
42
2. Betätigen Sie die SEARCH-Taste während der VCD/MP3/WMA/CD-Wiedergabe zur Auswahl eines
Musiktitels. Benutzen Sie dann die Zifferntasten zur Eingabe der Titelnummer. Sie können dann die
Navigationstasten benutzen, um auf das Zeitfeld zu gehen. und dann mithilfe der Zifferntasten die gewünschte
Abspielzeit eingeben. Betätigen Sie schließlich die OK-Taste oder die WIEDERGABE-Taste, um den
ausgewählten Titel oder Zeitpunkt abzuspielen.
4.13 Zufallswiedergabe
Betätigen Sie während der DVD/VCD(PBC AUS)/MP3/CD-Wiedergabe die RDM-Taste, um zwischen
RANDOM (ON) / RANDOM (OFF) zu wechseln. Im RANDOM (ON)-Modus werden die Titel in zufälliger
Reihenfolge wiedergegeben.
4.14 Wiedergabe verschiedener Kameraperspektiven
1. Während der VCD/MP3/WMA/CD-Wiedergabe steht die VIEW-ANGLE-Taste auf der Fernbedienung nicht
zur Verfügung.
2. Betätigen Sie während der DVD-Wiedergabe die VIEW-ANGLE-Taste auf der Fernbedienung mehrmals,
um eine andere Kameraperspektive zu betrachten. (Diese Funktion ist nur mit DVD-Discs verfügbar, die mit
mehreren Kameraperspektiven aufgenommen wurden.)
4.15 Bildvergrößerung
Betätigen Sie im Video/Bild-Modus die ZOOM-Taste, um das Anzeigebild in verschiedenen Stufen zu
vergrößern:
Vergrößerungsfaktor: ZOOM x2, ZOOM x3, ZOOM x4, ZOOM x1/2, ZOOM x1/3, ZOOM x1/4, ZOOM AUS.
Benutzen Sie die Tasten ^/v / >/<, um den Bereich, den Sie vergrößern möchten, auszuwählen.
4.16 Ändern der Untertitelsprache
Bei der Wiedergabe von DVD-Discs können Sie die SUBTITLE-Taste wiederholt betätigen, um die
Untertitelsprache auszuwählen oder die Untertitel deaktivieren (abhängig von der eingelegten Disc).
Während der VCD/MP3/WMA/CD-Wiedergabe steht diese Taste nicht zur Verfügung.
4.17 Ändern der Audiosprache
1. Bei der Wiedergabe von DVD-Discs können Sie die mehrfache Betätigung der AUDIO-Taste auf der
Fernbedienung die gewünschte Audiosprache (abhängig von der eingelegten Disc) auswählen.
2. Betätigen Sie während der VCD-Wiedergabe die AUDIO-Taste wiederholt, um den Soundmodus auf
MONO L, MONO R, MIX-Mono oder Stereo zu stellen. Für VCD steht keine Sprachauswahlfunktion zur
Verfügung.
3. Während der CD/WMA/MP3-Wiedergabe steht die AUDIO-Taste nicht zur Verfügung.
4.18 Überprüfen des Wiedergabestatus
1. Während der DVD-Wiedergabe können Sie durch wiederholte Betätigung der OSD-Taste auf der
Fernbedienung die Anzeige des Wiedergabestatus ein- bzw. ausschalten. Wenn die Funktion eingeschaltet ist,
43
werden Informationen wie zum Beispiel folgende angezeigt: Titelnummer, Kapitelnummer, Abspielpunkt des
Kapitels, verbleibende Wiedergabezeit des Kapitels, Abspielpunkt des Titels, verbleibende Wiedergabezeit,
etc.
2. Während der VCD/CD-Wiedergabe können Sie durch wiederholte Betätigung der OSD-Taste auf der
Fernbedienung die Anzeige des Wiedergabestatus ein- bzw. ausschalten. Wenn die Anzeige aktiviert ist,
werden Informationen wie Titelnummer, Abspielpunkt, verbleibende Wiedergabezeit des Titels, Abspielpunkt
der Disc, verbleibende Wiedergabezeit der Disc angezeigt.
3. Während der MP3/WMA-Wiedergabe können Sie durch wiederholte Betätigung der OSD-Taste auf der
Fernbedienung die Anzeige des Wiedergabestatus ein- bzw. ausschalten. Wenn die Anzeige aktiviert ist,
werden Informationen wie Titelnummer, Abspielpunkt des Titels, verbleibende Wiedergabezeit des Titels
angezeigt.
4.19 Programmwiedergabe
Ermöglicht Ihnen die Reihenfolge in der die Kapitel / Spuren auf der DVD/VCD/MP3/CD-Disc
wiedergegeben werden, zu programmieren.
1 Betätigen Sie während der Wiedergabe die PROG-Taste, um den folgenden Programmmodus aufzurufen:
2 Benutzen Sie die Navigationstasten, um den Cursor an die gewünschten Stelle zur Eingabe der
Positionsnummer zu bewegen.
3 Benutzen Sie die Zifferntasten zur Eingabe der gewünschten Position des Titels / Kapitels / Spur.
4 Benutzen Sie die Navigationstasten, um den Cursor auf das Wiedergabe-Feld zu bewegen und betätigen
Sie die OK-Taste, um die programmierten Titel / Kapitel / Spuren in der programmierten Reihenfolge
wiederzugeben.
Sie können auch die programmierten Titel / Kapitel / Spuren in der programmierten Reihenfolge
wiedergeben, indem Sie nur die WIEDERGABE-Taste betätigen.
* Zum Verlassen der Programmwiedergabe betätigen Sie zuerst die STOPP-Taste und dann die
WIEDERGABE-Taste, um zur normalen Wiedergabe zu wechseln. Sie können ebenfalls die PROG-Taste
zweimal betätigen.
* Um alle programmierten Positionen zu entfernen, bewegen Sie den Cursor auf Clear und betätigen Sie die
OK-Taste.
* Um das Programm zu ändern, bewegen Sie den Cursor auf die Position, die Sie ändern möchten und geben
Sie neue Positionsnummer ein.
* Während der VCD-Wiedergabe wird der PBC-Modus ausgeschaltet, wenn Sie die Programmwiedergabe
starten.
4.20 Wiedergabe von Bilddateien
1. Das Hauptmenü wird auf dem Monitor angezeigt, wenn Sie in den BILD-Modus wechseln.
Im Hauptmenü stehen das linke Sortiersymbol für MP3/WMA-Dateien, die mittlere für Bilddateien und das
rechte für Videodateien. Wenn eine dieser 3 Dateitypen nicht existiert, kann der Cursor nicht auf das
entsprechende Sortiersymbol bewegt werden.
44
2. Bei der Anzeige des Hauptmenüs können Sie mit den Navigationstasten auf den gewünschten Ordner,
Datei oder Sortiersymbol gehen und dann die OK-Taste oder die WIEDERGABE-Taste betätigen, um den
Ordner zu öffnen, die ausgewählte Datei wiederzugeben bzw. nur den gewünschten Dateityp wiederzugeben.
Bei der Anzeige des Hauptmenü können Sie auch die Zifferntasten verwenden, um eine Dateinummer
auszuwählen und die entsprechende Datei wiederzugeben.
Wenn Sie das Bildsortiersymbol wählen, betätigen Sie die Taste ^ oder >, um das erste Bild zu wählen und
dann die Taste v, um die gewünschte Bilddatei auszuwählen. Betätigen Sie schließlich die OK- oder
WIEDERGABE/PAUSE-Taste, um das ausgewählte Bild im Vollbildmodus anzuzeigen.
3. Betätigen Sie während der Bildwiedergabe die Tasten >/< / ^/v, um den Betrachtungswinkel wie folgt zu
ändern:
>: 90° nach rechts; <: 90° nach links; ^: Vertikal spiegeln; v: Horizontal spiegeln
Betätigen Sie während der Bildwiedergabe die PROG-Taste, um den Bildwiederholungsrate zu ändern.
Betätigen Sie während der Bildwiedergabe die STOPP-Taste, um die Wiedergabe zu stoppen und zum
Hauptmenü zurückzukehren.
* Während der Bildwiedergabe sind folgende Tasten nicht funktionsfähig: SLOW-FWD, SUBTITLE, TITLE,
ANGLE, AUDIO, RDM, INT und A-B.
* Alle Funktionen im BILD-Modus entsprechen den Funktionen im MP3/WMA-Modus.
4.21 Wiedergabe von MP4-Dateien
1. Das Hauptmenü wird auf dem Bildschirm angezeigt, wenn Sie zum MP4-Modus wechseln. Die
Wiedergabe der ersten Datei beginnt automatisch.
Betätigen Sie die STOPP-Taste, um die Wiedergabe zu stoppen und zum Hauptmenü zurückzukehren.
2. Bei der Anzeige des Hauptmenüs können Sie mit den Navigationstasten auf den gewünschten Ordner,
Datei oder Sortiersymbol gehen und dann die OK-Taste oder die WIEDERGABE-Taste betätigen, um den
Ordner zu öffnen, die ausgewählte Datei wiederzugeben bzw. nur den gewünschten Dateityp wiederzugeben.
Bei der Anzeige des Hauptmenü können Sie auch die Zifferntasten verwenden, um eine Dateinummer
auszuwählen und die entsprechende Datei wiederzugeben.
* Die Tasten ANGLE, PROG, RDM, INT und TITLE/PBC sind in diesem Modus nicht verfügbar.
* Die übrigen Funktionen entsprechen denen des DVD-Modus, außer der RPT-Funktion, die der Funktion im
MP3/WMA-Modus entspricht.
4.22 ESP- und ID3-Funktion
Die ESP-Funktion steht bei allen Disc-Formaten zur Verfügung.
Informationen, wie der Dateiname, Ordnername, Titel, Interpret und Album erscheinen als Lauftext im
MP3-/WMA-Betrieb während der Wiedergabe auf dem LCD-Bildschirm.
Solange die Wiedergabe anhält und die entsprechende Datei über einen ID3-Tag der Version 1.0 oder 2.0
verfügt, werden jeweils 3 der genannten Informationen scrollend auf dem LCD-Display angegeben.
4.23 DVD-Systemeinstellungsmenü
1. Betätigen Sie die SETUP-Taste auf der Fernbedienung, um das DVD-Systemmenü auf dem Bildschirm
anzuzeigen.
45
2. Im Systemmenü stehen 6 verschiedene Einstellungsseiten zur Verfügung. Benutzen Sie die Tasten > und
<, um
die gewünschte Einstellungsseite zu wählen.
3. Betätigen Sie die Taste ^ oder v, um eine Option auf der gewählten Einstellungsseite auszuwählen.
4. Betätigen Sie die Taste >, um die Option ändern zu können. Betätigen Sie die Taste v oder ^ zur Auswahl
der gewünschten Einstellung und betätigen Sie abschließend OK zur Bestätigung.
* Betätigen Sie die Taste < zum Zurückkehren ins vorige Menü.
* Betätigen Sie die SETUP-Taste erneut oder verwenden Sie die Navigationstasten, um die Option
EXIT SETUP zu wählen und betätigen Sie dann die OK-Taste, um das Systemmenü zu verlassen.
Das DVD-Systemmenü verfügt über 6 Einstellungsseiten. Siehe folgende Abbildung:
4.23.1 SYSTEMEINSTELLUNGEN
BILDFORMAT
Die Einstellungsoption zum Angleichen der TV-Bildschirmgröße.
4:3 PS: Wählen Sie diese Einstellung, wenn Sie ein Fernsehgerät mit einem
4:3-Bildschirm verwenden. Bei der Wiedergabe von Bildern im 16:9-Format
werden die linken und rechten Seiten des Videos abgeschnitten und das
Bild erscheint im Vollbildmodus.
4:3 LB: Wählen Sie diese Einstellung, wenn Sie ein Fernsehgerät mit einem
4:3-Bildschirm verwenden. Bei der Wiedergabe von Bildern im 16:9-Format
werden erscheinen oben und unten auf dem TV-Bildschirm schwarze Ränder.
16:9: Wählen Sie diese Einstellung, wenn Sie einen Fernseher mit 16:9-Breitbildschirm verwenden.
PASSWORT
Diese Option dient zum Freigeben / Sperren der Altersstufenfunktion.
Diese Option ist standardmäßig gesperrt. Das werksmäßig eingestellte Passwort ist 0000.
Sie können bei Bedarf ein neues Passwort setzen: Wählen Sie die Passwort-Option und betätigen Sie >.
Geben Sie dann das Original-Passwort 0000 ein und betätigen Sie die OK-Taste, um die Funktion freizugeben.
Betätigen Sie die Taste >, um dann ein neues Passwort zu bestimmen und mit der OK-Taste zu bestätigen.
Bevor die andere Personen die Bedienungsanleitung lesen, sollten Sie sich das Passwort merken und aus der
Bedienungsanleitung herausschneiden.
ALTERSSTUFEN
Diese Option dient zur Einstellung der Altersstufenfunktion.
1. Gehen Sie auf die Passwort-Option und betätigen Sie dann >, um es einzugeben. Betätigen Sie die
OK-Taste, um die Altersstufenfunktion zu entsperren.
2. Wählen Sie RATING und betätigen Sie dann die Taste >, um die Funktion aufzurufen. Benutzen Sie die
Navigationstasten, um die gewünschte Freigabestufe auszuwählen und betätigen Sie dann die OK-Taste zur
Bestätigung.
3. Gehen Sie erneut auf die Passwort-Option und betätigen Sie dann erneut >, um das Passwort einzugeben.
Betätigen Sie dann die OK-Taste, um die neue Einstellung der Altersstufenfunktion zu übernehmen.
WERKSEINSTELLUNGEN
Mit dieser Option werden alle Einstellungen auf die ursprünglichen Werte zurückgesetzt.
46
4.23.2 SPRACHEINSTELLUNGEN
ANZEIGESPRACHE
Diese Option dient der Auswahl der Sprache für das Systemmenü und
alle Anzeige während der Wiedergabe.
AUDIOSPRACHE
Diese Option dient der Auswahl der Audiosprache.
UNTERTITELSPRACHE
Diese Option dient der Auswahl der Untertitelsprache.
MENÜSPRACHE
Diese Option dient der Auswahl der Menüsprache.
4.23.3 AUDIOEINSTELLUNGEN
AUDIOAUSGANG
Es steht nur der ANALOG-Modus, d.h. SPDIF/OFF zur Verfügung.
Andere Optionen können nicht ausgewählt werden.
TASTENTON
Auswahl des gewünschten Tastentons (von niedrig zu hoch).
4.23.4 VIDEOEINSTELLUNGEN
HELLIGKEIT
Einstellung der Helligkeit der Videoausgabe.
KONTRAST
Einstellung des Kontrasts der Videoausgabe.
FARBTON
Anpassung des Farbtons der Videoausgabe.
SÄTTIGUNG
Einstellung der Sättigung der Videoausgabe.
BILDSCHÄRFE
Es Einstellung der Bildschärfe der Videoausgabe.
47
4.23.5 LAUTSPRECHEREINSTELLUNGEN
DOWNMIX
Zur Auswahl des gewünschten Soundeffekts, wenn kein Mittel-Lautsprecher und Subwoofer vorhanden sind.
Es stehen 3 Modi zur Verfügung: LT/RT, STEREO, VSS.
LT/RT: Wenn eine Disc mit Dolby PRO LOGIC-Stereo-Effekt wiedergegeben wird, wird das Ausgangsignal mit
einem lebendigen Theatereffekt ausgegeben.
STEREO: Wenn Sie diese Option mit einem Audiosignal mit 5.1 Kanälen
wählen, wird das Signal auf den linken und rechten Kanal des Signals verteilt.
Bei der Ausgabe eines Audiosignals mit 2 Kanälen, wird es normal als
2-Kanal-Stereo-Signal ausgegeben.
VSS: Wenn Sie diese Option zusammen mit einer Disc mit 5.1 Kanälen
benutzen, wird auf den Hauptkanal-Lautsprechern ein Audiosignal mit
VSS-Effekt ausgegeben.
4.23.6 DIGITALEINSTELLUNGEN
AUSGABEMODUS
Auswahl des Audioausgabemodus.
LINE OUT: Komprimiert das Audiosignal. Mit dieser Funktion wird die
Gesamtlautstärke gesenkt.
Wählen Sie diese Option in der Nacht.
RF REMOD: Mit dieser Funktion kann die Lautstärke erhöht werden.
Wählen Sie diese Option am Tag.
DYNAMIKBEREICH
Nach der Auswahl der LINE OUT-Kompressionsmodus können Sie diese Option benutzen, um die lineare
Kompressionsrate einzustellen. Wenn Sie die Option auf FULL stellen, werden die Spitzenwerte des
Audiosignals auf ein Minimum gesenkt. Wenn Sie die Option auf OFF stellen, bleiben die Spitzenwerte bei
ihrem Maximum.
DUAL-MONO
Auswahl des gewünschten Audio-Ausgabemodus für den linken und rechten Kanal.
Die Funktion ist vor allem für Karaoke mit AC3 gedacht. Es stehen 4 Modi zur Verfügung:
STEREO, MONO L, MONO R und MIX MONO.
48
* Benutzereinschränkung
F: Nach dem Einlegen einer DVD in das Disc-Ladefach, erscheint ein Dialogfenster, das dazu auffordert ein
Kennwort mit 4 Ziffern einzugeben. Warum?
A: Das liegt daran, dass die Disc Materialien enthält, deren Bewertung über der von Ihnen eingestellten
Altersstufe liegt. Sie müssen das Kennwort eingeben und das Altersstufenmenü aufrufen. Sie können dann
eine gleichwertige oder höhere Einstellung wählen, um die Disc wiedergeben zu können.
!
HINWEIS
* Wenn Sie das Kennwort nicht geändert haben, wird das werksseitig eingestellte Passwort für den
DVD-Player ungesetzt bleiben. Geben Sie das gewünschte Passwort ein und bestätigen Sie es, um auf das
Altersstufenmenü zuzugreifen.
* Für weitere Informationen
Sperrungs-Einstellungsmenüs.
zur
Benutzereinschränkung,
beachten
Sie
bitte
den
Inhalt
des
Anmerkung: Benutzereinschränkung
Mit der Altersstufenfunktion eines DVD-Players können die Wiedergabe auf Filme bestimmter Stufen
begrenzen. Sie können den DVD-Player (genau wir Software-Player auf Ihrem PC) im Einstellungsmenü auf
einen Altersstufe stellen. Wenn die Altersstufe der Disc über der des DVD-Players liegt, kann die Disc nicht
wiedergegeben werden. In manchen Fällen sind die Steuersequenzen der Discs verschieden voneinander. Die
Altersstufenfunktion wird durch das Passwort geschützt. Wenn Sie das richtige Passwort eingegeben haben
ist die eingestellte Altersstufe nicht mehr relevant und der Inhalt der Disc kann vollständig abgespielt werden.
Die Disc kann u. U. so programmiert worden sein, sodass der DVD-Player die andere Version des gleichen
Films wiedergibt, die der eingestellten Altersstufe entspricht. Abhängig von den DVD-Funktionen, werden dann
die Szenen, die nicht für Kinder geeignet sind, entfernt oder automatisch durch andere Szenen ersetzt.
Es stehen die folgenden Altersstufen zur Auswahl zur Verfügung:
Entsperren
1 Kindersicher
2G
3 PG
4 PG-13
5 PG-R
6R
7 NC-17
8 Nur für Erwachsene
49
* Regionalcode
F: Nach dem Einlegen der Disc erscheint die Meldung REGION ERROR. Warum?
A: Der DVD-Player und die Disc verfügen über verschiedene Regionalcodes. Wenn die Regionalcodes nicht
übereinstimmen, kann der DVD-Player die Disc nicht abspielen.
Anhang: Regionalcodes von DVDs:
Die Motion Picture Association of America (MPAA) unterteilt die Welt in sechs Regionen und gibt jeder
Region einen Code. Die Regionalcodes und die Länder oder Gebiete werden wie folgt unterteilt:
Region 1: USA, Kanada, Ostpazifikinseln
Region 2: Japan, Westeuropa, Nordeuropa, Ägypten, Südafrika, Mittlerer Osten
Region 3: Südostasiatische Länder, Taiwan, Hongkong, Südkorea, Thailand, Indonesien, etc.
Region 4: Australien, Neuseeland, Mittel-/Südamerika, Südpazifikinseln
Region 5: Russland, Mongolei, indische Halbinsel, Zentralasien, Osteuropa, Nordkorea, Nordafrika,
Nordwestasien etc.;
Region 6: China
Nur Discs der 8 größten Filmdistributoren der USA sind an Regionalcodes gebunden. DVDs, die nicht von
diesen Firmen produziert
wurden, sind nicht durch die Benutzung des Regionalcodes beschränkt. Diese Discs sind regionslose
Discs und können von allen Abspielgeräten wiedergegeben werden. Die 8 größten Filmdistributoren der USA:
1. Warner Bros
2. Columbia
3. 20 th Century Fox
4. Paramount
5. Universal
6. UA (United Artists)
7. MGM (Metro Goldwyn Mayer)
8. Walt Disney
50
5. BLUE TOOTH HANDFREE SYSTEM
1.
Aktivieren des Bluetooth-Modus
Wenn Sie die MODE-Taste oder das Modusmenü verwenden, um in
Den Bluetooth-Modus zu gelangen, wird die Bluetooth-Oberfläche auf
Der rechten Seite angezeigt.
In der Bluetooth-Oberfläche erhalten Sie Zugriff auf die folgenden
Symbole und Funktionen:
: Tippen Sie auf dieses Symbol, um die Wiedergabe des
Audiosignals zwischen dem Autoradio und dem Mobiltelefon
zu wechseln.
: Tippen Sie auf dieses Symbol, um auf die Anruf-Oberfläche
rechts zuzugreifen.
: Tippen Sie auf dieses Symbol, um den Sprachanruf-Modus
zu aktivieren. Sprechen Sie den Namen, den Sie auf Ihrem
Telefon gespeichert haben, und die entsprechende
Nummer wird dann automatisch gewählt.
Die anderen Symbole entsprechen den Tasten der Gerätevorderseite und der der Fernbedienung.
2. Pairing und Verbindungsaufbau
1) Schalten Sie die Bluetooth-Funktion Ihres Mobiltelefons ein.
2) Suchen Sie nach dem Bluetooth-Gerät und wählen Sie es aus. Danach erscheint der Name des
Bluetooth-Geräts.
Wählen Sie es und Sie werden aufgefordert ein Kennwort einzugeben. Geben Sie 0000 ein und
bestätigen Sie. Wenn der Verbindungsaufbau erfolgreich war, erscheint eine entsprechende Meldung.
3) Einige Mobiltelefone können automatisch eine Verbindung mit dem BT-Gerät des KFZ-Audiosystems
aufbauen, sofern zuvor bereits eine Verbindung aufgebaut wurde. Bei anderen Mobiltelefonen muss das
BT-Gerät jeweils ausgewählt werden, bevor eine Verbindung aufgebaut werden kann. Wenn die Verbindung in
Ordnung ist, erscheint LINK OK in der Anzeige des KFZ-Audiosystems.
* Wenn der Pairing-Vorgang fehlgeschlagen ist, halten Sie die PAIR-Taste auf der Fernbedienung gedrückt,
um in den Pairing-Modus zu gehen. Dann erscheint PAIR START in der LCD-Anzeige und der
Verbindungsaufbau wird erneut gestartet.
3.
Benutzen Sie Ihr Mobiltelefon, um die Verbindung aufzubauen bzw. abzubrechen.
Suchen Sie nach dem gekoppelten und verbunden Bluetooth-Gerät im Verbindungsmodus und betätigen
Sie die Trenn-Taste, um die Verbindung abzubrechen.
Suchen Sie nach dem gekoppelten Bluetooth-Gerät, wenn keine Verbindung aufgebaut ist und betätigen
Sie die Verbindungstaste, um eine Verbindung aufzubauen.
51
4. Im Verbindungsmodus: Das Audiosignal kann während des Wählens oder bei entgegengenommenen
Anrufen vom Mobiltelefon auf das Audiosystem des Fahrzeugs umgeleitet werden.
5.
Wählen Sie im Verbindungsmodus
5.1 Wählen Sie direkt mit Ihrem Mobiltelefon
5.2 Wählen Sie auf die folgende Weise mit der Fernbedienung:
(1) Geben Sie die Telefonnummer über die Zifferntasten 0~9 ein.
* Betätigen Sie die CLEAR-Taste zum Löschen der letzten Eingabe, falls notwendig.
(2) Betätigen Sie die TEL-Taste zum Wählen.
5.3 Um die zuletzt gewählte Telefonnummer zu wählen,
betätigen Sie die REDIAL-Taste oder tippen Sie auf das Symbol
wiederholen.
6.
, um die zuletzt gewählte Nummer zu
Annehmen / Ablehnen / Anruf beenden
6.1 wenn das Telefon klingelt, betätigen Sie die TEL-Taste, um den Anruf entgegen zu nehmen
6.2 wenn das Telefon klingelt, betätigen Sie die HANGUP-Taste, um den Anruf abzuweisen
6.3 Betätigen Sie die HANGUP-Taste während eines Gesprächs, um den Anruf zu beenden.
Hinweis: Während des Klingelns, erscheint die Telefonnummer in der Anzeige.
52
6. Fehlerbehebung
Lesen Sie bitte diese Bedienungsanleitung vor der Inbetriebnahme dieses DVD-Players sorgfältig durch. Wenn Sie Probleme bei
der Benutzung dieses DVD-Player haben sollten, versuchen Sie es zunächst mit folgender Fehlerbehebungsliste. Sollte das
Problem bestehenbleiben, wenden Sie sich bitte an den Hersteller oder an einen von uns autorisierten technischen
Kundendienst. Versuchen Sie bitte zu Ihrer eigenen Sicherheit niemals das Gehäuse zu öffnen und das Gerät selbst zu
reparieren. Es kann dabei zu Beschädigungen oder Stromschlägen kommen.
KEIN BILD, TON ODER ANZEIGE
* Vergewissern Sie sich, dass das Gerät eingeschaltet ist.
* Vergewissern Sie sich, dass die Steckdose Strom führt.
* Vergewissern Sie sich, dass das Netzkabel nicht beschädigt ist und die Sicherung nicht durchgebrannt ist.
Vergewissern Sie sich, dass der Netzstecker richtig in der Steckdose sitzt.
KEIN TON
* Vergewissern Sie sich, dass das Audiokabel korrekt mit dem Monitor verbunden ist.
* Überprüfen Sie, ob die Stecker beschädigt sind.
* Überprüfen Sie, ob Sie eventuell die Lautstärke heruntergestellt haben.
* Vergewissern Sie sich, dass Sie die richtigen Audioeinstellungen vorgenommen haben.
* Vergewissern Sie sich, dass der Ton nicht ausgeschaltet wurde.
KEIN BILD
* Vergewissern Sie sich, dass der Video-Ausgang des Players richtig mit dem Video-Eingang des Monitors {1 verbunden ist.
* Vergewissern Sie sich, dass der Monitor eingeschaltet ist und darauf der richtige AV-Kanal eingestellt wurde.
* Überprüfen Sie, ob die Stecker beschädigt sind.
* Vergewissern Sie sich, dass Sie die richtigen Videoeinstellungen vorgenommen haben.
KEINE FARBE ODER LAUFENDES BILD
* Vergewissern Sie sich, dass Sie das richtige Farbsystem (PAL oder NTSC) eingestellt haben.
FEHLERHAFTE BILD- ODER TONWIEDERGABE
* Überprüfen Sie, ob Sie die richtigen Audioeinstellungen vorgenommen haben.
* Überprüfen Sie, ob die Disc zerkratzt oder verschmutzt ist.
* Überprüfen Sie, ob die AV-Anschlüsse und Ausgänge sauber sind.
* Überprüfen Sie, ob sich Feuchtigkeit im Inneren des Geräts gebildet hat. Wenn ja, schalten Sie das Gerät für eine Stunde aus
und versuchen Sie es dann erneut.
* Überprüfen Sie, ob der Einbauwinkel unter dem Maximum von 30° liegt.
"NO DISC"- ODER "BAD DISC"-ANZEIGE
* Vergewissern Sie sich, dass sich im Ladefach eine Disc befindet.
* Überprüfen Sie, ob die Disc mit der richtigen Seite nach oben eingelegt wurde.
* Überprüfen Sie, ob die Disc verbogen ist.
* Überprüfen Sie, ob die Disc stark zerkratzt oder verschmutzt ist.
* Vergewissern Sie sich, dass die Disc in einem für diesen Player kompatiblen Format aufgenommen wurde.
* Vergewissern Sie sich, dass die Temperatur innerhalb des Fahrzeugs nicht zu hoch ist. Warten Sie, bis die
Umgebungstemperatur im Fahrzeug gesunken ist.
* Legen Sie eine andere Disc in das Disc-Ladefach ein.
DIE FERNBEDIENUNG REAGIERT ODER FUNKTIONIERT NICHT
* Überprüfen Sie die Batterien der Fernbedienung und vergewissern Sie sich, dass sie über genügend Strom und Leitfähigkeit
verfügen.
* Richten Sie die Fernbedienung direkt auf den IR-Sensor des Players.
* Überprüfen Sie, ob es Hindernisse zwischen Fernbedienung und IR-Sensor gibt.
BESTIMMTE FUNKTIONSTASTEN FUNKTIONIEREN NICHT
* Schalten Sie das Gerät aus und dann wieder ein.
* Führen Sie einen Systemreset des Geräts durch und schalten Sie es dann wieder ein.
* Entfernen Sie die Bedientafel vom Gerät, setzen Sie sie wieder zurück und schalten Sie das Gerät dann wieder ein.
DAS RADIO FUNKTIONIERT NICHT
* Überprüfen Sie, ob das Antennenkabel richtig angeschlossen ist. Versuchen Sie u. U. den Sender manuell einzustellen.
DAS TFT DISPLAY IST OHNE TOUCH-EFFEKT
* Legen Sie eine Disc ein und drücken Sie auf die Stopp-Taste. Drücken Sie anschließend auf die Zoom-Taste, gefolgt von ^
und v, um den Modus für die Kalibrierung zu aktivieren.
Tippen Sie auf das Curser-Kreuz, bis im Display die Anzeige OK erscheint und sich das Gerät ausschaltet. Schalten Sie das
Gerät anschließend wieder ein.
53
7. Technische Daten
Allgemeine Spezifikationen
Stromversorgungsanforderungen..................................... DC 12 V
Max. Ausgangsleistung .................................................... 4 x 25 W (gemessen bei 14,4 V DC)
Abmessungen (B x H x T): .............................................. 178 x 50 x 160 mm
DVD-Spezifikationen
Formate........................................................................... DVD/VCD/JPEG/MP4/MP3/WMA/CD
Videosystem ....................................................................NTSC
Audiosystem....................................................................24 Bit / 96 kHz
Ladesystem.......................................................... ..........Selbstladend
Einbauwinkel....................................................................0 bis +/-30
Video-Spezifikationen
Videobild.........................................................................16:9 und 4:3
Videoausgangspegel..................................................... Composite: 1,0 ±0,2 Vp-p
Bürde: 75 Ω
Horizontale Auflösung.....................................................500
Audio-Spezifikationen
Audioausgang (Analogaudio).........................................2,0+0-1,0 Vrms
Frequenzbereich ......................................................... 20 Hz ~ 20 kHz (bei 1 kHz, 0 dB)
Rauschabstand (Audio)................................................ ≥ 90 dB (bei 1 kHz, 0 dB)
Abstand.........................................................................50 dB
Radio-Spezifikationen
Radio (UKW)
Frequenzbereich ......................................................... 87,5 - 108 MHz
Benutzbare Empfindlichkeit .........................................3 µV
I.F Frequenz ................................................................10,7 MHz
RADIO (MW)
Frequenz........................................................................522 kHz - 1620 kHz
54
Formats for media player:
Video:
MPEG-1
MPEG-2
Xvid
MP4
VCD
SVCD
DVD-Video
Picture:
JPEG
Audio:
MP2
MP3
WMA
AAC
AC3
CDDA
HDCD/CD-G
55
CS-470 DVD
Manuel d’instruction
SYSTÈME AUDIO DE VOITURE 5 EN 1
AVEC CD/USB/CARTE/BT/RADIO
ET ÉCRAN TACTILE
Remarque : Toute information est sujette à changement sans notification préalable
56
PRÉCAUTION
Attention
RISQUE DE CHOC ELECTRIQUE
NE PAS OUVRIR
AVERTISSEMENT: POUR RÉDUIRE LE
RISQUE D'INCENDIE OU DE CHOC
ELECTRIQUE, N'EXPOSEZ PAS CET
APPAREIL A LA PLUIE OU A L’HUMIDITÉ
ATTENTION : POUR RÉDUIRE LE RISQUE DE CHOC ÉLECTRIQUE, N’ENLEVEZ PAS LA PROTECTION
(OU L’ARRIÈRE). AUCUNE PIÈCE UTILE À L’UTILISATEUR À L’INTÉRIEUR. CONFIEZ LA RÉPARATION
A DU PERSONNEL DE SERVICE QUALIFIÉ
Le symbole d’éclair avec une flèche dans un triangle équilatéral sert à alerter l’utilisateur de la
présence de tension non-isolée à l’intérieur de l’appareil, d’ampleur suffisante pour constituer un
risque de choc électrique pour les personnes
!
Le point d’exclamation dans un triangle équilatéral sert à alerter l’utilisateur de la présence
d’instructions importantes sur l’utilisation et l’entretien (réparation) dans le livret accompagnant
l’appareil.
CLASS 1 LASER PRODUCT
Symbole produit laser : Situe sur le panneau arrière de l’unité, il indique que ce lecteur est un produit laser
de classe 1. Il utilise un laser léger qui n’émet pas de radiations dangereuses en dehors de l’unité.
1. Lisez ce manuel d’instruction dans son intégralité avant d’installer et d’utiliser.
2. Ne touchez pas les connexions d’alimentation avec les mains humides
3. Eteignez l’alimentation principale lorsque l’unité n’est pas utilisée. (Déconnectez le cordon d’alimentation du
secteur lorsque vous n’utilisez pas l’appareil pendant une durée prolongée). Avant de déplacer l’unité, enlevez
le disque de l’unité/du tiroir d’abord.
4. N’ouvrez pas le couvercle et ne touchez aucun composant exposé hors de l’unité, seulement pour des
techniciens qualifiés.
5. N’exposez pas l’unité à la lumière directe du soleil ou a des objets qui émettent de la chaleur, pour éviter des
dégâts sur l’unité.
6. Ne placez pas l’unité dans des conditions humides, cela pourrait influencer le pick-up de l’unité.
Placez l’unité sur une surface stable et dans un environnement bien ventilé. Assurez-vous de la bonne
ventilation de l’appareil.
7. Les trous ne sont pas couverts pour éviter la surchauffe et les dysfonctionnements.
8. Nettoyez le panneau et le boitier avec un linge sec et doux seulement, n’appliquez aucun alcool ou spray
plus lourd.
9. L’appareil ne doit pas être exposé aux gouttes ou aux éclaboussures et aucun objet rempli de liquide,
comme des vases, ne doivent être posés sur l’appareil.
10. Débranchez l’appareil lorsque vous ne l’utilisez pas pendant une longue durée, débranchez-le du secteur.
57
Table des matières
1. Avant d’utiliser...................................................................................................................59
1.1 Glossaire............................................................................................................ 59
1.2 Précautions.........................................................................................................59
1.3 Entretien et nettoyage des disques.....................................................................60
1.4 Information des piles de la télécommande..........................................................60
1.5 Description de la télécommande.........................................................................61
1.6 Emplacement et nom des commandes sur ou dans l’unité.................................62
1.7 Description des fils de connexion........................................................................63
1.8 Installation de l’unité............................................................................................64
2. Utilisation basique............................................................................................................65
3. Utilisation de la radio........................................................................................................66
4. Utilisation des fonctions disque, USB et cartes MMC/SD ...............................................68
4.1 Chargement/déchargement de disque, USB ou carte..........................................68
4.2 Mettre la lecture en Pause....................................................................................69
4.3 Arrêter la lecture ..................................................................................................69
4.4 Choisir le chapitre, la piste avec les touches UP/DN ou >>|/|<< .........................70
4.5 Choisir le chapitre ou la piste avec les touches numériques...............................70
4.6 Choisir le chapitre ou la piste avec le menu Root/PBC.......................................70
4.7 Lecture accélérée................................................................................................71
4.8 Lecture ralentie....................................................................................................71
4.9 Affichage d’image fixe saccadées.......................................................................71
4.10 Lecture répétée.................................................................................................71
4.10.1 Répéter un/tout..............................................................................................71
4.10.2 Répéter A-B................................................................................................... 71
4.11 Lecture en mode scan.......................................................................................72
4.12 Lecture à partir d’un chapitre/d’une piste ou d’un moment spécifique..............72
4.13 Lecture aléatoire...............................................................................................72
4.14 Lecture avec différents angles de vision...........................................................72
4.15 Lecture en mode zoom.....................................................................................72
4.16 Changement de langue des sous-titres............................................................73
4.17 Changement du langage audio.........................................................................73
4.18 Affichage du statut de lecture...........................................................................73
4.19 Lecture programmée.........................................................................................73
4.20 Lecture de fichiers image..................................................................................74
4.21 Lecture de fichiers Mp4.....................................................................................75
4.22 Fonction ESP et Id3 ..........................................................................................75
4.23 Utilisation du menu de configuration du système DVD......................................75
*
Contrôle parental..........................................................................................79
*
Code zone....................................................................................................80
5. Système main libre Bluetooth…………………………………………………………………81
6. Résolution des problèmes...............................................................................................83
7. Spécification.....................................................................................................................84
58
1. Avant l’utilisation
1.1
Glossaire
PBC (commande de lecture)
C’est une sorte de signal (menu) enregistré sur les disques au format avec SVCD ou VCD2.0
Pour la commande de lecture Pour les disques qui contiennent PBC, il peut lire des contenus logiciels
interactifs avec le menu affiche sur la TV. Et si le disque contient des images fixes, il peut afficher l'image fixe
en haute définition.
Titre
Généralement, le titre est une partie importante d’un disque DVD. Par exemple, la partie thématique du film est
le titre 1, la partie qui décrit comment faire le film est le titre 2, le casting est le titre 3, etc. chaque titre contient
un numéro de série qui le rend facile à détecter.
Chapitre
Un titre peut être divisé en plusieurs blocs, afin que chaque bloc puisse fonctionner comme une unité, l’unité
est appelée chapitre. Le chapitre contient au moins une unité.
Piste
C’est le plus gros composant des VCD. Généralement, chaque chanson d’un disque karaoké est une piste
1.2 Précautions
Sécurité
1. Source d’alimentation: L’unité doit être connectée à une source d’alimentation du type mentionné dans
les instructions d’utilisation ou marqué sur l’unité
2. L’unité est conçue pour que le terminal négatif de la batterie soit connecté à la fiche du véhicule.
Confirmez cela avant l’installation.
3. Ne laissez pas les fils des haut-parleurs être court-circuités en même temps lorsque l’unité est allumée.
Autrement, cela peut surcharger ou faire griller l’amplificateur de puissance.
4. N’installez pas le panneau détachable avant de connecter les fils.
5. Le boitier de protection permet de garder le panneau frontal en toute sécurité (voir photo).
Environnement
1. N’utilisez pas cette unité a proximité de l’eau ou de l’humidité.
2. Si de l’humidité se forme dans la lentille, elle risque de ne pas fonctionner correctement. Pour corriger ce
problème, attendez environ une heure pour que l’humidité s’évapore.
3. Si l’intérieur de la voiture est extrêmement chaud, n’utilisez pas le lecteur jusqu'à ce que la température
intérieure de le voiture soit redescendue.
59
1.3
Entretien et nettoyage des disques
Entretien des disques
1. Pour conserver le disque propre, manipulez-le par la tranche, ne touchez pas la surface de lecture du
disque.
2. Ne collez pas d’étiquette ou de scotch sur le disque. Si de la colle (ou autre) reste sur la surface du disque,
vous devez la nettoyer avant d’utiliser.
3. N’exposez pas le disque a la lumière directe du soleil, ou a proximité de toute autre source de chaleur
comme un conduit de chaleur, ou ne le laissez pas dans une voiture garée directement à la lumière du soleil
ou il peut y’avoir une forte hausse de la température.
4. Mettez le disque dans le boitier de disque pour conserver la température après que la lecture soit terminée.
Nettoyer un disque
1. Avant la lecture, nettoyez le disque avec un linge propre, nettoyez-le depuis le centre vers l’extérieur.
2. N’utilisez pas de nettoyants du commerce a base d'essence, ou de diluant ou de vaporisateur antistatique
qui peuvent endommager l’unité.
1.4 Informations sur les piles de la télécommande
Remplacer les piles de la télécommande
1. Avant d’utiliser la télécommande pour la première fois, enlevez le film isolant de la télécommande dans la
direction indiquée par la flèche (voir Fig.1)
2. Appuyez sur le support de blocage amovible dans la direction indiquée par la flèche A (voir Fig.2), puis
sortez le réceptacle de pile de la télécommande dans la direction indiquée par la flèche B (voir Fig.2).
3. Remplacez l’ancienne pile avec une pile neuve, la polarité (+) orientée vers le haut. (voir Fig.3).
4. Insérez le réceptacle de pile dans la position d’origine de la télécommande. (voir Fig.3).
Remarque concernant la pile de la télécommande :
1. Une utilisation incorrecte de la pile peut provoquer une surchauffe ou une explosion, et engendrer des
blessures ou des incendies.
2. Les fuites de piles peuvent provoquer des dégâts sur la télécommande (durée de vie des piles : 6 mois en
utilisation normale à température ambiante).
3. Ne coupez pas la pile.
4. Ne jetez pas la pile dans le feu.
5. Pour minimiser les risques d’accident, laissez la pile hors de portée des enfants.
60
1.5 Description de la télécommande
3
27
PWR
OPEN
14
EQ
1
35
4
BAND
1. TOUCHE ANG
2
29
32
9
34
MU
0K
SE L
+
M ENU
M OD E
SE T UP
CL EAR
31
40
2. TOUCHE MENU
6
3. TOUCHE ALIMENTATION
8
13
30
33
3
4
6
7
8
CLK
9/AF
0/10
TA
10+
/PTY
SLOW_FWD
ST
1
2
-10
+10
5
4. TOUCHE ▲
5
7
5. TOUCHE >>|
10
6. TOUCHE >
11
7. TOUCHE |<<
12
8. TOUCHE▼
41
24
28
21
22
LOC
ZOOM
26
25
#
INT
AUDIO
A-B
36
OSD
9. TOUCHE SEL
15
SEA RC H
AP S
RPT
RDM
TITLE/PBC
SUBT ITLE
PAIR
REDI AL
23
PROG
16
LOUD
TEL
37
10. TOUCHE LECTURE/PAUSE
18
11.
17
TOUCHES
NUMERIQUES
(0-10,+10, -10)
19
20
12. TOUCHE 10+/PTY :
39
13. TOUCHE SETUP
38
14. TOUCHE MODE
15. TOUCHE APS/Hang Up
16. TOUCHE RECHERCHE
29. TOUCHE MUET
17. TOUCHE RDM
30. TOUCHE STOP
18. TOUCHE RPT
31. TOUCHE VOLUME -
19. TOUCHE SUBTITLE / REDIAL
32. TOUCHE ◄
20. TOUCHE TITLE/PBC/PAIR
33. TOUCHE OK
21. TOUCHE VIEW-ANGLE/ST/#
34. TOUCHE VOLUME +
22. TOUCHE ZOOM
35. TOUCHE BAND
23. TOUCHE AUDIO
36. TOUCHE PROGRAMMATION
24. TOUCHE CLK
37. TOUCHE OSD
25. TOUCHE A-B
38. TOUCHE LOUD
26. TOUCHE INT
39. TOUCHE TEL
27. TOUCHE EQ/OPEN
40. TOUCHE TA
28. TOUCHE LOC/SLOW-FWD*
41. TOUCHE AF
61
1.6 Emplacement et nom des commandes sur ou dans l’unité
1
12
9
5
16
3
18
17 14
8
2
AP S
AV IN
REL
11 13 10
4 19 6
Panneau frontal
SD/MMC
7
15
Face frontal après avoir enlevé le panneau frontal
11. touche |<<
12. Touche BAND/TEL
13. TOUCHE APS/Hang Up
14. Touche EJECT
15. Touche RESET (réinitialisation)
16. Petit écran LCD
17.
Capteur
infrarouge
de
télécommande
18. Microphone
19. Touche REL
1. Touche OPEN (ouvrir)
2. Touche POWER/MUTE (M/A, Muet)
3. Moniteur
4. Fente AV IN
5. Fente disque
6. Prise USB
7. Fente carte SD/MMC
8. Touche MODE
9. Molette de Volume
10. Touche >>|
62
la
1.7 Description des fils de connexion
Description des fils de connexion
Remarque: Utilisez les pinces aux extrémités d’une ligne de terre fournie par le fabricant pour connecter les boulons de vis de
fixation, utilisez l’autre extrémité de la Ligne de Terre pour connecter au pole négatif de la source d’alimentation. Autrement la
vidéo sur l’écran risque de clignoter.
Description des fils de connexion de la fente de connexion de fils 1
NOTES
1. Seuls des haut-parleurs d’une impédance de 4 ohms peuvent être utilisés
2. Assurez-vous que le câble d’antenne auto bleu ne rentre pas en contact avec la connexion de terre.
Description du schéma de connexion pour la fente 2
FENTE DE CONNEXION DE FILS 2
PRISE DE CONNEXION DE FILS 2
Description de la connexion des lignes de frein de parking sur le système de freinage de parking intégré à la
voiture
Vers le corps métallique ou le
châssis de la voiture
Remarque: Apres avoir connecté la ligne de stationnement, la vidéo sur le petit moniteur sur le panneau frontal ne s’affichera
qu’après avoir activé le stationnement électronique.
63
1.8 INSTALLATION DE L’UNITE
INSTRUCTIONS D’INSTALLATION
L’UNITE EST CONCUE AVEC UN SYSTEME ANTIVOL. LA CHASSIS DE L’UNITE EST MUNI D’UN BOITIER DE METAL
COULISSANT. VEUILLEZ EFFECTUER LES CONNEXION A L’ALIMENTATION, AUX HAUT-PARLEURS ET A L’ANTENNE
CONFORMEMENT AUX CONDITIONS MENTIONNEES DANS LA NOTICE D’INSTRUCTION, PUIS INSTALLEZ LE BOITIER
DE METAL COULISSANT DANS LA VOITURE DE LA MANIERE SUIVANTE.
Pour augmenter la capacité anti
coincement, veuillez vous assurez de
fixer fermement la bride de support en
métal dans le joint de étal qui connecte
au châssis de la voiture.
BRIDE DE SUPPORT EN MÉTAL
Pliez les pattes dans la gaine de
montage en métal contre le tableau
de bord avec un tournevis.
CHASSIS DE L’UNITÉ
GARNITURE EN PLASTIQUE
TABLEAU DE BORD
PANNEAU FRONTAL
GAINE DE MONTAGE EN MÉTAL
Pour sortir l’unité de la gaine de montage en métal, insérez les
deux CLÉS fournies dans les fentes gauche et droite du châssis
en même temps. Puis, tirez le châssis hors de la gaine de
montage en métal comme indiqué sur l’illustration de droite.
64
2. Opération basique
1. Allumer / éteindre l’unité
L’appareil éteint, appuyez sur la touche POWER pour allumer l’unité.
L’appareil allumé, maintenez la touche POWER appuyé sur le panneau frontal ou appuyez sur la touche
POWER de la télécommande pour éteindre l’unité.
2. Faire coulisser le moniteur du système sonore de voiture hors du châssis
Appuyez sur la touche OPEN pour faire coulisser le moniteur du système sonore de voiture hors du
châssis ou pour le remettre en place.
3. Régler l’angle optimal du moniteur du système sonore de voiture
Pour régler l’angle optimal du moniteur du système sonore de
voiture, appuyez sur les touches BAS/HAUT sur le moniteur ou sur la
touche ANG de la télécommande plusieurs fois.
4. Sélectionner le mode de fonction
Appuyez sur la touche MODE pour sélectionner entre les
modes RADIO, DISC (après avoir inséré un disque, USB (après avoir
inséré un dispositif de stockage USB, AUX ou BLUETOOTH.
Mode Menu
Durant la lecture, une touche sur l’icône
après que l’interface clavier soit apparue, pour faire
apparaitre le menu de sélection du mode sur la droite. Alors, touchez sur l’icône correspondante au mode de
votre choix.
5. Ajuster le volume sonore
Faites tourner la molette de volume sur le panneau frontal ou maintenez appuyées les touches + ou –
sur la télécommande pour ajuster le volume sonore directement.
6. Pour couper le son
Appuyez sur la touche MUTE de la télécommande pour activer ou désactiver la fonction MUET.
Appuyer brièvement sur la touche POWER sur le panneau frontal peut également activer ou désactiver
la fonction MUET.
7. Afficher l’heure de l’horloge
Appuyez sur la touche CLK pour afficher l’heure de l’horloge sur le petit moniteur du panneau frontal.
Apres avoir fait coulisser le moniteur dans le châssis, appuyer sur la touche CLK peut afficher l’heure de
l’horloge sur le petit écran LCD.
8. Pour sélectionner le mode EQ de votre choix
Appuyez sur la touche EQ sur la télécommande pour sélectionner l’un des équaliseurs musicaux
présélectionnés : POP, ROCK, CLAS, OFF. L’effet sonore sera changé.
9. Activer / désactiver le mode LOUD
Appuyez sur la touche LOUD pour activer/ désactiver le mode LOUD.
Lorsque vous activez le mode LOUD, cela augmentera le niveau de basse immédiatement lorsque les
graves sont trop faibles.
65
10. Enlever le panneau frontal et réinitialiser le lecteur
Lorsque le moniteur sur le petit écran LCD s’affiche mal ou que certaines touches ne sont plus
accessibles ou que le son est distordu, appuyez sur la touche REL sur le panneau frontal pour détacher
celui-ci et tirez-le vers la droite puis sur la gauche pour l’enlever, ensuite appuyez sur la touche RESET pour
réinstaller les programmes sur leur configuration initiale.
11. Configuration
du menu
Pour configurer l’appareil, appuyez sur l’icône
principal pour passer sur l’interface SETUP (configuration) sur la
droite.
Dans l’interface, sélectionnez entre GENERAL, TIME, AUDIO,
VIDEO, RADIO, CALIBRATE en appuyant dessus, puis réglez-les en
appuyant sur les icones respectives apparaissant sur la droite.
3.
Utilisation de la radio
GENERAL SETUP
1. Passer en mode RADIO
Lorsque vous utilisez la touche MODE, ou le menu de sélection
de mode, l’interface RADIO apparaitra comme sur l’image à droite
Dans l’interface RADIO, appuyez sur l’icône
pour retourner
au menu de sélection de mode; l’ors de la lecture, maintenez la
touche mode pour allumer ou éteindre l’écran tactile, appuyez sur
pour passer a l’interface de fréquence comme sur
l’icone
l’image de droite; les autres icones sont les même que celle sur le
panneau de l’unité ou sur la télécommande.
Dans l’interface de réglage du menu vous pouvez régler MUTE,
APS< EQ, TA, AF. PTY, comme sur l’image de droite
2. TOUCHE BAND
En mode radio, appuyez sur la touche BAND sur la
télécommande pour sélectionner la fréquence radio de votre choix
entre Fm1, Fm2, Fm3, Am1 et Am2, et le mot signifie quelle station
est sélectionnée apparaitre sur le petit moniteur sur le panneau
frontal.
3. TOUCHES TUNE/SEEK UP/DOWN
En mode RADIO :
1) Maintenez les touches >>| ou |<< appuyées pour rechercher
automatiquement vers le bas ou le haut une station disponible à
partir de la fréquence actuelle.
RADIO interface
AUDIO & VIDEO SETUP interface
2) Appuyez brièvement sur les touches >>| ou |<< pour effectuer une recherche manuelle vers le haut ou vers
le bas de la station de votre choix à partir de la fréquence en cours
4. TOUCHE APS
En mode RADIO :
1) lorsque vous maintenez la touche APS appuyée, la radio recherche a partir de la fréquence la plus basse et
inspecte la force des signaux jusqu'à ce qu’un cycle de recherche soit terminée. Alors, les 6 stations au signal
le plus fort sont présélectionnées sur les numéros de présélection correspondant dans la mémoire. L’opération
APS est appliquée sur chaque espace de la bande sélectionnée. Lorsque l’opération APS est terminée, elle
scannera automatiquement chaque station pendant 5 secondes en bande FM ou AM depuis M ! comme avec
une pression brève sur la touche APS. Apres avoir terminé un cercle de recherche, la diffusion reprendra sur le
M1. En tout, 3x6 stations FM et 2x6 stations AM peuvent être sélectionnées.
66
2) lorsque vous appuyez brièvement sur la touche APS, la radio scannera chaque station présélectionnée
pendant 5 secondes sur la bande FM ou AM depuis M1. Apres avoir terminé un cercle de recherche, la
diffusion de M1 reprendra.
REMARQUE : Sur la bande FM, FM1, FM2, FM3 sont vérifiées un par un, sur la bande AM AM1 et AM2
sont vérifiées un par un.
5. TOUCHES DE STATION PRESELECTIONNEES [1-6]
En mode RADIO :
1) Pour mémoriser la fréquence en cours sur la bande en cours, maintenez l’un des six boutons de
présélection (1-6) appuyées sur la télécommande ou tournez la molette de nombre et maintenez-la appuyée.
2) Pour rappeler la mémoire de présélection ou la bande en cours, appuyez sur l’une des touches de
présélection (1-6) sur la télécommande ou faites tourner la molette de nombre et appuyez dessus.
6. TOUCHE STEREO/MONO
Appuyez sur la touche ST sur la télécommande pour sélectionner le mode sonore STEREO ou MONO
pour la bande FM.
7. TOUCHE LOC
1) En mode Radio, lorsque les signaux des stations radio distantes sont très faibles et que l’effet de réception
est mauvais lors du réglage, vérifiez si le mot LOC apparait sur l’écran LCD. Si le mot LOC apparait sur l’écran
LCD, appuyez sur cette touche pour éteindre la fonction LOC, puis réglez de nouveau la station de radio
distante.
2) En mode Radio, lorsque les signaux des stations radio distantes sont très forts et que cela cause des
interférences lors du réglage, appuyez sur cette touche pour activer la fonction LOC, puis réglez de nouveau la
station de radio distante.
8. TOUCHE PTY (PROGRAM TYPE = TYPE DE PROGRAMME)
Appuyez sur la touche PTY brièvement pour sélectionner l’un des modes suivants :
PTY MUSIC group- - PTY SPEECH group -- OFF
Lorsque le groupe PTY est activé, appuyez sur les touche VOL+ ou VOL- de la télécommande ou
tournez la molette de VOLUME sur le panneau frontal pour sélectionner l’un des types de programmes PTY
comme suit :
<-->NEWS<-->AFFAIRS<-->INFO<-->SPORT<-->EDUCATE<-->DRAMA
<-->CULTURE<-->SCIENCE<--> VARIED<-->WEATHER<--> FINANCE
<-->CHILDREN<-->SOCIAL<-->RELIGION<-->PHONE IN<-->TRAVEL
<-->LEISURE<-->DOCUMENT< -->PTY NONE<-->POP M< -->ROCK M
<-->EASY M<-->LIGHT M<--> CLASSICS<-->OTHER M<-->JAZZ
<-->COUNTRY<-->NATION M<-->OLDIES<-->FOLK M<-->
Lorsque le groupe PTY est activé, appuyer sur les 6 touches numériques permet également de
sélectionner un des programmes PTY mentionnés ci-dessus.
Après avoir sélectionné l’un des programmes PTY, il affichera SEEK PTY et recherchera
automatiquement la station du programme PTY. Si la station du programme PTY n’existe pas, il affichera PTY
NONE, puis reviendra à la station normale.
9. TOUCHE AF [ALTERNATIVE FREQUENCIES = FRÉQUENCES ALTERNATIVES]
Lorsque vous appuyez sur la touche AF brièvement, le mode de fréquence alternative AF est sélectionné,
et apparait avec un segment AF sur l’écran.
Segment éteint : Mode de commutation AF éteint.
Segment allumé : Mode de commutation AF allumé avec information RDS.
Segment clignotant : Mode de commutation AF allumé, mais l’information RDS n'est pas encore reçue.
67
Lorsque le mode de commutation AF est sélectionné, la radio inspecte la force du signal AF en
permanence. L’intervalle entre les moments de vérification de chaque AF dépend de la force du signal de la
station en cours, entre quelques minutes pour une station forte et quelques secondes pour une station faible.
Chaque fois qu’une nouvelle fréquence alternative est plus forte que la station en cours, elle passe sur
cette fréquence pendant un très court moment, et la NOUVELLE FREQUENCE est affichée pendant 1-2
secondes.
Etant donné que la durée muette de la commutation AF ou du temps d’inspection est très courte, elle est
quasiment inaudible en cas de programme normal.(Lorsqu’AF clignote sur l’écran LCS, il recherchera la plus
forte station RDS. Si AF et TP clignotent sur l’écran, il peut seulement chercher les stations d’annonce de
trafic).
En mode FM, lorsque AF est activé, les fonctions SEEK, (SCAN), AUTO-MEMORY peuvent seulement
recevoir et enregistrer des programmes RDS.
10. TOUCHE TA [TRAFFIC ANNOUNCEMENT = ANNONCES DE TRAFIC]
Appuyez sur la touche TA brièvement pour activer le mode de recherche TA.
Lorsqu’une annonce concernant le trafic est transmise :
1) Si l’unité est en mode MMC/SD ou USB, elle passera temporairement en mode radio.
2) passe temporairement sur une station liée EON lorsque EON détecte une annonce de trafic ou cet
autre programme et TA, TP s’afficheront sur l’écran LCD
* Fonction interruption de TA :
L’annonce de trafic en cours est annulée si vous appuyez sur cette touche.
* Lorsque TA est activé, les fonctions SEEK, (SCAN), AUTO MEMORY peuvent être reçues ou
enregistrées seulement lorsque le code d’identification du programme de trafic a été reçu.
4. Utilisation disque et USB
4.1 Charger/ décharger un disque ou USB
Pour lire des fichiers ou une carte, appuyez sur la touche EJECT pour faire coulisser le moniteur.
Puis, Insérez le disque ou la carte dans la fente pour disque ou la fente pour carte SD/MMC.
Pour décharger le disque ou la carte, appuyez sur la touche STOP une fois pour arrêter la lecture, puis
appuyez sur la touche EJECT pour faire coulisser le moniteur et éjecter le disque dans la fente, enlevez donc
le disque, ou appuyez d’abord sur la carte et sortez la carte de la fente.
Pour lire des fichiers sur une clé USB, insérez une clé USB dans la prise USB connectée au boitier
arrière. Pour décharger la clé USB, appuyez sur la touche STOP deux fois, puis enlevez la clé USB.
Sélectionnez le mode USB ou CARTE comme indiqué sur la droite
Remarque : L’icône
correspond aux fichiers audio, l’icone
correspond aux fichiers vidéo, l’icone
image.
Touchez l’icône
l’icone
correspond aux fichiers
pour allumer le menu principal, touchez
pour retourner à la configuration précédente.
68
USB/CARD INTERFACE
: Touchez pour mettre la lecture en pause.
: Touchez pour arrêter la lecture.
: Touchez l’un des deux pour passer entre les niveaux de
vitesse de retour ou avance rapide. (sauf en mode image).
: Touchez l’un des deux pour sélectionner le chapitre / la piste
suivant(e) ou précédent(e)
Root int er face f or MUSIC
: Touchez pour augmenter ou diminuer le volume.
: Touchez pour passer à la page supérieure / inferieure.
: Touchez pour sélectionner le mode de lecture INT (sauf
en mode image).
: Lors de la lecture de VCD, touchez pour sélectionner le
mode audio ST/MONO.
: Fonction identique à la touche MENU de la
télécommande.
: Fonction identique à la touche TITLE de la
télécommande.
: Fonction identique à la touche REPEAT de la
télécommande.
: Fonction identique à la touche SUBTITLE de la
télécommande.
: Touchez pour sélectionner une piste entre 1-9 puis
sélectionnez OK pour jouer votre sélection
: Lors de la lecture, appuyez sur la touche ZOOM, puis
touchez l’un d’entre eux équivaut aux touches directionnelles sur la
télécommande. (sauf en mode musique et image) :Lors de la lecture,
appuyez sur l’un d’eux pour changer l’angle de lecture (seulement en mode
image)
: Fonction identique à la touche ZOOM de la télécommande.
: Fonction identique à la touche RDM de la télécommande.
: Lors de la lecture de DVD, touchez cette icône pour changer
l’angle de lecture.
Keyboard interface-1
Keyboard interface-2
Keyboard interface-3
4.2 Mise en pause de la lecture
En lecture sous les modes DVD/VCD/CD/MP3/WMA, appuyez sur la touche PAUSE de la
télécommande pour mettre la lecture en pause, appuyez sur la touche LECTURE pour reprendre la lecture
normale
4.3 Arrêter la lecture
En lecture sous les modes DVD/VCD/CD/MP3/WMA, appuyez sur la touche PAUSE de la
télécommande pour arrêter la lecture, appuyez sur la touche LECTURE pour reprendre la lecture normale
Appuyez sur la touche STOP deux fois pour arrêter complément la lecture, puis appuyez sur la touche
LECTURE pour reprendre la lecture à partir du début du chapitre/ de la piste.
69
4,4 Choisir le chapitre ou la piste avec les touches >>| ou |<<
Appuyez sur les touches >>| / |<< pendant la lecture pour sélectionner le chapitre / la piste suivant(e)
ou précédent(e)
Remarque: Appuyez sur la touche >>|/|<< à plusieurs reprises pour avancer/reculer de plusieurs
chapitres / pistes.
4.5 Choisir le chapitre ou la piste avec les touches numériques
L’appareil en mode de lecture DVD/VCD(PBC OFF)/MP3/WMA/CD, appuyez sur l’une des touches
1-9 et sur la touche 0/10 pour sélectionner et jouer directement la première à la 10e piste / chapitre (la touche
0/10 est utilisée comme la touche 10).
Si vous voulez saisir un numéro de piste supérieur à 10, utilisez les touches 10+, puis 0-9 et 0/10
Par exemple, pour jouer la 13e piste/chapitre, commencez par appuyer une fois sur la touche 10+, puis
sur la touche 3. Par exemple, pour jouer la 34e piste / chapitre, commencez par appuyer trois fois sur la touche
10+, puis appuyez sur la touche 4 (la touche 0/10 est utilisée comme la touche 0)
Remarque: Une longue pression sur les touche +10 ou – 10 permet de jouer les 10 chapitres/ pistes
suivants ou précédents (seulement en mode MP3/WMA)
4.6 Sélectionner un chapitre/ piste avec le menu Root / PBC (si le disque contient un menu root/PBC)
L’appareil en mode de lecture de DVD
1.
Appuyez sur la touche TITLE sur la télécommande pour afficher la liste de titres.
2.
Appuyez sur les flèches directionnelles pour sélectionner le titre de votre choix, puis appuyez sur les
touches OK ou LECTURE pour ouvrir le menu racine du dossier sélectionné.
3.
Appuyez sur les flèches directionnelles pour sélectionner le titre de votre choix, enfin appuyez sur les
touches OK ou LECTURE pour ouvrir lire le chapitre sélectionné.
Pendant la lecture, appuyer sur la touche MENU permet d’afficher directement le menu racine du titre
en cours de lecture.
En mode CVD
1. Lorsque vous commencez à activer la fonction PBC, il lira à partir du début du disque jusqu'à ce que le
menu PBC apparaisse sur l’écran TV, si le disque contient un menu PBC
2.
Appuyez sur les touches numériques pour sélectionner la piste que vous souhaitez jouer.
En mode MP3/WMA/CD, les touches TITLE, PBC et MENU sont désactivées.
4.7 Lecture rapide
Pendant la lecture normale, maintenez les touches >>|/|<< appuyées pour avancer ou reculer
rapidement aux vitesses suivantes : x2, x4, x8. x20, normal.
Pendant la lecture rapide, appuyez sur la touche LECTURE pour reprendre la lecture normale.
70
4.8 Lecture ralentie
Pendant la lecture, appuyez sur la touche SLOW_FWD pour passer en mode de lecture arrière ralentie
A chaque pression consécutive de la touche SLOW_FWD, la vitesse de lecture ralentira. Les niveaux
de vitesse de lecture ralentie, sont les suivants :
x1/2,x1/3,x1/4,x1/5,x1/6,x1/7,normal.
Pendant la lecture ralentie, appuyez sur la touche LECTURE pour reprendre la lecture normale.
La fonction ne fonctionne qu’avec les fichiers vidéo.
4.9 Affichage d’image fixe saccadées
Si l’unité est en cours de lecture de vidéo, appuyez sur la touche TEL de manière répétée pour
afficher l’image fixe image par image.
Appuyez sur la touche LECTURE pour reprendre la lecture normale.
4.10 Lecture répétée
4.10.1 Répéter UN/TOUT
1.
En mode lecture DVD:
Appuyez sur la touche RPT pour sélectionner REP CHAPTER, REP TITLE, REP ALL ou REP OFF.
2.
En mode de lecture VCD (PBC OFF)/CD :
Appuyez sur la touche RPT pour sélectionner REP ONE, REP ALL ou OFF.
Lorsque l’appareil est en mode de PBC ON, lors de la lecture de disque VCD, la touche RPT n’est pas
disponible.
3.
En mode de lecture MP3/WMA
Appuyez sur la touche RPT pour sélectionner REP ONE, REP DIR, REP ALL ou OFF.
4.10.2 Répéter A-B
Appuyez sur la touche A-B si vous souhaitez répéter un segment spécifique sur un disque que vous
définissez :
1.
Appuyez sur la touche A-B a un point (A) ou vous souhaitez que la boucle de répétition commence
Appuyez de nouveau sur la touche A-B au point ou vous souhaitez que la boucle de répétition se
termine. Le segment sera alors lu de manière répétée.
2.
Pour annuler le mode de répétition A-B et reprendre la lecture normale, appuyez sur la touche A-B une
troisième fois.
Remarque:
Pendant la lecture de VCD/MP3/WMA/CD, les points A et B doivent être situées sur la même piste.
Pendant la lecture de DVD, les points A et B peuvent être sélectionnés depuis des chapitres différents.
4.11 Lecture en mode scan
1. En mode de lecture VCD(PBC OFF)/CD, appuyez sur la touche INT pour lire les 15 premières secondes
de chaque piste du disque. Appuyez sur la touche INT de nouveau pour reprendre la lecture normale.
71
2. En mode de lecture de DVD/MP3/WMA, la touche INT n’est pas disponible.
4.12 Lecture à partir d’un chapitre/d’une piste ou d’un moment spécifique
1. En mode de lecture DVD, appuyez sur la touche SEARCH pour afficher une interface et mettre l’élément
titre en surbrillance, puis utilisez les touches numériques pour saisir le numéro de série du titre, utilisez les
touche directionnelles pour mettre l’élément du chapitre en surbrillance, alors utilisez les touches numériques
pour saisir le numéro de série du chapitre ;
Vous pouvez encore utiliser les touches directionnelles pour mettre en surbrillance l’élément du temps,
puis utiliser les touches numériques pour saisir le moment de début de lecture de votre choix, finalement
appuyez sur les touches OK ou LECTURE pour lire le chapitre sélectionnée ou lire à partir du moment
sélectionné
2. En mode de lecture VCD/MP3/WMA/CD, appuyez sur la touche SEARCH pour afficher une interface et
mettre en surbrillance l’élément piste, puis utilisez les touches numériques pour saisir le numéro de la piste,
vous pouvez encore utiliser les touches directionnelles pour mettre en surbrillance l’élément temps, alors
saisissez le moment de début de lecture avec les touches numérique, finalement appuyez sur les touches OK
ou LECTURE pour lire la piste sélectionnée ou lire à partir du moment sélectionné..
4.13 Lecture aléatoire
L’appareil en mode de lecture DVD/VCD(PBC OFF)/MP3/WMA/CD, appuyez sur la touche RDM pour
passer entre les modes RANDOM (ON) / RANDOM OFF. EN mode RANDOM (ON), les pistes seront jouées
dans un ordre aléatoire.
4.14 Lecture avec différents angles de vision
1. En mode de lecture VCD/MP3/WMA/CD, la touche VIEW-ANGLE sur la télécommande n’est pas
disponible.
2. En mode de lecture DVD, appuyez sur la touche VIEW-ANGLE sur la télécommande pour afficher
différents angles de vision. (Cette fonction n’est disponible que pour les DVD avec la fonction ANGLE)
4.15 Lecture en mode zoom
En mode vidéo/image, lors de la lecture, appuyez de manière répétée sur la touche ZOOM pour agrandir
certaines zones des images sur l’écran avec ces multiples :
ZOOMx2,ZOOMx3,ZOOMx4,ZOOMx1/2,ZOOMx1/3,ZOOMx1/4,ZOOM OFF.
Appuyez sur l’une des touches ^/v/>/< pour sélectionner la zone que vous souhaitez agrandir.
4.16 Changement de langue des sous-titres
En mode de lecture DVD, appuyez sur la touche SUBTITLE de manière répétée pour sélectionner la
langue des sous-titres ou éteindre les sous-titres (en fonction des media utilisés.)
En mode de lecture de VCD/MP3/WMA/CD, cette touche n’est pas disponible.
4.17 Changement du langage audio
1. En mode de lecture DVD, appuyez plusieurs fois sur la touche AUDIO sur la télécommande pour
sélectionner le type de langue de votre choix (dépend du media utilisé)
72
2. En mode de lecture VCD, appuyez plusieurs fois sur la touche AUDIO sur la télécommande pour
sélectionner le mode sonore entre MONO L, MONO R, MIX MONO et Stéréo, fonction sans langage.
3. En mode de lecture de CD/MP3/WMA, la touche AUDIO n’est pas disponible.
4.18 Affichage du statut de lecture
1. En mode de lecture DVD, appuyez sur la touche OSD de manière répétée pour allumer/éteindre le statut
de lecture. Lorsqu’il est allumé il affichera des informations telles que : le numéro du titre en cours de lecture,
le numéro du chapitre en cours de lecture, le temps écoulé dans le chapitre en cours, le temps restant dans le
chapitre en cours, le temps écoulé du titre en cours, le temps restant du titre en cours, etc.
2. En mode de lecture VCD/CD, appuyez sur la touche OSD de manière répétée pour allumer/éteindre le
statut de lecture. Lorsqu’il est allumé il affichera des informations telles que : le numéro de piste en cours de
lecture, le temps écoulé dans la piste en cours, le temps restant dans la piste en cours, le temps écoulé sur le
disque, le temps restant sur le disque.
3. En mode de lecture MP3/WMA, appuyez sur la touche OSD de manière répétée pour allumer/éteindre le
statut de lecture. Lorsqu’il est allumé il affichera des informations telles que : le numéro de piste en cours de
lecture, le temps écoulé dans la piste en cours, le temps restant dans la piste en cours.
4.19 Lecture programmée
Cette fonction vous permet de saisir l’ordre dans lequel vous souhaitez lire les chapitres/piste sur les
DVD/VCD/MP3/WMA/CD.
1
Pendant la lecture, appuyez sur la touche PROG pour entrer dans l’interface de programmation
comme suit :
2 Utilisez les touches directionnelles pour déplacer le curseur sur l’emplacement de votre choix pour saisir
le numéro de séquence
3 Utilisez les touches numériques pour saisir le numéro du titre/chapitre/piste suivant dans l’ordre de votre
choix.
4 Utilisez les touches directionnelles pour déplacer le curseur sur l’élément lecture, puis appuyez sur la
touche OK pour lire les titres/chapitres/pistes dans l’ordre programmés.
73
Vous pouvez aussi appuyer simplement sur la touche LECTURE pour lire les titres/chapitres/pistes dans
l’ordre programmés
*
Pour quitter le mode de lecture programmée, appuyez d’abord sur la touche STOP, puis appuyez sur la
touche LECTURE pour entrer l’ordre de lecture, ou appuyez sur la touche PROG deux fois à nouveau.
*
Pour enlever tous les numéros programmés, déplacez le curseur sur l’élément Clear, puis appuyez sur la
touche OK.
*
Pour changer l’ordre programmé, déplacez le curseur sur l’élément que vous souhaitez changer,
saisissez le numéro de votre choix.
*
En mode de lecture VCD, si le mode PBC est allumé, il s’éteint lorsque vous entrez en mode de lecture
programmée.
4.20 Lecture de fichiers image
1. Le menu source s’affiche sur le moniteur lorsque vous commencez a passer en mode IMAGE.
Dans le menu racine, l’icône de fichier a gauche est pour les fichiers MP3/WMA, celui du milieu est pour
les fichiers IMAGE, celui de droite est pour les fichiers VIDEO. Si l’un des ces 3 types de fichiers n’existent pas,
vous ne pouvez pas déplacer le curseur sur l’icône en question.
2. Lorsque vous affichez le menu racine, appuyez sur les touche directionnelles pour sélectionner le
dossier/le fichier/ ou le type de fichier de votre choix, puis appuyez sur OK ou LECTURE pour ouvrir le dossier
ou lire le fichier sélectionné ou lire seulement cette sorte de fichier.
Lorsque vous affichez le menu racine, vous pouvez aussi utiliser les touches directionnelles pour
sélectionner les numéros des fichiers et les lire directement.
Lorsque vous sélectionnez l’icône de fichiers de type IMAGE, appuyez sur les touche Haut ou Droite pour
sélectionner le premier fichier IMAGE, puis appuyez sur la touche V pour sélectionner le fichier IMAGE de
votre choix, finalement, appuyez sur les touches OK ou LECTURE/PAUSE pour afficher l’image sélectionnée
en mode plein écran.
3. Pendant la lecture d’IMAGE, appuyez sur les touches directionnelles pour changer l’angle de vision des
images qui s’affiche comme suit :
>: 90 deg cw; <: 90deg ccw; ^:HAUT<-->BAS; v: GAUCHE<-->DROITE
Pendant la lecture d’IMAGE, appuyez sur la touche PROG pour changer le mode de rafraichissement
d’image.
Pendant la lecture d’IMAGE, appuyez sur la touche STOP pour arreter la lecture et retourner au menu
racine.
*
Pendant la lecture d’image, les touches suivantes ne sont pas disponibles : SLOW-FWD,
SUBTITLE, TITLE, ANGLE, AUDIO, RDM, INT et A-B.
*
En mode Image, les autres opérations sont les mêmes qu’en mode MP3/WMA.
4.21 Lecture de fichiers Mp4
1. Le menu racine s’affiche sur l’écran lorsque vous passez en mode MP4, puis le premier fichier est joué
automatiquement.
Pendant la lecture, appuyez sur la touche STOP pour arrêter la lecture et retourner au menu racine.
2. Lorsque vous affichez le menu racine, appuyez sur les touche directionnelles pour sélectionner le
dossier/le fichier/ ou le type de fichier de votre choix, puis appuyez sur OK ou LECTURE pour ouvrir le dossier
ou lire le fichier sélectionné ou lire cette sorte de fichier.
74
Lorsque vous affichez le menu racine, vous pouvez aussi utiliser les touches directionnelles pour
sélectionner les numéros des fichiers et les lire directement.
*
Les touches ANGLE, PROG, RDM INT et TITLE/PBC ne sont pas valides
*
Les autres fonctions sont les mêmes qu’en mode DVD, mais la fonction RPT est la même
MP3/WMA.
qu’en mode
4.22 Fonction ESP et Id3
La fonction ESP existe pour tous les formats de disques.
En mode MP3/WMA, pendant la lecture, l’information du nom de fichier, de dossier, le titre de la chanson,
et l’album défileront sur l’écran LCD.
A condition que les fichiers mp3 en cours de lecture contiennent des informations Id3 tag en version de
format 1.0/2.0, les 3 éléments soulignés ci-dessus défileront sur l’écran LCD. Autrement ils ne défileront pas.
4.23 Utilisation du menu de configuration du système DVD
1. Appuyez sur la touche SETUP sur la télécommande pour accéder au menu de système DVD sur le
moniteur
2. Il y’a 6 pages de configuration en tout dans le menu système. Appuyez sur la touche > ou < pour
sélectionner la page de configuration de votre choix.
3. Appuyez sur la touche ^ ou v pour sélectionner un élément de configuration sur la page de configuration
sélectionnée.
4. Appuyez sur la touche > pour entrer l’élément de configuration. Puis appuyez sur la touche v ou ^ pour
sélectionner un mode de configuration, finalement appuyez sur OK pour confirmer.
*
Appuyez sur la touche < pour retourner au niveau supérieur.
*
Appuyez sur la touche SETUP de nouveau ou utilisez les touches directionnelles pour mettre en
surbrillance l’élément EXIT SETUP et appuyez sur la touche OK pour quitter le menu système.
Dans le menu système du DVD, il y’a 6 pages en tout. Elle se présentent ainsi :
4.23.1 CONFIGURATION SYSTEME
Type de TV
L’élément de configuration permet de correspondre à la taille de l’écran.
4:3 PS: Choisissez l’élément lorsque vous connectez un téléviseur avec
écran 4 :3. lorsque vous diffusez des images de taille 16 :9 , les parties
gauches et droite de la vidéo seront coupées, et affichées en plein écran.
4:3 LB: Choisissez l’élément lorsque vous connectez un téléviseur avec
écran 4 :3. Lorsque vous diffusez des images de taille 16 :9 , les parties
haut et bas de la vidéo seront affichées noir.
16:9: Choisissez cet élément lorsque vous connectez un téléviseur avec écran 16 :9.
MOT DE PASSE
Cet élément de configuration sert à verrouiller ou déverrouiller le niveau de contrôle parental.
Par défaut, cet état est verrouillé. Le mot de passe par défaut est 0000.
75
Vous pouvez définir un nouveau mot de passe de la manière suivante : Sélectionnez l’élément PASSWORD et
appuyez sur la touche > pour entrer dedans, puis saisissez le mot de passe d’origine 0000, puis appuyez sur
la touche OK pour le débloquer.
Appuyez de nouveau sur la touche > pour entrer à nouveau, puis saisissez un nouveau mot de passe de
votre choix et appuyez sur OK pour confirmer le changement.
Avant que d’autres personnes ne voient le manuel, vous devez mémoriser le mot de passe et couper la partie
concernant le mot de passe dans le manuel.
RATING
Cet élément sert à définir un nouveau niveau de contrôle parental.
1. Sélectionnez l’élément PASSWORD et appuyez sur la touche > pour entrer, puis saisissez le mot de passe
mentionné ci-dessus, puis appuyez sur la touche OK pour déverrouiller le niveau de contrôle parental.
2. Sélectionnez l’élément RATING et appuyez sur la touche > pour entrer, puis utilisez les flèches
directionnelles pour sélectionner le niveau de contrôle de votre choix, puis appuyez sur la touche OK pour
confirmer.
3. Sélectionnez l’élément PASSWORD de nouveau et appuyez sur la touche > pour entrer, puis saisissez le
mot de passe, puis appuyez sur la touche OK pour verrouiller le niveau de contrôle parental.
DEFAULT
Cet élément sert à reconfigurer tous les éléments paramétrables sur leur statut initial.
4.23.2
CONFIGURATION DE LANGUE
LANGAGE DE L’OSD
Cet élément sert à sélectionner la langue du MENU SYSTEME et de
toutes les interfaces ponctuelles apparaissant durant la lecture.
LANGAGE AUDIO
Cet élément sert à sélectionner le langage audio.
LANGUE DES SOUS-TITRES
Cet élément sert à sélectionner le langage des sous-titres.
LANGUE DU MENU
Cet élément sert à sélectionner le langage de menu des disques.
4.23.3 PARAMETRES AUDIO
SORTIE AUDIO
Il n’y a que le mode ANALOG, ex : SPDIF/OFF, non optionnel.
TOUCHES
Cela sert à sélectionner la tonalite de votre choix pour les touches (de faible à fort).
4.23.4 PARAMETRE VIDEO
LUMINOSITE
Cela sert à régler la luminosité de la sortie vidéo.
CONTRASTE
Cela sert à régler le contraste de la sortie vidéo.
76
NUANCE
Cela sert à régler les nuances de la sortie vidéo.
SATURATION
Cela sert à régler la saturation de la sortie vidéo.
NETTETE
Cela sert à régler la netteté de la sortie vidéo.
4.23.5 PARAMETRES HAUT-PARLEURS
DOWNMIX
Cela sert à sélectionner l’effet sonore de votre choix lorsqu’il n’y a pas de
haut parleur central ou de caisson de graves.
Il y’a 3 modes : LT/RT, STEREO, VSS.
LT/RT (Gauche/Droite): Lorsque vous lisez un disque avec effet Dolby stéréo PRO LOGIC, choisissez cet
élément afin que la sortie soit d’effet théâtre vivid.
STEREO: Si vous choisissez cet élément, lorsque vous émettrez des signaux audio 5.1 Canaux, les canaux
gauche et droite seront émis, lorsque vous émettez des signaux 2 canaux, les deux canaux stéréo normaux
seront émis.
VSS: Si vous choisissez cet élément, lorsque vous jouerez un disque enregistré en 5.1 canaux, les
haut-parleurs du canal principal peuvent émettre un signal audio avec effet VSS.
4.23.6 PARAMETRE DIGITAL
MODE OP
Cela sert à sélectionner le mode de sortie audio
SORTIE LIGNE : Cela compresse le signal audio de manière linéaire.
Donc le volume sonore est moindre. Cet élément peut être
sélectionné le soir.
RF REMOD: Cela permet d’augmenter le niveau sonore, cet élément peut être sélectionné le jour.
DYNAMIC RANGE
Apres avoir sélectionné le mode de compression SORTIE LIGNE, réglez cet élément, vous pourrez alors
ajuster le ratio de compression linéaire. Si vous le réglez sur FULL, la valeur crête à crête du signal sera la
minimum, si vous le réglez sur OFF, la valeur crête à crête du signal audio sera la maximum.
DUAL MONO
Cela permet de sélectionner un mode de sortie audio de votre choix pour les cotés gauche et droite du signal.
Cela sert principalement pour les karaokés d’Ac3. Il y’a 4 modes en tout, comme suit :
STEREO, MONO L, MONO R, MIX MONO.
77
* Contrôle parental
Q : Apres avoir inséré un DVD dans le compartiment de disque, une boite de dialogue apparait qui me
demande de saisir un mot de passe de 4 chiffres. Pourquoi ?
A : C’est parce que le film que vous souhaitez voir a été classé avec contrôle parental et le niveau actuel de
contrôle du lecteur est inferieur a celui du disque en cours de lecture.
Vous devez saisir le mot de passer et entrer dans le menu de configuration du contrôle parental pour
régler une valeur égale ou supérieure au niveau de contrôle du disque, vous pourrez alors lire le disque.
!
NOTE
* Si vous n’avez pas changé le mot de passe, le mot de passe par défaut pour le lecteur DVD sera vide.
Donc vous devez saisir le mot de passe de votre choix et le saisir de nouveau pour le vérifier et entrer dans le
menu de configuration du contrôle parental.
* Pour la configuration du niveau de contrôle parental du lecteur DVD, veuillez consulter le contenu relatif
au menu LOCK pour plus de détails.
Accessoires : Contrôles parental
La fonction de contrôle parental d’un lecteur DVD permet de contrôler la lecture d’un film classé sur un
disque.
Vous pouvez définir le lecteur DVD (y compris le logiciel de lecture sur le PC) sur un certain classement
avec le MENU SETUP sur l’écran. SI le niveau de contrôle défini sur le disque est supérieur à celui du lecteur
DVD, le lecteur DVD ne pourra pas lire le disque. Parfois, l’ordre de contrôle parental de certains disques
diffère entre eux. La configuration du niveau de contrôle peut être protégé par mot de passe. Cependant, si
vous sélectionnez l’élément Déverrouiller, la fonction de contrôle parental sera invalide, le contenu du disque
pourra être joué entièrement.
Le disque de film peut être conçu afin que le lecteur DVD lise les différentes versions de contenus d’un
même film sur un niveau de contrôle différent défini par le contrôle parental. EN fonction des caractéristiques
du DVD de changement décrites ci-dessus, les scènes ne convenant pas aux enfants seront éliminées ou
remplacées par les autres scènes convenables automatiquement.
Tous les niveaux de contrôle parental sont les suivants :
Débloqué
1
Enfants
2
G
3
PG
4
PG 13
5
PG R
6
R
7
NC 17
8
Adulte
78
*
Code zone
Q: REGION ERROR apparait après avoir inséré un disque dans le compartiment de disque. Pourquoi ?
R : Car le lecteur DVD et le disque ont des codes zones respectifs. Si les codes zone ne correspondent pas, le
lecteur DVD ne peut pas lire le disque.
Annexe : Code zone de DVD :
La Motion Picture Association of America (MPAA) a divise le monde en 6 zones, et désignée chacune de
ces régions par un code. Les codes zone et les pays des zones représentées par les codes régions sont les
suivants :
Zone 1: USA, Canada, iles du pacifique Est ;
Zone 2: Japon, Europe de l’ouest, Europe du nord, Egypte, Afrique du Sud, Moyen Orient ;
Zone 3: Pays d’Asie du sud-est y compris Taiwan, Hong Kong et la Corée du Sud, la Thaïlande,
l’Indonésie, etc.
Zone 4: Australie, Nouvelle Zélande, Amérique Centrale et Amérique du sud, Iles du Pacifique Sud ;
Zone 5: Russie, Mongolie, Péninsule Indienne, Asie centrale, Europe de l’est, Corée du nord, Afrique du
nord, Asie du Nord-ouest, etc.
Zone 6: Chine continentale.
Seuls les disques produits par les 8 plus grandes sociétés productrices de film des USA assignent des
codes zones. Les disques de film DVD produits par d’autres sociétés que les 8 plus grandes sociétés
productrices de film des USA ne sont pas restreints par la loi des codes zone. Généralement ils sont appelés
disques libres de code zone ou disque de zone intégrale. Les 8 plus grandes sociétés productrices de film des
USA sont les suivantes :
1. WarnerBros;
2. Columbia;
3. 20thCenturyFOX;
4. Paramount;
5. Universal;
6. UA(UnitedArtist);
7. MGM(MetroDogwynMayer);
8. WaltDisney
79
5. SYSTEME MAINS LIBRES BLUETOOTH
1.
Entrer en mode Bluetooth
Lorsque vous utilisez la touche MODE, ou le menu de sélection de mode, l’interface BLUETOOTH
apparaitra comme sur l’image à droite
Dans l’interface Bluetooth, les descriptions des icones sont les
suivantes :
: Touchez cette icône pour transférer l’audio entre le système audio
de la voiture et le téléphone.
: Touchez cette icône pour faire apparaitre l’interface des messages
comme sur l’image a droite.
: Touchez cette icône pour le mode d’appel audio, appeler le nom
que vous avez enregistré sur votre téléphone, et il apparaitra
automatiquement.
Les autres icones sont les mêmes que celle du panneau frontal et de la télécommande
2. Couplage et connexion
1) Activez le mode Bluetooth du téléphone portable ;
2) Sélectionnez l’élément de recherche d'appareil Bluetooth et entrez dedans. Apres que la recherche soit
terminée, les noms des appareils Bluetooth apparaitront s’il y en a. Sélectionnez-le et entrez dedans, une
interface apparaitra qui vous demandera de saisir un mot de passe, Saisissez le mot de passe 0000 et entrez
dedans. Puis un message vous indiquera que le couplage est OK.
3) Pour certains téléphones portables, ils peuvent automatiquement être connectés avec l’appareil
Bluetooth du système sonore de voiture après que le couplage soit effectué ; certains téléphones portables
doivent effectuer une sélection du dispositif Bluetooth et appuyer sur la touche CONNEXION. Lorsque la
connexion est effectuée, l’écran LCD du système audio de voiture affichera LINK OK.
* Lorsque le couplage échoue, maintenez le bouton PAIR appuyé sur la télécommande pour entrer dans
le mode de couplage, alors, l’écran LCD affichera PAIR START, et tentera à nouveau de se coupler et de se
connecter avec le téléphone portable.
3.
Utilisez votre téléphone mobile pour effectuer la connexion ou la déconnexion.
En statut de connexion, trouvez les dispositifs Bluetooth connectés, puis appuyez sur la touche de
déconnexion pour déconnecter ;
En statut de déconnexion, trouvez les dispositifs Bluetooth déconnectés, puis appuyez sur la touche de
connexion pour connecter ;
4.
En statut de connexion: Le son du téléphone portable est transféré sur le système audio de voiture
dès lors que vous passez ou recevez un appel.
80
5.
Passez un appel en statut de connexion
5.1
Appelez directement avec le téléphone portable.
5.2 Appelez avec la télécommande de la manière suivante :
(1) Saisissez le numéro de téléphone avec les touches 0-9
*
(2)
Appuyez sur la touche CLEAR brièvement pour annuler un numéro incorrect si nécessaire.
Appuyez brièvement sur TEL pour passer l’appel.
5.3 Pour rappeler le dernier numéro composé
Appuyez sur la touche REDIAL brièvement ou touchez l’icône
6.
pour valider le numéro de téléphone.
Accepter/rejeter/terminer l’appel
6.1 Lorsque le téléphone sonne, appuyez sur la touche TEL pour accepter l’appel ;
6.2 Lorsque le téléphone sonne, appuyez sur la touche HANGUP pour rejeter l’appel ;
6.3 Durant la conversation, appuyez sur la touche HANGUP brièvement pour terminer l’appel ;
Remarque: Lors de la sonnerie le numéro de téléphone s’affiche.
81
6. Résolution des problèmes
Veuillez lire le manuel de l’utilisateur attentivement avant d’utiliser le lecteur DVD. Si vous avez des soucis pour utiliser ce lecteur,
essayez de résoudre les problèmes à l’aide des suggestions ci-dessous, si vous ne pouvez pas résoudre les problèmes après
avoir utilisé toutes les suggestions, merci de contacter notre entreprise ou l’un de nos centres de réparation autorisé. Pour
garantir votre sécurité, merci de ne pas ouvrir le boitier du lecteur par vos propres moyens, autrement vous risquez un choc
électrique.
PAS D’ IMAGE, PAS DE SON ET PAS D’INDICATION
*
Assurez-vous que l’alimentation est active.
*
Assurez-vous que le secteur est alimenté.
*
Assurez-vous que le cordon d’alimentation n’est pas endommagé ou que le fusible n’est pas grillé
*
Assurez-vous que la prise d’alimentation est connectée fermement dans la fente.
PAS DE SON, MAIS L’IMAGE APPARAIT
*
Assurez-vous que la sortie audio du lecteur est bien connectée avec l’entrée audio du moniteur.
*
Vérifiez si le connecteur audio est endommagé.
*
Vérifiez si le volume n’est pas baissé au maximum.
*
Vérifiez que vous avez réglé le paramètre AUDIO correct du lecteur.
*
Vérifiez que l’audio n’est pas réglé sur muet.
PAS D’IMAGE, MAIS DU SON EST EMIS
*
Assurez-vous que la sortie vidéo du lecteur est bien connectée avec l’entrée vidéo du moniteur.
*
Assurez-vous que vous avez réglé votre moniteur sur le canal d’entré AV correspondant sur votre lecteur.
*
Vérifiez si le connecteur vidéo est endommagé.
*
Vérifiez que vous avez réglé le paramètre VIDEO correct du lecteur.
IMAGE EN NOIR ET BLANC OU ROULEMENT DE L’ECRAN
*
Assurez-vous d’avoir réglé le paramètre TV SYSTEM (ex : PAL, NTSC) correct.
DEFAUTS D’IMAGE OU DE SON
*
Vérifiez si la configuration AUDIO est correcte.
*
Vérifiez si le disque est rayé ou taché.
*
Vérifiez si les connecteurs AV et les terminaux sont tachés.
*
Vérifiez s’il ya de la condensation dans la lentille. Si oui, éteignez le lecteur pendant une heure environ et essayez à nouveau
*
Vérifiez si l’angle d’installation est inferieur à 30º
AUCUN DISQUE NE S’AFFICHE OU MAUVAIS DISQUE
*
Assurez-vous d’avoir mis le disque sur le plateau.
*
Vérifiez si le disque est mis du mauvais coté.
*
Vérifiez si le disque est tordu.
*
Vérifiez si le disque est rayé ou taché gravement.
*
Assurez-vous que le format du disque est compatible avec le lecteur.
*
Assurez-vous que la température dans la voiture n’est pas trop élevée. Si oui, laissez refroidir jusqu'à une température
ambiante normale
*
Mettez un autre disque dans le compartiment de disque.
LA TELECOMMANDE N’EST PAS SENSIBLE OU NE FONCTIONNE PAS
*
Vérifiez les piles de la télécommande et assurez-vous qu’elles soient chargées et de bonne conductivité.
*
Dirigez la télécommande vers le capteur infrarouge du lecteur.
*
Vérifiez s’il y’a des obstacles entre la télécommande et le capteur infrarouge.
CERTAINES TOUCHES NE FONCTIONNENT PAS
*
Coupez l’alimentation, puis rallumez.
*
Réinitialisez l’unité, puis rallumez-la.
*
Enlevez le panneau frontal de l’unité, puis installez-le à nouveau et allumez l’unité à nouveau.
LA RADIO NE FONCTIONNE PAS
*
Vérifiez si le câble de l’antenne est connecté fermement. Ou réglez une station manuellement.
L’ECRAN TFT A PERDU DE SON EFFET TACTILE
Insérez un disque et appuyez sur la touche stop, puis appuyez sur la touche zoom, pour finir appuyez sur les touches ^ et v
*
pour passer en mode de calibrage, puis tapez sur la croix du curseur alors qu’elle affiche ok, puis éteignez l’appareil et
rallumez-le.
82
7. Spécifications
Spécifications générales
Tension d’alimentation........................................................................DC 12V
Puissance de sortie maximale....................4 x 25W (mesuré sur DC 14.4 V)
Dimensions (LxHxL).......................................................178 x 50 x 160mm
Spécification du poste DVD
Format.................................................DVD/VCD/JPEG/MP4/MP3/WMA/CD
Système vidéo......................................................................................NTSC
Système audio...........................................................................24 bit/96KHz
Système de chargement……….………………… Chargement automatique
Angle de montage.........................................................................0 to +/-30
Spécifications vidéo
Type de vidéo.............................................................................16:9 et 4:3
Niveau de sortie Vidéo.........................................Composite:1.0± 0.2Vp-p
Impédance de chargement…....................................................... 75 ohms
Résolution horizontale..........................................................................500
Spécifications audio
Sortie audio (audio Analog)……………………....………….2.0+0-1.0Vrms
Réponse en fréquence………………….......20Hz ~ 20KHz(at 1KHz 0 dB)
Ratio Son / Bruit(Audio)...........................................≥90dB(at 1KHz 0 dB)
Séparation........................................................................................50dB
Spécification radio
Section FM
Gamme de fréquence.................................................87.5MHz 108MHz
Sensibilité utile…..............................................................................3uV.
Fréquence I.F ..........................................................................10.7MHz
Section AM
Fréquence...............................................................522KHz - 1620KHz
83
Formats for media player:
Video:
MPEG-1
MPEG-2
Xvid
MP4
VCD
SVCD
DVD-Video
Picture:
JPEG
Audio:
MP2
MP3
WMA
ACC
AC3
CDDA
HDCD/CD-G
84
CS-470 DVD
Manual de Instrucciones
SISTEMA DE AUDIO PARA COCHE 5 EN 1
CON DISCO/USB/TARJETA/BT/RADIO
Y PANTALLA TÁCTIL
Aviso: Cualquier información queda sujeta a cambios sin notificación previa
85
PRECAUCIÓN
PRECAUCIÓN
ADVERTENCIA: PARA REDUCIR EL RIESGO
DE INCENDIO O DESCARGA ELÉCTRICA, NO
RIESGO DE DESCARGA ELÉCTRICA
EXPONGA ESTE APARATO A LA LLUVIA O LA
NO ABRIR
HUMEDAD
PRECAUCIÓN: PARA REDUCIR EL RIESGO DE DESCARGA ELÉCTRICA, NO RETIRE LA CUBIERTA (O
TAPA). EL INTERIOR DEL APARATO NO CONTIENE PARTES REPARABLES POR EL USUARIO. PARA SU
REPARACIÓN, ACUDA A PERSONAL CUALIFICADO.
El símbolo del rayo dentro de un triángulo equilátero está pensado para alertar al usuario de la
presencia de voltaje peligroso no aislado en el interior del producto, que podría ser de la suficiente
magnitud como para constituir un riesgo de descarga eléctrica para las personas.
!
El signo de exclamación dentro de un triángulo equilátero está pensado para alertar al usuario de la
presencia de importantes instrucciones operativas y de mantenimiento (reparación) en los impresos
que acompañan al aparato.
PRODUCTO LÁSER DE CLASE 1
Símbolo de producto láser: localizado en el panel posterior de la unidad, indica que este reproductor es
un producto láser de clase 1. Utiliza un láser de baja potencia que no emite radiación peligrosa fuera de la
unidad.
1.Lea este manual de instrucciones antes del uso y la instalación.
2.No toque el enchufe con las manos mojadas.
3.Apague el aparato cuando no lo esté usando. (Desconéctelo de la toma de corriente cuando no tenga
pensado usarlo por un periodo prolongado.)
Antes de desplazar la unidad, saque antes el disco de su interior.
4.No abra la cubierta ni toque ninguno de los componentes expuestos de la unidad, para ello deje que se
ocupen técnicos cualificados.
5.No exponga la unidad a la luz solar directa, ni la instale cerca de objetos que irradien calor, para evitar
dañarla.
6.No deje la unidad en condiciones húmedas, lo cual afectaría a su sistema de lectura.
7.Coloque la unidad sobre una superficie llana y en un lugar ventilado. Asegúrese de que los agujeros de
ventilación no están cubiertos para evitar el recalentamiento y fallos en el funcionamiento.
8.Limpie el panel y el cuerpo del aparato únicamente con un paño suave seco, sin aplicar ningún tipo de
disolvente, alcohol o espray.
9.No exponga el aparato a bloqueos ni salpicaduras, y no coloque objetos que contengan líquidos, como
jarrones, sobre este.
10.Desenchufe el aparato de la toma de corriente cuando no piense usarlo por un largo periodo.
86
Contenidos
1. Antes del uso...............................................................................................................89
1.1 Glosario......................................................................................................... 89
1.2 Precauciones..................................................................................................89
1.3 Mantenimiento y limpieza de los discos.........................................................90
1.4 Información sobre la pila del mando a distancia............................................90
1.5 Descripción del mando a distancia.................................................................91
1.6 Localización y nombre de los controles de la unidad.....................................92
1.7 Descripción de la conexión de los cables.......................................................93
1.8 Instalación de la unidad..................................................................................94
2. Funcionamiento básico................................................................................................95
3. Funcionamiento de la radio..........................................................................................96
4. Funcionamiento de un disco, USB y tarjeta MMC/SD.................................................98
4.1 Carga/descarga de un disco, USB o tarjeta.....................................................98
4.2 Pausa de la reproducción.................................................................................99
4.3 Detención de la reproducción ..........................................................................99
4.4 Selección de un capítulo/pista con los botones AR/AB o >>|/|<<.....................99
4.5 Selección de un capítulo/pista con los botones numéricos..............................99
4.6 Selección de un capítulo/pista con el menú raíz/PBC......................................99
4.7 Reproducción rápida.......................................................................................100
4.8 Reproducción ralentizada...............................................................................100
4.9 Reproducción fotograma a fotograma............................................................100
4.10 Reproducción repetida..................................................................................100
4.10.1 Repetición de Uno/Todo.............................................................................100
4.10.2 Repetición A-B............................................................................................101
4.11 Reproducción en el modo Búsqueda.............................................................101
4.12 Reproducción de un capítulo/pista específica o un momento determinado..101
4.13 Reproducción aleatoria.................................................................................101
4.14 Reproducción desde otro ángulo..................................................................102
4.15 Reproducción en el modo Zoom...................................................................102
4.16 Cambio del idioma de subtítulos...................................................................102
4.17 Cambio del idioma audio..............................................................................102
4.18 Visualización del estado de reproducción....................................................102
4.19 Reproducción programada...........................................................................102
4.20 Reproducción de archivos de imágenes ...................................................103
4.21 Reproducción de archivos MP4....................................................................103
4.22 Funciones ESP y Id3 ...................................................................................104
4.23 Operaciones con la configuración del menú del sistema de DVD................104
*
Control parental.......................................................................................107
*
Código regional.......................................................................................108
5. Sistema Bluetooth manos libres.................................................................................109
.
6. Localización y resolución de problemas.....................................................................111
7. Especificaciones.........................................................................................................112
87
1. Antes del uso
1.1 Glosario
PBC (playback control-Control de reproducción-)
Es un tipo de señal (menú) grabado en el disco con el formato SVCD o VCD2.0, usado para el control de la
reproducción. Para los discos que contengan PBC, será posible reproducir software interactivo con el menú
mostrado en el TV. Y si el disco contiene capturas de imágenes, podrá reproducirlas en alta definición.
Título
Por lo general, el título es la parte importante de un disco DVD. Por ejemplo, la parte temática de una película
es el título 1, la parte que describe el "cómo se hizo" de la película el título 2, el reparo es el título 3, etc. Cada
título contiene un número de serie fácil de buscar.
Capítulo
Un título puede estar dividido en varios bloques, de modo que cada bloque puede funcionar como una unidad
individual, denominada capítulo. El capítulo contiene al menos una unidad.
Pista
Es el componente más grande de un VCD. Normalmente, cada canción de un disco de karaoke equivale a
una pista.
1.2 Precauciones
Seguridad
1. Fuente de alimentación: Conecte la unidad solo a la fuente de alimentación especificada en las
instrucciones o en la unidad.
2. La unidad está diseñada para el terminal negativo de la batería, que está conectado al metal del
vehículo. Por favor, confírmelo antes de la instalación.
3. No deje que los cables del altavoz hagan cortocircuito cuando la unidad esté encendida, de otro modo
podría sobrecargarse o quemar el amplificador de potencia.
4. No instale el panel extraíble antes de conectar el cable.
5. La funda protectora sirve para guardar a buen recaudo el panel frontal (ver foto).
Medio ambiente
1. No use esta unidad cerca del agua o en ambientes húmedos.
2. Si se forma humedad en el interior de la lente, puede que la unidad no funcione correctamente. Para
corregir este problema, espere alrededor de una hora a que se evapore la humedad.
3. Si en el interior del coche el calor fuera extremo, no use el reproductor hasta haber conducido durante
un rato para refrescarlo.
88
1.3 Mantenimiento y limpieza de los discos
Mantenimiento del disco
1. Para mantener limpio el disco, sosténgalo por los bordes. No toque la superficie del disco por la cara de
reproducción.
2. No pegue papel ni cinta adhesiva en el disco. Si hubiera pegamento (o un material similar) en la superficie
del disco, deberá limpiarlo antes de usarlo.
3. No exponga el disco a la luz solar directa, ni lo acerque a fuentes de calor, no lo deje al sol, donde pueda
haber un considerable aumento en la temperatura.
4. Guarde el disco en su estuche después del uso para mantener su temperatura.
Limpieza del disco
1. Antes de la reproducción, limpie el disco con una gasa limpia. Hágalo limpiando hacia fuera desde el centro
hacia los bordes.
2. No use bencina, disolventes, limpiadores comerciales o espráis antiestáticos para evitar dañar la unidad.
+ side up
B
A
Fig.1
Fig.2
Fig.3
1.4 Información sobre la pila del mando a distancia
Sustitución de la pilas del mando a distancia:
1.Antes de usar el mando a distancia por primera vez, tire de la pestaña aislante del mando hacia fuera en
la dirección que indica la flecha.(ver fig.1)
2.Presione el bloque móvil en la dirección indicada por la flecha A
(ver fig.2), después tire del sostén de la pila hacia fuera en la dirección indicada por la flecha B, para
sacarlo del mando a distancia (ver fig.2).
3.Sustituya la pila usada por una nueva con la polaridad (+) mirando hacia arriba (ver fig.3).
4.Introduzca el sostén de la pila de nuevo en el mando a distancia (ver fig.3).
Nota sobre la pila del mando a distancia:
1. Un uso inadecuado de la pila podría causar el recalentamiento o la explosión, pudiendo ello provocar un
incendio o lesiones personales.
2.La pérdida de líquido de la pila podría dañar el mando a distancia (duración de la pila: 6 meses con un uso
normal con una temperatura de la habitación normal).
3.No provoque el cortocircuito de la pila.
4.No tire la pila al fuego.
5.Para evitar el riesgo de accidentes, mantenga la pila fuera del alcance de los niños.
89
1.5 Descripción del mando a distancia
3
27
PWR
OPEN
14
29
32
9
34
35
1
4
BAND
EQ
2
MU
M ENU
M OD E
0K
SE L
+
SE TUP
13
CLEAR
30
40
33
2. BOTÓN MENU
6
3. BOTÓN PWR
8
4. BOTÓN ^
5
7
31
4
1
2
-10
+10
5
6
7
8
CLK
9/AF
0/10
TA
10+
/PTY
SLOW_FWD
ST
3
28
21
22
LOC
ZOOM
26
25
#
SE A RC H
INT
AUDIO
RPT
AP S
RDM
TITLE/PBC
SUBT ITLE
PAIR
REDI AL
A-B
23
36
6. BOTÓN >
11
7. BOTÓN |<<
12
OSD
LOUD
TEL
37
8.BOTÓN v
16
9. BOTÓN SEL
15
10. BOTÓN REPR/PAUSA
18
11.
17
19
20
PROG
5. BOTÓN >>|
10
41
24
1. BOTÓN ANG
39
38
BOTONES
NUMÉRICOS
(0~10,+10 -10)
12. BOTÓN 10+/PTY
13. BOTÓN SETUP
14. BOTÓN MODE
15. BOTÓN APS/Colgar
16. BOTÓN SEARCH
29. BOTÓN MUTE
17. BOTÓN RDM
30. BOTÓN STOP
18. BOTÓN RPT
31. BOTÓN VOLUMEN -
19. BOTÓN SUBTITLE/REDIAL
32. BOTÓN <
20. BOTÓN TITLE/PBC/PAIR
33. BOTÓN OK
21. BOTÓN ÁNGULO DE VISIONADO/ST/#
34. BOTÓN VOLUMEN +
22. BOTÓN ZOOM
35. BOTÓN BAND
23. BOTÓN AUDIO
36. BOTÓN PROG
24. BOTÓN CLK
37. BOTÓN OSD
25. BOTÓN A-B
38. BOTÓN LOUD
26. BOTÓN INT
39. BOTÓN TEL
27. BOTÓN EQ/OPEN
40. BOTÓN TA
28. BOTÓN LOC/SLOW-FWD/*
41. BOTÓN AF
90
1.7
Localización y nombre de los controles de la unidad
1
12
9
5
16
3
18
17 14
8
2
AP S
AV IN
REL
11 13 10
4 19
6
Panel frontal
SD/MMC
7
15
Cara frontal después de extraer el panel
11. Botón |<<
12. Botón BAND/TEL
13. Botón APS/Colgar
14. Botón de expulsión
15. Botón RESET
16. Pequeño display LCD
17. Sensor infrarrojo del mando a
distancia
18. Micrófono
19. Botón REL
1. Botón OPEN
2. Botón POWER/MUTE
3. Monitor
4. Toma AV IN
5. Ranura de introducción de discos
6. Toma USB
7. Ranura para tarjetas SD/MMC
8. Botón MODE
9. Control de VOL
10.Botón >>|
91
1.7 Descripción de la conexión de los cables
Perno de fijación
Toma de conexión de cables 1
Toma de conexión de cables 2
CABLE DE MARCHA ATRÁS
Nota: emplee el extremo de un cable de toma de tierra suministrado por el fabricante para conectar el perno
de fijación. Use el otro extremo del cable de toma de tierra para conectar el polo negativo de la fuente de
alimentación. Si no, el vídeo de la pantalla podría parpadear.
Descripción de la conexión de los cables de la Toma de conexión de cables 1
TOMA DE CONEXIÓN DE CABLES 1
CLAVIJA DE CONEXIÓN DE CABLES 1
NOTAS: 1. Solo podrán usarse altavoces con 4 ohmios de impedancia
2. Asegúrese de que el cable de la antena auto azul no hace contacte con ninguna conexión de toma de tierra.
Descripción del diagrama de cables para la toma 2
TOMA DE CONEXIÓN DE CABLES 2
CLAVIJA DE CONEXIÓN DE CABLES 2
MARRÓN
VÍDEO AMARILLO
SALIDA DE VÍDEO RCA
CÁMARA DE VISIÓN POSTERIOR
Descripción de la conexión del cable del freno de mano al sistema de freno de mano incorporado en el coche
Al cuerpo metálico o chasis del coche
Nota: después de conectar el cable del freno de mano, el vídeo del pequeño monitor del panel frontal se mostrará solo después
de aplicar el e-freno.
92
1.8 INSTALACIÓN DE LA UNIDAD
INSTRUCCIONES DE INSTALACIÓN
LA UNIDAD ES INSTALADA DE MODO QUE SEA ANTIRROBO. EL CHASIS DE LA UNIDAD
INCORPORA UNA ESTRUCTURA METÁLICA DESLIZANTE. POR FAVOR, REALICE LA CONEXIÓN DE LA
UNIDAD, LOS ALTAVOCES Y LA ANTENA SEGÚN LO EXPLICADO EN EL MANUAL DE INSTRUCCIONES,
DESPUÉS INSTALE LA ESTRUCTURA METÁLICA DESLIZANTE EN EL COCHE DE LS FORMA SIGUIENTE
PARA MEJORAR LA CAPACIDAD
ANTI-ATASQUE, POR FAVOR, FIJE LA
CORREA
METÁLICA
AL
METAL
CONECTADO AL SOPORTE INFERIOR
DEL COCHE
CORREA METÁLICA
SELECCIONE LA LENGÜETA
ADECUADA PARA FIJAR LA
ESTRUCTURA
METÁLICA
DESLIZANTE
CHASIS DE LA UNIDAD
REFUERZO PLÁSTICO
SALPICADERO
PANEL FRONTAL
ESTRUCTURA METÁLICA DESLIZANTE
PARA EXTRAER EL CHASIS DE LA ESTRUCTURA
METÁLICA DESLIZANTE, INTRODUZCA LAS LLAVES
DE PLACA IZQUIERDA Y DERECHA EN LA POSICIÓN
CORRECTA DE AMBOS LADOS DEL CHASIS
93
2. Funcionamiento básico
1. Para encender/apagar la unidad
En el modo de apagado, pulse el botón POWER para encender la unidad.
En el modo de encendido, mantenga pulsado el botón POWER del panel frontal o pulse el botón PWR
del mando a distancia para apagar la unidad.
2. Para deslizar el monitor del Sistema de Audio para Coche dentro/fuera del chasis
Pulse el botón OPEN para deslizar el monitos del Sistema de Audio para Coche hacia fuera o dentro del
chasis.
3. Para seleccionar el ángulo óptimo del monitos del Sistema de Audio para Coche
Para seleccionar el ángulo óptimo hacia arriba o hacia abajo del monitos del Sistema de Audio para
Coche, pulse el botón ARRIBA/ABAJO del monitos o el botón ANG del mando a distancia repetidamente.
4. Para seleccionar el modo de funciones
Pulse el botón MODE para seleccionar los modos RADIO, DISCO
(después de introducir un disco), USB (después de conectar una
unidad USB), TARJETA (después de introducir una tarjeta), AUX o
BLUETOOTH.
después de
Durante la reproducción, toque el icono
que aparezca la interfaz de teclado, podrá aparecer el Menú de Modos
como se ve a la derecha. Después toque sobre un icono para seleccionar
el modo deseado.
Mode Menu
5. Para ajustar el volumen
Gire el control VOL del panel frontal o pulse/mantenga pulsado el botón + o - del mando a distancia
para ajustar directamente el volumen.
6. Para suprimir el sonido
Pulse el botón MUTE del mando a distancia para activar/desactivar el modo MUTE (supresión sonora).
Si pulsa el botón POWER del panel frontal también podrá activar/desactivar el modo MUTE.
7. Para mostrar la hora
Pulse el botón CLK para mostrar la hora en el pequeño monitor del panel frontal.
Después de deslizar el monitos en el chasis, si pulsa el botón CLK podrá mostrar la hora en el pequeño
display LCD.
8. Para seleccionar el modo de ecualizador deseado
Pulse el botón EQ del mando a distancia para seleccionar una de las curvas de ecualizador de música
preseleccionadas: POP, ROCK, CLAS, OFF. El efecto sonoro cambiará con cada una de ellas.
9. Para encender/apagar el modo LOUD (sonoridad)
Pulse el botón LOUD para encender/apagar el modo LOUD.
Cuando encienda el modo LOUD, mejorará el nivel de graves inmediatamente cuando este no sea
suficiente.
10.Para extraer el panel frontal y resetear el reproductor
Cuando el monitor o el pequeño display LCD fallen, o algunos botones no respondan, o el sonido se
distorsione, pulse el botón REL del panel frontal para separar el panel y después tire de él a izquierda y
derecha para extraerlo, a continuación, pulse el botón RESET para restablecer el estado inicial del sistema.
11.Para realizar la configuración
Para realizar la configuración, toque sobre el icono
del
Menú Principal para pasar a la interfaz SETP (Configuración)
como se muestra a la derecha.
En dicha interfaz, seleccione GENERAL, HORA, AUDIO,
VÍDEO ,RADIO , CALIBRACIÓN tocando sobre ellos, después
ajústelos tocando algunos iconos del lado derecho como
corresponda.
94
GENERAL SETUP
3.
Funcionamiento de la radio
1. Entrada en el modo RADIO
Cuando pulse el botón MODE o el Menú de Modos ara entrar en el modo RADIO, se mostrará la interfaz
de la RADIO como se ve a la derecha.
En la interfaz de RADIO, toque sobre el icono
para entrar en el Menú de Modos; durante la
reproducción, mantenga pulsado el botón MODE para apagar el display TFT; si toca el icono
podrá pasar a
la interfaz de frecuencia, como se muestra a la derecha; el resto de iconos son los mismos que en el panel de
la unidad o en el mando a distancia.
En la interfaz de selección de menú, podrá ajustar MUTE, APS, EQ,
TA, AF, PTY como se ve a la derecha.
2. Botón BAND
En el modo RADIO, pulse el botón BAND del mando a distancia para
seleccionar su banda de radio deseada: Fm1, Fm2, Fm3, Am1 y AM2, y la
palabra indicará la banda que se ha seleccionado y se mostrará en el
pequeño monitos del panel frontal.
3. Botones SINTONIZACIÓN/BÚSQUEDA ARRIBA/ABAJO
En el modo RADIO:
1) Mantenga pulsado el botón >>|/|<< para buscar automáticamente
hacia arriba/abajo una emisora disponible desde la emisora en la que se
encuentre.
2) Pulse el botón >>| / |<< para buscar anualmente hacia
arriba/abajo su emisora deseada a breves intervalos de frecuencia desde
la emisora en la que se encuentre.
RADIO interface
AUDIO & VIDEO SETUP interface
4. Botón APS
En el modo RADIO:
1)Cuando mantenga pulsado el botón APS, la radio realizará una búsqueda desde la frecuencia más baja y
comprobará el nivel de intensidad de señal hasta haber completado un ciclo de búsqueda. Entonces, las 6
emisoras con la señal más intensa serán almacenadas en las presintonías con su número de memoria
correspondiente. La operación APS será ejecutada en cada banco de la banda seleccionada. Cuando haya
finalizado la operación APS, buscará cada una de las emisoras preseleccionadas durante 5 segundos en la
banda FM o AM desde M1 pulsando el botón APS. Después de completar un ciclo de búsqueda, reanudará la
retransmisión de M1.
(podrá almacenar 3x6 emisoras para FM y 2x6 emisoras para AM en total)
2) Cuando pulse el botón APS, la radio buscará cada una de las emisoras preseleccionadas durante 5
segundos en la banda FM o AM desde M1. Después de completar un ciclo de búsqueda, reanudará la
retransmisión de M1.
NOTA: En la banda FM, FM1,FM2,FM3 se escanean una a una; En la banda AM, AM1, AM2 se
escanearán también una a una.
5. Botones de emisoras presintonizadas [ 1-6 ]
En el modo RADIO:
1) Para memorizar la frecuencia actual de la banda actual, mantenga pulsado uno de los seis botones de
presintonías (1-6) del mando a distancia o gire el control numérico y manténgalo pulsado.
2) Para recuperar la memoria presintonizada de la banda actual, pulse uno de los botones de las
presintonías [1-6] del mando a distancia o gire el control numérico y manténgalo pulsado.
6. Botón STEREO/MONO
Pulse el botón ST del mando a distancia para seleccionar los modos de sonido ESTÉREO o MONO para
la banda de frecuencias FM.
7. Botón LOC
1) En el modo RADIO, cuando las señales de las emisoras de radio distantes sean muy débiles, y el efecto
de recepción sea malo durante la sintonización, compruebe si la palabra LOC aparece en el LCD. Si así fuera,
95
pulse este botón para desactivar la función LOC, a continuación, sintonice de nuevo las emisoras de radio
distantes;
2) En el modo RADIO, cuando las señales de las emisoras de radio locales sean demasiado intensas, esto
podría causar interferencias en el efecto de recepción durante la sintonización. Pulse este botón para activar
la función LOC y mostrar la palabra LOC en el display LCD, después sintonice de nuevo las emisoras de radio
locales.
8. Botón PTY (Tipo de programa)
Pulse el botón PTY para seleccionar uno de los modos siguientes:
PTY MUSIC group- - PTY SPEECH group -- OFF
Cuando PTY group esté encendido, pulse el botón VOL+ o VOL- del mando a distancia o gire el control
VOL del panel frontal para seleccionar uno de los programas PTY de la siguiente manera:
<-->NEWS(Noticias)<-->AFFAIRS(Corazón)<-->INFO<-->SPORT(Deportes)<-->EDUCATE(Educación)<-->
DRAMA<-->CULTURE<-->SCIENCE(Ciencias)<-->VARIED(Variados)<-->WEATHER(Tiempo)<-->FINANCE
(Finanzas)<-->CHILDREN(Infantil)<-->SOCIAL<-->RELIGION<-->PHONEIN(Consultorio)<-->TRAVEL(Viajes)
<-->LEISURE(Ocios)<-->DOCUMENT(Documental)<-->PTYNONE(Sin
PTY)<-->POP
M(Música
pop)
<-->ROCK
M(Música
rock)<-->EASY
M(Música
de
fondo)<-->LIGHT
M(Música
ligera)<-->
CLASSICS(Clásicos)<-->OTHER
M(Otra
música)<-->JAZZ<-->COUNTRY<-->NATION
M(Música
nacional)<-->OLDIES(Canciones de ayer)<-->FOLK M(Música folk)<-->
Cuando PTY group esté encendido, pulsando los 6 botones numéricos también podrá seleccionar los
programas PTY de la lista de arriba.
Después de seleccionar uno de los programas PTY, se mostrará SEEK PTY, y buscará automáticamente
la emisora del programa PTY. Si la emisora del programa PTY no existiera, se mostrará PTY NONR, volviendo
después a la emisora normal.
9. Botón AF [Frecuencias alternativas]
Cuando pulse el botón AF, el modo de cambio de AF se habrá seleccionado y se mostrará por el
segmento AF en el display.
Segmento encendido: Modo de cambio AF desactivado.
Segmento apagado: Modo de cambio AF activado, información RDS incluida.
Segmento parpadeante: Modo de cambio AF encendido, pero la información RDS no se recibe aún.
Cuando se seleccione el modo de cambio AF, la radio comprobará la intensidad de señal de las AF todo el
tiempo. El intervalo de comprobación de cada una de las AF dependerá de la intensidad de la señal de la
emisora actual, e irá desde unos pocos minutos para la emisora más intensa a unos pocos segundos para las
emisoras más débiles.
Cada vez que una nueva AF sea más intensa que la emisora actual, se pasará a esa frecuencia durante
unos breves momentos, y la NUEVA FRECUENCIA se mostrará durante 1-2 segundos.
Debido a que el tiempo de supresión sonora del cambio AF o el tiempo de comprobación es muy corto,
será casi inaudible si se trata de un programa normal. (Cuando AF parpadee en el LCD, buscará la emisora
RDS más intensa. Si AF y TP parpadean en el LCD, solo podrá buscar las emisoras con información sobre el
tráfico).
En el modo FM, cuando AF esté encendido, las funciones SEEK (Búsqueda), (SCAN), AUTO-MEMORY
(Automemoria) solo podrán recibir y guardar el programa RDS.
10. Botón TA [Anuncio de tráfico]
Pulse el botón TA para activar el modo de búsqueda TA.
Cuando se transmita un anuncio de tráfico:
1).Si la unidad se encuentra en el modo de reproducción de disco, pasará temporalmente al modo radio.
2).Pasará temporalmente a una emisora enlazada con EON cuando EON detecte un anuncio de tráfico
en ese otro programa, y TA, TP se mostrarán en el display LCD.
*
*
Función de interrupción de TA:
El anuncio de tráfico actual se cancelará pulsando el botón TA.
Cuando TA esté activado, las funciones SEEK, (SCAN), AUTO MEMORY podrán recibirse y
guardarse solo cuando se haya recibido el código de identificación del programa de tráfico.
96
4. Funcionamiento de un disco y una unidad USB
4.1 Carga/descarga de un disco o USB
Para reproducir archivos de un disco o tarjeta, pulse el botón de
Expulsión para deslizar el monitos hacia abajo. A continuación, inserte el
disco o la tarjeta en la ranura para discos o en la ranura para tarjetas
SD/MMC.
Para expulsar el disco o la tarjeta, pulse el botón STOP dos
veces para detener la reproducción, después pulse el botón de Expulsión
para deslizar el monitor hacia abajo y expulsar el disco de su alojamiento,
usted podrá sacarlo con los dedos; o bien presione ligeramente la tarjeta
primero y tire de ella hacia fuera después desde su alojamiento.
USB/CARD INTERFACE
Para reproducir los archivos de una unidad USB, conecte una unidad USB a la toma USB de la parte
posterior del sistema. Para desconectarla, pulse el botón STOP dos veces y después retire la unidad USB.
En los modos USB y CARD (Tarjeta), seleccione su opción deseada como se muestra a la derecha.
Observación: el icono
es para los archivos de audio;
para los de vídeo;
para archivos de
imágenes.
para regresar al menú principal, y sobre para regresar al ajuste anterior.
Toque sobre el icono
: Tóquelo para dejar en pausa la reproducción
: Tóquelo para detener la reproducción .
:Si toca sobre uno de ellos podrá seleccionar entre los niveles de
velocidad de avance o de retroceso.
(Excepto en el modo imagen.)
Root interface for MUSIC
: Si toca sobre uno de ellos podrá seleccionar el capítulo/pista
anterior o siguiente.
: Tóquelo para subir y bajar el volumen.
: Tóquelo para desplazarse por la página seleccionada hacia arriba
y hacia abajo.
: Tóquelo para seleccionar el modo de reproducción INT
(Excepto en el modo imagen.)
Keyboard interface-1
: Durante la reproducción de un VCD, tóquelo para seleccionar
el audio ST/MONO .
: Misma función que el botón MENU del mando a distancia.
: Misma función que el botón TITLE del mando a distancia.
: Misma función que el botón REPEAT del mando a distancia.
Keyboard interface-2
: Misma función que el botón SUBTITLE del mando a distancia.
: Tóquelo para seleccionar las pistas entre 1-9 y después pulse
OK ara reproducir su selección.
97
Keyboard interface-3
: Durante la reproducción, pulse el botón ZOOM y después toque uno de ellos. Misma función
que los botones direccionales del mando a distancia.(Excepto en los modos música e imagen.);
Durante la reproducción, pulse uno de ellos para cambiar el ángulo de reproducción. (Solo para
el modo imagen.)
: Misma función que el botón ZOOM del mando a distancia.
: Misma función que el botón RDM del mando a distancia.
: Durante la reproducción de un DVD, toque sobre el icono para cambiar el ángulo de reproducción.
4.2 Pausa de la reproducción
Durante la reproducción de un DVD/VCD/CD/MP3/WMA, pulse el botón PAUSA del mando a distancia
para dejar la reproducción en pausa. Pulse el botón REPR para reanudar la reproducción normal.
4.3 Detención de la reproducción
Durante la reproducción de un DVD/VCD/MP3/WMA/CD, pulse el botón STOP una vez para dejar la
reproducción en pausa, después pulse el botón REPR para reanudar la reproducción normal; pulse el botón
STOP dos veces para detener la reproducción del todo, después pulse el botón REPR para empezar la
reproducción desde el inicio del primer capítulo/pista.
4.4 Selección de un capítulo/pista con los botones >>| / |<<
Pulse el botón >>| / |<< durante la reproducción para seleccionar el capítulo/pista siguiente o anterior
para su reproducción.
atrás.
Nota: Pulse el botón >>|/|<< múltiples veces para pasar varios capítulos/pistas hacia delante o hacia
4.5 Selección de un capítulo/pista con los botones numéricos
En el estado de reproducción de un DVD/VCD(PBC OFF)/MP3/WMA/CD, pulse uno de los botones
numéricos 1~9 y 0/10 para seleccionar directamente y reproducir de la primera a la décima pista/capítulo (el
botón 0/10 se usa como el botón 10).
Si desea reproducir una pista/capítulo mayor a 10, use el botón 10+,
1~9 y 0/10. Ejemplo 1: para reproducir la pista/capítulo 13, primero pulse una vez el botón 10+, a
continuación pulse el botón 3. Ejemplo 2: para reproducir la pista/capítulo 34, primero pulse el botón
10+ 3 veces, a continuación, pulse el botón 4. (El botón 0/10 se usa como el 0)
Nota: si mantiene pulsado el botón +10 o -10, podrá reproducir las siguientes o las últimas 10
pistas/capítulos (solo para MP3/WMA).
4.6 Selección de un capítulo/pista con el menú raíz/PBC (Si el disco incluye el menú raíz/PBC)
En el estado de reproducción de un DVD
1.
Pulse el botón TITLE del mando a distancia para mostrar la lista de títulos.
2.
Pulse los botones direccionales para seleccionar el título que desee, y después pulse OK o REPR para
abrir el menú raíz del título seleccionado.
98
3.
Pulse los botones direccionales para seleccionar el capítulo que desee. Finalmente, pulse el botón OK
o REPR para reproducir dicho capítulo.
Durante la reproducción, si pulsa el botón MENU, podrá mostrar directamente el menú raíz del título
que esté reproduciendo.
En el modo VCD
1. Cuando active la función PBC, reproducirá desde el comienzo del disco hasta que muestre el menú PBC
en la pantalla si está incluido en el disco.
2.
Pulse los botones numéricos para seleccionara pista que desee reproducir.
En el modo MP3/WMA/CD, los botones TITLE, PBC y MENU estarán desactivados.
4.7 Reproducción rápida
Durante la reproducción normal. mantenga pulsado el botón >>|/|<< para avanzar o retroceder de
forma rápida a las velocidades siguientes: x2, x4, x8, x20, normal.
Durante la reproducción rápida, pulse el botón REPR para reanudar la reproducción normal.
4.8 Reproducción ralentizada
Durante la reproducción, pulse el botón SLOW_FWD para ejecutar la función de reproducción hacia
delante ralentizada.
Cada vez que pulse de forma consecutiva el botón SLOW_FWD, la velocidad de la reproducción
disminuirá. Las velocidades de reproducción ralentizada son los siguientes:
x1/2,x1/3,x1/4,x1/5,x1/6,x1/7,normal.
Durante la reproducción hacia delante ralentizada, pulse el botón REPR para reanudar la reproducción normal.
Esta función es válida únicamente para vídeo.
4.9 Reproducción fotograma a fotograma
Si la unidad está reproduciendo vídeo, pulse el botón TEL consecutivamente para mostrar la imagen
congelada fotograma a fotograma.
Pulse el botón REP para reanudar la reproducción normal.
4.10 Reproducción repetida
4.10.1
Repetición de Uno/Todo
1.
Para la reproducción de DVD:
Pulse el botón RPT para seleccionar REP CHAPTER (Rep Capítulo), REP TITLE (Rep Título), REP
ALL (Rep Todo) o REP OFF (Rep Desactivada).
2.
Para la reproducción de VCD(PBC OFF)/CD:
Pulse el botón RPT para seleccionar REP ONE (Rep Una), REP ALL u OFF.
Cuando se encuentre en el estado PBC ON, durante la reproducción de un VCD, el botón RPT no
será válido.
3.
Para la reproducción de MP3/WMA:
Pulse el botón RPT para seleccionar REP ONE, REP DIR (Rep Directorio), REP ALL u OFF.
99
4.10.2
Repetición A-B
Pulse el botón A-B si desea repetir un segmento específico de un disco que usted determine:
1.
Pulse el botón A-B en el punto (A) en el que usted decida que será el punto de inicio del segmento de
repetición. Pulse el botón A-B de nuevo para fijar el punto (B) que usted habrá decidido que será el punto final
del segmento. Entonces, el segmento se reproducirá repetidamente.
2.
Para cancelar el modo de repetición A-B, y retomar la reproducción normal, pulse el botón A-B una
tercera vez.
Nota:
Durante la reproducción de un VCD/MP3/WMA/CD, los puntos A y B deberán encontrarse en la misma
pista. Durante la reproducción de un DVD, los puntos A y B podrán ser seleccionados de diferentes capítulos.
4.11 Repetición en el modo Búsqueda
1. En el estado de reproducción VCD (PBC OFF)/CD, pulse el botón INT para reproducir los 15 primeros
segundos de cada pista del disco. Pulse de nuevo el botón INT para retomar la reproducción normal.
2. En el estado de reproducción de DVD/MP3/WMA, el botón INT estará desactivado.
4.12 Reproducción de un capítulo/pista específica o un momento determinado
1. En el estado de reproducción de DVD, pulse el botón SEARCH para mostrar una interfaz y destacar el
elemento título, después use los botones numéricos para introducir el número de serie del título; use los
botones direccionales para destacar el elemento capítulo, después use los botones numéricos para introducir
el número de serie del capítulo; podrá todavía usar los botones direccionales para destacar el elemento del
tiempo, después use los botones numéricos para introducir el tiempo deseado de comienzo de la
reproducción; finalmente, pulse el botón OK o REPR para reproducir el capítulo seleccionado o reproducir
desde el tiempo seleccionado.
2. En el estado de reproducción de VCD/MP3/WMA/CD, para mostrar una interfaz y destacar el elemento
pista, después use los botones numéricos para introducir el número de serie de la pista; podrá todavía usar
los botones direccionales para destacar el elemento del tiempo, después use los botones numéricos para
introducir el tiempo deseado de comienzo de la reproducción; finalmente, pulse el botón OK o REPR para
reproducir la pista seleccionada o reproducir desde el tiempo seleccionado.
4.13 Reproducción aleatoria
En el estado de reproducción de DVD/VCD(PBC OFF)/MP3/WMA/CD, pulse el botón RDM para
seleccionar entre RANDOM (ON)/RANDOM OFF. Cuando seleccione el modo RANDOM (ON), reproducirá de
forma aleatoria.
4.14 Reproducción desde otro ángulo
1. En el estado de reproducción VCD/MP3/WMA/CD, el botón ÁNGULO DE VISIONADO del mando a
distancia estará desactivado.
2. En el estado de reproducción de un DVD, pulse el botón ÁNGULO DE VISIONADO del mando a distancia
repetidamente para ver la escena desde diferentes ángulos. (Solo disponible para aquellos DVDs con la
función ángulo)
100
4.15 Reproducción en el modo Zoom
En el modo de vídeo/imágenes, durante su reproducción, pulse el botón ZOOM repetidamente para
aumentar el tamaño de un área determinada de las imágenes de la pantalla en la siguiente proporción:
ZOOMx2,ZOOMx3,ZOOMx4,ZOOMx1/2,ZOOMx1/3,ZOOMx1/4,ZOOM OFF.
Pulse uno de los botones ^/v/>/< para seleccionar el área que desee aumentar.
4.16 Cambio del idioma de subtítulos
En el estado de reproducción de un DVD, pulse el botón SUBTITLE repetidamente para seleccionar el
idioma de subtítulos o para desactivarlos (dependerá del disco).
En el estado de reproducción de VCD/MP3/WMA/CD, este botón estará desactivado.
4.17 Cambio del idioma de audio
1. En el estado de reproducción de un DVD, pulse el botón AUDIO del mando a distancia repetidamente
para seleccionar el tipo de idioma deseado (dependerá del disco).
2. En el estado de reproducción de un VCD, pulse el botón AUDIO repetidamente para seleccionar el modo
de sonido de la función no hablada MONO L, MONO R, MIX MONO y STEREO.
3. En el estado de reproducción de CD/WMA/MP3, el botón AUDIO estará desactivado.
4.18 Visualización del estado de reproducción
1. En el estado de reproducción de un DVD, pulse el botón OSD del mando a distancia repetidamente para
activar/desactivar el estado de reproducción. Cuando esté activado, mostrará información del tipo: número de
serie del título en reproducción, número de serie del capítulo en reproducción, tiempo transcurrido del título en
reproducción, Tiempo restante del título en reproducción, etc.
2. En el estado de reproducción de un VCD/CD, pulse el botón OSD del mando a distancia repetidamente
para activar/desactivar el estado de reproducción. Cuando esté activado, mostrará información del tipo:
número de serie de la pista en reproducción, tiempo transcurrido de la pista en reproducción, tiempo restante
de la pista en reproducción, tiempo transcurrido del disco, tiempo restante del disco.
3. En el estado de reproducción de MP3/WMA, pulse el botón OSD del mando a distancia repetidamente
para activar/desactivar el estado de reproducción. Cuando esté activado, mostrará información del tipo:
número de serie de la pista en reproducción, tiempo transcurrido de la pista en reproducción, tiempo restante
de la pista en reproducción.
4.19 Reproducción programada
Le permitirá introducir el orden de reproducción de unos capítulos/pistas de un DVD/VCD/MP3/WMA/CD
en el orden que usted desee.
1 Durante la reproducción, pulse el botón PROG para entrar en la interfaz de programación de la forma
siguiente:
101
2 Use los botones direccionales para desplazar el cursor hasta el espacio deseado para introducir la
secuencia de números.
3 Use los botones numéricos para introducir la secuencia numérica deseada de títulos/capítulos/pistas.
4 Use los botones direccionales para desplazar el cursor hasta el elemento Play, después pulse el botón
OK para reproducir los títulos/capítulos/pistas en el orden programado;
si pulsa el botón REPR, también podrá reproducir los títulos/capítulos/pistas en el orden programado.
*
Para salir de la reproducción programada, pulse primero el botón STOP, después pulse el botón REPR
para introducir la secuencia de reproducción; o pulse el botón PROG dos veces.
*
Para eliminar toda la secuencia de números programados, desplace el cursor hasta el elemento Clear, y
después pulse el botón OK.
*
Para modificar la secuencia de programación, desplace el cursor hasta el elemento que desee modificar,
e introduzca el número de secuencia deseado.
*
Durante la reproducción de un VCD, si se encuentra en el modo PBC ON, en el momento de entrar en el
estado de reproducción programada, el modo PBC se desactivará.
4.20 Reproducción de archivos de imágenes
1. El menú raíz se mostrará en el monitor cuando cambie al modo IMAGEN.
En el menú raíz, el icono de tipo de archivo de la izquierda es para archivos MP3/WMA; el icono de tipo
de archivo del medio es para archivos de imágenes; el icono de tipo de archivo de la derecha es para archivos
de vídeo. Si uno de estos 3 tipos de archivo no existiera, no será posible desplazar el cursor hasta el icono del
tipo de archivo.
2. Cuando muestre el menú raíz, pulse los botones direccionales para seleccionar la carpeta, archivo o icono
de tipo de archivo que le interese, después pulse el botón OK o REPR para abrir la carpeta o reproducir el
archivo seleccionado, o reproducir solo ese tipo de archivo. Cuando muestre el menú raíz, también podrá usar
los botones numéricos para seleccionar el número de serie del archivo y reproducirlo.
Cuando seleccione el icono de tipo de archivo IMAGEN, pulse el botón ^ o > para seleccionar el primer
archivo de imagen, después pulse el botón v para seleccionar el archivo de imagen deseado, y finalmente
pulse el botón OK o REPR/PAUSA para mostrar la imagen a pantalla completa del archivo de imagen
seleccionado.
3. Durante la reproducción de una imagen, pulse uno de los siguientes botone >/</^/v para cambiar de
ángulo de visionado de la imagen que se está mostrando de la manera siguiente:
>: 90 grad cw; <: 90grad ccw; ^:ARRIBA<-->ABAJO; v: IZQ<-->DER
Durante la reproducción de una imagen, pulse el botón PROG para cambiar de modo o para actualizar la
imagen.
Durante la reproducción de una imagen, pulse el botón STOP para detener la reproducción y regresar al
menú raíz.
*
*
Durante la reproducción de una imagen, los siguientes botones estarán desactivados: SLOW-FWD,
SUBTITLE, TITLE, ANGLE, AUDIO, RDM, INT y A-B.
En el modo imagen, el resto de operaciones serán las mismas que las del modo MP3/WMA.
4.21 Reproducción de archivos MP4
1. El menú raíz se mostrará en el TV cuando pase al modo MP4, entonces reproducirá automáticamente el
primer archivo.
Durante la reproducción, pulse el botón STOP para detenerla y regresar al menú raíz.
2. Cuando se muestre el menú raíz, pulse los botones direccionales para seleccionar la carpeta, archivo o
icono de tipo de archivo, a continuación, pulse el botón OK o REPR para abrir la carpeta, los archivos del
icono de tipo de archivo o reproducir el archivo seleccionado.
Cuando visualice el menú raíz, podrá también usar los botones direccionales para seleccionar el número de
serie del archivo y reproducirlo.
*
Los botones ANGLE, PROG, RDM, INT y TITLE/PBC estarán desactivados.
*
El resto de funciones serán las mismas que las del modo DVD, aunque la función RPT será la misma
que la del modo MP3/WMA.
102
4.22 Función ESP y Id3
Hay una función ESP para todos los formatos de disco.
En el modo MP3/WMA, durante la reproducción, la información del nombre del archivo, nombre de
carpeta, título de las canciones, artista y álbum aparecerán desplazándose por el display LCD.
Siempre que la música MP3 que se esté reproduciendo contenga información codificada Id3 en el
formato versión 1.0/2.0, los 3 elementos subrayados arriba aparecerán desplazándose por el display LCD; de
otro modo, no lo harán.
4.23 Operaciones con la configuración del menú del sistema de DVD
1. Pulse el botón SETUP del mando a distancia para acceder al menú del sistema de DVD en el monitor.
2. En total hay 6 páginas de configuración en el menú del sistema. Pulse el botón > o < para seleccionar la
que le interese.
3. Pulse el botón ^ o v para elegir un elemento de configuración en la página de configuración seleccionada
4. Pulse el botón > para entrar en el elemento de configuración. Después pulse el botón v o ^ para
seleccionar el modo deseado del elemento de configuración, finalmente pulse el botón OK para confirmarlo.
*
Pulse el botón < para regresar al nivel anterior.
*
Pulse de nuevo el botón SETUP o use los botones direccionales para destacar el elemento EXIT SETUP
y después pulse el botón OK para salir del menú del sistema. Para el menú del sistema de DVD, hay en total 6
páginas de configuración. Se mostrarán de la forma siguiente:
4.23.1 CONFIGURACIÓN DEL SISTEMA
TIPO DE TV
El elemento de configuración sirve para hacer coincidir el tamaño de la
pantalla del TV.
4:3 PS: Elija este elemento cuando se conecte a un TV cuya pantalla es del
tipo 4:3. Cuando reproduzca imágenes con el formato 16:9 las partes
izquierda y derecha del vídeo estarán cortadas, y se mostrarán a pantalla
completa.
4:3 LB: Elija este elemento cuando se conecte a un TV cuya pantalla es del
tipo 4:3. Cuando reproduzca imágenes con el formato 16:9 las partes
superior e inferior de la pantalla de TV mostrarán unas bandas negras.
16:9: Elija este elemento cuando se conecte a un TV con la pantalla panorámica 16:9.
CONTRASEÑA
Este elemento de configuración sirve para bloquear o desbloquear el nivel de clasificación del Control Parental.
El estado por defecto será el de bloqueo. La contraseña predeterminada es 0000. Podrá establecer una nueva
contraseña a su gusto: Seleccione el elemento PASSWORD, y después pulse el botón
> para entrar en él, a continuación, introduzca la contraseña original 0000 y pulse el botón OK para
desbloquearla. Pulse el botón > para introducirla de nuevo, y luego introduzca una nueva contraseña que
usted decida y pulse el botón OK para hacerla efectiva. Antes de que otras personas vean el manual, intente
recordar la contraseña y elimine la parte explicativa de la CONTRASEÑA de dicho manual
CLASIFICACIÓN
Este elemento se usa para establecer un nuevo nivel clasificatorio del Control Parental.
1. Seleccione el elemento PASSWORD y después pulse el botón > para entrar en él, después introduzca la
contraseña mencionada arriba y luego el botón OK para desbloquear el ajuste del nivel de clasificación del
Control Parental.
2. Seleccione el elemento RATING y pulse el botón > para entrar en él, después utilice los botones
direccionales para seleccionar el nivel clasificatorio que desee, y pulse el botón OK para confirmar.
3. Seleccione de nuevo elemento PASSWORD de nuevo y después pulse el botón > para entrar en él, a
continuación, introduzca la contraseña y pulse el botón OK para bloquear el nuevo ajuste de nivel clasificatorio
del Control Parental.
103
PREDETERMINADO
Este elemento (DEFAULT) sirve para restablecer el estado original de todos los elementos de configuración.
4.23.2 CONFIGURACIÓN DE IDIOMA
IDIOMA OSD
Este elemento sirve para seleccionar el idioma del Menú del Sistema y todas
Las interfaces de mensajes sobre el funcionamiento mostrados durante
la reproducción.
IDIOMA DE AUDIO
En este elemento podrá seleccionar el idioma de audio.
IDIOMA DE SUBTÍTULOS
En este elemento podrá seleccionar el idioma de subtítulos.
IDIOMA DEL MENÚ
En este elemento podrá seleccionar el idioma del menú del disco.
4.23.3 CONFIGURACIÓN DE AUDIO
SALIDA DE AUDIO (AUDIO OUT)
Solo se dispone del modo ANÁLOGO, por ejemplo, SPDIF/OFF,
no opcional.
CLAVE (KEY)
Para seleccionar su tono de música básico
(de bajo a alto).
4.23.4 CONFIGURACIÓN DE VÍDEO
BRILLO (BRIGHTNESS)
Para ajustar el brillo de la salida de vídeo.
CONTRASTE (CONTRAST)
Para ajustar el contraste de la salida de vídeo.
COLOR (HUE)
Para ajustar el color de la salida de vídeo.
SATURACIÓN (SATURATION)
Para ajustar la saturación de la salida de vídeo.
NITIDEZ (SHARPNESS)
Para ajustar la nitidez de la salida de vídeo.
4.23.5 CONFIGURACIÓN DE ALTAVOZ
DOWNMIX
Aquí podrá seleccionar el efecto de sonido que desee cuando no haya
altavoz central ni subwoofer.
Hay 3 modos: LT/RT, STEREO, VSS.
LT/RT: Cuando reproduzca un disco con efecto Dolby estéreo PRO LOGIC,
elija esta opción para reproducir una señal de audio con un efecto
cinematográfico muy realista.
ESTÉREO: Si elije esta opción, cuando reproduzca una señal de
audio con canales 5.1, reproducirá los canales izquierdo y derecho de a señal; cuando reproduzca una señal
de audio de 2 canales, reproducirá las 2 canales ordinarios de la señal estéreo.
VSS: Si elije esta opción, cuando reproduzca un disco registrado con canales 5.1, los altavoces del canal
principal reproducirán la señal de audio con efecto VSS.
104
4.23.6 CONFIGURACIÓN DIGITAL
MODO OP
Para la selección del modo de salida de audio
LINE OUT: Puede comprimir linealmente la señal de audio, de modo
que el volumen sea más bajo. Se aconseja seleccionar esta opción
de noche.
RF REMOD: Puede aumentar el nivel de volumen.
Puede seleccionar esta opción de día.
RANGO DINÁMICO
Después de seleccionar el modo de compresión de LINE OUT, seleccione el elemento, para que usted pueda
ajustar la proporción de compresión lineal. Si selecciona FULL, el valor de pico a pico de la señal de audio
será el mínimo; si selecciona OFF, el valor de pico a pico será el máximo.
DUAL MONO
Para la selección de un modo de salida de audio de su preferencia para las vías de señal izquierda y derecha.
Se usa principalmente para Karaoke de Ac3. En total hay 4 modos:
STEREO, MONO L, MONO R, MIX MONO.
105
* El Control Parental
P: Después de introducir un disco DVD en el compartimento para discos, aparecerá una ventana de diálogo
que le preguntará que introduzca una contraseña de 4 dígitos ¿Por qué?
R:Será debido a que la película del disco que está usted reproduciendo ha sido clasificado por el Control
Parental, y el nivel actual de clasificación del reproductor de DVD es más bajo que el del disco que quiere
reproducir. Deberá introducir la contraseña para acceder a la configuración del Control Parental. Entonces
deberá establecer un nivel de clasificación igual o superior al del disco que quiere ver, para poder reproducirlo.
!
NOTA
* So no ha cambiado de contraseña, la contraseña predeterminada de fábrica para el reproductor de DVD
estará vacía. Así, usted podrá introducir la que desee, e introducirla de nuevo para verificar la entrada en el
menú de configuración del Control Parental.
* Para el ajuste de la clasificación del Control Parental del reproductor de DVD, por favor, consulte el
contenido relativo al menú de configuración de bloqueo para más detalles.
Accesorios: Control Parental
La función de Control Parental de un reproductor de DVD puede controlar la reproducción del nivel de
clasificación de una película en un disco. Podrá hacer que el reproductor de DVD (incluido el software de
reproducción del PC) tenga un nivel de clasificación determinado con el Menú de Configuración en pantalla. Si
el nivel clasificatorio fijado para el disco es superior al establecido para el reproductor de DVD, el reproductor
de DVD no podrá reproducir el disco. A veces, la secuencias de Control Parental de algunos discos son
distintas de una de otra. La configuración del nivel de clasificación puede ser protegida por la contraseña. Por
lo tanto, si usted selecciona el elemento de desbloqueo (Unlock), la función de Control Parental será inválida,
y el contenido del disco se reproducirá por completo.
La película del disco puede ser designada para que el reproductor de DVD reproduzca la versión
diferente de contenido de una misma película según los distintos niveles de clasificación establecidos en el
Control Parental. Dependiendo de la característica de cambio perfecto descrito más arriba, las escenas no
adecuadas para niños serán automáticamente eliminadas o sustituidas por otras aptas
Los siguientes son todos los niveles de clasificación del Control Parental:
Desbloqueado (Unlock)
1
Kid Safe (Todos los públicos)
2
G
3
PG
4
PG 13
5
PG R
6
R
7
NC 17
8
Adult (Adultos)
106
*
Código regional
P: REGION ERROR (Error de Región) mostrado después de introducir un disco en el compartimento para
discos ¿Por qué ?
R: Se debe a que el reproductor de DVD y el disco tienen sus respectivos códigos regionales. Si los códigs
regionales no coinciden, el reproductor de DVD no podrá reproducir el disco.
Apéndice: El código regional de un DVD:
La Motion Picture Association of America (MPAA) dividió el mundo en 6 regiones, dándole a cada una un
código. Los códigos regionales y los países o áreas representados por los códigos regionales son los
siguientes:
Región 1: Estados Unidos, Canadá, Tierras del Pacífico Oriental;
Región 2: Japón, Europa Oriental, Europa Septentrional, Egipto, Suráfrica, Oriente Medio;
Región 3: Países del Sureste Asiático que incluyen: Taiwán, Hong Kong, Tailandia, Indonesia; Corea del
Sur, etc.;
Región 4: Australia, Nueva Zelanda, América Central y del Sur, Tierras del Pacífico Sur;
Región 5: Rusia, Mongolia, Península India, Asia Central, Europa Oriental, Corea del Norte, África del
Norte, Asia Nororiental, etc.;
Región 6: China Continental.
Solo los discos producidos por las 8 compañías cinematográficas más importantes de los Estados
Unidos asignan códigos regionales. Por lo general, son conocidos como discos de Código de Región Libre.
Las 8 compañías cinematográficas más importantes son las siguientes:
1. Warner Bros;
2. Columbia;
3. 20thCenturyFOX;
4. Paramount;
5. Universal;
6. UA (United Artist);
7. MGM (Metro Goldwyn Mayer);
8. Walt Disney
107
5. SISTEMA BLUE TOOTH MANOS LIBRES
1.
Entre en el modo Bluetooth
Cuando use el botón MODE o MENU para entrar en el modo Bluetooth, se mostrará la interfaz de
Bluetooth como se puede ver a la derecha.
En la interfaz de Bluetooth, las descripciones de los iconos se explican a continuación:
: Toque sobre este icono para transferir audio entre el Sistema de
Audio para el Coche y el teléfono.
: Toque sobre este icono para hacer aparecer la interfaz de
mensajes, como se puede ver a la derecha.
: Toque sobre este icono para pasar al modo de llamada d
audio. Llame el nombre que usted ha grabado en su
teléfono, para que se realice la llamada automáticamente.
El resto de iconos son los mismos que los del panel frontal y
el mando a distancia.
Bluetooth interface
2. Emparejamiento y conexión
1) Active el modo Bluetooth del teléfono móvil;
NOTE interface
2) Seleccione el elemento de Búsqueda de Dispositivos Bluetooth
y entre en él. Una vez finalizadla búsqueda, mostrará el nombre de
dispositivos Bluetooth encontrados, en caso de que los haya.
Selecciónelo y entre en él, después mostrará una interfaz que le pedirá que introduzca una contraseña,
que será la predeterminada 0000. Hágalo y entre. Finalmente, se le avisará de que se ha realizado el
emparejamiento.
3) Algunos teléfonos móviles podrán conectar automáticamente con el dispositivo BT del sistema de audio
para coche después del emparejamiento; para otro tipo de teléfonos móviles, será preciso seleccionar el
dispositivo BT emparejado y pulsar el botón CONNECTION. Cuando se haya conectado, el display del
sistema de audio para coche mostrará el mensaje LINK OK.
* Cuando haya fallado el emparejamiento, mantenga pulsado el botón PAIR del mando a distancia para
entrar en el modo de emparejamiento, y entonces el display LCD mostrará PAIR START, momento en el cual
se intentará de nuevo el emparejamiento y la conexión con el teléfono móvil.
3.
Uso del teléfono móvil para la conexión o la desconexión
En el estado de conexión, encuentre el dispositivo Bluetooth emparejado y conectado, después pulse
el botón de desconexión para realizar la desconexión;
En el estado de desconexión, encuentre el dispositivo Bluetooth emparejado y conectado, después
pulse el botón de conexión para realizar la conexión.
4. En el estado de conexión: el audio del teléfono móvil se transfiere al sistema de audio para el coche cada
vez que se marque un número o se reciba una llamada.
5.
Marcación en el estado de conexión
5.1
Marcación directa con el teléfono móvil.
5.2 Marcación con el mando a distancia siguiendo los pasos siguientes:
(1) Introduzca el número de teléfono con los botones numéricos 0-9
108
*
Pulse el botón CLEAR para cancelar los números introducidos erróneamente, si fuera necesario.
(2) Pulse TEL para realizar la llamar después de introducir los números.
5.3 Para volver a marcar el último número de teléfono
para validar el último número de teléfono.
Pulse el botón REDIAL o toque sobre el icono
6.
Aceptar/Rechazar/Finalizar una llamada
6.1 Cuando suene, pulse el botón TEL para aceptar la llamada;
6.2 Cuando suene, pulse COLGAR para rechazar la llamada;
6.3 Cuando esté en una conversación, pulse COLGAR para finalizar la llamada.
Nota: En el momento de recibir la llamada, se mostrará el número de teléfono.
109
6. Localización y resolución de problemas
Por favor, lea el manual del usuario atentamente antes de usar el reproductor de DVD. Si tuviera problemas
usando este reproductor, intente resolverlos después de leer las sugerencias mencionadas a continuación. Si
después de hacerlo, persistiera el problema, por favor, contacte con nuestra empresa o con un centro de
servicio técnico autorizado por nosotros. Por su seguridad, por favor, no abra la cubierta ni intente reparar el
reproductor por su cuenta, de lo contrario podría provocar una descarga eléctrica.
NO HAY IMAGEN, SONIDO NI INDICACIÓN
*
Asegúrese de que el aparato está encendido.
*
Asegúrese de que la toma de pared se encuentra en buen estado.
*
Asegúrese de que el cable de alimentación no está dañado o de que el fusible no está fundido.
*
Asegúrese de que ha enchufado bien el cable de alimentación a la toma de corriente.
NO HAY SONIDO PERO HAY IMAGEN
*
Asegúrese de que la salida de audio del reproductor está bien conectada a la entrada de audio del monitor.
*
Compruebe si el conector de audio está dañado.
*
Compruebe si usted ha bajado el volumen.
*
Asegúrese de haber seleccionado el ajuste de AUDIO correcto del reproductor.
*
Asegúrese de que el audio no se encuentra en el modo de supresión de audio (Mute).
NO HAY IMAGEN PERO HAY SONIDO
*
Asegúrese de que la salida de vídeo del reproductor está bien conectada a la entrada de vídeo del monitor.
*
Asegúrese de que ha seleccionado el canal de entrada de AV de su monitor conectado a su reproductor.
*
Compruebe si el conector de vídeo está dañado.
*
Asegúrese de haber seleccionado el ajuste de VÍDEO correcto del reproductor.
IMAGEN EN BLANCO Y NEGRO O PANTALLA TEMBLOROSA
*
Asegúrese de haber seleccionado el sistema de TV correcto (PAL, NTSC).
DEFECTOS EN LA IMAGEN O EN EL SONIDO
*
Compruebe si el ajuste de AUDIO es el correcto.
*
Compruebe si el disco está rayado o sucio.
*
Compruebe si el conector de AV y el terminal de salida están sucios.
*
Compruebe si se ha formado condensación en el interior de la lente. Si así fuera, apague el reproductor y
déjelo descansar durante aproximadamente una hora. Inténtelo de nuevo más tarde.
*
Compruebe si el ángulo de instalación es inferior a 30°.
SE MUESTRA EL MENSAJE NO DISC O BAD DISC
*
Asegúrese de haber colocado un disco en la bandeja.
*
Compruebe si el disco ha sido colocado al revés.
*
Compruebe si el disco está distorsionado.
*
Compruebe si el disco está muy sucio o muy rayado.
*
Asegúrese de que el formato del disco es compatible con el reproductor.
*
Asegúrese de que la temperatura en el interior del coche no es demasiado alta. Si lo fuera, deje que la temperatura
ambiente baje hasta recuperar los niveles normales.
*
Coloque otro disco en el compartimento para discos.
EL MANDO A DISTANCIA NO ES DEMASIADO SENSIBLE O NOFUNCIONA
*
Compruebe la pila del mando a distancia, asegurándose de que no está agotada y hace buen contacto.
*
Apunte con el mando a distancia directamente al sensor infrarrojo del reproductor.
*
Compruebe si hay algún obstáculo que se interponga entre el mando a distancia y el sensor infrarrojo.
LOS BOTONES DE ALGUNAS FUNCIONES NO RESPONDEN
*
Apague el aparato y vuélvalo a encender.
*
Lleve a cabo un reseteado de la unidad, a continuación, vuelva a encenderla.
*
Retire el panel frontal de la unidad, después instálelo de nuevo y vuelva a encenderlo
LA RADIO NO FUNCIONA
*
Compruebe si el cable de la antena ha sido bien conectado; o sintonice manualmente una emisora.
EL DISPLAY TFT PIERDE EL EFECTO TÁCTIL
*
Introduzca un disco y pulse el botón Stop, después pulse el botón Zoom. Finalmente pulse los botones ^ y v para
seleccionar el modo de calibrado, después toque sobre el cursor de cruz como se muestra hasta que vea ok, a continuación,
apague la unidad, y luego vuelva a encenderla.
110
7. Especificaciones
Especificaciones generales
Requisitos de alimentación........................................................DC 12V
Potencia máxima de salida..................4 x 25W(medida en DC 14.4 V)
Dimensiones(an x al x pr)........................................178 x 50 x 160mm
Especificaciones del reproductor de DVD
Formato.....................................DVD/VCD/JPEG/MP4/MP3/WMA/CD
Sistema de vídeo........................................................................NTSC
Sistema de audio..............................................................24 bit/96KHz
Sistema de carga................................................................ Auto carga
Ángulo de montaje.................................................................0 a +/-30
Especificaciones de vídeo
Tipo de vídeo........................................................................16:9 y 4:3
Nivel de salida de vídeo................................Compuesto:1.0± 0.2Vp-p
Impedancia de carga: 75 ohmios
Resolución horizontal.....................................................................500
Especificaciones de audio
Salida de audio(audio analógico)...................................2.0+0-1.0Vrms
Respuesta de frecuencia..........................20Hz ~ 20KHz(a 1KHz 0 dB)
Proporción S/N(Audio)..........................................≥90dB(a 1KHz 0 dB)
Separación....................................................................................50dB
Especificaciones de radio
Sección FM
Banda de frecuencias.............................................87.5MHz - 108MHz
Sensibilidad útil..............................................................................3uV
Frecuencia I.F........................................................................10.7MHz
Sección AM
Banda de frecuencias...........................................522KHz - 1620KHz
111
Formats for media player:
Video:
MPEG-1
MPEG-2
Divx
Xvid
MP4
VCD
SVCD
DVD-Video
Picture:
JPEG
Audio:
MP2
MP3
WMA
AAC
AC3
CDDA
HDCD/CD-G
112
CS-470 DVD
Handleiding
5 IN 1 AUDIOSYSTEEM VOOR IN AUTO
MET DISC/USB/KAART/BT/RADIO
EN TOUCHSCREEN
Opmerking: Alle informatie is onderhevig aan verandering zonder kennisgeving
113
OORZORGSMAATREGELEN
WARNUNG
STROMSCHLAGGEFAHR!
LET OP: OM HET RISICO VAN ELEKTRISCHE SCHOKKEN TE VERMINDEREN, OPEN DE BEHUIZING
(OF ACHTERKANT) NIET. GEEN DOOR DE GEBRUIKER TE ONDERHOUDEN ONDERDELEN IN
APPARAAT. LAAT ONDERHOUD OVER AAN GEKWALIFICEERD PERSONEEL.
Het bliksemschicht met pijlpunt symbool in een gelijkzijdige driehoek is bedoeld om de gebruiker attent te
maken op de aanwezigheid van “gevaarlijke spanning” binnenin de behuizing van het product die sterk genoeg
kan zijn om te leiden tot een gevaar op elektrische schokken voor personen.
Het uitroepteken in een gelijkzijdige driehoek is bedoeld de gebruiker attent te maken op de aanwezigheid van
belangrijke bedienings- en onderhoudsinstructies in de literatuur die bij het apparaat wordt geleverd.
CLASS 1 LASER PRODUCT
Symbool laserproduct: zit op de achterpaneel van het apparaat, geeft aan dat deze speler een klasse 1 laser
product is. Het gebruikt een zwakke laser zonder gevaarlijke uitstraling buiten het apparaat.
1. Lees deze handleiding zorgvuldig door vóór installatie en gebruik.
2. Raak de stekker niet aan met natte handen.
3. Zet het apparaat uit als het niet wordt gebruikt. (Haal de stekker uit het stopcontact als u van plan bent het
apparaat voor langere tijd niet te gebruiken.)
Haal de disc uit het apparaat/de disclade voordat u het apparaat verplaatst.
4. Open de behuizing niet en raak geen onderdelen aan die zijn blootgesteld buiten het product, dit is alleen
voor gekwalificeerde technici.
5. Stel het apparaat niet bloot aan direct zonlicht en plaats het niet in de buurt van voorwerpen die warmte
uitstralen om schade aan het apparaat te voorkomen.
6. Plaats het apparaat niet in vochtige omgevingen, die de werking van de pick-up van het apparaat kunnen
beïnvloeden.
7. Plaats het apparaat op een vlakke ondergrond in een ruimte met goede ventilatie. Zorg ervoor dat de
ventilatieopeningen niet worden bedekt om oververhitting en storing te voorkomen.
8. Maak het panel alleen schoon met een zachte, droge doek, gebruik geen thinner, alcohol of sprays.
9. Het apparaat mag niet worden blootgesteld aan druppend of spattend water en er mogen geen voorwerpen
gevuld met water, zoals vazen, op het apparaat worden geplaatst.
10.Haal de stekker uit het stopcontact en verbreek de verbinding met het lichtnet als het apparaat voor lange
tijd niet wordt gebruikt.
114
Inhoudsopgave
1. Vóór gebruik…….........................................................................................................117
1.1 Woordenlijst.................................................................................................. 117
1.2 Voorzorgsmaatregelen...................................................................................117
1.3 Onderhoud en reinigen van discs…..............................................................118
1.4 Informatie over batterij in afstandsbediening.................................................118
1.5 Beschrijving afstandsbediening.....................................................................119
1.6 De plaatsing en benaming van bedieningselementen op het apparaat.........120
1.7 Beschrijving aansluiten draden.......................................................................121
1.8 Installatie van het apparaat............................................................................122
2. Algemene bediening.....................................................................................................123
.
3. Bediening radio............................................................................................................124
4. Bediening bij afspelen Disc, USB en MMC/SD-kaart..................................................126
4.1 Een disc, USB-apparaat of kaart plaatsen/verwijderen...................................126
4.2 Het afspelen pauzeren.....................................................................................127
4.3 Het afspelen stoppen.......................................................................................127
4.4 Het hoofdstuk/nummer selecteren met OMH/OML of >>|/|<<..........................127
4.5 Het hoofdstuk/nummer selecteren met de numerieke toetsen.........................127
4.6 Het hoofdstuk/nummer selecteren met het hoofd-/PBC-menu.........................127
4.7 Vooruitspoelen/Terugspoelen...........................................................................128
4.8 Afspelen in slowmotion….................................................................................128
4.9 Frame voor frame afspelen…….......................................................................128
4.10 Herhalen…………….......................................................................................128
4.10.1 Herhaal een/alle...........................................................................................128
4.10.2 A-B herhalen................................................................................................129
4.11 Afspelen in scanmodus..................................................................................129
4.12 Afspelen vanaf een specifiek hoofdstuk/nummer of een specifieke tijd.........129
4.13 Afspelen in willekeurige volgorde...................................................................129
4.14 Afspelen vanuit andere kijkhoek.....................................................................129
4.15 Afspelen in zoommodus.................................................................................130
4.16 De ondertiteltaal veranderen..........................................................................130
4.17 De audiotaal veranderen................................................................................130
4.18 De afspeelstatus bekijken...............................................................................130
4.19 Programma afspelen......................................................................................130
4.20 Het afspelen van foto-bestanden...................................................................131
4.21 Het afspelen van MP4-bestanden.................................................................131
4.22 De ESP- en Id3-functie.................................................................................132
4.23 Bediening instellingenmenu van DVD……...................................................132
*
Ouderlijk toezicht…...................................................................................135
*
De regiocode……......................................................................................136
5. Bluetooth handsfree-systeem.....................................................................................137
.
6. Problemen oplossen...................................................................................................139
7. Specificaties................................................................................................................140
115
1. ‘Vóór gebruik
1.1 Woordenlijst
PBC (playback control)
Dit is een soort signaal (menu) dat op een disc van het SVCD- of VCD2.0-formaat is opgenomen
en kan worden gebruikt om het afspelen te bedienen. Discs met PBC zijn voorzien van interactieve software
waarmee een menu kan worden getoond op de TV. Als de disc stilstaande beelden bevat, dan kan het
apparaat deze
beelden in high definition afspelen.
Titel
Over het algemeen zijn titels erg belangrijk op een DVD-disc. Zo zou het thema van een film titel 1 kunnen zijn,
het gedeelte waar beschreven wordt hoe de film is gemaakt is titel 2, de cast is titel 3, etc.
Elke titel bevat een nummer dat eenvoudig op te zoeken is.
Hoofdstuk
Een titel kan worden verdeeld in verschillende hoofdstukken. De hoofdstukken van een film kunnen apart
worden afgespeeld
Track
Dit is het grootste onderdeel van een VCD. Over het algemeen is elk nummer op een karaoke-disc een track.
1.2 Voorzorgsmaatregelen
Veiligheid
1. Voeding: Het apparaat mag alleen worden aangesloten op het type voeding dat is beschreven in de
handleiding of aangegeven op het apparaat.
2. Het apparaat is ontworpen voor de negatieve pool van de accu die is verbonden met het chassis.
Bevestig dit vóór de installatie.
3. Laat de draden van de luidsprekers geen kortsluiting maken als het apparaat wordt ingeschakeld.
Anders kan dit de versterker overbelasten of doen doorbranden.
4. Installeer het afneembare paneel voordat u de draden aansluit.
5. De beschermhoes is bestemd om het voorpaneel veilig te bewaren (zie foto).
Omgeving
1. Gebruik het apparaat niet in de buurt van water of vocht.
2. Als er vocht in de lens komt, dan is het mogelijk dat het apparaat niet juist functioneert. Verhelp dit
probleem door het apparaat ongeveer een uur uit te schakelen, zodat het vocht kan verdampen.
3. Als het interieur van de auto extreem warm is, gebruik de speler dan niet tot de auto een tijdje heeft
gereden, zodat het interieur is afgekoeld.
116
1.3 Onderhoud en reinigen van discs
Onderhoud discs
1. Houd discs schoon door ze bij de randen vast te houden, raak het oppervlak van de disc en de afspeelzijde
niet aan.
2. Plak geen papier of tape op discs. Als er lijm op het oppervlak van een disc zit, veeg de disc dan schoon
vóór gebruik.
3. Stel discs niet bloot aan direct zonlicht of warmtebronnen, zoals de verwarming, en laat ze niet achter in een
auto die is geparkeerd in de zon, omdat de temperatuur daar aanzienlijk kan stijgen.
4. Plaats discs na gebruik in hun doosje, zodat ze niet te warm worden.
Reinigen discs
1. Veeg discs voor het afspelen schoon met een schoon doekje. Veeg van de buitenkant naar het centrum van
de disc.
2. Gebruik geen benzine, thinner, reinigers of anti-statische sprays, deze kunnen het apparaat beschadigen.
1.4 Informatie over batterij in afstandsbediening
De batterij in de afstandsbediening vervangen:
1.Trek voordat u de afstandsbediening voor het eerst gebruikt het isolatievel uit de afstandsbediening in de
richting die is aangegeven met de pijl.(zie fig.1)
2.Druk het verschuifbare blok in de richting die is aangegeven bij pijl A (zie fig.2), en trek vervolgens de
batterijhouder uit de afstandsbediening, zoals is aangegeven met pijl B (zie fig.2).
3.Vervang de oude batterij door een nieuwe batterij met de (+) pool naar boven gericht. (zie fig.3).
4.Plaats de batterijhouder terug in de originele positie in de afstandsbediening. (zie fig.3).
Opmerking over de batterij in de afstandsbediening:
1.Onjuist gebruik van batterijen kan leiden tot oververhitting, explosies verwondingen of brand.
2.Batterijlekkage kan schade aan de afstandsbediening veroorzaken (de levensduur van de batterij is bij een
normale kamertemperatuur ongeveer 6 maanden).
3.Sluit de batterij niet kort.
4.Gooi batterijen niet in vuur.
5.Houd de batterij buiten het bereik van kinderen om ongelukken te voorkomen.
117
1.5 Beschrijving van de afstandsbediening
3
27
PWR
OPEN
14
35
EQ
29
MU
32
34
+
4
B AND
M ENU
M OD E
0K
SE L
9
1
SE T UP
C L EA R
31
40
3
4
6
7
8
0/10
TA
10+
/PTY
1
2
-10
+10
5
2. MENU
6
3. POWER
5
CLK
9/AF
28
SLOW_FWD
ST
21
22
LOC
ZOOM
26
#
INT
AUDIO
25
SE A RC H
RPT
AP S
RDM
TITLE/PBC
SUBT ITLE
PAIR
REDI AL
A-B
23
5. >>|
10
6. >
11
7. |<<
12
36
OSD
37
LOUD
TEL
8. v
16
9. SEL
15
10. PLAY/PAUSE
18
17
11.NUMERIEKE TOETSEN
(0~10,+10 ,-10)
19
20
PROG
4. ^
7
41
24
1. ANG
33
8
13
30
2
12. 10+/PTY
39
13. SETUP
38
14. MODE
15. APS/Ha
16. SEARCH
29. MUTE
17. RDM
30. STOP
18. RPT
31. VOLUME-
19. SUBTITLE/REDIAL
32. <
20. TITLE/PBC/PAIR
33. OK
21. VIEW-ANGLE/ST/#
34. VOLUME+
22. ZOOM
35. BAND
23. AUDIO
36. PROG
24. CLK
37. OSD
25. A-B
38. LOUD
26. INT
39. TEL
27. EQ/OPEN
40. TA
28. LOC/SLOW-FWD/*
41. AF
118
1.6 De plaatsing en benaming van de bedieningselementen op het apparaat
1
12
9
5
16
3
18
17 14
8
2
AP S
AV IN
REL
11 13 10
4 19
6
Het voorpaneel
SD/MMC
7
15
De voorkant na het verwijderen van het voorpaneel
11. |<<
12. BAND/TEL
13. APS/HANG UP
14. EJECT
15. RESET
16. Klein LCD-scherm
17. IR-afstandsbedieningssensor
18. Microfoon
19. REL
1. OPEN
2. POWER/MUTE
3. Monitor
4. AV INGANG
5. Discsleuf
6. USB-poort
7. SD/MMC-kaartsleuf
8. MODE
9. VOL-knop
10. >>|
119
1.7 Beschrijving aansluiting draden
Beschrijving aansluiting draden
White
REVERSAL LINE
Opmerking: Sluit het uiteinde met klem van een aardekabel die is geleverd door de fabrikant aan op de om de schroef vast te
zetten. sluit het andere uiteinde van de aardekabel aan op de negatieve pool van de voeding. Als u dit niet doet, dan kan het
beeld knipperen.
Beschrijving aansluiting draden voor draadaansluiting 1
OPMERKINGEN:
1. Er mogen alleen luidsprekers met 4 ohm impedantie worden gebruikt.
2. Zorg ervoor dat de blauwe automatische antenne kabel geen contact maakt met een aardeverbinding.
Beschrijving aansluiting draden voor draadaansluiting 2
Beschrijving van de parkeerremdraad naar parkeerremsysteem in de auto
120
1.8 INSTALLATIE VAN HET APPARAAT
INSTALLATIE-INSTRUCTIES
HET APPARAAT DAT U GAAT INSTALLEREN IS EEN APPARAAT MET DIEFSTALBEVEILIGING. HET
CHASSIS VAN HET APPARAAT HEEFT EEN GLADDE METALEN BEHUIZING. MAAK DE
STROOMAANSLUITING EN DE VERBINDING MET DE, LUIDSPREKERS EN ANTENNE VOLGENS
DE INSTRUCTIES IN HET INSTRUCTIEBOEKJE, INSTALLEER VERVOLGENS DE METALEN BEHUIZING
ALS VOLGT IN DE AUTO.
METALEN BEUGEL
SELECTEER HET JUISTE LIPJE
OM DE METALEN BEHUIZING
VAST TE ZETTEN.
CHASSIS APPARAAT
CHASSIS APPARAAT
VOORPANEEL
DASHBOARD
LADDE METALEN BEHUIZING
PLAATS DE LINKER EN RECHTER SLEUTELPLATEN IN
DE TWEE ZIJKANTEN VAN HET CHASSIS OM HET
CHASSIS UIT DE METALEN BEHUIZING TE TREKKEN.
121
2. Algemene bediening
1. Het apparaat in-/uitschakelen
Druk als het apparaat is uitgeschakeld kort op POWER om het apparaat in te schakelen.
Druk als het apparaat is ingeschakeld lang op POWER op het voorpaneel of kort op POWER op
de afstandsbediening om het apparaat uit te schakelen.
2. De monitor van het audiosysteem uit/in de behuizing te schuiven
Druk op OPEN om de monitor van het audiosysteem uit de behuizing of in de behuizing te schuiven.
3. De hoek van de monitor van het audiosysteem voor in de auto optimaal instellen
Druk herhaaldelijk op OMHOOG/OMLAAG op de monitor of ANG op de afstandsbediening om de hoek
van de monitor van het audiosysteem optimaal in te stellen .
4. De functiemodus selecteren
Druk op MODE om de RADIO-, DISC- (na het plaatsen van
een disc), USB- (na het plaatsen van een USB-apparaat),
KAART- (na het plaatsen van een kaart), AUX- of
BLUETOOTH-modus te selecteren.
Tik tijdens het afspelen na het verschijnen van het toetsenbord
op het icoontje om naar de menu-modus te gaan, zoals
in de afbeelding aan de rechterkant. Tik vervolgens op een in
het menu op een icoontje om naar de desbetreffende modus
te gaan.
Mode Menu
5. Het volume instellen
Draai aan de VOL-knop op het voorpaneel of houd + of – op de afstandsbediening ingedrukt om het
volumeniveau rechtstreeks in te stellen.
6. Het geluid dempen (mute)
Druk op MUTE op de afstandsbediening om de MUTE-functie in/uit te schakelen.
U kunt ook kort op POWER op het voorpaneel drukken om de MUTE-functie in/uit te schakelen.
7. De tijd weergeven
Druk op CLK om de tijd weer te geven op de kleine monitor op het voorpaneel.
Druk, als de monitor in de behuizing is geschoven, op CLK om de klok op het kleine LCD weer te geven.
8. De gewenste EQ-modus selecteren
Druk op EQ op de afstandsbediening om een van de voorgeprogrammeerde equalizermodi te selecteren:
POP, ROCK, CLAS, OFF. Het geluidseffect zal worden veranderd.
9. De LOUD-functie in-/uitschakelen
Druk op LOUD om de LOUD-functie in/uit te schakelen.
Als de LOUD-functie is ingeschakeld, dan zal het bassniveau direct worden verbeterd als er
onvoldoende bass is.
10. Het voorpaneel verwijderen en de speler resetten
Als de monitor of het kleine LCD-display een verkeerde weergave geven of als sommige toetsen niet
werken of als het geluid is vervormd, druk dan op REL op het voorpaneel om het voorpaneel los te koppelen
en trek het vervolgens naar rechts en daarna naar links om het te verwijderen. Druk ten slotte op de
RESET-knop om het probleem op te lossen.
11.Het apparaat instellen
Druk om de instellingen te openen op het icoontje
in het
hoofdmenu, het SETUP-menu wordt geopend zoals in de
afbeelding aan de rechterkant.
In dit menu kunt u GENERAL (ALGEMEEN), TIME (TIJD),
AUDIO, VIDEO ,RADIO , CALIBRATE (CALIBREREN)
selecteren door op de icoontjes die u aan de rechterkant ziet
te drukken.
122
GENERAL SETUP
3.
Bediening radio
1. De RADIO-modus openen
Druk op MODE of gebruik het Modusmenu om de
RADIO-modus te openen. Het scherm toont RADIO, zoals
getoond in de afbeelding rechts.
Tik in het radiomenu op het icoontje
om naar het
modusmenu te gaan; houd MODE tijdens het afspelen
ingedrukt om het TFT-display in of uit te schakelen; tik op het
icoontje
om naar het frequentiescherm te schakelen,
zoals getoond aan de rechterkant; de andere icoontjes zijn
hetzelfde als de toetsen op het panel of de afstandsbediening.
U kunt in het menu MUTE, MUTE, EQ, TA, AF, PTY naar wens
instellen, zoals getoond in de afbeelding aan de rechterkant.
2. DE BAND-TOETS
Druk in de RADIO-modus, op BAND op de afstandsbediening
om de gewenste radioband te selecteren, FM1, FM2, FM3,
AM1 of AM2. De geselecteerde band wordt getoond op de
kleine monitor van het voorpaneel.
3. De TUNE/SEEK OMHOOG/OMLAAG TOETSEN
In RADIO-modus:
1) Houd >>|/|<< ingedrukt om vanaf de huidige frequentie
automatisch naar een zender met een hogere/lagere frequentie te zoeken.
2) Druk kort op >>| / |<< om de frequentie handmatig, stap voor stap, te verhogen/verlagen en naar uw
favoriete zender te zoeken.
4. De APS-TOETS
In RADIO-modus:
1)Houd APS ingedrukt om vanaf de laagste frequentie te zoeken naar zenders met een sterk signaal tot een
volledig zoekcyclus is voltooid. Zes zenders met het sterkste signaal worden in het geheugen opgeslagen als
voorkeurszender. Het automatisch zoeken kan op elke bank van de geselecteerde band. Als het automatisch
zoeken is voltooid, dan zal elke zender, vanaf M1, op de FM- of AM-band voor 5 seconden worden gescand
alsof u kort op APS drukt. Na het voltooien van een scancyclus, zal de radio de voorkeurszender M1 blijven
afspelen. (De radio kan in totaal 3x6 zenders opslaan voor FM en 2x6 zenders voor AM).
2) Als u kort op APS drukt, dan zal de radio elke voorkeurszender voor 5 seconden scannen, op de FM- of
AM-band vanaf M1. Na het voltooien van een scancyclus, zal de radio de voorkeurszender M1 blijven
afspelen.
OPMERKING: Op de FM-band, worden FM1,FM2,FM3 tegelijk gecontroleerd; Op de AM-band worden
AM1, AM2 tegelijk gecontroleerd.
5. DE TOETSEN VOOR DE VOORKEURSZENDERS [ 1-6 ]
In RADIO-modus:
1) Houd om de huidige frequentie op de huidige band op te slaan een van de toetsen van de zes
voorkeurszenders (1-6) op de afstandsbediening ingedrukt of draai aan de nummerknop en houd deze
lang ingedrukt.
2) Druk om een voorkeurszender op de huidige band af te spelen op een van de knoppen van de
voorkeurszenders [1-6] op de afstandsbediening of draai aan de nummerknop en druk op de knop .
6. STEREO/MONO-TOETS
Druk op ST op de afstandsbediening om STEREO of MONO te selecteren voor de FM-band.
7. LOC-TOETS
1) In RADIO-modus: als de signalen van zenders ver weg erg zwak zijn en de ontvangst erg slecht is tijdens
het afstemmen, controleer dan of het woord LOC op het LCD staat. Als het woord LOC op het LCD staat,
druk dan op deze knop om de LOC-functie uit te schakelen en stem nogmaals af op de desbetreffende
zender;
123
2) In RADIO-modus: als de signalen van lokale radiozenders te sterk zijn, dan kan dit leiden tot interferentie
tijdens het afstemmen, druk op deze knop om de LOC-functie in te schakelen. Het woord LOC zal op het
LCD verschijnen, stem daarna nogmaals af op de lokale zender.
8. PTY-TOETS (PROGRAMMA TYPE)
Druk kort op PTY om een van de volgende modi te selecteren:
PTY MUZIEK-groep - - PTY SPRAAK-groep – UITGESCHAKELD (OFF)
Als er een PTY-groep is ingeschakeld, druk dan op VOL+ of VOL- op de afstandsbediening of draai
aan de VOL-knop op het voorpaneel om een van de volgende PTY-programma’s te selecteren:
<-->NIEUWS<-->ZAKEN<-->INFO<-->SPORT<-->EDUCATIE<-->DRAMA
<-->CULTUUR<-->WETENSCHAP<--> GEVARIEERD<-->WEER<--> FINANCIEN
<-->KINDEREN<-->SOCIAAL<-->RELIGIE<-->INBEL<-->REIZEN
<-->VRIJE TIJD<-->DOCUMENT< -->GEEN PTY<-->POP M< -->ROCK M
<-->EASY M<-->LIGHT M<--> CLASSICS<-->ANDERE M<-->JAZZ
<-->COUNTRY<-->NATIONALE M<-->OLDIES<-->FOLK M<-->
Als PTY-groep is ingeschakeld, dan kunt u ook op een van de 6 numerieke toetsen drukken om de
bovenstaande programma’s te selecteren.
Na het selecteren van een van de PTY-programma’s zal het display de melding SEEK PTY tonen en
automatisch naar een zender met het gekozen PTY-programma zoeken. Als er geen zender met het
PTY-programma is, dan zal het display de melding PTY NONE tonen en terugkeren naar de normale
zender.
9. AF-TOETS [ALTERNATIEVE FREQUENTIES]
Druk kort op AF om de AF-schakelmodus te selecteren. De schakelmodus wordt aangegeven met AF
segment op het display.
Segment uit: AF-schakelmodus is uitgeschakeld.
Segment aan: AF-schakelmodus is ingeschakeld en heeft RDS-informatie.
Segment knippert: AF-schakelmodus is ingeschakeld, maar er is nog geen RDS-informatie ontvangen.
Als de AF-schakelmodus is geselecteerd, dan zal de radio de signaalsterkte van de AF constant
controleren. Het interval van de controle van elke AF hangt af van de signaalsterkte van de huidige
zender, van een paar minuten voor sterke zenders tot een paar seconden voor zwakke zenders.
Elke keer als de radio een nieuwe AF vindt die sterker is dan de huidige zender, dan zal de radio voor
korte tijd naar die frequentie schakelen en de NIEUWE FREQUENTIE wordt voor 1-2 seconden
getoond.
Omdat de radio zeer snel tussen frequenties kan schakelen en de controletijd erg kort is, is het bijna
niet hoorbaar bij normale programma’s. (Als AF knippert op het LCD, dan zal de radio naar een sterkere
RDS-zender zoeken. Als AF en TP knipperen op het LCD, dan kan het apparaat alleen naar een zender
met verkeersinformatie zoeken).
In de FM-modus: als AF is ingeschakeld, dan kunnen de functies SEEK, (SCAN), AUTO-MEMORY
alleen RDS-programma’s ontvangen en opslaan.
10. TA-TOETS [VERKEERSINFORMATIE]
Druk kort op TA om de verkeersinformatie-modus in te schakelen.
Als er verkeersinformatie wordt uitgezonden:
1).Als het apparaat een disc afspeelt, dan zal het apparaat tijdelijk naar de radiomodus schakelen.
2).Tijdelijk overschakelen naar een gekoppelde EON zender als EON verkeersinformatie detecteert
op een andere zender. In dit geval zullen TA, TP worden getoond op het LCD.
* Verkeersinformatie onderbreken:
De huidige verkeersinformatie wordt geannuleerd door kort op TA te drukken.
* Als TA is ingeschakeld, dan kunnen de functies SEEK, (SCAN), AUTO MEMORY alleen worden
ontvangen of opgeslagen als de verkeersinformatiecode is ontvangen.
124
4. Bediening bij afspelen disc en USB
4.1 Een disc, USB-apparaat of kaart plaatsen/verwijderen
Als u bestanden op een disc of kaart wilt afspelen, druk dan op EJECT om de monitor omlaag te
schuiven.
Plaats vervolgens de disc of kaart in de discsleuf of de SD/MMC-kaartsleuf.
Druk om de disc of kaart te verwijderen twee keer op STOP om het afspelen te stoppen en druk
vervolgens op EJECT om de monitor omlaag te schuiven en de disc uit de discsleuf te werpen en deze
vervolgens uit de discsleuf te halen; of druk eerst op de kaart en haal deze vervolgens uit de kaartsleuf.
Als u bestanden wilt afspelen van USB, plaats dan een USB-apparaat in de USB-poort op de achterzijde
van het apparaat.
Druk om het USB-apparaat te verwijderen twee keer op STOP en
verwijder het USB-apparaat.
In USB- of KAART-modus: selecteer de gewenste modus,
zoals afgebeeld aan de rechterkant.
Opmerking: het icoontje
is voor audiobestanden;
Het icoontje
is voor videobestanden; het icoontje
Is voor afbeeldingen.
Tik op het icoontje
om terug te keren naar het
om terug te keren naar
hoofdmenu, tik op het icoontje
de voorgaande instelling.
: Tik hierop om het afspelen te pauzeren.
: Tik hierop om het afspelen te stoppen.
: Tik op een van deze icoontjes de snelheid van het vooruit- of
achteruitspoelen in te stellen.
(Behalve bij het bekijken van afbeeldingen)
: Tik op een van deze icoontjes om naar het volgende of vorige
hoofdstuk/track te gaan.
: Tik hierop om het volume te verhogen of verlagen.
: Tik hierop om de pagina omhoog of omlaag om te slaan.
: De INT-afspeelmodus selecteren. (Behalve voor foto’s)
: Tik tijdens het afspelen van VCD hierop om de audio te selecteren,
STEREO of MONO.
: Dezelfde werking als MENU op de afstandsbediening.
: Dezelfde werking als TITLE op de afstandsbediening.
: Dezelfde werking als REPEAT op de afstandsbediening.
: Dezelfde werking als SUBTITLE op de afstandsbediening.
125
US B/CARD INTERFACE
: Tik hierop om track 1-9 te selecteren en selecteer vervolgens OK om uw keuze af te spelen.
: Druk tijdens het afspelen op ZOOM en tik vervolgens op een van deze icoontjes. Ze hebben
dezelfde werking als de navigatietoetsen op de afstandsbediening.
(Behalve bij muziek & afbeeldingen.);
Druk tijdens het afspelen op een van deze icoontjes om de afspeelhoek te veranderen.
(Alleen tijdens het bekijken van afbeeldingen.)
: Dezelfde werking als ZOOM op de afstandsbediening.
: Dezelfde werking als RDM op de afstandsbediening.
: Tik tijdens het afspelen van een DVD op dit icoontje om de afspeelhoek te veranderen.
4.2 Het afspelen pauzeren
Druk tijdens het afspelen van DVD/VCD/CD/MP3/WMA op PAUSE op de afstandsbediening
om het afspelen te pauzeren, druk op PLAY om het normale afspelen te hervatten.
4.3 Het afspelen stoppen
Druk tijdens het afspelen van DVD/VCD/MP3/WMA/CD één keer op STOP om het afspelen te
pauzeren. Druk daarna op PLAY om het normale afspelen te hervatten;
Druk twee keer op STOP om het afspelen volledig te stoppen en druk daarna op PLAY
om het afspelen vanaf het begin van het eerste hoofdstuk/track te hervatten.
4.4 Het hoofdstuk/nummer selecteren met >>| / |<<
Druk tijdens het afspelen op >>| / |<< om de volgende of vorige hoofdstuk/nummer te selecteren.
Opmerking: Druk herhaaldelijk op >>|/|<< om meerdere hoofdstukken/nummers vooruit of achteruit
te gaan.
4.5 Het hoofdstuk/nummer selecteren met de numerieke toetsen
Druk tijdens het afspelen van DVD/VCD(PBC UIT)/MP3/WMA/CD op een van de numerieke toetsen
1~9 of 0/10 om rechtstreeks het eerste tot tiende hoofdstuk/nummer af te spelen (de toets 0/10 wordt
om het nummer 10 in te voeren).
Als u een track/hoofdstuk wilt afspelen met een nummer dat hoger is dan 10, gebruik dan 10+,
1~9 en 0/10. Voorbeeld 1: druk om het 13e nummer/hoofdstuk af te spelen eerst één keer op 10+
en daarna op de toets 3. Voorbeeld 2: druk om het 34e nummer/hoofdstuk af te spelen eerst drie keer
op 10+ en druk daarna op de toets 4.(de toets 0/10 wordt gebruikt om het nummer 0 in te voeren)
Opmerking: druk lang op +10 of -10 om 10 hoofdstukken/tracks vooruit of achteruit te gaan.
(alleen voor MP3/WMA).
4.6 Het hoofdstuk/nummer selecteren met het Hoofd-/PBC-menu (Indien aanwezig op de disc)
Tijdens het afspelen van een DVD
1.
Druk op TITLE op de afstandsbediening om de titellijst te tonen.
126
2.
Druk op de navigatietoetsen om de gewenste titel te selecteren en druk vervolgens op OK of PLAY om
het hoofdmenu van de geselecteerde titel te openen.
3.
Druk op de navigatietoetsen om het gewenste hoofdstuk te selecteren en druk ten slotte op OK of PLAY
om het geselecteerde hoofdstuk af te spelen.
Druk tijdens het afspelen op MENU om het hoofdmenu van de titel die wordt afgespeeld te openen.
In de VCD-modus
1.
Als de PBC-functie wordt ingeschakeld, zal het afspelen starten aan het begin van de disc tot het
PBC-menu wordt getoond op het TV-scherm (als de disc een PBC-menu bevat).
2.
Druk op de numerieke toetsen om de track die u wilt afspelen te selecteren.
In de MP3/WMA/CD-modus, de knoppen TITLE, PBC, MENU hebben geen functie.
4.7 Vooruitspoelen/Terugspoelen
Houd tijdens het normale afspelen >>|/|<< ingedrukt om vooruit of achteruit te spoelen met de volgende
snelheden: x2, x4, x8, x20, normaal.
Druk tijdens het spoelen op PLAY om het normale afspelen te hervatten.
4.8 In slowmotion afspelen
Druk tijdens het afspelen op SLOW_FWD om in slowmotion af te spelen.
Met elke opeenvolgende druk op SLOW_FWD zal de afspeelsnelheid afnemen. De snelheid van het
afspelen zal als volgt veranderen: x1/2,x1/3,x1/4,x1/5,x1/6,x1/7,normaal.
Druk tijdens het afspelen in slowmotion op PLAY om het afspelen met normale snelheid te hervatten.
Deze functie werkt alleen bij het afspelen van video.
4.9 Frame voor frame afspelen
Als het apparaat video afspeelt, druk dan herhaaldelijk op TEL om de video frame voor frame af te
spelen. Druk op PLAY om het afspelen met normale snelheid te hervatten.
4.10 Herhalen
4.10.1
1.
2.
3.
4.10.2
1.
Herhaal EEN/ALLE
Tijdens het afspelen van een DVD:
Druk op RPT om HERHAAL HOOFDSTUK, HERHAAL TITEL, HERHAAL ALLE of UIT te selecteren.
Tijdens het afspelen van een VCD(PBC UIT)/CD:
Druk op RPT om HERHAAL EEN, HERHAAL ALLE of UIT te selecteren.
Als PBC is ingeschakeld tijdens het afspelen van een BCD, dan heeft RPT geen functie.
I Tijdens het afspelen van MP3/WMA:
Druk op RPT om HERHAAL EEN, HERHAAL MAP, HERHAAL ALLE of UIT te selecteren.
A-B herhalen
Druk op A-B om zelf een specifiek gedeelte van een disc in te stellen dat wordt herhaald:
Druk op A-B op het beginpunt (A) van het te herhalen gedeelte.
127
Druk nogmaals op A-B om het eindpunt (B) van het te herhalen gedeelte in te stellen.
Het gedeelte zal daarna worden herhaald.
2.
Druk een derde keer op A-B om de A-B herhaalmodus te annuleren en het normale afspelen te
hervatten.
Opmerking:
De punten A en B moeten tijdens het afspelen van VCD/MP3/WMA/CD binnen dezelfde track liggen.
De punten A en B kunnen tijdens het afspelen van DVD uit verschillende hoofdstukken worden
geselecteerd.
4.11 Afspelen in scanmodus
1. Druk tijdens het afspelen van VCD(PBC UIT)/CD op INT om de eerste 15 seconden van elke track op de
disc af te spelen. Druk nogmaals op INT om het normale afspelen te hervatten.
2. De toets INT heeft tijdens het afspelen van DVD/MP3/WMA geen functie.
4.12 Afspelen vanaf een specifiek hoofdstuk/nummer of een specifieke tijd
1. Druk tijdens het afspelen van een DVD op SEARCH om een menu op te roepen en selecteer het item
titel, gebruik vervolgens de numerieke toetsen om het serienummer van de titel in te voeren; gebruik de
navigatietoetsen om het item chapter (hoofdstuk) te selecteren en gebruik de numerieke toetsen om
het serienummer van het hoofdstuk in te voeren; u kunt hierna nog de navigatietoetsen gebruiken om
het item time (tijd) te selecteren en daarna de numerieke toetsen gebruiken om de gewenste starttijd van
het afspelen in te voeren; druk tenslotte op OK of PLAY om het afspelen te starten vanaf het
geselecteerde hoofdstuk of de geselecteerde tijd.
2. Druk tijdens het afspelen van VCD/MP3/WMA/CD op SEARCH om een menu op te roepen en selecteer
het item track, gebruik vervolgens de numerieke toetsen om het serienummer van de track in te voeren; u
kunt de navigatietoetsen hierna gebruiken om het item time (tijd) te selecteren en daarna de numerieke
toetsen gebruiken om de gewenste starttijd van het afspelen in te voeren; druk ten slotte op OK of PLAY
om het afspelen te starten vanaf de geselecteerde track of de geselecteerde tijd.
4.13 Afspelen in willekeurige volgorde
Druk tijdens het afspelen van DVD/VCD(PBC OFF)/MP3/WMA/CD op RDM om te schakelen tussen
RANDOM (AAN)/RANDOM OFF (UIT). Het apparaat zal de content op de disc in willekeurige volgorde
afspelen als RANDOM is aangezet.
4.14 Afspelen vanuit andere kijkhoek
1. De toets VIEW-ANGLE op de afstandsbediening heeft tijdens het afspelen van VCD/MP3/WMA/CD
geen functie.
2. Druk tijdens het afspelen van een DVD herhaaldelijk op VIEW-ANGLE op de afstandsbediening
om een scène vanuit een andere hoek te bekijken.(Deze functie is alleen beschikbaar op DVD’s die de
ANGLE-functie ondersteunen)
4.15 Afspelen in zoommodus
Druk tijdens het afspelen van video’s/afbeeldingen herhaaldelijk op ZOOM om een bepaald gedeelte van
de weergave op het beeld te vergroten met de volgende factor:
ZOOMx2,ZOOMx3,ZOOMx4,ZOOMx1/2,ZOOMx1/3,ZOOMx1/4,ZOOM UIT.
Druk op ^/v/>/< om het gebied dat u wilt vergroten te selecteren.
128
4.16 De ondertiteltaal veranderen
Druk tijdens het afspelen van een DVD herhaaldelijk op SUBTITLE om de ondertiteltaal te
Selecteren of de ondertitels uit te schakelen.(afhankelijk van de gebruikte media.)
Deze toets heeft geen functie tijdens het afspelen van VCD/MP3/WMA/CD.
4.17 De audiotaal veranderen
1. Druk tijdens het afspelen van een DVD herhaaldelijk op AUDIO op de afstandsbediening om de
gewenste taal te selecteren. (afhankelijk van de gebruikte media)
2. Druk tijdens het afspelen van een VCD herhaaldelijk op AUDIO om de geluidsmodus te selecteren:
MONO L, MONO R, MIX MONO of Stereo.
Er is geen taaloptie.
3. De toets AUDIO heeft tijdens het afspelen van CD/WMA/MP3 geen functie.
4.18 De afspeelstatus bekijken
1. Druk tijdens het afspelen van DVD herhaaldelijk op OSD op de afstandsbediening om de afspeelstatus
in/uit te schakelen. Als de functie is ingeschakeld, dan zal het apparaat informatie tonen, zoals:
het nummer van de huidige titel, het nummer van het huidige hoofdstuk, de verstreken tijd van
huidige het hoofdstuk, de resterende tijd van het huidige hoofdstuk, de verstreken tijd van de huidige
titel, de resterende tijd van de huidige titel, etc.
2. Druk tijdens het afspelen van VCD/CD herhaaldelijk op OSD op de afstandsbediening om de afspeelstatus
n/uit te schakelen. Als de functie is ingeschakeld, dan zal het apparaat informatie tonen, zoals:
het nummer van de huidige track, de verstreken tijd van de huidige track, de resterende tijd van de huidige
track, de verstreken tijd van de huidige disc en de resterende tijd van de huidige disc.
3. Druk tijdens het afspelen van MP3/WMA herhaaldelijk op OSD op de afstandsbediening om de
afspeelstatus in/uit te schakelen. Als de functie is ingeschakeld, dan zal het apparaat informatie tonen,
zoals: het nummer van de huidige track, verstreken tijd van de huidige track, de resterende tijd van de
huidige track.
4.19 Programma afspelen
1
2
3
4
*
Het is bij het afspelen van DVD/VCD/MP3/WMA/CD mogelijk om een programma te maken, u kunt zelf
instellen welke hoofdstukken/tracks u wilt afspelen en de volgorde waarin deze worden afgespeeld.
Druk tijdens het afspelen op PROG om het programma menu te openen, dit ziet er als volgt uit:
Gebruik de navigatietoetsen om de cursor te verplaatsen naar de gewenste positie voor het invoeren van
het nummer.
Gebruik de numerieke toetsen om het gewenste nummer van de titel/hoofdstuk/track in te voeren op de
geselecteerde positie.
Gebruik de navigatietoetsen om het item Play te selecteren en druk vervolgens op OK om de
geprogrammeerde titels/hoofdstukken/tracks in de geprogrammeerde volgorde af te spelen.
Druk om het afspelen van het programma te verlaten twee keer op STOP; als u één keer op STOP heeft
gedrukt, dan kunt u het programma weer starten door op PLAY te drukken.
129
*
*
*
Als u alle geprogrammeerde nummers wil verwijderen, verplaats de cursor dan naar het item Clear en
druk op OK.
Als u de geprogrammeerde volgorde wil veranderen, verplaats de cursor dan naar het item dat u wil
veranderen en voer het gewenste nummer in.
Als u tijdens het afspelen van VCD een programma wilt afspelen en PBC is ingeschakeld, dan zal de
PBC-modus automatisch worden uitgeschakeld.
4.20 Het afspelen van foto-bestanden
1. Het hoofdmenu wordt op de monitor getoond als er naar de afbeeldingmodus wordt geschakeld. .
Het icoontje aan de linkerkant van het hoofdmenu is voor het selecteren van MP3/WMA bestanden; het
Icoontje in het midden is voor het selecteren van foto-bestanden; het sorteericoontje aan de rechterkant
is voor het selecteren van videobestanden. Als een van deze bestandssoorten niet aanwezig is, dan kunt
u de cursor niet verplaatsen naar het desbetreffende icoontje.
2. Druk, als het hoofdmenu wordt getoond, op de navigatietoetsen om de gewenste MAP of het gewenste
bestand of icoontje te selecteren en druk vervolgens op OK of PLAY om de MAP te openen, het
geselecteerde bestand af te spelen, of alleen het gekozen soort bestanden af te spelen.
U kunt , als het hoofdmenu wordt getoond, ook de numerieke toetsen gebruiken om het nummer van een
bestand te selecteren en dat bestand af te spelen.
Als u het icoontje van foto-bestanden selecteert, druk dan op ^ of > om de eerste afbeelding te
Selecteren en druk vervolgens op v om de gewenste afbeelding te selecteren. Druk ten slotte op OK of
PLAY/PAUSE om het geselecteerde bestand op het volledige scherm te bekijken.
3. Druk tijdens het afspelen van foto-bestanden op >/</^/v om de afbeelding als volgt te roteren:
>: 90° met klok mee; <: 90° tegen klok in; ^:OMHOOG<-->OMLAAG; v: LINKS<-->RECHTS
Druk tijdens het afspelen van foto-bestanden op PROG om de overgangsmodus te veranderen.
Druk tijdens het afspelen van foto-bestanden op STOP om het afspelen te stoppen en terug te keren
naar het hoofdmenu.
*
*
De volgende toetsen hebben tijdens het afspelen van foto-bestanden geen functie: SLOW-FWD,
SUBTITLE, TITLE, ANGLE, AUDIO, RDM, INT en A-B.
Alle andere toetsen hebben in de afbeeldingmodus dezelfde functie als in de MP3/WMA-modus.
4.21 Het afspelen van MP4-bestanden
1. Het hoofdmenu wordt getoond op TV als er naar de MP4-modus wordt geschakeld en het apparaat zal
daarna automatisch het eerste bestand afspelen.
Druk tijdens het afspelen op STOP om het afspelen te stoppen en terug te keren naar het hoofdmenu.
2. Druk, als het hoofdmenu wordt getoond, op de navigatietoetsen om de gewenste MAP, het gewenste
bestand of icoontje te selecteren en druk vervolgens op OK of PLAY om de MAP of bestanden van het
geselecteerde icoontje te openen of het geselecteerde bestand af te spelen..
U kunt , als het hoofdmenu wordt getoond, ook de numerieke toetsen gebruiken om het nummer van een
bestand te selecteren en dat bestand af te spelen.
*
*
De toetsen ANGLE, PROG, RDM, INT en TITLE/PBC hebben geen functie.
De andere toetsen hebben dezelfde functie als in de DVD-modus; maar de herhaalfunctie is hetzelfde als
in de MP3/WMA-modus.
4.22 De ESP- en Id3-functie
Er is een ESP-functie voor alle discformaten.
Tijdens het afspelen van MP3/WMA zullen de bestandsnaam, mapnaam, titel van het nummer, artiest en
het album worden getoond op het LCD-display.
Zolang de afgespeelde Mp3-muziek relevante Id3-tag informatie bevat in het formaat van versie 1.0/2.0,
Zullen de drie onderstreepte items hierboven op het LCD-display verschijnen; anders zal dit niet het
geval zijn.
130
4.23 Bediening instellingenmenu van DVD
1. Druk op SETUP op de afstandsbediening om het instellingenmenu van de DVD-speler te tonen op de
monitor.
2. Er zijn in totaal 6 instellingenpagina’s in het instellingenmenu. Druk op > of < om de gewenste
instellingenpagina te selecteren.
3. Druk op ^ of v om een instelling te selecteren op de geselecteerde instellingenpagina.
4. Druk op > om de instelling te openen. Druk vervolgens op v of ^ om een gewenste waarde voor het item te
selecteren en druk ten slotte ter bevestiging op OK.
*
*
Druk op < om terug te keren naar het bovenliggende menu.
Druk nogmaals op SETUP of gebruik de navigatietoetsen om het item EXITT SETUP te selecteren en
druk vervolgens op OK om het instellingenmenu te verlaten.
Het instellingenmenu van de DVD-speler heeft 6 instellingenpagina’s. Deze hebben de volgende opties:
4.23.1 SYSTEEMINSTELLINGEN
TV TYPE
Deze instelling moet overeenkomen met de grootte van
het TV-scherm.
4:3 PS: Selecteer deze optie als het apparaat wordt aangesloten op een
TV met 4:3 scherm. Bij het afspelen
van beeldmateriaal met 16:9 formaat zullen de linker- en rechterkant van
de video worden afgesneden en zal de
video op het volledige scherm worden getoond.
4:3 LB: Selecteer deze optie als het apparaat wordt aangesloten op een
TV met 4:3 scherm. Bij het afspelen van beeldmateriaal met een 16:9 formaat zal het gehele beeld te zien zijn,
maar zullen er aan de bovenkant en onderkant van het beeld zwarte balken verschijnen.
16:9: Selecteer deze optie als het apparaat wordt aangesloten op een TV met 16:9 breedbeeld.
PASSWORD
Deze optie is voor het vergrendelen en ontgrendelen van ouderlijk toezicht en het ratingniveau.
De optie is standaard ingesteld op vergrendeld. Het standaardwachtwoord is 0000.
U kunt zelf een nieuw wachtwoord instellen: Selecteer het item PASSWORD en druk daarna op > om de optie
te openen, voer vervolgens het originele wachtwoord 0000 in en druk op OK om de optie te ontgrendelen. Druk
op > om de optie nogmaals te openen, voer vervolgens het nieuwe wachtwoord in en druk op OK om het
nieuwe wachtwoord te bevestigen.
Het is verstandig om het wachtwoord goed te onthouden en het WACHTWOORD-gedeelte uit de handleiding
te knippen, zodat anderen het niet kunnen zien.
RATING
Dit item is voor het instellen van een nieuw ratingniveau van ouderlijk toezicht.
1. Selecteer het item PASSWORD en druk op > om het item te openen, voer vervolgens het bovenstaande
wachtwoord in en druk op OK om de instelling van het ratingniveau te ontgrendelen.
2. Selecteer het item RATING en druk op > om het item te openen, gebruik vervolgens de navigatietoetsen
Om het gewenste ratingniveau te selecteren en druk ter bevestiging op OK.
3. Selecteer nogmaals het item PASSWORD en druk op > om het item te openen, voer het wachtwoord in,
en druk op OK om de nieuwe instellen van het ouderlijk toezicht en het ratingniveau te vergrendelen.
DEFAULT
Dit item kan worden gebruikt om alle instellingen te herstellen naar de originele status.
131
4.23.2 TAALINSTELLINGEN
OSD LANGUAGE
Dit item is voor het instellen van de taal in het instellingenmenu en alle
menu’s die tijdens het afspelen
worden getoond.
AUDIO LANG
Dit item is voor het instellen van de audiotaal.
SUBTITLE LANG
Dit item is voor het instellen van de ondertiteltaal.
MENU LANG
Dit item is voor het instellen van de taal van discmenu’s.
4.23.3 AUDIO-INSTELLINGEN
AUDIO OUT
Er is alleen een analoge modus, d.w.z. SPDIF/OFF zijn niet mogelijk.
KEY
Dit is voor het selecteren van de gewenste basis
muziektonen (van laag tot hoog).
4.23.4 VIDEO-INSTELLINGEN
BRIGHTNESS
Dit is voor het instellen van de helderheid van het beeld.
CONTRAST
Dit is voor het instellen van het contrast van het beeld.
HUE
Dit is voor het instellen van de tint van het beeld.
SATURATION
Dit is voor het instellen van de verzadiging van het beeld.
SHARPNESS
Dit is voor het instellen van de scherpte van het beeld.
4.23.5 LUIDSPREKERINSTELLINGEN
DOWNMIX
Dit is voor het instellen van het gewenste geluidseffect als u niet de beschikking hebt over een centrale
luidspreker en subwoofer.
Er zijn 3 modi: LT/RT, STEREO, VSS.
LT/RT: Bij het afspelen van een disc met PRO LOGIC
Dolby stereo-effect, selecteer dit item, zodat het audiosignaal
levendig klinkt net als in de bioscoop.
STEREO: Als u dit item selecteert, zullen bij het weergeven van
5.1-kanaals audiosignalen de linker- en rechterkanalen worden
weergegeven; bij uitvoer van een signaal met 2 kanalen zullen de
algemene 2 kanalen van het stereosignaal worden weergegeven.
VSS: Als u dit item selecteert, dan zullen de hoofdluidsprekers
de audio van discs met 5.1-kanaals audiosignalen weergeven met VSS-effect.
132
4.23.6 DIGITALE INSTELLINGEN
OP MODE
Dit is voor het selecteren van de audioweergavemodus
LINE OUT: Dit kan het audiosignaal lineair comprimeren. Het volume is dus
lager. Selecteer dit item ’s nachts.
RF REMOD: Dit kan het volume verhogen.
Selecteer deze optie bij daglicht.
DYNAMIC RANGE
Na het selecteren van de compressie-modus van de LINE OUT is het
belangrijk om dit item in te stellen, zodat u de lineaire
compressieverhouding kunt instellen. Als u de optie instelt op FULL, dan zal de piek-tot-piek waarde van het
audiosignaal minimaal zijn; als u de instelling instelt op OFF, dan zal de piek-tot-piek waarde maximaal zijn.
DUAL MONO
Dit is voor het selecteren van een gewenste audioweergavemodus voor de linker- en rechterkant van het
signaal.
Het is voornamelijk bedoeld voor Karaoke van Ac3. Er in totaal zijn 4 verschillende modi:
STEREO, MONO L, MONO R, MIX MONO.
133
* Ouderlijk toezicht
Q:Er verschijnt na het plaatsen van een DVD in de discsleuf een venster dat me vraagt om een 4-cijferig
wachtwoord in te voeren. Waarom ?
A:Dit komt doordat de DVD die u wilt afspelen is beoordeeld met ouderlijk toezicht en het huidige ratingniveau
van de DVD-speler is lager dan het niveau van de DVD. U moet het wachtwoord invoeren om de
instellingen van ouderlijk toezicht te openen. Daarna moet u een ratingniveau instellen dat gelijk of hoger is
dan niveau van de DVD, zodat u de DVD kunt afspelen.
!
OPMERKING
*
Als u het wachtwoord niet heeft veranderd, dan is er nog geen wachtwoord ingesteld. U moet dus een
gewenst wachtwoord invoeren en het wachtwoord nogmaals invoeren om het te verifiëren en de
instellingen van ouderlijk toezicht te openen.
*
Kijk voor meer informatie over het instellen van het ratingniveau en ouderlijk toezicht van de DVD-speler in
de paragraaf over de systeeminstellingen en het de vergrendelinstellingen.
Accessoires: Ouderlijk toezicht
De ouderlijk toezicht-functie van een DVD-speler kan het ratingniveau van films controleren bij het
afspelen. U kunt de DVD-speler (inclusief software op de PC) met het INSTELLINGEMENU op het
scherm op een bepaald ratingniveau instellen. Als het ratingniveau van de disc hoger is dan het
ratingniveau van de DVD-speler dan kan de DVD-speler de disc niet afspelen. Het ratingniveau verschilt
op sommige discs per scène
Het instellen van het ratingniveau kan worden beschermd door een wachtwoord. Als het item niet wordt
vergrendeld, dan zal de ouderlijk toezicht-functie niet worden toegepast en zal alle content van discs
kunnen worden afgespeeld.
Sommige films hebben verschillende versies van dezelfde film op dezelfde disc. Zo wordt de film
afgespeeld met, afhankelijk van het ingestelde ratingniveau, de juiste scènes die voor iedereen geschikt
zijn. Afhankelijk van de DVD-functie die hierboven is beschreven kunnen scènes die niet zijn geschikt voor
kinderen automatisch worden vervangen door scènes die wel zijn geschikt.
De ratingniveaus van ouderlicht toezicht zijn:
1
2
3
4
5
6
7
8
Ontgrendeld
Kinderveilig
G
PG
PG 13
PG R
R
NC 17
Volwassene
134
*
The regiocode
Q: De melding REGION ERROR wordt getoond nadat de disc in de discsleuf is geplaatst. Waarom?
A: Omdat de DVD-speler en de disc allebei een regiocode hebben. Als deze regiocodes niet overeenkomen,
dan kan de DVD-speler de disc niet afspelen.
Bijlage: De regiocode van de DVD:
De Motion Picture Association of America (MPAA) heeft de wereld in 6 regio’s verdeeld en iedere regio
een code toegewezen. De regiocodes en de landen of gebieden die door de regiocodes worden
vertegenwoordig zijn als volgt:
Regio 1: Amerika, Canada, Oost-Pacifische Eilanden;
Regio 2: Japan, West-Europa, Noord Europa, Egypte, Zuid-Afrika, Midden-Oosten;
Regio 3: Zuidoost Aziatische landen, waaronder Taiwan, Hong Kong, Zuid-Korea,
Thailand, Indonesië, etc.;
Regio 4: Australië, Nieuw Zeeland, Centraal Zuid-Amerika, Zuid-Pacifische Eilanden;
Regio 5: Rusland, Mongolië, Indische Schiereiland, Midden-Azië, Oost-Europa, Noord-Korea,
Noord-Afrika, Noord-West-Azië, etc.;
Regio 6: Vasteland China.
Alleen discs die geproduceerd worden door de 8 grootste filmbedrijven van Amerika gebruik regiocodes.
De DVD-discs die niet worden geproduceerd door de 8 grootste filmbedrijven in Amerika worden niet
beperkt door de regiocode. In het algemeen worden deze discs regiovrije discs of volledige regio discs
genoemd. De 8 grootste filmbedrijven van Amerika zijn:
1. Warner Bros;
2. Columbia;
3. 20th Century FOX;
4. Paramount;
5. Universal;
6. UA(UnitedArtist);
7. MGM(MetroDogwynMayer);
8. WaltDisney
135
5. BLUETOOTH HANDSFREE-SYSTEEM
1.
Open de Bluetooth-modus
Gebruik MODE of het modusmenu om de Bluetooth-modus
te openen. Het Bluetooth-menu verschijnt, zoals getoond in
de afbeelding aan de rechterkant.
In het Bluetooth-menu zult u de volgende icoontjes
tegenkomen:
: Tik op dit icoontje om audio tussen het audiosysteem
in de auto en de telefoon over te dragen.
: Tik op dit icoontje om het belmenu
op te roepen, zoals getoond in de afbeelding rechts.
: Tik op dit icoontje om de audio-belmodus te openen,
bel een nummer in uw telefoon en het apparaat zal het nummer
automatisch opbellen.
De andere icoontjes zijn hetzelfde als op het voorpaneel en
de afstandsbediening.
2. Pairen en verbinding maken
1) Schakel de Bluetooth-modus van de telefoon in;
2) Selecteer het item Finding the Bluetooth Device en open het item. Als het zoeken is voltooid, zal de naam
van het Bluetooth-apparaat worden getoond (als er een Bluetooth-apparaat is gevonden).
Selecteer het apparaat en open het, de radio toont een interface en vraagt u om een wachtwoord in te
voeren. Voer het wachtwoord 0000 in en bevestig het. Daarna zal de melding pair OK verschijnen.
3) Sommige mobiele telefoons kunnen automatisch verbinding maken met het BT-apparaat van het
audiosysteem nadat het pairen is gelukt; sommige mobiele telefoons moeten het gepaide BT-apparaat
selecteren en op de verbindingsknop drukken. Als de verbinding is opgezet, dan zal het LCD van het
audiosysteem de melding LINK OK tonen.
* Als het pairen is mislukt, houd dan PAIR op de afstandsbediening ingedrukt om de pairmodus te
openen, daarna zal het LCD de melding PAIR START tonen. Pair en maak daarna opnieuw verbinding
met de mobiele telefoon.
3.
De mobiele telefoon gebruiken om de verbinding te maken of de verbinding te verbreken
Zoek als er verbinding is gemaakt naar gepairde en verbonden Bluetooth-apparaten en druk vervolgens
op de knop verbinding verbreken om de verbinding te verbreken;
Zoek als er geen verbinding is naar gepairde en niet-verbonden Bluetooth-apparaten en druk op de
knop verbinding maken om de verbinding te maken.
4.
Als er verbinding is gemaakt, dan zal de audio van de telefoon naar het audiosysteem in de auto worden
overgedragen wanneer u een oproep plaatst of ontvangt.
5.
Bellen als er verbinding is gemaakt
5.1
Rechtstreeks met de mobiele telefoon bellen.
5.2 Met de afstandsbediening bellen met de volgende procedures:
(1) Voer een telefoonnummer in met de numerieke toetsen 0-9
136
*
(2)
Druk, indien nodig, kort op CLEAR om verkeerd ingevoerde cijfers te wissen
Druk kort op TEL om te bellen.
5.3 Het laatst gebelde nummer opnieuw bellen
Druk kort op REDIAL of tik op het icoontje
6.
om het laatste telefoonnummer te valideren.
Oproep accepteren/weigeren/beëindigen
6.1 Druk als de telefoon gaat kort op TEL om de oproep te accepteren;
6.2 Druk als de telefoon gaat kort op HANGUP om de oproep te weigeren;
6.3 Druk tijdens het telefoongesprek kort op HANGUP om de oproep te beëindigen.
Opmerking: Als de telefoon gaat, dan zal het nummer worden getoond.
137
6. Problemen oplossen
Lees de handleiding zorgvuldig door voordat u de DVD-speler gebruikt. Als u problemen heeft bij het gebruik
van de speler, probeer deze problemen dan op te lossen met behulp van de onderstaande suggesties. Als u
de problemen niet kunt oplossen met de suggesties, neem dan contact op met ons bedrijf of een
geautoriseerde technische dienst. In het belang van uw eigen veiligheid, open de behuizing en repareer de
speler niet zelf. Dit kan leiden tot elektrische schokken.
GEEN BEELD, GELUID EN INDICATIE
*
Zorg ervoor dat het apparaat is ingeschakeld.
*
Zorg ervoor dat de stroomaansluiting in orde is.
*
Zorg ervoor dat het stroomsnoer niet is beschadigd en de zekering niet is gesprongen.
*
Zorg ervoor dat het stroomsnoer stevig is aangesloten op de ingang.
GEEN GELUID, MAAR WEL BEELD
*
Zorg ervoor dat de audio-uitgang van de speler goed is aangesloten op de audio-ingang van de monitor.
*
Controleer of de audio-aansluiting is beschadigd.
*
Controleer of u het volume te laag heeft ingesteld.
*
Zorg ervoor dat u de audio-instellingen van de speler juist heeft ingesteld.
*
Zorg ervoor dat het geluid niet is gedempt (mute).
GEEN BEELD, MAAR WEL GELUID
*
Zorg ervoor dat de video-uitgang van de speler goed is aangesloten op de video-ingang van de monitor.
*
Zorg ervoor dat u uw monitor heeft ingesteld op de AV-ingang die is aangesloten op de speler.
*
Controleer of de video-aansluiting is beschadigd.
*
Zorg ervoor dat u de video-instellingen van de speler juist heeft ingesteld.
ZWART/WIT BEELD OF STOREND BEELD
*
Zorg ervoor dat u het juiste TV-SYSTEEM heeft ingesteld (bijv. PAL, NTSC).
FOUTEN IN BEELD OF GELUID
*
Controleer of de audio-instelling juist zijn ingesteld.
*
Controleer of de disc bekrast of verkleurd is.
*
Controleer of de AV-aansluiting en de uitgang vuil zijn.
*
Controleer of er condensatie in de lens zit. Als dit het geval is, zet de speler een uur uit en probeer het
daarna nog eens.
*
Controleer of de installatiehoek kleiner dan 30° is.
DE MELDING NO DISC OF BAD DISC WORDT GETOOND
*
Zorg ervoor dat u de disc op de lade heeft geplaatst.
*
Controleer of de disc verkeerd om in de speler is geplaatst.
*
Controleer of de disc is gebogen.
*
Controleer of de disc erg is verkleurd of bekrast.
*
Zorg ervoor dat het discformaat compatibel is met de speler.
*
Zorg ervoor dat de temperatuur in de auto niet te hoog is. Als de temperatuur te hoog is, laat de auto dan
afkoelen tot de omgevingstemperatuur weer normaal is.
*
Plaats een andere disc in de DVD-speler.
AFSTANDSBEDIENING IS ONGEVOELIG OF WERKT NIET
*
Controleer de batterijen van de afstandsbediening en zorg ervoor dat ze genoeg stroom hebben en goed
zijn geplaatst.
*
Richt de afstandsbediening op de IR-sensor van de speler.
*
Controleer of er obstakels tussen de afstandsbediening en de IR-sensor staan.
SOMMIGE FUNCTIETOETSEN WERKEN NIET
*
Zet het apparaat uit en daarna weer aan.
*
Reset het apparaat tot nul en zet het daarna opnieuw aan.
*
Verwijder het voorpaneel van het apparaat en plaats het terug. Zet het apparaat daarna opnieuw aan.
DE RADIO WERKT NIET
*
Controleer of de antennekabel stevig is aangesloten. Of stem handmatig af op een zender.
HET TOUCHSCREEN (TFT-DISPLAY) WERKT NIET JUIST
*
Plaats een disc en druk op stop, druk vervolgens op zoom en daarna op ^ en v om de
calibratiemodus te openen. Druk daarna op de kruiscursors die verschijnen tot de melding ok wordt weergegeven. Schakel
het apparaat uit en daarna weer in.
138
7. Specificaties
Algemene specificaties
Voeding......................................................................DC 12V
Maximaal vermogen…………....................................4 x 25W(gemeten op DC 14.4 V)
Afmetingen(b x h x d)................................................178 x 50 x 160mm
DVD-speler Specificaties
Formaat......................................................................DVD/VCD/JPEG/MP4/MP3/WMA/CD
Videosysteem.............................................................NTSC
Audiosysteem.............................................................24 bit/96KHz
Laadsysteem….......................................................... Automatisch laden
Montagehoek..............................................................0 tot +/-30 graden
Video-specificaties
Videotype...................................................................16:9 en 4:3
Video-uitvoerniveau....................................................Composiet:1.0± 0.2Vp-p
Laad impedantie: 75 ohms
Horizontale resolutie....................................................500
Audio-specificaties
Audio-uitvoer(Analoge audio)......................................2.0+0-1.0Vrms
Frequentierespons......................................................20Hz ~ 20KHz(at 1KHz 0 dB)
S/N verhouding(Audio)................................................≥90dB(op 1KHz 0 dB)
Scheiding….................................................................50dB
Radio-specificaties
FM-gedeelte
Frequentiebereik..........................................................87.5MHz - 108MHz
Bruikbare gevoeligheid.................................................3uV
I.F Frequentie...............................................................10.7MHz
AM-gedeelte
Frequentie.....................................................................522KHz - 1620KHz
139
Fente
de
connexion
de fil 1
Formats for media player:
Video:
MPEG-1
MPEG-2
Xvid
MP4
VCD
SVCD
DVD-Video
Picture:
JPEG
Audio:
MP2
MP3
WMA
ACC
AC3
CDDA
HDCD/CD-G