1
SOLIS Rice Cooker deutsch_2014 16.03.14 21:23 Seite 1
SINCE
RICE COOKER
DUO PROGRAM
Typ/Type/Tipo 817
Bedienungsanleitung
Mode d’emploi
Istruzioni per l’uso
User Manual
Gebruiksaanwijzing
1908
SOLIS Rice Cooker deutsch_2014 16.03.14 21:23 Seite 2
BEDIENUNGSANLEITUNG
103 – 127
MODE D'EMPLOI
129 – 153
ISTRUZIONI PER L'USO
155 – 179
USER MANUAL
181 – 105
GEBRUIKSAANWIJZING
107 – 131
SOLIS Rice Cooker deutsch_2014 16.03.14 21:23 Seite 3
▲ I N H A LT
04
Gerätebeschreibung
06
Wichtige Sicherheitsbestimmungen
10
Vor der Inbetriebnahme
11
Reisgaren
14
Die Funktion "Keep Warm"
14
Reis-Kochtabelle
15
Reis-Variationen
17
Zeitverzögertes Reisgaren mit der Funktion "Delay Timer"
18
Dampfgaren
21
Dampfgartabellen
24
Reinigung und Pflege
25
Aufbewahrung
25
Technische Angaben
26
Probleme und wie sie behoben werden können
27
Entsorgung / Solis Helpline
3
SOLIS Rice Cooker deutsch_2014 16.03.14 21:23 Seite 4
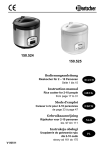
▲ GERÄTEBESCHREIBUNG
A
Fest installierter Deckel mit Entriegelungsknopf und Handgriff
Um den Deckel zu öffnen, drücken Sie den Entriegelungsknopf und heben
Sie den Deckel am Handgriff an.
B
Dampfauslass
C
Kondenswasser-Sammelbehälter
D
Herausnehmbarer, antihaft-beschichteter Kocheinsatz
Verhindert, dass der Reis anhaftet.
E
Edelstahl-Dampfgareinsatz
Ideal zum Dämpfen von Gemüse, Meeresfrüchten, Geflügel oder Fleisch.
F
Kunststoff-Schöpfkelle
G
Messbecher
H
Abnehmbares Netzkabel (ohne Abbildung)
Für bequemes Servieren bei Tisch und zur einfachen Aufbewahrung.
BEDIENFELD:
I
Einstellung "Delay Timer"
zum zeitverzögerten Kochen von Reis.
J
Display mit Anzeige der letzten 12 Koch-Minuten bei weissem Reis
bzw. 25 Koch-Minuten bei braunem Reis
bzw. der Stundendauer im "Keep Warm" Modus
bzw. der Einstellung für zeitverzögertes Kochen.
K
EIN/AUS-Taste
L
Einstellung "White Rice"
zum Reisgaren von weissem Reis.
M Einstellung "Brown Rice"
zum Reisgaren von braunem Reis oder Reissorten mit längerer Garzeit.
N
Einstellung "Steam"
zum Dampfgaren von Gemüse, Meeresfrüchten, Geflügel oder Fleisch.
O
Einstellung "Keep Warm"
Diese Einstellung schaltet sich nach jeder Funktion automatisch ein,
wenn der Kochvorgang abgeschlossen ist. Zusätzlich kann die WarmhalteFunktion auch alleine eingeschaltet werden.
Jede der genannten Tasten (ausser die
-Taste) verfügt über ein Funktionslicht, das während des Betriebs aufleuchtet.
Zudem gibt es das Funktionslicht "Cooking", das sich einschaltet, sobald
das Wasser erhitzt wird.
4
SOLIS Rice Cooker deutsch_2014 18.03.14 08:42 Seite 5
A
B
A
E
D
C
D
I
J
K
D
E
G
F
L
M
N
O
5
SOLIS Rice Cooker deutsch_2014 16.03.14 21:23 Seite 6
▲ WICHTIGE SICHERHEITSBESTIMMUNGEN
Bitte lesen Sie vor Gebrauch Ihres Solis Rice Cooker Duo Program diese
Bedienungsanleitung aufmerksam durch, damit Sie Ihr Gerät kennenlernen
und sicher bedienen können. Wir empfehlen, diese Anleitung sorgfältig aufzubewahren und gegebenenfalls bei Weitergabe des Gerätes auch dem
neuen Besitzer auszuhändigen.
Bei der Verwendung von elektrischen Geräten sind zu Ihrer eigenen Sicherheit folgende Vorsichts-Massnahmen zu beachten:
1. Um einen Stromschlag zu vermeiden, dürfen weder das Gerät noch das Stromkabel und der Netzstecker bzw. Verbindungsstecker mit Wasser oder anderen
Flüssigkeiten in Kontakt kommen. In das Gehäuse könnte Wasser eindringen und
das Gerät beschädigen! Sollten das Gerät, das Netzkabel oder der Netzstecker
bzw. Verbindungsstecker mit Flüssigkeit in Kontakt kommen, ziehen Sie mit trockenen Gummihandschuhen sofort den Netzstecker aus der Steckdose.
2. Prüfen Sie vor der Inbetriebnahme, ob die auf dem Gerät angegebene Spannung
mit Ihrer Netzspannung übereinstimmt.
3. Stecken Sie den Verbindungsstecker immer erst in die Gerätebuchse, bevor Sie
den Netzstecker in eine Steckdose stecken und schalten Sie erst dann das Gerät ein. Die Gerätebuchse und der Verbindungsstecker müssen absolut trocken
sein, bevor Sie beide anschliessen. Berühren Sie den Netzstecker niemals mit nassen oder feuchten Händen.
4. Den Reiskocher/Dampfgarer nur auf einem stabilen, trockenen und hitzeresistenten Untergrund in Betrieb nehmen. Nicht unter Hängeschränken, Regalen
oder anderen dampfempfindlichen Materialien betreiben.
5. Lassen Sie das Netzkabel nicht über Tischkanten hängen, damit es nicht heruntergezogen werden kann. Achten Sie darauf, dass es nicht mit heissen Oberflächen wie z.B. einer Herdplatte oder einem Heizkörper bzw. mit dem Gerät selbst
in Kontakt kommt. Kabel immer komplett entrollen, bevor Sie den Netzstecker
einstecken.
6. Gerät von heissem Gas, heissen Öfen oder anderen wärmeabgebenden Geräten oder Wärmequellen fernhalten. Gerät nie auf einer nassen oder heissen Oberfläche benutzen. Gerät nicht in der Nähe von Feuchtigkeit, Hitze und offenen
Flammen platzieren. Gerät von beweglichen Teilen oder Geräten fernhalten.
7. Gerät nie am Netzkabel tragen oder ziehen und nichts auf das Netzkabel stellen.
8. Wir empfehlen, mit diesem Gerät kein Verlängerungskabel zu benutzen. Gerät
nicht direkt unter eine Steckdose stellen.
6
SOLIS Rice Cooker deutsch_2014 16.03.14 21:23 Seite 7
9. Ziehen Sie immer den Netzstecker, wenn das Gerät ausser Betrieb oder unbeaufsichtigt ist, oder wenn es gereinigt werden soll. Wir empfehlen den Einsatz
eines Fehlerstromschutzschalters (FI-Sicherheitsschalter), um einen zusätzlichen
Schutz bei der Verwendung von elektrischen Geräten zu gewährleisten. Es ist ratsam, einen Sicherheitsschalter mit einem Nennfehlerbetriebsstrom von maximal
30 mA zu verwenden. Fachmännischen Rat erhalten Sie bei Ihrem Elektriker.
10. Nehmen Sie keine Änderungen am Gerät, Kabel, Stecker oder am Zubehör vor.
11. Bei unsachgemässem Gebrauch besteht Verletzungsgefahr!
12. Vorsicht: Die Temperaturen der Geräteteile und –oberflächen sind während des
Kochvorgangs und noch einige Zeit danach sehr hoch.
13. Greifen Sie niemals nach einem Gerät, das ins Wasser gefallen ist. Ziehen Sie immer erst den Netzstecker, bevor Sie es aus dem Wasser nehmen. Nehmen Sie es
nicht wieder in Betrieb, bevor Sie es bei Solis oder einer von Solis autorisierten
Servicestelle auf seine Funktionsfähigkeit und Sicherheit überprüfen haben lassen.
14. Das Gerät niemals so platzieren, dass es ins Wasser fallen könnte (z.B. neben
Spülbecken).
15. Das Gerät so platzieren, dass es keiner direkten Sonneneinstrahlung ausgesetzt
ist.
16. Niemals scharfe oder spitze Gegenstände und Werkzeug in die Geräteöffnungen stecken. Das Gerät könnte beschädigt werden bzw. Gefahr von Stromschlag!
17. Das Gerät nicht schütteln oder umplatzieren während es in Gebrauch ist.
18. Das Gerät nur wie in dieser Bedienungsanleitung beschrieben verwenden. Nur
mitgeliefertes Zubehör benutzen, falsches Zubehör kann zur Beschädigung des
Geräts führen.
19. Das Gerät ist nur für den häuslichen Gebrauch und nicht für den gewerblichen
Einsatz geeignet.
20. Das Gerät ist nicht zum Gebrauch im Freien konzipiert. Nicht in Fahrzeugen oder
auf Booten verwenden.
21. Prüfen Sie Ihren Reiskocher/Dampfgarer vor jedem Gebrauch.
22. Um einen Stromschlag zu vermeiden, verwenden Sie das Gerät nicht, wenn Kabel oder Netzstecker beschädigt sind oder das Gerät anderweitige Störungen aufweist, heruntergefallen oder sonstwie beschädigt ist. Führen Sie Reparaturen niemals selbst durch sondern geben Sie das Gerät bei Solis oder bei einer von Solis
autorisierten Servicestelle ab, um es überprüfen, reparieren oder mechanisch und
elektrisch instand setzen zu lassen.
7
SOLIS Rice Cooker deutsch_2014 16.03.14 21:23 Seite 8
23. Personen mit eingeschränkten physischen, sensorischen oder geistigen Fähigkeiten (auch Kinder) oder unwissende und unerfahrende Personen dürfen den
Reiskocher/Dampfgarer nicht benutzen, ausser sie werden durch eine für ihre Sicherheit zuständige Person beaufsichtigt oder von dieser genau instruiert, wie
das Gerät zu benutzen ist.
24. Kinder müssen beaufsichtigt werden, damit sie nicht mit dem Gerät spielen.
25. Stellen Sie sicher, dass der Solis Rice Cooker Duo Program korrekt zusammengebaut ist, bevor Sie ihn in Betrieb nehmen. Wie Sie dies genau machen müssen, entnehmen Sie bitte dieser Anleitung.
26. Niemals die Luftöffnungen abdecken, während das Gerät in Gebrauch ist.
27. Bevor Sie das Gerät verstellen oder auseinander nehmen, schalten Sie das Gerät immer erst mit der EIN/AUS-Taste
aus. Dann ziehen Sie den Netzstecker
aus der Steckdose und warten Sie, bis das Gerät abgekühlt ist. Der Netzstecker
sollte immer ausgesteckt sein, wenn das Gerät nicht in Gebrauch ist.
28. Prüfen Sie immer, ob das Geräteinnere, die Kochplatte und die Aussenseite des
Kocheinsatzes absolut sauber und trocken sind, bevor Sie das Gerät in Betrieb
nehmen.
29. Halten Sie das Gerät immer sauber. Beachten Sie dazu die Hinweise in der Rubrik „Reinigung und Pflege“ dieser Anleitung. Ausser dem Dampfgareinsatz dürfen die entnehmbaren Teile nicht in den Geschirrspüler gegeben werden.
30. Niemals explosive bzw. entflammbare Substanzen wie Aerosol-Behälter (Deodorant-Sprays, Haarsprays etc.) im Gerät lagern.
31. Positionieren Sie den Reiskocher immer so, dass die Dampföffnung des Deckels
nicht in Ihre Richtung zeigt. Seien Sie immer vorsichtig, wenn Sie den Deckel anheben, damit Sie sich nicht an dem heissen Dampf verbrühen.
32. Benutzen Sie mit diesem Gerät nur den mitgelieferten, herausnehmbaren Kocheinsatz und evtl. zusätzlich den Dampfgareinsatz. Stellen Sie niemals einen anderen Topf oder ein anderes Gefäss in den Reiskocher. Der Kocheinsatz darf nicht
für andere Kochzwecke benutzt werden oder direkt auf die Herdplatte / einen
Gasofen gestellt werden.
33. Benutzen Sie den Rice Cooker Duo Program Kocheinsatz nicht, wenn er beschädigt oder verbeult ist. Einen Ersatz für den Kocheinsatz erhalten Sie im guten Fachhandel oder direkt bei Solis.
34. Stellen Sie nichts auf den Deckel, während das Gerät in Gebrauch ist oder gelagert wird. Decken Sie das Gerät während des Kochvorgangs oder der Warmhaltephase niemals ab.
35. Benutzen Sie zur Reinigung des Geräts oder des Kocheinsatzes niemals chemische, alkalische, aggressive oder kratzende Reinigungsmittel oder Scheuer8
SOLIS Rice Cooker deutsch_2014 16.03.14 21:23 Seite 9
schwämme, da diese die Beschichtung des Kocheinsatzes bzw. der Gehäuseoberfläche beschädigen könnten. Benutzen Sie nur ein weiches Tuch und ein mildes Spülmittel zur Reinigung.
36. Stecken Sie niemals den Netzstecker des Geräts in die Steckdose und schalten
Sie das Gerät niemals ein, wenn sich der Kocheinsatz nicht im Gerät befindet.
37. Geben Sie Lebensmittel oder Flüssigkeiten niemals direkt in das Gehäuse des Reiskochers/Dampfgarers. Nur der herausnehmbare Rice Cooker Duo Program Kocheinsatz und der Dampfgareinsatz dürfen mit Lebensmitteln und Flüssigkeiten in
Kontakt kommen. Der Dampfgareinsatz darf nur in Kombination mit dem Kocheinsatz verwendet werden.
38. Betreiben Sie das Gerät nicht, ohne dass sich Lebensmittel und Flüssigkeiten in
dem herausnehmbaren Kocheinsatz befinden.
39. Berühren Sie keine heissen Oberflächen, wenn Sie den Deckel öffnen oder den
Kocheinsatz entfernen wollen, verwenden Sie immer Kochhandschuhe oder Topflappen. Öffnen Sie den Deckel immer vorsichtig und achten Sie darauf, dass der
Dampf nicht in Ihre Richtung entweicht, damit Sie sich nicht verbrühen.
40. Achten Sie darauf, dass das Kondenswasser vom Deckel nicht in das Gehäuse
des Geräts tropft, sondern nur in den Kocheinsatz.
41. Extreme Vorsicht ist geboten, wenn sich im Gerät heisse Speisen oder Flüssigkeiten befinden. Verstellen Sie das Gerät nicht, während es in Betrieb ist. Berühren Sie niemals die heissen Oberflächen mit blossen Händen.
42. Während des Kochvorgangs immer den Deckel des Geräts schliessen. Auch bei
der Lagerung sollte der Deckel immer geschlossen sein. Legen oder stellen Sie
nichts auf das Gerät.
43. Um zu verhindern, dass die Antihaft-Beschichtung des Kocheinsatzes zerkratzt
wird, benutzen Sie bitte nur Küchenwerkzeug aus Holz oder hitzeresistentem
Kunststoff.
44. Stellen Sie sicher, dass der Kocheinsatz korrekt im Gerät positioniert ist, bevor
Sie mit dem Kochvorgang starten. An der Aussenseite des Geräts muss der Kondenswasser-Sammelbehälter korrekt angebracht sein.
45. Der Reis darf bei eingeschalteter Warmhalte-Funktion nicht länger als 10 Stunden im Kocheinsatz verbleiben.
46. Vor der Reinigung immer das Gerät mit der EIN/AUS-Taste
ausschalten (2 x
drücken), den Netzstecker aus der Steckdose und den Verbindungsstecker aus
der Gerätebuchse ziehen und das Netzkabel entfernen. Dann alle Teile des Geräts komplett abkühlen lassen. Die Gerätebuchse muss vor der erneuten Inbetriebnahme sorgfältig getrocknet werden.
9
SOLIS Rice Cooker deutsch_2014 16.03.14 21:23 Seite 10
47. Halten Sie einen Mindestabstand von 20 cm zwischen Gerät und Wänden, Vorhängen oder anderen hitze- und dampfempfindlichen Materialien und Objekten ein und beachten Sie, dass die Luft über und um das Gerät frei zirkulieren
können muss.
Wichtig: Rollen Sie das Netzkabel vor dem Gebrauch komplett ab. Wenn Sie das
Netzkabel zur Aufbewahrung in den Kocheinsatz legen wollen, muss dieser komplett abgekühlt sein.
▲ VOR DER INBETRIEBNAHME
•
Bevor Sie Ihren Solis Rice Cooker Duo Program das erste Mal benützen, entfernen Sie bitte alle Werbe-Aufkleber. Reinigen Sie den Kocheinsatz und den Edelstahl-Dampfgareinsatz sowie die Kunststoff-Schöpfkelle mit einem sanften Spülmittel und warmem Wasser und spülen Sie alles sorgfältig. Trocknen Sie alle Teile.
- Den Deckel sollten Sie innen mit einem feuchten Tuch abwischen.
- Prüfen Sie, ob der Kondenswasser-Sammelbehälter korrekt am Gerät
angebracht ist.
Zum Abnehmen: Behälter unten hochheben und oben aus der Halterung ziehen.
Zum Einsetzen: Erst oben die Nasen links und rechts in die Halterung schieben,
dann unteres Teil an das Gerät drücken.
10
SOLIS Rice Cooker deutsch_2014 16.03.14 21:23 Seite 11
▲ REISGAREN MIT DER EINSTELLUNG
"WHITE RICE" ODER "BROWN RICE"
1. Messen Sie mit dem mitgelieferten Reis-Messbecher
die gewünschte Menge Reis ab (siehe Reis-Kochtabelle). Der Messbecher sollte immer gestrichen voll
sein, nicht gehäuft (siehe Abbildung).
•
Hinweis: Der Reis-Messbecher des Solis Rice Cooker
Duo Program entspricht nicht einem Standard-Messbecher. Ein Rice Cooker Duo Program Messbecher entspricht 160g ungekochtem Reis. Sollten Sie Ihren Messbecher verlieren, können
Sie auch einen anderen Messbecher verwenden, allerdings sollten Sie die o.g.
Menge auch damit abmessen und niemals die Maximum-Markierung für
6 Messbecher Reis im Kocheinsatz überschreiten.
2. Füllen Sie den abgemessenen Reis in ein Sieb und waschen Sie den Reis mit kaltem Wasser, um anhaftende Stärke zu entfernen. Sobald das Wasser klar abläuft,
ist Ihr Reis kochbereit. Gut abtropfen lassen.
3. Schütten Sie den gewaschenen Reis in den
Kocheinsatz. Der Reis sollte gleichmässig über
dem Boden des Kocheinsatzes verteilt sein
und nicht auf einer Seite angehäuft liegen.
✓ ✗
4. Geben Sie mit dem mitgelieferten Messbecher Wasser hinzu.
Wenn Sie 2 Messbecher Reis in den Kocheinsatz geben, füllen
Sie anschliessend soviel Wasser ein, bis die Linie "2" im Kocheinsatz erreicht ist. Wenn Sie 3 Messbecher einfüllen, sollte der
Wasserstand bei der Linie zwischen 2 und 4 stehen. Wenn Sie
4 Messbecher einfüllen, sollte der Wasserstand bei der Linie "4" stehen, usw.
Maximal können Sie 6 Messbecher Reis kochen. Die folgende Tabelle gibt Ihnen
Aufschluss über die zu erwartende fertige Reismenge und die Garzeit.
R E I S - K O C H TA B E L L E
Ungekochter
Reis
(Messbecher)*
Kaltes Leitungswasser bis zur
Markierung
Gekochter Reis,
ca.
(Messbecher)*
Garzeit
weisser Reis
ca. (in Minuten)
Garzeit
brauner Reis
ca. (in Minuten)
2
2
4
30 - 35
60 - 65
3
3
6
32 - 37
65 - 70
4
4
8
35 - 42
70 - 75
5
5
10
40 - 45
75 - 80
6
6
12
42 - 47
80 - 85
* mit dem Rice Cooker Duo Program Messbecher abgemessen
11
SOLIS Rice Cooker deutsch_2014 16.03.14 21:23 Seite 12
5. Prüfen Sie, ob der Kocheinsatz aussen, am Boden und an den Seiten sauber ist,
bevor Sie ihn in das Gerät setzen – somit wird ein guter Kontakt zu der innenliegenden Kochplatte garantiert.
VORSICHT:
1. Vor dem Kochprozess sollten Sie immer den Boden des Kocheinsatzes und
die Oberfläche der Kochplatte reinigen. Achten Sie darauf, dass keine Reiskörner im Gerät bzw. auf der Kochplatte liegen.
2. Um sicher zu stellen, dass der Kocheinsatz flach auf der Kochplatte positioniert
ist, drehen Sie ihn im Gerät etwas nach links und rechts.
3. Der Kocheinsatz muss ganzflächig im Reiskocher positioniert sein,
sonst setzt sich das Gerät nicht in Betrieb bzw. könnte beschädigt werden.
Um die Gefahr eines Stromschlags zu mindern, darf nur in dem herausnehmbaren Kocheinsatz gekocht werden. Tauchen Sie das Gerät niemals ins Wasser.
6. Schliessen Sie den Deckel, so dass er einrastet.
7. Stecken Sie den Verbindungsstecker in die
Gerätebuchse. Dann stecken Sie den Netzstecker in eine passende Steckdose.
8. Drücken Sie die EIN/AUS-Taste
um das Gerät einzuschalten. Alle Funktionslichter leuchten nacheinander kurz auf, im Display leuchten rote Querstriche auf.
Drücken Sie dann die Taste "White Rice" oder "Brown Rice" (je nachdem, welche Reissorte Sie kochen) um die Einstellung zu aktivieren. Das Funktionslicht der
Taste "White Rice" oder "Brown Rice" leuchtet rot auf. Sobald der Kochprozess
startet, leuchtet auch das Funktionslicht bei "Cooking" rot auf und im Display
leuchten die Striche abwechselnd im Viereck auf.
9. Wenn sich der Reisgarprozess dem Ende nähert, erscheint die noch verbleibende
Kochzeit im Display und zählt herunter: Die letzten 12 Minuten bei weissem Reis,
die letzten 25 Minuten bei braunem Reis.
10. Sobald der Kochprozess abgeschlossen ist, ertönt ein akustisches Fertig-Signal
und der Solis Rice Cooker Duo Program schaltet sich automatisch in den Warmhalte-Modus, das Funktionslicht bei "Keep Warm" leuchtet auf. Im Display erscheint die Anzahl der Stunden, seit der sich das Gerät im "Keep Warm" Modus befindet. Es beginnt mit der Zahl "0".
11. Öffnen Sie vorsichtig den Deckel und rühren Sie den Reis mit der mitgelieferten
Servierkelle um. Schliessen Sie den Deckel wieder und lassen Sie den Reis noch
10 – 15 Minuten im Warmhalte-Modus ruhen, bevor Sie ihn servieren. Damit wird
noch eventuell verbliebende Feuchtigkeit aufgesaugt und der Reis wird luftiger.
12
SOLIS Rice Cooker deutsch_2014 16.03.14 21:23 Seite 13
12. Wenn die Einstellung "White Rice" oder "Brown Rice" abgeschlossen ist, schaltet sich das Gerät automatisch für 10 Stunden in den "Keep Warm" Modus.
13. Wenn Sie keinen warmen Reis mehr benötigen, drücken Sie zum Ausschalten
zweimal die EIN/AUS-Taste
und ziehen Sie den Netzstecker. Lassen Sie das
Gerät abkühlen, bevor Sie es reinigen.
Hinweise:
•
Öffnen Sie den Deckel erst, wenn der Reis fertig ist (d.h., das Fertig-Signal ertönt).
•
Um die Einstellung Reiskochen oder Warmhalten zu stoppen, müssen Sie nur die
EIN/AUS-Taste
zweimal drücken.
•
Warum dauert die Kochzeit von braunem Reis ("Brown Rice") länger? Auf
Grund der zusätzlichen Kleie-Schicht rund um die Reiskörnern von braunem Reis,
benötigt dieser generell eine längere Garzeit. Die Einstellung "Brown Rice"
trägt diesem Umstand Rechnung und ist so angelegt, dass die Hitze genau darauf abgestimmt ist, braunen Reis optimal zu kochen. Dazu gehört auch, dass
der Reiskocher nicht sofort heiss wird, sondern die Reiskörner zu Beginn bei kleiner Hitze erst einmal "einweichen" dürfen, um das volle Aroma zu entfalten.
Wichtig:
•
Immer Flüssigkeit in den Kocheinsatz geben, bevor Sie die EIN/AUS-Taste
cken.
drü-
•
Während des Betriebs nicht die Funktionstasten drücken, um den Kochvorgang
nicht zu stören.
•
Damit die Antihaftbeschichtung des Kocheinsatzes nicht zerkratzt wird, immer
Küchenwerkzeug aus Holz oder hitzebeständigem Kunststoff verwenden.
•
Immer prüfen, ob der Kocheinsatz richtig, d.h. gerade im Gerät positioniert ist,
bevor Sie den Kochprozess starten.
Warnung:
•
Bevor Sie den Kocheinsatz aus dem Gerät nehmen, immer sicherstellen, dass das
Gerät ausgeschaltet und der Netzstecker gezogen ist.
•
Benutzen Sie immer Kochhandschuhe oder Topflappen, wenn Sie den Deckel öffnen oder den Kocheinsatz aus dem Gerät holen.
•
Positionieren Sie den Dampfauslass des Deckels immer in die Richtung, die von
Ihnen weg zeigt, damit Sie sich nicht am austretenden Dampf verbrühen.
•
Öffnen Sie den Deckel immer vorsichtig, der Öffnungswinkel sollte nicht in Ihre
Richtung zeigen, damit Sie sich nicht am austretenden Dampf verbrühen.
•
Damit Sie vor einem Stromschlag geschützt sind, das Gerät nur an einer geerdeten Steckdose anschliessen.
13
SOLIS Rice Cooker deutsch_2014 16.03.14 21:23 Seite 14
•
Das Gerät nur zusammen mit dem mitgelieferten, herausnehmbaren Kocheinsatz verwenden.
•
Verwenden Sie den Kocheinsatz nicht mehr, wenn er beschädigt oder verbeult
sein sollte. Einen neuen Rice Cooker Duo Program Kocheinsatz von Solis erhalten Sie im guten Fachhandel oder direkt bei Solis.
▲ DIE FUNKTION "KEEP WARM"
•
Ihr Solis Rice Cooker Duo Program schaltet automatisch in den "Keep Warm"
Modus (Warmhaltefunktion), wenn die Einstellung "White Rice", "Brown Rice"
oder "Steam" abgeschlossen ist. Der "Keep Warm" Modus bleibt bis zu 10 Stunden aktiviert. Nach 10 Stunden schaltet sich das Gerät ab. Im Display wird die
Stundenanzahl angezeigt, wie lange sich das Gerät schon im Warmhalte-Modus
befindet. Die erste angezeigte Zahl ist "0".
•
Sie können die "Keep Warm" Funktion auch unabhängig von den anderen Programen einschalten.
•
Zum Abschalten des "Keep Warm" Modus die EIN/AUS-Taste
drücken.
▲ R E I S - K O C H TA B E L L E
•
Für die folgenden Angaben wurde der Rice Cooker Duo Program Messbecher
verwendet.
•
Hinweis: Der Reis-Messbecher des Solis Rice Cooker Duo Program entspricht
nicht einem Standard-Messbecher. Ein Rice Cooker Duo Program Messbecher
entspricht 160g ungekochtem Reis. Sollten Sie Ihren Messbecher verlieren, können Sie auch einen anderen Messbecher verwenden, allerdings sollten Sie die o.g.
Menge auch damit abmessen und niemals die Maximum-Markierung für 6
Messbecher Reis im Kocheinsatz überschreiten.
R E I S - K O C H TA B E L L E
Verhältnis Reis : Wasser bei weissem / braunem Reis
Ungekochter
Reis
(Messbecher)*
Kaltes Leitungswasser bis zur
Markierung
Gekochter Reis,
ca.
(Messbecher)*
Garzeit
weisser Reis
ca. (in Minuten)
Garzeit
brauner Reis
ca. (in Minuten)
2
2
4
30 - 35
60 - 65
3
3
6
32 - 37
65 - 70
4
4
8
35 - 42
70 - 75
5
5
10
40 - 45
75 - 80
6
6
12
42 - 47
80 - 85
* mit dem Rice Cooker Duo Program Messbecher abgemessen
14
SOLIS Rice Cooker deutsch_2014 16.03.14 21:23 Seite 15
▲ R E I S - VA R I AT I O N E N
•
Sie können zwischen vielen verschiedenen Reissorten wählen und ihn auch unterschiedlich zubereiten – wir wollen Ihnen einen kleinen Überblick geben.
HERZHAFTER REIS
•
Bereiten Sie den Reis wie beschrieben im Rice Cooker Duo Program zu, nehmen
Sie anstatt Wasser dieselbe Menge an Hühner-, Rindfleisch- oder Gemüsebrühe
bzw. Fischfond.
SÜSSER REIS
•
Bereiten Sie den Reis wie beschrieben im Rice Cooker Duo Program zu, ersetzen
Sie die halbe Menge Wasser mit Apfel-, Orangen- oder Ananassaft. Achtung:
Wir empfehlen Ihnen nicht, Milchreis im Rice Cooker Duo Program zuzubereiten, da er am Boden des Kocheinsatzes anbrennen könnte.
SAFRAN-REIS
•
Fügen Sie 1/4 Teelöffel Safranpulver oder 2 Safranfäden pro 2 Messbecher Reis
in das Wasser. Nehmen Sie die Angaben für weissen Reis aus der Tabelle. Rühren Sie den Reis gut durch.
A R B O R I O ODER CARNAROLI-R E I S F Ü R R I S O T T O
•
Arborio und Carnaroli-Reis stammt aus Italien und ist ein glänzender Rundkornreis, der für Risottogerichte verwendet wird. Für den Risotto-Reis nehmen
Sie bitte die Angaben aus der Tabelle für den braunen Reis.
JASMIN-REIS
•
Jasmin-Reis ist ein duftender Langkornreis. Bitte benützen Sie die Tabelle für weissen Reis.
B A S M AT I - R E I S
•
Basmati-Reis ist ein aromatischer Langkornreis. Bitte benützen Sie die Tabelle für
weissen Reis.
WILDREIS
•
Es wird nicht empfohlen, Wildreis alleine im Rice Cooker Duo Program zu garen,
da er eine besonders grosse Menge Wasser benötigt. Er kann allerdings unter
weissen oder braunen Reis gemischt werden.
15
SOLIS Rice Cooker deutsch_2014 16.03.14 21:23 Seite 16
QUINOA
•
Quinoa ist eine alte südamerikanische Reissorte, reich an Protein mit einer luftigen, cremigen und körnigen Textur. Benutzen Sie dafür die Tabelle für braunen
Reis.
SUSHI REIS
•
Sushi Reis ist ein kleinkörniger Reis, der für die japanische Küche verwendet wird.
Benutzen Sie dafür die Tabelle für braunen Reis.
Tipp:
•
16
Um den Reis besonders locker zu garen, fügen Sie etwas mehr Wasser in den
Kocheinsatz. Wollen Sie den Reis besonders fest zubereiten, verzichten Sie auf
einen Teil des Wassers.
SOLIS Rice Cooker deutsch_2014 16.03.14 21:23 Seite 17
▲ ZEITVERZÖGERTES REISGAREN MIT
D E R F U N K T I O N " D E L AY T I M E R "
•
Dank der Funktion "Delay Timer" können Sie eine Stundenanzahl eingeben, nach
welcher der Reis fertig gegart sein soll. Ihr Reiskocher wird sich dann zur passenden Zeit automatisch einschalten, damit Ihr Reis zu der gewünschten Zeit fertig gegart ist. Sie können also am Morgen den Reis und das Wasser in den Kocheinsatz geben – und wenn Sie abends nach Hause kommen, ist ein leckerer Reis
schon fertig zubereitet.
Gehen Sie bitte wie folgt vor:
•
Waschen Sie den Reis und geben Sie ihn und die passende Menge Wasser in den
Kocheinsatz. Gehen Sie vor, wie auf S. 11/12 von Punkt 1 bis 7 beschrieben.
•
Schalten Sie das Gerät mit der EIN/AUS-Taste
•
Drücken Sie nun die Taste "Delay Timer", im Display erscheint die Zahl "1" für
eine Fertigstellung in 1 Stunde. Durch jeden Druck erhöht sich die Zahl um 1. Sie
können eine Stundenanzahl zwischen 1 und 15 für die Funktion "White Rice"
eingeben, und zwischen 2 und 15 Stunden, wenn Sie im Anschluss die Funktion
"Brown Rice" wählen.
•
Wenn die für Sie passende Stundenzahl im Display aufleuchtet, drücken Sie entweder die Taste "White Rice" oder "Brown Rice", je nach zu kochender Reissorte.
•
Im Display zählen die Stunden herunter. Sobald der richtige Zeitpunkt gekommen ist, schaltet sich das Gerät in den Koch-Modus und das Funktionslicht bei
"Cooking" leuchtet auf, die Displayanzeige zeigt wechselnde Striche.
•
Wie beim normalen Reiskoch-Vorgang werden beim weissen Reis die letzten
12 Minuten im Display heruntergezählt, und beim braunen Reis die letzten
25 Minuten.
•
Sobald der Reiskoch-Vorgang abgeschlossen ist, ertönt ein akustisches Signal und
das Gerät schaltet sich automatisch für 10 Stunden in den Warmhalte-Modus
"Keep Warm". Im Display wird die Stundenanzahl angezeigt, wie lange der
Warmhalte-Modus schon aktiviert ist. Die erste angezeigte Zahl ist "0".
•
Bevor Sie den Reis servieren, sollten Sie ihn mit der mitgelieferten Servierkelle
nochmals umrühren, damit die verbliebende Restfeuchtigkeit verteilt wird.
•
Sobald Sie keinen warmen Reis mehr benötigen, drücken Sie zweimal die
EIN/AUS-Taste
, um das Gerät auszuschalten, und ziehen Sie im Anschluss
den Netzstecker.
•
Lassen Sie das Gerät abkühlen, bevor Sie es reinigen.
ein.
17
SOLIS Rice Cooker deutsch_2014 16.03.14 21:23 Seite 18
▲ DAMPFGAREN
MIT DER FUNKTION "STEAM"
•
Lebensmittel, die dampfgegart werden, behalten die meisten Nährstoffe und Vitamine und sind deshalb ideal für eine gesundheitsbewusste Ernährung. Zum
Dampfgaren legen Sie die Lebensmittel in den Edelstahl-Dampfgareinsatz, in den
Kocheinsatz geben Sie Brühe oder Wasser und schliessen den Deckel. Lassen Sie
den Deckel während des gesamten Dämpfvorgangs geschlossen. Wenn Sie den
Deckel unnötigerweise öffnen, entweicht der Dampf und die Garzeit verlängert
sich.
Gehen Sie bitte wie folgt vor:
1. Giessen Sie 3 Rice Cooker Duo Program
Messbecher Wasser oder Brühe in den
Kocheinsatz. Abb. 1
2. Setzen Sie den an der Aussenseite trockenen und sauberen Kocheinsatz in
das Gerät. Abb. 2
Abb. 1
Abb. 2
3. Legen Sie die Lebensmittel, die dampfgegart werden
sollen, direkt in den Edelstahl-Dampfgareinsatz. Abb. 3
Tipp: Sollten die Lebensmittel so klein sein, dass sie
durch die Löcher des Dampfgareinsatzes fallen können
(z.B. Erbsen), können Sie auf den Boden des Einsatzes
auch ein Backpapier legen, in dieses kleine Löcher stechen und die Lebensmittel darauf legen. Achtung: das
Backpapier sollte nicht über den Rand des Dampfgareinsatzes ragen.
Abb. 3
Achtung: Füllen Sie nur so viel Lebensmittel in den
Dampfgareinsatz, dass der Deckel noch perfekt schliessen kann.
4. Setzen Sie den Dampfgareinsatz in den Kocheinsatz.
Abb. 4
Abb. 4
5. Schliessen Sie den Deckel, so dass er
einrastet. Abb. 5
6. Stecken Sie die Verbindungsstecker
in die Gerätebuchse. Dann stecken
Sie den Netzstecker in eine passende
Steckdose.
Abb. 6
Abb. 5
18
Abb. 6
SOLIS Rice Cooker deutsch_2014 16.03.14 21:23 Seite 19
7. Drücken Sie die EIN/AUS-Taste
um das Gerät einzuschalten. Drücken Sie dann
die Taste "Steam" um die Dampfgar-Einstellung zu aktivieren, das rote Funktionslicht leuchtet auf. Im Display blinkt die Zahl "5" für 5 Minuten Dampfgarzeit. Drücken Sie mehrmals auf die Taste "Steam", durch jeden Druck erhöht sich
die Dampfgarzeit um 1 Minute. Maximal können Sie 30 Minuten einstellen, dann
springt das Display wieder zurück auf "5".
8. Sobald Sie die Zeit eingegeben haben, d. h. die Taste "Steam" nicht mehr drücken, ertönt ein akustisches Signal, die Displayanzeige blinkt nicht mehr und signalisiert, dass die Einstellung getätigt ist und der Dämpfvorgang startet.
Das Funktionslicht bei "Cooking" leuchtet auf.
9. Sobald das Wasser im Kocheinsatz den Siedepunkt erreicht hat, zählt die Displayanzeige in 1-Minuten-Intervallen abwärts.
10. Wenn das Dampfgaren beendet ist, ertönt das akustische Fertig-Signal und das
Gerät schaltet sich automatisch in den "Keep Warm" Modus. Auch hier zeigt die
Displayanzeige die Stundenzahl, seit der sich das Gerät im Warmhalte-Modus befindet.
11. Öffnen Sie den Deckel und entnehmen Sie vorsichtig mit Kochhandschuhen die
Lebensmittel oder den Dampfgareinsatz. Lassen Sie das Gerät abkühlen, bevor
Sie es reinigen.
Hinweise:
•
Lassen Sie den Deckel während des gesamten Dampfvorgangs geschlossen.
Wenn Sie den Deckel unnötigerweise öffnen, entweicht der Dampf und die Garzeit verlängert sich.
•
Während des Dampfgarens muss sich immer Wasser im Kocheinsatz befinden.
•
Sollte sich während des Dampfgarens kein Wasser mehr im Kocheinsatz befinden, schaltet sich das Gerät automatisch in den „Keep Warm“ Modus.
•
Bei Bedarf kann während des Dampfgarens heisse Flüssigkeit zugefügt werden.
•
Sollte das Dampfgargut noch nicht durch sein, geben Sie etwas Wasser oder
Brühe in den Kocheinsatz und starten Sie die "Steam" Funktion nochmals.
•
Die "Keep Warm" Funktion bleibt auch nach dem Dampfgaren 10 Stunden eingeschaltet. Wir empfehlen jedoch, das Dampfgargut möglichst bald nach dem
Dämpfen zu verspeisen, da dann noch die meisten Vitamine und Nährstoffe in
den Lebensmitteln enthalten sind.
Warnung:
•
Öffnen Sie den Deckel immer mit äusserster Vorsicht, damit Sie sich nicht an dem
entweichenden Dampf verbrühen.
19
SOLIS Rice Cooker deutsch_2014 16.03.14 21:23 Seite 20
KOMBINIERTES REISGAREN UND DAMPFGAREN
•
Um Energie zu sparen, können Sie auch gleichzeitig Reis kochen und Gemüse
Geflügel oder Fleisch bzw. Meeresfrüchte dampfgaren.
•
Verfahren Sie so, wie ab S. 11 im Kapitel "Reisgaren mit der Einstellung "White
Rice" oder "Brown Rice"" beschrieben.
•
Setzen Sie gleichzeitig den Dampfgareinsatz mit dem zu garenden Lebensmittel in den Kocheinsatz.
•
Schliessen Sie den Deckel und schalten Sie die Funktion "White Rice" oder
"Brown Rice" ein. Merken Sie sich die Uhrzeit. Bei der Funktion "White Rice"
startet die Dampfgarzeit ziemlich schnell, sobald das Wasser warm ist, bei der
Funktion "Brown Rice" dauert dies etwas länger, da der braune Reis erst eine
Weile einweicht.
•
Überwachen Sie die Zeit und prüfen Sie schon vor Ablauf der Reiskochzeit, ob
das Dampfgargut fertig gegart ist. Die Gemüse-Gartabelle auf S. 21 bzw. die anderen Gartabellen geben Ihnen Anhaltspunkte, wie lange der Dampfgarprozess
ungefähr dauern wird.
•
Wenn das Dampfgargut fertig gegart ist, nehmen Sie den Dampfgareinsatz vorsichtig aus dem Gerät. Achtung: Der Dampfgareinsatz ist heiss und darf nur mit
Kochhandschuhen angefasst werden! Schliessen danach sofort wieder den Deckel, damit der Reis fertig kochen kann und nicht zuviel Dampf entweicht.
•
Sobald der Reiskocher in den "Keep Warm" Modus schaltet, können Sie bei Bedarf den Dampfgareinsatz mit den Lebensmitteln erneut in das Gerät stellen, damit das Dampfgargut nochmals erwärmt wird.
TIPPS ZUM DAMPFGAREN VON GEMÜSE
•
Kleine Stücke garen schneller als grosse Stücke. Alles Gemüse sollte in gleich
grosse Stücke geschnitten werden, damit alles Gemüse gleichzeitig fertig gegart
ist.
•
Es kann sowohl frisches als auch gefrorenes Gemüse dampfgegart werden. Wenn
Sie gefrorenes Gemüse dampfgaren, sollte es vorher nicht aufgetaut werden.
•
Die Grösse und Konsistenz des Gemüses und auch der persönliche Geschmack
bestimmen, wie lange die Garzeit sein soll. Wollen Sie weicheres Gemüse, müssen Sie die Garzeit erhöhen.
•
Die Flüssigkeit sollte in keinem Fall so hoch stehen, dass sie den Dampfgareinsatz berührt. Sonst wäre das Dampfgaren nicht effektiv.
•
Sollten die angegebenen Garzeiten 30 Minuten überschreiten, so prüfen Sie nach
30 Minuten den Wasserstand, giessen bei Bedarf Flüssigkeit nach und starten die
"Steam" Funktion mit der verbliebenen Restzeit erneut.
20
SOLIS Rice Cooker deutsch_2014 16.03.14 21:23 Seite 21
G E M Ü S E - G A R TA B E L L E
Gemüse
Vorschläge und Tipps
Menge
Garzeit (Min.)
Artischocken
Entfernen Sie die harten, äusseren Blätter
und den Strunk.
2 mittelgrosse
30 - 35
Bohnen
Enden abschneiden, ganz lassen.
250g
13 - 15
Brokkoli
In Röschen teilen.
250g
8 - 10
Erbsen
Frisch zubereitet muss man sie schälen.
Gefroren.
250g
250g
8 - 10
4-5
Karotten
In Streifen oder Scheiben schneiden.
3 mittelgrosse
14 - 16
Kartoffel
Im Ganzen dämpfen.
4 (150 – 180g)
35 - 40
Neue Kartoffel
Im Ganzen dämpfen.
6 (125g jede)
25 - 30
Kichererbsen
12 Stunden wässern.
1 Tasse getrocknete Kichererbsen
40 - 45
Kohl
In grosse Stücke teilen.
500g
10 - 12
Kohlrabi
Schälen und in Scheiben schneiden
(ca. 50g grosse Stücke).
350g
15 - 17
Kürbis
In Stücke schneiden.
300g
20 - 25
Baby-Kürbis
Spitze wegschneiden und zerkleinern.
350g
8
Mais
Ganze Maiskolben dämpfen.
2 kleine Kolben
20 - 22
Peperoni
In Streifen schneiden, Gehäuse entfernen.
3 mittelgrosse
14 - 16
Pilze
Ganz und ungewaschen dämpfen.
300g
8 - 10
Randen
Ende abschneiden, nicht schälen.
300g
12 - 13
Rosenkohl
Schneiden Sie ein Kreuz in den Stängel.
375g
17 - 19
Spargel
Schälen, das untere Ende entfernen, ganz lassen.
2 Bund
12 - 14
Spinat
Blätter und Stängel waschen.
1/2 Bund
5
Stangensellerie
In Scheiben schneiden.
3 Stängel
5-6
Süsskartoffel
In Stücke schneiden.
300g
20 - 25
Zucchini
Geschält.
350g
6
Zuckererbsen
Zerkleinern.
250g
4-5
Zwiebel
Schälen und im Ganzen dämpfen.
6 mittelgrosse
20 - 25
21
SOLIS Rice Cooker deutsch_2014 16.03.14 21:23 Seite 22
TIPPS ZUM DÄMPFEN VON FISCH UND MEERESFRÜCHTEN
•
Würzen Sie den Fisch vor der Zubereitung mit frischen Kräutern, Zwiebeln,
Zitrone etc.
•
Fischfilets sollten nebeneinander liegen, nicht übereinander.
•
Fisch ist gar, wenn er sich mit einer Gabel leicht teilen lässt und eine undurchsichtig-milchige Farbe annimmt.
Typ
Vorschläge und Tipps
Fischfilet,
ganzer Fisch,
Fischstücke
Garen, bis der Fisch undurchsichtig und leicht zu teilen ist.
Fischstücke sind gar, wenn sich das Fischfleisch leicht von
der Mittelgräte trennen lässt.
8 - 10
15 - 20
12 - 14
Hummer und
Hummerschwanz
Unterseite der Schale entfernen
18 - 20
Muscheln
in der Schale
Dämpfen, bis sich die Schalen öffnen
12 - 14
Venusmuscheln
Dämpfen, bis sich die Schalen öffnen
8 - 10
Crevetten mit Schale
Dämpfen, bis sie rosa sind
8 - 10
Jakobsmuscheln
Dämpfen, bis sie undurchsichtig sind
4-6
22
Garzeit (Min.)
SOLIS Rice Cooker deutsch_2014 16.03.14 21:23 Seite 23
TIPPS ZUM DÄMPFEN VON GEFLÜGEL
•
Verwenden Sie ungefähr gleich grosse Stücke.
•
Legen Sie die Geflügelstücke nebeneinander, nicht übereinander.
•
Entfernen Sie sichtbares Fett und die Haut.
•
Prüfen Sie, ob das Geflügel gar ist, indem Sie in den dicksten Teil stechen. Ist der
Fleischsaft klar, ist das Geflügel fertig.
Typ
Vorschläge und Tipps
Garzeit (Min.)
Brustfilet
Mit der Hautseite nach oben dämpfen
20 - 25
Hähnchenkeule
Die dicken Stellen sollten am äusseren Rand
des Dampfgareinsatzes liegen
30 - 35
Schenkelfilet
Die dicken Stellen sollten am äusseren Rand
des Dampfgareinsatzes liegen
18 - 20
TIPPS ZUM DÄMPFEN VON KNÖDELN UND KLÖSSEN
•
Frische oder gefrorene Klösse können Sie hervorragend in Ihrem Solis Rice Cooker Duo Program dämpfen. Wir empfehlen, etwas Backpapier oder Kohlblätter
auf den Dampfgareinsatz zu legen, und darauf einzeln die Klösse zu setzen, damit Sie nicht am Dampfgareinsatz festkleben.
•
Gefrorene Klösse benötigen ca. 8 – 10 Minuten bis sie gar sind, frische Klösse
ca. 5 – 6 Minuten.
23
SOLIS Rice Cooker deutsch_2014 16.03.14 21:23 Seite 24
▲ REINIGUNG UND PFLEGE
•
Schalten Sie das Gerät mit der EIN/AUS-Taste
aus (2 x drücken) und ziehen
Sie den Netzstecker aus der Steckdose. Entfernen Sie das Netzkabel vom Gerät.
•
Warten Sie, bis alle Teile abgekühlt sind, bevor Sie den Kocheinsatz entnehmen.
Reinigen Sie den Kocheinsatz, den Dampfgareinsatz und den KondenswasserSammelbehälter in warmem Spülwasser, spülen und trocknen Sie alles sorgfältig. Der Kocheinsatz und der Dampfgareinsatz müssen aus Hygienegründen nach
jeder Benutzung gespült werden.
•
Solis empfiehlt, ausser dem Dampfgareinsatz, keine Zubehörteile des Rice Cooker Duo Program in der Spülmaschine zu reinigen, da sowohl die Spülmaschinen-Reinigungsmittel, die zu aggressiv sind, als auch die heissen Wassertemperaturen die Oberflächen des Kocheinsatzes beschädigen oder die anderen Teile
deformieren könnten.
•
Das Deckel-Innere sollten Sie sorgfältig mit einem feuchten Tuch reinigen und
anschliessend trocknen. Dies gilt auch für den Gummirand rund um den Deckel.
Lassen Sie den Deckel und den Gummirand immer komplett trocknen, bevor Sie
den Deckel wieder schliessen.
•
Verwenden Sie generell zur Reinigung der Zubehörteile und des Geräts keine aggressiven oder scheuernden Reinigungsmittel oder Metallschwämme, da diese
die Oberflächen beschädigen könnten.
•
Das Gerät selbst sollte nur mit einem feuchten Tuch abgewischt und im Anschluss
getrocknet werden. Verwenden Sie keine alkalischen Reinigungsmittel sondern
immer nur ein weiches Tuch und ein mildes Reinigungsmittel.
•
Der Kondenswasser-Sammelbehälter sollte nach der Reinigung wieder am Gerät montiert werden.
Hinweis:
•
Sollte sich Reis am Boden des Kocheinsatzes festgesetzt haben, füllen Sie den
Kocheinsatz mit heissem Wasser, geben einen Spritzer mildes Geschirrspülmittel hinzu und lassen den Kocheinsatz für 10 Minuten stehen. Danach können Sie
ihn leicht reinigen.
Warnung:
•
Der Verbindungsstecker muss aus der Gerätebuchse entfernt werden, bevor Sie
den Rice Cooker Duo Program reinigen. Die Gerätebuchse muss in jedem Fall
komplett trocken sein, bevor Sie das Gerät erneut in Betrieb setzen.
•
Damit die Oberfläche des Geräts und des Zubehörs nicht beschädigt wird, verwenden Sie niemals alkalische Reinigungsmittel sondern nur ein weiches Tuch
und ein mildes Reinigungsmittel.
24
SOLIS Rice Cooker deutsch_2014 16.03.14 21:23 Seite 25
•
Verwenden Sie niemals chemische Mittel, Metallschwämme, Stahlwolle oder
Scheuermilch zur Reinigung des Geräts oder des Zubehörs, da dies die Oberflächen und Beschichtungen beschädigen kann.
•
Tauchen Sie das Gerät oder das Netzkabel niemals in Wasser oder andere Flüssigkeiten, da dies zu Stromschlag führen kann.
▲ AUFBEWAHRUNG
1. Prüfen Sie, ob das Gerät ausgeschaltet und der Netzstecker gezogen ist.
2. Prüfen Sie, ob das Gehäuse und alle Zubehörteile absolut kalt, sauber und
komplett trocken sind.
3. Legen Sie die Zubehörteile in das Gerät und schliessen Sie den Deckel.
4. Bewahren Sie das Gerät aufrecht stehend an einem trockenen, dunklen Ort, am
besten in der Originalverpackung, auf. Stellen Sie nichts auf das Gerät.
▲ TECHNISCHE ANGABEN
Modell-Nr.
JH-926SBD, Typ 817
Produktbezeichnung
Dampfgarer und Reiskocher
Spannung/Frequenz
220-240V ~ / 50Hz
Leistung
640-760 Watt
Abmessungen
ca. 24 x 23 cm (H x Ø)
Gewicht
ca. 2,2 kg
25
SOLIS Rice Cooker deutsch_2014 16.03.14 21:23 Seite 26
▲ PROBLEME UND WIE SIE BEHOBEN
WERDEN KÖNNEN
PROBLEM
LÖSUNG
Der Rice Cooker Duo
Program schaltet sich
plötzlich ab.
• Prüfen Sie, ob der Verbindungsstecker fest in der
Gerätebuchse steckt und der Netzstecker in der
Steckdose.
• Das Gerät wurde überbeansprucht oder hat sich
überhitzt. Trennen Sie das Gerät vom Stromnetz und
lassen Sie es ein paar Minuten abkühlen. Stecken Sie
es dann wieder ein, schalten Sie es mit der -Taste
wieder ein und und starten Sie den Kochvorgang
erneut.
Der Reis ist nach dem
Kochen zu trocken/hart.*
• Wenn der Reis am Ende des Kochprograms zu trocken oder fest ist, kann er durch Zugabe von zusätzlichem Wasser und durch zusätzliche Kochzeit weicher gemacht werden. Abhängig davon, wie fest Ihr
Reis noch ist, geben Sie 1/2 bis 1 Messbecher Wasser dazu und rühren ihn gut um. Schliessen Sie den
Deckel und schalten Sie nochmals die Einstellung
"White Rice" oder "Brown Rice" ein.
Wenn der Reiskocher in den Warmhalte-Modus
wechselt, den Deckel öffnen und den Reis umrühren.
Evtl. reicht es auch, den Reis einfach noch 10 – 15
Minuten im Warmhalte-Modus stehen zu lassen.
Der Reis ist nach dem
Kochen zu feucht.*
• Wenn Ihr Reis am Ende des Kochprograms noch zu
feucht/nass ist, rühren Sie ihn mit der Servierkelle
um. Dadurch wird der feuchteste Teil am Boden verteilt und die Feuchtigkeit kann entweichen. Schliessen Sie den Deckel und lassen das Gerät nach Bedarf
noch für 10 – 30 Minuten im Warmhalte-Modus. Öffnen Sie den Deckel von Zeit zu Zeit und rühren Sie
den Reis um, damit die überschüssige Feuchtigkeit
entweichen kann.
* Da Reissorten in ihrer Zusammensetzung und Konsistenz variieren, können die Ergebnisse unterschiedlich sein.
Diese Tipps helfen Ihnen, um den für Sie idealen Reis zu kochen.
26
SOLIS Rice Cooker deutsch_2014 16.03.14 21:23 Seite 27
▲ ENTSORGUNG
EU 2002/96/EC
Hinweise zur ordnungsgemässen Entsorgung des Produkts gemäss EU-Richtlinie 2002/96/EC
Das Gerät darf nach Gebrauch nicht als normaler Haushaltsabfall entsorgt werden.
Es muss zu einer örtlichen Abfallsammelstelle oder einem Händler gebracht werden,
der es fachgerecht entsorgt. Die getrennte Entsorgung von elektrischen und elektronischen Geräten vermeidet im Gegensatz zur nicht fachgerechten Entsorgung
mögliche negative Folgen für Umwelt und Gesundheit und ermöglicht die erneute
Nutzung und Rezyklierung der Komponenten mit bedeutenden Energie- und Rohstoffeinsparungen. Um die Verpflichtung zur ordnungsgemässen Entsorgung des Geräts deutlich hervorzuheben, ist es mit dem Symbol eines durchgestrichenen Abfallcontainers gekennzeichnet.
Solis of Switzerland AG behält sich das Recht vor, jederzeit technische und optische
Veränderungen sowie der Produktverbesserung dienliche Modifikationen vorzunehmen.
S
SOLIS
OLIS H
HELPLINE:
ELPLINE:
044
0
44 8
874
74 6
64
41
14
4
((Nur
Nur für
für Kundinnen
Kundinnen und
und Kunden
Kunden in
in der
der Schweiz)
Schweiz)
Dieser
Artikel
durch
aus. Sollte
Sollte aber
aber trotzdem
trotzdem
D
i e s er A
r tikel zzeichnet
eichnet ssich
i ch d
urch Langlebigkeit
L anglebigkeit und
und Zuverlässigkeit
Zuverlässigkeit aus.
eeinmal
inmal eine
eine Funktionsstörung
Funktionsstörung auftreten,
auftreten, rufen
rufen Sie
Sie uns
uns einfach
einfach aan.
n. Oftmals
Oftmals lässt
lässt sich
sich nämlich
nä m li c h
eeine
ine PPanne
anne mit
mit dem
dem richtigen
richtigen Tipp
Tipp oder
oder Kniff
Kniff unkompliziert
unkomplizier t und
und einfach
einfach wieder
wieder beheben,
beheben,
ohne
dass
o
hn e d
ass Sie
Sie das
das Gerät
Gerät gleich
gleich zur
zur Reparatur
Reparatur einschicken
einschicken müssen.
müssen. Wir
Wir stehen
stehen Ihnen
Ihnen gerne
g er n e
mit
m
it Rat
Rat und
und Tat
Tat zzur
ur Seite.
Seite.
Bewahren Sie die Originalverpackung dieses Artikels gut auf damit Sie sie für
einen eventuell nötigen Transport oder Versand des Produktes verwenden
können.
Solis of Switzerland AG
Solis-Haus • CH-8152 Glattbrugg-Zürich • Schweiz
Telefon +41 44 874 64 54 • Telefax +41 44 874 64 99
[email protected] • www.solis.ch • www.solis.com
27
SOLIS Rice Cooker franz._2014 16.03.14 21:25 Seite 28
SOLIS Rice Cooker franz._2014 16.03.14 21:25 Seite 29
▲ TA B L E D E S M AT I E R E S
30
Description de l’appareil
32
Consignes de sécurité importantes
36
Avant la mise en service
37
Cuisson du riz
40
La fonction « Keep Warm »
40
Tableau du temps de cuisson du riz
41
Les différentes variétés de riz
43
Départ différé de la cuisson du riz avec la programmation « Delay Timer »
44
Cuisson à la vapeur
47
Tableaux du temps de cuisson à la vapeur
50
Nettoyage et entretien
51
Rangement
51
Caractéristiques techniques
52
Problèmes et dépannage possible
53
Elimination / Solis Helpline
29
SOLIS Rice Cooker franz._2014 16.03.14 21:25 Seite 30
▲ D E S C R I P T I O N D E L’ A P PA R E I L
A
Couvercle d’un seul tenant avec bouton de déverrouillage et poignée
Pour ouvrir le couvercle, appuyez sur le bouton de déverrouillage et relevez le
couvercle en le tenant par la poignée.
B
Evacuation de la vapeur
C
Récupérateur de condensation
D
Cuve de cuisson amovible avec revêtement antiadhésif
Empêche le riz de coller.
E
Panier vapeur en acier inoxydable
Idéal pour la cuisson à la vapeur de légumes, fruits de mer, volaille ou viande.
F
Cuiller en plastique
G
Verre gradué
H
Cordon électrique amovible (sans illustration)
Permet d’utiliser le cuiseur à riz comme plat de service et de le ranger
facilement.
TA B L E A U D E C O M M A N D E :
I
Programmation « Delay Timer » pour un départ différé de la cuisson
du riz.
J
Ecran avec affichage des 12 dernières minutes de cuisson en cas de
préparation de riz blanc ou des 25 dernières minutes en cas de préparation
de riz complet
ou de la minuterie en mode « Keep Warm »
ou de la programmation d’un départ différé.
K
Touche MARCHE/ARRET
L
Programmation « White Rice » pour la cuisson de riz blanc.
M Programmation « Brown Rice » pour la cuisson de riz complet ou autre
variété de riz nécessitant une cuisson plus longue.
N
Programmation « Steam » pour la cuisson à la vapeur de légumes, fruits
de mer, volaille ou viande.
O
Programmation « Keep Warm »
Cette programmation s’enclenche automatiquement en fin de cuisson – quelque soit le mode de cuisson sélectionné. La programmation de maintien au
chaud peut également être enclenchée manuellement.
30
Chaque touche du tableau de commande (à l’exception de la touche
) est
accompagnée d’un témoin lumineux qui est éclairé lorsque la programmation
correspondante est activée. De plus, il y a un témoin lumineux « Cooking »
qui s’affiche lorsque l’eau est chauffée.
SOLIS Rice Cooker franz._2014 18.03.14 08:46 Seite 31
A
B
A
E
D
C
D
I
J
K
D
E
G
F
L
M
N
O
31
SOLIS Rice Cooker franz._2014 16.03.14 21:25 Seite 32
▲ CONSIGNES DE SECURITE IMPORTANTES
Merci de lire ce mode d’emploi attentivement avant la première utilisation
afin de vous familiariser avec votre Solis Rice Cooker Duo Program et de l’utiliser en toute sécurité. Nous vous conseillons de conserver ce mode d’emploi.
En cas de vente de l’appareil, merci de transmettre le mode d’emploi au nouveau propriétaire.
Comme pour chaque utilisation d’un appareil électrique les consignes suivantes sont à respecter pour votre propre sécurité :
1. Afin d’éviter toute électrocution, le cuiseur à riz (y compris le cordon, la prise ou
l’adaptateur secteur) ne doit pas entrer en contact avec de l’eau ou autre liquide.
De l’eau pourrait s’infiltrer dans l’appareil et l’endommager. Si l’appareil (y compris le cordon, la prise ou l’adaptateur secteur) est entré en contact avec un liquide, enfilez des gants en caoutchouc secs et débranchez aussitôt l’appareil.
2. Vérifiez avant l’utilisation que la tension de l’appareil soit compatible avec la tension de secteur.
3. Branchez d’abord l’adaptateur secteur dans la prise de l’appareil, puis branchez
le cordon dans la prise secteur avant de mettre l’appareil en marche. Vérifiez que
la prise de l’appareil et l’adaptateur sont absolument secs avant de les connecter.
Ne manipulez jamais la prise avec des mains humides.
4. Ne mettez le cuiseur à riz/vapeur en marche que sur une surface stable, sèche
et résistante à la chaleur. Ne le placez pas en dessous d’une étagère ou d’une
armoire suspendue ou d’autres matériaux sensibles à la vapeur.
5. Ne laissez pas pendre le cordon électrique au bord d’une table, l’appareil risquerait de tomber. Veillez à ce que le cordon n’entre pas en contact avec des surfaces chaudes telles que des plaques de cuisson, des radiateurs ou même avec
l’appareil lui-même. Déroulez le cordon entièrement avant de le brancher dans
la prise secteur.
6. Tenez l'appareil à l’écart de sources de chaleur telles qu’une gazinière, un four
ou autre appareil dégageant de la chaleur. N'utilisez jamais l'appareil sur une surface mouillée ou chaude. Ne placez jamais l'appareil à proximité d’une source
d'humidité, de chaleur ou d’une flamme nue. Tenez à l’écart d’objets ou appareils mobiles.
7. Ne tenez jamais l’appareil par le cordon. Ne tirez pas sur le cordon. Ne posez pas
d’objets sur le cordon.
8. Nous vous conseillons de ne pas utiliser de rallonge électrique. Ne placez jamais
l'appareil directement en-dessous d'une prise électrique.
32
SOLIS Rice Cooker franz._2014 16.03.14 21:25 Seite 33
9. Débranchez toujours l’appareil lorsque celui-ci n’est pas utilisé ou n’est pas sous
surveillance ou lorsque vous voulez le nettoyer. Afin de garantir une protection
supplémentaire lors de l’utilisation d’appareils électriques, nous vous recommandons un disjoncteur différentiel (DDR). Nous conseillons d’utiliser un interrupteur de sécurité avec une sensibilité différentielle de maximum 30 mA. Demandez conseil à votre électricien.
10. N’apportez aucune modification à l’appareil, au cordon, à la prise ou aux accessoires.
11. Risque d’accident en cas d’utilisation inappropriée !
12. Attention : Les différentes parties et le revêtement de l’appareil restent très
chauds pendant un certain temps après l’utilisation du cuiseur à riz.
13. Ne cherchez jamais à attraper un appareil tombé dans l’eau. Débranchez d’abord l’appareil de la prise secteur avant de le sortir de l’eau. Avant de le réutiliser, remettez votre appareil à Solis ou à un service après-vente agréé par Solis
afin que celui-ci vérifie son bon fonctionnement et sa sécurité !
14. Ne disposez jamais l’appareil à proximité d’une source d’eau dans laquelle il pourrait tomber (par exemple un évier).
15. N’exposez pas l’appareil directement au soleil.
16. N’introduisez jamais d’objets aigus ou pointus dans les ouvertures de l’appareil.
Risque d’endommagement de l’appareil ou d’électrocution.
17. Ne secouez ou déplacez jamais l’appareil pendant son utilisation.
18. N’utilisez l’appareil que comme indiqué dans ce mode d’emploi. N’utilisez que
les accessoires fournis. Des accessoires inappropriés peuvent entraîner un endommagement de l’appareil.
19. L’appareil est destiné à un usage privé et non pas commercial.
20. N’utilisez pas l'appareil à l'extérieur. N’utilisez pas l’appareil dans un véhicule ou
sur un bateau.
21. Contrôlez toujours votre cuiseur à riz avant de le mettre en marche.
22. Afin d’éviter toute électrocution, n’utilisez pas l’appareil si le cordon ou la prise
est endommagé ou si l’appareil présente une anomalie, a subi une chute ou est
lui-même endommagé. N’essayez jamais de réparer vous-même l’appareil.
Remettez un appareil défectueux à Solis ou à un service après-vente agréé par
Solis afin que celui-ci le vérifie et le répare.
23. Les personnes ayant un handicap physique, sensoriel ou mental (et les enfants)
ainsi que les personnes inexpérimentées ne doivent pas utiliser le cuiseur à riz
sans surveillance d’une personne responsable ou sans avoir été instruites par cette
dernière sur son fonctionnement.
33
SOLIS Rice Cooker franz._2014 16.03.14 21:25 Seite 34
24. Ne laissez pas les enfants jouer avec le cuiseur à riz.
25. Vérifiez que votre Solis Rice Cooker Duo Program soit correctement assemblé
avant de le mettre en marche. Référez-vous pour cela au mode d’emploi.
26. Ne recouvrez jamais les ouvertures pendant que l’appareil est en marche.
27. Avant de déplacer ou de démonter l’appareil, éteignez-le toujours en appuyant
d’abord sur la touche MARCHE/ARRET
puis débranchez ensuite le cordon
de la prise secteur et attendez le refroidissement complet de l’appareil. Débranchez toujours l’appareil en cas de non-utilisation.
28. Vérifiez toujours que les parois intérieures de l’appareil, les parois extérieures de
la cuve ainsi que la plaque chauffante sont absolument propres avant de mettre l’appareil en marche.
29. L’appareil doit être toujours propre. Voir à ce propos le chapitre « Nettoyage et
entretien ». Seul le panier vapeur peut être lavé en machine.
30. Ne mettez jamais de substances explosives ou inflammables telles qu’un récipient
aérosol (spray déodorant, laque à cheveux, etc.) dans l’appareil.
31. Positionnez toujours le cuiseur à riz de manière à ce que la vapeur ne se dégage
pas dans votre direction. Soyez toujours très prudent lorsque vous relevez le couvercle afin de ne pas vous brûler avec la vapeur chaude.
32. N’utilisez cet appareil qu’avec la cuve amovible fournie en y ajoutant éventuellement le panier vapeur. Ne placez jamais une autre casserole ou un autre récipient dans le cuiseur à riz. La cuve ne peut pas être utilisée à d’autres fins ou être
directement placée sur une plaque de cuisson électrique ou une gazinière.
33. N’utilisez pas la cuve de votre Rice Cooker Duo Program si celle-ci est endommagée ou cabossée. Des cuves de rechange sont disponibles dans tous les bons
magasins spécialisés ou directement auprès de Solis.
34. Ne placez jamais rien sur le couvercle, que l’appareil soit en marche ou entreposé.
Ne recouvrez jamais l’appareil pendant la cuisson ou le maintien au chaud.
35. N’utilisez jamais de produits détergents chimiques, alcalins ou agressifs ou
d’éponges-grattoir pour nettoyer l’appareil et la cuve, car cela pourrait endommager le revêtement de la cuve ou de l’appareil. Utilisez simplement un chiffon
humide et un peu de liquide vaisselle.
36. Ne branchez jamais l’appareil dans une prise secteur et ne mettez jamais l’appareil en marche si la cuve n’est pas correctement placée sur l’appareil.
37. Ne mettez jamais des liquides ou aliments directement dans le châssis du cuiseur
à riz. Seuls la cuve amovible et le panier vapeur de votre Rice Cooker Duo Program peuvent entrer en contact avec de la nourriture. N’utilisez jamais le panier
vapeur sans la cuve.
34
SOLIS Rice Cooker franz._2014 16.03.14 21:25 Seite 35
38. Ne faites jamais fonctionner le cuiseur à riz à vide.
39. Ne touchez pas le revêtement chaud de l’appareil lorsque vous voulez relever le
couvercle ou retirer la cuve. Utilisez toujours des gants de cuisine ou maniques.
Relevez toujours le couvercle avec précaution et prenez soin que la vapeur ne se
dégage pas dans votre direction, afin de ne pas vous brûler.
40. Prenez soin que la condensation qui s’accumule sous le couvercle ne retombe
que dans la cuve et non pas dans l’appareil lui-même.
41. Soyez très prudents lorsque des aliments et liquides chauds se trouvent dans l’appareil. Ne déplacez jamais l’appareil lorsqu’il est en marche. Ne touchez jamais
le revêtement chaud de l’appareil avec vos mains nues.
42. Maintenez toujours le couvercle en position fermée que ce soit pendant la cuisson ou lorsque l’appareil est entreposé. Ne posez rien sur le couvercle.
43. N’utilisez que des ustensiles de cuisine en bois ou en plastique résistant à la chaleur afin d’éviter que le revêtement antiadhésif de la cuve ne soit abîmé.
44. Vérifiez toujours que la cuve est correctement placée dans l’appareil avant de le
mettre en marche. Le récupérateur de condensation doit toujours être correctement placé sur la paroi extérieure de l’appareil.
45. La programmation « Keep Warm » permet de maintenir le riz au chaud dans la
cuve pendant 10 heures maximum.
46. Avant de nettoyer le cuiseur à riz, éteignez toujours l’appareil en appuyant d’abord (2 fois) sur la touche MARCHE/ARRET
, débranchez ensuite le cordon de
la prise secteur et l’adaptateur de l’appareil et retirez le cordon. Attendez ensuite
le refroidissement complet de tous les éléments de l’appareil. Séchez soigneusement la prise de l’appareil avant de le remettre en marche.
47. La distance minimale requise entre l’appareil et le mur, des rideaux ou autres matériaux ou objets sensibles à la vapeur et à la chaleur est de 20 cm. Une bonne
circulation de l’air sur et autour de l’appareil doit être garantie.
Important : Déroulez complètement le cordon électrique avant de mettre l’appareil en marche. Attendez le refroidissement complet de l’appareil si vous voulez ranger le cordon dans l’appareil.
35
SOLIS Rice Cooker franz._2014 16.03.14 21:25 Seite 36
▲ AVA N T L A M I S E E N S E R V I C E
•
Avant d’utiliser votre Solis Rice Cooker Duo Program pour la première fois, retirez tous les autocollants. Nettoyez soigneusement la cuve, le panier vapeur en
acier inoxydable et la cuiller en plastique avec du liquide vaisselle et de l’eau
chaude. Ensuite séchez bien le tout.
- Nettoyez l’intérieur du couvercle avec un chiffon humide.
- Vérifiez que le récupérateur de condensation soit correctement fixé sur
- l’appareil.
Pour le retirer : Soulevez le récupérateur par le bas et le retirer de son support
par le haut.
Pour le mettre en place : Insérez d’abord les encoches à droite et à gauche dans
le support puis enfoncez la partie inférieure sur l’appareil.
36
SOLIS Rice Cooker franz._2014 16.03.14 21:25 Seite 37
▲ C U I S S O N D U R I Z AV E C L A
P R O G R A M M AT I O N « W H I T E R I C E »
OU « BROWN RICE »
1. Mesurez la quantité souhaitée de riz en utilisant le verre
gradué fourni (voir le tableau du temps de cuisson du
riz). Effectuez la mesure avec un verre gradué ras et
non pas bombé (cf. fig.)
•
Remarque : Le verre gradué à riz de votre Solis Rice
Cooker Duo Program ne correspond pas à verre gradué
standard. Un verre gradué Rice Cooker Duo Program
correspond à 160g de riz cru. Si vous deviez perdre votre verre gradué, vous pouvez bien sûr utiliser un autre verre gradué mais devez toutefois respecter les quantités indiquées ci-dessus et ne jamais dépasser la quantité maximum de 6 verres gradués de riz dans la cuve.
2. Versez le riz dans un tamis et lavez-le à grande eau froide pour éliminer la couche d’amidon qui le recouvre. Dès que l’eau qui s’en échappe est claire, le riz est
prêt à cuire. Egouttez alors bien le riz.
✓ ✗
3. Versez le riz lavé dans la cuve. Répartissez
bien le riz afin qu’il ne soit pas entassé dans
une seule partie de la cuve.
4. Utilisez le verre gradué fourni pour ajouter de
l’eau. Si vous avez mis 2 verres gradués de riz dans la cuve,
ajoutez ensuite de l’eau jusqu’à ce que le niveau « 2 » indiqué
dans la cuve soit atteint. Si vous avez mis 3 verres gradués de
riz, le niveau d’eau doit être entre les marquages « 2 » et « 4 ».
Pour 4 verres gradués de riz, remplissez la cuve avec de l’eau
jusqu’à la ligne « 4 », et ainsi de suite. Vous pouvez préparer
jusqu’à 6 verres gradués de riz. Le tableau ci-dessous vous indique la quantité
de riz cuite et le temps de cuisson correspondants.
TA B L E A U D U T E M P S D E C U I S S O N D U R I Z
riz cru
(verre gradué)*
eau froide du
robinet jusqu’au
marquage
riz cuit, approx.
(verre gradué) *
temps de cuisson
riz blanc, approx.
(en minutes)
Temps de cuisson
riz complet, approx. (en minutes)
2
2
4
30 - 35
60 - 65
3
3
6
32 - 37
65 - 70
4
4
8
35 - 42
70 - 75
5
5
10
40 - 45
75 - 80
6
6
12
42 - 47
80 - 85
* mesuré avec le verre gradué Rice Cooker Duo Program
37
SOLIS Rice Cooker franz._2014 16.03.14 21:25 Seite 38
5. Vérifiez que les parois externes de la cuve (fond et côtés) sont bien propres avant
de la placer dans l’appareil – afin de vous garantir un contact parfait avec la
plaque de cuisson située dans l’appareil.
ATTENTION :
1. Avant la cuisson nettoyez toujours le fond de la cuve et le revêtement de la
plaque de cuisson. Vérifiez qu’il n’y a pas de grains de riz en dehors de la cuve
ou sur la plaque de cuisson.
2. Tournez la cuve légèrement vers la droite et la gauche pour être sûr qu’elle
soit bien à plat sur la plaque de cuisson.
3. Le fond de la cuve doit être entièrement positionné dans le cuiseur à riz,
sinon l’appareil ne se met pas en marche ou pourrait être endommagé.
Pour éviter tout risque d’électrocution, la cuisson doit se faire uniquement dans la cuve
amovible. Ne plongez jamais l’appareil dans l’eau.
6. Fermez le couvercle en prenant soin qu’il
s’enclenche.
7. Branchez l’adaptateur dans la prise de l’appareil puis le cordon dans une prise secteur
appropriée.
8. Appuyez sur la touche MARCHE/ARRET
pour mettre l’appareil en marche. Tous les témoins lumineux s’allument brièvement les uns après les autres. Des traits transversaux rouges s’affichent sur l’écran.
Appuyez alors sur la touche « White Rice » ou « Brown Rice » (selon la variété
de riz que vous désirez cuisiner) pour activer la programmation correspondante.
Le témoin de la touche « White Rice » ou « Brown Rice » s’allume en rouge. Dès
que le processus de cuisson se met en place, le témoin « Cooking » s’allume également en rouge et sur l’écran les traits s’affichent tour à tour pour former un
carré.
9. A l’approche de la fin de cuisson, le temps de cuisson restant s’affiche sur l’écran
et effectue un compte à rebours. Les dernières 12 minutes pour du riz blanc,
25 minutes pour du riz complet.
10. En fin de cuisson un signal sonore retentit et le Solis Rice Cooker Duo Program
passe automatiquement sur le mode de maintien au chaud. Le témoin « Keep
Warm » s’allume. Le nombre d’heures depuis le passage sur le mode « Keep
Warm » s’affiche sur l’écran. Le premier chiffre affiché est donc « 0 ».
11. Relevez le couvercle avec précaution et mélangez le riz avec la cuiller fournie. Refermez ensuite le couvercle et laissez le riz reposer pendant encore 10 – 15 minutes sur le mode de maintien au chaud avant de le servir. Cela permet d’absorber le résidu d’humidité. Le riz sera ainsi plus aéré.
38
SOLIS Rice Cooker franz._2014 16.03.14 21:25 Seite 39
12. Si la programmation « White Rice » ou « Brown Rice » a été sélectionnée, en
fin de cuisson, l’appareil passe sur la programmation « Keep Warm » qui s’éteint
automatiquement au bout de 10 heures.
13. Si vous n’avez plus besoin que le riz soit maintenu au chaud, appuyez 2 fois sur
la touche MARCHE/ARRET
pour éteindre l’appareil, puis débranchez-le.
Attendez le refroidissement complet avant de nettoyer l’appareil.
Remarques :
•
Ne soulevez pas le couvercle avant que le riz ne soit cuit (attendez le signal sonore).
•
Pour interrompre la cuisson ou le maintien au chaud, il vous suffit d’appuyer deux
fois sur la touche MARCHE/ARRET
.
•
Pourquoi la cuisson du riz complet (« Brown Rice ») est plus longue ? En raison
de l’enveloppe de son autour des grains de riz complet, le temps de cuisson est
plus long. La programmation « Brown Rice » prend ceci en considération et est
programmé de telle manière à ce que la chaleur soit parfaitement adaptée à une
cuisson optimale du riz complet. Par exemple, la température du cuiseur à riz est
peu élevée en début de cuisson pour permettre aux grains de riz de « tremper »
dans un premier temps ce qui leur permet de développer tout leur arôme.
Important :
•
Mettez toujours de l’eau ou autre liquide dans la cuve avant d’appuyer sur la touche MARCHE/ARRET
.
•
N’appuyez pas sur les touches de programmation pendant la cuisson, afin de ne
pas dérégler le processus de cuisson.
•
Utilisez toujours des ustensiles de cuisine en bois ou en plastique résistant à la
chaleur pour ne pas abîmer le revêtement antiadhésif de la cuve.
•
Vérifiez toujours que la cuve soit correctement positionnée (c’est-à-dire bien à
plat dans l’appareil) avant de commencer la cuisson.
Avertissement :
•
Vérifiez toujours que l’appareil est éteint et débranché avant de retirer la cuve
de l’appareil.
•
Utilisez toujours des gants de cuisine ou des maniques pour relever le couvercle
ou retirer la cuve de l’appareil.
•
Positionnez l’évacuation de vapeur en façon que la vapeur ne s’échappe pas dans
votre direction afin de ne pas vous brûler.
•
Relevez le couvercle avec précaution. Prenez soin que l’angle d’ouverture ne soit
pas face à vous afin de ne pas vous brûler avec la vapeur qui s’échappe.
39
SOLIS Rice Cooker franz._2014 16.03.14 21:25 Seite 40
•
Pour éviter toute électrocution, branchez toujours l’appareil à une prise de terre.
•
N’utilisez pas l’appareil sans la cuve amovible fournie.
•
Remplacez la cuve si elle est endommagée ou cabossée. Une cuve de remplacement Rice Cooker Duo Program de Solis est disponible dans tous les bons magasins spécialisés et ou directement auprès de Solis.
▲ LA FONCTION « KEEP WARM »
•
Votre Solis Rice Cooker Duo Program passe automatiquement sur le mode
« Keep Warm » (maintien au chaud) lorsque la cuisson avec la programmation
« White Rice », « Brown Rice » ou « Steam » est achevée. Le mode « Keep
Warm » est activé pendant 10 heures. Au-delà l’appareil s’éteint automatiquement. Le nombre d’heures depuis le passage sur le mode « Keep Warm » s’affiche sur l’écran. Le premier chiffre affiché est donc « 0 ».
•
Vous pouvez utiliser la fonction « Keep Warm » indépendamment des autres programmations.
•
Pour éteindre le mode « Keep Warm », appuyez sur la touche MARCHE/ARRET
.
▲ TABLEAU DU TEMPS DE CUISSON DU RIZ
•
Les données suivantes ont été mesurées avec le verre gradué Rice Cooker Duo
Program.
•
Remarque : Le verre gradué à riz de votre Solis Rice Cooker Duo Program ne
correspond pas à verre gradué standard. Un verre gradué Rice Cooker Duo Program correspond à 160g de riz cru. Si vous deviez perdre votre verre gradué, vous
pouvez bien sûr utiliser un autre verre gradué mais devez toutefois respecter les
quantités indiquées ci-dessus et ne jamais dépasser la quantité maximum de
6 verres gradués de riz dans la cuve.
TA B L E A U D U T E M P S D E C U I S S O N D U R I Z
Rapport riz (blanc ou complet)/eau
riz cru
(verre gradué)*
eau froide du
robinet jusqu’au
marquage
riz cuit, approx.
(verre gradué) *
temps de cuisson
riz blanc, approx.
(en minutes)
temps de cuisson
riz complet, approx. (en minutes)
2
2
4
30 - 35
60 - 65
3
3
6
32 - 37
65 - 70
4
4
8
35 - 42
70 - 75
5
5
10
40 - 45
75 - 80
6
6
12
42 - 47
80 - 85
* mesuré avec le verre gradué Rice Cooker Duo Program
40
SOLIS Rice Cooker franz._2014 16.03.14 21:25 Seite 41
▲ L E S D I F F E R E N T E S VA R I E T E S D E R I Z
•
Vous avez le choix entre de nombreuses sortes de riz et vous pouvez le préparer de différentes façons – nous souhaitons vous présenter un aperçu.
RIZ SALE
•
Préparez le riz dans votre Rice Cooker Duo Program comme indiqué en remplaçant l’eau par du bouillon de légumes, de volaille, de bœuf ou de poisson.
RIZ SUCRE
•
Préparez le riz dans votre Rice Cooker Duo Program comme indiqué en remplaçant la moitié de la quantité d’eau par du jus de pommes, d’oranges ou d’ananas. Attention : Nous vous déconseillons de préparer du riz au lait dans votre
Rice Cooker Duo Program parce qu’il a tendance à coller au fond de la cuve.
RIZ SAFRANE
•
Ajoutez dans l’eau ¼ de cuiller de safran en poudre ou 2 pistils de safran pour
2 verres gradués de riz. Référez-vous au tableau du riz blanc. Mélangez bien le
tout.
RIZ ARBORIO OU CARNAROLI POUR RISOTTO
•
Les riz arborio et carnaroli proviennent d’Italie. Ce sont des riz éclatants à grain
rond qui sont utilisés pour les recettes de risotto. Pour la cuisson du riz à risotto,
référez-vous au tableau du riz complet.
RIZ AU JASMIN
•
Le riz au jasmin est un riz long grain parfumé. Référez-vous au tableau du riz
blanc.
R I Z B A S M AT I
•
Le riz basmati est un riz long grain parfumé. Référez-vous au tableau du riz blanc.
R I Z S A U VA G E
•
Nous vous déconseillons de préparer seulement du riz sauvage dans le Rice Cooker Duo Program parce qu’il nécessite une trop grande quantité d’eau. Il peut
toutefois être ajouté à du riz blanc ou complet.
41
SOLIS Rice Cooker franz._2014 16.03.14 21:25 Seite 42
QUINOA
•
Quinoa est une ancienne variété de riz d’Amérique du Sud. Il est riche en protéines et a une consistance aérée, crémeuse et croquante. Référez-vous au tableau du riz complet.
RIZ POUR SUSHI
•
Le riz pour sushi est un riz à petit grain utilisé dans la cuisine japonaise. Référezvous au tableau du riz complet.
Conseil :
•
42
Si vous voulez obtenir un riz qui ne colle pas, ajoutez un peu plus d’eau dans la
cuve. Si vous voulez un riz particulièrement al dente, diminuez la quantité
d’eau.
SOLIS Rice Cooker franz._2014 16.03.14 21:25 Seite 43
▲ D E PA R T D I F F E R E D E L A C U I S S O N D U
R I Z AV E C L A P R O G R A M M AT I O N
« D E L AY T I M E R »
•
La programmation « Delay Timer » vous permet de programmer l’heure à laquelle
le riz doit être cuit. Votre cuiseur à riz se mettra automatiquement en marche
de manière à ce que le riz soit prêt à l’heure souhaitée. Cela vous permet de préparer le riz et l’eau dans la cuve le matin – et celui-ci sera prêt à servir lorsque
vous rentrerez chez vous le soir.
Procédez comme suit :
•
Lavez le riz et mettez-le avec la quantité d’eau correspondante dans la cuve. Procédez comme indiqué pages 37/38, étapes 1 à 7.
•
Mettez l’appareil en marche en appuyant sur la touche MARCHE/ARRET
•
Appuyez ensuite sur la touche « Delay Timer ». Le chiffre « 1 » s’affiche sur
l’écran pour une fin de cuisson dans une heure. Appuyez à nouveau sur la touche « Delay Timer » pour augmenter l’heure de la fin de cuisson. Vous pouvez
programmer une fin de cuisson dans 1 à 15 heures si vous utilisez la programmation « White Rice » et dans 2 à 15 heures si vous utilisez la programmation « Brown Rice ».
•
Une fois que l’heure souhaitée apparaît sur l’écran, appuyez soit sur la touche
« White Rice » ou sur la touche « Brown Rice » selon le riz que vous désirez préparer.
•
Un compte à rebours se met en place sur l’écran. Une fois le compte à rebours
achevé, l’appareil passe en mode cuisson et le témoin « Cooking » s’allume. Des
traits s’affichent alors tour à tour sur l’écran.
•
Comme pour la préparation en direct, à l’approche de la fin de cuisson le
temps de cuisson restant s’affiche sur l’écran et effectue un compte à rebours.
Les dernières 12 minutes pour du riz blanc, 25 minutes pour du riz complet.
•
En fin de cuisson un signal sonore retentit et le Solis Rice Cooker Duo Program
passe automatiquement sur le mode « Keep Warm » (maintien au chaud) pendant 10 heures maximum. Le nombre d’heures depuis le passage sur le mode
« Keep Warm » s’affiche sur l’écran. Le premier chiffre affiché est donc « 0 ».
•
Avant de servir le riz mélangez-le avec la cuiller fournie pour bien répartir le résidu d’humidité.
•
Si vous n’avez plus besoin de maintenir le riz au chaud, appuyez deux fois sur
la touche MARCHE/ARRET
pour éteindre l’appareil. Débranchez ensuite l’appareil.
•
Attendez le refroidissement complet de l’appareil avant de le nettoyer.
.
43
SOLIS Rice Cooker franz._2014 16.03.14 21:25 Seite 44
▲ C U I S S O N A L A VA P E U R AV E C L A
P R O G R A M M AT I O N « S T E A M »
•
Les plats cuits à la vapeur gardent au mieux leurs valeurs nutritionnelles et vitamines et sont idéaux pour une alimentation saine. Pour une cuisson à la vapeur,
placez les aliments dans le panier vapeur en acier inoxydable, mettez de l’eau
ou du bouillon dans la cuve et rabattez le couvercle sur l’appareil. Ne relevez pas
le couvercle pendant la cuisson à la vapeur. Si vous relevez inutilement le couvercle, la vapeur s’échappe ce qui prolonge le temps de cuisson.
Procédez comme suit :
1. Versez 3 verres gradués Rice Cooker
Duo Program d’eau ou de bouillon dans
la cuve (fig. 1).
2. Placez la cuve dans l’appareil (fig. 2).
Prenez soin que les parois extérieures de
la cuve soient sèches et propres.
fig. 1
fig. 2
3. Placez les ingrédients devant être cuits à la vapeur directement dans le panier vapeur en acier inoxydable
(fig. 3).
Conseil : Si les aliments sont si petits qu’ils risquent de
tomber à travers les trous du panier vapeur (par ex. des
petits pois), vous pouvez placer une feuille de papier
sulfurisé dans le fond du panier et percer cette feuille
de petits trous avant d’y disposer les aliments.
Attention : Le papier sulfurisé ne doit dépasser le rebord du panier.
fig. 3
Attention : Ne mettez pas trop d’ingrédients dans le
panier vapeur afin que le couvercle puisse fermer correctement.
4. Placez le panier vapeur dans la cuve (fig. 4).
5. Fermez le couvercle de manière à
ce qu’il s’enclenche (fig. 5).
fig. 4
6. Branchez l’adaptateur secteur dans
la prise de l’appareil puis la fiche
dans une prise secteur appropriée
(fig. 6).
fig. 5
44
fig. 6
SOLIS Rice Cooker franz._2014 16.03.14 21:25 Seite 45
7. Appuyez sur la touche MARCHE/ARRET
pour mettre l’appareil en marche.
Appuyez ensuite sur la touche « Steam » pour activer la programmation de la
cuisson à la vapeur. Le témoin lumineux correspondant s’éclaire alors en rouge
et sur l’écran s’affiche le chiffre « 5 » correspondant à 5 minutes de cuisson à
la vapeur. Appuyez à nouveau sur la touche « Steam » pour augmenter le nombre de minutes de cuisson à la vapeur. La durée de maximum de la cuisson à la
vapeur est de 30 minutes. L’affichage sur l’écran repasse ensuite à 5 minutes.
8. Dès que vous avez programmé la minuterie, c’est à dire dès que vous n’appuyez
plus sur la touche « Steam », un signal sonore retentit. L’affichage sur l’écran ne
clignote plus et indique que la programmation est activée et que la cuisson à la
vapeur démarre. Le témoin « Cooking » s’allume.
9. Dès que le liquide dans la cuve est en ébullition, la minuterie se déclenche et le
compte à rebours défile minute par minute sur l’écran.
10. En fin de cuisson à la vapeur un signal sonore retentit et l’appareil passe automatiquement sur le mode « Keep Warm ». Le nombre d’heures depuis le passage sur le mode « Keep Warm » s’affiche sur l’écran.
11. Relevez le couvercle et retirez les aliments ou le panier vapeur avec précaution
en utilisant des gants de cuisine. Attendez le refroidissement complet de l’appareil avant de le nettoyer.
Remarques :
•
Ne relevez pas le couvercle pendant la cuisson à la vapeur. Si vous relevez inutilement le couvercle, la vapeur s’échappe ce qui prolonge le temps de cuisson.
•
Prenez soin qu’il y ait toujours de l’eau dans la cuve pendant la cuisson à la vapeur.
•
S’il n’y a plus d’eau dans la cuve pendant la cuisson à la vapeur, l’appareil interrompt automatiquement la cuisson et passe en mode « Keep Warm ».
•
Si nécessaire, rajoutez du liquide chaud pendant la cuisson à la vapeur.
•
Si les aliments ne sont pas suffisamment cuits, ajoutez un peu d’eau ou de bouillon dans la cuve et redémarrez la programmation « Steam ».
•
Le mode « Keep Warm » est également activé pendant 10 heures après une cuisson à la vapeur. Nous vous conseillons toutefois de consommer les aliments cuits
à la vapeur sans attente pour qu’ils gardent la plupart de leurs valeurs nutritionnelles et vitamines.
Avertissement :
•
Relevez le couvercle toujours avec la plus grande précaution pour ne pas vous
brûler avec la vapeur qui s’en échappe.
45
SOLIS Rice Cooker franz._2014 16.03.14 21:25 Seite 46
C U I S S O N S I M U LTA N E E D U R I Z E T A L A VA P E U R
•
Pour économiser de l’énergie vous pouvez cuire le riz tout en cuisant les légumes, volailles, viandes ou fruits de mer à la vapeur.
•
Procédez comme indiqué dans le chapitre « Cuisson du riz avec la programmation « White Rice » ou « Brown Rice », page 37.
•
Placez parallèlement le panier vapeur avec les aliments devant être cuits à la vapeur dans la cuve.
•
Fermez le couvercle et activez la programmation « White Rice » ou « Brown
Rice ». Notez l’heure à laquelle vous avez mis le programme en marche. Si vous
avez sélectionné le programme « White Rice », la cuisson à la vapeur se met relativement rapidement en place, dès que l’eau bout. Si vous avez sélectionné le
programme « Brown Rice », cela prend un peu plus de temps car le riz complet
traverse d’abord une phase de trempage.
•
Contrôlez le temps écoulé et vérifiez avant même la fin de la cuisson du riz si les
aliments devant être préparés à la vapeur sont cuits. Référez-vous au tableau du
temps de cuisson à la vapeur page 47 ou aux autres tableaux de cuisson de ce
mode d’emploi qui peuvent vous servir de référence pour le temps de cuisson.
•
Une fois les aliments sont cuits, retirez le panier vapeur de la cuve avec précaution. Attention : Le panier vapeur est très chaud. Il est absolument nécessaire
de mettre des gants de cuisine ! Refermez ensuite le couvercle sans attente afin
que le riz puisse finir de cuire sans que trop de vapeur ne s’échappe.
•
Dès que l’appareil passe sur le mode « Keep Warm », vous pouvez, si vous le souhaitez, replacer le panier vapeur dans la cuve afin de réchauffer les aliments cuits
à la vapeur.
C O N S E I L S P O U R L A C U I S S O N D E S L E G U M E S A L A VA P E U R
•
Des morceaux plus petits cuisent plus vite que des gros. Coupez tous les légumes en morceaux de taille égale afin qu’ils cuisent uniformément.
•
Vous pouvez cuire à la vapeur aussi bien des légumes frais que des légumes congelés. Si vous utilisez des légumes congelés, ne les décongelez pas avant de les
cuire.
•
La durée de cuisson dépend de la taille et de la consistance des légumes ainsi
que de vos préférences culinaires. Si vous préférez des légumes tendres, prolongez la durée de cuisson.
•
Le niveau d’eau ou de bouillon dans la cuve doit être tel qu’il ne pénètre pas dans
le panier vapeur. Sinon le résultat de la cuisson à la vapeur en sera entravé.
•
Si le temps de cuisson indiqué est supérieur à 30 minutes, vérifiez au bout de
30 minutes le niveau d’eau, ajoutez si nécessaire de l’eau (ou du bouillon) et remettez la fonction « Steam » en marche en programmant le temps restant.
46
SOLIS Rice Cooker franz._2014 16.03.14 21:25 Seite 47
TABLEAU DU TEMPS DE CUISSON A LA VAPEUR DES LEGUMES
temps de
cuisson (min.)
légumes
idées et conseils
quantité
artichaut
Retirer les feuilles extérieures dures et le tronc.
2, taille moyenne
30 - 35
haricot
Couper les extrémités, cuire en entier.
250g
13 - 15
brocoli
Couper en petites fleurs.
250g
8 - 10
petit-pois
Eplucher s’ils sont frais.
Congelé.
250g
250g
8 - 10
4-5
carotte
Couper en lanières ou en rondelles
3 taille moyenne
14 - 16
pomme de terre
Cuire en entier.
4 (150 – 180g)
35 - 40
pomme de
terre nouvelle
Cuire en entier.
6 (125g chacune)
25 - 30
pois chiche
Faire tremper pendant 12 heures.
1 tasse de pois
chiche secs
40 - 45
chou
Couper en gros morceaux.
500g
10 - 12
chou-rave
Eplucher et couper en rondelles (en morceaux
d’environ 50 g).
350g
15 - 17
courge
Couper en morceaux.
300g
20 - 25
potimarron
Couper la pointe et couper en morceaux.
350g
8
maïs
Cuire les épis de maïs en entier.
2 petits épis
20 - 22
poivron
Couper en lanières, retirer le pédoncule.
3 taille moyenne
14 - 16
champignon
Cuire en entier sans laver.
300g
8 - 10
betterave rouge
Couper l’extrémité. Ne pas éplucher.
300g
12 - 13
chou
de Bruxelles
Découper l’extrémité de la tige en forme de
croix.
375g
17 - 19
asperge
Eplucher, retirer l’extrémité inférieure, cuire en
entier.
2 bottes
12 - 14
épinard
Laver les feuilles et les tiges.
1/2 botte
5
céleri-branche
Couper en rondelles.
3 branches
5-6
patate douce
Couper en morceaux.
300g
20 - 25
courgette
Eplucher.
350g
6
mange-tout
Couper en morceaux.
250g
4-5
oignon
Eplucher et cuire en entier.
6 taille moyenne
20 - 25
47
SOLIS Rice Cooker franz._2014 16.03.14 21:25 Seite 48
C O N S E I L S P O U R L A C U I S S O N A L A VA P E U R D U P O I S S O N
ET DES FRUITS DE MER
•
Avant la cuisson, assaisonnez le poisson avec des herbes, des oignons, du citron,
etc.
•
Placez les filets de poisson les uns à côté des autres et non pas les uns sur les autres.
•
Le poisson est cuit lorsqu’il est facilement possible de le couper avec une fourchette et qu’il a une couleur opaque laiteuse.
temps de
cuisson (min.)
désignation
idées et conseils
filet de poisson,
poisson en entier
poisson en morceaux
Cuire jusqu’à obtention d’un poisson de couleur opaque
facile à couper. Les morceaux de poisson sont cuits lorsque
la chair se détache facilement de l’arrête centrale.
8 - 10
15 - 20
12 - 14
homard et queue de
homard
Retirer la partie inférieure de la carapace
18 - 20
coquillages dans leur
coquille
Faire cuire à la vapeur jusqu’à ce que les coquilles
s’ouvrent
12 - 14
praires
Faire cuire à la vapeur jusqu’à ce que les coquilles
s’ouvrent
8 - 10
crevettes avec leur
carapace
Faire cuire à la vapeur jusqu’à ce que les crevettes soient
roses
8 - 10
coquilles Saint
Jacques
Faire cuire à la vapeur jusqu’à obtention d’une couleur
opaque
4-6
48
SOLIS Rice Cooker franz._2014 16.03.14 21:25 Seite 49
C O N S E I L S P O U R L A C U I S S O N A L A VA P E U R D E V O L A I L L E
•
Faites cuire des morceaux de taille égale.
•
Placez les morceaux de volaille les uns à côté des autres et non pas les uns sur
les autres.
•
Retirez la graisse et la peau.
•
Vérifiez la cuisson de la volaille en piquant dans le morceau le plus épais. Si le
jus de la viande est clair, la volaille est cuite.
temps de
cuisson (min.)
désignation
idées et conseils
suprême de volaille
Faire cuire à la vapeur avec le côté peau en haut
20 - 25
cuisse de poulet
Placer les parties des cuisses les plus épaisses le long de la
paroi du panier
30 - 35
filet dans la cuisse
Placer les parties des filets les plus épaisses le long de la
paroi du panier
18 - 20
C O N S E I L S P O U R L A C U I S S O N A L A VA P E U R D E K N Ö D E L E T
QUENELLES DE POMME DE TERRE
•
Votre Solis Rice Cooker Duo Program est idéal pour cuire à la vapeur les quenelles
et knödel fraîches ou congelées. Nous vous conseillons de disposer du papier sulfurisé ou des feuilles de chou dans le fond du panier vapeur avant d’y déposer
les quenelles afin qu’elles ne collent pas au panier.
•
Le temps de cuisson des quenelles congelées est d’environ 8 – 10 minutes, celui des quenelles fraîches d’environ 5 – 6 minutes.
49
SOLIS Rice Cooker franz._2014 16.03.14 21:25 Seite 50
▲ N E T T O YA G E E T E N T R E T I E N
•
Eteignez l’appareil en appuyant deux fois sur la touche MARCHE/ARRET
débranchez-le. Retirez le cordon électrique de l’appareil.
et
•
Attendez le refroidissement complet de tous les éléments avant de retirer la cuve.
Nettoyer la cuve, le panier vapeur et le récupérateur de condensation avec de
l’eau de vaisselle chaude. Rincez le tout et séchez soigneusement. Pour des raisons d’hygiène il est nécessaire de laver la cuve et le panier vapeur après chaque utilisation.
•
Solis vous recommande de ne mettre aucun des éléments du Rice Cooker Duo
Program, à l’exception du panier vapeur, dans le lave-vaisselle, car les détergents
pour lave-vaisselle sont trop agressifs et la température élevée de l’eau risque
d’abîmer ou de déformer le revêtement de la cuve et des autres accessoires.
•
Nettoyez l’intérieur du couvercle avec précaution en utilisant un chiffon humide
et séchez-le bien ensuite. Procédez de même pour le rebord en caoutchouc du
couvercle. Faites bien sécher le couvercle et le rebord en caoutchouc avant de
refermer l’appareil.
•
N’utilisez jamais de détergents agressifs ou d’éponges en métal pour nettoyer
les différents accessoires et l’appareil car cela pourrait endommager le revêtement.
•
Essuyez l’appareil lui-même seulement avec un chiffon humide. Séchez-le bien
ensuite. N’utilisez pas de détergents alcalins. Utilisez seulement un chiffon et un
produit d’entretien doux.
•
Après le nettoyage, replacez le récupérateur de condensation sur l’appareil.
Remarque :
•
Si du riz a collé dans le fond de la cuve, remplissez-la avec de l’eau chaude, ajoutez quelques gouttes de produit vaisselle et laissez agir pendant 10 minutes. Vous
pourrez ensuite nettoyer la cuve facilement.
Avertissement :
•
Retirez l’adaptateur secteur de la prise de l’appareil avant de nettoyer le Rice Cooker Duo Program. Séchez toujours très bien la prise de l’appareil avant de le remettre en marche.
•
Afin de ne pas endommager le revêtement de l’appareil et des accessoires, n’utilisez jamais de produits d’entretien alcalins. Utilisez seulement un chiffon humide
et du produit d’entretien doux.
50
SOLIS Rice Cooker franz._2014 16.03.14 21:25 Seite 51
•
N’utilisez jamais de produits chimiques, d’éponges en métal, de laine d’acier ou
de crème à récurer pour nettoyer l’appareil et les accessoires car cela risquerait
d’endommager le revêtement.
•
Ne plongez jamais l’appareil ou le cordon électrique dans de l’eau ou autre
liquide. Risque d’électrocution !
▲ RANGEMENT
1. Vérifiez que l’appareil est éteint et débranché.
2. Vérifiez que le châssis et tous les éléments de l’appareil sont absolument refroidis, propres et complètement secs.
3. Placez les accessoires dans l’appareil et refermez le couvercle.
4. Rangez l’appareil en position debout dans un endroit sec et obscur, de préférence
dans l ‘emballage d’origine. Ne disposez rien sur l’appareil.
▲ CARACTERISTIQUES TECHNIQUES
modèle
JH-926SBD, type 817
description du produit
cuiseur à riz et vapeur
voltage / fréquence
220-240V ~ / 50Hz
puissance
640-760 watt
dimensions
env. 24 x 23 cm (hauteur x Ø)
poids
env. 2,2 kg
51
SOLIS Rice Cooker franz._2014 16.03.14 21:25 Seite 52
▲ P R O B L E M E S E T D E PA N N A G E
POSSIBLE
PROBLEME
DEPANNAGE
Le Rice Cooker Duo Program s’éteint soudainement.
• Vérifiez que l’adaptateur secteur est correctement
branché dans la prise de l’appareil et la fiche dans la
prise secteur.
• L’appareil a été surchargé ou a surchauffé. Débranchez l’appareil et laissez-le refroidir pendant quelques minutes. Rebranchez-le ensuite, mettez-le en
marche en appuyant sur la touche
et activez à
nouveau la cuisson désirée.
Après la cuisson, le riz
est trop dur/sec.*
• Si le riz est trop sec ou dur après la cuisson, vous
pouvez le rendre plus tendre en rajoutant de l’eau et
en prolongeant le temps de cuisson. Selon la cuisson
supplémentaire requise, ajoutez ½ à 1 verre gradué
d’eau, remuez bien le tout. Refermez le couvercle et
réactivez la programmation « White Rice » ou
« Brown Rice ».
Lorsque le cuiseur à riz passe sur le mode de maintien au chaud, soulevez le couvercle et mélangez le
riz. Dans certains cas il suffit de laisser tout simplement le riz pendant 10 – 15 minutes sur le mode de
maintien au chaud.
Après la cuisson, le riz est
trop humide.*
• Si le riz est trop humide après la cuisson, mélangezle avec la cuiller fournie. Cela permet de mieux répartir le riz le plus humide qui se trouve au fond de
la cuve afin que l’humidité s’échappe. Refermez
ensuite le couvercle et laissez au besoin le riz pendant 10 – 30 minutes sur le mode de maintien au
chaud. Soulevez de temps en temps le couvercle
pour mélanger le riz et permettre à l’humidité de
s’échapper.
* Etant donné que la composition et la consistance du riz varient selon le riz utilisé, les résultats peuvent être différents
d’un riz à l’autre. Ces conseils vous aident pour obtenir le meilleur riz selon vos goûts.
52
SOLIS Rice Cooker franz._2014 16.03.14 21:25 Seite 53
▲ E L I M I N AT I O N
EU 2002/96/EC
Indications sur l’élimination réglementaire du produit conformément à la directive 2002/96/EC
Après usage, l’appareil ne doit pas être éliminé avec les ordures ménagères normales. Vous devez l’apporter dans un centre local de collecte des déchets ou chez un
revendeur qui l’éliminera de façon appropriée. Contrairement à une élimination inappropriée, l’élimination séparée des appareils électriques et électroniques permet d’éviter les éventuelles conséquences négatives sur l’environnement et la santé et autorise la réutilisation et le recyclage des composants, ainsi que des économies d’énergie
et de matières premières significatives. Afin d’attirer clairement l’attention sur l’obligation d’élimination réglementaire de l’appareil, celui-ci porte un symbole représentant un conteneur à ordures barré.
Solis of Switzerland SA se réserve le droit d’apporter à tout moment des modifications techniques et de présentation, ainsi que de procéder à des modifications visant
à l’amélioration du produit.
S
SOLIS
OLIS H
HELPLINE:
ELPLINE:
044
0
44 8
874
74 6
64
41
14
4
((Uniquement
Uniquement pour
pour clientes
clientes et
et clients
clients en
en Suisse)
Suisse)
C
et aarticle
r ticle se
se distingue
distingue par
un disfonctionnement
disfonc tionnement devait
devait tout
tout
Cet
par sa
sa longévité
longévité et
et sa
sa fiabilité.
fiabilité. Si
Si un
d
em
ême ssurvenir,
ur venir, appelez-nous
appelez-nous tout
tout ssimplement.
implement. IlIl arrive
arrive souvent
souvent qu’une
qu’une panne
panne soit
soit facile
facile à
de
même
rréparer
éparer sans
sans difficulté
difficulté grâce
grâce au
au bon
bon conseil
conseil et
et à la
la bonne
bonnee astuce,
astuce, ssans
ans q
ue l’appareil
l’appareil ne doive
doive
que
être eenvoyé
nvoyé chez
chez un
un réparateur.
réparateur. Nous
Nous vous
vous conseillons
conseillons et
et vous
vous aidons
aidons volontiers.
volontiers.
être
Conservez l’emballage d’origine de cet article afin de pouvoir le transporter
en cas de besoin.
Solis of Switzerland SA
Solis-Haus • CH-8152 Glattbrugg-Zurich • Suisse
Téléphone +41 44 874 64 54 • Téléfax +41 44 874 64 99
[email protected] • www.solis.ch • www.solis.com
53
SOLIS Rice Cooker ital._2014 16.03.14 21:29 Seite 54
SOLIS Rice Cooker ital._2014 16.03.14 21:29 Seite 55
▲ INDICE
56
Descrizione dell’apparecchio
58
Importanti istruzioni di sicurezza
62
Prima della messa in funzione
63
Cottura del riso
66
La funzione "Keep Warm"
66
Tabella di cottura del riso
67
Variazioni di riso
69
Cottura ritardata del riso con la funzione "Delay Timer"
70
Cottura a vapore
73
Tabelle di cottura a vapore
76
Pulizia e manutenzione
77
Deposito
77
Dati tecnici
78
Problemi e come possono essere risolti
79
Smaltimento / Solis Helpline
55
SOLIS Rice Cooker ital._2014 16.03.14 21:29 Seite 56
▲ D E S C R I Z I O N E D E L L’ A P PA R E C C H I O
A
Coperchio con pulsante di sgancio e manico
Per aprire il coperchio premere il pulsante di sgancio e sollevare il coperchio
usando il manico.
B
Scarico del vapore
C
Vaschetta di raccolta della condensa
D
Recipiente di cottura antiaderente rimovibile
Evita che il riso si attacchi durante la cottura.
E
Cestello per cottura a vapore in acciaio inox
Ideale per la cottura al vapore di verdure, pesce, pollame o carne.
F
Spatola in plastica
G
Dosatore
H
Cavo di alimentazione staccabile (non raffigurato)
Per servire comodamente a tavola e per riporre facilmente.
PA N E L L O D I C O N T R O L L O :
I
Funzione "Delay Timer"
per una cottura ritardata del riso.
J
Display con indicazione degli ultimi 12 minuti di cottura del riso bianco,
dei 25 minuti di cottura del riso integrale,
della durata in modalità "Keep Warm",
della regolazione per la cottura ritardata.
K
Tasto ON/OFF
L
Funzione "White Rice"
per la cottura del riso bianco.
M Funzione "Brown Rice"
per la cottura del riso integrale o varietà di riso con tempi di cottura più lunghi.
N
Funzione "Steam"
per la cottura al vapore di verdure, pesce, pollame o carne.
O
Funzione "Keep Warm"
Questa impostazione si attiva automaticamente quando il processo di cottura
è completo. Inoltre, la funzione di mantenimento di calore può essere attivata
separatamente.
Ognuno dei tasti descritti (eccetto il tasto
) dispone di una spia luminosa
che si accende durante il funzionamento.
Esiste, inoltre, la spia luminosa "Cooking", che si accende quando viene
riscaldata l'acqua.
56
SOLIS Rice Cooker ital._2014 18.03.14 08:45 Seite 57
A
B
A
E
D
C
D
I
J
K
D
E
G
F
L
M
N
O
57
SOLIS Rice Cooker ital._2014 16.03.14 21:29 Seite 58
▲ IMPORTANTI ISTRUZIONI DI SICUREZZA
Prima di utilizzare il Solis Rice Cooker Duo Program, leggere attentamente le
istruzioni per l’uso e le indicazioni di sicurezza, in modo da conoscere e saper utilizzare in modo sicuro il dispositivo. Consigliamo di conservare il presente manuale e, in caso di cessione dell’apparecchio ad altre persone, di consegnare anche le istruzioni.
Durante l’uso di apparecchi elettrici è necessario seguire le seguenti norme
di sicurezza:
1. Per evitare una scossa elettrica, l’apparecchio, il cavo di alimentazione e la spina
resp. il connettore non devono venire a contatto con acqua o con altri liquidi.
Acqua potrebbe penetrare nell’apparecchio e danneggiarlo! Se l'apparecchio, il
cavo di alimentazione o la spina resp. il connettore vengono a contatto con liquidi, rimuovere immediatamente con guanti di gomma asciutti la spina dalla
presa di corrente.
2. Prima di collegare l’apparecchio controllare che i dati della tensione di rete indicati corrispondano a quelli della rete elettrica disponibile.
3. Inserire il connettore nella presa dell’apparecchio prima di collegare il cavo di alimentazione in una presa a muro e poi accendere il dispositivo. La presa dell’apparecchio e il connettore di alimentazione devono essere assolutamente asciutti
prima di collegarli. Non toccare mai la spina con mani umide o bagnate.
4. Posizionare il cuociriso/vaporiera solo su un ripiano stabile, asciutto e resistente
al calore. Non mettere in funzione l’apparecchio sotto pensili, mensole o altri materiali sensibili al vapore.
5. Non lasciare pendere il cavo di alimentazione da bordi di tavoli per evitare che
venga tirato. Fare attenzione che non venga a contatto con superfici calde, ad
esempio piastre da cucina o radiatori o con l’apparecchio stesso. Srotolare completamente il cavo di alimentazione prima di inserire la spina nella presa.
6. Tenere l’apparecchio lontano da fiamme, stufe calde o altre fonti di calore. Non
utilizzare mai l’apparecchio su una superficie bagnata o calda. Non esporre il dispositivo a umidità, calore e fiamme aperte. Tenere il dispositivo lontano da parti
o dispositivi mobili.
7. Non tirare o trasportare l’apparecchio per il cavo di alimentazione e non appoggiare nulla sul cavo di alimentazione.
8. Si consiglia di non utilizzare una prolunga con questo dispositivo. Non collocare
direttamente sotto una presa a muro.
9. Staccare sempre la spina quando l’apparecchio è spento, incustodito o deve essere pulito. Per assicurare un‘ulteriore protezione durante l’uso di apparecchi elet-
58
SOLIS Rice Cooker ital._2014 16.03.14 21:29 Seite 59
trici, si consiglia l‘utilizzo di un interruttore di protezione per guasti accidentali
sulla tensione di rete (Fl-interruttore di sicurezza). E’ raccomandabile utilizzare un
interruttore di sicurezza con un valore nominale di impiego di corrente residua
di un massimo di 30 mA. Qualora avesse bisogno di ulteriori informazioni, La invitiamo a rivolgersi ad un elettricista.
10. Non apportare modifiche all’apparecchio, al cavo, al connettore e agli accessori.
11. L'uso improprio può provocare lesioni!
12. Attenzione: La temperatura delle superfici e parti dell’apparecchio durante e
dopo la cottura è molto elevata.
13. Non afferrare mai l’apparecchio caduto in acqua. Staccare sempre la spina
prima di estrarlo dall’acqua. Non riprendere in funzione l’apparecchio se non è
stato prima portato da Solis o a un centro di assistenza autorizzato da Solis per
controllare la sua funzionalità e sicurezza.
14. Non posizionare mai l’apparecchio in modo che possa cadere in acqua (ad
esempio vicino al lavandino).
15. Posizionare l’apparecchio in modo che non sia esposto ai raggi diretti del sole
16. Non inserire spille, aghi o altri oggetti appuntiti nell’apparecchio. Esso potrebbe
venire danneggiato ossia pericolo di scossa elettrica!
17. Non scuotere o trasferire l’apparecchio mentre è in funzione.
18. Utilizzare l’apparecchio soltanto come descritto in queste istruzioni per l’uso. Utilizzare solo gli accessori inclusi, un accessorio sbagliato potrebbe danneggiare
l’apparecchio.
19. L’apparecchio è adatto esclusivamente per uso domestico e non per uso commerciale.
20. L'apparecchio non è progettato per uso esterno. Non usare in veicoli o imbarcazioni.
21. Controllare il cuociriso/vaporiera prima di ogni utilizzo.
22. Per evitare scosse elettriche, non utilizzare mai l'apparecchio se questo presenta
dei disturbi, sia caduto o si sia riscontrata la presenza di danni al cavo o alla spina.
Non eseguire mai riparazioni da soli, ma consegnare l’apparecchio presso Solis,
o a un centro di assistenza tecnica autorizzato da Solis, per permettere un’ispezione e consentire la riparazione meccanica ed elettrica.
23. Il cuociriso/vaporiera non è destinato a essere usato da persone (bambini compresi) le cui capacità fisiche, sensoriali o mentali siano ridotte, a meno che esse
abbiano potuto beneficiare, attraverso l’intermediazione di una persona responsabile della loro sicurezza, di istruzioni riguardanti l’uso sicuro dell’apparecchio.
59
SOLIS Rice Cooker ital._2014 16.03.14 21:29 Seite 60
24. I bambini devono essere sorvegliati per assicurarsi che non giochino con l’apparecchio.
25. Assicurarsi che il Solis Rice Cooker Duo Program è montato correttamente
prima di utilizzarlo. Si prega di fare riferimento a questo manuale riguardo alle
modalità di montaggio.
26. Non coprire i fori di ventilazione mentre il dispositivo è in uso.
27. Prima di spostare o smontare l'apparecchio, spegnere prima sempre il dispositivo con il tasto ON/OFF . Staccare poi la spina di alimentazione dalla presa a
muro e attendere che l'apparecchio si sia raffreddato. La spina di rete deve sempre essere scollegata quando l'apparecchio non è in uso.
28. Controllare sempre che l'apparecchio, la piastra e le superfici esterne del recipiente di cottura siano completamente puliti e asciutti prima di mettere in funzione l'apparecchio.
29. Mantenere sempre pulito l’apparecchio. Osservare, a riguardo, le istruzioni nella
sezione "Pulizia e manutenzione" di questo manuale. A parte il cestello per la
cottura a vapore, non devono essere collocate in lavastoviglie le parti rimovibili.
30. Non collocare mai nell’apparecchio sostanze esplosive o infiammabili tipo vaschette aerosol (deodoranti, spray per capelli ecc.).
31. Posizionare il cuociriso sempre in modo che lo scarico del vapore non mostri nella
vostra direzione. Prestare sempre attenzione di non scottarsi con il vapore caldo
quando si solleva il coperchio.
32. Utilizzare con quest’apparecchio solo il recipiente di cottura estraibile in dotazione
ed eventualmente in aggiunta anche il cestello per la cottura a vapore. Non inserire mai un’altra pentola o un altro recipiente nel cuociriso. Il recipiente di cottura non deve essere utilizzato per altri scopi di cottura o essere collocato direttamente su una stufa/forno a gas.
33. Non utilizzare il recipiente di cottura Rice Cooker Duo Program se è danneggiato
o ammaccato. Un recipiente sostitutivo può essere ottenuto presso rivenditori
specializzati o direttamente da Solis.
34. Non appoggiare nulla sul coperchio mentre l’apparecchio è in uso o è riposto.
Non coprire il dispositivo durante la fase di cottura o mentre si trova in modalità di mantenimento del calore
35. Per la pulizia dell’apparecchio e del recipiente di cottura non utilizzare detergenti
chimici e alcalini o spugne aggressive e abrasive in quanto potrebbero danneggiare il rivestimento del recipiente di cottura o la superficie dell’apparecchio. Usare
solo un panno morbido e un detergente delicato per la pulizia.
36. Non inserire la spina nella presa di corrente e non accendere l’apparecchio se non
è inserito il recipiente di cottura.
60
SOLIS Rice Cooker ital._2014 16.03.14 21:29 Seite 61
37. Non inserire alimenti o liquidi direttamente nel cuociriso/vaporiera. Solo il recipiente di cottura estraibile Rice Cooker Duo Program e il cestello per la cottura
a vapore devono venire a contatto con alimenti e liquidi. Il cestello per la cottura
a vapore deve essere usato solo in combinazione al recipiente di cottura.
38. Non utilizzare l'apparecchio se non ci sono alimenti o liquidi nel recipiente di cottura estraibile.
39. Quando si desidera aprire il coperchio o rimuovere il recipiente di cottura di cottura, non toccare le superfici calde; usare sempre guanti da cucina o presine.
Aprire sempre il coperchio con attenzione e, per non scottarsi, fare in modo che
lo scarico del vapore non mostri nella vostra direzione.
40. Fare attenzione che la condensa non goccioli nell’apparecchio ma solo nel recipiente di cottura.
41. Fare estrema attenzione se nell’apparecchio si trovano alimenti o liquidi caldi. Non
movimentare il dispositivo quando è in funzione. Non toccare mai le superfici
calde a mani nude.
42. Durante la cottura, tenere il coperchio chiuso. Anche quando l’apparecchio viene
riposto tenere chiuso il coperchio. Non posare o stendere nulla sull’apparecchio.
43. Per evitare che il rivestimento antiaderente venga graffiato, usare solo utensili da
cucina in legno o in plastica resistente al calore.
44. Assicurarsi che il recipiente di cottura sia posizionato correttamente nell’apparecchio prima di iniziare il processo di cottura. La vaschetta di raccolta condensa
deve essere montata correttamente, sulla parte esterna del dispositivo.
45. In modalità di mantenimento del calore, il riso non deve rimanere nel recipiente
di cottura per più di 10 ore.
46. Prima della pulizia, spegnere sempre l’apparecchio con il tasto ON/OFF
(premere 2 volte), staccare la spina dalla presa di corrente e il connettore dalla presa
dell’apparecchio. Rimuovere il cavo. Lasciare poi raffreddare le parti dell’apparecchio. La presa dell’apparecchio deve essere completamente asciutta prima di
poter riprendere in funzione l’apparecchio.
47. Tenere l’apparecchio a una distanza minima di 20 cm da pareti, tende o altri materiali e oggetti sensibili al calore e al vapore, assicurarsi che l'aria possa circolare liberamente intorno al dispositivo.
Importante: Srotolare completamente il cavo di alimentazione prima di inserire
la spina nella presa. Se si desidera riporre il cavo di alimentazione nel recipiente
di cottura, questo deve essere completamente raffreddato.
61
SOLIS Rice Cooker ital._2014 16.03.14 21:29 Seite 62
▲ PRIMA DELLA MESSA IN FUNZIONE
•
Prima si usare il Solis Rice Cooker Duo Program per la prima volta, rimuovere tutti
gli adesivi promozionali. Pulire il recipiente di cottura, il cestello per la cottura a
vapore in acciaio inox e la spatola di plastica con un detergente delicato e acqua
tiepida e risciacquare tutto accuratamente. Asciugare tutte le parti.
- Pulire l’interno del coperchio con un panno umido.
- Assicurarsi che la vaschetta di raccolta condensa sia montata correttamente.
Per rimuovere: Alzare la vaschetta e tirarla dal supporto in alto.
Per inserire: Spingere le linguette a sinistra e a destra nel supporto, quindi premere la parte inferiore del dispositivo.
62
SOLIS Rice Cooker ital._2014 16.03.14 21:29 Seite 63
▲ CUOCERE IL RISO CON LA FUNZIONE
"WHITE RICE" O "BROWN RICE"
1. Misurare con il dosatore di riso in dotazione la quantità desiderata di riso (vedi tabella di cottura del riso).
Il dosatore deve essere sempre pieno, non colmo (vedi
figura).
•
Nota: Il dosatore di riso Solis Rice Cooker Duo Program
non corrisponde a un misurino standard. Un dosatore
di riso Solis Rice Cooker Duo Program equivalente a
160g di riso crudo. Se si dovesse perdere il dosatore, è possibile utilizzare un misurino diverso, ma si devono considerare sempre le dosi sopraindicate e non superare mai il massimo di 6 dosatori di riso.
2. Versare il riso dosato in un recipiente separato e lavarlo con acqua fredda, al fine
di rimuovere l’amido. Una volta che l'acqua è pulita, il riso è pronto per essere
cotto. Scolare bene.
3. Versare il riso lavato nel recipiente di cottura.
Il riso va distribuito uniformemente sul fondo
del recipiente di cottura e non essere ammucchiato su un lato.
✓ ✗
4. Aggiungere l'acqua usando il dosatore in dotazione. Se si versano due dosatori di riso nel recipiente di cottura, aggiungere
poi acqua sufficiente fino a quando la tacca "2" nel recipiente di cottura viene raggiunta. Quando si versano 3 dosatori, il livello dell'acqua dovrebbe essere all’altezza della tacca
fra 2 e 4. Quando si versano 4 dosatori, il livello dell'acqua dovrebbe essere all’altezza della tacca "4", ecc. Si può cucinare un massimo di 6 dosatori di riso. La tabella seguente fornisce informazioni sulla quantità finale di riso
da aspettarsi e il tempo di cottura.
TA B E L L A D I C O T T U R A D E L R I S O
Riso crudo
(Dosatore)*
Acqua fredda
fino al segno
Riso cotto,
ca. (Dosatore)*
Tempo di cottura
del riso bianco
ca. (in minuti)
Tempo di cottura
del riso integrale
ca. (in minuti)
2
2
4
30 - 35
60 - 65
3
3
6
32 - 37
65 - 70
4
4
8
35 - 42
70 - 75
5
5
10
40 - 45
75 - 80
6
6
12
42 - 47
80 - 85
* misurato con il dosatore Solis Rice Cooker Duo Program
63
SOLIS Rice Cooker ital._2014 16.03.14 21:29 Seite 64
5. Controllare che il recipiente di cottura sia pulito sul fondo e sui lati prima di metterlo nel dispositivo – in questo modo viene garantito un buon contatto con il
piano di cottura interno.
ATTENZIONE:
1. Prima di avviare il processo di cottura, si dovrebbe sempre pulire il fondo del
recipiente di cottura e la superficie della piastra di cottura. Assicurarsi che
nessun chicco di riso sia nel dispositivo o sulla piastra.
2. Per assicurarsi che l'inserto di cottura è posizionato bene sulla piastra di
cottura, girarlo nel dispositivo leggermente verso sinistra e destra.
3. Il recipiente di cottura deve essere posizionata su tutta l'area dell’apparecchio,
altrimenti l'apparecchio non si accende o potrebbe essere danneggiato.
Per ridurre il rischio di scosse elettriche, è necessario cucinare solo con il recipiente di
cottura estraibile. Non immergere mai l'apparecchio in acqua.
6. Chiudere il coperchio, in modo che questo
ingrani.
7. Inserire il connettore nella presa dell’apparecchio. Poi collegare il cavo di alimentazione a una presa di alimentazione appropriata.
8. Premere il pulsante ON/OFF
per accendere l'apparecchio. Tutte le spie luminose si accendono brevemente in successione, il display visualizza trattini rossi.
Premere quindi il pulsante "White Rice" o "Brown Rice" (a seconda del tipo di
riso che si sta cucinando) per attivare la funzione. La spia luminosa "White Rice"
o "Brown Rice" si illumina di rosso. Una volta che il processo di cottura si avvia,
s’illumina di rosso anche la spia luminosa “Cooking” e nel display i trattini rossi
lampeggiano alternativamente in un quadrato.
9. Quando la cottura del riso si avvicina alla fine, il tempo di cottura rimanente viene
visualizzato sul display e si avvia un conto alla rovescia: degli ultimi 12 minuti per
il riso bianco e degli gli ultimi 25 minuti per il riso integrale.
10. Una volta che il processo di cottura è terminato, risuona un segnale acustico e
il Solis Rice Cooker Duo Program passerà automaticamente in modalità di mantenimento del calore, la spia luminosa "Keep Warm" si illumina in rosso. Sul display appare il numero di ore da quando il dispositivo è in modalità "Keep
Warm", iniziando con il numero "0".
11. Aprire cautamente il coperchio, e girare il riso con la spatola in dotazione. Richiudere il coperchio e lasciare il riso a riposo per altri 10 – 15 minuti nella fun64
SOLIS Rice Cooker ital._2014 16.03.14 21:29 Seite 65
zione di mantenimento di calore, prima di servirlo. In questo modo il riso potrà
assorbire la restante umidità e risulterà più soffice.
12. Quando la funzione "White Rice" o "Brown Rice" è terminata, l’apparecchio
passa automaticamente nella modalità "Keep Warm" per una durata massima
di 10 ore.
13. Se non si necessita più di riso caldo, premere 2 volte il tasto ON/OFF
per spegnere l’apparecchio e staccare il cavo di alimentazione. Lasciare raffreddare l’apparecchio prima di pulirlo.
Note:
•
Aprire il coperchio solo quando il riso è pronto (cioè quando risuona il segnale
acustico).
•
Per terminare la funzione di cottura del riso o di mantenimento del calore, basta
premere 2 volte il tasto ON/OFF
.
•
Come mai il tempo di cottura del riso integrale ("Brown Rice") è più lungo? A
causa della pellicina supplementare intorno ai chicchi del riso integrale, questo
necessita di una cottura più lunga. L’apparecchio tiene conto di questo aspetto
e durante la funzione "Brown Rice" distribuisce il calore in modo da garantire
una cottura ottimale. Questo significa anche che il cuociriso non si riscalda subito, ma inizialmente lascia i chicchi di riso a mollo a basse temperature, per permettergli di sviluppare il loro sapore pieno.
Importante:
•
Versare sempre acqua nel recipiente di cottura prima di premere il tasto ON/OFF
.
•
Durante il funzionamento non premere i tasti funzione per non disturbare il processo di cottura.
•
Per non graffiare la superfice antiaderente del recipiente di cottura, usare sempre utensili in legno o in plastica resistente al calore.
•
Controllare sempre che il recipiente di cottura sia posizionato correttamente
nell’apparecchio prima di iniziare la cottura.
Attenzione:
•
Prima di estrarre il recipiente di cottura dall’apparecchio, assicurarsi che questo
sia spento e che il cavo di alimentazione sia staccato.
•
Usare sempre guanti da forno o presine per aprire il coperchio e per estrarre il
recipiente di cottura dall’apparecchio.
•
Posizionare lo scarico del vapore del coperchio in modo che questo non mostri
nella vostra direzione per evitare di scottarsi con il vapore fuoriuscente.
65
SOLIS Rice Cooker ital._2014 16.03.14 21:29 Seite 66
•
Aprire sempre il coperchio con attenzione e, per non scottarsi, fare in modo che
lo scarico del vapore non mostri nella vostra direzione.
•
Per proteggersi da scosse elettriche, attaccare l’apparecchio solo a prese con
messa a terra.
•
Usare l’apparecchio solo insieme al recipiente di cottura estraibile in dotazione.
•
Non usare il recipiente di cottura se danneggiato o ammaccato. È possibile ottenere un nuovo recipiente di cottura Rice Cooker Duo Program da Solis o presso
un centro autorizzato Solis.
▲ LA FUNZIONE "KEEP WARM"
•
Appena le funzione "White Rice", "Brown Rice" o "Steam" sono terminati, il
Solis Rice Cooker Duo Program passa automaticamente nella modalità "Keep
Warm" (Mantenimento del calore). La funzione “Keep Warm” rimane attiva fino
a 10 ore. Dopo 10 ore l’apparecchio si spegne. Sul display viene visualizzato il
numero di ore che l’apparecchio si trova nella modalità di mantenimento del calore. Il primo numero visualizzato è „0“.
•
È possibile usare la funzione "Keep Warm" indipendentemente dalle altre funzioni.
•
Per terminare la modalità "Keep Warm", premere il tasto ON/OFF
.
▲ TA B E L L A D I C O T T U R A D E L R I S O
•
Per le seguenti indicazioni è stato utilizzato il dosatore Rice Cooker Duo Program.
•
Nota: Il dosatore di riso Solis Rice Cooker Duo Program non corrisponde a un
misurino standard. Un dosatore di riso Rice Cooker Duo Program equivalente a
160g di riso crudo. Se si dovesse perdere il dosatore, è possibile utilizzare un
misurino diverso, ma si devono considerare sempre le dosi sopraindicate e non
superare mai il massimo di 6 dosatori di riso.
TA B E L L A D I C O T T U R A R I S O
Rapporto riso: acqua con riso bianco / riso integrale
Riso crudo
(Dosatore)*
Acqua fredda
fino al segno
Riso cotto,
ca. (Dosatore)*
Tempo di cottura
del riso bianco
ca. (in minuti)
Tempo di cottura
del riso integrale
ca. (in minuti)
2
2
4
30 - 35
60 - 65
3
3
6
32 - 37
65 - 70
4
4
8
35 - 42
70 - 75
5
5
10
40 - 45
75 - 80
6
6
12
42 - 47
80 - 85
* misurato con il dosatore Solis Rice Cooker Duo Program
66
SOLIS Rice Cooker ital._2014 16.03.14 21:29 Seite 67
▲ VA R I A Z I O N I D I R I S O
•
È possibile usare vari tipi di riso e cuocerlo in modi diversi. Qua le vogliamo fare
una piccola panoramica:
RISO CONDITO
•
Preparare il riso nel Rice Cooker Duo Program come descritto; utilizzare al posto
dell’acqua, il brodo di pollo, di carne, vegetale o di pesce.
RISO DOLCE
•
Preparare il riso nel Rice Cooker Duo Program come descritto; sostituire metà
dell’acqua con succo di mela, succo d’arancia o succo di ananas. Attenzione:
Non consigliamo di preparare nel Rice Cooker Duo Program il riso al latte, in
quanto potrebbe bruciarsi sul fondo del recipiente di cottura.
RISO ALLO ZAFFERANO
•
Aggiungere all’acqua 1/4 di cucchiaino di zafferano in polvere o 2 stimmi di zafferano per 2 dosatori di riso. Prendete le indicazioni per il riso bianco dalla tabella. Mescolare bene il riso.
RISO ARBORIO O CARNAROLI PER RISOTTO
•
Riso arborio e carnaroli provengono dall’Italia ed è un riso con chicchi brillanti
arrotondati il quale viene utilizzato per risotti. Per il riso per risotti, prendere le
indicazioni del riso integrale dalla tabella.
RISO JASMIN
•
Il riso jasmin è un riso a grana lunga e fragrante. Si prega di utilizzare la tabella
per riso bianco.
R I S O B A S M AT I
•
Il riso basmati è un riso a grana lunga e aromatico. Si prega di utilizzare la tabella per riso bianco.
R I S O S E LVAT I C O
•
Non è consigliabile cucinare il riso selvatico da solo nel Rice Cooker Duo Program,
in quanto richiede una grande quantità di acqua. Tuttavia, può essere miscelato
con riso bianco o integrale.
67
SOLIS Rice Cooker ital._2014 16.03.14 21:29 Seite 68
QUINOA
•
La quinoa è una antica varietà di riso Sudamericana, ricco di proteine, con una
consistenza ariosa, cremosa e granulosa. Utilizzare la tabella per il riso integrale.
RISO PER SUSHI
•
Riso sushi è un riso a grana corta che viene utilizzato nella cucina giapponese.
Utilizzare la tabella per il riso integrale.
Suggerimento:
•
68
Per avere un riso particolarmente soffice, aggiungere un po’ d'acqua nel recipiente di cottura. Se invece si vuole un riso particolarmente solido, si rinuncia a
una parte dell'acqua.
SOLIS Rice Cooker ital._2014 16.03.14 21:29 Seite 69
▲ C O T T U R A R I TA R D AT E D E L R I S O C O N
L A F U N Z I O N E " D E L AY T I M E R "
•
Grazie alla funzione "Delay Timer" è possibile inserire un numero di ore dopo
le quali il riso dovrebbe essere cucinato. Il vostro cuociriso si accenderà automaticamente in modo che il riso sarà pronto al momento desiderato. Si può
quindi aggiungere il riso e l'acqua nel recipiente di cottura al mattino – e
quando si arriva a casa la sera, un delizioso riso è pronto.
Si prega di procedere come segue:
•
Lavare il riso e inserirlo insieme alla giusta quantità di acqua nel recipiente di cottura. Procedere come descritto a pagina 63/64 dal punto 1 al 7.
•
Accendere l'apparecchio utilizzando il pulsante ON/OFF
•
Premere ora il pulsante "Delay Timer", il numero "1" appare sul display per un
completamento della cottura in 1 ora. Continuando a premere il tasto, il numero
aumenta sempre di 1. È possibile scegliere un numero di ore da 1 a 15 per la funzione "White Rice", e da 2 a 15 ore se in seguito si seleziona la funzione "Brown
Rice".
•
Quando il giusto numero di ore s’illumina sul display, premere il tasto "White
Rice" o "Brown Rice", a seconda del tipo di riso che si vuole cuocere.
•
Il display visualizza il conto alla rovescia delle ore. Una volta che è arrivato il momento per iniziare la cottura, l’apparecchio passa in modalità di cottura e la spia
luminosa della funzione "Cooking" si illumina, il display visualizza trattini alternanti.
•
Come per il normale processo di cottura, per il riso bianco vengono contati alla
rovescia nel display gli ultimi 12 minuti, e per il riso integrale gli ultimi 25 minuti.
•
Una volta che il processo di cottura del riso è completo, risuona un segnale acustico e l'apparecchio passa automaticamente per 10 ore nella modalità di mantenimento del calore "Keep Warm". Sul display viene visualizzato il numero di
ore che l’apparecchio si trova nella modalità di mantenimento del calore. Il primo
numero visualizzato è "0".
•
Prima di servire il riso, si dovrebbe mescolare ancora una volta con la spatola in
dotazione, in modo da distribuire l’umidità residua.
•
Una volta che non si ha più bisogno di riso caldo, premere due volte il tasto
ON/OFF
per spegnere l'apparecchio e scollegare il cavo di alimentazione dalla
presa di corrente.
•
Lasciate raffreddare l'apparecchio prima di pulirlo.
.
69
SOLIS Rice Cooker ital._2014 16.03.14 21:30 Seite 70
▲ C O T T U R A A VA P O R E C O N
LA FUNZIONE "STEAM"
•
Gli alimenti che vengono cotti al vapore, mantengono la maggior parte delle sostanze nutritive e vitamine e sono quindi ideali per una dieta salutista. Per cuocere a vapore è sufficiente collocare il cibo nel cestello per la cottura a vapore in
acciaio inox, versare nel recipiente di cottura del brodo o dell’acqua e chiudere
il coperchio. Lasciare il coperchio chiuso per l'intero processo di cottura. Se si apre
il coperchio inutilmente, il vapore fuoriesce e il tempo di cottura viene prolungato.
Si prega di procedere come segue:
1. Versate 3 dosatori Rice Cooker Duo Program di acqua o brodo nel recipiente di
cottura. Figura 1
2. Mettere il recipiente di cottura pulito e
asciutto all’esterno nel dispositivo.
Figura 2
Figura 1
Figura 2
3. Collocare il cibo da cuocere a vapore direttamente nel
cestello in acciaio inox. Figura 3
Suggerimento: Se il cibo che si vuole cucinare è così
piccolo che passa attraverso i fori del cestello per la cottura a vapore (ad esempio, piselli), è possibile inserire
della carta da forno forata sul fondo del cestello e posizionare il cibo su di esso. Attenzione: la carta da
forno non deve sporgere oltre il bordo del cestello per
la cottura a vapore.
Figura 3
Attenzione: Inserire nel cestello solo una quantità di
cibo utile affinché il coperchio possa ancora chiudere
perfettamente.
4. Collocare il cestello per la cottura a vapore nel recipiente di cottura. Figura 4
Figura 4
5. Chiudere il coperchio, in modo che
questo ingrani. Figura 5
6. Inserire il connettore nella presa
dell’apparecchio. Collegare poi il
cavo di alimentazione in una presa
appropriata.
Figura 6
Figura 5
70
Figura 6
SOLIS Rice Cooker ital._2014 16.03.14 21:30 Seite 71
7. Premere il pulsante ON/OFF
per accendere l'apparecchio. Premere poi il tasto
"Steam" per attivare l'impostazione di cottura a vapore, la spia luminosa si accende di rosso. Nel display lampeggia il numero "5" per indicare 5 minuti di cottura a vapore. Premete ripetutamente il tasto "Steam", per aumentare la cottura di 1 minuto. È possibile impostare al massimo 30 minuti, poi il display torna
di nuovo a "5".
8. Dopo aver programmato il tempo di cottura, cioè dopo aver smesso di premere
il tasto "Steam", risuona un segnale acustico, il display non lampeggia più per
indicare che l'impostazione è inserita e il processo di cottura al vapore si avvia.
La spia luminosa della funzione "Cooking" si illumina.
9. Una volta che l'acqua ha raggiunto il punto di ebollizione nel recipiente di cottura, il display conta alla rovescia in intervalli di 1 minuto.
10. Quando la cottura a vapore è terminata, risuona il segnale acustico e l'apparecchio passa automaticamente alla modalità "Keep Warm". Ancora una volta,
il display visualizza il numero di ore da quando il dispositivo è passato in modalità mantenimento del calore.
11. Aprire il coperchio e rimuovere con attenzione e con dei guanti da cucina, il cibo
o il cestello per la cottura vapore. Lasciate raffreddare l'apparecchio prima di pulirlo.
Note:
•
Lasciare il coperchio chiuso per l'intero processo di cottura. Se si apre il coperchio inutilmente, il vapore fuoriesce e il tempo di cottura viene prolungato.
•
Durante la cottura a vapore nel recipiente di cottura deve trovarsi sempre acqua.
•
Se durante la cottura a vapore non dovesse più trovarsi acqua nel recipiente di
cottura, l'apparecchio passa automaticamente alla modalità "Keep Warm".
•
Se necessario, è possibile aggiungere del liquido caldo durante la cottura a vapore.
•
Se il cibo cotto a vapore non risulterà abbastanza cotto, aggiungere un po’
d'acqua o brodo nel recipiente di cottura e avviare nuovamente la funzione
"Steam".
•
La funzione "Keep Warm" rimane attiva fino a 10 ore dopo la cottura a vapore.
Tuttavia, si consiglia di mangiare gli alimenti cotti a vapore il più presto possibile,
in quanto solo allora gli alimenti contengono la maggior parte delle vitamine e
sostanze nutritive.
Attenzione:
•
Aprire il coperchio sempre con estrema attenzione per non scottarsi con il vapore
che fuoriesce.
71
SOLIS Rice Cooker ital._2014 16.03.14 21:30 Seite 72
C O T T U R A C O M B I N ATA D E L R I S O E D I A L I M E N T I A L VA P O R E
•
Per risparmiare energia, è possibile anche cucinare simultaneamente riso e cuocere a vapore verdure, pollame, carne o pesce.
•
Procedere come descritto a partire da pagina 63 nel capitolo “Cuocere il riso con
la funzione “White Rice” o “Brown Rice”.
•
Inserire contemporaneamente il cestello per la cottura a vapore con il cibo da cuocere nel recipiente di cottura.
•
Chiudere il coperchio e avviare l’impostazione “White Rice” o “Brown Rice”.
Ricordarsi l’orario. Con la funzione “White Rice” la cottura al vapore inizia abbastanza rapidamente una volta che l'acqua è calda, con la funzione "Brown
Rice" ciò richiede un po’ più di tempo in quanto il riso verrà lasciato prima a mollo.
•
Monitorare il tempo e controllare prima della fine del tempo di cottura del riso,
se gli alimenti cotti a vapore sono cotti bene. La tabella di cottura delle verdure
a pagina 73 e le altre tabelle di cottura vi daranno un'idea di quanto tempo all’incirca impiegherà il processo di cottura.
•
Quando gli alimenti sono cotti, togliere il cestello per la cottura al vapore
dall’apparecchio. Attenzione: Il cestello è caldo e deve essere toccato solo con
guanti da cucina! Richiudere immediatamente il coperchio affinché il riso possa
terminare la cottura e non sfugga troppo vapore.
•
Una volta che il cuociriso passa alla modalità "Keep Warm", è possibile inserire
il cestello con il cibo di nuovo nell’apparecchio, per riscaldare nuovamente gli alimenti cotti a vapore.
C O N S I G L I P E R L A C O T T U R A A VA P O R E D I V E R D U R E
•
Pezzi piccoli cuociono più velocemente che i pezzi di grandi dimensioni. Tutte le
verdure devono essere tagliate a pezzi di uguali dimensioni in modo che vengono
cotte contemporaneamente.
•
Si possono cuocere al vapore sia ortaggi freschi che surgelati. Per la cottura di
verdure surgelate, non è necessario che queste vengono prima scongelate.
•
La dimensione e la consistenza della verdura come anche il gusto personale, determinano il tempo di cottura. Se si preferiscono verdure morbide, è necessario
aumentare il tempo di cottura.
•
In nessun caso il liquido nel recipiente di cottura deve essere così tanto da toccare il cestello per la cottura a vapore, altrimenti la cottura a vapore non sarebbe
efficace.
•
Se i tempi di cottura indicati dovessero essere superiori a 30 minuti, controllare,
dopo 30 minuti, il livello dell'acqua, versare se necessario del liquido e avviare
nuovamente la funzione "Steam" insieme al tempo residuo.
72
SOLIS Rice Cooker ital._2014 16.03.14 21:30 Seite 73
TA B E L L A D I C O T T U R A A VA P O R E D E L L E V E R D U R E
Tempi di
cottura (Min.)
Verdure
Suggerimenti e consigli
Quantità
Carciofi
Togliere le foglie esterne più dure e il gambo.
2 medi
30 - 35
Fagioli
Tagliare le estremità, lasciare intatto.
250g
13 - 15
Broccoli
Dividere in roselline.
250g
8 - 10
Piselli
Se freschi bisogna sbucciarli.
Surgelato.
250g
250g
8 - 10
4-5
Carote
Tagliare a strisce o fette.
3 medie
14 - 16
Patate
Cuocere a vapore interamente.
4 (150 – 180g)
35 - 40
Patate novelle
Cuocere a vapore interamente.
6 (125g ognuna)
25 - 30
Ceci
Lasciare a mollo per 12 ore.
1 tazza di ceci secchi
40 - 45
Cavolo
Dividere in pezzi grossi.
500g
10 - 12
Cavolo rapa
Sbucciare e tagliare a fette (ca. pezzi da 50gr.).
350g
15 - 17
Zucca
Tagliare a pezzi.
300g
20 - 25
Baby-Zucca
Togliere la punta e tritare.
350g
8
Mais
Cuocere a vapore la pannocchia intera.
2 piccole pannocchie
20 - 22
Peperoni
Tagliare a strisce, togliere il torsolo.
3 medi
14 - 16
Funghi
Cuocere a vapore interni e non lavati.
300g
8 - 10
Barbabietola
rossa
Tagliare le estremità, non sbucciare.
300g
12 - 13
Cavolini di
Bruxelles
Incidere una croce nel gambo.
375g
17 - 19
Asparagi
Sbucciare, tagliare le estremità, lasciare interi.
2 mazzi
12 - 14
Spinaci
Lavare le foglie e il gambo.
1/2 mazzo
Sedano
Tagliare in strisce.
3 gambi
Patata
americana
Tagliare a pezzi.
300g
20 - 25
Zucchine
Sbucciate.
350g
6
Pisello dolce
Tritato.
250g
4-5
Cipolla
Sbucciare e cuocere a vapore intero.
6 medie
5
5-6
20 - 25
73
SOLIS Rice Cooker ital._2014 16.03.14 21:30 Seite 74
C O N S I G L I P E R L A C O T T U R A A VA P O R E D I P E S C E
E FRUTTI DI MARE
•
Condire il pesce prima della cottura con erbe fresche, cipolle, limone, ecc.
•
I filetti di pesce devono trovarsi fianco a fianco e non uno sopra l'altro.
•
Il pesce è cotto quando è facilmente sfaldabile con una forchetta e acquista un
colore lattiginoso opaco.
Tipo
Suggerimenti e consigli
Tempi di cottura (Min.)
Filetto di pesce,
Pesce intero,
Pezzi di pesce
Cuocere fino a quando il pesce è opaco e facilmente
sfaldabile. Pezzi di pesce sono cotti quando la carne
si stacca senza difficoltà dalla lisca.
8 - 10
15 - 20
12 - 14
Aragosta e coda di
aragosta
Rimuovere la parte inferiore del guscio
18 - 20
Molluschi con la
conchiglia
Cuocere a vapore finché i gusci si aprono
12 - 14
Vongole
Cuocere a vapore finché i gusci si aprono
8 - 10
Gamberi con guscio Cuocere a vapore finché acquistano un colore roseo
8 - 10
Capesante
4-6
74
Cuocere a vapore finché saranno opachi
SOLIS Rice Cooker ital._2014 16.03.14 21:30 Seite 75
C O N S I G L I P E R L A C O T T U R A A VA P O R E D E L P O L L A M E
•
Utilizzare pezzi di dimensioni approssimativamente uguali.
•
Posizionare i pezzi di pollo fianco a fianco e non uno sopra l'altro.
•
Togliere il grasso in eccesso e la pelle.
•
Controllare che il pollame è cotto forando la parte più grossa. Se i liquidi che fuoriescono sono trasparenti, il pollo è pronto.
Tipo
Suggerimenti e consigli
Tempi di cottura (Min.)
Petto di pollo
Cuocere a vapore con il lato della pelle verso l‘alto
20 - 25
Cosce di pollo
I pezzi più spessi dovrebbero trovarsi sul bordo
esterno del cestello
30 - 35
Filetto di coscia
I pezzi più spessi dovrebbero trovarsi sul bordo
esterno
18 - 20
C O N S I G L I P E R L A C O T T U R A A VA P O R E D I C A N E D E R L I E
GNOCCHI
•
Gnocchi freschi o surgelati possono essere cotti perfettamente a vapore con il
vostro Solis Rice Cooker Duo Program. Si consiglia di mettere della carta da forno
o foglie di cavolo nel cestello e poi collocarci gli gnocchi uno ad uno, in modo
che non si attacchino al cestello.
•
Gli gnocchi surgelati necessitano di circa 8 – 10 minuti fino a quando sono cotti,
gli gnocchi freschi circa 5 – 6 minuti.
75
SOLIS Rice Cooker ital._2014 16.03.14 21:30 Seite 76
▲ PULIZIA E MANUTENZIONE
•
Spegnere l'apparecchio con il tasto ON/OFF
(premere 2 volte) e poi scollegare il cavo di alimentazione dalla presa di corrente. Rimuovere il cavo di alimentazione dall'apparecchio.
•
Attendere fino a quando tutte le parti si siano raffreddate prima di rimuovere il
recipiente di cottura. Pulire il recipiente di cottura, il cestello per la cottura a vapore e la vaschetta di raccolta della condensa con acqua calda e detergente, poi
risciacquare e asciugare il tutto accuratamente. Il recipiente di cottura e il cestello
per la cottura a vapore devono essere risciacquati dopo ogni uso per motivi
d’igiene.
•
Tranne il cestello per la cottura a vapore, Solis raccomanda di non inserire le altre parti del Solis Rice Cooker Duo Program in lavastoviglie, poiché sia i detersivi per lavastoviglie, che sono troppo aggressivi, così come le temperature
dell'acqua calda, potrebbero danneggiare la superficie del recipiente di cottura
o deformare le altre parti.
•
L'interno del coperchio deve essere pulito accuratamente con un panno umido
e poi asciugato. Ciò vale anche per il bordo di gomma attorno al coperchio. Lasciare asciugare completamente il coperchio e il bordo di gomma, prima di richiudere il coperchio.
•
In generale, per la pulizia degli accessori e del dispositivo stesso, non utilizzare
detergenti aggressivi o abrasivi o pagliette di metallo, in quanto potrebbero danneggiare la superficie.
•
Il dispositivo stesso deve essere pulito solo con un panno umido e asciugato in
seguito. Non utilizzare detergenti alcalini, ma solo un panno morbido e un detergente delicato.
•
La vaschetta di raccolta della condensa deve essere nuovamente montato
nell’apparecchio dopo la pulizia.
Nota:
•
Se del riso si fosse attaccato sul fondo del recipiente di cottura, riempire il recipiente di cottura con acqua calda, aggiungere una spruzzata di detergente neutro e lasciare il recipiente di cottura a riposo per 10 minuti. In seguito si può facilmente pulire.
Attenzione:
•
76
Il connettore deve essere rimosso dalla presa dell’apparecchio prima della pulizia del Rice Cooker Duo Program. La presa del connettore deve essere completamente asciutta prima di rimettere in funzione l'apparecchio.
SOLIS Rice Cooker ital._2014 16.03.14 21:30 Seite 77
•
Affinché la superficie del dispositivo e dei suoi accessori non siano danneggiati,
non usare mai detergenti alcalini, ma solo un panno morbido e un detergente
delicato.
•
Non usare agenti chimici, spugne in metallo, lana d'acciaio o detergenti abrasivi per pulire il dispositivo o gli accessori, in quanto ciò potrebbe danneggiare
le superfici e rivestimenti.
•
Non immergere l'apparecchio o il cavo di alimentazione in acqua o in altri liquidi,
in quanto ciò potrebbe causare una scossa elettrica.
▲ DEPOSITO
1. Controllare che l’apparecchio sia spento e che il cavo di alimentazione sia staccato.
2. Controllare che la struttura e tutti gli accessori siano assolutamente freddi, puliti e completamente asciutti.
3. Collocare gli accessori nell'apparecchio e chiudere il coperchio.
4. Conservare l’apparecchio in posizione verticale in un luogo buio e asciutto, preferibilmente nella confezione originale. Non appoggiare nulla sul dispositivo.
▲ D AT I T E C H N I C I
Modello No.
JH-926SBD, Tipo 817
Descrizione del prodotto
Vaporiere e Cuociriso
Tensione/Frequenza
220-240V ~ / 50Hz
Potenza
640-760 watt
Misure
ca. 24 x 23 cm (H x Ø)
Peso
ca. 2,2 kg
77
SOLIS Rice Cooker ital._2014 16.03.14 21:30 Seite 78
▲ PROBLEMI E COME POSSONO
E S S E R E R I S O LT I
PROBLEMA
SOLUZIONE
Il Rice Cooker Duo
Program si spegne
all‘improvviso.
• Controllare che il connettore sia ben inserito nella
presa dell’apparecchio e la spina nella presa a muro.
Il riso dopo la cottura è
troppo secco/duro.*
• Se il riso alla fine del programma di cottura risulta
troppo secco o solido, può essere ammorbidito con
l'aggiunta di ulteriore acqua e tempo di cottura supplementare. A seconda di quanto il vostro riso è
ancora compatto, aggiungere 1/2 a 1 dosatore di
acqua e mescolate bene. Chiudere il coperchio e
accendere nuovamente l'impostazione "White Rice"
o "Brown Rice". Quando il cuociriso passa nella
modalità di mantenimento del calore, aprire il coperchio e mescolare il riso. Eventualmente è sufficiente
anche solo lasciare riposare il riso per 10 – 15 minuti in modalità di mantenimento del calore.
Il riso dopo la cottura è
troppo umido.*
• Se il riso alla fine del programma di cottura risulta
ancora troppo umido/bagnato, mescolare con la spatola. La parte più umida sul fondo viene, così, distribuita e l'acqua può fuoriuscire. Chiudere il coperchio
e lasciare l'apparecchio per 10 – 30 minuti nella
modalità di mantenimento del calore. Ogni tanto
aprire il coperchio e mescolare il riso per permettere
all'umidità in eccesso di fuoriuscire.
• Il dispositivo è stato usato troppo o si è surriscaldato. Scollegare il dispositivo dalla rete e lasciarlo raffreddare per alcuni minuti. Ricollegarlo, accenderlo
premendo di nuovo il pulsante
e ricominciare il
processo di cottura.
* Dato che le varietà di riso variano in composizione e consistenza, i risultati possono essere diversi. Questi consigli vi
aiuteranno a cucinare il riso perfetto per voi.
78
SOLIS Rice Cooker ital._2014 16.03.14 21:30 Seite 79
▲ S M A LT I M E N T O
EU 2002/96/EC
Precauzioni per un corretto smaltimento del prodotto secondo la Direttiva UE
2002/96/CE
Alla fine del ciclo di vita, l’apparecchio non deve essere smaltito insieme ai rifiuti domestici, ma dovrà essere portato a un centro di raccolta rifiuti locale o a un rivenditore che provvederà al regolare smaltimento. Rispetto a uno smaltimento non conforme, lo smaltimento separato di apparecchi elettrici ed elettronici evita conseguenze
negative per l’ambiente e per la salute e consente, inoltre, il recupero e il riciclaggio
di componenti con un risparmio energetico e di materia prima notevole.
L'obbligo per il corretto smaltimento dell’apparecchio è evidenziato distintamente dal
simbolo di un contenitore di spazzatura barrato.
Solis of Switzerland SA si riserva il diritto di apportare, in qualsiasi momento, modifiche tecniche ed estetiche nonché effettuare modifiche atte a migliorare il prodotto.
SOLIS
S
OLIS H
HELPLINE:
ELPLINE:
0
044
44 8
874
74 6
64
41
14
4
(Solo
(Solo per
per i clienti
clienti in
in Svizzera)
Svizzera)
Questo
durata
Q
uesto articolo
ar ticolo si
si contraddistingue
contraddistingue per
per la
la sua
sua lunga
lunga d
urata eed
d aaffidabilità.
ffidabilità. SSe
e cciononostante
iononostantee
dovessero
d
ovessero presentarsi
presentarsi dei
dei problemi
problemi di
di funzionamento,
funzionamento, ci
ci telefoni.
telefoni. Spesso,
Spesso, un
un guasto
guasto si
si risolve
r is o l ve
senza
modo
giusti
senza complicazioni
complicazioni e iin
nm
odo ssemplice
emplice ccon
on iill cconsiglio
onsiglio o llo
o sstratagemma
tratagemma g
iusti senza
senza dovere
d o ve re
spedire
per
Sua
disposizione
er rripararlo.
ipararlo. SSiamo
iamo a Su
ad
isposizione per
per consigli
consigli ed
ed aiuto.
aiuto.
spedire subito
subito ll’apparecchio
’apparecchio p
Si prega di conservare l'imballaggio originale di questo articolo in modo da
poterlo utilizzare per un eventuale trasporto o spedizione del prodotto.
Solis of Switzerland SA
Solis-Haus • CH-8152 Glattbrugg-Zurigo • Svizzera
Telefono +41 44 874 64 54 • Fax +41 44 874 64 99
[email protected] • www.solis.ch • www.solis.com
79
SOLIS Rice Cooker engl._2014 16.03.14 21:32 Seite 80
SOLIS Rice Cooker engl._2014 16.03.14 21:32 Seite 81
▲ TA B L E O F C O N T E N T S
82
Appliance description
84
Important safety precautions
88
Before initial start-up
89
Rice cooking
92
The „Keep Warm“ function
92
Rice cooking table
93
Rice variations
95
Time-delayed rice cooking using the „Delay Timer“ function
96
Steaming
99
Cooking tables
102
Cleaning and maintenance
103
Storage
103
Technical specifications
104
Problems and how they can be solved
105
Disposal / Solis Helpline
81
SOLIS Rice Cooker engl._2014 16.03.14 21:32 Seite 82
▲ APPLIANCE DESCRIPTION
A
Fixed lid with release button and handle
To open the lid, press the release button and lift the lid by the handle.
B
Steam outlet
C
Condensed water tank
D
Removable, nonstick cooking bowl
Prevents rice from sticking.
E
Stainless steel steaming tray
Ideal for steaming vegetables, seafood, poultry or meat.
F
Plastic scoop
G
Measuring cup
H
Removable power cord (not shown)
For comfortable serving at the table and easy storage.
C O N T R O L PA N E L :
I
„Delay Timer“ setting
for time-delayed rice cooking.
J
Display showing the last 12 cooking-minutes for white rice
resp. 25 cooking-minutes for brown rice
resp. the number of hours in „Keep Warm“ mode
resp. the setting for time-delayed cooking.
K
ON/OFF-switch
L
„White Rice“ setting
for cooking white rice.
M „Brown Rice“ setting
for cooking brown rice or rice varieties with longer cooking times.
N
„Steam“ setting
for steaming vegetables, seafood, poultry or meat.
O
„Keep Warm“ setting
This setting will automatically switch on after every function once the cooking process is finished. Additionally, the „Keep Warm“ function can be
turned on separately.
Each of the mentioned buttons (save the
-button) has a function light that
illuminates during operation.
Additionally, there is the „Cooking“ function light that switches on once
water is being heated up.
82
SOLIS Rice Cooker engl._2014 18.03.14 08:43 Seite 83
A
B
A
E
D
C
D
I
J
K
D
E
G
F
L
M
N
O
83
SOLIS Rice Cooker engl._2014 16.03.14 21:32 Seite 84
▲ IMPORTANT SAFETY PRECAUTIONS
Please read this user manual and the safety precautions thoroughly before
using your Solis Rice Cooker Duo Program in order to become familiar with
your appliance and learning how to use it safely. We recommend that you
safely keep these instructions and, should you pass the appliance on, that you
also hand these instructions to the new owner.
For your own safety, please consider the following safety measures when
using electric appliances:
1. To avoid electric shock, neither the appliance nor the power cord and power plug
resp. connection adapter must come into contact with water or other liquids. Water might get into the casing and damage the appliance! Should the appliance,
the power cord or power plug resp. connection adapter come into contact with
liquid, use dry rubber gloves to immediately pull the power plug from the socket.
2. Before use, check if the voltage stated on the appliance matches your mains voltage.
3. Always plug the connection adapter into the appliance jack before connecting
the power plug to a socket and only then switch on the appliance. The appliance jack and the connection adapter both have to be absolutely dry before you
connect them. Never touch the power plug with wet or moist hands.
4. Only operate the rice cooker/steamer on a solid, dry and heat resistant surface.
Do not operate beneath hanging cupboards, shelves or other steam sensitive
materials.
5. Do not let the power cord hang over table edges to prevent it from being pulled down. Ensure that it does not come into contact with hot surfaces like hotplates or a radiator resp. with the appliance itself. Always fully unwind the power
cord before plugging in the appliance.
6. Keep appliance away from hot gas, hot ovens or other heat emitting appliances or heat sources. Never use the appliance on a wet or hot surface. Do not place
appliance near moisture, heat and open flames. Keep appliance away from moving parts or appliances.
7. Never pull or carry the appliance by its power cord and do not place anything
on the cord.
8. We recommend not using an extension cord. Do not place the appliance directly
beneath a power outlet.
9. Always pull the plug when the appliance is out of use, unsupervised or before
cleaning. We recommend using a residual current device (RCD-safety switch) to
84
SOLIS Rice Cooker engl._2014 16.03.14 21:32 Seite 85
provide additional protection when operating electrical devices. It is advisable that
a circuit breaker with a leakage current not exceeding 30 mA is used. Your electrician can provide you with professional advice.
10. Do not make any changes to the appliance, the cord, the plug or the accessory
parts.
11. Inappropriate handling might cause injury!
12. Caution: The temperatures of appliance parts and surfaces are very high during
cooking process and even some time afterwards.
13. Never reach out for an appliance that has fallen into water. Always pull the plug
before removing the appliance from the water. Do not operate it again before
having it checked for functionality and safety by Solis or an authorised Solis service centre.
14. Never place the appliance so that it might fall into water (f.e. next to a sink).
15. Do not place the appliance in direct sunlight.
16. Never insert sharp or pointed objects and tools into the appliance openings. The
appliance might be damaged resp. risk of electric shock!
17. Do not shake or move the appliance while it is in use.
18. Only use the appliance as described in this manual. Only use provided accessory
parts, wrong accessory parts might cause damage to the appliance.
19. The appliance is only suited to domestic use, not to commercial use.
20. The appliance is not suited to outdoor use. Do not use in vehicles or on boats.
21. Check your rice cooker/steamer before every use.
22. To prevent electric shock, do not use the appliance when cord or power plug are
damaged or the appliance is faulted in some other way, has been dropped or is
somehow damaged. Never do repairs yourself, instead give the appliance to
Solis or an authorised Solis service centre to have it checked, repaired or mechanically or electrically maintained.
23. People with limited physical, sensorial or mental capabilities (incl. children) or
unaware or inexperienced people must not use the rice cooker, except when
supervised or thoroughly instructed on how to use the appliance by a person
responsible for their safety.
24. Children must be supervised so that they don’t play with the appliance.
25. Ensure that the Solis Rice Cooker Duo Program has been correctly assembled before starting to use it. Exactly how to do that you will learn in this manual.
85
SOLIS Rice Cooker engl._2014 16.03.14 21:32 Seite 86
26. Never cover the air vents while the appliance is in use.
27. Before moving or disassembling the appliance, always switch the appliance off
first, using the ON/OFF-switch
. Then, pull the power plug from the socket
and wait until the appliance has cooled down. The power plug should always
be disconnected while the appliance is not in use.
28. Always check if the inside of the appliance, the cooking plate and the outside
of the cooking bowl are completely clean and dry before operating the appliance.
29. Always keep the appliance clean. Please refer to the notes given in the section
„Cleaning and maintenance“ in this manual. Except for the steaming tray, the
removable parts must not be washed in a dish washer.
30. Never keep explosive resp. flammable substances like aerosol containers (deodorants, hair sprays etc.) in the appliance.
31. Always position the cooker in such a way that the steam outlet of the lid is pointing away from you. Always be careful when lifting the lid to avoid scalding yourself with the hot steam.
32. Only use the appliance with the provided, removable cooking bowl and possibly the steaming tray. Never place another pot or container in the rice cooker.
The cooking bowl must not be used for other cooking purposes or be directly
placed on a stove top/gas cooker.
33. Do not use the Rice Cooker Duo Program cooking bowl when it has been damaged or dented. Replacement for your cooking bowl you will find at good specialised dealers or directly at Solis.
34. Do not place anything on the lid while the appliance is in use or in storage. Never cover the appliance during the cooking process or in the keeping warm phase.
35. Never use chemical, alkaline, aggressive or scratching detergents or scouring
sponges to clean the appliance or the cooking bowl, as they might damage the
coating of the cooking bowl resp. the casing surface. Only use a soft cloth and
a mild detergent for cleaning.
36. Never plug the power plug of the appliance into the socket and never switch on
the appliance if the cooking bowl is not placed in the appliance.
37. Never directly put foods or liquids into the casing of the rice cooker/steamer. Only
the removable Rice Cooker Duo Program cooking bowl and the steaming tray
must come into contact with foods and liquids. The steaming tray must only be
used in combination with the cooking bowl.
38. Do not operate the appliance when there aren’t any foods or liquids in the
removable cooking bowl.
86
SOLIS Rice Cooker engl._2014 16.03.14 21:32 Seite 87
39. Do not touch any hot surfaces when opening the lid or removing the cooking
bowl, always use cooking gloves or oven mitts. Always open the lid carefully and
ensure that the steam does not escape in your direction, so that you don’t scald
yourself.
40. Ensure that the condensed water from the lid does drip only into the cooking
bowl, not into the casing.
41. Extreme caution should be exercised when the appliance contains hot foods or
liquids. Never move the appliance while in use. Never touch the hot surfaces with
bare hands.
42. Always close the lid during the cooking process. During storage as well, the lid
should be closed. Do not place anything on top of the appliance.
43. To avoid scratching the non-stick coating of the cooking bowl, please only use
kitchen tools made from wood or heat resistant plastic.
44. Ensure that the cooking bowl is correctly positioned in the appliance before starting the cooking process. The condensed water tank has to be correctly fixed to
the outside of the appliance.
45. With enabled „Keep Warm“ function, the rice must not remain in the cooking
bowl for more than 10 hours.
46. Before cleaning the appliance, always use the ON/OFF-switch
to switch it
off (press twice), pull the power plug from the socket and the connection adapter from the appliance jack. Remove the power cord. Then, let all parts of the
appliance cool down completely. The appliance jack has to be thoroughly dried
before operating the appliance again.
47. Maintain a minimum distance of 20 cm between the appliance and walls, curtains or other heat or steam sensitive materials and objects. Please ensure that
air must be allowed to freely circulate around and over the appliance.
Important: Fully unwind the power cord before use. If you want to place the
power cord in the cooking bowl for storage, it has to be cooled down completely.
87
SOLIS Rice Cooker engl._2014 16.03.14 21:32 Seite 88
▲ B E F O R E I N I T I A L S TA R T- U P
•
Before using your Solis Rice Cooker Duo Program for the first time, please remove all promotion stickers. Clean the cooking bowl, the stainless steel steaming
tray and the plastic scoop with mild detergent and warm water and carefully rinse
afterwards. Dry all parts.
- You should wipe the inside of the lid with a moist cloth.
- Check if the condensed water tank has been properly attached to the
appliance.
To remove: Lift the tank by its lower side and pull out of its upper bracket.
To insert: First, push the pins into the bracket on both sides. Then, press the
lower part against the appliance.
88
SOLIS Rice Cooker engl._2014 16.03.14 21:32 Seite 89
▲ COOKING RICE WITH „WHITE RICE“
OR „BROWN RICE“ SETTING
1. Use the provided rice measuring cup to measure the
desired amount of rice (see rice cooking table). The
measuring cup should always be evenly filled to the
brim and not be heaped (see illustration).
•
Note: The rice measuring cup delivered with the Solis
Rice Cooker Duo Program is not equal to a standard
measuring cup. One Solis Rice Cooker Duo Program
measuring cup is equivalent to 160g of uncooked rice. Should you lose your measuring cup, you can use an-other measuring cup. Nevertheless, you should still
measure out the aforementioned amount and never exceed the maximum mark
for 6 measuring cups of rice in the cooking bowl.
2. Fill the measured rice into a sieve and wash the rice with cold water to remove
the starch covering the grains. Once the water running off is clear, your rice is
ready to cook. Let it drain well.
3. Pour the washed rice into the cooking bowl.
The rice should be spread evenly across the
bottom of the cooking bowl and not be heaped to one side.
✓ ✗
4. Use the provided measuring cup to add water. If you have filled 2 measuring cups of rice into the cooking bowl, pour water into the cooking bowl until the line marking „2“ is reached.
If you have filled 3 measuring cups of rice, the water level should
be up to the line in between lines 2 and 4. If you have filled 4
measuring cups, the water level should be up to the line marking „4“ etc. At a
maximum, you can boil 6 measuring cups of rice. The following table will give
some indication of the amount of cooked rice to expect and cooking times.
R I C E C O O K I N G TA B L E
Uncooked
rice
(measuring cup)*
Cold tap water
up to the
marking
Cooked rice,
approx.
(measuring cup)*
Cooking time for
white rice approx. (in minutes)
Cooking time for
brown rice approx. (in minutes)
2
2
4
30 - 35
60 - 65
3
3
6
32 - 37
65 - 70
4
4
8
35 - 42
70 - 75
5
5
10
40 - 45
75 - 80
6
6
12
42 - 47
80 - 85
* measured with the Rice Cooker Duo Program measuring cup
89
SOLIS Rice Cooker engl._2014 16.03.14 21:32 Seite 90
5. Check the outside, bottom and sides of the cooking bowl for cleanliness before
inserting it into the appliance – this will ensure good contact to the inlying cooking plate.
CAUTION:
1. You should always clean the bottom of the cooking bowl and the surface of
the cooking plate before beginning to cook. Please ensure that no rice grains
are in the appliance resp. on the cooking plate.
2. To ensure that the cooking bowl is positioned evenly on the cooking plate,
spin it to both sides in the appliance.
3. The cooking bowl has to be entirely inserted into the rice cooker, otherwise
the appliance will not start resp. might be damaged.
To reduce the risk of electric shock, it is imperative that the removable cooking bowl be
used for cooking. Never submerge the appliance in water.
6. Close the lid so that it clicks shut.
7. Plug the connection plug into the appliance
socket. Then, connect the power plug to a
suitable power outlet.
8. Press the ON/OFF-switch
to switch on the
appliance. All function lights will briefly light up one by one, red bars will illuminate in the display. Now, press the „White Rice“ or „Brown Rice“ button
(depending on the kind of rice you wish to cook) to activate the corresponding
setting. The function light of the „White Rice“ or „Brown Rice“ button will light
up red. Once the cooking process has commenced, the „Cooking“ function light
light up red and the bars on the display will alternately illuminate, forming a
rectangle.
9. When the rice cooking process comes to an end, the remaining cooking time will
appear on the display, counting down: For white rice, the last 12 minutes, for
brown rice, the last 25 minutes will be displayed.
10. Once the cooking process is finished, an acoustic signal will sound and the
Solis Rice Cooker Duo Program will automatically switch to „Keep Warm“
mode, the corresponding function light will illuminate. The display will state the
number of hours the appliance has been in „Keep Warm“ mode, starting at the
number „0“.
11. Carefully open the lid and stir the rice with the provided scoop. Close the lid and
allow the rice to stand for 10 – 15 minutes in „Keep Warm“ mode before serving. This will absorb possibly remaining moisture and fluff up the rice.
90
SOLIS Rice Cooker engl._2014 16.03.14 21:32 Seite 91
12. When the settings „White Rice“ or „Brown Rice“ are completed, the appliance
will automatically switch to „Keep Warm“ mode for 10 hours.
13. Should you not require any more warm rice, press the ON/OFF-switch
twice
to switch off the appliance and pull the power plug. Let the appliance cool down
before cleaning it.
Notes:
•
Only open the lid after the rice is ready (that is when the finished-signal sounds).
•
To stop the cooking rice- or keeping warm-settings, press the ON/OFF-switch
twice.
•
„Why does cooking brown rice take longer?“ you might ask. The increased cooking time is due to an additional layer of bran around the brown rice grains. The
„Brown Rice“ setting takes this factor into account and is designed in such a way
that the heat is precisely measured to optimally cooking brown rice. This includes letting the rice grains soak at low temperatures to develop the full aroma
instead of fully heating up upon start-up.
Important:
•
Always pour some liquid into the cooking bowl before pressing the ON/OFFswitch
.
•
Do not press the function buttons during operation, so as not to interfere the
cooking process.
•
To avoid scratching the non-stick coating of the cooking bowl, always use kitchen tools made from wood or heat resistant plastic.
•
Always check if the cooking bowl is properly positioned (meaning straight) in the
appliance before starting the cooking process.
Warning:
•
Before removing the cooking bowl from the appliance, always ensure that the
appliance is switched off and not plugged in.
•
Always use cooking gloves or oven mitts when opening the lid or removing the
cooking bowl from the appliance.
•
Always position the steam outlet in the direction pointing away from you to avoid
scalding yourself with the escaping steam.
•
Always open the lid carefully, angling it away from yourself to avoid scalding from
escaping steam.
•
To protect yourself from electric shock, only connect the appliance to an appropriate power outlet.
91
SOLIS Rice Cooker engl._2014 16.03.14 21:32 Seite 92
•
Only use the appliance with the provided, removable cooking bowl.
•
Do not use the cooking bowl if it has been damaged or dented. Replacement
for your Rice Cooker Duo Program cooking bowl will be available to you at good
specialised dealers or directly at Solis.
▲ THE „KEEP WARM“ FUNCTION
•
Your Solis Rice Cooker Duo Program will automatically switch to „Keep Warm“
mode when the settings „White Rice“, „Brown Rice“ or „Steam“ are finished.
The „Keep Warm“ mode will stay active for up to 10 hours. After 10 hours, the
appliance will switch off. The display will state the number of hours the appliance has been in „Keep Warm“ mode. The number displayed first is „0“.
•
You can switch on the „Keep Warm“ function separately from other programs.
•
To switch off the „Keep Warm“ mode, press the ON/OFF-switch
.
▲ R I C E C O O K I N G TA B L E
•
For the following statements, the Rice Cooker Duo Program measuring cup was
used.
•
Note: The rice measuring cup of the Solis Rice Cooker Duo Program does not
match a standard measuring cup. One Rice Cooker Duo Program measuring cup
is equivalent to 160g of uncooked rice. Should you lose your measuring cup, you
can use another measuring cup to measure the amount stated above. You should
never exceed the maximum mark for 6 measuring cups of rice in the cooking
bowl.
R I C E C O O K I N G TA B L E
Water to rice ratio for white/brown rice
Uncooked
rice
(measuring cup)*
Cold tap water
up to the
marking
Cooked rice,
approx.
(measuring cup)*
Cooking time for
white rice approx. (in minutes)
Cooking time for
brown rice approx. (in minutes)
2
2
4
30 - 35
60 - 65
3
3
6
32 - 37
65 - 70
4
4
8
35 - 42
70 - 75
5
5
10
40 - 45
75 - 80
6
6
12
42 - 47
80 - 85
* measured with the Rice Cooker Duo Program measuring cup
92
SOLIS Rice Cooker engl._2014 16.03.14 21:32 Seite 93
▲ R I C E VA R I AT I O N S
•
You can choose between many different kinds of rice and prepare them differently – we would like to give you a little overview.
S AV O U RY R I C E
•
Prepare the rice as described in the Rice Cooker Duo Program but instead of water, use the identical amount of chicken, beef or vegetable broth resp. fish stock.
SWEET RICE
•
Prepare the rice as described in the Rice Cooker Duo Program but replace half
of the water with apple, orange or pineapple juice. Caution: We don’t recommend preparing rice pudding in the Rice Cooker Duo Program, as it might burn
on the bottom of the cooking bowl.
SAFFRON RICE
•
Add 1/4 tsp. of saffron powder or 2 saffron threads per 2 measuring cups of rice
to the water. Use the table statements for white rice. Thoroughly stir the rice.
ARBORIO OR CARNAROLI RICE FOR RISOTTO
•
Arborio and Carnaroli rice are shiny round grain rice varieties from Italy and is
used for risotto dishes. For risotto rice, use the table statements for brown rice.
JASMINE RICE
•
Jasmine rice is fragrant long grain rice. Please refer to the table for white rice.
B A S M AT I R I C E
•
Basmati rice is aromatic long grain rice. Please refer to the table for white rice.
WILD RICE
•
Solely cooking wild rice in the Rice Cooker Duo Program is not recommended,
as it requires an especially high amount of water. It can, however, be mixed into
white or brown rice.
QUINOA
•
Quinoa is an old, south american variety of rice, rich in protein with a light,
creamy and grainy texture. Please refer to the table for brown rice.
93
SOLIS Rice Cooker engl._2014 16.03.14 21:32 Seite 94
SUSHI REIS
•
Sushi rice is a small grain rice, used for Japanese cuisine. Please refer to the
table for brown rice.
Tip:
•
94
To cook the rice especially fluffy, add a little more water into the cooking bowl.
Should you wish to cook the rice especially tight, leave out some of the water.
SOLIS Rice Cooker engl._2014 16.03.14 21:32 Seite 95
▲ T I M E D E L AY E D R I C E C O O K I N G U S I N G
T H E „ D E L AY T I M E R “ F U N C T I O N
•
Using the „Delay Timer“ function, you can set a number of hours after which
you want the rice to be cooked. Your rice cooker will then switch on at an appropriate time to finish cooking your rice at the desired time. Thus, you can put
rice and water into the cooking bowl in the morning – and when you come home
at night, delicious rice will be prepared and ready to eat.
Please proceed as follows:
•
Wash the rice and put it, together with the appropriate amount of water, into
the cooking bowl. Proceed as described on p. 89/90 in points 1 through 7.
•
Use the ON/OFF-switch
•
Now, press the „Delay Timer“ button, the number „1“ will show up in the display to indicate completion in one hour. Each press of the button will increase
the number by one. You can set a number of hours between 1 and 15 for the
„White Rice“ function, and 2 to 15 hours for subsequently choosing the „Brown
Rice“ function.
•
When a number of hours suitable for you shows up in the display, either press
the „White Rice“ or „Brown Rice“ button, depending on which variety of rice
you wish to cook.
•
In the display, the numbers will count down. Once the time is right, the appliance will switch to cooking mode and the „Cooking“ function light will illuminate. The display will show interchanging lines.
•
Just like during normal rice cooking operation, the display will count down the
last 12 minutes of cooking for white rice and the last 25 minutes for brown rice.
•
Once the rice cooking operation is finished, an acoustic signal will sound and the
appliance will automatically switch to „Keep Warm“ mode for 10 hours. The display will show the number of hours for which „Keep Warm“ mode has been activated. The first number shown is „0“.
•
Before serving the rice, you should stir it with the provided scoop to spread out
the remaining moisture.
•
Should you not require any more warm rice at some point, press the ON/OFFswitch
twice to turn off the appliance and afterwards, pull the power plug.
•
Let the appliance cool down before cleaning it.
to switch on the appliance.
95
SOLIS Rice Cooker engl._2014 16.03.14 21:32 Seite 96
▲ STEAMING WITH THE „STEAM“
FUNCTION
•
Foods that are steamed keep most of their nutrients and vitamins and are therefore ideal for a health-conscious diet. For steaming, put the foods into the stainless steel steaming tray. Pour broth or water into the cooking bowl and close the
lid. Leave the lid closed for the entire steaming process. Opening the lid unnecessarily lets the steam escape and prolongs cooking time.
Please proceed as follows:
1. Pour 3 Rice Cooker Duo Program measuring cups of water or broth into the
cooking bowl. Fig. 1
2. Put the cooking bowl into the appliance. Please ensure that its outer side is
clean and dry. Fig. 2
Fig. 1
Fig. 2
3. Put the foods you wish to steam directly into the stainless steel steaming tray. Fig. 3
Tip: Should the foods be so small that they might fall
through the holes in the steaming tray (f.e. peas), you
can put a sheet of baking paper on the bottom of the
tray. Punch tiny holes into the baking paper and lay the
foods on top. Caution: The baking paper should not
stick out over the edge of the steaming tray.
Fig. 3
Caution: Only fill so many foods into the steaming tray
that the lid can still close perfectly.
4. Put the steaming tray into the cooking bowl. Fig. 4
Fig. 4
5. Close the lid so that it locks into
place. Fig. 5
6. Plug the connection adapter into
the appliance jack. Then, connect
the power plug to a suitable power
outlet. Fig. 6
Fig. 5
96
Fig. 6
SOLIS Rice Cooker engl._2014 16.03.14 21:32 Seite 97
7. Press the ON/OFF-switch
to switch on the appliance. Then, press the „Steam“
button to activate the steaming setting. The red function light will illuminate. The
number „5“ will flash in the display to indicate five minutes of steaming time.
Repeatedly press the „Steam“ button, each press of the button will increase steaming time by one minute. At a maximum, you can set 30 minutes, after that,
the display will jump back to „5“.
8. Once you have entered the time, meaning not pressing the „Steam“ button anymore, an acoustic signal will sound and the display will stop flashing to indicate
that the setting has been done. The steaming process begins. The „Cooking“
function light will light up.
9. When the water in the cooking bowl reaches its boiling point, the display will
count down in one-minute-intervals.
10. When steaming is completed, the acoustic finished-signal will sound and the appliance will automatically switch to „Keep Warm“ mode. Again, the display will
show the number of hours for which the appliance has been in „Keep Warm“
mode.
11. Open the lid and use cooking gloves to carefully remove the foods or the steaming tray. Let the appliance cool down before cleaning it.
Notes:
•
Leave the lid closed for the entire steaming process. Opening the lid unnecessarily lets the steam escape and prolongs cooking time.
•
While steaming, the cooking bowl must remain filled with water permanently.
•
If no water should remain in the cooking bowl while steaming, the appliance will
automatically switch to „Keep Warm“ mode.
•
If necessary, hot water can be added while steaming.
•
Should the steamed foods not be done, fill some water or broth into the cooking bowl and restart the „Steam“ function.
•
The „Keep Warm“ function will stay active after steaming for 10 hours. However, we recommend eating the steamed foods as soon as possible after steaming, as most vitamins and nutrients will then still be present in the foods.
Warning:
•
Always open the lid with extreme caution to avoid scalding yourself with the escaping steam.
97
SOLIS Rice Cooker engl._2014 16.03.14 21:32 Seite 98
RICE COOKING AND STEAMING COMBINED
•
To save energy, you can simultaneously cook rice and steam vegetables, poultry
and meat or seafoods.
•
Proceed as described in the chapter „Cooking rice with „White Rice“ or „Brown
Rice“ setting“ from p. 89 onwards.
•
Simultaneously insert the steaming tray with the foods you wish to steam into
the cooking bowl.
•
Close the lid and activate the setting „White Rice“ or „Brown Rice“. Remember the time. In the „White Rice“ function, the steaming time will start rather
soon once the water is warm. The „Brown Rice“ function will take a little longer, as the brown rice soaks a little while first.
•
Keep an eye on the time and check if the steamed foods are finished even before the rice cooking time has elapsed. The cooking table for vegetables on
p. 99 resp. the other cooking tables can give you some clues as to how long the
steaming process will approximately take.
•
When the steaming foods are done cooking, carefully remove the steaming tray
from the appliance. Caution: The steaming tray is hot and must only be handled with cooking gloves! Immediately afterwards close the lid, so that the rice
can finish cooking and to avoid letting too much steam escape.
•
If desired, you can replace the steaming tray with the foods into the rice cooker
to warm up the steamed foods once the rice cooker switches to „Keep Warm“
mode.
H I N T S A N D T I P S F O R S T E A M I N G V E G E TA B L E S
•
Smaller pieces will steam faster than larger pieces. Try to keep vegetables to a
standard size to ensure even cooking.
•
Fresh or frozen vegetables may be steamed. If steaming frozen vegetables, do
not thaw.
•
The size and shape of vegetables as well as personal taste may call for adjustments to the cooking time. If softer vegetables are required, allow extra cooking
time.
•
Do not allow water or stock to reach the steaming tray. The steaming will not
be effective.
•
Should the stated cooking times exceed 30 minutes, please check the water level after 30 minutes and refill liquid, if required. Restart the „Steam“ function
for the remaining time.
98
SOLIS Rice Cooker engl._2014 16.03.14 21:32 Seite 99
V E G E TA B L E S C O O K I N G TA B L E
Vegetables
Suggestions and tips
Quantity
Cooking
time (min.)
Artichoke
remove hard outer leaves & stalk
2 medium
30 – 35
Asparagus
trim, leave as spears
2 bunches
12 – 14
Beans
top and tail, leave whole
250g
13 – 15
Beets
trim, do not break skin
300g
12 – 13
Bell Peppers
cut into strips
3 medium
14 – 16
Broccoli
cut into florets
250g
8 – 10
Brussels Sprouts cut a cross in the base
375g
17 – 19
Cabbage
large pieces
500g
10 – 12
Carrots
cut into strips
3 medium
14 – 16
Celery
slice into strips
3 stalks
Chickpeas
soak for 12 hours
1 cup dried
40 – 45
Corn
whole corn cobs
2 small cobs
20 – 22
Mushrooms
whole, unwashed
300g
8 – 10
Onions
peeled, leave whole
6 medium
20 – 25
Snow peas
topped and tailed
250g
4–5
Peas
fresh, peeled
frozen
250g
250g
8 – 10
4–5
Potatoes
all purpose, whole
4 (150 – 180g)
35 – 40
Potatoes new
whole
6 (125g each)
25 – 30
Sweet Potato
cut into pieces
300g
20 – 25
Pumpkin
cut into pieces
300g
20 – 25
Spinach
leaves and stems cleaned
1/2 bunches
5
Squash (baby)
topped and tailed
350g
8
Turnips
peeled, sliced & cut to 50g pieces
350g
15 – 17
Zucchini
sliced
350g
6
5–6
99
SOLIS Rice Cooker engl._2014 16.03.14 21:32 Seite 100
HINTS AND TIPS FOR STEAMING FISH AND SEAFOOD
•
Season fish with fresh herbs, onions, lemon etc. before cooking.
•
Ensure fish fillets are in a single layer and do not overlap.
•
Fish is cooked when it flakes easily with a fork and is opaque in color.
Type
Suggestions and tips
Fish – fillets
– whole
– cutlets
Steam until opaque and easy to flake. A cutlet is cooked
when the centre bone is able to be easily removed
8 – 10
15 – 20
12 – 14
Lobster – tails
Remove underside of shell
18 – 20
Mussels – in shell
Steam until just opened
12 – 14
Clams
Steam until just opened
8 – 10
Prawns – in shell
Steam until pink
8 – 10
Scallops
Steam until opaque
4–6
100
Cooking
time (min.)
SOLIS Rice Cooker engl._2014 16.03.14 21:32 Seite 101
H I N T S A N D T I P S F O R S T E A M I N G P O U LT RY
•
Select similar sized pieces of poultry for even cooking.
•
For even cooking results arrange poultry in a single layer.
•
Remove visible fat and skin.
•
Check if poultry is cooked by piercing the thickest part. The poultry is cooked
when the meat juices run clear.
Type
Suggestions and tips
Cooking
time (min.)
Breast fillet
Place skin side up
20 – 25
Drumstick
Place thickest part to outside of the steaming tray
30 – 35
Thigh fillet
Place thickest part to outside of the steaming tray
18 – 20
HINTS AND TIPS FOR STEAMING DUMPLINGS
•
Fresh or frozen dumplings and savoury buns can be steamed perfectly in your
Solis Rice Cooker Duo Program. We recommend to place small pieces of baking
paper, or cabbage or lettuce leaves, under the dumplings to avoid sticking to the
steaming tray. Separate the dumplings before cooking.
•
Frozen dumplings will need approx. 8 – 10 minutes to cook, fresh dumplings
approx. 5 – 6 minutes.
101
SOLIS Rice Cooker engl._2014 16.03.14 21:32 Seite 102
▲ CLEANING AND MAINTENANCE
•
Switch off the appliance with the ON/OFF-switch
(press twice) and pull the
power plug from the socket. Remove the power cord from the appliance.
•
Wait until all parts have cooled down before removing the cooking bowl. Clean
the cooking bowl, the steaming tray and the condensed water tank with warm
dishwater and carefully wash and dry everything. The cooking bowl and steaming tray must be cleaned after every use for hygienic reasons.
•
Solis recommend not washing any accessory parts, except the steaming tray, in
the dishwasher, as the overly aggressive dish detergent as well as hot water temperatures might damage the surfaces of the cooking bowl or deform other parts.
•
The inside of the lid should be cleaned with a moist cloth and then be dried. This
also applies to the rubber lining around the lid. Always let lid and rubber lining
dry completely before closing the lid again.
•
Generally, do not use aggressive or abrasive detergents or steel sponges to clean
the accessory parts and the appliance itself, as they might damage the surface.
•
The appliance should only be wiped with a moist cloth and then be dried. Do
not use any alkaline detergents but only ever soft wipes and mild detergent.
•
The condensed water tank should be remounted to the appliance after cleaning.
Note:
•
In case rice got stuck to the bottom of the cooking bowl, fill the cooking bowl
with hot water, add a dash of mild detergent and let the cooking bowl stand for
10 minutes. Afterwards, you should be able to easily clean it.
Warning:
•
The connection adapter has to be removed from the appliance jack before
cleaning the Rice Cooker Duo Program. The appliance jack has to be completely dry in any case before restarting the appliance.
•
To prevent the surface of the appliance and accessory parts, never use alkaline
detergents but only ever soft wipe and a mild detergent.
•
Never use chemical agents, steel sponges, steel wool or scouring milk for
cleaning the appliance and accessory parts, as they might damage surfaces and
coatings.
•
Never immerse the appliance or the power cord in water or other liquids, as this
might lead to electric shock.
102
SOLIS Rice Cooker engl._2014 16.03.14 21:32 Seite 103
▲ STORAGE
1. Check, if the appliance is switched off and the power plug is pulled.
2. Check, if the appliance and all accessory parts are absolutely cold, clean and completely dry.
3. Place the accessory parts in the appliance and close the lid.
4. Keep the appliance standing upright at a dry, dark place, ideally in the original
packaging. Do not place anything on the appliance.
▲ T E C H N I C A L S P E C I F I C AT I O N S
Model-No.
JH-926SBD, type 817
Product description
Steamer and rice cooker
Voltage/Frequency
220-240V ~ / 50Hz
Output
640-760 Watt
Specifications
ca. 24 x 23 cm (H x Ø)
Weight
ca. 2,2 kg
103
SOLIS Rice Cooker engl._2014 16.03.14 21:32 Seite 104
▲ PROBLEMS AND HOW THEY CAN
B E S O LV E D
PROBLEM
SOLUTION
The Rice Cooker Duo
Program suddenly switches off
• Check, if the connection adapter resp. power plug is
properly fixed to the appliance jack resp. power outlet.
• The appliance has been overstrained or has overheated. Separate the appliance from the mains and
let it cool down for a few minutes. Then, plug it back
in and switch it on with the
button. Restart the
cooking process.
The rice is too dry/hard
after cooking.*
• If the rice is too dry or hard at the end of the cooking program, it can be softened by adding extra
water or additional cooking time. Depending on how
hard your rice still is, add 1/2 to 1 measuring cups of
water and stir thoroughly. Close the lid and switch
the „White Rice“ or „Brown Rice“ setting on again.
When the rice cooker switches to „Keep Warm“
mode, open the lid and stir the rice. Possibly, letting
the rice stand for 10 – 15 minutes in „Keep Warm“
mode, will do.
The rice is too moist after
cooking. *
• If the rice is too moist/wet at the end of the cooking
program, stir it with the scoop. By doing so, the
moistest part will be spread out at the bottom and
moisture is allowed to escape. Close the lid and let
the appliance in „Keep Warm“ mode for 10 – 30
minutes. Occasionally open the lid and stir the rice
to let excessive moisture escape.
* Because rice varieties differ in their composition and consistency, results may be different. These tips help you with
cooking ideal rice for you.
104
SOLIS Rice Cooker engl._2014 16.03.14 21:32 Seite 105
▲ DISPOSAL
EU 2002/96/EC
Directions for proper disposal of the product according to EU directive
2002/96/EU
At the end of its working life this equipment must not be disposed of as an household waste. It must be taken to special local community waste collection centres or
to a dealer providing this service. Disposing of electrical and electronic equipment separately avoids possible negative effects on the environment and human health deriving from an inappropriate disposal and enables its components to be recovered
and recycled to obtain significant savings in energy and resources. In order to underline the duty to dispose of this equipment separately, the product is marked with
a crossed-out dustbin.
Solis of Switzerland Ltd reserves the right to carry out technical and visual changes
and modifications to improve the product at any time.
S
SOLIS
OLIS H
HELPLINE:
ELPLINE:
044
0
44 8
874
74 6
64
41
14
4
((Only
Only ffor
or ccustomers
ustomers in
in Switzerland)
Switzerland)
TThis
his item
item stands
stands out
out due
due to
to iits
ts llong-life
ong-life ccycle
ycle aand
nd rreliability.
eliability. D
espite tthis
his tthough,
hough, iiff a m
alfunction
Despite
malfunction
eever
ver occurs,
occurs, simply
simply give
give us
us a call.
call. Often
Often a breakdown
breakdown can
can be
be easily
easily and
and quickly
quickly remedied
remedied
w
ith the
the right
right tip
tip or technique
technique without
without having
having to
to straight
straight away
away ssend
end o
ff tthe
he d
evice ffor
or rrepair.
epair.
with
off
device
W
ew
ill g
ive yyou
ou aallll tthe
he ad
vice aand
nd p
ractical ssupport
upport yyou
ou rrequire.
equire.
We
will
give
advice
practical
Keep the original packaging in a safe place so that you may use it in the event
that transportation or shipping of the product becomes necessary.
Solis of Switzerland Ltd
Solis-House • CH-8152 Glattbrugg-Zurich • Switzerland
Phone +41 44 874 64 54 • Fax +41 44 874 64 99
[email protected] • www.solis.ch • www.solis.com
105
SOLIS Rice Cooker niederl._2014 16.03.14 21:26 Seite 106
SOLIS Rice Cooker niederl._2014 16.03.14 21:26 Seite 107
▲ INHOUD
108 Beschrijving van het apparaat
110 Belangrijke veiligheidsvoorschriften
114 Voor ingebruikname
115 Rijst koken
118 De functie "Keep Warm"
118 Kooktabel voor rijst
119 Rijst variaties
121 Uitgesteld rijst koken met de functie "Delay Timer"
122 Gaar stomen
125 Stoomtabellen
128 Reiniging en onderhoud
129 Opbergen
129 Technische gegevens
130 Problemen en hoe ze verholpen kunnen worden
131 Verwijdering / Solis Helpline
107
SOLIS Rice Cooker niederl._2014 16.03.14 21:26 Seite 108
▲ B E S C H R I J V I N G VA N H E T A P PA R A AT
A
Vastgeschroefde deksel met ontgrendelingsknop en handgreep
Om de deksel te openen, drukt u op de ontgrendelingsknop en tilt u de
deksel aan de handgreep op.
B
Stoomuitlaat
C
Opvangbak voor condensaat
D
Uitneembare binnenpan met anti-aanbaklaag
Voorkomt dat de rijst aanbakt.
E
RVS stoomschaal
Ideaal voor het stomen van groenten, vis, gevogelte of vlees.
F
Kunststof pollepel
G
Maatbeker
H
Afneembaar netsnoer (niet afgebeeld)
Voor het aangenaam serveren op tafel en voor eenvoudig bewaren.
B E D I E N I N G S PA N E E L :
I
Instelling "Delay Timer"
voor het uitgesteld koken van rijst.
J
Display met weergave van de laatste 12 kookminuten bij witte rijst
of 25 kookminuten bij bruine rijst
of de tijdsduur in de "Keep Warm" stand
of de instelling voor het uitgesteld koken.
K
AAN/UIT knop
L
Instelling "White Rice"
voor het koken van witte rijst.
M Instelling "Brown Rice"
voor het koken van bruine rijst of rijstsoorten met een langere kooktijd.
N
Instelling "Steam"
voor het stomen van groenten, vis, gevogelte of vlees.
O
Instelling "Keep Warm"
Deze instelling schakelt naar iedere functie automatisch aan, zodra de kooktijd afgelopen is. Daarnaast kan de warmhoudfunctie ook apart worden ingeschakeld.
Alle zojuist genoemde knoppen (behalve de
knop) beschikt over een
functieverlichting die tijdens gebruik oplicht.
Ook is er een functieverlichting "Cooking", die inschakelt zodra het water
verwarmd wordt.
108
SOLIS Rice Cooker niederl._2014 18.03.14 08:43 Seite 109
A
B
A
E
D
C
D
I
J
K
D
E
G
F
L
M
N
O
109
SOLIS Rice Cooker niederl._2014 16.03.14 21:26 Seite 110
▲ BELANGRIJKE
VEILIGHEIDSVOORSCHRIFTEN
Lees voor het gebruik van uw Solis Rice Cooker Duo Program deze gebruiksaanwijzing aandachtig door, zodat u uw apparaat goed leert kennen en
goed kunt bedienen. Wij raden u aan om deze gebruiksaanwijzing goed te
bewaren en bij eventuele overdracht van het apparaat deze ook te overhandigen aan de nieuwe eigenaar.
Voor uw eigen veiligheid, dient u bij het gebruik van elektrische apparatuur
de volgende veiligheidsmaatregelen in acht te nemen:
1. Om een stroomstoot te vermijden, mogen het apparaat noch het snoer en de
netstekker of verbindingstekker met water of andere vloeistoffen in aanraking
komen. Water kan in de behuizing komen en het apparaat beschadigen! Mocht
het apparaat, het snoer of de stekker of verbindingstekker met een vloeistof in
aanraking komen, trek dan met droge rubberen handschoenen direct de stekker uit het stopcontact.
2. Controleer voor ingebruikname of de op het apparaat aangegeven spanning
overeenkomt met uw netspanning.
3. Doe altijd eerst de verbindingsstekker in de aansluiting op het apparaat, voordat u de stekker in het stopcontact doet. Zet het apparaat daarna pas aan. De
aansluiting op het apparaat en de verbindingstekker moeten volledig droog zijn,
voordat u beide aansluit. Raakt nooit de netstekker aan met natte of vochtige
handen.
4. De rijstkoker/stoompan alleen op een stabiele, droge en hittebestendige ondergrond gebruiken. Ook niet onder bovenkasten, planken of andere stoomgevoelige materialen gebruiken.
5. Laat het snoer niet over de tafelranden hangen om te voorkomen dat het apparaat er vanaf getrokken wordt. Zorg ervoor dat het apparaat zelf niet met hete
oppervlakten, zoals kachels of radiatoren in aanraking kan komen. Rol het
snoer altijd volledig uit, voordat u de stekker in het stopcontact doet.
6. Houd het apparaat uit de buurt van hete lucht, hete ovens, apparaten die
warmte afgeven of andere warmtebronnen. Gebruik het apparaat nooit op een
nat of warm oppervlak. Plaats het apparaat niet in de buurt van vocht, hitte of
open vuur. Houd het apparaat uit de buurt van bewegende delen of andere apparaten.
7. Til het apparaat niet aan het snoer op en trek niet aan het snoer. Plaats niets op
het snoer.
8. Wij raden het af om met dit apparaat met een verlengsnoer te gebruiken. Plaats
het apparaat niet direct onder een stopcontact.
110
SOLIS Rice Cooker niederl._2014 16.03.14 21:26 Seite 111
9. Haal altijd de stekker uit het stopcontact, als u het apparaat niet gebruikt, het
onbeheerd achterlaat of als het schoongemaakt moet worden. We raden het gebruik van een aardlekschakelaar aan, om een extra zekerheid bij het gebruik van
elektrische apparatuur te waarborgen. Het is raadzaam om een veiligheidsschakelaar van maximaal 30 mA te gebruiken. Vakkundig advies vindt u bij uw
elektricien.
10. Voer geen wijzigen uit aan het apparaat, het snoer, de stekker of de accessoires.
11. Bij onjuist gebruik bestaat letselgevaar!
12. Wees voorzichtig: De temperaturen van de onderdelen en oppervlakten van het
apparaat kunnen tijdens het koken en nog enige tijd daarna zeer heet zijn.
13. Grijp nooit naar een apparaat dat in het water gevallen is. Haal eerst de stekker
uit het stopcontact, voordat u het apparaat uit het water haalt. Neem deze niet
weer in gebruik, totdat u het apparaat bij Solis of bij een door Solis erkend servicepunt op zijn werking en gebruiksveiligheid heeft laten controleren.
14. Plaats het apparaat nooit zo, dat in het in water zou kunnen vallen (bijvoorbeeld
in de buurt van een gootsteen).
15. Plaats het apparaat zo, dat er geen direct zonlicht op valt.
16. Stop nooit scherpe of spitse objecten en gereedschap in de openingen van het
apparaat. Het apparaat kan beschadigd worden, met (als gevolg) gevaar voor
stroomstoten!
17. Schud en verplaats het apparaat niet zolang deze gebruikt wordt.
18. Gebruik het apparaat alleen zoals in deze gebruiksaanwijzing is beschreven. Gebruik alleen de meegeleverde accessoires. Het gebruik van verkeerde accessoires
kan tot beschadiging van het apparaat leiden.
19. Het apparaat is alleen geschikt voor gebruik thuis en niet voor commercieel gebruik.
20. Het apparaat is niet geschikt voor buiten gebruik. Gebruik het apparaat niet op
vaartuigen of boten.
21. Controleer uw rijstkoker/stoompan voor ieder gebruik.
22. Om een stroomstoot te vermijden, dient u het apparaat niet meer te gebruiken
als het snoer of de stekker beschadigd is of als het apparaat andere storingen
vertoont, gevallen is of enigszins beschadigd is. Voer nooit zelf reparaties uit,
maar geef het apparaat af bij Solis of een van de door Solis erkende servicepunten, om het te laten controleren, repareren of mechanisch en elektrisch in
orde te maken.
111
SOLIS Rice Cooker niederl._2014 16.03.14 21:26 Seite 112
23. Personen met beperkte psychische, sensorische of intellectuele capaciteit (ook
kinderen) of onwetende en onervaren personen mogen de rijstkoker/stoompan
niet gebruiken, tenzij door een bevoegd persoon toezicht wordt gehouden of
diegene exact uitlegt hoe het apparaat gebruikt dient te worden.
24. Er moet op worden toegezien, dat kinderen niet met het apparaat spelen.
25. Controleer of de Solis Rice Cooker Duo Program goed is opgebouwd, voordat
u deze gebruikt. Hoe u dit precies moet doen, vindt u in deze gebruiksaanwijzing.
26. Bedek nooit de luchtopeningen zolang het apparaat in gebruik is.
27. Zet het apparaat altijd eerst uit met de AAN/UIT knop , voordat u het apparaat verplaatst of uit elkaar haalt. Haal daarna de stekker uit het stopcontact en
wacht tot het apparaat volledig is afgekoeld. Dit geldt ook als het apparaat niet
wordt gebruikt.
28. Controleer altijd of de binnenkant van het apparaat, de kookplaat en de buitenkant van de binnenpan volledig schoon en droog zijn, voordat u het apparaat gaat gebruiken.
29. Zorg dat het apparaat schoon blijft. Kijk hiervoor naar het hoofdstuk "Reiniging
en onderhoud" in deze gebruiksaanwijzing. Behalve de stoomschaal mogen de
overige verwijderbare onderdelen niet in de afwasmachine.
30. Bewaar nooit explosieve of ontvlambare substanties zoals spuitbussen (deodorant sprays of haarspray, etc.) in het apparaat.
31. Plaats de rijstkoker altijd zo, dat de stoomuitlaat in de deksel niet in uw richting
wijst. Wees altijd voorzichtig met het optillen van de deksel, zodat u zich niet aan
de hete damp brandt.
32. Gebruik met dit apparaat alleen de meegeleverde, uitneembare binnenpan en
eventueel aanvullend de stoomschaal. Plaats nooit een andere pan of een andere schaal in de rijstkoker. De binnenpan mag niet in andere kokers gebruikt
worden en niet direct op het fornuis / gasfornuis worden geplaatst.
33. Gebruik de binnenpan van de Rice Cooker Duo Program niet als deze beschadigd of ingedeukt is. Een vervangende binnenpan is verkrijgbaar bij de betere
speciaalzaak of direct bij Solis.
34. Plaats niets op de deksel als het apparaat in gebruik is of opgeborgen is. Bedek
het apparaat ook nooit tijdens het koken of de opwarmfase.
35. Gebruik nooit chemische, bijtende, agressieve of schurende schoonmaakmiddelen of schuursponsjes, omdat hierdoor de coating van de binnenpan en het
oppervlak van de behuizing kan beschadigen. Gebruik alleen een zachte doek
en een mild schoonmaakmiddel om het apparaat te reinigen.
36. Doe nooit de stekker van het apparaat in het stopcontact en zet het apparaat
nooit aan als de binnenpan niet in het apparaat zit.
112
SOLIS Rice Cooker niederl._2014 16.03.14 21:26 Seite 113
37. Doe nooit eten of vloeistoffen direct in de behuizing van de rijstkoker/stoompan.
Alleen de uitneembare binnenpan van de Rice Cooker Duo Program en de stoomschaal mogen met het eten en met vloeistoffen in contact komen. De stoomschaal mag alleen in combinatie met de binnenpan gebruikt worden.
38. Gebruik het apparaat niet, als er geen eten of vloeistoffen in de uitneembare binnenpan zitten.
39. Raak geen hete oppervlakken aan als u de deksel wilt openen of de binnenpan
wilt verwijderen. Gebruik dan altijd ovenwanten of pannenlappen. Open de deksel altijd voorzichtig, zodat de stoom niet naar u gericht is en u zich niet brandt.
40. Let op dat het condenswater van de deksel niet in de behuizing van het apparaat loopt, maar alleen in de binnenpan.
41. Wees extreem voorzichtig als er heet eten of hete vloeistoffen in het apparaat
zitten. Verplaats het apparaat niet tijdens gebruik. Raak de hete oppervlakken
nooit met blote handen aan.
42. Sluit het apparaat altijd met deksel af tijdens het koken. Ook als u het apparaat
opbergt, dient de deksel altijd gesloten te zijn. Plaats niet of op het apparaat.
43. Gebruik alleen houten of hittebestendige kunststof keukengerei om krassen op
de anti-aanbaklaag van de binnenpan te voorkomen.
44. Controleer of de binnenpan op een correcte wijze in het apparaat zit, voordat
u met het koken begint. Aan de buitenzijde van het apparaat moet de opvangbak
voor het condenswater juist zijn aangebracht.
45. De rijst mag bij een ingeschakelde warmhoudfunctie niet langer dan 10 uur in
de binnenpan blijven zitten.
46. Zet, voordat u gaat schoonmaken, het apparaat altijd uit met de AAN/UIT knop
(2x drukken), haal de stekker uit het stopcontact en de verbindingstekker
uit het aansluitpunt op het apparaat en verwijderen het snoer. Dan alle onderdelen van het apparaat volledig laten afkoelen. Het aansluitpunt op het apparaat moet eerst zorgvuldig droog gemaakt worden, voordat u het apparaat opnieuw in gebruik neemt.
47. Houd een minimale afstand van 20 cm tussen het apparaat en de wanden, gordijnen of andere warmte- en stoomgevoelige materialen en objecten aan en zorg
ervoor dat de lucht over en om het apparaat kan circuleren.
Belangrijk: Rol het netsnoer voor gebruik volledig uit. Als u het netsnoer in de
binnenpan wilt opbergen, dan moet deze eerst volledig afgekoeld zijn.
113
SOLIS Rice Cooker niederl._2014 16.03.14 21:26 Seite 114
▲ VOOR INGEBRUIKNAME
•
Verwijder alle verpakkingsmateriaal en stickers, voordat u uw Solis Rice Cooker
Duo Program voor het eerst gaat gebruiken. Reinig de binnenpan, de RVS
stoomschaal en de kunststof pollepel met een mild schoonmaakmiddel en
warm water en spoel alles zorgvuldig af. Droog alle onderdelen.
- De deksel dient u met een vochtige doek af te nemen.
- Controleer of de opvangbak voor het condenswater op een juiste wijze op het
- apparaat is aangebracht.
Verwijderen: Opvangbak aan de onderkant ophoog tillen en aan de bovenkant
uit de houder halen.
Plaatsen: Eerst de naden aan de bovenkant links en rechts in de houder schuiven en dan de onderkant tegen het apparaat aandrukken.
114
SOLIS Rice Cooker niederl._2014 16.03.14 21:26 Seite 115
▲ RIJST KOKEN MET DE INSTELLING
"WHITE RICE" OF "BROWN RICE"
1. Meet de gewenste hoeveelheid rijst af met de meegeleverde maatbeker voor rijst (zie de kooktabel voor
rijst). De maatbeker moet altijd vol en afgestreken en
niet opgehoopt zijn (zie afbeelding).
•
Opmerking: De rijstmaatbeker van de Solis Rice Cooker Duo Program komt niet overeen met een standaard
maatbeker. Een Rice Cooker Duo Program maatbeker
komt overeen met 160 g ongekookte rijst. Mocht u uw maatbeker kwijtraken,
dan kunt u ook een andere maatbeker gebruiken. Echter, u moet de hierboven
vermelde hoeveelheid afmeten en nooit de maximaal aanduiding van 6 maatbekers in de binnenpan overschrijden.
2. Doe de afgemeten hoeveelheid rijst in een zeef en was de rijst met koud water
om aangehecht zetmeel te verwijderen. Uw rijst is klaar om te koken, zodra het
water helder wegloopt. Goed laten uitlekken.
3. Doe de gewassen rijst in de binnenpan. De
rijst moet gelijkmatig over de bodem van de
binnenpan worden verdeeld en niet aan een
kant opgehoopt zijn.
✓ ✗
4. Voeg hier water aan toe met de meegeleverde maatbeker. Als
u 2 maatbeker tijd in de binnenpan heeft gedaan, vul dan vervolgens het water tot de lijn "2" in de binnenpan aan. Als u
drie maatbekers rijst gebruikt, dan moet de waterstand tussen
de lijnen 2 en 4 komen te staan. Als u 4 maatbekers rijst gebruikt, dan moet de waterstand tot de lijn "4" komen, enzovoort. U kunt maximaal 6 maatbekers rijst koken. De volgende tabel geeft u informatie over de
te verwachte hoeveelheid rijst en de kooktijd.
K O O K TA B E L V O O R R I J S T
Ongekookte rijst
(maatbeker)*
Koud
leidingwater tot
de markering
Gekookte rijst
ca. (maatbeker)*
Kooktijd
witte rijst
ca. (in minuten)
Kooktijd
bruine rijst
ca. (in minuten)
2
2
4
30 - 35
60 - 65
3
3
6
32 - 37
65 - 70
4
4
8
35 - 42
70 - 75
5
5
10
40 - 45
75 - 80
6
6
12
42 - 47
80 - 85
* met de Rice Cooker Duo Program maatbeker afgemeten
115
SOLIS Rice Cooker niederl._2014 16.03.14 21:26 Seite 116
5. Controleer of de binnenpan aan de buitenkant, op de bodem en op de zijkanten schoon is, voordat u deze in het apparaat zet, zodat deze goed contact kan
maken met de kookplaat aan de binnenkant.
VOORZICHTIG:
1. Voor het koken moet u altijd de bodem van de binnenpan en het oppervlak
van de kookplaat reinigen. Let daarbij op dat er geen rijstkorrels in het apparaat of op de kookplaat liggen.
2. Draai de binnenpan iets van links naar rechts in het apparaat, om er zeker
van te zijn dat deze vlak op de kookplaat staat.
3. De binnenpan moet recht in de rijstkoker geplaatst worden, anders kunt u het
apparaat niet aanzetten en kan deze beschadigd worden.
Om het gevaar van stroomstoten te verminderen, mag er alleen in de uitneembare binnenpan gekookt worden. Doe het apparaat nooit in water.
6. Sluit de deksel, zodat deze goed vastzit.
7. Doe de verbindingstekker in het aansluitpunt op het apparaat. Doe dan de stekker in
een passend stopcontact.
8. Druk nu op de AAN/UIT knop
om het apparaat aan te zetten. Alle functieverlichting lichten na elkaar kort op. In de display verschijnen rode streepjes. Druk dan op de "White Rice" of de "Brown Rice"
knop (afhankelijk van welke soort rijst u gaat koken) om de instelling te activeren. De functieverlichting van de knop "White Rice" of "Brown Rice" licht nu
rood op. Zodra het kookproces gestart worden, dan licht ook de functieverlichting bij "Cooking" rood op en in de display lichten de streepjes afwisselt in een
vierkant op.
9. Als het kookproces bijna klaar is, dan verschijnt in de display de nog resterende
kooktijd en deze telt af: de laatste 12 minuten bij witte rijst en de laatste 25 minuten bij bruine rijst.
10. Zodra het kookproces beëindigd is, klinkt er een geluidssignaal die aangeeft dat
de rijst klaar is en de Solis Rice Cooker Duo Program schakelt automatisch in de
warmhoudstand. De functieverlichting "Keep Warm" licht op. In de display verschijnt het aantal uren dat het apparaat zich in de "Keep Warm" stand bevindt.
Het begint met het getal "0".
11. Open voorzichtig de deksel en roer de rijst met de meegeleverde pollepel door.
Sluit de deksel weer en laat de rijst nog 10 – 15 minuten in de warmhoudstand
rusten, voordat u deze gaat serveren. Hierdoor wordt het nog eventueel overgebleven vocht opgezogen en wordt de rijst luchtiger.
116
SOLIS Rice Cooker niederl._2014 16.03.14 21:26 Seite 117
12. Als de instelling "White Rice" of "Brown Rice" afgesloten is, dan schakelt het
apparaat automatisch over naar de "Keep Warm" stand gedurende 10 uur.
13. Als u geen warme rijst meer nodig heeft, druk dan twee keer op de AAN/UIT
knop
om het apparaat uit te schakelen en haal de stekker uit het stopcontact. Laat het apparaat afkoelen, voordat u deze gaat schoonmaken.
Tips:
•
Open de deksel pas als de rijst klaar is (d.w.z. als u het eindsignaal heeft gehoord).
•
Om de instelling rijst koken of warm houden te stoppen, hoeft u alleen maar de
AAN/UIT knop
twee keer in te drukken.
•
Waarom is de kooktijd van bruine rijst ("Brown Rice") langer? Omdat er extra
zemelen rondom de rijstkorrels van bruine rijst zitten, hebben deze over het algemeen een langere kooktijd nodig. De instelling "Brown Rice" houdt hier rekening mee en is zo ontworpen dat de warmte hier precies op afgestemd
wordt en de bruine rijst optimaal gekookt wordt. Hierbij hoort ook dat de rijstkoker niet direct heel warm wordt, maar dat de rijstkorrels in het begin juist bij
lage temperatuur eerst kunnen "weken", zodat het volle aroma behouden blijft.
Belangrijk:
•
Vloeistoffen altijd in de binnenpan doen, voordat u op de AAN/UIT knop
drukt.
•
Tijdens gebruik niet op de functieknoppen drukken, om zo de voortgang van het
koken niet te verstoren.
•
Gebruik altijd kookgerei van hout of hittebestendig kunststof, zodat de anti-aanbaklaag van de binnenpan niet bekrast wordt.
•
Controleer altijd of de binnenpan juist, d.w.z. rechtop in het apparaat, geplaatst
is, voordat u het kookproces start.
Waarschuwing:
•
Zorg ervoor dat het apparaat uitgeschakeld is en de stekker uit het stopcontact
is gehaald, voordat u de binnenpan uit het apparaat haalt.
•
Gebruik altijd ovenwanten of pannenlappen als u de deksel opent of de binnenpan uit het apparaat haalt.
•
Plaats de stoomuitlaat van de deksel altijd in een richting die van u afstaat, zodat u zich niet kan verbranden aan het uittredende stoom.
•
Open de deksel altijd voorzichtig. Open deze ook niet in uw richting, zodat u zich
niet kan verbranden aan de uittredende stoom.
•
Sluit het apparaat alleen aan op een geaard stopcontact, om een stroomstoot
te vermijden.
117
SOLIS Rice Cooker niederl._2014 16.03.14 21:27 Seite 118
•
Gebruik het apparaat alleen samen met de meegeleverde, uitneembare binnenpan.
•
Gebruik de binnenpan niet meer indien deze beschadigd of verbogen is. Een
nieuwe Rice Cooker Duo Program binnenpan van Solis is verkrijgbaar bij de betere speciaalzaak of direct bij Solis.
▲ DE FUNCTIE "KEEP WARM"
•
Uw Solis Rice Cooker Duo Program schakelt automatisch naar de "Keep Warm"
functie (warmhoudstand), als de instelling "White Rice", "Brown Rice" of
"Steam" klaar is. De "Keep Warm" stand blijft tot 10 uur actief. Na 10 uur schakelt het apparaat zich uit. In de display wordt het aantal uren dat het apparaat
reeds in de warmhoudstand staat aangegeven. Het eerste aangegeven getal is
"0".
•
U kunt de "Keep Warm" functie ook onafhankelijk van de andere programma's
aanzetten.
•
Om de "Keep Warm" stand uit te zetten drukt u op de AAN/UIT knop
.
▲ K O O K TA B E L V O O R R I J S T
•
Voor de informatie die volgt is de Rice Cooker Duo Program maatbeker gebruikt.
•
Opmerking: De rijstmaatbeker van de Solis Rice Cooker Duo Program komt niet
overeen met een standaard maatbeker. Een Rice Cooker Duo Program maatbeker komt overeen met 160 g ongekookte rijst. Mocht u uw maatbeker kwijtraken, dan kunt u ook een andere maatbeker gebruiken. Echter, u moet de hierboven vermelde hoeveelheid afmeten en nooit de maximaal aanduiding van
6 maatbekers in de binnenpan overschrijden.
K O O K TA B E L V O O R D E R I J S T
Verhouding rijst:water bij witte/bruine rijst
Ongekookte rijst
(maatbeker)*
Koud
leidingwater tot
de markering
Gekookte rijst
ca. (maatbeker)*
Kooktijd
witte rijst
ca. (in minuten)
Kooktijd
bruine rijst
ca. (in minuten)
2
2
4
30 - 35
60 - 65
3
3
6
32 - 37
65 - 70
4
4
8
35 - 42
70 - 75
5
5
10
40 - 45
75 - 80
6
6
12
42 - 47
80 - 85
* met de Rice Cooker Duo Program maatbeker afgemeten
118
SOLIS Rice Cooker niederl._2014 16.03.14 21:27 Seite 119
▲ R I J S T VA R I AT I E S
•
U kunt tussen vele verschillende rijstsoorten kiezen en deze ook anders bereiden.
Wij geven u graag een overzicht.
HARTIGE RIJST
•
Bereid de rijst in de Rice Cooker Duo Program zoals beschreven staat. Gebruik
in plaats van water dezelfde hoeveelheid kippen-, rundvlees-, of groentebouillon of visbouillon.
ZOETE RIJST
•
Bereid de rijst in de Rice Cooker Duo Program zoals staat beschreven. Vervang
de helft van de aangegeven hoeveelheid water met appel-, sinasappel- of ananassap. Let op: Wij raden het af om rijstepudding in de Rice Cooker Duo Program te bereiden, omdat dit aan de bodem van de kookpan kan kunnen aanbranden.
SAFFRAAN RIJST
•
Voeg 1/4 theelepel saffraanpoeder of 2 saffraandraadjes aan de rijst toe per twee
cups water. Volg de hoeveelheden die voor witte rijst in de tabel worden aangegeven. Roer de rijst goed door.
ARBORIO OF CARNAROLI RIJST VOOR RISOTTO
•
Arborio of carnaroli rijst komt uit Italië en is een glanzende ronde rijstkorrel die
zeer geschikt is voor het bereiden van risotto. Houdt voor de breiding van de
risottorijst de hoeveelheden aan zoals deze aangegeven worden voor bruine rijst
in de rijsttabel.
JASMIJN RIJST
•
Jasmijn rijst is een geurende lange rijstkorrel. Houd hiervoor de tabel voor witte
rijst aan.
B A S M AT I R I J S T
•
Basmati rijst is aromatische lange rijstkorrel. Houd hiervoor de tabel voor witte
rijst aan.
WILDE RIJST
•
Het wordt afgeraden om alleen wilde rijst in de Rice Cooker Duo Program te koken, omdat hiervoor een bijzonder grote hoeveelheid water nodig is. Desalniettemin kan het goed met witte of bruine rijst vermengt worden.
119
SOLIS Rice Cooker niederl._2014 16.03.14 21:27 Seite 120
QUINOA
•
Quinoa is een Zuid-Amerikaanse rijstsoort die rijk is aan proteïnen en die een luchtige, romige en korrelige textuur heeft. Gebruik de tabel voor bruine rijst.
SUSHI RIJST
•
Sushi rijst is een kleikorrelige rijst die veel in de Japanse keuken gebruikt wordt.
Gebruik hiervoor de tabel voor bruine rijst.
Tip:
•
120
Om de rijst losser te koken, voegt u iets meer water toe aan de binnenpan. Als
u juist een vastere rijst wilt, dan voegt u wat minder water toe.
SOLIS Rice Cooker niederl._2014 16.03.14 21:27 Seite 121
▲ UITGESTELD RIJST KOKEN MET DE
F U N C T I E " D E L AY T I M E R "
•
Dankzij de functie "Delay Timer" kunt u het aantal uren ingeven waarna de rijst
gekookt en gaar dient te zijn. Uw rijstkoker wordt dan op de daarbij passende
tijd automatisch ingeschakeld, zodat uw rijst op de gewenste tijd klaar is. U kunt
dus 's morgens de rijst en het water in de binnenpan doen – en als u dan 's
avonds thuiskomt, dan staat er een lekkere, gare rijst voor u klaar.
Volg de volgende stappen:
•
Was de rijst en doe dit met de juiste hoeveelheid water in de binnenpan. Volg
daarbij de beschrijving op pagina 115/116 van punt 1 tot 7.
•
Zet het apparaat aan met de AAN/UIT knop
•
Druk nu op de knop "Delay Timer". In de display verschijnt het getal "1" voor
een bereiding die over 1 uur klaar is. Met iedere keer dat u op de knop drukt,
wordt het getal 1 cijfer hoger. U kunt een urental tussen 1 en 15 invoeren voor
de functie "White Rice" en tussen 2 en 15 als u vervolgens de kiest voor de
functie "Brown Rice".
•
Als u het gewenste urental in de display opgelicht ziet, dan drukt u weer op de
knop "White Rice" of "Brown Rice", afhankelijk van de te koken rijstsoort.
•
In de display tellen de uren af. Het apparaat schakelt automatisch naar de kookstand, zodra het juiste tijdstip is gekomen. De functieverlichting van "Cooking"
licht op en de displayaanduiding toont wisselende streepjes.
•
Zoals bij de normale voortgang wordt bij het koken van witte rijst de laatste
12 minuten op de display afgeteld en bij bruine rijst de laatste 25 minuten.
•
Zodra de voortgang is afgelopen hoort u een geluidsignaal en schakelt het apparaat automatisch voor 10 uur over naar de warmhoudstand "Keep Warm".
In de display wordt het aantal uren weergegeven dat de warmhoudstand al geactiveerd is. Het eerst aangegeven getal is "0".
•
U kunt het beste de rijst nogmaals goed omroeren met de meegeleverde pollepel, voordat u deze gaat serveren, zodat het overgebleven restvocht goed verdeeld wordt.
•
Zodra u geen warme rijst meer nodig heeft, druk u twee keer op de AAN/UIT
knop
om het apparaat uit te schakelen en haalt u het snoer uit de aansluiting.
•
Laat het apparaat afkoelen, voordat u deze gaat schoonmaken.
.
121
SOLIS Rice Cooker niederl._2014 16.03.14 21:27 Seite 122
▲ GAAR STOMEN MET
DE FUNCTIE "STEAM"
•
Levensmiddelen die gestoomd worden behouden de meeste voedingstoffen en
vitamines en zijn daarom ideaal voor een gezonde voeding. Om gaar te stomen
legt u de levensmiddelen in de RVS stoomschaal. In de binnenpan doet u bouillon of water en u sluit de deksel. Laat de deksel gedurende het gehele kookproces gesloten. Als u de deksel onnodig opent, dan verdwijnt de damp en wordt
de kooktijd verlengd.
Volg de volgende stappen:
1. Giet 3 Rice Cooker Duo Program maatbekers water of bouillon in de binnenpan. Afb. 1
2. Plaats de aan de buitenzijde droge binnenpan in het apparaat. Afb. 2
3. Plaats de levensmiddelen die u wilt gaar
stomen in de RVS stoomschaal. Afb. 3
Afb. 1
Tip: Mochten de levensmiddelen zo klein zijn dat ze
door de gaatjes van de stoomschaal kunnen vallen
(bijv. erwten), dan kunt u op de bodem van de schaal
een stuk bakpapier leggen. Prik hierin kleine gaatjes en
plaats vervolgens de levensmiddelen hierop. Let op:
het bakpapier mag niet over de rand van de stoomschaal komen.
Afb. 2
Afb. 3
Let op: Vul de stoomschaal slechts tot zover, dat de
deksel nog perfect kan sluiten.
4. Plaats de stoomschaal in de binnenpan. Afb. 4
5. Sluit de deksel, zodat deze vergrendeld wordt. Afb 5
6. Stop de verbindingstekker in de aansluiting op het apparaat en doe vervolgens de stekker in een juist stopcontact.
Afb. 6
7. Druk op de AAN/UIT knop
om
het apparaat aan te zetten. Druk
dan op de knop "Steam" om de
stoominstelling te activeren. De rode
functieverlichting licht op. Op de
display knippert het getal "5" voor
een stoomtijd van 5 minuten. Druk
122
Afb. 5
Afb. 4
Afb. 6
SOLIS Rice Cooker niederl._2014 16.03.14 21:27 Seite 123
nogmaals op de knop "Steam". Met iedere keer dat u drukt worde de stoomtijd met 1 minuut verhoogt. U kunt maximaal 30 minuten instellen. Daarna
springt de display weer terug naar "5".
8. Zodra u de tijd ingesteld heeft, d.w.z. de "Steam" knop niet meer indrukt, dan
klikt een geluidsignaal. De aanduiding op de display knippert niet meer en geeft aan dat de instelling bevestigd is en het stomen begint. De functieverlichting
bij "Cooking" licht op.
9. Zodra het water in de binnenpan het kookpunt heeft bereikt, telt de displayaanduiding in intervallen van 1 minuut af.
10. Als het gaar stomen klaar is, dan klinkt er een geluidsignaal die aangeeft dat het
klaar is en het apparaat schakelt automatisch over naar de "Keep Warm" stand.
Ook hier geeft de display weer hoe lang het apparaat in de warmhoudstand
staat.
11. Open de deksel en verwijder met ovenwanten voorzichtig de levensmiddelen of
de stoomschaal. Laat het apparaat afkoelen, voordat u deze gaat schoonmaken.
Opmerking:
•
Laat de deksel gedurende het gehele kookproces gesloten. Als u de deksel onnodig opent, dan verdwijnt de stoom en wordt de kook- en gaartijd verlengd.
•
Tijdens het stomen moet er altijd water in de binnenpan zitten.
•
Mocht er tijdens het koken geen water meer in de binnenpan zitten, dan schakelt het apparaat automatisch over naar de „Keep Warm“ stand.
•
Indien gewenst kan tijdens het koken hete vloeistof toegevoegd worden.
•
Mocht het te stomen eten nog niet helemaal gaar zijn, voeg dan wat water of
bouillon toe aan de binnenpan en start de "Steam" functie nogmaals.
•
De "Keep Warm" functie blijft ook na het stomen nog 10 uur aan staan. Toch
raden wij aan om het gestoomde eten zo snel mogelijk na het stomen te nuttigen, omdat de levensmiddelen dan nog de meeste vitamines en voedingstoffen
bevatten.
Waarschuwing:
•
Open de deksel altijd uiterst voorzichtig, zodat u zich niet aan de uittredende
stoom brandt.
123
SOLIS Rice Cooker niederl._2014 16.03.14 21:27 Seite 124
GECOMBINEERD RIJST KOKEN EN STOMEN
•
Om energie te besparen, kunt u ook tegelijkertijd rijst koken en groenten, gevogelte of vlees of vis gaar stomen.
•
Volg de stappen zoals beschreven staat op pagina 115 in het hoofdstuk "Rijst
koken met de instelling "White Rice" of "Brown Rice".
•
Plaats tegelijkertijd de stoompan met de te stomen levensmiddelen in de binnenpan.
•
Sluit de deksel en schakel de functie "White Rice" of "Brown Rice" in. Let op
de tijd. Bij de functie "White Rice" start de kooktijd redelijk snel, zodra het water warm is. Bij de functie "Brown Rice" duurt dat wat langer, omdat de bruine
rijst eerst een tijdje weekt.
•
Houd de tijd in de gaten en controleer voordat de tijd verstreken is of het te stomen eten al goed gaar is. De kooktabel voor groenten op pagina 125 en de andere kooktabellen geven u een aanknooppunt voor hoe lang de kooktijd ongeveer is.
•
Als het te stomen eten goed gaar is, haal de stoomschaal dan voorzichtig uit het
apparaat. Let op: de stoomschaal is heet en mag alleen met ovenwanten aangeraakt worden! Sluit daarna direct de deksel weer, zodat de rijst verder kan koken en niet te veel stoom verloren gaat.
•
Zodra de rijst in de de "Keep Warm" stand gaat, kunt u indien gewenst de
stoomschaal terug plaatsen in de rijstkoker, zodat het eten nog een keer opgewarmd wordt.
T I P S V O O R H E T S T O M E N VA N G R O E N T E N
•
Kleine stukjes worden sneller gaar dan grote stukken. Alle groenten moeten in
even grote stukken gesneden worden, zodat ze gelijkmatig gaar worden.
•
Zowel verse als ook bevroren groenten kunnen gestoomd worden. Als u bevroren groenten wilt stomen, dan hoeven deze niet eerst ontdooid te worden.
•
De grootte en consistentie van de groenten en ook uw persoonlijke smaak bepalen hoe lang de kooktijd moet zijn. Wilt u hele zachte groenten, dan moet u
de kooktijd verhogen.
•
De vloeistof mag nooit zo hoog staan dat het met de stoomschaal in aanraking
komt. Anders kan er niet goed worden gestoomd.
•
Mocht de aangegeven kooktijd meer dan 30 minuten zijn, controleer dan na
30 minuten de waterstand. Vul indien nodig de vloeistof bij en start en de
"Steam" functie met de resterende tijd.
124
SOLIS Rice Cooker niederl._2014 16.03.14 21:27 Seite 125
K O O K TA B E L V O O R G R O E N T E N
Groenten
Suggesties en tips
Hoeveelheid Kooktijd (min.)
Artisjokken
Verwijder harde buitenste bladeren en
de stengel.
2 middelgrote
30 - 35
Bonen
Doppen, heel laten.
250 g
13 - 15
Broccoli
In roosjes verdelen.
250 g
8 - 10
Erwten
Als u ze vers bereidt dan schillen.
Bevroren.
250 g
250 g
8 - 10
4-5
Wortelen
In plakken of schrijven snijden.
3 middelgrote
14 - 16
Aardappel
In zijn geheel stomen.
4 (150 – 180 g)
35 - 40
Nieuwe
aardappel
In zijn geheel stomen.
6 (ieder 125 g)
25 - 30
Kikkererwten
12 uur laten weten.
1 cup gedroogde
40 - 45
Kool
In grote stukken verdelen.
500 g
10 - 12
Koolraap
Schillen en in stukken snijden
(stukken van ca. 50 g).
350 g
15 - 17
Pompoen
In stukken snijden.
300 g
20 - 25
Baby pompoen
Topjes verwijderen en verkleinen.
350 g
8
Maïs
Stoom hele maïskolven.
2 kleine kolven
20 - 22
Pepers
In schijven snijden, klokhuis verwijderen.
3 middelgrote
14 - 16
Paddenstoelen
In zijn geheel en ongewassen stomen.
300 g
8 - 10
Bieten
Einde afsnijden, niet schillen.
300 g
12 - 13
Spruitjes
Snijd een kruisje in de stronk.
375 g
17 - 19
Asperges
Schillen, de onderkant verwijderen, heel laten.
2 bosje
12 - 14
Spinazie
Bladeren en stengels wassen.
1/2 bosje
5
Selderij
In schijven snijden.
3 stronken
5-6
Zoete aardappel In stukken snijden.
300 g
20 - 25
Courgette
Geschild.
350 g
6
Peultjes
Verkleinen.
250 g
4-5
Uien
Schillen en in zijn geheel stomen.
6 middelgrote
20 - 25
125
SOLIS Rice Cooker niederl._2014 16.03.14 21:27 Seite 126
T I P S V O O R H E T S T O M E N VA N V I S E N Z E E V R U C H T E N
•
Kruid de vis voor de bereiding met verse kruiden, uien, citroen, etc.
•
Visfilets dienen naast elkaar en niet bovenop elkaar te worden geplaatst.
•
De vis is gaar als het makkelijk uit elkaar valt en een melkachtige, niet doorzichtige kleur krijgt.
Type
Suggesties en tips
Visfilet,
hele vis,
stukken vis
Stomen tot de vis niet meer doorzichtig is en makkelijk uit
elkaar valt. Visstukken zijn gaar als het visvlees makkelijk
van de graat afkomt.
8 - 10
15 - 20
12 - 14
Kreeft en
kreeftenstaart
Verwijder de onderzijde van de schaal
18 - 20
Mosselen
in de schelp
Stomen tot de schelpen open zijn
12 - 14
Venusschelpen
Stomen tot de schelpen open zijn
8 - 10
Garnalen met schaal
Stomen tot ze roze zijn
8 - 10
Jakobsschelpen
Stomen tot ze niet meer doorzichtig zijn
4-6
126
Kooktijd (min.)
SOLIS Rice Cooker niederl._2014 16.03.14 21:27 Seite 127
T I P S V O O R H E T S T O M E N VA N G E V O G E LT E
•
Gebruik stukken die allemaal ongeveer even groot zijn.
•
Leg de stukken gevogelte naast en niet bovenop elkaar.
•
Verwijder het zichtbare vet en het vel.
•
Controleer of het gevogelte gaar is, door op het dikste gedeelte te drukken. Is
het vocht dat uit het gevogelte komt helemaal helder, dan is het klaar.
Type
Suggesties en tips
Kooktijd (min.)
Borstfilet
Stomen met de vleeskant naar boven
20 - 25
Kippenpoten
Plaats het dikste deel aan de buitenrand van de
stoomschaal
30 - 35
Dijfilet
Plaats het dikste deel aan de buitenrand van de
stoomschaal
18 - 20
T I P S V O O R H E T S T O M E N VA N K N O E D E L S ( B A L VA N D E E G )
•
Verse of bevroren knoedels kunnen heel goed in uw Solis Rice Cooker Duo Program gestoomd worden. Wij raden aan om wat bakpapier of koolbladeren op
de stoomschaal te leggen en daarop de knoedels een voor een te stomen, zodat ze niet aan de stoomschaal vastkleven.
•
Bevroren knoedels worden gaar in ca. 8 - 10 minuten. Verse knoedels worden
gaar in ca. 5 – 6 minuten.
127
SOLIS Rice Cooker niederl._2014 16.03.14 21:27 Seite 128
▲ REINIGING EN ONDERHOUD
•
Zet het apparaat uit met de AAN/UIT knop
(2x drukken) en trek de stekker
uit het stopcontact. Verwijder het snoer van het apparaat.
•
Wacht tot alle onderdelen zijn afgekoeld, voordat u de binnenpan verwijderd.
Maak de binnenpan, de stoomschaal en de opvangbak voor het condenswater
schoon in warm afwaswater, spoel en droog alles zorgvuldig af. De binnenpan
en de stoomschaal moeten om hygiënische redenen na ieder gebruik omgespoeld worden.
•
Solis raadt het af om onderdelen van de Rice Cooker Duo Program in de vaatwasser te doen, met uitzondering van de kookschaal, omdat zowel vaatwastabletten te agressief zijn, als ook de hoge temperaturen die het oppervlak van de
binnenpan kunnen beschadigen of andere onderdelen kan vervormen.
•
De binnenkant van de deksel moet zorgvuldig met een vochtige doek schoongemaakt en aansluitend goed gedroogd worden. Dit geldt ook voor de rubberen rand om de deksel. Laat de deksel en de rubberen rand altijd eerst goed drogen, voordat u de deksel weer sluit.
•
Gebruik in het algemeen voor het schoonmaken van de onderdelen van het apparaat zelf geen agressieve of schurende schoonmaakmiddelen of schuursponsjes, omdat deze het oppervlak kunnen beschadigen.
•
Het apparaat zelf dient alleen met een vochtige doek afgeveegd en aansluitend
gedroogd te worden. Gebruik geen alkalische schoonmaakmiddelen maar gebruik alleen een zachte doek en een mild schoonmaakmiddel.
•
De opvangbak voor het condenswater moet na het schoonmaken weer op het
apparaat gezet worden.
Opmerking:
•
Mocht de rijst aan de bodem van de binnenpan vastgekoekt zijn, vul de binnenpan dan met heet water, voeg een klein beetje mild afwasmiddel toe en laat
de binnenpan 10 minuten staan. Daarna kunt u deze licht reinigen.
Waarschuwing:
•
De verbindingstekker moet uit de aansluiting van het apparaat verwijderd worden, voordat u de Rice Cooker Duo Program gaat schoonmaken. De aansluiting
op het apparaat moet in ieder geval volledig droog zijn, voordat u het apparaat
opnieuw gaat gebruiken.
•
Om het oppervlak van het apparaat en de accessoires niet te beschadigen, mag
u nooit een alkalisch schoonmaakmiddel, maar alleen een zachte doek met een
mild schoonmaakmiddel gebruiken.
128
SOLIS Rice Cooker niederl._2014 16.03.14 21:27 Seite 129
•
Gebruik nooit chemische middelen, schuursponsjes, staalwolsponsjes of schuurmiddelen voor het reinigen van het apparaat of de accessoires, omdat dit de oppervlaktes en coating kan beschadigen.
•
Dompel het apparaat of het snoer nooit onder in water of andere vloeistoffen,
omdat dit tot stroomstoten kan leiden.
▲ OPBERGEN
1. Controleer of het apparaat uitgeschakeld en de stekker verwijderd is.
2. Controleer of de behuizing en alle onderdelen helemaal afgekoeld, schoon en
volledig droog zijn.
3. Leg de onderdelen in het apparaat en sluit de deksel.
4. Berg het apparaat rechtop op, op een droge, donkere plaats. Bij voorkeur in de
originele verpakking. Plaats niets op het apparaat.
▲ TECHNISCHE GEGEVENS
Modelnr.
JH-926SBD, type 817
Productbeschrijving
Stoompan en rijstkoker
Spanning/frequentie
220-240V ~ / 50Hz
Vermogen
640-760 Watt
Afmetingen
ca. 24 x 23 cm (H x Ø)
Gewicht
ca. 2,2 kg
129
SOLIS Rice Cooker niederl._2014 16.03.14 21:27 Seite 130
▲ PROBLEMEN EN HOE ZE VERHOLPEN
KUNNEN WORDEN
PROBLEEM
OPLOSSING
De Rice Cooker Duo Program gaat plotseling uit.
• Controleer of de verbindingsstekker wel goed in het
aansluitpunt op het apparaat zit en of de stekker wel
goed in het stopcontact zit.
• Het apparaat is te zwaar belast of is oververhit
geraakt. Haal het apparaat van de stroom af en laat
het een aantal minuten afkoelen. Doe dan de stekker
weer in het stopcontact en zet het weer aan met
behulp van de
knop en start een nieuw kookproces.
De rijst is na het koken te
droog/hard.*
• Als de rijst aan het einde van het kookprogramma te
droog of te vast is, dan kan deze door de toevoeging
van water en extra kooktijd zachter gemaakt worden. Afhankelijk van hoe hard de rijst nog is, voegt u
1/2 tot 1 maatbeker water toe en roert u alles goed
om. Sluit de deksel en schakel nogmaals de instelling
"White Rice" of "Brown Rice" in.
Als de rijstkoker wisselt naar de warmhoudstand,
open dan de deksel en roer de rijst door. Eventueel
kan het ook voldoende zijn om de rijst gewoon
10 – 15 minuten langer in de warmhoudstand te
laten staan.
De rijst is na het koken
nog te vochtig.*
• Als de rijst aan het eind van het kookprogramma
nog te vochtig/nat is, roer deze dan met de pollepel
goed door. Hierdoor wordt het vochtige deel over de
bodem verdeeld en kan het vocht verdwijnen. Sluit
de deksel en laat het apparaat indien nodig nog
10 – 30 minuten in de warmhoudstand staan. Open
de deksel van tijd tot tijd en roer de rijst door, zodat
het overtollige vocht weg kan.
* Omdat rijstsoorten in samenstelling en consistentie kunnen wisselen, kunnen ook de resultaten verschillend zijn.
Deze tips zullen helpen om de voor u ideale rijst te koken.
130
SOLIS Rice Cooker niederl._2014 16.03.14 21:27 Seite 131
▲ VERWIJDERING
EU 2002/96/EC
Aanwijzingen voor het verwijderen van het product volgens EU-richtlijn
2002/96/EC
Doe het toestel na afdanking niet bij het normale huisvuil, maar lever het in op een
plaatselijk afvalinzamelpunt of bij een leverancier die ervoor zorgt dat het toestel op
de juiste manier wordt verwerkt. Door de gescheiden inzameling van elektrische en
elektronische apparaten worden mogelijke negatieve gevolgen voor het milieu en de
gezondheid voorkomen en is het mogelijk dat de componenten worden hergebruikt
resp. gerecycled, waardoor er veel energie en grondstoffen worden bespaard. Om
de verplichting om het toestel volgens de voorschriften te verwijderen, duidelijk onder de aandacht te brengen, is hiernaast het symbool van een doorgekruiste afvalbak afgebeeld.
Solis of Switzerland AG behoudt zich te allen tijde het recht voor van technische en
optische wijzigingen en modificaties ter verbetering van haar producten.
Dit apparaat heeft een zeer lange levensduur en is erg betrouwbaar. Komt het toch voor dat er een
storing optreedt kunt u ons zonder meer bellen. Vaak is het probleem met een tip of met een trucje
op te lossen, zonder dat u ons het apparaat hoeft te sturen. Wij adviseren u graag.
Bewaar de originele verpakking van dit product goed, zodat u deze voor een
eventueel transport of verzending van het product gebruiken kan.
Solis of Switzerland AG
Solis-House • Glattbrugg-Zürich, Zwitserland
Telefoon +41 44 874 64 54 • Fax +41 44 874 64 99
[email protected] • www.solis.ch • www.solis.com
131