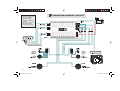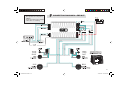
1
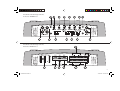
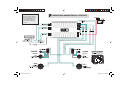
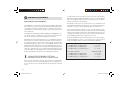
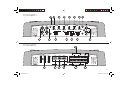
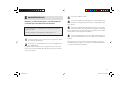
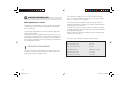
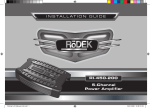
5-CHANNEL POWER AMPLIFIER
Einbau- und Bedienungsanleitung
Installation & Operating Instructions
C609 Manual DE.indd 1
15.02.2005 10:33:57 Uhr
Inhalt
Einleitung . . . . . . . . . . . . . . . . . . . . . . . . . . . . . . . . . . . . .
A
B
C
D
E
F
G
H
I
J
Seite 4
Allgemeine Merkmale . . . . . . . . . . . . . . . . . . . . . . . . . . 4
Anschlüße & Bedienungselemente C609. . . . . . . . . . .5/6
Montage-Tips . . . . . . . . . . . . . . . . . . . . . . . . . . . . . . . . 7
Verkabelungs-Tips . . . . . . . . . . . . . . . . . . . . . . . . . . . . . 7
Anschluß C609 . . . . . . . . . . . . . . . . . . . . . . . . . . . . . . . 9
Anschlußvarianten C609 . . . . . . . . . . . . . . . . . . . . 10/11
Einstellungen. . . . . . . . . . . . . . . . . . . . . . . . . . . . . . 12-14
Störungsbehebung . . . . . . . . . . . . . . . . . . . . . . . . . . . 15
Technische Daten . . . . . . . . . . . . . . . . . . . . . . . . . . . . 16
Garantiekarte . . . . . . . . . . . . . . . . . . . . . . . . . . . . 43/44
2
C609 Manual DE.indd 2
15.02.2005 10:34:00 Uhr
Index
Introduction . . . . . . . . . . . . . . . . . . . . . . . . . . . . . . . . . .
A
B
C
D
E
F
G
H
I
J
Index
Page 18
General Features . . . . . . . . . . . . . . . . . . . . . . . . . . . . . 18
Connections & Controls C609 . . . . . . . . . . . . . . . . . 19-20
Amplifier Location . . . . . . . . . . . . . . . . . . . . . . . . . . . . . 21
Wiring Tips. . . . . . . . . . . . . . . . . . . . . . . . . . . . . . . . . . . 21
Connecting the C609. . . . . . . . . . . . . . . . . . . . . . . . . . 23
Connecting Diagrams C609 . . . . . . . . . . . . . . . . . . 24-25
Controls and Adjustments . . . . . . . . . . . . . . . . . . . . . . . 26
Troubleshooting. . . . . . . . . . . . . . . . . . . . . . . . . . . . . . 29
Specifications . . . . . . . . . . . . . . . . . . . . . . . . . . . . . . . 30
Warranty Certificate . . . . . . . . . . . . . . . . . . . . . . . 43/44
Introduction . . . . . . . . . . . . . . . . . . . . . . . . . . . . . . . . . . . Page 32
A
B
C
D
E
F
G
H
I
J
Caractéristiques principales . . . . . . . . . . . . . . . . . . . . . 32
Connections et réglages C609 . . . . . . . . . . . . . . . . . . . 34
Placement de l’amplificateur. . . . . . . . . . . . . . . . . . . . . 35
Astuces de câblages . . . . . . . . . . . . . . . . . . . . . . . . . . . 35
Connecter le C609 . . . . . . . . . . . . . . . . . . . . . . . . . . . . 37
Connecting Diagrams C609 . . . . . . . . . . . . . . . . . . 24-25
Contrôles et réglages . . . . . . . . . . . . . . . . . . . . . . . . . . 38
défauts / solutions . . . . . . . . . . . . . . . . . . . . . . . . . . . . 40
Spécifications . . . . . . . . . . . . . . . . . . . . . . . . . . . . . . . . 41
Warranty Certificate . . . . . . . . . . . . . . . . . . . . . . . 43/44
3
C609 Manual DE.indd 3
15.02.2005 10:34:00 Uhr
Einleitung
Vielen Dank für das Vertrauen, das Sie uns mit dem Kauf dieses AXTONQualitätsprodukts entgegengebracht haben.
Ob im Auto, Wohnmobil oder auf einem Boot, die AXTON Car Audio
Verstärker wurden speziell für den Einsatz in mobilen Soundsystemen
mit einer 12-Volt-Stromversorgung (mit negativer Chassis-Masse)
entwickelt.
Korrekt installiert, garantieren Ihnen die Axton-Verstärker in jedem Fall
hervorragende Klangqualität.
Damit Sie sich mit den technischen Eigenschaften und klanglichen
Feinheiten Ihres Verstärkers vertraut machen können, empfehlen wir
Ihnen, diese Einbau- und Bedienungsanleitung vor der Installation sorgfältig durchzulesen. Sollten beim Einbau oder bei den Einstellungen
dennoch Fragen oder Probleme auftauchen, wenden Sie sich bitte an
Ihren Axton-Händler.
A
ALLGEMEINE MERKMALE AXTON C609
∑ 5-Kanal Endstufe zur Ansteuerung eines kompletten LautsprecherSystems mit Front- und Heck-Satelliten plus Subwoofer
∑ PWM MOSFET Schaltnetzteile mit hohem Wirkungsgrad
∑ A/B Endstufenschaltung mit BJT Transistoren
(Bipolar Junction Transistors)
∑ Diskret aufgebaute Halbleiter-Endstufe
∑ 3 Paar Cinch-Eingänge (Front, Rear, Sub)
∑ Integrierte elektronische Hoch-/Tiefpaß-Filter mit 12dB/Oktave
Flankensteilheit
∑ Subsonicfilter für Kanal 5 mit 20Hz / 12dB/Okt.
∑ Übergangsfrequenzen für Front- bzw. Heck-Satelliten und Subwoofer getrennt und stufenlos regelbar von 40-240 Hz
∑ Ein- /Ausschaltverzögerung
∑ Automatische Ein-/Ausschaltung über REMOTE-Leitung
∑ Umfangreiche Schutzschaltungen gegen Gleichspannung und
Kurzschluß an den Lautsprecherausgängen sowie Überlastung
bzw. Überhitzung des Verstärkers
∑ Variable Eingangsempfindlichkeit von 0.2 bis 9 V
4
C609 Manual DE.indd 4
15.02.2005 10:34:01 Uhr
Anschlüße & Bedienungselemente
Frontseite AXTON C609
1
14
2
5
6
8
4
7
Anschlüße & Bedienungselemente
Rückseite AXTON C609
16
9
11
10
12
15
13
3
20
17
18
19
21
22
5
C609 Manual DE.indd 5
15.02.2005 10:34:01 Uhr
B
ANSCHLÜSSE UND BEDIENUNGSELEMENTE C609
1 INPUTS FRONT 1/2CH L+R Cinch-Eingangsbuchsen links und
rechts zum Anschluß an die NF/Front-Pre-Out Signal-Ausgänge des
Steuergerätes.
2
INPUTS REAR 3/4CH L+R Cinch-Eingangsbuchsen links und
rechts zum, Anschluß an die NF/Rear-Pre-Out Signal-Ausgänge des
Steuergerätes.
3
INPUTS SUB 5CH L+R Cinch-Eingangsbuchsen links und
rechts zum Anschluß an die NF/Sub-Pre-Out Signal-Ausgänge des
Steuergerätes.
4
HIGHPASS CH1/2 Schalter für die Frequenzweiche der
Frontkanäle (CH1/2). Schalterstellung „Full“ bedeutet, Weiche ist deaktiviert. Schalterstellung „HPF“ heisst, Weiche ist aktiviert.
5 + 8 + 11 FRONT/REAR/SUB GAIN Getrennte Eingangsempfindlichkeitsregler für 3 Paar Eingänge (Front, Rear, Sub) zur
individuellen Anpaßung der drei Verstärker-Sektionen an die Ausgangsspannung des Steuergerätes.
6 + 9
HIGHPASS FRONT+REAR Regler zum Einstellen der
gewünschten Highpass-(HPF)/Übergangs- bzw. Trennfrequenzen für die
beiden Satelliten-Paare (FRONT und REAR) zwischen 40 Hz und
240 Hz
7
HIGHPASS CH3/4 Schalter für die Frequenzweiche der
12 LOWPASS SUB Regler zum Einstellen der gewünschten Lowpass(LPF) / Übergangs- bzw. Trennfrequenz für den Subwoofer-Kanal (SUB)
zwischen 40 Hz und 240 Hz.
13 SUBSONICFILTER Schalter für das Subsonicfilter des SubwooferKanals (5CH). Schalterstellung „OFF“ bedeutet, Subsonicfilter ist deaktiviert. Schalterstellung „ON“ heisst, Subsonicfilter ist aktiviert.
14 POWER LED Betriebszustands LED. Leuchtet grün, wenn die
Endstufe eingeschaltet ist.
15 PROTECT LED Schutzschaltungs-LED. Leuchtet rot, wenn die
Endstufe im Protect-Modus ist, z.B. bei Übertermperatur, Kurzschluss am
Lautsprecherausgang oder Fehlfunktion.
16 FUSE Sicherungen für die interne Absicherung das Verstärkers
gegen Überlastung und Fehlmanipulation.
17
+12 V Anschluß-Klemme für die direkte Verbindung zum positiven
Batterie-Pol des Kfz.
18 REMOTE/REM Anschluß-Klemme für die automatische Ein- bzw.
Ausschaltung des Verstärkers über den ‚Amp‘- oder ‚Antenna-Remote‘Anschluß Ihres Steuergerätes.
19 GROUND/GND Anschluß-Klemme für die Verbindung zur
Chassis-Masse (-12V).
20 FRONT 팬 L 팫 und 팫 R 팬 Lautsprecher-Anschlußklemmen für
das hintere Satelliten-Lautsprecher-Paar (Min. Impedanz 2 Ohm!).
Rearkanäle (CH3/4). Schalterstellung „Full“ bedeutet, Weiche ist deaktiviert. Schalterstellung „HPF“ heisst, Weiche ist aktiviert.
21 REAR 팬 L 팫 und 팫 R 팬 Lautsprecher-Anschlußklemmen für
das vordere Satelliten-Lautsprecher-Paar (Min. Impedanz 2 Ohm!).
10 LOWPASS CH5 Schalter für die Frequenzweiche der Subwoofer-
22 SUB 팬 L 팫 und 팫 R 팬 Lautsprecher-Anschlußklemmen für
den Subwoofer (Min. Impedanz 4 bis 2 Ohm).
Kanals (5CH). Schalterstellung „Full“ bedeutet, Weiche ist deaktiviert.
Schalterstellung „LPF“ heisst, Weiche ist aktiviert.
6
C609 Manual DE.indd 6
15.02.2005 10:34:01 Uhr
C MONTAGE-TIPS
Die Plazierung Ihres Verstärkers hat einen großen Einfluß auf die
Ableitung der im normalen Betrieb entstehenden Wärme bzw. auf
das eventuelle Ansprechen der automatischen Überhitzungssicherung
des Gerätes. Aufgrund der Wärmeentwicklung des Verstärkers sollten Sie einen gut belüfteten Installationsort auswählen. Ideal für die
Langzeitstabilität Ihres Verstärkers ist grundsätzlich jeder Montageort,
an dem Luft ungehindert an den Kühlrippen vorbeiziehen kann.
1
Die beste Kühlung erreichen Sie bei einem AXTON Verstärker,
wenn Sie ihn hochkant, d.h. stehend montieren.
D VERKABELUNGS-TIPS
Generell gilt: falsche Verdrahtung bzw. falsche Anschlüße können sowohl
Ihren Verstärker als auch andere, damit verbundene Audio-Komponenten
beschädigen. Beachten Sie deshalb unbedingt die Anschlußhinweise
in dieser Bedienungsanleitung.
Die Kabelführung in Ihrem Fahrzeug hat einen erheblichen Einfluß
auf das störungsfreie Funktionieren ihres Verstärkers bzw. der daran
angeschlossenen Komponenten. Die folgenden allgemeinen Einbauhinweise sind dazu gedacht, Ihnen zu einer einfachen, korrekten und
problemlosen Installation Ihres Verstärkers zu verhelfen. Einzelheiten
zu den verschiedenen Ein- und Ausgängen bzw. den besonderen Einstellungsmöglichkeiten finden Sie in Abschnitten B, E, F und G dieser
Anleitung.
Da der Verstärker für seinen normalen Betrieb keinerlei Bedienungselemente aufweist, kann er z.B. gut unter einem Sitz oder im Kofferraum montiert werden. Wählen Sie für etwaige Einstellungsarbeiten
dennoch einen bequem zugänglichen, ausreichend belüfteten Platz.
Der Verstärker darf jedoch keinesfalls übermäßigem Staub, direktem
Sonnenlicht, Feuchtigkeit, Wasser, Öl oder anderen Flüssigkeiten, die
in das Geräteinnere eindringen können, ausgesetzt werden.
Für die Audio-Signal-Verbindungen zwischen Steuergerät und
Endverstärker sollten Sie nur doppelt oder dreifach abgeschirmte
Qualitäts-Cinch-Kabel verwenden).
Der Verstärker sollte auf einem soliden, vibrationsfreien Untergrund montiert werden. Haben Sie einen passenden Ort gefunden, verwenden Sie den Verstärker als Schablone zur Markierung der
Montagelöcher.
™ Lautsprecher- und Stromkabel lassen sich problemlos auf die
benötigten Längen konfektionieren.
2
Bohren Sie die vier Schraubenlöcher vor und schrauben Sie das
Gerät mit den mitgelieferten Schrauben fest. Achten Sie darauf,
dass der Verstärker nicht in Kontakt mit Metallteilen des Fahrzeugs
kommt (Brummschleife!).
3
1
2
Halten Sie die Kabel immer so kurz wie möglich. Dies gilt besonders für die Strom- und die Signalkabel:
™ Abgeschirmte Cinch/Signal-Kabel sollten nie zerschnitten und
wieder zusammengesetzt werden, da an den Schnittstellen der Abschirmungsschutz verloren geht. Falls ein Signal-Kabel zu lang sein
sollte, verlegen Sie es mit einer S-förmigen Schleife (keine Rund- bzw.
Spiralschleife) in der Kabelmitte.
3
Cinch-/Signal-Kabel sollten nie neben oder parallel zu Lautsprecher-, Zündungs- oder Stromkabeln verlegt werden.
7
C609 Manual DE.indd 7
15.02.2005 10:34:02 Uhr
Verwenden Sie die empfohlenen Stromkabelquerschnitte
(siehe E). Zu geringe Querschnitte verringern die Ausgangsleistung,
bewirken Verzerrungen und evtl. zu frühes Ansprechen der Übertemperatur-Sicherung.
4
Sichern Sie die +12V-Hauptleitung von der Batterie zum
Verstärker ca. 20-30 cm nach der Batterie mit einer Hauptsicherung ab und verwenden Sie unbedingt Stromkabel mit leistungsbezogenem Querschnitt (Einzelheiten dazu finden Sie unter Abschnitt
F: Anschluß und Einstellungen).
5
Die -12V/Masse-Leitung sollte unbedingt denselben Querschnitt
wie das +12V-Kabel haben! Achten Sie unbedingt auf guten
Masse-Kontakt. Schlechte Masse-Kontakte sind die Ursache für
die meisten Probleme.
6
Beachten Sie beim Verlegen der Kabel, daß keine Kurzschlüße mit
dem Fahrzeugchassis entstehen. Verwenden Sie überall dort, wo
Kabel durch Blech- bzw. Metallteile des Fahrzeugs hindurchgeführt
werden müssen, passende Gummi-Tüllen.
7
Wichtig: Um Kurzschlüßen vorzubeugen, sollten Sie vor sämtlichen
Installations- oder Verdrahtungsarbeiten immer den Plus-(+)-Pol der
Batterie von der Stromversorgung des Fahrzeugs abtrennen.
Machen Sie sich zur Regel: Erst nach Beendigung und Überprüfung aller
anderen Installationsschritte wird die Verbindung zwischen dem +12VAnschluß der Batterie und dem Bordstromnetz wiederhergestellt.
8
C609 Manual DE.indd 8
15.02.2005 10:34:02 Uhr
E ANSCHLUSS C609
ACHTUNG: DAS +12V KABEL MUSS VOR BEGINN DER ANSCHLUSSARBEITEN UNBEDINGT VOM PLUSPOL DER BATTERIE ENTFERNT
WERDEN!
Der empfohlene Stromkabel-Querschnitt für +12V und Masse (bei ca.
5 Meter +12V Kabel) beträgt bei der AXTON C609 20mm2.
Die Hauptsicherung bei der Fahrzeugbatterie sollte bei diesem Verstärker
ca. 60 A betragen.
Idealerweise werden die Anschlüße in dieser Reihenfolge durchgeführt:
1
2
Das Steuergerät muss ausgeschaltet und der Lautstärke-Regler
ganz zurückgedreht sein.
Cinch Ausgänge vom Steuergerät mit entsprechenden Eingängen
am Verstärker verbinden (beachten Sie auch die Anschluß-Diagramme auf den Seiten 10-11).
Sub Pre-Outs vom Steuergerät sollten Vollbereichs Signale (FullrangeSignale) sein, da Tiefpass Sub-Ausgänge vom Vorverstärker immer die
Filter-Elektronik des Verstärkers beeinträchtigen. Im Zweifelsfall oder
beim Fehlen eines Sub Pre-Outs ‚verdoppeln‘ Sie einfach ein Vollbereichs-Pre-Out-Signal (wie etwa den Front- oder Rear-Ausgang des
Steuergeräts) mit Hilfe von zwei Y-Adaptern.
3
4
Remote Schaltleitung vom Steuergerät zum Verstärker
Lautsprecher-Kabel zu den entsprechenden Lautsprechern oder
Passiv-Weichen. Achten Sie auf korrekte Polarität! Immer „팬“
auf „팬“ und „팫“ auf „팫“.
Die Minimum-lmpedanz für jeden angeschlossenen Lautsprecher darf
2 Ohm nicht unterschreiten!!!
GND/Masse-Verbindung zum Chassis oder direkt an den -12V
Batterie-Pol. Wenn möglich, Masse-Kabel sehr kurz halten und
sicherstellen, daß der Masse-Kontakt optimal leitet, d.h. Farbe, Rost
oder Schmutz muß vor dem Anschluß gründlich vom Fahrzeugblech
entfernt werden.
Wenn Probleme auftauchen sollten, den „GND/GROUND“-Anschluß des
Verstärkers direkt mit dem Minus-Pol der Batterie verbinden.
5
+12V direkt mit dem Plus-Pol der Batterie verbinden. Nicht vergessen innerhalb von 30 cm nach der Batterie eine Hauptsicherung
zu installieren (Kabelbrand-Gefahr)!!! Vorschrift der Kfz.-Versicherer.
6
Schließen Sie den Stromkreis nicht, bevor Sie nochmals sämtliche
Verbindungen und Anschlüße aberprüft haben!
Schalten Sie Ihr Steuergerät ein, Lautstärke auf Minimum. Jetzt muß die
grüne Status-LED auf der Frontseite des Verstärkergehäuses aufleuchten.
Wenn nicht, Gerät sofort wieder ausschalten und die Installation auf
fehlende oder fehlerhafte Anschlüße überprüfen.
9
C609 Manual DE.indd 9
15.02.2005 10:34:02 Uhr
Wichtig!
• Min. Impedanz für alle
Lautsprecher-Ausgänge
2 Ohm!
• SUB-Eingangssignal
sollte ein Vollbereichs-/
Fullrange-Signal sein!
• Eine Hauptsicherung von
60 A muß innerhalb
30 cm von der Batterie
eingebaut werden!
F ANSCHLUSS-VARIANTE mit 3 x PRE-OUT
10
C609 Manual DE.indd 10
15.02.2005 10:34:02 Uhr
Wichtig!
• Min. Impedanz für alle Lautsprecher-Ausgänge 4 Ohm!
• Eine Hauptsicherung von
60 A muß innerhalb 30 cm
von der Batterie eingebaut
werden!
F ANSCHLUSS-VARIANTE mit 2 x PRE-OUT
11
C609 Manual DE.indd 11
15.02.2005 10:34:03 Uhr
G
EINSTELLUNGEN
C609 System-Verstärker-Konzept
Die AXTON C609 ist eine 5-Kanal Endstufe. Mit einer einzigen C609
läßt sich auf einbaufreundliche Weise ein komplettes und klangstarkes 5-kanaliges Lautsprechersystem mit zwei Paar Stereo-Satelliten
(vorn und hinten) und einem Mono-Subwoofer ansteuern.
Die individuell, regelbaren integrierten Hochpass- bzw. Tiefpass-Filter
der C609 erlauben es, die eingesetzten Lautsprecher genau den
Einsatzbereich zuzuteilen, für den sie am besten geeignet sind.
Die bassschwachen Satelliten arbeiten bei der C609 nur im Midbassund Mittel-Hochtonbereich, wodurch sie einerseits mechanisch
und elektrisch weniger belastet werden, was sich andererseits
in einer höheren Pegelfestigkeit niederschlägt. Der weder für
Mittel- noch für Hochton geeignete Subwoofer verarbeitet nur
Bass- und Tiefbass-Signale und kann dadurch nicht das Klangbild im
Mittelhochtonbereich verfärben.
1
TRENNFREQUENZ-EINSTELLUNGEN
HIGHPASS FRONT und REAR, LOWPASS SUB
Bevor die Eingangsempfindlichkeiten (GAIN) angepaßt werden können,
müssen zunächst die Trennfrequenzen aller Lautsprecher eingestellt
werden. Alle diese Frequenz-Einstellungen sollten grundsätzlich
gehörmäßig gemacht werden!
Bringen Sie vor der Trennfrequenz-Einstellung alle Klangregler
(Bass, Mid, Treble und evtl. Sub) am Steuergerät sowie Fader und
Balance in ihre Neutral- bzw. Mittelstellung. Auch die LoudnessFunktion sollte während den Einstellungen ausgeschaltet sein.
Mit der Einstellung des Hochpass-Filters (HPF) der Satelliten-Lautsprecher an den HIGHPASS FRONT/REAR Reglern soll eine elektrische und
mechanische Entlastung der eingesetzten Koax- oder Kompo-Systeme
erreicht werden. Je nach vorhandener Membranfläche und Nennbelastbarkeit der Lautsprecher empfiehlt sich eine Einsatz- bzw. Trennfrequenz
zwischen 40 und 240 Hz.
Eine zu tief gewählte Einsatz- bzw. Trennfrequenz bringt eine gute Midbass-Wiedergabe, schränkt aber gleichzeitig die Pegelfestigkeit ein. Eine
zu hohe Einsatz- bzw. Trennfrequenz erbringt eine gute Pegelfestigkeit,
macht aber auch den Klang ‚dünner‘.
Als Anhaltspunkte für die richtige HPF/HIGHPASS Trennfrequenzwahl der Satelliten finden Sie untenstehend einige praxiserprobte
Richtwerte für die gängigsten Armaturenbrett-, Tür- und HeckablagenLautsprecher:
Front-Satelliten-Systeme
10 cm Ø Koax oder 2-Weg-Kompos
13 cm Ø Koax oder 2-Weg-Kompos
16 cm Ø Koax oder 2/3-Weg-Kompos
HIGHPASS FREQ.
90-120 Hz
80-100 Hz
70 - 80 Hz
Heck-Satelliten-Systeme
10 cm Ø Koax oder 2-Weg-Kompos
13 cm Ø Koax oder 2-Weg-Kompos
16 cm Ø Koax oder 2/3-Weg-Kompos
HIGHPASS FREQ.
100-150 Hz
120-130 Hz
100-130 Hz
12
C609 Manual DE.indd 12
15.02.2005 10:34:03 Uhr
Satelliten-Grundregel 1 Das klanglich hochwertigere
Satelliten-System sollte immer vorne
eingebaut werden.
und System2 Empfindlichkeits-Anpassung
Abgleich LEVEL FRONT, REAR und SUB
Satelliten-Grundregel 2 Ausgehend von ungefähr gleichen
Durchmessern und gleicher Bauart
des Front- und Heck-LautsprecherSystems sollte die Trennfrequenz der
Front-Satelliten wennmöglich immer
tiefer liegen als die der HeckSatelliten!
Die richtige Eingangsempfindlichkeits-Einstellung ist wichtig für die
Erreichung des optimalen Dynamikspielraumes Ihrer gesamten CarAudio-Anlage. Nicht optimale Anpassungen haben entweder einen
überhöhten Rauschanteil oder verminderte Maximallautstärke oder
unnötige Verzerrungen zur Folge.
Es empfiehlt sich die GAIN-Einstellungen in der nachstehenden Reihenfolge vorzunehmen:
Die zu wählende LOWPASS / LPF-Tiefpass-Trennfrequenz des Subwoofers
sollte normalerweise im Bereich zwischen 50 und 90 Hz liegen. Stellen
Sie den LOWPASS FREQ. Regler so ein, daß der Klang im Baßbereich satt
und trocken mit ausreichend Tiefbass-Anteil wiedergegeben wird.
™ Bringen Sie alle Klangregler (Bass, Mid, Treble und evtl. Sub) am
Steuergerät sowie Fader und Balance in ihre Neutral- bzw. Mittelstellung. Auch die Loudness-Funktion sollte während den Einstellungen
ausgeschaltet sein.
Subwoofer-Grundregel
Eine zu tiefe LPF-Trennfrequenz läßt
den Bass-Bereich kraft- und kontrastlos
wirken. Bei einer zu hohen Trennfrequenz tendiert der Bass zum
Dröhnen.
™ Drehen Sie alle 3 GAIN-Regler der C609 auf ihre Minimumpositionen.
Durch ein Auseinanderlegen der
HPF-/Hochpass-Einsatzfrequenzen der
Satelliten und der LPF/Tiefpass-Trennfrequenz kann der allgemeinen DröhnNeigung der meisten PKWs im Bereich
um 100 Hz entgegengewirkt werden.
™ Nun drehen Sie den SUB GAIN Regler langsam im Uhrzeigersinn
auf, bis deutliche Verzerrungen im Baßbereich zu hören sind. Drehen
Sie den Regler gerade soweit zurück, bis die Verzerrungen wieder
verschwunden sind.
Hochpass/TiefpassSystem-Tip
™ Schalten Sie das Steuergerät ein und drehen Sie die Lautstärkeregelung ca. 3/4 auf. Setzen Sie für die folgenden Einstellungen ein
gut aufgenommenes, dynamikreiches Musikstück ein.
™ Jetzt drehen Sie die Lautstärke am Steuergerät auf ein mittleres
Maß zurück.
13
C609 Manual DE.indd 13
15.02.2005 10:34:03 Uhr
™ Drehen Sie nun den GAIN FRONT Regler Ihres Verstärkers langsam
im Uhrzeigersinn auf, bis Sie einen tonal ausgewogenen Klangcharakter
erzielt haben. Eine leichte Baßbetonung ist vorzuziehen, da sie von
den Fahrgeräuschen wieder „überdeckt‘ wird.
™ Drehen Sie nun den GAIN REAR Regler langsam auf, bis Sie mit
den Heck-Lautsprechern einen guten ‚Rear-Fill‘ und ein homogenes
Gesamtklangbild erreicht haben.
™ Abschließend empfiehlt sich eventuell ein Fine-Tuning der eingestellten Hoch- und Tiefpassfrequenzen, wobei Sie mit der Nachregelung der
Subwoofer-Trennfrequenz (LOWPASS SUB) beginnen sollten. Danach
werden u.U. noch die Front-Satelliten (HIGHPASS FRONT) und zum
Schluß die Heck-Satelliten (HIGHPASS REAR) fein-eingestellt.
WICHTIG: Die in diesem Abschnitt erwähnten Einstellungshinweise
setzen voraus, daß Sie mit den Anforderungen und Möglichkeiten der
angeschlossenen Audio-Komponenten (v.a. Steuergerät und Lautsprecher) eingehend vertraut sind!
14
C609 Manual DE.indd 14
15.02.2005 10:34:03 Uhr
H
STÖRUNGSBEHEBUNG
Problem
Ursache
Kein Musiksignal auf den Lautsprechern
und Power-LED leuchtet nicht grün
●
●
●
●
●
●
●
●
+ 12 V oder GROUND (Masse) oder
“Remote“-Kabel nicht (richtig) angeschlossen
Sicherung des Verstärkers durchgebrannt
Hauptsicherung an der Batterie durchgebrannt
Kurzschluß auf einem der Lautsprecherausgänge
DC/Gleichspannung am Ausgang
Überlastung des Verstärkers
Überhitzung des Verstärkers
Ein Sirren das mit der
Motordrehzahl zu- oder abnimmt
●
●
Schlechter Masseanschluß des Verstärkers oder des Steuergerätes
Schlecht geschirmte Cinchleitungen und- oder schlecht gewählte
Cinchkabelführung (induktive Einstreuungen der Bordelektrik)
Prasseln in Abhängigkeit der
Motordrehzahl
●
Schlecht entstörte Zündanlage
Störgeräusche
●
Deutet auf eine Masseschleife (doppelter Masseanschluß) hin.
Bei der Montage des Verstärkers Kontakt zur Kfz. Masse vermeiden
Überprüfen Sie auch die Masse-Verbindungen der anderen
angeschlossenen Audio-Geräte
●
Wichtig! Die Schutzschaltung schaltet den Verstärker bei Kurzschluß, Überlastung, Überhitzung oder DC/Gleichspannung am Ausgang
ab. Wenn die Fehlerursache behoben ist, läuft die Endstufe wieder normal (LED an); ansonsten schaltet der Verstärker immer wieder an
und aus.
15
C609 Manual DE.indd 15
15.02.2005 10:34:04 Uhr
I
TECHNISCHE DATEN
AXTON 5-Kanal System Verstärker
Sinusleistung mono/stereo (an 13.8V)
Satelliten (Front+Rear) an 4 Ohm (2 x stereo) min.
Subwoofer (mono) an 4 Ohm min.
Sinusleistung mono/stereo (an 13.8V)
Satelliten (Front+Rear) an 2 Ohm (2 x stereo)
Subwoofer (mono) an 2 Ohm
Frequenzgang (Sub+Front+Rear)
Verzerrungen/Klirr (THD) an 4 Ohm
Rauschabstand
Kanaltrennung
Flankensteilheit Hochpass und Tiefpass
Regelbereich Hochpass
Regelbereich Tiefpass
Empf. Stromkabel-Querschnitt bei ca. 5 m Kabellänge
Eingangsimpedanz
Max. Eingangsempfindlichkeit
Dämpfungsfaktor
Thermische Sicherung
Sicherung
Empf. Hauptsicherung batterie-seitig bei 20 mm2 Stromkabel
Abmessungen (L x H x B) mm
Technische Änderungen vorbehalten
C609
4 x 50 W RMS
1 x 150 W RMS
4 x 70 W
1 x 220 W RMS
10 - 30.000 Hz
< 0.05 %
> 95 dB
> 55 dB
12 dB/oct.
40 - 240 Hz
40 - 240 Hz
20 mm2
47 k Ohm
0.2 - 9 V
> 250@ 4 Ohm
85 °C
3 x 25 A
60 A
410 x 53 x 256 mm
AXTON ist eine eingetragene Handelsmarke der ACR AG, Bohrturmweg 1, CH-5330 Zurzach, Switzerland.
16
C609 Manual DE.indd 16
15.02.2005 10:34:04 Uhr
17
C609 Manual DE.indd 17
15.02.2005 10:34:04 Uhr
Introduction
Thank you for purchasing this AXTON quality audio component.
The AXTON automotive amplifier series has been developed for the
use with mobile sound systems using 12 Volts negative ground power
supply.
The amplifiers may be used in combination with almost any brand and
type of head unit and speakers in cars, vans, boats etc., when installed
correctly, this amplifier will produce exceptional sound results.
In order to familiarize yourself with all the special features and controlling
options of your brandnew power amplifier, we advise you to read these
instructions carefully before starting with the actual installation.
A
GENERAL FEATURES
∑ 5-Channel amplifier for powering a complete car audio
speaker system with front and rear satellites plus subwoofer
∑ PWM MOSFET high efficiency switching power supply
∑ A/B amplification technology with dedicated BJT transistors
(Bipolar Junction Transistors)
∑ Discrete solid state layout
∑ 3 pairs of RCA inputs (Front, Rear, Sub)
Should you have any difficulty in installing this amplifier in your vehicle,
please contact your nearest AXTON dealer.
∑ Integrated active high-/low pass filtering with 12 dB/oct.
cutting slope
∑ Subsonicfilter for channel 5CH 20Hz / 12dB/oct.
∑ Crossover frequencies independently adjustable for front and
rear satellites and subwoofer channel from 40-240 Hz
∑ Soft start and turn-off delay circuit
∑ Automatic on/off via remote switching from head-units.
∑ Protection circuitry against D.C. offset and shortcircuits at
speaker outputs as well as amplifier overload or overheat
∑ Input level/gain adjustable from 0.2 to 9 V
18
C609 Manual DE.indd 18
15.02.2005 10:34:04 Uhr
Connections & Controls
Front Panel AXTON C609
14
1
2
5
6
8
4
9
7
Connections & Controls
Rear Panel AXTON C609
11
10
12
15
13
3
20
16
17
18
19
21
22
19
C609 Manual DE.indd 19
15.02.2005 10:34:04 Uhr
B
CONNECTIONS AND CONTROLS C609
1 INPUTS FRONT 1/2CH L+R Low-level RCA signal input for
connection to the head-unit front pre-out.
12 LOWPASS SUB Lowpass filter frequency control for the subwoofer channel allowing the setting of the respective lowpass cut-off frequencies between 40 and 240 Hz.
13 SUBSONICFILTER Activates, resp. deactivates the subsonic
filter of the sub channel.
2 INPUTS REAR 3/4CH L+R Low-level RCA signal input for
connection to the head-unit rear pre-out.
14 POWER LED Amplifier status-LED, signalling normal operation
(green).
3 INPUTS SUB 5CH L+R Low-Level RCA signal input for connection to the head-unit sub pre-out or - if not available - to the ‚doubled‘ rear pre-out (using a pair of Y-adaptors).
4 HIGHPASS 1CH/2CH Operating mode switch, activates the
highpass filter of the front channels.
5 +
8 + 11
FRONT/REAR/SUB/GAIN Separate input
gain/sensitivity controls for all 3 input sections allowing the individual
matching of the amplifier sections to the respective head-unit
(pre-out) output voltages.
6 + 9
HIGHPASS FRONT+REAR Highpass filter frequency
controls for the front and rear satellites allowing the setting of the
respective highpass cut-in frequencies between 40 and 240 Hz.
7 HIGHPASS 3CH/4CH Operating mode switch, activates the
highpass filter of the rear channels.
10 LOWPASS CH5 Operating mode switch, activates the lowpass
filter of the sub channel.
15 PROTECT LED Protect mode LED, signalling amplifier malfunction
when lit red, due to shorted speakers, overtemperature etc.
16 FUSE Fuse for protection of the amplifier-internal electronics
against overload or faulty operation / wrong manipulation.
17 +12 V Power connection terminal to positive terminal of car battery.
18 REMOTE/REM Remote switching contact for the automatic
(remote) turn-on / turn-off of the power amplifier from the head-unit‘s
remote (or antenna control) lead.
19 GROUND/GND Power connection terminal to chassis ground or
negative terminal of car battery (-12V).
20 FRONT 팬 L 팫 und 팫 R 팬 Speaker output terminals for the
front satellite speaker pair (min. impedance 2 Ohms!).
21 REAR 팬 L 팫 und 팫 R 팬 Speaker output terminals for the rear
satellite speaker pair (min. impedance 2 Ohms!).
22 SUB 팬 L 팫 und 팫 R 팬 Speaker output terminals for the subwoofer (min. impedance 4 - 2 Ohms!)
20
C609 Manual DE.indd 20
15.02.2005 10:34:05 Uhr
C AMPLIFIER LOCATION
The mounting location of the power amplifier will have a large effect
both on its ability to dissipate the heat generated during normal
operation through the heat sink and on the possible triggering of its
protective internal overheat protection circuit. Any mounting position
allowing for a good air stream across the cooling fins of the amplifiers
heatsink will improve cooling and long-term stability dramatically.
1
With the AXTON amplifier series the most efficient ventilation is achieved
when the units are installed standing up!
Therefore select a suitable location that is convenient for mounting and
accessible for wiring and offers sufficient ventilation for cooling. As your
amplifier features no controls for normal operation, it may be mounted
away from the dashboard, i.e. under a car seat or in the trunk. However,
make sure the unit is not exposed to excessive dust, direct sunlight,
humidity, water, oil or other fluids that may enter the amplifier.
D WIRING TIPS
Please note: wrong power or signal connections may damage the amplifier and other components connected to it. Therefore, please read
this manual carefully before the connection of any power, signal and
speaker leads is done.
The wire routing is critical for noise-free performance. For best results,
please follow the general wiring guidelines listed below (for details see
sections B, E, F and G of this manual).
1
2
3
Secure the amplifier using the four screws. Avoids to let the amplifier get in contact with metal parts of the vehicle. This helps to
eliminate unwanted ground loops.
4
3
Signal, speaker and power cables should always be kept as short
as possible:
™ Speaker and power cables may be cut to fit the actual lengths
required.
™ Shielded RCA/signal cables should never be cut and respliced, as
they will loose their protective shielding effect in the places where
they are cut. If the signal cable is too long, make an S-type loop (never
a coil loop) about midway of the cable stretch.
The amplifier should be mounted to a solid surface that will ensure
a vibration-free mount. Once selected, use the unit as a template
for the marking of the mounting holes which should also be pilot-drilled
before final installation with the provided screws is carried out.
2
For audio signal connections you should always use double or
triple shielded quality RCA cables.
Never route any low level/signal cable near or parallel to speaker
outputs/speaker cables, amplifier power cables or high energy
ignition wires.
Use power cable with the recommended cross section (see section E). Small cross sections are reducing the output power, are
causing distortions and may be triggering the overheat protection of
the amplifier.
21
C609 Manual DE.indd 21
15.02.2005 10:34:05 Uhr
Make sure you are using a main fuse protection for the +12V-power
input of the amplifier within max. 30 cm of the car battery and
power cables with an amperage adequate cross-section and main fuse
(for details see section E: „Connecting“).
5
The GROUND/GND cable (-12V) should have the same crosssection as the +12V power cable. Make sure to get a good chassis
ground contact, because poor ground contacts are the cause for most
power problems with car audio installations.
6
Make sure no power, signal or speaker lines are shorting to chassis
ground by using rubber grommets wherever a cable has to pass
through any metal part of the vehicle.
7
Important: Before any wiring, always remove the (+) terminal of the
battery to prevent short-circuiting. The last lead to be connected in
every installation is always the positive (+) 12 Volt terminal of the
battery. Connect this lead only after having completed and checked
all other connections.
22
C609 Manual DE.indd 22
15.02.2005 10:34:05 Uhr
E CONNECTING THE C609
IMPORTANT: DISCONNECT THE +12V MAIN POWER CABLE
FROM YOUR CAR BATTERY BEFORE ANY CONNECTING WORK
IS CARRIED OUT!
The recommended power cable cross-section for +12 V
(average length 5 m) and ground cable is 20 mm2!
The recommended main fuse value for this amplifier is 60 A!
It is recommended to connect your amplifier as follows:
1
2
Make sure your head-unit is turned off and the volume control is
in its minimum position.
RCA outputs of your head unit to respective RCA inputs of your
amplifier (see connecting diagrams on pages 23 - 24 of this manual).
Sub pre-outs from head-unit should be fullrange signals because lowpass pre-out signals always affect filtering electronics of amplifier! In
case of doubt just ‚double‘ a fullrange front or rear pre-out by using
Y-adaptors.
3
4
Remote lead connection from head-unit to amplifier.
Speaker cables to respective speakers or passive crossovers. Make
sure to keep correct polarity! „팬“ to „팬“ and „팫“ to „팫“
All speakers must have a minimum impedance of 2 Ohms!!!
Ground connection to chassis ground or -12 V negative battery: If
possible ground cable as short as possible and make sure chassis
contact is well sand-papered, i.e. clean from any paint, rust or dirt for
maximum contact.
In case of problems hook-up your your annplifier directly with the -12
V negative pole or your battery.
5
6
+12 V power connection to positive battery pole. Do not forget
to install a main fuse within 30 cm of car battery (fire hazards)!!!
Do not connect +12 V cable to battery before re-checking every
other connection on the amplifier!
Turn-on your head-unit keeping your volume at the minimum. The
green status LED on the front of the amplifier should light up now.
If not, turn-off your head-unit and recheck all wiring to and from the
amplifier for missing or faulty connections.
23
C609 Manual DE.indd 23
15.02.2005 10:34:05 Uhr
PLEASE NOTE!
• Min. Impedance for all
speaker is 2 Ohms!
• SUB-input signal
should be a fullrange
signal!
• A main fuse 60 A must
be installed 30 cm
within of car battery!
F CONNECTING DIAGRAM 3 x PRE-OUT
24
C609 Manual DE.indd 24
15.02.2005 10:34:06 Uhr
PLEASE NOTE!
• Min. Impedance for all speaker is
4 Ohms!
• A main fuse 60 A must be installed
within 30 cm of car battery!
F CONNECTING DIAGRAM 2 x PRE-OUT
25
C609 Manual DE.indd 25
15.02.2005 10:34:06 Uhr
G
CONTROLS & ADJUSTMENTS
C609 5-Channel System Amplifier
The AXTON C609 is a powerful 5-channel system amplifier. One single
C609 allows for an easy-to-install, speaker-dedicated amplification
of a complete 5-channel speaker system, i.e. with two stereo pairs of
independently controlled satellite speakers (front and rear) and one
mono subwoofer.
The integrated, separately adjustable HIGHPASS and LOWPASS crossover filters of the C609 enable you to drive the connected speakers in
the specific frequency range where they will perform best.
Dashboard, door and rear shelf speakers of 10-16cm diameter will never
have a good low-end bass reproduction anyway. Therefore the C609
front and rear satellite channels will only be playing in the midbass
and mid/high frequency range. This so-called highpass filtered or HPF
amplification mode aIso puts less electrical and mechanical ‚strain‘ on
the speaker units, resulting in an increased power handling capacity. The
subwoofer output will only receive lowpass filtered (LPF) signals resulting in the subwoofer only playing in the low-end bass frequency range
without any unwanted‚ booming‘ into the mid/high frequencies.
CROSSOVER FREQUENCY SETTINGS
1 HIGHPASS
FRONT & REAR, LOWPASS SUB
For appropriate crossover frequency selection, all tone controls (Bass,
Mid, Treble, Sub) and all fader and balance controls etc. on the head unit
have to be brought to their neutral or center position! The „Loudness”
function should also be deactivated.
Depending on the actual cone surface area, voice-coil diameter and
the rated power handling of the ‚satellites‘ it is recommended to set the
high-pass crossover / cut-in frequency between 40 and 240 Hz.
If the satellite highpass frequency is set too low, the mid-bass reproduction will be increased, but at the same time the power handling
capacity of the satellites will decrease. If the highpass frequency is set
too high, the mid-bass reproduction will become ‚thinner‘ while the
power-handling capacity of the satellites will increase.
As a general guideline, below you find a practice-proven list for appropriate satellite HPF crossover / cut-in frequencies covering the most
widely used dashboard, door and rear-shelf speaker diameters:
Front Satellite Speakers
10 cm Ø Coaxials or 2-Way Compos
13 cm Ø Coaxials or 2-Way Compos
16 cm Ø Coaxials or 2/3-Way Compos
HIGHPASS FREQ.
90-120 Hz
80-100 Hz
70 - 80 Hz
Rear Satellite Speakers
10 cm Ø Coaxials or 2-Way Compos
13 cm Ø Coaxials or 2-Way Compos
16 cm Ø Coaxials or 2/3-Way Compos
HIGHPASS FREQ.
100-150 Hz
120-130 Hz
100-130 Hz
Before you can effect the respective input sensitivity or gain LEVELs
you first have to select the system appropriate crossover frequencies.
For best results all crossover adjustments should usually be effected
by ear.
26
C609 Manual DE.indd 26
15.02.2005 10:34:06 Uhr
Satellite rule 1
The better sounding satellite system
should always be installed in the front
of the vehicle.
Adjustments and System Matching
2 Sensitivity
GAIN FRONT, REAR and SUB
Satellite rule 2
Based on identical speaker diameters
and comparable engineering quality
of the front and rear satellites, the
crossover cut-in frequency of the
front satellites should usually be set
lower than the highpass frequency of
the rear satellites.
To reach a maximum of dynamic response from your individual head unit
/ amplifier / speaker combination, it is important to set the respective
input sensitivity controls (LEVEL) correctly. On the one hand the sensitivity determines the actual signal-to-noise ratio. On the other hand the
sensitivity also controls the maximum distortion-free sound pressure
level (SPL) possible with your specific car audio system.
The LPF / LOWPASS SUB cut-off frequency for the subwoofer should
usually be set in between 50 and 90 Hz. Adjust the LOWPASS SUB
control in such a way that the bass reproduction will be precise and
rich, while still delivering a good and solid low-end bass.
Subwoofer
guideline
Generally, setting the LPF lowpass cut-off
frequency too low will result in a weak
and uncontoured bass response. Setting the LPF
control too high tends to give the subwoofer
a ‚booming‘ sound.
High- & lowpass
system tip
When selecting the high- and lowpass
frequencies of a sound system, it is
recommended to ‚leave a gap‘ between the
subwoofer LPF cut-off frequency and the
satellite HPF cut-in frequencies. Such a ‚gap‘
between the LPF and HPF settings can be
helpful to compensate for much of the midbass
resonance (around 100 Hz) otherwise occuring
in most vehicle environments.
It is recommended to effect the sensitivity adjustments and system
GAIN matching in the same sequence as listed below:
™ Set all tone controls (Bass, Mid, Treble, Sub) on the head-unit as
well as all fader and balance controls to neutral. The „Loudness“
option should be in the „Off“ position, too.
™ Set all 3 GAIN controls of the C609 to their lowest position.
™ Turn-on your head-unit and turn-up the volume control to approximately 3/4 of full volume and start playing a well recorded, dynamic
piece of music.
™ Slowly turn up the GAIN control of 5CH until you can just hear
distorted bass sounds. Slowly decrease the GAIN SUB control to the
point where the distortions have disappeared.
™ Now you reduce the main volume level on the head-unit to a
medium listening level.
™ Start turning up the FRONT GAIN control (1CH/2CH) clockwise until
you have reached a good tonal balance between the front satellites
and the subwoofer. A slight attenuation of the bass range should be
preferred, as this will be compensated by normal driving noises.
27
C609 Manual DE.indd 27
15.02.2005 10:34:06 Uhr
™ Start turning up the REAR GAIN control (3CH/4CH) clockwise
until you feel to you have reached an appropriate ‚rear fill‘ in the
back of the car, so that the overall in-car sound becomes smooth
and homogenous.
™ Finally, you may want to do some fine-tuning on the different
highpass and lowpass frequencies selected.
It is recommended to start fine-tuning with the subwoofer (LOWPASS
SUB) frequency. Proceed - if necessary - with the front satellites
(HIGH-PASS FRONT) and finish the frequency adjustments with the
rear satellites (HIGHPASS REAR).
IMPORTANT: All advice on controls and adjustments of this manual
section is based on the assumption that you are also thouroughly
acquainted with all the requirements and features of the entire audio
equipment - especially the head-unit and the speakers - connected to
this amplifier!
28
C609 Manual DE.indd 28
15.02.2005 10:34:07 Uhr
H
TROUBLESHOOTING
Problem
Cause
No music signal on loudspeakers
and POWER-LED on amp is off
●
●
●
●
●
●
●
●
A high-pitched buzzing sound
in- or decreasing with engine speed
● Bad ground (GND) conntact of amplifier or head unit /CD/MD-changer
● Insufficiently shielded RCA interconnects and/or bad RCA cable routing
(inductive interference of on-board electronics)
Crackling sound in- or decreasing
with engine speed
● Insufficient interference elimination of ignition circuitry
Humming
● Sign of ground loop(s), i.e. multiple ground connections of the car audio
installation or parts there of.
● Check also ground connections of all other audio components conncected
+ 12 V and/or GROUND (GND/ -12V) and/or
“Remote” line not (properly) connected
Fuse on amplifier or distributor blown
Main Fuse on car battery side blown
Short-circuit on any of the speaker outputs
DC voltage at speaker outputs
Amplifier overload
Amplifier overheat
IMPORTANT! The amplifier’s protection circuitry will shut-off the amplifier in case of short-circuit, overload or DC offset at the speaker
out-puts or in case of overheat. There will be an automatic re-start after approx. 5 sec. In case the cause for protection shut-off has been
eliminated, the amplifier will operate normally again (LED on). Otherwise the amplifier will continue switching on and off.
29
C609 Manual DE.indd 29
15.02.2005 10:34:07 Uhr
I
SPECIFICATIONS
AXTON 5-Channel System Amplifier
Rated power output mono/stereo (at 13.8V)
Satellites (Front+Rear) at 4 Ohms (2 x stereo) min.
Subwoofer (mono) at 4 Ohms min.
Rated power output mono/stereo (at 13.8V)
Satellites (Front+Rear) at 2 Ohms (2 x stereo)
Subwoofer (mono) at 2 Ohms
Frequency response (Sub+Front+Rear)
Total Harmonic Distortion (THD) at 4 Ohms
Signal to noise ratio
Channel separation
Crossover slope highpass and lowpass
Adjustable highpass frequency range
Adjustable lowpass frequency range
Recommended cross-section with 5m powercable
Input impedance
Input sensitivity
Damping factor
Thermal cut-off
Fuse
Recommended main fuse at car battery with 20 mm2 power cable
Dimensions (W x H x L)
Specifications subject to change without notice.
C609
4 x 50 W RMS
1 x 150 W RMS
4 x 70 W
1 x 220 W
10 - 30.000 Hz
< 0.05 %
> 95 dB
> 55 dB
12 dB/oct
40 - 240 Hz
40 - 240 Hz
20 mm2
47 k Ohms
0.2 - 9 V
> 250@ 4 / 20Hz
85 °C
3 x 25 A
60 A
256 x 53 x 410 mm
AXTON is a registred trademark of ACR AG, Bohrturmweg 1, CH-5330 Zurzach, Switzerland.
30
C609 Manual DE.indd 30
15.02.2005 10:34:07 Uhr
31
C609 Manual DE.indd 31
15.02.2005 10:34:07 Uhr
Introduction
Merci d’avoir acheté cet amplificateur AXTON
Cette gamme d’amplificateurs a été spécialement développée pour
une utilisation en milieu automobile utilisant une alimentation 12 v
avec masse au châssis.
Ces amplificateurs peuvent être utilisés en combinaison avec tout
autre composants audio disponible sur le marché tant au niveau hautparleurs que sources.
Installés correctement, les appareils AXTON vous procureront un niveau
de reproduction sonore exceptionnelle.
Afin de vous familiariser avec les possibilités et les réglages de votre
amplificateur AXTON, nous vous conseillons de lire attentivement cette
notice d’utilisation.
Si vous rencontrez un quelconque problème, n’ hésitez pas à vous
rapprocher de votre revendeur AXTON.
A CARACTÉRISTIQUES PRINCIPALES
∑ Amplificateur 5 canaux pour amplifier un système complet
satellites et subwoofer.
∑ Alimentation MOSFET hautes performances.
∑ Etages de sorties à transistors bipolaires en classe A/B.
∑ 3 paires d’entrées RCA.
∑ filtres actifs 12 dB/oct intégrés.
∑ filtrage subsonic 12dB/oct. intégré sur le canal 5.
∑ Fréquences de coupure des filtres indépendantes entre les
canaux avant, arrière et subwoofer (40-240 Hz).
∑ Démarrage et arrêt de l’amplificateur temporisés.
∑ Circuits de protection contre les surchauffes, les court circuits et
le courant continu en sortie.
∑ Input level/gain adjustable from 0.2 to 9 V
∑ Gain d’entrée ajustable entre 0.2 et 9 V
32
C609 Manual F 2
15.02.2005 10:43:24 Uhr
Connections et réglages
Face avant AXTON C609
14
1
2
5
6
8
4
9
7
Connections et réglages
Face avant AXTON C609
11
10
12
15
13
3
20
16
17
18
19
21
22
33
C609 Manual F 3
15.02.2005 10:43:24 Uhr
B
CONNECTIONS ET RÉGLAGES C609
1 ENTRÉES AVANT: entrées RCA bas niveau à connecter à la
2 ENTRÉES ARRIÈRE: entrées RCA bas niveau à connecter à la
source.
13 FILTRE SUBSONIC: active ou désactive le filtre subsonic sur le
14 INDICATEUR DE MISE EN MARCHE: ce voyant (vert) indique
le bon fonctionnement de l’amplificateur.
3
ENTRÉES SUBWOOFER: entrées RCA bas niveau à connecter à la source. Si votre source ne dispose pas de sorties subwoofer,
utilisez un Y rca sur les sorties arrières.
4 PASSE-HAUT CANAUX 1 & 2: active les filtres passe-haut
sur les entrées 1 & 2.
GAINS AVANT, ARRIÈRE ET SUBWOOFER:
gains séparés afin d’ajuster au mieux les différents niveaux d’entrée
aux niveaux de sortie de la source.
6 + 9 PASSE-HAUT AVANT ET ARRIÈRE: réglages des fréquences de coupure des filtres passe-haut pour les canaux avant et
arrière. Réglage effectif entre 40 et 240 Hz.
7 PASSE-HAUT CANAUX 3 & 4: active les filtres passe-haut
sur les entrées 3 & 4.
10 PASSE-BAS CANAL 5: active le filtre passe-bas sur le canal
5 (subwoofer).
passe-bas de canal 5 (subwoofer). Réglage effectif entre 40 et 240 Hz.
canal sub.
source.
5 + 8 + 11
12 PASSE-BAS SUB: réglage de la fréquence de coupure du filtre
15 INDICATEUR DE MISE EN PROTECTION: ce voyant (rouge)
indique que l’amplificateur a enclenché une de ces protections suite à un
problème.
16 FUSIBLE: protége l’amplificateur contre les surcharges.
17 +12 V: à connecter à la borne positive de la batterie.
18 REMOTE: signal de mise en marche de l’amplificateur, à connecter
à une sortie télécommandée de la source.
19 MASSE: à connecter au châssis du véhicule ou à la borne négative
de la batterie.
20 SORTIES AVANT: bornier haut parleur avant. Impédance mini: 2
ohms
21 SORTIES ARRIÈRE: bornier haut parleur arrière. Impédance
mini: 2 ohms
22 SORTIES SUBWOOFER: bornier haut parleur subwoofer.
Impédance mini: 2 ohms stéréo ou 4 ohms bridgé.
34
C609 Manual F 4
15.02.2005 10:43:24 Uhr
C PLACEMENT DE L’AMPLIFICATEUR
L’emplacement de l’amplificateur dans le véhicule a une grosse
incidence sur sa capacité à dissiper la température qu’il génère lors
de son fonctionnement. Il peut en résulter un enclenchement excessif
de la protection thermique. La position d’installation doit permettre une
bonne circulation de l’air au travers des ouies d’aération.
1
Pour les amplificateurs AXTON, la meilleur position pour la ventilation
est : amplificateur installé debout.
L’emplacement choisis doit être donc bien ventilé, à l’abris de la
poussière et de l’humidité. Evitez aussi un emplacement en contact
direct des rayons du soleil.
La surface qui accueil l’amplificateur doit être suffisamment
solide pour en supporter le poids. Une fois cet emplacement
définis, marquez les trous de fixation et faites un avant trous. Assurez
vous bien qu’aucun conduit (eau, essence, huile, câbles électriques)
ne se trouve derrière l’endroit percé.
2
Sécurisez le montage en utilisant les 4 vis fournies. La carcasse
de l’appareil ne doit pas être en contact avec la carrosserie du
véhicule ce qui évitera les boucles de masse à l’origine de nombreux
parasites.
3
D ASTUCES DE CÂBLAGES
Note : un mauvais câblage des alimentations ou des RCA peut sévèrement
endommager l’amplificateur. Lisez soigneusement ce manuel avant de
procéder au câblage.
Le passage des câbles est une opération critique, l’absence de parasite
lors de l’utilisation en dépend. Pour obtenir les meilleurs résultats
possibles respectez les conseils donnés ci-dessous :
1
2
Pour obtenir un signal audio de qualité, utilisez des câbles doubles
ou triples blindages haute qualité.
3
4
Les câbles bas niveau (RCA) doivent toujours rester le plus éloignés
possible des autres câbles.
tous les câbles doivent toujours être dimensionnés au plus court
possible :
si les câbles Hps et alimentations peuvent être coupés à la bonne
distance, un câbles RCA ne doit jamais être coupé. Il convient si le câble
est trop long de le faire circuler en S dans le véhicule.
Utilisez toujours des câbles à la section recommandée ( voir
chapitre E), une section trop faible va occasionner des pertes
de puissance voir la mise en sécurité de l’amplificateur.
35
C609 Manual F 5
15.02.2005 10:43:25 Uhr
Il est impératif de placer un fusible principal au maximum à 30
cm de la batterie. L’ampérage de ce fusible est déterminé par la
consommation de l’installation globale. (voir chapitre E)
5
Le câble de masse (GND) doit être de même section que le câble positif
( il y circule le même courant). Le point de masse sur le châssis doit être
le meilleur possible et bien nettoyé pour assurer un bon contact électrique.
6
7
8
Assurez vous bien que le passage des câbles ne risque pas de gêner les
manœuvres du conducteur.
Chaque fois qu’un câble traverse une pièce de métal il faut impérativement
utiliser un passe-câble pour éviter une usure prématurée qui aboutirai
à un court circuit.
36
C609 Manual F 6
15.02.2005 10:43:25 Uhr
E CONNECTER LE C609
IMPORTANT : LE CÂBLE D’ALIMENTATION 12 V NE SERA CONNECTÉ À
LA BATTERIE QU’A LA FIN COMPLÈTE DE L’INSTALLATION.
3
4
Le câble d’alimentation recommandé pour une longueur de 5 m aura une
section de 20 mm2.
5
Le fusible principal pour cet amplificateur sera d’au moins 60 A
Il est recommandé de câbler votre amplificateur comme suit :
1
2
assurez vous que la source est hors service et que sont contrôle
de volume est au minimum.
Connectez les cordons RCA de votre source à l’amplificateur
(voir diagrammes).
Le signal de la sortie sub de la source ne doit pas être filtré sous peine d’interférer avec les filtres de l’amplificateur. En cas de doute, utilisez un Y RCA
sur les sorties arrières.
connectez le câble de remote
connectez les câbles des haut-parleurs en respectant bien les
polarités. Les haut-parleurs doivent avoir une impédance mini
de 2 ohms !!!
connectez le câble de masse qui devra être le plus court possible,
enlevez bien toutes traces de peintures et de graisses à l’endroit
de la connection. Au cas ou aucun point ne convienne, tirez un câble
directement à la borne négative de la batterie.
vous pouvez maintenant connecter le câble d’alimentation positif en n’oubliant pas d’insérer un fusible à 30 cm max de la
batterie.
6
Mettez votre source en service avec le volume au minimum. Le voyant vert
de l’amplificateur doit s’allumer. Si ce n’est pas le cas, débranchez la batterie
et contrôlez complètement l’installation.
37
C609 Manual F 7
15.02.2005 10:43:25 Uhr
G
CONTRÔLES ET RÉGLAGES
C609 Amplificateur 5 canaux
L’ AXTON C609 est un amplificateur 5 canaux performant. Un seul appareil
vous permet d’alimenter un système de 5 haut-parleurs complet (avant,
arrière et subwoofer).
Les filtres intégrés indépendants vous permettent d’utiliser chaque hautparleur de façon optimum.
Les haut-parleurs destinés au tableau de bord ou au portières ( 10-16 cm)
n’ont pas un bon rendu dans le grave, c’est pourquoi votre amplificateur est
équipé de filtres passe-haut sur les voies satellites. Le filtre passe-bande
dont est équipé le canal subwoofer vous permettra de tirer le meilleur parti
de vos haut-parleurs de basses.
1 RÉGLAGE DES FILTRES INTÉGRÉS
La première opération à effectuer avant même de régler les gains est de
sélectionner les bonnes solutions de filtrage. Les meilleurs résultats s’obtiennent toujours grâce à un réglage à l’oreille.
Pour vous faciliter le réglage, nous vous conseillons de placer en position
neutre ou centrale, l’ensemble des réglages de votre source ( basses, aigus,
fader, …..). Le loundness doit être désactivé.
En fonction de la surface de membrane, du moteur ainsi que des autres
paramètres des haut-parleurs la fréquence de coupure des filtres passe-haut
devra être réglée entre 40 et 240 Hz.
Si la fréquence de coupure est réglée trop basse, il se produira une exagération du bas médium alors que dans un même temps, la puissance admissible
des haut-parleurs va diminuée.
Réglée trop haute, vous obtiendrez une faible reproduction du médium mais
une bonne tenu en puissance.
Vous pouvez, à titre indicatif, vous baser sur le tableau suivant :
Haut-parleurs avants :
Ø10 cm Coax ou 2 voies
Ø13 cm Coax ou 2 voies
Ø16 cm Coax ou 2/3 voies
Haut-parleurs arrières :
Ø10 cm Coax ou 2 voies
Ø13 cm Coax ou 2 voies
Ø16 cm Coax ou 2/3 voies
Fréquence de coupure :
90-120 Hz
80-100 Hz
70-80 Hz
fréquence de coupure :
100-150 Hz
120-130 Hz
100-130 Hz
38
C609 Manual F 8
15.02.2005 10:43:25 Uhr
Règle 1 :
Les haut-parleurs de meilleur qualité sont installés à
l’avant du véhicule
Il est recommandé de procéder aux réglages de sensibilité de gain d’amplification
afin de correspondre à la séquence décrite ci-après :
Règle 2 :
en se basant sur des haut-parleurs de diamètres et de qualité
identiques, la fréquence de coupure des hps avant sera tou
jours réglée plus bas que la fréquence de coupure du filtre
passe-haut des hps arrières.
∑ Réglez tous les contrôles de tonalités (basses, medium, aigus, sub) sur
la source avec réglage de balance et fader au neutre, sans oublier de
mettre le loudness en position « off » (éteint).
La fréquence de coupure du filtre passe-bas pour le subwoofer sera réglée entre
50 et 90 Hz. Elle sera ajustée à l’oreille pour obtenir le résultat escompté.
Réglée trop bas vous obtiendrez un son traînant, réglée trop haut, les basses
n’auront pas de profondeur, elles seront trop dynamiques.
Astuce pour les systèmes passe haut et passe bas.
Lorsque vous sélectez le système sonore avec passe haut et passe bas,
il est recommandé de laisser un « écart » entre la fréquence de coupure
du subwoofer LPF et la fréquence de fonctionnement du satellite HPF. Un
tel « écart »entre les réglages LPF et HPF peut permettre de compenser
la plupart de la résonance bas medium (aux environs de 100 Hz) qui se
produit souvent en environnement du véhicule.
∑ Positionnez les trois réglages de gain du C609 à leur position la plus
basse.
∑ Mettez en marche votre source/amplificateur et positionnez le curseur
de volume aux trois quarts du volume maximum et passez un morceau
de musique dynamique et bien enregistré.
∑ Augmentez doucement le gain du canal 5 jusqu‘à obtenir de la
distorsion, diminuez alors légèrement le gain jusqu‘à ce que la distorsion
disparaisse.
∑ Vous pouvez maintenant diminuer le volume de la source jusqu‘à obtenir
le niveau d’écoute souhaité.
DE LA SENSIBILITÉ ET DU SYSTÈME
2 RÉGLAGES
AVANT, ARRIÈRE ET SUB
∑ Diminuez le gain des canaux avant ( ch 1/2) jusqu’ obtenir la bonne
balance entre les canaux avant et subwoofer.
Afin d’obtenir le maximum de réponse dynamique de votre source/amplificateur/configuration des hauts parleurs, il est important de régler correctement les différents niveaux de sensibilité d’entrée (niveau, LEVEL). D’une
part, la sensibilité détermine le niveau du rapport signal/bruit. D’autre part,
la sensibilité contrôle aussi le niveau maximum de son hors distorsion permis par votre système audio embarqué.
∑ Augmentez alors le gain des canaux arrière (ch 3/4) jusqu‘à obtenir une
ambiance sonore homogène.
∑ Pour finir, vous pouvez réajuster les différentes fréquences de coupures
afin d’optimiser au mieux le fonctionnement du système.
39
C609 Manual F 9
15.02.2005 10:43:25 Uhr
H DÉFAUTS / SOLUTIONS
Problème
Cause
Pas de musique,
Voyant sur l’amplificateur
éteint.
●
●
●
●
●
Parasites aigus en rythme avec
Le moteur
● mauvaise masse sur l’amplificateur et/ou l’autoradio.
● câble RCA de mauvaise qualité (blindage insuffisant).
● mauvaise antiparasitage du circuit d’allumage
Bourdonnements
● signe d’une boucle de masse : masse prise en différents points du châssis.
● testez les différentes masses de l’installation
+12v, gnd, remote mal connecté
fusible principal défectueux
fusible sur l’amplificateur défectueux
court-circuit sur les sorties Hps
protection de l’amplificateur enclenchée
Important : le circuit de protection de l’amplificateur coupe l’appareil en cas de court-circuit, courant continu ou surchauffe. L’amplificateur tente de redémarrer
environ toutes les 5 secondes. Si la cause de la mise en protection n’a pas été résolue, l’amplificateur ne redémarre pas.
40
C609 Manual F 10
15.02.2005 10:43:25 Uhr
I SPÉCIFICATIONS
AXTON amplificateur 5 canaux
Puissance de sortie @ 13.8V
Satellites (av/ar) @4 ohms stéréo
Subwoofer (mono) @ 4 ohms min
Puissance de sortie @ 13.8V
Satellites (av/ar) @2 ohms stéréo
Subwoofer (mono) @ 2 ohms min
Réponse en fréquence
Distorsion harmonique @4 ohms
Rapport signal / bruit
Séparation des canaux
Pente des filtres intégrés
Fréquence des filtres ajustables
Section de câble recommandée
Impédance d’entrée
Sensibilité d’entrée
Facteur d’amortissement
Coupure thermique
Fusibles
Fusible principal recommandé
Dimensions
C609
4 x 50 W Rms
1 x 150 W Rms
4 x 70 W Rms
1 x 220 W Rms
10 – 30.000 Hz
< 0.05 %
> 95 dB
> 55 dB
12 dB / oct.
40 – 240 Hz
20 mm2
47 K ohms
0.2 – 9 V
>200 @ 4 ohms / 20 Hz
85 °C
3 x 25 A
60 A
256 x 53 x 410 mm
41
C609 Manual F 11
15.02.2005 10:43:25 Uhr
42
C609 Manual DE.indd 32
15.02.2005 10:34:07 Uhr
WARRANTY CERTIFICATE
Please keep this Warranty Certificate along with the
sales slip/proof of purchase.
Limited Warranty
The AXTON product listed is fully warranted against
defective materials or workmanship for a period of 2
YEARS from date of purchase at retail. Warranty will
only be granted if the warranty certificate is presented
fully completed with model, serial number (if applicable), purchaser´s address, purchasing date and dealer
stamp together with the original sales slip or proof of
purchase.
Model C609
Serial No.
Dealer´s Address
Warranty Limitations
This warranty does not cover any
damage due to:
Date of Purchase
1.
2.
Important!
Dear customer,
3.
thank you for buying this AXTON product. It is recommended to keep the original packing material for any
future transporting of the product. Please read the
warranty specifications carefully.
Should your AXTON product require warranty service, please return it to the retailer from whom it was
purchased or contact the official distributor in your
country. Please do not send any product to AXTON,
Switzerland. Should you have difficulty in finding an
authorized AXTON service-center, details are avaible
from your local distributor or from the manufacturer´s
address below.
Address of
manufacturer:
C609 Manual DE.indd 33
Inappropriate use, incorrect installation,
audio or mains connection.
Exposure to excessive humidity,
fluids, heat, direct sunlight or excessive
dirt or dust.
Accidents or abuse, unauthorized
repair attempts and modifications
not explicitly authorized by the
manufacturer.
This warranty is limited to the repair or the replacement
of the defective product at the manufacturer´s option
and does not include any other form of damage, whether
incidential, consequential otherwise.
This warranty will not cover any loss during transportation, transport costs or any other damage caused
by transport or shipment of the product.
AXTON, Bohrturmweg 1, CH-5330 Zurzach, Switzerland
Phone (+41) (0) 56/269 64 64, Fax (+41) (0) 56/269 64 66
43
15.02.2005 10:34:07 Uhr
GARANTIEKARTE
Bitte bewahren Sie diese Garantiekarte zusammen mit
Ihrer Kaufbestätigung auf.
Garantiebestimmungen
AXTON gewährleistet auf das in dieser Karte aufgeführte AXTON-Produkt für den Fall von Material- oder
Herstellungsfehlern 2 Jahr Garantie beginnend ab
Kaufdatum im Fachhandel. Garantieansprüche können nur mit einer korrekt und vollständig ausgefüllten
Garantiekarte zusammen mit dem Original-Kaufbeleg
geltend gemacht werden.
Modell C609
Seriennummer
Adresse des Händlers
Garantie-Einschränkungen
Nicht unter Garantie fallen Schäden infolge von:
Kaufdatum
Wichtig!
Sehr geehrter Kunde,
sehr geehrte Kundin,
vielen Dank, daß Sie sich zum Kauf eines AXTON-Gerätes entschlossen haben. Wir möchten Sie bitten, die
Originalverpackung für den Fall einer Garantieleistung
aufzuheben und die folgenden Garantiebestimmungen
gut durchzulesen.
Sollten Sie für Ihr AXTON-Produkt Garantieleistungen beanspruchen, wenden Sie sich bitte direkt an
den Händler, bei dem Sie das Gerät gekauft haben.
Bitte senden Sie keine Geräte an den Hersteller. Bei
Schwierigkeiten, ein geeignetes AXTON-Service-Center
zu finden, erhalten Sie bei AXTON in CH-5330 Zurzach
weitere Informationen.
Herstelleradresse:
C609 Manual DE.indd 34
1. unsachgemäßer Verwendung, Montage, unsachgemäßen Audio- oder Stromanschlüssen.
2. schädlichen Einwirkungen von übermäßiger
Feuchtigkeit, Flüssigkeiten, Hitze, Sonnenstrahlung oder übermäßiger Verschmutzung.
3. mechanischer Beschädigung durch Unfall, Fall
oder Stoss; Schäden durch nicht autorisierte
Reparaturversuche oder nicht durch den Hersteller ausdrücklich autorisierte Modifikationen.
Die Garantie dieses Produkts bleibt in jedem Fall auf die
Reparatur bzw. den Ersatz (Entscheidung beim Hersteller) des jeweiligen AXTON-Produkts beschränkt. Verlust durch Transport bzw. auf dem Transportweg oder
Schäden durch ungenügende Verpackung oder Transportkosten sind durch diese Garantie nicht gedeckt.
Jeder über diese Garantie-Erklärung hinausgehende
Anspruch und jede Haftung für direkte oder indirekte
Folgeschäden werden ausdrücklich abgelehnt.
AXTON, Bohrturmweg 1, CH-5330 Zurzach, Schweiz
Tel. (+41) (0) 56/269 64 64, Fax (+41) (0) 56/269 64 66
15.02.2005 10:34:08 Uhr