1
NÄHMASCHINE
Bedienungs- und Sicherheitshinweise
MACHINE A COUDRE
Instructions d'utilisation et consignes de sécurité
IAN 96742
SEWING MACHINE
Operation and Safety Notes
Klappen Sie vor dem Lesen die Seite mit den Abbildungen aus und machen Sie sich
anschließend mit allen Funktionen des Gerätes vertraut.
Before reading, unfold the page containing the illustrations and familiarise yourself with all
functions of the device.
Avant de lire le mode d'emploi, ouvrez la page contenant les illustrations et familiarisezvous ensuite avec toutes les fonctions de l'appareil.
DE / AT / CH
Bedienungs- und Sicherheitshinweise
Seite
5
GB / IE
Operation and Safety Notes
Page
27
FR / BE
Instructions d'utilisation et consignes de sécurité
Page
49
7
1
8
9
2
10
3
11
PUSH
4
12
5
PUSH
13
6
20
14
15
21
16
22
23
17
24
25
26
18
19
a
006806008
g
b
d
c
006905008
h
006Q6A0150
i
e
f
006914008
j
k
l
Inhaltsverzeichnis
Einleitung
Herzlichen Glückwunsch .......................................................................................................Seite
6
Beschreibung der Maschine..................................................................................................Seite
6
Zubehör.................................................................................................................................Seite
6
Technische Daten .................................................................................................................Seite
7
Wichtige Sicherheitshinweise.............................................................................Seite
8
Grundlagen der Nähmaschine
Maschine an das Netz anschließen ......................................................................................Seite
9
Zweistufen-Nähfußhebel .......................................................................................................Seite
9
Einfädeln der Nähmaschine
Unterfaden aufspulen............................................................................................................Seite 10
Unterfadenspule einsetzen ...................................................................................................Seite 11
Oberfadenspannung .............................................................................................................Seite 12
Einfädeln des Oberfadens.....................................................................................................Seite 13
Automatischer Nadeleinfädler ...............................................................................................Seite 14
Unterfaden heraufholen ........................................................................................................Seite 14
Nähen
Wahl des Musters .................................................................................................................Seite 15
Stichbreiten- und Stichlängenrad ..........................................................................................Seite 16
Nähen von Geradstichen ......................................................................................................Seite 17
Vernähen / Naht beenden / Faden abschneiden ..................................................................Seite 17
Wahl von Elastikstichen ........................................................................................................Seite 18
Blindstich...............................................................................................................................Seite 19
1-Step-Knopflöcher nähen ....................................................................................................Seite 20
Annähen von Knöpfen...........................................................................................................Seite 21
Allgemeine Informationen
Anschiebetisch befestigen ....................................................................................................Seite 22
Anbringen des Nähfußhalters ...............................................................................................Seite 22
Stoff/Nadel/Faden-Tabelle ....................................................................................................Seite 23
Stopfplatte .............................................................................................................................Seite 23
Pflege und Fehlerbehebung
Einsetzen und Wechseln von Nadeln ...................................................................................Seite 24
Wechseln der Glühlampe ......................................................................................................Seite 24
Behebung von Störungen .....................................................................................................Seite 25
Entsorgung ......................................................................................................................Seite
26
Garantie ..............................................................................................................................Seite
26
Service Adresse............................................................................................................Seite
26
Konformitätserklärung .............................................................................................Seite
26
DE / AT / CH
5
Einleitung
Herzlichen Glückwunsch
®
Wir gratulieren zum Kauf Ihrer PFAFF -Nähmaschine, die Ihnen das Nähen, Schneidern und
Ausbessern erleichtert und die Voraussetzung schafft, Ihre eigene Kreativität zu entfalten. Sie werden
®
schnell feststellen wie leicht und einfach Ihre neue PFAFF -Nähmaschine zu handhaben ist.
Um die vielen Möglichkeiten der Nähmaschine richtig kennenzulernen, empfehlen wir Ihnen, die
Bedienungsanleitung in Ruhe durchzulesen und die Funktionen Schritt für Schritt an der Maschine
praktisch zu erproben.
Damit Sie immer vom neuesten Stand der Technik profitieren können, behält sich der Hersteller das
Recht vor, Ausstattung, Design oder Zubehör ohne vorherige Ankündigung zu ändern.
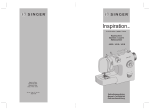
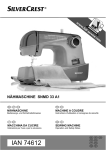
Beschreibung der Maschine
1. Fadenspannung
2. Fadengeber
3. Fadenabschneider
4. Nähfuß
5. Stichplatte
6. Anschiebetisch
7. Hebel zum Rückwärtsnähen
8. Spulereistopper
9. Stichbreitenrad
10. Stichlängenrad
11. Stichwählrad
12. Kopflochhebel
13. Automatischer Nadeleinfädler
14. Waagrechter Garnhalter
15. Spuler
16. Bohrung für zweiten Garnhalter
17. Handrad
18 Lichtschalter, Netzschalter
19. Stecker
20. Fadenspannung für Spuler
21. Oberfadenführung
22. Frontplatte
23. Tragegriff
24. Lüfterhebel
25. Fußanlasser
26. Netzstecker
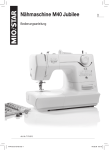
Zubehör
a.
b.
c.
d.
e.
f.
6
Allzweckfuß
Reißverschlussfuß
Knopflochfuß
Knopfannähfuß
Pinsel / Nahttrenner
Kanten- / Quiltführung
DE / AT / CH
g.
h.
i.
j.
k.
l.
Nadel
Großer und kleiner Garnhalter
Spulen
Schraubenzieher
Stopfplatte
Schutzhaube
Einleitung
Technische Daten
120 V/ 60 Hz (Nordamerika)
Nennspannung
230 V/ 50 Hz (Europa)
Nennleistung
- Nähmaschine
70 Watt
- Nählicht
10 Watt (Nordamerika)
15 Watt (Europa)
- Total
80 Watt (Nordamerika)
85 Watt (Europa)
Abmessungen
- Griff eingeklappt
ca. 375 x 163 x 270 mm (B x H x T)
Kabellänge
- Netzkabel
ca. 1.8 m
- Fußanlasserkabel
ca. 1.4 m
- Nähmaschine
ca. 5.2 kg
Gewicht
Material
Bedienungselemente
Anzeigeelemente
Aluminium / Kunststoff
- Hauptschalter
vorhanden
- Fußanlasser für Nähgeschwindigkeit
vorhanden
- Nählicht
vorhanden
Greifersystem
CB-Greifer
Nadelsystem
130/705H
Funkentstört
nach EU-Richtlinie
TÜV geprüft
Ja
Produkte-Garantie
3 Jahre
Schutzklasse
II
DE / AT / CH
7
Wichtige Sicherheitshinweise
Wichtige Sicherheitshinweise
Wenn sie ein elektrisches Gerät benutzen, sollten Sie immer die grundlegenden Sicherheitshinweise
beachten. Lesen Sie alle Anleitungen bevor Sie die Nähmaschinen benutzen.
Gefahr - wie das Risiko eines Stromschlages reduziert wird
1. Die Maschine sollte nie unbeaufsichtigt eingeschalten sein.
2. Ziehen Sie immer den Stecker aus der Steckdose, wenn Sie die Maschine unbeaufsichtigt lassen um
Verletzungen durch versehentliches einschalten zu verneiden.
Achtung - wie das Risiko eines Brandes, eines Feuers oder einer Verletzung verringert wird
1. Gestatten Sie nicht, dass die Nähmaschine als Spielzeug verwendet wird. Eine gründliche
Überwachung ist notwendig, wenn die Maschine in der Nähe von Kindern verwendet wird.
2. Verwenden Sie die Maschine nur für jene Dinge, wie in der Anleitung beschrieben ist.
3. Verwenden Sie die Maschine nicht, wenn das Kabel oder der Stecker kaputt ist, wenn Wasser in das
Innere eingedrungen ist oder wenn die Maschine nicht richtig näht. Bringen Sie die Nähmaschine in
diesen Fällen in eine autorisierte Werkstätte, um sie dort überprüfen zu lassen.
4. Wegen der Auf- und Abwärtsbewegung der Nadel beim Nähen besteht eine Verletzungsgefahr !
Arbeiten Sie stets mit Vorsicht und behalten Sie das Arbeitsfeld in Auge.
5. Verwenden Sie immer die entsprechende Stichplatte. Eine falsche Stichplatte kann zu
Nadelbrüchen führen.
6. Verwenden Sie keine verbogenen Nadeln
7. Ziehen Sie während des Nähens nie am Stoff! Dies kann die Nadel ablenken und zum
Nadelbrechen führen.
8. Schalten Sie die Maschine immer aus, wenn Sie Einstellungen in der Nadelgegend machen, wie z.B.
Einfädeln, Nadeln wechseln, Wechslen des Fußes ets.
9. Ziehen Sie immer den Netzstecker, bevor Sie Deckel entfernen, die Maschine Ölen oder andere
Wartungsarbeiten, wie im Anleitungsbuch beschrieben, durchführen.
10. Werfen Sie keine Gegenstände in die Öffnungen der Maschine.
11. Verwenden Sie die Maschine nicht im Freien.
12. Um die Maschine abzuschalten, stellen Sie alle Schalter auf ("O") und ziehen den Stecker aus der
Steckdose.
13. Ziehen Sie den Stecker nie am Kabel aus der Steckdose, sondern immer am Stecker.
14. Der Schalldruckpegel unter normalen Betriebsbedingungen beträgt 75dB(A).
15. Bitte schalten Sie die Nähmaschine aus oder ziehen Sie den Stecker, wenn die Nähmaschine nicht
ordnungsgemäß funktioniert.
16. Platzieren Sie keine Gegenstände auf dem Fußanlasser.
17. Wenn das am Fußanlasser befestigte Kabel beschädigt ist, muss es vom Hersteller, dessen
Kundendienst oder anderem qualifizierten Personal ausgetauscht werden, um Gefahren zu
vermeiden.
18. Dieses Gerät ist nicht für die Verwendung von Personen (einschließlich Kindern) mit reduzierten
körperlichen, sensorischen oder geistigen Fähigkeiten oder fehlender Erfahrung und Kenntnis
vorgesehen, es sei denn, sie werden beim Gebrauch des Geräts von einer für ihre Sicherheit
verantwortlichen Person beaufsichtigt oder angeleitet.
19. Kinder sind zu beaufsichtigen, um sicherzustellen, dass sie nicht mit dem Gerät spielen.
20. Betreiben Sie die Maschine niemals mit blockierten Belüftungsöffnungen. Halten Sie die
Belüftungsöffnungen der Maschine sowie dem Fußpedal frei von Fusseln, Staub und Stoffabfällen.
21. Bewahren Sie die Gebrauchsanweisung an einem geeigneten Ort in der Nähe des Gerätes auf.
Händigen Sie die Gebrauchsanleitung bei der Weitergabe des Gerätes an Dritte ebenfalls mit aus.
Verwahren Sie diese Bedienungsanleitung
Diese Maschine ist nur für den Haushalt gedacht.
8
DE / AT / CH
Grundlagen der Nähmaschine
Maschine an das Netz anschließen
Schließen Sie die Maschine wie abgebildet
an. (1) Verwenden Sie für den Stecker auch
die richtige Steckdose.
Achtung:
Stecken Sie die Maschine aus, wenn sie
nicht in Betrieb ist.
A
Fußanlasser
Der Fußanlasser regelt die Geschwindigkeit
mit der sie nähen wollen. (2)
Achtung:
Falls Sie Probleme mit dem Netzstecker
haben, fragen Sie einen qualifizierten
Elektriker.
1
Nählicht
Drücken Sie den Hauptschalter (A) um das
Licht und den Strom einzuschalten.
Stecker
Achtung:
Wenden Sie sich an einen qualifizierten
Techniker, wenn es beim.
Anschließen der Maschine ans
Stromnetz Zweifel gibt.
Trennen Sie die Maschine vom Netz,
wenn die Maschine nicht in Betrieb ist.
Die Nähmaschine darf nur mit dem
Fußpedal vom Typ KD-1902, FC-1902
(110-120V area)/ KD-2902, FC-2902D
(220-240V area)/ 4C-316B (110-125V
area)/ 4C-326G (230V area).
Csteckdose
2
3
Zweistufen - Nähfußhebel
Wenn Sie mehrlagig nähen, dann kann der
Fuß mit dem Lüfterhebel in eine höhere
Position gehoben werden. (A)
A
DE / AT / CH
9
Einfädeln der Nähmaschine
Unterfaden aufspulen
- Legen Sie die Garnspule auf den
Garnhalter und befestigen Sie diese mit
dem Garnhalter. (1,2)
- Fädeln Sie den Faden wie abgebildet ein.
(3)
- Ziehen Sie den Faden durch die
Spannung. (4)
- Geben Sie das Fadenende durch das
kleine Loch in der Spule und setzen diese
auf die Spulerei auf. (5)
1
2
- Drücken Sie die Spule nach rechts. (6)
- Halten Sie den Faden beim Annähen fest,
bis er fixiert ist. (7)
- Drucken Sie dann den Fusanlasser bis
das Garn aufgespult ist und der
Spulenstopper automatisch stoppt. (8)
3
- Nach dem Spulen schneiden Sie den
Faden ab. (9)
5
6
4
7
8
9
10
10
DE / AT / CH
- Bewegen Sie die Spule nach links (10)
und nehmen Sie sie ab.
Hinweis:
Wenn der Spuler auf die Funktion "Spulen"
eingestellt ist, lässt sich weder die
Maschine starten noch das Handrad drehen.
Zum Nähen müssen Sie die Spulerspindel
nach links (auf die Funktion "Nähen")
bringen.
Einfädeln der Nähmaschine
Unterfadenspule einsetzen
a
Wenn Sie die Unterspule einsetzen,
dann muss die Nadel in der höchsten
Position sein.
- Öffnen Sie die untere Klappe. (1)
- Ziehen Sie am Spulenkapselriegel (a)
und entnehmen Sie die Spulenkapsel. (2)
1
2
- Halten Sie die Spulenkapsel mit einer
Hand. Setzen Sie die Spule so ein, dass
sich die Spule im Uhrzeigersinn dreht. (3)
- Ziehen Sie den Faden, bis er in der Kerbe
einrastet. (4) Arbeiten Sie mit einem
Fadenanfang von ca. 15 cm.
3
4
5
- Halten Sie die Spulenkapsel an der
kleinen Lasche (5) und drücken Sie sie in
den Greifer. (6)
Achtung:
Schalten Sie die Maschine immer aus,
bevor Sie die Spule einlegen.
6
DE / AT / CH
11
Einfädeln der Nähmaschine
Oberfadenspannung
Oberfadenspannung
Die normale Spannungseinstellung ist auf "4".
Um die Spannung zu erhöhen, drehen Sie
den Spannungsknopf auf die nächst höhere
Nummer.
Um die Spannung zu lockern, drehen Sie
den Spannungsknopf auf die nächst
niedrigere Nummer.
1
2
A
B
C
D
Abbildung:
A. Normale Fadenspannung für Geradstich.
B. Die Fadenspannung ist zu locker.
Drehen Sie den Spannungsknopf höher.
C. Die Fadenspannung ist zu fest: Drehen
Sie den Spannungsknopf auf eine
niedrigere Nummer.
D. Normale Fadenspannung bei Zick-ZackStich und Zierstichen.
Bitte beachten Sie:
- Eine exakte Fadenspannung ist
entscheidend für ein sauberes Nähergebnis.
- Es gibt keine allgemein gültige
Fadenspannungseinstellung für alle
Stoffe und alle Fadenstärken.
Die Spannung muss je nach Stoff oder
Faden neu reguliert werden.
- Eine ausgewogene Spannung (Ober- und
Unterfaden gleich fest) ist nur bei
Geradstich sinnvoll. Bei Zierstichen oder
beim Zick-Zack-Stich sollte die
Fadenspannung so eingestellt werden,
dass der Oberfaden etwas lockerer ist als
der Unterfaden.
- 90% aller Einstellungen sind zwischen "3"
- "5". (Normaleinstellung "4").
- Bei allen Zierstichen wird das Stichbild
schöner, wenn die Oberfadenspannung
etwas gelockert wird und die Verknotung
von Ober- und Unterfaden auf der
Unterseite des Stoffes zu sehen ist.
Unterfadenspannung
Um die Unterfadenspannung zu erhöhen
drehen Sie die kleine Schraube an der
Spulenkapsel im Uhrzeigersinn leicht zu.
Um Sie zu lockern, drehen Sie gegen den
Uhrzeigersinn leicht auf. Die
Unterfadenspannung sollte jedoch selten
reguliert werden.
12
DE / AT / CH
Einfädeln der Nähmaschine
Einfädeln des Oberfadens
4
6
2
3
1
8
7
5
Das Einfädeln des Oberfadens ist einfach,
muss jedoch unbedingt richtig ausgeführt
werden, da sonst diverse Probleme beim
Nähen auftreten können.
- Bringen Sie die Nadel in Hochstellung (1)
und drehen Sie das Handrad so lange
entgegen dem Uhrzeigersinn, bis die
Nadel eben beginnt, sich abwärts zu
bewegen, um die Spannungsscheiben zu
lösen.
Hinweis: Aus Sicherheitsgründen wird
dringend empfohlen, dass Sie die
Maschine vor dem Einfädeln ausschalten.
- Heben Sie den Garnrollenstift an. Stecken
Sie eine Garnrolle so auf den Halter, dass
der Faden wie abgebildet von der Rolle
läuft. Bei kleinen Garnrollen sollte die
schmale Seite des Garnrollenständers
neben der Garnrolle positioniert werden. (2)
1
2
3
4
- Ziehen Sie den Faden wie abgebildet von
der Garnrolle durch die Oberfadenführung
(3) und dann durch die Vorspannungsfeder.
(4)
- Fädeln Sie den Faden durch das
Spannungsmodul, indem Sie den Faden
erst im rechten Schlitz nach unten und
dann im linken Schlitz wieder nach oben
führen (5). Dabei ist es hilfreich, wenn Sie
den Faden zwischen der Garnrolle und
Fadenführung festhalten.
- Führen Sie den Faden ganz oben von
rechts nach links durch die Öse des
Fadenhebels und anschließend wieder
nach unten. (6)
5
6
- Fädeln Sie den Faden nun durch die
Nadelklammerführung aus dünnem Draht
(7) und dann nach unten zur Nadel, die
anschließend von vorne nach hinten
eingefädelt werden sollte.
- Ziehen Sie den Faden ca. 20 cm unter
dem Nähfuß nach hinten heraus.
Schneiden Sie den Faden mit dem
integrierten Fadenschneider auf die
richtige Länge zu. (8)
7
8
DE / AT / CH
13
Einfädeln der Nähmaschine
Automatischer Nadeleinfädler
A
B
A
C
B
D
D
C
- Bringen Sie die Nadel in ihre höchste
Stellung.
- Drücken Sie den Hebel (A) so weit es
geht nach unten.
- Der Einfädler nimmt automatisch die
Einfädelposition (B) ein.
- Führen Sie den Faden um die
Vorspannung (C) herum.
- Führen Sie den Faden vor der Nadel von
unten nach oben um den Haken (D)
herum.
- Lassen Sie den Hebel (A) los.
- Ziehen Sie den Faden durch das
Nadelöhr.
Achtung:
Schalten Sie den Hauptschalter aus (auf
"O")!
A
Unterfaden heraufholen
Halten Sie den Oberfaden mit der linken
Hand und drehen Sie das Handrad mit der
rechten Hand. (1)
Hinweis:
Sollten Probleme beim Hochziehen des
Unterfadens auftreten, so stellen Sie
sicher, dass sich der Faden nicht in der
Spulenkapsel bzw. im ausziehbaren
Anschiebetisch verfangen hat.
1
Ziehen Sie den Oberfaden vorsichtig nach
oben, damit der Unterfaden hochkommt. (2)
Ziehen Sie nun beide Fäden unter dem
Nähfuß ca. 15 cm nach hinten. (3)
3
2
14
DE / AT / CH
Nähen
Wahl des Musters
a
b
c
Um einen Stich auszuwählen, müssen Sie
einfach den Stichauswahlknopf drehen. Der
Stichauswahlknopf kann in jede Richtung
gedreht werden.
d
Für den Geradstich wählen Sie das Muster
"__" mit dem Stichauswahlknopf. Stellen Sie
die Stichlänge mit dem Stichlängenwahlrad
ein.
Für einen Zickzack Stich, wählen Sie das
Muster "__" (Dessin) mit dem
Stichauswahlknopf. Passen Sie Stichlänge
und Stichbreite entsprechend dem Stoff an,
der gerade benutzt wird.
A
B
C
D
E
F
G
H
I
J
K
Um die anderen Muster zu erhalten, muss
die Stichlänge nach "S1" oder "S2" gedreht
werden. Wählen Sie das gewünschte
Muster mit einem Stichwahlrad aus, und
passen Sie die Stichbreite mit dem
Stichbreitenwahlrad an.
S1
S2
a. Hebel zum Rückwärtsnähen
b. Stichbreitenrad
c. Stichlängenrad S1-S2
d. Stichwählrad
DE / AT / CH
15
Nähen
Stichbreiten- und Stichlängenrad
Funktion des Stichbreitenrads
Die maximale Zickzackstichweite ist 5mm,
die Weite kann für jedes Muster reduziert
werden. Die Weite erhöht sich wenn Sie mit
dem Stichbreitenrad die Stichweite von "0"
auf "5" verstellen.
Mit dem Stichbreitenrad wird auch die
Nadelposition für den geraden Stich
eingestellt, wobei "0" die Position im der
Mitte und "5" die äußerste linke Position ist.
4
3
2
1
0.5
4
3
2
1
0.5
Funktion des Stichlängenrads beim Nähen
mit Zickzackstich
Stellen Sie das Stichwählrad auf Zickzack
ein.
Wenn Sie das Stichlängenrad in Richtung
"0" drehen, nimmt die Stichdichte des
Zickzackstiches zu.
Ordentliche Zickzackstiche erzielt man
normalerweise mit einer Einstellung von
"2.5" oder darunter.
Sehr dichte Zickzackstiche bezeichnet man
auch als Satinstiche.
Funktion des Stichlängenrads beim
Nähen mit Geradstich
Für das Nähen mit Geradstich müssen Sie
mit dem Stichwählrad die
Geradsticheinstellung wählen. Wenn Sie
das Stichlängenrad in Richtung "0" drehen,
wird die Länge des jeweiligen Stiches
reduziert. Wenn Sie es in Richtung "4"
drehen, nimmt die Länge des gewählten
Stiches zu. Allgemein gilt: für schwerere
Stoffe und dickere Nadeln bzw. Garne
sollte eine größere Stichlänge gewählt
werden. Für leichtere Stoffe und feinere
Nadeln bzw. Garne sollte eine geringere
Stichlänge gewählt werden.
16
DE / AT / CH
Nähen
Nähen von Geradstichen
Vor Nähbeginn müssen Sie die Maschine
auf Geradstich einstellen.
Legen Sie den Stoff so unter den Nähfuß,
dass die Stoffkante an der gewünschten
Führungslinie auf der Stichplatte anliegt. (1)
Senken Sie den Nähfußheber ab und
betätigen Sie dann den Fußanlasser, um mit
dem Nähen zu beginnen. (2)
1
2
Vernähen / Naht beenden / Faden abschneiden
Vernähen
Um die Naht am Anfang und am Ende zu
festigen, sollten Sie die Rückwärtstaste
drücken, und einige Stiche nach rückwärts
nähen (A). Lassen Sie die Rückwärtstaste
los und nähen Sie weiter. Am Ende der
Naht wiederholen Sie den Vorgang. (1)
A
2
1
B
Naht beenden
Drehen Sie das Handrad gegen den
Uhrzeigersinn, um die Nadel in die höchste
Position zu bringen.
Heben Sie den Fuß und ziehen Sie das
Nähgut vorsichtig nach hinten. (2)
Faden abschneiden
Ziehen Sie den Faden hinter den Nähfuß
Richtung Fadenabschneider (B) auf der
rechten hinteren Seite und schneiden Sie
den Faden ab, in dem Sie den Faden durch
den Abschneider nach unten ziehen. (3)
3
DE / AT / CH
17
Nähen
Wahl von Elastikstichen
Die elastischen Stiche werden auf dem
Stichwählrad in blauer Farbe angezeigt.
Wenn Sie diese Stiche wählen möchten,
müssen Sie das Stichwählrad auf den
gewünschten Stich einstellen. Stellen Sie
dann das Stichlängenrad auf "S1" ein. Es
gibt mehrere Elastikstiche. Hier erhalten Sie
zwei Beispiele:
Gerader Elastikstich
Stellen Sie das Stichwählrad auf " " ein.
Diese Einstellung dient der dreifachen
Verstärkung von elastischen und besonders
strapazierfähigen Nähten.
Die Maschine näht zunächst zwei Stiche
nach vorn und dann einen Stich zurück.
Rick-Rackstich
Stellen Sie das Stichwählrad auf " " ein.
Wählen Sie für das Stichbreitenrad eine
Einstellung zwischen "3" und "5".
Der Rick-Rack-Stich eignet sich vor allem für
unelastische Stoffe und dichte Gewebe wie
Jeans, Cord, Popeline, Segeltuch usw.
18
DE / AT / CH
Nähen
Blindstich
Für Säume an Vorhängen, Hosen, Röcken
usw.
Blindstich für elastische Stoffe.
Blindstich für unelastische Stoffe.
1
Stellen Sie das Stichlängenrad auf den
rechts abgebildeten Bereich ein. Blindstiche
werden normalerweise mit einer größeren
Stichlänge genäht. Wählen Sie für das
Stichbreitenrad eine für die zu nähende
Stoffqualität geeignete Einstellung innerhalb
des rechts abgebildeten Bereichs. Allgemein
gilt: für leichtere Stoffe werden schmalere
Stiche und für schwerere Stoffe breitere
Stiche verwendet. Probieren Sie die
Maschineneinstellungen zunächst auf einem
Stück des gewünschten Stoffes aus.
Blindstich:
Bügeln Sie den Saum in der gewünschten
Breite um. Schlagen Sie den Saum so nach
rechts um (s. Abb. 1), dass noch ca. 7 mm
des Saums hervorstehen.
2
Nähen Sie zunächst langsam über die Kante.
Achten Sie darauf, dass die Nadel beim
Einstechen in die Kante nur ein oder zwei
Fäden erfasst. (2)
Glätten und Bügeln Sie den Stoff nach dem
Nähen.
DE / AT / CH
19
Nähen
1-Step-Knopflöcher nähen
Das Nähen von Knopflöchern ist einfach und
führt zu einem zuverlässigen Ergebnis. Wir
empfehlen Ihnen jedoch, immer erst auf einem
Rest des zu verwendenden Stoffes samt Vlies
ein Probeknopfloch zu nähen.
b
a
A
3
4
2
H
PUS
1
B
C
H
PUS
E
20
DE / AT / CH
D
Knopflöcher nähen
1. Markieren Sie die Position des Knopflochs
mit Schneiderkreide auf dem Stoff.
2. Setzen Sie den Knopflochfuß ein und stellen
Sie das Stichwählrad auf " " ein.
Stellen Sie das Stichlängenrad auf "
" ein.
Wählen Sie für die Stichbreite die Einstellung
"5". Die Breite muss eventuell an das
Nähprojekt angepasst werden. Dies sollten
Sie auf einem Stoffrest ausprobieren.
3. Senken Sie den Nähfuß so ab, dass die
Markierungen auf dem Nähfuß mit den
Markierungen auf dem Stoff (A) eine Linie
bilden. (Der vordere Riegel wird zuerst
genäht.) (Bringen Sie die Markierung auf
dem Stoff (a) mit der am Nähfuß (b) auf eine
Linie.)
4. Öffnen Sie die Knopfplatte und setzen Sie
den Knopf (B) ein.
5. Senken Sie den Knopflochhebel ab und
drücken Sie ihn vorsichtig nach hinten (C).
6. Halten Sie den Oberfaden leicht hoch und
starten Sie die Maschine.
7. Knopflöcher werden in dieser Reihenfolge (D)
genäht.
8. Halten Sie die Nähmaschine an, wenn das
Knopfloch fertig genäht ist.
Knopflöcher auf elastischen Stoffen (E)
Beim Nähen von Knopflöchern auf elastischen
Stoffen empfehlen wir, den Knopflochfuß mit
dickerem Garn oder Beilaufgarn zu unterlegen.
Beim fertigen Knopfloch wird das Garn von den
Raupen verdeckt.
1. Markieren Sie die Position des Knopflochs
mit Schneiderkreide auf dem Stoff,
befestigen Sie den Knopflochfuß und stellen
Sie das Stichwählrad auf " " ein. Stellen
Sie das Stichlängenrad auf "
" ein.
2. Haken Sie das dicke Garn am hinteren Ende
des Knopflochfußes ein, bringen Sie die
beiden Fadenenden nach vorn, führen Sie
sie in die Rillen ein und verknoten Sie sie
vorübergehend.
3. Senken Sie den Nähfuß ab und beginnen
Sie zu nähen.
* Wählen Sie eine Stichbreite, die dem
Durchmesser des Beilauffadens entspricht.
4. Ziehen Sie nach dem Nähen vorsichtig am
Faden, damit der Stoff nicht die Form verliert,
und schneiden Sie die Überreste ab.
Nähen
Annähen von Knöpfen
Bringen Sie die Stopfplatte an. (1) Entfernen
Sie den Allzweckfuß und setzen Sie den
Knopfannähfuß ein. (2) Stellen Sie die
Stichlänge auf "0" ein.
Vernähen Sie die Naht zu Beginn mit
Geradstich und Stichbreite "0".
Heben Sie die Nadel aus dem Stoff heraus.
Stellen Sie die Maschine auf Zickzackstich
und die Stichbreite auf einen Wert zwischen
"3" und "5" ein. Stellen Sie durch Drehen des
Handrads sicher, dass die Nadel sauber in
das rechte und das linke Loch im Knopf
hineingeht. Stellen Sie die Stichbreite so ein,
dass sie dem Abstand der beiden Löcher im
Knopf entspricht. Nähen Sie den Knopf mit
ca. 10 Stichen langsam an.
Heben Sie die Nadel aus dem Stoff heraus.
Stellen Sie die Maschine wieder auf
Geradstich und Stichbreite "0" ein, um die
Naht zum Abschluss mit ein paar Stichen zu
vernähen.
1
Sollte eine Umwickelung erforderlich sein,
können Sie eine Stopfnadel auf den Knopf
legen und so nähen. Bei Knöpfen mit vier
Löchern müssen Sie zunächst durch die
beiden vorderen Löcher und dann durch die
beiden hinteren nähen.
2
3
DE / AT / CH
21
Allgemeine Informationen
Anschiebetisch befestigen
Halten Sie den Anschiebetisch waagrecht
und drücken ihn in die Pfeilrichtung. (A)
PUSH
AA
B
Das Innere des Anschiebetisches kann als
Zubehörfach verwendet werden.
Um es zu öffnen, klappen Sie die
Abdeckung wie abgebildet auf. (B)
Anbringen des Nähfußhalters
Heben Sie die Nähfußstange (a) mithilfe
des Nähfußhebers an. Befestigen Sie den
Nähfußhalter (b) wie abgebildet. (1)
a
e
c
d
1
b
f
Entfernen des Nähfußes
Heben Sie den Nähfuß mithilfe des
Nähfußhebers an. (3)
Wenn Sie den Hebel (e) nach oben
bewegen, löst sich der Nähfuß.
2
e
g
3
22
Anbringen des Nähfußes
Senken Sie den Nähfußhalter (b) mithilfe
des Nähfußhebers ab, bis sich die
Aussparung (c) exakt über dem Stift (d)
befindet. (2) Der Nähfuß (f) rastet
automatisch ein.
4
DE / AT / CH
Anbringen der Kanten-/Quiltführung
Bringen Sie die Kanten-/Quiltführung (g)
wie abgebildet an der Öffnung an. Nehmen
Sie die nötigen Einstellungen für Säume,
Falten, Quiltprojekte o. ä. vor. (4)
Achtung:
Schalten Sie beim Durchführen einer der
o. g. Vorgänge immer den Hauptschalter
aus (auf "O")!
Allgemeine Informationen
Stoff/ Nadel/ Faden-Tabelle
Stoff/ Nadel/ Faden-Tabelle
Nadelstärke
Stoff
9-11 (70-80)
Leichte Baumwolle, Seide, Musselin, Interlock
Jersey, leichte Polyesterstoffe, Hemd- und
Blusenstoffe.
Dünner
Baumwollfaden,Polyester-oder
Nylonfaden.
11-14 (80-90)
Mittlere Baumwollstoffe, Satin, Doppelstrick,
leichte Wollstoffe.
14 (90)
Wollstoffe, Jeansstoffe, grobe Strickstoffe.
16 (100)
Dicke Wollstoffe, dicke Jeansstoffe, Zeltstoffe
Möbelstoffe, schwere Vorhangstoffe etc.
Die meisten handelsüblichen
Fäden können für diese
Nadelstärke verwendet
werden, egal ob dies
Baumwoll- oder
Polyesterfäden sind.
18 (110)
Sehr schwere Wollstoffe, einige Lederarten,
Möbelstoffe etc.
Faden
Dickeren Faden verwenden.
Beachte: Wechseln Sie die Nadeln regelmäßig und nicht erst wenn Sie stumpf oder krumm sind.
Stopfplatte
Bei bestimmten Projekten (z. B. Stopfen
oder Freihandsticken) ist die Verwendung
der Stopfplatte erforderlich.
Bringen Sie die Stopfplatte wie abgebildet an.
Für normale Näharbeiten müssen Sie die
Stopfplatte entfernen.
DE / AT / CH
23
Pflege und Fehlerbehebung
Einsetzen und Wechseln von Nadeln
Wechseln Sie die Nadeln regelmäßig,
besonders dann, wenn sie krumm oder
beschädigt sind.
D
A
Setzten Sie die Nadel wie abgebildet ein:
A. Lösen Sie die Nadelhalterschraube.
B. Die flache Seite der Nadel muss immer
hinten sein.
C/D. Setzen Sie die Nadel so ein, dass Sie
oben anstößt.
B
C
B
Achtung:
Schalten Sie die Maschine immer aus,
bevor Sie die Nadel wechseln.
A
C
Nadeln müssen immer in perfektem
Zustand sein:
Probleme können auftreten mit:
A. Verbogenen Nadeln
B. Beschädigten Spitzen
C. Stumpfen Nadeln
Wechseln der Glühlampe
Ziehen Sie zuerst den Netzstecker.
Wechseln Sie die Glülampe nur gegen eine
Glühlampe gleichen Typs 15 W.
A
B
- Abdeckung (A) entfernen.
- Entfernen Sie die Frontplatte (B).
- Drehen Sie die Lampe heraus und geben
eine neue (C) hinein.
- Befestigen Sie die Frontplatte.
PUSH
C
24
DE / AT / CH
Pflege und Fehlerbehebung
Behebung von Störungen
Störung
Ursache
Fehlerbehebung
Die Maschine ist falsch eingefädelt.
Die Fadenspannung ist zu stark.
Der Faden ist zu dick.
Die Nadel ist nicht richtig eingesetzt.
Der Faden umschlingen den
Spulenhalter.
6. Die Nadel ist beschädigt.
1. Die Maschine neu einfädeln.
2. Die Fadenspannung reduzieren (kleinere
Nummer).
3. Die Nadelstärke erhöhen.
4. Die Nadel neu einsetzen (Flache
Koblenseite muß hinten sein).
5. Den Faden entfernen.
6. Die Nadel ersetzen.
Die Stiche
überspringen
1.
2.
3.
4.
Die Nadel ist nicht richtig eingesetzt.
Die Nadel ist beschädigt.
Die Nadelstärke ist falsch.
Der Nähfuß ist nicht richtig
eingesetzt.
1. Die Nadel neu einsetzen (Flache
Koblenseite muß hinten sein).
2. Die Nadel ersetzen.
3. Die richtige Nadel verwenden.
4. Den Nähfuß neu einsetzen.
Nadelbruch
1.
2.
3.
4.
1. Die Nadel ersetzen.
Die Nadel ist beschädigt.
Die Nadel ist nicht richtig eingesetzt. 2. Die Nadel neu einsetzen (Flache
Koblenseite muß hinten sein).
Die Nadelstärke ist falsch.
3. Die richtige Nadel verwenden.
Der Nähfuß ist falsch.
4. Den richtigen Nähfuß verwenden.
Lose Stiche
1. Die Maschine ist nicht richtig
eingefädelt.
2. Die Spule ist nicht richtig gefädelt.
3. Nadel/ Stoff/ Fadenkombination ist
falsch.
4. Die Fadenspannung ist falsch.
Die Stiche
ziehen sich
zusammen
1. Die Nadelstärke reduzieren.
1. Die Nadelstärke ist zu groß.
2. Die Stichlänge ist falsch eingestellt. 2. Die Stichlänge neu einstellen.
3. Die Fadenspannung reduzieren.
3. Die Fadenspannung ist zu stark.
Die Stiche und
der Transport
sind
ungleichmäßig
1. Die Fadenqualität ist schlecht.
2. Die Spule ist falsch gefädelt.
3. Der Stoff ist gezogen.
1. Eine besssere Fadenqualität verwenden.
2. Die Spule neu fädeln.
3. Beim Nähen den Stoff nicht ziehen.
Die Maschine
ist laut
1. Staub oder Öl in dem Greifer oder
der Nadelstange.
2. Die Ölqualität ist schlecht.
3. Die Nadel ist beschädigt.Faden im
Greifer.
4. Die Nadel ist beschädigt.
1.
2.
3.
4.
Die Maschine
sitzt fest
Faden im Greifer.
Den Oberfaden und die Spule entfernen, das
Handrad nach vorne und hinten drehen und
den Faden entfernen. Den Greifer ölen.
Oberfaden reißt 1.
2.
3.
4.
5.
1.
2.
3.
4.
Die Maschine neu einfädeln.
Die Spule neu fädeln.
Die Komibination korrigieren.
Die Fadenspannung korrigieren.
Den Greifer und die Nadelstange reinigen.
Eine bessere Ölqualität verwenden.
Die Nadel ersetzen.
Die Nadel ersetzen.
DE / AT / CH
25
Entsorgung / Garantie / Serviceadresse / Konformitätserklärung
Entsorgung
Bitte beachten Sie, dass hinsichtlich der Entsorgung dieses Produkts, vorschriftsmäßig
entsprechend der gültigen nationalen Gesetzgebung für elektrische/elektronische Produkte,
recycelt werden muss. Bei Zweifel setzen Sie sich bitte mit Ihrem Fachhändler in
Verbindung.
Garantie
Sie erhalten zum Zeitpunkt des Kaufs auf dieses Gerät 36 Monate Garantie. Das Gerät wurde
sorgfältig produziert und einer genauen Qualitätskontrolle unterzogen. Innerhalb der Garantiezeit
beheben wir kostenlos alle Material- oder Herstellerfehler. Sollten sich dennoch während der
Garantiezeit Mängel herausstellen, senden Sie das Gerät bitte an die aufgeführte Service-Adresse
unter Angabe folgender Artikel-Nummer: 1070s. Von der Garantie ausgeschlossen sind Schäden
durch nicht sachgemäße Handhabung, Nichtbeachtung der Bedienungsanleitung oder Eingriff durch
nicht autorisierte Personen sowie Verschleißteile. Durch die Garantieleistung wird die Garantiezeit
weder verlängert noch erneuert.
Serviceadresse
Singer Service Center
Breitefeld 15, D-64839 Münster bei Dieburg
Phone: 00800-74643700
E-Mail: [email protected]
VSM Austria GmbH
Moosstr. 60, A-5020 Salzburg
Phone: 00800-74643700
E-Mail: [email protected]
VSM Switzerland GmbH
Hauptstr. 91, CH-5070 Frick
Phone: 062-8715665
E-Mail: [email protected]
IAN 96742
Bitte halten Sie für alle Anfragen den Kassenbon und die Artikelnummer (z. B. IAN 12345) als
Nachweis für den Kauf bereit.
Konformitätserklärung
Dieses Gerät erfüllt die Anforderungen der geltenden europäischen und nationalen Richtlinien. Dies
wird durch CE-Kennzeichnung bestätigt.
Entsprechende Erklärungen sind beim Hersteller hinterlegt.
26
DE / AT / CH
Table of contents
Introduction
Congratulations .....................................................................................................................Page 28
Principle Parts of the Machine ..............................................................................................Page 28
Accessories ...........................................................................................................................Page 28
Technical Data ......................................................................................................................Page 29
Important safety instructions ..............................................................................Page
30
Machine Basics
Connecting Machine to Power Source ..................................................................................Page 31
Two Step Presser Foot Lifter ................................................................................................Page 31
Threading the Machine
Winding the Bobbin ...............................................................................................................Page 32
Inserting the Bobbin ..............................................................................................................Page 33
Thread Tension .....................................................................................................................Page 34
Threading the Upper Thread .................................................................................................Page 35
Automatic Needle Threader ..................................................................................................Page 36
Raising the Bobbin Thread....................................................................................................Page 36
Sewing
How to Choose Your Pattern ................................................................................................Page 37
Stitch Width Dial & Stitch Length Dial ...................................................................................Page 38
Sewing Straight Stitch ...........................................................................................................Page 39
Reverse Sewing/ Removing the Work/ Cutting the Thread...................................................Page 39
Choosing Stretch Stitch Patterns ..........................................................................................Page 40
Blind Hem..............................................................................................................................Page 41
Sew 1-step Buttonholes ........................................................................................................Page 42
Sewing On Buttons ...............................................................................................................Page 43
General Information
Installing the Removable Extension Table ............................................................................Page 44
Attaching the Presser Foot Shank ........................................................................................Page 44
Needle/ Fabric/ Thread Chart................................................................................................Page 45
Darning Plate ........................................................................................................................Page 45
Maintenance and Trouble shooting
Inserting & Changing Needle ................................................................................................Page 46
Changing the Bulb.................................................................................................................Page 46
Trouble shooting Guide .........................................................................................................Page 47
Disposal .............................................................................................................................Page
48
Warranty.............................................................................................................................Page
48
Service Address ...........................................................................................................Page
48
Declaration of Conformity .....................................................................................Page
48
GB / IE
27
Introduction
Congratulations
®
As the owner of a new PFAFF sewing machine, you are about to begin an exciting adventure in
creativity. From the moment you first use your machine, you will know you are sewing on one of the
easiest to use sewing machines ever made.
May we recommend that, before you start to use your sewing machine, you discover the many
advantages and the ease of operation by going through this instruction book, step by step, seated at
your machine.
To ensure that you are always provided with the most modern sewing capabilities, the manufacturer
reserves the right to change the appearance, design or accessories of this sewing machine when
considered necessary.
Principal Parts of the Machine
1.
2.
3.
4.
5.
6.
7.
8.
9.
10.
11.
12.
13.
Thread tension dial
Thread take-up lever
Thread cutter
Presser foot
Needle plate
Removable extension table/ accessory storage
Reverse sewing lever
Bobbin stopper
Stitch width dial
Stitch length dial
Pattern selector dial
One step buttonhole lever
Automatic threader
14.
15.
16.
17.
18.
19.
20.
21.
22.
23.
24.
25.
26.
Horizontal spool pin
Bobbin winding spindle
Hole for second spool pin
Handwheel
Power and light switch
Main plug socket
Bobbin thread guide
Upper thread guide
Face plate
Handle
Presser foot lifter
Foot speed control
Power cord
Accessories
a.
b.
c.
d.
e.
f.
28
All purpose foot
Zipper foot
Buttonhole foot
Button sewing foot
Seam ripper/ brush
Edge/ quilting guide
GB / IE
g.
h.
i.
j.
k.
l.
Pack of needles
Spool holder
Bobbin (3x)
L-screwdriver
Darning plate
Soft cover
Introduction
Technical Data
Rated voltage
120 V/ 60Hz (North America)
230 V/ 50 Hz (Europe)
Power rating
- Machine
70 Watt
- Sewing light
10 Watt (North America)/15 Watt (Europe)
- Total
80 Watt (North America)/85 Watt (Europe)
Dimensions
- When handle is folded down
Approx. 375 x 163 x 270 mm (L x W x H)
Cable length
- Power cable
Approx. 1,8 m
- Foot control cable
Approx. 1,4 m
- Machine
Approx. 5,2kg
Weight
Material
Operating elements
Display elements
Aluminium / plastic
- Mains power switch ON/OFF
Available
- Foot control for sewing speed
Available
- Sewing light
Available
Looper system
Oscillating Hook
Needle system
130/705H
Interference-free
In acc. with EU Directive
TÜV approved
Yes
Product guarantees
3 years
Class
II
GB / IE
29
Important Safety Instructions
Important Safety Instructions
When using an electrical appliance, basic safety should always be followed, including the following:
Read all instructions before using this sewing machine.
DANGER - To reduce the risk of electric shock:
1. An appliance should never be left unattended when plugged in.
2. Always unplug this appliance from the electric outlet immediately after using, as well as before
cleaning and other maintenance.
3. Always unplug before re-lamping. Replace bulb with same type rated 10 watts (110-120V area) or
15 watts (220-240V area).
WARNING - To reduce the risk of burns, fire, electric shock, or injury to persons:
1. Do not allow to be used as a toy. Close attention is necessary when this appliance is used by or
near children.
2. Use this appliance only for its intended use as described in this manual. Use only attachments
recommended by the manufacturer as contained in this manual.
3. Never operate this appliance if it has a damaged cord or plug, if it is not working properly, if it has
been dropped or damaged, or dropped into water. Return the appliance to the nearest authorized
dealer or service center for examination, repair, electrical or mechanical adjustment.
4. Never operate the appliance with any air openings blocked. Keep ventilation openings of the
sewing machine and foot controller free from accumulation of lint, dust, and loose cloth.
5. Keep fingers away from all moving parts. Special care is required around the sewing machine
needle.
6. Always use the proper needle plate. The wrong plate can cause the needle to break.
7. Do not use bent needles.
8. Do not pull or push fabric while stitching. It may deflect the needle causing it to break.
9. Switch the sewing machine off ("O") when making any adjustments in the needle area, such as
threading needle, changing needle, threading bobbin, or changing presser foot, and the like.
10. Always unplug sewing machine from the electrical outlet when removing covers, lubricating, or
when making any other user servicing adjustments mentioned in the instruction manual.
11. Never drop or insert any object into any opening.
12. Do not use outdoors.
13. Do not operate where aerosol spray products are being used or where oxygen is being
administered.
14. To disconnect, turn all controls to the off ("O") position, then remove plug from outlet.
15. Do not unplug by pulling on cord. To unplug, grasp the plug, not the cord.
16. The sound pressure level under normal operating conditions is 75dB(A).
17. Please turn off the machine or unplug when the machine is not operating properly.
18. Never place anything on the foot controller.
19. If the supply cord that is fixed with foot controller is damaged, it must be replaced by the
manufacturer or its service agent or a similar qualified person in order to avoid a hazard.
20. This appliance is not intended for use by persons (including children) with reduced physical,
sensory or mental capabilities, or lack of experience and knowledge, unless they have been given
supervision or instruction concerning use of the appliance by a person responsible for their safety.
21. Children should be supervised to ensure that they do not play with the appliance.
SAVE THESE INSTRUCTIONS
This sewing machine is intended for household use only.
30
GB / IE
Machine Basics
Connecting Machine To Power Source
Connect the machine to a power source as
illustrated. (1)
This appliance is equipped with a polarized
plug which must be used with the
appropriate polarized outlet. (2)
Attention:
Unplug power cord when machine is not
in use.
A
Foot control
The foot control pedal regulates the sewing
speed. (3)
Attention:
Consult a qualified electrician if in doubt
of how to connect machine to power
source. Unplug power cord when
machine is not in use.
The foot control must be used with the
appliance by KD-1902, FC-1902 (110120V area)/ KD-2902, FC-2902D (220240V area)/ 4C-316B (110-125V area)/
4C-326G (230V area).
1
a
Sewing light
Press main switch (A) to " l " for power and
light.
b
2
3
a. Polarized attachment plug
b. Conductor intended to be grounded
Two Step Presser Foot Lifter
When sewing several layers or thick fabrics,
the presser foot can be raised to a higher
position for easy positioning of the work. (A)
A
GB / IE
31
Threading the Machine
Winding the Bbobbin
- Place thread and corresponding spool
holder on to spool pin. (1/2)
- Snap thread into thread guide. (3)
- Wind thread counterclockwise around
bobbin winder tension discs. (4)
- Thread bobbin as illustrated and place on
spindle. (5)
- Push bobbin spindle to right. (6)
1
2
- Hold thread end. (7)
- Step on foot control pedal. (8)
- Cut thread. (9)
- Push bobbin spindle to left (10) and
remove.
3
5
6
4
7
8
9
10
32
GB / IE
Please Note:
When the bobbin winder spindle is in
"bobbin winding" position, the machine will
not sew and the hand wheel will not turn.
To start sewing, push the bobbin winder
spindle to the left (sewing position).
Threading the Machine
Inserting the Bobbin
When inserting or removing the bobbin,
the needle must be fully raised.
a
- Remove the extension table, then open
the hinged cover. (1)
- Pull the bobbin case tab (a) and remove
the bobbin case. (2)
1
2
- Hold the bobbin case with one hand.
Insert the bobbin so that the thread runs
in a clockwise direction (arrow). (3)
- Pull the thread through the slit and under
the finger. (4) Leave a 6 inch tail of
thread.
3
4
5
- Hold the bobbin case by the hinged latch.
(5)
- Insert it into the shuttle. (6)
Attention:
Turn power switch to off ("O") before
inserting or removing the bobbin.
6
GB / IE
33
Threading the Machine
Thread Tension
1
2
A
B
C
D
34
GB / IE
Upper thread tension
Basic thread tension setting: "4"
To increase the tension, turn the dial to the
next number up.
To reduce the tension, turn the dial to the
next number down.
A. Normal thread tension for straight stitch
sewing.
B. Thread tension too loose for straight
stitch sewing. Turn dial to higher number.
C. Thread tension too tight for straight
stitch sewing. Turn dial to lower number.
D. Normal thread tension for zig zag and
decorative sewing. Correct thread
tension is when a small amount of the
upper thread appears on the bottom side
of fabric.
Lower thread tension
To test the bobbin thread tension, remove
the bobbin case and bobbin and hold it by
suspending it by the thread. Jerk it once or
twice. If the tension is correct, the thread
will unwind by about an inch or two. If the
tension is too tight, it does not unwind at all.
If the tension is too loose, it will drop too
much. To adjust, turn the small screw on
the side of the bobbin case.
Please note:
- Proper setting of tension is important to
good sewing.
- There is no single tension setting
appropriate for all stitch functions, thread
or fabric.
- A balanced tension (identical stitches
both top and bottom) is usually only
desirable for straight stitch construction
sewing.
- 90% of all sewing will be between "3" and
"5".
- For zig zag and decorative sewing stitch
functions, thread tension should generally
be less than for straight stitch sewing.
- For all decorative sewing you will always
obtain a nicer stitch and less fabric
puckering when the upper thread appears
on the bottom side of your fabric.
Threading the Machine
Threading the Upper Thread
4
6
This is a simple operation but it is important
to carry out correctly as by not doing so
several sewing problems could result.
2
3
1
8
7
5
- Start by raising the needle to its highest
point (1), and continue turning the
handwheel counterclockwise until the
needle just slightly begins to descend.
Raise the presser foot to release the
tension discs.
Note: For safety, it is strongly suggested
you turn off the power before threading.
- Lift up the spool pin. Place the spool of
thread on the holder with the thread
coming off the spool as shown. For small
thread spools, place small side of spool
holder next to spool. (2)
- Draw thread from spool through the upper
thread guide (3) and pulling thread
through pre-tension spring as illustrated.
(4)
1
2
3
4
5
6
- Thread tension module by leading thread
down right channel and up left channel. (5)
During this process it is helpful to hold the
thread between the spool and thread
guide.
- At the top of this movement pass thread
from right to left through the slotted eye of
the take-up lever and then downwards
again. (6)
- Now pass thread behind the thin wire
needle clamp guide (7) and then down to
the needle which should be threaded from
front to back.(See page 36 for instructions
on how to use the Automatic needle
threader.)
- Pull about 6-8 inches of thread to the rear
beyond the needle eye. Trim thread to
length with built in thread cutter. (8)
7
8
GB / IE
35
Threading the Machine
Automatic Needle Threader
- Raise the needle to its highest position.
- Press lever (A) down as far as it will go.
A
B
A
- Pass thread around thread guide (C).
C
B
D
D
C
- The threader automatically swings to the
threading position (B).
- Pass the thread in front of the needle
around the hook (D) from bottom to top.
- Release lever (A).
- Pull the thread through the needle eye.
Attention:
Turn power switch to off ("O")!
A
Raising the Bobbin Thread
Hold the upper thread with the left hand.
Turn the handwheel (1) towards you
(counterclockwise) lowering, then raising
needle.
Note:
If it is difficult to raise the bobbin thread,
check to make sure the thread is not
trapped by the hinged cover or the
Removable Extension Table.
1
Gently pull on the upper thread to bring the
bobbin thread up through the needle plate
hole. (2)
Lay both threads to the back under the
presser foot. (3)
3
2
36
GB / IE
Sewing
How to Choose Your Pattern
a
b
c
To select a stitch, simply turn the pattern
selector dial. The pattern selector dial may
be turned in either direction.
For straight stitch, select pattern " " with
the pattern selector dial. Adjust the stitch
length with the stitch length dial.
d
A
B
C
D
E
F
G
H
I
J
K
For zigzag stitch, select pattern " " with
the pattern selector dial. Adjust the stitch
length and stitch width according to the
fabric being used.
To obtain the other patterns, turn the stitch
length dial to "S1" or "S2", select the pattern
desired with pattern selector dial, and
adjust the stitch width with the stitch width
dial.
S1
S2
a. Reverse Sewing Lever
b. Stitch Width Dial
c. Stitch Length Dial S1-S2
d. Pattern Selector Dial
GB / IE
37
Sewing
Stitch Width Dial & Stitch Length Dial
Function of stitch width dial
The maximum zigzag stitch width for zigzag
stitching is 5mm; however, the width can be
reduced on any patterns. The width
increases as you move zigzag dial from "0"
- "5".
The stitch width dial is also the control for
the straight stitch infinite needle position.
"0" is center needle position, "5" is full left
needle position.
Function of stitch length dial while zigzag stitching
Set the Pattern Selector Dial to zig-zag.
The density of zig-zag stitches increase as
the setting of stitch length dial approaches
"0".
Neat zig-zag stitches are usually achieved
at "2.5" or below.
Dense zig-zag stitches are called satin
stitches.
4
38
3
GB / IE
2
1
0.5
4
3
2
1
0.5
Function of stitch length dial for when
straight stitching
For straight stitch sewing, turn the Pattern
Selector Dial to the straight stitch setting.
Turn the Stitch Length Dial, and the length
of the individual stitches will decrease as
the dial approached "0". The length of the
individual stitches will increase as the dial
approaches "4". Generally speaking, use a
longer stitch length when sewing heavier
weight fabrics or when using a thicker
needle or thread. Use a shorter stitch length
when sewing lighter weight fabrics or when
using a finer needle or thread.
Sewing
Sewing Straight Stitch
To begin sewing, set the machine for
straight stitch.
Place the fabric under the presser foot with
the fabric edge lined up with the desired
seam guide line on the needle plate. (1)
Lower the presser foot lifter, and then step
on the foot controller to start sewing. (2)
1
2
Reverse Sewing / Removing the Work / Cutting the Thread
Reverse sewing
To secure the beginning and the end of a
seam, press down the reverse sewing lever
(A). Sew a few reverse stitches. Release
the lever and the machine will sew forwards
again. (1)
A
2
1
B
Removing the work
Turn the handwheel toward you
(counterclockwise) to bring the thread take
up lever to its highest position, raise the
presser foot and remove work behind the
needle and presser foot. (2)
Cutting the thread
Pull the threads under and behind the
presser foot. Guide the threads to the side
of the face plate and into thread cutter (B).
Pull threads down to cut. (3)
3
GB / IE
39
Sewing
Choosing Stretch Stitch Patterns
The Stretch Stitch Patterns are indicated
with a blue color on the Pattern Selector
Dial. To select these stitches, turn the
Pattern Selector Dial to the desired pattern.
Then, turn the Stitch Length Dial to the
indicator marked "S1". Though there are
several stretch patterns, here are two
examples:
Straight Stretch Stitch
Set the Pattern Selector Dial to " ".
Used to add triple reinforcement to stretch
and hardwearing seams.
The machine sews two stitches forward and
one stitch backwards.
Ric Rac
Set the Pattern Selector Dial to " ".
Adjust the Stitch Width Dial to between "3"
and "5".
Ric Rac Stitch is suitable for firm fabrics like
denim, corduroy, poplin, duck, etc.
40
GB / IE
Sewing
Blind Hem
For hems on curtains, trousers, skirts, etc.
Blind hem for stretch fabrics.
Blind hem for firm fabrics.
1
Set the Stitch Length Dial with the range
shown on the diagram at the left. Blind
hems, however, are normally sewn with a
longer stitch length setting. Set the Stitch
Width Dial at a setting appropriate for the
weight / type of fabric being sewn, within
the range shown in the diagram on the left
of the page. Generally, a narrower stitch is
used for lighter weight fabrics, and a wider
stitch is used for heavier weight fabrics.
Sew a test first to make sure the machine
settings are appropriate for the fabric.
Blind Hem:
Turn up the hem to the desired width and
press. Fold back (as shown in Fig. 1)
against the right side of the fabric with the
top edge of the hem extending about 7 mm
(1/4") to the right side of the folded fabric.
2
Start to sew slowly on the fold, making sure
the needle touches slightly the folded top to
catch one or two fabric threads. (2)
Unfold the fabric when hemming is
completed and press.
GB / IE
41
Sewing
Sew 1-Step Buttonhole
Buttonhole sewing is a simple process
that provides reliable results. However,
it is strongly suggested to always make
a practice buttonhole on a sample of
your fabric and stabilizer.
b
a
A
3
4
2
H
PUS
1
B
C
H
PUS
E
42
GB / IE
D
Making a Buttonhole
1. Using tailor's chalk, mark the position of
the buttonhole on the fabric.
2. Attach the buttonhole foot and set the
Pattern Selector Dial to " ".
Set stitch length dial to "
". Set the
stitch width at "5". The width however
may need to be adjusted according to
the project, Sew a test first to determine
this.
3. Lower the presser foot aligning the
marks on foot with the marks on the
fabric (A). (The front bar tack will be
sewn first.) (Align the mark on the fabric
(a) with the mark on the foot (b).)
4. Open the button plate and insert the
button (B).
5. Lower the buttonhole lever and gently
push it back (C).
6. While lightly holding the upper thread,
start the machine.
7. Buttonhole stitching is done in the order
(D).
8. Stop the machine when the buttonhole
cycle has completed.
Making a Buttonhole on Stretch Fabrics (E)
When sewing buttonholes on stretch fabric,
hook heavy thread or cord under the
buttonhole foot. When the buttonhole is
sewn the legs will overcast the cord.
1. Mark the position of the buttonhole on
the fabric with the tailor's chalk, attach
the buttonhole foot, and set the pattern
selector dial to " ". Set stitch length
dial to "
".
2. Hook the heavy thread onto the back
end of the buttonhole foot, then bring
the two heavy thread ends to the front
of the foot, insert them into the grooves
and temporarily tie them there.
3. Lower the presser foot and start sewing.
*Set the stitch width to match the
diameter of the gimp thread.
4. Once sewing is completed, gently pull
the heavy thread to remove any slack,
then trim off the excess.
Sewing
Sewing on Buttons
Install the darning plate. (1) Change the all
purpose foot to the button sewing foot. Set
the stitch length to "0".
To sew a few securing stitches, set the
machine for straight stitch, with the stitch
width set at "0".
Raise the needle out of the fabric. Set the
machine for zig-zag stitch, then set the
width to number "3" - "5". Turn the
handwheel to check that the needle goes
cleanly into the left and right holes of the
button. Adjust the stitch width, as needed,
according to the distance between the
holes of the button. Slowly sew on the
button with about 10 stitches.
Raise the needle out of the fabric. Set the
machine for straight stitch again, with the
width at "0" sew a few securing stitches to
finish.
1
If a shank is required, place a darning
needle on top of the button and sew. (3)
For buttons with 4 holes, sew through the
front two holes first, push the work forward
and then sew through the back two holes.
2
3
GB / IE
43
General Information
Installing the Removable Extension Table
Hold the removable extension table
horizontal, and push it in the direction of the
arrow. (A)
PUSH
AA
B
The inside of the removable extension table
can be utilized as an accessory box.
To open, flip cover down as shown. (B)
Attaching the Presser Foot Shank
Raise the presser bar (a). Attach the
presser foot shank (b) as illustrated. (1)
a
e
c
d
1
b
f
Removing the presser foot
Raise the presser foot. (3)
Raise the lever (e) and the foot disengages.
2
e
g
3
44
Attaching the presser foot
Lower the presser foot shank (b) until the
cut-out (c) is directly above the pin (d). (2)
Raise the lever (e).
Lower the presser foot shank (b) and the
presser foot (f) will engage automatically.
4
GB / IE
Attaching the edge/ quilting guide
Attach the edge/ quilting guide (g) in the
slot as illustrated.
Adjust according to need for hems, pleats,
etc. (4)
Attention:
Turn power switch to off ("O") when
carrying out any of the above operations!
General Information
Needle/ Fabric/ Thread Chart
NEEDLE, FABRIC, THREAD SELECTION GUIDE
NEEDLE SIZE
FABRICS
THREAD
9-11 (70-80)
Lightweight fabrics-thin cottons, voile, serge, silk,
muslin, interlocks, cotton knits, tricots, jerseys,
crepes, woven polyester, shirt & blouse fabrics.
Light-duty thread in cotton,
nylon, polyester or cotton
wrapped polyester.
11-14 (80-90)
Medium weight fabrics-cotton, satin, kettlecloth,
sailcloth, double knits, lightweight woolens.
14 (90)
Medium weight fabrics-cotton duck, woolen,
heavier knits, terrycloth, denims.
16 (100)
Heavyweight fabrics-canvas, woolens, outdoor
tent and quilted fabrics, denims, upholstery
material (light to medium).
Most threads sold are medium
size and suitable for these
fabrics and needle sizes.
Use polyester threads on
synthetic materials and cotton
on natural woven fabrics for
best results.
Always use the same thread
on top and bottom.
18 (110)
Heavy woolen, overcoat fabrics, upholstery
fabrics, some leathers and vinyls.
Heavy duty thread, carpet
thread.
IMPORTANT: Match needle size to thread size and weight of fabric.
Note : Replace needle often (approximately every other garment ) and/ or at first thread breakage or
skipped stitches.
Darning Plate
For certain types of work, (e.g. darning or
free-hand embroidery), the darning plate
must be used.
Install the darning plate as illustrated.
For normal sewing, remove the darning
plate.
GB / IE
45
Maintenance and Trouble shooting
Inserting and Changing Needles
Change the needle regularly, especially if it
is showing signs of wear and causing
problems.
D
A
Insert the needle as illustrated as follows:
A. Loosen the needle clamp screw and
tighten again after inserting the new
needle.
B. The flat side of the shaft should be
towards the back.
C/D.Insert the needle as far up as it will go.
B
C
Attention:
Turn power switch to off ("O") before
inserting or removing the needle.
B
A
C
Needles must be in perfect condition.
Problems can occur with:
A. Bent needles
B. Damaged points
C. Blunt needles
Changing the Bulb
Disconnect the machine from the power
supply by removing the plug from the main
socket!
Replace bulb with same type rated 10 watts
(110-120V area) or 15 watts (220-240V area).
B
A
- Loosen screw (A) as illustrated.
- Remove the face plate (B).
- Unscrew the bulb and install a new one
(C).
- Replace the face plate and tighten screw.
PUSH
C
46
GB / IE
Maintenance and Trouble shooting
Trouble Shooting Guide
Problem
Cause
Upper thread
breaks
1.
2.
3.
4.
5.
Lower thread
breaks
1. The bobbin case is not inserted
1. Remove and reinsert the bobbin case and
correctly.
pull on the thread.
2. The bobbin case is threaded wrong.
The thread should pull easily.
3. The lower thread tension is too tight. 2. Check both bobbin and bobbin case.
3. Loosen lower thread tension as described.
Skipped
stitches
1. The needle is not inserted correctly. 1. Remove and reinsert needle. (flat side
2. The needle is damaged.
towards the back)
3. The wrong size or type of needle
2. Insert a new needle.
has been used.
3. Choose a needle to suit the thread and
4. The foot is not attached correctly.
fabric.
4. Check and attach correctly.
Needle breaks
Loose stitches
Seams gather
or pucker
Correction
The machine is not threaded correctly. 1.
The thread tension is too tight.
2.
The thread is too thick for the needle. 3.
The needle is not inserted correctly. 4.
The thread is wound around the
spool holder pin.
5.
6. The needle is damaged.
6.
1.
2.
3.
4.
Rethread the machine.
Reduce the thread tension. (lower number)
Select a larger needle.
Remove and reinsert the needle. (flat side
towards the back)
Remove the reel and wind thread onto reel.
Replace the needle.
The needle is damaged.
1. Insert a new needle
The needle is not correctly inserted. 2. Insert the needle correctly. (flat side
Wrong needle size for the fabric.
towards the back)
The wrong foot is attached.
3. Choose a needle to suit the thread and
fabric.
4. Select the correct foot.
1. The machine is not correctly
threaded.
2. The bobbin case is not correctly
threaded.
3. Needle/ fabric/ thread combination
is wrong.
4. Thread tension wrong.
1. Check the threading.
2. Thread the bobbin case as illustrated.
3. The needle size must suit the fabric and
thread.
4. Correct the thread tension.
1. Select a finer needle.
1. The needle is too thick for the fabric.
2. Readjust the stitch length.
2. The stitch length is incorrectly
3. Loosen the thread tension.
adjusted.
3. The thread tension is too tight.
Uneven stitches, 1. Poor quality thread.
uneven feed
2. The bobbin case is incorrectly
threaded.
3. Fabric has been pulled.
1. Select a better quality thread.
2. Remove bobbin case, thread and insert
correctly.
3. Do not pull on the fabric while sewing, let
it be taken up by the machine.
The machine is 1. The machine must be lubricated.
noisy
2. Lint or oil have collected on the
hook or needle bar.
3. Poor quality oil has been used.
4. The needle is damaged.
1. Lubricate as described.
2. Clean the hook and feed dog as
described.
3. Only use good quality sewing machine oil.
4. Replace the needle.
The machine
jams
Thread is caught in the hook.
Remove the upper thread and bobbin case,
turn the handwheel backwards and forwards
by hand and remove the thread. Lubricate as
described.
GB / IE
47
Disposal / Warranty / Service Address / Declaration of Conformity
Disposal
Please note that on disposal, this product must be safely recycled in accordance with
relevant National legislation relating to electrical/electronic products. If in doubt please
contact your retailer for guidance.
Warranty
You receive a 36 month warranty on this product, valid from the date of purchase. The appliance has
been carefully produced under strict quality control. Within the warranty period we shall rectify without
charge all material and manufacturing defects. In the event of a defect arising during the warranty
period, please send the device to the listed Service Centre address, making reference to the following
article number: 1070s. Damage caused by improper handling, non-observance of the operating
instructions or unauthorised interference with the appliance are excluded from the warranty. The
performance of services under the warranty does not extend or renew the warranty period.
Service Address
Bogod & Company Ltd.
Fortran Road, St Mellons, CF3 0WJ Cardiff, GB
)0044-29-20774910
IAN 96742
When inquiring about your product, please have your receipt and product number (e.g. IAN 12345)
ready as your proof of purchase.
Declaration of Conformity
This appliance complies with the requirements of the relevant European and national guidelines. This
is confirmed by the CE mark.
The relevant declarations are held by the manufacturer.
48
GB / IE
Table des matières
Introduction
Félicitations ...........................................................................................................................Page 50
Composants principaux de la machine à coudre ..................................................................Page 50
Accessoires ...........................................................................................................................Page 50
Données techniques .............................................................................................................Page 51
Instructions importantes de sécurité.............................................................Page
52
Les bases de la machine
Branchement de la machine à une source d'alimentation.....................................................Page 53
Lever le pied presseur à deux niveaux .................................................................................Page 53
Enfilage de la machine
Remplissage de la canette ....................................................................................................Page 54
Insertion de la canette...........................................................................................................Page 55
Tension du fil.........................................................................................................................Page 56
Enfilage supérieur .................................................................................................................Page 57
Enfileur automatique d'aiguille ..............................................................................................Page 58
Pour remonter le fil de canette ..............................................................................................Page 58
Couture
Comment choisir votre motif ...............................................................................................Page 59
Cadran de largeur de point et cadran de longueur de point ................................................Page 60
Couture de points droits ........................................................................................................Page 61
Couture en marche arrière / Pour retirer votre ouvrage en cours / Pour couper le fil ...........Page 61
Choisir les motifs de point extensible ....................................................................................Page 62
Ourlet invisible .......................................................................................................................Page 63
Couture de boutonnières en 1 étape.....................................................................................Page 64
Couture de boutons...............................................................................................................Page 65
Informations générales
Installation du bras amovible.................................................................................................Page 66
Poser le support du pied presseur ........................................................................................Page 66
Table de correspondance de l'aiguille, du tissu et du fil........................................................Page 67
Plaque à repriser ...................................................................................................................Page 67
Maintenance and Trouble shooting
Insertion et changement d'aiguille.........................................................................................Page 68
Changement de l'ampoule ....................................................................................................Page 68
Guide de dépannage.............................................................................................................Page 69
Elimination .......................................................................................................................Page
70
Garantie ..............................................................................................................................Page
70
Adresse du service apres-vente........................................................................Page
70
Déclaration de conformité .....................................................................................Page
70
FR / BE
49
Introduction
Félicitations
®
Vous voici à présent propriétaire d'une machine à coudre PFAFF et en cette qualité, vous allez
vous lancez dans une aventure excitante dans le domaine de la créativité. Dès le départ, vous
réaliserez que vous allez coudre avec l'une des machines les plus faciles à utiliser qui ait jamais été
fabriquée.
Avant de commencer à coudre, nous vous recommandons de voir quelques avantages ainsi que la
facilité d'utilisation en lisant ce mode d'emploi en étant assis devant votre machine à coudre.
Afin de garantir que votre machine vous donnera toujours le meilleur du point de vue technique, le
fabricant se réserve le droit de modifier l'apparence, le concept ou les accessoires de cette machine
s'il le juge nécessaire.
Composants principaux de la machine à coudre
1. Réglage de la tension
2. Releveur du fil
3. Coupe fil
4. Pied presseur
5. Plaque a aiguille
6. Bras amovible / rangement des accessoires
7. Levier de couture arrière
8. Axe butoir de la canette
9. Cadran de largeur de point
10. Cadran de longueur de point
11. Cadran de sélection de motifs
12. Levier de boutonnière à une étape
13. Enfileur automatique
14. Porte bobine horizontal
15.
16.
17.
18.
19.
20.
21.
22.
23.
24.
25.
26.
Axe pour disposer la canette
Trou pour insérer un deuxième axe de bobine
Volant
Interrupteur d'alimentation et d'éclairage
Prise de branchement du fil d'alimentation
Guide remplissage de canette
Guide-fil supérieur
Plaque frontale
Poignée de transport
Levier pied de biche
Rhéostat
Fil électrique
Accessoires
a.
b.
c.
d.
e.
f.
50
Pied multi-usage
Pied pour fermeture-éclair
Pied pour boutonnière
Pied pour pose de bouton
Brosse/ Découseur
Guide couture/ matelassage
FR / BE
g.
h.
i.
j.
k.
l.
Étui à aiguilles
Arrêt bobine
Canette (3x)
Tournevis L
Plaque de reprisage
Housse de protection souple
Introduction
Données techniques
Tension nominale
120 Volt/ 60 Hz (North America)
230 Volt/ 50 Hz (Europe)
Puissance nominale
- Machine
70 Watt
- Ampoule
10 Watt (North America)/15 Watt (Europe)
- Total
80 Watt (North America)/85 Watt (Europe)
Dimensions
- Ppoignée encastrée
env. 375 x 163 x 270 mm (B x H x T)
Longeur du cordon
- Cordon d'alimentation
env. 1,8 m
- Cordon pédale
env. 1,4 m
- Machine à coudre
env. 5,2kg
Poids
Matériau
Eléments de commande
Aluminium / plastique
- Interrupteur Allumé / Eteint
inclus
- Pédale pour commander la
Inclus
vitesse de couture
Eléments de vision
- Lampe pour coudre
inclus
Système de crochet
crochet CB
Système pour aiguilles
130/705H
Compatibilité
selon directive UE
électromagnétique
Contrôle TÜV
Oui
Garantie de produit
3 ans
Classe
II
FR / BE
51
Instructions importantes de sécurité
Instructions importantes de sécurité
Lors de l'utilisation d'un appareil électrique, il est important de toujours suivre certaines précautions de
sécurité dont certaines sont les suivantes :
Lire toutes les instructions avant d'utiliser votre machine à coudre :
DANGER - Pour éviter tout risque d'électrocution :
1. Lorsque la machine est branchée, ne jamais la laisser sans surveillance.
2. Toujours débrancher la machine à coudre de la prise de courant immédiatement après l'usage et
avant l'entretien.
3. Toujours débrancher la machine avant de changer l'ampoule.
Remplacer cette dernière par une ampoule de même type d'une puissance de 10 watts (pour une
alimentation de 110-120V) ou 15 watts (pour une alimentation de 220-240V).
AVERTISSEMENT - Pour réduire les risques de brûlures, d'incendie, d'électrocution ou
de blessures:
1. Ne pas autoriser l'utilisation de la machine comme jouet. Faire très attention lorsque la machine
est utilisée par des enfants ou a proximité d'enfants.
2. N'utiliser cette machine que dans le but pour lequel elle a été conçue tel que spécifié dans ce
manuel. N'utiliser que les accessoires spécifiés dans ce manuel et recommandés par le fabricant.
3. Ne jamais utiliser cette machine à coudre si le câble d'alimentation ou la prise sont endommagés
ou si son fonctionnement n'est pas normal, si elle est tombée par terre, dans de l'eau ou si elle a
subi des dommages. Si c'est le cas s'adresser au service après vente le plus proche pour obtenir
une réparation ou un réglage électrique ou mécanique.
4. Ne jamais utiliser le machine si des ouvertures d'air sont obstruées. S'assurer que les orifices de
ventilation et la pédale de commande sont libres de toute accumulation de poussières ou de
morceaux de tissu.
5. Ne pas approcher vos doigts de toute partie mobile. Prêter une attention particulière à proximité
de l'aiguille de votre machine à coudre.
6. Toujours utiliser la plaque à aiguille appropriée. Une mauvaise plaque peut entraîner la casse de
l'aiguille.
7. Ne pas utiliser d'aiguilles tordues.
8. Ne pas tirer sur le tissu ou le pousser lors de la couture. Ceci pourrait entraîner une courbure de
l'aiguille causant une casse.
9. Mettre la machine hors tension (position "O") avant de faire tout réglage dans la zone de l'aiguille,
comme par exemple enfiler l'aiguille ou remplacer celle-ci ou encore changer le pied presseur etc.
10. Toujours débrancher la machine à coudre de la prise de courant avant d'enlever le capotage, de
lubrifier ou de faire tout réglage spécifié dans ce mode d'emploi.
11. Ne jamais laisser tomber ou introduire d'objet dans les ouvertures de la machine.
12. Ne pas utiliser à l'extérieur.
13. Ne pas utiliser la machine dans des endroits ou des aérosols sont pulvérisés ou de l'oxygène est
administré.
14. Pour débrancher la machine, placer toutes les commandes sur la position d'arrêt ("O") et ensuite,
retirer la fiche de la prise de courant.
15. Ne pas débrancher la machine en tirant sur le fil. Débrancher en tirant sur la fiche et non sur le fil.
16. Le niveau sonore est conforme aux réglementations soit de 75dB (A).
17. Veuillez éteindre la machine ou la débrancher si elle ne fonctionne pas correctement.
18. Ne disposez jamais un objet quelconque sur la pédale.
19. Si le cordon d'alimentation qui relie la machine à la pédale est abîmé, il doit être remplacé par le
fabricant ou par un service après vente agrée afin d'éviter tout danger.
20. Cet appareil ne doit pas être utilisé par les personnes (ainsi que les enfants) aux capacités
physiques, sensorielles ou mentales réduites ou qui n'ont pas l'expérience et les connaissances
requises, sauf si elles sont supervisées ou ont reçu des instructions concernant l'utilisation de
l'appareil par une personne responsable de leur sécurité.
21. Les enfants doivent être surveillés pour assurer qu'ils ne jouent pas avec l'appareil.
GARDER CE MODE D'EMPLOI
Cette machine à coudre est destinée à un usage domestique exclusif.
52
FR / BE
Les bases de la machine
Branchement de la machine à une source d'alimentation
Brancher la machine comme indiqué ci-contre. (1)
La fiche de la machine est dotée de broches
normalisées et doit être utilisée avec une prise de
courant conforme aux normes en vigueur. (2)
Attention:
Débrancher le fil d'alimentation lorsque la
machine n'est pas utilisée.
A
Rhéostat
Le rhéostat contrôle la vitesse de
fonctionnement de la machine. (3)
Attention:
Consulter un électricien qualifié en cas de
doute pour brancher la machine. Débrancher
la machine quand celle-ci n'est pas utilisée.
Le rhéostat doit être obligatoirement utilisé
avec l'appareil. KD-1902, FC-1902 (110120V area)/ KD-2902, FC-2902D (220-240V
area)/ 4C-316B (110-125V area)/ 4C-326G
(230V area).
1
Fiche polarisée
Voyant témoin
Appuyer sur le bouton d'alimentation : le voyant
s'allume et la machine est prête a fonctionner (A).
REMARQUE IMPORTANTE
La prise de la machine comporte des broches
polarisées (l'une est plus large que l'autre).
Afin de réduire les risques d'électrocution
brancher la machine en respectant la taille
des trous de la prise.
Si la fiche n'entre pas complètement dans la
prise, inverser le sens. Si vous rencontrez une
difficulté contacter un électricien. Ne pas
modifier la fiche vous-même.
Prise de terre
2
3
Lever le pied presseur à deux niveaux
A
Lorsque vous cousez plusieurs épaisseurs
de tissus épais, le pied presseur peut être
soulevé sur une position élevée afin de
faciliter le positionnement du tissu. Faire
attention lorsque vous cousez plusieurs
épaisseurs et travailler lentement. (A)
FR / BE
53
Enfilage de la machine
Remplissage de la canette
- Placer le fil et le support correspondant
sur le porte bobine. (1/2)
- Glisser le fil dans le guide. (3)
- Enroulez le fil dans le sens anti-horaire
autour des disques de tension du dévidoir.
(4)
- Glissez le fil dans la canette tel qu'indiqué
et placez celle-ci sur l'axe. (5)
1
- Poussez la canette vers la droite. (6)
2
- Tenez l'extrémité du fil. (7)
- Appuyez sur le rhéostat de la machine. (8)
- Coupez le fil. (9)
- Repoussez l'axe du dévidoir vers la
gauche (10) et retirez la canette.
3
5
6
4
7
8
9
10
54
FR / BE
Veuillez noter:
Lorsque l'axe du dévidoir de canette est
dans la position de remplissage de la
canette, la machine ne coud pas et le volant
reste immobile. Pour commencer la couture,
pousser l'axe du dévidoir de canette vers la
gauche (position de couture).
Enfilage de la machine
Insertion de la canette
a
Lors de la mise en place et du retrait de
la canette, veillez à ce que l'aiguille se
trouve en position haute maximale.
- Ouvrez le couvercle à charnière. (1)
- Retirez le boîtier à canette en tirant sur le
loquet du boîtier (a). (2)
1
3
2
4
- Tenez le boîtier à canette d'une main.
Introduisez la canette de façon à ce que
le fil s'enroule dans le sens des aiguilles
d'une montre (flèche). (3)
5
- Engagez le fil dans la fente et tirez-le vers
la gauche et sous le ressort jusqu'à ce
que le fil apparaisse dans l'ouverture
rectangulaire (4). Laisser dépasser le fil
d'environ 15 cm (6").
- Maintenez le loquet du boîtier à canette
entre le pouce et l'index. (5)
- Glissez le boîtier à canette dans le
crochet en s'assurant que le doigt du
boîtier s'insère complètement dans la
fente. (6)
6
Attention:
Placer l'interrupteur sur la position ("O")
avant d'insérer ou de retirer la canette.
FR / BE
55
Enfilage de la machine
Tension du fil
1
2
A
B
C
D
56
FR / BE
Tension du fil supérieur
Réglage de base pour la tension du fil: "4"
Pour augmenter la tension, tourner la
sélecteur sur une valeur plus élevée.
Pour réduire la tension, tourner la sélecteur
sur une valeur inférieure.
A. La tension du fil normale pour couture
avec points droits est illustrée.
B. Si la tension du fil est trop faible pour
couture avec un point droit, tourner le
sélecteur sur une valeur plus élevée.
C. Si la tension du fil est trop forte pour
couture avec un point droit, tourner le
sélecteur sur une valeur plus basse.
D. La tension du fil normale pour couture
zigzag et décorative.
Veuillez noter :
- Le bon réglage de la tension est
important pour bien coudre.
- Il n'existe pas un réglage de tension
standard pour toutes les fonctions de
points, fil ou tissu.
- Une tension équilibrée (points identiques
hauts et bas) n'est habituellement
souhaitable que pour la couture utilisant
le point droit.
- 90% de tous les travaux de couture
requièrent un réglage de tension compris
entre "3" et "5" .
- Pour les fonctions de couture avec point
zigzag et couture décorative, la tension
du fil devrait généralement être inférieure
à celle utilisée pour la couture utilisant le
point droit.
- Pour tous les travaux de couture
décorative, vous obtiendrez toujours de
meilleures finitions et moins de plis dans
le tissu lorsque l'enfilage supérieur
apparaît à l'arrière de votre tissu.
Enfilage de la machine
Enfilage supérieur
4
6
2
3
1
8
7
Cette opération est simple. Il est important
de l'exécuter correctement sous peine de
faire éventuellement face à plusieurs
problèmes de couture.
- Tournez le volant pour lever l'aiguille dans
sa position la plus haute (1) et qu'elle
s'abaisse légèrement, relevez le pied
presseur pour libérer les disques de
tension.
Note: Pour des raisons de sécurité, il est
fortement recommandé d'éteindre la
machine avant de l'enfiler.
5
- Levez le porte bobine horizontale. Placez
la bobine de fil sur le porte bobine, le fil
sortant de la bobine comme indiqué cicontre. Pour les petites bobines utiliser le
petit arrêt bobine.
- Passez le fil de la bobine à travers le
guide-fil supérieur. (3) Guider le fil autour
du guide en le tirant à travers le ressort de
pré tension tel qu'illustré. (4)
1
2
3
4
- Enfilez le module de tension en guidant le
fil vers le bas via la rainure droite et vers
le haut via la rainure gauche (5). Au cours
de cette opération, il est utile de tenir le fil
entre la bobine et le guide-fil et de le tirer
doucement vers le haut.
- Enfilez maintenant l'oeillet du releveur de
fil en y passant le fil de droite à gauche et
en tirant vers vous. Guidez le fil à nouveau
vers le bas. (6)
- Passez le fil dans le guide-fil horizontal qui
se trouve sur le pince aiguille. (7)
5
6
7
8
- Enfilez ensuite le chas de l'aiguille de
l'avant vers l'arrière et tirez à peu près 10
cm de fil vers l'arrière de la machine.
Coupez le fil à la longueur désirée à l'aide
du coupe fil incorporé. (8)
GB / IE
57
Enfilage de la machine
Enfileur automatique d'aiguille
- Relever l'aiguille à sa position la plus
haute.
A
B
A
C
B
D
D
C
- Enfoncer le levier (A) le plus possible.
- L'enfileur se met automatiquement en
position d'enfilage (B).
- Faire passer le fil autour du guide-fil (C).
- Faire passer le fil devant l'aiguille autour
du crochet (D) depuis le bas vers le haut.
- Relâcher le levier (A).
- Tirer le fil à travers le chas de l'aiguille.
Attention :
Eteindre l'interrupteur ("O") !
A
Pour remonter le fil de canette
Tenir le fil supérieur avec la main gauche.
Tourner le volant (1) vers vous (sens antihoraire) pour abaisser et lever l'aiguille.
Note:
Sil y est difficile de remonter le fil de la
canette, vérifier que le fil n'est pas pris
dans le couvercle du boîtier ou dans la
fermeture du bras amovible.
1
Tirer doucement vers le haut sur le fil
supérieur de la bobine pour faire passer le
fil de la canette à travers l'orifice de la
plaque à aiguille (2). Reposer les deux fils à
l'arrière sous le pied presseur. (3)
3
2
58
FR / BE
Couture
Comment choisir votre motif
a
b
c
Pour sélectionner un point, il suffit de
tourner le bouton de sélection de points. Le
sélecteur de points peut se tourner dans
n'importe quel sens (vers la droite ou vers
la gauche)
d
Pour le point droit, sélectionnez le point " "
à l'aide du bouton de sélection de points.
Réglez la longueur de point à l'aide du
bouton de réglage de longueur.
Pour le point zig zag, sélectionnez le point
" " à l'aide du bouton de sélection de
points. Réglez la longueur et la largeur de
point, en fonction du type de tissu.
A
S1
B
C
D
E
F
G
H
I
J
K
Pour obtenir les autres points, mettre le
bouton de longueur de point sur "S1" ou
"S2", sélectionnez ensuite le point désiré à
l'aide du bouton de sélection de points, puis
réglez la largeur de point à l'aide du bouton
de réglage de la largeur.
S2
a. Levier de couture arrière
b. Cadran de largeur de point
c. Cadran de longueur de point S1-S2
d. Cadran de sélection de motifs
FR / BE
59
Couture
Cadran de largeur de point et cadran de longueur de point
Fonction du cadran de largeur de point
La largeur maximum de point zigzag pour la
couture en zigzag est 5mm ; toutefois, la
largeur peut être réduite sur n'importe quel
motif. La largeur augmente au fur et à
mesure que vous déplacez le cadran de
zigzag de "0" à "5". (1)
Le cadran de largeur de point contrôle
également la position d'aiguille de point
droit infini. La position "0" est complètement
à gauche, "5" est complètement à droite et
la position centrale d'aiguille se trouve entre
"2" et "3".
4
3
2
1
0.5
4
3
2
1
0.5
Fonction du cadran de longueur de point
lors de la couture en zigzag
Régler le cadran de sélection de motifs sur
zigzag.
La densité des points en zigzag augmente
au fur et à mesure que le réglage du cadran
de longueur de point approche du "0".
Des points en zigzag soignés sont
généralement obtenus sur
"2,5" ou en dessous. (2)
Les points en zigzag serrés sont appelés
points bourdon. (2)
Fonction du cadran de longueur de point
lors de la couture de points droits
Pour coudre des points droits, tourner le
cadran de sélection de motifs sur couture
de points droits. Tourner le cadran de
longueur de point et la longueur des points
individuels sera réduite au fur et à mesure
que le cadran se rapproche du "0". La
longueur des points individuels augmentera
au fur et à mesure que le cadran se
rapproche de "4". En général, il faut utiliser
un point plus long lors de la couture de
tissus plus lourds ou lorsqu'une aiguille ou
un fil plus épais sont utilisés. Utiliser une
longueur de point plus courte lors de la
couture de tissus plus légers ou lorsqu'une
aiguille ou un fil plus fins sont utilisés.
60
FR / BE
Couture
Couture de points droits
Pour commencer à coudre, régler la
machine sur le point droit.
Placer le tissu sous le pied presseur avec le
bord du tissu aligné au guide de couture
souhaité sur la plaque à aiguilles. (1)
Abaisser le releveur du pied presseur, puis
appuyer sur la pédale pour commencer à
coudre. (2)
1
2
Couture en marche arrière / Pour retirer votre ouvrage en cours / Pour couper le fil
Couture en marche arrière
Afin de renforcer le début et la fin d'une
couture, abaisser le bouton marche arrière
en le poussant ver le bas. Faire quelques
points en sens inverse. Lâcher le bouton et
la machine reprendra la couture vers l'avant
(A). (1)
A
2
1
B
Pour retirer votre ouvrage en cours
Tourner le volant vers vous afin d'amener le
releveur de fil en position haute, lever le
pied presseur et retirer votre ouvrage en le
tirant vers l'arrière du pied presseur et de
l'aiguille. (2)
Pour couper le fil
Tirer sur les deux fils à l'arrière du pied
presseur. Les guider le long de la plaque
frontale et les placer dans le coupe-fil (B).
Tirer les fils vers le bas pour couper. (3)
3
FR / BE
61
Couture
Choisir les motifs de point extensible
Les motifs de point extensible sont indiqués
en bleu sur le cadran de sélection de motifs.
Pour sélectionner ces points, tourner le
cadran de sélection de motifs sur le motif
souhaité. Puis, tourner le cadran de
longueur de point sur l'indicateur marqué
par "S1". Il existe plusieurs motifs
extensibles et en voici deux exemples :
Point extensible droit
Régler le cadran de sélection de motifs sur
" ".
Utilisé pour ajouter un triple renforcement
aux coutures extensibles et résistant à
l'usure.
La machine coud deux points en avant et
un point en arrière.
Croquet
Régler le cadran de sélection de motifs sur
" ".
Régler le cadran de largeur de point entre
"3" et "5".
Le point de croquet convient aux tissus
solides comme le denim, le velours, la
popeline, le coutil, etc.
62
FR / BE
Couture
Ourlet invisible
Pour les ourlets sur les rideaux, pantalons,
jupes, etc.
Ourlet invisible pour tissus extensibles.
Ourlet invisible pour tissus solides.
1
2
Régler le cadran de longueur de point dans
la fourchette indiquée sur le diagramme à
droite. Toutefois, les ourlets invisibles ne
sont normalement pas cousus avec un
réglage de longueur de point plus long.
Régler le cadran de largeur de point sur un
réglage approprié pour le poids/type de
tissu cousu, dans la fourchette indiquée sur
le diagramme sur la droite de la page. En
général, un point plus étroit est utilisé pour
les tissus plus légers et un point plus large
est utilisé pour les tissus plus lourds. Faire
un test en premier pour assurer que les
réglages de la machine conviennent au
tissu.
Ourlet invisible :
Rabattre l'ourlet à la largeur souhaitée et
repasser. Replier (comme indiqué à la fig. 1)
contre le côté droit du tissu avec le bord
supérieur de l'ourlet s'allongeant d'environ 7
mm (1/4 de pouce) sur le côté droit du tissu
plié.
Commencer à coudre lentement, en
assurant que l'aiguille touche légèrement le
haut plié pour attraper un ou deux fils de
tissu. (2)
Déplier le tissu une fois que l'ourlet est
terminé et repasser.
FR / BE
63
Couture
Couture de boutonnières en 1 étape
La couture de boutonnière est un processus
simple qui assure des résultats fiables.
Toutefois, il est fortement suggéré de
toujours réaliser une boutonnière d'essai
sur un échantillon de tissu et d'entoilage.
b
a
A
3
4
2
H
PUS
1
B
C
D
Faire une boutonnière
1. Avec une craie de tailleur, marquer la
position de la boutonnière sur le tissu.
2. Poser le pied de boutonnière et régler le
cadran de sélection de motifs sur " ".
Régler le cadran de longueur de point sur
"
". Régler la largeur de point sur "5".
Toutefois, la largeur peut avoir besoin
d'être réglée selon le projet, faire un essai
en premier afin de déterminer ceci.
3. Abaisser le pied presseur en alignant les
marques sur le pied avec les marques sur
le tissu (A). (Le renfort avant sera cousu
en premier.) (Aligner la marque sur le tissu
(a) avec la marque sur le pied (b).)
4. Ouvrir la plaque à boutonnière et insérer
le bouton (B).
5. Abaisser le levier de boutonnière et le
pousser doucement vers l'arrière (C).
6. Tout en tenant légèrement le fil du haut,
mettre la machine en marche.
7. La couture de boutonnière se fait dans
l'ordre (D).
8. Arrêter la machine lorsque le cycle de la
boutonnière est terminé.
Faire une boutonnière sur des tissus
extensibles (E)
H
PUS
E
64
FR / BE
Lorsque vous cousez des boutonnières sur
tissu extensible, crochetez du fil épais ou un
cordon sous le pied de boutonnière. Lorsque
la boutonnière est cousue, les pieds surfileront
le cordon.
1. Marquer la position de la boutonnière sur
le tissu avec la craie de tailleur, poser le
pied de boutonnière et régler le cadran de
sélection de motif sur " ". Régler le
cadran de longueur de point sur "
".
2. Crocheter le fil épais à l'arrière du pied
pour boutonnière, puis ramener les deux
bouts de fil épais à l'avant du pied, les
insérer dans les rainures et les attacher là
temporairement.
3. Abaisser le pied presseur et commencer à
coudre.
*Régler la largeur du point pour
correspondre au diamètre du fil guimpeur.
4. Une fois que la couture est terminée, tirer
avec précaution le fil épais pour le tendre,
puis couper ce qui reste.
Couture
Couture de boutons
Poser la plaque de reprisage. (1) Changer
le pied presseur multi-usage pour le pied de
couture de bouton. (2) Régler la longueur
de point sur "0".
Pour coudre quelques points de fixation,
régler la machine sur point droit, avec la
largeur de point réglée sur "0".
Relever l'aiguille du tissu. Régler la
machine sur point en zigzag, puis régler la
largeur sur "3" à "5". Tourner le volant pour
vérifier que l'aiguille entre proprement dans
les trous gauches et droits du bouton.
Régler la largeur de point, selon le besoin,
suivant la distance entre les trous du
bouton. Coudre lentement le bouton avec
environ 10 points.
Relever l'aiguille du tissu. Régler à nouveau
la machine sur point droit, avec la largeur
sur "0" coudre quelques points de fixation
pour finir.
1
Si un support est nécessaire, placer une
aiguille à repriser en haut du bouton et
coudre. (3)
Pour les boutons à 4 trous, coudre à travers
les deux trous avant en premier, avancer
l'ouvrage, puis coudre les deux trous
arrières.
2
3
FR / BE
65
Informations générales
Installation du bras amovible
Maintenir le bras amovible en position
horizontal et le pousser comme indiqué cicontre. (A)
PUSH
AA
B
L'intérieur du bras amovible peut être utilisé
comme boîte de rangement pour les
accessoires.
Pour ouvrir, tirer vers vous comme indiqué
ci-contre. (B)
Poser le support du pied presseur
Relever la barre du pied (a) avec le releveur
de pied presseur. Attacher le support du pied
presseur (b) comme illustré. (1)
a
e
c
d
1
b
f
Retirer le pied presseur
Relever le pied presseur à l'aide du releveur
de pied presseur. (3)
Relever le levier (e) et le pied se
désenclenche.
2
e
g
3
66
Poser le pied presseur
Abaisser le support du pied presseur (b) à
l'aide du releveur de pied presseur, jusqu'à
ce que la découpe (c) se trouve directement
au-dessus de la broche (d). (2)
Le pied presseur (f) s'enclenchera
automatiquement.
4
FR / BE
Poser le guide-bord/guide pour quilting
Poser le guide-bord/guide pour quilting (g)
dans la rainure, comme illustré. Régler selon
le besoin pour les ourlets, plis, quilting, etc.
(4)
Attention :
Eteindre l'interrupteur (sur "O") lorsque
vous effectuez n'importe laquelle des
opérations ci-dessus !
Informations générales
Table de correspondance de l'aiguille, du tissu et du fil
GUIDE DE SÉLECTION DE L'AIGUILLE, DU TISSU ET DU FIL
DIMENSIONS
DE L'AIGUILLE
TISSUS
FIL
9-11 (70-80)
Tissus légers, cotons légers, voile, serge, soie,
mousseline, Qiana, tissu interlock, tricots de
coton, tricots, jerseys, crêpes, polyester tissé,
tissus pour chemises et blouses.
File de coton léger, nylon,
polyester ou de coton enrobé
de polyester.
11-14 (80-90)
Tissus d'épaisseur moyenne, coton, satin,
kettlecloth, tissu de marine, jersey double,
lainages légers.
14 (90)
Tissus d'épaisseur moyenne, cirés en coton,
lainage, jerseys plus épais, tissus éponge et
jeans.
16 (100)
Tissus épais, canevas, lainage, tentes et tissus
courtepointe, jeans, tissus pour rembourrage
(légers et moyens).
La plupart des types de fils
vendus sont de calibre moyen
et conviennent pour ces tissus
et dimensions d'aiguille.
Utiliser un fil polyester pour
des tissus synthétiques et un
fil de coton pour les fibre
naturelles et tissées pour un
meilleur résultat. Toujours
utiliser le même fil sur la
bobine et dans la canette.
18 (110)
Lainage épais, tissus pour manteaux et
pardessus, tissus pour rembourrage, certains
cuirs et vinyle.
Fil résistant, fil pour tapis.
IMPORTANT: Adapter les dimensions de l'aiguille au fil et à la qualité du tissu.
NOTE: Remplacez régulièrement l'aiguille (chaque fois que vous commencez un nouveau vêtement)
et/ou quand le fil casse ou les points sautent.
Plaque à repriser
Pour certains types de travaux, (par ex.
reprisage ou broderie à main levée), la
plaque à repriser doit être utilisée.
Installer la plaque à repriser comme illustré.
Pour la couture normale, retirer la plaque à
repriser.
FR / BE
67
Entretien et dépannage
Insertion et changement d'aiguille
Remplacer l'aiguille régulièrement, plus
particulièrement si elle indique des signes
d'usure et cause des problemès.
D
A
Insérer l'aiguille tel qu'indiqué ci-contre.
A. Desserrer la vis du pince aiguille et la
resserrer après avoir inséré une
nouvelle aiguille.
B. Le côté plat de la tige doit être face à
l'arrière.
C/D.Insérer l'aiguille jusqu'au bout.
B
C
B
Attention:
Mettre l'interrupteur d'alimentation sur
arrêt ("O") avant d'insérer ou de retirer
l'aiguille.
A
C
Les aiguilles doivent être en parfait état.
Des problèmes peuvent survenir si:
A. L'aiguille est tordue
B. L'extrémité de l'aiguille est endommagée
C. L'aiguille est épointée
Changement de l'ampoule
Débrancher la machine de l'alimentation
électrique en retirant la prise!
Remplacer l'ampoule par une ampoule du
même type de 10 Watts (pour 110-120V)
ou 15 watts (pour 220-240V).
B
A
- Desserrer la vis (A) comme indiqué.
- Enlever la plaque frontale (B).
- Dévisser l'ampoule et installer une
nouvelle (C).
- Reposer la plaque frontale et visser la vis.
PUSH
C
68
FR / BE
Entretien et dépannage
Guide de dépannage
Problème
Cause
Solution
Le fil supérieur
casse
1. La machine n'est pas correctement
enfilée.
2. La tension du fil est trop élevée.
3. Le fil est trop gros pour l'aiguille.
4. L'aiguille n'est pas bien insérée.
5. Le fil est enroulé autour du porte
bobine.
6. L'aiguille est endommagée.
1. Réenfiler la machine.
2. Réduire la tension. (valeur inférieure)
3. Choisir une aiguille plus grosse.
4. La retirer et la réinsérer. (côté plat vers
l'arrière)
5. Retirer la canette et enrouler le fil.
6. Remplacer.
Le fil inférieur
casse
1. Réinsérer le boîtier de façon correcte.
1. Le boîtier n'est pas bien inséré.
2. Contrôler la canette et le boîtier.
2. Le boîtier n'est pas bien enfilé.
3. La tension inférieure est trop élevée. 3. Réduire la tension du fil de canette.
Points
manqués
1. L'aiguille n'est pas bien insérée.
2. L'aiguille est endommagée.
3. Une aiguille de dimensions
incorrectes a été utilisée.
4. Le mauvais pied a été utilisé.
L'aiguille casse 1. L'aiguille est endommagée.
2. L'aiguille n'est pas bien insérée.
3. Aiguille de mauvaises dimensions
pour le tissu.
4. Le mauvais pied a été fixé.
1. La retirer et la réinsérer. (côté plat vers
l'arrière)
2. Remplacer.
3. Choisir une aiguille convenant au fil et au
tissu.
4. Vérifiez et fixez le bon pied de biche.
1. Insérer une nouvelle aiguille.
2. Insérer l'aiguille correctement. (côté plat
vers l'arrière)
3. Choisir une aiguille convenant au fil et au
tissu.
4. Choisir le bon pied.
Points lâches
1. La machine n'est pas correctement
enfilée.
2. Le boîtier n'est pas bien enfilé.
3. La combinaison aiguille/ tissu/ fil
n'est pas la bonne.
4. La tension du fil est mauvaise.
1. Vérifier l'enfilage.
2. Enfiler à nouveau correctement.
3. Choisir une aiguille/ fil /tissu adéquat.
4. Corriger la tension du fil.
La couture
fronce
1. L'aiguille est trop grosse pour le
tissu.
2. La longueur de point n'a pas été
bien ajustée.
3. La tension du fil est trop élevée.
1. Choisir une aiguille plus fine.
2. Réajuster la longueur de point.
3. Réduire la tension.
Points
irréguliers,
Entraînement
irrégulier
1. Le fil est de qualité inférieure.
2. Le boîtier n'est pas bien enfilé.
3. Le tissu a été tiré.
1. Choisir un fil de meilleure qualité.
2. Retirer la canette réenfiler et l'inserer
correctement.
3. Ne pas tirer sur le tissu en cousant.
Laisser la machine entraîner le tissu.
La machine est 1. La machine doit être lubrifiée.
2. De la poussière ou de l'huile s'est
bruyante
accumulée sur le crochet ou la
barre d'aiguille.
3. De l'huile de qualité inférieure a été
utilisée.
4. L'aiguille est endommagée.
La machine se
bloque
Du fil est coincé dans le crochet.
1. Emmener la machine au detaillant pour
l'entretien.
2. Nettoyer le crochet et les griffes
d'entrainement comme decrit.
3. Emmener la machine au detaillant pour
l'entretien et le nettoyage.
4. Remplacer.
Retirer le fil supérieur et la bobine, tourner
manuellement le volant vers l'avant et vers
l'arrière puis retirer les restes de fil.
FR / BE
69
Elimination / Garantie / Adresse du service apres-vente / Déclaration de conformité
Elimination
Veuillez noter qu'en cas de destruction, ce produit doit bénéficier d'un recyclage sécurisé,
conforme à la législation nationale applicable aux produits électriques/électroniques. En cas
de doute, veuillez contacter votre distributeur agréé.
Garantie
Vous bénéficiez d'une garantie de 36 mois à partir de la date d'achat de l'appareil. Cet appareil a été
fabriqué avec soin et soumis à un contrôle qualité minutieux. Pendant la durée de la garantie, nous
réparons gratuitement tous les défauts de matériaux ou de fabrication. Si toutefois une vous constatez
des défauts pendant la durée de la garantie, veuillez envoyer l'article à l'adresse indiquées plus
bas en indiquant le numéro d'article suivant : 1070s. La garantie exclut les dommages dus à une
manipulation non conforme, au non-respect des instructions du mode d'emploi ou à une intervention
par une personne non autorisée, ainsi que les pièces d'usure (par ex. ampoule). La durée de garantie
n'est aucunement prolongée ou renouvelée par une prestation de garantie.
Adresse du service apres-vente
Teknihall benelux
P/A Antwoordnummer 13533, 4800 WE Breda
)00800-74643700
e-mail: [email protected]
Teknihall benelux
Brusselstraat 33, 2321 Meer
)00800-74643700
e-mail: [email protected]
Teknihall benelux
Brusselstraat 33, 2321 Meer
)00800-74643700
E-mail : [email protected]
IAN 96742
Veuillez conserver le ticket de caisse et le numéro de référence de l'article (par ex. IAN 12345) au titre
de preuves d'achat pour toute demande.
Déclaration de conformité
Cet appareil est conforme aux exigences des directives européennes et nationales applicables. Le
marquage CE en est l'indicateur.
Les déclarations correspondantes sont disponibles auprès du fabricant.
70
FR / BE
VSM Group AB
Drottninggatan 2
SE- 56184 Huskvarna
Version des informations · Stand der Informationen ·
Last Information Update:03/ 2014
Ident.-No.: 1070s032014-DE/GB/FR
PFAFF is a registered trademark of KSIN Luxembourg II, S.à.r.l.
The trademark is used under license by VSM Group AB. ©2014 KSIN Luxembourg II, S.à.r.l.
All rights reserved.
021K6B0702(DE.GB.FR)
IAN 96742
DE, GB
FR