1
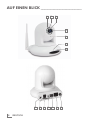
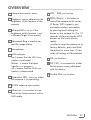
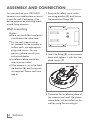
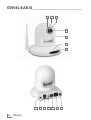
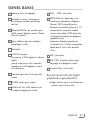
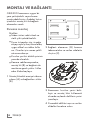
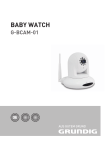
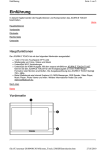
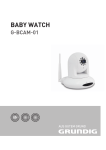
BABY WATCH G-BCAM-01 DE EN TR AUS GUTEM GRUND _______________________________________________________ 2 DEUTSCH DEUTSCH 03 -18 ENGLISH 19 - 34 TURKÇE 35 - 51 SICHERHEIT UND INFORMATIONEN_ ____ Sicherheit Keine Reinigungsmittel verwenden, 7 diese können das Gehäuse beschädigen. Die Kamera mit einem sauberen, trockenen Tuch reinigen. Dieses Gerät ersetzt nicht die Auf- 7 sicht der Eltern über die Kinder. Es dient Eltern bei der Beaufsichtigung ihrer Kinder als Hilfe. 7 Zur Vermeidung von Erstickungsgefahr (z. B. durch Erdrosseln mit dem Netzkabel), sollte die Videokamera außerhalb der Reichweite von Kindern installiert werden. 7 Diese Videokamera ist kein Spielzeug; Kinder dürfen nicht damit spielen. 7 Dieses Gerät ist für die Übertragung von Bild-/Tonsignalen in einem Haus oder Gebäude bestimmt. Jede andere Verwendung ist ausdrücklich ausgeschlossen. 7 Kamera vor Regen, Feuchtigkeit (Tropf- und Spritzwasser) und Hitze (hohe Temperaturen, Sonneneinstrahlung etc.) schützen. 7 Kamera nur unter normalen Wetterbedingungen verwenden. Gerät nicht längere Zeit im direkten Sonnenlicht nutzen. 7 Kamera nicht fallen lassen. 7 Unter keinen Umständen eine Netzspannung an die Buchsen »DIR/DO« anschließen. 7 Kameragehäuse auf keinen Fall öffnen. Bei Schäden, die durch unsachgemäße Eingriffe entstehen, geht der Anspruch auf Gewährleistung verloren. Gerät vor der Reinigung von der 7 Netzspannung trennen. Das mitgelieferte Netzteil nur mit 7 der Kamera nutzen. BABYWATCH Mit Ihrer Überwachungskamera behalten Sie Ihren Nachwuchs im Auge. Sie benötigen einen Internetzugang und ein GRUNDIG Fernsehgerät mit der Applikation „BABYWATCH“, die auf Ihrem Fernsehgerät installiert ist. Informationen zur Kamera 3 Megapixel Auflösung. 7 Großer Schwenkbereich und 7 großer Neigungswinkel. Unterstützt IEEE 802.3 Ethernet 7 Standard. Hinweise: 7 Ist die Kamera kabellos mit dem Internet verbunden, kann das die Audio-/Videoqualität vermindern. 7 W enn das Fernsehgerät ausgeschaltet ist bzw. die BABYWATCH-Anwendung in noch keinem Modus gestartet wurde, können weder Ton noch Bild von der Kamera empfangen werden. DEUTSCH 3 AUF EINEN BLICK_______________________________ A B C D E F G N 4 DEUTSCH M L K J I H AUF EINEN BLICK_______________________________ A B Kamerobjektiv und Abdeckung. Helligkeitssensor, ermittelt die Helligkeit am Aufstellungsort der Kamera. C Infrarot-LEDs, leuchten bei unzureichender Helligkeit am Aufstellungsort (Nachtsichtmodus). D Einstellring, zur Korrektur der Bildschärfe. E Mikrofon. F L AN-Anzeige, leuchtet: die LAN-Verbindung ist aktiv; blinkt: Datentransfer; aus: die LAN-Verbindung ist unterbrochen. Betriebsanzeige, leuchtet wenn die Kamera in Betrieb ist. G H Buchse für die WLAN-Antenne. I E thernet, Buchse zum Anschließen an das Heimnetzwerk über LAN-Kabel. J DO ... DIR, ohne Funktion. PS/Reset ist die Taste zur W Aufnahme der Kamera am Router (falls der Router WPS unterstützt, können Sie eine kabellose Verbindung herstellen, indem Sie die Taste an der Kamera 3 bis 10 Sekunden gedrückt halten, während Sie gleichzeitig die WPS-Tasten am Router drücken). Taste zur Rücksetzung der Kamera auf die Werksstandards mehr als 10 Sekunden gedrückt halten; alle Einstellungen werden gelöscht. K L SD, ohne Funktion. M DC 12V, Anschlussbuchse für das mitgelieferte Steckernetzteil. N Audio Out, ohne Funktion. DEUTSCH 5 MONTAGE UND ANSCHLIESSEN__________ Sie können Ihre GRUNDIG Kamera an einem geeigneten Ort aufstellen oder an der Wand montieren. Eine Halterung und Befestigungsmaterial befinden sich in der Verpackung des Gerätes.  (A) Wandmontage Hinweise: 7 Der Untergrund muss fest und statisch tragfähig sein. 7 Für Wandaufbauten wie z.B. Holz- oder Hohlraumwände verwenden Sie geeignete Dübel und Schrauben. Lassen Sie sich im Fachhandel beraten. 7 Der Montageort muss sich in der Nähe einer Steckdose befinden. 7 Wird die Kamera nur aufgestellt, werden der Gerätehalter (B) und der Haltewinkel nicht benötigt. Beginnen Sie im Kapitel ab Pkt. 6. 1 Sicherungsschraube (A) am Haltewinkel herausdrehen und Gerätehalter (B) abnehmen. 2 Gerätehalter (B) in den Einsatz am Boden der Kamera einschieben und mit den beiden mitgelieferten Schrauben (C) befestigen. (C) (B) (C) 3 Montageort für die Kamera festlegen und Bohrungen mit Hilfe des Haltewinkels an der Wand markieren. 4 Bohrungen an der Wand anbringen und beiliegende Dübel einsetzen. 6 DEUTSCH MONTAGE UND ANSCHLIESSEN__________ 5 Haltewinkel mit den 4 mitgelieferten Schrauben an der Wand befestigen. 6 Für den WLAN-Betrieb die WLAN Antenne anschrauben; oder für den LAN-Betrieb das LANKabel in die Buchse »Ethernet« stecken. Hinweis: 7 Das LAN-Kabel wird mit dem Gerät geliefert. 7 Das Kabel des Steckernetzteiles in Buchse »DC 12V« stecken. (A) 9 Steckernetzteil in die Netzsteckdose stecken. – Die Betriebsanzeige leuchtet nach kurzer Zeit und die Kamera führt einen Selbsttest der Motoren durch. 10LAN-Kabel an einen nicht verwendeten Anschluss am Modem oder Router anschließen. Achtung: 7 Kamera nicht an den LANEingang des Fernsehgerätes anschließen. Kamera und Fernseher sollten per Modem oder Router miteinander verbunden sein, damit sie sich im selben Netzwerk befinden. 8 Kamera auf den Haltewinkel aufschieben und Sicherungsschraube (A) eindrehen. Hinweise: 7 Abdeckung des Kameraobjektives abnehmen. 7 Kamera mit den Tasten der Fernbedienung auf die zu überwachende Position ausrichten. 7 Zum Anpassen der Bildschärfe den Abschnitt Schärfe anpassen auf Seite 11 beachten. DEUTSCH 7 NETZWERK INSTALLATION_____________________ Kamera am Heimnetzwerk anschließen und anmelden Damit das Bild der Kamera über die Applikation »BABYWATCH« auf Ihrem Fernsehgerät eingeblendet wird, muss sie an Ihrem Heimnetzwerk mit Internetzugang angeschlossen und angemeldet werden. Sie können Ihre Kamera über eine LAN-Verbindung oder ohne Kabel über WLAN mit dem Heimnetzwerk verbinden. Wenn Sie eine LAN-Verbindung verwenden, lesen Sie im Kapitel »Kamera über LAN-Verbindung anschließen ...« auf dieser Seite weiter; wenn Sie WLAN benutzen wollen, folgen Sie der Beschreibung im Kapitel »Betrieb über WLAN« ab Seite 10. Achtung: Schadsoftware kann über das Internet in Ihr Heimnetzwerk eindringen und audiovisuelle Dateien missbrauchen. Für solche Fälle sollte sollte Ihr Heimnetzwerk entsprechend gesichert werden. Die Gewährleistung der Sicherheit des Heimnetzwerks obliegt der Verantwortung des Benutzers. Kamera über LAN-Verbindung anschließen und anmelden Hinweis: 7 Die meisten Heimnetze sind dynamisch. Wenn Sie ein dynamisches Netzwerk verwenden, benötigen Sie einen DSL Router, der DHCP unterstützt. Falls der DHCP-Server des Routers nicht funktioniert, kann die Kamera keine IP Adresse empfangen. 1 Das Fernsehgerät einschalten. 2 Das Menü »Quick Apps« mit »@« anwählen. 3 Die Applikation »BabyWatch« mit »V« oder »Λ« wählen und mit »OK« bestätigen. – Das Menü »Hilfe« wird eingeblendet und erläutert die Installationsschritte. 7 8 DEUTSCH Kamerastart ∙∙ ∙ Kameranetzteil zum Start der Einrichtung einstecken. Die Betriebsleuchte an der Vorderseite der Kamera leuchtet auf. Der obere Kamerateil bewegt sich nach einer Weile. Ein Ende des LAN-Kabels an der Kamera anbringen, das andere Ende am Modem oder Router anschließen, mit dem der Fernseher verbunden ist. 4 Menü »Hilfe« mit »<« abschalten. – Das Menü »Einstellungen« wird eingeblendet. NETZWERK INSTALLATION_____________________ 5 Die Zeile »Kamera suchen« mit »V« oder »Λ« wählen und mit »OK« bestätigen. – Nach kurzer Zeit wird ein Kamera-Symbol und die IP Adresse der Kamera eingeblendet. Hinweis: 7 Bei fehlgeschlagener Kamerasuche; Zur detaillierten Suche »▯« (rot) drücken; oder wenn auch die detaillierte Suche fehlschlägt, zur manuellen IP-Eingabe »▯▯« (grün) drücken. 6 Gefundene Kamera mit »OK« bestätigen. – Das Eingabemenü für Namen und Kennwort der Kamera wird eingeblendet. 7 Die Tastatur mit »OK« einblenden. Hinweise zur Dateneingabe: 7 Die Daten werden mit der virtuellen Tastatur eingeben. Den benötigten Buchstaben/die Ziffer jeweils mit »V«, »Λ« , »<« oder »>« wählen und mit »OK« bestätigen. 7 Zum Umschalten von Großbuchstaben auf Kleinbuchstaben die Schaltfläche »Shift« wählen und mit »OK« bestätigen. 7 Der Tastaturmodus kann mit »▯« (rot) geändert werden. 7 Die Sprache der Tastatur/Tastenbelegung wird mit »▯▯« (grün) geändert. Das letzte Zeichen/die letzte 7 Ziffer kann mit »▯▯▯▯« (blau) gelöscht werden. Mit »▯▯▯« (gelb) wird der gesamte Eintrag gelöscht. 7 Wenn der Eintrag der aktuellen Zeile abgeschlossen ist, Tastatur mit »<« schließen. 8 Kameraname – wie im Hinweis beschrieben – eingeben und speichern. 9 Mit »V« die Zeile »Kennwort« wählen und mit »OK« die Tastatur einblenden. Hinweise: 7 Das Kennwort der Kamera lautet ab Werk standardmäßig "admin". 7 Wir empfehlen, ein eigenes Passwort zu vergeben, siehe Kapitel „Einstellungen“ auf Seite 15. 10 Das Kennwort „admin“ – wie im Hinweis beschrieben – eingeben und speichern. 11Mit »V« die Schaltfläche »OK« wählen und mit »OK« bestätigen. – Das „Livebild“ der Kamera wird angezeigt. Hinweis: Wenn der Router aus- und wieder eingeschaltet wird, kann sich die IP-Adresse der Kamera ändern; daraufhin die Schritte 5 7 bis 11 wiederholen. DEUTSCH 9 NETZWERK INSTALLATION_____________________ Betrieb über WLAN Hinweise: 7 Damit die Kamera über WLAN mit dem Heimnetzwerk verbunden werden kann, muss sie bei der Anmeldung mit einem LAN-Kabel mit dem Router verbunden und am Heimnetzwerk angemeldet sein, siehe Kapitel „Kamera über LAN-Verbindung ...“, auf Seite 8. 7 Die meisten Heimnetze sind dynamisch. Wenn Sie ein dynamisches Netzwerk verwenden, benötigen Sie einen DSL Router, der DHCP unterstützt. Falls der DHCP-Server des Routers nicht funktioniert, kann die Kamera keine IP Adresse empfangen. 1. Das Fernsehgerät einschalten. 2. Das Menü »Quick Apps« mit »@« anwählen. 3. Die Applikation »BabyWatch« mit »V« oder »Λ« wählen und mit »OK« bestätigen. . – Das „Livebild“ der Kamera wird angezeigt. 4. Während Das „Livebild“ eingeblendet wird, mit »▯« (rot) das Menü »Einstellungen« anwählen. 5. Die Zeile »Kameraeinstellungen« mit »V« oder »Λ« wählen und mit »OK« bestätigen. . – Die über die LAN-Verbindung mit dem Heimnetzwerk verbundene Kamera wird am Bildschirm angezeigt. 10 DEUTSCH 6 Kameraeinstellungen mit »OK« aufrufen, mit »V« oder »Λ« die Zeile »Drahtlosverbindungseinstellungen« wählen und mit »OK« bestätigen. – Nach kurzer Zeit werden die verfügbaren Drahtlosnetzwerke am Bildschirm angezeigt. 7. Das Drahtlosnetzwerk, an dem das Fernsehgerät angemeldet ist mit »V«, »Λ« »<« und »>« anwählen und mit »OK« bestätigen. . – Der Name des Netzwerkes und das Menü zur Kennworteingabe werden eingeblendet. 8 Die Zeile »Kennwort« mit »V« oder »Λ« anwählen und mit »OK« bestätigen. Über die virtuellen Tastatur das Kennwort eingeben danach Tastatur mit »<« abschalten. 9Mit »V« die Schaltfläche »Yes« wählen und mit »OK« bestätigen. – Das Menü »Hilfe« wird eingeblendet. 10Zurückschalten zum Menü »Einstellungen« mit »<«. 11Das LAN-Kabel von der Kamera entfernen. –D ie LAN-Anzeige an der Kamera blinkt schnell, die WLANVerbindung ist hergestellt. 12Das „Livebild“ der Kamera mit »▯« (rot) einblenden. BETRIEB MIT DER KAMERA___________________ Bildschärfe einstellen 1 Bildschärfe mit dem Einstellring am Kameraobjektiv einstellen. Ansichtsmodus wählen 1 Während das „Livebild“ eingeblendet wird, mit »@« das Menü »Applikationsansichtsmodus« anwählen. – Die Möglichkeiten: Vollbildmodus – das „Livebild“ wird als „Großbild“ eingeblendet; Widget-Modus – das „Livebild“ wird als Kleinbild zur aktuellen Fernsehsendung eingeblendet. Die Position und die Größe des Kleinbildes kann gewählt werden; Benachrichtigungsmodus – das „Livebild“ wird nur dann eingeblendet, wenn eine Bewegung stattfindet oder ein Geräusch übertragen wird. Meine Anwendungen – die Funktion wird beendet und das Gerät schaltet zum Menü »Quick Apps« zurück; Schließen – die Funktion wird beendet und das Gerät schaltet zur aktuellen Fernsehsendung zurück. 2 Gewünschten Modus mit »<« oder »>« wählen und mit »OK« bestätigen. Blickwinkel der Kamera verändern Im Vollbildmodus kann der Blickwinkel für das „Livebild“ eingestellt werden. 1 »Applikationsansichtsmodus« mit »@« anwählen. 2 »Vollbildmodus« mit »<« oder »>« wählen und mit »OK« bestätigen. 3 Gewünschten Kamerawinkel mit »V«, »Λ« , »<« oder »>« anpassen. Hinweis: 7 Die Kamera kann auf die Ausgangsposition (90° horizontal/vertikal) zurückgesetzt werden, dazu: das Menü »Einstellungen« mit »▯« (rot) anwählen, die Zeile »Kameraeinstellungen« mit »Λ« oder »V« wählen und mit »OK« bestätigen. Nocheinmal »OK« drücken, die Zeile »Position rücksetzen« mit »Λ« oder »V« wählen und mit »OK« bestätigen. Einstellung mit »<« beenden und mit »▯« (rot) zum „Livebild“ schalten. DEUTSCH 11 BETRIEB MIT DER KAMERA_______________________ Position des Kleinbildes wählen Im Widget-Modus kann eingestellt werden, an welcher Position das Kleinbild am Bildschirm eingeblendet wird. 1 »Applikationsansichtsmodus« mit »@« anwählen. 2 »Widget-Modus« mit »<« oder »>« wählen und mit »OK« bestätigen. 3 Gewünschte Position mit »V«, »Λ«, »<« oder »>« wählen. Größe des Kleinbildes einstellen Im Widget-Modus kann die Größe des Kleinbildes eingestellt werden. 1 »Applikationsansichtsmodus« mit »@« anwählen. 2 »Widget-Modus« mit »<« oder »>« wählen und mit »OK« bestätigen. 3 Kleinbild mit »▯« (rot) verkleinern oder Kleinbild mit »▯▯▯▯« (blau) vergrößern. Bild drehen – vertikal 1 Während das „Livebild“ eingeblendet wird, mit »▯« (grün) das Bild vertikal drehen. 12 DEUTSCH Bild drehen – horizontal 1 Während das „Livebild“ eingeblendet wird, mit »▯« (gelb) das Bild horizontal drehen. Babywatch-Funktion beenden 1 »Applikationsansichtsmodus« mit »@« anwählen. 2 »Schließen« mit »<« oder »>« wählen und mit »OK« bestätigen. EINSTELLUNGEN_______________________________________ Optionen im Modus Benachrichtigungen Bewegungserkennungseinstellungen Bewegungserkennung deaktivieren und wieder aktivieren 1 Mit »V« oder »Λ« die Option »Umgebungslicht“ wählen, dann mit »<« oder »>« je nach Umgebungsbedingungen »Helligkeit« oder »Dunkelheit« wählen. 1 Während das „Livebild“ eingeblendet wird, mit »▯« (rot) das Menü »Einstellungen« anwählen. 2 Die Zeile »Erkennungseinstellungen« mit »V« oder »Λ« wählen und mit »OK« bestätigen. – E in Auswahlmenü wird eingeblendet. 3 Wenn die Benachrichtigung nur über die Tonüberwachung erfolgen soll, mit »V« oder »Λ« das Zeichen »x« im Kästchen neben »Bewegungserkennung aktivieren« wählen und mit »OK« entfernen. –D ie Videoüberwachung ist deaktiviert. Hinweis: 7 Soll die Benachrichtigung wieder mit der Videoüberwachung erfolgen, mit »V« oder »Λ« das Kästchen anwählen und mit »OK« das Zeichen »x« setzen. 2 Die Zeile »Bewegungsempfindlichkeit (%)« mit »V« oder »Λ« wählen, dann Empfindlichkeit mit »<« oder »>« anpassen. 3 Die Zeile »Bewegungsrate (%)« mit »V« oder »Λ« wählen, dann Bewegungsrate mit »<« oder »>« anpassen. Hinweis: 7 Bewegungsrate ist das Verhältnis der Größe des beweglichen Objekts zum Bewegungsbereich. Wenn dieser Wert höher eingestellt ist, wird die Erkennung bei Bewegung großer Objekte aktiviert. Wenn dieser Wert geringer eingestellt ist, wird die Erkennung bei Bewegung kleiner Objekte aktiviert. DEUTSCH 13 EINSTELLUNGEN_______________________________________ 4 Zum Anpassen des Erkennungsbereichs die Zeile »Bewegungsfenster« mit »V« oder »Λ« wählen und mit »OK« bestätigen. Mit »V«, »Λ«, »<« oder »>« die Position des Erkennungsfensters wählen. Mit »▯« (rot), »▯▯« (grün), »▯▯▯« (gelb) und »▯▯▯▯« (blau) die Abmessungen des Erkennungsfensters anpassen. Zum Beenden der Einstellung »<« drücken. Geräuscherkennung deaktivieren und wieder aktivieren 1 Wenn die Benachrichtigung nur über die Bildüberwachung erfolgen soll, mit »V« oder »Λ« das Zeichen »x« im Kästchen neben „Geräuscherkennung“ wählen und mit »OK« entfernen. – Die Tonüberwachung ist deaktiviert. Hinweis: 7 Soll die Benachrichtigung wieder mit der Tonüberwachung erfolgen, mit »V« oder »Λ« das Kästchen anwählen und mit »OK« das Zeichen »x« setzen. 14 DEUTSCH Geräuschempfindlichkeit einstellen 1 Die Schaltfläche neben der Zeile »Geräuschempfindlichkeit« mit »V« oder »Λ« wählen. 2 Die gewünschte Empfindlichkeit mit »<« oder »>« einstellen. Anzeigedauer der Benachrichtigung einstellen 1 Die Schaltfläche neben der Zeile »Ereignisanzeigezeit« mit »V« oder »Λ« wählen. 2 Die gewünschte Option mit »<« oder »>« wählen. Einstellungen speichern 1 Die Schaltfläche »OK« mit »V« oder »Λ« anwählen und mit »OK« bestätigen. Hinweis: 7Wenn die Änderungen nicht gespeichert werden sollen, die Schaltfläche »Abbrechen« mit »V« oder »Λ« anwählen und mit »OK« bestätigen. EINSTELLUNGEN_______________________________________ Einblendung und Meldungen bei der Benachrichtigung 9 Neues Kennwort noch einmal eingeben und bestätigen. Abhängig von der gewählten 10 Die Schaltfläche »Ändern« mit Einstellung und der „Aktion“ im »V« oder »Λ« anwählen und mit überwachten Raum wird eine Mel»OK« bestätigen. dung eingeblendet: ,Hinweis: – Lautes Geräusch erkannt. 7Wenn das neue Kennwort nicht – Bewegung erkannt. gespeichert werden sollen, die Kennwort ändern Schaltfläche »Abbrechen« mit »V« oder »Λ« anwählen und 1 Während das „Livebild“ eingemit »OK« bestätigen. blendet wird, mit »▯« (rot) das Menü »Einstellungen« anwählen. 2 Die Zeile »Kameraeinstellungen« mit »V« oder »Λ« wählen und mit »OK« bestätigen. – Die Kamera wird angezeigt. Bildübertragungsart wählen 1 Während das „Livebild“ eingeblendet wird, mit »▯« (rot) das Menü »Einstellungen« anwählen. 3 Mit »OK« die Kameraeinstellungen aufrufen. 2 Die Zeile »Videotyp« mit »V« oder »Λ« wählen. 4 Die Zeile »Kennwort ändern« mit »V« oder »Λ« wählen und mit »OK« bestätigen. 3 Die gewünschte Bildübertragungsart (»mjpeg« oder »rtsp«) mit »<« oder »>« wählen. – »mjpeg« – Videocodec mit komprimierten Bildern (empfohlen beim WLAN-Betrieb); – »rtsp« – Echtzeitübertragung und geringer Komprimierung (empfohlen beim LAN-Betrieb). Hinweis: 7 Wenn bei WLAN-Betrieb die Bildübertragungsart »rtsp« Probleme bereitet, verwenden Sie die Bildübertragungsart »mjpeg«. 5 »OK« drücken und über die Tastatur das aktuelle Kennwort eingeben und speichern. 6 Die Zeile »Neues Kennwort« mit »V« oder »Λ« wählen und mit »OK« bestätigen. 7 Neues Kennwort eingeben (max. 22 Zeichen) und bestätigen. 8 Die Zeile »Kennwort wiederholen« mit »V« oder »Λ« wählen und mit »OK« bestätigen. DEUTSCH 15 EINSTELLUNGEN_______________________________________ Hintergrundbild für das Menü wählen Andere Kamera im Heimnetzwerk wählen 1 Während das „Livebild“ eingeblendet wird, mit »▯« (rot) das Menü »Einstellungen« anwählen. 1 Während der »Echtzeit-Stream« angezeigt wird, mit »▯« (rot) das Menü »Einstellungen« anwählen. 2 Die Zeile »Thema« mit »V« oder »Λ« wählen. 2 Die Zeile »Kameraeinstellungen« mit »V« oder »Λ« wählen. – Die Symbole aller am Fernseher angeschlossenen Kameras und ihre IP-Adressen werden angezeigt. 3 Die gewünschte Kamera mit »V«, »Λ«, »<« oder »>« wählen, mit »OK« die Kameraeinstellungen aufrufen. 3 Das gewünschte Hintergrundbild mit »<« oder »>« wählen. Andere Kamera im Heimnetzwerk suchen 1 Während das „Livebild“ eingeblendet wird, mit »▯« (rot) das Menü »Einstellungen« anwählen. 2 Die Zeile »Kamera suchen« mit 4. Die Zeile »Stream starten« mit »V« oder »Λ« wählen und mit »OK« »V« oder »Λ« anwählen und mit bestätigen. »OK« bestätigen. – Das „Livebild“ der Kamera wird – Nach einer Weile erscheinen angezeigt. Symbole der gefunden Kameras und IP-Adresse. 16 DEUTSCH INFORMATIONEN______________________________ Bitte folgende Beschränkungen für die nachstehenden Länder beachten: Servicehinweise für den Fachhandel  Für Kunden in Frankreich: Die Kamera darf nur mit dem mitgelieferten Netzkabel/Netzteil verwendet werden. Dieses Produkt erfüllt die folgenden EU-Richtlinien: Stromverbrauchswerte und Klassen wurden gemäß Vorgaben 2009/642, 2010/1062 sowie den Richtlinien EN62087 und EN62301 nach Direktiven 2009/125/EG und 2010/30/EU der Europäischen Union ermittelt. Grundig erklärt, dass dieses Produkt die EU-Richtlinie 1999/5/EG und 2011/65/EU erfüllt. Den genauen Wortlaut der Konformitätserklärung (DOC) finden Sie auf der GRUNDIG Homepage www.grundig.com/download/doc. Dieses Gerät kann ohne Einschränkung in den folgend aufgeführten Ländern betrieben werden. AT BE BG CH CY CZ DE DK EE ES FI FR GB GR HU IE IS IT LI LT LU LV MT NL NO PL PT RO SE SI SK TR Verwendung im Freien beschränkt auf 10 mW EIRP im Frequenzbereich 2454 - 2483,5 MHz. Verwendung für militärische Funkortung. Die Neuordnung der 2,4-GHzFrequenz trat in den letzten Jahren in Kraft, um die aktuelle weniger strenge Regelung zuzulassen. Vollständige Implementierung geplant für 2012. Für Kunden in Italien: Für den Privatgebrauch ausserhalb von eigenen Gebäuden besteht eine allgemeine Genehmigungspflicht wie auch bei der Nutzung für öffentliche Zwecke. Für Kunden in Norwegen: Dieser Unterabschnitt gilt nicht für den geographischen Bereich in einem Umkreis von 20 km um das Zentrum von NyÅlesund. Für Kunden in Russland: 1. SRD mit FHSS Modulation 7 Maximum 2,5 mW EIRP. Dieses Gerät kann auch in Ländern außerhalb Europas betrieben werden. DEUTSCH 17 INFORMATIONEN______________________________ aximum 100 mW EIRP. Erlaubt M für die Benutzung im Aussenbereich ohne Einschränkungen an den Aufstellort (Höhe) des Gerätes, zum Sammeln und Überwachen von Telemetriedaten und Berechnungssysteme. Bei anderen, wie oben aufgeführten Anwendungen, darf der Aufstellort (Höhe) des Gerätes 10 m nicht überschreiten. 7 Maximum 100 mW EIRP im Innenbereich. 7 2. SRD mit DSSS und anderen Breitband-Modulationssystemen als FHSS 7 Maximaler Mittelwert EIRP, Signaldichte bei 2 mW/MHz. Maximum 100 mW EIRP. 7 Maximum 100 mW EIRP. Erlaubt für die Benutzung im Aussenbereich ohne Einschränkungen an den Aufstellort (Höhe) des Gerätes, zum Sammeln und Überwachen von Telemetriedaten, Berechnungssysteme und Sicherheitseinrichtungen. 7 Maximaler Mittelwert EIRP, Signaldichte bei 10 mW/MHz. Maximum 100 mW EIRP im Innenbereich. Für Kunden in der Ukraine: EIRP ≤100 mW mit eingebauter Antenne und einem Verstärkungsfaktor bis zu 6 dBi. 18 DEUTSCH Umwelthinweis Dieses Produkt wurde aus hochwertigen Materialien und Teilen hergestellt, die für das Recycling tauglich sind und wiederverwendet werden können. Das Produkt darf daher am Ende seiner Lebensdauer nicht über den normalen Hausmüll entsorgt werden, sondern muss an einem Sammelpunkt zum Recycling von elektrischen und elektronischen Geräten abgegeben werden. Nebenstehendes Symbol am Produkt, in der Bedienungsanleitung oder auf der Verpackung weist darauf hin. Informationen zu Sammelstellen erhalten Sie bei Ihrer Stadtverwaltung. Die Verwertung von Altgeräten leistet einen wichtigen Beitrag zum Schutze unserer Umwelt. Technische Daten Spannungsversorgung: DC 12 V, 2 A Abmessungen und Gewicht: B x H x T: 105 x 123 x 107 mm Gewicht: ca. 305 g Technische und optische Änderungen vorbehalten! SAFETY AND INFORMATION_ ______________ Safety Do not use any cleaning agent dur- 7 ing the cleaning process as these may damage its body. Wipe the camera with a clean and dry cloth. This device should not replace 7 parental supervision of your children. It is designed to assist you as parents for supervision of your children. In order to avoid the risk of chok- Unplug the device before cleaning. 7 Use the power supply delivered 7 with the product only. ing with power cable, the video camera should be installed out of BABYWATCH reach of children. Monitoring camera ensures you to 7 This video camera is not a toy; do keep an eye on your children. not let the children play with it. For this, you need a local network 7 This device is for transmission of access and a GRUNDIG television image/sound signals within a on which the "BABYWATCH" applihouse or building. Any other use cation is installed. is strictly prohibited. 7 Protect the camera against rain, 7 humidity (dripping or splashing) and heat (temperature, direct sunlight, etc.). Information about the camera 3 Megapixel resolution. 7 Large pivot range and wide angle 7 of inclination. Use the camera only under aver- 7 age weather conditions. Do not use the device under direct sunlight for a long time. Do not drop the camera. 7 Never supply power to the "DIR/ 7 DO" sockets. 7 Do not dismantle the camera body under any circumstances. Warranty claims are excluded for damage resulting from improper usage. Supports IEEE 802.3 Ethernet 7 Standard. Notes: 7 When the camera is used with wireless network connection, audio/ video quality may be impaired. 7 W hen the television is switched off or the BABYWATCH application has not been started in any mode yet, no sound or video image can be received from the camera. ENGLISH 19 OVERVIEW________________________________________ A B C D E F G N 20 ENGLISH M L K J I H OVERVIEW________________________________________ A B Camera lens and its cover. Brightness sensor determines the brightness of the location of the camera. C Infrared LEDs turn on if the brightness at this location is not sufficient (Night Vision mode). D Adjustment Ring is used to correct the image clarity. E Microphone. F LAN Indicator on: it means that the LAN connection is activated; flashes: it means that data transfer is in progress; off: it means that the LAN connection is deactivated. G peration LED, turns on when O the camera is in operating. H WLAN antenna input socket. I E thernet, it is a socket to connect to the home network with a LAN cable. J DO ... DIR, no function. PS/Reset, is the button to W record the camera to the router; (If Router WPS supports, you can make wireless connection by pressing and holding the button on the camera for 3 to 10 seconds while pressing the WPS buttons on the router concurrently). in order to reset the camera to its factory defaults, press and hold the button for more than 10 seconds; all settings will be deleted. K L SD, no function. M DC 12V, is a connection socket for the power supply delivered with the device. N Audio Out, no function. ENGLISH 21 ASSEMBLY AND CONNECTION____________ You can position your GRUNDIG camera in a suitable place or mount it onto the wall. Packaging of the device contains an mounting bracket and fixing elements. 1 Remove the safety screw in the mounting bracket (A) and loosen the connection fittings (B). Wall mounting Notes: 7 Base unit should be fixed and it should draw the static load. 7 For the wall superstructures, for example for the wooden or hollow walls, use appropriate plugs and screws. For suggestions, please consult your authorised dealer. 7 Installation place should be near a power outlet. 7 If the camera is not to be fixed, the bracket (B) and fixings are not required. Please start from step 6. (A) 2 Insert the fixing (B) to the camera base and tighten it with the supplied screws (C). (C) (B) (C) 3 Determine the installation place of the camera and mark the places where holes will be drilled on the wall by using the mounting kit. 22 ENGLISH ASSEMBLY AND CONNECTION____________ 4 Drill the holes on the wall and insert the given plugs into these holes. 8 Adjust the camera position onto the mounting bracket and tighten the safety screw (A). 5 Fix the mounting bracket with the 4 supplied screws to the wall. 6 For the WLAN operation, screw the WLAN antenna onto the device; or for LAN operation, connect the LAN cable to the »Ethernet« socket. Note: 7 LAN cable is supplied with the device. 7 Plug the power cable to the »DC 12V« socket. (A) 9 Plug the DC 12V adaptor to the wall socket. – Operation LED lights up soon and the camera tests the motors automatically. 10Connect the LAN cable to an unused socket on the modem or router. Warning: 7 Do not connect the camera to the LAN input of the television set. Camera and television should be connected to each other over modem or router as to be on the same network. Notes: 7 Remove the lens cover. 7 Adjust the camera to the observation position by using the buttons on the remote control. 7 See Adjusting Sharpness section on page 27 to adjust image sharpness. ENGLISH 23 NETWORK INSTALLATION___________________ Connect the camera to the home network and sign in In order to ensure that the camera view is displayed on your TV screen over the "BABYWATCH" application, your TV and Camera should be connected to the same network. You can connect your camera to the home network with the cabled “LAN” or wireless “WLAN” connection. If you are using a cabled “LAN” connection, please refer to the part titled "Connection of the camera with the LAN connection..." in this section; If you want to use a wireless network “WLAN”, follow the instructions described in the section "Operation on the Wireless Network" "WLAN”. Connection of the camera with a LAN connection and signing in Note: 7 Many home networks are Dynamic Networks. If you have a dynamic network, you must use a DSL modem that supports DHCP. If the DHCP server of the modem does not work, the camera cannot receive an IP address. 1 Switch on your television. 2 Select the »Quick Apps« menu with »@«. 3 Select the »BabyWatch« application with »V« or »Λ« and confirm with »OK«. – »Help« page will be displayed soon which shows how the installation will be made. Warning: 7 Malicious software may penCamera Start ∙∙ etrate through your personal local network via Internet and ∙ abuse your audio-visual files. For such situations, secure your personal local network. Ensur- 4 With the »<«, exit the »Help« page. ing the security of the personal local network is under the re- – Settings page will be displayed. sponsibility of the user. Plug in the camera adaptor to start set-up. Power lamp in the front part of the camera will light up. Upper part of the camera will move after a while.. Attach one end of the LAN cable to the camera and the other to the modem or router to which the TV is connected.. 24 ENGLISH NETWORK INSTALLATION___________________ 5 Select the »Search Camera« line 7Last character/number can be dewith »V« or »Λ« and confirm it leted with »▯▯▯▯« (blue). with »OK«. All entries can be deleted with – After a while, the found camera »▯▯▯« (yellow). icon and IP address will be 7 If the entry of the current line is displayed. completed, close the keyboard with »<«. Note: 7 If camera search fails; 8 Enter and save the name of the For detailed search, press »« camera according to your pref- (red); erence as explained in the notes or about data entry. if the detailed search fails too, for Manual IP entry, press »« 9 Select the »Password« line with »V« and open the pop-up key(green). 6 Confirm the found camera with »OK«. – »Add Camera« menu will be displayed. 7 In order to display the on-screen keyboard, press »OK«. board with »OK«. Notes: 7 Camera password has been set as »admin« as standard factory default. 7 We recommend you to use a password belonging to you, see page 31 “Settings” section. 10Enter and save »admin« password as explained in the notes about data entry. Notes for data entry: Data are entered with the pop-up keyboard. Select the necessary letters/numbers with »V«, »Λ«, »<« or »>« and confirm with 11Select the push button »OK« »OK«. with »V« and confirm with 7 »OK«. To toggle between uppercase and lowercase letters, select »Shift« – “ Live streaming” of the camera and confirm with »OK«. is shown on the screen. 7 Keyboard mode can be changed by Note: pressing »▯« (red). 7 If the modem is switched off and 7You can change the language of on, IP address of the camera the keyboard/key assignments may change, then repeat the with »▯▯« (green). steps from 5 to 11. 7 ENGLISH 25 NETWORK INSTALLATION___________________ Registration of the Camera via the Wireless Network “WLAN” 6. Enter the camera settings with »OK« and select the »Set Wireless Connection« line with the »V« or »Λ« and confirm with »OK«. Notes: . – After a while, available wireless 7 In order to make the wireless networks will be displayed on network “WLAN” settings, first the screen. camera should be connected to the router over the cabled local 7. Select the wireless network which the TV is connected to by using area network. »V«, »Λ« »<« and »>« and con7 Many home networks are Dyfirm with »OK« button. namic Networks. If you have a dynamic network, you must . – Network name and entrance menu with password will be disuse a DSL modem that supports played. DHCP. If the DHCP server of the modem does not work, the cam- 8. Select the »Password« line with era cannot receive an IP. the »V« or »Λ« and press »OK«. Enter by using the keyboard the 1. Switch on your television. wireless network password and 2. Select the »Quick Apps« menu close the keyboard with »<«. with »@«. 3. Select the »BabyWatch« applica- 9.Select »Yes« push button with »V« and confirm with »OK«. tion with »V« or »Λ« and confirm with »OK«. 10 T o return to the »Settings« menu, . – “Live streaming” of the camera press »<«. is shown on the screen. 11 Remove the Network cable. 4. While "live streaming" is shown on LAN led on the camera will flash the screen, select the »Settings« quickly. menu with the »▯« (red). . – Wireless network connection is 5. Select the »Camera Settings« line made now. with the »V« or »Λ« and confirm 12 In order to view the “live streamwith »OK«. ing” of the camera on the screen, . – The camera which is connectpress »▯« (red). ed to the network via cabled “LAN” is displayed on the screen. 26 ENGLISH OPERATION OF THE CAMERA_ _____________ Adjusting the Image sharpness lose – function ends and C the device returns to the current television show. 1 Adjust the image sharpness by using the adjustment ring on the camera lens. 2 Select the desired mode with »<« or »>« and confirm with »OK«. Selecting the viewing mode Changing the camera angle 1 While "live streaming" is displayed on the screen, select the »Application View Mode« menu with »@«. – Options: Full Screen Mode– "live streaming" is displayed as "full screen"; Widget Mode – "live streaming" is displayed as a small image in the valid television show. Dimension and position of this small image can be selected; Notification Mode – streaming is displayed only when a movement is made or a sound is transmitted. My Applications – function ends and the device returns to the »Quick Apps« menu or »My Applications« page; Camera angle can be set to the Full Screen Mode for the "Live streaming". 1 Select the »Application View Mode« with »@«. 2 Select the »Full Screen Mode« with »<« or »>« and confirm with »OK«. 3 Adjust the desired camera angle with »V«, »Λ«, »<« or »>«. Note: The camera can be reset to the starting position (90° horizontal/vertical). To do this: select the »Settings« menu with »▯« (red), select the »Camera settings« row with »V« or »Λ« and confirm with »OK«. Press»OK« again, select the »Reset Position« row with »V« or »Λ« and confirm with »OK«. Close the settings menu with »<« and switch to the “live streaming” with »▯« (red). 7 ENGLISH 27 OPERATION OF THE CAMERA_ _____________ Selecting the position of the inset picture In the Widget mode you can select the position at which the inset image is displayed on the screen. 1 Select the »Application View Mode« with »@«. 2 Select the »Widget Mode« with »<« or »>« and confirm with »OK«. 3 Select the desired location with »V«, »Λ«, »<« or »>«. Selecting the dimension of the inset picture You can select the dimension of the inset image to be displayed on the screen from the Widget mode. 1 Select the »Application View Mode« with »@«. 2 Select the »Widget Mode« with »<« or »>« and confirm with »OK«. 3 To decrease the size of the inset image press »▯« (red) and to increase its size press »▯▯▯▯« (blue). 28 ENGLISH Turn the picture – vertically 1 While “live streaming” is shown on the screen, turn the picture vertically with »▯« (green). Turn the picture – horizon- tally 1 While “live streaming” is shown on the screen, turn the picture horizontally with »▯« (yellow). End the Babywatch function 1 Select the »Application View Mode« with »@«. 2 Select »Close« with the »<« or »>« and confirm with »OK«. SETTINGS__________________________________________ Notification mode options 3 Select the »Movement Rate (%)« Deactivation/Activation of the Motion Detection Function 1 While “live streaming” is shown on the screen, select the »Settings« menu with »▯« (red). 2 Select the »Detection Settings« line with V« or »Λ« and confirm with »OK«. – Menu is displayed. 3 If the notification should be made only by sound, select the »x« character in the box next to the »Enable Motion Detection« with V« or »Λ« and delete it with »OK«. – Motion detection is disabled. Note: In order to restart the video monitoring, select the box with »V« or »Λ« and adjust the »x« character with »OK«. 7 Motion detection settings 1 Select »Ambient Light« with »V« or »Λ« and select either »Lightness« or »Darkness« with »<« or »>« depending on the condition of the environment. line with the »V« or »Λ« button and adjust the movement rate with »<« or »>«. Note: 7 Movement rate is the proportion of the size of the moving object to the movement area. When this value is selected higher, detection will be enabled upon movement of large objects. When this value is selected lower, detection will be enabled upon movement of small objects 4 To adjust the area of detection, select »Movement Window« line with »V« or »Λ« button and confirm with »OK« button. By using »V«, »Λ«, »<« or »>« button, select the position of the detection window. With »▯« (red), »▯▯« (green), »▯▯▯« (yellow) and »▯▯▯▯« (blue) buttons adjust the dimensions of the detection window. To end the setting process, press »<« button. 2 Select the »Movement Sensitivity (%)« line with the »V« or »Λ« button and adjust the sensitivity with »<« or »>« . ENGLISH 29 SETTINGS__________________________________________ Deactivation/Activation of the Sound Detection 1 If the notification should be only made by video monitoring, select the »x« character in the box next to the »Enable Sound Detection« with V« or »Λ« and delete it with »OK«. – Sound detection is disabled. Note: 7 In order to restart the sound detection, select the box with »V« or »Λ« and adjust the »x« character with »OK«. Adjusting the sound sensitivity 1 Select the line »Sound Sensitivity« with »V« or »Λ«. 2 Select the sensitivity level with »<« or »>«. Setting the period of time the notification will be displayed on the screen 1 Select the line »Event Display Time« line with »V« or »Λ«. 2 Select the desired option with »<« or »>«. 30 ENGLISH Saving the Settings 1 Select the push button »OK« with »V« or »Λ« and confirm with »OK«. Note: 7 If the changes will not be saved, select the push button »CANCEL« with »V« or »Λ« and confirm with »OK«. Displaying and reporting notifications “Live image” is displayed subject to the selected setting and the “action” in the room being monitored. In that case, a message will be displayed: – High sound detected. – Movement detected. SETTINGS__________________________________________ Changing the password 1 While "live streaming" is shown on the screen, select the »Settings« menu with »▯« (red). 2 Select the »Camera Settings« line with »V« or »Λ« and confirm with »OK«. – Connected camera is viewed. 3 Go to the camera settings with »OK«. 4 Select the »Change Password« line with »V« or »Λ« and confirm with »OK«. 5 Press »OK« and enter and save the current password using the keyboard. 6 Select the »New Password« line with »V« or »Λ« and confirm with »OK«. 7 Enter a new password (max. 22 characters) and confirm it. 8 Enter the »Retype Password« line with »V« or »Λ« and confirm with »OK«. 9 Enter the new password again and confirm it. Note: 7 If the new password will not be saved, select the push button »Cancel« with »V« or »Λ« and confirm with »OK«. Selecting the image transmission type 1 While "live streaming" is shown on the screen, select the »Settings« menu with »▯« (red). 2 Select the »Video Type« line with »V« or »Λ«. 3 Select the desired »mjpeg« or »rtsp« image transmission type with the »<« or »>«. – »mjpeg« – Video codec with compressed image (recommended for the WLAN connected works); – »rtsp« – Real time transmission and minimum compression video codec (recommended for the LAN connected works). Note: 7 If you face problems with »rtsp« on wireless connection, change your setting to »mjpeg«. 10 Select the push button »Change« with »V« or »Λ« and adjust it with »OK«. ENGLISH 31 SETTINGS__________________________________________ Selecting the background image for the menu Selecting other cameras in the local network 1 While "live streaming" is shown on the screen, select the »Settings« menu with »▯« (red) button. 1 While "live streaming" is displayed on the screen, select the »Settings« menu with the »▯« (red). 2 Select the »Theme« line with »V« or »Λ«. 3 Select the desired background image with »<« or »>«. Searching for the other cameras in the local network 1 While "live streaming" is shown on the screen, select the »Settings« menu with »▯« (red). 2 Select the »Search Camera« line with »V« or »Λ« and confirm it with »OK«. – After a while, icons of the found cameras and IP address will be displayed. 32 ENGLISH 2 Select the »Camera Settings« line with »V« or »Λ«. – Icons of all of the cameras connected to TV and their IP addresses will be displayed. 3 Select the camera which you want to view with »V«, »Λ«, »<« or »>« and go to the camera settings with »OK«. 4. Select the »Start Stream« line with »V« or »Λ« and confirm with »OK«. – “Live streaming” of the camera is shown on the screen. INFORMATION__________________________________ Service notes for the authorized sellers  BabyWatch set may only be operated with the power cable/ adaptor supplied with the set. This product meets the following EU requirements: Energy consumption values and classes were determined in accordance with specifications 2009/642, 2010/1062 and also guidelines EN62087 and EN62301 pursuant to directives 2009/125/EC and 2010/30/EU from the European Union. Grundig declares that this product complies with the EU Regulation 1999/5/EC and 2011/65/EU. Complete and accurate text of the Declaration of Conformity (DOC) can be accessed via the GRUNDIG page on www.grundig.com/download/doc. This device can be used in the following countries without any limitations. AT BE BG CH CY CZ DE DK EE ES FI FR GB GR HU IE IS IT LI LT LU LV MT NL NO PL PT RO SE SI SK TR This device can also be used in the countries outside Europe. Please be advised of the following limitations for the following countries: For the customers in France: Outdoor use of the device is limited with 10 mW EIRP at 2454 - 2483.5 MHz frequency range. Use for the military radio positions. Re-regulation of the 2.4 GHz frequency was put into effect in recent years in order to allow the current less stringent regulation. Transition to the full implementation has been planned as 2012 For the customers in Italy: For the private uses apart from the personal houses , there is general approval requirement for public use. For the customers in Norway: This subparagraph is not valid for the geographical area up to 20 km from the center of NyÅlesund. For the customers in Russia: 1. FHSS modulated SRD 7 Maximum 2.5 mW EIRP. ENGLISH 33 INFORMATION__________________________________ aximum 100 mW EIRP. For the M collection of and compliance with the telemetry data and the calculation systems, the device is allowed to be used in the outdoors where it is located (at the same height) without any limitation. In the similar practices which are listed above, the location (height) of the device should not exceed 10 m. 7 For indoors, it is maximum 100 mW EIRP. 7 2. Other broadband modulation systems such as SRD with DSSS and FHSS 7 Maximum average value EIRP, signal density at 2 mW/MHz. Maximum 100 mW EIRP. 7 Maximum 100 mW EIRP. For the collection of and compliance with the telemetry data and the security systems, the device is allowed to be used in the outdoors where it is located (at the same height) without any limitation. 7 Maximum average value EIRP, signal density at 10 mW/MHz. Maximum 100 mW EIRP Indoors. For the customers in Ukraine: EIRP ≤100 mW with integrated antenna and amplification factor up to 6 dBi 34 ENGLISH Environmental note This product has been made from high-quality parts and materials which can be re-used and recycled. Therefore, do not throw the product away with normal household waste at the end of its life. It should be disposed of in a collection point for recycling electrical and electronic devices. This information is indicated by a symbol on the product, in its user manual and on its packaging. For information about the collection points, please refer to your municipality officials. By recycling used devices, you make a significant contribution to the protection of our environment. Technical data Power supply: DC 12 V, 2 A Dimensions and weight: W x H x D: 105 x 123 x 107 mm Weight: approx. 305 g We reserve the right to make technical and optical modifications. GÜVENLİK VE BİLGİLER_______________________ Güvenlik Bu cihaz çocuğunuzun ebeveyn gö- 7 zetiminin yerini almamalıdır. Çocuğunuzun gözetimi için ebeveynlere yardımcı olmak için tasarlanmıştır. 7 Güç kablosu ile boğulma riskini önlemek için, kamerayı çocuğunuzun ulaşamayacağı şekilde montajını gerçekleştiriniz. 7 Bu kamera bir oyuncak değildir; çocukların oynamasına izin vermeyin. 7 Bu cihaz ev veya bina içinde görüntü/ses sinyallerinin iletimi içindir. Başka türlü bir kullanım kesinlikle yasaktır. 7 Kamerayı yağmur, nem (damlama veya sıçramalardan) ve ısıdan (sıcaklık, doğrudan güneş ışığı, vs.) koruyun. 7 Kamera oda şartlarında kullanıma uygun tasarlanmıştır, bu şartların dışında kullanılması durumunda üründen istenilen performans alınamayilir Doğrudan güneş ışığı altında uzun süre cihazı kullanmayın. 7 Ürünün kullanım yerindeki çevresel değişikliklerden dolayı ( ışık miktarı, nem, sıcaklık vb gibi ), hareket ve ses algılama fonksiyonlarının hassasiyeti değişebilir. Bu sebeple üründe, belirli bir seviyenin altındaki ses ve hareket farklılıklarını algılayamama durumu oluşabilir. 7 Kamerayı düşürmeyin. 7 "DIR/DO" soketlerine asla elektrik bağlamayın. Kamera gövdesini hiçbir durumda 7 açmayın. Yanlış kullanımdan kaynaklanan hasarlar garanti kapsamında değildir. 7 Temizlik sırasında herhangi bir temizlik maddesi kullanmayın zira gövdesine zarar verebilir. Kamerayı temiz, kuru bir bezle temizleyin. Temizlemeden önce ürünün fişini 7 çıkarın. Sadece ürün ile birlikte verilen 7 güç kaynağını kullanın. BABYWATCH İzleme kamerası gözünüzü çocuklarınızın üzerinden ayırmamanızı sağlar. Bunun için yerel ağ erişimine ve üzerine "BABYWATCH" uygulaması kurulmuş bir GRUNDIG televizyona ihtiyacınız vardır. Kamera hakkında bilgiler 3 Megapiksel çözünürlük. Büyük pivot aralığı ve geniş eğim 7 7 açısı. IEEE 802.3 Ethernet Standardını 7 destekler. Notlar: 7 Kamera kablosuz ağ bağlantısı ile kullanıldığında, ses/görüntü kalitesi azalabilir. 7 T elevizyon kapalıyken veya BABYWATCH uygulaması hiç bir modda başlatılmamışken, kameradan görüntü ve ses alınamaz. TÜRKÇE 35 GENEL BAKIŞ_____________________________________ A B C D E F G N 36 TÜRKÇE M L K J I H GENEL BAKIŞ_____________________________________ A B Kamera lensi ve kapağı. Parlaklık sensörü, kameranın bulunduğu yerdeki parlaklığı belirler. C İnfrared LED'ler bu yerdeki par- laklık yeterli değilse yanar (Gece Görüşü modu). D Ayar Halkası görüntü netliğini düzeltmek içindir. E Mikrofon. F L AN Göstergesi, yanıyorsa: LAN bağlantısı devrededir; yanıp sönüyorsa: Veri transferi; kapalıysa: LAN bağlantısı kesilmiş demektir; G Kamera çalışırken Çalışma ledi yanar. H WLAN anten giriş soketi. I E thernet, bir LAN kablosuyla ev ağına bağlanma soketi. J DO ... DIR, işlevsizdir. PS/Reset, kamerayı yönW lendiriciye kaydetme düğmesi; (Router WPS destekliyorsa, kamera üzerindeki butona 3-10 saniye basılı tutup bu sırada router üzerindeki WPS butonlarına basarak kablosuz bağlantı yapabilirsiniz). kamerayı fabrika ayarlarına sıfırlamak için 10’den saniyeden fazla basılı tutun; tüm ayarlar silinir. K L SD, işlevsizdir. M DC 12V, cihazla verilen güç kaynağı için bağlantı soketi. N Audio Out, işlevsizdir. Enerji tasarrufu ile ilgili yapılması gerekenler Eğer cihazı uzun süre kullanmayacak iseniz fişini çekin. 7 TÜRKÇE 37 MONTAJ VE BAĞLANTI_______________________ GRUNDIG kameranızı uygun bir yere yerleştirebilir veya duvara monte edebilirsiniz. Ambalaj kutusu içinde bir montaj kiti ile bağlantı elemanları vardır.  (A) Duvara montaj Notlar: 7 Taban ünitesi sabit olmalı ve statik yükü çekebilmelidir. 7 Duvar üstyapıları için, örneğin ahşap veya içi boş duvarlarda, uygun dübel ve vidalar kullanın. Öneriler için uzman yetkili satıcınıza danışın. 7 Kurulum yeri bir elektrik prizinin yanında olmalıdır. 7 Kamera sabitlenmeyecekse, montaj kiti (B) ve bağlantı elemanlarına gerek yoktur. Lütfen adım 6'dan başlayın. 1 Montaj kitindeki emniyet vidasını çıkarın (A) ve bağlantıları sökün (B). 2 Bağlantı elemanını (B) kamera tabanına takın ve verilen vidalarla sıkıştırın (C).  (C) (B) (C) 3 Kameranın kurulum yerini belirleyin ve montaj kitini kullanarak duvarda açılacak deliklerin yerini işaretleyin. 4 Duvardaki delikleri açın ve verilen dübelleri buralara sokun. 38 TÜRKÇE MONTAJ VE BAĞLANTI_______________________ 5 Montaj kitini verilen 4 vida ile duvara sabitleyin.  6 WLAN çalışması için WLAN antenini cihazın üzerine vidalayın; veya LAN çalışması için LAN kablosunu »Ethernet« soketine takın. Not: 7 LAN kablosu cihazla birlikte verilir. 7 Elektrik kablosunu »DC 12V« soketine takın. (A) 9 DC 12V adaptörü prize takın. – Kısa süre sonra çalışma ekranı aydınlanır ve kamera, motorları otomatik olarak test eder. 10LAN kablosunu modem veya yönlendirici üzerindeki boş bir sokete takın. 8 Kamera konumunu montaj kiti üzerinde ayarlayın ve emniyet vidasını sıkıştırın (A). Uyarı: 7 Kamerayı televizyonun LAN girişine bağlamayın. Kamera ve televizyon aynı ağda olacak şekilde modem veya yönlendirici üzerinden birbirine bağlanmalıdır. Notlar: 7 Lens kapağını çıkarın. 7 Uzaktan kumanda düğmelerini kullanarak kamerayı gözlem konumuna ayarlayın. 7 Görüntü netliğini ayarlamak için 43. sayfadaki Görüntü netliğinin ayarlanması bölümüne bakınız. TÜRKÇE 39 AĞ KURULUMU_________________________________ Kamerayı ev ağına bağlayın ve oturumu açın Kameranın bir LAN bağlantısı ile bağlanması ve oturum açılması "BABY- Kamera görüntüsünün WATCH" uygulaması üzerinden televizyon ekranınızda gösterilmesini sağlamak için TV ve Kameranız aynı yerel ağa bağlı olması gerekmektedir. Kameranızı ev ağına kablolu “LAN” bağlantısıyla ya da kablosuz “WLAN” üzerinden bağlayabilirsiniz. Bir kablo “LAN” bağlantısı kullanıyorsanız, lütfen bu bölümdeki "Kameranın bir LAN bağlantısıyla bağlanması..." kısmına bakın; Bir Kablosuz ağ “WLAN” kullanmak istiyorsanız, sayfa 42’de başlayan kablosuz ağ "WLAN” üzerinden çalıştırma" bölümünde açıklananları yapın. Not: 7 Bir çok ev ağı Dinamik Ağdır. Dinamik bir ağa sahipseniz, DHCP destekleyen bir DSL modem kullanmalısınız. Modemin DHCP sunucusu çalışmazsa kamera IP alamaz. 1 Televizyonu açın. 2 »@« ile »Quick Apps« menüsünü seçin. 3 »V« veya »Λ« ile »BabyWatch« uygulamasını seçip »OK« düğmesiyle onaylayın. –K ısa bir süre sonra kurulumun nasıl yapılacağını gösteren »Yardım« sayfası görüntülenir. Uyarı: 7 Kişisel Kamera Başlatma yerel ağınıza internet ∙∙ üzerinden kötü niyetli kişiler ∙ sızarak ses ve görüntüleriniz kötü amaçlı kullanabilir. Bu tür durumlar için kişisel yerel ağ gü- 4 » « ile »Yardım« sayfasından < venliğinizi sağlayın. Kişisel yerel çıkın. ağ güvenliği kullanıcının kendi – Ayarlar sayfası görüntülenir. sorumluluğundadır. 5 »Kamera Ara« satırını »V« veya »Λ« ile seçin ve »OK« ile onaylayın. – Kısa süre sonra bulunan kamera ikonu ve IP adresi ekrana gelir. Kuruluma başlamak için kameranın adaptörünü prize takın. Kameranın ön tarafındaki güç ışığı yanar. bir süre sonra kameranın üst kısmı hareket eder. LAN kablosunun bir ucunu kameraya, diğer ucunu TV’nin bağlı olduğu modem ya da router’a takın. 40 TÜRKÇE AĞ KURULUMU_________________________________ Not: 7 Kameranın adını kendi tercihinize 7 Eğer Kamera arama başarısız göre – Veri girişiyle ilgili notlarda olursa; açıklandığı gibi girin ve kaydedin. Detaylı arama için »« (kırmızı), 8»Şifre« satırını »V« ile seçin ve veya »OK« ile klavyeyi ekrana getirin. Detaylı aramada başarısız olurNotlar: sa Manuel IP girişi için »« (ye7 Kamera şifresi fabrika ayarlaşil) düğmesine basın. rından standart »admin« olarak 5 Bulunan kamerayı »OK« düğmeayarlanmıştır. siyle onaylayın. 7 Kendinize ait bir şifre kullan – »Kamera Ekle« menüsü ekrana manızı öneririz, bkz. sayfa 46 gelir. “Ayarlar” bölümü. 6 Klavyeyi ekrana getirmek için »admin« şifresini – Veri girişiyle il»OK« düğmesine basın. gili notlarda açıklandığı gibi girin ve kaydedin. Veri girişiyle ilgili notlar: 7 Veriler sanal klavye ile girilir. Ge- rekli harfleri/rakamları »V«, »Λ«, »<« veya »>« ile seçin ve »OK« ile onaylayın. 7 Büyük harf-küçük harf arası geçişler için »Shift« öğesini seçin ve »OK« ile onaylayın. 7 »▯« (kırmızı) düğmesine basarak klavye modunu değiştirbilir. 7 »▯▯« (yeşil) düğmesi ile klavyenin dilini/tuş atamasını değiştirebilirsiniz. 7 Son karakter/rakam »▯▯▯▯« (mavi) ile silinebilir. Girişlerin tamamı »▯▯▯« (sarı) ile silinebilir. 7 Mevcut satırın girişi tamamlanmışsa, »<« düğmesi ile klavyeyi kapatın. 9»V« ile »OK« düğmesini seçin ve »OK« ile onaylayın. – Kameranın “canlı görüntüsü” ekranda görünür. Not: Modemin kapatılıp açılması durumunda kameranın IP adresi değişebilir bu durumda 5 ila 9. 7 adımları tekrar ediniz. TÜRKÇE 41 AĞ KURULUMU_________________________________ Kameranın Kablosuz Ağ “WLAN” bağlantısı üzerinden kaydının yapılması 6. »OK« dümesi ile kamera ayarlarına girip »V« veya »Λ« düğmesiyle »Kablosuz Bağlantı Ayarları« satırını seçip ve »OK« ile onaylaNotlar: yın. 7 Kablosuz ağ “WLAN” ayarla. – Kısa süre sonra ekranda kullanırını yapabilmek için öncelikle labilir kablosuz ağlar görünür. kamera, televizyona kablolu 7. Televizyonun bağlı olduğu kabloyerel ağ bağlantısı üzerinden suz ağı »V«, »Λ« »<« veya »>« bağlanmalıdır. ile seçin ve »OK« düğmesiyle 7 Bir çok ev ağı Dinamik Ağdır. onaylayın. Dinamik bir ağa sahipseniz, . – E kranda ağ adı ve şifreli giriş DHCP destekleyen bir DSL momenüsü gösterilir. dem kullanmalısınız. Modemin DHCP sunucusu çalışmazsa ka- 8. »V« veya »Λ« düğmesi ile »Şifre« mera IP alamaz. satırını seçip »OK« düğmesine basın ve klavyeyi kullanarak kab1. Televizyonu açın. losuz ağ şifresini şifresini girin ve 2. »@« ile »Quick Apps« menüsünü kaydedin. seçin. 9.»V« ile »OK« düğmesini seçin ve 3. »V« veya »Λ« ile »BabyWatch« »OK« ile onaylayın. uygulamasını seçin ve »OK« düğ10 »Ayarlar« menüsüne dönmek için mesiyle onaylayın. »<« düğmesine basın. . – Kameranın "canlı görüntüsü" ek11 Ağ kablosunu çıkartın. Kamera randa görünür. üzerindeki LAN ledi hızlı bir 4. Ekranda "canlı görüntü" gösterilirşekilde yanıp sönecektir. ken »Ayarlar« menüsünü »▯« (kır. – Kablosuz ağ baglantısı gerçekmızı) ile seçin. leşmiştir. 5. »V« veya »Λ« düğmesiyle »Ka- 12 Kameranın “canlı görüntüsü” mera Ayarları« satırını seçip ekranda görüntülemek için »▯« »OK« ile onaylayın. (kırmızı) düğmesine basın. . – Kablo “LAN” ile bağlı olan kamera ekranda görüntülenir. 42 TÜRKÇE KAMERANIN ÇALIŞTIRILMASI______________ Görüntü netliğinin ayarlanması 1 Kamera lensi üzerinde bulunan ayar halkasını kullanarak görüntü netliğini ayarlayın. İzleme modunun seçilmesi apat– fonksiyon sona K erer ve cihaz geçerli televizyon programına döner. 2 »<« veya »>« ile istenilen modu seçin ve »OK« ile onaylayın. Kamera açısının değişti1 Ekranda "canlı görüntü" gösterilir- rilmesi ken »Uygulama Görünüm Modu« menüsünü »@« ile seçin. – Seçenekler: Tam Ekran Modu – "canlı görüntü", "tam ekran" olarak gösterilir; Widget Modu – "canlı görüntü" geçerli televizyon programının içinde küçük bir görüntü olarak gösterilir, bu görüntünün boyutu ve konumu seçilebilir; Bildirim Modu – yalnızca bir hareket olursa ya da ses iletilirse görüntü gösterilir. Uygulamalarım – fonksiyon sona erer ve cihaz »Quick Apps« menüsüne veya »Uygulamalarım« sayfasına döner; "Canlı görüntü" için kamera açısı tam ekran modunda ayarlanabilir. 1 »@« ile »Uygulama Görünüm Modu« menüsünü seçin. 2 »<« veya »>« ile »Tam Ekran Modu« öğesini seçin ve »OK« ile onaylayın. 3 İstenilen kamera açısını »V«, »Λ«, »<« veya »>« ile ayarlayın. Not: Kamera başlangıç konumuna geri getirilir (90° dikey/yatay). Filtreyi çıkarmak için: »Settings « (Ayarlar) menüsünü »▯« (kırmızı) ile, »Camera settings« (Kamera ayarları) satırını »V« veya »Λ« ile seçip »OK« düğmesiyle onaylayın. »OK« düğmesine tekrar basın, »Reset Position« (Konumu sıfırla) satırını »V« veya »Λ« ile seçip »OK« düğmesiyle onaylayın. Ayarlar menüsünü »<« ile kapatıp „canlı ekrana“ »▯« (kırmızı) düğmesiyle geçin. 43 TÜRKÇE 7 KAMERANIN ÇALIŞTIRILMASI______________ Küçük resim konumunun seçilmesi Küçük görüntünün ekranda gösterileceği konumu Widget modundan seçebilirsiniz. 1 »@« ile »Uygulama Görünüm Modu« menüsünü seçin. 2 »<« veya »>« ile »Widget Modunu« seçin ve »OK« ile onaylayın. 3 İstenilen konumu »V«, »Λ«, »<« veya »>« ile seçin. Küçük resim boyutunun seçilmesi Küçük görüntünün ekranda gösterileceği boyutu Widget modundan seçebilirsiniz. 1 »@« ile »Uygulama Görünüm Modu« menüsünü seçin. 2 »<« veya »>« ile »Widget Modunu« seçin ve »OK« ile onaylayın. 3 Küçük resmin boyutunu küçültmek için »▯« (kırmızı), büyütmek için »▯▯▯▯« (mavi) düğmesine basın. 44 TÜRKÇE Görüntünün döndürülmesi – dikey 1 Ekranda “canlı görüntü” gösterilirken görüntüyü dikey olarak çevirmek için »▯« (sarı) düğmesine basın. Görüntünün döndürülmesi – yatay 1 Ekranda “canlı görüntü” gösterilirken görüntüyü yatay olarak çevirmek için »▯« (yeşil) düğmesine basın. Babywatch fonksiyonunun sonlandırılması 1 »@« ile »Uygulama Görünüm Modu« menüsünü seçin. 2 »<« veya »>« düğmesiyle »Kapat« öğesini seçin ve »OK« ile onaylayın. AYARLAR Bildirim modu seçenekleri 3 »Hareket Oranı (%)« satırını »V« Hareket Algılama İşlevinin kapatılıp/açılması 1 Ekranda “canlı görüntü” gösterilirken »Ayarlar« menüsünü »▯« (kırmızı) ile seçin. 2 »V« veya »Λ« ile »Algılama Ayarları« öğesini seçin ve »OK« ile onaylayın. – Algılama Ayarları menüsü görüntülenir. 3 Bildirimin görüntü monitörü üzerinden yapılıyorsa, »Hareket Algılamayı Aktifleştir« yanındaki kutudan »x« karakterini »V« veya »Λ« ile seçin ve »OK« ile silin. – Görüntü izleme devreden çıkar. Not: 7 Görüntü izlemeyi yeniden başlatmak için kutuyu »V« veya »Λ« ile seçin ve »x« karakterini »OK« ile ayarlayın. Hareket algılama ayarları 1 »Ortam Işığı« satırını »V« veya »Λ« düğmesiyle ile seip »<« veya »>« ile ortam durumuna göre »Aydınlık« veya »Karanlık« seçimini yapın. veya »Λ« düğmesiyle ile seip »<« veya »>« ile hareket oranını ayarlayın. Not: 7 Hareket oranı hareket eden cismin büyüklüğünün hareket alanına oranıdır. Bu değer büyük seçildiğinde algılama büyük cisimlerin hareketiyle devreye girer. Bu değer küçük seçildiğinde ise algılama küçük cisimlerin hareketiyle devreye girer 4 Algılama yapılması istenilen alanı ayarlamak için »Hareket Penceresi« satırını »V« veya »Λ« düğmesiyle seçip »OK« ile onaylayın. »V«, »Λ«, »<« veya »>« düğmesiyle algılama penceresinin pozisyonunu seçin. »▯« (kırmızı), »▯▯« (yeşil), »▯▯▯« (sarı) ve »▯▯▯▯« (mavi) düğmeleri ile algılama penceresinin boyutunu ayarlayın. ayar işlemini sonlandırmak için »<« düğmesine basın. 2 »Hareket Hassasiyeti (%)« satırını »V« veya »Λ« düğmesiyle ile seçip »<« veya »>« ile duyarlılığı ayarlayın. TÜRKÇE 45 AYARLAR Ses Algılamanın kapatılıp/ açılması 1 Bildirimin yalnızca ses monitörü üzerinden yapılıyorsa, »Ses Algılamayı Etkinleştir« yanındaki kutudan »x« karakterini »V« veya »Λ« ile seçin ve »OK« ile silin. – Ses algılama devreden çıkar. Not: 7 Ses algılamayı yeniden başlatmak için kutuyu »V« veya »Λ« ile seçin ve »x« karakterini »OK« ile ayarlayın. Ses duyarlılığının ayarlanması 1 »Ses Hassasiyeti« satırının yanındaki düğmeyi »V« veya »Λ« ile seçin. 2 »<« veya »>« ile duyarlılığı seçin. Bildirimin ekranda kalacağı sürenin ayarlanması 1 »Algılama gösterim zamanı« satırı yanındaki düğmeyi »V« veya »Λ« ile seçin. 2 İstenilen seçeneği »<« veya »>« ile seçin. Ayarların kaydedilmesi 1 »V« veya »Λ« ile »OK« düğmesini seçin ve »OK« düğmesiyle onaylayın. Not: 7 Değişiklikler kaydedilmeyecekse, »İPTAL« düğmesini »V« veya »Λ« ile seçin ve »OK« ile onaylayın. Bildirimlerin gösterilmesi ve raporlanması Seçilen ayar ve gözlenen odadaki "eyleme" bağlı olarak ekranda "canlı görüntü", görüntülenir. Bu durumda ekrana bir mesaj gelir: – Yüksek ses algılandı. – Hareket algılandı. Şifrenin değiştirilmesi 1 Ekranda "canlı görüntü" gösterilirken »Ayarlar« menüsünü »▯« (kırmızı) ile seçin. 2 »Kamera ayarları« satırını »V« veya »Λ« ile seçin ve »OK« ile onaylayın. – Bağlı olan kamera görüntülenir. 3 »OK« düğmesi ile kamera ayarlarına girin. 4 »Parolayı Değiştir« satırını »V« veya »Λ« ile seçin ve »OK« ile onaylayın. 46 TÜRKÇE AYARLAR 5 »OK« düğmesine basın ve mevcut şifreyi klavye ile girerek kaydedin. 6 »Yeni Parola« satırını »V« veya »Λ« ile seçin ve »OK« ile onaylayın. 7 Yeni bir şifre girin (en fazla 22 karakter) ve onaylayın. 8 »Parolayı Yeniden Girin« satırını »V« veya »Λ« ile girin ve »OK« ile onaylayın. 9 Yeni şifreyi tekrar girin ve onaylayın. 10 »Değiştir« düğmesini »V« veya »Λ« ile seçin ve »OK« ile ayarlayın. Not: Yeni şifre kaydedilmeyecekse, »İPTAL« düğmesini »V« veya »Λ« ile seçin ve »OK« ile onaylayın. 7 Görüntü iletimi türünün seçilmesi 1 Ekranda "canlı görüntü" gösterilirken »Ayarlar« menüsünü »▯« (kırmızı) ile seçin. 2 »V« veya »Λ« düğmesiyle »Video Type« satırını seçin. 3 İstenilen »mjpeg« veya »rtsp« görüntü iletimi türünü »<« veya »>« ile seçin. – »mjpeg« – Sıkıştırılmış görüntülü video kodlayıcı (WLAN bağlantılı çalışmalar için tavsiye edilir); – »rtsp« – Gerçek zamanlı iletim ve minimum sıkıştırmalı video kodlayıcı (LAN bağlantılı çalışmalar için tavsiye edilir). Not: 7 Kablosuz bağlantıda »rtsp« ile sorun yaşarsanız görüntü ayarını »mjpeg« olarak değiştirin. Menü için arka alan görüntüsünün seçilmesi 1 Ekranda "canlı görüntü" gösterilirken »Ayarlar« menüsünü »▯« (kırmızı) ile seçin. 2 »V« veya »Λ« düğmesiyle »Tema« satırını seçin. 3 »<« veya »>« ile istenilen arka alan görüntüsünü seçin. TÜRKÇE 47 AYARLAR Yerel ağdaki diğer kameraların aranması 1 Ekranda "canlı görüntü" gösterilirken »Ayarlar« menüsünü »▯« (kırmızı) ile seçin. 2 »Kamera Ara« satırını »V« veya »Λ« ile seçin ve »OK« ile onaylayın. – Kısa süre sonra bulunan kameraların ikonu ve IP adresi ekrana gelir. Yerel ağdaki diğer kameraların seçilmesi 1 Ekranda “canlı görüntü” gösterilirken »Ayarlar« menüsünü »▯« (kırmızı) ile seçin. 2 »V« veya »Λ« düğmesiyle »Kamera Ayarları« satırını seçin. – T V’ye bağlı bulunan tüm kameraların ikonu ve IP adresleri ekrana gelir. 3 »V«, »Λ«, »<« veya »>« ile izlemek istediğiniz kamerayı seçip »OK« dümesi ile kamera ayarlarına girin. 4. »V« veya »Λ« düğmesiyle »Start Stream« satırını seçip ve »OK« ile onaylayın. – Kameranın “canlı görüntüsü” ekranda görünür. 48 TÜRKÇE BİLGİLER___________________________________________ Uzman yetkili satıcı için servis notları Fransa'daki müşteriler için  Dış mekanlardaki kullanım 2454 2483.5 MHz frekans aralığında 10 mW EIRP ile sınırlıdır. Askeri telsiz konumları için kullanım. 2.4 GHz frekansının yeniden düzenlemesi, mevcut daha az sıkı düzenlemeye olanak tanımak için geçtiğimiz yıllarda uygulamaya konulmuştur. Tam uygulamaya geçiş 2012 olarak planlanmıştır Baby cam seti yalnızca setle birlikte verilen elektrik kablosu/adaptör ile çalıştırılabilir. Bu ürün aşağıdaki EU gerekliliklerini karşılamaktadır: Enerji tüketim değerleri ile sınıfları, Avrupa Birliğinin 2009/125/EC ve 2010/30/EU yönergeleri uyarınca 2009/642, 2010/1062 şartnamesine ve ayrıca EN 62087 ve EN62301 tüzüklerine uygun olarak belirlenmiştir. Grundig, bu ürünün 1999/5/EC ve 2011/65/EU sayılı EU tüzüğüne uygun olduğunu beyan eder. Uyum beyanının (DOC) tam ve kesin metni www.grundig.com/download/doc adresindeki GRUNDIG giriş sayfasından bulunabilir. Bu cihaz aşağıdaki ülkelerde kısıtlama olmaksızın kullanılabilir. AT BE BG CH CY CZ DE DK EE ES FI FR GB GR HU IE IS IT LI LT LU LV MT NL NO PL PT RO SE SI SK TR Bu cihaz Avrupa dışındaki ülkelerde de kullanılabilir. Lütfen aşağıdaki ülkeler için şu kısıtlamalara dikkat ediniz: İtalya'daki müşteriler için Şahıs konutlarının dışındaki özel kullanımlar için kamusal kullanım açısından genel bir onay gerekliliği vardır. Norveç'teki müşteriler için Bu altparagraf NyÅlesund merkezinden 20 km'ye kadar olan coğrafik alan için geçerli değildir. Rusya'daki müşteriler için 1. FHSS modülasyonlu SRD 7 7 Maksimum 2.5 mW EIRP. Maksimum 100 mW EIRP. Telemetri verilerinin ve hesaplama sistemlerinin toplanması ve uyulması için cihazın bulunduğu yerdeki (yükseklikteki) dış mekanlarda herhangi bir kısıtlama olmaksızın kullanımına izin verilmiştir. TÜRKÇE 49 BİLGİLER___________________________________________ Yukarıda sıralananlara benzer diğer uygulamalarda, cihazın bulunduğu yer (yükseklik) 10 m'yi aşmamalıdır. 7 İç mekanlarda maksimum 100 mW EIRP. 2. DSSS'li SRD ile FHSS gibi diğer genişbant modülasyon sistemleri 7 Maksimum ortalama değer EIRP, 2 mW/MHz'te sinyal yoğunluğu. Maksimum 100 mW EIRP. 7 Maksimum 100 mW EIRP. Telemetri verilerinin ve güvenlik sistemlerinin toplanması ve uyulması için cihazın bulunduğu yerdeki (yükseklikteki) dış mekanlarda herhangi bir kısıtlama olmaksızın kullanımına izin verilmiştir. 7 Maksimum ortalama değer EIRP, 10 mW/MHz'te sinyal yoğunluğu. Maksimum 100 mW EIRP İç mekanlar. Ukrayna'daki müşteriler için Entegre antenli EIRP ≤100 mW ve 6 dBi'ye kadar amplifikasyon faktörü Çevre ile ilgili not Bu ürün, yeniden kullanılabilen ve geri dönüşüme sokulabilen yüksek kaliteli parça ve malzemelerden üretilmiştir. Bu nedenle, ürünü, hizmet ömrünün sonunda normal evsel atıklarla birlikte atmayın. Elektrikli ve elektronik cihazların geri dönüşüm toplama noktalarından birine atılmalıdır. Bu husus ürünün üzerinde, kullanım kılavuzunda ve ambalaj üzerinde bulunan simge ile gösterilir. Toplama noktaları hakkında bilgi edinmek için lütfen bağlı olduğunuz belediye yetkililerine danışın. Kullanılmış cihazları geri dönüştürerek çevremizin korunmasına önemli katkıda bulunursunuz. AEEE Yönetmeliğine Uygundur. PCB içermez. Teknik veriler Güç kaynağı: DC 12 V, 2 A Boyutlar ve ağırlık: G x Y x D: 105 x 123 x 107 mm Ağırlık: yaklaşık 305 g Teknik ve optik değişiklikler yapma hakkımız saklıdır. 50 TÜRKÇE TÜRKÇE 51 Garanti Kapsamı: Grundig tarafından verilen bu garanti, cihazın normalin dışında kullanılmasından doğacak arızaların giderilmesini ve aşağıdaki durumları kapsamamaktadır. 1. Kullanma hatalarından meydana gelen hasar ve arızalar, 2. Ürünün müşteriye tesliminden sonraki yükleme, boşaltma ve taşıma sırasında oluşan hasar ve arızalar, 3. Voltaj düşüklüğü veya fazlalığı; hatalı elektrik tesisatı; ürünün etiketinde yazılı voltajdan farklı voltajda kullanma nedenlerinden meydana gelecek hasar ve arızalar, 4. Yangın ve yıldırım düşmesi ile meydana gelecek arızalar ve hasarlar, 5. Ürünün kullanma kılavuzlarında yer alan hususlara aykırı kullanılmasından kaynaklanan arızalar. Yukarıda belirtilen arızaların giderilmesi garanti kapsamı dışında olup, yapılmaktadır. ücret karşılığında Ürünün kullanım yerine montajı ve nakliyesi ürün fiyatına dahil değildir. Garanti belgesinin tekemmül ettirilerek tüketiciye verilmesi sorumluluğu, tüketicinin malı satın aldığı satıcı, bayi, acenta ya da temsilciliklere aittir. Garanti belgesi üzerinde tahrifat yapıldığı, ürün üzerindeki orijinal seri numarası kaldırıldığı veya tahrif edildiği takdirde bu garanti geçersizdir. Bu ürün Arçelik A.Ş. tarafından ithal edilmiştir. Müşteri Hizmetleri: Tüm sorunlarınız için Grundig Hizmet Merkezi’ni haftanın 7 günü 24 saat aşağıdaki numaradan arayabilirsiniz. Hizmet Merkezimize 0216 4232207 nolu telefonu arayarak ya da 0216 4232353 nolu telefona faks çekerek de ulaşabilirsiniz. Yazılı başvurular için adresimiz: Arçelik Hizmet Merkezi, Ankara Asfaltı Yanı, 34950 Tuzla/İSTANBUL Grundig Çağrı Merkezi 444 9 888 (Sabit telefondan veya cep telefonundan alan kodu çevirmeden) Diğer Numaralar: (0216) 423 22 07) Öneriler: Garanti hizmetinden en iyi şekilde faydalanabilmeniz için aşağıdaki önerilere uymanızı rica ederiz. 1. Ürününüzü aldığınızda garanti belgesini yetkili satıcınıza onaylatınız. 2. Ürününüzü kullanma kılavuzu esaslarına göre kullanınız. 3. Ürününüzle ilgili hizmet talebiniz olduğunda yukarıdaki telefon numarasından Grundig Çağrı Merkezi’ne başvurunuz. 4. Hizmet için gelen teknisyene "Teknisyen Kimlik Kartı"nı sorunuz. 5. Servis hizmeti bittikten sonra, servis teknisyeninden hizmet fişi istemeyi unutmayınız. Alacağınız hizmet fişi ileride ürününüzde meydana gelebilecek herhangi bir sorunda size yarar sağlayacaktır. 6. Ürünün kullanım ömrü boyunca fonksiyonunu yerine getirebilmesi için gerekli yedek parça bulundurma süresi 7 yıldır. İmalatçı/İthalatçı: Arçelik A.Ş. Karaağaç cad. No: 2-6 Sütlüce 34445 İSTANBUL Tel: 0212 314 34 34 Menşei: Çin ÜRÜNÜNÜZ 2 (İKİ) YIL SÜRE İLE GARANTİ EDİLMİŞTİR. Garanti süresi Grundig BabyWatch, kullanma kılavuzunda gösterildiği şekilde kullanılması ve Arçelik A.Ş.’nin yetkili kıldığı servis elemanları dışındaki şahıslar tarafından bakım, onarım veya başka bir nedenle müdahale edilmemiş olması şartıyla, malın bütün parçaları dahil olmak üzere tamamen malzeme, işçilik ve üretim hatalarına karşı ürünün tesliminden itibaren başlar. Ürünün kullanma kılavuzunda yer alan hususlara aykırı kullanılmasından kaynaklanan arızalar garanti kapsamı dışındadır. Malın garanti süresi içerisinde gerek malzeme ve işçilik, gerekse montaj hatalarından dolayı arızalanması halinde işçilik masrafı, değiştirilen parça bedeli ya da herhangi bir ad altında hiçbir ücret talep edilmeksizin tamiri yapılacaktır. Garanti süresi içerisinde, servis istasyonları tarafından yapılmasının zorunlu olduğu, imalatçı ya da ithalatçı tarafından şart koşulan periyodik bakımlarda; verilen hizmet karşılığında tüketiciden işçilik ücreti veya benzeri bir ücret talep edilmez. Garanti süresi içinde yapılacak onarımlarda geçen süre, garanti süresine ilave edilir. Tamir süresi en fazla 20 iş günüdür. Bu süre mala ilişkin arızanın yetkili servis atölyelerimize, yetkili servis atölyelerimizin bulunmaması durumunda yetkili satıcılarımıza, ithalatçısına veya firmamıza bildirildiği tarihten itibaren başlar. Ürünün arızasının 10 iş günü içerisinde giderilmemesi halinde, imalatçı ya da ithalatçının; malın tamiri tamamlanıncaya kadar benzer özelliklere sahip başka bir sanayi malını tüketicinin kullanımına tahsis etmesi zorunludur. Arızanın giderilmesi konusunda uygulanacak teknik yöntemlerin tespiti ile değiştirilecek parçaların saptanması tamamen firmamıza aittir. Arızanın giderilmesi ürünün bulunduğu yerde veya yetkili servis atölyelerinde yapılabilir. Bu konuda müşteri onayı alınması zorunludur. Ancak; Tüketicinin onarım hakkını kullanmasına rağmen malın; - Tüketiciye teslim edildiği tarihten itibaren, garanti süresi içinde kalmak kaydıyla, bir yıl içerisinde en az dört defa veya imalatçı-üretici ve/veya ithalatçı tarafından belirlenen garanti süresi içerisinde altı defa arızalanmasının yanı sıra, bu arızaların maldan yararlanamamayı sürekli kılması, - Ürünün tamiri için gereken azami sürenin aşılması, - Yetkili Servis atölyelerince; mevcut olmaması halinde sırasıyla yetkili satıcımız, bayi, acente temsilciliği, ithalatçı ya da imalatçıdan birisinin bölgeye en yakın servis yetkilisiyle birlikte veya firmamız yetkilisince düzenlenecek raporla arızanın tamirinin mümkün bulunmadığının belirlenmesi durumunda, tüketici malın ücretsiz değiştirilmesini, bedel iadesi veya ayıp oranında indirimi talep edebilir. Garanti belgesi ile ilgili olarak çıkabilecek sorunlar için T.C. Gümrük ve Ticaret Bakanlığı Tüketicinin Korunması ve Piyasa Gözetim Genel Müdürlüğü’ne başvurulabilir. Bu Belgenin kullanılmasına; 4077 sayılı Tüketicinin Korunması Hakkında Kanun ve bu Kanun’a dayanılarak yürürlüğe konulan Garanti Belgesi Uygulama Esaslarına Dair Yönetmelik uyarınca, T.C. Gümrük ve Ticaret Bakanlığı Tüketicinin Korunması ve Piyasa Gözetim Genel Müdürlüğü tarafından izin verilmiştir. Arçelik A.Ş GENEL MÜDÜR Seri No : Tip : GENEL MÜDÜR YRD. Teslim Tarihi, Yeri : Fatura Tarihi, No : Satıcı Firma Ünvanı : Adres : Tel Faks : Satıcı Firma (Kaşe ve İmza) Bu belge, Gümrük ve Ticaret Bakanlğı’nın 116870 no’lu ve 26.09.2012 izin tarihli belgesine göre düzenlenmiştir. Bu bölümü, ürünü aldığınız Yetkili Satıcı imzalayacak ve kaşeleyecektir Grundig Intermedia GmbH Beuthener Strasse 41 90471 Nürnberg www.grundig.com 72011 908 7500 40/12