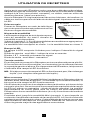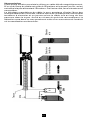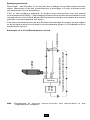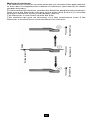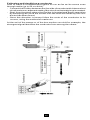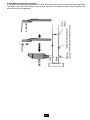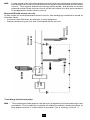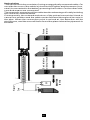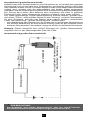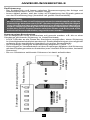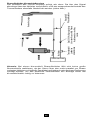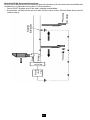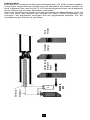
1
■ LOCALISATEUR DE CÂBLES ET DE
DÉFAUTS SUR TOUTE INSTALLATION
SOUS TENSION
■ CIRCUIT TRACERS AND FAULT FINDERS
ON ANY LIVE INSTALLATION
■ KABEL- UND FEHLERSUCHGERÄTE AN
ELEKTRISCHEN ANLAGEN WÄHREND
DES BETRIEBS
FRANCAIS
ENGLISH
DEUTSCH
Mode d'emploi
User's Manual
1
Bedienungsanleitung
LOCAT 110
LOCAT 220
Signification du symbole
:
Attention ! Consulter le mode d’emploi avant d’utiliser l’appareil.
Dans le présent mode d’emploi, les instructions précédées de ce symbole, si elles ne sont pas bien respectées ou réalisées, peuvent occasionner un accident corporel ou endommager l’appareil et les installations.
Signification du symbole
:
Cet appareil est protégé par une isolation double ou une isolation
renforcée. Il ne nécessite pas de raccordement à la borne de terre de
protection pour assurer la sécurité électrique.
Vous venez d’acquérir un LOCAT et nous vous remercions de votre
confiance. Pour obtenir le meilleur service de votre appareil:
■ lisez attentivement ce mode d’emploi
■ respectez les précautions d’emploi :
voir les paragraphes Attention.
ATTENTION
L'Emetteur du LOCAT est équipé d'un fusible à haut pouvoir de
coupure.
FF 0,1A 380V (5x20 mm) 10kA
En cas de remplacement du fusible, il est impératif d'en respecter la valeur et le type sous risque de détérioration de l'appareil
et d'annulation de la garantie.
INTRODUCTION
Le LOCAT, localisateur de câbles et de défauts électriques, est un
appareil original et astucieux à plus d'un titre.
Il permet de "suivre à la trace" une installation électrique en fonctionnement,
c'est-à-dire en situation réelle, sous tension.
Son premier point fort est l'identification, la localisation d'un circuit par le
repérage à travers les parois, les murs sans démontage, ni travaux de
démolition.
Le LOCAT fonctionne sur tous types d'installations électriques sous
tension, pourvu qu'elles ne soient pas blindées magnétiquement.
C'est un appareil polyvalent par excellence.
Parmi les mille et une applications du LOCAT citons les principales qui
vous permettront de vous familiariser à son utilisation :
- Trouver l'origine d'un circuit électrique.
- Suivre un circuit tout au long de son parcours.
- Reconnaître un câble parmi d'autres dans un toron ou une goulotte.
- Recherche de courts-circuits : phase/terre, phase/neutre et neutre/terre.
- Repérage d'un tuyau bouché (non magnétique) dans un mur, un sol ...
Le LOCAT porte le marquage CE. Il est notamment conforme aux normes
de compatibilité électromagnétique.
Le LOCAT se compose de deux éléments distincts : l'EMETTEUR et le
RECEPTEUR.
NB :La terminologie retenue Émetteur/Récepteur correspond à une
appellation simplifiée du principe physique du LOCAT mais elle
présente l'avantage d'être parfaitement compréhensible par tout
un chacun. C'est pourquoi nous l'avons retenue.
2
ENGLISH ............................................................................ P 26
DEUTSCH ........................................................................... P 50
SOMMAIRE
Page
PRINCIPE ........................................................................................ 4
Rappels d'électromagnétisme ....................................................... 4
L'émetteur ..................................................................................... 4
Le récepteur ................................................................................. 4
Les avantages .............................................................................. 4
PRÉSENTATION ............................................................................. 6
Déboîtage des éléments ............................................................... 6
Les émetteurs LOCAT E 110 et E 220 ......................................... 6
Le Récepteur LOCAT R ............................................................... 7
UTILISATION DE L'ÉMETTEUR ..................................................... 8
Branchement ................................................................................ 8
Test de contrôle ............................................................................ 8
Montage grande boucle ................................................................ 8
Méthode de pontage ..................................................................... 9
UTILISATION DU RÉCEPTEUR .................................................... 11
Prise en main .............................................................................. 11
Niveaux de sensibilité .................................................................. 11
Rampe à LED .............................................................................. 11
Test de contrôle ........................................................................... 11
Mise en oeuvre ............................................................................ 11
Méthode du maximum ................................................................. 12
Orientation du récepteur .............................................................. 13
Méthode du minimum .................................................................. 14
APPLICATIONS ............................................................................. 15
Origine d'un circuit ....................................................................... 15
Suivi et identification d'un conducteur .......................................... 16
Court-circuit phase/terre .............................................................. 17
Court-circuit phase/neutre ........................................................... 18
Court-circuit neutre/terre .............................................................. 19
Repérage d'un tuyau bouché ....................................................... 20
PIÈGES À ÉVITER ......................................................................... 22
CARACTÉRISTIQUES GÉNÉRALES ET
CONFORMITÉ AUX NORMES ...................................................... 23
MAINTENANCE ............................................................................. 24
POUR COMMANDER .................................................................... 25
GARANTIE
Notre garantie s’exerce, sauf stipulation expresse, pendant douze
mois après la date de mise à disposition du matériel (extrait de nos
Conditions Générales de Vente, communiquées sur demande).
3
PRINCIPE
Rappels d'électromagnétisme
■ Un courant électrique d'intensité (i) parcourant un conducteur crée,
tout autour et tout au long de ce conducteur un champ magnétique (H).
La grandeur (H) de ce champ magnétique est proportionnelle à la
valeur de ce courant (i).
■ Une bobine captant ce champ magnétique (H) délivrera donc un signal
d'autant plus fort que:
- le courant (i) sera fort
- la bobine sera proche du conducteur
NB : - Suivant le sens du courant (i) parcourant le conducteur, le champ
magnétique(H) tourne dans un sens ou dans l'autre.
- Les champs magnétiques (H) de deux courants (i) de sens opposés se soustraient. C'est le cas par exemple des conducteurs
d'aller et retour situés dans le même câble, ou bien placés en
parallèle, côte à côte, dans une installation.
L'Émetteur du LOCAT
Raccordé à un circuit sous-tension, l'Émetteur crée un courant pulsé à une
fréquence spécifique Fe=3500 Hz.
Ce courant génère un champ magnétique de même fréquence Fe sur tout
le trajet du courant.
Le Récepteur du LOCAT
Ce Récepteur identifie, localise le conducteur à retrouver grâce à ce
champ magnétique reconnu par sa fréquence Fe.
Le Récepteur comporte un capteur sensible au champ mangétique. Il est
très sélectif, ce qui veut dire qu'il n'est sensible qu'à cette fréquence
particulière Fe. En mesurant l'intensité du champ magnétique, il indiquera
en réalité la proximité du conducteur correspondant. En déplaçant le
Récepteur en face d'un groupe de câbles, d'un bornier ou d'une rangée de
coupe-circuits, on peut repérer rapidement celui qui alimente l'Émetteur
car il est parcouru par le courant de fréquence Fe et c'est en face de lui que
le Récepteur donne l'indication la plus forte.
Les avantages
Les avantages découlent du principe de fonctionnement et sont multiples.
■ Le plus important est que le repérage par le Récepteur se fait à distance
(jusqu'à 3 m environ) et même à travers un mur (jusqu'à 50 cm d'épaisseur).
■ Le courant de fréquence Fe ne peut pas se propager aux câbles autres
que le circuit direct d'alimentation de l'Émetteur.
■ Ce courant de fréquence Fe est le même tout au long du circuit d'alimentation, donc le repérage des câbles par le Récepteur est aussi facile à
100 mètres du point de branchement de l'Émetteur qu'à 1 mètre.
■ Les caractéristiques du courant pulsé (5mA à 3500 Hz) sont telles
qu'il n'y a aucun risque de perturbation magnétique d'appareils électroniques même très sensibles. Par exemple, le rayonnement créé
est tout à fait négligeable par rapport à celui d'un variateur d'intensité
domestique.
4
Principe du LOCAT
ÉMETTEUR
RÉCEPTEUR
~
Source de tension
➀
➁
➂
L’ÉMETTEUR consomme un courant pulsé (i) :
environ 5 mA avec une fréquence Fe = 3500 Hz (voir p. 20).
Champ magnétique spécifique (H) avec même fréquence Fe.
Le RÉCEPTEUR signale la présence de ce courant pulsé. Le signal
est maximum 3.2 ou faible 3.1 et 3.3 suivant le positionnement
du RÉCEPTEUR par rapport au conducteur à localiser.
5
PRESENTATION
Déboîtage des éléments
L'Émetteur s'emboîte sur le Récepteur.
Pour les désolidariser, il suffit de glisser
le doigt entre les deux éléments.
L'Émetteur s'extrait ensuite aisément.
Pour l'emboîter à nouveau, l'insérer
dans son logement en poussant bien à
fond jusqu'au déclic.
Les émetteurs
Deux modèles sont disponibles suivant
le type de tensions rencontrées :
- le LOCAT E 220 :
de 180 V à 440 V ~
de 180 V à 300 V
- le LOCAT E 110 :
de 9 V à 140 V et ~
RÉCEPTEUR
ÉMETTEUR
Clip pour transport à la ceinture
Le choix de l'Émetteur (LOCAT E 220 ou LOCAT E 110) est donc fonction
de la tension de l'installation à contrôler.
ATTENTION
Afin de prévenir tout risque d'erreur, il est conseillé, au préalable de mesurer la tension du réseau à l'aide d'un voltmètre.
NB : - Le LOCAT E 220 ne fonctionne que sur un réseau sous tension
(sans coupures)
- Le LOCAT E 110, à condition d'être alimenté par une source
extérieure (pile 9 V par exemple), peut fonctionner sur un réseau
non alimenté, mais en état de fonctionnement. En continu, respecter la polarité.
Après branchement, l'Émetteur se contente de consommer du courant de
façon pulsée (fréquence spécifique de 3500 Hz) qui le distingue de tous
les courants environnants.
NB : Ce signal de consommation se propagera donc entre la source de
tension et l'Émetteur, zone dans laquelle il pourra être reconnu par
le Récepteur.
L'Émetteur
Voyant de contrôle
Diode rectangulaire rouge.
Son clignotement (3 coups/seconde)
permet de vérifier que l'émetteur est sous tension.
Bornes femelles
de sécurité Æ 4 mm
(1) Polarité en continu
6
Le Récepteur
Le Récepteur LOCAT R, modèle unique, est alimenté par une pile 9V.
Il s'associe indifféremment à l'un des deux modèles d'Émetteur. Sensible
au champ magnétique créé par le courant pulsé et à lui seul, le Récepteur
réagit par l'émission d'un double signal sonore et visuel, proportionnel à
l'intensité du signal capté et donc à la proximité du câble parcouru par le
courant pulsé.
Symbole du signal sonore
L'intensité du bip sonore est fonction
de la distance séparant le récepteur du câble à repérer.
Flèche de visée
La bobine de réception du champ magnétique est logée
à hauteur de la flèche.
Axe de visée
Axe de la bobine
Signal visuel
Rampe lumineuse composée de 9 diodes rouges.
Le niveau de détection maximum se trouvant sur
la droite, le niveau minimum sur la gauche.
Boutons de sélection
de sensibilité et de mise en marche.
Le choix de la sensibilité est fonction de la
proximité du câble à repérer.
En appuyant sur deux boutons à la fois, on
obtient des sensibilités intermédiaires.
(Positions 2 et 4)
7
UTILISATION DE L'EMETTEUR
ATTENTION :
Avant de brancher l'Émetteur, toujours s'assurer que la tension
du secteur est compatible avec la tension maxi indiquée sur
l'émetteur : 140 V~ pour le LOCAT E 110
440 V~ pour le LOCAT E 220
Branchement
En branchant l'Émetteur on sélectionne le circuit, le câble sur lequel on
veut travailler. Le branchement se fait en deux temps. Tout d'abord
raccorder les 2 cordons aux bornes de sécurité de l'Émetteur. Ensuite
seulement se brancher sur le circuit sous tension sélectionné.
Test de contrôle
Brancher l'Émetteur dans une prise du circuit à contrôler.
Le voyant rouge doit se mettre à clignoter.
On constate ainsi que le circuit est sous tension et que
l'Émetteur fonctionne.
Pour un circuit hors tension voir, au chapitre "Applications", l'utilisation de l'Émetteur E 110 avec une pile 9V.
Remarque : en alimentation continue, si le voyant rouge
ne clignote pas, la polarité est mauvaise, inverser les
cordons.
NB: La rupture du fusible entraîne le non fonctionnement du voyant de
contrôle. Dans ce cas, voir le chapitre "changement de fusible".
8
Montage Grande Boucle
Si l'Émetteur est directement branché dans une prise électrique, l'aller du
courant pulsé se fait par l'un des câbles (phase) et le retour par l'autre
(neutre). Dans ce cas les câbles conducteurs se trouvent en parallèle et
les champs magnétiques émis sont égaux mais de sens contraires. Ils ont
alors tendance à s'annuler et le Récepteur ne voit que la différence des
deux (infime).
Cette perte de signal importante entraîne une détection difficile et impossible dès que l'on s'éloigne du circuit.
Afin d'éviter cet affaiblissement, on s'arrange pour "éloigner l'un des
courants, aller ou retour". C'est le montage grande boucle qui consiste à
brancher :
- un des cordons à la phase de la prise
- l'autre cordon à une terre ou neutre d'une autre prise n'empruntant pas
le même chemin que le circuit recherché.
NB : Ce montage grande boucle de l'Émetteur, résout la majorité des cas
de figure rencontrés.
Terre indépendante du circuit
recherché (radiateur, plomberie ...)
EMETTEUR
Phase
Tableau des coupe-circuits
Neutre
Terre
Montage grande boucle
ATTENTION
En conclusion du montage grande boucle, le branchement
direct de l'Émetteur dans une prise électrique est à proscrire.
9
Méthode du pontage
Cette méthode du pontage est employée dans le cas du court-circuit
phase/terre ou phase/neutre et permet de faire circuler le courant pulsé
tout en maintenant le disjoncteur ouvert. On peut donc, avec l'Émetteur
réaliser un pontage pour réalimenter une ligne en court-circuit (disjoncteur
ouvert), par exemple pour un court-circuit phase/terre.
Alimentation
Transfo
MT /BT
On réalimente le circuit grâce à l'Emetteur.
Le courant pulsé circule à travers le court-circuit et remonte par la terre.
Neutre
Phase
EMETTEUR
Court-circuit
Phase/Terre
Exemple pour un court-circuit Phase/Terre
NB: Les exemples de recherche de court-circuit sont traités dans le
chapitre "Applications".
10
UTILISATION DU RECEPTEUR
Après avoir raccordé l'Émetteur selon une des méthodes préconisées,
adaptée au type de recherche, le courant pulsé va circuler dans un câble
masqué à la vue (sous plinthe, encastré), ou visible, mais au milieu de
dizaines d'autres, (dans une armoire).
Avec le Récepteur il s'agit maintenant de suivre à la trace, de localiser, le
câble sur tout son parcours à l'aide du double signal : bip sonore et rampe
à LED.
Prise en main
Prenez le Récepteur en main de telle façon
que votre pouce tombe naturellement sur les
boutons rouges de sensibilité.
Axe du viseur
Axe de la bobine
Niveaux de sensibilité
Le Récepteur dispose de trois boutons poussoirs de sensibilité. Au total 5 niveaux de
sensibilité sont disponibles :
3 directs (repérés 1, 3, 5) et 2 intermédiaires accessibles en appuyant sur
deux boutons à la fois (repérés 2, 4).
La sensibilité Mini correspond au niveau 1 et la sensibilité Maxi au niveau 5.
Rampe à LED
La rampe à LED comporte 9 diodes pour indiquer l'intensité du signal
capté.
Diode de gauche : seuil Mini - indique la mise en marche.
Diodes 1 à 7 : intensité croissante du signal.
Diode de droite : seuil Maxi - saturation.
Test de contrôle
En enfonçant un poussoir le Récepteur se trouve alimenté par sa pile 9V.
Si l'on est loin du circuit à contrôler, on n'entend qu'un chuintement et seul
le voyant de gauche s'allume. En s'approchant de l'Émetteur, le bip sonore
s'intensifie et la rampe à LED fonctionne.
NB: Si le bip sonore et la rampe à LED ne fonctionnent pas, il faut changer
la pile. (voir chapitre changement de la pile).
Mise en oeuvre
Appuyer sur le bouton 5 (sensibilité Maxi) et déplacez le Récepteur à bout
de bras, dans diverses directions : on constate qu'à certains endroits, le
bip sonore et la rampe à LED fonctionnement.
Il suffit alors de continuer à se déplacer dans la direction qui donne le bip
sonore le plus fort. On arrive ainsi à une amplitude maximale de la rampe
à LED (ou même en saturation : diode de droite allumée). La position
approximative du circuit (dans l'axe du viseur) est ainsi déterminée.
Passez alors à une sensibilité inférieure (4 ou 3) et continuez de la même
manière.
Procédez ainsi jusqu'à la sensibilité Mini (poussoir 1) pour laquelle on
recherche l'amplitude maximale de la rampe à LED. Le circuit recherché
est dans le prolongement du viseur. Cette méthode de mise en oeuvre, par
approximations successives est appellée méthode du maximum. Elle
résout la grande majorité des applications rencontrées.
11
Direction toujours bonne.
Led la plus à droite possible
allumée avec Sensibilité Mini
Bonne direction.
Led la plus à droite possible allumée.
Sensibilité Intermédiaire
7
Terre éloignée
et indépendante
de celle
de la prise
Mauvaise direction
Sensibilité Intermédiaire
DEPART
Sensibilité Maxi
EMETTEUR
Conducteur
recherché
7
RECEPTEUR
Tableau des coupecircuits
Méthode du maximum
Mise en oeuvre (voir schéma) :
1/ Partir de l'endroit où est branché l'Émetteur pour remonter vers la
source de tension (voir A).
2/ Sélectionner la sensibilité Maxi et déplacer le Récepteur autour de
l'Émetteur pour trouver la direction du câble (voir B et C).
3/ Procéder ainsi de suite en diminuant progressivement la sensibilité
jusqu'à obtenir une amplitude maximale de la rampe à LED avec le
signal sonore le plus intense.
4/ On "retrace" ainsi le cheminement du câble jusqu'à sa source (voir D).
12
NB: La méthode du maximum offre une précision d'autant meilleure que
l'on peut approcher le Récepteur du câble recherché. On peut obtenir
une précision meilleure que le centimètre.
Cependant, si le câble est inaccessible (à 20 cm dans un mur par
exemple), la localisation ne pourra se faire qu'à 20 cm près.
Dans ce cas la méthode du minimum permet de s'affranchir de ce
problème.
Orientation du Récepteur
MINI de détection
axe de la bobine
Champ
magnétique
13
MINI de détection
axe de la bobine
MAXI de détection
axe de la bobine
Courant
pulsé
Câble
MAXI de détection
Câble
axe de la bobine
MAXI de détection
NB :La position du Récepteur par rapport au conducteur parcouru par le
courant pulsé a son importance. Elle influence la détection. Vous
constaterez en manipulant le Récepteur, qu'en le pivotant de 90°
autour de son axe longitudinal (axe du viseur) que la détection passe
d'un Maxi à un Mini, voire à une détection nulle.
Cela est dû aux lois de l'électro-magnétisme. (Pour avoir une détection maxi, le champ magnétique doit passer par l'axe de la bobine).
De fait, en utilisant la méthode du maximum, on se place naturellement en position de détection maxi. Par contre c'est cette influence
particulière de la position du Récepteur qui est utilisée dans la
méthode du minimum.
Maxi de détection
Courant pulsé i
Mini de détection
Câble
Maxi de détection
Méthode du minimum
La méthode du minimum est utilisée lorsqu'on ne peut pas s'approcher
suffisamment du circuit. Dans ce cas elle complète la méthode du
maximum (voir ci-avant) pour obtenir une meilleure précision.
Il faut pour cette méthode du minimum positionner le Récepteur parallèlement au conducteur. On déplace ensuite le Récepteur de part et d'autre
(voir B et C sur le schéma) pour trouver le minimum d'amplitude de la
rampe à LED (voir A).
Le Récepteur est alors aligné sur le câble.
Cette méthode peut donner une précision de quelques centimètres même
si le Récepteur se trouve à une distance de plusieurs dizaines de
centimètres du câble.
14
APPLICATIONS
Rappel :
- toujours travailler entre l'Émetteur et la source de tension.
- toujours éloigner l'aller du retour quand cela est possible
(montage grande boucle)
ATTENTION
En triphasé, si la charge de l'une des phases est très capacitive,
le courant pulsé à la fréquence de 3500 Hz peut dans certains
cas traverser le condensateur équivalent de la charge et continuer son parcours sur l'autre phase au lieu de revenir par le
neutre. C'est pourquoi, il est toujours préférable de brancher
l'Émetteur entre phase et terre plutôt qu'entre phase et neutre.
Déplacement
du
RECEPTEUR
15
Déviation faible
Déviation maximale
Terre éloignée
et indépendante
de celle de la prise
EMETTEUR
Phase de la prise
Tableau des coupe-circuits
Le fusible correspondant à la prise est repéré
Origine d'un circuit
Il s'agit de retrouver l'origine d'un circuit : identifier le coupe-circuit sur le
tableau par exemple.
- Brancher l'Émetteur entre la phase de la prise dont on veut localiser le
coupe-circuit et une terre non adjacente au circuit de manière à former
un montage grande boucle.
- Sélectionner la sensibilité la plus faible (sensibilité 1).
- Balayer le tableau des coupe-circuits avec le Récepteur jusqu'à obtenir
la déviation maximale de la rampe à LED et le bip sonore le plus fort.
- Le coupe-circuit correspondant à la prise est alors repéré.
Suivi et identification d'un conducteur
Il s'agit de suivre un conducteur tout au long de son parcours jusqu'à sa
source et ceci même à travers des parois (jusqu'à 50 cm d'épaisseur).
- Brancher l'Émetteur entre la phase de la prise dont on veut suivre le
cheminement et une terre non adjacente au circuit de manière à former
un montage grande boucle.
- Partir de l'endroit où se situe l'Émetteur et démarrer la recherche en
balayant tout autour de la prise jusqu'à trouver la direction prise par le
conducteur.
- Une fois cette direction connue suivre le cheminement du conducteur
jusqu'à sa source, en procédant suivant la méthode du maximum.
7
Bonne direction
Conducteur encastré dans
le mur (non apparent)
Tableau des coupe-circuits
Phase
Tuyau
relié à la terre
EMETTEUR
A la sortie du toron ou de la goulotte par exemple, le signal le plus fort
identifie le conducteur recherché parmi d'autres.
16
Transfo
MT/BT
Alimentation
17
Le courant circule à travers le court-circuit et remonte par la terre
Neutre
EMETTEUR
Phase
Court-circuit
Phase/Terre
Détection nulle
Court-circuit phase/terre
Dans le cas d'un défaut phase/terre suffisament important pour faire
sauter les protections (disjoncteur différentiel), on utilise la méthode du
pontage pour retrouver ce défaut.
- Brancher l'Émetteur coté phase tel qu'indiqué sur le schéma.
- Le courant circulera à travers le court-circuit et se refermera par la terre.
- Présenter le Récepteur face au tableau des coupe-circuits ; suivre le
parcours du conducteur jusqu'à extinction du signal de détection.
- Le court-circuit est alors retrouvé.
Faire un pontage
sur le neutre
Neutre
EMETTEUR
Phase
Le courant pulsé se referme par
le neutre à travers le court-circuit
Détection nulle
Court-circuit
Phase/Neutre
Court-circuit phase/neutre
Même raisonnement que ci-dessus, mais cette fois le retour se faisant par
le neutre, il faut court-circuiter le neutre comme indiqué sur le schéma.
Alimentation
NB: Dans le cas d'un court-circuit phase/neutre il ne s'agit pas d'un
montage grande boucle car le courant revient dans le même cable
par le court-circuit. Le signal étant donc assez faible, il faudra pouvoir
approcher le Récepteur assez près du circuit pour le suivre jusqu'à
sa disparition devant le court-circuit.
18
Neutre
Phase
Transfo
MT/BT
Alimentation
EMETTEUR
Court-circuit
Neutre/Terre
Détection nulle
Court-circuit neutre/terre
Dans le cas d'un court-circuit neutre/terre, on utilise la méthode du
pontage pour retrouver ce défaut.
- Brancher l'Émetteur comme indiqué sur le schéma.
- Même raisonnement que court-circuit phase/terre.
19
Repérage d'un tuyau bouché
NB : Le matériau de ce tuyau doit être non magnétique pour que le
repérage soit possible.
Cette méthode consiste à glisser un câble dans le tuyau jusqu'à
l'endroit où il est bouché, cassé (dans un plancher, un sol...).
EMETTEUR
E110
Cordon
bifilaire
Branche
Pas de détection
ou très faible
Détection de la boucle,
donc de l'endroit bouché.
1ère solution
Cette 1ère solution consiste à utiliser un cordon relié d'un côté à l'Émetteur
et à sa pile d'alimentation. De l'autre côté les deux fils sont reliés, formant
une boucle. Le long du cordon, les champs magnétiques ayant tendance
à s'annuler, la détection sera quasiment nulle. A l'endroit où se situe la
boucle, la détection sera plus importante. On aura donc atteint l'endroit où
le tuyau est bouché.
20
Ame
21
EMETTEUR
E110
Tresse
9V
Bonne détection
sur tout le parcours
Détection
très faible
Détection
nulle
2ème solution
Cette 2ème solution consiste à utiliser un cable blindé magnétiquement.
D'un côté l'âme du câble est reliée à l'Émetteur et la tresse (en fer, acier)
est reliée à la pile alimentant l'Émetteur. De l'autre côté, âme et tresse sont
raccordées.
Le blindage magnétique du câble à pour avantage d'isoler l'âme des
champs extérieurs. De ce fait, l'aller et retour du courant pulsé n'auront pas
tendance à s'annuler et on pourra suivre le câble tout au long de son
parcours dans le tuyau. Arrivé au niveau du point de raccordement, la
détection sera dans ce cas quasiment nulle et on aura retrouvé l'endroit
où la canalisation est bouchée.
PIÈGES A ÉVITER
EMETTEUR
Neutre
Phase
R fuite
Bonne détection également
Bonne détection
Compteur
Transfo
MT/BT
Le LOCAT a la possibilité de détecter la présence d'une résistance de fuite
phase/terre; cette résistance de fuite ne déclenchant pas nécessairement
le disjoncteur différentiel.
Attention donc aux erreurs d'interprétation !
Pour une installation sous 220 V, une résistance de fuite de 100 kW
provoquera un courant de fuite de 2,2 mA (non détectable par le disjoncteur différentiel).
Dans ce cas, le courant va circuler par la phase et se refermer d'un part
par la terre du poste, d'autre part par la terre reliant la résistance de fuite.
Le Récepteur présenté à l'endroit de la fuite, détectera le passage du
courant et on aura l'impression que le câble se prolonge dans cette
direction, alors qu'il se dirige vers le compteur.
Conclusion :
Le LOCAT est un appareil ingénieux mais il ne dispense pas d'un minimum
de réflexion pour diagnostiquer une installation électrique.
22
CARACTÉRISTIQUES GÉNÉRALES
ET CONFORMITÉ AUX NORMES
COMPATIBILITÉ ÉLECTROMAGNÉTIQUE
(selon NF EN 55 081 - 1 et NF EN 55 082 - 1)
Émission : classe B
(selon NF EN 55 014 et NF EN 55 022)
Immunité
- Décharges électrostatiques (selon CEI 801 - 2):
Niveau 3 (8kV - aptitude B)
- Champs électriques (selon CEI 801 - 3) :
Niveau 2 (3 V/m - aptitude A)
- Transitoires électriques rapides (selon CEI 801 - 4):
Niveau 2 (1kV - aptitude B)
ÉMETTEURS LOCAT E 110 et E 220
Alimentation
- Émetteur E 110 : de 9V à 140V~ et
- Émetteur E 220 : de 180V à 300V
de 180V à 440V~
Pour l'Émetteur E 110, il est possible de remplacer l'alimentation réseau
par une pile 9V (vérification d'installation non raccordée au réseau). Celleci doit être de type alcaline pour pouvoir fournir les impulsions de 250 mA.
- Fréquence d'utilisation : 50 ou 60 Hz
- Consommation moyenne : 5 mA
- Consommation crête : 250 mA pendant la période de conduction de
10 ms (fréquence de 3500 Hz pendant 10 ms toutes les 320 ms).
Sécurité électrique
- Double isolation : classe II (selon CEI 348)
- Tenue diélectrique : 4kV (selon CEI 348)
- Chocs électriques : tenue 5kV, 2 joules (selon CEI 801-5)
NB :Une surtension peut provoquer la fusion du fusible, à partir de :
- 1,5 kV pour l'émetteur E 110
- 2 kV pour l'émetteur E 220
RÉCEPTEUR LOCAT R
- Alimentation : 8V ±1V (pile 9V alcaline)
- Consommation : 20 mA
NB :Les variations des grandeurs climatiques et d'alimentation (dans le
domaine d'utilisation) n'ont que très peu d'influence sur la sensibilité
de la détection. Légère perte de sensibilité de 9 à 30V en alternatif
pour l'émetteur E 110.
CONDITIONS CLIMATIQUES
- Température de référence : +23°C ±3°C
- Température d'utilisation : 0°C à +50°C
- Température de stockage : -20°C à +50°C
- Humidité relative : 20 % à 70 % HR
23
45
215
BOITIERS
- Dimensions et masse : 215 x 55 x 45 mm - 250 g
- Indice de protection (selon CEI 529) :
IP 10 pour le récepteur
IP 40 pour les émetteurs
- Résistance aux chutes (selon CEI 68-2-32) : 1 mètre
- Autoextinguibilité : Vo (selon UL 94)
55
MAINTENANCE
Pour la maintenance, utilisez seulement les pièces de
rechange qui ont été spécifiées. Le fabricant ne pourra être
tenu pour responsable de tout accident survenu suite à une
réparation effectuée en dehors de son service après-vente ou des
réparateurs agréés.
CHANGEMENT DE LA PILE
La pile 9V est accessible à l'arrière du Récepteur.
Oter la partie de boîtier arrière après avoir enlevé la vis.
Le connecteur de la pile 9V standard est détrompé.
CHANGEMENT DU FUSIBLE
Pour changer le fusible à haut pouvoir de coupure de l'Emetteur, ôter les
2 vis du boîtier.
ATTENTION
Toujours respecter la valeur et le type du fusible :
FF 0,1A 380V (5 x 20 mm) 10 kA
STOCKAGE
Si l’appareil n’est pas mis en service pendant une durée dépassant 60
jours, enlever les piles et stocker les séparément.
NETTOYAGE
- L’appareil doit être déconnecté de toute source électrique.
- Pour nettoyer le boîtier, utiliser un chiffon légèrement imbibé d’eau
savonneuse. Rincer avec un chiffon humide. Ensuite, sécher rapidement
avec un chiffon ou de l’air pulsé.
VÉRIFICATION MÉTROLOGIQUE
Comme tous les appareils de mesure ou d’essais, une vérification périodique est nécessaire.
Pour les vérifications et étalonnages de vos appareils, adressez-vous à
nos laboratoires de métrologie accrédités COFRAC ou aux agences
Manumesure.
Renseignements et coordonnées sur demande :
Tél. : 02 31 64 51 43 Fax : 02 31 64 51 09
RÉPARATION
Réparation sous garantie et hors garantie.
Adressez vos appareils à l’une des agences régionales MANUMESURE,
agréées CHAUVIN ARNOUX
Renseignements et coordonnées sur demande :
Tél. : 02 31 64 51 43 Fax : 02 31 64 51 09
Réparation hors de France métropolitaine.
Pour toute intervention sous garantie ou hors garantie, retournez l’appareil
à votre distributeur.
24
POUR COMMANDER
Réf
LOCAT 110 .................................................................... P01.1416.21Z
Ensemble complet comprenant : un Récepteur LOCAT R, un Emetteur E
110, un jeu de cordons n° 250B/249A (1), une pince crocodile verte, une
pile 9 V alcaline et ce mode d'emploi.
LOCAT 220 .................................................................... P01.1416.22Z
Ensemble complet comprenant : un Récepteur LOCAT R, un Emetteur E
220, un jeu de cordons n° 250B/249A (1), une pince crocodile verte, une
pile 9 V alcaline et ce mode d'emploi.
Accessoires et rechanges
- LOCAT R (Récepteur seul) .......................................... P01.1416.23
- LOCAT E 110 (Emetteur seul) .................................... P01.1416.24
- LOCAT E 220 (Emetteur seul) .................................... P01.1416.25
- Cordons n°250B/249A (1) ............................................ P01.2950.35
- Fusibles 0,1 A HPC FF 380 V, 5 x 20 mm (jeu de 10) ..... P03.2975.14
- Pile 9V alcaline ............................................................ P01.1007.32
- Mallette N°10 (32 x 25 x 5,5 cm) ................................. P01.2980.04
(1) Cordons (longueur 1,50 m) :
- 1 cordon (rouge n° 250B) mâle de sécurité et pointe de touche (Ø 4 mm)
- 1 cordon (noir n° 249A) mâle/mâle de sécurité (Ø 4 mm)
25
ENGLISH
Meaning of the symbol
:
Warning ! Please refer to the User’s Manual before using the instrument.
In this User’s Manual, the instructions preceded by the above symbol,
should they not be carried out as shown, can result in a physical accident
or damage the instrument and the installations.
Meaning of the symbol
:
This device is protected by a double insulation or by a reinforced insulation.
No linking is required from the protection earth terminal to ensure the
electrical security.
Thank you for purchasing a LOCAT. To get the best service from this
instrument:
■ read this user’s manual carefully
■ respect the safety precautions detailed : see warning paragraphs.
WARNING
The LOCAT Emitter is fitted with a high breaking capacity fuse.
FF 0,1A 380V (5x20 mm) 10kA
If the fuse is replaced, it is essential to replace it with another of the
same value and type otherwise the instrument may be damaged and
the guarantee invalid.
INTRODUCTION
The LOCAT, wire tracer and electrical fault locator, is a clever and original
instrument in more than one way.
It may be used to «trace the path» of an operational electrical installation, that
is to say in a working installation which is live.
Its major application is the identification, the location, of a circuit by finding cable
runs through walls without dismantling or demolition work.
The LOCAT works on all types of live electrical installations, on condition that
they aren’t magnetically screened.
It’s an extremely versatile instrument.
Among the 1000 and 1 applications of the LOCAT we list the principal ones to
enable you to familiarise yourself with its use:
- Finding the origin of a circuit,
- Following a circuit throughout its route,
- Finding one wire amongst others in a weave or a surface mounted box conduit,
- Finding short circuits: live/earth, live/neutral and neutral/earth,
- Identifying phases
- Identifying an earth circuit
- Finding a blocked pipe (non-magnetic) in a wall, a floor...
The LOCAT bears the CE label. In particular, it conforms to electromagnetic
compatibility.
The LOCAT consists of two separate elements: the EMITTER and the RECEIVER.
NB : The terms Emitter/Receiver that are used correspond to a simplified
description of the physical principle of the LOCAT but it has the advantage of
being easy for everyone to understand. That’s why we have used them.
26
SUMMARY
Page
PRINCIPLE ..................................................................................... 28
Notes on electromagnetism .................................................... 28
The Emitter ............................................................................. 28
The Receiver .......................................................................... 28
The advantages ...................................................................... 28
PRESENTATION ............................................................................ 30
Unpacking the parts ............................................................... 30
The Emitters LOCAT E 110 and E 220 ................................... 30
The Receiver LOCAT R ......................................................... 31
USING THE EMITTER .................................................................... 32
Connecting ............................................................................. 32
Operational test ...................................................................... 32
Big loop mounting ................................................................... 32
Bridging method ..................................................................... 33
USING THE RECEIVER ................................................................. 35
Handling ................................................................................. 35
Levels of sensitivity ................................................................ 35
Vu-meter ................................................................................ 35
Operational test ...................................................................... 35
Setting up ............................................................................... 35
Method of maximum ............................................................... 36
Pointing the Receiver ............................................................. 37
Method of minimum ................................................................ 38
APPLICATIONS ............................................................................. 39
Origin of a circuit .................................................................... 39
Following and identifying a circuit ........................................... 40
Live/earth short circuit ............................................................ 41
Live/neutral short circuit ......................................................... 42
Neutral/earth short circuit ....................................................... 43
Tracking a blocked pipe ......................................................... 43
TRAPS TO AVOID ......................................................................... 46
GENERAL SPECIFICATIONS AND
CONFORMITY WITH STANDARDS ............................................... 47
MAINTENANCE ............................................................................. 48
TO ORDER ..................................................................................... 49
WARRANTY
Our guarantee is applicable for twelve, usually months after the date
on which the equipment is made available (extract from our General
Conditions of Sale, available on request).
27
PRINCIPLE
Notes on electromagnetism
■ An electrical current of intensity (i) passing through a conductor creates
a magnetic field (H) surrounding this conductor throughout its length.
The magnitude (H) of this magnetic field is proportional to the value of
this current (i).
■ A coil picking up this magnetic field (H) will therefore supply a strong
signal if:
- The current (i) is strong
- The coil is close to the conducting wire
NB : - According to the direction of the current (i) passing through the
wire, the magnetic field (H) turns in one direction or the other.
- The magnetic fields (H) of two currents (i) in opposing directions
cancel each other out.
This is the case for example in supply and return wires which are in the
same cable, or placed in parallel, side by side, in an installation.
The LOCAT Emitter
Connected to a live circuit, the Emitter creates a current at a specific
frequency Fe = 3500 Hz.
This current generates a magnetic field of the same frequency Fe
throughout the path of the current.
The LOCAT Receiver
This Receiver identifies, locates the conductor being traced by means of
the magnetic field picked up by its frequency Fe.
The Receiver contains a sensor sensitive to the magnetic field. It is very
selective, which means it is only sensitive to this particular frequency Fe.
When measuring the intensity of the magnetic field, it indicates in fact the
proximity of the corresponding conductor. By moving the Receiver in front
of a group of cables, a connecting terminal or a set of circuit breakers, the
one which supplies the Emitter can quickly be found because the frequency
current Fe is passing through it and the Receiver gives its strongest
reading when close to it.
The advantages
The advantages follow from its operating principle and are numerous.
- The most important is that identification by the Receiver is at a distance
(up to 3 m approx.) and even through a wall (up to 50 cm thick).
- The current of frequency Fe cannot spread to cables other than those
of the direct supply circuit of the Emitter.
- This current of frequency Fe is the same all through the supply circuit,
therefore finding the cables with the Receiver is as easy at 100 metres
from the Emitter connection as at 1 metre.
- The specifications of the pulsed current (5 mA at 3500 Hz) are such that
there is no risk of magnetic disturbance of even very sensitive electronic
equipment. For example, the radiation created is quite negligible by
comparison with that of a domestic dimmer switch.
28
Princeple of the LOCAT
EMITTER
RECEIVER
~
Voltage source
➀
➁
➂
THE EMITTER consumes a pulsed current (i):
approx. 5 mA with frequency Fe = 3500 Hz (See p. 46)
Specific magnetic field (H) with same frequency Fe
THE RECEIVER signals the presence of this pulsed current. The
signal is max. 3.2 or weak 3.1 and 3.3 according to the position
of the RECEIVER in relation to the conductor to be located.
29
PRESENTATION
Unpacking the parts
The Emitter fits on to the Receiver. To
separate them, simply slip a finger
between the two elements.
The Emitter is then easily extracted. To
fit it back in again, insert it in its housing,
pushing it well in until it clicks.
The Emitters
Two models are availa-ble according to
the type of voltage encountered :
- the LOCAT E 220 :
from 180 V to 440 V AC
from 180 V to 300 V DC
- the LOCAT E 110 :
from 9 V to 140 V DC and AC
RECEIVER
EMITTER
Clip for attaching to waist belt
The choice of Emitter (LOCAT E 220 or LOCAT E 110) is therefore
dependant on the voltage of the network.
WARNING :
To avoid any risk of error, it is advisable to measure the voltage
of the network first of all with a voltmeter.
NB : - The LOCAT E220 only works on a live circuit (without breaks).
- The LOCAT E 110 works on a non-live but operational network
as long as it is powered by an external source (9 V battery, for
example).
- Respect the polarity in DC voltage.
After connecting, the Emitter only consumes pulsed current (specific
frequency 3500 Hz) which distinguishes it from all other surrounding
currents.
NB : This consumption signal is therefore propagated between the
voltage source and the Emitter, zone in which it can be picked up
by the Receiver.
Checking light
Red rectangular diode.
Flashes (3 times/second) to indicate that the Emitter is live.
Female safety
terminals Æ 4 mm
(1) Polarity on DC.
30
The Receiver
The Receiver LOCAT R, the only model of Receiver, is powered by a
standard 9 V battery. It can be used with either of the two models of Emitter.
Sensitive to the magnetic field created by the pulsed current, the Receiver
reacts by the emission of a dual audio and visual signal, proportional to the
intensity of the signal picked up and thus to the distance from the wire
carrying the pulsed current.
Symbol for beep
The intensity of the beep is a function of the distance separating
the receiver from the cable to identify.
Sighting arrow
The receiving coil for the magnetic field
is housed at the position of the arrow.
Sighting axis
Coil axis
Visual signal
Luminous scale composed of 9 red
diodes, the level of maximum detection
being on the right, the minimum level
on the left.
ON/OFF
and sensitivity selection
The sensitivity selection depends
on the proximity of the cable to be
identified. By pressing two buttons at
the same time, intermediate sensitivity
is selected. (Positions 2 and 4).
31
USING THE EMITTER
WARNING:
Before connecting the Emitter to the auxiliary power supply,
always check that the network voltage is compatible with the
maximum voltage indicated on the Emitter :
140 V AC for the LOCAT E 110
440 V AC for the LOCAT E 220
Connection
When connecting the Emitter the user selects the circuit, the cable he
wants to work on. Connection consists of two procedures. First of all
connect the two leads to the safety terminals of the Emitter. Only now
connect to the selected live circuit.
Operational test
Connect the Emitter to a socket in the circuit to be tested.
The red light should start to flash. This shows that the
circuit is live and the Emitter is working.
For a non-live circuit see in «Applications» Chapter, the
use of the Emitter E110 with a 9 V battery.
Note : on DC supply, if the red incator doesn't flash the
polarity is wrong, reverse the leads.
NB : If the fuse is blown the test light doesn’t work. In this
case, see the chapter "Changing the fuse".
32
Connecting to a large loop
If the Emitter is directly connected to an electrical socket, the outward
pulsed current is carried by one of the wires (live) and the return by the
other (neutral).
In this case the conducting wires being in parallel the emitted magnetic
fields are equal but in opposite directions. They then have a tendency to
cancel each other and the Receiver only detects the difference between
the two (insignificant). This big loss of signal makes detection difficult and
it becomes impossible as soon as the user moves away from the circuit.
To avoid this weakening, the user connects up so that "one of the currents,
outward or return, is separated". This is the large loop connection which
consists of connecting :
- One of the leads to the live side of the socket
- The other lead to an earth or negative of another socket which doesn’t
follow the same route as the circuit to be traced.
NB : This large loop connection of the Emitter solves this problem in the
majority of cases. If RCDs are used in the circuit then the polarity
of the LOCAT must be connected as shown in the diagram. Failure
to do so will cause the RCD to trip.
Earth independant from the circuit
to be traced (radiator, plumbing...)
Fuse box
Live
Neutral
Earth
EMITTER
Connecting to a large loop
WARNING :
In conclusion to the large loop connection, connecting the
Emitter directly in an electrical socket is prohibited.
33
Bridging method
Reminder : the Emitter is a load for the voltage circuit the same as any
other. Because of its low consumption (I average < 5 mA) it doesn’t setoff upstream circuit breakers).
This is the bridging method. A large loop connection can be easily
connected in this way. This bridging method is used for a live/earth or live/
neutral short-circuit and allows the pulsed current to complete the circuit
with the circuit breakers left open.
The user can therefore use the Emitter as a bridge to supply power again
to a line that is short-circuited (circuit breakers open), for example a live/
earth short-circuit.
Live/Earth short-circuit
Example of a Live/Earth short circuit
Supply
Transfo
MT/BT
The power to the circuit is restored by the Emitter
The pulsed current by-passes the short circuit and returns to the earth
Live
Neutral
EMITTER
▼
NB:
Examples of tracing short-circuits are described in the
"Applications" chapter.
34
USING THE RECEIVER
After having connected the Emitter following one of the methods described,
according to the type of trace to be done, the pulsed current will run in a
cable which may be out of sight under skirting boards, in partitions,... or
may be in a cupboard, but amongst tens of other wires.
With the Receiver the user may now follow the cable run and identify it
throughout its run by means of a dual signal: audio signal (beep) and vumeter.
Sighting axis
Coil axis
Handling
Hold the Receiver so that your thumb is naturally
placed on the red sensitivity buttons.
Sensitivity levels
The Receiver has three sensitivity push buttons.
In total 5 levels of sensitivity are available: 3 direct
(marked 1, 3, 5) and 2 intermediate, which are obtained by pressing two
buttons at the same time (marked 2, 4).
Min. sensitivity is on level 1 and Max. sensitivity on level 5.
Vu-meter
The Vu-meter consists of 9 diodes which indicate the intensity of the signal
detected.
Left-hand diode: Min. threshold - shows the receiver is switched on.
Diodes 1 to 7 : Increasing signal intensity
Right-hand diode : Max. threshold - saturation.
Operational test
When a button is pressed the Receiver is powered by its 9 V battery. If the
user is a long way from the circuit to be tested, only a hissing noise will be
heard and only the left-hand light will come on. When the Emitter is
approached, the audio signal gets louder and the vu-meter lights up.
NB : If the sound signal and the vu-meter don’t work, the battery must be
changed (See chapter on changing the battery).
Operation
Press button 5 (Max. sensitivity) and hold the Receiver at arms length, in
various directions: you will note that in certain places the audio signal
comes on and the vu-meter lights up.
Now simply continue moving in the direction which gives the strongest
audio signal.
By these means a Max. visual display is obtained (or even saturation:
right-hand diode lit). The approximate position of the circuit (in the axis of
the sight) is found in this way. Now change to a lower sensitivity (4 or 3)
and continue in the same way.
Proceed in this way down to the Min. sensitivity (button 1) for which Max.
deviation of the Vu-meter is sought. The circuit being traced is now in the
line of sight.
This method of use by successive approximations is called the maximum
method. It works in the majority of cases.
35
NB:
Still the right direction.
The LED furthest to the right
is Min. sensitivity.
Right direction
The LED furthest to the right
is Medium sensitivity
7
Wrong direction
Medium sensitivity
Earth at a
distance
and
independently
from the socket
source
START
Max. sensitivity
EMITTER
Conductor
being traced
7
Fuse-box
RECEIVER
Method of maximum
Operation (see diagram) :
1/ Start from the point where the Emitter injection lead is connected
(See A).
2/ Select max. sensitivity and move the Receiver around the Emitter to
find the direction of the cable. (see B and C).
3/ Continue in this way progressively reducing the sensitivity until obtaining
max. indication on the Vu-meter and the strongest audio signal.
4/ "Trace" the cable run in this way to its source (See D).
The method of maximum gives better accuracy when the user is
able to hold the Receiver close to the wire being traced. Accuracy
is better than a centimetre. Nevertheless, if the wire is inaccessible
(20 cm. inside a wall for example), its position can only be found to
the nearest 20 cm. In this case the minimum method can be used
to overcome this problem.
36
Pointing the Receiver
NB : The position of the Receiver in relation to the cable carrying the
pulsed current is important. It affects the detection.
You will note when manipulating the Receiver, that when pivoting
it by 90° through its longitudinal axis (line of sight) that the detection
goes from Max. to Min., even to zero detection. This is due to the
laws of electromagnetism.
(To obtain max. detection, the magnetic field must go through the
axis of the coil). In fact, by using the method of maximum, the user
is naturally placed in the max. detection position.
On the other hand it is this particular effect of the Receiver position
which is used in the method of minimum.
Detection min.
Axis of the coil
Detection min.
Axis of the coil
Magnetic
field
Pulsed
current
Cable
Axis of the coil
Detection max.
Detection max.
Cable
Axis of the coil
Detection max.
Effect of position on detection
37
Detection max.
Pulsed current i
Detection min.
Cable
Detection max.
Method of minimum
The method of minimum is used when the circuit cannot be approached.
In this case it completes the method of maximum (see above) to obtain
greater accuracy.
For this method of minimum, position the Receiver parallel to the conductor.
Now move the Receiver one way or the other (see B and C) to find the
minimum deviation of the visual display (see A).
The Receiver is now lined up with the wire.
This method can give an accuracy of a few centimetres even if the
Receiver is several tens of centimetres from the wire.
38
APPLICATIONS
Reminder :
- Always work between the emitter and the voltage source.
- Always separate the outward and the return when possible (big loop connection).
WARNING :
In 3-phase, if the load on one of the phases is very capacitative,
the pulsed current with a 3500 Hz frequency can in certain cases
cross the condenser equivalent to the load and continue its run
on the other phase instead of returning through the neutral.
That’s why it is always preferable to connect the Emitter between
live and earth rather than between live and neutral.
Earth at a distance
and independently
from the socket
Move the
RECEIVER
Max. deviation
EMITTER
Live side of the socket
Min. deviation
Fuse board
The fuse corresponding to the socket is identified
Origin of a circuit
How to find the origin of a circuit: identify a circuit breaker on a fuse board,
for example.
- Connect the Emitter between the live side of a socket which has a short
circuit and a non-adjacent earth of the circuit so that a big loop is created.
- Select the lowest sensitivity (sensitivity 1).
- Sweep the fuse board with the Receiver until the max. display is
obtained on the visual display, and the loudest audio signal.
- The circuit breaker corresponding to the socket has been found.
39
Following and identifying a conductor
How to follow a conductor throughout its run as far as its source even
through walls (up to 50 cm thick).
- Connect the Emitter between the live side of a socket which has a short
circuit and a non-adjacent earth of the circuit so that a big loop is created.
- Start from the place where the Emitter is located and begin searching
by sweeping all round the socket until the direction taken by the conductor has been found.
- Once this direction is known follow the route of the conductor to its
source, using the method of maximum.
Fuse board
40
Right direction
Conductor recessed in the wall
(not apparent)
Live
Pipe connected
to the earth
EMITTER
At the exit of the weave or of the box section con-duit for example, the
strongest signal identifies the conductor from among the others.
Transfo
MT/BT
Supply
41
The current crosses the short-circuit and returns by the earth.
Neutral
EMITTER
Live
No detection
Short-circuit
Live/Earth
Live/earth short circuit
If the live/earth fault is sufficiently high to blow the protection (circuit
breakers), the bridging method is used to find the fault.
- Connect the Emitter to the live side as shown on the diagram.
- The current crosses the short circuit and returns by the earth.
- Hold the Receiver in front of the fuse board; follow the route of the
conductor until the detection signal disappears.
- The short circuit has been found.
Supply
42
The pulsed current returns through the Neutral.
Bridge across
the neutral The neutral return must be short-circuited at the fuse board.
Neutral
EMITTER
Live
No detection
Short-circuit
Live/Neutral
Live/Neutral short circuit
The same reasoning as above, but this time the return is done through the
neutral, the neutral return must be short circuited at the fuse board, as
shown in the diagram.
NB:
In the case of a live/neutral short circuit it is not a big loop connection
because the current comes back along the same cable to the short
circuit. The signal therefore being quite weak, the probe must be
placed quite close to the circuit so as to follow it to the point where
it disappears at the short circuit.
Neutral
Live
Transfo
MT/BT
Supply
EMITTER
Short-circuit
Neutral/Earth
No detection
Neutral/Earth short circuit
In the case of a neutral/earth short circuit, the bridging method is used to
find the fault.
- Connect the Emitter as shown in the diagram.
- Same reasoning as for the live/earth short circuit.
Tracking a blocked pipe
NB : The material of the pipe must be non-magnetic for the tracking to be
possible. This method consists of sliding a cable inside the pipe to
the place where it is blocked or broken. (In a ceiling, a floor...).
43
EMITTER
E 110
Two wire lead
Loop
Low or zero detection
Detection of the loop,
thus of the blockage
1st solution
This first solution consists of using a two wire lead connected to one side
of the Emitter and to its battery power supply. On the other side the two
wires are joined, making a loop. Along the lead, as the magnetic fields tend
to cancel each other, the detection will be almost zero. At the point where
the loop is joined, the detection will be greater. This is then the point where
the pipe is blocked.
44
Core
45
EMITTER
E 110
Weave
9V
Good detection
all along the route
Weak
detection
No more
detection
2nd solution
This second solution consists of using a magnetically screened cable. On
one side the core of the cable is joined to the Emitter and the weave (iron,
steel) is connected to the battery powering the Emitter. On the other side,
core and weave are connected.
The magnetic screening of the cable has the advantage of totally isolating
the core from external fields.
Consequently, the outward and return of the pulsed current don’t tend to
cancel one another and the cable can be followed throughout its route in
the pipe. When the connection point is arrived at, the detection will be
almost zero, and the user will have found the place where the pipework is
blocked.
TRAPS TO AVOID
Transfo
MT/BT
EMITTER
Neutral
Live
R Leak
Good detection
Counter
Good detection all
along the route
The LOCAT is able to detect the presence of a Live/Earth leak resistance:
this leak resistance not necessarily setting off the circuit breaker. Care
must be taken to avoid problems of interpretation!
For an installation on 220V, a leak resistance of 100 kW will cause a
leakage current of 2.2 mA (not detectable by the circuit breaker).
In this case, the current goes to the live side of the circuit and returns partly
by the earth of the receiver, partly to the earth side connecting to the
leakage resistance.
The Receiver, when positioned where the leak is, will detect the current
flow and the user will have the impression that the wire is prolonged in this
direction, when in fact it is going towards the counter.
Conclusion :
The LOCAT is an ingenious instrument but requires a minimum of
reflection in use to "sound out" an electrical installation.
46
GENERAL SPECIFICATIONS AND
CONFORMITY WITH STANDARDS
ELECTROMAGNETIC COMPATIBILITY
(To NF EN 55 081-1 and NF EN 55 082-1)
Emission : class B
(To NF EN 55 014 and NF EN 55 022)
Immunity
- Electrostatic discharges (To IEC 801-2) : level 3 (8kV - aptitude B)
- Electric fields (To IEC 801-3) : level 2 (3V/m - aptitude A)
- Rapid electrical transients (To IEC-4) : level 2 (1kV - aptitude B)
EMITTERS LOCAT E110 and E220
Supply
- Emitter E110 : from 9 V to 140 V AC and DC
- Emitter E220 : from 180 V to 330 V DC
from 180 V to 440 V AC
For the Emitter E110, the network power supply may be replaced by a
9 V battery (checking an installation not connected to a network). This
battery must be of alkaline type to be able to supply impulses of 250 mA.
- Working frequency: 50 or 60 Hz
- Average consumption: 5 mA
- Peak consumption: 250 mA during the conduction period of 10 ms
(frequency of 3500 Hz for 10 ms every 320 ms).
Electrical safety
- Double Insulation
: class II (To IEC 348)
- Dielectric strength : 4kV (To IEC 348)
- Electric shocks : withstand 5kV, 2 joules (To IEC 801-5)
NB : An overvoltage may blow the fuse, from :
- 1.5kV for emitter E 110
- 2kV for emitter E 220
RECEIVER LOCAT R
- Power supply : 8 V ± 1 V (9 V alkaline battery)
- Consumption : 20 mA
NB : Variations in climatic and supply magnitudes (in working range)
have very little distortion effect on the sensitivity of detection. There
is a slight loss of sensitivity from 9 V to 30 V AC for the Emitter E110.
CLIMATIC CONDITIONS
- Reference temperature : + 23°C ± 3°C
- Working temperature : 0°C to + 50°C
- Storage temperature : - 20°C to + 50°C
- Relative humidity : 20% to 70% RH
47
45
215
CASES
- Dimensions: 215 x 55 x 45 mm
- Weight : 250 g
- Protective index (to standard IEC 529) :
IP 10 for the Receiver
IP 40 for the Emitters
- Resistance to being dropped (IEC 68-2-32) : 1 meter
- Self extinguishing : Vo (To UL 94)
55
MAINTENANCE
For maintenance, use only specified spare parts. The manufacturer will not be held responsible for any accident occurring
following a repair done other than by its After Sales Service or
approved repairers.
CHANGING THE BATTERY
The 9 V battery is accessible at the back of the Receiver.
Remove the back section of the case after having undone the screw.
Pull off the standard 9 V battery connector.
WARNING:
Always replace the fuse with another of the same type and
value : FF 0,1A 380V (5 x 20 mm) 10kA
CHANGING THE FUSE
To change the HBC fuse of the Emitter, remove the two screws from the case.
STORAGE
If the instrument is not put into service for a time exceeding 60 days,
remove the batteries and store them separately.
CLEANING
- The instrument must be disconnected from any electrical source.
- To clean the case, use a cloth slightly moistned with soapy water. Rinse
with a damp cloth. Then, dry rapidly with a cloth or in a hot air stream.
CALIBRATION
It is essential that all measuring instruments are regularly calibrated.
For checking and calibration of your instrument, please contact our
accredited laboratories (list on request) or the Chauvin Arnoux subsidiary
or Agent in your country.
REPAIRS
Repairs under or out of guarantee: please return the product to your distributor.
48
TO ORDER
Ref
LOCAT 110 .............................................................................. P01.1416.21Z
Complete assembly comprising a LOCAT R Receiver, an E 110 Emitter, a set
of leads n° 250B/249A(1), a green crocodile clip, a 9 V alcaline battery and this
User’s Manual
LOCAT 220 .............................................................................. P01.1416.22Z
Complete assembly comprising a LOCAT R Receiver, an E 220 Emitter, a set
of leads n°250B/249A(1), a green crocodile clip, a 9 V alcaline battery andthis
User’s Manual
Accessories and spares
- LOCAT R (Receiver only) ..................................................... P01.1416.23
- LOCAT E 110 (Emitter only) ................................................. P01.1416.24
- LOCAT E 220 (Emitter only) ................................................. P01.1416.25
- Leads n° 250B/249A (1) ......................................................... P01.2950.35
- Fuses 0.1 A HBC fast fuse 380 V, 5 x 20 mm (set of 10) ...... P03.2975.14
- Battery : 9 V alkaline ............................................................. P01.1007.32
- Case n°10 (32 x 25 x 5.5 cm) ............................................... P01.2980.04
(1)
Leads (length 1,50 m) :
- 1 red lead n°250B male, safety type, and prod (Æ 4 mm)
- 1 black lead n°249A male/male safety type (Æ 4 mm)
49
DEUTSCH
Bedeutung des Zeichens
:
Achtung ! Beachten Sie vor Benutzung des Gerätes die Hinweise in der
Bedienungs-anleitung.
Falls die Anweisungen die in vorliegender Bedienungsanleitung nach
diesem Zeichen erscheinen nicht beachtet bzw. nicht ausgeführt werden,
können körperliche Verletzungen verursacht bzw. das Gerät und die
Anlagen beschädigt werden.
Wir bedanken uns bei Ihnen für den Kauf des Kabel- und Fehlersuchgeräte und
das damit entgegen-gebrachte Vertrauen. Um die besten Ergebnisse mit Ihrem
Meßgerät zu erzielen, bitten wir Sie :
■ die vorliegende Bedienungsanleitung aufmerksam
■ zu lesen und die darin enthaltenen Sicherheitshinweise zu beachten
ACHTUNG:
Der LOCAT-Sender ist mit einer Sicherung mit hohem Trennvermögen
ausgestattet: 0,1 A superflink, 380 V, 10 kA (5 x 20 mm).
Diese Sicherung darf nur durch eine Ersatzsicherung genau gleichen
Typs ersetzt werden, da sonst das Gerät zerstört werden kann und die
Garantieansprüche erlöschen!
EINLEITUNG
Die LOCAT-Geräte zur Kabel- und Fehlerortung an elektrischen Anlagen im
Betrieb sind besonders interessante und originelle Helfer des Elektrohandwerks.
Mit ihnen lassen sich Kabelwege an elektrischen Anlagen unter Spannung
verfolgen, d.h. im echten Betrieb der Anlage.
Der erste Vorteil ist die Identifizierung und die einwandfreie Ortung von Kabeln
unter Putz, durch Wände und Mauern hindurch, ohne Ausbauarbeiten, ohne
den Putz zu beschädigen.
Die LOCAT Geräte funktionieren an allen Arten von Elektroinstallationen unter
Betriebsspannung, soweit deren Kabel nicht magnetisch abgeschirmt sind.
Die LOCAT-Geräte sind sprichwörtliche Alleskönner: von den 1001
Einsatzmöglichkeiten seien nur einige Beispiele genannt:
- Ausgangspunkt eines elektrischen Stromkreises auffinden
- Eine Leitung verfolgen, durch Mauern und Wände hindurch
- Eine Leitung in einem Kabelschacht oder -bündel identifizieren
- Kurzschlußsuche: Phase/Erde, Phase/Nulleiter und Nulleiter/Erde
- Auffinden von Rohrverstopfungen in einer Mauer, im Boden
(bei nicht magnetischen Werkstoffen).
LOCAT-Geräte sind mit dem CE-Zeichen versehen. Sie erfüllen insbesondere
die Normen für elektromagnetische Verträglichkeit.
Ein LOCAT-System besteht aus zwei unterschiedlichen Geräten: einem
SENDER und einem EMPFÄNGER.
Hinweis: Die Bezeichnungen “Sender” und “Empfän-ger” werden hier
vereinfachend benutzt. Sie entsprechen weitgehend dem bei den LOCATGeräten verwendeten physikalischen Verfahren und sind für jedermann
verständlich.
50
INHALTSÜBERSICHT
Seite
FUNKTIONSPRINZIP .................................................................................. 52
- Elektromagnetische Grundlagen ............................................................ 52
- LOCAT-Sender ....................................................................................... 52
- LOCAT-Empfänger ................................................................................. 52
- Die Vorteile ............................................................................................. 52
GERÄTEVORSTELLUNG ........................................................................... 54
- Trennen der Geräteteile ......................................................................... 54
- Die LOCAT-Sender E 110 und E 220 .................................................... 54
- Der LOCAT-Empfänger R ...................................................................... 55
BENUTZUNG DES SENDERS .................................................................... 56
- Anschließen ............................................................................................ 56
- Selbsttest ................................................................................................ 56
- Anschluß mit großer Stromschleife ........................................................ 56
- Anschluß mit Überbrückung ................................................................... 57
BENUTZUNG DES EMPFÄNGERS ............................................................. 59
- Handhabung ........................................................................................... 59
- Empfindlichkeitsbereiche ....................................................................... 59
- LED-Leuchtbalken .................................................................................. 59
- Selbsttest ................................................................................................ 59
- Inbetriebnahme ...................................................................................... 59
- Maximum-Verfahren ............................................................................... 60
- Ausrichtung des Empfängers ................................................................. 61
- Minimum-Verfahren ................................................................................ 62
ANWENDUNGSBEISPIELE ........................................................................ 63
- Zur Erinnerung ....................................................................................... 63
- Ursprung eines Stromkreises ................................................................. 63
- Phase/erde-Kurzschlub suchen ............................................................. 64
- Phase/Nulleiter-Kurzschlub suchen ....................................................... 65
- Nulleiter/erde-Kurzschlub suchen .......................................................... 66
- Auffinden von Rohrverstopfungen ......................................................... 67
PROBLEMFÄLLE ....................................................................................... 69
ALLGEMEINE TECHNISCHE DATEN UND NORMENERFÜLLUNG ........... 70
WARTUNG .................................................................................................. 70
BESTELLANGABEN ................................................................................... 71
GARANTIE
Unsere Garantie erstreckt sich auf eine Dauer von zwölf Monaten ab dem
Zeitpunkt der Bereitstellung des Geräts (Auszug aus unseren allg. Verkaufsbedingungen. Erhältlich auf Anfrage).
51
FUNKTIONSPRINZIP
Elektromagnetische Grundlagen
■ Jeder in einem Leiter fließende elektrische Strom (i) erzeugt rund um den
Leiter und auf dessen gesamterb Länge ein magnetisches Feld (H).
Die Stärke (H) dieses magnetischen Feldes ist direkt zur Stromstärke (i)
proportional.
■ Eine Spule, die dieses Magnetfeld (H) empfängt, gibt ein Signal ab, das um
so größer ist
- je höher die Stromstärke (i) im Leiter ist, und/oder
- je näher sich die Spule beim Leiter befindet.
Hinweis:
- Je nach Flußrichtung des Stroms (i) im Leiter kehrt sich die Polarität (NordSüd) des erzeugten Magnetfelds (H) um.
- Die Magnetfelder von zwei in entgegengesetzter Richtung fließenden Strömen
heben sich also gegenseitig auf. Dies ist z.B. der Fall, wenn Hin- und
Rückleiter zu einem Verbraucher im selben Kabel liegen oder in einer
Elektroinstallation direkt nebeneinander verlegt sind.
Der LOCAT-Sender
Bei Anschluß an eine unter Betriebsspannung stehende Anlage erzeugt der
LOCAT-Sender im betreffenden Stromkreis einen gepulsten Strom mit der
besonderen Frequenz Fe = 3500 Hz.
Dieser Strom erzeugt entlang des Leiters ein mit genau derselben Frequenz Fe
gepulstes Magnetfeld..
Der LOCAT-Empfänger
Der Empfänger ist genau auf diese Magnetfeld mit der Frequenz Fe abgestimmt
und kann es eindeutig identifizieren.
Er verfügt an seiner Spitze über einen sehr empfindlichen und hochselektiven
Sensor für dieses Magnetfeld mit der Frequenz Fe. Da wegen der konstanten
Stromstärke entlang des Leiters überall dasselbe Magnetfeld erzeugt wird, ist
seine Stärke ein direktes Maß für die Entfernung zum Leiter. Durch Bewegen
des Empfängers in der Nähe des Leiters, z.B. an einem Kabelbündel, einem
Klemmenkasten oder einer Reihe von Sicherungen läßt sich der Leiter, an den
der LOCAT-Sender angeschlossen ist, sehr schnell und leicht identifizieren,
denn nur in diesem Leiter fließt der mit Fe gepulste Strom und der LOCATEmpfänger zeigt hier die höchste Feldstärke an.
Vorteile
Die zahlreichen Vorteile ergeben sich direkt aus dem verwendeten
Funktionsprinzip:
■ Der gesuchte Leiter wird anhand seines Magnetfelds auch über eine gewisse
Entfernung (bis ca. 3 m) und durch Hindernisse hindurch (bis ca. 50 cm
Wandstärke) erkannt.
■ Der mit der spezifischen Frequenz Fe gepulste Strom fließt nur in dem
Stromkreis, an den der LOCAT-Sender angeschlossen wurde.
■ Dieser Strom ist über die gesamte Länge des Leiters konstant, d.h. die
Lokalisierung des Leiters ist in 100 m Entfernung vom LOCAT-Sender
genauso einfach und zuverlässig wie in 1 m Entfernung.
■ Der gepulste Strom mit einer Stärke von 5 mA bei 3500 Hz wurde so gewählt,
daß er andere, auch hochempfindliche elektronische Geräte, nicht stört.
Das von ihm erzeugte Magnetfeld ist beispielsweise völlig vernachlässigbar
im Vergleich zu einem üblichen Haushalt-Dimmer.
52
FUNKTIONSPRINZIP LOCAT 220
SENDER
EMPFÄNGER
~
Spannungsquelle
➀
➁
➂
Der SENDER speist in den Leiter einen gepulsten Strom (i) von 5 mA mit der
spezifischen Frequenz Fe = 3500 Hz ein (siehe S. 20).
Erzeugtes Magnetfeld (H) mit derselben Frequenz Fe.
Der EMPFÄNGER reagiert auf dieses Magnetfeld und zeigt dessen Stärke
an: maximale Feldstärke in Position 3.2 , geringere Feldstärken in
Positionen 3.1 und 3.3 , entsprechend der Entfernung der Sensorspule
zum signalführenden Leiter.
53
GERÄTEVORSTELLUNG
Trennen der Geräteteile
Der Sender läßt sich in den Empfänger einclipsen. Zum Trennen der beiden Geräte einfach
die Fingerspitze am Gehäuserand des Senders
einschieben und Geräte auseinander drücken.
Der Sender läßt sich nun bequem entnehmen.
Zum Zusam-menfügen der beiden Geräteteile
den Sender auf den Empfänger auflegen und
fest einclipsen.
EMPFÄNGER
SENDER
LOCAT-Sender
Je nach Betriebsspannung der zu prüfenden
Anlage stehen zwei LOCAT-Sender zur Auswahl: Trageclip zum Einhängen
- LOCAT E 220 : von 180 V bis 440 V
am Gürtel
von 180 V bis 300 V
- LOCAT E 110: von 9 V bis 140 V
und ~ Die Auswahl des LOCAT
Senders (E 220 oder E 110) richtet sich also nach der Betriebsspannung
der zu prüfenden Anlage.
ACHTUNG:
Um Fehler auszuschließen, empfiehlt es sich in jedem Fall vor Anschluß
des Senders die Spannung mit einem Voltmeter zu prüfen.
Hinweis:
- Der LOCAT-Sender E 220 kann nur an einer unter Betriebsspannung
stehenden Anlage ohne Stromkreisunterbrechungen betrieben werden.
- Der LOCAT-Sender E 110 kann auch mit einer externen 9V-Batterie mit
Strom versorgt und deshalb auch an spannungslosen (aber betriebsbereiten!)
Anlagen benutzt werden. Bei Gleichstromversorgungen auf die Polarität
achten.
Nach seinem Anschluß an den Stromkreis erzeugt der LOCAT-Sender in ihm
einen gepulsten Strom mit der spezifischen Frequenz von 3500 Hz, die ihn von
allen anderen Strömen in der Anlage unterscheidet.
Hinweis:
Dieses besondere Stromsignal liegt also zwischen Stromversorgung und
Anschlußpunkt des LOCAT Senders an diesem Stromkreis an und kann auf
diesem Leiterabschnitt vom Empfänger lokalisiert werden.
LOCAT-Sender
Kontrolleuchte
Rote LED.
Sie blinkt 3 mal pro s um anzuzeigen, daß der
Sender mit Strom versorgt wird
Ø 4 mm
Sicherheits-buchsen
(1) Polarität bei DC-Anschluß
54
LOCAT-Empfänger
Der LOCAT-Empfänger R ist für beide Sender identisch und wird durch eine
eingebaute 9V-Blockbatterie mit Spannung versorgt.
Empfängt er das typische von einem LOCAT-Sender erzeugte Magnetfeld,
zeigt er dessen Feldstärke optisch und akustisch an. Die Stärke der Anzeige
hängt direkt ab von der Nähe des Empfängers zum gesuchten Leiter.
Symbol für akustisches Signal
Die Stärke des Summtons ist direkt proportional
zur Nähe des gesuchten Leiters.
Richtungspfeil
Dieser Pfeil zeigt die Empfangsrichtung der
darunter eingebauten Sensorspule an.
Empfangsachse
Achse de Spule
Optisches Signal
Der Leuchtbalken aus 9 roten
LEDs zeigt die Feldstärke optisch
an: links Pegel 1 = schwach, rechts
Pegel 7 = stark
Tasten zum Einschal-ten
und zur Empfindlichkeitseinstellung
Die Empfangsempfindlichkeit läßt
sich, je nach Abstand vom Leiter,
stufenweise durch Drücken der
Tasten einstellen (“1” = geringste,
“5” = größte Empfindlichkeit).
Für Zwischenstufen 2 Tasten
gleichzeitig drücken (Stellungen “2”
und “4”).
55
BENUTZUNG DES SENDERS
ACHTUNG:
Vor Anschluß des Senders immer darauf achten, daß die jeweilige
Anlagenspannung die maximal zulässige Spannung des LOCATSendermodells nicht übersteigt:
140 V ~ beim LOCAT E 110
440 V ~ beim LOCAT E 220
Anschluß des Senders
Vor Anschluß des Senders den zu prüfenden Stromkreis aussuchen.
Anschließend die beiden Meßleitungen in die Sicherheitsbuchsen des LOCATSenders einstecken und vor der eigentlichen Prüfung des Stromkreises (siehe
weiter unten) zunächst die Senderfunktion am gewünschten Stromkreis prüfen
(siehe Selbsttest).
Selbsttest
Den Sender mit den Meßleitungen an eine Steckdose des zu
prüfenden Strom-kreises anschließen.
Die rote LED muß nun blinken; dies ist das Zeichen, daß der
Stromkreis unter Spannung steht und der Sender sein
Stromsignal abgibt.
Der Anschluß an spannungslose Strom-kreise ist ebenfalls
möglich. Dazu muß der LOCAT-Sender E 110 mit einer externen
9V-Batterie
versorgt
werden
(siehe
Kapitel
Anwendungsbeispiele).
Anmerkung: Wenn die rote LED bei Anschluß an Gleichstromnetze nicht blinkt,
ist die Polarität falsch. Meßleitungen umpolen und Funktion erneut prüfen.
Hinweis: Bei defekter Sicherung blinkt rote Kontroll-LED ebenfalls nicht. In
diesem Fall die Sicherung prüfen (siehe Kapitel Ersetzen der Sicherung).
56
Anschluß mit “großer Stromschleife”
Schließt man den Sender direkt an eine Steckdose an, so verläuft das gepulste
Stromsignal zum einen über den Phasenleiter, gleichzeitig jedoch auch über
den Nulleiter wieder zurück. Da diese beiden Leiter meist direkt nebeneinander
verlegt sind, würden sich die Magnetfelder der beiden Kabel gegenseitig
aufheben und der Empfänger könnte nur eine schwache Signalstärke feststellen.
Die Ortung des Leiters wird dadurch sehr erschwert und wäre in größerer
Entfernung oder durch Hindernisse hindurch praktisch nicht mehr möglich.
Um diese gegenseitige Signal-Abschwächung auszus-chalten, bedient man
sich eines “Tricks”: man legt das Signal für den “Hinweg” auf den Phasenleiter,
für den “Rückweg” benutzt man jedoch einen davon entfernt verlaufenden
Leiter. Bei dieser sog. “großen Stromschleife” schließt man:
- eine Meßleitung des Senders an die Phase der zu prüfenden Steckdose an
- die andere Meßleitung an eine externe Erdung oder an den Nulleiter eines
anderen Stromkreises, der anders verlegt ist als der zu prüfende Stromkreis.
Hinweis: Dieser Anschluß des LOCAT-Senders mit “großer Stromschleife”
empfiehlt sich in der überwiegenden Zahl der Fälle.
Vom zu prüfenden Stromkreis unabhängige
Erde (Heizkörper, Wasserleitung, ...)
LOCAT-SENDER
Sicherungskasten
Phase
Nulleiter
Schutzerde
Anschluß mit großer Stromschleife
ZUR BEACHTUNG:
Bei Anschluß “mit großer Stromschleife” darf der LOCAT-Sender
keinesfalls direkt an eine Steckdose angeschlossen werden.
57
Anschluß mit Überbrückung Zur Erinnerung:
Der LOCAT-Sender ist für die Stromversorgung ein ganz normaler
“Stromverbraucher”.
Da er allerdings sehr wenig Strom aufnimmt (im Mittel weniger als 5 mA) lösen
ein FI-Schutzschalter oder andere Sicherheitseinrichtungen nicht aus.
Beim Anschluß mit Überbrückung wird im Falle von defekten Stromkreisen mit
Kurzschlüssen zwischen Phase/Erde oder Phase/Nulleiter eine “große
Stromschleife” simuliert, indem man den offenen Sicherungsautomaten mit
dem LOCAT-Sender überbrückt und das (ungefährliche) Signal in den defekten
Stromkreis einspeist.
Stromversorgung
NetzanschlußTrafo
Der defekte Stromkreis wird über den Sender mit Strom versorgt. Das 3500
Hz-Signal läuft durch den Stromkreis und gelangt über den Kurzschluß
Phase/Erde wieder zum Netz zurück.
Nulleiter
Phase
LOCAT-SENDER
Kurzschluß
Phase/Erde
Anschlußbeispiel bei Kurzschluß Phase/Erde
Hinweis: Beispiele für das Aufsuchen von Kurzschlüssen befinden sich in
Kapitel Anwendungsbeispiele.
58
BENUTZUNG DES EMPFÄNGERS
Nach Anschluß des LOCAT-Senders nach einem der obigen Schaubilder (je
nachdem ob man ein Kabel identifizieren oder einen Defekt suchen will) fließt
der gepulste Strom auf dem Leiter. Dieser Leiter kann unter Putz liegen, hinter
Wänden verlaufen oder in einem Bündel anderer Kabel verborgen sein (z.B. in
Kabelkanälen oder Schaltschränken).
Mit dem LOCAT-Empfänger und der akustischen als auch optischen LEDAnzeige läßt sich dieser Leiter nun leicht auffinden und auf seiner gesamten
Länge verfolgen.
Empfangsachse
Spulenachse
Handhabung
Nehmen Sie den Empfänger so in die Hand, daß die
Spitze mit dem Sensor frei bewegt werden kann und
der Daumen auf den roten Tasten zur
Empfindlichkeitseinstellung liegt.
Empfindlichkeitsstufen
Die Empfindlichkeit des Empfängers und der Anzeige
läßt sich durch drei rote Drucktasten in 5 Stufen einstellen.
Die mit 1, 3 und 5 bezeichneten Tasten entsprechen jeweils direkt der
geringsten (1), mittleren (3) und größten (5) Empfindlichkeit. Durch Drücken
von zwei Tasten gleichzeitig sind die Zwischenstufen (2) und (4) wählbar.
LED-Leuchtbalken
An diesem Leuchtbalken mit 9 roten LEDs wird die Feldstärke optisch angezeigt.
Die LED ganz links entspricht der geringsten Feldstärke, sie leuchtet
grundsätzlich beim Einschalten des Empfängers.
Die mit 1 bis 7 bezeichneten LEDs entsprechen je nach eingestellter
Empfindlichkeit (siehe oben) einer zunehmenden Feldstärke. Leuchtet die
LED ganz rechts, ist das Maximum erreicht und die Empfindlichkeit sollte um
eine Stufe heruntergeschaltet werden.
Selbsttest
Durch Drücken einer beliebigen Drucktaste wird der Empfänger eingeschaltet
und von der 9V-Batterie mit Strom versorgt. Wird kein Signal empfangen, hört
man ein leichtes Rauschen und lediglich die LED ganz links leuchtet. Nähert
man sich der Signalquelle (Stromkreis mit angeschlossenem LOCAT-Sender)
so wird der Summer lauter und der LED-Leuchtbalken schlägt nach rechts aus.
Hinweis: Ertönt kein Summton und leuchtet keine LED so ist die Batterie im
Empfänger verbraucht (siehe Kapitel Ersetzen der Batterie).
Inbetriebnahme
Taste “5” (= maximale Empfindlichkeit) drücken und Empfänger mit dem Arm
in verschiedene Richtungen schwenken: aus einer bestimmten Richtung wird
ein Signal empfangen und die Signalstärkeanzeige (Summer und LED-Balken)
spricht an.
Nun braucht man sich nur noch in die Richtung bewegen, in der ein
Empfangsmaximum angezeigt wird. Erreicht die LED-Anzeige das rechte
Ende (Maximum bzw. Sättigung), schaltet man auf die nächstniedere
Empfindlichkeit “4”, “3” usw... und sucht erneut das Empfangsmaximum.
Dieses Verfahren wird fortgesetzt bis man in der niedersten Empfindlichkeitsstufe
“1” eine maximale Signalstärke feststellt: der gesuchte Leiter befindet sich nun
genau in der Verlängerung des Richtungspfeils an der Empfängerspitze.
Dieses Verfahren der stufenweisen Annäherung bezeichnet man als “MaximumMethode”. Sie eignet sich für die Mehrzahl der Anwendungsfälle in der Praxis.
59
Unabhängig von
der Steckdose
verlaufende
Erde
Richtung immer noch o.k., bei
Aufleuchten der LED ganz rechts
Empfindlichkeit weiter
herunterschalten
Mauvaise direction
Sensibilité Intermédiaire
STARTPUNKT,
maxi-male
Empfindlichkeit
LOCAT-SENDER
Gesuchter
Leiter
Richtige Richtung, bei Aufleuchten
der LED ganz rechts auf niedrigere
Empfindlichkeit schalten
Sicherungskasten
EMPFÄNGER
Maximum-Methode Inbetriebnahme (siehe Abb.):
1) Dort beginnen, wo der Sender an den zu prüfenden Stromkreis
angeschlossen ist und den Leiter bis zur Stromquelle zurückverfolgen
(siehe A).
2) Maximale Empfindlichkeit einstellen (Taste “5”) und den Empfänger um
den Sender bewegen bis die Abgangsrichtung des Kabels feststeht (siehe
B, C).
3) Schrittweise die Empfindlichkeit verringern und jeweils die maximale
Signalstärke aufsuchen, d.h. mit dem lautesten Summton und den meisten
leuchtenden LEDs.
4) Auf diese Weise läßt sich der Leiter bis zu seinem
Ursprung zurückverfolgen (siehe D).
60
Hinweis: Die Fehlersuche mit der “Maximum-Methode” ist um so präziser, je
näher man mit dem Empfänger am gesuchten Leiter entlangfahren kann. Die
erreichbare Genauigkeit liegt bei weniger als 1 cm. Ist der Leiter allerdings
verborgen (z.B. 20 cm tief in einer Mauer verlegt) kann er auch nur auf ca. 20
cm genau lokalisiert werden.
Mit der nachfolgend beschriebenen Minimum-Methode kann man diesen
Genauigkeitsverlust ausgleichen.
MIN-Anzeige
Spulenachse
MIN-Anzeige
Spulenachse
Magnetisches
Feld H
gepulster
Strom
Leiter
Spulenachse
MAX-Anzeige
MAX-Anzeige
Leiter
Spulenachse
MAX-Anzeige
Ausrichtung des Empfängers
Hinweis: Die Lage des Empfängers in Bezug zum signalführenden Leiter spielt
eine wesentliche Rolle, da die Empfangsempfindlichkeit der Sensorspule von
der relativen Lage der Spulenachse zur Magnetfeldachse stark abhängt. Dreht
man z.B. den Empfänger um 90° um seine Längsache (d.h. in seiner
Empfangsachse) wird man eine Veränderung der Feldstärke von Minimum bis
Maximum feststellen.
Dies ist durch die Gesetze des Elektromagnetismus bedingt, da das Magnetfeld
in der Sensorspule nur dann ein maximales Signal erzeugt, wenn seine
Feldlinien genau in der Spulenachse liegen.
Bei der Maximum-Methode nutzt man diesen physikalischen Effekt, d.h. der
Empfänger zeigt ein Maximum, wenn die Empfangsachse zum Leiter zeigt. Die
Richtungsabhängigkeit des Empfängers kann man aber auch in der sog.
Minimum-Methode sinnvoll einsetzen.
61
MAX-Anzeige
gepulster Strom i
MIN-Anzeige
Leiter
MAX-Anzeige
Minimum-Methode
Diese Methode wird sinnvollerweise dann angewandt, wenn man nicht sehr
nahe an den Leiter herankommt. Als Ergänzung zum Maximum-Verfahren
(siehe oben) läßt sich dann mit dem Minimum-Verfahren eine höhere Genauigkeit
erreichen.
Der Empfänger wird dazu parallel zum signalführenden Leiter ausgerichtet. Bei
Bewegung nach rechts und links vom Leiter erhält man eine höhere
Feldstärkeanzeige (siehe Positionen B und C in der Abb.) als wenn der
Empfänger direkt über dem Leiter liegt (Position A) und die Spulenachse genau
quer zu den Feldlinien verläuft.
Mit diesem Verfahren ist eine Ortungsgenauigkeit von wenigen cm möglich,
auch wenn der Leiter mehrere 10 cm tief in einer Mauer verlegt ist.
62
ANWENDUNGSBEISPIELE
Zur Erinnerung:
- Der Suchbereich muß immer zwischen Stromversorgung der Anlage und
Anschlußpunkt des LOCAT-Senders liegen.
- Immer darauf achten, daß der Leiter zur Einspeisung des Signals getrennt
von der Rückführung liegt (Anschluß mit großer Stromschleife).
ACHTUNG
Wenn in einer Phase eines Drehstromnetzes eine stark kapazitiv wirkende
Last vorliegt, kann das vom LOCAT-Sender eingespeiste 3500 Hz-Signal
unter Umständen über diese Kapazität in eine andere Phase übertragen
werden, anstatt vollständig über den Nulleiter zurückzufließen. Deswegen
sollte der LOCAT-Sender immer zwischen Phase und Erde (und nicht
zwischen Phase und Nulleiter) angeschlossen werden.
63
Schwache Anzeige
Mit EMPFÄNGER
Sicherungsreihe
abfahren
MAX-Anzeige
Vom zu prüfenden
Stromkreis
unabhängige Erde
SENDER
Phase in der Steckdose
Sicherungskasten
Zum Stromkreis gehörende Sicherung
Ursprung eines Stromkreises
Der Anfangspunkt eines Stromkreises soll gesucht werden: z.B. die zu einer
Steckdose gehörende Sicherung im Verteilerschrank.
- LOCAT-Sender an die Phase der Steckdose anschließen, deren Sicherung
im Verteilerkasten lokalisiert werden soll. Zweite Meßleitung an eine möglichst
entfernte Erde anschließen (Anschluß mit großer Stromschleife).
- Am Empfänger niedrigste Empfindlichkeit einstellen (Taste “1”).
- Sicherungen im Verteilerkasten mit dem Empfänger abfahren und Sicherung
mit dem Empfangsmaximum feststellen (max. Anzahl LEDs leuchten, lautester
Summton).
- Die zur Steckdose gehörende Sicherung ist damit aufgefunden.
Leitung auffinden und verfolgen
Eine unter Putz oder bis zu 50 cm tief in einer Mauer verlegte Leitung soll
gefunden und über ihre gesamte Länge verfolgt werden.
- LOCAT-Sender an die Phase der Steckdose anschließen, deren Leitung
verfolgt werden soll. Zweite Meßleitung an eine möglichst entfernte Erde
anschließen (Anschluß mit großer Stromschleife).
- Mit dem Empfänger Mauer rings um die Steckdose abfahren und
Abgangsrichtung der Leitung feststellen.
- Leitungsverlauf unter Putz oder in der Mauer bis zum Ursprung, d.h. zum
Sicherungskasten, nach der Maximum-Methode zurückverfolgen.
64
Richtige Leitung
Unter Putz liegender
Leiter (unsichtbar)
Sicherungskasten
Steckdose
Mit Erde
verbundenes
Rohr
SENDER
Der Draht eines Kabelbündels, die Klemme oder die Sicherung, an denen
jeweils das stärkste Signal angezeigt wird, bezeichnen den Ausgangspunkt
des Stromkreises.
NetzanschlußTrafo
Stromversorgung
65
Das 3500 Hz-Signal gelangt über
den Kurzschluß Phase/Erde wieder ins Netz zurück.
Nulleiter
SENDER
Phase
MIN-Anzeige
Kurzschluß
Phase/Erde
Phase/Erde-Kurzschluß suchen
Wenn ein Phase/Erde-Kurzschluß oder ein Fehlerstrom vorliegt, der z.B. die
Sicherung oder den FI-Schutzschalter auslöst, läßt sich die Fehlerstelle durch
Überbrücken des Trennschalters mit dem LOCAT-Sender leicht finden.
- Mit dem LOCAT-Sender wie in der Abb. gezeigt den Phasen-Trennschalter
überbrücken.
- Der gepulste Strom fließt nun in den Stromkreis und kehrt über die Erde
zurück.
- Die defekte Leitung ab dem Sicherungskasten mit dem Empfänger verfolgen
bis ein plötzlicher Abfall der Feldstärke angezeigt wird.
- An dieser Stelle befindet sich der Kurzschluß bzw. Erdschluß der Leitung.
Trennkontakt
zeitweise
überbrücken
Nulleiter
SENDER
Phase
Das 3500 Hz-Signal gelangt
über den Kurzschluß Phase/
Nulleiter wieder ins Netz
zurück.
Keine Anzeige
Kurzschluß
Phase/Nulleiter
Phase/Nulleiter-Kurzschluß suchen
Der Anschluß des LOCAT-Senders erfolgt wie oben. Da hier das Signal
allerdings über den Nulleiter zurückfließt, muß der entsprechende Kontakt des
Trennschalters ebenfalls überbrückt werden (siehe Abb.).
Stromversorgung
Hinweis: Bei einem Kurzschluß Phase/Nulleiter läßt sich keine große
Stromschleife realisieren, da der Strom über den meist parallel zur Phase
verlegten Nulleiter zurückfließt. Das Kabel muß daher in sehr geringer Entfernung
verfolgt werden, um das plötzliche Verschwinden der Anzeige hinter der
Kurzschlußstelle richtig zu erkennen.
66
Phase
Nulleiter
NetzanschlußTrafo
Stromversorgung
SENDER
Kurzschluß
Nulleiter/Erde
Keine Anzeige
Nulleiter/Erde-Kurzschluß suchen
Wenn ein Nulleiter/Erde-Kurzschluß gesucht werden soll, benutzt man ebenfalls das
Verfahren mit Überbrückung des Trennschalters.
- Den LOCAT-Sender wie in der Abb. gezeigt anschließen.
- Ansonsten verfährt man wie bei der Suche nach einem Phase/Erde-Kurzschluß
(siehe oben).
67
Auffinden von Rohrverstopfungen
Hinweis: Die Ortung der verstopften Stelle ist nur an Rohren aus nicht
magnetischem Material möglich.
Hierbei wird ein Kabel in das Rohr bis zu der Stelle eingeschoben, an der es
verstopft ist.
SENDER
E 110
Zweiadriges
Kabel
Schleife
Keine oder nur
schwache Anzeige
Anzeige einer Feldstärke
am Schleifenende
1. Möglichkeit
Bei diesem Verfahren wird eine Buchse des LOCAT E 110-Senders über eine
externe 9 V-Batterie mit Spannung versorgt. Am jeweils anderen Pol des
Senders und der Batterie wird ein zweiadriges Kabel angeschlossen, das am
Ende eine Schleife bildet. Dieses Kabel wird bis zum Anschlag in das zu
prüfende Rohr eingeschoben. Beim Entlangfahren am Rohr zeigt der LOCATEmpfänger wegen der gegenläufigen Ströme nur eine geringe oder gar keine
Feldstärke an. Am Schleifenende jedoch, also an der Stelle der RohrVerstopfung, steigt die Feldstärke sprunghaft an.
68
69
SENDER
E110
Mittelleiter
Schirmung
9V
Starke Anzeige
entlang des
Rohres
Schwache
Anzeige
Keine
Anzeige
2. Möglichkeit
Beim zweiten Verfahren wird ein geschirmtes Kabel, z.B. Koax-Antennenkabel,
in das Rohr eingeschoben. Schirmung und Mittelleiter des Kabels werden an
die 9 V-Batterie, bzw. den LOCAT E 110-Sender angeschlossen, am Kabelende
ist die Schirmung mit dem Mittelleiter verbunden.
Durch die Abschirmung heben sich die gegenläufigen Magnetfelder nicht auf
und man kann den Verlauf des Rohres mit dem LOCAT-Empfänger gut
verfolgen. Am Kabelende verringert sich die Signalstärke plötzlich, d.h. die
Verstopfung des Rohres ist gefunden.
PROBLEMFÄLLE
SENDER
Nulleiter
Phase
Leckstrom
Starke Anzeige
Ebenfalls
starke Anzeige
Stromzähler
NetzanschlußTrafo
Mit dem LOCAT-System können auch Fehlerströme zwischen Phase und Erde
erkannt werden. Wenn ein solcher Fehlerstrom über einen hohen Widerstand
abfließt, löst er den Fehlerstromschutzschalter nicht notwendigerweise aus.
Allerdings sind Falschinterpretationen möglich!
Bei einer 220 V-Elektroinstallation fließt über einen 100 kW -Widerstand ein
Fehlerstrom von 2,2 mA, der vom FI-Schutzschalter nicht erkannt wird.
In diesem Fall fließt der 3500 Hz-Strom über den Phasenleiter und gelangt über
die Netz-Erdung wieder zurück. Ein Teil fließt jedoch über die Fehlerstelle zur
Erde ab. Kommt man mit dem LOCAT-Empfänger in die Nähe der Fehlerstelle,
kann der Eindruck entstehen, der Leiter verfolge hier einen anderen Weg,
während er in Wirklichkeit zum Zähler weiterführt.
Schlußfolgerung:
Trotz der intelligenten Konzeption des LOCAT-Systems muß der Benutzer
mitdenken, um die Anzeigen richtig interpretieren zu können.
70
ALLGEMEINE TECHNISCHE DATEN
SENDER LOCAT E 110 und E 220
Stromversorgung
- LOCAT E 110: von 9 V bis 140 V
und ~
- LOCAT E 220 : von 180 V bis 300 V
von 180 V bis 440 V ~
Der LOCAT-Sender E 110 läßt sich nicht nur durch das Netz, sondern auch mit
einer externen 9V-Blockbatterie betreiben (die Anlage darf dabei nicht unter
Spannung stehen!). Es muß eine Alkali-Batterie verwendet werden, da nur sie
entsprechende Stromstärken abgeben kann (250 mA-Impulse).
- Betriebsfrequenz : 50 bis 60 Hz
- Mittlere Stromaufnahme: 5 mA
- Spitzenstromaufnahme: 250 mA während der leitenden Zeit von 10 ms (10 ms
lange Impulse mit 3500 Hz alle 320 ms).
Elektrische Sicherheit
- Isolationsklasse E 110 und E 220: Klasse 2 gem. IEC 348 ( )
- Spannungsfestigkeit: 3 kV beim E 110
4 kV beim E 220
- Transiente Störgrößen (gem. IEC 801-4): Sicherheitsklasse 3 (2 kV)
- Stoßspannungsfestigkeit (gem. IEC 225-4): Sicherheitsklasse 5 kV, 2 Joule
Schutzeinrichtungen
Bei Überspannungen spricht die eingebaute Sicherung an:
- ab 1,5 kV beim Sender E 110
- ab 2 kV beim Sender E 220
EMPFÄNGER LOCAT R
- Stromversorgung: 8 V ± 1V (durch 9V-Alkali-Batterie)
- Verbrauch: ca. 20 mA
Hinweis: Schwankungen der Klimabedingungen oder der Strom-versorgung
(innerhalb des Benutzungs-bereichs) haben nur geringen Einfluß auf die
Anzeige-empfindlichkeit. Bei 9 bis 30 V~ Stromversorgung des Senders E 110
treten Empfindlichkeitseinbußen auf.
Klimabedingungen
- Bezugstemperatur : +23° ± 3°C
- Benutzungstemperatur : 0° bis +50°C
- Lagertemperatur : -20° bis +50°C
- Rel. Luftfeuchte : 20% bis 70% bei max. +50°C
45
215
Gehäuse
- Abmessungen und Gewicht: 215 x 55 x 45 mm - 250 g
- Schutzklasse (gem. IEC 529): Empfänger IP10
Sender IP 40
- Max. Fallhöhe (gem. IEC 68-2-32): 1 m
55
WARTUNG
Verwenden Sie für Reparaturen ausschlieblich die angegebenen
Ersatzteile. Der Hersteller haftet keinesfalls für Unfälle oder Schäden,
die nach Reparaturen auberhalb seines Kundendienstnetzes oder durch
nicht von ihm zugelassene Reparaturbetriebe entstanden sind.
71
ERSETZEN DER BATTERIE
Die 9V-Batterie im Empfänger ist auf der Gehäuse-rückseite zugänglich.
Schraube lösen und Deckel auf der Gehäuserückseite abnehmen.
Die 9V-Batterie ist mit einem Stecker verpolungssicher angeschlossen.
ERSETZEN DER SICHERUNG
Zum Ersetzen der Sicherung (0,1 A superflink, mit hohem Trennvermögen) die
beiden Schrauben am Gehäuse lösen.
Hinweis: Eine der beiden Schrauben befindet sich unter dem Aufkleber. Zum
Lösen der Schraube Aufkleber vorsichtig ablösen.
ACHTUNG:
Ausschließlich Sicherungen des Typs 0,1 A, superflink, mit hohem
Trennvermögen, 380 V, 5 x 20 mm einsetzen.
MEb
bGERÄT-ÜBERPRÜFUNG
b- und Prüfgeräten, ist eine Überprüfung in regelmäb
bigen
Wie bei allen Meb
Abständen erforderlich.
Fur eine Überprüfung und Kalibrierung Ihrer Geräte, wenden Sie sich an die
Niederlassung Ihres Landes.
REPARATUREN
Reparaturen während oder auberhalb des Garantiezeitraumes : senden Sie
die Geräte zu Ihrem Wiederverkäufer.
BESTELLANGABEN
LOCAT 110 .................................................................... 1416.17Z
Komplettsystem mit Empfänger LOCAT R, Sender E 110,
Kabelsatz 208B/229 (1), 9V-Alkali-Batterie und Bedienungsanleitung
LOCAT 220 .................................................................... 1416.15Z
Komplettsystem mit Empfänger LOCAT R, Sender E 220,
Kabelsatz 208B/229 (1), 9V-Alkali-Batterie und Bedienungsanleitung
Zubehör und Ersatzteile
- LOCAT R (nur Empfänger) ..............................................
- LOCAT E 110 (nur Sender) ..............................................
- LOCAT E 220 (nur Sender) ..............................................
- Kabelsatz 208B/229 (1) ....................................................
- Kabelsatz 231A/231B (2) ..................................................
- 10 Sicherungen 0,1 A, 380 V, superflink, 5 x 20 mm ...............
- Tragetasche Nr. 10 (32x25x5,5 cm) ...................................
- 9V-Alkali-Batterie ..........................................................
(1)
1416.04
1416.18
1416.16
2950.19
2950.18
2975.14
2980.04
1006.20
Serienmäßig mitgeliefert:
- 1 Kabel rot Nr. 208 B mit Tastspitze und Sicherheitsstecker Ø 4 mm
- 1 Kabel schwarz Nr. 229 B mit Sicherheitsstecker Ø 4 mm und grüner
Krokodilklemme (10 mm Öffnung)
(2)
Auf Wunsch lieferbar:
- 2 Kabel rot/schwarz mit Tastspitze und Sicherheitsstecker Ø 4 mm
- 2 Kabelclips rot/schwarz
72
07-99
Code 906 120 319 - Ed. 3
Deutschland : CA GmbH - Strabburger Str. 34 - 77694 Kehl / Rhein - Tel : (07851) 99 26-0 - Fax : (07851) 99 26-0
España : CA Iberica - C/Roger de Flor N° 293 - 08025 Barcelona - Tel : (93) 459 08 11 - Fax : (93) 459 14 43
Italia : AMRA CA SpA - via Torricelli, 22 - 20035 Lissone (MI) - Tel : (039) 2 45 75 45 - Fax : (039) 48 15 61
Österreich : CA Ges.m.b.H - Slamastrasse 29 / 3 - 1230 Wien - Tel : (1) 61 61 9 61 - Fax : (1) 61 61 9 61 61
Schweiz : CA AG - Einsiedlerstrasse 535 - 8810 Horgen - Tel : (01) 727 75 55 - Fax : (01) 727 75 56
UK : CA UK Ltd - Waldeck House - Waldeck road - Maidenhead SL6 8br - Tel : (01628) 788 888 - Fax : (01628) 628 099
USA : CA Inc - 99 Chauncy Street - Boston MA 02111 - Tel : (617) 451 0227 - Fax : (617) 423 2952
USA : CA Inc - 15 Faraday Drive - Dover NH 03820 - Tel : (603) 749 6434 - Fax : (603) 742 2346
190, rue Championnet - 75876 PARIS Cedex 18 - FRANCE
Tél. (33) 01 44 85 44 85 73
- Fax (33) 01 46 27 73 89