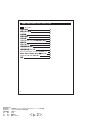
1
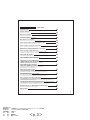
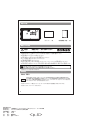
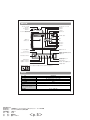
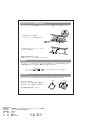
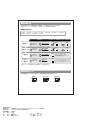
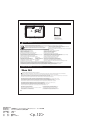
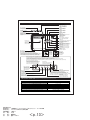
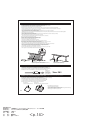
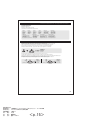
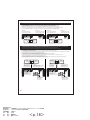
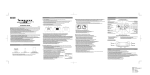
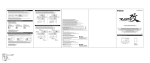
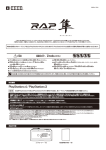
Officially licensed for Xbox 360®
対応スティック / ARCADE STICK / Manette arcade / Arcade Stick
/ Comando stile Arcade / Palanca de mando de acción
取扱説明書
Instruction Manual / Mode d'emploi
/ Bedienungsanleitung / Manuale di istruzioni / Manual de Instrucciones
このたびは、
弊社の『デッド オア アライブ 5 対応スティック for Xbox 360』
をお買い上げいただき誠にありがとうございます。
ご使用になる前に、この取扱説明書をよくお読みのうえ、本品を安全にご使用ください。
お読みになったあとは、
いつでも見られるように、
大切に保管してください。
Thank you for purchasing this product. Before using this product please read the instructions carefully.
After reading the instruction sheet, please keep it with you for reference.
/ Merci d favoir acheter ce produit. Lisez attentivement les instructions avant d'utiliser ce produit.
Après avoir lu le feuillet d'instructions, conservez le bien pour future référence.
/ Vielen Dank, dass Sie sich fur dieses Produkt entschieden haben. Bevor Sie dieses Produkt verwenden, lesen Sie bitte die Kurzanleitung sorgfältig durch.
Heben Sie die Kurzanleitung zu Ihrer Information auf.
/ Grazie per aver scelto questo prodotto. Prima di utilizzare questo prodotto, leggere attentamente le istruzioni.
Una volta lette le istruzioni, conservarle per riferimenti futuri.
/ Te agradecemos la compra de este producto. Antes de usar este producto, por favor lea detenidamente las instrucciones.
Después de leer la hoja de instrucciones, por favor, guárdelo para futuras referencias.
© TECMO KOEI GAMES CO., LTD. All rights reserved.
株式会社ホリ
機 種 名 : 1709#00 デッドオアアライブ5スティック for Xbox360
部 品 名 : InstructionManual(DOA5)360
部品図番 : 1709-11
印 刷 : 1C(K)
材 質 : 書紙80g
作 成 : 畠中 12.6.11
<p.1>
目次 / Index / Index / Index / Indice / Índice
JP ・・・4p∼10p
本品の内容
4
使用上のご注意
4
対応機種
4
各部の名称
5
主な仕様
5
コントローラー ケーブルの取り出し方法
6
接続方法
6
ボタンカバー
6
連射機能設定方法
7
連射速度切替スイッチ
7
左スティック ボタン/右スティック ボタン・LB/RB切替スイッチ
8
BACK ボタン/START ボタン切替スイッチ
8
クイック リリース コネクター
9
保証
10
2
株式会社ホリ
機 種 名 : 1709#00 デッドオアアライブ5スティック for Xbox360
部 品 名 : InstructionManual(DOA5)360
部品図番 : 1709-11
印 刷 : 1C(K)
材 質 : 書紙80g
作 成 : 畠中 12.6.11
<p.2>
EN FR DE
IT
ES ・・・12p∼20p
Included / Inclus
12
Caution / Attention
12
/ Plattform / Piattaforma / Plataforma
Platform / Plateforme
12
Layout / Description
13
Main Features / Points forts
13
How to extract cable / Comment extraire le câble
14
How to connect / Comment se connecter
14
Button cover / couvercle de protection du bouton
14
How to set Turbo / Turbo hold mode
15
Turbo Mode / Mode Turbo
15
Turbo Hold Mode / Mode Turbo Hold
16
Turbo Mode / Turbo Hold Mode OFF
/ ARRET du Mode Turbo / Mode Turbo Hold
16
Turbo Mode OFF (For all buttons)
/ Mode Turbo ARRET (Pour toutes les touches)
17
How to change Turbo Speed
/ Changer la vitesse du turbo
17
/ Enthält / Contenuto / Contenido
/ Achtung / Avvertenza / Aviso
/ Bezeichnung der Teile / Nomi dei componenti / Diseño
/ Hauptmerkmale / Caratteristiche principali / Principales Características
/ Entnahme des Kabels / Estrazione del cavo / Cómo extraer el cable
/ Wie wird eingeschaltet / Cómo conectarlo / Come connettersi
/ Knopfabdeckung / Cover per i pulsanti / Cubierta de botón
/ Comment régler le mode Turbo / Verrou Turbo
/ Come impostare la modalità Turbo / Turbo hold
/ Turbo / Turbo-Hold Modus einschalten
/ Cómo configurar el modo Turbo / Control Turbo
/ Turbomodus / Modalità Turbo / Modo Turbo
/ Turbo Halten Modus / Modalità Turbo Hold / Modo Bloqueo de Turbo
/ Turbomodus / Turbo Halten Modus AUS / Modalità Turbo / Turbo Hold OFF
/ Modo Turbo / Modo bloqueo de Turbo APAGADO (OFF)
/ Turbomodus AUS (Für alle Tasten) / Modalità Turbo OFF (Per tutti i pulsanti)
/ Modo Turbo APAGADO (OFF) (Para todos los botones)
/ Ändern der Turbostufen / Modificare la velocità Turbo / Cómo cambiar la Velocidad de Turbo
Stick control toggle switch
/ Interrupteur à bascule du manche de contrôle
17
/ Hin-und Herschaltung des Schalthebels (Joystick)
/ Interruptor a leva para control del joystick / Interruttore a bascula dello stick di controllo.
Button Configuration Switch (BACK, START button)
/ Commutateur Boutons de Configuration (Bouton BACK, START)
18
/ Schalter für Button-Konfiguration (BACK, START-Taste) / Selettore per la configurazione del pulsante (Pulsante BACK, START)
/ Interruptor de configuración de botones (BACK, START botón)
Button Configuration Switch (Left stick/Right stick, Left bumper/Right bumper)
/ Commutateur Boutons de Configuration (Gauche stick/Droit stick, Gauche gâchette haute/ Droite gâchette haute)
/ Schalter für Button-Konfiguration (Links Schalter/Rechts Schalter, Links Bumper/ Rechts Bumper)
/ Selettore per la configurazione del pulsante (Sinistro grilletto/ Destro grilletto, Sinistro pulsante dorsale/ Destro pulsante dorsale)
/ Interruptor de configuración de botones (Izquierdo gatillo/ Derecho gatillo, Izquierdo botón superior frontal/ Derecho botón superior frontal)
The Inline Release / Le Dispositif de sécurité du câble
/ Der Stolperschutz / Antistrappo / Desconexión de seguridad
18
19
20
Others / Autres / Ander / Altri / Otros
3
株式会社ホリ
機 種 名 : 1709#00 デッドオアアライブ5スティック for Xbox360
部 品 名 : InstructionManual(DOA5)360
部品図番 : 1709-11
印 刷 : 1C(K)
材 質 : 書紙80g
作 成 : 畠中 12.6.11
<p.3>
本品の内容
コントローラー本体・
・・1台
ステッカー・
・
・1枚
取扱説明書
(本書)
・
・
・1部
使用上のご注意
ほ
ちゅう い
ご しゃ かた かなら よ
保護者の方へ 必ずお読みください
ご注意
ちい ぶ ひん
さい み まん
こ さま
ぜったい
あた
● 小さな部品がありますので3歳未満のお子様には絶対に与えないでください。
にゅうようじ
て
とど
お
まんいち の
こ
ば あい
い
し
そうだん
● 乳幼児の手の届くところに置かないでください。万一飲み込んだ場合は、
すぐに医師に相談してください。
ほんぴん
しっ け
ほんぴん
もの
おお
お
● 本品を湿気やホコリの多いところに置かないでください。
あ
らっ か
つよ
しょうげき
あた
● 本品に物を当てたり、落下させるような強い衝撃を与えないでください。
ぶ
つよ
ま
ひ
ぱ
● ケーブル部を強く曲げたり引っ張ったりしないでください。
ぶんかい
しゅうり
かいぞう
ぜったい
● 分解や修理、改造は絶対にしないでください。
て
い
さい
かわ
やわ
ぬの
し よう
やくひん
し よう
● お手入れの際には、乾いた柔らかい布を使用してください。
また、ベンジン、
シンナーなどの薬品は使用しないでください。
ほんらい
もくてき い がい
し よう
ほんらい
もくてき い がい
し よう
ば あい
じ こ
そんがい
たい
へいしゃ
いっさい
せきにん
お
● 本来の目的以外には使用しないでください。本来の目的以外に使用した場合の事故や損害に対し、弊社は一切その責任を負いません。
本品は重いため足の上などに落とすと大けがの原因となることがあります。
また、ご使用にならない時は、
小さなお子様の手の届かない所に保管してください。
※付属のステッカーは、貼りなおしができません。
対応機種
Xbox 360
重 要
本品をご使用になる前に、本品と Xbox 360 本体の取扱説明書(および関連する取扱説明書)の安全
および健康に関する重要事項を必ずご確認ください。
すべての取扱説明書は、今後参照できるように保管
してください。
最新の取扱説明書を入手するには、http://www.xbox.com/support/ にアクセスするか、
Xbox カスタマーサポートまでお問い合わせください。
※本品はアナログスティック機能、
左トリガー、
右トリガーのアナログ操作および振動機能には対応しておりません。
※本品はワイヤレス コントローラーではありません。
4
株式会社ホリ
機 種 名 : 1709#00 デッドオアアライブ5スティック for Xbox360
部 品 名 : InstructionManual(DOA5)360
部品図番 : 1709-11
印 刷 : 1C(K)
材 質 : 書紙80g
作 成 : 畠中 12.6.11
<p.4>
各部の名称
クイック リリース
コネクター
コントローラー ケーブル
B ボタン
X ボタン
コントローラー
コネクター
Y ボタン
コントローラー ケーブル
収納ボックス
ボタンカバー
START ボタン
LB
方向パッド
(スティック)
RB
右トリガー
左トリガー
A ボタン
へッドセット端子※
連射インジケータ
リング ライト
左スティック ボタン/
右スティック ボタン・LB/RB
切替スイッチ
(4分割されており、
それぞれをクアドラントと呼びます)
Xbox® ガイド ボタン
連射速度切替スイッチ
BACK ボタン
左スティック ボタン
BACK ボタン/
START ボタン切替スイッチ
右スティック ボタン
TURBO ボタン
※旧形状のXbox 360 へッドセット
(別売り)ではご使用になれません。あらかじめご了承ください。
使用可
使用不可
主な仕様
全 長
奥 行 き
高 さ
質 量
ケーブル長
方向パッド
(スティック)
ボタン
A ボタン / B ボタン / X ボタン / Y ボタン
RB / LB / 右トリガー / 左トリガー
約430mm
約270mm
約120mm(スティックレバー含む)
約2.9kg
約3m
JLF-TP-8YT-SK(三和電子株式会社製)
OBSF-30(三和電子株式会社製)
5・12・20回/秒
連射速度
5
株式会社ホリ
機 種 名 : 1709#00 デッドオアアライブ5スティック for Xbox360
部 品 名 : InstructionManual(DOA5)360
部品図番 : 1709-11
印 刷 : 1C(K)
材 質 : 書紙80g
作 成 : 畠中 12.6.11
<p.5>
コントローラー ケーブルの取り出し方法
コントローラー ケーブルは本品背面のコントローラー ケーブル収納ボックスに収納されています。
ツマミ
①ツマミを押しながらフタを開け、
コントローラー ケーブルを引き出します。
フタ
②フタの通し穴にコントローラー ケーブルを
通して、
フタを閉じます。
通し穴
収納時は逆の順序で収納してください。
※開閉時にコントローラー ケーブルをはさまないようにご注意ください。
接続方法
コントローラー ケーブルのコネクターは、Xbox 360 本体のコントローラー端子に接続してください。
※接続する際はコネクターの方向をよく確認してから差し込んでください。
Xbox 360 本体のコントローラー端子へ
ボタンカバー
ボタンカバーはゲームプレイ中に誤ってSTART ボタンを押すことを防ぐためのものです。
ボタンカバーの開けかた
①ボタンカバーのくぼみ部分を押して開きます。
②開いたボタンカバーを隙間にしまい込みます。
閉じる時は逆の順序で閉じてください。
6
株式会社ホリ
機 種 名 : 1709#00 デッドオアアライブ5スティック for Xbox360
部 品 名 : InstructionManual(DOA5)360
部品図番 : 1709-11
印 刷 : 1C(K)
材 質 : 書紙80g
作 成 : 畠中 12.6.11
<p.6>
①押す
②しまい込む
連射機能設定方法
本品は下記のボタンに連射機能および連射ホールド機能を設定することができます。
[連射ホールド]:ボタンのON、
OFFに関わらず、
常に連射入力された状態を保持する機能です。
連射設定可能ボタン
A ボタン / B ボタン / X ボタン / Y ボタン / RB / LB / 右トリガー / 左トリガー
右スティック ボタン / 左スティック ボタン
設定方法
連射モード
各モードでの連射インジケータの状態
TURBO ボタン
連射モードにしたい
を押しながら
ボタンを押す
ボタンON
TURBO
連射ホールド
TURBO ボタン
連射モード状態の
を押しながら
ボタンを押す
連射OFF
TURBO ボタン
連射ホールド状態の
を押しながら
ボタンを押す
TURBO ボタン
BACK ボタン
を押しながら
を押す
TURBO
点 滅
点 灯
消 灯
TURBO
全ボタン
連射OFF
ボタンOFF
ボタンON
TURBO
点 灯
点 滅
消 灯
ボタンOFF
※ある特定のボタンを連射OFFの状態にしても、
連射インジケータが消灯しない時は、
他のボタンが連射モードまたは連射ホールドの
設定になっている状態です。
※どのボタンを連射モードまたは連射ホールドに設定
したか分からなくなった場合は、
一度全てのボタンを
連射OFFの状態にし、
最初から設定をし直してください。
BACK
※連射インジケータの点滅は設定された連射速度に応じた速度で点滅します。
連射速度切替スイッチ
連射速度切替スイッチを切り替えることで連射速度を3段階に調節できます。
約5回/秒
5
12 20
約12回/秒
5
12 20
約20回/秒
5
12 20
7
株式会社ホリ
機 種 名 : 1709#00 デッドオアアライブ5スティック for Xbox360
部 品 名 : InstructionManual(DOA5)360
部品図番 : 1709-11
印 刷 : 1C(K)
材 質 : 書紙80g
作 成 : 畠中 12.6.11
<p.7>
左スティック ボタン/右スティック ボタン・LB/RB切替スイッチ
左スティック ボタン/右スティック ボタン・LB/RB切替スイッチを切り替えることで、
左スティック ボタン/右スティック ボタンとLB/RBの配置を切り替えることができます。
LSB /RSB
LB/RB
LB/RB
LSB/ RSB
右スティック
ボタン
LSB/RSB
LB /RB
LB
左スティック
ボタン
RB
LB /RB
LSB/ RSB
左スティック ボタン
LB
右スティック ボタン
RB
※製品には左スティック ボタンは“LSB”、
右スティック ボタンは
“RSB”と表記されています。
BACK ボタン/START ボタン切替スイッチ
BACK ボタン/START ボタン切替スイッチを切り替えることで、BACK ボタンとSTART ボタンの
配置を切り替えることができます。
BACK ボタン
BACK
START
START ボタン
START
BACK
START ボタン
BACK
START
※誤操作を防ぐため、ご使用前にボタン切り替えの状態を確認してください。
8
株式会社ホリ
機 種 名 : 1709#00 デッドオアアライブ5スティック for Xbox360
部 品 名 : InstructionManual(DOA5)360
部品図番 : 1709-11
印 刷 : 1C(K)
材 質 : 書紙80g
作 成 : 畠中 12.6.11
<p.8>
BACK ボタン
START
BACK
クイック リリース コネクター
コントローラー ケーブルには、
クイック リリース コネクターが装備されています。
クイック リリース コネクターは、
ケーブルが引っ張られたとき、
Xbox 360 本体またはコンピューター
の落下をできるだけ防ぐためのものです。
Xbox 360 本体またはコンピューターが損傷する危険性を減
らすには、
コントローラーとクイック リリース コネクターを適切に使用することが重要です。
通常、
コントローラーの接続、
取り外しは、
クイック リリース コネクターではなくコントローラー コネク
ターで行ってください。
クイック リリース コネクターが外れた場合には、
両コネクタの印を合わせてはめ
るだけで再接続できます。
クイック リリース コネクターがきちんと接続されていないと、
コントローラー
は動作しません。
警告
クイック リリース コネクターは、
テープで留めたり接着剤で固定したりしないでください。
クイック リリース コネクターにより、
Xbox 360 本体が引っ張られて落下する危険性は減りますが、
まったくなくなるわけではありません。
危険性をさらに減らすには、
次の点に留意してください。
・ Xbox 360 本体が動くほど強くコントローラーやコントローラー ケーブルを引っ張ることは止めてください。
・ コントローラー ケーブルが互いにからみ合わないようにしてください。
9
株式会社ホリ
機 種 名 : 1709#00 デッドオアアライブ5スティック for Xbox360
部 品 名 : InstructionManual(DOA5)360
部品図番 : 1709-11
印 刷 : 1C(K)
材 質 : 書紙80g
作 成 : 畠中 12.6.11
<p.9>
保証書: 保証規定については本面記載の「保証規定」をご覧ください
品名: デッド オア アライブ 5 対応スティック for Xbox 360
お買い上げ日
(ご到着日)
型番:HX3-82
保証期間:1年
20 年 月 日
●お客様へ この保証書は大切に保管し、
お買い上げ、ご到着後直ちに、お名前、
ご住所、電話番号を明確にご記入ください。
お名前:
TEL:
ご住所:
●ご販売店様へ お買い上げ日、貴店名、住所、電話番号を記入の上、お客様へお渡しください。
販売店:(記入のない場合には保証対象となりません)(WEB販売の場合、記入の必要はありません)
保証規定:
【保証に関して】
同梱の
「デッド オア アライブ 5 対応スティック for Xbox 360」に関して、
お買い上げ日から1年以内に故障した場合には、
弊社にて無償で修理いたします。
万一故障が発生した場合は、弊社にご相談ください。
※保証書は日本国内においてのみ有効です。
This warranty is valid only in Japan.
※保証書は再発行いたしませんので紛失しないよう大切に保管してください。
※保証期間内でも、下記1.∼9.の場合は有償修理となります。
1.保証書のご提示が無い場合。
2.保証書にお買い上げ日、
販売店名が記載されていない場合、
または納品書
(領収書)
のご提示がない場合、
または字句を書き換えられた場合。
3.商品の取り扱い説明に表示された注意事項に反した誤用、乱用及び取扱不注意による故障。
4.火災、地震、風水害、
事故、
災害などによる故障及び破損。
5.改造、不当な修理及び異常電圧に起因する事故。
6.お買い上げ後の移動、輸送、落下などによる故障及び破損。
7.接続している他の機器に起因する故障。
8.弊社所定の最低限度のご使用条件を満たさない環境でご使用になられた結果の損傷。
9.譲渡・転売・中古販売・オークションなどにより入手された場合。
【修理をお断りさせていただく場合】
以下の場合は有償・無償問わず、
修理をお断りさせていただきます。
・分解または改造された場合 ・海外でご購入された商品 ・海外でのご使用が原因で損傷した商品 ・他社の商品
【発送に関して】
修理依頼品の発送は以下の手順で発送願います。
<ご購入から3ヶ月以内の場合 >
修理依頼品をお送りする場合は、外箱に入れて適切に梱包の上、運賃着払いで弊社へお送りください。
<ご購入から3ヶ月を過ぎた場合> 修理依頼品をお送りする場合は、
外箱に入れて適切に梱包の上、運賃元払いで弊社へお送りください。
※輸送中の事故、紛失につきましては保証できませんのでご了承願います。
注意事項
<店頭販売の場合> ● 保証書は所定事項を記入して効力を発するものです。お買い上げ日、販売店名が記入されていることをご確認ください。
記入のない場合は、お買い上げの販売店にお申し出ください。
<WEB販売の場合>● 保証書は所定事項を記入して効力を発するものです。ご到着後、
必ずご記入ください。
● ご到着日はWEB販売店から商品が届けられた日で、それ以外の所から入手した日ではありません。
● 保証書は上記の保証規定にもとづき無償修理をお約束するためのもので、これによりお客様の法律上の権利を制限するものではありません。
● 保証期間経過後の修理につきましては、
お買い上げ販売店または、弊社にご相談ください。
● イラストと本品は多少異なる場合があります。
● 本品の仕様および外観は改良のため予告なく変更することがありますので、ご了承ください。
● 本製品は米国 Microsoft Corporation のライセンスを受けて製造されています。
Microsoft、Kinect、
Xbox、
Xbox LIVE、Xbox 360、
Xbox 関連ロゴは米国 Microsoft Corporation および/またはその関連会社の商標です。
●“ ”
および“ ”は株式会社ホリの登録商標です。
10
株式会社ホリ
機 種 名 : 1709#00 デッドオアアライブ5スティック for Xbox360
部 品 名 : InstructionManual(DOA5)360
部品図番 : 1709-11
印 刷 : 1C(K)
材 質 : 書紙80g
作 成 : 畠中 12.6.11
<p.10>
株式会社ホリ
〒224-0054
横浜市都筑区佐江戸町640
お問い合わせ先 TEL:045-934-6787
h
t
tp://www.hor
i.j
p
株式会社ホリ
機 種 名 : 1709#00 デッドオアアライブ5スティック for Xbox360
部 品 名 : InstructionManual(DOA5)360
部品図番 : 1709-11
印 刷 : 1C(K)
材 質 : 書紙80g
作 成 : 畠中 12.6.11
<p.11>印刷の無い空白のページです。
Included / Inclus / Enthält / Contenuto / Contenido
Instruction Manual x 1
/ Mode d'emploi x 1
/ Bedienungsanleitung x 1
/ Manuale di istruzioni x 1
/ Manual de Instrucciones x 1
Controller x 1 / Manette x 1
/ Controller x 1 / Controller x 1 / Mando x 1
Caution / Attention / Achtung / Avvertenza / Aviso
Warning. Not suitable for children under 36 months. Small parts.
/ Avertissement. Ne convient pas aux enfants de moins de 36 mois. Contient des petites pièces.
/ Warnung. Nicht geeignet für Kinder unter 36 Monaten. Enthält kleine Teile.
/ Avvertenza: non adatto ai bambini di età inferiore a 36 mesi. Contiene piccole parti.
/ Advertencia. No apto para niños menores de 36 meses. Contiene piezas pequeñas.
Please read carefully before using this product.
/ Lisez ceci attentivement avant d’utiliser ce produit.
/ Bitte lesen Sie diese Instruktionen, bevor Sie das Produkt verwenden.
/ Leggere attentamente prima dell’utilizzo.
/ Por favor, lea detenidamente las instrucciones antes de usar este producto.
Keep this product away from children.
/ Maintenez ce produit à l’écart des enfants.
/ Halten Sie es von Kindern fern.
/ Mantenere lontano dalla portata dei bambini.
/ Mantenga este producto fuera del alcance de los niños.
Do not drop or throw this controller.
/ Ne pas faire tomber ou jeter ce boîtier de commande.
/ Arcade Stick nicht fallen lassen oder werfen.
/ Non lanciare o far cadere il comando.
/ No deje caer o lance el controlador.
Do not pull roughly or bend the cable of the controller.
/ Ne pas tirer fortement sur le câble du boîtier de commande et ne pas le plier.
/ Arcade Stick vorsichtig behandeln und Kabel nicht knicken.
/ Non tirare o piegare con forza il cavo del comando.
/ No tire del cable del controlador con brusquedad ni lo doble.
Keep the controller away from dusty or humid areas.
/ Maintenir le boîtier de commande à l’écart de toutes zones poussiéreuses ou humides.
/ Arcade Stick vor Staub und Feuchtigkeit geschützt aufbewahren.
/ Tenere lontano da polvere e ambienti saturi di umidità.
/ Manténgalo alejado de zonas húmedas o con polvo.
Do not use on unstable surface.
/ Ne pas utiliser sur une surface instable.
/ Nicht auf instabilem Untergrund verwenden.
/ Non appoggiare il dispositivo su superfici instabili.
/ No utilice sobre una superficie inestable.
Do not leave in a hot environment for a long time.
/ Ne laissez pas ce produit exposé à de hautes températures.
/ Lassen Sie es nicht für längere Zeit in heißer Umgebung.
/ Non lasciare per lungo tempo il prodotto in un ambiente caldo.
/ No deje este producto en un entorno caliente durante un periodo largo de tiempo.
Do not get it wet.
/ Protéger de toute humidité.
/ Vor Nässe schützen.
/ Non bagnare.
/ No lo moje.
If product needs cleaning, use only a soft dry cloth. Do not use any chemical agents like benzine or thinner.
/ Si ce produit requiert un nettoyage, nettoyez-le seulement en utilisant un chiffon sec. N’utilisez aucun produit chimique de type benzène ou diluants.
/ Reinigen Sie es nur mit einem weichen Tuch. Verwenden Sie keine chemischen Mittel, Benzin oder Verdünner.
/ Se il prodotto ha bisogno di essere pulito, utilizzare solamente un panno asciutto morbido. Non utilizzare agenti chimici quali benzina o diluenti.
/ Si desea limpiar este aparato, use sólo un paño suave y seco. No use ningún agente químico tales como gasolina o disolvente.
Platform / Plateforme / Plattform / Piattaforma / Plataforma
Xbox 360
Important! / Important! / Achtung! / Importante! / ¡Importante!
Before using the Xbox 360 with this product, read the Xbox 360 instruction manual for safety, health, and other information regarding the use of the Xbox 360.
/ Veuillez lire la section "Avis important pour la santé" dans le manuel de configuration d'installation de la Xbox 360 avant utilisation.
/ Bitte lesen Sie auch die Hinweise und Gesundheitsinformationen im Handbuch der Xbox 360 Konsole.
/ Prima di utilizzare il prodotto, leggere attentamente la sezione "Avvertenze per la Salute e la Sicurezza" presente nel menù di configurazione del sistema Xbox 360.
/ Por favor, antes de usar lea la sección "Advertencias de salud importantes" en el Manual de la Consola Xbox 360.
This product does not support analog stick functions and analog operations of the left & right triggers.
/ Ce produit ne prend pas en charge les fonctions de manette analogique et les opérations analogiques des gâchettes droite et gauche.
/ Dieses Produkt unterstützt keine analoge Steuerknüppelfunktionen und auch keine analogen Betätigungen für linke und rechte Schalter.
/ Questo prodotto non supporta le funzioni dello stick analogico e le operazioni analogiche dei grilletti destro e sinistro.
/ Este producto no soporta las funciones del stick analogico y operaciones analogicas de los gatillos derechos e izquierdos.
The expansion port does not support some accessories (i.e. Xbox 360 Chatpad, etc.).
/ Le port d'extension n'est pas compatible avec certains accessoires (par exemple, le Clavier Messenger Xbox 360, etc.).
/ Der Erweiterungsanschluss unterstützt bestimmte Zubehörteile nicht (z.B. Xbox 360 Chatpad usw.).
/ La porta di espansione non supporta alcuni accessori (es. Chatpad Xbox 360, ecc.).
/ El puerto de expansión no soporta algunos accesorios (por ejemplo, Chatpad Xbox 360, etc.).
This product is not a wireless controller.
/ Ce produit n'est pas une manette sans fil.
/ Bei diesem Produkt handelt es sich nicht um einen Wireless Controller.
/ Questo prodotto non è un controller wireless.
/ Este producto no es un mando inalámbrico.
This product does not have vibration capability.
/ Ce produit ne dispose pas de la fonction de vibration.
/ Das Produkt unterstützt keine Vibration - Funktion.
/ Questo prodotto non possiede la funzione di vibrazione.
/ Este producto no tiene capacidad de vibración.
12
株式会社ホリ
機 種 名 : 1709#00 デッドオアアライブ5スティック for Xbox360
部 品 名 : InstructionManual(DOA5)360
部品図番 : 1709-11
印 刷 : 1C(K)
材 質 : 書紙80g
作 成 : 畠中 12.6.11
<p.12>
Layout / Description / Bezeichnung der Teile / Nomi dei componenti / Diseño
Controller cable
/ Câble du contrôleur
/ Kabel für die Steuerung
/ Cavo unità di commando
/ Cable del controlador
B button
/ Touche B / B-Taste
/ Pulsante B / Botón B
X button
/ Touche X / X-Taste
/ Pulsante X / Botón X
Y button
/ Touche Y / Y-Taste
/ Pulsante Y / Botón Y
Button cover
/ couvercle de protection du bouton
/ Knopfabdeckung
/ Cover per i pulsanti
/ Cubierta de botón
The Inline Release
/ Le Dispositif de sécurité du câble / Der Stolperschutz
/ Antistrappo / Desconexión de seguridad
Connector
/ Connecteur / Stecker
/ Connettore / Conector
Cable storage box
/ Espace de rangement du câble
/ Kabelbox zur Aufbewahrung
/ Portacavo
/ Caja de almacenamiento del cable
START button
/ Touche START / START-Taste
/ Tasto START / Botón START
Left Bumper
/ Gauche gâchette haute / Links Bumper
/ Sinistro pulsante dorsale
/ Izquierdo botón superior frontal
Right Bumper
/ Droite gâchette haute / Rechts Bumper
/ Destro grilletto / Derecho gatillo
Right Trigger
/ Droite gâchette / Rechts Schalter
/ Destro grilletto / Derecho gatillo
Left Trigger
/ Gauche gâchette / Links Schalter
/ Sinistro grilletto / Izquierdo gatillo
A button
/ Touche A / A-Taste
/ Pulsante A / Botón A
Direction Pad
/ Croix directionnelle
/ Stick
/ Pad direzionale
/ Dirección D-Pad
Expansion port *
/ port d'extension / Erweiterungsanschluss
/ porta di espansione / puerto de expansión
* Not compatible with older version Xbox 360® Headsets
/ N'est pas compatible avec l'ancienne version du Micro/casque Xbox 360.
/ Nicht mit älteren Version des Xbox 360 Headset kompatibel.
/ Non compatibile con le versioni precedenti delle cuffie Xbox 360.
/ No es compatible con la versión anterior de los auriculares Xbox 360.
Compatible
/ Compatible
/ Kompatibel
/ Compatibile
/ Compatible
Not compatible
/ Incompatible
/ Nicht kompatibel
/ Non Compatibile
/ Incompatible
Button Configuration Switch (Left stick/Right stick, Left bumper/Right bumper)
/ Commutateur Boutons de Configuration (Gauche stick/Droit stick, Gauche gâchette haute/ Droite gâchette haute)
/ Schalter für Button-Konfiguration (Links Schalter/Rechts Schalter, Links Bumper/ Rechts Bumper)
/ Selettore per la configurazione del pulsante (Sinistro grilletto/ Destro grilletto, Sinistro pulsante dorsale/ Destro pulsante dorsale)
/ Interruptor de configuración de botones (Izquierdo gatillo/ Derecho gatillo, Izquierdo botón superior frontal/ Derecho botón superior frontal)
Ring of Light (Composed of 4 quadrants)
/ Anneau de lumière (Composé de 4 quadrants)
/ Lichtkreis (bestehend aus 4 Quadranten)
/ L'anello di luce (composto da 4 quadranti)
/ Anillo de luz (compuesto de 4 cuadrantes)
Turbo Indicator
/ Indicateur Turbo / Turboanzeige
/ Spia Turbo / Indicador Turbo
Xbox® Guide button
/ Touche Xbox Guide
/ Xbox Guide-Taste
/ Pulsante Guida Xbox
/ Botón Guía Xbox
BACK button
/ Touche BACK / BACK-Taste
/ Pulsante BACK / botón BACK
Left stick button
/ Gauche stick analogique / Linke stick taste
/ Pulsante levetta sinistro / Iziquierdo botón de stick
Right stick button
/ Droit stick analogique / Rechte stick taste
/ Pulsante levetta destro / Derecho botón de stick
Turbo Switch
/ Sélecteur de Turbo / Turboregler
/ Switch Turbo / Disparo de Turbo
Button Configuration Switch (BACK, START button)
/ Commutateur Boutons de Configuration (Bouton BACK, START)
/ Schalter für Button-Konfiguration (BACK, START-Taste)
/ Selettore per la configurazione del pulsante (Pulsante BACK, START)
/ Interruptor de configuración de botones (BACK, START botón)
Turbo button
/ Touche Turbo / Turbo-Taste
/ Pulsante Turbo / Botón Turbo
Main Features / Points forts / Hauptmerkmale / Caratteristiche principali / Principales Características
Length / Longueur / Laenge / Lunghezza / Longitud
16.9 inches / 430mm
Width / Largeur / Breite / Larghezza / Anchura
10.6 inches / 270mm
*includes stick lever / manette inclue
Height / Hauteur / Hoehe / Altezza / Altura / Beinhaltet Steuerhebel / include stick di leva / Incluye palanca
Cable Length / Longueur de Cable / Kabellaenge / Lunghezza del cavo / Longitud del cable
Direction Pad / Croix directionnelle / Stick / Pad direzionale / Dirección D-Pad
Button / Bouton / Taste / Pulsante / Botón
4.7 inches / 120mm
6.4 lbs / 2.9kg
Weight / Poids / Gewicht / Peso / Peso
A button / B button / X button / Y button /
Left Trigger / Right Trigger / Left Bumper / Right Bumper
Turbo Setting / Modes Turbo / Turbostufen / Impostazioni Turbo / Posiciones de Turbo
9.8 ft / 3m
JLF-TP-8YT-SK(Sanwa)
OBSF-30(Sanwa)
5・12・20 times/second / fois/seconde
/ Mal/Sekunde / volte/seconde / veces/segundo
13
株式会社ホリ
機 種 名 : 1709#00 デッドオアアライブ5スティック for Xbox360
部 品 名 : InstructionManual(DOA5)360
部品図番 : 1709-11
印 刷 : 1C(K)
材 質 : 書紙80g
作 成 : 畠中 12.6.11
<p.13>
How to extract cable / Comment extraire le câble / Entnahme des Kabels / Estrazione del cavo / Cómo extraer el cable
The controller cable is stored within the cable storage found in the backside of the controller.
/ Le cable de la manette est rangé dans l'espace de rangement du cable situé à l'arriére de la manette.
/ Das Steuerkabel befindet sich im Kabelspeicher auf der Rückseite der Steuerung.
/ Il cavo del controller si trova nella scatola cavi sul retro del controller.
/ El cable de control está almacenado en el almacenamiento de los cables que se encuentra en la parte posterior del controlador.
Open the cable storage as shown in the image. (Use of excessive force to open the cover will cause it to come off, but this is not a defect.)
/ Ouvrez l'espace de rangement du cable comme montré sur l'image.
(Une préssion excessive pour ouvrir le couvercle entraînera son détachement, mais il ne s'agit pas d' un défaut)
/ Öffnen Sie den Kabelspeicher, wie auf der Abbildung gezeigt.
(Möglicherweise müssen Sie etwas stärker am Deckel des Kabelspeichers ziehen, damit sich dieser öffnet. Dabei kann sich der Deckel vollständig ablösen.
Dabei handelt es sich um keinen Defekt.)
/ Aprire la scatola cavi come mostrato nell'immagine.
(L'uso eccessivo di forza per aprire la mascherina potrebbe farla staccare dal dispositivo, ma questo non costituisce un difetto).
/ Abra el almacenamiento de los cables tal y como se muestra en la imagen.
(El uso de una fuerza excesiva para abrir la tapa hará que ésta salga, esto no es un defecto.)
Remove the controller cable from the cable storage.
/ Enlevez le cable de la manette de l'espace de rangement du cable.
/ Nehmen Sie das Steuerungskabel aus dem Kabelspeicher heraus.
/ Rimuovere il cavo del controller dalla scatola cavi.
/ Quite el cable controlador del almacenamiento de los cables.
Slide out the controller cable through the hole as shown in the image and close the cover.
Be careful not to get the controller cable caught when closing the cover.
/ Faites glisser le cable de la manette à travers le trou comme monté sur l'image et fermez le couvercle.
Faites attention de ne pas coincer le cable de la manette quand vous fermez le couvercle.
/ Schieben Sie das Steuerungskabel durch das Loch, wie in der Abbildung zu sehen, und schließen Sie den Deckel.
Achten Sie darauf, dass Sie beim Schließen des Deckels das Steuerungskabel nicht einklemmen.
/ Inserire il cavo del controller nel foro come mostrato nell'immagine e chiudere la mascherina.
Fare attenzione a non incastrare il cavo chiudendo la mascherina.
/ Deslice el cable controlador a través del agujero tal y como se muestra en la imagen y cierre la tapa.
Evite enganchar el cable controlador cuando cierre la placa superior.
Cable storage box
/ Espace de rangement du câble / Kabelbox zur Aufbewahrung
/ Portacavo / Caja de almacenamiento del cable
Cable opening
/ Ouverture du câble / Kabelöffnung
/ Apertura del cavo / Apertura del cable
How to connect / Comment se connecter / Wie wird eingeschaltet / Cómo conectarlo / Come connettersi
Please insert the connector of the controller cable into the controller port of the Xbox 360® console.
/ Veuillez insérer la Connecteur du cable de contrôle dans la port de manette de la console Xbox 360.
/ Stecker des Steuerungs kabels bitte an Controller-Anschluss Xbox 360 Konsole anschließen.
/ Si prega di inserire il connettore del cavo del controllo nel porta del controller della console Xbox 360.
/ Introduzca el conector del cable controlador en el puerto de mando de la consola Xbox 360.
USB port of the
/ Port USB de la
/ USB-Anschluss der
/ Porta USB della
/ Puerto USB de la
Xbox 360
Button cover / couvercle de protection du bouton / Knopfabdeckung / Cover per i pulsanti / Cubierta de botón
The button cover is to protect against accidental pressing of the START button.
/ Le couvercle de protection est la afin d'éviter des pressions accidentelles du bouton START " de démarrage"
/ Die Knopfabdeckung dient als Schutz gegen versehentliches Druecken des START-Taste.
/ La cover del pulsante è protetta contro le pressioni accidentali del pulsante di Tasto START.
/ La cubierta del botón es para proteger contra la pulsación accidental del botón START.
How to open / Comment ouvrir / Oeffnungsanleitung / Come aprire / Cómo abrir
Push / Appuyez
/ Druecken / Premere / Presionar
Slide in / Inserer
/ Einschieben / Far scorrere / Deslizar hacia dentro
Please follow in reverse order to close.
/ Inversez la manoeuvre afin de fermer.
/ Um zu schliessen, befolgen Sie die Anleitungen bitte in umgekehrter Reihenfolge.
/ Seguire le istruzioni in ordine inverso per chiudere.
/ Por favor, seguir en orden inverso para cerrar.
14
株式会社ホリ
機 種 名 : 1709#00 デッドオアアライブ5スティック for Xbox360
部 品 名 : InstructionManual(DOA5)360
部品図番 : 1709-11
印 刷 : 1C(K)
材 質 : 書紙80g
作 成 : 畠中 12.6.11
<p.14>
How to set Turbo / Turbo hold mode
/ Comment régler le mode Turbo / Verrou Turbo
/ Come impostare la modalità Turbo / Turbo hold
/ Turbo / Turbo-Hold Modus einschalten
/ Cómo configurar el modo Turbo / Control Turbo
Turbo / Turbo hold feature buttons:
/ Les touches Turbo / Turbo hold:
/ Turbo / Turbo Halten Taste:
/ Pulsanti per la funzione Turbo / Turbo hold:
/ Características de los botones Turbo / bloqueo de Turbo:
A button
/ Touche A
/ A-Taste
/ Pulsante A
/ Botón A
B button
/ Touche B
/ B-Taste
/ Pulsante B
/ Botón B
Left Bumper
/ Gauche gâchette haute
/ Links Bumper
/ Sinistro pulsante dorsale
/ Izquierdo botón superior frontal
X button
/ Touche X
/ X-Taste
/ Pulsante X
/ Botón X
Y button
/ Touche Y
/ Y-Taste
/ Pulsante Y
/ Botón Y
Right Bumper
/ Droite gâchette haute
/ Rechts Bumper
/ Destro grilletto
/ Derecho gatillo
Left Trigger
/ Gauche gâchette
/ Links Schalter
/ Sinistro grilletto
/ Izquierdo gatillo
Left stick button
/ Gauche stick analogique
/ Linke stick taste
/ Pulsante levetta sinistro
/ Iziquierdo botón de stick
Right Trigger
/ Droite gâchette
/ Rechts Schalter
/ Destro grilletto
/ Derecho gatillo
Right stick button
/ Droit stick analogique
/ Rechte stick taste
/ Pulsante levetta destro
/ Derecho botón de stick
Turbo Mode / Mode Turbo / Turbomodus / Modalità Turbo / Modo Turbo
Hold down the Turbo button and then press the button that you want to set in Turbo mode.
/ Maintenez enfoncé la touche Turbo, appuyez ensuite sur la touche sur laquelle vous souhaitez activer le mode Turbo.
/ Halten Sie die Turbo-Taste gedrückt und drücken Sie dann die Taste, die Sie in den Turbomodus setzen wollen.
/ Tenere premuto il pulsante Turbo e premere poi il pulsante che si desidera assegnare alla modalità Turbo.
/ Mantenga presionado el botón Turbo y luego presione el botón que desea programar en el modo Turbo.
Turbo Mode
/ Mode Turbo
/ Turbomodus
/ Modalità Turbo
/ Modo Turbo
TURBO
The turbo indicator will blink when pressing the button and it will light on when it's released.
/ Le Témoin Turbo clignote lorsque vous appuyez sur la touche et s’allume lorsque vous relâchez cette touche.
/ Die Turboanzeige blinkt, wenn Sie die gewählte Taste drücken und leuchtet nachdem Sie die von Ihnen gewählte Taste wieder loslassen.
/ Alla pressione del pulsante, la spia Turbo lampeggerà e resterà poi illuminata quando il pulsante viene rilasciato.
/ El indicador de turbo parpadeará cuando presione el botón y se encenderá cuando lo deje suelto.
ON
/ MARCHE
/ EIN
/ ON
/ ENCENDIDO (ON)
Blink
/ Clignotement
/ Blinken
/ Lampeggia
/ Parpadeo
OFF
/ ARRET
/ AUS
/ OFF
/ APAGADO (OFF)
Light on
/ Témoin allumé
/ Leuchten
/ Luce accesa
/ Luz encendida
15
株式会社ホリ
機 種 名 : 1709#00 デッドオアアライブ5スティック for Xbox360
部 品 名 : InstructionManual(DOA5)360
部品図番 : 1709-11
印 刷 : 1C(K)
材 質 : 書紙80g
作 成 : 畠中 12.6.11
<p.15>
Turbo Hold Mode / Mode Turbo Hold / Turbo Halten Modus / Modalità Turbo Hold / Modo Bloqueo de Turbo
Turbo Hold: Automatic Turbo mode
/ Turbo Hold: Mode Turbo Automatique.
/ Turbo Halten: Automatischer Turbomodus.
/ Turbo Hold: Modalità Turbo Automatica.
/ Bloqueo de Turbo: modo de Turbo automático.
Turbo hold mode will not function when holding the button.
/ le mode Turbo hold ne fonctionnera pas si vous restez appuyé sur la touche.
/ Der Turbo Halten Modus funktioniert nicht, wenn die Taste dauerhaft gedrückt wird.
/ La modalità Turbo non funziona quando si tiene il pulsante premuto.
/ El modo de bloqueo de Turbo no funciona cuando mantiene presionado el botón.
Hold down the Turbo button and then press the button that is already set in Turbo mode.
/ Maintenez enfoncé la touche Turbo, appuyez ensuite sur la touche qui est déjà paramétrée en mode Turbo.
/ Halten Sie die Turbo-Taste gedrückt und drücken Sie dann die Taste, die sich bereits im Turbomodus befindet.
/ Tenere il pulsante Turbo premuto e premere poi il pulsante già assegnato alla modalità Turbo.
/ Mantenga presionado el botón Turbo y luego presione el botón que ya está programado en modo Turbo.
Turbo Hold Mode
/ Mode Turbo Hold
/ Turbo Halten Modus
/ Modalità Turbo Hold
/ Modo Bloqueo de Turbo
TURBO
The turbo indicator will light on when pressing the button and the light will blink when it’s released.
/ Le témoin Turbo s’allume lorsque on appuie sur la touche, et clignote lorsque on la relâche.
/ Wird eine Taste im Turbo oder Turbo Halten Modus gedrückt, wird die Turboanzeige leuchten und wieder blinken, wenn Sie die Taste freigeben.
/ Alla pressione del pulsante, la spia Turbo lampeggerà e resterà poi illuminata quando il pulsante viene rilasciato.
/ El indicador de turbo se encenderá cuando presione el botón y la luz parpadeará cuando la deje suelta.
Light on
ON
/ MARCHE
/ EIN
/ ON
/ ENCENDIDO (ON)
OFF
/ Témoin allumé
/ Leuchten
/ Luce accesa
/ Luz encendida
/ ARRET
/ AUS
/ OFF
/ APAGADO (OFF)
Blink
/ Clignotement
/ Blinken
/ Lampeggia
/ Parpadeo
Turbo hold mode will not work on D-pad Up, Down, Left, or Right at the same time.
/ Le mode Turbo hold ne fonctionnera pas sur la croix directionnelle Haut, Bas, Gauche ou Droite en même temps.
/ Der Turbo Halten Modus funktioniert nicht gleichzeitig für die Stickrichtungen Hoch, Runter, Links und Rechts.
/ La modalità Turbo hold non funziona su D-pad Su, Giù, Sinistra, o Destra allo stesso tempo.
/ El modo bloqueo de Turbo no funciona en D-Pad Arriba, Abajo, Izquierda o Derecha al mismo tiempo.
The controller will function as Turbo mode when you set Turbo and Turbo Hold mode on D-Pad Up and down or left and right.
/ La manette fonctionnera en mode Turbo lorsque vous aurez paramétré le mode Turbo et Turbo Hold sur la croix directionnelle Haut et Bas, ou Gauche et Droite.
/ Der Controller befindet sich im Turbomodus, wenn Sie den Turbo und Turbo Halten Modus für die Stickrichtungen Hoch, Runter, Links und Rechts gesetzt haben.
/ Quando viene impostata la modalità Turbo e Turbo hold su D-Pad su e giù o sinistra e destra, il controller funzionerà in modalità Turbo.
/ El controlador funciona como modo Turbo cuando está programado el modo Turbo y bloqueo de Turbo en D-Pad Arriba y Abajo o Izquierda y Derecha.
The turbo indicator will blink when you have multiple buttons set in Turbo and Turbo hold mode.
/ Le témoin Turbo clignotera lorsque vous aurez plusieurs touches paramétrées en mode Turbo et Turbo hold.
/ Sollten Sie mehrere Tasten in den Turbo oder Turbo Halten Modus versetzt haben, wird die Turboanzeige blinken.
/ Quando ci sono pulsanti multipli impostati in modalità Turbo e Turbo hold, la spia Turbo lampeggerà.
/ El indicador de turbo parpadeará cuando tenga varios botones programados en modo Turbo y bloqueo de Turbo.
Turbo Mode / Turbo Hold Mode OFF
/ Turbomodus / Turbo Halten Modus AUS
/ ARRET du Mode Turbo / Mode Turbo Hold
/ Modalità Turbo / Turbo Hold OFF
/ Modo Turbo / Modo bloqueo de Turbo APAGADO (OFF)
Hold down the Turbo button and then press the button that is already set in Turbo hold mode.
/ Maintenez enfoncé la touche Turbo, appuyez ensuite sur une touche où le mode Turbo Hold est activé.
/ Halten Sie die Turbo-Taste gedrückt und drücken Sie dann die Taste, die Sie aus dem Turbo Halten Modus nehmen wollen.
/ Tenere il pulsante Turbo premuto e premere poi il pulsante già impostato in modalità Turbo hold.
/ Mantenga presionado el botón Turbo y luego presione el botón que ya está programado en modo bloqueo de Turbo.
Turbo Mode OFF
/ ARRET du Mode Turbo
/ Turbomodus AUS
/ Modalità Turbo OFF
/ Modo Turbo APAGADO (OFF)
TURBO
The turbo indicator light will go OFF when Turbo and Turbo hold mode is OFF.
/ Le témoin lumineux du Turbo s’éteindra si les modes Turbo et Turbo Hold sont désactivés.
/ Die Turboanzeige schaltet sich aus, wenn der Turbo oder Turbo Halten Modus deaktiviert ist.
/ La luce della spia turbo si spegnerà quando le modalità turbo e turbo hold sono in off.
/ El indicador de turbo se APAGARÁ (OFF) cuando el modo Turbo y bloqueo de Turbo esté APAGADO (OFF).
ON
/ MARCHE
/ EIN
/ ON
/ ENCENDIDO (ON)
OFF
/ ARRET
/ AUS
/ OFF
/ APAGADO (OFF)
OFF
/ ARRET
/ AUS
/ OFF
/ APAGADO (OFF)
OFF
/ ARRET
/ AUS
/ OFF
/ APAGADO (OFF)
If the turbo indicator doesn't turn OFF, it means that one of the buttons is still on Turbo or Turbo hold mode.
/ Si le témoin du mode Turbo reste allumé, cela signifie qu’une des touches est toujours en mode Turbo ou en mode Turbo Hold.
/ Sollte sich die Turboanzeige nicht ausschalten, befindet sich noch eine der Tasten im Turbo oder Turbo Halten Modus.
/ Se l’indicatore turbo non si spegne, significa che uno dei pulsanti è ancora in modalità Turbo o Turbo hold.
/ Si el indicador de turbo no se APAGA (OFF), eso significa que uno de los botones sigue en modo Turbo o modo bloqueo de Turbo.
16
株式会社ホリ
機 種 名 : 1709#00 デッドオアアライブ5スティック for Xbox360
部 品 名 : InstructionManual(DOA5)360
部品図番 : 1709-11
印 刷 : 1C(K)
材 質 : 書紙80g
作 成 : 畠中 12.6.11
<p.16>
Turbo Mode OFF (For all buttons) / Mode Turbo ARRET (Pour toutes les touches)
/ Turbomodus AUS (Für alle Tasten) / Modalità Turbo OFF (Per tutti i pulsanti) / Modo Turbo APAGADO (OFF) (Para todos los botones)
Hold down the Turbo button and then press BACK button to turn off Turbo Mode for all buttons and D-Pad.
/ Maintenez enfoncé la touche Turbo, appuyez ensuite sur la touche BACK pour désactiver le Mode Turbo qui est actif sur toutes les touches.
/ Halten Sie die Turbo-Taste gedrückt und drücken Sie anschließend die BACK-Taste, um den Turbomodus für alle Tasten sowie den Stick zu deaktivieren.
/ Per disattivare la modalità Turbo per tutti i pulsanti e per il D-Pad, tenere il pulsante Turbo premuto e premere poi il pulsante BACK.
/ Mantenga presionado el botón Turbo y luego presione el botón BACK para seleccionar para apagar el Modo Turbo para todos los botones y D-Pad.
OFF (All buttons)
TURBO
/ ARRET (Toutes les touches)
/ AUS (Alle Tasten)
/ OFF (Tutti i pulsanti)
/ APAGADO (OFF)(Todos los botones)
BACK
Please follow this step, if you forget which button you turn on the Turbo mode.
/ Suivez cette étape si vous avez oublié sur quelles touches vous avez activé le mode Turbo.
/ Auf diese Weise können Sie den Turbomodus auch für Tasten deaktivieren, bei denen Sie vergessen haben, ob sich diese noch im Turbomodus befinden.
/ Seguire questo passo se si dimentica quale pulsante è stato assegnato alla modalità Turbo.
/ Por favor, siga el siguiente paso, si se olvida de qué botón está encendido en el modo Turbo.
How to change Turbo Speed / Changer la vitesse du turbo
/ Ändern der Turbostufen / Modificare la velocità Turbo / Cómo cambiar la Velocidad de Turbo
You can adjust the turbo mode in 3 different speeds.
/ Vous pouvez régler le turbo sur 3 vitesses différentes.
/ Der Turbomodus kann in 3 Stufen geregelt werden.
/ La modalità Turbo può essere regolata in 3 velocità differenti.
/ Puede ajustar el modo turbo en 3 diferentes velocidades.
SLOW Mode / LENT
/ Langsam / Modalità SLOW / Modo LENTO
5
5
times / second
fois / seconde
volte / seconde
12 20
Mal / Sekunde
veces / segundo
NORMAL Mode / NORMAL
/ Normal / Modalità NORMAL / Modo NORMAL
12
5
times / second
fois / seconde
volte / seconde
12 20
Mal / Sekunde
veces / segundo
FAST Mode / RAPIDE
/ Schnell / Modalità FAST / Modo RÁPIDO
20
5
times / second
fois / seconde
volte / seconde
Mal / Sekunde
veces / segundo
12 20
Blinking rate reflects the selected Turbo speed.
/ La vitesse de clignotement dépend de la vitesse du mode Turbo choisie.
/ Die Blinkgeschwindigkeit reflektiert die gewählte Turbo-Geschwindigkeit.
/ La velocità di lampeggio riflette la velocità Turbo selezionata.
/ El grado de parpadeo refleja la velocidad de Turbo selccionada.
17
株式会社ホリ
機 種 名 : 1709#00 デッドオアアライブ5スティック for Xbox360
部 品 名 : InstructionManual(DOA5)360
部品図番 : 1709-11
印 刷 : 1C(K)
材 質 : 書紙80g
作 成 : 畠中 12.6.11
<p.17>
Button Configuration Switch (BACK, START button) / Commutateur Boutons de Configuration (Bouton BACK, START)
/ Schalter für Button-Konfiguration (BACK, START-Taste) / Selettore per la configurazione del pulsante (Pulsante BACK, START) / Interruptor de configuración de botones (BACK, START botón)
The BACK and START button function can be switched by toggling the button configuration switch (BACK/START button).
/ Le bouton BACK/START peut être mis en marche en basculant le commutateur Boutons de Configuration (Bouton BACK, START).
/ Der BACK und START Knopffunktion kann durch den Schalter für Button-Konfiguration (BACK, START-Taste) umgeschaltet werden.
/ La funzione del pulsante BACK e START O può essere scambiata tramite Selettore per la configurazione del pulsante (Pulsante BACK, START).
/ La función del botón BACK y START se puede cambiar alternando el interruptor de configuración de botones (botón BACK/START).
BACK button
/ Touche BACK / BACK-Taste
/ Pulsante BACK / botón BACK
BACK
START
START button
/ Touche START / START-Taste
/ Tasto START / Botón START
START
BACK
START button
/ Touche START / START-Taste
/ Tasto START / Botón START
BACK
START
BACK button
/ Touche BACK / BACK-Taste
/ Pulsante BACK / botón BACK
START
BACK
Button Configuration Switch (Left stick/Right stick, Left bumper/Right bumper)
/ Commutateur Boutons de Configuration (Gauche stick/Droit stick, Gauche gâchette haute/ Droite gâchette haute)
/ Schalter für Button-Konfiguration (Links Schalter/Rechts Schalter, Links Bumper/ Rechts Bumper)
/ Selettore per la configurazione del pulsante (Sinistro grilletto/ Destro grilletto, Sinistro pulsante dorsale/ Destro pulsante dorsale)
/ Interruptor de configuración de botones (Izquierdo gatillo/ Derecho gatillo, Izquierdo botón superior frontal/ Derecho botón superior frontal)
The Left stick/Right stick and Left bumper/Right bumper function can be switched by toggling the button configuration switch
(Left stick/Right stick, Left bumper/Right bumper).
/ Le bouton gauche stick/droite stick et la touche gauche gâchette haute/ Droite gâchette peut être mis en marche en basculant le commutateur Boutons de Configuration
(gauche stick/droite stick et la touche gauche gâchette haute/ Droite gâchette).
/ Der linke Hebel/rechte Hebel und die linke/rechte Bumperfunktion kann durch den Schalter für Button-Konfiguration
(Links Schalter/Rechts Schalter, Links Bumper/ Rechts Bumper) umgeschaltet werden.
/ La funzione stick sinistro/stick destro e bumper sinistro/bumper destro può essere scambiata tramite selettore per la configurazione del pulsante
(Sinistro grilletto/ Destro grilletto, Sinistro pulsante dorsale/ Destro pulsante dorsale)
/ La función del joystick izquierdo/joystick derecho y sus botones izquierdo/derecho se pueden cambiar alternando el interruptor de configuración de botones
(joystick izquierdo/joystick derecho, botón de joystick izquierdo/botón de joystick derecho).
LSB /RSB
LB/RB
LB/RB
LSB/ RSB
Right stick button
/ Droit stick analogique
/ Rechte stick taste
/ Pulsante levetta destro
/ Derecho botón de stick
Left Bumper
/ Gauche gâchette haute / Links Bumper
/ Sinistro pulsante dorsale
/ Izquierdo botón superior frontal
LSB/RSB
LB /RB
Right Bumper
/ Droite gâchette haute
/ Rechts Bumper
/ Destro grilletto
/ Derecho gatillo
LB /RB
LSB/ RSB
Left stick button
/ Gauche stick analogique
/ Linke stick taste
/ Pulsante levetta sinistro
/ Iziquierdo botón de stick
Left Bumper
/ Gauche gâchette haute
/ Links Bumper
/ Sinistro pulsante dorsale
/ Izquierdo botón superior frontal
Left stick button
/ Gauche stick analogique
/ Linke stick taste
/ Pulsante levetta sinistro
/ Iziquierdo botón de stick
Right Bumper
/ Droite gâchette haute
/ Rechts Bumper
/ Destro grilletto
/ Derecho gatillo
18
株式会社ホリ
機 種 名 : 1709#00 デッドオアアライブ5スティック for Xbox360
部 品 名 : InstructionManual(DOA5)360
部品図番 : 1709-11
印 刷 : 1C(K)
材 質 : 書紙80g
作 成 : 畠中 12.6.11
<p.18>
Right stick button
/ Droit stick analogique
/ Rechte stick taste
/ Pulsante levetta destro
/ Derecho botón de stick
The Inline Release / Le Dispositif de sécurité du câble / Der Stolperschutz / Antistrappo / Desconexión de seguridad
Your controller cord has an inline release. This is a safety feature designed to reduce the chance of the Xbox 360® console or computer falling when the cord is pulled.
If the console or computer falls and hits someone, especially a small child, it could cause serious injury.
To reduce the risk of injuries or damage to the console or computer, it is important to use the controller and the inline release properly.
Use the controller connector, not the inline release, to routinely connect and disconnect the controller. If an inline release disconnects, simply reconnect it by aligning the
grooved indentations and pressing the two parts completely together. The controller will not work unless the inline release is connected properly. Never tape, glue, or
otherwise prevent an inline release from pulling apart. The inline release reduces, but does not eliminate, the risk of the computer or console being pulled off its surface.
To further reduce the risk:
• Do not allow anyone to pull on the controller or controller cord in a way that causes the computer or console to move.
• Do not allow controller cords to become crossed or tangled with one another.
Le câble de la manette est équipé d’un Dispositif de sécurité. Ce Dispositif permet de réduire le risque que la Xbox 360 ou l’ordinateur ne tombe lorsque l’on tire trop fort sur le câble.
Si la Xbox 360 ou l’ordinateur tombe et heurte quelqu’un, en particulier un jeune enfant, cela risque d’entraîner des blessures graves.
Afin de diminuer les risques de blessures ou de dégâts sur la console ou l’ordinateur, il est important d’utiliser correctement la manette et le Dispositif de sécurité du câble.
Utilisez le connecteur de la manette, et non le Dispositif de sécurité du câble, pour brancher et débrancher la manette.
Si le Dispositif de sécurité du câble est débranché, rebranchez-le simplement en alignant les rainures et en pressant les deux parties l’une contre l’autre jusqu’à ce qu’elles s’emboîtent.
La manette ne fonctionnera pas si le Dispositif de sécurité n’est pas correctement connecté.
N’utilisez jamais de ruban adhésif, de colle ou autre pour empêcher un Dispositif de sécurité de se débrancher. Le Dispositif de sécurité du câble diminue le risque de faire tomber la console ou l’ordinateur,
mais ne l’élimine pas complétement. Pour réduire encore ce risque :
• Empêchez toute personne de tirer sur la console ou sur son cordon, d’une façon qui la ferait bouger.
• Évitez de croiser ou d’emmêler les câbles des manettes.
Ihr Controllerkabel hat einen Stolperschutz. Dies ist ein Sicherheitsmerkmal, das die Gefahr verringern soll, dass die Xbox 360 oder der Computer herunterfällt, wenn jemand am Kabel zieht.
Wenn das Entertainmentsystem oder der Computer herunterfällt und jemanden trifft, insbesondere kleine Kinder, kann dies zu schweren Verletzungen führen.
Um die Gefahr von Verletzungen oder Schäden am Entertainmentsystem oder Computer zu verringern, müssen der Controller und der Stolperschutz richtig eingesetzt werden.
Verwenden Sie den Controlleranschluss, nicht den Stolperschutz, um den Controller routinemäßig anzuschließen und zu entfernen. Falls ein Stolperschutz getrennt wird, schließen
Sie ihn einfach wieder an, indem Sie die Einkerbungen ausrichten und die zwei Teile vollständig zusammendrücken. Der Controller funktioniert erst, wenn der Stolperschutz richtig angeschlossen ist.
Befestigen Sie einen Stolperschutz nie mit Klebeband, Kleber oder anderen Verfahren, um ein Auseinanderziehen zu vermeiden.
Der Stolperschutz verringert die Gefahr, dass der Computer oder das Entertainmentsystem von der Standfläche gezogen werden, beseitigt diese jedoch nicht vollkommen. So verringern Sie das Risiko weiter:
• Sorgen Sie dafür, dass niemand am Controller oder Controllerkabel so zieht, dass sich der Computer oder das Entertainmentsystem bewegt.
• Sorgen Sie dafür, dass sich die Controllerkabel nicht kreuzen oder verheddern.
Il cavo del controller ha una funzione antistrappo. Si tratta di una misura di sicurezza, progettata per ridurre la possibilità che Xbox 360 o il computer cada quando si tira il cavo.
Se la console o il computer dovesse cadere e colpire qualcuno, specialmente un bambino piccolo, potrebbe causare gravi lesioni.
Per ridurre il rischio di danni al computer o alla console, è importante utilizzare correttamente il controller e l’antistrappo. Utilizzare il connettore del controller,
non l’antistrappo, per collegare e scollegare normalmente il controller. Se un antistrappo si stacca, è sufficiente ricollegarlo allineando le tacche scanalate e premendo le due parti fino ad unirle
completamente. Il controller non funziona a meno che l’antistrappo non sia collegato correttamente. Non fissare mai con nastro adesivo, incollare o altrimenti impedire ad un antistrappo di staccarsi.
L’antistrappo riduce, ma non elimina, il rischio che il computer o la console siano separati dalla loro superficie. Per ridurre ulteriormente il rischio:
• Non permettere a nessuno di tirare il controller o il cavo del controller in modo tale da consentire lo spostamento del computer o della console.
• Non lasciare che i cavi del controller si incrocino o si aggroviglino tra di loro.
El cable del mando posee una desconexión de seguridad. Se trata de una característica destinada a reducir las posibilidades de que la Xbox 360 o el ordenador se caigan al tirar del cable.
Si la consola o el ordenador se caen y golpean a alguien, sobre todo a un niño pequeño, podrían provocarle lesiones graves.
Con el fin de reducir el riesgo de lesiones o daños en la consola o en el ordenador, es importante una utilización adecuada del mando y de la desconexión de seguridad.
Utiliza normalmente el conector del mando para conectar y desconectar el mando, en lugar de la desconexión de seguridad.
Si ésta se desconecta, basta con volver a conectarlo alineando las muescas y presionando las dos partes para unirlas completamente.
El mando no funcionará hasta que la desconexión de seguridad esté conectada adecuadamente. Nunca utilices cinta adhesiva, pegamento ni nada parecido para impedir que la desconexión de seguridad se separe.
Esta desconexión de seguridad reduce, aunque no elimína, el riesgo de que el ordenador o la consola sean arrastrados de la superficie que ocupan normalmente. Para reducir aún más este riesgo:
• No permitas que nadie tire del mando o de su cable de manera que se mueva el ordenador o la consola.
• No permitas que los cables de los mandos se crucen o se enreden entre sí.
19
株式会社ホリ
機 種 名 : 1709#00 デッドオアアライブ5対応スティック for Xbox360
部 品 名 : InstructionManual(DOA5X)
部品図番 : 1709-12
印 刷 : 1C(K)
材 質 : 書紙80g
作 成 : 畠中 12.6.11
<p.19>
The normal function of the product may be disturbed by strong Electro-Magnetic Interference.
If so, simply reset the product to resume normal operation by following the instruction manual.
In case the function does not resume, please use the product in another location.
Il est possible que la fonction normale du produit soit perturbée par de fortes Interférences Électromagnétiques.
Dans ce cas, réinitialisez simplement le produit pour en reprendre l'utilisation en suivant le manuel d'instructions.
Dans le cas où la fonction n'a pas pu être redémarrée, utilisez le produit dans un autre emplacement.
Die normale Funktion des Produktes kann durch starke elektromagnetische Interferenzen gestört sein.
Ist dies der Fall, setzen Sie das Produkt einfach gemäß der Anweisungen in der Bedienungsanleitung in den Normalbetrieb zurück.
Für den Fall, dass es auch dann nicht funktioniert, verwenden Sie das Produkt bitte an einem anderen Ort.
Il normale funzionamento del prodotto potrebbe essere disturbato da forti interferenze elettromagnetiche.
Nel caso in cui ciò si verificasse effettuare il reset del prodotto per riprendere la normale operazione e seguendo le istruzioni riportate nel manuale.
Nel caso in cui il prodotto non dovesse riprendere a funzionare, si prega di utilizzarlo in un luogo diverso.
El correcto funcionamiento del producto podría verse afectado por fuertes interferencias electromagnéticas.
Si esto sucediera, simplemente reinicie el producto para reanudar el funcionamiento normal, siguiendo el manual de instrucciones.
En caso de que el funcionamiento no se reanude, por favor utilice el producto en otra ubicación.
PRODUCT DISPOSAL INFORMATION
Dispose of this product in accordance with local and national disposal regulations (if any), including those governing the recovery and recycling of waste
electrical and electronic equipment (WEEE).
INFORMATIONS SUR LA DESTRUCTION DU PRODUIT
Jetez ce produit selon les reglementations locales et nationales en vigueur (le cas echeant), y compris celles regissant la collecte et le traitement des
dechets d'equipements electriques et electroniques (WEEE).
ENTSORGUNG DES PRODUKTS
Entsorgen Sie dieses Produkt gemas der geltenden ortlichen und nationalen Entsorgungsvorschriften (falls zutrefend), einschlieslich jener zur Entsorgung
und Wiederverwertung von Elektro- und Elektronikalt-/schrottgeraten (WEEE).
INFORMAZIONE PER LO SMALTIMENTO DEI PRODOTTI
Smaltire questo prodotto conformemente alla normativa locale, portandolo presso il punto di raccolta specifico per le apparecchiature elettriche ed elettroniche.(WEEE).
INFORMACION DE DESECHO DEL PRODUCTO
Desecha este producto conforme a las leyes locales y nacionales de desechos, incluidas aquellas relacionadas con la recuperacion y reciclado de
equipos electricos y electronicos (WEEE).
The supply terminals are not to be short-circuited.
/ Ne pas court-circuiter les bornes d'alimentation.
/ Die Versorgungsanschlüsse dürfen nicht kurzgeschlossen werden.
/ I terminali di alimentazione non devono essere messi in corto circuito.
/ Los terminales de provisión no deben de ser cortocircuitados.
Please retain contact information for future reference.
The manufacturer reserves the right to change the product design or specifications without notice.
The image on the package may differ from the actual product.
HORI and HORI logo are registered trademarks of HORI.
/ Veuillez conserver les informations de contact pour toute référence ultérieure.
Le fabriquant se réserve le droit de changer le design du produit ou les caractéristiques techniques sans préavis.
L'image sur l'emballage peut être différente du produit réel.
HORI et le logo de HORI sont des marques déposées de HORI.
This product is manufactured under license from Microsoft Corporation.
Microsoft, Kinect, Xbox, Xbox LIVE, Xbox 360, and the Xbox logos are trademarks of the Microsoft group of companies.
20
1709-12
株式会社ホリ
機 種 名 : 1709#00 デッドオアアライブ5対応スティック for Xbox360
部 品 名 : InstructionManual(DOA5X)
部品図番 : 1709-12
印 刷 : 1C(K)
材 質 : 書紙80g
作 成 : 畠中 12.6.11
<p.20>