1
5. Switch the power button to “ON”.
3. CLEAN TIPS
• Insert food slowly to allow juicer time to work.
• Do not overstuff the hopper or force food in.
The pusher is only to be used if food becomes
stuck.
• Periodically remove the silicone brushes from
the spinning brush and clean thoroughly before
reassembling.
• Thoroughly clean immediately after each use to
minimize staining.
• Pull out the rubber stopper on the base of the
bowl to clean bowl effectively. Always ensure
the rubber stopper is re-inserted prior to juicing
otherwise it may cause a leak.
• Do not use harsh abrasives or chemicals to
clean the juicer.
• Do not clean in the dish washer.
6. When you are finished switch the power button to “OFF”.
If the machine becomes clogged and inoperable:
1. Turn the machine off and press the reverse button for a few seconds then try operating again.
Note: The reverse button works with a ‘pulse’
motion.
2. If the reverse button does not work turn off the
machine and switch off at the power point. Disassemble the unit to dislodge any material then
reassemble as per the instructions and try again.
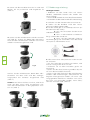
How to disassemble and clean the unit:
1. Switch off the unit.
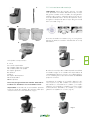
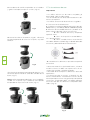
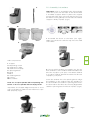
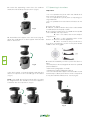
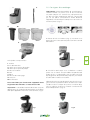
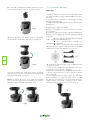
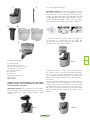
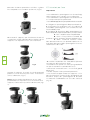
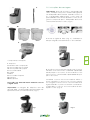
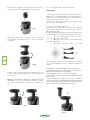
2. Twist the bowl and hopper as one piece to
the right so that the arrow on the hopper moves
away from the close position. Lift off (Fig. 9).
4. TECNIC SPECIFICATIONS
•
•
•
•
•
Input voltage: AC 220-240V
Frequency: 50Hz
Power: 150W
Speed: 65rpm
Max. Operation time: 30 minutes
15
→
→
Fig. 9
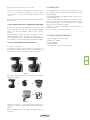
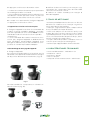
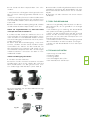
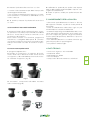
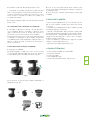
3. Disassemble the parts in the order show by the
diagram (Fig 10).
→
→
→
Fig. 10
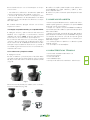
4. Use the brush to clean all of these parts thoroughly in warm soapy water then dry thoroughly.
5. Use a damp cloth to wipe down the base of
the unit.
EN