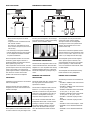
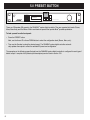
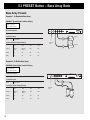
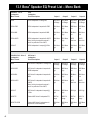
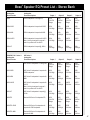
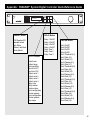
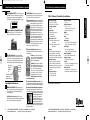
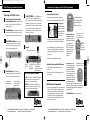
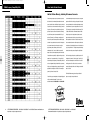
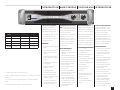
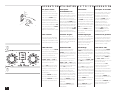
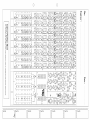
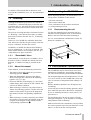
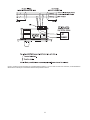
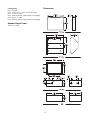
1
Products and accessories Bose® Panaray® MA12 modular line array loudspeaker BOSE PROFESSIONAL SYSTEMS DIVISION – COMPLETE COMMERCIAL SOLUTIONS Customer focus | Acoustic design | Listen before you buy | Project management | Products and accessories | Installation services | After sales services Bose® Panaray® MA12 modular line array loudspeaker REPRESENTATION OF DISPERSION 1 - 4kHz (-6dB point average) Long-term power handling3 300W continuous Impedance 8Ω nominal Mechanical specifications Dimensions: 5.1"D x 4.2"W x 38.7"H (13 cm x 10.7 cm x 98.4 cm) Weight: 20 lb (9 kg) Available colors: white and black Connectors: two parallel-wired NL4 connectors and one two-position barrier strip Enclosure construction: aluminum GENERAL DESCRIPTION TECHNICAL INFORMATION Maximum acoustic output1 113dB-SPL @ 1m A single MA12 produces cylindrical waves above 2kHz. Please be careful extrapolating SPL at greater distances, as a true cylindrical source falls off at 3dB per doubling of distance, and a conventional spherical source falls off at 6dB per doubling of distance (inverse square law). Sensitivity2 88dB-SPL @ 1W, 1m Frequency range 155Hz to 12kHz (-3dB) 100Hz to 16kHz (-10dB) Dispersion (–6dB point, average, 1-4kHz) Horizontal 160° Vertical coverage is a band of constant height as shown above The Panaray MA12 modular line array is a 300W loudspeaker. As a line array element, this product is designed for use in singles and multiples in permanently-installed indoor applications. The slim profile of the MA12 speaker provides an attractive design element. As an addition to the Bose line of Panaray loudspeakers, this product combines innovative design technology with Bose standards for acoustic quality and performance. The MA12 speaker offers the following features: • One-way system for accurate voice and light music reproduction • Full-range system performance when combined with a Bose bass loudspeaker • Line array characteristics that put the sound where you want it: - Radiation is a band of sound at a constant height, to significantly reduce ceiling and floor reflections 1 Full bandwidth pink noise is applied to the MA12 speaker and amplified to a level at the loudspeaker terminals corresponding to the long-term rated power handling of the speaker. The average sound pressure level (dB-SPL) is measured at distances from the speaker in an anechoic environment. 2 Full bandwidth pink noise is applied to the MA12 speaker and amplified to a level at the loudspeaker terminals corresponding to1 Watt as referenced to the nominal impedance. The average sound pressure level (dB-SPL) is measured at 1 meter from the speaker in an anechoic environment. 3 Full bandwidth noise, meeting the IEC Standard #268-5 is applied to the MA12 speaker and amplified to a level at the loudspeaker terminals corresponding to the power handling of the loudspeaker. The loudspeaker must show no visible damage or measurable loss of performance after 100 hours of continuous testing. BASIC VOICE SYSTEM EXPANDED FULL-RANGE SYSTEM Mixer Mixer PANARAY® System Digital Controller INPUT METERS POWER PRESET L -dB 40 24 18 12 INPUT METERS POWER PRESET L -dB 40 24 18 12 6 R 0 O 6 0 O LIMIT Stereo Bank 802 Full Range R LIMIT Stereo Bank 802 Full Range UTILITY DELA PANARAY DIGITAL SYSTEM CONTROLLER UTILITY DELA PANARAY DIGITAL SYSTEM CONTROLLER PANARAY System Digital Controller CH1 CH1 MA12 speaker Amplifier Amplifier CH2 CH1 Amplifier CH2 CH2 MA12 speaker MA12 speaker MA12 speaker MA12 speaker MA12 speaker - Wide horizontal dispersion for broad coverage - Longer throw than conventional sources with less SPL variation. This means you will experience sound that is not too loud up front, and not too soft far away. • Low sensitivity to microphone feedback • Slender, aesthetic styling in white or black • A full complement of brackets available for product installations MA12 loudspeaker modules are used with the Panaray system digital controller or the Bose amplifiers in combination with the MA12 speaker plug-in EQ card. Active equalisation assures smooth, accurate spectral response across the entire operating range of the module. Use of the Panaray system digital controller or amplifier EQ card also allows for crossover of the MA12 speaker with a Bose bass loudspeaker. INSTALLATION Installation and use instructions are included with the loudspeaker. The MA12 modular line array speakers are designed to be wall or floor mounted at the listener’s ear height. MA12 speakers can be installed end-on-end to create a taller line array. The height of the line array must correspond to the ear height range of the listeners, in sitting and standing positions, in the installation venue. MB4 speakers The loudspeaker shall be provided with a ducted vent system, tuned at 100Hz. The input connector of the loudspeaker module shall consist of two parallel-wired Speakon® NL4 receptacles and one twoposition barrier strip. The enclosure of the MA12 speaker module shall be aluminum. Its outer dimensions shall be 5.1"D x 4.2"W x 38.7"H (13 cm x 10.7 cm x 98.4 cm). Its weight shall be 20 lb (9kg). LOUDSPEAKER CONFIGURATION The Bose MA12 loudspeaker module can be used with the Bose M2150, 1600 and 1800 amplifiers. It is also compatible with industry standard amplifiers rated for 4 to 8Ω loads. The MA12 loudspeaker is packaged one per carton. ENGINEERS’ AND ARCHITECTS’ SPECIFICATIONS The MA12 speaker shall be a multiple driver, full-range system with matched active equalisation as follows: The transducer complement shall consist of twelve 2.2" (5.7 cm) full-range drivers mounted in a vertical line array. Each driver shall have a rated impedance of 3.2Ω and be wired in series/parallel, resulting in a composite nominal impedance of 8Ω. The nominal horizontal beamwidth of the loudspeaker shall be 160°, and the vertical coverage is a band of constant height. The power handling capacity of the loudspeaker shall be 300W continuous pink noise, band-limited from 155Hz to 12kHz (-3dB). The loudspeaker system shall be supplied with a separate system controller, to be connected before the input(s) of the system power amplifier(s), or with an MA12 EQ card, to be installed in a Bose M2150, 1600 or 1800 amplifier. The loudspeaker shall be the Bose Panaray MA12 modular line array loudspeaker. PANARAY MA12 ACCESSORIES The following accessories are available from Bose: • PC028333 - WB-MA12 wall mount bracket (0°-10° pitch) – black • PC028334 - WB-MA12 wall mount bracket (0°-10° pitch) – white • PC028673 - WBP-MA12 wall mount bracket (0°-10° pitch, +/- 90° yaw) – black • PC028674 - WBP-MA12 wall mount bracket (0°-10° pitch, +/- 90° yaw) – white • PC028337 - CB-MA12 coupling bracket – black • PC028338 - CB-MA12 coupling bracket – white • PC030114 - PSA-12 stand adapter – black • PC029388 - CVT-12 70V/100V transformer – black • PC029389 - CVT-12 70V/100V transformer – white DIMENSIONS PANARAY® MA12 SPEAKER DATA For additional information on the MA12 including polar data please refer to the following documents: REAR VIEW (1) Panaray MA12 modular line array: technical information 4 x M6 x 15 mmm (2) Panaray MA12 modular line array: technical foundation and discussion These documents can be downloaded from the Bose® professional systems website at http://pro.bose.com. 6.0” 6.00cm 15.2 33.3” 33.33 84.6 cm 38.7” 38.50 98.4 cm SAFETY AND REGULATORY COMPLIANCE The Bose MA12 loudspeaker complies with ANSI/EIA 636, recommended loudspeaker safety practices and EMC directive 89/336/EEC and article 10 (1) of the directive in compliance with EN50081-1, EN50082-1, as signified by the CE mark. WARRANTY INFORMATION The Bose MA12 loudspeaker is covered by a 5-year, transferable limited warranty. Subject to change without notice. TOP VIEW 4.2” 1.15 10.7 cm 5.1” 5.050 13 cm Products and accessories Bose® Panaray® MB 4 modular bass loudspeaker BOSE PROFESSIONAL SYSTEMS DIVISION – COMPLETE COMMERCIAL SOLUTIONS Customer Focus | Acoustic design | Listen before you buy | Project management | Products and accessories | Installation services | After sales services Bose® Panaray® MB4 modular bass loudspeaker TECHNICAL INFORMATION Frequency Range 40Hz to 300Hz ±3dB Sensitivity1 87dB-SPL @ 1W, 1m (pink noise) GENERAL DESCRIPTION Enclosure construction: High-density MultiFiber multi-layer wood particle panel with high-impact foamed polypropylene end caps. PANARAY MB4 LOUDSPEAKER SIZING Maximum Acoustic Output2 110dB-SPL, @ 1m (pink noise) Dispersion Omnidirectional at all frequencies below 200Hz Long-Term Power Handling3 200W continuous Impedance 8Ω nominal MECHANICAL SPECIFICATIONS Dimensions: 18.1"D x 10.2"W x 26.7"H (46 cm x 25.9 cm x 67.8 cm) Weight: 45 lb (20 kg) Connectors: Two (2) parallel-wired NL4 connectors Available colors: White and Black Incremental bass output can be achieved by combining multiple MB4 units in close proximity. # of Panaray MB4s Max Output (dB) 1 110 2 116 3 119 4 122 A single MB4 speaker is well matched in output and bandwidth to one or two Panaray 402-II, 502A or MA12 loudspeakers, providing a full-range solution for distributed or portable systems. Two or three MB4 speakers are a good match for higher-output loudspeakers, like the Panaray 802®-III speaker, for engineered or portable systems. For larger spaces that require even higher SPL, four or more MB4 speakers can be combined with each Panaray LT series loudspeaker. The Panaray MB4 modular bass loudspeaker is a 200W, low-frequency loudspeaker that can be used for indoor permanent installations and for portable applications. Multiple MB4 speakers can be combined to effectively create a larger single bass enclosure resulting in higher SPL. The MB4 speaker’s output, bandwidth and size make it useful as a single bass unit, or as a modular building block to match other Bose® products in most professional systems. The MB4 speaker can also be used in conjunction with the MB4 endfire or broadside bass array brackets and the Panaray system digital controller to create directional bass. The Panaray MB4 modular bass loudspeaker offers the following features: • Wide frequency range, from 40Hz to 300Hz, which can be easily matched to any Bose professional loudspeaker • High impact output for dominant bass material • Rugged portable enclosure with metal grille and carrying handles • Distinctive styling • Recessed back plate with two Speakon® NL4 connectors 1 Band-limited pink noise is applied to the MB4 speaker and amplified to a level at the loudspeaker terminals corresponding to 1 Watt as referenced to the nominal impedance. The average sound pressure level (dBSPL) is measured at 1 metre from the speaker in an anechoic environment. 2 Band-limited pink noise is applied to the MB4 speaker and amplified to a level at the loudspeaker terminals corresponding to the long-term rated power handling of the speaker. The average sound pressure level (dB-SPL) is measured at 1 metre from the speaker in an anechoic environment. 3 Band-limited noise, meeting the IEC Standard #268-5 is applied to the MB4 speaker and amplified to a level at the loudspeaker terminals corresponding to the power handling of the loudspeaker. The loudspeaker must show no visible damage or measurable loss of performance after 100 hours of continuous testing. FULL-RANGE SYSTEM WITH BOSE® AMPLIFERS • Full complement of brackets to simplify installations Mixer The MB4 speaker can be used with the Bose Panaray system digital controller to provide smooth accurate spectral response over the entire operating range of the system. LOUDSPEAKER CONFIGURATION 1800-VI amplifier with 802®-III EQ card The MB4 modular bass loudspeaker can be used with the Bose® 1600 and 1800 amplifiers. The MB4 plug-in EQ card must be used with these amplifiers to provide active equalisation for the system. When used with the Panaray® system digital controller, the MB4 speaker is also compatible with industry standard amplifiers rated for 4Ω to 8Ω loads. 1800-VI amplifier with MB4 EQ card I CHANNEL 2 GAIN 4 5 –1 dB 802-III speaker 4 –3 dB 7 5 CHANNEL 2 4 1800–IV PROFESSIONAL POWER AMPLIFIER 10 –1 dB MB4 speaker 4 –3 dB 7 5 6 7 2 –40 dB 9 10 3 –12 dB 8 1 0 802-III speaker CLIPPING LEVEL 6 2 8 9 0 5 3 7 1 ON CHANNEL 1 CHANNEL 2 GAIN 6 2 –40 dB 9 10 3 –12 dB 8 1 0 I CLIPPING LEVEL 6 3 2 1800–IV PROFESSIONAL POWER AMPLIFIER 8 1 ON CHANNEL 1 CHANNEL 2 9 0 10 MB4 speaker The MB4 speaker is packaged one per carton. FULL-RANGE SYSTEM WITH PANARAY® SYSTEM DIGITAL CONTROLLER INSTALLATION Mixer Installation and user instructions are included with the loudspeaker. MB4 modular bass loudspeakers are designed to be wall mounted. They can also be assembled into bass arrays, by using the MB4 endfire or broadside brackets in conjunction with the Bose Panaray system digital controller. Panaray system digital controller INPUT METERS POWER PRESET L -dB 40 24 18 12 6 0 O LIMIT Stereo Bank 802 Full Range R UTILITY DELA PANARAY DIGITAL SYSTEM CONTROLLER No stands are required for portable use. ACCESSORIES The following versatile accessories are available from Bose: • PC027056 - MB4 single-unit wall mount bracket - black, PC027057 - white • PC028664 - MB4 endfire 2x bass array bracket • PC028665 - MB4 endfire 4x bass array bracket • PC028663 - MB4 broadside 2x bass array bracket • PC030132 - MB4 Protection Bag ENGINEERS’ AND ARCHITECTS’ SPECIFICATIONS The loudspeaker shall be a multiple driver, low-frequency system with matched active equalisation as follows: The transducer complement shall consist of four low-frequency drivers of 5.2" (13.3 cm) diameter, mounted symmetrically in vertical Amplifier 802-III speaker Amplifier 802-III speaker pairs. Each driver shall have rated impedance of 8Ω and shall be wired in series/parallel, resulting in composite nominal impedance of 8Ω. The loudspeaker system sensitivity shall be 87dB-SPL in the 40Hz to 300Hz frequency range with measurements referenced to 1W (2.85V) pink noise input at 1m. The dispersion shall be omnidirectional at MB4 speaker MB4 speaker all frequencies below 200Hz. The power handling capacity of the loudspeaker shall be 200W continuous pink noise, band-limited from 40Hz to 300Hz. The loudspeaker shall be a vented enclosure, tuned at 45Hz. The input connectors of the Panaray MB4 speaker shall consist of two parallel Speakon® NL4 receptacles. DIMENSIONS The enclosure of the MB4 loudspeaker shall be composed of high-density MultiFiber multi-layer wood particle panel with highimpact foamed polypropylene end caps. TOP VIEW 18.1" 459mm M8 Its outer dimensions shall be 18.1"D x 10.2"W x 26.7"H (45 cm x 25.9 cm x 67.8 cm). Its weight shall be 45 lb (20 kg). 10.2" 260mm The loudspeaker shall be the Panaray® MB4 modular bass loudspeaker. 8.6" 219mm The loudspeaker system shall be used with a separate system controller, to be connected to the input(s) of the system power amplifier(s), or with an MB4 EQ card, to be installed in a Bose 1600 or 1800 amplifier. The Panaray system digital controller shall provide active electronic equalisation and crossover functions. BACK VIEW 10.2" 260mm SAFETY AND REGULATORY COMPLIANCE All versions of the Panaray MB4 modular bass loudspeakers comply with ANSI/EIA 636, Recommended Loudspeaker Safety Practices and EMC Directive 89/336/EEC and Article 10 (1) of the Directive in compliance with EN50081-1, EN 50082-1, as signified by the CE mark. 26.7" 677mm 23" 583mm WARRANTY INFORMATION All versions of the Bose Panaray MB4 modular bass loudspeakers are covered by a 5year, transferable limited warranty. SIDE VIEW 18.1" 459mm 12.2" 310mm 26.7" 677mm 23" 583mm PANARAY® System Digital Controller Installation guide STANDBY INPUT METER TPM L -dB 40 24 18 12 6 R 0 O PRESET LIMITER UTILITY DELAY Stereo Bank 802 Full Range PANARAY SYSTEM DIGITAL CONTROLLER pro.bose.com 2 Table of Contents Safety Information . . . . . . . . . . . . . . . . . . . . . . . . . . . . . . . . . . . . . . . . . . . . . . . . . . . 4 1.0 2.0 3.0 4.0 5.0 6.0 7.0 8.0 9.0 10.0 11.0 12.0 13.0 14.0 Introduction . . . . . . . . . . . . . . . . . . . . . . . . . . . . . . . . . . . . . . . . . . . . . . . . . . . . . . . . 8 Front Panel . . . . . . . . . . . . . . . . . . . . . . . . . . . . . . . . . . . . . . . . . . . . . . . . . . . . . . . . 9 Rear Panel . . . . . . . . . . . . . . . . . . . . . . . . . . . . . . . . . . . . . . . . . . . . . . . . . . . . . . . . 10 Signal Flow . . . . . . . . . . . . . . . . . . . . . . . . . . . . . . . . . . . . . . . . . . . . . . . . . . . . . . . . 11 4.1 Ch1 and Ch2 Inputs . . . . . . . . . . . . . . . . . . . . . . . . . . . . . . . . . . . . . . . . . . . . 12 4.2 EQ and Crossover . . . . . . . . . . . . . . . . . . . . . . . . . . . . . . . . . . . . . . . . . . . . . 13 4.3 2 x 4 Router . . . . . . . . . . . . . . . . . . . . . . . . . . . . . . . . . . . . . . . . . . . . . . . . . . 14 4.4 Delay and Limiter . . . . . . . . . . . . . . . . . . . . . . . . . . . . . . . . . . . . . . . . . . . . . . 15 PRESET Button. . . . . . . . . . . . . . . . . . . . . . . . . . . . . . . . . . . . . . . . . . . . . . . . . . . . . 16 5.1 Stereo Bank . . . . . . . . . . . . . . . . . . . . . . . . . . . . . . . . . . . . . . . . . . . . . . . . . . 17 5.1.1 Stereo Mid-High with Mono Bass . . . . . . . . . . . . . . . . . . . . . . . . . . . . . 18 5.2 Mono Bank . . . . . . . . . . . . . . . . . . . . . . . . . . . . . . . . . . . . . . . . . . . . . . . . . . . 19 5.3 Bass Array Bank . . . . . . . . . . . . . . . . . . . . . . . . . . . . . . . . . . . . . . . . . . . . . . . 20 5.4 Dual Mono Operation . . . . . . . . . . . . . . . . . . . . . . . . . . . . . . . . . . . . . . . . . . . 22 DELAY Button . . . . . . . . . . . . . . . . . . . . . . . . . . . . . . . . . . . . . . . . . . . . . . . . . . . . . . 24 LIMITER Button. . . . . . . . . . . . . . . . . . . . . . . . . . . . . . . . . . . . . . . . . . . . . . . . . . . . . 25 UTILITY Button . . . . . . . . . . . . . . . . . . . . . . . . . . . . . . . . . . . . . . . . . . . . . . . . . . . . . 26 8.1 User Lockout . . . . . . . . . . . . . . . . . . . . . . . . . . . . . . . . . . . . . . . . . . . . . . . . . 28 Router Functionality. . . . . . . . . . . . . . . . . . . . . . . . . . . . . . . . . . . . . . . . . . . . . . . . . . 29 Optimizing Signal-to-Noise. . . . . . . . . . . . . . . . . . . . . . . . . . . . . . . . . . . . . . . . . . . . . 31 Custom Preset Mode. . . . . . . . . . . . . . . . . . . . . . . . . . . . . . . . . . . . . . . . . . . . . . . . . 33 Bass Array Presets . . . . . . . . . . . . . . . . . . . . . . . . . . . . . . . . . . . . . . . . . . . . . . . . . . 34 12.1 Bass Array Setup and Connections . . . . . . . . . . . . . . . . . . . . . . . . . . . . . . . . . 35 Bose® Speaker EQ Preset List . . . . . . . . . . . . . . . . . . . . . . . . . . . . . . . . . . . . . . . . . . 38 13.1 Mono Bank . . . . . . . . . . . . . . . . . . . . . . . . . . . . . . . . . . . . . . . . . . . . . . . . . . . 39 13.2 Stereo Bank . . . . . . . . . . . . . . . . . . . . . . . . . . . . . . . . . . . . . . . . . . . . . . . . . . 46 13.3 Bass Array Bank . . . . . . . . . . . . . . . . . . . . . . . . . . . . . . . . . . . . . . . . . . . . . . . 53 Technical Information. . . . . . . . . . . . . . . . . . . . . . . . . . . . . . . . . . . . . . . . . . . . . . . . . 54 Appendix: PANARAY® System Digital Controller Quick-Reference Guide. . . . . . . . . . 55 3 Important Safety Instructions Warning (English) To reduce the risk of fire or electric shock, do not expose the unit to rain or moisture. Advarsel (Dansk) Enheden må ikke udsættes for regn eller fugtighed af hensyn til risikoen for brand eller elektrisk stød. CAUTION FFORSIGTIGHEDOF RISK OF ELECTRICAL SHOCK DO NOT OPEN RISIKO FOR ELEKTRISK STØD MÅ IKKE ÅBNES CAUTION: TO REDUCE THE RISK OF ELECTRIC SHOCK, DO NOT REMOVE COVER (OR BACK). NO USER-SERVICEABLE PARTS INSIDE. REFER SERVICING TO QUALIFIED PERSONNEL. FJERN IKKE LÅGET (ELLER BAGKLÆDNINGEN) AF HENSYN TIL RISIKOEN FOR ELEKTRISK STØD. DER ER INGEN DELE INDEN I, DER KAN SERVICERES AF BRUGEREN. OVERLAD SERVICERINGEN TIL KVALIFICERET PERSONALE. These CAUTION marks may be located on the back of the PANARAY® System Digital Controller. The lightning flash with arrowhead symbol, within an equilateral triangle, is intended to alert the user to the presence of uninsulated dangerous voltage within the system enclosure that may be of sufficient magnitude to constitute a risk of electric shock. Disse FORSIGTIGHEDSMÆRKER er anbragt på de PANARAY® System Digital Controller. Symbolet med et lyn med pilespids i en ligesidet trekant skal gøre brugeren opmærksom på tilstedeværelsen af en ikke-isoleret farlig spænding i det lukkede system, der kan være tilstrækkelig kraftig til at give elektrisk stød. The exclamation point within an equilateral triangle, as marked on the system, is intended to alert the user to the presence of important operating and maintenance instructions in this owner’s guide. Important Safety Instructions Vigtige sikkerhedsinstruktioner 1. 2. 3. 4. 5. 1. 2. 3. 4. 5. 6. 7. 8. 9. 10. 11. 12. 13. 14. 15. 16. 17. 4 Udråbstegnet i en ligesidet trekant, som systemet er mærket med, er beregnet til at advare brugeren om vigtige instruktioner til betjening og vedligeholdelse i denne betjeningsvejledning. Read and follow these instructions. Heed all warnings–on the product and in the owner’s guide. Do not use this apparatus near water or moisture. Clean only with a dry cloth. Do not block any ventilation openings. Install in accordance with the manufacturer’s instructions. To ensure reliable operation of the product and to protect it from overheating, put the product in a position and location that will not interfere with its proper ventilation. Do not install near any heat sources, such as radiators, heat registers, stoves, or other apparatus (including amplifiers) that produce heat. Do not defeat the safety purpose of the grounding-type plug. A grounding-type plug has two blades and a third grounding prong. The third prong is provided for your safety. If the provided plug does not fit in your outlet, consult an electrician for replacement of the outlet. Protect the power cord from being walked on or pinched, particularly at plugs, convenience receptacles, and the point where they exit from the apparatus. Only use attachments/accessories specified by the manufacturer. Use only with a cart, stand, tripod, bracket or table specified by the manufacturer or sold with the apparatus. When a cart is used, use caution when moving the cart/apparatus combination to avoid injury from tip-over. Refer all servicing to qualified service personnel. Servicing is required when the apparatus has been damaged in any way: such as power supply cord or plug is damaged; liquid has been spilled or objects have fall en into the apparatus; the apparatus has been exposed to rain or moisture, does not operate normally, or has been dropped–Do not attempt to service this product yourself. Opening or removing covers may expose you to dangerous voltages or other hazards. Please call Bose® to be referred to an authorized service center near you. To prevent risk of fire or electric shock, avoid overloading wall outlets, extension cords, or integral convenience receptacles. Do not let objects or liquids enter the product– as they may touch dangerous voltage points or short-out parts that could result in a fire or electric shock. See product enclosure back for safety related markings. No naked flame sources, such as lighted candles, should be placed on the apparatus. Product must be rack-mounted and installed in accordance with local building codes. Product is not intended for marine applications. Læs og følg disse instruktioner. Læg mærke til alle advarsler - på produktet og i betjeningsvejledningen. Anvend ikke dette apparat i nærheden af vand eller fugtighed. Rengør kun med en tør klud. Undgå at blokere ventilationsåbningerne. Installér i overensstemmelse med producentens instruktioner - Til sikring af pålidelig funktion og beskyttelse mod overophedning skal produktet anbringes i en position og på et sted, der ikke hindrer korrekt ventilation. 6. Installér ikke i nærheden af varmekilder, såsom radiatorer, varmeovne, komfurer eller andre apparater (herunder forstærkere) der frembringer varme. 7. Omgå ikke sikkerheden ved brug af et ikke jordforbundet stik. Et jordforbundet stik har to ben og et tredje jordben. Det tredje ben er der af hensyn til din sikkerhed. Hvis det medfølgende stik ikke passer i stikkontakten, skal du kontakte en elektriker for at få stikkontakten udskiftet. 8. Beskyt netledningen mod at blive trådt på eller klemt, specielt ved stik, stikkontakter og der, hvor den kommer ud af apparatet. 9. Brug kun tilslutningsudstyr/tilbehør, der er angivet af producenten. 10.Brug det kun sammen med en vogn, eller bord, der er angivet af producenten eller solgt sammen med apparatet. Når der anvendes en vogn, skal der udvises forsigtighed ved kørsel med vogn/apparat, så det ikke vælter. 11. Overlad al serviceringen til kvalificeret servicepersonale. Service er påkrævet, hvis apparatet på nogen måde er blevet beskadiget: f.eks. hvis netledningen eller stikket er blevet beskadiget, der er blevet spildt væske eller faldet genstande ned i apparatet, apparatet er blevet udsat for regn eller fugt, hvis det ikke fungerer normalt, eller hvis det er blevet tabt - forsøg ikke at reparere apparatet selv. Åbning eller fjernelse af låget kan udsætte dig for farlige spændinger eller andre farer. Kontakt Bose® for at få oplysninger om det nærmeste servicecenter. 12.Undgå at overbelaste stikkontakter, forlængerledninger eller indbyggede stik af hensyn til risikoen for brand eller elektrisk stød. 13.Undgå at genstande eller væsker kommer ind i produktet, da de kan berøre steder med farlige spændinger eller kortslutte dele, hvilket kan resultere i brand eller elektrisk stød. 14.Se på bagklædningen angående mærkater, der er relevante for sikkerheden. 15.Der må ikke anbringes åben ild såsom tændte lys på apparatet. 16.Produktet skal monteres i rack og installeres i henhold til lokale bygningsregler. 17.Produktet er ikke beregnet til marineprogrammer. Important Safety Instructions Vorsicht! (Deutsch) Advertencia (Español) Dieses Gerät darf weder Regen noch Feuchtigkeit ausgesetzt werden, damit Brände durch Kurzschluss oder elektrische Schläge verhindert werden. Con el fin de reducir el riesgo de descarga eléctrica, no exponga la unidad a lluvia o humedad. FPRECAUCIÓNF FVORSICHT!OF STROMSCHLAGGEFAHR! NICHT ÖFFNEN. RIESGO DE DESCARGA ELÉCTRICA NO ABRIR ACHTUNG! ZUR VERMEIDUNG VON ELEKTRISCHEN SCHLÄGEN WEDER DIE ABDECKUNG NOCH DIE RÜCKWAND ENTFERNEN. IM INNEREN BEFINDEN SICH KEINE VOM BENUTZER ZU WARTENDEN TEILE. WENDEN SIE SICH BEI NOTWENDIGEN REPARATUREN AN QUALIFIZIERTES FACHPERSONAL. PRECAUCIÓN: PARA REDUCIR EL RIESGO DE DESCARGA ELÉCTRICA, NO QUITE LA CUBIERTA (O LA PARTE TRASERA). EL INTERIOR NO CONTIENE COMPONENTES REPARABLES POR EL USUARIO. PARA REPARACIONES, LLEVE EL APARATO A PERSONAL CUALIFICADO. Diese Sicherheitshinweise befinden sich auf der Rückseite des PANARAY® System DigitalController. Das Blitzsymbol mit Pfeilspitze in einem gleichseitigen Dreieck soll den Benutzer auf das Vorhandensein einer nichtisolierten gefährlichen elektrischen Spannung innerhalb des Systemgehäuses hinweisen, die so hoch ist, dass eine Gefährdung durch elektrische Schläge besteht. Das Ausrufungszeichen in einem gleichseitigen Dreieck, wie es auf dem System angebracht ist, soll den Benutzer auf wichtige Bedienungs- und Wartungsanweisungen in dieser Bedienungsanleitung aufmerksam machen. Estas marcas de PRECAUCIÓN podrian estar situadas en la parte trasera del Controlador Digital para Systemas PANARAY® El símbolo de un relámpago con una flecha, dentro de un triángulo equilátero, avisa al usuario que dentro de la caja del sistema puede haber voltaje de una magnitud suficiente para constituir un riesgo de descarga eléctrica. Wichtige Sicherheitshinweise Importantes instrucciones de seguridad 1. Lesen Sie die folgenden Sicherheitshinweise noch vor der Inbetriebnahme des Geräts aufmerksam durch. 2. Beachten Sie alle Warn- und Sicherheitshinweise am Gerät und in dieser Bedienungsanleitung. 3. Verwenden Sie dieses Gerät nicht in der Nähe von Wasser oder Feuchtigkeit. 4. Reinigen Sie das Gerät nur mit einem sauberen, trockenen Tuch. 5. Achten Sie darauf, dass die Lüftungsöffnungen nicht blockiert sind. Stellen Sie das Gerät gemäß den Herstelleranweisungen auf. Stellen Sie es nur an einem Ort auf, an dem eine gute Luftzirkulation gewährleistet ist, um den zuverlässigen Betrieb des Geräts sicherzustellen und es gegen Überhitzung zu schützen. 6. Stellen Sie das Gerät nicht in der Nähe von Wärmequellen auf, wie Heizkörpern, Wärmespeichern, Öfen oder anderen Geräten (auch Verstärkern), die Wärme erzeugen. 7. Beeinträchtigen Sie in keiner Weise die Schutzfunktion des Schutzkontaktsteckers. Ein Schutzkontaktstecker hat zwei Stromkontakte und einen dritten Erdungskontakt. Dieser Erdungskontakt dient Ihrer Sicherheit. Falls der mitgelieferte Schutzkontaktstecker nicht n Ihre Steckdose passt, wenden Sie sich an einen qualifizierten Elektriker, um die Steckdose auszutauschen. 8. Verlegen Sie das Netzkabel so, dass es keine Stolpergefahr darstellt und nicht beschädigt werden kann - insbesondere im Bereich von Steckern und Steckdosen und dort, wo das Netzkabel aus dem Gerät herausgeführt wird. 9. Verwenden Sie nur Zubehör-/Anbauteile, die vom Hersteller zugelassen sind. 10.Verwenden Sie für das Gerät nur Rollwagen, Ständer, Dreibeine, Halterungen oder Tische, die vom Hersteller zugelassen sind oder zusammen mit dem Gerät verkauft werden. Falls Sie einen Rollwagen verwenden, dürfen Sie die Einheit Gerät/Rollwagen nur mit Vorsicht bewegen, damit Verletzungen beim möglichen Umkippen ausgeschlossen sind. 11. Wenden Sie sich bei allen Reparatur- und Wartungsarbeiten nur an qualifiziertes Kundendienstpersonal. Eine Reparatur ist erforderlich, wenn das Gerät in irgendeiner Weise beschädigt wurde: Beispielsweise falls das Netzkabel oder der Netzstecker beschädigt ist, Flüssigkeit oder Fremdkörper in das Gerät gelangt sind oder das Gerät Regen bzw. Feuchtigkeit ausgesetzt war, nicht einwandfrei arbeitet oder heruntergefall en ist. Versuchen Sie in solchen Fällen keinesfalls, das Gerät selbst zu reparieren. Öffnen oder entfernen Sie unter keinen Umständen Gehäuseabdeckungen, da Sie andern falls mit gefährlichen elektrischen Spannungen in Berührung kommen oder anderen Gefahren ausgesetzt sein könnten. Wenden Sie sich telefonisch an Bose®, um die Anschrift eines autorisierten Kundendienstzentrums in Ihrer Nähe zu erfragen. 12.Vermeiden Sie Gefahren durch Brände oder elektrische Schläge, indem Sie Steckdosen, Verlängerungskabel und integrierte Gerätesteckdosen nicht überlasten. 13.Lassen Sie keine Flüssigkeiten oder Fremdkörper in das Gerät gelangen - sie können unter gefährliche elektrische Spannung gesetzt werden oder Bauteile kurzschließen und folglich Brände und elektrische Schläge auslösen. 14.Beachten Sie die Sicherheitshinweise auf der Geräterückseite. 15.Stellen Sie keine offenen Flammen, wie brennende Kerzen, auf das Gerät. 16.Rack-Einbau und Installation des Produkts müssen in Übereinstimmung mit den vor Ort geltenden Bauordnungen erfolgen. 17.Das Produkt ist nicht für den Einsatz in Wassernähe bestimmt. 1. 2. 3. 4. 5. El signo de exclamación dentro de un triángulo equilátero, según las marcas en el sistema, sirven para avisar al usuario de que existen instrucciones de operación y mantenimiento importantes en esta guía del usuario. Lea y siga estas instrucciones. Respete todos los avisos – del producto y de la guía del usuario. No utilice este aparato cerca del agua o humedad. Limpie sólo con un trapo seco. No bloquee las aperturas de ventilación. Instale según las instrucciones del fabricante – Para garantizar que el producto funciona de manera fiable y con el fin de evitar que se sobrecaliente, coloque el producto en una posición y ubicación que no interfiera con su ventilación adecuada. 6. No lo instale cerca de fuentes de calor, tales como radiadores, salidas de aire caliente, hornos o demás aparatos (inclusive amplificadores), que generen calor. 7. No elimine el dispositivo de seguridad ofrecido por el enchufe con toma a tierra. Los enchufes con toma a tierra tienen dos patas para la corriente, y una tercera para la toma de tierra. La tercera pata está instalada a efectos de seguridad. Si el enchufe suministrado no encaja en sus tomas de electricidad, consulte con un electricista para sustituirlo. 8. Proteja el cable eléctrico de forma que nadie lo pise o quede apretado, particularmente cerca de los enchufes, receptáculos de tomas múltiples, y en el lugar en el que sale del aparato. 9. Utilice sólo conexiones y accesorios suministrados por el fabricante. 10.Utilice sólo con un carrito, soporte, trípode, abrazadera o mesa suministrados por el fabricante o vendidos junto al aparato. Cuando se utilice un carrito, tenga cuidado al mover la combinación de carrito/aparato para evitar lesiones en caso de que se caiga. 11. Toda reparación debe ser realizada por personal cualificado. Lleve el aparato a reparar si éste sufre cualquier daño, como por ejemplo: si el cable eléctrico o enchufe están dañados, se ha derramado líquido o han caído objetos dentro del aparato; el aparato ha sido expuesto a la lluvia o a la humedad, no funciona normalmente, o ha caído – No intente reparar este producto usted mismo. Abrir o sacar las tapas le expondrá a volta jes peligrosos o a otros peligros. Por favor llame a Bose® para que le indiquen un centro de reparación autorizado en su zona. 12.Para impedir el riesgo de descarga eléctrica, evite la sobrecarga de los enchufes, cables de extensión o receptáculos de varias tomas. 13.No deje que caigan objetos o líquidos dentro del aparato – ya que podrían tocar puntos en los que existen niveles de voltaje peligrosos, o causar cortocircuitos que podrían causar incendios o descargas eléctricas. 14.Vea la parte posterior de la caja para indicaciones de seguridad. 15.No coloque en el aparato ninguna llama viva, como por ejemplo una vela. 16.El producto se debe montar en bastidor y debe instalarse según los códigos de montaje locales. 17.El producto no está pensado para aplicaciones marinas. 5 Important Safety Instructions Avertissement (Français) Avvertenza (Italiano) Afin de réduire le risque d’incendie ou de choc électrique, ne pas exposer le système à la pluie ou à l’humidité. Per ridurre il pericolo di incendi o scosse elettriche, non esporre l’apparecchio alla pioggia o all’umidità. ATTENTION PERICOLO DI SCOSSE ELETTRICHE NON APRIRE ATTENTION : AFIN DE REDUIRE LE RISQUE DE CHOC ELECTRIQUE, NE PAS RETIRER LE CAPOT DE L’APPAREIL (OU SON PANNEAU ARRIÈRE). IL N’EXISTE A L’INTERIEUR DE CET EQUIPEMENT AUCUN ELEMENT OU SOUS-ENSEMBLE POUVANT ETRE DEPANNE PAR L’UTILISATEUR. LA MAINTENANCE DOIT ETRE REALISEE PAR UN PERSONNEL QUALIFIE. ATTENZIONE: PER RIDURRE IL PERICOLO DI SCOSSE ELETTRICHE, NON RIMUOVERE IL COPERCHIO (O IL PANNELLO POSTERIORE). NON SONO PRESENTI PARTI SOSTITUIBILI DALL’UTENTE. PER L’ASSISTENZA CONTATTATE IL PERSONALE QUALIFICATO. Ces signalisations d’AVERTISSEMENT sont peut-être situées à l’arrière del PANARAY® System Digital Controller L’éclair terminé par une flèche et contenu dans un triangle équilatéral est prévu pour attirer l’attention de l’utilisateur sur la présence à l’intérieur du produit, de tensions dangereuses appliquées à certains éléments non protégés. Ces tensions sont d’une magnitude suffisamment importante pour constituer un risque de choc électrique ou d’électrocution. Le point d’exclamation contenu dans un triangle équilatéral est prévu pour avertir l’utilisateur sur la présence d’instructions importantes de fonctionnement ou de maintenance (sur le produit et dans ce manuel). Consignes de sécurité importantes 1. Lisez et appliquez les instructions données dans ce document. 2. Soyez attentif à tous les avertissements—Ceux figurant sur l’appareil et ceux délivrés dans ce guide. 3. N’utilisez pas cet appareil à proximité d’eau ou d’humidité. 4. Pour le nettoyage, utilisez un chiffon sec. 5. N’obstruez aucun des orifices de ventilation. Choisissez un emplacement conforme aux instructions du fabricant—Pour assurer le bon fonctionnement de l’appareil et le protéger contre tout risque de surchauffe, placez celui-ci à un endroit et dans une position qui ne compromette pas sa ventilation. 6. Ne posez pas l’appareil à proximité de sources de chaleur telles que : radiateurs, bouches de chauffage pulsé, poêle ou autres appareils (amplificateurs y compris) dégageant de la chaleur. 7. Pour votre sécurité, ne débranchez pas la liaison de terre sur la prise secteur. Cette prise comporte deux broches mâles et une broche femelle de mise à la terre. Cette dernière sert à vous protéger. Si la fiche équipant votre appareil ne correspond pas à votre prise secteur murale, faites appel à un électricien qualifié pour qu’il effectue son remplacement. 8. Evitez que le cordon d’alimentation ne soit piétiné ou pincé, en particulier au niveau de la prise, d’un bloc multiprises ou de sa sortie de l’appareil. 9. N’utilisez que les accessoires préconisés par le fabricant. 10.N’utilisez qu’un rack, un meuble, un support ou une table préconisé par le fabricant ou vendu pour être utilisé avec l’appareil. Si l’appareil est placé à l’intérieur d’un rack, déplacez celui-ci avec prudence afin d’éviter qu’il n’occasionne des blessures en se renversant. 11. Faites effectuer tous les travaux d’entretien ou de réparation par un personnel qualifié. Une maintenance est nécessaire dès que l’appareil est endommagé de manière quelconque, notamment lorsque le cordon d’alimentation est en mauvais état, qu’un liquide a été renversé ou qu’un objet est tombé à l’intérieur du produit. Il en va de même si l’équipement a été exposé à la pluie ou à l’humidité, qu’il est tombé ou qu’il ne fonctionne pas normalement—N’essayez pas de réparer cet appareil vous-même. En ouvrant ou en retirant un capot, vous risquez d’entrer en contact avec des tensions dangereuses ou de vous retrouver exposé à d’autres dangers. Appelez la société Bose® afin de connaître la station technique agréée la plus proche de chez vous. 12.Pour éviter tout risque d’incendie ou de choc électrique, ne surchargez pas les prises murales, les prolongateurs ou les blocs multiprises. 13.Evitez que des objets ou des liquides ne pénètrent dans l’appareil. Ils pourraient entrer en contact avec des éléments alimentés par des tensions dangereuses ou créer des courts-circuits pouvant provoquer un incendie ou une électrocution. 14.Reportez-vous aux avertissements relatifs à la sécurité, apposés à l’arrière du châs<None><None>sis. 15.Ne placez aucune flamme nue, telle qu’une bougie, sur l’appareil. 16.L’appareil doit être monté sur rack et installé conformément aux réglements locaux du bâtiment. 17.L’appareil n’est pas destiné à être utilisé sur un bateau. 6 ATTENZIONE RISQUE DE CHOC ELECTRIQUE NE PAS OUVRIR I seguenti simboli di AVVERTENZA sono apposti sul pannello posteriore del PANARAY® System Digital Controller. Il simbolo del fulmine all’interno di un triangolo equilatero ha lo scopo di avvertire gli utenti della presenza di tensione pericolosa non isolata all’interno dell’apparecchio, il cui livello è tale da costituire un potenziale rischio di scossa elettrica. Il simbolo del punto esclamativo all’interno del triangolo equilatero, riportato sull’apparecchio, ha lo scopo di informare gli utenti della presenza di importanti istruzioni di funzionamento e manutenzione nella documentazione fornita con il prodotto. Importanti norme di sicurezza 1. Leggete attentamente le istruzioni riportate di seguito. 2. Prestate attenzione alle avvertenze riportate sull’apparecchio e nel manuale di istruzioni. 3. Non utilizzate questo apparecchio vicino a fonti di umidità o acqua. 4. Utilizzate esclusivamente un panno asciutto per pulire l’apparecchio. 5. Non ostruite le aperture di ventilazione. Installate l’apparecchio conformemente a quanto indicato nelle istruzioni fornite dal produttore. Al fine di garantire il corretto funzionamento del prodotto e di proteggerlo da un riscaldamento eccessivo, collocate l’apparecchio in una posizione tale da non ostacolarne la corretta aerazione. 6. Non installate l’apparecchio vicino a fonti di calore, quali radiatori, stufe o altri apparati (compresi gli amplificatori) che generano calore. 7. Non manomettete la spina dotata di massa (Shuko), progettata per la vostra sicurezza. Una spina Shuko è composta da due terminali e da un terzo terminale a forca per la massa aggiunto per garantire un più elevato livello di sicurezza. Se la spina fornita in dotazione non è adatta alle vostre prese a muro, contattare un tecnico per sostituire le prese. 8. Collocate il cavo di alimentazione in modo da evitare che venga calpestato o piega to, in particolare in corrispondenza delle spine, delle prese multiple e dei punti dove questo esce dall’apparecchio. 9. Utilizzate esclusivamente gli accessori specificati dal produttore. 10.Utilizzate esclusivamente con supporti mobili, piedistalli, staffe o ripiani specificati dal produttore o forniti in dotazione con l’apparecchio. Quando utilizzate un supporto mobile, prestate attenzione durante gli spostamenti dell’insieme carrello/apparecchio per evitare danni fisici causati da un possibile ribaltamento. 11. Per le riparazioni rivolgetevi al personale di assistenza qualificato. Contattate il servizio di assistenza nel caso l’apparecchio presenti danni di qualsiasi tipo, ad esempio al cavo di alimentazione o alla spina oppure dovuti alla penetrazione di liq uido o di altro materiale all’interno dell’apparecchio, all’esposizione dell’apparecchio alla pioggia o all’umidità, a malfunzionamenti o, infine, a caduta. Non tentate di riparare da soli il prodotto. L’apertura o la rimozione del coperchio potrebbe esporre l’utente a tensioni pericolose o ad ulteriori rischi. Vi suggeriamo di contattare la Bose® per informazioni relative al centro di assistenza autorizzato più vicino. 12.Per prevenire il pericolo di incendi o scosse elettriche, evitate il sovraccarico delle prese a muro, delle prolunghe o delle prese multiple di corrente. 13.Prestate attenzione che del liquido o altro materiale non penetri all’interno del prodotto poiché potrebbe venire a contatto con parti sotto tensione o soggette a cortocircuito con conseguente possibilità di incendi o di scosse elettriche. 14.I marchi delle certificazioni di sicurezza sono apposti sul pannello posteriore del prodotto. 15.Non avvicinate all’apparecchio alcun tipo di fiamma, ad esempio un candeliere acceso. 16.Il prodotto deve essere montato in rack e installato in linea con le disposizioni vigen ti in materia edilizia. 17.Il prodotto non è adatto per l’utilizzo in ambito marittimo. Important Safety Instructions 1. Read these instructions. 2. Keep these instructions – for future reference. 3. Heed all warnings – on the product and in the owner’s guide. 4. Follow all instructions. 5. Do not use this apparatus near water or moisture. 6. Clean only with a dry cloth. 7. Do not block any ventilation openings. Install in accordance with the manufacturer’s instructions – To ensure reliable operation of the product and to protect it from overheating, put the product in a position and location that will not interfere with its proper ventilation. 8. Do not install near any heat sources, such as radiators, heat registers, stoves or other apparatus (including amplifiers) that produce heat. 9. Do not defeat the safety purpose of the polarized or grounding-type plug. A polarized plug has two blades with one wider than the other. A grounding-type plug has two blades and a third grounding prong. The wider blade or third prong are provided for your safety. If the provided plug does not fit in your outlet, consult an electrician for replacement of the obsolete outlet. 10. Protect the power cord from being walked on or pinched, particularly at plugs, convenience receptacles, and the point where they exit from the apparatus. 11. Only use attachments/accessories specified by the manufacturer. 12. Use only with the cart, stand, tripod, bracket or table specified by the manufacturer or sold with the apparatus. When a cart is used, use caution when moving the cart/apparatus combination to avoid injury from tipover. 13. Unplug this apparatus during lightning storms or when unused for long periods of time – to prevent damage to this product. 14. Refer all servicing to qualified service personnel. Servicing is required when the apparatus has been damaged in any way: such as power-supply cord or plug is damaged; liquid has been spilled or objects have fallen into the apparatus; the apparatus has been exposed to rain or moisture, does not operate normally, or has been dropped – Do not attempt to service this product yourself. Opening or removing covers may expose you to dangerous voltages or other hazards. Please call Bose® to be referred to an authorized service center near you. 15. To prevent risk of fire or electric shock, avoid over loading wall outlets, extension cords, or integral convenience receptacles. 16. Do not let objects or liquids enter the product – as they may touch dangerous voltage points or shortout parts that could result in a fire or electric shock. 17. See product enclosure back for safety related markings. 18. No naked flame sources, such as lighted candles, should be placed on the apparatus. Information about products that generate electrical noise This equipment has been tested and found to comply with the limits for a Class A digital device, pursuant to Part 15 of the FCC rules. These limits are designed to provide reasonable protection against harmful interference in a residential installation. This equipment generates, uses, and can radiate radio frequency energy and, if not installed and used in accordance with the instructions, may cause harmful interference to radio communications. However, this is no guarantee that interference will not occur in a particular installation. If this equipment does cause harmful interference to radio or television reception, which can be determined by turning the equipment off and on, you are encouraged to try to correct the interference by one or more of the following measures: • Reorient or relocate the receiving antenna. • Increase the separation between the equipment and receiver. • Connect the equipment to an outlet on a different circuit than the one to which the receiver is connected. • Consult the dealer or an experienced radio/TV technician for help. Note: Unauthorized modification of the receiver or radio remote control could void the user’s authority to operate this equipment. This product complies with the Canadian ICES-003 Class A specifications. 7 1.0 Introduction Thank you for purchasing the Bose® PANARAY® system digital controller. The PANARAY system digital controller uses a digital signal processing (DSP) architecture to provide smooth, accurate spectral response for Bose professional loudspeakers that require active equalization. Bose professional loudspeaker EQ can be applied by simply selecting the appropriate preset and configuration. No additional programming is required. The PANARAY system digital controller has two balanced XLR analog inputs and four balanced XLR analog outputs. It can be configured to run two mono Bose speaker EQ presets or a single stereo Bose speaker EQ preset (including preset crossover settings). There are a total of 180 presets, which are separated into Stereo, Mono, and Bass Array Banks. All routing is automatic, based on the selected preset and configuration. See the preset chart in section 13.0 for a full list of presets with descriptions and output routing defaults. In addition to providing Bose speaker equalization, the PANARAY system digital controller also has the following easy-to-use programmable features: • Four independent programmable line delays (200 ms per output) that can be used for decentralized or distributed speaker alignment and for creating custom bass arrays. • Four independent programmable output limiters that can be set to protect speakers from unpredictable spikes in program material. • Programmable signal router that allows each output to select Full Range, High Pass, Low Pass or Bypass EQ combinations of input signals. INPUT METER TPM STANDBY L -dB 40 24 18 12 6 0 O PRESET LIMITER UTILITY DELAY Stereo Bank 802 Full Range R PANARAY SYSTEM DIGITAL CONTROLLER OUTPUTS INPUTS CH1/MONO CH2 CH1 CH2 CH3 CH4 COM Bose Corporation, Framingham, MA 01701-9168 Made in the U.S.A. POWER 100-240V~AC 50-60Hz 300W MAX RISK OF ELECTRICAL DO NOT OPEN 8 RISQUE DE CHOC ELECTRIQUE NE PAS OUVRIR 2.0 Front Panel STANDBY INPUT METER TPM L -dB 40 24 18 12 6 0 O PRESET LIMITER UTILITY DELAY Stereo Bank 802 Full Range R PANARAY SYSTEM DIGITAL CONTROLLER STANDBY button: Standby on/off Input Meters: The peak meter shows the input level of left and right channels. The meter range is: O (Overload), 0, -6, -12, -24, -40dB Overload LEDs: The Overload LEDs indicate one of two situations. • The input level is clipping (you will hear it). • There is an internal DSP overflow. The Overload LED is lit when one sample is at 0 dBFS. Display: The 2 x 16 LCD displays Preset names, parameter names, and values depending on the mode of operation. PRESET Button: Press to enter preset mode, which provides access to Bose® speaker EQ presets. LIMITER Button: Press to access output limiter parameters. UTILITY Button: Press to access ROUTING, LEVEL and general SYSTEM parameters. DELAY Button: Press to access output delay parameters. Encoder Wheel: Selects presets and changes parameter values. Arrow UP Button: Press to navigate up through the user interface. Arrow DOWN Button: Press to navigate down through the user interface. 9 3.0 Rear Panel OUTPUTS INPUTS CH1/MONO CH2 CH1 CH2 CH3 CH4 COM POWER Bose Corporation, Framingham, MA 01701-9168 Made in the U.S.A. 100-240V~AC 50-60Hz 300W MAX RISK OF ELECTRICAL DO NOT OPEN RISQUE DE CHOC ELECTRIQUE NE PAS OUVRIR Balanced XLR Inputs: Two balanced XLR inputs Balanced XLR Outputs: Four balanced XLR outputs Jack (balanced) - XLR COM Port: 5-pin DIN that will be used for future software upgrades or for adding new Bose® speaker EQ presets Sleeve - Pin 1 (Ground) Tip - Pin 2 (Hot) Ring - Pin 3 (Cold) Power Input: 100-240VAC switching power supply input TIP RING GND 1 XLR Wiring Jack (balanced) - XLR 3 2 + Hot – Cold Sleeve - Pin 1 (Ground) Tip - Pin 2 (Hot) Ring - Pin 3 (Cold) 10 Ground 4.0 Signal Flow The PANARAY® system digital controller has the ability to run a single stereo preset, a single mono preset, or to run in dual mono mode. In the following section, the controller’s signal flow is broken down to provide a better understanding of its full functionality. Input Meter Input CH1 Input trim EQ CH1 Xover CH1 High Low 1 CH1 High 2 CH2 High 3 Mono High 4 CH1 Low 5 CH2 Low 6 Mono Low 7 CH1 FR 8 CH2 FR 9 Mono FR 10 CH1 No EQ 11 CH2 No EQ 12 Mono No EQ Input CH2 Input trim EQ CH2 Input meter Xover CH2 Delay line Limiter Output 4 Delay line Limiter Output 3 Delay line Limiter Output 2 Delay line Limiter Output 1 High Low Stereo Operation: When a preset is loaded from the stereo bank, the EQ/crossover blocks both process each input the same way, meaning that the parameters are “linked”. The signal then passes through the router section where the CH1 and CH2 inputs are sent to independent output channels for stereo operation. Mono Operation: When a preset is loaded from the mono bank, the EQ/crossover blocks both process each input the same way, meaning that the parameters are “linked”. The signal then passes through the router section where the CH1 and CH2 inputs are summed to mono. The controller has the ability to sum a stereo signal to mono, or, it can process a single input for mono operation. Audio information is routed to the same outputs regardless of the number of inputs that are connected. Dual Mono Operation: When the PANARAY® system digital controller is used in dual mono mode, the EQ/crossover blocks process each input independently – allowing the user to run two independent speaker EQs. The router also processes each input independently, so each output is discrete. 11 4.1 Signal Flow – CH1 and CH2 Inputs 1. CH1 and CH2 Inputs Input Meter Input CH1 Input trim EQ CH1 Xover CH1 High Low 1 CH1 High 2 CH2 High 3 Mono High 4 CH1 Low 5 CH2 Low 6 Mono Low 7 CH1 FR 8 CH2 FR 9 Mono FR 10 CH1 No EQ 11 CH2 No EQ 12 Mono No EQ Input CH2 Input trim EQ CH2 Xover CH2 Limiter Output 4 Delay line Limiter Output 3 Delay line Limiter Output 2 Delay line Limiter Output 1 High Low Input meter 1. CH1 and CH2 Input Section: A stereo, mono, or dual mono signal passes through the input section. 12 Delay line 4.2 Signal Flow – EQ and Crossover 2. EQ and Crossover Input Meter Input CH1 Input trim EQ CH1 Xover CH1 High Low 1 CH1 High 2 CH2 High 3 Mono High 4 CH1 Low 5 CH2 Low 6 Mono Low 7 CH1 FR 8 CH2 FR 9 Mono FR 10 CH1 No EQ 11 CH2 No EQ 12 Mono No EQ Input CH2 Input trim EQ CH2 Xover CH2 Delay line Limiter Output 4 Delay line Limiter Output 3 Delay line Limiter Output 2 Delay line Limiter Output 1 High Low Input meter 2. EQ and Crossover: Next, the program material passes through the EQ and crossover section. 13 4.3 Signal Flow – 2 x 4 Router 3. 2 x 4 Router Input Meter Input CH1 Input trim EQ CH1 Xover CH1 High Low 1 CH1 High 2 CH2 High 3 Mono High 4 CH1 Low 5 CH2 Low 6 Mono Low 7 CH1 FR 8 CH2 FR 9 Mono FR 10 CH1 No EQ 11 CH2 No EQ 12 Mono No EQ Input CH2 Input trim EQ CH2 Input meter Xover CH2 Delay line Limiter Output 4 Delay line Limiter Output 3 Delay line Limiter Output 2 Delay line Limiter Output 1 High Low 3. 2 x 4 Router: The 2 x 4 router gives the user the ability to select from the options listed in the routing matrix to the right, and route the selection to any of the controller’s four outputs. Complete detail of the router operation can be found in section 9.0. 14 4.4 Signal Flow – Delay and Limiter Input Meter Input CH1 Input trim EQ CH1 Xover CH1 High Low 1 CH1 High 2 CH2 High 3 Mono High 4 CH1 Low 5 CH2 Low 6 Mono Low 7 CH1 FR 8 CH2 FR 9 Mono FR 10 CH1 No EQ 11 CH2 No EQ 12 Mono No EQ 4. Delay and Limiter Input CH2 Input trim EQ CH2 Input meter Xover CH2 Delay line Limiter Output 4 Delay line Limiter Output 3 Delay line Limiter Output 2 Delay line Limiter Output 1 High Low 4. Delay and Limiter: After the signal passes through the routing matrix, it goes to each of the four outputs and passes through the delay and limiter blocks on each channel. The delay and limiter blocks can be bypassed by the user. For more information on controlling the delay and limiter see sections 6.0 and 7.0. 15 5.0 PRESET BUTTON STANDBY PRESET INPUT METER TPM L -dB 40 24 18 12 6 0 O R PRESET LIMITER UTILITY DELAY Stereo Bank 802 Full Range PANARAY SYSTEM DIGITAL CONTROLLER There are 180 speaker EQ presets in the PANARAY® system digital controller. They are organized into banks: Stereo, Mono, Bass Array and Dual Mono. Within each bank are presets that provide Bose® speaker equalization. To load a preset from the front panel: • Press the PRESET button. Next, use the Arrow UP or Arrow DOWN button to select the configuration bank (Stereo, Mono, etc.). • Then use the Encoder to select the desired preset. The PANARAY system digital controller automatically updates the outputs to reflect the selected EQ preset and configuration. The examples on the following pages illustrate how the PANARAY system digital controller is configured for each type of default output. A complete list of presets (with descriptions) can be found in section 13.0. 16 5.1 PRESET Button – Stereo Bank Stereo Preset Bank: Presets designed for Stereo operation. Example 1: Stereo Full Range PANARAY® System Digital Controller Display Stereo 802III Preset Description OUTPUTS INPUTS CH1 CH2 CH1/MONO CH2 CH3 COM CH4 100-240V~AC 50-60Hz 300W MAX 802 -III Speaker Stereo Full Range RISK OF ELECTRICAL DO NOT OPEN RISQUE DE CHOC ELECTRIQUE NE PAS OUVRIR Controller Inputs Ch 1/Mono Left from mixer Ch 2 Right from mixer POWER Bose Corporation, Framingham, MA 01701-9168 Made in the U.S.A. 802®-III speaker Right (Full range) From mixer Left Controller Default Output Routing Ch 1 Ch 2 Routing 802-III speaker CH1 (Full range) 802-III speaker 802-III speaker 802-III speaker CH2 CH1 CH2 (Full range) (Full range) (Full range) Ch 3 Limiter Off Off Of f Off Delay Off Off Off Off Right 802-III speaker Left (Full range) Ch 4 Example 2: Stereo Mid-High with Stereo Bass PANARAY System Digital Controller Display Stereo 802III+MB4 OUTPUTS INPUTS Preset Description CH1/MONO CH2 CH1 CH2 CH3 CH4 COM Bose Corporation, Framingham, MA 01701-9168 Made in the U.S.A. POWER 100-240V~AC 50-60Hz 300W MAX RISK OF ELECTRICAL DO NOT OPEN 802-III Speaker Stereo with MB4 Speaker Stereo Bass RISQUE DE CHOC ELECTRIQUE NE PAS OUVRIR Controller Inputs Ch 1/Mono Left from mixer Ch 2 Right from mixer From mixer Left Controller Default Output Routing Ch 1 Ch 2 Ch3 Ch4 Routing 802-III speaker 802-III speaker MB4 speaker CH1 CH2 CH1 (High freq) (High freq) (Low freq) MB4 speaker CH2 (Low freq) Limiter Off Off Off Off Delay Off Off Of f Off Right 802-III speaker Right (High freq) 802-III speaker Left (High freq) MB4 speaker Right (Low freq) MB4 speaker Left (Low freq) 17 5.1.1 PRESET Button – Stereo Bank Example 3: Stereo Mid-High with Mono Bass Due to space limitations in the PANARAY® system digital controller, there are no Presets that default to a Stereo Mid-High with Mono Bass configuration. To set up the controller for this operation, simply perform the following steps. 1. Select the desired Preset from the Stereo bank. 2. Press the UTILITY Button and use the Arrow DOWN button to navigate to Output Route 3 and Output Route 4. Set both outputs to Mono/Low. Now all of the bass content is set up to be summed to mono, but the mid-high devices will still be stereo. Note: Save all changes before loading a new Preset. Unsaved router changes will be lost if another speaker EQ Preset is loaded. To save settings see section 11.0. PANARAY System Digital Controller Display Stereo 402II+MB4 OUTPUTS INPUTS CH1/MONO CH2 CH1 CH2 CH3 CH4 COM Bose Corporation, Framingham, MA 01701-9168 Made in the U.S.A. POWER Preset Description 100-240V~AC 50-60Hz 300W MAX RISK OF ELECTRICAL DO NOT OPEN RISQUE DE CHOC ELECTRIQUE NE PAS OUVRIR 402 -II Speaker Stereo with MB4 Speaker Mono Controller Inputs Ch 1/Mono Left from mixer Ch 2 Right from mixer MB4 speaker Mono (Low freq) From mixer Right Left 402-II speaker Right (High freq) Controller Default Output Routing 18 Ch 1 Ch 2 Ch3 Ch4 Routing 402-II speaker CH1 (High freq) 402-II speaker CH2 (High freq) MB4 speaker CH1 (Low freq) MB4 speaker CH2 (Low freq) Limiter Off Off Off Of f Delay Off Off Off Off 402-II speaker Left (High freq) 5.2 PRESET Button – Mono Bank Mono Preset Bank: Presets designed for Mono Operation. Example 1: Mono Full Range PANARAY® System Digital Controller Display Mono 402II Preset Description OUTPUTS INPUTS CH2 CH1/MONO CH1 CH2 CH3 CH4 COM Bose Corporation, Framingham, MA 01701-9168 Made in the U.S.A. POWER 100-240V~AC 50-60Hz 300W MAX 402 -II Speaker Mono Full Range RISK OF ELECTRICAL DO NOT OPEN RISQUE DE CHOC ELECTRIQUE NE PAS OUVRIR Controller Inputs Ch 1/Mono Mono from mixer Ch 2 No input Controller Default Output Routing Mono from mixer Ch 1 Ch 2 Ch3 Ch4 Routing 402-II speaker Mono (Full range) 402-II speaker Mono (Full range) 402-II speaker Mono (Full range) 402-II speaker Mono (Full range) Limiter Off Off Off Off Delay Off Off Of f Off 402-II speaker Mono (Full range) Example 2: Mono Mid-High Device with Mono Bass PANARAY System Digital Controller Display Mono 502A+502B Preset Description OUTPUTS INPUTS CH1/MONO CH2 CH1 CH2 CH3 CH4 COM Bose Corporation, Framingham, MA 01701-9168 Made in the U.S.A. POWER 100-240V~AC 50-60Hz 300W MAX 502® A Speaker Mono with 502B Speaker Mono RISK OF ELECTRICAL DO NOT OPEN RISQUE DE CHOC ELECTRIQUE NE PAS OUVRIR Controller Inputs Ch 1/Mono Mono from mixer ® Ch 2 No input 502A speaker Mono (High freq) Mono from mixer Controller Default Output Routing Routing 502B speaker Mono (Low freq) Ch 1 Ch 2 Ch3 Ch4 502A speaker Mono (High freq) 502A speaker Mono (High freq) 502B speaker Mono (Low freq) 502B speaker Mono (Low freq) Limiter Off Of f Of f Off Delay Off Off Off Off ® ® 19 5.3 PRESET Button – Bass Array Bank Bass Array Presets: Example 1: 2x Broadside Bass Array PANARAY® System Digital Controller Display Bass Array MB4 2XBS180Hz OUTPUTS INPUTS CH1 CH2 CH1/MONO CH2 CH3 POWER Bose Corporation, Framingham, MA 01701-9168 Made in the U.S.A. COM CH4 Preset Description 100-240V~AC 50-60Hz 300W MAX RISK OF ELECTRICAL DO NOT OPEN RISQUE DE CHOC ELECTRIQUE NE PAS OUVRIR Preset: MB4 2x Broadside Bass Array Controller Inputs Ch 1 MB4 (1) Mono source Controller Default Output Routing Routing Mono from mixer Ch 1 Ch 2 Ch 3 Ch 4 MB4 (1) Mono MB4 (2) Mono N/A N/A Limiter Off Off Off Off Delay Off Off Of f Off MB4 (2) Example 2: 2x Endfire Bass Array PANARAY System Digital Controller Display Bass Array MB4 2XEF180Hz Preset Description OUTPUTS INPUTS CH1/MONO CH2 CH1 CH2 CH3 CH4 COM Bose Corporation, Framingham, MA 01701-9168 Made in the U.S.A. RISQUE DE CHOC ELECTRIQUE NE PAS OUVRIR Controller Inputs Ch 1 Mono source Controller Default Output Routing Routing Ch 1 Ch 2 Ch 3 Ch 4 MB4 (1) Mono MB4 (2) Mono N/A N/A Limiter Off Off Off Off Delay On On Off Off Mono from mixer MB4 (1) 20 POWER 100-240V~AC 50-60Hz 300W MAX Preset: MB4 2x Endfire Bass Array RISK OF ELECTRICAL DO NOT OPEN MB4 (2) 5.3 PRESET Button – Bass Array Bank Example 2: 4x Endfire Bass Array PANARAY® System Digital Controller Display Bass Array MB4 4XEF180Hz Preset Description OUTPUTS INPUTS CH1/MONO CH2 CH1 CH2 CH3 CH4 COM Bose Corporation, Framingham, MA 01701-9168 Made in the U.S.A. POWER 100-240V~AC 50-60Hz 300W MAX Preset: MB4 4x Endfire Bass Array RISK OF ELECTRICAL DO NOT OPEN RISQUE DE CHOC ELECTRIQUE NE PAS OUVRIR Controller Inputs Ch 1 Mono source Controller Default Output Routing Ch 1 Ch 2 Ch 3 Ch 4 Routing MB4 (1) mono MB4 (2) mono MB4 (3) mono MB4 (4) mono Limiter Off Off Off Off Delay On On On On Mono from mixer MB4 (1) MB4 (2) MB4 (3) MB4 (4) 21 5.4 PRESET Button – Dual Mono Operation Loading presets from Dual Mono mode: Note: If you only have a connection plugged into Input 1, the signal will only pass through Outputs 1 and 2. Dual Mono: When the PANARAY® system digital controller is used in Dual Mono mode, the EQ/Crossover blocks process each input independently, allowing you to run two different speaker EQs. If you only have a signal plugged into Input 2, the signal will only pass through Outputs 3 and 4. To access Dual Mono mode, press the PRESET button. Then press the Arrow DOWN button until you see the following display: 1: .402I 2: 402I The period (.) next to the preset name indicates that the Encoder can change the preset. To select between 1 and 2, use the Arrow UP/Arrow Down buttons. CH1 Input The top of the display shows the preset name that will be processed by the CH1 input. This signal will be routed to Outputs CH1 and CH2. If this is a fullrange preset, the same EQ will be applied to Outputs CH1 and CH2. If this preset consists of a mid-high device with a bass loudspeaker, the midhigh frequencies will be routed to Output CH1 and the low frequencies will be routed to Output CH2. CH2 Input The bottom of the display shows the preset that is processed by the CH2 input. This signal will be routed to Outputs CH3 and CH4. If this is a fullrange preset, the same EQ will be applied to Outputs CH3 and CH4. If this preset consists of a mid-high device with a bass loudspeaker, the midhigh frequencies will be routed to Output CH3 and the low frequencies will be routed to Output CH4. 22 If you want to send the same audio information to both of the PANARAY system digital controller’s inputs, you can achieve this in two ways: 1. From your mixer set all of your pan controls to center position (this will sum your information to mono). Next plug the left and right outputs from your mixer into CH1 and CH2 on the PANARAY system digital controller. 2. From a mono source use a Y-cable to send the same information into CH1 and Ch2 on the PANARAY system digital controller. 5.4 PRESET Button – Dual Mono Bank Dual Mono Presets: Independent selection of two single mono presets. Example 1: Dual Mono PANARAY® System Digital Controller Display 1: 802III+502B 2: 402II+MB4 OUTPUTS INPUTS Presets CH1 CH2 CH1/MONO CH2 CH3 100-240V~AC 50-60Hz 300W MAX RISK OF ELECTRICAL DO NOT OPEN Preset 1: 802 -III Speaker with 502B Speaker Mono RISQUE DE CHOC ELECTRIQUE NE PAS OUVRIR MB4 speaker Source #2 (Low freq) Preset 2: 402 -II Speaker with MB4 Speaker Mono From mixer Controller Inputs Ch 1 Ch 2 Zone 2 Source #1 from mixer Source #1 Source #2 from mixer Source #2 402-II speaker Source #2 (High freq) Controller Default Output Routing Routing POWER Bose Corporation, Framingham, MA 01701-9168 Made in the U.S.A. COM CH4 Ch 1 Ch 2 Ch3 Ch4 802-III speaker Source #1 (High freq) 502B speaker Source #1 (Low freq) 402-II speaker Source #2 (High freq) MB4 speaker Source #2 (Low freq) Limiter Off Of f Of f Off Delay Off Of f Of f Off 502B speaker Source #1 (Low freq) ® Zone 1 802-III speaker Source #1 (High freq) Example 2: Dual Mono PANARAY System Digital Controller Display OUTPUTS INPUTS 1: 502A+502B 2: 402II CH1/MONO CH2 CH1 CH2 CH3 CH4 COM POWER Bose Corporation, Framingham, MA 01701-9168 Made in the U.S.A. 100-240V~AC 50-60Hz 300W MAX RISK OF ELECTRICAL DO NOT OPEN RISQUE DE CHOC ELECTRIQUE NE PAS OUVRIR 402-II speaker (Full range) Preset Description Preset 1: 502 A Speaker with 502B Speaker Mono Preset 2: 402 -II Single Zone 402-II speaker (High freq) Controller Inputs Ch 1 Mono source (from Y-cable) Ch 2 Mono source (from Y-cable) ® 502B-speaker (Full range) Mono from mixer Controller Default Output Routing Ch 1 Ch 2 Ch3 Ch4 Routing 502A (High freq) 502B (Low freq) 402II (Full range) 402II (Full range) Limiter Off Of f Off Off Delay Off Off Off Off 502A speaker (High freq) ® ® 23 6.0 DELAY Button STANDBY INPUT METER TPM L -dB 40 24 18 12 6 0 O PRESET LIMITER UTILITY DELAY Stereo Bank 802 Full Range R PANARAY SYSTEM DIGITAL CONTROLLER DELAY Pressing the DELAY button provides access to four independent output delays. There is a single delay line available on each of the controller’s four outputs. The delay function is always available regardless of the mode of operation. Each delay provides up to 200ms of delay on each of the four outputs (increments in 0.02ms intervals). Use the Arrow UP and Arrow DOWN buttons to navigate through the parameters, and use the Encoder wheel to select parameter values. The four output delays have the following parameters: Delay On/Off: Bypasses delay Delay Time: Adjustable in 0.02ms increments 24 Delay Parameter Range Delay 1 On/Off Delay 2 On/Off Delay 3 On/Off Delay 4 On/Off Delay time 1 0.00ms - 200.00ms Delay time 2 0.00ms - 200.00ms Delay time 3 0.00ms - 200.00ms Delay time 4 0.00ms - 200.00ms 7.0 LIMITER Button STANDBY LIMITER INPUT METER TPM L -dB 40 24 18 12 6 0 O PRESET LIMITER UTILITY DELAY Stereo Bank 802 Full Range R PANARAY SYSTEM DIGITAL CONTROLLER Pressing the LIMITER button provides access to four independent output limiters that can protect the loudspeakers from damage if an operator overdrives the system. Use the Arrow UP and Arrow DOWN buttons to navigate through the parameters, and use the ENCODER wheel to select parameter values. Limiter Parameter Range Lim1 On/Off Lim2 On/Off Lim3 On/Off Lim4 On/Off Lim1 Threshold off - inf:1 Lim1 Ratio off - inf:1 The four output limiters each have the the following parameters: Lim1 Attack 1.0ms - 100ms Lim1 Release 100ms - 7.0s Limiter On/Off: Bypasses the limiter Lim1 Gain -100dB - 18dB Lim2 Threshold -40bB - 0dB Lim2 Ratio off - inf:1 Lim2 Attack 1.0ms - 100ms Lim2 Release 100ms - 7.0s Lim2 Gain -100dB - 18dB Threshold: Sets the level at which the limiter will activate. When the input signal exceeds the threshold, the limiter will be activated. The lower the threshold, the more sensitive the limiting will be. Ratio: The ratio of gain reduction. For example: if the ratio is set to 4:1, it means that for every 4dB the actual audio signal will rise only 1dB over the threshold. Attack: The time it takes the limiter to reach gain reduction specified by the ratio parameter when the signal is above the set threshold. Release: Release is the time that the limiter uses to release the gain reduction when the signal exceeds the threshold. Lim3 Threshold -40bB - 0dB Lim3 Ratio off - inf:1 Lim3 Attack 1.0ms - 100ms Lim3 Release 100ms - 7.0s Lim3 Gain -100dB - 18dB Lim4 Threshold -40bB - 0dB Lim4 Ratio off - inf:1 Lim4 Attack 1.0ms - 100ms Lim4 Release 100ms - 7.0s Lim4 Gain -100dB - 18dB Gain: Use the gain parameter to compensate for unwanted gain reduction caused by heavy limiting. 25 8.0 UTILITY Button STANDBY INPUT METER TPM L -dB 40 24 18 12 6 0 O PRESET LIMITER UTILITY DELAY Stereo Bank 802 Full Range R UTILITY Pressing the UTILITY button provides access to the Level, System and Routing parameters. Use the Arrow UP/Arrow DOWN buttons to navigate through the parameters, and use the Encoder wheel to select parameter values. Input Trim CH1 Allows you to change the input level in 1dB steps on CH1. Parameter Range: -40dB to 0dB Default Value: 20dB Parameter Definitions: Input Trim CH2 Allows you to change the input level in 1dB steps on CH2. Parameter Range: -40dB to 0dB Default Value: 20dB Output Level Controls the overall output level of outputs 1, 2, 3, and 4. Parameter Range: Off; -97dB to 0dB Default Value: 0dB Output Range You can use this parameter to match the input level of other equipment. Parameter Range: 2dB, 8dB (consumer), 14dB, and 20dB (pro) Default Value: 20dB Allows you to adjust the maximum output level of the PANARAY® system digital controller. Input Sensitivity Sets level in dBu to allow full-scale operation. A digital product produces the best signal-to-noise performance when operating at 0 dBFS (full scale). For example: For a mixer with +4dBu outputs, the Input Sensitivity should be set to +8dBu to account for peaks in the programming material. Parameter Range: 0dBu – 24dBu Default Value: 20dBu 26 PANARAY SYSTEM DIGITAL CONTROLLER Output Route 1 Output Route 2 Output Route 3 Output Route 4 Note: See Section 9.0 on page 29 for details on router functionality. Delay Unit Selectable between milliseconds, feet, and meters. Default Value: milliseconds 8.0 UTILITY Button Delay Master: Selectable between PRESET and GLOBAL. When set to PRESET, the delay values will be reset each time a new preset is selected and will match the delay values stored in the original preset. When set to GLOBAL, the delay values remain fixed atthe current settings even if a new preset is loaded. Default Value: PRESET Limiter Master: Selectable between PRESET or GLOBAL. When set to PRESET, the limiter values will be reset each time a new preset is selected and will match the limiter values stored in the original preset. When set to GLOBAL, the limiter values remain fixed at the current settings even if a new preset is loaded. Default Value: PRESET Lock Out: Turns user lockout on and off. Note: See section 8.1 for more details. Default Value: Off Custom Presets: Provides access to stored presets. Selectable between ON and OFF. Default Value: Off View Angle: Adjusts display contrast. Selectable 0 – 7. Default Value: 3 Input Configuration: Selectable between Stereo, CH1+CH2 (sum), or CH1 (mono). Stereo: Optimizes input gain for stereo operation CH1+CH2 (sum): Optimizes the input gain when the controller is used to sum CH1 and CH2 to MONO. CH1 (mono): Optimizes the input gain when a single input is used for MONO operation. Note: When this option is selected CH2 input does not work. Default Value: Stereo 27 8.1 UTILITY Button – User Lockout User Lockout: To Disable User Lockout: The User Lockout feature is available to prevent others from tampering with the EQs and associated parameters that have been set. Press and hold the UTILITY button for five seconds until you see the following display: To access the User Lockout feature, press the UTILITY button, then press the Arrow UP/Arrow DOWN button until you see the following display: Lockout: Off Toggle the Encoder to select ON. > Lockout On < When set to ON, the User Lockout feature locks the current preset and prevents users from accessing the following buttons and their associated parameters: PRESET DELAY LIMITER UTILITY Pressing any of these buttons or turning the Encoder wheel will yield the following message on the display: > Lockout: > No Access 28 < < > Lockout > Unlocked < < User Lockout is now disabled. 9.0 Router Functionality The 2 x 4 router is updated every time a new preset is loaded to reflect the stored output configuration. The router can be manually edited by the user to accommodate additional output configurations. To access the router, press the UTILITY button and use the Arrow UP/Arrow DOWN buttons to navigate through the Utility row. Use the Encoder wheel to change router values.The following routing parameters can be accessed under the UTILITY button: Output Route 1: Selects audio information from the CH1 or CH2 inputs and sends it to Output CH1. Default Value: The routing information is stored with each preset. Output Route 2: Selects the type of audio information from the CH1 or CH2 inputs and sends it to Output CH2. Default Value: The routing information is stored with each preset. Output Route 3: Selects the type of audio information from the CH1 or CH2 inputs and sends it to Output CH3. Default Value: The routing information is stored with each preset. Output Route 4: Selects the type of audio information from the CH1 or CH2 inputs and sends it to Output CH4. Default Value: The routing information is stored with each Preset. Each of the four outputs can be set to the following: 1. CH1/High Frequency: Selects the high frequency information from the CH1 input. 2. CH2/High Frequency: Selects the high frequency information from the CH2 input. 3. Mono/High Frequency: Selects the high frequency information from the CH1 and CH2 inputs and sums them to Mono. 4. CH1/Low Frequency: Selects the lowfrequency information from the CH1 input. 5. CH2/Low Frequency: Selects the lowfrequency information from the CH2 Input. 6. Mono/Low Frequency: Selects the lowfrequency information from the CH1 and CH2 inputs and sums them to Mono. 7. CH1/Full Range: Selects the lowfrequency information from the CH1 input. 8. CH2/Full Range: Selects the lowfrequency information from the CH2 input. 9. Mono/Full Range: Selects information from the CH1 and CH2 inputs and sums them to Mono. 10. CH1/No EQ: Bypasses active Bose® EQ for CH1 Program Material. 11. CH2/No EQ: Bypasses Active Bose EQ for CH2 Program Material. 12. Mono/No EQ: Sums the CH1 and CH2 to Mono and bypasses the Bose EQ presets. 29 Router Functionality PANARAY® System Digital Controller Output Configuration Table Router Matrix 30 Output Route 1 Output Route 2 Output Route 3 Output Route 4 CH1/High CH1/High CH1/High CH1/High CH2/High CH2/High CH2/High CH2/High Mono/High Mono/High Mono/High Mono/High CH1/Low CH1/Low CH1/Low CH1/Low CH2/Low CH2/Low CH2/Low CH2/Low Mono/Low Mono/Low Mono/Low Mono/Low CH1/Full Range CH1/Full Range CH1/Full Range CH1/Full Range CH2/Full Range CH2/Full Range CH2/Full Range CH2/Full Range Mono/Full Range Mono/Full Range Mono/Full Range Mono/Full Range CH1/No EQ CH1/No EQ CH1/No EQ CH1/No EQ CH2/No EQ CH2/No EQ CH2/No EQ CH2/No EQ Mono/No EQ Mono/No EQ Mono/No EQ Mono/No EQ 10.0 Optimizing Signal-to-Noise Optimizing Signal-to-Noise using the PANARAY® System Digital Controller with a Third-Party Amplifier In order to achieve the best signal-to-noise performance with the PANARAY® system digital controller, you must optimize the input sensitivity and output range to match the equipment you are interfacing with. 1. Before making any connections between the PANARAY system digital controller and an amplifier, make sure all of your electronics are set to Off, and your amplifier level controls set to Minimum. 2. Next, connect an audio source to the PANARAY system digital controller inputs CH1 and CH2. If you have a mono source, plug your connection into CH1 and set the input configuration (located under the utility button) to CH1 (mono). 3. Connect the PANARAY system digital controller outputs to your amplifier inputs. 4. Turn on your audio source. Then turn on your PANARAY system digital controller. 5. Select a Speaker EQ on the Panaray controller by pressing the PRESET button and use the Encoder wheel to select the desired speaker EQ. 6. Set the PANARAY system digital controller’s input sensitivity. In general you should set this parameter to match the output range of the equipment you connect to the controller. A digital product has the best signal-to-noise performance when operating at 0dBFS (full scale), so you should run the PANARAY system digital controller as close to 0dBFS as possible. For example: If you have a mixer with +4dBU outputs, the PANARAY controller input sensitivity should be set to +8dBu. This will allow you to reach 0dBFS while at the same time providing some additional headroom to account for peaks in program material. Set the parameter based on the amount of headroom needed. To access the PANARAY system digital controller input sensitivity, press the UTILITY button. Then press the Arrow DOWN button until you see the following display: Input Sense 20dBu Adjust this parameter with the Encoder wheel to match your audio source’s maximum output. Input Sense 8dBu Next, send a signal from your audio source to the PANARAY system digital controller and view the front panel input meters to ensure your signal is at approximately 0dbFS (full scale). Adjust the input sensitivity parameter accordingly. Note: The input signal may occasionally light the red Overload LED. This is normal. 7. After you have properly calibrated your PANARAY controller’s input sensitivity, you must adjust your controller’s output range to match your amplifier’s input sensitivity. Since this will vary with each manufacturer, please consult your amplifier user guide. 31 10.0 Optimizing Signal-to-Noise Use the table below to match the PANARAY® system digital controller’s Output Range to your amplifier. Output Range Parameter Amplifier Input Sensitivity 2dBu Use for anything less than 0.775V 8dBu 0.775V to 0.975V 14dBu 0.975V to 3.9V 20dBu 3.9V to 7.75V Note: If there are no settings that exactly match your amplifier's input sensitivity, pick the highest setting that is nearest your amplifier input sensitivity and use the controller's OUTPUT LEVEL control to scale back the overall output. Set the PANARAY system digital controller output range. First, press the UTILITY button. Then press the Arrow DOWN button until you see the following display: Output Range 20dB (Pro) Adjust this parameter with the Encoder wheel to match your amplifier’s input sensitivity. Output Range 14dB (Consumer) This setting will provide the optimum input level for your amplifier. 32 8. Select a speaker EQ preset on the PANARAY system digital controller by pressing the PRE SET button and using the Encoder wheel to select the desired speaker EQ preset. 9. Turn your amplifier On, and turn up each level control until you reach the desired SPL. These settings will automatically be retained. 11.0 Custom Preset Mode The PANARAY® controller’s Custom Preset feature allows users to edit and store the delay, limiting and routing settings. Up to 20 custom presets can be stored using this feature. After making the desired changes to a preset, follow the steps below to store a new preset. 1. Press and hold the DELAY and LIMITER buttons at the same time (for approximately 5 seconds) until you see the following display: Store: Select no 1>EMPTY PRESET Use the Encoder wheel to select the location where the preset will be stored (up to 20 loca tions can be used). 2. Once you have selected your location, press the Arrow DOWN button to name your preset. You will see the following display: Store: Edit name 1 402I Use the Arrow UP/Arrow DOWN buttons to align the cursor under the desired letter or number you want to change, then move the Encoder wheel through the list of characters. Press the Arrow UP button to move to the next character, and press the Arrow DOWN button to move back. To CANCEL the store process, press the PRESET button. 3. Once you have named your preset, press and holdD the DELAY and LIMITER buttons until you see the following display: > Preset > Stored < < After you store a program, you will be immediately transferred to the custom preset mode. The stored preset will be displayed. Note that the bank designation will be based on the preset that you edited. For example: If the preset came from the Mono bank, it will be designated as Mono Custom. If a preset originates from the Stereo bank then it will be designated as Stereo Custom. And if a preset originates from the Bass Array bank, it will be designated as Bass Array Custom. Mono Custom 402I - TEST In this mode, the user only has access to the custom presets. Select presets in the same manner as in the standard operating mode. The Encoder wheel selects presets and the Arrow UP/Arrow DOWN buttons select the desired bank. To Turn Off Custom Presets: To turn off custom presets and return to standard operation press the UTILITY button and use the Arrow UP/Arrow DOWN button to find the Custom Presets parameter and set it to Off. You will immediately be transferred to standard operating mode. To Activate Custom Presets: To return to custom preset mode, go back to the UTILITY row and turn the Custom Presets parameter to On. You will immediately be transferred to custom preset mode.To create additional custom presets, repeat the procedure above. Note: You cannot store a Dual Mono preset, but can create one by storing two custom mono presets, which you have access to in custom preset mode. Follow standard operation instructions for loading Dual Mono presets. 33 12.0 Bass Array Presets The following presets are available in the PANARAY® system digital controller for Bass Array Applications: MB4 2xBS280Hz – The MB4 2x Broadside Bass Array preset provides 360 degree horizontal coverage with a 10 to 15dB suppression in energy going up and down from 80 – 200Hz. The crossover is set at 280Hz and is recommended for use with the LT Series. MB4 2xBS180Hz – The MB4 2x Broadside Bass Array preset provides 360 degree horizontal coverage with a 10 to 15dB suppression in energy going up and down from 80 – 200Hz. The crossover is set at 180Hz and is recommended for use with MA12, MB4 and 02 Series speakers. MB4 2xEF280Hz – The MB4 2x Endfire Bass Array preset provides 180 degree conical dispersion @ 160Hz. The crossover is set at 280Hz and is recommended for use with MA12, MB4 and LT Series speakers. MB4 2xEF180Hz – The MB4 2x Endfire Bass Array preset provides 180 degree conical dispersion @ 160Hz. The crossover is set at 180Hz and is recommended for use with MA12, MB4 and 02 Series speakers. MB4 4xEF280Hz – The MB4 4x Endfire Bass Array preset provides 120 degree conical dispersion @ 160Hz. The crossover is set at 280Hz and is recommended for use with MA12, MB4 and LT Series speakers. MB4 4xEF180Hz – The MB4 4x Endfire Bass Array preset provides 120 degree conical dispersion @ 160Hz. The crossover is set at 180Hz and is recommended for use with MA12, MB4 and 02 Series speakers. 34 Loading and Setting Up Bass Arrays Using Presets 1. Press the PRESET button on the front panel of the PANARAY system digital controller. 2. Press the Arrow DOWN button until you see the following display: Bass Array MB4 2xBS280Hz 3. Turn the Encoder wheel to the right to select the desired bass array configuration. Bass Array MB4 4xEF280Hz 4. Once you have selected your bass array preset, the program is automatically loaded and ready to go. 12.1 Bass Array Setup and Connections MB4 4x Endfire Bass Array MB4 4x endfire bass array (280Hz and 180Hz) PANARAY system digital controller output POWER 0 O PRESET LIMIT UTILITY DELAY CH1 MB4 (1) CH2 MB4 (2) CH3 MB4 (3) CH4 MB4 (4) Stereo Bank 802 Full Range PANARAY DIGITAL SYSTEM CONTROLLER Out 1 Out 3 Out 2 Out 4 MB4 1 MB4 2 29" (73.6 cm) 29" (73.6 cm) MB4 3 MB4 4 MB4 4x Endfire Horizontal Octave-Band Polar Data 29" (73.6 cm) Bose® Components: 1 PANARAY® system digital controller 2 Bose 1800-VI power amplifiers 2 4x endfire bass array brackets (top and bottom) 4 MB4 modular bass loudspeakers Spacing: In order to effectively create the MB4 4x endfire bass array, each unit must be spaced 29" (73.6 cm) on center from each other. This is shown in the illustration above. IF THE UNITS ARE NOT SPACED PROPERLY THE BASS ARRAY WILL NOT WORK. 40Hz 63Hz 125Hz 0 0 0 270 90 180 270 90 180 270 90 180 This array fires from the end of the fourth MB4 speaker to provide the dispersion shown above. Note: All EQ and delay settings are already set in the PANARAY system digital controller. In order for the bass array to work, you must connect the MB4 units to the appropriate outputs on the controller and apply the proper spacing. The output assignments are listed to the right. 35 12.1 Bass Array Setup and Connections MB4 2x Endfire Bass Array MB4 4x endfire bass array (280Hz and 180Hz) PANARAY system digital controller output PRESET LIMIT UTILITY DELAY Stereo Bank 802 Full Range CH1 MB4 (1) CH2 MB4 (2) CH3 MB4 (3) CH4 MB4 (4) PANARAY DIGITAL SYSTEM CONTROLLER Out 1 MB4 1 Out 2 MB4 2 MB4 2x Endfire Horizontal Octave-Band Polar Data 40Hz 63Hz 125Hz 0 0 0 23" (58.4 cm) 270 Bose® Components: 1 PANARAY® system digital controller 1 Bose 1800-VI power amplifier 2 2x endfire bass array brackets (top and bottom) 2 MB4 modular bass loudspeakers Spacing: In order to effectively create the MB4 2x endfire bass array, each unit must be spaced 23" (58.4 cm) on center from each other). This is shown in the illustration above. IF THE UNITS ARE NOT SPACED PROPERLY THE BASS ARRAY WILL NOT WORK. Note: All EQ and delay settings are already set in the PANARAY system digital controller. In order for the bass array to work, you must connect the MB4 units to the appropriate outputs on the controller and apply the proper spacing. The output assignments are listed to the right. 36 90 180 270 90 180 270 90 180 This array fires from the end of the second MB4 speaker to provide the dispersion shown above. 12.1 Bass Array Setup and Connections MB4 2x Broadside Bass Array MB4 2x broadside bass array (280Hz and 180Hz) PANARAY system digital controller output PRESET LIMIT UTILITY DELAY Stereo Bank 802 Full Range PANARAY DIGITAL SYSTEM CONTROLLER Out 1 Out 2 CH1 MB4 (1) CH2 MB4 (2) CH3 Not used CH4 Not used MB4 1 MB4 2x Broadside Horizontal Octave-Band Polar Data 45" (114.3 cm) MB4 2 40Hz 63Hz 125Hz 0 0 0 270 Bose® Components: 1 PANARAY® system digital controller 1 Bose 1800-VI power amplifier 2 2x broadside bass array brackets (top and bottom) 2 MB4 modular bass loudspeakers 90 180 Horiz. Vert. 270 90 180 Horiz. Vert. 270 90 180 Horiz. Vert. This array fires from the sides of both MB4 speakers to provide the dispersion shown above. Spacing: In order to effectively create the MB4 2x endfire bass array, each unit must be spaced 45" (114.3 cm) on center from each other. This is shown in the illustration above. IF THE UNITS ARE NOT SPACED PROPERLY THE BASS ARRAY WILL NOT WORK. Note: All EQ and delay settings are already set in the PANARAY system digital controller. In order for the bass array to work, you must connect the MB4 units to the appropriate outputs on the controller and apply the proper spacing. The output assignments are listed to the right. 37 13.0 Bose® Speaker EQ Preset List The following is a list of 180 presets that are available in the PANARAY® system digital controller. The presets are separated into three separate banks: Mono, Stereo and Bass Array. Included in this list is the name of each preset as it appears on the PANARAY controller LCD as well as a description of the preset and the default settings for each of the four outputs. 38 LCD Display Preset Description Mono Presets Preset Description Mono Preset Name Preset Description Stereo Preset Preset Description Stereo Preset Name Preset Description Bass Array Preset Description Bass Array Preset Name Preset Description Output Default Configuration Output 1 Output 2 Output 3 Output 4 Preset Default Preset Default Preset Default Preset Default Output 1 Output 2 Output 3 Output 4 Preset Default Preset Default Preset Default Preset Default Output 1 Output 2 Output 3 Output 4 Preset Default Preset Default Preset Default Preset Default 13.1 Bose® Speaker EQ Preset List – Mono Bank PANARAY 402 Series I loudspeaker Mono Presets 402 Series I loudspeaker Preset Descriptions 402I Output 1 Output 2 Output 3 Output 4 402 Series I loudspeaker Full Range EQ 402I Mono Full Range 402I Mono Full Range 402I Mono Full Range 402I Mono Full Range 402I+502B 402 Series I loudspeaker bi-amped with 502 B loudspeaker 402I Mono High 402I Mono High 502B Mono Low 502B Mono Low 402I+MB4 402 Series I loudspeaker bi-amped with MB4 402I Mono High 402I Mono High MB4 Mono Low MB4 Mono Low 402I+AWCS 402 Series I loudspeaker bi-amped with AWCS Note: Limiting is assigned to outputs 3 and 4 for protection of the AWCS 402I Mono High 402I Mono High AWCS Mono Low AWCS Mono Low 402I HF 402 Series I loudspeaker bi-amped @ 160Hz 402I Mono High 402I Mono High 402I Mono High 402I Mono High PANARAY 402 Series II loudspeaker Mono Presets 402 Series II loudspeaker Preset Descriptions Output 1 Output 2 Output 3 Output 4 402II 402 Series II loudspeaker Full Range EQ 402II Mono Full Range 402II Mono Full Range 402II Mono Full Range 402II Mono Full Range 402II+502B 402 Series II loudspeaker bi-amped with 502B loudspeaker 402II Mono High 402II Mono High 502B Mono Low 502B Mono Low 402II+502BEX 402 Series II loudspeaker bi-amped with 502BEX loudspeaker 402II Mono High 402II Mono High 502BEX Mono Low 502BEX Mono Low 402II+MB4 402 Series II loudspeaker bi-amped with MB4 402II Mono High 402II Mono High MB4 Mono Low MB4 Mono Low 402II+AWCS 402 Series II loudspeaker bi-amped with AWCS Note: Limiting is assigned to outputs 3 and 4 for protection of the AWCS. 402II Mono High 402II Mono High AWCS Mono Low AWCS Mono Low 402II HF 402 Series II loudspeaker bi-amped @ 180Hz 402II Mono High 402II Mono High 402II Mono High 402II Mono High 39 13.1 Bose® Speaker EQ Preset List – Mono Bank 40 PANARAY 502 A loudspeaker Mono Presets 502A loudspeaker Preset Descriptions 502A Output 1 Output 2 Output 3 Output 4 502A loudspeaker Full Range EQ 502A Mono Full Range 502A Mono Full Range 502A Mono Full Range 502A Mono Full Range 502A+502B 502A loudspeaker bi-amped with 502B 502A Mono High 502A Mono High 502B Mono Low 502B Mono Low 502A+MB4 502A loudspeaker bi-amped with MB4 502A Mono High 502A Mono High MB4 Mono Low MB4 Mono Low 502A+AWCS 502A loudspeaker bi-amped with AWCS Note: Limiting is assigned to outputs 3 and 4 for protection of the AWCS 502A Mono High 502A Mono High AWCS Mono Low AWCS Mono Low 502A HF 502A loudspeaker bi--amped @ 160Hz 502A Mono High 502A Mono High 502A Mono High 502A Mono High PANARAY 802 Series II loudspeaker Mono Presets 802 Series II loudspeaker Preset Descriptions Output 1 Output 2 Output 3 Output 4 802II 802 Series II loudspeaker Full Range EQ 802II Mono Full Range 802II Mono Full Range 802II Mono Full Range 802II Mono Full Range 802II+502B 802 Series II loudspeaker bi-amped with 502B loudspeaker 802II Mono High 802II Mono High 502B Mono Low 502B Mono Low 802II+MB4 802 Series II loudspeaker bi-amped with MB4 802II Mono High 802II Mono High MB4 Mono Low MB4 Mono Low 802II+AWCS 802 Series II loudspeaker bi-amped with AWCS Note: Limiting is assigned to outputs 3 and 4 for protection of the AWCS 802II Mono High 802II Mono High AWCS Mono Low AWCS Mono Low 802II HF 802 Series II loudspeaker bi-amped @ 112Hz 802II Mono High 802II Mono High 802II High 802II High 802IISTK Stacked 802 Series II loudspeaker EQ 802II Full Range 802II Full Range 802II Full Range 802II Full Range 802IISTK+502B Stacked 802 Series II loudspeakers biamped with 502B loudspeaker 802II Mono High 802II Mono High 502B Mono Low 502B Mono Low Bose® Speaker EQ Preset List – Mono Bank PANARAY 802 Series II loudspeaker Mono Presets 802 Series II loudspeaker Preset Descriptions 802IISTK+AWCS Output 1 Output 2 Output 3 Output 4 Stacked 802 Series II loudspeakers biamped with AWCS Note: Limiting is assigned to outputs 3 and 4 for protection of the AWCS 802II Mono High 802II Mono High AWCS Mono Low AWCS Mono Low 802IISTK HF Stacked 802 Series II loudspeakers biamped @ 112Hz 802II Mono High 802II Mono High 802II Mono High 802II Mono High PANARAY 802 Series III loudspeaker Mono Presets 802 Series III loudspeaker Preset Descriptions Output 1 Output 2 Output 3 Output 4 802III 802 Series III loudspeaker Full Range EQ 802III Mono Full Range 802III Mono Full Range 802III Mono Full Range 802III Mono Full Range 802III+502B 802 Series III loudspeaker bi-amped with 502B loudspeaker 802III Mono High 802III Mono High 502B Mono Low 502B Mono Low 802III+502BEX 802 Series III loudspeaker bi-amped with 502BEX loudspeaker 802III Mono High 802III Mono High 502BEX Mono Low 502BEX Mono Low 802III+MB4 802 Series III loudspeaker bi-amped with MB4 802III Mono High 802III Mono High MB4 Mono Low MB4 Mono Low 802III+AWCS 802 Series III loudspeaker bi-amped with AWCS Note: Limiting is assigned to outputs 3 and 4 for protection of the AWCS 802III Mono High 802III Mono High AWCS Mono Low AWCS Mono Low 802III HF 802 Series III loudspeaker bi-amped @ 125Hz 802III Mono High 802III Mono High 802III Mono High 802III Mono High 802IIIST Stacked 802 Series III loudspeaker EQ 802III Mono Full Range 802III Mono Full Range 802III Mono Full Range 802III Mono Full Range 802IIIST+502B Stacked 802 Series III loudspeakers biamped with 502B loudspeaker 802III Mono High 802III Mono High 502B Mono Low 502B Mono Low 802IIIST+502X Stacked 802 Series III loudspeakers biamped with 502BEX loudspeaker 802III Mono High 802III Mono High 502BEX Mono Low 502BEX Mono Low 802IIISTK+MB4 Stacked 802 Series III loudspeakers biamped with MB4 802III Mono High 802III Mono High MB4 Mono Low MB4 Mono Low 41 Bose® Speaker EQ Preset List – Mono Bank 42 PANARAY 802 Series III loudspeaker Mono Presets 802 Series III loudspeaker Preset Descriptions 802IIISTK+AWCS Output 1 Output 2 Output 3 Output 4 Stacked 802 Series III loudspeaker biamped with AWCS Note: Limiting is assigned to outputs 3 and 4 for protection of the AWCS 802III Mono/High 802III Mono/High 802III Mono/Low 802III Mono/Low 802IIISTK HP Stacked 802 Series III loudspeaker biamped @ 125 Hz 802III Mono/High 802III Mono/High 802III Mono/High 802III Mono/High PANARAY MA12 loudspeaker Mono Presets MA12 loudspeaker Preset Descriptions Output 1 Output 2 Output 3 Output 4 MA12 WALL MA12 loudspeaker Full Range, Wall Mount, EQ Curve MA12 Mono Full Range MA12 Mono Full Range MA12 Mono Full Range MA12 Mono Full Range MA12 FREE MA12 loudspeaker Full Range, Free Field, EQ Curve MA12 Mono Full Range MA12 Mono Full Range MA12 Mono Full Range MA12 Mono Full Range MA12+502B MA12 loudspeaker bi-amped with 502 B loudspeaker MA12 Mono High MA12 Mono High 502B Mono Low 502B Mono Low MA12+MB4 MA12 loudspeaker bi-amped with MB4 MA12 Mono High MA12 Mono High MB4 Mono Low MB4 Mono Low MA12 HF MA12 loudspeaker bi-amped @ 160 Hz MA12 Mono High MA12 Mono High MA12 Mono High MA12 Mono High MA12STK WALL Stacked MA12 loudspeaker Full Range, Wall Mount, EQ Curve MA12 Mono Full Range MA12 Mono Full Range MA12 Mono Full Range MA12 Mono Full Range MA12STK FREE Stacked MA12 loudspeaker Full Range, Free Field, EQ Curve MA12 Mono Full Range MA12 Mono Full Range MA12 Mono Full Range MA12 Mono Full Range MA12STK+502B Stacked MA12 loudspeaker bi-amped with 502B loudspeaker MA12 Mono High MA12 Mono High 502B Mono Low 502B Mono Low MA12STK+MB4 Stacked MA12 loudspeaker bi-amped with MB4 MA12 Mono High MA12 Mono High MB4 Mono Low MB4 Mono Low MA12STK HF Stacked MA12 loudspeaker bi-amped @ 160Hz MA12 Mono High MA12 Mono High MA12 Mono High MA12 Mono High Bose® Speaker EQ Preset List – Mono Bank PANARAY MB4 loudspeaker Mono Presets MB4 loudspeaker Preset Descriptions MB4 100Hz LP Output 1 Output 2 Output 3 Output 4 MB4 loudspeaker 100Hz Low Pass MB4 MB4 MB4 MB4 MB4 160Hz LP MB4 loudspeaker 160Hz Low Pass MB4 MB4 MB4 MB4 MB4 200Hz LP MB4 loudspeaker 200Hz Low Pass MB4 MB4 MB4 MB4 MB4 280Hz LP MB4 loudspeaker 280Hz Low Pass MB4 MB4 MB4 MB4 PANARAY 502 B loudspeaker Mono Presets 502B loudspeaker Preset Descriptions Output 1 Output 2 Output 3 Output 4 502B 502B loudspeaker Mono Low Pass @ 160 Hz PANARAY 502 BEX loudspeaker Mono Presets 502BEX loudspeaker Descriptions 502BEX 502BEX loudspeaker Mono Low Pass @ 200 Hz AWCS Mono Presets AWCS Preset Descriptions AWCS AWCS Mono Low Pass with limiting assigned to all four outputs PANARAY LT3202 Mono Presets LT3202 loudspeaker Preset Descriptions LT3202 502B 502B 502B 502B Preset Output 1 502BEX Output 1 AWCS Output 2 502BEX Output 2 AWCS Output 3 502BEX Output 3 AWCS Output 4 502BEX Output 4 AWCS Output 1 Output 2 Output 3 Output 4 LT3202 loudspeaker Full Range EQ LT3202 Mono Full Range LT3202 Mono Full Range LT3202 Mono Full Range LT3202 Mono Full Range LT3202CLUSTER LT3202 loudspeaker Cluster EQ LT3202 Mono Full Range LT3202 Mono Full Range LT3202 Mono Full Range LT3202 Mono Full Range LT3202+MB4 LT3202 loudspeaker bi-amped with MB4 LT3202 Mono High LT3202 Mono High MB4 Mono Low MB4 Mono Low LT3202+502BEX LT3202 loudspeaker bi-amped with 502BEX loudspeaker LT3202 Mono High LT3202 Mono High 502BEX Mono Low 502BEX Mono Low 43 Bose® Speaker EQ Preset List – Mono Bank 44 PANARAY LT4402 loudspeaker Mono Presets LT4402 loudspeaker Preset Descriptions LT4402 LT4402 loudspeaker Full Range EQ LT4402 Mono Full Range LT4402 Mono Full Range LT4402 Mono Full Range LT4402 Mono Full Range LT4402CLUSTER LT4402 Cluster EQ LT4402 Mono Full Range LT4402 Mono Full Range LT4402 Mono Full Range LT4402 Mono Full Range LT4402+MB4 LT4402 loudspeaker bi-amped with MB4 LT4402 Mono High LT4402 Mono High MB4 Mono Low MB4 Mono Low LT4402+502BEX LT4402 loudspeaker bi-amped with 502 BEX loudspeaker LT4402 Mono High LT4402 Mono High 502BEX Mono Low 502BEX Mono Low PANARAY LT9702 loudspeaker Mono Presets LT9702 loudspeaker Preset Descriptions Output 1 Output 2 LT9702 LT9702 loudspeaker Full Range EQ LT9702 Mono Full Range LT9702 Mono Full Range LT9702 Mono Full Range LT9702 Mono Full Range LT9702CLUSTER LT9702 Cluster EQ LT9702 Mono Full Range LT9702 Mono Full Range LT9702 Mono Full Range LT9702 Mono Full Range LT9702+MB4 LT9702 loudspeaker bi-amped with MB4 LT9702 Mono High LT9702 Mono High MB4 Mono Low MB4 Mono Low LT9702+502BEX LT9702 loudspeaker bi-amped with 502BEX loudspeaker LT9702 Mono High LT9702 Mono High 502BEX Mono Low 502BEX Mono Low FreeSpace Model 8 loudspeaker Mono Presets Model 8 loudspeaker Preset Descriptions Output 1 Output 2 Output 3 Output 4 M8 Model 8 loudspeaker Full Range EQ M8 Mono Full Range M8 Mono Full Range M8 Mono Full Range M8 Mono Full Range M8+MB4 Model 8 loudspeaker bi-amped with MB4 M8 Mono High M8 Mono High MB4 Mono Low MB4 Mono Low M8+FS3 Model 8 loudspeaker bi-amped with FreeSpace 3 loudspeaker M8 Mono High M8 Mono High FS3 Mono Low FS3 Mono Low M8+FS1B Model 8 loudspeaker bi-amped with FreeSpace 1B loudspeaker M8 Mono High M8 Mono High FS1B Mono Low FS1B Mono Low Output 1 Output 2 Output 3 Output 3 Output 4 Output 4 Bose® Speaker EQ Preset List – Mono Bank FreeSpace Model 32 loudspeaker Mono Presets Model 32 loudspeaker Preset Descriptions M 32 Model 32 loudspeaker Full Range EQ M32 Mono Full Range M32+MB4 Model 32 loudspeaker bi-amped with MB4 M32+FS3 Model 32 loudspeaker bi-amped with FS3 Output 1 Output 3 Output 4 M32 Mono Full Range M32 Mono Full Range M32 Mono Full Range M32 Mono High M32 Mono High MB4 Mono Low MB4 Mono Low M32 Mono High M32 Mono High FS3 Mono Low FS3 Mono Low M32+FS1B Model 32 loudspeaker bi-amped with FS1B M32 Mono High M32 Mono High FS1B Low FS1B Low M32+502BEX Model 32 loudspeaker bi-amped with 502 BEX loudspeaker M32 Mono High M32 Mono High 502BEX Mono Low 502BEX Mono Low FreeSpace Model 1B loudspeaker Mono Presets FreeSpace Model 1B loudspeaker Preset Descriptions FS1B 100Hz LP FreeSpace Model 1B loudspeaker 100Hz Low Pass FS1B FS1B FS1B FS1B FS1B SURFACE FreeSpace Model 1B loudspeaker Surface Mount EQ FS1B FS1B FS1B FS1B FS1B FLUSH FreeSpace Model 1B loudspeaker Flush Mount EQ FS1B FS1B FS1B FS1B FreeSpace 3 Bass Mono Presets FreeSpace 3 Bass Preset Descriptions FS3 100Hz LP FreeSpace 3 Bass 100Hz Low Pass FS3 FS3 FS3 FS3 FS3 150Hz LP FreeSpace 3 Bass 150Hz Low Pass FS3 FS3 FS3 FS3 FreeSpace 360 Mono Presets FreeSpace 360 loudspeaker Preset Descriptions FS360 HARD FS360 loudspeaker inground hard EQ FS360 Mono Full Range FS360 SOFT FS360 loudspeaker inground soft EQ FS360 DECK FS360 loudspeaker deck EQ Output 1 Output 1 Output 1 Output 2 Output 2 Output 2 Output 2 Output 3 Output 3 Output 4 Output 4 Output 3 Output 4 FS360 Mono Full Range FS360 Mono Full Range FS360 Mono Full Range FS360 Mono Full Range FS360 Mono Full Range FS360 Mono Full Range FS360 Mono Full Range FS360 Mono Full Range FS360 Mono Full Range FS360 Mono Full Range FS360 Mono Full Range 45 13.2 Bose® Speaker EQ Preset List – Stereo Bank 46 PANARAY 402 Series I loudspeaker Stereo Presets 402 Series I loudspeaker Preset Descriptions 4 02I 402 Series I loudpeaker Full Range EQ 402I CH1/Full Range 402I CH2/Full Range 402I CH1/Full Range 402I CH2/Full Range 402I+502B 402 Series I loudspeaker bi-amped with 502 B loudspeaker 402I CH1/High 402I CH2/High 502B CH1/Low 502B CH2/Low 402I+MB4 402 Series I loudspeaker bi-amped with MB4 402I CH1/High 402I CH2/High MB4 CH1/Low MB4 CH2/Low 402I+AWCS 402 Series I loudspeaker bi-amped with AWCS Note: Limiting is assigned to outputs 3 and 4 for protection of the AWCS 402I CH1/High 402I CH2/High AWCS CH1/Low AWCS CH2/Low 402I HF 402 Series I loudspeaker bi-amped @ 160Hz 402I CH1/High 402I CH2/High 402I CH1/High 402i CH2/High Panaray 402 Series II loudspeaker Stereo Presets 402 Series II loudspeaker Preset Descriptions 402II 402 Series II loudpeaker Full Range EQ 402II CH1/Full Range 402II CH2/Full Range 402II CH1/Full Range 402II CH2/Full Range 402II+502B 402 Series II loudspeaker bi-amped with 502B loudspeaker 402II CH1/High 402II CH2/High 502B CH1/Low 502B CH2/Low 402II+502BEX 402 Series II loudspeaker bi-amped with 502 BEX loudspeaker 402II CH1/High 402II CH2/High 502BEX CH1/Low 502BEX CH2/Low 402II+MB4 402 Series II loudspeaker bi-amped with MB4 402II CH1/High 402II CH2/High MB4 CH1/Low MB4 CH2/Low 402II+AWCS 402 Series II loudspeaker bi-amped with AWCS Note: Limiting is assigned to outputs 3 and 4 for protection of the AWCS 402II CH1/High 402II CH2/High AWCS CH1/Low AWCS CH2/Low 402II HF 402 Series II loudspeaker bi-amped @ 180Hz 402II CH1/High 402II CH2/High 402II CH1/High 402II CH2/High Output 1 Output 1 Output 2 Output 2 Output 3 Output 3 Output 4 Output 4 Bose® Speaker EQ Preset List – Stereo Bank PANARAY 502 A loudspeaker Stereo Presets 502A loudspeaker Preset Descriptions 502A 502A loudspeaker Full Range EQ 502A CH1/Full Range 502A CH2/Full Range 502A CH1/Full Range 502A CH2/Full Range 502A+502B 502A loudspeaker bi-amped with 502B 502A CH1/High 502A CH2/High 502B CH1/Low 502B CH2/Low 502A+MB4 502A loudspeaker bi-amped with MB4 502A CH1/High 502A CH2/High MB4 CH1/Low MB4 CH2/Low 502A+AWCS 502A loudspeaker bi-amped with AWCS Note: Limiting is assigned to outputs 3 and 4 for protection of the AWCS 502A CH1/High 502A CH2/High AWCS CH1/Low AWCS CH2/Low 502A HF 502A loudspeaker bi-amped @ 160Hz 502A CH1/High 502A CH2/High 502A CH1/High 502A CH2/High PANARAY 802 Series II loudspeaker Stereo Presets 802 Series II loudspeaker Preset Descriptions 802II 802 Series II loudspeaker Full Range EQ 802II CH1/Full Range 802II CH2/Full Range 802II CH1/Full Range 802II CH2/Full Range 802II+502B 802 Series II loudspeaker bi-amped with 502B loudspeaker 802II CH1/High 802II CH2/High 502B CH1/Low 502B CH2/Low 802II+MB4 802 Series II loudspeaker bi-amped with MB4 802II CH1/High 802II CH2/High MB4 CH1/Low MB4 CH2/Low 802II+AWCS 802 Series II loudspeaker bi-amped with AWCS Note: Limiting is assigned to outputs 3 and 4 for protection of the AWCS 802II CH1/High 802II CH2/High AWCS CH1/Low AWCS CH2/Low 802II HF 802 Series II loudspeaker bi-amped @ 112Hz 802II CH1/High 802II CH2/High 802II CH1/High 802II CH2/High 802IISTK Stacked 802 Series II loudspeaker EQ 802II CH1/Full Range 802II CH2/Full Range 802II CH1/Full Range 802II CH2/Full Range 802IISTK+502B Stacked 802 Series II loudspeakers biamped with 502B loudpeaker 802II CH1/High 802II CH2/High 502B CH1/Low 502B CH2/Low 802IISTK+MB4 Stacked 802 Series II loudspeakers biamped with MB4 802II CH1/High 802II CH2/High MB4 CH1/Low MB4 CH2/Low Output 1 Output 1 Output 2 Output 2 Output 3 Output 3 Output 4 Output 4 47 13.2 Bose® Speaker EQ Preset List – Stereo Bank 48 PANARAY 802 Series II loudspeaker Stereo Presets 802 Series II loudspeaker Preset Descriptions 802IISTK+AWCS Stacked 802 Series II loudspeakers biamped with AWCS Note: Limiting is assigned to outputs 3 and 4 for protection of the AWCS 802II CH1/High 802II CH2/High AWCS CH1/Low AWCS CH2/Low 802IISTK HF Stacked 802 Series II loudspeakers biamped @ 112Hz 802II CH1/High 802II CH2/High 802II CH1/High 802II CH2/High PANARAY 802 Series III loudspeaker Stereo Presets 802 Series III loudspeaker Preset Descriptions 802III 802 Series III loudspeaker Full Range EQ 802III CH1/Full Range 802III CH2/Full Range 802III CH1/Full Range 802III CH2/Full Range 802III+502B 802 Series III loudspeaker bi-amped with 502 B loudspeaker 802III CH1/High 802III CH2/High 502B CH1/Low 502B CH2/Low 802III+502BEX 802 Series III loudspeaker bi-amped with 502BEX loudspeaker 802III CH1/High 802III CH2/High 502BEX CH1/Low 502BEX Ch2/Low 802III+MB4 802 Series III loudspeaker bi-amped with MB4 802III CH1/High 802III CH2/High MB4 CH1/Low MB4 CH2/Low 802III+AWCS 802 Series III loudspeaker bi-amped with AWCS Note: Limiting is assigned to outputs 3 and 4 for protection of the AWCS 802III CH1/High 802III CH2/High AWCS CH1/Low AWCS CH2/Low 802III HF 802 Series III loudspeaker bi-amped @ 125Hz 802III CH1/High 802III CH2/High 802III CH1/High 802III CH2/High 802IIIST Stacked 802 Series III loudspeaker EQ 802III CH1/Full Range 802III CH2/Full Range 802III CH1/Full Range 802III CH2/Full Range 802IIIST+502B Stacked 802 Series III loudspeakers biamped with 502B 802III CH1/High 802III CH2/High 502B CH1/Low 502B CH2/Low 802IIIST+502X Stacked 802 Series III loudspeakers biamped with 502BEX 802III CH1/High 802III CH2/High 502BEX CH1/Low 502BEX CH2/Low 802IIISTK+MB4 Stacked 802 Series III loudspeakers biamped with MB4 802III CH1/High 802III CH2/High MB4 CH1/Low MB4 CH2/Low Output 1 Output 1 Output 2 Output 2 Output 3 Output 3 Output 4 Output 4 Bose® Speaker EQ Preset List – Stereo Bank PANARAY 802 Series III loudspeaker Stereo Presets 802 Series III loudspeaker Preset Descriptions 802IIISTK+AWCS Stacked 802 Series III loudspeaker biamped with AWCS Note: Limiting is assigned to outputs 3 and 4 for protection of the AWCS 802III CH1/High 802III CH2/High AWCS CH1/Low AWCS CH2/Low 802IIISTK HP Stacked 802 Series III loudspeaker biamped @ 125 Hz 802III CH1/High 802III CH2/High 802III CH1/High 802III CH2/High PANARAY MA12 loudspeaker Stereo Presets MA12 loudspeaker Preset Descriptions MA12 WALL MA12 loudspeaker Full Range, Wall Mount, EQ Curve MA12 CH1/Full Range MA12 CH2/Full Range MA12 CH1/Full Range MA12 CH2/Full Range MA12 FREE MA12 loudspeaker Full Range, Free Field, EQ Curve MA12 CH1/Full Range MA12 CH2/Full Range MA12 CH1/Full Range MA12 CH2/Full Range MA12+502B MA12 loudspeaker bi-amped with 502 B loudspeaker MA12 CH1/High MA12 CH2/High 502B CH1/Low 502B CH2/Low MA12+MB4 MA12 loudspeaker bi-amped with MB4 MA12 CH1/High MA12 CH2/High MB4 CH1/Low MB4 CH2/ Low MA12 HF MA12 loudspeaker bi-amped @ 160 Hz MA12 CH1/High MA12 CH2/High MA12 Mono High MA12 Mono High MA12STK WALL Stacked MA12 loudspeaker Full Range, Wall Mount, EQ Curve MA12 CH1/Full Range MA12 CH2/Full Range MA12 CH1/Full Range MA12 CH2/Full Range MA12STK FREE Stacked MA12 loudspeaker Full Range, Free Field, EQ Curve MA12 CH1/Full Range MA12 CH2/Full Range MA12 CH1/Full Range MA12 CH2/Full Range MA12STK+502B Stacked loudspeaker bi-amped with 502B loudspeaker MA12 CH1/High MA12 CH2/High 502B CH1/Low 502B CH2/Low MA12STK+MB4 Stacked MA12 loudspeaker bi-amped with MB4 MA12 CH1/High MA12 CH2/High MB4 CH1/Low MB4 CH2/Low MA12STK HF Stacked MA12 loudspeaker bi-amped @ 160Hz MA12 CH1/High MA12 CH2/High MA12 CH1/High MA12 CH2/High Output 1 Output 1 Output 2 Output 2 Output 3 Output 3 Output 4 Output 4 49 Bose® Speaker EQ Preset List – Stereo Bank 50 PANARAY® MB4 loudspeaker Stereo Presets MB4 loudspeaker Preset Descriptions Output 1 Output 2 Output 3 Output 4 MB4 100Hz LP MB4 loudspeaker 100Hz Low Pass MB4/CH1 MB4/CH2 MB4/CH1 MB4/CH2 MB4 160Hz LP MB4 loudspeaker 160Hz Low Pass MB4/CH1 MB4/CH2 MB4/CH1 MB4/CH2 MB4 200Hz LP MB4 loudspeaker 200Hz Low Pass MB4/CH1 MB4/CH2 MB4/CH1 MB4/CH2 MB4 280Hz LP MB4 loudspeaker 280Hz Low Pass MB4/CH1 MB4/CH2 MB4/CH1 MB4/CH2 PANARAY 502® B loudspeaker Mono Presets 502B loudspeaker Preset Descriptions Output 1 Output 2 Output 3 Output 4 502B 502B loudspeaker Mono Low Pass @ 160 Hz PANARAY 502® BEX loudspeaker Stereo Presets 502BEX loudspeaker Descriptions 502BEX 502BEX loudspeaker Mono Low Pass @ 200 Hz AWCS Stereo Presets AWCS Preset Descriptions AWCS AWCS Mono Low Pass with limiting assigned to all four outputs PANARAY LT3202® Stereo Presets LT3202 loudspeaker Preset Descriptions LT3202 502B/CH1 502B/CH2 502B/CH1 502B/CH2 Preset Output 1 502BEX/ CH1 Output 2 502BEX/ CH2 Output 3 502BEX/ CH1 Output 4 502BEX/ CH2 Output 1 Output 2 Output 3 Output 4 AWCS/CH1 AWCS/CH2 AWCS/CH1 AWCS/CH2 Output 1 Output 2 Output 3 Output 4 LT3202 loudspeaker Full Range EQ LT3202 CH1 Full Range LT3202 CH2 Full Range LT3202 CH1 Full Range LT3202 CH2 Full Range LT3202CLUSTER LT3202 loudspeaker Cluster EQ LT3202 CH1 Full Range LT3202 CH2 Full Range LT3202 CH1 Full Range LT3202 CH2 Full Range LT3202+MB4 LT3202 loudspeaker bi-amped with MB4 LT3202 CH1/High LT3202 CH2/High MB4 CH1/Low MB4 CH2/Low LT3202+502BEX LT3202 loudspeaker bi-amped with 502BEX loudspeaker LT3202 CH1/High LT3202 CH2/High 502BEX CH1/Low 502BEX CH2/Low Bose® Speaker EQ Preset List – Stereo Bank PANARAY LT4402 loudspeaker Mono Presets LT4402 loudspeaker Preset Descriptions LT4402 LT4402 loudspeaker Full Range EQ LT4402 Mono Full Range LT4402 Mono Full Range LT4402 Mono Full Range LT4402 Mono Full Range LT4402CLUSTER LT4402 Cluster EQ LT4402 Mono Full Range LT4402 Mono Full Range LT4402 Mono Full Range LT4402 Mono Full Range LT4402+MB4 LT4402 loudspeaker bi-amped with MB4 LT4402 Mono High LT4402 Mono High MB4 Mono Low MB4 Mono Low LT4402+502BEX LT4402 loudspeaker bi-amped with 502 BEX loudspeaker LT4402 Mono High LT4402 Mono High 502BEX Mono Low 502BEX Mono Low PANARAY LT9702 loudspeaker Mono Presets LT9702 loudspeaker Preset Descriptions Output 1 Output 2 LT9702 LT9702 loudspeaker Full Range EQ LT9702 Mono Full Range LT9702 Mono Full Range LT9702 Mono Full Range LT9702 Mono Full Range LT9702CLUSTER LT9702 Cluster EQ LT9702 Mono Full Range LT9702 Mono Full Range LT9702 Mono Full Range LT9702 Mono Full Range LT9702+MB4 LT9702 loudspeaker bi-amped with MB4 LT9702 Mono High LT9702 Mono High MB4 Mono Low MB4 Mono Low LT9702+502BEX LT9702 loudspeaker bi-amped with 502BEX loudspeaker LT9702 Mono High LT9702 Mono High 502BEX Mono Low 502BEX Mono Low FreeSpace Model 8 loudspeaker Mono Presets Model 8 loudspeaker Preset Descriptions Output 1 Output 2 Output 3 Output 4 M8 Model 8 loudspeaker Full Range EQ M8 Mono Full Range M8 Mono Full Range M8 Mono Full Range M8 Mono Full Range M8+MB4 Model 8 loudspeaker bi-amped with MB4 M8 Mono High M8 Mono High MB4 Mono Low MB4 Mono Low M8+FS3 Model 8 loudspeaker bi-amped with FreeSpace 3 loudspeaker M8 Mono High M8 Mono High FS3 Mono Low FS3 Mono Low M8+FS1B Model 8 loudspeaker bi-amped with FreeSpace 1B loudspeaker M8 Mono High M8 Mono High FS1B Mono Low FS1B Mono Low Output 1 Output 2 Output 3 Output 3 Output 4 Output 4 51 Bose® Speaker EQ Preset List – Stereo Bank 52 FreeSpace Model 32 loudspeaker Mono Presets Model 32 loudspeaker Preset Descriptions M32 Model 32 loudspeaker Full Range EQ M32 Mono Full Range M32 Mono Full Range M32 Mono Full Range M32 Mono Full Range M32+MB4 Model 32 loudspeaker bi-amped with MB4 M32 Mono High M32 Mono High MB4 Mono Low MB4 Mono Low M32+FS3 Model 32 loudspeaker bi-amped with FS3 M32 Mono High M32 Mono High FS3 Mono Low FS3 Mono Low M32+FS1B Model 32 loudspeaker bi-amped with FS1B M32 Mono High M32 Mono High FS1B Low FS1B Low M32+502BEX Model 32 loudspeaker bi-amped with 502 BEX loudspeaker M32 Mono High M32 Mono High 502BEX Mono Low 502BEX Mono Low FreeSpace Model 1B loudspeaker Mono Presets FreeSpace Model 1B loudspeaker Preset Descriptions FS1B 100Hz LP FreeSpace Model 1B loudspeaker 100Hz Low Pass FS1B FS1B FS1B FS1B FS1B SURFACE FreeSpace Model 1B loudspeaker Surface Mount EQ FS1B FS1B FS1B FS1B FS1B FLUSH FreeSpace Model 1B loudspeaker Flush Mount EQ FS1B FS1B FS1B FS1B FreeSpace 3 Bass Mono Presets FreeSpace 3 Bass Preset Descriptions FS3 100Hz LP FreeSpace 3 Bass 100Hz Low Pass FS3 FS3 FS3 FS3 FS3 150Hz LP FreeSpace 3 Bass 150Hz Low Pass FS3 FS3 FS3 FS3 FreeSpace 360 Mono Presets FreeSpace 360 loudspeaker Preset Descriptions FS360 HARD FS360 loudspeaker inground hard EQ FS360 Mono Full Range FS360 SOFT FS360 loudspeaker inground soft EQ FS360 DECK FS360 loudspeaker deck EQ Output 1 Output 1 Output 1 Output 1 Output 2 Output 2 Output 2 Output 2 Output 3 Output 3 Output 3 Output 4 Output 4 Output 4 Output 3 Output 4 FS360 Mono Full Range FS360 Mono Full Range FS360 Mono Full Range FS360 Mono Full Range FS360 Mono Full Range FS360 Mono Full Range FS360 Mono Full Range FS360 Mono Full Range FS360 Mono Full Range FS360 Mono Full Range FS360 Mono Full Range Bose® Speaker EQ Preset List – Bass Array Bank PANARAY MB4 Bass Array Presets MB4 Bass Array Preset Descriptions Output 1 Output 2 Output 3 Output 4 MB4 2xBS180Hz The MB4 2x broadside bass array preset provides 360 degree horizontal coverage with a 10 to 15 dB suppression in energy going up and down from 80 - 200Hz. The crossover is set at 180Hz and is recommended for use with MA12, MB4 and 02 Series speakers. MB4/Mono MB4/Mono N/A N/A MB4 2xBS280Hz The MB4 2x broadside bass array preset provides 360 degree horizontal coverage with a 10 to 15 dB suppression in energy going up and down from 80 - 200Hz. The crossover is set at 280Hz and is recommended for use with the LT Series. MB4/Mono MB4/Mono N/A N/A MB4 2xEF180Hz The MB4 2x endfire bass array preset provides 180 degree conical dispersion @ 160Hz. The crossover is set at 180Hz and is recommended for use with MA12, MB4 and 02 Series speakers. MB4/Mono MB4/Mono N/A N/A MB4 2xEF280Hz The MB4 2x endfire bass array preset provides 180 degree conical dispersion @ 160Hz. The crossover is set at 280Hz and is recommended for use with MA12, MB4 and LT Series speakers. MB4/Mono MB4/Mono N/A N/A MB4 4xEF280Hz The MB4 4x endfire bass array preset provides 120 degree conical dispersion @ 160Hz. The crossover is set at 280Hz and is recommended for use with MA12, MB4 and LT Series speakers. MB4/Mono MB4/Mono MB4/Mono MB4/Mono MB4 4xEF180Hz The MB4 4x endfire bass array preset provides 120 degree conical dispersion @ 160Hz. The crossover is set at 180Hz and is recommended for use with MA12, MB4 and 02 Series speakers. MB4/Mono MB4/Mono MB4/Mono MB4/Mono 53 14.0 Technical Information Sample Rate 44.1kHz Output ranges Balanced 20/14/8/2dBu Analog Inputs: D to A conversion 24 bit, 128x oversampling bitstream Connectors (2) XLR balanced Impedance balanced 21kΩ Input level Maximum: +18dBu Minimum: 0dBu Sensitivity @9dB headroom: -12dBu to +9dBu A to D conversion 24 bit, 128x oversampling bitstream Dynamic range 95dB typ, 20Hz - 20kHz THD Typ < 92dB (0.0025%) @ 1kHz Frequency response 20Hz to 20kHz, +0/-0.1dB Crosstalk < -100dB, 20Hz to 20kHz D to A Delay 0.63ms @ 44.1kHz Dynamic range 100dB typ 20Hz - 20kHz THD Typ < 94dB (0.002%) @ 1kHz +20dBu output Frequency response 20Hz to 20kHz: +0/-0.5dB Crosstalk < -95dB, 20Hz to 20kHz Environment: Operating temperature 32˚F to 122˚F (0˚C to 50˚C) Storage temperature -22˚F to 167˚F (-30˚C to 70˚C) Humidity Maximum 90% non-condensing Control interface: Analog Outputs: 54 Connectors (4) XLR balanced Finish Black anodized aluminum front-plated and painted steel chassis Impedance balanced 40Ω Mains voltage 100 to 240VAC, 50Hz to 60Hz (auto switching) Maximum output level +18dBu (balanced) Power consumption < 15W Appendix: PANARAY® System Digital Controller Quick-Reference Guide STANDBY INPUT METER TPM L -dB 40 24 18 12 6 0 O PRESET LIMITER UTILITY DELAY Stereo Bank 802 Full Range R PANARAY SYSTEM DIGITAL CONTROLLER PRESET Button DELAY Button 180 Speaker EQ presets sorted into Mono, Stereo, and Bass Array Banks Delay 1 On/Off Delay 2 On/Off Delay 3 On/Off Delay 4 On/Off Delay Time 1 Delay Time 2 Delay Time 3 UTILITY Button Output level Output range Input sensitivity Input trim CH1 Input trim CH2 Output route 1 Output route 2 Output route 3 Output route 4 Delay units Delay master Limiter master Input configuration Custom presets Input configuration Custom presets View angle LIMITER Button Lim1 On/Off Lim2 On/Off Lim3 On/Off Lim4 On/Off Lim1 Threshold (L1) Lim1 Ratio (L1) Lim1 Attack (L1) Lim1 Release (L1) Lim1 Gain (L1) Lim2 Threshold (L2) Lim2 Ratio (L2) Lim2 Attack (L2) Lim2 Release (L2) Lim2 Gain (L2) Lim3 Threshold (L3) Lim3 Ratio (L3) Lim3 Attack (L3) Lim3 Release (L3) Lim3 Gain (L3) Lim4 Threshold (L4) Lim4 Ratio (L4) Lim4 Attack (L4) Lim4 Release (L4) Lim4 Gain (L4) 55 ©2002 Bose Corporation, The Mountain Framingham, MA 01701-9168 USA www.bose.com 262350 AM Rev.00 JN20793 SPECIFICATIONS SM109z FEATURES • Compact 2-way, 10-in stage monitor/PA • Dual purpose loudspeaker: stage monitor and PA • Rubber feet included for floor use plus a pole mount cup for stand mounting • Passive crossover and EQ for economical single amplifier operation • Dual Neutrik NL4 connectors for input and loop through connection • Integral handle strategically placed for easy transport DESCRIPTION The SM109z is a compact, professional loudspeaker configured for dual-purpose stage monitor and PA use. It is designed for applications with limited space requiring high quality monitoring. The enclosure is fitted with a pole cup for upright use, increasing the SM109z’s usefulness as a main PA loudspeaker. The conical HF waveguide provides wide-angle projection, important in smaller venues where a single monitor must often cover several performers. As a PA loudspeaker, this same pattern is ideal for meetings and presentations. Portable usage is enhanced by the heavy-duty enclosure construction, steel grille, and integral handle. Two Neutrik NL4 jacks provide reliable input and loop through connections. The SM109z carries a six year warranty. APPLICATION Applications Include: • Houses of worship • TV studios • Meeting rooms • Club Bands • Theatres • Classrooms PERFORMANCE Frequency Response (1 W @ 1m) ±3 dB 100 Hz to 19 kHz -10 dB 80 Hz Axial Sensitivity (dB SPL, 1 Watt @ 1m) Full Range 95 Impedance (Ohms) Full Range 8 Power Handling (Watts) Full Range 300 Recommended High-Pass Frequency (24 dB/octave) 70 Hz Calculated Maximum Output (dB SPL) Full Range Peak 126 Full Range Long Term 120 Nominal Coverage Angle / -6 dB points (degrees) Conical 100 PHYSICAL Part Number 0001307 Configuration 2-way, full-range floor monitor LF Subsystem 1x 10-in, vented HF Subsystem 1-in exit/1.4-in voice coil compression driver on Wave Guide Plate™ Powering Mode Passive LF/HF crossover Enclosure Materials Exterior grade Baltic birch plywood Finish Wear resistant textured black paint Connectors 2x Neutrik NL4 Speakon Mounting Hardware Pole mount cup Grille Powder coated perforated steel Dimensions inches millimeters Height 14.88 378 Height w/feet 15.5 394 Width 12.25 311 Depth 18.00 457 Floor Angle 37° Weights pounds kilograms Net Weight 30 13.7 Shipping Weight 33 15.0 One Main Street, Whitinsville, MA 01588 508 234 6158 Toll Free 800 992 5013 EAW products are continually improved. All specifications are therefore subject to change without notice. FAX 508 234 8251 SM109z/0004644/001/2 pp [email protected] September 2002 www.eaw.com Printed in USA SPECIFICATIONS SM109z DIMENSIONAL DRAWING A & E SPECIFICATIONS The 2-way full-range loudspeaker system shall incorporate a 10-in LF transducer and a 1.4-in voice coil compression driver. NOTES: 1. SYMBOL INDICATES FEET. 2. SYMBOL INDICATES CENTER OF BALANCE. 3. WEIGHT APPROX. 27 LBS. 4. SHIPPING WEIGHT APPROX. 32 LBS. 5. HEIGHT OF FEET APPROX. .4" 7.43 1.32 2X 7.56 4.31 2X 9.64 1.73 C L 9.25 12.25 C L VIEW A-A 3.94 R 3.44 TOP HAT The LF transducer shall be mounted in a vented enclosure tuned for optimum low frequency response. The HF transducer shall be loaded on a axis-symmetrical, 1-in exit Wave Guide Plate™ with a nominal conical beamwidth of 100°. An internal passive filter network shall provide all acoustical crossover and system equalization requirements. 2X INPUT CONNECTOR 2X 20.15 C L 6.44 19.75 CL 9.25 HANDLE 3.75 A RIGHT SIDE GRILLE PARTIALLY SHOWN 2X 4.00 T.S.C 10.53 LEFT SIDE 0001243(A) 9/12/02 A System frequency response shall vary no more than ±3 dB from 100 Hz to 19 kHz measured on axis. The loudspeaker shall produce a sound pressure level (SPL) of 95 dB SPL on axis at 1 meter with a power input of 1 watt, and shall be capable of producing a peak output of 126 dB SPL on axis at 1 meter. The loudspeaker shall handle 300 watts of amplifier power (continuous) and shall have a nominal impedance of 8 ohms. S/N The loudspeaker enclosure shall be irregularly trapezoidal in shape and shall have rubber footpads on one side. Its baffle shall be angled up 37°. It shall be constructed of exterior grade Baltic birch plywood and shall employ extensive internal bracing. It shall be finished in wear-resistant textured black paint. Input connectors shall be 2x Neutrik NL4 Speakon wired in parallel. It shall include a pole mount cup and handle integral to the enclosure. The front of the loudspeaker shall be covered with powder coated perforated steel grille. PIN 1--...-- PIN 1+...+ The 2-way full-range loudspeaker shall be the EAW model SM109z. Manufacturing tolerances are +/- 0.13 and +/- 1° INPUT SM109z WHITINSVILLE, MA USA NEUTRIK NL 4 MPR One Main Street, Whitinsville, MA 01588 508 234 6158 Toll Free 800 992 5013 EAW products are continually improved. All specifications are therefore subject to change without notice. FAX 508 234 8251 SM109z/0004644/001/2 pp [email protected] September 2002 www.eaw.com Printed in USA user manual 101100.qrk 8/27/01 4:19 PM Page 1 TM User’s Manual LT-800 Stationary Transmitter LT-700 Portable Transmitter LR-500 Programmable Display Receiver LR-400 Display Receiver LR-300 Digital Receiver (Both 72 and 216MHz Systems) TM LIS T E N T E C H N O L O G I E S C O R P O R AT I O N 8535 South 700 West, Suite A Sandy, Utah 84070 U.S.A. Telephone: +1.801.233.8992 Toll Free: 1.800.330.0891 Fax: +1.801.233.8995 Internet: www.listentech.com E-Mail: [email protected] Printed in U.S.A. 5/2001 (c) Copyright 2001 Reprint with permission only LISTEN TECHNOLOGIES C O R P O R AT I O N © C o p y r i g h t 2 0 01 L i s t e n Te c h n o l o g i e s C o r p o r a t i o n user manual 101100.qrk 8/27/01 4:19 PM Page 2 Introduction 216MHz Frequency Compatibility Table (Continued) Dear Valued Customer, Thank you for choosing Listen! All of us at Listen are dedicated to providing you the highest quality products and prompt, efficient customer care. Our products are manufactured in an ISO-9000 factory that has been independently certified to the highest quality standards. We stand ready to answer any questions you might have at installation or in the operation of our products. And should there be any problems with your Listen products, we are ready to help you in any way we can. Should you have any comments on how we might improve our products or our service, we’re here to listen. Here’s how to reach us: Telephone: +1.801.233.8992 Facsimile: +1.801.233.8995 U.S. Toll Free: 1.800.330.0891 E-Mail: [email protected] Web: www.listentech.com Thank you... and enjoy your listening experience! Best Regards, The Listen Team TM 2 LISTEN TECHNOLOGIES CORPORATION +1.801.233.8992 1.800.330.0891 Fax: +1.801.233.8995 Internet: www.listentech.com All specifications are subject to change without notice. LISTEN TECHNOLOGIES CORPORATION +1.801.233.8992 1.800.330.0891 Fax: +1.801.233.8995 Internet: www.listentech.com All specifications are subject to change without notice. 31 user manual 101100.qrk 8/27/01 4:19 PM Page 3 216MHz Frequency Compatibility Table Table of Contents MISCELLANEOUS Technical Service Contacts . . . . . . . . . . . . . . . . . . . . . . . . .4 Warnings . . . . . . . . . . . . . . . . . . . . . . . . . . . . . . . . . . . . . . .4 Compliance Notices . . . . . . . . . . . . . . . . . . . . . . . . . . . . . . .4 Limited Lifetime Warranty . . . . . . . . . . . . . . . . . . . . . . . . . .5 LT-800 Stationary Transmitter LT-800 front illustration: controls & display descriptions . .7 Audio connections illustration . . . . . . . . . . . . . . . . . . . . . .7 Preparing the LT-800 for use . . . . . . . . . . . . . . . . . . . . . . .8 Lock into or unlock a channel . . . . . . . . . . . . . . . . . . . . . .8 Audio control instructions . . . . . . . . . . . . . . . . . . . . . . . . .9 Operating the unit . . . . . . . . . . . . . . . . . . . . . . . . . . . . . .10 Selecting a channel to transmit on . . . . . . . . . . . . . . . . .10 LT-800 specifications . . . . . . . . . . . . . . . . . . . . . . . . . . . .11 LT-800 troubleshooting . . . . . . . . . . . . . . . . . . . . . . . . . .12 LT-700 Portable Transmitter Preparing the LT-700 for use . . . . . . . . . . . . . . . . . . . . . .13 Operating the unit . . . . . . . . . . . . . . . . . . . . . . . . . . . . . .14 Selecting a channel to transmit on . . . . . . . . . . . . . . . . .15 Look & Listen™ LCD display descriptions . . . . . . . . . . . .15 LT-700 programming . . . . . . . . . . . . . . . . . . . . . . . . . . . .16 Locking into only one channel . . . . . . . . . . . . . . . . . . . . .16 LED indicator . . . . . . . . . . . . . . . . . . . . . . . . . . . . . . . . . .16 Battery status icon . . . . . . . . . . . . . . . . . . . . . . . . . . . . .16 Locking the access door . . . . . . . . . . . . . . . . . . . . . . . . .17 Charging batteries using SmartCharge™ . . . . . . . . . . . . . .17 Operating the unit with a wall transformer . . . . . . . . . . . .18 LT-700 troubleshooting . . . . . . . . . . . . . . . . . . . . . . . . . .19 LT-700 specifications . . . . . . . . . . . . . . . . . . . . . . . . . . . .20 30 LISTEN TECHNOLOGIES CORPORATION +1.801.233.8992 1.800.330.0891 Fax: +1.801.233.8995 Internet: www.listentech.com All specifications are subject to change without notice. LR-500 Programmable Display Receiver LR-400 Display Receiver LR-300 Digital Receiver LR-500 Programmable Display Receiver, LR-400 Display Receiver and LR-300 Digital Receiver Differences in the LR- 300, 400 and 500 . . . . . . . . . .21 Preparing Listen receivers for use . . . . . . . . . . . . . . .21 Operating the LR-300 receiver . . . . . . . . . . . . . . . . . .22 Operating the LR-400 and LR-500 receivers . . . . . . . .22 Locking into only one channel . . . . . . . . . . . . . . . . . .23 LED indicator . . . . . . . . . . . . . . . . . . . . . . . . . . . . . .23 LR-400 and LR-500 Look & Listen™ LCD display descriptions . . . . . . . . . . . . . . . .23 Battery status icon . . . . . . . . . . . . . . . . . . . . . . . . . .24 Unlocking and locking the access door . . . . . . . . . . .24 Charging batteries using SmartCharge™ . . . . . . . . . . .24 Operating the receiver with a wall transformer . . . . .25 LR-300, LR-400 and LR-500 specifications . . . . . . . .26 Receiver troubleshooting . . . . . . . . . . . . . . . . . . . . . .27 LR-500 programming . . . . . . . . . . . . . . . . . . . . . . .25 Frequency & Compatibility Tables 72MHz . . . . . . . . . . . . . . . . . . . . . . . . . . . . . . . . .28-29 216MHz . . . . . . . . . . . . . . . . . . . . . . . . . . . . . . . .30-31 LISTEN TECHNOLOGIES CORPORATION +1.801.233.8992 1.800.330.0891 Fax: +1.801.233.8995 Internet: www.listentech.com All specifications subject to change without notice. TM 3 user manual 101100.qrk 8/27/01 4:19 PM Page 4 Technical Service Contacts & Compliance Notices Technical Service Contacts If technical service is needed, please contact Listen. Pre-authorization is required before returning Listen products. If products were damaged in shipment, please contact the carrier, then contact Listen for replacement or repair requirements payable by the carrier. Toll Free: 1.800.330.0891 Telephone: +1.801.233.8992 Fax: +1.801.233.8995 Internet: www.listentech.com General E-Mail: [email protected] Shipping & Correspondence Address: Listen Technologies Corporation 8535 South 700 West, Suite A Sandy, Utah 84070 U.S.A. FCC ID Numbers: LT-800-072 (72MHz base transmitter) ID: OMD800-001 LT-800-216 (216MHz base transmitter) ID: OMD800-216 LT-700-072 (72MHz portable transmitter) ID: OMD700-001 LT-700-216 (216MHz portable transmitter) ID: OMD700-216 72MHz Frequency Compatibility Table (continued) Compliance Notices Listen’s Models LT-800, LT-700, LR-300, LR-400 and LR-500 These devices comply with part 15 of the FCC Rules. Operation is subject to the following two conditions: (1) These devices may not cause harmful interference, and (2) these devices must accept any interference received, including interference that may cause undesirable operation. Listen’s LT-800 and LT-700 Transmitters (216MHz only) Listen’s LT-800 and LT-700 transmitters are authorized by rule under the Low Power Radio Service (47 C.F.R. Part 95) and must not cause harmful interference to TV reception or United States Navy SPASUR installations. You do not need an FCC license to operate these transmitters. These transmitters may only be used to provide: auditory assistance to persons with disabilities, persons who require language translation, or persons in educational settings; health care services to the ill; law enforcement tracking services under agreement with a law enforcement agency; or automated maritime telecommunications system (AMTS) network control communications. Two-way voice communications and all other types of uses not mentioned above are expressly prohibited. Caution: Changes or modifications not expressly approved by the party responsible for compliance could void the user’s authority to operate Listen’s equipment. FCC Statement This equipment has been tested and found to comply with the limits for a class B digital device, pursuant to part 15 of the FCC Rules. These limits are designed to provide reasonable protection against harmful interference in a residential installation. This equipment generates, uses and can radiate radio frequency energy and if not installed and used in accordance with the instructions, may cause harmful interference to radio communications. However, there is no guarantee that interference will not occur in a particular installation. If this equipment does cause harmful interference to radio or television reception, which can be determined by turning the equipment off and on, the user is encouraged to try to correct the interference by one or more of the following measures: Reorient or relocate the receiving antenna. Increase the separation between the equipment and receiver. Connect the equipment into an outlet on a circuit different from that to which the receiver is connected. Consult the dealer or an experienced radio/TV technician for help. This equipment has been certified to comply with the limits for a class B computing device, pursuant to FCC Rules. In order to maintain compliance with FCC regulations, shielded cables must be used with this equipment. Operation with non-approved equipment or unshielded cables is likely to result in interference to radio and TV reception. The user is cautioned that changes and modifications made to the equipment without the approval of manufacturer could void the user’s authority to operate this equipment. 4 LISTEN TECHNOLOGIES CORPORATION +1.801.233.8992 1.800.330.0891 Fax: +1.801.233.8995 Internet: www.listentech.com All specifications are subject to change without notice. TM LISTEN TECHNOLOGIES CORPORATION +1.801.233.8992 1.800.330.0891 Fax: +1.801.233.8995 Internet: www.listentech.com All specifications subject to change without notice. 29 user manual 101100.qrk 8/27/01 4:19 PM Page 5 72MHz Frequency Compatibility Table Listen Limited Lifetime Warranty Limited Lifetime Warranty, Including Performance Guarantee Listen Technologies Corporation (Listen) warrants its products to Listen will refund the purchase price of the product to the original be free from defects in workmanship and material under normal purchaser within the first ninety days after purchase if the product use and conditions for the useful lifetime of the product from date does not perform better than a similar competitive product subject of purchase. Accessories are warranted for ninety days from date to an annual amount to any one original purchaser not to exceed of purchase. This warranty is only available to the original end $1,000 and subject to the conditions of this limited warranty. This purchaser of the product and cannot be transferred. Warranty is is called our Whatever-It-takes Performance Guarantee. Refunds only valid if warranty card has been returned within 90 days of will only be given to the original purchaser of product once the purchase. This warranty is void if damage occurred because of product has been returned to the factory in good working order misuse or if the product has been repaired or modified by anyone with an explanation for the refund. To receive a refund, call Listen other than a factory authorized service technician. Warranty does for a return authorization number. Return the product with a letter not cover normal wear and tear on the product or any other on the end user’s letterhead stating the reason for the refund and a physical damage unless the damage was the result of a copy of the original invoice. If the product was purchased through manufacturing defect. Listen is not liable for consequential a dealer, refunds must be processed through the original dealer. damages due to any failure of equipment to perform as intended. Listen shall bear no responsibility or obligation with respect to the In the first ninety days after purchase, any defective product will manner of use of any equipment sold by it. Listen specifically be replaced with a new unit. After ninety days, Listen will, at its disclaims and negates any warranty of merchantability or fitness of own discretion either replace the unit with a new unit or a unit of use of such equipment including, without limitation, any warranty similar type and condition. Product that is not covered under that the use of such equipment for any purpose will comply with warranty shall be replaced with a unit of similar type and condition applicable laws and regulations. The terms of the warranty are based on a flat fee. governed by the laws of the state of Utah. This limited lifetime warranty, prices and the specifications of Listen will only accept returned products with prepaid shipping and products are subject to change without notice. with a return authorization number. To receive a return authorization number call 1.800.330.0891 or +1.801.233.8992. TM 28 LISTEN TECHNOLOGIES CORPORATION +1.801.233.8992 1.800.330.0891 Fax: +1.801.233.8995 Internet: www.listentech.com All specifications are subject to change without notice. LISTEN TECHNOLOGIES CORPORATION +1.801.233.8992 1.800.330.0891 Fax: +1.801.233.8995 Internet: www.listentech.com All specifications are subject to change without notice. 5 8/27/01 4:19 PM Page 7 Listen Receiver Specifications LT-800 Stationary Transmitter Controls & Audio Connections LR-500 Specifications LR-400 Specifications LR-300 Specifications RF Frequency Range: 72MHz: 72.05 - 75.95 MHz 216MHz: 216.025 - 216.975 MHz Sensitivity: .6uV typical, 1uV maximum for 12dB SINAD, Max deviation at ±70kHz Signal to Noise ratio: 72MHz: Wide band channels, 60dB; Narrow, 54dB 216MHz: Wide band channels, 50dB; Narrow, 44dB Frequency Response: 72 50Hz to 17kHz, ±3dB 216 50Hz to 10kHz, ±3dB Distortion: < 2% THD Squelch: 40dB with loss of RF signal Antenna: Uses headphone cable Available Channels: 72MHz: 17 wide band, 40 narrow band 216MHz: 19 wide band, 38 narrow band (see charts on pages 28-31 for details) Physical Dimensions: 3" W x 1"D x 5"H (7.6cm W x 2.5cm D x 13cm H) Weight: < 1 lb. (.45 kg) with batteries Door: CHANNEL and SEEK buttons are accessible through door, lockable LR-500 Programmability: Allows only programmed channels to appear on the display, user functions can be locked by pressing the Seek button for > 3 seconds Power: Two AA batteries, high capacity alkaline or NiMH rechargeable; external power connector 8-9 VDC, tip positive,<300mA Battery Charging: Fully automatic, <14 hours Battery Life: 40 hours with high capacity alkaline, 20 hours with rechargeable NiMH Headphone Output: 750mW RMS maximum at 25kHz deviation, 32 ohms, 3.5MM mono or stereo RF Frequency Range: 72MHz: 72.05 - 75.95 MHz 216MHz: 216.025 - 216.975 MHz Sensitivity: .6uV typical, 1uV maximum for 12dB SINAD, Max deviation at ±70kHz Signal to Noise ratio: 72MHz: Wide band channels, 60dB; Narrow, 54dB 216MHz: Wide band channels, 50dB; Narrow, 44dB Frequency Response: 72 50Hz to 17kHz, ±3dB 216 50Hz to 10kHz, ±3dB Distortion: < 2% THD Squelch: 40dB with loss of RF signal Antenna: Uses headphone cable Available Channels: 72MHz: 17 wide band, 40 narrow band 216MHz: 19 wide band, 38 narrow band (see charts on pages 28-31 for details) Physical Dimensions: 3" W x 1"D x 5"H (7.6cm W x 2.5cm D x 13cm H) Weight: < 1 lb. (.45 kg) with batteries Door: CHANNEL and SEEK buttons are accessible through door, lockable Power: Two AA batteries, high capacity alkaline or NiMH rechargeable; external power connector 8-9 VDC, tip positive, <300mA Battery Charging: Fully automatic, <14 hours Battery Life: 40 hours with high capacity alkaline, 20 hours with rechargeable NiMH Headphone Output: 750mW RMS maximum at 25kHz deviation, 32 ohms, 3.5MM mono or stereo RF Frequency Range: 72MHz: 72.05 - 75.95 MHz Sensitivity: .6uV typical, 1uV maximum for 12dB SINAD, Max deviation at ±70kHz Signal to Noise ratio: 72MHz: Wide band channels, 60dB Frequency Response: 50Hz to 17kHz, ±3dB Distortion: < 2% THD Squelch: 40dB with loss of RF signal Antenna: Uses headphone cable Available Channels: 72MHz: 17 wide band Frequency Channel Letter 72.100 A 72.200 K 72.300 B 72.400 N 72.500 C 72.600 O 72.700 D 72.800 P 72.900 E 74.700 I 75.300 J 75.400 R 75.500 F 75.600 S 75.700 G 75.800 T 75.900 H Physical Dimensions: 3" W x 1"D x 5"H (7.6cm W x 2.5cm D x 13cm H) Weight: < 1 lb. (.45 kg) with batteries Door: CHANNEL and SEEK buttons are accessible through door, lockable Power: Two AA batteries, high capacity alkaline or NiMH rechargeable; external power connector 8-9 VDC, tip positive,<300mA Battery Charging: Fully automatic, <14 hours Battery Life: 40 hours with high capacity alkaline, 20 hours with rechargeable NiMH Headphone Output: 750mW RMS maximum at 25kHz deviation, 32 ohms, 3.5MM mono or stereo LT-800 Front Illustration: Controls & Displays INPUT: Adjust audio input levels of Inputs 1 and 2 Indicates audio input level of Inputs 1 and 2 Shows modulation level after processing Indicates RF output power (full, 1/2 or 1/4) – select on rear panel Channel the unit is tuned to LT-800 Transmitter user manual 101100.qrk If decimal place is lit, channel is locked Plug in a headset then adjust volume Power ON/OFF Activates a tone to aid tuning of nonListen receivers PROCESS: Adjust the amount of audio processing – to make all audio sources sound like they are at the same level, adjust clockwise CONTOUR: Adjust voice intelligibility equalization for your application requirements SELECT CHANNEL TO LOCK: press both UP and DOWN buttons simultaneously to lock channel; press both again to unlock Please Note: as of December, 2002, "Process" has been relabeled "MIX" LT-800 Audio Connections INPUT 1 CONNECTION: Connect a microphone or balanced line level input. See Preparation instruction #7 for details (Page 9). The LT-800 has two possible audio inputs: INPUT 1 is used to connect a balanced mic or line level input. INPUT 2 is used to connect an unbalanced, high impedance line input or speaker input. LINE OUTPUT – the LINE OUTPUT connector is a mixed output of INPUT 1 and INPUT 2 after processing. This is an unbalanced phono connector. The output level is –10dBm. INPUT 2 CONNECTION: this is a phono connector used to connect an unbalanced, high impedance line or speaker input INPUT 2 SWITCH: Select LINE or SPEAKER on the slide switch directly next to the INPUT 2 connector. In the line position, the input level is –10dBm, and on speaker, the input level is +10dBm. INPUT 1 SWITCH: Select MIC or LINE input on the slide switch. For Mic input, the level is –55dBm and the input impedance is 50 ohms. In the line position, the input level is +4dBm and the input impedance is 600 ohms. TM Specifications subject to change without notice. 26 LISTEN TECHNOLOGIES CORPORATION +1.801.233.8992 1.800.330.0891 Fax: +1.801.233.8995 Internet: www.listentech.com All specifications are subject to change without notice. LISTEN TECHNOLOGIES CORPORATION +1.801.233.8992 1.800.330.0891 Fax: +1.801.233.8995 Internet: www.listentech.com All specifications subject to change without notice. 7 user manual 101100.qrk 8/27/01 4:19 PM Page 8 LT-800 Stationary Transmitter Preparation Preparing the LT-800 for Use Listen Receivers: Charging (cont.) & LR-500 Programming 5 Remove the product from the shipping container and plastic cover. Inspect for physical 1 damage. See "Technical Service Contacts" (Page 4) if damage has occurred. For Rack Mounting: If rack mounting the unit, install 2 the rack mount shelf according the instructions that come with the shelf, then install the unit and shelf in the rack. 3 Set the RF POWER: Set the RF POWER switch for FULL, 1/2 or 1/4. (Level is also indicated on the front panel.) The amount of transmitted RF power that you will need depends on your application. If you are operating other transmitters in the same environment and receivers can be used close to the antenna, it is best to have the transmitter’s output power at its lowest level to reduce the possibility of interference. 5. Plug a wall transformer into the side of the Listen receiver or place receiver in a Listen Carrying/Charging Case (LA-311 or LA-317). For charging using a transformer: with NiMH batteries in unit, plug wall transformer in CHARGING connection and into wall outlet (as shown). Batteries will be fully charged when red LED stops flashing and is unlit. (LED and battery symbol will flash slowly while charging.) Plug in Wall Transformer Plug the connector on the wall transformer into the power connector on the back panel. Do not plug into power source yet. (Only use a Listen supplied transformer.) Charging the Batteries (continued) 6 Power Up 6. Once the batteries are fully charged, the unit will stop charging the batteries. Full-charge will be indicated when all the battery symbol segments are illuminated and the LED near the volume control is not lit. 1. Plug transformer into outlet 2. To enter PROGRAM mode, press the UP and DOWN keys simultaneously until the PGM symbol is displayed on the LCD display. 3. Use the UP and DOWN keys to select channels. As channels are displayed, the L/O symbol on the LCD display will be displayed for those channels that are locked out. When a channel is locked out, the channel is not available to the user. To toggle between locked out and not locked out, press the SEEK button. On each channel, check to see if “L/O” is displayed; it means channel is locked out from the user To toggle between locked out and not locked out, press the SEEK button. 4 2. Press to 3. Select channel 4. If desired, lock in turn power ON using UP and DOWN buttons Connect Antenna: Connect the supplied antenna according the instructions that come with the antenna. Only use an antenna supplied by Listen. Connect external antenna here, or... Connect telescoping or rubber ducky antenna through cover here selected channel by pressing both UP and DOWN buttons simultaneously 1. The unit will operate normally when connected to a wall transformer. 2. Batteries do not need to be installed in the unit operate from a wall transformer. Lock Into or Unlock A Channel TO LOCK: Press the LT-800’s channel UP and DOWN buttons simultaneously for three or more seconds until you see a decimal dot light up next to the channel number. To UNLOCK: Press the channel UP and DOWN buttons LR-500 Receiver Programming simultaneously for three or more seconds until you see the decimal dot next to the channel number disappear. 1. The LR-500 can be programmed to operate on a limited number of channels. (The LR-400 and LR-300 cannot be programmed.) For applications where users are required to select a channel (such as language interpretation or classrooms), and you don’t want them to have to go through all of the available channels, this feature is ideal. If all channels where available, the user could have 57 channels to select from. TM 8 Operating the Receiver with a Wall Transformer LISTEN TECHNOLOGIES CORPORATION +1.801.233.8992 1.800.330.0891 Fax: +1.801.233.8995 Internet: www.listentech.com All specifications are subject to change without notice. 4. To adjust squelch, the padlock In PROGRAM mode on the LR-500, icon will appear after you program dots indicate level of squelch your channels in PROGRAM mode. You should still be in PROGRAM mode. To NOT adjust squelch, don’t press a button for 4 seconds and the unit will exit PROGRAM mode. To adjust squelch, press SEEK to unlock squelch (the padlock will disappear). The squelch level will appear as a number of dots showing. No dots means no squelch. The factory default setting is four dots. Press the UP button to increment through five possible squelch settings indicated by dots. More dots means more squelch sensitivity. 5. To exit PROGRAM mode, don’t press a key for 4 seconds. LISTEN TECHNOLOGIES CORPORATION +1.801.233.8992 1.800.330.0891 Fax: +1.801.233.8995 Internet: www.listentech.com All specifications subject to change without notice. TM 25 LISTEN RECEIVERS 7. The unit can be operated while batteries are charging. 8/27/01 4:19 PM Page 9 Listen Receivers: Door Lock & Batteries LR-400 and LR-500 Receiver Battery Status Icon The status of the battery is indicated by the battery symbol on the LCD. When the battery is fully charged, all three segments of the battery symbol will be displayed, as shown. As fewer battery segments are displayed, the lower the battery level, as shown. When the batteries are almost fully discharged, the battery segments and the red LED near the volume control will blink. When this occurs, less than 5% of the battery life is remaining and the batteries should be immediately replaced or recharged. LT-800 Stationary Transmitter Preparation & Audio Control All Receivers: Charging Batteries Using SmartCharge™ 7 1. Listen’s receivers are unique because they have an automatic battery charger built in. That means that when the Listen receiver is connected to a wall transformer or placed in a Listen battery charging case (LA-311 or LA-317), Nickel Metal Hydride (NiMH) batteries will be charged while in the receiver. Once batteries are charged, the internal battery charger will automatically turn off. This prevents overcharging of batteries, automates the process of charging, and makes it so you don’t have to remember to unplug the charger. Connect Audio Inputs: Connect audio source(s) to one or both audio input connections: Input 1 offers a choice of balanced XLR or 1/4” phone connection. Input 2 is an unbalanced phono connector. (See LT-800 Audio Connections on Page 7 for specific connection instructions.) Unbalanced Input 2 connection: phono connector Input 2 Switch Input 1 Switch Connect balanced and unbalanced audio sources as shown in diagram. Make sure that if you are connecting an unbalanced audio source, that Pin 2 of the XLR and the ring of 1/4” phone jack are connected to ground as shown. 3. IMPORTANT: To charge NiMH batteries, the BATTERY SELECT switch must be selected to NiMH. Use a pen or small screwdriver to the move the switch (located in the battery compartment directly below the BATTERY SELECT label) to the proper position. XLR Wiring 1/4” Phone Wiring To unlock: On both the right and left side, unlock by turning slot horizontal as shown. To lock: On both the right and left side, lock door by turning slot vertical as shown. 24 LISTEN TECHNOLOGIES CORPORATION +1.801.233.8992 1.800.330.0891 Fax: +1.801.233.8995 Internet: www.listentech.com All specifications are subject to change without notice. _ The LT-800 incorporates automatic audio level control and processing. Input levels can be viewed on the two VU meters on the front panel. 1. ADJUST INPUT: Adjust INPUT knob counter-clockwise to add gain to INPUT 1. Adjust INPUT knob clockwise to add gain to INPUT 2. If you have two audio sources connected to both INPUT 1 and 2, adjust the level of one input using the VU meter, then adjust the output level of the other audio source. 3. ADJUST PROCESS: Adjust the PROCESS knob 4. Install NiMH rechargeable batteries in the battery compartment ensuring that proper polarity has been observed. + _ LT-800 Audio Control counter-clockwise. If most of your audio source is voice, adjust clockwise for music. The CONTOUR knob adjusts the relative equalization of the unit. This equalization boosts or cuts frequencies above 3kHz. For only NiMH batteries: set BATTERY SELECT switch to NiMH. For all other batteries, set BATTERY SELECT at alkaline. Top of Unit and Battery Compartment sources active and the unit powered ON, plug a headset into the jack located on the LT-800’s front panel to listen to the audio source. Adjust headset volume to a comfortable level. 2. ADJUST CONTOUR: Adjust the CONTOUR knob This segment will blink when batteries are low. Locking the Receiver’s Access Door Use the headset jack to listen to audio source – With the audio source or (Refer to LT-800 Controls & Displays Illustration on Page 7.) 2. Do not attempt to charge alkaline or any other type of non-NiMH batteries. Only charge NiMH batteries within Listen receivers. We recommend that you use NiMH batteries supplied by Listen. WARNING: Attempting to charge non-NiMH batteries may result in physical harm, destruction of property and /or fire. Balanced Input 1 connection: XLR or 1/4” phone 9 LT-800 Transmitter user manual 101100.qrk 8 Adjust Audio Input Switches – For Input 1 clockwise if you want more processing. This will provide for even more consistent levels. This knob adjusts processing, relative to automatic processing already performed in the unit. The LT-800 provides dynamic audio processing intended to keep audio levels consistent to the listener. When the PROCESS knob is rotated fully clockwise, all audio is at the same relative level. When rotated fully counter clockwise, more dynamic range is provided for the transmitted audio source. Switch, select MIC or LINE input level; Input 2 Switch, select LINE or speaker level. (See illustration on Page 7.) + TM LISTEN TECHNOLOGIES CORPORATION +1.801.233.8992 1.800.330.0891 Fax: +1.801.233.8995 Internet: www.listentech.com All specifications are subject to change without notice. 9 8/27/01 4:19 PM Page 10 LT-800 Stationary Transmitter, Operation & Selecting a Channel 3 3Adjust volume control for the best listening level. Operating the LT-800 1 Make sure the unit is powered on. Selecting a Channel to Transmit On Selecting a clear channel to broadcast is important for interferencefree broadcasting. Wide Band Recommendation – If you don’t plan to have Press POWER button and verify power connections. When “ON”, display should be lit. 2 Select a channel – Select the channel to transmit on to by pressing the channel UP and DOWN buttons. See "Selecting a Channel to Transmit On" to the right. Can’t change the channel? It may be locked. Press both the UP and DOWN buttons simultaneously for 3 seconds until the decimal dot next to the channel turns off. Press again to lock in new channel, if desired. At 72MHz: The LT-800 at 72MHz operates on 17 wide band channels and 40 narrow band channels: Letters = Wide Band Channels Numbers = Narrow Band Channels At 216MHz: The LT-800 at 216MHz operates on 19 wide band channels and 38 narrow band channels: “2” as left digit = wide band channel “1” and “3” left digits = narrow band channels Please refer to the Frequency Compatibility Tables (Pages 28-31) for specific frequencies and compatibility with other manufacturers. NOTE: Operating on a narrow band channel will have more noise. 3 Test Tone, if necessary: To broadcast a tone, press the test tone button. This button is used to tune other manufacturer receivers or to identify a particular channel on a receiver. Listen Receivers: Locking, and LED & LCD Indicators other transmitters (or a limited number) operating in the same area, it is recommended that you use wide band channels. These are the most common channels used. Many people own receivers that will operate on these channels. In addition, wide band channels offer the best fidelity and the lowest noise. In this case, select one of the 17 wide band channels A through R on 72MHz systems (19 wide band channels beginning with “2” on 216MHz systems). The best way to select a channel is by trial and error. Try a channel, if it has low interference and reliable performance, stick to that channel. Compatibility with other manufacturers – If you are using other manufacturer’s receivers with the LT-800, find out their frequency, then refer to Listen’s Frequency Compatibility Tables (Pages 28-31) to find the LT-800 channel number or letter that corresponds with the receiver’s frequency. As much as possible, Listen has duplicated the wide band channel letters to cover frequencies of other major brands. However, we recommend verifying corresponding channel numbers and letters on the tables on pages 28-31. If you are using other manufacturer’s receivers and the sound is distorted, it is probably because the receiver is not designed to handle the ±25kHz deviation of the Listen transmitter. This can be corrected by turning the PROCESS control knob all the way counterclockwise and turning the INPUT LEVEL knob down. Several transmitters operating in the same environment – For this, you’ll need to choose your transmitting frequencies carefully. The following guidelines should be used to choose channels: a. If possible, use all wide band channels. These channels offer lower noise. b. Select channels that have the highest frequency separation as possible (see Frequency Compatibility Tables, pages 28-31), to avoid adjacent channels and interference. Channels should be at least 200kHz apart. Locking into Only One Channel On the LR-400 and LR-500, when locked, the unit will display the LOCK symbol. On the LR-300 (no LCD display), when listening to the unit, it will sound like the channel isn’t changing when pressing the SEEK button, thus it is electronically locked. Receiver LED Indicator Steady Red LED = Proper Operation Slow Flashing = Battery is Low Slow Flashing when Charging = Unit is Charging To electronically lock in the channel so it cannot be changed, press the SEEK button for five seconds or, on the LR-400 and LR-500, until the LOCK symbol is displayed. To electronically unlock the channel, press and hold down the SEEK button for five seconds or, on the LR400 and LR-500, until the LOCK symbol disappears on the display. LR-400 and LR-500 Receivers: Look & Listen ™ Display Descriptions Small dots indicate the relative RF signal strength. When there is no signal the unit is squelched LISTEN RECEIVERS user manual 101100.qrk Letters and numbers indicate the channel the unit is tuned to Battery indicator – flashes slowing when charging, quickly when almost discharged Indicates the unit is in PROGRAM mode (to enter PROGRAM mode, press UP and DOWN until the PGM symbol on the LCD display is shown) In OPERATING mode, this icon indicates the channel is locked and cannot be changed by the user (to lock/unlock, press the SEEK button until the LOCK symbol on the LCD display is displayed / not displayed) In PROGRAM mode (PGM symbol is displayed), icon indicates the channel is locked out and the user does not have access to the channel TM c. Through a process of trial and error select a combination of channels that offer the lowest interference and highest reliability. 10 LISTEN TECHNOLOGIES CORPORATION +1.801.233.8992 1.800.330.0891 Fax: +1.801.233.8995 Internet: www.listentech.com All specifications are subject to change without notice. LISTEN TECHNOLOGIES CORPORATION +1.801.233.8992 1.800.330.0891 Fax: +1.801.233.8995 Internet: www.listentech.com All specifications subject to change without notice. 23 8/27/01 4:19 PM Page 11 Listen Receivers: Preparation Continued & Operation 5 Place Batteries in Unit Place two AA batteries in the compartment, making note of the battery polarity shown in the battery compartment, and again verifying that the BATTERY SELECT switch is switched correctly for your batteries (see Step 4). 2 + _ 6 _ + Place an earpiece or headset in the mini jack on the top of the unit. The LR-500 and LR-400 are designed to work with either mono or stereo connectors. channel to match the transmission channel by pressing the UP and DOWN buttons. At 72MHz, each LR-400 and LR-500 receiver operates on 17 wide band channels and 40 narrow band channels. (Letters = Wide Band Channels, Numbers = Narrow Band Channels) Turn the receiver on by rotating the volume knob counter-clockwise. The red LED should activate and, on the LR400 and LR-500, the LCD display should illuminate. If they do not, check to ensure you have installed charged batteries and that the batteries have been installed with the proper polarity. LED should light up solid red when unit is on At 216MHz: receivers operate on 19 wide band channels and 38 narrow bands: Channels starting with “2” are wide band, and channels beginning with “1” or “3” are narrow band channels. Please refer to the Frequency Compatibility Tables section (Pages 28-31) for specific frequencies and compatibility with other manufacturers. NOTE: Operating on a narrow band channel will have more noise. Turn volume knob counterclockwise to turn unit on On the LR-400 and LR-500: LCD display should illuminate when unit is on Make sure the unit is on by rotating the volume knob to ON when an earpiece or headset is plugged into the unit. Listen receivers use the cable of the earphone or headset as a receiving antenna. CAUTION: Don’t blow out your ears! Slightly rotate the volume knob to turn the unit ON while keeping the volume turned down. Then, adjust volume after listening to earphone. 22 LT-800 Stationary Transmitter Specifications RF Frequency Range: 72MHz: 72.05 - 75.95MHz 216MHz: 216.025 - 216.975 MHz Transmitter Stability: 50 PPM Output Power: 72MHz: 8000uV at 3 meters 216MHz: 100mW (Max allowed by FCC) Signal to Noise ratio: 72MHz: Wide band channels, 60dB; Narrow, 54dB 216MHz: Wide band channels, 50dB; Narrow, 44dB Antenna: 72MHz: Telescoping, Rubber Ducky, Front Mount, Remote Base, or Coaxial Dipole 216MHz: Telescoping, Whip, Front Mount, Remote Base, Ground Plane, or Coaxial Dipole Available Channels: 72MHz: 17 wide band, 40 narrow band 216MHz: 19 wide band, 38 narrow band (Modulation is automatically switched when changing between narrow and wide band channels) Frequency Response: 72 50Hz to 17kHz, ±3dB 216 50Hz to 8kHz, ±3dB RF Power Selection: Full, 1/2, 1/4 Physical Dimensions: 8" W x 8"D x 1.75"H (20.3cm W x 20.3cm D x 4.45cm H) Optional rack mount brackets Weight: 3 lbs. (1.4 kg) Power: 16 VAC/850mA Audio Input 1: F-XLR / 1/4" Phone, 50/600 ohms, balanced -55dBm / +4dBm, selectable, adjustable Audio Input 2: Phono, 10k/50 ohms, unbalanced -10dBm / +20dBm, selectable, adjustable Audio Output (Mix): Phono, 10k ohms, unbalanced, -10dBm Headphone Output: 250mW, 32 ohms, 3.5MM stereo Controls: Mix, Process, Contour, Headphone Level, Tone, RF Power Output, and ON/OFF Visual Indicators: Audio input levels 1, 2 and post processed modulation level; channel; RF power, test tone 2b continued (LR-400 and LR-500): Test the audio. If a trans- Operating Listen Receivers 1 transmission channel. For the LR-300, follow instructions on 2a. For the LR-400 and LR-500, follow instructions on 2b. 2b) LR-400 and LR-500 Display Receivers: Select the NOTE: Listen receivers accept mono or stereo jacks. 7 Select channel: match the receiver’s channel to the 2a) LR-300 channel selection: first, make sure the transmitter is transmitting continuous audio within range. Second, place the receiver’s earphone on your ear to listen. Turn on and adjust volume to reasonable level. Open the LR-300 receiver’s front access door and press the SEEK button for less than one second. Listen. Do this three or more times and decide which audio channel sounds best because you won’t have channel verification otherwise. Continue to do this until you get back to the best sounding audio channel. You can electronically lock it into the selected channel by pressing and holding the same SEEK button for five or more seconds. (Press and hold the SEEK button again for five+ seconds to unlock.) You’re set. Close the front access door. Top of Unit and Battery Compartment LT-800 Stationary Transmitter Specifications LT-800 Transmitter user manual 101100.qrk mitter is broadcasting on that channel, you will be able to hear the audio. If the signal is too weak, the audio will be muted (squelched). 4 Specifications subject to change without notice. 2b continued (LR-400 and LR-500): Find audio transmission. Another way to select a channel on the LR-400 and LR-500 is to press the SEEK button. When you do this, the Listen receiver looks for the next channel that is active. Sometimes the unit will mistake interference for a real broadcast signal. If you get interference, simply press the SEEK button again. The SEEK button will also likely stop on adjacent narrow band channels, or the wide band channel associated with the narrow band you are looking for. Simply continue to press SEEK until you reach the clearest operating channel. LISTEN TECHNOLOGIES CORPORATION +1.801.233.8992 1.800.330.0891 Fax: +1.801.233.8995 Internet: www.listentech.com All specifications are subject to change without notice. TM LISTEN TECHNOLOGIES CORPORATION +1.801.233.8992 1.800.330.0891 Fax: +1.801.233.8995 Internet: www.listentech.com All specifications subject to change without notice. 11 8/27/01 4:19 PM Page 11 Listen Receivers: Preparation Continued & Operation 5 Place Batteries in Unit Place two AA batteries in the compartment, making note of the battery polarity shown in the battery compartment, and again verifying that the BATTERY SELECT switch is switched correctly for your batteries (see Step 4). 2 + _ 6 _ + Place an earpiece or headset in the mini jack on the top of the unit. The LR-500 and LR-400 are designed to work with either mono or stereo connectors. channel to match the transmission channel by pressing the UP and DOWN buttons. At 72MHz, each LR-400 and LR-500 receiver operates on 17 wide band channels and 40 narrow band channels. (Letters = Wide Band Channels, Numbers = Narrow Band Channels) Turn the receiver on by rotating the volume knob counter-clockwise. The red LED should activate and, on the LR400 and LR-500, the LCD display should illuminate. If they do not, check to ensure you have installed charged batteries and that the batteries have been installed with the proper polarity. LED should light up solid red when unit is on At 216MHz: receivers operate on 19 wide band channels and 38 narrow bands: Channels starting with “2” are wide band, and channels beginning with “1” or “3” are narrow band channels. Please refer to the Frequency Compatibility Tables section (Pages 28-31) for specific frequencies and compatibility with other manufacturers. NOTE: Operating on a narrow band channel will have more noise. Turn volume knob counterclockwise to turn unit on On the LR-400 and LR-500: LCD display should illuminate when unit is on Make sure the unit is on by rotating the volume knob to ON when an earpiece or headset is plugged into the unit. Listen receivers use the cable of the earphone or headset as a receiving antenna. CAUTION: Don’t blow out your ears! Slightly rotate the volume knob to turn the unit ON while keeping the volume turned down. Then, adjust volume after listening to earphone. 22 LT-800 Stationary Transmitter Specifications RF Frequency Range: 72MHz: 72.05 - 75.95MHz 216MHz: 216.025 - 216.975 MHz Transmitter Stability: 50 PPM Output Power: 72MHz: 8000uV at 3 meters 216MHz: 100mW (Max allowed by FCC) Signal to Noise ratio: 72MHz: Wide band channels, 60dB; Narrow, 54dB 216MHz: Wide band channels, 50dB; Narrow, 44dB Antenna: 72MHz: Telescoping, Rubber Ducky, Front Mount, Remote Base, or Coaxial Dipole 216MHz: Telescoping, Whip, Front Mount, Remote Base, Ground Plane, or Coaxial Dipole Available Channels: 72MHz: 17 wide band, 40 narrow band 216MHz: 19 wide band, 38 narrow band (Modulation is automatically switched when changing between narrow and wide band channels) Frequency Response: 72 50Hz to 17kHz, ±3dB 216 50Hz to 8kHz, ±3dB RF Power Selection: Full, 1/2, 1/4 Physical Dimensions: 8" W x 8"D x 1.75"H (20.3cm W x 20.3cm D x 4.45cm H) Optional rack mount brackets Weight: 3 lbs. (1.4 kg) Power: 16 VAC/850mA Audio Input 1: F-XLR / 1/4" Phone, 50/600 ohms, balanced -55dBm / +4dBm, selectable, adjustable Audio Input 2: Phono, 10k/50 ohms, unbalanced -10dBm / +20dBm, selectable, adjustable Audio Output (Mix): Phono, 10k ohms, unbalanced, -10dBm Headphone Output: 250mW, 32 ohms, 3.5MM stereo Controls: Mix, Process, Contour, Headphone Level, Tone, RF Power Output, and ON/OFF Visual Indicators: Audio input levels 1, 2 and post processed modulation level; channel; RF power, test tone 2b continued (LR-400 and LR-500): Test the audio. If a trans- Operating Listen Receivers 1 transmission channel. For the LR-300, follow instructions on 2a. For the LR-400 and LR-500, follow instructions on 2b. 2b) LR-400 and LR-500 Display Receivers: Select the NOTE: Listen receivers accept mono or stereo jacks. 7 Select channel: match the receiver’s channel to the 2a) LR-300 channel selection: first, make sure the transmitter is transmitting continuous audio within range. Second, place the receiver’s earphone on your ear to listen. Turn on and adjust volume to reasonable level. Open the LR-300 receiver’s front access door and press the SEEK button for less than one second. Listen. Do this three or more times and decide which audio channel sounds best because you won’t have channel verification otherwise. Continue to do this until you get back to the best sounding audio channel. You can electronically lock it into the selected channel by pressing and holding the same SEEK button for five or more seconds. (Press and hold the SEEK button again for five+ seconds to unlock.) You’re set. Close the front access door. Top of Unit and Battery Compartment LT-800 Stationary Transmitter Specifications LT-800 Transmitter user manual 101100.qrk mitter is broadcasting on that channel, you will be able to hear the audio. If the signal is too weak, the audio will be muted (squelched). 4 Specifications subject to change without notice. 2b continued (LR-400 and LR-500): Find audio transmission. Another way to select a channel on the LR-400 and LR-500 is to press the SEEK button. When you do this, the Listen receiver looks for the next channel that is active. Sometimes the unit will mistake interference for a real broadcast signal. If you get interference, simply press the SEEK button again. The SEEK button will also likely stop on adjacent narrow band channels, or the wide band channel associated with the narrow band you are looking for. Simply continue to press SEEK until you reach the clearest operating channel. LISTEN TECHNOLOGIES CORPORATION +1.801.233.8992 1.800.330.0891 Fax: +1.801.233.8995 Internet: www.listentech.com All specifications are subject to change without notice. TM LISTEN TECHNOLOGIES CORPORATION +1.801.233.8992 1.800.330.0891 Fax: +1.801.233.8995 Internet: www.listentech.com All specifications subject to change without notice. 11 8/27/01 4:19 PM Page 12 LT-800 Stationary Transmitter Troubleshooting Listen Receivers: Preparing for Use LT-800 Troubleshooting Listen Receivers: LR-500 Programmable Display Receiver, LR-400 Display Receiver and LR-300 Digital Receiver The LT-800 has no power. Make sure the power transformer is connected to a power source and is connected to the jack marked "Power Input". Make sure the POWER button is pressed. There is no audio or the audio level is too low. Make sure that you have an audio source properly connected to INPUT 1 and/or 2. The INPUT 1 or 2 switch must be located in the correct position for the appropriate input level. For example: if you are using the output of a mixer on INPUT 2, the switch should be in the LINE position. If it were in the SPEAKER position, the level would be too low. Also, check the INPUT knob to ensure it is properly adjusted. You should be able to see the VU meter deflect on INPUTS 1 or 2 corresponding with the input level of the audio source. Try connecting a headset to the front panel jack and adjusting the MONITOR volume control so that you can listen to the audio source. The audio is distorted. Check to make sure you have the input level select switches in the proper position. You may be providing too much audio level for the input stage to handle. There is hum in the audio. Make sure you have properly grounded the audio source to the LT-800. Check the connections from the audio source to the LT-800. If you can, try to use a balanced audio source - this will reduce the chance of creating hum. Try connecting a ground from the LT-800 to ground and/or to the ground of the source audio. There is interference. Try different frequencies until you find a clear channel. If this does not work, try a different frequency band (i.e. if you're using 72MHz, try 216MHz or vice versa). This is accomplished by returning the equipment to Listen (no charge) and replacing it with Listen’s alternate frequency band equipment. I cannot pick up the signal on the receiver. Check to make sure the receiver and the transmitter are on the same frequency. I can pick up the signal on the receiver, but it sounds like it's not tuned in. Check to make sure the transmitter and receiver are on exactly the same channel number/letter. I'm using another brand of receiver - how do I tell which channel to use? The Audio Input 1 sounds “tinny”. If you are using an unbalanced audio source, make sure Pin 2 or the XLR and the ring on the 1/4” jack is grounded. It is probably because the Listen transmitter is over-deviated. See Page 10 for instructions on how to correct this. tabs with your thumb and index finger. The LR-300 does not have a LCD Display, is only avaiable in the 72MHz band, accesses 17 wide band channels and uses a SEEK button to change channels. Audio quality and charging capabilities are the same. Differences between the LR-500 and LR-400 include: SEEK and channel UP and DOWN buttons are behind the door on the LR-400 versus protruding through the door on the LR-500. Also, the LR-500 is programmable. See page 25 for LR-500 programming features. (Other than these differences, instructions for use of Listen’s LR-400 and LR-500 receivers and their specifications are identical.) The LR-400 has channel UP, DOWN and SEEK buttons behind the door. The LR-300 has a SEEK button only and it is located behind the front door. There is not sufficient range. Other manufacturers’ receivers sound distorted. Open the front access door by gripping the two Differences in the LR- 300, 400 and 500 Refer to Listen’s Frequency Compatibility Tables (pages 28-31). Adjust Listen’s transmitter or receiver to the same frequency as the other major brand. Since Listen products can access 57 channels, they will most likely transmit or receive on the same fixed channel or channels of other major ALD brands. First make sure that the receivers you are using are operating properly. Then, make sure that you have an antenna connected either to the top of the LT-800 transmitter or connected to the back of the unit (but not both!). Locate the antenna at a location as high as possible and free of obstacles. Make sure There is too much audio processing. Please note: PROCESS the antenna is of the correct type and is connected properly to Adjust the process knob counter-clockwise. has been relabeled MIX the unit. Try using different frequencies that don't have interference. If you're using 216MHz, you might want to try a There is a tone. directional antenna. The TEST TONE button has been pressed (its LED light is on). Push the TEST TONE button to turn off the tone. End users are adjusting the unit. First, lock the channel by pressing the UP and DOWN buttons I cannot change the broadcast channel. together for 3+ seconds. Consider removing the INPUT, The unit is locked. To unlock, press the UP and DOWN button PROCESS AND CONTOUR knobs. You can order from Listen a simultaneously for 3+ seconds. You can tell when it's locked rack mount kit and security cover that will limit access to unit because the decimal is illuminated. from end users. 3 The LR-500 has channel UP, DOWN and SEEK buttons protruding through the door. 4 Select Battery Type – CAUTION: If you are using any battery type other than rechargeable Nickel Metal Hydride (NiMH) batteries, make sure the BATTERY SELECT switch is in the alkaline position (located in the battery compartment and labeled BATTERY SELECT, remove batteries to access this switch). The product is shipped from the factory in the alkaline position. To use NiMH batteries, before placing in unit, change the battery switch to NiMH. BATTERY SELECT Switch - With batteries removed, use a pen or small screwdriver to select the battery type Preparing Listen Receivers for Use 1 Remove the product from the shipping container and plastic cover. Inspect for physical damage. See "Technical Service Contacts” (Page 4) if damage has occurred. 2 Check to see if the door is locked. If locked, use a pocketknife or small screwdriver to unlock the door locks on the both sides of the unit. To unlock the door, rotate the lock 1/4 turn counter clockwise. WARNING: Do not place the BATTERY SELECT switch in the NiMH position when using Non-Nickel Metal Hydride batteries. The NiMH position will attempt to charge the batteries. Charging non-Nickel Metal Hydride batteries may result in physical harm, destruction of property and/or fire. To unlock door: On both the right and left side, unlock by turning slot horizontal as shown. 12 LISTEN TECHNOLOGIES CORPORATION +1.801.233.8992 1.800.330.0891 Fax: +1.801.233.8995 Internet: www.listentech.com All specifications are subject to change without notice. LISTEN TECHNOLOGIES CORPORATION +1.801.233.8992 1.800.330.0891 Fax: +1.801.233.8995 Internet: www.listentech.com All specifications subject to change without notice. TM 21 LISTEN RECEIVERS user manual 101100.qrk 8/27/01 4:19 PM Page 13 LT-700 Portable Transmitter Specifications LT-700 Portable Transmitter Specifications RF Frequency Range: 72MHz:72.05 - 75.95MHz 216MHz:216.025 - 216.975 MHz Transmitter Stability: 50 PPM Output Power: 72MHz: 8000uV at 3 meters 216MHz: 100mW (Max allowed by FCC) Signal to Noise ratio: 72MHz: Wide band channels, 60dB; Narrow, 54dB 216MHz: Wide band channels, 50dB; Narrow, 44dB Antenna: Uses microphone cable Available Channels: 72MHz: 17 wide band, 40 narrow band 216MHz: 19 wide band, 38 narrow band (Modulation is automatically switched when changing between narrow and wide band channels) Physical Dimensions: 3"W x 1"D x 5"H (7.6cm W x 2.5cm D x 13cm H) Weight: < 1 lb. (0.45 kg) with batteries Door: Channel and ON/OFF buttons are accessible through the door, lockable Power: Two AA batteries, alkaline or NiMH rechargeable; external power connector 8-9 VDC, center positive, <300mA Battery Life: 16 hours with high capacity alkaline 8 hours with rechargeable NiMH Battery Charging: Fully automatic, < 14 hours Phantom Power: Included for microphone Microphone Input: -55dBm, 50 ohms, unbalanced, tip of 3.5MM connector Line Input: -10dBm, 10k ohms, unbalanced, ring of 3.5MM connector Audio Processing: 40dB automatic 3-speed dynamic control with noise gate Controls: On/Off/Program/Lockout, Channel UP, Channel DOWN, Battery Type Mute Control: Located on top of unit, LED flashes when mute is activated Programmability: Allows only programmed channels to be tuned and to be displayed LCD: Channel, Battery/Charge Status, Program, Locked, Channel Lock Out LED: Red, Constant = ON and/or charged, fast flash = muted, slow flash = battery low or charging LT-700 Portable Transmitter Preparation Preparing the LT-700 for Use 1 Remove the product from the shipping container and plastic cover. Inspect for physical 4 any battery type other than rechargeable Nickel Metal Hydride (NiMH) batteries, make sure the BATTERY SELECT switch is in the alkaline position (located in the battery compartment and labeled BATTERY SELECT, remove batteries to access this switch). The product is shipped from the factory in the alkaline position. damage. See "Technical Service Contacts” (Page 4) if damage has occurred. 2 Select Battery Type – CAUTION: If you are using Check to see if the door is locked. If locked, use a pocketknife or small screwdriver to unlock the door locks on the both sides of the unit. To unlock the door, rotate the lock 1/4 turn counter clockwise. To use NiMH batteries, before placing in unit, change the battery switch to NiMH. (See page 17 for more details.) BATTERY SELECT Switch - With batteries removed, use a pen or small screwdriver to select the battery type On both the right and left side, unlock by turning slot horizontal as shown. 3 Open the front access door by gripping the two tabs with your thumb and index finger. WARNING: Do not place the BATTERY SELECT switch in the NiMH position when using Non-Nickel Metal Hydride batteries. The NiMH position will attempt to charge the batteries. Charging non-Nickel Metal Hydride batteries may result in physical harm, destruction of property and/or fire. 5 Place Batteries in Unit Place two AA batteries in the compartment, making note of the battery polarity shown in the battery compartment, and again verifying that the BATTERY SELECT switch is switched correctly for your batteries (see Step 4). Top of Unit and Battery Compartment + _ _ + TM Specifications subject to change without notice. 20 LISTEN TECHNOLOGIES CORPORATION +1.801.233.8992 1.800.330.0891 Fax: +1.801.233.8995 Internet: www.listentech.com All specifications are subject to change without notice. LISTEN TECHNOLOGIES CORPORATION +1.801.233.8992 1.800.330.0891 Fax: +1.801.233.8995 Internet: www.listentech.com All specifications subject to change without notice. 13 LT-700 Transmitter user manual 101100.qrk 8/27/01 4:19 PM Page 14 LT-700 Portable Transmitter Preparation (cont.), Operation LT-700 Portable Transmitter Troubleshooting Preparing the LT-700 for Use (continued) Operating the LT-700 Transmitter LT-700 Troubleshooting 6 1 The LT-700 has no power. Connect the microphone to the microphone jack on the top of the unit. The unit uses the microphone cable as an antenna. If you are using the line input, use the special cable accessory designed for this purpose. Make sure the unit is on by opening the access door and pressing the POWER button. 2 Select the channel to transmit on by pressing and holding the channel UP and DOWN buttons for 3 seconds. The LOCK symbol on the LCD will go off and the channel can be changed. Also see “Selecting a Channel to Transmit On”. Operating the LT-700: Select a Channel (continued) At 72MHz, the LT-700 operates on 17 wide band channels and 40 narrow band channels (letters = wide band and numbers = narrow band channels). At 216MHz, the LT-700 operates on 19 wide band channels and 38 narrow band channels (channels beginning with “2” = wide band, and channels beginning with “1” or “3” = narrow band channels). Or, connect optional Line Level Input Cable – Use an optional Listen supplied line input cable (LA-263), or connect as follows: 7 Turn the unit on. If it does not turn on by pressing power button, check to ensure you have installed charged batteries and that the batteries have been installed with the proper polarity. 2. LED should light up red when ON 1. Turn POWER on 3. LCD display should show battery level, channel and the Listen logo 14 Please refer to the Frequency Compatibility Tables (Pages 28-31) for specific frequencies and compatibility with other manufacturers. by pressing button, turn off by pressing again NOTE: Operating on a narrow band channel will have more noise. 3 Close the access door. If you choose, lock the door by rotating the locks on the right side 1/4 turn clockwise, and on the left side 1/4 turn counter clockwise. This can be done with a small screwdriver or pocketknife. LISTEN TECHNOLOGIES CORPORATION +1.801.233.8992 1.800.330.0891 Fax: +1.801.233.8995 Internet: www.listentech.com All specifications are subject to change without notice. Make sure the unit has either fully charged batteries or a Listen approved wall transformer connected to the unit. Open the door and press the ON button. If this does not work, try a different set of batteries. Make sure the batteries are installed properly. There is no audio. Make sure the MUTE switch is in the TALK position. Make sure you have the microphone plugged all the way in the top of unit. Make sure you are using a Listen approved microphone. If you're using the line input, make sure you have connected a line level, unbalanced input to the "ring" of the connector. The audio is distorted. Make sure you're using an approved Listen microphone. Make sure the line input level is not too high. There is hum in the audio. The microphone may be too close to a transformer. The microphone is low in level. The microphone must be placed in close proximity to the person speaking. If this does not work, try using a head-worn microphone. There is too much noise. This is probably due to the fact that the microphone is not close enough to the person speaking and is picking up background noise. Try positioning the microphone closer or try using a microphone that is directional (like a head-worn mic). There is interference. Access Door Closed On both the right and left side, lock door by turning slot vertical as shown. Try different frequencies until you find a clear channel. If this does not work, try a different frequency band (i.e. if you're using 72MHz, try 216MHz or vice versa). This is accomplished by returning the equipment to Listen (no charge) and replaced with alternate frequency band equipment. I cannot pick up the signal on the receiver. I can pick up the signal on the receiver, but it sounds like it's not tuned in. Check to make sure the transmitter and receiver are on exactly the same channel number/letter. I'm using another brand of receiver - how do I tell which channel to use? Refer to Listen’s Frequency Compatibility Table (included on Pages 28-31). Either adjust the transmitter or the receiver to a common channel. There is not sufficient range. The LT-700 is a portable transmitter that uses the microphone cable as an antenna and as such, the range will vary depending on the location of the receivers compared to the transmitter. You can only expect 100 feet of effective working area. It's confusing for users to have 57 channels when switching between channels. Use the programming feature of the LT-700 to limit the number of channels users have access to. How can I limit access to the batteries? Use the side door locks. My batteries are not charging. Make sure the battery switch is in the NiMH position. Make sure you have turned the unit’s POWER on initially to charge. Make sure you have connected an approved Listen charging transformer. Or if inserted in charging tray, make sure the unit is ON and is pushed securely into tray. Make sure you use ONLY NiMH batteries provided by Listen. Never try to charge alkaline batteries. I want to run the unit from a wall transformer. Simply plug a Listen approved transformer to the Charge/Power connectors. Batteries need not be installed, however NiMH will be recharged if installed, and if the BATTERY SELECT switch is set to NiMH. Check to make sure the receiver and the transmitter are on the same frequency. LISTEN TECHNOLOGIES CORPORATION +1.801.233.8992 1.800.330.0891 Fax: +1.801.233.8995 Internet: www.listentech.com All specifications subject to change without notice. TM 19 LT-700 Transmitter user manual 101100.qrk 8/27/01 4:19 PM Page 15 LT-700 Portable Transmitter, Battery Recharging Charging the Batteries (continued) 4. Install NiMH rechargeable batteries in the battery compartment, ensuring that proper polarity has been observed. Top of Unit and Battery Compartment + _ _ LT-700 Portable Transmitter, Selecting a Channel Operating the LT-700 with a Wall Transformer 1. The unit will operate normally when connected to a wall transformer. 2. Batteries do not need to be installed in the unit to operate using a wall transformer. + Note: It is recommended that you only use a Listen charging transformer. Or, set the LT-700 with NiMH batteries within unit and powered ON in a Listen Carrying/Charging Case (LA-311 or LA-317). For charging using a transformer: with NiMH batteries in unit, plug wall transformer in CHARGING connection and into wall outlet (as shown). Batteries will be fully charged when red LED stops flashing and is unlit. (LED and battery symbol will flash slowly while charging.) Selecting a Channel Transmit On Selecting a clear channel to broadcast is important for interference free broadcasting. Wide Band Recommendation: If you don’t plan to have other transmitters (or a limited number) operating in the same area, it is recommended that you use wide band channels. These are the most common channels used. Many people own receivers that will operate on these channels. In addition, wide band channels offer the best fidelity and the lowest noise. In this case, select one of the 17 wide band channels A through R on the 72MHz system, or one of the 19 wide band channels on the 216MHz system labeled 2A, 2B, 2C, etc. The best way to select a channel is by trial and error. Try a channel, if it has low interference and reliable performance, stick to that channel. Compatibility with other manufacturers – If you are using other manufacturer’s receivers with the LT-700, find out their frequency, then refer to Listen’s Frequency Compatibility Tables (Pages 28-31) to find the LT-700 channel number or letter that corresponds with the receiver’s frequency. As much as possible, Listen has duplicated the wide band channel letters to cover 7. The unit can be operated while batteries are charging. 18 LISTEN TECHNOLOGIES CORPORATION +1.801.233.8992 1.800.330.0891 Fax: +1.801.233.8995 Internet: www.listentech.com All specifications are subject to change without notice. If you are using other manufacturer’s receivers and the sound is distorted, it is probably because the receiver is not designed to handle the ±25kHz deviation of the Listen transmitter. Several transmitters operating in the same environment – For this, you will need to choose your transmitting frequencies carefully. The following guidelines should be used to choose channels: a. If possible, use all wide band channels. These channels offer lower noise. b. Select channels that have the highest frequency separation as possible (see Frequency Compatibility Tables, pages 28-31), to avoid adjacent channels and interference. Selected channels should be at least 200kHz apart. c. Through a process of trial and error select a combination of channels that offer the lowest interference and highest reliability. LT-700 Look & Listen ™ Display Descriptions Channel the unit is tuned to 5. The LT-700 must be powered ON initially to charge NiMH batteries within unit – Connect a wall transformer to the LT-700 or place unit in a Listen Charging Case (LA-311 or LA-317). The unit must be on to charge. However, once the charger has started, the unit can be turned off. 6. Once the batteries are fully charged, the unit will stop charging the batteries. Full-charge will be indicated when all the battery symbol segments are illuminated and the LED near the volume control stops flashing and is unlit. frequencies of other major brands. However, we recommend verifying corresponding channel numbers and letters on the tables on pages 28-31. Indicates battery level in 3 stages, flashes when battery is low along with flashing red LED Indicates the unit is in PROGRAM mode (to enter PROGRAM mode, press UP and DOWN until the PGM symbol on the LCD display is shown.) Indicates unit is locked into channel, press and hold UP or DOWN button for 3 seconds to unlock L/O = Locked Out – while in PROGRAM mode, L/O shows what channels are locked in or out LISTEN TECHNOLOGIES CORPORATION +1.801.233.8992 1.800.330.0891 Fax: +1.801.233.8995 Internet: www.listentech.com All specifications subject to change without notice. TM 15 LT-700 Transmitter user manual 101100.qrk 8/27/01 4:19 PM Page 16 LT-700 Portable Transmitter Programming LT-700 Portable Transmitter LT-700 Programming Locking into One Channel Unlocking and Locking the Access Door Charging Batteries Using SmartCharge™ In General: The LT-700 can be programmed to transmit on a limited number of channels. For applications where users are required to select a channel (such as classrooms or language interpretation), and you don’t want them to have to scroll through all of the available channels, this feature is ideal. If all channels where available, the user could have 57 channels to select from. Enter PROGRAM Mode (as described to the right), lock all channels except the channel you want to use. The front access door can be locked so that the users will not have access to controls or batteries. To do this, use a pocketknife or small screwdriver to rotate the locks as shown. 1. The LT-700 is unique because it has an automatic battery charger built in. That means that when the unit is connected to a wall transformer or placed in a Listen battery recharging tray, NiMH batteries will be charged within the LT-700. Once batteries are charged the internal battery charger will automatically turn off. This prevents overcharging of batteries, automates the process of charging, and makes it so you don’t have to remember to unplug the charger. LED Indicator To unlock: On both the right and left side, unlock by turning slot horizontal as shown. 1. Enter PROGRAM Mode: To enter PROGRAM mode, open the access door and press the UP and DOWN keys simultaneously until the PGM symbol is displayed on the LCD display. Steady Red LED = Normal Operation Slow Flashing = Battery is Low Slow Flashing while charging = Unit is Charging Fast Flashing = Mute 2. Do not attempt to charge alkaline or any other type of non-NiMH batteries. Only charge Nickel Metal Hydride (NiMH) batteries within the LT-700. We recommend that you use NiMH batteries supplied by Listen. WARNING: Attempting to charge non-NiMH batteries may result in physical harm, destruction of property and /or fire. Battery Status Icon The status of the battery is indicated by the battery symbol on the LCD. 2. Scroll through channels to lock or unlock Use the UP and DOWN channel select keys to scroll through all 57 channels. When checking a particular channel, the L/O symbol on the LCD will be displayed when that channel is locked out. “Locked Out” means the channel is not available to the user after the programmer exits PROGRAM mode. On each channel, check to see if “L/O” is displayed; it means channel is locked out from the user To toggle between locked out and not locked out, press the POWER button. 3. To exit PROGRAM mode, don’t press a key for 4 seconds. When the battery is fully charged, all three segments of the battery symbol will be displayed, as shown. To lock: On both the right and left side, lock door by turning slot vertical as shown. 3. IMPORTANT: To charge NiMH batteries, the BATTERY SELECT switch must be selected to NiMH. Use a pen or small screwdriver to the move the switch (located in the battery compartment directly below the BATTERY SELECT label) to the proper position. For only NiMH batteries: set BATTERY SELECT switch to NiMH. For all other batteries, set BATTERY SELECT at alkaline. As fewer battery segments are displayed, the lower the battery level, as shown. (Continued...) When the batteries are almost fully discharged, the battery segments and the red LED near the volume control will blink. When this occurs, less than 5% of the battery life is remaining and the batteries should be immediately replaced or recharged. TM This segment will blink when batteries are low. 16 LISTEN TECHNOLOGIES CORPORATION +1.801.233.8992 1.800.330.0891 Fax: +1.801.233.8995 Internet: www.listentech.com All specifications are subject to change without notice. LISTEN TECHNOLOGIES CORPORATION +1.801.233.8992 1.800.330.0891 Fax: +1.801.233.8995 Internet: www.listentech.com All specifications subject to change without notice. 17 LT-700 Transmitter user manual 101100.qrk 8/27/01 4:19 PM Page 16 LT-700 Portable Transmitter Programming LT-700 Portable Transmitter LT-700 Programming Locking into One Channel Unlocking and Locking the Access Door Charging Batteries Using SmartCharge™ In General: The LT-700 can be programmed to transmit on a limited number of channels. For applications where users are required to select a channel (such as classrooms or language interpretation), and you don’t want them to have to scroll through all of the available channels, this feature is ideal. If all channels where available, the user could have 57 channels to select from. Enter PROGRAM Mode (as described to the right), lock all channels except the channel you want to use. The front access door can be locked so that the users will not have access to controls or batteries. To do this, use a pocketknife or small screwdriver to rotate the locks as shown. 1. The LT-700 is unique because it has an automatic battery charger built in. That means that when the unit is connected to a wall transformer or placed in a Listen battery recharging tray, NiMH batteries will be charged within the LT-700. Once batteries are charged the internal battery charger will automatically turn off. This prevents overcharging of batteries, automates the process of charging, and makes it so you don’t have to remember to unplug the charger. LED Indicator To unlock: On both the right and left side, unlock by turning slot horizontal as shown. 1. Enter PROGRAM Mode: To enter PROGRAM mode, open the access door and press the UP and DOWN keys simultaneously until the PGM symbol is displayed on the LCD display. Steady Red LED = Normal Operation Slow Flashing = Battery is Low Slow Flashing while charging = Unit is Charging Fast Flashing = Mute 2. Do not attempt to charge alkaline or any other type of non-NiMH batteries. Only charge Nickel Metal Hydride (NiMH) batteries within the LT-700. We recommend that you use NiMH batteries supplied by Listen. WARNING: Attempting to charge non-NiMH batteries may result in physical harm, destruction of property and /or fire. Battery Status Icon The status of the battery is indicated by the battery symbol on the LCD. 2. Scroll through channels to lock or unlock Use the UP and DOWN channel select keys to scroll through all 57 channels. When checking a particular channel, the L/O symbol on the LCD will be displayed when that channel is locked out. “Locked Out” means the channel is not available to the user after the programmer exits PROGRAM mode. On each channel, check to see if “L/O” is displayed; it means channel is locked out from the user To toggle between locked out and not locked out, press the POWER button. 3. To exit PROGRAM mode, don’t press a key for 4 seconds. When the battery is fully charged, all three segments of the battery symbol will be displayed, as shown. To lock: On both the right and left side, lock door by turning slot vertical as shown. 3. IMPORTANT: To charge NiMH batteries, the BATTERY SELECT switch must be selected to NiMH. Use a pen or small screwdriver to the move the switch (located in the battery compartment directly below the BATTERY SELECT label) to the proper position. For only NiMH batteries: set BATTERY SELECT switch to NiMH. For all other batteries, set BATTERY SELECT at alkaline. As fewer battery segments are displayed, the lower the battery level, as shown. (Continued...) When the batteries are almost fully discharged, the battery segments and the red LED near the volume control will blink. When this occurs, less than 5% of the battery life is remaining and the batteries should be immediately replaced or recharged. TM This segment will blink when batteries are low. 16 LISTEN TECHNOLOGIES CORPORATION +1.801.233.8992 1.800.330.0891 Fax: +1.801.233.8995 Internet: www.listentech.com All specifications are subject to change without notice. LISTEN TECHNOLOGIES CORPORATION +1.801.233.8992 1.800.330.0891 Fax: +1.801.233.8995 Internet: www.listentech.com All specifications subject to change without notice. 17 LT-700 Transmitter user manual 101100.qrk 8/27/01 4:19 PM Page 15 LT-700 Portable Transmitter, Battery Recharging Charging the Batteries (continued) 4. Install NiMH rechargeable batteries in the battery compartment, ensuring that proper polarity has been observed. Top of Unit and Battery Compartment + _ _ LT-700 Portable Transmitter, Selecting a Channel Operating the LT-700 with a Wall Transformer 1. The unit will operate normally when connected to a wall transformer. 2. Batteries do not need to be installed in the unit to operate using a wall transformer. + Note: It is recommended that you only use a Listen charging transformer. Or, set the LT-700 with NiMH batteries within unit and powered ON in a Listen Carrying/Charging Case (LA-311 or LA-317). For charging using a transformer: with NiMH batteries in unit, plug wall transformer in CHARGING connection and into wall outlet (as shown). Batteries will be fully charged when red LED stops flashing and is unlit. (LED and battery symbol will flash slowly while charging.) Selecting a Channel Transmit On Selecting a clear channel to broadcast is important for interference free broadcasting. Wide Band Recommendation: If you don’t plan to have other transmitters (or a limited number) operating in the same area, it is recommended that you use wide band channels. These are the most common channels used. Many people own receivers that will operate on these channels. In addition, wide band channels offer the best fidelity and the lowest noise. In this case, select one of the 17 wide band channels A through R on the 72MHz system, or one of the 19 wide band channels on the 216MHz system labeled 2A, 2B, 2C, etc. The best way to select a channel is by trial and error. Try a channel, if it has low interference and reliable performance, stick to that channel. Compatibility with other manufacturers – If you are using other manufacturer’s receivers with the LT-700, find out their frequency, then refer to Listen’s Frequency Compatibility Tables (Pages 28-31) to find the LT-700 channel number or letter that corresponds with the receiver’s frequency. As much as possible, Listen has duplicated the wide band channel letters to cover 7. The unit can be operated while batteries are charging. 18 LISTEN TECHNOLOGIES CORPORATION +1.801.233.8992 1.800.330.0891 Fax: +1.801.233.8995 Internet: www.listentech.com All specifications are subject to change without notice. If you are using other manufacturer’s receivers and the sound is distorted, it is probably because the receiver is not designed to handle the ±25kHz deviation of the Listen transmitter. Several transmitters operating in the same environment – For this, you will need to choose your transmitting frequencies carefully. The following guidelines should be used to choose channels: a. If possible, use all wide band channels. These channels offer lower noise. b. Select channels that have the highest frequency separation as possible (see Frequency Compatibility Tables, pages 28-31), to avoid adjacent channels and interference. Selected channels should be at least 200kHz apart. c. Through a process of trial and error select a combination of channels that offer the lowest interference and highest reliability. LT-700 Look & Listen ™ Display Descriptions Channel the unit is tuned to 5. The LT-700 must be powered ON initially to charge NiMH batteries within unit – Connect a wall transformer to the LT-700 or place unit in a Listen Charging Case (LA-311 or LA-317). The unit must be on to charge. However, once the charger has started, the unit can be turned off. 6. Once the batteries are fully charged, the unit will stop charging the batteries. Full-charge will be indicated when all the battery symbol segments are illuminated and the LED near the volume control stops flashing and is unlit. frequencies of other major brands. However, we recommend verifying corresponding channel numbers and letters on the tables on pages 28-31. Indicates battery level in 3 stages, flashes when battery is low along with flashing red LED Indicates the unit is in PROGRAM mode (to enter PROGRAM mode, press UP and DOWN until the PGM symbol on the LCD display is shown.) Indicates unit is locked into channel, press and hold UP or DOWN button for 3 seconds to unlock L/O = Locked Out – while in PROGRAM mode, L/O shows what channels are locked in or out LISTEN TECHNOLOGIES CORPORATION +1.801.233.8992 1.800.330.0891 Fax: +1.801.233.8995 Internet: www.listentech.com All specifications subject to change without notice. TM 15 LT-700 Transmitter user manual 101100.qrk 8/27/01 4:19 PM Page 14 LT-700 Portable Transmitter Preparation (cont.), Operation LT-700 Portable Transmitter Troubleshooting Preparing the LT-700 for Use (continued) Operating the LT-700 Transmitter LT-700 Troubleshooting 6 1 The LT-700 has no power. Connect the microphone to the microphone jack on the top of the unit. The unit uses the microphone cable as an antenna. If you are using the line input, use the special cable accessory designed for this purpose. Make sure the unit is on by opening the access door and pressing the POWER button. 2 Select the channel to transmit on by pressing and holding the channel UP and DOWN buttons for 3 seconds. The LOCK symbol on the LCD will go off and the channel can be changed. Also see “Selecting a Channel to Transmit On”. Operating the LT-700: Select a Channel (continued) At 72MHz, the LT-700 operates on 17 wide band channels and 40 narrow band channels (letters = wide band and numbers = narrow band channels). At 216MHz, the LT-700 operates on 19 wide band channels and 38 narrow band channels (channels beginning with “2” = wide band, and channels beginning with “1” or “3” = narrow band channels). Or, connect optional Line Level Input Cable – Use an optional Listen supplied line input cable (LA-263), or connect as follows: 7 Turn the unit on. If it does not turn on by pressing power button, check to ensure you have installed charged batteries and that the batteries have been installed with the proper polarity. 2. LED should light up red when ON 1. Turn POWER on 3. LCD display should show battery level, channel and the Listen logo 14 Please refer to the Frequency Compatibility Tables (Pages 28-31) for specific frequencies and compatibility with other manufacturers. by pressing button, turn off by pressing again NOTE: Operating on a narrow band channel will have more noise. 3 Close the access door. If you choose, lock the door by rotating the locks on the right side 1/4 turn clockwise, and on the left side 1/4 turn counter clockwise. This can be done with a small screwdriver or pocketknife. LISTEN TECHNOLOGIES CORPORATION +1.801.233.8992 1.800.330.0891 Fax: +1.801.233.8995 Internet: www.listentech.com All specifications are subject to change without notice. Make sure the unit has either fully charged batteries or a Listen approved wall transformer connected to the unit. Open the door and press the ON button. If this does not work, try a different set of batteries. Make sure the batteries are installed properly. There is no audio. Make sure the MUTE switch is in the TALK position. Make sure you have the microphone plugged all the way in the top of unit. Make sure you are using a Listen approved microphone. If you're using the line input, make sure you have connected a line level, unbalanced input to the "ring" of the connector. The audio is distorted. Make sure you're using an approved Listen microphone. Make sure the line input level is not too high. There is hum in the audio. The microphone may be too close to a transformer. The microphone is low in level. The microphone must be placed in close proximity to the person speaking. If this does not work, try using a head-worn microphone. There is too much noise. This is probably due to the fact that the microphone is not close enough to the person speaking and is picking up background noise. Try positioning the microphone closer or try using a microphone that is directional (like a head-worn mic). There is interference. Access Door Closed On both the right and left side, lock door by turning slot vertical as shown. Try different frequencies until you find a clear channel. If this does not work, try a different frequency band (i.e. if you're using 72MHz, try 216MHz or vice versa). This is accomplished by returning the equipment to Listen (no charge) and replaced with alternate frequency band equipment. I cannot pick up the signal on the receiver. I can pick up the signal on the receiver, but it sounds like it's not tuned in. Check to make sure the transmitter and receiver are on exactly the same channel number/letter. I'm using another brand of receiver - how do I tell which channel to use? Refer to Listen’s Frequency Compatibility Table (included on Pages 28-31). Either adjust the transmitter or the receiver to a common channel. There is not sufficient range. The LT-700 is a portable transmitter that uses the microphone cable as an antenna and as such, the range will vary depending on the location of the receivers compared to the transmitter. You can only expect 100 feet of effective working area. It's confusing for users to have 57 channels when switching between channels. Use the programming feature of the LT-700 to limit the number of channels users have access to. How can I limit access to the batteries? Use the side door locks. My batteries are not charging. Make sure the battery switch is in the NiMH position. Make sure you have turned the unit’s POWER on initially to charge. Make sure you have connected an approved Listen charging transformer. Or if inserted in charging tray, make sure the unit is ON and is pushed securely into tray. Make sure you use ONLY NiMH batteries provided by Listen. Never try to charge alkaline batteries. I want to run the unit from a wall transformer. Simply plug a Listen approved transformer to the Charge/Power connectors. Batteries need not be installed, however NiMH will be recharged if installed, and if the BATTERY SELECT switch is set to NiMH. Check to make sure the receiver and the transmitter are on the same frequency. LISTEN TECHNOLOGIES CORPORATION +1.801.233.8992 1.800.330.0891 Fax: +1.801.233.8995 Internet: www.listentech.com All specifications subject to change without notice. TM 19 LT-700 Transmitter user manual 101100.qrk 8/27/01 4:19 PM Page 13 LT-700 Portable Transmitter Specifications LT-700 Portable Transmitter Specifications RF Frequency Range: 72MHz:72.05 - 75.95MHz 216MHz:216.025 - 216.975 MHz Transmitter Stability: 50 PPM Output Power: 72MHz: 8000uV at 3 meters 216MHz: 100mW (Max allowed by FCC) Signal to Noise ratio: 72MHz: Wide band channels, 60dB; Narrow, 54dB 216MHz: Wide band channels, 50dB; Narrow, 44dB Antenna: Uses microphone cable Available Channels: 72MHz: 17 wide band, 40 narrow band 216MHz: 19 wide band, 38 narrow band (Modulation is automatically switched when changing between narrow and wide band channels) Physical Dimensions: 3"W x 1"D x 5"H (7.6cm W x 2.5cm D x 13cm H) Weight: < 1 lb. (0.45 kg) with batteries Door: Channel and ON/OFF buttons are accessible through the door, lockable Power: Two AA batteries, alkaline or NiMH rechargeable; external power connector 8-9 VDC, center positive, <300mA Battery Life: 16 hours with high capacity alkaline 8 hours with rechargeable NiMH Battery Charging: Fully automatic, < 14 hours Phantom Power: Included for microphone Microphone Input: -55dBm, 50 ohms, unbalanced, tip of 3.5MM connector Line Input: -10dBm, 10k ohms, unbalanced, ring of 3.5MM connector Audio Processing: 40dB automatic 3-speed dynamic control with noise gate Controls: On/Off/Program/Lockout, Channel UP, Channel DOWN, Battery Type Mute Control: Located on top of unit, LED flashes when mute is activated Programmability: Allows only programmed channels to be tuned and to be displayed LCD: Channel, Battery/Charge Status, Program, Locked, Channel Lock Out LED: Red, Constant = ON and/or charged, fast flash = muted, slow flash = battery low or charging LT-700 Portable Transmitter Preparation Preparing the LT-700 for Use 1 Remove the product from the shipping container and plastic cover. Inspect for physical 4 any battery type other than rechargeable Nickel Metal Hydride (NiMH) batteries, make sure the BATTERY SELECT switch is in the alkaline position (located in the battery compartment and labeled BATTERY SELECT, remove batteries to access this switch). The product is shipped from the factory in the alkaline position. damage. See "Technical Service Contacts” (Page 4) if damage has occurred. 2 Select Battery Type – CAUTION: If you are using Check to see if the door is locked. If locked, use a pocketknife or small screwdriver to unlock the door locks on the both sides of the unit. To unlock the door, rotate the lock 1/4 turn counter clockwise. To use NiMH batteries, before placing in unit, change the battery switch to NiMH. (See page 17 for more details.) BATTERY SELECT Switch - With batteries removed, use a pen or small screwdriver to select the battery type On both the right and left side, unlock by turning slot horizontal as shown. 3 Open the front access door by gripping the two tabs with your thumb and index finger. WARNING: Do not place the BATTERY SELECT switch in the NiMH position when using Non-Nickel Metal Hydride batteries. The NiMH position will attempt to charge the batteries. Charging non-Nickel Metal Hydride batteries may result in physical harm, destruction of property and/or fire. 5 Place Batteries in Unit Place two AA batteries in the compartment, making note of the battery polarity shown in the battery compartment, and again verifying that the BATTERY SELECT switch is switched correctly for your batteries (see Step 4). Top of Unit and Battery Compartment + _ _ + TM Specifications subject to change without notice. 20 LISTEN TECHNOLOGIES CORPORATION +1.801.233.8992 1.800.330.0891 Fax: +1.801.233.8995 Internet: www.listentech.com All specifications are subject to change without notice. LISTEN TECHNOLOGIES CORPORATION +1.801.233.8992 1.800.330.0891 Fax: +1.801.233.8995 Internet: www.listentech.com All specifications subject to change without notice. 13 LT-700 Transmitter user manual 101100.qrk 8/27/01 4:19 PM Page 12 LT-800 Stationary Transmitter Troubleshooting Listen Receivers: Preparing for Use LT-800 Troubleshooting Listen Receivers: LR-500 Programmable Display Receiver, LR-400 Display Receiver and LR-300 Digital Receiver The LT-800 has no power. Make sure the power transformer is connected to a power source and is connected to the jack marked "Power Input". Make sure the POWER button is pressed. There is no audio or the audio level is too low. Make sure that you have an audio source properly connected to INPUT 1 and/or 2. The INPUT 1 or 2 switch must be located in the correct position for the appropriate input level. For example: if you are using the output of a mixer on INPUT 2, the switch should be in the LINE position. If it were in the SPEAKER position, the level would be too low. Also, check the INPUT knob to ensure it is properly adjusted. You should be able to see the VU meter deflect on INPUTS 1 or 2 corresponding with the input level of the audio source. Try connecting a headset to the front panel jack and adjusting the MONITOR volume control so that you can listen to the audio source. The audio is distorted. Check to make sure you have the input level select switches in the proper position. You may be providing too much audio level for the input stage to handle. There is hum in the audio. Make sure you have properly grounded the audio source to the LT-800. Check the connections from the audio source to the LT-800. If you can, try to use a balanced audio source - this will reduce the chance of creating hum. Try connecting a ground from the LT-800 to ground and/or to the ground of the source audio. There is too much audio processing. Adjust the process knob counter-clockwise. There is a tone. The TEST TONE button has been pressed (its LED light is on). Push the TEST TONE button to turn off the tone. I cannot change the broadcast channel. The unit is locked. To unlock, press the UP and DOWN button simultaneously for 3+ seconds. You can tell when it's locked because the decimal is illuminated. The Audio Input 1 sounds “tinny”. If you are using an unbalanced audio source, make sure Pin 2 or the XLR and the ring on the 1/4” jack is grounded. There is interference. Try different frequencies until you find a clear channel. If this does not work, try a different frequency band (i.e. if you're using 72MHz, try 216MHz or vice versa). This is accomplished by returning the equipment to Listen (no charge) and replacing it with Listen’s alternate frequency band equipment. I cannot pick up the signal on the receiver. Check to make sure the receiver and the transmitter are on the same frequency. I can pick up the signal on the receiver, but it sounds like it's not tuned in. Check to make sure the transmitter and receiver are on exactly the same channel number/letter. I'm using another brand of receiver - how do I tell which channel to use? First, lock the channel by pressing the UP and DOWN buttons together for 3+ seconds. Consider removing the INPUT, PROCESS AND CONTOUR knobs. You can order from Listen a rack mount kit and security cover that will limit access to unit from end users. Other manufacturers’ receivers sound distorted. It is probably because the Listen transmitter is over-deviated. See Page 10 for instructions on how to correct this. tabs with your thumb and index finger. The LR-300 does not have a LCD Display, is only avaiable in the 72MHz band, accesses 17 wide band channels and uses a SEEK button to change channels. Audio quality and charging capabilities are the same. Differences between the LR-500 and LR-400 include: SEEK and channel UP and DOWN buttons are behind the door on the LR-400 versus protruding through the door on the LR-500. Also, the LR-500 is programmable. See page 25 for LR-500 programming features. (Other than these differences, instructions for use of Listen’s LR-400 and LR-500 receivers and their specifications are identical.) The LR-400 has channel UP, DOWN and SEEK buttons behind the door. The LR-300 has a SEEK button only and it is located behind the front door. There is not sufficient range. End users are adjusting the unit. Open the front access door by gripping the two Differences in the LR- 300, 400 and 500 Refer to Listen’s Frequency Compatibility Tables (pages 28-31). Adjust Listen’s transmitter or receiver to the same frequency as the other major brand. Since Listen products can access 57 channels, they will most likely transmit or receive on the same fixed channel or channels of other major ALD brands. First make sure that the receivers you are using are operating properly. Then, make sure that you have an antenna connected either to the top of the LT-800 transmitter or connected to the back of the unit (but not both!). Locate the antenna at a location as high as possible and free of obstacles. Make sure the antenna is of the correct type and is connected properly to the unit. Try using different frequencies that don't have interference. If you're using 216MHz, you might want to try a directional antenna. 3 The LR-500 has channel UP, DOWN and SEEK buttons protruding through the door. 4 Select Battery Type – CAUTION: If you are using any battery type other than rechargeable Nickel Metal Hydride (NiMH) batteries, make sure the BATTERY SELECT switch is in the alkaline position (located in the battery compartment and labeled BATTERY SELECT, remove batteries to access this switch). The product is shipped from the factory in the alkaline position. To use NiMH batteries, before placing in unit, change the battery switch to NiMH. BATTERY SELECT Switch - With batteries removed, use a pen or small screwdriver to select the battery type Preparing Listen Receivers for Use 1 Remove the product from the shipping container and plastic cover. Inspect for physical damage. See "Technical Service Contacts” (Page 4) if damage has occurred. 2 Check to see if the door is locked. If locked, use a pocketknife or small screwdriver to unlock the door locks on the both sides of the unit. To unlock the door, rotate the lock 1/4 turn counter clockwise. WARNING: Do not place the BATTERY SELECT switch in the NiMH position when using Non-Nickel Metal Hydride batteries. The NiMH position will attempt to charge the batteries. Charging non-Nickel Metal Hydride batteries may result in physical harm, destruction of property and/or fire. To unlock door: On both the right and left side, unlock by turning slot horizontal as shown. 12 LISTEN TECHNOLOGIES CORPORATION +1.801.233.8992 1.800.330.0891 Fax: +1.801.233.8995 Internet: www.listentech.com All specifications are subject to change without notice. LISTEN TECHNOLOGIES CORPORATION +1.801.233.8992 1.800.330.0891 Fax: +1.801.233.8995 Internet: www.listentech.com All specifications subject to change without notice. TM 21 LISTEN RECEIVERS user manual 101100.qrk 8/27/01 4:19 PM Page 11 Listen Receivers: Preparation Continued & Operation 5 Place Batteries in Unit Place two AA batteries in the compartment, making note of the battery polarity shown in the battery compartment, and again verifying that the BATTERY SELECT switch is switched correctly for your batteries (see Step 4). 2 + _ 6 _ + Place an earpiece or headset in the mini jack on the top of the unit. The LR-500 and LR-400 are designed to work with either mono or stereo connectors. channel to match the transmission channel by pressing the UP and DOWN buttons. At 72MHz, each LR-400 and LR-500 receiver operates on 17 wide band channels and 40 narrow band channels. (Letters = Wide Band Channels, Numbers = Narrow Band Channels) Turn the receiver on by rotating the volume knob counter-clockwise. The red LED should activate and, on the LR400 and LR-500, the LCD display should illuminate. If they do not, check to ensure you have installed charged batteries and that the batteries have been installed with the proper polarity. LED should light up solid red when unit is on At 216MHz: receivers operate on 19 wide band channels and 38 narrow bands: Channels starting with “2” are wide band, and channels beginning with “1” or “3” are narrow band channels. Please refer to the Frequency Compatibility Tables section (Pages 28-31) for specific frequencies and compatibility with other manufacturers. NOTE: Operating on a narrow band channel will have more noise. Turn volume knob counterclockwise to turn unit on On the LR-400 and LR-500: LCD display should illuminate when unit is on Make sure the unit is on by rotating the volume knob to ON when an earpiece or headset is plugged into the unit. Listen receivers use the cable of the earphone or headset as a receiving antenna. CAUTION: Don’t blow out your ears! Slightly rotate the volume knob to turn the unit ON while keeping the volume turned down. Then, adjust volume after listening to earphone. 22 LT-800 Stationary Transmitter Specifications RF Frequency Range: 72MHz: 72.05 - 75.95MHz 216MHz: 216.025 - 216.975 MHz Transmitter Stability: 50 PPM Output Power: 72MHz: 8000uV at 3 meters 216MHz: 100mW (Max allowed by FCC) Signal to Noise ratio: 72MHz: Wide band channels, 60dB; Narrow, 54dB 216MHz: Wide band channels, 50dB; Narrow, 44dB Antenna: 72MHz: Telescoping, Rubber Ducky, Front Mount, Remote Base, or Coaxial Dipole 216MHz: Telescoping, Whip, Front Mount, Remote Base, Ground Plane, or Coaxial Dipole Available Channels: 72MHz: 17 wide band, 40 narrow band 216MHz: 19 wide band, 38 narrow band (Modulation is automatically switched when changing between narrow and wide band channels) Frequency Response: 72 50Hz to 17kHz, ±3dB 216 50Hz to 8kHz, ±3dB RF Power Selection: Full, 1/2, 1/4 Physical Dimensions: 8" W x 8"D x 1.75"H (20.3cm W x 20.3cm D x 4.45cm H) Optional rack mount brackets Weight: 3 lbs. (1.4 kg) Power: 16 VAC/850mA Audio Input 1: F-XLR / 1/4" Phone, 50/600 ohms, balanced -55dBm / +4dBm, selectable, adjustable Audio Input 2: Phono, 10k/50 ohms, unbalanced -10dBm / +20dBm, selectable, adjustable Audio Output (Mix): Phono, 10k ohms, unbalanced, -10dBm Headphone Output: 250mW, 32 ohms, 3.5MM stereo Controls: Mix, Process, Contour, Headphone Level, Tone, RF Power Output, and ON/OFF Visual Indicators: Audio input levels 1, 2 and post processed modulation level; channel; RF power, test tone 2b continued (LR-400 and LR-500): Test the audio. If a trans- Operating Listen Receivers 1 transmission channel. For the LR-300, follow instructions on 2a. For the LR-400 and LR-500, follow instructions on 2b. 2b) LR-400 and LR-500 Display Receivers: Select the NOTE: Listen receivers accept mono or stereo jacks. 7 Select channel: match the receiver’s channel to the 2a) LR-300 channel selection: first, make sure the transmitter is transmitting continuous audio within range. Second, place the receiver’s earphone on your ear to listen. Turn on and adjust volume to reasonable level. Open the LR-300 receiver’s front access door and press the SEEK button for less than one second. Listen. Do this three or more times and decide which audio channel sounds best because you won’t have channel verification otherwise. Continue to do this until you get back to the best sounding audio channel. You can electronically lock it into the selected channel by pressing and holding the same SEEK button for five or more seconds. (Press and hold the SEEK button again for five+ seconds to unlock.) You’re set. Close the front access door. Top of Unit and Battery Compartment LT-800 Stationary Transmitter Specifications LT-800 Transmitter user manual 101100.qrk mitter is broadcasting on that channel, you will be able to hear the audio. If the signal is too weak, the audio will be muted (squelched). 4 Specifications subject to change without notice. 2b continued (LR-400 and LR-500): Find audio transmission. Another way to select a channel on the LR-400 and LR-500 is to press the SEEK button. When you do this, the Listen receiver looks for the next channel that is active. Sometimes the unit will mistake interference for a real broadcast signal. If you get interference, simply press the SEEK button again. The SEEK button will also likely stop on adjacent narrow band channels, or the wide band channel associated with the narrow band you are looking for. Simply continue to press SEEK until you reach the clearest operating channel. LISTEN TECHNOLOGIES CORPORATION +1.801.233.8992 1.800.330.0891 Fax: +1.801.233.8995 Internet: www.listentech.com All specifications are subject to change without notice. TM LISTEN TECHNOLOGIES CORPORATION +1.801.233.8992 1.800.330.0891 Fax: +1.801.233.8995 Internet: www.listentech.com All specifications subject to change without notice. 11 8/27/01 4:19 PM Page 10 LT-800 Stationary Transmitter, Operation & Selecting a Channel 3 3Adjust volume control for the best listening level. Operating the LT-800 1 Make sure the unit is powered on. Selecting a Channel to Transmit On Selecting a clear channel to broadcast is important for interferencefree broadcasting. Wide Band Recommendation – If you don’t plan to have Press POWER button and verify power connections. When “ON”, display should be lit. 2 Select a channel – Select the channel to transmit on to by pressing the channel UP and DOWN buttons. See "Selecting a Channel to Transmit On" to the right. Can’t change the channel? It may be locked. Press both the UP and DOWN buttons simultaneously for 3 seconds until the decimal dot next to the channel turns off. Press again to lock in new channel, if desired. At 72MHz: The LT-800 at 72MHz operates on 17 wide band channels and 40 narrow band channels: Letters = Wide Band Channels Numbers = Narrow Band Channels At 216MHz: The LT-800 at 216MHz operates on 19 wide band channels and 38 narrow band channels: “2” as left digit = wide band channel “1” and “3” left digits = narrow band channels Please refer to the Frequency Compatibility Tables (Pages 28-31) for specific frequencies and compatibility with other manufacturers. NOTE: Operating on a narrow band channel will have more noise. 3 Test Tone, if necessary: To broadcast a tone, press the test tone button. This button is used to tune other manufacturer receivers or to identify a particular channel on a receiver. Listen Receivers: Locking, and LED & LCD Indicators other transmitters (or a limited number) operating in the same area, it is recommended that you use wide band channels. These are the most common channels used. Many people own receivers that will operate on these channels. In addition, wide band channels offer the best fidelity and the lowest noise. In this case, select one of the 17 wide band channels A through R on 72MHz systems (19 wide band channels beginning with “2” on 216MHz systems). The best way to select a channel is by trial and error. Try a channel, if it has low interference and reliable performance, stick to that channel. Compatibility with other manufacturers – If you are using other manufacturer’s receivers with the LT-800, find out their frequency, then refer to Listen’s Frequency Compatibility Tables (Pages 28-31) to find the LT-800 channel number or letter that corresponds with the receiver’s frequency. As much as possible, Listen has duplicated the wide band channel letters to cover frequencies of other major brands. However, we recommend verifying corresponding channel numbers and letters on the tables on pages 28-31. If you are using other manufacturer’s receivers and the sound is distorted, it is probably because the receiver is not designed to handle the ±25kHz deviation of the Listen transmitter. This can be corrected by turning the PROCESS control knob all the way counterclockwise and turning the INPUT LEVEL knob down. Several transmitters operating in the same environment – For this, you’ll need to choose your transmitting frequencies carefully. The following guidelines should be used to choose channels: a. If possible, use all wide band channels. These channels offer lower noise. b. Select channels that have the highest frequency separation as possible (see Frequency Compatibility Tables, pages 28-31), to avoid adjacent channels and interference. Channels should be at least 200kHz apart. Locking into Only One Channel On the LR-400 and LR-500, when locked, the unit will display the LOCK symbol. On the LR-300 (no LCD display), when listening to the unit, it will sound like the channel isn’t changing when pressing the SEEK button, thus it is electronically locked. Receiver LED Indicator Steady Red LED = Proper Operation Slow Flashing = Battery is Low Slow Flashing when Charging = Unit is Charging To electronically lock in the channel so it cannot be changed, press the SEEK button for five seconds or, on the LR-400 and LR-500, until the LOCK symbol is displayed. To electronically unlock the channel, press and hold down the SEEK button for five seconds or, on the LR400 and LR-500, until the LOCK symbol disappears on the display. LR-400 and LR-500 Receivers: Look & Listen ™ Display Descriptions Small dots indicate the relative RF signal strength. When there is no signal the unit is squelched LISTEN RECEIVERS user manual 101100.qrk Letters and numbers indicate the channel the unit is tuned to Battery indicator – flashes slowing when charging, quickly when almost discharged Indicates the unit is in PROGRAM mode (to enter PROGRAM mode, press UP and DOWN until the PGM symbol on the LCD display is shown) In OPERATING mode, this icon indicates the channel is locked and cannot be changed by the user (to lock/unlock, press the SEEK button until the LOCK symbol on the LCD display is displayed / not displayed) In PROGRAM mode (PGM symbol is displayed), icon indicates the channel is locked out and the user does not have access to the channel TM c. Through a process of trial and error select a combination of channels that offer the lowest interference and highest reliability. 10 LISTEN TECHNOLOGIES CORPORATION +1.801.233.8992 1.800.330.0891 Fax: +1.801.233.8995 Internet: www.listentech.com All specifications are subject to change without notice. LISTEN TECHNOLOGIES CORPORATION +1.801.233.8992 1.800.330.0891 Fax: +1.801.233.8995 Internet: www.listentech.com All specifications subject to change without notice. 23 8/27/01 4:19 PM Page 9 Listen Receivers: Door Lock & Batteries LR-400 and LR-500 Receiver Battery Status Icon The status of the battery is indicated by the battery symbol on the LCD. When the battery is fully charged, all three segments of the battery symbol will be displayed, as shown. As fewer battery segments are displayed, the lower the battery level, as shown. When the batteries are almost fully discharged, the battery segments and the red LED near the volume control will blink. When this occurs, less than 5% of the battery life is remaining and the batteries should be immediately replaced or recharged. LT-800 Stationary Transmitter Preparation & Audio Control All Receivers: Charging Batteries Using SmartCharge™ 7 1. Listen’s receivers are unique because they have an automatic battery charger built in. That means that when the Listen receiver is connected to a wall transformer or placed in a Listen battery charging case (LA-311 or LA-317), Nickel Metal Hydride (NiMH) batteries will be charged while in the receiver. Once batteries are charged, the internal battery charger will automatically turn off. This prevents overcharging of batteries, automates the process of charging, and makes it so you don’t have to remember to unplug the charger. Connect Audio Inputs: Connect audio source(s) to one or both audio input connections: Input 1 offers a choice of balanced XLR or 1/4” phone connection. Input 2 is an unbalanced phono connector. (See LT-800 Audio Connections on Page 7 for specific connection instructions.) Unbalanced Input 2 connection: phono connector Input 2 Switch Input 1 Switch Connect balanced and unbalanced audio sources as shown in diagram. Make sure that if you are connecting an unbalanced audio source, that Pin 2 of the XLR and the ring of 1/4” phone jack are connected to ground as shown. 3. IMPORTANT: To charge NiMH batteries, the BATTERY SELECT switch must be selected to NiMH. Use a pen or small screwdriver to the move the switch (located in the battery compartment directly below the BATTERY SELECT label) to the proper position. XLR Wiring 1/4” Phone Wiring To unlock: On both the right and left side, unlock by turning slot horizontal as shown. To lock: On both the right and left side, lock door by turning slot vertical as shown. 24 LISTEN TECHNOLOGIES CORPORATION +1.801.233.8992 1.800.330.0891 Fax: +1.801.233.8995 Internet: www.listentech.com All specifications are subject to change without notice. _ The LT-800 incorporates automatic audio level control and processing. Input levels can be viewed on the two VU meters on the front panel. 1. ADJUST INPUT: Adjust INPUT knob counter-clockwise to add gain to INPUT 1. Adjust INPUT knob clockwise to add gain to INPUT 2. If you have two audio sources connected to both INPUT 1 and 2, adjust the level of one input using the VU meter, then adjust the output level of the other audio source. 3. ADJUST PROCESS: Adjust the PROCESS knob 4. Install NiMH rechargeable batteries in the battery compartment ensuring that proper polarity has been observed. + _ LT-800 Audio Control counter-clockwise. If most of your audio source is voice, adjust clockwise for music. The CONTOUR knob adjusts the relative equalization of the unit. This equalization boosts or cuts frequencies above 3kHz. For only NiMH batteries: set BATTERY SELECT switch to NiMH. For all other batteries, set BATTERY SELECT at alkaline. Top of Unit and Battery Compartment sources active and the unit powered ON, plug a headset into the jack located on the LT-800’s front panel to listen to the audio source. Adjust headset volume to a comfortable level. 2. ADJUST CONTOUR: Adjust the CONTOUR knob This segment will blink when batteries are low. Locking the Receiver’s Access Door Use the headset jack to listen to audio source – With the audio source or (Refer to LT-800 Controls & Displays Illustration on Page 7.) 2. Do not attempt to charge alkaline or any other type of non-NiMH batteries. Only charge NiMH batteries within Listen receivers. We recommend that you use NiMH batteries supplied by Listen. WARNING: Attempting to charge non-NiMH batteries may result in physical harm, destruction of property and /or fire. Balanced Input 1 connection: XLR or 1/4” phone 9 LT-800 Transmitter user manual 101100.qrk 8 Adjust Audio Input Switches – For Input 1 clockwise if you want more processing. This will provide for even more consistent levels. This knob adjusts processing, relative to automatic processing already performed in the unit. The LT-800 provides dynamic audio processing intended to keep audio levels consistent to the listener. When the PROCESS knob is rotated fully clockwise, all audio is at the same relative level. When rotated fully counter clockwise, more dynamic range is provided for the transmitted audio source. Switch, select MIC or LINE input level; Input 2 Switch, select LINE or speaker level. (See illustration on Page 7.) + TM LISTEN TECHNOLOGIES CORPORATION +1.801.233.8992 1.800.330.0891 Fax: +1.801.233.8995 Internet: www.listentech.com All specifications are subject to change without notice. 9 user manual 101100.qrk 8/27/01 4:19 PM Page 8 LT-800 Stationary Transmitter Preparation Preparing the LT-800 for Use Listen Receivers: Charging (cont.) & LR-500 Programming 5 Remove the product from the shipping container and plastic cover. Inspect for physical 1 damage. See "Technical Service Contacts" (Page 4) if damage has occurred. For Rack Mounting: If rack mounting the unit, install 2 the rack mount shelf according the instructions that come with the shelf, then install the unit and shelf in the rack. 3 Set the RF POWER: Set the RF POWER switch for FULL, 1/2 or 1/4. (Level is also indicated on the front panel.) The amount of transmitted RF power that you will need depends on your application. If you are operating other transmitters in the same environment and receivers can be used close to the antenna, it is best to have the transmitter’s output power at its lowest level to reduce the possibility of interference. 5. Plug a wall transformer into the side of the Listen receiver or place receiver in a Listen Carrying/Charging Case (LA-311 or LA-317). For charging using a transformer: with NiMH batteries in unit, plug wall transformer in CHARGING connection and into wall outlet (as shown). Batteries will be fully charged when red LED stops flashing and is unlit. (LED and battery symbol will flash slowly while charging.) Plug in Wall Transformer Plug the connector on the wall transformer into the power connector on the back panel. Do not plug into power source yet. (Only use a Listen supplied transformer.) Charging the Batteries (continued) 6 Power Up 6. Once the batteries are fully charged, the unit will stop charging the batteries. Full-charge will be indicated when all the battery symbol segments are illuminated and the LED near the volume control is not lit. 1. Plug transformer into outlet 2. To enter PROGRAM mode, press the UP and DOWN keys simultaneously until the PGM symbol is displayed on the LCD display. 3. Use the UP and DOWN keys to select channels. As channels are displayed, the L/O symbol on the LCD display will be displayed for those channels that are locked out. When a channel is locked out, the channel is not available to the user. To toggle between locked out and not locked out, press the SEEK button. On each channel, check to see if “L/O” is displayed; it means channel is locked out from the user To toggle between locked out and not locked out, press the SEEK button. 4 2. Press to 3. Select channel 4. If desired, lock in turn power ON using UP and DOWN buttons Connect Antenna: Connect the supplied antenna according the instructions that come with the antenna. Only use an antenna supplied by Listen. Connect external antenna here, or... Connect telescoping or rubber ducky antenna through cover here selected channel by pressing both UP and DOWN buttons simultaneously 1. The unit will operate normally when connected to a wall transformer. 2. Batteries do not need to be installed in the unit operate from a wall transformer. Lock Into or Unlock A Channel TO LOCK: Press the LT-800’s channel UP and DOWN buttons simultaneously for three or more seconds until you see a decimal dot light up next to the channel number. To UNLOCK: Press the channel UP and DOWN buttons LR-500 Receiver Programming simultaneously for three or more seconds until you see the decimal dot next to the channel number disappear. 1. The LR-500 can be programmed to operate on a limited number of channels. (The LR-400 and LR-300 cannot be programmed.) For applications where users are required to select a channel (such as language interpretation or classrooms), and you don’t want them to have to go through all of the available channels, this feature is ideal. If all channels where available, the user could have 57 channels to select from. TM 8 Operating the Receiver with a Wall Transformer LISTEN TECHNOLOGIES CORPORATION +1.801.233.8992 1.800.330.0891 Fax: +1.801.233.8995 Internet: www.listentech.com All specifications are subject to change without notice. 4. To adjust squelch, the padlock In PROGRAM mode on the LR-500, icon will appear after you program dots indicate level of squelch your channels in PROGRAM mode. You should still be in PROGRAM mode. To NOT adjust squelch, don’t press a button for 4 seconds and the unit will exit PROGRAM mode. To adjust squelch, press SEEK to unlock squelch (the padlock will disappear). The squelch level will appear as a number of dots showing. No dots means no squelch. The factory default setting is four dots. Press the UP button to increment through five possible squelch settings indicated by dots. More dots means more squelch sensitivity. 5. To exit PROGRAM mode, don’t press a key for 4 seconds. LISTEN TECHNOLOGIES CORPORATION +1.801.233.8992 1.800.330.0891 Fax: +1.801.233.8995 Internet: www.listentech.com All specifications subject to change without notice. TM 25 LISTEN RECEIVERS 7. The unit can be operated while batteries are charging. 8/27/01 4:19 PM Page 7 Listen Receiver Specifications LT-800 Stationary Transmitter Controls & Audio Connections LR-500 Specifications LR-400 Specifications LR-300 Specifications RF Frequency Range: 72MHz: 72.05 - 75.95 MHz 216MHz: 216.025 - 216.975 MHz Sensitivity: .6uV typical, 1uV maximum for 12dB SINAD, Max deviation at ±70kHz Signal to Noise ratio: 72MHz: Wide band channels, 60dB; Narrow, 54dB 216MHz: Wide band channels, 50dB; Narrow, 44dB Frequency Response: 72 50Hz to 17kHz, ±3dB 216 50Hz to 10kHz, ±3dB Distortion: < 2% THD Squelch: 40dB with loss of RF signal Antenna: Uses headphone cable Available Channels: 72MHz: 17 wide band, 40 narrow band 216MHz: 19 wide band, 38 narrow band (see charts on pages 28-31 for details) Physical Dimensions: 3" W x 1"D x 5"H (7.6cm W x 2.5cm D x 13cm H) Weight: < 1 lb. (.45 kg) with batteries Door: CHANNEL and SEEK buttons are accessible through door, lockable LR-500 Programmability: Allows only programmed channels to appear on the display, user functions can be locked by pressing the Seek button for > 3 seconds Power: Two AA batteries, high capacity alkaline or NiMH rechargeable; external power connector 8-9 VDC, tip positive,<300mA Battery Charging: Fully automatic, <14 hours Battery Life: 40 hours with high capacity alkaline, 20 hours with rechargeable NiMH Headphone Output: 750mW RMS maximum at 25kHz deviation, 32 ohms, 3.5MM mono or stereo RF Frequency Range: 72MHz: 72.05 - 75.95 MHz 216MHz: 216.025 - 216.975 MHz Sensitivity: .6uV typical, 1uV maximum for 12dB SINAD, Max deviation at ±70kHz Signal to Noise ratio: 72MHz: Wide band channels, 60dB; Narrow, 54dB 216MHz: Wide band channels, 50dB; Narrow, 44dB Frequency Response: 72 50Hz to 17kHz, ±3dB 216 50Hz to 10kHz, ±3dB Distortion: < 2% THD Squelch: 40dB with loss of RF signal Antenna: Uses headphone cable Available Channels: 72MHz: 17 wide band, 40 narrow band 216MHz: 19 wide band, 38 narrow band (see charts on pages 28-31 for details) Physical Dimensions: 3" W x 1"D x 5"H (7.6cm W x 2.5cm D x 13cm H) Weight: < 1 lb. (.45 kg) with batteries Door: CHANNEL and SEEK buttons are accessible through door, lockable Power: Two AA batteries, high capacity alkaline or NiMH rechargeable; external power connector 8-9 VDC, tip positive, <300mA Battery Charging: Fully automatic, <14 hours Battery Life: 40 hours with high capacity alkaline, 20 hours with rechargeable NiMH Headphone Output: 750mW RMS maximum at 25kHz deviation, 32 ohms, 3.5MM mono or stereo RF Frequency Range: 72MHz: 72.05 - 75.95 MHz Sensitivity: .6uV typical, 1uV maximum for 12dB SINAD, Max deviation at ±70kHz Signal to Noise ratio: 72MHz: Wide band channels, 60dB Frequency Response: 50Hz to 17kHz, ±3dB Distortion: < 2% THD Squelch: 40dB with loss of RF signal Antenna: Uses headphone cable Available Channels: 72MHz: 17 wide band Frequency Channel Letter 72.100 A 72.200 K 72.300 B 72.400 N 72.500 C 72.600 O 72.700 D 72.800 P 72.900 E 74.700 I 75.300 J 75.400 R 75.500 F 75.600 S 75.700 G 75.800 T 75.900 H Physical Dimensions: 3" W x 1"D x 5"H (7.6cm W x 2.5cm D x 13cm H) Weight: < 1 lb. (.45 kg) with batteries Door: CHANNEL and SEEK buttons are accessible through door, lockable Power: Two AA batteries, high capacity alkaline or NiMH rechargeable; external power connector 8-9 VDC, tip positive,<300mA Battery Charging: Fully automatic, <14 hours Battery Life: 40 hours with high capacity alkaline, 20 hours with rechargeable NiMH Headphone Output: 750mW RMS maximum at 25kHz deviation, 32 ohms, 3.5MM mono or stereo LT-800 Front Illustration: Controls & Displays INPUT: Adjust audio input levels of Inputs 1 and 2 Indicates audio input level of Inputs 1 and 2 Shows modulation level after processing Indicates RF output power (full, 1/2 or 1/4) – select on rear panel Channel the unit is tuned to LT-800 Transmitter user manual 101100.qrk If decimal place is lit, channel is locked Plug in a headset then adjust volume Power ON/OFF Activates a tone to aid tuning of nonListen receivers PROCESS: Adjust the amount of audio processing – to make all audio sources sound like they are at the same level, adjust clockwise CONTOUR: Adjust voice intelligibility equalization for your application requirements LT-800 Audio Connections SELECT CHANNEL TO LOCK: press both UP and DOWN buttons simultaneously to lock channel; press both again to unlock INPUT 1 CONNECTION: Connect a microphone or balanced line level input. See Preparation instruction #7 for details (Page 9). The LT-800 has two possible audio inputs: INPUT 1 is used to connect a balanced mic or line level input. INPUT 2 is used to connect an unbalanced, high impedance line input or speaker input. LINE OUTPUT – the LINE OUTPUT connector is a mixed output of INPUT 1 and INPUT 2 after processing. This is an unbalanced phono connector. The output level is –10dBm. INPUT 2 CONNECTION: this is a phono connector used to connect an unbalanced, high impedance line or speaker input INPUT 2 SWITCH: Select LINE or SPEAKER on the slide switch directly next to the INPUT 2 connector. In the line position, the input level is –10dBm, and on speaker, the input level is +10dBm. INPUT 1 SWITCH: Select MIC or LINE input on the slide switch. For Mic input, the level is –55dBm and the input impedance is 50 ohms. In the line position, the input level is +4dBm and the input impedance is 600 ohms. TM Specifications subject to change without notice. 26 LISTEN TECHNOLOGIES CORPORATION +1.801.233.8992 1.800.330.0891 Fax: +1.801.233.8995 Internet: www.listentech.com All specifications are subject to change without notice. LISTEN TECHNOLOGIES CORPORATION +1.801.233.8992 1.800.330.0891 Fax: +1.801.233.8995 Internet: www.listentech.com All specifications subject to change without notice. 7 8/27/01 4:19 PM Page 6 Receiver Troubleshooting LR-300, LR-400 and LR-500 Receiver Troubleshooting The receiver has no power. Make sure the unit has either fully charged batteries or a Listen approved wall transformer connected. Make sure the VOLUME knob has been rotated to the ON position. If this does not work, try a different set of batteries. Make sure the batteries are installed properly. There is no audio. Make sure you have turned the volume control up. Make sure the earphone jack is plugged all the way in to the top of unit. Make sure the transmitter is broadcasting an audio source. Make sure you're tuned to the same channel as the transmitter. If the RF signal is too weak, the receiver will squelch and thus mute the audio source; move closer to the antenna or make sure the transmitter’s output RF power select is on 'FULL' . The audio is distorted. Make sure you're receiving on the correct channel. Make sure the audio on the transmitter is not turned up too loud so that it is clipping or distorting. Make sure the earphone connector is pushed all the way in. If you’re using the LR-300 (without an LCD display), re-scan the channels to find the clearest channel by pressing SEEK (see page 22, section 2a for more information). There is interference. Try different frequencies until you find a clear channel. If this does not work, try a different frequency band (i.e. if you're using 72MHz, try 216MHz or vice versa). This is accomplished by returning the equipment to Listen (at no charge). I cannot pick up the signal on the receiver. Check to make sure the receiver and the transmitter are on the same frequency. Also make sure the receiver is in broadcast range of the transmitter. I can pick up the signal on the receiver, but it sounds like it's not tuned in. Check to make sure the transmitter and receiver are on exactly the same channel number/letter. If you’re using the LR-300 (without an LCD display), re-scan the channels to find the clearest channel by pressing SEEK (see page 22, section 2a for more information). There is not sufficient range. Make sure you are located as close to the antenna of the transmitter as possible. Try to locate the antenna as high as possible and free from obstacles. You can also check the squelch setting; perhaps it’s too sensitive. To change this setting, refer to instructions on page 25, #4 under programming. It's confusing for users to have 57 channels when switching between channels. Use the programming feature of the LR-500 (only) to limit the number of channels users have access to. Users keep changing channels. You can prevent users from changing channels by pressing the SEEK button and holding it for five seconds. This will electronically lock into the channel. In addition, lock the access door to prevent users from accessing channel buttons. I cannot change channels when pressing the UP and DOWN buttons or the SEEK button. The unit is electronically locked. Press the SEEK button for five seconds to unlock. When I change channels, only certain channels are accessible. The unit has been programmed to tune to only certain channels (LR--500 ONLY!). You can change these tunable channels by reprogramming the unit. How can I limit access to the batteries? Use the side door locks. My batteries are not charging. Make sure the battery switch is in the NiMH position. Make sure you have connected an approved Listen charging transformer. Make sure you use ONLY NiMH batteries provided by Listen. Never try to charge alkaline or NICAD batteries. I want to run the unit from a wall transformer. Simply plug a Listen approved transformer to the CHARGE/ POWER connector. Batteries need not be installed, however, NiMH will recharge if installed while the unit is being used. I'm using another brand of transmitter - how do I tell which channel to use? Refer to Listen’s Frequency Compatibility Tables (included on pages 28-31). Either adjust the transmitter or the receiver to a common channel. LISTEN TECHNOLOGIES CORPORATION +1.801.233.8992 1.800.330.0891 Fax: +1.801.233.8995 Internet: www.listentech.com All specifications subject to change without notice. TM 27 LISTEN RECEIVERS user manual 101100.qrk user manual 101100.qrk 8/27/01 4:19 PM Page 5 72MHz Frequency Compatibility Table Listen Limited Lifetime Warranty Limited Lifetime Warranty, Including Performance Guarantee Listen Technologies Corporation (Listen) warrants its products to Listen will refund the purchase price of the product to the original be free from defects in workmanship and material under normal purchaser within the first ninety days after purchase if the product use and conditions for the useful lifetime of the product from date does not perform better than a similar competitive product subject of purchase. Accessories are warranted for ninety days from date to an annual amount to any one original purchaser not to exceed of purchase. This warranty is only available to the original end $1,000 and subject to the conditions of this limited warranty. This purchaser of the product and cannot be transferred. Warranty is is called our Whatever-It-takes Performance Guarantee. Refunds only valid if warranty card has been returned within 90 days of will only be given to the original purchaser of product once the purchase. This warranty is void if damage occurred because of product has been returned to the factory in good working order misuse or if the product has been repaired or modified by anyone with an explanation for the refund. To receive a refund, call Listen other than a factory authorized service technician. Warranty does for a return authorization number. Return the product with a letter not cover normal wear and tear on the product or any other on the end user’s letterhead stating the reason for the refund and a physical damage unless the damage was the result of a copy of the original invoice. If the product was purchased through manufacturing defect. Listen is not liable for consequential a dealer, refunds must be processed through the original dealer. damages due to any failure of equipment to perform as intended. Listen shall bear no responsibility or obligation with respect to the In the first ninety days after purchase, any defective product will manner of use of any equipment sold by it. Listen specifically be replaced with a new unit. After ninety days, Listen will, at its disclaims and negates any warranty of merchantability or fitness of own discretion either replace the unit with a new unit or a unit of use of such equipment including, without limitation, any warranty similar type and condition. Product that is not covered under that the use of such equipment for any purpose will comply with warranty shall be replaced with a unit of similar type and condition applicable laws and regulations. The terms of the warranty are based on a flat fee. governed by the laws of the state of Utah. This limited lifetime warranty, prices and the specifications of Listen will only accept returned products with prepaid shipping and products are subject to change without notice. with a return authorization number. To receive a return authorization number call 1.800.330.0891 or +1.801.233.8992. TM 28 LISTEN TECHNOLOGIES CORPORATION +1.801.233.8992 1.800.330.0891 Fax: +1.801.233.8995 Internet: www.listentech.com All specifications are subject to change without notice. LISTEN TECHNOLOGIES CORPORATION +1.801.233.8992 1.800.330.0891 Fax: +1.801.233.8995 Internet: www.listentech.com All specifications are subject to change without notice. 5 user manual 101100.qrk 8/27/01 4:19 PM Page 4 Technical Service Contacts & Compliance Notices Technical Service Contacts If technical service is needed, please contact Listen. Pre-authorization is required before returning Listen products. If products were damaged in shipment, please contact the carrier, then contact Listen for replacement or repair requirements payable by the carrier. Toll Free: 1.800.330.0891 Telephone: +1.801.233.8992 Fax: +1.801.233.8995 Internet: www.listentech.com General E-Mail: [email protected] Shipping & Correspondence Address: Listen Technologies Corporation 8535 South 700 West, Suite A Sandy, Utah 84070 U.S.A. FCC ID Numbers: LT-800-072 (72MHz base transmitter) ID: OMD800-001 LT-800-216 (216MHz base transmitter) ID: OMD800-216 LT-700-072 (72MHz portable transmitter) ID: OMD700-001 LT-700-216 (216MHz portable transmitter) ID: OMD700-216 72MHz Frequency Compatibility Table (continued) Compliance Notices Listen’s Models LT-800, LT-700, LR-300, LR-400 and LR-500 These devices comply with part 15 of the FCC Rules. Operation is subject to the following two conditions: (1) These devices may not cause harmful interference, and (2) these devices must accept any interference received, including interference that may cause undesirable operation. Listen’s LT-800 and LT-700 Transmitters (216MHz only) Listen’s LT-800 and LT-700 transmitters are authorized by rule under the Low Power Radio Service (47 C.F.R. Part 95) and must not cause harmful interference to TV reception or United States Navy SPASUR installations. You do not need an FCC license to operate these transmitters. These transmitters may only be used to provide: auditory assistance to persons with disabilities, persons who require language translation, or persons in educational settings; health care services to the ill; law enforcement tracking services under agreement with a law enforcement agency; or automated maritime telecommunications system (AMTS) network control communications. Two-way voice communications and all other types of uses not mentioned above are expressly prohibited. Caution: Changes or modifications not expressly approved by the party responsible for compliance could void the user’s authority to operate Listen’s equipment. FCC Statement This equipment has been tested and found to comply with the limits for a class B digital device, pursuant to part 15 of the FCC Rules. These limits are designed to provide reasonable protection against harmful interference in a residential installation. This equipment generates, uses and can radiate radio frequency energy and if not installed and used in accordance with the instructions, may cause harmful interference to radio communications. However, there is no guarantee that interference will not occur in a particular installation. If this equipment does cause harmful interference to radio or television reception, which can be determined by turning the equipment off and on, the user is encouraged to try to correct the interference by one or more of the following measures: Reorient or relocate the receiving antenna. Increase the separation between the equipment and receiver. Connect the equipment into an outlet on a circuit different from that to which the receiver is connected. Consult the dealer or an experienced radio/TV technician for help. This equipment has been certified to comply with the limits for a class B computing device, pursuant to FCC Rules. In order to maintain compliance with FCC regulations, shielded cables must be used with this equipment. Operation with non-approved equipment or unshielded cables is likely to result in interference to radio and TV reception. The user is cautioned that changes and modifications made to the equipment without the approval of manufacturer could void the user’s authority to operate this equipment. 4 LISTEN TECHNOLOGIES CORPORATION +1.801.233.8992 1.800.330.0891 Fax: +1.801.233.8995 Internet: www.listentech.com All specifications are subject to change without notice. TM LISTEN TECHNOLOGIES CORPORATION +1.801.233.8992 1.800.330.0891 Fax: +1.801.233.8995 Internet: www.listentech.com All specifications subject to change without notice. 29 user manual 101100.qrk 8/27/01 4:19 PM Page 3 216MHz Frequency Compatibility Table Table of Contents MISCELLANEOUS Technical Service Contacts . . . . . . . . . . . . . . . . . . . . . . . . .4 Warnings . . . . . . . . . . . . . . . . . . . . . . . . . . . . . . . . . . . . . . .4 Compliance Notices . . . . . . . . . . . . . . . . . . . . . . . . . . . . . . .4 Limited Lifetime Warranty . . . . . . . . . . . . . . . . . . . . . . . . . .5 LT-800 Stationary Transmitter LT-800 front illustration: controls & display descriptions . .7 Audio connections illustration . . . . . . . . . . . . . . . . . . . . . .7 Preparing the LT-800 for use . . . . . . . . . . . . . . . . . . . . . . .8 Lock into or unlock a channel . . . . . . . . . . . . . . . . . . . . . .8 Audio control instructions . . . . . . . . . . . . . . . . . . . . . . . . .9 Operating the unit . . . . . . . . . . . . . . . . . . . . . . . . . . . . . .10 Selecting a channel to transmit on . . . . . . . . . . . . . . . . .10 LT-800 specifications . . . . . . . . . . . . . . . . . . . . . . . . . . . .11 LT-800 troubleshooting . . . . . . . . . . . . . . . . . . . . . . . . . .12 LT-700 Portable Transmitter Preparing the LT-700 for use . . . . . . . . . . . . . . . . . . . . . .13 Operating the unit . . . . . . . . . . . . . . . . . . . . . . . . . . . . . .14 Selecting a channel to transmit on . . . . . . . . . . . . . . . . .15 Look & Listen™ LCD display descriptions . . . . . . . . . . . .15 LT-700 programming . . . . . . . . . . . . . . . . . . . . . . . . . . . .16 Locking into only one channel . . . . . . . . . . . . . . . . . . . . .16 LED indicator . . . . . . . . . . . . . . . . . . . . . . . . . . . . . . . . . .16 Battery status icon . . . . . . . . . . . . . . . . . . . . . . . . . . . . .16 Locking the access door . . . . . . . . . . . . . . . . . . . . . . . . .17 Charging batteries using SmartCharge™ . . . . . . . . . . . . . .17 Operating the unit with a wall transformer . . . . . . . . . . . .18 LT-700 troubleshooting . . . . . . . . . . . . . . . . . . . . . . . . . .19 LT-700 specifications . . . . . . . . . . . . . . . . . . . . . . . . . . . .20 30 LISTEN TECHNOLOGIES CORPORATION +1.801.233.8992 1.800.330.0891 Fax: +1.801.233.8995 Internet: www.listentech.com All specifications are subject to change without notice. LR-500 Programmable Display Receiver LR-400 Display Receiver LR-300 Digital Receiver LR-500 Programmable Display Receiver, LR-400 Display Receiver and LR-300 Digital Receiver Differences in the LR- 300, 400 and 500 . . . . . . . . . .21 Preparing Listen receivers for use . . . . . . . . . . . . . . .21 Operating the LR-300 receiver . . . . . . . . . . . . . . . . . .22 Operating the LR-400 and LR-500 receivers . . . . . . . .22 Locking into only one channel . . . . . . . . . . . . . . . . . .23 LED indicator . . . . . . . . . . . . . . . . . . . . . . . . . . . . . .23 LR-400 and LR-500 Look & Listen™ LCD display descriptions . . . . . . . . . . . . . . . .23 Battery status icon . . . . . . . . . . . . . . . . . . . . . . . . . .24 Unlocking and locking the access door . . . . . . . . . . .24 Charging batteries using SmartCharge™ . . . . . . . . . . .24 Operating the receiver with a wall transformer . . . . .25 LR-300, LR-400 and LR-500 specifications . . . . . . . .26 Receiver troubleshooting . . . . . . . . . . . . . . . . . . . . . .27 LR-500 programming . . . . . . . . . . . . . . . . . . . . . . .25 Frequency & Compatibility Tables 72MHz . . . . . . . . . . . . . . . . . . . . . . . . . . . . . . . . .28-29 216MHz . . . . . . . . . . . . . . . . . . . . . . . . . . . . . . . .30-31 LISTEN TECHNOLOGIES CORPORATION +1.801.233.8992 1.800.330.0891 Fax: +1.801.233.8995 Internet: www.listentech.com All specifications subject to change without notice. TM 3 user manual 101100.qrk 8/27/01 4:19 PM Page 2 Introduction 216MHz Frequency Compatibility Table (Continued) Dear Valued Customer, Thank you for choosing Listen! All of us at Listen are dedicated to providing you the highest quality products and prompt, efficient customer care. Our products are manufactured in an ISO-9000 factory that has been independently certified to the highest quality standards. We stand ready to answer any questions you might have at installation or in the operation of our products. And should there be any problems with your Listen products, we are ready to help you in any way we can. Should you have any comments on how we might improve our products or our service, we’re here to listen. Here’s how to reach us: Telephone: +1.801.233.8992 Facsimile: +1.801.233.8995 U.S. Toll Free: 1.800.330.0891 E-Mail: [email protected] Web: www.listentech.com Thank you... and enjoy your listening experience! Best Regards, The Listen Team TM 2 LISTEN TECHNOLOGIES CORPORATION +1.801.233.8992 1.800.330.0891 Fax: +1.801.233.8995 Internet: www.listentech.com All specifications are subject to change without notice. LISTEN TECHNOLOGIES CORPORATION +1.801.233.8992 1.800.330.0891 Fax: +1.801.233.8995 Internet: www.listentech.com All specifications are subject to change without notice. 31 User Manual Digitool™ MX Intended to alert the user to the presence of uninsulated “dangerous voltage” within the product’s enclosure that may be of sufficient magnitude to constitute a risk of electric shock to persons. Intended to alert the user of the presence of important operating and maintenance (servicing) instructions in the literature accompanying the product. CAUTION: Risk of electrical shock — DO NOT OPEN! CAUTION: To reduce the risk of electric shock, do not remove cover. No user serviceable parts inside. Refer servicing to qualified service personnel. WARNING: To prevent electrical shock or fire hazard, do not expose this appliance to rain or moisture. Before using this appliance, read the operating guide for further warnings. Este símbolo tiene el propósito, de alertar al usuario de la presencia de “(voltaje) peligroso” sin aislamiento dentro de la caja del producto y que puede tener una magnitud suficiente como para constituir riesgo de descarga eléctrica. Este símbolo tiene el propósito de alertar al usario de la presencia de instruccones importantes sobre la operación y mantenimiento en la información que viene con el producto. PRECAUCION: Riesgo de descarga eléctrica ¡NO ABRIR! PRECAUCION: Para disminuír el riesgo de descarga eléctrica, no abra la cubierta. No hay piezas útiles dentro. Deje todo mantenimiento en manos del personal técnico cualificado. ADVERTENCIA: Para evitar descargas eléctricas o peligro de incendio, no deje expuesto a la lluvia o humedad este aparato Antes de usar este aparato, Iea más advertencias en la guía de operación. Ce symbole est utilisé dans ce manuel pour indiquer à l’utilisateur la présence d’une tension dangereuse pouvant être d’amplitude suffisante pour constituer un risque de choc électrique. Ce symbole est utilisé dans ce manuel pour indiquer à l’utilisateur qu’il ou qu’elle trouvera d’importantes instructions concernant l’utilisation et l’entretien de l’appareil dans le paragraphe signalé. ATTENTION: Risques de choc électrique — NE PAS OUVRIR! ATTENTION: Afin de réduire le risque de choc électrique, ne pas enlever le couvercle. Il ne se trouve à l’intérieur aucune pièce pouvant être reparée par l’utilisateur. Confiez I’entretien et la réparation de l’appareil à un réparateur Peavey agréé. AVERTISSEMENT: Afin de prévenir les risques de décharge électrique ou de feu, n’exposez pas cet appareil à la pluie ou à l’humidité. Avant d’utiliser cet appareil, lisez attentivement les avertissements supplémentaires de ce manuel. Dieses Symbol soll den Anwender vor unisolierten gefährlichen Spannungen innerhalb des Gehäuses warnen, die von Ausreichender Stärke sind, um einen elektrischen Schlag verursachen zu können. Dieses Symbol soll den Benutzer auf wichtige Instruktionen in der Bedienungsanleitung aufmerksam machen, die Handhabung und Wartung des Produkts betreffen. VORSICHT: Risiko — Elektrischer Schlag! Nicht öffnen! VORSICHT: Um das Risiko eines elektrischen Schlages zu vermeiden, nicht die Abdeckung enfernen. Es befinden sich keine Teile darin, die vom Anwender repariert werden könnten. Reparaturen nur von qualifiziertem Fachpersonal durchführen lassen. ACHTUNG: Um einen elektrischen Schlag oder Feuergefahr zu vermeiden, sollte dieses Gerät nicht dem Regen oder Feuchtigkeit ausgesetzt werden. Vor Inbetriebnahme unbedingt die Bedienungsanleitung lesen. 2 IMPORTANT SAFETY INSTRUCTIONS Read This! WARNING: When using electric products, basic cautions should always be followed, including the following: 1. Read these instructions. 2. Keep these instructions. 3. Heed all warnings. 4. Follow all instructions. 5. Do not use this apparatus near water. For example, near or in a bathtub, swimming pool, sink, wet basement, etc. 6. Clean only with a dry cloth. 7. Do not block any of the ventilation openings. Install in accordance with manufacturer’s instructions. It should not be placed flat against a wall or placed in a built-in enclosure that will impede the flow of cooling air. 8. Do not install near any heat sources such as radiators, heat registers, stoves or other apparatus (including amplifiers) that produce heat. 9. Do not defeat the safety purpose of the polarized or grounding-type plug. A polarized plug has two blades with one wider than the other. A grounding type plug has two blades and a third grounding plug. The wide blade or third prong is provided for your safety. When the provided plug does not fit into your inlet, consult an electrician for replacement of the obsolete outlet. Never break off the grounding. Write for our free booklet “Shock Hazard and Grounding.” Connect only to a power supply of the type marked on the unit adjacent to the power supply cord. 10. Protect the power cord from being walked on or pinched, particularly at plugs, convenience receptacles, and the point they exit from the apparatus. 11. Only use attachments/accessories provided by the manufacturer. 12. Use only with a cart, stand, tripod, bracket, or table specified by the manufacturer, or sold with the apparatus. When a cart is used, use caution when moving the cart/apparatus combination to avoid injury from tip-over. 13. Unplug this apparatus during lightning storms or when unused for long periods of time. 14. Refer all servicing to qualified service personnel. Servicing is required when the apparatus has been damaged in any way, such as power-supply cord or plug is damaged, liquid has been spilled or objects have fallen into the apparatus, the apparatus has been exposed to rain or moisture, does not operate normally, or has been dropped. 15. If this product is to be mounted in an equipment rack, rear support should be provided. 16. Exposure to extremely high noise levels may cause a permanent hearing loss. Individuals vary considerably in susceptibility to noise-induced hearing loss, but nearly everyone will lose some hearing if exposed to sufficiently intense noise for a sufficient time. The U.S. Government’s Occupational and Health Administration (OSHA) has specified the following permissible noise level exposures: Sound Duration Per Day In Hours 8 6 4 3 2 1 1/2 1 1/2 1/4 or less Sound Level dBA, Slow Response 90 92 95 97 100 102 105 110 115 According to OSHA, any exposure in excess of the above permissible limits could result in some hearing loss. Ear plugs or protectors to the ear canals or over the ears must be worn when operating this amplification system in order to prevent a permanent hearing loss, if exposure is in excess of the limits as set forth above. To ensure against potentially dangerous exposure to high sound pressure levels, it is recommended that all persons exposed to equipment capable of producing high sound pressure levels such as this amplification system be protected by hearing protectors while this unit is in operation. SAVE THESE INSTRUCTIONS! 3 Description The Digitool™ MX is a fully programmable audio processing and control system. It includes advanced parallel DSP processing, a multi-layer front panel display, and multiple interface and control options. Signal processing is accomplished using two 32-bit parallel SHARC processors with a combined power of 132 Mips. The Digitool MX gives the system designer an economical alternative to design, and is considerably more powerful than similarly priced components. The Digitool MX’s host processor and non-volatile flash memory maintain user-defined configurations and allow interface via the unit’s front panel control and optional external control interfaces. Completely upgradable through a standard serial connection to a PC, the Digitool MX allows the system designer to upgrade to the latest version without removing the unit from the rack and disassembling the chassis. The graphic display is capable of displaying real-time audio signal activity, active presets, and control information for audio processes, as well as monitoring critical variables such as internal cabinet temperature and power presence. Features • Eight balanced analog line/mic inputs • Phantom power • Eight balanced analog line outputs • 24-bit A/D and D/A converters • Up to 96 kHz sample rate • Sixteen front panel dual-color LED indicators (eight input, eight output) • Three front panel parameter controls • Large 64 x 128 pixel display with back light • Jog/select control encoder for navigating the display • 32-bit parallel processing performed by two ADI SHARC DSPs • RS-232 connection for easy set-up and operation • RS-485 connection for remote serial functions • Four assignable control input ports(analog) with 0-10 VDC range for external potentiometers • Worldwide-compatible power supply Applications • Stadiums • Music Clubs • Auditoriums • Hotel Meeting Rooms • Civic Centers • Conference Centers • Performing Arts Centers • Schools • Theaters • Sports Bars • Courts of Law • Cruise Ships • Houses of Worship • Teleconferencing • Theme Parks • Paging Systems • Arenas • Any facility requiring distribution of • University Campus Buildings multiple line-level signals 4 Front Panel ACTIVE 1 2 3 4 5 RCHITECTURAL 6 7 8 INPUTS TM DIGITOOL MX PROGRAMMABLE AUDIO MULTI PROCESSOR COUSTICS TM OUTPUTS PROGRAM by 1 1. 2 3 4 PROGRAM WHEEL: This control navigates the display as well as performing parameter changes on functions with more than three settable parameters. It is used to scroll through the various functions, and to select among items such as inputs/outputs and hardware configuration. 2. LCD DISPLAY: This screen gives a graphical representation of unit configuration and parameter settings. The layout of the screen and the information conveyed will depend on the function being monitored or set. 3. PARAMETER CONTROLS: These controls are used to adjust the settings of the displayed effect. Their individual function will depend on the effect being displayed. 4. ACTIVE LEDs: These LEDs (eight input and eight output) will illuminate as an indication of the active inputs and outputs. Rear Panel 5 5. 6 7 8 9 10 IEC CONNECTOR: This receptacle is for the IEC line cord (included) that provides AC power to the unit. Never break off the ground pin on any equipment. It is provided for your safety. If the outlet used does not have a ground pin, a suitable grounding adapter should be used and the third wire should be grounded properly. To prevent the risk of shock or fire hazard, always be sure that the mixer and all associated equipment is properly grounded. Note for UK only If the colors of the wires in the mains lead of this unit do not correspond with the colored markings identifying the terminals in your plug, proceed as follows: (1) The wire that is colored green and yellow must be connected to the terminal that is marked by the letter E, the earth symbol, colored green, or colored green and yellow. (2) The wire that is colored blue must be connected to the terminal that is marked with the letter N or the color black. (3) The wire that is colored brown must be connected to the terminal that is marked with the letter L or the color red. 5 6. POWER SWITCH: This rocker switch applies mains power to the unit. 7. RJ-45 INPUT / OUTPUT CONNECTORS: These standard, eight-connector jacks allow connection to a multi-drop RS-485 bus. 8. RS-232 CONNECTOR: This standard DB-9 serial cable connector allows interface between the Digitool™ and a PC. 9. CONTROL VOLTAGE CONNECTORS: These four-control, removable Euro-style input ports (analog) have a 0-10 V DC range to accommodate assignable external potentiometers. 10. INPUTS AND OUTPUTS: These detachable, Euro-style connectors allow analog input to and output from the unit. NAVIGATING THE DISPLAY The layout of the front panel is designed to simplify navigation and editing of internal processes. The PROGRAM WHEEL, which is located to the left of the display, controls all cursor movements within the display. The PROGRAM WHEEL has 32 detented positions per full rotation. Clockwise rotation results in left-to-right or top-to-bottom motion while counterclockwise motion reverses this order. Each detent results in the cursor moving by one position. In some view panels, the cursor location remains in a fixed location on the screen while each detent of the wheel results in a view change. This allows the user to navigate through multiple screens in just a few clicks of the PROGRAM WHEEL. SELECTING DISPLAY OBJECTS The PROGRAM WHEEL also functions to select items on the screen. If the cursor is over an object on the screen, it may be selected by pressing the PROGRAM WHEEL. This will either take you to an appropriate screen or enable additional options within the display. PARAMETER CONTROLS To the right of the display are three undefined encoder controls. The function for these controls are indicated in the display along the right side of the screen, adjacent to the encoders. Figure 1 illustrates the function for each control within the Mix View panel, which is described in the next section. 6 Panel Screens The front panel screen consists of four primary views. They are: Mix, Route, Edit and Utilities. The Mix View is the default view. Edit, Route and Utilities are accessed through the Mix view. Highlighting and selecting the corner box enters the utility view Mix box provides a quick view of the relative levels of each channel for the selected mix Controls the level of the selected output Controls the selected input to output matrix level Master level control for the entire system Indicates the currently selected input Only the selected mix is visible in the mix view. There are eight views, one for each mix Figure 1. The Mix View is the primary view from which all other functions are accessed. Mix View The Mix View is considered to be the main view from which other views and controls are accessed. The Mix View provides a symbolic layout of each of eight output mixes. Figure 1 illustrates the components of this display and identifies the controllable functions. Rotating the PROGRAM WHEEL highlights each input or output channel object, indicated by small rectangles on the left and right sides of the Mix Box. The Mix Box contains bar graphs indicating the levels of all eight inputs that contribute to the selected mix. Along the left side of the Mix Box are the eight inputs. Similar to the input objects in the display are the output objects which represent 1 of 8 mixes. These appear on the right side of the Mix Box. Notice in figure 1 that only one output mix is visible at a time. MIX VIEW CONTROLS The three controls for the Mix View are Output Level, Matrix Level and Master Level controls. OUTPUT LEVEL: The top encoder affects the Output Level for one of eight outputs. This level corresponds to the selected mix along the right side of the Mix Box. MATRIX LEVEL: The middle encoder controls 1 of 64 levels. This control corresponds to a combination of the selected input channel and output mix. In the illustration of figure 1, channel 3 is highlighted and therefore enables the Matrix Level of channel 3 to be visible for the selected mix. Notice that the nomenclature of the label for this control, which appears in the display adjacent to the encoder, indicates a level control within the 8X8 matrix. That is “Level 3-1” identifies the Input-3 to Mix-1 level. There are 64 active levels within the matrix. All are accessible from the Mix panel view. MASTER LEVEL: The third or bottom encoder functions as the Master Level for the entire system. When this Level is changed, all eight outputs are changed by an equivalent amount. Route View The Route View is an alternative presentation to the Mix View (Figure 2). In the Route View, a single input channel is selected. The display then shows the routing of the selected input channel to each output. Each output level can be changed in the same manner as is done in the Mix View. It should be noted that in either view, routing and mixing can be accomplished. The Route View is handy when you need to route a selected channel to multiple outputs. The three parameter knobs perform the same function as in the Mix View. The top knob controls the highlighted output mix, the second knob controls the selected Matrix Level and the bottom knob controls the Master Volume for all outputs. 7 Digitool Security Access to the Digitool’s settings may be restricted by clicking on the key icon at the upper right portion of the Mix View screen. An option menu will appear which allows the user to either set the unit's password or to lock the screen. In order to set a new password, the user is first asked to enter the old password using the program knob and the displayed graphical numeric keypad. When shipped from the factory, the Digitool's default password is '1234'. After correct entry of the old password, the user will be prompted to enter the new password (up to four digits long), and then to confirm this new password again. Figure 2. The Route View allows the user to quickly determine the signals that are mixed to a particular output channel. The Digitool will enter secure mode by choosing Lock Screen from the key option menu. In this mode, a banner will appear in the graphics display, and any movements of the front panel controls will cause a password entry screen to appear. A user must type the correct password before they can gain access to the Digitool’s settings via the front panel. If the unit is powered down while in secure mode, then it will power up in secure mode. Similarly, if it was powered down unsecure, it will power up unsecure. Edit View - Input Channel Pressing the PROGRAM knob while an input or output object is selected will open the edit window for the selected channel. These panels are used to access and control filters, gates, compressors and other signal processes. Refer to these sections in the following pages of this manual for a detailed description. (a) (b) Figures 3a and 3b. Security options and password entry views. Once Edit is selected the Edit View panel will be activated. The Edit View panel is actually a series of views that are presented in the same manner that the signal path follows. The views are described below. INPUT CHANNEL HARDWARE The first panel that is visible in Edit View is the Input Channel Hardware page (figures 4a and 4b). This panel allows for configuration of the input hardware. There are two different views depending upon whether Mic or Line is selected. LINE MODE: The control options for Line mode are Sensitivity and Trim. Sensitivity can be adjusted for one of four settings: 30, 24, 18 and 12 dBu. Each setting scales the full digital range to the specified sensitivity setting. For example, if an input signal has a nominal level of +4 dBu, then a sensitivity setting of 24 dBu provides 20 dB of digital headroom before clip. A compact disc player has a nominal level of –10 dBV (-7.79 dBu) therefore a sensitivity setting of +12 dBu provides 19.8 dB of headroom before clip. Trim provides +/- 6 dB of gain or attenuation in the input hardware. 8 Figures 4a and 4b. Input Channel Hardware views for Line mode (a) and Mic mode (b). MIC MODE: The control options are Phantom On/Off and Gain. The Mic gain is adjustable from +15 to +50 dB in 0.5 dB steps. INPUT CHANNEL LPF-HPF The first DSP process for the input signal chain is the filter. The filter parameters are as follows: Frequency, Q and Type (see figures 5a and 5b). The user can select either a low-pass filter (LPF) or high-pass filter (HPF). In general this filter is intended to be used as a high pass type for the purpose of removing unwanted low frequencies at the input, particularly when used for high-gain microphone applications. This will tend to stabilize dynamic processing such as gates and compressors that appear later in the chain. In addition, the user has control over the Q of the filter. (a) DigiTool MX HPF +10 +5 +0 d B -5 -10 -15 -20 -25 -30 20 50 100 200 500 1k 2k 5k 10k 20k Hz (b) Q ADJUSTMENT: The Q is a primitive component of the filter and is usually fixed in most HPF or LPF implementations. Figure 5b illustrates the effect of the Q adjustment on the frequency Figures 5a and 5b. Filter control panel response of the filter. The illustration shows the filter in high(a) and varying Q values (b). pass mode with the corner frequency set for 100 Hz. There are five sweeps shown, each with a different Q value. The normal setting for Q is typically 0.707 which is shown in the illustration as the 2nd sweep from the bottom. At this value, the filter is considered to be critically damped and has a monotonic response throughout the attenuation band. The attenuation at the corner frequency is –3 dB. Higher Q values result in corner frequency gain rather than attenuation. Lower Q values result in more attenuation at the corner frequency. Note that in either case, the filter still achieves a 12 dB/oct slope below the corner frequency and is ultimately unattenuated above the corner frequency. Notice also that the value of Q specifies the gain at the specified frequency. Therefore a Q of 2 provides a +6 dB boost at the specified corner while a Q of 0.5 attenuates by 6 dB. It is important to observe that the Q value does not specify the maximum boost or cut level of the filter. For example, notice the middle curve which has a Q of 1.0. This curve is 0 dB at the corner frequency yet has slight gain above the corner. One application for this control is to simultaneously roll off the low end and add warmth to the input signal which could serve to free up one of the two parametric equalizers in later stages. (a) NOISE GATE DigiTool MX Noise Gate , Thresh = -26 dB, variable Floor The next process in the input signal chain is the Noise Gate. There are four parameter controls for the noise gate. See figures 6a & 6b for the control view and transfer function graph. THRESHOLD: The top encoder sets the gate’s turn-on threshold. This control is specified in dBFS. The range of the control is from 0 to –100 dBFS. +0 -10 O U T -20 -30 -40 d B F S -50 -60 -70 -80 -90 -50 -40 -30 -20 -10 +0 IN ( dBFS ) (b) Figures 6a and 6b. Panel view (a) and transfer function (b) for the noise gate. 9 ATTACK: The middle control adjusts the attack time of the gate. The value range is from 1 to 1000 ms in 1 ms steps. DECAY: The bottom control adjusts the decay time of the gate. The value range is from 1 to 1000 ms in 1 ms steps. (a) FLOOR: The floor specifies the level to which the gate attenuates when off. This parameter must be accessed and modified using the PROGRAM WHEEL to navigate and select. The range of this control is 0 to –100 dBFS. DigiTool MX Hi-Shelf EQ +10 +5 d B HIGH SHELF EQ Ampl Sweeps , Freq = 5k Hz +15 +0 -5 This is the first of four shaping EQs for the input signal chain. The top encoder adjusts the Gain (boost/cut) and has a range of –15 dB to +15 dB. The corner frequency is adjustable down to 3 kHz. The corner frequency is positioned 3 dB below the shelf level with a 6 dB/oct slope between the shelf point and 0 dB. The graph of figure 7b shows multiple curves for varying gain settings with the frequency set for 5 kHz. -10 -15 20 50 100 200 500 1k 2k 5k 10k Hz (b) Figures 7a and 7b. High Shelving EQ panel view (a) and boost/cut response curves. PARAMETRIC EQ 1 & 2 The next two processes in the signal chain are fully parametric equalizers. The control functions are Gain (boost/cut), Frequency and Bandwidth. The Gain control is adjustable from -20 to +15 dB in 1/2 dB steps. Frequency is adjustable for the full audio range. Bandwidth is specified per octave and is adjustable from 3.0 to 0.004 octaves. Figure 8 illustrates the panel view and Figures 9a, 9b and 9c show response curves for a range of parametric sweeps. LOW SHELF EQ The response of this EQ has a shelf level that is determined by the boost or cut value. The top encoder adjusts the Gain (boost/cut) and has a range of –15 dB to +15 dB. The corner frequency is adjustable up to 200 Hz. The corner frequency is positioned 3 dB below the shelf level with a 6 dB/oct slope between the shelf point and 0 dB. Figures 10a and 10b show the panel view and frequency response sweeps for several values of gain. COMPRESSOR The compressor is the last process in the input chain. The output of this process feeds the matrix for the associated channel. The compressor has a total of five functions available. They are: Threshold, Ratio, Gain, Attack and Decay. Refer to figures 11a, 11b, and 11c for panel views and performance graphs. THRESHOLD: The threshold is adjusted via the top encoder. The range is 0 to –100 dBFS in 1/2 dB steps. This control 10 Figure 8. Panel view for one of two parametric equalizers. 20k determines when the compressor begins to limit the dynamic range of the input signal. The signal strength measured at the input to the compressor is constantly monitored. The compressor has no effect upon the signal as long as the measured signal strength is below the threshold point. Once the signal strength reaches and surpasses the threshold point, the compressor will begin limiting the dynamic range of the output. The amount of dynamic compression is determined by the Ratio control. DigiTool MX Parametric EQ, Ampl Sweeps +15 +10 +5 +0 d B -5 -10 -15 -20 20 50 100 200 500 1k 2k 5k 10k 20k Hz (a) DigiTool MX Parametric EQ, BW sweeps RATIO: The Ratio of the compression is adjusted using the middle encoder. The range of control is from 1 to 20. Though it is not specified in the panel view, the ratio is referenced to 1 dB. Therefore a Ratio setting of eight is an 8 to 1 ratio. This particular setting for example means that as the input signal increases its level by 8 dB, the compressor allows only 1 dB of increase at its output. +5 +0 -5 d -10 B -15 -20 20 50 100 200 500 1k 2k 5k 10k 20k Hz (b) GAIN: The output gain of the compressor is adjusted via the bottom encoder. The range of this control is –100 to +30 dB in 1/2 dB steps. This adjustment can serve to compensate for the loss in average signal strength due to the dynamic compression. If the user desires to optimally set the gain in order to maintain digital full scale and therefore maximum dynamic range, the following formula can be used: DigiTool MX Parametric EQ, Freq sweeps +20 +15 +10 +5 +0 d B -5 -10 -15 -20 20 50 100 200 500 1k 2k 5k 10k 20k Hz (c) Figures 9a, 9b and 9c. Frequency response curves for a range of parametric sweeps. For example, given a threshold of –20 dB and a ratio of 4:1, the calculation is: Therefore the above gain setting will result in the output level reaching maximum full scale just as the input signal reaches full scale. Note that this formula is given only to provide a mechanism to maximize dynamic range. It is not intended to compensate for average signal loss due to the compression. ATTACK & DECAY: The Attack and Decay functions are accessed via the PROGRAM WHEEL. Attack sets the amount of time for the compressor to respond once the threshold has been met. Decay determines the amount of time for the compressor to recover from a compressed state once the input signal strength falls below the threshold. The adjustment range for each control is 1 to 1000 ms. (a) DigiTool MX Lo Shelf EQ Ampl Sweeps , Freq = 120 Hz +15 +10 +5 d B +0 -5 -10 -15 Edit View - Output Channel Editing of an output channel object is identical to editing an input process. The following signal processes are: 20 50 100 200 500 1k 2k 5k 10k 20k Hz (b) Figures 10a and 10b. Low shelving EQ panel view (a) and boost/cut response curves. 11 5-BAND PARAGRAPHIC There is a five-band paragraphic equalizer for each output channel. Functionally, each band operates identically to the parametrics of the input stage. Paragraphics are named as such to differentiate their control facility from a graphic equalizer, which has fixed bandwidth and frequency. From the Digitool™ front panel, they are presented as parametric equalizers with their frequencies centered on five octaves. They are 40, 160, 640, 2.56k and 10.25 kHz, each with 1 octave bandwidths. Figure 12 displays the boost/cut response curves. For detailed operation, refer to the parametric EQ description in the “EDIT VIEW-Input Channel” section. (a) DigiTool MX COMPRESSOR/LIMITER RATIO CURVES (-22 dBFS Threshold) +0 -5 -10 -15 -20 OUT (dBFS ) -25 -30 -35 -40 -45 -50 -50 -40 -30 -20 -10 +0 INPUT ( dBFS ) COMPRESSOR (b) Refer to the “EDIT VIEW – Input Channel” section for a description of the operation of the compressor. DigiTool MX COMPRESSOR/LIMITER THRESHOLD CURVES (6:1 RATIO) +0 -10 d B F S OUTPUT CHANNEL FILTERS 1 & 2 -20 -30 Each output channel provides two general purpose filters for low-pass, band-pass or high-pass functions. Each filter is a 2nd order hi-pass or low-pass function (12 dB/oct. slope). A 24 dB/oct slope is possible by configuring both filters to be either low-pass or hi-pass types. Configuring both filters for a bandpass response (filter 1 = HP, fiter 2 = LP), will result in response that is limited to a 12 dB/octave slope. Each filter operates identically to the input-section filter. Refer to the "EDIT VIEW – Input channel" section for a description of the operation of the LPF-HPF filter function. -40 -50 -50 -40 -30 -20 -10 +0 dBr (c) Figures 11a, 11b and 11c. Panel view for the compressor parameter controls. DigiTool MX 5-Band EQ OUTPUT CHANNEL DELAY +20 Each output channel provides an alignment delay for up to 5 seconds. The delay is specified in milliseconds and µseconds and can be resolved to samples periods. Figure 13 provides the panel view for the delay control. +10 +0 d B -10 -20 -30 20 Utility View Selecting ‘UTIL’ in the upper left-hand corner of the Mix View panel will enable the Utility View panel. The Utility View allows the user to store and save presets, enable the internal generator and turn on the priority function. 50 100 200 500 1k 2k 5k 10k Hz Figure 12. Response curves for the 5-band paragraphic EQ. SAVE PRESET Parameters for a given configuration can be saved into 1 of 8 preset locations. All hardware and software variables are saved. Figure 14 illustrates the Panel View for the save function. LOAD PRESET Parameters for a given configuration can be reloaded from 1 of 8 previously saved preset locations. All hardware and software variables are reloaded. Figure 15 illustrates the panel view for the save function. Figure 13. Panel view for the output delay controls. 12 20 The user also has the option to reload the factory default configuration. This configuration has all functions bypassed and each input channel routed to it’s corresponding output. SIGNAL GENERATOR An internal signal generator may be accessed from the Utility View. The generator output signal is positioned prior to the paragraphic equalizers in each of the output stages. The signal can be routed to one or more output channels. This signal, when enabled, is mixed with the normal audio signal flow for each channel. The generator provides three functions - Sine, Pink Noise and White Noise. The frequency range of the sine wave generator is 10 to 20 kHz. The attenuation range is -127 to 0 dBFS. Refer to Figure 16 for the panel view. Figure 14. Panel view for the utility save function. PRIORITY OVERRIDE Channel one provides a priority override of channels two through eight. The Priority View provides the user with the ability to enable and select any or all channels for override (Figure 17). The Priority function is implemented via the channel one gate. When the channel one gate threshold is reached and Priority is enabled, the selected override channels will be attenuated by an envelope set by the channel one gate attack, decay and floor settings. That is, if the channel one gate attack is set for 10 ms, then slave channels will attenuate with the same attack time. Similarly, the decay and floor settings for channel one will determine the attenuation floor and decay recovery of the slave channels. The Priority Override acts on the gates of the slave channels. The gates for each slave channel still operate normally as gates until the Priority condition becomes true. In addition, the Priority Override acts on the slave channel gates even if the gate function is disabled (assuming that priority override is enabled for that channel). Figure 15. Panel view for the utility load function. Figure 16. Panel view for the utility signal generator. UPGRADING DIGITOOL DigiTool firmware and DSP code can be upgraded using a Flash utility which is available from the Peavey web site. The Flash utility is a Windows-based application that allows the user to connect to the Digitool via the back-panel serial port, using a standard PC running Win95, 98 or NT. The user must select the proper comm port channel number in the utility's 'Options' pull-down menu. Once the proper communications port is selected, you can open a source file for download from the PC to Digitool. The download process takes approximately 4 minutes. At the end of the download, the Flash utility will report a successful download and instruct the user to cycle power for the new program to take affect. Figure 17 Channel 1 priority override view. 13 CAUTION: Once the download is in progress, it should not be interrupted. Digitool usually detects bad data or communication errors. Under some circumstances Digitool may attempt to load a corrupt file and become unresponsive. To recover from this condition, the user must load the upgrade using the hardware method, described below. LOADING FIRMWARE VIA HARDWARE RESET To download new firmware and DSP code from the PC to Digitool using the hardware method, the user must use a terminal emulator. Hyperterminal is a terminal emulation program provided by Windows which is intended for connection to a modem. It is often found in the Accessories folder under Communications. Hyperterminal should be setup as follows: Connection name: Digitool Area code: Not applicable for this connection, but you must provide one anyway Connect using: Com1, Com2, Com3, etc., (Select the PC communications port that is connected to Digitool) Port Settings: Bits per second (baudrate): 57.6k Data bits: 8 Parity: None Stop bits: 1 Flow control: None Once you have a hyperterminal window, open the 'File' pulldown menu and select 'Properties'. Select the 'Settings' tab and change the emulation type to 'VT 100'. Select save to keep this configuration. Next, turn the Digitool unit off and remove the top cover. 14 Locate the 'Flash' pads which is between U1705 and U1708 (see figure 18). The steps are as follows: 1. While the unit is still off, short across the two Flash pads using a small flat head screwdriver. 2. While still shorting the pads, turn the unit on. 3. Digitool will respond with all front panel LEDs brightly lit Green. If Digitool does not respond this way, repeat steps 1 and 2. 4. Once the LEDs are all green you may release the short. 5. In the Hyperterminal 'Transfer' pull-down menu, select 'Send Text file..' 6. Browse to the directory containing the upgrade file, select the file and press 'Open'. 7. Digitool will report 'GDone' to the emulator screen if the download was successful. If not, the message 'BDone' will appear, and therefore the process will need to be repeated. 8. If successful, cycle power on the unit to enable the new program. 15 16 Figure 18 Location of shorting pads for hardware-reset download operation. Block Diagram DIGITOOL MX SYSTEM LEVEL BLOCK DIAGRAM AUDIO INPUTS (8) AUDIO CIRCUITS DSP X 2 AD-DA AUDIO OUTPUTS (8) DATA & CONTROL DATA RS-232 PORT PWM HOST PROCESSOR RS-485 PORT POWER SUPPLY 100 ~ 240 VAC 50/60 Hz 8 MEG SDRAM FLASH 8-bit A-D Converter CV INPUTS (4) PANEL DISPLAY & CONTROLS TEMPERATURE SENSOR DIGITOOL MX ANALOG INPUT SIGNAL PATH - EACH CHANNEL PHANTOM SUPPLY SWITCH CONTROL BALANCED AUDIO IN + + - + PAD A-D MIC GAIN TO DSP CONVERTER LINE TRIM CHASSIS GND DIGITOOL MX ANALOG OUTPUT SIGNAL PATH - EACH CHANNEL CONTROL BALANCED AUDIO OUT + FROM DSP D-A LPF CONVERTER FILTER MUTE - CHASSIS GND 17 DIGITOOL MX INPUT & DSP SIGNAL PATH (Symbolic) DIGITOOL MX DSP OUTPUT SIGNAL PATH (Symbolic) 18 Specifications SPECIFICATIONS AUDIO CHANNELS MEASURE 8 inputs/8 outputs COMMENTS Line or Mic level inputs LED METERING 8 input / 8 output peak-reading Dual color LEDs LED STATUS: -6 to +6 dB +30 dBu, +24 dBu, +18 dBu, +12 dBu Software controlled Software selectable INPUT ANALOG TRIM RANGE LINE SENSITIVITY SETTINGS MIC GAIN RANGE INPUT IMPEDANCE PHANTOM POWER CMRR CROSSTALK DYNAMIC RANGE OUTPUT OUTPUT FULL SCALE SETTINGS OUTPUT IMPEDANCE MINIMUM LOAD IMPEDANCE DYNAMIC RANGE +15 to +50 dB 6.6 k Ω +24 Volts 55 dB >90 dB 104 dB +24 dBu, +18 dBu, +12 dBu, 6 dBu 102 Ω 600 Ω 109 dB ANALOG INPUT-TO-OUTPUT TOTAL HARMONIC DISTORTION (+ NOISE) 0.01 % Red = -0.5 dBFS and higher (Clip) Red & Green = -4 to -0.5 dBFS Green = -4 to -40 dBFS Off = below -40 dBFS The sensitivity setting determines the maximum input signal that results in a full-scale digital input (0 dBFS ). 1/2 dB steps Electronically balanced @ 1 kHz A-weighted, 150 Ohm input termination Software selectable The sensitivity setting determines the maximum output signal that results from a full-scale digital signal (0 dBFS). Electronically balanced Maximum output @ 600Ω = 22.5 dBu A-weighted FREQUENCY RESPONSE DYNAMIC RANGE 20 Hz to 20 kHz 103 dB 20 Hz to 20 kHz, 22 kHz BW filter +4 dBu signal with 20 dB headroom ± 0.5 dBr referenced at 1 kHz A-weighted, 150 Ohm input termination LATENCY 1.4 mS Propagation delay from input to output DIGITAL SAMPLE RATE QUANTIZATION 44.1 kHz, 48 kHz, 96 kHz 24-bit DIGITAL PROCESSING MASTER CPU CLOCK SPEED DSP CYCLE SPEED 132 Mips 48-bit accumulators 6 MHz 66 MHz CONTROL RS-485 half-duplex 57.6 kbaud RS-232 56.7 kbaud CV Inputs 0 to 10 V 256 x-over-sampled Delta-sigma Analog-to-Digital and Digital-to-Analog Uses two ADI SHARC processors 1 port with 2 multi-drop RJ-45 connections Standard dB-9 serial cable connector (female) Operates with either an external voltage applied or using a remote passive potentiometer connection GENERAL DIMENSIONS 19" (48.26 cm) W x 12.25" (31.12 cm) D x without connectors 3.5" (8.89 cm) H NET WEIGHT 11.6 lbs. (5.26 kg) AC POWER INPUT VOLTAGE 100 VAC to 240 VAC 47 Hz to 63 Hz Universal Power Supply POWER CONSUMPTION 20.7 Watts @100 V 20.5 Watts @120 V 330 mA 321 mA POWER DISSIPATION AGENCY COMPLIANCE LISTINGS 22.7 Watts @240 V 206 mA 70.7 BTU (17.7 kcal) @100 V 70.0 BTU (17.6 kcal) @120 V 77.5 BTU (19.5 kcal) @240 V UL, CUL, CE, FCC part 15 Class B Pending Notes: 1. All specifications are typical for any channel(s). 2. All measurements are made in the digital domain. 3. All specifications are for an AC line input of 120 Volts RMS. 4. All input measurements are made using a 40 Ω balanced source impedance at +24 dBu full scale unless otherwise noted. 5. All measurements are made with gain/attenuation set for unity unless otherwise noted. 19 Performance Graphs DigiTool MX Frequency Response, 600 ohm load DigiTool MX Frequency Response, 100k Ohm Load +3 +3 +2 +2 +1 d B r +1 d B r +0 +0 -1 -1 -2 -2 -3 20 50 100 200 500 1k 2k 5k 10k -3 20 20k Hz Ref: +4 dBu 50 100 200 500 DigiTool MX Input THD+N 1k 2k 5k 10k 20k Hz Ref: +2.5 dBu DigiTool MX RELATIVE ( interchannel ) Phase 0.1 +5 +4 0.07 0.06 +3 0.05 0.04 +2 0.03 +1 deg % +0 0.02 -1 -2 0.01 -3 0.007 -4 0.006 -5 20 50 100 200 500 1k 2k 5k 10k 20 20k 50 100 200 500 Hz DigiTool 1k 2k 5k 10k 20k Hz MX Input Cross Talk DigiTool MX Input Cross Talk with +52 dB of +0 Mic Gain +0 -10 -20 -20 -30 -40 -40 -50 dB -60 d B -70 -60 -80 -80 -90 -100 -100 -110 -120 -120 -130 20 5 0 100 200 500 1k 2k 5k 10k 20 20k 50 100 200 Hz 500 Hz DigiTool MX FFT, 1k Hz, -20 dBFS +0 -20 -40 -60 dBFS -80 -100 -120 -140 10 20 50 100 200 500 Hz 20 1k 2k 5k 10k 20k 1k 2k 5k 10k 20k WARRANTY Architectural Acoustics® PEAVEY ELECTRONICS CORPORATION LIMITED WARRANTY Effective Date: July 1, 1998 What This Warranty Covers Your Peavey Warranty covers defects in material and workmanship in Peavey products purchased and serviced in the U.S.A. and Canada. What This Warranty Does Not Cover The Warranty does not cover: (1) damage caused by accident, misuse, abuse, improper installation or operation, rental, product modification or neglect; (2) damage occurring during shipment; (3) damage caused by repair or service performed by persons not authorized by Peavey; (4) products on which the serial number has been altered, defaced or removed; (5) products not purchased from an Authorized Peavey Dealer. Who This Warranty Protects This Warranty protects only the original retail purchaser of the product. How Long This Warranty Lasts The Warranty begins on the date of purchase by the original retail purchaser. The duration of the Warranty is as follows: Product Category Duration MediaMatrix® DPU (Excluding Frames), Cinema Processors, Power Amplifiers, Pre-Amplifiers, Mixers, Electronic Crossovers and Equalizers 5 years Loudspeakers 5 years Microphones 2 years Frames 1 year Speaker Components (incl. speakers, baskets, drivers, diaphragm replacement kits and passive crossovers) and all Accessories 1 year What Peavey Will Do We will repair or replace (at Peavey's discretion) products covered by warranty at no charge for labor or materials. If the product or component must be shipped to Peavey for warranty service, the consumer must pay initial shipping charges. If the repairs are covered by warranty, Peavey will pay the return shipping charges. How To Get Warranty Service (1) Take the defective item and your sales receipt or other proof of date of purchase to your Authorized Peavey Dealer or Authorized Peavey Service Center. OR (2) Ship the defective item, prepaid, to Peavey Electronics Corporation, International Service Center, 412 Highway 11 & 80 East, Meridian, MS 39301 or Peavey Canada Ltd., 95 Shields Court, Markham, Ontario, Canada L3R 9T5. Include a detailed description of the problem, together with a copy of your sales receipt or other proof of date of purchase as evidence of warranty coverage. Also provide a complete return address. OR (3) All MediaMatrix® Frames needing repair, should be shipped prepaid to Peavey Electronics Corporation, International Service Center, 412 Highway 11 & 80 East, Meridian, MS 39301 Limitation of Implied Warranties ANY IMPLIED WARRANTIES, INCLUDING WARRANTIES OF MERCHANTABILITY AND FITNESS FOR A PARTICULAR PURPOSE, ARE LIMITED IN DURATION TO THE LENGTH OF THIS WARRANTY. Some states do not allow limitations on how long an implied warranty lasts, so the above limitation may not apply to you. Exclusions of Damages PEAVEY'S LIABILITY FOR ANY DEFECTIVE PRODUCT IS LIMITED TO THE REPAIR OR REPLACEMENT OF THE PRODUCT, AT PEAVEY'S OPTION. IF WE ELECT TO REPLACE THE PRODUCT, THE REPLACEMENT MAY BE A RECONDITIONED UNIT. PEAVEY SHALL NOT BE LIABLE FOR DAMAGES BASED ON INCONVENIENCE, LOSS OF USE, LOST PROFITS, LOST SAVINGS, DAMAGE TO ANY OTHER EQUIPMENT OR OTHER ITEMS AT THE SITE OF USE, OR ANY OTHER DAMAGES WHETHER INCIDENTAL, CONSEQUENTIAL OR OTHERWISE, EVEN IF PEAVEY HAS BEEN ADVISED OF THE POSSIBILITY OF SUCH DAMAGES. Some states do not allow the exclusion or limitation of incidental or consequential damages, so the above limitation or exclusion may not apply to you. This Warranty gives you specific legal rights, and you may also have other rights which vary from state to state. If you have any questions about this warranty or service received or if you need assistance in locating an Authorized Service Center, please contact the Peavey International Service Center at (601) 483-5365 / Peavey Canada Ltd. at (905) 475-2578. Features and specifications subject to change without notice. 21 80303050 Peavey Electronics Corporation • 711 A Street • Meridian, MS 39301 601-483-5376 • Fax 601-486-1678 • http://aa.peavey.com © 2001 Printed in the U.S.A. 11/01 ▼ PLX 1202 ▼ PLX 1602 ▼ PLX 2402 Manuel de l’utilisateur ▼ PLX 3002 Bedienhandbuch ▼ PLX 3402 User Manual Manual del Usuario *TD-000072-00* TD-000072-00 Rev. C PLX™ Series Amplifiers 1 Explanation of graphical symbols Explication des symboles graphiques Erklärung der Bildsymbole Explicación de símbolos The lightning flash with arrowhead Le symbole éclair avec pointe de Das Blitzzeichen innerhalb eines El rayo dentro de un tríangulo symbol, within an equilateral flèche à l'intérieur d'un triangle gleichseitigen Dreiecks warnt den equilátero alerta al usuario de la triangle, is intended to alert the user équilatéral est utilisé pour alerter Benutzer vor nicht isolierter, presencia de voltaje peligroso no to the presence of uninsulated l'utilisateur de la présence à gefährlicher Spannung im Inneren aislado dentro del producto, que “dangerous voltage” within the l'intérieur du coffret de "tension non- des Gerätes. Diese Spannung ist puede tener un nivel suficiente para product’s enclosure that may be of isolée dangereuse" d'ampleur hoch genug, um Personen durch constitutuir un riesgo de descarga sufficient magnitude to constitute a suffisante pour constituer un risque elektrischen Schlag zu gefährden. eléctrica para el usario. risk of electric shock to humans. de choc électrique pour l'être Das Ausrufungszeichen innerhalb El signo de exclamación inscrito en eines gleichseitigen Dreiecks weist un triángulo equilátero alerta a los The exclamation point within an humain. equilateral triangle is intended to Le point d'exclamation à l'intérieur den Benutzer auf wichtige usuarios de la presencia de alert the users to the presence of d'un triangle équilatéral est employé Bedienungs- und instrucciones importantes de important operating and pour alerter les utilisateur de la Wartungsanweisungen hin, die in funcionamiento y mantenimiento maintenance (servicing) instructions présence d'instructions importantes den gerätebegleitenden Unterlagen (servicio) en la literatura que in the literature accompanying the pour le fonctionnement et l'entretien aufgeführt sind. acompaña al producto. product. (service) dans les documents accompagnant l'appareil. CAUTION ATTENTION! VORSICHT PRECAUCIÓN RISK OF ELECTRIC SHOCK DO NOT OPEN RISQUE DE CHOC ÉLECTRIQUE NE PAS OUVRIR GEFAHR EINES ELEKTRISCHEN SCHLAGES. NICHT ÖFFNEN! RIESGO DE DESCARGA ELÉCTRICA. NO LO ABRA. ATTENTION: Pour éviter les risques de choc électrique, ne pas enlever le couvercle. Cet appareil ne comporte aucune pièce pouvant être réparée par l'utilisateur. Confier l'entretien à un technicien qualifié. VORSICHT: Um Gefährdung durch elektrischen Schlag zu vermeiden, darf das Gehäuse nicht geöffnet werden. Es befinden sich keine vom Benutzer reparierbaren Teile im Inneren des Gerätes. Überlassen Sie jegliche Reparatur dem qualifizierten Fachmann. CAUTION: To reduce the risk of electric shock, do not remove the cover. No user-serviceable parts inside. Refer servicing to qualified service personnel. WARNING: To prevent fire or electric shock, do not expose this equipment to rain or moisture. 2 AVERTISSEMENT: Pour éviter le risque de choc électrique ou d'incendie, n'exposez cet appareil ni à l'humidité excessive ni aux projections d'eau (pluie, ruissellement, etc …) WARNUNG: Um die Gefahr eines Brandes bzw. eine Verletzung durch elektrischen Schlag zu vermeiden, sollten Sie das Gerät niemals Regen oder Feuchtigkeit aussetzen. PRECAUCIÓN: Para reducir el riesgo de descarga eléctrica, no quite la tapa. El usario no debe ajustar los componentes internos. Para mantenimiento solicite la ayuda de personal cualificado. AVISO: Para evitar un incendio o una descarga eléctrica, no exponga este equipo a la lluvia o humedad. TABLE OF CONTENTS ▼ TABLE DES MATIÈRES ▼ INHALTSVERZEICHNIS ▼ TABLA DE LAS MATERIAS Explanation of graphical symbols ...................... 2 Explication des symboles graphiques Erklärung der Bildsymbole Explicación de símbolos TABLE OF CONTENTS .............................................. 3 Table des matières Inhaltsverzeichnis Tabla de las materias Declaration of Conformity ..................................... 4 Déclaration de Conformité Konformitätserklärung Declaración de Conformidad INTRODUCTION .................................................... 5–7 AVANT-PROPOS EINFÜHRUNG INTRODUCCIÓN Front panel ............................................................... 6 Panneau avant Vorderseite Panel frontal Rear panel ................................................................ 7 Panneau arrière Rückseite Panel posterior FEATURES & SETUP .......................................... 8–13 CARACTÉRISTIQUES ET LEUR UTILISATION AUSSTATTUNG & EINSTELLUNGEN CARACTERÍSTICAS Y AJUSTES Clip limiter ................................................................ 8 Limiteur d'écrêtement Clip Limiter Limitador de picos Input filter ................................................................. 9 Filtres d'entrée Eingangsfilter Filtro de entrada Parallel input mode .............................................. 10 Mode entrées parallèles Eingangsparallelschaltung Modo de entradas paralelas Bridge mono mode ............................................... 11 Mode ponté mono Monobrückenbetrieb Modo puenteado en mono What are the differences among Stereo, Parallel Input, and Bridge Mono modes? ............................................... 12 Modes stéréo, parallèle et ponté, quelles sont les différences? Unterschiede zwischen Stereo-, Parallel- und Monobrückenbetrieb ¿Cuáles son las diferencias entre los modos Estéreo, Entradas Paralelas y Puenteado en Mono? INSTALLATION ........................................................ 14 INSTALLATION EINBAU INSTALACIÓN CONNECTIONS ................................................. 15–17 CONNEXIONS ANSCHLÜSSE CONEXIONES Inputs ....................................................................... 15 Entrées Eingänge Entradas Speakon™ outputs ............................................... 16 Sorties Speakon™ Speakon™ Ausgänge Salidas Speakon™ Binding post outputs ............................................ 17 Bornes à écrou Anschlussklemmen Terminales con tornillo Operating voltage (AC mains) ............................. 17 Tension d’utilisation (alimentation CA) Netzanschluß Voltaje de operación (CA principal) OPERATION ........................................................ 18, 19 UTILISATION BETRIEB OPERACIÓN AC power switch .................................................. 18 Interrupteur d'alimentation CA Netzschalter Interruptor de encendido Gain controls ......................................................... 18 Contrôles de gain Verstärkungsregler Controles de ganancia LED indicators ....................................................... 18 Indicateurs DEL LED-Anzeige Indicadores LED Fan cooling ............................................................ 19 Ventilation Lüfterkühlung Ventilación Safe operating levels ........................................... 19 Niveaux d'utilisation sécuritaires Betriebspegel Niveles adecuados de operación APPLICATIONS .................................................. 20, 21 APPLICATIONS ANWENDUNGSBEISPIELE APLICACIONES Sound reinforcement ........................................... 20 Sonorisation Beschallung Sonido en vivo Instrument amplification ..................................... 21 Amplification d'instrument Instrument-Verstärkung Amplificación de instrumento TROUBLESHOOTING ....................................... 22–25 DÉPANNAGE FEHLERBEHEBUNG BUSQUEDA DE AVERÍAS Problem: no sound ................................................ 22 Problème: pas de son Problem: kein Ton Problema: no hay sonido Problem: distorted sound .................................... 23 Problème: son distortionné Problem: Verzerrungen Problema: sonido distorsionado Problem: no channel separation ....................... 24 Problème: pas de séparation des canaux Problem: keine Kanaltrennung Problema: no hay separación entre los canales Problem: hum ......................................................... 24 Problème: ronflement Problem: Brummen Problema: zumbidos Problem: hiss ......................................................... 25 Problème: sifflement Problem: Rauschen/Zischen Problema: ruido (hiss) Problem: squeals and feedback ........................ 25 Problème: bruits et effet Larsen Problem: Pfeifen und Rückkopplungen Problema: chillidos y retroalimentación INNER WORKINGS ............................................ 26, 27 SOUS LE CAPOT INNERER AUFBAU OPERACIÓN INTERNO SPECIFICATIONS ............................................... 28, 29 SPÉCIFICATIONS TECHNISCHE DATEN ESPECIFICACIONES WARRANTY INFORMATION ................................. 30 INFORMATIONS DE GARANTIE GARANTIE-BEDINGUNGEN INFORMACIÓN DE GARANTÍA ADDRESS & TELEPHONE INFORMATION ........... 31 ADRESSE POSTALE ET NUMÉROS ADRESSE UND TELEFONNUMMERN DIRECCIÓN Y TELÉFONO 3 98 NOTE: This equipment has been tested and found to comply with the limits for a Class B digital device, pursuant to part 15 of the FCC Rules. These limits are designed to provide reasonable protection against harmful interference in a residential installation. This equipment generates, uses, and can radiate radio frequency energy and, if not installed and used in accordance with the instructions, may cause harmful interference to radio communications. However, there is no guarantee that interference will not occur in a particular installation. If this equipment does cause harmful interference to radio or television reception, which can be determined by turning the equipment off and on, the user is encouraged to try to correct the interference by one or more of the following measures: 4 • Reorient or relocate the receiving antenna. • Increase the separation between the equipment and the receiver. • Connect the equipment into an outlet on a circuit different from that to which the receiver is connected. • Consult the dealer or an experienced radio/TV technician for help. Declaration of Conformity Déclaration de Conformité Konformitätserklärung Declaración de Conformidad QSC Audio Products, Inc. declares as its sole responsibility that the above named product is in compliance with the Council Directive 89/336/EEC of 3 May 1989 on the harmonization of the laws of the Member States relating to electromagnetic compatibility, as well as requirements of the harmonized product standard EN 55013 related to the limits and the methods of measurement of radio disturbance characteristics of broadcast receivers and associated equipment, and EN 55020, related to the electromagnetic immunity of broadcast receivers and associated equipment. QSC Audio Products Inc déclare être seul responsable que le produit nommé ci-dessus est en conformité avec la directive européenne 89/ 336/EEC du 3 mai 1989 concernant l’harmonisation des lois des états membres relatives à la compatibilité électromagnétique, ainsi que de les spécifications de la norme harmonisée EN 55013 relative aux limites et méthodes de mesure des perturbations radio des récepteurs de télédiffusion et équipements associés, et EN 55020 relative à l’immunité électromagnétique des récepteurs de télédiffusion et équipements associés. QSC Audio Products, Inc. further declares as its sole responsibility that the above named product is in compliance with the Council Directive 73/23/EEC of 19 February 1973 on the harmonization of the laws of the Member States relating to electrical equipment for use within certain voltage limits and the Council Directive 93/68/EEC of 22 July 1993 which amends the previous mentioned directive, as well as requirements of the harmonized product standard EN 60065, related to safety requirements of the harmonized product standard EN 60065, related to safety requirements for mains operated electronic and related apparatus for household and similar general use. QSC Audio Products Inc déclare de plus être seul responsable que le produit nommé ci-dessus est en conformité avec la directive européenne 73/23/EEC du 19 février 1973 concernant l’harmonisation des lois des états membres relatives aux équipements électriques pour un usage dans une certaine limite de tension, et à la directive 93/68/EEC du 22 juillet 1993 qui amende la directive précédente, ainsi qu’aux spécifications de la norme harmonisée EN 60065, relative à la sécurité pour les appareils électriques d’usage domestique et général connectés au réseau électrique. QSC Audio Products, Inc. erklärt in alleiniger Verantwortung, daß dieses Produkt der Ratsdirektive 89/ 336/EEC vom 3. Mai 1989 zur Gesetzesharmonisierung der Mitgliedstaaten betreffend der elektromagnetischen Kompatibilität entspricht, sowie die Erfordernisse der Einheitlichen Norm EN55013 bezüglich Grenzen und Messmethoden von Rundfunkstörungscharakteristik von Rundfunkempfängern und zugehörigen Geräten erfüllt, sowie der Einheitlichen Norm EN55020 bezüglich der elektromagnetischen Strahlungssicherheit von Rundfunkempfängern und zubehörigen Geräten. QSC Audio Products, Inc. declara bajo su propia responsabilidad que el producto anteriormente mencionado cumple con el Concejo Directivo 89/336/EEC del 3 de Mayo de 1989 en la armonización de las leyes de los Estados Miembros que se relacionan a la compatibilidad electromagnética, como también a los requerimientos del producto armonizado con la norma EN 55013 relacionados a los límites y métodos de medidas de perturbaciones de radio que son características de los receptores de la radiodifusión y equipo asociado, y la EN 55020 relacionada con la inmunidad electromagnética de receptores de radiodifusión y equipo asociado. QSC Audio Products, Inc. erklärt ferner, daß das oben bezeichnete Produkt der Ratsdirektive 72/23/EEC vom 19. Februar 1973 entspricht, in dem die Gesetzesharmonisierung der Mitgliedstaaten bezogen auf elektrische Geräte zur Benutzung innerhalb bestimmter Spannungsgrenzen festgelegt sind, sowie der Ratsdirektive 93/68/EEC vom 22. Juli 1993 mit Änderungsbestimmungen, sowie der Einheitlichen Produktnorm EN60065 entspricht, in der Sicherheitsbestimmungen für netzbetriebene elektronische und ähnliche Geräte für Haushaltsgebrauch oder ähnlichen QSC Audio Products, Inc. además declara bajo su propia responsabilidad que el producto ya mencionado cumple con el Concejo Directivo 72/23/EEC del 19 de Febrero de 1973 en la armonización de la leyes de los Estados Miembros relacionados al equipo eléctrico para uso dentro de ciertos límites de voltaje y el Concejo Directivo 93/68/ EEC del 22 de Julio de 1993 el cual reforma la directiva previamente mencionada, como también los requerimientos de la norma del producto armonizado EN 60065, relacionado a los requerimientos de seguridad de los circuitos eléctricos que se operan en aparatos electrónicos relacionados para el hogar y similarmente para uso generellen Gebrauch festgelegt sind. general. I N T R O D U C T I O N A V A N T- P R O P O S E I N F Ü H R U N G I N T R O D U C C I Ó N 20 1 22 P R O 3 0 0 0 W AT T A U D I PL X 3 0 0 2 O P OWER AMPLIFIER 26 28 I4 30 8 -OO The PLX Series Amplifiers. PowerWave TM technology and a refined audio structure combine Model PLX 1202 Power, 8Ω/ch Power, 4Ω/ch Power, 2Ω/ch 20 Hz–20 kHz, 0.03% THD 20 Hz–20 kHz, 0.05% THD 1 kHz, 1% THD 200 W 325 W 600 W PLX 1602 300 W 500 W 800 W PLX 2402 425 W 700 W 1200 W PLX 3002 550 W 900 W 1500 W PLX 3402 700 W 1100 W 1700 W studio-quality performance with touring-quality portability. These fancooled, 2-channel, 2-RU, amps provide unprecedented power in a strong, compact chassis. Features • Independent, user-defeatable clip limiters QSC® is a registered trademark, and PowerWave™ is a trademark, of QSC Audio Products, Inc. “QSC” and the QSC logo are registered with the U.S. Patent and Trademark Office. All other trademarks are the property of their respective owners. dB CLIP -IOdB -20dB SIGNAL P OW E R 2 20 Les amplificateurs de la série PLX. La technologie PowerWave™ et une circuiterie audio rafinée sont combinées pour obtenir une qualité sonore digne d'un studio d'enregistrement, avec la robustesse requise pour la tournée. Ces amplificateurs ventilés, 2 canaux, occupant 2 espaces normalisés, vous procurent un niveau de puissance sans précédent dans un châssis compact et solide. 24 26 28 I4 30 8 -OO 32 BRIDGE 22 I8 PA R A L L E L dB 32 Die PLX Verstärkerserie. Die La línea de amplificadores PLX. Verbindung einer hochentwickelten La tecnología PowerWave™ y una refinada estructura sonora se han combinado para ofrecerle la calidad de estudio con la portabilidad necesaria para el sonido en vivo. Estos amplificadores de dos canales con enfriamiento por ventiladores y que ocupan dos espacios en un rack, ofrecen una increíble potencia en un compacto y resistente armazón. Audioverarbeitung mit der patentierten PowerWave™ Technologie kombiniert studiotaugliche Tonqualität mit den robusten Eigenschaften einer Touring-Endstufe. Diese kompakten, lüftergekühlten 2-Kanal-Endstufen mit 2 HE liefern unübertroffen hohe Leistung in einem stabilen Gehäuse. Caractéristiques Ausstattungsmerkmale • Fully selectable low-frequency filtering; choice of 30 or 50 Hz roll-off • Limiteurs d'écrêtement indépendants, commutables par l'utilisateur • unabhängige, abschaltbare Spitzenbegrenzer • Stereo (dual-channel), parallelinput, or bridged mono operating modes • Filtres passe-haut commutables, avec choix de coupure à 30 ou 50 Hz • Einstellbare Hochpassfilter: 30 oder 50 Hz Eckfrequenz Características • Limitador de picos independiente • Filtro de frecuencias graves completamente seleccionables; con la elección de atenuación entre 30 ó 50 Hz • Stereo (Zweikanal)-, Parallel- oder Mono Brückenbetrieb • Estéreo (dos canales), modos de operación para entradas paralelas, o "puenteadas" en mono • Entrées symétriques sur prises XLR et ¼" (6.3 mm) • Symmetrische Eingänge—XLR und Stereoklinke • Entradas balanceadas, con conectores XLR y ¼" (6.3mm) TRS • Binding post and Neutrik Speakon™ outputs • Sorties sur bornes à écrou et prises Speakon • Neutrik Speakons und Ausgangsklemmen • Postes de amarre y salidas Neutrik Speakon™ • Detented gain controls • Contrôles de gain à détentes • Rasterpotis • Front panel LED indicators for power, signal, -20 and -10 dB, clip/protect, parallel inputs, and bridged mono mode • Indicateurs à DEL sur le panneau avant pour alimentation, présence de signal, -20 dB, -10 dB, écrêtement/protection, modes mono ponté et parallèle • LED Frontanzeigen für: Power, -20 dB, -10dB und Clip/Protect, parallelen und Monobrückenbetrieb • Balanced inputs, both XLR and ¼" (6.3 mm) TRS © Copyright 1998 & 1999, QSC Audio Products, Inc. CHANNEL 24 I8 • QSC's exclusive high-performance PowerWave switching technology power supply • Modes d'opération stéréo (deux canaux), parallèle, ou ponté mono • Bloc d'alimentation à commutation haute performance utilisant le technologie PowerWave exclusive à QSC • QSC's patentierte PowerWave Netzteile • Controles de ganancia con retén • Indicadores LED en el panel frontal para el encendido, la señal de entrada, niveles de -20 y -10 dB, para protección/ saturación, entradas paralelas, modo "puenteado" en mono • Tecnología de encendido exclusiva de QSC PowerWave en la fuente de alimentación 5 I N T R O D U C T I O N A V A N T- P R O P O S E I N F Ü H R U N G I N T R O D U C C I Ó N 1 3 2 20 22 1 A U D I PL X 3 10 602 P OWER AMPLIFIER 26 28 I4 O 30 8 - 7 CLIP -IOdB -20dB SIGNAL P OW E R 2 20 26 28 30 8 - PA R A L L E L dB 6 Panneau avant Vorderseite 24 I4 32 BRIDGE 22 I8 32 7 Panel frontal 1. Power switch 1. Commande marche/arrêt 1. Netzschalter 1. Interruptor de encendido 2. Cooling vents 2. Bouches de ventilation 2. Abluftöffnungen 2. Rejillas de ventilación 3. Gain control (Channel 1) 3. Commande de gain (Canal 1) 3. Pegelsteller (Kanal 1) 3. Control de ganancia (Canal 1) 4. CLIP, -10 dB, -20 dB and SIGNAL indicator LEDs, both channels 4. DELs CLIP (écrêtage), -10 dB, -20 dB, et SIGNAL (tous les deux canaux) 4. LED-Anzeige für CLIP, -10 dB, -20 dB und SIGNAL (beide Kanäle) 4. Indicadores LED de CLIP, -10 dB, -20 dB y SIGNAL (dos canales) 5. Gain control (Channel 2) 5. Commande de gain (Canal 2) 5. Pegelsteller (Kanal 2) 5. Control de ganancia (Canal 2) 6. POWER, BRIDGE, and PARALLEL indicator LEDs 6. DELs POWER (alimentation), BRIDGE (mode mono ponté), et PARALLEL (entrées parallèles) 6. LED-Anzeige für POWER (Betrieb), BRIDGE (MonoBrückenschaltung) und PARALLEL (Eingangsparallelschaltung) 6. Indicadores LED de POWER (encendido), BRIDGE (puenteado en mono) y PARALLEL (entradas paralelas) 7. Handles 7. Poignées 7. Griffe 6 dB 2 Front panel CHANNEL 24 I8 P R O 13 60 0 0 W A T T 5 4 7. Asas I N T R O D U C T I O N A V A N T- P R O P O S E I N F Ü H R U N G I N T R O D U C C I Ó N 2 4 5 CH 1 INPUT CH 1 1 MODE SWITCHES CLIP LIMIT ON FILTER ON 30 Hz FILTER PARALLEL INPUTS 1 3 50 Hz 2 4 STEREO 5 6 BRIDGE MODE ON 30 Hz FILTER FILTER ON CLIP LIMIT ON 8 9 BRIDGE MODE OFF 50 Hz 7 INPUT PINOUTS XLR 1/4 P2 TIP P3 RNG P1 SLV 10 CH 2 INPUT MODE SWITCHES CH 2 1 CH 1 CH 2 BRIDGE PINOUT 1+ 1- 2+ 2- 1+ 2+ POS NEG POS NEG POS NEG 8 MODE SWITCH SETTINGS CLIP LIMIT OFF CH1 1 OUTPUT MADE IN U.S.A. BRIDGE MONO CH2 OFF CH 2 9 6 Rear panel ON 2 3 4 5 6 7 8 9 ON FILTERS CH1 FILTER OFF 50 Hz FILTER 50 Hz FILTER FILTER OFF CH2 1 FILTER OFF 30 Hz FILTER 4 5 6 7 30 Hz FILTER FILTER OFF 10 STEREO MODE 1 2 3 4 5 6 7 8 9 10 PARALLEL MODE 1 2 3 4 5 6 7 8 9 10 BRIDGE MONO MODE 1 USE CH1 INPUT. 2 3 4 USE THE BRIDGE 5 MONO SPEAKER 6 CONNECTION. 7 8 9 USE CH1 GAIN CONTROL. 10 UL 2 CH 2 1+ 1- PINOUT POS NEG 4 3 CH 1 LO CK INPUT IMPEDANCE: 12K BALANCED 7 LO CK 1 Panneau arrière Rückseite 10 Panel posterior 1. XLR inputs, Channels 1 and 2 1. Entrées XLR (Canaux 1 et 2) 1. XLR-Eingänge (Kanäle 1 und 2) 1. Entradas XLR (Canales 1 y 2) 2. Configuration switch 2. Sélecteur de configuration 2. Konfigurationsschalter 2. Selector de configuración 3. Configuration switch chart 3. Diagramme au sélecteur de configuration 3. Erläuterung des Konfigurationsschalters 3. Esquema del selector de configuración 4. Entrées TRS (Canaux 1 et 2) 4. Stereoklinken (Kanäle 1 und 2) 4. Entradas TRS (Canales 1 y 2) 5. Sortie Speakon (Canal 1 plus Canal 2) 5. Speakon-Ausgang (Kanal 1 mit Kanal 2) 5. Salida Speakon (Canal 1 con Canal 2) 6. Sortie Speakon (Canal 2) 6. Speakon-Ausgang (Kanal 2) 6. Salida Speakon (Canal 2) 7. Sorties sur bornes à écrou (Canaux 1 et 2) 7. Ausgangsklemmer (Kanäle 1 und 2) 7. Salidas postes de amarre 8. Bouches de ventilation 8. Lufteinlaßöffnung 9. Étiquette du numéro en série 9. Seriennummer 4. TRS inputs, Channels 1 and 2 5. Speakon output, Channel 1 plus Channel 2 6. Speakon output, Channel 2 7. Binding post outputs, Channels 1 and 2 8. Cooling air inlet vents 9. Serial number label 10. AC power cable 10. Câble d’alimentation secteur 8. Rejillas de ventilación 9. Etiqueta del número de serie 10. Cable de alimentación 10. Netzkabel 7 FEATURES & SETUP CARACTÉRISTIQUES AUSSTATTUNG & CARACTERÍSTICAS ET LEUR UTILISATION E I N S T E L L U N G E N Y A J U S T E S Clip limiter Limiteur d'écrêtement Clip Limiter Limitador de picos WHAT IT IS DESCRIPTION Quand le signal audio dépasse la capacité de puissance du circuit de sortie de l'amplificateur, le signal est écrêté, tronquant les pointes de la forme d'onde. Le circuit limiteur d'écrêtement détecte cette condition et réduit rapidement le gain de l'amplificateur pour minimiser la surtension. Afin de préserver le maximum de la dynamique du signal, le limiteur ne reste en fonction que pour la durée de l'écrêtement. BESCHREIBUNG ¿QUÉ ES? Wenn das Audiosignal die Ausgangsverstärker übersteuert, wird das Signal geklippt, was zu einer Abflachung der Wellenspitzen führt. Der Clip Limiter (Spitzenbegrenzer) erkennt dies und verringert schnell die Verstärkung um die Stärke der Übersteuerung zu reduzieren. Um dabei gleichzeitig aber soviel Dynamik als möglich zu erhalten, spricht der Spitzenbegrenzer nur während echter Übersteuerungen an. Cuando la señal de audio estimula el circuito de salida del amplificador más allá de su capacidad de potencia se satura con los picos de la forma de onda. El limitador de picos detecta este fenómeno y rápidamente reduce la ganancia para minimizar la cantidad de sobresaturación. Para conservar las dinámicas del programa al máximo, la limitación sólo ocurrira durante el instante mismo de la saturación. Jeder Kanal hat seinen eigenen Limiter, der wahlweise zu- oder abgeschaltet werden kann (siehe Zeichnung). Cada canal tiene su propio limitador de picos, usted los puede activar o desactivar independientemente, como se muestra a la izquierda. When the audio signal drives the amp's output circuit beyond its power capability, it clips, flattening the peaks of the waveform. The clip limiter detects this and quickly reduces the on • en marche ein • conectado off • hors circuit aus • desconectado gain to minimize the amount of overdrive. To preserve as much of the program dynamics as possible, limiting occurs only during actual clipping. 1 2 3 CLIP LIMITER OFF LF FILTER OFF LF 50 HZ CLIP LIMITER ON (CH 1) LF FILTER ON LF 30 HZ 4 5 STEREO PARALLEL INPUTS 6 7 8 9 10 BRIDGE MODE OFF LF 50 HZ LF FILTER OFF CLIP LIMITER OFF BR MODE ON LF 30 HZ LF FILTER ON CLIP LIMITER ON (CH2) = NOT APPLICABLE NON APPLICABLE NICHT ANWENDBAR NO APLICABLE Each channel has its own clip limiter, and you can switch it on or off independently, as shown at left. WHEN TO USE IT (OR NOT) When driving full-range speakers, clip limiting reduces high frequency distortion caused by bass overloads. It also protects higher frequency drivers from excess overdrive and harsh clipping harmonics. When driving subwoofers, some users let the amplifier clip without limiting because it gives extra “punch” to kick drums and similar sounds. CAUTION: Clip limiting reduces extreme overdrive peaks, allowing a higher average signal level without audible distortion. However, increasing the gain with the clip limiter engaged, until clipping is again audible, can double the average output power. Be careful not to exceed the power rating of your speakers. 8 Chaque canal est muni de son propre limiteur, que vous pouvez activer et désactiver indépendamment, tel qu'illustré à gauche. UTILISATION Lors de l'utilisation de l'amplificateur avec un signal plein registre, le circuit limiteur réduit la distortion des hautes fréquences causée par les surtensions des basses fréquences. Le circuit protège aussi les hautparleurs de hautes fréquences des surtensions et des harmoniques dues aux écrêtements. En utilisation avec des haut-parleurs de sous-graves, certains utilisateurs préfèrent laisser le circuit limiteur hors-circuit, on peut ainsi obtenir un son avec plus d'impact dans la reproduction des grosses caisses et autres instruments du même type. ATTENTION; le circuit de limiteur d'écrêtement réduit les pointes de surtension, augmentant le niveau moyen du signal sans distortion audible. On peut ainsi facilement doubler la puissance moyenne livrée aux hautparleurs. Il faut prendre soin de ne pas excéder la puissance admissible des haut-parleurs. EINSATZ DES LIMITERS Bei der Verwendung von BreitbandLautsprechersystemen reduziert der Einsatz eines Spitzenbegrenzers die Hochfrequenzverzerrungen, welche von Übersteuerungen im Bassbereich verursacht werden. Außerdem werden die Höhentreiber vor Übersteuerung und hart geklippten Harmonischen geschützt. Einige Anwender bevorzugen aber die Übersteuerung des Verstärkers um bei Sub-Woofer Systemen zusätzlich Punch für die Bass-Drum oder ähnlich perkussive Instrumente zu erhalten. ACHTUNG: Der Einsatz eines Spitzenbegrenzers ermöglicht eine höheres Durchschnittssignal ohne hörbare Verzerrungen. Eine Erhöhung der Verstärkung mit eingeschaltetem Clip Limiter kann die durchschnittliche Ausgangsleistung auf das Doppelte erhöhen. Bitte achten Sie daher darauf, die Leistungsangaben Ihrer Lautsprecher nicht zu überschreiten. ¿CUÁNDO (O CUÁNDO NO) USARLO? Cuando se usan bocinas de rango completo, el limitador de picos reduce la distorsión de las frecuencias agudas causada por la sobrecarga de graves. También protege a los drivers de frecuencias agudas del exceso de saturación y armónicos descontrolados. Cuando se usan subwoofers, algunos prefieren usar los picos del amplificador sin limitación para obtener un "punch" adicional en el bombo de la batería y otros sonidos similares. ADVERTENCIA: El limitador de picos reduce señales extremas de saturación, permitiendo un nivel de señal más alto sin distorsión audible. Sin embargo, aumentar la ganancia con el limitador de picos activado puede doblar la capacidad de salida. Tenga cuidado de no rebasar el límite de potencia de sus bocinas. FEATURES & SETUP CARACTÉRISTIQUES AUSSTATTUNG & CARACTERÍSTICAS ET LEUR UTILISATION E I N S T E L L U N G E N Y A J U S T E S on • en marche ein • conectado off • hors circuit aus • desconectado 1 2 3 CLIP LIMITER OFF LF FILTER OFF LF 50 HZ CLIP LIMITER ON LF FILTER ON (CH 1) LF 30 HZ 5 Filtres d'entrée Eingangsfilter Filtro de entrada WHAT IT IS DESCRIPTION Le filtre passe-haut, lorsqu'activé, réduit le niveau de signal sous 30 Hz ou 50 Hz. Ce filtre améliore la performance du système en limitant le mouvement excessif du cône du haut-parleur de basses à des fréquences infrasoniques, donnant plus de puissance disponible dans le spectre audible. BESCHREIBUNG ¿QUÉ ES? Ein LF- oder Hochpassfilter schneidet Frequenzen unterhalb 30 Hz, bzw. 50 Hz ab. Hierdurch wird die Basswiedergabe verbessert, da ultratiefe, störende Frequenzen abgeschnitten werden, und hierdurch mehr Leistung für die normale Wiedergabe zur Verfügung steht. El filtro de frecuencias graves (LF) le permite atenuar señales abajo de los 30 Hz ó 50 Hz. Esto mejora el rendimiento de las frecuencias graves limitando una porción de audio no audible que mueve el cono, dejando más potencia disponible para el rango de frecuencia de las bocinas. The low-frequency (LF) filter rolls off signals below either 30 Hz or 50 Hz. 4 STEREO Input filter PARALLEL INPUTS This improves bass performance by 6 7 8 9 10 BRIDGE MODE OFF LF 50 HZ LF FILTER OFF CLIP LIMITER OFF limiting sub-audio cone motion, BR MODE ON LF 30 HZ LF FILTER ON (CH 2) CLIP LIMITER ON making more power available for the speakers' rated frequency range. The filter settings for each channel are = NOT APPLICABLE NON APPLICABLE NICHT ANWENDBAR NO APLICABLE controlled individually through the DIP switch settings shown. When the filter is turned off, a 5 Hz rolloff protects 1 2 5 -1 WHEN TO USE IT (OR NOT) -2 As a rule, your speakers will sound 6 7 8 50 HZ 0 dB 4 Ch. 1 Ch. 2 LF ON 3 50 HZ against DC or deep sub-audio inputs. +1 9 LF ON -3 10 better with proper filtering. Unless -4 you already have filtering in a -5 -6 20 Hz 30 40 50 60 80 100 200 300 400 500 1 kHz preceding device, match the setting to the low frequency rating of your speakers. Vented (bass reflex, 1 +1 2 3 ported, etc.) speakers are especially LF ON 30 HZ 0 dB 4 5 -1 sensitive to cone over-excursion at -2 frequencies below their rated limit. 6 7 Ch. 1 Ch. 2 8 9 30 HZ LF ON -3 10 The 50 Hz filter works well with most -4 -5 -6 20 Hz 30 40 50 60 80 100 compact full-range speakers, and 200 300 400 500 1 kHz has a slight boost at 100 Hz for greater fullness. The 30 Hz filter is 1 3 full-range cabinets. The "off" position 0 dB 4 5 -1 should be used only for applications 6 7 Ch. 1 Ch. 2 intended for subwoofers and large +1 2 LF OFF -2 such as studio playback monitoring, 8 9 LF OFF -3 10 where you need to know if there are -4 -5 -6 20 Hz 30 40 50 60 80 100 unwanted sub-audio signals present 200 300 400 500 1 kHz in your mix. Les ajustements des filtres pour chaque canal se font séparément sur les interrupteurs tel que montré cicontre. Lorsque les filtres sont désactivés, un filtre passe-haut à 5 Hz entre en fonction afin de protéger le haut-parleur contre les tensions continues, et contre les signaux infrasoniques. Die Filtereinstellungen werden durch den links abgebildeten DIP-Schalter eingestellt. Bei abgeschaltetem Filter werden die Frequenzen unterhalb 5 Hz unterdrückt, damit ein Schutz von Gleichspannung und Infraschallanteilen besteht. EINSATZ DES EINGANGSFILTERS UTILISATION En règle générale, les haut-parleurs fonctionnent mieux avec un filtre bien ajusté. A moins que d'autres équipements en amont dans la chaîne soient munis de filtre, ajustez le filtre de votre amplificateur en accord avec votre haut-parleur. Les enceintes à évent (bass reflex, etc) sont particulièrement sensibles aux surexcursion des cônes aux fréquences inférieures à la fréquence d'accord de l'enceinte. In der Regel werden Ihre Lautsprecher bei richtiger Filterung besser klingen. Falls nicht schon an anderer Stelle eine entsprechende Filterung stattgefunden hat, stellen Sie die Filterung entsprechend dem Frequenzgang Ihrer Lautsprecher ein. Belüftete Lautsprecher (z.B. Bassreflex, etc.) sind ausgesprochen empfindlich gegen zu große Auslenkungen der Membran unterhalb des spezifizierten Frequenzbereichs. Le filtre à 50 Hz fonctionne très bien avec la plupart des enceintes plein registre compactes, et le filtre augmente le gain autour de 100 Hz, pour un son plus riche. Le filtre à 30 hz est prévu pour les enceintes de sous-graves et pour les grosses enceintes plein registre. La position "off", ou dérivation, devrait être utilisée dans des applications telles l'écoute en studio, là où on doit vérifier l'absence de signal infrasonique dans le mix. Der 50 Hz Filter arbeitet bestens mit praktisch allen Breitbandlautsprechern, da er zusätzlich eine leichte Verstärkung im Bereich um 100 Hz aufweist, was in einem volleren Klang resultiert. Der 30 Hz Filter ist für Subwoofer und große Breitbandkabinette gedacht. Die "Off" Einstellung sollte nur für Anwendungen wie z.B. eine Studiobeschallung verwendet werden; wo es darauf ankommt, Infraschallanteile im Mix zu erkennen. Los ajustes del filtro para cada canal se controlan individualmente con el interruptor tipo DIP, como se describe. Un atenuador de 5 Hz ofrece protección contra DC o entradas de frecuencias ultragraves cuando se apaga el filtro. ¿CUÁNDO (O CUÁNDO NO) USARLO? Por regla, sus bocinas sonarán mejor con el filtro apropiado. A menos que anteriormente haya utilizado otro aparato para filtrar y haya igualado las frecuencias graves de sus bocinas. Las bocinas con ventilación (como la bass reflex, ported, etc …) son especialmente sensibles al desplazamiento exagerado de los conos causado por frecuencias por debajo de su límite. El filtro de 50 Hz funciona bien con la mayoría de las bocinas de rango completo, y ofrece un suave realce a los 100 Hz para reforzar el cuerpo del sonido. El filtro de 30 Hz está diseñado para subwoofers y para gabinetes de rango completo de gran tamaño. La posición "off"—apagado—puede usarse en trabajos como monitoreo en el estudio, donde usted necesita saber si en su mezcla hay señales ultragraves no deseadas. 9 CLIP LIMITER ON LF FILTER ON LF 30 HZ 1 2 3 CLIP LIMITER OFF LF FILTER OFF LF 50 HZ 4 PARALLEL INPUTS 5 STEREO 6 BR MODE ON LF 30 HZ LF FILTER ON CLIP LIMITER ON 7 8 9 10 BRIDGE MODE OFF LF 50 HZ LF FILTER OFF CLIP LIMITER OFF = NOT APPLICABLE NON APPLICABLE NICHT ANWENDBAR NO APLICABLE MODE SWITCHES 1 3 LF 50 Hz 2 4 STEREO 5 6 8 9 BRIDGE MODE OFF LF 50 Hz 7 NPUT PINOUTS XLR 1/4 P2 TIP P3 RNG P1 SLV CH 1 1 10 CH2 INPUT CLIP LIMIT ON LF ON LF 30 Hz MONO: INPUTS IN PARALLEL BRIDGE MODE ON LF 30 Hz LF ON CLIP LIMIT ON MODE SWITCHES CH 2 1 OUTPUT CH 2 1+ 1- PINOU Patching the input signal to additional amps MODE SWITCHES 1 2 3 4 5 6 STEREO 7 8 9 BRIDGE MODE OFF LF 50 Hz 10 CH2 INPUT CLIP LIMIT ON LF ON LF 30 Hz MONO: INPUTS IN PARALLEL BRIDGE MODE ON LF 30 Hz LF ON CLIP LIMIT ON MODE SWITCHES 1 10 CH 1 1 LF 50 Hz CH 2 LO CK CH1 INPUT NPUT PINOUTS XLR 1/4 P2 TIP P3 RNG P1 SLV CH 1 CH 2 1+ 1- 2+ 2 BRIDGE - OUTPUT LO CK INPUT IMPEDANCE: 12K BALANCED INPUT PINOUTS Parallel input mode Mode entrées parallèles Parallelbetrieb Modo de entradas paralelas WHAT IT IS DESCRIPTION Les interrupteurs "Parallel Inputs" vous permettent d'utiliser l'amplificateur en mode parallèle, où le même signal est livré aux deux canaux sans avoir à utiliser un câble "Y". Chaque canal amplifie le signal indépendamment, avec ajustements propres de gain, de filtre, et de limiteur. BESCHREIBUNG Durch die "Parallel Input" Schalter kann der Verstärker parallel betrieben werden, wobei das gleiche Signal beiden Kanälen zugeführt wird. Jeder Verstärkerkanal treibt dabei seinen eigenen Lautsprecher mit unabhängiger Verstärkung, Filterung und Spitzenbegrenzung. ¿QUÉ ES? El interruptor "Parallel Input" le permite operar el amplificador en modo paralelo, enviando la misma señal hacia ambos canales sin necesidad de utilizar un cable tipo "Y". Cada canal controla su propia carga de bocinas, con ganancia independiente, filtros y limitador de picos. Ajustez les interrupteurs 4, 5, et 6 en position "on" pour joindre les entrées des deux canaux. Laissez les interrupteurs en position "off" pour utilisation en mode stéréo, bi-amplification, ou toute autre application 2 canaux. La DEL jaune PARALLEL sur le panneau avant allume pour indiquer que l'amplificateur est réglé en mode parallèle. Stellen Sie die Schalterpositionen 4, 5 und 6 auf "ON" um die Eingänge zu verkoppeln. Schalten Sie die Schalter aus für Stereo-, Bi-Amping- oder einen anderen 2-Kanalbetrieb. Die gelbe PARALLEL-LED auf der Frontplatte leuchtet auf, wenn Parallelbetrieb gewählt wurde. The "Parallel Input" switches let you operate the amplifier in parallel mode, delivering the same signal to both channels without using a Y-cable. Each channel drives its own speaker load, with independent gain, filtering, and clip limiting. Set switch positions 4, 5, and 6 "ON" to couple the inputs together. Turn the switches off for stereo, bi-amping, or other 2-channel modes. The yellow PARALLEL LED indicator on the front panel warns you when the switches are set to parallel. LO CK CH1 INPUT CH 1 CH 2 1+ 1- 2+ 2 BRIDGE - LO CK INPUT IMPEDANCE: 12K BALANCED INPUT PINOUTS FEATURES & SETUP CARACTÉRISTIQUES AUSSTATTUNG & CARACTERÍSTICAS ET LEUR UTILISATION E I N S T E L L U N G E N Y A J U S T E S CH 2 1+ 1- PINOU With the inputs in parallel, you can use the other set of input connectors to carry the signal to other amps. This is often called a "daisy-chain." WHEN TO USE IT Parallel the inputs when driving two speakers with one input signal (parallel mode) while keeping separate control of both channels' gain, filtering, and limiting. Use them in bridged mono mode to patch the signal to additional amplifiers through the extra input jacks. See page 12 for an explanation of amp operating modes. NOTE: If you're using a balanced signal, use only balanced patch cables; even one unbalanced cable will unbalance the entire signal chain, possibly causing hum. NOTE: Turn off the "Parallel Inputs" switches when feeding the amp two separate signals. Lorsque les entrées sont réglées en mode parallèle, vous pouvez utiliser le connecteur de la seconde entrée pour envoyer le signal vers un autre amplificateur. On appelle ce type branchement le chaînage en guirlande, ou "daisy chaining". UTILISATION Joignez les entrées (mode parallèle) quand vous voulez contrôler deux haut-parleurs avec des ajustementes de gain, de filtre et de limiteur à partir d'un même signal. Voir la page 12 pour les explications des modes d'opération. NOTE; si vous utilisez un signal symétrique, n'utilisez que des câbles construit à cet effet, puisque l'insertion d'un seul câble asymétrique dans la chaîne rendra la chaîne asymétrique, avec tous les désavantages de ce type de connexion. NOTE; désengager les interrupteurs "parallel inputs" quand vous amenez des signaux différents aux deux canaux. Mit parallelgeschalteten Eingängen können die anderen Eingangsstecker benutzt werden, um das Signal an weitere Verstärker zu liefern. EINSATZ DES PARALLELBETRIEBS Schalten Sie die Eingänge parallel, wenn zwei Lautsprecher mit einem Signal angefahren, und dabei aber separate Verstärkung, Filterung oder Begrenzung benutzt werden soll. Wählen Sie Bridged Mono Mode (Monobrückenbetrieb) um die Signale an zusätzliche Verstärker mit Hilfe der übrigen Eingangsbuchsen zu verbinden (siehe auch Seite 12 für weitere Erläuterungen). BITTE BEACHTEN SIE: Wenn Sie ein symmetrisches Eingangssignal anlegen, benutzen Sie auch ausschließlich symmetrische Kabel zur Weiterverbindung, da auch nur ein einziges unsymmetrisches Kabel das Gesamtsignal unsymmetrisch werden läßt, was möglicherweise Brummen verursachen kann. BITTE BEACHTEN SIE: Schalten Sie den Parallelbetrieb aus, wenn zwei separate Signale eingespeist werden sollen. Ajuste los selectores 4, 5 y 6 en la posición de "ON", para acoplar las entradas. Coloque los interruptores en la posición de "OFF" para trabajar en el modo estéreo, biamplificado, o cualquier otro modo de 2 canales. El indicador LED amarillo para el modo PARALLEL del panel frontal, le advierte cuando el interruptor ha sido ajustado en el modo paralelo. Con las entradas en paralelo, usted puede usar los conectores de la otra entrada para enviar la señal a otros amplificadores. Lo que comúnmente se llama una cadena "daisy". ¿CUÁNDO USARLO? Utilice la entrada paralela cuando se alimentan dos bocinas con una sola señal de entrada (modo paralelo) mientras se mantiene control por separado de la ganancia, los filtros y la limitación de ambos canales. Use el modo "puenteado" en mono para conectar la señal a amplificadores adicionales por medio de los conectores extra de entrada. Consulte la página 12 para una explicación completa de los modos de operación del amplificador. NOTA: Si usa una señal balanceada, utilice únicamente cables adecuados. Un solo cable no balanceado puede afectar el recorrido de la señal y producir zumbidos. NOTA: Cuando alimente el amplificador con dos señales independientes, coloque el interruptor "Parallel Inputs" en la posición de apagado—"Off". FEATURES & SETUP CARACTÉRISTIQUES AUSSTATTUNG & CARACTERÍSTICAS ET LEUR UTILISATION E I N S T E L L U N G E N Y A J U S T E S CLIP LIMITER ON LF FILTER ON LF 30 HZ 1 CLIP LIMITER OFF LF FILTER OFF LF 50 HZ 2 3 4 PARALLEL INPUTS 5 STEREO 6 BR MODE ON LF 30 HZ LF FILTER ON CLIP LIMITER ON 7 BRIDGE MODE OFF LF 50 HZ LF FILTER OFF CLIP LIMITER OFF 8 9 10 Bridge mono mode Mode ponté mono Monobrückenbetrieb Modo puenteado en mono WHAT IT IS DESCRIPTION Le mode ponté mono combine la puissance des deux canaux pour utilisation sur un seul haut-parleur, doublant la tension, quadruplant la puissance de crête, et donnant environ le triple de la puissance continue par rapport à un canal simple. En mode ponté, utiliser l'entrée, le gain, le filtre et le limiteur du canal 1, le canal 2 étant sans effet. BESCHREIBUNG Der Monobrückenbetrieb addiert die Leistung beider Kanäle um sie einem Lautsprecher zur Verfügung zu stellen. Das heißt, es steht ungefähr die doppelte Ausgangsspannung, die vierfache Spitzenleistung und ungefähr die dreifache Dauerleistung eines Einzelkanals zur Verfügung. Diese Betriebsart verwendet das Eingangssignal von Kanal 1, seine Verstärkung, Filter und Begrenzung. Die Regler von Kanal 2 haben keine Wirkung. ¿QUÉ ES? El modo puenteado en mono combina la potencia de ambos canales de amplificador hacia una bocina, aumentando dos veces el consumo de voltaje, cuatro veces la potencia de picos y aproximadamente tres veces la potencia de sostenimiento de un solo canal. Este modo utiliza la entrada, el control de ganancia, filtro y limitador del canal 1. Los controles del canal 2 no producen ningún efecto. Bridged mono mode combines the power of both amp channels into one = NOT APPLICABLE NON APPLICABLE NICHT ANWENDBAR NO APLICABLE speaker, resulting in twice the voltage swing, four times the peak power, and approximately three times the CLIP LIMITER ON LF FILTER ON LF 30 HZ 1 CLIP LIMITER OFF LF FILTER OFF LF 50 HZ sustained power of a single channel. 2 3 This mode uses Channel 1's input, 4 gain control, input filter, and clip PARALLEL INPUTS 5 STEREO limiter; Channel 2's have no effect. 6 BR MODE ON LF 30 HZ LF FILTER ON CLIP LIMITER ON 7 BRIDGE MODE OFF LF 50 HZ LF FILTER OFF CLIP LIMITER OFF 8 9 The BRIDGE LED on the front panel 10 indicates when the amp is in bridged To patch the signal to additional amplifiers, use the parallel input switches described on page 10. Pour amener le signal vers d'autres amplificateurs, suivez les instructions de la page 10. mono mode. Um das Eingangs-signal weiteren Verstärkern zur Verfügung zu stellen, verwenden Sie die Parallel Input Schalter wie auf Seite 10 beschrieben. Para pasar la señal a los amplificadores adicionales utilice el selector de entrada paralela descrito en la página 10. WHEN TO USE IT (OR NOT) 7 to "BRIDGE MONO ON." Use Channel 1's inputs, and connect the 1 UTPUT 16Ω 8Ω 4Ω BRIDGE MONO 2 CH 1 CH 2 1+ 1- 2+ 2- PINOUT BRIDGE - NPUT PINOUTS MODE SWITCHES CH 2 Upper Speakon only To speaker À vers l'enceinte Zum Lautsprechersystem A la bocina OUTPUT 16Ω 8Ω 4Ω LO CK CLIP LIMIT ON LF ON LF 30 Hz MONO: INPUTS IN PARALLEL BRIDGE MODE ON LF 30 Hz LF ON CLIP LIMIT ON CH 2 1+ 1- PINOUT 2Ω 21+ BRIDGED-MONO PRECAUTIONS: This mode puts a high demand on the amplifier and speaker, Excessive clipping may cause protective muting or speaker damage. Be sure the speaker has a sufficient power rating. LO CK CH 1 MODE SWITCHES speaker as shown. 2Ω CH 2 2 1- PINOUT power of both channels to a single 8- or 4-ohm load. Set switch position CH 1 1 CH 2 1- 2+ 2- PINOUT RIDGE - Use bridged mono to deliver the 2+ 1- Bridged mono • Mono ponté • Monobrückenbetrieb • Mono puente Output voltages greater than 100 volts rms are available between the amplifier's bridged terminals. NEC CLASS 3 wiring methods, as specified in accordance with national and local codes, must be used to connect the speaker. La DEL BRIDGE sur le panneau avant allume pour indiquer que l'amplificateur est réglé en mode ponté mono. UTILISATION Utilisez le mode ponté mono pour amener la puissance des deux canaux sur une seule charge de 4 ou 8 ohms. Ajustez l'interrupteur 7 en position "on". Utilisez l'entrée du canal 1 et branchez la charge tel qu'indiqué ci-contre. PRÉCAUTIONS EN MODE MONO PONTÉ: Le mode ponté mono place un stress supplémentaire sur l'amplificateur et le haut-parleur. L'écrêtage excessif peut causer la mise en sourdine par le circuit de protection et/ou peut endommager le haut-parleur. Veuillez vous assurer que le haut-parleur peut accepter la puissance de l'amplificateur. Des pointes de tension de plus de 100 volts rms sont possibles entre les bornes de sortie de l'amplificateur en mode ponté mono. Installez votre système selon les codes électriques local et national du site d'installation. Die BRIDGE LED auf der Frontplatte leuchtet auf, wenn diese Betriebsart gewählt wurde. EINSATZ DES MONOBRÜCKENBETRIEBS Verwenden Sie diese Betriebsart, um die Leistung beider Kanäle einer einzigen 8 oder 4Ω Last zur Verfügung zu stellen. Stellen Sie den Schalter 7 auf "BRIDGE MONO ON". Verwenden Sie die Eingänge von Kanal 1 und schließen Sie die Lautsprecher wie aus der Zeichnung ersichtlich an. BRÜCKENBETRIEB VORSICHTSMAßNAHMEN: Diese Betriebsart stellt hohe Anforderungen an Verstärker und Lautsprecher. Übermäßige Übersteuerung kann zu Abschalten des Verstärkers oder auch Lautsprecherbeschädigungen führen. Stellen Sie sicher, daß der Lautsprecher entsprechende Leistungen verarbeiten kann. Ausgangsspannungen von mehr als 100 Volt rms liegen zwischen den Ausgangsanschlüssen an. Daher müssen die einschlägigen Sicherheitsmaßnahmen beim Anschluß der Lautsprecher beachtet werden. El LED marcado BRIDGE en el panel frontal, indica la posición del amplificador en el modo "puenteado" en mono. ¿CUÁNDO (O CUÁNDO NO) USARLO? Utilice el modo puenteado en mono para pasar la potencia de ambos canales, a una sola carga de 8 ó 4 ohmios. Ajuste el selector número 7 en la posición "BRIDGE MONO ON". Use las entradas del canal 1 y conecte la bocina como se muestra en la figura. PRECAUCIONES DEL MODO PUENTEADO EN MONO Este modo implica un gran requerimiento para el amplificador y las bocinas. La saturación excesiva puede provocar un silencio para proteger de cualquier daño a la bocina. Asegúrese de que ésta tenga el rango de potencia necesario. Los voltajes de salida mayores a 100 voltios RMS están disponibles entre las terminales "puenteadas" del amplificador. Los métodos de conexión CLASS 3 (NEC), se especifican de acuerdo a los códigos locales o nacionales, y deben utilizarse para conectar la bocina. 11 FEATURES & SETUP CARACTÉRISTIQUES AUSSTATTUNG & CARACTERÍSTICAS ET LEUR UTILISATION E I N S T E L L U N G E N Y A J U S T E S What are the differences among Stereo, Parallel Input, and Bridge Mono modes? Stereo, bi-amp, 2-channel STEREO MODE This is the "normal" way of using the Ch. 1 input Ch. 2 input Ch. 1 amplifier, in which each channel is fully independent. Separate signals connect at the inputs, the gain knobs control their respective channels, and separate speakers connect to each output. Ch. 2 Ch. 2 input STEREOBETRIEB Exemples: • Two-channel (stereo) playback. • deux signaux mono indépendants, tel mix principal et moniteurs de scène • utilisation en mode bi-amplification, avec les basses fréquences amplifiées par le canal 1 et les hautes par le canal 2 (recquiert l'utilisation d'un séparateur de fréquences électronique vendu séparément) PARALLEL INPUT MODE Ch. 1 Ch. 2 This mode is just like Stereo mode, except that the inputs for Channel 1 and Channel 2 are internally connected together. A signal into any input jack will therefore drive both channels directly. Each channel's gain control still functions as usual, and each channel feeds its own speaker load. You can patch the input signal on to additional amplifiers by using any of the remaining input jacks. Example: • One mono signal driving both channels, with independent gain control for each speaker system. 12 MODE STÉRÉO C'est la façon "normale" d'utiliser l'amplificateur, où les des canaux sont distincts. Des signaux différents peuvent se trouver aux deux entrées, des ajustements de gain, de filtre et de limiteur sont possibles, et des haut-parleurs distincts sont branchés aux deux sorties. • écoute deux canaux (stéréo) • Bi-amped operation, with the low frequencies in Channel 1 and the highs in Channel 2. Ch. 1 input Unterschiede zwischen Stereo-, Parallel- und Monobrückenbetrieb Examples: • Two independent mono signals, such as main and monitor mixes. Parallel Modes stéréo, parallèle et ponté, quelles sont les différences? MODE PARALLÈLE Similaire au mode stéréo pour les gains, filtres, limiteurs et connexion des haut-parleurs, mais les entrées sont reliées à l'intérieur. Un signal branché à l'une ou l'autre des entrées sera donc amplifié par les deux canaux. Vous pouvez envoyer le signal vers un autre amplificateur en vous servant de la seconde entrée comme sortie. Exemple: • Deux haut-parleurs de même registre dans un système multivoies Dies ist die "normale" Betriebsart eines Verstärkers, bei der beide Kanäle vollständig unabhängig arbeiten. An den Eingängen liegen separate Signale an, und an den Ausgängen sind unabhängige Lautsprecher angeschlossen. ¿Cuáles son las diferencias entre los modos Estéreo, Entradas Paralelas y Puenteado en Mono? • Zweikanal- (Stereo-) Wiedergabe MODO ESTÉREO Esta es la manera "normal" de usar el amplificador, donde cada canal funciona independientemente. Con señales separadas conectadas a las entradas, botones de ganancia que controlan su respectivo canal y bocinas separadas conectadas a cada salida. • Zwei unabhängige Monosignale Ejemplos: Beispiele: wie z.B. Summen- und Monitormix • Biamp-Betrieb, mit den tiefen Frequenzanteilen an Kanal 1 und den Höhen an Kanal 2 PARALLELBETRIEB Diese Betriebsart entspricht dem Stereobetrieb, außer daß die Eingänge der beiden Kanäle intern zusammengeschaltet werden. Ein Signal, welches an einem der beiden Eingänge anliegt, wird daher beiden Kanälen zugeführt werden. Die Funktion der Regler der beiden Kanäle bleibt vollständig erhalten, und jeder Kanal speist seine eigene Last. Mit Hilfe der freien Eingangsbuchse kann das Eingangssignal auch an weitere Verstärker geleitet werden. Beispiel: * Ein Monosignal speist beide Kanäle, mit unabhängiger Verstärkungseinstellung für jedes Lautsprechersystem • Reproducción de dos canales (Estéreo). • Dos señales mono independientes, como la de la mezcla principal (main) y la de los monitores. • Operación bi-amplificada, con las frecuencias graves por el canal 1 y las frecuencias agudas por el canal 2. MODO DE ENTRADAS PARALELAS Este modo es como el modo estéreo, excepto que las entradas para el canal 1 y el canal 2, están unidas internamente. Una señal conectada a cualquiera de las entradas alimentará a ambos canales directamente. Los controles de ganancia de cada canal funcionarán de una manera normal, y cada canal lleva su propia carga para la bocina. Usted puede conectar la señal de entrada a otros amplificadores, usando el conector de entrada que queda libre. Ejemplo: • Una señal monofónica que alimenta a ambos canales, con controles de ganacia independientes para cada sistema de bocinas. Bridged Mono FEATURES & SETUP CARACTÉRISTIQUES AUSSTATTUNG & CARACTERÍSTICAS ET LEUR UTILISATION E I N S T E L L U N G E N Y A J U S T E S This mode combines the full power capabilities of both channels into a single speaker system. The amplifier internally re-configures so that both channels operate as a unit. This delivers double the output voltage, resulting in four times the peak power and three times the sustained power into a single 8- or 4-ohm speaker load. The Bridge Mono mode section on page 11 describes the special speaker connection used. MODE PONTÉ MONO Ce mode combine la puissance des deux canaux vers une seule sortie. L'amplificateur est rebranché de façon à ce que les deux canaux fonctionnent en tant qu'unité. Ce branchement double la tension de sortie, ce qui multiplie par un facteur de 4 la puissance en pointe et triple la puissance en continu par rapport à un canal simple dans un charge de 4 ou de 8 ohms. La section Mode ponté mono en page 11 décrit les branchements spéciaux des hautparleurs en ce mode. MONOBRÜCKENBETRIEB Diese Betriebsart addiert die volle Verstärkung beider Kanäle für eine einzelnes Lautsprechersystem. Der Verstärker wird intern so umkonfiguriert, so daß beide Kanäle wie ein einzelner Kanal funktionieren. Hierdurch steht ungefähr die doppelte Ausgangsspannung, die vierfache Spitzenleistung und ungefähr die dreifache Dauerleistung eines Einzelkanals in eine 8 oder 4Ω Last zur Verfügung. Weitere Erläuterungen zur besonderen Art des Anschlusses der Lautsprecher finden Sie auf Seite 11. Examples: Exemples: Beispiele: • Driving a single 8-ohm speaker with the combined 4-ohm power of both channels. • faire fonctionner un haut-parleur de 8 ohms avec la puissance combinée à 4 ohms des deux canaux • Betrieb eines einzelnen 8Ω Lautsprecher mit der addierten 4Ω Leistung beider Kanäle • faire fonctionner un haut-parleur de 4 ohms avec la puissance combinée à 2 ohms des deux canaux • Betrieb eines einzelnen 4Ω Lautsprecher mit der addierten 2Ω Leistung beider Kanäle Précautions: Vorsichtsmaßnahmen: Precauciones: • Le mode ponté mono permet d'envoyer des milliers de watts de puissance vers un seul haut-parleur. La consommation de courant sera plus élevée. S'assurer que le câblage et le haut-parleur peuvent supporter la puissance générée. • Im Monobrückenbetrieb können tausende Watt Leistung an einen einzelnen Lautsprecher abgegeben werden. Die Stromaufnahme des Verstärkers wird höher als normal sein. Vermeiden Sie daher überhöhte Signalpegel und stellen Sie sicher, daß die Verkabelung und der Lautsprecher die hohe Leistung verarbeiten können. • El modo de puenteado en mono puede mandar miles de watts a una sola bocina. El consumo de corriente alterna (AC) también será mayor. Evite niveles de señales excesivos, y asegurese que el cableado y las bocinas resistan la potencia. BRIDGE MONO MODE Ch. 1 input Ch. 2 input Ch. 1 Ch. 2 • Driving a single 4-ohm speaker with the combined 2-ohm power of both channels. Precautions: • Bridge Mono mode makes it possible to drive thousands of watts into a single speaker. AC current consumption will usually be higher. Avoid excessive signal level, and make sure the wiring and speaker can handle the power. • If the load is less than 4 ohms, or prolonged overloads occur, the amplifier will probably mute for several seconds during peaks. • Do not use 2-ohm loads. Ejemplos: • Si la charge (haut-parleur) est de moins de 4 ohms ou que des surtensions prolongées se produisent, il est possible que l'amplificateur passe en mode protection pour quelques secondes lors de surtensions. • Ne pas utiliser de charges de 2 ohms. SEE THE ADDITIONAL BRIDGE MONO MODE WARNINGS ON PAGE 11. MODO PUENTEADO EN MONO Este modo combina la capacidad total de potencia de ambos canales, en un solo sistema de bocinas. El amplificador se reconfigura internamente de manera que ambos canales operen como uno. Esto produce el doble de voltaje de salida, cuatro veces la potencia en picos y tres veces la potencia de sostenimiento en cargas de 8 y 4 ohmios. La sección del modo "Puenteado en Mono" en la página 11 describe la conexión usada para las bocinas. VOIR LES INSTRUCTIONS ADDITIONNELLES POUR UTILISATION EN MODE PONTÉ MONO EN PAGE 11. • Bei Lasten kleiner als 4Ω, oder zu langen Übersteuerungen kann der Verstärker für einige Sekunden abschalten. • 2Ω Lasten dürfen nicht betrieben werden. BITTE BEACHTEN SIE DIE WARNHINWEISE AUF SEITE 11. • Para alimentar una bocina de 8ohmios, con la potencia de dos canales de 4-ohms. • Para alimentar una bocina de 4ohmios, con la potencia de dos canales de 2-ohms. • Si la carga es menor a 4 ohms, ó la saturación es muy frecuente, el amplificador puede enmudecerse (función Mute) durante los picos por varios segundos. • No use cargas de 2 ohmios. LEA LAS PRECAUCIONES ADICIONALES PARA EL MODO DE PUENTEADO EN MONO EN LA PÁGINA 11. 13 I N S TA L L AT I O N I N S TA L L AT I O N E I N B A U I N S T A L A C I Ó N Utiliser les quatre vis et rondelles de montage pour fixer le devant de l'amplificateur sur les rails de montage. Use four screws and washers when 13.25" 13.10" 12.85" 12.73" 12.60" 336.6 mm 332.7 mm 326.4 mm 323.2 mm 320.4 mm mounting the amplifier to the front 1.60" 40.6 mm rack rails. Il est recommandé de supporter l'arrière de l'amplificateur, tout particulièrement pour applications mobiles et de tournée; des ensembles de support sont disponibles du service à la clientèle de QSC, ou en commande spéciale chez votre marchand ou distributeur local. Support the amp at the rear also, especially in mobile and touring use; rear rack mounting ear kits are available from QSC’s technical services department or by special order from your dealer or distributor. Utilice cuatro tornillos con rondanas schrauben und Unterlegscheiben cuando coloque el amplificador en la zum Fronteinbau in das Rack. parte frontal del rack. Stützen Sie den Verstärker auch an De la misma manera apoye la parte seiner Rückseite ab. Dies gilt besonders posterior, especialmente cuando für den mobilen Einsatz. Rückwärtige vaya a transportar el equipo. Las Einbausätze können direkt bei QSC asas de montaje están disponibles oder den jeweiligen Händlern oder en el departamento de servicios Distributoren bestellt werden. técnicos de QSC o pídalas directamente a su distribuidor. 1 44 7.3 0 0" m m 3.00" 76.2 mm Benutzen Sie vier Befestigungs- CH 1 22 24 20 5" .2 mm 12 .2 1 31 5" .2 mm 13 .6 6 33 O PR A 0" 3.5 m 9m . 8 8 14 U D I O 00 30 W T AT PL X 3 2 00 W PO AM R IE IF PL 8 32 - BR PO ID G E WE 2 L CL dB - IO B 0d -2 AL N S IG 30 I4 ER 26 28 I8 NE A NIP 8 RA 24 LL 26 28 30 I4 R PA 22 20 I8 32 - dB EL dB All four screws: Toutes les quatre vis: Alle vier Schrauben: Todos cuatro tornillos: £ #10 (typ. #10-32) £ 5 mm or ou oder ó CONNECTIONS C O N N E X I O N S A N S C H L Ü S S E C O N E X I O N E S Inputs Entrées Eingänge Entradas Each channel has active balanced Chaque canal est équipé d'une entrée symétrique sur prises XLR et ¼" (6.3 mm) branchées en parallèle. L'impédance d'entrée est de 12 KΩ symétrique, 6 KΩ asymétrique. Jeder Kanal verfügt über symmetrische XLR- und 6,3 mm Stereoklinkeneingänge. Die Eingangsimpedanz beträgt symmetrisch 12 KΩ, unsymmetrisch 6 KΩ. Cada canal tiene entradas activas balanceadas con conectores XLR y ¼" (6.3 mm), cableadas en paralelo. La impedancia de entrada es de 12 KΩ en la balanceada, 6 KΩ en la no balanceada. Les signaux reçus en mode symétrique sont moins sujets aux ronflements dû aux interférences de réseau électrique (hum), alors que les branchements asymétriques peuvent convenir pour les courtes distances. L'impédance de sortie de la source de signal devrait être de moins de 600Ω afin de réduire les pertes en hautes fréquences avec de longs câbles. Symmetrische Signale verursachen weniger Brummproblem, wobei unsymmetrische Verbindungen allerdings bei kurzen Kabelwegen häufig ausreichen. Die Quellimpedanz sollte dabei weniger als 600Ω betragen, um einen Höhenverlust bei längeren Kabelwegen zu vermeiden. Las señales balanceadas son menos propensas a inducir zumbidos debido a la corriente alterna, pero para cables cortos se pueden usar señales no balanceadas. La impedancia de salida debe ser menor de 600 ohms para prevenir la pérdida de frecuencias agudas en cables largos. Symmetrische Eingänge: Verwenden Sie die XLR oder 6,3mm Stereoklinkenbuchsen Entradas balanceadas: Use conectores XLR o TRS de ¼" (6.3 mm). XLR and ¼-inch (6.3 mm) inputs wired in parallel. The input impedance is CH1 INPUT MODE SWITCHES 1 3 LF 50 Hz 2 4 7 8 9 BRIDGE MODE OFF LF 50 Hz 6 STEREO 5 INPUT PINOUTS XLR 1/4 P2 TIP P3 RNG P1 SLV CH 1 1 10 CH2 INPUT CLIP LIMIT ON LF ON LF 30 Hz MONO: INPUTS IN PARALLEL BRIDGE MODE ON LF 30 Hz LF ON CLIP LIMIT ON MODE SWITCHES 1 CH 2 CH 2 CH 1 1+ 1- 2+ 2BRIDGE - Balanced signals are less prone to be suitable for short cable runs. The AC hum, but unbalanced signals can signal source's output impedance OUTPUT LO CK INPUT IMPEDANCE: 12K BALANCED INPUT PINOUTS LO CK 12 KΩ balanced, 6 KΩ unbalanced. should be less than 600Ω to avoid high frequency loss in long cables. Balanced inputs: Use the XLR or ¼-inch (6.3 mm) TRS input jacks. CH 2 1+ 1- PINOUT Unbalanced inputs: Connect the unused side of the balanced input to ground, as shown below left. A tip- XLR unbalanced • XLR asymêtrique • unsymetrische XLR • sleeve ¼-inch (6.3 mm) connector will XLR no balanceado correctly terminate the unused side of the input without modification. 1 1 3 2 2 3 For two-channel (stereo) operation, use the inputs for both Channel 1 and Channel 2; for parallel or bridged mono operation, use the Channel 1 input. See the section on operating modes for more explanation. To patch the audio signal to other amps (parallel and bridged modes only), see the instructions for using parallel inputs on page 9. Entrées symétriques: Utilisez la prise XLR ou ¼" (6.3 mm). Entrées asymétriques: Connectez le côté non-utilisé de l'entrée symétrique au châssis, tel qu'illustré ci-contre. Une fiche ¼" (6.3 mm) mono (Tip Sleeve) fermera le circuit sans modification. En utilisation deux canaux (stéréo), utilisez les prises des canaux 1 et 2; en mode parallèle ou ponté mono, utilisez la prise du canal 1. Voir les explications dans les sections appropriées du présent manuel. Pour relier le signal audio de cet amplificateur vers d'autres amplificateurs (mode parallèle et ponté mono seulement), voyez les instructions en page 9. • Balanced asymêtrique • unsymetrische Stereoklinke • TRS no balanceado • Symmetrisch • Balanceado Im 2-Kanalbetrieb (Stereo), verwenden Sie bitte beide Eingänge; im Parallel-, bzw. Monobrückenbetrieb verwenden Sie nur Eingang 1. Bitte beachten sie die jeweiligen Beschreibungen der verschiedenen Betriebszustände. Um das Signal an weitere Verstärker zu leiten (nur im Parallel-, bzw. Monobrückenbetrieb), beachten Sie bitte die Beschreibungen auf Seite 9. Para operación en dos canales (estéreo), use las entradas de los canales 1 y 2. Para operación en paralelo o puenteada en mono, use la entrada del canal 1. Lea la sección de los modos de operación para una explicación más detallada. Para enviar la señal de audio a otros amplificadores (sólo en los modos paralelo o puenteado en mono), lea las instrucciones para entradas paralelas en la página 9. • Unbalanced 1 • Symétrique TRS unbalanced • TRS Unsymmetrische Eingänge: Verbinden Sie den ungenutzten Pin des symmetrischen Steckers mit Masse (siehe Abbildung). Bei einem MonoKlinkenstecker ist keine Änderung nötig. Entradas no balanceadas: Conecte el lado libre de la salida balanceada a tierra, como se muestra a la izquierda. Con un conector tipo tipsleeve de ¼" (6.3mm) se llevará a cabo la terminación apropiada del conductor sin usar de la entrada sin ninguna modificación. 3 2 • Asymétrique • Unsymmetrisch ground inverting input non-inverting input • No balanceado 15 CLIP LIMIT ON LF ON LF 30 Hz MONO: INPUTS IN PARALLEL BRIDGE MODE ON LF 30 Hz LF ON CLIP LIMIT ON MODE SWITCHES CH 2 To Channel 1 speaker Vers l'enceinte canal 1 Zum Lautsprechersystem Kanal 1 A la bocina canal 1 LO CK CH 1 MODE SWITCHES CONNECTIONS C O N N E X I O N S A N S C H L Ü S S E C O N E X I O N E S CH 1 CH 2 1+ 1- 2+ 2- PINOUT BRIDGE - OUTPUT To Channel 2 speaker Vers l'enceinte canal 2 Zum Lautsprechersystem Kanal 2 A la bocina canal 2 LO CK NPUT PINOUTS CH 2 1+ 1- PINOUT 21+ 2+ 1- Speakon™ Outputs Sorties Speakon™ Speakon™ Ausgänge Salidas Speakon™ The PLX amplifier offers a choice of Cet amplificateur PLX offre un choix de connecteurs de sortie, avec deux prises Neutrik Speakon NL4MD et deux paires de bornes à écrou protégées. Der PLX Verstärker stellt mehrere Ausgangsanschlüsse zur Verfügung: zwei Neutrik NL4MD Speakonbuchsen und zwei Paar berührungssichere Schraubklemmen. El amplificador PLX ofrece varias Der Speakonanschluß wurde speziell für den Anschluß von Hochleistungslautsprechern konzipiert. Er rastet ein, verhindert elektrischen Schlag und sorgt für die richtige Polarität. El conector Speakon está diseñado output connections, with two Neutrik NL4MD Speakon jacks and two pairs of "touchproof" binding posts. 8Ω 4Ω 2Ω The Speakon connector is designed specially for high-power speaker 2 channels/canals/Kanäle/canals & 2 Speakons (Stereo, bi-amp, or parallel mode; Modes stéreo, bi-amp ou parallèle; Stereo-, Biamp- oder Parallelbetrieb; Modos estéreo, bi-amp o paralelo) connections. It locks in place, prevents shock hazard, and assures the correct polarity. MODE SWITCHES CLIP LIMIT ON LF ON LF 30 Hz MONO: INPUTS IN PARALLEL BRIDGE MODE ON LF 30 Hz LF ON CLIP LIMIT ON MODE SWITCHES CH 2 LO CK CH 1 CH 1 CH 2 1+ 1- 2+ 2- PINOUT BRIDGE - OUTPUT LO CK NPUT PINOUTS Channel 1 Canal 1 Kanal 1 To Channel 1 speaker Vers l'enceinte canal 1 Zum Lautsprechersystem Kanal 1 A la bocina canal 1 The upper Speakon jack has both To Channel 2 speaker Vers l'enceinte canal 2 Zum Lautsprechersystem Kanal 2 A la bocina canal 2 it is especially useful for parallel, bi- 1+ 8Ω 4Ω 2Ω 2 channels/canals/Kanäle/canals & 1 Speakon (Stereo, bi-amp, or parallel mode; Modes stéreo, bi-amp ou parallèle; Stereo-, BiAmp- oder Parallelbetrieb; Modos estéreo, bi-amp o paralelo) CLIP LIMIT ON LF ON LF 30 Hz MONO: INPUTS IN PARALLEL BRIDGE MODE ON LF 30 Hz LF ON CLIP LIMIT ON MODE SWITCHES CH 2 To speaker Vers l'enceinte Zum Lautsprechersystem A la bocina LO CK CH 1 MODE SWITCHES CH 1 CH 2 1+ 1- 2+ 2- PINOUT BRIDGE - OUTPUT 16Ω 8Ω 4Ω CH 2 1+ 1- PINOUT 2Ω 21+ 2+ 1- Bridged mono • Mono ponté • Monobrückenbetrieb • Mono puente 16 fijamente, previene cortos eléctricos y asegura una correcta polaridad. El conector Speakon superior tiene Pour insertion plus facile, utiliser la Für eine leichtere Anbindung, Para facilitar la inserción de los nouvelle génération des Speakon verwenden Sie die NL4FC-Speakon- conectores, le recomendamos que with quicklock thumb latches. NL4FC avec loquet à ressort. stecker der neueren Generation. use los nuevos conectores Speakon las salidas de los canales 1 y 2, y se usa para una operación en paralelo, biamplificada, o puenteada en mono (lea las recomendaciones de la página 12). El otro conector Speakon sólo tiene la salida del canal 2. Observe las ilustraciones a la izquierda. NL4FC con retén. SPEAKER CABLING CÂBLAGE DU HAUT-PARLEUR LAUTSPRECHERKABEL CABLEADO DE BOCINAS Larger wire sizes and shorter lengths Les câbles de fort calibres et les courtes distances minimisent à la fois les pertes de puissance et la dégradation du coefficient d'amortissement. Evitez de placer les câbles de haut-parleurs à proximité des câbles d'entrée. Dickere und kürzere Kabel verringern sowohl Leistungsverlust wie eine Verschlechterung des Dämpfungsfaktors. Verlegen Sie keine Ausgangskabel neben den Eingangskabeln. Los cables gruesos y los trayectos cortos AVERTISSEMENT: Afin de prévenir les risques de choc électrique, ne pas utiliser l'amplificateur si une portion de conducteur du fil de hautparleur est exposée. WARNUNG: Um elektrische Schläge zu vermeiden, sollte der Verstärker nicht betrieben werden, wenn blanke Kabelenden sichtbar sind. minimize both loss of power and LO CK NPUT PINOUTS bocinas de alta potencia. Se ajusta style NL4FC Speakon connectors 2+ 1- especialmente para conexiones de For easier insertion, use the newer- amp, or bridged mono operation (see carries only Channel 2’s output. See Channel 2 Canal 2 Kanal 2 dos pares de terminales con tornillo. the illustrations at left. Channel 1 and Channel 2 outputs, so on page 12). The other Speakon 2- Die obere Speakonbuchse enthält beide Kanäle, so daß sie besonders für Parallel-, Biamp- oder Monobrückenbetrieb geeignet ist (bitte beachten Sie die Vorsichtsmaßnahmen wie auf Seite 12 beschrieben). Die andere Speakonbuchse enthält nur die Signale von Kanal 2 (siehe auch nebenstehende Zeichnung). conectores Neutrik Speakon NL4MD y La prise Speakon du haut porte les signaux de sortie des deux canaux, elle est donc très utile lors de branchement en modes parallèle, bi-amplifié, ou ponté mono (voir les instructions et précautions à suivre pour le branchement en mode ponté mono en page 12). La prise du bas ne porte que le signal du canal 2. Voir les illustrations ci-contre. bridged mono operating precautions 8Ω 4Ω 2Ω CH 2 1+ 1- PINOUT Les prises Speakon sont conçues spécifiquement pour la connexion de haut-parleurs de haute puissance. Elles verrouillent en place, préviennent les risques de choc électrique, et assurent le branchement avec polarité correcte. opciones de salida, con dos degradation of damping factor. Do not place speaker cables next to input wiring. WARNING: To prevent electric shock, do not operate the amplifier with any of the conductor portion of the speaker wire exposed. minimizan la pérdida de potencia y degradación por el factor de amortiguación. No coloque los cables de las bocinas cercanos a los de entrada. ¡AVISO! Para evitar una descarga eléctrica, no opere el amplificador si alguno de los cables de la bocina está expuesto. CONNECTIONS C O N N E X I O N S A N S C H L Ü S S E C O N E X I O N E S ½" ≤ 7 AWG 4 mm 13 mm Ê ➋ ➍ ➌ Binding post outputs Bornes à écrou Anschlussklemmen Terminales con tornillo Ê Strip back insulation not more than 13 mm (½ inch). Ê Dénuder le fil sur un maximum de 13 mm (½ puce). Ê Das Kabelende nicht länger als 13 mm abisolieren. Ê Remueva el aislamiento no más de 13 mm (½ pulgado). ➋ Insert wire fully so that none of the conductor is exposed; tighten barrel (use coin if necessary). ➋ Insérer le fil de façon à ce qu'aucune partie du conducteur ne soit exposée; serrer le corps du connecteur (utiliser une pièce de monnaie si nécessaire). ➋ Das abisolierte Kabelende komplett einführen, ohne daß blanker Draht sichtbar bleibt; Klemme festdrehen. Münze benutzen falls notwendig. ➋ Inserte el cable hasta que el conductor se pueda ver. Asegure la rosca con fuerza (si es necesario use una moneda). ➌ Non-European models only. ➍ Spade lugs must have insulated barrels to prevent electric shock. 0.25" 6.3 mm 1 CH 2 1- 2+ 2- PINOUT RIDGE - CH 1 8Ω 4Ω 2Ω 1 UTPUT ≤ 0.51" 12.9 mm BRIDGE MONO 8Ω 4Ω 2Ω 2 2 1- PINOUT CH 2 1 CH 2 1- 2+ 2- PINOUT RIDGE - CH 1 1 UTPUT 16Ω 8Ω 4Ω BRIDGE MONO 2 2 1- PINOUT ¡AVISO! Para evitar una descarga eléctrica, no opere el amplificador si alguno de los cables de la bocina está expuesto. Connections for stereo and parallel operations Connexions pour utilisation en modes stéréo ou parallèle. Anschlüsse für Stereo-, bzw. Parallelbetrieb. Conexiones para operación en estéreo o paralelo. Connections for bridged mono operation. See bridged mono operating precautions on page 11. Connexions pour utilisation en mode ponté mono. Voir les instructions et précautions à suivre pour le branchement en mode ponté mono en page 12. Anschluß im Monobrückenbetrieb. Bitte beachten Sie die Erläuterungen auf Seite 11. Conexiones para operación de puenteada en mono. Lea las recomendaciones de la página 11. SPEAKER CABLING LAUTSPRECHERKABEL CABLEADO DE BOCINAS Dickere und kürzere Kabel verringern sowohl Leistungsverlust wie eine Verschlechterung des Dämpfungsfaktors. Verlegen Sie keine Ausgangskabel neben den Eingangskabeln. Los cables gruesos y los trayectos cortos input wiring. CÂBLAGE DU HAUT-PARLEUR Les câbles de fort calibres et les courtes distances minimisent à la fois les pertes de puissance et la dégradation du coefficient d'amortissement. Evitez de placer les câbles de haut-parleurs à proximité des câbles d'entrée. Operating voltage (AC mains) Tension d'utilisation (alimentation CA) Netzanschluß Voltaje de operación (alimentación CA) Make sure you connect the amplifier Vous devez vous assurer de raccorder l'amplificateur à une source de courant alternatif de tension correcte, tel qu'indiqué sur l'étiquette du numéro de série. Connecter à une source de courant autre qu'indiqué est dangereux et pourrait endommager l'amplificateur. Schließen Sie den Verstärker nur an die richtige Netzspannung an, die auf dem Etikett mit der Seriennummer aufgedruckt ist. Ein Anschluß an die falsche Netzspannung kann zu Beschädigungen am Verstärker führen. Asegúrese de conectar el amplificador degradation of damping factor. Do not place speaker cables next to to the correct AC line voltage, which is shown on the serial number label. Connecting to the wrong line voltage is dangerous and may damage the 220–240V ➍ Los conectores tipo herradura deben estar aislados apropiadamente para prevenir un corto eléctrico. WARNUNG: Um elektrische Schläge zu vermeiden, sollte der Verstärker nicht betrieben werden, wenn blanke Kabelenden sichtbar sind. minimize both loss of power and 120V ➍ Um die Gefahr elektrischer Schläge zu vermeiden, müssen Kabelklemmschuhe isolierte Klemmen aufweisen. ➌ Unicamente para modelos noeuropeos. AVERTISSEMENT: Afin de prévenir les risques de choc électrique, ne pas utiliser l'amplificateur si une portion de conducteur du fil de hautparleur est exposée. Larger wire sizes and shorter lengths Outlets • Prises de courant • Netzanschluß • Tomas de corriente ➍ Les cosses à fourche devraient avoir un corps isolé afin de prévenir les risques de choc électrique. ➌ Nur bei außereuropäischen Gerätetypen. WARNING: To prevent electric shock, do not operate the amplifier with any of the conductor portion of the speaker wire exposed. 2Ω CH 2 ➌ Modèles non-européens seulement. amplifier. minimizan la pérdida de potencia y degradación por el factor de amortiguación. No coloque los cables de las bocinas cercanos a los de entrada. a una línea de corriente alterna (AC) con el voltaje adecuado, el cual aparece en la etiqueta con el número de serie. Conectarlo a una línea de voltaje diferente es peligroso y puede dañarlo. 17 O P E R A T I O N UTILISATION B E T R I E B O P E R A C I Ó N AC power switch on marche ein conectado 20 22 1 24 26 I8 28 I4 30 8 - 18 CHANNEL dB CLIP -IOdB -20dB SIGNAL P OW E R 2 20 22 24 26 I8 28 I4 30 8 - 32 BRIDGE Netzschalter Interruptor de encendio Avant de mettre l'amplificateur en marche, vérifiez toutes les connexions et fermez les contrôles de gain. A la mise en marche, la fonction "Soft start" est activée, avec comme indication l'allumage de la DEL POWER à demiintensité. Quelques secondes plus tard le ventilateur démarre et l'amplificateur passe en mode protection pour une seconde, tel qu'indiqué par la DEL CLIP qui passe au rouge. La DEL POWER passe alors à pleine intensité et l'amplificateur est prêt à fonctionner. Bevor Sie einschalten, überprüfen Sie alle Verbindungen und drehen Sie die Verstärkung zurück. Die SoftstartSequenz beginnt mit halber Helligkeit der POWER LED. Einige Sekunden später beginnt der Ventilator zu laufen und der Verstärker schaltet für etwa eine Sekunde stumm, wobei die rote CLIP LED hell aufleuchtet. Danach erscheint die POWER-Anzeige in voller Helligkeit und der Verstärker ist betriebsbereit. Antes de encender el equipo, revise las conexiones y baje los controles de ganancia. La secuencia de encendido "suave" inicia con el indicador LED POWER a media luz. Un par de segundos después el ventilador se enciende y el amplificador hace un silencio momentáneo de protección, que se puede visualizar en los indicadores LED rojos de CLIP. Después el indicador POWER se enciende completamente y el amplificador está listo para operar. Gain controls Contrôles de gain Verstärkungsregler Controles de ganancia The gain controls are detented for repeatable adjustment. The actual voltage gain of the amplifier is shown in dB. Maximum gain is 40×, or +32 dB. Les contrôles de gain à taquets permet les réajustements répétés. Le gain en tension de l'amplification est indiqué en dB. Le gain maximum est de 40×, soit +32 dB. Die Regler wurden als Rastpotentiometer ausgelegt, um reproduzierbare Einstellungen zu erlauben. Die tatsächliche Verstärkung wird in dB angezeigt. Volle Verstärkung entspricht 40×, oder 32 dB. Los controles de ganancia han sido diseñados para un ajuste continuo. El voltaje de ganancia del amplificador aparece en decibeles. La ganancia máxima es de 40×, ó +32 dB. LED indicators Indicateurs DEL LED-Anzeige Indicadores LED At full brightness, the green POWER LED indicates that the amplifier is operating. Half brightness means the amp is in its startup sequence. A pleine intensité, la DEL (diode électroluminescente) verte de POWER indique que l'amplificateur est en marche. A demi-intensité, elle indique que l'amplificateur est en mise en marche. Bei voller Helligkeit zeigt die grüne POWER LED die Betriebsbereitschaft des Verstärkers an. Halbe Helligkeit bedeutet, daß sich der Verstärker in der Startsequenz befindet. La luz verde en el LED de POWER indica que el amplificador está en uso. Y a media luz, que está en la secuencia de encendido. A medida de que la señal aumenta, los LED indicadores verdes de SIGNAL, los de -20 dB y -10 dB, se illuminan respectivamente al 0.1%, 1%, y 10% de la potencia máxima. Before applying power, check all connections and turn down the gain controls. The "soft start" sequence starts with the POWER indicator LED at half brightness. A couple seconds later the fan starts and the amplifier cycles through one second of protective muting, indicated by the CLIP LEDs glowing bright red. The POWER indicator then changes to full brightness and the amplifier is ready. PA R A L L E L dB 32 As the signal increases, the green SIGNAL, -20dB, and -10dB LED indicators light respectively at 0.1%, 1% and 10% of full power. The red CLIP LED indicator flashes during overload (clipping). A bright, steady glow indicates protective muting. If this occurs during use, see Troubleshooting. Interrupteur d'alimentation CA Au fur et à mesure que le niveau de signal augmente, les DEL vertes SIGNAL, -20dB, et -10dB allument respectivement à 0.1%, 1%, et 10% de la pleine puissance de l'amplificateur. Bei steigendem Eingangssignal, leuchten die grünen SIGNAL, -20dB und -10dB LEDs nacheinander auf und zeigen 0,1%, 1% und 10% der möglichen vollen Leistung an. The yellow BRIDGE LED indicates the amp is in bridged mono mode. La DEL CLIP clignote lors de surcharges (écrêtage). La DEL reste allumée à pleine intensité pour indiquer la mise en sourdine par le circuit de protection. Si cette condition se présentait lors de l'utilisation, voir la section dépannage de ce manuel. Die rote CLIP LED leuchtet während Übersteuerungen (Clipping) auf. Ein helles, gleichmäßiges Leuchten zeigt außerdem schützendes Stummschalten an. Falls dieser Zustand während des Betriebs auftritt, lesen Sie bitte den Abschnitt Fehlerbehebung. The yellow PARALLEL LED indicates the Parallel Input switches are set. La DEL jaune BRIDGE indique que l'amplificateur a été réglé en mode ponté mono. Die gelbe BRIDGE LED leuchtet auf, wenn der Verstärker Monobrücke betrieben wird. La DEL jaune PARALLEL indique que l'amplificateur a été réglé en mode parallèle. Die gelbe PARALLEL LED zeigt an, daß die Parallel Input Schalter eingestellt wurden. El indicador LED rojo de CLIP, parpadea cuando hay saturación (clips). Cuando permanece encendido indica "enmudecimiento" (función Mute) de protección. Si esto ocurre durante el uso, lea la sección Busqueda de Averías. El LED amarillo de BRIDGE indica que el amplificador está en modo de puenteado en mono. El LED amarillo de PARALLEL indica que los interruptores de entrada paralela han sido activados. O P E R A T I O N UTILISATION B E T R I E B O P E R A C I Ó N Fan cooling Ventilation Lüfterkühlung Ventilación The fan speed varies automatically Le ventilateur à vitesse variable s'ajuste automatiquement pour maintenir une température interne raisonnable. Veillez à garder les entrées et sorties d'air libres d'obstructions afin de permettre libre circulation d'air. Die Lüftergeschwindigkeit ist geregelt, um immer einen sicheren Betrieb zu gewährleisten. Blockieren Sie niemals die Lufteinlaß-, bzw. ausströmöffnungen. La velocidad del ventilador varía automáticamente para mantener la temperatura interna adecuada. Mantenga las rejillas de ventilación delanteras y posteriores despejadas para que el aire pueda circular. to maintain safe internal temperatures. Keep the front and Fan • Ventilateur Fan • Ventilateur Lüfter • Ventilador Lüfter • Ventilador rear vents clear to allow full air flow. Warm air exits amp L'air chaud est explulsé Warme Luft fließt aus den Verstärker Aire caliente del amplificador RACK COFFRET Hot air exhausts out the front of the amp so it does not heat the interior of the rack. Make sure that plenty of cool air can enter the rack, especially if there are other units which exhaust hot air into it. Cool air enters rack L'air frais entre dans le coffret Kuhle Luft fließt in den Rack Aire fresco que entra en el rack Safe operating levels The amp's protective muting system guards against excessive internal temperatures. With normal ventilation and 4- to 8-ohm loads, the amplifier will handle any signal level including overdrive—but make sure that the speakers can handle the full power! However, lower load impedances and higher signal levels produce more internal heating. Into 2-ohm loads, frequent or prolonged clipping (indicated by constant flashing of the red CLIP LED) may trigger power cutback or even protective muting. Bridged mono mode doubles the output impedance of the amp; 4 ohms is the minimum load impedance. Heavy clipping may cause muting. If this happens, see Troubleshooting, page 23. L'air chaud sort par le devant de l'amplificateur afin de pas surchauffer l'intérieur du coffret d'équipement. Assurez vous que beaucoup d'air frais puisse entrer dans le coffret, tout particulièrement si vous utilisez d'autres appareils qui soufflent leur air chaud à l'intérieur du coffret. Niveaux d'utilisation sécuritaire Le circuit de protection de l'amplificateur entre en fonction et met le signal en sourdine lors de température excessive. Avec une charge de 4 ou de 8 ohms et avec une ventilation normale, l'amplificateur fonctionnera sans arrêt avec tout signal, incluant les surcharges-assurez vous cependant que les haut-parleurs peuvent accepter toute la puissance de l'amplificateur. Il est possible que des charges d'impédance plus faible ou que des niveaux de signal plus élevés génèrent plus de chaleur. Ainsi, une charge de 2 ohms accompagnée de surcharges constantes, tel qu'indiqué par l'allumage continuel de la DEL CLIP, pourrait amener l'amplificateur à réduire le niveau de puissance, voire à amener le passage en mode protection, avec mise en sourdine. Le mode ponté mono double l'impédance de sortie de l'amplificateur; 4Ω devient donc la charge minimum. L'écrêtage continuel pourrait entraîner la mise en sourdine. Si cette condition se présentait lors de l'utilisation, voir la section dépannage de ce manuel. Die heiße Kühlluft verläßt tritt aus der Front des Verstärkers aus, damit das Rack nicht aufgeheizt wird. Stellen Sie sicher, daß ausreichend kühle Luft in das Rack gelangen kann. Dies gilt besonders dann, wenn andere Geräte warme Kühlluft in das Rack leiten. Betriebspegel Die Schutzabschaltung des Verstärkers schützt vor übermäßigen internen Temperaturen. Bei normaler Lüftung und Lasten von 4–8Ω kann der Verstärker jedes Signal, einschließlich Übersteuerungen problemlos verarbeiten—stellen Sie aber sicher, daß die angeschlossenen Lautsprecher die Leistung verarbeiten können. Niedrigere Impedanzen und höhere Signalpegel führen zu größerer Abwärme. Häufige oder lange Übersteuerungen (erkennbar durch dauerndes Aufflackern der roten CLIP LED) mit Lasten von 2Ω können eine Leistungsverringerung oder sogar eine Abschaltung der Endstufe zur Folge haben. Der Monobrückenbetrieb verdoppelt die Ausgangsimpedanz des Verstärkers. Daher dürfen in dieser Betriebsart keine Lasten kleiner 4Ω angeschlossen werden. Erhebliche Übersteuerungen könne ein Abschalten zur Folge haben. In diesem Fall lesen Sie bitte den Abschnitt Fehlerbehebung (Seite 23). El aire caliente sale por la parte frontal del amplificador para no calentar el rack. Asegúrese de que circule aire fresco en el rack, especialmente si hay otras unidades que generan aire caliente hacio adentro. Niveles adecuados de operación El sistema de "enmudecimiento" (función Mute) de protección, se activa con temperaturas altas internas. Con una ventilación normal y cargas de 4 y 8 ohmios, el amplificador puede manejar cualquier nivel de señal incluyendo la saturación—pero verifique que sus bocinas puedan manejar esa potencia. Sin embargo, las bajas impedancias y los altos niveles de señal producen calor interno. En cargas de 2 ohmios, con 'clipeo' frecuente o prolongado (indicado por el parpadeo del LED CLIP) puede ocurrir un corte de corriente o un "enmudecimiento" de protección. El modo de puenteado en mono duplica la impedancia de salida del amplificador; 4 ohmios es la mínima impedancia de carga. La saturación extrema puede causar paro total. Si ésto sucede lea la sección Busqueda de Averías, en la página 23. 19 Mono mix APPLICATIONS APPLICATIONS ANWENDUNGS- APLICACIONES Sound reinforcement Sonorisation B E I S P I E L E Sonido en vivo MONO Mixing board Console de mixage Mischpult Mezclador Beschallung Line-level audio Audio niveau ligne Linepegel-Audio Audio de nivel de linéa Stereo mix Ch. 1 input Entrée Canal 1 Eingang Kanal 1 Entrada Canal 1 (parallel mode) Full-range loudspeakers Enceintes de plein registre Vollbereichlautsprecher Bocinas de gama llena ≥2Ω ≥2Ω Monitor mix Mixing board Console de mixage Mischpult Mezclador Mixing board Console de mixage Mischpult Mezclador PLX amp Biamp monitor STEREO L/R G/D L/R I/D Line-level audio Audio niveau ligne Linepegel-Audio Audio de nivel de linéa Line-level audio Audio niveau ligne Linepegel-Audio Audio de nivel de linéa Ch. 1 input • Entrée Canal 1 Eingang Kanal 1 • Entrada Canal 1 Ch. 2 input • Entrée Canal 2 Eingang Kanal 2 • Entrada Canal 2 Active crossover Séparateur activ Aktivweiche Crossover activo PLX amp 1 PLX amp 2 (stereo mode) (stereo mode) ≥2Ω 2-way monitor Enceinte monitor deux voies Zweiweg-Aktivmonitorsystem Bocina monitor dos vías Stereo biamp mix #1, + subwoofer L/R G/D L/R I/D ≥2Ω Mixing board Console de mixage Mischpult Mezclador ≥2Ω Full-range loudspeakers Enceintes de plein registre Vollbereichlautsprecher Bocinas de gama llena STEREO ≥2Ω Line-level audio Audio niveau ligne Linepegel-Audio Audio de nivel de linéa Speakon Stereo biamp mix #1 1 Active crossover Séparateur activ Aktivweiche Crossover activo (stereo) 2 1 2 Sub (mono) 1 PLX amp (stereo mode) Mixing board Console de mixage Mischpult Mezclador PLX amp Ch 2 ≥2Ω Ch 1 2-way loudspeakers Enceintes deux voies Zweiweg-Aktivsystem Bocinas dos vías Ch 1 Active crossover Séparateur activ Aktivweiche Crossover activo (stereo) 1 2 ≥2Ω Speakon PLX amp (stereo mode) 1 2 PLX amp ≥2Ω Ch 2 ≥2Ω Ch 1 20 STEREO L/R G/D L/R I/D ≥2Ω Line-level audio Audio niveau ligne Linepegel-Audio Audio de nivel de linéa Active crossover Séparateur activ Aktivweiche Crossover activo (stereo) (stereo mode) Ch 2 Subwoofer ≥4Ω Stereo biamp mix #2 Mixing board Console de mixage Mischpult Mezclador PLX amp Ch 2 ≥2Ω Line-level audio Audio niveau ligne Linepegel-Audio Audio de nivel de linéa (stereo mode) (bridged mono mode) ≥2Ω STEREO L/R G/D L/R I/D 2-way loudspeakers Enceintes deux voies Zweiweg-Aktivsystem Bocinas dos vías Ch 1 ≥2Ω 1 2 1 2 PLX amp (stereo mode) PLX amp (stereo mode) ≥2Ω ≥2Ω ≥2Ω ≥2Ω 2-way loudspeakers Enceintes deux voies Zweiweg-Aktivsystem Bocinas dos vías APPLICATIONS APPLICATIONS ANWENDUNGS- APLICACIÓNES Instrument amplification Amplification B E I S P I E L E Amplifación de d'instrument Instrument-Verstärkung instrumento 1 cabinet Effects Instrument input Entrée de l’instrument Instrumentseingang Entrada del instrumento Ch. 1 input Entrée Canal 1 Eingang Kanal 1 Entrada Canal 1 Preamp Line-level output Sortie audio niveau ligne Linepegel-Audio-Ausgang Salida de nivel de linéa Bi-amp Effects Instrument input Entrée de l’instrument Instrumentseingang Entrada del instrumento PLX amp (bridged mono mode) Preamp Line-level output Sortie audio niveau ligne Linepegel-Audio-Ausgang Salida de nivel de linéa Active crossover Ch. 1 input Entrée Canal 1 Eingang Kanal 1 Entrada Canal 1 ≥4Ω Ch. 2 input Entrée Canal 2 Eingang Kanal 2 Entrada Canal 2 PLX amp (stereo mode) ≥2Ω 2 cabinets Effects Instrument input Entrée de l’instrument Instrumentseingang Entrada del instrumento Ch. 1 input Entrée Canal 1 Eingang Kanal 1 Entrada Canal 1 Preamp Line-level output Sortie audio niveau ligne Linepegel-Audio-Ausgang Salida de nivel de linéa ≥2Ω PLX amp (parallel mode) ≥2Ω ≥2Ω 21 TROUBLESHOOTING D É P A N N A G E FEHLERBEHEBUNG BUSQUEDA DE AVERÍAS 1 Key • Légende Zeicherklärung • Leyende CHANNEL CLIP -IOdB -20dB SIGNAL 2 P OW E R = lit allumé aufgeleuchtet illuminado BRIDGE PA R A L L E L Problem: no sound Problème: pas de son Problem: kein Ton Problema: no hay sonido ➤ INDICATION: POWER INDICATOR NOT LIT ➤ INDICATION: DEL "POWER" ÉTEINTE ➤ ANZEICHEN: POWER ANZEIGE LEUCHTET NICHT ➤ INDICACIÓN: EL INDICADOR DE ENCENDIDO NO SE ILUMINA • Check the AC plug. • Vérifiez le branchement du cordon d'alimentation. • Überprüfen Sie den Netzstecker. • Revise el cable de corriente. • Stellen Sie sicher, daß die Steckdose Strom führt, indem Sie ein anderes Gerät einstecken. Falls zu viele Verstärker angeschlossen sind, kann die Haussicherung ansprechen und die Versorgung unterbrechen. • Confirme que la toma de corriente funcione conectando otro aparato. Si se conectan muchos amplificadores a una sola toma, el circuito se sobrecarga y se desconecta. • Confirm that the AC outlet works by plugging in another device. If too many amplifiers are used on one outlet, the building's circuit breaker may trip and shut off power. • An overload in bridged mono mode may cause the amplifier to click off for three seconds, indicated by the half-bright POWER LED, followed by a normal restart cycle. Check the load impedance (4 ohms minimum), or reduce signal level. CLIP LEDs glowing bright red indicate a thermal shutdown. = blinking clignotant blinkt parpadeo = off éteint aus apagado • An amplifier which keeps shutting off may have a serious internal fault. Turn it off, remove AC power, and have the amplifier serviced by a qualified technician. • Assurez vous que la prise de courant fonctionne en y branchant un autre appareil. Un trop grand nombre d'amplificateur reliés au même circuit pourraient faire déclencher le disjoncteur, coupant l'alimentation. • Une surcharge en mode ponté mono pourrait éteindre momentanément l'amplificateur, tel qu'indiqué par la DEL POWER qui passera à demiintensité, suivi par le cycle normal d'allumage. Vérifiez l'impédance de la charge (4 ohms minimum), ou réduisez le niveau de signal. L'allumage continu des DEL CLIP indique la mise en sourdine par le circuit de protection à cause de surchauffe. • Un amplificateur qui passe continuellement en mode protection pourrait être défectueux. Eteignez l'amplificateur, débranchez le, puis faites le vérifier par un technicien compétent. 1 CHANNEL CLIP -IOdB -20dB SIGNAL P OW E R 22 2 • Eine Übersteuerung im Monobrückenbetrieb kann den Verstärker für drei Sekunden stummschalten, was durch eine halbhelle POWER LED angezeigt wird. Überprüfen Sie die Impedanz der angeschlossenen Lautsprecher (minimal 4Ω!), oder reduzieren Sie den Signalpegel. Eine hell aufleuchtende, rote CLIP LED zeigen eine thermische Abschaltung an. • Ein Verstärker der ausgeschaltet bleibt, kann einen internen Defekt haben. Schalten Sie ihn aus, trennen Sie ihn von der Netzversorgung und lassen Sie den Verstärker von qualifiziertem Servicepersonal überprüfen. • Una sobrecarga en el modo de puenteado en mono puede causar un apagado momentáneo, como de tres segundos, y el indicador LED de POWER bajará la intensidad de su luz, reiniciando la secuencia de encendido. Verifique la impedancia de carga (4 ohmios mínimo), o reduzca el nivel de la señal. Si el LED rojo de CLIP se ilumina indicará un apagado térmico. • Un amplificador que se apagada continuamente, puede tener una falla interna. Apáguelo, desconéctelo de la toma de corriente y llévelo con un técnico especializado para su revisión. ➤ INDICATION: SIGNAL LED NOT LIT ➤ INDICATION: DEL SIGNAL ÉTEINTS CHECK ➤ ANZEICHEN: SIGNAL ANZEIGEN LEUCHTEN NICHT ➤ INDICACIÓN: EL INDICADOR LED DE SEÑAL NO SE ILUMINA • If the green POWER indicator LED is at full brightness and the fan is running, yet the signal LEDs indicate no signal, check the input. Make sure the signal source is operating and try another input cable. Connect the source to another channel or amplifier to confirm its operation. • Si la DEL POWER est allumée et que le ventilateur fonctionne, mais que les DEL SIGNAL restent éteintes, vérifiez la source de signal. Assurez vous que la source fonctionne normalement, puis essayez d'autres câbles de raccord. Brancher le signal de source à un autre canal d'amplificateur pour confirmer la présence de signal. • Wenn die grüne POWER LED in voller Helligkeit leuchtet, der Lüfter läuft, die Signal LEDs aber kein Signal anzeigen, überprüfen Sie den Eingang. Stellen Sie sicher, daß die Quelle arbeitet und versuchen Sie es mit einem anderen Eingangskabel. Schließen Sie die Quelle an einen anderen Verstärker an, um sicherzustellen, daß sie arbeitet. • Si el indicador verde de POWER está completamente iluminado, y el ventilador está funcionando, pero el LED de signal no indica nada, revise las entradas. Asegúrese de que exista la señal y cambie los cables en las entradas. Conecte la señal a otro canal u otro amplificador para confirmar su funcionamiento. TROUBLESHOOTING D É P A N N A G E FEHLERBEHEBUNG BUSQUEDA DE AVERÍAS 1 Key • Légende Zeicherklärung • Leyende CHANNEL 2 CLIP -IOdB -20dB SIGNAL P OW E R = lit allumé aufgeleuchtet illuminado = blinking clignotant blinkt parpadeo 1 = off éteint aus apagado CHANNEL CLIP -IOdB -20dB SIGNAL 2 CHANNEL CLIP -IOdB -20dB SIGNAL P OW E R Pas de son (suite) Kein Ton (Fortsetzung) No hay sonido (continuación) ➤ INDICATION: SIGNAL LEDs RESPONDING TO SIGNAL LEVEL ➤ INDICATION: DEL DE SIGNAL FONCTIONNENT NORMALEMENT ➤ ANZEICHEN: SIGNAL ANZEIGEN LEUCHTEN NORMAL • If the green SIGNAL, -20 dB, and -10 dB indicators are lighting normally, the fault is somewhere between the amp and the speaker. Check the speaker wiring for breaks. Try another speaker and cable. • Si les DEL SIGNAL, -20dB et -10dB fonctionnent normalement, le problème se situe entre la sortie de l'amplificateur et le haut-parleur. Vérifiez l'intégrité du câble de haut-parleur. Essayez un autre câble et un autre haut-parleur. ➤ INDICACIÓN: EL INDICADOR LED DE "SIGNAL" Y LOS INDICADORES DE NIVELES SE ENCIENDAN AL DETECTAR EL NIVEL DE LA SEÑAL ➤ INDICATION: CLIP LEDs BRIGHT AND STEADY ➤ INDICATION: DEL CLIP ALLUMÉES EN CONTINU The amplifier is in protective muting. L'amplificateur est en mode protection. • One second of muting is normal when the amp is turned on or off. P OW E R 1 No sound (continued) • Overheating will cause protective muting. The fan will be running at full speed and the chassis will be hot to the touch; sound should resume within a minute as the amplifier cools to a safe operating temperature. Check for proper ventilation. If the fan isn't running at all, the amplifier requires servicing. 2 • La mise en sourdine pour une seconde est normale lors de la mise en tension et hors-tension de l'amplificateur. • Wenn die grüne SIGNAL, -20dB und -10dB LEDs normal aufleuchten, liegt der Fehler an anderer Stelle zwischen Verstärker und Lautsprecher. Überprüfen Sie die Lautsprecherleitungen auf Unterbrechungen. Schließen Sie einen anderen Lautsprecher mit anderen Kabeln an. ➤ ANZEICHEN: CLIP ANZEIGE LEUCHTET HELL UND GLEICHMÄßIG • Si los indicadores LED verdes de SIGNAL, -20 dB y -10 dB parpadean, la falla ocurre entre el amplificador y las bocinas. Revise los cables de las bocinas, e intente cambiarlas o cambiar los cables. Die Schutzschaltung hat den Verstärker abgeschaltet. ➤ INDICACIÓN: LOS INDICADORES CLIP PERMANECEN ENCENDIDOS El amplificador está haciendo un "enmudecimiento" (mute) de protección. • Eine Abschaltung von einer Sekunde Dauer ist beim Ein- oder Ausschalten normal. • Un segundo de asilenciamiento (mute) es normal cuando se enciende o se apaga el amplificador. • El sobrecalentamiento puede causar "enmudecimiento" de protección. El ventilador estará funcionando a su máxima velocidad y el armazón o caja del amplificador estará caliente al tacto. El sonido se suspenderá por un minuto mientras el amplificador vuelve a una temperatura adecuada de operación. Revise si existe la ventilación necesaria. Si el ventilador no se mueve, el amplificador necesita mantenimiento. • La surchauffe entraîne la mise en sourdine de l'amplificateur. Le ventilateur tournera alors à pleine vitesse et le châssis sera chaud au contact; le son devrait revenir sitôt l'amplificateur refroidi à température normale d'utilisation. Assurez une ventilation suffisante. Si le ventilateur ne tournait pas, l'amplificateur serait défectueux. • Überhitzung führt zu einer Abschaltung des Verstärkers. Der Lüfter läuft mit höchster Geschwindigkeit und das Chassis fühlt sich heiß an. Der Ton sollte innerhalb einer Minute zurückkehren, sobald der Verstärker wieder eine normale Betriebstemperatur erreicht hat. Überprüfen Sie, ob eine einwandfreie Kühlung möglich ist. Falls der Lüfter nicht läuft, muß der Verstärker zur Reparatur eingeschickt werden. ➤ INDICATION: CLIP LED FLASHING ➤ INDICATION: DEL CLIP CLIGNOTE ➤ ANZEICHEN: CLIP LED BLINKT ➤ INDICACIÓN: EL INDICADOR LED DE CLIP PARPADEA • If the red CLIP indicator flashes when signal is applied, the amplifier output may be shorted. Check the speaker wiring for stray strands or breaks in the insulation. • Si la DEL CLIP clignote lors de la présence de signal, la sortie de l'amplificateur est court-circuitée. Vérifiez l'intégrité du câblage. • Wenn die rote CLIP LED bei anliegendem Eingangssignal blinkt, kann der Verstärkerausgang kurzgeschlossen sein. Überprüfen Sie die Anschlußklemmen auf eventuell herausstehende Drähte oder Brüche der Isolation. • Si ésto sucede cuando entra una señal, la salida del amplificador puede estar en corto circuito. Vaya a los cables de las bocinas y revise si tienen alambres sueltos o averías en el aislamiento. 23 TROUBLESHOOTING D É P A N N A G E FEHLERBEHEBUNG BUSQUEDA DE AVERÍAS 1 CHANNEL CLIP -IOdB -20dB SIGNAL Key • Légende Zeicherklärung • Leyende = off éteint aus apagado 1 CHANNEL CLIP -IOdB -20dB SIGNAL 2 P OW E R P OW E OW E R BRIDGE Problème: son distortionné Problem: Verzerrungen Problema: sonido distorsionado ➤ INDICATION: CLIP LED FLASHING ➤ INDICATION: DEL CLIP CLIGNOTE • Si la DEL CLIP clignote avant que les trois DEL de niveau de signal, ou l'impédance de charge est trop faible, ou la sortie de l'amplificateur est court-circuitée. Débranchez les haut-parleurs un à un à l'amplificateur. Si la DEL CLIP s'éteint quand vous débranchez un câble, ou le câble ou le hautparleur est court-circuité. Essayez un autre câble puis un autre hautparleur pour localiser le problème. ➤ ANZEICHE: CLIP LED BLINKT • Falls die rote CLIP LED blinkt, bevor alle drei Signal-Anzeigen aufleuchten, ist die angeschlossene Last entweder zu niedrig oder kurzgeschlossen. Schließen Sie jeden Lautsprecher, einen nach dem anderen, auf der Verstärkerseite ab. Wenn die CLIP LED erlischt, wenn ein Kabel abgeschlossen wird, weisen entweder Kabel oder Lautsprecher einen Kurzschluß auf. Versuchen Sie ein anderes Kabel/Lautsprecher um den Fehler zu finden. ➤ INDICACIÓN: EL INDICADOR LED DE CLIP PARPADEA • Si el indicador rojo de CLIP parpadea antes que los otros tres indicadores de señal, la impedancia de carga es anormal, muy baja o corta. Desconecte cada bocina, una por una, desde el amplificador. Si el indicador se apaga cuando usted desconecta un cable, éste o esa bocina estan bajos. Pruebe con otros para localizar la falla. • This could be caused by a faulty speaker or loose connection. Check the wiring and try another speaker. ➤ INDICATION: DEL CLIP N'ALLUMENT PAS • Peut être dû à du câblage ou un haut-parleur défectueux. Vérifiez le câblage et essayez un autre haut-parleur. ➤ INDICACIÓN: EL INDICADOR CLIP NO PARPADEA • Esto puede ser causado por una defectuosa o por desconexión. Revise el cableado y pruebe con otra bocina. • The signal source may be clipping. Keep the amplifier gain controls at least halfway up so that the source does not have to be overdriven. • Le signal pourrait être distortionné à la source. Utilisez l'amplificateur avec les contrôles de gain au moins à mi-course afin d'éviter avoir à surcharger la source de signal. ➤ ANZEICHE: CLIP ANZEIGE BLINKT NICHT • Hier liegt die Ursache wahrscheinlich bei einem fehlerhaften Lautsprecher oder einem Wackelkontakt. Überprüfen Sie die Verkabelung und versuchen Sie einen anderen Lautsprecher. Problem: no channel separation Problème: pas de séparation des canaux Problem: keine Kanaltrennung • Check the yellow PARALLEL or BRIDGE MONO LEDs on the front panel, which indicate the switch settings on the back of the amplifier. Neither should be lit in dual-channel, bi-amp, or stereo use where different signals go to each channel. Make sure the "Parallel Input" and "Bridge Mode" switches are OFF. • Assurez vous que les DEL jaunes PARALLEL et BRIDGE MONO sont éteintes sur le panneau avant, ce qui indiquerait la position des interrupteurs sur le panneau arrière. Ni l'une ni l'autre ne devrait être allumée pour utilisation en mode stéréo, bi-amplification, ou deux canaux, quand des signaux distincts sont amenés aux deux canaux de l'amplificateur. Assurez vous que les interrupteurs PARALLEL et BRIDGE sont en position OFF. • Assurez vous que les autres équipements dans la chaîne audio en amont, soit les pré-amplificateurs, mixers ou autres, sont réglés en mode stéréo, et non en mono. • Überprüfen Sie die frontseitigen, gelben PARALLEL oder BRIDGE MONO LEDs, welche die Schalterstellung auf der Rückseite anzeigen. Keine sollte im Zweikanal-, Biamp oder Stereobetrieb aufleuchten, bei denen unterschiedliche Signale den individuellen Kanälen zugeführt werden. Stellen Sie sicher, daß die "Parallel Input" und "Bridge Mono" Schalter auf OFF stehen. • If the red CLIP indicator flashes before all three signal indicators do, the load impedance is abnormally low or shorted. Unplug each speaker one-by-one at the amplifier. If the CLIP LED goes out when you disconnect a cable, that cable or speaker is shorted. Try another cable and speaker to locate the fault. P OW E R = lit allumé aufgeleuchtet illuminado = blinking clignotant blinkt parpadeo 2 Problem: distorted sound PA R A L L E L ➤ INDICATION: CLIP INDICATOR NOT FLASHING • Make sure other equipment in the signal path, such as mixers, preamps, etc., are set for stereo, not mono. 24 • Die Signalquelle kann verzerren. Halten Sie die Gain-Regler etwa halb aufgedreht, damit die Quelle nicht übersteuert werden muß. • Stellen Sie sicher, daß andere Geräte der Signalkette, z.B. Mixer o.ä. nicht im Monobetrieb laufen. • La fuente de la señal puede que se esté saturando. Mantenga los controles de ganancia del amplificador a más de medio trayecto, para que de esa manera no tenga que exigir demasiado al fuente de la señal. Problema: no hay separación entre los canales • Revise los indicadores amarillos PARALLEL o BRIDGE MONO en el panel frontal del amplificador, que indican la posición de los interruptores en la parte de atrás del amplificador. Ninguno debe iluminar si usan los modos de dos canales, biamplificado o estéreo. Revise que los interruptores "Parallel Input" y "Bridge mode" estén apagados. • Verifique el resto del equipo en el trayecto de la señal, como mezcladores, preamplificadores, etc., estén ajustados en estéreo y no en mono. TROUBLESHOOTING D É P A N N A G E FEHLERBEHEBUNG BUSQUEDA DE AVERÍAS Problem: hum Problème: ronflement Problem: Brummen Problema: zumbidos • The PowerWave supply eliminates internal hum fields, but AC transformers in other devices may cause hum. Move cabling and signal sources to identify "hot spots" in the system. Cables with faulty shielding are a frequent entry point for hum. • Le bloc d'alimentation PowerWave élimine les champs magnétiques internes, mais il est possible que les blocs d'alimentations d'autres appareils génèrent du bruit sous forme de ronflement (hum). Déplacez les câbles et/ou les appareils du système afin de localiser les sources de bruit. Les câbles avec un blindage défectueux sont une source commune de ronflement. • Das PowerWave Netzteil eliminiert interne Brummfelder, aber Netztransformatoren in anderen Geräte können immer noch Brummen verursachen. Bewegen Sie die Verkabelung und Eingangsquellen hin und her, um Fehlerquellen im System aufzuspüren. Kabel mit fehlerhafter Abschirmung sind die häufigste Ursache für Brummschleifen. • La fuente de alimentación PowerWave™ elimina los zumbidos internos, pero los transformadores de corriente alterna (AC) de otros aparatos pueden causarlos. Mueva los cables y la fuente de la señal para encontrar los "puntos débiles" del sistema. Los cables con aislamiento defectuoso por lo general son un punto de entrada de zumbidos y ruidos. Problem: hiss Problème: souffle Problema: ruido (hiss) • Unplug the amplifier input to confirm that the hiss is coming from the source or a device upstream; erratic or popping noises indicate an electronic fault in the offending unit. • Débranchez le câble d'entrée pour confirmer que le bruit provient d'autres équipements dans la chaîne audio en amont, soit les préamplificateurs, mixers ou autres; des bruits transitoires pourraient indiquer un problème électronique dans l'unité en cause. Problem: Rauschen/ Zischen TM • To keep the normal noise floor low, operate the primary signal source at full level, without clipping, and avoid boosting the signal further between the source and the amplifier. • Trennen Sie den Verstärkereingang von der Quelle, um festzustellen, ob die Störgeräusche von einem vorgeschalteten Gerät stammen. Harte und poppende Störgeräusche lassen auf einen elektronischen Fehler im störenden Gerät schließen. • Desconecte la entrada del amplificador para revisar si el ruido proviene desde la fuente de la señal o de otro aparato intermedio. El ruido permanente o explosivo revela una falla eléctrica en la unidad. • Afin de reduire le niveau de bruit de fond au minimum, utilisez les sources à un niveau de signal élevé, sans distortion ou écrêtage, et ajustez le niveau final sur l'amplificateur. • Um den normalen Störgeräuschteppich niedrig zu halten, empfiehlt es sich, die Quelle mit vollem Pegel, aber ohne Übersteuerungen zu betreiben. Achten Sie auch darauf, den Signalpegel zwischen Quelle und Verstärker weiter anzuheben. • Para mantener el ruido de piso normal abajo, mantenga la fuente de la señal a un volumen máximo, sin saturación, y absténgase de resaltar la señal entre la fuente y el amplificador. Problem: squeals and feedback Problème: bruits et effet Larsen Problem: Pfeifen und Rückkopplungen Problema: chillidos y retroalimentación • Microphone feedback should be controlled with mixer controls. If noise continues to build up with zero mic gain, there is a serious fault in the signal processors or cables. Working in succession from the signal source towards the amplifier, check each device in the signal path by reducing its gain or unplugging it. • L'effet Larsen (feedback) par les microphones devrait être contrôlé sur le mixer. Si le problème persiste avec les micros fermés, il existe une problème dans le système, soit au niveau électronique ou au niveau du câblage. En travaillant à partir de la source, vérifiez chaque appareil de la chaîne en en réduisant le gain ou en le mettant hors-circuit. • Rückkopplungen die von Mikrofonen verursacht werden, sollten mit Hilfe eines Mischpultes unterdrückt werden. Wenn die Störgeräusche trotz ausgeschalteter Mikrofonverstärkung erhalten bleiben, liegt wahrscheinlich ein Fehler innerhalb eines Signalprozessors oder der Verkabelung vor. Eine schrittweise Überprüfung aller beteiligten Geräte, von der Signalquelle bis hin zum Verstärker, mit Überprüfung der jeweiligen Verstärkung, ist notwendig. • La retroalimentación del micrófono puede controlarse desde el mezclador. Si el ruido continua, aún con la ganancia del micrófono en cero, entonces debe de haber una falla seris en los procesadores de señales o en los cables. Siga el trayecto de la señal y desconecte o baje el volumen de los aparatos uno por uno hacia el amplificador. 25 INNER WORKINGS S O U S L E C A P O T INNERER AUFBAU OPERACIÓN INTERNA EMI Filter Inrush Limiting Control Power Main Energy Bank PWM Control PowerWave Switching Transformer DC Supply for Amplifier An impressive amount of technology is packed "under the hood" of a PLX Series amplifier. Thousands of watts of power flow inches away from state-of-the-art low noise inputs. Precise circuit layout and thorough protection assure that all of this activity occurs smoothly and safely. So, what actually happens when you turn on the power switch? Soft Start Sequence. The first task is to charge the primary energy reservoir without drawing a large surge current. A special inrush resistor allows just enough current to charge the energy bank in three seconds. Meanwhile, a low-power switching supply provides power to start up the main supply. After three seconds, a relay bypasses the inrush resistor and full power operation is enabled. The audio circuitry mutes for one second to eliminate start-up thumps. When the red CLIP lights go out, the amplifier is ready for action. PowerWave™ Technology. High current switching devices draw over 10,000 watts of peak power from the main energy reservoir, which is replenished directly from the AC line for maximum stiffness. Conventional amplifiers must isolate the energy bank with a large AC transformer, which weakens the flow of current, allows greater sag under load, and produces hum. The PowerWave supply performs voltage conversion at a very high frequency, allowing better coupling through a much smaller isolation transformer. 26 Une quantité impressionnante de technologie se trouve "sous le capot" des amplificateurs de série PLX de QSC. Des milliers de watts de puissance déferlent à la sortie de l'amplificateur, à quelques centimètres à peine des circuits d'entrée à faible bruit et de technologie de pointe. L'implantation précise des composantes électroniques et les circuits de protections sophistiqués assurent le fonctionnement sécuritaire et sans soubresaut. En fait, qu'arrivet'il quand vous mettez l'amplificateur en marche? Séquence Soft Start. La première tâche de l'amplificateur est de charger le réservoir d'énergie primaire sans faire un appel de courant trop élevé. Une résistance spéciale est installée de façon à ce que l'amplificateur prenne trois secondes pour charger le réservoir d'énergie. Pendant ce temps, un circuit d'alimentation secondaire à faible courant s'occupe de mettre en marche le circuit d'alimentation à commutation principal. Une fois les trois secondes écoulées, un relais dérive la résistance d'appel de courant, et l'amplificateur fonctionne normalement à pleine puissance potentielle. Le circuit de protection met le circuit audio en sourdine pendant une seconde pour éviter les à-coups de démarrage. Quand la DEL CLIP s'éteint, l'amplificateur est prêt à fonctionner. La technologie PowerWave. Des disposistifs de commutation à courant élevé peuvent passer plus de 10,000 watts en puissance de pointe à partir du réservoir d'énergie principal, qui est lui-même directement alimenté par la source de courant CA, pour une tension de base très stable. Les amplificateurs conventionnels doivent isoler le réservoir d'énergie de la source de courant avec un transformateur de grande dimension, ce qui réduit le transfert de courant, permet une chute de tension en pointe de courant, et produit du ronflement. Le bloc d'alimentation à commutation PowerWave effectue le conversion de tension à très haute fréquence, ce qui rend possible un bien meilleur couplage à travers un petit transformateur. In jeder PLX ist beeindruckende Technologie verborgen. Tausende Watt Leistung fließen nur Zentimeter entfernt von State-of-the-Art rauscharmen Eingängen. Ein präziser Schaltungsaufbau und gründliche Abschirmungen garantieren einen problemlosen und sicheren Betrieb. Daher interessiert es Sie vielleicht, was nach dem Einschaltvorgang im Verstärker passiert. Softstart Sequenz. Die erste Aufgabe hierbei ist, das primäre Energiereservoir aufzuladen, ohne einen zu hohen Einschaltstrom zu verursachen. Ein spezieller Einschaltwiderstand ermöglicht ausreichend Energie innerhalb von drei Sekunden an die Netzkondensatoren zu liefern. In der Zwischenzeit stellt ein schwaches, getaktetes Netzteil die Energie zur Verfügung, um das Hauptnetzteil zu starten. Nach diesen drei Sekunden , überbrückt ein Relais den Einschaltwiderstand und die volle Energie steht zur Verfügung. Die Audio-Schaltkreise schalten für eine Sekunde stumm, um Einschaltknackgeräusche zu unterdrücken. Wenn die roten CLIP LEDs erlöschen ist der Verstärker betriebsbereit. PowerWave Technologie. Hochleistungs-Schaltnetzteile ziehen über 10000 Watt Spitzenleistung aus den Netzkondensatoren, die direkt aus der Netzleitung versorgt werden. Konventionelle Verstärker müssen diese Kondensatoren mit Hilfe eines großen Transformators versorgen, was zu höheren Einbrüchen bei hohem Strombedarf führt, den zur Verfügung stehenden Strom begrenzt und zusätzlich Brummen verursacht. Die PowerWave Technologie wandelt die Spannungen bei sehr hoher Frequenz, was mit wesentlich kleineren Transformatoren zu einer besseren Ausnützung führt. Una impresionante tecnología se encuentra "escondida" en los amplificadores de la Serie PLX. Miles de wattios de potencia se mueven a pocos centímetros de sus entradas de bajo ruido. Los elaborados diagramas de circuito y una protección general le dan la confianza de que toda esa actividad es precisa y segura. Pero, ¿qué es lo que realmente ocurre cuando usted presiona el interruptor de encendido? Secuencia de encendido suave. La primera tarea es cargar el receptor primario de energía sin una gran cantidad de corriente. Una resistencia de entrada permite tomar sólo la corriente necesaria para cargar el banco de energía en tres segundos. Mientras tanto un interruptor de baja potencia enciende la fuente principal. Después de tres segundos, se bloquea la resistencia de entrada y puede así operar a su máxima potencia. El circuito de audio se asilencia por un segundo para eliminar cualquier ruido de encendido Cuando la luz roja de CLIP se apaga, quiere decir que el amplificador está listo para usarse. La tecnología PowerWave™. Los aparatos con interruptores de corriente alta "jalan" más de 10,000 wattios de potencia en picos desde el contenedor principal de energía, el cual se alimenta directamente de la línea de corriente alterna (AC) para máxima confiabilidad. Los amplificadores convencionales deben aislar el banco de energía con grandes transformadores AC, lo que debilita el flujo de corriente, provocando una gran pérdida de carga, y produciendo zumbidos o hum. La fuente de alimentación PowerWave hace la conversión de voltaje a una frecuencia muy alta, acoplándose mejor a un transformador de aislamiento más pequeño. INNER WORKINGS S O U S L E C A P O T INNERER AUFBAU OPERACIÓN INTERNA Balanced In Filters High Performance Audio. High speed power transistors convert this DC power into the full range audio output which drives the speakers. High-current design and special dual-sense output feedback corrects errors on both sides of the speaker terminals, improving damping and control of speaker motion. The power devices are directly mounted to isolated heat sinks, which form a short, wide air tunnel in front of the fan for optimum cooling. Gain Fan DC Supply Temperature Sense Clip Limiting Muting Display DC Blocking Power Control Output + Out – Out DC Fault Monitor A thermal sensor embedded in each channel's heat sink monitors the temperature and controls fan speed, thermal shutdown, and bias control, assuring maximum audio clarity at all temperatures and signal levels. A circuit monitors transistor dissipation and triggers protective cutback only when actually needed. The output circuitry is actively clamped during clipping for smooth and very fast recovery. The clamp also feeds a proportional clip limiter, which actually senses the depth of clipping and responds accordingly. The balanced inputs use premium 0.1% precision resistors for very high noise rejection. The precision components used in the input filters and all other circuitry ensure accurate performance. Shutdown. The amplifier mutes as soon as power is shut off, preventing turn-off noises. Serious faults trigger a shutdown of the power supply; the high switching frequency cuts off power within microseconds to limit damage. Audio haute performance. Des transistors de puissance à haute vitesse convertissent cette puissance de courant continu en une sortie audio plein registre qui actionne le hautparleur. La conception à haute tension et le circuit spécial de rétroaction à double détecteur corrige les erreurs sur les tensions positives et négatives des haut-parleurs, améliorant ainsi le coefficient d'amortissement et le contrôle du mouvement du cône du haut-parleur. Les composantes de puissance sont montées directement sur le radiateur isolé, qui lui-même forme un tunnel d'air large et court directement devant le ventilateur, pour un refroidissement optimal. Une sonde thermique est noyée à même le radiateur de chaque canal pour contrôler la température et piloter la vitesse du ventilateur, le circuit de protection, le circuit de polarisation, assurant ainsi une performance audio maximale à tout niveau de température ou de signal. Un circuit supervise la dissipation des transistors et n'active le délestage de protection que lorsque vraiment nécessaire. L'étage de sortie est bloqué électroniquement lors de l'écrêtage pour obtenir un rétablissement très doux et ultra rapide. Le circuit de blocage pilote aussi le circuit limiteur proportionnel, en détectant la montant d'écrêtement et réagissant en conséquence. Les entrées symétriques utilisent des résistances de précision à 0.1% afin d'obtenir un facteur de différence (CMRR) très élevé. Les composantes de précision utilisées dans les filtres d'entrée et aux autres étages du circuit audio assurent une reproduction des plus fidèles. Arrêt. L'amplificateur passe en sourdine aussitôt qu'on l'éteint, éliminant ainsi tout bruit ultérieur. Toute panne majeure déclenchera le bloc d'alimentation; le circuit de commutation à haute fréquence est désengagé en quelques microsecondes afin de limiter les dégâts. High Performance Audio. Hochgeschwindigkeitstransistoren wandeln diese Gleichspannungsleistung in Audiosignale mit voller Bandbreite um, welche zum Betrieb der Lautsprecher verwendet werden. Ein HochleistungsSchaltungsaufbau und zweifache Ausgangsüberprüfung korrigiert Fehler auf beiden Seiten der Lautsprecheranschlüsse, verbessert den Dämpfungsfaktor und steuert die Lautsprecherbewegungen. Die Leistungskomponenten sind direkt mit isolierten Kühlkörpern verbunden. Zur Erzielung optimaler Kühlung bilden diese Kühlkörper eine breite Luftschleuse direkt vor einem Lüfter. Ein Thermofühler im Kühlkörper jedes Kanals mißt die Temperatur und steuert Lüftergeschwindigkeit, thermisches Abschalten und die Steuerung des BIAS, wodurch höchste Audioqualität bei allen Betriebstemperaturen und Signalpegeln gewährleistet wird. Ein Schaltkreis überwacht die Stromaufnahme der Transistoren und löst schützende Reduktion der Leistung nur dann aus, wenn sie auch tatsächlich benötigt wird. Der Ausgangskreis wird während Übersteuerungen aktiv reduziert, um eine weiche und schnelle Wiederherstellung des Signals zu ermöglichen. Diese Schutzschaltung steuert zusätzlich einen proportional arbeitenden Spitzenbegrenzer, der die tatsächliche Stärke der Übersteuerung mißt und entsprechend reagiert. Die symmetrischen Eingänge verwenden hochqualitative 0,1% Eingangswiderstände für beste Störgeräuschunterdrückung. Die Präzisionsbauteile, die in den Eingangsfiltern Verwendung finden, ermöglichen eine akkuraten, problemlosen Betrieb. Abschalten. Der Verstärker schaltet die Ausgangskreise stumm, sobald die Netzversorgung abgeschaltet wurde, um hierdurch Ausschaltgeräusche wirksam zu unterdrücken. Schwerwiegende Fehler verursachen ein Ausschalten des Netzteiles; die hohe Schaltgeschwindigkeit des Netzteils schaltet innerhalb weniger Mikrosekunden ab, um Schaden zu begrenzen. Audio de alto rendimiento. Los transistores de potencia de alta velocidad, convierten esta energía DC en una salida de audio de rango completo que va a las bocinas. El diseño de corriente alta y una salida especial de doble sentido corrige errores en ambos lados de las terminales de las bocinas, mejorando la amortiguación y el control del movimiento de la misma. Los aparatos de potencia están colocados sobre superficies con aislamiento térmico, lo que forma un túnel de aire frente al ventilador para un enfriamiento óptimo. Un sensor térmico puesto en cada canal monitorea la temperatura y controla la velocidad del ventilador, del apagado térmico y del control de polarización (bias), asegurando máxima claridad de audio a cualquier temperatura y nivel de señal. Un circuito monitorea la disipación de los transistores y realiza cortes de protección sólo cuando realmente se necesita. El circuito de salida se comprime activamente durante la saturación para permitir una recuperación rápida y suave. El compresor también alimenta un limitador de picos proporcional, el cual realmente siente la intensidad del pico y responde de manera semejante. Las entradas balanceadas usan resistores premium al 0.1% de precisión para un alto rechazo al ruido. Los componentes de precisión usados en los filtros de entrada y el resto de accesorios del circuito le aseguran un funcionamiento exacto. Apagado. El amplificador asilencia tan pronto como se corta la corriente, evitando ruidos de apagado. El apagado de la fuente de alimentación puede provocar un daño serio. La frecuencia alta del interruptor corta la potencia en microsegundos para evitar un daño mayor. 27 S P E C I F I C AT I O N S S P É C I F I C AT I O N S TECHNISCHE DATEN ESPECIFICACIONES 28 PLX 1202 PLX 1602 PLX 2402 PLX 3002 PLX 3402 200 300 425 550 700 325 500 700 900 1100 OUTPUT POWER in watts 20 Hz–20 kHz @ 0.03% THD 8Ω per channel 20 Hz–20 kHz @ 0.05% THD 4Ω per channel EIA: 1 kHz @ 1% THD 8Ω per channel 4Ω per channel 2Ω per channel Bridge Mono: 16Ω, 20 Hz–20 kHz, 0.1% THD 8Ω, 20 Hz–20 kHz, 0.1% THD 4Ω, 1 kHz, 1% THD 215 375 600 325 550 800 475 825 1200 625 1050 1500 800 1250 1700 400 700 1200 600 1000 1600 850 1500 2400 1100 2000 3000 1400 2200 3400 DYNAMIC HEADROOM 2 dB @ 4Ω DISTORTION SMPTE-IM < 0.01% < 0.01% < 0.02% < 0.02% < 0.02% FREQUENCY RESPONSE (at 10 dB below rated output power) 20 Hz–20 kHz, ±0.15 dB -3 dB points: 5 Hz and 100 kHz DAMPING FACTOR > 500 @ 8W NOISE (unweighted 20 Hz to 20 kHz, below rated output) 106 dB 107 dB 108 dB 107 dB 107 dB VOLTAGE GAIN 40× (32 dB) INPUT SENSITIVITY, V RMS full rated power @ 8Ω full rated power @ 4Ω 1.0v (+2.2 dBu) 0.9v (+1.3 dBu) 1.2v (+3.9 dBu) 1.1v (+3.2 dBu) 1.5v (+5.5 dBu) 1.3v (+4.6 dBu) 1.7v (+6.8 dBu) 1.5v (+5.7 dBu) 1.9v (+7.7 dBu) 1.7v (+6.6 dBu) INPUT IMPEDANCE 6 KW unbalanced 12 KW balanced CONTROLS Front: AC switch, Ch. 1 and Ch. 2 gain knobs with 11 detents Rear: 10-position DIP switch INDICATORS POWER: PARALLEL: BRIDGED: CONNECTORS Input: Output: COOLING Continuously variable speed fan, back-to-front air flow AMPLIFIER PROTECTION Full short circuit, open circuit, thermal, ultrasonic, and RF protection Stable into reactive or mismatched loads Green LED Yellow LED Yellow LED CLIP: -10 dB: -20 dB: SIGNAL: Red LED, 1 per channel Green LED, 1 per channel Green LED, 1 per channel Green LED, 1 per channel XLR and ¼" (6.3 mm) TRS, tip and pin 2 positive “Touch-Proof” binding posts and Neutrik Speakon™ S P E C I F I C AT I O N S S P É C I F I C AT I O N S TECHNISCHE DATEN ESPECIFICACIONES PLX 1202 PLX 1602 PLX 2402 LOAD PROTECTION Turn-on/turn-off muting, DC-fault power supply shutdown, clip limiting OUTPUT CIRCUIT TYPE AB AB H PLX 3002 PLX 3402 H H AB: Class AB complementary linear output H: Class AB complementary linear output with Class H 2-step high efficiency circuit DIMENSIONS 19.0" (48.3 cm) wide, 3.5" (8.9 cm) tall (2 rack spaces) 13.2" (33.5 cm) deep (rack mounting to rear support ears) WEIGHT Shipping: 27 lbs (12.3 kg) POWER REQUIREMENTS Available for 120 or 220–240 VAC, 50/60 Hz Typical1 Full2 POWER CONSUMPTION @ 120 VAC (both channels driven) Idle 0.8 A Multiply currents by 0.5 for 230V units 8Ω POWER CONSUMPTION NOTES 3.8 A Net: 21 lbs (9.5 kg) Max3 Typical1 Full2 Max3 Idle 0.9 A 5.4 A 8.4 A Typical1 Full2 Max3 Idle 0.9 A 8Ω 5.6 A 8.0 A 12.5 A 8Ω Typical1 Full2 Max3 Idle 0.9 A 5.0 A 8.4 A 15.8 A 8Ω 6.0 A Typical1 Full2 11 A 20 A 8Ω 7.6 A 4Ω 6.0 A 8.9 A 14.0 A 4Ω 9.0 A 13.3 A 21 A 4Ω 7.9 A 13.5 A 26 A 4Ω 9.5 A 17 A 33 A 4Ω 11.6 A 2Ω 9.6 A 14.3 A* 23 A* 2Ω 14 A 21 A* 34 A* 2Ω 11.8 A 22 A* 42 A* 2Ω 14 A 27 A* 50 A* 2Ω 16.6 A 1 1/8 power with pink noise represents typical program with occasional clipping. 2 1/3 power with pink noise represents severe program with heavy clipping. 3 Continuous sine wave at 1% clipping. Max3 Idle 0.9 A 13.1 A 25 A 20 A 39 A * Thermal or overcurrent cutback limits duration. US patents pending SPECIFICATIONS SUBJECT TO CHANGE WITHOUT NOTICE 29 W A R R A N T Y INFORMATIONS DE G A R A N T I E - INFORMACIÓN DE INFORMATION G A R A N T I E BEDINGUNGEN G A R A N T Í A (USA only; see your dealer or distributor) (É-U seulement; consultez votre marchand ou distributeur) (Nur USA; in anderen Ländern Ihren Fachhändler fragen.) (EE. UU. solamente; consulte su comerciante o su distribuidor) Disclaimer Décharge Haftungserklärung Atención QSC Audio Products, Inc. is not liable QSC Audio products, Inc. ne peut QSC Audio Products, Inc. haftet nicht QSC Audio Products, Inc., no es for any damage to speakers, être tenu responsable de tout für Schäden an Lautsprechern, responsable por daños a las bocinas, amplifiers, or any other equipment dommage à des haut-parleurs, Verstärkern, oder anderen Geräten, amplificadores o cualquier otro that is caused by negligence or amplificateurs, ou tout autre die durch Fahrlässigkeit im Betrieb equipo que sea causado por improper installation and/or use of équipement qui pourrait être dû à de oder durch nachlässige Installation negligencia o mala instalación o uso the PLX amplifier. la négligence ou mauvaise verursacht wurden. de los amplificadores PLX. Produktgarantie Garantía QSC garantiert für die PLX- QSC garantiza que el PLX estará Verstärker einwandfreie Herstellung libre de defectos en piezas o mano Product Warranty QSC guarantees the PLX to be free from defective material and/or 30 installation et/ou utilisation d'un amplificateur PLX. Garantie de produit workmanship for a period of three QSC garantit le produit PLX libre de und Freiheit von Materialmängeln de obra por un período de tres años years from the date of sale, and will défaut de pièce et/ou de fabrication, für die Dauer von drei Jahren nach de la fecha de venta, y cambiará las replace defective parts and repair et ce pour une période de trois ans à Verkaufsdatum. Innerhalb dieser Zeit partes que no funcionen y arreglará malfunctioning products under this partir de la date d'achat, et ersetzt QSC defekte Teile und productos cubiertos por esta warranty when the defect occurs remplacera les pièces défectueuses repariert nicht funktionierende garantía mientras que el defecto under normal installation and use— et réparera le produit sous l'effet de Komponenten /Produkte, wenn der surja bajo condiciones normales de provided the unit is returned to our cette garantie en autant que le Defekt unter normalen uso y asumiendo que la unidad será factory via prepaid transportation produit est installé et utilisé de façon Betriebsumständen auftritt. Dies bei enviada a nuestra fábrica vía with a copy of the proof of purchase, normale, et que le produit est frachtfreiem Versand zum Hersteller, transporte prepagado con una copia i.e., sales receipt. This warranty retourné à notre usine port payé, mit Kaufquittung. Der Garantiefall de la prueba de compra (ejemplo: provides that examination of the accompagné d'une copie de la muss nach unserer Untersuchung recibo de venta). Esta garantía returned product must indicate, in preuve d'achat, i.e. facture originale. und nach unserem Urteil, durch dependerá de una examinación del our judgment, a manufacturing Cette garantie est conditionnelle à einen Herstellungsfehler ausgelöst producto devuelto y deberá indicar, a defect. This warranty does not ce qu'une inspection du produit worden sein. Eine weitergehende nuestro juicio, un defecto de fabrica. extend to any product which has retourné révèle, selon notre Haftung für Produkte, die Esta garantía no se extiende a been subjected to misuse, neglect, jugement, un défaut de fabrication. missbräuchlich genutzt wurden, ningún producto que ha sido accident, improper installation, or Cette garantie ne couvre pas les durch Fahrlässigkeit beschädigt sometido a uso fuera de nuestras where the date code has been produits ayant subi abus, négligence, worden sind, durch Unfall, durch recomendaciones, accidentes, removed or defaced. accident, installation incorrecte, ou unsachgemässe Installation, oder bei instalación deficiente y si el código dont le code de date a été enlevé ou Entfernung des Datumscodes, de la fecha ha sido enmendado o rendu illisible. schliessen wir aus. retirado. A D D R E S S A D R E S S E ANSCHRIFT D I R E C C I Ó N & P O S T A L E UND Y TELEPHONE ET T E L E F O N - T E L É F O N O INFORMATION N U M É R O S N U M M E R N Mailing address / Adresse postale / Postanschrift / Dirección postal: QSC Audio Products, Inc. 1675 MacArthur Boulevard Costa Mesa, CA 92626-1468 USA Telephone Numbers / Numéros de téléphone / Telefonnummern / Números de teléfono: Main Number / Numéro principal / Hauptnummer / Número principal +(714) 754-6175 Sales Direct Line / Ligne directe ventes / Verkauf-Direkt / Línea directo ventas +(714) 957-7100 Sales & Marketing / Ventes & marketing / Verkauf u. Marketing / Ventas y marketing (800) 854-4079 (toll-free in U.S.A. only) (sans frais aux É-U seulement) (zollfrei nur beim USA) (sin costo en EE. UU. solamente) Customer Service / Service à la clientèle / Kundendienst / Servicio a la clientela +(714) 957-7150 (800) 772-2834 (toll-free in U.S.A. only) (sans frais aux É-U seulement) (zollfrei nur beim USA) (sin costo en EE. UU. solamente) Facsimile Numbers / Numéros de télécopieur / Telefaxnummern / Número de FAX: Sales & Marketing FAX / Télécopie ventes & marketing / Telefax der Verkauf u. Marketing / FAX ventas y marketing +(714) 754-6174 Customer Service FAX / Télécopie service à la clientèle / Kundendienst-Telefax / FAX servicio a la clientela +(714) 754-6173 World Wide Web: www.qscaudio.com BBS/World Group: QSC OnLine Technical Support / Support technique QSC enligne / Technische fachberaten QSC „On-Line“ / Soporte técnico QSC "OnLine" 1200-14400 bps; 8N1 +(714) 668-7567 (800) 856-6003 CompuServe: GO QSCAUDIO E-mail: [email protected] [email protected] [email protected] 31 QSC Audio Products, Inc. 1675 MacArthur Boulevard Costa Mesa, California 92626 USA “QSC” and the QSC logo are registered with the U.S. Patent and Trademark Office. ©1998 & 1999 QSC Audio Products, Inc. 32 A Harman International Company PAGE 15 PAGE 15 PAGE 14 PAGE 15 PAGE 9 PAGE 9/12 PAGE 9 PAGE 9 PAGE 10 PAGE 10 PAGE 10 PAGE 11 Page 1 PAGE 14 PAGE 14 PAGE 15 PAGE 11 Page 2 INTRODUCTION Thank you for purchasing a SPIRIT FOLIO SX mixer, brought to you with pride by the SPIRIT team of Andy, Colin, Chris, James, Simon, Mukesh, Graham, Martin, Paul, Matt and Peter, with the support of many others - we hope you will have as much fun using it! Owning a SPIRIT console brings you the expertise and support of one of the industrys leading manufacturers and the results of over 23 years experience supporting some of the biggest names in the business. Built to the highest standards using quality components and new surface mount technology, FOLIO SX is designed to be as easy to use as possible, but some time spent NOW, looking through this manual and getting to know your new mixer will give you lots of helpful tips and confidence, away from the pressures of a live session. Dont be afraid to experiment to find out how each control affects the sound - this will only extend your creativity and help you to get the best from your mixer. Installation and Safety Precautions Installing the Mixer C orrect connection and positioning of your mixer is important for successful and trouble-free operation. The following sections are intended to give guidance with cabling, connections and configuration of your mixer. o Choose the mains supply for the sound system with care, and do not share sockets or earthing with lighting dimmers. o Position the mixer where the sound can be heard clearly. o Run audio cables separately from dimmer wiring, using balanced lines wherever possible. If necessary, cross audio and lighting cables at right angles to minimise the possibility of interference. Keep unbalanced cabling as short as possible. o Check your cables regularly and label each end for easy identification. SAFETY PRECAUTIONS For your own safety and to avoid invalidation of the warranty please read this section carefully. The FOLIO SX mixer must only be connected through the Power Supply supplied. The wires in the mains lead are coloured in accordance with the following code: Earth: Green and Yellow (Green/Yellow - US) Neutral: Blue (White - US) Live: (Black - US) Brown As the colours of the wires in the mains lead may not correspond with the coloured markings identifying the terminals in your plug, proceed as follows: The wire which is coloured Green and Yellow must be connected to the terminal in the plug which is marked with the letter E or by the earth symbol. The wire which is coloured Blue must be connected to the terminal in the plug which is marked with the letter N. The wire which is coloured Brown must be connected to the terminal in the plug which is marked with the letter L. Ensure that these colour codings are followed carefully in the event of the plug being changed. To avoid the risk of fire, replace the mains fuse only with the correct value fuse, as indicated on the power supply. Page 3 CONNECTING IT UP Page 4 WIRING UP Please refer to pages 27/28 for additional wiring details. Balanced Mic XLR 2. Hot(+ve) 3. Cold(-ve) 1. Screen Unbalanced Mic XLR 2. Hot(+ve) Link 3 to 1 1. Screen Balanced 3 pole Jack Unbalanced 3 pole Jack Hot (+ve) Cold (-ve) Gnd/Screen Signal Gnd/Screen Gnd/Screen Tip The mic input accepts XLR-type connectors and is designed to suit a wide range of BALANCED or UNBALANCED low-level signals, whether from delicate vocals requiring the best low-noise performance or close-miked drum kits needing maximum headroom. Professional dynamic, condenser or ribbon mics are best because these will be LOW IMPEDANCE. While you can use low-cost HIGH IMPEDANCE mics, you do not get the same degree of immunity to interference on the microphone cable and as a result the level of background noise may be higher. If you turn the PHANTOM POWER on, the socket provides a suitable powering voltage for professional condenser mics. DO NOT use UNBALANCED sources with the phantom power switched on. The voltage on pins 2 & 3 of the XLR connector may cause serious damage. BALANCED dynamic mics may normally be used with phantom power switched on (contact your microphone manufacturer for guidance). The input level is set using the input SENS knob. The LINE input offers the same gain range as the MIC input, but at a higher input impedance. This is suitable for most line level sources, and provides the gain needed for lower level keyboards and high impedance microphones. WARNING - Start with the input SENS knob turned fully anticlockwise when plugging high level sources into the LINE input to avoid overloading the input channel or giving you a very loud surprise! LINE INPUT Ring Sleeve Inserts Signal Send Signal Return Gnd/Screen Tip Ring MIC INPUT Sleeve Accepts 3-pole `A gauge jacks, or 2-pole mono jacks which will automatically ground the cold input. Use this input for sources other than mics, such as keyboards, drum machines, synths, tape machines or guitars. The input is BALANCED for low noise and immunity from interference, but you can use UNBALANCED sources by wiring up the jacks as shown, although you should then keep cable lengths as short as possible to minimise interference pick-up on the cable. Note that the ring must be grounded if the source is unbalanced. Set the input level using the SENS knob, starting with the knob turned fully anticlockwise. Unplug any MIC connection when using the LINE input. INSERT POINT The unbalanced, pre-EQ insert point is a break in the channel signal path, allowing limiters, compressors, special EQ or other signal processing units to be added in the signal path. The Insert is a 3-pole A gauge jack socket which is normally bypassed. When a jack is inserted, the signal path is broken, just before the EQ section. The signal from the channel appears on the TIP of the plug and is returned on the RING, with the sleeve as a common ground. The Send may be tapped off as an alternative pre-fade, pre-EQ direct output if required, using a lead with tip and ring shorted together so that the signal path is not interrupted. Page 5 STEREO INPUTS 13/14 & 17/18 These accept RCA phono jacks to allow easy connection to hi-fi equipment or DAT players. The input is unbalanced, and ideal for pre-show music sources or signals that do not require any EQ or effects. Mix & Sub Outputs Aux Outputs Mono Output Signal + Signal Screen STEREO INPUTS 15/16 & 19/20 These accept 3-pole `A gauge jacks, or 2-pole mono jacks which will automatically ground the cold input. Use these inputs for sources such as keyboards, drum machines, synths, tape machines or as returns from processing units. The input is BALANCED for low noise and immunity from interference, but you can use UNBALANCED sources by wiring up the jacks as shown, although you should then keep cable lengths as short as possible to minimise interference pick-up on the cable. Note that the ring must be grounded if the source is unbalanced. Mono sources can be fed to both paths by plugging into the Left jack only. Mix Inserts Signal Send Signal Return Gnd/Screen Tip Ring Sleeve MIX INSERTS The unbalanced, pre-fade Mix insert point is a break in the output signal path to allow the connection of, for example, a compressor/limiter or graphic equaliser. The Insert is a 3-pole A gauge jack socket which is normally bypassed. When a jack is inserted, the signal path is broken, just before the mix fader. The mix signal appears on the TIP of the plug and is returned on the RING. A Y lead may be required to connect to equipment with separate send and return jacks as shown below: Signal Send Headphones Send to External Device Insert Point Left Signal Right Signal Ground Screen Signal Return Note: If XLRs are used, join Pins 1 & 3 and connect to cable screen. Connect Pin 2 to signal. Return from External Device MIX & SUB OUTPUTS Monitor Outputs Direct Outputs Signal Ground Ground The MIX and SUB outputs are on 3-pole 3-pole A gauge jack sockets, wired as shown, and incorporate impedance balancing, allowing long cable runs to balanced amplifiers and other equipment. From FOLIO SX Impedance Balanced Output Signal Screen From FOLIO SX Impedance Balanced Output Signal Screen (a) Balanced Connection To External Device Signal Ground (b) Unbalanced Connection To External Device Signal Ground Experience has shown that sometimes it is better not to connect screen at external device end. Page 6 AUX OUTPUTS The Aux outputs are on 3-pole A gauge jack sockets, wired as shown on the left, and incorporate impedance balancing, allowing long cable runs to balanced amplifiers and other equipment. Mix & Sub Outputs Aux Outputs Mono Output Signal + Signal Screen CHANNEL DIRECT OUTPUTS The Direct outputs are on 3-pole A gauge jack sockets, wired as shown on the left, and are unbalanced. HEADPHONES The PHONES output is a 3-pole A gauge jack, wired as a stereo output as shown, suitable for headphones of 200W or greater. 8W headphones are not recommended. Polarity (PHASE) Mix Inserts Signal Send Signal Return Gnd/Screen Tip Ring Sleeve You will probably be familiar with the concept of polarity in electrical signals and this is of particular importance to balanced audio signals. Just as a balanced signal is highly effective at cancelling out unwanted interference, so two microphones picking up the same signal can cancel out, or cause serious degradation of the signal if one of the cables has the +ve and -ve wires reversed. This phase reversal can be a real problem when microphones are close together and you should therefore take care always to connect pins correctly when wiring audio cables. Grounding and Shielding Headphones Left Signal Right Signal Ground For optimum performance use balanced connections where possible and ensure that all signals are referenced to a solid, noise-free earthing point and that all signal cables have their screens connected to ground. In some unusual circumstances, to avoid earth `loops ensure that all cable screens and other signal earths are connected to ground only at their source and not at both ends. If the use of unbalanced connections is unavoidable, you can mimimise noise by following these wiring guidelines: l On INPUTS, unbalance at the source and use a twin, screened cable as though it were balanced. Monitor Outputs Direct Outputs Signal Ground Ground l On OUTPUTS, connect the signal to the +ve output pin, and the ground of the output device to -ve. If a twin screened cable is used, connect the screen only at the mixer end. l Avoid running audio cables or placing audio equipment, close to thyristor dimmer units or power cables. l Noise immunity is improved significantly by the use of low impedance sources, such as good quality professional microphones or the outputs from most modern audio equipment. Avoid cheaper high impedExample 1 ance microphones, which may suffer Audio (with ground connected) Mixer Amplifier from interference over long cable runs, even with well-made cables. Supply Earth Loop Supply l Grounding and shielding is still seen as a black art, and the suggestions above are only guidelines. If your system still hums, an earth loop is the most likely cause. Two examples of how an earth loop can occur are shown on the right Page 7 Mains Earth Example 2 Left Signal (with ground connected) Mixer Earth Loop Right Signal (with ground connected) Amplifier Fault Finding Guide Repairing a sound mixing console requires specialist skills, but basic Fault Finding is within the scope of any user if a few basic rules are followed. l Get to know the Block Diagram of your console (see page 29). l Get to know what each component in the system is supposed to do. l Learn where to look for common trouble spots. The Block Diagram is a representative sketch of all the components of the console, showing how they connect together and how the signal flows through the system. Once you have become familiar with the various component blocks you will find the Block Diagram quite easy to follow and you will have gained a valuable understanding of the internal structure of the console. Each Component has a specific function and only by getting to know what each part is supposed to do will you be able to tell if there is a genuine fault! Many `faults are the result of incorrect connection or control settings which may have been overlooked. Basic Troubleshooting is a process of applying logical thought to the signal path through the console and tracking down the problem by elimination. l Swap input connections to check that the source is really present. Check both Mic and Line inputs. l Eliminate sections of the channel by using the insert point to re-route the signal to other inputs that are known to be working. l Route channels to different outputs or to auxiliary sends to identify problems on the Master section. l Compare a suspect channel with an adjacent channel which has been set up identically. Use PFL and AFL to monitor the signal in each section. Insert contact problems may be checked by using a dummy jack with tip and ring shorted together as shown below. If the signal appears when the jack is inserted it shows that there is a problem with the normalling contacts on the jack socket, caused by wear or damage, or often just dirt or dust. Keep a few in your gig tool box. Wire Link Dummy Insert Bypass Jack Page 8 GETTING TO KNOW YOUR CONSOLE 1 2 Mono Input Channel 1 The first eight channels have a dedicated Direct Output which allows direct connection to external devices, for example to feed Tape Machines or effects units. See the Advanced Features section on page 18 for a full explanation of these outputs. 3 4 DIRECT OUTPUT 2 MIC INPUT The mic input accepts XLR-type connectors and is designed to suit a wide range of BALANCED or UNBALANCED signals. Professional dynamic, condenser or ribbon mics are best because these will be LOW IMPEDANCE. You can use low-cost HIGH IMPEDANCE mics, but the level of background noise will be higher. If you turn the PHANTOM POWER on (top right-hand side of the mixer) the socket provides a suitable powering voltage for professional condenser mics. 5 6 ONLY connect condenser microphones with the +48V powering OFF, and ONLY turn the +48V powering on or off with all output faders DOWN, to prevent damage to the mixer or external devices. 7 TAKE CARE when using unbalanced sources, which may be damaged by the phantom power voltage on pins 2 & 3 of the XLR connector. Unplug any mics if you want to use the LINE Input. The input level is set using the SENS knob. 8 3 Accepts 3-pole `A gauge (TRS) jacks. Use this input for sources other than mics, such as keyboards, drum machines, synths, tape machines or guitars. The input is BALANCED for low noise and top quality from professional equipment, but you can use UNBALANCED sources by wiring up the jacks as shown below, although you should then keep cable lengths as short as possible. Unplug anything in the MIC input if you want to use this socket. Set the input level using the SENS knob. 9 10 11 LINE INPUT 4 INSERT POINT (ALTERNATIVE DIRECT SEND) 12 The unbalanced, pre-EQ insert point is a break in the channel signal path, allowing limiters, compressors, special EQ or other signal processing units to be added in the signal path. The Insert is a 3-pole A gauge jack socket which is normally bypassed. When a jack is inserted, the signal path is broken, just before the EQ section. 13 The Send may be tapped off as an alternative pre-fade, pre-EQ direct output if required, using a lead with tip and ring shorted together so that the signal path is not interrupted (see below). Mono pre-fade Direct Send Signal Send Insert Point Wire Link 14 Screen RCA Phono centre Link pins 1 & 3 XLR XLR Screen 1 3 2 Signal Page 9 5 SENS This knob sets how much of the source signal is sent to the rest of the mixer. Too high, and the signal will distort as it overloads the channel. Too low, and the level of any background hiss will be more noticeable and you may not be able to get enough signal level to the output of the mixer. Setting the knob to the `U mark gives unity gain for the LINE input. Note that some sound equipment, particularly that intended for domestic use, operates at a lower level (-10dBV) than professional equipment and will therefore need a higher gain setting to give the same output level. See `Initial Set Up on page 16 to learn how to set SENS correctly. 6 dB Pressing this switch activates a steep 18dB per octave filter which reduces the level of bass frequencies only, and is a real bonus for a such a small mixer. Use this in live PA situations to clean up the mix, reducing stage rumble or `popping from microphones. 7 20 100Hz HI-PASS FILTER 100Hz Frequency/Hz EQUALISER The Equaliser (EQ) allows fine manipulation of the sound, particularly to improve the sound in live PA applications where the original signal is often far from ideal and where slight boosting or cutting of particular voice frequencies can really make a difference to clarity. There are three sections giving the sort of control usually only found on much larger mixers. The EQ knobs can have a dramatic effect, so use them sparingly and listen carefully as you change any settings so that you get to know how they affect the sound. 20k Muddiness & Rumble dB HF EQ HF 20 Frequency/Hz Turn to the right to boost high (treble) frequencies above 12kHz by up to 15dB, adding crispness to cymbals, vocals and electronic instruments. Turn to the left to cut by up to 15dB, reducing hiss or excessive sibilance which can occur with certain types of microphone. Set the knob in the centre-detented position when not required. 20k dB MID EQ MID 20 Frequency/Hz There are two knobs which work together to form a SWEPT MID EQ. The lower knob provides 15dB of boost and cut, just like the HF EQ knob, but the frequency at which this occurs can be set by the upper knob over a range of 240Hz to 6kHz. This allows some truly creative improvement of the signal in live situations, because this mid band covers the range of most vocals. Listen carefully as you use these controls together to find how particular characteristics of a vocal signal can be enhanced or reduced. Set the lower knob to the centre-detented position when not required. 20k dB LF LF EQ 20 Frequency/Hz Turn to the right to boost low (bass) frequencies below 60Hz by up to 15dB, adding warmth to vocals or extra punch to synths, guitars and drums. Turn to the left to cut low frequencies by up to 15dB for reducing hum, stage rumble or to improve a mushy sound. Set the knob to the centre-detented position when not required. 20k 8 AUX SENDS These are used to set up a separate mixes for FOLDBACK, EFFECTS or recording, and the combination of each the Aux Send is mixed to the respective Aux Output at the rear of the mixer. For Effects it is useful for the signal to fade up and down with the fader (this is called POST-FADE), but for Foldback or Monitor feeds it is important for the send to be independent of the fader (this is called PRE-FADE). AUX SEND 1 This is always PRE-FADE and therefore most appropriate for foldback or monitor mixes or external submix. Page 10 AUX SEND 2 This is normally POST-FADE, and would typically be used as an effects send, but may be switched globally to PRE-FADE using the POST/PRE switch on the Master section, providing a second foldback or monitor send if required. 1 AUX SEND 3 2 3 This is always POST-FADE for effects sends, external submix (or for Centre Voice cluster or mono Tape mix). 9 4 5 PAN This control sets the amount of the channel signal feeding the Right and Left MIX or SUB buses, allowing you to move the source smoothly across the stereo image. When the control is turned fully right or left you are able to route the signal at unity gain to either left or right outputs individually. 10 ON All outputs from the channel except inserts are muted when the ON switch is released and enabled when the switch is down, allowing levels to be pre-set before the before the signal is required. 6 11 MIX / SUB The channel signal may be routed to either the main MIX (switch UP) or SUB buses (switch DOWN). The left/right balance is set by the PAN control (see above) allowing the signal to be sent proportionately to any of the buses. 7 12 FADER The 100mm FADER, with a custom-designed law to give even smoother control of the overall signal level in the channel strip, allows precise balancing of the various source signals being mixed to the Master Section. You get most control when the input SENSITIVITY is set up correctly, giving full travel on the fader. See the `Initial Set Up section on page 16 for help in setting a suitable signal level. 8 13 DIRECT PRE/POST See Direct Output (1) and Advanced Features on page 18 for an explanation of the Direct Output. The output may be selected as either PRE or POST fader. The factory default setting is POST-FADER, but this may be changed by moving an internal switch as shown on the right. 9 10 11 Remove the protective grommet to gain access to the switch and move the switch carefully upwards using a small screwdriver or the end of a POST-FADE pencil. It is advisable to turn the unit off before making this adjustment. 12 13 PRE-FADE Always check all outputs after adjusting to ensure that switching has been successful. 14 14 PFL When the latching PFL switch is pressed, the pre-fade signal is fed to the headphones, control room output and meters, where it replaces the selected monitor source (MIX, SUB or 2TK). The PFL/AFL LED on the Master section illuminates to warn that a PFL is active. This is a useful way of listening to any required input signal without interrupting the main mix, for making adjustments or tracing problems. Page 11 1 STEREO INPUT CHANNEL Each stereo input channel comprises two pairs of inputs per channel strip: 1 INPUTS 13/14 & 17/18 These inputs are unbalanced on RCA phono connectors, and are intended for use with CD players, DAT machines or Hi-Fi equipment. Alternatively they may be used as simple effects returns or stereo instrument inputs. 4 2 LEVEL The LEVEL control sets the level of the channel signal. 2 3 The MIX/SUB switch allows the signal to be routed to either the main MIX (switch up) or SUB mix (switch down). 3 5 MIX/SUB 4 INPUTS 15/16 & 19/20 These inputs accept 3-pole `A gauge (TRS) jacks. Use these inputs for sources such as keyboards, drum machines, synths, tape machines or processing units. The inputs are BALANCED for low noise and top quality from professional equipment, but you can use UNBALANCED sources by wiring up the jacks as shown in the Wiring it Up section earlier in this manual, although you should then keep cable lengths as short as possible. Mono sources may be used by plugging into the left jack only. 6 5 GAIN The GAIN control sets the input level to the channel, allowing matching to a wide range of line level sources. 7 6 EQUALISER HF EQ Turn to the right to boost high (treble) frequencies, adding crispness to percussion from drum machines, synths and electronic instruments. Turn to the left to cut these frequencies, reducing hiss or excessive brilliance. Set the knob in the centre-detented position when not required. The control has a shelving response giving 15dB of boost or cut at 12kHz. 8 9 10 LF EQ Turn to the right to boost low (bass) frequencies, adding extra punch to synths, guitars and drums. Turn to the left to reduce hum, boominess or improve a mushy sound. Set the knob to the centre-detented position when not required. The control has a shelving response giving 15dB of boost or cut at 60Hz. 11 7 AUX SENDS These are used to set up a separate mixes for FOLDBACK, EFFECTS or recording, and the combination of each the Aux Send is mixed to the respective Aux Output at the rear of the mixer. For Effects it is useful for the signal to fade up and down with the fader (this is called POST-FADE), but for Foldback or Monitor feeds it is important for the send to be independent of the fader (this is called PRE-FADE). 12 AUX SEND 1 This is always PRE-FADE and therefore most appropriate for foldback or monitor mixes. Page 12 AUX SEND 2 1 This is normally POST-FADE, and would typically be used as an effects send, but may be switched globally to PRE-FADE using the POST/PRE switch on the Master section, providing a second foldback or monitor send if required. AUX SEND 3 4 This is always POST-FADE. 8 This control sets the amount of the channel signal feeding the Right and Left MIX or SUB buses, allowing you to balance the source in the stereo image. When the control is turned fully right or left you feed only that side of the signal to the mix. Unity gain is provided by the control in the centre-detented position. 2 3 BALANCE 9 ON All outputs from the channel except inserts are muted when the ON switch is released and enabled when the switch is down. 5 10 MIX / SUB The channel signal may be routed in stereo to either the main MIX (switch UP) or SUB buses (switch DOWN). The left/right balance is set by the BAL control (see above). 6 11 The 100mm FADER gives you smooth control of the overall signal level in the channel strip, allowing precise balancing of the various source signals being mixed to the Master Section. It is important that the input level is set correctly to give maximum travel on the fader which should normally be used at around the `0 mark. See the `Initial Set Up section on page 16 for help in setting the right level. 7 12 8 9 10 FADER PFL When the latching PFL switch is pressed, the pre-fade signal is fed in mono to the headphones, control room output and meters, where it replaces the selected monitor source (MIX, SUB or 2TK). The PFL/AFL LED on the Master section illuminates to warn that a PFL is active. The Left and Right meters display the PFL signal in mono. This is a useful way of listening to any required input signal without interrupting the main mix, for making adjustments or tracing problems. 11 12 Page 13 Master Section 1 1 2 3 4 Many professional condenser mics need PHANTOM POWER, which is a method of sending a powering voltage down the same wires as the mic signal. Press the switch to enable the +48V power to all of the MIC inputs. The adjacent LED illuminates when the power is active. TAKE CARE when using unbalanced mics which may be damaged by the phantom power voltage. Balanced dynamic mics can normally be used with phantom power switched on (contact your microphone manufacturer for guidance) Mics should always be plugged in, and all output faders set to minimum before switching the Phantom Power ON to avoid damage to external equipment 5 6 PHANTOM POWER 2 POWER INDICATOR This LED lights to show when power is connected to the console. 7 3 BARGRAPH METERS The three colour peak reading BARGRAPH METERS normally follow the Monitor selection to show the level of the MIX RIGHT and MIX LEFT outputs, giving you a constant warning of excessive peaks in the signal which might cause overloading. Aim to keep the signal just touching the amber segments at peak levels for best performance. 8 9 Similarly, if the output level is too low and hardly registering at all on the meters, the level of background noise may become significant. Take care to set up the input levels for best performance. 11 10 When any PFL switch is pressed, the meters switch to show the selected PFL signal on both meters, in mono. 4 2TK LEVEL The rotary control sets the level of the 2 Track Tape input, which is routed to the headphones, monitor outputs and meters. These inputs, on RCA phono connectors are an ideal to connect the playback of a tape machine for monitoring. 5 MIX/SUB When this switch is released the meters and headphones monitor the Mix signal. Alternatively, pressing the switch selects the SUB mix as the monitor source. 6 2TK Pressing the 2TK switch selects the 2TK input as the monitor source, instead of the MIX or SUB signal (see MIX/SUB above). 7 MONITOR & PHONES LEVEL This control sets the output level to the MONITOR LEFT & RIGHT outputs. If HEADPHONES are plugged into the PHNS jack the Monitor outputs are cut off, and the knob then sets the headphone listening level. When the PHONES are unplugged the Monitor output is restored. 8 AUX MASTERS Each Aux output has a master output level control and associated AFL switch. Page 14 AUX AFLs 1 2 3 4 Just like the PFL switches on the channels, you can monitor each AUX output by pressing the AFL switch. This routes the AUX output signal to the MONITOR or PHONES, replacing any existing signal (normally the Monitor receives either MIX, SUB or 2TK, see above). The METERS also switch from the selected source to display the PFL/AFL signal and the PFL/AFL LED lights to warn that a PFL or AFL switch is pressed. When you release the switch the Monitor swaps back to the previous source. AUX 2 POST/PRE The input channels provide both Pre- and Post-Fade AUX 2 sends which may be selected desk-wide on the Master Section. Press the POST/PRE switch to make all of the AUX 2 Sends on the channel strips PRE-FADE. This means that they will all be unaffected by the position of the channel faders, making them ideal for FOLDBACK or MONITORING. 5 6 7 When the switch is released the AUX 2 Sends are all POST-FADE, and will fade up and down with the channel faders. This is more suitable for effects sends which need to fade out with the associated source. 8 9 The Mix Left and Right signals are summed to a MONO output on a 3 pole A gauge jack. Output level is set by the dedicated rotary control. Monitoring of the Mono output, if required, but be done at the external equipment it feeds, or the signal brought back to a spare console input. 9 11 10 MONO SUM 10 MASTER FADERS The MASTER FADERS set the final level of the MIX and SUB outputs, and separate faders are provided for each output. These should normally be set close to the `0 mark if the input GAIN settings have been correctly set, to give maximum travel on the faders for smoothest control. 11 SUB TO MIX The SUB outputs may be used as independent outputs from the console, or used as true subgroups, routed to the main Mix outputs. When the switch is released the SUB signal feeds the SUB outputs only. With the switch pressed the post-fade Sub Left and Right signals are routed to Mix Left and Right respectively. The Sub outputs remain unaffected. Page 15 USING YOUR FOLIO SX CONSOLE T he final sound from your P.A. system can only ever be as good as the weakest link in the chain, and especially important is the quality of the source signal because this is the starting point of the chain. Just as you need to become familiar with the control functions of your mixer, so you must recognise the importance of correct choice of inputs, microphone placement and input channel settings. However, no amount of careful setting up can take account of the spontaneity and unpredictability of live performance and the mixer must be set up to provide `spare control range to compensate for changing microphone position and the absorption effect of a large audience (different acoustic characteristics from sound check to show). Microphone Placement Cardioid Response Hypercardioid Response Omnidirectional Response Careful microphone placement and the choice of a suitable type of microphone for the job is one of the essentials of successful sound reinforcement. The diagrams on the left show the different pick-up patterns for the most common types of microphone. Cardioid microphones are sensitive to sound coming from in front, and hypercardioid microphones offer even greater directivity, with a small amount of pickup behind the microphone. These types are ideal for recording vocalists or instruments, where rejection of unwanted sounds and elimination of feedback is important. The aim should be to place the microphone as close as physically possible to the source, to cut out unwanted surrounding sounds, allow a lower gain setting on the mixer and avoid feedback. Also a well-chosen and well-placed microphone should not need any appreciable equalisation. There are no exact rules - let your ears be the judge. In the end, the position that gives the desired effect is the correct position! Initial Set Up Once you have connected up your system (see the sections on connection and wiring earlier in this manual for guidance) you are ready to set initial positions for the controls on your mixer. The front panel drawing inside the rear cover shows typical initial control positions which may be found a useful guide to setting up the mixer for the first time. Set up individual input channel as follows: l Connect your sources (microphone, keyboard etc.) to the required inputs. Note: Phantom powered mics should be connected before the +48V is switched on. Route the channel to Mix. l Set Master faders at 0, input faders at 0, and set power amplifier levels to about 70%. l Provide a typical performance level signal and press the PFL button on the first channel, monitoring the level on the bargraph meters. l Adjust the input gain until the meter display is in the amber section, with occasional peaks to the first red LED at a typical maximum source level. This allows sufficient headroom to accommodate peaks and establishes the maximum level for normal operation (but see note below). Page 16 l Repeat this procedure on other channels as required. As more channels are added to the mix, the meters may move into the red section. Adjust the overall level using the Master Faders if necessary. l Listen carefully for the characteristic sound of `feedback. If you cannot achieve satisfactory input level setting without feedback, check microphone and speaker placement and repeat the exercise. If feedback persists, it may be necessary to use a Graphic Equaliser to reduce the system response at particular resonant frequencies. Note: The initial settings should only be regarded as a starting point for your mix. It is important to remember that many factors affect the sound during a live performance, for instance the size of the audience! You are now ready to start building the mix and this should be done progressively, listening carefully for each component in the mix and watching the meters for any hint of overload. If this occurs, back off the appropriate Channel Fader slightly until the level is out of the red segments, or adjust the Master Faders. Remember that the mixer is a mixer, not an amplifier. Increasing the overall level is the job of the amplifier, and if it is found impossible to provide adequate level, it is probable that the amplifier is too small for the application. Choose your amplifier carefully, and do not try to compensate for lack of power by using the mixer to increase output level. Note: The level of any source signal in the final output is affected by many factors, principally the Input Sensitivity control, Channel Fader, Sub and Mix Faders. You should try to use only as much microphone gain as required to achieve a good balance between signals, with the faders set as described above. If the input gain is set too high, the channel fader will need to be pulled down too far in compensation to leave enough travClipped el for successful mixing and there is a Signal greater risk of feedback because small fader movements will have a very significant effect on output level. Also Noise there will be a chance of distortion as the signal overloads the channel and If the signal level is too high, clipping distortion causes clipping. may occur. If the gain is set too low, you will not find enough gain on the faders to bring the signal up to an adequate level, and backgound hjiss will be more noticeable. Signal Noise This is illustrated on the right: If the signal level is too low it may be masked by the noise. Page 17 Advanced Features 1 DIRECT OUTPUT The Direct outputs on the first eight channels allow you to record signals direct to a multitrack tape machine. Normally they are set POST-FADER but can be changed to PRE-FADER by moving the internal PRE/POST switch (13) accessible through an aperture covered by a grommet beside the fader on channel 1 (see below). POST-FADE PRE-FADE In the POST-FADER position the outputs may be used as individual effects sends or to provide fader control of recording levels in a studio recording application. For live recording, the outputs would normally be set to PRE-FADE, so that the direct output levels remain unaffected by fader settings for the main PA mix. The direct output level may be monitored by pressing the PFL switch on the appropriate channel to feed the pre-fade signal to the monitors and the bargraph meters. In applications where more than 8 tracks are being created, the Direct outputs may be split to feed multiple tape tracks in blocks of 8, and individual tracks enabled on the recorder. Note also that the insert sends may also be used as an alternative pre-fade, pre-EQ direct output, using a lead with tip and ring shorted together so that the signal path is not interrupted. Refer to page 9 for an example. Page 18 USING THE FOLIO SX ON LOCATION The FOLIO SX may be powered from a DC source of 11-18V using the optional Portapower unit, for applications where a source of mains power is unavailable. Contact your dealer for further details, quoting Spirit Part No ZZ2849. Page 19 Application 1 - LIVE SOUND REINFORCEMENT This drawing shows a typical configuration for sound reinforcement with the main PA fed from Mix L & R, plus an additional centre fill fed from the Mono output. The Aux sends are used for foldback and effects, and Sub L & R are used to feed a recorder. In this case all channels would be routed to SUB, and SUB TO MIX pressed to routed all sources to SUB and MIX. Using Delay IN REINFORCEMENT SYSTEMS The drawing below illustrates how to calculate delay settings for fill speakers in multiple speaker installations. Page 20 APPLICATION 2 - MULTISPEAKER APPLICATIONS This configuration demonstrates how multiple speaker configurations can be driven by the FOLIO SX. APPLICATION 3 - PLACES OF WORSHIP This mono configuration uses the Mono output to drive the main speaker system and an induction loop for the hard of hearing. Aux sends are used for monitors and effects and Mix L & R feed a cassette or DAT machine to record the occasion if required. Page 21 APPLICATION 4 - RECORDING The direct outputs on channels 1-8 may be used to feed a multitrack recorder as shown. The direct outputs should be set to PRE, so that they are unaffected by fader position. The Mix outputs are used for a preliminary stereo mix on a DAT recorder. Application 5 - LINKING TWO FOLIO SX CONSOLES Two or more FOLIO SX consoles may be combined to create a larger number of input channels by connecting Mix and Aux outputs from one console to the Stereo and Line inputs on another as shown. Note that the PFL/AFL systems remain separate on each console. Page 22 CARE OF YOUR MIXER General Precautions l Avoid storing or using the mixer in conditions of excessive heat or cold, or in positions where it is likely to be subject to vibration, dust or moisture. l Keep the mixer clean using a soft dry brush, and an occasional wipe with a damp cloth or ethyl alcohol. Do not use any other solvents which may cause damage to paint or plastic parts. l Avoid placing drinks or smoking materials on or near the mixer. Sticky drinks and cigarette ash are frequent causes of damage to faders and switches. Regular care and inspection will be rewarded by a long life and maximum reliability. Glossary AFL (After Fade Listen) a function that allows the operator to monitor the post-fade signal in a channel independently of the main mix. auxiliary send an output from the console comprising a mix of signals from channels and groups derived independently of the main stereo/group mixes. Typically the feeds to the mix are implemented on rotary level controls. balance the relative levels of the left and right channels of a stereo signal. balanced a method of audio connection which balances the signal between two wires and a screen which carries no signal. Any interference is picked up equally by the two wires, but out of phase resulting in cancellation of the interference signal. clipping the onset of severe distortion in the signal path, usually caused by the peak signal voltage being limited by the circuits power supply voltage. DAT Digital Audio Tape, a cassette-based digital recording format. dB (decibel) a ratio of two voltages or signal levels, expressed by the equation dB=20Log10 (V1/V2). Adding the suffix u denotes the ratio is relative to 0.775V RMS. DI(direct injection)/DI Box the practice of connecting an electric musical instrument directly to the input of the mixing console, rather than to an amplifier and loudspeaker which is covered by a microphone feeding the console. direct output a post fade line level output from the input channel, bypassing the summing amplifiers, typically for sending to individual tape tracks during recording. equaliser a device that allows the boosting or cutting of selected bands of frequencies in the signal path. fader a linear control providing level adjustment feedback the `howling sound caused by bringing a microphone too close to a loudspeaker driven from its amplified signal. foldback a feed sent back to the artistes via loudspeakers or headphones to enable them to monitor the sounds they are producing. frequency response the variation in gain of a device with frequency. gain/input sensitivity the variation in level of the signal Page 23 (sub) group an output into which a group of signals can be mixed. headroom the available signal range above the nominal level before clipping occurs. highpass filter a filter that rejects low frequencies. impedance balancing a technique used on unbalanced outputs to minimise the effect of hum and interference when connecting to external balanced inputs. insert a break point in the signal path to allow the connection of external devices, for instance signal processors or to another mixer line level signals at a nominal level of -10 to +6dBu, usually coming from a low impedance source. pan (pot) abbreviation of panorama: controls levels sent to left and right outputs. peaking an equaliser response curve affecting only a band of frequencies i.e. based on a bandpass response. PFL (pre-fade listen) a function that allows the operator to monitor the pre-fade signal in a channel independently of the main mix. phase a term used to describe the relationship of two audio signals. In-phase signals reinforce each other, out-of-phase signals result in cancellation. polarity a term used to describe the orientation of the positive and negative poles of an audio connection. Normally connections are made with positive to positive, negative to negative and this would correct polarity. If this is reversed, the result will be out-of-phase signals (see phase above). post-fade the point in the signal path after the monitor or master fader and therefore affected by fader position. pre-fade the point in the signal path before the monitor or master fader position and therefore unaffected by the fader position. rolloff a fall in gain at the extremes of the frequency response. shelving an equaliser response affecting all frequencies above or below the break frequency i.e. a highpass or lowpass derived response. spill acoustic interference from other sources. transient a momentary rise in the signal level. unbalanced a method of audio connection which uses a single wire and the cable screen as the signal return. This method does not provide the noise immunity of a balanced input (see above) +48V the phantom power supply, available at the channel mic inputs, for condenser microphones and active DI boxes. Page 24 TYPICAL SPECIFICATIONS NOISE Measured RMS, 20Hz to 20kHz Bandwidth Line inputs selected at unity gain and terminated 150R AUX, MIX, SUB O/Ps 16 Inputs routed, faders & pots down <85 dBu E.I.N. -129 dBu CROSSTALK Microphone Input, Maximum Gain, terminated 150R Channel mute Fader cutoff (rel to 0 mark) Routing isolation Aux Sends pots offness 1kHz <95 dB <90dB <90dB <85dB 10kHz <85 dB <80dB <80dB <80dB FREQUENCY RESPONSE T.H.D. Mic/Line In to any output 25Hz to 30kHz <1dB Mic Sens. -30dBu, +20dBu at all outputs @ 1kHz < 0.006% INPUT & OUTPUT IMPEDANCES Microphone Input Line Input Stereo Input A/B Stereo Input C/D Direct Out, Sub-Mix, Aux, Insert 1.8 kW 10 kW 12 kW 10 kW 75 W INPUT & OUTPUT LEVELS Mic Input Maximum Level Line Input Maximum Level Stereo Input Maximum Level Headphones (@200W) Page 25 +22 dBu >+30dBu >+30 dBu 150mW DIMENSIONS All dimensions are in millimetres (inches in brackets). 80.0 (3.15") inc. conns 33.0 (1.29") 511.5 (20.14") 40.0 (1.57") 440.0 (17.32") 479.0 (18.86") 60.0 (2.36") Rack Mount Option inc. knobs 443.5 (17.46") 10U 440.0 (17.32") 483.0 (19") FITTING THE Rack MounT OPTION The FOLIO SX may be rack mounted using the optional rack-mounting kit which requires only a posidriv screwdriver and pliers for installation. The procedure is as follows: o Remove the moulded side cheeks by releasing 3 screws each side. o Remove the base panel by releasing 10 screws, noting the small cutout at the front edge. o Carefully release the power connector by sqeezing the moulded side clips with pliers (note that you do not have to disconnect the wiring) and reposition it in the cutout on the bottom edge of the panel (see illustration). o Replace the base panel with the cutout at the rear of the desk, positioned over the power connector. o Fit the rack-mount side brackets with the mounting flanges to the front of the desk. Page 26 Rack Mount Normal Rear of fascia Power Supply Connector Location APPENDIX 1 - TYPICAL CONNECTING LEADS Balanced - Line, Mix L & R, Sub L & R, Aux, Stereo Inputs Unbalanced - Direct Output, Control Room L & R, Stereo Inputs Insert Leads - Mono Inserts, Mix L & R Inserts Page 27 ’Y’ Leads (Balanced) Headphone Splitter Headphone Separator ’Y’ Leads (Unbalanced) Page 28 3 1 2 DIRECT PRE / POST POST PRE MIC/LINE GAIN Page 29 HF & LF EQ 100Hz PFL / ENABLE ON FADER HIGH PASS FILTER ON STEREO INPUTS 13 - 20 R L STEREO INPUTS 13/14 (17/18 SIMILAR) STEREO INPUTS 15/16 (19/20 SIMILAR) R L HF & LF EQ MONO INPUTS 1 - 12 CH. 1 - 8 ONLY DIRECT OUTPUT LINE INPUT MIC INPUT +48V FADER PAN INSERT EQ BAL MIX / SUB MIX / SUB MIX / SUB PFL / ENABLE AUX3 AUX2 AUX1 AUX3 AUX2 AUX1 PFL/AFL BUS L ▲ AUX2 PRE AUX2 POST AUX1 (AUX 3 SIMILAR) SUB RIGHT SUB LEFT PFL ENABLE PFL/AFL R 2 TRACK MIX RIGHT MIX LEFT AUX2 POST / PRE MASTER INSERT INSERT AFL MIX R MIX L 2 TRK FADER FADER AFL SUB TO MIX +48V FADER FADER MIX / SUB +48V POWER PHONES R METER/ PFL/AFL L METER/ PFL/AFL MONO AUX2 AUX1 (3) SUB RIGHT OUT SUB LEFT OUT C/RM R C/RM L PHONES MONO OUT MIX RIGHT MIX LEFT SYSTEM BLOCK DIAGRAM SUB RIGHT BUS SUB LEFT BUS MIX RIGHT BUS MIX LEFT BUS AUX BUSSES ▲ Page 30 A Harman International Company » CD-RW700 3D0031900A CD Rewritable Recorder OWNER’S MANUAL Ü ÿ Ÿ CAUTION: TO REDUCE THE RISK OF ELECTRIC SHOCK, DO NOT REMOVE COVER (OR BACK). NO USER-SERVICEABLE PARTS INSIDE. REFER SERVICING TO QUALIFIED SERVICE PERSONNEL. The lightning flash with arrowhead symbol, within an equilateral triangle, is intended to alert the user to the presence of uninsulated “dangerous voltage” within the product’s enclosure that may be of sufficient magnitude to constitute a risk of electric shock to persons.. The exclamation point within an equilateral triangle is intended to alert the user to the presence of important operating and maintenance (servicing) instructions in the literature accompanying the appliance. This appliance has a serial number located on the rear panel. Please record the model number and serial number and retain them for your records. Model number Serial number WARNING: TO PREVENT FIRE OR SHOCK HAZARD, DO NOT EXPOSE THIS APPLIANCE TO RAIN OR MOISTURE. Important Safety Precautions Note for U.K. Customers TO THE USER DO NOT cut off the mains plug from this equipment. If the plug fitted is not suitable for the power points in your home or the cable is too short to reach a power point, then obtain an appropriate safety approved extension lead or consult your dealer. If nonetheless the mains plug is cut off, remove the fuse and dispose of the plug immediately, to avoid a possible shock hazard by inadvertent connection to the mains supply. If this product is not provided with a mains plug, or one has to be fitted, then follow the instructions given below: IMPORTANT: DO NOT make any connection to the larger terminal which is marked with the letter E or by the safety earth symbol ç or coloured GREEN or GREEN-and-YELLOW. The wires in the mains lead on this product are coloured in accordance with the following code: BLUE BROWN : NEUTRAL : LIVE As these colours may not correspond with the coloured markings identifying the terminals in your plug proceed as follows: This equipment has been tested and found to comply with the limits for a Class B digital device, pursuant to Part 15 of the FCC Rules. These limits are designed to provide reasonable protection against interference in a residential area. This device generates and uses radio frequency energy and if not installed and used in accordance with the instructions, it may cause interference to radio or TV reception. If this unit does cause interference with TV or radio reception you can try to correct the interference by one or more of the following measures: a) b) b) c) b) b) b) Reorient or relocate the receiving antenna. Increase the separation between the equipment and the receiver. Plug the equipment into a different outlet so that it is not on the same circuit as the receiver. If necessary, consult the dealer or an experienced radio/TV technician for additional suggestions. CAUTION Changes or modifications to this equipment not expressly approved by TEAC CORPORATION for compliance could void the user’s authority to operate For the consumers in Europe WARNING This is a Class A product. In a domestic environment, this product may cause radio interference in which case the user may be required to take adequate measures. Pour les utilisateurs en Europe The wire which is coloured BLUE must be connected to the terminal which is marked with the letter N or coloured BLACK. The wire which is coloured BROWN must be connected to the terminal which is marked with the letter L or coloured RED. When replacing the fuse only a correctly rated approved type should be used and be sure to re-fit the fuse cover. IF IN DOUBT — CONSULT A COMPETENT ELECTRICIAN. 2 TASCAM CD-RW700 AVERTISSEMENT Il s’agit d’un produit de Classe A. Dans un environnement domestique, cet appareil peut provoquer des interférences radio, dans ce cas l’utilisateur peut être amené à prendre des mesures appropriées. Für Kunden in Europa Warnung Dies is eine Einrichtung, welche die Funk-Entstörung nach Klasse A besitzt. Diese Einrichtung kann im Wohnbereich Funkstörungen versursachen ; in diesem Fall kann vom Betrieber verlang werden, angemessene Maßnahmen durchzuführen und dafür aufzukommen. IMPORTANT SAFETY INSTRUCTIONS CAUTION: … Read all of these Instructions. … Save these Instructions for later use. … Follow all Warnings and Instructions marked on the audio equipment. 1) Read Instructions — All the safety and operating instructions should be read before the product is operated. 2) Retain Instructions — The safety and operating instructions should be retained for future reference. 3) Heed Warnings — All warnings on the product and in the operating instructions should be adhered to. 4) Follow Instructions — All operating and use instructions should be followed. 5) Cleaning — Unplug this product from the wall outlet before cleaning. Do not use liquid cleaners or aerosol cleaners. Use a damp cloth for cleaning. 6) Attachments — Do not use attachments not recommended by the product manufacturer as they may cause hazards. 7) Water and Moisture — Do not use this product near water — for example, near a bath tub, wash bowl, kitchen sink, or laundry tub; in a wet basement; or near a swimming pool; and the like. 8) Accessories — Do not place this product on an unstable cart, stand, tripod, bracket, or table. The product may fall, causing serious injury to a child or adult, and serious damage to the product. Use only with a cart, stand, tripod, bracket, or table recommended by the manufacturer, or sold with the product. Any mounting of the product should follow the manufacturer’s instructions, and should use a mounting accessory recommended by the manufacturer. 9) A product and cart combination should be moved with care. Quick stops, excessive force, and uneven surfaces may cause the product and cart combination to overturn. 10) Ventilation — Slots and openings in the cabinet are provided for ventilation and to ensure reliable operation of the product and to protect it from overheating, and these openings must not be blocked or covered. The openings should never be blocked by placing the product on a bed, sofa, rug, or other similar surface. This product should not be placed in a built-in installation such as a bookcase or rack unless proper ventilation is provided or the manufacturer’s instructions have been adhered to. 11) Power Sources — This product should be operated only from the type of power source indicated on the marking label. If you are not sure of the type of power supply to your home, consult your product dealer or local power company. For products intended to operate from battery power, or other sources, refer to the operating instructions. 12) Grounding or Polarization — This product may be equipped with a polarized alternating-current line plug (a plug having one blade wider than the other). This plug will fit into the power outlet only one way. This is a safety feature. If you are unable to insert the plug fully into the outlet, try reversing the plug. If the plug should still fail to fit, contact your electrician to replace your obsolete outlet. Do not defeat the safety purpose of the polarized plug. 13) Power-Cord Protection — Power-supply cords should be routed so that they are not likely to be walked on or pinched by items placed upon or against them, paying particular attention to cords at plugs, convenience receptacles, and the point where they exit from the product. 14) Outdoor Antenna Grounding — If an outside antenna or cable system is connected to the product, be sure the antenna or cable system is grounded so as to provide some protection against voltage surges and builtup static charges. Article 810 of the National Electrical Code, ANSI/NFPA 70, provides information with regard to proper grounding of the mast and supporting structure, grounding of the lead-in wire to an antenna discharge unit, size of grounding conductors, location of antenna-discharge unit, connection to grounding electrodes, and requirements for the grounding electrode. "Note to CATV system installer: This reminder is provided to call the CATV system installer’s attention to Section 820-40 of the NEC which provides guidelines for proper grounding and, in particular, specifies that the cable ground shall be connected to the grounding system of the building, as close to the point of cable entry as practical. Example of Antenna Grounding as per National Electrical Code, ANSI/NFPA 70 ANTENNA LEAD IN WIRE GROUND CLAMP ANTENNA DISCHARGE UNIT (NEC SECTION 810-20) ELECTRIC SERVICE EQUIPMENT GROUNDING CONDUCTORS (NEC SECTION 810-21) GROUND CLAMPS POWER SERVICE GROUNDING ELECTRODE SYSTEM (NEC ART 250. PART H) NEC - NATIONAL ELECTRICAL CODE 15) Lightning — For added protection for this product during a lightning storm, or when it is left unattended and unused for long periods of time, unplug it from the wall outlet and disconnect the antenna or cable system. This will prevent damage to the product due to lightning and power-line surges. 16) Power Lines — An outside antenna system should not be located in the vicinity of overhead power lines or other electric light or power circuits, or where it can fall into such power lines or circuits. When installing an outside antenna system, extreme care should be taken to keep from touching such power lines or circuits as contact with them might be fatal. 17) Overloading — Do not overload wall outlets, extension cords, or integral convenience receptacles as this can result in risk of fire or electric shock. 18) Object and Liquid Entry — Never push objects of any kind into this product through openings as they may touch dangerous voltage points or short-out parts that could result in a fire or electric shock. Never spill liquid of any kind on the product. 19) Servicing — Do not attempt to service this product yourself as opening or removing covers may expose you to dangerous voltage or other hazards. Refer all servicing to qualified service personnel. 20) Damage Requiring Service — Unplug this product from the wall outlet and refer servicing to qualified service personnel under the following conditions: a) when the power-supply cord or plug is damaged. b) if liquid has been spilled, or objects have fallen into the product. c) if the product has been exposed to rain or water. d) if the product does not operate normally by following the operating instructions. Adjust only those controls that are covered by the operating instructions as an improper adjustment of other controls may result in damage and will often require extensive work by a qualified technician to restore the product to its normal operation. e) if the product has been dropped or damaged in any way. f ) when the product exhibits a distinct change in performance – this indicates a need for service. 21) Replacement Parts — When replacement parts are required, be sure the service technician has used replacement parts specified by the manufacturer or have the same characteristics as the original part. Unauthorized substitutions may result in fire, electric shock, or other hazards. 22) Safety Check — Upon completion of any service or repairs to this product, ask the service technician to perform safety checks to determine that the product is in proper operating condition. 23) Wall or Ceiling Mounting — The product should be mounted to a wall or ceiling only as recommended by the manufacturer. 24) Heat — The product should be situated away from heat sources such as radiators, heat registers, stoves, or other products (including amplifiers) that produce heat. TASCAM CD-RW700 3 SAFETY INFORMATION This product has been designed and manufactured according to FDA regulations "title 21, CFR, chapter 1, subchapter J, based on the Radiation Control for Health and Safety Act of 1968", and is classified as a class 1 laser product. There is no hazardous invisible laser radiation during operation because invisible laser radiation emitted inside of this product is completely confined in the protective housings. The label required in this regulation is shown 1. CAUTION - DO NOT REMOVE THE PROTECTIVE HOUSING USING A SCREWDRIVER. - USE OF CONTROLS OR ADJUSTMENTS OR PERFORMANCE OF PROCEDURES OTHER THAN THOSE SPECIFIED HEREIN MAY RESULT IN HAZARDOUS RADIATION EXPOSURE. - IF THIS PRODUCT DEVELOPS TROUBLE, CONTACT YOUR NEAREST QUALIFIED SERVICE PERSONNEL, AND DO NOT USE THE PRODUCT IN ITS DAMAGED STATE. Voltage Conversion (General export models only) Be sure to remove the power cord from the AC outlet before repositioning the voltage converter switch. 1.Locate the voltage selector on the rear panel. 2.Using a flat-bladed screwdriver, set to the appropriate 230V or 120V position according to your area. Optical pickup: Type : KRS-202A or KRS-220B Manufacturer : SONY Corporation Laser output : Less than 0.1 mW (Play) and 32 mW Laser output : (Record) on the objective lens Wavelength : 777 - 787 nm Pour le CANADA For CANADA AC POWER CORD CONNECTION CAUTION: TO PREVENT ELECTRIC SHOCK, MATCH WIDE BLADE OF PLUG TO WIDE SLOT, FULLY INSERT. 4 TASCAM CD-RW700 CORDE DE CONNEXION CA ATTENTION: POUR ÉVITER LES CHOCS ÉLECTRIQUES, INTRODUIRE LA LAME LA PLUS LARGE DE LA FICHE DANS LA BORNE CORRESPONDANTE DE LA PRISE ET POUSSER JUSQU’AU FOND. Table of Contents D E F G H I J K L 1 - Introduction 1.1 1.2 About CD-R and CD-RW discs .........6 Finalizing ............................................7 1.2.1 1.2.2 1.3 “Recordable” discs ....................................7 About this manual ......................................7 Unpacking the CD-RW700 .................7 1.3.1 1.4 Rack-mounting the unit .............................7 Environmental considerations .........7 1.4.1 1.4.2 1.4.3 1.4.4 1.4.5 1.4.6 1.4.7 Beware of condensation ............................8 Never use a stabilizer or printable discs .8 Handling of compact discs .......................8 Additional notes with regard to CD-R and CD-RW discs .............................8 Recommended media ................................9 Default settings ..........................................9 Dimensional drawing .................................9 2 - Features of the CD-RW700 2.1 2.2 1 2 3 4 5 6 7 8 9 A B C D E F G H I J K L M N O P Q 2.3 1 2 3 4 5 6 7 8 9 A B C 2.3.1 2.4 2.5 Remote control unit .........................12 POWER key ........................................12 OPEN/CLOSE key ..............................12 Number keys (0 through 10 and +10) .............................................12 CLEAR key .........................................12 REPEAT key .......................................12 DISPLAY key ......................................12 MENU key ...........................................12 ENTER key .........................................12 FADER key .........................................12 MONITOR key ....................................12 PLAY MODE key ................................12 FINALIZE key .....................................12 Setting the clock ...................................... 13 Setting the timer ...................................... 14 Using the timer ......................................... 14 3 - Playback operations 3.1 Simple playback operations ........... 15 3.1.1 3.1.2 3.1.3 3.2 3.3 Time display modes ................................ 15 Track search ............................................. 15 Playback modes ....................................... 15 Programmed order playback ......... 16 Repeat play ...................................... 16 4 - Recording 4.1 Input selection ................................. 17 4.1.1 4.1.2 4.1.3 4.2 4.3 Playing back tracks ................................. 18 Time display while recording ................. 18 Manual track division .............................. 19 Restricting the number of tracks ........... 19 Full disc .................................................... 19 Advanced recording ....................... 19 4.3.1 4.3.2 4.3.3 4.3.4 4.3.5 4.3.6 4.4 Signal volume .......................................... 17 Input monitoring ...................................... 17 Frequency conversion ............................ 17 Basic recording ............................... 18 4.2.1 4.2.2 4.2.3 4.2.4 4.2.5 Rear panel ........................................12 ANALOG IN (L, R) (UNBALANCED) .12 ANALOG OUT (L, R) (UNBALANCED) ................................12 DIGITAL COAXIAL (IN, OUT) ............12 DIGITAL OPTICAL (IN, OUT) ............12 Connections .................................... 13 Timer operations ............................. 13 2.5.1 2.5.2 2.5.3 Front panel .......................................11 POWER switch (STANDBY/ON) ..............11 Disc tray ....................................................11 OPEN/CLOSE key .....................................11 RHSL key ..................................................11 DIGITAL DIRECT ......................................11 INPUT SELECT .........................................11 REMOTE SENSOR ....................................11 Display ......................................................11 MENU key ..................................................11 DISPLAY key ......................................11 MULTI JOG control ...........................11 TIMER switch (PLAY, OFF, REC) .....11 PHONES jack and LEVEL control ....11 REC LEVEL controls .........................11 FINALIZE key .....................................11 ERASE key .........................................11 STOP key ...........................................12 PLAY key ............................................12 PAUSE key .........................................12 RECORD key ......................................12 SYNC REC key ...................................12 FADER key .........................................12 ERASE key ........................................ 12 RECORD key ..................................... 12 SYNC REC key .................................. 13 REC MUTE key ................................. 13 SEARCH keys ................................... 13 SKIP keys .......................................... 13 STOP key .......................................... 13 PAUSE key ........................................ 13 PLAY key ........................................... 13 Use of the remote control unit ................ 13 Synchronized recording .......................... 19 Automatic track division ......................... 21 SCMS and the CD-RW700 ....................... 22 Digital direct ............................................. 22 Rec mute function ................................... 23 Fade-in and fade-out ............................... 23 Rehearsal ......................................... 23 4.4.1 4.4.2 Rehearsal for synchronized recording .. 24 Rehearsal for track division .................... 25 5 - After recording 5.1 Finalizing .......................................... 26 5.1.1 5.2 Unfinalizing CD-RW discs ....................... 26 Erasing ............................................. 26 5.2.1 5.2.2 5.2.3 Erasing tracks .......................................... 26 Erasing a whole disc ............................... 27 Refreshing a disc ..................................... 27 6 - Reference and specifications 6.1 6.2 Troubleshooting .............................. 28 Specifications .................................. 28 TASCAM CD-RW700 5 1 - Introduction The CD-RW700 CD rewritable recorder allows you to make your own CDs from a variety of sources— other CDs, MD recordings, analog cassette tapes, and records. Tracks can be recorded all at one time, or added, until the disc is “finalized”, allowing it to be played on CD players. NOTE ate permission from the copyright holder or the rightful licensor, your unauthorized recording, reproduction or distribution thereof may result in severe criminal penalties under copyright laws and international copyright treaties. If you are uncertain about your rights, contact your legal advisor. Under no circumstances will TEAC Corporation be responsible for the consequences of any illegal copying performed using the CD-RW700. Some models of CD player may be unable to play certain discs produced using the CD-RW700. 1.1 About CD-R and CD-RW discs A variety of sophisticated features are incorporated in the CD-RW700, allowing a wide degree of flexibility. The CD-RW700 uses CD-R and CD-RW Digital media. The CD-RW700 provides analog unbalanced audio inputs and outputs for connection to –10 dBV equipment. In addition, coaxial and optical inputs and outputs are provided for recording from and playing back to suitably-equipped digital audio equipment. The analog and digital signals may be mixed, allowing unprecedented versatility while recording. 24-bit digital-to-analog and analog-to-digital converters provide excellent recording and playback quality. CD-R discs can be recorded once only. Once they have been used for recording, they cannot be erased or re-recorded. However, if space is available on the disc, additional material can be recorded. The packaging of CD-R discs will include the following logo: A sampling frequency convertor is incorporated, allowing the recording of CDs from digital audio sources which are at frequencies other than the CD standard sampling frequency of 44.1 kHz. Track divisions can be entered manually, or can produced automatically as a response to the input signal level. A recording buffer ensures that even the first milliseconds of a track are recorded, and a rehearsal mode allows the precise positioning of track divisions, allowing the elimination of false starts or late entries. “One-touch” fade-ins and fade-outs over a specified time allow you to edit program material to your specific requirements. A multi-function “multi jog” dial is used to set and confirm parameter settings. A wireless remote control unit allows control of the CD-RW700 from remote locations. NOTE This product is designed to help you record and reproduce sound works to which you own the copyright, or where you have obtained permission from the copyright holder or the rightful licensor. Unless you own the copyright, or have obtained the appropri- 6 TASCAM CD-RW700 By contrast, a CD-RW disc can be used in much the same way as a CD-R disc, but the last track or tracks recorded can be erased before the disc has been “finalized”, and the space on the disc can be re- used for other recordings. The packaging of CD-RW discs will include the a logo similar to the following: However, you should note that an audio CD created using a CD-RW disc may not play back satisfactorily on every audio CD player. It will, naturally, be playable on the CD-RW700. This is in no way a limitation of the CD-RW700 itself, but of the difference between the different types of media and the methods used to read them. CD-R discs created on the CD-RW700, by contrast, may be played satisfactorily on the majority of audio CD players. 1 • Introduction—Finalizing For details of disc brands that are known to work well with the CD-RW700, see 1.4.5, “Recommended media”. 1.2 Finalizing Although audio data may be written on a CD-R or CD-RW disc, a standard CD player will not be able to read the data (i.e. play back the audio) until a final table of contents (TOC) has been written at the start of the disc. The process of writing this table of contents is known as “finalizing”. Once this has been done, no further data can be written to the disk. See 5.1, “Finalizing” for details. In the case of a CD-RW disc which has been finalized, the whole of the disc may be erased, or the disc may be “refreshed”, and the disc re-used. 1.3 Unpacking the CD-RW700 When unpacking the unit, you should find the following items, in addition to this manual: • • • • The main unit itself The remote control unit Two AA batteries for the remote control unit A rack-mounting screw kit 1.3.1 Rack-mounting the unit Use the rack-mounting kit to mount the unit in a standard 19-inch equipment rack, as shown below. Remove the feet of the unit before mounting it. See 1.4, “Environmental considerations” below for details of ventilation, etc. In addition, a CD-RW disc that has been finalized may be “unfinalized”, i.e. the TOC is removed. This allows further tracks to be recorded to the disc, provided that there is space on the disc. 1.2.1 “Recordable” discs In this manual, we use the term “recordable” disc to describe a CD-R or CD-RW disc that has not been finalized, i.e. further recording is possible on the disc. 1.2.2 About this manual In this manual, we use the following conventions: • The names of keys and controls are given in the following typeface: ERASE. • When the alphanumeric portion of the display shows a message, this is shown in the following typeface: Welcome. • If a preset indicator in the display (i.e. one which cannot change, but is either on or off) is shown, this is shown as follows: SHUFFLE. • When referring to a front or rear panel control or feature, the following typeface is used to show the number of the feature (as given in the diagram in this manual, and the corresponding explanation): 5. • When referring to a remote control key, the following typeface is used to show the number of the key (as given in the diagram in this manual, and the corresponding explanation): 5. 1.4 Environmental considerations The CD-RW700 may be used in most areas, but to maintain top performance, and prolong operating life, observe the following environmental conditions: The nominal temperature should be between 5˚C and 35˚C (41˚F and 95˚F). The CD-RW700 is more sensitive to extremes of temperature than ordinary CD players. Relative humidity should be 30 to 90 degrees noncondensing. As the unit may become hot during operation, always leave sufficient space above the unit for ventilation. If you are mounting the unit in a rack, leave 1U of space above it. You should not place the unit on a piece of equipment generating heat, e.g. an amplifier, to avoid possible problems with overheating. Make sure that the unit is mounted in a level position for correct operation. Do not mount the unit in a rack tilted 5˚ or more from the vertical position. TASCAM CD-RW700 7 1 • Introduction—Environmental considerations NOTE If the mounting surface is more than 5 degrees away from the horizontal, it will not open or close. The voltage supplied to the unit should match the voltage as printed on the rear panel. If you are in any doubt regarding this matter, consult an electrician. NOTE When transporting the unit, always use the original packing materials. For this reason, we strongly recommend that you save all the packing materials that came with the CD-RW700, in case you need to transport it in the future. • Finger marks and dust should be carefully wiped off the disc’s recorded surface with a soft cloth. Unlike conventional records, the compact disc has no grooves to collect dust and microscopic debris, so gently wiping with a soft cloth should remove most particles. • Wipe in a straight motion from the inside to the outside of the disc. Small dust particles and light stains will have absolutely no effect on reproduction quality. In addition, when transporting the unit, you should tape the disc tray closed, using an adhesive tape that will not spoil the finish of the unit. 1.4.1 Beware of condensation If the unit (or a compact disc) is moved from a cold to a warm place, or used after a sudden temperature change, there is a danger of condensation; vapor in the air could condense on the internal mechanism, making correct operation impossible. To prevent this, or if this occurs, leave the player for one or two hours with the power turned on, then turn the power off and on again. 1.4.2 Never use a stabilizer or printable discs Using commercially available CD stabilizers or printable recordable discs with this player will damage the mechanism and cause it to malfunction. • Never use such chemicals as record sprays, antistatic sprays or fluid, benzine or thinner to clean compact discs. Such chemicals will do irreparable damage to the disc’s plastic surface. • Discs should be returned to their cases after use to avoid serious scratches that could cause the laser pickup to “skip”. • Don’t expose discs to direct sunlight or high humidity and temperature for extended periods. Long exposure to high temperature can warp the disc. • Only use circular compact discs. Avoid using noncircular promotional, etc. discs. NOTE Never use a disc that has had a stabilizer mounted to it. The residual adhesive may cause the disc to stick to the mechanism of the CD-RW700. If it sticks to the mechanism, you will need a technician to get it out. • To keep the laser pickups clean, don’t touch them. For the same reason, don’t leave the disc trays opened unnecessarily. 1.4.3 Handling of compact discs 1.4.4 Observe the following: • Always place the compact discs in the trays with their label facing upward (compact discs can only be played on one side). • To remove a disc from its storage case, press down on the center of the case, and lift the disc out, holding it carefully by the edges. 8 TASCAM CD-RW700 Additional notes with regard to CD-R and CD-RW discs There are additional precautions that you should take when handling CD-R and CD-RW discs, that are different to those that you should take when handling ordinary CDs. • Avoid touching the recording (non-label) side of a disc on which you will be recording. Recording on a disc requires a cleaner surface than playing back, and fingerprints, grease, etc. can cause errors in the recording process. • CD-R discs are more sensitive to the effects of heat and ultraviolet rays than ordinary CDs. It is important that they are not stored in a location where 1 • Introduction—Environmental considerations • • • • 1.4.5 1.4.6 Setting Description Default value Digital direct (D_DIRECT) Input selection Auto track (A_TRACK) Trigger level (S_LEVEL) FADE IN time 4.3.4, “Digital direct” Off 4.1, “Input selection” Analog 4.3.2, “Automatic track On division” 4.3.1, “Synchronized –54 dB recording” 4.3.6, “Fade-in and fade- 3 seconds out” FADE OUT time 4.3.6, “Fade-in and fade- 3 seconds out” Volume (DIGITAL IN) 4.1.1, “Signal volume” 0 dB Volume (ANALOG IN) 4.1.1, “Signal volume” 0 dB Timer on/off times 2.5.2, “Setting the timer” Unset Play mode 3.1.3, “Playback modes” Continue Trim 4.4, “Rehearsal” ±0 frames Recommended media An up-to-date list of manufacturers who produce media suitable for use in the CD-RW700 can be 483mm (19.0") 465mm (18.3") 88mm (3.5") Dimensional drawing 76mm (3.0") 1.4.7 Default settings The default settings when the CD-RW700 is shipped from the factory are given below. 98mm (3.9") • obtained from your TASCAM dealer, or found on the TASCAM Web site at http://www.tascam.com. direct sunlight will fall on them, and which is away from sources of heat such as radiators or heat-generating electrical devices. Always store CD-R discs in their “jewel cases” to avoid dirt and dust accumulating on their surfaces. Do not put labels or protective sheets on the discs and do not use any protective coating spray. When labeling CD-R discs, always use a soft oilbased felt-tipped pen to write the information. Never use a ball-point or hard-tipped pen, as this may cause damage to the recorded side. Dirty discs may be cleaned using a soft dry cloth and/or a commercial CD cleaning fluid or ethyl alcohol. Do not use thinner, gasoline, benzene or LP cleaning fluid, as these will damage the disc. If you are in any doubt as to the care and handling of a CD-R disc, read the precautions supplied with the disc, or contact the disc manufacturer directly. 21mm (0.8") 284.5m m 6.5mm (0.3") 435mm (17.1") TASCAM CD-RW700 9 2 - Features of the CD-RW700 10 TASCAM CD-RW700 2 • Features of the CD-RW700—Front panel 2.1 Front panel 1 POWER switch (STANDBY/ON) The power switch is used to switch the unit between standby mode (the time from the internal clock is displayed) and on (full operational mode). When the unit is turned on, the display shows Welcome!. 2 Disc tray Discs should be placed label side upwards in the disc tray. When a disc is loaded into the unit, the display briefly shows TOC Reading., with a flashing period following the word “Reading” as the unit determines the contents of the disc. A DISPLAY key Repeated presses of this key cycle through the different time display modes. These modes differ, according to whether the unit is playing back or recording a disc. B MULTI JOG control Use this control to select tracks for playback, to set parameter values, etc. Typically, turning the control clockwise will increase a value, and turning it counterclockwise will decrease the value. There is no “end-stop” to the control—it may be turned continuously in either direction. In addition, pushing the control acts like an “enter” key, i.e. the currently-displayed value or setting is confirmed. 3 OPEN/CLOSE key C TIMER switch (PLAY, OFF, REC) Use this key to open and close the disc tray. The display shows OPEN when the tray is opening and CLOSE when the tray is closing. Use this switch with the timer functions to control the behavior of the unit when the timer “on” time is reached. See 2.5, “Timer operations” for details. 4 RHSL key D PHONES jack and LEVEL control Use this key when recording to set and adjust the start point of a recording session or the start of a track on the recorded disc. See 4.4, “Rehearsal” for details. Use a standard pair of stereo headphones, equipped with a 1/4-inch plug, with this jack. 5 DIGITAL DIRECT When this is active, any digital audio signals input to the unit bypass the frequency convertor and the digital volume control. See 4.3.4, “Digital direct” for details Adjust the volume from the jack with the control (turn clockwise for higher volume). E REC LEVEL controls 6 INPUT SELECT Use these concentric controls to adjust the level of the analog audio signals received at the ANALOG IN jacks N. Typically, turning one of these controls will cause the other to turn, but they can be turned independently of each other. Repeated presses of this key cycle through the different audio inputs and the input combinations. See 4.1, “Input selection” for full details. Use the lower (outer) control to adjust the left signal, and the upper (inner) control to adjust the right signal. 7 REMOTE SENSOR This is not a control, but the sensor for the remote control unit. When using the remote control unit, make sure that there is a clear path from the remote control unit to the sensor. Turning the controls clockwise past the “5” position will boost the signals relative to their input level, and turning them counterclockwise to a position below “5” will cut the signals relative to their original input level. 8 Display F FINALIZE key The display is used to show the current status of the unit, as well as the current menu settings. See 2.2, “Rear panel” for details. Use this key to finalize recordable discs. See 1.2, “Finalizing” and 5.1, “Finalizing” for details. 9 MENU key Use this key (with CD-RW discs only) to erase tracks, or a whole disc, or to refresh a “bad” disc, or Repeated presses of this key cycle through the different menu items used to set parameters. G ERASE key TASCAM CD-RW700 11 2 • Features of the CD-RW700—Rear panel to unfinalize a finalized disc. See 5.2, “Erasing” for details. 3 Number keys (0 through 10 and +10) Use this key to stop playback or recording. Use these keys for direct entry of track numbers when playing back, or making a programmed play list. I PLAY key 4 CLEAR key Use this key to start or resume playback or recording. Use this key to clear a mistaken entry made with the number keys. H STOP key J PAUSE key Use this key to pause playback or recording. K RECORD key Use this key to enter record ready mode (see 4, “Recording” for details) and also to enter manual track divisions (see 4.2.3, “Manual track division”). L SYNC REC key Use this key to turn synchronized recording on and off (see 4.3.1, “Synchronized recording” for details). M FADER key 5 REPEAT key Use this key to change between the various repeat modes when playing back (see 3.3, “Repeat play”). 6 DISPLAY key Use this key to switch between the different display modes available (equivalent to A). 7 MENU key Repeated presses of this key cycle through the different menu items used to set parameters (equivalent to 9). Use this key to start fade-in recordings or to start a fade-out when recording (see 4.3.6, “Fade-in and fade-out” for details). 8 ENTER key 2.2 Rear panel 9 FADER key N ANALOG IN (L, R) (UNBALANCED) Use this key to start fade-in recordings or to start a fade-out when recording (equivalent to M). These RCA jacks accept analog audio signals from suitably-equipped units (–10 dBV, unbalanced). O ANALOG OUT (L, R) (UNBALANCED) These RCA jacks output analog audio signals (at –10 dBV levels, unbalanced) to suitably-equipped units. P DIGITAL COAXIAL (IN, OUT) These two RCA jacks accept and output digital audio in standard consumer format (SPDIF). Q DIGITAL OPTICAL (IN, OUT) These two TOSLINK optical connectors accept and output digital audio using optical fiber connectors. 2.3 Remote control unit 1 POWER key Use this to turn the unit between off and standby modes (equivalent to 1). 2 OPEN/CLOSE key Opens and closes the disc tray (equivalent to 3). 12 TASCAM CD-RW700 Pressing this key is equivalent to pressing the MULTI JOG control B to confirm an entry. A MONITOR key Use this key to output the signals received at the currently selected input(s) through the outputs when not recording or in record ready mode. B PLAY MODE key Use this key to choose between the different playback modes (single play, continue play, etc.). C FINALIZE key Use this key to finalize recordable discs. See 1.2, “Finalizing” and 5.1, “Finalizing” for details (equivalent to F). D ERASE key Use this key (with CD-RW discs only) to erase tracks, or a whole disc, or to refresh a “bad” disc, or to unfinalize a finalized disc. See 5.2, “Erasing” for details (equivalent to G). E RECORD key Use this key to enter record ready mode (equivalent to K). 2 • Features of the CD-RW700—Connections F SYNC REC key Use this key to turn synchronized recording on and off (equivalent to L). See 4.3.1, “Synchronized recording” for details). G REC MUTE key Use this key when recording, to mute the input signal for about four seconds and then to enter record ready mode (see 4.3.5, “Rec mute function”). the batteries should match the + markings inside the battery compartment, and the negative terminals should match the – markings). • If you are not going to use the remote control unit for an extended period of time, remove the batteries. Old batteries can leak, casing damage to the remote control unit. • Always dispose of old batteries in the way recommended by your local garbage disposal authorities. H SEARCH keys Use these keys to move the playback position inside a track. 2.4 Connections I SKIP keys The following should be noted when you connect the unit to other equipment. Use these keys to move between tracks when playing back (equivalent to turning B). They are also used to set the parameter values, etc. J STOP key Use this key to stop playback or recording (equivalent to H). K PAUSE key Use this key to pause playback or recording (equivalent to J). L PLAY key Use this key to start playback, or enter record mode from record ready mode (equivalent to I). 2.3.1 Use of the remote control unit It is possible to connect the unit’s DIGITAL COAXIAL IN P and DIGITAL OPTICAL IN Q to other equipment at the same time. However, the unit can receive signals from only one digital input at a time. Audio signals output from the unit are output from the ANALOG OUT O jacks, as well as from the DIGITAL COAXIAL OUT jack P and DIGITAL OPTICAL OUT connector Q simultaneously. If the ANALOG IN jacks N are connected, it is possible to select a “mix mode”, where the ANALOG IN signals are mixed with the digital audio signals at either the COAXIAL or OPTICAL input. The digital audio signal is attenuated (cut) by 12 dB when this mix takes place. When using the remote control unit, make sure: • There is a clear unobstructed path between the remote control unit and the remote sensor 7 on the main unit. • The remote control unit is located within 5 m (15 ft.) of the main unit, and is pointing at approximately right angles (±30°) to the front panel. 2.5 Timer operations When fitting or replacing the batteries: 1 When the unit must be in standby mode (power connected but not turned on), and if the time has not been set, the display shows Clock Adjust in dimmed characters. The unit can use its internal clock to start and stop playback or recording at pre-determined times. 2.5.1 Setting the clock 2 Press the MENU key (9 or 7). The display lights, and shows CLOCK ADJ ?. • Always make sure that both batteries are replaced together. Do not mix old and new batteries. • Do not mix batteries of different types. • Always make sure that the batteries are located with the correct polarity (the positive terminals of 3 Press the MULTI JOG control B or the ENTER key on the remote control unit 8. The “hours” value will start flashing. 4 Turn the MULTI JOG control or use the remote control unit SKIP keys I to set the current hour. TASCAM CD-RW700 13 2 • Features of the CD-RW700—Timer operations 5 Press the MULTI JOG control or the ENTER key to confirm the hour setting. The “minutes” value starts flashing. NOTE The unit uses the 24 hour “military” clock, where 1 p.m. is represented by 13, etc. 6 Turn the MULTI JOG control or use the remote control unit SKIP keys to set the current minutes. 7 Press the MULTI JOG control or the ENTER key to confirm the minute setting and return to the standby mode. The unit now shows the current time in standby mode and the colon : between the hours and the minutes flash once per second. NOTE If the unit is disconnected from the power supply for an extended period of time, the clock must be reset (the Clock Adjust message appears when power is reapplied). For this reason, if connecting the unit through a power distributor, we suggest that you use an unswitched outlet on the distributor. 2.5.2 Setting the timer Once the clock has been set following the procedure above, the timer can be set. The procedure below sets the time at which the unit will turn on and off. 1 Make sure the unit is turned on and a disc is inserted. 2 Press the MENU key (9 or 7) until the display shows TIMER ?. 3 Press the MULTI JOG control B or the ENTER key on the remote control unit 8. 4 Turn the MULTI JOG control or use the remote control unit SKIP keys I to set the timer hour. NOTE The unit uses the 24 hour “military” clock, where 1 p.m. is represented by 13, etc. 5 Press the MULTI JOG control or the ENTER key to confirm the hour setting. The “minutes” value starts flashing. 6 Turn the MULTI JOG control or use the remote control unit SKIP keys to set the timer minutes. 7 Press the MULTI JOG control or the ENTER key to confirm the minutes setting. 14 TASCAM CD-RW700 8 After step 7 above, the display shows OFF 0:00. 9 Repeat steps 4 through 7 above to set the hours and minutes value. If the TIMER switch C is set to REC or PLAY, the display shows a small “clock” icon, to show that the unit is in timer mode. 2.5.3 Using the timer When the start time has been set, slide the TIMER switch C to either the PLAY or REC position, depending on whether playback or recording is to start at the specified time. The display shows a small clock icon to show the unit is in timer mode, in standby mode as well as in power-on mode. When the switch is set to REC, and a recordable disc is loaded, the REC indicator shows beside the clock icon. When the unit is in standby mode and timer playback is selected, the unit will turn on and start playing at the specified time. If recording is selected, the unit will turn itself on one minute before recording is due to start. Recording will start at the specified time at the first free location on the disc. If the off time is set to a time greater than the length of the disc, and playback is selected, the unit will start playing at the start of the disc, and continue to the end. If timer recording is selected, and the off time is set to a time which is greater than the remaining time on the disc, the unit will continue recording until there is no space left on the disc. If the timer is set, and the unit is switched on at the timer start time, the timer operation will have no effect. If the unit has been disconnected from the power supply so that the clock time has been lost, and the timer switch is set, the clock icon will flash rapidly in standby mode as an indication that the current timer setting is invalid. NOTE If the unit has recognized the current disc as nonrecordable, Timer Error! appears when the timer switch is set to REC. If the timer is set with the switch at OFF or PLAY and a non-recordable disc loaded, the unit is then placed in standby, and the switch then set to the REC position, this error message will not appear (of course, recording will not take place under these conditions). 3 - Playback operations The CD-RW700 can be used to play back CDs (including CD-R and CD-RW discs that have been recorded and finalized on other types of recorder), as well as CD-R discs and CD-RW discs that have been recorded on the unit. 3.1 Simple playback operations 1 Press the OPEN/CLOSE key (3 or 2) to open the disc tray. 2 Discs should be inserted in the tray with the label uppermost. 3 Press the OPEN/CLOSE key (3 or 2) to close the tray again. When a disc is loaded into the unit, the display briefly shows TOC Reading., with a flashing period following the word “Reading” as the unit determines the contents of the disc. When the TOC has been read, the display shows (at the top left of the display) one of the following: CD CD-R, NO TOC CD-RW, NO TOC CD-RW [blank] A commercial pre-recorded CD or a finalized CD-R A CD-R which has yet to be finalized A CD-RW which has yet to be finalized A finalized CD-RW (this differs from a CD, as it may be unfinalized and erased) Unusable or unreadable disc or no disc 1 Press the PLAY key (I or L) to start playback 2 Press the STOP key (H or J) to stop playback 3 Press the PAUSE key (J or K) to pause playback temporarily. The track number indicators at the bottom of the display light, to show the available unplayed tracks. If there are thirteen tracks on the disc, for example, indicators 1 through 13 will light. If there are more than 20 tracks on a disc, the track number OVER indicator (at the bottom of the display) will light. 3.1.1 Time display modes When playing back a CD (or in pause mode), there are four different time display modes. In each mode, the current track number is given, followed by the time, as given below, e.g. 10Tr 0:48 Press the DISPLAY key (A or 6) to cycle through these time display modes, as described below: Display shows Meaning TOTAL [blank] TOTAL REMAIN REMAIN Total elapsed time of the disc Elapsed time of the current track Time remaining of the current disc Time remaining of the current track NOTE If programmed playback has been selected (3.2, “Programmed order playback”), the elapsed time and total remaining time refer to the programmed material, not the whole disc. 3.1.2 Track search Use the MULTI JOG control B or the SKIP keys on the remote control unit I to jump forward or backward by one track at a time, as shown on the display. Note that going forward from the last track of the disc will “wrap round” to track 1, and going backward from the first track of the disc will “wrap round” to the last track of the disc. The track number indicators at the bottom of the display shows the selected track (the lit indicator at the left of the row of indicators). It is also possible to use the number keys on the remote control unit 3 to jump directly to a particular track: 1 To play tracks 1 through 9, simply press the appropriate key (1 through 9). 2 To play a track whose number is higher than 9, press the +10 key an appropriate number of times to set the “tens” digit of the track number, followed by a single key to set the “units” digit. For example: Track 13 = +10, 3 Track 30 = +10, +10, +10, 0 On the remote control unit only, the SEARCH keys Hcan be used to “fast-forward” and “fast-rewind” through the disc. 3.1.3 Playback modes The unit can be set to play back a single track, the whole disc in the order in which it was created, the tracks of the disc in a random (shuffled) order, or a programmed order (see 3.2, “Programmed order playback”). TASCAM CD-RW700 15 3 • Playback operations—Programmed order playback NOTE Selecting the playback mode is only possible using the remote control unit. It is not possible to select the playback mode using the main unit alone. 1 Press the PLAY MODE key B repeatedly to cycle the display through the following: • Program (see 3.2, “Programmed order playback” below). The red PROGRAM display indicator lights in this mode. • Shuffle (random track order). In this mode, each track is played once before the disc repeats. Using the track search functions will move backwards or forwards through the random order, e.g. if track 7 is followed by track 10, it is possible to use the track search keys to go back to track 7, which is remembered as being before immediately before track 10. The red SHUFFLE display indicator lights in this mode. • Continue. Normal playback mode. Programming is cancelled, and playback continues in the normal order. The selected mode is shown in large characters disappears from the display a few seconds after selecting the mode, and the display returns to its previous mode. 3.2 Programmed order playback The steps to set up to 25 program steps (tracks) to be played back in a specified order are as follows: 1 Press the PLAY MODE key B until the display shows Program. 2 The display changes to show 0Tr 0:00 00, meaning that no program steps have yet had tracks assigned to them. 3 Use the number keys to enter a track number (including the +10 key to enter values greater than 9, as described in 3.1.2, “Track search”). There is no need to press ENTER. The track entered is assigned to the program step, and the display changes, showing the track number, the total time of the program so far, and the step number, e.g. 2Tr14:56 03. 4 The next program step can then be entered. NOTE Steps 3 and 4 above can be carried out from the main unit by turning and pushing the MULTI JOG control B. 16 TASCAM CD-RW700 5 Repeat steps 3 and 4 above until the program is complete. 6 Press the PLAY key (I or L) to start playback at the first program step. The display shows the track, the current time display, and the program step number. While in programmed playback mode, using the SKIP keys I or the MULTI JOG control B moves backwards and forwards in the order set in the program. Use the PAUSE key (J or K) to halt playback temporarily or the STOP key (H or J) to stop playback of the program. If the STOP key is used, when playback is restarted, it starts from the first program step. Clear the program by pressing PLAY MODE B until the display shows Continue. The program is also cleared when the disc tray is opened, and if the STOP key is pressed when playback is stopped in programmed order mode. The programmed play order is not memorized when power is turned off. If an attempt is made to enter more than 25 program steps, the message PGM Full ! appears on the display. 3.3 Repeat play The unit can repeat the whole of the disc (or program) or the current track only. NOTE Selecting the repeat mode is only possible using the remote control unit. It is not possible to select the repeat mode using the main unit alone. 1 The unit should be in playback, pause or stop mode. 2 Continue to press the REPEAT key 5 so that the display shows Repeat 1 (the REPEAT 1 indicator lights) to repeat one track, or Repeat ALL (the REPEAT ALL indicator lights) to repeat the whole disc or program. 3 If playback has not started, restart it. To cancel repeat mode, press the REPEAT key so that the display shows Repeat OFF and the REPEAT indicator goes out. 4 - Recording Before you start recording using the CD-RW700, make sure that you understand the following key points: nals are being mixed, the digital signals are attenuated by 12 dB. The level of the analog/digital mix is then controlled using the digital volume menu, as described below. 1 Press the RECORD key (K or E) to place the unit in record ready mode. • Once you have recorded on a CD-R disc, the data cannot be erased from it. • You can add tracks to an unfinalized recordable disc. Once finalized, a CD-R disc is “fixed” and behaves in the same way as a pre-recorded disc. Finalized CD-RW discs, however, can be erased, refreshed and re-recorded. To select the input to be recorded, press the INPUT SELECT key on the main unit 6. Repeated presses of the key cycle through the following options: Coax +Analog Analog in Optical digital in Coaxial digital in Optical digital and analog, mixed Coaxial digital and analog, mixed In the case of either the coaxial or optical inputs being selected, either alone, or together with the analog inputs, the boxed DIGITAL indicator shows on the display, and the appropriate indicator: COAXIAL or OPTICAL, lights on the display. If the analog signal is selected, either alone, or together with either of the digital inputs, the boxed ANALOG indicator lights on the display. 4.1.1 3 Use the MULTI JOG control B or the SKIP keys I to adjust the input volume between 60dB and +18db (relative to the original input level). There is also a ---- setting which represents a complete signal cut. NOTE 4.1 Input selection Analog In Optical In Coaxial In Opt +Analog 2 Repeatedly press the MENU key (9 or 7) until the display shows VOLUME XXXdB where XXX is the current setting. Signal volume The signals from either of the digital inputs (coaxial or optical) can be mixed with the signals from the analog inputs. The signal path is as follows (this description applies, no matter how many inputs are being mixed): • The analog signals received at the ANALOG IN jacks are controlled with the REC LEVEL controls E. • Any input analog signals are then mixed with the digital signals received at either the COAXIAL or OPTICAL IN (P or Q). If analog and digital sig- If digital direct is selected, as described below (4.3.4, “Digital direct”), the digital volume is bypassed and the menu item does not appear. 4.1.2 Input monitoring When the unit is in record ready, or record mode, the input signal is output from the OUT jacks (digital and analog), allowing you to hear the input signal. The meters also show the current signal level. However, it is only possible to record, or to enter record ready mode, when a recordable disc is inserted. To allow monitoring of the input signal at other times, or when the unit is stopped, use the MONITOR key on the remote control unit A. The RECORD key K on the main unit will also enter monitor mode from stop mode when there is no recordable disc in the unit (when there is a recordable disc in the unit, pressing the RECORD key enters record ready mode). The word MONITOR appears on the display to show that the output signal is an echo of the input signal(s). The meters show the current input level. Exit the monitor mode by using the STOP key. 4.1.3 Frequency conversion The sampling frequency for CDs is 44.1 kHz. The CD-RW700 will always record (and play back) CDs at this frequency. However, if recording through a digital connection (either coaxial or optical) and the source has been recorded at a frequency other than 44.1 kHz, or is being played back at a non-standard speed using a varispeed unit (more than 1% away from the standard), the CD-RW700’s internal frequency converter TASCAM CD-RW700 17 4 • Recording—Basic recording will automatically convert the incoming frequency to 44.1 kHz. NOTE If digital direct is selected, as described below (4.3.4, “Digital direct”), the frequency convertor is bypassed. In this case, recording from digitally-connected devices is only possible when the source frequency is 44.1 kHz. If an attempt is made to record from a digitally-connected source at a different frequency, the error message Not Fs44.1k!is displayed. 4.2 Basic recording NOTE According to the “Red Book” (the specification for audio CDs), a track cannot be less than four seconds in length, and there can be a maximum of 99 tracks on an audio CD. Bear these limitations in mind when recording. If you press either the STOP or the PAUSE key within four seconds of starting recording, the unit will continue recording until four seconds have elapsed (since the start of recording) and then stop or pause as appropriate. After selecting the input source(s) (4.1, “Input selection”), it is possible to start recording. The basic record procedure is as follows: 1 Load a recordable disc is into the unit. As the disc is loaded, the display shows TOC Reading. When the disc has been loaded, the display indicators show CD-R, NO TOC, or CD-RW, NO TOC, as appropriate. 2 Press the RECORD key (K or E). The unit enters record ready mode, as shown by the REC and pause indicators on the display. As the unit enters record ready mode, the display shows Now OPC (Optimum Power Control), as the unit prepares to record on the disc. 3 Adjust the level of the source(s), following the guidelines in 4.1.1, “Signal volume”. NOTE The red OVER indicators on the meters should never light. Unlike analog equipment, digital audio units produce extremely unpleasant sounds when distorted, and there is no “headroom” after the 0 mark. If recording digitally from a commercially-produced CD, the volume set in the menu should be 0dB. This will maintain all the dynamic range of the source CD without clipping. Only boost the signal if the source is exceptionally quiet. 18 TASCAM CD-RW700 An analog signal input at nominal level, with no cut or boost from the volume controls, is equivalent to a reading of –16 dB on the meters (on other words, 0 is equivalent to 16 dBFS). 4 Press the PLAY key (I or L) or the PAUSE key (J or J) to start recording. Note that there is no need to “cue up” the recording position—the unit always finds the next available location on the disc and start recording to it. 5 Press the PAUSE key (J or J) to pause recording temporarily. The pause indicator on the display shows this. Pressing PAUSE or PLAY again restarts recording with a new track number. 6 Press STOP (H or J) to stop recording. When recording stops, the display shows PMA Writing (Program Memory Area) and the REC indicator flashes for a few seconds as the unit writes to the disc. NOTE While the “PMA Writing” message is displayed, all keys are disabled, and the unit is actually writing to disc. Do not disconnect the power or subject the unit to severe vibration or shocks at this time, as this will prevent proper recording of the information. When this message disappears, you must press the RECORD key (step 2) before restarting the recording. Recording restarts with a new track number. NOTE Remember that every time recording is paused or stopped, when recording is restarted, a new track will always be started. It is not possible to record in two “stages” within one track. 4.2.1 Playing back tracks Although an unfinalized disc cannot be played back on an ordinary CD player, the CD-RW700 can play back tracks that have been recorded. Use the MULTI JOG control B or the SKIP keys I to select a track for playback. 4.2.2 Time display while recording While a recordable disc is being played back, the four time display modes available in normal playback as described in 3.1.1, “Time display modes”: TOTAL, TOTAL REMAIN, track REMAIN and elapsed track time. 4 • Recording—Advanced recording However, during recording there are fewer options available (obviously, the unit cannot see into the future and know how much time remains of the track which is being currently recorded!). When in record or record ready mode, repeated presses of the DISPLAY key (A or 6) cycle between displaying the remaining time left for recording on the disc (TOTAL REMAIN) and the elapsed time of the track currently being recorded (no indicator lit). When playback is stopped at the start of a recordable disc, there are only two options available: TOTAL (the total time recorded so far on the disc) and TOTAL REMAIN (the total time available on the disc for further recording). 4.2.3 Manual track division It is possible to divide the recording into tracks “on the fly” while recording. While recording is taking place, press the RECORD key (K or E) . The current track number is incremented by one. For details of automatic track division while recording, see 4.3.2, “Automatic track division”. NOTE According to the “Red Book” (the specification for audio CDs), a track cannot be less than four seconds in length, and there can be a maximum of 99 tracks on an audio CD. Bear these limitations in mind when adding track divisions. 4.2.4 Restricting the number of tracks When making a recording using the CD-RW700, it is possible to restrict the number of tracks that may be recorded at one time. This applies whether the tracks are being divided manually, as described above (4.2.3, “Manual track division”) or being divided automatically (4.3.2, “Automatic track division”). At any time within record or record ready mode, turn the MULTI JOG control B or use the SKIP keys I. This sets the number of remaining tracks, as shown to the right of the time display. The maximum number here is limited by the standard limit of 99 tracks, and the number of tracks currently recorded. In other words, if 8 tracks have already been recorded on the disc, the maximum value that can be set here is 91 (91+8=99). If 49 tracks have already been recorded on the disc, the maximum value that can be set here is 50 (49+50=99). Every time a track division is made, the number shown at the right of the display goes down by one. When the number shown is 1, and a track division is made, the display shows PMA Writing and the unit enters stop mode. The number of remaining tracks can be changed during recording using the MULTI JOG control. 4.2.5 Full disc If recording a long program, and the number of tracks has not been restricted, when there is no space remaining on the disc for recording, as shown by the time display (see 4.2.2, “Time display while recording”), just before the end of the disc is reached, the unit starts a fade-out over a few seconds (the display shows FADE OUT). When the fade-out has finished, the display shows Disc Full!! for a few seconds, and the unit then goes into stop mode (the display shows PMA Writing). If the disc is a CD-RW, the final track can be erased, if required (see 5.2.1, “Erasing tracks”) and the disc then finalized. If the disc is a CD-R, it must be finalized prior to use (see 5.1, “Finalizing”). 4.3 Advanced recording These sections cover more advanced recording techniques. 4.3.1 Synchronized recording Synchronized recording means that recording will begin automatically when a signal is received, and will stop when the signal ends. To enable or disable synchronized recording: 1 A recordable disc must be loaded. 2 With the unit in record ready or record mode, press the SYNC REC key (Lor F). The display shows SYNC ON briefly, and then changes to the track and time display. When synchronized recording is enabled, the SYNC indicator lights in the display. The SYNC REC key is also used to turn off synchronized recording (the display briefly shows SYNC OFF and then returns to the track and time display). The signal level which may be used with synchronized recording operations (here called the “trigger level” or “threshold”) is set as below: TASCAM CD-RW700 19 4 • Recording—Advanced recording 1 With a recordable disc loaded, press the MENU key (9 or 7) until the display shows: S_LVL>> xxdB, where xx is the current value. 2 Turn the MULTI JOG control B or use the SKIP keys Ito change the value between 24, -30, -36, -42, -48, -54, -60, -66, and -72 dB. The conditions under which synchronized recording stops are: • when recording digitally, an appropriate digital signal is detected. If the signal is detected from a CD, the unit enters record ready mode after 2 seconds. If the signal is detected from an MD, the unit enters record ready mode immediately: level Low numerical values of this setting (towards –24) mean that it takes a louder signal to trigger the start of the synchronized recording. A high numerical value (towards –72) means that a relatively quiet signal will trigger the start of recording. CD stop REC pause 2 seconds The conditions under which an input signal is used as the trigger to start recording are: time • when recording digitally, a digital start signal is detected, and audio is subsequently detected level MD stop REC pause level Track start signal received Start of recording time S_LVL Note that the trigger level is not used here. time or • the sound level rises above the threshold (see below) after having been below the threshold for one second or more. Note that the diagram below represents a special case (the source is stopped or paused) of the more general condition, as explained later: or • the sound level drops below the threshold level for five seconds level REC pause 5 seconds S_LVL level Start of recording time S_LVL If you set the threshold value so that only high-level signals trigger recording, remember that this will not record the start of a piece with a slow fade-in: noise level time To start synchronized recording when the source is stopped or in pause mode: 1 The unit must be in record ready mode, and the SYNC indicator in the display must be lit, as explained above. 2 Start playing the source. The pause indicator disappears from the display, and the unit starts recording. 20 TASCAM CD-RW700 level Recording starts S_LVL This part of the track is not recorded time Also remember that when recording from an analog source, the threshold should be set so that it is higher than the “noise floor” (the base level of hiss, pops 4 • Recording—Advanced recording and crackles which may come from an older vinyl recording, for example). If the “noise floor” is higher than the threshold, synchronized recording will not take place (the rehearsal facility can be used here (4.4, “Rehearsal”) to help): level Start of track is not registered Noise is higher than threshold S_LVL time Because synchronized recording can be turned on and off while recording is taking place, it is therefore possible to record with a synchronized automatic start, and a manual end, or vice versa. When the source material is being played back before synchronized recording is enabled, the conditions under which synchronized recording will start (after synchronized recording has been enabled) are: When the signal drops below the threshold for one second or more and then rises above the threshold again (this is the general condition, of which starting synchronized recording from a stopped or paused source is a special case): level At least 1 second Recording starts To stop synchronized recording: 1 The unit must be in record mode, and the SYNC indicator in the display must be lit. 2 Stop the source. After a few seconds, the unit enters record ready mode. The time between the stopping of the source and entering record ready mode is used to record a gap at the end of the track. 3 If no changes are made to the unit’s controls, restarting the source restarts recording, as the unit is still in sync mode and will start recording again when the source is detected. NOTE When recording in sync mode, you may notice a slight delay between starting the source, and the CDRW700 responding. This is due to the way in which the unit works, storing the data in a memory buffer before writing it to the disc. The resulting delay is therefore not a cause for concern—all audio data received between the start and end points will be recorded. 4.3.2 Automatic track division The trigger level, as set above (4.3.1, “Synchronized recording” can also be used to divide tracks if the ATRACK (auto track) function is enabled. When this function is enabled, the unit automatically inserts a track division in the recorded material when: • recording digitally from MD, CD or DAT, an increment signal is detected and the sound level rises above the threshold: S_LVL Track increment from source level CD-RW increments track time Alternatively, when recording digitally from sources (MD, CD and DAT) which output track divisions, synchronized recording starts when a track division is received, regardless of the level: S_LVL time Track signal from source starts recording or level • increment signals are unavailable (e.g. analog recording or digital sources other than MD. CD or DAT) and the sound level has dropped below the S_LVL time TASCAM CD-RW700 21 4 • Recording—Advanced recording threshold for more than two seconds, and sound has re-started Track increment automatic track increment. Digital recording from CD, MD and level Long "pause" in signal, but track is not incremented At least 2 seconds level S_LVL S_LVL time time To enable or disable automatic track division: 1 With a recordable disc inserted, and with the unit in record ready mode, press the MENU key (9 or 7) repeatedly until A_TRACK>XX is shown, where XX may be ON or OFF. 2 Turn the MULTI JOG control B or use the SKIP keys Ito change the value to ON or OFF. The A-TRACK indicator at the top right of the display lights when the auto track function is enabled. You may find it helpful to use the track restriction facility (see 4.2.4, “Restricting the number of tracks”) together with the automatic track division. For instance, if you have recorded two albums on one DAT tape, and you wish to make two separate CDs from this tape, you can use the MULTI JOG control to set the number of tracks to the number of tracks comprising the first album. When the final track of the first album has been recorded, the unit automatically performs the PMA writing procedure and enters stop mode. Automatic track division can be turned on or off while recording is taking place. NOTE When recording certain types of material (e.g. certain types of classical music or spoken word) through the analog connections, since the track divisions are determined by relative silence, it is possible that spurious track divisions will be inserted. Under these conditions, it may be better to use manual track division (4.2.3, “Manual track division”). However, if recording through a digital connection, the track number will be incremented only when a track division signal is received, followed by a rise in volume. level Track start signal received Track incremented 4.3.4 S_LVL time Digital direct As mentioned earlier, the digital direct mode bypasses some of the input circuitry of the CDRW700 (the frequency convertor and the digital level control) to write directly to the disc. To enable or disable digital direct recording: A fall and subsequent rise in volume alone when recording digitally from CD, MD or DAT is not sufficient to trigger an 1 Ensure that the input source is set to DIGITAL (either COAXIAL or OPTICAL). 2 Press the DIGITAL DIRECT key 5 (main unit only). The display shows D_Direct XX where XX is ON or OFF. 22 TASCAM CD-RW700 4 • Recording—Rehearsal 3 Press the DIGITAL DIRECT key to toggle between ON and OFF. When digital direct recording is enabled, the DIGITAL indicator in the display flashes slowly. To perform the fade-in: NOTE As mentioned earlier, the digital direct feature bypasses the frequency convertor. Recording is therefore only possible from sources recorded with 44.1 kHz sampling frequency. 4.3.5 Rec mute function The rec mute function allows instant cut-off of the input signal, and records four seconds of silence on the disc. 1 While recording is in progress, press the REC MUTE key G. The display shows REC MUTE, the meters stop displaying the current level and the monitored sound is cut. 2 After about four seconds, the unit enters record ready mode. NOTE This function is only available from the remote control unit. It is not possible to use this function with the main unit only. 4.3.6 It is possible to set the fade-in time only (perform step 5 after step 2) or the fade-out time only (in step 1, press the MENU key until the fade-out time menu item is shown). Fade-in and fade-out To provide smooth beginnings and endings to recorded tracks, the unit provides fade facilities. Fade-ins are from –∞ (silence) to the set input level (4.1.1, “Signal volume”) and fade-outs go from the current input volume to silence. The fade-in and fade-out times can be set independently in increments of one second, from 1 second to 24 seconds. 1 With a recordable disc loaded, press the RECORD key (K or E) so that the unit enters record ready mode. 2 Start the source material, and press the FADER key (M or 9). The display shows FADE IN for the time specified in the menu item above. As the fade progresses, the monitored signal gradually becomes louder, reflecting the level recorded on disc. To perform a fade-out: 1 While recording, press the FADER key (M or 9). The display shows FADE OUT for the time specified in the menu above. As the fade progresses, the monitored signal gradually becomes quieter, reflecting the level recorded on disc. 2 When the end of the fade-out time is reached, the unit goes into record ready mode. Recording can be restarted with the FADER key or the PLAY or PAUSE keys. The fade-in and fade-out times can be reset to new values while recording is in progress. Fades are also possible in digital direct mode (4.3.4, “Digital direct”). 4.4 Rehearsal To set the fade times: 1 Press the MENU key (9 or 7) repeatedly until the display shows FADE IN > XXS, where XX is the current fade-in time, in seconds. There are two areas in which the unit’s rehearsal facilities can be used: synchronized recording (4.3.1, “Synchronized recording”) and automatic track division (4.3.2, “Automatic track division”). 2 Turn the MULTI JOG control B or use the SKIP keys Ito change the value of the fade-in time. The purpose of the rehearsal facilities is to allow you to override the automatic synchronized recording and track division facilities where necessary. 3 Press the MENU key again so that the display shows FADE OUT> XXS, where XX is the current fade-out time, in seconds. 4 Turn the MULTI JOG control or use the SKIP keys to change the value of the fade-out time. Here is an example where this facility may be of value: A piece has been recorded on DAT, with a verbal count-in immediately prior to the first drum beat. This count-in is not to be recorded as a part of the CD track, but the threshold level has been set to a TASCAM CD-RW700 23 4 • Recording—Rehearsal level where the fourth count will trigger recording (– 24 dB — this is the limit of the threshold sensitivity and cannot be adjusted further). S_LVL Drum beat "1" "2" "3" "4" When the rehearsal facility is used, the source is cued up and played, and the first few seconds of the track are sampled and looped. The position of the loop can be adjusted. This section is looped. The MULTI JOG control adjusts the position of the loop S_LVL Drum beat "2" "3" "4" S_LVL Drum beat "2" "3" Rehearsal for synchronized recording To perform a synchronized recording, using the rehearsal mode to slip the start of the track forwards or backwards: 1 Load a recordable disc into the unit and make sure the unit is in stop mode. 2 Cue the source material to the start of the source track to be recorded (i.e. in the example above, this would be just before the count-in). 3 Press the RHSL key 4 so that the display shows Waiting Sync. 4 Start playing the source. When the start of the track is detected (as explained in 4.3.1, “Synchronized recording”), the display changes to Sync RHSL. 5 If the rehearsal does not start at the region of the true start point, press the RHSL key once again to “re-arm” the trigger. When this offset has been set, synchronized recording takes place with the start occurring at the new location: "1" The maximum trim value is 125 frames on either side of the original point (represented by 0), where there are 75 frames in a second (i.e. 1.67 seconds). 4.4.1 Sync recording starts here "1" Both the sync start trim and the track start trim can take the same value and can be used in the same recording. "4" Sync recording starts at new point 6 After nine seconds, the message changes from Sync RHSL, and the sampled data loops in a four-second loop. The display shows Sync 0:0X, where X is the current second of the loop. 7 Stop the source. 8 Turn the MULTI JOG control B to adjust the point of the loop. The display shows: TRIM = +XXXf or TRIM = -XXXf, where XXX can be a number between 0 and 125 and changes back to the Sync 0:0x display when the loop restarts. Every time the trim value is changed, the loop starts replaying from the new start point. This example shows how the start time can be moved forward, in order to eliminate unwanted “false starts”. It is also possible to “slip” the start time backwards, in order to record a quiet passage that would otherwise not trigger the sync recording facility (this is done by the use of a memory buffer). 9 When the new start point has been set, press the STOP key (H or J). As well as being used for changing the start time of synchronized recording, the start of an automatic track division can also be trimmed backwards and forwards in a similar way. 11 Press the RECORD key (K or E) to enter record ready mode, and then press the SYNC REC key (L or F). 24 TASCAM CD-RW700 10 Cue up the source material to the original point set in step 2. 4 • Recording—Rehearsal 12 Start playing the source material. The unit starts recording, with the start point being determined by the trim value. 8 Stop the source. NOTE If a trim setting is made for the sync start, this will apply to all sync starts and track divisions made in the future until the value is reset using the procedure above. 4.4.2 a four-second loop. The display shows Inc 0:0X, where X is the current second of the loop. Rehearsal for track division In the same way that the automatic threshold may produce a false trigger, starting recording at the wrong point, the automatic threshold may produce false track divisions. By rehearsing the point at which the track division is to be made, it is possible to trim the division point so that it corresponds to a the track division which is actually required. 1 Load a recordable disc into the unit and make sure the unit is in stop mode. 2 If the unit is not already in auto track mode, set it so that the A-TRACK indicator is lit on the display (4.3.2, “Automatic track division”). 3 Cue the source material to a little before the point of the planned track division. 4 Press the RHSL key 4 twice so that the display shows Waiting Inc. If the auto track mode has not previously been selected, the display shows No Inc Mode when the key is pressed. 5 Start playing the source. When the start of the track is detected (as explained in 4.3.1, “Synchronized recording”), the display changes to Inc RHSL. 6 If the rehearsal does not start at the region of the true track division point, press the RHSL key once again to “re-arm” the trigger. 7 After nine seconds, the message changes from Inc RHSL, and the sampled data loops in 9 Turn the MULTI JOG control B to adjust the point of the loop. The display shows: TRIM = +XXXf or TRIM = -XXXf, where XXX can be a number between 0 and 125 and changes back to the Inc 0:0x display when the loop restarts. 10 When the track division point has been fixed, press the STOP key (H or J). 11 Press the RECORD key (K or E) to enter record ready mode. The synchronized recording mode can be used here, and so the SYNC REC key (L or F) may be pressed to prepare for synchronized recording. 12 Cue up the source material to the point where recording is to start. 13 Start playing the source material. If sync recording is not being used, start recording on the CD-RW700 (otherwise recording starts automatically). When the track division point (plus or minus the trim value set earlier) is reached, the recording will divide into tracks. Note that if a positive trim value is set (i.e. the start point of the track is “slipped” to a position past the “normal” start), the counter shows a minus value (e.g. -0.02) for the period between the “normal” and the actual adjusted start position. This minus value is also displayed when recording starts, if sync recording has been enabled. NOTE If a trim setting is made for the track division, this will apply to all track divisions and sync starts made in the future until the value is reset using the procedure above. TASCAM CD-RW700 25 5 - After recording This section deals with the actions taken after recording: finalizing for CD-R and CD-RW discs, and erase operations for CD-RW discs. Once finalized, CD-R discs are truly final—no more can be recorded on them. By contrast, CD-RW discs can be “unfinalized” using the CD-RW700, i.e. their TOC can be deleted, and if there is space, further material can be recorded on them. Even if the disc is full, tracks can be erased following the unfinalize process, and new material can be recorded. 5.1 Finalizing As has been explained earlier (1.2, “Finalizing”), in order for a disc to become a standard CD, it must have a Table of Contents (TOC) written to it. This process is known as finalizing. An unfinalized disc can always be distinguished on the CD-RW700 by the NO TOC indicator under the disc type on the display being lit when the disc is inserted. To finalize a disc: 1 With the unfinalized (recordable) disc loaded, and the unit in stop mode, press the FINALIZE key (F or C). The display shows Finalize OK?. 2 If you do not want to proceed with the finalizing process, press any other key (such as the STOP key). 3 To start the finalizing process, press the MULTI JOG control B or press the ENTER key 8. 4 If finalization has been chosen, the display changes. The NO TOC indicator goes out, and the word TOC and the REC indicator flashes in the display. The unit starts counting down from a time shown on the display (about 1 minute 10 seconds). 5 After finalization, a CD-RW NO TOC changes to CD-RW and a CD-R NO TOC changes to a CD. NOTE Although CD-R discs finalized on the CD-RW700 may be replayed on ordinary CD players, remember that finalized CD-RW discs may not play on CD players. 5.1.1 Unfinalizing CD-RW discs If a CD-RW disc has been finalized, it is possible to erase the Table of Contents in the following way: 26 TASCAM CD-RW700 1 With the finalized disc loaded and the unit in stop mode, press the ERASE key (G or D). 2 If the display does not show the word Unfinalize?, turn the MULTI JOG control B or use the SKIP keys I until it is displayed. 3 If you do not want to proceed with the unfinalizing process, press any other key (such as the STOP key). 4 To start the unfinalizing process, press the MULTI JOG control B or press the ENTER key 8. 5 If unfinalization has been chosen, the NO TOC indicator starts flashing in the display, and the word ERASE also starts flashing. The unit starts counting down from a time shown on the display (depending on the disc and material, this value will be between 50 seconds and 1 minute 30 seconds). 6 After unfinalization, a CD-RW indicator changes to a CD-RW NO TOC indicator. 5.2 Erasing Unfinalizing (described above) is a special case of erasing a disc. It is also possible to erase a track or tracks, starting with the last-recorded track, a whole disc, or to “refresh” a disc. NOTE Erase procedures are possible only on a CD-RW disc. Even if a CD-RW disc has been finalized, selecting an erase procedure will automatically unfinalize it prior to erasure. The disc may then have to be re-finalized. Remember that it is not possible to perform any erase procedures on a CD-R disc. 5.2.1 Erasing tracks It is possible to erase the last recorded track, the last two recorded tracks, the last three recorded tracks, etc. It is not, however, possible to erase tracks in the “middle” of the disc. 1 With the disc loaded, and the unit in stop mode, press the ERASE key (G or D). 2 If the display does not show ERASE XXXX?, where XX is the number of the last track recorded on the disc, turn the MULTI JOG control B or use the SKIP keys I until it is displayed. 5 • After recording—Erasing 3 Turn the MULTI JOG control or use the SKIP keys to change the number of the first track to be erased. The highest value that this number can take is the last track recorded (e.g. if 17 tracks have been recorded on the disc, 1717 means that the last track only, 17, will be erased). The lowest value that this number can take is 2 (if this number was 1, the whole disc would be erased, as described below). 4 If you do not want to proceed with the erase operation, press any other key (such as the STOP key). NOTE If only one track has been recorded on the disc, only the “erase disc” option (5.2.2, “Erasing a whole disc”) is available. 5 When the range of tracks to be erased has been selected, press the MULTI JOG control or press the ENTER key 8. NOTE This operation cannot be undone. If you are going to erase a track or tracks, make sure that they are recordings that you really want to erase! 6 If the erase operation has been selected, the word ERASE flashes on the display, and the timer starts counting down from 0:20 (20 seconds). 7 At the end of the countdown period, the word Complete appears briefly on the display, and the display returns to the track/time display. 5.2.2 Erasing a whole disc When you want to erase a whole disc (all the tracks on a disc), follow the procedure below: 1 With the disc loaded, and the unit in stop mode, press the ERASE key (G or D). 2 Turn the MULTI JOG control B or use the SKIP keys I until the display shows ERASE DISC?. 3 If you do not want to proceed with the erase operation, press any other key (such as the STOP key). 4 To erase the contents of the disc, press the MULTI JOG control or press the ENTER key 8. NOTE This operation cannot be undone. If you are going to erase a disc, make sure that it contains only recordings that you really want to erase! 5 If the erase operation has been selected, the word ERASE flashes on the display, and the timer starts counting down a time value shown on the display. 6 At the end of the countdown period, the word Complete appears briefly on the display, and the display returns to the track/time display. 5.2.3 Refreshing a disc If a CD-RW disc has been corrupted at any point (e.g. power has been cut off in the middle of a finalize operation, etc.), or has been used in a computer or another piece of equipment that makes it unreadable, it is possible to “refresh” the disc to make it usable again. This is equivalent to formatting a disk on a computer to prepare it for use. This operation destroys all data on the disc. 1 With the disc loaded, and the unit in stop mode, press the ERASE key (G or D). 2 Turn the MULTI JOG control B or use the SKIP keys I until the display shows DISC REFRESH. 3 If you do not want to proceed with the refresh operation, press any other key (such as the STOP key). 4 To refresh the disc, press the MULTI JOG control or press the ENTER key 8. NOTE This operation cannot be undone. If you are going to refresh a disc, make sure that it contains only recordings that you really want to erase! 5 If the erase operation has been selected, the word ERASE flashes on the display, and the timer starts counting down. The refresh operation typically takes around 20 minutes or so. 6 At the end of the countdown period, the word Complete appears briefly on the display, and the display returns to the track/time display (of course, there are no tracks, and the disc is as the start, with the total time of the disc available for recording). TASCAM CD-RW700 27 6 - Reference and specifications 6.1 Troubleshooting Symptom Possible cause and remedy No sound on playback (the disc is playing and the time display is incrementing) No meter indication when a source is input The connections from the CD-RW700 to the amplifier system have not been made properly, or the input source selector is not at the correct position. Analog and/or digital volume (4.1.1, “Signal volume”) is set too low. The signal is being input through an unselected input source (4.1, “Input selection”) A digital input source has been selected, but the source is not connected or is not switched on. A finalized disc has been inserted. Use an unfinalized recordable disc. D-IN UNLOCK! Cannot record on a disc (pressing RECORD shows MONITOR) Symptom OPC Area CLR Need Repair!, System Err!, Tray Error!, Drive Error! Possible cause and remedy Seen when a CD-RW disc OPC area is full, and the CD-RW700 automatically cleans up the OPC area for further recording. These messages indicate an internal error in the unit. Consult your dealer or distributor regarding repair facilities. 6.2 Specifications Recording media type Recording resolution Recording sampling frequency Frequency convertor input Frequency response S/N ratio PGM Full ! Disc Full! or Cannot Rec! SCMS !! Not FS 44.1k! No Inc Mode Timer Error! Disc Error Erase Error! The display suddenly shows PMA Writing Rec Error No OPC Area! An attempt has been made to create more than 25 program steps. There is no space on the disc, or no tracks are available, or a general recording error has occurred You are trying to record digitally from a “second-generation” digital copy. Try analog recording (4.3.3, “SCMS and the CDRW700”. You are trying to do digital direct recording from a source which has not been recorded at 44.1 kHz (4.3.4, “Digital direct”) Auto track is not on when an attempt is being made to rehearse track split times. An attempt has been made to set timer recording (2.5.3, “Using the timer”) with a non-recordable disc, or no disc. The disc is bad. If it is a CD-RW disc, you may refresh it (5.2.3, “Refreshing a disc”), otherwise replace the disc. An error has occurred while trying to erase the disc Either the disc is full (this message will be prefaced by Disc Full!! (4.2.5, “Full disc”) or an attempt has been mode to write more than 99 tracks. General recording error. This may be caused by vibration or a shock during recording, for example, or may be the result of a bad disc. Try recording again with the same disc. If the message appears again, try a different disc. Appears only with CD-R discs. The OPC area is full, and no further recording is possible on this disc. Finalize the disc. Dynamic range Total harmonic distortion Channel separation Wow & flutter CD-R, CD-RW 16-bit linear 44.1 kHz 32 kHz — 48 kHz 20 Hz — 20 kHz (playback ±0.5 dB, recording ±1 dB) 98 dB (playback) 92 dB (recording) 94 dB (playback) 92 dB (recording) 0.004% (playback) 0.005% (recording) 90 dB (playback : 1 kHz) 80 dB (recording : 1 kHz) Unmeasurable (< 0.001%) Analog inputs Unbalanced RCA Nominal input level –10 dBV (FS –16 dB) Maximum input level + 6dBV Input impedance 33 kΩ (unbalanced) Analog outputs Unbalanced RCA Nominal output level –10 dBV (FS –16 dB) Maximum output level+6 dBV Output impedance 800 Ω (unbalanced) Headphone output 6 mm (1/4”) stereo Output level 35 mW + 35 mW (into 32 Ω) Digital inputs COAXIAL RCA pin, IEC60958 TYPE II OPTICAL TOSLINK , IEC60958 TYPE II Digital outputs COAXIAL RCA pin, IEC60958 TYPE II OPTICAL TOSLINK , IEC60958 TYPE II Voltage requirements Power consumption Dimensions w x h x d Weight Operating temperature Supplied accessories USA/Canada 120 VAC, 60 Hz U.K./Europe 230 VAC, 50 Hz Australia 240 VAC, 50 Hz General export 120/230 VAC, 60 Hz 27 W 483 x 98 x 312 (mm) 19 x 3.9 x 12.3 (in) 6.3 kg (13.9 lbs) 5˚C to 35˚C (41˚F to 95˚F) RC-RW700 remote control unit 2 x type 3 (AA) batteries PRINTED IN CHINA MA-0335 Telex Operating Instructions 1 C 2 han Call Talk BP-1002/BP-2002 Belt Packs Audiocom® Intercom System 93507740-000 Rev E 10/2003 INTRODUCTION The Audiocom® BP-1002 and BP-2002 are microprocessor controlled one- and twochannel intercom belt packs. An internal switch and jumper setting allows the units to be used with Clear-Com® components, if desired. Other internal switch and jumper settings allow the unit to be uniquely configured to the operator’s requirements. FCC STATEMENT This equipment uses, and can radiate radio frequency energy that may cause interference to radio communications if not installed in accordance with this manual. The equipment has been tested and found to comply with the limits of a Class A computing device pursuant to Subpart B, Part 15 of FCC Rules which are designed to provide reasonable protection against such interference when operated in a commercial environment. Operation of this equipment in a residential area may cause interference which the user (at his own expense) will be required to correct. This product meets the Electromagnetic Compatibility Directive, 89/336/EEC. ® Audiocom is a registered trademark of Telex Communications, Inc., Burnsville, Minnesota 55337 ® Clear-Com is a registered trademark of Clear-Com Intercom Systems 3 End-User License Agreement for Telex® Software IMPORTANT - Please read this document carefully before using this product. THIS DOCUMENT STATES THE TERMS AND CONDITIONS UPON WHICH TELEX COMMUNICATIONS, INC. (THE ‘COMPANY’) OFFERS TO LICENSE THE INSTALLED SOFTWARE OR PROGRAM (THE ‘SOFTWARE’) FOR USE WITH THE PRODUCT IN WHICH IT WAS INSTALLED. YOU ARE AGREEING TO BECOME BOUND BY THE TERMS OF THIS AGREEMENT. IF YOU DO NOT AGREE TO THE TERMS OF THIS AGREEMENT, DO NOT USE THIS PRODUCT. PROMPTLY RETURN THE PRODUCT TO THE PLACE WHERE YOU OBTAINED IT FOR A FULL REFUND. The installed software as supplied by the Company is licensed, not sold, to you for use only under the terms of this license, and the Company reserves all rights not expressly granted to you. You own the product or other media on or in which the Software is originally or subsequently recorded or fixed, but the Company retains ownership of all copies of the Software itself. 1. License: This license allows you to use the Software for internal purposes only on a single product in which it was installed. 2. Restrictions: (a)You may not market, distribute or transfer copies of the Software to others or electronically transfer or duplicate the software. YOU MAY NOT REVERSE ENGINEER, DECOMPILE, DISASSEMBLE, MODIFY, ADAPT, TRANSLATE, RENT, LEASE OR LOAN THE SOFTWARE OR CREATE DERIVATIVE WORKS BASED ON THE SOFTWARE OR ANY ACCOMPANYING WRITTEN MATERIALS. (b) The Software and the accompanying written materials are copy-righted. Unauthorized copying of the Software, including portions thereof or the written materials, is expressly forbidden. (c) You understand that the Company may update or revise the Software and in so doing incurs no obligation to furnish such updates to you. 3. Limited Warranty: The Company does not warrant that the operation of the Software will meet your requirements or operate free from error. The Company DISCLAIMS ALL OTHER WARRANTIES AND CONDITIONS EITHER EXPRESS OR IMPLIED, INCLUDING THE WARRANTIES OF MERCHANTABILITY, FITNESS FOR A PARTICULAR PURPOSE AND NON-INFRINGEMENT OF THIRD PARTY RIGHTS. 4. Limited Liability: The liability of the Company for any claims arising out of this License based upon the Software, regardless of the form of action, shall not exceed the greater of the license fee for the Software 4 OPERATION SYSTEM POWER The BP-2002 belt pack receives power externally, in one of two ways: • Via the intercom channel. • Via the local-power (pin 2) of the intercom channel connector The BP-1002 belt pack receives power externally, via the intercom channel. Both the BP-1002 and BP-2002 will pass system power through to subsequent belt packs that are “daisy chained” together. INITIAL BP-1002/BP-2002 SETUP The channel termination is initially set for balanced operation, which is compatible with other Audiocom® equipment. If the unit is going to be connected to ClearCom equipment, one switch and several jumpers must be changed as described in the section on Clear-Com Setup in this manual. The headset microphone type is initially set for singleended dynamic operation. To change the microphone type to balanced dynamic, refer to Table 2 for the position of JP9. 5 Figure 1. BP-2002 & BP-1002 Connections and Controls 6 EXTERNAL CONNECTIONS & CONTROLS NOTE: The numbers refer to the callouts in Figure 1. 1. VOLUME CONTROL: Use this control to adjust the headset listen level. 2. CHAN BUTTON AND INDICATORS: The Chan button (only on the BP-2002) allows the user to select which intercom channel is active. The yellow indicator next to the 1 or 2 lights to show the active channel. Press the Chan button to change the channel selection, the yellow indicator for that channel will light. 3. CALL BUTTON AND INDICATOR: The Call function allows the user to send or receive signals to other devices on the intercom channel selected. The Call button operates in two ways: Call receive: When there is an incoming call signal, the indicator is red. (If Audible Call Alert is enabled, incoming calls will cause beeps in the headset.) On the BP-2002, calls can be received on the selected channel only. Call send: To send a call signal to all stations on a channel, press and hold the Call button until a verbal response is received. The indicator will glow red. On the BP-2002, calls can be sent on the selected channel only. 4. TALK BUTTON AND INDICATOR: The Talk button activates the headset microphone and operates in two ways: Connections and Controls 7 Latched Mode: Tap the button once to talk. The indicator will glow green. Tap the button again when finished with a conversation. Momentary Mode: Press and hold the button to talk momentarily. Release the button when finished talking. NOTE:On the BP-2002, if no headset is connected when the Talk button is pressed, the Talk button will have the same function as the Chan button. 5. SIDETONE CONTROL: When using a headset, this control adjusts your own voice level heard in the head phones. To adjust the level, tap the Talk button once to turn on the headset microphone. Then, use a small flat-blade screwdriver to increase or decrease your voice level while talking into themicrophone. (This control is accessible by removing one screw of belt clip.) 6. HEADSET CONNECTOR: This connector accepts a fourwire Telex® boom-microphone headset. 7. INTERCOM CHANNEL CONNECTORS: On the BP-2002, intercom channels are connected via a pair of 6-pin connectors (one male and one female). The male and female connectors are wired together in parallel, providing a “loop through” at each connector pin. Use one connector to connect to the intercom channel. Use the other connector to “daisy chain” a cable to the next belt pack or other station on the channel. 8 Local Power Input (BP-2002 only) Normally the BP-2002 is powered from the intercom system and will turn on with the intercom system. The BP-2002 belt pack may also be powered from an optional power supply (18-30 VDC) connected between pin 2 (+) and pin 1 (-) of the intercom channel connector. 8. INTERCOM CHANNEL CONNECTORS: On the BP-1002, the intercom channel is connected via a pair of 3-pin connectors (one male and one female). The male and female connectors are wired together in parallel, providing a “loop through” at each connector pin. Use one connector to connect to the intercom channel. Use the other connector to “daisy chain” a cable to the next belt pack or other station on the channel. OPERATING MODES The microprocessor within the BP-1002/BP-2002 controls four modes of operation that affects the Microphone Kill and Audible Call Alert features. M O DE (BEEPS) M I C K I LL AUDIBLE C ALL AL ERT 1 Disabled Disabled 2 (Default) Enabled Disabled 3 Disabled Enabled 4 Enabled Enabled Table 1. Operating Modes 9 Changing Modes of Operation: Perform the following steps to change the mode of operation. 1. Both the Talk and Call indicators should be off. 2. Press and hold the Talk key, then press and hold the Call key, then release both keys. The Call indicator should now glow red. (The number of beeps heard in the headset indicates the current mode of operation.) 3. Press the Call key to change to the next mode of operation. Each press of the Call key will cause the BP-1002/BP-2002 to change to the next mode of operation. 4. When the desired mode is reached, press the Talk key to select that mode and exit the mode changing function. (Beeps will be heard in the headset when the mode changing function is exited. The number of beeps heard indicates the selected mode of operation.) NOTE: Each time the intercom system power is turned on, the beltpack will reset to the default mode of operation (Mode 2). 10 INTERNAL SWITCHES, JUMPERS AND ADJUSTMENTS There are several internal switches, jumpers and an adjustment that affect operation. These are described below. To gain access to the switches, jumpers and the adjustment, disconnect all power and line connections. Remove two screws from the top of each side and two screws from bottom of each side. Switch, jumper and adjustment locations are shown in Figure 2. Figure 2. Internal Switches, Jumpers and Adjustments. Note, if you have 9350-7749-000 board, figure 4 on page 19. NOTE: Figure 2 shows a BP-2002 with the switches and jumpers in their factory default positions (referenced in Table 2). The SIDETONE adjustment is also accessible behind the screw that holds the belt clip (callout 5 in Figure 1). The functions of the internal switches and jumpers are described in Table 3. 11 NOTE: On the BP-1002, jumper JP6 must always have pins 2 and 3 shorted. Side Tone Adjustment (R145) The side tone adjustment is accessible either internally (refer to Figure 2) or by removing the belt clip mounting screw (callout 5 in Figure 1). To adjust the level of your own voice heard in the headphones, tap the Talk button once to turn on the headset microphone. Then, use a small flatblade screwdriver to increase or decrease your voice level while talking into the microphone. Clear-Com Setup Make the following switch and jumper changes when the belt pack is used with Clear-Com equipment: BP-2002 1. SW1 must be placed in the UNBAL position. 2. JP4 must have pins 1 and 2 shorted (U position). 3. JP5 jumper must be removed and placed on JP2. 4. JP2 must have pins 1 and 2 shorted (using jumper from JP5). 5. JP1 must have pins 1 and 2 shorted. BP-1002 1. SW1 must be placed in the UNBAL position. 2. JP4 must have pins 1 and 2 shorted (U position). 3. JP6, JP5 must have pins 2 and 3 shorted at all times. Pr o d u c t BP-1002 Def au l t J u m p er Set t i n g s Shor ting across Pins 1 and 2: JP13 Shor ting across Pins 2 and 3: JP5, JP6 and JP9 Not Populated: JP1, JP2, and JP3 Populated on Pin 1 Only: JP4 BP-2002 Shor ting across Pins 1 and 2: JP9 and JP13 Shor ting across Pins 2 and 3: JP5 and JP6 Not Populated: JP3 Populated on Pin 1 Only: JP1, JP2, and JP4 Table 2. Default Settings. If you are using the 000 board, see page 19 for the default settings. 12 Table 3. Internal Switches and Jumpers Jumper/Switch Number Jumper or Switch Function Default Setting SW3 ^ Electret/Dynamic Microphone Select (Must be set to Dynamic when JP9 functions are designed Dynamic JP9 ^ ^ Balanced/Single-ended Dynamic Pins 1&2 shor ted Mic (SW1 must be set to Dynamic) Single-ended Mic: Pins 1&2 shor ted ^ Balanced Mic: Pins 2&3 shor ted JP6 ^ ^ Power Select Channel One Power : Pins 2&3 shor ted (On BP-1002, pins 2&3 always shor ted) ^ Channel Two Power : Pins 1&2 shor ted JP5 Power Select ^ Channel One Power : Pins 2&3 shor ted (On BP-1002, Pins 2&3 always shor ted.) Channel Two Power : Pins 1&2 Shor ted ^ ^ ^ Pins 2&3 shor ted Pins 2&3 shor ted (Must be set for same channel as JP6 for proper power operation in Audiocom® mode on BP-2002) (Must be used in conjunction with SW1) SW1 Clear-Com / Audiocom® Operation ^ ^ Unbalanced / Balanced Line (Must be used in conjunction with JP4, JP5, JP2, and JP1) JP4 Clear-Com / Audiocom® Operation Pins 1&2 shor ted: UNBAL (ClearCom) Jumper on one pin only JP2 No jumper present ^ DC Call Detect (Clear-Com operation only, not used in Audiocom® mode) BP-2002 only Disabled: No pins jumpered ^ ^ Enabled: Pins 1&2 shor ted (To enable, use jumper from JP5) JP1 Jumper on one pin only ^ ^ DC Call Detect (Clear-Com operation only, not used in Audiocom® mode) BP-2002 only Disabled: No pins jumpered Enabled: Pins 1&2 shor ted JP13 For RTS™ use only Must be installed 13 Balanced Note: In case of local power use, install a jumper on pins 2 & 3 of U6 CONNECTOR PIN CONFIGURATIONS Headset Connector Type: XLR-4M (callout 6 in Figure 1) Pin 1 Headset microphone low Pin 2 Headset microphone high Pin 3 Headphone high Pin 4 Headphone low Intercom Channel Connectors BP-1002 Type: One XLR-3M and XLR-3F pair (callout 8 in Figure 1) Audiocom® Mode (Internal switch SW1 and jumpers JP4, JP5, JP2 and JP1 set to BAL position) Pin 1 Common Pin 2 Intercom audio low and +24 VDC input Pin 3 Intercom audio high and +24 VDC input Clear-Com Mode (Internal switch SW1 and jumpers JP4, JP5, JP2 and JP1 set to UNBAL position) Pin 1 Common Pin 2 +30 VDC input Pin 3 Intercom audio/call signal 14 BP-2002 Type: One XLR-6M and XLR-6F pair (callout 7 in Figure 1) Audiocom® Mode (Internal switch SW1 and jumpers JP4, JP5, JP2 and JP1 set to BAL position) Pin 1 Pin 2 Pin 3 Pin 4 Pin 5 Pin 6 Common Local power (+24 VDC) Channel A intercom audio low and +24 VDC input Channel A intercom audio high and +24 VDC input Channel B intercom audio low and +24 VDC input Channel B intercom audio high and +24 VDC input Clear-Com Mode (Internal switch SW1 and jumpers JP4, JP5, JP2 and JP1 set to UNBAL position) Pin 1 Pin 2 Pin 3 Pin 4 Pin 5 Pin 6 Common Local power (14 to 30 VDC) Channel A +30 VDC input Channel A intercom audio/call signal Channel B +30 VDC input Channel B intercom audio/call signal 15 SPECIFICATIONS GENERAL: Power Requirements: Channel supplied: 24 VDC nominal, 45 to 70 mA Local-power: (BP-2000 only) 24 VDC nominal (18 to 30 VDC), 45 to 70 mA Environmental Requirements: Storage: -20ºC to 80ºC; 0% to 95% humidity, non-condensing Operating: -15ºC to 60ºC; 0% to 95% humidity, non-condensing Dimensions: 5.0" (127 mm) H x 3.5" (88.9 mm) W x 1.8" (45.7 mm) D Weight: 1.5 pounds (0.68 kg) INTERFACE REQUIREMENTS: Headset: 50 to 200 ohm dynamic microphone 150 to 600 ohm headphones Balanced Intercom Channel: Output Level: 1 Vrms nominal Input Impedance: 300 ohm ±5% Bridging Impedance: greater than 10,000 ohm Call Signalling: Send: 20 kHz ±100 Hz, 0.5 Vrms ±10% Receive: 20 kHz ±800 Hz, 100 mVrms Mic-Off Frequency: Detect: 24 kHz ±800 Hz, 100 mVrms Noise Contribution: less than -60 dB on the line 16 Unbalanced Intercom Channel: Output Level: 480 mVrms ±10% Input Impedance: 200 ohm ±5% Bridging Impedance: greater than 10,000 ohm Call Signalling: Send: 12 ±3 VDC Receive: 4 VDC minimum HEADPHONE AMPLIFIER: Voltage Gain: 20 ±3 dB from the line Maximum Output: 60 mW into 150 ohm Frequency Response: 200 Hz to 8 kHz with no more than 4 dB deviation Audible Alert: 1 kHz, at the headset Total Harmonic Distortion: Less than 2% at 50 mW from the line Sidetone: 20 dB minimum range, adjustable 17 DYNAMIC MICROPHONE AMPLIFIER: Voltage Gain: Mic to Channel; 45 ±3 dB, before limiting Mic to Headphone; adjustable, 65 dB range into 150 ohm Frequency Response: 200 Hz to 8 kHz +1/-3dB Total Harmonic Distortion: Less than 1% at Channel output at 1 kHz ELECTRET MICROPHONE AMPLIFIER: Voltage Gain: Mic to Channel; 24 ±3 dB, before limiting Mic to Headphone; adjustable, 45 dB ±10% into 150ohm Frequency Response: 200 Hz to 8 kHz +1/-3dB Total Harmonic Distortion: Less than 1% at Channel output 18 Figure 4. Board Number 9040-7740-000. Product Default Jumper Settings BP-1002 Shor ting across Pins 1 and 2: JP7, JP8, JP10, JP11, JP12, and JP13 Shor ting across Pins 2 and 3: JP5, JP6 and JP9 Not Populated: JP1, JP2, and JP3 Populated on Pin 1 Only: JP4 BP-2002 Shor ting across Pins 1 and 2: JP7, JP8, JP9, JP10, JP11, JP12, and JP13 Shor ting across Pins 2 and 3: JP5 and JP6 Not Populated: JP3 Populated on Pin 1 Only: JP1, JP2, and JP4 Default Settings 19 APPENDIX A OPTIONAL FOOTBALL MODIFICATIONS GENERAL DESCRIPTION In Audiocom® Intercom Systems, the Mic-Kill feature is used to turn off any activated microphones on a selected channel. The Mic-Kill feature is activated when the beltpack receives a 24 kHz signal from the channel. In some applications the Mic-Kill and Call signal features are not desired and need to be disabled. ELIMINATING MIC-KILL AND CALL SIGNAL CAUTION TO PREVENT DAMAGE TO THE EQUIPMENT, THESE MODIFICATIONS SHOULD ONLY BE MADE BY QUALIFIED TECHNICIANS. If desired, the Mic-Kill and Call signal features can be disabled in the BP2002/BP-1002 by removing a surface-mounted capacitor from the printed circuit board. Perform the following: 1. Before making changes to the printed circuit board, disconnect all power and line connections from the beltpack. 2. Refer to Figure 3 and locate C61 on the underside of the printed circuit board. 3. Remove capacitor C61 from the printed circuit board. RESTORING MIC-KILL AND CALL SIGNAL To restore the Mic-Kill and Call signal features, replace C61 with Telex® part number 102879-218, 1500 pF, 50V capacitor. 20 Figure 3. Printed Circuit Board FACTORY SERVICE All equipment returned for repair must be accompanied by documentation stating your return address, telephone number and proof of date of purchase, along with a description of the problem. In lieu of this, you may obtain a Return Authorization form from our Customer Service Department. Customer Service Department Telex Communications, Inc. 12000 Portland Avenue South Burnsville, Minnesota 55337 U.S.A. Telephone: (800) 392-3497 Fax: (800) 323-0498 Return equipment to: Service Department Telex Communications, Inc. West 1st Street Blue Earth, Minnesota 56013 U.S.A. WARRANTY REPAIRS - If in warranty, no charge will be made for the repairs. Equipment being returned for warranty repair must be sent prepaid and will be returned prepaid. NON-WARRANTY REPAIRS - Equipment that is not under warranty must be sent prepaid to Telex. If requested, an estimate of repair costs will be issued prior to service. Once your approval for repair, and repair of equipment is completed, the equipment will be returned on a collect basis. Collect charges may be avoided by sending a signed check for payment in full along with your signed estimate approval form (the estimate includes the shipping charge). 22 Telex ® Parts List and Wiring Diagrams Model PH-1 Headset (64438 Series) The PH-1 headset is a medium weight, full cushion, single sided headset for the ultimate in day-long comfort. The PH-1 features a high quality monaural dynamic earphone with dynamic noise cancelling microphone on adjustable ball joint boom that can be positioned on either side of the head. The unit has a straight cord and is available in various connector configurations. Specifications Receiver Type .................................................. Dynamic Impedance ....................................................... 150 ohms Microphone Type ............................................. Dynamic Impedance ....................................................... 150 ohms Weight ................................................................... 12 ozs Cord ................................................................ 6' straight Parts List ITEM NO. DESCRIPTION 1 Headband Assy. QTY 1 PART NO. 61162-046 2 Headband Spacer 1 63709-001 3 Slider Tip 1 61166-005 4 Headband 1 63801-001 5 Earcup-Yoke-Slider Assy 1 70398-034 6 Boom Assy 1 70398-001 7 Strain Relief 1 63465-006 8 Connector, PH-1 XLR-4F 1 35320-004 Connector, PH-1R, XLR-4M 1 35398-004 Connector, PH-1R5, XLR-5M 1 35398-005 9 Cushion 1 64442-000 10 Cord Unit 1 63988-063 11 Terminal 1 54462-001 51856-008 12 Screw, No. 6-20 x 1/4 1 13 Ball Half 1 63451-003 14 Ball Joint Spring 1 63453-000 15 Hex Spacer 2 57907-000 16 Foam Liner 1 63763-000 17 Screw, No. 4-40 x 1/4 2 51845-038 18 Ear Cushion 1 63444-001 19 Ear Cushion Cover 1 35772-000 20 Receiver Element/Earplate Assy 1 70398-035 70608-000 21 Foam 1 22 Slider 1 64440-001 23 Screw, No. 2-28 x 3/8 1 51856-002 24 Mic Housing Cover 1 63460-005 25 Foam 1 63124-018 26 Mic Element Assy 1 61585-037 27 Mic Housing 1 63459-005 28 Contact Tension Spring 1 63455-000 Wiring Diagram N/C MICROPHONE POLARITY DOT BLK BLU BLK RED RED WHT RED BLK + RECEIVER SHLD YEL N/C N/C GRN Connector Wiring N.C. N.C. YEL GRN SHLD RED BLK WHT BLU 4 3 N.C. N.C. 1 2 64438-100 PH-1 YEL GRN SHLD BLU WHT BLK RED N.C. N.C. 1 2 4 3 YEL SHLD BLU WHT RED BLK N.C. N.C. 5 1 4 2 3 64438-103 64438-102 PH-1R PH-1R5 ® 38109-637 Rev D 8/00 User Instructions 1L 00 -2 PS 1 2 ™ Model PS-2001L Power Supply 20 SSP 1 2 ™ Model SPS-2001 Power Supply Audiocom® Intercom Systems 9350-7699-000 Rev. A, 4/2001 1 l Vo um e 01 FCC Statement This equipment uses, and can radiate radio frequency energy that may cause interference to radio communications if not installed in accordance with this manual. The equipment has been tested and found to comply with the limits of a Class A computing device pursuant to Subpart J, Part 15 of FCC Rules which are designed to provide reasonable protection against such interference when operated in a commercial environment. Operation of this equipment in a residential area may cause interference which the user (at his own expense) will be required to correct. This product meets Electromagnetic Compatibility Directive 89/336/EEC 2 Table of Contents Description ................................................................................ 4 PS-2001L........................................................................................................................................ 4 SPS-2001 ........................................................................................................................................ 5 Installation ................................................................................. 6 Unpacking ..................................................................................................................................... 6 PS-2001L........................................................................................................................................ 6 SPS-2001 ........................................................................................................................................ 6 Configuration Switches ................................................................................................................ 6 Intercom Channel and Program Connections ........................................................................... 6 Desktop or Rackmount Installation ............................................................................................ 6 Specifications ........................................................................... 12 General ........................................................................................................................................ 12 Intercom Channels ..................................................................................................................... 12 General ........................................................................................................................................ 12 Balanced Mode (set to BAL position) ....................................................................................... 12 Unbalanced Mode (set to UNBAL position) ............................................................................. 12 Speaker Inputs (SPS-2001 Only) ............................................................................................... 12 Approvals .................................................................................................................................... 12 Power-Up Check ..................................................................... 12 3 Description The PS-2001L and SPS-2001 are versatile power supplies that can be used in a variety of Audiocom® intercom system applications. They both directly accept any AC input power from 100 to 240 VAC, 50/60 Hz and can be configured to power two separate intercom channels or one large intercom channel with twice the intercom station capacity. Additionally, the units can be configured for compatibility with Clear-Com* Intercom Systems. The units may be rack mounted or used on a desktop. For rack mounting, optional hardware is required. For desktop use, four non-marring rubber feet are supplied. The SPS-2001 also provides a speaker with two mixed inputs making it ideal for situations calling for a master station with a microphone / speaker combination. PS-2001L PS-2001L ® 1 Combine Isolate 2 1 3 4 CH 1 100-240 VAC 60/50 HZ TELEX COMMUNICATIONS, INC. MADE IN USA 2 CH 2 UNBAL BAL CLASS 2 WIRING 1.5A 24VDC 5 Figure 1 - PS-2001L Front and Rear Panel Features. 1. Combine / Isolate Switch: When in the Combine position, the unit will combine the audio signals of the two channels to create a single audio channel where all users can intercommunicate. When in the Isolate position, the unit will create two groups of completely independent users. 2. Channel Status Indicators: The indicators are green for normal operation and red when there is an overload or short circuit. The circuitry in the unit will automatically reset when the overload or short circuit is located and fixed. 3. Universal AC Power Input: The unit accepts any input power in the range of 100-240 VAC, 50/60 Hz. 4. Intercom Channel Connectors: When the Combine / Isolate switch is set to the Isolate position, each channel connector is powered separately and has completely separate intercom audio. When the Combine / Isolate switch is set to the Combine position, each channel is still powered separately, but the audio signals are combined so that all users on both channels can intercommunicate. 5. BAL / UNBAL Selector Switch: This selector switch allows the user to configure the unit for use in either an Audiocom® (BALANCED) or Clear-Com (UNBALANCED) system. Compatibility includes channel connector pin-outs, channel power requirements, and call signaling requirements. The default setting for this switch is in the Audiocom® (BAL) position. 4 SPS-2001 SPS-2001 ® 1 Combine Isolate 2 Volume 1 2 4 3 5 CH 1 INPUT 1 CH 2 SPEAKERS LINE LEVEL 1VRMS 100-240 VAC 60/50 HZ TELEX COMMUNICATIONS, INC. MADE IN USA INPUT 2 UNBAL BAL CLASS 2 WIRING 1.5A 24VDC 6 Figure 2 - SPS-2001 Front and Rear Panel Features. 1. Speaker, Inputs, and Volume Control: Two audio inputs are provided. The inputs are combined internally and sent as a monaural signal to the internal speaker amplifier. The Volume control adjusts the level to the front panel speaker. Typically, these inputs are used with the speaker outputs of a master station when the master station is set for use with a panel microphone and speaker instead of a headset. 2. Combine / Isolate Switch: When in the Combine position, the unit will combine the audio signals of the two channels to create a single audio channel where all users can intercommunicate. When in the Isolate position, the unit will create two groups of completely independent users. 3. Channel Status Indicators: The indicators are green for normal operation and red when there is an overload or short circuit. The circuitry in the unit will automatically reset when the overload or short circuit is located and fixed. 4. Universal AC Power Input: The unit accepts any input power in the range of 100-240 VAC, 50/60 Hz. 5. Intercom Channel Connectors: When the Combine / Isolate switch is set to the Isolate position, each channel connector is powered separately and has completely separate intercom audio. When the Combine / Isolate switch is set to the Combine position, each channel is still powered separately, but the audio signals are combined so that all users on both channels can intercommunicate. 6. BAL / UNBAL Selector Switch: This selector switch allows the user to configure the unit for use in either an Audiocom® (BALANCED) or Clear-Com (UNBALANCED) system. Compatibility includes channel connector pin-outs, channel power requirements, and call signaling requirements. The default setting for this switch is in the Audiocom® (BAL) position. 5 Installation Unpacking The package contains the following items. Contact the shipper or your Audiocom® dealer immediately if anything is damaged or missing. Detach and fill out the registration card and return it to Telex to properly register the product. PS-2001L Qty 1 1 1 4 1 Description PS-2001L Power Supply Warranty and registration card User Manual Rubber Feet (install for desktop use of the PS-2001L) Power Cord SPS-2001 Qty 1 1 1 4 1 1 Description PS-2001L Power Supply Warranty and registration card User Manual Rubber Feet (install for desktop use of the PS-2001L) Power Cord RCA to RCA Patch Cord Configuration Switches The BAL / UNBAL switch (located on the rear of the unit) is set to the Balanced (Audiocom) position when the unit is shipped from the factory. To set the switch to the Unbalanced (Clear-Com) mode, use a pointed object such as a pen to push in the switch. The Combine / Isolate switch (located on the front of the unit) can be changed at any time by using a pointed object such as a pen to push in the switch. When the switch is in the Combine position, all users on both channels may intercommunicate. When the switch is set to the Isolate position, channels 1 and 2 cannot intercommunicate. Intercom Channel and Program Connections Channel Capacity: When connecting intercom stations to the PS-2001L or SPS-2001, determine the total current for all stations on each channel. The total per channel should not exceed 2A. If you exceed this limit, an overload indication will be provided and the output of the power supply will be turned off. Once the overload is corrected, the overload indication will disappear and the power supply output will be turned on. Note that if you are using DC wallpacks with some intercom stations, you do not need to add the current consumption of those stations to the total current. Audiocom Connections: Intercom Cable wiring details are shown in Figure 3. Speaker interconnection cables (SPS-2001 only) are standard RCA phono types. For program input cable wiring, refer to your master intercom station user manual. Some typical intercom applications are shown in Figures 4 through 8. Clear-Com Applications: Refer to your Clear-Com system documentation for intercom cable wiring and connection details. Desktop or Rackmount Installation For desktop use, install the four supplied rubber feet to the bottom of the unit. Do not obstruct the cooling vents when using the unit on a desktop. For rackmounting, use an optional Audiocom Rackmount Kit. Several kits are available to meet the requirements of your particular system. Follow the assembly instructions supplied with the rackmount kit. 6 TYPICAL 1-CHANNEL CABLE WIRING 3 2 Pair 1 3 2 1 Pair 2 1 (Both wires) Shield Shield Cable Type: 22AWG Stranded, 2-Pair Twisted-wire, with Shield Connector Type: 3-Pin XLR Audio (Neutrik or Switchcraft)* Pin 1: Common Denotes twisted pair. Pin 2: Channel Audio / Power Pin 3: Channel Audio / Power Denotes shield. Shield: Earth ground TYPICAL 2-CHANNEL CABLE WIRING 4 3 6 5 4 3 6 5 Pair 1 Pair 2 1 1 (Both wires) Pair 3 Shield Shield Cable Type: 22AWG Stranded, 3-Pair Twisted-wire, with Shield Connector Type: 6-Pin XLR Audio (Neutrik only, not compatible with 6-pin Switchcraft)* Pin 1: Channel 1 & 2 Common Pin 2: No connection Denotes twisted pair. Pin 3: Channel 1 Audio / Power Pin 4: Channel 1 Audio / Power Denotes shield. Pin 5: Channel 2 Audio / Power Pin 6: Channel 2 Audio / Power Shield: Earth ground 3 Ch1 2 1 Case “Y” CABLE WIRING Pair 1 Pair 2 3 Ch2 2 1 Shield Pair 3 4 3 6 5 1 (Both wires) Shield Use second drain wire if available, or add an extra section of wire. * Standard cables are generally constructed using a male connector at one end and a female connector at the other end. This allows several cables to be interconnected to create longer cable runs. Audiocom master stations, speaker stations and belt packs also typically provide both a male and female Neutrik connector for each intercom channel. This permits loop-through connection of several intercom stations using the standard cables. Audiocom power supplies use a 3-pin male Neutrik connector for each channel. Audiocom wallplates use male Neutrik connectors. Figure 3 - Cable Wiring Diagrams for Audiocom Applications. 7 1 PS-2001L Power Supply 2 Combine / Isolate Switch Y set to Isolate 1-channel cable 2-channel cable “Y” cable CH 2 CH 1 100-240 VAC 60/50 HZ TELEX COMMUNICATIONS, INC. MADE IN USA BAL UNBAL CLASS 2 WIRING 1.5A 24VDC 1 1 PUSH US2000A Master Station PUSH PROGRAM INPUTS + SPEAKERS LINE LEVEL 1 VRMS - 1 VOL PGM 1 VOL PGM 2 2 P.A. 12-15 VDC BAL - OUT UNBAL - IN CHN 2 CHN 1 To all stations on channel 2 1 BP-1000 To all stations on channel 1 1 BP-1000 HEADSET LINES HEADSET 1 BP-1000 HEADSET EXP OUT 1 BP-1000 LINES HEADSET LINES LINES Y BP-2000 HEADSET Note: A JB-2 Junction Box may be used instead of the “Y” cables. The JB-2 provides a means of combining two channels, while also allowing the single channels to be continued directly from the junction box. LINES 2 BP-2000 HEADSET LINES Y BP-1000 HEADSET BP-1000 LINES HEADSET LINES Figure 4 - Typical connections using a single PS-2001L Power Supply to power two channels. 8 1 SPS-2001 Power Supply 2 Combine / Isolate Switch Y set to Isolate 1-channel cable 2-channel cable “Y” cable CH 2 CH 1 SPEAKER INPUT 1 INPUT 2 100-240 VAC 60/50 HZ TELEX COMMUNICATIONS, INC. MADE IN USA Speaker Interconnect cable. Program Input cable. From 2 audio sources UNBAL CLASS 2 WIRING 1.5A 24VDC 1 1 PUSH US2000A Master Station PUSH PROGRAM INPUTS + SPEAKERS LINE LEVEL 1 VRMS - 1 VOL PGM 1 VOL PGM 2 2 P.A. 12-15 VDC EXP OUT BAL - OUT UNBAL - IN HEADSET To all stations on channel 2 1 BP-1000 LINES HEADSET 1 BP-1000 CHN 2 CHN 1 To all stations on channel 1 1 BP-1000 HEADSET BAL LINE LEVEL 1 VRMS 1 BP-1000 LINES HEADSET LINES LINES Y BP-2000 HEADSET Note: A JB-2 Junction Box may be used instead of the “Y” cables. The JB-2 provides a means of combining two channels, while also allowing the single channels to be continued directly from the junction box. LINES 2 BP-2000 HEADSET LINES Y BP-1000 HEADSET BP-1000 LINES HEADSET LINES Figure 5 - Typical connections using one SPS-2001 Power Supply for two intercom channels. The two program sources are monitored independently by their intercom channels. All audio (program and intercom) is monitored as a monaural mix in the SPS-2001 speaker. The US2000A is set for monaural speaker output (default). 9 1 SPS-2001 Power Supply 2 Combine / Isolate Switch Y set to Isolate SPK1000 Powered Speaker TELEX COMMUNICATIONS, INC. MADE IN USA 1-channel cable 2-channel cable “Y” cable CH 2 CH 1 SPEAKER INPUT 1 INPUT 1 + INPUT 2 INPUT 2 100-240 VAC 60/50 HZ BAL LINE LEVEL 1 VRMS 12-15 VDC TELEX COMMUNICATIONS, INC. MADE IN USA Speaker interconnect cables. Program input cable. From 2 audio sources UNBAL CLASS 2 WIRING 1.5A 24VDC 1 1 PUSH US2000A Master Station PUSH PROGRAM INPUTS + SPEAKERS LINE LEVEL 1 VRMS - 1 VOL PGM 1 VOL PGM 2 2 P.A. 12-15 VDC EXP OUT BAL - OUT UNBAL - IN HEADSET To all stations on channel 2 1 BP-1000 LINES HEADSET 1 BP-1000 CHN 2 CHN 1 To all stations on channel 1 1 BP-1000 HEADSET BAL LINE LEVEL 1 VRMS 1 BP-1000 LINES HEADSET LINES LINES Y BP-2000 HEADSET Note: A JB-2 Junction Box may be used instead of the “Y” cables. The JB-2 provides a means of combining two channels, while also allowing the single channels to be continued directly from the junction box. LINES 2 BP-2000 HEADSET LINES Y BP-1000 HEADSET BP-1000 LINES HEADSET LINES Figure 6 - Adding an SPK1000 to the example in Figure 5. The two program sources are monitored independently by the intercom channels. The SPS-2001 monitors intercom channel 1 and program 1. The SPK1000 monitors intercom channel 2 and program 2. The US2000A is set for binaural speaker output as described in the US2000A User Manual. 10 PS-2001L Channel 1 Power Combine / Isolate Switch set to Combine PS-2001L Channel 2 Power Combine / Isolate Switch set to Combine CH 2 CH 1 100-240 VAC 60/50 HZ TELEX COMMUNICATIONS, INC. CH 2 CH 1 100-240 VAC 60/50 HZ MADE IN USA TELEX COMMUNICATIONS, INC. BAL UNBAL MADE IN USA BAL UNBAL CLASS 2 WIRING 1.5A 24VDC CLASS 2 WIRING 1.5A 24VDC 1 1 PUSH PUSH PROGRAM INPUTS + SPEAKERS LINE LEVEL 1 VRMS - 1 VOL PGM 1 VOL PGM 2 2 EXP OUT P.A. 12-15 VDC BAL - OUT UNBAL - IN CHN 2 CHN 1 PS-L (Optional) 1 1 To ½ of stations on channel 1 1 To ½ of stations on channel 1 1 To ½ of stations on channel 2 To ½ of stations on channel 2 Figure 7 - Using two PS-2001L Power Supplies to provide a greater capacity on each channel. SPS-2001 Channel 2 Power Combine / Isolate Switch set to Combine SPS-2001 Channel 1 Power Combine / Isolate Switch set to Combine CH 2 CH 1 SPEAKER INPUT 1 INPUT 1 INPUT 2 100-240 VAC 60/50 HZ TELEX COMMUNICATIONS, INC. MADE IN USA LINE LEVEL 1 VRMS CH 2 CH 1 SPEAKER INPUT 2 100-240 VAC 60/50 HZ TELEX COMMUNICATIONS, INC. BAL UNBAL MADE IN USA LINE LEVEL 1 VRMS CLASS 2 WIRING 1.5A 24VDC BAL UNBAL CLASS 2 WIRING 1.5A 24VDC 1 4 4 1 PUSH PUSH PROGRAM INPUTS + SPEAKERS LINE LEVEL 1 VRMS - 1 VOL PGM 1 VOL PGM 2 2 P.A. 12-15 VDC EXP OUT BAL - OUT UNBAL - IN CHN 2 CHN 1 US2000A Internal DIP switches set for binaural operation PS-L (Optional) 1 Program input cable. From 2 audio sources To ½ of stations on channel 1 1 1 To ½ of stations on channel 1 To ½ of stations on channel 2 1 To ½ of stations on channel 2 Figure 8 - Using two SPS-2001 Power Supplies to provide a greater capacity on each channel. Using two SPS-2001 Power Supplies also lets you independently monitor and adjust volume for both intercom channels without the need for a separate powered loudspeaker. In this application, the US2000A should be set for binaural speaker output as described int he US2000A manual. 11 Power-Up Check 1. Plug in any DC wallpacks that are being used with individual intercom stations. Note: If you plug in DC wallpacks after applying power to the PS-2001L or SPS-2001, you may get an overload indication. This is because the stations that are being powered by wallpacks will draw current from the units until their own DC wallpack supplies are connected. To correct the problem, plug in the DC wallpacks. 2. Plug in the AC power cords for any connected PS-2001L or SPS-2001 Power Supplies. The channel status indicators should be green. 3. If a channel status indicator turns red during operation, locate the short or overload that is causing the problem. Once the short or overload is corrected, the Power Supply should reset itself and the overload indication should go away. Specifications General Input Power Requirements: 100 to 240 VAC, 50/60 Hz Output Power (each channel): 21±1 VDC, 2 A Dimensions 1.75”(44.5 mm) high x 8.25” (209.5 mm) wide x 10.31” (261.9 mm) deep Weight: approximately 2.5 lb (1.13 kg) Environmental Requirements: Storage: -20°C to 80°C, 0% to 95% humidity, non-condensing Operating: 0°C to 50°C, 0% to 95% humidity, non-condensing Intercom Channels General Connector Type: One XLR-3M audio connector for each channel. Pin-out depends on setting of BAL / UNBAL switch for balanced or unbalanced operation as defined below: Balanced Mode (set to BAL position) Line Terminating Impedance: 300 ohms ±10% Connector Pin-out: Pin 1 Common (audio and DC return) Pin 2 Full-duplex, balanced intercom audio and +24 VDC output Pin 3 Full-duplex, balanced intercom audio and +24 VDC output Unbalanced Mode (set to UNBAL position) Line Terminating Impedance: 150 ohms ±5% Connector Pin-out: Pin 1 Common (audio and DC return) Pin 2 +24 VDC output Pin 3 Full-duplex, unbalanced Intercom audio high Speaker Inputs (SPS-2001 Only) Type: RCA Phone Jack Tip: Speaker + Input Sleeve: Speaker - Input Approvals UL, CUL, CE 12 TRADEMARKS Audiocom® is a registered trademark of Telex Communications. Names of other products mentioned herein are used for identification purposes only and may be trademarks and/or registered trademarks of their respective companies. WARRANTY INFORMATION Products are warranted by Telex Communications, Inc. to be free from defects in materials and workmanship for a period of one year from the date of sale. The sole obligation of Telex during the warranty period is to provide, without charge, parts and labor necessary to remedy covered defects appearing in products returned prepaid to Telex. This warranty does not cover any defect, malfunction or failure caused beyond the control of Telex, including unreasonable or negligent operation, abuse, accident, failure to follow instructions in the manual, defective or improper associated equipment, attempts at modification and repair not authorized by Telex, and shipping damage. Products with their serial numbers removed or effaced are not covered by this warranty. To obtain warranty service, follow the procedures entitled “Procedure for Returns” and “ Shipping to Manufacturer for Repair or Adjustment”. This warranty is the sole and exclusive express warranty given with respect to Audiocom products. It is the responsibility of the user to determine before purchase that this product is suitable for the user’s intended purpose. ANY AND ALL IMPLIED WARRANTIES, INCLUDING THE IMPLIED WARRANTY OF MERCHANTABILITY ARE LIMITED TO THE DURATION OF THIS EXPRESS LIMITED WARRANTY. NEITHER TELEX NOR THE DEALER WHO SELLS TELEX PRODUCTS IS LIABLE FOR INCIDENTAL OR CONSEQUENTIAL DAMAGES OF ANY KIND. CUSTOMER SUPPORT Technical questions should be directed to: Customer Service Department Telex 12000 Portland Avenue South Burnsville, MN 55337 U.S.A Telephone: (952) 884-4051 Fax: (952) 884-0043 RETURN SHIPPING INSTRUCTIONS Procedure for Returns If a return is necessary, contact the dealer where this unit was purchased. If a return through the dealer is not possible, obtain a RETURN AUTHORIZATION from: Customer Service Department Telex Communications, Inc. Telephone: 1-800-392-3497 or (952) 884-4051 Fax: 1-800-323-0498 or (952) 884-0043 DO NOT RETURN ANY EQUIPMENT DIRECTLY TO THE FACTORY WITHOUT FIRST OBTAINING A RETURN AUTHORIZATION. Be prepared to provide the company name, address, phone number, a person to contact regarding the return, purchase order number, the type and quantity of equipment, a description of the problem and the serial number(s). Shipping to Manufacturer for Repair or Adjustment All shipments of products should be made via United Parcel Service or the best available shipper prepaid. The equipment should be shipped in the original packing carton; if that is not available, use any suitable container that is rigid and of adequate size. If a substitute container is used, the equipment should be wrapped in paper and surrounded with at least four inches of excelsior or similar shock-absorbing material. All returns must include the return authorization number. Units sent for repair or adjustment DO NOT need a return authorization number Factory Service department Telex Communications, Inc. West 1st Street Blue Earth, MN 56013 U.S.A. Upon completion of any repair the equipment will be returned via United Parcel Service or specified shipper collect. 13 User Instructions Model SS-1002 Single Channel Intercom Speaker Station Model SS-2002 Two Channel Intercom Speaker Station Model SS-2002RM Two Channel Rack Mount Intercom Speaker Station Audiocom® Intercom Systems 9350-7741-000 Rev A, 10/2002 1 FCC Statement This equipment uses, and can radiate radio frequency energy that may cause interference to radio communications if not installed in accordance with this manual. The equipment has been tested and found to comply with the limits of a Class A computing device pursuant to Subpart J, Part 15 of FCC Rules which are designed to provide reasonable protection against such interference when operated in a commercial environment. Operation of this equipment in a residential area may cause interference which the user (at his own expense) will be required to correct. This product meets Electromagnetic Compatibility Directive 89/336/EEC 2 Table of Contents Introduction............................................................................... 4 Description ................................................................................ 4 Features ..................................................................................... 4 Installation ................................................................................. 6 Unpacking ..................................................................................................................................... 6 Configuration Pre-check .............................................................................................................. 6 DIP Switches .................................................................................................................................. 6 Power-Up ..................................................................................................................................... 14 Sidetone Adjustment................................................................................................................... 14 Operation ................................................................................. 15 Channel Select (SS-2002 & SS-2002RM Only) ........................................................................ 15 Headset/Headphone/Speaker/Microphone Selection .............................................................. 15 Receiving Calls ............................................................................................................................ 15 Calling an Intercom Channel .................................................................................................... 15 Specifications ........................................................................... 16 General ........................................................................................................................................ 16 Dynamic-mic Headset/Handset ................................................................................................. 16 Panel Microphone ....................................................................................................................... 16 Intercom Channels, Balanced mode (SW1 set to BAL position) ............................................ 16 Intercom Channels, Unbalanced mode (SW1 set to UNBAL position).................................. 16 Speaker Output Power ............................................................................................................... 17 Dimensions .................................................................................................................................. 17 3 Introduction Thank you for purchasing the Audiocom SS-1002/SS-2002/SS-2002RM Intercom Speaker Station. We hope the many design features of this product will satisfy your intercommunication requirements for many years to come. To get the most out of your new intercom station, please take a few moments to look through this booklet before using the Intercom Speaker Station for the first time. Description The Intercom Speaker Stations may be used with a headset, or with the built-in speaker and the panel microphone or an optional gooseneck microphone. Another alternative is to use headphones and either the built-in panel microphone or an optional gooseneck microphone. As an alternative to a headset, a telephone style handset may also be used. The SS-1002 is a single-channel station; the SS-2002 & SS-2002RM provide switch selectable access to either of two intercom channels. Both the SS-1002 and SS-2002 come in three versions to suit a variety of applications. The “S” box is a portable version. It has a carrying handle and dual “loop-through” intercom connectors which permit stations to be quickly interconnected using prefabricated cables. The “P” box is a stationary version. It also has dual “loop-through” connectors for quick interconnection, but the case is designed for desktop or console-mount applications. The “U” box is designed for permanent, in-the-wall mounting. It uses push type wire terminals for connection to the intercom system. In addition, the SS-2002RM can be used on a desktop or mounted in a standard 19” equipment rack (using the optional RM-14 Rack Mount Kit). Features 1. 2. 3. 4. 5. 6. 7. 8. 9. 10. 11. 12. 13. 14. Channel and Power connections: The “U” box uses quick release terminals to connect audio and power wires. For the “S” box and “P” box versions, the terminal connections are brought out to the dual, loop-thru XLR connectors on the side of the box. These permit several stations to be connected in a string, or daisy-chain, using prefabricated intercom cables. Configuration DIP switches: These switches control the following features: Call Beep: In addition to a flashing call key indication for incoming calls, an incoming call beep tone can also be used. Headset Microphone Type Selection: Either a balanced or unbalanced dynamic microphone can be selected. DC call enable: This may be turned on to use the intercom station with intercom systems that use DC call signaling. Panel Mic Key: Selects the Panel Mic connector / Built-in Mic (11) in the on position and the headset connector (10) in the off position. Speaker Key: Selects the built-in speaker in the on position and the Headset connector (10) in the off position. Channel Select Key (SS-2002 & SS-2002RM only): Selects intercom channel 1 or 2. The key lights green for channel 1 and red for channel 2. Volume Control: Adjusts intercom listen volume to headphones or speaker. Intercom Listen Key: Both momentary (push-to-listen) and latching (hands-free listen) are possible. Call Key: Used to send call signals on the intercom channel. Flashes for incoming calls. Intercom Talk Key: Both momentary (push-to-talk) and latching (hands-free talk) are possible. All models are also equipped with a “mic kill receive” circuit, which allows an operator at a remote master station (such as the US-2000A) to turn off the talk key on all stations on the intercom line. Dynamic-Mic Headset Connector: 4-pin male XLR connector accepts headsets with monaural headphones and either a balanced or unbalanced dynamic microphone. Also accepts a telephone style handset. Can also be used with headphones when a Panel Mic is connected. Can also be used with a handheld microphone along with the internal speaker. Panel Mic Connector: Accepts an electret gooseneck microphone such as the Telex MCP-90. Built-in Panel Microphone: Active when the Panel Mic key is pressed and a gooseneck microphone is not inserted in the Panel Mic connector. Sidetone Trimmers: These adjust the level of the user’s own voice in the headphones when using full-cushion headphones. (Eliminates the muffled sensation when talking with the ears completely covered.) When using the speaker or open-ear style headphones, the sidetone trimmers are adjusted to eliminate the user’s voice from the headphones or speaker. This helps to prevent feedback. Balanced / Unbalanced Selector Switch: This switch sets the intercom station for compatibility with either Audiocom (balanced) or Clear-Com* (unbalanced) intercom systems. * Brand names mentioned are the property of their respective companies. 4 Figure 1 - SS-1002 / SS-2002 features. Figure 2 - SS-2002RM features. 5 Installation Unpacking Each SS-1002 / SS-2002 / SS-2002RM is supplied with the following items. Contact the shipper or your Audiocom dealer immediately if anything is damaged or missing. Be sure to fill out and return the product registration card to Telex to properly register your intercom station. For SS-1002 / SS-2002 units: Qua nt it y De s cr ipt ion 1 SS1002 or SS2002 Intercom Station 1 Warranty and registration card 1 User Instructions For SS-2002RM units: Qua nt it y De s cr ipt ion 1 SS2002RM Intercom Station 1 Warranty and registration card 1 User Instructions 4 Rubber feet (apply to bottom of SS2002RM for desktop use) Configuration Pre-check Before making connections, read the configuration notes that follow, and make sure that all internal controls are properly set for your intended usage. If you need to access the internal controls, remove the four screws on the front that secure the intercom station faceplate to the mounting box, then lift out the faceplate for all versions except the RM version. To access the internal controls for the RM version, remove the 10 screws securing the cover on the box and then lift the cover. DIP Switches Table 1 lists the DIP switch descriptions and factory default settings. Swit ch Numbe r De s cr ipt ion Se t t ings Ope n=Off, Clos e d=On 1 Mic kill receive Closed: Disabled- no mic kill Open: Enabled- mic kill active Open 2 Call signal method Closed: DC (SW1 set to UNBAL) Open: Audiocom (SW1 set to BAL) Open 3 Incoming call beep Closed: Disabled Open: Enabled Open 4 Microphone type Closed: Unbalanced Open: Balanced Open 5 Closed: Enabled (DIP switch 3 must Speaker beep be set to Open) for incoming call Open: Disabled Open 6 Not used Don't care Open 7 Not used Don't care Open 8 Not used Don't care Open 6 De fa ult Se t t ing Mic Kill Receive Audiocom master stations, such as the US-2002A, can transmit an inaudible signal to turn off the microphones in all remote intercom stations on an intercom channel. This is useful when a remote intercom station has been left unattended with the microphone on. The procedure to send a mic kill signal from a master station is a two-step process, so that it is very unlikely that microphones will ever be turned off by accident. However, you may wish to disable the mic kill receive feature at the intercom unit. You might do this, for example, if communications will be of a very critical nature where it is absolutely essential the microphone never be remotely deactivated. To enable the mic kill receive function set DIP switch 1 to the open position. To disable the mic kill function set DIP switch 1 to the closed position. Call Signal Compatibility For Audiocom setup, leave this switch in the open position, and also leave the Balanced / Unbalanced switch in the Balanced position. For Clear-Com setup, set DIP switch 2 to the closed position and set the Balanced / Unbalanced switch in the Unbalanced position. Incoming Call Beep Incoming calls are always indicated by a red-flashing call key. If you also want incoming call beep in headphones, set DIP switch 3 to the Open position (default). DIP switch 3 must also be in the Open position if you want to activate incoming call beep to the speaker using DIP switch 5. Microphone Type If you will be using a headset, telephone-style handset, or dynamic handheld microphone, and the specifications indicate the microphone type is balanced, leave DIP switch 4 in the Open (default) position. If the specifications indicate an unbalanced microphone set this switch to the Closed position. If you are not sure, leave the switch in the Open position for now, then try both positions during the operation. Use the position that produces the best audio quality at other stations. Speaker Beep for Incoming Call Set DIP switch 5 to the Closed position if you want to hear incoming call beep in the speaker. Note that DIP switch 3 must be in the Open position. Balanced/Unbalanced Switch This switch is set at the factory to the Balanced, or BAL, position for use with Audiocom intercom channels. Set the switch to the Unbalanced, or UNBAL position for use with a Clear-Com intercom system. Sidetone Trimmers These are normally adjusted after all connections are completed. See “Sidetone Adjustment.” Figure 3 - DIP Switch Location RM Version. Figure 4 - DIP Switch Location S, U, and P Versions. 7 Headset Connector Notes If you are using a monaural, dynamic-mic headset, or a monaural, telephone-style, dynamic-mic handset, or a handheld dynamic microphone, plug it into the Headset connector. You can also use this connector with monaural headphones for listening when you are using either the built in panel microphone, or the optional gooseneck microphone for talk back. Panel Mic Connector Notes As an alternative to a headset or telephone-style handset, you can use either the built-in panel microphone or an optional gooseneck microphone. To connect a Telex MCP-90 gooseneck microphone, insert the 1/4” TRS connector into the panel microphone connector and screw the microphone in. When a gooseneck microphone is inserted in the panel microphone connector, the built-in panel microphone is automatically bypassed. Use either of these microphones for talk back, then use the internal speaker for listening, or connect a pair of headphones to the headset connector for private listening. Intercom Channel Connections the method of connection depends on the type of box. The “S” box, “P” box, and RM versions connect to the intercom system using prefabricated cables in a phantom-powered configuration. The “U” box version is designed for permanent installation, and it can be either phantom powered or locally powered. Description of Phantom Powered Connection Figure 5 - An example of a phantom powered system. In this system a PS-2001L power supply is set to isolate mode. In this mode each channel is a separate party line and current per channel is limited to 1 amp. Note that both single and two channel intercom stations may be connected by using “Y” cables (or JB2 Junction boxes). Prefabricated cables may be used, or cables may be constructed using the diagrams in FIgure 11. In this method, operating power and intercom audio for the entire intercom system ware carried over the same wires. The advantage of this method is simplicity of connection. The system power supply (PS-2001L, SPS-2001A) etc.) automatically provides what is know as a terminating impedance for the intercom system. Without this terminating impedance, the sound quality will be distorted, and the levels will shift every time additional stations are connected. The disadvantage of the phantom power method is that some operating power is lost over very long intercom cables, and performance at distant 8 intercom stations may be reduced. Generally, if intercom stations are within a few hundred feet from the system power supply, phantom power will be sufficient. Also note that increasing the number of stations will reduce the overall operating distance. Phantom power is generally the only method that will be used to connect the “S” box, “P” box, and RM versions. Figure 5 illustrates a phantom powered intercom system. Note that the distance over which power can be delivered is less than the distance over which audio can be delivered. Audio can be delivered for several miles to locally powered stations as described below. Description of Locally Powered Connection Using this method, an intercom station is connected to the intercom line just like any phantom-powered intercom station, except that a local power supply is also connected. This local power supply is located with the intercom station and provides power for that station only. Since power loss on the intercom lines is no longer an issue, the operating range is now limited only to the audio transmission range, which is several miles. Another advantage to this method is that more stations can be connected to the intercom channels. When local power is supplied to an intercom station, the station detects this and automatically disconnects from the system’s phantom power supply. Figure 6 illustrates an intercom system with both phantom powered and locally powered “U” boxes. As long as a system power supply (PS-2001L, SPS-2001, etc.) is located somewhere in the intercom system, the proper terminating impedance will still be suppled for all stations. However, if all stations are locally powered, and there is not system power supply, a special line termination must be installed. Figure 6 - A two-channel Audiocom intercom system using a PS2001L power supply. the PS2001L is set to isolate mode. In isolate mode, each intercom channel is a separate party line, and total current for each channel is limited to 1 amp. Note that both SS1002 and SS2002 stations may be connected depending on each location’s need to communicate with one or two channels. SS1002 stations may be connected to either channel one or two. Also note that locally powered stations may be connected. This is recommended when stations are installed at remote locations. Since the PS2001L provides termination for the intercom channels, no user-installed termination is required. 9 All Locally Powered Intercom Stations (Dry Lines) If intercom stations are widely distributed, you can dispense with a system power supply (PS2001L, SPS-2001, etc.) and use local power for each station. When no power is delivered on the intercom channels, this is known as dry-line operation. Since a system power supply is not used, a line termination must be inserted in each intercom channel for proper operation. Again, note that only the “U” box has provisions for local power. The 3-pin connectors on the “S”, “P”, and RM versions do not permit this type of connection. Figure 7 illustrates an intercom system using all locally powered “U” boxes. Figure 7 - An example of an Audicom intercom system using all locally powered “U” box stations, with no power being distributed on the intercom channels (dry lines). Since an Audiocom power supply is not used, the installer must connect a line termination somewhere in each channel for proper operation. Figure 8 - Audiocom mode line termination for dry-line operation. (One required for each channel). the termination is available via PN: 90207550-000. 10 Figure 9 - Audiocom mode connections for an SS1002 Intercom Station in a “U” box. Note: for Clear-Com connection, use the Unbalanced Mode Intercom Channel pin-out information listed in the Specifications section. 11 Figure 10 - Audiocom mode connections for an SS2002 Intercom Station in a “U” box. Note: for Clear-Com connection, use the Unbalanced Mode Intercom Channel pin-out information listed in the Specifications section. 12 Figure 11 - Audiocom cable wiring diagrams. 13 Power-Up Make sure any local power supplies are plugged in, then turn on the power switches of any phantom power supplies (PS2001L, SPS-2001, etc.) Sidetone Adjustment The SS-1002, SS-2002, and SS-2002RM use full-duplex audio (the same as conventional telephone lines) in which the talk and listen audio are sent and received on the same wires. Thus, when you talk, you also here your own voice back as with a telephone. If you are using the built-in speaker for listening and a either a panel microphone or handheld microphone for talkback, you could experience unwanted feedback since the microphone may pick up your returned voice audio from the speaker and re-amplify it. This could also happen if you are using a headset or headphones with open-ear style earmuffs. On the other hand, if you are using earmuffs that completely enclose the ears, the microphone is not likely to pick up the returned audio. A certain amount of your own voice level is desirable to overcome the muffled sensation when talking. The sidetone adjustment is different for these different operating conditions: If you are suing the speaker with a panel microphone, or if you are using an open-ear style headset or headphones, adjust sidetone as follows: 1. SS-2002 & SS-2002RM only: activate channel 1 as described in the operating instructions. 2. Activate talk and listen as described in the operating instructions 3. Slowly increase the volume to maximum while talking into the microphone. 4. Using a small flat-bladed screwdriver, adjust the channel 1 sidetone trimmer to minimize your voice level in the headphones. 5. SS-2002 & SS-2002RM only: activate channel 2 and repeat the above steps to adjust the channel 2 sidetone. 6. Install the intercom station mounting screws after completing the adjustments. The station is now ready for use. If you are using headphones that completely enclose the ears, adjust sidetone as follows: 1. SS-2002 & SS-2002RM only: activate channel 1 as described in the operating instructions. 2. Activate talk and listen as described in the operating instructions. 3. Set the volume control to the normal listening level for intercom audio 4. While talking into the microphone, use a small flat-bladed screwdriver to adjust the channel 1 sidetone trimmer so that you can hear your own voice in the headphones at an acceptable level. 5. SS-2002 & SS-2002RM only: activate channel 2 and repeat the above steps to adjust the channel 2 sidetone. 14 Operation Channel Select (SS-2002 & SS-2002RM Only) Tap the Ch Select key to select channel 1 or 2. The key is green when channel 1 is selected and red when channel two is selected. Headset/Headphone/Speaker/Microphone Selection • To use a headset or telephone style handset, set the Speaker and Panel Mic keys to off. • To use headphones with the built-in panel microphone, set the Speaker key to off, set the Panel Mic Key to on, and make sure that a gooseneck microphone is not inserted in the panel microphone connector. • To use headphones with a gooseneck microphone, set the Speaker key to off, set the Panel Mic Key to on, and make sure that a gooseneck microphone is inserted in the panel microphone connector. • To use the speaker with a handheld dynamic microphone, set the speaker key to on and set the Panel Mic Key to off. • To use the speaker with the built-in panel microphone, set the Speaker and Panel Mic keys to on, and make sure that a gooseneck microphone is not inserted in the panel microphone connector. • To use the speaker with a gooseneck microphone, set the Speaker and Panel Mic keys to on, and make sure that a gooseneck microphone is inserted in the panel microphone connector. Receiving Calls When there is an incoming call signal, the Call key will flash red. There will also be a beep tone in the headphones or speaker if the beep feature is activated. NOTE: The incoming call indication is provided only for the currently selected intercom channel in the case of SS-2002 & SS-2002RM models. Turn on the Talk and Listen keys and begin your conversation. Turn the keys off when finished. NOTE: You can turn the talk and listen keys on in either momentary or latched mode. For momentary operation, press and hold the key. For latched operation, tap the key to turn it on. Then tap it again to turn it off when finished. Calling an Intercom Channel 1. SS-2002 & SS-2002RM only: select the desired intercom channel. 2. Press and hold the Call key. An inaudible call signal will be sent, and the Listen key will automatically turn on. 3. When you hear a response, release the call key and activate the talk key. 4. Turn off your Talk and Listen keys to end the conversation. 15 Specifications General Power Requirements: Phantom Power: +24 VDC nominal, 175 mA Local Power: +12 to +15 VDC, 250 mA Dimensions: See dimension drawings. Environmental Requirements: Storage: -20°C to 80°C; 0% to 95% RH, non-condensing Operating: -15°C to 60°C; 0% to 95% RH, non-condensing Dynamic-mic Headset/Handset Microphone: 50 to 200 ohms, dynamic (balanced or unbalanced) Headphones: 150 to 600 ohms, monaural Connector Type: XLR-4M Pin 1 - Microphone Low Pin 2 - Microhpne High Pin 3 - Headphone High Pin 4 - Headphone Low Panel Microphone Built-in Microphone: 2.2k ohms, electret (-44 dB nominal), Omnidirectional Gooseneck Microphone: Connector Type: ¼” Threaded TRS 5k ohms, electret (-47 dB nominal) Tip - Microphone High (+12 VDC bias) Ring - Common Sleeve - Common Compatible with MCP-90 Series Microphones Intercom Channels, Balanced mode (SW1 set to BAL position) Output Level: 1Vrms nominal Input Impedance: 300 ohms Bridging Impedance: greater than 10k ohms Sidetone: -40 dB, 35 dB adjustable range Call Signaling: Send: 20 kHz ±100 Hz, 0.5 Vrms ±10% Receive: 20 kHz ±800 Hz, 100 mVrms Mic-Kill Detect Frequency: 24 kHz ±800 Hz, 100mVrms Noise Contribution: less than -70 dB Common Mode Rejection Ratio: greater than 50 dB Connector Type: Six-position push type terminal block Pin 1 - Audio and DC Common Pin 2 - Local power (+12 to +15 VDC) If needed Pin 3 - Intercom channel 1 audio low and +24 VDC power Pin 4 - Intercom channel 1 audio high and +24 VDC power Pin 5 - Intercom channel 2 audio low and +24 VDC power Pin 6 - Intercom channel 2 audio high and +24VDC power Intercom Channels, Unbalanced mode (SW1 set to UNBAL position) Output Level: 0.70 Vrms ±10% Input Impedance: 200 ohms Bridging Impedance: greater than 10k ohms Sidetone: -40 dB, 35 dB adjustable range 16 Call Signaling: Pin 1 - Common Pin 2 - Local power (+12 to +15 VDC) If needed Pin 3 - Power +30 VDC Pin 4 - Intercom channel 1 audio and DC call signaling Pin 5 - Power +30 VDC Pin 6 - Intercom channel 2 audio and DC call signaling Dimensions Speaker Output Power 4W max @ 8 ohms 17 TRADEMARKS Audiocom® is a registered trademark of Telex Communications. Names of other products mentioned herein are used for identification purposes only and may be trademarks and/or registered trademarks of their respective companies. WARRANTY INFORMATION Products are warranted by Telex Communications, Inc. to be free from defects in materials and workmanship for a period of one year from the date of sale. The sole obligation of Telex during the warranty period is to provide, without charge, parts and labor necessary to remedy covered defects appearing in products returned prepaid to Telex. This warranty does not cover any defect, malfunction or failure caused beyond the control of Telex, including unreasonable or negligent operation, abuse, accident, failure to follow instructions in the manual, defective or improper associated equipment, attempts at modification and repair not authorized by Telex, and shipping damage. Products with their serial numbers removed or effaced are not covered by this warranty. To obtain warranty service, follow the procedures entitled “Procedure for Returns” and “ Shipping to Manufacturer for Repair or Adjustment”. This warranty is the sole and exclusive express warranty given with respect to Audiocom products. It is the responsibility of the user to determine before purchase that this product is suitable for the user’s intended purpose. ANY AND ALL IMPLIED WARRANTIES, INCLUDING THE IMPLIED WARRANTY OF MERCHANTABILITY ARE LIMITED TO THE DURATION OF THIS EXPRESS LIMITED WARRANTY. NEITHER TELEX NOR THE DEALER WHO SELLS TELEX PRODUCTS IS LIABLE FOR INCIDENTAL OR CONSEQUENTIAL DAMAGES OF ANY KIND. CUSTOMER SUPPORT Technical questions should be directed to: Customer Service Department Telex 12000 Portland Avenue South Burnsville, MN 55337 U.S.A Telephone: (952) 884-4051 Fax: (952) 884-0043 RETURN SHIPPING INSTRUCTIONS Procedure for Returns If a return is necessary, contact the dealer where this unit was purchased. If a return through the dealer is not possible, obtain a RETURN AUTHORIZATION from: Customer Service Department Telex Communications, Inc. Telephone: 1-800-392-3497 or (952) 884-4051 Fax: 1-800-323-0498 or (952) 884-0043 DO NOT RETURN ANY EQUIPMENT DIRECTLY TO THE FACTORY WITHOUT FIRST OBTAINING A RETURN AUTHORIZATION. Be prepared to provide the company name, address, phone number, a person to contact regarding the return, purchase order number, the type and quantity of equipment, a description of the problem and the serial number(s). Shipping to Manufacturer for Repair or Adjustment All shipments of products should be made via United Parcel Service or the best available shipper prepaid. The equipment should be shipped in the original packing carton; if that is not available, use any suitable container that is rigid and of adequate size. If a substitute container is used, the equipment should be wrapped in paper and surrounded with at least four inches of excelsior or similar shock-absorbing material. All returns must include the return authorization number. Units sent for repair or adjustment DO NOT need a return authorization number Factory Service department Telex Communications, Inc. West 1st Street Blue Earth, MN 56013 U.S.A. Upon completion of any repair the equipment will be returned via United Parcel Service or specified shipper collect. 18