Download MOVING HEAD
Transcript
MOVING HEAD LYRE DMX TWIST-150 Best.-Nr. 38.1630 BEDIENUNGSANLEITUNG • INSTRUCTION MANUAL • MODE D’EMPLOI ISTRUZIONI PER L’USO • GEBRUIKSAANWIJZING • MANUAL DE INSTRUCCIONES • INSTRUKCJA OBSŁUGI SIKKERHEDSOPLYSNINGER • SÄKERHETSFÖRESKRIFTER • TURVALLISUUDESTA D Bevor Sie einschalten … A Wir wünschen Ihnen viel Spaß mit Ihrem neuen Gerät von „img Stage Line“. Bitte lesen Sie diese Bedienungsanleitung vor dem Betrieb gründlich durch. Nur so lernen Sie alle Funktionsmöglichkeiten kennen, vermeiden Fehlbedienungen und schützen sich und Ihr Gerät vor eventuellen Schäden durch unsachgemäßen Gebrauch. Heben Sie die Anleitung für ein späteres Nachlesen auf. We wish you much pleasure with your new “img Stage Line” unit. Please read these operating instructions carefully prior to operating the unit. Thus, you will get to know all functions of the unit, operating errors will be prevented, and yourself and the unit will be protected against any damage caused by improper use. Please keep the operating instructions for later use. Der deutsche Text beginnt auf der Seite 4. The English text starts on page 4. CH GB Before switching on … F Avant toute installation … B Nous vous souhaitons beaucoup de plaisir à utiliser cet appareil “img Stage Line”. Lisez ce mode dʼemploi entièrement avant toute utilisation. Uniquement ainsi, vous pourrez apprendre lʼensemble des possibilités de fonctionnement de lʼappareil, éviter toute manipulation erronée et vous protéger, ainsi que lʼappareil, de dommages éventuels engendrés par une utilisation inadaptée. Conservez la notice pour pouvoir vous y reporter ultérieurement. Vi auguriamo buon divertimento con il vostro nuovo apparecchio di “img Stage Line”. Leggete attentamente le istruzioni prima di mettere in funzione lʼapparecchio. Solo così potete conoscere tutte le funzionalità, evitare comandi sbagliati e proteggere voi stessi e lʼapparecchio da eventuali danni in seguito ad un uso improprio. Conservate le istruzioni per poterle consultare anche in futuro. La version française se trouve page 12. Il testo italiano inizia a pagina 12. CH NL B PL S Voor u inschakelt … I E Prima di accendere … Antes de la utilización … Wij wensen u veel plezier met uw nieuwe apparaat van “img Stage Line”. Lees deze gebruikershandleiding grondig door, alvorens het apparaat in gebruik te nemen. Alleen zo leert u alle functies kennen, vermijdt u foutieve bediening en behoedt u zichzelf en het apparaat voor eventuele schade door ondeskundig gebruik. Bewaar de handleiding voor latere raadpleging. Le deseamos una buena utilización para su nuevo aparato “img Stage Line”. Por favor, lea estas instrucciones de uso atentamente antes de hacer funcionar el aparato. De esta manera conocerá todas las funciones de la unidad, se prevendrán errores de operación, usted y el aparato estarán protegidos en contra de todo daño causado por un uso inadecuado. Por favor, guarde las instrucciones para una futura utilización. De Nederlandstalige tekst vindt u op pagina 20. La versión española comienza en la página 20. Przed uruchomieniem … DK Før du tænder … Życzymy zadowolenia z nowego produktu “img Stage Line”. Dzięki tej instrukcji obsługi będą państwo w stanie poznać wszystkie funkcje tego urządzenia. Stosując się do instrukcji unikną państwo błędów i ewentualnego uszkodzenia urządzenia na skutek nieprawidłowego użytkowania. Prosimy zachować instrukcję. Tillykke med dit nye “img Stage Line” produkt. Læs sikkerhedsanvisningerne nøje før ibrugtagning, for at beskytte Dem og enheden mod skader, der skyldes forkert brug. Gem venligst denne betjeningsvejledning til senere brug. Tekst polski zaczyna się na stronie 28. Sikkerhedsanvisningerne findes på side 32. Innan du slår på enheten … FIN Ennen kytkemistä … Vi önskar dig mycket glädje med din nya “img Stage Line” produkt. Läs igenom säkerhetsföreskrifterna innan enheten tas i bruk för att undvika skador till följd av felaktig hantering. Behåll instruktionerna för framtida bruk. Toivomme Sinulle paljon miellyttäviä hetkiä uuden “img Stage Line” laitteen kanssa. Ennen laitteen käyttöä Sinua huolellisesti tutustumaan turvallisuusohjeisiin. Näin vältyt vahingoilta, joita virheellinen laitteen käyttö saattaa aiheuttaa. Ole hyvä ja säilytä käyttöohjeet myöhempää tarvetta varten. Säkerhetsföreskrifterna återfinns på sidan 32. Turvallisuusohjeet löytyvät sivulta 33. www.imgstageline.com 2 DMX MASTER SLAVE SOUND MENU 1 DOWN 2 UP ENTER 3 4 5 6 7 8 MENU DMX-Startadresse DMX start address 230 V~ / 50 Hz REMOTE CONTROL ONLY Anzahl der DMX-Kanäle Number of DMX channels SENSITIVITY MAX MIN DMX CONFIGURATION Show-Modus Show mode SPECIAL FUNCTION 11 CHANNEL 1 USE ONLY WITH A 250V FUSE PAN PAN MOVEMENT FINE TILT TILT MOVEMENT FINE PAN/TILT SPEED PAN/TILT MOVEMENT MACRO MOVEMENT SPEED SPECIAL FUNCTION STROBE / SHAKING GOBO COLOUR 3 PAN TILT STROBE/SHAKING GOBO COLOUR T3.15 AL 2 8 CHANNEL CH1 CH2 CH3 CH4 CH5 CH6 CH7 CH8 CH9 CH10 CH11 DMX OUTPUT DMX INPUT TWIST-150 MOVING HEAD Slave-Modus Slave mode 9 10 11 12 13 ein • on Sound-Modus • Sound mode aus • off nein • no Blackout ja • yes normal Pan invers 14 15 normal Tilt invers ein • on Display aus • off 16 autom. Test Bewegungsablauf Motion sequence Geschwindigkeit Motion speed Pan D GB F I NL E PL Lampenfach geöffnet Lamp compartment open Compartiment lampe ouvert Vano lampada aperto Geopend lampencompartiment Compartimento de la lámpara abierto Otwarta komora żarówki Master-Modus Master mode Gobo Farbe Colour Betriebsstunden Fixture hours Software-Version Reset 3 18 D GB F I NL E PL Tilt Blende Shutter 17 D GB F I NL E PL Leuchtmittel eingesetzt Lamp inserted Lampe insérée Lampada inserita Gemonteerde lamp Lámpara insertada Żarówka zamontowana optionale Fernbedienung Optional remote control Télécommande en option Telecomando opzionale Optionele afstandsbediening Control remoto opcional Pilot zdalnego sterowania D A Bitte klappen Sie die Seite 3 heraus. Sie sehen dann immer die beschriebenen Bedienelemente und Anschlüsse. CH 1 Übersicht der Bedienelemente und Anschlüsse 1.1 TWIST-150 11 DMX-Signal-Eingang (3-pol. XLR); Pin 1 = Masse, 2 = DMX-, 3 = DMX+ 12 DMX-Signal-Ausgang (3-pol. XLR) zum Anschluss an den DMX-Eingang eines weiteren Lichteffektgerätes; Pin 1 = Masse, 2 = DMX-, 3 = DMX+ Inhalt 1 Display 1 Übersicht der Bedienelemente und Anschlüsse . . . . . . . . . . . . . . . . . . . . . 4 2 Taste MENU zum Aufrufen des Einstellmenüs und zum Anwählen der Menüpunkte 13 Regler SENSITIVITY für die Ansprechempfindlichkeit bei Musiksteuerung über das interne Mikrofon 1.1 TWIST-150 . . . . . . . . . . . . . . . . . . . . . . . . . . 4 3 Tasten DOWN und UP zum Ändern einer Einstellung im Menü 14 Halterung für das Leuchtmittel im Schwenkkopf (6), Blick von oben in das geöffnete Lampenfach 4 Taste ENTER zum Aktivieren eines Menüpunktes und zum Speichern einer Einstellung 15 Anschlussklemme für das Leuchtmittel 1.2 Fernbedienung LC-3 . . . . . . . . . . . . . . . . . . . 4 2 Hinweise für den sicheren Gebrauch . . . . . 5 3 Einsatzmöglichkeiten . . . . . . . . . . . . . . . . . 5 4 Leuchtmittel einsetzen . . . . . . . . . . . . . . . . 5 5 Montage . . . . . . . . . . . . . . . . . . . . . . . . . . . . 6 6 Inbetriebnahme . . . . . . . . . . . . . . . . . . . . . . 6 6.1 Grundeinstellungen . . . . . . . . . . . . . . . . . . . 6 7 Betrieb ohne DMX-Steuergerät . . . . . . . . . 7 7.1 Zusammenschalten mehrerer TWIST-150 . . 7 7.2 Fernbedienung LC-3 . . . . . . . . . . . . . . . . . . . 8 8 Bedienung über ein Lichtsteuergerät . . . . 8 8.1 Anschluss . . . . . . . . . . . . . . . . . . . . . . . . . . . 8 8.2 Startadresse und Anzahl der DMX-Kanäle einstellen . . . . . . . . . . . . . . . . . . . . . . . . . . . 9 9 Weitere Funktionen . . . . . . . . . . . . . . . . . . 9 5 Kontroll-LEDs für den Betriebsmodus: DMX leuchtet, wenn am Eingang DMX INPUT (11) DMX-Steuersignale anliegen MASTER Master-Modus: Betrieb ohne DMX-Steuergerät oder mit der Fernbedienung LC-3 SLAVE Slave-Modus (Kap. 7.1): Steuerung über einen weiteren TWIST-150 SOUND leuchtet kurz auf, wenn das Gerät durch vom internen Mikrofon aufgenommenen Schall die Farbe, das Lichtmuster oder die Bewegung ändert 6 Schwenkkopf 7 Objektiv, zur Schärfeeinstellung drehbar 9.1 Korrekturwerte einstellen (Offset-Modus) . . . 9 8 Dreharm 9.2 Selbsttest . . . . . . . . . . . . . . . . . . . . . . . . . . . 9 9 Netzbuchse zum Anschluss an eine Steckdose (230 V~/50 Hz) über das beiliegende Netzkabel 9.3 Master-Modus . . . . . . . . . . . . . . . . . . . . . . . 10 Darunter befindet sich die Halterung für die Netzsicherung. Eine durchgebrannte Sicherung nur durch eine gleichen Typs ersetzen. 9.4 Anzeige der Betriebsstunden . . . . . . . . . . . 10 9.5 Anzeige der Firmware-Version . . . . . . . . . . 10 9.6 Reset . . . . . . . . . . . . . . . . . . . . . . . . . . . . . 10 10 Reinigung der Optik . . . . . . . . . . . . . . . . . 10 11 Technische Daten . . . . . . . . . . . . . . . . . . . 10 10 Anschluss für die Fernbedienung LC-3 (Abb. 5) 1.2 Fernbedienung LC-3 Die Fernbedienung LC-3 ist als Zubehör erhältlich und gehört nicht zum Lieferumfang des TWIST-150. 16 Taste STAND BY für den Ruhemodus: Der Schwenkkopf fährt in die Ausgangsposition und der Lichtstrahl wird abgeblendet. Die LED neben der Taste leuchtet zur Kontrolle. 17 Taste FUNCTION für verschiedene Funktionen in Abhängigkeit von dem mit der Taste MODE gewählten Betriebsmodus (Kap. 7.2) 18 Taste MODE zum Wechseln zwischen: – Stroboskop-Modus; LED neben der Taste MODE leuchtet nicht – Show-Modus; LED blinkt langsam – manuelle Farb- und Lichtmusterwahl; LED leuchtet kontinuierlich – manuelle Lichtstrahlausrichtung; LED blinkt schnell Hinweis: Zur Steuerung über die Fernbedienung darf am Eingang DMX INPUT (11) kein DMX-Signal anliegen. 11.1 Übersicht der DMX-Kanäle . . . . . . . . . . . . . 11 GB Please unfold page 3. Then you will always see the operating elements and connections described. 1 Operating Elements and Connections 1.1 TWIST-150 1 Display Contents 1 Operating Elements and Connections . . . 4 1.1 TWIST-150 . . . . . . . . . . . . . . . . . . . . . . . . . . 4 1.2 Remote control LC-3 . . . . . . . . . . . . . . . . . . 4 2 Safety Notes . . . . . . . . . . . . . . . . . . . . . . . . 5 3 Applications . . . . . . . . . . . . . . . . . . . . . . . . 5 4 Inserting the Lamp . . . . . . . . . . . . . . . . . . . 5 5 Mounting . . . . . . . . . . . . . . . . . . . . . . . . . . . 6 6 Setting into Operation . . . . . . . . . . . . . . . . 6 6.1 Basic adjustments . . . . . . . . . . . . . . . . . . . . 6 7 Operation without DMX controller . . . . . . 7 7.1 Interconnecting several TWIST-150 units . . 7 7.2 Remote control LC-3 . . . . . . . . . . . . . . . . . . 8 8 Operation via a light controller . . . . . . . . . 8 8.1 Connection . . . . . . . . . . . . . . . . . . . . . . . . . . 8 3 Buttons DOWN and UP to change an adjustment in the menu 4 Button ENTER to activate a menu item and to memorize an adjustment 5 Indicating LEDs for the operating mode: DMX lights up when DMX control signals are present at the DMX INPUT (11) MASTER master mode: operation without DMX control unit or with the remote control LC-3 SLAVE slave mode (chapter 7.1): control via another TWIST-150 SOUND shortly lights up when the unit changes the colour, the light pattern, or the movement by the sound picked up by the internal microphone 8.2 Adjusting the start address and the number of DMX channels . . . . . . . . . . . . 9 6 Pan head 9 8 Rotary arm Further Functions . . . . . . . . . . . . . . . . . . . . 9 7 Lens, can be turned for focus adjustment 9.1 Adjusting the correction values (offset mode) . . . . . . . . . . . . . . . . . . . . . . . . 9 9 Mains jack for connection to a socket (230 V~/ 50 Hz) via the supplied mains cable 9.2 Self-test . . . . . . . . . . . . . . . . . . . . . . . . . . . . 9 The support for the mains fuse is located below the mains jack. Only replace a blown fuse by one of the same type. 9.3 Master mode . . . . . . . . . . . . . . . . . . . . . . . . 10 9.4 Display of the working hours . . . . . . . . . . . 10 9.5 Display of the firmware version . . . . . . . . . 10 9.6 Reset . . . . . . . . . . . . . . . . . . . . . . . . . . . . . 10 10 Cleaning of the Optical System . . . . . . . . 10 11 Specifications . . . . . . . . . . . . . . . . . . . . . . 10 11.1 Overview of the DMX channels . . . . . . . . . 11 4 2 Button MENU to call the adjusting menu and to select the menu items 10 Connection for the remote control LC-3 (fig. 5) 11 DMX signal input (3-pole XLR); pin 1 = ground, 2 = DMX-, 3 = DMX+ 12 DMX signal output (3-pole XLR) for connection to the DMX input of another light effect unit; pin 1 = ground, 2 = DMX-, 3 = DMX+ 13 Control SENSITIVITY for the sensitivity of response in case of music control via the internal microphone 14 Support for the lamp in the pan head (6), open lamp compartment seen from above 15 Terminal for the lamp 1.2 Remote control LC-3 The remote control LC-3 is available as an accessory and is not supplied with the TWIST-150. 16 Button STAND BY for the sleep mode: The pan head goes to the starting position and the light beam is extinguished. The LED next to the button lights up as a a check. 17 Button FUNCTION for various functions depending on the operating mode selected with the button MODE (chapter 7.2) 18 Button MODE for switching between: – stroboscope mode; LED next to the button MODE does not light up – show mode; LED flashes slowly – manual selection of colour and light pattern; LED lights up continuously – manual positioning of the light beam; LED flashes rapidly Note: For control via the remote control no DMX signal must be present at the DMX INPUT (11). 2 Hinweise für den sicheren Gebrauch Das Gerät entspricht allen erforderlichen Richtlinien der EU und ist deshalb mit gekennzeichnet. WARNUNG Das Gerät wird mit lebensgefährlicher Netzspannung (230 V~) versorgt. Nehmen Sie deshalb niemals selbst Eingriffe am Gerät vor, die nicht in dieser Anleitung beschrieben sind und stecken Sie nichts durch die Lüftungsöffnungen! Es besteht die Gefahr eines elektrischen Schlages. Soll das Gerät endgültig aus dem Betrieb genommen werden, übergeben Sie es zur umweltgerechten Entsorgung einem örtlichen Recyclingbetrieb. 3 Beachten Sie auch unbedingt die folgenden Punkte: Verwenden Sie das Gerät nur im Innenbereich und schützen Sie es vor Tropf- und Spritzwasser, hoher Luftfeuchtigkeit und Hitze (zulässiger Einsatztemperaturbereich 0 – 40 °C). Stellen Sie keine mit Flüssigkeit gefüllten Gefäße, z. B. Trinkgläser, auf das Gerät. Nehmen Sie das Gerät nicht in Betrieb und ziehen Sie sofort den Netzstecker aus der Steckdose, 1. wenn sichtbare Schäden am Gerät, z. B. am Gehäuse, an der Linse, am UV-Filter oder an der Netzanschlussleitung vorhanden sind, 2. wenn nach einem Sturz oder Ähnlichem der Verdacht auf einen Defekt besteht, 3. wenn Funktionsstörungen auftreten. Geben Sie das Gerät in jedem Fall zur Reparatur in eine Fachwerkstatt. Wird das Gerät zweckentfremdet, nicht sicher montiert, falsch bedient oder nicht fachgerecht repariert, kann keine Haftung für daraus resultierende Sach- oder Personenschäden und keine Garantie für das Gerät übernommen werden. Verwenden Sie für die Reinigung des Gehäuses nur ein trockenes, weiches Tuch, niemals Wasser oder Chemikalien. Für die Linse kann auch ein handelsübliches Glasreinigungsmittel verwendet werden. Artikel Best.-Nr. mittlere Lebensdauer HLT-150HID 05.9945 1000 h No guarantee for the unit and no liability for any resulting personal damage or material damage will be accepted if the unit is used for other purposes than originally intended, if it is not safely mounted or correctly operated, or not repaired in an expert way. Important for U. K. Customers! The wires in this mains lead are coloured in accordance with the following code: green/yellow = earth blue = neutral brown = live As the colours of the wires in the mains lead of this appliance may not correspond with the coloured markings identifying the terminals in your plug, proceed as follows: 1. The wire which is coloured green and yellow must be connected to the terminal in the plug which is marked with the letter E or by the earth symbol , or coloured green or green and yellow. 2. The wire which is coloured blue must be connected to the terminal which is marked with the letter N or coloured black. 3. The wire which is coloured brown must be connected to the terminal which is marked with the letter L or coloured red. Please observe the following items in any case: The unit is suitable for indoor use only. Protect it against dripping water and splash water, high air humidity, and heat (admissible ambient temperature range 0 – 40 °C). Do not place any vessel filled with liquid on the unit, e. g. a drinking glass. Do not operate the unit and immediately disconnect the mains plug from the mains socket 1. if there is visible damage to the unit, e. g. to the housing, the lens, the UV filter, or the mains cable, 2. if a defect might have occurred after the unit was dropped or suffered a similar accident, 3. if malfunctions occur. In any case the unit must be repaired by skilled personnel. Never pull the mains cable for disconnecting the mains plug from the mains socket, always seize the plug. When transporting the unit, only seize the lower part of the unit. Never carry the unit by the pan head (6) or the rotary arm (8). For cleaning the housing only use a dry, soft cloth, never use chemicals or water. For the lens, a commercial glass cleaner may also be used. Blicken Sie niemals bei geöffnetem Gerät direkt in die brennende Entladungslampe. Die hohe Helligkeit und die UV-Strahlung können zu Augenschäden führen. 2) Das Leuchtmittel zentriert in die Halterung (14) einsetzen. Dabei muss der Reflektor genau zwischen den beiden Schraubenköpfen einrasten (siehe Pfeile in der Abb. 4, Seitenansicht). Anderenfalls werden die Lichtmuster (Gobos) nicht gleichmäßig ausgeleuchtet. 4) Das Lampenfach mit dem Deckel wieder schließen. Die hier aufgeführte Lampe enthält in geringen Mengen umweltrelevante Schadstoffe (z. B. Quecksilber) und muss deshalb in Europa als Sondermüll entsorgt werden. In anderen Ländern sind die jeweiligen nationalen Vorschriften zu beachten. Die Lampe muss spätestens nach der 1,25-fachen mittleren Lebensdauer gewechselt werden, da mit Aus dem Sortiment von „img Stage Line“ kann folgendes Leuchtmittel eingesetzt werden: The unit corresponds to all required directives of the EU and is therefore marked with . 3) Die Kabelenden des Leuchtmittels an der Anschlussklemme (15) festschrauben. Leuchtmittel einsetzen Auf keinen Fall dürfen Lampen eines anderen Typs verwendet werden! Da die Lampe im Betrieb sehr heiß wird, müssen das Gehäuse und die Lampe nach dem Betrieb erst abkühlen (Abkühlzeit min. 15 Minuten), bevor Sie die Lampe auswechseln können. 4 Fassen Sie das Gerät beim Transport nur am Unterteil an. Auf keinen Fall das Gerät am Schwenkkopf (6) oder Dreharm (8) tragen. WARNING The unit is supplied with hazardous mains voltage (230 V~). Leave servicing to skilled personnel only. Never make any modification on the unit not described in this instruction manual and do not insert anything into the air vents, otherwise you will risk an electric shock! 1) Die Schraube auf der Rückseite des Schwenkkopfs entfernen, sodass der Deckel des Lampenfachs abgenommen werden kann. Die Abbildung 3 auf der Seite 3 zeigt das geöffnete Lampenfach mit Blick von oben. Safety Notes Ziehen Sie vor dem Einsetzen bzw. Herausnehmen der Lampe unbedingt den Netzstecker aus der Steckdose! Einsatzmöglichkeiten Das Lichteffektgerät wird ohne Leuchtmittel geliefert. Es wird eine HID-Entladungslampe 95 V/150 W benötigt. is able to project a great variety of light patterns. The 16-bit resolution for the head movement allows a most precise positioning of the light beam at a variable speed. Due to an automatic repositioning feature the head will automatically regain its initial position even if it has been displaced by external influence. The unit can be controlled via the integrated microphone, via the remote control LC-3 (separately available as an accessory), or via a DMX light controller. 4 3 Applications The Moving Head TWIST-150 is ideally suited for professional applications on stage and in discothèques. Due to its features with gobo wheel, colour wheel, stroboscopic effects and wobbling effects, it GB Inserting the Lamp The light effect unit is supplied without lamp. A HID discharge lamp of 95 V/150 W is required. Never use lamps of a different type! From the “img Stage Line” product range, the following lamp may be used: Item Order No. Average Life HLT-150HID 05.9945 1000 h Never touch the glass tube of the lamp with your fingers! Finger marks will burn into the glass and reduce the luminous power. WARNING Always disconnect the mains plug before inserting or removing the lamp! Warning – This appliance must be earthed. If the unit is to be put out of operation definitively, take it to a local recycling plant for a disposal which is not harmful to the environment. D A CH WARNUNG Der Moving-Head TWIST-150 ist besonders für den professionellen Einsatz auf der Bühne und in Diskotheken geeignet. Durch seine Ausstattung mit Goborad, Farbrad sowie Stroboskop- und Wackeleffekten kann es eine Vielzahl abwechslungsreicher Lichtmuster projizieren. Die 16-Bit-Auflösung für die Kopfbewegung erlaubt mit einer variablen Geschwindigkeit eine sehr genaue Positionierung des Lichtstrahls. Die automatische Repositionierung bewirkt, dass der Kopf beim Verdrehen durch äußere Einflüsse selbsttätig in die Ausgangslage zurückkehrt. Die Steuerung des Gerätes kann über das integrierte Mikrofon, über die Fernbedienung LC-3 (separat als Zubehör erhältlich) oder über ein DMXLichtsteuergerät erfolgen. Ziehen Sie den Netzstecker nie an der Zuleitung aus der Steckdose, fassen Sie immer am Stecker an. 2 Den Glaskolben der Lampe nie mit den Fingern berühren! Hautfett und -schweiß mindern die Leuchtkraft und brennen sich ein. As the lamp heats up very much during operation, let the housing and the lamp cool down after operation (minimum cooling down time 15 minutes) before replacing the lamp. Never look directly into the lit discharge lamp when the unit is open; the high brightness and UV radiation may cause eye damage. 1) Unscrew the screw on the rear side of the pan head so that the cover of the lamp compartment can be removed. Figure 3 on page 3 shows the open lamp compartment seen from above. 5 fortschreitender Nutzungsdauer das Risiko eines Lampenplatzers infolge von Gefügeveränderungen des Quarzglases deutlich ansteigt. Das Gerät ist mit einem Betriebsstundenzähler ausgestattet. Dieser kann zur Bestimmung der Lampenbrenndauer genutzt werden. Notieren Sie sich bei einem Lampenwechsel den Zählerstand, Kapitel 9.4 „Anzeige der Betriebsstunden“. D A CH 5 Nach einem Lampenplatzer während des Betriebs sollte die unmittelbare Umgebung der Lampe vorsichtshalber verlassen werden, um eine Gesundheitsgefährdung durch frei werdende Quecksilberdämpfe völlig auszuschließen. Sorgen Sie für eine gute Raumdurchlüftung. Montage WICHTIG Platzieren Sie das Gerät immer so, dass im Betrieb eine ausreichende Luftzirkulation gewährleistet ist. Der Abstand zu angrenzenden Flächen muss mindestens 1 m betragen. Die Lüftungsöffnungen am Gehäuse dürfen auf keinen Fall abgedeckt werden. Achten Sie auch unbedingt auf einen ausreichenden Abstand zu leicht entflammbaren oder hitzeempfindlichen Materialien. Das Gerät kann auf einer festen, ebenen Fläche aufgestellt werden. Es lässt sich mithilfe der Befestigungsmöglichkeiten der Bodenplatte aber auch kopfüber an einer Traverse montieren. Die Bodenplatte ist in der Abbildung 6 auf der Seite 37 dargestellt. Zur Befestigung werden stabile Montageschellen benötigt. Die Schellen direkt in die M10-Gewinde (21) schrauben oder an dem mitgelieferten Montagebügel (23) befestigen. Die Bolzen (24) des Bügels, wie in der Abbildung gezeigt, in die vorgesehenen Öffnungen (20) in der Bodenplatte stecken und im Uhrzeigersinn verriegeln (bis zum GB 2) Place the lamp into the centre of the support (14). The reflector must precisely engage between the two screw heads (see arrows in fig. 4, side view). Otherwise the light patterns (gobos) will not be uniformly illuminated. 3) Tightly screw the cable ends of the lamp to the connecting terminal (15). 4) Close the lamp compartment with the cover. 5 The lamp listed above contains slight quantities of harmful substances (e. g. mercury) which may affect the environment and therefore requires a disposal as special waste in Europe. In other countries, the corresponding national regulations must be observed. Replace the lamp at the latest after its 1.25 fold average life because with increasing service life the risk of a lamp explosion will considerably increase due to structural transformation of the quartz glass. The unit is provided with a working hour meter. This may be used to determine the lighting hours of the lamp. Note down the count of the meter when replacing the lamp – see chapter 9.4 “Display of the working hours”. After a lamp explosion during operation, everyone should leave the immediate surroundings of the lamp as a precaution to completely exclude a health risk caused by the mercury vapours being released; ensure a good ventilation of the room. Mounting IMPORTANT Always place the unit in such a way that a sufficient air circulation will be ensured during operation. 6 The unit must have a minimum distance of 1 m to adjoining surfaces. Never cover the air vents of the housing. Always ensure a sufficient distance to easily flammable material or material sensitive to heat. Anschlag drehen). Die Montagestelle muss ausreichend stabil sein und eine Last von min. 20 kg pro Gerät tragen können. WARNUNG Das Gerät muss fachgerecht und sicher montiert werden. Wird es an einer Stelle installiert, unter der sich Personen aufhalten können, muss es zusätzlich gesichert werden (z. B. durch ein Fangseil). Das Fangseil durch die beiden Öffnungen (22) in der Mitte der Bodenplatte ziehen und so befestigen, dass der Fallweg des Gerätes nicht mehr als 20 cm betragen kann. nur kurz von der Stromversorgung getrennt, leuchtet die Lampe nicht sofort wieder auf. Sie muss erst einige Zeit abkühlen, um erneut zünden zu können. 6.1 Grundeinstellungen Über ein Menü (Abb. 2) lassen sich folgende Grundeinstellungen durchführen. Die Taste MENU (2) so oft drücken, bis die gewünschte Funktion im Display (1) angezeigt wird. Dann die Taste ENTER (4) drücken. Mit dem Drücken der nächsten Taste nie länger als 8 Sekunden warten, sonst wird der Einstellvorgang beendet. Blackout-Modus ein oder aus Mit der Taste DOWN oder UP (3) wählen: 6 Inbetriebnahme WARNUNG Blicken Sie nicht direkt in den Lichtstrahl, das kann zu Augenschäden führen. Beachten Sie, dass sehr schnelle Lichtwechsel bei fotosensiblen Menschen und Epileptikern epileptische Anfälle auslösen können! Das beiliegende Netzkabel zuerst in die Netzbuchse (9) stecken und dann in eine Steckdose (230 V~/ 50 Hz). Der Schwenkkopf und alle Steuermotoren fahren in eine definierte Ausgangsstellung. Das Display (1) signalisiert währenddessen . Danach ist das Gerät betriebsbereit und lässt sich über ein DMX-Lichtsteuergerät bedienen ( Kap. 8) oder läuft eigenständig sein Showprogramm durch ( Kap. 7). Zum Ausschalten den Netzstecker aus der Steckdose ziehen. Um einen besseren Bedienkomfort zu erhalten, ist es empfehlenswert, das Gerät an eine Steckdose anzuschließen, die sich über einen Lichtschalter einund ausschalten lässt. Der Lichtstrahl wird nicht abgeblendet. Diese Einstellung muss beim Betrieb ohne DMXSteuergerät gewählt werden. Der Lichtstrahl wird abgeblendet, wenn kein DMX-Steuersignal an der Buchse DMX INPUT (11) anliegt (DMX-Steuergerät ausgeschaltet oder nicht angeschlossen). Sobald entsprechende DMX-Signale anliegen, wird der Lichtstrahl freigegeben. Zum Speichern die Taste ENTER drücken. Drehrichtung normal oder entgegengesetzt Beim Betrieb mit mindestens zwei TWIST-150 kann bei einem Gerät der Dreharm in eine Richtung herumdrehen, während beim zweiten Gerät der Dreharm genau entgegengesetzt dreht. Mit der Taste DOWN oder UP (3) wählen: Drehrichtung normal Drehrichtung entgegengesetzt (invers) Zum Speichern die Taste ENTER drücken. Hinweis: Als Lichtquelle dient eine Entladungslampe. Wird das Gerät nur kurz ausgeschaltet oder The unit may be set up on a solid and even surface. By means of the fixing facilities of the base plate, the unit can also be mounted upside down to a cross arm. The base plate is shown in figure 6 on page 37. For fixing, stable mounting clips are required. Directly screw the clips into the M10 threads (21) or fasten them to the supplied mounting bracket (23). As shown in the figure, place the bolts (24) of the bracket into the openings (20) provided in the base plate and turn them clockwise (to the stop) to lock them. The mounting place must be of sufficient stability and be capable of carrying a minimum load of 20 kg per unit. WARNING The unit must be mounted expertly and safely. If it is installed as a suspended load above persons, it must additionally be secured (e. g. by a safety rope). Pull the safety rope through the two openings (22) in the centre of the base plate and fasten it in such a way that the falling distance of the unit may not exceed 20 cm. 6 Setting into Operation WARNING Never look directly into the light beam, this may cause eye damage. Please note that very fast light changes may trigger epileptic seizures with photosensitive persons or persons with epilepsy! cession ( chapter 7). To switch off, disconnect the mains plug from the socket. For a more convenient operation it is recommended to connect the unit to a socket which can be switched on and off via a light switch. Note: The light source is a discharge lamp. If, for a short time only, the unit is switched off or disconnected from the power supply, the lamp will not immediately light up again. To be able to ignite again, it must cool down for some time. 6.1 Basic adjustments Via a menu (fig. 2) the following basic adjustments can be made. Press the button MENU (2) so many times until the desired function is shown in the display (1). Then press the button ENTER (4). Never wait for more than 8 seconds to press the next button, otherwise the adjusting procedure will be stopped. Blackout mode on or off Select with the button DOWN or UP (3): The light beam is not extinguished. This adjustment must be selected when operating without DMX controller. The light beam is extinguished when no DMX control signal is present at the jack DMX INPUT (11) [DMX controller switched off or not connected]. As soon as corresponding DMX signals are present, the light beam will be released. To memorize, press the button ENTER. Connect the supplied mains cable to the mains jack (9) first and then to a socket (230 V~/50 Hz). The pan head and all control motors go to a defined starting position. The display (1) meanwhile indicates . Then the unit is ready for operation and can be operated via a DMX controller ( chapter 8) or independently displays its show programme in suc- Pan direction normal or opposite For operation with at least two TWIST-150 units, the rotary arm of one unit may rotate in one direction while the rotary arm of the second unit rotates precisely in the opposite direction. Schwenkrichtung normal oder entgegengesetzt Beim Betrieb mit mindestens zwei TWIST-150 kann sich bei einem Gerät der Schwenkkopf in eine Richtung bewegen und beim zweiten Gerät genau entgegengesetzt. a) Die Taste MENU (2) so oft drücken, bis im Display (Sound) erscheint. Mit dem Drücken der nächsten Taste nie länger als 8 Sekunden warten, sonst wird der Einstellvorgang beendet. Show 4 ist wieder für die Deckenmontage vorgesehen. Der Drehwinkel beträgt max. 160° und der Neigungswinkel max. 90° (75° nach vorne und 15° nach hinten). b) Die Taste ENTER (4) drücken. Das Display blinkt. Mit der Taste DOWN oder UP (3) wählen: c) Mit der Taste DOWN oder UP (3) die Musiksteuerung einschalten ( ) oder aus ( ). a) Zum Wählen zwischen Show 1 – 4 die Taste MENU (2) so oft drücken, bis im Display (Show Mode) erscheint. Mit dem Drücken der nächsten Taste nie länger als 8 Sekunden warten, sonst wird der Einstellvorgang beendet. Schwenkrichtung normal Schwenkrichtung entgegengesetzt (invers) Zum Speichern die Taste ENTER drücken. Display ein oder aus Mit der Taste DOWN oder UP (3) wählen: Das Display (1) ist immer eingeschaltet. Das Display schaltet sich ca. 60 s nach dem letzten Drücken einer Taste aus. Beim nächsten Tastendruck schaltet es sich wieder ein. Zum Speichern die Taste ENTER drücken. Acht Sekunden nach dem letzten Drücken einer Taste wird das Einstellmenü automatisch verlassen. 7 Betrieb ohne DMX-Steuergerät Liegt kein DMX-Steuersignal an der Buchse DMX INPUT (11) an, leuchtet die gelbe Kontroll-LED MASTER (5), das Display (1) zeigt (Show 1) und das Gerät läuft eigenständig sein Showprogramm durch. (Voraussetzung dafür ist, dass der Blackout-Modus ausgeschaltet ist, Kap. 6.1.) d) Zum Speichern die Taste ENTER drücken. Das Display zeigt für einige Sekunden . Danach wird wieder die Nummer des eingestellten Showprogramms angezeigt und der Programmablauf startet. Zur Musiksteuerung den Regler SENSITIVITY (13) für die Mikrofonempfindlichkeit so einstellen, dass die Dynamik der Musik optimal durch die Bewegungen des Lichtstrahls sowie durch den Wechsel der Lichtmuster und Farben wiedergegeben wird. Bei einer Farb-, Muster- oder Bewegungsänderung durch ein Musiksignal leuchtet kurz die grüne LED SOUND (5) auf. Hinweis: Bei Veränderung der Lautstärke an der Musikanlage muss auch die Mikrofonempfindlichkeit über den Drehregler entsprechend angepasst werden. 3) Es stehen vier verschiedene Showprogramme zur Verfügung. Sie unterscheiden sich durch die maximalen Dreh- und Neigungswinkel für den Schwenkkopf: Show 1 ist für die Aufstellung des Gerätes auf dem Fußboden vorgesehen. Der Neigungswinkel (Tilt) beträgt hierbei max. 210°. 1) Durch Drehen des Objektivs (7) die Lichtmuster scharf stellen. Show 2 ist für die Deckenmontage vorgesehen. Der Neigungswinkel beträgt hierbei max. 90°. 2) Durch das Ein- oder Ausschalten des SoundModus kann bestimmt werden, ob die Bewegungen des Lichtstrahls sowie das Wechseln der Lichtmuster und der Farben musikgesteuert über das interne Mikrofon erfolgen sollen oder nicht. Show 3 ist für die Aufstellung des Gerätes auf einer Bühne in Richtung Publikum vorgesehen. Der Drehwinkel (Pan) beträgt dabei 160°, der Neigungswinkel 90° (von der Waagerechten aus 60° nach oben und 30° nach unten). Select with the button DOWN or UP (3): pan direction normal pan direction opposite (inverse) To memorize, press the button ENTER. Tilt direction normal or opposite For operation with at least two TWIST-150 units, the pan head of one unit may move in one direction while the pan head of the second unit precisely moves in the opposite direction. Select with the button DOWN or UP (3): tilt direction normal tilt direction opposite (inverse) To memorize, press the button ENTER. Display on or off Select with the button DOWN or UP (3): The display (1) is always switched on. The display switches off approx. 60 s after pressing the last button. It switches on again when pressing the next button. To memorize, press the button ENTER. Eight seconds after pressing the last button the adjusting menu is automatically exited. 7 Operation without DMX controller If no DMX control signal is present at the jack DMX INPUT (11), the yellow indicating LED MASTER (5) lights up, the display (1) indicates (Show 1) and the unit independently runs through its show programme (provided that the blackout mode is switched off, chapter 6.1.). 1) Set the light patterns into focus by turning the lens (7). 2) By switching the sound mode on or off, it can be defined whether or not the movements of the light beam and the changes of the light patterns and colours are music-controlled via the internal microphone. a) Press the button MENU (2) so many times until (Sound) appears in the display. Never wait for more than 8 seconds to press the next button, otherwise the adjusting procedure will be stopped. b) Press the button ENTER (4). The display flashes. c) With the button DOWN or UP (3) switch the music control on ( ) or off ( ). d) To memorize, press the button ENTER. The display shows for some seconds. Then the number of the adjusted show programme reappears and the programme sequence starts. For music control adjust the control SENSITIVITY (13) for the microphone sensitivity so that the dynamic power of the music will be reproduced in an optimum way by the movements of the light beam and the change of the light patterns and colours. When changing the colour, the pattern, or the movement by a music signal, the green LED SOUND (5) shortly lights up. Note: When changing the volume of the music system, the microphone sensitivity must be adapted accordingly via the rotary control. 3) Four different show programmes are available which differ in the maximum panning and tilting angles for the pan head: Show 1 is provided for placing the unit on the floor. The maximum tilting angle is 210°. Show 2 is provided for ceiling mounting. The maximum tilting angle is 90°. Show 3 is provided for setting up the unit on stage towards the audience. The panning angle D A CH b) Die Taste ENTER (4) drücken. Das Display blinkt. c) Mit der Taste DOWN oder UP (3) zwischen Show 1 – 4 wählen. d) Zum Speichern die Taste ENTER drücken. Das Display zeigt für einige Sekunden . Danach erscheint wieder die Showprogrammnummer und der Programmablauf startet. 7.1 Zusammenschalten mehrerer TWIST-150 Es lassen sich mehrere Geräte zusammenschalten, um über das Mikrofon des Hauptgerätes (Master) alle weiteren Nebengeräte (Slave) synchron zu steuern. 1) Den Anschluss DMX OUTPUT (12) des Hauptgerätes über ein 3-poliges XLR-Kabel (z. B. Serie MEC-... oder MECN-... aus dem Sortiment von „img Stage Line“) mit dem Anschluss DMX INPUT (11) des ersten Nebengerätes verbinden. 2) Den Anschluss DMX OUTPUT des ersten Nebengerätes mit dem Anschluss DMX INPUT des zweiten Nebengerätes verbinden usw., bis alle Geräte in einer Kette geschlossen sind. 3) Sobald an den Nebengeräten die Steuersignale vom Hauptgerät anliegen, leuchtet bei ihnen die rote LED SLAVE (5) auf. 4) Die Bewegungen der Nebengeräte können mit dem Hauptgerät gleich laufen oder genau entgegengesetzt (z. B. wenn nur ein Nebengerät eingesetzt wird). is 160° and the tilting angle 90° (60° above the horizontal plane and 30° below the horizontal plane). GB Show 4 is also provided for ceiling mounting. The maximum rotating angle is 160° and the maximum tilting angle 90° (75° to the front and 15° to the rear). a) To switch between Show 1 to 4, press the button MENU (2) so many times until the display shows (Show Mode). Never wait for more than 8 seconds to press the next button, otherwise the adjusting procedure will be stopped. b) Press the button ENTER (4). The display starts flashing. c) With the button DOWN or UP (3), select between Show 1 to Show 4. d) To memorize, press the button ENTER. The display will show for a few seconds. Then the show programme number will reappear and the programme sequence will start. 7.1 Interconnecting several TWIST-150 units Several units may be interconnected in order to control all further slave units to the same rhythm via the microphone of the master unit. 1) Connect the DMX OUTPUT (12) of the master unit via a 3-pole XLR cable (e. g. series MEC-... or MECN-... from the “img Stage Line” product range) to the DMX INPUT (11) of the first slave unit. 2) Connect the DMX OUTPUT of the first slave unit to the DMX INPUT of the second slave unit, etc. until all units are connected in a chain. 3) As soon as the control signals from the master unit are present at the slave units, their red LED SLAVE (5) will light up. 4) The movements of the slave units may be in sync with the master unit or be precisely opposite to it (e. g. if only one slave unit is used). 7 D A CH a) Zum Umschalten zwischen gleich- und gegenläufiger Bewegung die Taste MENU (2) am Nebengerät so oft drücken, bis im Display (Slave Mode) angezeigt wird. Mit dem Drücken der nächsten Taste nie länger als 8 Sekunden warten, sonst wird der Einstellvorgang beendet. b) Die Taste ENTER (4) drücken. Das Display blinkt. c) Zwischen (Slave 1) für gleichläufige und (Slave 2) für gegenläufige Bewegung mit der Taste DOWN oder UP (3) wählen. d) Zum Speichern die Taste ENTER drücken. Das Display zeigt für einige Sekunden . Danach erscheint wieder die Nummer des gewählten Showprogramms und der Programmablauf startet. 7.2 Fernbedienung LC-3 Über die als Zubehör erhältliche Fernbedienung LC-3 (Abb. 5) können verschiedene Funktionen gesteuert werden. 1) Die Fernbedienung an die Buchse REMOTE CONTROL ONLY (10) anschließen. 2) Am Eingang DMX INPUT (11) darf kein DMX-Signal anliegen. Die gelbe LED MASTER (5) muss leuchten. 3) Über den DMX-Ausgang (12) können weitere TWIST-150 angeschlossen werden ( Kap. 7.1), um diese über die Fernbedienung gemeinsam mit dem Hauptgerät zu steuern. 4) Mit der Taste STAND BY (16) lässt sich der Ruhemodus ein- und ausschalten. Bei eingeschaltetem Ruhemodus leuchtet die LED neben der Taste. Der Schwenkkopf fährt in die Ausgangsposition und die Blende wird geschlossen. GB a) To switch between movement in sync and opposite movement, press the button MENU (2) on the slave unit so many times until the display shows (Slave Mode). Never wait for more than 8 seconds to press the next button, otherwise the adjusting procedure will be stopped. b) Press the button ENTER (14). The display starts flashing. c) With the button DOWN or UP (3), select (Slave 1) for movement in sync and (Slave 2) for opposite movement. d) To memorize, press the button ENTER. The display will show for a few seconds. Then the number of the selected show programme will reappear and the programme sequence will start. 7.2 Remote control LC-3 The remote control LC-3 (fig. 5) available as an accessory allows to control different functions: 1) Connect the remote control to the jack REMOTE CONTROL ONLY (10). 2) No DMX signal must be present at the DMX INPUT (11). The yellow LED MASTER (5) must light up. 3) Via the DMX OUTPUT (12), it is possible to connect further TWIST-150 units ( chapter 7.1) in order to control them via the remote control together with the master unit. 4) With the button STAND BY (16), the sleep mode can be switched on and off. With the sleep mode switched on, the LED next to the button will light up. The pan head will go to its starting position and the shutter will be closed. 8 5) Mit der Taste MODE (18) den Betriebsmodus wählen: 1. Stroboskop-Modus SOUND 1 (LED neben der Taste MODE leuchtet nicht) Bei jedem neuen Gedrückthalten der Taste FUNCTION (17) wechselt das Gerät auf den nächsten der drei Stroboskop-Effekte: – musikunabhängiges Stroboskop, bei den Nebengeräten synchron – musikunabhängiges Stroboskop, abwechselnd mit den Nebengeräten – musikabhängiges Stroboskop Nach dem Loslassen der Taste FUNCTION ist das Showprogramm wieder aktiviert. 2. Show-Modus (LED blinkt) Mit der Taste FUNCTION (17) das gewünschte Showprogramm (Show 1 – 4) auswählen ( Kapitel 7, Bedienschritt 3). 3. Manuelle Farb- und Lichtmusterwahl (LED leuchtet kontinuierlich) Durch kurzes Drücken der Taste FUNCTION die Farbe des Lichtmusters wählen und durch längeres Drücken der Taste das Lichtmuster auswählen. Soll der Lichtstrahl sich nicht bewegen, im nächsten Modus den Strahl auf einen bestimmten Punkt ausrichten. 4. Manuelle Lichtstrahlausrichtung (LED blinkt schnell) Die Taste FUNCTION gedrückt halten, der Schwenkkopf dreht sich. Strahlt das Licht in die gewünschte Richtung, die Taste loslassen. Durch erneutes Gedrückthalten der Taste den Lichtstrahl vertikal ausrichten. Um diese beiden Funktionen erneut ausführen zu können, die Taste FUNCTION zuerst zweimal kurz drücken (ohne weitere Funktion). 5) With the button MODE (18), select the operating mode: 1. Stroboscope mode SOUND 1 (LED next to the button MODE does not light up) Each time the button FUNCTION (17) is kept pressed, the unit changes to the next of the three stroboscopic effects: – stroboscope independent of the music, in sync with the slave units – stroboscope independent of the music, alternating with the slave units – stroboscope depending on the music After releasing the button FUNCTION, the show programme will be reactivated. 2. Show mode (LED flashing) Select the desired show programme (Show 1 to 4) with the button FUNCTION (17) [ chapter 7, operating step 3]. 3. Manual selection of colour and light pattern (LED lights continuously) Select the colour of the light pattern by shortly pressing the button FUNCTION and select the light pattern by pressing the button for a longer time. If the light beam should not move, position the beam to a certain spot in the next mode. 4. Manual positioning of light beam (LED flashing rapidly) Keep the button FUNCTION pressed, the pan head will turn. If the light is radiated in the desired direction, release the button. By keeping the button pressed again, position the light beam vertically. To be able to carry out these two functions again, first press the button FUNCTION shortly twice (without any further function). 8 Bedienung über ein Lichtsteuergerät Zur Bedienung über ein Lichtsteuergerät mit DMX512-Protokoll (z. B. DMX-1440 oder DMX-510USB von „img Stage Line“) verfügt das Gerät über 11 Steuerkanäle. Es kann aber auch in den 8-KanalModus umgeschaltet werden, wenn nicht alle Funktionen benötigt werden. Die Funktionen der Kanäle und die DMX-Werte finden Sie im Kapitel 11.1. 8.1 Anschluss Als DMX-Schnittstelle besitzt das Gerät 3-polige XLR-Anschlüsse (11 und 12) mit folgender Kontaktbelegung: Pin 1 = Masse, 2 = DMX-, 3 = DMX+. Zum Anschluss sollten spezielle Kabel für hohen Datenfluss verwendet werden. Normale abgeschirmte Mikrofonkabel mit einem Leitungsquerschnitt von mindestens 2 × 0,22 mm2 und möglichst geringer Kapazität sind nur bei einer Gesamtkabellänge bis 100 m zu empfehlen. Bei Leitungslängen ab 150 m wird das Zwischenschalten eines DMXAufholverstärkers empfohlen (z. B. SR-103DMX von „img Stage Line“). 1) Den DMX-Eingang (11) mit dem DMX-Ausgang des Lichtsteuergerätes verbinden. 2) Den DMX-Ausgang (12) mit dem DMX-Eingang des nächsten Lichteffektgerätes verbinden. Dessen Ausgang wieder mit dem Eingang des nachfolgenden Gerätes verbinden usw., bis alle Lichteffektgeräte in einer Kette angeschlossen sind. 3) Den DMX-Ausgang des letzten DMX-Geräts der Kette mit einem 120-Ω-Widerstand (> 0,3 W) abschließen: An die Pins 2 und 3 eines XLR-Steckers den Widerstand anlöten und den Stecker in den DMX-Ausgang stecken oder einen entsprechenden Abschlussstecker (z. B. DLT-123 von „img Stage Line“) verwenden. 8 Operation via a Light Controller For operation via a light controller with DMX-512 protocol (e. g. DMX-1440 or DMX-510USB by “img Stage Line”), the unit is equipped with 11 control channels. However, it can also be switched to the 8-channel mode if not all functions are required. The functions of the channels and the DMX values can be found in chapter 11.1. 8.1 Connection As a DMX interface the unit is equipped with 3-pole XLR connections (11 and 12) with the following pin configuration: pin 1 = ground, 2 = DMX-, 3 = DMX+. For connection, special cables for high data flow should be used. The use of standard microphone cables with a minimum cable cross section of 2 × 0.22 mm2 and a capacity as low as possible can only be recommended for a total cable length of up to 100 m. For cable lengths exceeding 150 m it is recommended to insert a DMX level matching amplifier (e. g. SR-103DMX from “img Stage Line”). 1) Connect the DMX input (11) to the DMX output of the light controller. 2) Connect the DMX output (12) to the DMX input of the following light effect unit. Connect its output again to the input of the following unit, etc. until all light effect units are connected in a chain. 3) Terminate the DMX output of the last DMX unit in the chain with a 120 Ω resistor (> 0.3 W): Solder the resistor to the pins 2 and 3 of an XLR plug and connect the plug to the DMX output or use a corresponding terminating plug (e. g. DLT-123 from “img Stage Line”). 8.2 Startadresse und Anzahl der DMX-Kanäle einstellen Um das Lichteffektgerät mit einem Lichtsteuergerät bedienen zu können, muss die DMX-Startadresse für den ersten DMX-Kanal eingestellt werden. Ist z. B. am Steuergerät die Adresse 17 für die Steuerung der Schwenkkopfdrehung vorgesehen, am TWIST-150 die Startadresse 17 einstellen. Die anderen Funktionen des Geräts sind dann automatisch den 10 folgenden Kanälen (in diesem Beispiel 18 – 27) zugeordnet. Als nächstmögliche Startadresse für das folgende DMX-gesteuerte Gerät könnte dann bei diesem Beispiel die Adresse 28 verwendet werden. (Im 8-Kanal-Modus werden nur 8 DMX-Kanäle belegt, d. h. als nächstmögliche Startadresse für das folgende DMX-gesteuerte Gerät ergibt sich dann die Adresse 25.) 1) Die DMX-Startadresse einstellen: a) Die Taste MENU (2) einmal drücken, sodass im Display (1) erscheint. Mit dem Drücken der nächsten Taste nie länger als 8 Sekunden warten, sonst wird der Einstellvorgang beendet. b) Die Taste ENTER (4) drücken. Die eingestellte Adresse wird angezeigt. c) Mit der Taste DOWN oder UP (3) die Adresse einstellen und mit der Taste ENTER speichern. 2) Die Anzahl der DMX-Kanäle einstellen, die zum Steuern des Gerätes benutzt werden sollen. a) Die Taste MENU so oft drücken, bis im Display (Channel Mode) erscheint. b) Die Taste ENTER drücken. Die Anzahl der DMX-Kanäle wird angezeigt. c) Mit der Taste DOWN oder UP die Anzahl der DMX-Kanäle einstellen ( oder ) und mit der Taste ENTER speichern. 3) Zum Ausblenden des Menüs die Taste MENU gedrückt halten, bis das Display auf die Startadresse oder auf die gewählte Showprogrammnummer zurückschaltet oder ca. 8 s warten. 8.2 Adjusting the start address and the number of DMX channels For operating the light effect unit with a light controller, adjust the DMX start address for the first DMX channel. If e. g. on the controller the address 17 is provided for controlling the pan motion of the pan head, adjust the start address 17 on the TWIST-150. Then the other functions of the unit are automatically assigned to the following 10 channels (in this example 18 to 27). As the next possible start address for the following DMX-controlled unit, the address 28 could be used for this example. (In the 8-channel mode only 8 DMX channels are reserved, i. e. as the next possible start address for the following DMX-controlled unit the address 25 will result.) 4) Sobald die Steuersignale des DMX-Steuergerätes empfangen werden, leuchtet die rote LED DMX (5) und das Display zeigt die Startadresse an. Der TWIST-150 kann nun mit dem DMX-Steuergerät bedient werden. Um durch Öffnen der Blende den Lichtstrahl freizugeben, den DMX-Kanal 3 (im 8-KanalModus) bzw. den DMX-Kanal 9 (im 11-KanalModus) auf einen DMX-Wert zwischen 8 und 15 oder auf 255 einstellen ( Kapitel 11.1). 5) Durch Drehen des Objektivs (7) die Lichtmuster scharf stellen. b) Press the button ENTER (4). The adjusted address will be displayed. c) With the button DOWN or UP (3), adjust the address and memorize it with the button ENTER. 2) Adjust the number of DMX channels which are to be used for controlling the unit. a) Press the button MENU so many times until the display shows (Channel Mode). b) Press the button ENTER. The number of DMX channels is displayed. c) Adjust the number of the DMX channels ( or ) with the button DOWN or UP and memorize it with the button ENTER. 3) To exit the menu, keep the button MENU pressed until the display switches back to the start address or to the selected show programme number or wait for approx. 8 s. D Feinkorrektur Schwenkkopfneigung A Drehwinkelkorrektur für das Goborad CH Drehwinkelkorrektur für das Farbrad 6) Die Funktion mit der Taste ENTER aktivieren. 7) Mit der Taste DOWN oder UP die Korrektur vornehmen. 8) Zum Speichern die Taste ENTER drücken. Danach kann mit der Taste DOWN oder UP auf eine andere Korrekturfunktion umgeschaltet werden. 9) Etwa 8 s nach dem letzten Drücken einer Taste wird das Einstellmenü automatisch verlassen. 9 Weitere Funktionen 9.2 Selbsttest 9.1 Korrekturwerte einstellen (Offset-Modus) Zur Feinjustierung der Schwenkkopfposition sowie des Farb- und des Goborads können Korrekturwerte eingestellt werden. Sollen mehrere TWIST-150 synchron über dieselben DMX-Adressen gesteuert werden, lassen sich z. B. Abweichungen der Lichtstrahlrichtung minimieren. 1) Die Taste MENU (2) drücken. Das Display (1) zeigt (Address) an. Mit dem Drücken der nächsten Taste nie länger als 8 Sekunden warten, sonst wird der Einstellvorgang beendet. 2) Die Taste ENTER (4) ca. 5 Sekunden gedrückt halten, bis das Display auf umspringt. Der Schwenkkopf fährt in die senkrechte Position (vertikal 0°) und der Lichtstrahl wird abgeblendet. 3) Die Taste ENTER erneut betätigen. Die Blende gibt den Lichtstrahl frei und im Display blinkt . 4) Ist zur weiteren Einstellung eine waagerechte Strahlrichtung geeigneter, die Taste ENTER (mehrfach) drücken. 5) Die Taste MENU drücken und mit der Taste DOWN oder UP (3) die benötigte Funktion auswählen: Für den Selbsttest des Gerätes stehen drei Programme zur Verfügung. Die Taste MENU (2) so oft drücken, bis im Display (1) das gewünschte Testprogramm angezeigt wird: Kurztest Zum Starten die Taste ENTER (4) drücken. Während des Testdurchlaufs blinkt im Display . Am Ende des Tests wird kurz (finish = Ende) signalisiert, dann schaltet das Gerät auf den vorherigen Betriebsmodus zurück. oder Endlostest mit dem Durchlauf aller Farben und aller Gobos Für beide Testprogramme lassen sich 12 verschiedene Bewegungsabläufe auswählen und es kann die Bewegungsgeschwindigkeit geändert werden. 1) Zum Starten die Taste ENTER drücken. Während des Testdurchlaufs blinkt im Display bzw. . 2) Zum Ändern des Bewegungsablaufs oder der Bewegungsgeschwindigkeit die Taste ENTER erneut drücken. Das Display zeigt (Move). 3) Soll nur die Geschwindigkeit geändert werden, mit dem Bedienschritt 4) fortfahren. Zum Ändern des 4) As soon as control signals from the DMX controller are received, the red LED DMX (5) lights up and the display shows the start address. The TWIST-150 can now be operated with the DMX controller. To release the light beam by opening the shutter, adjust the DMX channel 3 (in the 8-channel mode) or the DMX channel 9 (in the 11-channel mode) to a DMX value between 8 and 15 or to 255 ( chapter 11.1). 5) Press the button MENU and select the required function with the button DOWN or UP (3): 5) By turning the lens (7) bring the light patterns into focus. 6) Activate the function with the button ENTER. 9 Further Functions 1) Adjusting the DMX start address: a) Press the button MENU (2) once so that the display (1) will show . Never wait for more than 8 seconds to press the next button, otherwise the adjusting procedure will be stopped. Feinkorrektur Schwenkkopfdrehung 9.1 Adjusting the correction values (offset mode) For fine adjustment of the pan head position and the colour and gobo wheels, correction values can be adjusted. For synchronous control of several TWIST-150 via the same DMX addresses it is e. g. possible to minimize deviations of the light beam direction. 1) Press the button MENU (2). The display (1) shows (Address). Never wait for more than 8 seconds to press the next button, otherwise the adjusting procedure will be stopped. 2) Keep the button ENTER (4) pressed for approx. 5 seconds until the display changes to . The pan head goes to the vertical position (0°) and the light beam is extinguished. 3) Press the button ENTER again. The shutter releases the light beam and flashes in the display. 4) If a horizontal beam direction is more suitable for a further adjustment, press the button ENTER (several times). GB fine readjustment for panning the pan head fine readjustment for tilting the pan head readjustment of the rotary angle for the gobo wheel readjustment of the rotary angle for the colour wheel 7) Make the readjustment with the button DOWN or UP. 8) To memorize, press the button ENTER. Then it is possible to select another readjustment function with the button DOWN or UP. 9) Approx. 8 s after pressing the last button the adjusting menu is automatically exited. 9.2 Self-test Three programmes are available for the self-test of the unit. Press the button MENU (2) so many times until the desired test programme is shown in the display (1): short test To start press the button ENTER (4). During the test run, flashes in the display. At the end of the test (Finish) is shortly indicated, then the unit switches back to the previous operating mode. or continuous test with successive display of all colours and all gobos For both test programmes 12 different motion sequences can be selected and the motion speed can be changed. 1) To start press the button ENTER. During the test run or flashes in the display. 9 D A CH Bewegungsablaufs die Taste ENTER erneut betätigen. Das Display zeigt die Nummer des momentanen Bewegungsablaufs an ( … ). Mit der Taste DOWN oder UP (3) die Nummer ändern und mit der Taste ENTER den gewählten Bewegungsablauf starten. 4) Mit der Taste DOWN oder UP von auf (Move Speed) umschalten und die Taste ENTER drücken. Das Display zeigt die momentane Geschwindigkeit zwischen 0 (sehr langsam) und 255 (schnell) an. Mit der Taste DOWN oder UP den Wert ändern und mit der Taste ENTER die gewählte Geschwindigkeit aktivieren. 5) Zum Beenden des Selbsttests die Taste MENU drücken. Nach 8 Sekunden schaltet das Gerät auf den vorherigen Betriebsmodus zurück. 6) Zum Beenden des Master-Modus 8 Sekunden lang keine Taste betätigen. 10 Reinigung der Optik 9.4 Anzeige der Betriebsstunden Um den Stand des Betriebsstundenzählers anzuzeigen: 1) Die Taste MENU (2) so oft drücken, bis im Display (1) (Fixture hours) erscheint. 2) Die Taste ENTER (4) drücken. Die Betriebsstunden werden angezeigt. 3) Nach 8 Sekunden schaltet das Gerät auf den vorherigen Betriebsmodus zurück. Die Linsen und die Farbfilter sollten in regelmäßigen Abständen, je nach Verschmutzung durch Staub, Rauch oder andere Partikel, gereinigt werden. Nur dann kann das Licht in maximaler Helligkeit abgestrahlt werden. Vor dem Öffnen des Schwenkkopfs den Stecker aus der Steckdose ziehen und das Gerät 15 Minuten abkühlen lassen. Zur Reinigung ein weiches, sauberes Tuch und ein handelsübliches Glasreinigungsmittel verwenden. Anschließend die Teile vorsichtig trocken wischen. 9.5 Anzeige der Firmware-Version Im Master-Modus können z. B. die wichtigsten Steuerfunktionen des TWIST-150 ohne DMX-Steuergerät überprüft werden. Um die Versionsnummer der Firmware (Betriebssystem des Lichteffektgeräts) anzuzeigen: 1) Die Taste MENU (2) so oft drücken, bis im Display (1) (Version) erscheint. Stromversorgung: . . . . . 230 V~ / 50 Hz 1) Die Taste MENU (2) so oft drücken, bis das Display (Master Mode) anzeigt. Beachten Sie: Wird 8 Sekunden lang keine Taste betätigt, schaltet das Gerät auf den vorherigen Betriebsmodus zurück! 2) Die Taste ENTER (4) drücken. Die Versionsnummer wird angezeigt. Leuchtmittel: . . . . . . . . . HID-Entladungslampe 95 V/150 W 3) Nach 8 Sekunden schaltet das Gerät auf den vorherigen Betriebsmodus zurück. Abstrahlwinkel: . . . . . . . 14° Schwenkkopfdrehung Schwenkkopfneigung Blendensteuerung Gobo Farbe 3) Zum Aktivieren der Funktion die Taste ENTER (4) drücken. 9.6 Reset Sollten Funktionsstörungen auftreten, kann eventuell durch ein Reset (Zurücksetzen des Gerätes) Abhilfe geschaffen werden: 1) Die Taste MENU (2) so oft drücken, bis im Display (1) (reset) erscheint. 2) Die Taste ENTER (4) drücken. Der Schwenkkopf und alle Steuermotoren fahren in eine definierte 11 Technische Daten Leistungsaufnahme: . . . 200 VA Drehwinkel horizontal (Pan): . . . . 540° vertikal (Tilt): . . . . . . . 270° Einsatztemperatur: . . . . 0 – 40 °C Abmessungen: . . . . . . . 280 × 340 × 270 mm Gewicht: . . . . . . . . . . . . 9,9 kg Änderungen vorbehalten. 4) Mit der Taste DOWN oder UP den DMX-Wert einstellen ( Kap. 11.1). Das Gerät reagiert sofort. Diese Bedienungsanleitung ist urheberrechtlich für MONACOR ® INTERNATIONAL GmbH & Co. KG geschützt. Eine Reproduktion für eigene kommerzielle Zwecke – auch auszugsweise – ist untersagt. 2) To change the motion sequence or the motion speed, press the button ENTER again. The display shows (Move). 3) To activate the function, press the button ENTER (4). 3) For only changing the speed continue with operating step 4). To change the motion sequence, press the button ENTER again. The display shows the number of the present motion sequence ( … ). Change the number with the button DOWN or UP (3) and start the selected motion sequence with the button ENTER. 4) Switch from to (Move Speed) with the button DOWN or UP and press the button ENTER. The display shows the present speed between 0 (very slow) and 255 (fast). Change the value with the button DOWN or UP and activate the selected speed with the button ENTER. 5) To stop the self-test, press the button MENU. The unit switches to the previous operating mode after 8 seconds. 4) Adjust the DMX value with the button DOWN or UP ( chapter 11.1). The unit responds immediately. 5) After pressing the button ENTER again, it is possible to select another control function with the button DOWN or UP. 6) To stop the master mode, do not actuate any button for 8 seconds. 9.4 Display of the working hours To show the state of the working hour meter: 1) Press the button MENU (2) so many times until (Fixture hours) appears in the display (1). 2) Press the button ENTER (4). The working hours are displayed. 3) After 8 seconds the unit switches back to the previous operating mode. 9.5 Display of the firmware version In the master mode e. g. the most important control functions of the TWIST-150 can be checked without DMX controller. To display the version number of the firmware (operating system of the light effect unit): 2) Select the control function with the button DOWN or UP (3): panning of pan head tilting of pan head shutter control gobo colour 2) Press the button ENTER (4). The pan head and all control motors go to a defined starting position. Meanwhile the display indicates . Then the unit switches back to the previous operating mode. 10 Cleaning the Optical System It is recommended to clean the lenses and the colour filters at regular intervals, depending on impurities caused by dust, smoke, or other particles to ensure that the light is radiated at maximum brightness. Prior to opening the pan head, always disconnect the plug from the mains socket and let the unit cool down for 15 minutes. For cleaning use a soft, clean cloth and a commercial glass cleaner. Then carefully wipe the parts dry. 11 Specifications Power supply: . . . . . . . . 230 V~/50 Hz 9.3 Master mode 1) Press the button MENU (2) so many times until the display shows (Master Mode). Note: If no button is pressed for 8 seconds, the unit switches back to the previous operating mode! 10 Ausgangsstellung. Das Display signalisiert währenddessen . Danach schaltet das Gerät auf den vorherigen Betriebsmodus zurück. 9.3 Master-Modus 2) Mit der Taste DOWN oder UP (3) die Steuerfunktion anwählen: GB 5) Nach dem erneuten Drücken der Taste ENTER kann mit der Taste DOWN oder UP auf eine andere Steuerfunktion umgeschaltet werden. 1) Press the button MENU (2) so many times until (Version) appears in the display (1). 2) Press the button ENTER (4). The version number is displayed. 3) After 8 seconds the unit switches back to the previous operating mode. Power consumption: . . . 200 VA Lamp: . . . . . . . . . . . . . . HID discharge lamp 95 V/150 W Beam angle: . . . . . . . . . 14° Rotary angle horizontal (pan): . . . . 540° vertical (tilt): . . . . . . . 270° Ambient temperature: . . 0 – 40 °C Dimensions: . . . . . . . . . 280 × 340 × 270 mm 9.6 Reset Weight: . . . . . . . . . . . . . 9.9 kg In case of malfunctions it may be possible to eliminate them by a reset of the unit: 1) Press the button MENU (2) so many times until (reset) appears in the display (1). Subject to technical modification. All rights reserved by MONACOR ® INTERNATIONAL GmbH & Co. KG. No part of this instruction manual may be reproduced in any form or by any means for any commercial use. 11.1 Übersicht der DMX-Kanäle D DMX-Kanal DMX-Kanal 8-KanalModus* 11-KanalModus Funktion DMX-Wert 1 1 Schwenkkopfdrehung (Pan) 0 – 540°, grob 000 – 255 — 2 Schwenkkopfdrehung, fein 000 – 255 2 3 Schwenkkopfneigung (Tilt) 0 – 270°, grob 000 – 255 — 4 Schwenkkopfneigung, fein 000 – 255 — 5 Pan-/Tilt-Geschwindigkeit, schnell langsam 000 – 255 6 Makros (programmierte Bewegungsabläufe) kein Makro Makro 1 Makro 2 Makro 3 Makro 4 Makro 5 Makro 6 Makro 7 Makro 8 Makro 9 Makro 10 Makro 11 Makro 12 000 – 015 016 – 035 036 – 055 056 – 075 076 – 095 096 – 115 116 – 135 136 – 155 156 – 175 176 – 195 196 – 215 216 –235 236 – 255 7 Geschwindigkeit der Makros, schnell langsam 000 – 255 8 ohne Funktion Reset ohne Funktion autonomer Betrieb (Show-Programm) 000 – 199 200 – 209 210 – 239 240 – 255 9 Blende geschlossen (Blackout) Blende offen Stroboskop, langsam schnell Stroboskop aus, Blende offen Wackeleffekt, langsam schnell Blende offen 000 – 007 008 – 015 016 – 131 132 – 139 140 – 247 248 – 255 — — 8 3 8-KanalModus* 4 5 A 10 11 * Im 8-Kanal-Modus sind die DMX-Kanäle 6 und 7 ohne Funktion. 1 2 3 4 5 6 7 Funktion 11-KanalModus 8 9 DMX-Wert Gobo kein Gobo Gobo 1 Gobo 2 Gobo 3 Gobo 4 Gobo 5 Gobo 6 Gobo 7 Gobo 8 Gobo 9 Gobo 10 Gobo 11 Gobo 12 Gobo 13 Gobo 14 ständiger Gobowechsel langsam schnell schnell langsam (Gegenrichtung) 000 – 008 009 – 016 017 – 025 026 – 033 034 – 042 043 – 050 051 – 059 060 – 067 068 – 076 077 – 084 085 – 093 094 – 101 102 – 110 111 – 118 119 – 127 128 – 191 192 – 255 Farbe Weiß Grün Grün + Magenta Magenta Hellblau Gelb Rot Blau + Rot Blau UV-Violett Grün Grün + Orange Orange Gelb + Orange Gelb Gelb + Rosa Rosa ständiger Farbwechsel schnell langsam langsam schnell (Gegenrichtung) 10 11 12 000 – 007 008 – 014 015 – 022 023 – 029 030 – 037 038 – 044 045 – 052 053 – 059 060 – 067 068 – 074 075 – 082 083 – 089 090 – 097 098 – 104 105 – 112 113 – 119 120 – 127 128 – 191 192 – 255 13 14 11.1 Overview of the DMX channels GB DMX Channel DMX Channel 8-channelmode* 11-channemode Function DMX Value 1 1 panning of pan head 0 – 540°, coarse 000 – 255 — 2 panning of pan head, fine 000 – 255 2 3 tilting of pan head 0 – 270°, coarse 000 – 255 — 4 tilting of pan head, fine 000 – 255 — 5 pan/tilt speed, fast slow 000 – 255 6 macros (programmed motion sequences) no macro macro 1 macro 2 macro 3 macro 4 macro 5 macro 6 macro 7 macro 8 macro 9 macro 10 macro 11 macro 12 000 – 015 016 – 035 036 – 055 056 – 075 076 – 095 096 – 115 116 – 135 136 – 155 156 – 175 176 – 195 196 – 215 216 –235 236 – 255 — — 7 speed of the macros, fast slow 000 – 255 8 8 no function reset no function autonomous operation (show programme) 000 – 199 200 – 209 210 – 239 240 – 255 9 shutter closed (blackout) shutter open stroboscope, slow fast stroboscope off, shutter open wobbling effect, slow fast shutter open 000 – 007 008 – 015 016 – 131 132 – 139 140 – 247 248 – 255 3 CH * In the 8-channel mode the DMX channels 6 and 7 have no function 8-channelmode* 4 5 11-channelmode 10 11 Function gobo no gobo gobo 1 gobo 2 gobo 3 gobo 4 gobo 5 gobo 6 gobo 7 gobo 8 gobo 9 gobo 10 gobo 11 gobo 12 gobo 13 gobo 14 continuous change of gobos slow fast fast slow (opposite direction) colour white green green + magenta magenta light-blue yellow red blue + red blue UV violet green green + orange orange yellow + orange yellow yellow + pink pink continuous change of colours fast slow slow fast (opposite direction) DMX Value 000 – 008 009 – 016 017 – 025 026 – 033 034 – 042 043 – 050 051 – 059 060 – 067 068 – 076 077 – 084 085 – 093 094 – 101 102 – 110 111 – 118 119 – 127 128 – 191 192 – 255 000 – 007 008 – 014 015 – 022 023 – 029 030 – 037 038 – 044 045 – 052 053 – 059 060 – 067 068 – 074 075 – 082 083 – 089 090 – 097 098 – 104 105 – 112 113 – 119 120 – 127 128 – 191 192 – 255 11 F B Ouvrez le présent livret page 3 de manière à visualiser les éléments et branchements. 1 Eléments et branchements 1.1 TWIST-150 CH Table des matières 1 Affichage 1 2 Touche MENU pour appeler le menu de réglage et sélectionner les points de menu Eléments et branchements . . . . . . . . . . . 12 1.1 TWIST-150 . . . . . . . . . . . . . . . . . . . . . . . . . 12 1.2 Télécommande LC-3 . . . . . . . . . . . . . . . . . 12 2 Conseils dʼutilisation et de sécurité . . . . 13 3 Possibilités dʼutilisation . . . . . . . . . . . . . 13 4 Placement de la lampe . . . . . . . . . . . . . . . 13 5 Montage . . . . . . . . . . . . . . . . . . . . . . . . . . . 14 6 Utilisation . . . . . . . . . . . . . . . . . . . . . . . . . 14 12 Sortie signal DMX (XLR 3 pôles); pour brancher à lʼentrée DMX dʼun autre jeu de lumière ; pin 1 = masse, 2 = DMX-, 3 = DMX+ 13 Potentiomètre de réglage SENSITIVITY pour régler la sensibilité de réponse en mode de gestion par la musique, via le microphone interne 4 Touche ENTER pour activer un point du menu et mémoriser un réglage 14 Support pour la lampe dans la tête (6), compartiment lampe ouvert, vue du dessus 5 LEDs de contrôle pour le mode de fonctionnement : 15 Borne de branchement pour la lampe DMX Fonctionnement sans contrôleur DMX . . 15 brille si des signaux de commande DMX sont présents à lʼentrée DMX INPUT (11) 7.2 Télécommande LC-3 . . . . . . . . . . . . . . . . . 16 MASTER mode master ; gestion sans contrôleur DMX ou via la télécommande LC-3 8 SLAVE mode slave (voir chapitre 7.1) ; gestion via une seconde TWIST-150 SOUND brille brièvement si lʼappareil modifie la couleur, le modèle ou le mouvement via un son capté par le microphone interne 7.1 Interconnexion de plusieurs TWIST-150 . . 15 Utilisation via un contrôleur . . . . . . . . . . 16 8.1 Connexion . . . . . . . . . . . . . . . . . . . . . . . . . 16 8.2 Réglage de lʼadresse de démarrage et nombre des canaux DMX . . . . . . . . . . . . 17 9 11 Entrée signal DMX (XLR 3 pôles) ; pin 1 = masse, 2 = DMX-, 3 = DMX+ 3 Touches DOWN et UP pour modifier un réglage dans le menu 6.1 Réglages de base . . . . . . . . . . . . . . . . . . . . 14 7 10 Branchement pour la télécommande LC-3 (schéma 5) Autres fonctions . . . . . . . . . . . . . . . . . . . . 17 1.2 Télécommande LC-3 La télécommande LC-3 est disponible en option mais nʼest pas livrée avec la TWIST-150. 16 Touche STAND BY pour le mode Repos : la tête va sur la position de départ, le faisceau est coupé. La LED à côté de la touche sert de contrôle et brille. 17 Touche FUNCTION pour différentes fonctions selon le mode de fonctionnement sélectionné avec la touche MODE (chapitre 7.2) 9.1 Réglage des valeurs de correction (Mode Offset) . . . . . . . . . . . . . . . . . . . . . . . 17 6 Tête inclinable 9.2 Auto-test . . . . . . . . . . . . . . . . . . . . . . . . . . . 17 7 Objectif, orientable pour régler la netteté 9.3 Mode Master . . . . . . . . . . . . . . . . . . . . . . . . 18 8 Bras de rotation 9.4 Affichage des heures de fonctionnement . . 18 9 Prise secteur pour brancher le cordon secteur livré et lʼautre extrémité du cordon à une prise 230 V~/50 Hz. 18 Touche MODE pour commuter entre : – Mode stroboscope : la LED à côté de la touche MODE ne brille pas – Mode Show : la LED clignote lentement – Sélection manuelle de couleur et de modèle : la LED brille en continu – Orientation manuelle du faisceau lumineux : la LED clignote rapidement Le porte fusible se trouve dessous : tout fusible fondu doit être remplacé uniquement par un fusible de même type. Conseil : Aucun signal DMX ne doit être présent à lʼentrée DMX INPUT (11) pour une gestion via la télécommande. 9.5 Affichage de la version du système dʼexploitation . . . . . . . . . . . . . . 18 9.6 Réinitialisation . . . . . . . . . . . . . . . . . . . . . . 18 10 Nettoyage de lʼoptique . . . . . . . . . . . . . . . 18 11 Caractéristiques techniques . . . . . . . . . . 18 11.1 Présentation des canaux DMX . . . . . . . . . . 19 I Vi preghiamo di aprire completamente la pagina 3. Così vedrete sempre gli elementi di comando e i collegamenti descritti. 1 Elementi di comando e collegamenti 1.1 TWIST-150 Indice 1 Elementi di comando e collegamenti . . . 12 1.1 TWIST-150 . . . . . . . . . . . . . . . . . . . . . . . . . 12 1.2 Telecomando LC-3 . . . . . . . . . . . . . . . . . . . 12 2 Avvertenze di sicurezza . . . . . . . . . . . . . . 13 3 Possibilità dʼimpiego . . . . . . . . . . . . . . . . 13 4 Inserire la lampadina . . . . . . . . . . . . . . . . 13 5 Montaggio . . . . . . . . . . . . . . . . . . . . . . . . . 14 6 Messa in funzione . . . . . . . . . . . . . . . . . . . 14 6.1 Impostazioni base . . . . . . . . . . . . . . . . . . . . 14 7 Funzionamento senza unità di comando DMX . . . . . . . . . . . . . . . . . . . 15 7.1 Collegamento di più TWIST-150 . . . . . . . . 15 7.2 Telecomando LC-3 . . . . . . . . . . . . . . . . . . . 16 8 Funzionamento tramite unità di comando luce . . . . . . . . . . . . . . . . . . . . 16 8.1 Collegamento . . . . . . . . . . . . . . . . . . . . . . . 16 8.2 Impostare lʼindirizzo di start e il numero dei canali DMX . . . . . . . . . . . . . . . . . . . . . . 17 9 Altre funzioni . . . . . . . . . . . . . . . . . . . . . . . 17 9.1 Impostare valori correttivi (Modo Offset) . . 17 9.2 Autotest . . . . . . . . . . . . . . . . . . . . . . . . . . . 17 9.3 Modo Master . . . . . . . . . . . . . . . . . . . . . . . . 18 9.4 Indicazione delle ore di funzionamento . . . 18 9.5 Indicazione della versione del firmware . . . 18 9.6 Reset . . . . . . . . . . . . . . . . . . . . . . . . . . . . . 18 10 Pulizia del sistema ottico . . . . . . . . . . . . . 18 11 Dati tecnici . . . . . . . . . . . . . . . . . . . . . . . . 18 11.1 Panoramica dei canali DMX . . . . . . . . . . . . 19 12 1 Display 2 Tasto MENU per chiamare il menù per le impostazioni e per scegliere i punti del menù 3 Tasti DOWN e UP per modificare le impostazioni del menù 11 Ingresso dei segnali DMX (XLR a 3 poli); Pin 1 = Massa, 2 = DMX-, 3 = DMX+ 12 Uscita dei segnali DMX (XLR a 3 poli) per il collegamento con lʼingresso DMX di un ulteriore unità per effetti luce; Pin 1 = Massa, 2 = DMX-, 3 = DMX+ 13 Regolatore SENSITIVITY per la sensibilità in caso di comando tramite la musica per mezzo del microfono interno 4 Tasto ENTER per attivare un punto del menù e per memorizzare lʼimpostazione 14 Supporto per la lampada nella testa orientabile (6), vista dallʼalto nel vano lampada aperto 5 LED di controllo per il modo di funzionamento: DMX è acceso se allʼingresso DMX INPUT (11) sono presenti dei segnali DMX di comando MASTER modo Master: funzionamento senza unità di comando DMX oppure con il telecomando LC-3 SLAVE modo Slave (Cap. 7.1): comando per mezzo di un ulteriore TWIST-150 SOUND si accende brevemente, se lʼapparecchio, in seguito ai segnali acustici rilevati dal microfono, modifica il colore, il disegno delle luci o il movimento 15 Morsettiera per la connessione della lampada 6 Testa orientabile 7 Obiettivo, girevole per la messa a fuoco 8 Braccio girevole 9 Presa per il collegamento con una presa di rete (230 V~/50 Hz) tramite il cavo rete in dotazione Sotto la presa si trova il portafusibile. Sostituire un fusibile difettoso solo con uno dello stesso tipo. 10 Contatto per il telecomando LC-3 (fig. 5) 1.2 Telecomando LC-3 Il telecomando LC-3 è disponibile come accessorio e non è in dotazione alla TWIST-150. 16 Tasto STAND BY per il modo di riposo: La testa orientabile si porta nella posizione di partenza e il raggio di luce viene mascherato. Il LED vicino al tasto si accende come controllo. 17 Tasto FUNCTION per diverse funzioni a seconda del modo di funzionamento scelto con il tasto MODE (Cap. 7.2) 18 Tasto MODE per cambiare fra: – Modo Stroboscopio; il LED vicino al tasto MODE è spento – Modo Show; il LED lampeggia lentamente – scelta manuale di colori e disegni di luci; il LED rimane acceso – orientamento manuale del raggio di luce; il LED lampeggia velocemente N.B.: Per poter usare il telecomando, allʼingresso DMX INPUT (11) non deve essere presente nessun segnale DMX. 2 Conseils dʼutilisation et de sécurité Cet appareil répond à toutes les directives nécessaires de lʼUnion Européenne et porte donc le symbole . AVERTISSEMENT Lʼappareil est alimenté par une tension dangereuse 230 V~. Ne faites jamais de modification sur lʼappareil si cela nʼest pas décrit dans la présente notice et ne faites rien tomber dans les ouïes de ventilation! Une mauvaise manipulation pourrait générer une décharge électrique. Pour nettoyer le boîtier, utilisez uniquement un chiffon sec et doux, en aucun cas, de produits chimiques ou dʼeau. Pour la lentille, vous pouvez utiliser des produits de nettoyage pour verres usuels. Dans la gamme “img Stage Line”, la lampe suivante peut être utilisée : Article Ref.Num. Durée de vie moyenne Nous déclinons toute responsabilité en cas de dommages matériels ou corporels résultants si lʼappareil est utilisé dans un but autre que celui pour lequel il a été conçu, sʼil nʼest pas monté de manière sûre, correctement utilisé ou nʼest pas réparé par une personne habilitée. HLT-150HID 05.9945 1000 h Lorsque lʼappareil est définitivement retiré du service, vous devez le déposer dans une usine de recyclage adaptée pour contribuer à son élimination non polluante. Respectez scrupuleusement les points suivants : Cet appareil nʼest conçu que pour une utilisation en intérieur. Protégez-le de tout type de projections dʼeau, des éclaboussures, dʼune humidité élevée et de la chaleur (plage de température de fonctionnement autorisée : 0 – 40 °C). En aucun cas, vous ne devez poser pas dʼobjet contenant du liquide ou un verre sur lʼappareil. Ne faites pas fonctionner lʼappareil et débranchezle immédiatement du secteur lorsque : 1. des dommages apparaissent sur lʼappareil, par exemple sur le boîtier, sur la lentille, sur le filtre UV ou sur le cordon secteur, 2. après une chute ou un cas similaire, vous avez un doute sur lʼétat de lʼappareil, 3. des défaillances apparaissent. En tout cas, faites effectuer les réparations de lʼappareil par un technicien spécialisé. 2 Ne débranchez jamais lʼappareil en tirant sur le cordon secteur ; retirez toujours le cordon secteur en tirant la fiche. Pour le transport, saisissez lʼappareil uniquement par la base. En aucun cas, vous ne devez le porter par la tête (6) ou par le bras (8). Avvertenze di sicurezza 3 4 Far funzionare lʼapparecchio solo allʼinterno di locali. Proteggerlo dallʼacqua gocciolante e dagli spruzzi dʼacqua, da alta umidità dellʼaria e dal calore (temperatura dʼimpiego ammessa fra 0 °C e 40 °C). Non depositare sullʼapparecchio dei contenitori riempiti di liquidi, p. es. bicchieri. Non mettere in funzione lʼapparecchio e staccare subito la spina rete se: 1. lʼapparecchio, p. es. il contenitore, la lente, il filtro UV o il cavo rete presentano dei danni visibili; 2. dopo una caduta o dopo eventi simili sussiste il sospetto di un difetto; 3. lʼapparecchio non funziona correttamente. Per la riparazione rivolgersi sempre ad unʼofficina competente. Staccare il cavo rete afferrando la spina, senza tirare il cavo. Per trasportare lʼapparecchio afferrarlo per la parte inferiore. In nessun caso portare lʼapparecchio prendendolo per la testa orientabile (6) o per il braccio girevole (8). Per la pulizia usare solo un panno morbido, asciutto; non impiegare in nessun caso prodotti chimici o acqua. Per la lente si può usare anche un detergente per vetri che si trova in commercio. Avant dʼinsérer ou retirer la lampe, vous devez impérativement débrancher lʼappareil du secteur. Pendant le fonctionnement, la lampe est très chaude, vous devez laisser refroidir le boîtier et la lampe après toute utilisation et avant tout remplacement (refroidissement pendant 15 minutes au moins). Ne regardez jamais directement, appareil ouvert, vers la lampe à décharge allumée. La luminosité élevée et le rayonnement UV peuvent causer des dommages aux yeux. 1) Desserrez la vis sur la face arrière de la tête de telle sorte que le couvercle du compartiment lampe puisse être retiré. Le schéma 3, page 3, montre le compartiment lampe ouvert, vue du dessus. 2) Placez la lampe sur le support (14) en la centrant. Le réflecteur doit sʼencastrer précisément entre les deux têtes de vis (voir flèches sur le schéma 4, vue de côté). Sinon les gobos ne sont pas éclairés de manière uniforme. 3) Vissez les extrémités de câble de la lampe à la borne (15). 4) Refermez le compartiment lampe avec le couvercle. Non toccare mai il bulbo della lampadina con le dita! I grassi e il sudore della pelle riducono la potenza e lasciano impronte AVVERTIMENTO Lʼapparecchio funziona con pericolosa tensione di rete (230 V~). Non intervenire mai al suo interno al di fuori delle operazioni descritte nelle presenti istruzioni e non inserire niente nelle fessure di aerazione! Esiste il pericolo di una scarica elettrica. AVERTISSEMENT ! En aucun cas, vous ne devez utiliser une lampe de type différent ! Questʼapparecchio è conforme a tutte le direttive richieste dellʼUE e pertanto porta la sigla . Si devono osservare assolutamente anche i seguenti punti: Placement de la lampe Le jeu de lumière est livré sans lampe. Il est nécessaire dʼutiliser une lampe à décharge de type HID (HID = high intensity discharge) 95 V/150 W. Nel caso dʼuso improprio, di montaggio non sicuro, dʼimpiego scorretto o di riparazione non a regola dʼarte non si assume nessuna garanzia per lʼapparecchio e nessuna responsabilità per eventuali danni consequenziali a persone o a cose. Se si desidera eliminare lʼapparecchio definitivamente, consegnarlo per lo smaltimento ad unʼistituzione locale per il riciclaggio. 3 Possibilità dʼimpiego La moving head TWIST-150 è adatta in modo particolare per lʼimpiego professionale sul palcoscenico e in discoteca. Grazie al suo equipaggiamento con ruota gobo, ruota colori, nonché con effetti stroboscopici e di oscillazione, è in grado di proiettare un gran numero di vari disegni di luci. La risoluzione a 16 bit per il movimento della testa, insieme alla velocità variabile, permette un posizionamento molto preciso del raggio di luce. Il riposizionamento automatico fa sì che la testa torna automaticamente nella posizione di partenza se viene girata per via di cause esterne. Il comando dellʼapparecchio è possibile tramite il microfono integrato, tramite il telecomando LC-3 (disponibile separatamente come accessorio) oppure per mezzo di unʼunità DMX di comando luce. CH Ne touchez jamais le tube de la lampe avec les doigts ; la sueur et les pellicules grasses sur les doigts diminuent la puissance lumineuse de la lampe et se consument. Possibilités dʼutilisation La lyre TWIST-150 est particulièrement bien adaptée à une utilisation professionnelle sur scène et en discothèque. Grâce à son équipement complet avec une roue de gobos, une roue de couleur, des effets stroboscope et scintillement, elle peut projeter une multitude de modèles de lumière. La résolution 16 bits pour le mouvement de la tête permet, avec une vitesse variable, un positionnement très précis du faisceau lumineux. En cas de déréglage causé par des influences extérieures la tête revient automatiquement à sa position initiale. La gestion de lʼappareil peut se faire par le microphone intégré, via la télécommande LC-3 (disponible en option séparément) ou via un contrôleur DMX. F B I AVVERTIMENTO Staccare assolutamente la spina di rete prima di inserire o togliere la lampadina! Poiché la lampadina si riscalda moltissimo durante il funzionamento, fare raffreddare lʼapparecchio e la lampadina (minimo 15 minuti), prima di sostituire la lampadina. Non guardare mai direttamente nella lampadina accesa quando lʼapparecchio è aperto. Lʼalta luminosità e i raggi UV possono danneggiare gli occhi. 1) Svitare la vite sul retro della testa orientabile in modo da poter togliere il coperchio del vano lampada. La figura 3 a pagina 3 mostra il vano lampada aperto visto dallʼalto. 2) Inserire la lampada nel supporto (14). Il riflettore deve entrare a scatto esattamente fra le due teste delle viti (vedi le frecce in fig. 4, vista laterale). Altrimenti, i disegni di luci (gobo) non saranno illuminati in modo uniforme. 3) Fissare i terminali del cavo della lampadina alla morsettiera (15). 4) Richiudere il vano lampada con il suo coperchio. 4 Inserire la lampadina La lampadina indicata qui contiene piccole quantità di sostanze nocive allʼambiente (p. es. mercurio), e perciò in Europa deve essere trattata come rifiuto tossico. In altri paesi si devono rispettare le norme nazionali. Al massimo dopo 1,25 volte la durata media della lampadina occorre sostituirla perché con lʼuso aumenta notevolmente il rischio di scoppio in seguito alle modifiche strutturali del vetro di quarzo. Lʼunità viene consegnata senza lampadina. È richiesta una lampadina HID a scarica elettrica 95 V/150 W. In nessun caso si devono usare lampadine di un altro tipo! Dal programma “img Stage Line” si può usare la seguente lampadina: Articolo N. dʼordine Durata media HLT-150HID 05.9945 1000 h 13 F La lampe proposée contient en faible quantité des produits toxiques nocifs pour lʼenvironnement (mercure par exemple). En Europe, il est impératif de la déposer dans une poubelle adéquate. Dans dʼautres pays, vous devez vous reporter aux lois nationales en vigueur. Il convient de remplacer la lampe après au moins 1,25ème de sa durée moyenne de vie car une durée dʼutilisation croissante augmente de manière significative le risque dʼun éclatement de la lampe à la suite de modifications de structure du verre quartz. La lyre est équipée dʼun compteur dʼheures de fonctionnement. Il peut être utilisé pour déterminer la durée dʼéclairage de la lampe. Lorsque vous changez la lampe, notez lʼindication du compteur Voir chapitre 9.4 “Affichage des heures de fonctionnement”. B CH 5 Après un éclatement de la lampe pendant le fonctionnement, il est recommandé de quitter lʼenvironnement immédiat de la lampe, par précaution, pour éviter toute mise en danger de la santé générée par la dispersion à lʼair libre des vapeurs de mercure ; veillez à une aération correcte de la pièce. Montage IMPORTANT ! Placez toujours lʼappareil de telle sorte que pendant le fonctionnement, la circulation dʼair soit suffisante. Lʼappareil doit être placé à une distance minimale de 1 m des surfaces voisines. Les ouïes de ventilation sur le boîtier ne doivent en aucun cas être obturées. Veillez impérativement à laisser une distance suffisante avec des matériaux facilement inflammables ou sensibles à la chaleur. Lʼappareil peut être posé sur une surface fixe et plane. La lyre peut également être montée sur une traverse, la tête en bas, via les possibilités de fixa- Lʼapparecchio è equipaggiato con un contaore che può essere usato per determinare le ore di funzionamento della lampadina. Segnalare lʼindicazione del contatore quando si sostituisce la lampadina – Cap. 9.4 “Indicazione delle ore di funzionamento”. I 5 Se la lampadina scoppia durante lʼuso conviene abbandonare per precauzione le dirette vicinanze della lampadina per escludere completamente i rischi alla salute per i vapori di mercurio che si libereranno; provvedere ad una buona aerazione dellʼambiente. Montaggio IMPORTANTE Il punto di montaggio deve essere scelto in modo da garantire una circolazione dʼaria sufficiente durante il funzionamento. Lʼapparecchio deve essere ad una distanza minima di 1 m dalle superfici vicine. Le aperture di aerazione del contenitore non devono essere coperte in nessun caso. Considerare anche una distanza di sicurezza da materiali facilmente infiammabili o sensibili al calore. Lʼapparecchio può essere collocato su un piano solido. Ma grazie alle possibilità di fissaggio della piastra base, lʼapparecchio può essere montato anche a testa in giù, su una traversa. La piastra base è illustrata nella figura 6 a pagina 37. Per il fissaggio occorrono delle fascette robuste di montaggio. Avvitare le fascette direttamente nelle filettature M10 (21) oppure fissarle alla staffa di montaggio (23) in dotazione, i cui perni (24), come si vede nellʼillustrazione, sono da inserire nelle apposite aperture (20) della piastra dove vengono bloccati con una rotazione in senso orario (fino allʼarresto). Il punto di 14 tion de la plaque de base. La plaque de base est présentée sur le schéma 6 page 37. Pour la fixation, des clips stables de montage sont nécessaires. Vissez les clips directement dans les filetages M10 (21) ou fixez-les sur lʼétrier de montage livré (23) ; comme indiqué sur le schéma, les boulons (24) de lʼétrier sont placés dans les ouvertures (20) prévues sur la plaque de base et verrouillés dans le sens des aiguilles dʼune montre (tournez jusquʼà la butée). Le lieu de montage doit être suffisamment stable et pouvoir supporter une charge de 20 kg au moins par appareil. AVERTISSEMENT Lʼappareil doit être monté de manière sûre et professionnelle. Si lʼappareil doit être installé comme charge suspendue au-dessus de personnes, il doit être en plus solidement fixé (p. ex. par une corde de sécurité). Faites passer la corde de sécurité via les deux trous (22) au milieu de la base et fixez la corde de telle sorte que la distance de chute maximale de lʼappareil soit de 20 cm au plus. 6 Utilisation prêt à fonctionner et peut être utilisé via un contrôleur DMX ( chapitre 8) ou fait défiler son propre programme ( chapitre 7). Pour éteindre lʼappareil, débranchez le cordon secteur. Pour un meilleur confort dʼutilisation, il est recommandé de relier lʼappareil à une prise secteur pouvant être allumée et éteinte via un interrupteur. Conseil : Comme source de lumière, on utilise une lampe à décharge. Si lʼappareil est éteint ou si lʼalimentation est interrompue, même brièvement, la lampe ne se rallume pas tout de suite. Elle doit refroidir quelques instants pour pouvoir sʼallumer à nouveau. 6.1 Réglages de base Il est possible dʼeffectuer les réglages suivants via un menu (schéma 2). Appuyez sur la touche MENU (2) jusquʼà ce que la fonction voulue soit indiquée sur lʼaffichage (1). Appuyez ensuite sur la touche ENTER (4). Nʼattendez jamais plus de 8 secondes pour appuyer sur une autre touche sinon vous quittez le processus de réglage. Marche/Arrêt Mode Blackout Sélectionnez avec la touche DOWN ou UP (3) : le faisceau nʼest pas éteint. Ce réglage doit être sélectionné pour un fonctionnement sans contrôleur DMX. AVERTISSEMENT Ne regardez jamais directement la source de lumière pour éviter tout dommage sur les yeux. Gardez présent à lʼesprit quʼune fréquence élevée des éclairs peut causer des crises dʼépilepsie sur les personnes photosensibles ou épileptiques. Pour mémoriser, appuyez sur la touche ENTER. Reliez la fiche du cordon secteur livré à la prise (9) et lʼautre extrémité du cordon à une prise secteur 230 V~/50 Hz. La tête et tous les moteurs de commande se mettent dans une position initiale définie. Lʼaffichage (1) indique . Ensuite, lʼappareil est Sens de rotation normal ou inversé Si vous utilisez au moins deux TWIST-150, le bras de rotation peut, sur un appareil, tourner dans un sens et sur lʼautre appareil tourner exactement en sens inverse. montaggio deve avere una stabilità sufficiente e supportare un peso di 20 kg min. per apparecchio. 6.1 Impostazioni base AVVERTIMENTO Lʼapparecchio deve esser montato a regola dʼarte e in modo sicuro. Se viene installato sospeso, sopra delle persone, è richiesta una protezione supplementare (p. es. con una fune di sicurezza). Far passare la fune attraverso le due aperture (22) nel centro della piastra e fissarla in modo tale che la caduta dellʼapparecchio non possa superare i 20 cm. 6 Messa in funzione AVVERTIMENTO Non guardare direttamente nel raggio di luce per escludere possibili danni agli occhi. Tenete presente che unʼalta frequenza dei lampi può provocare attacchi dʼepilessia presso persone fotosensibili o epilettici. Inserire la spina del cavo rete nella presa (9) e quindi in una presa di rete (230 V~/50 Hz). La testa orientabile e tutti i motori di comando si mettono in una precisa posizione di partenza. Intanto, il display (1) segnala . A questo punto, lʼapparecchio è pronto e può essere comandato da un unità DMX di comando luce ( Cap. 8) oppure svolge autonomamente il suo programma Show ( Cap. 7). Per spegnerlo staccare la spina dalla presa di rete. Per maggiore comodità è consigliabile collegare lʼapparecchio con una presa comandata da un interruttore di luce. N.B.: Come fonte di luce viene usata una lampada a scarica elettrica. Se lʼapparecchio viene spento brevemente o se la corrente viene interrotta solo brevemente, la lampada non si riaccende subito. Deve prima raffreddarsi per potersi accendere di nuovo. le faisceau est éteint si aucun signal de commande DMX nʼest présent à la prise DMX INPUT (11) [contrôleur DMX éteint ou non relié]. Dès que les signaux DMX correspondants sont présents, le faisceau est libéré. Per mezzo di un menù (fig. 2) si possono eseguire le seguenti impostazioni base. Premere il tasto MENU (2) tante volte finché il display (1) indica la funzione desiderata. Quindi premere il tasto ENTER (4). Non far passare più di 8 secondi fra due pressioni dei tasti, perché altrimenti la procedura dʼimpostazione termina. Modo Blackout on o off Con il tasto DOWN o UP (3) scegliere: Il raggio di luce non viene mascherato. Questa impostazione deve essere scelta nel caso di funzionamento senza unità DMX di comando. Il raggio di luce viene mascherato se alla presa DMX INPUT (11) non è presente nessun segnale di comando DMX (unità di comando DMX spenta o non collegata). Non appena sono presenti dei segnali DMX, il raggio di luce viene liberato. Per memorizzare premere il tasto ENTER. Direzione di rotazione normale e opposta Impiegando per lo meno due TWIST-150, in un apparecchio il braccio può girare in un senso, mentre nellʼaltro apparecchio il braccio gira in senso opposto. Con il tasto DOWN o UP (3) scegliere: Direzione di rotazione normale Direzione di rotazione opposta (invers) Per memorizzare premere il tasto ENTER. Avec la touche DOWN ou UP (3), sélectionnez entre : sens de rotation normal sens de rotation inversé Pour mémoriser, appuyez sur la touche ENTER. Sens dʼinclinaison normal ou inversé Si vous utilisez au moins deux TWIST-150, la tête peut sur un appareil tourner dans un sens et sur lʼautre appareil tourner exactement en sens inverse. Avec la touche DOWN ou UP (3), sélectionnez entre : sens dʼinclinaison normal sens dʼinclinaison inversé Pour mémoriser, appuyez sur la touche ENTER. Affichage allumé ou éteint Avec la touche DOWN ou UP (3), sélectionnez entre : lʼaffichage (1) est toujours allumé lʼaffichage sʼéteint 60 secondes environ après la dernière pression sur une touche. Il se rallume à toute nouvelle pression sur une touche. Pour mémoriser, appuyez sur la touche ENTER. 8 secondes après la dernière pression sur une touche, le menu de réglage est automatiquement quitté. 7 Fonctionnement sans contrôleur DMX Si aucun signal de commande DMX nʼest présent à la prise DMX INPUT (11), la LED jaune de contrôle MASTER (5) brille, lʼaffichage (1) indique (Show 1) et lʼappareil fait défiler tout seul son programme. (Condition préalable : le mode Blackout est éteint, chapitre 6.1). le changement des modèles et des couleurs doivent se faire en fonction de la musique via le microphone interne ou pas. a) Appuyez sur la touche MENU (2) jusquʼà ce que sur lʼaffichage (Sound) soit visible. Nʼattendez pas plus de 8 secondes avant dʼappuyer sur une touche sinon vous quittez le processus de réglage. b) Appuyez sur la touche ENTER (4), lʼaffichage clignote. c) Avec la touche DOWN ou UP (3), allumez ( ) ou éteignez ( ) la gestion par la musique. d) Pour mémoriser, appuyez sur la touche ENTER. Lʼaffichage indique quelques secondes . Puis le numéro du programme réglé est affiché, le déroulement du programme débute. Pour une gestion par la musique, réglez le réglage SENSITIVITY (13) pour la sensibilité du microphone de telle sorte que la dynamique de la musique soit restituée de manière optimale par les mouvements du faisceau lumineux et par le changement des modèles et couleurs. La LED verte SOUND (5) brille en cas de modification de couleur, modèle, mouvement par un signal de musique. Remarque : Lorsque le volume est modifié sur lʼinstallation de musique, la sensibilité du microphone peut être adaptée en conséquence via le réglage rotatif. 3) Quatre programmes différents sont disponibles. Ils se différencient par les angles maxima de rotation et dʼinclinaison pour la tête : Show 1 prévu pour la présentation de lʼappareil sur le sol. Lʼangle dʼinclinaison (Tilt) est de 210° max. 1) En tournant lʼobjectif (7), réglez la netteté des modèles. Show 2 prévu pour un montage au plafond, lʼangle dʼinclinaison est de 90° max. 2) En allumant ou éteignant le mode Sound, vous pouvez définir si les mouvements du faisceau et Show 3 prévu pour le positionnement de lʼappareil sur une scène, dirigé vers le public. Lʼangle Direzione di orientamento normale e opposta Impiegando per lo meno due TWIST-150, in un apparecchio la testa orientabile può muoversi in un senso, mentre nellʼaltro apparecchio si muove in senso opposto. a) Premere il tasto MENU (2) tante volte finché sul display si vede (Sound). Non far passare più di 8 secondi prima di premere il tasto successivo, altrimenti la procedura delle impostazioni viene terminata. b) Premere il tasto ENTER (4). Il display lampeggia. c) Con il tasto DOWN o UP (3) attivare ( ) o disattivare ( ) il comando musica. d) Per memorizzare premere il tasto ENTER. Il display indica per alcuni secondi . Quindi viene visualizzato nuovamente il numero del programma Show impostato e il programma inizia a svolgersi. Con il tasto DOWN o UP (3) scegliere: Direzione di orientamento normale Direzione di orientamento opposta (invers) Per memorizzare premere il tasto ENTER. Display on o off Con il tasto DOWN o UP (3) scegliere: Il display (1) è sempre acceso. Il display si spegne dopo 60 sec. ca. dallʼultima pressione di un tasto. Con la successiva pressione di un tasto si riaccende. Per memorizzare premere il tasto ENTER. Dopo otto secondi dallʼultima pressione di un tasto, si esce automaticamente dal menù delle impostazioni. 7 Funzionamento senza unità di comando DMX Se alla presa DMX INPUT (11) non è presente nessun segnale di comando DMX, il LED giallo di controllo MASTER (5) si accende, il display (1) indica (Show 1) und lʼapparecchio svolge il suo programma Show autonomamente. (Il modo Blackout deve tuttavia essere disattivato, Cap. 6.1.) Per il comando tramite la musica impostare il regolatore SENSITIVITY (13) per la sensibilità del microfono in modo tale che la dinamica della musica venga riprodotta in maniera ottimale dai movimenti del raggio di luce nonché dal cambio dei disegni di luce e dei colori. In caso di cambio dei colori, disegni o movimenti per via di un segnale musicale, il LED verde SOUND (5) si accende brevemente. N.B.: Modificando il volume dellʼimpianto di musica occorre adattare anche la sensibilità del microfono tramite lʼapposito regolatore. 3) Sono disponibili quattro differenti programmi Show. Si distinguono per gli angoli massimi di rotazione e dʼinclinazione della testa orientabile: Show 1 è previsto per il collocamento dellʼapparecchio sul pavimento. Lʼangolo dʼinclinazione (tilt) è di 210° max. 1) Mettere a fuoco i disegni di luce girando lʼobiettivo (7). Show 2 è previsto per il montaggio al soffitto. Lʼangolo dʼinclinazione e di 90° max. 2) Attivando e disattivando il modo Sound si può decidere se il movimento del raggio di luce e il cambio dei disegni di luce e dei colori avvenga comandato o no dalla musica o tramite il microfono interno. Show 3 è previsto per il collocamento dellʼapparecchio su un podio in direzione del pubblico. Lʼangolo di rotazione (pan) è di 160°, lʼangolo dʼinclinazione è 90° (dalla posizione orizzontale 60° in alto e 30° in basso). de rotation (Pan) est de 160°, lʼangle dʼinclinaison de 90° (60° au-dessus du plan horizontal et 30° sous le plan horizontal). Show 4 à nouveau pour un montage au plafond : lʼangle de rotation est de 160° max. et lʼangle dʼinclinaison de 90° max. (75° vers lʼavant et 15° vers lʼarrière). a) Appuyez sur la touche MENU (2) pour sélectionner entre Show 1 à 4, jusquʼà ce que sur lʼaffichage (Show Mode) soit visible. Appuyez sur la touche suivante dans les 8 secondes, sinon vous quittez le processus de réglage. b) Appuyez sur la touche ENTER (4). Lʼaffichage clignote. c) Avec la touche DOWN ou UP (3), choisissez entre Show 1 à Show 4. d) Pour mémoriser, appuyez sur la touche ENTER ; lʼaffiche indique pendant quelques secondes puis le numéro de programme apparaît et le programme démarre. F B CH 7.1 Interconnexion de plusieurs TWIST-150 Il est possible dʼinterconnecter plusieurs appareils pour commander dʼautres appareils auxiliaires (Slave) sur le même rythme, via le micro de lʼappareil principal (Master). 1) Reliez le branchement DMX OUTPUT (12) de lʼappareil principal via un cordon XLR 3 pôles (par exemple série MEC-… ou MECN-… de la gamme “img Stage Line”) au branchement DMX INPUT (11) du premier appareil auxiliaire. 2) Reliez le branchement DMX OUTPUT du premier appareil auxiliaire au branchement DMX INPUT du deuxième appareil auxiliaire et ainsi de suite jusquʼà former une chaîne. 3) Dès que les signaux de commande de lʼappareil principal sont présents sur les appareils auxiliaires, leur LED rouge SLAVE (5) brille en continu. Show 4 è nuovamente previsto per il montaggio al soffitto. Lʼangolo di rotazione è di 160° max. e lʼangolo dʼinclinazione è di 90° max, (75° in avanti e 15° allʼindietro). a) Per scegliere fra Show 1 – 4 premere il tasto MENU (2) tante volte finché sul display si vede (Show Mode). Non far passare più di 8 secondi prima di premere il tasto successivo, altrimenti la procedura delle impostazioni viene terminata. b) Premere il tasto ENTER (4). Il display lampeggia. c) Con il tasto DOWN o UP (3) scegliere fra Show 1 – 4. d) Per memorizzare premere il tasto ENTER. Il display indica per alcuni secondi . Quindi viene visualizzato nuovamente il numero del programma Show e il programma inizia a svolgersi. I 7.1 Collegamento di più TWIST-150 Si possono collegare più apparecchi per comandare, per mezzo del microfono dellʼapparecchio principale (Master), tutte le unità secondarie (Slave) nello stesso ritmo. 1) Collegare lʼuscita DMX OUTPUT (12) dellʼunità principale con lʼingresso DMX INPUT (11) del primo apparecchio secondario servendosi di un cavo XLR a 3 poli (per esempio della serie MEC-… o MECN-… del programma “img Stage Line”). 2) Collegare lʼuscita DMX OUTPUT del primo apparecchio secondario con lʼingresso DMX INPUT del secondo apparecchio secondario finché tutti gli apparecchi sono collegati formando una catena. 3) Non appena agli apparecchi secondari sono presenti i segnali di comando dellʼunità principale, il loro LED rosso SLAVE (5) si accende. 15 F B CH 4) Les mouvements des appareils auxiliaires peuvent être synchronisés avec lʼappareil principal ou être exactement à lʼinverse (par exemple si un seul appareil auxiliaire est utilisé). a) Pour commuter entre mouvement synchrone et opposé, enfoncez la touche MENU (2) sur lʼappareil auxiliaire autant de fois que nécessaire jusquʼà ce que sur lʼaffichage (mode slave) soit visible. Appuyez sur la touche suivante dans les 8 secondes, sinon vous quittez le processus de réglage. b) Enfoncez la touche ENTER (4). Lʼaffichage clignote. c) Avec la touche DOWN ou UP (3), commutez entre (Slave 1) pour un mouvement synchrone et (Slave 2) pour un mouvement opposé. d) Pour mémoriser, enfoncez la touche ENTER. Lʼaffichage indique pendant quelques secondes . Ensuite, le numéro du programme sélectionné est à nouveau visible et le déroulement du programme commence. 7.2 Télécommande LC-3 Diverses fonctions peuvent être gérées via la télécommande LC-3 (schéma 5) disponible en option. 1) Reliez la télécommande à la prise REMOTE CONTROL ONLY (10). 2) Aucun signal DMX ne doit être présent à lʼentrée DMX INPUT (11) ; la LED jaune MASTER (5) doit briller. 3) Via la sortie DMX (12), dʼautres TWIST-150 peuvent être reliées ( chapitre 7.1) pour les gérer avec la télécommande de manière synchrone avec lʼappareil principal. 4) Avec la touche STAND BY (16), le mode Repos peut être activé ou éteint. Si la fonction est I 4) I movimenti degli apparecchi secondari possono essere in sincronia con lʼunità principale oppure possono essere il contrario (p. es. se si usa una sola unità secondaria). a) Per passare fra movimento sincronizzato e movimento opposto premere tante volte il tasto MENU (2) sullʼapparecchio secondario finché il display indica (Slave Mode). Non far passare più di 8 secondi prima di premere il tasto successivo, altrimenti la procedura delle impostazioni viene terminata. b) Premere il tasto ENTER (4). Il display lampeggia. c) Con il tasto DOWN o UP (3) cambiare fra (Slave 1) per un movimento sincronizzato e (Slave 2) per un movimento opposto. d) Per memorizzare premere il tasto ENTER. Il display indica per alcuni secondi . Quindi viene visualizzato nuovamente il numero del programma Show scelto e il programma inizia a svolgersi. 7.2 Telecomando LC-3 Con il telecomando opzionale LC-3 (fig. 5) si possono comandare diverse funzioni. 1) Collegare il telecomando con la presa REMOTE CONTROL ONLY (10). 2) Allʼingresso DMX INPUT (11) non deve essere presente nessun segnale DMX. Il LED giallo MASTER (5) deve essere acceso. 3) Allʼuscita DMX (12) si possono collegare altre TWIST-150 ( Cap. 7.1), per comandarli tramite il telecomando insieme allʼapparecchio principale. 4) Con il tasto STAND BY (16) si può attivare e disattivare il modo di riposo. Se il modo è attivato, il LED vicino al tasto è acceso. La testa orientabile si porta nella posizione di partenza e il diaframma viene chiuso. 16 activée, la LED à côté de la touche brille. La tête se met dans la position initiale et le diaphragme est fermé. 5) Avec la touche MODE (18), sélectionnez le mode de fonctionnement : 1. Mode stroboscope SOUND 1 (la LED à côté de la touche ne brille pas) Chaque fois la touche FUNCTION (17) est maintenue enfoncée, on peut activer un des trois effets stroboscopiques : – stroboscope dépendant de la musique, synchronisé avec les appareils auxiliaires – stroboscope indépendant de la musique : en alternance avec les appareils auxiliaires – stroboscope dépendant de la musique Une fois la touche FUNCTION relâchée, lʼeffet Show réglé est réactivé. 2. Mode Show (la LED clignote) Avec la touche FUNCTION (17), sélectionnez le programme voulu (Show 1 à 4) [ chapitre 7, point 3]. 3. Changement manuel des couleurs et modèles (la LED brille en continu) Par une brève pression sur la touche FUNCTION, sélectionnez la couleur du modèle et par une pression plus longue, sélectionnez le modèle. Si le faisceau ne doit pas bouger, dirigez le faisceau sur un point donné dans le mode suivant. 4. Orientation manuelle du faisceau (la LED clignote vite) En maintenant la touche FUNCTION enfoncée, la tête tourne. Si le faisceau éclaire dans la direction souhaitée, relâchez la touche ; si la touche est à nouveau maintenue enfoncée, orientez verticalement le faisceau. Pour pouvoir réutiliser ces deux fonctions, appuyez tout dʼabord brièvement deux fois sur la touche FUNCTION (sans autre fonction). 5) Con il tasto MODE (18) selezionare il modo di funzionamento: 1. Modo stroboscopico SOUND 1 (il LED vicino al tasto non è acceso) Con ogni nuova pressione del tasto FUNCTION (17) lʼapparecchio passa allʼeffetto stroboscopico successivo fra i tre disponibili: – stroboscopio indipendente dalla musica, in sincronia con gli apparecchi secondari – stroboscopio indipendente dalla musica, in alternanza con gli apparecchi secondari – stroboscopio dipendente dalla musica Lasciando il tasto FUNCTION si attiva di nuovo il programma Show. 2. Modo Show (il LED lampeggia) Con il tasto FUNCTION (17) si può scegliere il programma Show desiderato ( Capitolo 7, punto 3). 3. Scelta manuale di colori e disegni (il LED rimane acceso) Premendo brevemente il tasto FUNCTION, scegliere il colore del disegno e premendo il tasto più a lungo, scegliere il disegno stesso. Se il raggio di luce non deve muoversi, nel modo successivo orientare il raggio verso un punto preciso. 4. Orientamento manuale del raggio di luce (il LED lampeggia velocemente) Tenere premuto il tasto FUNCTION: la testa orientabile si gira. Quando il raggio è indirizzato nella direzione giusta, lasciare il tasto. Tenendo ancora premuto il tasto, si può orientare il raggio in senso verticale. Per poter eseguire unʼaltra volta le due funzioni, esercitare prima una duplice breve pressione sul tasto FUNCTION (senza ulteriore funzione). 8 Utilisation via un contrôleur Pour une utilisation via un contrôleur avec protocole DMX-512 (par exemple DMX-1440 ou DMX-120 de “img Stage Line”), la TWIST-150 est équipée de 11 canaux de commande. On peut également commuter dans le mode 8 canaux si toutes les fonctions ne sont pas nécessaires. Vous trouverez les fonctions des canaux et les valeurs DMX dans le chapitre 11.1. 8.1 Connexion Lʼappareil possède comme interface DMX des prises XLR 3 pôles (11 et 12) avec la configuration suivante : pin 1 = masse, 2 = DMX-, 3 = DMX+. Pour le branchement, il est recommandé dʼutiliser des câbles spécifiques pour des flots importants de données. Des câbles micro blindés usuels de section 2 × 0,22 mm2 au moins et une capacité la plus faible possible ne sont recommandés que pour une longueur totale de câble jusquʼà 100 m. Pour des longueurs de liaison à partir de 150 m, il est recommandé dʼinsérer un amplificateur DMX de signal (par exemple SR-103DMX de “img Stage Line”). 1) Reliez lʼentre DMX (11) à la sortie DMX du contrôleur. 2) Reliez la sortie DMX (12) à lʼentrée DMX du jeu de lumière suivant. Reliez sa sortie à lʼentrée du prochain appareil et ainsi de suite jusquʼà ce que tous les jeux de lumière soient reliés dans une chaîne. 3) Terminez la sortie DMX du dernier appareil DMX de la chaîne avec une résistance 120 Ω (> 0,3 W) : soudez aux pins 2 et 3 dʼune fiche XLR la résistance et branchez la fiche dans la sortie DMX ou utilisez un bouchon correspondant (par exemple DLT-123 de “img Stage Line”). 8 Funzionamento tramite unità di comando luce Per il funzionamento tramite unʼunità di comando luce con protocollo DMX-512 (p. es. DMX-1440 o DMX-510USB di “img Stage Line”), lʼapparecchio è equipaggiato con 11 canali di comando. Se non sono richieste tutte le funzioni, è possibile attivare il modo a 8 canali. Le funzioni dei canali e i relativi valori DMX si trovano nel Capitolo 11.1. 8.1 Collegamento Come interfaccia DMX, lʼapparecchio dispone di ingressi XLR a 3 poli (11 e 12) con i seguenti contatti: Pin 1 = Massa, 2 = DMX-, 3 = DMX+. Per il collegamento si dovrebbero usare cavi per un alto flusso di dati. Lʼimpiego di normali cavi per microfoni con sezione di 2 × 0,22 mm2 min. e con capacità possibilmente bassa è consigliabile solo per una lunghezza complessiva dei cavi fino a 100 m. Nel caso di lunghezze oltre i 150 m è consigliabile lʼinserimento di un amplificatore DMX (p. es. SR-103DMX di “img Stage Line”). 1) Collegare lʼingresso DMX (11) con lʼuscita DMX dellʼunità di comando luce. 2) Collegare lʼuscita DMX (12) con lʼingresso DMX della successiva unità per effetti luce, lʼuscita di questʼultima con lʼingresso dellʼunità successiva e via dicendo finché tutte le unità sono collegate formando una catena. 3) Terminare con una resistenza di 120 Ω (> 0,3 W) lʼuscita DMX dellʼultima unità per effetti luce della catena: saldare la resistenza ai pin 2 e 3 di un connettore XLR e inserire il connettore nellʼuscita DMX oppure usare un terminatore adatto (p. es. DLT-123 di “img Stage Line”). 8.2 Réglage de lʼadresse de démarrage et nombre des canaux DMX Pour pouvoir utiliser le jeu de lumière avec un contrôleur, il faut régler lʼadresse de démarrage DMX pour le premier canal DMX. Si p. ex. lʼadresse 17 est prévue sur le contrôleur pour gérer la rotation de la tête, réglez lʼadresse de démarrage 17 sur la TWIST-150. Les autres fonctions de lʼappareil sont automatiquement attribuées aux 10 canaux suivants (dans cet exemple 18 à 27). Lʼadresse de démarrage suivante possible pour le prochain appareil contrôlé par DMX pourrait être dans cet exemple lʼadresse 28. (En mode 8 canaux, seuls 8 canaux DMX sont configurés, cʼest-à-dire que la prochaine adresse de démarrage possible pour lʼappareil suivant à gestion DMX est lʼadresse 25.) 1) Réglez lʼadresse de démarrage DMX : a) Appuyez une fois sur la touche MENU (2) pour que (1) soit visible sur lʼaffichage. Appuyez sur la touche suivante dans les 8 secondes, sinon vous quittez le processus de réglage. b) Appuyez sur la touche ENTER (4), lʼadresse réglée est affichée. c) Avec la touche DOWN ou UP (3), réglez lʼadresse et mémorisez avec la touche ENTER. 2) Réglez le nombre de canaux DMX devant être utilisés pour gérer lʼappareil : a) Appuyez sur la touche MENU jusquʼà ce que (Channel Mode) sʼaffiche. b) Appuyez sur la touche ENTER, le nombre de canaux DMX sʼaffiche. c) Avec la touche DOWN ou UP, réglez le nombre de canaux DMX ( ou ) et mémorisez avec la touche ENTER. 3) Pour quitter le menu, maintenez la touche MENU enfoncée jusquʼà ce que sur lʼaffichage, lʼadresse de démarrage ou le numéro du programme sélectionné soit visible ou attendez 8 secondes environ. 8.2 Impostare lʼindirizzo di start e il numero dei canali DMX Per poter comandare lʼunità per effetti di luce con unʼunita di comando, occorre impostare lʼindirizzo di start DMX per il primo canale DMX. Se p. es. sullʼunità di comando lʼindirizzo 17 è previsto per comandare la rotazione della testa orientabile, si deve impostare sulla TWIST-150 lʼindirizzo di start 17. Le altre funzioni dellʼapparecchio sono quindi assegnate automaticamente ai 10 canali successivi (in questo esempio 18 – 27). Come prossimo indirizzo di start possibile per lʼapparecchio DMX successivo si potrebbe quindi prendere nel nostro esempio lʼindirizzo 28. (Nel modo a 8 canali sono occupati solo 8 canali DMX, pertanto il prossimo indirizzo di start possibile per lʼapparecchio DMX successivo è lʼindirizzo 25.) 1) Impostare lʼindirizzo DMX di start: a) Premere una volta il tasto MENU (2), in modo che sul display (1) si veda . Non far passare più di 8 secondi prima di premere il tasto successivo, altrimenti la procedura delle impostazioni viene terminata. b) Premere il tasto ENTER (4). Lʼindirizzo impostato viene indicato. c) Con il tasto DOWN o UP (3) impostare lʼindirizzo e memorizzare con il tasto ENTER. 2) Impostare il numero dei canali DMX da utilizzare per comandare lʼapparecchio. a) Premere il tasto MENU finché sul display si vede (Channel Mode). b) Premere il tasto ENTER. Viene indicato il numero dei canali DMX. c) Con il tasto DOWN o UP impostare il numero dei canali DMX ( o ) e memorizzare con il tasto ENTER. 3) Per uscire dal menù tenere premuto il tasto MENU finché il display ritorna allʼindirizzo di start oppure al numero del programma Show scelto oppure aspettare 8 secondi ca. 4) Dès que les signaux de commande du contrôleur DMX sont reçus, la LED rouge DMX (5) brille et lʼaffichage indique lʼadresse de démarrage. La TWIST-150 peut maintenant être utilisée avec le contrôleur DMX. Pour libérer le faisceau en ouvrant le diaphragme, réglez le canal DMX 3 (en mode 8 canaux) ou le canal DMX 9 (en mode 11 canaux) sur une valeur DMX entre 8 et 15 ou sur 255 ( chapitre 11.1). 5) Tournez lʼobjectif (7) pour régler la netteté des modèles. 9 Autres fonctions 9.1 Réglage des valeurs de correction (Mode Offset) Pour un réglage précis de la position de la tête et des roues de couleur et de gobos, on peut régler des valeurs de correction. Si plusieurs TWIST-150 doivent être gérées de manière synchrone via ces mêmes adresses DMX, on peut limiter par exemple les déviations de la direction du faisceau lumineux. 1) Appuyez sur la touche MENU (2). Lʼaffichage (1) indique (Address). Appuyez sur la touche suivante dans les 8 secondes, sinon vous quittez le processus de réglage. 2) Maintenez la touche ENTER (4) enfoncée 5 secondes environ jusquʼà ce que lʼaffichage passe sur . La tête va sur une position verticale (0°), le faisceau est éteint. 3) Appuyez une nouvelle fois sur la touche ENTER, le diaphragme libère le faisceau, sur lʼaffichage clignote. 4) Si pour un autre réglage, une direction verticale du faisceau est plus adaptée, appuyez (plusieurs fois) sur la touche ENTER. 5) Appuyez sur la touche MENU, sélectionnez, avec la touche DOWN ou UP (3), la fonction dont vous avez besoin : 4) Non appena si ricevono i segnali di comando dellʼunità di comando DMX, il LED rosso DMX (5) si accende e il display indica lʼindirizzo di start. La TWIST-150 può ora essere comandata dallʼunità di comando DMX. Per liberare il raggio di luce, aprendo il diaframma, impostare per il canale DMX 3 (nel modo a 8 canali) o nel canale DMX 9 (nel modo a 11 canali) un valore DMX fra 8 e 15 oppure 255 ( Capitolo 11.1). 5) Girando lʼobiettivo (7) mettere a fuoco i disegni. 6) 7) 8) 9) correction précise pour la rotation de la tête correction précise pour lʼinclinaison de la tête correction de lʼangle de rotation pour la roue de gobos correction de lʼangle de rotation pour la roue de couleurs Activez la fonction avec la touche ENTER. Avec la touche DOWN ou UP, faites la correction. Pour mémoriser, appuyez sur la touche ENTER. Avec la touche DOWN ou UP, on peut commuter sur une autre fonction de correction. 8 secondes environ après la dernière pression sur une touche, le menu de réglage est automatiquement quitté. F B CH 9.2 Auto-test Trois programmes sont disponibles pour que lʼappareil fasse son test. Appuyez sur la touche MENU (2) jusquʼà ce que le programme de test voulu soit visible sur lʼaffichage (1) : Test rapide Appuyez sur la touche ENTER (4) pour démarrer. clignote sur lʼaffichage pendant le test. A la fin du test, (Finish = fin) sʼaffiche brièvement, puis lʼappareil revient au mode de fonctionnement précédent. ou test en continu avec défilement de toutes les couleurs et de tous les gobos On peut sélectionner 12 séquences différentes de mouvement pour les deux programmes de test, on peut également modifier la vitesse. 1) Pour démarrer, appuyez sur la touche ENTER. Pendant le test, ou clignote sur lʼaffichage. 2) Pour modifier la séquence ou la vitesse de mouvement, appuyez une nouvelle fois sur la touche ENTER, lʼaffichage indique (Move). Correzione fine della rotazione della testa orientabile I Correzione fine dellʼinclinazione della testa orientabile Correzione dellʼangolo di rotazione per la ruota gobo Correzione dellʼangolo di rotazione per la ruota colori 6) Attivare la funzione con il tasto ENTER. 7) Con il tasto DOWN o UP eseguire la correzione. 9 Altre funzioni 9.1 Impostare valori correttivi (Modo Offset) Per la regolazione fine della posizione della testa orientabile nonché della ruota dei colori e della ruoto gobo, si possono impostare dei valori correttivi. Se più TWIST-150 devono essere comandati in sincronia per mezzo di indirizzi DMX identici, è possibile, per esempio, minimizzare le divergenze nellʼorientamento del raggio di luce. 1) Premere il tasto MENU (2). Il display (1) indica (Address). Non far passare più di 8 secondi prima di premere il tasto successivo, altrimenti la procedura delle impostazioni viene terminata. 2) Tener premuto per 5 secondi ca. il tasto ENTER (4), finché il display passa a . La testa orientabile si mette in posizione verticale (verticale 0°) e il raggio di luce viene mascherato. 3) Premere nuovamente il tasto ENTER. Il diaframma libera il raggio di luce e sul display lampeggia . 4) Se per lʼulteriore impostazione è più adatta una direzione orizzontale del raggio, premere (più volte) il tasto ENTER. 5) Premere il tasto MENU e con il tasto DOWN o UP (3) scegliere la funzione richiesta: 8) Per memorizzare premere il tasto ENTER. Quindi, con il tasto DOWN o UP si può passare ad unʼaltra funzione correttiva. 9) Dopo 8 secondi circa dallʼultima pressione di un tasto, si esce automaticamente dal menù delle impostazioni. 9.2 Autotest Per lʼautotest dellʼapparecchio sono disponibili tre programmi. Premere il tasto MENU (2) tante volte finché il display (1) indica il programma di test desiderato: Test breve Per iniziarlo premere il tasto ENTER (4). Durante lo svolgimento del test, nel display lampeggia . Al termine del test viene segnalato brevemente (finish = fine), quindi lʼapparecchio ritorna nel modo precedente di funzionamento. o Test senza fine con lo svolgimento di tutti i colori e di tutti i gobo Per entrambi i programmi di test si possono scegliere 12 differenti svolgimenti dei movimenti e si può modificare la velocità di movimento. 1) Per iniziare premere il tasto ENTER. Durante lo svolgimento del test, nel display lampeggia rispettivamente e . 17 F B CH 3) Si seule la vitesse doit être modifiée, poursuivez avec le point 4). Pour modifier la séquence de mouvements, activez une nouvelle fois la touche ENTER. Lʼaffichage indique le numéro de la séquence en cours ( … ). Avec la touche DOWN ou UP (3), modifiez le numéro et démarrez la séquence de mouvements avec la touche ENTER. 5) Après une nouvelle pression sur la touche ENTER, on peut commuter sur une autre fonction de commande avec la touche DOWN ou UP. 4) Avec la touche DOWN ou UP, commutez de sur (Move Speed) et appuyez sur la touche ENTER. Lʼaffichage indique la vitesse à cet instant-là entre 0 (très lent) et 255 (rapide). Avec la touche DOWN ou UP, modifiez la valeur et activez la vitesse sélectionnée avec la touche ENTER. Pour afficher lʼétat du compteur dʼheures de fonctionnement : 9.4 Affichage des heures de fonctionnement 1) Appuyez sur la touche MENU (2) jusquʼà ce que (fixture hours) soit visible sur lʼaffichage (1). 2) Appuyez sur la touche ENTER (4), les heures de fonctionnement sʼaffichent. 5) Pour terminer le test, appuyez sur la touche MENU. 8 secondes après, lʼappareil revient au mode de fonctionnement précédent. 3) 8 secondes après, lʼappareil revient sur le mode de fonctionnement précédent. 9.3 Mode Master 9.5 Affichage de la version du système dʼexploitation En mode Master, on peut vérifier par exemple les fonctions de commande les plus importantes de la TWIST-150 sans contrôleur DMX. 1) Appuyez sur la touche MENU (2) jusquʼà ce que sur lʼaffichage, (Master Mode) soit visible. Remarque : si aucune touche nʼest activée pendant 8 secondes, lʼappareil revient au mode de fonctionnement précédent. 2) Avec la touche DOWN ou UP (3) sélectionnez la fonction de commande : Pour afficher le numéro de version du système dʼexploitation du jeu de lumière : 1) Appuyez sur la touche MENU (2) jusquʼà ce que (version) soit visible sur lʼaffichage (1). 2) Appuyez sur la touche ENTER (4), le numéro sʼaffiche. 3) 8 secondes après, lʼappareil revient sur le mode de fonctionnement précédent. 9.6 Réinitialisation inclinaison de la tête En cas de dysfonctionnements des fonctions, une réinitialisation de lʼappareil peut apporter des solutions : gobo couleur Il est recommandé de nettoyer régulièrement les lentilles et les filtres de couleurs, des impuretés causées par la poussière, la fumée ou toute autre particule. Cʼest à cette seule condition que la lumière peut rayonner avec une luminosité maximale. Avant lʼouverture de lʼappareil, débranchez-le du secteur et laissez-le refroidir pendant 15 minutes. Pour le nettoyage, utilisez un chiffon doux et propre et des produits usuels de nettoyage de verre; ensuite, essuyez avec précaution les éléments. 11 Caractéristiques techniques Alimentation : . . . . . . . . 230 V~/50 Hz Consommation : . . . . . . 200 VA Lampe : . . . . . . . . . . . . lampe à décharge HID, 90 V/150 W Angle rayonnement : . . 14° Angle rotation axe horizontal (Pan) : 540° axe vertical (Tilt) : . . . 270° Température fonc. : . . . 0 – 40 °C Poids : . . . . . . . . . . . . . 9,9 kg 1) Appuyez sur la touche MENU (2) jusquʼà ce que (reset) soit visible sur lʼaffichage (1). 3) Pour activer la fonction, appuyez sur la touche ENTER (4). 2) Appuyez sur la touche ENTER (4). La tête et tous les moteurs vont sur une position de départ défi- 4) Avec la touche DOWN ou UP, réglez la valeur DMX ( chapitre 11.1). Lʼappareil réagit immédiatement. Notice dʼutilisation protégée par le copyright de MONACOR ® INTERNATIONAL GmbH & Co. KG. Toute reproduction même partielle à des fins commerciales est interdite. 2) Per modificare lo svolgimento o la velocità dei movimenti, premere nuovamente il tasto ENTER. Il display indica (Move). 4) Con il tasto DOWN o UP impostare il valore DMX ( Cap. 11.1). Lʼapparecchio reagisce immediatamente. 3) Se si deve modificare solo la velocità, proseguire con il punto 4). Per modificare lo svolgimento dei movimenti premere nuovamente il tasto ENTER. Il display indica il numero dello svolgimento attuale dei movimenti ( … ). Con il tasto DOWN o UP (3) modificare il numero e con il tasto ENTER iniziare lo svolgimento scelto per il movimenti. 5) Dopo una nuova pressione del tasto ENTER, con il tasto DOWN o UP si può passare ad unʼaltra funzione di comando. 4) Con il tasto DOWN o UP passare da a (Move Speed) e premere il tasto ENTER. Il display indica la velocità attuale fra 0 (molto lenta) e 255 (veloce). Con il tasto DOWN o UP modificare il valore e con il tasto attivare la velocità scelta. Per visualizzare lo stato del contaore: 5) Per terminare lʼautotest premere il tasto MENU. Dopo 8 secondi, lʼapparecchio ritorna al modo precedente funzionamento. 3) Dopo 8 secondi, lʼapparecchio ritorna al modo precedente di funzionamento. 6) Per terminare il modo Master, non azionare, per 8 secondi, nessun tasto. 9.4 Indicazione delle ore di funzionamento 1) Premere il tasto MENU (2) tante volte, finché sul display (1) si vede (Fixture hours). 2) Premere il tasto ENTER (4). Vengono indicate le ore di funzionamento. 9.5 Indicazione della versione del firmware 9.3 Modo Master Nel modo Master è possibile, per esempio, verificare senza unità di comando DMX le più importanti funzioni di comando della TWIST-150. 1) Premere il tasto MENU (2) tante volte finché il display indica (Master Mode). Da notare: Se entro 8 secondi non si aziona nessun tasto, lʼapparecchio ritorna al modo precedente di funzionamento! 2) Con il tasto DOWN o UP (3) scegliere la funzione di comando: Rotazione della testa orientabile Inclinazione della testa orientabile Comando del diaframma Gobo Colore 3) Per attivare la funzione premere il tasto ENTER (4). 18 10 Nettoyage de lʼoptique Dimensions : . . . . . . . . 280 × 340 × 270 mm rotation de la tête gestion du diaphragme I 6) Pour quitter le mode Master, nʼactivez pas de touche pendant 8 secondes. nie. Lʼaffichage indique . Puis il revient au mode de fonctionnement précédent. Tout droit de modification réservé. 2) Premere il tasto ENTER (4). La testa orientabile e tutti i motori di comando ritornano in una posizione di partenza predefinita. Nel frattempo, il display visualizza . Quindi, lʼapparecchio ritorna al modo precedente di funzionamento. 10 Pulizia del sistema ottico Si dovrebbe procedere, ad intervalli regolari, alla pulizia delle lenti e dei filtri cromatici per asportare polvere, fumo e altre particelle. Solo così, la luce può essere irradiata con la luminosità massima. Prima di aprire lʼapparecchio staccare la spina dalla presa di rete e fare raffreddare lʼapparecchio per 15 minuti circa. Per la pulizia usare un panno morbido, pulito e un detergente per vetri come si trovano in commercio. Quindi asciugare le parti delicatamente. 11 Dati tecnici Per visualizzare il numero della versione del firmware (sistema operativo dellʼunità di effetti luci): Alimentazione: . . . . . . . 230 V~/50 Hz 1) Premere il tasto MENU (2) tante volte finché sul display (1) si vede (Version). Lampadina: . . . . . . . . . Lampada HID a scarica elettrica 95 V/150 W 2) Premere il tasto ENTER (4). Viene visualizzato il numero della versione. Angolo dʼirradiazione: . . 14° 3) Dopo 8 secondi, lʼapparecchio ritorna al modo precedente di funzionamento. Potenza assorbita: . . . . 200 VA Angolo di rotazione orizzontale (Pan): . . . 540° verticale (Tilt): . . . . . . 270° Temp. dʼesercizio: . . . . 0 – 40 °C 9.6 Reset Dimensioni: . . . . . . . . . 280 × 340 × 270 mm Nel caso di disturbi nel funzionamento, un possibile rimedio può essere il reset dellʼapparecchio: Peso: . . . . . . . . . . . . . . 9,9 kg 1) Premere il tasto MENU (2) tante volte finché sul display (1) si vede (Reset). Con riserva di modifiche tecniche. La MONACOR ® INTERNATIONAL GmbH & Co. KG si riserva ogni diritto di elaborazione in qualsiasi forma delle presenti istruzioni per lʼuso. La riproduzione – anche parziale – per propri scopi commerciali è vietata. 11.1 Présentation des canaux DMX F Canal DMX Canal DMX mode 8 canaux* mode 11 canaux Fonction Valeur DMX 1 1 rotation de la tête (pan) 0 – 540°, grossier 000 – 255 — 2 rotation de la tête, précis 000 – 255 2 3 inclinaison de la tête (tilt) 0 – 270°, grossier 000 – 255 — 4 inclinaison de la tête, précis 000 – 255 — 5 vitesse pan/tilt, rapide lent 000 – 255 6 macros (séquences de mouvements programmées) aucune macro macro 1 macro 2 macro 3 macro 4 macro 5 macro 6 macro 7 macro 8 macro 9 macro 10 macro 11 macro 12 000 – 015 016 – 035 036 – 055 056 – 075 076 – 095 096 – 115 116 – 135 136 – 155 156 – 175 176 – 195 196 – 215 216 –235 236 – 255 7 vitesse des macros, rapide lent 000 – 255 8 sans fonction réinitialisation sans fonction fonctionnement autonome (programme Show) 000 – 199 200 – 209 210 – 239 240 – 255 9 diaphragme fermé (blackout) diaphragme ouvert stroboscope, lent rapide stroboscope arrête, diaphragme ouvert effet scintillement, lent rapide diaphragme ouvert 000 – 007 008 – 015 016 – 131 132 – 139 140 – 247 248 – 255 — — 8 3 mode 8 canaux* 4 B Fonction mode 11 canaux Gobo aucun gobo gobo 1 gobo 2 gobo 3 gobo 4 gobo 5 gobo 6 gobo 7 gobo 8 gobo 9 gobo 10 gobo 11 gobo 12 gobo 13 gobo 14 changement continu de gobos lent rapide rapide lent (sens inverse) 10 5 11 2 3 4 5 6 7 8 9 10 11 12 128 – 191 192 – 255 000 – 007 008 – 014 015 – 022 023 – 029 030 – 037 038 – 044 045 – 052 053 – 059 060 – 067 068 – 074 075 – 082 083 – 089 090 – 097 098 – 104 105 – 112 113 – 119 120 – 127 128 – 191 192 – 255 13 14 11.1 Panoramica dei canali DMX I Canale DMX Canale DMX Modo a 8 canali* Modo a 11 canali Funzione Valore DMX 1 1 Rotazione della testa (Pan) 0 – 540°, grossolana 000 – 255 — 2 Rotazione della testa orientabile, fine 000 – 255 2 3 Inclinazione della testa (Tilt) 0 – 270°, grossolana 000 – 255 — 4 Inclinazione della testa orientabile, fine 000 – 255 — 5 Velocità Pan/Tilt, veloce lenta 000 – 255 6 Macro (svolgimenti programmati dei movimenti) Nessuna macro Macro 1 Macro 2 Macro 3 Macro 4 Macro 5 Macro 6 Macro 7 Macro 8 Macro 9 Macro 10 Macro 11 Macro 12 000 – 015 016 – 035 036 – 055 056 – 075 076 – 095 096 – 115 116 – 135 136 – 155 156 – 175 176 – 195 196 – 215 216 –235 236 – 255 — — 7 Velocità delle macro, veloce lenta 000 – 255 8 8 Senza funzione Reset Senza funzione Funzionamento autonomo (programma Show) 000 – 199 200 – 209 210 – 239 240 – 255 9 Diaframma chiuso (Blackout) Diaframma aperto Stroboscopio, lento veloce Stroboscopio spento, diaframma aperto Effetto oscillazione, lento veloce Diaframma aperto 000 – 007 008 – 015 016 – 131 132 – 139 140 – 247 248 – 255 3 CH 000 – 008 009 – 016 017 – 025 026 – 033 034 – 042 043 – 050 051 – 059 060 – 067 068 – 076 077 – 084 085 – 093 094 – 101 102 – 110 111 – 118 119 – 127 Couleur blanc vert vert + magenta magenta bleu clair jaune rouge bleu + rouge bleu violet UV vert vert + orange orange jaune + orange jaune jaune + rose rose changement continu des couleurs rapide lent lent rapide (sens inverse) * En mode 8 canaux, les canaux DMX 6 et 7 sont sans fonction. 1 Valeur DMX * Nel modo a 8 canali, i canali DMX 6 e 7 sono senza funzione. Modo a 8 canali* 4 5 Modo a 11 canali 10 11 Funzione Gobo Nessun gobo Gobo 1 Gobo 2 Gobo 3 Gobo 4 Gobo 5 Gobo 6 Gobo 7 Gobo 8 Gobo 9 Gobo 10 Gobo 11 Gobo 12 Gobo 13 Gobo 14 Cambio continuo dei gobo lento veloce veloce lento (direzione opposta) Colore Bianco Verde Verde + Magenta Magenta Azzurro Giallo Rosso Blu + rosso Blu Viola UV Verde Verde + arancione Arancione Giallo + arancione Giallo Giallo + rosa Rosa Cambio continuo dei colori veloce lento lento veloce (direzione opposta) Valore DMX 000 – 008 009 – 016 017 – 025 026 – 033 034 – 042 043 – 050 051 – 059 060 – 067 068 – 076 077 – 084 085 – 093 094 – 101 102 – 110 111 – 118 119 – 127 128 – 191 192 – 255 000 – 007 008 – 014 015 – 022 023 – 029 030 – 037 038 – 044 045 – 052 053 – 059 060 – 067 068 – 074 075 – 082 083 – 089 090 – 097 098 – 104 105 – 112 113 – 119 120 – 127 128 – 191 192 – 255 19 NL B Vouw bladzijde 3 helemaal open, zodat u steeds een overzicht hebt van de bedieningselementen en de aansluitingen. Inhoudsopgave 1 Overzicht van de bedieningselementen en aansluitingen . . . . . . . . . . . . . . . . . . . . 20 1.1 TWIST-150 . . . . . . . . . . . . . . . . . . . . . . . . . 20 1.2 Afstandsbediening LC-3 . . . . . . . . . . . . . . . 20 2 Veiligheidsvoorschriften . . . . . . . . . . . . . 21 3 Toepassingen . . . . . . . . . . . . . . . . . . . . . . 21 4 De lampen aanbrengen . . . . . . . . . . . . . . 21 5 Montage . . . . . . . . . . . . . . . . . . . . . . . . . . . 22 6 Ingebruikneming . . . . . . . . . . . . . . . . . . . . 22 1 Overzicht van de bedieningselementen en aansluitingen 1.1 TWIST-150 1 Display 2 Toets MENU om het instelmenu op te roepen en de menu-items te selecteren 4 Toets ENTER voor het activeren van een menuitem en voor het opslaan van een instelling 14 Houder voor de lamp in de zwenkkop (6), bovenaanzicht in het geopende lampencompartiment 5 Controle-LEDʼs voor de bedrijfsmodus: 15 Aansluitklem voor de lamp DMX Bediening via een lichtregelaar . . . . . . . . 24 SLAVE slavemodus (hoofdstuk 7.1): besturing via een tweede TWIST-150 SOUND licht kort op, als het apparaat door een geluid dat via de ingebouwde microfoon is geregistreerd, de kleur, het lichtpatroon of de beweging wijzigt 8.1 Aansluiting . . . . . . . . . . . . . . . . . . . . . . . . . 24 8.2 Startadres en aantal DMX-kanalen instellen 25 Overige functies . . . . . . . . . . . . . . . . . . . . 25 9.1 Correctiewaarden instellen (offsetmodus) . 25 6 Zwenkkop 9.2 Zelftest . . . . . . . . . . . . . . . . . . . . . . . . . . . . 25 7 Lens, kan worden gedraaid om de beeldscherpte te regelen 9.3 Mastermodus . . . . . . . . . . . . . . . . . . . . . . . 26 9.4 De bedrijfsuren weergeven . . . . . . . . . . . . . 26 8 Draaiarm 9.5 De firmwareversie weergeven . . . . . . . . . . 26 9 POWER-jack voor aansluiting op een stopcontact (230 V~/50 Hz) met behulp van het bijgeleverde netsnoer 9.6 Reset . . . . . . . . . . . . . . . . . . . . . . . . . . . . . 26 10 De optica reinigen . . . . . . . . . . . . . . . . . . 26 11 Technische gegevens . . . . . . . . . . . . . . . 26 Daaronder bevindt zich de houder voor de netzekering. Vervang een gesmolten zekering uitsluitend door een zekering van hetzelfde type. 11.1 Overzicht van de DMX-kanalen . . . . . . . . . 27 E licht op, als er op de ingang DMX INPUT (11) DMX-besturingssignalen beschikbaar zijn MASTER mastermodus: Bediening zonder DMX-besturingsapparaat of met de afstandsbediening LC-3 Bediening zonder DMX-besturingsapparaat . . . . . . . . . . . . . 23 7.2 Afstandsbediening LC-3 . . . . . . . . . . . . . . . 24 9 Abra la página 3. En ella podrá ver los elementos de funcionamiento y las conexiones que se describen. 1 Elementos de Funcionamiento y Conexiones 1.1 TWIST-150 Contenidos 1 1.1 1.2 2 3 4 5 6 6.1 7 7.1 7.2 8 8.1 8.2 9 9.1 9.2 9.3 9.4 9.5 9.6 10 11 11.1 20 Elementos de Funcionamiento y Conexiones . . . . . . . . . . . . . . . . . . . . . . 20 TWIST-150 . . . . . . . . . . . . . . . . . . . . . . . . . 20 Control remoto LC-3 . . . . . . . . . . . . . . . . . . 20 Notas de Seguridad . . . . . . . . . . . . . . . . . 21 Aplicaciones . . . . . . . . . . . . . . . . . . . . . . . 21 Insertar la Lámpara . . . . . . . . . . . . . . . . . 21 Montaje . . . . . . . . . . . . . . . . . . . . . . . . . . . 22 Puesta en Marcha . . . . . . . . . . . . . . . . . . . 22 Ajustes básicos . . . . . . . . . . . . . . . . . . . . . . 22 Funcionamiento sin controlador DMX . . 23 Interconexión de varios aparatos TWIST-150 . . . . . . . . . . . . . . . . . 23 Control Remoto LC-3 . . . . . . . . . . . . . . . . . 24 Funcionamiento mediante un controlador . . . . . . . . . . . . . . . . . . . . . 24 Conexión . . . . . . . . . . . . . . . . . . . . . . . . . . 24 Ajuste de la dirección de inicio y del número de canales DMX . . . . . . . . . . . 25 Otras Funciones . . . . . . . . . . . . . . . . . . . . 25 Ajuste de los valores de corrección (modo de compensación) . . . . . . . . . . . . . . 25 Autotest . . . . . . . . . . . . . . . . . . . . . . . . . . . 25 Modo Master . . . . . . . . . . . . . . . . . . . . . . . . 26 Visualización de las horas de funcionamiento . . . . . . . . . . . . . . . . . . . 26 Visualización de la versión de firmware . . . 26 Reinicio . . . . . . . . . . . . . . . . . . . . . . . . . . . . 26 Limpieza del Sistema Óptico . . . . . . . . . . 26 Especificaciones . . . . . . . . . . . . . . . . . . . 26 Vista general de los canales DMX . . . . . . . 27 12 DMX-signaaluitgang (3-polig XLR) voor de aansluiting op de DMX-ingang van een ander lichteffectapparaat; pen 1 = massa, 2 = DMX-, 3 = DMX+ 13 Regelaar SENSITIVITY voor de aanspreekgevoeligheid bij de muzieksturing via de ingebouwde microfoon 7.1 Meerdere TWIST-150-apparaten aaneenschakelen . . . . . . . . . . . . . . . . . . . . 23 8 11 DMX-signaalingang (3-pol. XLR); pen 1 = massa, 2 = DMX-, 3 = DMX+ 3 Toetsen DOWN en UP om een instelling in het menu te wijzigen 6.1 Basisinstellingen . . . . . . . . . . . . . . . . . . . . . 22 7 10 Aansluitjack voor de afstandsbediening LC-3 (figuur 5) 1 Visualización 2 Botón MENU para abrir el menú de ajustes y seleccionar los objetos del menú 3 Botones DOWN y UP para cambiar un ajuste en el menú 4 Botón ENTER para activar un objeto del menú y para memorizar un ajuste 5 LEDs indicadores para el modo de funcionamiento: DMX Se ilumina cuando las señales de control DMX están presentes en la entrada DMX INPUT (11) MASTER Modo Master: Funcionamiento sin controlador DMX o con el control remoto LC-3 SLAVE Modo Slave (apartado 7.1): control mediante otra TWIST-150 SOUND Se ilumina brevemente cuando el aparato cambia el color, el dibujo, o el movimiento por sonido recogido por el micrófono interno 6 Cabeza giratoria 7 Lente, puede girarse para su enfoque 8 Brazo rotatorio 9 Toma de corriente para la conexión a un enchufe (230 V~/50 Hz) mediante el cable de corriente entregado El soporte del fusible está colocado debajo de la toma de corriente. Reemplace un fusible fundido sólo por otro del mismo tipo. 1.2 Afstandsbediening LC-3 De afstandsbediening LC-3 is als toebehoren verkrijgbaar en is niet in de levering van de TWIST-150 inbegrepen. 16 Toets STAND BY voor de rustmodus: De zwenkkop gaat naar de uitgangspositie en de lichtbundel wordt gedimd. De LED naast de toets licht op ter controle. 17 Toets FUNCTION voor verschillende functies afhankelijk van de bedrijfsmodus die met de toets MODE werd geselecteerd (hoofdstuk 7.2) 18 Toets MODUS voor het wisselen tussen: – Stroboscoopmodus; De LED naast de toets MODE licht niet op – Showmodus; De LED knippert traag – Handmatige kleur- en lichtpatroonselectie; De LED licht op permanent – Manueel richten van de lichtbundel; De LED knippert snel Opmerking: Voor de besturing via de afstandsbediening mag er geen DMX-signaal naar de ingang DMX INPUT (11) worden gestuurd. 10 Conexión para el control remoto LC-3 (fig. 5) 11 Entrada de señal DMX (3 polos XLR); pin 1 = masa, 2 = DMX-, 3 = DMX+ 12 Salida de señal DMX (3 polos XLR) para conectar a la entrada DMX de otro efecto de luces; pin 1 = masa, 2 = DMX-, 3 = DMX+ 13 Control SENSITIVITY para la sensibilidad de respuesta en caso de control por música mediante el micrófono interno 14 Soporte para la lámpara en la cabeza giratoria (6), compartimento de la lámpara abierto, visto desde arriba 15 Terminal para la lámpara 1.2 Control remoto LC-3 El control remoto LC-3 está disponible como accesorio y no se entrega con la TWIST-150. 16 Botón STAND BY para el modo suspendido: La cabeza giratoria vuelve a su posición inicial y se apaga el haz de luz. Se ilumina el LED junto al botón como prueba. 17 Botón FUNCTION para varias funciones dependiendo del modo de funcionamiento seleccionado con el botón MODE (apartado 7.2) 18 Botón MODE para cambiar entre: – Modo estroboscopio; El LED junto al botón MODE no se ilumina – Modo Show; El LED parpadea lentamente – Selección manual de color y dibujo; El LED se ilumina sin interrupciones – Posicionamiento manual del haz de luz; El LED parpadea rápidamente Nota: Para el control mediante mando a distancia no puede haber ninguna señal DMX en la entrada DMX INPUT (11). 2 Veiligheidsvoorschriften Het apparaat is in overeenstemming met alle vereiste EU-Richtlijnen en is daarom gekenmerkt met . WAARSCHUWING De netspanning (230 V~) van het apparaat is levensgevaarlijk. Open het apparaat niet voor ingrepen die niet in de handleiding zijn beschreven, en zorg dat u niets in de ventilatieopeningen steekt! U loopt het risico van een elektrische schok. In geval van ongeoorloofd of verkeerd gebruik, onveilige montage, foutieve bediening of van herstelling door een niet-gekwalificeerd persoon vervalt de garantie en de aansprakelijkheid voor hieruit resulterende materiële of lichamelijke schade. Wanneer het apparaat definitief uit bedrijf wordt genomen, bezorg het dan voor milieuvriendelijke verwerking aan een plaatselijk recyclagebedrijf. Let eveneens op het volgende: 3 Het apparaat is enkel geschikt voor gebruik binnenshuis; vermijd druip- en spatwater, plaatsen met een hoge vochtigheid en uitzonderlijk warme plaatsen (toegestaan omgevingstemperatuurbereik: 0 – 40 °C). Plaats geen bekers met vloeistof zoals drinkglazen etc. op het apparaat. Schakel het apparaat niet in resp. trek onmiddellijk de stekker uit het stopcontact, 1. wanneer het apparaat, b.v. aan de behuizing, de lens, het UV-filter of het netsnoer zichtbaar is beschadigd, 2. wanneer er een defect zou kunnen optreden nadat het apparaat bijvoorbeeld is gevallen, 3. wanneer het apparaat slecht functioneert. Het apparaat moet in elk geval worden hersteld door een gekwalificeerd vakman. De zwenkkop TWIST-150 is in het bijzonder geschikt voor professioneel gebruik op het podium en in discotheken. Door zijn uitrusting met gobowiel, kleurwiel evenals stroboscoop- en waggeleffecten kan het apparaat talrijke lichtpatronen vol afwisseling projecteren. De 16-bit-resolutie voor de kopbeweging laat met een variabele snelheid een zeer nauwkeurige positionering van de lichtbundel toe. De automatische herpositionering zorgt ervoor dat de kop bij het verdraaien door invloeden van buitenaf automatisch naar de uitgangspositie terugkeert. De besturing van het apparaat kan via de ingebouwde microfoon, via de afstandsbediening LC-3 (afzonderlijk als toebehoren verkrijgbaar) of via een DMX-lichtregelaar gebeuren. Toepassingen 4 De lampen aanbrengen /vervangen Trek de stekker nooit met het snoer uit het stopcontact, maar steeds met de stekker zelf. Het lichteffectapparaat wordt zonder lampen geleverd. Er is een HID-ontladingslamp 95 V/150 W nodig. Neem het apparaat tijdens het transport alleen aan het onderste gedeelte vast. Draag het apparaat in geen geval aan de zwenkkop (6) of draaiarm (8). Er mogen in geen geval lampen van een ander type worden gebruikt! Verwijder het stof van de behuizing met een droge, zachte doek. Gebruik zeker geen water of chemicaliën. Voor de lens kunt u ook een in de handel verkrijgbaar detergent voor glas gebruiken. Artikel bestelnr. gemiddelde levensduur HLT-150HID 05.9945 1000 h cos. Para limpiar la lente puede utilizar también un limpiacristales convencional. ADVERTENCIA El aparato está alimentado con un voltaje peligroso (230 V). Deje el mantenimiento en manos del personal cualificado. No haga nunca ninguna modificación en el aparato que no se describa en este manual de instrucciones y no introduzca nada por las rejillas de ventilación, podría sufrir una descarga. Preste atención a los siguientes puntos en cualquier caso: El aparato está adecuado para su utilización sólo en interiores. Protéjalo de goteos y salpicaduras, elevada humedad del aire y calor (temperatura ambiente admisible: 0 – 40 °C). No coloque ningún recipiente lleno de líquido encima del aparato, como por ejemplo un vaso. No utilice el aparato y desconecte inmediatamente el cable de la toma de corriente: 1. Si existe algún daño visible en el aparato, ya sea en la carcasa, en la lente, en el filtro UV o en el cable de corriente. 2. Si aparece algún defecto por caída o accidente similar. 3. Si no funciona correctamente. Sólo el personal cualificado puede reparar el aparato. No tire nunca del cable de corriente para desconectarlo de la toma, tire siempre del enchufe. B WAARSCHUWING Alvorens de lamp aan te brengen resp. te verwijderen, dient u in elk geval de stekker uit het stopcontact te trekken! Omdat de lamp tijdens het gebruik zeer heet wordt, moeten de behuizing en de lamp na gebruik van het apparaat eerst afkoelen (afkoeltijd min. 15 minuten), alvorens de lamp te vervangen. Kijk bij een geopend apparaat nooit rechtstreeks in de brandende ontladingslamp. De grote helderheid en de UV-straling kunnen beschadiging van de ogen veroorzaken. 1) Verwijder de schroef aan de achterzijde van de zwenkkop verwijderen, zodat u het deksel van het lampencompartiment kunt wegnemen. Figuur 3 op pagina 3 toont een bovenaanzicht van het geopende lampencompartiment. 2) Plaats de lamp gecentreerd in de houder (14). Daarbij moet de reflector precies tussen de beide schroefkoppen vast klikken (zie pijlen in figuur 4, zijaanzicht). Anders worden de lichtpatronen (goboʼs) niet gelijkmatig verlicht. 4) Sluit het lampencompartiment opnieuw met het deksel. De hier beschreven lamp bevat geringe hoeveelheden stoffen die schadelijk zijn voor het leefmilieu (b.v. kwikzilver) en moet daarom in Europa als speciaal afval worden verwijderd. In de andere landen dient men zich te houden aan de desbetreffende nationale voorschriften. De lamp moet uiterlijk na de 1,25-voudige gemiddelde levensduur worden vervangen, aangezien Uit het gamma “img Stage Line” kan volgende lamp worden gebruikt: Notas de Seguridad El aparato corresponde con todas las directivas requeridas por la UE y por lo tanto está marcado con el símbolo . NL 3) Schroef de kabeleinden van de lamp op de aansluitklem (15) vast. 2 Raak de glazen ballon van de nieuwe lamp niet met de vingers aan! Huidvet en -zweet verminderen de lichtsterkte en branden zich in. No podrá reclamarse garantía o responsabilidad alguna por cualquier daño personal o material si se utiliza el aparato para fines diferentes a los originalmente concebidos, si no se monta con seguridad, no se utiliza correctamente o no se repara por expertos. Si va a poner el aparato fuera de servicio definitivamente, llévelo a la planta de reciclaje más cercana para que su eliminación no sea perjudicial para el medioambiente. 3 Producto Ref. nº Vida media HLT-150HID 05.9945 1000 h No toque nunca el tubo de crista de la lámpara con sus dedos ya que las huellas digitales pueden reducir la luminosidad. ADVERTENCIA Desconecte siempre la toma de corriente antes de insertar o extraer la lámpara. Puesto que la lámpara alcanza temperaturas muy elevadas durante el funcionamiento, deje que la carcasa y la lámpara se enfríen después de su funcionamiento (deje enfriar durante 15 minutos como mínimo) antes de reemplazar la lámpara. No mire nunca directamente hacia la luz de la lámpara de descarga cuando el aparato está abierto, su gran brillo y la radiación UV pueden provocar daños oculares. Aplicaciones La Cabeza Móvil TWIST-150 está adecuada especialmente para aplicaciones profesionales en escenarios y discotecas. Debido a sus características con rueda de gobos, rueda de colores, efectos estroboscópicos y efectos balanceo, es capaza de proyectar una gran variedad de dibujos. La resolución de 16 bits para el movimiento de la cabeza permite un posicionamiento más preciso del haz de luz a una velocidad variable. Debido a su capacidad de reposicionamiento automático, la cabeza recupera su posición inicial incluso cuando se ha movido por causas externas. El aparato puede controlarse mediante el micrófono integrado, mediante el control remoto LC-3 (disponible por separado como accesorio), o mediante controlador DMX. 1) Desenrosque el tornillo de la parte posterior de la cabeza giratoria de modo que pueda extraer la tapa del compartimento de la lámpara. La figura 3 de la página 3 muestra el compartimento de la lámpara abierto desde arriba. 4 3) Apriete fuertemente los extremos de cable de la lámpara al terminal de conexión (15). Insertar la Lámpara Durante el transporte del aparato, coja el aparato sólo por la parte inferior. No lo coja por la cabeza giratoria (6) o por el brazo rotatorio (8). Este juego se luces se entrega sin lámpara. Se necesita una lámpara de descarga de 95 V/150 W. Para limpiar la carcasa utilice solo un paño suave y seco, no utilice nunca agua ni productos quími- De la gama de productos de “img Stage Line” puede utilizar la siguiente lámpara: No utilice nunca una lámpara de otro tipo. E 2) Coloque la lámpara en el centro del soporte (14). El reflector tiene que acoplarse de un modo preciso entre las cabezas de los dos tornillos (ver las flechas de la figura 4, vista lateral), de lo contrario, los dibujos luminosos (gobos) no se iluminarían correctamente. 4) Cierre el compartimento de la lámpara con la tapa. La lámpara antes nombrada contiene pequeñas cantidades de substancias nocivas (p. ej. mercurio) que pueden afectar al medioambiente y que por lo tanto tienen que eliminarse como residuo 21 bij langer gebruik het risico op barsten sterk toeneemt ten gevolge van structurele veranderingen in het kwartsglas. Het apparaat is uitgerust met een bedrijfsurenteller. U kunt hem gebruiken om de brandtijd van de lamp te bepalen. Noteer de meterstand bij het vervangen van de lamp, hoofdstuk 9.4 “De bedrijfsuren weergeven”. NL B 5 Wanneer de lamp barst op het ogenblik dat het toestel is ingeschakeld, ontruimt men best uit voorzorg de onmiddellijke omgeving van de lamp om gevaar voor de gezondheid door vrijkomende kwikzilverdampen volledig uit te sluiten. Zorg voor een goede ventilatie in de kamer. Montage BELANGRIJK Plaats het apparaat steeds zo, dat bij het gebruik voldoende ventilatie is gegarandeerd. De afstand tot de belendende oppervlakken moet minstens 1 m bedragen. De ventilatieopeningen in de behuizing mogen in geen geval zijn afgedekt. Zorg in elk geval ook voor een voldoende grote afstand tot licht ontvlambare of hittegevoelige materialen. Het apparaat kan op een stevige, vlakke ondergrond worden opgesteld. U kunt het met de bevestigingsmogelijkheden van de grondplaat maar ook voorover gekanteld aan een brug monteren. De bodemplaat wordt weergegeven in de figuur 6 op pagina 37. Voor de bevestiging hebt u stabiele montageklemmen nodig. Schroef de klemmen direct in de gaten met M10-schroefdraad (21) of bevestig ze aan de bijgeleverde montagebeugel (23). Steek de bouten (24) van de beugel (zie figuur) in de voorziene openingen (20) in de bodemplaat en vergrendel ze door ze volledig naar rechts te draaien (tot tegen de especial en Europa. Preste atención a las correspondientes regulaciones para otros países. E Reemplace la lámpara antes de sobrepasar 1,25 veces su vida media, aumentar sus horas de uso incrementa considerablemente el riesgo de explosión debido a la transformación estructural del cristal de cuarzo. El aparato está provisto con un contador de horas de funcionamiento que puede utilizarse para determinar las horas de iluminación de la lámpara. Anote las horas del contador cuando reemplace la lámpara ver apartado 9.4 “Visualizar las horas de funcionamiento”. En caso de explosión de la lámpara durante su funcionamiento, todo el mundo debería abandonar los alrededores como precaución para evitar completamente el riesgo de inhalación de los vapores de mercurio liberados; asegure una buena ventilación en la sala. aanslag). De montageplaats moet voldoende stabiel zijn en een last van minstens 20 kg per apparaat kunnen dragen. WAARSCHUWING Het apparaat moet deskundig en veilig worden gemonteerd. Als het op een plek wordt geïnstalleerd, waar personen onder kunnen komen staan, moet het extra worden beveiligd (b.v. door een hijskabel). Haal de hijskabel door beide openingen (22) in het midden van de bodemplaat en bevestig hem zo dat de valweg van het apparaat niet groter kan zijn dan 20 cm). 6 Verbind het meegeleverde netsnoer eerst met de jack (9) en plug de stekker vervolgens in een stopcontact (230 V~/ 50 Hz). Zwenkkop en alle besturingsmotoren bewegen naar een vastgelegde uitgangspositie. Tegelijk verschijnt de melding op het display (1). Daarna is het apparaat gebruiksklaar, en kunt u het via een DMX-lichtregelaar bedienen ( hoofdstuk 8) of wordt er een automatisch showprogramma afgespeeld ( hoofdstuk 7). Trek de stekker uit het stopcontact om het apparaat uit te schakelen. Voor een makkelijker bediening is het aangeraden het apparaat in een stopcontact te pluggen dat u via een lichtschakelaar kan in- en uitschakelen. Montaje IMPORTANTE Coloque siempre el aparato de modo que exista suficiente circulación de aire durante el funcionamiento. Tiene que haber como mínimo 1 metro de distancia entre el aparato y las superficies adyacentes. No cubra nunca las rejillas de ventilación de la carcasa. Asegúrese de que mantenga una distancia suficiente con materiales inflamables o sensibles al calor. Tiene que colocarse el aparato en una superficie plana y sólida. Mediante la estructura de fijación de la base, puede montarse el aparato del revés en una barra transversal. La base del aparato se muestra en figura 6, en la página 37. Se necesitan pinzas de montaje estables para la sujeción. Enrósquelas 22 6.1 Basisinstellingen Via een menu (figuur 2) kunt u volgende basisinstellingen doorvoeren. Druk op de toets MENU (2) tot de gewenste functie op het display (1) verschijnt. Druk dan op de toets ENTER (4). Wacht niet langer dan acht seconden om de volgende toets in te drukken, anders wordt de instelprocedure automatisch beëindigd. Blackoutmodus aan of uit Selecteer met de toets DOWN of UP (3): De lichtbundel wordt niet gedimd. Selecteer deze instelling bij bediening zonder DMXbesturingsapparaat. De lichtbundel wordt gedimd, als er geen DMX-besturingssignaal op de jack DMX INPUT (11) aanwezig is (DMX-besturingsapparaat uitgeschakeld of niet aangesloten). Zodra er DMX-signalen aanwezig zijn, wordt de lichtbundel vrijgegeven. Om op te slaan, drukt u op de toets ENTER. Draairichting normaal of tegengesteld Bij gebruik met ten minste twee TWIST-150apparaten kan bij één apparaat de draaiarm in een richting ronddraaien, terwijl bij het tweede apparaat de draaiarm precies in tegengestelde richting draait. Selecteer met de toets DOWN of UP (3): Draairichting normaal Draairichting tegengesteld (invers) Om op te slaan, drukt u op de toets ENTER. directamente en los orificios M10 (21) o sujételas con el soporte de montaje entregado (23). Coloque los tornillos (24) del soporte en las aperturas (20) de la base y enrósquelos en el sentido de las agujas del reloj (hasta el stop) para apretarlas, como se muestra en la figura. El lugar del montaje debe tener suficiente estabilidad y ser capaz de soportar una carga mínima de 20 kg por aparato. pueda conectarse y desconectarse mediante un interruptor. ADVERTENCIA El aparato tiene que montarse de un modo experto y seguro. Si se instala como carga suspendida por encima de personas, tiene que asegurarse adicionalmente, por ejemplo con una cuerda. Pase la cuerda a través de las dos aperturas (22) en el centro de la base y sujétela de modo que la distancia máxima de caída del aparato no exceda los 20 cm. 6.1 Ajustes básicos Nota: La fuente de luz es una lámpara de descarga. Si apaga o desconecta el aparato durante un breve periodo de tiempo, la lámpara no se encenderá de nuevo inmediatamente. Para encenderse de nuevo, tiene que enfriarse durante algún rato. Puede hacer los siguientes ajustes básicos con el menú de la figura 2. Pulse el botón MENU (2) las veces que sea necesario hasta que se muestre en el visualizador (1) la función que desee. A continuación pulse el botón ENTER (4), no espere más de 8 segundos antes de pulsar el siguiente botón o se parará el procedimiento de ajuste. Modo Blackout ON/OFF Escoja con los botones DOWN o UP (3): 6 5 Ingebruikneming WAARSCHUWING Kijk niet rechtstreeks in de lichtbron, omdat dit de ogen kan beschadigen. Weet dat stroboscoopeffecten en zeer snelle lichtwisselingen bij fotosensibele mensen en epileptici epileptische aanvallen kunnen veroorzaken! Opmerking: Een ontladingslamp dient als lichtbron. Indien het apparaat slechts even wordt uitgeschakeld of van de voedingsspanning losgekoppeld, licht de lamp niet onmiddellijk weer op. Ze moet eerst even afkoelen, om opnieuw te kunnen doen branden. Puesta en Marcha ADVERTENCIA Nunca mire directamente al haz de luz, puede provocarle daños oculares. Tenga en cuenta que los cambios rápidos de iluminación pueden provocar ataques epilépticos en personas fotosensibles o epilépticas. Conecte el cable de corriente entregado a la toma de corriente (9) y luego a un enchufe (230 V~/50 Hz). La cabeza giratoria y todos los motores de control se colocarán en una posición de inicio definida. Mientras, el visualizador (1) indica . Ahora el aparato ya está listo para el funcionamiento y puede utilizarse mediante un controlador DMX ( apartado 8) o independientemente visualiza su programa de muestra sucesivamente ( apartado 7). Para que se apague, desconecte la toma de corriente del enchufe. Para un funcionamiento más adecuado se recomienda que conecte el aparato a un enchufe que El haz de luz no se apaga. Este ajuste tiene que elegirse cuando se utiliza sin controlador DMX. El haz de luz se apaga cuando no hay ninguna señal de control DMX presente en la entrada DMX INPUT (11) [Controlador DMX apagado o no conectado]. En cuanto aparecen las correspondientes señales DMX, se libera el haz de luz. Pulse el botón ENTER para la memorización. Dirección de rotación normal u opuesta Para funcionar con 2 TWIST-150 por lo menos, el brazo de rotación de un aparato puede rotar en una dirección mientras el brazo giratorio del segundo aparato lo hace en la dirección opuesta exacta. Escoja con los botones DOWN o UP (3): Dirección de rotación normal. Dirección de rotación opuesta (inversa). Pulse el botón ENTER para la memorización. Zwenkrichting normaal of tegengesteld Bij gebruik met ten minste twee TWIST-150apparaten kan de zwenkkop van het ene apparaat in een richting bewegen en deze van het andere apparaat precies in tegengestelde richting. Selecteer met de toets DOWN of UP (3): Zwenkrichting normaal Zwenkrichting tegengesteld (invers) Om op te slaan, drukt u op de toets ENTER. Display aan of uit Selecteer met de toets DOWN of UP (3): Het display (1) is steeds ingeschakeld. Het display schakelt uit 60 sec. nadat er een toets een laatste keer werd ingedrukt. Als er dan een toets wordt ingedrukt, schakelt het display opnieuw in. Om op te slaan, drukt u op de toets ENTER. Acht seconden nadat er een laatste keer op een toets is gedrukt, wordt het instelmenu automatisch verlaten. 7 Bediening zonder DMX-besturingsapparaat Als er geen DMX-besturingssignaal op de jack DMX INPUT (11) beschikbaar is, licht de gele controleLED MASTER (5) op, verschijnt de melding (Show 1) op het display en speelt het apparaat automatisch een eigen showprogramma af. (Voorwaarde hiervoor is dat de blackoutmodus is uitgeschakeld, hoofdstuk 6.1.) a) Druk enkele keren op de toets MENU (2) tot op het display de melding (Sound) verschijnt. Wacht niet langer dan acht seconden om de volgende toets in te drukken, anders wordt de instelprocedure automatisch beëindigd. b) Druk op de toets ENTER (4). Het display knippert. c) Schakel met de toets DOWN of UP (3) de muzieksturing in ( ) of uit ( ). d) Om op te slaan, drukt u op de toets ENTER. Op het display verschijnt de melding gedurende enkele seconden. Daarna wordt opnieuw het nummer van het ingestelde showprogramma weergegeven; het programma wordt afgespeeld. Show 4 is opnieuw voor de montage tegen het plafond voorzien. De draaiingshoek bedraagt max. 160° en de hellingshoek max. 90° (75° naar voor en 15° naar achter). Voor de muzieksturing stelt u de regelaar SENSITIVITY (13) voor de microfoongevoeligheid zo in dat de dynamiek van de muziek optimaal wordt weergegeven door de bewegingen van de lichtbundel en door het wisselen van de lichtpatronen en de kleuren. Bij wijziging van kleur, patroon of beweging door een muzieksignaal licht de groene LED SOUND (5) even op. d) Om op te slaan, drukt u op de toets ENTER. Op het display verschijnt de melding gedurende enkele seconden. Daarna verschijnt opnieuw het showprogrammanummer; het programma wordt afgespeeld. Opmerking: Bij verandering van het volume van de muziekinstallatie dient ook de microfoongevoeligheid via de regelknop overeenkomstig aangepast te worden. 3) Er staan vier verschillende showprogrammaʼs ter beschikking. Ze onderscheiden zich door de maximale draai- en hellingshoek voor de zwenkkop: Show 1 is bedoeld voor opstelling van het apparaat op de vloer. De hellingshoek (Tilt) bedraagt hierbij max. 210°. 1) Stel de lichtpatronen scherp door het objectief (7) te draaien. Show 2 is bedoeld voor montage aan het plafond. De hellingshoek bedraagt hierbij max. 90°. 2) Door het in- of uitschakelen van de geluidsmodus kan worden bepaald of de bewegingen van de lichtbundel evenals het wisselen van de lichtpatronen en de kleuren muziekgestuurd via de ingebouwde microfoon moeten gebeuren of niet. Show 3 is bedoeld voor opstelling van het apparaat op een podium in de richting van het publiek. De draaiingshoek (Pan) bedraagt daarbij 160°, de hellingshoek 90° (vanuit de horizontaal 60° omhoog en 30° omlaag). Dirección de giro normal u opuesta Para funcionar con 2 TWIST-150 por lo menos, la cabeza giratoria de un aparato puede girar en un dirección mientras que la cabeza del segundo aparato se mueve en la dirección opuesta exacta. a) Pulse el botón MENU (2) las veces que sea necesario hasta que aparezca (Sound = sonido) en el visualizador. No tarde más de 8 segundos en pulsar el siguiente botón o se parará el procedimiento de ajuste. b) Pulse el botón ENTER (4), el visualizador parpadea. c) Conecte ( ) o desconecte ( ) el control por música con los botones DOWN o UP (3). d) Pulse el botón ENTER para la memorización. En el visualizador se muestra durante algunos segundos. A continuación reaparece el número del programa de muestra seleccionado y se inicia la secuencia de programa. Escoja con los botones DOWN o UP (3): Dirección de giro normal. Dirección de giro opuesta (inversa). Pulse el botón ENTER para la memorización. Visualización ON/OFF Escoja con los botones DOWN o UP (3): El visualizador (1) está siempre conectado. El visualizador se apaga aproximadamente 60 segundos después de pulsar el último botón. Se enciende de nuevo cuando se pulsa el siguiente botón. Pulse el botón ENTER para la memorización. Ocho segundos después de pulsar el último botón, el menú de ajuste se sale automáticamente. 7 Funcionamiento sin controlador DMX So no hay ninguna señal de control DMX en la entrada DMX INPUT (11), se ilumina el LED amarillo indicador LED MASTER (5), el visualizador (1) indica (show 1 = muestra 1) y el aparato ejecuta independientemente su programa de muestra (siempre que el modo Blackout esté apagado, apartado 6.1). 1) Coloque los dibujos luminosos en el enfoque girando la lente (7). 2) Conectando o desconectando el modo Sound, puede definirse si los movimientos del haz de luz y los cambios de dibujos y colores se controlan por música mediante el micrófono interno o no. Para el control por música, ajuste el control SENSITIVITY (13) para la sensibilidad del micrófono de modo que la potencia dinámica de la música se reproduzca de modo óptimo con los movimientos del haz de luz y el cambio de color y dibujo. El LED SOUND (5) de color verde se ilumina brevemente cuando cambia el color, el dibujo o el movimiento mediante la música. Nota: Cuando se cambia el volumen del sistema de música, tiene que adaptarse la sensibilidad del micrófono mediante el control giratorio. 3) Están disponibles cuatro programas de muestra diferentes que se diferencian en el ángulo máximo de movimiento horizontal y vertical de la cabeza giratoria: Show 1 Para una colocación del aparato en el suelo. Inclinación vertical (Tilt) máxima: 210º. Show 2 Para un montaje en techo. Inclinación vertical máxima: 90º. Show 3 Para una colocación en escenario dirigida hacia el público. Inclinación horizontal (Pan): 160º, inclinación vertical: 90º (60º por encima del plano horizontal y 30º por debajo). Show 4 También para un montaje en techo. Inclinación horizontal máxima: 160º, inclinación verti- NL B a) Om te kiezen tussen Show 1 tot 4 drukt u enkele keren op de toets MENU (2) tot op het display de melding (Show Mode) verschijnt. Wacht niet langer dan acht seconden om de volgende toets in te drukken, anders wordt de instelprocedure automatisch beëindigd. b) Druk op de toets ENTER (4). Het display knippert. c) Kies met de toets DOWN of UP (3) tussen Show 1 – 4. 7.1 Meerdere TWIST-150-apparaten aaneenschakelen U kunt meerdere apparaten aaneenschakelen om zo via de microfoon van het centrale apparaat (master) alle overige randapparaten (slave) synchroon te besturen. 1) Verbind de aansluiting DMX OUTPUT (12) van het centrale apparaat via een 3-polige XLR-kabel (b.v. serie MEC-... of MECN-... uit het gamma van “img Stage Line”) met de aansluiting DMX INPUT (11) van het eerste randapparaat. 2) Verbind de aansluiting DMX OUTPUT van het eerste randapparaat met de aansluiting DMX INPUT van het tweede randapparaat etc. tot alle toestellen in een ketting gesloten zijn. 3) Zodra de randapparaten de besturingssignalen van het centrale apparaat ontvangen, lichten de respectieve rode LEDʼs SLAVE (5) op. cal máxima: 90º (75º hacia delante y 15º hacia atrás). E a) Para cambiar entre los programas 1 a 4, pulse el botón MENU (2) hasta que el visualizador muestre (Modo Show). No espere más de 8 segundos antes de pulsar el siguiente botón o se parará el procedimiento de ajuste. b) Pulse el botón ENTER (4). Parpadeará el visualizador. c) Selección de Show 1 a Show 4 con los botones DOWN o UP (3). d) Pulse ENTER para la memorización. En el visualizador se mostrará durante algunos segundos. A continuación reaparecerá el número del programa de muestra y se iniciará la secuencia de programa. 7.1 Interconexión de varios aparatos TWIST-150 Pueden interconectarse varios aparatos para controlar todas las unidades Slave al mismo ritmo mediante el micrófono de la unidad Master. 1) Conecte la salida DMX OUTPUT (12) de la unidad Master mediante un cable XLR de 3 polos (p. ej. las gamas MEC-... o MECN-... de los productos de “img Stage Line”) a la entrada DMX INPUT (11) de la primera unidad Slave. 2) Conecte la salida DMX OUTPUT de la primera unidad Slave a la entrada DMX INPUT de la segunda unidad Slave, etc., hasta que todos los aparatos estén conectados en cadena. 3) En cuanto las señales de control de la unidad Master están presentes en las unidades Slave, su LED rojo SLAVE (5) se ilumina. 4) Los movimientos de las unidades Slave pueden sincronizarse con la unidad Master o ser exactamente opuestas (p. ej. si sólo se utiliza una unidad Slave). 23 NL B 4) De bewegingen van de randapparaten kunnen synchroon lopen met het centrale apparaat of net omgekeerd (b.v. bij gebruik van slechts één randapparaat). a) Om te wisselen tussen gelijklopende en tegengestelde beweging drukt u enkele keren op de toets MENU (2) op het randapparaat tot op het display de melding (slave mode) verschijnt. Wacht niet langer dan acht seconden om de volgende toets in te drukken, anders wordt de instelprocedure automatisch beëindigd. b) Druk op de toets ENTER (4). Het display knippert. c) Kies met de toets DOWN of UP (3) tussen (Slave 1) voor gelijklopende en (Slave 2) voor tegengestelde beweging. d) Om op te slaan, drukt u op de toets ENTER. Op het display verschijnt de melding gedurende enkele seconden. Daarna verschijnt opnieuw het nummer van het geselecteerde showprogramma; het programma wordt afgespeeld. 7.2 Afstandsbediening LC-3 Via de als toebehoren verkrijgbare afstandsbediening LC-3 (figuur 5) kunnen verschillende functies worden gestuurd. 1) Sluit de afstandsbediening aan op de jack REMOTE CONTROL ONLY (10). 2) Op de ingang DMX INPUT (11) mag geen DMXsignaal beschikbaar zijn. De gele LED MASTER (5) moet oplichten. 3) Via de uitgang DMX (12) kunnen andere TWIST150-apparaten worden aangesloten ( hoofdstuk 7.1), om deze via de afstandsbediening samen met het centrale apparaat te besturen. 4) Met de toets STAND BY (16) kunt u de rustmodus in- en uitschakelen. Bij ingeschakelde rust- E a) Para cambiar entre movimiento sincronizado y opuesto, pulse el botón MENU (2) de la unidad Slave las veces que sea necesario hasta que el visualizador muestre (Modo Slave). No tarde nunca más de 8 segundos en pulsar el siguiente botón o se parará el procedimiento de ajuste. b) Pulse el botón ENTER (14), el visualizador parpadeará. c) Selección (Slave 1) con los botones DOWN o UP (3) para el movimiento sincronizado y (Slave 2) para el movimiento opuesto. d) Pulse el botón ENTER para la memorización. El visualizador mostrará durante unos segundos. A continuación reaparecerá el número del programa de muestra seleccionado y empezará la secuencia de programa. 7.2 Control remoto LC-3 El control remoto LC-3 (fig. 5) disponible como accesorio permite controlar las siguientes funciones: 1) Conecte el control remoto a la toma REMOTE CONTROL ONLY (10). 2) No puede haber ninguna señal DMX en la entrada DMX INPUT (11). El LED amarillo MASTER (5) tiene que iluminarse. 3) Mediante la salida DMX OUTPUT (12), es posible conectar más aparatos TWIST-150 ( apartado 7.1) para controlarlos mediante el mando a distancia con la unidad Master. 4) Con el botón STAND BY (16), el modo de reposo puede conectarse y desconectarse. Con el modo de reposo conectado, el LED junto al botón se ilumina. La cabeza giratoria se coloca en su posición de inicio y se cierra el obturador. 24 modus licht de LED naast de toets op. De zwenkkop wordt in de uitgangspositie gebracht en het paneel wordt gesloten. 5) Selecteer met de toets MODE (18) de bedrijfsmodus: 1. Stroboscoopmodus SOUND 1 (De LED naast de toets MODE licht niet op) Telkens u de toets FUNCTION (17) ingedrukt houdt, wisselt het apparaat naar het volgende van de drie stroboscoopeffecten: – muziekonafhankelijke stroboscoop, bij de randapparaten synchroon – muziekonafhankelijke stroboscoop, afwisselend met de randapparaten – muziekafhankelijke stroboscoop Na loslaten van de toets FUNCTION is het showprogramma opnieuw geactiveerd. 2. Showmodus (LED knippert) Selecteer met de toets FUNCTION (17) het gewenste showprogramma (Show 1 – 4) ( hoofdstuk, 7, bedieningsstap 3). 3. Handmatige kleur- en lichtpatroonselectie (De LED licht op permanent) Als u de toets FUNCTION kortstondig ingedrukt houdt, selecteert u de kleur van het lichtpatroon, als u de toets langer ingedrukt houdt, selecteert u het lichtpatroon. Als de lichtbundel niet mag bewegen, stelt u de bundelrichting in de volgende modus in op één bepaald punt. 4. De lichtbundel handmatig richten (De LED knippert snel) Houd de toets FUNCTION ingedrukt, de zwenkkop draait. Als het licht in de gewenste richting straalt, laat u de toets los. Door de toets opnieuw ingedrukt te houden, richt u de lichtbundel verticaal. Om deze beide functies opnieuw te kunnen uitvoeren, drukt u eerst twee keer kort op de toets FUNCTION (zonder andere functie). 5) Con el botón MODE (18), elija el modo de funcionamiento: 1. Modo estroboscópico SOUND 1 (El LED junto al botón MODE no se ilumina) Cada vez que se mantiene pulsado el botón FUNCTION (17), el aparato pasa al siguiente de los tres efectos estroboscópicos: – Estroboscopio independiente de la música, sincronizado con las unidades Slave. – Estroboscopio independiente de la música, alternando con las unidades Slave. – Estroboscopio dependiente de la música Después de soltar el botón FUNCTION, el programa de muestra se reactiva. 2. Modo Show (LED parpadeante) Elija el programa de muestra seleccionado (Show 1 a 4) con el botón FUNCTION (17) [ apartado 7, paso de funcionamiento 3] 3. Selección manual de color y dibujo (el LED se ilumina ininterrumpidamente) Seleccione el color del dibujo pulsando brevemente el botón FUNCTION y seleccione el dibujo pulsando el botón durante más tiempo. El haz de luz no debe moverse, coloque el haz en algún lugar en el siguiente modo. 4. Posicionamiento manual del haz de luz (el LED parpadea rápidamente) Mantenga pulsado el botón FUNCTION y se moverá la cabeza giratoria. Si la luz se irradia en la dirección deseada, suelte el botón. Manteniendo el botón pulsado nuevamente, se coloca el haz de luz verticalmente. Para poder llevar a cabo estas dos funciones de nuevo, pulse primero el botón FUNCTION dos veces brevemente (sin ninguna otra función). 8 Bediening via een lichtregelaar Voor de bediening via een lichtregelaar met DMX512-protocol (b.v. DMX-1440 of DMX-510USB van “img Stage Line”) beschikt het apparaat over 11 besturingskanalen. Het kan ook naar de 8-kanaalmodus worden omgeschakeld, als niet alle functies nodig zijn. De functies van de kanalen en de DMXwaarden vindt u terug in het hoofdstuk 11.1. 8.1 Aansluiting Als DMX-interface heeft het apparaat 3-polige XLRaansluitingen (11 en 12) met volgende penconfiguratie: pen 1 = massa, 2 = DMX-, 3 = DMX+. Voor de aansluiting moeten speciale kabels voor hoge gegevensstromen worden gebruikt. Normale afgeschermde microfoonkabels met een leidingdiameter van ten minste 2 × 0,22 mm2 en een zo gering mogelijke capaciteit zijn alleen bij een totale kabellengte tot 100 m aan te bevelen. Bij kabellengten vanaf 150 m is het aanbevolen om een DMX-ophaalversterker tussen te schakelen (b.v. SR-103DMX van “img Stage Line”). 1) Verbind de DMX-ingang (11) met de DMX-uitgang van de lichtregelaar. 2) Verbind de DMX-uitgang (12) met de DMX-ingang van het volgende lichteffectapparaat. Verbind de uitgang hiervan opnieuw met de ingang van het nageschakelde apparaat etc., tot alle lichteffectapparaten in een kring zijn aangesloten. 3) Sluit de DMX-uitgang van het laatste DMX-apparaat in de ketting af met een weerstand van 120 Ω (> 0,3 W): Soldeer de weerstand vast aan de pinnen 2 en 3 van een XLR-stekker en plug de stekker in de DMX-uitgang, of gebruik een overeenkomstige afsluitstekker (b.v. DLT-123 van “img Stage Line”). 8 Funcionamiento mediante un controlador Para el funcionamiento mediante un controlador con protocolo DMX-512 (como el DMX-1440 o el DMX510USB de “img Stage Line”), el aparato está equipado con 11 canales de control. Sin embargo, también puede pasarse al modo de 8 canales si no se necesitan todas las funciones. Las funciones de los canales y los valores DMX se encuentran en el apartado 11.1. 8.1 Conexión Como interfaz DMX, el aparato está equipado con conexiones XLR de 3 polos (11 y 12) con la siguiente configuración de pines: pin 1 = Masa, 2 = DMX-, 3 = DMX+. Debería utilizar cables especiales de alta transmisión de datos para la conexión. La utilización de cables de micrófono estándar con blindaje, un corte de sección mínimo de 2 × 0,22 mm2 y una capacidad tan baja como sea posible sólo se puede recomendar para una distancia de cableado total de hasta 100 m. Para cableados que superen los 150 m se recomienda insertar un amplificador DMX adecuado (p. ej. el SR-103DMX de “img Stage Line”). 1) Conecte la entrada DMX (11) a la salida DMX del controlador. 2) Conecte la salida DMX (12) a la entrada DMX del siguiente juego de luces. Conecte su salida de nuevo a la entrada de la siguiente unidad, etc., hasta que todos los aparatos estén conectados en cadena. 3) Termine la salida DMX del último aparato DMX de la cadena con un resistor de 120 Ω (> 0,3 W): Suelde el resistor a los pines 2 y 3 de una toma XLR y conecte la toma a la salida DMX o utilice el tapón correspondiente (como el DLT-123 de “img Stage Line”). 8.2 Startadres en aantal van de DMX-kanalen instellen Om het lichteffectapparaat met een lichtregelaar te kunnen bedienen, moet het DMX-startadres voor het 1ste DMX-kanaal worden ingesteld. Als bijvoorbeeld het adres 17 voor het besturen van de zwenkkopdraaiing is voorzien, stel dan op de TWIST-150 het startadres 17 in. De andere functies van het apparaat zijn dan automatisch aan de tien volgende kanalen (in dit voorbeeld 18 – 27) toegewezen. Als volgend mogelijke startadres voor het volgende DMX-gestuurde apparaat zou in dit voorbeeld het adres 28 kunnen worden gebruikt. (In de 8-kanaalmodus worden slechts 8 DMX-kanalen gebruikt, d.w.z. het volgend mogelijke startadres voor het volgende DMX-gestuurde apparaat is dan 25.) 1) Het DMX-startadres instellen: a) Druk eenmaal op de toets MENU (2), zodat op het display verschijnt. Wacht niet langer dan acht seconden om de volgende toets in te drukken, anders wordt de instelprocedure automatisch beëindigd. b) Druk op de toets ENTER (4). Het ingestelde adres wordt weergegeven. c) Stel met de toets DOWN of UP (3) het adres in en sla op met de toets ENTER. 2) Stel het aantal DMX-kanalen in die voor het besturen van het apparaat moeten worden gebruikt. a) Druk enkele keren op de toets MENU tot op het display (channel mode) verschijnt. b) Druk op de toets ENTER. Het aantal DMXkanalen wordt weergegeven. c) Stel met de toets DOWN of UP het aantal DMX-kanalen in ( of ) en sla op met de toets ENTER. 3) Voor het uitmengen van het menu houdt u de toets MENU ingedrukt tot het display naar het startadres of het geselecteerde showprogrammanummer terugschakelt, of wacht ca. acht seconden. 8.2 Ajuste de la dirección de inicio y del número de canales DMX Para el funcionamiento del juego de luces con un controlador, ajuste la dirección de inicio DMX del primer canal DMX. Si por ejemplo en el controlador la dirección 17 se utiliza para controlar el movimiento horizontal de la cabeza giratoria, ajuste la dirección de inicio 17 en la TWIST-150. Entonces, las demás funciones del aparato se asignan automáticamente a los 10 canales siguientes (del 18 al 27 en este ejemplo). La siguiente dirección de inicio posible de este ejemplo para el siguiente aparato controlado por DMX sería la dirección 28. (En el modo de 8 canales sólo se reservan 8 canales DMX, por lo tanto la siguiente dirección de inicio posible para el siguiente aparato controlado por DMX sería la dirección 25.) 1) Ajuste de la dirección de inicio DMX: a) Pulse el botón MENU (2) una vez para que el visualizador (1) muestre . No espere nunca más de 8 segundos en pulsar el siguiente botón o el procedimiento de ajuste se parará. b) Pulse el botón ENTER (4). Se mostrará la dirección ajustada. c) Ajuste la dirección con los botones DOWN o UP (3) y pulse ENTER para la memorización. 2) Ajuste el número de canales DMX que se van a utilizar para controlar el aparato. a) Pulse el botón MENU las veces que sea necesario hasta que se muestre (modo canal) en el visualizador. b) Pulse el botón ENTER. Se mostrará el número de canales DMX. c) Ajuste el número de los canales DMX ( o ) con los botones DOWN o UP y memorice el número con el botón ENTER. 3) Para salir del menú, mantenga pulsado el botón MENU hasta que el visualizador vuelva a la dirección de inicio o al número de programa de muestra seleccionado o espero unos 8 segundos. 4) Zodra de besturingssignalen van het DMX-besturingsapparaat worden ontvangen, licht de rode LED DMX (5) op en verschijnt het startadres op het display. De TWIST-150 kan nu met het DMXbesturingsapparaat worden bediend. Om de lichtbundel vrij te geven door het paneel te openen, stelt u het DMX-kanaal 3 (in de 8-kanaalmodus) resp. het DMX-kanaal 9 (in de 11-kanaalmodus) in op een DMX-waarde tussen 8 en 15 of op 255 ( hoofdstuk 11.1). 5) Stel de lichtpatronen scherp door het objectief (7) te draaien. 9 Overige functies fijnregeling zwenkkopdraaiing NL fijnregeling zwenkkopkanteling B draaiingshoekcorrectie voor het gobowiel draaiingshoekcorrectie voor het kleurwiel 6) Activeer de functie met de toets ENTER. 7) Corrigeer met de toets DOWN of UP. 8) Om op te slaan, drukt u op de toets ENTER. Daarna kan het apparaat met de toets DOWN of UP naar een andere correctiefunctie worden geschakeld. 9) Ongeveer acht seconden nadat er een laatste keer op een toets is gedrukt, wordt het instelmenu automatisch verlaten. 9.1 Correctiewaarden instellen (offsetmodus) Voor het fijnregelen van de zwenkkoppositie evenals van het kleur- en gobowiel kunt u correctiewaarden instellen. En door verschillende TWIST-150-apparaten synchroon via dezelfde DMX-adressen te besturen, kunt u b.v. afwijkingen van de lichtbundelrichting tot een minimum beperken. 1) Druk op de toets MENU (2). Op het display (1) wordt (Address) weergegeven. Wacht niet langer dan acht seconden om de volgende toets in te drukken, anders wordt de instelprocedure automatisch beëindigd. 2) Houd de toets ENTER (4) ca. 5 seconden ingedrukt tot het display naar verspringt. De zwenkkop beweegt naar de verticale stand (verticaal 0°) en de lichtbundel wordt gedimd. 3) Druk opnieuw op de toets ENTER. Het paneel laat de lichtbundel door, en op het display knippert . 4) Als voor de verdere instellingen een horizontale straalrichting meer geschikt is, druk dan (meerdere keren) op de toets ENTER. 5) Druk op de toets MENU en selecteer de benodigde functie met de toets DOWN of UP (3): 4) En cuanto se reciben las señales de control del controlador DMX, se enciende el LED rojo DMX (5) y el visualizador muestra la dirección de inicio. Ya puede utilizarse la TWIST-150 con el controlador DMX. Para liberar el haz de luz abriendo el obturador, ajuste el canal DMX 3 (en el modo 8 canales) o el canal DMX 9 (en el modo 11 canales) en un valor DMX entre 8 y 15 o el 255 ( apartado 11.1). 5) Moviendo la lente (7) pueden enfocarse los dibujos. 9 Otras Funciones 9.1 Ajuste de los valores de corrección (modo de compensación) Para el ajuste fino de la posición de la cabeza giratoria y las ruedas de colores y gobos, pueden retocarse los valores de corrección. Para el funcionamiento sincronizado de varias TWIST-150 con las mismas direcciones DMX es posible, por ejemplo, minimizar las desviaciones de la dirección del haz de luz. 1) Pulse el botón MENU (2). En el visualizador (1) se muestra (Address = Dirección). No espere nunca más de 8 segundos en pulsar el siguiente botón o se parará el proceso de ajuste. 2) Mantenga pulsado el botón ENTER (4) aproximadamente unos 5 segundos hasta que el visualizador pase a . La cabeza giratoria vuelve a la posición vertical (0º) y se apaga el haz de luz. 9.2 Zelftest Voor de zelftest van het apparaat beschikt u over drie programmaʼs. Druk enkele keren op de toets MENU (2) tot op het display (1) het gewenste testprogramma wordt weergegeven: Korte test Om te starten, drukt u op de toets ENTER (4). Tijdens het verloop van de test knippert op het display. Aan het einde van de test wordt even (finish = einde) weergegeven, dan schakelt het apparaat terug naar de vorige bedrijfsmodus. of Continutest waarbij alle kleuren en alle goboʼs worden overlopen Voor beide testprogrammaʼs kunt u 12 verschillende bewegingsprocessen selecteren en de bewegingssnelheid kan worden gewijzigd. 1) Om te starten, drukt u op de toets ENTER. Tijdens het verloop van de test knippert resp. op het display. 2) Om het bewegingsproces of de bewegingssnelheid te wijzigen, drukt u opnieuw op de toets ENTER. Op het display verschijnt (Move). Reajuste fino del movimiento horizontal de la cabeza giratoria E Reajuste fino del movimiento vertical de la cabeza giratoria Reajuste del ángulo de rotación para la rueda de gobos Reajuste del ángulo de rotación para la rueda de colores 6) Active la función con el botón ENTER. 7) Haga el reajuste con los botones DOWN o UP. 8) Pulse el botón ENTER para la memorización. Ahora ya puede seleccionar otra función de reajuste con los botones DOWN o UP. 9) Aproximadamente 8 segundos después de pulsar el último botón, se sale automáticamente del menú de ajuste. 9.2 Autotest Hay tres programas disponibles para el autotest del aparato. Pulse el botón MENU (2) las veces que sea necesario hasta que aparezca el programa de test que quiere en el visualizador (1): Test breve Pulse el botón ENTER (4) para empezar. Durante la ejecución del test parpadea en el visualizador. Al finalizar el test, se muestra (finish = fin) en el visualizador y el aparato vuelve al modo de funcionamiento previo. o 3) Pulse el botón ENTER de nuevo. El obturador libera el haz de luz y parpadea en el visualizador. Test continuo con visualización sucesiva de todos los colores y todos los gobos. Para ambos programas de test pueden seleccionarse 12 secuencias de movimiento diferentes y puede cambiarse la velocidad de movimiento. 4) Si es más adecuado un haz de dirección horizontal para otro ajuste, pulse el botón ENTER (varias veces). 1) Pulse el botón ENTER para empezar. En el visualizador parpadea o durante la ejecución del test. 5) Pulse el botón MENU y elija la función que necesite con los botones DOWN o UP (3): 2) Para cambiar la secuencia de movimiento o la velocidad de movimiento, pulse de nuevo el 25 NL B E 3) Als alleen de snelheid moet worden gewijzigd, ga dan verder met bedieningsstap 4). Om het bewegingsproces te wijzigen, drukt u opnieuw op de toets ENTER. Op het display verschijnt het nummer van het huidige bewegingsproces ( … ). Wijzig het nummer met de toets DOWN of UP(3) en start het geselecteerde bewegingsproces met de toets ENTER. 4) Schakel met de toets DOWN of UP van naar (Move Speed) en druk op de toets ENTER. Op het display verschijnt de momentele snelheid tussen 0 (heel langzaam) en 255 (snel) aan. Wijzig de waarde met de toets DOWN of UP en activeer de geselecteerde waarde met de toets ENTER. 5) Om de zelftest te beëindigen, drukt u op de toets MENU. Na acht seconden schakelt het apparaat terug naar de vorige bedrijfsmodus. 5) Nadat u opnieuw op de toets ENTER hebt gedrukt, kan met de toets DOWN of UP naar een andere besturingsfunctie worden geschakeld. 9.3 Mastermodus 9.5 De firmwareversie weergeven In de mastermodus kunnen b.v. de belangrijkste besturingsfuncties van de TWIST-150 zonder DMXbesturingsapparaat worden gecontroleerd. 1) Druk enkele keren op de toets MENU (2) tot op het display de melding (Master Mode) verschijnt. Denk eraan: als er gedurende acht seconden geen toets wordt ingedrukt, schakelt het apparaat terug naar de vorige bedrijfsmodus! 2) Selecteer de besturingsfunctie met de toets DOWN of UP (3): Zwenkkopdraaiing Zwenkkopkanteling Besturing van het paneel Gobo Kleur 3) Om de functie te activeren, drukt u op de toets ENTER (4). 4) Stel met de toets DOWN of UP de DMX-waarde in ( hoofdstuk 11.1). Het apparaat reageert onmiddellijk. Om het versienummer van de firmware (besturingssysteem van het lichteffectapparaat) weer te geven: 11 Technische gegevens 1) Druk enkele keren op de toets MENU (2) tot op het display (1) (versie) verschijnt. Vermogensverbruik: . . . 200 VA botón ENTER. En el visualizador se muestra (move = movimiento). 4) Ajuste el valor DMX con los botones DOWN o UP ( apartado 11.1). El aparato responde inmediatamente. 5) Puede seleccionarse otra función de control con los botones DOWN o UP después de pulsar el botón ENTER de nuevo. 6) Para parar el modo Master, no toque ningún botón durante 8 segundos. 3) Para cambiar solo la velocidad continúe con el paso 4). Para cambiar la secuencia de movimiento, pulse el botón ENTER de nuevo. En el visualizador se muestra el número de la secuencia de movimiento actual ( … ). Cambie el número con los botones DOWN o UP (3) y inicie la secuencia de movimiento que ha elegido con el botón ENTER. 4) Pase de a (Move Speed = velocidad de movimiento) con los botones DOWN o UP y pulse el botón ENTER. El visualizador muestra la velocidad actual entre 0 (muy lenta) y 255 (rápida). Cambie el valor con los botones DOWN o UP y active la velocidad seleccionada con el botón ENTER. 10 De optica reinigen 9.4 De bedrijfsuren weergeven Om de stand van de bedrijfsurenteller weer te geven: 1) Druk enkele keren op toets MENU (2) tot op het display (1) (Fixture hours) wordt weergegeven. 2) Druk op de toets ENTER (4). De bedrijfsuren worden weergegeven. 3) Na acht seconden schakelt het apparaat terug naar de vorige bedrijfsmodus. 3) Na acht seconden schakelt het apparaat terug naar de vorige bedrijfsmodus. Uitstralingshoek: . . . . . . 14° 9.6 Reset Als het apparaat slecht functioneert, kan hieraan eventueel worden verholpen door het apparaat te resetten (Reset): 1) Druk enkele keren op de toets MENU (2) tot op het display (1) (reset) verschijnt. 2) Druk op de toets ENTER (4). Zwenkkop en alle besturingsmotoren bewegen naar een vastge- 9.4 Visualización de las horas de funcionamiento En el modo Master, por ejemplo, pueden comprobarse las funciones de control más importantes de la TWIST-150 sin controlador DMX. Para ver el número de la versión del firmware (sistema operativo del juego de luces): 1) Pulse el botón MENU (2) las veces que sea necesario hasta que se muestre (versión) en el visualizador (1). 2) Pulse el botón ENTER (4). Se mostrará el número de versión. 3) El aparato vuelve al modo de funcionamiento previo después de 8 segundos. Control del obturador Gobo Color 3) Pulse el botón ENTER (4) para activar la función. Draaiingshoek horizontaal (Pan): . . . 540° verticaal (Tilt): . . . . . . 270° Omgevingstemperatuurbereik: . . . . 0 – 40 °C Afmetingen: . . . . . . . . . 280 × 340 × 270 mm Gewicht: . . . . . . . . . . . . 9,9 kg Wijzigingen voorbehouden. Deze gebruiksaanwijzing is door de auteurswet beschermde eigendom van MONACOR ® INTERNATIONAL GmbH & Co. KG. Een reproductie – ook gedeeltelijk – voor eigen commerciële doeleinden is verboden. 9.5 Visualización de la versión del firmware Movimiento vertical de la cabeza Voedingsspanning: . . . . 230 V~ / 50 Hz Verlichting: . . . . . . . . . . HID-ontladingslamp 95 V/150 W 9.3 Modo Master Movimiento horizontal de la cabeza De lenzen en de kleurfilters moeten op regelmatige tijdstippen, afhankelijk van de verontreiniging door stof, rook of andere vuildeeltjes, worden gereinigd. Alleen dan kan het licht met maximale helderheid worden uitgestraald. Trek de stekker uit het stopcontact en laat het apparaat 15 minuten afkoelen, alvorens de zwenkkop te openen. Voor de reiniging gebruikt u een zachte, schone doek en een in de handel verkrijgbaar detergent voor glas. Wrijf de onderdelen vervolgens voorzichtig droog. 2) Druk op de toets ENTER (4). Het versienummer wordt weergegeven. 5) Para parar el autotest, pulse el botón MENU. El aparato cambia al modo de funcionamiento previo después de 8 segundos. 2) Seleccione la función de control con los botones DOWN o UP (3): 26 6) Om de mastermodus te beëindigen, drukt u gedurende acht seconden op geen enkele toets. Para mostrar el estado del medidor de horas: 1) Pulse el botón MENU (2) las veces que sea necesario hasta que se muestre (Fixture hours = horas fijas) en el visualizador (1). 2) Pulse el botón ENTER (4). Se mostrarán las horas de funcionamiento. 3) El aparato vuelve al modo de funcionamiento previo después de 8 segundos. 1) Pulse el botón MENU (2) las veces que sea necesario hasta que en el visualizador se muestre (modo Master). Nota: Si no se pulsa ningún botón después de 8 segundos, el aparato vuelve al modo de funcionamiento previo. legde uitgangspositie. Tegelijk verschijnt de melding op het display. Daarna schakelt het apparaat terug naar de vorige bedrijfsmodus. 2) Pulse el botón ENTER (4). La cabeza giratoria y todos los motores de control se colocan en una posición definida de inicio. Mientras tanto, el visualizador indica . A continuación, el aparato vuelve al modo de funcionamiento previo. 10 Limpieza del Sistema Óptico Se recomienda limpiar las lentes y los filtros de colores regularmente, dependiendo de las impurezas provocadas por el polvo, el humo u otras partículas para asegurar que la luz se irradie en su máximo brillo. Antes de abrir la cabeza giratoria, desconecte siempre la toma del enchufe de corriente y deje que el aparato se enfríe durante 15 minutos. Para la limpieza utilice un paño suave y seco y un limpiacristales comercial. A continuación seque las partes húmedas con cuidado. 11 Especificaciones Alimentación: . . . . . . . . 230 V~ / 50 Hz Consumo: . . . . . . . . . . . 200 VA Lámpara: . . . . . . . . . . . Lámpara de descarga HID 95 V/150 W Ángulo de radiación: . . 14° Ángulo de rotación Horizontal (pan): . . . . 540° Vertical (tilt): . . . . . . . 270° Temperatura ambiente: 0 – 40 °C 9.6 Reinicio Dimensiones: . . . . . . . . 280 × 340 × 270 mm En caso de mal funcionamiento, cabe la posibilidad de eliminar los fallos reiniciando el aparato: 1) Pulse el botón MENU (2) las veces que sea necesario hasta que se muestre (reset = reinicio) en el visualizador (1). Peso: . . . . . . . . . . . . . . 9,9 kg Sujeto a modificaciones técnicas. Manual de instrucciones protegido por el copyright de MONACOR ® INTERNATIONAL GmbH & Co. KG. Toda reproducción mismo parcial para fines comerciales está prohibida. 11.1 Overzicht van de DMX-kanalen NL DMX-kanaal DMX-kanaal 8-kanaalmodus* 11-kanaalmodus Functie DMX-waarde 1 1 Zwenkkopdraaiing (Pan) 0 – 540°, grof 000 – 255 — 2 Zwenkkopdraaiing, fijn 000 – 255 2 3 Zwenkkopkanteling (Tilt) 0 – 270°, grof 000 – 255 — 4 Zwenkkopkanteling, fijn 000 – 255 — 5 Pan- / Tilt-snelheid, snel langzaam 000 – 255 6 Macro’s (geprogrammeerde bewegingsprocessen) geen macro macro 1 macro 2 macro 3 macro 4 macro 5 macro 6 macro 7 macro 8 macro 9 macro 10 macro 11 macro 12 000 – 015 016 – 035 036 – 055 056 – 075 076 – 095 096 – 115 116 – 135 136 – 155 156 – 175 176 – 195 196 – 215 216 –235 236 – 255 7 Snelheid van de macro’s, snel langzaam 000 – 255 8 zonder functie reset zonder functie autonome bediening (Showprogramma) 000 – 199 200 – 209 210 – 239 240 – 255 9 paneel gesloten (Blackout) paneel open stroboscoop, langzaam snel stroboscoop uit, paneel open waggeleffect, langzaam snel paneel open 000 – 007 008 – 015 016 – 131 132 – 139 140 – 247 248 – 255 — — 8 3 8-kanaalmodus* B 4 10 5 11 * In de 8-kanaalmodus zijn de DMX-kanalen 6 en 7 zonder functie. 1 2 3 4 5 6 7 Functie 11-kanaalmodus 8 9 DMX-waarde gobo geen gobo gobo 1 gobo 2 gobo 3 gobo 4 gobo 5 gobo 6 gobo 7 gobo 8 gobo 9 gobo 10 gobo 11 gobo 12 gobo 13 gobo 14 continue wisseling gobo’s langzaam snel snel langzaam (tegengestelde richting) 000 – 008 009 – 016 017 – 025 026 – 033 034 – 042 043 – 050 051 – 059 060 – 067 068 – 076 077 – 084 085 – 093 094 – 101 102 – 110 111 – 118 119 – 127 128 – 191 192 – 255 kleur Wit Groen Groen + magenta Magenta Lichtblauw Geel Rood Blauw + rood Blauw UV-violet Groen Groen + oranje Oranje Geel + oranje Geel Geel + roze Roze permanente kleurwisseling snel langzaam langzaam snel (tegengestelde richting) 10 11 12 000 – 007 008 – 014 015 – 022 023 – 029 030 – 037 038 – 044 045 – 052 053 – 059 060 – 067 068 – 074 075 – 082 083 – 089 090 – 097 098 – 104 105 – 112 113 – 119 120 – 127 128 – 191 192 – 255 13 14 11.1 Vista general de los canales DMX E Canal DMX Canal DMX Modo 8 canales* Modo 11 canales Función Valor DMX 1 1 Movimiento horizontal (Pan) de la cabeza 0 – 540°, normal 000 – 255 — 2 Movimiento horizontal de la cabeza, fino 000 – 255 2 3 Movimiento vertical (Tilt) de la cabeza 0 – 270°, normal 000 – 255 — 4 Movimiento vertical de la cabeza, fino 000 – 255 — 5 Velocidad horizontal/vertical, rápido lento 000 – 255 6 Macros (secuencias de movimientos programadas) Sin macro Macro 1 Macro 2 Macro 3 Macro 4 Macro 5 Macro 6 Macro 7 Macro 8 Macro 9 Macro 10 Macro 11 Macro 12 000 – 015 016 – 035 036 – 055 056 – 075 076 – 095 096 – 115 116 – 135 136 – 155 156 – 175 176 – 195 196 – 215 216 –235 236 – 255 — — 7 Velocidad de las macros, rápido lento 000 – 255 8 8 Sin función Reinicio Sin función Funcionamiento autónomo (programa de muestra) 000 – 199 200 – 209 210 – 239 240 – 255 9 Obturador cerrado (Blackout) Obturador abierto Estroboscopio, lento rápido Estroboscopio apagado, obturador abierto Efecto de balanceo, lento rápido Obturador abierto 000 – 007 008 – 015 016 – 131 132 – 139 140 – 247 248 – 255 3 * En el modo de 8 canales, los canales DMX 6 y 7 no tiene función. Modo 8 canales* 4 5 Modo 11 canales 10 11 Función Gobo Sin gobo Gobo 1 Gobo 2 Gobo 3 Gobo 4 Gobo 5 Gobo 6 Gobo 7 Gobo 8 Gobo 9 Gobo 10 Gobo 11 Gobo 12 Gobo 13 Gobo 14 Cambios continuos de gobos Lento rápido Rápido lento (dirección opuesta) Color Blanco Verde Verde + magenta Magenta Azul claro Amarillo Rojo Azul + rojo Azul UV violeta Verde Verde + naranja Naranja Amarillo + naranja Amarillo Amarillo + rosa Rosa Cambio continuo de colores Rápido lento Lento rápido (dirección opuesta) Valor DMX 000 – 008 009 – 016 017 – 025 026 – 033 034 – 042 043 – 050 051 – 059 060 – 067 068 – 076 077 – 084 085 – 093 094 – 101 102 – 110 111 – 118 119 – 127 128 – 191 192 – 255 000 – 007 008 – 014 015 – 022 023 – 029 030 – 037 038 – 044 045 – 052 053 – 059 060 – 067 068 – 074 075 – 082 083 – 089 090 – 097 098 – 104 105 – 112 113 – 119 120 – 127 128 – 191 192 – 255 27 PL Proszę otworzyć niniejszą instrukcję na stronie 3. Pokazano tam rozkład elementów operacyjnych i złączy. 1 11 Wejście DMX (3-pin XLR); pin 1 = masa, 2 = DMX-, 3 = DMX+ Elementy operacyjne i złącza 12 Wyjście DMX (3-pin XLR) do podłączania wejścia DMX kolejnego efektu świetlnego; pin 1 = masa, 2 = DMX-, 3 = DMX+ 1.1 TWIST-150 1 Wyświetlacz Spis treści 1 Elementy operacyjne i złącza . . . . . . . . . 28 1.1 TWIST-150 . . . . . . . . . . . . . . . . . . . . . . . . . 28 1.2 Pilot zdalnego sterowania LC-3 . . . . . . . . . 28 2 Środki bezpieczeństwa . . . . . . . . . . . . . . 28 3 Zastosowanie . . . . . . . . . . . . . . . . . . . . . . 28 4 Montaż/wymiana żarówki . . . . . . . . . . . . 28 5 Montaż . . . . . . . . . . . . . . . . . . . . . . . . . . . . 29 6 Przygotowanie do pracy . . . . . . . . . . . . . 29 6.1 Podstawowe ustawienia . . . . . . . . . . . . . . . 29 7 Praca bez kontrolera DMX . . . . . . . . . . . . 29 7.1 Łączenie kilku urządzeń TWIST-150 . . . . . 29 7.2 Sterowanie pilotem LC-3 . . . . . . . . . . . . . . 30 8 Praca z kontrolerem świateł . . . . . . . . . . 30 8.1 Podłączanie . . . . . . . . . . . . . . . . . . . . . . . . 30 8.2 Ustawianie adresu startowego i numeru kanałów DMX . . . . . . . . . . . . . . . 30 9 Dodatkowe funkcje . . . . . . . . . . . . . . . . . . 30 9.1 Ustawianie wartości korygujących (tryb offset) . . . . . . . . . . . . . . . . . . . . . . . . . 30 9.2 Test samosprawdzający . . . . . . . . . . . . . . . 30 9.3 Tryb Master . . . . . . . . . . . . . . . . . . . . . . . . 30 2 Przycisk MENU do wywoływania menu oraz wyboru poleceń 3 Przyciski DOWN i UP do wyboru pozycji i zmiany wartości parametrów w menu 4 Przycisk ENTER do aktywacji pleceń w menu i zapisywania ustawień 5 Wskaźniki diodowe dla trybów pracy: DMX zapala się gdy na wejściu DMX INPUT (11) pojawia się sygnał sterujący MASTER tryb master: praca bez kontrolera DMX lub z pilotem LC-3 SLAVE tryb slave (rozdz. 7.1): sterowanie poprzez inny TWIST-150 SOUND zapala się na krótko podczas zmiany kolorów, wzorów oraz ruchu, sterowanych muzyką poprzez wbudowany mikrofon 6 Głowica 7 Obiektyw, z regulacją ostrości 8 Ramię obrotowe 9 Gniazdo zasilania do łączenia z gniazdkiem sieciowym (230 V~/50 Hz) za pomocą dołączonego kabla zasilającego Bezpiecznik znajduje się pod pokrywą, poniżej gniazda zasilania. Spalony bezpiecznik wymieniać na nowy o identycznych parametrach. 9.4 Wyświetlanie czasu pracy . . . . . . . . . . . . . 31 9.5 Wyświetlanie wersji firmwareʼa . . . . . . . . . . 31 9.6 Resetowanie . . . . . . . . . . . . . . . . . . . . . . . . 31 10 Czyszczenie systemu optycznego . . . . . 31 11 Specyfikacja . . . . . . . . . . . . . . . . . . . . . . . 31 10 Gniazdo pilota LC-3 (rys. 5) 13 Regulator SENSITIVITY do regulacji czułości wbudowanego mikrofonu w przypadku sterowania muzyką 14 Osłona żarówki wewnątrz głowicy (6), widok otwartej komory żarówki z góry 15 Terminal połączeniowy żarówki 1.2 Pilot zdalnego sterowania LC-3 Pilot zdalnego sterowania LC-3 jest dostępny jako wyposaż. dodatkowe i nie jest dołączany do urządzenia TWIST-150. 16 Przycisk STAND BY do włączania trybu sleep: Głowica ustawia się w pozycję wyjściową i następuje zamknięcie migawki. Zapala się dioda sygnalizacyjna obok przycisku. 17 Przycisk FUNCTION do wywoływania różnych funkcji, w zależności od trybu pracy, wybranego przyciskiem MODE (rozdz. 7.2) 18 Przycisk MODE do przełączania pomiędzy: – trybem stroboskopu; dioda obok przycisku MODE nie zapala się – trybem show; dioda miga wolno – manualnym wyborem kolorów i wzorów; dioda świeci ciągle – manualnym ustawianiem wiązki światła; dioda miga szybko Uwaga: Przy sterowaniu pilotem nie wolno równocześnie podawać sygnału sterującego na wejście DMX INPUT (11). 11.1 Kanały DMX . . . . . . . . . . . . . . . . . . . . . . . . 31 2 można zastosować standardowe czyszczenia szyb i luster. Środki bezpieczeństwa Urządzenie spełnia wszystkie wymagania norm UE dzięki czemu jest oznaczone symbolem . UWAGA Urządzenie jest zasilane wysokim napięciem sieciowym (230 V~). Wszelkie naprawy należy zlecić przeszkolonemu personelowi. Nie należy przeprowadzać żadnych modyfikacji nie opisanych w instrukcji obsługi, oraz nie wolno umieszczać niczego w otworach wentylacyjnych! Może to spowodować porażenie prądem elektrycznym! środki do Producent ani dostawca nie ponoszą odpowiedzialności za wynikłe uszkodzenia sprzętu lub obrażenia użytkownika w przypadku, gdy urządzenie jest wykorzystywane w innych celach niż to się przewiduje lub jeśli jest nieodpowiednio zainstalowane, użytkowane lub naprawiane. Nie stawiać na urządzeniu żadnych pojemników z płynem np. szklanek. Nie należy włączać lub natychmiast odłączyć urządzenie od sieci w przypadku gdy 1. stwierdzono widoczne uszkodzenie urządzenia lub kabla zasilającego, 2. urządzenie mogło ulec uszkodzeniu na skutek upadku lub podobnego zdarzenia, 3. stwierdzono nieprawidłowe działanie. Naprawy urządzenia może dokonywać tylko przeszkolony personel. 28 Urządzenie jest przeznaczone tylko do użytku wewnątrz pomieszczeń. Należy chronić je przed działaniem wody, dużej wilgotności powietrza oraz wysokiej temperatury (dopuszczalny zakres 0 – 40 °C). Nie wolno odłączać zasilania ciągnąc za kabel, należy zawsze chwytać za wtyczkę. Podczas przenoszenia urządzenia, należy chwytać tylko za dolną część. Nie wolno trzymać za głowicę (6) ani za ramię obrotowe (8). Do czyszczenia obudowy używać tylko suchej, miękkiej ściereczki. Nie używać wody ani silnych środków chemicznych. Do czyszczenia obiektywu Nr kat. Średnia żywotność HLT-150HID 05.9945 1000 h Nie należy chwytać za szklaną cześć żarówki – zostawienie odcisków palców może spowodować osłabienie jasności żarówki. UWAGA Przed przystąpieniem do wymiany żarówki należy bezwzględnie odłączyć kabel zasilający urządzenie od gniazdka sieciowego! Aby nie zaśmiecać środowiska po całkowitym zakończeniu eksploatacji urządzenia należy je oddać do punktu recyklingu. Należy przestrzegać następujących zasad: Symbol 3 Zastosowanie Ruchoma głowa TWIST-150 jest przeznaczona do profesjonalnych zastosowań na scenie oraz w dyskotekach. Dzięki wyposażeniu w kolorowe koło, koło z gobo oraz efekty stroboskopu i drżenia, pozwala na uzyskanie wielu ciekawych wzorów świetlnych. 16bitowa rozdzielczość ruchu głowicy, pozwala na precyzyjne sterowanie wiązką światła z różnymi prędkościami. Ponadto, dzięki funkcji automatycznego powrotu, możliwe jest ustawienie do głowicy pozycji wyjściowej z każdego innego ustawienia. Urządzenie może być sterowane sygnałem muzycznym, poprzez wbudowany mikrofon, za pomocą pilota zdalnego sterowania LC-3 (dostępny jako wyposaż. dodatkowe), lub poprzez kontroler DMX. Ze względu na znaczne nagrzewanie się żarówki podczas pracy, należy przed jej wymianą odczekać, aż się wychłodzi (minimum 15 minut). Nie należy patrzeć bezpośrednio na żarówkę podczas pracy; silne światło oraz promieniowanie UV może uszkodzić wzrok. 1) Odkręcić śruby blokujące na tylnej stronie głowicy a następnie ostrożnie zdjąć obudowę głowicy. Na rysunku 3, na stronie 3 pokazano widok z góry na otwartą komorę żarówki. 2) Umieścić żarówkę w środku uchwytu (14). Reflektor musi być precyzyjnie ustawiony pomiędzy dwiema śrubami (patrz strzałki na rysunku 4, widok z boku). W przeciwnym razie kolorowe wzory (gobo) będą zniekształcone. 3) Przykręcić końcówki przewodów do terminali połączeniowych żarówki (15). 4) Zamknąć komorę żarówki pokrywą. 4 Montaż/wymiana żarówki Żarówki mogą zawierać śladowe ilości substancji szkodliwych dla środowiska (np. rtęć), dlatego należy je wyrzucać do specjalnych oznaczonych pojemników. Żarówkę należy wymieniać najpóźniej po 1,25 krotności podanego czasu jej żywotności. W przeciwnym wypadku zwiększa się ryzyko wybuchu Urządzenie dostarczane jest bez żarówki. Odpowiednia żarówka wyładowcza HID 95 V/150 W dostępna jest jako wyposażenie dodatkowe. Nie należy używać żarówki innego typu! Z oferty “img Stage Line”, odpowiednia jest żarówka: 
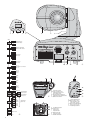
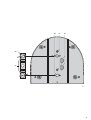
żarówki na skutek zmian strukturalnych w szkle kwarcowym. Urządzenie zostało wyposażone w licznik godzin pracy. Dzięki niemu możliwe jest przewidywanie czasu wymiany żarówki. Przy wymianie żarówki należy zapisać stan licznika – rozdz. 9.4. W przypadku nastąpienia wybuchu żarówki, należy jak najszybciej odsunąć się od urządzenia, aby nie narażać się na działanie szkodliwych substancji z żarówki (np. rtęci) oraz wywietrzyć pomieszczenie. UWAGA Urządzenie musi być zamontowane w sposób bezpieczny i fachowy. Jeśli ma pracować ponad ludźmi, należy je dodatkowo zabezpieczyć przed upadkiem np. wykorzystując linki zabezpieczające – należy przeciągnąć je przez otwory (22) w płycie montażowej. Długość takich linek należy tak dobrać, aby w przypadku upadku, urządzenie maksymalnie spadło o 20 cm. Montaż WAŻNE Należy zapewnić wystarczającą wentylację urządzenia podczas pracy. Zaleca się utrzymanie minimum 1m dystansu od innych powierzchni. Nie wolno zasłaniać otworów wentylacyjnych. Zachować bezpieczną odległość urządzenia od materiałów łatwopalnych oraz czułych na wysoką temperaturę. Urządzenie może być ustawiane na stabilnej powierzchni lub zamontowane, poprzez dołączoną płytę montażową, do góry nogami na ścianie lub poprzeczce statywu. Płyta montażowa pokazana jest na rysunku 6, na stronie 37. Do montażu wymagane jest użycie wytrzymałych uchwytów. Przykręcić uchwyty bezpośrednio do otworów z gwintem M10 (21) lub poprzez dołączony uchwyt montażowy (23). Jak pokazano na rysunku, umieścić śruby blokujące (24) w otworach (20) płyty montażowej, a następnie przekręcić je zgodnie z ruchem wskazówek zegara (do końca) aby je zablokować. Miejsce montażu musi być stabilne i na tyle wytrzymałe, aby utrzymać ciężar 20 kg na każde urządzenie. Włączanie i wyłączanie wyświetlacza Przyciskami DOWN lub UP (3) wybrać: Wyświetlacz (1) jest zawsze włączony. Wyświetlacz wyłącza się po około 60 sekundach od ostatniego wciśnięcia przycisku. Zapala się ponownie po wciśnięciu dowolnego przycisku. Aby zapisać ustawienia, wcisnąć przycisk ENTER. Po 8 sekundach od wciśnięcia ostatniego przycisku następuje automatyczne wyjście z menu. Przygotowanie do pracy UWAGA Nie należy patrzeć bezpośrednio na żarówkę, silne światło może uszkodzić wzrok. Efekt stroboskopu i szybkie zmiany światła mogą być groźne dla osób wrażliwych na światło oraz chorych na epilepsję! Podłączyć kabel zasilający (9) urządzenia do gniazdka sieciowego (230 V~/50 Hz). Głowica ustawi się w pozycję wyjściową. Na wyświetlaczu (1) pojawi się symbol . Urządzenie jest gotowe do pracy i może być sterowane kontrolerem DMX (patrz rozdz. 8) lub pracować niezależnie wyświetlając kolejne programy ( rozdz. 7). Aby wyłączyć urządzenie należy odłączyć kabel zasilający od gniazdka sieciowego. Aby ułatwić obsługę zaleca się podłączenie urządzenia do gniazdka, które będzie włączane i wyłączane razem z oświetleniem. Uwaga: Źródłem światła jest żarówka wyładowcza. Jeżeli urządzenie zostanie wyłączone lub nastąpi przerwa w jego zasilaniu, żarówka nie zapali się ponownie od razu po włączeniu. Nastąpi chwilowa przerwa na wychłodzenie żarówki. Praca bez kontrolera DMX Jeżeli na wejście DMX INPUT (11) nie jest podawany sygnał sterujący, zapala się żółta dioda MASTER (5), na wyświetlaczu (1) pojawia się (Show 1), natomiast urządzenie pracuje niezależnie, zgodnie z odtwarzanym programem (funkcja Blackout musi być wyłączona, rozdz. 6.1.). 1) Wybrać wyświetlany wzór przekręcając obiektyw (7). 2) Po włączeniu trybu dźwiękowego SOUND, ruch głowicy oraz zmiana wzorów i kolorów, będzie sterowana w rytm muzyki poprzez wbudowany mikrofon. a) Wcisnąć przycisk MENU (2) kilka razy, aż na wyświetlaczu pojawi się (Sound). Jeżeli nastąpi przerwa ponad 8 sekund od ostatniego wciśnięcia przycisku, procedura ustawiania zostanie zakończona. b) Wcisnąć przycisk ENTER (4). Wyświetlacz zaczyna migać. c) Za pomocą przycisku DOWN lub UP (3) włączyć ( ) lub wyłączyć ( ) sterowanie muzyką. d) Aby zapisać ustawienia, wcisnąć przycisk ENTER. Na wyświetlaczu pojawi się na chwile Żarówka nie zostaje wygaszona. To ustawienie należy wybrać podczas pracy bez kontrolera DMX. Żarówka zostaje wygaszona gdy na wejściu DMX INPUT (11) nie ma sygnału sterującego [kontroler DMX wyłączony lub nie podłączony]. Po pojawieniu się sygnału sterującego DMX, żarówka zostanie zapalona. Aby zapisać ustawienia, wcisnąć przycisk ENTER. Praca ramienia normalna lub przeciwna W przypadku pracy dwóch lub więcej TWIST-150, ramiona obrotowe poszczególnych urządzeń mogą pracować jednakowo lub przeciwnie. Przyciskami DOWN lub UP (3) wybrać: praca normalna praca przeciwna (odwrócona) Aby zapisać ustawienia, wcisnąć przycisk ENTER. Praca głowicy normalna lub przeciwna W przypadku pracy dwóch lub więcej TWIST-150, głowice poszczególnych urządzeń mogą pracować jednakowo lub przeciwnie. Przyciskami DOWN lub UP (3) wybrać: praca normalna praca przeciwna (odwrócona) Aby zapisać ustawienia, wcisnąć przycisk ENTER. . Po chwili ponownie zostanie wyświetlony numer odtwarzanego programu. Za pomocą regulatora SENSITIVITY (13) możliwe jest ustawianie czułości mikrofonu odpowiednio do żądanego stopnia sterowania muzyką. Podczas zmiany kolorów i wzorów oraz ruchu głowicy i ramienia w rytm muzyki, zapala się na krótko zielona dioda SOUND (5). Uwaga: Po zmianie głośności muzyki, może zachodzić potrzeba zmiany ustawienia regulatora czułości. 3) Dostępne są cztery programy, o różnym maksymalnym kącie obrotu głowicy: 7 PL Poprzez menu (rys. 2) możliwe jest dokonywanie podstawowych ustawień. Wcisnąć przycisk MENU (2) kilka razy, aż żądana funkcja pojawi się na wyświetlaczu (1). Następnie wcisnąć przycisk ENTER (4). Jeżeli nastąpi przerwa ponad 8 sekund od ostatniego wciśnięcia przycisku, procedura ustawiania zostanie zakończona. Włączanie i wyłączanie funkcji Blackout Przyciskami DOWN lub UP (3) wybrać: 6 5 6.1 Podstawowe ustawienia Show 1 odpowiedni gdy urządzenie jest ustawione na podłodze. Maksymalny kąt nachylenia wynosi 210°. Show 2 odpowiedni gdy urządzenie jest zamocowane na suficie. Maksymalny kąt nachylenia wynosi 90°. Show 3 odpowiedni gdy urządzenie pracuje na scenie i świeci w stronę publiczności. Kąt obrotu wynosi 160° natomiast nachylenie 90° (60° ponad poziom i 30° w dół). Show 4 również odpowiedni przy montażu sufitowym urządzenia. Maksymalny kąt obrotu to 160° natomiast nachylenie 90° (75° w przód i 15° w tył). a) Przełączanie pomiędzy programami Show 1 do 4, odbywa się przyciskiem MENU (2). Należy wcisnąć go kilka razy, aż na wyświetlaczu pojawi się (Tryb Show). Jeżeli nastąpi przerwa ponad 8 sekund od ostatniego wciśnięcia przycisku, procedura ustawiania zostanie zakończona. b) Wcisnąć przycisk ENTER (4). Wyświetlacz zaczyna migać. c) Przyciskiem DOWN lub UP (13), wybrać Show 1 do Show 4. d) Aby zapisać ustawienia, wcisnąć przycisk ENTER. Na wyświetlaczu pojawi się na kilka sekund. Następnie zostanie wyświetlony numer wybranego programu. 7.1 Łączenie kilku urządzeń TWIST-150 Pojedyncze urządzenia mogą zostać połączone w celu równoczesnego sterowania wszystkich urządzeń podrzędnych zgodnie z rytmem nadrzędnego, poprzez wbudowany mikrofon. 1) Połączyć wyjście DMX OUTPUT (12) urządzenia nadrzędnego z wejściem DMX INPUT (11) pierwszego urządzenia podrzędnego, za pomocą kabla z 3-pinowymi złączami XLR (np. serii MEC-... lub MECN-... marki “img Stage Line”). 2) Kolejne urządzenia podłączać analogicznie, łącząc wyjścia DMX OUT z wejściami DMX IN kolejnych urządzeń, itd. 3) W czasie sterowania urządzeniem podrzędnym za pomocą sygnału z urządzenia nadrzędnego, świeci się czerwona dioda SLAVE (5). 4) Ruch urządzenia podrzędnego może być zgodny lub przeciwny do ruchu nadrzędnego (np. gdy podłączone jest tylko jedno urządzenie podrzędne). a) Aby przełączać się pomiędzy pracą zgodną i przeciwną, należy wcisnąć przycisk MENU (2) na urządzeniu podrzędnym klika razy, aż na wyświetlaczu pojawi się (Tryb Slave). Jeżeli nastąpi przerwa ponad 8 sekund od ostatniego wciśnięcia przycisku, procedura ustawiania zostanie zakończona. b) Wcisnąć przycisk ENTER (14). Wyświetlacz zacznie migać. c) Przyciskiem DOWN lub UP (3), wybrać (Slave 1) dla pracy zgodnej lub (Slave 2) dla przeciwnej. d) Aby zapisać ustawienia, wcisnąć przycisk ENTER. Na wyświetlaczu pojawi się na kilka sekund. Następnie zostanie wyświetlony numer wybranego programu. 29 PL wybór wzoru przez przyciśnięcie przycisku na dłużej. Jeżeli wiązka światła ma się nie poruszać, należy ręcznie skierować wiązkę na odpowiedni punkt, jak podano poniżej. 4. Manualne kierowanie wiązką światła (dioda miga szybko) Przytrzymać wciśnięty przycisk FUNCTION, głowica zacznie się obracać. Po skierowaniu wiązki w odpowiednią stronę, zwolnić przycisk. Ponowne wciśnięcie i przytrzymanie przycisku pozwoli ustawić odpowiednie nachylenie wiązki w pionie. Aby móc ponownie przeprowadzić ustawienie wiązki, należy wcisnąć dwukrotnie, na krótko przycisk FUNCTION. 7.2 Sterowanie pilotem LC-3 Pilot zdalnego sterowania LC-3, dostępny jest jako wyposażenie dodatkowe, pozwala na sterowanie różnymi funkcjami: 1) Podłączyć pilot do gniazda REMOTE CONTROL (10). 2) Nie wolno jednocześnie podawać sygnału sterującego na wejście DMX INPUT (11). Żółta dioda MASTER (5) musi się świecić. 3) Poprzez wyjście DMX OUTPUT (12), możliwe jest podłączenie kolejnych urządzeń TWIST-150 ( rozdz. 7.1) w celu równoczesnego sterowania pilotem. 4) Za pomocą przycisku STAND BY (16), możliwe jest włączanie i wyłączanie trybu sleep. Głowica ustawia się w pozycję wyjściową i następuje zamknięcie migawki . Zapala się dioda sygnalizacyjna obok przycisku. 5) Przycisk MODE (18), służy do wyboru trybu pracy: 1. Tryb stroboskopowy SOUND 1 (dioda obok przycisku MODE nie świeci się) Każde przyciśnięcie i przytrzymanie przycisku FUNCTION (17), powoduje przełączenie na kolejny z trzech efektów stroboskopowych: – stroboskop niezależny od muzyki, synchronizacja z urządzeniami podrzędnymi – stroboskop niezależny od muzyki, przemienny z urządzeniami podrzędnymi – stroboskop zależny od muzyki Po zwolnieniu przycisku FUNCTION, następuje powrót do odtwarzanego programu. 2. Tryb Show (dioda miga) Wybór programu (Show 1 do 4) odbywa się za pomocą przycisku FUNCTION (17) [ rozdz. 7, krok 3] 3. Manualny wybór koloru i wzoru (dioda świeci ciągle) Wybór koloru odbywa się przez krótkie naciśnięcie przycisku FUNCTION, natomiast Praca z kontrolerem świateł Do sterowania wymagany jest kontroler z protokołem DMX-512 (np. DMX-1440 lub DMX-510USB marki “img Stage Line”). Urządzenie wyposażone jest w 11 kanałów sterujących. Można jednak przełączyć je w tryb pracy 8-kanałowej, jeżeli nie zachodzi konieczność korzystania ze wszystkich 11 kanałów. Funkcje poszczególnych kanałów podano w rozdz. 11.1. 8.1 Podłączanie Złącza DMX w urządzeniu stanowią 3-pinowe XLR (11 i 12) o następującej konfiguracji pinów: pin 1 = masa, 2 = DMX-, 3 = DMX+. Do podłączania, powinno się używać kabli o wysokiej przepływności danych. W przypadku stosowania kabli mikrofonowych o standardowym ekranowaniu, minimalna średnica żył powinna wynosić 0,22 mm2, pojemność możliwie mało, a całkowita długość kabla do 100 m. Dla kabli o długości powyżej 150 m zaleca się stosowanie wzmacniacza poziomu DMX (np. SR-103DMX marki “img Stage Line”). 3) Na wyjście DMX ostatniego z podłączonych efektów podłączyć opornik 120 Ω (> 0,3 W): Opornik należy wlutować pomiędzy 2 i 3 pin we wtyku XLR i następnie wpiąć go do wyjścia; można również użyć gotowy wtyk kończący (np. DLT123 marki “img Stage Line”) 8.2 Ustawianie adresu startowego oraz numeru kanałów DMX W przypadku sterowania efektem świetlnym poprzez kontroler DMX, należy ustawić adres startowy DMX pierwszego kanału. Jeśli np. adres 17 kontrolera przewidziany jest do sterowania obrotem głowicy, należy ustawić adres startowy 17 na urządzeniu TWIST-150. Pozostałym funkcjom urządzenia zostanie automatycznie przypisanych kolejnych 10 kanałów (tu: 18 do 27). Następnemu urządzeniu sterowanemu kontrolerem może zostać przypisany pierwszy wolny adres, w tym przypadku 28. (W trybie 8kanałowym, urządzenie wykorzystuje tylko 8 kanałów DMX, adres startowy kolejnego urządzenia wynosi wówczas 25). 1) Ustawianie adresu startowego DMX: a) Wcisnąć przycisk MENU (2) jeden raz, na wyświetlaczu (1) pojawi się . Jeżeli nastąpi przerwa ponad 8 sekund od ostatniego wciśnięcia przycisku, procedura ustawiania zostanie zakończona. b) Wcisnąć przycisk ENTER (4). Wyświetlony zostanie ustawiony adres. 1) Połączyć wejście DMX (11) z wyjściem DMX kontrolera. c) Przyciskiem DOWN lub UP (3) ustawić żądany adres i zapisać ustawienie przyciskiem ENTER. 2) Ustawić liczbę kanałów DMX wykorzystywanych przez urządzenie. ponad 8 sekund od ostatniego wciśnięcia przycisku, procedura ustawiania zostanie zakończona (Finish) po czym urządzenie powraca do poprzedniego trybu pracy. a) Wcisnąć przycisk MENU kilka razy, aż na wyświetlaczu pojawi się (Kanały). b) Wcisnąć przycisk ENTER. Liczba kanałów DMX zostanie wyświetlona. 2) Wcisnąć przycisk ENTER (4) na około 5 sekund, aż na wyświetlaczu pojawi się . Głowica ustawi się w pionowo (0°) i zostanie wygaszone światło. c) Ustawić odpowiednią liczbę kanałów DMX ( lub ) przyciskiem DOWN lub UP i zatwierdzić przyciskiem ENTER. 3) Wcisnąć ponownie przycisk ENTER. Migawka zostanie otwarta, a na wyświetlaczu pojawi się migający symbol . 3) Aby wyjść z menu, przytrzymać wciśnięty przycisk MENU aż wyświetlacz przełączy się ponownie na adres startowy lub numer wybranego programu, albo odczekać około 8 sekund. 4) Jeżeli poziome ustawienie głowicy jest wygodniejsze do dalszych ustawień, należy wcisnąć przycisk ENTER (kilka razy). 4) Po odebraniu sygnału sterującego DMX z kontrolera, zapala się czerwona dioda DMX (5), a na wyświetlaczu pokazany zostaje adres startowy. TWIST-150 może być sterowany poprzez kontroler DMX. Aby wypuścić wiązkę światła przez otwarcie migawki, ustawić na kanale 3 (trybie 8-kanałowym) lub kanale 9 (w trybie 11-kanałowym) wartość DMX pomiędzy 8 a 15 lub do 255 ( rozdz. 11.1). 5) Przez obrót obiektywu (7) możliwa jest zmiana wzoru. 9 Dodatkowe funkcje 9.1 Ustawianie wartości korygujących (tryb offset) Wartości korygujące umożliwiają precyzyjne ustawienie głowicy oraz kolorów i gobo. W przypadku synchronicznego sterowania kilkoma TWIST-150 poprzez te same adresy DMX, możliwe jest m.in. zminimalizowanie odchyleń wiązki światła. 1) Wcisnąć przycisk MENU (2). Na wyświetlaczu (1) pojawi się (Adres). Jeżeli nastąpi przerwa 30 8 2) Połączyć wyjście DMX (12) urządzenia nadrzędnego z wejściem DMX pierwszego z urządzeń podrzędnych. Kolejne urządzenia podłączać analogicznie. 5) Wcisnąć przycisk MENU, a następnie za pomocą przycisku DOWN lub UP (3) wybrać: płynne ustawienie obrotu głowicy płynne ustawienie nachylenia głowicy ustawienie kąta obrotu koła z gobo ustawienie kąta obrotu kolorowego koła 6) Aktywować wybraną funkcję klawiszem ENTER. 7) Dokonać żądanego DOWN i UP. ustawienia przyciskami 8) Zapisać ustawienia przyciskiem ENTER. Teraz możliwe jest przejście do kolejnej funkcji za pomocą przycisków DOWN lub UP. 9) Wciągu 8 sekund od wciśnięcia ostatniego przycisku menu zostanie zamknięte. 9.2 Test samosprawdzający Urządzenie posiada trzy programy samosprawdzające. Wcisnąć przycisk MENU (2) kilka razy, aż na wyświetlaczu (1) pojawi się symbol wybranego programu testującego: krótki test Wcisnąć przycisk ENTER (4), aby uruchomić program. W czasie sprawdzania, na wyświetlaczu miga symbol . Zakończenie testu sygnalizowane jest lub test ciągły z sekwencyjnym wyświetlaniem wszystkich kolorów i gobo. Dla obu tych programów testujących, możliwy jest wybór 12 różnych sekwencji ruchów oraz zmiana prędkości ruchu. 1) Wcisnąć przycisk ENTER aby uruchomić test. Podczas sprawdzania na wyświetlaczu miga lub . 2) Aby zmienić sekwencję lub prędkość ruchów, wcisnąć przycisk ENTER ponownie. Na wyświetlaczu pojawia się (Move). 3) Jeżeli zmieniona ma być tylko prędkość ruchu, należy przejść do punktu 4). Aby zmienić sekwencję ruchów, wcisnąć jeszcze raz przycisk ENTER. Na wyświetlaczu pojawi się numer aktywnej sekwencji ruchów ( … ). Zmiana numeru sekwencji odbywa się przyciskami DOWN lub UP (3), uruchamianie przyciskiem ENTER. 4) Przełączyć z do (Move Speed) za pomocą przycisku DOWN lub UP, a następnie przyciskiem ENTER. Na wyświetlaczu pojawi się aktualna prędkość pomiędzy 0 (bardzo wolno) a 255 (szybko). Zmiana wartości odbywa się za pomocą przycisków DOWN i UP zatwierdzanie przyciskiem ENTER. 5) Do zatrzymania programu testującego służy przycisk MENU. Urządzenie powraca do poprzedniego trybu pracy po 8 sekundach. 9.3 Tryb Master W trybie master, najważniejsze funkcje sterujące urządzenia TWIST-150 mogą być wywoływane bez użycia kontrolera DMX. 1) Wcisnąć przycisk MENU (2) kilka razy, aż na wyświetlaczu pojawi się (Master Mode). Uwaga: Jeżeli nastąpi przerwa ponad 8 sekund od ostatniego wciśnięcia przycisku, procedura ustawiania zostanie zakończona! 9.5 Wyświetlanie wersji firmwareʼa W celu wyświetlenia wersji firmwareʼa (systemu operacyjnego urządzenia) należy: 2) Wybrać odpowiednią funkcję sterującą przyciskiem DOWN lub UP (3): 1) Wcisnąć przycisk MENU (2) kilka razy, aż na wyświetlaczu (1) pojawi się (Version). obrót głowicy 2) Wcisnąć ponownie ENTER (4). Wersja firmwareʼa zostanie wyświetlona. nachylenie głowicy sterowanie migawką gobo 4) Ustawić wartość DMX przyciskami DOWN lub UP ( rozdz. 11.1). Urządzenie zareaguje natychmiast. 5) Po ponownym wciśnięciu przycisku ENTER, możliwy jest wybór kolejnej funkcji sterującej, przyciskami DOWN lub UP. 6) Aby wyjść z trybu master należy odczekać 8 sekund od ostatniego wciśnięcia przycisku. 9.4 Wyświetlanie czasu pracy PL 11 Specyfikacja Zasilanie: . . . . . . . . . . . 230 V~ / 50 Hz 3) Po 8 sekundach urządzenie powróci do poprzedniego trybu pracy. Pobór mocy: . . . . . . . . . 200 VA 9.6 Resetowanie Szerokość wiązki: . . . . . 14° W przypadku wystąpienia zakłóceń w pracy urządzenia, do ich wyeliminowania można posłużyć się funkcją reset: Kąty obrotu W poziomie (pan): . . 540° W pionie (tilt): . . . . . . 270° 1) Wcisnąć przycisk MENU (2) kilka razy, aż na wyświetlaczu (1) pojawi się (reset). Zakres temperatur: . . . . 0 – 40 °C 2) Wcisnąć ponownie ENTER (4). Głowica i ramię ustawią się w pozycję wyjściową. Na wyświetlaczu pojawi się symbol . Następnie urządzenie powróci do poprzedniego trybu pracy. Waga: . . . . . . . . . . . . . . 9,9 kg kolor 3) Aby aktywować wybraną funkcję, należy wcisnąć przycisk ENTER (4). Do czyszczenia można wykorzystać standardowe środki do czyszczenia szyb i luster, a następnie wytrzeć czyszczone elementy do sucha. Żarówka: . . . . . . . . . . . wyładowcza HID 95 V/150 W Wymiary: . . . . . . . . . . . 280 × 340 × 270 mm 10 Czyszczenie systemu optycznego W celu wyświetlenia stanu licznika godzin pracy, należy: Zaleca się regularne czyszczenie obiektywu oraz filtrów, w zależności od warunków pracy urządzenia: kurzu, dymu oraz innych czynników wpływających na osłabienie siły światła. Przed przystąpieniem do czyszczenia urządzenia należy bezwzględnie odłączyć urządzenie od gniazdka sieciowego, a następnie odczekać około 15 minut aż się wychłodzi. 1) Wcisnąć przycisk MENU (2) kilka razy, aż na wyświetlaczu (1) pojawi się (Fixture hours). 2) Wcisnąć ponownie ENTER (4). Liczba przepracowanych godzin zostanie wyświetlona. 3) Po 8 sekundach urządzenie powróci do poprzedniego trybu pracy. Z zastrzeżeniem możliwości zmian. Instrukcje obsługi są chronione prawem copyright for MONACOR ® INTERNATIONAL GmbH & Co. KG. Przetwarzanie całości lub części instrukcji dla osobistych korzyści finansowych jest zabronione. 1 2 3 4 5 6 7 8 9 10 11 12 13 14 11.1 Kanały DMX Kanał DMX Kanał DMX Tryb Tryb 8-kanałowy* 11-kanałowy Funkcja Wartość DMX 1 1 obrót głowicy 0 – 540°, skokowy 000 – 255 — 2 obrót głowicy, płynny 000 – 255 2 3 nachylenie głowicy 0 – 270°, skokowe 000 – 255 — 4 nachylenie głowicy, płynne 000 – 255 — 5 szybkość obrotu, szybko wolno 000 – 255 6 makra (sekwencje ruchów) bez makra makro 1 makro 2 makro 3 makro 4 makro 5 makro 6 makro 7 makro 8 makro 9 makro 10 makro 11 makro 12 000 – 015 016 – 035 036 – 055 056 – 075 076 – 095 096 – 115 116 – 135 136 – 155 156 – 175 176 – 195 196 – 215 216 –235 236 – 255 — — 7 szybkość makra, szybko wolno 000 – 255 8 8 brak funkcji reset brak funkcji niezależna praca (program show) 000 – 199 200 – 209 210 – 239 240 – 255 9 migawka zamknięta (Blackout) migawka otwarta stroboskop, wolno szybko bez stroboskopu, migawka otwarta efekt drżenia, wolno szybko migawka otwarta 000 – 007 008 – 015 016 – 131 132 – 139 140 – 247 248 – 255 3 * W trybie 8-kanałowym kanały DMX 6 i 7 nie mają przypisanej funkcji. Tryb Tryb 8-kanałowy* 11-kanałowy 4 10 Funkcja gobo brak gobo gobo 1 gobo 2 gobo 3 gobo 4 gobo 5 gobo 6 gobo 7 gobo 8 gobo 9 gobo 10 gobo 11 gobo 12 gobo 13 gobo 14 ciągła zmiana gobo wolno szybko szybko wolno (praca przeciwna) Wartość DMX 000 – 008 009 – 016 017 – 025 026 – 033 034 – 042 043 – 050 051 – 059 060 – 067 068 – 076 077 – 084 085 – 093 094 – 101 102 – 110 111 – 118 119 – 127 128 – 191 192 – 255 kolor 5 11 biały zielony zielony + magenta magenta jasnoniebieski żółty czerwony niebieski + czerwony niebieski UV fiolet zielony zielony + pomarańczowy pomarańczowy żółty + pomarańczowy żółty żółty + różowy różowy ciągła zmiana kolorów szybko wolno wolno szybko (praca przeciwna) 000 – 007 008 – 014 015 – 022 023 – 029 030 – 037 038 – 044 045 – 052 053 – 059 060 – 067 068 – 074 075 – 082 083 – 089 090 – 097 098 – 104 105 – 112 113 – 119 120 – 127 128 – 191 192 – 255 31 DK Lyseffektenhed TWIST-150 Til rengøring af huset må kun benyttes en tør, blød klud; der må under ingen omstændigheder benyttes kemikalier eller vand. Til rengøring af linsen kan der benyttes almindelig vindues-/ skærmrens. Hvis enheden benyttes til andre formål, end den oprindeligt er beregnet til, hvis den monteres eller betjenes forkert, eller hvis den ikke repareres af uautoriseret personel, omfattes eventuelle skader ikke af garantien. Læs nedenstående sikkerhedsoplysninger grundigt igennem før ibrugtagning af enheden. Bortset fra sikkerhedsoplysningerne henvises til den engelske tekst. Vigtige sikkerhedsoplysninger Denne enhed overholder alle nødvendige EU-direktiver og er som følge deraf mærket . ADVARSEL Enheden benytter livsfarlig netspænding (230 V~). Overlad servicering til uddannet personel. Udfør aldrig modifikationer der ikke er beskrevet i denne manual. Indfør ikke genstande i lampens ventilationshuller. Lyseffekten leveres uden lyskilde. Der skal brubes en udladningspære af typen HID 95 V/150 W. S Enheden er kun beregnet til indendørs brug. Beskyt den mod vanddråber og -stænk, høj luftfugtighed og varme (tilladt omgivelsestemperatur 0 – 40 °C). Undgå at placere væskefyldte genstande, som f. eks. glas, ovenpå enheden. Tag ikke enheden i brug og tag straks stikket ud af stikkontakten i følgende tilfælde: 1. hvis der er synlig skade på enheden, f. eks. kabinettet, linsen eller netkablet. 2. hvis der kan være opstået skade, efter at enheden er tabt eller lignende. 3. hvis der forekommer fejlfunktion. Enheden skal altid repareres af autoriseret personel. Tag aldrig netstikket ud af stikkontakten ved at trække i kablet, tag fat i selve stikket. Tag kun fat i den nederste del, når du skal transportere enheden. Enheden må aldrig bæres i rammen (8) eller hovedet (6). Andre typer lyskilder må under ingen omstændigheder benyttes! Følgende lyskilder fra “img Stage Line” kan benyttes: Best. Nr. Gns. levetid HLT-150HID 05.9945 1000 h Rør aldrig ved lyskilden med fingrene. Fingeraftryk reducerer lyset, brænder ind u glasset og nedsætter lyskildens levetid væsentligt. ADVARSEL Før lyskilden installeres af enheden, skal stikket under alle omstændigheder tages ud af stikkontakten! Rengör endast med en mjuk och torr trasa, använd aldrig kemikalier eller vatten vid rengöring. Linsen kan rengöras med vanligt fönsterputsmedel. Om enheten används för andra ändamål än avsett, om den monteras eller används på fel sätt eller inte repareras av auktoriserad personal upphör alla garantier att gälla. I dessa fall tas inget ansvar för uppkommen skada på person eller materiel. Säkerhetsföreskrifter Enheten uppfyller alla krav enligt EU och har därför försetts med symbolen . 32 Da lyskilden bliver meget varme under drift, skal de have lov til at køle ned efter brug af enheden, før de udskiftes (nedkølingstiden er mindst 15 minutter). Läs igenom säkerhetsföreskrifterna innan enheten tas i bruk. Ytterligare information återfinns på övriga språk i manualen. Ge ovillkorligen även akt på följande: VARNING: Titta aldrig direkt in i ljuskällan. Risk för permanent ögonskada föreligger. Observera att snabba ljusväxlingar kan ge upphov till epileptiska anfall hos känsliga personer. Enheten är endast avsedd för inomhusbruk. Skydda enheten mot vätskor, hög luftfuktighet och hög värme (tillåten omgivningstemperatur 0 – 40 °C). Placera inte föremål innehållande vätskor, t. ex. dricksglass, på enheten. Använd inte enheten och ta omedelbart kontakten ur eluttaget om något av följande fel uppstår: 1. Om det finns synliga skador på enheten, chassiet, linsen eller elsladden. 2. Enheten är skadad av fall e. d. 3. Enheten har andra felfunktioner. Enheten skall alltid lagas av kunnig personal. Drag aldrig ur kontakten genom att dra i sladden, utan ta tag i kontaktkroppen. Ta endast tag i enhetens nedre delar vid transport. Lyft aldrig i panoreringshuvudet (6) eller i fästet (8) som häller denna. Kig aldrig direkte på lyskilden, når enheden er åben. Det kraftige lys og UV-strålerne kan være farlige for øjnene. Lyskilderne indeholder skadelige stoffer (f. eks. kviksølv), som kan skade miljøet, og skal derfor afleveres på en genbrugsstation. Lamperne skal senest udskiftes efter at den gennemsnitlige levetid er overskredet med 25 %, da der eller ved fortsat brug er fare for eksplosion som følge af forhøjede strukturændringer i quartzglasset. Enheden er forsynet med en levetidstæller. Denne bruges til at bestemme levetiden på lyskilden. Noter tælleren når lyskilden udskiftes – se kapitel 9.4 i det engelske afsnit under “Display of operating hours”. Hvis en lampe eksploderer under drift skal de umiddelbare omgivelser hvori lampen er monteret forlades med det samme, for at undgå sundhedsfare der opstår som følge af kviksølvdampe; en god udluftning af lokalet er påkrævet. Montering Fastgør enheden på en sikker måde. Type Ljuseffektenhet TWIST-150 VARNING Enheten använder hög spänning internt (230 V~). Överlåt all service till utbildad personal. Gör aldrig modifieringar som inte angetts i denna manual. Stoppa aldrig in föremål i ventilhålen då detta kan ge elektriska överslag med skada på person och materiel. Installering af lampen Hvis enheden skal tages ud af drift for bestandigt, skal den bringes til en lokal genbrugsstation for bortskaffelse. Vær altid opmærksom på følgende: ADVARSEL: Hurtige farveskift kan udløse epileptiske anfald hos personer der fotosensitive eller lider af epilepsi. VIGTIGT For at undgå ophobning af varme i enheden skal monteringsstedet vælges således, at der sikres tilstrækkelig luftcirkulation under drift. Stil enheden mindst 1 m fra andre overflader. Kabinettets ventilationshuller må ikke tildækkes. Det er absolut nødvendigt at sikre tilstrækkelig afstand til materialer, som er let antændelige og følsomme over for varme. ADVARSEL Hvis enheden monteres hvor personer opholder sig nede under enheden, skal den sikres med f. eks. en sikkerhedswire. Træk wiren gennem de 2 åbninger (22) og fastgør den så faldet maksimalt kan blive 20 cm. Lamporna som anvisas innehåller små mängder skadligt material, främst kvicksilver, som kan skada miljön och måste därför kasseras på ett betryggande sätt enligt föreskrifter i respektive land där dessa används. Lamporna måste bytas ut senast efter 1,25 gånger medellivslängden eftersom risken för en explosion därefter stiger avservärt p.g.a. strukturförändringar i kvartsglaset. Enheten är försedd med en arbetstidsmätare. Denna kan användas för avläsning av lampans glödtid. Skriv ner tidgivningen vid byte av lampa – se kapitel 9.4 “Display of operating hours”. Om en lampexplosion skett då lampan varit i drift skall rummet där apparaten finns, för säkerhets skull utrymmas, för att fullständigt kunna utesluta hälsovådlig kvicksilverånga. Sörj för god ventilation. Om enheten skall kasseras skall den lämnas till återvinning. Montering av lampa Ljuseffektenheten levereras utan lampa. En urladdningsbar lampa av typ HID 95 V/150 W behövs. Lampor av annan typ får under inga omständigheter användas. Följande lampor från “img Stage Line” produkt område kan användas. Montering Montera enheten säkert och professionellt. Föremål Order nummer Genomsnittlig livslängd OBS För att undvika överhettning av enheten skall den monteras så att luften kan cirkulera fritt runt den. HLT-150HID 05.9945 Placera enheten minst 1 m från materialet som skall belysas. Enheten får inte heller täckas över då detta medför risk för brand. Det är mycket viktigt att hålla avstånd från brännbart eller värme känsligt material då lampan blir mycket varm vid användning. 1000 h Rör aldrig vid lampan, fingeravtryck ger försämrad belysning och även inbränning av smuts på lampan. VARNING All montering/ demontering av lampa skall ske endast om kontakten är uttagen ur elurtaget! Då lampor blir mycket varma vid användning, låt först lampan kallna en stund (minst 15 min.) innan byte sker för att undvika brännskador. Titta aldrig direkt in i lampan när den är i funktion. Det skarpa ljuset och UV-ljuset kan orsaka permanenta ögonskador. VARNING Enheten måste monteras på ett yrkesmässigt sätt. Om den monteras hängande över personer skall den säkras med en kedja eller en vajer så att den inte kan orsaka skada. Montera vajern eller kedjan i de 2 öppningarna i basplattan (22) och i ljusenheten så att maximal fallhöjd blir 20 cm. Valoefektilaite TWIST-150 Käytä laitteen ulkopuoliseen puhdistamiseen ainoastaan kuivaa, pehmeää kangasta. Älä milloinkaan käytä vettä tai kemikaaleja. Linssin puhdistamisessa voidaan käyttää markkinoilla olevia, tähän käyttöön tarkoitettuja lasilinssinpuhdistusaineita. Laitteen takuu raukeaa, eikä valmistaja, maahantuoja tai myyjä ota vastuuta mahdollisista välittömistä tai välillisistä vahingoista, jos laitetta on käytetty muuhun kuin alkuperäiseen käyttötarkoitukseen, laitetta on taitamattomasti käytetty tai kytketty tai jos laitetta on huollettu muussa kuin valtuutetussa huollossa. Ole hyvä ja tutustu seuraaviin ohjeisiin varmistaaksesi tuotteen turvallisen käytön. Tarvitessasi lisätietoja tuotteen käytöstä löydät ne muun kielisistä käyttöohjeista. Turvallisuudesta Laite vastaa kaikkia vaadittuja EU direktiivejä, joten se on varustettu merkinnällä. VAROITUS Tämä laite toimii vaarallisella 230 V~ jännitteellä. Huollon saa tehdä vain siihen koulutuksen saanut henkilö. Laitteeseen ei saa tehdä ohjekirjan vastaisia muutoksia. Asiaa tuntematon käsittely saattaa aiheuttaa sähköiskun. Ole hyvä ja huomioi seuraavat seikat: HUOMIO: Älä katso suoraan valonlähteeseen, se voi vaurioittaa silmää. Erittäin nopeat valon muutokset saattavat laukaista epileptisen kohtauksen henkilöillä, jotka ovat valoherkkiä tai epileptisiä. Laitteet soveltuvat vain sisätilakäyttöön. Suojele niitä kosteudelta, vedeltä ja kuumuudelta (sallittu ympäröivä lämpötila 0 – 40 °C). Älä sijoita laitteen päälle mitään nestettä sisältävää, kuten vesilasia tms. Irrota virtajohto pistorasiasta, äläkä käynnistä laitetta, jos: 1. laitteessa on näkyviä vaurioita esim. ulkokuoressa, linsseissä tai virtajohdossa, 2. putoaminen tai muu vastaava vahinko on saattanut aiheuttaa vaurion, 3. laitteessa esiintyy toimintahäiriöitä. Laite täytyy kaikissa näissä tapauksissa huollattaa valtuutetussa huoltoliikkeessä. Älä koskaan irrota virtajohtoa pistorasiasta johdosta vetämällä. Kanna, liikuta ja suuntaa laitetta ainoastaan sen alaosasta. Älä milloinkaan kanna laitetta sen kääntöpäästä (6) tai kääntöpään aisasta (8). Kun laite poistetaan lopullisesti käytösta, vie se paikalliseen kierrätyskeskukseen jälkikäsittelyä varten. Lampun asennus Valoefektilaite toimitetaan ilman polttimoa. Laitteessa tulee käyttää HID 95 V/150 W -purkauspolttimoa. Muuntyyppistä polttimoa ei saa käyttää missään tapauksessa! Seuraavia “img Stage Line” -tuoteryhmän polttimoita voidaan käyttää: Tuot Tilausnumero Käyttöikä keskimäärin HLT-150HID 05.9945 1000 h Älä koske sormilla polttimon lasiin! Sormenjäljet vähentävät polttimon valotehoa ja lyhentävät polttimon elinikää. VAROITUS Ennen lamppujen vaihtoa tai asennusta tulee virtajohto irrottaa pistorasiasta! Koska halogeenilamput kuumenevat käytön aikana kovasti, anna niiden jäähtyä käytön jälkeen (jäähtymisaika ainakin 15 minuuttia). Älä koskaan katso sytytettyyn purkauslamppuun laitteen ollessa avattuna. Lampun kirkkaus ja UV-säteily saattavat aiheuttaa silmävaurion. FIN Tässä luetellut polttimot sisältävät pieniä määriä haitallisiksi luokiteltuja aineita (esim. elohopeaa), joten polttimoiden käytössä tulee noudattaa varovaisuutta ja hävitettäessä polttimot tulee toimittaa ongelmajätekeräykseen. Polttimot on vaihdettava viimeistään, kun niitä on poltettu 1,25-kertaisen keskimääräisen polttoiän verran. Enemmän käytettäessä räjähtämisriski huomattavasti kasvaa johtuen kvartsilasin liitoskohdissa tapahtuvista muutoksista. Laitteessa on polttimon käyttöaikalaskuri, joka auttaa ajoittamaan polttimon vaihtoa. Polttimoa vaihtaessasi muista nollata laskuri – katso luku 9.4. Käytössä tapahtuneen polttimon räjähdyksen jälkeen tulisi varovaisuussyistä poistua valoefektin välittömästä läheisyydestä, jotta täysin vältyttäisiin vapautuneen elohopeahöyryn terveydelle haitallisilta vaikutuksilta. Huolehdi tilan tehokkaasta, tuuletuksesta. Kiinnitys Noudata kiinnityksessä erityistä huolellisuutta ja huomioi turvallisuustekijät. HUOMIO Jotta lämmön kertyminen laitteeseen voitaisiin estää, tulee asennuspaikka valita siten, että riittävä ilmanvaihto varmistetaan toiminnan aikana. Sijoita laite niin, että ympäröiviin pintoihin jää vähintään 1 metrin välimatka. Laitteen tuuletusaukkoja ei saa peittää. Ehdottoman tärkeää on säilyttää riittävä etäisyys syttyviin tai lämmönarkoihin materiaaleihin. VAROITUS Laite on asennettava huolellisesti ja turvallisesti. Mikäli se asennetaan riippumaan, on asennus turvattava turvavaijerin avulla. Asenna vaijeri niin, että se menee läpi pohja levyssä olevista kahdesta aukosta (22). Vaijeri tulee kiristää niin, että laite pääsee tippumaan enintään 20 cm matkan. 33 34 35 36 20 21 22 23 24 37 ® Copyright © by MONACOR INTERNATIONAL GmbH & Co. KG, Bremen, Germany. All rights reserved. A-0819.99.01.03.2008