1
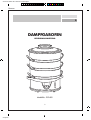
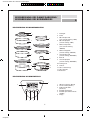
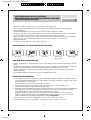
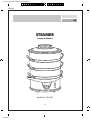
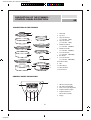
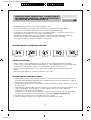
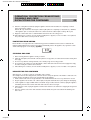
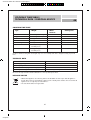
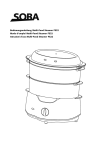
27331 AE steamer IM-A 8/14/06 4:56 PM Page 1
C
M
Y
CM
MY
CY CMY
A5
Dampfgarofen
(3003116 - 3003117)
Hergestellt von:
Guang Dong Xinbao Electrical für:
AERA Rundfunk und Fernseh GmbH
Hanns-Martin-Schleyer Strasse 2, D-77656 Offenburg
Hotline/EU: (0049) - (0)1805 64 66 66*
(*0,14€/Minute aus dem Netz der Deutschen Telekom)
Composite
K
27331 AE steamer IM-A 8/14/06 4:56 PM Page 2
C
Dampfgarofen
M
Y
CM
MY
CY CMY
K
Hotline/EU: (0049) - (0)1805 64 66 66*
BEDIENUNGSANLEITUNG
USER MANUAL
Composite
27331 AE steamer IM-A 8/14/06 4:56 PM Page 3
C
M
Y
CM
MY
CY CMY
K
German
D
DAMPFGAROFEN
BEDIENUNGSANLEITUNG
Modell-Nr.: FS1149S
3
Composite
27331 AE steamer IM-A 8/14/06 4:56 PM Page 4
C
M
INHALTSVERZEICHNIS /
WICHTIGE SICHERHEITSHINWEISE
Y
CM
MY
CY CMY
K
D
INHALTSVERZEICHNIS
Wichtige Sicherheitshinweise
Beschreibung des Dampfgarofens
Beschreibung des Bedienfeldes
Beschreibung des Funktionswahlschalters
Vor dem Einschalten
Einzelteilbeschreibung
Bedienung
Trockenschutz
Reinigung und Pflege
Entkalken des Behälters
Hinweise zur Zubereitung
Garzeittabelle
Technische Daten
Entsorgungshinweise
Serviceadresse
4
6
6
7
7
7
8
9
9
9
10
11
11
11
12
Bei der Benutzung elektrischer Geräte sind grundlegende Sicherheitshinweise zu beachten. Um
die Gefahr von Verbrennungen, Stromschlägen, Bränden, und/oder Personenschäden zu
verringern, lesen Sie bitte vor der Inbetriebnahme des Gerätes diese Bedienungsanweisung
aufmerksam durch und beachten Sie beim Gebrauch des Gerätes alle Hinweise.
Bewahren Sie diese Bedienungsanleitung für den weiteren Gebrauch sorgfältig auf.
Bei Weitergabe des Gerätes an Dritte, geben Sie bitte auch diese Bedienungsanleitung mit.
WICHTIGE SICHERHEITSHINWEISE
• Schließen Sie das Gerät nur an eine vorschriftsmäßig installierte Steckdose an. Verwenden Sie keine
Tischsteckdosenleiste oder Verlängerungskabel.
• Die auf dem Typenschild des Gerätes angegebene Spannung muss mit der Spannung Ihres Stromnetzes
übereinstimmen.
• Achten Sie beim Verlegen des Netzkabels darauf, dass es beim Betrieb des Gerätes nicht zu einer Stolperfalle werden
kann.
• Halten Sie das Netzkabel fern von heißen Flächen, offenen Flammen, sowie von scharfen Kanten.
• Berühren Sie das Netzkabel und den Netzstecker niemals mit feuchten oder nassen Händen.
• Tauchen Sie das Gerät, das Netzkabel und den Netzstecker niemals in Wasser oder andere Flüssigkeiten. Es besteht
Lebensgefahr durch Stromschlag!
• Wenn Sie den Netzstecker ziehen, ziehen Sie immer am Stecker und niemals am Kabel.
• Für einen ordnungsgemäßen Betrieb muss das Gerät ausreichend belüftet werden. Gewähren Sie nach oben einen
Abstand von 20 cm, an der Rückseite und an beiden Seiten jeweils 5 cm. Die Öffnungen an dem Gerät dürfen nicht
abgedeckt oder versperrt werden. Die Gerätefüße dürfen nicht entfernt werden
4
Composite
27331 AE steamer IM-A 8/14/06 4:56 PM Page 5
C
M
Y
CM
MY
CY CMY
K
WICHTIGE SICHERHEITSHINWEISE
D
• Benutzen Sie das Gerät niemals ohne Deckel. Entfernen Sie den Deckel nicht während des Betriebs.
Verbrennungsgefahr durch austretenden heißen Dampf.
• Bitte achten Sie darauf, dass der Wasserbehälter vor jeder Inbetriebnahme aufgefüllt, und korrekt eingesetzt wurde.
• Das Gerät darf nicht ohne Wasser und Gargut betrieben werden. Achten Sie darauf, dass das Gerät nicht überhitzt
wird.
• Lassen Sie das Gerät während des Gebrauchs nicht unbeaufsichtigt.
• Während des Betriebes wird das Gerät stark erhitzt. Berühren Sie das Gerät nur an den für die Handhabung und
Bedienung vorgesehen Stellen (Bedienfeld, Griff). Vermeiden Sie insbesondere jeden Kontakt zu den Heizelementen im
Innenraum. Verbrennungsgefahr!
• Im Gerätegehäuse befinden sich Lüftungsschlitze, durch welche während des Betriebs überschüssiger, heißer Dampf
austreten kann! Vermeiden Sie jeden Kontakt mit dem austretenden Dampf und sorgen Sie für ausreichende
Abluftfreiheit. Positionieren Sie das Gerät so, das die Lüftungsschlitze nicht auf Personen oder Gegenstände zeigen.
• Flüssigkeiten oder andere Nahrungsmittel dürfen nicht in fest verschlossenen Behältern oder Gläsern erhitzt werden, da
diese aufgrund der Wärmeausdehnung explodieren können.
• Während des Betriebs werden die Speisen und Behälter stark erhitzt. Verwenden Sie für die Speiseentnahme bitte
immer Topflappen.
• Um Verbrühungen zu vermeiden, muss der Inhalt von Saugflaschen und Gläsern mit Babynahrung vor dem Füttern
umgerührt oder geschüttelt werden und die Temperatur unbedingt überprüft werden.
• Ziehen Sie vor der Reinigung immer den Netzstecker aus der Steckdose und lassen Sie das Gerät vollständig
abkühlen.
• Kinder erkennen nicht die Gefahren, die beim Umgang mit Elektrogeräten entstehen können. Halten Sie Kinder vom
Gerät fern. Seien Sie beim Gebrauch des Gerätes bitte besonders aufmerksam, wenn Kinder in der Nähe sind!
• Benutzen Sie das Gerät nicht, wenn es Beschädigungen aufweist, wenn es heruntergefallen ist oder nicht einwandfrei
funktioniert.
• Überprüfen Sie das Gerät, das Netzkabel sowie den Netzstecker regelmäßig auf sichtbare Beschädigungen.
Verwenden Sie das Gerät auf keinen Fall, wenn Sie Beschädigungen festgestellt haben. Versuchen Sie nicht das Gerät
selbst zu reparieren.
• Die Steckdose muss leicht zugänglich sein, so dass der Stecker im Notfall mühelos herausgezogen werden kann.
• Reparaturen dürfen nur durch qualifiziertes Fachpersonal durchgeführt werden.
• Verwenden Sie das Gerät nur auf ebenen, stabilen und hitzebeständigen Oberflächen. Stellen Sie das Gerät nicht in
der Nähe von Wärmequellen oder offenem Feuer auf.
• Bitte achten Sie darauf, dass sich der Wasserstand im Wasserbehälter immer zwischen der minimalen und maximalen
Markierung befindet.
• Benutzen Sie das Gerät nicht im Freien.
• Das Gerät ist nur für den Gebrauch in Privathaushalten und nicht für den gewerblichen Einsatz geeignet.
5
Composite
27331 AE steamer IM-A 8/14/06 4:56 PM Page 6
C
M
Y
CM
MY
CY CMY
BESCHREIBUNG DES DAMPFGAROFENS/
BESCHREIBUNG DES BEDIENFELDES
K
D
BESCHREIBUNG DES DAMPFGAROFENS
1
2
8
1
2
3
4
3
5
9
4
6
10
7
5
11
8
9
6
13
12
7
14
10
11
12
13
14
Deckelgriff
Deckel
Obere Dampfschale
(siehe Seitenbeschriftung: “TOP“)
Obere Dampfplatte
(siehe Beschriftung: “TOP“)
Mittlere Dampfschale
(siehe Seitenbeschriftung:
“MIDDLE“)
Mittlere Dampfplatte
(siehe Beschriftung: “MIDDLE“)
Untere Dampfschale
(siehe Beschriftung: “BOTTOM“)
Reiskorb
Untere Dampfplatte
(siehe Beschriftung: “BOTTOM“)
Auffangschale
Schlauch
Wasserstandsanzeige
Wasserbehälter
Bedienfeld
BESCHREIBUNG DES BEDIENFELDES
1
1
2
3
6
4
5
6
2
3
4
5
6
Composite
LCD-Power-Anzeige (Betrieb)
An-/Aus-Schalter (An/Aus)
Funktionswahlschalter
(Garmodus)
Einstellknopf (Einstellen)
Einstellknopf für Minuten/Stunde
(Std/Min)
Display
27331 AE steamer IM-A 8/14/06 4:56 PM Page 7
C
M
Y
CM
MY
CY CMY
K
BESCHREIBUNG DES BEDIENFELDES/
BESCHREIBUNG DES FUNKTIONSWAHLSCHALTERS/
EINZELTEILBESCHREIBUNG
D
• Zum Ein-/Ausschalten des Gerätes müssen Sie den An-/Ausschalter drücken (2).
• Über den Funktionswahlschalter (3) können Sie das gewünschte Programm einstellen (siehe: Beschreibung des
Funktionswahlschalters)
• Mit dem Einstellknopf (4) können Sie die entsprechende Garzeit bis zu 59 Minuten einstellen.
• Das Gerät verfügt über eine automatische Startfunktion (5). Drücken Sie den Einstellknopf für Minuten und Stunde (5),
um zwischen „Minute“ und „Stunde“ zu wechseln und um die automatische Startzeit einzustellen.
• Wenn die LCD-Power-Anzeige (1) grün leuchtet, steht Ihr Gerät in dem Bereitschaftsmodus. Bei einer grün blinkenden
LCD-Anzeige (1) wird die automatische Startzeit und der Countdown angezeigt. Die rote LED ist die
Betriebskontrollleuchte.
• Im Display (6) wird der Garmodus und die Garzeit angezeigt.
BESCHREIBUNG DES FUNKTIONSWAHLSCHALTERS
Brot garen
Reis garen
Fisch garen
Geflügel oder
Fleisch garen
Gemüse garen
VOR DEM ERSTEN EINSCHALTEN
• Nehmen Sie das Gerät aus der Verpackung und entfernen Sie sämtliche Schutz- und Verpackungsmaterialien aus dem
Gerät.
• Um Staub oder evt. Rückstände vom Herstellungsprozess zu entfernen, empfehlen wir die Dampfschalen, -platten, den
Schlauch, den Wasserbehälter, den Reiskorb und die Auffangschale vor dem Erstgebrauch zu reinigen.
• Achten Sie darauf, dass sich der Wasserstand im Wasserbehälter immer zwischen der minimalen und maximalen
Markierung befindet.
• Bei erstmaligem Gebrauch, sollten Sie das Gerät ohne Inhalt in Betrieb nehmen.
EINZELTEILBESCHREIBUNG
1.
2.
3.
4.
5.
Wasserbehälter (13): In diesen Behälter wird das, für die Dampferzeugung benötigte Wasser eingefüllt. Hierbei ist
auf die minimale bzw. maximale Füllmenge zu achten. Befüllen Sie den Wasserbehälter nur mit Wasser und nicht mit
anderen Flüssigkeiten oder Gewürzen.
Achtung: Nehmen Sie das Gerät niemals ohne Wasser in Betrieb.
Auffangschale (10): Sie dient zum Auffangen des kondensierten Wassers und der Flüssigkeit aus den
Nahrungsmitteln, damit diese nicht in den Wasserbehälter laufen.
Dampfplatten (4;6;9) und Dampfschalen (3;5;7): Ihr Gerät verfügt über drei verschiedene Größen an Dampfplatten
und- schalen. Diese können Sie einzeln benutzen. D.h. Sie können das Gerät mit einer, zwei oder drei PlattenSchalenkombinationen benutzen. Der Deckel ist für alle Kombinationen ausgelegt.
Achtung: Es ist darauf zu achten, dass Sie bei den jeweiligen Zusammenstellungen auch die entsprechenden
Größen der einzelnen Dampfschalen und Dampfplatten miteinander benutzen. Vergewissern Sie sich, dass die
Schalen und Platten sicher und standfest aufgestellt sind. Achtung: Kippgefahr!
Reiskorb: Dieser wird in die untere Dampfplatte eingesetzt und dient zum Kochen von Reis.
Wasserstandsanzeige: Hier ist die enthaltene, eingefüllte Wassermenge im Behälter zu erkennen.
7
Composite
27331 AE steamer IM-A 8/14/06 4:56 PM Page 8
C
M
Y
CM
MY
CY CMY
K
BEDIENUNG
D
BEDIENUNG
1.
2.
3.
4.
5.
6.
7.
Füllen Sie den Behälter mit der entsprechenden Wassermenge, die den zu garenden Lebensmitteln und der Menge
entspricht (siehe Garzeittabelle). Wenn die Garzeit zwischen 15-60 Minuten beträgt, füllen Sie das Wasser bis zur
Höchstmarkierung. Wenn die Garzeit unter 15 Minuten liegt, füllen Sie Wasser bis zur Mindestmarkierung.
Wenn der Dampfgarer keinen Dampf mehr erzeugt oder noch vor Garzeitende sichtbar
vermindert ist, dann sollten Sie Wasser in den Behälter nachfüllen.
Achtung: Vor dem Nachfüllen
Stecker ziehen.
Achten Sie stets darauf, dass sich der Wasserstand immer zwischen der Mindest- und Höchstmarkierung befindet.
Das Gerät kann auf drei verschiedene Arten benutzt werden:
1) Verwenden der unteren Dampfplatte: Legen Sie die zu garenden Lebensmittel auf die untere Dampfplatte und
stellen Sie dann die Platte auf den Behälter.
2) Verwenden der drei Dampfplatten zusammen: Stellen Sie die Teile jeder Schicht anhand der Abb. aufeinander.
Bitte halten Sie die Reihenfolge unbedingt ein, ansonsten sitzt die Dampfplatte nicht sicher und standfestflach auf.
3) Verwenden von zwei Dampfplatten und Dampfschalen: Die mittlere Dampfplatte kann an der unteren
Dampfplatte befestigt werden.
Anmerkung: Bitte bedenken Sie, dass die Garzeit auf der unteren Dampfplatte schneller ist als auf der oberen,
legen Sie daher die schwer zu garenden Lebensmittel auf die untere Platte.
Verwenden Sie immer einen Deckel.
Anmerkung: Bitte bedienen Sie das Gerät nicht ohne Dampfplatte und ohne Deckel.
Stecken Sie den Netzstecker ein und ein langer Signalton ist zu hören. Auf dem Display erscheint nach ca. 1
Sekunde “0:00” und die grüne Anzeige leuchtet. Nun kann die Taste "Mode" aktiviert werden.
Drücken Sie die Taste “Mode” und auf dem Display erscheint hintereinander: a. Brot garen b. Reis garen c. Fisch
garen d. Geflügel oder Fleisch garen e. Gemüse garen. Wählen Sie das gewünschte Programm und auf dem
Display erscheint die vorgegebene Garzeit, die Sie durch Drücken der Taste “Einstellen” (4)einstellen können.
Das Gerät hat eine automatische Startfunktion. Die maximale Einstellzeit beträgt zwischen 12 Std. und 59 Min.
Wenn der Dampfgarer nicht sofort starten soll, können Sie die automatische Einschaltfunktion einstellen, indem Sie
die Taste “Std/Min” (5) drücken. Gehen Sie wie folgt vor:
Zum Beispiel: Das Gerät soll sich in 2 Std. und 30 Min. einschalten.
a Befolgen Sie die Schritte 1-5. Drücken Sie einmal die Taste “Std/Min” und ein Weckersymbol erscheint links im
Display und die Anzeige “00” beginnt zu blinken.
b Stellen Sie mit der Einstelltaste “Einstellen” die Anzeige “00” auf “30”, drücken Sie dann erneut die Taste
“Std/Min”, dann beginnt “0” zu blinken und Sie können nun mit der Taste "Einstellen” die Stunde auf "2" einstellen
und mit "Std/Min" bestätigen.
c Drücken Sie den Ein-/Ausschalter und es ertönt ein langer Signalton. Die Betriebsleuchte wird grün und der
Countdown beginnt. Sobald ‘’0:00” erreicht ist, verschwindet das Weckersymbol, die Betriebsleuchte wird rot,
hört auf zu blinken und das Gerät beginnt mit dem Garen.
d Sobald die Garzeit beendet ist, ertönt ein Signalton.
Anmerkung: Die Mindestgarzeit jedes Modus wird vorgegeben, jedoch beträgt die maximale Einstellzeit 59
Minuten. Während des Garvorgangs können Sie die Einstellung durch ein etwas längeres Drücken des An/AusSchalters (2) aufheben.
Beenden des automatischen Startprogramms: Drücken Sie die Taste “An/Aus” 2 Sekunden lang und es ertönt ein
langer Signalton. Die grüne Anzeige blinkt nicht mehr, das Weckersymbol verschwindet und die Zeitangabe kehrt
auf Null zurück und annulliert sämtliche Einstellungen.
Achtung: Während des Betriebs weder Deckel, Dampfplatten, Dampfschale, etc. berühren. Verwenden Sie hierzu
immer Topflappen bzw. Ofenhandschuhe.
8
Composite
27331 AE steamer IM-A 8/14/06 4:56 PM Page 9
C
M
Y
CM
BEDIENUNG/ TROCKENGEHSCHUTZ/
REINIGUNG UND PFLEGE/
ENTKALKEN DES BEHÄLTERS
MY
CY CMY
K
D
Nach Beendigung der Garzeit, Netzstecker ziehen und Gerät vollständig abkühlen lassen, bevor Sie den Behälter
entfernen.
Anmerkung: Gehen Sie beim Entfernen der Auffangschale sehr vorsichtig vor (auch erst vollständig abkühlen
lassen), während die anderen Geräteteile abkühlen, ist das Wasser im Behälter und in der Auffangschale immer
noch sehr heiß.
9. Entleeren Sie den Behälter nach jeder Verwendung und füllen Sie für den nächsten Garvorgang frisches Wasser ein.
10. Bewahren Sie den Dampfgarer nach Abkühlen sämtlicher Teile an einem trockenen Ort, wie z.B. auf einem Tisch
oder in einem Schrank auf. Das Netzkabel kann unter dem Dampfgarer aufgewickelt werden.
8.
TROCKENGEHSCHUTZ
Achten Sie während des Betriebs darauf, dass immer genügend Wasser im Behälter ist und dass der Wasserstand nicht
unter die Mindestmarkierung fällt. Ansonsten schaltet der Trockengehschutz das Gerät automatisch ab und es ertönt ein
Signalton und auf dem Display erscheint: (Symbol)
REINIGUNG UND PFLEGE
1.
2.
3.
4.
5.
Lassen sie das Gerät vor dem Reinigen vollständig abkühlen.
Waschen Sie die Dampfplatten, den Deckel, die Auffangschale in heißem Seifenwasser, unter klarem Wasser
abspülen und vollständig trocknen.
Verwenden Sie keine reibenden Reinigungsmittel, wie z.B. Metallschwämme und Scheuerpulver.
Tauchen Sie den Behälter nicht in Wasser. Füllen Sie zunächst warmes Wasser in den Behälter ein und spülen Sie ihn
gründlich. Entleeren Sie dann das Wasser und trocknen Sie den Behälter mit einem weichen Tuch ab.
Bewahren Sie den Dampfgarer nach Abkühlen sämtlicher Teile an einem trockenen Ort, wie z.B. auf einem Tisch
oder in einem Schrank auf.
ENTKALKEN DES BEHÄLTERS
Nach ca. 2 – 3 Monaten Gebrauch, können sich Ablagerungen im Behälter gebildet haben.
Auf den Heizelementen ist dies ganz normal, wobei die Menge der Ablagerungen von der Wasserhärte abhängt. Daher
müssen Sie den Behälter entkalken, um die Lebensdauer des Gerätes zu erhöhen.
1. Füllen Sie den Behälter mit einer Mischung aus Essig und Wasser bis zur Höchstmarkierung. Benutzen Sie keine
anderen Chemikalien oder Lösungsmittel.
2. Verbinden Sie das Gerät mit der Steckdose. Auffangschale, Dampfplatten und Deckel müssen während der
Entkalkung aufgesetzt sein.
3. Stellen Sie das Gerät auf ca. 20-25 Minuten ein. Sollte der Essig aus dem Behälter überlaufen, ziehen Sie sofort den
Netzstecker. Schalten Sie den Timer aus und reduzieren Sie die Essigmenge.
4. Sobald der Timer klingelt, ziehen Sie den Netzstecker und lassen Sie das Gerät abkühlen, bevor Sie den Essig aus
dem Behälter entleeren.
5. Spülen Sie den Behälter mehrmals mit kaltem Wasser aus und reinigen Sie die anderen Teile, wie unter Reinigung und
Pflege, beschrieben.
9
Composite
27331 AE steamer IM-A 8/14/06 4:56 PM Page 10
C
M
Y
CM
MY
CY CMY
K
HINWEISE ZUR ZUBEREITUNG:
D
HINWEISE ZUR ZUBEREITUNG:
1.
2.
3.
4.
5.
6.
7.
8.
9.
10.
11.
12.
13.
Die in den Rezepten angegebene Garzeit dient nur als Hinweis, da sie auch von Größe, Frische,
Geschmackswunsch und dem Ort abhängt.
Die Garzeiten mit nur einer Dampfplatte sind schneller als bei Verwendung von mehreren Dampfplatten. Daher
dauert sie bei großen Mengen länger.
Für optimale Ergebnisse sollten Sie die geeignete Größe der Lebensmittel auswählen. Ist die Größe der zu
garenden Lebensmittel unterschiedlich, sollten Sie die kleineren nach oben legen.
Legen Sie nicht zu viel in den Reiskorb hinein, da immer noch genügend Platz für den Dampffluss zwischen den
Lebensmitteln bleiben muss.
Beim Garen großer Mengen von Lebensmitteln, entfernen Sie den Deckel und rühren Sie in der halben Garzeit mit
einem langstieligen Löffel um.
Um Schäden am Heizelement zu vermeiden, bitte kein Salz, Pfeffer, Gewürze oder sonstige Extrakte auf die
Dampfplatte geben.
Wir empfehlen, die Flüssigkeit in der Auffangschale zum Zubereiten von Suppen, Soßen oder Braten aufzuheben.
Tauen Sie gefrorenes Fleisch oder Geflügel vor dem Garen auf.
Die in den Rezepten angegebene Garzeit beruht auf der Verwendung von kaltem Wasser.
Die Dampfplatten dienen auch zum Garen anderer Lebensmittel, wie z.B. Früchte, Gemüse, Pudding, schnelles Brot,
usw.
Wenn Sie die drei Dampfplatten benutzen, sollten Sie die Lebensmittel mit der längeren Garzeit immer auf die
unteren Dampfplatten legen.
Sie können auch unterschiedliche Lebensmittel in den drei Dampfplatten zusammengaren, da der Dampf von der
oberen Schicht heruntertropft. Dadurch können Sie sicher sein, dass jede Zubereitung ihren Eigengeschmack
beibehält. Beim Garen von Fleisch und Gemüse, das Fleisch immer auf die untere Schicht legen, damit der
Bratensaft nicht auf die anderen Lebensmittel tropfen kann.
Die Garzeit für Lebensmittel auf der unteren Dampfplatte beträgt im Allgemeinen länger als 5 Minuten. Wenn Sie
Lebensmittel mit verschiedenen Kochzeiten garen müssen, beginnen Sie mit dem Garen der Teile mit der längsten
Garzeit auf der untersten Dampfplatte. Sobald die Restzeit zum Garen der anderen Lebensmittel mit der kürzeren
Garzeit erreicht ist, nehmen Sie den Deckel vorsichtig mit den Ofenhandschuhen ab und legen Sie die noch zu
garenden Lebensmittel auf die Platte.
10
Composite
27331 AE steamer IM-A 8/14/06 4:56 PM Page 11
C
M
Y
CM
MY
CY CMY
K
GARZEITTABELLE/ TECHNISCHE DATEN/
ENTSORGUNGSHINWEISE
D
GARZEITTABELLE
Typ
Gewicht
Garzeit
Reis 330g Wasser 200g
6 Stck. (ein Loch einpieksen)
Füllmenge
Wasser
1200ml
1200ml
Reis
Eier
Fisch
Fleisch
Hähnchenschenkel
300g
300g
400g
1200ml
1200ml
1200ml
12-18 Minuten
18-22 Minuten
20-28 Minuten
Kartoffeln
1 Stck. (in ca. 2 cm
dicke Stücke schneiden)
250g (in ca. 2 cm
dicke Stücke schneiden)
1200ml
35-42 Minuten
1200ml
45-50 Minute
Karotten
38-50 Minuten
18-26 Minuten
Die o.a. Garzeit oder das Gewicht dienen nur als Hinweis und können je nach Geschmack individuell angepasst werden.
TECHNISCHE DATEN
Modell-Nr.:
Netzspannung
FS1149S
230V - 50Hz
Nennleistung
Maße (Höhe x Breite x Tiefe)
Gerätegewicht
750 Watt
452mm x 384mm x 270mm
Ca. 3 kg
Im Zuge von Produktverbesserungen behalten wir uns technische Änderungen vor.
ENTSORGUNGSHINWEISE
• Elektroaltgeräte gehören nicht in den Hausmüll. Der Gesetzgeber schreibt vor, dass Altgeräte bei den
öffentlichen Sammelstellen der Gemeinden oder über die Sperrmüllsammlung entsorgt werden müssen.
Nur so ist sichergestellt, dass Altgeräte fachgerecht entsorgt und verwertet werden.
• Die Umwelt wird es Ihnen danken!
11
Composite
27331 AE steamer IM-A 8/14/06 4:56 PM Page 12
C
M
Y
CM
MY
CY CMY
K
SERVICE / GARANTIE
D
SERVICE / GARANTIE
Die Garantiezeit beträgt 3 Jahre und beginnt mit dem Kaufdatum. Für den Nachweis des Kaufdatums bitte unbedingt
den Kaufbeleg aufbewahren.
Die Garantie gilt für Geräte, die innerhalb Deutschlands gekauft wurden. Sie deckt Defekte und Fehlfunktionen, die
innerhalb der Garantiezeit bei normaler Nutzung auftreten und auf Material- oder Verarbeitungsfehler zurückzuführen
sind.
Im Garantiefall entstehen Ihnen für die Durchführung der Reparatur keine Kosten.
Die Garantie erlischt bei Beschädigung, Veränderungen oder zweckwidriger Verwendung des Geräts, sofern diese
außerhalb des Verantwortungsbereichs des Garantiegebers liegen. Das gilt insbesondere in folgenden Fällen:
• Eingriff in das Gerät durch nicht autorisierte Personen.
• Veränderungen an oder innerhalb des Gerätes, Entfernung oder Unkenntlichmachung der Seriennummer, Entfernung
oder Veränderung des Gerätesiegels.
• bei Schäden die auf Stöße, Stürze oder äußerer Einwirkung zurückzuführen sind.
• Bei Schäden die auf eine unsachgemäße Handhabung oder einen Fehlgebrauch zurückzuführen sind.
• Bei Schäden durch externe Ursachen, wie z.B. Überspannung, Blitzschlag.
• Gewerbliche Nutzung des Gerätes
Bitte bewahren Sie die Originalverpackung für eine mögliche Reparaturrücksendung auf.
Reparierte oder ausgetauschte Komponenten unterliegen generell der restlichen Garantielaufzeit des Gerätes.
Sollten Sie Fragen zum Produkt oder zu dieser Bedienungsanleitung haben oder am Produkt evt. Mängel feststellen,
wenden Sie sich bitte direkt an unsere Servicehotline um weitere Schritte zu besprechen.
Hotline/EU: (0049) - (0)1805 64 66 66*
(*0,14 €/Minute aus dem Netz der Deutschen Telekom)
Wichtiger Hinweis:
Bitte versenden Sie Ihr Gerät nicht ohne Aufforderung an unsere Anschrift. Kontaktieren Sie vorher unbedingt unsere
Servicehotline. Die Kosten und die Gefahr des Verlustes für eine unaufgeforderte Zusendung gehen zu Lasten des
Absenders. Wir behalten uns vor, die Annahme unaufgeforderter Zusendungen zu verweigern oder entsprechende
Waren an den Absender unfrei zurückzusenden.
Art. Nr.:
10000048
Order Nr.: 3003116
Hergestellt von:
Guang Dong Xinbao Electrical
für:
AERA Rundfunk und Fernseh GmbH
Hanns-Martin-Schleyer Strasse 2
D-77656 Offenburg
Ihre gesetzlichen Rechte im Falle eines Mangels des Gerätes (Nachlieferung, Rücktritt, Minderung, Schadensersatz,
jeweils gemäß § 437 BGB) werden durch diese Garantie nicht eingeschränkt.
12
Composite
27331 AE steamer IM-A 8/14/06 4:56 PM Page 13
C
M
Y
CM
MY
CY CMY
K
English
GB
STEAMER
Instruction Manual
Model No.: FS1149S
13
Composite
27331 AE steamer IM-A 8/14/06 4:56 PM Page 14
C
CONTENTS /
IMPORTANT SAFETY ADVICE
M
Y
CM
MY
CY CMY
K
GB
CONTENTS
Important Safety Advice
Description of the Steamer
Control Panel Description
Description of the Function Switches
Before Utilisation
Description of Individual Parts
Operation
Protection from Drying
Cleaning and Care
Decalcifying the Container
Preparation Instructions
Cooking time table
Technical Data
Disposal Advice
Service Address
14
16
16
17
17
17
18
19
19
19
20
21
21
21
22
Basic safety instructions should be followed when using electrical appliances. In order to reduce
the risk of burning, electric shocks, fires and/or personal injury, please read this instruction
manual carefully before using the appliance and ensure that you follow the instructions during
use.
Carefully retain this instruction manual for further use.
Should this appliance be transferred to a third party, please ensure that this instruction manual
is also transferred.
IMPORTANT SAFETY ADVICE
• Only connect the appliance to an approved, correctly installed plug socket. Do not use any multi-plug adaptors or
extension leads.
• The voltage annotated on the appliance label must correspond to your mains supply voltage.
• When laying the electricity cable, ensure that it cannot be tripped over whilst using the appliance.
• Keep the electricity cable away from hot surfaces, open flames and sharp edges.
• Never touch the electricity cable or plug with damp or wet hands.
• Never immerse the appliance, the mains cable or the electricity plug in water or other liquids. There is a danger of
electric shocks!
• When unplugging the mains connection, always unplug it using the plug, never the cable.
• To ensure correct operation, the appliance must be sufficiently ventilated. Ensure that you leave a space of 20cm
above the appliance as well as a 5cm space at the rear and on each side of the appliance. The appliance openings
should not be blocked or covered. The appliance feet should not be removed.
14
Composite
27331 AE steamer IM-A 8/14/06 4:56 PM Page 15
C
M
Y
CM
MY
CY CMY
K
IMPORTANT SAFETY ADVICE
GB
• Never use the appliance without the lid. Do not remove the lid during operation. There is a risk of burns due to hot
steam being released.
• Please ensure that the water container is filled before each utilisation and that it is correctly inserted.
• The appliance should not be used without water and foodstuff. Ensure that the appliance does not over-heat.
• Do not leave the appliance unsupervised during use.
• The appliance becomes very hot during utilisation. Only touch the appliance on the places designed for operation
(control panel, handle) In particular, avoid all contact with the heating elements inside the appliance. Risk of burns!
• Ventilation slits are found on the appliance housing, through which excess hot steam can escape during operation.
Avoid all contact with the escaping steam and ensure that there is sufficient ventilation for the escaping air. Position the
appliance so that the ventilation slits are not directed at people or objects.
• Liquids or other foodstuffs should not be heated in sealed containers or glasses, since these could explode due to heat
expansion.
• Both the food and the container become very hot during use. Please always use oven gloves to remove food.
• To avoid scolding, the contents of feeding bottles and glasses with baby food must be shaken or stirred before being
consumed and the temperature must be checked.
• Before cleaning, un-plug the mains connection and allow the appliance to completely cool down.
• Children do not recognise the dangers that can be created by contact with electrical appliances. Keep children away
from the appliance. Take special care whilst using the appliance if children are in the vicinity.
• Do not use the appliance if it shows signs of damage, if it is dropped or does not function correctly.
• Regularly check the appliance, the electricity cable and the plug for visible signs of damage. Under no circumstances
should you use the appliance if you have established that it is damaged. Do not attempt to repair the appliance
yourself.
• The plug socket must be easily accessible so that the plug can be removed without difficulty in an emergency.
• Repairs should only be carried out by qualified technicians.
• Only use the appliance on even, stable and heat-resistant surfaces. Do not place the appliance near to heat sources or
open fires.
• Please ensure that the water level in the water container always remains between the minimum and maximum
markings.
• Do not use the appliance outdoors.
• The appliance is only for use in private households and is not suitable for commercial utilisation.
15
Composite
27331 AE steamer IM-A 8/14/06 4:56 PM Page 16
C
M
Y
CM
MY
CY CMY
DESCRIPTION OF THE STEAMER /
CONTROL PANEL DESCRIPTION
K
GB
DESCRIPTION OF THE STEAMER
1
2
8
1
2
3
4
3
5
9
4
6
10
7
11
8
9
5
6
13
12
7
14
10
11
12
13
14
Lid Handle
Top Cover
Upper Steam Bowl
(see side label: “TOP”)
Upper Steam Plate
(see side label: “TOP”)
Middle Steam Bowl
(see side label: “MIDDLE”)
Middle Steam Plate
(see side label: “MIDDLE”)
Lower Steam Plate
(see side label: “BOTTOM“)
Rice Basket
Lower Steam Plate
(see side label: “BOTTOM“)
Collection Plate
Tube
Water Gauge
Water Container
Control Panel
CONTROL PANEL DESCRIPTION
1
1
2
3
4
5
6
6
2
3
4
5
16
Composite
LCD Power Display (On)
On / Off Switch (On/Off)
Mode selector (Cooking Mode)
Adjustment Button (Adjust)
Adjustment Button for
Minutes/Hours (Hr/Min)
Display
27331 AE steamer IM-A 8/14/06 4:56 PM Page 17
C
M
Y
CM
MY
CY CMY
K
CONTROL PANEL DESCRIPTION / DESCRIPTION OF
THE FUNCTION SWITCHES / BEFORE UTILISATION /
DESCRIPTION OF INDIVIDUAL PARTS
GB
•
•
•
•
The On/Off switch (2) must be pressed to switch the appliance on/off.
You can set the desired program using the Mode Selector (3) (see: Description of the Function Switches)
You can set the corresponding cooking time up to 59 minutes with the Adjustment Button (4).
The appliance has an automatic Start Function (5). Press the Adjustment Button to set the minutes and hours (5), to
change between “minute” and “hour” and to set the automatic start time.
• If the LCD Power Display (1) lights up green, the appliance is on ready mode. If the LCD Display (1) blinks, the
automatic start time and the countdown are displayed. The red LED is the operation control light.
• The cooking mode and the cooking time is displayed on the Display (6).
DESCRIPTION OF THE FUNCTION SWITCHES
Steam bread
Steam rice
Steam fish
Steam chicken or meat
Steam vegetables
BEFORE UTILISATION
• Take the appliance out of its packaging and remove all protective and packaging material from the appliance.
• To remove dust or possible objects from the manufacturing process, we recommend that you clean the steam bowl, the
steam plate, water tube, the water container, the rice basket and the collection plate before first use.
• Please ensure that the water level in the water container always remains between the minimum and maximum
markings.
• When first using the appliance, it should be operated without any contents.
DESCRIPTION OF INDIVIDUAL PARTS
1.
2.
3.
4.
5.
Water Container (13): This container is filled with water necessary for creating steam. You should take note of the
minimum and maximum fill levels. Only fill the water container with water and not with other liquids or condiments.
Warning: Never use the appliance without water.
Collection Plate (10): This collects the condensed water and the liquid from the foodstuff, so that they do not run into
the water container.
Steam Plate (4;6;9) and Steam Bowl (3;5;7): Your appliance has three different sized steam plates and bowls. These
can be used individually. This means that you can use the appliance with one, two or three plate/bowl
combinations. The lid is designed for all combinations.
Warning: Please ensure that you always combine the corresponding sized steam bowls and steam plates. Make
sure that the bowls and plates are stacked safely and securely. Warning: Danger of tipping over!
Rice Basket: This is placed in the lower steam plate and serves to cook rice.
Water Level Display: This allows you to recognise the level of water filled in the container.
17
Composite
27331 AE steamer IM-A 8/14/06 4:56 PM Page 18
C
M
Y
CM
MY
CY CMY
K
OPERATION
GB
OPERATION
1.
Fill the container with the corresponding quantity of water, depending on the type and quantity of food to be
steamed (see Cooking Time Table). If the cooking time is between 15-60 minutes, fill the water to the highest
marking. If the cooking time is under 15 minutes, fill the water to the minimum level. If the appliance does not
produce any more steam or if the amount of steam is visibly reduced before the end of the
cooking time, then fill the container with additional water.
Warning: Before filling
unplug the appliance.
Please ensure that the water level is always between the minimum and maximum markings.
2.
The appliance can be used in three different ways:
1) Using the lower steam plate: Place the food to be steamed on the lower steam plate and place the plate on the
container.
2) Using the three steam plates together: Place the parts of each layer on top of each other with the help of the
diagram. Please ensure that you follow the correct order, otherwise the steam plates do not sit safely and
properly in place.
3) Using two steam plates and steam bowls: The middle steam plate can be secured on the lower steam plate.
Remark: Please be aware that the cooking time is faster on the lower steam plates than on the upper ones,
therefore, place the food that is more difficult to steam on the lower plate.
3.
Always use a lid.
Remark: Please do not use the appliance without a steam plate or lid.
4.
A long signal tone is heard when you plug in the appliance. “0:00” appears on the display after approx. 1 second
and the green display lights up. The “Mode” key can now be activated.
Press the „Mode“ key and the display shows the following one after the other: a. Steaming bread b. Steaming rice
c. Steaming fish d. Steaming chicken or meat e. Steaming vegetables. Choose the desired program and the pre-set
cooking time appears on the display, this can be set by pressing the “Adjust” (4) button.
The appliance has an automatic start function. The maximum adjustable time is between 12 hours and 59 minutes.
If you do no want the steamer to start immediately you can set the automatic start function by pressing the “Hr/Min”
(5) button. Use the following procedure:
For example: The appliance should switch on in 2 hours and 30 minutes.
a Follow steps 1-5. Press the “Hr/Min” button once and an alarm symbol appears on the left of the display and
the “00” on the display begins to flash.
b Using the adjustment key “Adjust”, set the display “00” onto “30”, then press the “Hr/Min” key again. “0” begins
to flash and you can now set the hour onto “2” with the “Adjust” key and confirm with the “Hr/Min” key.
c Press the On/Off switch and a longer signal tone sounds. The operating lamp becomes green and the countdown
begins. When “0:00” is reached the alarm symbol disappears, the operating lamp turns red, it begins to flash
and the appliance starts cooking.
d When the cooking time is finished, a signal tone sounds.
Remark: The minimum cooking time of each mode is specified, however the maximum settable time is 59 minutes.
The setting can be cancelled during the cooking process by pressing and holding down the On/Off switch (2).
Ending the automatic start program: Press the “On/Off” key for 2 seconds and a long signal tone sounds. The green
display does not flash anymore, the alarm symbol disappears and the time returns to zero and cancels all settings.
5.
6.
7.
Warning: Do not touch the lid, steam plates, steam bowls, etc. during use. Always use oven gloves and/or cloths.
18
Composite
27331 AE steamer IM-A 8/14/06 4:56 PM Page 19
C
M
Y
CM
MY
CY CMY
OPERATION/ PROTECTION FROM DRYING/
CLEANING AND CARE/
DECALCIFYING THE CONTAINER
K
GB
Once the cooking time has finished, unplug the appliance from the mains and allow it to completely cool down
before removing the container.
Remark: Be very careful when removing the collection plate (allow it to completely cool down first too). Whilst the
other appliance parts cool down, the water in the container and in the collection plate is always still very hot.
9. Empty the container after each use and fill it with fresh water for the next cooking process.
10. After allowing it to cool down, store the steamer and all parts in a dry place, such as on a table or in a cupboard.
The power cable can be wound up under the steamer.
8.
PROTECTION FROM DRYING
Ensure that there is enough water in the container during operation and that the water level does not fall under the
minimum marking. Otherwise the protection from drying automatically switches the appliance off, a signal tone sounds
and the following appears on the display: (Symbol)
CLEANING AND CARE
1.
2.
3.
4.
5.
Before cleaning, allow the appliance to fully cool down.
Wash the steam plates, the lid and the collection plate in hot soapy water, rinse them with fresh water and dry them
thoroughly.
Do not use any abrasive cleaning materials, such as metal sponges and scouring powders.
Do not immerse the container in water. Next fill the container with warm water and rinse it thoroughly. Then empty
the water and dry the container with a soft cloth.
After allowing it to cool down, store the steamer and all parts in a dry place, such as on a table or in a cupboard.
DECALCIFYING THE CONTAINER
After approx. 2 – 3 months use, deposits can build up in the container.
This is totally normal on the heating elements, where the amount of deposits depends on the hardness of the water. The
container must be decalcified to increase the operational life of the appliance.
1. Fill the container with a mix of vinegar and water to the maximum fill level. Do not use any chemicals or solvents.
2. Plug the appliance into the mains. The collection plate, steam plate and lid must be in place during the decalcifying.
3. Set the appliance for approx. 20-25 minutes. Should the vinegar overflow from the container, unplug the appliance
immediately from the mains. Switch off the timer and reduce the amount of vinegar.
4. When the timer sounds, unplug the appliance from the mains and let it cool down before emptying the vinegar from
the container.
5. Rinse the container various times with cold water and clean all the other parts as described in the Cleaning and
Care section.
19
Composite
27331 AE steamer IM-A 8/14/06 4:56 PM Page 20
C
M
Y
CM
MY
CY CMY
K
PREPARATION INSTRUCTIONS
GB
PREPARATION INSTRUCTIONS
1.
2.
3.
4.
The cooking times given in the recipes are only a guide; they are also dependent on the size, freshness, taste
preferences and the placing of the food.
The cooking time is quicker with only one steam plate than with various steam plates. Larger quantities require a
longer duration.
For optimal results, you should choose suitably sized foodstuff. If the size of the food to be steamed is different, you
should place the smaller pieces on top.
6.
Do not place too much in the rice basket, as there must always be enough room between the foods for the steam to
flow.
When cooking larger quantities of food, remove the lid and move the contents with a long-handled spoon halfway
through the cooking time.
To avoid damage to the heat element, please do not put any salt, pepper, spices or any extracts on the steam plate.
7.
8.
9.
We recommend that you use the liquid in the collection plate for the preparation of soups, sauces or roasts.
Defrost frozen meat or poultry before cooking.
The cooking times given in the recipes are based on the use of cold water.
5.
10. The steam plates can be used to cook different foodstuffs, such as fruit, vegetables, pudding, bread, etc.
11. If you use the three steam plates, you should always place the foods with the longest cooking time on the lower
steam plates.
12. You can also cook different foods in the three steam plates together, as the steam moves down from the upper layer.
You can therefore be sure that each preparation keeps its own individual taste. When cooking meat and vegetables,
always place the meat on the lower level so that the juices do not drop onto the other foods.
13. The cooking time for food on the lower steam plate is generally more than 5 minutes. If you have to cook foods
with different cooking times, begin cooking with the parts with the longest cooking time on the lower steam plate.
When the remaining cooking time of the other foodstuff with a shorter cooking time is reached, carefully remove the
lid with an oven glove and lay the food still to be cooked on the plate.
20
Composite
27331 AE steamer IM-A 8/14/06 4:56 PM Page 21
C
M
Y
CM
MY
CY CMY
K
COOKING TIME TABLE /
TECHNICAL DATA / DISPOSAL ADVICE
GB
COOKING TIME TABLE
Type
Weight
Cooking Time
Rice 330g Water 200g
Water
Fill Level
1200ml
Rice
Eggs
Fish
Meat
6 Pieces (prick a hole)
300g
300g
1200ml
1200ml
1200ml
18-26 Minutes
12-18 Minutes
18-22 Minutes
Chicken thighs
Potatoes
400g
1 Piece (cut in approx.
2cm thick pieces)
1200ml
1200ml
20-28 Minutes
35-42 Minutes
Carrots
250g (cut in approx.
2cm thick pieces)
1200ml
45-50 Minutes
38-50 Minutes
The above detailed cooking times and weights only serve as an example and can be changed according to personal
taste.
TECHNICAL DATA
Model No.:
FS1149S
Supply Voltage
Capacity
Measurements (height x width x depth)
Appliance weight
230V 50Hz
750 Watt
452mm x 384mm x 270mm
Approx. 3 kg
We reserve the right to make technical modifications to ensure product improvements.
DISPOSAL ADVICE
• Old electrical appliances do not belong with household rubbish. The law requires that old appliances
must be disposed of at a local authority collection point or a bulky waste collection. This ensures that old
appliances are correctly disposed of and utilised.
• The environment will be most appreciative!
21
Composite
27331 AE steamer IM-A 8/14/06 4:56 PM Page 22
C
M
Y
CM
MY
CY CMY
K
SERVICE / GUARANTEE
GB
SERVICE / GUARANTEE
The guarantee is for 3 years and begins from the date of purchase. Ensure that you retain the receipt as proof of the
date of purchase.
The guarantee is valid for the appliances, which are bought in Germany. It covers defects and malfunctions, which occur
through normal use within the guarantee time and which are traced back to the material or processing faults.
In the event of a guarantee claim, you are not liable for any repair costs.
The guarantee is cancelled through damage, alterations or improper use of the appliance, as long as these lay outside of
the guarantor’s area of responsibility. This is especially valid in the following cases:
• Intervention inside the appliance by an unauthorised person.
• Alterations on or inside the appliance, the removal or defacing of the serial number or the removal or alteration of the
appliance seal.
• With damages traced back to blows, falls or other effects.
• With damages traced back to improper handling or use.
• With damages through external sources, such as excess voltage, lightening strike.
• Commercial use of the appliance.
Please retain the original packaging in case the appliance needs to be sent for repair.
Repaired or exchanged components are generally subject to the appliance’s remaining guarantee duration.
Should you have any questions regarding the product or this instruction manual, or if you find any possible problems
with the product, please contact our Service Hotline directly in order to discuss further action.
Hotline / EU: (0049) - (0)1805 64 66 66*
(*0.14 €/minute from a Deutche Telekom landline)
Important Advice:
Do not send your appliance to our address unless requested to do so by us. Always contact our service hotline in the
first instance. The cost and the risk against loss for an unsolicited consignment is carried by the sender. We reserve the
right to refuse acceptance of unsolicited consignments or to return the corresponding goods to the sender at their cost.
Art. No.:
10000048
Order No.: 3003116
Manufactured by:
Guang Dong Xinbao Electrical
For:
AERA Rundfunk und Fernseh GmbH
Hanns-Martin-Schleyer Strasse 2
D-77656 Offenburg
Your statutory rights are not affected by this guarantee in the event of a fault with the appliance (further delivery, return,
reduction, compensation, all according to Law 437 BGB).
22
Composite