1
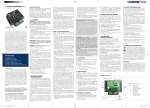
4. LED display The LED display consists of 17 LEDs which have the following meanings: 1 LED „Power“: The supply voltage is present . 2 LED „Learn“: The device is in learning mode. 3 LED „NO ASC“: The device has detected a valid signal from a transmitter, but the transmitter is not authorized to control the device. The receiver must first learn the code of the transmitter. 4 LED „MEM FULL“: All available memory slots (32) for programming transmitters are occupied. 5 LED „ERASE MEM“: This LED is lit during the deletion of the memory. 6 LED „LOW BAT“: This LED is lit when the battery voltage of the transmitter is below 2.5V. 7 LED „MEM ERR“: This LED is lit when an error occurs when reading / writing the EEPROM memory. 8 LED „ERR RX“: This LED is lit when a broadcast packet arrives containing an error. (eg by external disturbances) 9 LED „RC ERR“: This LED indicates a transmitter data package with a Rolling-Code, that has already expired. This can happen if there was short interruption in the transmission signal. 5. Learning process The receiver is capable of learning how to connect with 32 suitable transmitters (e.g. H B641 or H B643). The learning process consists of the following steps: 1.Press BTN 1 “Learn” to activate the learning sequence. The LED “Learn” lights up to show that the programming mode is active. 2.Within 10 seconds, press any control key of the transmitter.* The LED “Learn” will start flashing if the signal is recognized. 3.Press BTN1 “Learn” again to finalize the learning sequence. The LED will go out. *The transmitter needs to be preprogrammed. 24 | LED display Setting the operation mode Setting the operation mode consists of the following steps: 1.Press BTN 1 “Learn” to activate the learning sequence. The LED “Learn” lights up to show that the programming mode is active. 2.Within 10 seconds, press the “1, 2, 3 or 4“ (see the following chart) control key of the transmitter.* 3.The LED “Learn” will blink for a short time and finalize the learning sequence. The device will restart. Deleting the station memory list A maximum of 32 transmitters can be programmed. If 32 stations have al ready been programmed into the receiver, no additional transmitters can be programmed. Previously learnt codes are not lost. After deleting all transmitters, new transmitters can be programmed again. If the transmitter list needs to be cleared and reset, the deletion can be made with the following steps: 1. Separate the receiver from the power supply. 2.Press and hold the button 1 “Learn”. 3.Reconnect the device to the power supply. 4.The LED “Learn” will light up. 5.Wait till the LED starts blinking rapidly. 6.Release the button “Learn”. All programmed transmitters are now deleted The receiver can now be programmed with new transmitters. 6. Installation and connection Connect the device to a suitable power supply (12 V DC/500 mA). Make sure that the correct polarity of the +12 V DC is connected to the relay output. The maximum load per relay is 230 VAC/5 A or 24 V DC/10 A. The total power output may not exceed 3000 V. Use the supplied rubber pads for the cable entry holes of the box. Unused holes must be sealed with intact rubber pads. External consumers should be directly connected to the relay terminals according to the printed circuit symbols. *The transmitter needs to be preprogrammed. 8-Channel Receiver HT200E | 25