1
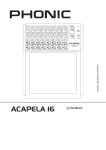
REDNERPULT MIT VERSTÄRKERSYSTEM
LECTERN WITH AMPLIFIER SYSTEM
SPEECH -200
Best.-Nr. 17.3160
BEDIENUNGSANLEITUNG
INSTRUCTION MANUAL
1
2
3
17
1
MIC 1
VOLUME
12
RF
+12
0
10
XLR (PHANTOM)
MICROPHONE INPUT
JACK - LINE
MONO
2
2
1
1
3
3
1
VOLUME
+12
12
RF
12
MICROPHONE INPUT
JACK - LINE
MONO
+7
7
7
+7
+12
12
0
XLR
+7
7
12
+12
+12
SPEECH-200
10
MICROPHONE INPUT
JACK - LINE
MONO
2
2
1
1
3
3
0
7
PROFESSIONAL
LECTERN
10
+7
AUDIO IN
12
+12
LINE OUT
REC
LIMITER
POWER
SPEECH-200
10
MICROPHONE INPUT
JACK - LINE
MONO
1
1
3
3
+12
12
0
XLR
MICROPHONE INPUT
JACK - LINE
MONO
2
2
VOLUME
+12
0
10
XLR (PHANTOM)
+12
12
RF
VOLUME
4
VOLUME
RF
0
10
XLR (PHANTOM)
MICROPHONE INPUT
JACK - LINE
MONO
3
2
MIC 2
VOLUME
+7
4
VOLUME
0
10
XLR (PHANTOM)
7
12
MIC 1
3
2
MIC 2
VOLUME
0
7
PROFESSIONAL
LECTERN
10
+7
AUDIO IN
2
1
2
3
+12
12
5 6
1
2
3
7
1
3
12
+12
12
LINE OUT
REC
+12
8
9
10
LIMITER
POWER
18
11 12
18
13
POWER
POWER
19
230 V~ / 50 Hz /180
/180VA
VA
F1AL
FREQUENCY
863.05 MHz
230 V~ / 50 Hz /180VA
F1AL
FREQUENCY
863.05 MHz
14
15
16
2
4
D
Bevor Sie einschalten …
Wir wünschen Ihnen viel Spaß mit Ihrem neuen Gerät von
MONACOR. Bitte lesen Sie diese Bedienungsanleitung vor dem
CH
Betrieb gründlich durch. Nur so lernen Sie alle Funktionsmöglichkeiten kennen, vermeiden Fehlbedienungen und schützen
sich und Ihr Gerät vor eventuellen Schäden durch unsachgemäßen Gebrauch. Heben Sie die Anleitung für ein späteres Nachlesen auf.
Der deutsche Text beginnt auf der Seite 4.
A
GB
Before switching on …
We wish you much pleasure with your new MONACOR unit.
Please read these operating instructions carefully prior to operating the unit. Thus, you will get to know all functions of the unit,
operating errors will be prevented, and yourself and the unit will
be protected against any damage caused by improper use.
Please keep the operating instructions for later use.
The English text starts on page 6.
3
D
A
Auf der Seite 2 finden Sie alle beschriebenen
Bedienelemente und Anschlüsse.
CH
1 Übersicht der Bedienelemente
und Anschlüsse
1 Eingang MIC 1 als XLR-Buchse mit 24-VPhantomspeisung zum Anschluss eines Mikrofons an den Eingangskanal 1 [alternativ
zum Anschluss (7) auf der Rückseite]
2 Pultbeleuchtung
3 Schalter für die Pultbeleuchtung (2 Helligkeitsstufen)
2 Hinweise für den
sicheren Gebrauch
4 Gerät transportieren
und aufstellen
Das Gerät entspricht allen relevanten Richtlinien
der EU und ist deshalb mit
gekennzeichnet.
Zum Transportieren das Rednerpult am Oberteil
anfassen und leicht nach hinten kippen, so dass
es nur auf den beiden Rollen steht. Es kann so
bequem zum Einsatzort gefahren werden. Das
Gerät so aufstellen, dass die Lautsprecher auf
der Vorderseite des Pultes auf das Publikum
gerichtet sind.
WARNUNG Das Gerät wird mit lebensgefährlicher Netzspannung versorgt.
Nehmen Sie deshalb niemals
selbst Eingriffe am Gerät vor. Es
besteht die Gefahr eines elektrischen Schlages.
Beachten Sie auch unbedingt die folgenden
Punkte:
G
Das Gerät ist nur zur Verwendung im Innenbereich geeignet. Schützen Sie es vor Tropfund Spritzwasser, hoher Luftfeuchtigkeit und
Hitze (zulässiger Einsatztemperaturbereich
0 – 40 °C).
G
Nehmen Sie das Gerät nicht in Betrieb und
ziehen Sie sofort den Netzstecker aus der
Steckdose,
1. wenn sichtbare Schäden am Gerät oder am
Netzkabel vorhanden sind,
2. wenn nach einem Sturz oder Ähnlichem der
Verdacht auf einen Defekt besteht,
3. wenn Funktionsstörungen auftreten.
Geben Sie das Gerät in jedem Fall zur Reparatur in eine Fachwerkstatt.
G
Ziehen Sie den Netzstecker nie am Kabel aus
der Steckdose, fassen Sie immer am Stecker
an.
G
Verwenden Sie für die Reinigung nur ein trockenes, weiches Tuch, niemals Wasser oder
Chemikalien.
G
Wird das Gerät zweckentfremdet, nicht richtig
angeschlossen, falsch bedient oder nicht
fachgerecht repariert, kann keine Haftung für
daraus resultierende Sach- oder Personenschäden und keine Garantie für das Gerät
übernommen werden.
4 Eingang MIC 2 als XLR-Buchse mit 24-VPhantomspeisung zum Anschluss eines Mikrofons an den Eingangskanal 2 (alternativ
zum Anschluss auf der Rückseite)
5 Lautstärkeregler VOLUME jeweils für die Eingangskanäle 1 – 4
6 LED RF; leuchtet, wenn ein Funksignal am
Eingangskanal 1 empfangen wird
Das Signal von einem Funkmikrofon wird
einem Signal am Eingang von Kanal 1 dazugemischt.
Die LED RF am Eingangskanal 2 ist ohne
Funktion.
7 kombinierte XLR-/ Klinkenbuchse zum Anschluss eines Mikrofons über einen XLR-Stecker oder einer Signalquelle mit Line-Pegel
über einen zweipoligen 6,3-mm-Klinkenstecker jeweils für die Eingangskanäle 1 – 3
Die XLR-Kontakte der Eingangskanäle 1 und
2 sind mit einer Phantomspeisung (24 V),
z. B. für Elektretmikrofone, ausgestattet.
8 Klangregler HIGH, MID und LOW, jeweils für
die Kanäle 1 – 3
9 Cinch-Eingänge AUDIO IN zum Anschluss
einer Signalquelle mit Line-Pegel an den Eingangskanal 4; beim Anschluss beider Buchsen (z. B. Stereosignal von einem CD-Spieler) wird aus den Signalen die Summe
(Mono) gebildet
10 Ausgang LINE OUT, REC als Cinch-Buchsen zum Weiterleiten des Mischsignals z. B.
zu einem Aufnahmegerät oder einem weiteren Verstärkersystem
11 LED LIMITER leuchtet, wenn der Eingangspegel zu hoch ist und vom Limiter begrenzt
wird
12 Betriebsanzeige POWER
13 Netzschalter POWER
14 Netzbuchse zum Anschluss an eine Steckdose (230 V~/50 Hz) über das beiliegende
Netzkabel
15 Halterung für die Netzsicherung
Eine geschmolzene Sicherung nur durch eine
gleichen Typs ersetzen!
16 Transportrollen
17 Ablagefach, z. B. für Schreibstifte oder ein
Gerät zur Tonaufnahme oder -wiedergabe
18 Ablagefächer, z. B. für Vortragsunterlagen
und diese Bedienungsanleitung
19 Staufach, z. B. für Anschlusskabel
4
Soll das Gerät endgültig aus dem Betrieb genommen werden, übergeben
Sie es zur umweltgerechten Entsorgung einem örtlichen Recyclingbetrieb.
3 Einsatzmöglichkeiten
Das Rednerpult SPEECH-200 besteht aus
einem hochwertigen 2-Wege-Lautsprechersystem, einem Mischverstärker mit vier Eingangskanälen und einem Empfangsteil für ein Funkmikrofon mit 863,05 MHz Trägerfrequenz. Es dient
zur Beschallung bei Vorträgen, Ansprachen,
Lesungen etc., wobei das optionale Funkmikrofon eine zusätzliche Mobilität bietet (z. B. kann
es für Rückfragen im Publikum herumgereicht
werden).
Neben drei Mikrofonen lassen sich auch
andere Audiogeräte (z. B. CD-Spieler für Musikeinspielungen) anschließen. Über den Anschluss LINE OUT, REC kann das Ausgangssignal zu einem Aufnahmegerät oder zu einem
anderen Verstärkersystem weitergeleitet werden. Die integrierte Beleuchtung der Auflagefläche kann in zwei Helligkeitsstufen eingeschaltet
werden.
Durch die beiden eingebauten Rollen an der
Rückseite lässt sich das Pult bequem transportieren.
5 Anschlüsse herstellen
Vor dem Anschließen von Geräten oder dem
Ändern bestehender Anschlüsse das Verstärkersystem und die anzuschließenden Geräte
ausschalten.
5.1 Mikrofone und Audiogerät
1) Ein Mikrofon (z. B. ein passendes Schwanenhalsmikrofon aus der EMG...P-Serie) auf
eine der XLR-Buchsen (1 oder 4) auf der
Pultoberseite stecken und auf den Sprecher
ausrichten. Es können auch beide Buchsen
mit je einem Mikrofon versehen werden. Die
Buchsen besitzen eine Verriegelung. Zum
Herausziehen eines Steckers den PUSHHebel drücken.
Alternativ kann ein Mikrofon mit einem
XLR-Stecker auch an die Eingangsbuchse
(7) der Kanäle 1 und 2 auf der Pultrückseite
angeschlossen werden. Diese Mikrofoneingänge stellen, wie auch die Buchsen auf der
Pultoberseite, die von einigen Mikrofonen
benötigte Phantomspeisung (24 V ) zur Verfügung.
Ein weiteres Mikrofon kann mit einem
XLR-Stecker an die Eingangsbuchse von
Kanal 3 angeschlossen werden.
2) Zum Anschluss einer Signalquelle mit LinePegel (z. B. Mischpult, CD-Spieler) können
die Klinkenbuchsen (7) der Eingangskanäle
1 – 3 (wenn der jeweilige Kanal noch nicht
durch ein Mikrofon belegt ist) oder die CinchBuchsen AUDIO IN (9) von Kanal 4 genutzt
werden. Beim Anschluss beider Cinch-Buchsen (z. B. Stereosignal von einem CD-Spieler) wird aus den Signalen die Summe
(Mono) gebildet.
Hinweis: Bei Verwendung eines Funkmikrofons
wird dessen Signal zum Eingangssignal von
Kanal 1 hinzugemischt.
5.2 Aufnahmegerät oder
zusätzliches Verstärkersystem
An die Cinch-Buchsen des Ausgangs LINE
OUT, REC (10) kann ein Aufnahmegerät oder
ein weiteres Audiogerät mit Line-Eingang angeschlossen werden (z. B. ein zusätzliches Verstärkersystem zur Beschallung eines größeren
Bereichs). Hier steht das Mischsignal der Tonquellen zur Verfügung.
5.3 Stromversorgung
Das beiliegende Netzkabel in die Netzbuchse
(14) stecken und den Netzstecker in eine Steckdose (230 V~ / 50 Hz).
6 Bedienung
6.2 Beleuchtung der Auflagefläche
1) Um Einschaltgeräusche und eine zu hohe
Lautstärke zu vermeiden, vor dem Einschalten die VOLUME-Regler (5) aller vier Eingangskanäle auf „0“ drehen.
Zum Einschalten der Pultbeleuchtung (2) den
Schalter (3), je nach gewünschter Helligkeit, in
die Position „I“ oder „II“ schalten.
2) Erst die angeschlossenen Tonquellen einschalten, dann das SPEECH-200 mit dem
Schalter POWER (13). Die Betriebsanzeige
POWER (12) leuchtet. Ist am SPEECH-200
ein zusätzliches Verstärkersystem zur Beschallung angeschlossen, dieses zuletzt einschalten.
Nach dem Betrieb die Geräte in umgekehrter Reihenfolge ausschalten:
1. das zusätzliche Verstärkersystem
2. das SPEECH-200
3. die angeschlossenen Tonquellen
3) Die Signale der Eingangskanäle mit den entsprechenden Lautstärkereglern VOLUME (5)
mischen oder nach Bedarf ein- oder ausblenden; bei Verwendung eines Funkmikrofons
siehe zusätzlich Kapitel 6.1. Die Lautstärke
immer nur so hoch einstellen, dass der Klang
nicht verzerrt wiedergegeben wird.
Leuchtet die LED LIMITER (11) häufig, ist
der Eingangspegel zu hoch und sollte mit
dem entsprechenden Lautstärkeregler reduziert werden.
VORSICHT!
G Achten Sie auf eine angemessene Lautstärke. Hohe Lautstärken können auf
Dauer das Gehör schädigen.
G Um ein Rückkopplungspfeifen zu vermeiden, halten Sie ein Mikrofon nicht in Richtung des Lautsprechers oder zu nah an ihn
heran. Bei einer zu hoch eingestellten
Lautstärke kann ebenfalls eine Rückkopplung auftreten. In diesem Fall mit dem entsprechenden Regler VOLUME (5) eine
niedrigere Mikrofonlautstärke einstellen.
4) Der Klang kann für die Kanäle 1 – 3 jeweils
mit den Reglern (8) für Höhen (HIGH), Mitten
(MID) und Tiefen (LOW) optimiert werden.
Nach einer Änderung der Klangeinstellung
bei Bedarf mit dem entsprechenden Regler
VOLUME (5) die Lautstärke korrigieren.
D
A
CH
7 Technische Daten
Verstärkerleistung
Sinusleistung: . . . . . . . . . . . . 75 W
Spitzenleistung: . . . . . . . . . . 100 W
Lautsprecher: . . . . . . . . . . . . . . 2-Wege-System
Frequenzbereich: . . . . . . . . . . . 60 – 20 000 Hz
Funkempfangsfrequenz: . . . . . . 863,05 MHz
Eingangsempfindlichkeit
MIC 1, MIC 2
(XLR-Buchsen oben): . . . . . .
Mikrofoneingang Kanal 1 – 3
(XLR-Buchsen hinten): . . . . .
JACK-LINE, Klinke: . . . . . . .
AUDIO IN, Cinch: . . . . . . . .
15 mV
4 mV
220 mV
250 mV
Kontaktbelegung der Mikrofoneingänge, XLR
Kanal 1 und 2:
1 = Masse
2 = Signal +, +24 V Phantomspeisung
3 = Signal -, +24 V Phantomspeisung
2
1
3
1 = Masse
2 = Signal +, +24 V Phantomspeisung
3 = Signal -, +24 V Phantomspeisung
Kanal 3:
2
1
3
1 = Masse
2 = Signal +
3 = Signal -
Kontaktbelegung der Line-Eingänge, 6,3-mm-Klinke:
T = Signal
S = Masse
Ausgang LINE OUT, REC: . . . 390 mV
Klangregler
LOW: . . . . . . . . . . . . . . . . . . ±12 dB bei 60 Hz
MID: . . . . . . . . . . . . . . . . . . . ±7 dB bei 1 kHz
HIGH: . . . . . . . . . . . . . . . . . . ±12 dB bei 15 kHz
Stromversorgung: . . . . . . . . . . . 230 V~/ 50 Hz
Leistungsaufnahme: . . . . . . . . . max. 180 VA
6.1 Betrieb mit einem Funkmikrofon
Das Pult ist zusätzlich mit einem Empfangsteil für
ein Funkmikrofon mit einer Sendefrequenz von
863,05 MHz (z. B. TXS-821HT, TXS-820HSE,
TXS-820LT oder TXS-820SX) ausgestattet.
Sobald das Funkmikrofon eingeschaltet ist und
das Funksignal empfangen wird, leuchtet die
LED RF (6).
Die Lautstärke des empfangenen Audiosignals mit dem Regler VOLUME (5) des Eingangskanals 1 einstellen. Ist an eine Eingangsbuchse des ersten Kanals (1 oder 7) ein
Mikrofon oder eine andere Signalquelle angeschlossen, werden die Signale gemischt.
Einsatztemperatur: . . . . . . . . . . 0 – 40 °C
Abmessungen: . . . . . . . . . . . . . 540 × 1140 × 430 mm
Gewicht: . . . . . . . . . . . . . . . . . . 33 kg
Änderungen vorbehalten.
Hinweise
1. Falls kein Signal vom Funkmikrofon empfangen wird, sicherstellen, dass das Mikrofon
auf der richtigen Frequenz (863,05 MHz) sendet und die Batterie des Mikrofons überprüfen. Wenn nötig, den Abstand zwischen Pult
und Mikrofon verringern.
2. Ein schlechter Empfang kann eventuell durch
Drehen oder Versetzen des Pultes verbessert werden.
Diese Bedienungsanleitung ist urheberrechtlich für MONACOR ® INTERNATIONAL GmbH & Co. KG
geschützt. Eine Reproduktion für eigene kommerzielle Zwecke – auch auszugsweise – ist untersagt.
5
GB
All operating elements and connections
described can be found on page 2.
1 Operating Elements
and Connections
1 Input MIC 1 (XLR jack) with a 24 V phantom
power for connecting a microphone to input
channel 1 [as an alternative to the jack (7) on
the rear side]
2 Safety Notes
This unit corresponds to all relevant directives of
the EU and is therefore marked with .
WARNING The unit uses dangerous mains
voltage. Leave servicing to skilled
personnel only. Inexpert handling
or modification of the unit may
result in electric shock.
Please observe the following items in any case:
G
The unit is suitable for indoor use only. Protect
it against dripping water and splash water,
high air humidity and heat (admissible ambient temperature range 0 – 40 °C).
G
Do not operate the unit and immediately disconnect the mains plug from the socket
1. if the unit or the mains cable is visibly damaged,
2. if a defect might have occurred after the unit
was dropped or suffered a similar accident,
3. if malfunctions occur.
In any case the unit must be repaired by
skilled personnel.
2 Reading light
3 Switch for the reading light (2 brightness levels)
4 Input MIC 2 (XLR jack) with a 24 V phantom
power for connecting a microphone to input
channel 2 [as an alternative to the jack on the
rear side]
5 VOLUME control, for each input channel 1 – 4
6 LED RF; will light up when a radio signal is
received at input channel 1
G
Never pull the mains cable to disconnect the
mains plug from the socket, always seize the
plug.
The LED RF at input channel 2 has no function.
G
For cleaning only use a dry, soft cloth; never
use water or chemicals.
7 Combined XLR / 6.3 mm jack for connecting a
microphone via an XLR plug or a signal
source with line level via a two-pole 6.3 mm
plug for each input channel 1 – 3.
G
No guarantee claims for the unit and no liability for any resulting personal damage or material damage will be accepted if the unit is used
for other purposes than originally intended, if it
is not correctly connected or operated, or if it
is not repaired in an expert way.
G
Important for U. K. Customers!
The wires in this mains lead are coloured in
accordance with the following code:
green/yellow = earth
blue = neutral
brown = live
As the colours of the wires in the mains lead of
this appliance may not correspond with the
coloured markings identifying the terminals in
your plug, proceed as follows:
1. The wire which is coloured green and yellow
must be connected to the terminal in the
plug which is marked with the letter E or by
the earth symbol , or coloured green or
green and yellow.
2. The wire which is coloured blue must be
connected to the terminal which is marked
with the letter N or coloured black.
3. The wire which is coloured brown must be
connected to the terminal which is marked
with the letter L or coloured red.
The signal from a wireless microphone will be
mixed to the signal at the input of channel 1.
The XLR contacts of the input channels 1 and
2 are supplied with a 24 V phantom power,
e. g. for electret microphones.
8 Equalizer controls HIGH, MID an LOW for
each channel 1 – 3
9 RCA inputs AUDIO IN for connecting a signal
source with line level to input channel 4;
when both jacks are connected (e. g. stereo
signal from a CD player), the signals will
create the sum (mono)
10 Output LINE OUT, REC (RCA jacks) to route
the mixed signal, e. g. to a recorder or
another amplifier system
11 LED LIMITER; will light up when the input
level is too high and is reduced by the limiter
12 POWER LED
13 POWER switch
14 Mains jack for connection to a socket (230 V~/
50 Hz) via the mains cable provided
15 Support for the mains fuse
Always replace a blown fuse by one of the
same type!
16 Castors
17 Compartment; e. g. for pens or an audio
recorder or audio player
18 Shelves; e. g. for scipts / notes and this instruction manual
19 Storage compartment; e. g. for connection
cables
6
Warning – This appliance must be earthed.
If the unit is to be put out of operation
definitively, take it to a local recycling
plant for a disposal which will not be
harmful to the environment.
3 Applications
The lectern SPEECH-200 consists of a highquality 2-way speaker system, a mixing amplifier
with four input channels and a receiving part for
a wireless microphone with a carrier frequency
of 863.05 MHz. It is ideally suited to reproduce
sound, e. g. for lectures, speeches, readings, etc.
The optional wireless microphone offers additional mobility (e. g. for passing round the microphone in the audience when questions arise).
Besides three microphones, it will also be
possible to connect other audio units (e. g. CD
player for adding music). Via the jacks LINE
OUT, REC, the output signal will be routed to a
recorder or to another amplifier system. The integrated reading light offers two brightness levels.
The two integrated castors on the rear side
of the lectern allow convenient transport.
4 Transport and Setting up
For transporting the lectern, seize the top part
and tilt it slightly backwards so that it will stand
on its two castors only. Thus, it will be easy to
wheel it to the place of application. Set up the
lectern is such a way that the speakers on its
front side will be directed towards the audience.
5 Connections
Prior to connecting any units or to changing any
existing connections, switch off the amplifier system and all units to be connected.
5.1 Microphones and audio unit
1) Connect a microphone (e. g. a suitable
gooseneck microphone from the EMG…P
series) to one of the XLR jacks (1 or 4) on the
upper side of the lectern and adjust it to the
person speaking. It will also be possible to
equip both jacks with one microphone each.
The jacks have a latching; to disconnect the
plug, press the PUSH lever.
As an alternative, connect a microphone
with an XLR plug to the input jack (7) of the
channels 1 and 2 on the rear side of the
lectern. Like the jacks on the upper side of the
lectern, these microphone inputs will supply
the phantom power (24 V ) required by some
microphones.
The input jack of channel 3 allows connection of another microphone with XLR plug.
2) To connect a signal source with line level
(e. g. mixer, CD player), use the 6.3 mm jacks
(7) of the input channels 1 – 3 (if the corresponding channel is not reserved by a microphone) or the RCA jacks AUDIO IN (9) of
channel 4. When both RCA jacks are connected (e. g. stereo signal from a CD player),
the signals will create the sum (mono).
Note: If you use a wireless microphone, its signal will be mixed to the input signal of channel 1.
5.2 Recorder or
additional amplifier system
The RCA jacks of the output LINE OUT, REC
(10) allow connection of a recorder or another
audio unit with line input (e. g. an additional
amplifier system for PA applications in large
zones). The mixed signal of the audio sources
will be available at these jacks.
5.3 Power supply
Connect the power supply cable provided to the
mains jack (14) and the mains plug to a socket
(230 V~ / 50 Hz).
6 Operation
1) Before switching on, set the VOLUME controls (5) of all four input channels to “0” to prevent switching noise and an excessive volume.
2) Switch on the audio sources connected first,
then switch on the SPEECH-200 with the
POWER switch (13). The POWER LED (12)
will light up. If an additional amplifier system
for PA applications has been connected to
the SPEECH-200, switch on this amplifier
system last.
After operation, switch off the units in
reverse order:
1. the additional amplifier system
2. the SPEECH-200
3. the audio sources connected
3) Mix the signals of the input channels with the
corresponding VOLUME controls (5) or fade
them in and out as required. If you use a wireless microphone, also see chapter 6.1. Only
adjust the volume to such a level that the
sound reproduced will not be distorted.
If the LED LIMITER (11) lights up frequently, the input level is too high and should
be reduced with the corresponding volume
control.
CAUTION!
G Make sure to use an adequate volume
level. Permanent high volumes may damage your hearing.
G To prevent feedback howl, never direct the
microphone towards the speaker and
never place it too close to the speaker.
Feedback may also occur when the volume is too high. In this case, reduce the
microphone volume with the corresponding VOLUME control (5).
4) To optimize the sound for the channels 1 – 3,
use the corresponding equalizer controls
HIGH, MID and LOW (8). After modifying the
sound, readjust the volume with the corresponding VOLUME control (5), if required.
6.2 Reading light
7 Specifications
Amplifier power
RMS power: . . . . . . . . . . . . . 75 W
Peak power: . . . . . . . . . . . . . 100 W
Speaker: . . . . . . . . . . . . . . . . . . 2-way system
Frequency range: . . . . . . . . . . . 60 – 20 000 Hz
Received radio frequency: . . . . 863.05 MHz
Input sensitivity
MIC 1, MIC 2
(XLR jacks, top): . . . . . . . . . . 15 mV
Microphone input of channels 1 – 3
(XLR jacks, rear): . . . . . . . . . 4 mV
JACK-LINE, 6.3 mm jack: . . . 220 mV
AUDIO IN, RCA: . . . . . . . . . . 250 mV
Pin configuration of the microphone inputs, XLR
Channels 1 and 2:
1 = ground
2 = signal +, +24 V phantom power
3 = signal -, +24 V phantom power
2
1
3
The lectern is also equipped with a receiving part
for a wireless microphone with a radio frequency
of 863.05 MHz (e. g. TXS-821HT, TXS-820HSE,
TXS820LT or TXS-820SX). Once the wireless
microphone is switched on and a radio signal is
received, the LED RF (6) will light up.
Adjust the volume of the audio signal
received with the VOLUME control (5) of input
channel 1. If a microphone or another signal
source has been connected to an input jack of
the first channel (1 or 7), the signals will be
mixed.
Note
1. If you do not receive a signal from the wireless microphone, make sure that the microphone is transmitting on the correct frequency (863.05 MHz) and check the battery
of the microphone. Reduce the distance
between the lectern and the microphone, if
required.
1 = ground
2 = signal +, +24 V phantom power
3 = signal -, +24 V phantom power
Channel 3:
2
1
3
6.1 Operation with a wireless
microphone
GB
To switch on the reading light (2), set the switch
(3) to the position “I” or “II” according to the
brightness level desired.
1 = ground
2 = signal +
3 = signal -
Pin configuration of the line inputs, 6.3 mm jack:
T = signal
S = ground
Output LINE OUT, REC: . . . . . . 390 mV
Equalizer
LOW: . . . . . . . . . . . . . . . . . . ±12 dB at 60 Hz
MID: . . . . . . . . . . . . . . . . . . . ±7 dB at 1 kHz
HIGH: . . . . . . . . . . . . . . . . . . ±12 dB at 15 kHz
Power supply: . . . . . . . . . . . . . . 230 V~ / 50 Hz
Power consumption: . . . . . . . . . 180 VA max.
Ambient temperature: . . . . . . . . 0 – 40 °C
Dimensions: . . . . . . . . . . . . . . . 540 × 1140 × 430 mm
Weight: . . . . . . . . . . . . . . . . . . . 33 kg
Subject to technical modification.
2. If reception is poor, turning or moving the
lectern may improve it.
All rights reserved by MONACOR ® INTERNATIONAL GmbH & Co. KG. No part of this instruction
manual may be reproduced in any form or by any means for any commercial use.
7
®
MONACOR INTERNATIONAL GmbH & Co. KG • Zum Falsch 36 • 28307 Bremen • Germany
A-1107.99.02.12.2011
Copyright © by MONACOR INTERNATIONAL. All rights reserved.