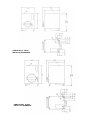
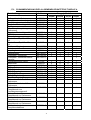
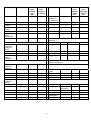
1
TROCKENDAMPF-SCHNELLGARER. 205GH, 305GH, 305TH, 2228H INSTALLATION BETRIEB (SEITE 1). MANUEL D'INSTALLATION ET D’UTILISATION (PAGE 33). INSTALLATION AND OPERATION MANUAL (PAGE 67). PLE200594 A 01-13 EU8752 BITTE BEWAHREN SIE DIESES HANDBUCH FÜR EINE SPÄTERE VERWENDUNG AN EINEM SICHEREN ORT AUF VEUILLEZ CONSERVER CE MANUEL EN LIEU SÛR POUR RÉFÉRENCE ULTÉRIEURE PLEASE KEEP THIS MANUAL IN A SAFE PLACE FOR FUTURE REFERENCE INHALTSVERZEICHNIS Vorwort Allgemeine Informationen Haftung Definitionen Umweltverantwortlichkeit RoHS-Konformität WEEE-Richtlinie Verpackungsrecycling Sicherheitsinformationen Sicherheitsrichtlinien Warnsymbole Sicherheitsanweisungen Was zu unterlassen ist Was zu tun ist Allgemeine Informationen Funktionen und Vorteile Hydraulikplan Betrieb des Dampfgarers Layout des Bedienfelds Einschalten des Dampfgarers Wählen des Temperatur- oder Druckmodus Garen Betrieb der zweiten Kammer Atmosphärisches Garen Türverriegelung, Bedienungsbeschreibung Garsonde (optional) Ausschalten des Dampfgarers Hinweise und Tipps zum Thema Garen Automatische Vorwärmung Würze Gemüse Fleisch Fisch Empfohlene Garzeiten und Drücke Nach dem Garen Tägliche Reinigung Entfernen der Blechschienen Design- und Konstruktionsdaten Technische Informationen 205G Installationsmaße 305G Installationsmaße 305T Installationsmaße 305T Installationsmaße, gestapelt 2228 Installationsmaße Installation Auspacken und Handhabung Installationsort Montage auf einer Arbeitsfläche Montage auf eigenem Ständer Abschnitt 1 2 3 4 5 5.1 5.2 5.3 6 6.1 6.2 6.3 6.3.1 6.3.2 7 8 Abbildung 1 9 Abbildung 2 9.1 9.2 9.3 9.3.1 9.3.2 9.3.3 9.3.4 9.3.5 9.4 9.4.1 9.4.2 9.4.3 9.4.4 9.4.5 Tabelle 1 10 10.1 10.2 11 12 Tabelle 2 Abbildung 3 Abbildung 4 Abbildung 5 Abbildung 6 Abbildung 7 13 13.1 13.2 13.2.1 13.2.2 1 Seite 3 3 3 3 3 3 4 4 4 5 5 6 6 6 6 7 8 9 9 9 10 10 12 12 13 14 14 15 15 15 15 15 15 16 17 18 18 19 20 22 22 23 23 24 24 24 25 25 25 INHALTSVERZEICHNIS Forts. Installation des Dampfgarers Elektrische Installation Elektrischer Anschluss Anschluss des Netzkabels Einstellung der elektrischen Last Wasserversorgung Wasserversorgungsqualität Wasserversorgung zum Garen Wasserversorgung zum Kondensieren des Dampfs Wasseranschlüsse Voraussetzungen für Abflussanschluss Inbetriebnahmeanweisungen Inbetriebnahme Wartung Wartung des Drucksicherheitsventils Fehlersuche Standardcodes Fehlersuche Übliche Ersatzteile Service-Informationen und Kontakttelefonnummern 2 Abschnitt 13.3 13.4 13.5 13.5.1 13.5.2 13.6 13.6.1 13.6.2 13.6.3 13.7 13.8 14.0 14.1 15 15.1 16 16.1 16.2, Tabelle 3 17, Tabelle 4 18 Seite 26 26 26 27 27 27 28 28 28 28 29 29 29 29 30 30 30 30 31 32 1. VORWORT Hobart behält sich das Recht vor, das Design seiner Produkte ohne vorherige Ankündigung zu ändern. Während alle Bemühungen unternommen werden, um sicherzustellen, dass diese Veröffentlichung das neueste Design wiedergibt, kann das Unternehmen eine vollständige Einhaltung nicht garantieren. Herzlichen Glückwunsch zu Ihrem Dampfgarer - halten Sie ihn sauber und in gutem mechanischen und elektrischen Zustand. 2. ALLGEMEINE INFORMATIONEN Die in diesem Handbuch enthaltenen Informationen und Anweisungen decken möglicherweise nicht alle Details oder Veränderungen der Anlage ab und können nicht alle Situationen behandeln, die sich aus der Installation, dem Betrieb oder der Wartung ergeben. Für zusätzliche Informationen wenden Sie sich bitte an Ihre lokale Hobart Geschäftsstelle. Kontaktangaben finden Sie auf der Rückseite des Handbuchs. 3. HAFTUNG Installationen und Reparaturen, die nicht von autorisierten Technikern ausgeführt werden, die Verwendung von nicht originalen Ersatzteilen sowie technische Änderungen der Maschine können die in den Standardverkaufsbedingungen dargelegte Garantie beeinträchtigen. 4. DEFINITIONEN Qualifizierte Bediener Der Dampfgarer ist nur für den professionellen Gebrauch durch qualifizierte Bediener bestimmt. Qualifizierte Bediener sind Personen, die eine Schulung für den Betrieb des Geräts durch eine geeignete qualifizierte Person erhalten haben, die die Information in diesem Handbuch aufmerksam gelesen haben und die mit der Funktion der Anlage vertraut sind oder Erfahrung mit dem Betrieb von Dampfgarern haben. Qualifiziertes Installationspersonal. Alle „Arbeiten“, die an dem Dampfgarer durchgeführt werden, einschließlich der Installation und Wartung, sind von Personen auszuführen, die mit den erforderlichen Vorsichtsmaßnahmen vertraut und darin erfahren sind und alle Anforderungen der staatlichen und lokalen Behörden erfüllt haben. In der EU muss die Installation nationale oder lokale Anforderungen des Bestimmungslandes des Gerätes erfüllen. Qualifizierte Service-Fachkräfte: Personen, die mit Hobart Dampfgarern vertraut sind und fachkundig, geschult und von Hobart Großbritannien anerkannt sind. Alle ServiceFachkräfte müssen über einen vollständigen Satz von Handbüchern und Originalersatzteilen verfügen. 5. UMWELTVERANTWORTLICHKEIT 5.1 RoHS-KONFORMITÄT Dieser Dampfgarer erfüllt die Anforderungen der RoHS-Richtlinie (2002/95/EG), die am 1. Juli 2006 in Kraft trat, sowie die nachfolgende Revision 2011/65/EU. Die RoHS-Richtlinie betrifft „die Beschränkung des Gebrauchs von bestimmten gefährlichen Substanzen in elektrischen und elektronischen Anlagen“. Diese Richtlinie verbietet die Vermarktung neuer elektrischer und elektronischer Geräte auf dem EU- 3 Markt, die unzulässig viel Blei, Kadmium, Quecksilber, hexavalentes Chrom, polybrominiertes Biphenyl (PBB) und polybrominiertes Diphenylether (PBDE) als Flammhemmer enthalten. 5.2 WEEE-RICHTLINIE Ziel der Richtlinie zur Entsorgung elektrischer und elektronischer Geräte (Waste Electrical and Electronic Equipment, WEEE-Richtlinie 2011/19/EU) ist die Minimierung des Einflusses von elektrischen und elektronischen Geräten auf die Umwelt, indem die Wiederverwendung, das Recycling und die Verringerung der Anzahl der auf Deponien entsorgten elektrischen und elektronischen Geräte gefördert wird. Die WEEE-Richtlinie trat am 1. Juli 2007 in Kraft. Wenn dieser Dampfgarer ein existierendes Gerät ersetzt, stellen Sie sicher, dass es korrekt entsorgt wird. Setzen Sie sich mit Ihrem lokalen Hobart Verkaufsbüro für die Entsorgung Ihres alten Gerätes in Verbindung. 5.3 RECYCLING DER VERPACKUNG Stellen Sie sicher, dass die Verpackung korrekt entsorgt wird. 6. SICHERHEITSINFORMATIONEN Die Verfahren und Vorsichtsmaßnahmen, die in diesem Handbuch beschrieben sind, gelten nur dann für den Dampfgarer, wenn er in der vorgeschriebenen Weise verwendet wird. Wenn das Gerät nicht wie in diesem Handbuch beschrieben verwendet wird, ist der Bediener für seine eigene Sicherheit und die Sicherheit der anderen beteiligten Personen verantwortlich. Die Informationen in diesem Handbuch dienen dazu, dem Bediener zu helfen, die Funktion des Dampfgarers zu verstehen und diesen zu warten und zu bedienen. Um Unfälle zu vermeiden, lesen, verstehen und befolgen Sie vor der Installation und der ersten Inbetriebnahme alle Vorsichtsmaßnahmen und Warnungen, die in diesem Handbuch enthalten sind. Dieses Handbuch muss studiert werden, um gute Kenntnisse des Dampfgarers und seiner Fähigkeiten zu erlangen. Heißes Wasser, Dampf und Elektrizität sind gefährlich und können Verletzungen verursachen, wenn keine ausreichenden Vorsichtsmaßnahmen vor dem Betrieb und der Wartung des Dampfgarers vorgenommen werden. Stellen Sie sicher, dass die Stromversorgung unterbrochen und der GESAMTE Druck und heißes Wasser vor Beginn der Demontage des Wasser- oder Drucksystems abgelassen wurde. Das interne Messgerät am Dampfgenerator zeigt den Druck an. In bestimmten Fehlersuchsituationen kann es notwendig sein, die Anlage mit befüllter heißer Flüssigkeit zu betreiben. In diesem Fall ist äußerste Vorsicht geboten. Nur entsprechend qualifiziertes Personal darf den Dampfgarer bedienen. 4 6.1 SICHERHEITSRICHTLINIEN Stellen Sie sicher, dass während der manuellen Handhabung des Dampfgarers ausreichende Vorsichtsmaßnahmen beachtet werden, insbesondere, wenn er bei der Installation in Position gebracht wird. Die Vorschriften zur manuellen Handhabung müssen beachtet werden. Die Gewichtsangaben des Dampfgarers finden Sie in Tabelle 2. Siehe Abschnitt 6.3 für Betriebssicherheitsanweisungen. • Spritzen Sie dieses Gerät nicht mit einem Schlauch oder einem Druckreiniger ab. Es ist äußerst wichtig, die Reinigungsanweisungen in diesem Handbuch zu beachten. 6.2 • Entfernen Sie keine Abdeckungen und lösen Sie keine Befestigungen, während das Gerät in Betrieb ist. • Stellen Sie sicher, dass dieses Handbuch für die zukünftige Bezugnahme an einem leicht zugänglichen Ort in der Nähe des Dampfgarers aufbewahrt wird. • Dieses Gerät ist nicht für den Gebrauch durch Personen gedacht, deren physische, sensorische oder geistige Fähigkeiten verhindern, es sicher zu benutzen. • Alle Bediener müssen für den sicheren Betrieb des Gerätes geschult werden. • Stellen Sie sicher, dass die Stromversorgung isoliert und der gesamte Druck abgelassen wurde, bevor der Dampfgarer gewartet oder bewegt wird. • Elektrische Geräte, Dampf und Wasser sind potenziell gefährlich und können Verletzungen verursachen, wenn vor dem Betrieb oder der Wartung der Anlage keine ausreichenden Vorsichtsmaßnahmen getroffen werden. • Lassen Sie Ihren Dampfgarer stets regelmäßig warten: mindestens zweimal jährlich und abhängig von der Häufigkeit des Betriebs. Für Informationen zu Wartungsverträgen setzen Sie sich bitte mit Ihrem lokalen Hobart Verkaufsbüro in Verbindung. • Die Garkammertür vorsichtig öffnen, falls der Abfluss mit Nahrungsmittelresten blockiert wird. Wenn der Abfluss blockiert ist, kann heißes Wasser von der Vorderseite der Garkammer ausströmen. • Um Verbrühungen zu vermeiden, stellen Sie keine Töpfe mit Flüssigkeiten (oder Produkten, die bei Erhitzung flüssig werden) auf die Regale in der Garkammer, die nicht leicht beobachtet und gehandhabt werden können. WARNSYMBOLE Um die Sicherheitshinweise in diesem Handbuch identifizieren zu können, werden folgende Symbole verwendet. Das Symbol „Warnung“ wird in erster Linie dort verwendet, wo die entsprechenden Informationen für den sicheren Gebrauch des Geräts wichtig sind. 5 Das Symbol für elektrische Gefahren wird verwendet, wenn Gefahren elektrischer Art vorliegen. Trennen Sie vor der Wartung des Geräts stets das Stromkabel von der Netzstromversorgung. 6.3 SICHERHEITSANWEISUNGEN NUR EINE VOLLSTÄNDIG GESCHULTE UND FACHKUNDIGE PERSON DARF DEN DAMPFGARER BENUTZEN. Folgende Anweisungen müssen beim Gebrauch des Geräts beachtet werden. Hinweis: Der Dampfgarer darf nur für den Zweck, für den er bestimmt ist, und gemäß der mitgelieferten Bedienungsanleitung verwendet werden. 6.3.1 WAS ZU UNTERLASSEN IST • • • • • • • • • • Erlauben Sie Kindern oder unqualifiziertem Personal nicht, den Dampfgarer zu bedienen. Bedienen Sie das Gerät nicht, wenn ein Fehler entsteht oder das Gerät unsicher ist. Tragen Sie keine lose Kleidung. Verwenden Sie kein Bleichmittel, Hypochlorit oder Chlor, um den Dampfgarer innen oder außen zu reinigen. Wenden Sie bei der Bedienung keine übermäßige Kraft an, die die Stabilität des Dampfgarers beeinträchtigen könnte. Bedienen Sie das Gerät nicht, wenn Teile demontiert sind. Verwenden Sie den Dampfgarer nicht in einer unsicheren Situation. Reinigen Sie das Gerät nicht mit Scheuerpulver oder Topfreinigern. Trocknen Sie keine Geschirrtücher oder Lappen auf dem Gerät. Versuchen Sie nicht, die Tür zu öffnen, bevor der Druck aus der Garkammer abgelassen wurde. 6.3.2 WAS ZU TUN IST • • • • • • • 7. Verwenden Sie den Dampfgarer in einem gut beleuchteten Bereich. Trennen Sie vor der Reinigung des Geräts und nach dem Ablassen den Netzstrom und die Wasserversorgung vom Dampfgarer. Verwenden Sie den Dampfgarer nur bestimmungsgemäß und gemäß der Bedienungsanleitung. Achten Sie auf heiße Oberflächen, insbesondere auf die Garkammertür. Unterbrechen Sie am Ende des Tages nach dem Ablassen die Stromversorgung und die Wasserzufuhr. Halten Sie das Gerät in einem sauberen und betriebsbereiten Zustand. Reinigen Sie das Abflusssieb der Garkammer täglich. ALLGEMEINE INFORMATIONEN Der Hochdruck-Dampfgarer ist für mehrere Garkapazitäten in einer Vielzahl von Modellen erhältlich. Die Abbildungen 4 bis 7 zeigen die Installationsmaße für jedes Modell und Tabelle 2 listet die technischen und Leistungsdaten auf. 6 Das Gerät verwendet trockenen Dampf unter Druck, um das Nahrungsmittelprodukt zu garen, wodurch außergewöhnliche Farbe und Aussehen erzielt werden. Kammer, Dampfgenerator/Dampfkessel, Heizelemente und das elektronische Regelungssystem bestehen aus Edelstahl. Der Dampf wird von hocheffizienten Heizelementen im Edelstahldampfkessel erzeugt.. Ein elektronisches Regelungssystem hält eine beständige Dampftemperatur aufrecht. Während des Garens regelt ein Magnetventil die Strömung des Dampfs in die Garkammer und die Temperatur wird von einem schnell reagierenden Sensor überwacht. Der Dampf wird an der Rückseite der Garkammer eingespritzt. Am Ende des Garzyklus wird der kondensierte Dampf von der Vorderseite der Kammer abgelassen. Das einzigartige Design der Garkammertür gewährleistet eine maximale Nutzung der Garkammer und eine wirksame Abdichtung. 8. • • • • • • • • • • • • FUNKTIONEN UND VORTEILE Garkammer aus hochwertigem Edelstahl. Bedienungsfreundliches Regelungssystem für atmosphärisches (druckloses) Garen, Garen bei halbem Druck (0,5 Bar) und bei vollem Druck (1,0 Bar). Einfach zu reinigende Garkammer. Garen mit trockenem Dampf stellt sicher, dass das Gemüse außergewöhnliche Farbe und Aussehen aufweist. Schnelle Garzyklen, typischerweise zwischen 1 und 3 Minuten. Garen auf Abruf vermeidet Nahrungsmittelvergeudung. Der Garprozess erzeugt ein erstklassiges Produkt, das die vollständigen natürlichen Vitamine und Mineralien beibehält. Schnellstart Dampfgenerator und Garkammer sind thermisch isoliert, wodurch Hitzeverlust und Energieverbrauch verringert werden. Automatische Vorwärmung. Das Gerät erfasst automatisch die anfängliche Garkammertemperatur, um sicherzustellen, dass das Produkt garbereit ist. Die Konstruktion der Tür stellt sicher, dass während des Garzyklus nicht auf die Garkammer zugegriffen werden kann. Es ist ein optionaler Ständer mit Ablage für Gasto-Normtöpfe und Führung von Wasser- und Abflussschläuchen und elektrischen Leitungen erhältlich. 7 ABBILDUNG 1. HYDRAULIKPLAN. Teil 1 2 Beschreibung Netzstromversorgung Füllsolenoid Teil 7 8 3 9 4 Einzelnes Rückschlagventil Dampfkessel Beschreibung Teil Manometer 12 Dampfeinlasssolenoi 13 d Garkammer 14 10 Abfluss/Abtauventil 15 5 Wasserstandschalter 11 Abflussventil des Dampfkessels 16 6 Sicherheitsventil 8 Beschreibung Kondensatsolenoid Abfluss Atmosphärische Öffnung Luftspaltbaugruppe (OPTIONAL) Pumpe 9. BEDIENUNG DES DAMPFGARERS Garleistungsauswahl Wählschalter und Anzeigen für atmosphärischen Druck, 0,5 Bar und 1,0 Bar. Druckanzeige Druck- und Temperaturanzeige Temperaturanzeige Einschalta nzeige Temperatureinstellung EIN-AUSSchalter des Geräts Zeitanzeige Timer-Einstellung Stopp-StartAnzeige für den Garzyklus. ABBILDUNG 2. LAYOUT DES BEDIENFELDS Hinweis: In diesem Handbuch werden die Kontrollleuchten auf dem Bedienfeld in gelb gezeigt. Die tatsächliche Farbe der leuchtenden Kontrollleuchten auf dem Dampfgarer ist hellblau. 9.1 EINSCHALTEN DES DAMPFGARERS. Der Dampfgarer wird wie folgt eingeschaltet: • Schalten Sie den Hauptstromschalter ein (für einen Moment leuchten die Kontrollleuchten auf dem Bedienfeld, um anzuzeigen, dass die Stromversorgung eingeschaltet ist). • Stellen Sie die Wasserversorgung her. • Drücken Sie den „I/O“-Schalter 9 • • • Im oberen Fenster wird 3 Sekunden lang „HH“ angezeigt und im unteren Fenster werden die Betriebsstunden angezeigt. Die „EIN“-Kontrollleuchte leuchtet, um anzuzeigen, dass der Dampfgarer eingeschaltet ist. Wählen Sie den erforderlichen Betriebsdruck, indem Sie die Taste für atmosphärischen Druck (drucklos), halben Druck oder vollen Druck drücken. Die entsprechende hellblaue Kontrollleuchte leuchtet, um die ausgewählte Option anzuzeigen. Während der Aufwärmung des Geräts blinkt die Kontrollleuchte. Wenn das Gerät garbereit ist, leuchtet die Kontrollleuchte ununterbrochen. Das Gerät füllt sich automatisch auf den erforderlichen Stand und erwärmt sich auf die gewünschte Temperatur. 9.2 WÄHLEN DER GARMODUS Wenn der Dampfgarer betriebsbereit ist, wird die Garzeit angezeigt, die mit dem Drehknopf eingestellt werden kann. • • • Zum Ändern des Garmodus drücken Sie den gewünschten Schalter. Der Dampfgarer wird automatisch (durch Ablassen durch die Garkammer) auf den ausgewählten Druck eingestellt. Schließen Sie die Tür und bringen Sie den Türgriff in die obere Position, wenn der Druck von vollem Druck auf halben Druck oder auf atmosphärischen Druck abnimmt. Dadurch kann der Dampfdruck durch den Abfluss anstatt in die Küche abgelassen werden. Folgende Garmodi stehen zur Verfügung: Atmosphärisches Garen (drucklos), wobei die Temperatur zwischen 50 und 99° C eingestellt werden kann. Im atmosphärischen Modus kann die Gartemperatur mit den Auf- und AbPfeilen eingestellt werden. Halbe Leistung, wobei die typische Garkammertemperatur 110° C (0,5 Bar) beträgt. Programm mit voller Leistung, wobei die typische Garkammertemperatur 118° C (1,0 Bar) beträgt. Hinweis: Ein Garzyklus kann nicht geändert werden, nachdem der „Start“-Schalter betätigt wurde. 9.3 GAREN. Ein Garzyklus kann erst dann beginnen, wenn der Dampfgenerator den korrekten Betriebsdruck erreicht hat. Wenn das Gerät bereit ist, leuchtet die hellblaue Kontrollleuchte ununterbrochen. 10 Tabelle 2 führt die maximale Garkapazität auf. • Wählen Sie den erforderlichen Garprogramm-Modus (zum Garen mit der optionalen Temperatursonde siehe Abschnitt 9.4.2). • Stellen Sie den Timer-Drehknopf auf die erforderliche Garzeit ein. • Schieben Sie die Produkte in die Garkammer. • Wenn die Tür offen ist, befindet sich der Hebel in der oberen Position. • Schließen Sie die Tür und drehen den Türhebel in die horizontale Position. Die Tür bleibt etwas offen, damit die Garkammer zu Beginn des Garzyklus mit Dampf gereinigt werden kann. • Drücken Sie den „Start“-Schalter und lassen Sie den Dampf etwa 5 bis 10 Sekunden lang aus der Garkammer entweichen. Dadurch wird die kalte Luft in der Kammer verdrängt. • Drehen Sie den Türhebel langsam in die untere Position, um die Tür vollständig zu schließen. Der Druck baut sich in der Garkammer auf, das Schloss der Tür wird aktiviert und der Timer beginnt rückwärts zu zählen, wenn der automatische Vorwärmzyklus abgeschlossen ist. Eine rotierende „Null“ zeigt den Vorwärmzyklus an. Die Vorwärmtemperatur ist werkseitig auf 96° C eingestellt, jedoch ist dieser Wert einstellbar. Setzen Sie sich für weitere Informationen mit Ihrem lokalen Hobart Service-Center in Verbindung. • • Am Ende des Garzyklus blinken vertikale Segmente der Zeitanzeige von oben nach unten und ein Summer ertönt. Wenn der Druck aus der Garkammer entwichen ist und die Tür sicher geöffnet werden kann, blinkt die Garzeitanzeige. In einer Küche mit mehreren Dampfgarern zeigt die blinkende Anzeige an, welches Gerät den Garzyklus abgeschlossen hat. • Wenn der Türschlossbolzen eingefahren ist, drehen Sie den Türhebel in die obere Position und öffnen Sie die Tür vorsichtig. GEFAHR: Die Tür, das Schlossschaltgehäuse, die Garkammer, die Nahrungsmittelprodukte und der restliche entweichende Dampf sind noch sehr heiß. Verwenden Sie passende Schutzkleidung, Schutzhandschuhe und eine Schutzausrüstung. 11 Nehmen Sie die gegarten Produkte aus der Kammer und lassen Sie die Tür offen. Es kann unmittelbar ein anderer Garzyklus mit derselben Dauer gestartet werden oder es kann eine neue Garzeit ausgewählt werden. Wenn die ausgewählte Zeit falsch ist oder Sie einen laufenden Zyklus unterbrechen möchten, drücken Sie jederzeit den „Stopp“-Schalter. 9.3.1 BETRIEB DER ZWEITEN KAMMER (BETRIFFT NUR DAS MODELL 2228). Der Dampfgarer 2228 wird mit zwei Garkammern geliefert. Die zweite Kammer wird mit dem Druck und der Temperatur betrieben, die am Haupttastenfeld gewählt wurden. Kammer 1 ist die untere Kammer und Kammer 2 ist die obere Kammer. Garkammer 1 wird als Hauptkammer bezeichnet. So starten Sie die zweite Kammer: • • • • Wählen Sie die erforderliche Garzykluszeit mit dem Drehknopf aus. Drücken Sie die „Start/Stopp“-Taste, um den Zyklus zu starten. Durch Drücken der „Start/Stopp“-Taste während des Betriebszyklus wird der ausgewählte Zyklus bei Bedarf gestoppt. Am Ende des ausgewählten Garzyklus ertönt der Summer, um anzuzeigen, dass die Funktion abgeschlossen ist. Entnehmen Sie die gegarten Produkte vorsichtig. GEFAHR: Die Tür, das Schlossschaltgehäuse, die Garkammer, die Nahrungsmittelprodukte und der restliche entweichende Dampf sind noch sehr heiß. Verwenden Sie passende Schutzkleidung, Schutzhandschuhe und eine Schutzausrüstung. • Drücken Sie den Aufwärtspfeil auf dem Haupttastenfeld, um Druck bzw. Temperatur der zweiten Kammer während des Betriebs anzuzeigen. Dadurch wird der Wert der zweiten Kammer einige Sekunden lang angezeigt, bevor der Wert für Druck bzw. Temperatur der Hauptkammer wieder angezeigt wird. Hinweis: Die Produkttemperatursonde ist nur für die Hauptkammer vorhanden. 9.3.2 ATMOSPHÄRISCHES GAREN. Diese Option erlaubt atmosphärisches (druckloses) Garen mit Temperaturregelung. So betreiben Sie den Dampfgarer im atmosphärischen Modus: • • • • Schließen Sie die Tür. Drücken Sie den Wählschalter für atmosphärisches Garen. Dadurch kann der Dampfdruck durch den Abfluss anstatt in die Küche abgelassen werden. Stellen Sie die erforderliche Gartemperatur mit den Auf- und AbTasten ein. Der Temperaturbereich reicht von 50 bis 110° C. Stellen Sie die erforderliche Garzeit mit dem Drehknopf ein. 12 • Öffnen Sie die Tür und schieben Sie das Nahrungsmittelprodukt hinein. • Schließen Sie die Tür und drücken Sie den „Start“-Schalter. Die Temperaturanzeige zeigt die tatsächliche Kammertemperatur an. Die ausgewählte Temperatur kann jederzeit durch Drücken des Garwählschalters übergeprüft werden. • Am Ende des Garzyklus blinken auf der Zeitanzeige vertikale Segmente von oben nach unten und ein Summer ertönt. Wenn die Tür sicher geöffnet werden kann, blinkt die Garzeitanzeige. Die Einstellungen kehren zum vorherigen Zyklus zurück und sind bereit für den nächsten Betrieb. • Wenn der Türschlossbolzen (falls vorhanden) eingefahren wurde, drehen Sie den Türhebel in die obere Position und öffnen Sie die Tür vorsichtig. GEFAHR: Die Tür, das Schlossschaltgehäuse, die Garkammer, die Nahrungsmittelprodukte und der restliche entweichende Dampf sind noch sehr heiß. Verwenden Sie passende Schutzkleidung, Schutzhandschuhe und eine Schutzausrüstung. • Nehmen Sie die gegarten Produkte aus der Kammer und lassen Sie die Tür offen. 9.3.3 BETRIEBSBESCHREIBUNG DES TÜRSCHLOSSES (OPTIONAL). Das Türschloss ist nicht bei allen Modellen vorhanden. Wenn die Stromversorgung zum Dampfgarer ohne Druck in der Garkammer eingeschaltet wird, wird der Türbolzen eingefahren, damit die Tür geöffnet und geschlossen werden kann. Wenn ein Garzyklus ausgewählt wurde und die Kammertür geschlossen wird, nimmt der Druck in der Kammer zu. Bei einem Druck von etwa 0,3 bis 0,4 Bar verriegelt der Türmechanismus die Tür. Am Ende des Garzyklus fällt der Druck in der Garkammer ab und bei einem Wert von etwa 0,3 bis 0,4 Bar wird der Schlossbolzen aus dem Schlitznocken zurückgezogen, damit die Tür geöffnet werden kann. SCHLOSSBOLZ SCHLITZNOCKE Am Ende des Tages muss die Tür offen bleiben, bevor die Stromversorgung zum Gerät ausgeschaltet wird, da die Tür andernfalls verriegelt bleibt. Das Türschlossgehäuse wird während Betriebs heiß und das ist normal. Ein Etikett „Vorsicht heiß“ warnt den Bediener. 13 9.3.4 GARSONDE (OPTIONAL). Mit der Garsonde kann der Küchenchef garen, indem er die Innentemperatur des Produktes kontrolliert. Die Garsonde ist als Option erhältlich. Für weitere Informationen setzen Sie sich bitte mit Ihrem lokalen Hobart Verkaufsbüro in Verbindung. So betreiben Sie den Dampfgarer im Garsondenmodus: • Wählen Sie den Sondenmodus atmosphärischen Auswahltaste. • Die Anzeige „blaues Hähnchen“ leuchtet auf dem Bedienfeld. • Wählen Sie die erforderliche Gartemperatur (50 bis 99° C) mit den Aufund Ab-Schaltern. Öffnen Sie die Garkammertür und stellen das Produkt in die Kammer. Führen Sie danach die Sonde ein, so dass sich die Spitze im Zentrum des Nahrungsmittelproduktes befindet. Drücken Sie den Start-Schalter, um den Garzyklus zu starten. Das Produkt wird automatisch mit der ausgewählten Temperatur gegart, deshalb kann keine Zeitauswahl eingegeben werden. Wenn das Nahrungsmittelprodukt die voreingestellte Temperatur erreicht, stoppt der Garzyklus automatisch. Am Ende des Garzyklus blinken auf der Zeitanzeige vertikale Segmente von oben nach unten und ein Summer ertönt. Wenn die Tür sicher geöffnet werden kann, blinkt die Garzeitanzeige. Die Einstellungen kehren für den nächsten Betrieb zum vorherigen Zyklus zurück. Ziehen Sie die Sonde vorsichtig heraus und entnehmen Sie das Produkt aus der Garkammer. • • • • • • durch zweimaliges Drücken der Hinweis: Die Garsonde muss am Halter aufbewahrt werden, wenn sie nicht in Gebrauch ist. 9.3.5 AUSSCHALTEN DES DAMPFGARERS. So schalten Sie den Dampfgarer am Ende des Tages oder eines Garvorgangs ab: • Drücken Sie den „I/O“-Schalter • Nach 10 Sekunden blinkt die blaue Ein-/Aus-Kontrollleuchte und die Timer-Segmente blinken von oben nach unten. Der Dampfgarer kann während der 10 Sekunden langen Verzögerung wieder eingeschaltet werden. Nach 10 Sekunden beginnt der Abflusszyklus. • 14 9.4 HINWEISE UND TIPPS ZUM THEMA GAREN 9.4.1 AUTOMATISCHE VORWÄRMUNG Die Garzeit bleibt ungeachtet der Menge und der Produkttemperatur dieselbe. Zum Beispiel ist die Gar-Timer-Einstellung für das Garen von 1 oder 30 Portionen Erbsen in eingefrorenem Zustand oder bei Umgebungstemperatur dieselbe. Der automatische Vorwärm-Auftauzyklus nimmt die notwendige Zeitanpassung vor, um das Nahrungsmittelprodukt vor dem Start des Garzyklus zu erwärmen. Je nach Produktmenge verlängert der automatische Vorwärmzyklus die Gesamtgarzeit um etwa 1,5 bis 2 Minuten. Diese zusätzliche Zeit soll nicht zur Zeit hinzugefügt werden, die auf dem Timer eingestellt ist. Um ein schnelles und gleichmäßiges Garen sicherzustellen, sollte das Produkt in den perforierten Seiher, ins Wasserbad oder perforierte Wasserbad ohne Wasser gelegt werden. Dadurch kann der Dampf das Produkt von allen Seiten erreichen. 9.4.2 WÜRZE. Mit dem Trockendampfgarer von HOBART können die Produkte mit wenig zusätzlicher Würze gegart werden, da verglichen mit dem Garen in Wasser, oder dem Garen in einem Dampfkochtopf, der normalen nassen Dampf verwendet, mehr natürliche Vitamine, Nährstoffe und Mineralsalze im Nahrungsmittelprodukt erhalten bleiben. 9.4.3 GEMÜSE Erbsen, Karotten, grüne Bohnen usw. können vor oder nach dem Garen gewürzt werden. Kartoffeln gelingen am besten, wenn sie mit Salz gesprenkelt werden oder 15 Minuten vor dem Garen in Salzwasser getränkt werden. Zur Optimierung des Geschmacks kann Gemüse nach dem Garen und kurz von dem Servieren mit Kräuterbutter oder Brühegesprenkelt werden. WICHTIG. Die Säfte, die nach Garen im Behälter zurückbleiben, sind voller Geschmack und Nährstoffe und sollten entweder vor dem Servieren über das Produkt gegossen oder als Soße mitserviert werden. 9.4.4 FLEISCH. Wenn Ragout oder Eintopf gegart wird, kann der Geschmack verbessert werden, indem zum Fleisch ein Bouquet Garni hinzugefügt wird. 9.4.5 FISCH, SCHALENTIERE USW. Fisch zum Blau-Dünsten kann auf dem Boden des Wasserbadtopfs gegart und nach Bedarf mit etwas Brühe, Marinade oder Wein bzw. einer anderen Verzierung oder einem anderen Garnierung übergossen werden. Die resultierende Brühe, 15 die voller Geschmack ist, kann mit dem Gericht serviert werden. Zarter Fisch sollte mit einem Tuch oder fettabweisenden Papier bedeckt werden. TABELLE 1: EMPFOHLENE GARZEITEN UND DRUCKWERTE Produkt Kommentar 1 bar Druck Minuten 0,5 bar Druck Minuten Gemüse Artischocke Artischocke Aubergine Bohnen Ganz Herz In Scheiben Frisch 30-35 s 10-12 s 1,5-2 2-3 60-70 s 20-24 s 3-4 4-6 Bohnen Tiefgefr. 2-3 4-6 Blumenkohl Blumenkohl Kopf Röschen 4-5 2-3 8-10 4-6 Pilze Chicorée Hälften Chicorée In Stücken Erbsen Frisch Erbsen Tiefgefr. Erbsen Getroc-knet (vorher einweichen, mit Wasser bedeckt garen) Fenchel Hälften 2-3 1-2 1 1-2 1-2 10-15 4-6 2-4 2 2-4 2-4 20-30 15-20 30-40 Karotten Gewürfelt/Auf geschn./Stick s Geviertelt 15-20 30-40 8-10 16-20 Gewürfelt/Auf geschn. In Dosen 3 6 3 6 Rinderrouladen Schweinshaxe Blutwurst Kartoffeln Kartoffeln Kartoffeln Kohlrabi Produkt Gemüse Rosenkohl Rosenkohl Sauerkraut Knollensellerie Knollensellerie Tomaten Zwiebeln Kommentar 1 bar Druck Minuten 0,5 bar Druck Minuten Tiefgefr. (vorwärm.) In Stücken 4 4 8 4-5 4 8 16 8-10 Gewürfelt 2-3 4-6 (blanchier.) Scheiben (blanchiert) 0,5 1 0,5 2 Zucchini 1-1,5 2-3 Fleisch Brust (Abh. von Größe und Qualität) 35-60 70-120 55-70 110-140 15 30 5 10 12 24 4 8 4 8 Wiederaufwärmen 3 6 Garen 6-7 1-2 12-16 2-4 Ganz Beine 15-20 6-7 30-40 12-14 Ochsenzunge (abh. von Größe) Kalbsbrust für Frikassee 2-5 5 Leberwurst Weißkohl Weißkohl Aufgeschn./G e-würfelt Stücke Aufgeschn. 4 2-5 8 4-6 Kasseler Koteletts Lauch Lauch Mischgemüse In Stücken Aufgeschn. Tiefgefr. 2-5 1,5-2 1,5-2 6 3-4 3-4 Mischgemüse Spinat Frisch Frisch 1,5-2 0,5-1 3-4 1-2 Kasseler Koteletts Bratwurst oder Wiener Würstchen Hähnchen Hähnchen 16 Wiederaufwärmen Wiederaufwärmen Wiederaufwärmen Wiederaufwärmen Produkt Kommentar 0,5 bar Druck Minuten 4-8 Produkt Kommentar Tiefgefr. 1 bar Druck Minuten 2-4 Spinat (in Stücke brechen) Paprika Hähnchen Brust Aufgeschn. 1 2 8-10 20 7-8 14-16 Truthahn Brust 4-6 Taube Jung 10 Pasta in Salzwasser garen ohne Sieb Nudeln 8-9 2-3 4-6 Lasagne 10 20 3 4 6 8 Makkaroni Reis Spaghetti 8-9 8-9 8-9 16-18 16-18 16-18 Schalentiere Hummer/Languste (Abh. von Größe) Krabben/ Krebse Muscheln Jakobs muscheln Fisch Kabeljau Portionen 2-3 4-6 Heilbutt Seezunge Portionen Filets 4-5 1,5 8-10 3 4-5 3,5 12 8-10 7 24 6 12 Lachs Portionen Aal In Stücken Karpfen (Abh. von Größe) Hecht In Stücken 10. 1 bar Druck Minuten 10 (Pasta kann auch in Portionen wiederaufgewärmt werden, soweit erforderlich) Eier Weichge3 kocht Hartgekocht 6 Pochiert (wiederauf2 gewärmt) Rührei 1-2 Früchte (Abh. von Größe) Äpfel Ganz Äpfel, In Stücken Edbeeren Birnen Pfirsiche 0,5 bar Druck Minuten 20 16-18 5,6 6 4 2-4 3-5 1 6-10 2 3-5 2-3 6-10 4-6 NACH DEM GAREN. • Schließen Sie die Garkammertür. • Drücken Sie den EIN-AUS-Schalter. Nach einer Verzögerung von 10 Sekunden (während der der Abflusszyklus gestoppt werden kann) blinkt die EIN-AUS-Kontrollleuchte, um anzuzeigen, dass ein Abflusszyklus ausgeführt wird. Der Druck nimmt ab und der Dampfkessel wird automatisch entleert. Wenn die EIN-AUS-Kontrollleuchte erlischt: • Öffnen Sie die Garkammertür. • Unterbrechen Sie die Wasserversorgung. • Schalten Sie den Haupttrennschalter aus. 17 10.1. TÄGLICHE REINIGUNG. Der Dampfgarer muss am Ende jedes Tages oder nach einem Garvorgang wie folgt gereinigt werden: GEFAHR: Die Tür, das Schlossschaltgehäuse, die Garkammer, die Nahrungsmittelprodukte und der restliche entweichende Dampf sind noch sehr heiß. Verwenden Sie passende Schutzkleidung, Schutzhandschuhe und eine Schutzausrüstung. Entnehmen Sie die Blechschienen, wie in Abschnitt 10.2. beschrieben. Reinigen Sie das Gerät und die Garkammer mit einer milden Reinigungslösung, spülen Sie gründlich und trocknen Sie die Flächen. Reinigen Sie das Sieb vorne am Boden der Garkammer mit einer harten Bürste von Nahrungsmittelresten. Um das innere Abflussrohr zu spülen, schieben Sie einen Topf mit Eis ein und tauen Sie es unter Druck auf. Verwenden Sie kein Hochdruckreinigungsgerät. Verwenden Sie keine TOPFREINIGER oder chloridhaltige Reinigungsmittel. Bei den Modellen 305GH und 305TH müssen die Blechschienen entfernt und in einem Geschirrspüler gereinigt werden. Vorsicht! Wenn das Sieb an der Vorderseite der Garkammer blockiert ist, strömt heißes Wasser aus der Kammer, wenn die Tür geöffnet wird. 10.2 ENTFERNEN DER BLECHSCHIENEN. Aufhänge schlitz Positions schlitz • • • Die Blechschienen können für die Reinigung leicht entfernt werden. Jede Blechschiene wird in der Garkammer mit vier „T“-förmigen Haltevorrichtungen befestigt. So werden die Blechschienen entfernt und wieder eingesetzt: Öffnen Sie die Tür und lassen Sie die Garkammer und die Blechschienen auf eine sichere Handhabungstemperatur abkühlen. Falls nötig, tragen Sie Schutzhandschuhe bei der Entfernung der Blechschienen. Heben Sie die Blechschiene an, um die oberen Aufhängelöcher von den Haltevorrichtungen zu trennen und schwenken Sie die Schiene zur Mitte der Garkammer. Heben Sie die Blechschiene von den unteren Haltevorrichtungen ab und ziehen Sie sie aus der Garkammer heraus. 18 So wird die Blechschiene wieder eingebaut: Beachten Sie, dass die Blechschienen links und rechts Seite unterschiedlich sind. Es ist wichtig, dass das geschlossene Ende der Schiene an der Rückseite der Garkammer angeordnet wird. • Führen Sie die Blechschiene in die Garkammer ein. • Bringen Sie die unteren Positionsschlitze auf den Haltevorrichtungen an und heben Sie die Aufhängeschlitze der Blechschiene auf die oberen Haltevorrichtungen. • Senken Sie die Blechschiene ab und stellen Sie sicher, dass sie korrekt positioniert und befestigt ist. 11 DESIGN- UND KONSTRUKTIONSDATEN. Die Daten in Tabelle 2 gelten für das Drucksystem des Dampfgarers, der von Hobart Manufacturing in UK gemäß der Gesundheits- und Sicherheitsvorschrift Nr. 2169 für Druckgefäße in Großbritannien entwickelt und hergestellt wird. 19 12 TABELLE 2. TECHNISCHE INFORMATIONEN. Beschreibung Anzahl der Garkammern Einheiten 205GH 1 Gastro-Normtopfgröße GN ½ -100 mm Portionen pro Stunde (Näherungswert) Maximale Garkapazität 400 Gardruck Nennspannungsbereich Drehstrom plus Nullleiter Volllaststrom bei Nennspannung 400 Volt, Drehstrom plus Nullleiter Empfohlene Sicherung 400 V/Drehstrom plus Nullleiter/50 Hz Minimale und maximale Umgebungstemperatur Minimale und maximale Wassereinlasstemperatur Dampfkesselkapazität Gesamtkesselkapazität Dampfausgabe bei 1,0 Bar g Start-Zykluszeit im kalten und leeren Zustand (garbereit/Vollast). Ablass-Zykluszeit Typischer Energieverbrauch (für Kartoffeln mit einer Garzykluszeit von 7 Minuten) Wasserverbrauch für oben genannten Garzyklus (Garen und Kondenswasser) Energieverbrauch im Bereitschaftsmodus (garbereit) Energieverbrauch (bei Inbetriebnahme im kalten und leeren Zustand) Dampftemperatur (Nennwert) Abflussanschlussgröße Ablasskapazität (Minimum) Wassereinlassanschluss (erforderlich) 305GH, 305TH, 2228H 1 (305G und 305T), 2 (2228) GN 1/1 –100 mm (305G und 305T), 2 x GN ½ -100 mm (2228) 650 (305G und 305T), 800 (2228) 20 (305G und 305T) 7 x 2 (2228) kg 7 Bar g Volt/Hz 0, 0,5 und 1,0 380-415/50 380-415/50 kW/A 17,8/25,8 26,7/38,7 A 35 50 o C +5 bis +45 +5 bis +45 o C +5 bis +25 +5 bis +25 Liter Liter kg/h Minuten 6 17 30 9 6 17 45 9 Minuten kWh/(kg) 4 0,4 kWh (2 kg Kartoffeln) 4 1,6 kWh (12 kg Kartoffeln) Liter 6,6 (2,3 Garen, 4,3 Kondensat) kWh 3,25 (0,25 Garen, 3 Kondensat) 0,20 0,20 kWh 1,6 1,6 o 117 1” 5,0 117 1” 5,0 G3/4A G3/4A C BSP M Liter / Minute BSP 20 Beschreibung Minimale Wasserdurchflussmenge bei unten angegebenem Druckbereich (behandelte Versorgung zum Dampfkessel). Minimale Wasserdurchflussmenge bei unten angegebenem Druckbereich (Kondensatabfluss). Wassereinlassdruck Geräteklasse IP-Schutzart des Gehäuses Verdrahtungsklemmengröße Kabeleinführungsgröße Sekundärer ÄquipotentialErdungsanschluss Höheneinstellbereich Länge des externen Wassereinlassschlauchs (empfohlen) Geräuschpegel Einheiten Liter / Minute 205GH 2,5 305GH, 305TH, 2228H 2,5 Liter / Minute 5,0 5,0 Bar g 1,7 bis 10 # Class I IP33 16 25 (Pg29) M8 1,7 bis 10 # Class I IP33 16 25 (Pg29) M8 mm mm 15 bis 35 1500 15 bis 35 1500 dB (A) ## Gewicht (leeres Gerät) Kg weniger als 60 69 ## Versandgewicht kg 81 Versandabmessungen (einschließlich Palette) BxTxH cm 88 x 63,5 x 102 Lagerungsbedingungen. Temperatur und Luftfeuchtigkeit. Auslegungsdruck Druckbegrenzungsventil, voller Strömungsdruck Hydrauliktestdruck Dampfkesselmaterial Heizelement o C, % rel.Luftf. +5 bis +55, 85 +5 bis +55, 85 Bar g 1,38 1,38 Bar g 1,3 1,3 Bar g 2,3 2,3 Edelstahl, Güteklasse 1.4404 Incoloy Edelstahl, Güteklasse 1.4301 und 1.4404 mm2 mm Garkammer # Gemäß EN60335-1. Siehe Abschnitt 4.3. ## Gemäß EN-ISO 11202. 21 weniger als 60 85 (305G) 98 (305T) 85 (2228) 89 (305G) 110 (305T) 89 (2228) 88 x 63,5 x 111,5 (305G) 116 x 108 x 107 (305T) 88 x 63,5 x 120 (2228) ABBILDUNG 3. 205GH INSTALLATIONSMASSE. ABBILDUNG 4. 305GH INSTALLATIONSMASSE. 22 ABBILDUNG 5. 305TH INSTALLATIONSMASSE. ABBILDUNG 6. 305TH INSTALLATIONSMASSE GESTAPELT. 23 ABBILDUNG 7. 2228H INSTALLATIONSABMESSUNGEN. 13 INSTALLATION. 13.1 AUSPACKEN UND HANDHABUNG. Transportieren Sie den Dampfgarer möglichst in der bereitgestellten Verpackung zum Installationsort, um Beschädigungen zu vermeiden. Schneiden Sie nicht mit einem scharfen Messer in die Verpackung, da das Gerät beschädigt werden kann. Überprüfen Sie die Lieferung auf mögliche Versandschäden. Wenn die Einheit beschädigt ist, verwahren Sie das Verpackungsmaterial und wenden Sie sich an Ihr nächstes Hobart Verkaufsbüro. Vorsicht: Der Dampfgarer ist ein schwerer Gegenstand und muss korrekt gehandhabt und gehoben werden, um Personenschaden zu vermeiden. Wenn sich das Gerät in der Nähe seiner endgültigen Position befindet, entfernen Sie die Verpackung und heben das Gerät von der Transportpalette ab. Gehen Sie bei diesem Vorgang vorsichtig vor und stellen Sie sicher, dass: a) alle erforderlichen Sicherheitsmaßnahmen ergriffen werden, um das Gerät korrekt zu heben und zu handhaben und Verletzungsgefahren durch Fallen, Stürzen und Kippen zu vermeiden. 24 b) an dem Gerät keine Beschädigungen auftreten, die den normalen Betrieb beeinträchtigen können. 13.2 INSTALLATIONSORT. Der Dampfgarer ist für die Außeninstallation nicht geeignet und darf nicht an Orten installiert werden, an denen ein Wasserstrahl für die Reinigung verwendet werden könnte. Der Dampfgarer darf nur von geschultem Personal bedient werden und muss in einem Bereich installiert werden, in dem Gebrauch und Wartung auf geschultes Personal beschränkt ist. Der Dampfgarer muss auf einer horizontalen flachen Oberfläche installiert werden, die einen Höhenunterschied von höchstens 1 mm auf 1 m von Seite zu Seite und von vorn nach hinten aufweist. Wählen Sie eine geeignete flache Standfläche, die das Gewicht des Geräts und des vollen Inhalts tragen kann (siehe Tabelle 2 für Gewichte und Abmessungen). In Bereichen, in denen Stabilität ein Problem sein kann, ist das Gerät sicher zu befestigen. Bei Betrieb erzeugt das Gerät Dampf und Wasserdampf. Stellen Sie sicher, dass an das Gerät angrenzende Vorrichtungen angemessen geschützt sind, um Beschädigungen durch Spritzer und Kondensation zu verhindern. Der Dampfgarer darf nicht in Bereichen installiert werden, in denen Frost auftreten kann. Wichtig! Stellen Sie sicher, dass ausreichend Raum um den Dampfgarer vorhanden ist, um einen sicheren Betrieb zu ermöglichen. Die Wartung kann durch geringe Abstände erschwert werden. Prüfen Sie stets, ob die Geräteangaben eine Installation in der Nähe von anderen Geräten erlauben. Siehe Abbildung 3, 4, 5, 6 und 7 für die Gesamtabmessungen des Dampfgarers. Versorgungszugang ist von der Vorderseite, der Rückseite, den Seiten und der Oberseite des Geräts erforderlich. Mindestabstände: 100 mm an den Seiten und der Rückseite, 600 mm über der Oberseite. Das Gerät lässt an der oberen Ecke hinten links Dampf ab. Es wird empfohlen, einen Absaugventilator oder eine Absaughaube zu verwenden, um den Dampf aus der Küchenecke abzuleiten. 13.2.1 MONTAGE AUF EINER ARBEITSFLÄCHE. Wenn das Gerät auf einem vorhandenen Tisch oder einer Arbeitsfläche aufgestellt werden soll, stellen Sie sicher, dass der Tisch bzw. die Arbeitsfläche für das Gewicht und die Größe geeignet ist, um eine sichere Installation zu gewährleisten. Der Dampfgarer muss an der Arbeitsfläche befestigt werden (dazu kann der einstellbare Fuß verwendet werden). Für jeden Fuß ist eine Bohrung mit einem Durchmesser von 26 bis 28 mm erforderlich. 13.2.2 EIGENER STÄNDER. Stellen Sie den Ständer am korrekten Ort auf. 25 Kippen Sie den Dampfgarer vorsichtig (diese Arbeit ist von mehr als einer Person auszuführen) und entnehmen Sie den Einsatz des einstellbaren Fußes. Heben Sie das Gerät auf den Ständer und richten Sie es aus. Schrauben Sie die Einsätze der hinteren Füße durch den Ständer in das Gerät. Schieben Sie den Sockel zwischen den Dampfgarer und die Oberseite des Ständers und positionieren Sie die hinteren Schlitze im Sockel auf den Positionierungszapfen an der Oberseite des Ständers. Befestigen Sie den Sockel in seiner Position, indem Sie durch den Ständer (an der Vorderseite 2 mal) in den Sockel schrauben. 13.3 INSTALLATION DES DAMPFGARERS. Stellen Sie das Gerät auf einen Ständer, der das volle Gewicht des Geräts tragen kann. Passen Sie die Höhe an die Arbeitsfläche an. Stellen Sie sicher, dass die Versorgungsanschlüsse mit den Bohrungen in der Arbeitsfläche oder im Ständer ausgerichtet sind. Der Dampfgarer kann jetzt an die entsprechende Wasser-, Abflussund Stromversorgung angeschlossen werden. 13.4 ELEKTRISCHE INSTALLATION. Die elektrische Installation des Dampfgarers muss gemäß den Vorschriften für Elektrogeräte erfolgen. Dieses Gerät muss geerdet werden. Die elektrische Installation ist von einer fachkundigen Person auszuführen. Die technischen Daten in Tabelle 2 zeigen die elektrischen Anforderungen für die verschiedenen Stromversorgungsoptionen. Der Dampfgarer ist ein Gerät der „Klasse I“, wobei der Schutz gegen Stromschlag nicht nur auf einer Basisisolierung beruht. Ein externer elektrischer Trennschalter sowie die Hauptleiterplatte/Sicherungen (beide Komponenten werden von Drittanbietern geliefert) müssen an der eingehenden Stromversorgung am Dampfgarer an einem leicht zugänglichen und feuchtigkeitsfreien Ort angebracht werden. Außerdem wird nachdrücklich ein 30 mA Fehlerstromschutzschalter für zusätzlichen Schutz empfohlen. Prüfen Sie, ob die Impedanz der Erdungsleitung sicher ist und mit dem korrekten Wert betrieben wird. Das Gerät muss mit Äquipotenzial angeschlossen werden. Die Erdungsschraube befindet sich an der unteren Fläche des Basisrahmens und ist mit dem rechts gezeigten Symbol gekennzeichnet. Hinweis: Das Stromversorgungskabel muss einen für die Stromversorgung und die Umgebungstemperatur geeigneten Wert aufweisen. Stellen Sie sicher, dass der Erdanschlusswiderstand kleiner als 0,1 Ω und der Isolierwiderstand größer als 2 MΩ ist. 13.5 ELEKTRISCHER ANSCHLUSS. Beachten Sie die Warnetiketten am Gerät und den Schaltplan innen der Seitenwand des Dampfgarers. 26 Das Gerät ist für eine Stromversorgung mit 400 Volt, Drehstrom plus Nullleiter konfiguriert. 13.5.1 ANSCHLUSSVERFAHREN FÜR DAS ELEKTRISCHE VERSORGUNGSKABEL. 1. 2. 3. 4. 5. Wählen Sie ein flexibles Stromversorgungskabel, das für die erforderliche elektrische Last geeignet ist (siehe Tabelle 2 für Strom und Leistungswerte). Entfernen Sie die rechte Seitenwand, indem Sie die beiden Schrauben an der Vorderseite entfernen. Führen Sie das Kabel durch die Pressführung, schließen Sie es an den korrekten Positionen am Steckerblock an und ziehen Sie die Schrauben fest (siehe Schaltplan an der Innenfläche der rechten Seitenwand des Geräts). Stellen Sie vor dem Einschalten des elektrischen Stroms sicher, dass alle elektrischen Anschlüsse im Gerät fest angebracht sind (stellen Sie sicher, dass sich während des Transports keine Anschlüsse gelockert haben). Dieses Gerät muss geerdet werden. Die Erdungsklemme des Netzstroms befindet sich im elektrischen Schaltschrank (Hauptklemmenblock) und ist dort gekennzeichnet. An der Hinterseite des Basisrahmens des Gerät befindet sich der externe Erdungsanschluss. 13.5.2 EINSTELLUNG DER ELEKTRISCHEN LAST. Der Dampfgarer ist mit einem Schalter ausgerüstet, mit dem der Strom bzw. die elektrische Leistung reduziert werden kann. Das Modell 205GH kann mit einer elektrischen Last von 9 oder 18 kW betrieben werden. Die Modelle 305GH, 305TH und 2228H können mit einer elektrischen Last von 18 oder 27 kW betrieben werden. Ein Kippschalter am internen Bedienfeld muss auf die gewünschte Position eingestellt werden. Das Gerät ist werkseitig auf die maximale Leistung eingestellt. Der Software-Parameter C16 muss für den entsprechenden Dampfgarer und die gewählte Leistungsoption eingestellt werden. Dieser Wert darf nur von einem autorisierten Techniker eingestellt werden. Modell 305GH, 305TH und 2228H 305GH, 305TH und 2228H 205GH 205GH 13.6 Elektrische Last 27 kW 18 kW 18 kW 9 kW Kippschalter einstellen auf: Max. Min. Max. Min. C16 einstellen auf: 1 2 2 3 WASSERVERSORGUNG. Die Installation muss den Vorschriften der lokalen Wasserversorgungsbehörde entsprechen und von einem autorisierten Techniker ausgeführt werden. Der Dampfgarer verfügt über zwei Wassereinlassanschlüsse: 1 Ausschließlich Dampfgenerator. 2 Dampfkondensationsversorgung. 27 13.6.1 WASSERVERSORGUNGSQUALITÄT. Wenn der Dampfgarer in einer Gegend installiert wird, in der der Wasserhärtegrad 5o Clark überschreitet (entspricht 60-ppm Gesamthärte (CaCO3)), muss eine geeignete Wasserbehandlungseinheit installiert und regelmäßig gewartet werden, um Verkalkung zu vermeiden. Stellen Sie sicher, dass der Wasserversorgungsdruck zur Wasserbehandlungseinheit die Hersteller-Anforderungen erfüllt. Für Informationen über empfohlene Wasserbehandlungseinheiten wenden Sie sich bitte an Ihr lokales Hobart Verkaufsbüro. 13.6.2 WASSERVERSORGUNG ZUM GAREN. Der Wasserversorgungsdruck muss 1,7 bis 10 Bar g betragen, wenn ein minimaler Durchfluss, der in Tabelle 2 aufgeführt ist, und eine Einlasstemperatur von 5 bis 65o C vorliegt. Wenn in der Versorgung zum Dampfgarer ein Wasserfilter installiert ist, stellen Sie sicher, dass ein angemessener Wasserdruck mit der erforderlichen Durchflussmenge vorhanden ist. Einige Wasserfilter erfordern einen Mindestdruck über 2 Bar g (30 psi g). Tabelle 2 führt die Wasserversorgungsanforderungen für den Dampfkessel auf. 13.6.3 WASSERVERSORGUNG ZUR KONDENSATION VON DAMPF. Es gibt keine speziellen Wasserqualitätsanforderungen für den Kondensatoreinlass. Der Wasserversorgungsdruck muss 1,0 bis 10 Bar g betragen, wenn ein minimaler Durchfluss, der in Tabelle 2 aufgeführt ist, und eine Einlasstemperatur von 5 bis 25 C vorliegt. 13.7 WASSERANSCHLUSSSANFORDERUNGEN An der Wasserversorgungsleitung muss nahe dem Dampfgarer ein manuelles Absperrventil in einer zugänglichen Position installiert werden, das einen ¾ " BSP-Steckanschluss aufweist. Für beide Wasserversorgungen muss ein geeigneter Schlauch mit ¾ " BSPAnschlüssen verwendet werden. Ein Wassereinlassschlauch ist mit der Teile-Nr. 01240316-001 bei Hobart erhältlich. Die Wasseranschlussspunkte befinden sich von vorn gesehen an der Hinterseite rechts unter dem Gerät. Identifikationsetiketten zeigen die Ausrichtung der Anschlüsse an. Achten Sie darauf, dass die elastischen Wasserversorgungsschläuche korrekt verlegt sind und nicht gequetscht werden, wenn das Gerät in seine Position geschoben wird. Wenn der Schlauch auf einer Arbeitsfläche oder einem Tisch verlegt wird, sind alle scharfen Ecken und Grate zu entfernen und eine geeignete Schutztülle anzubringen. Stellen Sie sicher, dass eine freie Länge des Schlauchs vorhanden ist, damit der Dampfgarer, falls nötig, für die Wartung herausgezogen werden kann. Vor dem Anschließen des Dampfgarers muss die Wasserversorgungsleitung überprüft werden, um sicherzustellen, dass sie keine Fremdkörper aufweist und wenn notwendig, ausgespült wird. Es wird empfohlen, einen Wasserversorgungsdruckmesser (0 bis 10 Bar g) nahe dem Dampfgarer zu installieren. 28 13.8 ANFORDERUNGEN AN DEN ABFLUSSANSCHLUSS Der Abflussanschluss befindet sich von vorn gesehen an der hinteren Ecke links. Die Anschlusssgröße beträgt 1 " BSP. Die Leitungen und Armaturen des Abflusses müssen aus Kupfer oder wärmebeständigem Kunststoff (typischerweise bis 100° C) bestehen. Die Abflussleitung muss zu einem offenen Bodenabfluss oder einem Trichterabfluss geleitet und an ein Abflussrohr angeschlossen werden. Die Leitung muss frei zugänglich sein und ein geeignetes „Gefälle“ aufweisen. Sie darf nicht mit anderen Leitungen verbunden sein und keine übermäßige Länge aufweisen. Hinter dem Trichterabfluss muss ein Syphon vorgesehen sein. Das Abflusssystem muss mit einem Mindestdurchfluss von 5 Litern/Minute betrieben werden können. ACHTUNG! Beachten Sie, dass der Dampfgarer mit einem Drucksicherheitsventil ausgerüstet ist, das sich bei einem Komponentenausfall öffnet, um den Druck abzulassen. Der Dampf wird in das Kondensatorsystem abgelassen, das in dem Gerät vorgesehen ist. Das Sicherheitsventil öffnet sich bei 1,3 Bar. Achten Sie darauf, dass Sie nicht mit dem Dampf in Kontakt kommen, um Verbrühungen zu vermeiden. 14.0 INBETRIEBNAHMEANWEISUNGEN. Dieser Dampfgarer ist nur für den professionellen Gebrauch durch angemessen geschulte Personen bestimmt. Stellen Sie sicher, dass die Bediener dieses Handbuch gelesen und verstanden haben und eine entsprechende Schulung erhalten haben. 14.1 INBETRIEBNAHME. Der Hobart Hochdruck-Dampfgarer arbeitet automatisch. Drehen Sie die Wasserzufuhr auf und stellen Sie sicher, dass keine Leckstellen vorhanden sind. Schalten Sie die Stromversorgung ein. Folgen Sie dem in Abschnitt 9 angegebenen Verfahren. 15. WARTUNG. Trotz der Verwendung von behandeltem Wasser empfehlen wir eine vollständige Inspektion der Einheit alle 1000 Betriebsstunden oder alle 6 Monate, je nachdem, welcher Zeitpunkt früher liegt. (Die Betriebsstunden werden bei jedem Einschalten des Dampfgarers angezeigt). Diese Inspektion umfasst die Überprüfung aller Dichtungen und Fugen des Dampfgenerators, der Garkammer und der Leitungen. 29 15.1 WARTUNG DES DRUCKSICHERHEITSVENTILS. Testen Sie das Drucksicherheitsventil mindestens einmal monatlich. Testanleitung: Drehen Sie die gerändelte Mutter gegen den Uhrzeigersinn, bis der Druck entweicht. Drehen Sie die gerändelte Mutter daraufhin im Uhrzeigersinn, bis das Ventil wieder schließt. Achtung: Das Druckbegrenzungsventil ist sehr heiß. Tragen Sie Schutzhandschuhe. 16 ZUSAMMENFASSUNG DER FEHLERSUCHE. 16.1 FEHLERCODES. Wenn ein Fehler in dem Gerät auftritt, wird eine Reihe von Fehlercodes angezeigt, die das relevante Problem identifizieren. Eine kurze Zusammenfassung der Fehlercodes wird unten aufgeführt. • • • • • • • • • • • dEF2 und dEF7 falscher Dampfgenerator/Ablassfehler des Dampfkessels. dEF3 Befüllung des Dampfgenerators/Dampfkessels dauert zu lange. dEF5 Wasserversorgungsfehler des Dampfgenerators/Dampfkessels. dEF8 Dampfgenerator/Dampfkessel überfüllt. dEF 9 während des Garzyklus füllte sich der Dampfgenerator/Dampfkessel nicht wieder mit Wasser. Der Schwimmerschalter ist zu überprüfen. dEF10 der Dampfgenerator/Dampfkessel ist überhitzt. dEF11 Temperatursondenfehler der Garkammer (Nummer 1). dEF12 Abflussventilfehler der Garkammer (Nummer 1). dEF13 Unterbrechung oder Fehler der internen Nahrungsmittelsonde. Die Nahrungsmittelsonde ist als Option erhältlich. dEF21 Temperatursondenfehler der Garkammer (Nummer 2) (gilt für Modell 2228). dEF22 Abflussventilfehler der Garkammer (Nummer 2). Wenn ein Fehler nicht behoben werden kann, wenden Sie sich an den Hobart Kundendienst. 16.2 FEHLERSUCHE. TABELLE 3. Fehler Mögliche Ursache Abhilfe Gerät schaltet Hauptstromsicherung Prüfen und ersetzen Sie die defekte sich nicht ein. durchgebrannt oder Sicherung/setzen Sie die Hauptleiterplattendefekt Hauptleiterplatte zurück. Durchgebrannte Prüfen und ersetzen Sie die defekte Regelkreissicherung Sicherung. Gerät funktioniert immer noch Wenden Sie sich an das lokale Hobart nicht. Kundendienstzentrum. Gerät wird nicht Wasserversorgungsfehler Stellen Sie sicher, dass die befüllt. Wasserversorgung angeschlossen und eingeschaltet ist. Stellen Sie sicher, dass der Wasserversorgungsdruck und die Durchflussmenge den Werten in Tabelle 2 entsprechen. 30 17.0 ZUSAMMENFASSUNG DER ALLGEMEINEN ERSATZTEILE TABELLE 4. Beschreibung Abflusssieb der Garkammer Dampfkesselaustausch (neu) Dampfkesselaustausch (überholt) Doppeltes Rückschlagventil Druckmesser Düse Dampfeinspritzung Garkammer Einzelnes Rückschlagventil EPROM Filter - Leitung Gastro-Norm-Topf ½ x 100 mm tief Gastro-Norm-Topf 1/1 x 65 mm tief Gehäuse - Pegelregler Heizelement Knopfregler Kolbenpumpe Leiterplatte - Berührfeld Leiterplatte - Berührfeld zweite Kammer Leiterplattenstrom/-relais Motorventil Nocken O-Ring Garkammerauslass O-Ring Heizelement O-Ring Pegelregler O-Ring Türdichtung O-Ring Türdichtung Schalter - Pegelregler Schlauch - elastisch, Abfluss der Garkammer Schlauch - elastisch, Abfluss der Garkammer Schlauch - elastisch, Dampfkessel zum Druckbegrenzungsventil Schlauch - elastisch, Dampfkessel zur Garkammer Schlauch - elastisch, Dampfkessel zur Garkammer Schlauch - elastisch, Dampfkessel zur Garkammer Schlauch - elastisch, Dampfkesselabfluss Teile-Nr. 174648 00-739365-1 00-739365-2 143450 00-739068 323273 205GH 1 1 1 1 1 1 297498-1 737399-15 737324 141502 1 1 1 1 737003 233979-1 737059 OS-E-1-3 00-738620 OS-E-1-45 276903-12 323167-10 00-739324 00-739181-1 2228H 2 1 1 1 1 2 1 1 1 1 1 1 2 2 3 1 1 1 3 1 1 1 3 1 1 1 3 1 1 1 1 1 2 2 1 3 1 1 1 2 2 1 3 1 1 2 2 1 3 1 1 2 2 1 3 1 2 1 1 1 1 1 142450 00-739072 00-739320 737121 00-739631 00-740558 00-740571 Menge je Modell 305GH 305TH 1 1 1 1 1 1 1 1 1 1 1 1 1 1 1 1 1 2 1 2 00-739291-1 1 00-739309 1 00-739183-1 1 1 00-739283-1 1 00-739283-2 1 00-739291-2 1 31 Beschreibung Teile-Nr. Schlauch - elastisch, Dampfkesselabfluss Schlauch - elastisch, Dampfkesselabfluss Schlauch Wassereinlass Schütz Schütz Schwimmerschalter - Luftspalt Siebplatte Siebplatte Siebplatte Temperatursonde Dampfkessel Temperatursonde Garkammer Temperatursonde Garprodukt Temperatursonde Garprodukt Topfschienen links Topfschienen rechts Unterdruckschalter Ventil - Dampfeinlass Ventil - Füllwassersolenoid 2,5 lpm Ventil - Kondenswassersolenoid 5 lpm Ventil - Sicherheit Ventilbaugruppe motorisiert Ventilbaugruppe motorisiert, Dampfkesselabfluss Ventilbaugruppe motorisiert, Garkammer Ventilgehäuse Wassereinlassanschluss 2-in-1 18.0 00-739182-1 205GH 1 00-739182-2 01-240316001 00-739266-3 00-740618-3 737522 173055-2 170054-2 173055-1 00-737831 737006 00-738428-1 00-738428-2 737351 737352 297536 173863 00-738728-1 Menge je Modell 305GH 305TH 2228H 1 2 2 1 2 2 2 2 2 2 1 2 1 2 1 1 1 1 2 1 1 1 1 1 1 1 1 1 1 1 1 1 1 1 1 1 1 1 1 2 2 1 00-738728-2 1 1 1 1 169556 737063-999 00-739190-3 1 2 1 1 2 1 1 2 1 1 2 1 00-739190-2 1 1 1 1 323314-11 00-895401-44 2 1 2 1 2 1 2 1 KUNDENDIENST HOBART GmbH SERVICE-INFORMATIONEN UND -TELEFONNUMMERN. HOBART behält sich das Recht vor, an allen Produkten Änderungen oder Verbesserungen ohne Ankündigungen vorzunehmen. Ausführliche Informationen erhalten Sie bei Ihrem Fachhändler oder unter: Service Tel. 01803 / 45 62 58 – www.hobart.de – [email protected] Deutschlands) 32 (innerhalb CUISEURS VAPEUR SÈCHE HAUTE PRESSION. 205GH, 305GH, 305TH, 2228H MANUEL D'INSTALLATION ET D’UTILISATION PLE200594 A 01-13 EU8752 33 SOMMAIRE Avant-propos Informations générales Responsabilité Définitions Responsabilité environnementale Compatibilité RoHS Directive DEEE Recyclage de l’emballage Informations de sécurité Consignes de sécurité Pictogrammes d'avertissement Instructions de sécurité Ne jamais Toujours Généralités Caractéristiques et avantages Schéma de principe hydraulique Comment utiliser le cuiseur vapeur Configuration du panneau de commandes Allumage du cuiseur vapeur Sélection du mode température ou pression Cuisson Utilisation de la seconde enceinte de cuisson Cuisson atmosphérique Interverrouillage de porte, description du fonctionnement Sonde de cuisson (en option) Arrêt du cuiseur vapeur Suggestions et conseils de cuisson Préchauffage automatique Assaisonnement Légumes Viande Poisson Suggestions de durées et de pressions de cuisson Après la cuisson Nettoyage quotidien Démontage des glissières de plats Données de conception et de fabrication Informations techniques. Dimensions d’installation 205GH Dimensions d’installation 305GH Dimensions d’installation 305TH Dimensions d’installation 305TH superposés Dimensions d’installation 2228H Installation Déballage et manutention Emplacement Montage sur support existant 34 Section 1 2 3 4 5 5.1 5.2 5.3 6 6.1 6.2 6.3 6.3.1 6.3.2 7 8 Figure 1 9 Figure 2 9.1 9.2 9.3 9.3.1 9.3.2 9.3.3 Page 36 36 36 36 36 36 37 37 37 38 38 38 39 39 40 40 41 42 42 42 43 44 45 46 46 9.3.4 9.3.5 9.4 9.4.1 9.4.2 9.4.3 9.4.4 9.4.5 Tableau 1 10 10.1 10.2 11 12, Tableau 2 Figure 3 Figure 4 Figure 5 Figure 6 Figure 7 13 13.1 13.2 13.2.1 47 47 48 48 48 48 48 48 49 51 51 52 52 53 55 55 56 56 57 57 57 58 58 SOMMAIRE suite Montage sur socle spécial Installation du cuiseur vapeur Installation électrique Branchement électrique Procédure de branchement du câble d’alimentation électrique Réglage de la puissance d’alimentation électrique Alimentation en eau Qualité de l’eau d’alimentation Alimentation en eau de cuisson Alimentation en eau pour la condensation de la vapeur Connecteurs d’alimentation d’eau Spécifications du raccordement à la conduite d’évacuation Instructions de mise en service Mise en service Maintenance. Maintenance de la vanne de sécurité de surpression Recherches des pannes Codes des pannes Recherches des pannes Pièces de rechange courantes Informations sur les services et n° de téléphone des contacts 35 Section 13.2.2 13.3 13.4 13.5 13.5.1 Page 58 59 59 59 60 13.5.2 13.6 13.6.1 13.6.2 13.6.3 60 60 60 61 61 13.7 13.8 61 61 14.0 14.1 15 15.1 16 16.1 16.2, Tableau 3 17, Tableau 4 18 62 62 62 62 63 63 63 64 66 1. AVANT-PROPOS Hobart se réserve le droit de modifier la conception de ses produits sans avis préalable. Bien que tout ait été mis en œuvre pour s’assurer que cette publication reflète les dernières innovations, la société ne peut pas garantir la pleine conformité. Soyez fier de votre cuiseur vapeur – maintenez-le propre et en bon état mécanique et électrique. 2. INFORMATIONS GÉNÉRALITÉS Il est possible que les informations et les instructions contenues dans ce manuel ne couvrent pas la totalité des détails et des variations des équipements, ou qu’elles ne prévoient pas toutes les éventualités susceptibles de se produire durant l’installation, l’utilisation ou la maintenance. En cas d’informations supplémentaires requises, veuillez contacter le bureau Hobart le plus proche. Les coordonnées des contacts sont indiquées à la dernière page de ce manuel. 3. RESPONSABILITÉ Les installations ou les réparations qui ne sont pas exécutées par des techniciens accrédités ou l’utilisation de pièces autres que les pièces de rechange d’origine, et toutes autres modifications techniques de l’appareil, sont susceptibles d’affecter la garantie spécifiée dans les conditions de vente standard. 4.0 DÉFINITIONS Opérateurs qualifiés. Le cuiseur vapeur est destiné à un usage professionnel par des opérateurs qualifiés. Les opérateurs qualifiés sont ceux qui ont reçu une formation concernant le fonctionnement de l’appareil par une personne dûment qualifiée, qui ont lu attentivement les informations contenues dans ce manuel et qui sont familiers avec les fonctions de l’équipement ou qui possèdent une expérience antérieure de l’utilisation de cuiseurs vapeur. Personnel d’installation qualifié. Tous les «travaux» exécutés sur le cuiseur vapeur, y compris l’installation et la maintenance, doivent être entrepris par un personnel d’installation qualifié qui possède l’expérience, qui est familier avec les précautions nécessaires et qui a satisfait à toutes les exigences des autorités nationales et locales ayant juridiction. L’installation dans l’UE doit être conforme aux exigences nationales ou locales du pays de destination de l’appareil. Personnel d’entretien qualifié. Les membres du personnel familiers avec les cuiseurs vapeur Hobart, compétents, formés et agréés par Hobart UK. Tout le personnel d’entretien doit être en possession d’un jeu complet de manuels et de pièces d’entretien d’origine. 5. RESPONSABILITÉ ENVIRONNEMENTALE 5.1 COMPATIBILITÉ RoHS Le produit cuiseur vapeur est conforme aux dispositions de la directive RoHS (2002/95/EC) qui est entrée en vigueur le 1er juillet 2006 et à celles de la révision 2011/65/EU. La directive RoHS concerne la restriction de l’utilisation de certaines substances dangereuses dans les appareils électriques et électroniques. Cette directive interdit de 36 mettre sur le marché dans l’UE des nouveaux appareils électriques ou électroniques contenant une quantité de retardateurs de flammes, plomb, cadmium, mercure, chrome hexavalent, PBB (polybromobiphényle) et PBDE (polybromodiphényléther) excédant les taux convenus. 5.2 DIRECTIVE DEEE L’objectif de la directive sur les déchets d’équipements électriques et électroniques (Directive DEEE 2011/19/EU) est de minimiser l’impact des appareils électriques et électroniques sur l’environnement en augmentant leur réutilisation et leur recyclage et en réduisant la quantité de DEEE rejetée dans les décharges. La directive DEEE a pris effet le 1er juillet 2007. Si ce cuiseur vapeur remplace une appareil existant, s’assurer de disposer de ce dernier de manière appropriée. Contactez votre bureau de vente Hobart le plus proche pour disposer de votre ancien appareil. 5.3 RECYCLAGE DE L’EMBALLAGE S’assurer du recyclage correct de l’emballage. 6. INFORMATIONS CONCERNANT LA SÉCURITÉ Les procédures et les précautions contenues dans ce manuel s’appliquent uniquement au cuiseur vapeur lorsqu’il est utilisé de la manière prescrite. Si le cuiseur vapeur est utilisé d’une autre manière que celle décrite dans ce manuel, l’opérateur ou l’opératrice sera responsable de sa propre sécurité, ainsi que de la sécurité des autres personnes susceptibles d’être impliquées. Les informations contenues dans ce manuel ont été rédigées de manière à permettre à l’opérateur de comprendre, d’entretenir et d’utiliser le cuiseur vapeur. Dans le but d’éviter les accidents, veuillez lire, assimiler et respecter toutes les précautions et les avertissements contenus dans ce manuel avant de procéder à l’installation de l’appareil et de l’utiliser pour la première fois. Ce manuel doit être étudié afin d’obtenir une bonne compréhension du cuiseur vapeur Hobart et de ses capacités. L’eau chaude, la vapeur et l’électricité présentent des dangers et peuvent occasionner des blessures si des précautions suffisantes ne sont pas prises avant de faire fonctionner ou de procéder à l’entretien du cuiseur vapeur Hobart. S’assurer que l’alimentation électrique a été coupée et que TOUTE la pression a été relâchée et toute l’eau chaude vidangée avant de commencer à démonter le système d’eau sous pression. Le manomètre interne installé dans le générateur de vapeur indique la pression. Dans certaines situations de recherche de panne, il peut s’avérer nécessaire de faire fonctionner l’appareil rempli de liquide chaud ; dans ce cas faire preuve d'une extrême prudence. L’entretien du cuiseur vapeur ne doit être réalisé que par du personnel qualifié. 37 6.1 CONSIGNES DE SÉCURITÉ S’assurer de prendre des précautions appropriées pendant la manutention du cuiseur vapeur Hobart, en particulier lors de sa mise en place pendant l’installation. Se reporter à la règlementation sur la manutention. Le poids des différents modèles de cuiseur vapeur est indiqué au Tableau 2. Se reporter à la section 6.3 pour les instructions de sécurité en cours d’utilisation. • Ne jamais nettoyer cet appareil en utilisant un tuyau d’eau ou sous pression. Il est essentiel de respecter les instructions de nettoyage détaillées dans ce manuel. 6.2 • N’enlever aucun couvercle, ne desserrer aucun accessoire pendant que l’appareil est en fonctionnement. • Conserver ce manuel dans un endroit facilement accessible à proximité du cuiseur vapeur Hobart pour référence future. • Cet appareil n’est pas conçu pour être utilisé par des personnes dont les capacités physiques, sensorielles ou mentales les empêchent de le faire en toute sécurité. • Tous les opérateurs doivent avoir suivi une formation à l’utilisation de l’appareil en toute sécurité. • S’assurer que l’alimentation électrique a bien été coupée et que toute la pression a été relâchée avant d’entreprendre l’entretien ou de déplacer l’appareil. • Les appareils électriques, la vapeur et l’eau sont potentiellement dangereux et peuvent occasionner des blessures si des précautions suffisantes ne sont pas prises avant de faire fonctionner l’appareil ou de procéder à son entretien. • Toujours faire effectuer régulièrement l’entretien de votre cuiseur vapeur ; au moins deux fois par an en fonction de la fréquence d’utilisation. Pour les informations sur les contrats de services, veuillez contacter le bureau de vente Hobart le plus proche. • Ouvrir la porte de l’enceinte de cuisson en faisant attention que la conduite d’évacuation ne soit pas obstruée par des débris d’aliments. Si la conduite d’évacuation est obstruée, l’eau chaude peut s’écouler de l’avant de l’enceinte de cuisson. • Pour éviter tout risque de brûlure, ne pas poser de bacs remplis de liquide (ni de produits qui deviennent liquides à chaud) sur les étagères de l’enceinte de cuisson où ils ne peuvent pas être facilement surveillés et manipulés. PICTOGRAMMES D'AVERTISSEMENT. Pour identifier les messages de sécurité dans ce manuel, les pictogrammes suivants ont été utilisés. Le pictogramme «Avertissement» est utilisé principalement lorsque les informations correspondantes sont importantes pour l’utilisation de l’appareil 38 en toute sécurité. Le pictogramme «Danger électrique» est utilisé lorsqu’il y a des risques de nature électrique. Avant d’effectuer l’entretien de l’appareil, toujours débrancher le câble d’alimentation électrique de la prise secteur. 6.3 INSTRUCTIONS DE SÉCURITÉ LE CUISEUR VAPEUR NE DOIT ÊTRE UTILISÉ QUE PAR UNE PERSONNE CORRECTEMENT FORMÉE ET COMPÉTENTE. Les instructions suivantes doivent être suivies lors de l’utilisation de l’appareil. Remarque : Le cuiseur vapeur ne doit être utilisé qu’aux fins pour lesquelles il a été conçu et conformément aux instructions d’utilisation fournies. 6.3.1 NE JAMAIS • • • • • • • • • • Laisser des enfants ou des personnes non qualifiées utiliser le cuiseur vapeur. Continuer à utiliser l’appareil en état de dysfonctionnement ou si la sécurité n’est pas assurée. Porter des vêtements amples. Utiliser de l’eau de javel, des composés d'hypochlorite ou de chlore pour nettoyer l’intérieur ou l’extérieur du cuiseur vapeur. Utiliser une force excessive pouvant affecter la stabilité du cuiseur vapeur lors de son utilisation. Utiliser le cuiseur vapeur alors que des composants ont été démontés. Utiliser le cuiseur vapeur dans un état où la sécurité n’est pas assurée. Nettoyer le cuiseur vapeur avec de la poudre à récurer ou un tampon récurant. Faire sécher des serviettes ou des torchons sur l’appareil. Essayer d’ouvrir la porte avant d’avoir relâcher toute la pression de l’enceinte de cuisson. 6.3.2 TOUJOURS • • • • • • • Utiliser le cuiseur vapeur dans un espace bien éclairé. Débrancher l’alimentation électrique et l’arrivée d’eau du cuiseur vapeur avant de le nettoyer et après l’avoir vidangé. Utiliser le cuiseur vapeur aux fins pour lesquelles il a été conçu et conformément aux instructions d’utilisation. Faire attention aux surfaces très chaudes, en particulier la porte de l’enceinte de cuisson. Couper l’alimentation électrique et l’arrivée d’eau en fin de journée, après avoir procédé à la vidange. Maintenir l’appareil en bon état de propreté et de fonctionnement. Nettoyer quotidiennement le système de vidange de l’enceinte de cuisson. 39 9. GÉNÉRALITÉS Le cuiseur vapeur haute pression est disponible dans une grande variété de modèles pour satisfaire à un grand éventail de capacités de cuisson. Les Figures 4 à 7 indiquent les dimensions de l’installation de chaque modèle et le Tableau 2 contient une liste d’informations techniques et de performances. L’appareil utilise de la vapeur sèche sous pression pour cuire les aliments, ce qui leur donne une couleur et un aspect exceptionnels. L’appareil se compose d’une enceinte de cuisson en acier inoxydable, d’un générateur / d’une chaudière de vapeur, d’éléments chauffants et d’un système de commande électronique. La vapeur est générée par des éléments chauffants très performants situés dans la chaudière en acier inoxydable. Un système de commande électronique maintient une température de vapeur uniforme. Pendant la cuisson, une électrovanne contrôle le flux de vapeur entrant dans l’enceinte de cuisson et la température est surveillée par un capteur à réponse rapide. La vapeur est injectée à l’arrière de l’enceinte de cuisson et à la fin du cycle de cuisson, la vapeur condensée est vidangée à l’avant de l’enceinte. La conception unique de la porte de l’enceinte de cuisson garantit l’utilisation d’un maximum d’espace dans l’enceinte de cuisson et une étanchéité efficace. 10. • • • • • • • • • • • • CARACTÉRISTIQUES ET AVANTAGES Enceinte de cuisson en acier inoxydable haute qualité Système de commande de cuisson atmosphérique (sans pression), demi (0,5 bar) et pleine (1 bar) pression de cuisson. Enceinte de cuisson facile à nettoyer. La cuisson à la vapeur sèche donne une couleur et un aspect exceptionnels aux légumes. Cycles de cuisson rapides, généralement de 1 à 3 minutes. La cuisson à la demande évite le gaspillage d’aliments. Cette procédure de cuisson produit des aliments de haute qualité en préservant l’ensemble de leurs vitamines et de leurs minéraux naturels. Démarrage rapide. L’isolation thermique du générateur de vapeur et de l’enceinte de cuisson réduit les pertes de chaleur et la consommation d’énergie. Préchauffage automatique L’appareil repère automatiquement la température initiale de l’enceinte de cuisson pour veiller à ce que les aliments soient prêts à cuire. La conception sécurisée de la porte empêche l’accès à l’enceinte de cuisson pendant le cycle de cuisson. Un support est disponible en option avec un espace de rangement des récipients aux normes gastro et le passage des canalisations d’eau, des câbles électriques et de la conduite de vidange. 40 FIGURE 1. SCHÉMA DE PRINCIPE HYDRAULIQUE. Élément 1 Description Alimentation électrique Élément 7 Description Manomètre Élément 12 2 Électrovanne de remplissage Clapet anti-retour simple Chaudière 8 Electrovanne d’entrée de vapeur Enceinte de cuisson 13 Interrupteur de niveau d’eau Soupape de sécurité 11 3 4 5 6 9 10 Vidange/vanne de décongélation Vanne de vidange de chaudière 41 14 15 16 Description Solénoïde de condenseur Vidange Évent dans l’atmosphère Système d’intervalle d’air (EN OPTION) Pompe 9. COMMENT UTILISER LE CUISEUR VAPEUR Sélecteur de puissance de cuisson Sélecteurs et indicateurs de cuisson atmosphérique, 0,5 bar ou 1 bar Indicateur de pression Affichage de la pression/température Indicateur de température Indicateur d’allumage Réglage de température Interrupteur MARCHE/ARRÊT Affichage de la durée de cuisson Réglage de la minuterie Arrêt/marche du cycle de cuisson et FIGURE 2. CONFIGURATION PANNEAU DE COMMANDES DU Remarque : Dans tout ce manuel, les voyants du panneau de commandes sont indiqués en jaune. La couleur du voyant réel lorsqu’il est allumé sur le cuiseur vapeur est bleu intense. 9.1 ALLUMAGE DU CUISEUR VAPEUR. La procédure d’allumage du cuiseur vapeur est la suivante : • • • Allumer l’interrupteur principal (les voyants du panneau de commandes s’allument momentanément pour indiquer que l’appareil est sous tension). Ouvrir le robinet d’arrivée d’eau. Appuyer sur l’interrupteur ‘I/O’. 42 • • • L’indication “HH” s’affiche dans la fenêtre supérieure de l’écran et les heures écoulées dans la fenêtre inférieure. Le voyant Marche/Arrêt s’allume pour indiquer que l’appareil est sous tension. Sélectionner la pression de fonctionnement nécessaire en appuyant sur la touche de cuisson atmosphérique (sans pression), demie ou pleine puissance. Le voyant bleu intense correspondant s’allume pour indiquer l’option sélectionnée. Le voyant clignote pendant le préchauffage de l’appareil. Lorsque l’appareil est prêt pour la cuisson, le voyant reste continuellement allumé. L’appareil se remplit au niveau requis et monte à la température appropriée automatiquement. 9.2 CHOIX DU MODE DE CUISSON. Lorsque le cuiseur vapeur est prêt à être utilisé, la durée de cuisson s’affiche et peut être régulée en utilisant le sélecteur rotatif. • • • Pour changer de mode de cuisson, appuyer sur l’interrupteur approprié. La pression dans le cuiseur vapeur augmentera ou diminuera automatiquement (relâchée par l’enceinte de cuisson) à la pression sélectionnée. Il faut fermer la porte en relevant la poignée lorsqu’on passe du mode de cuisson à pleine pression au mode demie pression ou atmosphérique. Ceci permet à la vapeur sous pression de s’échapper par le système de vidange plutôt que dans la cuisine. Les trois modes de cuisson sont les suivants : Mode de cuisson atmosphérique (sans pression) au cours duquel la température peut être réglée entre 50° et 99°C. En mode atmosphérique, la température de cuisson peut être ajustée en utilisant les flèches haut et bas. Mode demie puissance au cours duquel la température de l’enceinte de cuisson est généralement de 110° (0,5 bar). Mode pleine puissance au cours duquel la température de l’enceinte de cuisson est généralement de 118° (1 bar). Remarque : Le cycle de cuisson ne peut plus être modifié une fois que la touche ‘Marche’ a été enfoncée. 43 9.3 CUISSON. Le cycle de cuisson ne peut pas commencer avant que le générateur de vapeur ait atteint la pression opérationnelle correcte. Lorsque l’appareil est prêt, le voyant bleu intense reste continuellement allumé Le Tableau 2 indique en détails la capacité de cuisson maximum. • Sélectionner le mode de cuisson requis (pour la cuisson en utilisant la sonde de température optionnelle, se reporter à la section 9.4.2). • Régler le sélecteur rotatif de la minuterie sur la durée de cuisson requise. • Enfourner les plats à l’intérieur de l’enceinte de cuisson. • Lorsque la porte est ouverte, le levier est en position haute. • Fermer la porte et mettre le levier en position horizontale. La porte est alors légèrement ouverte et permet de purger l’enceinte de cuisson à la vapeur au début du cycle de cuisson. • Appuyer sur le bouton ‘Marche’ et laisser la vapeur s’échapper de l’enceinte de cuisson pendant environ 5 à 10 secondes. Ceci permet d’évacuer l’air froid restant dans l’enceinte de cuisson. • Tourner lentement le levier de la porte en position basse pour fermer la porte complètement. La pression augmente dans l’enceinte de cuisson, l’interverrouillage de la porte est activé et la minuterie commence le compte à rebours une fois le cycle automatique de préchauffage terminé. Un ‘zéro’ en rotation indique le déroulement du cycle de préchauffage. La température de préchauffage est réglée en usine à 96°C, cependant cette valeur est réglable. Contacter le centre de service local Hobart pour de plus amples informations. • • A la fin du cycle de cuisson, des segments verticaux clignotent (en pluie) sur l’écran d’affichage de la durée et un bruiteur se déclenche. Une fois que l’enceinte de cuisson s’est dépressurisée et que la porte peut être ouverte en toute sécurité, l’affichage de durée de cuisson clignote. Dans une cuisine où il y a plusieurs cuiseurs vapeur, le clignotement indique l’appareil dont le cycle est terminé. • Une fois la goupille d’interverrouillage de la porte rentrée, mettre le levier de la porte en position haute et ouvrir la porte avec précaution. 44 DANGER : La porte, le boîtier de l’interverrouillage, l’enceinte de cuisson, les plats d’aliments et la vapeur résiduelle qui s’échappe encore, sont très chauds. Utiliser des vêtements de protection appropriés, des gants et des accessoires isolants. Sortir les produits cuits de l’enceinte de cuisson et laisser la porte ouverte. Vous pouvez immédiatement démarrer un autre cycle de cuisson de même durée ou sélectionner une autre durée de cuisson. Si la durée sélectionnée est incorrecte ou pour interrompre le cycle en cours, il suffit d’appuyer sur la touche d’arrêt ’Stop’ à tout moment. 9.3.1 UTILISATION DE LA SECONDE ENCEINTE DE CUISSON (NE CONCERNE QUE LE MODELE 2228). Le cuiseur vapeur 2228 comporte deux enceintes de cuisson. La seconde enceinte de cuisson fonctionne à la pression/température présélectionnée choisie sur clavier principal. L’enceinte 1 est en bas et l’enceinte 2 est en haut. L’enceinte de cuisson 1 est considérée comme l’enceinte principale. Pour utiliser la seconde enceinte, procéder comme suit : • • • • Sélectionner la durée de cuisson du cycle requis en utilisant le sélecteur rotatif. Appuyer sur la touche Marche/Arrêt pour démarrer le cycle. En appuyant sur la touche Marche/Arrêt pendant le cycle en cours, vous pouvez au besoin interrompre le cycle sélectionné. À la fin du cycle de cuisson sélectionné, le bruiteur se déclenche pour indiquer que l’opération est terminée. Retirer les plats de l’enceinte avec précaution. DANGER : La porte, le boîtier de l’interverrouillage, l’enceinte de cuisson, les plats d’aliments et la vapeur résiduelle qui s’échappe encore, sont très chauds. Utiliser des vêtements de protection appropriés, des gants et des accessoires isolants. • Pour visualiser la pression ou la température de la seconde enceinte de cuisson en cours de fonctionnement, appuyer sur la flèche haut du clavier principal. Cette opération affiche les valeurs de la seconde enceinte de cuisson pendant quelques secondes avant de revenir aux valeurs de pression/température de l’enceinte principale. Remarque : La sonde thermique pour aliments n’est disponible que pour l’enceinte de cuisson principale. 45 9.3.2 CUISSON ATMOSPHÉRIQUE. Cette option permet une cuisson atmosphérique (sans pression) avec un contrôle de la température. Pour utiliser le cuiseur vapeur en mode atmosphérique (sans pression), procéder comme suit : • • Fermer la porte. Appuyer sur la touche de sélection du mode de cuisson atmosphérique. Ceci permet à la vapeur sous pression de s’échapper par le système de vidange plutôt que dans la cuisine. • Régler la température de cuisson requise en utilisant les touches haut et bas. L’échelle de température est comprise entre 50 et 110°C. • Régler la durée de cuisson requise en utilisant le sélecteur rotatif. • Ouvrir la porte et enfourner le produit alimentaire. • Fermer la porte et appuyer sur la touche ’Marche’. L’affichage de température indique la température actuelle dans l’enceinte de cuisson. Pour vérifier la température sélectionnée à tout moment, appuyer sur la touche de sélection du mode de cuisson. • A la fin du cycle de cuisson, des segments verticaux clignotent (en pluie) et un bruiteur se déclenche. L’indicateur de durée de cuisson clignote lorsque la porte peut être ouverte en toute sécurité. Les réglages reviennent au cycle précédent, prêts pour l’opération suivante. • Une fois la goupille d’interverrouillage de la porte (le cas échéant) rentrée, mettre le levier de la porte en position haute et ouvrir la porte avec précaution. DANGER : La porte, le boîtier de l’interverrouillage, l’enceinte de cuisson, les plats d’aliments et la vapeur résiduelle qui s’échappe encore, sont très chauds. Utiliser des vêtements de protection appropriés, des gants et des accessoires isolants. • Sortir les produits cuits de l’enceinte de cuisson et laisser la porte ouverte. 9.3.3 DESCRIPTION DU FONCTIONNEMENT DE L’INTERVERROUILLAGE DE PORTE (EN OPTION). L’interverrouillage de porte n’équipe pas tous les modèles. Lorsque le cuiseur vapeur est mis sous tension sans pression dans l’enceinte de cuisson, la goupille d’interverrouillage de porte est rentrée et la porte peut être librement ouverte ou fermée. Lorsqu’un cycle de cuisson a été sélectionné et que la porte de l’enceinte est fermée, la pression dans l’enceinte de cuisson augmente. A une pression d’environ 0,3 à 0,4 bar, le mécanisme d’ouverture de la porte se verrouille. A la fin du cycle de cuisson, la pression dans l’enceinte décroit jusqu’à environ 0,3 à 0,4 bar et la goupille d’interverrouillage se rétracte de la came fendue pour permettre l’ouverture de la porte. GOUPILLE CAME 46 En fin de journée, la porte doit rester ouverte avant d’éteindre l’appareil, sinon la porte sera verrouillée en position fermée. Le boîtier du mécanisme d’interverrouillage devient normalement chaud pendant le fonctionnement de l’appareil. Une étiquette ’Attention chaud’ prévient les utilisateurs. 9.3.4 SONDE DE CUISSON (EN OPTION) La sonde de cuisson permet au chef cuisinier de faire cuire un aliment en contrôlant sa température interne. La sonde de cuisson est disponible en option. Veuillez contacter votre point de vente Hobart local pour de plus amples informations. Pour utiliser le cuiseur vapeur en mode sonde de cuisson, procéder comme suit : • Sélectionner le mode sonde en appuyant deux fois sur la touche de sélection de cuisson atmosphérique. • L’indicateur ’Poulet bleu’ s’allume sur le panneau de commandes. • Sélectionner la température de cuisson requise (entre 50 et 99°C) en utilisant les touches haut et bas. Ouvrir la porte de l’enceinte de cuisson et enfourner le plat puis insérer la sonde de manière à ce que la pointe soit au centre de l’aliment. Appuyer sur la touche ’Marche’ pour commencer le cycle de cuisson. Le produit est automatiquement cuit à la température sélectionnée. Il est donc impossible de saisir une durée de cuisson. Lorsque les aliments atteignent la température présélectionnée, le cycle de cuisson s’arrête automatiquement. A la fin du cycle de cuisson, des segments verticaux clignotent (en pluie) et un bruiteur se déclenche. L’indicateur de durée de cuisson clignote lorsque la porte peut être ouverte en toute sécurité. Les réglages reviennent au cycle précédent, prêts pour l’opération suivante. Retirer la sonde avec précaution et sorter les aliments de l’enceinte de cuisson. • • • • • • Remarque : Remarque : la sonde de cuisson doit être replacée sur son support quand elle n’est pas utilisée. 9.3.6 ARRÊT DU CUISEUR VAPEUR. Pour éteindre le cuiseur vapeur à la fin de la journée ou de la session, procéder comme suit : • Appuyer sur l’interrupteur ‘I/O’. • • Après 10 secondes le voyant I/O bleu et les gouttes de pluie de la minuterie commencent à clignoter. Le cuiseur vapeur peut être rallumé pendant les 10 secondes qui suivent. Après 10 secondes le cycle de vidange commence. 47 9.5 SUGGESTIONS ET CONSEILS DE CUISSON. 9.4.1 PRÉCHAUFFAGE AUTOMATIQUE. Le temps de cuisson restera le même, quelle que soit la quantité ou la température du produit. Par exemple, que vous cuisiez 1 ou 30 portions de petits pois, congelés ou à température ambiante, le réglage de la minuterie sera le même. Le cycle de décongélation automatique réglera la durée appropriée pour décongeler le produit avant que le cycle de cuisson ne démarre. En fonction de la quantité de produit, le cycle de préchauffage automatique prolongera la durée totale de cuisson d’environ 1 minute et demie à 2 minutes. Cette durée supplémentaire ne doit pas être ajoutée lors du réglage du minuteur. Pour assurer une cuisson rapide et homogène, le produit doit être placé sur la plaque perforée, dans le bain-marie ou le bain-marie perforé, sans eau. Ceci permet à la vapeur d’atteindre le produit de tous côtés. 9.4.2 ASSAISONNEMENT La cuisson des aliments avec le cuiseur HOBART à vapeur sèche permet de n’ajouter qu’un minimum d’assaisonnement car une plus grande quantité de vitamines, de nutriments et de sels minéraux naturels est préservée en comparaison d’une cuisson à l’eau bouillante ou à la vapeur humide normale. 9.4.3 LÉGUMES Les petits pois, carottes, haricots verts, etc. peuvent être assaisonnés avant ou après la cuisson. Les pommes de terre seront meilleures avec une pincée de sel ou trempées dans de l’eau salée pendant 15 min avant de les cuire. Pour renforcer la saveur des légumes, utiliser du beurre assaisonné ou du bouillon après la cuisson ou juste avant de servir. IMPORTANT. Le jus qui reste dans le récipient après la cuisson est plein de saveur et de bienfaits, il devrait être utilisé soit en le versant sur les aliments avant de servir ou comme sauce d’accompagnement. 9.4.4 VIANDES. Lors de la cuisson d’un ragoût ou d’un civet, ajouter un bouquet garni à la viande pour en renforcer la saveur. 9.4.5 POISSONS, FRUITS DE MER, ETC. Les poissons à pocher peuvent être cuits au fond d’une casserole à bain marie et couverts d’un peu de bouillon, de marinade ou de vin et/ou d’une autre garniture ou assaisonnement selon le goût. Le jus qui reste est plein de saveur et peut être utilisé pour accompagner le plat. Les poissons délicats doivent être recouverts d’un torchon ou de papier sulfurisé. 48 TABLEAU 1 : SUGGESTIONS DE DURÉE ET DE PRESSION DE CUISSON. Produit Commenter Minutes avec pressio n de 1 bar Minutes avec pression de 0,5 bar Produit Légumes Artichaut Entier 30-35 s 60-70 s Artichaut Cœur 10-12 s 20-24 s Aubergine En tranches 1,5-2 3-4 Légumes Choux de Bruxelles Choux de Bruxelles Choucroute Haricots Haricots Chou-fleur Chou-fleur Frais Surgelés Têtes Fleurettes 2-3 2-3 4-5 2-3 4-6 4-6 8-10 4-6 Céleri-rave Céleri-rave Tomates Oignons 2-3 4-6 Courgettes Commenter Minutes avec pressio n de 1 bar Minutes avec pression de 0,5 bar 4 4 Surgelés 4 8 (à préchauffer) En morceaux En dés (à blanchir) En rondelles (blanchis) 8 16 4-5 2-3 0,5 1 8-10 4-6 0,5 2 1-1,5 2-3 35-60 70-120 55-70 110-140 15 30 À réchauffer 5 10 À réchauffer 12 24 Champignon s Endives Endives Petits pois Moitiés En morceaux Frais 1-2 1 1-2 2-4 2 2-4 Petits pois Surgelés 1-2 2-4 Petits pois Secs (Prétrempés, cuisson couverte avec de l’eau) Moitiés 10-15 s 20-30 s 15-20 s 30-40 s Carottes En dés/ rondelles/ bâtonnets 15-20 s 30-40 s Pommes de terre Pommes de terre Pommes de terre Chou-rave Quarts 8-10 16-20 Boudin À réchauffer 4 8 Dés/ rondelles En conserve 3 6 À réchauffer 4 8 3 6 2-5 5 À réchauffer 3 6 Chou Rondelles/ dés En morceaux Saucisse de foie Poitrine fumée Côtelettes 4 8 Chou En rondelles 2-5 4-6 Poitrine fumée Côtelettes À cuire 6-7. 12-16 Fenouil Viandes Poitrine de bœuf (selon taille et qualité) Langue de bœuf (selon la taille) Poitrine de veau pour fricassée Roulades de bœuf Jarret de porc mariné 49 Produit Commenter Minutes avec pression de 0,5 bar Produit Commenter En morceaux Minutes avec pressio n de 1 bar 2-5 6 Minutes avec pression de 0,5 bar 2-4 En rondelles Surgelés 1.5-2 1.5-2 3-4 3-4 Saucisse bratwurst / de Francfort Poulet Poulet Minutes avec pressio n de 1 bar 1-2 Poireaux Poireaux Légumes variés Légumes variés Épinards Épinards (en petits morceaux) Poivrons Entier Cuisses 15-20 6-7. 30-40 12-14 Frais 1,5-2 3-4 Poulet Escalopes 10 20 Frais Surgelés 0,5-1 2-4 1-2 4-8 Dinde Pigeon Escalopes Jeune 4-6 10 8-10 20 En rondelles 1 2 7-8 14-16 Pâtes À cuire dans de l’eau salée sans plaque perforée Nouilles 8-9 16-18 Lasagnes 10 20 2-3 3 4 4-6 6 8 Macaronis Riz Spaghettis (Les pâtes peuvent aussi être réchauffées par portions au besoin) Œufs Fruits de mer Homard/ langouste (selon la taille) Crabe Moules Coquilles SaintJacques Poissons Filets de poisson/ cabillaud Flétan Sole Saumon Anguille Carpe (selon la taille) Brochet Portions 2-3 4-6 Portions 4-5 8-10 Filets Portions En morceaux 12 1,5 4-5 3,5 24 3 8-10 7 En morceaux 6 12 8-9 8-9 8-9 Œufs à la coque Durs Pochés (réchauffés) Brouillés Fruits (selon la taille) Pommes Pommes Poires Pêches Fraises / framboises Prunes 50 16-18 16-18 16-18 3 5-6 6 2 1-2 6 4 2-4 3-5 1 6-10 2 Surgelées 3-5 2-3 1 6-10 4-6 2 Surgelées 1,5 2 Entières En morceaux 10. APRÈS LA CUISSON. • Fermer la porte de l’enceinte de cuisson. • Appuyer sur la touche MARCHE/ARRÊT. Après un intervalle de 10 secondes (pendant lequel le cycle de vidange peut être interrompu), le voyant MARCHE/ARRÊT clignote pour indiquer que le cycle de vidange est en cours. La pression diminue et la chaudière se vidange automatiquement. Lorsque le voyant MARCHE/ARRÊT s’éteint : • Ouvrir la porte de l’enceinte de cuisson. • Fermer le robinet d’arrivée d’eau. • Fermer l’interrupteur principal d’alimentation électrique. 10.2. NETTOYAGE QUOTIDIEN. Le cuiseur vapeur doit être nettoyé à la fin de chaque journée ou session de cuisson, comme suit : DANGER : La porte, le boîtier de l’interverrouillage, l’enceinte de cuisson, les plats d’aliments et la vapeur résiduelle qui s’échappe encore, sont très chauds. Utiliser des vêtements de protection appropriés, des gants et des accessoires isolants. Enlever les glissières de plat comme l’indique la section 10.2. Nettoyer l’appareil et l’enceinte de cuisson avec un détergent doux, puis rincer abondamment et sécher. Nettoyer toutes les traces d’aliments sur la plaque perforée de la partie frontale inférieure de l’enceinte de cuisson avec une brosse dure. Pour rincer la conduite d’évacuation interne, enfourner une casserole remplie de glace et décongeler sous pression. Ne jamais utiliser un nettoyeurs haute pression. Ne jamais utiliser de TAMPONS À RÉCURER ou de détergent à base de chlorures. Pour les modèles 305G et 305T, les glissières de plats doivent être retirées et nettoyées au lave-vaisselle. Attention ! Si les trous de la plaque perforée à l’avant de l’enceinte de cuisson sont obstrués, de l’eau chaude s’écoulera de l’enceinte à l’ouverture de la porte. 51 10.2 DÉMONTAGE DES GLISSIÈRES DE PLATS. Trou en fente Fente de positionn ement • • • Les glissières de plats sont conçues pour être faciles à démonter et à nettoyer. Chaque glissière est fixée à l’intérieur de l’enceinte de cuisson sur quatre ergots en ‘T. Pour retirer et remettre les glissières en place, procéder comme suit : Ouvrir la porte et laisser refroidir l’enceinte de cuisson et les glissières à une température qui permette de les manipuler sans danger. Porter des gants de protection thermique au besoin pour retirer les glissières. Soulever les glissières pour décrocher les glissières des ergots supérieurs et pour pouvoir les incliner vers le centre de l’enceinte de cuisson. Soulever les glissières des ergots inférieurs et les tirer hors de l’enceinte de cuisson. Pour remettre les glissières en place, procéder comme suit : Vérifier que chaque glissière est du bon côté. Il est important que l’extrémité fermée des glissières se trouve à l’arrière de l’enceinte de cuisson. • Insérer les glissières dans l’enceinte de cuisson. • Accrocher les fentes inférieures sur les ergots puis soulever la glissière par-dessus les ergots supérieurs. • Tirer la glissière vers le bas en s’assurant qu’elle est fermement accrochée en place. 11 DONNÉES RELATIVES À LA CONCEPTION ET LA CONSTRUCTION Les données mentionnées dans le Tableau 2 s’appliquent au système de cuiseur vapeur conçu et fabriqué par Hobart Manufacturing UK et s’appuient sur les actes réglementaires d’Hygiène et de sécurité n°2169, relatives aux enceintes sous pression. 52 12 TABLEAU 2. INFORMATIONS TECHNIQUES. Description Nombre d’enceintes de cuisson Unités 205GH 1 305GH, 305TH, 2228H 1 (305G et 305T), 2 (2228) GN ½ -100 mm GN 1/1 –100 mm (305G et 305T), 2 x GN ½ -100 mm (2228) 400 650 (305G et 305T), 800 (2228) 7 20 (305G et 305T) 7 x 2 (2228) 0, 0,5 et 1,0 380-415/50 380-415/50 Taille de plaque Gastronorme Plats par heure (environ) Capacité de cuisson maximum kg Pression de cuisson Échelle de tension nominale 3 phases plus neutre Courant de pleine charge à une tension nominale de 400 V, 3 phases + Neutre Taille de fusible recommandée 400V, 3 phases + neutre/50hz Température ambiante minimum et maximum Température minimum et maximum d’arrivée d’eau Capacité de vapeur de la chaudière Capacité totale de la chaudière Sortie de vapeur à 1,0 bar g Durée de démarrage de l’appareil froid et vide (prêt à cuire/pleine charge). Durée du cycle de vidange Consommation normale d’énergie (pommes de terre pour une durée de cycle de cuisson de 7 minutes) Consommation d’eau pour le cycle de cuisson ci-dessus (eau de cuisson et de condensat) Consommation d’énergie en mode veille (prêt à cuire) Consommation d’énergie (démarrage initial à froid et vide) Température de la vapeur (nominale) Taille de raccordement d’évacuation Capacité de vidange (minimum) Bar g Volts/Hz Raccord d’arrivée d’eau. kW/ Amps 17,8/25,8 26,7/38,7 Amps 35 50 °C +5 à +45 +5 à +45 °C +5 à +25 +5 à +25 Litres 6 6 Litres kg/h Minutes 17 30 9 17 45 9 Minutes kWh/(kg) 4 4 0,4 kWh (2 kg de 1,6 kWh (12 kg de pommes de terre) pommes de terre) Litres kWh 3,25 (0,25 6,6 (2,3 cuisson, 4,3 cuisson, 3 condensat) condensat) 0,20 0,20 kWh 1,6 1,6 °C 117° 117° BSP M 1” 1” Litres/ minute BSP 5,0 5,0 G3/4A G3/4A 53 Description Débit d’eau minimum pour l’échelle de pression indiquée ci-dessous (alimentation chaudière en eau traitée) Débit d’eau minimum pour l’échelle de pression indiquée ci-dessous (vidange de condensat) Pression arrivée d’eau Classe d’appareil Indice IP du caisson Taille de borne de branchement Taille de presse-étoupe d’entrée de câble électrique Raccord de continuité de masse secondaire équipotentielle Échelle de réglage hauteur Longueur du tuyau d’arrivée d’eau externe (recommandée) Niveau acoustique Poids (appareil vide) Poids d'expédition Unités Litres/ minute 205GH 2,5 305GH, 305TH, 2228H 2,5 Litres/ minute 5,0 5,0 Bar g 1,7 à 10 1,7 à 10 mm² mm IP33 16 25 (Pg 29) IP33 16 25 (Pg 29) M8 M8 mm mm 15 à 35 1500 15 à 35 1500 dB (A) kg ## ## kg 81 #Classe I inférieur à 60 69 Dimensions d’expédition lxpxh cm (palette comprise) Conditions d’entreposage. Température et humidité. Pression de conception Pression de débit maximum de la soupape de sûreté Pression d’essai hydraulique Matériau de la carcasse de la chaudière Élément chauffant Enceinte de cuisson # 88x63,5x102 #Classe I inférieur à 60 85 (305G) 98 (305T) 85 (2228) 89 (305G) 110 (305T) 89 (2228) 88x63,5x111.5 (305G) 116x108x107 (305T) 88x63,5x120 (2228) o C, % RH Bar g +5 à +55, 85 1,38 +5 à +55, 85 1,38 Bar g 1,3 1,3 Bar g 2,3 2,3 Acier inoxydable, grade 1.4404 Incoloy Acier inoxydable, grade 1.4301 et 1.4404 Conformément à la norme EN60335-1. Voir la section 4.3 ## Conformément à la norme EN-ISO 11202 54 FIGURE 3 : DIMENSIONS D’INSTALLATION 205GH FIGURE 4 : DIMENSIONS D’INSTALLATION 305GH 55 FIGURE 5 : DIMENSIONS D’INSTALLATION 305TH FIGURE 6 : DIMENSIONS D’INSTALLATION 305TH SUPERPOSÉS. 56 FIGURE 7 : DIMENSIONS D’INSTALLATION 2228H 13.0 INSTALLATION. 13.1 DÉBALLAGE ET MANUTENTION. Dans la mesure du possible, le cuiseur vapeur doit être transporté sur son lieu d’installation dans l’emballage fourni pour éviter tout dommage. Ne pas utiliser un couteau pointu pour découper l’emballage au risque d’endommager l’appareil. Vérifier que l’appareil n’a pas été endommagé pendant le transport. Si des dommages sont apparents, conserver l’emballage et contacter le bureau de vente Hobart le plus proche. Attention : Le cuiseur vapeur pèse lourd et doit être manipulé et soulevé correctement pour éviter de se blesser. Lorsque l’appareil est à proximité de son emplacement final, retirer l’emballage et soulever-le de sa palette de transport. Prendre soin pendant cette opération de s’assurer que : c) Toutes les mesures de sécurité ont été prises pour soulever et manipuler l’appareil correctement et éviter tout risque de blessure en le laissant tomber, en faisant une chute ou en l’inclinant. 57 d) L’appareil ne subisse aucun dommage qui pourrait l’empêcher de fonctionner normalement. 13.2 EMPLACEMENT. Le cuiseur vapeur ne convient pas pour une installation en extérieur et ne doit pas être installé dans un endroit où un jet d’eau pourrait être utilisé pour le nettoyage. Le cuiseur vapeur ne doit être utilisé que par du personnel formé et doit être installé dans un endroit où son utilisation et sa maintenance sont restreintes à du personnel formé. Le cuiseur vapeur doit être installé sur une surface horizontale et de niveau, avec une dénivellation maximale de 1 mm par mètre en largeur et en profondeur. Choisir une surface plate et de niveau appropriée et apte à supporter le poids du cuiseur vapeur Hobart plein d’aliments (se reporter au Tableau 2 pour les poids et les dimensions). Dans les zones concernées par des problèmes de stabilité, l’appareil doit être fixé en place. En cours de fonctionnement, l’appareil produit de la vapeur. S’assurer que les meubles et les équipements adjacents à l’appareil sont adéquatement protégés contre les dommages causés par un épandage d’eau ou de la condensation. Le cuiseur vapeur ne doit pas être installé dans une zone sujette au gel. Important ! S’assurer qu’il y a un espace suffisant autour du cuiseur vapeur pour qu’il fonctionne en toute sécurité. La maintenance peut être rendue plus difficile dans un espace restreint et il faut toujours vérifier que les spécifications de l’appareil autorisent l’installation d’autres équipements à proximité. Se reporter aux Figures 3, 4, 5, 6 ou 7 pour obtenir les cotes d’encombrement du cuiseur vapeur. Pour la maintenance, un accès est nécessaire devant, derrière, sur les côtés et au-dessus de l’appareil. Les distances minimum sont : 100 mm sur les côtés et à l’arrière et 600 mm au-dessus. L’appareil évacue la vapeur par l’angle arrière gauche supérieur. Il est recommandé d’utiliser un ventilateur ou une hotte d’extraction pour évacuer la vapeur du coin cuisine. 13.2.1 MONTAGE SUR SUPPORT EXISTANT. Si l’appareil doit être monté sur un support existant, s’assurer qu’il convient au poids et aux dimensions de l’appareil, pour une installation en toute sécurité. Le cuiseur vapeur doit être fixé sur le support (un pied réglable est disponible). Un orifice de 26 à 28 mm de diamètre est nécessaire pour chaque pied. 13.2.2 MONTAGE SUR SOCLE SPÉCIAL. Placer le support à son emplacement correct. Incliner le cuiseur vapeur avec précaution (cette opération requiert plus d’une personne) et retirer l’insert du pied réglable. Déposer l’appareil sur le support et l’aligner en position correcte. 58 Visser les inserts des pieds arrières dans l’appareil à travers le support. Glisser la plinthe du support entre le cuiseur vapeur et le dessus du support en alignant les encoches arrières de la plinthe sur les ergots de positionnement situés sur le dessus du support. Fixer la plinthe en vissant les vis dans la plinthe à travers le support (avant x 2). 13.3 INSTALLATION DU CUISEUR VAPEUR. Placer l’appareil sur un support conçu pour supporter son poids total. Régler la hauteur pour l’adapter au plan de travail. S’assurer que les raccordements sont bien alignés avec les trous dans le plan de travail ou le support. Le cuiseur vapeur peut maintenant être raccordé en eau et en électricité et à la canalisation d’évacuation. 13.4 INSTALLATION ÉLECTRIQUE. L’installation électrique du cuiseur vapeur doit être réglementations en vigueur sur les équipements électriques. L’appareil doit être connecté à la terre. conforme aux L’installation électrique doit être effectuée par une personne compétente. Les données techniques du Tableau 2 indiquent en détail les spécifications des diverses options d’alimentation électrique. Le cuiseur vapeur est un appareil de “classe I”, dont la protection contre les chocs électriques ne consiste pas seulement en une isolation basique. Un sectionneur électrique externe et un tableau de commande principal/des fusibles (éléments non fournis par Hobart) doivent être installés sur l’alimentation électrique du cuiseur vapeur à un emplacement facilement accessible et non humide. De plus, un disjoncteur différentiel à courant résiduel de 30mA est vivement recommandé pour apporter une protection supplémentaire. Vérifier que l’impédance du circuit de terre est sécurisée et fonctionne à la bonne valeur. L’appareil doit être équipé d’une liaison équipotentielle La vis de terre est située sur la surface inférieure du cadre de la base et elle est indiquée par le symbole ci-contre. Remarque : Le câble d’alimentation électrique doit être adapté à l’alimentation électrique et à la température ambiante. Vérifier que la résistance de la connexion à la masse est inférieure à 0,1Ω et que la résistance de l’isolation est supérieure à 2 MΩ. 13.5 BRANCHEMENT ÉLECTRIQUE. Se reporter aux étiquettes d’avertissement apposées sur l’appareil et au schéma de câblage électrique collé sur la face interne du panneau latéral du cuiseur vapeur. L’appareil est configuré pour une alimentation électrique de 400 V, triphasée plus neutre. 59 13.5.1 PROCÉDURE ÉLECTRIQUE. 6. 7. 8. 9. 10. DE BRANCHEMENT DU CÂBLE D’ALIMENTATION Choisir un câble d’alimentation électrique souple adapté à la charge électrique spécifiée (voir Tableau 2 pour les valeurs de courant et de puissance). Déposer le panneau latéral droit en enlevant les deux vis frontales. Faire passer le câble par le presse-étoupe et le raccorder aux bornes appropriées sur le bloc de connexion puis serrer les vis (Voir schéma de câblage apposé sur la face interne du panneau latéral droit de l’appareil). S’assurer que toutes les connexions électriques à l’intérieur de l’appareil sont bien serrées avant d’allumer l’interrupteur principal (pour vérifier qu’aucune connexion ne s’est desserrée pendant le transport). L’appareil doit être connecté à la terre. La borne de terre principale est indiquée par un repère dans l’armoire électrique (boîtier de jonction secteur) avec une connexion à la terre extérieure située à l’arrière du cadre de base de l’appareil. 13.5.2 RÉGLAGE DE LA PUISSANCE D’ALIMENTATION ÉLECTRIQUE. Le cuiseur vapeur est équipé d’un interrupteur variable permettant de réduire la puissance/le courant électrique. Le modèle 205GH peut fonctionner à partir d’un courant de 9 ou de 18 kW. Les modèles 305GH, 305TH et 2228H peuvent fonctionner à partir d’un courant de 18 kW ou de 27 kW. Le commutateur qui se trouve sur le tableau de commandes interne de l’appareil doit être réglé sur la position requise. L’appareil est réglé par défaut en usine sur la puissance maximum. La valeur du paramètre C16 du logiciel doit correspondre au modèle de cuiseur vapeur et à l’option de puissance sélectionnée. Cette valeur ne peut être modifiée que par un technicien agréé. Modèle Charge électrique 305GH, 305TH et 2228H 305GH, 305TH et 2228H 205GH 205GH 27 kW 18 kW 18 kW 9 kW 13.6 Mettre le commutateur sur : Max. Min. Max. Min. Régler C16 sur : 1 2 2 3 ALIMENTATION EN EAU. L’installation doit être conforme aux exigences de l’autorité locale en charge des eaux et effectuée par un technicien agréé. Le cuiseur vapeur comporte deux raccords d’arrivée d’eau :1 L’alimentation du générateur de vapeur. 3 L’alimentation du condenseur de vapeur. 13.6.1 QUALITÉ DE L’EAU D’ALIMENTATION. Si le cuiseur vapeur est installé dans une zone où l’alimentation en eau dépasse une dureté de 5° Clark (équivalente à une dureté totale de 60 ppm (CaCO3)), dans ce cas un adoucisseur approprié doit être installé et entretenu de manière régulière pour éliminer les dépôts de 60 calcaire. S’assurer que la pression d’entrée d’eau dans l’adoucisseur est conforme aux spécifications du fabricant. Pour obtenir des renseignements sur les adoucisseurs recommandés, veuillez contacter votre point de vente Hobart local. 13.6.2 ALIMENTATION EN EAU DU CONDENSEUR. La pression d’alimentation en eau doit être comprise entre 1,7 et 10 bars g pour un débit minimum indiqué au Tableau 2 et à une température d’entrée comprise entre 5 et 25°C. Si un filtre à eau est installé sur l’arrivée d’eau du cuiseur vapeur, s’assurer que la pression disponible est suffisante au débit requis. Certains filtres requièrent une pression minimum supérieure à 2 bars g. Le Tableau 2 indique en détail les spécifications de l’alimentation en eau de la chaudière. 13.6.3 ALIMENTATION EN EAU DU CONDENSEUR DE VAPEUR. Il n’y a pas d’exigences de qualité d’eau spécifiques pour l’alimentation du condenseur. La pression d’alimentation en eau doit être comprise entre 1,0 et 10 bars g pour un débit minimum indiqué au Tableau 2 et à une température d’entrée comprise entre 5 et 25°C. 13.7 SPÉCIFICATION DU RACCORDEMENT DE L’ALIMENTATION EN EAU. Un robinet d’arrêt manuel doit être installé sur la conduite d’eau à un emplacement accessible, adjacent au cuiseur vapeur avec un raccord mâle ¾” BSP. Un tuyau approprié avec des raccords ¾” BSP doit être utilisé pour l’alimentation des deux systèmes. Un tuyau d’alimentation en eau est disponible auprès de Hobart, N° de pièce 01-240316-001. Les points de raccordement en eau sont situés sur la partie arrière du côté droit, sous l’appareil vu de face. Des étiquettes indiquent l’orientation des connexions. S’assurer que le passage des tuyaux flexibles d’alimentation en eau reliés au cuiseur est correct et qu’ils ne peuvent pas être écrasés lorsque l’appareil est poussé en place. Si le tuyau passe par le plan de travail ou un autre support existant, éliminer tous les rebords tranchants et les bavures et utiliser un passe-fil approprié. S’assurer que le tuyau est assez long pour permettre de déplacer le cuiseur vapeur au besoin lors des opérations de maintenance. Avant de raccorder le cuiseur vapeur, vérifier que la ligne d’alimentation en eau ne comporte aucune impureté et la rincer au besoin. Il est recommandé d’installer un manomètre sur l’alimentation en eau (de 0 à 10 bars g) à proximité du cuiseur vapeur. 13.8 SPÉCIFICATIONS POUR LE RACCORDEMENT À LA CONDUITE D’ÉVACUATION. Le raccord de la conduite d’évacuation se trouve dans l’angle gauche à l’arrière de l’appareil vu de face. La taille du raccord est de 1” BSP. La tuyauterie et les raccords de la conduite d’évacuation doivent être en cuivre ou en plastique résistant à la chaleur (normalement 100°C). Le tuyau d’évacuation doit se vidanger dans un drain ouvert ou un entonnoir d’écoulement connecté à une canalisation d’assainissement. La tuyauterie ne 61 doit comprendre aucune restriction et comporter une déclivité appropriée ; elle ne doit pas être connectée à une autre tuyauterie, ni être de longueur excessive. Un siphon doit être installé en aval de la fosse ou de l’entonnoir. Le système de vidange doit pouvoir fonctionner avec un débit minimum de 5 litres/minute. AVERTISSEMENT ! Il est essentiel de rappeler que le cuiseur vapeur est équipé d’une soupape de surpression de sécurité avec évacuation dans le système de vidange en cas de défaillance d’un composant. La vapeur s’évacue dans le système de condensat installé à l’intérieur de l’appareil. Cette soupape de sécurité évacue la vapeur à une pression de 1,3 bar et il est essentiel d’éviter tout contact avec la vapeur susceptible d’occasionner des brûlures. 14.0 INSTRUCTIONS DE MISE EN SERVICE. Ce cuiseur vapeur est destiné exclusivement à un usage professionnel par des personnes spécifiquement formées. S’assurer que les utilisateurs ont lu et compris les instructions de ce manuel et reçu une formation appropriée. 14.1 MISE EN SERVICE. Le cuiseur vapeur haute pression Hobart fonctionne automatiquement. Ouvrir l’arrivée d’eau et vérifier qu’il n’y a aucune fuite. Allumer l’alimentation électrique. Suivre la procédure indiquée à la Section 4.2. 15. MAINTENANCE. Malgré l’utilisation d’eau adoucie, il est recommandé de faire effectuer une inspection complète de l’appareil toutes les 1000 heures de fonctionnement ou tout les 6 mois, la première date étant applicable. (Le nombre d’heures de fonctionnement s’affiche à chaque allumage du cuiseur vapeur). Cette inspection comprend la vérification de tous les joints et connexions du générateur de vapeur, de l’enceinte de cuisson et des tuyauteries. 15.1 MAINTENANCE DE LA SOUPAPE DE SURPRESSION DE SÉCURITÉ. Effectuer un test de la soupape de surpression de sécurité au moins une fois par mois. Pour tester : tourner l’écrou moleté dans le sens antihoraire jusqu’à ce que la pression s’échappe dans la conduite d’évacuation, puis tourner l’écrou moleté dans le sens horaire jusqu’à ce que la soupape se referme. AVERTISSEMENT ! La soupape de surpression de sécurité sera très chaude. Utiliser des gants isolants. 62 16 RÉSUMÉ DES RECHERCHES DE PANNES. 16.2 CODES DES PANNES. En cas de dysfonctionnement de l’appareil, une série de codes de panne s’affichent pour permettre d’identifier le problème. Voir ci-dessous un bref résumé des codes de pannes. • • • • • • • • • • • dEF2 et dEF7 indiquent un dysfonctionnement du générateur de vapeur/de vidange de chaudière. dEF3 remplissage trop lent du générateur de vapeur/de la chaudière. dEF5 panne d’alimentation en eau du générateur de vapeur/de la chaudière. dEF8 débordement du générateur de vapeur/de la chaudière. dEF 9 pendant le cycle de cuisson, le générateur de vapeur/la chaudière ne se remplissent pas d’eau. Vérifier le fonctionnement de l’interrupteur à flotteur. dEF10 surchauffe du générateur de vapeur/de la chaudière. dEF11 dysfonctionnement de la sonde de température de l’enceinte de cuisson (N° 1). dEF12 dysfonctionnement de la vanne de vidange de l’enceinte de cuisson (N° 1). dEF13 concerne la déconnexion ou le dysfonctionnement de la sonde alimentaire interne. La sonde alimentaire est une option non-standard. dEF21 dysfonctionnement de la sonde de température de l’enceinte de cuisson (N° 2) (applicable au modèle 2228). dEF22 dysfonctionnement de la vanne de vidange de l’enceinte de cuisson (N° 2). Si une panne ne peut pas être rectifiée, contacter le centre de service Hobart. 16.2 RECHERCHES DE PANNES. TABLEAU 3. Panne L’appareil ne se met pas sous tension. Cause possible Fusible du secteur fondu ou tableau de commande principal disjoncté. Fusible du circuit de commande fondu L’appareil ne fonctionne toujours pas L’appareil ne se Problème d’alimentation en eau remplit pas 63 Solution Vérifier et remplacer le fusible défectueux ou réarmer le disjoncteur du tableau de commande principal Vérifier et remplacer le fusible défectueux Contacter le centre de service Hobart local. Vérifier que l’arrivée d’eau est bien raccordée et le robinet ouvert. Vérifier que la pression et le débit de l’eau sont conformes aux valeurs indiquées au Tableau 2. 17.0 RÉSUMÉ TABLEAU 4. Description DES PRINCIPALES PIÈCES N° de pièce Chaudière de rechange (neuve) 00-739365-1 Chaudière de rechange 00-739365-2 (reconditionnée) Came 737059 Contacteur 00-739266-3 Contacteur 00-740618-3 Raccord - Entrée d’eau 2 en 1 00-895401-44 Double clapet anti-retour 143450 Crépine de vidange - enceinte de 174648 cuisson EPROM 737399-15 Filtre en ligne 737324 Interrupteur à flotteur - intervalle 737522 d’air Récipient gastronorme ½ x 100 141502 mm de profondeur Récipient gastronorme 1/1x65 142450 mm de profondeur Élément chauffant 00-739320 Tuyau flexible de vidange de 00-739291-2 chaudière Tuyau flexible de vidange de 00-739182-1 chaudière Tuyau flexible de vidange de 00-739182-2 chaudière Tuyau flexible de la chaudière à 00-739183-1 l’enceinte de cuisson Tuyau flexible de la chaudière à 00-739283-1 l’enceinte de cuisson Tuyau flexible de la chaudière à 00-739283-2 l’enceinte de cuisson Tuyau flexible de la chaudière à la 00-739309 soupape de surpression Tuyau flexible de vidange de 00-739181-1 l’enceinte de cuisson Tuyau flexible de vidange de 00-739291-1 l’enceinte de cuisson Tuyau d’admission d’eau 01-240316001 Boîtier - commande de niveau 00-739072 Bouton de commande 737121 Moteur-vanne 233979-1 Buse d’injection de vapeur dans 323273 l’enceinte de cuisson 64 DE RECHANGE COURANTES. Quantité par modèle 205GH 305GH 305TH 2228H 1 1 1 1 1 1 1 1 2 2 2 2 2 2 2 2 1 1 1 1 1 1 1 1 1 1 1 2 1 1 1 1 1 1 1 1 1 1 1 1 1 3 2 2 2 3 3 3 1 1 1 1 1 1 1 1 1 1 2 1 2 2 2 2 1 2 1 1 2 1 1 2 1 1 2 2 Description N° de pièce Joint torique de sortie d’enceinte OS-E-1-3 de cuisson Joint torique de porte 276903-12 Joint torique de porte 323167-10 Joint torique de contrôle de OS-E-1-45 niveau Joint torique d’élément chauffant 00-738620 Glissières côté gauche 737351 Glissières côté droit 737352 Carte de circuit imprimé 737003 Tension/relais Carte de circuit imprimé - Tableau 00-740558 tactile Carte de circuit imprimé - Tableau 00-740571 tactile 2ème enceinte Pompe à piston 00-739631 Manomètre 00-739068 Clapet anti-retour simple 297498-1 Plaque perforée 173055-2 Plaque perforée 170054-2 Plaque perforée 173055-1 Interrupteur de contrôle de niveau 00-739324 Sonde de température 00-737831 chaudière Sonde de température - enceinte 737006 de cuisson Sonde de température - produits 00-738428-1 de cuisson Sonde de température - produits 00-738428-2 de cuisson Reniflard 297536 Électrovanne 737063-999 Électrovanne de vidange de 00-739190-3 chaudière Électrovanne d’enceinte de 00-739190-2 cuisson Corps de vanne 323314-11 Vanne - solénoïde d’eau de 00-738728-2 condensation 5 l/m Vanne - solénoïde de remplissage 00-738728-1 d’eau 2,5 l/m Soupape de sécurité 169556 Soupape - entrée de vapeur 173863 65 205GH 1 Quantité par modèle 305GH 305TH 2228H 1 1 1 1 2 1 1 1 1 3 1 1 1 3 1 3 1 1 1 1 1 1 1 1 3 1 1 1 1 1 1 1 1 1 2 1 1 1 2 1 1 1 1 2 1 1 1 1 1 1 1 1 1 1 1 1 1 1 1 1 2 1 2 1 2 1 2 2 1 1 1 1 1 2 1 2 1 2 1 2 1 1 1 1 1 1 1 1 1 1 1 1 2 18.0 CONTACTS. Les techniciens compétents Hobart, stratégiquement situés dans les succursales Hobart, sont prêts à vous offrir un service après-vente rapide, efficace et fiable. Protégez votre investissement en souscrivant un contrat d’inspection Hobart, qui vous garantira un fonctionnement continu et efficace de vos appareils, pièces et accessoires Hobart. Pour plus de renseignements, contactez : HOBART SERVICE FRANCE Téléphone : 08 25 02 12 22 L’amélioration continue des produits étant une des politiques de Hobart UK, les caractéristiques techniques peuvent être amenées à changer sans préavis. 66 HIGH SPEED STEAM COOKER. 205GH, 305GH, 305TH, 2228H INSTALLATION AND OPERATION MANUAL PLE200594 A 01-13 EU8752 67 CONTENTS. Foreword General information Liability Definitions Environmental responsibility RoHS compliance WEEE directive Packaging recycling Safety information Safety guidelines Warning symbols Safety instructions Never Always General Information Features and Benefits Hydraulic schematic How to operate the steam cooker Control panel layout Starting the steam cooker Selecting the temperature or pressure mode Cooking Second chamber operation Atmospheric cooking Door interlock, description of operation Cooking probe (optional) Turning off the steam cooker Cooking hints and tips Automatic pre-heat Seasoning Vegetables Meat Fish Suggested cooking times and pressures After cooking Daily cleaning Removing the pan rails Design and construction data Technical information. 205G installation dimensions 305G installation dimensions 305T installation dimensions 305T stacked installation dimensions 2228 installation dimensions Installation Unpacking and handling Location Bench mounting Dedicated stand mounting 68 Section 1 2 3 4 5 5.1 5.2 5.3 6 6.1 6.2 6.3 6.3.1 6.3.2 7 8 Figure 1 9 Figure 2 9.1 9.2 9.3 9.3.1 9.3.2 9.3.3 9.3.4 9.3.5 9.4 9.4.1 9.4.2 9.4.3 9.4.4 9.4.5 Table 1 10 10.1 10.2 11 12, Table 2 Figure 3 Figure 4 Figure 5 Figure 6 Figure 7 13 13.1 13.2 13.2.1 13.2.2 Page 70 70 70 70 70 70 71 71 71 71 72 72 72 73 73 74 74 75 75 75 76 76 78 78 79 79 80 80 80 80 80 81 81 81 83 83 83 84 84 86 86 87 87 88 88 88 89 89 89 CONTENTS continued. Installing the steam cooker Electrical installation Electrical connection Electrical supply cable connection procedure Setting the electrical load Water supply Water supply quality Water supply for cooking Water supply to condense the steam Water connections Drain connection requirements Commissioning instructions Commissioning Maintenance. Pressure safety valve maintenance Fault finding Default codes Fault finding Common spares Service information and contact telephone numbers 69 Section 13.3 13.4 13.5 13.5.1 13.5.2 13.6 13.6.1 13.6.2 13.6.3 13.7 13.8 14.0 14.1 15 15.1 16 16.1 16.2, Table 3 17, Table 4 18 Page 90 90 90 90 91 91 91 91 92 92 92 93 93 93 91 93 93 94 94 96 1. FOREWORD. Hobart reserves the right to alter the design of their products without prior notice. Whilst every effort is made to ensure this publication reflects the latest design, the Company cannot guarantee full compliance. Take pride in your Steam Cooker - keep it clean and in good mechanical and electrical condition. 2. GENERAL INFORMATION The information and instructions contained in this manual may not cover all details or variations in the equipment, nor provide for every eventuality to arise with installation, operation, or maintenance. If additional information is required please contact your local Hobart office. Contact details are provided on the back page of the manual. 3. LIABILITY. Installations and repairs which are not carried out by Authorised technicians or the use of non original spare parts, and any technical alterations to the machine, may affect the warranty set out in the standard conditions of sale. 4.0 DEFINITIONS. Qualified operators. The Steam Cooker is only intended for professional use by qualified operators. Qualified operators are those personnel who have received training in the operation of the appliance from a suitable qualified person and have carefully read the information in this manual and are familiar with the equipment’s function or had previous experience with the operation of Steam Cookers. Qualified installation personnel. Any ‘work’ performed on the Steam Cooker including installation and servicing must be by personnel who are experienced and familiar with precautions required, have complied with all requirements of state and local authorities having jurisdiction. In the EU installation must comply with national or local requirements of the country of destination of the appliance. Qualified Service Personnel: Those who are familiar with Hobart Steam Cookers, competent, trained and approved by Hobart UK. All service personnel are required to be equipped with a complete set of manuals and original service parts. 5. ENVIRONMENTAL RESPONSIBILITY. 5.1 RoHS COMPLIANCE. This Steam Cooker product complies with the requirements of the RoHS directive (2002/95/EC) that came into force on 1 July 2006 and subsequent revision 2011/65/EU. The RoHS Directive stands for "the restriction of the use of certain hazardous substances in electrical and electronic equipment". This Directive bans the placing on the EU market of new electrical and electronic equipment containing more than agreed levels of lead, cadmium, mercury, hexavalent chromium, polybrominated biphenyl (PBB) and polybrominated diphenyl ether (PBDE) flame retardants. 70 5.2 WEEE DIRECTIVE. The aim of the Waste Electrical and Electronic Equipment Directive (WEEE Directive 2011/19/EU) is to minimise the impact of electrical and electronic goods on the environment, by increasing re-use and recycling and reducing the amount of WEEE going to landfill. The WEEE directive became effective on 1st July 2007. If this Steam Cooker is replacing an existing appliance make sure it is disposed of in the correct manner. Contact your local Hobart sales office for disposal of your old appliance. 5.3 PACKAGING RECYCLING. Ensure the packaging is correctly recycled. 6. SAFETY INFORMATION. The procedures and precautions contained in this manual apply to the Steam Cooker only when it is used in the prescribed manner. If the machine is not used as described in this manual, the operator will be responsible for his/her own safety and for the safety of the other persons who may be involved. The information in this manual has been prepared to assist the operator to understand, maintain, and operate the steam cooker. In order to prevent accidents, read, understand and follow all the precautions and warnings contained in this manual before installation or operating for the first time. This manual must be studied to obtain a clear knowledge of the Steam Cooker and its capabilities. Hot water, steam and electricity are dangerous and may cause injury if sufficient precautions are not taken prior to operating or servicing the Steam Cooker. Ensure the electrical supply has been isolated and ALL pressure has been vented and hot water drained before commencing work to dismantle the water/pressure system. The internal gauge fitted to the steam generator indicates the pressure. In certain fault finding situations it may be necessary to operate the machine full of hot liquid; in which case extreme caution must be used. Only suitably qualified personnel must service the steam cooker. 6.1 SAFETY GUIDELINES. Ensure sufficient precautions are observed during manually handling of the Steam Cooker particularly when moving into position on installation. Reference must be made to manual handling regulations. The Steam Cooker weights are given in table 2. Refer to section 6.3 for operating safety instructions. • Do not hose or pressure clean this appliance. It is vital to adhere to the cleaning instructions detailed in this manual. • Do not remove any covers or loosen any fittings whilst the machine is operating. • Ensure this manual is kept in an easily accessible place near the Steam Cooker for future reference. 71 6.2 • This appliance is not intended for use by persons if their physical, sensory or mental capabilities prevent them from using it safely. • All operators must be trained in the safe operation of the appliance. • Ensure the electrical supply has been isolated and all pressure exhausted before attempting to service or move the Steam Cooker. • Electrical machinery, steam and water are potentially hazardous and may cause injury if sufficient precautions are not taken prior to operating or servicing the machine. • Always have your Steam Cooker regularly serviced; at least twice a year, depending on frequency of use. For information on service contracts please contact your local Hobart sales office. • Open the cooking chamber door carefully in case the drain is blocked with food debris. If the drain is blocked hot water may discharge from the front of the cooking chamber. • To avoid scalding, do not place pans loaded with liquid (or products that become liquid when heated) on shelves in the cooking chamber that can not be easily observed and handled. WARNING SYMBOLS. To identify the safety messages in this manual, the following symbols have been used. The "Warning" symbol is found primarily where the corresponding information is important for the safe use of the machinery. The electrical hazard symbol is used when there are risks of an electrical nature. Prior to servicing the machinery, always disconnect the power cable from the mains supply. 6.3 SAFETY INSTRUCTIONS. ONLY A FULLY TRAINED AND COMPETENT PERSON MUST USE THE STEAM COOKER. The following instructions must be observed when using the appliance. Note: The Steam Cooker must only be used for the purpose it was design and inline with the supplied operating instructions. 6.3.1 NEVER • • • Allow children or unqualified personnel to operate the Steam Cooker. Operate the appliance if a fault develops or the machine is unsafe. Wear loose clothing. 72 • • • • • • • Use bleach, hypochlorite or chlorine compounds to clean the Steam Cooker internally or externally. Use excessive force when operating which could affect the stability of the Steam Cooker. Operate the appliance if parts are disassembled. Use the Steam Cooker in an unsafe condition. Clean the machine with scouring powder or a scouring pad. Dry tea towels and cloths on the appliance Attempt to open the door before the pressure has been evacuated from the cooking chamber. 6.3.2 ALWAYS • • • • • • • 11. Use the Steam Cooker in a well-lit area. Disconnect the mains electricity and water supply to the Steam Cooker before cleaning the machine and after drain down. Use the Steam Cooker as intended and inline with the operating instructions. Be aware of hot surfaces in particular the cooking chamber door. Isolate the electrical supply and turn off the water at the end of each day following the drain down sequence. Keep the appliance in a clean and serviceable condition. Clean the cooking chamber drain strainer daily. GENERAL INFORMATION. The High Pressure Steam Cooker is available in a variety of models to accommodate a range of cooking capacities. Figures 4 to 7 show the installation dimensions for each model and table 2 lists the technical and performance information. The appliance uses dry steam under pressure to cook the food product resulting in exceptional colour and appearance. The machine comprises a stainless steel cooking chamber, steam generator/boiler, heating elements and electronic control system. Steam is generated by high efficiency heating elements situated in the stainless steel boiler. An electronic control system maintains a consistent steam temperature. During the cooking process a solenoid valve controls the flow of steam into the cooking chamber and the temperature is monitored by a rapid response sensor. Steam is injected at the back of the cooking chamber and at the end of the cooking cycle the condensed steam is drained from the front of the chamber. The unique design of the cooking chamber door ensures maximum cooking chamber space utilisation and an effective seal. 73 12. • • • • • • • • • • • • FEATURES AND BENEFITS. High grade stainless steel cooking chamber. Simple to use control system for atmospheric (pressure less), half (0.5 bar) and full (1.0 bar) power pressure-cooking. Easy to clean cooking chamber. Cooking with dry steam ensures vegetables have exceptional colour and appearance. Rapid cooking cycles, typically between 1 and 3 minutes. Cooking by demand eliminates food wastage. The cooking process produces a high quality product retaining the entire natural vitamins and minerals. Quick start up. Thermally insulated steam generator and cooking chamber reduces heat loss and reduces energy consumption. Automatic pre-heat. The appliance automatically senses the initial cooking chamber temperature to ensure the product is ready for cooking. The door design ensures the cooking chamber can not be accessed during the cooking cycle. An optional stand is available with storage for gasto norm pans and routing for the water, electrical and drain services. FIGURE 1. HYDRAULIC SCHEMATIC. Item 1 2 3 4 Description Mains Supply Fill solenoid Single non return valve Boiler Item 7 8 9 10 Description Manometer Steam inlet solenoid Cooking chamber Drain/defrost valve Item 12 13 14 15 5 6 Water level switch Safety valve 11 Boiler drain valve 16 74 Description Condensate solenoid Drain Atmospheric vent Air gap assembly (OPTIONAL) Pump 9. HOW TO OPERATE THE STEAM COOKER. Cooking power selection. Atmospheric, 0.5 and 1.0 bar selection switches and indicators Pressure indication Pressure/Temperature display Temperature indication Power ON indicator Temperature adjustment Machine ON/OFF switch Time display Timer adjustment Cooking cycle stop/start and indicator. FIGURE 2. CONTROL PANEL LAYOUT. Note: Throughout this manual the lamps on the control panel are shown in yellow. The actual lamp colour when illuminated on the steam cooker is bright blue. 9.1 STARTING THE STEAM COOKER. The Steam Cooker is energised as follows: • • • Turn on the main electricity isolator switch (momentarily the control panel lamps will illuminate to indicate the electrical supply is on). Turn on the water supply. Press the ‘I/O’ switch. 75 • • • ‘HH’ will be displayed for 3 seconds in the top window together with the hours run in lower window. The power ‘ON’ lamp illuminates to indicate the steam cooker is ‘switched on’. Select the required operating pressure by pressing the atmospheric (pressure less), half or full power switch. The corresponding bright blue lamp will illuminate to indicate the option selected. Whilst the appliance is heating up the lamp will flash. When the appliance is ready for cooking the lamp will illuminate continuously. The appliance will automatically fill to the required level and heat up to temperature. 9.2 SELECTING THE COOKING MODE. When the Steam Cooker is ready for use the cooking time will be displayed and can be adjusted using the rotary knob. • • • To change the cooking mode, press the desired switch. The steam cooker will automatically increase or decrease (vent down via the cooking chamber) to the selected pressure. Close the door with the door handle in the up position when decreasing from full to half or to atmospheric cooking programme. This allows the steam pressure to vent down to drain rather than into the kitchen. The three cooking modes are as follows: Atmospheric cooking (pressure less) where the temperature can be adjusted between 50 and 99°C. When in the atmospheric mode the cooking temperature can be adjusted using the up and down arrows. Half power where the typical cooking chamber temperature is 110°C (0.5 bar). Full power programme where the typical cooking chamber temperature is 118°C (1.0 bar). Note: A cooking cycle cannot be changed once the ‘start’ switch is selected. 9.3 COOKING. A cooking cycle can not commence until the steam generator is at the correct operating pressure. When the appliance is ready the bright blue lamp will illuminate continuously Table 2 details the maximum cooking capacity. • Select the required cooking programme mode (for the optional temperature probe cooking refer to section 9.4.2). 76 • Adjust the rotary timer knob to the required cooking time. • Slide the products into the cooking chamber. • When the door is open the lever will be in the upper position. • Close the door and turn the door lever to the horizontal position. The door will be slightly open and will allow the cooking chamber to be purged with steam during the start of the cooking cycle. • Press the ‘start’ switch and allow steam to escape out of the cooking chamber for approximately 5 to 10 seconds. This will allow the cold air within the chamber to be displaced. • Turn the door lever slowly to the lower position to fully close the door. The pressure will build up in the cooking chamber, the door interlock will be activated and the timer will start to count down when the automatic pre-heat cycle is completed. • A rotating ‘zero’ will indicate the pre-heat cycle. The pre-heating temperature is factory set to 96°C, however this value is adjustable. Contact your local Hobart Service Centre for more information. • At the end of the cooking cycle the time display flashes vertical segments (raindrops) and a buzzer sounds. When the cooking chamber has depressurised and it is safe to open the door the cooking time will flash. In a kitchen where there are several steam cookers the flashing indicates which appliance has completed the cooking cycle. • When the door interlock pin has retracted turn the door lever to the upper position and carefully open the door. DANGER: The door, interlock switch housing, cooking chamber, food products and the residual steam still escaping are very hot. Use suitable protective clothing, insulated gloves and equipment. Take the cooked products out of the chamber and leave the door open. Another cooking cycle with the same duration can be started immediately or a new cooking time can be selected. If the selected time is incorrect or to interrupt a running cycle, press the ‘stop’ switch at any time. 77 9.3.1 SECOND CHAMBER OPERATION (ONLY RELEVANT FOR THE 2228). The 2228 steam cooker is supplied with two cooking chambers. The second chamber operates at the pre-selected pressure/temperature chosen on the main keypad. Chamber 1 is the lower and chamber 2 is the upper. Cooking chamber 1 is referred to as the main chamber. To start the second chamber operation, use the following procedure: • • • • Select the required cook cycle time using the rotary knob. Press the ‘start/stop’ key to operate the cycle. Pressing the ‘start/stop’ key during the operational cycle will stop the selected cycle if required. At the end of the selected cooking cycle the buzzer sounds to indicate the function is completed. Carefully remove the cooked products. DANGER: The door, interlock switch housing, cooking chamber, food products and the residual steam still escaping are very hot. Use suitable protective clothing, insulated gloves and equipment. • To view the second chamber pressure/temperature during operation the up arrow switch on the main keypad should be pressed. This will display the second chamber value for a few seconds before returning to the main chamber pressure/temperature value. Note: The product temperature probe is only available for the main chamber. 9.3.2 ATMOSPHERIC COOKING. This option allows atmospheric (pressure less) cooking with temperature control. To operate the steam cooker in the atmospheric mode use the following procedure: • • Close the door. Press the atmospheric cooking selection switch. This allows the steam pressure to vent down to drain rather than into the kitchen. • Adjust the required cooking temperature with the up and down buttons. The temperature range is from 50 to 110°C. • Adjust the required cooking time using the rotary knob • Open the door and slide in the food product. • Close the door and push the ‘start’ switch. The temperature display will indicate the actual chamber temperature. The selected temperature can be checked at any time by pushing the cooking selection switch. • At the end of the cooking cycle the time display will flash vertical segments (raindrops) and a buzzer sounds. When it is safe to open the door the cooking time will flash. The settings return to the previous cycle ready for the next operation. • When the door interlock pin (if fitted) has retracted, turn the door lever to upper position and carefully open the door. 78 DANGER: The door, interlock switch housing, cooking chamber, food products and the residual steam still escaping are very hot. Use suitable protective clothing, insulated gloves and equipment. • Take the cooked products out of the chamber and leave the door open. 9.3.3 DOOR INTERLOCK DESCRIPTION OF OPERATION (OPTIONAL). The door interlock is not fitted to all models. When the electricity supply is switched ‘on’ to the Steam Cooker with no pressure in the cooking chamber the door interlock pin will be retracted allowing the door to be opened and closed. When a cooking cycle is selected and the chamber door is closed the pressure in the chamber will increase. At a pressure of approximately 0.3 to 0.4 bar the door mechanism will lock. At the end of the cooking cycle the pressure in the cooking chamber will decay and at a value of approximately 0.3 to 0.4 bar the interlock pin will retract from the slotted cam allowing the door to be opened. INTERLOCK PIN SLOTTED CAM At the end of the day the door must left open before the electricity supply to the machine is switched off otherwise the door will be locked closed. The door interlock housing will become hot during use and this is normal. A caution hot label warns operators. 9.3.4 COOKING PROBE (OPTIONAL). The cooking probe enables the chef to cook by controlling the internal temperature of the product. The cooking probe is available as an optional extra. Please contact your local Hobart Sales office for more details. To operate the steam cooker in the cooking probe mode use the following procedure: • Select the probe mode by pressing the atmospheric selection key twice. • The ‘Blue chicken’ indicator illuminates on control panel. • Select the required cooking temperature (50 to 99°C) using the up and down switches. Open the cooking chamber door and place the product into the chamber then insert the probe so that the tip is in the centre of the food product. Press the start switch to commence the cooking cycle. The product is automatically cooked to the selected temperature therefore a time selection cannot be entered. • • • 79 • • • When the food product reaches the preset temperature the cooking cycle automatically stops. At the end of the cooking cycle the time display will flash vertical segments (raindrops) and a buzzer sounds. When it is safe to open the door the cooking time will flash. The settings return to the previous cycle for the next operation. Carefully withdraw the probe and remove the product from the cooking chamber. Note: The cooking probe must be returned to the holder when not in use. 9.3.7 TURNING OFF THE STEAM COOKER. To turn off the steam cooker at the end of the day or cooking session use the following procedure. • • • 9.4 Press the ‘I/O’ switch. After 10 seconds the blue I/O lamp and the timer rain drops will flash. The steam cooker can be switched ‘on’ again during the 10 second delay. After 10 seconds the drain down cycle commences. COOKING HINTS AND TIPS. 9.4.1 AUTOMATIC PRE-HEAT. The cooking time will remain the same irrespective of the quantity or product temperature. For example, whether cooking 1 or 30 portions of peas, from frozen or ambient temperature, the cooking timer setting is the same. The automatic pre-heat/ defrost cycle will make the necessary time adjustment to heat the food product before the cooking cycle starts. Depending on the quantity of the product the automatic pre-heat cycle will extend the total cooking time by approximately 1.5 to 2 minutes. This extra time should not be added to the time set on the timer. To ensure quick and even cooking, the product should be placed on the perforated strainer pan, in the Bain Marie or perforated Bain Marie, without water. This will enable the steam to reach the product from all sides. 9.4.3 SEASONING. Using the HOBART dry steam cooker allows products to be cooked with little extra seasoning because more natural vitamins, nutrients and mineral salts are retained in the food product compared to boiling in water, or cooking in a steamer using normal wet steam. 9.4.4 VEGETABLES Peas, carrots, green beans etc. can either be seasoned before or after cooking. Potatoes are best when sprinkled with salt, or soaked in salt water, 15 minutes before cooking. 80 To enhance their flavour vegetables can be sprinkled with seasoned butter, or stock, after cooking and just prior to serving. IMPORTANT. The juices left in the container after cooking are full of flavour and goodness, and should be used, either by pouring over the product prior to serving, or in an accompanying sauce. 9.4.5 MEAT. When cooking ragout or stews, a bouquet garni added to the meat will improve the flavour. 9.4.5 FISH, SHELLFISH, ETC. Fish for poaching can be cooked in the bottom of a Bain-Marie pan and covered with a little stock, marinade or wine and/or other garnish or flavouring as required. The resulting stock, which is full of flavour, can be utilised to accompany the dish. Delicate fish should be covered with a cloth or greaseproof paper. TABLE 1. SUGGESTED COOKING TIMES AND PRESSURES. Product Comment Cooking time at full power Product Comment Cooking time at full power Vegetables Artichoke Whole 8 minutes Shell Fish Lobster (Depending on size) (Depending on Size) Fresh Fresh 5 Minutes Artichoke Heart 4 minutes Crabs Aubergine Beans Beans Brussel Sprouts Brussel Sprouts Cabbage Cabbage Carrots Sliced Fresh Frozen Fresh 45 Seconds 30 Seconds 40 Seconds 1 minute Mussels Prawns 40 seconds 35 Seconds Frozen 1.50 Minute Fish Fillets /Cod Portions 2 Minutes Pieces Sliced Baton 45 Seconds 20 Seconds 40 Seconds Halibut Portions 1.50 Minutes Cauliflower Cauliflower Celery Root Celery Root Heads Florrettes Pieces Diced 1.50 minutes 45 Seconds 1.30 Minutes 1 Minute Sole Salmon Eel Fillets Portions Pieces 1.50 Minutes 1.50 Minutes 2 Minutes Chicory Chicory Halves Pieces 20 Seconds 40 Seconds Fennel Halves 50 Seconds 3 -4 Fish Meat Brisket (Depending on size and quality) Brisket 81 35-60 15 – 30 Minutes Product Comment Kohlrabi Sliced/Diced Leeks Leeks Mushrooms Mixed Veg Pieces Sliced Frozen 1.30 Minute 1 Minute 30 Seconds 40 Seconds Mixed Veg Fresh 40 Seconds Macaroni Onions Slices (blanched) Fresh Frozen (Pre-soak, cook covered with water Sliced Quartered Diced/Sliced Tinned Fresh Frozen 15 Seconds Rice 20 Seconds 25 Seconds 10-15 Minutes Spaghetti Peas Peas Peas -dried Peppers Potatoes Potatoes Potatoes Spinach Spinach (break into small pieces) Tomatoes Zucchini Sliced (to blanch) Cooking time at full power 1 Minute Product Comment Chicken (Depending on Size) Chicken Breast Pasta and rice Noodles Legs 6-7 Minutes Perforated tray Perforated Tray Perforated Tray 15 – 20 seconds 15 seconds 15 sec 15 Seconds Eggs 45 seconds 8-10 Minutes 3 Minutes 4 Minutes 10 Seconds 1 Minute Soft Boiled Hard Boiled Poached Scrambled 15 Seconds 35 Seconds Apples Apples 3 Minutes 6 Minutes 2 Minutes 1-2 Minutes Fruit (Depending on size) Pears Peaches Plums Strawberries/ Raspberries 10. Cooking time at full power 8 – 10 Minutes Whole Pieces 3-5 Minutes 1 Minute Frozen Frozen 3-5 Minutes 2-3 Minutes 1.5 Minutes 1 Minutes AFTER COOKING. • Close the cooking chamber door. • Press the ON/OFF switch. After a 10 second time delay (during which the drain down cycle can be stopped) the ON /OFF light flashes to indicate a drain down cycle is in process. The pressure reduces and the boiler drains automatically. When the ON/Off lamp switches off: • Open the cooking chamber door. • Isolate the water supply • Switch off main electrical isolator switch. 82 10.1 DAILY CLEANING. The steam cooker must be cleaned at the end of every day or cooking session as follows: DANGER: The door, interlock switch housing, cooking chamber, food products and the residual steam still escaping are very hot. Use suitable protective clothing, insulated gloves and equipment. Remove the pan rails as described in section 10.2. Clean the machine and cooking chamber with a mild detergent solution then rinse thoroughly and dry. Clean the strainer at the bottom front of the cooking chamber of food remains using a stiff brush. To rinse the internal drain pipe, slide in a pan filled with ice and defrost with pressure. Do not use high pressure cleaning equipment. Do not use SCRATCHPADS or any detergent containing chlorides. On the 305GH and 305TH models the pan rails must be removed and cleaned in a dishwasher. Caution! If the strainer at the front of the cooking chamber becomes blocked, hot water will leak from the chamber when the door is opened. 10.2 REMOVING THE PAN RAILS. Key hole slot Location slot • • • The pan rails are designed to be are easily removed for cleaning. Each pan rail is secured in the cooking chamber by four ‘T’ shaped lugs. To remove and replace the pan rails use the following procedure: Open the door and allow the cooking chamber and pan rails to cool to a safe handling temperature. If necessary wear heat protective gloves before attempting to remove. Lift the pan rail up to disengage the upper key holes from the lugs and hinge towards the centre of the cooking chamber. Lift the pan rail off the lower lugs and withdraw from the cooking chamber. To replace the pan rail use the following procedure. Be careful the pan rails are ‘handed’. It is important the closed end of the rail is positioned to the back of the cooking chamber. • Insert the pan rail into the cooking chamber. • Fit the lower location slots over the lugs and then lift the pan rail key hole slots on to the upper lugs. • Lower the pan rail and ensure it is correctly positioned and secure. 83 11 DESIGN AND CONSTRUCTION DATA. The data listed in table 2 applies to the Steam Cooker pressure system designed and manufactured by Hobart Manufacturing UK, with reference to the Health and Safety statutory instruments No 2169 for pressure Vessels in the UK. 12 TABLE 2. TECHNICAL INFORMATION. Description Units 205GH Number of cooking chambers 1 305GH, 305TH, 2228H 1 (305G & 305T), 2 (2228) GN ½ -100mm GN 1/1 –100mm (305G & 305T), 2 x GN ½ -100mm (2228) 400 650 (305G & 305T), 800 (2228) 7 20 (305G & 305T) 7 x 2 (2228) 0, 0.5 and 1.0 380-415/50 380-415/50 Gastro norm pan size Servings per hour (approximate) Maximum cooking capacity kg Cooking pressure Rated voltage range 3 phase plus neutral Full load current at rated voltage 400 volts, 3 ph+N Recommended fuse size 400v/3 ph plus neutral/50Hz Minimum and maximum ambient temperature Minimum and maximum water inlet temperature Boiler steam capacity Boiler total capacity Steam output at 1.0 Bar g Cycle time start up from cold and empty (ready to cook/full load). Cycle time drain down Typical energy consumption (for potatoes with a cook cycle time 7 minutes) Water consumption for above cooking cycle (cooking and condensate water) Energy consumption when in standby mode (ready to cook) Energy consumption (initial start up from cold and empty) Steam temperature (nominal) Drain connection size Drain capacity (minimum) Water inlet (required) to BS2779 Bar g Volts/Hz kW/ Amps amps 17.8/25.8 26.7/38.7 35 50 o C +5 to +45 +5 to +45 o C +5 to +25 +5 to +25 Litres Litres Kg/hr Minutes 6 17 30 9 6 17 45 9 Minutes kWh/(kg) 4 0.4 kWh potatoes) Litres kWh 3.25 (0.25 6.6 (2.3 cooking, 4.3 cooking, 3 condensate) condensate) 0.20 0.20 kWh 1.6 1.6 o 117 1” 5.0 117 1” 5.0 G3/4A G3/4A C BSP M Litres/ minute connection BSP 84 4 (2kg 1.6 kWh potatoes) (12 kg Description Minimum water flow rate at pressure range stated below (Treated supply to boiler). Minimum water flow rate at pressure range stated below (Condensate drain). Water inlet pressure Class of appliance Enclosure IP rating Wiring terminal size Electrical cable entry gland size Equi- potential secondary earth bonding connection Height adjustment range Length of external water inlet hose (recommended) Noise level Weight (machine empty) Units Litres/ minute 205GH 2.5 305GH, 305TH, 2228H 2.5 Litres/ minute 5.0 5.0 Bar g 1.7 to 10 Class I IP33 16 25 (Pg29) M8 1.7 to 10 Class I IP33 16 25 (Pg29) M8 mm mm 15 to 35 1500 15 to 35 1500 dB (A) Kg ## ## Shipping weight kg 81 # mm2 mm less than 60 69 Shipping dimensions (including WxDxH pallet) cm Storage conditions. Temperature and humidity. Design pressure Pressure relief valve full flow pressure Hydraulic test pressure Boiler shell material Heating element Cooking chamber # 88x63.5x102 # less than 60 85 (305G) 98 (305T) 85 (2228) 89 (305G) 110 (305T) 89 (2228) 88x63.5x111.5 (305G) 116x108x107 (305T) 88x63.5x120 (2228) o C, % RH Bar g +5 to +55, 85 1.38 +5 to +55, 85 1.38 Bar g 1.3 1.3 Bar g 2.3 2.3 Stainless steel grade 1.4404 Incoloy Stainless steel grade 1.4301 and 1.4404 In accordance with EN60335-1. Refer to section 4.3. ## In accordance with EN-ISO 11202. 85 FIGURE 3. 205GH INSTALLATION DIMENSIONS. FIGURE 4. 305GH INSTALLATION DIMENSIONS. 86 FIGURE 5. 305TH INSTALLATION DIMENSIONS. FIGURE 6. 305TH STACKED INSTALLATION DIMENSIONS. 87 FIGURE 7. 2228H INSTALLATION DIMENSIONS. 13.0 INSTALLATION. 13.1 UNPACKING AND HANDLING. Wherever possible transport the Steam Cooker to the installation position in the packaging provided to avoid damage. Do not use a sharp knife to cut into the packaging as damage to the machine may occur. Check for possible shipping damage. If the unit is found to be damaged, save the packaging material and contact your nearest Hobart sales office. Caution: The Steam Cooker is a heavy object and must be correctly handled and lifted to avoid personal injury. With the machine in the vicinity of its final position remove the packaging and lift the machine from the transportation pallet. Care must be taken during this operation to ensure: e) All required safety measures are taken to ensure correct lifting and handling to avoid risk of injury through dropping, falling and tilting. f) No damage occurs to the machine that could impair the normal operation. 88 13.2 LOCATION. The Steam Cooker is not suitable for outdoor installation and must not be installed where a water jet could be used for cleaning. The Steam Cooker must only be operated by trained staff and must be installed in an area where the use and maintenance is restricted to trained personnel. The Steam Cooker must be installed on a horizontal flat surface level to a minimum of 1mm in 1 metre side to side and front to back. Select a suitable flat level surface that can support the weight of the appliance and contents when full (refer to Table 2 for weights and dimensions). In areas where stability may be an issue, the machine should be secured in position. When operating, the appliance will produce steam and water vapour. Ensure any fixtures and fittings adjacent to the machine are adequately protected to prevent any damage from spillage or condensation. The Steam Cooker must not be installed in any areas subject to frost. Important! Ensure there is sufficient space around the Steam Cooker to enable safe operation. Servicing may be more difficult because of reduced clearances and you should always check that equipment specifications permit the close proximity of other equipment. Refer to figure 3, 4, 5, 6 or 7 for the overall dimensions of the Steam Cooker. Service access is required to the front, rear, sides and top of the appliance. Minimum distances are: 100-mm sides and rear, 600 mm over the top. The machine vents steam from the top left-hand rear corner. It is recommended an extraction fan or hood be used to vent any steam from the kitchen area. 13.2.1 BENCH MOUNTED. If the machine is to be located onto an existing tabling/bench ensure it is suitable for the weight and size for safe installation. The steam cooker must be secured to the bench (the adjustable foot can be used). A 26 to 28 mm diameter hole is required for each foot. 13.2.2 DEDICATED STAND. Position the stand in its correct location. Carefully tilt the steam cooker (more than one person’s function) and remove the adjustable foot insert. Lift the machine onto the stand and align. Screw the rear feet inserts through the stand into the machine. Slide the plinth between the Steam Cooker and top of the stand locating the back slots in the plinth onto location studs on top of the stand. Fix the plinth into position by screwing through the stand (front x 2) into the plinth to secure. 89 13.3 INSTALLING THE STEAM COOKER. Place the appliance on a stand designed to support the full weight of the machine. Adjust the height to suit the counter. Ensure that the service connections align with the holes in the counter or stand. The steam cooker may now be connected to the appropriate water, drain and electricity supplies. 13.4 ELECTRICAL INSTALLATION. The electrical installation of the Steam Cooker must be in accordance with the regulations for electrical equipment. This appliance must be earthed. A competent person must carry out the electrical installation. The technical data shown in table 2 details the electrical requirements for the various electrical supply options. The Steam Cooker is a ‘class I’ appliance where the protection against electric shock does not rely solely on basic insulation. An external electrical isolator and MCB/fuses (both items supplied by others) must be fitted to the incoming electrical supply to the Steam Cooker in an easily accessible and damp free position. In addition a 30mA residual current device is strongly recommended to provide extra protection. Check that the impedance of the earth circuit is safe and operating at the correct value. The machine must be equi-potentially bonded. The earthing screw is situated on the lower surface of the base frame and is identified by the symbol shown on the right. Note: The electrical supply cable must of suitable rating for the electrical supply and ambient temperature. Check the earth bonding resistance is less than 0.1Ω and the insulation resistance is greater than 2 MΩ. 13.5 ELECTRICAL CONNECTION. Refer to the warning labels fitted to the machine and the wiring diagram adhered to the inside of the side panel of the Steam Cooker. The machine is configured for a 400 volt, 3 phase plus neutral electrical supply. 13.5.1 ELECTRICAL SUPPLY CABLE CONNECTION PROCEDURE. 11. 12. 13. 14. Select the flexible supply cable to suit the required electrical load (refer to table 2 for current and power values). Remove the right hand side panel by removing the two front screws. Route the cable through the compression gland and connect to the correct positions on the connector block and tighten the screws (refer to the wiring diagram situated on the inside surface of the right hand side panel supplied with the appliance). Ensure all electrical connections within the machine are secure prior to switching on the electrical supply (to ensure no connections became loose during transit). 90 15. This appliance must be earthed. The mains earth terminal is located and identified within the electrical cabinet (mains terminal block) with an external earth bonding connection at the rear of the machine base frame. 13.5.2 SETTING THE ELECTRICAL LOAD. The steam cooker is fitted with a switch that enables the power/electrical current to be reduced. The 205GH can be operated on a 9 or 18 kW electrical load. The 305GH, 305TH and 2228H can be operated on an 18 or 27 kW electrical load. A rocker switch located on the internal control panel must be set to the desired position. The factory default is the maximum power setting. The software parameter C16 value must be set for the appropriate model of steam cooker and power option selected. This value must only be adjusted by an authorised technician. Model Electrical load 305GH, 305TH & 2228H 305GH, 305TH & 2228H 205GH 205GH 27kW 18kW 18kW 9kW 13.6 Set rocker switch to: Max Min Max Min Set C16 to: 1 2 2 3 WATER SUPPLY. The installation must conform to the requirements of the local water authority and be carried out by an authorised technician. The Steam Cooker has two water inlet connections:1 Steam generator supply. 4 Steam condense supply. 13.6.1 WATER SUPPLY QUALITY. If the Steam Cooker is installed in an area where the water supply exceeds a 5o Clark hardness value (equivalent to 60-ppm total hardness (CaCO3)) then a suitable water treatment unit must be installed and regularly maintained to eliminate scale build up. Ensure the water supply pressure to the water treatment unit complies with the manufacturers requirements. For details of recommended water treatment units please contact your local Hobart Sales office. 13.6.2 WATER SUPPLY FOR COOKING. The water supply pressure must be between 1.7 and 10 bar g when supplying a minimum flow rate detailed in table 2 and at an inlet temperature between 5 and 65oC. If a water filter is installed in the supply to the Steam Cooker ensure there is adequate water pressure available at the required flow rate. Some water filters require a minimum pressure in excess of 2 bar g (30 psi g). Table 2 details the water supply requirements to the boiler. 91 13.6.3 WATER SUPPLY TO CONDENSE STEAM. There are no special water quality requirements to the Condenser inlet. The water supply pressure must be between 1.0 and 10 bar g when supplying a minimum flow rate detailed in table 2 and at an inlet temperature between 5 and 25oC. 13.7 WATER CONNECTION REQUIREMENTS. A manual shut off valve must be installed to the water supply line in an accessible position adjacent to the Steam Cooker and must terminate with a ¾” BSP male fitting. A suitable hose with ¾” BSP fittings must be used for both water supplies. A water inlet hose is available from Hobart, part number 01-240316-001. The water connection points are located at the rear, right hand side under the appliance when viewed from the front. Identification labels indicate the orientation of the connections. Care must be taken to ensure the flexible water supply hoses are correctly routed and not crushed when the machine is pushed into position. If the hose is routed through the counter or tabling all sharp edges and burrs must be removed and a suitable grommet fitted. Ensure there is free length of hose to enable the Steam Cooker to be withdrawn if necessary for servicing. Before connecting the Steam Cooker, the water supply line must be checked to ensure it is free from any foreign matter and flushed out if necessary. It is recommended a water supply pressure gauge (0 to 10-bar g) be installed close to the Steam Cooker. 13.8 DRAIN CONNECTION REQUIREMENTS. The drain connection is location at the rear left hand corner when viewed from front. The connection size is 1” BSP. The drain pipework and fittings must be manufactured from copper or heat resistant plastic (typically 100°C). The waste pipe must be directed to an open floor drain or tun dish and connected to a drainpipe. The pipework must be unrestricted and have a suitable ‘fall’; it must not be connected into other pipework or be of excessive length. A drain trap must be fitted down stream of the tun dish. The drain system must be capable of operating with a minimum flow rate of 5 litres/minute. WARNING! Awareness must be made that the steam cooker is fitted with a pressure safety valve that vents to drain in case of component failure. The steam vents into the condensate system fitted inside the appliance. The safety valve vents at 1.3 bar pressure and caution must be taken to avoid contact with steam to avoid scalding. 92 14.0 COMMISSIONING INSTRUCTIONS. This Steam Cooker is only for professional use by suitably trained persons. Ensure operators have read and understood this manual and have received adequate training. 14.1 COMMISSIONING. The Hobart high-pressure steam cooker operates automatically. Turn on the water supply and check for leaks. Switch on the electricity supply. Follow the procedure given in section 9. 15. MAINTENANCE. In spite of the use of treated water, we recommend a complete inspection of the unit every 1000 hours of operation or every 6 months whichever comes first. (The hours of operation are displayed each time the steam cooker is turned on). This inspection will involve checking all seals and joints on the steam generator, cooking chamber and pipe work. 15.1 PRESSURE SAFETY VALVE MAINTENANCE. At least once a month test the pressure safety valve. To test: turn the knurled nut anti-clockwise until pressure escapes to drain, then turn the knurled nut clockwise until the valve re-seats. Warning: The pressure relief valve will be very hot. Use insulated gloves. 16 FAULT FINDING SUMMARY. 16.3 DEFAULT CODES. In the event of a fault occurring with the machine a series of default codes are displayed to identify the relevant problem. A brief summary of the fault codes are given below. • • • • • • • • • • dEF2 and dEF7 incorrect steam generator/boiler drain down fault. dEF3 steam generator/boiler taking too long to fill. dEF5 water supply failure to steam generator/boiler. dEF8 steam generator/boiler over filling. dEF 9 during the cooking cycle the steam generator/boiler did not re-fill with water. The float switch should be checked. dEF10 steam generator/boiler is over heating. dEF11 cooking chamber (number 1) temperature probe fault. dEF12 cooking chamber (number 1) drain valve fault. dEF13 refers to an internal food probe disconnection or failure. The food probe option is a non-standard. dEF21 cooking chamber (number 2) temperature probe fault (applicable to the 2228). 93 • dEF22 cooking chamber (number 2) drain valve fault. If a fault can not be rectified call the Hobart Service department. 16.2 FAULT FINDING. TABLE 3. Fault Possible cause Machine fails to Main supply fuse or MCB blown energise. Blown control circuit fuse Machine still fails to operate Machine fails to Water supply fault fill 17.0 Remedy Check and replace faulty fuse/re-set MCB Check and replace faulty fuse Call local Hobart service centre. Check the water supply is connected and turned on. Check water supply pressure and flowrate comply with values in table 2. SUMMARY OF COMMON SPARE PARTS. TABLE 4. Description Boiler service exchange (new) Boiler service exchange (refurbished) Cam Contactor Contactor Connector-2 into 1 water inlet Double check valve Drain strainer-cooking chamber EPROM Filter-line Float switch –air gap Gastro norm pan ½ x 100mm deep Gastro norm pan 1/1x65 mm deep Heating element Hose –flexible boiler drain Hose –flexible boiler drain Hose –flexible boiler drain Hose –flexible boiler to cooking chamber Hose –flexible boiler to cooking chamber Hose –flexible boiler to cooking chamber Hose –flexible boiler to pressure relief valve Hose –flexible cooking chamber drain Part number 00-739365-1 00-739365-2 737059 00-739266-3 00-740618-3 00-895401-44 143450 174648 737399-15 737324 737522 141502 Quantity per model 205GH 1 1 305GH 1 1 305TH 1 1 2228H 1 1 2 2 2 2 2 2 2 1 1 1 1 1 1 1 1 1 1 1 1 1 1 2 1 1 1 2 2 2 3 3 2 1 1 1 1 1 1 1 142450 00-739320 00-739291-2 00-739182-1 00-739182-2 00-739183-1 3 3 1 1 1 1 1 00-739283-1 1 00-739283-2 1 00-739309 1 00-739181-1 94 1 1 2 Description Part number 205GH Hose –flexible cooking chamber drain Hose water inlet Housing –level control Knob-control Motor -valve Nozzle steam injection cooking chamber O ring cooking chamber outlet O ring door seal O ring door seal O ring level control O ring-heating element Pan rails left hand side Pan rails right hand side PCB-power/relay PCB-touch panel PCB-touch panel 2nd chamber Piston pump Pressure gauge Single check valve Strainer plate Strainer plate Strainer plate Switch -level control Temperature probe-boiler Temperature probe-cooking chamber Temperature probe-cooking product Temperature probe-cooking product Vacuum breaker Valve assembly-motorised Valve assembly-motorised boiler drain Valve assembly-motorised cooking chamber Valve body Valve-condense water solenoid 5 lpm Valve-fill water solenoid 2.5 lpm Valve-safety Valve-steam inlet 00-739291-1 01-240316001 00-739072 737121 233979-1 323273 OS-E-1-3 276903-12 323167-10 OS-E-1-45 00-738620 737351 737352 737003 00-740558 00-740571 00-739631 00-739068 297498-1 173055-2 170054-2 173055-1 00-739324 00-737831 737006 Quantity per model 305GH 305TH 2228H 1 2 2 2 2 1 2 1 1 2 1 1 2 1 1 2 2 1 1 1 1 1 2 1 1 3 1 1 1 1 1 1 3 1 1 1 1 1 1 1 2 1 1 1 2 1 3 1 1 1 1 1 1 1 1 1 00-738428-1 00-738428-2 1 3 1 1 1 1 1 1 2 1 1 1 1 1 1 1 1 1 1 1 1 1 297536 737063-999 00-739190-3 2 1 2 1 2 1 2 2 1 00-739190-2 1 1 1 1 323314-11 00-738728-2 2 1 2 1 2 1 2 1 00-738728-1 169556 173863 1 1 1 1 1 1 1 1 1 1 1 2 95 18.0 SERVICE CONTACTS. Hobart trained service technicians strategically located at the listed Hobart branches are prepared to give you fast, efficient and reliable service. Protect your investment by having a Hobart inspection contract, which assures the continued, efficient operation of your Hobart machines, spares and accessories. For further details contact:SALES, SERVICE AND SPARES: 0844 888 7777 Continued product improvement is a Hobart UK policy, specifications may change without notice. Hobart UK Southgate Way Orton Southgate Peterborough PE2 6GN Tel: 0844 888 7777 E-mail : [email protected] www.hobartuk.com 96