1
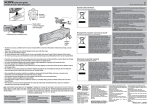
EOS
LESEN SIE SICH DIESE
BEDIENUNGSANLEITUNG VOR DEM
GEBRAUCH DER EOS
SORGFÄLTIG DURCH.
EOS
LISEZ CE MANUEL DANS SON
INTÉGRALITÉ AVANT
D’UTILISER L’EOS.
EOS
LEA DETENIDAMENTE ESTE
MANUAL ANTES DE MANIPULAR
LA EOS
EOS
LEIA ESTE MANUAL
COMPLETAMENTE ANTES DE
UTILIZAR O EOS
EOS
Quick Start Manual
– Die EOS ist kein Spielzeug.
– L’EOS N’EST PAS UN JOUET.
– LA EOS NO ES UN JUGUETE.
– O EOS NÃO É UM BRINQUEDO.
– DER FÄLSCHLICHE GEBRAUCH DER EOS KANN ZU ERNSTHAFTEN VERLETZUNGEN ODER TOD FÜHREN.
– UNE UTILISATION INCORRECTE DE L’EOS PEUT CAUSER DES BLESSURES GRAVES, VOIRE MORTELLES.
– UN USO INADECUADO DE LA EOS PODRÍA PROVOCAR LESIONES GRAVES O INCLUSO LA MUERTE.
– A UTILIZAÇÃO INCORRECTA DO EOS PODERÁ ORIGINAR GRAVES FERIMENTOS OU MESMO A MORTE.
– DER SPEZIELL FÜR DEN GEBRAUCH MIT PAINTBALLS KONZIPIERTE AUGENSCHUTZ MUSS DER ASTM-SPEZI
FIKATION F1776 ENTSPRECHEN UND IST VOM SCHÜTZEN UND ALLEN PERSONEN IN REICHWEITE DER EOS
ZU TRAGEN.
– UNE PROTECTION OCULAIRE SPÉCIALEMENT CONÇUE POUR L’ACTIVITÉ DE PAINTBALL ET CONFORME À LA NORME ASTM F1776 DOIT ÊTRE UTILISÉE PAR L’UTILISATEUR ET TOUTE PERSONNE SE TROUVANT DANS LE RAYON DE PORTÉE DE L’EOS.
– TANTO EL USUARIO COMO CUALQUIER PERSONA QUE SE ENCUENTRE DENTRO DEL ALCANCE DE LA EOS DEBERÁ LLEVAR PROTECCIÓN OCULAR DISEÑADA ESPECÍFICAMENTE PARA SU USO EN PAINTBALL, LA CUAL DEBERÁ CUMPLIR CON LA NORMA F1776.
– A UTILIZAÇÃO DE PROTECÇÃO OCULAR ESPECIFICAMENTE CONCEBIDA PARA O PAINTBALL DEVERÁ RES
PEITAR A NORMA F1776 DA ASTM E DEVERÁ SER UTILIZADA PELO UTILIZADOR E QUALQUER OUTRA PESSOA DENTRO DO ALCANCE DO EOS.
– TRAGEN SIE BEIM AUSEINANDERNEHMEN DER EOS ODER BEI WARTUNGSARBEITEN STETS AUGENSCHUTZ.
– PORTEZ UNE PROTECTION OCULAIRE PENDANT LE DÉMONTAGE ET L’ENTRETIEN.
– LLEVE TAMBIÉN PROTECCIÓN OCULAR DURANTE EL DESMONTAJE O EL MANTENIMIENTO.
– UTILIZE PROTECÇÃO OCULAR DURANTE A DESMONTAGEM OU A MANUTENÇÃO.
– SMART PARTS EMPFIEHLT DEN VERKAUF DER EOS NUR AN PERSONEN ÜBER 18 JAHREN.
– SMART PARTS RECOMIENDA VENDER LA EOS ÚNICAMENTE A PERSONAS CON MÁS DE 18 AÑOS.
– A SMART PARTS RECOMENDA QUE O EOS SEJA VENDIDO APENAS A PESSOAS A PARTIR DOS 18 ANOS.
– LESEN SIE SICH DIE BEDIENUNGSLANLEITUNG VOR DEM GEBRAUCH DER EOS SORGFÄLTIG DURCH.
– SMART PARTS RECOMMANDE QUE LA VENTE DE L’EOS SOIT RÉSERVÉE À DES PERSONNES ÂGÉES D’AU MOINS 18 ANS.
– LEA DETENIDAMENTE EL MANUAL DE LA EOS ANTES DE MANIPULARLA.
– LEIA COMPLETAMENTE O MANUAL DO EOS ANTES DE INICIAR A SUA UTILIZAÇÃO.
– BEHANDELN SIE JEDEN PAINTBALL-MARKIERER SO, ALS OB ER GELADEN WÄRE.
– LISEZ LE MANUEL DE L’EOS DANS SON INTÉGRALITÉ AVANT D’UTILISER LE PRODUIT.
– CUANDO MANIPULE UNA MARCADORA DE PAINTBALL, TRÁTELA COMO SI ESTUVIERA CARGADA.
– ENCARE QUALQUER MARCADOR DE PAINTBALL COMO SE ESTIVESSE CARREGADO.
– SCHAUEN SIE NIE IN DEN LAUF EINES PAINTBALL-MARKIERERS.
– TRAITEZ CHAQUE MARQUEUR DE PAINTBALL COMME S’IL ÉTAIT CHARGÉ.
– NO MIRE NUNCA POR EL CAÑÓN DE UNA MARCADORA DE PAINTBALL.
– NUNCA ESPREITE PELO TAMBOR DE UM MARCADOR DE PAINTBALL.
– LEGEN SIE DEN FINGER ERST DANN AN DEN ABZUG, WENN SIE SCHUSSBEREIT SIND.
– NE REGARDEZ JAMAIS DANS LE CANON D’UN MARQUEUR DE PAINTBALL.
– MANTENGA EL DEDO ALEJADO DEL GATILLO HASTA QUE ESTÉ LISTO PARA DISPARAR.
– MANTENHA O DEDO FORA DO GATILHO ATÉ QUE ESTEJA PRONTO A DISPARAR.
– ZIELEN SIE DIE EOS NIEMALS AUF ETWAS, DAS SIE NICHT ABSCHIESSEN MÖCHTEN.
– NE LAISSEZ PAS LE DOIGT SUR LA DÉTENTE TANT QUE VOUS N’ÊTES PAS PRÊT À TIRER.
– NO APUNTE NUNCA CON LA EOS A NINGÚN OBJETIVO AL QUE NO QUIERA DISPARAR.
– NUNCA APONTE O EOS A ALGO QUE NÃO PRETENDA ATINGIR.
– SICHERN SIE DIE EOS (POWER OFF), BIS SIE SCHUSSBEREIT SIND.
– NE POINTEZ JAMAIS L’EOS SUR UNE CIBLE SUR LAQUELLE VOUS NE VOULEZ PAS TIRER.
– MANTENGA LA EOS CON EL SEGURO PUESTO (APAGADA) HASTA QUE VAYA A DISPARAR.
– MANTENHA O EOS NO MODO DE SEGURANÇA (DESLIGADO) ATÉ QUE ESTEJA PRONTO A DISPARAR.
– WENN SIE NICHT SCHIESSEN, SICHERN SIE DIE MÜNDUNG MIT DER LAUFVERRIEGELUNG.
– MAINTENEZ L’EOS SUR LA POSITION DE SÉCURITÉ (ARRÊT) TANT QUE VOUS N’ÊTES PAS PRÊT À TIRER.
– ENTFERNEN SIE IMMER PAINTBALLS UND GAS AUS DER EOS, BEVOR SIE DAS GERÄT AUSEINANDERNEHMEN.
– MAINTENEZ LE DISPOSITIF DE BLOCAGE DU CANON SUR LA BOUCHE DE L’EOS LORSQUE VOUS NE TIREZ PAS.
– CUANDO NO ESTÉ DISPARANDO, MANTENGA EL DISPOSITIVO DE BLOQUEO DEL CAÑÓN EN LA BOCA DE
LA EOS.
– MANTENHA O DISPOSITIVO BLOQUEADOR DO TAMBOR NA BOCA DO EOS SEMPRE QUE NÃO ESTIVER
A DISPARAR.
– BEWAHREN SIE DIE EOS IM UNGELADENEN ZUSTAND UND OHNE GAS AN EINEM SICHEREN ORT AUF. DIES GILT AUCH FÜR DEN TRANSPORT DER EOS.
– RETIREZ TOUJOURS LES BILLES ET DÉGAZEZ L’EOS AVANT LE DÉMONTAGE.
– RETIRE SIEMPRE LAS BOLAS DE PINTURA Y EXTRAIGA EL GAS DE LA EOS ANTES DE PROCEDER
A DESMONTARLA.
– REMOVA SEMPRE AS BOLAS DE TINTA E TODO O GÁS ANTES DA DESMONTAGEM.
– GUARDE Y TRANSPORTE LA EOS DESCARGADA Y SIN GAS EN UN LUGAR SEGURO.
– RESPEITE TODOS OS AVISOS E INSTRUÇÕES DO FABRICANTE NO QUE DIZ RESPEITO A LIDAR COM A FONTE PROPULSORA, O ARMAZENAMENTO E O ENCHIMENTO.
– BEFOLGEN SIE SÄMTLICHE WARNHINWEISE UND ANLEITUNGEN DES HERSTELLERS ZUR HANDHABUNG, AUFBEWAHRUNG UND BEFÜLLUNG MIT DEM TREIBMITTEL.
– SUIVEZ TOUS LES AVERTISSEMENTS ET INSTRUCTIONS DU FABRICANT CONCERNANT LA MANIPULATION, LE STOCKAGE ET LE REMPLISSAGE DE GAZ PROPULSEUR.
– SCHIESSEN SIE NICHT AUF ZERBRECHLICHE GEGENSTÄNDE WIE FENSTERSCHEIBEN.
– NE TIREZ PAS SUR DES OBJETS FRAGILES, TELS QUE DES FENÊTRES.
– MESSEN SIE VOR DER VERWENDUNG STETS DIE GESCHWINDIGKEIT DER PAINTBALLS, DIE VON DER EOS ABGEFEUERT WERDEN, UND STELLEN SIE DIE GESCHWINDIGKEIT NIEMALS ÜBER 300 FUSS/S (91,44 M/S) EIN.
STATISTISCHE DATEN
Länge/Höhe/Gewicht (ohne Lauf und Untersatz):
IMPORTANT
Paintballs:
VITAL STATISTICS
Length/Height/Weight (Less barrel and bottomline):
Operating Pressure:
Paintballs:
8.4"/7.9"/2lb 3oz
Appox 250 to 280 psi max
.68 caliber – Compliant to ASTM F1979 Specification
Power Source:
9-volt alkaline battery
CO2 or Nitrogen/Compressed Air
Propellant:
Firing Mode:
Semi-Automatic, 3-Round Burst and Full-Automatic
Rate of Fire:
Up to 17bps – Higher with optional Blackheart upgrade
Operation:
While every effort has been made
to ensure that the information
contained in this guide is accurate
and complete, no liability can be
accepted for errors or omissions.
Smart Parts, Inc. reserves the right
to change the specifications of
the EOS at any time without prior
notice. The latest version of this
manual may be downloaded free of
charge at www.SmartParts.com.
21,33 cm/ 20,06 cm/1 kg
ca. 17,23 bis max. 19,30 bar
Kaliber 0,68 – entspricht der Spezifikation ASTM F1979
Stromversorgung:
9-Volt Alkalibatterie
CO2 oder Stickstoff/Pressluft
Treibgas:
Schussbetrieb:
Feuerrate:
Halbautomatisch, 3-Round Burst und vollautomatisch
Bis zu 17 Bps - höher mit dem optionalen Blackheart Upgrade
Betrieb:
Elektropneumatisch mit niedrigem Druck
Anti-Chop-System:
Break-Beam Infrarot-Vision
Gewinde:
Smart Parts (Impulse/Ion)
Schmiermittel: Für einen ordnungsgemäßen und gleichmäßigen Betrieb sollte für die EOS nur das Schmierfett SL33K verwendet werden.
Es wurden sämtliche
Anstrengungen unternommen, um
die Richtigkeit und Vollständigkeit
der in dieser Bedienungsanleitung
enthaltenen Informationen
sicherzustellen. Für Fehler oder
Auslassungen kann jedoch keine
Haftung übernommen werden.
Smart Parts, Inc. behält sich das
Recht vor, die Spezifikationen
für die EOS jederzeit und ohne
vorherige Ankündigung zu ändern.
Die neueste Version dieser
Bedienungsanleitung können Sie
kostenlos bei
www.SmartParts.com
herunterladen.
Longueur/Hauteur/Poids (moins le canon et la ligne de fond) :
21,3 cm (8,4 po)/20 cm (7,9 po)/0,9 kg (2 lb), 85 g (3 oz)
Pression de fonctionnement :
environ 1 723 à 1 930 kPa (250 à 280 psi) au maximum
Billes de peinture :
calibre 0,68 – conformes à la norme ASTM F1979
Source d’alimentation :
Smart Parts (Impulse/Ion)
800.922.2147 100 Station St. Loyalhanna, PA 15661 USA Schnelle Starthilfe, Version 1.0
pile alcaline de 9 V
CO2 ou azote/air comprimé
Gaz propulseur :
Mode de tir :
semi-automatique, rafale de 3 coups et automatique
Cadence de tir : jusqu’à 17 billes par seconde - plus avec l’option Blackheart
Fonctionnement :
– SIGA TODAS LAS ADVERTENCIAS E INSTRUCCIONES DEL FABRICANTE ACERCA DE LA MANIPULACIÓN, LA CONSERVACIÓN Y EL RELLENADO DE LA FUENTE DE PROPELENTE.
– NO DISPARE SOBRE OBJETOS FRÁGILES, COMO UNA VENTANA, POR EJEMPLO.
– MIDA SIEMPRE LA VELOCIDAD DE LAS BOLAS DE PINTURA DISPARADAS POR LA EOS ANTES DE USARLA Y NO LA CONFIGURE NUNCA PARA DISPARAR POR ENCIMA DE 300 PPS (91,44 M/S).
ESTADÍSTICAS
IMPORTANT
CARACTÉRISTIQUES GÉNÉRALES
Si bien se ha hecho todo lo posible
para garantizar que la información
incluida en esta guía sea precisa
y completa, no podemos asumir
ninguna responsabilidad por
errores u omisiones. Smart Parts,
Inc. se reserva el derecho a
modificar las especificaciones de
la EOS en cualquier momento y sin
previo aviso. Puede descargar la
última versión de este manual de
manera gratuita en
www.SmartParts.com.
électropneumatique basse pression
Système antichop :
Vision infrarouge à faisceau fractionné
Filetage du canon :
Smart Parts (Impulse/Ion)
Break-Beam infrared Vision
Barrel Thread:
CARACTÉRISTIQUES
Lubrifiant :
Low-Pressure Electropneumatic
Anti-Chop System:
Lubricant:
Betriebsdruck:
– MESUREZ TOUJOURS LA VÉLOCITÉ DES BILLES DE PEINTURE TIRÉES AVEC L’EOS AVANT L’UTILISATION ET NE RÉGLEZ JAMAIS LE TIR AU-DELÀ DE 91,44 M/S (300 PI/S).
WICHTIG
WESENTLICHE DATEN
STATISTICS
– RANGEZ ET TRANSPORTEZ L’EOS DÉCHARGÉ ET DÉGAZÉ DANS UN LIEU SÛR.
ESTADÍSTICAS PRINCIPALES
Longitud / altura / peso (menos cañón y parte inferior):
Presión de funcionamiento:
Bolas de pintura:
Calibre .68 – Cumple con la especificación ASTM F1979
Fuente de alimentación:
Batería alcalina de 9 voltios
CO2 o nitrógeno / aire comprimido
Propelente:
Semiautomático, ráfaga de tres disparos y totalmente automático
Modo de disparo:
Velocidad de disparo:
Hasta 17 bps – superior con la opción superior Blackheart
Funcionamiento:
800.922.2147 100 Station St. Loyalhanna, PA 15661 manuel d’utilisation rapide version 1.0
Si bien se ha hecho todo lo posible
para garantizar que la información
incluida en esta guía sea precisa
y completa, no podemos asumir
ninguna responsabilidad por
errores u omisiones. Smart Parts,
Inc. se reserva el derecho a
modificar las especificaciones de
la EOS en cualquier momento y sin
previo aviso. Puede descargar la
última versión de este manual de
manera gratuita en
www.SmartParts.com.
Electroneumático de baja presión
Rosca del cañón:
Lubricante:
8,4” / 7,9” / 2lb 3oz
Aprox. de 250 a 280 psi máx.
Sistema anti-rotura:
Pour obtenir un fonctionnement correct et régulier, l’EOS doit
uniquement être lubrifié avec de la graisse SL33K.
IMPORTANTE
– GUARDE E TRANSPORTE O EOS DESCARREGADO E SEM GÁS NUM LOCAL SEGURO.
– NÃO DISPARE CONTRA OBJECTOS FRÁGEIS COMO, POR EXEMPLO, JANELAS.
– MEÇA SEMPRE CUIDADOSAMENTE A VELOCIDADE DAS BOLAS DE TINTAS DISPARADAS PELO EOS ANTES DE O UTILIZAR E NUNCA O AJUSTE PARA DISPARAR ACIMA DOS 300FPS (91.44 M/S.)
ESTATÍSTICAS
IMPORTANTE
ESTATÍSTICAS ESSENCIAIS
Comprimento/Altura/Peso (Sem o tambor e parte inferior): “/ /7.9”/2lb, 3oz
Pressão de funcionamento:
Bolas de tinta:
Aprox. 250 a 280 psi máx.
.Calibre 68 – Compatível com a especificação ASTM F1979
Fonte de alimentação:
Pilha alcalina de 9 volts
CO2 ou Nitrogénio/Ar comprimido
Propulsor:
Modo de disparo:
Semi-Automática, Rajada de 3 Disparos e Totalmente
Automática
Velocidade de disparo:
Até 17 bps - Mais com extra Blackheart
Funcionamento:
Electropneumático de baixa pressão
Vision infrarroja de detección por rayos
Sistema anti-corte:
Visão infra-vermelhos Break-Beam
Smart Parts (Impulse / Ion)
Encaixe do tambor:
Pequenas peças (Impulso/Ião)
Para un funcionamiento correcto y sistemático, la EOS sólo se deberá lubricar con grasa lubricante SL33K.
Lubrificante:
800.922.2147 100 Station St. Loyalhanna, PA 15661 manual de inicio rápido versión 1.0
Apesar de terem sido feitos
todos os esforços possíveis para
garantir que as informações
presentes neste manual estão
correctas e completas, nenhuma
responsabilidade poderá ser
aceite em caso de erros ou
omissões. A Smart Parts, Inc.
reserva-se no direito de alterar as
especificações do EOS a qualquer
altura sem aviso prévio. A mais
recente versão deste manual pode
ser transferida gratuitamente a
partir de www.SmartParts.com.
Para um funcionamento consistente e correcto, o EOS deverá
ser apenas lubrificado com o fluído de lubrificação SL33K.
800.922.2147 100 Station St. Loyalhanna, PA 15661 manual de iniciação rápida versão 1.0
For proper and consistent operation, the EOS should
only be lubricated with SL33K lubricating grease.
800.922.2147 100 Station St. Loyalhanna, PA 15661 quick start manual version 1.0
EOS WARNINGS
READ THIS MANUAL THROUGHLY
BEFORE OPERATING THE EOS
VORBEREITUNG
01
BITTE SORGFÄLTIG LESEN
02
LAUFVERRIEGELUNG
– THE EOS IS NOT A TOY.
– MISUSE OF THE EOS MAY RESULT IN SERIOUS INJURY OR DEATH.
– EYE PROTECTION SPECIFICALLY DESIGNED FOR PAINTBALL USE MUST BE IN COMPLIANCE WITH ASTM SPECIFICATION F1776 AND MUST BE USED BY THE USER AND ANYONE WITHIN RANGE OF THE EOS.
– WEAR EYE PROTECTON DURING DISASSEMBLY OR MAINTENANCE.
– SMART PARTS RECOMMENDS THAT THE EOS ONLY BE SOLD TO PERSONS 18 AND OLDER.
– THOROUGHLY READ THE EOS MANUAL BEFORE OPERATING.
Schrauben Sie den mitgelieferten Lauf an die EOS. Schieben Sie
die mitgelieferte Laufverriegelung über den Lauf und sichern Sie die
Schnur möglichst weit hinten am Gehäuse der EOS und ziehen sie
sie fest. Die Laufverriegelung ist ein wichtiges Sicherheitszubehör für
Paintball-Markierer – fast genauso wichtig wie Paintball-Schutzbrillen. Die Laufverriegelung muss komplett auf der Laufmündung aufgesetzt
und mit dem angebrachten Riemen an Ort und Stelle gesichert sein,
wenn der Markierer aufbewahrt oder in einem Bereich bedient wird, in
dem Menschen oder Sachgegenstände nicht ordnungsgemäß durch
Paintball-Schutzbrillen bzw. Netze geschützt oder abgeschirmt sind.
– TREAT EVERY PAINTBALL MARKER AS IF IT WERE LOADED.
– NEVER LOOK DOWN THE BARREL OF A PAINTBALL MARKER.
– KEEP YOUR FINGER OFF THE TRIGGER UNTIL READY TO SHOOT.
– NEVER POINT THE EOS AT ANYTHING YOU DON’T WISH TO SHOOT.
– KEEP THE EOS ON SAFE (POWER OFF) UNTIL READY TO SHOOT.
– KEEP THE BARREL BLOCKING DEVICE ON THE EOS’S MUZZLE WHEN NOT SHOOTING.
– ALWAYS REMOVE PAINTBALLS AND DEGAS THE EOS BEFORE DISASSEMBLY.
PRÉPARATION
01
TREIBGAS
Die EOS ist kompatibel mit CO2 und Pressluft (HPA), die
beste Leistung wird jedoch mit HPA erzielt. Anschraubbare Pressluftsysteme und CO2-Flaschen werden in den
Air System Adapter (ASA, Luftsystemadapter) unten am
Griffstück der EOS eingeschraubt. Der Gebrauch mit CO2
funktioniert am besten mit einem Anti-Syphon-Tank oder
mit einem normalen Tank mit Schlauch. Schrauben Sie
die neue Flasche langsam ein, so dass sich das Ventil
langsam öffnet und der Druck nur allmählich und nicht
schnell und plötzlich ansteigt. Hinweis: CO2- und Pressluftflaschen werden leer verkauft und müssen vor der
Verwendung befüllt werden. Bei der Verwendung von CO2
werden Sie eventuell feststellen, dass gelegentlich etwas
Gas vom Regler aufsteigt. Das ist die normale Funktionsweise des Sicherheitsventils, das Ihren Markierer vor
flüssigem CO2 schützt.
Verwenden Sie in einem Pressluftsystem niemals
Reiniger oder Schmiermittel auf Erdölbasis. Verwenden
Sie nur die vom Hersteller empfohlenen Schmiermittel
und folgen Sie genau den Anweisungen des Herstellers.
VEUILLEZ LIRE ATTENTIVEMENT
02
OBTURATEUR DE CANON
Vissez le canon inclus dans l’EOS. Glissez l’obturateur de canon
inclus sur le canon et attachez-en la corde aussi loin en arrière que
possible sur le corps de l’EOS en serrant bien. L’obturateur du canon
est une pièce essentielle de l’équipement de sécurité du paintball,
presque aussi importante que les lunettes de sécurité pour paintball.
L’obturateur du canon doit être bien installé sur la bouche du
marqueur et bien attaché avec sa sangle chaque fois que le marqueur
est rangé ou manipulé dans une zone où les biens ne sont pas
adéquatement protégés par un filet de sécurité délimitant le terrain de
jeu et les personnes protégées par des lunettes de sécurité.
– STORE AND TRANSPORT THE EOS UNLOADED AND DEGASSED IN A SECURE PLACE.
– FOLLOW ALL MANUFACTURER’S WARNINGS AND INSTRUCTIONS FOR PROPELLANT SOURCE HANDLING, STORAGE, AND FILLING.
03
Die EOS ist ein leistungsstarker Markierer von
Turnierngüte. Das Breakbeam-Visionsystem ermöglicht die Verwendung eines
einfachen Schüttelhoppers
ohne Paintball-Chopping. Für maximale Feuerraten
ist die Verwendung eines
leistungsstarken Loaders
notwendig, der vorzugsweise mit einer Force-Feeding-Funktion ausgestattet
ist. Öffnen Sie den Feedneck des Markierers, indem
Sie den Verschlusshebel
am Q-förmigen Schloss des
Feednecks abziehen. Setzen
Sie dann den Loader ein
und sichern Sie ihn durch
Verriegeln des Hebels.
– DO NOT SHOOT FRAGILE OBJECTS SUCH AS WINDOWS.
– ALWAYS MEASURE THE VELOCITY OF PAINTBALLS FIRED BY THE EOS BEFORE USE, AND NEVER ADJUST TO FIRE ABOVE 300FPS (91.44 M/S.)
SETUP
01
PLEASE READ CAREFULLY
02
BARREL BLOCKER
Screw the included barrel into the EOS. Slide the included barrel
blocker over the barrel and secure its cord as far back on the EOS
body as possible, cinching it tight. The barrel blocker is a critical
piece of paintball safety equipment – nearly as important as paintball
goggles. The barrel blocker must be fully seated on the marker’s
muzzle and secured in place with its strap any time the marker
is stored or handled in an area where people or property are not
properly protected by paintball goggles or paintball field netting.
03
04
LOADER
The EOS is a high-performance tournament grade
marker. The break-beam
Vision system will allow it
to use a low-end hopper
without chopping paintballs. A high-performance,
preferably force-feeding
loader must be used to
achieve maximum rates
of fire. Open the marker’s
Q-Lock feedneck by pulling
the locking lever away from
the feedneck, then insert the
loader and secure it in place
by folding the lever back to
its locked position.
PROPELLANT GAS
The EOS is compatible with both CO2 and high pressure
compressed air (HPA,) though best performance will be
achieved with HPA. Screw-in style HPA systems and CO2
tanks are screwed into the Air System Adapter (ASA) on
the bottom of the EOS grip frame. For best performance
with CO2, use an anti-siphon tank, or a regular tank with
a remote hose. Screw the tank in slowly so that its valve
opens slowly, creating a gentle rise in pressure, rather
than a rapid pop. Note – CO2 and HPA tanks are sold
empty, and must be filled before use. When using CO2,
you may notice occasional bursts of gas released from
the bottom of the regulator. This is the normal function of
the relief valve protecting your marker from liquid CO2.
Never use oil or any petroleum based cleaner or
lubricant in an HPA system. Use only manufacturer
recommended lubricants, and strictly follow the
manufacturer’s instructions.
TURN POWER ON.
POWER BUTTON
Turn the marker on by pressing the
power button, and holding it in for a
full second. When the EOS turns on,
the power button will glow red. The
EOS is turned off by pressing and
holding power button for one second.
To conserve battery power, the EOS
will turn itself off if it is not fired for
more than 30 minutes. Pressing the
power button momentarily while the
EOS is on, will de-activate the Vision
anti-chop system, which is indicated
by the power button blinking.
Although the power button serves as the EOS’s safety switch to
prevent accidental firing, it should never be relied upon in place of a
barrel blocker and proper paintball eye protection.
[ CONTINUED ON BACK ]
04
LOADER
05
EINSCHALTEN DER STROMZUFUHR
EINSCHALTKNOPF
L’EOS est un marqueur
haute performance de
classe tournoi. Le système
Vision à faisceau fractionné
lui permet d’utiliser une
trémie bas de gamme et
d’éviter la casse des billes.
Un chargeur haute performance, à alimentation sous
pression de préférence,
doit être utilisé pour obtenir des cadences de tir
optimales. Ouvrez le goulot
d’alimentation Q-Lock du
marqueur en tirant le levier
de verrouillage à l’écart
du goulot d’alimentation,
puis insérez le chargeur et
maintenez-le en place en
repliant le levier en position
de verrouillage.
05
06
Geschwindigkeit steigern.
JUSTIERUNG DES ABZUGS
Die Länge des Abzugs an der
EOS kann justiert werden. Mit
einem 0,050-Zoll SechskantInbusschlüssel können Sie das
Spiel des Abzugs justieren,
d.h. wie weit sich der Abzug
nach dem Feuerungspunkt
noch weiter ziehen lässt.
Dazu befindet sich unten am
Abzug eine Justierschraube.
Mit einem 1/8-Zoll SechskantInbusschlüssel können Sie
einstellen, wie weit sich der
Abzug nach vorn bewegt,
nachdem er freigegeben
wurde. Diese Schraube
befindet sich dort, wo der
Abzugsschutz auf das
Griffstück trifft.
04
CHARGEUR
Der Einschaltknopf dient zwar auch als Sicherheitsschalter an der
EOS, um versehentliches Feuern zu vermeiden. Der Benutzer sollte
sich aber nie anstelle einer Laufverriegelung und eines sachgemäßen Augenschutzes hierauf verlassen.
EINSTELLEN DER GESCHWINDIGKEIT
Füllen Sie den Hopper mit
Paintballs und schalten Sie ihn
ein. Wenn Sie eine nach ASTM
zugelassene Paintball-Schutzbrille
tragen und sich in einem Bereich
befinden, in dem alle umstehenden
Personen geschützt sind, können
Sie die Laufverriegelung entfernen
und über einen Chronographen
feuern, um die Geschwindigkeit
zu messen. Mit einem 5/32-Zoll
Sechskant-Inbusschlüssel können
Sie unten am senkrechten Regler
die Geschwindigkeit/den Druck
durch Drehen im Uhrzeigersinn
erhöhen und durch Drehen im
Gegenuhrzeigersinn herabsetzen.
Feuern Sie nach jeder Justierung
drei- bis viermal, damit sich der
Gasdruck im Innern der EOS
stabilisieren kann. Fahren Sie
mit der Justierung fort, bis der
Markierer beständig innerhalb
Ihrer Feldbegrenzung feuert (aus
Sicherheitsgründen die EOS
niemals auf mehr als 300 Fuß (91 m)
pro Sekunde einstellen).
Sie schalten den Markierer ein,
indem Sie auf den Einschaltknopf
drücken und diesen eine Sekunde
lang niedergedrückt halten. Ist die
EOS eingeschaltet, leuchtet der
Einschaltknopf in Rot. Schalten
Sie die EOS aus, indem Sie den
Einschaltknopf eine Sekunde
lang niedergedrückt halten. Um
Batteriestrom zu sparen, schaltet
sich die EOS selbst aus, wenn sie
mehr als 30 Minuten lang nicht
gefeuert wird. Durch kurzes Drücken
des Einschaltknopfes, während die
EOS in Betrieb ist, wird das Vision
Anti-Chop-System abgeschaltet, was
durch Blinken des Einschaltknopfes
angezeigt wird.
03
01
GAZ PROPULSEUR
L’EOS est compatible avec le CO2 et avec l’air comprimé
haute pression, mais pour une performance optimale,
utilisez de l’air comprimé haute pression. Les systèmes
à air comprimé haute pression de style vissable et les
bouteilles de CO2 sont vissés dans l’adaptateur du
système pneumatique au bas du corps de poignée de
l’EOS. Pour une meilleure performance avec le CO2,
utilisez une bouteille antisiphon ou une bouteille standard
dotée d’un tuyau à distance. Vissez la bouteille lentement
de sorte que son robinet s’ouvre lentement, créant une
légère augmentation de pression, au lieu d’un claquement rapide. Remarque : Les bouteilles de CO2 et d’air
comprimé haute pression sont vendues vides et doivent
être remplies avant l’utilisation. Lorsque vous utilisez du
CO2, il est possible que vous notiez des bouffées de gaz
libérées au bas du régulateur. Il s’agit du fonctionnement
normal de la soupape de sécurité protégeant le marqueur
du CO2 liquide.
N’utilisez jamais de nettoyant ou de lubrifiant à base
d’huile ou de pétrole dans un système à air comprimé
haute pression. Utilisez uniquement les lubrifiants
recommandés par le fabricant et suivez avec soin les
instructions du fabricant.
02
Atornille el cañón que se incluye en la EOS. Deslice el bloqueador
por el cañón y fije el cable lo más atrás que sea posible sobre el
cuerpo de la Luxe, asegurándolo fuertemente. El bloqueador del
cañón constituye una pieza fundamental del equipo de seguridad
en el paintball, casi tan importante como las gafas de seguridad. El
bloqueador de cañón debe estar completamente asentado sobre la
boca de la marcadora y fijado con la cinta siempre que ésta se vaya
a guardar o a utilizar en una zona en la que haya personas u objetos
que no estén adecuadamente protegidos mediante gafas o redes de
campo de paintball.
03
BOUTON MARCHE/ARRÊT
LEA ESTA SECCIÓN DETENIDAMENTE
BLOQUEDOR DE CAÑÓN
04
CARGADOR
MISE SOUS TENSION
La EOS es una marcadora
de campeonato de alto rendimiento. El sistema Vision
anti-rotura le permitirá utilizar una tolva de gama baja
sin que se le rompan las
bolas de pintura. Si desea
alcanzar la máxima velocidad de disparo, deberá
utilizar un cargador de alto
rendimiento, preferiblemente
uno de alimentación forzosa. Abra el tubo de carga
Q-Lock de la marcadora
tirando de la palanca de bloqueo hacia fuera del tubo de
carga, inserte el cargador y
fíjelo devolviendo la palanca
a su posición de bloqueo.
Mettez le marqueur sous tension
en appuyant sur le bouton marche/
arrêt pendant une seconde entière.
Lorsque l’EOS se met sous tension,
le bouton marche/arrêt s’illumine en
rouge. Mettez l’EOS hors tension en
appuyant sur le bouton marche/arrêt
pendant une seconde. Pour conserver
la charge de la pile, l’EOS se met
automatiquement hors tension si
aucun tir n’a lieu pendant plus de
30 minutes. Appuyez sur le bouton
marche/arrêt momentanément alors
que l’EOS est sous tension pour
désactiver le système antichop Vision,
indiqué par le clignotement du bouton
marche/arrêt.
Bien que le bouton marche/arrêt serve d’interrupteur de sécurité
de l’EOS pour éviter les tirs accidentels, il ne doit jamais remplacer
l’utilisation de l’obturateur de canon et d’une protection oculaire
pour paintball adéquate.
06
RÉGLAGE DE LA VÉLOCITÉ
Remplissez la trémie de billes
et mettez-la en marche. Tout en
portant des lunettes de sécurité
conformes aux normes ASTM et
en vous tenant dans une zone
où les personnes présentes sont
protégées, retirez l’obturateur
de canon et effectuez un test au
chronographe pour mesurer la
vélocité. Utilisez une clé hexagonale
de 3,9 mm (5/32 po) sur le dispositif
de réglage au bas du régulateur
vertical, tournez dans le sens
des aiguilles d’une montre pour
augmenter la vélocité/pression
et dans le sens contraire des
aiguilles d’une montre pour la
réduire. Effectuez 3 ou 4 tirs après
chaque réglage pour permettre à la
pression gazeuse de se stabiliser
dans l’EOS. Réglez jusqu’à ce que
le marqueur tire des billes à une
vitesse uniforme dans les limites du
terrain de jeu (pour des raisons de
sécurité, ne réglez jamais l’EOS à
plus de 91,44 m/s [300 pi/s]).
AJUSTE
Augmentation de la vélocité.
05
01
GAS PROPELENTE
La EOS es compatible tanto con CO2 como con aire
comprimido de alta presión (HPA), aunque obtendrá un
mejor rendimiento con HPA. Los sistemas de HPA de y
depósitos de CO2 de acoplamiento se enroscan en el
adaptador del sistema de aire (ASA), situado en la parte
inferior de la empuñadura de la EOS. Para obtener un
mayor rendimiento con CO2, utilice un depósito antisifón
o uno normal con manga remota. Enrosque el depósito
lentamente de forma que la válvula se vaya abriendo
lentamente, lo que creará un ligero aumento de la presión
en lugar de un rápido “pop”. Nota – los depósitos de
CO2 y HPA se venden vacíos y hay que llenarlos antes de
utilizarlos. Si utiliza CO2, es posible que de vez en cuando
escuche estallidos de gas que se liberan desde la parte
inferior del regulador. Esto corresponde al funcionamiento
normal de la válvula de descarga que protege la marcadora del CO2 líquido.
No utilice nunca productos de limpieza ni lubricantes de
aceite o con base de petróleo en un sistema de HPA.
Use únicamente los lubricantes recomendados por el
fabricante y siga fielmente sus instrucciones.
AJUSTE DEL GATILLO
04
CARREGADOR
Encienda la marcadora pulsando y
manteniendo pulsado el botón de
encendido durante un segundo.
Cuando se encienda la EOS, el
botón de encendido se iluminará en
rojo. Para apagar la EOS, mantenga
pulsado el botón de encendido
durante un segundo. Para no
gastar batería, la EOS se apagará
automáticamente si no se dispara
en un periodo superior a 30 minutos.
Si pulsa el botón rápidamente con
la EOS encendida, se desactivará el
sistema Vision anti-rotura, lo cual se
indica por medio del parpadeo del
botón de encendido.
06
02
BLOQUEIO DO TAMBOR
O EOS é um marcador de
alto desempenho de categoria de otrneio. O sistema
de Visão Break-beam vai
permitir a utilização de um
depósito de bolas na parte
inferior sem cortar as bolas
de tinta. Um carregador de
alto desempenho, de preferência com force feed deve
ser utilizado para atingir o
máximo de disparos. Abra
o pescoço de alimentação Q-Lock do marcador
afastando a patilha de fecho
do pescoço de alimentação,
depois insira o carregador
e mantenha-o no lugar
dobrando a patilha até à sua
posição de fecho.
Si bien es cierto que el botón de encendido sirve como interruptor de seguridad de la EOS para evitar un disparo involuntario, en
ningún caso debe ser un sustituto del bloqueador de cañón y de
una correcta protección ocular para paintball.
AJUSTE DE LA VELOCIDAD
POR FAVOR LEIA CUIDADOSAMENTE
Enrosque o tambor incluído no EOS. Encaixe o bloqueio do
tambor incluído no tambor e prenda o seu fio o mais atrás possível
no EOS, apertando-o bem. O bloqueio do tambor é uma peça
essencial do equipamento de segurança do paintball – quase tão
importante quanto os óculos de paintball. O bloqueio do tambor
deve estar correctamente colocado na boca do marcador, e preso
com o respectivo fio, sempre que o marcador for armazenado ou
transportado numa área onde as pessoas ou os materiais não estão
adequadamente protegidos com óculos de paintball ou uma rede de paintball.
03
ENCIENDA EL APARATO
BOTÓN DE ENCENDIDO
CONFIGURAÇÃO
05
GÁS PROPULSOR
O EOS é compatível com CO2 e com ar comprimido de
alta pressão (HPA, High Pressure Air). Os sistemas HPA
de rosca e os depósitos de CO2 encaixam no Adaptador
de Sistema de Ar (ASA, Air System Adapter) na parte
inferior da estrutura do punho do EOS. Para um melhor
desempenho com CO2, utilize um depósito anti-sifão ou
um depósito normal com um tubo remoto. Enrosque o
depósito devagar de modo a que a válvula abra lentamente, criando um lento aumento da pressão e não
um rápido estouro. Nota – os depósitos de CO2 e HPA
vendem-se vazios e devem ser cheios antes da utilização. Ao utilizar CO2, poderão ocorrer pequenos disparos
ocasionais de gás vindos da parte inferior do regulador.
Este é o funcionamento normal da válvula reguladora de
pressão que protege o marcador do CO2 líquido.
Nunca utilize óleo ou qualquer lubrificante ou produto
de limpeza baseado em petróleo num sistema HPA.
Utilize apenas os lubrificantes recomendados pelo
fabricante e siga à risca todas as suas instruções.
LIGAR A ALIMENTAÇÃO
BOTÃO DE ALIMENTAÇÃO
Ligue o marcador premindo o botão
de alimentação sem soltar durante
um segundo. Quando o EOS estiver
ligado, o botão de alimentação ficará
vermelho. O EOS desliga-se premindo
o botão de alimentação sem soltar
durante dois segundos. Para poupar
pilhas, o EOS desligar-se-á caso não
seja disparado durante 30 minutos. Pressionar momentaneamente o
botão de alimentação enquanto o
EOS está ligado irá desactivar o
sistema anti-corte Vision, o que é
indicado pelo piscar do botão de alimentação.
Apesar do botão de alimentação actuar como interruptor de
segurança do EOS para evitar disparos acidentais, nunca deverá
confiar totalmente no mesmo mas sim num bloqueio de tambor e
numa protecção ocular adequada.
06
AJUSTAR A VELOCIDADE
AJUSTAR O GATILHO
RÉGLAGE DE LA DÉTENTE
La longueur du poids de la
détente de l’EOS est réglable.
Utilisez une clé hexagonale de
1,2 mm (0,050 po) pour régler
la limite de l’après-course
de la détente, c’est-à-dire la
distance de déplacement de
la détente au-delà du point de
tir, à l’aide de la vis de réglage
située sur la portion inférieure
de la détente. Utilisez une clé
hexagonale de 3,1 mm (1/8
po) sur la vis de réglage de
l’avant-course, située au point
où le garant de la détente
entre en contact avec le corps
de poignée, pour régler la
distance de déplacement en
avant de la détente une fois
qu’elle a été relâchée.
Llene la tolva de bolas de pintura
y enciéndala. Colóquese unas
gafas de seguridad para paintball
que cumplan con la norma ASTM,
asegúrese de que no haya nadie
en las proximidades sin protección,
retire el bloqueador del cañón y
dispare con un cronógrafo para
medir la velocidad. Si desea
modificar la velocidad, introduzca
una llave allen de 5/32 pulgadas
en el ajustador situado en la parte
inferior del regulador vertical y gírela
en el sentido de las agujas del
reloj para aumentar la velocidad /
presión o en sentido contrario para
disminuirla. Realice tres o cuatro
disparos después de cada ajuste
para permitir que se estabilice
la presión del gas en la EOS.
Proceda con el ajuste hasta que la
marcadora dispare de una forma
adecuada a los límites del campo
en el que vaya a jugar (por razones
de seguridad, no ajuste nunca la
EOS a una velocidad de disparo
superior a 300 pies por segundo).
Aumento de la velocidad.
Es posible regular la
profundidad de retroceso
del gatillo de la EOS. Puede
utilizar una llave allen de
0,050 pulgadas para ajustar
el límite de carrera posterior
del gatillo, es decir, lo que
puede retroceder éste una
vez alcanzado el punto de
disparo, con el tornillo de
ajuste situado en la parte
inferior del mismo. Para
ajustar el movimiento hacia
delante del gatillo una vez
liberado, utilice una llave
allen de 1/8 pulgadas en el
tornillo ajustador de la carrera
delantera, situado justo donde
la guarda del gatillo se junta
con la empuñadura.
Encha o depósito com bolas de
tinta e ligue o aparelho. Utilizando
óculos de protecção compatíveis
com as normas da ASTM, e numa
área onde todos os espectadores
estejam protegidos, remova o
bloqueio do tambor e dispare
sobre um cronógrafo para medir a
velocidade. Utilizando uma chave
Allen 5/32 polegadas no ajustador
no botão do regulador vertical,
girar no sentido dos ponteiros do
relógio para aumentar a velocidade/
pressão, e no sentido contrário para
diminuir. Dispare três ou quatro
tiros após cada ajuste para permitir
que a pressão do gás presente no
interior do EOS estabilize. Faça
ajustes até o marcador estar a
disparar consistentemente dentro
dos limites do campo onde está
a ser utilizado (por razões de
segurança, nunca ajuste o EOS
para disparar a uma distância
superior a 90 metros por segundo.)
Aumentar a velocidade.
O comprimento a que se
pode puxar o gatilho no EOS
é ajustável. Pode utilizar-se
uma chave Allen de 0,050
polegadas para ajustar o limite
pós-viagem do gatilho – quão
longe o gatilho pode continuar
a mover-se após o ponto de
disparo – com o parafuso
de ajuste localizado na parte
inferior do gatilho. Uma chave
Allen de 1/8 polegadas pode
ser utilizada no parafuso
de ajuste da pré-viagem,
localizado onde o gatilho toca
na estrutura do punho, para
ajustar a distância até onde o
gatilho pode chegar assim que
for libertado.
DESCARREGAR/REMOVER O GÁS
DESCARGA/EXTRACCIÓN DEL GAS
IMPORTANTE
Antes de guardar, transportar ou fazer manutenção, terá de descarregar e retirar o gás ao seu marcador.
Numa zona onde seja seguro disparar, e utilizando óculos de paintball, alargue o pescoço de alimentação
do grampo do EOS e remova o carregador. Virando o marcador de cabeça para baixo, pode retirar as
bolas extra do pescoço de alimentação para a sua mão. Remova o tanque de CO2 ou de HPA.
Tenha muita atenção e certifique-se que a válvula do tanque de gás está desapertada da ASA do marcador, em vez do tanque se desapertar da sua válvula.
Ligue o marcador e dispare a seco numa direcção segura até que toda a pressão do gás no interior seja
libertada. Ligue o EOS premindo o botão de alimentação sem soltar durante um segundo.
Caso não seja retirado o gás ao marcador, o regulador pode reter pressão suficiente para fazer 3 ou mais
disparos, mesmo após a fonte de gás ter sido removida.
DESMONTAGEM/LIMPEZA
CÂMARA DE PROJÉCTEIS
INSERÇÕES DE CONTROLO DE VOLUME
TAMPÃO
DO BOLT
Preste especial atención al comprobar que la válvula del depósito de gas se esté desatornillando del
adaptador del sistema de aire (ASA) de la marcadora y que no sea el depósito el que se esté desatornillando de la válvula.
Encienda la marcadora y dispare en seco en una dirección segura hasta que se haya liberado toda la
presión del gas en el interior. Apague la EOS manteniendo pulsado el botón de encendido durante un
segundo. Veillez particulièrement à ce que le robinet de la bouteille de gaz se dévisse de l’adaptateur du système
pneumatique du marqueur, et que ce ne soit pas la bouteille qui se dévisse du robinet.
Mettez le marqueur en marche et tirez à sec dans une direction ne présentant aucun danger jusqu’à ce
que toute la pression gazeuse interne se soit dissipée. Mettez l’EOS hors tension en appuyant sur le
bouton marche/arrêt pendant une seconde. Achten Sie genauestens darauf, dass das Ventil der Gasflasche vom ASA des Markierers und nicht der
Tank vom Ventil abgeschraubt wird.
Schalten Sie den Markierer ein und feuern Sie Trockenschüsse in einer ungefährlichen Richtung ab, bis
der gesamte Gasdruck im Inneren entwichen ist. Schalten Sie die EOS aus, indem Sie den Einschaltknopf
eine Sekunde lang niedergedrückt halten. Si no se extrae el gas de la marcadora, el regulador puede conservar presión suficiente como para disparar tres o más veces, incluso sin el suministro de gas.
Si le marqueur n’est pas dégazé, son régulateur peut contenir suffisamment de pression pour effectuer 3
tirs ou plus, même si l’alimentation en gaz a été retirée.
Wenn der Markierer nicht entgast wird, enthält der Regler eventuell noch genügend Druck für 3 oder mehr
Schüsse, selbst wenn die Gaszufuhr abgenommen wurde.
A UTILIZAÇÃO À CHUVA NÃO
DANIFICARÁ O EOS, MAS NUNCA
DEVERÁ IMERGI-LO EM ÁGUA.
CASO O MARCADOR FIQUE
ENCHARCADO, REMOVA O
TAMBOR E OS GRAMPOS DE
BORRACHA E DEIXE SECAR. EM
SEGUIDA, SIGA AS INSTRUÇÕES
DE LIMPEZA/DESMONTAGEM.
01 Descarregue e retire todo o gás do EOS. Remova o tambor e utilize uma chave Allen de 5/16 polegadas para desapertar e retirar a tampa do bolt da parte de trás do EOS.
CERROJO
02 Utilizando uma ferramenta suave, como um pauzinho de madeira ou uma escova de dentes de plástico, empurre o bolt, o stop do bolt e a inserção de controlo de volume. Insira, se existir, pela parte de trás do EOS.
03 Limpe o interior da arma, a câmara de projécteis, o bolt e o stop do bolt com um pano limpo ou com um guardanapo de papel. Inspeccione os o-rings procurando sinais de danos como rasgões ou cortes e substitua-os se necessário.
04 Lubrifique os o-rings com lubrificante de marcador SL33K. Insira a inserção de controlo de volume na
câmara de projécteis. Encaixe o stop do bolt no bolt pela parte de trás. Enfie o comjunto na parte de trás do EOS. Aperte o tampão do bolt utilizando uma chave Allen de 5/16 polegadas - não aperte demais. DESMONTAJE/LIMPIEZA
IMPORTANTE
CÁMARA
DE DISPARO
REVESTIMIENTO DE
CONTROL ACÚSTICO
MANGUITO
DEL CERROJO
LA EOS NO RESULTARÁ DAÑADA
POR JUGAR CON ELLA CUANDO
LLUEVA, PERO NO DEBERÁ SUMERGIRLA NUNCA EN AGUA. SI LA
MARCADORA SE LLENA DE AGUA,
SAQUE EL CAÑÓN Y LAS EMPUÑADURAS DE GOMA Y DÉJELA SECAR. A CONTINUACIÓN SIGA LAS
INSTRUCCIONES DE DESMONTAJE
Y LIMPIEZA.
CULASSE
El sistema de válvulas de la EOS tiene solamente una pieza móvil importante, lo que hace que el mantenimiento sea simple, aunque no por ello se puede dejar de hacer. La EOS se deberá desmontar y limpiar
siempre que su funcionamiento sea errático, se llene de pintura, suciedad o residuos o simplemente como
parte del mantenimiento general cada 3 ó 4 días de uso.
01 Descargue y extraiga el gas de la EOS. Con una llave allen de 5/16 pulgadas, desatornille y extraiga el manguito del cerrojo de la parte trasera de la EOS.
02 Saque el cerrojo, el tope del mismo y el revestimiento de control acústico de la parte trasera de la EOS. Para ello utilice una herramienta blanda, como una varilla de madera o un cepillo de dientes de plástico.
03 Limpie el interior del cuerpo, la cámara de disparo, el cerrojo propiamente dicho y el tipo del mismo utilizando un paño limpio o una toallita de papel. Compruebe que las juntas tóricas no presenten daños como rasgaduras o cortes y, en caso necesario, sustitúyalas.
04 Lubrique las juntas tóricas con lubricante para marcadoras SL33K. Coloque el revestimiento de IMPORTANT
AUSEINANDERNEHMEN/REINIGUNG
REMARQUE CONCERNANT
L’UTILISATION PAR TEMPS
PLUVIEUX :
control acústico en la cámara de disparo. Deslice el tope del cerrojo sobre éste desde la parte posterior. Coloque el conjunto en la parte posterior de la EOS. Atornille el manguito del cerrojo con una llave allen de 5/16 pulgadas, sin apretarlo en exceso. Isto é o suficiente para a manutenção de rotina do EOS. Uma desmontagem mais detalhada para
inspeccionar ou substituir ball detentes e componentes Vision ou do quadro de circuitos pode ser feita
seguindo as instruções de desmontagem no manual EOS, excepto que a porca da estrutura do punho
traseiro e e o encaixe do banjo apertam-se directamente na estrutura da arma sem necessitar de um
swivel donut.
Esto es todo lo necesario para el mantenimiento habitual de la EOS. Si es necesario un desmontaje más
profundo para examinar o sustituir las retenciones de las bolas o componentes Vision o del panel de
circuitos, se puede hacer siguiendo las instrucciones de desmontaje que figuran en el manual de la EOS,
con la excepción del tornillo de la empuñadura trasera y del tornillo de sumersión, que ahora se atornillan
directamente en el cuerpo de la culata sin necesidad de una arandela giratoria.
AJUSTE ELECTR´ÓNICO
AJUSTE ELECTRÓNICO
IMPORTANTE
SETUP (CONT.)
WICHTIG
Ihr Markierer muss vor Lagerung, Transport oder Wartung entladen und entgast werden. Wenn Sie sich in
einem Bereich befinden, in dem das Schießen sicher ist, lockern Sie, während Sie eine Schutzbrille tragen,
den Feedneck der EOS und entnehmen den Loader. Stellen Sie den Markierer auf den Kopf und fangen
Sie eventuell verbliebene Paintballs direkt vom Feedneck fallend in Ihrer Hand auf. Nehmen Sie die CO2oder Pressluftflasche ab.
NOTA SOBRE CLIMA HÚMEDO:
O sistema de válvulas do EOS só tem uma parte grande amovível, simplificando a sua manutenção. No
entanto, isso não significa que a manutenção possa ser ignorada. O EOS deve ser desmontado e limpo
sempre que exiba um comportamento errático, fique contaminado com tinta, sujidade ou outros detritos,
ou para manutenção geral após 3 ou 4 dias de utilização.
ENTLADEN/ENTGASEN
Avant le rangement, le transport ou l’entretien, le marqueur doit être déchargé et dégazé. Alors que
vous vous trouvez dans une zone où vous pouvez tirer en toute sécurité et que vous portez des lunettes
de sécurité pour paintball, desserrez le goulot d’alimentation à dispositif de serrage de l’EOS et retirez
le chargeur. En retournant le marqueur, vous pouvez vider toutes les billes de peinture du goulot
d’alimentation dans votre main. Retirez la bouteille deCO2 ou d’air comprimé haute pression.
NOTA PARA UTILIZAÇÃO COM
TEMPO HÚMIDO:
BOLT
IMPORTANT
Antes de guardar, transportar o realizar labores de mantenimiento, es necesario descargar y extraer el
gas de su marcadora. Asegúrese de estar en una zona en la que sea seguro disparar y póngase las gafas
de seguridad para paintball y a continuación afloje el tubo de carga de agarre de la EOS para extraer el
cargador. Vacíe el tubo de carga de bolas de pintura girando la marcadora de arriba abajo. Extraiga el
depósito de CO2 o de HPA.
DESMONTAJE/LIMPIEZA
IMPORTANTE
DÉCHARGEMENT/DÉGAZAGE
IMPORTANTE
IMPORTANTE
CHAMBRE
À FEU
INSERTS DE BOUCHON
RÉGLAGE DU VOLUME DE CULASSE
01 Déchargez et dégazez l’EOS. Utilisez une clé hexagonale de 7,9 mm (5/16 po) pour dévisser et retirer le bouchon de culasse à l’arrière de l’EOS.
02 À l’aide d’un outil souple, tel qu’une baguette en bois ou une brosse à dents en plastique, poussez la culasse, la butée de la culasse et la pièce de réglage du volume, le cas échéant, hors de l’EOS.
KOLBEN FEUERKAMMER EINSÄTZE ZUR KOLBENSTOPFEN
VOLUMENKONTROLLE
Ceci constitue la totalité de l’entretien de routine pour l’EOS. Un démontage supplémentaire visant à
inspecter ou remplacer les cliquets à bille et les composants de la carte de circuit ou du système Vision
peut être effectué en respectant les instructions de démontage indiquées dans le manuel de l’EOS, à
l’exception près que la vis du corps de poignée arrière et le raccord banjo se vissent maintenant directement dans la culasse sans qu’il soit nécessaire d’utiliser un anneau à pivot.
RÉGLAGE ÉLECTRONIQUE
IMPORTANT
BOLT
Inbusschlüssel den Kolbenstopfen an der Rückseite der EOS losschrauben und abnehmen.
und den Kolbenstopfen sowie eventuell den Einsatz für die Volumenkontrolle hinten aus der EOS hinausschieben.
04 O-Ringe mit Schmiermittel SL33K für Markierer schmieren. Den Einsatz für Volumenkontrolle in die Damit ist die reguläre Wartung Ihrer EOS abgeschlossen. Für weitere Zerlegearbeiten, um BallDetents und Vision oder Platinenkomponenten zu prüfen oder zu ersetzen, folgen Sie den Anleitungen
im Handbuch der EOS. Einzige Ausnahme ist dabei, dass die Schraube hinten am Griffstück und die
Banjohalterung jetzt direkt und ohne Drehgelenk an das Gehäuse angeschraubt werden können.
ELEKTRONISCHE JUSTIERUNG
BOLT PLUG
the back of the EOS.
02 Using a soft tool, like a wooden chopstick or plastic toothbrush, push the bolt, bolt stop and volume VOLUME
CONTROL
INSERTS
01 Unload and degas the EOS. Use a 5/16-inch allen wrench to unscrew and remove the bolt plug from Papiertuch reinigen. Dichtungsringe auf Beschädigungen wie Risse oder Einschnitte prüfen und bei Bedarf ersetzen.
Feuerkammer einschieben. Den Kolbenstopfen von hinten über den Kolben ziehen. Das Ganze von hinten in die EOS einschieben. Den Kolbenstopfen mit einem 5/16-Zoll Sechskant-
Inbusschlüssel festschrauben, aber nicht zu fest anziehen. FIRE CHAMBER PLAYING IN THE RAIN WILL NOT
DAMAGE YOUR EOS, BUT YOU
SHOULD NEVER IMMERSE IT IN
WATER. IF YOUR MARKER SHOULD
BECOME WATERLOGGED, REMOVE
THE BARREL AND RUBBER GRIPS
AND ALLOW THEM TO DRY OUT,
THEN FOLLOW THE DISASSEMBLY/
CLEANING INSTRUCTIONS.
The EOS valve system has only one major moving part, making it simple to maintain, but this does not
mean maintenance can be ignored. The EOS should be disassembled and cleaned any time it shows erratic performance, becomes contaminated with paint, dirt or other debris, or for general maintenance after
3 or 4 days of use.
03 Das Innere des Gehäuses, Feuerkammer, Kolben und Kolbenstopfen mit einem sauberen Tuch oder IMPORTANT
WET WEATHER NOTE:
02 Mit einem weichen Werkzeug, z.B. ein Holzstäbchen oder eine Plastikzahnbürste, den Kolben 04 Graissez les joints toriques avec du lubrifiant pour marqueur SL33K. Glissez la pièce de réglage du volume dans la chambre à feu. Glissez la butée de culasse sur la culasse par l’arrière. Glissez l’ensemble à l’arrière de l’EOS. Vissez le bouchon de culasse en place à l’aide d’une clé hexagonale de 7,9 mm (5/16 po) sans trop serrer. Increasing Velocity.
DISASSEMBLY/CLEANING
DER BETRIEB IM REGEN SCHADET
IHRER EOS NICHT, ABER SIE
SOLLTEN DEN MARKIERER NIE
IN WASSER TAUCHEN. SOLLTE
IHR MARKIERER MIT WASSER
VOLLLAUFEN, DEN LAUF UND DIE
GUMMIGRIFFE ABNEHMEN UND
TROCKNEN LASSEN. FOLGEN SIE
DANN DEN ANWEISUNGEN ZUM
AUSEINANDERNEHMEN/REINIGEN.
01 Entladen und entgasen Sie die EOS. Den Lauf abnehmen und mit einem 5/16-Zoll Sechskant-
03 Nettoyez l’intérieur du corps, la chambre à feu, la culasse et la butée de la culasse avec un chiffon ou une serviette en papier propre. Inspectez les joints toriques pour vérifier qu’ils ne présentent pas de dommages, tels que des entailles ou des coupures, et remplacez-les au besoin.
TRIGGER ADJUSTMENT
The length of the EOS’s trigger
pull is adjustable. A 0.050inch allen wrench can be used
to adjust the trigger’s post
travel limit – how far back the
trigger can continue to move
past the firing point – with the
adjustment screw located on
the lower portion of the trigger.
A 1/8-inch allen wrench can
be used on the pre-travel
adjuster screw, located where
the trigger guard meets the
grip frame, to adjust how far
forward the trigger can move
once it is released.
Fill the hopper with paintballs and
turn it on. While wearing ASTM
compliant paintball goggles, in
an area where all bystanders
are protected, remove the barrel
blocker and fire over a chronograph
to measure the velocity. Using
a 5/32-inch allen wrench on the
adjuster in the bottom of the vertical
regulator, turn clockwise to increase
velocity/pressure, and counterclockwise to decrease. Take three
or four shots after every adjustment
to allow the gas pressure inside the
EOS to stabilize. Adjust until the
marker is firing consistently within
the limits for the field where you are
playing (for safety reasons, never
adjust the EOS to fire at greater
than 300 feet per second.)
WICHTIG
Das Ventilsystem der EOS besitzt nur ein größeres bewegliches Teil, wodurch die Wartung vereinfacht
wird. Das heißt aber nicht, dass die Instandhaltung vernachlässigt werden kann. Die EOS sollte
jedesmal dann auseinandergenommen und gereinigt werden, wenn sie keine zuverlässige Leistung mehr
erbringt oder durch Farbe, Schmutz oder sonstige Verunreinigungen verschmutzt ist; eine allgemeine
Wartungsmaßnahme ist außerdem nach 3 oder 4 Tagen Benutzung angezeigt.
06
ADJUST VELOCITY
HINWEIS FÜR NASSE WITTERUNG:
L’UTILISATION DE L’EOS SOUS LA
PLUIE NE L’ENDOMMAGERA PAS,
MAIS VOUS NE DEVEZ JAMAIS
L’IMMERGER DANS L’EAU. SI LE
MARQUEUR SE REMPLIT D’EAU,
RETIREZ LE CANON ET LES PRISES
EN CAOUTCHOUC ET LAISSEZLES SÉCHER PUIS SUIVEZ LES
INSTRUCTIONS DE DÉMONTAGE/
NETTOYAGE.
Le système de valve de l’EOS est muni d’une seule pièce mobile principale, le rendant facile d’entretien ;
toutefois, cela ne signifie pas que l’entretien doit être ignoré. L’EOS doit être démonté et nettoyé chaque
fois qu’il présente un rendement inconstante, est contaminé par de la peinture, de la saleté ou d’autres
débris, ou pour un entretien général après 3 ou 4 jours d’utilisation.
05
PLEASE READ CAREFULLY
control insert, if present, out the back of the EOS.
03 Clean the interior of the body, the fire chamber, bolt and bolt stop with a clean cloth or paper towel. Inspect their o-rings for signs of damage such as rips or cuts and replace if necessary.
04 Lubricate o-rings with SL33K marker lubricant. Slide the volume control insert into the fire chamber. Slide the bolt stop onto the bolt from the rear. Slide this assembly into the rear of the EOS. Screw the bolt plug into place with a 5/16-inch allen wrench – do not overtighten. This is all that is required for routine maintenance of the EOS. Further disassembly to inspect or replace
ball detents and Vision or circuit board components may be done by following the disassembly instructions in the EOS manual, with the exception that the rear grip frame screw and banjo fitting now screw
directly into the body breech without the need for a swivel donut.
WICHTIG
ELECTRONIC ADJUSTMENT
IMPORTANT
Para informações sobre como ajustar a quantidade de disparos, optimizar o tempo de dwell, alterar os
modos de disparo e seleccionar a inserção de volume optimizada, por fazer faça o download e leia o
Manual Operativo e de Manutenção do EOS na secção de apoio do smartparts.com.
Si desea información para ajustar la velocidad de disparo, optimizar el tiempo de parada, cambiar los
modos de disparo o seleccionar el mejor revestimiento de control acústico, descargue y consulte el
manual de funcionamiento y mantenimiento de la EOS de la sección de asistencia de smartparts.com.
Pour plus de détails concernant le réglage de la cadence de tir, l’optimisation du temps d’activation du
solénoïde (dwell), la modification des modes de tir et le choix de la pièce de réglage du volume optimal,
veuillez télécharger et lire le manuel de fonctionnement et d’entretien de l’EOS dans la section Assistance
sur le site www.SmartParts.com.
Wenn Sie Informationen zur Einstellung der Feuerrate, Optimierung des Dwell-Timing, Änderung der
Schussbetriebsarten und Auswahl des optimalen Einsatzes für die Volumenkontrolle benötigen, laden Sie
sich bitte die Wartungs- und Bedienungsanleitung für die EOS online aus dem Abschnitt “Support” bei
smartparts.com herunter.
For information on adjusting rate of fire, optimizing dwell timing, changing firing modes and selecting the
optimal volume control insert, please download and read the EOS Maintenance and Operation Manual
from the support section at smartparts.com.
RESOLUCIÓN DE PROBLEMAS
RESOLUCIÓN DE PROBLEMAS
DÉPANNAGE
FEHLERSUCHE
UNLOADING/DEGASSING
POR FAVOR LEIA CUIDADOSAMENTE
LEA ESTA SECCIÓN DETENIDAMENTE
VEUILLEZ LIRE ATTENTIVEMENT
BITTE SORGFÄLTIG LESEN
IMPORTANT
O EOS NÃO LIGA
— As pilhas podem estar fracas ou gastas. Substitua por uma pilha alcalina de marca de 9-volts removendo a fita de borracha protectora do punho. Desligue a pilha puxando cuidadosamente o grampo da pilha – não puxe os fios do grampo.
LA EOS NO SE ENCIENDE
— Es posible que la batería esté baja o gastada. Sustitúyala por una batería alcalina de 9 voltios de una buena marca retirando la empuñadura cruzada de goma. Descargue la batería retirando con cuidado la pinza de la misma; no tire de los cables de la pinza de la batería. L’EOS NE SE MET PAS EN MARCHE
— La pile est faible ou morte. Remplacez-la par une pile alcaline de 9 V de marque en retirant l’enveloppe en caoutchouc. Retirez la pile en veillant à retirer l’attache avec précaution, sans tirer sur les fils d’attache de la pile.
DIE EOS LÄSST SICH NICHT EINSCHALTEN
— Die Batterie hat nicht mehr genügend Strom oder ist leer. Nehmen Sie die Gummihalterung ab und setzen Sie eine neue Marken-Alkalibatterie mit 9 Volt Spannung ein.
— Zum Entnehmen der Batterie den Clip vorsichtig abziehen – nicht an den Drähten ziehen. Before storage, transport or maintenance, your marker will need to be unloaded and degassed. In an area
where it is safe to shoot and while wearing paintball goggles, loosen the EOS’s clamping feedbeck and
remove the loader. By turning the marker upside down, you can empty any extra paintballs from the feedneck into your hand. Remove the CO2 or HPA tank.
O EOS ESTÁ A VERTER OU APRESENTA UMA VELOCIDADE INSCONSISTENTE
— Desmonte e limpe o conjunto do bolt. Inspeccione todos os o-rings e substitua qualquer um que demonstre sinais de desgaste ou danos. Volte a lubrificar com SL33K e volte amontar.
— Utilize uma pilha alcalina de marca de 9-volts nova.
— Se estiver a utilizar CO2, um tanque-anti-sifão ou um tanque comum com um tubo remoto melhorará a consistência.
LA EOS TIENE FUGAS O MUESTRA UNA VELOCIDAD DESIGUAL
— Desmonte y limpie el conjunto del cerrojo. Examine todas las juntas tóricas y sustituya aquéllas que muestren señales de desgaste o daños. Vuelva a lubricar con SL33K y móntelo otra vez.
— Utilice una batería alcalina nueva de 9 voltios de buena marca.
— Si está utilizando CO2, mejorará el rendimiento con un depósito antisifón o con uno normal con manga remota.
LA EOS TIENE FUGAS O MUESTRA UNA PRECISIÓN DESIGUAL
— La causa de este fallo puede ser que las bolas de pintura sean de mala calidad o estén deformes. Utilice bolas de alta calidad y guárdelas dentro de un recipiente sellado en un lugar fresco y seco.
— Es posible que el gas salga de vez en cuando cerca de la parte inferior del regulador vertical Max-Flo R. Se trata de una función normal, ya que el regulador protege la marcadora y no indica ningún problema.
— Utilice una batería alcalina nueva de 9 voltios de buena marca.
— Si está utilizando CO2, mejorará el rendimiento con un depósito antisifón o con uno normal con manga remota.
LA EOS SE ENCIENDE PERO NO DISPARA
— Puede que la batería esté casi agotada. Sustitúyala por una batería alcalina de buena marca.
— El depósito de CO2 o aire comprimido puede estar muy bajo o vacío, rellénelo.
L’EOS SE MET EN MARCHE MAIS NE TIRE PAS
— La pile est peut-être faible. Remplacez-la par une pile alcaline neuve de marque.
— La bouteille de CO2 ou d’air comprimé est peut-être vide ou presque vide. Remplissez-la.
DIE EOS LECKT ODER FEUERT MIT UNBESTÄNDIGER GESCHWINDIGKEIT
— Kolbensystem auseinandernehmen und reinigen. Prüfen Sie alle O-Ringe und ersetzen Sie die Dichtungen, die Beschädigungen oder Verschleißerscheinungen aufweisen. Neu mit SL33K schmieren und wieder zusammensetzen.
— Verwenden Sie eine frische Marken-Alkalibatterie mit 9 Volt Spannung.
— Wenn Sie CO2 verwenden, sorgen ein Anti-Syphon-Tank oder ein normaler Tank mit Schlauch für mehr Beständigkeit.
DIE EOS LECKT ODER FEUERT MIT UNBESTÄNDIGER GENAUIGKEIT
— Das kann durch Farbe von schlechter Qualität passieren. Verwenden Sie Paintballs von hoher Qualität und bewahren Sie diese in einem dicht verschlossenen Behälter an einem kühlen und trockenen Ort auf.
— Bisweilen kann am Boden des senkrechten Reglers Max-Flo R etwas Gas austreten. Das eine normale Schutzfunktion des Reglers und weist nicht auf ein Problem hin.
— Verwenden Sie eine frische Marken-Alkalibatterie mit 9 Volt Spannung.
— Wenn Sie CO2 verwenden, sorgen ein Anti-Syphon-Tank oder ein normaler Tank mit Schlauch für mehr Beständigkeit.
Pay careful attention to make sure the gas tank valve is unscrewing from the marker’s ASA, rather than the
tank unscrewing from its valve.
Turn on the marker and dry fire in a safe direction until all of the gas pressure inside has been released.
Turn the EOS off by pressing and holding the power button for one second. O EOS ESTÁ A VERTER OU APRESENTA UMA PRECISÃO INSCONSISTENTE
— Isto pode ser provocado por bolas de tinta de má qualidade. Utilize bolas de tinta de qualidade e armazene-as num sítio fechado num local frio e seco.
— O gás pode ocasionalmente ser libertado junto ao fundo do regulador vertical Max-Flo R. Esta é uma função normal, enquanto o regulador protege o seu marcador e apresenta qualquer problema.
— Utilize uma pilha alcalina de marca de 9-volts nova.
— Se estiver a utilizar CO2, um tanque-anti-sifão ou um tanque comum com um tubo remoto melhorará a consistência.
L’EOS FUIT OU PRÉSENTE UNE VÉLOCITÉ ERRATIQUE
— Démontez et nettoyez la culasse. Inspectez tous les joints toriques et remplacez ceux qui présentent des signes d’usure ou de dommage. Lubrifiez de nouveau avec de la graisse SL33K et remontez la culasse.
— Utilisez une pile alcaline de 9 V neuve de marque.
— Si vous utilisez du CO2, une bouteille antisiphon ou une bouteille standard dotée d’un tuyau à distance amélioreront la constance de la vélocité.
L’EOS FUIT OU PRÉSENTE UNE PRÉCISION INCONSTANTE
— Ceci peut être dû à des billes de mauvaise qualité ou ovalisées. Utilisez des billes de haute qualité et conservez-les dans un récipient fermé, dans un lieu frais et sec.
— Du gaz peut parfois fuir près du bas du régulateur vertical Max-Flo R. Il s’agit d’un fonctionnement normal du régulateur protégeant le marqueur et n’indique pas un problème.
— Utilisez une pile alcaline de 9 V neuve de marque.
— Si vous utilisez du CO2, une bouteille antisiphon ou une bouteille standard dotée d’un tuyau à distance amélioreront la précision.
O EOS LIGA MAS NÃO DISPARA
— A pilha pode estar fraca. Substitua-a por uma pilha alcalina de marca.
— O tanque de ar comprimido ou CO2 pode estar em baixo ou vazio – recarregue-o.
GARANTIA
A Smart Parts garante pelo período de um (1) ano a partir da data
de compra que o regulador e o marcador de paintball não possuem
defeitos de materiais ou de fabrico. As peças substituíveis (pilhas, anéis
de borracha para selagem (o-rings), vedantes, molas, etc.) não possuem
garantia. A montagem da válvula possui uma garantia de seis (6) meses.
O solenóide e a electrónica do marcador possuem uma garantia de
seis (6) meses, bem como uma garantia adicional de seis meses para
as peças electrónicas (instalação e mão-de-obra não incluídas). Esta
garantia não cobre danos de superfície (riscos e cortes), má utilização,
desmontagem ou montagem indevidas, tentativas de fazer orifícios
ou remover metal das superfícies externas que poderão prejudicar o
desempenho e reduzir os factores de segurança relacionados com
a pressão do marcador. Não faça alterações às peças essenciais do
marcador sem possuir uma aprovação por escrito. O único lubrificante
autorizado para o marcador é o Lubrificante SL33K. A utilização de
qualquer outro lubrificante pode invalidar a garantia. Os marcadores de
paintball não são passíveis de reembolso. Esta garantia está limitada à
reparação ou substituição de peças defeituosas, sendo que o cliente
pagará os custos de envio. Esta garantia é apenas válida se o cliente
devolver o cartão de registo da garantia juntamente com o marcador. A
garantia não é transferível. Não tente alterar a montagem do gatilho de
nenhuma forma pois tal procedimento invalidará a garantia da Smart
Parts Inc. Qualquer alteração efectuada ao gatilho poderá originar
graves ferimentos. A recolocação ou a alteração do regulador
vertical de Máximo-Flo R anularão a garantia e podem resultar nos
danos sérios e ou em ferimento.
800.922.2147
100 Station St. Loyalhanna, PA 15661 manual de iniciação rápida versão 1.0
SUPORTE TÉCNICO
SUPORTE TÉCNICO
Smart Parts, Inc.
100 Station Street
Loyalhanna, PA 15661
800.992.2147
COSTA OESTE DOS E.U.A.
West Coast Repair Center
27326 Jefferson Ave #2
Temecula, CA 92590
951.296.1000
REINO UNIDO
Unit A6
Larkfield Trading Estate
New Hythe Lane
Aylesford,Kent
ME20 65W
++40 (0) 1622.719.995
Está disponível mais ajuda
bem como outros manuais de
produtos que poderá transferir
através do nosso web site,
www.smartparts.com.
GARANTÍA
Smart Parts garantiza durante un (1) año al comprador inicial que la
marcadora de paintball y el regulador se entregan sin defecto alguno
tanto de materiales como de mano de obra. No entran en esta garantía
las piezas desechables como baterías, juntas tóricas, resortes, etc. La
garantía del conjunto de la válvula es de seis (6) meses. El solenoide
y los componentes electrónicos de la marcadora tienen una garantía
de seis (6) meses, además de una garantía adicional de seis meses
únicamente para las piezas electrónicas (instalación y mano de obra
no incluidas). Esta garantía no cubre los daños superficiales (arañazos
y hendiduras), el mal uso, el desmontaje y montaje inadecuados ni
intentos de perforar agujeros o eliminar metal de las superficies externas
que pudieran disminuir el rendimiento y reducir los factores de seguridad
de presión de la marcadora. No realice modificaciones en las piezas
básicas de la marcadora sin autorización previa expresada por escrito.
El único lubricante autorizado para la marcadora es el SL33K. El uso de
cualquier otro lubricante puede derivar en la anulación de la garantía.
Las marcadoras de paintball no son reembolsables. La presente garantía
se limita a la reparación o sustitución de componentes defectuosos. El
cliente correrá a cargo de los gastos de envío. Esta garantía solamente
será efectiva si el cliente devuelve la tarjeta de registro de la misma junto
con la marcadora. La garantía es intransferible. No intente modificar el
conjunto del gatillo de ninguna manera, ya que esto anulará la garantía
de Smart Parts Inc. Cualquier modificación que se realice sobre el
gatillo puede tener como consecuencia lesiones graves. El reemplazo
o la alteración del regulador vertical de Ma’ximo-Flo R anulará la
garantía y puede dar lugar a daño serio y o a lesión.
800.922.2147 100 Station St. Loyalhanna, PA 15661 manual de inicio rápido versión 1.0
ASISTENCIA TÉCNICA
COSTA ESTE DE EE.UU.
Smart Parts, Inc.
100 Station Street
Loyalhanna, PA 15661
800.992.2147
COSTA OESTE DE EE.UU.
West Coast Repair Center
27326 Jefferson Ave #2
Temecula, CA 92590
951.296.1000
REINO UNIDO
Unit A6
Larkfield Trading Estate
New Hythe Lane
Aylesford,Kent
ME20 65W
++40 (0) 1622.719.995
Puede encontrar asistencia
adicional y manuales
descargables de productos en nuestra página web www.smartparts.com.
GARANTIE
ASSISTANCE TECHNIQUE
Smart Parts garantit pour une durée d’un (1) an à l’acheteur au détail
initial que le marqueur et le régulateur du paintball sont exempts de
vices de fabrication et de main d’œuvre. Les pièces jetables (piles, joints
toriques, joints, ressorts, etc.) ne sont pas couverts par la garantie. La
soupape est garantie pour une durée de six (6) mois. Le solénoïde et
le circuit électronique du marqueur sont garantis pour une durée de six
(6) mois, avec une garantie supplémentaire de 6 mois pour les pièces
électroniques uniquement (installation et main d’œuvre non incluses).
Cette garantie ne couvre pas les dommages de surface (rayures et
entailles), les utilisations, montages et démontages incorrects, les
tentatives visant à percer des trous ou à retirer du métal des surfaces
externes, ce qui pourrait nuire aux performances et réduire les
coefficients de sécurité de pression du marqueur. N’effectuez aucune
modification sur les pièces de base du marqueur sans autorisation
écrite. Le seul lubrifiant autorisé pour le marqueur est le SL33K.
L’utilisation de tout autre lubrifiant peut entraîner l’annulation de la
garantie. Les marqueurs de paintball ne sont pas remboursables. Cette
garantie est limitée à la réparation et au remplacement des pièces
défectueuses et les frais d’expédition sont à la charge du client. Cette
garantie n’est valide que si le client renvoie la carte d’enregistrement de
garantie incluse avec le marqueur. La garantie n’est pas transférable.
Ne tentez pas de modifier la détente en aucune façon, car toute
modification annulerait la garantie Smart Parts Inc. Toute modification
de la détente peut causer de graves blessures. Le remplacement ou
le changement du régulateur vertical de Maximum-Flo R videra la
garantie et peut avoir comme conséquence des dommages sérieux
et ou des dommages.
800.922.2147
100 Station St. Loyalhanna, PA 15661
manuel de démarrage rapide version 1.0
CÔTE EST DES ÉTATS-UNIS
Smart Parts, Inc.
100 Station Street
Loyalhanna, PA 15661
800.992.2147
CÔTE OUEST DES
ÉTATS-UNIS
West Coast Repair Center
27326 Jefferson Ave #2
Temecula, CA 92590
951.296.1000
ROYAUME-UNI
Unit A6
Larkfield Trading Estate
New Hythe Lane
Aylesford, Kent
ME20 65W
++40 (0) 1622.719.995
Une assistance supplémentaire
et des manuels de produit
téléchargeables sont
disponibles sur notre site www.smartparts.com.
DIE EOS LÄSST SICH EINSCHALTEN, FEUERT ABER NICHT
— Unter Umständen hat die Batterie nur noch wenig Strom. Ersetzen Sie sie mit einer Alkalibatterie einer guten Marke.
— Eventuell ist auch der CO2- oder Presslufttank fast oder ganz leer – wieder neu befüllen.
GARANTIE
SmartParts garantiert gegenüber dem ersten Einzelhandelskäufer,
dass der Paintball-Markierer und Regler ein (1) Jahr lang frei von
Material- und Verarbeitungsfehlern sind. Verschleißteile (Batterien,
O-Ringe, Dichtungen, Federn usw.) fallen nicht unter diese Garantie.
Für das Ventilsystem besteht eine Garantie von sechs (6) Monaten.
Das Magnetventil und die Elektronik des Markierers haben einen
Garantieschutz von sechs (6) Monaten; nur für Elektronikteile besteht
eine zusätzliche Sechsmonatsgarantie (Installation und Arbeit sind
nicht eingeschlossen). Diese Garantie gilt nicht für Oberflächenschäden
(Kratzer und Dellen), Falschgebrauch, unsachgemäßes Auseinanderund wieder Zusammenbauen, Versuche Löcher zu bohren oder Metall
von den Außenflächen zu entfernen, die die Leistung herabsetzen und
Drucksicherheitsfaktoren des Markierers beeinträchtigen könnten.
Veränderungen an den grundlegenden Teilen des Markierers dürfen nur
nach schriftlicher Genehmigung vorgenommen werden. Das einzige
autorisierte Schmiermittel für den Markierer ist SL33K. Der Einsatz
von anderen Schmiermitteln kann dazu führen, dass die Garantie
unwirksam wird. Paintball Markierer sind nicht erstattungsfähig. Diese
Garantie beschränkt sich auf Reparatur oder Ersatz fehlerhafter Teile.
Versandkosten gehen zu Lasten des Kunden. Diese Garantie ist
nur dann wirksam, wenn der Kunde die Garantiekarte, die mit dem
Markierer geliefert wird, einschickt. Die Garantie ist nicht übertragbar.
Versuchen Sie nicht, das Abzugssystem in irgendeiner Weise zu
verändern. Dadurch wird Ihre Garantie von Smart Parts Inc. unwirksam.
Veränderungen jeglicher Art am Abzug können zu ernsten Verletzungen
führen. Wiedereinbau oder Änderung des Maximum-Flo R vertikalen
Reglers heben Garantie auf und können ernste Beschädigung und
oder Verletzung ergeben.
800.922.2147 100 Station St. Loyalhanna, PA 15661 USA Schnelle Starthilfe, Version 1.0
TECHNISCHER KUNDENDIENST
OSTKÜSTE USA
Smart Parts, Inc.
100 Station Street
Loyalhanna, PA 15661, USA
800.992.2147
WESTKÜSTE USA
West Coast Repair Center
27326 Jefferson Ave #2
Temecula, CA 92590, USA
951.296.1000
Großbritannien
Unit A6
Larkfield Trading Estate
New Hythe Lane
Aylesford,Kent
ME20 65W
++40 (0) 1622.719.995
Weitere Supportdienste und
Bedienungsanleitungen für
die Produkte finden Sie zum
Herunterladen in unserem
Webauftritt unter www.smartparts.com.
If the marker is not degassed, its regulator may hold enough pressure to fire 3 or more shots, even if the
gas supply is removed.
TROUBLESHOOTING
PLEASE READ CAREFULLY
EOS WILL NOT TURN ON
— Battery may be low or dead. Replace with a name brand 9-volt alkaline battery by removing the rubber wraparound grip. Unplug the battery by carefully pulling away the battery clip – do not pull on the battery clip wires. EOS IS LEAKING OR SHOWS INCONSISTENT VELOCITY
— Disassemble and clean the bolt assembly. Inspect all o-rings and replace any that show signs of wear or damage. Re-lubricate with SL33K and reassemble.
— Use a fresh 9-volt name-brand alkaline battery.
— If using CO2, an anti-siphon tank, or regular tank and remote hose will improve consistency.
EOS IS LEAKING OR SHOWS INCONSISTENT ACCURACY
— This can be caused by poor quality, out of round paint. Use high-quality paintballs and store them in a sealed container in a cool, dry place.
— Gas may occasionally vent near the bottom of the Max-Flo R vertical regulator. This is a normal function as the regulator protects your marker and does not indicate a problem.
— Use a fresh 9-volt name-brand alkaline battery.
— If using CO2, an anti-siphon tank, or regular tank and remote hose will improve consistency.
EOS WILL TURN ON BUT WILL NOT FIRE
— Battery may be low. Replace with a name brand alkaline battery.
— CO2 or compressed air tank may be very low or empty – refill.
WARRANTY
Smart Parts warrants for one (1) year to initial retail purchaser that the
paintball marker and regulator are free from defects in materials and
workmanship. Disposable parts (batteries, o-rings, seals, springs,
etc.) are not warranted. The valve assembly is warranted for six (6)
months. The solenoid and electronics on the marker are warranted for
six (6) months, plus an additional warranty of six months for electronic
parts only (installation and labor are not included.) This warranty does
not cover surface damages (scratches and nicks), misuse, improper
disassembly and re-assembly, attempts made to drill holes or remove
metal from the external surfaces which could degrade performance and
reduce pressure safety factors of the marker. Do not make changes to
the basic marker parts without written approval. The only authorized
lubricant for the marker is SL33K Lubricant. Use of any other lubricant
could result in voiding your warranty. Paintball markers are nonrefundable. This warranty is limited to repair or replacement of defective
parts with the customer to pay shipping costs. This warranty is effective
only if the customer returns the warranty registration card enclosed
with the marker. The warranty is non-transferrable. Do not attempt to
alter the trigger assembly in any way, as this will void your Smart Parts
Inc. warranty. Trigger alteration of any kind may result in serious injury.
Replacement or alteration of the Max-Flo R Vertical regulator will
void warranty and may result in serious damage and or injury.
800.922.2147 100 Station St. Loyalhanna, PA 15661 quick start manual version 1.0
TECH SUPPORT
U.S. EAST COAST
Smart Parts, Inc.
100 Station Street
Loyalhanna, PA 15661
800.992.2147
U.S. WEST COAST
West Coast Repair Center
27326 Jefferson Ave #2
Temecula, CA 92590
951.296.1000
U.K.
Unit A6
Larkfield Trading Estate
New Hythe Lane
Aylesford,Kent
ME20 65W
++40 (0) 1622.719.995
Additional support and downloadable product manuals are
available through our web site,
www.smartparts.com.