1
Bedienungsanleitung
Operating manual
(S. 2)
(p. 30)
Funk-Fernbedienung 8 Tasten
Remote Control 8 buttons
HM-RC-8
Lieferumfang
Inhaltsverzeichnis
Anzahl Artikel
1
Hinweise zu dieser Anleitung . . . . . . . . . . . . . . 4
2Gefahrenhinweise . . . . . . . . . . . . . . . . . . . . . . . 4
3
Allgemeine Systeminformation zu HomeMatic . 6
4
Funktion und Geräteübersicht . . . . . . . . . . . . . . 6
5Inbetriebnahme . . . . . . . . . . . . . . . . . . . . . . . . . 9
5.1 Batterien einlegen und wechseln . . . . . . . . . . . 9
5.2Anlernen . . . . . . . . . . . . . . . . . . . . . . . . . . . . . 11
5.3 Neu angelernte Geräte konfigurieren . . . . . . . 17
6Bedienung . . . . . . . . . . . . . . . . . . . . . . . . . . . . 18
7
Fehler- und Rückmeldungen durch
die Geräte-LED . . . . . . . . . . . . . . . . . . . . . . . 19
7.1 Blinkcodes und Fehlermeldungen . . . . . . . . . . 19
7.2 Schwache Batterien . . . . . . . . . . . . . . . . . . . . 22
7.3 Befehl nicht bestätigt . . . . . . . . . . . . . . . . . . . . 23
7.4 Duty Cycle überschritten . . . . . . . . . . . . . . . . . 23
8
Werkseinstellungen wiederherstellen . . . . . . . 24
9
Wartung und Reinigung . . . . . . . . . . . . . . . . . 26
10 Allgemeine Hinweise zum Funkbetrieb . . . . . . 27
11
Technische Daten . . . . . . . . . . . . . . . . . . . . . . 28
1x
HomeMatic Funk-Fernbedienung 8 Tasten
2x
1,5 V LR03/Micro/AAA Batterien
1x
Bedienungsanleitung
1. Ausgabe Deutsch 06/2014
Dokumentation © 2014 eQ-3 Ltd. Hong Kong
Alle Rechte vorbehalten. Ohne schriftliche Zustimmung des Herausgebers
darf dieses Handbuch auch nicht auszugsweise in irgendeiner Form reproduziert werden oder unter Verwendung elektronischer, mechanischer oder
chemischer Verfahren vervielfältigt oder verarbeitet werden.
Es ist möglich, dass das vorliegende Handbuch noch drucktechnische Mängel oder Druckfehler aufweist. Die Angaben in diesem Handbuch werden
jedoch regelmäßig überprüft und Korrekturen in der nächsten Ausgabe
vorgenommen. Für Fehler technischer oder drucktechnischer Art und ihre
Folgen übernehmen wir keine Haftung.
Alle Warenzeichen und Schutzrechte werden anerkannt.
Printed in Hong Kong
Änderungen im Sinne des technischen Fortschritts können ohne Vorankündigung vorgenommen werden.
132751 / V 1.0
Hinweise zu dieser Anleitung
1 Hinweise zu dieser Anleitung
Lesen Sie diese Anleitung sorgfältig, bevor Sie Ihre
HomeMatic Komponenten in Betrieb nehmen. Bewahren Sie die Anleitung zum späteren Nachschlagen auf!
Wenn Sie das Gerät anderen Personen zur Nutzung
überlassen, übergeben Sie auch diese Bedienungsanleitung.
Benutzte Symbole:
Achtung!
Hier wird auf eine Gefahr hingewiesen.
Hinweis. Dieser Abschnitt enthält zusätzliche
wichtige Informationen!
Hinweis. Dieser Abschnitt enthält zusätzliche
wichtige Informationen zur Verwendung des
Gerätes in Verbindung mit der HomeMatic
Zentrale.
2 Gefahrenhinweise
Öffnen Sie das Gerät nicht. Es enthält keine
durch den Anwender zu wartenden Teile. Im
Fehlerfall schicken Sie das Gerät an den Service.
4
Gefahrenhinweise
Aus Sicherheits- und Zulassungsgründen (CE)
ist das eigenmächtige Umbauen und/oder Verändern des Produktes nicht gestattet.
Betreiben Sie das Gerät nur in trockener sowie
staubfreier Umgebung, setzen Sie es keinem
Einfluss von Feuchtigkeit, Vibrationen, ständiger Sonnen- oder anderer Wärmeeinstrahlung, Kälte und keinen mechanischen Belastungen aus.
Das Gerät ist kein Spielzeug! Erlauben Sie Kindern nicht damit zu spielen. Lassen Sie das Verpackungsmaterial
nicht
achtlos
liegen.
Plastikfolien/-tüten, Styroporteile etc. könnten
für Kinder zu einem gefährlichen Spielzeug werden.
Bei Sach- oder Personenschaden, die durch unsachgemäße Handhabung oder Nichtbeach-ten
der Sicherheitshinweise verursacht werden,
übernehmen wir keine Haftung. In solchen Fällen erlischt jeder Garantieanspruch! Für Folgeschäden übernehmen wir keine Haftung!
5
Allgemeine Systeminformation zu HomeMatic
Funktion und Geräteübersicht
3 Allgemeine Systeminformation
zu HomeMatic
stendruck gleichzeitig mehrere Funktionen ausgeführt
werden.
Dieses Gerät ist Teil des HomeMatic Haussteuersystems und arbeitet mit dem bidirektionalen BidCoS
Funkprotokoll. Alle Geräte werden mit einer Standardkonfiguration ausgeliefert. Darüber hinaus ist die
Funktion des Gerätes über ein Programmiergerät und
Software konfigurierbar. Welcher weitergehende Funktionsumfang sich daraus ergibt, und welche Zusatzfunktionen sich im HomeMatic System im Zusammenspiel
mit weiteren Komponenten ergeben, entnehmen Sie
dem HomeMatic WebUI Handbuch. Alle technischen
Dokumente und Updates finden Sie stets aktuell unter
www.homematic.com.
Die nebeneinander liegenden Tasten bilden jeweils ein
Tastenpaar, das beim direkten Verknüpfen mit einem
Aktor gemeinsam angelernt wird. Die jeweils linke Taste
hat dabei z. B. die Funktion „Aus/Dunkler/Runter“ und
die rechte Taste „An/Heller/Hoch“.
®
Jeder andere Einsatz, als der in dieser Bedienungsanleitung beschriebene, ist nicht bestimmungsgemäß und führt zu Garantie- und Haftungsausschluss.
4 Funktion und Geräteübersicht
Mit der HomeMatic Funk-Fernbedienung können Sie
angelernte HomeMatic Geräte bequem über acht Tasten steuern.
Die Fernbedienung kann direkt an andere HomeMatic
Geräte oder die HomeMatic Zentrale angelernt werden,
um z. B. Beleuchtung ein- bzw. auszuschalten oder
Rollladen rauf bzw. runter zu fahren. Sie können die
Funktionen der 8 Tasten individuell festlegen. An eine
Taste können dabei mehrere HomeMatic Geräte angelernt werden. Dadurch können über einen einzigen Ta6
7
Funktion und Geräteübersicht
Inbetriebnahme
5 Inbetriebnahme
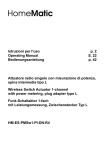
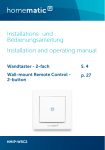
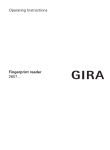
Bedienelemente:
A
E
5.1 Batterien einlegen und wechseln
F
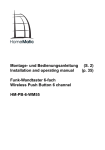
5.1.1Batterien einlegen
Um das Gerät in Betrieb zu nehmen, legen Sie zunächst die Batterien ein. Gehen Sie dafür wie folgt vor:
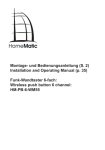
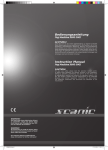
• Öffnen Sie das rückseitige Batteriefach (H), indem
Sie die Entriegelungstaste (F) mit dem Finger eindrücken (1.) und die Abdeckung der Fernbedienung
etwas nach hinten verschieben (2.).
B
C
D
G
H
1.
F
C
M
Y
CM
MY
CY
A – Tastenpaar 1
B – Tastenpaar 2
C – Tastenpaar 3
D – Tastenpaar 4
E – Geräte-LED
F – Entriegelungstaste
G – Anlerntaste
H – Batteriefach
8
CMY
2.
K
• Dadurch öffnet sich die Verrastung und die Abdeckung kann abgenommen werden (3.).
9
Inbetriebnahme
Entsorgungshinweis!
Verbrauchte Batterien gehören nicht in
den Hausmüll! Entsorgen Sie diese in
Ihrer örtlichen Batteriesammelstelle!
3.
• Legen Sie zwei Batterien vom Typ LR03/Micro/
AAA polrichtig entsprechend den Polaritätsmarkierungen in das Batteriefach ein.
• Schließen Sie das Batteriefach wieder, indem Sie
die Abdeckung auflegen und mit leichtem Druck
wieder Richtung Gehäuseende schieben, bis sie
einrastet.
5.1.2Batterien wechseln
Wird beim Betätigen einer Taste der Fernbedienung
der Blinkcode für leere Batterien (5 x kurzes rotes
Blinken) angezeigt oder erfolgt keine Reaktion des zu
steuernden Gerätes, tauschen Sie die verbrauchten
Batterien wie im vorangegangenen Kapitel beschrieben gegen zwei neue Batterien vom Typ LR03/Micro/
AAA aus. Beachten Sie dabei die richtige Polung der
Batterien.
Normale Batterien dürfen niemals aufgeladen
werden. Batterien nicht ins Feuer werfen! Batterien nicht übermäßiger Wärme aussetzen. Batterien nicht kurzschließen. Es besteht Explosionsgefahr!
10
Inbetriebnahme
5.1.3Verhalten nach Batteriewechsel
Nach dem Einlegen der Batterien führt die Fernbedienung zunächst einen Selbsttest/Neustart (ca. 2 Sekunden) durch. Die LED blinkt kurz rot, grün und orange auf
(LED-Test-Anzeige). Danach erfolgt die Initialisierung.
Sind die Batterien für die weitere Verwendung
zu schwach, erfolgt die Meldung (5 x kurzes
rotes Blinken) direkt nach dem Tastendruck. In
diesem Fall müssen Sie die Batterien durch
zwei neue ersetzen.
5.2 Anlernen
Bitte lesen Sie diesen Abschnitt erst vollständig,
bevor Sie mit dem Anlernen beginnen!
Damit die Fernbedienung in Ihr HomeMatic System integriert werden und mit anderen HomeMatic Geräten
kommunizieren kann, muss das Gerät zunächst angelernt werden. Sie können die Fernbedienung direkt
an andere HomeMatic Geräte oder an die HomeMatic
Zentrale anlernen.
11
Inbetriebnahme
Inbetriebnahme
5.2.1Direktes Anlernen an HomeMatic Geräte
Wenn Sie die Fernbedienung an ein oder mehrere
HomeMatic Geräte anlernen möchten, müssen Sie die
beiden zu verknüpfenden Geräte in den Anlernmodus
bringen und die gewünschte Taste bzw. den Kanal zum
Anlernen auswählen.
K
CY
MY
CMY
Y
12
CM
Zum Anlernen gehen Sie wie folgt vor:
• Die Anlerntaste (G) befindet sich auf der Rückseite
der Fernbedienung unter der Abdeckung. Nehmen
Sie die Abdeckung ab und drücken Sie kurz mit
einem spitzen Gegenstand auf die Anlerntaste.
M
Bitte beachten Sie, dass Sie beim Anlernen zwischen den Geräten einen Abstand von mindestens 50 cm einhalten.
• Die Fernbedienung befindet sich nun im Konfigurationsmodus. Dies wird durch grünes Blinken
der Geräte-LED angezeigt. (Durch erneutes kurzes
Drücken der Anlerntaste können Sie den Konfigurationsmodus beenden.)
• Drücken Sie die Taste der Fernbedienung, an die
Sie eine Funktion anlernen wollen, um in den Anlernmodus zu gelangen. Die Geräte-LED blinkt
langsam orange. (Wenn das anzulernende Gerät
noch nicht im Anlernmodus ist, können Sie den
Anlernmodus der Fernbedienung durch erneutes
kurzes Drücken der Anlerntaste abbrechen. Die
Geräte-LED leuchtet dann rot auf.)
• Bringen Sie nun das Gerät, an das Sie die Fernbedienung anlernen wollen, gemäß der zugehörigen
Bedienungsanleitung in den Anlernmodus.
• Befinden sich beide Geräte im Anlernmodus, wird
dieses durch schnelles oranges Blinken angezeigt.
C
Beim Anlernen werden immer eine linke und
eine rechte Taste als Tastenpaar angelernt. Dies
bedeutet, dass beim Drücken einer linken Taste
die Funktion „Aus“ und für die rechte Taste automatisch die Funktion „Ein“ angelernt wird. Dies
gilt ebenso für die anderen drei Tastenpaare.
13
Inbetriebnahme
Ein erfolgreicher Anlernvorgang wird durch grünes
Leuchten der Geräte-LED angezeigt.
Wenn die Geräte-LED für 2 Sekunden rot aufleuchtet,
war der Anlernvorgang fehlerhaft. Versuchen Sie es
erneut.
Wenn kein Anlernen erfolgt, wird der Anlernmodus automatisch nach 20 Sekunden beendet.
Ist die Fernbedienung bereits an eine Zentrale
angelernt, ist kein direktes Anlernen an andere
Geräte möglich und die Geräte-LED leuchtet für
2 Sekunden rot auf.
5.2.2Anlernen an eine HomeMatic Zentrale
Um Ihr Gerät softwarebasiert und komfortabel
• steuern und konfigurieren,
• direkt mit anderen Geräten verknüpfen oder
• in Zentralenprogrammen nutzen zu können,
muss es zunächst an die HomeMatic Zentrale angelernt
werden. Das Anlernen neuer Geräte an die Zentrale erfolgt über die HomeMatic Bedienoberfläche „WebUI“.
Inbetriebnahme
Beim Anlernen beachten Sie bitte, dass Sie einen Abstand der Geräte zur Zentrale von mindestens 50 cm einhalten.
Zum Anlernen Ihres Gerätes an die Zentrale gehen Sie
wie folgt vor:
• Öffnen Sie die WebUI Bedienoberfläche in Ihrem
Browser. Klicken Sie auf den Button „Geräte anlernen“ im rechten Bildschirmbereich.
• Um den Anlernmodus zu aktivieren, klicken Sie auf
„BidCoS-RF Anlernmodus“.
Sobald eine Komponente an eine Zentrale angelernt ist, kann sie nur noch über diese mit anderen Komponenten verknüpft werden.
Jede Komponente kann immer nur an eine Zentrale angelernt werden.
14
• Der Anlernmodus ist für 60 Sekunden aktiv. Das
Infofeld zeigt die aktuell noch verbleibende Anlernzeit.
15
Inbetriebnahme
• Versetzen Sie innerhalb dieser Anlernzeit die Fernbedienung in den Konfigurationsmodus, indem Sie
die Abdeckung abnehmen und kurz mit einem spitzen Gegenstand auf die Anlerntaste (G) der Fernbedienung drücken.
Inbetriebnahme
an, wie viele neue Geräte erfolgreich angelernt wurden.
• Lernen Sie ggf. weitere Geräte an, indem Sie die
vorher beschriebenen Schritte für jedes Gerät wiederholen.
• Konfigurieren Sie nun die neu angelernten Geräte
im Posteingang wie im folgenden Abschnitt („Neu
angelernte Geräte konfigurieren“) beschrieben.
5.3 Neu angelernte Geräte konfigurieren
• Die Fernbedienung befindet sich nun im Konfigurationsmodus. Dies wird durch grünes Blinken
der Geräte-LED angezeigt. (Durch erneutes kurzes
Drücken der Anlerntaste, können Sie den Konfigurationsmodus verlassen.)
• Sobald die Zentrale mit der Fernbedienung kommuniziert, blinkt die Geräte-LED orange. Erfolgreiches
Anlernen wird durch grünes Leuchten der LED angezeigt.
• Nach kurzer Zeit erscheint das neu angelernte Gerät im Posteingang Ihrer Softwareoberfläche. Der
Button „Posteingang (x neue Geräte)“ zeigt dabei
16
Nachdem Sie Ihr Gerät an die HomeMatic Zentrale
angelernt haben, wird es in den „Posteingang“ verschoben. Hier muss Ihr Gerät und die dazugehörigen
Kanäle zunächst konfiguriert werden, damit es für Bedien- und Konfigurationsaufgaben zur Verfügung steht.
Vergeben Sie einen Namen und ordnen Sie das Gerät
einem Raum zu. Sie haben zusätzlich die Möglichkeit,
einzelne Parametereinstellungen vorzunehmen.
Anschließend können Sie Ihr Gerät über die Bedienoberfläche „WebUI“ steuern und konfigurieren, direkt
mit anderen Geräten verknüpfen oder in Zentralenprogrammen nutzen. Einzelheiten hierzu entnehmen Sie
bitte dem HomeMatic WebUI Handbuch (zu finden im
Download-Bereich der Website www.homematic.com).
17
Bedienung
Fehler- und Rückmeldungen durch die Geräte-LED
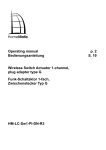
6 Bedienung
Die 8 Tasten sind im Auslieferungszustand als vier separate Tastenpaare (TP 1, TP 2, TP 3 und TP 4) definiert. Dabei hat die jeweils rechte Taste die Funktion
„An/Heller/Hoch“ und die linke Taste „Aus/Dunkler/Runter“. Mit der Ferndienung können Sie
• Licht an- bzw. ausschalten
• Licht heller bzw. dunkler dimmen und
• Rollladen hoch- bzw. runterfahren.
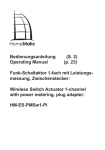
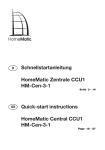
Beispiel:
Rollladen hoch
Licht aus
7 Fehler- und Rückmeldungen
durch die Geräte-LED
7.1 Blinkcodes und Fehlermeldungen
Licht an
Die Rückmeldungen gelten sowohl für den Betrieb mit als auch ohne Zentrale.
Rollladen runter
18
19
Fehler- und Rückmeldungen durch die Geräte-LED
Fehlermeldungen
Blinkcode
Bedeutung
Lösung
5 x kurzes
rotes Blinken
Batterien fast leer
Tauschen Sie die
Batterie aus (siehe
„5.1.2 Batterien wechseln“ auf
Seite 10).
1 x langes, 2
x kurzes rotes
Blinken
Die Fernbedienung ist defekt.
Bitte wenden
Sie sich an Ihren
Fachhändler.
1 x langes
und 1 x kurzes
rotes Blinken
Duty Cycle
Siehe „7.4 Duty Cycle überschritten“
auf Seite 23
1 s grünes
Leuchten
Alle Aktoren haben
den (letzten) bidirektionalen Befehl
bestätigt.
Sie können mit der
weiteren Bedienung fortfahren.
2 s rotes
Leuchten
Mindestens ein
Aktor hat den
(letzten) bidirektionalen Befehl nicht
bestätigt.
Bitte versuchen Sie
es erneut.
1 x rotes,
grünes und
oranges
Blinken
LED-Test-Anzeige
Nachdem die TestAnzeige erloschen
ist, können Sie
fortfahren.
Anlernen und Wiederherstellen der Werkseinstellungen
Normalbetrieb
Blinkcode
Bedeutung
Lösung
Oranges
Leuchten bei
kurzem bzw.
langem
Tastendruck
Die LED leuchtet
solange orange,
wie die Funkübertragung andauert.
Nach erfolgreicher
Funkübertragung
leuchtet die LED
für 1 s grün,
bei fehlerhafter
Übertragung für 2 s
rot auf.
Bei fehlerhafter
Übertragung versuchen Sie es bitte
erneut.
20
Fehler- und Rückmeldungen durch die Geräte-LED
Blinkcode
Bedeutung
Lösung
Langsames
grünes Blinken
Konfigurationsmodus (Gerät wartet
auf Funk)
Warten bis Konfigurationsdaten
gesendet wurden.
Langsames
oranges
Blinken
Anlernmodus
(Gerät wartet auf
Funkpartner)
Bringen Sie das anzulernende Gerät in
den Anlernmodus.
Schnelles oranges Blinken
Konfigurationsoder Anlernmodus
(Daten werden
empfangen)
Warten Sie, bis der
Vorgang beendet
ist.
21
Fehler- und Rückmeldungen durch die Geräte-LED
1 s grünes
Leuchten
Anlernen erfolgreich
Sie können mit der
weiteren Bedienung fortfahren.
2 s rotes
Leuchten
Anlernen fehlgeschlagen
Bitte versuchen Sie
es erneut.
Langsames
grünes Blinkes
und bei Tastenbetätigung
rotes Leuchten
Fernbedienung
bereits an Zentrale
angelernt und
damit für direktes
Anlernen gesperrt.
Siehe „5.2.1 Direktes Anlernen an
HomeMatic Geräte“
auf Seite 12.
Langsames
rotes Blinken
Vorstufe zum
Zurücksetzen auf
die Werkseinstellungen
Gerät wartet auf
langen Tastendruck
der Anlerntaste
zum Zurücksetzen oder kurzen
Tastendruck zum
Beenden.
Schnelles rotes
Blinken
Anlerntaste
wurde lange
genug gedrückt,
um Werksreset
durchzuführen
Beim Loslassen der
Anlerntaste wird
der Werksreset
durchgeführt
7.2 Schwache Batterien
Wenn es der Spannungswert zulässt, ist die Fernbedienung auch bei niedriger Batteriespannung betriebsbereit. Je nach Beanspruchung kann evtl. nach kurzer
Erholungszeit der Batterie wieder mehrfach gesendet
22
Fehler- und Rückmeldungen durch die Geräte-LED
werden.
Wenn Sie schwache Batterien verwenden, kann das
Gerät beim Betätigen einer Taste automatisch einen
Neustart durchführen. Dann blinkt die Geräte-LED kurz
rot, grün und orange, gefolgt von 5 x kurzem roten Blinken für die schwachen Batterien.
7.3 Befehl nicht bestätigt
Bestätigt ein Empfänger (bei mehreren angelernten
Geräten, mindestens einer) einen Befehl nicht, leuchtet zum Abschluss der Übertragung die Geräte-LED rot
auf. Dieses Verhalten kann folgende Ursachen haben:
• Der Empfänger ist nicht erreichbar.
• Der Empfänger kann den Befehl nicht ausführen
(Lastausfall, mechanische Blockade etc.).
• Der Empfänger ist defekt.
7.4 Duty Cycle überschritten
Der Duty Cycle beschreibt eine gesetzlich geregelte
Begrenzung der Sendezeit von Geräten im 868 MHz
Bereich. Das Ziel dieser Regelung ist es, die Funktion
aller im 868 MHz Bereich arbeitenden Geräte zu gewährleisten.
In dem von uns genutzten Frequenzbereich 868 MHz
beträgt die maximale Sendezeit eines jeden Gerätes 1
% einer Stunde (also 36 Sekunden in einer Stunde). Die
23
Werkseinstellungen wiederherstellen
Geräte dürfen bei Erreichen des 1 %-Limits nicht mehr
senden, bis diese zeitliche Begrenzung vorüber ist. Gemäß dieser Richtlinie, werden HomeMatic-Geräte zu
100 % normenkonform entwickelt und produziert.
Im normalen Betrieb wird der Duty Cycle in der Regel
nicht erreicht. Dies kann jedoch in Einzelfällen bei der
Inbetriebnahme oder Erstinstallation eines Systems
durch vermehrte und funkintensive Anlernprozesse der
Fall sein. Eine Überschreitung des Duty Cylcle Limits
wird durch einmal langes und einmal kurzes rotes Blinken der Geräte LED angezeigt und kann sich durch
temporär fehlende Funktion des Gerätes äußern. Nach
kurzer Zeit (max. 1 Stunde) ist die Funktion des Gerätes wiederhergestellt.
8 Werkseinstellungen wiederherstellen
Wenn Sie die Werkseinstellungen der Fernbedienung wiederherstellen, gehen alle Einstellungen verloren.
Um die Werkseinstellungen der Fernbedienung wiederherzustellen, gehen Sie wie folgt vor:
• Halten Sie die Anlerntaste (G) mindestens 5 Sekunden gedrückt. Die LED der Fernbedienung beginnt
langsam rot zu blinken.
24
Werkseinstellungen wiederherstellen
>5s
Um das Wiederherstellen der Werkseinstellungen abzubrechen, drücken Sie die Anlerntaste erneut kurz oder warten Sie 20 Sekunden
ab. In beiden Fällen stoppt das langsame rote
Blinken und das Zurücksetzen ist beendet.
• Zum Zurücksetzen der Fernbedienung drücken Sie
nun erneut für mindestens 5 Sekunden die Anlerntaste (G). Die LED beginnt nun während des Gedrückthaltens schneller rot zu blinken.
• Wenn Sie die Anlerntaste loslassen, schließt dies
den Rücksetzvorgang ab.
• Die rote LED hört auf zu Blinken und die Fernbedienung führt einen Neustart durch.
• Nach der LED-Test-Anzeige (rotes, grünes und
oranges Blinken - siehe „7.1.3 Verhalten nach Bat25
Wartung und Reinigung
Allgemeine Hinweise zum Funkbetrieb
teriewechsel“ auf Seite 11) ist der Fernbedienung
zurückgesetzt und einsatzbereit.
10 Allgemeine Hinweise zum Funkbetrieb
Mögliche Fehlermeldungen:
Der nachfolgende Fehler kann nur auftreten,
wenn Sie die Fernbedienung an eine Zentrale
angelernt haben.
Die Funk-Übertragung wird auf einem nicht exklusiven
Übertragungsweg realisiert weshalb, Störungen nicht
ausgeschlossen werden können. Weitere Störeinflüsse
können hervorgerufen werden durch Schaltvorgänge,
Elektromotoren oder defekte Elektrogeräte.
Beginnt die LED nach 5 Sekunden Gedrückthalten
nicht zu blinken, sondern leuchtet dauerhaft auf, kann
die Fernbedienung nicht zurückgesetzt werden, da sie
an die Zentrale angelernt ist. In diesem Fall ist das manuelle Zurücksetzen für das Gerät gesperrt worden.
Setzen Sie die Fernbedienung über die Bedienoberfläche „WebUI“ der Zentrale zurück.
9 Wartung und Reinigung
Das Produkt ist für Sie bis auf einen eventuell erforderlichen Batteriewechsel wartungsfrei. Überlassen
Sie eine Wartung oder Reparatur einer Fachkraft. Reinigen Sie das Produkt mit einem weichen, sauberen,
trockenen und fusselfreien Tuch. Für die Entfernung
von stärkeren Verschmutzungen kann das Tuch leicht
mit lauwarmem Wasser angefeuchtet werden. Verwenden Sie keine lösemittelhaltigen Reinigungsmittel, das
Kunststoffgehäuse und die Beschriftung können dadurch angegriffen werden.
26
Die Reichweite in Gebäuden kann stark von der
im Freifeld abweichen. Außer der Sendeleistung
und den Empfangseigenschaften der Empfänger spielen Umwelteinflüsse wie Luftfeuchtigkeit
neben baulichen Gegebenheiten vor Ort eine
wichtige Rolle.
Hiermit erklärt die eQ-3 Entwicklung GmbH, dass sich
dieses Gerät in Übereinstimmung mit den grundlegenden Anforderungen und den anderen relevanten
Vorschriften der Richtlinie 1999/5/EG befindet. Die
vollständige Konformitätserklärung finden Sie unter www.homematic.com.
27
Technische Daten
11 Technische Daten
Geräte-Kurzbezeichnung:HM-RC-8
Versorgungsspannung:
2x 1,5 V LR03/Micro/AAA
Stromaufnahme:
40 mA max.
Batterielebensdauer:
> 5 Jahre
(bei ca. 10 Betätigungen
am Tag)
Schutzart:IP20
Umgebungstemperatur:
5 bis 35 °C
Funkfrequenz:
868,3 MHz
Typ. Funk-Freifeldreichweite:
> 100 m
Empfängerkategorie:
SRD category 2
Duty Cycle:
< 1 % pro h
Abmessungen (B x H x T): 46 x 126 x 16 mm
Gewicht:
86 g (inkl. Batterien)
Technische Daten
Entsorgungshinweis
Gerät nicht im Hausmüll entsorgen! Elektronische Geräte sind entsprechend der Richtlinie
über Elektro-und Elektronik-Altgeräte über die
örtlichen Sammelstellen für Elektronik-Altgeräte
zu entsorgen.
Hinweis auf Konformität
Das CE-Zeichen ist ein Freiverkehrszeichen,
das sich ausschließlich an die Behörden wendet
und keine Zusicherung von Eigenschaften beinhaltet.
Technische Änderungen vorbehalten.
28
29
Scope of delivery
Table of contents
Quantity Item
1
Information about this manual . . . . . . . . . . . .
2
Hazard information . . . . . . . . . . . . . . . . . . . . .
3
General information about the
HomeMatic system . . . . . . . . . . . . . . . . . . . . .
4
Function and device overview . . . . . . . . . . . . .
5Start-up . . . . . . . . . . . . . . . . . . . . . . . . . . . . . .
5.1 Inserting and replacing batteries . . . . . . . . . . .
5.2Teaching-in . . . . . . . . . . . . . . . . . . . . . . . . . . .
5.3 Configuring newly taught-in devices . . . . . . . .
6Operation . . . . . . . . . . . . . . . . . . . . . . . . . . . .
7
Errors and information indicated by
the device LED . . . . . . . . . . . . . . . . . . . . . . . .
7.1 Flashing codes and error messages . . . . . . . .
7.2 Weak batteries . . . . . . . . . . . . . . . . . . . . . . . .
7.3 Command not confirmed . . . . . . . . . . . . . . . . .
7.4 Duty cycle exceeded . . . . . . . . . . . . . . . . . . . .
8
Restore factory settings . . . . . . . . . . . . . . . . .
9
Maintenance and cleaning . . . . . . . . . . . . . . .
10 General information about radio operation . . .
11
Technical specifications . . . . . . . . . . . . . . . . . .
1x
HomeMatic Remote Control 8 buttons
2x
1.5 V LR03/micro/AAA batteries
1x
Operating manual
1st English edition 06/2014
Documentation © 2014 eQ-3 Ltd., Hong Kong
All rights reserved. Translation of the original version in German. This manual may not be reproduced in any format, either in whole or in part, nor may it
be duplicated or edited by electronic, mechanical or chemical means, without
the written consent of the publisher.
Typographical and printing errors cannot be excluded. However, the
information contained in this manual is reviewed on a regular basis and any
necessary corrections will be implemented in the next edition. We accept no
liability for technical or typographical errors or the consequences thereof.
All trademarks and industrial property rights are acknowledged.
Printed in Hong Kong.
Changes may be made without prior notice as a result of technical advances.
32
32
33
34
36
36
38
44
45
46
46
49
50
50
51
53
54
55
132751/V 1.0
30
31
Information about this manual
1 Information about this manual
Read this manual carefully before beginning operation
with your HomeMatic components. Keep the manual so
you can refer to it at a later date if you need to. If you
hand over the device to other persons for use, please
hand over the operating manual as well.
Symbols used:
Attention!
This indicates a hazard.
Note. This section contains important
additional information.
Note. This section contains additional important
information about using the device in connection
with the HomeMatic Central Control Unit.
2 Hazard information
Do not open the device. It does not contain any
parts that can be maintained by the user. In the
event of an error, please return the device to our
service department.
For safety and licensing reasons (CE), unauthorized change and/or modification of the product is not permitted.
32
General information about the HomeMatic system
The device may only be operated in dry and
dust-free environment and must be protected
from the effects of moisture, vibrations, solar or
other methods of heat radiation, cold and mechanical loads.
The device is not a toy; do not allow children to
play with it. Do not leave packaging material lying around. Plastic films/bags, pieces of polystyrene, etc. can be dangerous in the hands of a
child.
We do not assume any liability for damage to
property or personal injury caused by improper
use or the failure to observe the safety instructions. In such cases any claim under guarantee
is extinguished! For consequential damages,
we assume no liability!
3 General information about the
HomeMatic system
This device is part of the HomeMatic home control system and works with the bidirectional BidCoS wireless
protocol. All devices are delivered in a standard configuration. The functionality of the device can also be
configured with a programming device and software.
The additional functions that can be made available in
this way and the supplementary functions provided by
®
33
Function and device overview
the HomeMatic system when it is combined with other
components are described in the HomeMatic WebUI
Manual. All current technical documents and updates
are provided at www.homematic.com.
4 Function and device overview
The HomeMatic Remote Control provides a convenient
way of controlling taught-in HomeMatic devices using
eight buttons.
The remote control can be taught-in directly to other
HomeMatic devices or to the HomeMatic Central Control Unit. Thus, lights can be switched on and off and
shutters can be moved up or down. You can individually
define the functions of all eight buttons. A single button
can be taught-in to work with one or more HomeMatic
components. At the push of a button, several functions
can be executed simultaneously.
The opposite buttons serve as pair. When connecting
the device directly with an actor, a pair of buttons is
taught-in at once. The left buttons are defined for the
instructions „Off/Darker/Down“ and the right buttons for
the instructions „On/Brighter/Up“.
Using the device for any purpose other than that
described in this operating manual does not fall
within the scope of intended use and shall invalidate any warranty or liability.
34
Function and device overview
Controls:
A
E
F
B
C
D
G
H
A – Button pair 1
B – Button pair 2
C – Button pair 3
D – Button pair 4
E – Device LED
F – Release button
G – Teach-in button
H – Battery compartment
35
Start-up
Start-up
5 Start-up
3.
5.1 Inserting and replacing batteries
5.1.1Inserting batteries
To start up the device, please insert the batteries. To do
this, proceed as follows:
• Open the battery compartment on the rear (H) by
pressing the release button (F) with you finger (1.)
and moving the cover of the remote control to the
back (2.).
1.
F
2.
• This will open the catch; you can then remove the
cover (3.).
36
• Place two LR03/AAA/micro batteries into the battery compartment, using the polarity markings to
ensure the polarity is correct.
• Close the battery compartment by replacing the
cover and pushing it with light pressure to the end
of the housing until it latches into place.
5.1.2Changing batteries
If you press a button on the remote control and the flashing code indicating empty batteries is displayed (5 x red
flashes), or the device being controlled does not respond, replace the used batteries with two new LR03/
AAA/micro batteries, as described in the previous section. You must observe the correct battery polarity.
Never recharge standard batteries. Do not
throw the batteries into a fire. Do not expose
batteries to excessive heat. Do not short-circuit
batteries. Doing so will present a risk of explosion.
37
Start-up
Start-up
Instructions for disposal:
Used batteries should not be disposed of
with regular domestic waste! Instead,
take them to your local battery disposal
point.
5.2.1Teaching-in directly to HomeMatic devices
If you want to teach-in the remote control to one or
more HomeMatic devices, you must put the devices to
be taught-in into teach-in mode and select the required
button/channel.
5.1.3Behaviour after replacing batteries
Once the batteries have been inserted, the remote
control performs a self-test/restart (approx. 2 seconds).
The LED flashes red, green and orange briefly (LED
test display). Initialisation is carried out.
During teach-in mode, always one left and one
right button are taught-in as button pair. When
pressing a left button to teach-in the function
„Off“, the function „On“ will be taught-in for the
right button automatically. This also applies to
the other three pairs of buttons.
If the batteries are too weak for the device to
continue being used, the 5 brief red flashes take
place directly after the button is pressed. In this
case, you have to replace the batteries with two
new ones.
5.2 Teaching-in
Please read this entire section before starting
the teach-in procedure!
During teach-in, please make sure you maintain
a distance of at least 50 cm between the devices.
To teach in, proceed as follows:
• You will find the teach-in button (G) on the back side
of the remote control under the cover. Remove the
cover and briefly press the teach-in button with a
pointed object.
To integrate the remote control into your HomeMatic
system and enable it to communicate with other HomeMatic devices, you must teach it in first. You can teachin the remote control directly to other HomeMatic devices or to the HomeMatic Central Control Unit.
38
39
Start-up
Start-up
If the device LED lights up red for 2 seconds, teachingin the device failed. In this case, please try again.
If no teach-in operations are carried out, teachin mode is exited automatically after 20 seconds.
• The remote control is now in configuration mode.
The device LED flashes green to indicate this. (To
exit configuration mode, briefly press the teach-in
button again.)
• To enter teach-in mode, press the remote control
button in to which you wish to teach a function. The
device LED flashes orange slowly. (Provided the
device to be taught-in is not yet in teach-in mode,
you can cancel teach-in mode on the remote control
by pressing the teach-in button again briefly. The
device LED then lights up red.)
• Now put the device in to which you wish to teach the
remote control into teach-in mode by following the
relevant operating manual instructions.
• If both devices are in teach-in mode, the LED flashes orange quickly to indicate this.
40
K
CY
MY
CMY
Y
CM
M
C
The device LED lights up green to indicate that teaching-in has been successful.
If the remote control has already been taught-in
to a central control unit, it is blocked for direct
teach-in to other devices and the device LED
lights up red for 2 seconds.
5.2.2Teaching-in to a HomeMatic Central Control Unit
Your device can be conveniently
• controlled and configured,
• connected directly to other devices or
• used in central control unit programs
by using the HomeMatic software "WebUI". Therefore,
your remote control has to be taught-in to the HomeMatic Central Control Unit first. New devices are taughtin to the central control unit via the HomeMatic „WebUI“.
A soon as a component has been taught-in to a
central control unit, it can only be connected to
other components via this unit.
Each component can only be taught-in to one
CCU.
41
Start-up
Start-up
During teach-in, please make sure you maintain
a distance of at least 50 cm between the devices and the central control unit.
mode of your remote control. Therefore, remove the
cover and briefly press the teach-in button (G) of
your remote control with a pointed object.
To teach-in your device to the central control unit, proceed as follows:
• Open the "WebUI" user interface in your browser.
Click the "Teach in devices" button on the right-hand
side of the screen.
• To activate teach-in mode, click "Start teach-in
mode".
• Teach-in mode remains activated for 60 seconds.
An information box shows how much teach-in time
remains.
• Within this teach-in time, activate the configuration
42
• The remote control is now in configuration mode.
The device LED flashes green to indicate this. (To
exit configuration mode, briefly press the teach-in
button again.)
• As soon as communication between the remote
control and the central control unit has been established, the device LED flashes orange. The device
LED lights up green to indicate that teaching-in has
been successful.
• After a short time, the newly taught-in device appears in the inbox of your software interface. The
button "Inbox (x new devices)" indicates how many
new devices have been taught-in successfully.
• If required, you can teach-in additional devices by
repeating the steps described above for each device.
43
Start-up
• Now configure the newly taught-in devices in the
inbox as described in the next section ("Configuring
newly taught-in devices").
5.3 Configuring newly taught-in devices
Once you have taught-in your device to the HomeMatic
Central Control Unit, it is moved to the inbox. Here, you
must configure the device and its associated channels
in order to make them available for operating and configuration tasks. Give the device a name and assign
it to a room. You can also make individual parameter
settings.
Now you can use the "WebUI" user interface to control
your device, configure it, link it directly to other devices,
or use it in central control unit programs. Please refer
to the HomeMatic WebUI Manual for more details (you
can find this in the „Downloads“ area of the website
www.homematic.com).
Operation
6 Operation
In the factory settings, the 8 buttons are defined as
three separate button pairs (BP 1, BP 2, BP 3 and BP
4). The right buttons are defined for the functions „On/
Brighter/Up“, the left buttons for the functions „Off/Darker/Down“. With the remote control you can
• switch lights on and off
• dim lights brighter or darker
• move shutters up or down.
Example:
Light on
Shutters down
44
45
Errors and information indicated by the device LED
Errors and information indicated by the device LED
Error messages
Shutters raised
Flashing code
Meaning
Solution
5 x short red
flashes
Batteries almost
empty
Replace the batteries (see „5.1.2 Changing batteries“
on page 37).
1 x long, 2
x short red
flashes
The remote control
is defective.
Please contact your
specialist dealer.
1 x long and
1 x short red
flash
Duty cycle
see „7.4 Duty cycle
exceeded“ on page
50
Flashing code
Meaning
Solution
Orange flashing with short
or long
button press
LED lights up
orange throughout
the duration of
wireless transmission. Once wireless transmission
is successfully
completed, the
LED lights up
green for 1 s. If
transmission was
not successful,
it lights up red
for 2 s.
If transmission was
not successful,
please try again.
Light off
Normal mode
7 Errors and information indicated by the device LED
7.1 Flashing codes and error messages
This information applies to operation with and
without a central control unit.
46
47
Errors and information indicated by the device LED
1 s lighting up
green
All actuators
have confirmed
the (most recent)
bidirectional command.
You can continue
with operation.
2 s lighting
up red
At least one
actuator has not
confirmed the
(most recent)
bidirectional command.
Please try again.
1 x red, green
and orange
flash
LED test display
Once the test display has stopped,
you can continue.
Errors and information indicated by the device LED
1 s lighting up
green
Teach-in successful
You can continue
with operation.
2 s lighting
up red
Teach-in failed
Try again.
Slow green
flashing and
red light if button is pressed
Remote control
has already been
taught-in to a
central control unit
and is therefore
blocked for direct
teach-in
see „5.2.1 Teaching-in directly
in to HomeMatic
devices“ on page
39
Slow red
flashing
Stage before
resetting to factory
settings
Device is waiting
for teach-in button
to be pressed and
held in order to
carry out a reset, or
for a short button
press to cancel the
process.
Fast red
flashing
Teach-in button
has been pressed
long to perform
factory reset
Factory settings are
restored if teach-in
button is released
Teaching-in and restoring factory settings
Flashing code
Meaning
Solution
Slow green
flashing
Configuration
mode (device
waiting for radio
signal)
Wait until the
configuration data
has been sent.
Slow orange
flashing
Teach-in mode
(device waiting for
wireless partner)
Switch the device
to be taught-in to
teach-in mode.
Fast orange
flashing
Configuration or
teach-in mode
(data being
received)
Wait until the process is completed.
48
7.2 Weak batteries
Provided that the voltage value permits it, the remote
control will remain ready for operation also if the battery
voltage is low. Depending on the particular load, it may
be possible to send transmissions again repeatedly, once
49
Errors and information indicated by the device LED
the battery has been allowed a brief recovery period.
If you are using weak batteries, the device may perform
a restart automatically when you press a button. The
device LED then briefly flashes red, green and orange,
and follow this with 5 brief red flashes to indicate that
the batteries are weak.
7.3 Command not confirmed
If a receiver (at least one in cases where multiple devices have been taught-in) does not confirm a command, the device LED lights up red at the end of the
transmission process. This behaviour may be caused
by the following:
• The receiver cannot be accessed.
• The receiver is unable to execute the command
(load failure, mechanical blockade, etc.).
• The receiver is defective.
7.4 Duty cycle exceeded
The duty cycle is a legally regulated limit of the transmission time of devices in the 868 MHz range. The aim
of this regulation is to safeguard the operation of all devices working in the 868 MHz range.
In the 868 MHz frequency range we use, the maximum
transmission time of any device is 1% of an hour (i.e. 36
seconds in an hour). Devices must cease transmission
50
Restore factory settings
when they reach the 1% limit until this time restriction
comes to an end. HomeMatic devices are designed and
produced with 100% conformity to this regulation.
During normal operation, the duty cycle is not usually
reached. However, repeated and wireless-intensive
teach-in processes mean that it may be reached in
isolated instances during start-up or initial installation
of a system. If the duty cycle is exceeded, this is indicated by one long and one short red flash of the device
LED, and may manifest itself in the device temporarily
working incorrectly. The device starts working correctly
again after a short period (max. 1 hour).
8 Restore factory settings
When the factory settings of the remote control
are restored, all setting will be deleted.
To restore the factory settings of the remote control,
please proceed as follows:
• Press and hold the teach-in button (G) for at least 5
seconds. The device LED starts to flash red slowly.
To cancel the reset process, press the teach-in
button again briefly or wait for 20 seconds. In
both cases, the slow red flashing and the reset
process stop.
51
Restore factory settings
Maintenance and cleaning
Possible error messages:
The errors listed below can only occur if you
have taught-in the remote control to a central
control unit.
>5s
• To restore the factory settings of the device, press
and hold the teach-in button for at least another five
seconds. With the button pressed, the LED starts to
flash red faster.
• When you release the teach-in button, the reset
process is completed.
• The red LED stops flashing and the remote control
performs a restart.
• Following the LED test display (red, green and orange flashing - see „5.1.3 Behaviour after replacing
batteries“ on page 38), the factory settings of the
remote control are restored and the device is ready
for operation.
52
If the LED does not start to flash once the button has
been held down for 5 seconds but lights up continuously instead, this means the remote control cannot be
reset as it is taught-in to the central control unit. In this
case, the remote control has been blocked for manual
resetting. To restore the factory settings of the remote
control, you need to use the "WebUI" user interface.
9 Maintenance and cleaning
This product does not require you to carry out any
maintenance other than replacing the batteries when
necessary. Enlist the help of an expert to carry out any
maintenance or repairs. Clean the product using a soft,
lint-free cloth that is clean and dry. You may dampen
the cloth a little with lukewarm water in order to remove
more stubborn marks. Do not use any detergents containing solvents, as they could corrode the plastic housing and label.
53
General information about radio operation
10 General information about radio
operation
Radio transmission is performed on a non-exclusive
transmission path, which means that there is a possibility of interference occurring. Interference can also
be caused by switching operations, electrical motors or
defective electrical devices.
The range of transmission within buildings can
differ greatly from that available in the open air.
Besides the transmitting power and the reception characteristics of the receiver, environmental factors such as humidity in the vicinity have
an important role to play, as do on-site structural/screening conditions.
eQ-3 Entwicklung GmbH hereby declares that this
device complies with the essential requirements and
other relevant regulations of Directive 1999/5/EC. You
can find the full declaration of conformity at www.homematic.com.
Technical specifications
11 Technical specifications
Device short description:
Supply voltage:
Current consumption:
Battery life:
HM-RC-8
2x 1.5 V LR03/micro/AAA
40 mA (max.)
> 5 years (based on a usage
rate of 10 times per day)
Degree of protection:
IP20
Ambient temperature:
5 to 35 °C
Radio frequency:
868.3 MHz
Typ. open area RF range:> 100 m
Receiver category:
SRD category 2
Duty cycle:
< 1 % per h
Dimensions (W x H x D): 46 x 126 x 16 mm
Weight:
86 g (incl. batteries)
Subject to technical changes.
Instructions for disposal:
Do not dispose of the device with regular domestic waste. Electronic devices must be disposed of in accordance with the Waste Electrical and Electronic Equipment Directive via local
disposal points for electronic waste.
Information about conformity:
The CE sign is a free trading sign addressed
exclusively to the authorities and does not include any warranty of any properties.
54
55
eQ-3 Entwicklung GmbH
Maiburger Straße 36
D-26789 Leer
www.eQ-3.de