1
shorter focal length. After changing the eyepiece, it might be necessary to
adjust the focus again (see section 8).
7. Dust cover
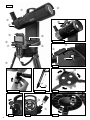
Remove the dust cover (15) that protects the objective lens of the optical
tube opening (2).
8. Focus wheel
To get objects into focus, your telescope is equipped with a precise focus
control. When you use the telescope for the first time, you might need to turn
the focus wheel (4) multiple times to achieve a focused image. To try it out,
pick a landmark or a building far away in daylight or bright twilight, and turn
the focus wheel until the object comes into focus. Remember, objects to be
observed cannot be closer than 20 metres away.
9. LED viewfinder (only included with 90-62100)
The telescope with Art. No. 90-62100 is equipped with a LED viewfinder
(10). The LED viewfinder projects a red dot on the visor to help you point
at objects. For the first use, remove the plastic cover on the battery so the
LED can be switched on. To use the viewfinder, you need to align the finder
to the telescope optic. To achieve this, point the telescope at a landmark or
building that is a few hundred metres away and centre this object in the field
of view while using an eyepiece with a low magnification (e.g. 20 mm or 25
mm). Switch on the LED viewfinder and adjust it using the alignment screws
of the viewfinder.
Part II – Handbox
1. Batteries
Remove the cover of the battery compartment (11), located on the top side
of the mount's base, and insert the batteries in the battery holder (No. 2).
Use 6 AA batteries and make sure the polarities are aligned correctly. Place
the holder into the compartment and cover it. Do not use rechargeable batteries.
2. Handbox
Ensure that the on/off switch is in the off position (No. 8). Remove the
handbox from the handbox tray (7), and plug one end of the cable into the
port labelled with "HBX" and the other one into the RJ-45 port of the handbox. Flip the switch to the on position. The handbox display should light up,
accompanied by a sound.
3. Setup
Time and Date
After turning on the handbox, you will be prompted to enter the date and
time. Do so by navigating with the arrow keys and entering the numbers with
the number pad (7) on the handbox. When done, press the centre key (5),
located between the arrow keys.
Daylight saving time
If the daylight saving time is in effect, select status:on. If daylight saving time
is not in effect, select status:off.
Location
When asked for your location, you can either choose a city near you by
selecting the 'Country & City' option or enter your GPS coordinates by selecting 'Custom Site'.
a) Country & City
Select the country where you are by using the up and down arrow keys. Then
select the city by using the left and right arrow keys. When done, use the
centre key (5) to select the location.
b) Custom Site
Enter the details of your location as follows:
Name: Enter a custom name for your location.
Lon: Enter the longitudinal coordinate of your location.
Lat: Enter the latitudinal coordinate of your location.
Zone: Enter the time zone of your location.
OTA (Optical Tube Assembly) Zero
Here you will be asked to provide the orientation of the telescope.
In the 'Azi:' field, enter '000'.
In the 'Alt:' field, enter '00'.
Open the Altitude and Azimuthal locking knobs. Adjust the telescope so that
the tube opening (2) is pointing directly north and is level. It is recommended
that you use the included compass (18) and bubble level to make sure the
device is positioned accurately. You can put the compass into the eyepiece
connection (3). Then retighten the locking knobs.
4. Alignment
In order to use your telescope's Go To mode, you must align the telescope
properly so it knows where it is pointing when it is turned on. There are three
ways to align your telescope: one-, two- and three-star alignment.
EN
Step 1: To start the alignment, press the centre key (5) on the handbox
and select the first menu option, 'Telescope Align'. There you will be able to
choose between one-, two- and three-star alignment.
The more stars you use for the alignment the higher the slewing precision of
your telescope will be.
One-Star Alignment:
Step 2: After you select this option, you will be prompted to select a target
star. The software will select a star that is very visible in the night sky. If you
happen to know of a star you can see with the naked eye, you can choose it
by pressing the up and down arrow keys and then selecting it with the centre
key (5). In most cases, you will want to select the first option presented to
you. Do so by pressing the centre key (5).
Step 3: The telescope will now slew to that star and will prompt you to centre
it in the field of view, which you can do by using the arrow keys. The star
you're focusing on is the brightest star in the region your telescope is pointing at. When the star is centred, confirm the position with the centre key (5).
The telescope is now aligned.
Two- and Three-Star Alignment:
The procedure is similar to one-star alignment. The only difference is that
you'll have to repeat steps 2 and 3 twice or thrice depending on the type of
alignment you've chosen.
Note: If you have aligned the telescope, don’t move it manually. Use the
arrow keys on the handbox to make adjustments. If you do move it manually
or change the tripod orientation, the telescope has to be realigned.
5. Further Adjustment:
Target Sync:
With this method, you can further improve the alignment of the telescope.
After slewing to a star target you know, you can centre the object precisely in
the field of view. Press the centre key (5) and select 'Telescope Align', then
'Target Sync'. The telescope will align to that target and have more precise
positioning for further targets you want to observe.
Backlash Correction:
You can improve the precision of the telescope by training the backlash
correction of the axis. This must be done separately for each axis and is not
necessary for most cases.
Simply go to the main menu by pressing the centre key (5) and select
'Telescope Align' and then 'RA BKlash Corr.' to adjust the right ascension
axis (horizontal axis) or 'DEC BKlash Corr.' to adjust the declination axis
(vertical axis). Then follow the on-screen instructions.
Part III – Menus
Initial Start:
Welcome screen
Date and Time
Daylight saving
Status: off
Status: on
Custom Site
Name:
Lon:
Lat:
Zone:
Country & City
Country: up and down
City: left and right
OTA Zero
Main Menu Overview:
• Telescope Align
• One Star Align
• Two Star Align
• Three Star Align
• Target Sync
• RA BKlash Corr.
• DEC Bklash Corr.
Aligns the telescope with a single star
Aligns the telescope with two stars
Aligns the telescope with three stars
Further improves the alignment
of the telescope
Calibrate RA axis backlash
Calibrate DEC axis backlash
11