1
Instruction Manual – Bedienungsanleitung
PerfectBlue™
Horizontal Mini Gel Systems /
Horizontale Minigelsysteme
Mini S, M, L & Mini L 'Revolution'
0314_E+D
Creating the future together.
Instruction Manual PerfectBlueTM Horizontal Mini Gel Systems
CONTENTS
WARRANTY
2
PACKAGING LIST
2
SAFETY PRECAUTIONS
2
SYSTEM OVERVIEW
3
Technical properties
3
GENERAL INSTRUCTIONS
4
Setting up the system and pouring the agarose gel
Loading of samples and electrophoresis
Visualisation
Cleaning
REQUIRED REAGENTS & RECIPES
7
Electrophoresis buffers
Agarose: Gel volumes and percentage
Ethidium bromide
Loading buffer/Sample buffer
Molecular weight marker
7
8
8
9
9
TROUBLESHOOTING
9
TECHNICAL SUPPORT AND ORDERING INFORMATION
PerfectBlue™ Mini S
PerfectBlue™ Mini M
PerfectBlue™ Mini L & Mini L 'Revolution'
JustCast adjustable casting chamber
Power Supplies
Agaroses
11
11
11
12
12
13
13
LITERATURE
PEQLAB_v0314_E
4
5
5
6
14
1
Instruction Manual PerfectBlueTM Horizontal Mini Gel Systems
WARRANTY
PEQLAB guarantees that the horizontal electrophoresis system you have received has been thoroughly
tested and meets its published specification.
However, immediately upon arrival, please check carefully that the shipment is complete and has not
been damaged in transit. For missing parts or to report any kind of damage, please contact PEQLAB
(see 'TECHNICAL SUPPORT AND ORDERING INFORMATION'). Please retain all packaging materials
until the delivery has been completely checked since this will speed up the return of goods if required
and reduce environmental impact. Any form of returns, replacements or credit notes must be agreed in
advance by PEQLAB.
For the complete range of PerfectBlue™ electrophoresis and blotting systems, PEQLAB guarantees a warranty period of 36 months if the products have been used solely according to the instruction manual
unless a different warranty has been offered in writing. No liability is accepted for loss or damage arising from incorrect use. PEQLAB's liability is limited to the repair or replacement of the unit or refund of
the purchase price, at PEQLAB's discretion. PEQLAB is not liable for any consequential damages. After
the warranty period has expired, PEQLAB can offer repairs.
PEQLAB reserves the right to alter the technical specifications of the PerfectBlue™ electrophoresis or blotting systems without prior notice. This will enable us to implement developments as soon as they arise.
PACKAGING LIST
Unless requested otherwise, the following items are included in shipment for the models PerfectBlue™
Mini S, Mini M, Mini L and Mini L 'Revolution':
one buffer chamber with corrosion-protected platinum electrodes
one safety lid with attached power cords
one UV-transmissible gel tray with gaskets
Mini S: 2 combs,1.5 mm thick, 6 and 10 teeth
Mini M: 2 combs, 1.5 mm thick, 10 and 14 teeth
Mini L ('Revolution'): 2 combs, 1.5 mm thick, 12 and 20 teeth
User Manual
SAFETY PRECAUTIONS
Please, read this Instruction Manual carefully before using the gel system.
Only use a CE marked DC power supply.
Always disconnect the gel system from the power supply before removing the safety lid.
Always disconnect the gel system from the power supply when it is not in use or before moving it.
Running conditions for this unit should not exceed the maximum operating voltage or current.
Do not fill the chamber with running buffer above the maximum fill line.
The buffer ascending tube at the lower side of the Mini L 'Revolution' gel chamber may not be used
as a carry handle as it does not resist mechanical forces in perpetuity.
PEQLAB_v0314_E
2
Instruction Manual PerfectBlueTM Horizontal Mini Gel Systems
SYSTEM OVERVIEW
The horizontal electrophoresis systems PerfectBlue™ Mini S, M, L and Mini L 'Revolution' have been designed as 'all-in-one' systems that make it possible to cast and run gels in the same chamber. The user
does not need any additional casting equipment such as grease, agarose seals or other accessories to
seal the gel tray for pouring the gel.
All PerfectBlue™ horizontal Mini Gel Systems include a UV-transmissible gel tray, which has the minimum of two comb positions, allowing the user to run two sets of samples for equal distances simultaneously and a fluorescent ruler that helps in the precise photo documentation of each gel run.
In total PEQLAB offers 6 different Mini Gel Systems. In addition to the Mini S, M, L and L 'Revolution'
models that are described here, two wide-format Mini Gel Systems are available (Mini ExM and Mini
ExW). A comprehensive range of accessories is available for this range. These include stand-alone casting chambers for pouring up to 3 gels simultaneously while the chamber is in use, the adjustable casting
chamber JustCast, a wide variety of standard combs, microtiter combs (not available for Mini S), preparative combs and wall combs that allow you to cast shorter gels in a standard gel tray. Microtiter combs
allow you time-saving loading of the gels via a multi channel pipette.
For detailed information on available accessories visit www.peqlab.com or see 'TECHNICAL SUPPORT
AND ORDERING INFORMATION'.
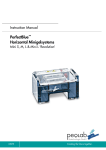
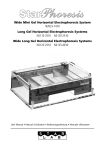
In contrast with all the other Mini Gel Systems,
the Mini L 'Revolution' model is equipped with
an internal buffer recirculation system. A trapping system captures hydrogen bubbles which
are produced at the cathode due to electrolysis,
and directs them through an ascending tube to
the opposing side of the buffer chamber where
the anode is located. During this hydrogen bubble migration, the buffer circulates, preventing
the creation of detrimental pH or ion gradients.
Schematic drawing: 'Revolution'-Technology
Technical properties
PerfectBlue™
Cat. No.
Mini S
40-0708
7 x 8 cm
Mini M
40-0911
Mini L
Mini L 'Revolution'
PEQLAB_v0314_E
Gel size (W x L)
Buffer volume
Voltage
Current
400 ml
20 - 150 V
1 - 75 mA
30 - 60 min
9 x 11 cm
600 ml
20 - 150 V
1 - 75 mA
45 - 90 min
40-1214
12 x 14 cm
800 ml
20 - 150 V
1 - 75 mA
60 - 120 min
40-1214R
12 x 14 cm
1000 ml
20 - 150 V
1 - 75 mA
60 - 240 min
3
Time required
Instruction Manual PerfectBlueTM Horizontal Mini Gel Systems
GENERAL INSTRUCTIONS
Setting up the system and pouring the agarose gel
1. Remove the lid from the gel box by holding the front of the buffer chamber with one hand and pulling the lid off by holding the center of the back of the lid.
2. For shipping and convenient storage, the gel tray is packaged inside the unit upon arrival. This is
also the correct 90 ° tray position for casting a gel. To remove the gel tray, hold the unit firmly with
one hand; grasp the long sides of the UVT gel tray and pull up slowly at an angle. The tray needs to
fit snug for leak proof gel casting, so it may seem somewhat tight. 'Walking' the tray upwards at an
angle may be helpful.
3. To cast a gel, place the gel tray into the chamber so that the gasketed ends press against the walls
of the buffer chamber. Make sure the gel tray is pressed all the way down and rests level on the
unit’s platform. Moistening the rubber gaskets of the gel tray may facilitate the placement into the
chamber. Similarly the gel trays can be sealed in optional casting chambers.
Optional: The wall comb available for Mini L and Mini L 'Revolution' allows you to sub-divide the
gel tray in order to cast shorter gels. The wall comb should be sealed with 2 % agarose before pouring the gel.
4. Use electrophoresis-grade agarose and compatible electrophoresis buffer to prepare the gel. The
percentage of agarose and the buffer to be used is determined by the size of the samples to be
separated and further recovery of the samples (see 'REQUIRED REAGENTS & RECIPES'). The agarose and buffer are mixed and heated over a heat plate by stirring or in a microwave oven until the
agarose is completely dissolved.
5. The prepared gel must then be cooled to below 60 °C before casting to avoid warping the UVT gel
tray due to excessive heat. If numerous gels are to be run in one day, a large volume of gel may be
prepared and be placed in a covered bottle stored between 40 - 60 °C in a water bath.
6. Pour or pipette the correct amount (see 'Agarose: Gel volumes and percentage') of warm agarose
(< 60 °C) onto the UVT gel tray that has been placed into the casting position in the gel box. Immediately after pouring, insert the desired comb or combs into the comb slots to form the sample wells.
Standard agarose should solidify completely in about 30 minutes. If low melting point or a specialty
agarose is used, consult the instructions that came with the product.
PEQLAB_v0314_E
4
Instruction Manual PerfectBlueTM Horizontal Mini Gel Systems
Loading of samples and electrophoresis
1. Once the gel is completely solidified, lift the tray out of the chamber, turn it 90 °, and replace it in
the chamber with the first comb closest to the cathode side (black electrode) of the chamber. The
running position exposes the open ends of the agarose to the buffer.
2. Pour enough compatible running buffer into the unit to fill chamber and completely cover and submerge the gel. A 'Fill Line' is located on each unit to clearly mark the correct buffer level. See 'Technical properties' for approximate buffer volumes needed for your unit. Too little buffer may cause
the gel to dry out during the run, while excess buffer may slow DNA migration in the gel, increase
heat build-up and cause distorted bands.
3. Carefully remove the comb (or combs) by tapping lightly to loosen, and slowly lift straight up out of
the gel tray to avoid damage to the wells.
4. Load prepared samples into the wells. Samples should be mixed with a sample loading buffer (giving weight to the samples so that they drop evenly into the wells), and contain tracking dye to monitor the gel run. For details on approximate well volumes see 'TECHNICAL SUPPORT & ORDERING
INFORMATION'. If Microtiter combs have been used, wells can be loaded by a multi channel pipette. Wells that have been cast with microtiter combs of 26 teeth or less can be loaded 'directly',
i.e. the pipette tips fit sequentially into the gel wells.
NOTE: It is wise to always run a sample lane of a known 'standard ladder' to determine concentration and size of separated fragments after the gel run, and to aid in photo documentation and analysis.
5. Carefully slide the lid with attached power cords onto the unit. This will connect the power cords to
the banana plugs to complete the circuit. Plug the other end of the cords (4 mm, male) into an appropriate power supply.
Take care to the proper orientation of the electrical field. Remember that nucleic acids are negatively
charged in an alkaline to neutral surrounding and therefore will migrate to the positively charged
anode. In general, the color coding for positively charged electrodes is red.
6. Turn on the power supply and run the gel at the appropriate voltage/current (see 'Technical properties'). You can observe the progress of electrophoresis by the visual migration of the loading dye.
Note that in 0.5 x TBE gels bromophenol blue co-migrates at 300 bp and xylene cyanol at 4 kbp
with the DNA fragments.
PEQLAB_v0314_E
5
Instruction Manual PerfectBlueTM Horizontal Mini Gel Systems
Visualization
When the tracking dye has migrated as far through the gel as desired, or to the end of the gel, turn off
the power supply and slide off the lid to disconnect from the power source. Carefully remove the tray
containing the gel (wear gloves). The UV-transmissible gel tray makes for simple visualization and photography with a UV light source without the need to remove the gel from the tray. The gel tray may be
placed back into the casting chamber for convenient transport to the darkroom and to avoid damage to
the gel.
Cleaning
The buffer chamber and tray should be rinsed under warm running water after each use. Use a mild
detergent to get rid of any debris. A following short rinse off with distilled water prevents the formation
of salt marks. It is recommended to allow the chamber to air dry rather than drying with a towel to
avoid damage to the electrode wires.
Do not use ethanol or other organic solvents to clean acrylic products, because organic solvents cause
acrylic to 'craze' or crack!
PEQLAB_v0314_E
6
Instruction Manual PerfectBlueTM Horizontal Mini Gel Systems
REQUIRED REAGENTS & RECIPES
Electrophoresis buffers
Electrophoresis buffers supply the ions necessary for electrophoresis and establishing a certain pH value
in which the target molecule adapts to the required electric charge. Nucleic acids will be negatively
charged in an alkaline to neutral surrounding. Additionally, electrophoresis buffers often contain reagents which protect the target molecule from degradation (e.g. EDTA, which complexes bivalent
cations and therefore inhibits DNases). If electrophoresis under denaturing conditions is desired (like for
the electrophoresis of RNA), electrophoresis buffers will additionally contain reagents that eliminate the
formation of secondary structures. You will find recipes below for TAE and TBE, two of the most commonly used buffers for the electrophoresis of DNA. If the intention is to eventually isolate DNA from the
gel, TAE buffer should be chosen. In comparison to TBE, migration will be faster and a better resolution
of supercoiled DNA will be achieved when using TAE. However, because of TAE's limited buffering
capacity, TBE should be selected for performing extended electrophoresis separations and if the electrophoresis chamber does not possess a system for buffer recirculation. PEQLAB's PerfectBlue 'Revolution'
Systems are equipped with an internal buffer recirculation system that prevents the formation of pH and
ion gradients during extended runs. Since agarose tends to create finer pore sizes and a more solid
matrix in TBE, diffusion of DNA will be reduced and a more discrete band pattern will be achieved.
TAE (Tris-Acetate-EDTA) Buffer
1 x working solution:
50 x stock solution (1 L):
TBE (Tris-Borate-EDTA) Buffer
0.5 x working solution*:
5 x stock solution (1 L)**:
40 mM Tris-acetate, 1 mM EDTA
242 g Tris-Base
57.1 ml Glacial acetic acid
100 ml 0.5 M EDTA (pH 8.0)
Adjust volume to 1L using distilled H2O
45 mM Tris-Borate, 1 mM EDTA
54 g Tris-Base
27.5 g Boric acid
20 ml 0.5 M EDTA (pH 8.0)
Adjust volume to 1L using distilled H2O
* 0.5 x TBE is sufficient for agarose gel electrophoresis. For vertical electrophoresis in polyacrylamide gels,
1 x TBE is often applied due to the comparatively smaller buffer reservoirs of vertical electrophoresis chambers.
** 5 x TBE stock solutions tend to precipitate during long storage periods and should get remade. Because of this
property, higher concentrations of TBE stock solutions should be avoided.
PEQLAB_v0314_E
7
Instruction Manual PerfectBlueTM Horizontal Mini Gel Systems
Agarose: Gel volumes and percentage
PEQLAB offers an extensive range of high quality agaroses, for many specific applications (see 'TECHNICAL SUPPORT AND ORDERING INFORMATION').
The required volume of the gel is calculated using the following formula.
gel width (cm) x gel length (cm) x gel thickness (cm) = required volume agarose solution (ml)
The following volumes will result:
Model
Gel size (cm)
PerfectBlue Mini S
PerfectBlue Mini M
PerfectBlue Mini L ('Revolution')
7 x 8 (W x L)
9 x 11 (W x L)
12 x 14 (W x L)
Gel thickness (cm)
0.25
0.5
14 ml
28 ml
25 ml
50 ml
42 ml
84 ml
0.75
42 ml
75 ml
126 ml
1.0
56 ml
100 ml
168 ml
The optimal range of DNA fragment sizes separated by any electrophoresis experiment is dependent on
the agarose concentration of the gel. The higher the agarose concentration, the better small fragments
are separated from each other and vice versa. However, for the smallest or largest fragment lengths, the
usage of specialized agaroses or polyacrylamide gels should be considered (see table below) since a
3 % agarose solution solidifies rapidly and a 0.3 % agarose gel is very soft and difficult to handle.
Agarose content (w/v)
0.3 %
0.5 %
0.7 %
1.0 %
1.2 %
1.5 %
2.0 %
3.0 %
Agarose (g)
0.3
0.5
0.7
1.0
1.2
1.5
2.0
3.0
Buffer (ml)
100
100
100
100
100
100
100
100
optimal separation range (kb)
5 - 30
1 - 15
0.8 - 10
0.5 - 7
0.3 - 6
0.2 - 4
0.1 - 3
< 0.1
Ethidium bromide
The gel may be stained during or following the run with a variety of stains for photo documentation. The
most common stain for DNA is ethidium bromide. Because of its capacity to intercalate into double
stranded nucleic acids and alter the conformation of DNA, ethidium bromide is judged to be highly
mutagenic. Therefore appropriate safety measures must be applied.
Ethidium bromide may be added directly to the gel before pouring it at a concentration of 0.1 to
0.5 μg/ml. However, being positively charged, ethidium bromide will migrate to the cathode during the
electrophoresis leading to uneven staining. Improved results can be obtained by incubating the gel after
the electrophoresis is finished in electrophoresis buffer containing 0.5 μg/ml ethidium bromide for 5 to
20 min. Subsequently the gel should get rinsed in electrophoresis buffer without ethidium bromide for up
to 20 min in order to reduce background signal.
PEQLAB_v0314_E
8
Instruction Manual PerfectBlueTM Horizontal Mini Gel Systems
Loading buffer/Sample buffer
Samples are prepared and mixed with loading buffer before applying to the prepared gel. Sample buffers contain dyes for visibility and glycerol to provide weight to the samples. This increased sample density ensures samples load evenly into the wells and do not float out during loading. Dyes also migrate
toward the anode end of the electrophoresis chamber at predictable rates allowing the gel run to be
monitored. In 0.5 x TBE gels, bromophenol blue migrates at the same rate as 300 bp DNA fragments
and xylene cyanol approximately at the same rate as 4 kbp DNA fragments.
6 x DNA sample buffer:
0.25 % (w/v) bromophenol blue
0.25 % (w/v) xylene cyanol FF
30 % (v/v) glycerol
Molecular weight marker
Markers are run on each gel to monitor the quality of sample separation and to enable a size estimation
of specific bands. By running a known marker of a specific concentration in parallel, the DNA amount
of the unknown samples can be estimated. PEQLAB offers an extensive range of DNA and RNA markers. For detailed information please contact us or visit www.peqlab.com.
TROUBLESHOOTING
Some possible solutions to potential problems are listed below. If these suggestions are unclear or unsuccessful, please contact PEQLAB-Service-Team (TECHNICAL SUPPORT & ORDERING INFORMATION).
Problem: Agarose leaks into chamber when pouring gel
Check to see if the gasket is firmly seated in the grooves on the ends of the UVT gel tray. Reseat gasket if
necessary by removing and rinsing under warm running water, then reseat evenly in the tray groove.
Problem: Bands appear diffused in the gel or bands seem to be running at an angle (Gel smiling).
Check to be sure the casting is being done on a level surface. Also confirm that the gel tray is inserted
all the way into the unit and rests on the platform for level gel casting. The voltage may be too high. Try
lowering the voltage setting on the power supply. Electrophoresis buffer may have been prepared with
wrong or expired chemicals. Perhaps no electrophoresis buffer has been used for preparing the gel
solution. Check if the stock solution of the electrophoresis buffer was diluted correctly for the preparation
of the working solution.
Problem: Samples seem to be running unevenly in certain areas.
Check that the platinum electrode wire is intact and running evenly across the base of the chamber and
up the side to the junction of the banana plug. The unit should produce small bubbles as the current
passes through. If there appears to be a break in the electrode connection, contact PEQLAB immediately. This problem may also be caused by regularly casting with very hot agarose gel (> 60 °C). Always cool the melted agarose to below 60 °C before casting to avoid warping the UVT gel tray. Warping the gel tray will cause all subsequent gels to be cast unevenly and hence cause bad electrophoretic
separation.
PEQLAB_v0314_E
9
Instruction Manual PerfectBlueTM Horizontal Mini Gel Systems
Problem: Samples do not band sharply.
Gels should be allowed to solidify completely before running. Standard agarose should solidify in about
30 minutes. If low melting point agarose is used, it may be necessary to completely solidify gels at a
cooler temperature in the refrigerator or cold room. Gels should be submerged in 3 - 5 mm of buffer to
prevent the gel from drying out, but excess buffer (> 5 mm) can cause decreased DNA mobility and
band distortion. Perhaps too much nucleic acid was applied to the wells potentially leading to 'smearing' of the bands.
Problem: Samples are remaining in the wells, running 'backwards' or diffusing out of the gel.
Check that a complete power circuit is achieved between the unit and the power supply. Platinum wire
and banana plugs should be intact. To test, simply fill the unit with running buffer and attach to the power supply without a gel or gel tray in the unit. The platinum wires on both sides of the unit should produce small bubbles as the current passes through. If a complete circuit does not exist there will be little to
no bubbles. If samples appear to run backwards through the gel or there are no bands visible, check to
be sure that the gel tray was placed in the electrophoresis chamber in the proper orientation. If the orientation or polarity is reversed, the samples will run backwards or migrate off the gel. The tray should
be placed in the chamber with the comb at the edge of the tray closest to the cathode side (black) of the
chamber.
Problem: When the comb is removed from the gel the sample well is ripped and damaged.
Always make sure to allow the gel to solidify completely and note that the gel should be submerged by
running buffer before moving the tray, unit, or removing the comb. To avoid damage to the sample
wells, gently rock the comb back and forth lightly to loosen and then slowly pull the comb straight up out
of the gel tray. This rocking helps to avoid suction as the comb is removed.
Problem: The gel seems to run slower under the usual running conditions.
The volume of running buffer used to submerge the gel should only be between 3 - 5 mm over the gel
surface. Gel should be completely submerged to avoid the gel from drying out and to assure that a uniform electrical field can be generated. However, if excessive running buffer is used, the current flow
through the gel and the migration of the DNA is decreased.
PEQLAB_v0314_E
10
Instruction Manual PerfectBlueTM Horizontal Mini Gel Systems
TECHNICAL SUPPORT AND ORDERING INFORMATION
For technical questions and more detailed information on PEQLAB’s products please visit
www.peqlab.com to find the respective contact person.
PerfectBlue™ Mini S
Item
Gel system Mini S
Casting chamber
Gel tray
MultiCast Casting chamber
Gaskets
Standard combs
Description
complete system for gels 7 x 8 cm (W x L)
Casting chamber for up to 3 gel trays
UV-transmissible gel tray and gaskets
Casting chamber and 3 UV-transmissible gel trays
2 rubber gaskets for gel tray
1.5 mm
5 teeth
64 μl*
1.5 mm
6 teeth
51 μl*
1.5 mm
8 teeth
36 μl*
1.5 mm
10 teeth
26 μl*
1.5 mm
12 teeth
21 μl*
1.0 mm
5 teeth
42 μl*
1.0 mm
6 teeth
34 μl*
1.0 mm
8 teeth
24 μl*
1.0 mm
10 teeth
18 μl*
1.0 mm
12 teeth
14 μl*
Preparative comb
1.5 mm
2 teeth
320/28 μl*
* volumes are calculated for a gel thickness of 5 mm
Cat. No.
40-0708
40-0708-CST
40-0708-UVT
40-0708-MC
40-0708-GK
40-0708-5D
40-0708-6D
40-0708-8D
40-0708-10D
40-0708-12D
40-0708-5C
40-0708-6C
40-0708-8C
40-0708-10C
40-0708-12C
40-0708-PD
PerfectBlue™ Mini M
Item
Gel system Mini M
Casting chamber
Gel tray
MultiCast Casting chamber
Gaskets
Standard combs
Description
complete system for gels 9 x 11 cm (W x L)
Casting chamber for up to 3 gel trays
UV-transmissible gel tray and gaskets
Casting chamber and 3 UV-transmissible gel trays
2 rubber gaskets for gel tray
1.5 mm
5 teeth
86 μl*
1.5 mm
8 teeth
51 μl*
1.5 mm
10 teeth
38 μl*
1.5 mm
12 teeth
30 μl*
1.5 mm
14 teeth
25 μl*
1.0 mm
5 teeth
58 μl*
1.0 mm
8 teeth
34 μl*
1.0 mm
10 teeth
25 μl*
1.0 mm
12 teeth
20 μl*
1.0 mm
14 teeth
16 μl*
Microtiter combs
1.5 mm
9 teeth
40 μl*
1.5 mm
18 teeth
16 μl*
1.0 mm
9 teeth
27 μl*
1.0 mm
18 teeth
11 μl*
Preparative comb
1.5 mm
2 teeth
439/28 μl*
* volumes are calculated for a gel thickness of 5 mm
PEQLAB_v0314_E
11
Cat. No.
40-0911
40-0911-CST
40-0911-UVT
40-0911-MC
40-0911-GK
40-0911-5D
40-0911-8D
40-0911-10D
40-0911-12D
40-0911-14D
40-0911-5C
40-0911-8C
40-0911-10C
40-0911-12C
40-0911-14C
40-0911-9D
40-0911-18D
40-0911-9C
40-0911-18C
40-0911-PD
Instruction Manual PerfectBlueTM Horizontal Mini Gel Systems
PerfectBlue™ Mini L & Mini L 'Revolution'
The same accessories are used for both models, Mini L and Mini L 'Revolution'.
Item
Gel system Mini L
Gel system Mini L 'Revolution'
Casing chamber
Gel tray L4
Gel tray L12
MultiCast Casting chamber
Gaskets
Wall comb
Standard combs
Description
complete system for gels 12 x 14 cm (W x L)
complete system for gels 12 x 14 cm (W x L)
Casting chamber for up to 3 gel trays
UV-transmissible gel tray and gaskets, for up to 4 combs
UV-transmissible gel tray and gaskets, for up to 12 combs
Casting chamber and 3 UV-transmissible gel trays
2 rubber gaskets for gel tray
Wall comb for dividing up the gel tray
1.5 mm
8 teeth
70 μl*
1.5 mm
16 teeth
30 μl*
1.5 mm
20 teeth
22 μl*
1.5 mm
24 teeth
17 μl*
1.0 mm
8 teeth
47 μl*
1.0 mm
16 teeth
20 μl*
1.0 mm
20 teeth
15 μl*
1.0 mm
24 teeth
11 μl*
Microtiter combs
1.5 mm
9 teeth
40 μl*
1.5 mm
12 teeth
40 μl*
1.5 mm
25 teeth
16 μl*
1.0 mm
9 teeth
27 μl*
1.0 mm
12 teeth
27 μl*
1.0 mm
25 teeth
11 μl*
Preparative comb
1.5 mm
2 teeth
596/28 μl*
* Volumes are calculated for a gel thickness of 5 mm
Cat. No.
40-1214
40-1214R
40-1214-CST
40-1214-UVT
40-1214-UVT
40-1214-MC
40-1214-GK
40-1214-WC
40-1214-8D
40-1214-16D
40-1214-20D
40-1214-24D
40-1214-8C
40-1214-16C
40-1214-20C
40-1214-24C
40-1214-9D
40-1214-12D
40-1214-25D
40-1214-9C
40-1214-12C
40-1214-25C
40-1214-PD
JustCast adjustable casting chamber
For the simple, leak-proof casting of up to three Mini S gels, two Mini M gels, two Mini L gels, one Mini
ExM gel or one Mini ExW gel.
Item
JustCast
PEQLAB_v0314_E
Description
Adjustable Casting Chamber for PerfectBlue™ Mini Gel
Systems, including a 3-point leveling system with water
level
12
Cat. No.
40-CST
Instruction Manual PerfectBlueTM Horizontal Mini Gel Systems
Power Supplies
Do not hesitate to contact us for advice on which Power Supply is most suitable for your application.
Item
Ports
max. Voltage (V)
max. Current (mA)
Power (W)
EV222
3
200
200
20
E300
4
300
500
90
EV245
3
400
500
50
EV231
4
300
1000
150
EV265
4
600
500
150
E250
4
250
3000
300
EV202
4
300
2000
300
EV261
4
600
1000
300
EV215
4
1200
500
300
EV232
4
3000
150
150
EV233
4
3000
300
300
EV262
4
6000
150
300
1)
Not available for customers in the US.
2)
For a 110 V US version please replace '230V' with '110V' in the ordering number.
Cat. No.
55-EV2221)
55-E300-230V2)
55-EV2451)
55-EV2311)
55-EV2651)
55-E250-230V2)
55-EV2021)
55-EV2611)
55-EV2151)
55-EV2321)
55-EV2331)
55-EV2621)
Agaroses1)
Item
peqGOLD Universal-Agarose
Purpose
Suitable for standard applications. Separation range between 0.05 and 50 kb.
Amount
100 g
500 g
1000 g
Cat. No.
35-1010
35-1020
35-1030
peqGOLD 'Low Melt'-Agarose
For the preparative separation of DNA fragments between 0.08 and 20 kbp.
25 g
100 g
250 g
35-2010
35-2020
35-2030
peqGOLD MoSieve-Agarose MS-500
Especially for high-resolution separation of
small fragments (0.01 - 1 kbp).
25 g
100 g
250 g
35-3010
35-3020
35-3030
peqGOLD MoSieve-Agarose MS-1000
Especially for high-resolution separation of
small fragments between 0.05 - 2 kbp.
25 g
100 g
250 g
35-4010
35-4020
35-4030
peqGOLD MegaBase-Agarose
Especially for separation of larger DNA fragments between 0.2 and 50 kbp.
25 g
100 g
250 g
35-5010
35-5020
35-5030
1)
Not available for customers in the US.
PEQLAB_v0314_E
13
Instruction Manual PerfectBlueTM Horizontal Mini Gel Systems
LITERATURE
SAMBROOK J, FRITSCH E. F. AND MANIATIS T. (1989) Molecular Cloning: A Laboratory Manual. Cold
Spring Harbor Laboratory Press, NY.
FREDERIK M. AUSUBEL et al. (Ed.) Short Protocols in Molecular Biology, - A Compendium of Methods from
Current Protocols in Molecular Biology.
OGDEN R. AND ADAMS D. A. (1987) Electrophoresis in Agarose and Acrylamide Gels. Methods Enzymol. 152: 61-87.
FOTADOR U., SHAPIRO L. E. AND SURKS, M. I. (1991) Simultaneous Use of Standard and Low-Melting Agarose for the Separation and Isolation of DNA by Electrophoresis. Bio Techniques, 10 (2): 171-2.
BOOTS S. (1989) Gel Electrophoresis of DNA. Anal. Chem., 61 (8): 551a-553a.
PEQLAB_v0314_E
14
Bedienungsanleitung PerfectBlueTM Horizontale Minigelsysteme
INHALT
GARANTIE
16
LIEFERUMFANG
16
SICHERHEITSHINWEISE
16
SYSTEMÜBERBLICK
17
Technische Merkmale
17
ALLGEMEINE BEDIENUNGSHINWEISE
18
Vorbereitung des Systems und Gießen des Agarosegels
Beladen des Gels und Elektrophorese
Auswertung/Dokumentation
Reinigung
BENÖTIGTE MATERIALIEN & REZEPTE
18
19
20
20
21
Elektrophoresepuffer
Agarose: Gelvolumen und -Konzentration
Ethidiumbromid
Lade- oder Probenpuffer
Längenstandards
21
22
22
23
23
TROUBLESHOOTING
23
TECHNISCHER SERVICE & BESTELLINFORMATIONEN
25
PerfectBlue™ Mini S
PerfectBlue™ Mini M
PerfectBlue™ Mini L & Mini L 'Revolution'
Justierbare Gießschiene JustCast
Power Supplies
Agarosen
25
25
26
26
27
27
LITERATUR
PEQLAB_v0314_D
28
15
Bedienungsanleitung PerfectBlueTM Horizontale Minigelsysteme
GARANTIE
PEQLAB garantiert, dass das ausgelieferte System genauestens geprüft wurde und den geltenden Anforderungen entspricht.
Bitte überprüfen Sie die Lieferung dennoch umgehend nach Erhalt auf Vollständigkeit und eventuelle
Transportschäden. Sollte die Lieferung beschädigt oder fehlerhaft sein, wenden Sie sich bitte umgehend
an den Technischen Service von PEQLAB oder Ihren PEQLAB-Außendienstmitarbeiter (siehe 'TECHNISCHER SERVICE & BESTELLINFORMATIONEN'). Durch die Aufbewahrung des Verpackungsmaterials
bis zur vollständigen Prüfung der Lieferung wird die Umwelt geschont und eine evtl. Rückholung beschleunigt. Alle Rücksendungen, Austauschlieferungen und Gutschriften müssen zuvor von PEQLAB freigegeben werden.
Auf sämtliche PerfectBlue™ Elektrophorese- und Blottingsysteme gewährt PEQLAB 36 Monate Garantie,
sofern die Systeme ausschließlich der Bedienungsanleitung entsprechend verwendet wurden und keine
anderslautende Vereinbarung besteht. Ansprüche auf Ersatz oder Reparatur, die aus einer fehlerhaften
Verwendung entstanden sind, werden nicht erfüllt. Die PEQLAB GmbH verpflichtet sich zur Reparatur
oder dem Ersatz des Gerätes bzw. der Rückerstattung des Kaufpreises nach ihren Bedingungen. PEQLAB haftet nicht für Folgeschäden, die aus der Verwendung des Systems entstanden sind. Nach Ablauf
der Garantiezeit können defekte PerfectBlue™ Elektrophorese- oder Blotting-Systeme durch PEQLAB
kostengünstig repariert werden.
Um Neuentwicklungen zeitnah einführen zu können, behält es sich PEQLAB vor, technische Details ohne
Vorankündigung zu ändern.
LIEFERUMFANG
Sofern nicht anders vereinbart bzw. auf dem Lieferschein angegeben, enthält der Lieferumfang der Modelle Mini S, Mini M, Mini L und Mini L 'Revolution' folgende Komponenten:
eine Pufferkammer mit korrosionsgeschützten Platinelektroden
einen Sicherheitsdeckel mit fest angeschlossenen Stromkabeln
einen UV-durchlässigen Gelträger mit stabilen Gummidichtungen
Mini S: 2 Kämme, 1.5 mm dick, 6 und 10 Zähne
Mini M: 2 Kämme, 1.5 mm dick, 10 und 14 Zähne
Mini L ('Revolution'): 2 Kämme 1.5 mm dick, 12 und 20 Zähne
eine Bedienungsanleitung
SICHERHEITSHINWEISE
Bitte lesen Sie diese Bedienungsanleitung sorgfältig durch, bevor Sie das System in Betrieb nehmen.
Verwenden Sie zur Stromversorgung eine CE-konforme Gleichstrom-Spannungsquelle.
Trennen Sie das System von der Stromversorgung, bevor Sie den Sicherheitsdeckel entfernen.
Trennen Sie das System bei Nichtbenutzung stets von der Stromversorgung.
Die für das System definierte maximale Stromstärke und Spannung sollte nicht überschritten werden.
Die Pufferkammer darf nicht über die maximale Fülllinie hinaus befüllt werden.
Das Puffersteigrohr an der Unterseite der Gelkammer Mini L 'Revolution' darf nicht als 'Tragegriff'
verwendet werden, da es entsprechender mechanischer Belastung auf Dauer nicht standhält.
PEQLAB_v0314_D
16
Bedienungsanleitung PerfectBlueTM Horizontale Minigelsysteme
SYSTEMÜBERBLICK
Bei den horizontalen Minigelkammern Mini S, M, L und Mini L 'Revolution' handelt es sich um 'All-inone'-Systeme, bei denen die Gele in der Kammer ohne zusätzliche Abdichtmaterialien oder Vorrichtungen gegossen und verwendet werden können.
Alle PerfectBlue™ Horizontalen Minigelsysteme enthalten einen UV-durchlässigen Gelträger mit mindestens zwei Kammpositionen, die es dem Benutzer erlauben, mindestens 2 Probenreihen gleichzeitig laufen zu lassen. Das fluoreszierende Lineal auf dem Gelträger hilft später bei der präzisen Fotodokumentation des Gels.
PEQLAB bietet insgesamt 6 unterschiedliche PerfectBlue™ Minigelsysteme an. Zusätzlich zu den hier
beschriebenen Minigelsystemen S, M, L und L 'Revolution' stehen die beiden Breitformatgelsysteme Mini
ExM und Mini ExW zu Verfügung. Optional erhältliche Gießschienen oder MultiCast Gießstände ermöglichen das Gießen von bis zu 3 Gelen während die Kammer in Benutzung ist. Die justierbare Gießschiene JustCast ist darüber hinaus für das komfortable Abdichten sämtlicher Minigelträger geeignet.
PEQLAB bietet eine Vielzahl von Standard- und Mikrotiterkämmen (nicht erhältlich für Mini S) in zwei
verschiedenen Dicken (1 und 1.5 mm) an. Mikrotiterkämme erlauben das zeitsparende Beladen der
Gele mit Mehrkanalpipetten. Für die größeren Gelsysteme (Mini L und Mini L 'Revolution') stehen zusätzlich einsetzbare Zwischenwände (Trennkämme) zur Verfügung, mit deren Hilfe bei Bedarf kürzere
Gele gegossen werden können, um Agarose einzusparen.
Eine ausführliche Auflistung des zur Verfügung stehenden Zubehörs ist im Kapitel 'TECHNISCHER SERVICE & BESTELLINFORMATIONEN' zu finden.
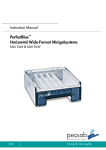
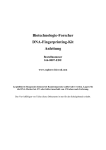
Im Unterschied zu den übrigen Minigelkammern ist das Modell Mini L 'Revolution' mit
einem System zur automatischen Pufferumwälzung ausgestattet. Seine Funktionsweise beruht
darin, dass Wasserstoffbläschen, welche durch
Elektrolyse an der Kathode entstehen, aufgefangen und durch ein aufsteigendes Rohr zur Anodenseite der Gelkammer geleitet werden. Durch
den dabei mitgerissenen Puffer kommt es zu
einer Pufferumwälzung, welche die Bildung von
störenden pH-und Ionengradienten verhindert.
Schemazeichnung: 'Revolution'-Technologie
Technische Merkmale
PerfectBlue™
Bestell-Nr.
Gelgröße (B x L)
Puffervolumen
Spannung
Stromstärke
typ. Laufzeit
Mini S
40-0708
7 x 8 cm
400 ml
20 - 150 V
1 - 75 mA
30 - 60 min
Mini M
40-0911
9 x 11 cm
600 ml
20 - 150 V
1 - 75 mA
45 - 90 min
Mini L
40-1214
12 x 14 cm
800 ml
20 - 150 V
1 - 75 mA
60 - 120 min
Mini L 'Revolution'
40-1214R
12 x 14 cm
1000 ml
20 - 150 V
1 - 75 mA
60 - 240 min
PEQLAB_v0314_D
17
Bedienungsanleitung PerfectBlueTM Horizontale Minigelsysteme
ALLGEMEINE BEDIENUNGSHINWEISE
Vorbereitung des Systems und Gießen des Agarosegels
1. Entfernen Sie den Sicherheitsdeckel von der Gelkammer durch Festhalten der Pufferkammer mit der
einen Hand und Ziehen an der Rückseite des Deckels mit der anderen Hand.
2. Der Gelträger ist für den Versand bereits in die Gelkammer eingesetzt und zwar in der 90 °Position, welche auch beim Gießen der Gele Verwendung findet. Um den Gelträger aus der Kammer herauszunehmen, halten Sie die Pufferkammer mit einer Hand fest und ziehen den Gelträger
langsam nach oben heraus. Abwechselndes Anheben der Seiten des Gelträgers unterstützt die Entnahme des Gelträgers. Bitte achten Sie darauf, den Gelträger dabei nur um seine Längsachse, nicht
aber um seine Querachse zu verkanten. Letzteres kann aufgrund der mechanischen Beanspruchung
auf Dauer zu Rissen an den Rinnen an den beiden Enden des Gelträgers führen.
3. Falls Sie den Gelträger aus der Pufferkammer entnommen oder in Laufrichtung gedreht hatten, setzen Sie ihn zum Gießen des Gels bitte um 90 ° von der Laufrichtung gedreht in die Gelkammer ein.
Auf diese Weise werden die beiden offenen Enden des Gelträgers über die Gummidichtungen von
den Gelkammerwänden abgedichtet. Wichtig ist, dass der Gelträger ganz nach unten gedrückt ist
und gerade in der Kammer sitzt. In ähnlicher Weise können die Gelträger auch in externen Gießschienen abgedichtet werden. Ein vorheriges Anfeuchten der Gummidichtungen des Gelträgers erleichtert dessen Einsetzen in die Kammer. Bei der Verwendung der justierbaren Gießschiene
JustCast kann auf die beiden Gummidichtungen des Gelträgers verzichtet werden.
Optional: Mit dem für die Mini L und Mini L 'Revolution' erhältlichen Trennkamm kann der Gelträger
unterteilt werden, um kürzere Gele zu gießen. Da der Trennkamm keine Gummidichtungen enthält,
sollte er mit 2 %iger Agaroselösung abgedichtet werden, bevor das eigentliche Gel gegossen wird.
4. Für Gele sollten nur für Elektrophorese taugliche Agarosen und entsprechende Puffer benutzt werden. Das Gel kann auf verschiedene Arten angesetzt werden. Agaroseart und -Konzentration sowie
der verwendete Puffer sind abhängig von Art und Länge der aufzutrennenden Nukleinsäuren sowie
den geplanten Folgeanwendungen (siehe 'BENÖTIGTE MATERIALIEN & REZEPTE'). Die entsprechende Menge Agarose wird in den Puffer gegeben, gemischt und über einer Heizplatte unter Rühren erhitzt bzw. in der Mikrowelle aufgekocht, bis die Agarose komplett aufgelöst ist.
5. Um eine Verformung der Gelträger aufgrund zu hoher Temperaturen zu vermeiden, sollte die Gellösung auf 60 °C abgekühlt sein, bevor sie in den Gelträger gegossen wird. Werden an einem Tag
zahlreiche Gele benötigt, kann eine größere Menge Gellösung angesetzt und in einem bedeckten
Gefäß bei 60 °C im Wasserbad oder Wärmeschrank bis zur weiteren Verwendung aufbewahrt
werden.
6. Unmittelbar nachdem eine entsprechende Menge (siehe 'Agarose: Gelvolumen und -Konzentration')
der Agaroselösung möglichst luftblasenfrei in den Gelträger gegossen wurde, sollten der oder die
Kämme eingesetzt werden. Gele aus handelsüblicher Standard-Agarose verfestigen sich bei Raumtemperatur innerhalb von ca. 30 Minuten. Sollten Sie 'Low-Melting'- oder andere Spezialagarosen
verwenden, befolgen Sie bitte die jeweiligen Herstellerangaben.
PEQLAB_v0314_D
18
Bedienungsanleitung PerfectBlueTM Horizontale Minigelsysteme
Beladen des Gels und Elektrophorese
1. Sobald das Gel vollständig fest ist, kann der Gelträger für den Gellauf passend eingesetzt werden,
d.h. wie oben beschrieben herausgenommen und um 90 ° versetzt wieder in die Pufferkammer eingesetzt werden, so dass die offenen Enden des Gelträgers zu den Pufferreservoiren gerichtet sind.
2. Füllen Sie nun so viel Elektrophoresepuffer in beide Pufferreservoire der Kammer bis das Gel komplett mit ca. 3 mm Puffer überschichtet ist; maximal aber bis zur Markierung 'Fill Line', die auf jeder
Pufferkammer zu finden ist. Eine ungefähre Angabe der dazu benötigten Puffervolumina finden Sie
unter 'SYSTEMÜBERBLICK/Technische Merkmale'. Zu wenig Puffer kann zum Austrocknen des Gels
während des Laufs führen, wogegen zu viel Puffer eine verminderte Migrationsgeschwindigkeit, erhöhte Wärmeentwicklung und ein verzerrtes Bandenmuster zur Folge haben kann.
3. Entfernen Sie die Kämme vorsichtig aus dem Gel, ohne die Taschen zu beschädigen, indem Sie sie
zum Lockern leicht hin- und herbewegen und dann gerade nach oben herausziehen.
4. Beladen Sie die Taschen nun mit den vorbereiteten Proben. Die Proben sollten mit einem entsprechenden Ladepuffer versetzt sein, damit sie gleichmäßig in die Taschen einsinken und der Fortschritt
des Gellaufs verfolgt werden kann. Angaben zum ungefähren Taschenvolumen finden Sie unter
'TECHNISCHER SERVICE & BESTELLINFORMATIONEN'. Falls Mikrotiterkämme verwendet wurden,
können die Taschen unter Verwendung einer Mehrkanalpipette beladen werden. Bis zu einer Zahnzahl von 26 können die Taschen der Minigel-Mikrotiterkämme 'direkt' beladen werden, d. h. die Pipettenspitzen passen fortlaufend in die Geltaschen.
Anmerkung: Auf jedem Gel sollte eine Probe eines definierten Molmassen- bzw. Längenstandards
aufgetragen werden, um eine Größen- und ggf. Konzentrationsbestimmung der zu analysierenden
Probe zu ermöglichen.
5. Schieben Sie den Sicherheitsdeckel mit den angeschlossenen Stromkabeln seitlich bis zum Anschlag
auf die Pufferkammer, wodurch es zu einem vollständig abgeschirmten elektrischen Kontakt zwischen den entsprechenden Anschlüssen des Kammerdeckels und der Pufferkammer kommt. Die Enden der Stromkabel (4 mm, male) werden nun an eine geeignete Gleichstrom-Spannungsquelle
(Power Supply) angeschlossen.
Bitte achten Sie dabei auf die richtige Polung. Zur Erinnerung: Nukleinsäuren sind in alkalischem bis
neutralem Milieu negativ geladen und wandern zur Anode, der positiven Elektrode. Der allgemeine
Farbcode für positiv geladene Elektroden ist ROT.
6. Schalten Sie den Power Supply an und führen Sie den Gellauf bei einer angemessenen elektrischen
Spannung durch (siehe 'SYSTEMÜBERBLICK/Technische Merkmale'). Beobachten Sie den Fortschritt
der Migration anhand der Farbstoffbande des Ladepuffers, um ein Herauslaufen der Proben aus
dem Gel bzw. in ein anderes Probenfeld hinein zu vermeiden. Dabei ist zu berücksichtigen, dass in
0.5 x TBE-Gelen Bromphenolblau mit 300 bp DNA-Fragmenten und Xylencyanol in etwa mit 4 kbp
DNA-Fragmenten komigriert.
PEQLAB_v0314_D
19
Bedienungsanleitung PerfectBlueTM Horizontale Minigelsysteme
Auswertung/Dokumentation
Zum Abbrechen der Elektrophorese sollte der Power Supply abgeschaltet und der Deckel der Gelkammer heruntergeschoben werden, um die Pufferkammer von der Spannungsquelle zu trennen. Erst dann
darf der Gelträger aus der Pufferkammer gehoben werden. Sind Ethidiumbromid oder sonstige interkalierenden Farbstoffe im Gel oder Puffer enthalten, ist direkter Hautkontakt unbedingt zu vermeiden
(Handschuhe!). Das Gel kann aufgrund der UV-Durchlässigkeit des Gelträgers auf einem UV-Tisch angesehen und evtl. fotografiert werden, ohne das Gel vom Gelträger herunternehmen zu müssen. Zum
sicheren und bequemen Transport des Gels kann der Gelträger in eine Gießschiene eingesetzt werden.
Reinigung
Pufferkammer, Gelträger und Kämme sollten nach jeder Benutzung unter fließendem Wasser gereinigt
werden. Zur Beseitigung von Rückständen kann außerdem ein mildes Reinigungsmittel verwendet werden. Ein anschließendes kurzes Abspülen mit destilliertem Wasser verhindert die Bildung von Salzflecken. Um die Platinelektroden nicht zu beschädigen, empfehlen wir die Kammer an der Luft trocknen zu
lassen und nicht mit Papiertüchern trocken zu wischen.
Zur Reinigung von Acrylglas dürfen weder Ethanol noch sonstige organische Lösungsmittel verwendet
werden, da sonst Risse und Sprünge im Material entstehen können!
PEQLAB_v0314_D
20
Bedienungsanleitung PerfectBlueTM Horizontale Minigelsysteme
BENÖTIGTE MATERIALIEN & REZEPTE
Elektrophoresepuffer
Im Allgemeinen müssen Elektrophoresepuffer die für die Elektrophorese nötigen Ionen bereitstellen und
für einen konstanten pH-Wert sorgen, damit das Zielmolekül die gewünschte Nettoladung aufweist
(Nukleinsäuren sind in alkalischem bis neutralem Milieu negativ geladen). Häufig enthalten sie außerdem Komponenten, welche das Zielmolekül vor Degradation schützen (z. B. EDTA, welches aufgrund
der Komplexierung zweiwertiger Kationen u. a. DNasen inhibiert). Soll die Elektrophorese unter denaturierenden Bedingungen erfolgen (z. B. bei der Elektrophorese von RNA), enthalten Gel- und Laufpuffer
darüber hinaus Substanzen, welche die Bildung von Sekundärstrukturen verhindern. Im Folgenden werden die beiden Elektrophoresepuffer TAE und TBE beschrieben, welche am häufigsten für die Elektrophorese von DNA unter nicht-denaturierenden Bedingungen verwendet werden. TAE-Puffer ist für
präparative Gele zu empfehlen, d. h. wenn die DNA im Anschluss an die Elektrophorese aus dem Gel
eluiert und weiterverwendet werden soll. Im Vergleich zu TBE sind mit TAE außerdem höhere Migrationsgeschwindigkeiten und eine bessere Auftrennung von supercoiled DNA zu erzielen. Aufgrund der
deutlich geringeren Pufferkapazität von TAE ist für zeitlich ausgedehnte Elektrophoresen jedoch TBE zu
empfehlen, sofern die Pufferkammer nicht über ein Pufferrezirkulationssystem verfügt (wie z. B. die PerfectBlue™ 'Revolution'-Systeme von PEQLAB), welches die Ausbildung eines pH-Gradienten (alkalische
Anodenseite, saure Kathodenseite) verhindert. Da Agarose in TBE-Puffer außerdem feinere Poren und
eine festere Matrix bildet, wird die vom elektrischen Feld unabhängige Diffusion der DNA verringert
und eine höhere Bandenschärfe erzielt.
TAE (Tris-Acetat-EDTA) Puffer
1 x Arbeitslösung:
50 x Stammlösung (1 l):
TBE (Tris-Borat-EDTA) Puffer
0.5 x Arbeitslösung*:
5 x Stammlösung (1 l)**:
40 mM Tris-Acetat, 1 mM EDTA
242 g Tris
57.1 ml Eisessig
100 ml 0.5 M EDTA (pH 8.0)
mit H2O auf 1 l auffüllen
45 mM Tris-Borat, 1 mM EDTA
54 g Tris
27.5 g Borsäure
20 ml 0.5 M EDTA (pH 8.0)
mit H2O auf 1 l auffüllen
* Während für Agarosegele eine TBE-Konzentration von 0.5 x ausreicht, wird für vertikale Polyacrylamidelektrophorese häufig 1 x TBE eingesetzt, um den vergleichsweise kleineren Pufferreservoiren vertikaler Gelkammern Rechnung zu tragen.
** 5 x TBE-Stammlösungen können bei längerer Lagerung ausfallen. Sie sollten dann verworfen werden. Aufgrund
dieser Eigenschaft ist das Ansetzen höher konzentrierter Stammlösungen nicht sinnvoll.
PEQLAB_v0314_D
21
Bedienungsanleitung PerfectBlueTM Horizontale Minigelsysteme
Agarose: Gelvolumen und -Konzentration
PEQLAB bietet eine Reihe hochwertiger Agarosen an, die für verschiedenste Anwendungen geeignet
sind (siehe 'TECHNISCHER SERVICE & BESTELLINFORMATIONEN').
Das benötigte Gelvolumen errechnet sich nach folgender Formel:
Gelbreite (cm) x Gellänge (cm) x Geldicke (cm) = ml Agaroselösung
Abhängig von der Geldicke ergeben sich somit folgende Gelvolumina:
Modell
PerfectBlue™ Mini S
PerfectBlue™ Mini M
PerfectBlue™ Mini L ('Revolution')
Gelgröße (cm)
Geldicke (cm)
0.25
0.5
14 ml
28 ml
25 ml
50 ml
42 ml
84 ml
7 x 8 (B x L)
9 x 11 (B x L)
12 x 14 (B x L)
0.75
42 ml
75 ml
126 ml
1.0
56 ml
100 ml
168 ml
Je nach Agarosegehalt des Gels werden Moleküle unterschiedlicher Größenbereiche optimal aufgetrennt. Für besonders kleine Nukleinsäurefragmente werden hochprozentige Gele, für besonders große
Fragmente niederprozentige Agarosegele verwendet. Für die in der folgenden Tabelle angegebenen
größten bzw. kleinsten Fragmentlängen sollte allerdings die Verwendung einer Spezialagarose bzw.
eines Polyacrylamidgels erwogen werden, da sich eine 3 %ige Agaroselösung extrem schnell verfestigt
bzw. ein 0.3 %iges Agarosegel sehr brüchig ist.
Agarosegehalt (w/v)
0.3 %
0.5 %
0.7 %
1.0 %
1.2 %
1.5 %
2.0 %
3.0 %
Agarose (g)
0.3
0.5
0.7
1.0
1.2
1.5
2.0
3.0
Puffer (ml)
100
100
100
100
100
100
100
100
optimaler Auftrennungsbereich (kb)
5 - 30
1 - 15
0.8 - 10
0.5 - 7
0.3 - 6
0.2 - 4
0.1 - 3
< 0.1
Ethidiumbromid
Ethidiumbromid ist für den Nachweis von Nukleinsäuren in Gelen immer noch der am häufigst verwendete Fluoreszenzfarbstoff. Aufgrund seiner Eigenschaft, zwischen die Basen eines Nukleinsäurestranges
zu interkalieren und somit dessen sterische Eigenschaft zu verändern, ist von einer stark mutagenen
Wirkung auszugehen. Da es sowohl hydrophile als auch hydrophobe Eigenschaften besitzt, müssen für
den Umgang mit Ethidiumbromid Maßnahmen getroffen werden, die sein Eindringen in lebende Hautschichten verhindern.
Zum Färben der Nukleinsäuren bereits während der Elektrophorese kann Ethidiumbromid der Gellösung
vor dem Gießen zu einer Konzentration von 0.1 bis 0.5 μg/ml beigefügt werden. Aufgrund seiner positiven Ladung wandert es allerdings während der Elektrophorese zur Kathode (negative Elektrode), sozusagen 'der Nukleinsäure entgegen', wodurch sich ein inhomogener Hintergrund und eine ungleichmäßige Färbung unterschiedlich langer Nukleinsäuren ergeben. Homogenere Färbeergebnisse mit geringem Hintergrund lassen sich erzielen, wenn das Gel im Anschluss an die Elektrophorese in einer Färbewanne in Elektrophoresepuffer mit 0.5 μg/ml Ethidiumbromid für ca. 5 bis 20 min leicht wippend
inkubiert und anschließend für ca. 5 bis 20 min in Elektrophoresepuffer entfärbt wird.
PEQLAB_v0314_D
22
Bedienungsanleitung PerfectBlueTM Horizontale Minigelsysteme
Lade- oder Probenpuffer
Die zu analysierenden Proben werden vor dem Auftragen auf das Gel mit einem geeigneten Ladepuffer
vermischt. Ladepuffer enthalten Farbstoffe zur Sichtbarmachung des Migrationsfortschrittes sowie Glycerol o. Ä., damit die Proben schwerer als der Elektrophoresepuffer werden und in die Geltaschen sinken.
Die verwendeten Farbstoffe sind wie die Nukleinsäuren negativ geladen und wandern wie diese zur
Anode. Dabei komigriert Bromphenolblau in 0.5 x TBE-Gelen mit 300 bp DNA-Fragmenten und Xylencyanol in etwa mit 4 kbp DNA-Fragmenten.
6 x DNA-Ladepuffer: 0.25 % (w/v) Bromphenolblau
0.25 % (w/v) Xylencyanol FF
30 % (v/v) Glycerol
Längenstandards
Längenstandards oder 'Marker' werden auf jedem Gel aufgetragen, um die Auftrennung zu kontrollieren und um eine Größenbestimmung der Proben vornehmen zu können. Wird eine spezifische Konzentration eines bekannten Markers aufgetragen, kann auch die DNA-Menge einer Bande bestimmt werden. Größenmarker bestehen z. B. aus entsprechend verdauter Plasmid-DNA mit Fragmenten bekannter
Größe. PEQLAB bietet eine Vielzahl an DNA- und RNA-Markern an. Informationen hierzu finden Sie in
unserem aktuellen Produktkatalog oder unter www.peqlab.com.
TROUBLESHOOTING
Hier finden Sie passende Lösungen zu möglichen Problemen. Sollten Sie weitere Fragen haben, wird
Ihnen das PEQLAB-Service-Team gerne weiterhelfen (TECHNISCHER SERVICE & BESTELLINFORMATIONEN).
Problem: Agarose läuft beim Gießen aus.
Überprüfen Sie den festen Sitz der Gummidichtungen um den Gelträger und dessen Sitz in der Gießschiene. Setzen Sie die Gummidichtungen nach eventueller Reinigung mit warmem Wasser erneut fest
ein. Achten Sie dabei auf ein gleichmäßiges Einsetzen der Gummidichtungen in die Aussparungen des
Gelträgers.
Problem: Bandenmuster ist verzerrt; Banden laufen nicht gerade ('Smiling Effekt').
Stellen Sie sicher, dass das Gel auf einer geraden Unterlage gegossen wird und der Gelträger eben in
der Pufferkammer sitzt. Möglicherweise wird eine zu hohe Spannung verwendet. Verringern Sie die
Spannung. Evtl. wurde der Elektrophoresepuffer falsch oder mit zu alten Chemikalien angesetzt. Evtl.
wurde vergessen zum Ansetzen der Gellösung Elektrophoresepuffer zu verwenden. Evtl. wurde die konzentrierte Stammlösung des Elektrophoresepuffers zur Herstellung der Arbeitslösung nicht oder falsch
verdünnt.
Problem: Proben laufen in bestimmten Bereichen des Gels ungleichmäßig.
Überprüfen Sie, ob die Platinelektroden intakt sind und über die gesamte Länge gleichmäßig Strom abgeben. Dies zeigt sich durch Blasenbildung an den Elektroden, bis zur Verbindung am Bananenstecker.
Sollte eine Elektrode gerissen sein, kontaktieren Sie bitte umgehend das PEQLAB Service-Team. Evtl.
wurden die Gele wiederholt mit zu heißer Agaroselösung (> 60 °C) gegossen. Die Gellösung sollte immer auf unter 60 °C abgekühlt werden, um den Gelträger nicht zu verformen und die Kammer nicht zu
beschädigen. Ein verformter Gelträger führt zu ungleichmäßig gegossenen Gelen und daraus resultierender schlechter Auftrennung.
PEQLAB_v0314_D
23
Bedienungsanleitung PerfectBlueTM Horizontale Minigelsysteme
Problem: Proben zeigen kein scharf begrenztes Bandenmuster.
Evtl. hat sich die Gellösung vor Beginn der Elektrophorese nicht vollständig verfestigt. Handelsübliche
Standardagarose ist nach ca. 30 Minuten bei RT vollständig erstarrt. Wird Low-Melting Agarose verwendet, sollte das Gel zum Festwerden bei niedrigeren Temperaturen gelagert werden, z.B. im Kühlschrank. Die Gele sollten mit 3 bis 5 mm Elektrophoresepuffer überschichtet sein. Zu viel Puffer (> 5 mm)
führt jedoch zu einer verlangsamten Migration und evtl. zu überhöhter Erwärmung, wodurch ein verzerrtes Bandenmustern entstehen kann. Evtl. wurde eine zu große Menge Nukleinsäure pro Tasche aufgetragen, wodurch es zu einem 'Schmieren' der Banden kommen kann.
Problem: Proben verbleiben in den Taschen, laufen 'rückwärts' oder diffundieren aus dem Gel.
Prüfen Sie, ob der Stromkreis zwischen Gelkammer und Power Supply vollständig geschlossen ist. Die
Platinelektroden und Bananenstecker sollten intakt sein. Sie können den Stromfluss überprüfen, indem
Sie die Pufferkammer ohne Gel oder Gelträger mit Puffer füllen, den Deckel aufsetzen und an den Power Supply anschließen. Entlang der gesamten Elektrode sollten bei Stromfluss gleichmäßig Blasen aufsteigen. Ist der Stromkreis nicht vollständig geschlossen, erfolgt keine oder nur geringe Blasenbildung. Ist
der Gelträger falsch herum eingesetzt oder stimmt die Polarität nicht, laufen die Proben in die andere
Richtung und oben aus dem Gel heraus. Der Gelträger muss so in der Pufferkammer platziert werden,
dass die Kammposition der negativ geladenen Kathode (schwarz) nächst gelegen ist.
Problem: Beim Entfernen des Kammes werden die Taschen beschädigt.
Das Gel sollte vor dem Entfernen des Kammes oder dem Bewegen der Gelkammer vollständig fest sein
und mit Laufpuffer überschichtet sein. Um eine Beschädigung der Taschen zu verhindern, kann der
Kamm durch vorsichtiges Hin- und Herbewegen gelöst und dann vorsichtig und gerade nach oben heraus gezogen werden. Diese Bewegung verhindert ein Festsaugen des Kammes in der Tasche. Um ein
Hängenbleiben der Agarose an den Zähnen des Kammes zu vermeiden, sollten die Kämme vor jedem
Gebrauch gründlich gereinigt werden.
Problem: Das Gel läuft bei üblicher Spannung auffallend langsam.
Beachten Sie, dass das Gel nur mit 3 bis 5 mm Laufpuffer bedeckt ist. Das Gel sollte komplett mit Puffer
bedeckt sein, damit es nicht austrocknet und ein homogenes elektrisches Feld entstehen kann. Ein deutlich höheres Überschichten des Gels führt zu einer verminderten Migrationsgeschwindigkeit und erhöhtem Stromfluss/Wärmeentwicklung.
PEQLAB_v0314_D
24
Bedienungsanleitung PerfectBlueTM Horizontale Minigelsysteme
TECHNISCHER SERVICE & BESTELLINFORMATIONEN
Bei technischen Fragen kontaktieren Sie uns bitte unter +49 (0)9131 610 7020 oder per e-mail an
[email protected]. Ausführliche Informationen zu unseren Produkten finden Sie in unserem aktuellen Produktkatalog, den wir Ihnen auf Wunsch gerne zusenden oder unter www.peqlab.com.
PerfectBlue™ Mini S
Artikel
Gelsystem Mini S
Gießschiene
Gelträger
MultiCast Gelgießstand
Ersatzdichtungen
Standardkämme
Beschreibung
vollständiges System für Gele 7 x 8 cm (B x L)
Schiene für das Abdichten von bis zu 3 Gelträgern
UV-durchlässiger Gelträger mit Gummidichtungen
Gießschiene mit 3 UV-durchlässigen Gelträgern
2 Gummidichtungen für Gelträger
1.5 mm
5 Zähne
64 μl*
1.5 mm
6 Zähne
51 μl*
1.5 mm
8 Zähne
36 μl*
1.5 mm
10 Zähne
26 μl*
1.5 mm
12 Zähne
21 μl*
1.0 mm
5 Zähne
42 μl*
1.0 mm
6 Zähne
34 μl*
1.0 mm
8 Zähne
24 μl*
1.0 mm
10 Zähne
18 μl*
1.0 mm
12 Zähne
14 μl*
Präparativer Kamm
1.5 mm
2 Zähne
320/28 μl*
* Taschenvolumen ist kalkuliert für eine Geldicke von 5 mm
Bestell-Nr.
40-0708
40-0708-CST
40-0708-UVT
40-0708-MC
40-0708-GK
40-0708-5D
40-0708-6D
40-0708-8D
40-0708-10D
40-0708-12D
40-0708-5C
40-0708-6C
40-0708-8C
40-0708-10C
40-0708-12C
40-0708-PD
PerfectBlue™ Mini M
Artikel
Gelsystem Mini M
Gießschiene
Gelträger
MultiCast Gelgießstand
Ersatzdichtungen
Standardkämme
Beschreibung
vollständiges System für Gele 9 x 11 cm (B x L)
Schiene für das Abdichten von bis zu 3 Gelträgern
UV-durchlässiger Gelträger mit Gummidichtungen
Gießschiene mit 3 UV-durchlässigen Gelträgern
2 Gummidichtungen für Gelträger
1.5 mm
5 Zähne
86 μl*
1.5 mm
8 Zähne
51 μl*
1.5 mm
10 Zähne
38 μl*
1.5 mm
12 Zähne
30 μl*
1.5 mm
14 Zähne
25 μl*
1.0 mm
5 Zähne
58 μl*
1.0 mm
8 Zähne
34 μl*
1.0 mm
10 Zähne
25 μl*
1.0 mm
12 Zähne
20 μl*
1.0 mm
14 Zähne
16 μl*
Mikrotiterkämme
1.5 mm
9 Zähne
40 μl*
1.5 mm
18 Zähne
16 μl*
1.0 mm
9 Zähne
27 μl*
1.0 mm
18 Zähne
11 μl*
Präparativer Kamm
1.5 mm
2 Zähne
439/28 μl*
* Taschenvolumen ist kalkuliert für eine Geldicke von 5 mm
PEQLAB_v0314_D
25
Bestell-Nr.
40-0911
40-0911-CST
40-0911-UVT
40-0911-MC
40-0911-GK
40-0911-5D
40-0911-8D
40-0911-10D
40-0911-12D
40-0911-14D
40-0911-5C
40-0911-8C
40-0911-10C
40-0911-12C
40-0911-14C
40-0911-9D
40-0911-18D
40-0911-9C
40-0911-18C
40-0911-PD
Bedienungsanleitung PerfectBlueTM Horizontale Minigelsysteme
PerfectBlue™ Mini L & Mini L 'Revolution'
Für die Gelkammern Mini L und Mini L 'Revolution' wird das identische Zubehör verwendet.
Artikel
Gelsystem Mini L
Gelsystem Mini L 'Revolution'
Gießschiene
Gelträger L4
Gelträger L12
MultiCast Gelgießstand
Ersatzdichtungen
Einsetzbare Zwischenwand
Standardkämme
Beschreibung
vollständiges System für Gele 12 x 14 cm (B x L)
vollständiges System für Gele 12 x 14 cm (B x L)
Schiene für das Abdichten von bis zu 3 Gelträgern
Gelträger mit Gummidichtungen, für bis zu 4 Kämme
Gelträger mit Gummidichtungen, für bis zu 12 Kämme
Gießschiene mit 3 UV-durchlässigen Gelträgern
2 Gummidichtungen für Gelträger
Trennkamm für Gele von geringerer Größe
1.5 mm
8 Zähne
70 μl*
1.5 mm
16 Zähne
30 μl*
1.5 mm
20 Zähne
22 μl*
1.5 mm
24 Zähne
17 μl*
1.0 mm
8 Zähne
47 μl*
1.0 mm
16 Zähne
20 μl*
1.0 mm
20 Zähne
15 μl*
1.0 mm
24 Zähne
11 μl*
Mikrotiterkämme
1.5 mm
9 Zähne
40 μl*
1.5 mm
12 Zähne
40 μl*
1.5 mm
25 Zähne
16 μl*
1.0 mm
9 Zähne
27 μl*
1.0 mm
12 Zähne
27 μl*
1.0 mm
25 Zähne
11 μl*
Präparativer Kamm
1.5 mm
2 Zähne
596/28 μl*
* Taschenvolumen ist kalkuliert für eine Geldicke von 5 mm
Bestell-Nr.
40-1214
40-1214R
40-1214-CST
40-1214-UVT4
40-1214-UVT12
40-1214-MC
40-1214-GK
40-1214-WC
40-1214-8D
40-1214-16D
40-1214-20D
40-1214-24D
40-1214-8C
40-1214-16C
40-1214-20C
40-1214-24C
40-1214-9D
40-1214-12D
40-1214-25D
40-1214-9C
40-1214-12C
40-1214-25C
40-1214-PD
Justierbare Gießschiene JustCast
Die flexible Alternative zur modellspezifischen Gießschiene. Für das Gießen von gleichzeitig bis zu 3
Mini S Gelen, 2 Mini M Gelen, 2 Mini L Gelen, 1 Mini ExM Gel oder 1 Mini ExW Gel.
Artikel
JustCast
PEQLAB_v0314_D
Beschreibung
justierbare Gießschiene für PerfectBlue™ Minigelsysteme mit 3Punkt-Nivellierungssystem und Wasserwaage
26
Bestell-Nr.
40-CST
Bedienungsanleitung PerfectBlueTM Horizontale Minigelsysteme
Power Supplies
Bei Bedarf beraten wir Sie gerne, welcher Power Supply für Ihre Anwendung geeignet ist.
Artikel
Anschlusspaare
Max. Spannung (V)
Stromstärke (mA)
Leistung (W)
EV222
3
200
200
20
E300
4
300
500
90
EV245
3
400
500
50
EV231
4
300
1000
150
EV265
4
600
500
150
E250
4
250
3000
300
EV202
4
300
2000
300
EV261
4
600
1000
300
EV215
4
1200
500
300
EV232
4
3000
150
150
EV233
4
3000
300
300
EV262
4
6000
150
300
1)
Nicht verfügbar für Kunden in den USA.
2)
Für eine 110V US-Variante ersetzen Sie bitte '230V' mit '110V' in der Bestell-Nummer.
Bestell-Nr.
55-EV2221)
55-E300-230V2)
55-EV2451)
55-EV2311)
55-EV2651)
55-E250-230V2)
55-EV2021)
55-EV2611)
55-EV2151)
55-EV2321)
55-EV2331)
55-EV2621)
Agarosen1)
Artikel
peqGOLD Universalagarose
Anwendung
geeignet für Standard-Auftrennungen von
Nukleinsäuren im Bereich von 0.05 – 50 kb
Menge
100 g
500 g
1000 g
Bestell-Nr.
35-1010
35-1020
35-1030
peqGOLD 'Low Melt'-Agarose
für präparative Gelelektrophoresen von
DNA-Fragmenten im Bereich von
0.08 – 20 kbp
25 g
100 g
250 g
35-2010
35-2020
35-2030
peqGOLD MoSieve-Agarose MS-500
speziell für die hochauflösende Auftrennung
von kleinen Nukleinsäuren im Bereich von
0.010 – 1.0 kb
25 g
100 g
250 g
35-3010
35-3020
35-3030
peqGOLD MoSieve-Agarose MS-1000
speziell für die hochauflösende Auftrennung
von mittelgroßen Nukleinsäuren im Bereich
von 0.050 – 2.0 kb
25 g
100 g
250 g
35-4010
35-4020
35-4030
peqGOLD MegaBase-Agarose
speziell für die Auftrennung von größeren
DNA-Fragmenten im Bereich von
0.2 – 50 kbp
25 g
100 g
250 g
35-5010
35-5020
35-5030
1)
Nicht verfügbar für Kunden in den USA.
PEQLAB_v0314_D
27
Bedienungsanleitung PerfectBlueTM Horizontale Minigelsysteme
LITERATUR
SAMBROOK J, FRITSCH E. F. AND MANIATIS T. (1989) Molecular Cloning: A Laboratory Manual. Cold
Spring Harbor Laboratory Press, NY.
FREDERIK M. AUSUBEL et al. (Ed.) Short Protocols in Molecular Biology, - A Compendium of Methods from
Current Protocols in Molecular Biology.
OGDEN R. AND ADAMS D. A. (1987) Electrophoresis in Agarose and Acrylamide Gels. Methods Enzymol. 152: 61-87.
FOTADOR U., SHAPIRO L. E. AND SURKS, M. I. (1991) Simultaneous Use of Standard and Low-Melting Agarose for the Separation and Isolation of DNA by Electrophoresis. Bio Techniques, 10 (2): 171-2.
BOOTS S. (1989) GEL ELECTROPHORESIS OF DNA. ANAL. CHEM., 61 (8): 551A-553A.
PEQLAB_v0314_D
28
D
AT
UK
USA
PEQLAB Biotechnologie GmbH, 91052 Erlangen, Freecall (D): 0800 100 20 16, [email protected], www.peqlab.de
PEQLAB Biotechnologie GmbH, 6404 Polling, Tel: +43 (0) 5238 84 169, [email protected], www.peqlab.at
PEQLAB Ltd., Southampton SO31 7ZN, Freephone (UK): 0808 202 1302, [email protected], www.peqlab.co.uk
PEQLAB LLC, Wilmington, DE 19810, Toll-Free (US): 877 737 5220, [email protected], www.peqlab.us
Creating the future together.