1
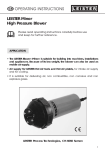
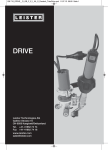
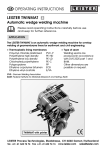
Titelseite_126.853_Ghibli_Titelseite.qxd 24.10.11 13:55 Seite 1
®
GHIBLI
Ihre autorisierte Service-Stelle:
Klappenbach GmbH - LEISTER-Vertrieb & Service
Rohrstr. 16, D-58093 Hagen
Tel. +49-(0)2331-95940, Fax +49-(0)2331-959444
[email protected] http://www.klappenbach.de
2
3
4
Ghibli.book Seite 2 Donnerstag, 10. Mai 2007 2:24 14
-2-
Deutsch .................... Bedienungsanleitung........................................ 4
English ..................... Operating Instructions...................................... 7
Ghibli.book Seite 3 Donnerstag, 10. Mai 2007 2:24 14
4
1
2
5
6
7
3
8
1
2
3
9
11
10
Deutsch - 4 -
Sicherheitshinweise
WARNUNG: Die Nichtbeachtung der Sicherheitshinweise kann beim Arbeiten mit dem
Heißluftgerät zu Feuer, Explosion, elektrischem Schlag oder Verbrennungen führen. Lesen Sie
die Bedienungsanleitung vor der Benutzung und halten
Sie stets die Sicherheitsvorschriften ein. Bewahren Sie
die Bedienungsanleitung auf und geben Sie diese einer
nicht-eingewiesenen Person vor der Benutzung.
WARNUNG: Falsch angeschlossene Netzstecker können zu einem lebensgefährlichen
elektrischen Schlag führen. Lassen Sie Netzstecker nur von einem Fachmann an das Kabel
anschließen.
Ein beschädigtes Gehäuse oder ein geöffnetes Gerät
kann zu einem lebensgefährlichen elektrischen Schlag
führen. Öffnen Sie das Gerät nicht und nehmen Sie ein
beschädigtes Gerät nicht in Betrieb. Bohren Sie das
Gehäuse nicht an, um z. B. ein Firmenschild zu befestigen. Ziehen Sie vor allen Arbeiten am Gerät den Netzstecker.
Ein beschädigtes Anschlusskabel kann zu einem
lebensgefährlichen elektrischen Schlag führen. Kontrollieren Sie das Anschlusskabel regelmässig. Nehmen
Sie das Gerät bei beschädigtem Kabel nicht in Betrieb.
Ein beschädigtes Kabel immer durch einen Fachmann
ersetzen lassen. Wickeln Sie das Kabel nicht um das
Gerät und schützen Sie es vor Öl, Hitze und scharfen
Kanten. Tragen Sie das Gerät nicht am Kabel und
benutzen Sie es nicht, um den Stecker aus der Steckdose zu ziehen.
Beim Einsatz des Gerätes auf Baustellen und im Freien
ist ein Fehlerstrom-(FI-) Schutzschalter für den Personenschutz zu verwenden.
WARNUNG: Arbeiten im Regen oder in
feuchter bzw. nasser Umgebung kann zu
einem lebensgefährlichen elektrischen Schlag
führen. Berücksichtigen Sie die Witterungsverhältnisse.
Halten Sie das Gerät trocken. Bei Nichtbenutzung das
Gerät trocken aufbewahren.
WARNUNG: Explosionsgefahr! Das Heißluftgebläse kann brennbare Flüssigkeiten und
Gase explosionsartig entzünden. Arbeiten Sie
nicht in einer explosionsgefährdeten Umgebung. Untersuchen Sie vor Arbeitsbeginn das Umfeld. Arbeiten Sie
nicht in der Nähe von oder an Kraftstoffen oder Gasbehältern, auch wenn diese leer sind.
WARNUNG: Feuergefahr! Hitze kann brennbare Materialien erreichen und entzünden,
die sich nicht sichtbar hinter Verschalungen,
in Decken, Böden oder Hohlräumen verbergen. Überprüfen Sie vor Arbeitsbeginn den Arbeitsbereich und
verzichten Sie bei unklarer Situation auf den Einsatz des
Heißluftgerätes. Halten Sie das Gerät nicht längere Zeit
auf die gleiche Stelle gerichtet. Betreiben Sie das Gerät
immer beaufsichtigt.
WARNUNG: Vergiftungsgefahr! Bei der Bearbeitung von Kunststoffen, Lacken oder ähnlichen Materialien entstehen Gase, die aggressiv oder giftig sein können. Vermeiden Sie das Einatmen von Dämpfen, auch wenn diese unbedenklich
scheinen. Sorgen Sie stets für eine gute Belüftung des
Arbeitsplatzes oder tragen Sie ein Atemschutzmaske.
WARNUNG: Verletzungsgefahr! Der Heißluftstrahl kann Personen oder Tiere verletzen.
Das Berühren des heißen Heizelementrohres
oder der Düse führt zu Hautverbrennungen. Halten Sie
Kinder und andere Personen vom Gerät fern. Heizelementrohr und Düse im heißen Zustand nicht berühren.
Verwenden Sie das Gerät nicht zum Erhitzen von Flüssigkeiten oder zum Trocknen von Gegenständen und
Materialien, die durch die Einwirkung von Heißluft zerstört werden.
WARNUNG: Verletzungsgefahr! Ein unbeabsichtigtes Anlaufen oder das unerwartete Einschalten der Heizung nach dem Auslösen des
Temperaturbegrenzers kann zu Verletzungen führen.
Vergewissern Sie sich, dass der Schalter beim
Anschliessen an das Stromnetz ausgeschaltet ist. Schalten sie das Gerät aus, wenn der Temperaturbegrenzer
angesprochen hat.
Konformität
Leister
Technologies
AG, Galileo-Strasse
10,CH-6056
6056 Kaegiswil
/ Schweiz bestätigt, dass dieses Produkt in der von
Leister Process
Technologies,
Galileo-Strasse 10,
Kaegiswil/Schweiz
uns in Verkehr gebrachten Ausführung die Anforderungen der folgenden EU-Richtlinien erfüllt.
2006/42,
2004/108,
2006/95, 2011/65
2004/108,
2006/95
Richtlinien:
EN
12100-2,
EN EN
14121-1,
ENEN
55014-1,
EN12100-1,
55014-1,ENEN
55014-2,
50366,
62233,EN
EN55014-2,
61000-3-2, EN 61000-3-3,
Harmonisierte Normen:
EN
ENEN
61000-3-3,
EN 62233, EN 60335-2-45, EN 50581
EN61000-3-2,
61000-3-3,
60335-2-45
60335-2-45
Kägiswil,
19.07.2012
Kaegiswil,
03.02.2012
Bruno von Wyl, CTO
Beat Mettler, COO
Entsorgung
Elektrowerkzeuge, Zubehör und Verpackungen sollen einer umweltgerechten Wiederverwertung zugeführt
werden. Nur für EU-Länder: Werfen Sie Elektrowerkzeuge nicht in den Hausmüll! Gemäß der Europäischen
Richtlinie 2002/96 über Elektro- und Elektronik-Altgeräte und ihrer Umsetzung in nationales Recht müssen nicht
mehr gebrauchsfähige Elektrowerkzeuge getrennt gesammelt und einer umweltgerechten Wiederverwertung
zugeführt werden.
Ghibli.book Seite 5 Donnerstag, 10. Mai 2007 2:24 14
Deutsch - 5 -
Technische Daten
GHIBLI
Spannung
Frequenz
Leistung
Temperatur
Luftmenge (20°C)
Luftdruck
Gewicht (mit 3 m Kabel)
Abmessungen L x B x H
Schutzklasse
Emissionspegel LpA
[V]
[Hz]
[W]
[°C]
[°F]
[l/min]
[cfm]
[mbar]
[kg]
[lbs]
[mm]
[dB]
100
120
200
230
50/60
1500
1500
1500
2000
20 – 600
70 – 1100
300 (Stufe 2)
350 (Stufe 3)
10.6
12.4
15
21
1.2
2.6
195 x 85 x 160, Handgriff Ø 57
II/
(Doppelt isoliert)
70
Geräteelemente
1. Netzschalter 2. Potentiometer für Temperatureinstellung 3. Schalter für Luftmengeneinstellung 4. Heizelementrohr 5. Schutzgitter 6. Schraube 7. Düse* 8. Handgriff 9.Luftfilter 10. Netzanschlussleitung 11. Luftschieber
Bestimmungsgemäßer Gebrauch
Dieses Heißluftgerät ist unter Einhaltung der Sicherheitsvorschriften und Verwendung von Original-Leister-Zubehör
für alle in dieser Bedienungsanleitung aufgeführten Heißluft-Anwendungen bestimmt.
Anwendungen
Löten und Entlöten von SMD- und bedrahteten Bauteilen.
Schweißen von thermoplastischen Kunststoffen sowie auch einzelnen Elastoplasten und Elastomer-Bitumen in Form
von Platten, Rohren, Profilen, Dichtungsbahnen, beschichteten Geweben, Folien, Schäumen, Fliesen und Bahnen.
Folgende Verfahren sind möglich: Überlapp-, Draht-, Band-, Heizelement- und Schmelzschweißen.
Trocknen von wässrig-feuchten Oberflächen
Schrumpfen von Wärme-Schrumpfschläuchen, Folien, -Bändern, Lötverbindern und Formteilen.
Aufheizen zum Formen, Biegen und Aufmuffen von thermoplastischen Halbzeugen.
Auftauen von eingefrorenen Wasserleitungen.
Aktivieren/Lösen von lösungsmittelfreien Klebstoffen und Schmelzklebern.
Sterilisieren von Labor- und Glaswaren sowie medizinischen Instrumenten.
Löten von Kupferrohren, Lötverbindern und Metallfolien.
Zünden von Holzschnitzel, Papier, Kohle oder Stroh in Feuerungsanlagen.
Enthornen von Kälbern (Sonderausführung 24V~ verwenden!)
Düse* montieren
Das Berühren der heißen Düse kann zu einer schweren Verbrennung führen. Vor dem Aufsetzen bzw. Wechseln der Düse das Gerät ganz abkühlen lassen oder ein geeignetes Werkzeug benutzen.
Eine herunterfallende Düse kann einen Gegenstand entzünden. Die Düsen müssen fest und sicher auf dem
Gerät montiert sein.
Eine heiße Düse kann eine Unterlage entzünden. Legen Sie die heiße Düse nur auf einer feuerfesten Unterlage ab.
Eine falsche oder defekte Düse kann zu Heißluftstau führen und das Gerät beschädigen. Nur für Ihr Gerät
geeignete Original-Leister-Düsen verwenden.
Die Düse 7 auf das Heizelementrohr 4 aufschieben und die Schraube 6 festziehen.
* Düsen nicht im Lieferumfang enthalten!
Ghibli.book Seite 6 Donnerstag, 10. Mai 2007 2:24 14
Deutsch - 6 Schließen sie, falls erforderlich, eine Erdungsleitung an den Potentialausgleich (ESD-Anschluss) x an.
Inbetriebnahme
Netzanschlussleitung und Stecker auf mechanische Beschädigung prüfen!
Netzspannung beachten: Die Netzspannung muss mit den Angaben auf dem Typschild des Gerätes übereinstimmen. Verlängerungskabel müssen einen Querschnitt von min. 2 x 1.5 mm2 haben.
Einschalten:
Stellen Sie die Luftmenge nach Bedarf mit dem Zweistufenschalter 3 und/oder dem Luftschieber 11 ein. Stellen Sie
die Temperatur mit dem Potentiometer 2 nach Bedarf ein. Stellen Sie den Netzschalter 1 auf I. Die Aufheizzeit
beträgt ca. 5 min.
Ausschalten:
Drehen Sie zum Abkühlen das Potentiometer 2 auf Position 0. Wenn das Gerät abgekühlt ist, stellen Sie den Schalter 1 auf 0.
Arbeitshinweise
– Leister Process Technologies wie auch die Service-Stellen bieten kostenlose Kurse im Bereich der Anwendungen
an.
– Testschweißung gemäß Schweißanleitung des Materialherstellers und nationalen Normen oder Richtlinien vornehmen. Testschweißung prüfen. Schweißtemperatur nach Bedarf anpassen.
Wartung, Service und Reparatur
–
–
–
–
–
Netzanschlussleitung und Stecker auf Unterbruch und mechanische Beschädigung prüfen.
Vor allen Arbeiten am Gerät: Netzstecker ziehen.
Gerät und Lüftungsschlitze stets sauber halten, um gut und sicher zu arbeiten.
Es darf nur Original-Leister-Zubehör verwendet werden.
Den Luftfilter 9 des Gerätes bei Verschmutzung im ausgeschalteten Zustand mit Pinsel reinigen. Beschädigte oder
stark verschmutzte Luftfilter ersetzen.
– Die Betriebsdauer der Kohlebürsten beträgt ca.1200 Stunden. Kohlebürsten von einer autorisierten Leister-Service-Stelle ersetzen lassen.
Sollte das Gerät trotz sorgfältiger Herstellungs- und Prüfverfahren einmal ausfallen, ist die Reparatur von einer autorisierten Leister-Service-Stelle ausführen zu lassen.
Gewährleistung
Für
diesesGerät
Gerätbesteht
besteht
grundsätzlich
gemäss
/ länderspezifischen
Für dieses
eine
grundsätzlicheGewährleistung
Gewährleistung von
einemden
(1) gesetzlichen
Jahr ab Kaufdatum
(Nachweis durch
Rechnung oder Lieferschein).
Entstandene
Schäden
werden
durch oder
Ersatzlieferung
oder Reparatur
beseitigt.
HeizBestimmungen
ab Kaufdatum
(Nachweis
durch
Rechnung
Lieferschein).
Entstandene
Schäden
elemente durch
sind von
dieser Gewährleistung
ausgeschlossen.
werden
Ersatzlieferung
oder Reparatur
beseitigt.
Weitere Ansprüche
gesetzlicher Bestimmungen,
ausgeschlossen.
Heizelemente
sindsind,
vonvorbehaltlich
dieser Gewährleistung
ausgeschlossen.
Schäden, Ansprüche
die auf natürliche
Überlastung
oder unsachgemässe
Behandlung
zurückzuführen sind, werWeitere
sind,Abnutzung,
vorbehältlich
gesetzlicher
Bestimmungen,
ausgeschlossen.
den von der Gewährleistung ausgeschlossen.
Schäden, die auf natürliche Abnützung, Überlastung oder unsachgemässe Behandlung zurückzuführen
Keine Ansprüche bestehen bei Geräten, die vom Käufer umgebaut oder verändert worden sind.
sind, werden von der Gewährleistung ausgeschlossen.
Keine Ansprüche bestehen bei Geräten, die vom Käufer umgebaut oder verändert worden sind.
Änderungen vorbehalten
English - 7 -
Safety Rules
WARNING: Non-observance of the safety
rules while working with the hot air tool can
lead to fire, explosion, electric shock or burns.
Read the operating instructions before using the tool
and always observe the safety rules. Save these instructions and give them to persons that have not been
instructed before they use the tool.
WARNING: An incorrectly connected mains
plug can lead to a highly dangerous electric
shock. Have mains plugs connected to the
cable only by a specialist.
WARNING: A damaged casing or an opened unit can
lead to a hazardous electric shock. Do not open the
unit and do not put a damaged unit into operation. Do
not drill into the casing, e. g., to attach a company
label. Before any work on the unit, pull the mains plug.
WARNING: A damaged power cord can lead to a
hazardous electric shock. Check the power cord regularly. Do not operate the unit when the power cord is
damaged. Always have a damaged cord replaced
through a specialist. Do not wrap the cord around the
unit and protect it from oil, heat and sharp edges. Do
not carry the unit by the cord and do not use the cord to
pull the plug from the outlet.
When operating the unit at construction sites and outdoors, the use of a residual current device (RCD) is
required for the protection of persons.
WARNING: Working in rain or moist/damp
conditions can lead to a highly dangerous
electric shock. Take the weather conditions into
consideration. Keep the unit dry. When not using, store
the unit at a dry location.
WARNING: Danger of explosion! The hot air
tool can explosively ignite combustible fluids
and gases. Do not work in a potentially explosive environment. Check the surrounding before starting
to work. Do not work on fuels or gas containers or in
their vicinity, even when they are empty.
WARNING: Danger of fire! Heat can reach
combustible materials that are hidden behind
coverings, in ceilings, floors or cavities, and
ignite them. Inspect the work area before starting to
work and in case of doubt, abstain from using the hot
air tool. Do not point the unit at the same spot for
extended periods. The unit must be supervised at all
times during operation.
WARNING: Danger of intoxication! When
working plastics, varnish or similar materials,
gases develop that can be aggressive or
toxic. Avoid breathing in vapours, even when they
appear to be harmless. Always provide for good ventilation of the work area or wear a respirator.
WARNING: Danger of injury! The hot air jet
can injure persons or animals. Touching the
hot tube of the heating element or the nozzle
leads to skin burns. Keep children and other persons
away from the unit. Do not touch the tube of the heating
element or the nozzle when they are hot. Do not use the
unit to heat up fluids or to dry objects or materials that
are destroyed through the influence of hot air.
WARNING: Unintentional starting or unexpected switching on of the heating element
after actuation of the thermal relay can lead
to injuries. Make sure that the switch is set to OFF when
connecting the unit to the mains supply. Switch the unit
OFF when the thermal relay has actuated.
Conformity
Leister Process
Technologies,
Galileo-Strasse 10,
Kaegiswil/Switzerland
Leister
Technologies
AG, Galileo-Strasse
10, CH-6056
6056 Kaegiswil
/ Switzerland confirms that this product, in the
version as brought into circulation through us, fulfils the requirements of the following EC directives.
2006/42,
2004/108,
2006/95, 2011/65
Directives:
2004/108,
2006/95
EN
12100-2,
EN EN
14121-1,
ENEN
55014-1,
Harmonized Standards:
EN12100-1,
55014-1,ENEN
55014-2,
50366,
62233,EN
EN55014-2,
61000-3-2, EN 61000-3-3,
EN
ENEN
61000-3-3,
EN 62233, EN 60335-2-45, EN 50581
60335-2-45
EN61000-3-2,
61000-3-3,
60335-2-45
Kaegiswil,
03.02.2012
Kägiswil, 19.07.2012
Bruno von Wyl, CTO
Beat Mettler, COO
Disposal
Power tools, accessories and packaging should be sorted for environmental-friendly recycling. Only for
EC countries: Do not dispose of power tools into household waste! According to the European Directive
2002/96 on waste electrical and electronic equipment and its incorporation into national law, power
tools that are no longer suitable for use must be separately collected and sent for recovery in an environmental-friendly manner.
Ghibli - GB Seite 8 Freitag, 11. Mai 2007 11:03 11
English - 8 IMPORTANT SAFETY INSTRUCTIONS
This appliance has a polarized plug (one blade is wider than the other). To reduce the risk of electric shock, this
plug is intended to fit in a polarized outlet only one way. If the plug does not fit fully in the outlet, reverse the plug.
If it still does not fit, contact a qualified electrician. Do not modify the plug in any way.
READ THESE INSTRUCTIONS
Warning:
Extreme care should be taken when stripping paint. The peelings, residue and vapors of paint may contain lead, which is poisonous. Any pre-1977 paint may contain lead and paint applied to homes prior
to 1950 is likely to contain lead. Once deposited on surfaces, hand to mouth contact can result in the
ingestion of lead. Exposure to even low levels of lead can cause irreversible brain and nervous system
damage; young and unborn children are particularly vulnerable.
Before beginning any paint removal process you should determine whether the paint you are removing
contains lead. This can be done by your local health department or by a professional who uses a paint
analyzer to check the lead content of the paint to be removed. LEAD-BASED PAINT SHOULD ONLY BE
REMOVED BY A PROFESSIONAL AND SHOULD NOT BE REMOVED USING A HEAT GUN.
Persons removing paint should follow these guidelines:
1. Move the work piece outdoors. If this is not possible, keep the work area well ventilated. Open the windows and
put an exhaust fan in one of them. Be sure the fan is moving the air from inside to outside.
2. Remove or cover any carpets, rugs, furniture, clothing, cooking utensils and air ducts.
3. Place drop cloths in the work area to catch any paint chips or peelings. Wear protective clothing such as extra
work shirts, overalls and hats.
4. Work in one room at a time. Furnishings should be removed or placed in the center of the room and covered.
Work areas should be sealed off from the rest of the dwelling by sealing doorways with drop cloths.
5. Children, pregnant or potentially pregnant women and nursing mothers should not be present in the work area
until the work is done and all clean up is complete.
6. Wear dust respirator mask or a dual filter (dust and fume) respirator mask which has been approved by the
Occupational Safety and Health Administration (OSHA), the National Institute of Safety and Health (NIOSH),
or the United States Bureau of Mines. These masks and replaceable filters are readily available at major hardware stores. Be sure the mask fits. Beards and facial hair may keep masks from sealing properly. Change filters
often. DISPOSABLE PAPER MASKS ARE NOT ADEQUATE.
7. Use caution when operating the heat gun. Keep the heat gun moving as excessive heat will generate fumes which
can be inhaled by the operator.
8. Keep food and drink out of the work area. Wash hands, arms and face and rinse mouth before eating or drinking. Do not smoke or chew gum or tobacco in the work area.
9. Clean up all removed paint and dust by wet mopping the floors. Use a wet cloth to clean all walls, sills and any
other surface where paint or dust is clinging. DO NOT SWEEP, DRY DUST OR VACUUM. Use a high phosphate
detergent or trisodium phosphate (TSP) to wash and mop areas.
10.At the end of each work session put the paint chips and debris in a double plastic bag, close it with tape or twist
ties and dispose of properly.
11.Remove protective clothing and work shoes in the work area to avoid carrying dust into the rest to the dwelling.
Wash work clothes separately. Wipe shoes off with a wet rag that is then washed with the work clothes. Wash
hair and body thoroughly with soap and water.
SAVE THESE INSTRUCTIONS
Ghibli - GB Seite 9 Freitag, 11. Mai 2007 11:03 11
English - 9 -
Technical Data
GHIBLI
Voltage
Frequency
Power
Temperatur
Air flow (20°C)
Air pressure
Weight with cord (3 m)
Dimensions L x Ø
Protection class
Noise level LpA
[V]
[Hz]
[W]
[°C]
[°F]
[l/min]
[cfm]
[mbar]
[kg]
[lbs]
[mm]
[dB]
100
120
200
230
50/60
1500
1500
1500
20 – 600
70 – 1100
300 (Step 2)
10.6
15
1.2
2.6
195 x 85 x 160, Handle Ø 57
II/
(Double insulated)
70
2000
350 (Step 3)
12.4
21
Product Features
1. Mains switch 2. Potentiometer for temperature adjustment 3. Switch for air volume control 4. Pipe of the heating
element 5. Protective grid 6. Screw 7. Nozzle* 8. Handle 9. Air filter 10. Mains connection 11. Air slide
Intended Use
When observing the safety instructions and using original Leister accessories, this hot air tool is suitable for all hot
air applications listed in these operating instructions.
Applications
Soldering and unsoldering of SMD and wired components.
Welding of thermoplastic polymers as well as individual elastoplastics and elastomer bitumen or asphalt in the
shape of plates, pipes, profiles, sealing material, coated fabrics, foils, foams, tiles and sheathing. The following
welding procedures are possible: Overlap, wire, band, heating element and fusion welding.
Drying of moist surfaces
Shrinking of heat-shrinkable tubing or sleeves, foils, sheathing, solder connectors and form components.
Heating for forming, bending and coupling of thermoplastic components
Defrosting frozen water lines
Activating/dissolving solvent-free and hot-melt adhesives
Sterilization of laboratory and glassware as well as medical instruments
Soldering of copper tubing, solder connectors and metal foils
Igniting of wood chips, paper, coal or straw in furnaces
Dehorning of calves (only with 24V~ special version!)
Mounting the Nozzle*
Touching a hot nozzle can lead to serious burns. Before attaching or replacing a nozzle, allow the unit to cool
down completely or use a suitable tool.
A falling down nozzle can set an object on fire. Nozzles must be mounted firmly and secure on the unit.
A hot nozzle can set a surface on fire. Place down hot nozzles only on fire-proof surfaces.
An incorrect or defective nozzle can lead to heat accumulation and damage the unit. Use only original nozzles according to the table that are suitable for your unit.
Slide the nozzle 7 onto the heating-element tube 4 and tighten the screw 6.
* Nozzles not included in the delivery scope!
Ghibli - GB Seite 10 Freitag, 11. Mai 2007 11:03 11
English - 10 -
Putting into Operation
Check the mains connection and the plug for mechanical defects!
Observe mains voltage: The mains voltage must agree with the data on the type plate of the unit. Extension cords
must have a cross section of at least 2 x 1.5 mm2.
Switching On:
Adjust the air volume as required with the two-position switch 3 and/or the air slide 11. Adjust the temperature as
required with potentiometer 2. Set the power switch 1 to I. The heat-up period is approx. 5 minutes.
Switching Off:
Turn the potentiometer 2 to the 0 position in order for the unit to cool down. When the unit has cooled down, set
the switch 1 to 0.
Operating Instructions
– Practical demonstrations of the applications are available free-of-charge at Leister Process Technologies as well
as through our after-sales service agents.
– Perform a test welding according to the welding instructions of the material manufacturer and the national standards or guidelines. Check the test welding. Adapt the welding temperature as required.
Maintenance, Service and Repairs
–
–
–
–
–
Check mains connection and plug for interruption and mechanical damage.
Before any work on the unit: Pull the mains plug.
For secure and proper operation, keep the unit and the ventilation slots clean at all times.
Use only original Leister accessories.
When contaminated, clean the air filter 9 of the switched off unit using a brush. Replace a damaged or heavily
contaminated air filter.
– The operating lifetime of the carbon brushes is approx. 1200 hours. Have carbon brushes replaced through an
authorized Leister after-sales service.
If the unit should fail despite the care taken in manufacturing and testing procedures, repair should be carried out
by an authorized Leister after-sales service agent.
Warranty
For
thistool,
tool,
generally
provide
a warranty
accordance
the statutory
country-specific
For this
wewe
generally
provide
a warranty
of one (1) in
year
from the datewith
of purchase
(verified/ by
invoice or delivery document).
Damage
thatofhas
occurred(verified
will be corrected
by or
replacement
or repair. Heating
elements
are
regulations
from
the date
purchase
by invoice
delivery document).
Damage
that has
excluded from
thiscorrected
warranty. by replacement or repair. Heating elements are excluded from this warranty.
occurred
will be
Additional claims
shall
be excluded,
subject
to statutory
regulations.
Additional
claims
shall
be excluded,
subject
to statutory
regulations.
Damage caused by normal wear, overloading or improper handling is excluded from the guarantee.
Damage caused by normal wear, overloading or improper handling is excluded from the warranty.
Guarantee claims will be rejected for tools that have been altered or changed by the purchaser.
Warranty claims will be rejected for tools that have been altered or changed by the purchaser.
Subject to change without notice
Seite_84_126.853_Ghibli_Deutsch_Varimat_V_09.03.qxd 27.06.13 13:19 Seite 1
®
© Copyright by Leister
Your authorised Service Centre is:
1
Leister Technologies AG
Tel.: +49 - 2331 - 9594-0
Fax.: +49 - 2331 - 9594-44
Web: www.klappenbach.de
E-Mail: [email protected]
BA GHIBLI
Art.126.853 / 06.2007 / 10.2013
Klappenbach GmbH
LEISTER-Heissluftgeräte Vertrieb
Rohrstraße 16
D-58093 Hagen