1
Before you start
About the cartridge
The cartridge is not provided.
Refer to the instruction manual for your cartridge.
Attach the cartridge on the headshell.
The lead wires of the headshell part are color-coded. Use tweezers or a
similar tool to correctly connect the wires to the corresponding cartridge
terminal per the indication on the cartridge.
Assembly
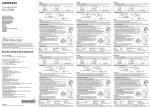
1 Attach the turntable and turntable sheet.
Set the turntable on the center spindle and place the turntable sheet on
top of the turntable.
Be careful not to hit the turntable on the main unit or drop it.
Make sure that iron powder or other dust is not adhering to the
magnet on the back of the turntable.
Do not touch the magnet fixing screw of the turntable (3 locations). If
the fixing screw position is changed, the rated performance cannot
be guaranteed.
Shell weight
Turntable sheet
Headshell
Turntable
Lead wires
Cartridge
When using a cartridge between 3.5 g and 6.5 g, use the supplied
shell weight.
Adjusting the overhang
Use the following overhang adjustment scale to adjust the position
using the cartridge attaching screw so that the stylus tip comes to a
position 54 mm from the tone arm attachment part.
2 Attach the cartridge on the headshell.
The lead wires of the headshell part are color-coded. Use tweezers or a
similar tool to correctly connect the wires to the corresponding cartridge
terminal per the indication on the cartridge.
3 Attach the headshell.
Insert the headshell with attached cartridge into the tone arm. Next,
while keeping the headshell horizontal, tighten the lock nut.
54 mm
Overhang adjustment scale
54 mm
Lock nut
0
4
1
En
2
3
4
5