1
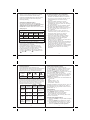
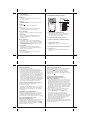
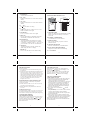
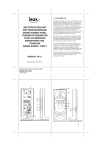
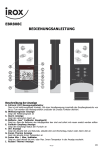
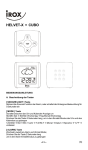
FUNKGESTEUERTE
WETTERSTATION
Art. 10380
BEDIENUNGSANLEITUNG
MEBUS RCW416 & TS23C MANUAL (ENG)
SIZE: W65 X H105 (mm)
BY EMILY TSOI 01/12/06
1. EINFÜHRUNG
Wir gratulieren Ihnen zum Kauf der Funkwetterstation.
Das Hauptgerät zeigt die Wetterprognose, die Innenund Aussen-Temperatur/Luftfeuchtigkeit sowie
Uhrzeit und das Datum an. Die Wetterdaten werden
von bis zu 3 externen Sensoren empfangen. Das
Hauptgerät zeigt die gemessenen Maximal-und
Minimaltemperaturen/Luftfeuchtigkeit an. Dank der
im Gerät zur Anwendung kommenden 433 MHz
Technologie brauchen keine Kabelverbindungen
zwischen den Aussensensoren und dem Hauptgerät
ausgeführt zu werden.
Das Gerät ist des weiteren mit einer Funkuhr
ausgerüstet Die Uhr synchronisiert aktuelle Zeit und
Datum mit dem Deutschen Funkzeitsignal “DCF77”.
Sollte sich das Gerät ausserhalb des Funkzeitsignals
“DCF77” befinden, können Zeit und Datum manuell
eingestellt werden.
Um die Wettervorhersage zuverlässig ausführen zu
können, ist das Gerät mit einem integrierten
Barometer ausgerüstet.
Lesen Sie bitte die Bedienungsanleitung sorgfältig
durch, bevor Sie das Gerät benutzen, um die
Eigenschaften und Funktionen ausführlich
kennenzulernen.
57
A
D
J
E
B
C
F
G H I
58
A SNOOZE
aktiviert die Weckwiederholung
B AL. 1 Taste
Ansehen der Weckalarmzeit
und Status für Alarm 1
C AL. 2 Taste
Ansehen der Weckalarmzeit
und Status für Alarm 2
MERKMALE DER SENDEEINHEIT
E
WIRELESS THERMO • HYGRO
A C
RESET
1 2 3
CHANNEL
F
D
B
D ( ) Taste
Herabsetzen der Werte
E (
) Taste
Heraufsetzen der Werte. Suchen nach Funkuhrsignal
F SEARCH Taste
Suchen nach Sensorsignal
G MEM Taste
Minimum und Maximum der Temperatur
und Luftfeuchte
H CHANNEL Taste
Wählt einen externen Funksensor.
Gedrückt halten um bei verschiedenen Sensoren
die Anzeige abwechselnd darzustellen
I MODE Taste
Umschalten der Anzeige und im Editiermodus
bestätigen von eingestellten Werten
J RESET Taste
Zurücksetzen des Gerätes auf Werkseinstellung
59
2. SCHNELLINSTALLATION
2a) BITTE VOR DEM EINSATZ BEACHTEN
Beachten Sie bitte die folgenden Hinweise, um einen
optimalen Betrieb der Geräte zu gewährleisten:
1. Weisen Sie jeder externen Sendeeinheit einen
eigenen Kanal zu.
2. Legen Sie zuerst die Batterien in die Sendeeinheiten
polrichtig ein.. Danach legen Sie die Batterien
in die Empfangseinheit polrichtig ein.
3. Platzieren Sie die Empfangseinheit und Sendeeinheit
innerhalb von 1 Meter zueinander und warten Sie
bis der Messwert auf der Anzeige erscheint.
4. Stellen Sie danach die Empfangseinheit und die
externen Sendeeinheiten
Beachten Sie, dass die tatsächliche Reichweite der
Sender von den jeweils verwendeten Baumaterialien
der Gebäude sowie der jeweiligen Position der
externen Sendeeinheit abhängt und durch externe
Einflüsse (diverse Funksender und andere Störquellen)
die mögliche Distanz stark reduziert wird.
Sollte kein Empfang möglich sein, empfehlen wir
sowohl für den Sender und den Empfänger andere
Positionen zu suchen. Manchmal reicht schon
ein Verschieben um wenige Zentimeter !
Obwohl die externen Sendeeinheiten wetterfest sind,
sollten Sie diese nicht an Orten platzieren, wo diese
direkter Sonneneinstrahlung, Regen oder Schnee
ausgesetzt sind.
Sind die Batterien des Senders leer. so erscheint
in der Anzeige des Hauptgerätes. Das gleiche gilt
für das Hauptgerät. Ist der Stromadapter nicht angeschlossen, so erscheint desweiteren in der
Anzeige.
61
A LED-INDIKATOR
Blinkt während der Sendung der Temperaturdaten
kurz auf. Blinkt 2x wenn die Batterie des Sensors
schwach ist
B BATTERIEFACH
C RÜCKSETZ-TASTE [RESET]
D KANAL-SCHALTER
Einstellen der Sendeeinheit auf einen Kanal
(1, 2 oder 3).
E HALTER FÜR WANDAUFHÄNGUNG
F °C/ °F TASTE
Nicht bei allen Geräten vorhanden
60
2b) VORBEREITUNG DER EXTERNEN
SENDEEINHEITEN
1. Nehmen Sie die Batteriefachabdeckung ab.
2. Stellen Sie den gewünschten Kanal mittels des
Schiebeschalters ein.
3. Setzen Sie 2 Alkalinebatterien (1,5V, UM-3 oder
Größe “AA”) den jeweiligen Polaritäten
entsprechend ein.
4. Schrauben Sie die Batteriefachabdeckung wieder auf.
2c) VORBEREITUNG DER EMPFANGSEINHEIT
1. Öffnen Sie vorsichtig den Deckel des Batteriefaches.
2. Setzen Sie 2 Alkalinebatterien (1,5V, UM-3 oder Größe
“AA”) den jeweiligen Polaritäten entsprechend ein.
3. Schließen Sie das Batteriefach wieder
4. Schließen Sie den Netzadapter an das Gerät und
an das Stromnetz an.
2d) WANDAUFHÄNGUNG ODER TISCHAUFSTELLUNG
Die Empfangseinheit ist mit einem Standfuss
ausgerüstet, und das Gerät damit auf einer ebenen
Fläche aufgestellt werden kann.
2e) EINSTELLEN DES EXTERNEN SENSORS TEMPERATUR - UND FUNKUHR
a. Sobald sich die Batterien im Aussensensor befinden,
beginnt dieser mit der Übertragung der Messwerte
in Intervallen von ca. 45 Sekunden. Auch das
Hauptgerät sucht nach Signalen (ca. 2 Minuten lang),
sobald die Batterien eingelegt werden. Wird das
Signal vom Aussensensor empfangen, erscheinen
Aussentemperatur und Luftfeuchtigkeitswert
auf dem Display. Wenn innerhalb von 2 Minuten
keine Sensorsignale empfangen werden, so betätigen
Sie die [SEARCH] (F) Taste, um eine Suche nach
den Signalen des externen Sensors zu erzwingen.
Empfangs-und Sendesignal zwischen Aussensensor
und Hauptgerät werden synchronisiert.
62
Wird das “DCF” Zeitsignal empfangen, erscheinen
automatisch Zeit und Datum auf dem Display.
Damit ist die Schnellinstallation abgeschlossen. Weitere
Funktionen entnehmen Sie bitte der nachfolgenden
Bedienungsanleitung.
Maximum und Minimum Speicher
Der Maximum und Minimum Wert für Luftfeuchte,
Temperatur wird durch Drücken von [MEM] angezeigt.
Mehrmals drücken für Minimum/Maximum/
Normalwerte. Gedrückt Halten zum Löschen der Werte.
Wetterprognose:
Anzeige
Prognose
Sonnig
Farbe
leicht
bewölkt
Bewölkt
Regen
Schnee
Grün
Hellblau
Lila
Weiss
Gelb
Die Empfangseinheit errechnet aufgrund der
barometrischen Luftdruckänderung die Wetterentwicklung
für die kommenden 12-24 Stunden.
Nach Inbetriebnahme der Wetterstation ist kein
Einstellen des aktuellen Luftdruckes erforderlich,
das Gerät wird in den folgenden Stunden aus den
Luftdruckänderungen eine Wettervorhersage
errechnen. Der Luftdruck wird dabei im Trend dargestellt mit
ansteigend,
gleichbleibend sowie
fallend.
63
64
TEMPERATUR UND LUFTFEUCHTIGKEITS
TENDENZANZEIGE
Der Tendenzindikator zeigt die Temperatur- und
Luftfeuchtigkeitstendenz der über den ensprechenden Sensorkanal
gemessenen Werte an. Der Indikator kann folgende drei
Trends anzeigen: Steigend, gleichbleibend und fallend.
Indikator
Trend
steigend
gleichbleibend
fallend
KOMFORTLEVEL INDIKATOREN
Die Komfortlevel Indikatoren COMFORT, WET oder DRY
zeigen Ihnen ob das aktuelle Raumklima komfortabel, zu feucht
oder zu trocken ist. Die Komfortlevel Indikatoren werden unter
folgenden Gegebenheiten im Display des Hauptgerätes
(oberhalb der Innenfeuchtigkeits-Anzeige) angezeigt:
Indikator
im Display
Temperatur
Bereich
Feuchtigkeits
Bereich
COMFORT
20˚C – 25˚C
(68˚F to 77˚F)
40%70%
idealer Bereich
Temperatur und
Feuchtigkeit
WET
-5˚C – 50˚C
(23˚F - 122˚F)
über
70%
zu feuchtes
Raumklima
DRY
-5˚C – 50˚C
(23˚F - 122˚F)
unter
40%
zu trockenes
Raumklima
kein
Indikator
weniger als
20˚C (68˚F) or
mehr als
25˚C (77˚F)
40%
bis
70%
kein
Kommentar
65
3b) BITTE BEACHTEN SIE FOLGENDES:
1. Nach Inbetriebnahme der Wetterstation ist kein
Einstellen des aktuellen Luftdruckes erforderlich,
das Gerät wird in den folgenden Stunden aus den
Luftdruckänderungen eine Wettervorhersage
errechnen.
2. Bei langen stabilen Wetterlagen wird eine
Wettervorhersage stark erschwert. Eine WetterSymboländerung am Display kann zum Teil länger
als erwünscht dauern.
3. Die Wettervorhersage wird ausschliesslich anhand
barometrischer Luftdruckänderungen errechnet.
4. Die Wahrscheinlichkeit der Wetttervorhersage liegt
bei etwa 70% und gilt für einen Umkreis von
20-30 Kilometer.
5. Erscheint das Symbol „sonnig“ bei Nacht ist
wolkenloses Wetter gemeint. Nebel wird von der
Wetterstation nicht angezeigt, da dieser bei
verschiedenen Wetterlagen auftreten kann
6. Falls Sie die Wetterstation auf Reisen nehmen,
wird sich die Wettervorhersage bedingt durch
Höhenänderungen und den darausfolgenden
Luftruckänderungen verstellen.
Warten Sie bis zu 24 Stunden bis die Wetterstation
die Wettervorhersage aufgrund der
Luftdruckverhältnisse für Ihren neuen Aufenthaltsort
errechnet hat. Aufgrund der Barometrischen Wetterprognose übernimmt der Hersteller keine
Verantwortung oder Haftung für eventuelle Schäden,
die aufgrund der ungenauigkeit der Wetterprognose
auftauchen können. Wetter ist nicht 100%tig
berechenbar.
aktuelles
Raumklima
bei Ihnen:
MANUELLE EINSTELLUNGEN
Das Gerät bietet diverse Möglichkeiten die
Grundeinstellungen zu verändern. Drücken Sie dazu
die Taste [MODE] drei Sekunden lang um in den
Einstellmodus zu gelangen. Mit jedem weiteren
Drücken der [MODE] Taste erscheint auf der Anzeige
eine einzustellende blinkende Funktion.
Drücken Sie dort jeweils eine der Tasten [ + ] oder
[ - ]. Folgende Funktionen können Sie verändern (in
dieser Reihenfolge, dazwischen einfach jeweils die
[MODE] Taste drücken):
Französisch-Fr, Italienisch-IT oder Niederländisch-DU
, Spanisch-SP)
- Jahr
- Kalender (Monat – Tag)
- Zeitformat 24h oder 12h
- Zeit (Stunden – Minuten)
Manuelle Einstellungen sind dann sinnvoll, wenn z.B.
das Funksignal nicht zur Verfügung steht. (DCF77)
Das Funksignal kann ausgeschaltet werden durch Gedrückt halten von “+”.
ZEITANZEIGE
Im normalen Anzeigemodus können Sie mittels der
Taste [MODE] folgende Anzeigemodi
zur Darstellung auf der Anzeige auswählen:
- Zeit mit Sekunden,- Zeit mit Wochentag
- Eine zweite Zeitzone mit Wochentag,- Eine zweite
Zeitzone mit Sekunden,
EINSTELLEN DER ZEITZONE
1. Drücken Sie [MODE] so lange bis ZONE im Display
erscheint.
2. Halten Sie [MODE] zwei Sekunden lang gedrückt.
3. Der Offset blinkt und kann nun durch [ + ] oder [ – ]
eingestellt werden. z.B. +1 Stunde oder -1 Stunde.
4. Drücken Sie [MODE] erneut zum Speichern.
66
EINSTELLEN DES WECKALARMS
Dieses Gerät besitzt zwei Weckzeiten [AL. 1] und
[AL. 2]. Einzustellen sind diese wie folgt:
WECKALARM1
1. Drücken Sie [AL. 1]
2. [ + ] oder [ – ] zum Einstellen/Ausstellen des Alarms.
3. Halten Sie [AL. 1] gedrückt bis die Zeit blinkt.
4. Einstellen der Weckstunde durch Drücken von [ + ]
oder [ – ], danach [AL. 1] zum Speichern.
5. Einstellen der Weckminute durch Drücken von [ + ]
oder [ – ], danach [AL. 1] zum Speichern.
6. Drücken Sie [MODE] um die normale Zeit und
Kalendar darzustellen. Die Alarmzeit 1 wird durch
Drücken von [AL.1] angezeigt.
WECKALARM2
1. Drücken Sie [AL. 2]
2. [ + ] oder [ – ] zum Einstellen/Ausstellen des Alarms.
3. Halten Sie [AL. 2] gedrückt bis die Zeit blinkt.
4. Einstellen der Weckstunde durch Drücken von [ + ]
oder [ – ], danach [AL. 2] zum Speichern.
5. Einstellen der Weckminute durch Drücken von [ + ]
oder [ – ], danach [AL. 2] zum Speichern.
6. Drücken Sie [MODE] um die normale Zeit und
Kalendar darzustellen. Die Alarmzeit 2 wird durch
Drücken von [AL.2] angezeigt.
SNOOZE FUNKTION
Drücken Sie SNOOZE für die Weckwiederholung
PFLEGEHINWEISE
1. Schützen Sie das Gerät vor Nässe, Staub, Stössen
und extremen Temperaturen und reinigen Sie es
nur mit einem trockenen Tuch ohne aggressive
Lösungsmittel.
2. Nehmen Sie keine Eingriffe in das Gerät vor, da
sonst der Garantieanspruch erlischt.
3. Verwenden Sie ausschliesslich neue Batterien und
mischen Sie niemals alte und neue Batterien.
Bitte denken Sie auch daran, dass verbrauchte
Batterien nicht in den Hausmüll gehören, sondern an
den dafür vorgesehenen Sammelstellen abgegeben
werden.
Der Inhalt dieser Bedienungsanleitung darf nicht ohne
die Zustimmung des Herstellers vervielfältigt werden.
TECHNISCHE DATEN
Hauptgerät
Messbereich Temperatur
Messbereich Luftfeuchte
Auflösung Temperatur
Auflösung Luftfeuchte
Batterien
: -5C bis 50C
: 25% bis 90%
: 0.1C
: 1%
: 1.5V AA x 2 Alkaline
Sensor
Messbereich Temperatur
Messbereich Luftfeuchte
Auflösung Temperatur
Auflösung Luftfeuchte
Übertragungsfrequenz
Maximale Anzahl der Sender
Übertragungsabstand
Batterien
Genauigkeit Temperatur
Genauigkeit Luftfeuchtigkeit
67
: -20C bis 60C
: 25% bis 90%
: 0.1C
: 1%
: 433 MHz
:3
: ca. 43 bis
47 seconds
: 1.5V AA x 2 Alkaline
: +/- 1ºC
: +/- 5% rel.
Luftfeuchte
68
Beachten Sie bitte unbedingt, dass Sie Batterien und
Gerät nach den geltenden gesetzlichen Bestimmungen
umweltgerecht entsorgen.
Das Gerät darf nur für den vorgesehenen Zweck
verwendet werden Reparaturen dürfen nur von
autorisiertem Fachpersonal durchgeführt werden.
EG KONFORMITÄTSERLÄRUNG
Produkt : RCW416
Dieses Produkt entspricht bei bestimmungsmäßiger
Anwendung den grundlegenden Anforderungen des
Artikels 3 der R&TTE 1999/5/EC Richtlinie:
Modellnummer
Art.-Nr.
L.-Nr.
Effizienter Gebrauch des Funkfrequenzspektrums
(Artikel 3.2 der R&TTE Richtlinie)
Angewandter Standard(s)
EN 300 220-1,3:2000
RCW416
10380
0407
Albert Mebus GmbH & Co.
Bergische Str. 11
42781 Haan
Hinweis:
TUV.com beurkundet die Prüfung der hohen Qualität
und Produktsicherheit auf der TUV.com Internetseite.
Hierzu geben Sie alle 10 Ziffern des Stempels in das
vorgesehene Eingabefeld ein und bestätigen durch
Anklicken des “SHOW” Buttons.
:0
1
3
I
D
0000187
Sollten Sie weitere Fragen zur Wetterstation haben, so können Sie sich von
Montag bis Freitag in der Zeit von 10
bis 15 Uhr an unsere Hotline unter
02129 / 344664 oder 0229 / 343387
wenden. Halten Sie Artikelnummer
und Modellnummer parat.
Elektromagnetische Verträglichkeit
(Artikel 3.1.b der R&TTE Richtlinie)
Angewandter Standard(s)
EN 301 489-1,3:2000
Angewandter Standard(s)
EN 300 339:2000
Zusätzliche Information:
Damit ist das Produkt konform mit der
Niederspannungsrichtlinie 73/23/EWG und der Richtlinie
für elektromagnetische Verträglichkeit 89/336/EWG
und trägt die entsprechende CE Kennzeichnung.
Konform in Folgenden Ländern:
Alle EU Staaten, die Schweiz CH
QA MANAGER : H.Y.WANG
K.S plastic factory
Guan Lan / Shen Shen / China
RoHS
www.mebus-electronic.com
69
70
HORLOGE MURALE
CONTRÔLEE PAR RADIO
AVEC PREVISIONS
METEOROLOGIQUES
THERMO-HYGROMETRE
INTERIEUR/EXTERIEUR
MANUEL DE L’UTILISATEUR
MEBUS RCW416 & TS23C MANUAL (FRA)
SIZE: W65 X H105 (mm)
BY EMILY TSOI 19/12/06
INTRODUCTION
Merci d’avoir acheté le RCW416.
Le kit de base comprend une unité principale, qui
est une station de prévisions météorologiques, une
unité télécommandée qui est le thermo hygromètre
et l’adaptateur AC/DC.
L’unité principale est capable d’enregistrer une
température maximum et minimum de différents
sites. Et aucune installation câblée n’est requise et
fonctionne à 433 MHz.
Le paquet comprend:
− Unité principale
− Capteur thermo hygromètre extérieur
− Adaptateur AC
− Manuel d’instruction
A
D
J
E
B
C
F
57
G H I
58
A Touche SNOOZE
Active la fonction snooze
B. Touche AL. 1
Affiche l’heure du réveil ou règle le statut du réveil
pour le réveil 1
C. Touche AL. 2
Affiche l’heure du réveil ou règle le statut du réveil
pour le réveil 2
CARACTERISTIQUES DU SENSEUR
E
WIRELESS THERMO • HYGRO
A C
RESET
1 2 3
CHANNEL
B
D. Touche ( )
Diminue la valeur d’un réglage
E. Touche ( )
Augmente la valeur d’un réglage; Permet de recevoir
un signal de l’horloge contrôlée par radio
F. Touche SEARCH
Permet de rechercher le signal du capteur à distance
G. Touche MEM
Reçoit la température et l’humidité maximum ou
minimum de l’unité principale et de l’unité à distance
H. Touche CHANNEL
Alterne entre les différents canaux des capteurs à
distance. Séquence des touches : Intérieur > Canal 1 >
Canal 2 > Canal 3 > Intérieur… Vous pouvez aussi
appuyer et maintenir pour entrer dans la fonction
Auto Déroulement.
I. Touche MODE
Alterne les modes d’affichage et confirme l’entrée
tout en réglant les valeurs d’affichage
J. Touche RESET
Appuyer pour réinitialiser toutes les valeurs au
réglage par défaut.
59
AVANT DE COMMENCER
Pour un meilleur fonctionnement:
1. Insérer les piles des unités à distance avant de le faire
pour l’unité principale.
2. Positionner l’unité à distance et l’unité principale
dans la portée de transmission efficace, qui dans des
circonstances usuelles, est de 20 à 30 mètres. Noter
que la portée efficace est largement affectée par les
matériaux des bâtiments et par la position des unités
principale et à distance. Essayer des positions variées
pour un meilleur résultat. Bien que les unités à
distance soient résistantes aux intempéries, elles
doivent être éloignées de la lumière du soleil directe,
la pluie ou la neige.
INSTALLATION DES PILES: UNITE A DISTANCE
1. Retirer les vis du compartiment à piles
2. Sélectionner le canal
3. Installer 2 piles (UM-3 ou taille “AA” 1.5V)
strictement selon les polarités montrées.
4. Replacer le boîtier et le revisser.
ALLUMER L’UNITE PRINCIPALE
Installer 2 batteries (UM-3 ou taille AA 1.5V) strictement
dans l’unité principale et brancher l’adaptateur AC pour
allumer l’unité principale et vous verrez l’affichage
s’illuminer.
ALERTE PILES FAIBLES
POUR LE CAPTEUR A DISTANCE
Quand il faut remplacer les piles du capteur à distance,
l’indicateur de piles faibles respectif s’affichera. De
plus, l’indicateur de piles faibles
s’affichera sur l’unité
principale pour cette unité de capteur à distance spécifiée.
61
F
D
A TEMOIN LUMINEUX (LED)
Clignote brièvement durant l'envoi des
données mesurées. Cignote 2x si les pilles de la
sonde faibles. (MODEL TS22C, TS23C, TS32C,
TS33C)
B COMPARTIMENT A PILE
C TOUCHE DE REMISE À ZERO [RESET]
D SELECTION DU CANAL
Assignation d'un canal au senseur (1,2 ou 3)
E ENCOCHE POUR FIXATION MURALE
F TOUCHE F °C/ °F
Cette fonction n'est pas disponible sur tous les
appareils
60
POUR L’UNITE PRINCIPALE
Lorsque la puissance de la pile n’est plus suffisante,
l’icône de piles
s’affichera afin de remplacer les
piles. Si l’adaptateur AC ne peut pas connecter l’unité
principale correctement, ou si l’adaptateur AC est
enlevé de l’unité principale, l’icône
s’affichera.
REGLER L’HORLOGE RC ET DE LA
TEMPERATURE A DISTANCE
a. Une fois les piles en place pour l’unité à distance, les
données de température et d’humidité commenceront
à être transmises à des intervalles d’environ 45
secondes. L’unité principale commencera aussi à
rechercher des signaux pendant environ 2 minutes une
fois que les piles sont installées.10 secondes après une
bonne réception, les températures extérieures et
l’humidité s’afficheront. L’unité principale actualisera
automatiquement ses enregistrements à des
intervalles d’environ 45 secondes.
b. Si aucuns signaux ne sont reçus, des blancs “
”
s’afficheront. Maintenir [SEARCH] pendant 2 secondes
pour faire une autre recherche pendant environ 2 minutes.
Ceci est utile pour synchroniser la transmission et la
réception des unités à distance et principale.
c. Lorsque la réception du signal à distance est terminée,
elle synchronisera automatiquement l’heure actuelle
et la date lorsqu’elle se trouve dans la portée du signal
“DCF” RF.
Répéter cette étape lorsque vous trouvez des différences
entre les enregistrements affichés sur l’unité principale
et sur l’unité à distance.
62
TEMPERATURE ET HUMIDITE MAXIMUM
ET MINIMUM
Les températures et l’humidité maximum et minimum
enregistrés à l’intérieur / l’extérieur seront gardées
automatiquement en mémoire. Pour afficher ces
enregistrements, appuyer sur le bouton [MEM] pour
les minima et appuyer sur le bouton [MEM] pour les
maxima, et puis appuyer sur le bouton [MEM] pour
retourner aux enregistrements actuels.
PREVISIONS METEOROLOGIQUES
L’unité principale est capable de détecter les
changements de pression atmosphérique. En se basant
sur les données collectées, elle peut prédire la météo
pour les 12 à 24 heures à venir.
Affichage des symboles
Prévisions
Ensoleillé Partiellement
couvert
Couvert
Pluvieux
Neigeux
Couleur
Jaune
Vert
Bleu clair
Violet
Blanc
Remarque :
1. La précision des prévisions météorologiques
générales basées sur la pression est d’environ 70%.
2. La prévision météorologique peut ne pas refléter la
situation actuelle.
3. L’icône ensoleillé lorsqu’il s’applique à la nuit
signifie un temps clair. Il y a un indicateur de
tendance sur le cadran d’affichage montrant si la
pression atmosphérique mesurée augmente , est
constante , ou diminue .
63
COLLISION DE TRANSMISSION
Des signaux d’autres appareils ménagers tels que des
sonneries de porte, systèmes de sécurité et contrôles
d’entrée peuvent interférer avec ceux de ce produit et
causer des échecs temporaires de réception. C’est
normal et cela n’affecte pas la performance générale
du produit. La transmission et la réception des
enregistrements de température reprendront une fois
que les interférences auront cessées.
COMMENT REGLER L’HORLOGE
RADIO CONTROLEE
1. Une fois les piles installées, l’horloge recherchera
automatiquement le signal radio. Cela prend environ
3-5 minutes pour finir ce processus.
2. Si l’utilisateur souhaite désactiver la fonction d’auto
réception, maintenir le bouton [ + ] pendant 2 secondes
pour la désactiver.
3. Pour réactiver la fonction auto réception, maintenir le
bouton [ + ] pendant 2 autres secondes pour permettre
la réception à une heure particulière.
4. Si le signal radio est reçu, la date & l’heure seront
réglées automatiquement avec l’icône de signal de
contrôle [ ] activé.
5. Si l’horloge ne reçoit pas le signal d’heure, l’icône
[ ] apparaîtra. Puis l’utilisateur peut régler l’heure
manuellement user.
COMMENT REGLER L’HORLOGE
MANUELLEMENT
Pour régler l’horloge manuellement, maintenir [MODE]
pendant deux secondes pour afficher la langue. Utiliser
[ + ] ou [ – ] pour la changer. Appuyer sur [MODE] pour
confirmer. Répéter la même procédure pour régler
l’année, le mois, le format 12/24 heures, les heures et les
minutes. Pendant le réglage, utiliser [ + ] ou [ – ] pour
augmenter ou diminuer les valeurs rapidement.
Pour afficher la langue, vous pouvez sélectionner.
65
INDICATEURS DE NIVEAU DE CONFORT
Les indicateurs de niveau de confort CON, HUM ou
SEC vous diront si l’environnement actuel est confortable,
trop humide ou trop sec. Les indicateurs de confort
apparaîtront sur l’affichage de l’unité principale lorsque
les conditions suivantes sont satisfaites:
Indicateur
affiché
sur l’unité
Portée de
Température
Portée
Humidité
Affiche
Environnement
actuel
CON
20˚C à 25˚C
40%RH
à 70%RH
Confortable
HUM
-5˚C à +50˚C
+ 70%RH
Trop humide
SEC
-5˚C à +50˚C
- 40%RH
Trop sec
Pas
d’Indicateur
Moins de
20°C ou
plus de 25°C
40%RH
à
70%RH
Pas de
commentaire
SIGNAUX DISCONNECTES
Si sans raisons évidentes l’affichage de la température
externe disparaît, maintenez le bouton [SEARCH]
pendant 2 secondes pour entamer une recherche
immédiate. Si cela ne fonctionne pas, vérifier:
1. L’unité du capteur à distance est toujours en place
2. Les piles des unités principale et à distance.
(Notes: lorsque la température tombe en dessous
du point de gel, les piles des unités extérieures
gèleront, ce qui baissera leur alimentation en
voltage et leur portée effective.
3. La transmission est dans la portée et il n’y a pas
d’obstacles et d’interférences. Réduire la distance
si nécessaire.
64
Anglais (En), Allemand (DE), Français (Fr), Italien (IT),
Espagnol (SP) et Hollandais (DU). S’il y a quelque chose
que vous ne devez pas changer, appuyer simplement sur
[MODE] pour le passer. Lorsque vous avez fini les
changements, appuyer sur [MODE] pour sortir.
L’affichage reviendra au mode horloge.
COMMENT REGLER LA ZONE HORAIRE
1. Pour régler la zone horaire
2. Appuyer sur [MODE] jusqu’à arriver au mode
d’affichage de la zone horaire avec l’icône‘ZONE’
sur l’écran LCD.
3. Maintenir [MODE] pendant 2 secondes, la zone
horaire s’affichera.
4. Entrer le réglage en utilisant [ + ] ou [ – ].
5. Appuyer sur [MODE] pour sortir.
COMMENT REGLER LE REVEIL
Il y a au total deux réveils, réveil1 et réveil 2 qui
peuvent être activés en appuyant respectivement sur
[AL. 1] et [AL. 2]. La procédure de réglage du réveil
est listée ci-dessous.
REGLAGE REVEIL 1
1. Appuyer sur [AL. 1]
2. Appuyer sur [ + ] ou [ – ] pour activer / désactiver
la fonction réveil.
3. Appuyer et maintenir le bouton [AL. 1] jusqu’à ce
que l’heure du réveil clignote
4. Régler l’heure en appuyant sur [ + ] ou [ – ], et puis
appuyez sur le bouton [AL. 1] pour confirmer.
5. Ensuite, pour régler les minutes en appuyant sur
[ + ] ou [ – ], et puis en appuyant sur le bouton
[AL.1] pour confirmer.
6. si vous souhaitez quitter l’affichage du réveil et
afficher le calendrier, appuyer sur [MODE] pour
afficher le calendrier. Si vous souhaitez passer à
l’affichage du réveil 2, appuyer sur le bouton [AL.1].
66
REGLER REVEIL 2
1. Appuyer sur [AL. 2]
2. Appuyer sur [ + ] ou [ – ] pour activer / désactiver la
fonction réveil.
3. Appuyer et maintenir le bouton [AL. 2] jusqu’à ce
que l’heure du réveil clignote
4. Régler l’heure en appuyant sur [ + ] ou [ – ], et puis
appuyez sur le bouton [AL. 2] pour confirmer.
5. Ensuite, pour régler les minutes en appuyant sur [ + ]
ou [ – ], et puis en appuyant sur le bouton [AL.2]
pour confirmer.
6. si vous souhaitez quitter l’affichage du réveil et
afficher le calendrier, appuyer sur [MODE] pour
afficher le calendrier. Si vous souhaitez passer à
l’affichage du réveil 1, appuyer sur le bouton [AL.2].
FONCTION SNOOZE
Lorsque le réveil sonne, vous pouvez appuyer sur
[SNOOZE] pour arrêter le réveilrm
SPECIFICATIONS
Unité principale
Portée de fonctionnement
proposée
Portée de mesure d’humidité
Résolution de température
Résolution d’humidité
Piles
: -5 °C à 50 °C
: 25% à 90% à 25%
: 0.1 °C
: 1%
: 1.5V AA x 2pcs
Unité de capteur à distance
Portée de fonctionnement
proposée
Portée de mesure d’humidité
Résolution de température
Résolution d’humidité
Fréquence de transmission
Nombre maximum d’unités
à distance
Cycle
Piles
Albert Mebus GmbH & Co.
Bergische Str. 11
42781 Haan
RoHS
www.mebus-electronic.com
: 25% à 90% à 25%
: 0.1 °C
: 1%
: 433 MHz
:3
: entre 43 et 47
secondes
: 1.5V AA x 2pcs
INDICATIONS D'ENTRETIEN
1. Préserver l'appareil de l'humidité et de la poussière,
éviter les chocs et les températures extrêmes. Pour
le nettoyer, utilisez seulement un chiffon doux et
sec sans produit de nettoyage agressifs
2. Ne procédez à aucune intervention (réparation,…)
dans l'appareil, sans quoi la garantie serait annulée.
3. Utilisez exclusivement des piles neuves et ne
mélangez jamais des piles neuves avec des
anciennes.
Pensez également à ne pas mettre les piles usagées
dans les déchets ménagers, mais de les ramener dans
les points de collecte prévus à cet effet.
Important: pour tous les produits Irox, toutes les
taxes anticipées de recyclage (TAR) en Suisse sont
acquittées.
67
REMARQUE
- Sur la base des restrictions des possibilités
d'impression, l'affichage de l'appareil peut
différer de la représentation dans le présent
mode d'emploi. Sous réserve de
modifications.
: -10 °C à 50 °C
68
CERTIFICAT DE CONFORMITE CE
Produit : RCW416
Ce produit est conforme aux dispositions en vigueur,
selon l' application des exigences fondamentales de
l'article 3 des directives R&TTE 1999/5/EC.
Directive
Utilisation adéquate du spectre de fréquence radio
(Article 3.2 des directives R&TTE)
Standard(s) appliqué (s)
EN 300 220-1,3:2000
Compatibilité électromagnétique
(Article 3.1.b des directives R&TTE)
Standard(s) appliqué(s)
EN 301 489-1,3:2000
Standard(s) appliqué(s)
EN 300 339:2000
Informations complémentaires
Le produit est conforme aux directives concernant
les appareils de basse tension 73/23/EWG
ainsi qu'aux directives concernant la compatibilité
électromagnétique 89/336/EWG
et porte le marquage du certificat CE correspondant
Conforme Dans Les Pays Suivants
Tous les états européens EU, en Suisse CH
QA MANAGER: Q.Y. ZENG
K.S plastic factory
Guan Lan / Shen Shen / China
S il vous plait , jetey les piles usages de facon
a proteger l environnement
69
70
OROLOGIO DA MURO
RADIOCONTROLLATO
CON PREVISIONI
METEOROLOGICHE
E TERMOIGROMETRO
INTERNO/ESTERNO
MANUALE DI UTILIZZO
MEBUS RCW416 & TS23C MANUAL (ITA)
SIZE: W65 X H105 (mm)
BY EMILY TSOI 19/12/06
INTRODUZIONE
La ringraziamo per aver acquistato un RCW416.
La confezione base comprende un’unità principale,
e cioè la stazione di previsioni meteorologiche,
un’unità remota, il termoigrometro e l’adattatore
AC/DC.
L’unità principale è in grado di memorizzare la
temperatura massima e minima di luoghi diversi.
Inoltre, non è necessario installare fili ed opera a
433 MHz.
L’imballaggio contiene:
− Unità principale
− Sensore esterno termoigrometro
− Adattatore AC
− Manuale di istruzioni
A
D
J
E
B
C
F
57
G H I
58
A Tasto SNOOZE
Attiva la funzione snooze
B. Tasto AL. 1
Visualizza l’orario della sveglia o imposta lo stato
di svegli a sveglia 1
C. Tasto AL. 2
Visualizza l’orario della sveglia o imposta lo stato
di svegli a sveglia 2
CARATERISTICHE DEL SENSORE
E
WIRELESS THERMO • HYGRO
A C
RESET
1 2 3
CHANNEL
F
D
D. Tasto ( )
Diminuisce il valore di un’impostazione
B
E. Tasto ( )
Aumenta il valore di un’impostazione; ricerca
forzata del segnale orario radiocontrollato
F. Tasto SEARCH
Ricerca forzata del segnale proveniente dal sensore
remoto
G. Tasto MEM
Riceve i dati relativi alla temperatura massima o
minima e all’umidità dell’unità principale e
dell’unità remota
H. Tasto CHANNEL
Permette di passare ai diversi canali delle unità
presenti sul sensore remoto. sequenza tasti: Interna >
Canale 1 > Canale 2 > Canale 3 > Interna… Inoltre,
è possibile tenere premuto questo tasto per inserire
la funzione di Auto Scroll
I. Tasto MODE
Permette di passare alle diverse modalità di
visualizzazione e conferma l’inserimento mentre
imposta i dati da visualizzare
J. Tasto RESET
Premerlo per ripristinare tutti i valori alla loro
impostazione iniziale
59
PRIMA DI INIZIARE
Per un migliore funzionamento:
1. Inserire le batterie nelle unità remote prima di
effettuare la medesima operazione nell’unità principale.
2. Posizionare l’unità remota e l’unità principale
all’interno di un intervallo di trasmissione reale, che,
in circostanze normali, è di 20 a 30 metri. Si prega di
notare che l’intervallo reale è notevolmente influenzato
dai materiali di costruzione e dal posizionamento
dell’unità principale e di quelle remote. E’ necessario
provare varie installazioni per ottenere un migliore
risultato. Nonostante le unità remote siano impermeabili,
è necessario comunque posizionarle lontane dalla
luce diretta del sole, dalla pioggia e dalla neve.
INSTALLAZIONE BATTERIE: UNITA’ REMOTA
1. Togliere le viti dal vano porta batterie.
2. Selezionare il canale
3. Installare 2 batterie (formato UM-3 o “AA” da 1.5V)
attenendosi scrupolosamente alle polarità mostrate.
4. Riposizionare il coperchio del vano porta batterie e
riavvitarlo.
ATTIVARE L’UNITA’ PRINCIPALE
Installare le 2 batterie (formato UM-3 o AA da 1.5V)
correttamente nell’unità principale ed inserire l’adattatore
AC nella presa elettrica in modo da azionare anche
l’unità principale, a questo punto il display si accenderà.
SEGNALE DI BATTERIA SCARICA
PER IL SENSORE REMOTO
Quando è ora di sostituire le batterie nel sensore remoto,
apparirà il rispettivo indicatore di batteria scarica
sul display. Inoltre, l’indicatore di batteria scarica
apparirà sul display dell’unità principale per quella
specifica unità di sensore remoto.
61
A TESTIMONE LUMINOSO (LED)
Lampeggia brevemente durante la trasmissione
delle date misurate. Lampeggia brevemente 2 x
se la batteria del sensore è bassa
B SCOMPARTIMENTO PER LE PILE
C TASTO DI REINSTALLAZIONE [RESET]
D SCELTA DEI CANALI
Installazione del sensore su uno dei canali
(1,2 o 3)
E ENCOCHE PER LA FISSAZIONE MURALE
F TASTO F °C/ °F
Questa funzione non è disponibile per tutti gli
apparecchi
60
PER L’UNITA’ PRINCIPALE
Quando le batterie sono scariche, apparirà l’immagine
di una batteria
sul display, a questo punto sarà
necessario sostituirle. Se l’adattatore AC non può
essere collegato correttamente all’unità principale o
l’adattatore AC viene tolto da quest’ultima, sul display
apparirà l’icona
.
IMPOSTARE TEMPERATURA ED
ORORLOGIO RADIOCONTROLLATO
PER L’UNITA’ REMOTA
a. Una volta posizionate le batterie per l’unità remota, si
potranno trasmettere le letture relative a temperatura
ed umidità ad intervalli di circa 45 secondi. L’unità
principale inizierà inoltre a cercare i segnali per circa
due minuti una volta installate le batterie. Trascorsi 10
secondi dall’avvenuta ricezione, appariranno a display
le temperature esterne ed il tasso di umidità. L’unità
principale aggiornerà automaticamente le sue letture
ad intervalli di circa 45 secondi.
b. Se non vengono ricevuti segnali, appariranno sul
display i seguenti spazi bianchi “ ”. Tenere
premuto [SEARCH] per 2 secondi per forzare
un’ulteriore ricerca per circa 2 minuti. Questa
operazione è utile nella sincronizzazione della
trasmissione e ricezione delle unità remote e principale.
c. Quando la ricezione di segnale remoto ha termine, il
dispositivo sincronizzerà automaticamente il suo
orario e la data quando portato all’interno
dell’intervallo del segnale RF “DCF”.
Ripetere questo passaggio ogniqualvolta siano ritrovate
differenze tra le letture visualizzate sull’unità principale
e quelle sull’unità remota.
62
TEMPERATURA MASSIMA E MINIMA
ED UMIDITA
La temperatura massima e la minima registrate
internamente / esternamente e l’umidità saranno
automaticamente memorizzate. Per visualizzare tali
letture, premere il tasto [MEM] per la lettura della
minima e premere il tasto [MEM] per la lettura della
massima, quindi premere nuovamente il tasto [MEM]
per ripristinare la lettura in atto.
PREVISIONI METEOROLOGICHE
L’unità principale è in grado di rilevare i cambiamenti
relativi alla pressione atmosferica. Basandosi sui dati
raccolti, essa è in grado di prevedere il tempo per le
successive 12-24 ore.
Simbolo visualizzato
Sole
Giallo
Indicatori
visualizzati
sull’unità
Intervallo di
temperatura
Intervallo
di umidità
COM
20°C a 25°C
40%RH a
70%RH
Confortevole
WET
-5°C a +50°C
Superiore
al 70%RH
Troppo umida
(umidità)
DRY
-5°C a +50°C
Inferiore
al 40%RH
Troppo secca
Inferiore ai
Assenza di
40%RH al
indicazione 20°C o superiore 70%RH
ai 25°C
Previsione
Colore
INDICATORI DI LIVELLO DI CONFORT
Gli indicatori di livello di confort COM, WET o DRY
vi indicheranno se l’atmosfera circostante è conforte
vole, troppo umido o troppo secco. Gli indicatori di
comfort appariranno sul display dell’unità principale
quando saranno soddisfatte le seguenti condizioni:
Parzialmente
nuvoloso
Nuvoloso
Pioggia
Precipitazioni
nevose
Verde
Azzurro
Viola
Bianco
Nota:
1. La precisione di una previsione meteo generale
basata sulla pressione atmosferica è circa del 70%.
2. La previsione meteo può non necessariamente
riflettere la situazione attuale.
3. L’icona Sole, applicata alla notte, implica un cielo
sereno.
Sul display è presente un indicatore di andamento che
mostra la pressione atmosferica misurata in aumento ,
stabile
o in diminuzione .
63
COLLISIONE DI TRASMISSIONE
I segnali provenienti da altri dispositivi domestici, quali
campanelli d’ingresso, sistemi di sicurezza della casa e
controlli di accesso, possono interferire con quelli
appartenenti al presente prodotto e causare una
temporanea interruzione di ricezione. Ciò è normale e
non influisce sul rendimento generale del prodotto. La
trasmissione e la ricezione delle letture della
temperatura verranno ripristinate non appena si
interromperà l’interferenza.
COME IMPOSTARE L’OROLOGIO
RADIOCONTROLLATO
1. Una volta inserite le batterie, l’orologio cercherà
automaticamente il segnale radio. Sono necessari
almento 3-5 minuti per terminare questo processo.
2. Qualora l’utilizzatore desiderasse disattivare la
funzione di auto-ricezione, tenere premuto il tasto
[ + ] per 2 secondi.
3. Per ripristinare nuovamente la funzione di autoricezione, tenere premuto il tasto [ + ] per 2 secondi
ancora per forzarne la ricezione e permettere di
riceverla all’orario desiderato.
4. Qualora fosse ricevuto il segnale radio, la data e
l’orario saranno automaticamente impostati con
l’accensione dell’icona del segnale di radio controllo
[ ] attiva.
5. Qualora l’orologio non dovesse riuscire a ricevere il
segnale orario, verrà rappresentata l’icona [ ]. A
questo punto l’utilizzatore potrà impostare l’orologio
manualmente.
COME IMPOSTARE l’OROLOGIO MANUALMENTE
Per impostare l’orologio manualmente, tenere premuto
il tasto [MODE] per due secondi per visualizzare la
lingua. Utilizzare il tasto [ + ] o [ – ] per modificarla.
Premere il tasto [MODE] per confermare.
65
Indica che
l’atmosfera
circostante è
Assenza di
commenti
SEGNALI DISCONTINUI
Qualora, in assenza di particolari motivazioni, il
display della temperatura esterna diventasse bianco,
tenere premuto il tasto [SEARCH] per 2 secondi per
forzare immediatamente una ricerca. Se tale operazione
non dovessero riuscire, verificare:
1. Se il sensore dell’unità remota è ancora posizionato
correttamente.
2. Le batterie di entrambe l’unità remota e quella
principale. (Note: quando la temperatura scende sotto
al punto di congelamento, le batterie delle unità
esterne congeleranno, abbassandone di conseguenza
il voltaggio fornito e l’intervallo reale.
3. Se la trasmissione si trova all’interno dell’intervallo
e se la traiettoria è libera da ostacoli ed interferenze.
Accorciare la distanza tra le unità se necessario.
64
Ripetere la stessa procedura per impostare l’anno, il
mese, la data, il formato orario 12/24, l’ora ed i minuti.
Durante l’impostazione, utilizzare il tasto [ + ] o [ – ]
per aumentare o diminuire rapidamente i valori. Per
visualizzare la lingua, è possibile selezionare Inglese (En),
Tedesco (DE), Francese (Fr), Italiano (IT), Spagnolo (SP)
ed Olandese(DU). In caso di covi che non si desidera
modificare, premere semplicemente il tasto [MODE]
per passare oltre a tale voce. Quando la modifica è
terminata, premere il tasto [MODE] per uscire.
Il display tornerà quindi in modalità orologio.
COMPE IMPOSTARE IL FUSO ORARIO
1. Per impostare il fuso orario,
2. Premere il tasto [MODE] fino a che la modalità di
visualizzazione fuso orario sia rappresentata da una
sigla ‘ZONE’ sul display a cristalli liquidi,
3. Tenere premuto il tasto [MODE] per due secondi,
per visualizzare lo scarto del fuso orario.
4. Inserire i dati utilizzando il tasto [ + ] o [ – ].
5. Premere [MODE] per uscire.
COME IMPOSTARE LA SVEGLIA
Esistono due sveglie in totale, sveglia 1 e sveglia 2 che
possono essere azionate premendo rispettivamente i
tasti [AL. 1] e [AL. 2]. La procedura di impostazione
dell’allarme è elencata qui di seguito.
IMPOSTAZIONE SVEGLIA 1
1. Premere [AL. 1]
2. Premere [ + ] o [ – ] per attivare / disattivare la
funzione di allarme.
3. Tenere premuto il tasto [AL. 1] fino a che l’ora
della sveglia lampeggi
4. Impostare l’ora premendo [ + ] o [ – ], quindi
premere il tasto [AL. 1] per confermare.
5. Quindi, per impostare i minuti premere [ + ] o [ – ],
quindi premere il tasto [AL. 1] per confermare.
66
6. Qualora desideraste la visualizzazione sveglia e
mostrare sul display il calendario, premere [MODE].
Qualora si desiderasse passare in visualizzazione
sveglia 1, premere il tasto [AL. 1].
IMPOSTAZIONE SVEGLIA 2
1. Premere [AL. 2]
2. Premere [ + ] o [ – ] per attivare / disattivare la
funzione di allarme.
3. Tenere premuto il tasto [AL. 2] fino a che l’ora della
sveglia lampeggi.
4. Impostare l’ora premendo [ + ] o [ – ], quindi premere
il tasto [AL. 2] per confermare.
5. Quindi, per impostare i minuti premere [ + ] o [ – ],
quindi premere il tasto [AL. 2] per confermare.
6. Qualora desideraste la visualizzazione sveglia e
mostrare sul display il calendario, premere [MODE].
Qualora si desiderasse passare in visualizzazione
sveglia 1, premere il tasto [AL. 2].
FUNZIONE SNOOZE
Quando la sveglia suona, è possibile premere [SNOOZE]
per interrompere l’allarme.
CARATTERISTICHE
Unità principale
Intervallo di operazione
proposto
Intervallo di misurazione
umidità
Risoluzione temperatura
Risoluzione umidità
Batterie
: -5 °C a 50 °C
: 25% a 90% al 25%
: 0.1 °C
: 1%
: 2 da 1.5V di tipo AA
Unità di sensore remoto
Intervallo di operazione
proposto
Intervallo di misurazione
umidità
Risoluzione temperatura
Risoluzione umidità
Frequenza di trasmissione RF
Numero massimo di
unità remote
Ciclo di percezione
Batterie
: -10 °C a 50 °C
: 25% a 90% al 25%
: 0.1 °C
: 1%
: 433 MHz
:3
: circa 43 a 47 secondi
: 2 da 1.5V di tipo AA
INDICAZIONI DI MANTENIMENTO
1. Preservare l'apparecchio dell'umidità e della
polvere, evitare gli scontri e temperature estreme.
Per pulirlo, utilizzare uno straccio morbido e
secco senza prodotti di pulizia.
2. Non procedere ad alcun intervento (riparazioni..)
dentro l'apparecchio; altrimenti la garanzia sarà
annullata.
3. Utilizzare solo nuove pile e non mescolare nuove
pile con vecchie.
La preghiamo di portare attenzione che le pile usate
non sono messe nella spazzatura, con ma devono
essere ritornate ai punti di colletta previsti a questo
scopo.
Importante: per tutti gli apparecchi Irox, tutte le tasse
anticipate di riciclaggio sono sdebitate.
67
68
CERTIFICATO DI CONFORMITÀ CE
ATTENZIONE
- A causa delle restrizioni dei possibilità
d'impressione, l'affissione può essere differente
della rappresentazione nel modo di uso.
Sotto riserva di modifiche.
Albert Mebus GmbH & Co.
Bergische Str. 11
42781 Haan
RoHS
www.mebus-electronic.com
Prodotto: RCW416
Questo prodotto è conforme alle disposizioni in vigore,
secondo l'applicazione delle esigente fondamentali
dell'articolo 3 delle direttive R&TTE 1999/5/EC.
Direttive:
Utilizzazione efficace dello spettro della frequenza radio
(Articolo 3.2 delle direttive R&TTE)
Standard applicati
EN 300 220-1,3:2000
Compatibilità elettromagnetica
(Articolo 3.1.b delle direttive R&TTE)
Standard applicati
EN 301 489-1,3:2000
Standard applicati
EN 300 339:2000
Informazioni supplementari
Il prodotto è conforme alle direttive degli apparecchi
a bassa tensione 73/23/EWG come alle direttive
concernenti la compatibilità elettromagnetica 89/336/
EWG. Porte il marchio del certificato CE corrispondente.
Conforme Nei Seguenti Paesi
Tutti i stati europei EU, in Svizzera CH
QA MANAGER: Q.Y. ZENG
K.S plastic factory
Guan Lan / Shen Shen / China
Eliminate le batterie usate in modo sicuro ed
ecologico.
69
70
RADIO CONTROLLED
WALL CLOCK
WITH WEATHER FORECAST
IN/OUT THERMOHYGROMETER
USER'S MANUAL
MEBUS RCW416 & TS23C MANUAL (ENG)
SIZE: W65 X H105 (mm)
BY EMILY TSOI 01/12/06
INTRODUCTION
Thank you for your purchase of the RCW416.
The basic package comes with a main unit, which
is the weather forecast station, a remote unit that is
the thermo-hygrometer and the AC/DC adaptor.
The main unit is capable of keeping track of
maximum and minimum temperature of different
sites. And no wire installation is required and
operates at 433 MHz.
The packaging consists of:
- Main Unit
- Outdoor Thermo-hygrometer sensor
- AC-adaptor
- Instruction Manual
A
D
J
E
B
C
F
57
G H I
58
A SNOOZE Key
Activate the snooze function
B AL. 1 Key
Display the alarm time or sets the alarm status for
alarm 1
MAIN FEATURES: REMOTE UNIT
E
WIRELESS THERMO • HYGRO
A C
C AL. 2 Key
Display the alarm time or sets the alarm status for
alarm 2
RESET
1 2 3
CHANNEL
F
D
B
D ( ) Key
Decrease the Value of a setting
E (
) Key
Increase the Value of a setting; Force to receive
Radio-controlled Clock signal
F SEARCH key
Force to search for remote sensor signal
G MEM key
Receive the maximum or minimum temperature
and humidity of main unit and remote unit
H CHANNEL key
Toggle among different channels of the remote
sensor units. Key sequence: Indoor > Channel 1
> Channel 2 > Channel 3 > Indoor… Also, you can
press and hold to enter the Auto Scroll function
I MODE Key
Toggles the display modes and confirms entry
while setting the values for display
J RESET key
Press to reset all values to their default setting
59
BEFORE YOU BEGIN
For best operation,
1. Insert batteries for remote units before doing so for
the main unit.
2. Position the remote unit and main unit within effective
transmission range, which, in usual circumstances, is
20 to 30 meters. Note that the effective range is vastly
affected by the building materials and where the main
and remote units are positioned. Try various set-ups
for best result. Though the remote units are weather
proof, they should be placed away from direct
sunlight, rain or snow.
BATTERY INSTALLATION: REMOTE UNIT
1. Remove the screws on the battery compartment.
2. Select the channel
3. Install 2 batteries (UM-3 or “AA” size 1.5V) strictly
according to the polarities shown.
4. Replace the battery compartment door and secure
its screws.
TURN ON MAIN UNIT
To install 2 batteries (UM-3 or AA size 1.5V) strictly into
the main unit and plug the AC-adaptor to give power to
the main unit as well, you will see the display is lighted up.
LOW BATTERY WARNING
FOR THE REMOTE SENSOR
When it is time to replace batteries for the remote sensor,
the respective low battery indicator
will show up on
display. In addition, the low battery indicator will
show up on the Main Unit display for this specified
Remote Sensor Unit.
61
A LED INDICATOR
Flashes once when the remote unit transmits a reading
Flashes twice when low battery is detected on
sensor unit
B BATTERY COMPARTMENT
Accommodates two AA-size batteries
C RESET BUTTON
Press to reset all setting if you have selected
different channel.
D CHANNEL SELECTOR
Select the channel before you install batteries.
E WALL-MOUNT RECESSED HOLE
Supports the remote until in wall-mounting
F ˚C/ ˚F BUTTON
60
FOR THE MAIN UNIT
When the battery power is not enough, there is a
battery icon
will be shown on the display, so we
need to use the new batteries.
If the AC-adaptor cannot connect to the Main Unit
properly, or the AC-adaptor is removed out of the
Main Unit, the icon
will be shown on display.
SETTING UP THE REMOTE
TEMP. AND RC CLOCK
a. Once batteries are in place for the remote unit, they
will start transmitting temperature and humidity
readings at around 45 seconds intervals.
The main unit will also start searching for signals for
about two minutes once batteries are installed. 10
seconds upon successful reception, the outdoors
temperatures and humidity will be displayed .The
main unit will automatically update its readings at
about 45-second intervals.
b. If no signals are received, blanks “ ” will be
displayed.
Hold [ SEARCH ] for 2 seconds to enforce another
search for about 2 minutes. This is useful in
synchronizing the transmission and reception of the
remote and main units.
c. When remote signal reception is finished, it will
automatically synchronize its current time and dated
when brought within rang of the “DCF” RF signal.
Repeat this step whenever you find discrepancies
between the reading shown on the main unit and that
on the remote unit.
62
MAXIMUM AND MINIMUM TEMPERATURE
AND HUMIDITY
The maximum and minimum recorded indoor / outdoor
temperature and humidity will be automatically
stored in memory. To display these readings, press
[MEM] button to display the minimum reading and
press [MEM] button to display the maximum reading,
and then press [MEM] button to resume to the current
reading.
WEATHER FORECAST
The Main Unit is able to detect atmospheric pressure
changes. Based on the collected data, it can predict
the weather for the forthcoming 12 to 24 hours.
Symbol display
Forecast
Sunny
Color
Yellow
Partly
Cloudy
Cloudy
Rainy
Snowy
Green
Light Blue
Purple
White
Remark:
1. The accuracy of a general pressure-based weather
forecast is at about 70%.
2. The weather forecast may not necessarily reflect the
current situation
3. The Sunny icon, as applies to night time, implies
clear weather
There is a trend indicator on the display to show the
measured atmospheric pressure are rising
,
steady , or Falling
.
63
COMFORT LEVEL INDICATORS
The comfort level indicators COM, WET or DRY will
tell you if the current environment is comfortable, too
wet, or too dry. The comfort indicators will appear on
the display of the Main Unit when the following
conditions are satisfied:
Indicator
displays
on the unit
Temperature
Range
Humidity
Range
Shows that the
Current
Environment
COM
20˚C to 25˚C
40%RH
to
70%RH
Comfortable
WET
-5˚C to +50˚C
OVER
70%RH
Too wet
(moisture)
DRY
-5˚C to +50˚C
Below
40%RH
Too Dry
No
Indicator
Less than 20˚C
or More than
25˚C
40%RH
to
70%RH
No comment
DISCONNECTED SIGNALS
If without obvious reasons the display of the outdoor
temperature goes blank, hold [SEARCH] button for 2
seconds to enforce an immediate search. If that fails, check:
1. The Remote Sensor Unit is still in place
2. The batteries of both the Remote unit and the Main
Unit. (Notes: when the temperature falls below freezing
point, the batteries of outdoor units will freeze,
lowering their voltage supply and the effective range.
3. The transmission is within range and path is clear of
obstacles and interference. Shorten the distance
when necessary.
64
TRANSMISSION COLLISION
Signals from other household devices, such as door
bells, home security systems and entry controls, may
interfere with those of this product and cause
temporarily reception failure. This is normal and does
not affect the general performance of the product. The
transmission and reception of temperature readings
will resume once the interference recedes.
HOW TO SET THE ZONE TIME
1. To set the zone time,
2. Press [MODE] until at zone time display mode
which there is a ‘ZONE’ icon on LCD display,
3. Hold [MODE] for two seconds, the zone time
offset will be displayed.
4. Enter the offset using [ + ] or [ – ].
5. Press [MODE] to exit.
HOW TO SET THE RADIO CONTROLLED CLOCK
1. After the batteries are installed. The clock will
automatically search the radio signal. It takes about
3-5 minutes to finish this process.
2. If user wishs to disable the auto-reception feature,
hold the [ + ] button for 2 seconds to disable it.
3. To enable the auto-reception feature again, holds the
[ + ] for 2 seconds again to force it receive and allow
it receive at desired time.
4. If the radio signal is received, the date & time will be set
automatically with radio control signal icon [ ] turns on.
5. If the clock fails to receive the time signal, it will be show
as [ ] icon. Then user can set the time manually.
HOW TO SET THE ALARM
There are total two alarms, namely alarm 1 and
alarm 2 which can be operated by press [AL. 1] an
[AL. 2] respectively. The alarm setting procedure is
listed as below.
HOW TO SET THE CLOCK MANUALLY
To set the clock manually, hold [MODE] for two
seconds it will show the display language. Use [ + ] or
[ – ] to change it. Press [MODE] to confirm. Repeat
the same procedure to set year, month, date, 12/24 hour
format, hour and minute. During the setting, use [ + ]
or [ – ] will increase or decrease the value rapidly.
For display language, you are able to select English (En),
German (DE), French (Fr), Italian (IT), Spanish (SP)
and Dutch (DU).
If there is an item you do not need to change, simply
press [MODE] to bypass the item.
When you finished the change, press [MODE] to exit.
The display will return to the clock mode.
65
SETTING ALARM 1
1. Press [AL. 1]
2. Press [ + ] or [ – ] to turn on / off the alarm function.
3. Press and Hold [AL. 1] button until the hour for
alarm is flashing
4. Set the hour by press [ + ] or [ – ], and then press
[AL. 1] button to confirm.
5. Then, to set the minute by press [ + ] or [ – ], and
then press [AL.1] button to confirm.
6. If you would like to leave the alarm display and
show calendar, press [MODE] to show calendar. If
you would like to switch to alarm 1 display, press
[AL.1] button.
66
SETTING ALARM 2
1. Press [AL. 2]
2. Press [ + ] or [ – ] to turn on / off the alarm function.
3. Press and Hold [AL. 2] button until the hour for
alarm is flashing
4. Set the hour by press [ + ] or [ – ], and then press
[AL. 2] button to confirm.
5. Then, to set the minute by press [ + ] or [ – ], and then
press [AL.2] button to confirm.
6. If you would like to leave the alarm display and show
calendar, press [MODE] to show calendar. If you
would like to switch to alarm 1 display, press [AL.2]
button.
SNOOZE FUNCTION
When the alarm is wake up, you are able to press
[SNOOZE] to off the alarm
SPECIFICATION
Main Unit
Proposed operation range
Humidity measuring range
Temperature resolution
Humidity Resolution
Battery
Remote Sensor Unit
Proposed operation range
Humidity measuring range
Temperature resolution
Humidity Resolution
RF Transmission frequency
Maximum No. of remote unit
Sensing cycle
Battery
67
Albert Mebus GmbH & Co.
Bergische Str. 11
42781 Haan
RoHS
www.mebus-electronic.com
: -5C to 50C
: 25% to 90% at 25%
: 0.1C
: 1%
: 1.5V AA x 2pcs
: -10C to 50C
: 25% to 90% at 25%
:
0.1C
: 1%
: 433 MHz
:3
: around 43 to
47 seconds
: 1.5V AA x 2pcs
PRECAUTIONS
This product is engineered to give you years of
satisfactory service if you handle it carefully. Here are
a few precautions:
1. Do not immerse the unit in water.
2. Do not clean the unit with abrasive or corrosive
materials. They may scratch the plastic parts and
corrode the electronic circuit.
3. Do not subject the unit to excessive force, shock, dust,
temperature or humidity, which may result in
malfunction, shorter electronic life span, damaged
battery and distorted parts.
4. Do not tamper with the unit's internal components.
Doing so will invalidate the warranty on the unit and
may cause unnecessary damage. The unit contains no
user-serviceable parts.
5. Only use fresh batteries as specified in the user's
manual. Do not mix new and old batteries as the old
ones may leak.
6. Always read the user's manual thoroughly before
operating the unit.
CAUTION
- The content of this manual is subject to change
without further notice.
- Due to printing limitation, the displays shown in
this manual may differ from the actual display.
- The contents of this manual may not be reproduced
without the permission of the manufacturer.
68
EC-DECLARATION OF CONFORMITY
Product : RCW416
This product contains the approved transmitter and
complies with the essential requirements of Article 3 of
the R&TTE 1999/5/EC Directives, if used for its
intended use and that the following standard(s) has/have
been applied:
Efficient use of radio frequency spectrum
(Article 3.2 of the R&TTE Directive)
applied standard(s)
EN 300 220-1,3:2000
Electromagnetic compatibility
(Article 3.1.b of the R&TTE Directive)
applied standard(s)
EN 301 489-1,3:2000
applied standard(s)
EN 300 339:2000
Additional information:
The product is therefore conform with the Low Voltage
Directive 73/23/EC, the EMC Directive 89/336/EC and
R&TTE Directive 1999/5/EC (appendix II) and carries
the respective CE marking.
RTTE Compliant Countries:
All EU countries, Switzerland CH
QA MANAGER : Q.Y.ZENG
K.S plastic factory
Guan Lan / Shen Shen / China
Attention: Please dispose of used unit and
batteries in an ecologically safe manner
69
70